

Page 1
5U, 19" rack mounted mixer
19" RACKMIXER MIT 5 HE
MEZCLADOR DE 5U, 19" FORMATO RACK
MIXER RACKABLE 19'' X 5U
OPERATIONS MANUAL
BEDIENUNGSHANDBUCH
MANUAL DEL OPERADOR
MANUEL D’INSTRUCTIONS
Page 2
MULTI LANGUAGE INSTRUCTIONS
ENGLISH..............................................................................................................................................................................................................................................................................PAGE 6
DEUTSCH............................................................................................................................................................................................................................................................................PAGE 9
ESPAÑOL........................................................................................................................................................................................................................................................................................................................................................................PAGE 12
FRANCAIS....................................................................................................................................................................................................................................................................................................................................................................PAGE 15
PLEASE READ BEFORE USING APPLIANCE, IMPORTANT WARNING & SAFETY INSTRUCTIONS!
CAUTION
RISK OF ELECTRICAL SHOCK DO NOT OPEN!
CAUTION: This product satisfies FCC regulations when shielded cables and connec-
tors are used to connect the unit to other equipment. To prevent electromagnetic
interference with electric appliances such as radios and televisions, use shielded
cables and connectors for connections.
The exclamation point within an equilateral triangle is intended to alert the user to
the presence of important operating and maintenance (servicing) instructions in
the literature accompanying the appliance.
The lightening flash with arrowhead symbol, within an equilateral triangle, is
intended to alert the user to the presence of uninsulated “dangerous voltage” within the product’s enclosure that may be of sufficient magnitude to constitute a risk
of electric shock to persons.
READ INSTRUCTIONS: All the safety and operating instructions should be read
before the product is operated.
RETAIN INSTRUCTIONS: The safety and operating instructions should be retained
for future reference.
HEED WARNINGS: All warnings on the product and in the operating instructions
should be adhered to.
FOLLOW INSTRUCTIONS: All operating and use instructions should be followed.
CLEANING: The product should be cleaned only with a polishing cloth or a soft dry
cloth. Never clean with furniture wax, benzine, insecticides or other volatile liquids
since they may corrode the cabinet.
ATTACHMENTS: Do not use attachments not recommended by the product manu-
acturer as they may cause hazards.
WATER AND MOISTURE: Do not use this product near water, for example, near a
bathtub, wash bowl, kitchen sink, or laundry tub; in a wet basement; or near a
swimming pool; and the like.
ACCESSORIES: Do not place this product on an unstable cart, stand, tripod, brack-
et, or table. The product may fall, causing serious injury to a child or adult, and
serious damage to the product. Use only with a cart, stand, tripod, bracket, or table
recommended by the manufacturer, or sold with the product. Any mounting of the
product should follow the manufacturer’s instructions, and should use a mounting
accessory recommended by the manufacturer.
CART: A product and cart combination should be moved with care. Quick stops,
excessive force, and uneven surfaces may cause the product and cart combination to overturn. See Figure A.
VENTILATION: Slots and openings in the cabinet are provided for ventilation and to
ensure reliable operation of the product and to protect it from overheating, and
these openings must not be blocked or covered. The openings should never be
blocked by placing the product on a bed, sofa, rug, or other similar surface. This
product should not be placed in a built-in installation such as a bookcase or rack
unless proper ventilation is provided or the manufacturer’s instructions have been
adhered to.
POWER SOURCES: This product should be operated only from the type of power
source indicated on the marking label. If you are not sure of the type of power supply to your home, consult your product dealer or local power company.
LOCATION: The appliance should be installed in a stable location.
NON-USE PERIODS: The power cord of the appliance should be unplugged from the
outlet when left unused for a long period of time.
GROUNDING OR POLARIZATION:
• If this product is equipped with a polarized alternating current line plug (a plug
having one blade wider than the other), it will fit into the outlet only one way. This
is a safety feature. If you are unable to insert the plug fully into the outlet, try
reversing the plug. If the plug should still fail to fit, contact your electrician to
replace your obsolete outlet. Do not defeat the safety purpose of the polarized
plug.
• If this product is equipped with a three-wire grounding type plug, a plug having
a third (grounding) pin, it will only fit into a grounding type power outlet. This is a
safety feature. If you are unable to insert the plug into the outlet, contact your electrician to replace your obsolete outlet. Do not defeat the safety purpose of the
grounding type plug.
POWER-CORD PROTECTION: Power-supply cords should be routed so that they
are not likely to be walked on or pinched by items placed upon or against them,
paying particular attention to cords at plugs, convenience receptacles, and the
point where they exit from the product.
OUTDOOR ANTENNA GROUNDING: If an outside antenna or cable system is con-
nected to the product, be sure the antenna or cable system is grounded so as to
provide some protection against voltage surges and built-up static charges. Article
810 of the National Electrical Code, ANSI/NFPA 70, provides information with
regard to proper grounding of the mast and supporting structure, grounding of the
lead-in wire to an antenna discharge unit, size of grounding conductors, location
of antenna-discharge unit, connection to grounding electrodes, and requirements
for the grounding electrode. See Figure B.
LIGHTENING: For added protection for this product during a lightening storm, or
when it is left unattended and unused for long periods of time, unplug it from the
wall outlet and disconnect the antenna or cable system. This will prevent damage
to the product due to lightening and power-line surges.
POWER LINES: An outside antenna system should not be located in the vicinity of
overhead power lines or other electric light or power circuits, or where it can fall
into such power lines or circuits. When installing an outside antenna system,
extreme care should be taken to keep from touching such power lines or circuits
as contact with them might be fatal.
OVERLOADING: Do not overload wall outlets, extension cords, or integral conven-
ience receptacles as this can result in a risk of fire or electric shock.
OBJECT AND LIQUID ENTRY: Never push objects of any kind into this product
through openings as they may touch dangerous voltage points or short-out parts
that could result in a fire or electric shock. Never spill liquid of any kind on the
product.
SERVICING: Do not attempt to service this product yourself as opening or removing
covers may expose you to dangerous voltage or other hazards. Refer all servicing to qualified service personnel.
DAMAGE REQUIRING SERVICE: Unplug this product from the wall outlet and refer
servicing to qualified service personnel under the following conditions:
• When the power-supply cord or plug is damaged.
• If liquid has been spilled, or objects have fallen into the product.
• If the product has been exposed to rain or water.
• If the product does not operate normally by following the operating instructions.
Adjust only those controls that are covered by the operating instructions as an
improper adjustment of other controls may result in damage and will often require
extensive work by a qualified technician to restore the product to its normal operation.
• If the product has been dropped or damaged in any way.
• When the product exhibits a distinct change in performance, this indicates a
need for service.
REPLACEMENT PARTS: When replacement parts are required, be sure the service
technician has used replacement parts specified by the manufacturer or have the
same characteristics as the original part. Unauthorized substitutions may result in
fire, electric shock, or other hazards.
SAFETY CHECK: Upon completion of any service or repairs to this product, ask the
service technician to perform safety checks to determine that the product is in
proper operating condition.
WALL OR CEILING MOUNTING: The product should not be mounted to a wall or
ceiling.
HEAT: The product should be situated away from heat sources such as radiators,
heat registers, stoves, or other products (including amplifiers) that produce heat.
(2)
Page 3
PDM-001
REAR
Front
(3)
Page 4
PDM-002
REAR
Front
(44)
Page 5
(5)
Page 6

INTRODUCTION:
Congratulations on purchasing a Gemini PDM series 19"5U, 4 chan-
nel, rack mounted audio mixer. This state of the art mixer is backed
by a 3 year warranty, excluding the cross fader
backed by a separate 90 day warranty. Prior to use, we suggest that you
carefully read all the instructions.
. The cross fader is
FEATURES:
- 5U, 19" rack mounted mixer
- 4 stereo channels
- 7 lines, 3 Mic, 2 phono/line convertible RCA inputs
- Master, record, booth, & zone RCA outputs
- 1/4" balanced master output
- 2 x 1/4" Mic inputs
- Dual 10 band graphic EQ with on/off switch & blue LED indicator
- Rotary zone, booth, & cue volume controls
- Stereo/mono switch
- Assignable cross fader
- Removable, user replaceable Rail Glide cross fader
- Push button cue section per channel with green LED indicator
- CUE/PGM fader control allowing cue mix
- XLR-1/4" combo Mic input
- 2 band rotary Mic EQ & volume controls
- Talk over feature
- BNC lamp port
- 1/4" headphone jack
NOTE: ABOVE FEATURES INCLUDED IN EACH MODEL IN THE PDM SERIES.
PDM-01 FACE:
- Master volume line fader control
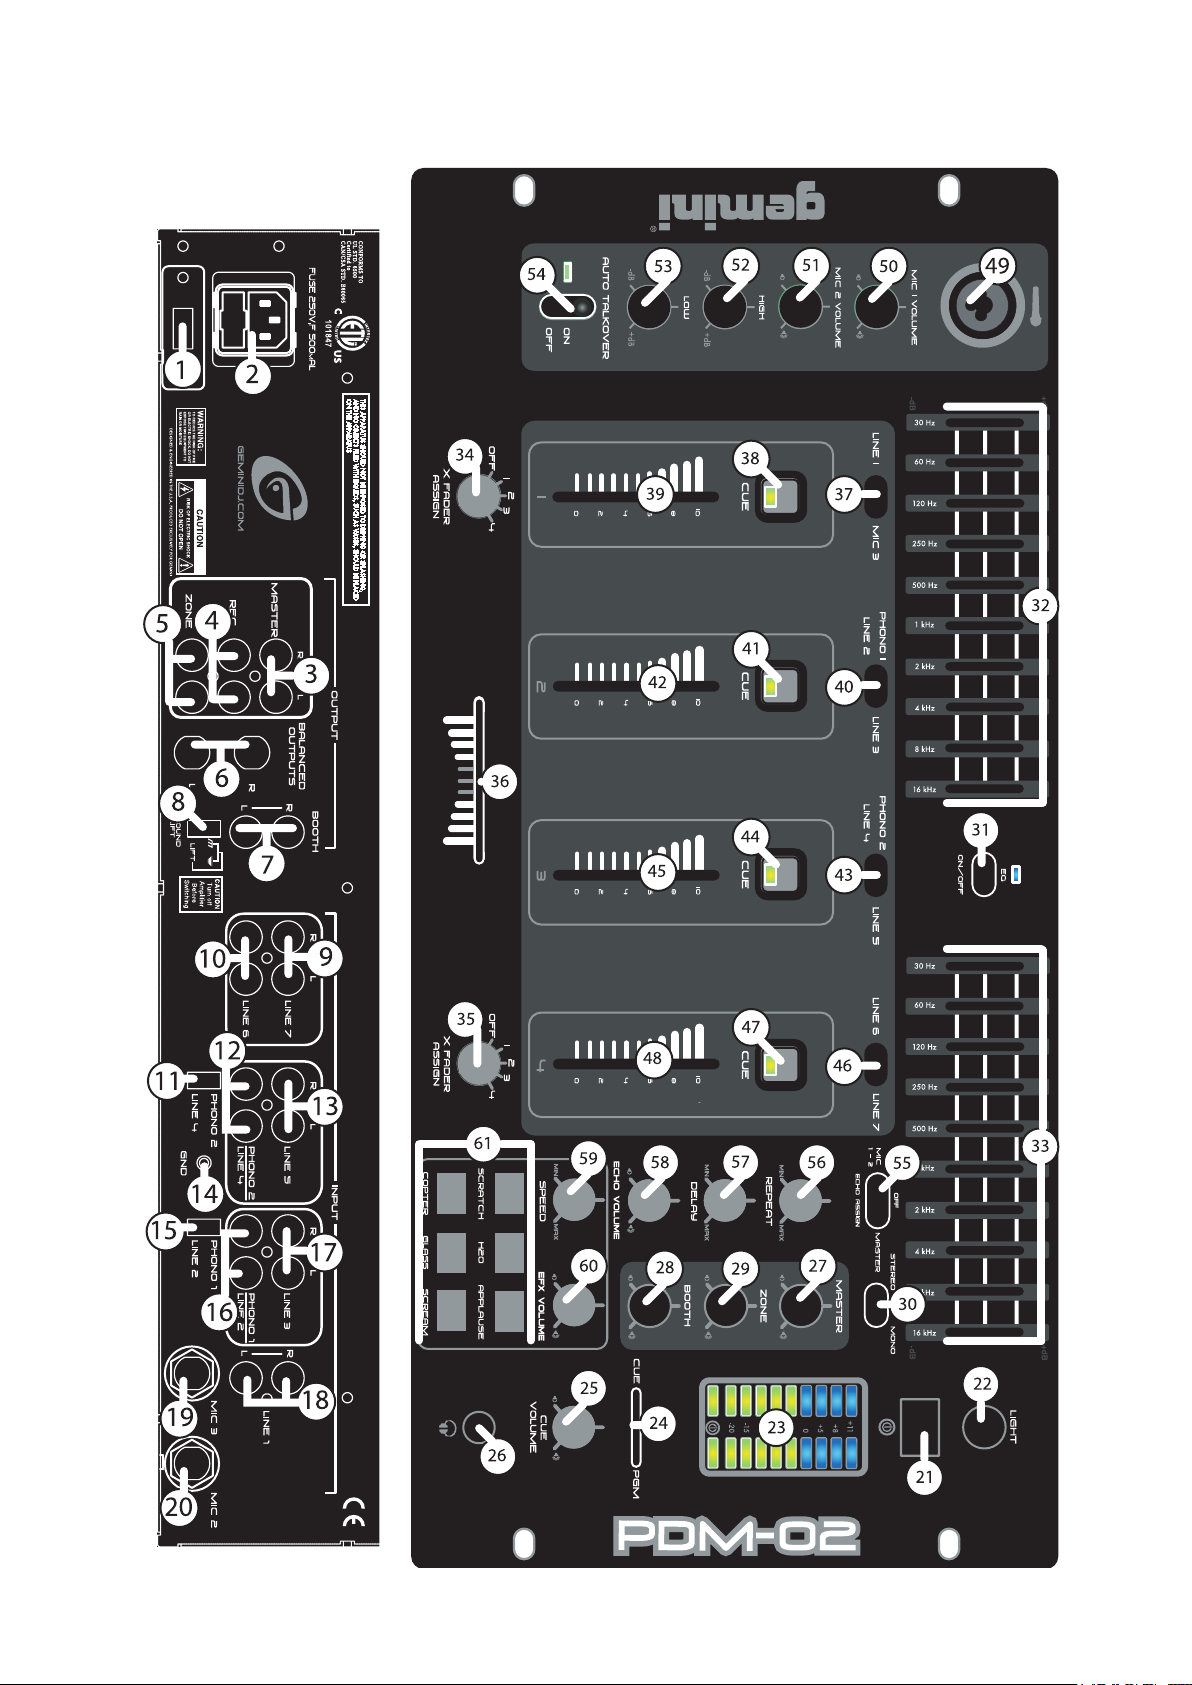
PDM-02 FACE:
- 6 digital samples with volume, & speed rotary controls
- Rotary master volume control
- Master/Mic assignable echo effect switch with repeat & delay controls
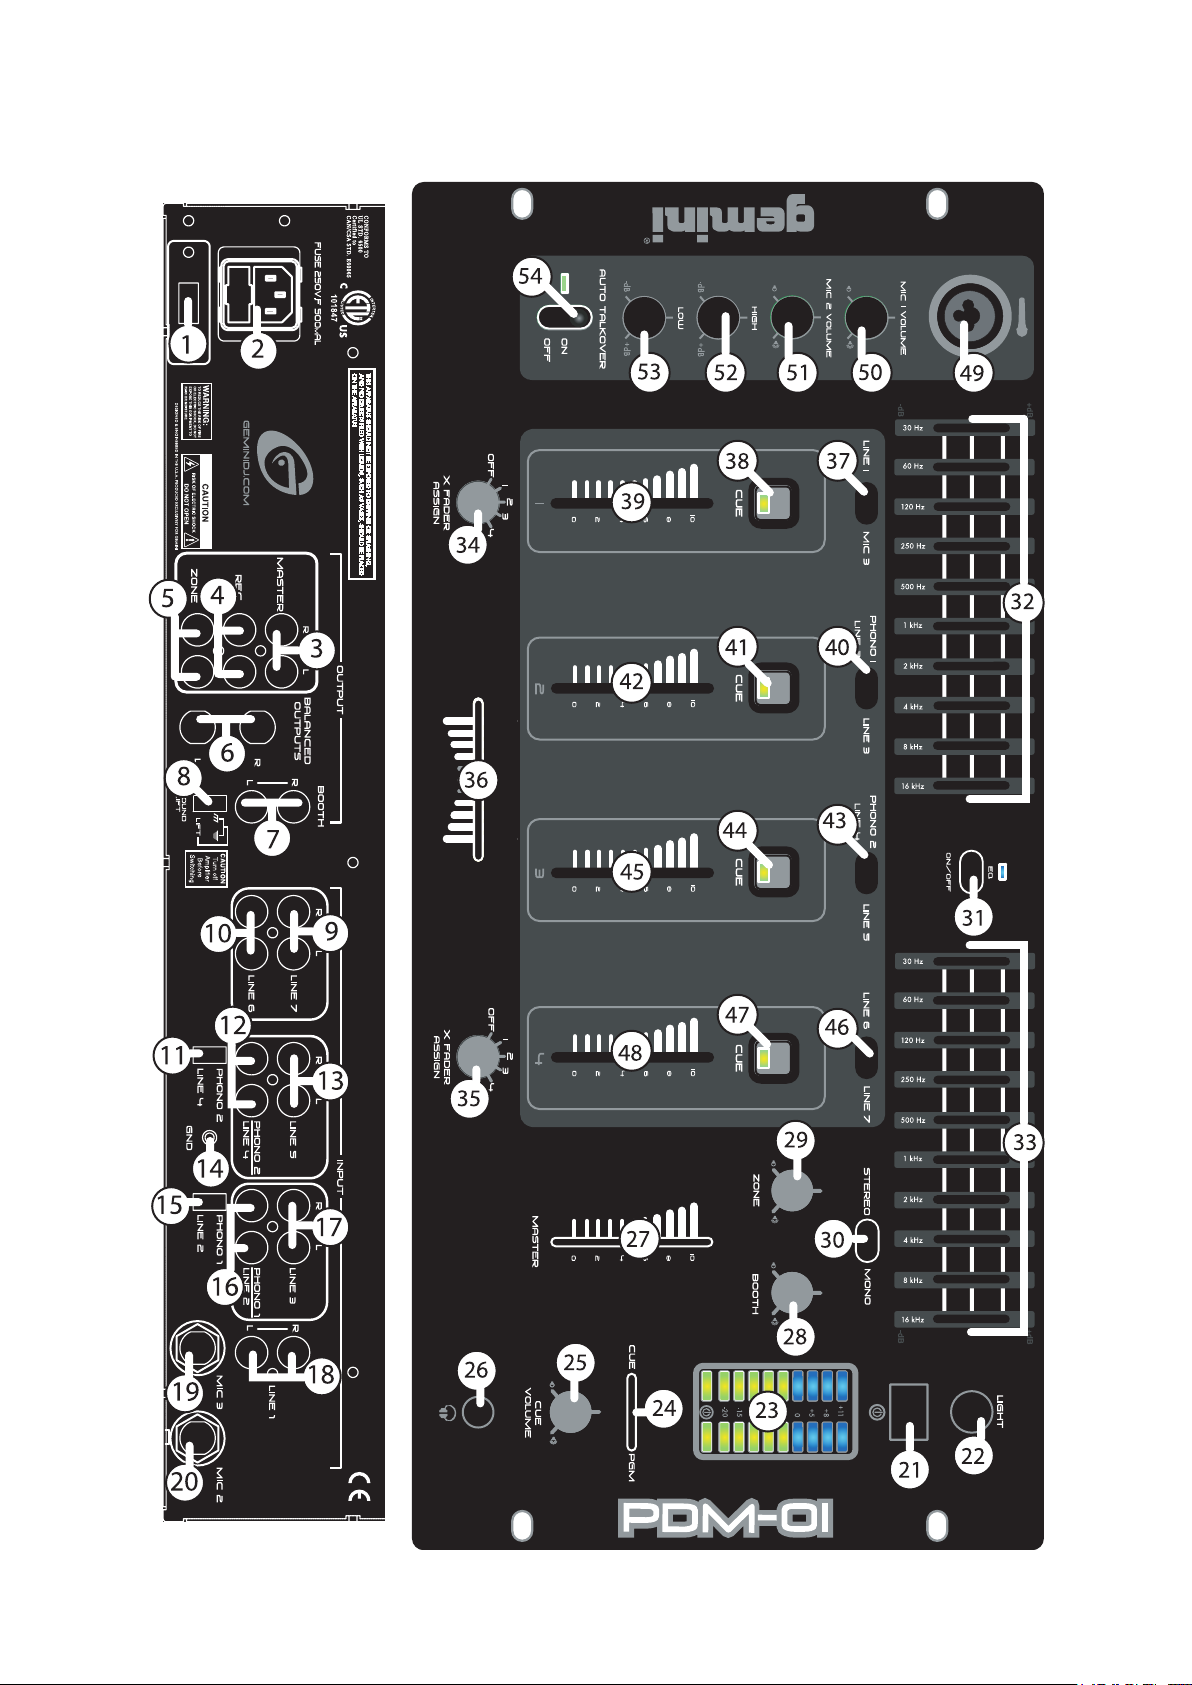
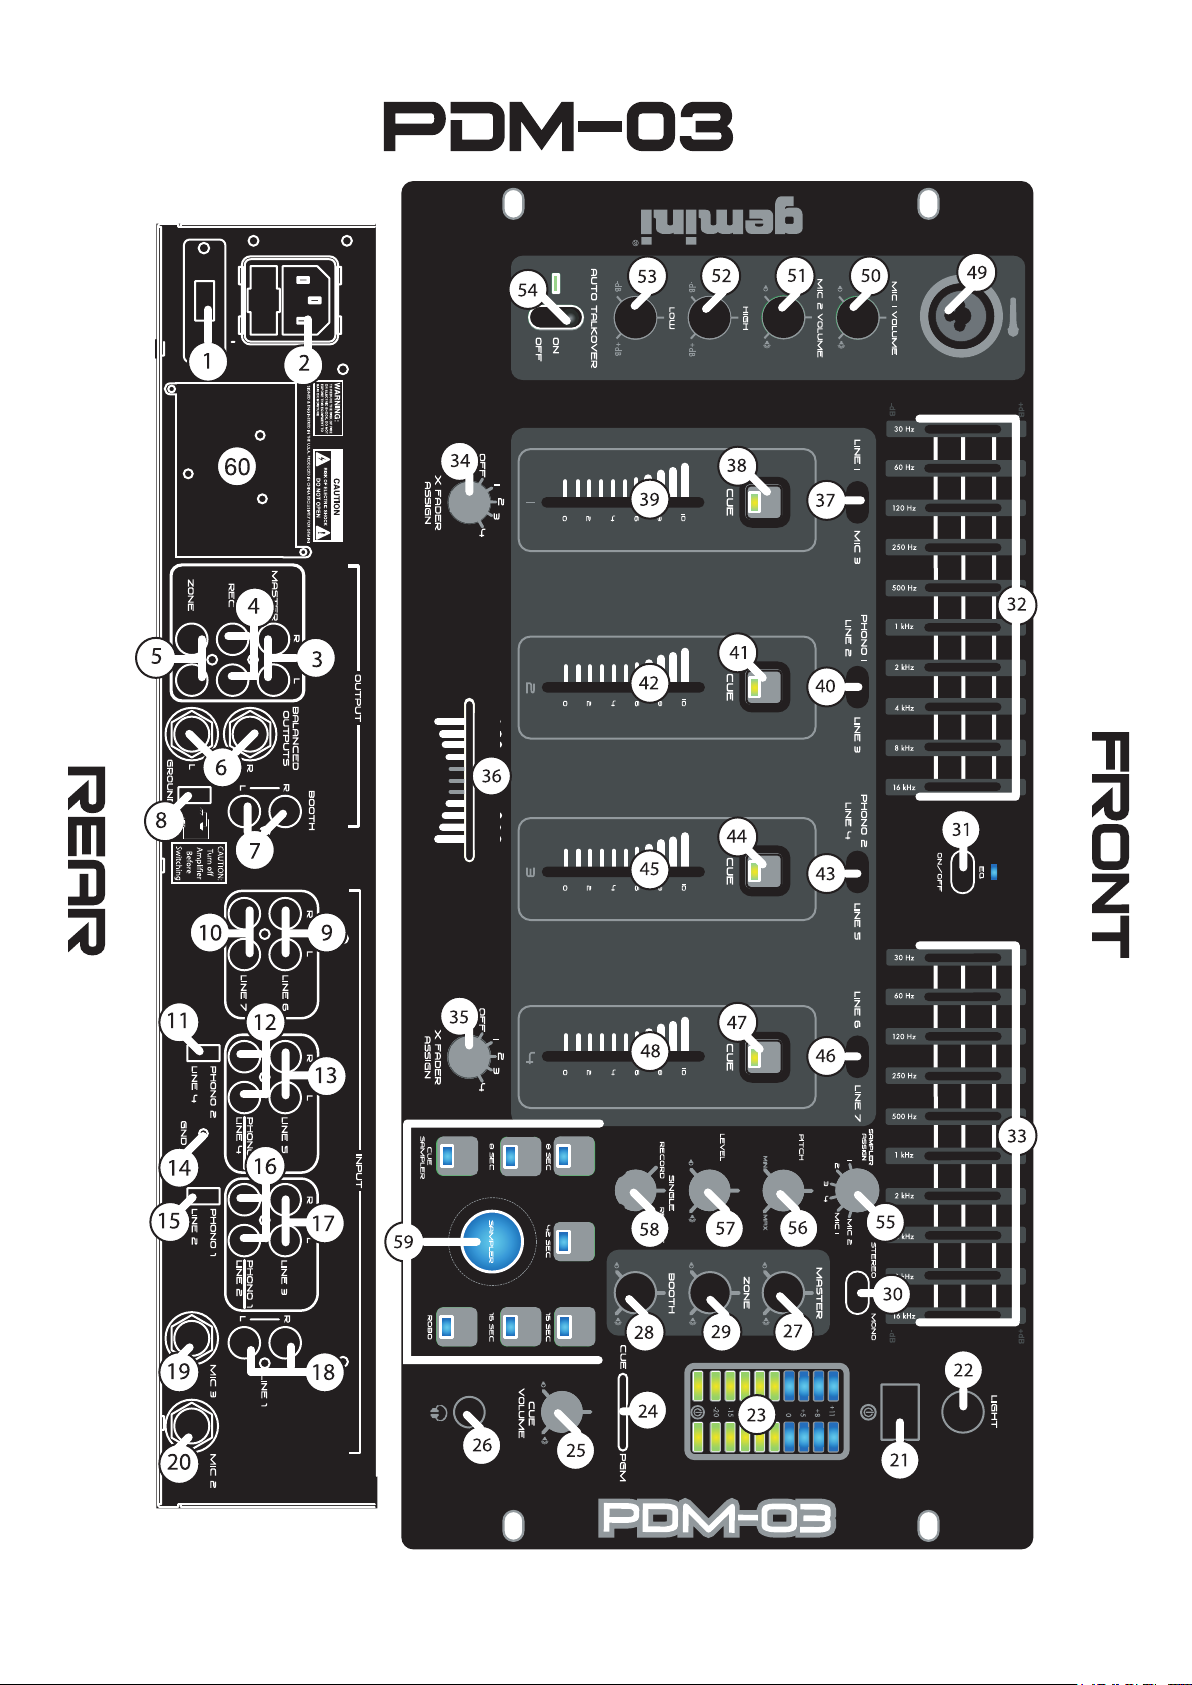
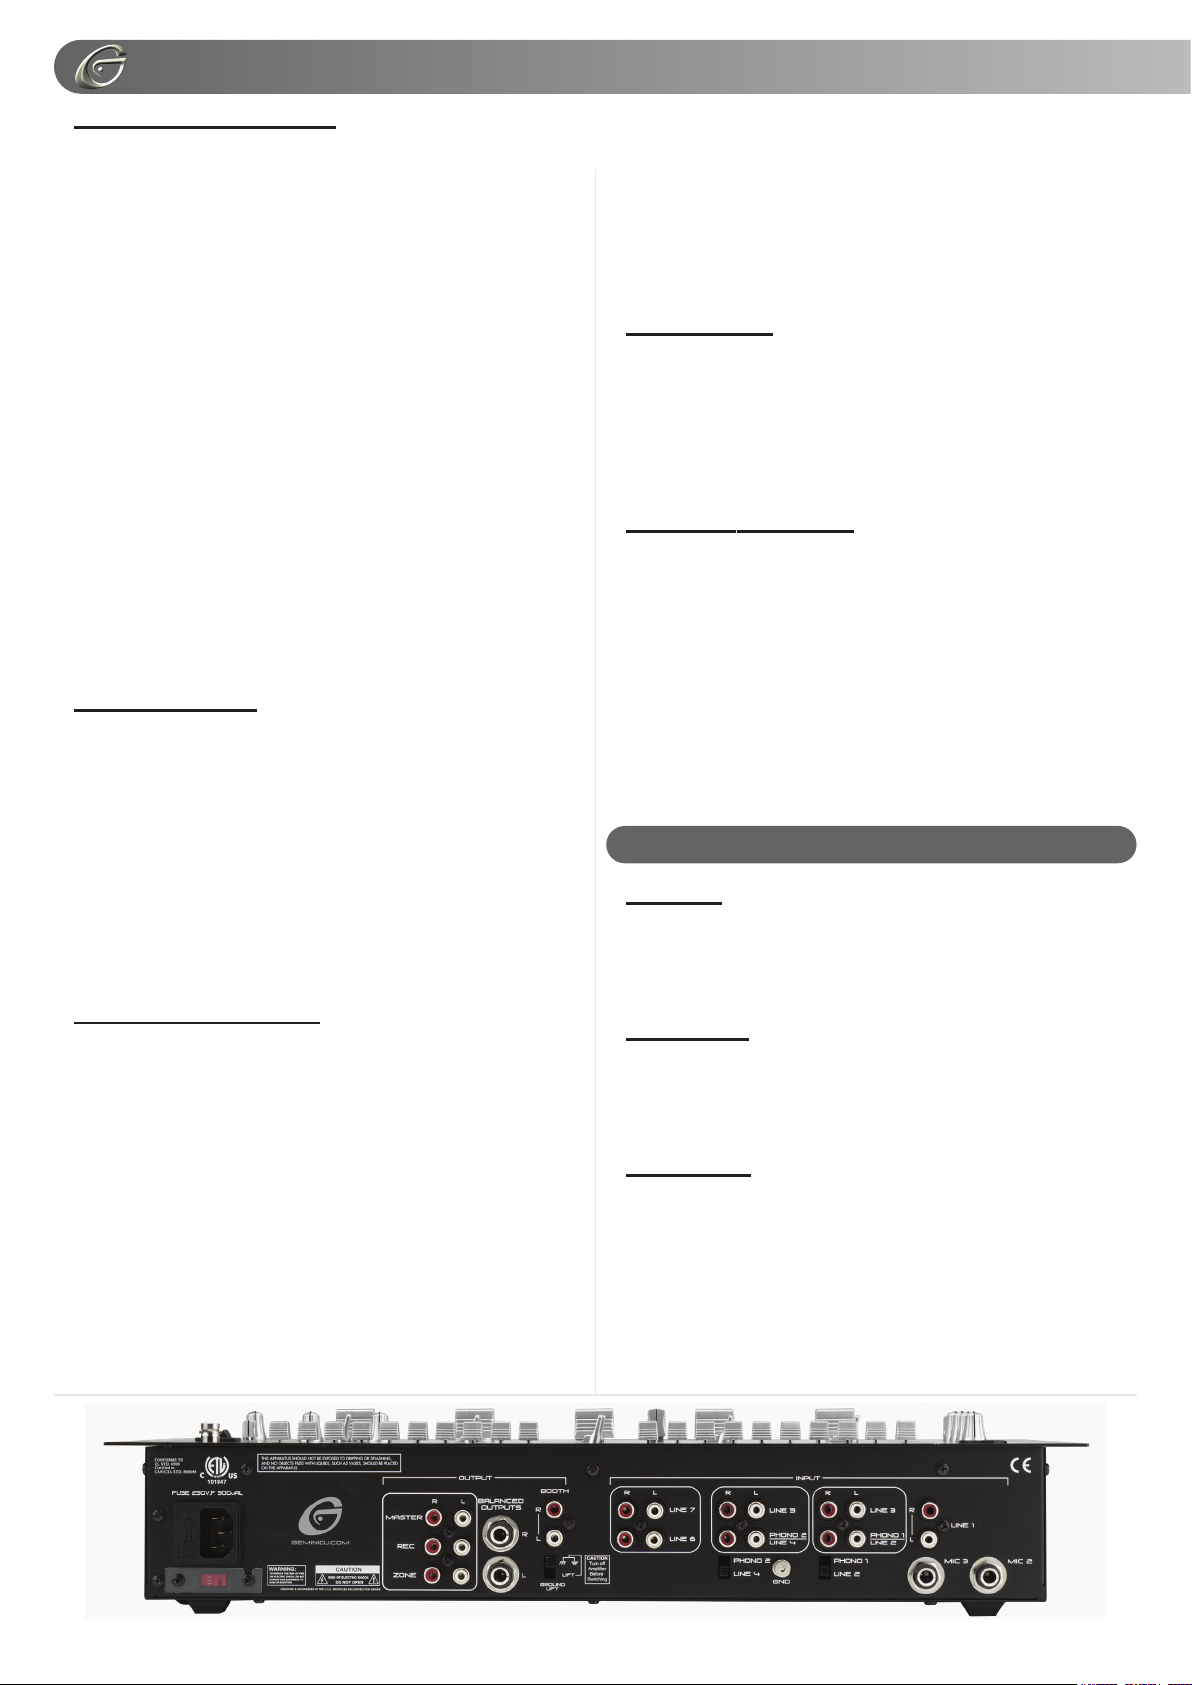
- Alternatively, the BALANCED MASTER (6) output jacks also con-
nects the mixer to the main amplifier using standard cables with 1/4"
TRS connectors. We recommend using balanced cables if the distance
to your amp is 10 feet or more.
- The BOOTH (7) output jacks allow the connection of an additional
amplifier with RCA cables.
- The ZONE (5) output jacks allow the connection of an additional
amplifier with RCA cables.
- The REC (4) output jacks can be used to connect the mixer to the
record input of your recording unit, thus enabling you to record your mix.
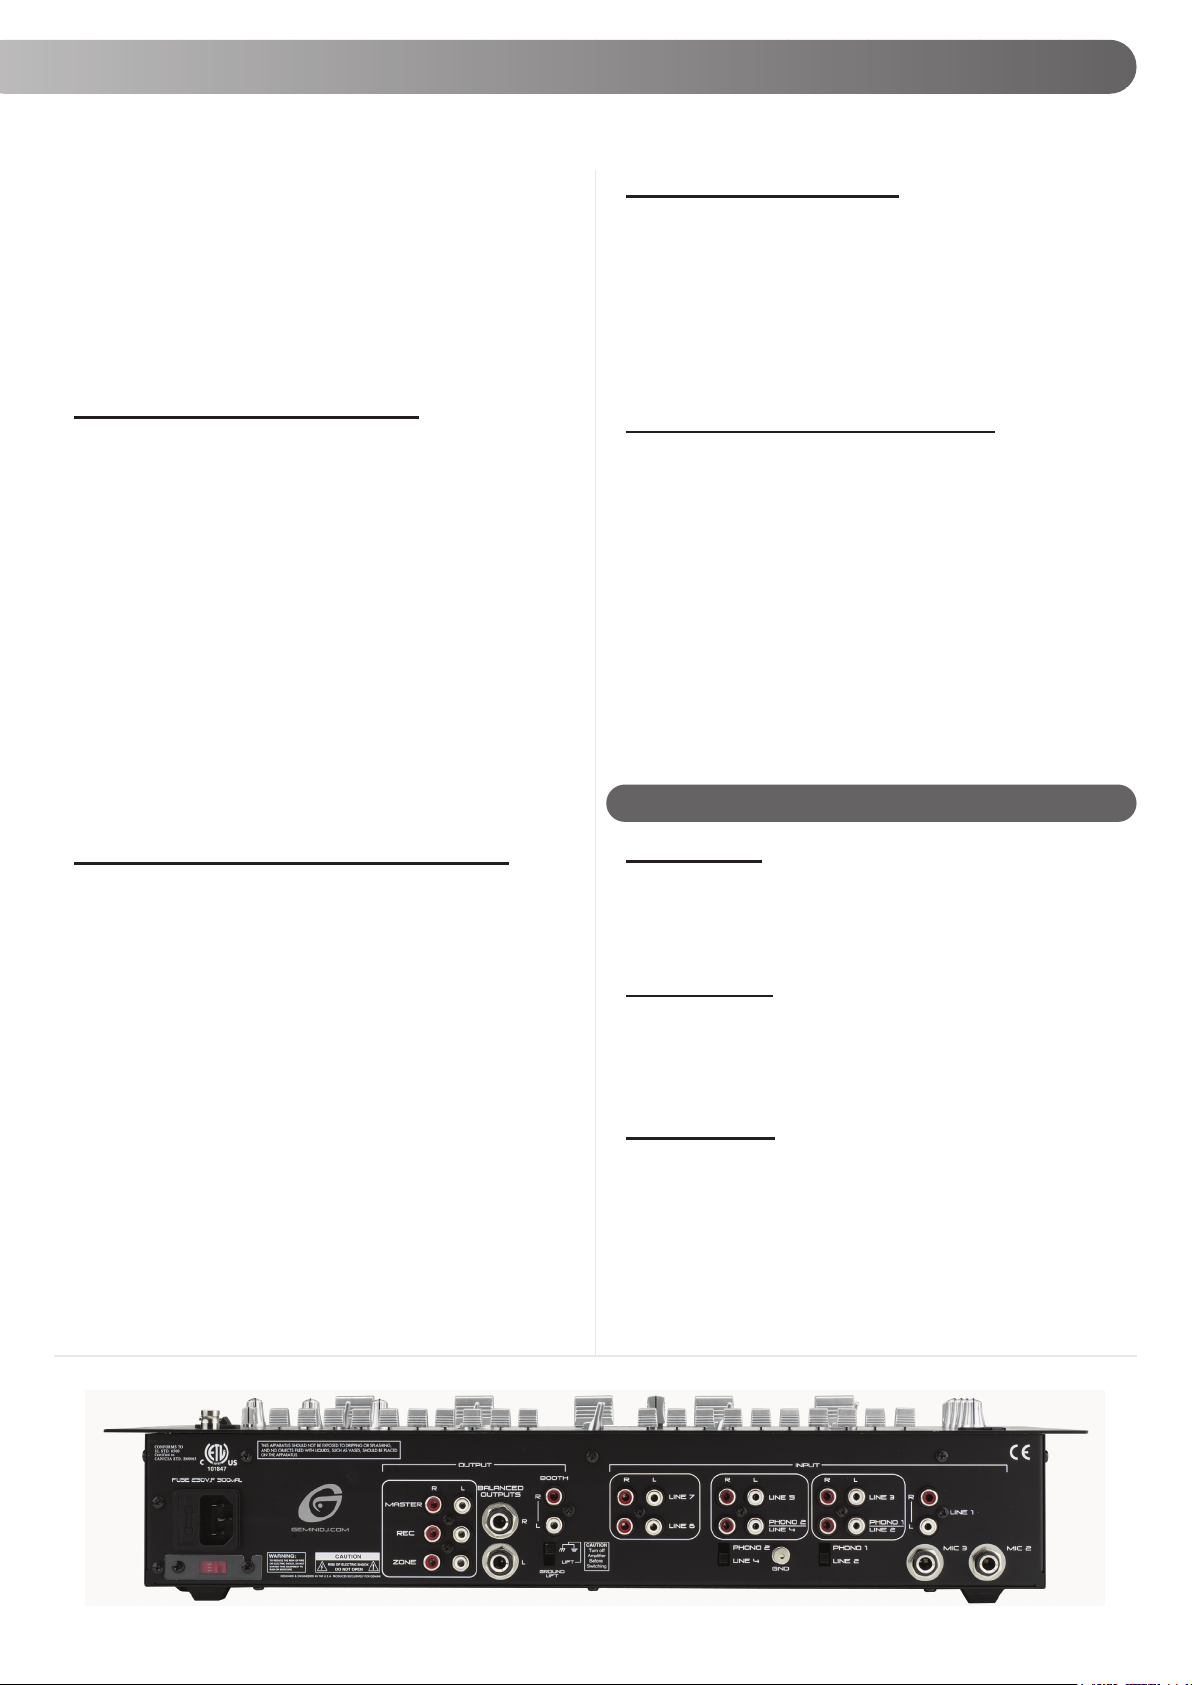
4. Located on the rear panel are 2 PHONO (PH) /LINE (LN) convertible
RCA inputs (12, 16), & 5 LINE RCA INPUTS (10, 9, 13, 17, 18). The
convertible RCA inputs for CH 2 (16) & CH 3 (12) allow PH and LN level
equipment to be connected to the mixer. To adjust the CONVERTER(s)
(11, 15), just flip the switch UP to operate PH 1 or PH 2. Flip the switch
DOWN to operate through LN 2 or LN 4. The PH INPUTS only accept
turntables with a magnetic cartridge. When using (a) turntable(s), you
will need to ground the RCA cable(s) by screwing in the grounding
fork(s) to the GROUNDING SCREW (14) located in the back panel of
the PDM mixers. This is located in between the CONVERTER SWITCH-
ES (11, 15). The stereo LN INPUTS only accept line level inputs such as
a CD, DAT, MiniDisc, etc.
NOTE: WHEN USING TURNTABLES, NOT ATTACHING A GROUND MAY CAUSE A SYSTEM
"HUM."
5. Headphones may be plugged into the face-plate located 1/4" HEADPHONE JACK (26).
6. The MIC 1 (49) input (located on the face panel) is a combination XLR
& 1/4” connector. The MIC 2 (20) & MIC 3 (19) inputs (in the rear panel)
accept only 1/4" connectors. The mic inputs accept balanced & unbalanced connections.
7. The BNC LAMP PORT (22) (located on the face panel, above the
POWER SWITCH (21)) is used to plug in a 12 V BNC goose neck lamp
such as the Gemini GNL-700.
PDM-03 FACE:
- 96 second digital sampler comprised of 5 memory banks with soft
touch backlit sample buttons
- Rotary assignable channel control for sample recording
- Sample parameter control with rotary level, pitch bend,
record/single/repeat controls
- Push button RoboPlay & cue sampler
- Rotary master volume control
PRECAUTIONS:
1. All operating instructions should be read before using this equipment.
2. To reduce the risk of electrical shock, do not open the unit. Please
refer servicing to a qualified service technician.
IN THE USA ~ IF YOU EXPERIENCE PROBLEMS WITH THIS UNIT CALL GEMINI
CUSTOMER SERVICE AT: 1 (732) 738-9003. DO NOT ATTEMPT TO RETURN THIS EQUIPMENT
3. Do not expose this unit to direct sunlight or to a heat source such as
a radiator or stove.
4. This unit should be cleaned only with a damp cloth. Avoid solvents or
other cleaning detergents.
5. When moving this equipment, it should be placed in its original carton
and packaging. This will reduce the risk of damage during transit.
6. DO NOT EXPOSE THIS UNIT TO RAIN OR MOISTURE.
7. DO NOT USE ANY SPRAY CLEANER OR LUBRICANT ON ANY
CONTROLS OR SWITCHES.
TO YOUR DEALER
.
CONNECTIONS:
1. Before plugging the power cord in, make sure that the VOLTAGE
SELECTOR (1) switch is set to the correct voltage.
2. Located on the rear panel is the 115 V/230 V PLUG (2). Before plugging the power cord in, make sure the POWER SWITCH (21) located on
the face panel is turned OFF.
3. The PDM mixers have 5 sets of outputs:
- The MASTER (3) output jacks connects to the main amplifier with
RCA cables.
OPERATING INSTRUCTIONS:
1. Once all of your connections have been made in the rear panel, turn
ON the mixer by pressing the POWER SWITCH (21). Once turned ON,
the POWER BAR LED, containing the power symbol located in the VU
METER (23), will be illuminated. Turn OFF the mixer when not in use by
pressing the POWER SWITCH (21) to OFF. When the PDM mixer is
turned OFF the POWER BAR LED will not be illuminated.
2. CHANNEL (CH) 1: To bring this channel into program mix (PGM), you
must first decide which LN will be in use. Use the LN SWITCH (37) to
toggle from LN 1 (18) to MIC 3 (19) on this channel. Slowly raise the CH
1 SLIDE CONTROL (39) to a comfortable level, once you've selected
the proper line.
3. CH 2: To bring this channel into PGM, you must first decide which LN
will be in use. Use the LN SWITCH (40) to toggle from PH 1/LN 2 (16)
to LN 3 (17) on this channel. Slowly raise the CH 2 SLIDE CONTROL
(42) to a comfortable level, once you've selected the proper line.
4. CH 3: To bring this channel into PGM, you must first decide which LN
will be in use. Use the LN SWITCH (43) to toggle from PN 2/LN 4
to LN 5 (13) on this channel. Slowly raise the CH 3 SLIDE CONTROL
(45) to a comfortable level, once you've selected the proper line.
5. CH 4: To bring this channel into PGM, you must first decide which LN
will be in use. Use the LN SWITCH (46) to toggle from LN 6 (10) to LN
7 (9) on this channel. Slowly raise the CH 4 SLIDE CONTROL (48) to a
comfortable level, once you've selected the proper line.
6. CUE: By connecting a set of headphones to the HEADPHONE (26)
jack, you can monitor any or all channels. Press the CUE BUTTONS
(38, 41, 44, 47) for CHs 1 through 4, respectively, to assign the CH(s) to
be monitored. The respective CUE LED indicators will glow when in use.
Use the rotary CUE VOLUME CONTROL (25) to adjust the CUE volume
without changing the overall mix. By moving the CUE/PGM FADER
CONTROL (24) to the LEFT you will be able to monitor the assigned
CUE signal. Moving the CUE/PGM FADER CONTROL (24) to the MIDDLE allows CUE mix with PGM. Moving the CUE/PGM FADER CON-
TROL (24) to the RIGHT allows you to monitor PGM output.
7. ASSIGN: There are 2 rotary controlled X FADER ASSIGN SWITCHES (34, 35), each having 5 settings OFF, 1, 2, 3, & 4. The LEFT (34) not
(6)
(12)
Page 7

ASSIGN switch allows you to direct CH 1, 2, 3, or 4 through the LEFT
side of the CROSS FADER (36). The RIGHT ASSIGN (35) switch allows
you to direct CH 1, 2, 3, or 4 through the RIGHT side of the CROSS
FADER (36). When the ASSIGN SWITCH(es) (34, 35) are at OFF, you
will not have a CH assigned to the CROSS FADER (36). This allows you
to control the PGM with the use of the respective CH SLIDE CON-
TROLS, thus layering the PGM with up to four CHs.
8. CROSS FADER SECTION: The CROSS FADER (36) allows you to
mix from one source to another. The PDM mixers feature an assignable
CROSS FADER (36). The rotary controlled ASSIGN SWITCHES (34,
35) allow you to select which channel will play through each side of the
CROSS FADER (36). The CROSS FADER (36) in your unit is removable & if the need arises can be easily replaced. Your Gemini mixer
comes with a RG- 45 (RAILGLIDE™) DUAL-RAIL CROSS FADER.
RAIL GLIDE™ CROSS FADERS have internal dual stainless steel rails
that allow the slider to ride smoothly and accurately from end to end.
Also available is our RG-45 PRO (PROGLIDE™) CROSS FADER with
a special curve designed for scratch mixing. Just purchase one from
your Gemini dealer & follow the instructions:
REPLACEABLE CROSS FADER
1. UNSCREW THE OUTSIDE
FADER PLATE SCREWS (B).
- DO NOT TOUCH INSIDE
SCREWS (C).
2. CAREFULLY REMOVE OLD
CROSS FADER AND UNPLUG
CABLE (D).
3. PLUG IN THE NEW CROSS
FADER INTO CABLE (D) AND
PLACE BACK INTO MIXER.
4. SCREW THE CROSS FADER
TO MIXER WITH THE FADER
PLATE SCREWS (B).
NOTE: DO NOT APPLY PRESSURE WHILE USING THE CROSSFADER. LIGHTLY GLIDE
THE CROSSFADER BACK AND FORTH. PRESSING DOWN ON THE CONTROLS CAN
BEND CONTACTS AND CAUSE A LOSS OF SOUND.
9. EQUALIZER (EQ): These units feature dual 10 BAND GRAPHIC
EQUALIZERS (32, 33) that will allow you to adjust the sound to fit any
room. By adjusting any of the 10 EQ SLIDE CONTROLS (32, 33), you
can cut or boost the tonal characteristics of the sound coming from PGM
to the speaker(s) by ±12 dB. To activate the dual 10 BAND GRAPHIC
EQ, switch the EQ SWITCH (31) to ON, & the EQ LED will light up to
indicate that the EQ has been engaged. To deactivate the dual 10 band
graphic EQ, switch the EQ SWITCH (31) to OFF, & the EQ LED will turn
OFF. When activated, the EQ (32, 33) controls the LEFT and RIGHT
side of your stereo speakers. The PGM & EQ are controlled by the MAS-
TER VOLUME (27). To balance the sound of the PGM playing through
the MASTER VOLUME (27) on the LEFT & RIGHT side of your speakers you must mirror the EQ levels on the LEFT (32) & RIGHT (33) EQ
controls.
NOTE: FOR OPTIMAL PERFORMANCE IN YOUR SOUND OUTPUT, HAVE YOUR SOUND
SET TO STEREO NOT MONO. START WITH THE EQ LEVELS (32, 33) AT CENTER VALUE.
THE EQ SLIDE CONTROLS (32, 33) SHOULD LOCK AT THIS POSITION. ADJUST YOUR
MASTER VOLUME (27) CONTROL FROM MID TO LOW VOLUME RANGE. THEN ADJUST
THE LEFT (32) OR RIGHT (33) EQ, ONE SLIDE CONTROL AT A TIME, TO A COMFORT
ABLE LEVEL. ONCE YOU ARE SATISFIED WITH THE SOUND OF ONE SIDE, MATCH THE
EQ SETTINGS ON THE OTHER SIDE. ONCE YOU HAVE PASSED THE CENTER VALUE ON
THE EQ (32, 33), THE MASTER OUTPUT, AS INDICATED IN THE VU METER (23), MAY
EXPERIENCE A TONAL BOOST. PLEASE ADJUST THE MASTER VOLUME (27) TO A COMFORTABLE LEVEL SO YOU DO NOT OVERLOAD YOUR SYSTEM. CLIPPING WILL OCCUR
WHEN YOU ARE OVERLOADING YOUR SYSTEM. LOWER THE MASTER VOLUME (27) OR
ADJUST YOUR EQ (32, 33) SETTINGS SO THAT CLIPPING DOES NOT OCCUR. THEN YOU
MAY RAISE THE MASTER VOLUME (27) TO A LEVEL WITH WHICH YOU ARE COMFORTABLE.
10. STEREO/MONO: You can convert your sound output from STEREO
to MONO & vice versa by using the STEREO/MONO SWITCH (30).
Switch to the LEFT to convert to STEREO. Switch RIGHT to convert to
MONO.
11. OUTPUT SELECTION CONTROL: Once you are comfortable with
the sound level of your music you may adjust the decibel level of the
PGM with the MASTER VOLUME (27) control. MASTER RCA & BALANCED MASTER OUTPUTS (3, 6) are controlled by the level of the
MASTER VOLUME (27) control. You may adjust the volume of the
ZONE (5) output with the ZONE (29) rotary control. You may adjust the
volume of the BOOTH (7) output with the BOOTH (28) rotary control.
The volume of your RECORD (4) output is controlled strictly by the CH
SLIDE CONTROLS.
12. MIC SECTION: Plug your main MIC into the MIC 1 combination
XLR-1/4" input (49) located on the face panel. The rotary controls for
HIGH (52) and LOW (53) allow you to adjust the tone of MIC 1 (49). The
rotary MIC 1 VOLUME CONTROL (50), above the rotary MIC 2 VOL-
UME CONTROL (51), adjusts the decibel level of MIC 1 (49). You may
PPDDMM SSEERRIIEESS
PPDDMM SSEERRIIEESS
also plug a second & third MIC into the rear panel's MIC 2 (20) & MIC 3
(19) 1/4" jacks. The decibel level of MIC 2 (20) is controlled by the rotary
MIC 2 VOLUME CONTROL (51). The decibel level of MIC 3 (19) is controlled by the CH 1 SLIDE CONTROL (39).
13. TALKOVER: The purpose of the AUTO TALKOVER MODE is to
allow the program playing to be attenuated so that the MIC may be
heard above the music. The AUTO TALKOVER SWITCH (54) controls
MIC 1 (49) and MIC 2 (20) with 3 settings:
- When the MIC/TALKOVER SWITCH (54) is in the BOTTOM position,
MIC 1 (49), MIC 2 (20) & TALKOVER MODE are all OFF.
- When the MIC/TALKOVER SWITCH (54) is in the CENTER position,
MIC 1 (49) & MIC 2 (20) are ON & TALKOVER MODE is OFF. The MIC
ON LED indicator glows when MIC 1 (49) & MIC 2 (20) are ON.
- When the MIC/TALKOVER SWITCH (54) is in the TOP position, MIC
1 (49) & MIC 2 (20) are ON, TALKOVER MODE is ON, & the volume of
all sources except MIC 1 (49) & MIC 2 (20) are lowered automatically by
-16 dB, when speaking into the MIC(s).
14. BNC LAMP PORT: The BNC LAMP PORT (22) connects a 12 V
goose neck lamp, such as the Gemini GNL-700 to the PDM mixer.
BNC
The goose neck lamp will be powered by your mixer. To turn ON the
goose neck lamp, you must first attach the goose neck lamp to the BNC
LAMP PORT (22). Make sure the PDM mixer is OFF when connecting
the 12 V BNC lamp. To connect the goose neck lamp, simply align the
screw cap of the goose neck lamp to the locking nodules of the BNC
LAMP PORT (22), push down, & twist the screw cap clockwise to lock
the 12 V BNC goose neck lamp in place. Then turn ON your mixer. The
goose neck lamp should light-up. To detach the goose neck lamp from
the BNC LAMP PORT (22), first make sure your mixer is OFF. Turn OFF
your mixer and the goose neck lamp will turn OFF. Unscrew the screw
cap by twisting it counterclockwise, then pull up & remove the goose
neck lamp.
15. GROUND LIFT SWITCH: The GROUND LIFT SWITCH (8) is used
to reduce background noise & hum when using multiple outlets to power
audio equipment. The switch should be in the position that provides the
least amount of noise or hum. If noise remains at the same level in both
positions, the GROUND LIFT SWITCH (8) should be kept in the GND
position.
NOTE: MAKE SURE THE MIXER AND/OR AMPLIFIER IS OFF BEFORE SWITCHING THE
GROUND LIFT SWITCH TO PREVENT A TRANSIENT POP THAT MAY DAMAGE YOUR SYSTEM.
16. VU METER: The VU METER (23) indicates the decibel level of the
MASTER RCA & MASTER BALANCED (3 & 6) outputs of the LEFT &
RIGHT stereo levels.
PDM-02 ECHO/EFX:
ECHO SECTION:
An echo effect may be applied to the PGM, or MIC 1 (49) & MIC 2 (20)
signals by switching the ECHO ASSIGN (55) switch from MIC 1-2 on the
LEFT, to OFF in the MIDDLE, to MASTER on the RIGHT & vice versa.
When using ECHO (55), you may adjust the effect of the ECHO (55) by
using the rotary REPEAT (56), DELAY (57), and ECHO VOLUME (58)
controls. To turn the ECHO ASSIGN (55) OFF or lower the ECHO VOL-
UME (58).
SOUND EFFECTS SECTION:
Six different sound effects (APPLAUSE, SCREAM, COPTER,
SCRATCH, H2O & GLASS) may be added to your mix by pressing the
SOUND EFFECTS CONTROL BUTTONS (61). The volume of the
effects can be adjusted using the rotary EFX VOLUME (60) located
above the APPLAUSE effect button. The pitch of the effects can be
increased or decreased using the rotary SPEED CONTROL (59) located above the SCRATCH effect button.
PDM-03 SAMPLER OPERATION:
MEMORY INFORMATION:
The PDM-03 is equipped with 5 MEMORY BANKS (59). The two banks
marked 8 & 8 are 8 seconds in length, the two banks marked 16 & 16
are 16 seconds in length and the bank marked 48 is 48 seconds in
length. These banks are separate & CANNOT be linked. You can store
a different sample in each bank, but they must be recorded individually
& must be played one at a time.
(77)
Page 8
SAMPLE RECORDING:
1. Select the sample source by switching to the appropriate channel with
the rotary SAMPLER ASSIGN (55) control.
2. The PDM-03 comes equipped with a rotary sampler PITCH CON-
TROL (56). To get a "perfect" sample, set the control to its CENTER
position & record the sample. Raising or lowering the control during playback raises or lowers the pitch of the sample. The CENTER position
retains the "normal" pitch.
HINT: YOU CAN RECORD A SAMPLE WITH THE PITCH CONTROL IN ANY POSITION.
THAT POSITION SETTING WILL BECOME THE NORMAL PITCH. IF YOU START TO
RECORD A SAMPLE WITH THE PITCH CONTROL SET AT "MINIMUM" THAT WILL
BECOME YOUR NORMAL PITCH. BY INCREASING THE PITCH TO "MAXIMUM" DURING
PLAYBACK, THE PITCH EFFECT WILL DOUBLE IN SPEED. RECORDING AT "MAXIMUM"
AND LOWERING TO "MINIMUM" DURING PLAYBACK WILLDO EXACTLYTHE OPPOSITE.
3. Put the MODE SELECTOR (58) switch into the RECORD position.
4. Listen to the channel to be recorded in CUE, by selecting the appropriate CUE button for this channel. When the track approaches the section to be sampled, press the proper MEMORY BANK (59) button where
you want the sample to be stored.
5. Then press the SAMPLER (59) button to start recording the sample.
The Memory bank in use will have a blinking LED, if a battery is not in
place or the battery is low (See BATTERY BACKUP section). The sam-
ple will be stored in this MEMORY BANK (59) & ready to play.
NOTE: TAPPING THE SAMPLER BUTTON BEGINS THE SAMPLING PROCESS (THE SAMPLER INDICATOR WILL "GLOW" BLUE DURING RECORDING). TAPPING THE SAMPLER
BUTTON A SECOND TIME ENDS THE SAMPLE (THE SAMPLER INDICATOR WILL TURN
OFF). IF YOU DO NOT TAP THE SAMPLER BUTTON A SECOND TIME, THE SAMPLING
PROCESS STOPS AUTOMATICALLY AFTER 8, 16 OR 48 SECONDS DEPENDING ON
WHICH MEMORY BANK WAS SELECTED.
CUE SAMPLER:
1. To record in CUE, press the CUE SAMPLER button and then press
the CUE button for the channel to be sampled. Be sure your CH slide
controls are at zero so the sample does not play in PGM. Follow the
SAMPLE RECORDING instructions to complete the process.
2. To test the recorded sample before playing in PGM, press the CUE
SAMPLER (59) button, placing the sampler in CUE. The blue CUE
SAMPLER LED will illuminate while in use. Use the CUE controls to
monitor this sample. Be sure your rotary SAMPLER LEVEL (57) is
turned counter clockwise so that the sample is not played in PGM. Set
your sampler to SINGLE or REPEAT, then press the SAMPLER button
and the sample will begin playing in CUE. If you are satisfied with your
sample, leave it stored in the MEMORY BANK (59). If not, please repeat
the steps for SAMPLE RECORDING.
SAMPLE PLAYBACK:
1. Set the MODE SELECTOR (58) switch to SINGLE or REPEAT.
2. Select the desired sample by pressing the proper MEMORY BANK
(59) button.
3. Tapping the SAMPLER (59) button with the MODE SELECTOR (58)
switch in the SINGLE position causes SAMPLER to play back one time
(the SAMPLER INDICATOR will "glow" GREEN). Each push of the
SAMPLER button restarts the sample from the beginning. Rapid pressing of the SAMPLER button will cause a stuttering effect. Once the sample has started playback & the SAMPLER button is not pushed a second time, the SAMPLE will SINGLE to the end & stop. This Sample will
play through completely regardless of switching the MEMORY BANK.
Switching the MEMORY BANK and pressing the SAMPLER button
while the sample is in play will repeat the sample previously selected
until it has completed its play cycle.
4. To play a new sample from another MEMORY BANK the old sample
must be stopped. Choose the MEMORY BANK to play. Then press
SAMPLER to begin the new Sample playback.
5. Tapping the SAMPLER (59) button with the MODE SELECTOR (58)
switch in the REPEAT position causes the SAMPLE to loop play continuously. In REPEAT mode, the SAMPLER button acts an ON/OFF
switch. The first push starts the sample, the second push stops it.
6. The SAMPLER LEVEL (57) controls the decibel level of the sample.
This feature allows you to adjust the volume of the sample to play over
or under PGM.
ROBO PLAY:
1. With the ROBO (59) button OFF the blue LED is OFF & the MODE
SELECTOR (58) switch in either the SINGLE or REPEAT mode, press-
ing the SAMPLER (59) button will cause the sample to play along with
the selected source.
2. When the ROBO (59) button is ON, the BLUE LED is on & starting
the sampler mutes the selected source. When the sample ends, the
source automatically turns back on.
BATTERY BACKUP:
1. BATTERY BACKUP: The PDM-03 is equipped with battery backup to
retain samples. To activate this feature, a 9 V battery (not included)
should be connected to the BATTERY HOLDER (60) located on the rear
panel. This enables the storage of samples in memory. When the unit is
unplugged, the battery backup retains the samples for future use.
NOTE: IF THE UNIT IS UNPLUGGED WITH NO BATTERY ATTACHED, ALL SAMPLES WILL
BE LOST.
2. LOW BATTERY INDICATOR: When the selected memory bank LED
blinks, this will indicate that there is a low battery or no battery in the
PDM-03. The LED blinks a warning if no battery is connected to the
PDM-03. When changing or placing the battery into the PDM-03, make
sure the unit is plugged in and the power is ON. Failure to adhere to this
will result in lost memory and "vanished" samples.
SPECIFICATIONS:
INPUTS:
Phono:.................................................................................3 mV, 47 KOhm
Line:................................................................................150 mV, 27 KOhm
MIC 1, 2, & 3:...................................................1.5 mV, 2 K Ohm Balanced
Bass:.................................................................................................± 12dB
High:..................................................................................................± 12dB
OUTPUTS:
Amp/Booth:.....................................................................0 dB 1 V, 400 Ohm
Max:................................................................................20 V Peak-to-Peak
Rec....................................................................................150 mV, 5 KOhm
Zone................................................................................0 dB 1 V 400 Ohm
Balanced..........................................................................6 dB 2 V 400 Ohm
GENERAL:
Frequency Response:.............................................20 Hz - 20 KHz +/- 2 dB
Distortion:...........................................................................................0.02%
S/N Ratio:........................................................................Better Than 80 dB
Talkover Attenuation:.........................................................................-16 dB
Headphone Impedance:..................................................................16 Ohm
Power Source:....................................................115/230 V, 60/50 Hz, 20 W
Unit Dimensions:........................................................W 19" x H 4" x D 9.1"
.......................................................................(482.6 x 100.6 x 231.2 mm)
Weight:............................................................................. 10.34 lbs (4.7 kg)
SPECIFICATIONS SUBJECT TO CHANGE WITHOUT NOTIFICATION FOR IMPROVEMENT.
(8)
Page 9

EINFÜHRUNG:
Vielen Dank, daß Sie sich für einen GEMINI Mixer aus der Serie PDM
entschieden haben. Diese Serie besteht aus 4 Mixern mit unterschiedlichen Features und ist für 19” 5HE-Rackeinbau vorgesehen. Die
Mischpulte sind nach dem neuesten Stand der Technik hergestellt und
mit einer Garantie von 3 Jahren versehen. Der Cross fader hat eine
Garantie von 2 Jahren. Bitte lesen Sie alle Anweisungen vor der
Inbetriebnahme sorgfältig durch
AUSSTATTUNG:
- 19" Rackmixer mit 5 HE
- 4 Stereo Kanäle
- 7 Line-, 3 Mic.-, und 2 umschaltbare Phono/Line Cincheingänge
- Cinchausgänge für Master, Record, Booth, & Zone
- Symmetrische Masetrausgänge mit 6.3 mm Klinkenbuchsen
- 2 x Mikrofoneingänge mit 6.3 mm Klinkenbuchsen
FRONTPLATTE:
- Stereo 10 Band graphischer Equalizer mit Ein/Aus-Schalter und blauer
LED
- Drehregler für Zone-, Booth-, & Cue-Volume
- Stereo/Mono Schalter
- Zuweisbarer Crossfader
- Einfach auszutauschender Rail Glide Crossfader
- Cuesektion mit Drucktastern und grüner LED pro Kanal
- CUE/PGM-Fader für Cue-Mix
- XLR/Klinkenkombibuchse für Mikrofonanschluß
- Mikrofoneingang mit 2 Band Equalizer & Volume Drehreglern
- Talk over Funktion
- BNC-Buchse für 12V Lampenanschluß
- 6,3mm Klinkenbuchse für Kopfhörer
ANMERKUNG: OBEN GENANNTE FEATURES SIND FÜR ALLE PDM MIXER GLEICH.
PDM-01 FRONTPLATTE:
- Fader für Master Volume
PDM-02 FRONTPLATTE:
- 6 digital Sampleeffekte mit Drehreglern fürVolume und
Geschwindigkeit
- Drehregler für Master Volume
- Echo-Effektschalter, zuweisbar auf Master/Mic mit Reglern für Repeat
und Delay
PDM-03 FRONTPLATTE:
- 96 Sekunden Digitalsampler mit 5 Speicherbänken und beleuchteten
Softtouch Tastern
- Kanäle per Drehschalter auf den Samplereingang zuweisbar
- Samplersektion mit Drehreglern für Parameter, Pegel, Pitch bend; unr
Tastern für Record/Single/Repeat
- Druckschalter für RoboPlay und Cue Sampler
- Drehregler für Master Volume
VORSICHTSMAßNAHMEN:
1. Vor der Anwendung des Mixers, bitte alle Anweisungen durchlesen.
2. Um einen elektrischen Schock zu vermeiden, das Gerät nicht öffnen.
Servicearbeiten dürfen nur qualifizierten Wartungstechnikern durchgeführt werden.
3. Setzen Sie das Gerät nie direkter Sonneneinstrahlung oder
Hitzequellen (Heizstrahler o.ä.) aus.
4. Reinigen Sie die Oberflächen nur mit einem weichen Tuch. Keine
scharfen Reinigungsmittel verwenden.
5. Transportieren Sie den Mixer möglichst im Originalkarton, um
Schäden zu vermeiden.
6. SETZEN SIE DIESES GERÄT NIE REGEN ODER STARKER
FEUCHTIGKEIT AUS.
7. VERWENDEN SIE KEIN KONTAKT-, ÖL-, ODER SILIKONSPRAY
AN DEN SCHALTERN, REGLERN, UND FADERN.
ANSCHLÜSSE:
1. Bevor Sie das Netzkabel anschliessen, vergewissern Sie sich, das
der Spannungswahlschalter VOLTAGE SELECTOR (1) auf die richtige
Netzspannung eingestellt ist.
PPDDMM SSEERRIIEESS
PPDDMM SSEERRIIEESS
2. Die NETZANSCHLUßBUCHSE (2) befindet sich an der Rückseite.
Achten Sie vor dem Anschluß des Netzkabels darauf, daß der
Netzschalter POWER SWITCH (21) auf der Frontplatte ausgeschaltet ist
3. Die PDM-Mixer sind miit 5 Ausgängen ausgestattet:
- Die Cinchbuchsen MASTER (3) dienen zum Anschluß an den
Hauptverstärker mit kurzen Kabeln.
- Alternativ sind die Klinkenbuchsen BALANCED MASTER (6) zum
Anschluß des Hauptverstärkers mit symmetrischen Kabeln für Längen
ab 3m vorgesehen.
- Die Cinchbuchsen BOOTH (7) und ZONE (5) sind als Ausgänge für
zusätzliche Verstärker oder Aktivboxen ausgelegt.
- Um Ihren Mix aufnehmen zu können, schließen Sie Ihren Recorder
(DAT, MD, PC) an die Cinchbuchsen REC (4) Output an.
4. An der Rückwand befinden sich 2 umschaltbare PHONO (PH) /LINE
(LN) Cincheingänge (12, 16), & 5 LINE Cincheingangsbuchsen (10,
9, 13, 17, 18). Die umschaltbaren Eingänge für CH 2 (16) & CH 3 (12)
dienen zum gleichzeitigen Anschluß von Plattenspielern mit
Magnetsystem PH und z.B. CD-Playern LN. Schalter (11) oben für
PHONO 1 oder 2; Schalter (11&15) unten für LINE 2 oder 4. Beim
Anschluß einens Plattenspielers, achten Sie darauf, daß das
Massekabel (Erdung) an die Schraube GROUNDING SCREW (14)
zwischen den Schalter (11&15) an der Rückwand des PDM Mixers
angeschlossen wird. An die Stereocincheingänge LN INPUTS können
die Ausgänge von CD, DAT, MiniDisc, MP-3 etc angeschlossen wer-
den.
ANMERKUNG: WIRD BEIM ANSCHLUß EINES PLATTENSPIELERS, DIE MASSELEITUNG
NICHT ANGESCHLOSSEN, KANN EIN BRUMMGERÄUSCH AUFTRETEN!
5. Kopfhörer können an die 6.3 mm Klinkenbuchse HEADPHONE
JACK (26) auf der Frontplatte angeschlossen werden.
6. Der MIC 1 (49) iEingang auf der Frontplatte ist als
XLR/Klinkenkombibuchse ausgeführt. Die Eingänge MIC 2 (20) & MIC
3 (19) auf der Rückwand haben je eine 6.3 mm Klinkenbuchse und
sind für symmetrische und unsymmetrische Mikrofone geeignet.
7. Über dem Netzschalter POWER SWITCH (21) auf der Frontplatte, ist
eine BNC-Buchse (22) zum Anschluß einer 12V-5W
Schwanenhalslampe (z.B. Gemini GNL-700) angebracht.
BEDIENUNG:
1. Wenn alle Verbindungen hergestellt sind, schalten Sie den Mixer mit
dem POWER SWITCH (21) ein. Die im VU METER (23) befindliche
Power LED leuchtet auf. Wenn Sie den Mixer nicht benutzen, schalten
Sie den POWER SWITCH (21) wieder aus. Die LED geht wieder aus..
2. KANAL 1 (CH1): Um diesen KANAL im Mix (PGM zu hören, wählen
Sie zuerst das Eingangssignal mit dem LN SWITCH (37) LN 1 (18) oder
MIC 3 (19). Schieben Sie nun den Fader CH 1 SLIDE CONTROL (39)
hoch, bis der gewünschte Pegel erreicht ist.
3. KANAL 2 (CH2): Um diesen Kanal im Mix (PGM zu hören, wählen Sie
zuerst das Eingangssignal mit dem LN SWITCH (40) PH 1/LN 2 (16)
oder LN 3 (17). Schieben Sie nun den Fader CH 2 SLIDE CONTROL
(42) hoch, bis der gewünschte Pegel erreicht ist.
4. KANAL 3 (CH3): Um diesen Kanal im Mix (PGM zu hören, wählen
Sie zuerst das Eingangssignal mit dem LN SWITCH (43) PH 2/LN 4 (12)
oder LN 5 (13). Schieben Sie nun den Fader CH 3 SLIDE CONTROL
(45) hoch, bis der gewünschte Pegel erreicht ist.
5. KANAL 4 (CH4): Um diesen Kanal im Mix (PGM zu hören, wählen Sie
zuerst das Eingangssignal mit dem LN SWITCH (46) LN 6 (10) oder LN
(9). Schieben Sie nun den Fader CH 4 SLIDE CONTROL (48) hoch,
7
bis der gewünschte Pegel erreicht ist.
6. CUE (Vorhören): Wenn Sie einen Kopfhörer an die Buchse HEAD-
PHONE (26) anschließen, können Sie alle Kanäle Vorhören. Drücken
Sie die Knöpfe CUE BUTTONS (38, 41, 44, 47) für Kanal 1 bis 4, um
den abzuhörenden Kanal anzuwählen. Die jeweils zugehörige LED
leuchtet auf. Mit dem Drehregler CUE VOLUME CONTROL (25) regeln
Sie die Vorhörlautstärke , unabhängig von Ihrem Mix. Bewegen Sie den
CUE/PGM FADER (24) nach links, hören Sie das CUE Signal. Schieben
Sie den CUE/PGM FADER (24) in die Mitte, hören Sie CUE gemischt
mit PGM. Ist der CUE/PGM FADER (24) nach rechts geschoben, hören
Sie PGM (Mixsignal (Bus) vor dem MASTER-OUT.
7. ASSIGN: Auf der Frontplatte befinden sich zwei Drehschalter X FADER
ASSIGN SWITCHES (34, 35), mit 5 Stellungen: OFF, 1, 2, 3, & 4.
(9)
Page 10

Der linke SCHALTER ASSIGN (34) schaltet die KANÄLE CH 1, 2, 3, or
4 auf die linke Seite des CROSS FADERS (36). Der rechte SCHALTER
ASSIGN (35) schaltet die KANÄLE CH 1, 2, 3, or 4, auf die rechte Seite
des CROSS FADERS (36). Sind die SCHALTER ASSIGN (34, 35) auf
OFF gestellt, wird kein Signal auf den CROSS FADER (36) geleitet.
Abhängig von der Stellung des jeweiligen KANALFADERS KANAL 1
bis 4, sind somit alle 4 KANÄLE im PGM-Mix hörbar.
8. CROSS FADER SEKTION: Der CROSS FADER (36) ermöglicht das
Überblenden von einerm Eingang zum Anderen. Die PDM Mixer sind
wie in PUNKT 7 (ASSIGN) beschrieben mit einem zuweisbaren CROSS
FADER (36) ausgestattet. Er ist leicht herausnehmbar und kann
dadurch schnell ausgetauscht werden. Ihr Gemini Mixer wird mit einem
RG- 45 (RAILGLIDE™) DUAL-RAIL CROSS FADER geliefert. RAIL
GLIDE™ CROSS FADER haben intern zwei Edelstahlschienen, die ein
sanftes und genaues Gleiten von einem Ende zum Anderen
ermöglichen. Alternativ ist der Einbau des RG-45 PRO (PROGLIDE™)
CROSS FADERS mit einer Spezialkurve für das Scratchen möglich.with
a special curve designed for scratch mixing. Beachten Sie zum
Austauschen folgende Anleitung:
CROSSFADER AUSTAUSCH:
1. DIE ÄUßEREN SCHRAUBEN
DER CROSSFADERPLATTE (B)
LOSSCHRAUBEN.. NICHT DIE
INNENSCHRAUBEN (C) LÖSEN.
2. DEN ÜBERBLENDER VORSICHTIG ANHEBEN UND DAS
KABEL (D) ABZIEHEN.
3. DAS KABEL AUF DEN NEUEN
FADER STECKEN UND WIEDER
IN DAS MISCHPULT SETZEN.
4. DEN NEUEN CROSSFADER
MIT DEN SCHRAUBEN AM
MISCHPULT BEFESTIGEN.
9. KLANGREGELUNG EQUALIZER (EQ): Die PDM-Mixer haben zur
Klangregelung zwei 10 BAND GRAPHIC EQUALIZER (32, 33) eingebaut. Bewegen Sie einen der Fader nach oben oder unten, so wird der
jeweilige Frequenzbereich um +
zweifach 10 BAND GRAPHIC EQ, wird mit dem Schalter EQ SWITCH
(31) Ein- und Ausgeschaltet. Dies wird durch die EQ.-LED signalisiert.
Ist der EQ aktiviert, werden beide PGM-KANÄLE damit beinfllußt. Der
gemeinsame Ausgangspegel wird mit MASTER VOLUME (27) geregelt.
Um eine gleichmäßige Balance des Ausgangssignals zu erreichen,
müssen beide EQ`s (32 & 33) gleich eingestellt sein (gespiegelt).
ANMERKUNG: FÜR OPTIMALE KLANGQUALITÄT MIXEN SIE IMMER IN STEREO NICHT
IN MONO: BEGINNEN SIE MIT DEN EQ PEGELN (32, 33) IN DER MITTE(REGLER
EINGERASTET). DREHEN SIE DEN MASTER VOLUME (27) REGLER IN DEN UNTEREN
BEREICH. STELLEN SIE NUN DEN LINKEN (32) UND RECHTEN (33) KANAL DES EQUALIZERS NACHEINANDER EIN, SIND SIE MIT DER KLANGEINSTELLUNG ZUFRIEDEN,
ÜBERPRÜFEN SIE, OB BEIDE EQ-KANÄLE GLEICH EINGESTELLT SIND. JEDE
VERÄNDERUNG IM EQ (32&33) MACHT SICH AUCH ALS PEGELÄNDERUNG IM MASTER
AUSGANG UND IM VU-METER (23) BEMERKBAR. STELLEN SIE JETZT MIT MASTER
VOLUME (27) DEN GEWÜNSCHTEN AUSGANGSPEGEL EIN OHNE IHREN MIXER UND
DAS GESAMTSYSTEM ZU ÜBERLASTEN. ES DÜRFEN KEINE VERZERRUNGEN DURCH
ZU HOHE PEGEL AUFTRETEN, DA SONST VERSTÄRKER UND/ODER LAUTSPRECHER
ZERSTÖRT WERDEN KÖNNEN.
10. STEREO/MONO: Mit dem Schalter STEREO/MONO (30) nach
links, wird das Ausgangssignal in Stereo wiedergegeben. Legen Sie den
SCHALTER (30) STERO/MONO nach rechts, ist der Ausgang auf Mono
geschaltet.
11. FUNKTION UND REGELUNG DER AUSGÄNGE (OUTPUTS):
Wenn sie mit Ihrem Sound zufrieden sind, können Sie den PGM-Pegel
mit dem Regler MASTER VOLUME (27) einstellen. Die beiden
Ausgänge: MASTER (Cinch, unsymmetrisch) und BALANCED MAS-
TER (Klinke, symmetrisch) (3, 6) werden mit dem Regler MASTER
VOLUME (27) geregelt. Der Ausgang ZONE (5) wird mit dem Drehregler
ZONE (29) eingestellt. Den Ausgang BOOTH (7) verändern Sie mit dem
Drehregler BOOTH (28). Der RECORD (4) Ausgang ist nur von den
Kanalfadern abhängig und nicht getrennt regelbar.
12. MIC SEKTION: Stecken Sie den Stecker Ihres Hauptmikrofons in die
MIC 1 KOMBIBUCHSE (49) auf der Frontplatte. Mit den Drehreglern
HIGH (52) und LOW (53) verändern Sie den Klang Ihres
Hauptmikrofons. Der Drehregler MIC 1 VOLUME CONTROL (50) regelt
den Pegel. Zwei weitere Mikrofone können an die Klinkenbuchsen MIC
2 (20) & MIC 3 (19) an der Rückwand angeschlossen werden. Der Pegel
von MIC 2 (20) ist mit dem Drehregler MIC 2 VOLUME CONTROL (51)
einstellbar. MIC 3 (19) wird mit dem KANALFADER 1 CH 1 SLIDE
CONTROL (39) geregelt.
13. TALKOVER: Um das Mikrofon bei laufender Musik besser hören zu
können, schalten Sie die AUTO TALKOVER FUNKTION ein. Der
Schalter AUTO TALKOVER (54) wirkt auf MIC 1 (49) und MIC 2 (20)
und hat 3 Stellungen:
12 dB angehoben bzw. abgesenkt. Der
- Ist der Schalter MIC/TALKOVER (54) in der unteren Position, sind
MIC 1 (49), MIC 2 (20) & TALKOVER MODE aus.
- Befindet sich der Schalter MIC/TALKOVER (54) in der Mitte, sind
MIC 1 (49) & MIC 2 (20) an & TALKOVER MODE
is aus. Die MIC ON
LED wenn MIC 1 (49) & MIC 2 (20) an sind.
- Mit dem Schalter MIC/TALKOVER (54) in der oberen Position, sind
MIC 1 (49) & MIC 2 (20) an und der TALKOVER MODE ist aktiviert. Der
Musikpegel der anderen Eingange wird automatisch um, -16 dB, wenn
in MIC 1 (49) oder MIC 2 (20) gesprochen wird.
14. BNC LAMPEN ANSCHLUß: Die Buchse BNC LAMP PORT (22)
dient zum Anschuß einer Schwannenhalslampe (12V-5W) wie z.B. die
Gemini GNL-700. Schließen Sie die Lampe nur an, wenn Ihr Mixer ausgeschaltet ist. Stecken Sie den BNC-Stecker vorsichtig auf die BNC-
Buchse und drehen Sie die Überwurfmutter (Bajonettverschluß) im
Uhrzeigersinn, um den Stecker zu verriegeln. Wenn Sie jetzt den Mixer
einschalten leuchtet die Lampe auf. Um die Lampe wieder zu entfernen,
schalten Sie zuerst den Mixer aus, lösen dann den BNC-Stecker entgegen dem Uhrzeigersinn und ziehen die Lampe wieder ab.
15. GROUND LIFT SCHALTER: Der Schalter GROUND LIFT SWITCH
(8) wird eingesetzt um Brummgeräusche zu vermeiden. Überprüfen Sie,
in welcher Stellung die geringsten Störgeräusche hörbar sind und
belassen Sie den Schalter GROUND LIFT SWITCH (8) in dieser
Stellung. Ist kein Störgeräusch vorhanden, oder in beiden Stellungen
des Schalters GROUND LIFT SWITCH (8) gleich, so lassen Sie den
Schalter in der Position GROUND.
ANMERKUNG: STELLEN SIE SICHER, DAS MIXER UND VERSTÄRKER AUSGESCHALTET
SIND; BEVOR SIE DEN GROUND LIFT SCHALTER BETÄTIGEN. DAS SCHALTGERÄUSCH
KÖNNTE SONST IHRE ANLAGE BESCHÄDIGEN.
16. VU METER (AUSSTEUERUNGSANZEIGE): Das VU METER (23)
zeigt in dB den Stereoausgangspegel der MASTERAUSGÄNGE (3 & 6)
an.
PDM-02 ECHO/EFX:
ECHO SEKTION:
Der Echo-Effekt kann mit dem Schalter ECHO (55) auf PGM, oder MIC
1 (49) & MIC 2 (20) geschaltet werden. Schalten Sie nach links geht der
Effekt zum PGM, in der Mitte ist Echo abgeschaltet und schalten Sie
nach rechts geht der Effekt auf MIC 1 (49) & MIC 2 (20). Mit den
Drehreglern REPEAT (56), DELAY (57), and wird der ECHO-EFFEKT
(58) eingestellt.
SOUND EFFEKT SEKTION:
Sechs verschiedene SOUND-EFFECTE (APPLAUSE, SCREAM,
COPTER, SCRATCH, H
werden. Sie sind mit den Tastern SOUND EFFECTS CONTROL BUTTONS (61) anwählbar.Der Pegel wird mit EFX VOLUME (60) geregelt,
welcher sich über dem APPLAUSE Tadter befindet. Die Tonhöhe (Pitch)
der Effekte kann mit dem Drehregler SPEED CONTROL (59) (über dem
SCRATCH Taster) eingestellt werden.
2
O & GLASS) können dem Mix hinzugefügt
PDM-03 SAMPLER BEDIENUNG:
SPEICHERBÄNKE:
Der PDM-03 hat 5 SPEICHERBÄNKE MEMORY BANKS (59). Die
beiden mit 8 & 8 bezeichneten Bänke speichern je 8 sek, die beiden mit
16 & 16 bezeichneten Bänke speichern je 16 sek. und die mit 48 bezeichnete Bank speichert 48 sek. Die Speicherbänke sind immer nur
einzeln anwählbar und können nicht zusammengefaßt werden. Jede
Bank kann ein anderes Sample enthalten, muß dazu aber separat
gesampelt und auch wieder einzeln abgespielt werden.
SAMPLE RECORDING:
1. Wählen Sie mit dem Drehschalter SAMPLER ASSIGN (55) den
gewünschten Eingang aus.
2. Drehen Sie den Drehregler PITCH CONTROL (56) in die Mitte um mit
normaler Tonhöhe aufzunehmen.
HINWEIS: SIE KÖNNEN EINEN SAMPLE IN JEDER STELLUNG DES PITCHREGLERS
AUFNEHMEN. DIESE STELLUNG IST DANN DIE NORMALPOSITION. BEISPIEL: NEHMEN
SIE EINEN SAMPLE IN POSITION GANZ LINKS AUF UND SPIELEN DEN SAMPLE IN POSITION GANZ RECHTS WIEDER AB, VERDOPPELT SICH DIE ABSPIELGESCHWINDIGKEIT
UND UMGEKEHRT.
(10)
Page 11
3. Schalten Sie den MODE SELECTOR (58) in die RECORD Position.
4. Hören Sie den ausgewählten Kanal ab, indem Sie den CUE
SCHALTER für diesen Kanal drücken und wählen Sie eine
Speicherbank MEMORY BANK (59) aus.
5. Ist die Stelle erreicht, die Sie sampeln wollen, drücken Sie die Taste
SAMPLER (59). Die gewählte Speicherbank LED blinkt, wenn keine
BACK-UP BATTERIE eingebaut bzw. diese leer ist (siehe Back-up
Batterie). Das Sample wird in der Speicherbank MEMORY BANK (59)
gespeichert und kann wieder abgespielt werden.
ANMERKUNG: DAS DRÜCKEN DER SAMPLETASTE STARTET DEN SAMPLEPROZESS
(SAMPLER LED LEUCHTET BLAU) NOCHMALIGES DRÜCKEN DER SAMPLETASTE
BEENDET DEN PROZESS (SAMPLER LED ERLISCHT WIEDER). WIRD DIE TASTE NICHT
WÄHREND DES SAMPELNS GEDRÜCKT, SO ENDET DER PROZESS NACH ABLAUF DER
JEWEILIGEN ZEIT (8, 16, ODER 48 SEK.)
SAMPLER CUE (VORHÖREN):
1. Stellen Sie Ihre SAMPLER ein SINGLE oder zu REPEAT, betätigen
Sie dann die SAMPLER taste und die SAMPLE fängt an, im CUE zu
spielen.
2. Drücken Sie den Knopf CUE SAMPLER (59) um den aufgenommenen Sample vorzuhören. Die CUE SAMPLER LED leuchtet dann auf.
3. Schalten Sie den Schalter MODE SELECTOR (58) auf SINGLE oder
REPEAT.
4. Wahlen Sie die gewünschte Speicherbank MEMORY BANK aus.
5. Drücken Sie den beleuchteten Taster SAMPLER um den Sample
abzuhören. Erneuted Drücken der Taste SAMPLE stoppt das Abspielen.
6. Sind Sie mit dm Sample nicht zufrieden wiederholen Sie den Vorgang
(Pos. 1-5).
7. Im CUE notieren, betätigen Sie die CUE SAMPLER taste und betätigen Sie danndie CUE-Taste, damit die Führung probiert werden kann.
Seien Sie sicher, daß Ihre KANAL SLIDE CONTROLS bei null sind,
also die SAMPLE nicht in PGM spielt. Befolgen Sie die
Beispielaufnahmeanweisungen, den Prozeßdurchzuführen.
PPDDMM SSEERRIIEESS
PPDDMM SSEERRIIEESS
6. Mit dem Drehregler SAMPLER LEVEL (57) wird die
Ausgangslautstärke des Samples im Verhältnis zum Originalsignal
geregelt (PGM).
ROBOTER-ABSPIELEN:
1. Wenn die Taste ROBO PLAY (59) auf OFF (Aus) steht (die Anzeige
ROBO PLAY INDICATOR ist aus) und der MODE SELECTOR (58) sich
entweder im Modus SINGLE oder REPEAT (Einzeln bzw. Wiederholen)
befindet, läßt ein Druck auf die Taste SAMPLER (59) das Sample mit
der ausgewählten Quelle zusammen abspielen.
2. Wenn die Taste ROBO PLAY auf ON (Ein) steht (die Anzeige ROBO
PLAY INDICATOR leuchtet blau auf), wird die ausgewählte Quelle auf
stumm gestellt, wenn der SAMPLER eingeschaltet wird. Wenn das
Sample beendet ist, schaltet die Quelle automatisch wieder an.
BATTERIEHILFSVERSORGUNG:
1. BATTERIEHILFSVERSORGUNG: Das Mischpult PDM-03 ist mit
einer Batteriehilfsversorgung ausgerüstet, die dazu dient, die Samples
im Speicher zu behalten. Um dieses Merkmal zu aktivieren, muß eine 9
V-Batterie (nicht mitgeliefert) an den Batteriehalter BATTERY HOLDER
(60) an der hinteren Schalttafel angeschlossen werden. Das erlaubt
Ihnen, die Samples zu speichern und für zukünftigen Gebrauch zu
behalten, auch wenn das Gerät ausgestöpselt wird.
HINWEIS: WENN DAS GERÄT AUSGESTÖPSELT WIRD UND KEINE BATTERIE
ANGESCHLOSSEN IST, GEHEN DIE SAMPLES VERLOREN.
2. ANZEIGE BATTERIE SCHWACH: Eine Anzeige "Batterie schwach"
wird mit dem PDM-03 mitgeliefert. Wenn die Batterie ausgewechselt
wird, sicherstellen, daß das Gerät eingestöpselt ist und der Netzstrom
AN ist. Wenn diese Maßnahme nicht befolgt wird, geht der
Speicherinhalt verloren. Die Anzeige "Batterie schwach" ist an, wenn die
LED der ausgewählten Speicherbank aufblinkt. Die LED blinkt auch auf,
wenn keine Batterie an das Gerät angeschlossen ist.
TECHNISCHE DATEN:
SAMPLE PLAYBACK (WIEDERGABE):
1. Schalten Sie den Schalter MODE SELECTOR (58) auf SINGLE oder
REPEAT.
2. Wahlen Sie die gewünschte Speicherbank MEMORY BANK aus.
3. Drücken Sie den beleuchteten Taster SAMPLER (SAMPLER LED
leuchtet grun) um den Sample abzuhören. Jedes Drücken der Taste
startet gen Abspielvorgang neu. Schnelles, wiederholtes Drücken ergibz
einen Stuttereffek. Wird die Taste SAMPLE nach dem starten nicht
nochmals gedrückt spielt der Sampler bid zum Ende des Sampels weiter. Diese Probe spielt durch vollständig unabhängig davon das
Schaltender Gedächtnisbank. Das Sample wird bis zum Ende abgespielt auch wenn zwischendurch eine Speichertaste gedrückt wird.
Wenn Sie eine Speicherbank wählen und die Sampler-Taste drücken,
während ein Sample abgespielt wird, wird das Sample wiederholt,
welches zuvor gewählt wurde und spielt bis zum Ende ab.
4. Um ein neues Sample abzuspielen, muss der Sample gestoppt sein.
Wählen Sie dann aus der Speicherbank das gewünschte Sample aus
und starten Sie erneut.
5. Steht der MODE SELECTOR (58) in der Position REPEAT und Sie
drücken die Taste SAMPLER (59), wird dann das Sample wie in einer
Schleife wiederholt (Loop). Drücken Sie die SAMPLER-Taste in
REPEAT-Mode erneut, stoppt das Sample.
EINGÄNGE:
Phono:.................................................................................3 mV, 47 KOhm
Line:................................................................................150 mV, 27 KOhm
MIC 1, 2, & 3:...................................................1.5 mV, 2 K Ohm Balanced
Bässe:...............................................................................................± 12dB
Höhen:..............................................................................................± 12dB
AUSGÄNGE:
Amp/Booth:.....................................................................0 dB 1 V, 400 Ohm
Max:................................................................................20 V Spitze-Spitze
Rec....................................................................................150 mV, 5 KOhm
Zone................................................................................0 dB 1 V 400 Ohm
symmetrisch....................................................................6 dB 2 V 400 Ohm
ALLGEMEIN:
Frequenzbereich:.....................................................20Hz - 20KHz +/- 2 dB
Klirrfaktor:...........................................................................................0.02%
Geräuschspannungsabstand:...........................................Besser als 80 dB
Talkover Dämpfung:...........................................................................-16 dB
Kopfhörer Impedanz:.......................................................................16 Ohm
Spannungsversorgung:.........................................115/230V, 60/50Hz, 20W
Abmessungen:................................................ 482.6 x 100.6 x 231.2 mm
Gewicht:..............................................................................................4.7 kg
ÄNDERUNGEN TECHNISCHER DATEN VORBEHALTEN.
(11)
Page 12

INTRODUCCIÓN:
Felicidades por su compra del mezclador de audio Gemini PDM
series 19" 5U, 4 canales, formato para enrracar. Este mezclador de
diseño está cubierto por una garantía limitada de 3 años, excluyendo el
crossfader. El cross fader está garantizado por su parte durante 90 días.
Antes de utilizarlo, por favor lea detenidamente estas instrucciones.
CARACTERÍSTICAS:
- Mezclador de 5U, 19" formato rack
- 4 canales estéreo
- Entradas RCA para 7 línea, 3 Mic, 2 phono/línea convertible
- Salidas RCA para Master, grabación, cabina, y zona
- Salida de master balanceada jack ¼"
- 2 x entrada micrófono jack ¼"
FRONTAL:
- Doble ecualizador gráfico de 10 bandas con interruptor on/off e indicador por LED azul
- Control rotativo de volumen para zona, cabina, y cue
- Interruptor estéreo/mono
- Crossfader asignable
- Crossfader Rail Guide removible y reemplazable por el propio usuario
- Pulsador de cue por canal con indicador por LED verde
- Control CUE/PGM permitiendo cue mix
- Entrada combo XLR-jack 1/4" para micrófono
- Control rotativo de volumen y 2 bandas de EQ para micrófono
- Talk over
- Entrada para lámpara BNC
- Jack ¼" para auriculares
NOTA: ESTAS CARACTERISTICAS SON COMUNES EN TODOS LOS MODELOS DE LA
SERIE PDM.
PDM-01 FRONTAL:
- Control de volumen Master lineal
PDM-02 FRONTAL:
- 6 Samplers digitales con control rotativo de volumen, y velocidad
- Control rotativo de volumen de master
- Efecto Echo asignable a Master/Mic con repetición y retardo
PDM-03 FRONTAL:
- Sampler digital de 96 segundos formado por 5 bancos de memoria con
botones con luz
- Control rotativo para asignación de canal a grabar en el sampler
- Control rotativo de parámetros del sample con nivel, pitch bend,
grabar/single/repeat
- Pulsador para RoboPlay y cue sampler
- Control rotativo de volumen master
PRECAUCIONES:
1. Lea todas estas instrucciones antes de usar esta unidad.
2. Para evitar riesgo de shock eléctrico, nunca abra esta unidad. Por
favor deje que un servicio técnico cualificado se encargue de cualquier
anomalía.
EN USA ~ SI USTED TIENE PROBLEMAS CONTACTE CON GEMINI
CUSTOMER SERVICE AL: 1 (732) 738-9003. NO INTENTE DEVOLVER ESTE
3. No exponga esta unidad directamente al sol o a fuentes de calor
como radiadores y estufas.
4. Esta unidad debe limpiarse solo con un trapo seco. Evite disolventes
u otros limpiadores domésticos.
5. Si desea transportar esta unidad, debe realizarlo en el embalaje original. Esto evitará daños durante el transporte.
6. NO EXPONGA ESTA UNIDAD A LA LLUVIA O ROCIO.
7. NUNCA UTILICE LIMPIADORES DE SPRAY O LUBRICANTES EN
NINGUN CONTROL O INTERRUPTOR.
EQUIPO A SU PROVEEDOR.
CONEXIONES:
1. Antes de conectar el cable de corriente, asegúrese que el SELECTOR DE VOLTAGE (1) esta colocado en la posición correcta.
2. En la parte trasera encontrará la conexión 115 V/230 V PLUG (2).
Antes de conectar el cable, asegúrese que el INTERRUPTOR GENER-
AL (21) en el frontal está apagado (OFF).
(12)
3. Los mezcladores PDM tienen 5 diferentes salidas:
- La salida MASTER (3) conecta a al amplificación principal con cables
RCA.
- Otra posibilidad es utilizar la salida MASTER BALANCEADA (6) que
también conecta a la amplificación a través de conectores jack 1/4".
Recomendamos utilizar siempre cables balanceados cuando la distancia hasta su amplificador sea de 3.5 metros o más.
- La salida CABINA - BOOTH (7) permite la conexión a un amplificador
auxiliar con cables RCA.
- La salida ZONE (5) permite la conexión a un amplificador auxiliar con
cables RCA.
- La salida REC (4) permite conectar su mezclador a una unidad
grabadora, permitiéndole registrar su mezcla.
4. En el panel trasero se encuentran las entradas 2 PHONO (PH)
/LINEA (LN) convertible RCA (12, 16), y 5 LINEA RCA (10, 9, 13, 17,
18). Las entradas convertibles RCA de CH 2 (16) y CH 3 (12) permiten
conectar equipos de niveles de PH y LN al mezclador. Para ajustar los
CONVERTER(s) (11, 15), solo displace hacia arriba el interruptor para
operar con PH 1 o PH 2. Desplace los interruptores abajo para operar
con LN 2 o LN 4. Las entradas de PH
sula magnética. Al utilizar giradiscos, deberá poner a masa el cable
RCA atornillando la horquilla de masa en GROUNDING SCREW (14)
que se encuentra en el panel trasero de su PDM. Exactamente entre los
interruptores CONVERTER SWITCHES (11, 15). Las entradas estéreo
LN solo aceptan unidades de nivel de línea como CD, DAT, MiniDisc,
etc.
NOTA: EN CASO DE USAR GIRADISCOS, EL NO CONECTAR LA MASA PUEDE CAUSAR
RUIDOS.
5. Los auriculares pueden conectarse en la entrada de la parte
delantera HEADPHONE JACK (26).
6. El MIC 1 (49) (en el panel delantero) es una combinación de XLR y
jack ¼". El MIC 2 (20) y MIC 3 (19) (en el panel trasero) acepta solo
conectores jack 1/4". Las entradas de micro aceptan conexiones balanceadas y no balanceadas.
7. La entrada para BNC LAMPARA (22) (en el frontal, por encima del
POWER SWITCH (21)) se utilice para insertar una lámpara de 12 V
BNC como la Gemini GNL-700.
solo aceptan giradiscos con cáp-
OPERATIVA:
1. Una vez haya realizado todas las conexiones en el panel trasero,
encienda el mezclador pulsando el POWER SWITCH (21). Al encenderse, el LED DE POWER que tiene el símbolo de encendido en el VU
METER (23), se iluminará. Cierre el mezclador si no va a usarlo pulsando el POWER SWITCH (21) de nuevo. Al apagar su PDM el LED tam-
bién se apagará.
2. CANAL (CH) 1: Para utilizar este canal en su mezcla program mix
(PGM), primero debe decidir que LINEA (LN) va a usar. Use el LN
CONTROL (37) para elegir entre LN 1 (18) o MIC 3 (19) en este canal.
Eleve suavemente el DESLIZANTE CH 1 CONTROL (39) hasta un nivel
confortable, cuando haya elegido la línea correcta.
3. CH 2: Para utilizar este canal en su mezcla PGM, primero debe
decidir que LN va a usar. Use el LN CONTROL (40) para elegir entre
PH 1/LN 2 (16) o LN 3 (17) en este canal. Eleve suavemente el
DESLIZANTE CH 2 CONTROL (42) hasta un nivel confortable, cuando
haya elegido la línea correcta.
4. CH 3: Para utilizar este canal en su mezcla PGM, primero debe
decidir que LN va a usar. Use el LN CONTROL (43) para elegir entre
PN 2/LN 4 (12) o LN 5 (13) en este canal. Eleve suavemente el
DESLIZANTE CH 3 CONTROL (45) hasta un nivel confortable, cuando
haya elegido la línea correcta.
5. CH 4: Para utilizar este canal en su mezcla PGM, primero debe
decidir que LN va a usar. Use el LN CONTROL (46) para elegir entre
LN 6 (10) o LN 7 (9) en este canal. Eleve suavemente el DESLIZANTE
CH 4 CONTROL (48) hasta un nivel confortable, cuando haya elegido
la línea correcta.
6. CUE: Conectando unos auriculares a la toma de AURICULARES
(26), usted podrá monitorizar cualquiera de los canales. Pulse los
botones de CUE (38, 41, 44, 47) para los CHs 1 hasta el 4, respectivamente, para asignar que CH(s) van a ser monitorizados. Los respectivos
Page 13

CUE LED se iluminarán cuando estén en uso. Use el control rotativo de
CUE VOLUMEN (25) para ajustar el volumen de CUE sin cambiar el
nivel de la mezcla. Moviendo el control CUE/PGM FADER (24) hacia la
IZQUIERDA usted podrá monitorizar la señal asignada a CUE.
Moviendo el control CUE/PGM FADER (24) hacia el MEDIO permite
mezclar el CUE con el PGM. Moviendo el control CUE/PGM FADER
(24) hacia la DERECHA usted podrá monitorizar la salida PGM.
7. ASIGNACIÓN: Hay dos controles rotativos ASIGNACIÓN X FADER
(34, 35), cada uno con 5 posiciones OFF, 1, 2, 3, y 4. El CONTROL
IZQUIERDO (34) permite direccionar los canales CH 1, 2, 3, o 4 hacia
el lado IZQUIERDO del CROSS FADER (36). El CONTROL DERECHO
(35) permite direccionar los canales CH 1, 2, 3, o 4 hacia el lado DERE-
CHO del CROSS FADER (36). Cuando los controles ASSIGN (34, 35)
están en OFF, usted no tendrá asignado ningún canal al CROSS
FADER (36). Esto le permite controlar su mezcla directamente desde
los faders de canal.
8. SECCIÓN CROSS FADER: El CROSS FADER (36) permite mezclar
de una fuente a otra. Los mezcladores PDM incluyen un CROSS
FADER (36) asignable. Los controles rotativos de asignación ASSIGN
(34, 35) permiten seleccionar que canales desea reproducir a través de
los lados del CROSS FADER (36). El
CROSS FADER (36) en esta
unidad es reemplazable y si necesita cambiarlo es de facil intercambio.
Su mezclador Gemini viene con un CROSS FADER RG- 45 (RAIL-
GLIDE™) DUAL-RAIL CROSS FADER. RAIL GLIDE™ CROSS
FADERS tienen internamente dos raíles de acero inoxidable que per-
miten un deslizamiento suave y preciso de un extreme al otro. También
se encuentra disponible el RG-45 PRO (PROGLIDE™) CROSS FADER
con una curva especialmente diseñada para scratch. Simplemente compre uno en su distribuidor habitual y sigua estas instrucciones:
CROSSFADER REEMPLAZABLE
1. DESATORNILLE LOS TORNILLOS EXTERIORES DE LA PLACA
DEL FADER (B). NO TOQUE LOS
TORNILLOS INTERIORES (C).
2. CON CUIDADO RETIRE EL
VIEJO CROSSFADER Y
DESCONECTE EL CABLE (D).
3. CONECTE EL NUEVO CROSSFADER AL CABLE (D) Y
COLÓQUELO DE NUEVO EN SU
ALOJAMIENTO.
4. ATORNILLE DE NUEVO EL
CROSSFADER CON LOS
TORNILLOS EXTERIORES (B).
9. EQUALIZADOR (EQ): Estas unidades vienen con un doble ECUALIZADOR GRAFICO DE 10 BANDAS (32, 33) que le permitirá ajustar el
sonido a la acústica de la sala. Ajustando cualquiera de los 10 controles
deslizantes de EQ (32, 33), usted podrá cortar o realzar las características tonales del sonido que llega de su PGM a los altavoces en ±12 dB.
Para activar el doble ecualizador grafico de 10 BANDAS, conecte el
interruptor EQ (31), y el LED EQ se iluminará para indicar que el EQ
está funcionando. Para desactivar el ecualizador grafico de 10 bandas,
coloque el interruptor de EQ (31) en OFF, y el LED EQ se apagará.
Cuando está activado, el EQ (32, 33) controla ambos canales estéreo.
El PGM y EQ están controlados por el MASTER VOLUMEN (27). Para
balancear el sonido del PGM en reproducción tanto a IZQUIERDA como
DERECHA usted deberá igualar las dos ecualizaciones del mezclador.
NOTA: PARA UNA OPTIMA REPRODUCCION DE SU SONIDO, COLOQUE LA UNIDAD EN
ESTEREO, NO EN MONO. EMPIECE CON LOS NIVELES DE EQ (32, 33) EN EL CENTRO.
LOS CONTROLES DESLIZANTES (32, 33) DEBERAN ENCONTRAR UNA FIJACION EN
ESA POSICION. AJUSTE EL NIVEL DE VOLUMEN (27) DELMEDIO HACIA ABAJO. LUEGO
AJUSTE UNO A UNO LOS CONTROLES IZQUIERDO (32) O DERECHO (33) DE SU EQ,
HASTAUN NIVEL CONFORTABLE. UNAVEZ SATISFECHO CON ELSONIDO DE UN LADO,
IGUALE LA ECUALIZACIÓN EN EL OTRO CANAL. EN EL MOMENTO QUE USTED PASE
EL PUNTO MEDIO DE DEL EQ (32, 33), LA SALIDA GENERAL, INDICADA EN EL VU
METER (23), EXPERIMENTARÁ UN REALCE TONAL. POR FAVOR AJUSTE EL VOLUMEN
GENERAL (27) A UN NIVEL CONFROTABLE DE FORMA QUE NO SOBRECARGUE SU
EQUIPO. SI ESTO OCURRE EL SISTEMA ENTRARÁ EN CLIPPING. BAJE EL VOLUMEN
(27) O AJUSTE EL EQ (32, 33) DE FORMA QUE EL CLIPPING DESAPAREZCA. DE NUEVO
COLOQUE EL VOLUMEN (27) AL NIVEL QUE PARA USTED SEA CONFORTABLE.
10. ESTEREO/MONO: Usted puede convertir su sonido de ESTEREO
a MONO y viceversa usando el interruptor ESTEREO/MONO (30).
Deslícelo a la IZQUIERDA para ESTEREO. Deslícelo a la DERECHA
para MONO.
11. CONTROL DE SELECCION DE SALIDA: Una vez usted tenga un
nivel confortable de escucha, deberá ajustar el nivel de decibelios de su
PGM con el MASTER VOLUMEN (27). Las salidas MASTER RCA y
BALANCED MASTER (3, 6) están controladas por el MASTER VOLUMEN (27). También deberá ajustar el volumen de ZONA (5) con el con-
PPDDMM SSEERRIIEESS
PPDDMM SSEERRIIEESS
trol rotativo ZONA (29). Así como el volumen de CABINA (7) con el control BOOTH (28). El volumen de su GRABACION (4) está controlado
únicamente por el nivel de los deslizantes de canal.
12. SECCION MICRO: Conecte su micrófono principal a la entrada MIC
1 combo de XLR-1/4" (49) localizada en el panel frontal. Los controles
rotativos de AGUDOS (52) y GRAVES (53) permiten ajustar el tono del
micro MIC 1 (49). El control rotativo MIC 1 VOLUMEN (50), situado enci-
ma del MIC 2 VOLUMEN (51), ajusta el nivel de decibelios del MIC 1
(49). Usted puede conectar también un Segundo y tercer micro en el
panel trasero en los jacks MIC 2 (20) y MIC 3 (19). El nivel de MIC 2 (20)
se controla por el control rotativo MIC 2 VOLUMEN (51). El nivel del MIC
3 (19) se controla con el deslizante de canal CH 1 (39).
13. TALKOVER: El propósito del modo AUTO TALKOVER es realizar
una atenuación sobre el programa que está sonando para dar prioridad
al micrófono sobre la música. El interruptor AUTO TALKOVER (54) con-
trola MIC 1 (49) y MIC 2 (20) con tres posibilidades:
- Cuando el interruptor MIC/TALKOVER (54) esta en la posición INFE-
MIC 1 (49), MIC 2 (20) y el modo TALKOVER están apagados.
RIOR,
- Cuando el interruptor MIC/TALKOVER (54) está en el CENTRO, MIC
1 (49) y MIC 2 (20) están activos y el modo TALKOVER está apagado.
El LED MIC ON brilla cuando MIC 1 (49) y MIC 2 (20) están en ON.
- Cuando el interruptor MIC/TALKOVER (54) está en la posición ARRI-
BA, MIC 1 (49) y MIC 2 (20) están activos, el modo TALKOVER está
encendido, y el volumen de todas las fuentes excepto MIC 1 (49) y MIC
2 (20) se disminuirán automáticamente en -16 dB, cuando se habla en
cualquiera de los micrófonos.
14. BNC LAMP: La entrada para BNC LAMPARA (22) permite conec-
tar una lámpara de cuello de cisne de 12 V BNC, como la Gemini GNL-
700 a su mezclador PDM. Esta lámpara recibe la alimentación del mezclador. Para encender la lámpara, usted debe primero tener conectada
la lámpara a la entrada BNC LAMP (22). Asegúrese que el mezclador
está apagado en el momento de conectar la lámpara 12 V BNC. Para
conectarla, simplemente alinee los pivotes del conector con las ranuras
de la lámpara. Presione suavemente hacia adentro y gire la lámpara
hasta que esta quede alojada en su emplazamiento. Luego encienda su
mezclador. La lámpara debe ahora encenderse. Para sacar la lámpara
de su alojamiento, primero asegúrese de que su mezclador está apagado. Al apagar su mezclador, la lámpara también se apagará.
Desenrosque la lámpara en sentido contrario a las agujas del reloj y
retire la lámpara de cuello de cisne.
15. INTERRUPTOR DE CONEXION A MASA: El interruptor de
CONEXION A MASA (8) se usa para reducir el ruido de fondo y
zumbido cuando se utilizan distintas fuentes de alimentación para distintas fuentes de sonido. El interruptor debe colocarse en la posición
que genere menos ruido. Si el nivel de ruido es el mismo en ambas posiciones, es aconsejable dejarlo en posición de tierra GND.
NOTA: ASEGURESE QUE EL MEZCLADOR Y/O AMPLIFICADOR ESTÁN APAGADOS
ANTES DE MODIFICAR LA POSICION DEL INTERRUPTOR PARA EVITAR POPEOS
MOMENTANEOS QUE PUEDAN DAÑAR EL APARATO.
16. VU METER: El VU METER (23) indica el nivel de decibelios del
MASTER RCA y MASTER BALANCEADO (3 & 6) tanto en canal
DERECHO como IZQUIERDO.
PDM-02 ECHO/EFX:
SECCION ECHO:
Un efecto eco se puede aplicar al PGM, o MIC 1 (49) y MIC 2 (20)
según la posición del interruptor ECHO (55) desde MIC 1-2 en la
IZQUIERDA, apagado en el CENTRO, o MASTER en la DERECHA. Al
usar el efecto ECHO (55), usted puede ajustar sus parámetros utilizando el control rotativo REPETICION (56), RETARDO (57), y ECHO VOL-
UMEN (58). Para apagar el ECHO (55), baje el ECHO VOLUME (58) o
cambia el interruptor ECHO (55) a posición OFF.
SECCION EFECTOS DE SONIDO:
Seis diferentes efectos de sonido (APLAUSO, GRITO, HELICOPTERO, SCRATCH, AGUA Y CRISTALES) pueden añadirse a su
mezcla pulsando los controles de EFECTOS DE SONIDO (61). El volumen de los efectos se regula por EFX VOLUMEN (60) localizado por
encima del botón APLAUSO. La velocidad del efecto puede incrementarse o disminuir con el control rotativo SPEED CONTROL (59) colocado encima del botón SCRATCH.
(13)
Page 14

PDM-03 OPERATIVA DEL SAMPLER:
INFORMACION SOBRE LA MEMORIA:
El PDM-03 está equipado con 5 BANCOS DE MEMORIA (59). Los dos
bancos marcados como 8 & 8 son de 8 segundos de duración, los dos
bancos marcados 16 & 16 son de 16 segundos de duración y el banco
marcado como 48 es de 48 segundos de duración. Estos bancos están
separados y no pueden puentearse (link). Usted puede guardar diferentes samplers en cada banco, pero deben ser grabados por separado
y reproducidos uno por uno.
GRABACION SAMPLE:
1. Seleccione la fuente a samplear asignando el canal en el control rotativo SAMPLER ASSIGN (55).
2. Los PDM-03 vienen equipados con control rotativo de PITCH (56).
Para obtener un perfecto sampleado, coloque el control en la posición
CENTRAL y grabe su muestra. Subiendo o bajando este control
durante la grabación, obtendremos variaciones de velocidad en la
grabación. La posición CENTRAL mantiene la velocidad original.
SUGERENCIA: USTED PUEDE GRABAR UNA MUESTRA CON EL CONTROL PITCH EN
CUALQUIER POSICION. SEA CUAL SEA ESA POSICIÓN SE CONVERTIRA EN EL SONIDO
NORMAL. SI USTED INICIA UNA GRABACION DE MUESTREO CON EL PITCH AL MINIMO,
ESE SE CONVERTIRA EN SU PITCH NORMAL. AL INCREMENTAR EL PITCH AL MAXIMO
DURANTE LA REPRODUCCION, EL EFECTO PITCH DOBLARA LAVELOCIDAD. GRABANDO AL MAXIMO Y REPRODUCIENDO AL MINIMO, CONSEGUIRA EXACTAMENTE LO CONTRARIO.
3. Coloque el MODE SELECTOR (58) en posición grabación RECORD.
4. Escuche el canal que va a grabar a través del cue, seleccionando el
botón CUE apropiado. Cuando la pista se acerca al punto que usted
desea grabar, pulse el botón apropiado de MEMORY BANK (59) donde
quiera guardar la selección.
5. Luego pulse el botón SAMPLER (59) para iniciar la grabación. El
banco de memoria que este usando tendrá el LED parpadeando, si la
batería no esta colocada o esta baja de tensión (Vea sección BATTERY
BACKUP). La muestra se almacenará en ese BANCO DE MEMORIA
(59) y listo para reproducir.
NOTA: PULSANDO EL BOTON DE SAMPLER EMPIEZA EL PROCESO DE SAMPLEADO
(EL INDICADOR DE SAMPLER SE ILUMINARA EN AZUL). PULSAR UNA SEGUNDA VEZ
EL BOTON PROVOCARÁ LA FINALIZACION DEL SAMPLEADO (EL INDICADOR SE APAGARA). SI USTED NO PULSA POR SEGUNDA VEZ EL BOTON SAMPLER, EL SAMPLEADO SE DETENDRA AUTOMATICAMENTE DESPUES DE 8, 16 O 48 SEGUNDOS DEPENDIENDO DEL BANCO DE MEMORIA EN USO.
CUE SAMPLER:
1. Para registrar en CUE, presione el botón del SAMPLER de la CUE
sus DESLIZANTES CH CONTROL están en ceroasí que la muestra no
juega en PGM. Siga las instrucciones de la grabación de la muestra de
terminar el proceso.
2. Para probar una muestra grabada antes de lanzarla al programa
PGM, pulse el CUE SAMPLER (59), poniendo la muestra en el CUE.
Use los controles de CUE para monitorizar el sample. El LED CUE
SAMPLER se iluminará cuando este en uso. Para poner el CUE SAM-
PLER en PGM, pulse el botón CUE SAMPLER de Nuevo para desen-
ganchar el CUE SAMPLER, y el LED CUE SAMPLER se apagara.
3. Coloque el MODE SELECTOR (58) en SINGLE o REPEAT.
4. Pulse la correcta MEMORY BANK para probarlo en CUE.
5. Pulse el botón iluminado de SAMPLER para reproducir el sample.
Pulse el botón SAMPLER de Nuevo para detener el sample o espere
hasta que el sample termine.
6. Si esta satisfecho con su sample, déjelo memorizado en la MEMO-
RY BANK. Si no, repita los pasos de grabación de SAMPLE.
REPRODUCCION DE SAMPLE:
1. Coloque el MODE SELECTOR (58) en SINGLE o REPEAT.
2. Seleccione el sample deseado pulsando el correcto MEMORY
BANK.
3. Pulsando el botón SAMPLER con el MODE SELECTOR (58) en
SINGLE hará que el SAMPLER inicie la reproducción una vez (el indicador de SAMPLER lucirá verde). Cada pulsación del SAMPLER reinicia
la reproducción del sample desde el principio. Pulsando rápidamente el
botón SAMPLER tendremos un efecto tartamudeo. Una vez se inicie la
reproducción del SAMPLER si no se pulsa de Nuevo el botón, la muestra continuará hasta el final y luego se detendrá. Este SAMPLE se
reproducirá completamente según el banco de memoria seleccionado.
Cambiando de banco de memoria y pulsando reproducir, conseguiremos solamente que se reproduzca una segunda vez el banco previamente seleccionado.
4. Para reproducir un nuevo banco de memoria, el sample previo debe
estar completamente parado. Elija ahora el banco deseado y pulse play
para el inicio de su reproducción.
5. Pulsando el botón SAMPLER (59) con el MODO (58) en posición
REPEAT provocará que el sample se reproduzca continuamente. En
modo repetición, el botón SAMPLER actúa como interruptor ON/OFF.
Al pulsarlo se enciende y pulsando de nuevo se apaga.
6. El NIVEL SAMPLER (57) controla el nivel de decibelios del sampler.
Esto le permite ajustar el volumen del sample en reproducción por encima o por debajo del nivel del programa PGM.
REPRODUCCION ROBO:
1. Con el botón ROBO PLAY (59) en la posición APAGADA (OFF) (El
INDICADOR DE ROBO PLAY estará APAGADO) y la llave de MODE
SELECTOR (58) (selector de modo) ya sea que esté en el modo SINGLE o REPEAT, pulsando el botón SAMPLER (59) ocasionará que la
muestra reproduzca junto con la fuente seleccionada.
2. Cuando el botón ROBO PLAY está en posición de PRENDER (ON)
(El ROBO PLAY INDICATOR ilumina azul), prender el muestreo
enmudece (mutes) la fuente seleccionada. Cuando la muestra se term
na, la fuente automáticamente se vuelve a prender.
BATERIA DE MEMORIA:
1. BATERIA DE MEMORIA: El PDM-03 está equipado con baterías de
memoria que retienen almacenados los samples. Para activarlas, una
batería de 9 voltios (no incluida) debe conectarse al alojamiento de
baterías BATTERY HOLDER (60) del panel trasero. Esto activa el alma-
cenamiento de los samples en memoria. Cuando la unidad esta
desconectada, la batería de memoria mantiene el sample para futuras
utilizaciones.
NOTA: SI ESTA UNIDAD ES DESENCHUFADA SIN TENER CONECTADA LA BATERIA,
TODOS LOS SAMPLES SE PERDERAN.
2. INDICADOR DE BATERIA BAJA: Cuando el LED de la memoria
seleccionada parpadee, esto indicará que la batería esta baja o no hay
batería en el PDM-03. El LED parpadea como aviso si no hay batería
conectada al PDM-03. Cuando cambie la batería del PDM-03,
asegúrese que la unidad esta conectada a corriente y la unidad encendida. Cualquier fallo total de alimentación provocará la perdida de las
memorias y samples.
ESPECIFICACIONES:
ENTRADAS:
Phono:.................................................................................3 mV, 47 KOhm
Linea:..............................................................................150 mV, 27 KOhm
MIC 1, 2, & 3:...............................................1.5 mV, 2 K Ohm Balanceado
Graves:.............................................................................................± 12dB
Agudos:.............................................................................................± 12dB
SALIDA:
Amp/Booth:.....................................................................0 dB 1V, 400 Ohm
Max:................................................................................20V Peak-to-Peak
Rec....................................................................................150 mV, 5 KOhm
Zona.................................................................................0dB 1V 400 Ohm
Balanceada.......................................................................6dB 2V 400 Ohm
GENERAL:
Respuesta en frecuencia:........................................20Hz - 20KHz +/- 2 dB
Distorsión:..........................................................................................0.02%
Relación S/R:.....................................................................Mayor de 80 dB
Talkover Atenuación:..........................................................................-16 dB
Impedancia de auriculares:.............................................................16 Ohm
Alimentación:........................................................115/230V, 60/50Hz, 20W
Dimensiones:.............................................................W 19" x H 4" x D 9.1"
.......................................................................(482.6 x 100.6 x 231.2 mm)
Peso:................................................................................. 10.44 lbs (4.7kg)
ESPECIFICACIONES SUJETAS A VARIACION POR MEJORA SIN PREVIO AVISO.
(144)
Page 15

PPDDMM SSEERRIIEESS
PPDDMM SSEERRIIEESS
INTRODUCTION:
Nos félicitations à l'occasion de l'achat de votre console de mixage
Gemini de la Série PDM (rackable 19'' x 5U). Ce mélangeur très mod-
erne est garanti durant trois ans, à l'exception du crossfader (-3 mois-).
Avant toute utilisation, veuillez lire attentivement toutes les instructions
ci-après.
CARACTERISTIQUES:
- Mixer rackable 19'' x 5U
- 4 voies stéréo
- 7 lignes, 3 micros, 2 voies commutables phono/ligne (connecteurs
RCA)
- Sorties: master, enregistrement, auxiliaire & zone (connecteurs RCA)
- Sortie master symétrique sur Jack 6.35 mm
- 2 entrées micro sur Jack 6.35 mm
FACE AVANT:
- Egaliseur graphique 10 bandes stéréo avec fonction on/off & LED
bleue
- Réglages sur potentiomètre rotatif: zone, auxiliaire & pré-écoute
- Commutation Mono/Stéréo
- Crossfader assignable
- Crossfader Rail Glide amovible & remplaçable
- Sélection de la préécoute sur chaque voie par touche rétro-éclairée
- Réglage préécoute CUE/PGM
- Prise combo pour micro 1 (XLR & Jack 6.35mm)
- Correction 2 bandes pour les micros & réglages de volume séparés
- Talkover
- Embase BNC pour flexible lumineux
- Prise casque Jack 6.35mm
NOTE: TOUTES LES FONCTIONS CI-DESSUS SONT PRESENTES DANS CHAQUE MODELE DE LA SERIE PDM.
PDM-01 FACE AVANT:
- Contrôle du volume général (Master) sur potentiomètre linéaire
PDM-02 FACE A
- 6 effets digitales avec réglages séparés du volume et de la vitesse
- Contrôle du volume général (Master) sur potentiomètre rotatif
- Echo avec réglages séparés (Répétition & retard) assignable sur la
sortie générale (Master) ou sur les micros
PDM-03 FACE AVANT:
- Sampler 96 secondes avec 5 banques d'enregistrement & soft touches rétro-éclairées
- Potentiomètre rotatif d'assignation du sampler
- Réglages du sampler: niveau d'enregistrement, vitesse de lecture,
enregistrement/lecture
- Fonction RoboPlay & cue sampler
- Contrôle du volume général (Master) sur potentiomètre rotatif
VANT:
CONNECTIONS:
1. Avant de brancher le cordon d'alimentation, assurez que le
SELECTEUR DE TENSION (1) est commuté sur 230 V.
2. L'embase 115 V/230 V (2) pour le cordon d'alimentation est située en
face arrière. Avant de brancher le cordon d'alimentation, assurez vous
que l'INTERRUPTEUR DE MISE EN SERVICE (21), situé en face
avant, soit en position OFF.
3. Les mixers de la Série PDM possèdent 5 sorties:
- Sortie principale MASTER (3) équipée de connecteurs RCA pour reli-
er la console de mixage à l'amplificateur.
- Cette sortie principale possède aussi une CONNECTION
SYMETRIQUE (6) utilisant des Jacks 6.35 mm. Cette dernière est à
utiliser lorsque la distance entre l'amplificateur et la console de mixage
dépasse 3 M.
- La sortie BOOTH/CABINE (7) permet de relier un amplificateur addi-
tionnel à l'aide d'un cordon RCA.
- La sortie ZONE (5) permet la connection d'un amplificateur addition-
nel à l'aide d'un cordon RCA.
- La sortie ENREGISTRMENT (4) permet de relier la console de mix-
age à l'entrée d'un appareil enregistreur à l'aide d'un cordon RCA
lorsque vous souhaitez enregistrer votre mix.
4. Vous trouverez en face arrière de l'appareil 2 VOIES COMMUTABLES PHONO (PH) /LIGNE (LN) (12, 16), & 5 ENTREES LIGNES (10,
9, 13, 17, 18). Les CANAUX 2 (16) & 3 (12) autorisent le branchement
de source de niveau PHONO ou LIGNE. Positionnez les COMMUTATEURS (11, 15) en haut afin d'opérer en mode PHONO 1 ou PHONO 2.
Commutez ces derniers en bas afin d'opérer en mode LIGNE 2 ou
LIGNE 4
de cellules magnétiques. Lorsque vous utilisez une ou plusieurs platines
vinyles, assurez vous de connecter le fils de masse -situé sur le cordon
RCA- de ces dernières sur la BORNE GROUNDING SCREW (14)
située à l'arrière de la console de mixage. Cette dernière est située entre
les COMMUTATEURS (11, 15). Les ENTREES LIGNES acceptent les
sources telles que: CD, DAT, MiniDisc, etc.
NOTE: LORSQUE VOUS UTILISEZ UNE OU PLUSIEURS PLATINES VINYLES, NE PAS
RELIER LA MASSE DE CES DERNIERS A LA CONSOLE DE MIXAGE PROVOQUERA DES
BRUITS PARASITES (BOURDONNEMENTS).
5. Le casque se branche à la prise CASQUE (26) (Jack 6.35 mm).
6. Le MICRO 1 (49) utilise une prise Combo acceptant un connecteur
XLR ou Jack 6.35 mm. Les MICROS 2 (20) & 3 (19) utilisent des connecteurs de type Jack 6.35 mm uniquement. Les entrées micro
acceptent le niveau symétrique & asymétrique.
7. L'embase BNC (22) (Située en face avant, au dessus de
l'INTERRUPTEUR POWER (21)) permet la connection d'un flexible
lumineux 12 V BNC telle que la référence Gemini GNL-700.
. Les entrées PHONO acceptent les platines vinyles équipées
MISES EN GARDE:
1. Toutes les instructions de fonctionnement doivent être lues avant utilisation de l'appareil.
2. Afin de réduire les risques de chocs électriques veuillez ne pas
démonter/ouvrir l'appareil. En cas de problème, merci de prendre contact auprès de votre revendeur.
3. Ne pas exposer l'appareil au soleil; ne pas l'exposer non plus à toute
source de chaleur (Ex.: radiateur, poêle).
4. Cet appareil ne doit être nettoyé qu'avec un chiffon humide. N'utilisez
pas de solvants ou tout autre produit de nettoyage.
5. Lorsque vous déplacez cet appareil, veillez à le placer dans son
emballage et carton d'origine. Ceci réduira tout risque d'endommagement durant le transport.
6. PROTÉGEZ CET APPAREIL CONTRE LA PLUIE - L'HUMIDITÉ.
7. N'APPLIQUEZ AUCUN PRODUIT DE NETTOYAGE OU DE LUBRI-
FICATION SUR LES COMMANDES (FADERS & CROSSFADER), LES
INTERRUPTEURS ET COMMUTATEURS.
(15)
INTRODUCTION:
1. Lorsque toutes les connections ont été effectuées à l'arrière de l'appareil, mettez l'appareil sous tension en appuyant sur
l'INTERRUPTEUR POWER (21). Lorsque vous avez mis l'appareil sous
tension, la LED POWER BAR contenant le symbole power et située
dans le VU METRE (23) s'allumera Eteignez l'appareil en appuyant sur
l'INTERRUPTEUR SWITCH (21). Lorsque l'appareil n'est pas sous tension, la LED POWER BAR ne sera pas illuminée.
2. CANAL 1 (CN): Avant d'utiliser cette voie, vous devez sélectionner la
source. Utilisez le COMMUTATEUR LIGNE (LN) (37) afin de choisir LN
1 (18) ou MICRO 3 (19). Puis augmentez doucement le volume du CN
1 à l'aide du POTENTIOMETRE CH 1 (39) jusqu'au niveau souhaité.
3. CN 2: Avant d'utiliser cette voie, vous devez sélectionner la source.
Utilisez le COMMUTATEUR LN (40) afin de choisir PHONO 1/ LN 2 (16)
ou LN 3 (17). Puis augmentez doucement le volume du CN 2 à l'aide du
POTENTIOMETRE CN 2 (42) jusqu'au niveau souhaité.
4. CN 3: Avant d'utiliser cette voie, vous devez sélectionner la source.
Utilisez le COMMUTATEUR LN (43) afin de choisir PHONO 2/ LN 4 (12)
ou LN 5 (13). Puis augmentez doucement le volume du CN 3 à l'aide du
POTENTIOMETRE CN 3 (45) jusqu'au niveau souhaité.
Page 16

5. CN 4: Avant d'utiliser cette voie, vous devez sélectionner la source.
Utilisez le COMMUTATEUR LN (46) afin de choisir LIGNE 6 (10) ou
LIGNE 7 (9). Puis augmentez doucement le volume du CN 4 à l'aide du
POTENTIOMETRE CN 1 (48) jusqu'au niveau souhaité.
6. PRE-ECOUTE: Vous pouvez pré-écouter l'ensemble des voies, individuellement ou simultanément, à l'aide d'un casque relié à la prise
CASQUE (26) (Jack 6.35mm). Sélectionnez l'une des voies 1 à 4, l'aide
des TOUCHES CUE (38, 41, 44, 47). Lorsque la pré-écoute est
enclenchée, la touche CUE s'illuminera. Utilisez le POTENTIOMETRE
CUE VOLUME (25) afin de régler le niveau du casque. En positionnant
le FADER CUE/PGM (24) à GAUCHE vous entendrez uniquement le
signal de la source sélectionnée en pré-écoute. En positionnant le
REMPLACEMENT DU CROSSFADER
1. DÉVISSEZ LES VIS SITUÉES
AUX EXTRÉMITÉS DU CROSSFADER (B). NE TOUCHEZ PAS
AUX VIS (C).
2. SOULEVEZ SOIGNEUSEMENT
LE CROSSFADER ET
DÉBRANCHEZ LE CABLE (D).
3. BRANCHEZ LE NOUVEAU
CROSSFADER AU CABLE (D) ET
REPLACEZ-LE DANS LA CONSOLE DE MIXAGE.
4. REMETTEZ EN PLACE LES VIS
DU CROSSFADER (B).
FADER CUE/PGM (24) au MILIEU vous entendrez à la fois la source
sélectionnée en pré-écoute & le signal de la sortie générale (PGM). En
positionnant ce même fader à DROITE, vous entendrez uniquement le
signal de la sortie principale (PGM).
7. ASSIGNATION DU CROSSFADER: Il y a 2 COMMUTATEURS
D'ASSIGNATION X FADER (34, 35), possèdant chacun 5 positions
(OFF, 1, 2, 3, & 4) et permettant l'assignation du crossfader. Celui de
GAUCHE (34) permet d'assigner les CN 1, 2, 3, or 4 au côté GAUCHE
du CROSS FADER (36). Celui de DROITE (35) permet d'assigner les
CN 1, 2, 3, or 4 au côté DROIT du CROSS FADER (36). Lorsque les
COMMUTATEURS D'ASSIGNATION (34, 35) sont en position OFF,
aucun canal ne sera affecté au CROSS FADER (36). Vous contrôlez
alors le niveau général (PGM) à l'aide des POTENTIOMETRES LIN-
EAIRES de chaque canal.
8. SECTION CROSS FADER: Le
CROSS FADER (36) permet de passer d'une source à une autre. Les consoles de mixage de la Série PDM
possèdent un CROSS FADER (36) assignable. Les COMMUTATEURS
D'ASSIGNATION (34, 35) permettent de sélectionner les canaux que
vous souhaitez assigner au CROSS FADER (36). Le CROSS FADER
(36) de votre appareil est amovible et remplaçable par l'utilisateur. Cet
appareil est équipé d'un CROSS FADER RG- 45 (RAILGLIDE™) à
DOUBLE GLISSIÈRE (DUAL-RAIL) possèdant deux rails en acier
inoxydable et procurant un toucher souple & précis. Vous pouvez aussi
équiper votre console de mixage d'un CROSS FADER RG-45 PRO
(PROGLIDE™) possédant une courbe et une coupure plus appropriées
au scratch. Cette pièce est disponible auprès de tout revendeur Gemini.
Veuillez respecter les instructions suivantes:
9. EGALISEUR GRAPHIQUE: Cet appareil est équipé d'un
EGALISEUR GRAPHIQUE STEREO 10 BANDES (32, 33) permettant
un réglage précis du son en fonction de l'accoustique de la pièce. En
modifiant la position des 10 FADERS LINEAIRES (32, 33), vous corrigez telle ou telle fréquence de +/- 12dB. Ce réglage influe sur le
NIVEAU GENERAL (PGM). Pour activer l'EGALISEUR GRAPHIQUE
STEREO, appuyez sur l'INTERRUPTEUR EQ (31), La LED EQ BLEUE
s'allumera indiquant que l'EGALISEUR est opérationnel. Pour désactiver l'EGALISEUR, appuyez sur l'INTERRUPTEUR EQ (31), la LED EQ
BLEUE s'éteindra. Lorsque l'EGALISEUR (32, 33) est activé vous pouvez régler les côtés GAUCHE & DROIT (Stéréo). Le NIVEAU GENER-
AL (PGM), CORRIGE OU NON A L'AIDE DE L'EGALISEUR, est contrôlé par le POTENTIOMETRE MASTER VOLUME (27). Afin de finaliser le réglage du NIVEAU GENERAL (PGM), vous devez effectuer les
mêmes réglages sur l'EGALISEUR du côté GAUCHE (32) et du côté
DROIT (33).
NOTE: POUR DES PERFORMANCES OPTIMALES, VEILLEZ A COMMUTER LA SORTIE
PRINCIPALE EN MODE STEREO ET NON MONO. COMMENCEZ LE REGLAGE DE VOTRE
NIVEAU DE SORTIE GENERALE AVEC L'ENSEMBLE DES POTENTIOMETRES DE L'EGALISEUR (32, 33) EN POSITION CENTRALE (0). PUIS DIMINUEZ LE NIVEAU GENERAL
A L'AIDE DU POTENTIOMETRE MASTER VOLUME (27). PUIS EFFECTUEZ LES CORRECTIONS NECESSAIRES SUR L'EGALISEUR A GAUCHE (32) & A DROITE (33), POTENTIOMETRE PAR POTENTIOMETRE. EFFECTUEZ DES REGLAGES IDENTIQUES SUR LES
2 COTES. LORSQUE VOUS DEPASSEZ LE CRAN CENTRAL, VOUS POURREZ
(16)
CONSTATEZ UNE AUGMENTATION DU NIVEAU GENERAL VISIBLE SUR LE VU-METRE
(23). DIMINUEZ LE NIVEAU DE SORTIE GENERAL A L'AIDE DU POTENTIOMETRE MASTER VOLUME (27) AFIN DE NE PAS SURCHARGER LE SIGNAL AUDIO DE VOTRE INSTALLATION. EN CAS DE SURCHARGE, LES LEDS DE CLIP (SURCHARGE) S'ALLUMENT SUR
VOTRE AMPLIFICATEUR. DIMINUEZ LE VOLUME GENERAL MASTER VOLUME (27) AFIN
QUE CES LEDS S'ETEIGNENT ET/OU EFFECTUEZ UN NOUVEAU REGLAGE SUR L'EGALISEUR GRAPHIQUE (32, 33).
10. COMMUTATION MONO/STEREO: Vous pouvez commuter le
niveau de sortie en mode MONO ou STEREO et inversement en utilisant l'INTERRUPTEUR STEREO/MONO (30). Positionnez le à
GAUCHE pour être en écoute STEREO et à DROITE pour une écoute
en mode MONO.
11. REGLAGE DU NIVEAU DE SORTIE: Lorsque vous avez réglé cor-
rectement le gain de chacune des sources, vous pouvez ajuster le
NIVEAU DE SORTIE GENERAL (PGM) à l'aide du POTENTIOMETRE
MASTER VOLUME (27). Le niveau des sorties RCA & SYMETRIQUE
(3, 6) est contrôlé par le POTENTIOMETRE MASTER VOLUME (27).
Vous pouvez régler le volume de la sortie ZONE (5) à l'aide du POTEN-
TIOMETRE ZONE (29). Le volume de la sortie AUXILIAIRE (7) est contrôlé par le POTENTIOMETRE AUXILIAIRE (28). Le volume de la sor
tie ENREGISTREMENT (4) est contrôlé par le niveau de chaque
CANAL.
12. SECTION MICRO: Connectez votre micro principale à la prise
COMBO (XLR & Jack 6.35 mm) (49) située en face avant. Les potentiomètres rotatifs permettent de modifier les AIGUS (52) & les GRAVES
(53) sur le MICRO (49). Le POTENTIOMETRE MICRO 1 (50), situé au
dessus du POTENTIOMETRE MICRO 2 (51), permet de régler le niveau
du MICRO 1 (49). Vous pouvez brancher deux autres micros en face
arrière: MICRO 2 (20) & MICRO 3 (19) sur embase Jack 6.35 mm. Le
niveau du MICRO 2 (20) se régle par le POTENTIOMETRE MICRO 2
(51). Le niveau du MICRO 3 (19) se régle par le FADER LINEAIRE (39).
13. TALKOVER: Le MODE AUTO TALKOVER permet de donner prior-
ité aux micros sur un programme musical. L'INTERRUPTEUR AUTO
TALKOVER (54) fonctionne sur les
MICRO 1 (49) & MICRO 2 (20) et
possède 3 réglages:
- Lorsque l'INTERRUPTEUR MIC/TALKOVER (54) est en positionné
en BAS, les MICROS 1 (49) & 2 (20) & le TALKOVER ne sont pas en
service (OFF).
- Lorsque l'INTERRUPTEUR MIC/TALKOVER (54) est positionné au
MILIEU, les MICROS 1 (49) & 2 (20) fonctionnent (ON), mais le
TALKOVER n'est pas en service (OFF). La LED MIC ON s'allume
lorsque les MICROS 1 (49) & 2 (20) sont en service.
- Lorsque l'INTERRUPTEUR MIC/TALKOVER (54) est positionné en
HAUT, les MICROS 1 (49) & 2 (20) fonctionnent (ON), ainsi que le
TALKOVER. Le volume de toutes les sources, l'exception des MICROS
1 (49) & 2 (20), sera alors diminué de -16 dB, dès que vous parlerez
dans les MICROS.
14. EMBASE BNC POUR FLEXIBLE LUMINEUX: L'embase BNC (22)
permet la connection d'un flexible lumineux 12 V BNC, telle que la
référence Gemini GNL-700. Le flexible lumineux est alimenté par la
console de mixage. Pour allumer le flexible lumineux, vous devez
d'abord l'installer sur l'embase prévue à cet effet: BNC LAMP PORT
(22). Assurez vous que votre appareil est hors tension (OFF) lorsque
vous effectuez l'installation du flexible 12 V. Positionnez le flexible
lumineux au-dessus de l'embase, puis enfoncez le sur l'embase et verrouillez la prise BNC à l'aide de la bague en tournant dans le sens des
aiguilles d'une montre. Puis mettez votre console de mixage sous tension (ON). Le flexible lumineux s'allumera. Le fait d'éteindre la console
de mixage éteindra automatiquement le flexible lumineux. Pour enlever
ce dernier de l'embase BNC (22), il vous suffit de dévisser la bague de
verrouillage en tournant dans le sens inverse des aiguilles d'une montre. Effectuez cette opération avec l'appareil éteint (OFF).
15. COMMUTATEUR DE MISE A LA TERRE: Le
COMMUTATEUR DE
MISE A LA TERRE (8) permet de réduire les bruits parasites liés à des
boucles de masse résultantes de l'utilisation de plusieurs appareils
audio simultanément. Le commutateur doit être sur la position générant
le moins de bruits parasites. Si, dans les deux cas, le niveau de parasite
reste identique, veuillez laisser le COMMUTATEUR DE MISE A LA
TERRE (8) en position GND (haute).
NOTE: EFFECTUEZ LE CHANGEMENT DE POSITION DU COMMUTATEUR DE MISE A LA
TERRE AVEC L'ENSEMBLE DES APPAREILS ETEINTS. CECI AFIN D'EVITER LES
COURANTS TRANSITOIRES SUSCEPTIBLES D'ENDOMMAGER SERIEUSEMENT VOTRE
INSTALLATION.
16. VU METRE: Le VU METRE (23) indique le niveau de sortie général
stéréo (PGM) sur les sorties MASTER RCA & MASTER SYMETRIQUE
(3 & 6).
Page 17

PPDDMM
PPDDMM SSEERRIIEESS
SSEERRIIEESS
PDM-02 SECTION ECHO/EFFET:
SECTION ECHO:
Un effet d'écho peut être ajouté sur le signal de sortie général (PGM) ou
sur les MICROS 1(49) & 2 (20) en commutant l'INTERRUPTEUR ECHO
(55) à GAUCHE pour les MICROS 1-2, en position CENTRALE pour
arrêter l'effet (OFF) & à DROITE pour obtenir l'effet d'écho sur la sortie
principale (PGM). L'effet ECHO (55) est réglable par l'intermédiaire des
potentiomètres rotatifs suivants: REPETITION (56), RETARD/DELAY
(57), et VOLUME ECHO (58). Pour arrêter l'effet ECHO (55), diminuez
le volume à l'aide du potentiomètre ECHO VOLUME (58) ou positionnez
l'INTERRUPTEUR ECHO (55) sur OFF.
EFFETS SONORES:
Six effets sonores (APPLAUDISSEMENT, HURLEMENT, HELICOPTERE, SCRATCH, EAU & BRIS DE VERRE) peuvent être ajouté
au mix par simple pression sur les TOUCHES SOUND EFFECTS CONTROL (61). Le volume de chaque effet peut être réglé à l'aide du potentiomètre rotatif EFX VOLUME (60) situé au dessus de la touche
APPLAUDISSEMENT. Vous pouvez modifier la vitesse de l'effet en util-
isant le potentiomètre rotatif SPEED CONTROL (59) situé au dessus de
la touche SCRATCH.
PDM-03 UTILISATION DU SAMPLER:
BANQUES D'ENREGISTREMENT:
La PDM-03 est équipée d'un sampler comportant 5 BANQUES D'ENREGISTREMENT (59) de capacité différente. Les touches 8 & 8 pos-
sède une capacité d'enregistrement de 8 secondes, les touches 16 & 16
de 16 secondes & la touche 48 de 48 secondes. Chaque banque d'enregistrement est indépendante, vous ne pouvez pas combiner leur
capacité d'enregistrement. Les samples doivent être enregistrés individuellement, vous ne pouvez lire qu'un sample à la fois.
ENREGISTREMENT D'UN SAMPLE:
1. Selectionnez la source à enregistrer à l'aide du POTENTIOMETRE
SAMPLER ASSIGN (55).
2. Le sampler de la PDM-03 possède un réglage de vitesse PITCH
CONTROL (56). Lors de l'enregistrement, positionnez ce potentiomètre
en position CENTRALE. Vous pouvez augmenter ou diminuer la vitesse
durant la lecture du sample. En position CENTRALE, vous lirez le sample à sa vitesse d'enregistrement.
REMARQUE: VOUS POUVEZ ENREGISTRER UN SAMPLE AVEC LE REGLAGE DE
VITESSE DANS TOUTES LES POSITIONS. PAR CONTRE CETTE POSITION DEVIENT LA
VITESSE DE REFERENCE DE LECTURE DU SAMPLE. SI VOUS DEMARREZ L'ENREGISTREMENT AVEC LE REGLAGE DE VITESSE AU MINIMUM IL S'AGIRA ALORS DE LA
VITESSE DE LECTURE NORMALE DU SAMPLE, EN AUGMENTANT LA VITESSE DE LECTURE AU MAXIMUM DURANT LA LECTURE, VOUS DOUBLEREZ LA VITESSE DE LECTURE. ENREGISTRER AU “MAXIMUM” ET DIMINUER LA VITESSE AU “MINIMUM”
DURANT LA LECTURE PRODUIRA L'EFFET INVERSE.
3. Mettez l'INTERRUPTEUR MODE SELECTOR (58) en position
RECORD (ENREGISTREMENT).
4. Sélectionnez le signal à enregistrer à l'aide de la pré-écoute (CUE).
Lorsque le passage à enregistrer approche, sélectionnez une BANQUE
D'ENREGISTREMENT (59).
5. Puis appuyez sur cette même touche afin de démarrer l'enregistrement. La banque d'enregistrement possèdant un sample en
mémoire clignotera, ainsi qu'en cas d'absence de pile ou lorsque cette
dernière est faible. (Voir section SAUVEGARDE PAR BATTERIE). Le
sample est maintenant enregistré dans cette BANQUE D'ENREG-
ISTREMENT (59) & prêt à jouer.
NOTE: APPUYEZ UNE FOIS SUR LA TOUCHE D'UN SAMPLE LANCE LA LECTURE DE CE
DERNIER (LA TOUCHE S'ILLUMINE EN BLEU). APPUYEZ UNE SECONDE FOIS POUR
L'ARRETER IMMEDIATEMENT (LA TOUCHE S'ETEIND). SI VOUS N'APPUYEZ PAS UNE
SECONDE FOIS, LA LECTURE DU SAMPLE SE POURSUIT JUSQU'À LA FIN (EN FONCTION DE LA DUREE DU SAMPLE: 8, 16 OU 48 SECONDES).
PRE-ECOUTE D'UN SAMPLE (ECHANTILLON):
1. Pour enregistrer dans la CUE, appuyez sur le bouton SAMPLER de
CUE et puis appuyezsur le bouton de CUE pour que le canal soit
prélevé. Soyez sûr que vos commandes de glissière de ch sont à zéro
ainsi SAMPLE ne joue pas dans PGM. Suivez les instructions d'enregistrement témoin de compléter leprocessus.
2. Pour tester le sample avant utilisation, appuyez sur la touche CUE
SAMPLER (59). Utilisez les réglages de la pré-écoute afin d'écouter le
sample. La LED CUE SAMPLER s'allumera dès son utilisation. Pour
commuter le CUE SAMPLER en mode PGM, appuyez de nouveau sur
la touche CUE SAMPLER afin de désactiver la fonction pré-écoute (La
LED CUE SAMPLER s'éteindra).
3. Commutez le sélecteur MODE SELECTOR (58) sur la position SIN-
GLE ou REPEAT.
4. Appuyez sur la touche possèdant le SAMPLE que vous souhaitez
pré-écouter (CUE). Cet échantillon jouera à travers complètement
indépendamment decommuter la banque de mémoire. Le changement
de la banque de mémoire et la pression del'échantillonneur se boutonnent tandis que l'échantillon est dans lejeu répétera l'échantillon
précédemment choisi jusqu'à ce qu'ilait accompli son cycle de jeu. Ce
sample sera joué du début jusqu'à la fin; peu importe la touche mémoire
sélectionnée. Sélectionner un sample et lancer sa lecture durant la lecture d'un autre engendrera la lecture complète du sample sélectionné
précédemment à l'issue du premier.
5. Pour jouer un nouveau sample, vous devez stopper celui qui est en
cours de lecture. Puis choisissez le nouveau sample à lire. Appuyez sur
la touche correspondante pour en démarrer la lecture.
6. Le fait d'appuyer sur la touche SAMPLE (59) avec le potentiomètre
rotatif MODE SELECTOR (58) en position REPEAT provoquera la lec-
ture en boucle de ce dernier. En mode REPEAT, la touche du sample
sélectionnée sert à lancer ou à arrêter (ON/OFF) la lecture de ce dernier.
La première pression démarre la lecture et la seconde l'arrête.
7. Le potentiomètre rotatif SAMPLER LEVEL (57) permet de régler le
niveau audio du sample en cours de lecture.
LECTURE D'UN SAMPLE (ECHANTILLON):
1. Commutez le sélecteur MODE SELECTOR (58) en positiion en mode
SINGLE ou REPEAT.
2. Sélectonnez le sample à lire en appuyant sur l'une des 5 BANQUES
D'ENREGISTREMENT.
3. Appuyez sur le sample sélectionné avec le commutateur MODE
SELECTOR (58) en position SINGLE: le SAMPLE sera lu une fois (La
LED SAMPLER INDICATOR s'illuminera en VERT). Chaque fois que
vous appuierez sur le SAMPLE, la lecture re-démarrera à partir du
début. Lorsque vous appuierez rapidement sur la touche du SAMPLE,
cela provoquera un effet de bégaiement. Lorsque vous appuyez une
seule 5.
LECTURE ROBO:
1. Le bouton ROBO PLAY (59) (LECTURE ROBO) en position OFF
(arret) (le ROBO PLAY INDICATOR - INDICATEUR DE LECTURE
ROBO sera OFF) et l'interrupteur MODE SELECTOR (58) soit en mode
SINGLE soit REPEAT, le fait d'appuyer sur le bouton SAMPLER (59)
fera jouer l'échantillon en même temps que la source choisie.
2. Quand le bouton ROBO PLAY est en position ON (marche) le ROBO
PLAYER INDICATOR s'illumine en bleu), mettant l'échantillonnage en
marche met la source choisie en sourdine. Quand l'échantillon prend fin,
la source se rallume automatiquement.
PILE DE SECOURS:
1. PILE DE SECOURS: Le PDM-03 est muni d'une pile de secours pour
conserver les échantillons. Pour activer cette caractéristique, il est
nécessaire de brancher une pile de 9 volts (non comprise) au BATTERY
HOLDER (60) (PORTE-PILE) situé sur le panneau arrière. Ceci vous
permet de mettre des échantillons en mémoire et quand l'appareil est
débranché. la pile de secours conservera les échantillons pour un usage
ultérieur.
SI L'APPAREIL EST DÉBRANCHÉ SANS PILE CONNECTÉE, TOUS LES ÉCHANTILLONS
SERONT PERDUS.
2. INDICATEUR DE PILE FAIBLE: Un indicateur de pile faible est com-
pris dans le PDM-03. Quand vous changez la pile, assurez-vous que
l'appareil est branché et que le courant est ON (SOUS TENSION). Le
défaut de se conformer à ceci résultera en une perte de mémoire.
L'indicateur de pile faible est ON (SOUS TENSION) quand la LED du
bloc mémoire choisie clignote. La LED clignotera aussi si aucune pile
n'est branchée à l'appareil.
(177)
Page 18

ENTREES:
Phono:................................................................................3 mV, 47 KOhms
Ligne:................ ............................................................150 mV, 27 KOhms
MICRO 1, 2, & 3: .........................................1.5 mV, 2 K Ohms Symétrique
Grave:.....................…......................................................................± 12 dB
Aigu:....................…..........................................................................± 12 dB
SORTIES:
Amplificateur/Auxiliaire:...............................................0 dB 1 V , 400 Ohms
Max:............... .........................................................……....20V Crête/Crête
Enregistrement.................................................................150 mV, 5 KOhms
Zone...............................................................................0 dB 1 V 400 Ohms
Symétrique.....................................................................6 dB 2 V 400 Ohms
GENERAL:
Bande passante:………….........................................20Hz - 20KHz +/- 2 dB
Distortion:.......................…….............................................................0.02%
Rapport Signal/Bruit:...........................................................………..> 80 dB
Atténuation Talkover:…......................................................................-16 dB
Impédance casque:……….............................................................16 Ohms
Alimentation:……...............................................115/230 V, 60/50 Hz, 20 W
Dimensions:.............................Largeur 19" x Hauteur 4” x Profondeur 9.1"
.................................……................................(482.6 x 100.6 x 231.2 mm)
Poids: …..:........................................................................ 10.34 lbs (4.7 kg)
REMARQUE: GEMINI, DANS LE CADRE D'UN SOUCI CONSTANT D'AMELIORATION DE
SES PRODUITS, SE RESERVE LE DROIT DE LES MODIFIER SANS AUCUN PREAVIS.
(18)
Page 19

NOTES:
PPDDMM
PPDDMM SSEERRIIEESS
SSEERRIIEESS
(19)
Page 20

IN THE USA: IF YOU EXPERIENCE PROBLEMS
WITH THIS UNIT, CALL 1-732-738-9003 FOR GEMINI
CUSTOMER SERVICE. DO NOT ATTEMPT TO RETURN
THIS EQUIPMENT TO YOUR DEALER.
Parts of the design of this product may be protected by worldwide patents.
Information in this manual is subject to change without notice and does not
represent a commitment on the part of the vendor. Gemini Sound Products
Corp. shall not be liable for any loss or damage whatsoever arising from the
use of information or any error contained in this manual. No part of this manual may be reproduced, stored in a retrieval system or transmitted, in any
form or by any means, electronic, electrical, mechanical, optical, chemical,
including photocopying and recording, for any purpose without the express
written permission of Gemini Sound Products Corp. It is recommended that
all maintenance and service on this product is performed by Gemini Sound
Products Corp. or its authorized agents. Gemini Sound Products Corp. will
not accept liability for loss or damage caused by maintenance or repair performed by unauthorized personnel.
Worldwide Headquarters • 120 Clover Place, Edison, NJ 08837 • USA
Tel: (732) 738-9003 • Fax: (732) 738-9006
France • Gemini France (GSL) • 1, Allee d’Effiat, Parc de l’evénement, 91160 Longjumeau, France
Tél: + 33 1 69 79 97 70 • Fax: + 33 1 69 79 97 80
Germany • Gemini Sound Products GmbH • Liebigstr. 16, Haus B - 3.0G, 85757 Karlsfeld, Germany
Tel: 08131 - 39171-0 • Fax: 08131 - 39171-9
UK • Gemini Sound Products • Unit C4 Hazleton Industrial Estate, P08 9JU Waterlooville, UK
Tel: 087 087 00880 • Fax: 087 087 00990
Spain • Gemini Sound Products S.A. • Rosello, 516, 08026 Barcelona, Spain,
Tel: 349-3435-0814 • Fax: 3493-347-6961
___________________________________________________
© Gemini Sound Products Corp. 2004 All Rights Reserved.
 Loading...