

Page 1

OPERA TIONS MANUAL
Bedienungsanleltung
Manual de funcionamiento
Manual de fonctionnement
Manual del utente
P-801
STEREO POWER AMPLIFIER
Stereo V erstärker
Amplificador de Poder Estereo
Amplificateur de Puissance Stéréo
Amplificatore di Potenza Stereofonico
Multi Language Instructions
English............................................................................Page 3
Deutsch..........................................................................Page 7
Español...........................................................................Page 11
Francais..........................................................................Page 15
Italiano............................................................................Page 19
Page 1
Page 2
3
2
5
7
8
6
Page 2
1
9 10
11
12
4
13
14
Page 3

Introduction
Operation
We congratulate you on choosing a Gemini Sound Products power
amplifier. The latest advancements in technology have been used
in the manufacturing of this amplifier. To obtain maximum
performance from your amplifier, please read all instructions before
operating.
Features
• Continuous Advanced Protection circuitry
• Fan Cooled
• One Switched & One Unswitched Rear Panel AC Outlets
• Supports Two Sets of Speakers
• Supports Balanced & Unbalanced Inputs
Cautions
1. All operating instructions should be read before using this
equipment.
2. To reduce the risk of electrical shock, do not open the unit.
There are NO USER REPLACEABLE PAR TS INSIDE. Please
refer servicing to a qualified service technician.
3. Do not expose this unit to direct sunlight or to a heat source
such as a radiator or stove.
4. This unit should be cleaned only with a damp cloth. Avoid
solvents or other cleaning detergents.
5. When moving this equipment, it should be placed in its original
carton and packaging. This will reduce the risk of damage
during transit.
6. DO NOT EXPOSE THIS UNIT TO RAIN OR MOISTURE.
7. DO NOT USE ANY SPRAY CLEANER OR LUBRICANT ON ANY
CONTROLS OR SWITCHES.
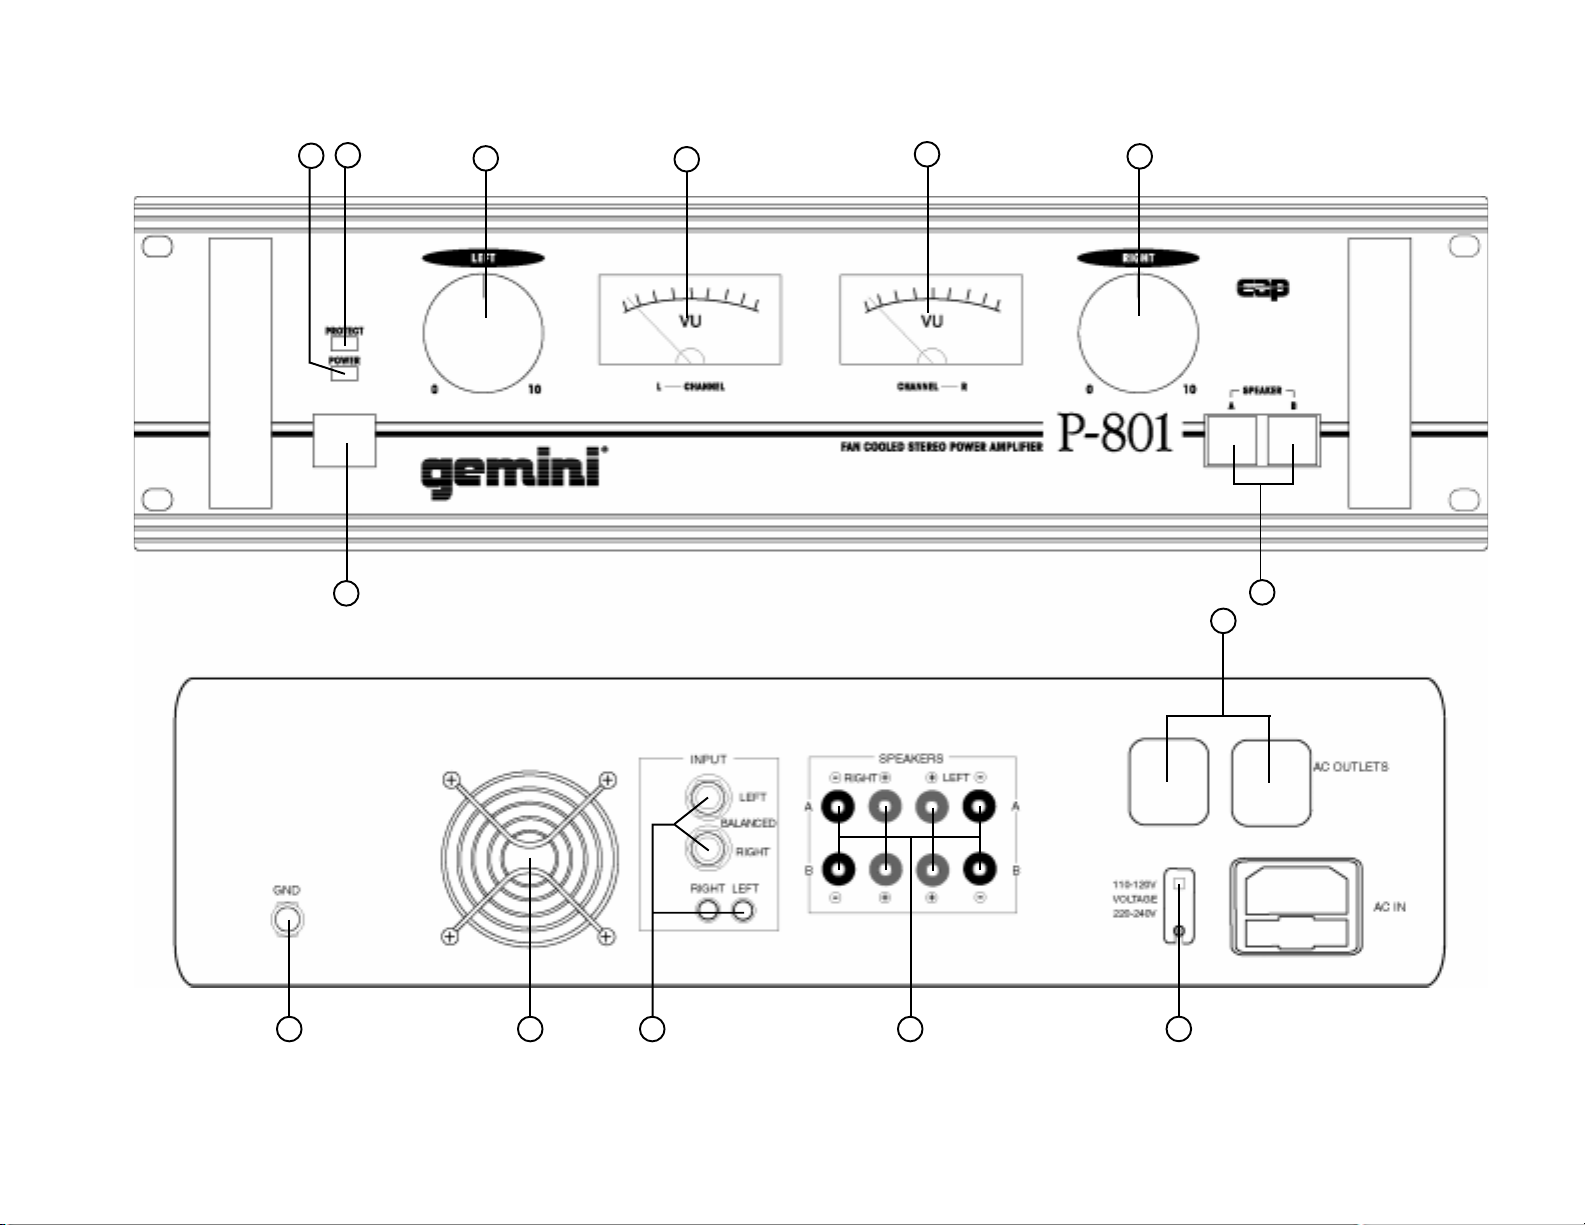
Connection
1. Be sure that POWER (1) is in the OFF position. All connections
must be made with all equipment OFF.
2. Before plugging in the power cord, make sure the VOLTAGE
SELECTOR SWITCH (14) is set to the correct voltage.
3. For best sound use only high quality audio cables for your hook
up. Make sure all cables are pushed in securely.
4. Use the LINE IN (11) jacks to attach your input signal to the P-
801. Make sure that you correctly attach the left and right
cables. You can use either RCA or 1/4" connectors.
5. There are two supplied AC OUTLETS (13), one unswitched
(Max. 500W) and one switched (Max. 400W), which allow the
electrical hook up of other units.
6. The P-801 provides two pairs of SPEAKER OUTPUT
TERMINALS (12) to enable you to run two sets of speakers.
You can either use banana plugs or bare speaker wire for your
connections.
7. A GND TERMINAL (9) is provided for grounding the P-801 to
your other equipment.
8. Make sure that the FAN (10) is not obstructed.
1. POWER ON: Once you have made all source connections to
your P-801, press the POWER (1) button, the power will turn on
and the POWER LED (2) will illuminate GREEN.
2. PROTECTION LED: The PROTECTION LED (3) illuminates
RED when the amplifier overheats or when a shorted load or
DC is detected on the amplifier output. The amplifier will reset
itself when the problem is corrected.
Note: When you first turn on the power, the
PROTECTION LED will illuminate for a few seconds.
This is normal.
3. SPEAKER SELECTION: The P-801 is capable of handling two
sets of speakers. To select, push the proper SPEAKER
BUTTONS (4). You can select either A, B or both A & B.
4. VOLUME CONTROL: You can easily control the output level to
your speakers (the volume) by using the rotary VOLUME
CONTROLS (5, 6). VOLUME CONTROL (5) adjusts the left
channel and VOLUME CONTROL (6) adjusts the right channel.
5. BUILT IN FAN: The P-801 is equipped with a built in FAN (10).
This allows the inside of your unit to be cooled and to prevent
overheating. Never obstruct or disconnect the fan.
Specifications
Momentary Music Peak Power at 1 kHz...........................800 watts
Maximum Power Output (RMS) at 1 kHz................180 watts at 4 Ω
125 watts at 8 Ω
Distortion..................less than 0.08% at rated power output into 8 Ω
Frequency Response...........................20 Hz to 60 kHz (+0/-3dB)
Signal To Noise Ratio................................................98 dB (IEC-A)
Output Section......................................................................4 - 16 Ω
Indicators..............................................................Power & Protection
Power Consumption.....................................................800 watts (Max)
Dimensions......................................................19 “ x 5 “ x 10 1/2 “
Weight...............................................................................21.6 lbs.
Rack.........................................................................3.5 U rack spaces
Page 3
Page 4

Einleitung
Wir gratulieren Ihnen zum Kauf eines Leistungsverstärkers von
Gemini Sound Products. Die neuesten Fortschritte in der
Technologie wurden bei der Herstellung dieses Verstärkers
eingesetzt. Um maximale Leistung mit diesem Verstärker zu
erzielen, lesen Sie bitte alle Anweisungen sorgfältig durch.
Leistungsmerkmale
6. Das P-801 verfügt über zwei LAUTSPRECHERAUSGANGSKLEMMEN (12), die den Betrieb der zwei Paar
Lautsprecher ermöglichen, wenn das Gerät im Steromodus ist
. Sie können entweder Bananenstecker oder unisolierte
Lautsprecherdrähte für die Anschlüsse verwenden.
7. Das P-801 ist mit einem ERDUNGSANSCHLUSS (9) zur
Erdung mit anderen Geräten ausgerüstet.
8. Sicherstellen, da der LÜFTER (10) nicht behindert ist.
• Ständige modernste Schutzschaltung
• Luftgekühlt
• Eine geschaltete und eine nicht geschaltete WS-Steckdose an
der Rückwand
• Für Anschlu an zwei Paar Lautsprecher
• Für Anschlu an balancierte und unbalancierte Eingänge
Vorsichtsmanahmen
1. Vor Anwendung dieses Geräts bitten alle Anweisungen
sorgfältig durchlesen.
2. Das Gerät nicht öffnen, um das Risiko elektrischen Schocks zu
mindern. Es enthält KEINE VOM ANWENDER ERSETZBAREN
TEILE. Die Wartung darf nur von befähigten
Wartungstechnikern durchgeführt werden.
3. Das Gerät von direktem Sonnenlicht oder einer Wärmequelle
wie Heizkörper oder Ofen aussetzen.
4. Dieses Gerät darf nur mit einem feuchten Tuch gesäubert
werden. Keine Lösungs- oder Reinigungsmittel benutzen.
5. Bei Umzügen sollte das Gerät in seinen ursprünglichen
Versandkarton und Verpackungsmaterial verpackt werden.
Dadurch verhindert man, da das Gerät während des
Transportes beschädigt wird.
6. DIESES GERäT NICHT REGEN ODER FEUCHTIGKEIT
AUSSETZEN.
7. AN DEN REGLERN ODER SCHALTERN KEIN SPRA YREINIGUNGSMITTEL ODER SCHMIERMITTEL BENUTZEN.
Anschlüsse
1. Sicherstellen, da der Schalter POWER (1) in OFF-Position
steht. Alle Anschlüsse erst dann herstellen, wenn das Gerät
ausgeschaltet ist.
2. Bevor Sie das Stromkabel anschlieen, sicherstellen, da der
SPANNUNGSWÄHLER (14) auf die richtige Spannung
eingestellt ist.
3. Um beste Tonqualität zu erzielen, sollten nur Qualitätstonkabel
angewendet werden. Sicherstellen, da die Kabel sicher
eingeschoben sind.
4. Die LEITUNGSEINGANG-BUCHSEN (11) zur Verbindung des
Eingangssignals am P-801 verwenden. Sicherstellen, da die
linken und rechten Kabel richtig angeschlossen werden. Sie
können entweder die RCA- oder die 0,38-mm-Anschlüsse
verwenden.
5. Es gibt zwei WS-STECKDOSEN (13), geschaltete (max. 400
W) und nicht geschaltete (max. 500 W), die den elektrischen
Anschlu der anderen Geräte ermöglichen.
Bedienung
1. STROM EIN: Sobald Sie das P-801 am Leistungsnetz
angeschlossen haben, drücken Sie auf die POWER-TASTE
(1). Der Strom wird eingeschaltet und die grüne LEISTUNGS-
LED (2) erleuchtet.
2. SCHUTZ-LED: Die rote SCHUTZ-LED (3) erleuchtet, wenn der
Verstärker überhitzt oder wenn eine kurzgeschlossene
Ladung oder Gleichstrom am Ausgang des Verstärkers
erkannt wird. Der Verstärker wird sich neu einstellen, wenn
das Problem behoben ist.
Hinweis: Wenn die Strom eingeschaltet wird,
erleuchtet die SCHUTZ-LED einige Momenten. Das
ist normal.
3. LAUTSPRECHERAUSWAHL: Das P-801 kann zwei Paar
Lautsprecher bedienen. Für die Lautsprecherauswahl die
richtige LAUTSPRECHERTASTEN (4) drücken. Sie können
entweder A oder A und B oder beide, A und B, auswählen.
4. LAUTSTÄRKENREGLER: Sie können leicht den Ausgangspegel
der Lautsprecher (Lautstärke) mit den LAUTSTÄRKE-
DREHKNÖPFE (5, 6) einstellen. Der eine LAUTSTÄRKE-
REGLER (5) stellt den linken Kanal und der andere
LAUTSTÄRKE-REGLER (6) den rechten Kanal ein.
5. EINGEBAUTER LÜFTER: Das P-801 ist mit einem einbauten
LÜFTER (10) ausgerüstet. Dies ermöglicht das Kühlen des
Geräteinneren und verhindert überhitzen.
Spezifikationen
Momentaner Musikspitzenleistung bei 1 kHz.......................800 watts
Maximale Leistungsausgabe (RMS) bei 1 kHz...... 180 watts bei 4 Ω
125 watts bei 8 Ω
Gesamter harmonischer Klirrfaktor......wenige als 0,08% bei
Nennleistungsausgabe von 8 Ω
Frequenzgang....................................20 Hz to 60 kHz (+0/-3dB)
Störabstand.........................................................98 dB (IEC-A)
Ausgangsteil..........................................................................4 - 16 Ω
Indikatoren............................................................Leistung und Schutz
Leistungsaufnahme...............................................800 watts (Max)
Abmessungen........................................482 mm x 127 mm x 266 mm
Gewicht...................................................................................9.8 kg
Gestell...................................................3,5 U-Gestell-Zwischenräume
Page 4
Page 5

Introducción
Felicitaciones por su compra de un amplificador de potencia de
Gemini Sound Products. Su nuevo amplificador incorpora los más
modernos avances tecnológicos. Para obtener un rendimiento
máximo de su amplificador, sírvase leer todas las instrucciones
antes de operarlo.
Características
• Avanzados circuitos de protección continua
• Enfriado por ventilador
• Un tomacorriente CA conmutado y otro sin conmutar en el
panel trasero
• Puede usarse con dos juegos de altoparlantes
• Puede usarse con entradas equilibradas y sin equilibrar
Advertencias
1. Deberán leerse todas las instrucciones de operación antes de
usar el equipo.
2. Para reducir el riesgo de shock eléctrico, no abra esta unidad.
No contiene PIEZAS REEMPLAZABLES PARA EL USADOR. Por
favor, refiera el servicio a un técnico de servicio calificado.
3. No exponga la unidad a la luz solar directa ni a una fuente de
calor, por ejemplo, un radiador o estufa.
4. Esta unidad sólo deberá limpiarse con un paño húmedo. Evite
el uso de disolventes u otros detergentes de limpieza.
5. Para mover este equipo, colóquelo en la caja y empaque
original, a fin de reducir el riesgo de daños durante el
transporte.
6. NO DEJE ESTA UNIDAD EXPUEST A A LLUVIA O HUMEDAD.
7. NO USE LIMPIADORES DE ROCÍO O LUBRICANTES EN
CUALQUIERA DE LOS CONTROLES O INTERRUPTORES.
Conexiones
1. Cerciórese de que el interruptor de ENERGÍA (1) esté en la
posición apagada. Todas las conexiones deberán efectuarse
con todos los equipos APAGADOS.
2. Antes de enchufar el cable eléctrico, cerciórese de que el
CONMUTADOR SELECTOR DE VOLTAJE (14) se haya fijado
en el voltaje apropiado.
3. Para obtener un sonido de óptima calidad, sólo deben usarse
cables de audio de alta calidad para efectuar las conexiones.
Cerciórese de que se hayan introducido firmemente todos los
cables.
4. Use los jacks de LÍNEA DE ENTRADA (11) para conectar la
señal de entrada al amplificador P-801. Cerciórese de conectar
correctamente los cables izquierdo y derecho. Podrán usarse
conectores RCA o de q”.
5. Se suministran dos TOMACORRIENTES CA (13), uno sin
conmutar (500W máx.) y uno conmutado (400W máx), para
permitir la conexión de otras unidades.
6. El amplificador P-801 está dotado de dos pares de bornes de
SALIDA DE ALTO PARLANTES (12) que le permiten conectar
dos juegos de altoparlantes. Podrá usar clavijas de punta cónica
o alambre desnudo de altoparlante para efectuar las
conexiones.
7. Se incluye un BORNE DE TIERRA (9) para conectar a tierra el
P-801 con los demás equipos.
8. Cerciórese de que el VENTILADOR (10) no esté obturado.
Operación
1. ENCENDIDO: Una vez que se hayan efectuado todas las
conexiones de los equipos a su amplificador P-801, oprima el
interruptor de ENERGÍA (1). Se encenderá la unidad y el LED
VERDE de ENERGÍA (2).
2. LED DE PROTECCIÓN: La luz roja del LED DE PROTECCIÓN (3)
se ilumina cuando el amplificador se sobrecalienta o se detecta
una carga de cortocircuito o de CC en la salida del
amplificador. El amplificador se reajustará cuando el problema
se haya corregido.
NOTA: Cuando se enciende el aparato, el DEL DE
PROTECCIÓN se ilumina algunos momentos. Esto es
normal.
3. SELECCIÓN DE ALTOPARLANTES: El amplificador P-801
tiene la capacidad de manejar dos juegos de altoparlantes.
Para seleccionar, oprima los BOTONES DE ALTOPARLANTES
(4) apropiado. Podrá seleccionar A, B o A y B.
4. CONTROL DE VOLUMEN: Usted podrá controlar fácilmente el
nivel de salida de sus altoparlantes (el volumen), usando los
CONTROLES DE VOLUMEN (5,6) giratorios. El CONTROL DE
VOLUMEN (5) ajusta el canal izquierdo y el CONTROL DE
VOLUMEN (6) ajusta el canal derecho.
5. VENTILADOR INCORPORADO: El amplificador P-801 está
dotado de un VENTILADOR INCORPORADO (10) para enfriar
el interior de la unidad y evitar que se sobrecaliente. Nunca
obture ni desconecte el ventilador.
Especificaciones
Potencia pico momentánia de música a 1 kHz...................... 800 vatio
Salida de potencia máxima (RMS) a 1 kHz..............180 vatios a 4 Ω
125 vatios a 8 Ω
Distorsión armónica total........menos de 0,08% a la salida de potencia
nominal hacia 8 Ω
Respuesta de frecuencia....................20 Hz to 60 kHz (+0/-3dB)
Razón de señal/ruido..............................................98 dB (IEC-A)
Sección de salida................................................................4 - 16 Ω
Indicadores..................................................Potencia y protección
Consumo de energía.......................................800 vatios (Max)
Dimensiones...........................482 mm x 127 mm x 266 mm
Peso..........................................................................9.8 kgs
Bastidor.............................................3,5 U espacios de bastidor
Page 5
Page 6

Introduction
Nos félicitations à l’occasion de votre achat d’un amplificateur de
Gemini Sound Products. Ce mélangeur très moderne inclut les
caractéristiques technologiques les plus récentes. Pour obtenir
les meilleures performance de cet appareil, lisez attentivement
toutes les instructions ci-après.
Caractéristiques
6. L’appareil P-801 offre deux paires de bornes de sortie de
HAUT-PARLEUR (12) pour vous permettre d’utiliser deux jeux
de haut-parleurs. Vous pouvez utiliser des fiches de type
banane ou du fil dénudé de haut-parleur pour les raccords.
7. Une BORNE DE TERRE - GND TERMINAL (9) est prévue pour
la mise à la masse de votre appareil P-801 à vos autres
appareils.
8. Le VENTILATEUR (10) ne doit pas être obturé.
• Circuits de protection continue avancés
• Refroidi par ventilateur
• Une prise à courant alternatif commutée et une prise non
commutée sur le panneau arrière
• Supporte deux jeux de haut-parleurs
• Supporte des entrées équilibrées et non équilibrées
Avertissements
1. Toutes les instructions de fonctionnement doivent être lues
avant de vous servir de cet appareil.
2. Pour réduire le risque de choc électrique, n’ouvrez pas
l’appareil. Il ne contient AUCUNE PIECE UTILISABLE P AR
L’UTILISATEUR. La solution de problèmes doit être confiée à un
technicien qualifié.
3. N’exposez pas cet appareil aux rayons directs du soleil; ne
l’exposez pas non plus à une source de chaleur (e.g.
radiateur, poêle)
4. Cet appareil ne doit être nettoyé qu’avec un chiffon humide.
N’utilisez pas de solvant ou autres produits de nettoyage.
5. Lorsque vous déplacez cet appareil, il doit être placé dans son
emballage et carton d’origine. Ceci réduit les risques de
demmage durant le transport.
6. PROTEGEZ CET APPAREIL CONTRE LA PLUIE OU
L’HUMIDITE.
7. N’APPLIQUEZ AUCUN PRODUIT DE NETTOYAGE OU DE
LUBRIFICATION PUL VERISE SUR LES COMMANDES OU LES
INTERRUPTEURS ET COMMUTA TEURS.
Exploitation
1. MISE SOUS TENSION: Après avoir réalisé tous les raccords à
votre appareil P-801, appuyez sur le bouton POWER (1) de
mise sous tension; la DEL (2) VERTE s’allumera.
2. DEL DE PROTECTION: La DEL DE PROTECTION ROUGE (3)
s’allumera en cas de surchauffe de l’amplificateur ou en cas
de présence de court-circuit ou de courant continu sur la
sortie de l’amplificateur. Une fois corrigé, l’amplificateur se
réarmera automatiquement.
NOTE: Lorsque lappareil est mis sous tension, la
DEL DE PROTECTION sallumera pendant quelques
instants, ce qui est normal.
3. CHOIX DE HAUT-PARLEUR: L’appareil P-801 est capable de
fonctionner avec deux jeux de haut-parleurs. Pour choisir,
appuyez sur les BOUTONS HAUT-PARLEUR (4) désirés. Vous
avez le choix entre A, B ou A & B.
4. COMMANDE DU VOLUME: Vous pouvez facilement commander
le volume de sortie de vos haut-parleurs à l’aide des
COMMANDES DE VOLUME (5, 6) rotatives. La COMMANDE
DU VOLUME (5) règle le canal gauche tandis que la
COMMANDE DU VOLUME (6) règle le canal droit.
5. VENTILATEUR INCORPORE: L’appareil P-801 est doté d’un
VENTILATEUR (10) incorporé. Ainsi, l’intérieur de votre
appareil est refroidi. N’obtruez ou ne débranchez jamais
le ventilateur.
Spéfications
Puissance de pointe momentanée de la musique à 1 kHz.....800W
Sortie de puissance maximale à 1 kKz.....................180 W à 4 Ω
Connexions
1. Assurez-vous que l’interrupteur de TENSION - POWER (1)
occupe la position HORS TENSION - OFF. Tous les raccords
doivent être effectués lorsque tous les appareils se trouvent
HORS TENSION - OFF .
2. Avant de raccorder le cordon au secteur, assurez-vous que le
SELECTEUR DE TENSION (14) se trouve sur la bonne
tension.
3. Pour obtenir la meilleure qualité de son, n’utilisez que des
câbles audio de haute qualité pour effectuer les connexions.
Tous les câbles doivent être bien raccordés.
4. Utilisez les LINE IN - ENTREE DE LIGNE (11) pour relier le
signal d’entrée à votre appareil P-801. Raccordez les câbles de
droite et de gauche correctement. Vous pouvez utiliser des
connecteurs RCA ou de 1/4".
5. Deux PRISES C.A. (13) sont fournies, une non commutée
(max. 500 W), l’autre commutée (max 400 W), qui permettent la
connexion d’autres appareils.
125 W à 8 Ω
Distorsion harmonique totale...................moins de 0,08% à la sortie
nominale à 8 Ω
Réponse en fréquence..............................20 Hz à 60 kHz (+0/-3dB)
Rapport signal/bruit....................................................98 dB (IEC-A)
Section de sortie...................................................................4 - 16 Ω
Indicateurs................................................Puissance et protection
Consommation de tension..............................................800 W (Max)
Dimensions..........................................482 mm x 127 mm x 266 mm
Poids.....................................................................................9.8 kg
Hauteur...................................................................3,5 espaces en U
Page 6
Page 7

Introduzione
Complimenti per l’acquisto di questo amplificatore di potenza
Gemini Sound. Nella creazione di questo amplificatore è stata
usata la tecnologia più avanzata. Per ottenere il massimo
rendimento da questo amplificatore preghiamo di leggere
attentamente queste istruzioni prima dell’uso.
Caratteristiche
• Circuito di protezione continua avanzato
• Raffreddamento con ventola
• Sul pannello posteriore due uscite CA una switched e l’altra
non switched
• Gestisce due set di altoparlanti
• Gestisce ingressi bilanciati e non bilanciati
Attenzione
1. Leggere attentamente queste istruzioni prima di usare questo
apparecchio.
2. Per evitare scosse elettriche non aprire l’apparecchio.
INTERNAMENTE NON CI SONO COMPONENTI SOSTITUIBILI
DALL’UTENTE. Per le riparazioni rivolgersi solo a personale
qualificato.
3. Non esporre l’apparecchio alla luce diretta del sole o metterlo
vicino a fonti di calore come caloriferi o stufe.
4. Pulire questo amplificatore solo con un panno inumidito. Evitare
di usare solventi o altri detergenti.
5. Per trasportare questo apparecchio, si consiglia di rimetterlo
nella scatola e usare l’imballaggio originale. Questo eviterà di
danneggiarlo durante il trasporto.
6. NON ESPONETE QUESTO APPARECCHIO ALLA PIOGGIA O
ALL’UMIDIT A ’.
7. NON USATE DETERGENTI A SPRUZZO O LUBRIFICANTI SUI
CONTROLLI E SUGLI INTERRUTTORI.
Collegamenti
1. Assicurarsi che l’interruttore di ALIMENTAZIONE (POWER) (1)
sia su off. Disattivare l’alimentazione quando si eseguono tutti i
collegamenti.
2. Prima di inserire il cavo di alimentazione, assicurarsi che
l’INTERRUTTORE SELETTORE VOLTAGGIO (14) sia
impostato sul voltaggio corretto.
3. Per una perfetta qualità del suono usare per i collegamenti solo
cavi di ottima qualità. Assicurarsi che tutti i cavi siano ben
inseriti.
4. Usare i jack LINE IN (11) per collegare il segnale di ingresso
con l’amplificatore P-801. Assicurarsi di collegare
correttamente i cavi di sinistra e di destra. E’ possibile usare o il
jack RCA o i connettori da 1/4".
5. L’amplificatore è dotato di due USCITE CA (13) una non
switched (max. 500W) e una switched (max. 400W) che
permettono di collegare altri apparecchi.
6. L’amplificatore P-801 è dotato di due paia di TERMINALI DI
USCITA DIFFUSORI (12) che permettono di operare con due
set di altoparlanti. E’ anche possibile usare per i collegamenti o
le spine a banana o il filo nudo per altoparlanti.
7. Per la messa a terra dell’amplificatore P-801 viene fornito un
TERMINALE DI TERRA (9).
8. Assicurarsi che la VENTOLA (10) non sia ostruita.
Funzionamento
1. ACCENSIONE: Dopo aver effettuato tutti i collegamenti con
l’amplificatore P-801, premere il pulsante POWER (1). Verrà
attivata l’alimentazione e l’INDICA TORE LED POWER (2)
diventerà VERDE.
2. INDICATORE LED DI PROTEZIONE: L ’INDICATORE LED DI
PROTEZIONE (3) diventerà ROSSO quando l’amplificatore si
surriscalda o quando si manifesta un basso carico (shorted
load) o una corrente continua all’uscita dell’amplificatore.
L’amplificatore si rimetterà a posto non appena il problema
viene eliminato.
NOTA BENE: Quando si attiva lalimentazione,
lINDICATORE LED DI PROTEZIONE si illumina
alcuni secondi. Questo è regolare.
3. SELEZIONE DIFFUSORI: L’amplificatore P-801 è in grado di
gestire due set di altoparlanti. Per selezionare, premere il
PULSANTE ALTOPARLANTI (4) appropriato. E’ possibile
selezionare sia A, B, o entrambi A & B.
4. CONTROLLO VOLUME: Usando le manopole dei CONTROLLI
VOLUME (5,6) si può facilmente regolare il livello di uscita degli
altoparlanti (volume). Il CONTROLLO VOLUME (5) regola il
canale di sinistro e il CONTROLLO VOLUME (6) regola il
canale di destro.
5. VENTOLA INCORPORATA: L’amplificatore P-801 ha in
dotazione una VENTOLA (10) incorporata. Questa permette di
raffreddare i componenti interni dell’apparecchio e di evitare il
surriscaldamento. Non ostruire e non disinserire mai la
ventola.
Caratteristiche
Picco di potenza momentaneoi musica a 1 kHz..................800 watts
Potenza massima di uscita (RMS) a 1 kHz..............180 watts a 4 Ω
125 watts a 8 Ω
Distorsione armonica totale...............................inferiore a 0.08% alla
potenza nominale di uscita in 8 Ω
Risposta in frequenza.....................da 20 Hz a 80 kHz (+0/-3dB)
Rapporto segnale/disturbo...........................................98 dB (IEC-A)
Sezione uscita...................................................................4 - 16 Ω
Indicatori............................................Alimentazione e protezione
Consumo elettrico...................................................800 watts (Max)
Dimensioni.........................................482 mm x 127 mm x 266 mm
Peso....................................................................................9.8 kg
Rack.............................................................................3,5 U posti rack
Page 7
Page 8

In the USA: If you experience problems with this unit,
call 1-732-738-9003 for Gemini Customer Service.
Do not attempt to return this equipment to your dealer.
Parts of the design of this product may be protected by worldwide patents.
Information in this manual is subject to change without notice and does
not represent a commitment on the part of the vendor. Gemini Sound
Products Corp. shall not be liable for any loss or damage whatsoever
arising from the use of information or any error contained in this manual.
No part of this manual may be reproduced, stored in a retrieval system or
transmitted, in any form or by any means, electronic, electrical, mechanical,
optical, chemical, including photocopying and recording, for any purpose
without the express written permission of Gemini Sound Products Corp.
It is recommended that all maintenance and service on this product is
performed by Gemini Sound Products Corp. or its authorized agents.
Gemini Sound Products Corp. will not accept liability for loss or damage
caused by maintenance or repair performed by unauthorized personnel.
Worldwide Headquarters • 120 Clover Place, Edison, NJ 08837 • USA
Tel: (732) 738-9003 • Fax: (732) 738-9006
France • G.S.L. France • 11, Avenue Leon Harmel, Z.I. Antony, 92160 Antony, France
Germany • Gemini Sound Products GmbH • Ottostrasse 6, 85757 Karlsfeld, Germany
UK • Gemini Sound Products • Unit C4 Hazleton Industrial Estate, Waterlooville, UK P08 9JU
Spain • Gemini Sound Products S.A. • Rosello, 516, Barcelona, Spain, 08026
© Gemini Sound Products Corp. 2002 All Rights Reserved
Tel: + 33 (0) 1 55 59 04 70 • Fax: + 33 (0) 1 55 59 04 80
Tel: 08131 - 39171-0 • Fax: 08131 - 39171-9
Tel: 087 087 00880 • Fax: 087 087 00990
Tel: 349-3435-0814 • Fax: 3493-347-6961
 Loading...