

Page 1

PortabLe USB Recorder
TRAGBARER USB-REKORDER
GRABADOR PORTATIL POR USB
ENREGISTREUR PORTABLE USB
In the USA: If you experience problems with this unit, please go to http://www.ikey-audio.com or call 1-732-738-9003 for GCI Customer Service. Do not attempt to return this equipment to your dealer. GCI
Technologies stands behind their products with a 1 year limited warranty on all audio products. For larger images & detailed specs visit our website @ http://www.ikey-audio.com. WE ARE NOT RESPONSIBLE FOR
TYPOGRAPHICAL ERRORS OR OMISSIONS. WE RESERVE THE RIGHT TO CHANGE WITHOUT NOTICE. Parts of the design of this product may be protected by worldwide patents. Information in this manual is subject to change without notice and does not represent a commitment on the part of the vendor. GCI Technologies shall not be liable for any loss or damage whatsoever arising from the use of information or any error
contained in this manual. No part of this manual may be reproduced, stored in a retrieval system or transmitted, in any form or by any means, electronic, electrical, mechanical, optical, chemical, including photocopying and recording, for any purpose without the express written permission of GCI Technologies Corp. It is recommended that all maintenance and service on this product is performed by GCI Technologies Corp.
or its authorized agents. GCI Technologies Corp. will not accept liability for loss or damage caused by maintenance or repair performed by unauthorized personnel.
USA:
GCI Technologies Corp.
Worldwide Headquarters
120 Clover Place
Edison, New Jersey 08837
Ph: 732.738.9003
Fax: 732.738.9006
Germany:
GCI Technologies GmbH
Lerchenstrasse 14
80995 München
Ph: + 49 89 319 019 80
Fax: + 49 89 319 019 818
Spain:
GCI Technologies
Caspe 172, 1º A
08013 – Barcelona
Ph: + 34 93 436 37 00
Fax: + 34 93 347 69 61
UK:
GCI Technologies LTD
Unit C4 Hazleton
Industrial Estate,
Waterlooville P08 9JU
Ph: +44 (0)87 087 00880
Fax: +44 (0)87 087 00990
France:
GSL France
1, Allée d' Effiat,
Parc de l'événement
F-91160 Longjumeau
Ph: + 33 1 69 79 97 70
Fax: + 33 1 69 79 97 80
Worldwide Offices
plus
Page 2

CAUTION: This product satisfies FCC regulations when shielded cables and
connectors are used to connect the unit to other equipment. To prevent electromagnetic interference with electric appliances such as radios and televisions, use shielded cables and connectors for connections.
The exclamation point within an equilateral triangle is intended to alert the
user to the presence of important operating and maintenance (servicing)
instructions in the literature accompanying the appliance.
The lightning flash with arrowhead symbol, within an equilateral triangle, is
intended to alert the user to the presence of uninsulated "dangerous voltage"
within the product's enclosure that may be of sufficient magnitude to constitute a risk of electric shock to persons.
READ INSTRUCTIONS: All the safety and operating instructions should be
read before the product is operated.
RETAIN INSTRUCTIONS: The safety and operating instructions should be
retained for future reference.
HEED WARNINGS: All warnings on the product and in the operating instructions should be adhered to.
FOLLOW INSTRUCTIONS: All operating and use instructions should be followed.
CLEANING: The product should be cleaned only with a polishing cloth or a
soft dry cloth. Never clean with furniture wax, benzine, insecticides or other
volatile liquids since they may corrode the cabinet.
ATTACHMENTS: Do not use attachments not recommended by the product
manufacturer as they may cause hazards.
WATER & MOISTURE: Do not use this product near water, for example, near
a bathtub, wash bowl, kitchen sink, or laundry tub; in a wet basement; or near
a swimming pool; and the like.
ACCESSORIES: Do not place this product on an unstable cart, stand, tripod,
bracket, or table. The product may fall, causing serious injury to a child or
adult, and serious damage to the product. Use only with a cart, stand, tripod,
bracket, or table recommended by the manufacturer, or sold with the product.
Any mounting of the product should follow the manufacturer's instructions,
and should use a mounting accessory recommended by the manufacturer.
CART: A product and cart combination should be moved with care. Quick
stops, excessive force, and uneven surfaces may cause the product and cart
combination to overturn. See Figure A.
VENTILATION: Slots and openings in the cabinet are provided for ventilation
and to ensure reliable operation of the product and to protect it from overheating, and these openings must not be blocked or covered. The openings
should never be blocked by placing the product on a bed, sofa, rug, or other
similar surface. This product should not be placed in a built-in installation
such as a bookcase or rack unless proper ventilation is provided or the manufacturer's instructions have been adhered to.
POWER SOURCES: This product should be operated only from the type of
power source indicated on the marking label. If you are not sure of the type
of power supply to your home, consult your product dealer or local power
company.
LOCATION: The appliance should be installed in a stable location.
NON-USE PERIODS: The power cord of the appliance should be unplugged
from the outlet when left unused for a long period of time.
GROUNDING OR POLARIZATION:
- If this product is equipped with a polarized alternating current line plug
(a plug having one blade wider than the other), it will fit into the outlet only
one way. This is a safety feature. If you are unable to insert the plug fully into
the outlet, try reversing the plug. If the plug should still fail to fit, contact your
electrician to replace your outlet, as it may be obsolete. Do not defeat the safety purpose of the polarized plug.
- If this product is equipped with a three-wire grounding type plug, a plug
having a third (grounding) pin, it will only fit into a grounding type power outlet. This is a safety feature. If you are unable to insert the plug into the outlet,
contact your electrician to replace your outlet, as it may be obsolete. Do not
defeat the safety purpose of the grounding type plug.
POWER-CORD PROTECTION: Power-supply cords should be routed so that
they are not likely to be walked on or pinched by items placed upon or against
them, paying particular attention to cords at plugs, convenience receptacles,
and the point where they exit from the product.
OUTDOOR ANTENNA GROUNDING: If an outside antenna or cable system
is connected to the product, be sure the antenna or cable system is grounded
so as to provide some protection against voltage surges and built-up static
charges. Article 810 of the National Electrical Code, ANSI/NFPA 70, provides
information with regard to proper grounding of the mast and supporting
structure, grounding of the lead-in wire to an antenna discharge unit, size of
grounding conductors, location of antenna-discharge unit, connection to
grounding electrodes, and requirements for the grounding electrode. See
Figure B.
LIGHTNING: For added protection for this product during a lightning storm,
or when it is left unattended and unused for long periods of time, unplug it
from the wall outlet and disconnect the antenna or cable system. This will prevent damage to the product due to lightning and power-line surges.
POWER LINES: An outside antenna system should not be located in the vicin-
ity of overhead power lines or other electric light or power circuits, or where
it can fall into such power lines or circuits. When installing an outside antenna system, extreme care should be taken to keep from touching such power
lines or circuits as contact with them might be fatal.
OVERLOADING: Do not overload wall outlets, extension cords, or integral
convenience receptacles as this can result in a risk of fire or electric shock.
OBJECT & LIQUID ENTRY: Never push objects of any kind into this product
through openings as they may touch dangerous voltage points or short-out
parts that could result in a fire or electric shock. Never spill liquid of any kind
on the product.
SERVICING: Do not attempt to service this product yourself as opening or
removing covers may expose you to dangerous voltage or other hazards. Refer
all servicing to qualified service personnel.
DAMAGE REQUIRING SERVICE: Unplug this product from the wall outlet
and refer servicing to qualified service personnel under the following conditions:
- When the power-supply cord or plug is damaged.
- If liquid has been spilled, or objects have fallen into the product.
- If the product has been exposed to rain or water.
- If the product does not operate normally by following the operating
instructions. Adjust only those controls that are covered by the operating
instructions as an improper adjustment of other controls may result in damage and will often require extensive work by a qualified technician to restore
the product to its normal operation.
- If the product has been dropped or damaged in any way.
- When the product exhibits a distinct change in performance, this indicates
a need for service.
REPLACEMENT PARTS: When replacement parts are required, be sure the
service technician has used replacement parts specified by the manufacturer
or have the same characteristics as the original part. Unauthorized substitutions may result in fire, electric shock, or other hazards.
SAFETY CHECK: Upon completion of any service or repairs to this product,
ask the service technician to perform safety checks to determine that the product is in proper operating condition.
WALL OR CEILING MOUNTING: The product should not be mounted to a
wall or ceiling.
HEAT: The product should be situated away from heat sources such as radiators, heat registers, stoves, or other products (including amplifiers) that produce heat.
DISPOSAL: This product shall not be treated as household waste. Instead it
shall be handed over to the applicable collection point for the recycling of
electrical and electronic equipment. By ensuring this product is disposed of
correctly, you will help prevent potential negative consequences for the environment and human health, which could otherwise be caused by inappropriate waste handling of this product. The recycling of materials will help to conserve natural resources. For more detailed information about recycling of this
product, please contact your local city office, your household waste disposal
service or the shop where you purchased the product.
CAUTION
PLEASE READ BEFORE USING APPLIANCE,
IMPORTANT WARNING & SAFET Y INSTRUCTIONS!
RISK OF ELECTRICAL SHOCK DO NOT OPEN!
Page 3

iKEYplus PORTABLE USB RECORDER
INTRODUCTION:
Congratulations on purchasing an iKEYplus P
ORTABLE USB RECORDER
. This next
generation recording device features the latest advancements in engineering and is
backed by a One year limited warranty*. Prior to use, we suggest that you carefully
read all instructions.
FEATURES:
- USB Port (For direct connectivity to supported USB Storage Device)
- Compatible with USB 2.0/1.1/1.0 devices
- Compatible with iPod®
- Records audio to Uncompressed WAV format or MP3 format (w/ selectable bit rate,
up to 320kbps)
- Gold plated RCA inputs
- Microphone input with Phantom power
- Built-in Phono preamp for direct connection of Turntables
- LED Indicator shows memory remaining on target drive
- Battery powered w/ low battery indicator
- DC charger input with DC adapter included for use with rechargeable batteries
- 6-bar VU meter with peak hold and Overload indicator
- 1/8" (3.5mm) Headphone monitor output
- Record volume control
- Reset button
- Requires 4 AA Rechargeable Batteries (Not Included)
TABLE OF CONTENTS:
Warnings and WEEE Page.............................................................................................2
Introduction, Features.................................................................................................3
Parts List and Included Accessories.............................................................................4
Visual Connection Diagrams........................................................................................5
Connecting the included Stereo T-Mic.....................................................................5
Connecting a phonograph turntable........................................................................6
Connecting an audio mixer.......................................................................................7
Connecting a guitar amplifier....................................................................................8
Connecting a handheld microphone........................................................................9
Visual Quick Start Guide............................................................................................10
Playing back and/or editing your recordings on a home computer...........................18
LOW BATTERY, DEVICE FULL, and BUSY LED indicators.........................................20
APPENDIX A: Detailed instructions for use with an Apple iPod................................21
Transferring your recordings from the iPod to PC for editing.................................22
Transferring your recordings from the iPod to Mac for editing..............................23
APPENDIX B: Troubleshooting guide........................................................................25
APPENDIX C: Detailed instructions for connecting a phonograph turntable...........27
APPENDIX D: Specifications......................................................................................28
3
Page 4
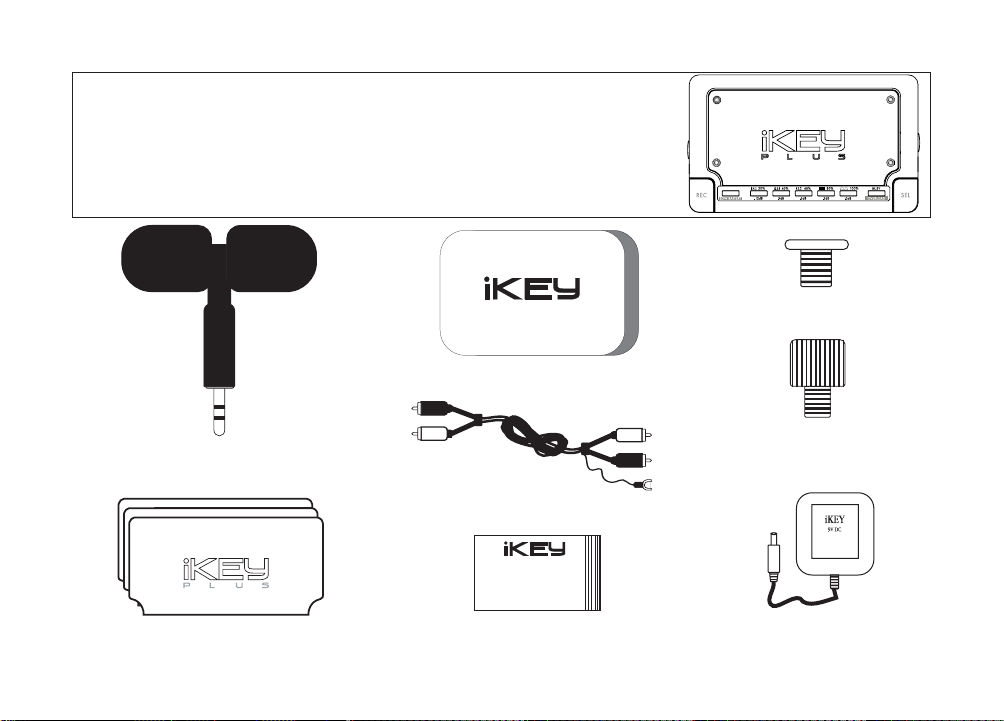
Included in this Package
Parts list & Accessories:
Stereo T-Mic
RCA cable with single ground spade
Carrying Case
4 x Regular Screws
4 x Thumb Screws
Operations Manual
Black, Red, & Chrome Faceplates
Power Supply
4
320
RECORD
RECORD
320
Page 5
320
RECORD
320
RECORD
320
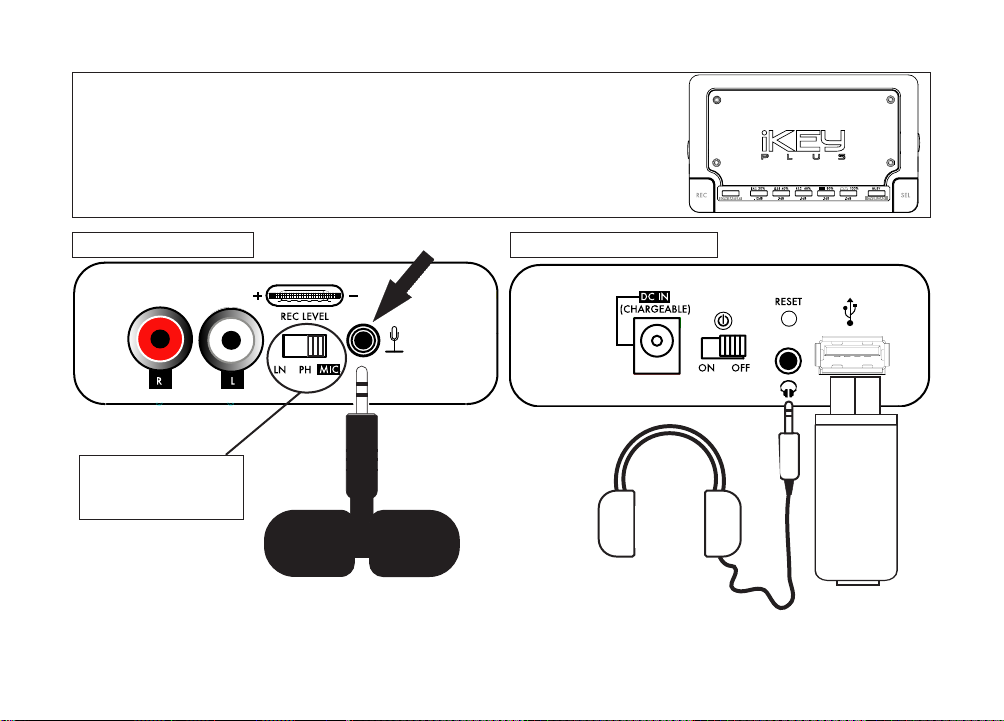
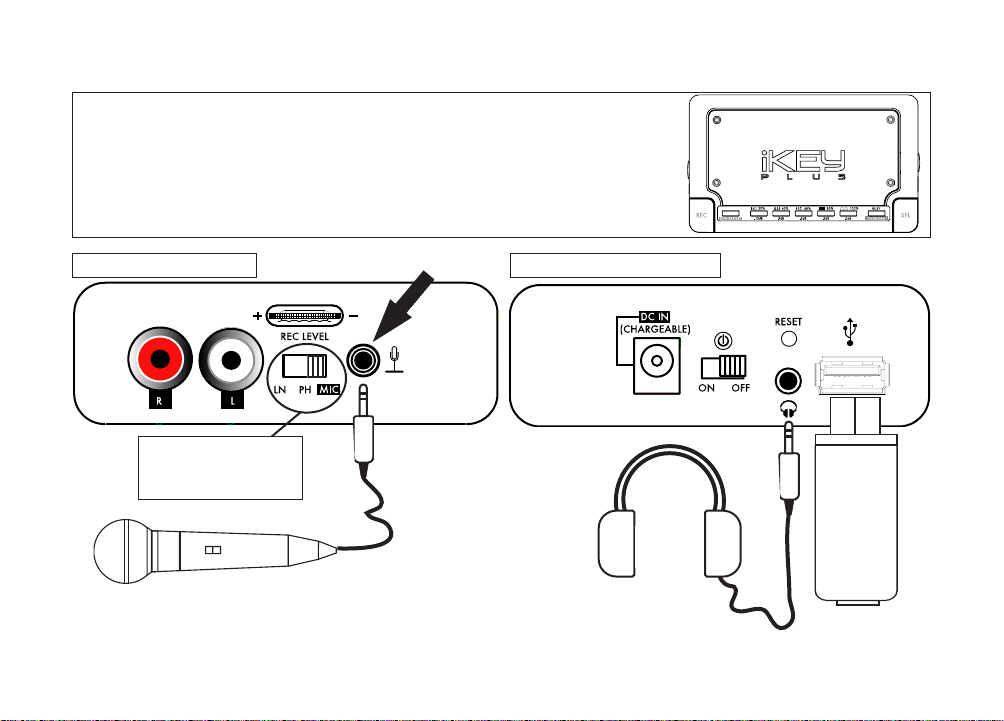
Connecting the iKEYplus using
the included Stereo T-Mic
left side: audio input right side: audio output
mic jack
USB device
Headphones
(optional for monitoring during recording process)
Stereo T-Mic (included)
NOTE:
BE SURE THE ACCOM-
PANYING SWITCH IS IN THE
MIC POSITION!
5
RECORD
320
Page 6
320
RECORD
320
RECORD
320
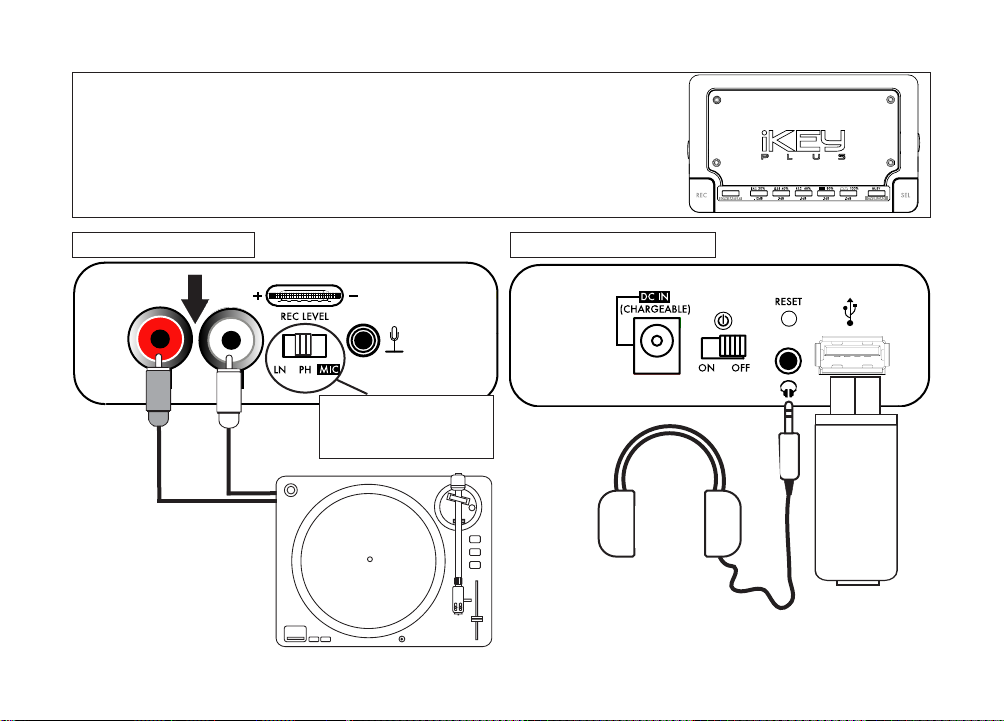
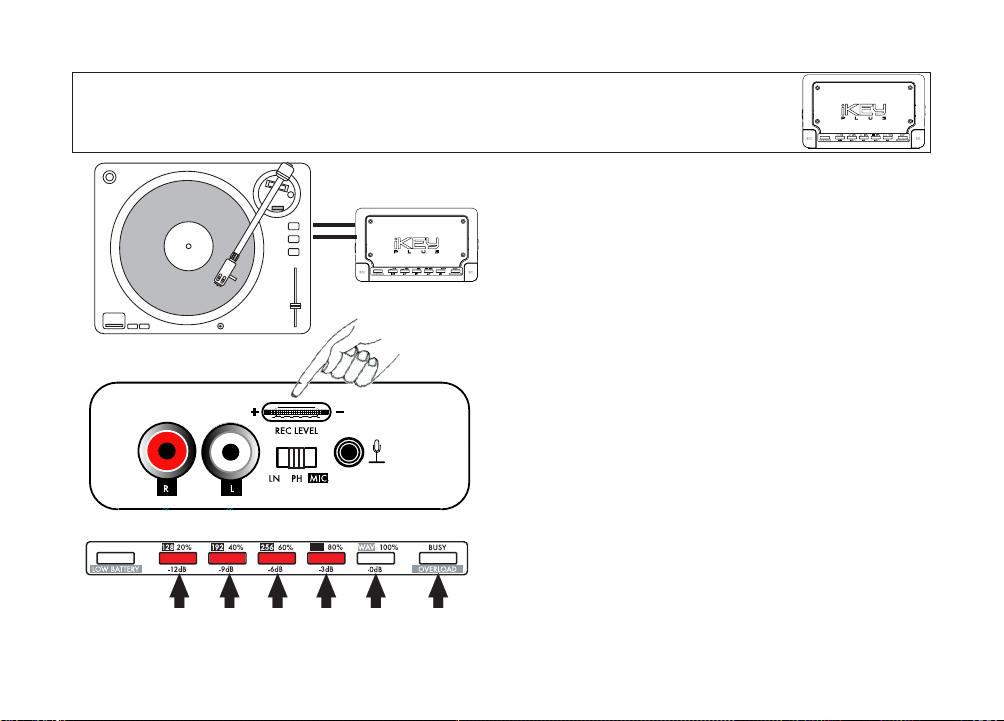
Connecting a phonograph
turntable to the iKEYplus*
left side: audio input right side: audio output
RCA jacks
USB device
Headphones
(optional for monitoring during recording process)
NOTE: BE SURE THE ACCOMPA-
NYING SWITCH IS IN THE
PH
POSITION
!
6
Phonograph Turntable
(Standard type, magnetic cartridge, not pre-amplified)
* See Appendix C for detailed instructions
RECORD
320
Page 7

320
RECORD
320
RECORD
320
Connecting a mixer*
to the iKEYplus
left side: audio input right side: audio output
RCA jacks
USB device
Headphones
(optional for monitoring during recording process)
NOTE: BE SURE THE ACCOMPA-
NYING SWITCH IS IN THE LN
POSITION!
Mixing Console
(Connect to Line output or
Record/Tape output)
*recording from a mixer may require alternate
cables/adapters (not included), depending on brand
7
RECORD
320
Page 8
320
RECORD
320
RECORD
320
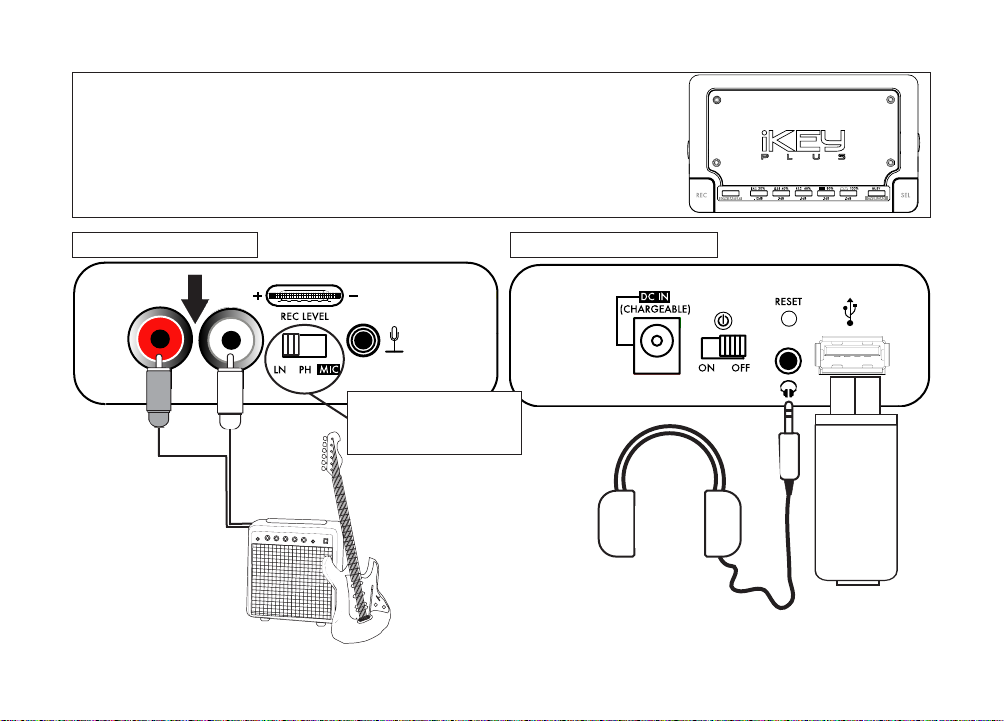
Connecting a guitar
amplifier* to the iKEYplus
left side: audio input right side: audio output
RCA jacks
USB device
Headphones
(Optional for monitoring
during recording process)
NOTE: BE SURE THE ACCOMPA-
NYING SWITCH IS IN THE
LN
POSITION!
*recording from a guitar amp may require alternate cables/adapters
(not included), depending on brand
Guitar Amplifier
(Connect to Line output or
record/tape output)
8
RECORD
320
Page 9
320
RECORD
320
RECORD
320
Connecting a handheld
mic to the iKEYplus
left side: audio input right side: audio output
mic jack
mic jack
USB device
Headphones
(Optional for monitoring
during recording process)
Handheld Mic (not included)
NOTE: BE SURE THE ACCOM-
PANYING SWITCH IS IN THE
MIC POSITION!
9
RECORD
320
Page 10
320
RECORD
Visual Quickstart Guide
320
STEP 1: SUPPLY POWER TO THE iKEY
Remove the aluminum cover and install batteries according to
the printed diagram on the battery tray. Alternatively, you may
use the supplied 9VDC power adapter. If you choose to use
rechargeable batteries, connecting the power adapter will
charge the batteries when the power switch is ON. IF YOU
CHOOSE TO USE ALKALINE OR OTHER NON-RECHARGEABLES, DO NOT CONNECT THE POWER ADAPTER AT THE
SAME TIME AS YOU WILL RISK EXPLODING THE BATTERIES AND DAMAGING THE iKEYPLUS!!!
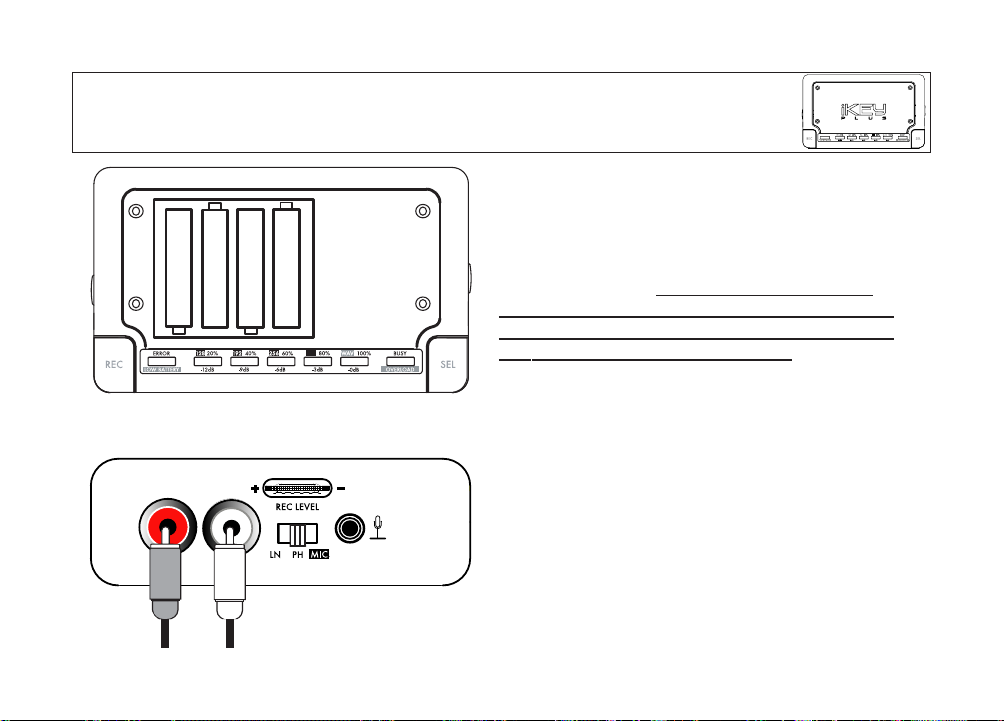
STEP 2: CONNECT AUDIO SOURCE
If you are recording from a line-level device (CD player, mixer,
karaoke machine, guitar amp, etc) OR a phonograph turntable,
you must connect it to the RCA inputs as illustrated. If you are
recording using a microphone, it must be connected to the
small 1/8” (3.5mm) jack. More detailed connection instructions
can be found in the connection diagrams before this section.
320
RECORD
10
320
RECORD
320
Page 11
320
RECORD
Visual Quickstart Guide
(continued)
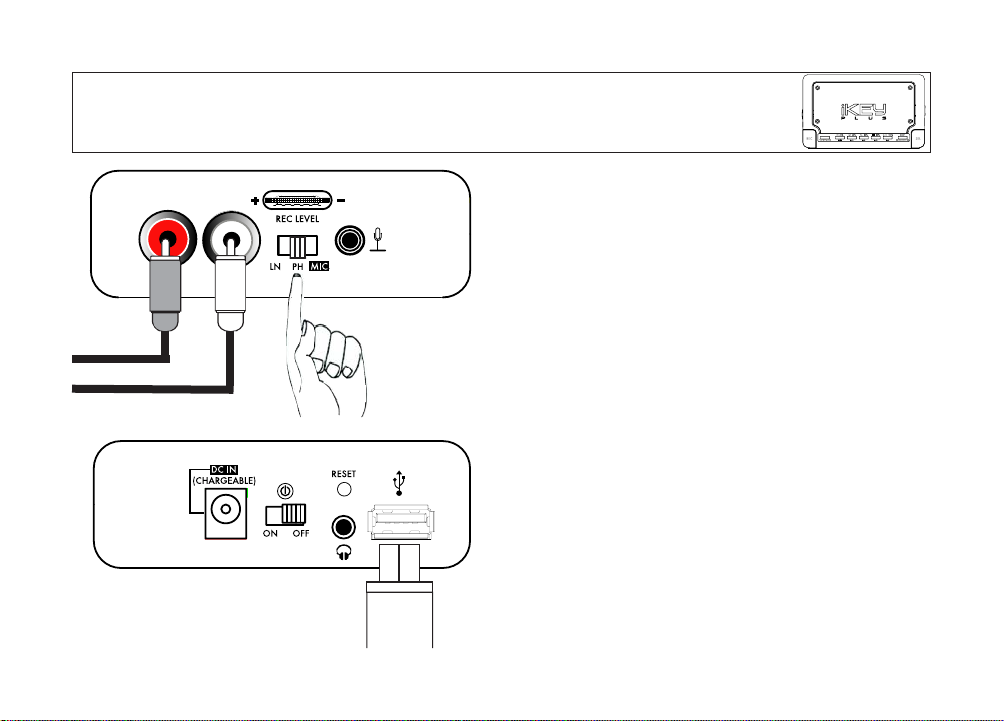
STEP 3: SET THE SWITCH!
If you are recording from a LINE LEVEL device, switch the position to LN (to the far left). If recording from a PHONOGRAPH
TURNTABLE, switch the position to PH (middle position).
Finally, if you are using a MICROPHONE, switch the position to
MIC.
STEP 4: CONNECT USB DEVICE
Connect the USB device that you wish to record to. Common
USB devices that can be used include FAT-32 and HFS+ based
USB Flash Memory, hard drives, and most MP3 players. If you
plan on using an iPod, please first consult the additional notes
found in APPENDIX A: iPod Usage. For a list of known incompatabilities, see APPENDIX B.
320
RECORD
320
RECORD
11
320
RECORD
Page 12
320
RECORD
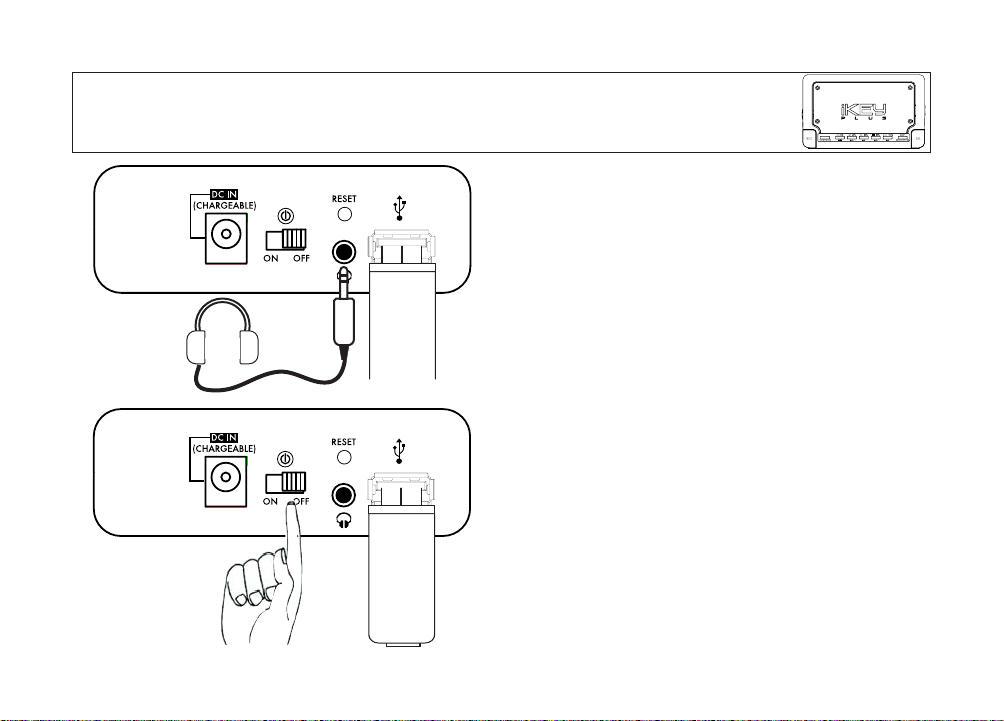
STEP 6: TURN POWER SWITCH ON
Once you turn the unit ON, the iKEYplus will take approximately 15 seconds to boot. During this process, the LEDs will illuminate briefly, indicating the amount of space that has already
been taken up on the storage device. Once the unit has booted,
the LEDs will shut off, and will instead respond as a VU level
meter.
STEP 5: CONNECT HEADPHONES (OPTIONAL)
If you wish to monitor the signal that will be recorded using the
iKEYplus, connect headphones with a 1/8 inch (3.5mm) jack to
the headphone monitor output. The signal coming from the
headphone jack may be very loud, so take the necessary precautions when using this output.
320
RECORD
320
RECORD
12
Visual Quickstart Guide
(continued)
320
RECORD
Page 13
320
RECORD
320
RECORD
320
RECORD
STEP 7: START PLAYBACK OF SOURCE
In order to adjust the recording level of the iKEYplus, it is necessary to start playing the source that you wish to record from.
If you will be recording from a microphone, begin speaking in
the same voice that you will use when the unit is recording.
STEP 8: ADJUST RECORD LEVEL CONTROL
While looking at the front LED lights on the unit, adjust the REC
LEVEL control (on the left side of the unit) until the lights reach
no further than the 0dB indicator (shown underneath the
lights). This is very important, as if the level exceeds 0dB, it will
cause distortion and will render the recording unlistenable.
Conversely, if the level is too low, it will cause the recording to
sound muffled. If you are recording something that may get
louder as time goes on (a live recording for instance), you may
want to set the REC LEVEL lower so that any unexpected
increase in volume will not cause distortion.
320
RECORD
Figure A - The illuminated LEDs show a level of -3dB.
The arrows point to the VU metering values (in dB).
13
Visual Quickstart Guide
(continued)
320
RECORD
RECORD
320
320
RECORD
Page 14
320
RECORD
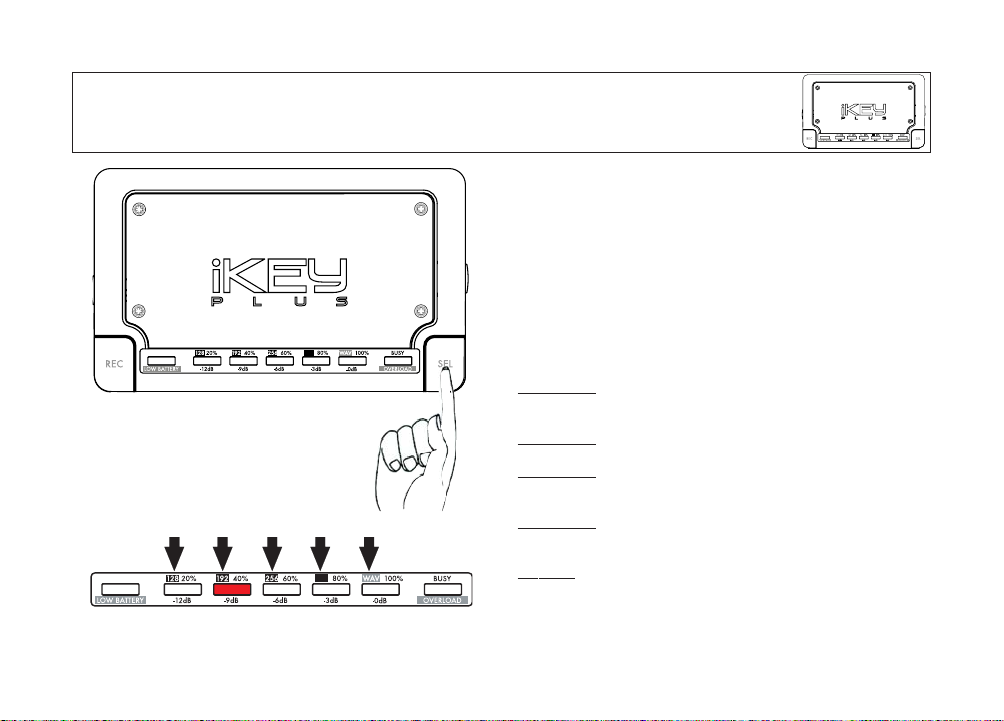
STEP 9: SELECT FORMAT AND QUALITY
Using the SEL button on the front left of the unit, select
what format you wish to record in. Press the button repeatedly until the LED light illuminates the desired format &
quality. After 3 seconds of inactivity, the LEDs will once
again shut off and respond as a VU meter.
MP3 format offers varying degrees of sound quality, and is used to conserve
space:
128kbps quality
is better than FM radio, and takes up approximately 55 megs
per hour of recording.
192kbps quality takes up approximately 83 megs per hour of recording.
256kbps quality
is close to CD quality, and takes up approximately 110 megs
per hour of recording.
320kbps quality
approaches CD quality, and takes up approximately 137.5
megs per hour of recording.
WAV format is the same as CD quality (44.1kHz, 16 bit Stereo), but will take
up an enormous 600 megs per hour of recording!
320
RECORD
Figure B - The illuminated LED shows 192kbps is selected.
The arrows point to the various format/quality settings.
320
RECORD
320
RECORD
320
RECORD
14
Visual Quickstart Guide
(continued)
320
RECORD
RECORD
RECORD
320
320
Page 15
320
RECORD
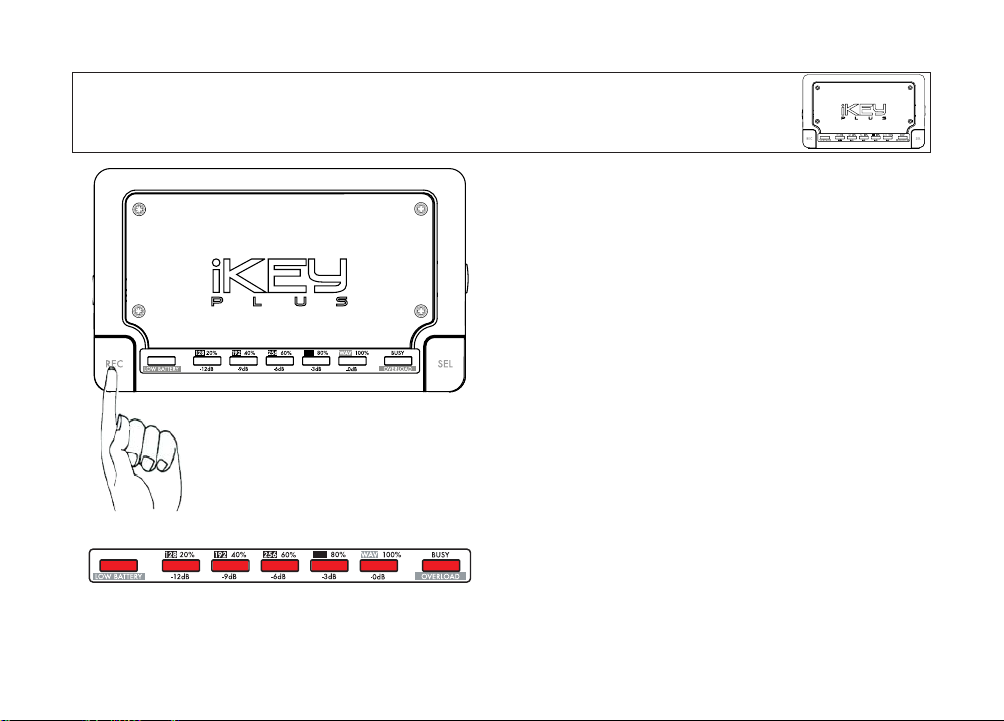
STEP 10: PRESS RECORD TO START!
When you are ready to start the recording, press the REC
button found on the left front of the unit.
Once the REC button is pressed, all of the LED lights will
turn on briefly to show that the unit has recognized your
command. After the LED lights extinguish (usally 0 to 2 seconds), the recording will commence. Notice that during
recording, the LED to the far left labeled RECORD will illuminate solidly.
Once the recording has started, the LED lights will once
again function as a VU meter, showing you the input volume.
You may adjust (if necessary) the RECORD LEVEL CONTROL,
as illustrated in STEP 8, at any time during the recording.
320
RECORD
Figure C - All LEDs illuminate briefly to show that the unit has
recognized your command.
320
RECORD
320
RECORD
15
Visual Quickstart Guide
(continued)
RECORD
320
320
RECORD
RECORD
320
Page 16
320
RECORD
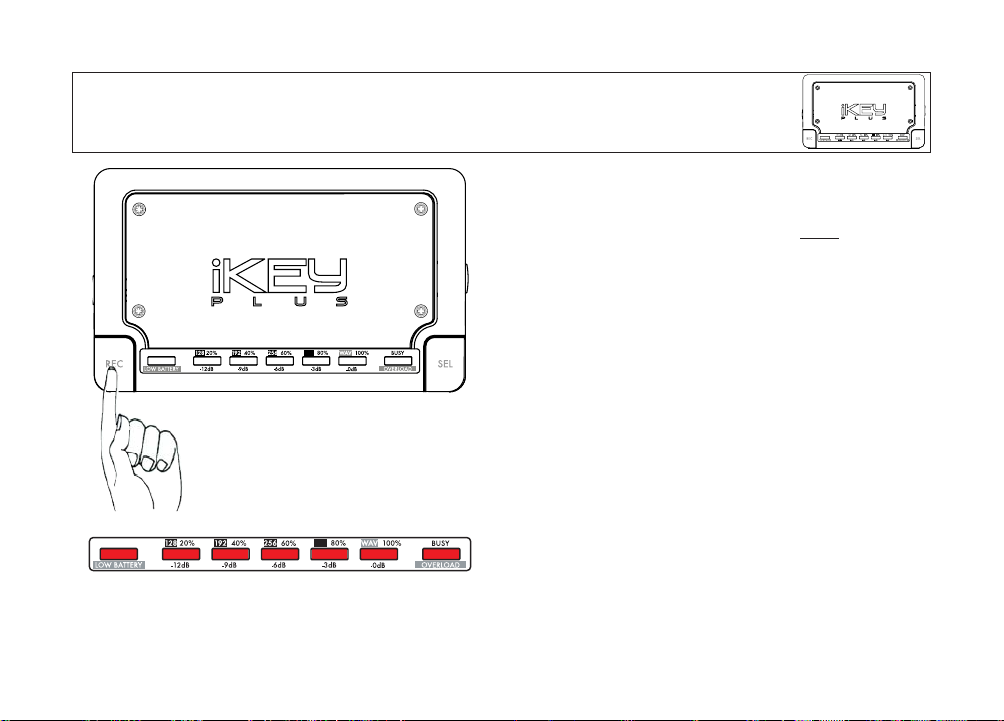
STEP 11: PRESS RECORD TO STOP!
When you are ready to end the recording, press the REC button found on the left front of the unit. You MUST
end
recording this way, or the file will not be saved.
Once the REC button is pressed, all of the LED lights will
turn on briefly to show that the unit has recognized your
command. After the LED lights extinguish (usually about 0
to 2 seconds), the recording will cease, and the RECORD
LED will extinguish. If you are recording to an iPod, the LED
lights may light for up to 30 seconds while the file is
processed by the iPod.
Once the recording has ended, the LED lights will once
again function as a VU meter, showing you the input volume.
You may create another recording by pressing REC again (ie.
repeat step 10).
320
RECORD
Figure D - All LEDs illuminate briefly to show that the unit has
recognized your command.
320
RECORD
320
RECORD
16
Visual Quickstart Guide
(continued)
RECORD
RECORD
320
320
320
RECORD
Page 17

320
RECORD
STEP 12: EJECTING THE USB DEVICE
You must hold down the REC button for 3 seconds before
disconnecting the USB device. The LED lights will flash 3
times in a row, showing that it is now safe to remove the
device.
F
AIL
URE TO USE THIS EJECT PROCEDURE CAN CAUSE
PROBLEMS RANGING FROM DATA CORRUPTION, TO
THE COMPLETE ERASURE OF YOUR RECORDING.
This procedure is not unique to the iKEYplus, in fact, you
must follow an ejection procedure when removing USB
devices from your computer.
Once you have completed the eject procedure, you may now
connect your USB storage device to a PC for playback and
editing. If you are using an iPod, please first consult the
additional notes found in APPENDIX A: iPod Usage.
320
RECORD
Figure E - All LEDs flash briefly, 3 times in a row to show
that it is now safe to remove the USB device.
320
RECORD
320
RECORD
17
Visual Quickstart Guide
(continued)
RECORD
RECORD
320
320
320
RECORD
Page 18

PLAYING BACK YOUR RECORDINGS ON A WINDOWS XP-BASED PERSONAL
COMPUTER:
Once you have followed the recording process as illustrated by the Visual Quick
Start Guide (pages 10-17), connect the USB storage device to your home computer.
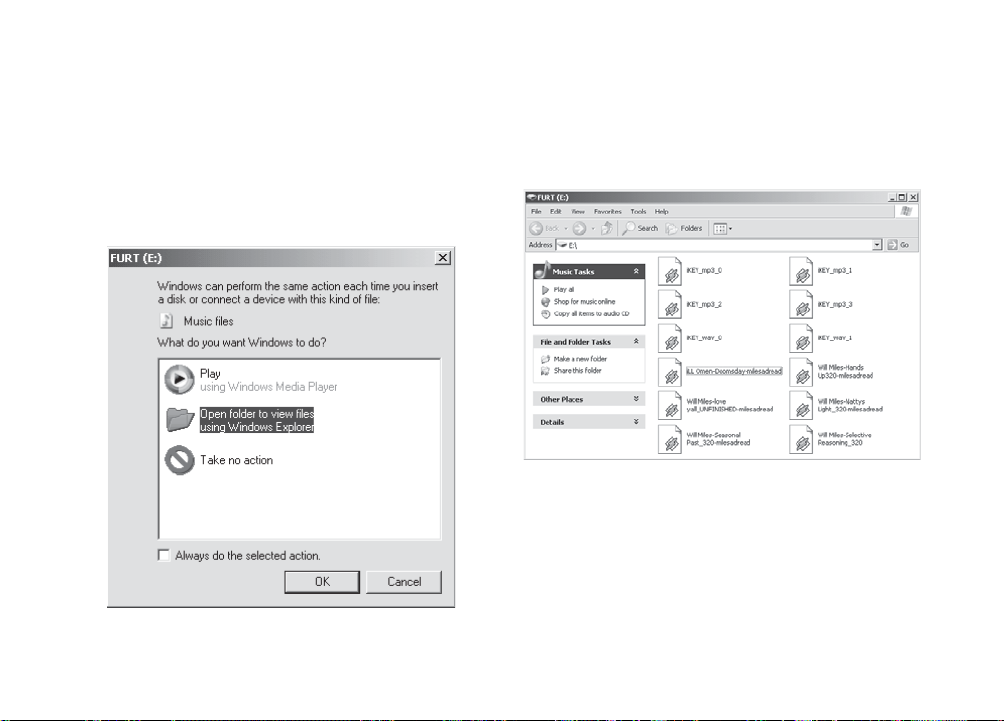
If you are running a Windows XP-based computer, a window should pop up upon
connecting the USB storage device, offering you a range of options. In this case, it
is best to select the option labeled “Open folder to view files using Windows
Explorer.” (See Fig. A)
Next, after selecting “Open folder to view files using Windows Explorer,” you will be
presented with a list of files, similar to what is shown in Fig. B. As you might be able
to figure out, the files that were recorded by the iKEYplus are named according to the
format of the file and are numbered according to the sequence in which they were
recorded. For instance, in this scenario, a file called iKEY_mp3_2 suggests that the
file is in MP3 format and that it was the 3rd file of that type that was recorded.
From this screen, simply double click the file that you want to play back. Depending
on what software is already installed on your PC, you may have a variety of applications that handle audio files for the purpose of playback or editing. If you have
numerous applications which handle these files, you may right click on any of the
iKEY files and select an application using the ‘Open With’ option.
Figure A - Choose Open folder to view files using
Windows Explorer.
Figure B - Using Windows Explorer to browse the files that are
stored on a USB storage device. Note that on your
computer, the icons that are displayed next to each
file may differ.
18
Page 19
PLAYING BACK YOUR RECORDINGS ON A WINDOWS XP-BASED PERSONAL
COMPUTER (
CONTINUED):
Something to take note of is the fact that most PC applications have a 2 GB limit
when dealing with WAV files. If you must record in WAV format for an extended period, try to make your recordings no longer than 3 hours for each file. At the time of
this publication, a free utility called Wave Splitter exists to split WAV files into smaller pieces, and can be found at http://claudiosoft.online.fr/wavsplit.html.
NOTE
THAT THIS SOFTWARE IS NOT SUPPORTED IN ANY WAY BY GCI OR IKEY
AUDIO, AND YOUR DECISION TO USE IT IS AT YOUR OWN RISK.
SUGGESTIONS FOR EDITING YOUR RECORDINGS:
For some people, simply having the capability to make high quality recordings to a
USB storage device is satisfactory. However, there are a whole range of others who
wish to trim, edit, and manipulate the recordings they have made. With the proper
know-ow, editing can bring out the best in your recordings. Although the iKEYplus
does not come with any type of editing software, customers wishing to perform editing may obtain a number of software titles. Here is a list of software that is recommended by the iKEY Audio development team (at the time of this publication):
Audacity is a free cross-platform audio editing software for Windows and Macintosh,
and can be found at http://audacity
.sourceforge.net/
Sony Sound Forge and Sound Forge Audio Studio are programs widely used for
professional audio editing and can be found at http://www
.sonymediasoftware.com.
Steinberg WaveLab can be found at http://www.steinberg.de
NOTE THAT THE AFOREMENTIONED SOFTWARE IS NOT SUPPORTED IN ANY
WAY BY GCI OR IKEY AUDIO, AND YOUR DECISION TO USE IT IS AT YOUR
OWN RISK.
If you wish to learn more about digital audio editing, as well as the principles of digital audio recording, you may want to check out Chris Middleton’s book, titled
Complete Guide To Digital Audio.
TIPS FOR EDITING:
- When editing a recording you’ve made on the iKEYplus, copy the file to your PC’s
hard drive before making edits.
- Try to keep backup copies of the original recordings, just in case you make a change
that you decide later to be unfavorable.
- If you plan on editing excessively large files often, you may want to consider a high
performance PC hard drive and some extra RAM to make the process quicker.
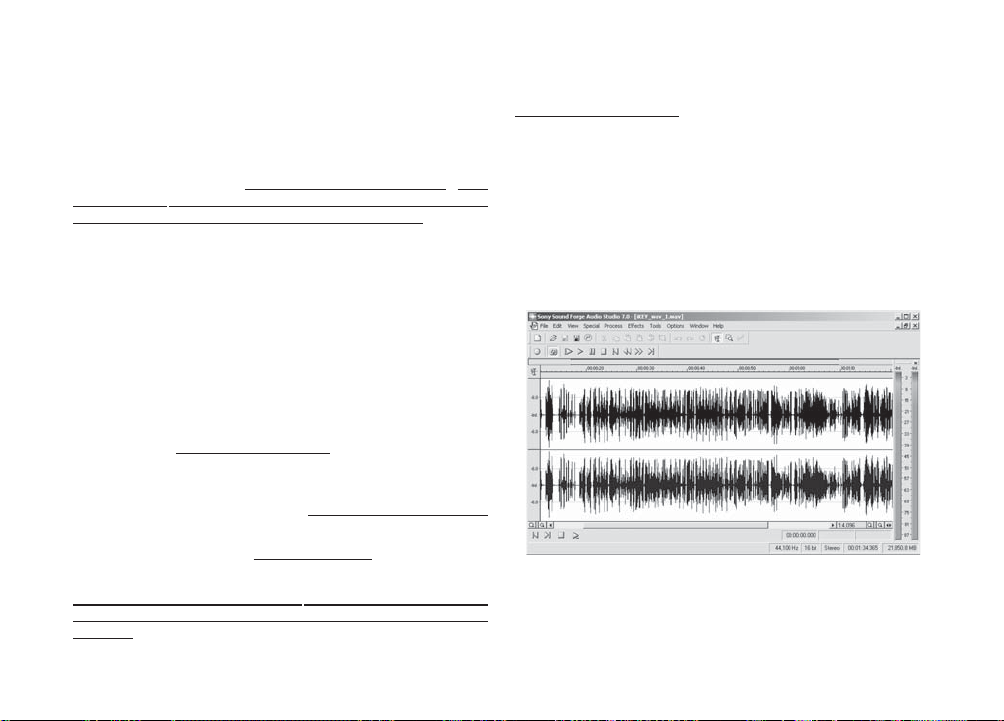
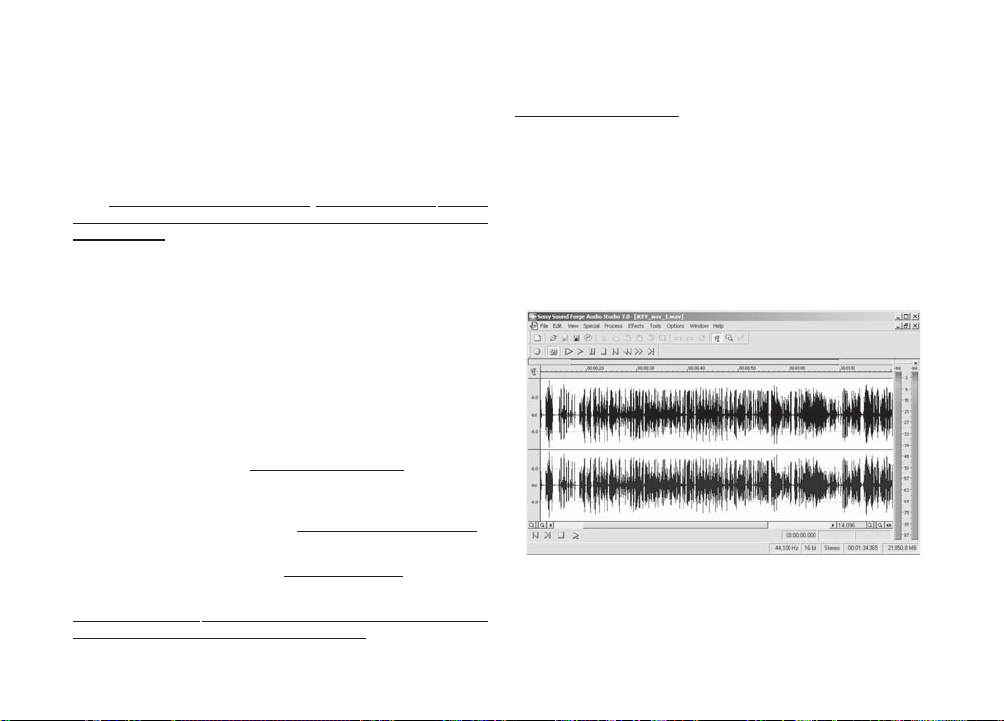
Using an audio editing application (not included) can allow you to
mainpulate the recordings that you have made with the iKEYplus.
Pictured: Sony Sound Forge Audio Studio 7.0...
19
Page 20

LOW BATTERY, DEVICE FULL, AND BUSY LED INDICATORS:
Additional LED indicators to take note of are the LOW BATTERY, DEVICE FULL,
and BUSY indicators.
The LOW BATTERY indicator shares the same LED as the RECORD LED. However,
LOW BATTERY is signaled when that LED is flashing.
When your storage device approaches more than 95% full, the iKEYplus will signal
DEVICE FULL by flashing all LEDs at once, repeatedly, until the storage device
becomes completely full. At this point, the iKEYplus will automatically stop the
recording process.
The BUSY LED will flash rhythmically when the unit is still processing (after recording), indicating that the unit is not yet ready to accept another command. The BUSY
LED also illuminates solidly when you first power on the unit, indicating that the
unit is booting.
20
Page 21
APPENDIX A
USING AN APPLE iPod AS A STORAGE DEVICE WITH THE iKEYPLUS:
When using an Apple iPod as a storage device, there are a few additional steps that
must be taken in order to insure the integrity of your recordings.
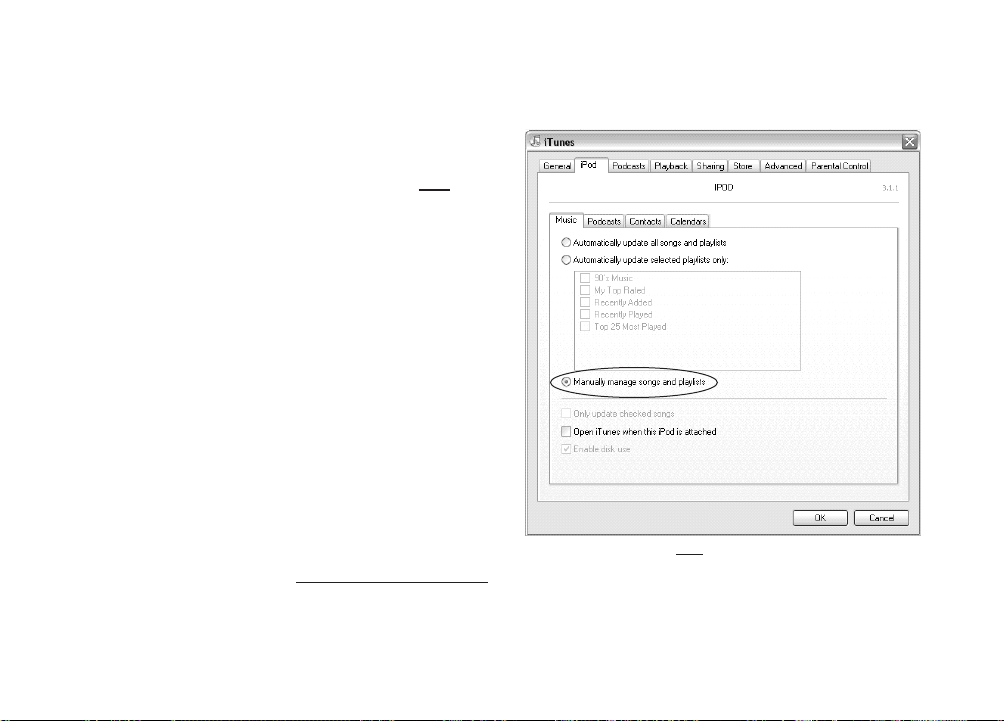
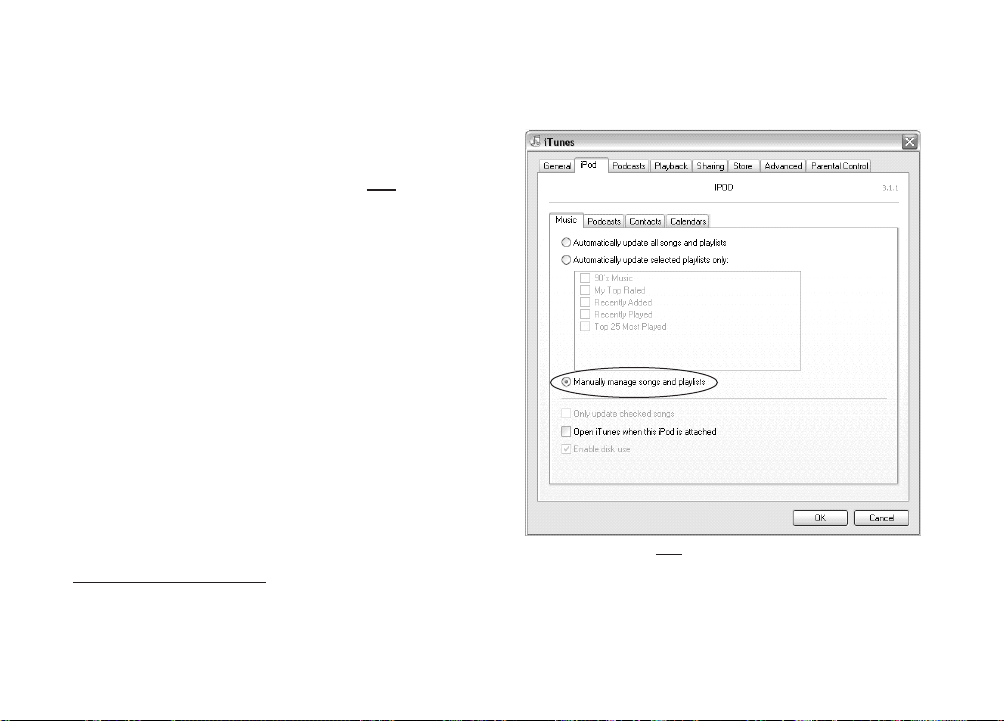
First of all, before you even begin using the iKEYplus, you absolutely MUST
change
the iPod settings (in iTunes) so that the music on the iPod is not automatically updated. FAILURE TO DO THIS WILL RESULT IN iTUNES ERASING YOUR RECORD-
INGS WHEN IT IS LAUNCHED. GCI Technologies and iKEY Audio will not be
held responsible for loss of data due to improper procedure!
1. Connect your iPod to your computer
2. If iTunes does not pop up automatically, launch it.
3. Once iTunes has initialized, go to the EDIT menu, and select PREFERENCES.
4. Once you are in preferences, select the iPod tab.
5.Once you are in the iPod tab, select the tab labeled MUSIC.
6. Select the option that says ‘Manually manage songs and playlists.’ This is illustrated in Figure C.
FIRMWARE UPDATES
For best performance when recording to an iPod, you should be using a current version of Apple’s iPod Firmware. If you have an older iPod, you might want to look
into downloading a firmware update, as the iKEYplus software was designed to be
compatible only with firmware versions from the year 2005 and beyond. If you
choose to use a firmware update, make sure you follow all of Apple’s instructions.
The website address to find these updates is: http://www
.apple.com/ipod/download/
Figure C - In iTunes, you must change the settings to Manually
Manage Songs and Playlists.
21
Page 22

APPENDIX A (
CONTINUED)
USING AN APPLE iPod AS A STORAGE DEVICE WITH THE iKEYPLUS:
Once all of your settings have been made in iTunes, you may follow the Visual
Quickstart Guide with 4 minor alterations. The iKEYplus works with both PC and
Macintosh formatted iPods.
1. When the iKEYplus recognizes that an iPod has been plugged in, the iPod screen
will say “Do Not Disconnect.”
2. When starting the recording (see Step 10), it may take slightly more than 1-2 seconds for the LED lights to extinguish prior to the start of recording.
3. When stopping the recording (see Step 11), it may take in excess of 30 seconds
before the LED lights extinguish. You will also notice that the BUSY LED light will
flash during this procedure. This happens as a result of the iPod processing the file
so that it can be played back on the iPod itself. Note that the more songs are on your
iPod, the longer this process can take.
4. When ejecting the iPod using the Eject Procedure (step 12), the screen will no
longer display “Do Not Disconnect” when it is safe to disconnect the iPod.
PLAYING BACK YOUR RECORDINGS DIRECTLY ON AN APPLE iPod:
Once you have completed recording, and the eject sequence has been completed,
the recorded files will be found in the Songs list on your iPod. If you have just disconnected the iPod from the iKEYplus, you will find that the iKEY files are at the very
bottom of the Songs list. If you have connected the iPod to your PC and have loaded
up iTunes, you will instead find the iKEY files in alphabetical order. Note that if you
find your iPod’s Songs list out of order, iTunes will re-sort the files once the iPod has
been connected to a computer.
TRANSFERRING YOUR RECORDINGS FROM iPod-TO-COMPUTER:
Transferring your recordings that are stored on your iPod can be accomplished by
following these steps. Depending on whether you are using Windows XP or Mac
OSX, there will be different steps to follow.
TRANSFERRING RECORDINGS FROM iPod TO A WINDOWS XP COMPUTER:
Note that only a PC version of the iPod can be connected to a Windows XP computer. Macintosh versions of the iPod must be connected to a MacOSbased computer.
1. Connect your iPod to your PC via the USB port.
2. If iTunes launches automatically (in most cases it probably will), close out of it
completely.
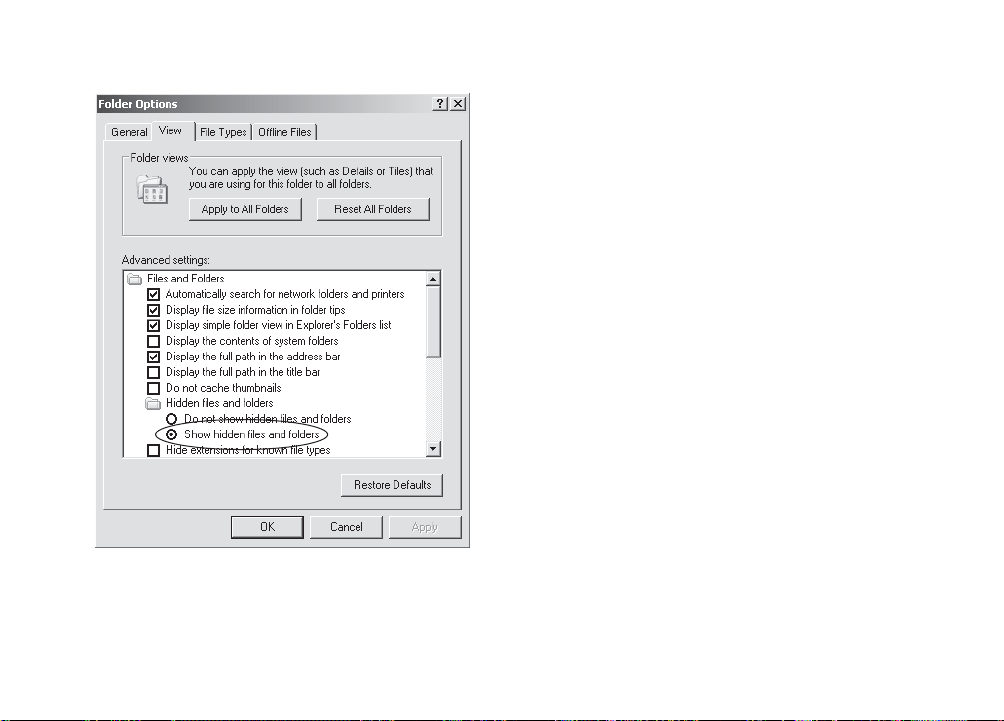
3. Under the Start menu, go to My Computer.
4. Under the heading ‘Devices with Removable Storage,’ double click on the drive
labeled according to your iPod - it will be called whatever you chose to name it when
you first set it up with your computer.
5. Go to the Tools option on the menu bar, and select Folder Options.
6. Go to the View tab.
7. Under the Advanced Settings box, there will be a heading titled ‘Hidden Files
and Folders.’ Select the option that says ‘Show hidden files and folders’, and
click OK. See Figure D (on the next page).
8. Find the directory labeled ‘iPod Control’ and double click on it.
9. Find the directory labeled ‘Music’ and double click on it.
10. Your recordings will be stored in a directory called ‘iKEY.’ Double click on it
and you will find your recordings. Copy them to your hard drive by dragging and
dropping, or by right clicking and using the Copy and Paste function.
11. Repeat steps 5 through 7, except for this time, select the option that states ‘Do
not show hidden files and folders.’ Once you have done this procedure, you will
no longer see the hidden files.
22
Page 23
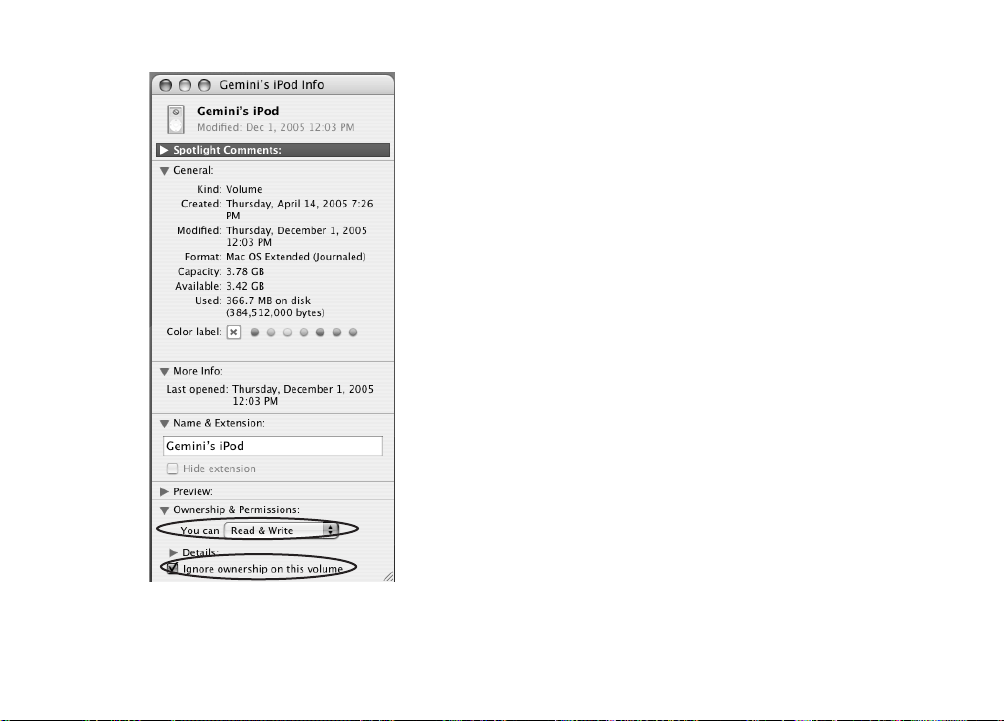
TRANSFERRING RECORDINGS FROM iPod TO A MAC OSX COMPUTER:
1. Connect your iPod to your PC via the USB port.
2. If iTunes launches automatically (in most cases it probably will), close out of it
completely.
3. Click on the iPod icon found on your desktop - it will be called whatever you
chose to name it when you first set it up with your computer.
4. Press Apple+I to get into the Info screen. At the bottom of the screen, change
the Ownership and Permissions to “You can Read and Write.” Also check the box
that says “Ignore ownership on this volume.” (See Figure F)
3. Double click on ‘Macintosh HD’ (found on your desktop), and open
‘Applications’, then ‘Utilities’, then load the application called ‘Terminal’. This will
bring you to a text-entry prompt.
4. Type the following string, exactly as you see it below (see Figure E):
defaults write com.apple.Finder AppleShowAllFiles TRUE (press Enter key)
killall Finder (press Enter key)
Keep this window open, as you will need to return here in step #6.
5. Next, go back to your desktop and double click on the drive labeled according to
your iPod.
6. Open the ‘iPod_Control’ directory, then the ‘Music’ directory, then click on the
directory (usually at the very bottom) labeled ‘iKEY’.
7. Copy the recordings you wish to your hard drive by dragging and dropping, or by
using the copy and paste function.
8. Return to the ‘Terminal’ application and type the following string, exactly as you
see it below:
defaults write com.apple.Finder AppleShowAllFiles FALSE (press Enter key)
killall Finder (press Enter key)
Once you have done this procedure, you will no longer see the hidden files.
Figure D - In order to access your recorded files, you must tell
Windows to Show hidden files and folders.
23
Page 24

Figure E - Opening the Terminal window in OSX allows you to
issue the necessary commands to retrieve your
recordings from an iPod.
24
Page 25
APPENDIX B
TROUBLESHOOTING THE iKEYPLUS / FREQUENTLY ASKED QUESTIONS
If you are having difficulty with your iKEYplus, read through some of these suggestions. The majority of issues can be resolved simply by going back over the procedures, and making sure you follow them word-for-word.
Q: The recording I have made is too quiet when I play it back, and it doesn’t
sound clear.
1. Try to increase the REC LEVEL knob so that the VU meter display is as close to
0dB as possible without going over.
2. Make sure that the INPUT SWITCH (which is directly below the REC LEVEL)is
set appropriately.
3. If you find that you are unable to achieve a strong enough level when looking at
the VU meter, increase the volume of the source (if possible).
Q: The recording I have made is distorted when I play it back.
1. When recording, verify that the VU meter is not exceeding 0dB, as in a digital
recording, this will render the recording useless.
2. Make sure that the INPUT SWITCH (which is directly below the REC LEVEL)is
set appropriately.
3. Another situation (which is extremely rare) that could exist is that you’re feeding
a signal that is too strong to the iKEYplus.
4. Verify that the issue does not exist only in your playback system, or in the original
source material itself, or in the cables you are using.
Figure F - Pressing Apple+I when the iPod is selected on the
desktop allows you to change the permissions to for
accessing the iPod.
25
Page 26

TROUBLESHOOTING THE iKEYPLUS / FREQUENTLY ASKED QUESTIONS
(
CONTINUED):
Q: I recorded a file, and it will not play back on my PC.
1. Make sure that you’re completing the USB eject procedure as illustrated in the
Quickstart Guide. Failure to do this can result in a range of issues, everything from
data corruption to complete erasure of the recording.
2. Another potential issue is that WAV files over 2 GB (over 3 hours long) are typically not supported by most software.
3. Make sure that the software you are using to play the files is operational.
Q: My recording has transient noise and/or skipping.
1. Make sure the noise isn’t being caused by poor cabling, interference, or in the
audio source itself.
2. If the recording seems like it’s skipping, you should try to degragment the storage device you are recording to. The iKEYplus streams packets of information to the
storage device, and if it is cluttered and fragmented, the device may not be able to
respond fast enough.to catch the data that is being sent to it.
3. It is a possibility that the USB flash drive that you are using is causing interference
when the LED light flashes on the actual flash drive itelf. Try another flash drive to
see if the problem goes away.
Q: Unit seemed to be recording without problems, but data is not found on
the target device.
1. It is possible that the power was removed from the unit before the recording was
stopped, as per the necessary procedure.
2. It is also possible that the USB storage device was removed before the recording
was stopped properly, or the eject procedure was not followed.
Q: Using my iKEYplus with an iPod is not working as stated.
1. It is possible that your iPod or iTunes is not configured properly, or that you are
running an old version firmware on your iPod. Please refer to APPENDIX A: USING
AN APPLE iPod AS A STORAGE DEVICE WITH THE iKEYplus.
Q: When a device is plugged into the iKEY, the record function does not
work, and when the record button is pressed, all of the LEDs flash 3 times.
1. This could mean that your device is not compatible for use with the iKEYplus.
Only driverless, plug and play devices are compatible. Note that just because you
don’t need to download drivers to use it with your PC, does not mean that it is driverless. Also, keep in mind that only FAT32 and HFS+ file systems are supported,
not NTFS.
2. It is possible that the storage device has been ejected using the eject sequence,
but then was never removed.
3. It is possible that the storage device you are using is write protected, full, or simply not working properly.
Q: The iKEYplus is showing that the device is nearly full, but upon connection
to a computer, there are no files on the storage device.
1. It is possible that your storage device is write protected, or simply that the iKEY
and/or the storage device needs to be reset.
2. In the worst case scenario, the file allocation table on the storage device can
become corrupted, and may require that the device be formatted.
Q: The iKEYplus is not responding at all, and appears to be frozen.
1. Use a ball-point pen to press the hardware RESET button, or cycle the power on
and off.
26
Page 27
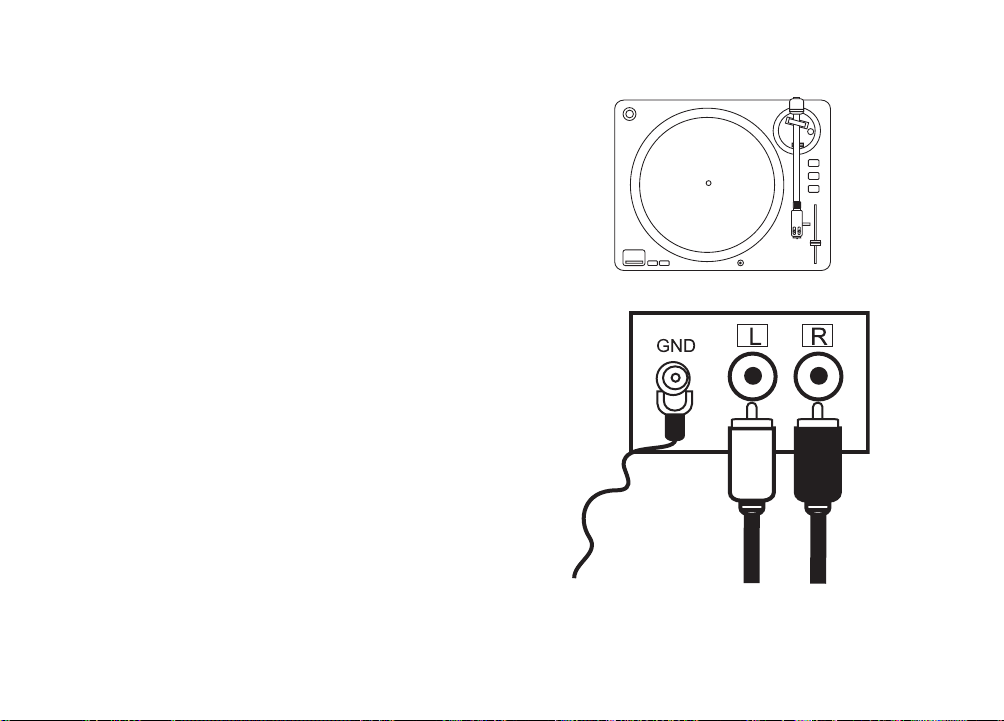
APPENDIX C
CONNECTING A PHONOGRAPH TURNTABLE TO THE iKEYPLUS
To connect a conventional phonograph turntable to the iKEYplus, you will need to
use the supplied RCA cable with single ground spade. As you will notice, there is
only a ground spade on one side of the cable, not both. In order to minimize hum,
this ground spade must be placed under the grounding lug found on the rear of
your turntable. If your turntable is hard-wired with RCA cables and a ground wire,
then you may alternatively ground the turntable by fastening the ground spade
under one of the included thumbscrews on the iKEYplus faceplate.
Some modern turntables, including many consumer models, may have built-in
phono preamplification. This means that instead of outputting a phono-level signal,
it outputs a line level signal, which is a much stronger signal. If you are not sure if
your turntable has built-in phono preamplication and find that your recordings are
coming out sounding excessively distorted, you may want to try switching the REC
LEVEL switch to ‘LN’ (line level).
For higher quality recordings from a conventional turntable (one without built-in
preamplification), we recommend the following options:
1. Record from a mixer that has phono inputs.
2. Use a standalone phono preamplifier.
3. Record from a home stereo receiver that has phono inputs.
Figure G - Connect the included RCA cable and ground spade to the
respective RCA jacks and ground terminal found on the
rear panel of your turntable.
27
Page 28

APPENDIX D: SPECIFICATIONS
Sampling Rate:......................................................................................44.1kHz, 16 Bit
Dynamic Range: ...................................................................................................98 dB
THD+N:.............................................................................................................-91 dB
Freq Response:.......................................................................................20Hz – 20KHz
MP3 compression rates.....................................................128, 192, 256, and 320 kbps
USB compatability...............................................................................USB 1.0, 1.1, 2.0
Power Source..................................................................4 ‘AA’ batteries (not included)
..................................................................................................9V 500mA DC adapter
Recording time on battery power.......................................Approximately 4 to 5 hours
...........................................(depending on storage device used and type of batteries)
AC Voltage Requirements............................................120 VAC 60Hz or 230 VAC 50Hz
iPod® and iTunes® are registered trademarks of Apple Computer, Inc.
*The stated warranty does not affect statutory local warranties
Please register your warranty online at www
.ikey-audio.com
NOTES:
______________________________________________
______________________________________________
______________________________________________
______________________________________________
______________________________________________
______________________________________________
______________________________________________
______________________________________________
______________________________________________
______________________________________________
______________________________________________
______________________________________________
______________________________________________
______________________________________________
______________________________________________
______________________________________________
______________________________________________
28
Page 29

PRECAUCION: Este producto sigue las regulaciones FCC siempre que se utilicen cables y conectores blindados para conectar este equipo a otras unidades.
Para prevenir interferencias electromagnéticas con otros aparatos eléctricos
como radios y televisiones, utilice siempre conectores y cables con blindaje a
masa.
El símbolo de exclamación en un triangulo equilátero alerta al usuario de
instrucciones importantes de operación y mantenimiento (servicio) en el
texto marcado.
El símbolo de luz flash con un rayo en un triangulo equilátero, alerta al
usuario de la presencia de "voltaje peligroso" no aislado en el producto que
puede ser de suficiente magnitud como para causar un shock eléctrico a personas.
LEA LAS INSTRUCCIONES: Todas las instrucciones de manejo y seguridad
deben ser leídas antes de poner en marcha el aparato.
GUARDE LAS INSTRUCCIONES: Las instrucciones deben guardarse para
futuras consultas.
OBVIAR LOS AVISOS: Todos los aviso en el propio producto y manual de
instrucciones deben ser tenidos en cuenta.
SEGUIR LAS INSTRUCCIONES: Todas las instrucciones deben ser estrictamente realizadas.
LIMPIEZA: El producto debe limpiarse solo con un trapo suave y seco. Nunca
utilice cera para muebles, gasolina, insecticidas u otro producto que pueda
corroer el chasis.
ACCESORIOS: No utilice accesorios no recomendados por el fabricante para
evitar posibles daños.
AGUA Y HUMEDAD: No use este producto cerca del agua, por ejemplo, cerca
de la ducha, el baño, la pica de la cocina, o del lavadero; en una superficie
húmeda; o cerca de una piscina o similar.
COLOCACION: No colocar este producto en mesas, soportes o brazos que no
sean totalmente estables. El producto podría caer y dañarse seriamente o
causar daños a personas. Utilice solo soportes recomendados por el fabricante, o vendidos con el producto. Al montar la unidad, siga las instrucciones
del manual, y utilice los accesorios recomendados por el fabricante.
MOBILIDAD: El producto montado en soporte móvil, debe ser desplazado
con cuidado. Frenazos, excesiva fuerza, y superficies deslizantes pueden hacer
volcar el conjunto entero. V
EA FIGURA A.
VENTILACION: Las ventanas y aberturas del chasis dan la ventilación nece-
saria para asegurar la correcta operativa y proteger la unidad de sobrecalentamientos, y estas aberturas no deben ser bloqueadas o tapadas en ningún
caso. Estas aberturas nunca deben bloquearse colocando el producto sobre un
sofá, cama, alfombra u otra superficie similar. Este producto no debe instalarse
en un sitio cerrado como una librería o rack que no tengan la suficiente ventilación.
ALIMENTACION: Este producto debe operar solamente con fuentes de alimentación del tipo indicado en la etiqueta de voltaje. Si usted no tiene la
seguridad de la tensión que tiene en su casa, consulte a su distribuidor local
o compañía de electricidad.
COLOCACION: Este producto debe ser colocado en un sitio estable.
PERIODOS SIN USO: El cordón de alimentación debe ser desenchufado de
la corriente en caso de no uso durante un largo periodo.
MASA O POLARIZACION:
- Si este producto esta equipado con un cable de polarización alternativa
(un conector con una pata más ancha que la otra), solo se podrá conectar en
una posición. Esto es una característica de seguridad. Si usted no puede introducir el conector, pruebe a invertir la posición. Si continua sin introducirse,
contacte con un electricista para reemplazar la base. No deseche la posibilidad
de utilizar conectores de seguridad.
- Si el producto viene equipado con un conector de tres bornes, es decir con
toma de masa, solo encajara en una toma de corriente del mismo tipo. Esto es
para su seguridad. Si el conector no encaja en la toma, contacte con un electricista para reemplazar la base. No deseche la posibilidad de utilizar conectores de seguridad.
PROTECCION DEL CABLE: Los cables de corriente deben colocarse de forma
que nadie pise o pinche los mismos, poniendo particular atención en la unión
con el conector, y en el punto donde se une a la unidad.
TOMA DE TIERRA DE ANTENA EXTERIOR: Si hay conectado a este producto un cable de antena o antena exterior, asegúrese de su correcta conexión a
tierra para proteger de posibles entradas de tensión y cargas de electricidad
estática. El Articulo 810 del Código Eléctrico Nacional, ANSI/NFPA 70, da información de la correcta conexión de masa de los soportes utilizados, del cable
de conexión de descarga de la antena, medidas de los conductores de masa,
colocación de las antenas, inserción de electrodos de masa, y características de
los electrodos. V
ER FIGURA B.
RAYOS: Para protección adicional de este producto durante una tormenta
eléctrica, o cuando este desatendido o sin utilización durante un largo periodo de tiempo, desconecte de la toma de corriente y desconecte la antena del
sistema. Esto evitará cualquier problema debido a rayos y subidas de tensión.
LINEA DE TENSION: Los sistemas de antena exterior nunca deben colocarse
en la proximidad de líneas eléctricas de alta tensión o centrales de transformación eléctrica, o donde puede ser afectado por este tipo de líneas. Al instalar
un sistema de este tipo, extreme la precaución de no tocar ningún tipo de
línea eléctrica ya que esto resultaría fatal.
SOBRECARGA: No sobrecargue las tomas de corriente, cables de alargo, o
ladrones de conexión ya que esto podría provocar fuego o shock eléctrico.
ENTRADA DE OBJECTOS & LIQUIDOS: Nunca introduzca objetos de
ningún tipo en las aberturas del producto ya que puedes provocar cortocircuitos o tocar con puntos de alto voltaje provocando fuego o shock eléctrico.
Nunca tire líquidos en este tipo de productos.
SERVICIO TECNICO: No intente reparar la unidad usted mismo abriendo o
quitando las tapas ya que el producto funciona con niveles peligrosos de tensión. Contacte con el servicio cualificado para cualquier reparación.
SOLICITUD DE REPARACION: Desconecte de la toma de corriente el producto y contacte con el servicio en caso de:
- Cuando la toma de corriente este dañada.
- Si se ha vertido líquido u objetos dentro de la unidad.
- Si el producto ha estado expuesto a lluvia o agua.
- Si el producto no funciona según las especificaciones del manual. Ajuste
tan solo los controles que le indique el manual ya que el modificar ajustes
internos puede dañar la unidad y eso requerirá mas trabajo del servicio para
reajustar la unidad a sus parámetros iniciales.
- Si el producto ha caído al suelo.
- Cuando el producto no actúa de forma normal.
RECAMBIOS: Cuando se necesiten recambios, asegúrese que los técnicos han
utilizado recambios originales especificados por el fabricante o tienen las mismas características del recambio original. La substitución incorrecta de piezas
puede crear fuego, shock eléctrico, u otros daños.
COMPROBACIONES: Tras una reparación, solicite al servicio que testee la
unidad para comprobar su correcto funcionamiento.
INSTALACION EN TECHO O PARED: Los productos no deben ser instalados
en techos ni paredes.
CALOR: El producto debe estar alejado de Fuentes de calor como radiadores,
estufas, u otros productos (incluyendo amplificadores) que producen y
emiten calor.
RECIRCULACIÓN: Este producto no debe tratarse del mismo modo que los
desechos domésticos. En su lugar, usted debe llevarlo al punto verde de
recogida más cercano para reciclaje de aparatos eléctricos y electrónicos.
Asegurándose que este producto se desecha de forma apropiada, usted esta
ayudando a preservar posibles consecuencias negativas para la salud humana
que se producirían por incorrectas manipulaciones en caso de utilizar otro
método de desecho. El reciclaje de materiales ayudará a conservar el entorno
natural. Para información más detallada sobre el reciclaje de este producto,
por favor contacte con su ayuntamiento local, el servicio local de basuras, o la
tienda donde usted adquirió el producto.
PRECAUCION
POR FAVOR LEALO ANTES DE UTILIZAR LA UNIDAD,
INSTRUCCIONES IMPORTANTES DE AVISO & SEGURIDAD!
RIESGO DE SHOCK ELÉCTRICO NO ABRIR!
Page 30

iKEYplus GRABADOR PORTATIL POR USB
INTRODUCCION:
Felicidades por la compra de iKEYplus G
RABADOR PORTATIL POR USB. Esta unidad de
grabación de la próxima generación incorpora los últimos avances en tecnología y
está cubierta por Un año de garantía limitada*. Antes de utilizarlo, lea detenidamente estas instrucciones.
CARACTERISTICAS:
- Puerto USB (Para conexión directa de unidades de almacenamiento por USB)
- Compatible con USB 2.0/1.1/1.0
- Compatible con iPod®
- Graba audio a formato no comprimido WAV o formato MP3 (con selección de bit
hasta 320kbps)
- Entradas doradas de RCA
- Entrada de micrófono con alimentación Phantom
- Pre amplificador integrado de Phono para conexión directa de giradiscos
- Indicadores LED de memoria restante en la unidad de almacenamiento
- Alimentación por baterias con indicador de bateria baja
- Entrada alimentación DC con adaptador incluido para uso de baterias recargables
- VU meter de 6 barras con indicador de picos y sobrecarga
- Salida auriculares monitorización jack 1/8" (3.5mm)
- Control de volumen de grabación
- Botón Reset
- Requiere 4 Pilas recargables AA (No Incluidas)
TABLA DE CONTENIDOS:
Precauciones y WEEE.................................................................................................29
Introducción y características....................................................................................30
Lista de componentes y accesorios............................................................................31
Diagramas graficos de conexión................................................................................32
Conexión del Micro en T incluido..........................................................................32
Conexión de un giradiscos.....................................................................................33
Conexión de un mezclador de audio.....................................................................34
Conexión de un amplificador de guitarra..............................................................35
Conexión de de micro de mano al iKEYplus...........................................................36
Guia grafica de inicio rapido......................................................................................37
Reproducción y/o edición de sus grabaciones en el ordenador personal................45
BATERIA BAJA, DISPOSITIVO LLENO, y LED OCUPADO...........................................47
APENDICE A: Instrucciones detalladas para uso de un Apple iPod...........................48
Transfiriendo su grabación del iPod al PC para edición.........................................49
Transfiriendo su grabación del iPod al Mac para edición......................................50
APENDICE B: Guia de solución de problemas..........................................................52
APENDICE C: Conectando un Giradiscos al iKEYplus...............................................54
APENDICE D: Especificaciones..................................................................................55
30
Page 31

Incluido en este embalaje
Unidades y accesorios:
Micro T Estereo
Cable RCA con terminal de masa
Funda Transporte
4 x Tornillos estandar
4 x Tornillos cabeza
Manual instrucciones
Carátulas Negra, Roja, y Cromada
Adaptador corriente
31
320
RECORD
RECORD
320
Page 32

320
RECORD
320
RECORD
320
Conexión del iKEYplus usando
el Micro en T Estereo incluido
Izquierda: entrada audio Derecha: salida audio
jack micro
dispositivo USB
Auriculares
(opcional para monitorizar
durante la grabación)
T-Mic Estereo (incluido)
NOTA
: ASEGURESE QUE EL
INTERRUPTOR ESTA EN
POSICIÓN MIC!
32
RECORD
320
Page 33

320
RECORD
320
RECORD
320
Conexión de giradiscos al
iKEYplus*
Izquierda: entrada audio Derecha: salida audio
RCA jacks
dispositivo USB
Auriculares
(opcional para monitorizar
durante la grabación)
NOTA: ASEGURESE QUE EL
INTERRUPTOR ESTA EN
POSICION
PH!
Giradiscos
(Tipo estandar, cápsula magnética, no pre-amplificado)
*Ver Apéndice C para instrucciones detalladas
33
RECORD
320
Page 34

320
RECORD
320
RECORD
320
Conexión del mezclador*
al iKEYplus
Izquierda: entrada audio Derecha: salida audio
jacks RCA
dispositivo USB
Auriculares
(opcional para monitorizar
durante la grabación)
NOTA: ASEGURESE QUE EL
INTERRUPTOR ESTA EN
POSICIÓN LN!
Mezclador
(Conecte a la salida de Line
o salida Grabación/Cinta)
*al grabar de un mezclador, puede necesitar cables alternativos (no incluidos), dependiendo de la marca
34
RECORD
320
Page 35

320
RECORD
320
RECORD
320
Conexión de amplificador
de guitarra al iKEYplus
Izquierda: entrada audio Derecha: salida audio
jacks RCA
dispositivo USB
Auriculares
(opcional para monitorizar
durante la grabación)
NOTA: ASEGURESE QUE EL
INTERRUPTOR ESTA EN
POSICIÓN
LN!
*grabar de un amplificador de guitarra puede requerir cables alternativos (no incluidos), según la marca
Amplificador Guitarra
(Conecte a la salida Line o salida de grabación/cinta)
35
RECORD
320
Page 36

320
RECORD
320
RECORD
320
Conexión de micro de
mano al iKEYplus
Izquierda: entrada audio Derecha: salida audio
jack mic
jack mic
dispositivo USB
Auriculares
(opcional para monitorizar
durante la grabación)
Micro de Mano (no incluido)
NOTA: ASEGURESE QUE EL
INTERRUPTOR ESTA EN
POSICIÓN
MIC!
36
RECORD
320
Page 37
320
RECORD
Guía Visual de inicio
320
PASO 1: ALIMENTACION DEL iKEY
Retire la tapa de aluminio y coloque las baterias según el diagrama impreso en el mismo alojamiento. Alternativamente, puede
utilizar el adaptador de corriente de 9VDC. Si elige usar baterias recargables, el mismo adaptador las recargara cuando la
unidad esté encendida. SI UTILIZA PIL
AS ALKALINAS U
OTRAS NO RECARGABLES, NO CONECTE EL ADAPTADOR
AL MISMO TIEMPO YA QUE HAY RIESGO DE EXPLOSION
DE LAS PILAS Y DAÑANDO EL iKEYPLUS!!!
PASO 2: CONEXION DE LA FUENTE DE AUDIO
Si está grabando de una unidad de nivel line (reproductor CD,
mezclador, karaoke, amplificador de guitarra, etc) O un giradiscos, debe conectarlos por las entradas RCA como la ilustración.
Si está grabando desde un micrófono, debe conectarlo al jack
pequeño de 1/8” (3.5mm). Mas detalles de conexión en el diagrama anterior a esta sección.
320
RECORD
37
320
RECORD
320
Page 38

320
RECORD
Guía Visual de inicio
(continuación)
PASO 3: AJUSTAR EL INTERRUPTOR!
Si está grabando en nivel LINEA, ajuste el interruptor a LN
(hacia la izquierda). Si está grabando de GIRADISCOS, ajuste a
posición PH (en el centro). Finalmente, si está usando un
MICROFONO, seleccione la posición MIC.
PASO 4: CONEXION DE LA MEMORIA USB
Conecte la memoria USB que vaya a utilizar. Las más comunes
unidades de USB pueden utilizarse incluyendo Flash memories
de FAT-32 y HFS+, hard drives, y la mayoria de los reproductores de MP3. Si desea utilizar un iPod, por favor lea las instrucciones adicionales en APENDICE A: Uso de iPod. Para unidades
incompatibles vea APENDICE B.
320
RECORD
320
RECORD
38
320
RECORD
Page 39

320
RECORD
PASO 6: ENCENDIDO
Al encender la unidad, el iKEYplus tardará unos 15 segundos en
inicializarse. Durante este proceso, el LED se iluminará brevemente indicando la cantidad de espacio que se ha utilizado de
la memoria. Una vez la unidad se arranca, los LEDs se apagan y
se tendrá respuesta de los VU meter.
PASO 5: CONEXION AURICULARES (OPCIONALES
)
Si quiere monitorizar la señal que está grabando en el iKEYplus,
conecte auriculares al jack de1/8”(3.5mm) para monitirización
por auriculares. La señal que encontrará en la toma de auriculares puede ser excesiva, así que tome precauciones al utilizar
esta salida.
320
RECORD
320
RECORD
Guía Visual de inicio
(continuación)
39
320
RECORD
Page 40

320
RECORD
320
RECORD
320
RECORD
PASO 7: REPRODUCCION DE LA FUENTE
Para regular el volumen de grabación del iKEYplus, es necesario
inciar la reproducción de la fuente que se desee grabar. Si va a
grabar de un micrófono, empice a hablar al mismo nivel que
utilizará durante la grabación.
PASO 8: AJUSTE DEL NIVEL DE GRABACION
Fijandose en los LED del frontal de la unidad, ajuste el NIVEL
DE GRABACION (en la izquierda de la unidad) hasta que las
luces no se enciendan mas alla del indicador de 0dB (marcado
bajo las luces). Esto es muy importante ya que si el nivel excede
los 0dB, se creará distorsión y obtendremos una grabación ininteligible. Al contrario, si el nivel es muy bajo la grabación resultante será apagada. Si está grabando algo que pueda subir de
volumen esporadicamente (una concierto en directo por ejemplo), deberá fijar el volumen un poco bajo para evitar la distorsión en esos fragmentos.
320
RECORD
Figura A - Los LEDs iluminados muestran un nivel de -3dB.
Las flechas muetran los valores del VU meter (en dB).
40
Guía Visual de inicio
(continuación)
320
RECORD
RECORD
RECORD
320
320
Page 41

320
RECORD
PASO 9: SELECCION FORMATO Y CALIDAD
Usando el botón SEL en el frontal de la unidad, seleccione el
formato en el que desea grabar. Pulse el botón repetidas
veces hasta que la luz LED light se ilumine en el formato y
calidad deseados. Trás 3 segundos de inactividad, el LED se
apagará y volvera a actuar como VU meter.
MP3 formato ofreces varios niveles de calidad de sonido, y se utiliza para
reducir el espacio de memoria necesario:
128kbps calidad
es mejor que la radio FM, y utiliza aproximadamente 55
megas por hora de grabación.
192kbps calidad utiliza unos 83 megas por hora de grabación.
256kbps calidad
es cercano a la calidad de un CD, y utiliza aproximadamente
110 megas por hora de grabación.
320kbps calidad
iguala la calidad CD, y utiliza aproximadamente 137.5 megas
por hora de grabación.
WAV formato es la calidad de un CD (44.1kHz, 16 bit Stereo), pero utiliza la
barbaridad de 600 megas por hora de grabación!
320
RECORD
Figura B - El LED iluminado muestra 192kbps está seleccionado.
Las flechas muestran los distintos formatos/calidades.
320
RECORD
320
RECORD
320
RECORD
41
Guía Visual de inicio
(continuación)
320
RECORD
RECORD
RECORD
320
320
Page 42

320
RECORD
PASO 10: PULSE REC PARA EMPEZAR!
Cuando esté preparado para empezar la grabación, pulse el
botón REC en el frontal de la unidad.
Una vez el botón REC se pulse, todos los LED se encenderan
por un momento para mostrar que la orden se ha recibido.
Despues de apagarse los LED (normalmente 0 a 2 segundos), la grabación se iniciará. Note que durante la grabación
el LED marcado como RECORD se ilumina fijo.
Una vez la grabación se ha iniciado, los LED vuelven a la función de VU meter, mostrando el nivel de señal de entrada.
Puede ajustar (si es necesario) el NIVEL DE GRABACION, tal
y como se indica en el PASO 8 en cualquier momento de la
grabación.
320
RECORD
Figura C - Todos los LEDs se iluminan brevemente para mostrar
que la unidad ha reconozido la orden.
320
RECORD
320
RECORD
42
Guía Visual de inicio
(continuación)
RECORD
320
320
RECORD
RECORD
320
Page 43

320
RECORD
PASO 11: PULSE REC PARA PARAR!
Cuando esté preparado para detener la grabación, pulse el
botón REC de la izquierda de la unidad. Usted DEBE terminar la grabación de esta forma, o el fichero no se almacenará.
Cuando se pulsa el botón REC, todos los LED se iluminan
brevemente para mostrar que se ha reconocido la orden.
Cuando los LED se apagan (normalmente en 0 a 2 segundos), la grabación cesará y el RECORD LED se apaga. Si está
grabando en un iPod, los LED pueden permanecer encendidos hasta 30 segundos ya que el fichero es procesado por el
propio iPod.
Una vez la grabación esta finalizada, los LED vuelven a su
función VU meter, mostrando el volumen de entrada. Puede
entonces crear una nueva grabación pulsando de nuevo
REC (ie. repita el paso 10).
320
RECORD
Figura D - Todos los LEDs se iluminan brevemente para mostrar
que la unidad ha reconozido la orden.
320
RECORD
320
RECORD
43
Guía Visual de inicio
(continuación)
RECORD
RECORD
320
320
320
RECORD
Page 44

320
RECORD
PASO 12: EXTRACCIÓN DE UNIDAD USB
Usted debe mantener apretado el botón REC durante 3
segundos antes de desconectar la unidad USB. Los LED
parpadearán 3 veces en linea mostrando que ahora es seguro
el quitar la memoria USB.
NO
UTILIZAR ESTE PROCEDIMIENTO DE EXTRACCION
PUEDE ACARREAR PROBLEMAS DE CORRUPCION EN
DA
TOS E INCLUSO BORRADO DE SU GRABACION.
Este procedimiento no es particular del iKEYplus, en realidad es el mismo procedimiento para desconectar cualquier
unidad USB de su ordenador.
Una vez desconectado correctamente, ya puede conectar su
memoria USB al ordenador para su reproducción o edición
Si está usando un iPod, lea primero las notas adicionales de
APPENDIX A: Uso de iPod.
320
RECORD
Figura E - Todos los LEDs parpadean 3 veces en linea para
indicar que es segura la extracción de la unidad USB.
320
RECORD
320
RECORD
44
Guía Visual de inicio
(continuación)
RECORD
RECORD
320
320
320
RECORD
Page 45
REPRODUCIENDO SUS GRABACIONES EN UN ORDENADOR PERSONAL PC
CON WINDOWS XP:
Una vez terminado el proceso de grabación ilustrado en la Guia Gráfica de Inicio
Rápido (paginas 7-14), conecte su memoria USB en el ordenador doméstico.
Si está utilizando un ordenador con Windows XP, una ventana debe abrirse al conectar la unidad USB, ofreciendo un abanico de opciones. En este caso, lo mejor es
optar por “Abrir carpeta usando Windows Explorer.” (Vea Fig. A)
Luego,despues de seleccionar “Abrir Carpeta con Windows Explorer,” verá una lista
de ficheros, similar a lo mostrado en Fig. B. Como ya debe suponer, los ficheros
grabados con el iKEYplus están nombrados según el formato del fichero y numerados secuencialmente siguiendo el orden de grabación. Por ejemplo, en el dibujo un
fichero llamado iKEY_mp3_2 sugiere que este fichero es de formato MP3 y que es
el 3er fichero de este tipo que se grabó.
En esta pantalla, simplemente doble click el fichero que quiera reproducir.
Dependiendo del software que tenga instalado en su PC, usted puede tener varias
aplicaciones que permitan reproducir los ficheros de audio o editarlos. Si este es el
caso, haga click derecha en cualquiera de los ficheros iKEY y seleccione una aplicación usando la opción ‘Abrir Con’.
Figura A - Elija Abrir carpeta usando Windows Explorer.
Figura B - Usando Windows Explorer para ver los ficheros almacena
dos en la unidad USB. Note que en su ordenador
los iconos que muestra cada fichero, pueden
ser distintos.
45
Page 46
REPRODUCIENDO SUS GRABACIONES EN UN ORDENADOR PERSONAL PC
CON WINDOWS XP (
CONTINUACION):
Algo que debe tener en cuenta es que la mayoria de las aplicaciones en PC tienen un
limite de 2 GB cuando trabajan con ficheros WAV. Si usted debe grabar durante bastante tiempo en formato WAV, intente no hacer su grabación mas larga de 3 horas
en cada fichero. En el momento de escribir este manual, existe una aplicación llamada Wave Splitter para partir en trozos pegueños un fichero WAV que puede encontrar en http://claudiosoft.online.fr/wavsplit.html.
NOTE QUE ESTE SOFT WARE NO
TIENE NADA QUE VER CON GCI O IKEY AUDIO, Y SI LO UTILIZA ES BAJO SU
PROPIO RIESGO.
SUGERENCIAS PARA EDITAR SUS GRABACIONES:
Para mucha gente, la capacidad simplemente de grabar en alta calidad en una memoria USB, ya es sufuciente. Sin embargo, hay otros muchos que desean editar, cortar
o manipular la grabación una vez realizada. Con el conocimiento apropiado, una correcta edición puede mejorar mucho su grabación. Aunque el iKEYplus no viene con
ningún tipo de software de edición, los usuarios pueden encontrar gran numero de
programas para hacerlo. He aqui una lista de titulos recomendados por el equipo de
desarrollo de iKEY Audio (en el momento de la publicación):
Audacity es un software de edición de audio en plataforma gratis para Windows y
Macintosh, y puede encontrarse en http://audacity
.sourceforge.net/
Sony Sound Forge y Sound Forge Audio Studioson programas mundialmente utilizados por profesionales del audio y está en http://www
.sonymediasoftware.com.
Steinberg WaveLab puede encontrarse en http://www.steinberg.de
NOTE QUE ESTE SOFT WARE NO TIENE NADA QUE VER CON GCI O IKEY
A
UDIO, Y SI LO UTILIZA ES BAJO SU PROPIO RIESGO.
Si quiere saber mas de edición de audio digital, así como los principios de la
grabación de audio digital, le recomendamos el libro de Chris Middleton, titulado
Complete Guide To Digital Audio.
TRUCOS PARA EDITAR:
- Cuando edite una grabación hecha con iKEYplus, copie el fichero en el disco duro
de su PC’s antes de hacer cambios.
- Guarde siempre copias del original por si los cambios realizados posteriormente no
son satisfactorios.
- Si piensa editar largos ficheros puede necesitar de un PC de alto rendimiento y
memoria RAM extra para acelerar el proceso.
Usando una aplicación de edición de audio (no incluida) puede
manipular la grabación realizada con el iKEYplus.
Mostrado: Sony Sound Forge Audio Studio 7.0...
46
Page 47

LEDS INDICADORES DE BATERIA BAJA, UNIDAD LLENA Y OCUPADO:
Otros indicadores LED muy utiles son los de BATERIA BAJA, UNIDAD LLENA, y
OCUPADO.
El indicador de BATERIA BAJA utiliza el mismo LED que el de RECORD. Sin embargo el aviso de BATERIA BAJA SE INDICA parpadeando.
Cuando su unidad de memoria se acreca al 95% llena, el iKEYplus mostrará UNIDAD
LLENA parpadeando repetidamente hasta que la unidad se complete totalmente. En
ese momento, el iKEYplus detendrá automaticamente el proceso de grabación.
El LED OCUPADOparpadeará ritmicamente cuando la unidad esté aún procesando
(trás la grabación) indicando que la unidad aún no puede aceptar otra orden. El LED
OCUPADO tambien quedará encendido al encender la unidad mientras esta se inicializa.
47
Page 48
APENDICE A
USANDO UN APPLE iPod COMO UNIDAD DE MEMORIA CON EL iKEYPLUS:
Cuando use un Apple iPod como unidad de almacenaje, hay una serie de pasos adicionales que deben realizarse para preservar la integridad de sus grabaciones.
Primero, antes de usar el iKEYplus, usted prioritariamente DEBE
cambiar la config-
uración del iPod (en iTunes) para que la música en iPod no se actualice automaticamente. SI NO HACE ESTO, iTUNES BORRARA SUS GRABACIONES CUANDO SE
ACTIVE. GCI Technologies y iKEY Audio no se hará responsable de perdidas de
datos por procedimientos incorrectos!
1. Conecte su iPod a su ordenador
2. Si iTunes no se carga automaticamente, carguelo usted.
3. Una vez iTunes se inicializa, vaya a menu EDICION, y seleccione PREFERENCIAS.
4. Una vez en preferencias, seleccione iPod.
5. En iPod, seleccione MUSICA.
6. Seleccione la opción que dice ‘Manejar manualmente canciones y listas.’ Esto
se muestra en la Figura C.
ACTUALIZACION DE FIRMWARE
Para mejor uso cuando se graba en iPod, debe utilizar una versión actualizada del
Firmware de Apple iPod. Si tiene un iPod antiguo, deberá bajarse un firmware acualizado, ya que el software del iKEYplus está diseñado para trabajar con versiones del
año 2005 y posteriores. Si va a utilizar un firmware actualizado, asegurese de seguir
las instrucciones de Apple. La website para encontrar estas actualizaciones es:
http://www
.apple.com/ipod/download/
Figura C - En iTunes, debe cambiar los ajustes a Manejar manual
mente las canciones y listas.
48
Page 49

APENDICE A (
CONTINUACION)
USANDO UN APPLE iPod COMO UNIDAD DE MEMORIA CON EL iKEYPLUS:
Una vez realizados los ajustes en iTunes, puede utilizar la Guia Rápida gráfica con 4
pequeñas alteraciones. El iKEYplus trabaja en iPods formateados en ambos formatos
PC y Macintosh.
1. Cuando el iKEYplus reconoce que se ha conectado un iPod, la pantalla del iPod
muestra “No desconectar.”
2. Al iniciar la grabación (vea Paso 10), puede estar mas de 1 o 2 segundos en apagarse los LED antes de iniciar la grabación.
3. Al detener la grabación (vea Paso 11), puede haber unos 30 segundos extra antes
de apagarse los LED. Tambien notará que el LED OCUPADO parpadea durante este
proceso. Esto ocurre porque el iPod está procesando el fichero para poder reproducirlo directamente en el iPod. Note que cuanto mas canciones tenga en el iPod,
mas largo será este proceso.
4. Al desconectar el iPod usando el procedimiento de expulsión (paso 12), la pantalla dejará de mostrar “No Desconectar” cuando sea segura la extracción del iPod.
REPRODUCIENDO SUS GRABACIONES EN UN APPLE iPod:
Una vez completada la grabación y la secuencia de expulsión se ha completado, los
ficheros grabados se encontrarán el la lista de Canciones de su iPod. Si acaba de
desconectar el iPod del iKEYplus, verá que los ficheros de iKEY están al final de la
lista de Canciones. Si ha conectado el iPod a su PC y cargado iTunes, entonces
encontrará los ficheros de iKEY en orden alfabetico. Note que si encuntra mezcladas
sus canciones en la lista, iTunes las recolocará al conectar el iPod a su ordenador.
TRANSFIRIENDO SUS GRABACIONES DEL iPod-AL ORDENADOR:
La transferencia de grabaciones guardadas en el iPod puede hacerse siguiendo estos
pasos. Dependiendo de si utiliza Windows XP o Mac OSX, deberá seguir los distintos pasos.
TRANSFIRIENDO GRABACIONES DE iPod A WINDOWS XP:
Note que solo la version PC de iPod puede conectarse a un ordenador con Windows
XP. La versión Macintosh del iPod debe conectarse a ordenadores con MacOS.
1. Conecte su iPod a su PC via el puerto USB.
2. Si iTunes se carga automaticamente (en muchos casos ocurre), cierrelo completamente.
3. En el menu de Inicio, ir a Mi PC.
4. Bajo el titulo ‘Unidades extraibles de almacenamiento,’ doble click en la
unidad que corresponda a su iPod - se llamará tal y como se ajusto en su dia en los
ajustes iniciales.
5. Ir a THerramientas en la barra menu, y seleccione Opciones de Carpetas.
6. Ir a Ver .
7. En la caja de Ajustes Avanzados, encontrará una cabecera titulada ‘Ficheros y
Carpetas ocultas.’ Seleccione la opción que dice ‘Mostrar ficheros y carpetas
ocultas’, y click OK. Ver Figura D (en la próxima página).
8. Vaya al directorio ‘iPod Control’ y doble click.
9. Vaya al directorio ‘Musica’ y doble click.
10. Sus grabaciones se almacenarán en un directorio llamado ‘iKEY.’ Doble click en
el y encontrará sus ficheros. Copielo en su disco duro arrastrandolo y soltandolo, o
clickando derecha y usando la función Copiar y Pegar.
11. Repita los pasos 5 a 7, excepto que esta vez seleccione la opción ‘No mostrar
ficheros y carpetas ocultos.’ De esta manera no volvera a ver los ficheros ocultos.
49
Page 50

TRANSFIRIENDO GRABACIONES DE iPod A MAC OSX:
1. Conecte su iPod a su PC via puerto USB.
2. Si iTunes se carga automaticamente (en la mayoria de los casos), cierrelo completamente.
3. Click en el icono iPod de su escritorio - se llamará tal y como se puso en los ajustes
iniciales.
4. Pulse Apple+I para ir a la pantalla de Info. Abojo en la pantalla, cambie los
Permisos y propiedades a “Puede leer y escribir.” Tambien compruebe el cajón
“Ignore propiedades en este volumen.” (Ver Figura F)
3. Doble click en ‘Macintosh HD’ (en su escritorio), y abra ‘Aplicaciones’, luego
‘Utilidades’, luego cargue la aplicación ‘Terminal’. Esto le llevará a una entrada de
texto.
4. Escriba esta frase, exactamente como se ve aqui (vea Figura E):
defaults write com.apple.Finder AppleShowAllFiles TRUE (pulse tecla Enter)
killall Finder (pulse tecla Enter)
Mantenga abierta esta ventana, ya que tendrá que volver aqui en el paso #6.
5. Ahora, vaya de nuevo a su escritorio y doble click en la unidad etiquetada según
su iPod.
6. Abra ‘iPod_Control’, luego directorio ‘Musica’, luego click en directorio (normalmente muy abajo) llamado ‘iKEY’.
7. Copie las grabaciones que quiera almacenar con arrastrar y soltar o usndo la función Copiar y Pegar.
8. Vuelva a la aplicación ‘Terminal’ y escriba la siguiente frase tal y como está:
defaults write com.apple.Finder AppleShowAllFiles FALSE (pulse tecla Enter)
killall Finder (pulse tecla Enter)
Una vez realizado esto, ya no verá los ficheros ocultos.
Figura D - Para poder acceder a sus ficheros grabados debe
decirle a Windows que Muestre los ficheros ocultos.
50
Page 51

Figura E - Abriendo la pantalla de Terminal en OSX podrá entrar el
comando necesario para encontrar sus grabaciones en
el iPod.
51
Page 52

APPENDIX B
SOLUCIÓN DE PROBLEMAS EN EL iKEYPLUS / PREGUNTAS FRECUENTES
Si tiene algún problema con el iKEYplus, lea estas sugerencias. La mayoria de dudas
pueden resolverse simplemente siguiendo los procedimientos, y asegurandose de
cumplirlos palabra por palabra.
Q: La grabación que he hecho es muy baja cuando la reproduzco, y no suena
clara.
1. Pruebe a incrementar el NIVEL DE GRABACION para que el VU meter este lo mas
cercano a 0dB sin sobrepasarlo.
2. Asegurese que el SELECTOR DE ENTRADA (que está justo debajo del NIVEL DE
GRABACION) este en la posición adecuada.
3. Si no puede llegar a alcanzar un nivel adecuado de volumen en el VU meter, incremente el volumen de la fuente (si es posible).
Q: La grabación que he hecho distorsiona al reproducirla.
1. Al grabar, verifique en el VU meter que no está excediendo los 0dB, ya que en una
grabación digital esto dejara el resultado inoperativo.
2. Asegurese que el SELECTOR DE ENTRADA (que está justo debajo del NIVEL DE
GRABACION) este en la posición adecuada..
3. Otra posible situación (aunque muy extraña) es que está introduciendo en el
iKEYplus una señal extremadamente elevada.
4. Verifique que la distorsión no se produzca en su sistema de reproducción, o que
ya exista en la fuente original que este grabando o en los cables usados.
Figure F - Pressing Apple+I when the iPod is selected on the
desktop allows you to change the permissions to for
accessing the iPod.
52
Page 53

SOLUCIÓN DE PROBLEMAS EN EL iKEYPLUS / PREGUNTAS FRECUENTES
(
CONTINUACION):
Q: He grabado un fichero y no se reproduce en mi PC.
1. Asegurese de realizar completamente el sistema de Expulsión de USB ilustrado en
la Guia Rápida. No hacer esto, puede provocar todo tipo de errores, cualquier cosa
desde corrupción de datos hasta el borrado total de la grabación.
2. Otro típico problema es que las grabaciones en WAV de mas de 2 GB (sobre 3
horas) no las admiten la mayoria de los softwares.
3. Asegurese que el software de reprodución esta operativo.
Q: Mi grabación tiene ruidos de fondo y/o saltos.
1. Asegurese que el ruido no es producido por cables de baja calidad, interferencias
o que ya estaban en la fuente original.
2. Si la grabación parece que salta, debe intentar desfragmentar la unidad de almacenaje en la que está grabando. El iKEYplus manda paquetes de información a la
unidad de memoria y si esta está fragmentada o desordenada, puede que la unidad
no sea lo suficientemente rápida para capturar los diferentes datos sin retardo.
3. Hay posibilidad que la unidad flash de USB utilizada esta causando interferencias
cuando el LED parpadea en la propia unidad. Pruebe con otra memoria flash para
ver si el problema desaparece.
Q: La unidad parece que graba sin problemas, pero los datos no están en la
memoria flash.
1. Es posible que la alimentación se quitara antes de acabar la grabación, sin hacer
el procedimiento necesario.
2. Tambien es posible que la unidad de almacenamiento USB se desconectara antes
de detener la grabación o sin seguir el procedimiento.
Q: Usando el iKEYplus con mi iPod no funciona correctamente.
1. Es posible que su iPod o iTunes no este configurado correctamente, o que este
utilizando una versión vieja del firmware. Por favor lease el APENDICE A: USANDO
UN APPLE iPod COMO MEMORIA DEL iKEYplus.
Q: Cuando una unidad se conecta al iKEY, la función grabar no funciona y
cuando pulso el botón REC, las luces parpadean tres veces.
1. Esto puede significar que su unidad de almacenamiento no es compatible con el
iKEYplus. Solo las unidades sin drivers, plug and play son compatibles. Note que
debido a que no tiene que bajarse drivers para conectar a su PC, esto no significa
que la unidad funcione sin drivers. Tambien tenga en cuenta que solo los ficheros
FAT32 y HFS+ son soportados, no los NTFS.
2. Es posible que la unidad haya sido extraida con la correcta secuencia, pero
despues nunca se desconecto fisicamente.
3. Es posible que la unidad utilizada este protegida contra escritura, llena, o simplemente no funciona correctamente.
Q: El iKEYplus muestra que la unidad está casi llena, pero al conectarla al
ordenador no hay ficheros en ella.
1. Es posible que la memoria este protegida contra escritura, o simplemente que el
iKEY y/o la unidad de memoria necesitan ser reseteados.
2. En el peor de los casos, the tabla de localización de ficheros puede estar corrupta y necesita reformatear la unidad.
Q: El iKEYplus no funciona y parece estar bloqueado.
1. Use un lapiz para pulsar el botón RESET, o apague y encienda la alimentación.
53
Page 54

APÉNDICE C
CONECTANDO UN GIRADISCOS AL IKEYPLUS
Para conectar un giradiscos convencional al iKEYplus, deberá utilizar el cable RCA
suministrado con terminal de masa. Como verá solo hay un terminal de masa en un
lado, no en ambos. Para reducir ruidos, debe conectar este terminal al tornillo de
masa de detrás de su giradiscos. Si su giradiscos posee un cable no desconectable
con Terminal de masa, conecte este Terminal en cualquier tornillo de la carátula del
iKEYplus.
Algunos giradiscos actuales, sobre todo de hi-fi, incorporan un previo de phono.
Esto implica que en lugar de salir una señal de nivel phono, emite una señal de nivel
línea, que es mucho más fuerte. Si usted no sabe si su giradiscos incorpora previo y
las grabaciones quedan distorsionadas, pruebe a cambiar el nivel de grabación a
Linea “LN”.
Para una mayor calidad en grabaciones con giradiscos convencional (sin previo
incorporado), recomendamos las siguientes opciones:
1. Grabe desde un mezclador que tenga entradas de phono.
2. Use un previo estándar de phono.
3. Grabe desde un equipo domestico que tenga entradas de phono.
Figura G - Conecte los cables incluidos RCA con terminal a las
respectivas entradas RCA y tornillo de masa en la parte
trasera del giradiscos.
54
Page 55

APENDICE D: ESPECIFICACIONES
Rango Muestreo:...................................................................................44.1kHz, 16 Bit
Rango Dinamico: .................................................................................................98 dB
THD+N:.............................................................................................................-91 dB
Respuesta frecuencia.............................................................................20Hz – 20KHz
Rango de compresión MP3...............................................128, 192, 256, and 320 kbps
Compatibilidad USB............................................................................USB 1.0, 1.1, 2.0
Alimentación....................................................................4 ‘AA’ baterias (no incluidas)
...............................................................................................9V 500mA DC adaptador
Tiempo de grabación con bateria..................................Aproximadamente 4 a 5 horas
..............(dependiendo de la unidad de almacenamiento usada y el tipo de baterias)
AC Alimentación .........................................................120 VAC 60Hz o 230 VAC 50Hz
iPod® y iTunes® son marcas registradas de Apple Computer, Inc.
*La garantia establecida no afecta a las leyes de garantia locales
Por favor registre su garantia en www
.ikey-audio.com
55
NO
TAS:
______________________________________________
______________________________________________
______________________________________________
______________________________________________
______________________________________________
______________________________________________
______________________________________________
______________________________________________
______________________________________________
______________________________________________
______________________________________________
______________________________________________
______________________________________________
______________________________________________
______________________________________________
______________________________________________
______________________________________________
Page 56

ATTENTION: Cet appareil répond aux certifications FCC lorsqu'il est connecté à d'autres appareils à l'aide de cordons blindés. Afin de prévenir tout risque
de parasites électromagnétiques avec un poste radio ou TV, veuillez utiliser
des cordons blindés.
Le point d'exclamation situé dans un triangle est destiné à attirer votre
attention durant l'utilisation de votre appareil ou d'un entretien périodique de
ce dernier. Vous en trouverez plusieurs dans le mode d'emploi de l'appareil.
LIRE LES INSTRUCTIONS: Toutes les instructions et consignes d'utilisation
doivent être lues avant l'utilisation de l'appareil.
CONSERVEZ LES INSTRUCTIONS: Nous vous recommandons de conserver
les instructions et consignes d'utilisation en cas de nécessité ultérieure.
RESPECT DES CONDITIONS D'UTILISATION: Nous vous recommandons
de respecter les instructions d'utilisation.
SUIVRE LES INSTRUCTIONS D'UTILISATION: Nous vous recommandons
de respecter la chronologie des instructions d'utilisation.
NETTOYAGE: L'appareil doit être nettoyé avec un chiffon légèrement humide.
Ne pas utiliser de produits chimiques corrosifs & volatiles (cire, essence, insecticide…) afin de ne pas endommager l'appareil.
CORDON: Ne pas utiliser de cordons non préconisés par le fabricant afin de
ne pas endommager l'appareil.
EAU & HUMIDITE: Ne pas utiliser l'appareil à proximité d'une source d'eau
(cuisine, salle de bain, lavabo…), ni dans un endroit sujet à l'humidité
(piscine…).
ACCESSOIRES: Ne pas installer cet appareil sur un support ou dans un
endroit instable. L'appareil pourrait tomber au risque de blesser une personne et être endommagé. Veiller à utiliser des accessoires (Pied, support, crochet..) recommandés par le fournisseur ou vendu avec l'appareil. Tout montage ou installation doit respecter les instructions du fabricant et utiliser des
accessoires d'installation recommandés par le fabricant.
TRANSPORT SUR CHARIOT: Tout produit installé sur un chariot doit être
manipulé avec précaution. Un déplacement brusque ou trop rapide sur une
surface non plane pourrait entraîner la chute de l'ensemble et endommager
l'appareil. V
OIR
FIGURE A.
VENTILATION: Les ouvertures et ouïes d'aération situées sur l'appareil per-
mettent une ventilation optimale de ce dernier afin d'éviter toute surchauffe.
Ces ouvertures ne doivent jamais être obstruées. Ne pas placer l'appareil sur
un support souple risquant de bloquer les ouïes d'aération (Lit, sofa,
canapé…). Si l'appareil est intégré dans une installation ou dans un rack,
veillez à la ventilation et consultez le fabricant pour toute information complémentaire.
ALIMENTATION:Veillez à respecter la tension d'alimentation située au dos de
l'appareil. Si vous n'êtes pas certain de la tension d'utilisation dans votre pays,
contactez votre revendeur.
EMPLACEMENT: Veillez à installer l'appareil sur un support stable.
PERIODE DE NON UTILISATION: Débranchez le cordon d'alimentation de
l'appareil en cas de non utilisation prolongée.
MISE A LA TERRE:
- Si l'appareil est équipé d'une alimentation à courant alternatif (Prise possédant un contact plus large que l'autre), celle-ci se connectera correctement
à la prise uniquement si vous respectez le sens de branchement. Il s'agit là
d'une mesure de sécurité. Si vous n'arrivez pas à insérer la fiche dans la prise,
inversez la fiche. Si vous ne pouvez toujours pas insérer cette dernière, contactez un électricien afin de remplacer votre prise électrique qui est obsolète.
Veillez à respecter cette consigne.
- Si l'appareil est équipé d'une fiche d'alimentation avec terre, veillez à la
connecter à une prise électrique équipée d'une connexion à la terre. Il s'agit
d'une mesure de sécurité. Si vous ne pouvez insérer la fiche dans la prise électrique, contactez un électricien afin de remplacer votre prise électrique qui est
obsolète. Il est important de respecter cette mesure de sécurité.
INSTALLATION DU CORDON D'ALIMENTATION: Les cordons d'alimentation doivent être déroulés et rangés proprement afin d'éviter de se prendre les
pieds dedans, en particulier les cordons reliés aux prises électriques.
ANTENNE EXTERIEURE: Si vous reliez votre appareil à une antenne ou un
câble extérieur, assurez-vous de la présence d'une connexion à la terre afin
d'éviter les surtensions et les décharges d'électricité statique. L'article 810 du
National Electrical Code, ANSI/NFPAS 70, précise toutes les informations
nécessaires afin d'effectuer correctement le branchement à la terre du pylône
ou de la structure porteuse, la connexion du câble à l'antenne de décharge,
dimensions des connecteurs de mise à la terre, connexions des électrodes,
consignes de mise à la terre des électrodes. V
OIR SCHÉMA B.
ORAGE/FOUDRE: En cas d'orage et de non utilisation prolongée, débranchez
le cordon d'alimentation, le câble d'antenne et les cordons audio. Ceci afin
d'éviter les dégâts occasionnés par la foudre et les surcharges électriques.
LIGNES ELECTRIQUES: Une antenne extérieure ne doit pas être située à
proximité immédiate de lignes électriques et/ou d'un transformateur électrique, afin de ne pas tomber dessus en cas de chute. Lors de l'installation
d'une antenne extérieure, veillez à éviter tout contact avec des lignes électriques : tout contact peut être fatal.
SURCHARGE: Ne surchargez pas les prises électriques, blocs multiprises &
rallonges en y connectant trop d'appareils. Ceci afin d'éviter tout risque de
surcharge électrique ou d'incendie (Surchauffe).
INSERTION D'OBJET & DE LIQUIDE: N'insérez pas d'objets dans les fentes
ou ouvertures de l'appareil afin d'éviter tout risque de choc électrique et d'incendie. Ne jamais renverser de liquide sur l'appareil.
SERVICE APRES VENTE: N'essayez pas de réparer cet appareil ; en l'ouvrant
ou en le démontant afin d'éviter tout risque de choc électrique. En cas de
problème, veuillez prendre contact avec votre revendeur.
PANNE/SITUATION NECESSITANT UN RETOUR EN SAV: Débranchez l'appareil de la prise électrique, remettez le dans son emballage d'origine et contactez votre revendeur en tenant compte des situations suivantes :
- Lorsque le cordon d'alimentation est endommagé.
- Si un liquide a été renversé dessus.
- Si l'appareil a été exposé à la pluie.
- Si l'appareil ne fonctionne pas correctement malgré le respect des instructions d'utilisation. Ajustez uniquement les réglages préconisés dans le mode
d'emploi, toute manipulation ou réglage non conseillés dans ce dernier peut
endommager l'appareil et procurer plus de travail en cas d'intervention SAV
afin de remettre l'appareil en état de marche.
PIECES DE RECHANGE: Lorsque vous avez besoin de remplacer des pièces
de l'appareil, veillez à utiliser des pièces d'origine ou possédant des caractéristiques identiques. L'utilisation de pièces non autorisées peut endommager
l'appareil : surchauffe, court-circuit, choc électrique…
CONTROLE DE SECURITE: Avant de récupérer votre appareil, assurez vous
que le SAV a effectué tous les contrôles de sécurité nécessaires afin de vous
restituer un appareil en état de marche.
INSTALLATION AU PLAFOND OU SUR UN MUR: Ce type d'installation est
déconseillé.
CHALEUR: Veillez à installer l'appareil loin de toute source de chaleur telle
que radiateur, réchaud ou tout autre appareil produisant de la chaleur.
RECYCLAGE: Cet appareil ne doit pas être considéré comme un déchet
domestique à usage unique. Vous devez le déposer dans un point de collecte
destiné au recyclage des appareils électroniques et électroménagers. AInsi
vous préserverez l'environnement et éviterez les problêmes de santé publique
vis à vis de conséquences négatives; liées à leur dépôt dans un endroit non
approprié. Le recyclage contribue à préserver les ressources naturelles. Pour
plus d'informations sur les conditions de recyclage de l'appareil, veuillez contacter les autorités de votre pays, les institutions locales ou votre revendeur.
ATTENTION
AVANT TOUTE UTILISATION DE L'APPAREIL, MERCI DE PRENDRE
CONNAISSANCE DES INSTRUCTIONS D'UTILISATION & DE SECU-
RITE! RISQUE DE CHOC ÉLECTRIQUE, NE PAS OUVRIR!
Page 57

ENREGISTREUR PORTABLE USB iKEYplus
INTRODUCTION:
Félicitations pour l’achat de l’enregistreur portable USB iKEYplus. Cet appareil, destiné à l’enregistrement, bénéficie des progrès les plus récents en matière de
développement et bénéficie d’une garantie d’un an*. Avant toute utilisation, nous
vous recommandons de prendre connaissance des instructions qui suivent.
CARACTERISTIQUES:
- Port USB (Connexion immédiate à tout périphérique de stockage USB)
- Compatible USB 2.0/1.1/1.0
- Compatible iPod®
- Enregistre en format non compressé WAV ou format compressé MP3 (Sélection du
taux de compression, jusqu'à 320kbps)
- Connecteurs RCA plaqués or
- Entrée micro avec alimentation fantôme
- Pré-amplificateur phono intégré permettant le branchement direct d'une platine
vinyle
- Indicateur à LEDs de mémoire disponible sur l'unité de stockage
- Fonctionne sur piles avec indicateur de charge
- Livré avec adaptateur secteur DC permettant de recharger les piles rechargeables
- VU mètre - 6 leds avec maintien de crête
- Prise casque Mini-jack 3.5mm
- Réglage du niveau d'enregistrement
- Touche Reset
- Alimentation : 4 piles LR6/AA (non fournies)
TABLE DES MATIERES:
Mises en garde...........................................................................................................56
Introduction & Caractéristiques................................................................................57
Pièces détachées & Accessoires fournis.....................................................................58
Schémas de connexion..............................................................................................59
Branchement du Micro Stéréo T................................................................................59
Branchement d’une platine vinyle.. ..........................................................................60
Branchement d’une console de mixage ....................................................................61
Branchement d’un amplificateur guitare...................................................................62
Branchement d’un micro main..................................................................................63
Guide Visuel de Démarrage Rapide...........................................................................64
Lecture/Edition des enregistrements via un ordinateur personnel...........................72
Témoins BATTERIES FAIBLES, PERIPHERIQUE PLEIN, & SURCHARGE...................74
APPENDIX A: Instructions détaillées pour utilisation avec un iPod Apple...............75
Transfert des enregistrements d’un iPod vers un PC...............................................76
Transfert des enregistrements d’un iPod vers un Mac.............................................77
APPENDIX B: Problèmes rencontrés.........................................................................79
APPENDIX C: Instructions détaillées pour le branchement d’une platine vinyle......81
APPENDIX D: Caractéristiques techniques................................................................82
57
Page 58

Pièces & accessoires
livrés avec l’appareil:
Micro Stéréo
Cordon RCA avec connecteur de mise à la terre intégré
Pochette de transport
4 x Vis normales
4 x Vis rapides
Mode d’emploi
Faces avant: Noire, Rouge & Chrome
Alimentation
320
RECORD
58
RECORD
320
Page 59

320
RECORD
320
RECORD
320
Branchement du Micro Stéréo au
iKEYplus
Côté gauche: entrée audio Côté droit: sortie audio
Mini Jack 3.5mm
Périphérique
USB
Sortie Casque
(Permet de contrôler le niveau audio
durant l’enregistrement)
Micro Stéréo (livré avec l’appareil)
NOTE: M
ETTRE
LE COMMUTATEUR
EN POSITION MIC !
59
RECORD
320
Page 60
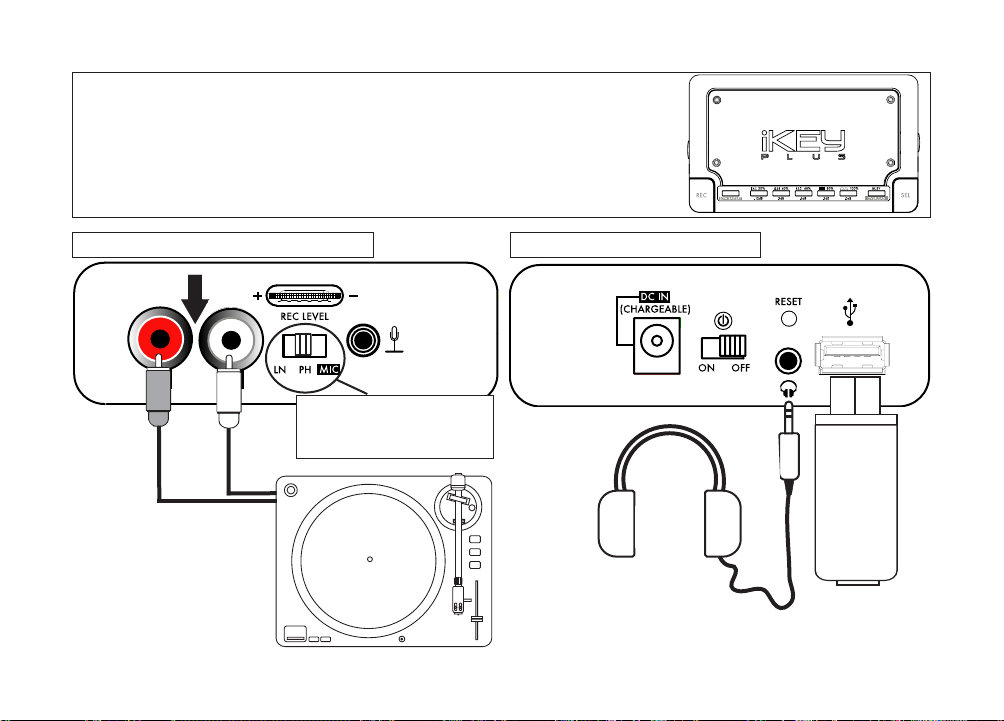
320
RECORD
320
RECORD
320
Branchement d’une Platine Vinyle au
iKEYplus*
Côté gauche: entrée audio Côté droit: sortie audio
RCA
Périphérique
USB
Sortie Casque
(Permet de contrôler le niveau audio
durant l’enregistrement)
NOTE: METTRE
LE COMMUTATEUR
EN POSITION
PH (PHONO)!
Platine Vinyle
(Type standard, cellule
magnétique, non pré-amplifiée)
60
*Consultez l'Appendix E pour plus d'informations
RECORD
320
Page 61
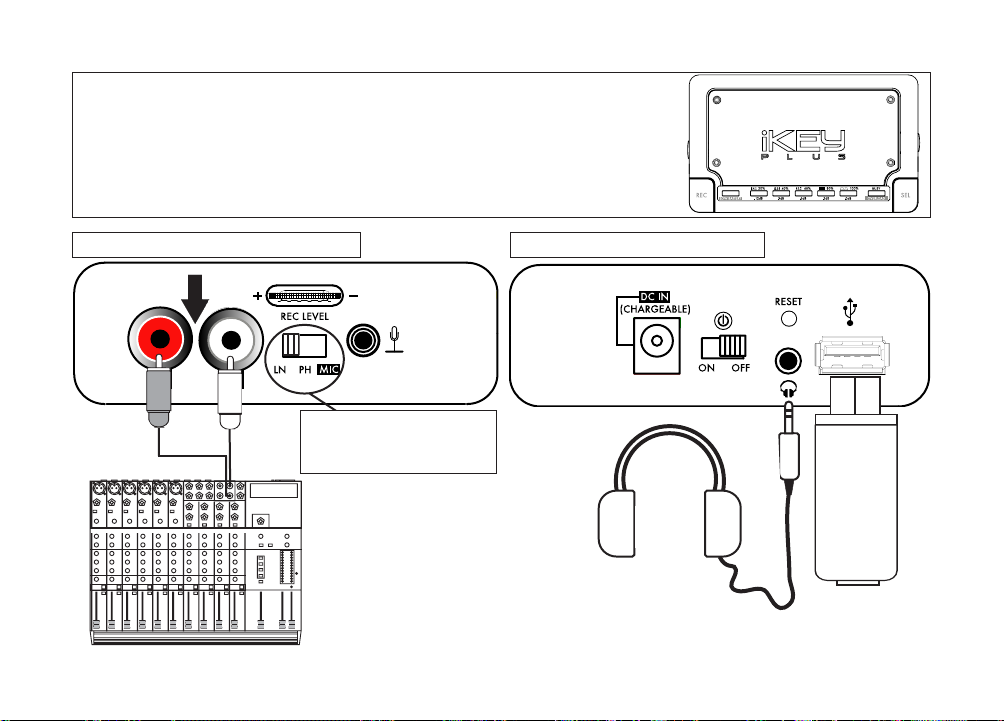
320
RECORD
320
RECORD
320
Branchement d’une Console
de Mixage* au iKEYplus
Côté gauche: entrée audio Côté droit: sortie audio
RCA
Périphérique
USB
Sortie Casque
(Permet de contrôler le niveau audio
durant l’enregistrement)
NOTE: METTRE
LE COMMUTATEUR
EN POSITION LN (LIGNE)!
Console de Mixage
(Utiliser une Sortie Ligne
ou la Sortie Record/Tape)
*Enregistrer à partir d’une console de mixage peut nécessiter des cordons audio particuliers
(Non livrés avec l’appareil) & dépendant de la marque.
61
RECORD
320
Page 62

320
RECORD
320
RECORD
320
Branchement d’un Amplificateur pour
Guitare* au iKEYplus
Côté gauche: entrée audio Côté droit: sortie audio
RCA
Périphérique
USB
Sortie Casque
(Permet de contrôler le niveau audio
durant l’enregistrement)
NOTE: METTRE
LE COMMUTATEUR
EN POSITION
LN (LIGNE)!
*Enregistrer à partir d’un amplificateur pour guitare peut nécessiter des cordons audio particuliers
(Non livrés avec l’appareil) & dépendant de la marque.
Amplificateur pour
Guitare
(Utiliser une Sortie Ligne
ou la Sortie Record/Tape)
62
RECORD
320
Page 63

320
RECORD
320
RECORD
320
Branchement d’un Microphone au
iKEYplus
Côté gauche: entrée audio Côté droit: sortie audio
Mini Jack 3.5mm
Périphérique
USB
Sortie Casque
(Permet de contrôler le niveau audio
durant l’enregistrement)
Microphone main (Non livré avec l’appareil)
NOTE: METTRE
LE COMMUTATEUR
EN POSITION
MIC !
63
RECORD
320
Page 64
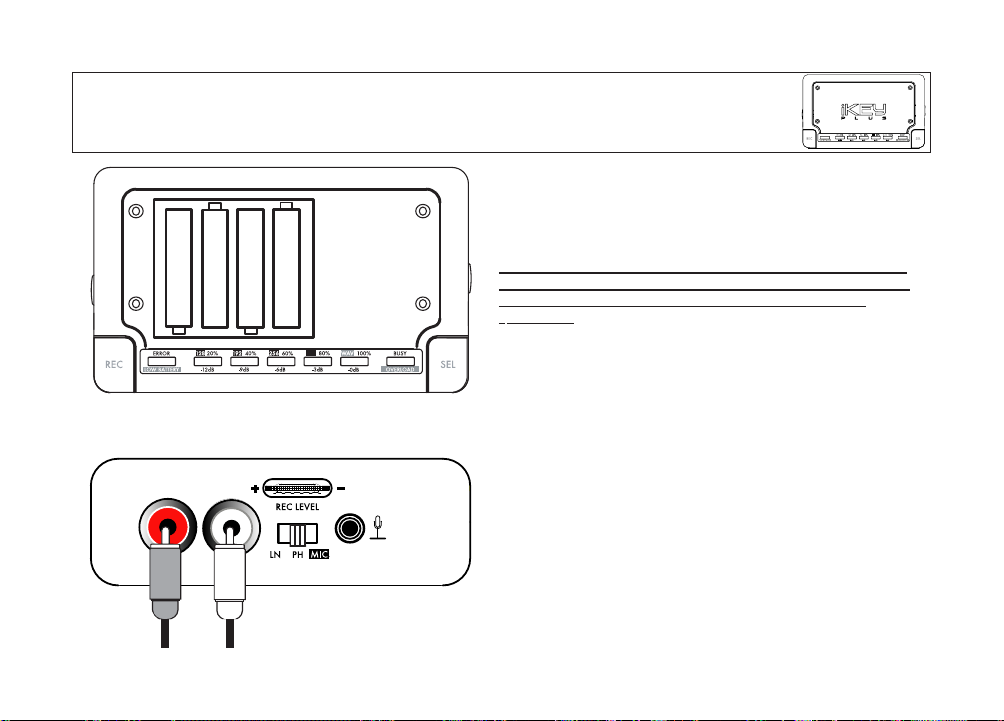
320
RECORD
Guide Visuel de Démarrage Rapide
320
ETAPE 1: ALIMENTATION DU iKEY
Enlever le capot en aluminum & installer les piles en respectant les indications.
Vous pouvez aussi utiliser l’alimentation externe 9V fournie avec l’appareil. Si vous
choisissez des piles rechargeables, celles-ci seront rechargées via l’alimentation
externe lorsque l’interrupteur de mise sous tension sera en position ON.
SI
VOUS CHOISISSEZ DES PILES ALCALINES OU NON RECHARGEABLES, NE
P
AS BRANCHER L’ALIMENTATION EXTERNE EN MEME TEMPS AFIN D’EVITER
TOUT RISQUE D’EXPLOSION DES PILES & D’ENDOMMAGEMENT DE
L’
iKEYPLUS !!!
ETAPE 2: BRANCHEMENT D’UNE SOURCE
AUDIO
Si vous enregistrez à partir d’un source de niveau ligne (Lecteur CD, mixer, lecteur
karaoké, amplificateur guitare...) OU d’une platine vinyle, vous devez brancher cet
appareil aux entrées RCA en respectant le schéma ci-contre. Si vous enregistrez en
utilisant un microphone, celui-ci doit être branché au Mini-Jack 3.5mm. Vous
trouverez plus d’informations dans les schémas de branchements précédents ce
paragraphe.
320
RECORD
64
320
RECORD
320
Page 65

320
RECORD
Guide Visuel de Démarrage Rapide (Suite)
ETAPE 3:
SELECTION DE LA SOURCE !
Si vous enregistrez à partir d’une source de NIVEAU LIGNE,
positionnez le commutateur en position LN (A l’extrême
gauche). Si vous enregistrez à partir d’une PLATINE VINYLE,
mettez le commutateur en position PH (Position centrale).
Enfin si vous utilisez un MICROPHONE, positionnez le commutateur sur MIC.
ETAPE 4: BRANCHEMENT D’UN PERIPHERIQUE
USB
Branchez votre périphérique USB sur lequel vous souhaitez
enregistrer. La majorité des périphériques USB utilise une
Mémoire Flash FAT-32 & HFS+, disques durs & la plupart des
lecteurs MP3. Si vous souhaitez utiliser un iPod, merci de consulter - avant toute opération - les notes additionnelles situées
dans APPENDIX A: utilisation avec un iPod. Pour les incompatibilitées répertoriées, consultez APPENDIX B.
320
RECORD
320
RECORD
65
320
RECORD
Page 66

320
RECORD
ETAPE 6: MISE EN ROUTE DE
L’APPAREIL
Une fois que vous avez mis l’appareil sous tension (ON),
l’iKEYplus mettra environ 15 secondes pour s’initialiser. Durant
cette phase, les LEDs s’illumineront brièvement, indiquant l’espace restant disponible sur le périphérique de stockage. Dès
que l’initialisation est terminée, les LEDs s’éteindront et se commuteront en mode VU mètre.
ETAPE 5: BRANCHEMENT D’UN CASQUE
(OPTION)
Si vous souhaitez contrôler la qualité du signal qui sera enregistré avec l’iKEYplus, branchez un casque au Mini Jack 3.5mm
(Sortie casque). Le signal fournit par cette sortie peut être très
élevé, prenez les précautions nécessaires lors de l’utilisation de
cette dernière.
320
RECORD
320
RECORD
66
Guide Visuel de Démarrage Rapide (Suite)
320
RECORD
Page 67
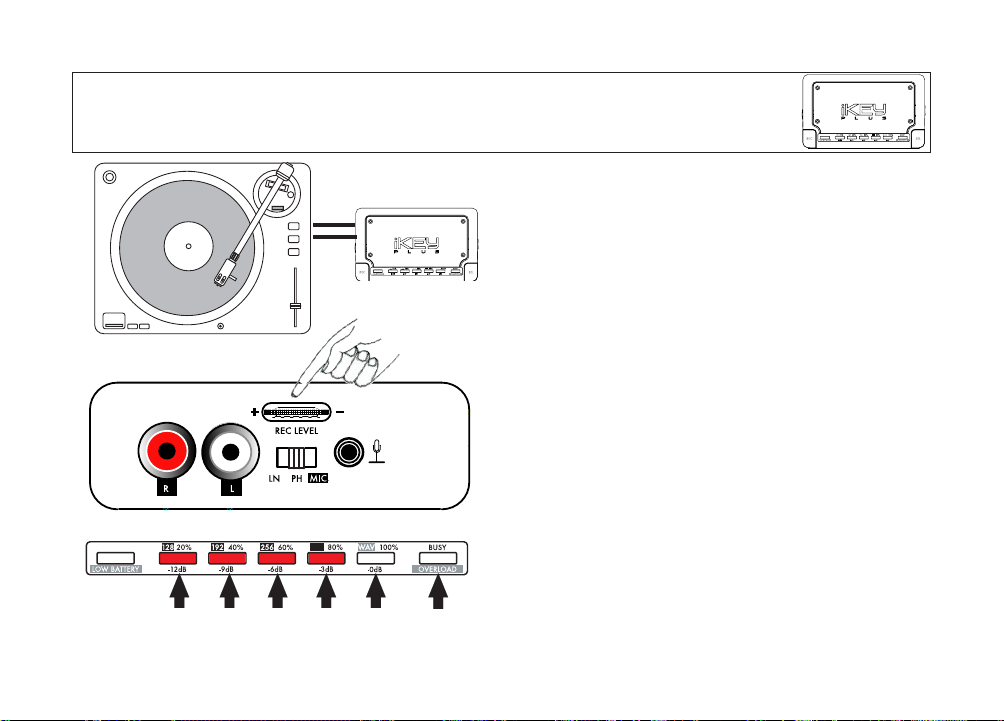
320
RECORD
320
RECORD
320
RECORD
ETAPE 7: MISE EN ROUTE DE
LA SOURCE
Afin de régler correctement le niveau d’enregistrement de l’iKEYplus, il est nécessaire de démarrer la lecture de la source à enregistrer. Si vous enregistrez en utilisant un microphone, faîtes un essai dans la même configuration que durant l’enregistrement.
ETAPE 8: REGLAGE DU NIVEAU D’ENREGISTREMENT
Utilisez les LEDs, situées sur la face avant de l’iKEYplus, et le potentiomètre REC
LEVEL (Situé à gauche de l’appareil) afin que les LEDs du VU mètre ne dépassent
pas le niveau 0dB.
Ceci est très important car au delà de 0dB, le son sera accompagné de distorsion
et donc de mauvaise qualité. Inversement, si le niveau d’enregistrement est trop
faible, le son sera étouffé et tout aussi inaudible. Si vous enregistrez un signal
dont le niveau audio peut varier durant l’enregistrement (Un concert par exemple), nous vous recommandons de sous-régler volontairement le NIVEAU D’ENREGISTREMENT. Ainsi vous éviterez l’apparition de distorsion si le niveau audio
augmente durant l’enregistrement.
320
RECORD
Figure A - Chaque LED illuminée indique un niveau de -3dB.
Les flèches indiquent le niveau du VU mètre en dB.
67
Guide Visuel de Démarrage Rapide (Suite)
320
RECORD
RECORD
RECORD
320
320
Page 68

320
RECORD
ETAPE 9: SELECTION DU
FORMAT & DE LA QUALITE AUDIO
Utilisez la touche SEL située à droite sur la face avant de l’appareil, pour sélectionner le format d’enregistrement désiré. Appuyez sur la touche jusqu’à ce
que la LED du format & de la qualité souhaité s’allume. Après 3 secondes d’inactivité, les LEDs se commuteront automatiquement en mode VU mètre.
Le format MP3 offre différents niveaux de qualité audio et permet d’économiser de l’espace:
Le format 128kbps
est meilleur que le signal radio FM, et nécessite environ 55
Mo par heure d’enregistrement.
Le format 192kbps nécessite environ 83 Mo par heure d’enregistrement.
Le format 256kbps
se rapproche de la qualité CD, et nécessite environ 110 Mo
par heure d’enregistrement.
Le format 320kbps est quasiment identique à la qualité CD, et nécessite environ 137.5 Mo par heure d’enregistrement.
Le format W
AV est identique à la qualité CD (44.1kHz, 16 bits Stéréo), mais
nécessitera jusqu’à 600 Mo par heure
d’enregistrement !
320
RECORD
Figure B - La LED allumée indique le choix du format 192kbps.
Les flêches indiquent les taux de compression.
320
RECORD
320
RECORD
320
RECORD
68
Guide Visuel de Démarrage Rapide (Suite)
RECORD
RECORD
320
320
320
RECORD
Page 69

320
RECORD
ETAPE 10: DEMARRAGE DE
L’ENREGISTREMENT !
Lorsque vous souhaitez démarrer l’enregistre-ment, appuyez
sur la touche REC située à gauche sur la face avant de l’appareil.
Lorsque vous avez appuyé sur la touche REC, toutes les LEDs
s’allumeront brièvement indiquant que l’appareil a validé
votre instruction. Après l’extinction de ces LEDs (Entre 0 &
2 se-condes), l’enregistrement démarrera. Vous remarquerez
que la LED RECORD située à gauche de l’appareil restera
allumée durant toute la durée de l’enregistrement.
Une fois que l’enregistrement a démarré, l’ensemble des
LEDs reprennent leur fonction de VU mètre; permettant
ainsi un contrôle permanent du niveau d’enregistrement.
Vous pouvez ajuster (Si nécessaire) le niveau, à l’aide du
potentiomètre RECORD LEVEL CONTROL (Voir étape 8), en
permanence.
320
RECORD
Figure C - Toutes les LEDs s’illuminent brièvement indiquant ainsi que
l’appareil a compris votre instruction.
320
RECORD
320
RECORD
69
Guide Visuel de Démarrage Rapide (Suite)
RECORD
RECORD
320
320
320
RECORD
Page 70

320
RECORD
ETAPE 11: ARRET DE
L’ENREGISTREMENT !
Lorsque vous souhaitez stopper l’enregistrement, appuyez sur la
touche REC située à gauche sur la face avant de l’appareil. Vous
DEVEZ stopper l’enregistrement en respectant cette procédure,
sinon le fichier ne sera pas sauvegardé.
Lorsque la touche REC est enfoncée, toutes les LEDs s’allumeront brièvement, indiquant ainsi que l’appareil a validé
votre instruction. Après l’extinction des LEDs (Entre 0 & 2 secondes), l’enregistrement s’arrêtera, & la LED RECORD s’éteinda. Si
vous enregistrez sur un iPod, cette LED peut rester allumée
durant 30 secondes (Temps nécessaire pour finaliser le fichier
sur un iPod).
Lorsque l’enregistrement est terminé, les LEDs commutent de
nouveau en mode VU mètre, vous indiquant ainsi le niveau d’entrée. Vous pouvez démarrer un nouvel enregistrement en
appuyant de sur la touche REC (Voir Etape 10).
320
RECORD
Figure D - Toutes les LEDs s’illuminent brièvement indiquant ainsi que
l’appareil a compris votre instruction.
320
RECORD
320
RECORD
70
Guide Visuel de Démarrage Rapide (Suite)
RECORD
RECORD
320
320
320
RECORD
Page 71
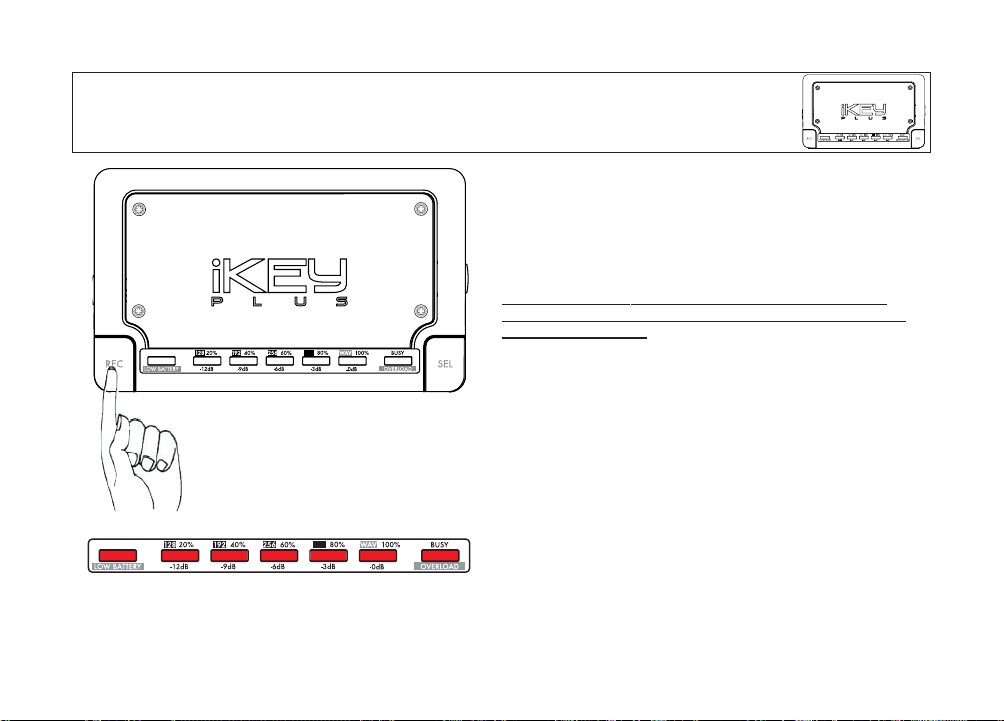
320
RECORD
ETAPE 12: DECONNEXION DU
PERIPHERIQUE USB
Vous devez maintenir enfoncée la touche REC durant 3secondes avant de
débrancher le périphérique USB. Toutes les LEDs s’allumeront simultanément &
rapidement 3 fois, indiquant que vous pouvez l’enlever en toute sécurité.
NE
PAS RESPECTER CETTE PROCEDURE LORS DU RETRAIT DU PERIPHERIQUE USB PEUT ENDOMMAGER IRREMEDIABLEMENT LES DONNEES DE
VOTRE ENREGISTREMENT.
Cette procédure n’est pas propre au iKEYplus, en fait, vous devez suivre ce type
d’instructions lors de toute déconnexion d’un périphérique USB de votre ordinateur. .
Lorsque vous avez terminé la procédure de déconnexion, vous pouvez brancher
votre périphérique USB sur votre ordinateur pour lire ou éditer le fichier. Si vous
utilisez un iPod, merci de consulter les notes additionnelles situées dans
l’APPENDIX A: Utilisation avec un iPod.
320
RECORD
Figure E - Toutes les LEDs s’allumeront simultanément & rapidement 3 fois, indiquant que vous pouvez retirer le périphérique USB
en toute sécurité.
320
RECORD
320
RECORD
71
Guide Visuel de Démarrage Rapide (Suite)
RECORD
320
320
RECORD
RECORD
320
Page 72

LECTURE DES ENREGISTREMENTS AVEC WINDOWS XP:
Lorsque vous avez suivi la procédure d’enregistrement telle qu’illustrée dans la
Guide Visuel de Démarrage Rapide (Pages 7-14), connectez votre périphérique USB
à votre ordinateur
Si vous utilisez Windows XP, une fenêtre s’ouvre dès la connexion du périphérique
USB à votre PC, offrant différentes options. Dans ce cas, sélectionnez l’option:
“Ouvrir le dossier pour visualiser les fichiers à l’aide de l’Explorateur Windows”
(Voir Figure. A).
Après avor sélectionné “Ouvrir le dossier pour visualiser les fichiers à l’aide de
l’Explorateur Windows”, une liste de fichiers s’affiche, telle que représentée dans le
schéma.B. Vous remarquerez les fichiers enregistrés par votre iKEYplus car affichant
le nom iKEY, ainsi que le format de compression et le numéro d’enregistrement. Par
exemple, iKEY_mp3_2 signifie qu’il s’agît d’un fichier MP3 et que c’est le troisième
fichier enregistré de ce type.
Cliquez deux fois sur l’icône du fichier que vous souhaitez lire. Sélectionnez un des
logiciels installés sur votre PC afin de lire ou d’éditer ce dernier. Si vous possèdez de
nombreuses applications capables de lire ces fichiers, sélectionnez un fichier iKEY,
cliquez à droite sur votre souris, puis choisissez une application en utilisant l’option
‘Ouvrir avec’.
Schéma A - Choisir Ouvrir le dossier pour visualiser les
fichiers à l’aide de l’Explorateur Windows.
Schéma B - Utilisez l’Explorateur Windows pour balayer les fichiers stockés
sur le périphérique USB. Notez que sur votre ordinateur, les icônes
affichées peuvent être différentes.
72
Page 73

LECTURE DES ENREGISTREMENTS AVEC WINDOWS XP (
SUITE):
La majorité des applications pour PC est limitée à 2 GB en ce qui concerne les fichiers
WAV. Si vous devez enregistrer dans ce format et pour une période longue, limitez la
durée à 3 heures par fichier. A ce jour, un utilitaire gratuit nommé Wave Splitter per-
met de divi-ser les fichiers WAV en fichiers plus légers, et peut être téléchargé:
http://claudiosoft.online.fr/wavsplit.html.
CE LOGICIEL EST MENTIONNÉ, PAR
GCI OU IKEY AUDIO, A TITRE INDICATIF. VOUS ETES SEUL RESPONSABLE DE
SON UTILISATION.
LOGICIELS RECOMMANDES POUR LA GESTION DE VOS ENREGISTREMENTS:
Pour certaine personne, la finalité de stocker des enregistrements de haute qualité
sur un périphérique USB est suffisante. Par contre, beaucoup d’utilisateurs souhaitent re-travailler leurs enregistrements. Avec certaines connaissances & certains outils, vous pouvez améliorer de façon substantielle vos enregistrements. iKEYplus
n’est pas livré avec un logiciel audio. Pour les clients désireux de modifier et
d’améliorer leur travail, les développeurs d’iKEY Audio vous recommandent les solutions suivantes (A cette date de parution):
Audacity est une plate-forme audio gratuite pour Windows & Macintosh, téléchargeable sur: http://audacity
.sourceforge.net/
Sony Sound Forge & Sound Forge Audio Studio sont des logiciels largement
répandus dans les milieux professionnels et peuvent être téléchargés sur:
http://www
.sonymediasoftware.com.
Steinberg WaveLab: http://www.steinberg.de
LES
LOGICIELS MENTIONNES PRECEDEMMENT, PAR GCI OU IKEY AUDIO, LE
SONT A TITRE INDICATIF. VOUS ETES SEUL RESPONSABLE DE LEUR UTILISATION,
Si vous souhaitez en apprendre plus sur l’audio numérique, nous vous suggérons le
livre de Chris Middleton, intitulé: Complete Guide T
o Digital Audio (Guide Complet
de l’Audio Numérique).
CONSEILS POUR ÉDITER LES ENREGISTREMENTS:
- Avant d’éditer votre enregistrement effectué avec l’iKEYplus, faîtes en une copie sur
le disque dur de votre PC.
- Pensez à conserver une copie originale de vos enregistrements,
au cas ou vous souhaiteriez les récupérer ultérieurement.
- Si vous éditez souvent des fichiers volumineux, utilisez un PC performant: disque
dur de grande capacité et mémoire vive (RAM) importante afin de ne pas pénaliser
la vitesse de traitement.
Schéma B - L’utilisation d’un logiciel audio (Non livré) permet de retravailler les enregistrements effectués avec l’iKEYplus.
Image: Sony Sound Forge Audio Studio 7.0...
73
Page 74

PILES FAIBLES, PERIPHERIQUE PLEIN & SURCHARGE:
Différentes LEDs permettent de constater certains états de l’appareil: PILES
FAIBLES, PÉRIPHÉRIQUE PLEIN & TÂCHE EN COURS.
Le témoin LOW BATTERY (PILES FAIBLES) utilise la même LED que la LED
RECORD. L’état LOW BATTERY (PILES FAIBLES) est signalé lorsque la LED clig-
note.
Lorsque le périphérique de stockage est rempli à plus de 95%, l’iKEYplus signalera
DEVICE FULL (PÉRIPHÉRIQUE PLEIN) en faisant clignoter toutes les LEDs de
façon continue, jusqu’à ce que le périphérique de stockage soit complètement rempli. A ce moment, l’iKEYplus arrêtera automatiquement l’enregistrement.
La LED BUSY (TÂCHE EN COURS) clignotera de façon continue lorsque l’appareil
effectue une tâche (Après l’enregistrement), indiquant ainsi qu’il ne peut accepter
une autre instruction. La LED BUSY restera allumée lors de la mise sous tension de
l’appareil, indiquant que ce dernier est en mode initialisation.
74
Page 75

APPENDIX A
UTILISATION D’UN iPod APPLE AVEC L’iKEYPLUS:
Lorsqu’un iPod APPLE est utilisé comme périphérique de stockage, il y a quelques
étapes complémentaires à respecter afin de sécuriser vos enregistrements.
Avant de connecter l’KEYplus, vous DEVEZ
absolument modifier les paramètres de
l’iPod (Dans iTunes) afin d’éviter toute mise à jour automatique des fichiers musicaux. LE NON RESPECT DE CETTE PROCÉDURE PEUT ENTRAÎNER L’EFFACE-
MENT DE VOS ENREGISTREMENTS PAR iTUNES LORSQUE VOUS LANCEZ CE
DERNIER. Les Sociétés GCI Technologies & iKEY Audio ne peuvent être tenues
pour responsable en cas de perte de données liée à un non respect de la
procédure !
1. Connectez votre iPod à votre ordinateur.
2. Si iTunes ne s’ouvre pas automatiquement, lancez le.
3. Lorsque la page iTunes est ouverte, allez dans le menu EDIT, et sélectionnez
PRÉFÉRENCES.
4. Dans les préférences, sélectionnez l’onglet iPod.
5.Dans l’onglet iPod, sélectionnez l’onglet nommé MUSIC.
6. Sélectionnez l’option: ‘Gestion manuelle des morceaux & playlists.’ Ceci est
illustré dans le Schéma C.
MISES A JOUR DU PROGICIEL
Pour un fonctionnement & un enregistrement optimal via l’iPod, nous vous recommandons l’utilisation d’un progiciel actualisé par Apple. Si vous possèdez un iPod
non récent, veuillez vérifier la compatibilité du progiciel avec l’iKEYplus. Seuls les
progiciels développés après 2005 sont compatibles. Si vous devez mettre à jour
votre progiciel, respecter précisemment les instructions Apple. Ces mises à jour sont
disponibles à l’adresse suivante: http://www
.apple.com/ipod/download/
Schéma C - Dans iTunes, vous devez changer les paramètres initiaux pour
une Gestion Manuelle des Morceaux & Playlists.
75
Page 76

APPENDIX A (
SUITE)
UTILISATION D’UN iPod APPLE AVEC L’iKEYPLUS:
Lorsque tous les paramètres ont été modifiés sur iTunes, vous pouvez vous reporter
au Guide Visuel de Démarrage Rapide en prenant connaissance des 4 remarques
suivantes. L’iKEYplus fonctionne avec les iPods compatibles PC & Macintosh.
1. Lorsque l’iKEYplus détecte la connexion d’un iPod, l’écran de ce dernier affiche:
“Ne Pas Déconnecter.”
2. Lorsque l’enregistrement démarre ( Voir Etape 10), cela peut prendre de 1 à 2 secondes pour que la LED s’allume confirmant ainsi le début de l’enregistrement.
3. Lors de l’arrêt de l’enregistrement (Voir Etape 11), cela peut prendre jusqu’à 30
secondes avant l’extinction de la LED. Vous remarquerez aussi que la LED BUSY clig-
notera durant cette procédure. Cela signifie que l’iPod finalise & installe le fichier
afin de pouvoir le lire à partir de ce dernier. Notez que plus il y a de morceaux dans
votre iPod, plus ce processus sera long.
4. Lorsque vous déconnecter l’iPod en utilisant la Procédure de Déconnexion du
Périphérique USB (Etape 12), l’écran n’affichera plus “Ne Pas Déconnecter” au
moment ou vous pouvez déconnecter votre iPod en toute sécurité.
LECTURE DES ENREGISTREMENTS AVEC UN iPod APPLE:
Lorsque vous avez fini l’enregistrement et la procédure de finalisation, les fichiers
enregistrés seront disponibles dans la liste des Chansons de votre iPod. Si vous avez
déconnecté votre iPod du iKEYplus, vous trouverez les fichiers iKEY tout en bas de
la liste des Chansons. Si vous avez connecté votre iPod à votre PC et ouvert iTunes,
vous trouverez les fichiers iKEY dans l’ordre alphabétique. Si les Chansons sont
déclassées dans votre iPod, iTunes les reclassera dès connexion de l’iPod à l’ordinateur.
TRANSFERT DES ENREGISTREMENTS DE L’iPod VERS
L’ORDINATEUR:
Vous pouvez transférez les enregistrements présents dans votre iPod vers un ordina-
teur (Utilisant Windows XP ou Mac OSX), en respectant les instructions suivantes.
TRANSFERT DES ENREGISTREMENTS DE L’iPod VERS UN PC (WINDOWS XP):
Un iPod PC doit être relié à un ordinateur utilisant Windows XP. Un iPod Macintosh
doit être relié à un ordinateur utilisant Mac OS.
1. Connectez votre iPod au PC via le port USB.
2. Si iTunes se lance automatiquement (Ce qui est le cas en général), fermez le complêtement.
3. Sous le menu Démarrer, allez dans Mes Documents.
4. Sous le titre ‘Périphérique de Stockage Amovible,’ double cliquez sur l’icône
de votre iPod - Il porte le nom que vous lui avez donné lors de sa configuration avec
l’ordinateur.
5. Allez dans le menu Outils situé dans la barre d’outils et sélectionnez Options des
Dossiers.
6. Cliquez sur Affichage.
7. Sous Paramètres Avancés, se trouve le titre: ‘Fichiers et dossiers cachés’.
Sélectionnez ‘Afficher les dossiers et fichiers cachés’, puis cliquez sur OK. Voir
Schéma D (Page suivante).
8. Trouvez le menu ‘Contrôle iPod’ & cliquez dessus.
9. Trouvez le menu ‘Musique’ & double cliquez dessus.
10.Vos enregistrements sont stockés dans un menu appelé ‘iKEY.’ Double cliquez
dessus & vous trouverez vos enregistrements. Copiez les sur votre disque dur en les
faisant glisser ou en utilisant la Fonction Copier, puis Coller en cliquant à droite sur
votre souris.
11. Répétez les étapes 5 à 7, sauf pour cette fois, sélectionnez l’option précisant ‘Ne
pas afficher les dossiers et fichiers cachés.’ Lorsque vous aurez effectué cette
procédure, vous ne verrez plus jamais de fichiers cachés.
76
Page 77

TRANSFERT DES ENREGISTREMENTS DE L’iPod VERS UN MAC OSX:
1. Connectez votre iPod à l’ordinateur via le port USB.
2. Si iTunes se lance automatiquement (Ce qui est le cas en général), fermez le complêtement.
3. Cliquez sur l’icône iPod situé sur votre bureau - Il porte le nom que vous lui avez
donné lors de sa configuration avec l’ordinateur
4. Appuyez sur Apple+I pour accéder à la fenêtre Info. En bas de la fenêtre,
changez “Propriétaires & Autorisations” pour “Vous pouvez Lire et Ecrire”.
Vérifiez aussi la boîte de dialogue disant “Ignorez propriétaire sur ce chapitre”
(Voir Schéma F).
3. Double cliquez sur ‘Macintosh HD’ (Situé sur votre bureau), et ouvrez
‘Applications’, puis ‘Utilitaires’, puis chargez l’application nommé ‘Terminal’.
Ceci vous permettra de saisir un texte.
4. Tapez précisemment le lien suivant (Voir Schéma E):
defaults write com.apple.Finder AppleShowAllFiles TRUE (Appuyez sur la
touche Entrée) killall Finder (Appuyez sur la touche Entrée). Gardez la fenêtre
ouverte pour l’étape #6.
5. Retournez sur le bureau et double cliquez sur votre iPod.
6. Ouvrez le menu ‘Contrôle iPod’, puis le menu ‘Musique’, puis cliquez sur le
menu ‘iKEY’ (Généralement situé tout en bas).
7. Copiez vous enregistrements sur le disque dur en les faisant glisser ou en utilisant
la Fonction Copier/Coller.
8. Retournez dans l’application ‘Terminal’ & tapez précisemment le lien suivant :
defaults write com.apple.Finder AppleShowAllFiles FALSE (Appuyez sur la
touche Entrée) killall Finder (Appuyez sur la touche Entrée)
Lorsque vous aurez effectué cette procédure, vous ne verrez plus jamais de fichiers
cachés.
Figure D - Afin d’accéder aux fichiers enregistrés, vous devez
demander à Windows d’afficher les dossiers & fichiers cachés.
77
Page 78

Figure E - Ouvrez la fenêtre Terminal, dans OSX, qui vous permet de
modifier les commandes afin de récupérer les enregistrements situés
sur un iPod.
78
Page 79

APPENDIX B
PROBLEMES RENCONTRÉS / QUESTIONS FRÉQUENTES:
Si vous rencontrez des difficultés avec votre iKEYplus, lisez les suggestions suivantes.
La majorité des problèmes peut être résolue en reprenant les procédures et en les
répétant précisemment.
Q: Le niveau de l’enregistrement effectué est trop bas lors de la lecture, et le
son n’est pas clair.
1. Augmentez le NIVEAU D’ENREGISTREMENT afin que le VU-mètre soit aussi
proche que possible de 0dB (Sans le dépasser).
2. Vérifiez la position du commutateur INPUT SWITCH (Situé sous le potentiomètre
REC LEVEL) en fonction de la source utilisée.
3. Si malgré ces vérifications, le niveau reste insuffisant (En deçà de 0dB), augmentez
le volume de la source (Si cela est possible).
Q: L’enregistrement effectué présente de la distorsion lors de la lecture.
1. Durant l’enregistrement, vérifiez que le VU mètre n’excède pas 0dB, dans le cadre
d’un enregistrement numérique, cela rendra ce dernier inaudible.
2. Vérifiez la position du commutateur INPUT SWITCH (Situé sous le potentiomètre
REC LEVEL) en fonction de la source utilisée.
3. Une autre situation (Très rare) qui pourrait se produire serait un niveau d’entrée
excessif pour l’iKEYplus.
4. Vérifiez la disparition de ces problèmes en écoutant l’enregis-trement sur votre
système, en écoutant l’original & en vérifiant l’ensemble des cordons audio utilisés.
Figure F - En appuyant sur Apple+I lorsque l’iPod est sélectionné sur
le bureau, vous pouvez modifier les paramètres d’accés à votre iPod.
79
Page 80

PROBLEMES RENCONTRÉS / QUESTIONS FRÉQUENTES
(
SUITE):
Q: J’ai enregistré un fichier, et mon PC ne veut pas le lire.
1. Respectez la procédure de déconnexion du périphérique USB telle qu’illustrée
dans le Guide Visuel de Démarrage Rapide. Une erreur lors de cette procédure peut
entraîner des dommages ou la perte complète des données de l’enregistrement.
2. Un autre problème potentiel survient lorsque les fichiers WAV ont une taille
supérieure à 2 GB (Plus de 3 heures d’enregistrement). Ils sont incompatibles avec
la majorité des logiciels.
3. Vérifiez si le logiciel destiné à lire les fichiers fonctionne.
Q: Mes enregistrements contiennent un bruit transitoire et/ou saute.
1. Vérifiez que les bruits parasites ne proviennent pas d’un câblage défectueux ou
de la source audio elle même.
2. Si l’enregistrement saute à la lecture, vous devriez défragmenter votre
périphérique de stockage. L’iKEYplus envoie des paquets d’informations au
périphérique de stockage, et si ce dernier est encombré et fragmenté, il ne pourra
pas récupérer rapidement les données qui lui sont envoyées.
3. Le périphérique de stockage USB génére des interférences: la LED sur celui-ci clignote. Changez de périphérique.
Q: L’appareil semble fonctionner normalement, mais il n’y a aucunes données
sur le périphérique de stockage.
1. Il est possible que l’alimentation ait été coupée avant la fin de l’enregistrement,
sans respect de la procédure recommandée.
2. Le périphérique de stockage a été enlevé avant l’arrêt de l’enre-gistrement, sans
respect de la procédure recommandée.
Q: L’iKEYplus ne fonctionne pas correctement avec un iPod .
1. L’iPod et/ou iTunes ne sont pas configurés correctement, ou le progiciel de votre
iPod est trop ancien. Consultez l’APPENDIX A: UTILISATION D’UN iPod APPLE
AVEC L’iKEYPLUS.
Q: Lorsqu’un périphérique est connecté avec l’iKEYplus, l’enregistrement ne
fonctionne pas, et lorsque la touche record est enfoncée, toutes les LEDs
clignotent 3 fois.
1. Votre périphérique de stockage est incompatible avec l’iKEYplus. Seuls les
périphériques plug & play, ne nécessitant pas de driver, sont compatibles. Notez
que, ne pas avoir besoin de télécharger un driver pour fonctionner avec votre PC,
ne signifie pas que celui ci ne possède pas de driver. Seuls les standards de partage
de disque dur suivants sont compatibles avec l’iKEYplus: FAT32 & HFS+ (NTFS non
compatible).
2. La procédure de déconnexion du périphérique de stockage a bien été respectée,
mais le périphérique n’a jamais été enlevé.
3. Le périphérique de stockage utilisé est protégé en écriture, plein ou tout simplement ne fonctionne pas correctement.
Q: L’iKEYplus indique que le périphérique de stockage est presque plein, mais
dès connexion à l’ordinateur, il n’y a aucunes données présentes.
1. Vérifiez si le périphérique est protégé en écriture ou si l’iKEYplus et/ou le
périphérique de stockage doivent être ré-initialisés.
2. Dans tout autre scénario, formattez votre périphérique de stockage.
Q: L’iKEYplus ne répond plus, et semble complêtement bloqué.
1. Utilisez une pointe de stylo bille pour appuyer sur la touche RESET ou éteignez
& rallumez l’appareil (on/off).
80
Page 81

APPENDIX C
CONNECTEZ LA PLATINE VINYLE AU IKEYPLUS
Pour connecter une platine vinyle conventionnelle au iKEYplus, veuillez utiliser le
cordon RCA fourni. Celui-ci ne comporte qu'un seul connecteur de mise à la terre.
Afin de minimiser le bruit de ronronnement, celui-ci doit être relié à la borne de
masse située à l'arrière de votre platine vinyle. Si cette dernière possède un cordon
RCA équipé d'un connecteur de mise à la terre solidaire de votre platine vinyle, vous
devez le relier à l'une des vis amovibles de la face avant du iKEYplus.
Certaines platines vinyles récentes intègrent un pré-amplificateur phono et délivrent
ainsi directement un niveau ligne plus élevé. Si vous n'êtes pas certain que votre platine vinyle possède un pré-amplificateur phono et si vous trouvez que le son enregistré comporte un niveau important de distorsion, nous vous recommandons de
commuter le niveau d'enregistrement (REC LEVEL) en mode LN (Niveau ligne).
Pour effectuer des enregistrements de meilleur qualité à partir d'une platine vinyle
conventionnelle (Sans pré-amplificateur), nous vous recommandons de suivre ces
instructions:
1. Enregistrer à partir d'une console de mixage possédant des entrées phono
2. Utiliser un pré-amplificateur phono
3. Enregistrer à partir d'une chaîne hi-fi possédant des entrées phono
Figure G - Connectez le cordon RCA équipé du connecteur de mise à
la terre à l'embase RCA et à la borne de masse de votre
platine vinyle.
81
Page 82

APPENDIX D: CARACTERISTIQUES TECHNIQUES
Echantillonnage:..................................................................................44.1kHz, 16 Bits
Dynamique: .........................................................................................................98 dB
Distorsion Harmonique Totale :..........................................................................-91 dB
Bande Passante:......................................................................................20Hz – 20KHz
Taux de Compression MP3:...................................................128, 192, 256 & 320 kbps
Compatibilité USB:..............................................................................USB 1.0, 1.1, 2.0
Alimentation: ....................................................................4 piles LR6/AA (Non livrées)
.................................................................Alimentation externe 9V 500mA DC (Livrée)
Autonomie sur piles/batteries:......................................................Environ 4 à 5 heures
...................................(Fonction du périphérique utilisé et du type de piles/batteries)
Alimentation Electrique:.............................................120 VAC 60Hz ou 230 VAC 50Hz
iPod® & iTunes® sont des marques déposées par Apple Computer, Inc.
*La garantie établie n’est pas affectée par les garanties localement en vigueur.
Merci d’enregistrer la garantie de votre appareil sur www
.ikey-audio.com
82
NO
TES:
______________________________________________
______________________________________________
______________________________________________
______________________________________________
______________________________________________
______________________________________________
______________________________________________
______________________________________________
______________________________________________
______________________________________________
______________________________________________
______________________________________________
______________________________________________
______________________________________________
______________________________________________
______________________________________________
______________________________________________
Page 83

VORSICHT: Dieses Produkt erfüllt die FCC-Regeln, wenn Sie zum Anschluss
abgeschirmte Kabel und Stecker verwenden, um es mit anderen Geräten zu
verbinden. Auch um elektromagnetische Störungen anderer elektrischer
Geräte wie Radios oder Fernseher zu vermeiden, benutzen Sie abgeschirmte
Kabel und Stecker für die Verbindungen.
Das Ausrufezeichen im gleichseitigen Dreieck weißt Sie in der
Bedienungsanleitung auf wichtige Bedienungsanweisungen und Wartungs/Serviceanweisungen hin.
Das Blitzsymbol im gleichseitigen Dreieck dient dazu, den Benutzer vor
gefährlichen Spannungen an nicht isolierten Stellen im Gehäuse zu warnen,
die so groß sind, dass Sie eine Gefahr für den Benutzer darstellen.
ANWEISUNGEN LESEN: Lesen Sie alle Sicherheits- und
Bedienungsanweisungen, bevor Sie mit dem Produkt arbeiten.
AUFBEWAHRUNGSHINWEIS: Bewahren Sie alle Sicherheits- und
Bedienungsanweisungen gut auf.
WARNHINWEISE: Alle Warnhinweise für das Produkt und die
Bedienungsanweisungen müssen genau eingehalten werden.
ANWEISUNGEN BEFOLGEN: Alle Anweisungen zum Betrieb des Produkts
sollten befolgt werden.
REINIGUNG: Das Produkt sollte nur mit einem Polier- oder einem weichen
trockenen Tuch gereinigt werden. Benutzen Sie dazu niemals Möbelwachs,
Benzine, Insektenmittel oder andere flüchtige Reinigungsmittel, denn Sie könnten zur Korrosion des Gehäuses führen.
ERWEITERUNGEN: Benutzen Sie keine Er weiterungen, die nicht vom
Hersteller empfohlen sind, da sie zu Risiken führen könnten.
WASSER&FEUCHTIGKEIT: Benutzen Sie dieses Produkt nicht in der Nähe
von Wasser, z. B. in der Nähe einer Badewanne, einer Waschschüssel, eines
Küchenspülbeckens eines Waschbeckens, in einem feuchten Keller, einem
Schwimmbecken oder an ähnlichen Orten.
ZUBEHÖR: Stellen Sie das Produkt nicht auf eine wackelige und labile
Unterlage. Das Produkt könnte herunterfallen und dabei Kinder oder
Erwachsene verletzen, wie auch selber beschädigt werden. Stellen Sie das
Produkt nur auf vom Hersteller empfohlene oder verkaufte Unterlagen. Jede
Befestigung und Montage des Produkts sollte nach den Anweisungen des
Herstellers ausgeführt werden. Nutzen Sie dazu ein vom Hersteller empfohlenes Montageset.
MOBILE UNTERLAGEN: Bewegen Sie eine Kombination aus dem Produkt
und einer mobilen Unterlage mit Vorsicht. Schnelles Anhalten, zu viel Schub
oder unebene Böden können dazu führen, dass sich Produkt und mobile
Unterlage überschlagen (S
IEHE BILD A).
BELÜFTUNG: Schlitze und Öffnungen im Gehäuse sind für die Belüftung
vorgesehen. Sie stellen den zuverlässigen Betrieb des Produkts sicher und
schützen es vor Überhitzung. Diese Öffnungen dürfen nicht verschlossen,
blockiert oder bedeckt werden. Stellen Sie deswegen das Produkt niemals auf
ein Bett, ein Sofa, einen Teppich oder Stellen mit ähnlicher Oberfläche. Wenn
Sie dieses Produkt in einer festen Installation wie z. B. in einem Regal oder
einem Rack einbauen, sorgen Sie für ausreichende Belüftung oder sorgen Sie
dafür, dass die Bestimmungen des Herstellers genau eingehalten werden.
STROMANSCHLUSS: Dieses Produkt darf nur mit dem auf dem Gerät
angegebenen Strom betrieben werden. Wenn Sie sich nicht sicher sind, welche
Stromart Sie bei sich zuhause haben, fragen Sie den Verkäufer des Geräts oder
Ihren Stromversorger.
AUFSTELLUNGSORT: Stellen Sie das Gerät an einem festen Ort auf.
ZEITEN DES NICHTGEBRAUCHS: Ziehen Sie das Stromkabel aus dem Gerät
heraus, wenn Sie es für eine längere Zeit nicht gebrauchen.
ERDUNG ODER POLUNG:
- Wenn dieses Produkt mit einem gepolten Wechselstromstecker (Ein
Stecker mit einem Kontakt mehr als andere Stecker) ausgestattet ist, passt
dieser nur in einer bestimmten Richtung in die Steckdose und ist ein besonderes Sicherheitsmerkmal. Sollten Sie den Stecker nicht komplett in die
Steckdose stecken können, versuchen Sie ihn andersherum einzustecken.
Sollte der Stecker auch dann noch nicht in die Steckdose passen, beauftragen
Sie einen Elektriker, um diese veraltete Steckdose auszutauschen.
- Wenn dieses Produkt mit einem geerdeten dreipoligen Stecker ausgestattet ist, hat der Stecker einen dritten (Erdungs-)Kontakt und passt nur in eine
Steckdose mit entsprechender Erdung. Auch das ist ein Sicherheitsmerkmal.
Sollte der Stecker nicht in die Steckdose passen, beauftragen Sie einen
Elektriker, um diese veraltete Steckdose auszutauschen.
SCHUTZ DES STROMKABELS: Stromkabel sollten so verlegt werden, dass
man nicht auf sie treten kann noch dass sie von darauf stehenden oder gegen
sie stoßenden Gegenständen gequetscht werden. Achten Sie besonders auf
Kanten, Sicherung, Stecker und Buchsen.
AUSSENANTENNENERDUNG: Wenn Sie eine Außenantenne oder ein Radio/Fernsehkabelsignal an das Produkt anschließen, achten Sie darauf, dass die
Antenne oder das Kabel geerdet sind, um dafür zu sorgen, dass Überspannungen und elektrostatische Aufladungen nicht auftreten können. Im Artikel 810
des National Electrical Code, ANSI/NFPA 70, finden Sie Informationen über die
richtige Erdung des Antennenmasts und weitere Informationen zu diesem
Thema. (S
IEHE AUCH ABBILDUNG B).
GEWITTER: Trennen Sie das Produkt während eines Gewitters oder wenn es
unbeaufsichtigt ist oder wenn es für eine lange Zeit nicht benutzt wird durch
Ziehen des Stromkabels vom Stromnetz. Trennen Sie auch die Verbindung zu
einer Antenne oder Radio-/Fernsehkabeln. Dadurch vermeiden Sie
Beschädigungen des Produkts durch Blitze oder Überspannungen.
STROM- UND ÜBERLANDLEITUNGEN: Stellen Sie eine Außenantenne nicht
in der Nähe von Überlandleitungen, elektrischen Licht- oder Stromkreisen
oder an Stellen, wo sie in eine solche Leitung fallen könnte auf. Wenn Sie eine
Außenantenne aufstellen, achten Sie besonders darauf, dass Sie auf keinen Fall
irgendwelche Stromleitungen berührt. Das kann zu gefährlichen
Auswirkungen führen.
ÜBERLASTUNG: Überlasten Sie keine Steckdosen, Verlängerungskabel oder
Sicherungen. Das kann zu Bränden oder elektrischen Schlägen führen.
EINDRINGEN VON GEGENSTÄNDEN ODER FLÜSSIGKEIT: Führen Sie
niemals irgendwelche Gegenstände durch Öffnungen in das Produkt ein. Sie
könnten mit Strom führenden Stellen in Verbindung kommen oder
Kurzschlüsse verursachen, die zu Bränden oder elektrischen Schlägen führen
können. Gießen Sie niemals irgendwelche Flüssigkeiten auf oder in das
Produkt.
SERVICE: Versuchen Sie nicht, das Produkt selber zu reparieren. Durch das
Öffnen des Gehäuses oder Entfernen von Schrauben können Sie mit
gefährlichen Spannungen oder anderen Risiken in Kontakt kommen.
Beauftragen Sie im Reparaturfall nur qualifiziertes Servicepersonal.
WANN SERVICE NÖTIG IST: Unter den folgenden Bedingungen ziehen Sie
auf jeden Fall das Stromkabel aus der Steckdose und beauftragen Sie für eine
Reparatur nur qualifiziertes Servicepersonal:
- Wenn das Stromkabel defekt ist.
- Wenn Flüssigkeit auf oder in das Produkt gelaufen ist oder Gegenstände in
das Produkt gefallen sind.
- Wenn das Produkt Regen oder Wasser ausgesetzt war.
- Wenn das Produkt trotz Befolgen der Bedienungsanweisungen nicht normal arbeitet. Stellen Sie dabei das Produkt nur nach den Anweisungen der
Bedienungsanleitung ein, andere Einstellungen können das Produkt beschädigen und den aufwändigen Einsatz von Technikern für die Wiederherstellung
erfordern.
- Wenn das Produkt hingefallen oder auf andere Art und Weise beschädigt
ist.
- Wenn das Produkt eine eindeutige Veränderung im Betrieb zeigt.
ERSATZTEILE: Wenn Ihr Produkt Ersatzteile benötigt, achten Sie darauf, dass
der Servicetechniker nur vom Hersteller erlaubte Ersatzteile oder Ersatzteile,
die die gleichen Eigenschaften wie die originalen Teile aufweisen, einsetzt.
Falsche Ersatzteile können zu Bränden, elektrischen Schlägen oder anderen
Risiken führen.
SICHERHEITSTEST: Bevor der Service oder eine Reparatur für dieses
Produkt beendet sind, beauftragen Sie den Servicetechniker, einen Servicetest
durchzuführen, um sicher zu stellen, dass das Produkt einwandfrei funktioniert.
WAND- ODER DECKENMONTAGE: Das Produkt sollte nicht an einer Wand
oder der Decke montiert werden.
HITZE: Stellen Sie das Produkt nicht in die Nähe von Wärmequellen wie
Radiatoren, Wärmespeichern, Öfen oder anderen Produkten (auch
Verstärker), die Hitze erzeugen.
VERWERTEN SIE WIEDER: Dieses Produkt sollte nicht als Haushaltsmüll
entsorgt werden. Entsorgen Sie das Produkt im Bedarfsfall bei einer zuständigen Entsorgungsstelle, die das Recycling der elektrischen und elektronischen
Bauteile übernimmt. Wenn Sie das Produkt dem gemäß entsorgen, schützen
Sie die Umwelt und die menschliche Gesundheit. Bei nicht sachgemäßer
Entsorgung gefährden Sie die Umwelt und die menschliche Gesundheit. Das
Recycling verschiedener Materialien hilft, die Natur und Ihre Ressourcen zu
schonen. Für nähere Informationen bezüglich der Entsorgung dieses Produkts
nehmen Sie Kontakt auf mit Ihrer lokalen Stadtverwaltung, dem zuständigen
Entsorgungsunternehmen oder dem Händler, bei dem Sie das Produkt gekauft
haben.
ACHTUNG!
BITTE UNBEDINGT VOR BENUTZUNG DES GERÄTS LESEN!
WICHTIGE HINWEISE UND SICHERHEITSANWEISUNGEN
GEFAHR EINES ELEKTRISCHEN SCHLAGS. GERÄT NICHT ÖFFNEN!
Page 84

iKEYplus TRAGBARER USB REKORDER
EINFÜHRUNG:
Glückwunsch zu deiner Entscheidung für einen tragbaren iKEYplus USB R
EKORDER
.
Diese nächste Generation der Aufnahmegeräte bietet den letzten Stand der Technik
und ist mit einer limitierten 1-Jahres-Garantie * versehen. Bevor du den iKEYplus in
Betrieb nimmst, empfehlen wir dir, die Bedienungsanleitung aufmerksam zu lesen.
AUSSTATTUNG:
- USB Port (zum direkten Anschluss von unterstützten USB-Speichermedien)
- Kompatibel mit USB 2.0/1.1/1.0-Geräten
- Kompatibel mit dem iPod®
- Nimmt Audio im unkomprimierten WAV-Format oder im MP3-Format mit
wählbarer Kompressionsrate (bis zu 320 kbps) auf
- Vergoldete Cinch-Eingänge
- Mikrofoneingang mit Phantomspeisung
- Eingebauter Phono-Vorverstärker zum direkten Anschluss von Plattenspielern
- LED-Anzeige für verbleibenden Speicherplatz auf dem angeschlossenen
Speichermedium
- Batteriebetrieben mit Warnanzeige für leere Batterien
- Eingang für Netzteil (im Lieferumfang) zum Laden von wiederaufladbaren
Batterien
- 6-stellige Pegelanzeige mit Peak-hold und Übersteuerungsanzeige
- 3,5-mm-Miniklinke Kopfhörerausgang
- Einstellbare Aufnahmelautstärke
- Reset-Taste
- Benötigt 4 AA Batterien (nicht im Lieferumfang enthalten)
INHALTSVERZEICHNIS:
Warn- und Sicherheitshinweise..................................................................................83
Einführung, Ausstattung............................................................................................84
Teileliste und Zubehör...............................................................................................85
Anschlussdiagramme.................................................................................................86
Das mitgelieferte Stereomikrofon anschließen.......................................................86
Einen Plattenspieler anschließen............................................................................87
Einen Audio Mixer anschließen...............................................................................88
Einen Gitarrenverstärker anschließen.....................................................................89
Einen Handmikrofon anschließen..........................................................................90
Schnellstartanleitung..................................................................................................91
Wiedergabe und/oder Editieren der Aufnahmen an einem Computer......................99
LOW BATTERY, DEVICE FULL und BUSY LED Anzeige...........................................101
AHANG A: Detaillierte Anweisungen zur Nutzung mit einem Apple iPod...............102
Aufnahmen vom iPod auf einen PC zum Editieren übertragen.............................103
Aufnahmen vom iPod auf einen Mac zum Editieren übertragen...........................104
AHANG B: Troubleshooting.....................................................................................106
AHANG C: Einen herkömmlichen Plattenspieler an den iKEYplus anschließen....108
AHANG D: Technische Daten...................................................................................109
84
Page 85

Lieferumfang
Teileliste & Zubehör:
Stereomikrofon
Cinch-Kabel mit zusätzlicher Erdungsklemme
Transporttasche
4 x Normalschrauben
4 x Rändelschrauben
Bedienungsanleitung
Schwarze, Rote & Chrom-Frontplatten
Netzteil
85
320
RECORD
RECORD
320
Page 86

320
RECORD
320
RECORD
320
Das mitgelieferte Stereo-Mikrofon
an den iKEYplus anschließen
Linke Seite: Audioeingang Rechte Seite: Audioausgang
Mikrofoneingang
USB
Speichermedium
Kopfhörer
(optional zur Kontrolle
während der Aufnahme)
Stereomikrofon (im Lieferumfang enthalten)
ACHTUNG
: DIESER SCHALTER
MUSS IN DER “MIC”POSITION
STEHEN”
86
RECORD
320
Page 87

320
RECORD
320
RECORD
320
Plattenspieler an den
iKEYplus anschließen*
Cinch-Buchsen
ACHTUNG: DIESER SCHALTER
MUSS IN DER
“PH”POSITION
STEHEN”
Plattenspieler
(Standardmodel, Magnettonabnehmer, ohne Vorverstärker)
Linke Seite: Audioeingang Rechte Seite: Audioausgang
USB
Speichermedium
Kopfhörer
(optional zur Kontrolle
während der Aufnahme)
87
*Siehe Anhang E für weitere Informationen
RECORD
320
Page 88

320
RECORD
320
RECORD
320
Einen Mixer* an den
iKEYplus anschließen
Mixer
(Mit den Line- oder Record/Tape-Ausgängen verbinden)
*je nach Mixer kann es sein, dass du für die Aufnahme
andere Kabel benötigst (nicht im Lieferumfang)
Cinch-Buchsen
ACHTUNG: DIESER SCHALTER
MUSS IN DER
“LN”POSITION
STEHEN”
Linke Seite: Audioeingang Rechte Seite: Audioausgang
USB
Speichermedium
Kopfhörer
(optional zur Kontrolle
während der Aufnahme)
88
RECORD
320
Page 89

320
RECORD
320
RECORD
320
Einen Gitarrenverstärker* an den
iKEYplus anschließen
Gitarrenverstärker
(Mit den Line- oder Record/Tape-Ausgängen verbinden)
Cinch-Buchsen
ACHTUNG: DIESER SCHALTER
MUSS IN DER “LN”POSITION
STEHEN
”
Linke Seite: Audioeingang
Rechte Seite: Audioausgang
USB
Speichermedium
Kopfhörer
(optional zur Kontrolle
während der Aufnahme)
*je nach Verstärker kann es sein, dass du für die Aufnahme
andere Kabel benötigst (nicht im Lieferumfang)
89
RECORD
320
Page 90

320
RECORD
320
RECORD
320
Handmikrofon (nicht im Lieferumfang)
Ein Handmikrofon an den
iKEYplus anschließen
Linke Seite: Audioeingang Rechte Seite: Audioausgang
Mikrofoneingang
USB
Speichermedium
Kopfhörer
(optional zur Kontrolle
während der Aufnahme)
ACHTUNG: DIESER SCHALTER
MUSS IN DER “MIC”POSITION
STEHEN
”
90
RECORD
320
Page 91
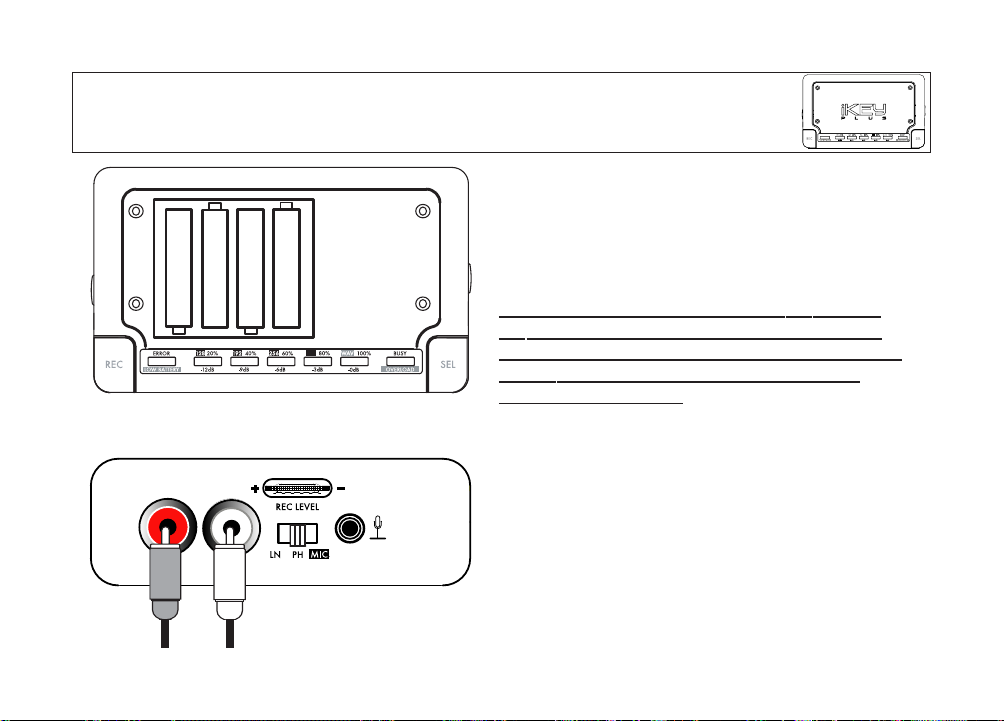
320
RECORD
Schnellstart-Anleitung
320
SCHRITT 1: STROM FÜR DEN iKEY
Entferne die Aluminium-Frontplatte und lege Batterien
entsprechend der Zeichnung in den Batterieschacht ein.
Alternativ kannst du auch das mitgelieferte 9 V DC Netzteil verwenden. Wenn du wiederaufladbare Batterien verwendest, werden diese aufgeladen, sobald der iKEY eingeschaltet wird.
WENN DU ALKALI ODER KEINE WIEDER
AUFLADBAREN
BATTERIEN VERWENDEST, DARF DAS NETZTEIL NICHT
GLEICHZEITIG ANGESCHLOSSEN WERDEN, DA DADURCH
DIE BATTERIEN EXPLODIEREN UND DEN IKEYPLUS
BESCHÄDIGEN KÖNNEN!!!
SCHRITT 2: AUDIOQUELLE ANSCHLIESSEN
Wenn du von einer Line-Signalquelle (CD-Player, Mixer
Karaokemaschine, Gitarrenverstärker, etc.) oder von einem
Plattenspieler aufnehmen willst , schließ die Cinch-Kabel wie
links im Bild gezeigt an.Wenn du mit einem Mikrofon
aufnehmen willst, musst du es an die 3,5-mm-Klinkenbuchse
anschließen. Mehr Informationen dazu findest Du in den
Anschlussbildern weiter vorne.
320
RECORD
91
320
RECORD
320
Page 92

320
RECORD
Schnellstart-Anleitung
(Fortsetzung)
SCHRITT 3: DEN SCHALTER EINSTELLEN!
Wenn du ein LINE-SIGNAL aufnimmst, stell den Schalter auf LN
(ganz nach links). Wenn du ein PHONO-SIGNAL von einem
Plattenspieler aufnimmst, stell den Schalter auf PH (mittlere
Position). Nimmst du mit einem MIKROFON auf, muss der
Schalter ganz nach rechts auf MIC gestellt werden.
SCHRITT 4: USB-GERÄT ANSCHLIESSEN
Schließ das USB-Speichermedium an, auf dem du aufnehmen
willst. Du kannst nahezu alle USB-Speichermedien verwenden,
inklusive FAT-32- und HFS+ USB Flash-Speicher, Festplatten
und die meisten MP3-Player. Wenn du auf einen iPod
aufnehmen möchtest, schau dir zuerst die Informationen in
ANHANG A “Benutzen eines iPods” an. Eine Liste bekannter
Inkompatibilitäten findest du im ANHANG B.
320
RECORD
320
RECORD
92
320
RECORD
Page 93

320
RECORD
SCHRITT 6: DEN IKEYPLUS EINSCHALTEN
Wenn du den iKEYplus eingeschaltet hast, braucht er noch
ungefähr 15 Sekunden, um zu booten. Während dieses
Vorgangs leuchten die LEDs kurz auf und zeigen den schon
belegten Speicherplatz auf dem Speichermedium an. Wenn der
iKEYplus fertig gebootet hat, hören die LEDs auf zu leuchten
und arbeiten nun als Pegelanzeige.
SCHRITT 5: KOPFHÖRER ANSCHLIESSEN
Wenn du das Signal, das gerade mit dem iKEYplus aufgenommen wird, kontrollieren möchtest, kannst du ganz einfach
Kopfhörer an die 3,5-mm-Kopfhörerklinkenbuchse anschließen.
Sei Vorsichtig, denn das Signal, dass aus dem Kopfhörerausgang
kommt, kann sehr laut sein.
320
RECORD
320
RECORD
93
Schnellstart-Anleitung
(Fortsetzung)
(OPTIONAL)
320
RECORD
Page 94

320
RECORD
320
RECORD
320
RECORD
SCHRITT 7: AUDIOSIGNAL STARTEN
Um den Aufnahmepegel am iKEYplus einstellen zu können, ist
es notwendig, dass du die Wiedergabe des Signals, das du
aufnehmen willst, startest. Bei der Aufnahme mit einem
Mikrofon solltest du in der gleichen Lautstärke in das Mikrofon
sprechen, mit der du auch später aufnehmen willst.
SCHRITT 8: AUFNAHMEPEGEL EINSTELLEN
Während du die leuchtenden LEDs auf der Oberseite im Auge
behälst, stellst du den REC LEVEL Regler auf der linken
Geräteseite so ein, dass die 0 dB Anzeige (steht unter den LEDs)
nicht aufleuchtet. Das ist sehr wichtig, denn wenn der Pegel die
0 dB überschreitet, treten Verzerrungen auf, sodass die
Aufnahme nicht mehr gut klingt. Ist der Pegel jedoch zu niedrig,
klingt die Aufnahme zu leise. Wenn du etwas aufnehmen willst,
dessen Pegel im Laufe der Aufnahme lauter werden könnte (z.B.
ein Live-Konzert), stell den REC LEVEL Regler so ein, dass du
noch eine Aussteuerungsreserve hast, um spätere Übersteuerungen und damit Verzerrungen zu vermeiden.
320
RECORD
Abbildung A -Die leuchtenden LEDs zeigen einen Pegel von -3 dB an.
Die Pfeile zeigen auf die Pegel-Werte (in dB).
94
Schnellstart-Anleitung
(Fortsetzung)
320
RECORD
RECORD
RECORD
320
320
Page 95

320
RECORD
SCHRITT 9: FORMAT UND QUALITÄT
Mit dem SEL-Button auf der linken Oberseite wählst du das
Aufnahmeformat. Drück den Button so oft, bis die LED des
gewünschten Formats/Qualität leuchtet. Nach 3 Sekunden
geht die LED aus und kehrt in die Pegelanzeige Betriebsart
zurück.
Das MP3 Format bietet verschiedene Klangqualitätsstufen und wird genutzt,
um Speicherplatz zu sparen:
128 kbps:
Qualität besser als FM Radio. Pro Aufnahmestunde fallen etwas 55
MB Daten an.
192 kbps Qualität: Pro Aufnahmestunde fallen etwa 83 MB Daten an.
256 kbps Qualität:
Erreicht fast CD-Qualität. Pro Aufnahmestunde fallen etwa
110 MB Daten an.
320 kbps Qualität:
Erreicht CD-Qualität. Pro Aufnahmestunde fallen etwa
137,5 MB Daten an.
WAV Format: Entspricht CD-Qualität (44,1 kHz, 16 bit Stereo), allerdings fallen
pro Aufnahmestunde 600 MB Daten an!
320
RECORD
Abbildung B -Die leuchtende LED zeigt an, dass 192 kbps gewählt
sind, die Pfeile die verschiedenen Format-/Qualitätseinstellungen.
320
RECORD
320
RECORD
320
RECORD
95
Schnellstart-Anleitung
(Fortsetzung)
320
RECORD
RECORD
RECORD
320
320
Page 96

320
RECORD
SCHRITT 10: AUFNAHME - REC DRÜCKEN!
Wenn du mit den Aufnahmevorbereitungen fertig bist, drück
den REC Button auf der linken Oberseite.
Nachdem du den REC Button gedrückt hast, leuchten alle
LEDs kurz auf, um anzuzeigen, dass der iKEYplus den Befehl
verstanden hat. Nachdem die LEDs wieder erlöschen, (normalerweise nach 0 bis 2 Sekunden) beginnt die Aufnahme.
Achtung: Während der Aufnahme leuchtet die LED ganz links
dauerhaft.
Nachdem die Aufnahme gestartet wurde, arbeiten die LEDs
wieder als Pegelanzeige und zeigen den Eingangspegel an.
Du kannst (falls nötig) wie in
Schritt
Schritt 8 beschrieben den
Eingangspegel mit dem RECORD LEVEL Regler jederzeit
während der Aufnahme anpassen.
320
RECORD
Abbildung C -Alle LEDS leuchten kurz auf, um zu zeigen, dass der
iKEYplus den Befehl verstanden hat.
320
RECORD
320
RECORD
96
Schnellstart-Anleitung
(Fortsetzung)
RECORD
320
320
RECORD
RECORD
320
Page 97

320
RECORD
SCHRITT 11: DRÜCK RECORD ZUM STOPPEN!
Wenn du die Aufnahme beenden willst, drück den REC
Button auf der linken Oberseite erneut. Du MUSST die
Aufnahme auf diese Art und Weise beenden, da die Daten
sonst nicht gespeichert werden.
Nachdem du den REC Button gedrückt hast, leuchten alle
LEDs kurz auf, um zu zeigen, dass der iKEYplus den Befehl
verstanden hat. Nachdem die LEDs erlöschen, (normalerweise nach 0 bis 2 Sekunden) wird die Aufnahme beendet
und die RECORD LED erlöscht. Wenn du auf einen iPod
aufnimmst kann es sein, dass die LED bis zu 30 Sekunden
leuchtet, bevor die Aufnahme vom iPod verarbeitet wurde.
Nach dem Ende der Aufnahme arbeiten die LEDs wieder als
Pegelanzeige und zeigen den Eingangspegel an. Du kannst
eine weitere Aufnahme durch erneutes Drücken des REC
Buttons starten (siehe Schritt 10).
320
RECORD
Abbildung D -Alle LEDS leuchten kurz auf, um zu zeigen, dass der
iKEYplus den Befehl verstanden hat.
320
RECORD
320
RECORD
97
Schnellstart-Anleitung
(Fortsetzung)
RECORD
RECORD
320
320
320
RECORD
Page 98

320
RECORD
SCHRITT 12: USB-GERÄT ENTFERNEN
Um das USB-Speichermedium vom iKEYplus zu trennen,
musst du vorher den REC Button für 3 Sekunden gedrückt
halten. Die LEDs leuchten dreimal hintereinander und
zeigen, dass nun das USB-Gerät entfernt werden kann.
HAL
TE DICH GENA
U AN DIESE VORGEHENSWEISE, DA
ES SONST ZU BESCHÄDIGTEN DA
TEN ODER KOMPLET-
TEM VERLUST DEINER AUFNAHMEN KOMMEN KANN.
Dieser Vorgang ist keine Besonderheit des iKEYplus, sondern
auch beim Entfernen von USB-Geräten am Computer muss
eine spezielle Vorgehensweise beachtet werden.
Nachdem du das USB-Speichermedium entfernt hast, kannst
du es an einen Computer anschließen und die Aufnahmen
anhören und editieren. Wenn du einen iPod benutzt, lies
bitte zuerst ANHANG A “Benutzen eines iPods”.
320
RECORD
Abbildung E -Alle LEDs blinken dreimal kurz hintereinander, um zu
zeigen, dass das USB-Speichermedium nun sicher ent
fernt werden kann.
320
RECORD
320
RECORD
98
Schnellstart-Anleitung
(Fortsetzung)
320
RECORD
RECORD
RECORD
320
320
Page 99

ABSPIELEN DEINER AUFNAHMEN AUF EINEM COMPUTER MIT WINDOWS XP:
Wenn du die Aufnahme, wie in der Schnellstart-Anleitung beschrieben (Seite 7-14)
abgeschlossen hast, schließ dein USB-Speichermedium an deinen Computer an.
Wenn du mit Windows XP arbeitest, sollte sich nach dem Anschließen des USBSpeichermediums ein Fenster öffnen, das dir verschiedene Optionen anbietet. Du
wählst am besten “Ordner öffnen, um Dateien anzuzeigen mit Windows Explorer”
(Siehe Abb. A)
Wenn du die Option “Ordner öffnen, um Dateien anzuzeigen mit Windows
Explorer” gewählt hast, wirst du einige Dateien in einem neuen Fenster sehen, ähnlich wie in Abbildung B. Wie du siehst, sind die vom iKEYplus aufgenommenen
Dateien alle entsprechend ihrem Aufnahmeformat und der Reihenfolge der
Aufnahme benannt. Eine Datei, die z.B. iKEY_mp3_2 heißt, sagt dir, dass sie im
MP3-Format und als dritte Aufnahme aufgenommen wurde.
Willst du eine der Dateien abspielen, mach einen Doppeklick auf die gewünschte
Datei im Fenster. Abhängig von der auf deinem Computer installierten Software gibt
es verschiedene Programme, die du zum Abspielen und Editieren deiner Dateien
benutzen kannst. Klicke dann mit der rechten Maustaste auf die gewünschte Datei
und wähle mit dem Befehl “Öffnen mit” das gewünschte Programm.
Abbildung A -Ordner öffnen, um Dateien anzuzeigen mit
Windows Explorer
Abbildung B - Benutz den Windows Explorer, um die auf dem USB-
Speichermedium gespeicherten Daten anzuzeigen. Die
Icons neben den Daten können auf deinem Computer
übrigens anders aussehen.
99
Page 100
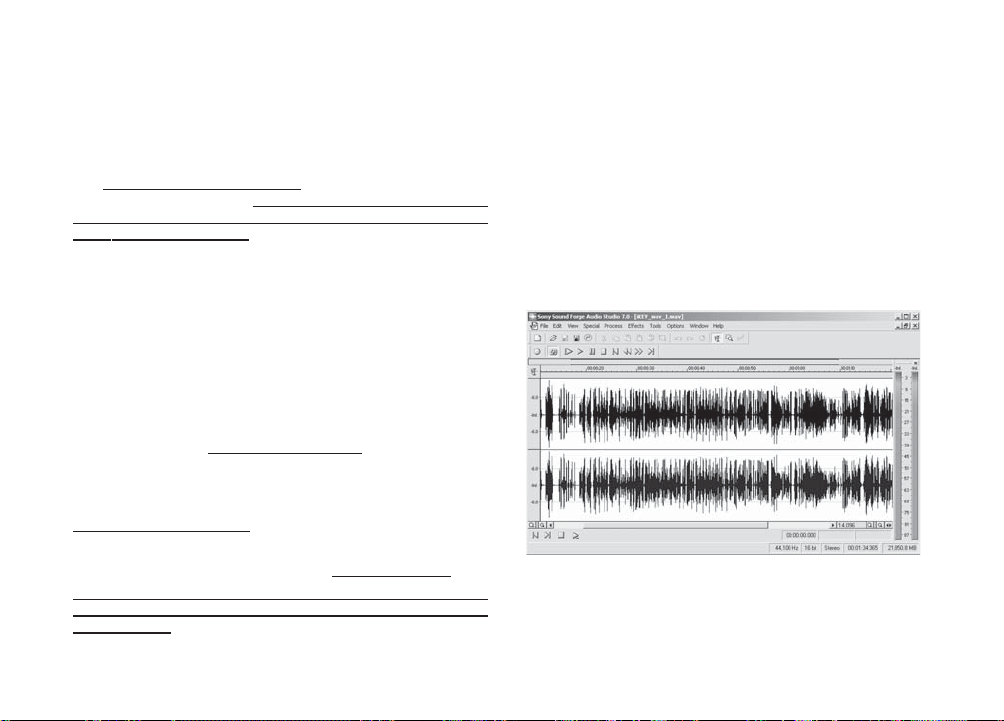
ABSPIELEN DEINER AUFNAHMEN AUF EINEM COMPUTER MIT WINDOWS XP:
(FORTSETZUNG):
Die meisten Windows Programme können mit WAV-Dateien größer als 2 GB nicht
umgehen. Wenn du lange Aufnahmen im WAV-Format machen musst, achte darauf,
dass diese nicht länger als 3 Stunden sind. Es gibt mit Wave Splitter ein kostenloses
Utility, das WAV-Dateien in mehrere kleinere Dateien aufteilt. Die Utility kannst du
unter http://claudiosoft.online.fr/wavsplit.html
herunterladen. (Stand zum Zeitpunkt
der Erstellung dieser Anleitung!) WICHTIG: GCI ODER iKEY AUDIO KANN
KEINEN SUPPORT FÜR DAS PROGRAMM LEISTEN UND ES LIEGT IN DEINEM
RISIKO, WENN DU ES EINSETZT.
VORSCHLÄGE ZUR EDITIERUNG DEINER AUFNAHMEN:
Neben der reinen High-Quality Aufnahme auf ein USB-Speichermedium gibt es
einiges mehr, was du mit den Aufnahmen tun kannst: schneiden, editieren und bearbeiten. Mit dem entsprechenden Wissen kannst du das Beste aus den Aufnahmen
holen. Da der iKEYplus ohne Software geliefert wird, findest du hier eine Liste von
Software zum Bearbeiten, die das Entwicklerteam von iKEY AUDIO empfiehlt. (Stand
zum Zeitpunkt der Erstellung dieser Anleitung!)
Audacity ist eine kostenlose Cross-Platform Audio Editing Software für Windows und
Macintosh und kann unter http://audacity
.sourceforge.net/ gefunden werden.
Sony Sound Forge und Sound Forge Audio Studio sind Programme, die für profes-
sionelles Audio Editing genutzt werden. Du kannst die beiden Programme unter
http://www
.sonymediasoftware.com finden.
Das Programm Steinberg WaveLab findest du unter http://www.steinberg.de
WICHTIG: GCI ODER iKEY AUDIO KANN KEINEN SUPPORT FÜR DIE GENANNTEN PROGRAMME LEISTEN UND ES LIEGT IN DEINEM RISIKO, WENN
DU SIE EINSETZT.
Um mehr zum Thema digitales Audio Editing zu erfahren, gibt es neben dem internet und verschiedenen Fachzeitschriften auch gute Bücher, die sich mit dem Thema
auseinandersetzen.
TIPPS FÜR’S EDITIEREN:
- Kopiere eine Aufnahme, die du mit dem iKEYplus gemacht hast und editieren willst
zuerst auf deinen Computer, bevor du editierst.
- Mach vorher eine Sicherheitskopie der Originalaufnahme, damit du diese, falls beim
Editieren etwas schief geht, wieder nutzen kannst.
- Wenn du ausgiebig und mit großen Dateien editieren willst, solltest du einen
schnellen Computer mit einer schnellen Festplatte und viel Arbeitsspeicher für
schnelles Arbeiten benutzen.
Mit einer Audioeditor-Software (nicht im Lieferumfang enthalten),
kannst du die mit dem iKEYplus gemachten Aufnahmen bearbeiten.
Abbildung: Sony Sound Forge Audio Studio 7.0...
100
 Loading...