

Page 1

OPERA TIONS MANUAL
Bedienungsanleltung
Manual de funcionamiento
Manual de fonctionnement
Manual del utente
EQ-30
GRAPHIC EQUALIZER
GRAPHISCHER ENTZERRER
COMPENSADOR GRÁFICO
ÉQUILIBREUR GRAPHIQUE
EQUALIZZATORE GRAFICO
Multi Language Instructions
English............................................................................Page 2
Deutsch...........................................................................Page 3
Español...........................................................................Page 4
Francais..........................................................................Page 5
Italiano.............................................................................Page 6
Page 1
Page 2
1 2 7 5
3
37 5
Page 2
11
4
9
10
9
10
6
12
4
8
6
Page 3

Introduction
Congratulations on purchasing a Gemini model EQ-30 equalizer. This
state of the art equalizer includes the latest features and is backed by a
three year warranty. Prior to use, we suggest that you carefully read all
the instructions.
to the right, turn the power back on and listen to determine which
position will provide a signal devoid of background noise and hum.
Keep the GROUND LIFT SWITCH in the ground position if the noise
level remains the same in either position.
CAUTION: DO NOT TERMINATE THE AC GROUND ON THE
EQUALIZER IN ANY WAY. TERMINATION OF THE AC GROUND CAN
BE HAZARDOUS.
Features
• Balanced/Unbalanced Inputs & Outputs
• In/Out Pass Switch
• Low Cut Switch
• Level Display
Cautions
1. All operating instructions should be read before using this equipment.
2. To reduce the risk of electrical shock, do not open the unit. There are
NO USER REPLACEABLE PARTS INSIDE. Please refer servicing to a
qualified service technician.
In the U.S.A., if you have any problems with this unit, call
1-732-738-9003 for customer service. Do not retur n equipment
to your dealer.
3. Do not expose this unit to direct sunlight or to a heat source such as
a radiator or stove.
4. This unit should be cleaned only with a damp cloth. Avoid solvents or
other cleaning detergents.
5. When moving this equipment, it should be placed in its original carton
and packaging. This will reduce the risk of damage during transit.
6. DO NOT EXPOSE THIS UNIT TO RAIN OR MOISTURE.
7. DO NOT USE ANY SPRAY CLEANER OR LUBRICANT ON ANY
CONTROLS OR SWITCHES.
Connection
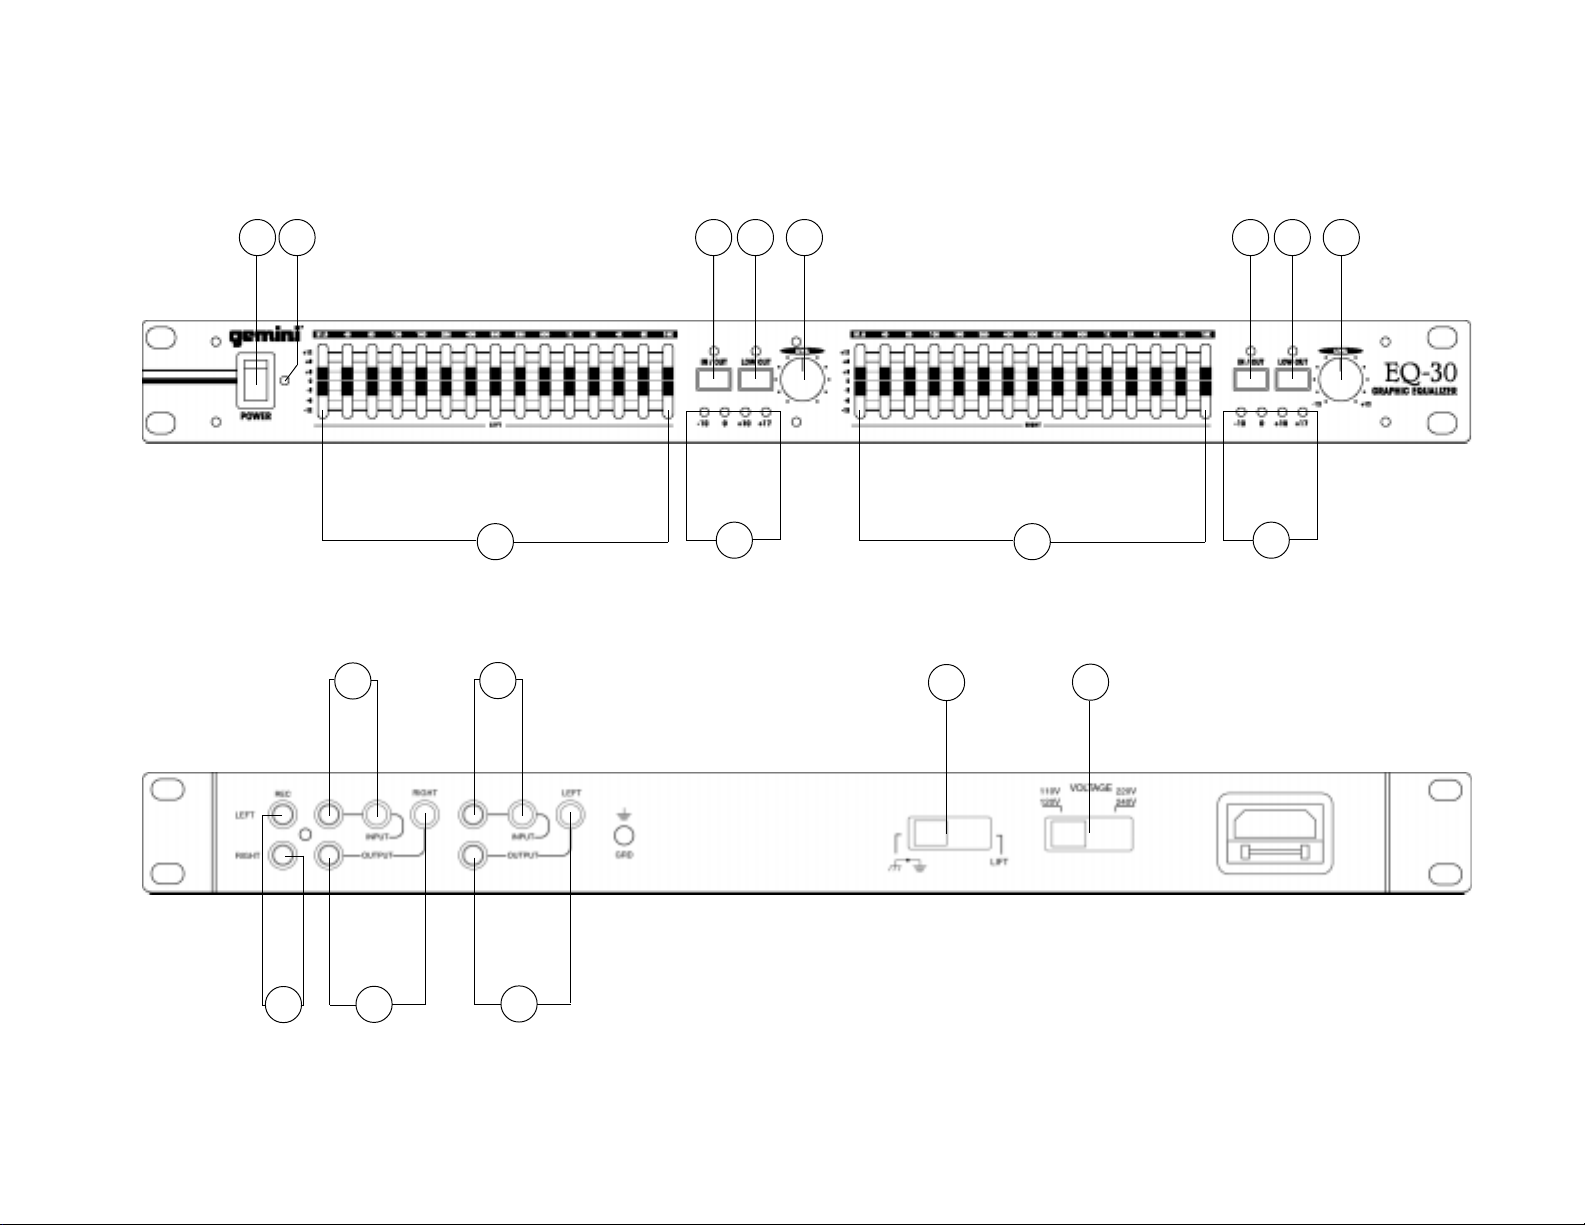
1. Make sure that the POWER (1) switch is in the off position (the
POWER LED will be off). All connections must be made with all
equipment OFF .
2. Before plugging in the power cord, make sure the VOLTAGE
SELECTOR (8) switch is set to the correct voltage. Plug the unit into
a proper power source.
3. Connect the input signal to your EQ-30 by using either the RCA or
1/4" INPUT JACKS (9).
4. Connect the cables for the output signal of the EQ-30 to either the
RCA or 1/4" OUTPUT JACKS (10).
NOTE: Use the 1/4" jacks for balanced signals and the
RCA jacks for unbalanced signals.
5. If you desire to record your mix, connect the REC OUTPUT (11) jacks
to the input of your recorder.
Operation
1. POWER ON: once you have made all the equipment connections to
your equalizer, press the POWER SWITCH (1). The power will turn
on and the POWER LED (2) will glow RED.
2. IN/OUT PASSING SWITCH: when the IN/OUT P ASS SWITCH (3) is in
the “IN” position, the EQ-30 will activate. If the switch is in the “OUT”
position, the signal will pass through the EQ-30 without being
equalized.
3. GRAPHIC EQUALIZER: the EQUALIZER SLIDE CONTROLS (4) are
provided to improve the frequency response of your system and to
compensate for room and environmental conditions. There are fifteen
bands per channel, each allowing +/- 12 dB adjustments. The bands
range from 31.5 Hz to 16 kHz.
4. LEVEL CONTROL: use the LEVEL CONTROLS (5) to obtain a proper
output signal. Each LEVEL CONTROL (5) has a bank of four LEVEL
DISPLAY LEDs (6). These indicate the output level in four steps from
-10 dB to +17 dB. If the +17 dB LED indicator is on, there is too much
output power and distortion will result. Lower the LEVEL CONTROL
(5) until this LED goes off.
5. LOW CUT SWITCH: the LOW CUT SWITCHES (7) are designed to
attenuate the muddy and unwanted low frequency sound created by
your source equipment (especially turntable rumble).
Specifications
Channels.........................................................................2 Channels
Bands..................................................................15 Bands/Channel
31.5, 40, 63, 100, 160, 250, 400, 500,
630, 800, 1k, 2k, 4k, 8k, 16 kHz
Input Impedance................................................................1.2 kOhm
Output Impedance.............................................................20 kOhm
Max Output Level.................................................................11 volts
Level Control......................................................................+/- 12 dB
S/N Ratio.................................................................................90 dB
Distortion................................................................................0.03 %
Power..........................................................................120/230 volts
Power Consumption...........................................................15 watts
Dimensions.......................19" W x 1.75" H x 9.75” D (483 x 45 x 248 mm)
Weight...................................................................................8 lbs. (3.6 kg)
Using the Ground Lift Switch
Depending on your system configuration, sometimes applying the ground
will create a quieter signal path. Sometimes lifting the ground can
eliminate ground loops and hum to create a quieter signal path.
1. With the equalizer on, listen to the system in idle mode (no signal
present) with the ground applied (the GROUND LIFT SWITCH (12) in
the left position).
2. Then turn the power off before moving the GROUND LIFT
SWITCH (12). Lift the ground by moving the GROUND LIFT SWITCH
Page 3
Page 4

Einführung
Wir gratulieren Ihnen zum Kauf eines Gemini EQ-30 Entzerrers. Dieser
moderne Entzerrer enthält die neueste Ausstattung mit dreijähriger
Garantie. Vor Anwendung dieser Einheit bitte alle Anweisungen
sorgfältig durchlesen.
Eigenschaften
• Symmetrier-Eingänge und -Ausgänge
• Ein/Aus-Durchgangsschalter
• Niederdämpfungsschalter
• Tonstärkenanzeige
Achtung
1. Die Bedienungsanleitungen sind ganz durchzulesen, bevor dieses
Gerät in Betrieb genommen wird.
2. Um die Gefahr eines Elektroschocks zu verringern, darf das Gerät
nicht geöffnet werden. ES BEFINDEN SICH KEINE VOM ANWENDER
ZU WARTENDEN TEILE IM GEHÄUSE. Wartung ist von einem
qualifizierten Kundendiensttechniker vorzunehmen.
3. Diese Einheit ist nicht direktem Sonnenlicht oder einer Wärmequelle
wie z.B. einem Heizungselement oder einem Ofen auszusetzen.
4. Diese Einheit soll nur mit einem feuchten Tuch gereinigt werden.
Lösemittel und andere Reinigungsmittel vermeiden.
5. Zum Transport ist dieses Gerät in den ursprünglichen Versandkarton
mit dazugehöriger Verpackung zu verpacken. Dadurch wird das
Risiko der Beschädigung bei Transport verringert.
6. DIESE EINHEIT DARF NICHT REGEN ODER FEUCHTIGKEIT
AUSGESETZT WERDEN.
7. AN DEN STEUERVORRICHTUNGEN UND SCHAL TERN DÜRFEN KEINE
SPRAYREINIGER ODER -SCHMIERST OFFE VERWENDET WERDEN.
2. Dann den Leistungsschalter ausschalten bevor der Masse-
Trennschalter - GROUND LIFT SWITCH (12) betätigt wird. Den
Masse-Trennschalter nach rechts legen, die Leistung wieder
einschalten und horchen, um zu bestimmen, welche Position ein
Signal ohne Grundgeräusch und Brummen erzeugt. Den MasseTrennschalter in Masseposition halten, falls der Geräuschpegel in
beiden Position unverändert bleibt.
VORSICHT: DIE MASSE IN KEINER WEISE AM ENTZERRER
ABSCHLIESSEN. DER ENDABSCHLUSS DER MASSE KANN MIT
GEFAHREN VERBUNDEN SEIN.
Bedienung
1. STROM EIN: Nachdem Sie das Gerät am Entzerrer angeschlossen
haben, drücken Sie die Leistungstaste [POWER] (1). Der Strom wird
eingeschaltet, und die rote Leistungs-LED (2) erleuchtet.
2. EIN/AUS-DURCHGANGSSCHALTER: Wenn der Ein/AusDurchgangsschalter [IN/OUT PASS] (3) in der IN-Position steht, wird
der EQ-30 aktiviert. Steht er in OUT-Position, läuft das Signal durch
den EQ-30, ohne entzerrt zu werden.
3. GRAPHISCHER ENTZERRER: Die Entzerrer-Schieberegler
[EQUALIZER SLIDE] (4) verbessern den Frequenzgang Ihrer Anlage
und kompensieren die Raum- und Umgebungsbedingungen. Jeder
Kanal hat 15 Frequenzbänder mit einer Abgleichung von jeweils +/12 dB. Der Bandbereich liegt zwischen 31,5 Hz und 16 kHz.
4. TONSTÄRKENREGLER: Benutzen Sie die T onstärkenregler [LEVEL]
(5), um ein vorschriftsmäßiges Eingangssignal zu erhalten. Jeder
Tonstärkenregler (5) ist mit einer Reihe von vier TonstärkenreglerLEDs (6) ausgerüstet. Diese zeigen den Ausgangspegel in vier
Stufen von -10 dB bis +17 dB an. Erleuchtet die +17-dB-LEDAnzeige, besteht zu viel Ausgangsleistung, welches zu Verzerrung
führen wird. In diesem Fall müssen Sie die Tonstärkenregler (5)
niedriger einstellen, bis die LED erlöscht.
5. NIEDERDÄMPFUNGSSCHALTER: Die Niederdämpfungsschalter [LOW
CUT] (7) wurden dazu entwickelt, um von der Tonquelle (besonders
von Plattenspielern) erzeugte verschwommene und ungewünschte
Niederfrequenztöne zu dämpfen.
Anschlüsse
1. Darauf achten, daß der Netzschalter [POWER] (1) in Off-Position
steht. Die Leistungs-LED (2) wird ausgeschaltet sein.
2. Bevor das Netzkabel eingesteckt wird, ist sicherzustellen, daß der
Spannungswahl [VOLTAGE SELECTOR] (8) auf die richtige
Spannung gestellt ist. Die Einheit an einer vorschriftsmäßigen
Stromquelle anschließen.
3. Die Kabel für das Eingangssignal des EQ-30 entweder mittels der
RCA- oder der 6,3-mm-Eingangsbuchsen (9) anschließen.
4. Die Kabel für das Ausgangssignal des EQ-30 entweder mittels der
RCA- oder der 6,3-mm-Ausgangsbuchsen (10) anschließen.
HINWEIS: Verwenden Sie 6,3-mm-Buchsen für
symmetrische Signale und die RCA-Buchsen für
unsymmetrische Signale.
5. Falls Sie Ihre Toschmischung aufnehmen möchten, schließen Sie die
REC OUTPUT-Buchsen (11) am Eingang des Zweispulentonbands
oder Kassettenrecorders an.
Benutzung des Masse-Trennschalters
Abhängig von Ihrer Systemkonfiguration, wenn man hin und wieder
Masse anlegt, kann man damit einen ruhigeren Signalpfad schaffen.
Wenn man hin und wieder die Masse trennt, kann man dadurch
Massekreise und Brummen eliminieren, um einen ruhigeren Signalpfad
schaffen.
1. Wenn der Entzerrer eingeschaltet ist, das System im Ruhemodus
(ohne Signal) bei angelegter Masse abhorchen (der Masse-
Trennschalter - GROUND LIFT SWITCH (12) ist nach links
geschaltet).
Technische Daten
Kanäle.................................................................................2 Kanäle
Frequenzbänder.......................................................15 Bänder/Kanal
31,5, 40, 63, 100, 160, 250, 400, 500, 630, 800,
1 kHz, 2 kHz, 4 kHz, 8 kHz, 16 kHz
Eingangsimpedanz.............................................................1,2 kOhm
Augangsimpedanz..............................................................20 kOhm
Max. Ausgangspegel.................................................................11 V
Tonstärkenregler................................................................+/- 12 dB
Störabstand.............................................................................90 dB
Verzerrung..............................................................................0,03%
Stromquelle......................................................................120/230 V
Leistungsaufnahme..................................................................15 W
Abmessungen....................................................483 x 45 x 248 mm
Gewicht..............................................................................3,6 kg
Page 4
Page 5

Introducción
Felicitaciones por su compra de un compensador Gemini modelo EQ-30.
Este compensador de la más avanzada tecnología está dotado de
características ultramodernas y está respaldado por una garantía de tres
años. Antes de usarlo, le recomendamos leer cuidadosamente todas las
instrucciones.
Características
• Entradas y salidas equilibradas
• Conmutador de paso de entrada/salida
• Conmutador supresor de frecuencias bajas
• Presentación de nivel
Precauciones
1. Antes de usar este equipo deben leerse todas las instrucciones de
manejo.
2. Para reducir el riesgo de choque eléctrico no abra la unidad. La
unidad NO CONTIENE PIEZAS REEMPLAZABLES PARA EL USADOR.
Encomiende el servicio a un técnico habilitado.
3. No exponga esta unidad a la luz solar directa o a una fuente de calor,
tal como un radiador o un calefactor.
4. La unidad debe limpiarse únicamente con un trapo húmedo. Evite los
solventes u otros detergentes de limpieza.
5. Para transportarlo, el equipo debe colocarse en las cajas y embalajes
originales. Esto reduce el riesgo de daño en tránsito.
6. EVITE EXPONER ESTA UNIDAD A LA LLUVIA O A LA HUMEDAD
7. NO APLIQUE LIMPIADORES O LUBRICANTES DE ROCO SOBRE LOS
CONTROLES O LAS LLAVES.
determinar cual de las posiciones le dará señal sin ruido de fondo y
sin zumbido. Mantenga el GROUND LIFT SWITCH en la posición de
puesta a tierra si el nivel del ruido permanece igual.
CUIDADO: NO TERMINE DE NINGUNA MANERA LA TIERRA C.A. EN
EL COMPENSADOR. EL HECHO DE TERMINAR LA TIERRA C.A.
PUEDE SER PELIGROSO.
Manejo
1. ENCENDIDO: Una vez que haya efectuado todas las conexiones de los
equipos a su compensador, oprima el INTERRUPTOR DE ENERGA (1).
Se encenderá la unidad y el led ROJO de energía (2).
2. CONMUTADOR DE P ASO DE ENTRADA/SALIDA: Cuando el
CONMUTADOR DE PASO DE ENTRADA/SALIDA (3) se encuentra
en la posición “ENTRADA”, el EQ-30 se activará. Si el conmutador se
coloca en la posición “SALIDA”, la señal atravesará el EQ-30 sin
compensar.
3. COMPENSADOR GRÁFICO: Los CONTROLES DE REGLETA DEL
COMPENSADOR (4) se incluyen para mejorar la respuesta de
frecuencia de su sistema y para compensar las condiciones de la
habitación y de entorno. Hay quince bandas por canal, cada uno de
los cuales permite ajustes de ± 12dB. Las bandas fluctúan entre 31,5
Hz y 16 kHz.
4. CONTROL DE NIVEL: Use los CONTROLES DE NIVEL (5) para
obtener una señal de salida apropiada. Cada CONTROL DE NIVEL
(5) tiene un banco de cuatro LED DE PRESENTACIN DE NIVEL (6).
Estos LED indican el nivel de salida en cuatro pasos desde -10 dB
hasta +17 dB. Si el indicador LED de +17 dB está encendido, hay
demasiada potencia de salida y se originará distorsión. Baje el
CONTROL DE NIVEL (5) hasta que el LED se haya apagado.
5. CONMUTADOR SUPRESOR DE FRECUENCIAS BAJAS: Los
CONMUTADORES SUPRESORES DE FRECUENCIAS BAJAS (7)
están diseñados para atenuar el sonido sordo e indeseado de baja
frecuencia originado por sus equipos de fuente (particularmente los
giradiscos).
Conexiones
1. Cerciórese de que el conmutador de ENERGA (1) se encuentre en la
posición apagada. El led de energía estará apagado.
2. Antes de enchufar el cable de alimentación de corriente, asegúrese
de que la LLAVE DE SELECCIÓN DE VOLT AJE (VOL TAGE
SELECTOR) (8) esté en posición correcta. Enchufe la unidad en un
tomacorriente apropiado.
3. Conecte la señal de entrada a su EQ-30, usando los JACKS DE
ENTRADA RCA o de q” (9).
4. Conecte los cables para la señal de salida del EQ-30 a los JACKS DE
SALIDA RCA o de q” (10).
NOTA: Use los jacks de q para señales equilibradas y
los jacks RCA para señales desequilibradas.
5. Si desea grabar su mezcla, conecte los jacks de SALIDA DE
GRABACIN (11) a la entrada de su grabador de carrete o casetera.
Uso del interruptor de separación de
tierra (Ground Lift)
Según la configuración de su sistema, a veces el hecho de aplicar la
tierra/masa resultará en una vía de señal con menos ruido. A veces, el
hecho de separar la tierra puede eliminar bucles de tierra y zumbido para
crear una vía de señal con menos ruido.
1. Con el compensador prendido, escuche el sistema en modo de
reposo (sin presencia de señal) con tierra aplicada (GROUND LIFT
SWITCH (12) en la posición izquierda).
2. Apague el aparato antes de desplazar el GROUND LIFT
SWITCH (12). Separe la tierra del marco moviendo el GROUND LIFT
SWITCH a la derecha, prenda el aparato de nuevo y escuche para
Especificaciones
Canales.....................................................................2 canales
Bandas...........................................................15 bandas/canal
31,5, 40, 63, 100, 150, 250, 400, 500, 630, 800, 1k, 2k, 4k, 8k, 16kHz
Impedancia de entrada.........................................1,2 kOhmios
Impedancia de salida.............................................20 kOhmios
Nivel de salida máxima.............................................11 voltios
Razón de señal a ruido...................................................90 dB
Distorsión.......................................................................0,03%
Alimentación....................................................120/230 voltios
Consumo de energía..................................................15 vatios
Dimensiones..............................................483 x 45 x 248 mm
Peso.................................................................................3.6 kg
Page 5
Page 6

Introduction
Nos félicitations à l’occasion de votre achat de l’équilibreur Gemini
EQ-30. Cet appareil très moderne inclut les caractéristiques
technologiques les plus récentes et il est couvert par une garantie de
trois ans. Avant de l’employer, lisez attentivement toutes les instructions
ci-après.
Caractéristiques
2. Ensuite, mettez l’appareil hors tension avant de mouvoir le
GROUND LIFT SWITCH (12). Séparez la terre/masse en déplaçant le
GROUND LIFT SWITCH à droite, mettez l’appareil de nouveau sous
tension et écoutez pour déterminer quelle position fournira un signal
sans bruit de fond et sans ronronnement. Gardez le GROUND LIFT
SWITCH dans la position de terre/masse si le niveau de bruit reste le
même dans l’une ou l’autre position.
ATTENTION: NE TERMINEZ EN AUCUN CAS LA TERRE C.A. SUR
L’ÉQUILIBREUR. TERMINER DE LA TERRE C.A. PEUT ÊTRE DANGEREUX.
• Entrées/sorties équilibrées/déséquilibrées
• Interrupteur de passage entrée/sortie
• Interrupteur de suppression des fréquences basses
• Affichage du niveau
Avertissements
1. On devrait lire toutes les consignes d’exploitation avant d’utiliser ce
matériel.
2. Afin de réduire le risque de choc électrique, n’ouvrez pas l’appareil. Il
n’y a pas de PICES REMPLAÇABLES L’INTÉRIEUR. V euillez soumettre
l’entretien/la réparation à un technicien qualifié.
3. Ne pas exposer cet appareil aux rayons du soleil direct ou à une
source de chaleur telle qu’un radiateur ou un poêle.
4. Cet appareil devrait être nettoyé seulement avec un chiffon humide.
Evitez les solvants et autres détergents de nettoyage.
5. Quand on déplace ce matériel, il devrait être mis dans son carton et
son emballage d’origine. Ceci réduira le risque de dommages pendant
le transport.
6. NE PAS EXPOSER CET APPAREIL LA PLUIE OU L ’HUMIDITÉ.
7. N’UTILISEZ PAS DE PRODUIT DE NETTOY AGE A VEC VAPORISA TEUR
OU LUBRIFIANT SUR AUCUNS DES BOUTONS OU DES
INTERRUPTEURS.
Connexions
1. Assurez-vous que l’interrupteur de PUISSANCE - POWER (1)
occupe la position Hors Tension - Off. La DEL sera éteinte.
2. Antes de enchufar el cable de alimentación de corriente, asegúrese
de que la LLAVE DE SELECCIÓN DE VOL TAJE (VOL TAGE
SELECTOR) (8) esté en posición correcta. Branchez l’appareil à une
source d’alimentation correcte.
3. Branchez le signal d’entrée à votre appareil EQ-30 à l’aide des
JACKS D’ENTRÉE RCA ou de 1/4" (9).
4. Branchez les câbles pour le signal de sortie de l’appareil EQ-30 soit aux
JACKS DE SORTIE RCA soit aux JACKS DE SORTIE de 1/4" (10).
REMARQUE: Utilisez les jacks de 1/4" pour les signaux
équilibrés et les jacks RCA pour les jacks déséquilibrés.
5. Si vous voulez enregistrer votre mélange, branchez les jacks de
SORTIE D’ENREGISTREMENT - REC OUTPUT (11) à l’admission de
votre enregistreur bobine-bobine ou cassette.
Exploitation
1. MISE SOUS TENSION - POWER ON: Après avoir réalisé toutes les
connexions des équipements à votre équilibreur, appuyez sur
l’INTERRUPTEUR DE PUISSANCE (1). L’appareil sera mis sous
tension et la DEL (2) de puissance s’allumera en ROUGE.
2. INTERRUPTEUR DE PASSAGE ENTRÉE/SORTIE: Lorsque
l’INTERRUPTEUR DE PASSAGE ENTRÉE/SORTIE (3) occupe la
position “ENTRÉE - IN”, l’appareil EQ-30 sera activé. Lorsque la
position “SORTIE - OUT” est occupée, le signal passera par l’appareil
EQ-30 sans être équilibré.
3. ÉQUILIBREUR GRAPHIQUE - Les CURSEURS DE
L’ÉQUILIBREUR (4) sont fournis pour améliorer la réponse de
fréquence de votre système et pour compenser les conditions
ambiantales et de la chambre. Il y a quinze bandes par canal,
chacune permettant des réglages de +/- 12 dB. La plage des bandes
varie entre 31,5 Hz et 16 kHz.
4. COMMANDE DU NIVEAU: Servez-vous des COMMANDES DU
NIVEAU (5) pour obtenir un signal de sortie correct. Chaque
COMMANDE DU NIVEAU (5) comporte une batterie de quatre DELs
D’AFFICHAGE DU NIVEAU (6). Elles indiquent le niveau de sortie en
quatre étapes de -10 dB à +17 dB. Si la DEL de +17 dB est allumée, la
puissance de sortie est excessive et la déformation en résultera.
Abaissez la COMMANDE DU NIVEAU (5) jusqu’à ce que la DEL
s’éteigne.
5. INTERRUPTEUR DE SUPPRESSION DES FRÉQUENCES BASSES: Les
INTERRUPTEURS DE SUPPRESSION DES FRÉQUENCES BASSES (7)
sont conçus pour atténuer les sons de basse fréquence troubles et
indésirés qui sont produits par vos appareils de source (surtout les
tables tournantes).
Spécifications
Canaux.......................................................................2 canaux
Bandes.............................................................15 bandes/canal
31,5, 40, 63, 100, 160, 250, 400, 500,
630, 800, 1k, 2k, 4k, 8k, 16 kHz
Impédance d’entrée...................................................1,2 kOhm
Impédance de sortie...................................................20 kOhm
Niveau de sortie max...................................................11 volts
Commande du niveau..............................................+/- 12 dB
Rapport son/bruit.............................................. 90 dB
Déformation...................................................................0,03%
Puissance...........................................................120/230 volts
Consommation d’énergie............................................15 watts
Dimensions..................................................483 x 45 x 248 mm
Poids..............................................................................3,6 kg
Emploi de l’interrupteur de soulèvement
de la terre/masse
Selon la configuration du système, parfois la mise en place d’une terre/
masse produira une voie de signalisation moins bruyante. Parfois, le
soulèvement de la terre/masse peut éliminer des circuits de terre ou le
ronronnement pour créer une voie de signalisation moins bruyante.
1. L’équilibreur étant sous tension, écoutez le système dans le mode de
repos (sans présence de signal) tout en ayant la terre/masse en
place (le GROUND LIFT SWITCH (12) occupe la position de gauche).
Page 6
Page 7

Introduzione
Congratulazioni per l’acquisto dell’ equalizzatore Gemini EQ-30. Questo
equalizzatore d’avanguardia ha incorporato i componenti più recenti e
offre una garanzia di 1 anno. Prima dell’uso leggere attentamente queste
istruzioni per poter utilizzare l’equalizzatore in modo corretto.
Caratteristiche principali
spostando a destra l’INTERRUTTORE DI SCOLLEGAMENTO
MASSA, inserire nuovamente l’alimentazione elettrica e procedere
all’ascolto in modo da stabilire in quale posizione si ottiene un segnale
privo di rumore di fondo e di ronzio. Se l’intensità del rumore risulta
identica in entrambe le posizioni, mantenere l’INTERRUTTORE DI
SCOLLEGAMENTO MASSA in posizione di collegamento a massa.
ATTENZIONE: EVITARE ASSOLUTAMENTE DI COLLEGARE
MEDIANTE MORSETTO LA MASSA DELLA TENSIONE DI RETE ALL
EQUALIZZATORE . TALE COLLEGAMENTO PUÒ ESSERE PERICOLOSO.
• Ingressi & Uscite bilanciati & non bilanciati
• Interruttore Passante Ingresso/Uscita
• Interruttore taglio bassa frequenza
• Display livello
Attenzione
1. Il presente libretto di istruzioni dovrebbe essere letto completamente
prima di utilizzate il Vostro nuovo Mixer.
2. Per ridurre il rischio di shock elettrici, non aprire il prodotto.
Internamente al Mixer non ci sono parti sostituibili o regolabili
dall’utente. In caso di malfunzionamento contattare esclusivamente un
centro di servizio tecnico qualificato.
3. Non esporre il prodotto alla luce solare diretta o a fonti di calore quali
caloriferi o stufe.
4. Non pulire il mobile del EQ-30 con solventi o detergenti chimici ma
utilizzare esclusivamente un panno soffice.
5. Per spostario utilizzare il cartone protettivo originale. Ciò riduce il
rischio di danni fisici al mixer durante il trasporto.
6. NON ESPORRE IL VOSTRO APPARECCHIO ALLA PIOGGIA E NON
VERSATECI SOPRA ALCUN LIQUIDO.
7. NON UTILIZZARE DETERSIVIO LUBRIFICANTI SPRAY SUI CONTROLLI
O I COMMUTA TORI.
Collegamenti
Utilizzo
1. ACCENSIONE: Dopo aver effettuato tutti i collegamenti con il
equalizzatore, premere l’INTERRUTTORE POWER (1). Verrà attivata
l’alimentazione e l’indicatore led diventerà ROSSO (2).
2. INTERRUTTORE PASSANTE INGRESSO/USCIT A: Quando
l’INTERRUTTORE P ASSANTE INGRESSO/USCIT A (3) è su “IN”,
l’equalizzatore EQ-30 verrà attivato. Se l’interruttore è su “OUT”, il
segnale passerà attraverso l’equalizzatore EQ-30 senza essere
equalizzato.
3. EQUALIZZATORE GRAFICO: Le LEVETTE DI SCORRIMENTO
EQUALIZZATORE (4) sono fornite per migliorare la frequenza di
risposta del sistema e per compensare le condizioni ambientali. Ci
sono quindici bande per canale, ciascuna permette di eseguire
regolazioni di banda +/- 12 dB. La gamma delle bande varia da 31.5
Hz a 16 Hz.
4. CONTROLLO LIVELLO: Usare i CONTROLLI LIVELLO (5) per
ottenere un segnale di uscita appropriato. Ciascun CONTROLLO
LIVELLO (5) ha un DISPLAY con quattro LED per il controllo del
LIVELLO (6). Questi indicano il livello d’uscita in quattro fasi da -10
dB a + 17dB. Se è acceso l’indicatore LED +17 dB, significa che
l’alimentazione in uscita è eccessiva e si avrà una distorsione.
Abbassare il CONTROLLO LIVELLO (5) finché questo indicatore
LED si spegne.
5. INTERRUTTORE TAGLIO BASSA FREQUENZA: Gli INTERRUTTORI
TAGLIO BASSA FREQUENZA (7) sono stati progettati per attenuare il
suono delle basse frequenze poco chiare e non desiderate create
dall’apparecchio sorgente (in particolar modo i giradischi).
1. Assicurarsi che l’interruttore di ALIMENTAZIONE (POWER) (1) sia su
off. L’indicatore power sarà spento.
2. Prima di inserire il cavo di alimentazione, assicuratevi che l’interruttore
VOLTAGE SELECTOR (8) sia fissato sul voltaggio giusto. Inserire
l’apparecchio nella presa di corrente appropriata.
3. Usare i cavi RCA o I JACK INPUT (9) da 1/4" per collegare il segnale
di ingresso dell’equalizzatore EQ-30.
4. Collegare i cavi per il segnale d’uscita dell’equalizzatore EQ-30 sia ai
cavi RCA o ai jack OUTPUT da 1/4" (10).
NOTA: Usare i jack da 1/4" per i segnali bilanciati e i cavi
RCA per i segnali non bilanciati.
5. Se si desidera registrare la miscelazione, collegare i jack OUTPUT
REC (11) all’ingresso della bobina o del registratore a cassette.
Impiego dell’interruttore di
scollegamento massa
In base alla configurazione dell’impianto di riproduzione, talvolta il
collegamento a massa dà luogo ad un percorso del segnale più
silenzioso. Altre volte scollegando la massa si possono eliminare gli anelli
di massa ed il ronzio, creando il percorso di massa più silenzioso.
1. Ad alimentazione elettrica dell’ equalizzatore inserita, ascoltare
l’impianto a riposo (in assenza di segnale) con la massa collegata
(INTERRUTTORE DI SCOLLEGAMENTO MASSA - GROUND LIFT
SWITCH (12) posizionato a sinistra).
2. Dopodiché, prima di agire sull’INTERRUTTORE DI
SCOLLEGAMENTO MASSA - GROUND LIFT SWITCH (12),
disinserire l’alimentazione elettrica. Scollegare la massa
Caratteristiche T ecniche
Canali.................................................................................2 Canali
Bande................................................................15 Bande/Canale
31.5, 40, 63, 100, 160, 250, 400, 500,
630, 800, 1k, 2k, 4k, 8k, 16 kHz
Impedenza Ingresso..............................................................1.2 kOhm
Impedenza Usita...........................................................20 kOhm
Livello massimo di uscita......................................................11 volt
Controllo livello.................................................................+/- 12 dB
Distorsione...........................................................................0.03 %
Alimentazione..............................................................120/230 volt
Consumo elettrico................................................................15 watt
Dimensioni....................................................483 x 45 x 248 mm
Peso......................................................................................3.6 kg
Page 7
Page 8

In the USA: If you experience problems with this unit,
call 1-732-738-9003 for Gemini Customer Service.
Do not attempt to return this equipment to your dealer.
Parts of the design of this product may be protected by worldwide patents.
Information in this manual is subject to change without notice and does
not represent a commitment on the part of the vendor. Gemini Sound
Products Corp. shall not be liable for any loss or damage whatsoever
arising from the use of information or any error contained in this manual.
No part of this manual may be reproduced, stored in a retrieval system or
transmitted, in any form or by any means, electronic, electrical, mechanical,
optical, chemical, including photocopying and recording, for any purpose
without the express written permission of Gemini Sound Products Corp.
It is recommended that all maintenance and service on this product is
performed by Gemini Sound Products Corp. or its authorized agents.
Gemini Sound Products Corp. will not accept liability for loss or damage
caused by maintenance or repair performed by unauthorized personnel.
Worldwide Headquarters • 120 Clover Place, Edison, NJ 08837 • USA
Tel: (732) 738-9003 • Fax: (732) 738-9006
France • G.S.L. France • 11, Avenue Leon Harmel, Z.I. Antony, 92160 Antony, France
Germany • Gemini Sound Products GmbH • Ottostrasse 6, 85757 Karlsfeld, Germany
UK • Gemini Sound Products • Unit C4 Hazleton Industrial Estate, Waterlooville, UK P08 9JU
Spain • Gemini Sound Products S.A. • Rosello, 516, Barcelona, Spain, 08026
© Gemini Sound Products Corp. 2002 All Rights Reserved
Tel: + 33 (0) 1 55 59 04 70 • Fax: + 33 (0) 1 55 59 04 80
Tel: 08131 - 39171-0 • Fax: 08131 - 39171-9
Tel: 087 087 00880 • Fax: 087 087 00990
Tel: 349-3435-0814 • Fax: 3493-347-6961
 Loading...