

Page 1

OPERA TIONS MANUAL
Bedienungsanleltung
Manual de funcionamiento
Manual de fonctionnement
Manual del utente
BPM-1
DUAL AUTOMATIC BPM COUNTER
Automatischer Zweikanal BPM Counter
Doble contador Automatico de BPM
Double compteur automatique de BPM
Doppio contatore BPM automatico
Multi Language Instructions
English............................................................................Page 2
Deutsch..........................................................................Page 3
Español...........................................................................Page 4
Francais..........................................................................Page 5
Italiano.............................................................................Page 6
Page 1
Page 2
11
10
21
20
19
12
11
10
9
8
8
7
7
6
5
5
4
4
3
2
2
1
1
Page 2
16
13
17 18
15
14
Page 3

Introduction
Operation
Congratulations on purchasing the Gemini BPM-1 automatic beat counter.
This state of the art beat counter is backed by a three year warranty. Prior
to use, we suggest that you carefully read all the instructions.
Features
• 4 Stereo Channels
• Ultrafast Beat Counter Can Read Up to 180 BPM (beats per minute)
• 4 Phono/Line Convertible Inputs
• BPM Displays and Beat Offset Indicators
Cautions
1. All operating instructions should be read before using this equipment.
2. To reduce the risk of electrical shock, do not open the unit. There are
NO USER REPLACEABLE PARTS INSIDE. Please refer servicing to a
qualified service technician.
In the U.S.A., if you have any problems with this unit,
call 1-732-738-9003 for customer service. Do not return
equipment to your dealer.
3. Do not expose this unit to direct sunlight or to a heat source such as a
radiator or stove.
4. This unit should be cleaned only with a damp cloth. Avoid solvents or
other cleaning detergents.
5. When moving this equipment, it should be placed in its original carton
and packaging. This will reduce the risk of damage during transit.
6. DO NOT EXPOSE THIS UNIT TO RAIN OR MOISTURE.
7. DO NOT USE ANY SPRAY CLEANER OR LUBRICANT ON ANY
CONTROLS OR SWITCHES.
Connections
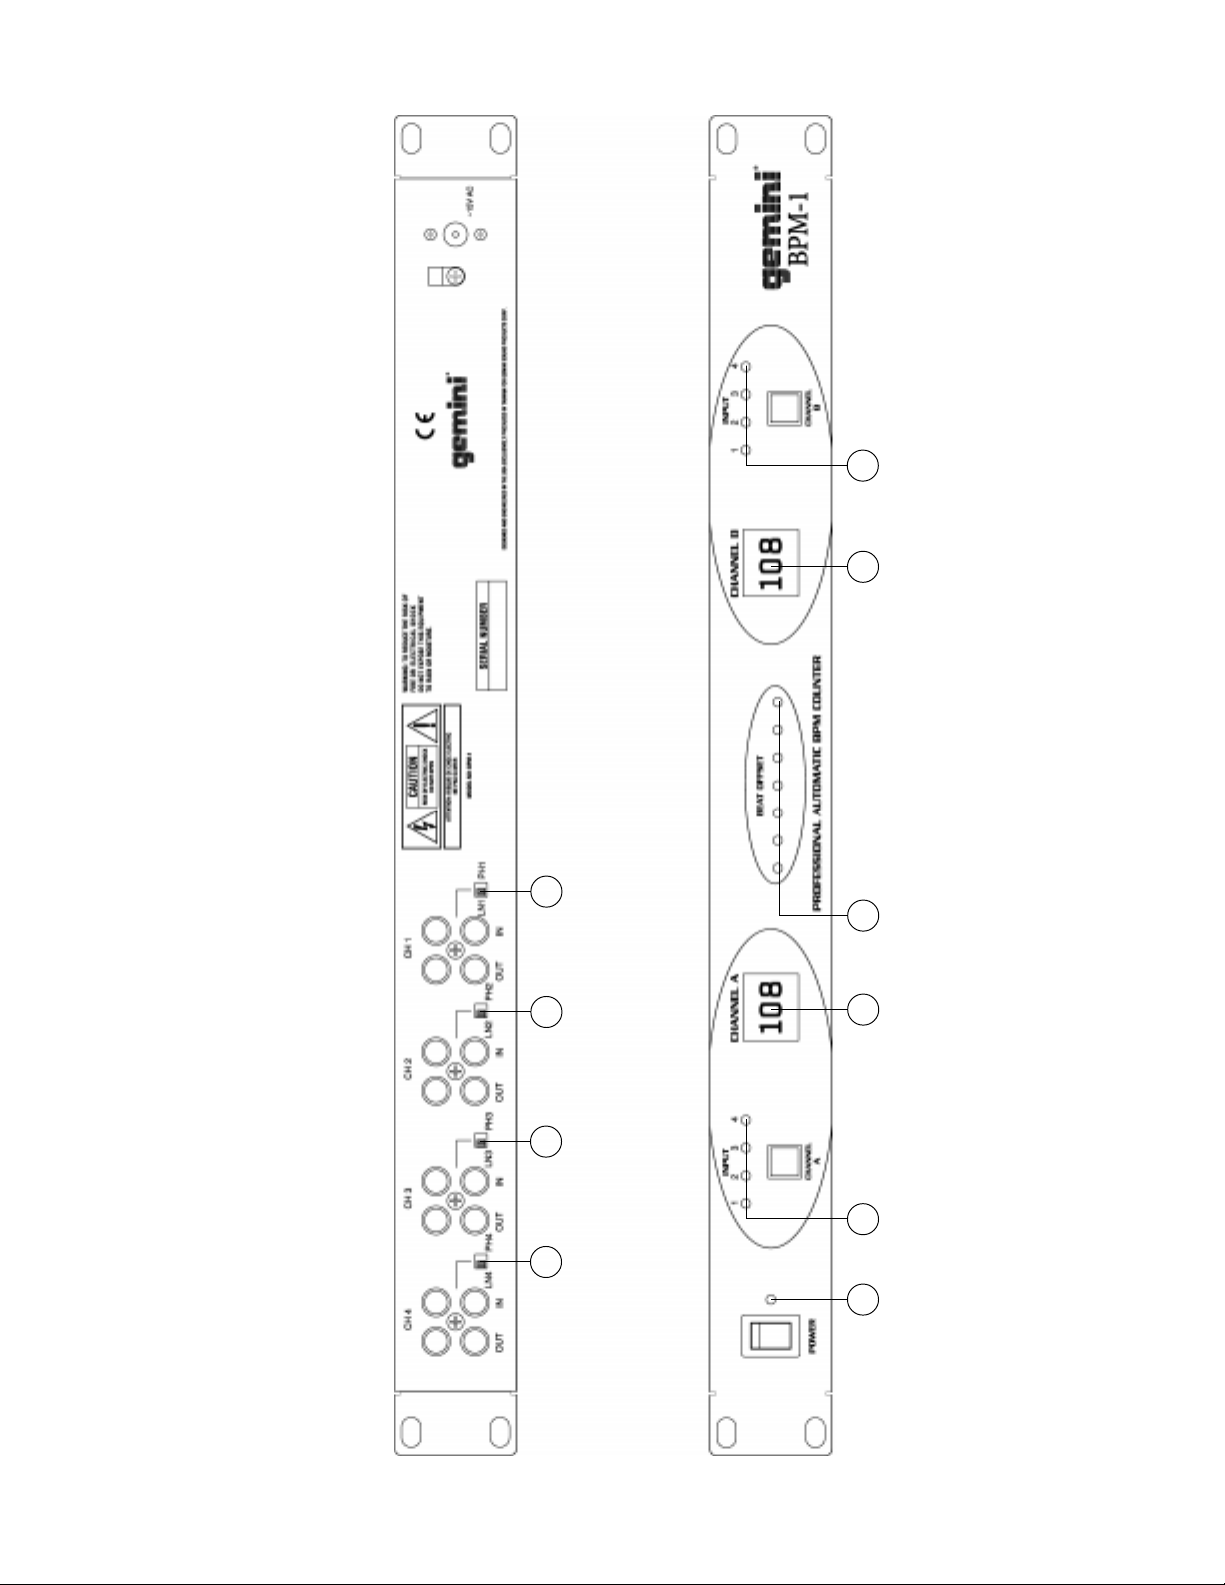
1. Make sure that the POWER (13) switch is in the off position. The
POWER LED (14) will be off. This unit comes supplied with a 15 volt
AC adaptor. Plug the adaptor into the rear panel power jack. Then plug
the adaptor into a proper power source.
2. Use the 4 stereo PHONO/LINE (2, 5, 8, 11) inputs on the rear panel to
connect to the output of your sources. The PH1/LN1 (12) switch
enables you to set the CHANNEL 1 (11) input sensitivity to Phono or
Line. The PH2/LN2 (9) switch enables you to set the CHANNEL 2 (8)
input sensitivity to Phono or Line. The PH3/LN3 (6) switch enables you
to set the CHANNEL 3 (5) input sensitivity to Phono or Line. The PH4/
LN4 (3) switch enables you to set the CHANNEL 4 (2) input sensitivity
to Phono or Line. Note: When using turntables, don’t forget to connect
the ground wire from your tuntable to the ground screw of your mixer.
3. The BPM-1 is supplied with 4 sets of OUTPUT (1, 4, 7, 10) jacks. If you
are using a turntable and have the input set to phono, the
corresponding output must be connected to phono inputs on your
mixer. If you have the input set to line, the corresponding output must
be connected to line inputs on your mixer. Use the CHANNEL 1
OUTPUT (10) jacks to connect to the appropriate inputs on your mixer.
Use the CHANNEL 2 OUTPUT (7) jacks to connect to the appropriate
inputs on your mixer. Use the CHANNEL 3 OUTPUT (4) jacks to
connect to the appropriate inputs on your mixer. Use the CHANNEL 4
OUTPUT (1) jacks to connect to the appropriate inputs on your mixer.
1. POWER ON: Once you have made all the equipment connections, press
POWER (13). The power will turn on and the POWER LED (14) will
glow RED. When you turn on the BPM-1, the unit will run through an
initialization period in which the BPM DISPLAYS (17, 19) and the BEAT
OFFSET INDICATORS (18) will flash. When the flashing stops, the unit
is ready for use.
2. The ASSIGN (16, 21) buttons allow you to select which channel will be
displayed on each side of the BPM-1. Press the ASSIGN (16) button to
select channel 1, 2, 3 or 4 to be displayed on the left BPM DISPLAY
(17). The ASSIGN LED (15) will indicate the channel you selected.
Press the ASSIGN (21) button to select channel 1, 2, 3 or 4 to be
displayed on the right BPM DISPLAY (19). The ASSIGN LED (20) will
indicate the channel you selected.
3. BPM DISPLAY: There are BPM DISPLAYS (17, 19) for each side of the
BPM-1. They update approximately every 2.5 seconds and digitally
display the Beats Per Minute allowing you to match the beats visually.
BPM DISPLAY (17) reflects the Beats Per Minute of the channel
assigned to the left side of the unit, and BPM DISPLAY (19) reflects
the Beats Per Minute of the channel assigned to the right side of the
unit.
NOTE: A [- -] reading will appear on the BPM DISPLAY if the
track has unclear beats. The [- -] reading will also appear if
there is no signal present.
4. The BEAT OFFSET INDICATORS (18) light when the tracks of the two
channels assigned to the BPM-1 are within 11 BPMs of each other and
display how aligned the beats of the two channels are. When the RED
LEDs light, the beats are not aligned. When the YELLOW LEDs light,
the beats are almost aligned. When the GREEN LED lights, the beats
are aligned perfectly.
NOTE: If the difference between the two channels beats
exceed 11 BPM, the BEAT OFFSET INDICATORS will not
light.
SUGGESTION: You can use the BPM DISPLAYS to determine which
tracks have similar or the same Beats Per Minute. When mixing two tracks
with similar Beats Per Minute, you can use one source’s pitch control to
align the Beats Per Minute with the other source’s BPM. The BPM
DISPLAYS and the BEAT OFFSET INDICATORS update every 2.5
seconds and will reflect the change in BPM and indicate when the beats
are aligned.
NOTE: Beat mixing is a skill that requires practice. Not
every track has a strong beat, and beat mixing works best
with tracks that have clear and strong beats.
Specifications
INPUTS:
Phono......................................................................................3 mV 3 Mohm
Line.....................................................................................150 mV 3 Mohm
OUTPUTS:
Input/Output Resistance..................................................................<0.1 Ohm
GENERAL:
BPM Range.............................................................................60 - 180 BPM
Power Adapter...........................................................115V/15V AC 500 mA
230V/15V AC 500 mA
Dimensions......................................19”w x 1.75”h x 3”d (483 x 44 x 78 mm)
Weight.....................................................................................3 lbs (1.5 kg)
Page 3
Page 4

Einleitung
Bedienung
Wir gratulieren Ihnen zum Kauf eines Gemini BPM-1 Automatischen TaktZählers. Dieser moderne Takt-Zähler enthält die neueste Ausstattung mit
dreijähriger Garantie. Vor Anwendung dieses Takt-Zählers bitte alle
Anweisungen sorgfältig durchlesen.
Funktionen
• 4 Stereokanäle
• Ultraschneller Takt-Zähler kann bis zu 180 Takte pro Minute zählen
• 4 Phono/Line umschaltbare Eingänge
• BPM-Displays und Beat Offset Indikator
Vorsichtsmaßnahmen
1. Vor Anwendung dieses Geräts bitte alle Anweisungen sorgfältig
durchlesen.
2. Das Gerät nicht öffnen, um das Risiko elektrischen Schocks zu
vermeiden. Es enthält KEINE VOM ANWENDER ERSETZBAREN
TEILE. Die Wartung darf nur von authorisierten Servicetechnikern
durchgeführt werden.
3. Das Gerät keinem direkten Sonnenlicht oder einer Wärmequelle wie
Heizkörper oder Ofen aussetzen.
4. Dieses Gerät darf nur mit einem feuchten Tuch gesäubert werden.
Keine Lösungs- oder Reinigungsmittel benutzen.
5. Bei Umzügen sollte das Gerät in seinem ursprünglichen Versandkarton
und Verpackungsmaterial verpackt werden. Dadurch verhindert man,
daß das Gerät während des Transportes beschädigt wird.
6. DIESES GERÄT NICHT REGEN ODER FEUCHTIGKEIT
AUSSETZEN.
7. An den Reglern oder Schaltern kein Spray-Reinigungsmittel oder
Schmiermittel benutzen.
Anschlüsse
1. Darauf achten, daß der Netzschalter POWER (13) in Off-Position
geschaltet ist. Die POWER LED (14) wird ausgeschaltet sein. Dieses
Gerät wird mit einem externen 15-V-Wechselstromadapter geliefert.
Den Adapter in die Leistungsbuchse an der Rückwand stecken. Dann
den Adapter an der vorschriftsmäßigen Stromquelle anschließen.
2. An der Rückwand sind jeweils 4 Stereoeingänge PHONO/LINE (2, 5, 8,
11) um den Ausgang ihre Quelle anzuschließen. Der Schalter PH1/LN1
(12) ermöglicht Ihnen, die Eingänge CHANNEL 1 (11) an Phono oder
Line anzuschließen. Der Schalter PH2/LN2 (9) ermöglicht Ihnen, die
Eingänge CHANNEL 2 (8) an Phono oder Line anzuschließen. Der
Schalter PH3/LN3 (6) ermöglicht Ihnen, die Eingänge CHANNEL 3 (5)
an Phono oder Line anzuschließen. Der Schalter PH4/LN4 (3)
ermöglicht Ihnen, die Eingänge CHANNEL 4 (2) an Phono oder Line
anzuschließen. Hinweis: Bei Benutzung eines Plattenspielers nicht
vergessen, den Erdungsdraht vom Plattenspielers an der
Erdungsschraube des Mischpults anschließen.
3. Der BPM-1 verfügt über 4 Ausgangsbuchsenpaare OUTPUT (1, 4, 7,
10). Wenn Sie einen Plattenspieler benutzen und den Eingang auf
Phono gesetzt haben, muß der entsprechende Ausgang an den
Phonoeingängen Ihres Mischpults angeschlossen werden. Wenn
Sie den Eingang auf Line gesetzt haben, muß der entsprechende
Ausgang an den Line-Eingängen Ihres Mischpults angeschlossen
werden. Benutzen Sie die Buchsen CHANNEL 1 OUTPUT (10), um die
Eingänge an Ihrem Mischpult anzuschließen. Benutzen Sie die
Buchsen CHANNEL 2 OUTPUT (7), um die Eingänge an Ihrem
Mischpult anzuschließen. Benutzen Sie die Buchsen CHANNEL 3
OUTPUT (4), um die Eingänge an Ihrem Mischpult anzuschließen.
Benutzen Sie die Buchsen CHANNEL 4 OUTPUT (1), um die Eingänge
an Ihrem Mischpult anzuschließen.
1. STROM EIN: Nachdem Sie das Gerät am Mischpult angeschlossen
haben, drücken Sie auf die Taste POWER (13). Der Strom wird
eingeschaltet und die POWER LED (14) erleuchtet ROT. Wenn Sie
den BPM-1 eingeschaltet haben, läuft das Gerät durch eine
Einleitungsphase, während der die BPM-DISPLAYS (17, 19) und die
BEAT OFFSET INDICATORS (18) aufleuchten. Wenn das Aufleuchten
stoppt, ist das Gerät betriebsbereit.
2. Die ASSIGN (16, 21) Schalter ermöglichen Ihnen denjenigen Kanal
auszuwählen, der durch jede Seite des BPM-1 angezeigt wird. Den
ASSIGN (16) Schalter drücken, um die Kanäle 1, 2, 3 oder 4
auszuwählen, die im linken BPM-DISPLAY (17) angezeigt werden. Der
ASSIGN-LED (15) wird die ausgewählten Kanäle anzeigen. Drücken
Sie den ASSIGN (15) Schalter, um Kanäle 1, 2, 3 oder 4 auszuwählen,
die im rechten BPM-DISPLAY (20) angezeigt werden. Die ASSIGN
LED (20) wird den ausgewählten Kanal anzeigen.
3. BPM DISPLAY: Es gibt ein BPM-DISPLAY (17, 19) für jede Seite des
BPM-1. Sie aktualisieren ca. alle 2,5 Sekunden und geben eine digitale
Anzeige des Taktes pro Minute, welches Ihnen ermöglicht, die Takte
visuell anzupassen. Das BPM-DISPLAY (17) zeigt die Takte pro Minute
des Kanals der an der linken Seite des Geräts zugeteilt ist, und das
BPM-DISPLAY (19) zeigt die Takte pro Minute des Kanals an, welcher
der rechten Seite des Geräts zugeteilt ist.
HINWEIS: Die Anzeige [- -] wird auf dem BMP-DISPLAY
erscheinen, wenn die Takte auf der Spur undefinierbar sind.
Die Anzeige [- -] wird ebenfalls erscheinen, wenn kein Signal
ausgegeben wird.
4. Die BEAT OFFSET INDICATORS (18) leuchten auf, wenn die dem
BPM-1 zugeteilten Spuren der zwei Kanäle 11 Takte pro Minute (BPM)
abgeben und anzeigen, wie die Takte der zwei Kanäle ausgerichtet
sind. Wenn die ROTEN LEDs aufleuchten, sind die Takte nicht
synchron. Wenn die GELBEN LEDs aufleuchten, sind die Takte fast
synchron. Wenn die GRÜNEN LEDs aufleuchten, sind die Takte
vollkommen synchron.
HINWEIS: Bei mehr als 11 BPM (Takten) Unterschied
zwischen den zwei Kanälen werden die BEAT OFFSET
INDICATORS nicht aufleuchten.
VORSCHLAG: Mit den BMP-DISPLAYS können Sie erkennen, welche
Spuren ähnliche oder die gleichen Takte pro Minute haben. Wenn zwei
Spuren mit ähnlichen Takten pro Minute gemischt werden, kann die
Höhenregelung der Tonquelle dazu benutzt werden, die Takte pro Minute
mit den Takten pro Minute der anderen Tonquelle auszurichten. Die BMPDISPLAYS und die BEAT OFFSET INDICATORS aktualisieren sich alle
2,5 Sekunden automatisch und werden die Änderung der Takte pro Minute
anzeigen, sowie daß die Takte eventuell synchron sind.
HINWEIS: Geschicktes Beat-Mixing erfordert Übung. Nicht
jede Spur hat einen starken Takt, und Beat-Mixing erzielt
die besten Ergebnisse mit lauten und starken Takten.
Technische Daten
EINGÄNGE:
Phono.......................................................................................3 mV 3 Mohm
Line....................................................................................150 mV 3 Mohm
AUSGÄNGE:
Eingangs-/Ausgangswiderstand....................................................<0,1 Ohm
ALLGEMEINES:
BPM-Anzeigebereich.................................................................60 - 180 BPM
Stromversorgung (exterenes Netzteil)...........................115V/15V ~ 500 mA
230V/15V ~ 500 mA
Abmessungen.....................................................................483 x 44 x 78 mm
Gewicht...............................................................................................1.5 kg
Page 4
Page 5

Introducción
Funcionamiento
Felicitaciones por su compra del contador automático de beats BPM-1 de
Gemini. Este contador de la más avanzada tecnología está respaldado por
una garantía de tres años. Antes de usarlo, le recomendamos leer
cuidadosamente todas las instrucciones.
Características
• 4 canales estereo
• contador de beats muy rápido; capaz de leer hasta 180 bpm (beats por
minuto)
• 4 entradas fono/línea convertibles
• BPM Displays e Indicadores de desalineación de los beats
Precauciones
1. Deberán leerse todas las instrucciones de operación antes de usar el
equipo.
2. Para reducir el riesgo de choques eléctricos, no abra esta unidad. No
contiene PIEZAS REEMPLAZABLES POR EL USUARIO. Por favor,
refiera el servicio a un técnico de servicio calificado.
3. No exponga la unidad a la luz solar directa ni a una fuente de calor, por
ejemplo, un radiador o estufa.
4. Esta unidad sólo deberá limpiarse con un paño húmedo. Evite el uso
de disolventes u otros detergentes de limpieza.
5. Para mover este equipo, colóquelo en la caja y empaque original, a fin
de reducir el riesgo de daños durante el transporte.
6. NO DEJE ESTA UNIDAD EXPUESTA A LLUVIA O HUMEDAD.
7. NO USE LIMPIADORES DE ROCÍO O LUBRICANTES EN
CUALESQUIER CONTROLES O INTERRUPTORES.
Conexiones
1. Cerciórese de que el interruptor de POWER (13) (ENERGÍA) esté en la
posición off (apagada). El POWER LED (14) (LED de ENERGÍA)
estará apagado. Esta unidad se suministra con un adaptador AC de 15
voltios. Enchufe el adaptador en el jack de energía del panel trasero.
Luego enchufe el adaptador en una fuente de energía apropiada.
2. Use en el panel trasero las 4 entradas estereo PHONO/LINE (2, 5, 8,
11) para conectar a la salida de sus fuentes. El conmutador PH1/LN1
(12) le permite seleccionar la entrada CHANNEL 1 (11) a Phono o Line
(fono o línea). El conmutador PH2/LN2 (9) le permite seleccionar la
entrada CHANNEL 2 (8) a Phono o Line (fono o línea). El conmutador
PH3/LN3 (6) le permite seleccionar la entrada CHANNEL 3 (5) a
Phono o Line (fono o línea). El conmutador PH4/LN4 (3) le permite
seleccionar la entrada CHANNEL 4 (2) a Phono o Line (fono o línea).
Nota: Cuando se usan tocadiscos, ne se olvide de conectar el terminal
de tierra de su tocadisco al tornillo de tierra de su mezclador.
3. El aparato BPM-1 está dotado de 4 series de jacks de SALIDA (1, 4, 7,
10). Si Ud hace uso de un tocadisco y Ud tiene la entrada seleccionada
para fonográfico, la salida correspondiente tiene que ser conectada a
las entradas fonográficas de su mezclador. Si Ud tiene la entrada
seleccionada para línea, la salida correspondiente tiene que ser
conectada a las entradas de línea de su mezclador. Haga uso de los
jacks CHANNEL 1 OUTPUT (10) para conectar a las entradas
apropiadas de su mezclador. Haga uso de los jacks CHANNEL 2
OUTPUT (7) para conectar a las entradas apropiadas de su mezclador.
Haga uso de los jacks CHANNEL 3 OUTPUT (4) para conectar a las
entradas apropiadas de su mezclador. Haga uso de los jacks
CHANNEL 4 OUTPUT (1) para conectar a las entradas apropiadas de
su mezclador.
1. ENCENDIDO: Una vez que se haya efectuado todas las conexiones de
los equipos, oprima el POWER (13) (INTERRUPTOR DE ENERGÍA).
Se encenderá la unidad así como el POWER LED (14) (LED ROJO de
ENERGÍA). Cuando se prenda el aparato BPM-1, el aparato pasará
por un período de inicialización durante el cual se observará el
parpadeo de BPM DISPLAYS (17, 19) y de los BEAT OFFSET
INDICATORS (18). Cuando se pare el parpadeo, el aparato está listo
para el empleo.
2. Los botones ASSIGN (16, 21) le permiten seleccionar el canal que se
visualizará en cada lado del BPM-1. Oprima el botón ASSIGN (16)
para seleccionar el canal 1, 2, 3 ó 4 a visualizar en el BPM DISPLAY
(17) del lado izquierdo. El ASSIGN LED (15) indicará el canal
seleccionado. Oprima el botón ASSIGN (21) para seleccionar el canal
1, 2, 3 ó 4 a visualizar en el BPM DISPLAY (19) del lado derecho. El
ASSIGN LED (20) indicará el canal seleccionado.
3. BPM DISPLAY: Hay BPM DISPLAYS (17, 19) para cada lado del BPM-
1. Se ponen al día aproximadamente cada 2,5 segundos y muestran
digitalmente los beats por minuto lo que le permite aparear los beats
visualmente. El BPM DISPLAY (17) corresponde a los beats por
minuto del canal asignado al lado izquierdo del aparato y el BPM
DISPLAY (19) corresponde a los beats por minuto del canal asignado
al lado derecho del aparato.
NOTA: Se observará una lectura [- -] en el BPM DISPLAY si la
pista no tiene beats claros. La lectura [- -] aparecerá
también si no hay señal.
4. Los BEAT OFFSET INDICATORS (18) (Indicadores de desalineación
de los beats ) se encienden cuando las pistas de los dos canales
asignados al BPM-1 se encuentran dentro de 11 beats/minuto la una
de la otra y muestran el grado de alineación de los beats de los dos
canales. Cuando se encienden los LEDs ROJOS, los beats no se
alinean. Cuando se encienden los LEDs AMARILLOS, los beats casi
se alinean. Cuando se encienden los LEDs VERDES, los beats se
alinean perfectamente.
NOTA: Si la diferencia entre los beats de los dos canales
supera 11 batidos/minuto, los BEAT OFFSET INDICATORS no
se encienden.
SUGERENCIA: Se puede utilizar los BPM DISPLAYS para determinar
cuales de las pistas tienen similares o los mismos beats por
minuto.Cuando se mezclan dos pistas con similares beats por minuto, se
puede utilizar el mando del tono de una fuente para alinear los beats por
minuto con los de la otra fuente. Los BPM DISPLAYS y los BEAT
OFFSET INDICATORS se ponen al día cada 2,5 segundos e indicarán el
cambio en BPM y cuando los beats están alineados.
NOTA: La mezcla de los beats es una destreza que requiere
práctica. Todas las pistas no tienen beat sólido; la mezcla
tiene los mejores resultados con beats claros y sólidos.
Especificaciones técnicas
ENTRADAS:
Fonó...............................................................................3 mV 3 Mohm
Línea...................................................................................150 mV 3 Mohm
SALIDAS:
Resistencia de entrada/salida.....................................................<0,1 ohmio
GENERALES:
Gama de batidos por minuto...................................................60 - 180 BPM
Adaptador de red...............................................115V/15V AC 500 mA
230V/15V AC 500 mA
Dimensiones...................................................................483 x 44 x 78 mm
Peso..................................................................................................1.5 kg
Page 5
Page 6

Introduction
Fonctionnement
Nos félicitations à l’occasion de votre achat du compteur de battements
automatique BPM-1 de Gemini. Ce compteur de battements très moderne
est doté d’une garantie de trois ans. Avant de vous en servir, lisez
attentivement toutes les instructions ci-après.
Caractéristiques
• 4 canaux stéréo
• compteur de battements très rapide; capable de lire jusqu’à 180
battements par minute
• 4 entrées phono/ligne commutables
• affichages BPM et Indicateurs de décalage des battements
Mises en garde
1. Toutes les instructions de fonctionnement doivent être lues avant de
vous servir de cet appareil.
2. Afin de réduire le risque de choc électrique, n’ouvrez pas l’appareil. Ce
dernier ne contient AUCUNE PIÈCE À REMPLACER PAR
L’UTILISATEUR. La solution de problèmes doit être confiée à un
technicien qualifié.
3. N’exposez pas cet appareil aux rayons directs du soleil; ne l’exposez
pas non plus à une source de chaleur (p.e. radiateur, poêle).
4. Cet appareil ne doit être nettoyé qu’avec un chiffon humide. N’utilisez
pas de solvants ou d’autre produits de nettoyage.
5. Lorsque vous déplacez cet appareil, il doit être placé dans son
emballage et carton d’origine. Ceci afin d’éviter tout risque
d’endommagement durant le transport.
6. PROTÉGEZ CET APPAREIL CONTRE LA PLUIE OU L’HUMIDITÉ.
7. N’APPLIQUEZ AUCUN PRODUIT DE NETTOYAGE OU DE
LUBRIFICATION PULVERISÉ SUR LES COMMANDES OU LES
INTERRUPTEURS ET COMMUTATEURS.
Connexions
1. Le commutateur POWER (13) (touche de mise sous tension) doit
occuper la position OFF (hors tension). La POWER LED (14) (LED de
puissance) sera éteinte. Cet appareil est livré avec un adaptateur de 15
V/AC. Raccordez l’adaptateur à la prise sur le panneau arrière. Puis,
raccordez l’adaptateur à une source électrique appropriée.
2. Sur le panneau arrière, utilisez les 4 entrées stéréo PHONO/LINE (2,
5, 8, 11) pour y connecter la sortie de vos sources. Le PH1/LN1 (12)
(commutateur phono/ligne) vous permet de régler l’entrée CHANNEL 1
(11) sur Phono ou Ligne. Le PH2/LN2 (9) (commutateur phono/ligne)
vous permet de régler l’entrée CHANNEL 2 (8) sur Phono ou Ligne. Le
PH3/LN3 (6) (commutateur phono/ligne) vous permet de régler l’entrée
CHANNEL 3 (5) sur Phono ou Ligne. Le PH4/LN4 (3) (commutateur
phono/ligne) vous permet de régler l’entrée CHANNEL 4 (2) sur Phono
ou Ligne. Remarque: Pour l’emploi de platines vinyles, n’oubliez pas de
raccorder le fil de terre de la platine vinyle à la vis de terre de votre
console de mixage.
3. L’appareil BPM-1 comporte 4 jeux de de connecteurs RCA de SORTIE
- OUTPUT (1, 4, 7, 10). Si vous employez une platine vinyle et que
l’entrée est réglée sur phono, la sortie correspondante doit être
raccordée aux entrées phono de votre console de mixage. Si
l’entrée est réglée sur ligne, la sortie correspondante doit être
raccordée aux entrées ligne de votre console de mixage. Utilisez les
connecteurs RCA CHANNEL 1 OUTPUT (10) pour raccorder les
entrées appropriées à votre console de mixage. Utilisez les
connecteurs RCA CHANNEL 2 OUTPUT (7) pour brancher les entrées
appropriées sur votre console de mixage. Utilisez les connecteurs RCA
CHANNEL 3 OUTPUT (4) pour brancher les entrées appropriées sur
votre console de mixage. Utilisez les connecteurs RCA CHANNEL 4
OUTPUT (1) pour brancher les entrées appropriées sur votre console
de mixage.
1. POWER ON (MISE SOUS TENSION): Une fois tous les branchements
effectués, appuyez sur POWER (13) (touche de mise sous tension).
L’appareil se mettra sous tension et la POWER LED (14) s’allumera en
ROUGE. Lorsque vous activez le BPM-1, l’appareil traversera une
période d’initialisation durant laquelle les BPM DISPLAYS (17, 19)
(AFFICHAGES BPM) et BEAT OFFSET INDICATORS (18)
(INDICATEURS DE DÉCALAGE DES BATTEMENTS) clignoteront.
Lorsque le clignotement s’arrête, l’appareil est prêt pour l’emploi.
2. Les touches ASSIGN (16, 21) vous permettent de choisir le canal à
afficher sur chaque côté du BPM-1. Appuyez sur la touche ASSIGN
(16) pour choisir le canal 1, 2, 3 ou 4 à être affiché sur le BPM
DISPLAY (17) gauche. L’ASSIGN LED (15) indiquera le canal choisi.
Appuyez sur la touche ASSIGN (21) pour choisir le canal 1, 2, 3 ou 4 à
être affiché sur le BPM DISPLAY (19) droit. L’ASSIGN LED (20)
indiquera le canal que vous avez choisi.
3. BPM DISPLAY - Affichage des battements/minute: des écrans BPM
DISPLAYS (17, 19) situés de chaque côté du BPM-1 affichent les BPM
des deux canaux. Ils sont actualisés environ toutes les 2,5 secondes et
ils affichent numériquement le nombre de battements par minute ce qui
vous permet de faire correspondre les battements visuellement. Le
BPM DISPLAY (17) correspond au nombre de battements par minute
du canal assigné au côté gauche de l’appareil tandis que BPM
DISPLAY (19) correspond au nombre de battements par minute
assigné au côté droit de l’appareil.
REMARQUE: Une lecture [- -] sera visible sur le BPM
DISPLAY si les battements des morceaux musicaux sont
confus. La lecture [- -] sera également visible si aucun
signal nest présent.
4. Les BEAT OFFSET INDICATORS (18) (indicateurs de décalage des
battements) s’allument lorsque les morceaux de musique des deux
canaux assignés au BPM-1 sont décalés de 11 battements par minute
au maximum et ils affichent alors dans quelle mesure les battements
des deux canaux s’alignent. Lorsque les DELs ROUGES s’allument,
les battements ne sont pas alignés. Lorsque les DELs JAUNES
s’allument, les battements sont quasiment alignés. Lorsque les DELs
VERTS s’allument, les battements sont parfaitement alignés.
REMARQUE: Si la différence entre les battements des deux
canaux dépasse 11 battements par minute, les BEAT
OFFSET INDICATORS (indicateurs de décalage des
battements) ne sallumeront pas.
SUGGESTION: Vous pouvez utiliser les BPM DISPLAYS pour déterminer
quelles voies ont des battements/minute semblables ou identiques. Lors
du mélange de deux voies ayant des battements/minute semblables, vous
pouvez utiliser la commande du ton d’une source pour aligner les
battements/minute avec ceux de l’autre source. Le BPM DISPLAYS et les
BEAT OFFSET INDICATORS s’actualisent toutes les 2,5 secondes et
indiqueront le changement en BPM et le moment quand les battements
seront alignés.
REMARQUE: Mixer au tempo est difficile et cette tâche
exige de la pratique. Les voies nont pas toutes un
programme musical incorporant un battement (BPM) clair et
précis; le mix au tempo offre les meilleurs résultats dans le
cas de programmes musicaux incluants des battements
(BPM) distincts.
Caractéristiques techniques
ENTRÉES:
Phono...................................................................................3 mV 3 Mohm
Ligne..................................................................................150 mV 3 Mohm
SORTIES:
Résistance entrée/sortie..................................................................<0,1 ohm
GÉNÉRALITÉS:
Gamme des battements......................................60-180 battements/minute
Adaptateur d’alimentation............................................115V/15V AC 500 mA
230V/15V AC 500 mA
Dimensions........................................................................483 x 44 x 78 mm
Poids...................................................................................................1.5 kg
Page 6
Page 7

Introduzione
Funzionamento
Complimenti per l’acquisto di questo contatore de battute automatico
BPM-1 Gemini. Questo contatore d’avanguardia offre una garanzia di tre
anni. Prima dell’uso leggere attentamente queste istruzioni.
Caratteristiche
• 4 canali stereo
• contatore ultrarapido per letture fino a 180 BPM (battute al minuto)
• 4 ingressi Phono/Linea convertibile
• Display BPM e Indicatori Beat Offset
Precauzioni
1. Leggere attentamente queste istruzioni prima di usare questo
apparecchio.
2. Per evitare scosse elettriche non aprire l’apparecchio.
INTERNAMENTE NON CI SONO COMPONENTI SOSTITUIBILI
DALL’UTENTE. Per le riparazioni rivolgersi solo a personale
qualificato.
3. Non esporre l’apparecchio alla luce diretta del sole o metterlo vicino a
fonti di calore come caloriferi o stufe.
4. Pulire questo apparecchio solo con un panno inumidito. Evitare di
usare solventi o altri detergenti.
5. Per trasportare questo apparecchio si consiglia di rimetterlo nella
scatola e usare l’imballaggio originale. Questo eviterà di danneggiarlo
durante il trasporto.
6. EVITARE DI ESPORRE L’APPARECCHIO ALLA PIOGGIA O
ALL’UMIDITÀ.
7. NON USARE DETERGENTI SPRAY O LUBRIFICANTI SU
QUALSIASI CONTROLLO O INTERRUTTORE.
Collegamenti
1. Assicurarsi che il POWER (13) sia su off. L’indicatore POWER LED
(14) sarà spento. Questo apparecchio viene fornito con un adattatore
di 15 volt CA. Inserire l’adattatore nel power jack posto sul pannello
posteriore. Inserire poi l’adattatore nell’appropriata presa di corrente.
2. Sul pannello posteriore ci sono 4 ingressi PHONO/LINE (2, 5, 8, 11)
per il collegamento a l’uscita dei sorgenti. L’interruttore PH1/LN1 (12)
permette di impostare gli ingressi su Phono o Line CHANNEL 1 (11).
L’interruttore PH2/LN2 (9) permette di impostare gli ingressi su Phono
o Line CHANNEL 2 (8). L’interruttore PH3/LN3 (6) permette di
impostare gli ingressi su Phono o Line CHANNEL 3 (5). L’interruttore
PH4/LN4 (3) permette di impostare gli ingressi su Phono o Line
CHANNEL 4 (2). Nota: se si usa un giradischi, non dimenticarsi di
collegarne il filo di terra alla vite di terra sul miscelatore.
3. Il BPM-1 viene fornito con 4 set di jack per l’uscita dell’amplificazione
OUTPUT (1, 4, 7, 10). Se si usa un giradischi e l’ingresso è impostato
su Phono, l’uscita corrispondente deve essere collegata agli ingressi
Phono sul miscelatore. Se l’ingresso è impostato su Line, l’uscita
corrispondente deve essere collegata agli ingressi Line sul
miscelatore. Usare i jack dell’uscita OUTPUT CHANNEL 1 (10) per il
collegamento agli ingressi appropriati sul miscelatore. Usare i jack
OUTPUT CHANNEL 2 (7) per il collegamento agli ingressi appropriati
sul miscelatore. Usare i jack OUTPUT CHANNEL 3 (4) per il
collegamento agli ingressi appropriati sul miscelatore. Usare i jack
OUTPUT CHANNEL 4 (1) per il collegamento agli ingressi appropriati
sul miscelatore
1. ACCENSIONE: Dopo che sono stati eseguiti tutti i collegamenti degli
apparecchi , premere POWER (13). Verrà attivata l’alimentazione e il
POWER LED (14) diventerà ROSSO. Quando si accende il BPM-1,
l’apparecchio esegue l’inizializzazione, durante la quale i DISPLAY
BPM (17, 19) e gli INDICATORI BEAT OFFSET (18) lampeggiano.
Quando gli indicatori smettono di lampeggiare, l’apparecchio è pronto
per l’uso.
2. I pulsanti ASSIGN (16, 21) permettono di selezionare il canale che
effettuerà la riproduzione da ciascun lato del BPM-1. Premere ASSIGN
(16) per selezionare il canale 1, 2, 3 o 4 per eseguire la riproduzione
dal lato sinistro del DISPLAY BPM (17). L’indicatore ASSIGN LED (15)
indica il canale selezionato. Premere ASSIGN (21) per selezionare il
canale 1, 2, 3 o 4 per eseguire la riproduzione dal lato destro del
DISPLAY BPM (19). L’indicatore ASSIGN LED (20) indica il canale
selezionato.
3. DISPLAY BPM: Ci sono DISPLAY BPM (17, 19) per i due canali
assegnati a ciascun lato del BPM-1. Si aggiornano all’incirca ogni 2.5
secondi e visualizzano in modo digitale le battute al minuto
permettendo di accordare la battuta in modo visivo. Il DISPLAY BPM
(17) riflette le battute al minuto del canale assegnato sul lato sinistro
dell’apparecchio e il DISPLAY BPM (19) riflette le battute al minuto del
canale assegnato sul lato destro.
NOTA: Sul DISPLAY BPM verrà visualizzato [] quando la
traccia non ha battute chiare e verrà anche visualizzato []
in assenza di segnale.
4. Gli BEAT OFFSET INDICATORS (18) (indicatori beat offset) si
illuminano quando la traccia dei due canali assegnati al BPM-1 sono
nei limiti di 11 BPM l’un l’altro e visualizzano il modo di allineamento
delle battute dei due canali. Quando si illumina il LED ROSSO, le
battute non sono allineate. Quando si illumina il LED GIALLO, le
battute sono quasi allineate. Quando si illumina il LED VERDE le
battute sono perfettamente allineate.
NOTA: Se la differenza tra le battute dei due canali supera
11 BPM, gli INDICATORI BEAT OFFSET non si illumineranno.
AVVERTENZA: E’ possibile usare i DISPLAY BPM per determinare quale
traccia ha battute al minuto simili o uguali. Quando si miscelano due
tracce con battute al minuto simili, è possibile usare una sorgente del
controllo picco per allineare le battute al minuto con l’altra sorgente BPM. I
DISPLAY BPM e gli INDICATORI BEAT OFFSET si aggiornano ogni 2.5
secondi e rifletteranno il cambiamento nei BPM indicando quando le
battute sono allineate.
NOTA: La miscelazione delle battute richiede esperienza.
Non tutte le tracce hanno battute forti e la miscelazione
delle battute funziona meglio con le tracce che hanno
battute chiari e forti.
Specifiche Tecniche
INGRESSI:
Phono.....................................................................................3 mV 3 Mohm
Linea...................................................................................150 mV 3 Mohm
USCITA:
Resistenza ingresso/uscita...........................................................<0.1 Ohm
GENERALE:
Range BPM.............................................................................60 - 180 BPM
Alimentazione............................................................115V/15V AC 500 mA
230V/15V AC 500 mA
Dimensioni.........................................................................483 x 44 x 78 mm
Peso.....................................................................................................1.5 kg
Page 7
Page 8

In the USA: If you experience problems with this unit,
call 1-732-738-9003 for Gemini Customer Service.
Do not attempt to return this equipment to your dealer.
Parts of the design of this product may be protected by worldwide patents.
Information in this manual is subject to change without notice and does not
represent a commitment on the part of the vendor. Gemini Sound Products Corp.
shall not be liable for any loss or damage whatsoever arising from the use of
information or any error contained in this manual.
No part of this manual may be reproduced, stored in a retrieval system or
transmitted, in any form or by any means, electronic, electrical, mechanical, optical,
chemical, including photocopying and recording, for any purpose without the
express written permission of Gemini Sound Products Corp.
It is recommended that all maintenance and service on this product is performed
by Gemini Sound Products Corp. or its authorized agents.
Gemini Sound Products Corp. will not accept liability for loss or damage caused
by maintenance or repair performed by unauthorized personnel.
Worldwide Headquarters • 120 Clover Place, Edison, NJ 08818 • USA
T el: (732) 738-9003 • Fax: (732) 738-9006
France • G.S.L. France • 11, A venue Leon Harmel, Z.I. Antony, 92160 Antony , France
Tel: + 33 (0) 1 55 59 04 70 • Fax: + 33 (0) 1 55 59 04 80
Germany • Gemini Sound Products GmbH • Ottostrasse 6, 85757 Karlsfeld, Germany
Tel: 08131 - 39171-0 • Fax: 08131 - 39171-9
UK • Gemini Sound Products • Unit C4 Hazleton Industrial Estate, Waterlooville, UK P08 9JU
Tel: 087 087 00880 • Fax: 087 087 00990
Spain • Gemini Sound Products S.A. • Mino, 112, Nave 1, 08223 Terrassa, Barcelona, Spain
Tel: 011-34-93-736-34-00 • Fax: 011-34-93-736-34-01
© Gemini Sound Products Corp. 2001 All Rights Reserved
Page 8
 Loading...