

Page 1

Dash Responder
Version V 1.0
Servicing Instructions
2004768-001 ENG Revision F
Page 2

GE Medical Systems
Information Technologies
Caution:
During repairs/service interventions, observe the protective measures against damage
due to ESD.
• GE Medical Systems Information Technologies GmbH is responsible for the
effects on safety, reliability, and performance of the device, only if
− assembly operations, extensions, readjustments, modifications, or
repairs are carried out by GE Medical Systems Information
Technologies GmbH or by persons authorized by GE Medical
Systems Information Technologies GmbH,
− the electrical installation of the relevant room complies with the
applicable national and local requirements, and
− the instrument is used in accordance with the instructions for use.
• This manual contains service information, operating instructions are provided in
the Operator’s Manual of the instrument.
• This manual is in conformity with the instrument at printing date.
• All rights are reserved for instruments, circuits, techniques, and names appearing in
the manual.
The authorized representative for GE Medical Systems Information Technologies Inc.
in Europe is:
GE Medical Systems
Information Technologies GmbH
Munzinger Str. 3
D-79111 Freiburg, Germany
Tel.+49(0)7614543-0
Fax:+49(0)7614543-233
©
2005 General Electric Company. All rights reserved.
Servicing Manual Dash Responder V1.0 Revision F
Page 2 of 72 2004768-001
Page 3

GE Medical Systems
Information Technologies
1 General Introduction_______________________________________________7
2 General Overview of the Dash Responder ______________________________9
GE Medical Systems Instrument Part Numbers _______________________________9
Configuration of Instrument Part Numbers __________________________________________ 9
Configuration of the PCB Part Numbers ____________________________________________ 9
Instrument status documentation __________________________________________________ 9
Instrument Versions of the Dash Responder __________________________________9
3 General Description_______________________________________________10
Dash Responder Block Diagram ___________________________________________10
Dash Responder Device___________________________________________________10
PCB Analog ____________________________________________________________10
Block Diagram _______________________________________________________________ 10
PCB Digital ____________________________________________________________11
Block Diagram _______________________________________________________________ 11
PCB Power Management _________________________________________________12
Block Diagram _______________________________________________________________ 12
PCB Pacer _____________________________________________________________13
Block Diagram _______________________________________________________________ 13
Battery ________________________________________________________________14
Batteries 2009218-001, 2009219-001 ________________________________________14
Battery conditioning___________________________________________________________ 16
Defective Battery _____________________________________________________________ 17
Battery replacement ___________________________________________________________ 17
4 Service Tool _____________________________________________________18
Software Download Information ___________________________________________18
Installation_____________________________________________________________19
Software Download ______________________________________________________19
Calibration_____________________________________________________________20
Monitor Interface test____________________________________________________21
Installation __________________________________________________________________ 21
Interface Test ________________________________________________________________ 22
5 Service Menu ____________________________________________________23
User configurable settings_________________________________________________23
Structure of the Service Menu _____________________________________________23
6 Replacing PCBs__________________________________________________26
Safety Information for Disassembly ________________________________________26
Disassembly Procedure___________________________________________________26
Opening Unit ________________________________________________________________ 26
Analog PCB _________________________________________________________________ 26
Digital PCB _________________________________________________________________ 28
Pacer PCB __________________________________________________________________ 29
Power Management PCB / Battery Case ___________________________________________ 30
High-Voltage Capacitor ________________________________________________________ 32
Revision F Servicing Manual Dash Responder V1.0
2004768-001 Page 3 of 72
Page 4

GE Medical Systems
Information Technologies
7 Troubleshooting Tips______________________________________________33
Electrostatic Discharge (ESD) _____________________________________________33
CMOS Components ___________________________________________________________ 33
Special Components___________________________________________________________ 33
Battery Failure _______________________________________________________________ 34
8 Error Messages and System Information______________________________36
Messages_______________________________________________________________36
Error Numbers _________________________________________________________37
9 Pin Configuration ________________________________________________38
External Connections ____________________________________________________38
Paddle Input Connector ________________________________________________________ 38
Monitor Connector____________________________________________________________ 39
Battery Connector ____________________________________________________________ 40
Internal Connections_____________________________________________________40
Digital P CB _________________________________________________________________ 40
Analog PCB _________________________________________________________________ 47
Power Management PCB _______________________________________________________ 49
Pacer PCB __________________________________________________________________ 49
10 Technical Specification __________________________________________50
Operating Modes________________________________________________________50
Energy Selection ________________________________________________________50
Defibrillator Charging ___________________________________________________50
Defibrillation Shock _____________________________________________________50
Discharge Circuit________________________________________________________51
Defibrillation Pulse Output _______________________________________________51
Safety Discharge ________________________________________________________51
Test Features ___________________________________________________________51
Synchronization_________________________________________________________52
Pacemaker _____________________________________________________________52
Power Supply___________________________________________________________52
Operational Readiness ___________________________________________________52
Operating Position_______________________________________________________52
Type of Protection_______________________________________________________52
Environment ___________________________________________________________52
Operation ___________________________________________________________________ 52
Transport and Storage _________________________________________________________ 53
Dimensions_____________________________________________________________53
Weight ________________________________________________________________53
Environmental Tests _____________________________________________________53
Servicing Manual Dash Responder V1.0 Revision F
Page 4 of 72 2004768-001
Page 5

GE Medical Systems
Information Technologies
11 Maintenance and Technical Inspection _____________________________54
Schedule _______________________________________________________________54
Manufacturer Responsibility ______________________________________________54
Visual Inspection ________________________________________________________54
General Cleaning________________________________________________________54
Checkout Procedures ____________________________________________________55
Testing Equipment ______________________________________________________55
Performance test ________________________________________________________56
Power up test ________________________________________________________________ 56
Key Test ____________________________________________________________________ 56
Display Test _________________________________________________________________ 57
Detection of internal Electrodes__________________________________________________ 57
Discharge and speaker test ______________________________________________________ 57
Pacemaker test _______________________________________________________________ 58
Defib Function Test and Pacer Option Test _________________________________________ 59
Battery conditioning te st _______________________________________________________ 59
12 Electrical Safety Tests ___________________________________________61
Patient (Sink) Leakage Current Test________________________________________62
13 Spare Parts List ________________________________________________64
14 Master Record Index (see Appendix) _______________________________69
15 Circuit Diagrams (see Appendix)___________________________________71
Revision F Servicing Manual Dash Responder V1.0
2004768-001 Page 5 of 72
Page 6

GE Medical Systems
Information Technologies
REFERENCES
Reference Document Title
[UM] User Manual for Dash Responder Version 1.0 Rev. A (2002853-002-A)
[Lang] Languages of Dash Responder Version 1
Revision History
This manual is subject to the GE Medical Systems Information Technologies change order service. The
revision code, a letter that follows the document part number, changes with every update of the manual.
The initial version of the manual has the letter A.
Part No. Revision Code Date Comment
2004768-001 V 0.1 2001-03 Draft
2004768-001 Rev. A 2001-05 Release A
2004768-001 Rev. B 2001-07 ECO 067557
2004768-001 Rev C 2001-09 ECO 067925
2004768-001 Rev D 2002-12 ECO 070336
2004768-001 Rev E 2004-01 ECO 075782
2004768-001 Rev F 2005-05 ECO 080823
Servicing Manual Dash Responder V1.0 Revision F
Page 6 of 72 2004768-001
Page 7

GE Medical Systems
Information Technologies
1 General Introduction
The Dash Responder is a lightweight, portable defibrillator which must be connected to a Dash 2000 or
Dash 3000/4000 patient monitor for operation.
The Dash Responder is available with or without transcutaneous pacer.
The Dash Responder is powered from a rechargeable battery which is inserted into t he device. A new
fully charged batter y provides power for approx. 60 shocks with 360 J each or for approx. 5 hours of
pacemaker operation at an average pulse rate and pacer output (75 ppm, 100 mA).
The Dash Responder will not operate unless equipped with the battery.
The battery charges automatically when the system (patient monitor and Dash Responder) is connected
to the power line and both devices are not turned on. When the devices are on, the battery will charge
only when the Dash Responder does not require the full energy for operation the patient monitor is able
to deliver.
The Dash 3000/4000 also charges the defibrillator battery when disconnected from power line. A
separate, optional charging unit (ASU 3000) is available for battery charging.
1 2 3
T
e
s
t
Pacer On/Off
Dash Responder
transport defibrillator
Sync.
On/Off Charge
123
Energy Select J (50
Shock
Ω
)Charging Status
Pacer Mode
Pacer Pause
Rate (ppm)
Output (mA)
4 1211109876 135 1514
GE Medical Systems
Information Technologies
D-79111 Freiburg
Munzinger Str. 3
Dash Responder
CAUTION
Defib Test 50 Ω
Refer to equipment
manual before
connencting to these connectors
16 17
Revision F Servicing Manual Dash Responder V1.0
2004768-001 Page 7 of 72
Page 8

GE Medical Systems
Information Technologies
1 Button to unlock batter y for removal
2 Monitor connector
3 Locking lever
4 Battery with "Test" button and charge level indication
5
Sync. button with indicator to enable and disable the synchronized operating mode (when the
synchronized mode is enabled, the indicator is illuminated and goes off with each sync pulse)
6 Charging Status indicator
solid yellow: battery charging
solid green: battery charged
blinking yellow: charging error (replace battery)
flashing green: battery conditioning program active
7
On/Off button to turn the defibrillator on and off (indicator is illuminated when the device is
turned on)
8
9
10
Energy Select buttons to select the defibrillation energy
Charge button to initiate defibrillator charging
Shock buttons to release the s hock when adhesive or internal electrodes are connected (both
buttons must be pressed simultaneously);
the indicator lights up when the defibrillator is charged
11
12
13
Pacer Mode button to select the pacer operating mode (fixed rate, demand)
Pacer Pause button to suspend delivery of pacer pulses (without changing the pacer settings)
Pacer On/Off button with indicator to turn the pacemaker on and off (when the pacemaker is
enabled, the indicator is illuminated and goes off with each delivered pacer pulse)
14
15
Output (mA) button to change the pacer output current
Rate (ppm) button to change the pacer rate
16 Contacts for test discharge (possible only with adapter lead for adhesive defibrillation pads)
17 Connector for exchange of the defibrillation electrodes (switch off the device before exchanging
the electrodes!)
Servicing Manual Dash Responder V1.0 Revision F
Page 8 of 72 2004768-001
Page 9

GE Medical Systems
Information Technologies
2 General Overview of the Dash Responder
GE Medical Systems Instrument Part Numbers
Configuration of Instrument Part Numbers
The instrument part number comprises of ten digits, the first seven digits determine the instrument type
and the last three—separated by a hyphen—the instrument version.
The user language is determined by configuration, thus is no part of the instrument number.
Configuration of the PCB Part Numbers
The number of the PCB is listed on the barcode label. The label can be seen on the PCB without
dismounting.
As some PCBs need additional tests before they get delivered as field replacement boards, this boards
and assemblies were given separate spare part numbers.
Therefore were special field replacement spare parts are available this need to be ordered (see Spare
Parts List on page 64).
The affiliated documentation, e.g. reference diagrams, circuit diagrams and parts lists are listed under
the part number of the PCB part number.
Instrument status documentation
Due to hardware and software combination, unambiguous documentation of the instrument assembly
status is necessary also in event o f repairs.
Master Record Index
2002550-013
The master record index lists the valid configurations for the Dash Responder. Numbers for all
permissible components of t he device are listed. Spare part numbers are provided where available.
Instrument Versions of the Dash Responder
CAT No Description
2002550-001 DASH RESPONDER, MANUAL
2002550-002 DASH RESPONDER, MANUAL, PACER
Revision F Servicing Manual Dash Responder V1.0
2004768-001 Page 9 of 72
Page 10
GE Medical Systems
Information Technologies
3 General Description
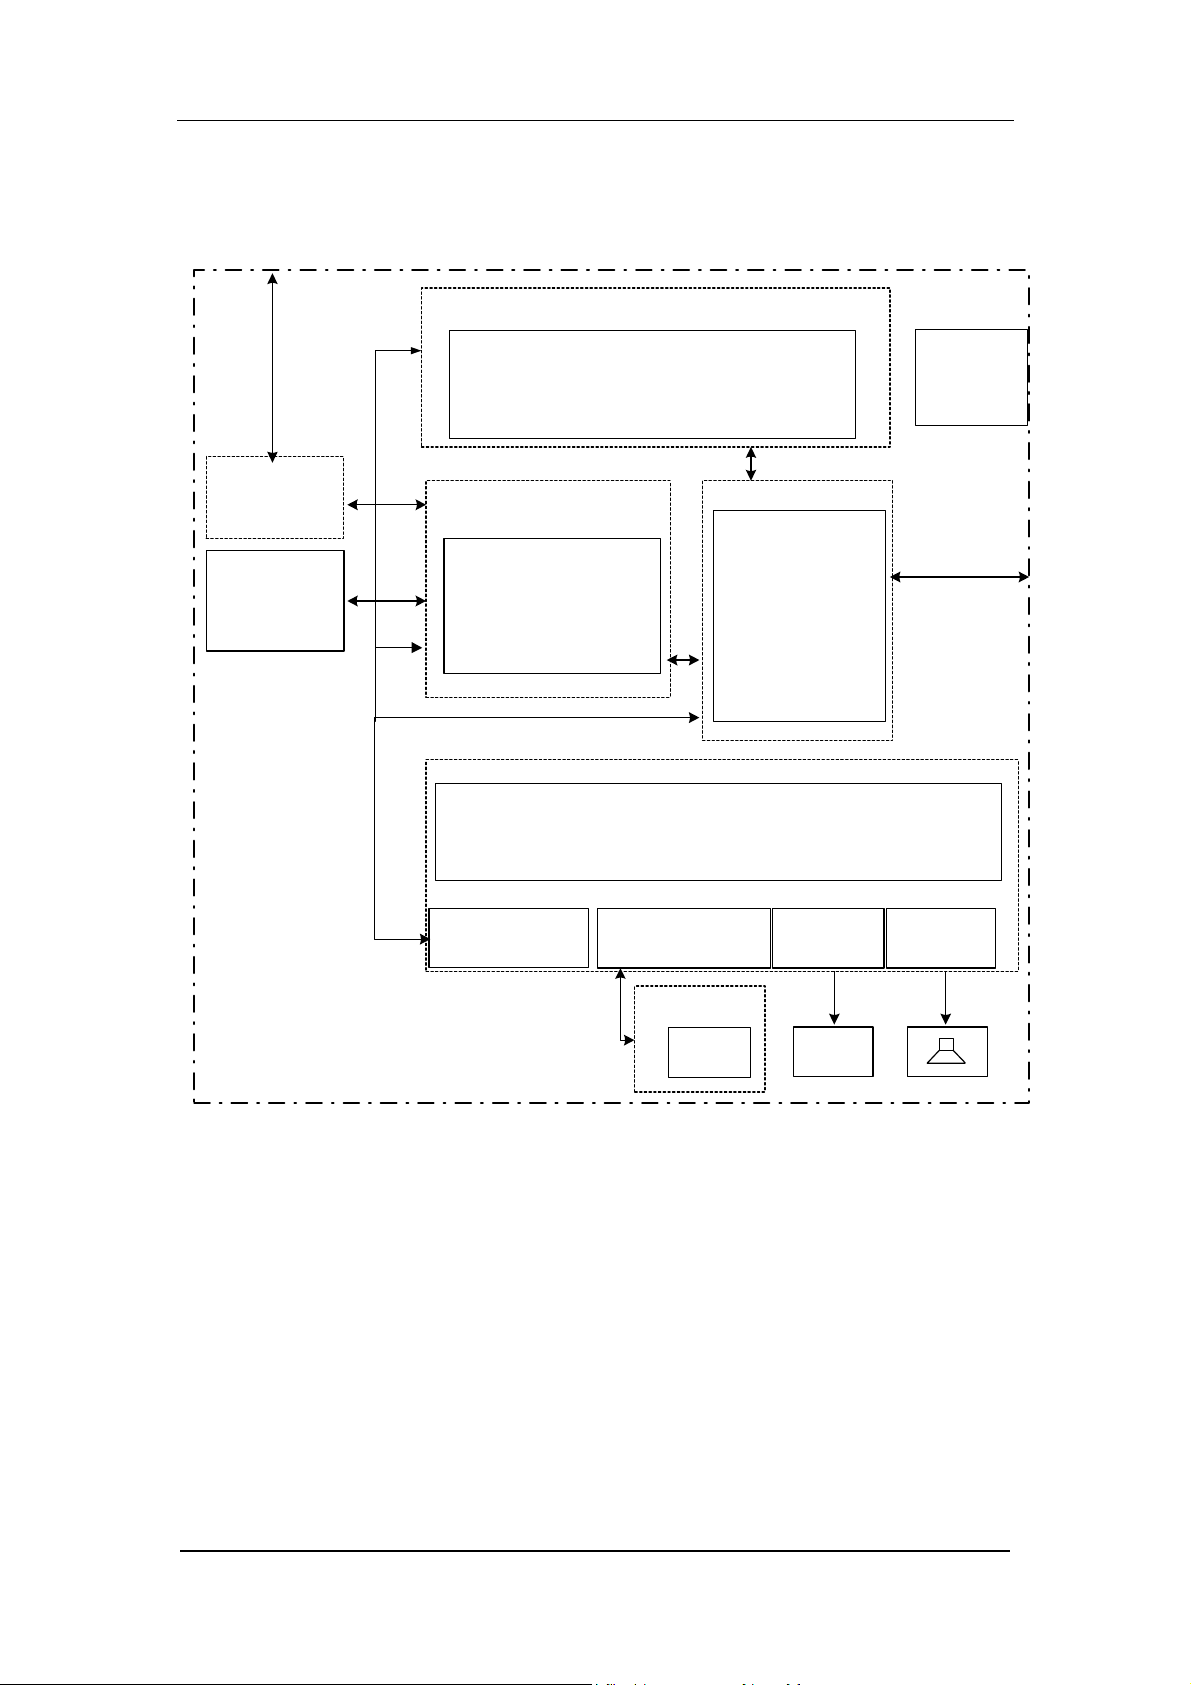
Dash Responder Block Diagram
from / to
Monitor
PCB
Monitor
Interface
Battery
PCB Pacer (device-variant)
Pace Control
Security
PCB Battery
Managemet
Battery Managm.Control
Charger
Deep Discharge Protection
Power switches
On/Off Circuit
PCB Digital
Device- Control,
FLASH, SRAM, EEPROM,
DC/DC- Converter
PCB Analog
HV Generation
HV Control
Paddle Interface
Shock Form
EnergyMeasurement
Pacer Interface
Security
Test
Discharge
50 Ohm
from / to
Paddles
Module Interface
Keypad Interface
Display-
Interface
Sound-
Interface
PCB Keypad
Keypad
Display
Dash Responder Device
PCB Analog
Block Diagram
The PCB Analog provides the following functions:
• Charging of the High-Voltage Capacitor.
The PIC-controllers initiate the charging of the high voltage capacitor to a voltage provided by the
main software on the PCB digital. One PIC supervises the other during the charging to make sure,
the selected voltage will not be exceeded. In the next charging cycle the PICs change place and the
first is supervised by the second.
• Shock delivering and measuring of applied energy.
The PIC-controllers initiate the switching of the relais to deliver the energy to the patient according
Servicing Manual Dash Responder V1.0 Revision F
Page 10 of 72 2004768-001
Page 11

GE Medical Systems
Information Technologies
to a command sequence of the main software. The energy which was delivered to the patient is
measured and the value transfered to the main software.
Block Diagram PCB Analog (2002316-001)
Connectors
HV Generation
Shock Control
Paddle Connector Code
Paddle Connector HV
PCB Pacer
HV Capacitor
PCB Power Management
PCB Digital
Speaker
PCB Digital
Block Diagram
The PCB Digital provides the following functions:
• Control of all subsystems (Powermanagement, Analog, Pacer).
• Display
The display is connected to the PCB Digital that contains a graphic controller.
• Keypad
Any pressed keys are decoded by the PCB Digital and the LEDs on the keypad get illuminated
under control of the PCB Digital.
• Sound generation
The alarm sounds are generated and amplified on the PCB Digital by a sound chip.
Revision F Servicing Manual Dash Responder V1.0
2004768-001 Page 11 of 72
Page 12
GE Medical Systems
Information Technologies
Block Diagram LPL Digital
Connectors
Status & Control
I2C-Bus
Display
Keypad
Sound
PCB Powermanagement
PCB Analog
PCB Pacer
(BDM)
Display (piggy back)
Keypad (flex)
PCB Power Management
Block Diagram
The PCB Powermanagement provides following functions:
• Charging and Conditioning (Discharge / Charge-cycle) of the battery
The battery gets charged if it n eeds to be and if energy is provided by a monitor connected to the
Dash Responder. The PCB Powermanagement powers the device and guarantees that every
remaining energy from the monitor is used to charge the battery, but the drawn current does not
exceed the maximum current the monitor is able to deliver.
During the conditioning cycle the battery gets fully depleted and afterwards fully recharged to
regain the optimal energy level.
• Communication with the battery charge level monitoring system which is integrated in the battery
In the service menu the energy level of the battery and the number of conditioning cycles are
given.
• Unregulated P ower supply for subsystems
The Powermanagement regulates the supply voltage to a value that the battery gets charged if
needed and the supply current drawn from the monitor so that the maximum current is not
exceeded.
Servicing Manual Dash Responder V1.0 Revision F
Page 12 of 72 2004768-001
Page 13

GE Medical Systems
Information Technologies
Block Diagram PCB Power Management
Connectors
Power Supply
Battery Charging/
Conditioning
Monitor
PCB Digital
PCB Analog
Battery Case
PCB Pacer
Block Diagram
The PCB Pacer provides following functions:
• Generation of floating HV
The generated voltage level is sufficient to deliver any selected current level to the highest
expectable patient resistance.
• Switched current source for pace pulses
The pace pulse current is regulated by means of a programmable current source.
Revision F Servicing Manual Dash Responder V1.0
2004768-001 Page 13 of 72
Page 14

GE Medical Systems
Information Technologies
Block Diagram PCB Pacer
Connectors
Pulse Generation
Pulse Control
PCB Analog
PCB Digital
Battery
The battery in the Dash Responder is a rechargeable NiCd battery with a charge level of 2000 mAh and
nominal 12 Volt (10 cells).
The battery contains a charge level monitoring system to measure the remaining charge in the battery.
By pressing the key on the battery front the actual charge level can be displayed.
Nevertheless, the displayed charge level provides no information about the quality and usability of the
battery. A worn out battery may still possess its capacity but—as a result of an i ncreased internal
resistance—is only partially operational in the defibrillator. The batteries should be periodically tested
in the ASU 3000.
Batteries 2009219-001
General Information
Rechargeable batteries require special maintenance and continued checks to assure they function in
emergency situations. It is normal for batteries of this type to self-discharge, even when the device is
switched off or in storage.
Furthermore, the battery capacity decreases with age: the storage capacity of older batteries is less than
that of new batteries. By regular maintenance (charging and discharging at regular intervals) the battery
service life can be considerably extended.
Battery type 2009219-001 allows you to determine the charge level and capacity at any time.
Furthermore, the LEDs on these batteries indicate
- the presence of a short-circuit (a distinction is made between a short-circuit in the device
(excessive current drain) and a short-circuit between battery cells),
- a display problem,
- the imminent shut-down of the display to protect the battery from over-discharging.
Servicing Manual Dash Responder V1.0 Revision F
Page 14 of 72 2004768-001
Page 15
GE Medical Systems
Information Technologies
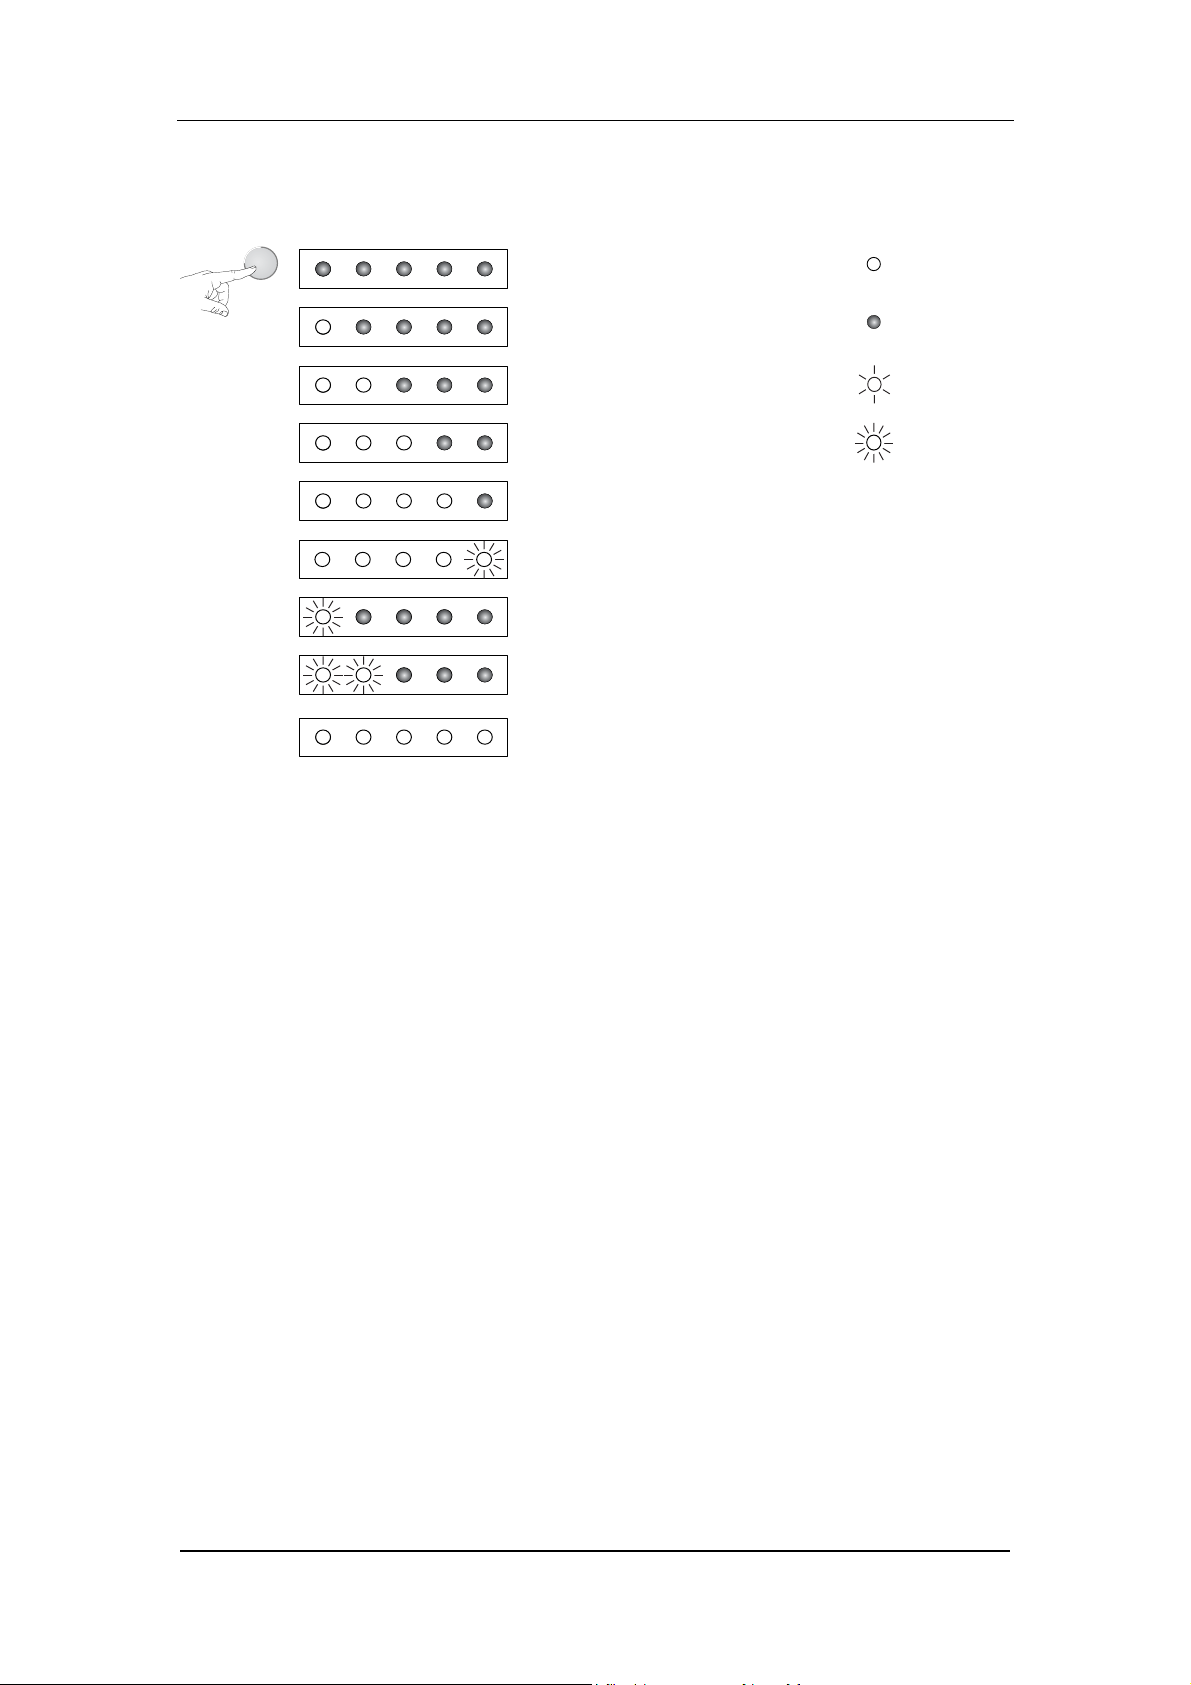
Indication of charge level and capacity
LED charge capacity key to symbols
Test
100 % 100 % LED off
60 ... 80 % 100 % LED on
40 ... 60 % 100 % LED blinking slowly
20 ... 40 % 100 % LED blinking rapidly
6 ... 20 % 100 %
0 ...6 % 100 %
100 % < 80 %
100 % < 60 %
depleted,
display off
Revision F Servicing Manual Dash Responder V1.0
2004768-001 Page 15 of 72
Page 16
GE Medical Systems
Information Technologies
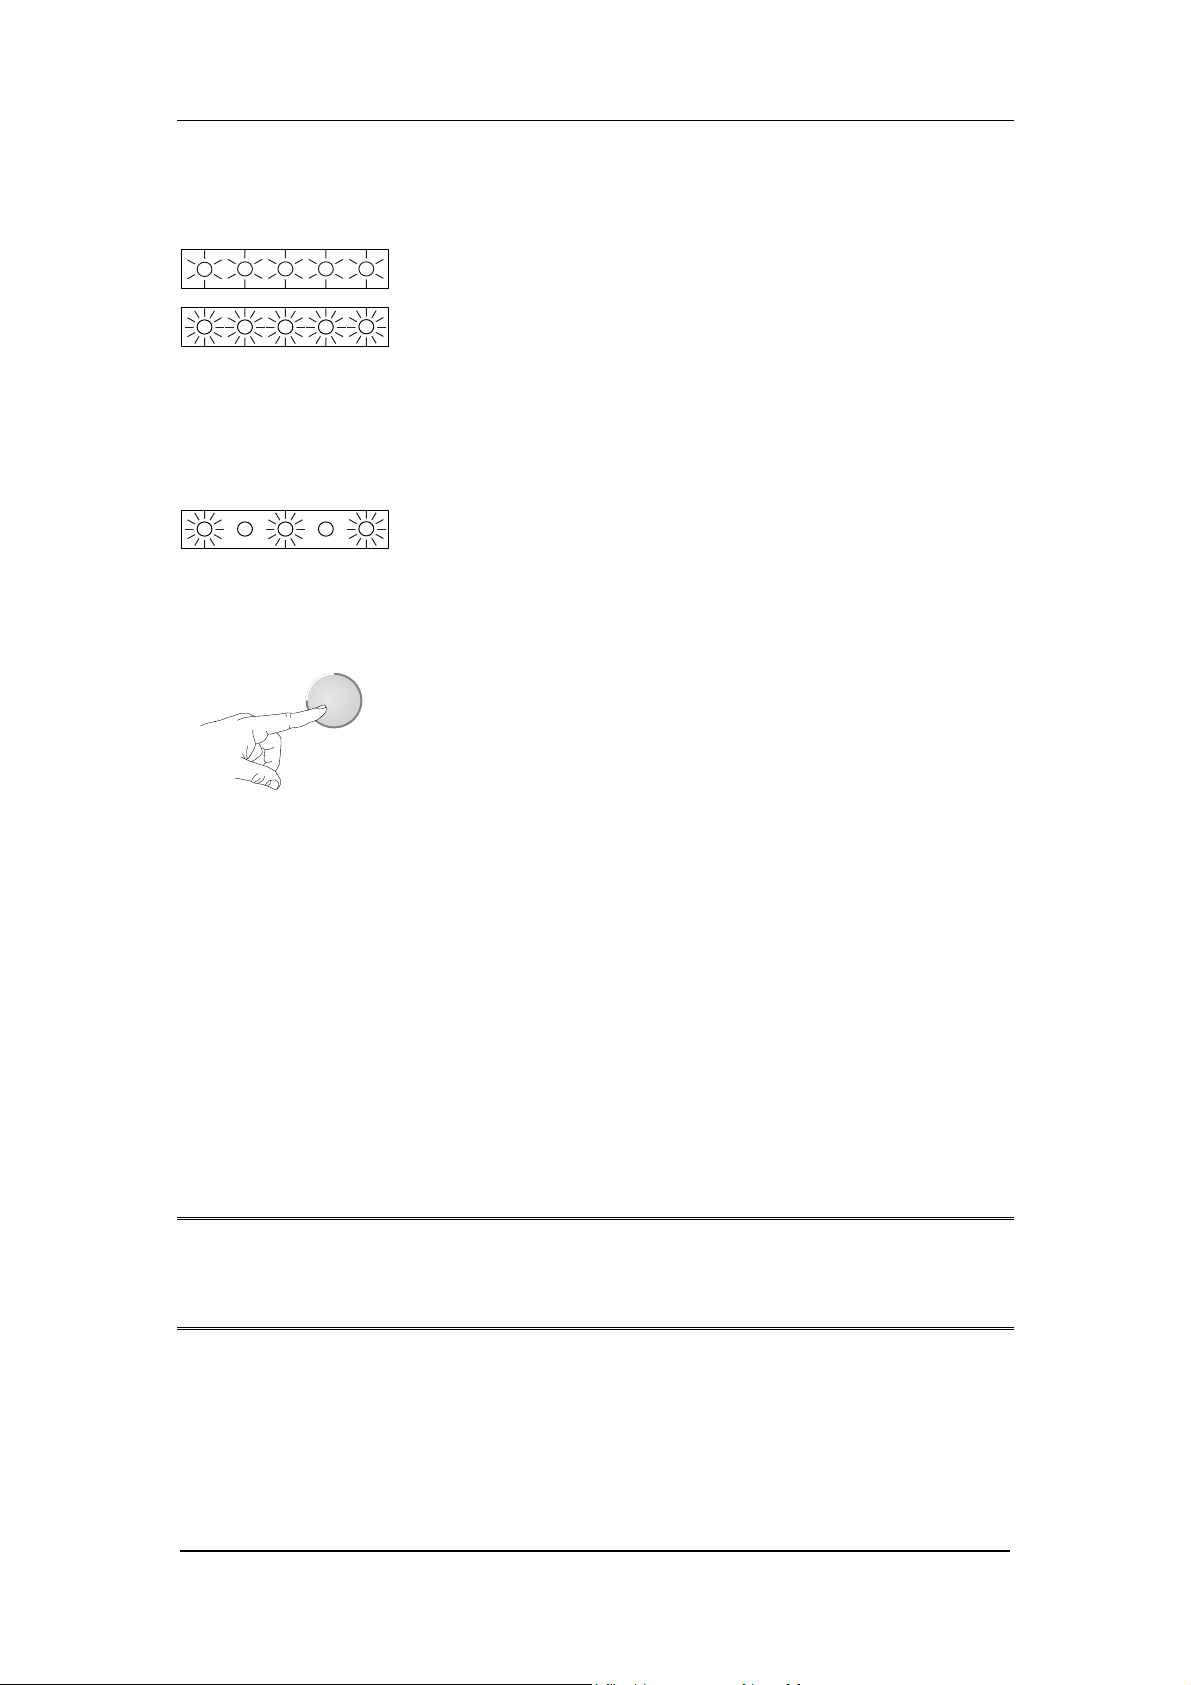
Indication of short-circuit
LED what it means comment
short-circuit i n the device disconnect battery fro m device
short-circuit of battery cells battery defect, battery cannot be used any more
Fault indication
LED what it means comment
electronics fault perform rese t; if problem persists, battery
Perform reset
cannot be used any more
Test
For a reset, the TEST button needs to be pressed longer than 10 seconds. It is
recommended to perform a reset each time a fault is indicated. If the fault indication
persists, the battery is defective and cannot be used any more.
> 10 s
Automatic shut-dow n of the display ( protection from deep discharging)
To protect the battery from deep discharging, the display shuts down automatically. The imminent
shut-down is indicated by running lights, with each of the 5 LEDs blinking in sequence for about 1
second. The display reactivates automatically when the battery is being charged.
Battery conditioning
The battery should be conditioned with the internal battery conditioning program or with the optional
battery charging unit ASU 3000 every month. As t he ASU 3000 is a specially designed battery
charging unit that has a definite conditioning mechanism, it is advisable to use it to condition the
battery. Furthermore the conditioning cycle will last about twenty-one hours if performed in the
defibrillator and only five hours in the ASU 3000.
NOTE
Since the battery will be discharged in the course of the program and the program takes several hours to
complete, a second charged battery must be available to ensure that the defibrillator is ready for use.
The conditioning program can only be run when the defibrillator is connected to the patient monitor
and the monitor, in turn, is connected to the power line.
Start of Conditioning
• Connect the monitor-defibrillator system to the power line.
• Turn the defibrillator on.
Servicing Manual Dash Responder V1.0 Revision F
Page 16 of 72 2004768-001
Page 17

GE Medical Systems
Information Technologies
• Display the main setup menu by simultaneously pressing the two E
NERGY SELECT keys (at least 2
seconds).
• Use the E
HARGE key.
C
The S
ERVICE MODE menu appears.
• Select B
NERGY SELECT key to highlight SERVICE MODE and confirm the selection with the
ATT COND with ENERGY SELECT key and confirm with CHARGE key.
You will see the battery conditioning menu.
• Select C
OND START with ENERGY SELECT key and initiate the conditioning program with CHARGE
key.
These are the steps of the conditioning program:
the Dash Responder switches off,
the battery charges (up to about seven hours, depending on the initial energy level), the green
LED blinks, the yellow LED is solid on
the battery discharges (seven hours), the green LED blinks, the yellow LED is off
the battery charges (about seven hours), the green LED blinks, the yellow LED is solid on
The two C
HARGINGSTATUS indicators signal the steps of the conditioning program:
green LED yellow LED conditioning program step
blinks on battery charging
blinks off battery discharging
blinks blinks charging error (defective
battery)
In the course of the program you can display the battery conditioning menu at any time to view the
battery status or to stop the program.
• Turn on the defibrillator to display the battery conditioning menu.
The battery status is not updated automatically when the battery conditioning menu is displayed; for
displaying a new status leave and enter again the conditioning menu.
Defective Battery
As soon as the battery quality (“F/NEW”) drops to 60% or less, the battery must be replaced by a new
one.
Battery replacement
NiCd batteries have a limited service life time as their storage capacity deteriorates with age. For this
reason, the battery must be replaced every 2 years.
Note
Disposal Notice: Should this product (battery) become damaged beyond repair, or for some reason
its useful life is considered to be at an end, please observe all local, state, and federal regulation that
relate to the disposal of products that contain lead, batteries, plastics, etc.
Revision F Servicing Manual Dash Responder V1.0
2004768-001 Page 17 of 72
Page 18
GE Medical Systems
Information Technologies
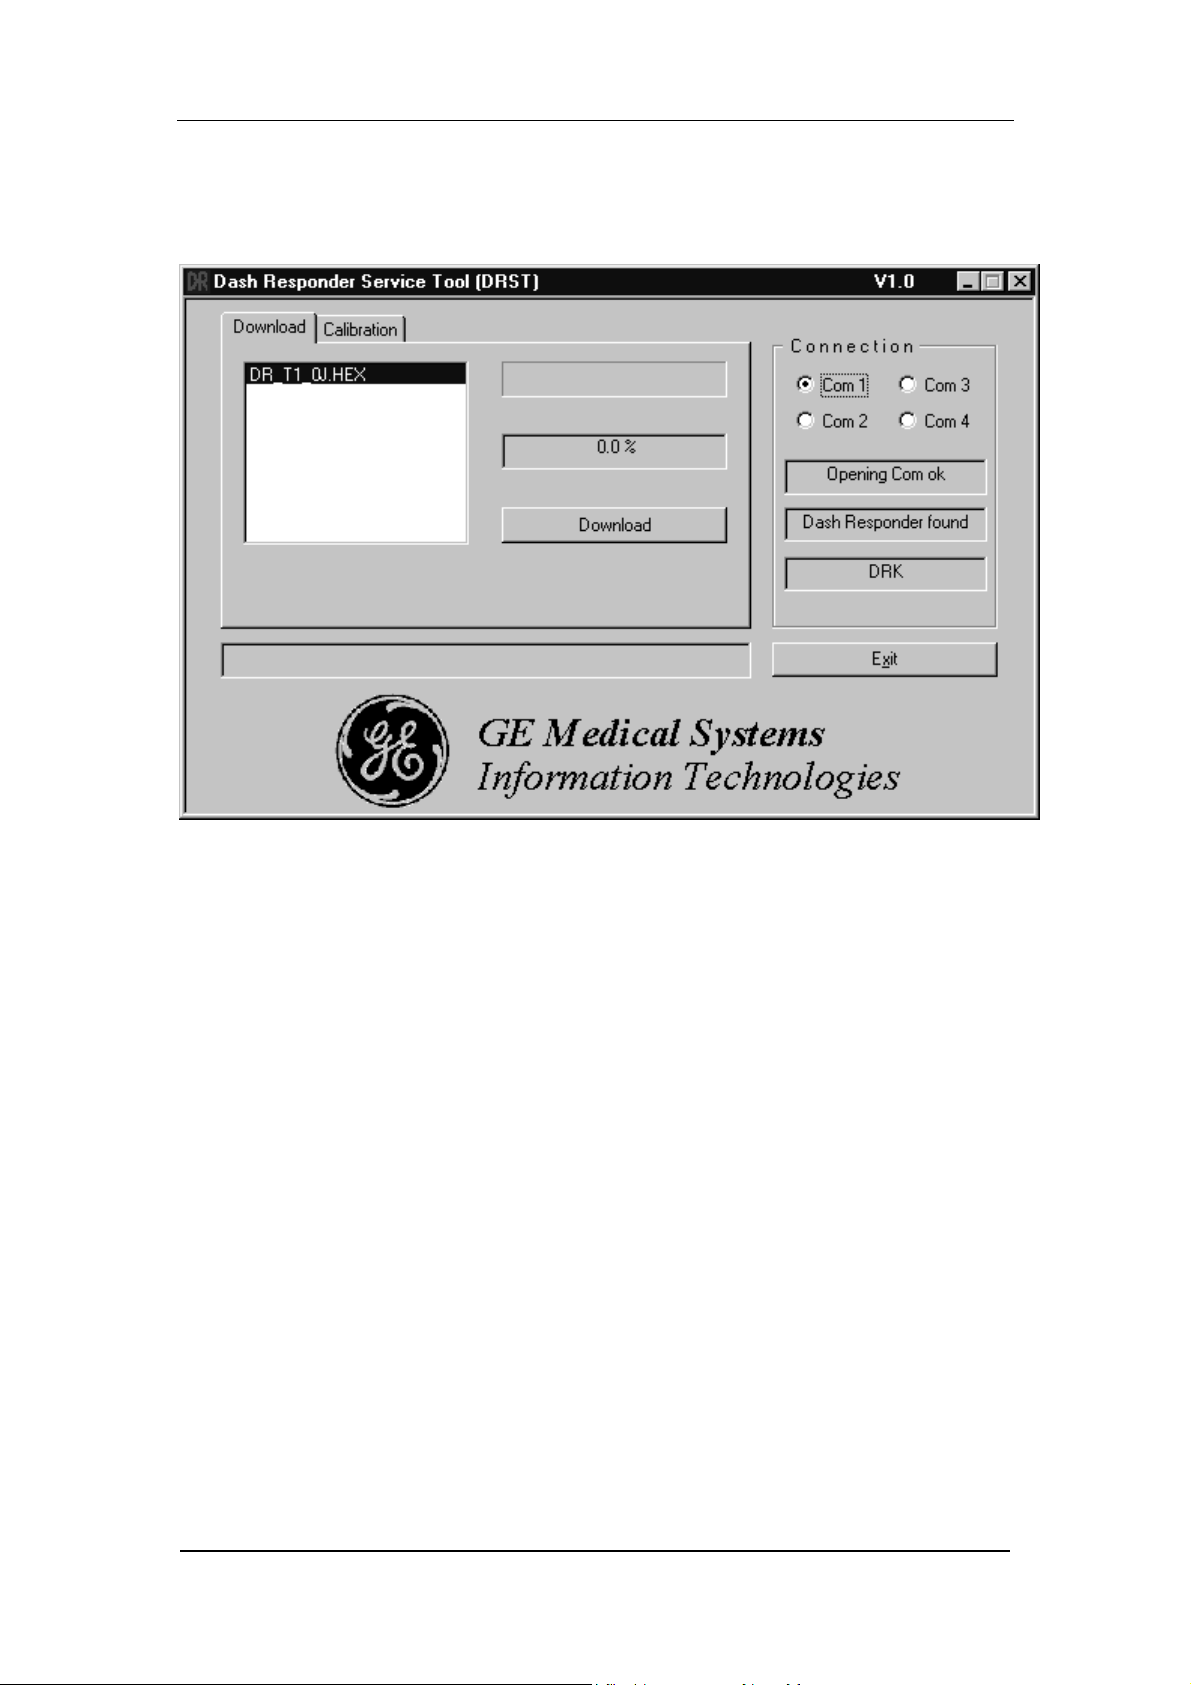
4 Service Tool
This Service Tool is suitable for testing of the Dash Responder and Dash Monitor separately, further
for software download and calibration of the Dash Responder.
Software Download Information
The product software for the Dash Responder can be loaded into the flash memory by means of a PC or
laptop. This requires the Dash Responder Service kit, a complete set for download, calibration and test.
The kit (2006861-001) can be ordered from GE Medical Systems, please contact your local distributor;
it includes
1. software diskette,
2. DRST-Box (2005378-001) for adaptation,
3. DCpower supply (2000300-001),
4. PC cable assembly (223 362 03).
Additional you need
• power cord for the power supply
• PC/laptop with
• Microsoft Windows 95 / 98 / NT / Windows 2000 or W indows Millennium.
• RS-232C serial port (COM).
• 3.5-inch floppy drive
When updating to a newer software version, please order the corresponding User Manual separately.
(see Spare Parts List on page 64)
Servicing Manual Dash Responder V1.0 Revision F
Page 18 of 72 2004768-001
Page 19

GE Medical Systems
Information Technologies
For authorized dealers (password required) the software download can be carried out via the following
Internet address:
http://213.164.65.40/octodata/osmh21.nsf/$start/homepage
Important servicing information:
1. Before loading a new software write down the actua l device, defib and pacer setup (see User
configurable settings on page 23).
2. After replacing any of the PCBs’, energy calibration has to be done. (For more details see Section
Calibration on page 20).
Installation
1. Create a directory on your hard disk (e.g., stools) and copy the service program 'drst.exe'
into this directory as well as the software file(s) (*.hex) for the p roduct software.
2. Attach the DRST-Box to the Dash Responder instead of a Dash Monitor.
3. Connect the power supply and the serial cable to the DRST-Box. The other end of the serial cable
should fit into a free COM-port of your PC. You may need a standard 9pin/25pin adapter if the PC
has a 25-pin socket COM.
4. The application software for the Dash Responder comes on a separate floppy disk.
Software Download
1. The product software must be available in the same directory as 'DRST.exe'.
2. Check at the DRST-Box that
• the LED P
• the Switch '9-18V' is ON.
3. Read out all user specific setup and write it down (see User configurable settings on page 23).
Start the Bootloader following these steps
• Switch off the defib
• Hold down the C
• Press and release the O
• Release the C
LED are blinking alternately.
• Start 'DRST.exe' on the PC and select the serial interface (COM 1…4) you chose to
connect the Das h Responder. If the connection is correct, ‘R
4. Nowselect the desired software in the download window (*.hex) and click on ‘D
After successful installation of the software (duration about 3 minutes), the message ‘E
DOWNLOAD
5. Enter the previous setup (see User configurable settings on page 23).
ERIPRESENT is ON and
HARGE and left SHOCK key simultaneously.
N/OFF key.
HARGE and the left SHOCK keys simultaneously when the SYNC LED and SHOCK
ESPONDER FOUND’ is displayed.
OWNLOAD’.
ND
’ appears in the bottom line of the service tool window. The Dash Responder restarts.
Revision F Servicing Manual Dash Responder V1.0
2004768-001 Page 19 of 72
Page 20
GE Medical Systems
Information Technologies
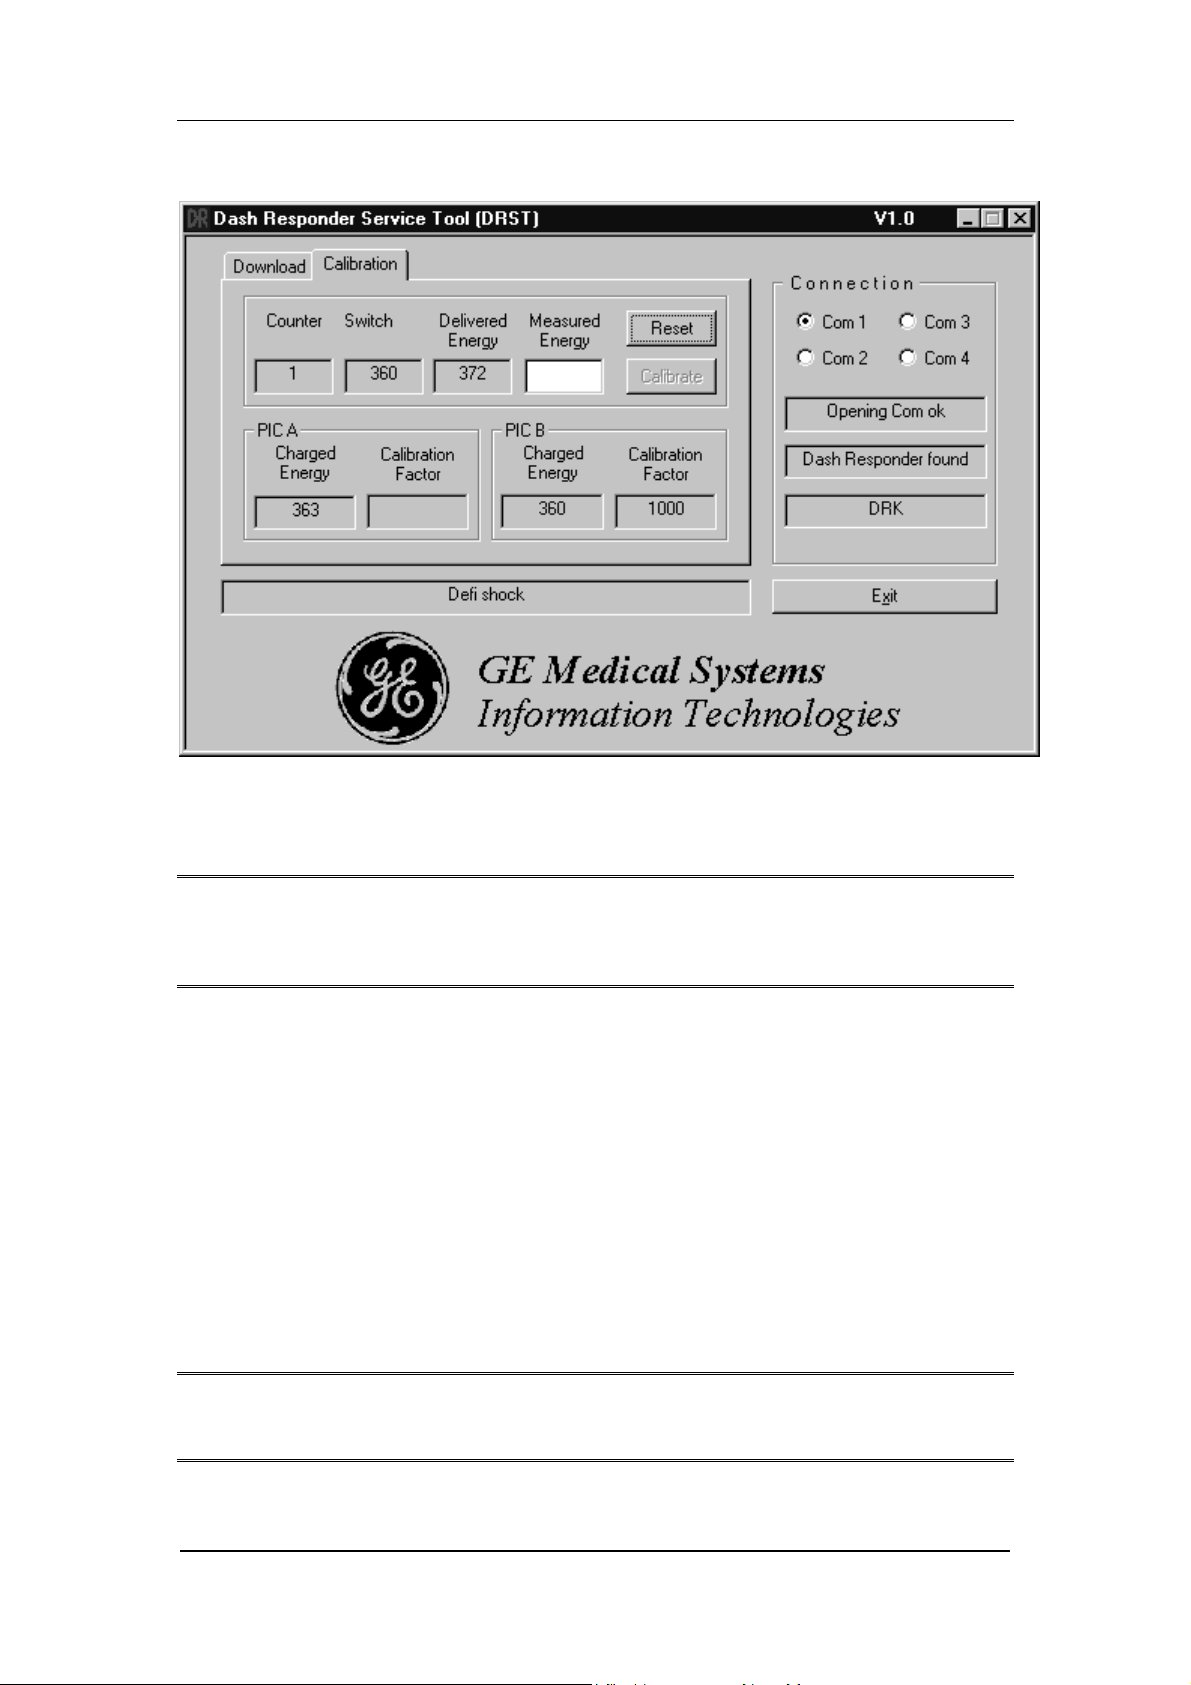
Calibration
The accuracy of the shock energy measurement needs to be checked on a regular basis (see
Maintenance and Technical Inspection on page 54) and after any replacements of PCBs or update of
the software.
CAUTION
No more than 16 shocks can be applied without a pause of about 15 minutes afterwards to avoid
overheating of the device!
Check the current calibration first:
Apply two shocks with each 50 J, 100 J and 360 J to a calibrated defibtester (e.g. DNI Nevada Inc.). If
any of the delivered energy values deviates for more than ± 5% from the chosen value calibration is
required.
The calibration p rocedure requires
• Dash Responder Service kit (2006861-001)
• PC/Laptop
• calibrated defibtester with energy display (e.g. DNI Nevada Inc.)
• hard paddles or the adapter cable for the adhesive paddles which are suitable for the used
defibtester.
NOTE
The charge level of the battery should be sufficient for several shocks.
The following steps describe how to calibrate the Dash Responder
Servicing Manual Dash Responder V1.0 Revision F
Page 20 of 72 2004768-001
Page 21

GE Medical Systems
(
)
Information Technologies
1. Connect the DRST-Box to the Dash Responder and the PC (COM 1 - 4).
Check at the DRST-Box that
• the LED 'P
ERIPRESENT'isONand
• the Switch '9-18V' is OFF for software version V 1.0
• the Switch '9-18 V' is ON for software version V1.01 and higher versions
2. Switch ON the defib.
Enter MAIN MENU by pressing both E
S
ERVICE MODE -> SERVICE TOOLS -> CALIBR.
NERGY SELECTkeys simultaneously for 2 sec. Select
3. Start the program 'DRST.exe' on the PC, select the 'Calibration' sheet and the serial interface
you chose to connect the Dash Responder. If the connection is correct, ‘D
ASH RESPONDER FOUND’
is displayed.
4. Now deliver a 360 J shock into the defibtester.
It is important to shock immediately after charging (sound indicator)!
5. Read the measured energy value from t he defibtester, calculate
_360
_
valuenew
=
+
valueenergyJ
2
and enter the calculated new_value into the window ‘MEASURED ENERGY’nexttothe
‘C
ALIBRATE’keyandclickonthe‘CALIBRATE’ key. The message ‘WAITING FOR SECOND SHOCK’
appears.
6. The 2
nd
shock is now delivered to the defibtester, then the energy calculated as above has to be
entered into the window ‘M
by the Dash Responder by clicking on the ‘C
EASURED ENERGY’nexttothe‘CALIBRATE’ key. This value is adopted
ALIBRATE’ key. The message ‘START CALIBRATION’
appears for approx. 1 seconds followed by the message ‘E
ND CALIBRATION’.
7. Exit S
ERVICE MODE:
Select E
XIT CALIBR ->MAIN MENU
IMPORTANT NOTE
Select SAVE &EXIT if you want to save the calibration values or
E
XIT for not changing the calibration.
8. Restart the defib with the ON/OFF key.
CAUTION
If calibration should not be possible (defibrillator does not charge up) due to an incorrect entry
(message ‘I
NCORRECT CALIBRATION FACTOR ...’ occurs), press the reset button and repeat the
calibration.
Evaluate the results of the calibration with energy levels of 50 J, 100 J and 360 J.. The accuracy levels
that must be gained are listed in the table Accuracy of Shock Energy on page 57.
Monitor Interface test
The Monitor Interface can be tested without a Monitor (if not available or not read y) using the service
tool kit Dash and a PC/Laptop (see Software Download Information on page 18).
Installation
1. Create a directory on your hard disk and copy the service program 'DRTest.exe' into this
directory.
Revision F Servicing Manual Dash Responder V1.0
2004768-001 Page 21 of 72
Page 22
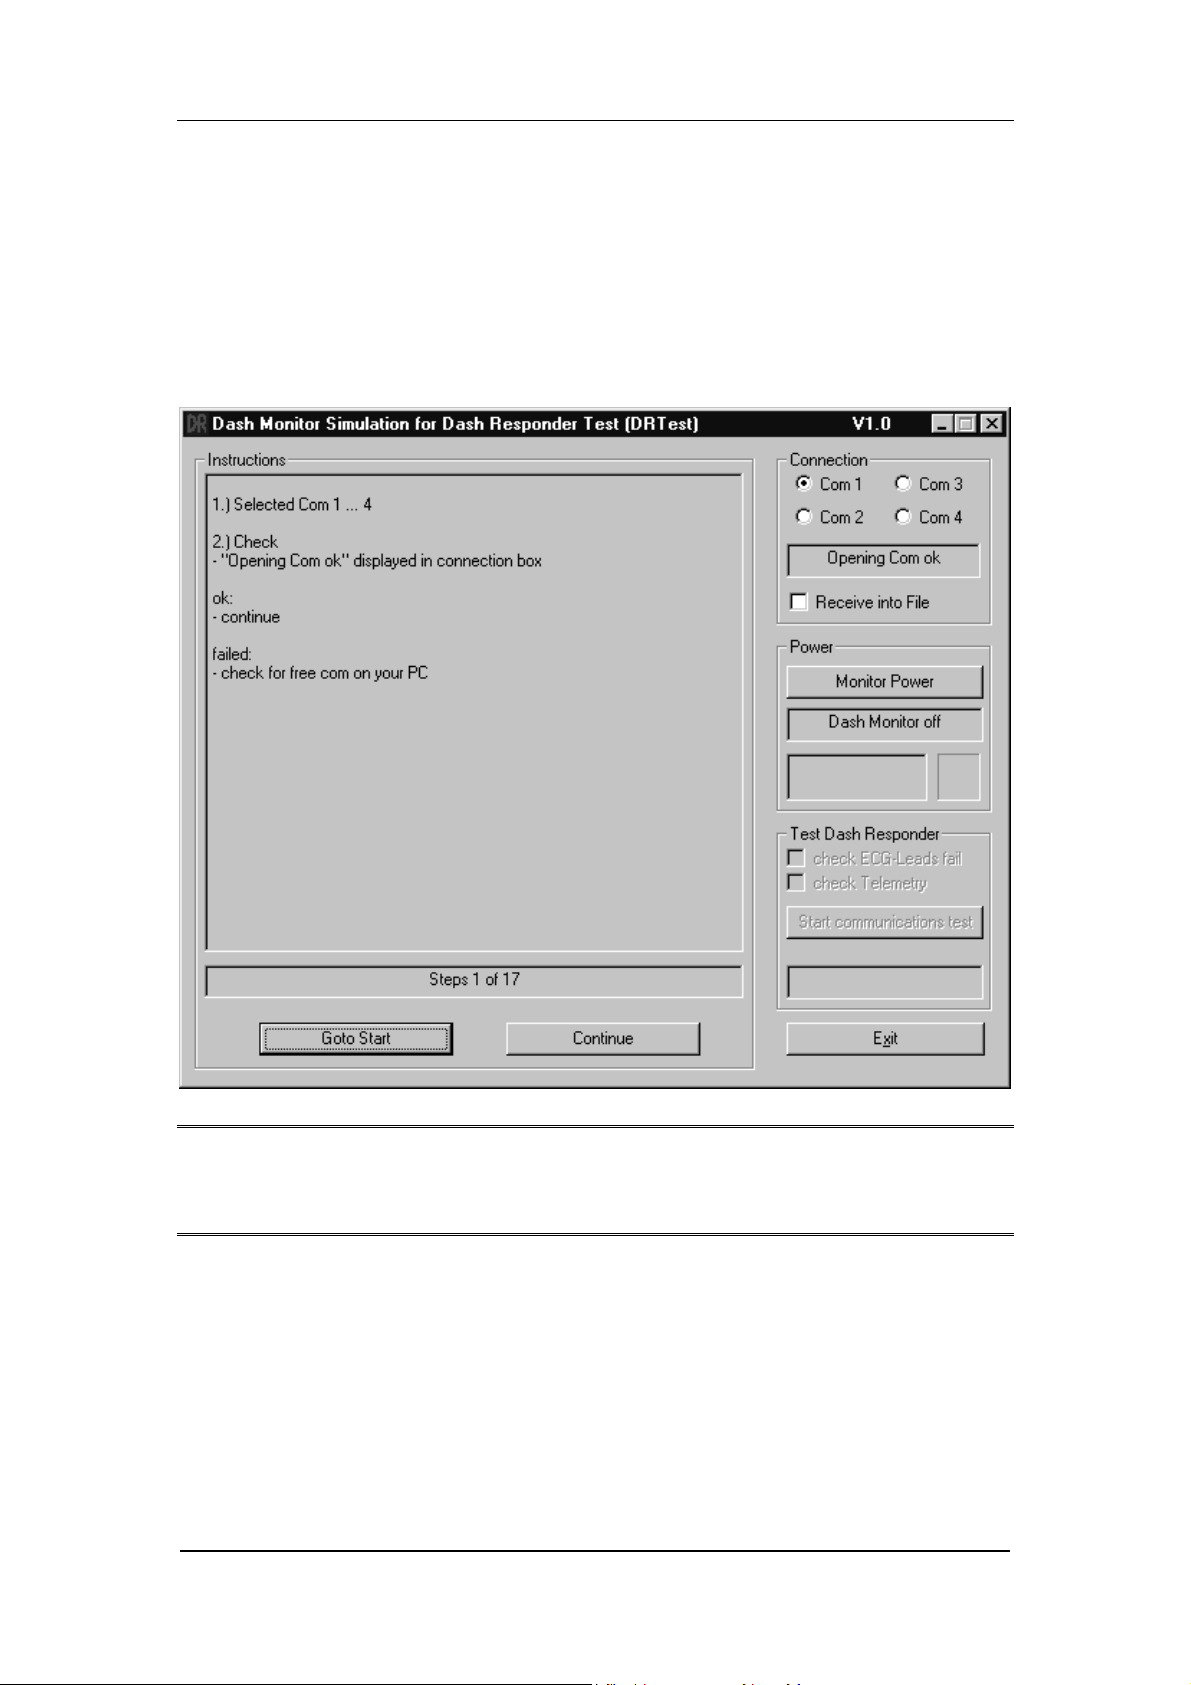
GE Medical Systems
Information Technologies
2. Attach the DRST-Box to the Dash Responder instead of a Dash Monitor.
3. Connect the power supply and the serial cable to the DRST-Box. The other end of the serial cable
should fit into a free COM-port of your PC. You may need a standard 9pin/25pin adapter if the PC
has a 25-pin socket COM.
Interface Test
Switch off the Dash Responder.
• Start the test by executing 'DRTest.exe'.
Follow the steps in the instruction window.
NOTE
The pushbuttons 'MONITOR POWER'and'START COMMUNICATION TEST' are on the right side of the
window.
Servicing Manual Dash Responder V1.0 Revision F
Page 22 of 72 2004768-001
Page 23
GE Medical Systems
Information Technologies
5 Service Menu
The SERVICE MENU can be reached by pressing the ENERGY SELECT keys simultaneously for at least
two seconds.
User configurable settings
Some settings of the Dash Responder are configurable to meet the user’s requirements. The settings
can be made in the Service Menu and comprise following values:
• Volume of the alarm sound
S
ERVICE MODE /DEVICE SETUP /ALARM <LOW |MEDIUM |HIGH>
• Automatic shutdown
S
ERVICE MODE /DEVICE SETUP /SHUTD <ON |OFF>
• User Language
S
ERVICE MODE /DEVICE SETUP /LANGUAGE <ENGLISH |DEUTSCH |…>
• Autosequence of defib shocks
ERVICE MODE /DEFIB SETUP /LEVEL1 <150 J | 200J | 300 J | 360 J>
S
S
ERVICE MODE /DEFIB SETUP /LEVEL2 <150 J | 200J | 300 J | 360 J>
S
ERVICE MODE /DEFIB SETUP /LEVEL3 <150 J | 200J | 300 J | 360 J>
• Pacer Rate
ERVICE MODE /PACER SETUP /RATE < 30 … 200 PPM>
S
Component Test
Service Mode / Comp Test
Keyboard Test
S
ERVICE MODE /COMP TEST /KEY TEST
Press the keys for at least one second
Structure of the Service Menu
Main Service Menu
1
DEVICE
SETUP
2
SERVICE
MODE
5
Device Setup
EFIB
D
SETUP
P
SETUP
3
E
XIT SAVE &
E
ACER
4
XIT
2
MAIN
MENU
SHUTD
<OFF>
ISPLAY
D
SETUP
1
L
ANG
UAGE
6
LARM
A
<LOW>
F
ACT
SETT
7
Revision F Servicing Manual Dash Responder V1.0
2004768-001 Page 23 of 72
Page 24
GE Medical Systems
Information Technologies
Defib Autosequence Setup
3
MAIN
MENU
1
LEVEL1
<200J>
Pacer Setup
4
MAIN
MENU
Service Mode
5
MAIN
MENU
1
1
LEVEL2
<200J>
ATE:
R
<60PPM>
LEVEL3
<360J>
BATT
COND
S
ERVICE
TOOLS
8
C
OMP
TEST
9
10
Display Setup
6
MAIN
MENU
CKLIT:
B
∇ ∆
CONTR:
∇ ∆
1
PREV
MENU
2
Servicing Manual Dash Responder V1.0 Revision F
Page 24 of 72 2004768-001
Page 25
GE Medical Systems
Information Technologies
Language Setup
7
∆
∇
Battery Conditioning
8
E
NGLISH
DEUTSCH
FRANÇAIS
NEDERLANDS
ITALIANO
ESPAÑOL
SVENSKA
MAIN
MENU
COND
START
Service Tools
9
MAIN
MENU
PREV
MENU
Component Test
FULL <2346mAh>
R
EM <2240mAh>
F/N
1
D
OWNLD
EW <122%>
C
OND <1>
S/W
ALIBR
C
1
5
10
MAIN
MENU
LCD
TEST
K
EY
TEST
1
PREV
MENU
RO
P
FILE
5
Revision F Servicing Manual Dash Responder V1.0
2004768-001 Page 25 of 72
Page 26

GE Medical Systems
Information Technologies
6 Replacing PCBs
Safety Information for Disassembly
Please observe the following safety information when disassembling the defibrillator.
All PCBs contain semiconductors which must be protected from electrostatic discharge. When
working on open devices and when handling PCBs, it is important to observe ESD safety precautions.
Please read also the paragraph Electrostatic Discharge (ESD) on page 33. It is especially important
that service personnel always establish contact between the PCB and ground before touching a
component.
Use the following ESD protection guidelines when working on an open defibrillator or when handling
PCBs.
• Use an ESD protective underlay connected to a non-fused earth conductor potential.
• Connect yourself to the ESD protective underlay via an armband.
• Use an ESD protective travel bag to transport PCBs.
The following tools may be required for disassembling the unit:
• Goose-necked tweezers
• Phillips Screwdriver, Type “Phillips-recess” sizes 0, 1 and 2
• Swivel wrench 7 mm for hexagonal spacers
• ESD packaging for PCBs
• ESD underlay with armband
NOTE
The Checkout Procedures and Electrical Safety Tests must be performed each time the device has been
opened, a circuit board is removed or replaced.
Disassembly Procedure
Before any service interventions, turn off the device and remove the battery.
Opening Unit
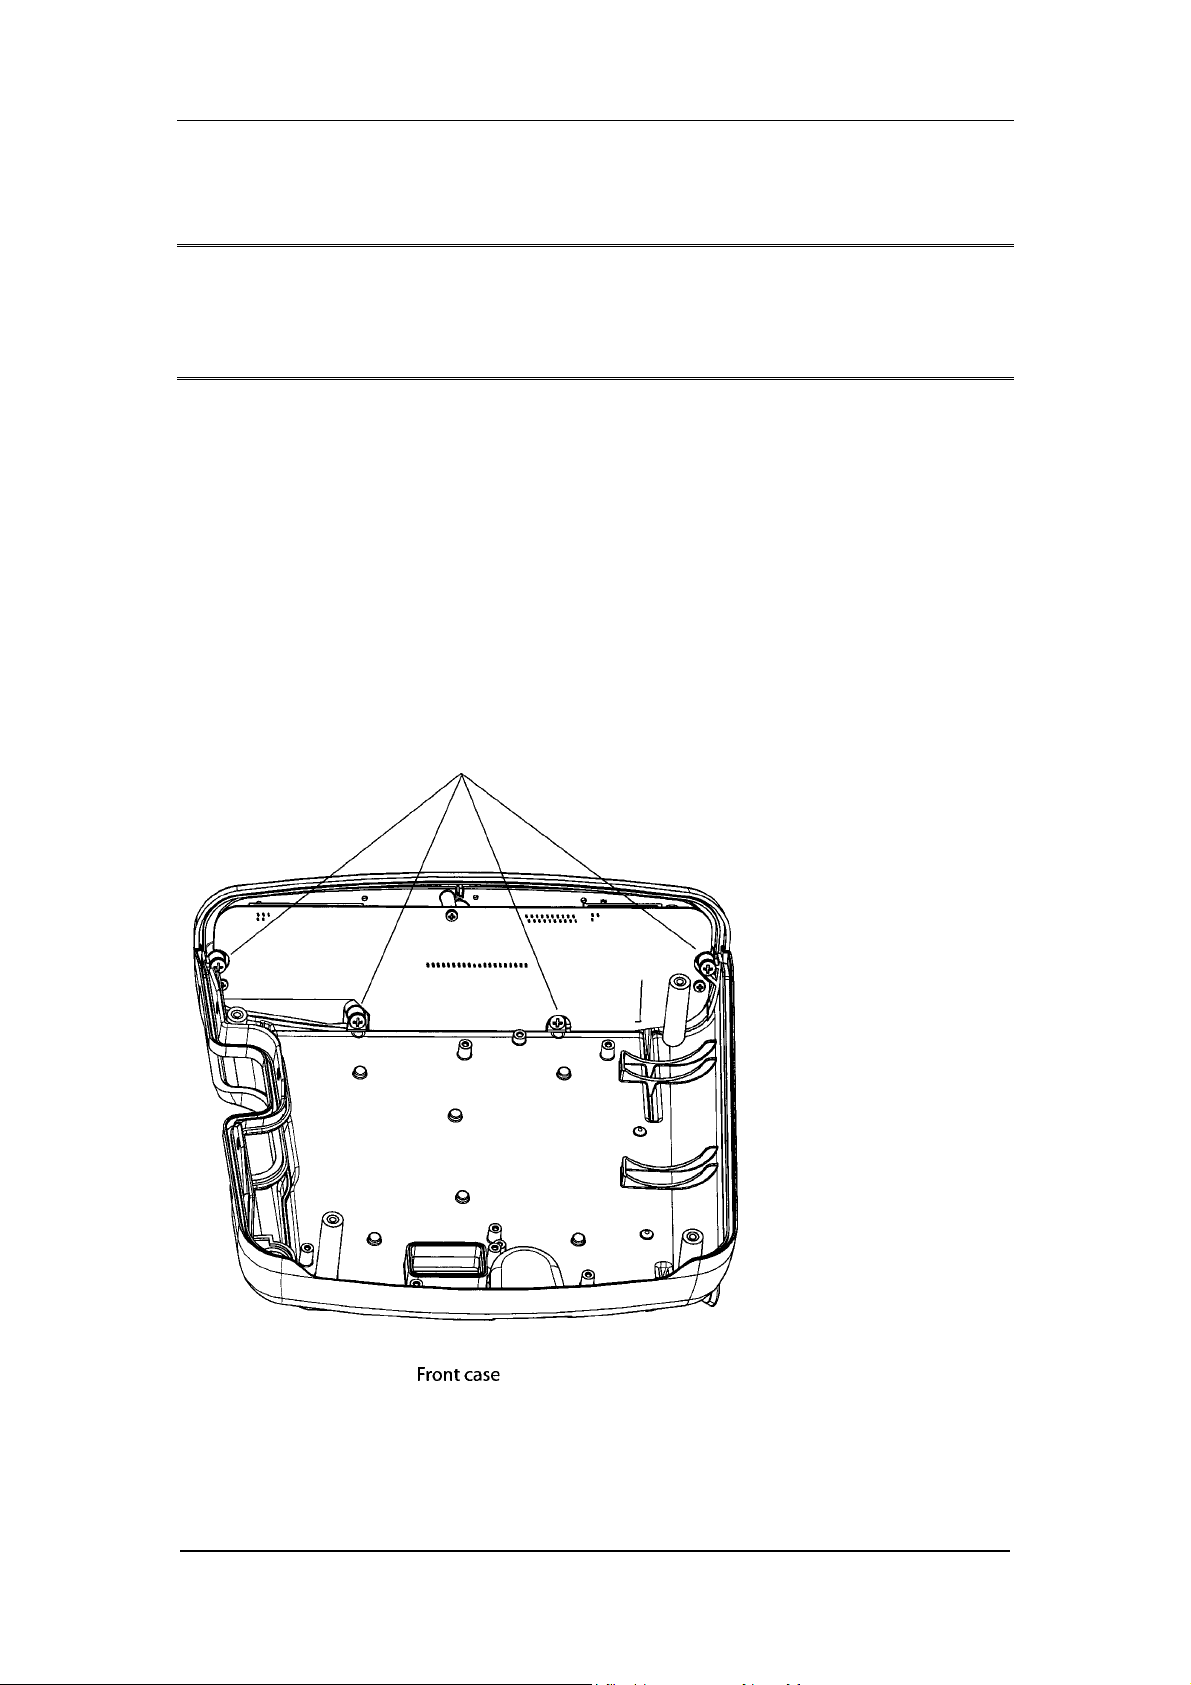
To open the unit, do the following:
• Lay the defibrillator upside down on a clean, level surface (ESD pad) which is placed on a soft
material.
• Undo the 4 buried screws on the bottom beneath the feet of the device to dismount the upper and
the lower shell of the case.
• Turn the device upright again and lift off the upper shell of the case. This can be done by lifting
the shell at the back by a small amount and pull it to the front until the front shell disconnects from
the lower shell. Then turn the upper shell to the right and thereby open the device.
• Disconnect the connectors of the Analog PCB and the Pacer PCB.
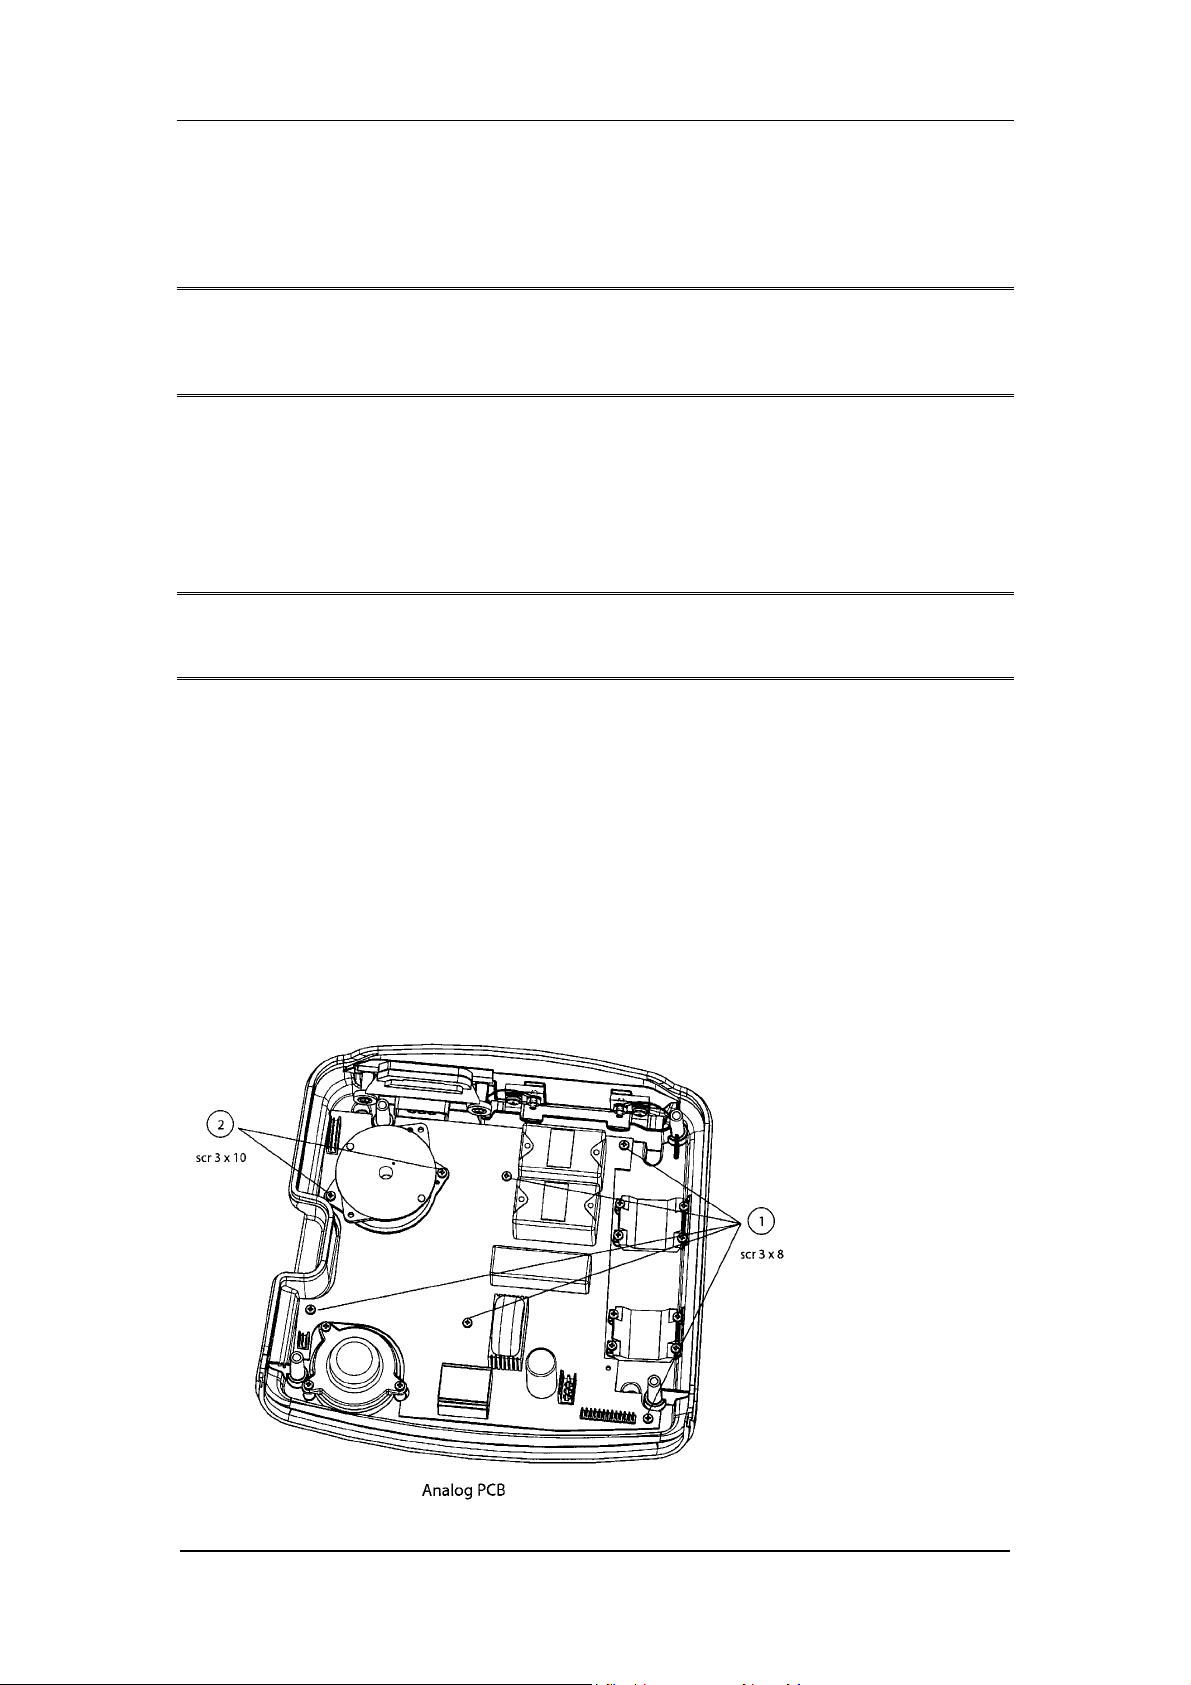
Analog PCB
Disassembling
• Disconnect the two connectors to the paddle connector on the rear of the unit. One connector
(PC/) is located at the left side of the air coil (L506) the other one (SHOCK_P/, SHOCK_M/) is
Servicing Manual Dash Responder V1.0 Revision F
Page 26 of 72 2004768-001
Page 27
GE Medical Systems
Information Technologies
located at the right side of the coil.
SHOCK_P/ and SHOCK_M/ should first be lifted with a goose-necked tweezers to loosen them
and afterwards disconnected.
• Disconnect the connectors to the HV-Capacitor.
CAUTION
Short circuit the capacitor as long as it is not in use, because it can show up a lethal voltage after a
certain amount of time if not short circuited.
• Cut the two cable ties that fix the HV-Capacitor and remove the Capacitor.
• Undo the seven screws on the Analog PCB. Remember that the two screws that mount the air coil
are a little bit longer than the others.
• Remove the Analog PCB and put in a ESD packing.
CAUTION
Don’t handle the Analog PCB on the air coil (L506), otherwise its thin wires could break.
Reassembling
• To reassemble the Analog PCB follow the steps mentioned in the assembling description in
reverse order.
• Remember the two screws fixing the air coil are a little bit longer than the other five that fix the
PCB.
• When reassembling the HV-Capacitor make sure the insulation foil is properly placed. The foil has
to be wrapped around the capacitor so that the joint is located in the middle of the lower side of the
capacitor.
• Fasten the capacitor on the bracket with two cable ties (360mm * 7,5mm).
Revision F Servicing Manual Dash Responder V1.0
2004768-001 Page 27 of 72
Page 28
GE Medical Systems
Information Technologies
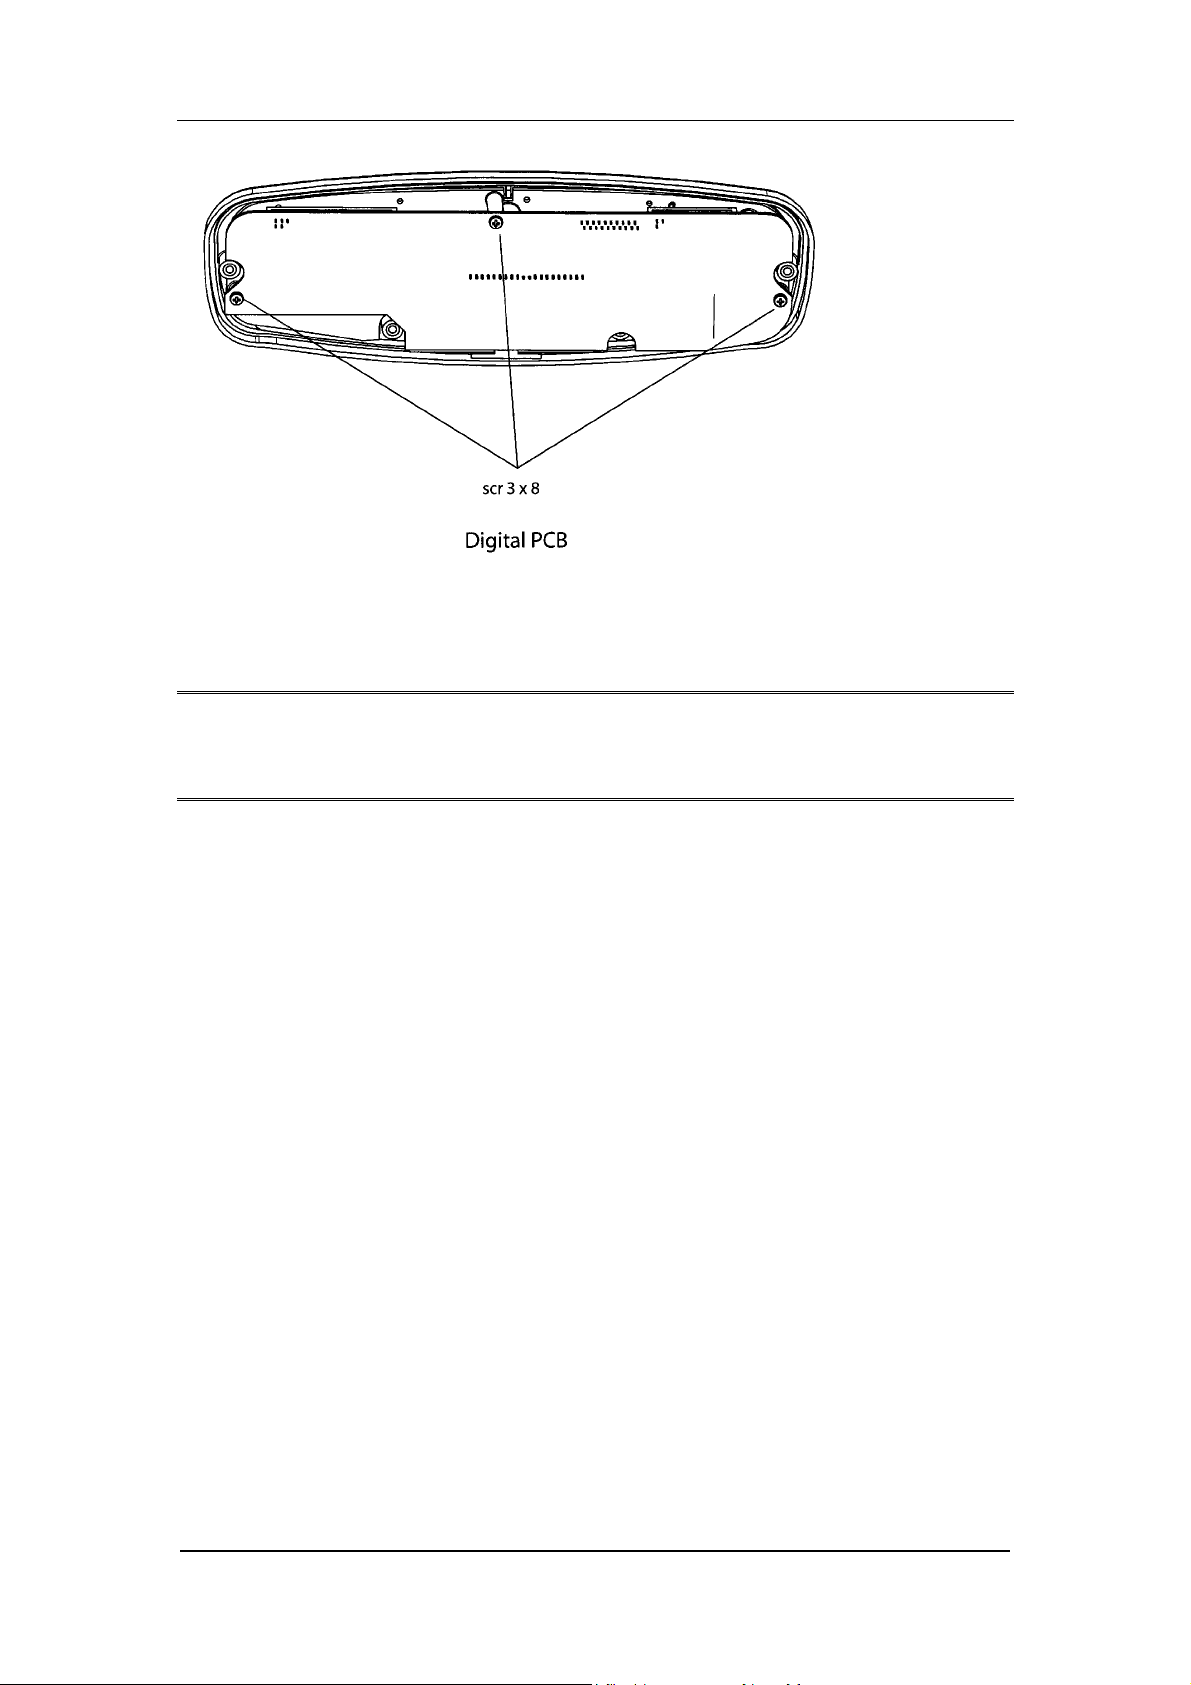
Digital PCB
Disassembling
NOTE
The Power Management PCB / Battery Case and the Pacer PCB have to be removed before removing
the Digital PCB (see disassembly procedure for Power Management PCB / Battery Case on page 30
and disassembly procedure for Pacer PCB on page 29). Otherwise no access to all screws is possible.
• Undo the big screws to dismount the front from the upper case shell.
• Disconnect the flex flat cable to the keypad. Be careful not to crack the flex cable!
• Undo the screw of the Digital PCB to remove the PCB.
• The display can be removed from the Digital PCB and replaced by a new one.
Reassembling
• Connect the Digital PCB with the front case shell by inserting the pins of the display connector in
the socket on the Digital PCB. Be careful not to bend any of the pins.
• FixthePCBwithitsthreescrews.
• Connect the flex flat cable to the keypad. This can best be done with a goose-necked tweezers.
Make sure to fasten the actuator properly.
Servicing Manual Dash Responder V1.0 Revision F
Page 28 of 72 2004768-001
Page 29
GE Medical Systems
Information Technologies
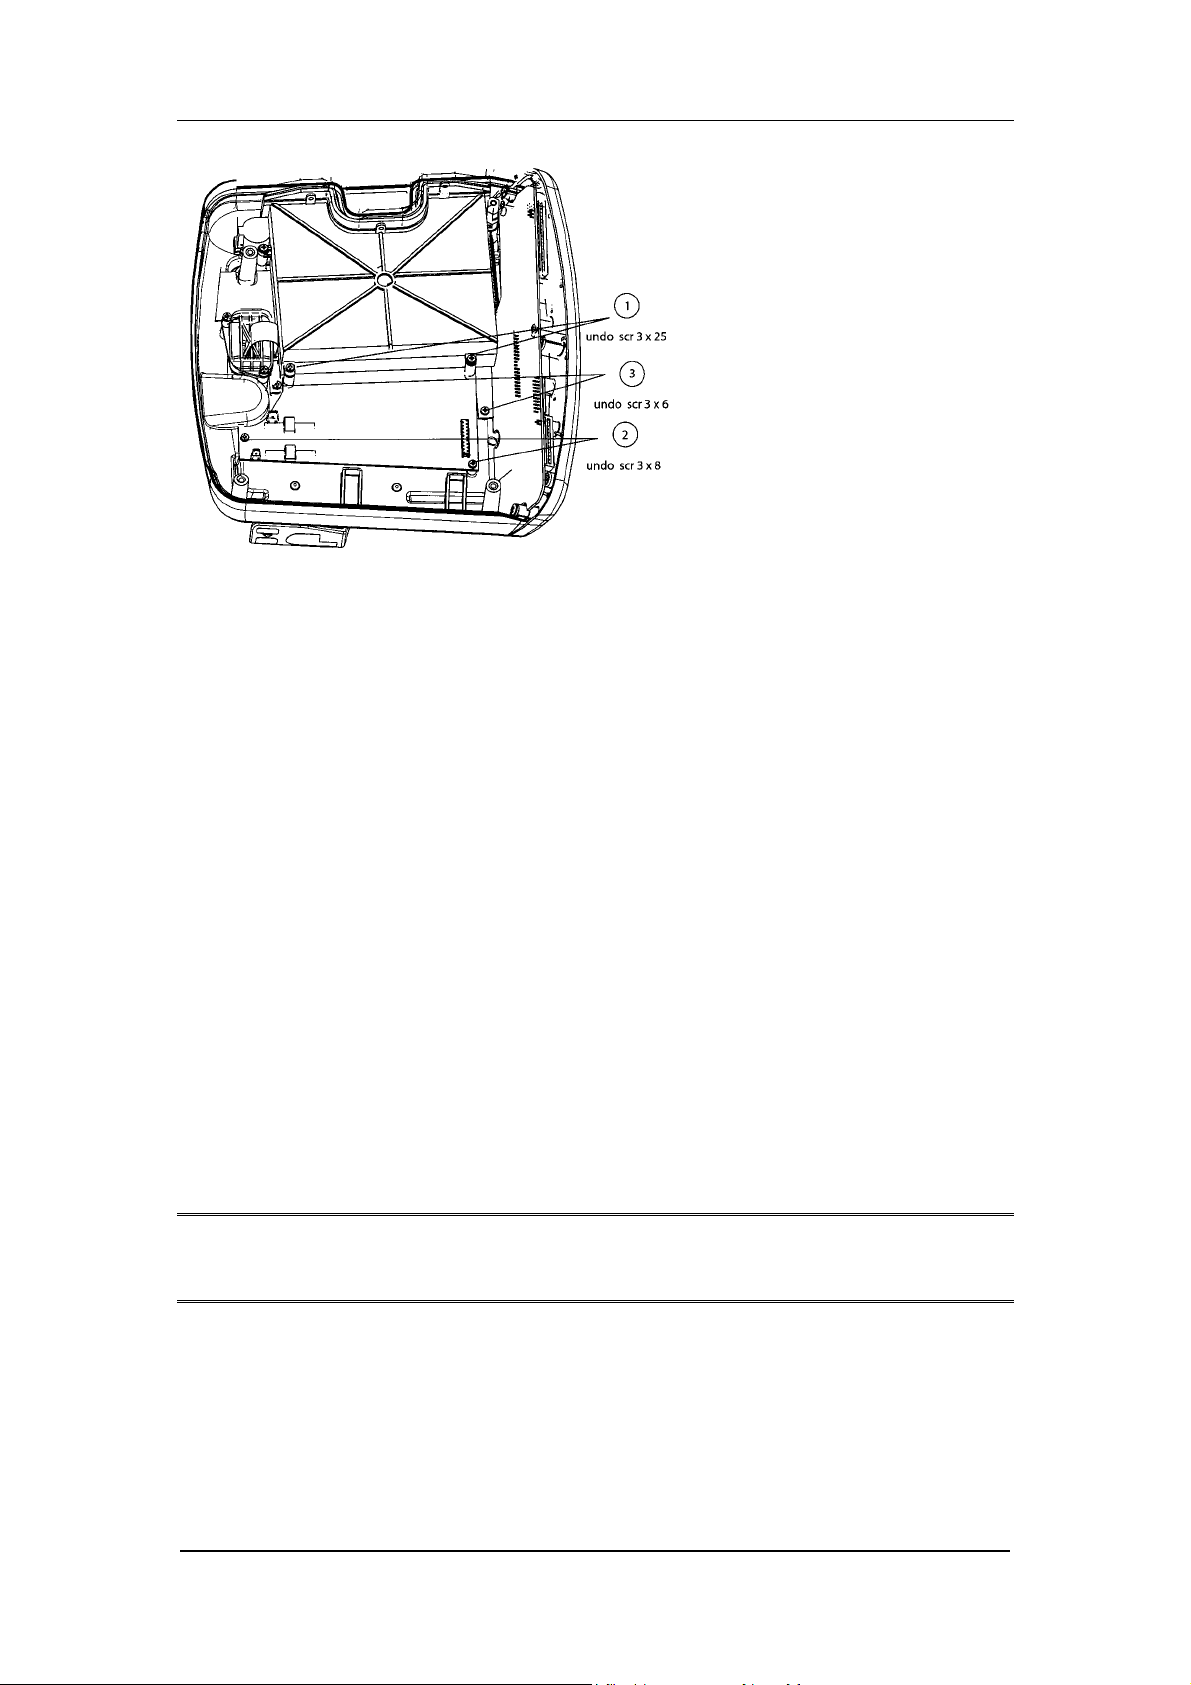
Pacer PCB
Disassembling
CAUTION
Wait a few minutes before dismounting the Pacer after it has been in use, because it can hold a harmful
voltage for several minutes.
• Disconnect all connectors to the Pacer PCB.
• Undo the two screws that fix the Pacer PCB to the upper case shell.
• Undo the two screws that fix the Power Management PCB to the upper case shell near the Pacer
PCB.
• Undo the two screws that fix the battery case as well as the Pacer PCB to the case shell.
• Lift up the battery case from the upper shell of the case and pull out the Pacer PCB under the
battery case.
Reassembling
• First remove the four screws that fix the battery case / Power Management PCB to the upper case
shell on the back of the battery case.
• Loosen the scre w that fix the battery case to the upper case shell that is located beneath the unlock
button of the battery. This screw also fixes the EMC-foil of the Power Management PCB to the
upper case shell.
• Reach into the battery case with one hand and lift it at its back so that the Pacer PCB can be
pushed under the bolts of the battery case.
• Mount the Pacer PCB with the screws to the upper case shell.
• Remount and fasten the screws of the Power Management PCB.
• Connect the flat ribbon cable from Digital PCB to Pacer PCB.
• Make sure the flex flat cable of the monitor connector receptacle didn’t get loose during mounting
the Pacer PCB. Reconnect and fasten it if necessary.
Revision F Servicing Manual Dash Responder V1.0
2004768-001 Page 29 of 72
Page 30
GE Medical Systems
Information Technologies
Power Management PCB / Battery Case
Disassembling
• To dismount the Power Management PCB the monitor connector receptacle must b e removed first.
• Carefully disconnect the flat flex cable to the monitor connector. The flat flex cable is locked in
the socket. Loose this actuator by lifting it on both sides with a goose-necked t weezers.
Don’t bend the cable to avoid cracks in the wires!
• Undo the screw that fix the monitor connector receptacle to the upper case s hell.
Carefully remember the orientation o f the flat flex cable versus the receptacle. Pay attention to the
orientation of the contacts on the flex flat cable in regard of the socket on the Power Management
PCB. The contacts are located on the side which is opposite to the battery case. In this orientation
the cable must be reassembled later.
• Remove the monitor connector receptacle.
• Disconnect the cable to the Analog PCB and the flat ribbon cable to the Digital PCB.
• Undo the screws of the battery case and the hexagonal threaded bolt. Undo the three countersunk
screws on the front of the battery case.
Remember the different lengths of the screws.
• Remove the whole battery case with the Power Management PCB mounted on it.
• The Power Management PCB can not be removed from the battery case. The spare part consists of
the Power Management PCB mounted on a new battery case.
Reassembling
NOTE
Before reassembling the Power Management PCB the Digital PCB should be reassembled.
• To reassemble the Power Management PCB the monitor connector receptacle has to be
reassembled first.
Servicing Manual Dash Responder V1.0 Revision F
Page 30 of 72 2004768-001
Page 31

GE Medical Systems
Information Technologies
• Put the receptacle through the hole in the upper case shell. Make sure that the orientation of the
receptacle is right. The flex flat cable has to protrude out of the rubber part of the receptacle on the
side located to the back of the upper case shell. Regard the notch in the joint between the rubber
part of the receptacle and the (outer) plastic part. This notch has to be located to the back side of
the upper case shell. Fix the monitor connector receptacle with the screws.
• The flat flex cable should be placed in the socket on the P ower Management PCB before
reassembling the Power Management PCB to the device.
Make sure that the flex flat cable is inserted completely and perpendicular to the socket. Secure it
by fasten the actuator.
• Carefully push the battery case into its place in the upper case shell. Make sure the rubber seal
around the opening of the battery case gets located in the frame properly. Be careful that the flex
flat cable doesn’t get cracked.
Revision F Servicing Manual Dash Responder V1.0
2004768-001 Page 31 of 72
Page 32

GE Medical Systems
Information Technologies
High-Voltage Capacitor
Disassembling
CAUTION
Short circuit the capacitor as long as it is not in use, because it can show up a lethal voltage after a
certain amount of time if not short circuited.
• Make sure that the HV-Capacitor contains no energy. If you are in doubt, that the discharging
circuit could not work properly, measure the voltage on the capacitor with an appropriate voltage
meter. Discharge the capacitor if necessary by means of resistors of about 60kOhms/10 W.
After 30 seconds capacitor is completely discharged.
• Cut the two cable ties that fix the HV-Capacitor and remove the Capacitor.
• Lift the capacitor of its sockets and remove the cap that cover the connector terminals at the top
and the cap that covers the bottom of the capacitor.
• Disconnect the connectors from the capacitor.
• Remove the plastic insulation foil.
• Short-circuit the terminals of the capacitor by an appropriate blank wire. (Hint: Use the wire that
short-circuits the replacement capacitor for this purpose.)
Reassembling
• Remove the short-circuit wire on the terminals of the replacement capacitor.
• Wrap the insulation foil around the capacitor so that the edge of the foil is placed in the middle of
the side of the negative (‘-‘) terminal of the capacitor and the end of the foil coincides with the
bottom of the capacitor.
• Put the cap on the bottom of the capacitor.
• Connect the wires to the capacitor; use the inner terminals. Beware the polarity!
• Put the cap on the top of the capacitor to cover the connection terminals.
• Thread new cable ties in the sockets for the capacitor.
• Put the capacitor on the sockets in the Dash Responder and fix it with the cable ties.
CAUTION
Check that the Dash Responder is loaded with minimum Software Version 1.01
Servicing Manual Dash Responder V1.0 Revision F
Page 32 of 72 2004768-001
Page 33

GE Medical Systems
Information Technologies
7 Troubleshooting Tips
Electrostatic Discharge (ESD)
CMOS Components
The defibrillator makes extensive use of CMOS components because they are more immune to noise
and consume less power than standard TTL or NMOS components. However, CMOS components are
inherently more susceptible to electrostatic discharge ( ESD) damage than other types of semiconductor
materials. ESD damage, causing a weakening or complete breakdown of p-n junctions within
multilayer semiconductor substrates, can range from slight degradation to catastrophic failure. Slight
degradation usually results in intermittent failure of the affected component catastrophic failure results
in rendering the affected component permanently unusable. Although CMOS components may be
more sensitive to ESD, all semiconductor devices are susceptible to ESD damage.
All external connector inputs and outputs of the defibrillator are designed with protection from ESD
damage. Ho wever, if the defibrillator requires service, exposed components and assemblies contained
within are susceptible to ESD damage. This includes human hands, non-ESD protected work stations
and/or improperly grounded test equipment.
The following guidelines help make a service workstation more resistant to the ESD damage:
• Discharge any static charge you may have built up before handling semiconductors or assemblies
containing semiconductors.
• A grounded, antistatic wristband (3M part number 2046 or equivalent) or heel strap should be
worn at all times while handling or repairing assemblies containing semiconductors.
• Use properly grounded soldering and test equipment.
• Use a static-free work surface (3M part number 8210 or equivalent) while handling or working on
assemblies containing semiconductors.
• Do not remove semiconductors or assemblies containing semiconductors from antistatic containers
(Velo-stat bags) u ntil absolutely necessary.
• Make sure power to an assembly is turned off before re moving or inserting a se miconductor.
• Do not slide semiconductors or electrical/electronic assemblies across any surface.
• Do not touch semiconductor leads unless absolutely necessary.
Semiconductors and electrical/electronic assemblies should be stored only in antistatic bags or boxes.
These guidelines may not guarantee a 100% static-free workstation, but can greatly reduce the potential
for failure of any electrical/electronic assemblies being serviced.
Special Components
Surface mounted devices are used to aid in miniaturizing the electrical/electronic assemblies within the
defibrillator.
Surface mounted integrated circuits have legs that are soldered to rectangular pads on the surface of the
printed circuit board (PCB), versus pin-through devices having legs that are made to be inserted into
solder fillets protruding completely through a PCB. Surface mounted integrated circuits (ICs, SMD,
PLCC) may have legs on either two or four sides of the IC. Another surface mounted technology are
Ball Grid Array ICs (BGA) using soldering balls as electrical connections on the bottom of the
components.
Surface mounted resistors, capacitors, and diodes have conductive parts acting as legs that are directly
soldered to the PCB.
WARNING
Surface mounted components were not designed to b e removed or replaced using standard soldering
equipment. Removal of surface mounted components using a conventional soldering iron can
Revision F Servicing Manual Dash Responder V1.0
2004768-001 Page 33 of 72
Page 34

GE Medical Systems
Information Technologies
potentially destroy the PCB. Only soldering workstations specifically designed for surface mount
technology may be used to remove and replace these type of components.
Battery Failure
Error Message: Battery Required
The Battery can not be detected by t he defibrillator or is not properly inserted.
Check the battery contacts and the contacts of the battery case of the defibrillator.
Error Message: Battery Low
The battery is depleted to a remaining charge le vel of at least 5 Shocks with 360 J each. The battery
can be charged in the defibrillator if a monitor is connected which, in turn, is connected to mains
power. Another way to charge the battery is b y the optional battery charging unit ASU 3000.
Charge level and battery status
The actual charge level and the “health” condition of the battery can be checked in the Setup Menu.
(S
ERVICE MODE /BATT COND).
The indication of the “F
it is fully charged.
The indication of the “R
The indication of the quotient “F/N
maximal chargeable amount of energy that this battery can hold compared with the nominal capacity of
a typical, already used battery. Therefore this indication can read a number greater than 100% because
a new battery has a capacity higher than the nominal value.
A battery with less than 60% “F/N
conditioning on page 16.
ULL” charge level in mAh gives the maximum charge level of the battery when
EM”chargelevelinmAhgivestheactualchargelevelofthebattery.
EW” gives a hint of the “health status” of the battery as it states the
EW” charge level must be replaced. See also chapter Battery
Charging Status Indicator
The ChargingStatus Indicators are:
• solid yellow while the battery is being charged
• solid green when the battery is charged
• blinking yellow when there is a charging problem
In case of a charging problem most probably the battery is defect and must be replaced.
Fault/Symptom Analysis
This information is provided for the benefit of service tec hnicians responsible for the maintenance and
repair of the monitor. The symptoms covered in this part of the Troubleshooting section represent only
a selected number of faults that you may encounter and by no means are intended to cover ever y
possible failure that may occur.
A systematic approach to the diagnosis of problems as well as a general understanding of the architecture, both hardware and software, of the defibrillator are essential to ensure successful troubleshooting of this device. The manufacturer recommends formal service training before repairs are
attempted on the defibrillator. The Service Tips listed below combined with formal training should
provide the service technician with skills necessary to service and repair a defibrillator, in the event of a
malfunction.
Servicing Manual Dash Responder V1.0 Revision F
Page 34 of 72 2004768-001
Page 35

GE Medical Systems
Information Technologies
Fault Reason Solution
The message ERROR <#>
occurs during selftest
Charging Status LED is not
illuminated when Monitor is
connected to the defibrillator
An error was detected during
test of internal parts of the
device.
No power supply provided from
monitor to defibrillator.
Consider the table of error
numbers on page 37 to get an
idea of the error cause. Try to
resolve the error or replace the
PCB
Connect the monitor to mains
power line.
Check if the monitor is properly
placed on top of the defibrillator
and the lever is engaged.
Revision F Servicing Manual Dash Responder V1.0
2004768-001 Page 35 of 72
Page 36

GE Medical Systems
Information Technologies
8 Error Messages and System Information
Messages
Overall Device
Message Explanation
SHUTDOWN message before the device switches off auto-
matically
BATTERY REQUIRED no battery inserted
DEVICE ERROR <#>
S
WITCH OFF
TRY AGAIN
Defibrillator
Message Explanation
APPLY ELECTRODES electrodes disconnected
BATTERY LOW Battery is partly depleted, 5 shocks with 360 J
CONNECT DEFIBELECTRODES no defibrillation electrode connector plugged into
ENERGY HIGH The charged energy is higher than the chosen
ENERGY LOW The charged energy didn’t reach the chosen level;
LEADSFAIL/NO SYNC ECG lead failure at monitor, synchronized
NO COMM/NO SYNC No communication with monitor, synchronized
NO MONITOR/NO SYNC monitor not ready, synchronized defibrillation not
Internal Device error, device should not be u sed.
Error number is a hint to the cause of the error.
ForErrornumbersseepage37
each can still be triggered
the device
level; shock possible with the charged energy
shock possible with the charged energy
defibrillation not possible
defibrillation not possible
possible
TELEMETRY/NO SYNC patient monitor receives ECG via telemetry; due
to the long delay, this signal is not suitable for
synchronization (Combo mode)
Pacemaker
Message Explanation
APPLY ELECTRODES excessive contact impedance at the defibrillation
electrodes
PACER ACTIVE user tries to turn off the defibrillator while
pacemaker is still in operation
PACER ERROR internal pacemaker problem
PADS REQUIRED no pads are applied when pacemaker is turned on
Servicing Manual Dash Responder V1.0 Revision F
Page 36 of 72 2004768-001
Page 37

GE Medical Systems
Information Technologies
Error Numbers
Error numbers displayed after device was switched on.
Error
Number
1 Unresolved exception in program
2 Internal RAM
3 External RAM
4 Keyboard; key pressed during device start
5 Bootloader Flash RAM
6 Program code Flash RAM
7 EEPROM
11 Failure of Internal Discharge; Caution: Risk of
high voltage on HV-Capacitor
12 Failure of high voltage control (PIC problem)
Explanation
Revision F Servicing Manual Dash Responder V1.0
2004768-001 Page 37 of 72
Page 38

GE Medical Systems
Information Technologies
9 Pin Configuration
External Connections
Paddle Input Connector
Paddle Connector
Name Description I/O-Type Level
PC4 Paddle coding I 5V L 1
GND Ground - 0V - 2
PC6 Paddle coding I 5V L 3
HP_CHARGE Charge key on external paddle I 5V L 4
HP_DISCHARGE
PC5 Paddle coding I 5V L 6
HV STERNUM Shock_P O 5000V H 7
HV APEX Shock_M O 5000V H 8
The following table shows the connections internal in the different paddle types that provide the coding
of the type. Shown are the connections that exist between two pins in each case.
For example softpaddles are coded via a connection between pin PC/4 and PC/5. Internal electrodes
without spoons are coded via a connection from PC/5 to PC/6 and a connection either directly or via
resistor (4.75 kiloohms) from PC/4 to PC/5.
PC/3 PC/4 PC/5 PC/6
|_______| Softpaddles 919 202 94/95
Discharge key on external
paddle
no paddles
(223 383 01)
I5V
active
L5
Pin
Nr.
|_(4k75)_| |______| internal electrodes
(without spoons) (217 308 01)
|______| paddle pair for external defibrillation with operating keys
(d)/(e) (217 333 01/02)
|_______| electrodes anterior/posterior (217 329 01)
|_(4k75)_| internal spoons with operating keys
|_____________| (not available yet)
Servicing Manual Dash Responder V1.0 Revision F
Page 38 of 72 2004768-001
Page 39

GE Medical Systems
Information Technologies
Monitor Connector
Described in the following table are the signals that are used by the Dash Responder; additional signal
on the "Dash Hardware Peripheral Expansion Interface", which are not used for the Dash Responder
are shaded.
DASH MONITOR HARDWARE INTERFACE
Name Description I/O-Type Level
GND Ground - 0V - 1
+9TO18VM
Switched +9-18V
PER_MARKER_O
UT
PER_ENET_PRES
ENT*
PER_ENET_TXD-
PER_ENET_RXD-
PER_ENET_TXD+
PER_ENET_RXD+
PER_AUTOPORT
_ID_RXD
PER_PRESENT_
PER_PRESENT*
PER_ASYNC_RX
D
PER_ASYNC_TX
D
PACER_BLANK_
TC_PACER_BLAN
K*
PER_AUTOPORT
_ID_TXD
PER_AUTOPORT
_RXD
PER_AUTOPORT
_TXD
SWITCHED +5V power supply from Monitor I +5V - 17
GND Ground - 0V - 18
Power Supply from Monitor I +9...18V
Sync pulse to Defibrillator I TTL
By this signal the Monitor
switches the Ethernet lines of
the docking station.
switched Ethernet Transmit
line -
switched Ethernet Receive line
switched Ethernet Transmit
line +
switched Ethernet Receive line
+
Autoport ID receive O TTL
This outport must be switched
to GND, then the monitor
switches the power supply to
the defib
Asynchronous communication
transmit to Monitor (Idle State
is HI, Startbit is LOW)
Asynchronous communication
transmit to defib (Idle State is
HI, Startbit is LOW)
Signal tells the monitor that an
pacemaker pulse was delivered.
Autoport ID transmit I TTL
Receive data from peripheral O TTL
Transmit data to peripheral I TTL
O 0V
I TTL
O TTL
I TTL
O TTL
OTTL
OTTL
ITTL
OTTL
active
-2
H3
L 4
- 5
- 6
- 7
- 8
- 9
L10
L11
L12
L13
- 14
- 15
- 16
Pin
Nr.
Revision F Servicing Manual Dash Responder V1.0
2004768-001 Page 39 of 72
Page 40

GE Medical Systems
Information Technologies
Battery Connector
BATTERY HARDWARE INTERFACE
Name Description I/O-Type Level active Pin
+12VBAT Supply Voltage from Nickel
Cadmium Battery Pack
BAT_CONN_ Battery-Pack present
(Connection to GND)
BQ_DQ Data/Controlbus from Battery-
Pack
BATT_EMPTY Battery-Pack empty (FET to
GND is switched on, as long as
the Battery voltage is greater
than 10 V)
GND Ground - 0V - 8, 9, 10
-
I
I/O
I
+12Vnom - 1, 2, 3
OC L 7
TTL L 5
OC H 4
Internal Connections
Digital PCB
Nr.
Analog PCB
Connector Name DEFI/
Interface PCB Analog to PCB Digital / Connector DEFI
Name Description I/O Level Active Pin
VCC Supply Voltage - +5V - 1
GND Ground - 0V - 2
SDA I²C- Datasignal I/O TTL - 3
GND Ground - 0V - 4
SCL I²C-Clocksignal I/O TTL - 5
GND Ground - 0V - 6
KB_CHARGE Keyboard key line CHARGE O TTL H 7
GND Ground - 0V - 8
KB_DISCHARGE Keyboard key line SHOCK O TTL H 9
GND Ground - 0V - 10
HP_CHARGE Hardpaddle key line CHARGE I TTL H 11
GND Ground - 0V - 12
HP_DISCHARGE Hardpaddle key line SHOCK I TTL H 13
GND Ground - 0V - 14
EN_ SHOCKA Enable Defishock to PIC_A O TTL H 15
Servicing Manual Dash Responder V1.0 Revision F
Page 40 of 72 2004768-001
Page 41

GE Medical Systems
Information Technologies
Interface PCB Analog to PCB Digital / Connector DEFI
Name Description I/O Level Active Pin
GND Ground - 0V - 16
EN_SHOCKB Enable Defishock to PIC_B O TTL H 17
(code) n. c. 18
A_DATA Request line from PIC_A I TTL H 19
GND Ground - 0V - 20
B_DATA Request line from PIC_B I TTL H 21
GND Ground - 0V - 22
DEFI_RESET Reset O TTL H 23
GND Ground - 0V - 24
SPEAKER1 Speaker line 1 - - - 25
SPEAKER2 Speaker line 2 - - - 26
Display Interface
Connector Name DISPLAY/
Interface Display to PCB Digital
Name Description I/O Level active Pin
GND Ground - 0V - 1
VCC Power supply for Logic Circuit - +5V - 2
V0 Power supply for LCD - +1V to –
5V
ADR0 L=Instruction, H=Data I TTL H 4
CS_DISPL1_ Chip Select1 I TTL L 5
CS_DISPL2_ Chip Select2 I TTL L 6
DISPL_EN Display Enable I TTL H 7
PWM_DISPCLK External Clock (2kHz) I TTL - 8
R/W_ Read/Write_ I TTL H/L 9
-3
IO_DAT0 Data Bus0 I/O TTL - 10
IO_DAT1 Data Bus1 I/O TTL - 11
IO_DAT2 Data Bus2 I/O TTL - 12
IO_DAT3 Data Bus3 I/O TTL - 13
IO_DAT4 Data Bus4 I/O TTL - 14
IO_DAT5 Data Bus5 I/O TTL - 15
Revision F Servicing Manual Dash Responder V1.0
2004768-001 Page 41 of 72
Page 42

GE Medical Systems
Information Technologies
Interface Display to PCB Digital
Name Description I/O Level active Pin
IO_DAT6 Data Bus6 I/O TTL - 16
IO_DAT7 Data Bus7 I/O TTL - 17
CPLD_RESET_ Reset I TTL L 18
VLED1 Power supply for LED Anode - +5V - 19
VLED2 Power supply for LED Cathode - 0 to +5V - 20
Keypad Interface
Connector Name KEYPAD/
Interface Keypad to PCB Digital
Name Description I/O Level Active PIN-
Nr.
KB_SEL0_ Matrix-Send line 0 O TTL L 10
KB_SEL1_ Matrix-Send line 1 O TTL L 9
KBSEL2_ Matrix-Send line 2 O TTL L 15
KBSEL3_ Matrix-Send line 3 (not used) O TTL L 13
KB_IN0_ Matrix-Receive line 0 I TTL L 12
KB_IN1_ Matrix- Receive line 1 I TTL L 8
KB_IN2_ Matrix- Receive line 2 I TTL L 11
KB_IN3_ Matrix- Receive line 3 I TTL L 14
KB_POWER_ON_ Key POWER ON ICMOS
+18V
KB_CHARGE_UB Key CHARGE I+5VH3
KB_DISCHARGE1
_UB
POWER_ON_LED O +5V H 20
BATT_GN_LED Green LED is illuminated if
Key SHOCK1I+5VH7
O+5VH1
Battery full (LED connected to
GND)
L19
BATT_YE_LED Yellow LED is illuminated
when Battery is being charged,
it blinks yellow when battery
charging function is defect or
disturbed (LED is connected to
GND)
Servicing Manual Dash Responder V1.0 Revision F
Page 42 of 72 2004768-001
O+5VH2
Page 43

GE Medical Systems
Information Technologies
Interface Keypad to PCB Digital
Name Description I/O Level Active PIN-
Nr.
SYNC_LED_ LED is illuminated in Sync
Mode and blinks during each
Sync pulse
CHARGED_LED_ LED is illuminated when
selected energy has been
charged
PACER_ON_LED_ LED is illuminated when Pacer
Mode active and blinks on eac h
delivered pace pulse
KB_DISCHARGE2
_UB
VCC Supply Voltage - +5V 4
GND Ground - 0V 18
Key SHOCK2O+5VH6
O+5VL16
O+5VL17
O+5VL5
Pacer PCB
Connector name PACER/
Interface PCB Pacer to PCB Digital
Name Description I/O Level Active Pin
VCCP switched power supply from
Dash 2000/3000/4000 for
voltage generation of pace
pulse
GNDP Ground for VCCP - 0V - 2
VCCP switched power supply from
Dash 2000/3000/4000 for
voltage generation of pace
pulse
GNDP Ground for VCCP - 0V - 4
VCC power supply - +5V - 5
GND Ground for VCC - 0V - 6
PHASE_A_ clock for HV-Generator I H/L L 7
GND Ground for VCC - 0V - 8
PHASE_B_ clock for HV-Generator I H/L L 9
GND Ground for VCC - 0V - 10
- +9...18V - 1
- +9...18V - 3
Revision F Servicing Manual Dash Responder V1.0
2004768-001 Page 43 of 72
Page 44

GE Medical Systems
Information Technologies
Interface PCB Pacer to PCB Digital
Name Description I/O Level Active Pin
PACE_RESET_ Pacer- Reset I H/L L 11
GND Ground for VCC - 0V - 12
PACE_ACKN_ Pace-pulse- acknowledge O H/L L 13
GND Ground for VCC - 0V - 14
PACE_TXD UART Send line O H/L H 15
GND Ground for VCC - 0V - 16
PACE_RXD UART Receive line I H/L H 17
GND Ground for VCC - 0V - 18
PACE_IMP Pace-pulse I H/L H 19
GND Ground for VCC - 0V - 18
Power Management
Connector Name BATTMAN/
Interface PCB Battery Management to PCB Digital
Name Description I/O Level Active Pin
BATT_GN_LED Charging Status- LED. Green
LED is solid on, when battery
is charged.
BATT_YE_LED ChargingStatus- LED. Yellow
LED is solid on, when battery
(NiCd) is being charged. If the
yellow LED blinks the battery
charging is erroneous.
GND Ground - 0V - 3
KB_POWER_ON_ Keypad Power On O 18V-
I+5VH1
CMOS
H2
L4
GND Ground - 0V - 5
POWER_ON_KEY Level shifted Power On signal I TTL H 6
GND Ground - 0V - 7
POWER_OFF_ Supply switch controlled by the
processor
GND Ground - 0V - 9
Servicing Manual Dash Responder V1.0 Revision F
Page 44 of 72 2004768-001
OTTLL8
Page 45

GE Medical Systems
Information Technologies
Interface PCB Battery Management to PCB Digital
Name Description I/O Level Active Pin
BATTMAN_RESETReset Powermanagement O TTL H 10
GND Ground - 0V - 11
BATT_TXD UART send line O TTL - 12
GND Ground - 0V - 13
BATT_RXD UART receive line I TTL - 14
GND Ground - 0V - 15
SYNC_ Sync-Signal for Cardioversion I TTL L 16
GND Ground - 0V - 17
MARKER_ Marker out signal for Monitor O TTL L 18
GND Ground - 0V - 19
PACER_BLANK Pace-inhibit signal for monitor
(during reset and defib
switched off: low). Inverted
outside of the Device-Control
GND Ground - 0V - 21
PER_ASYNC_TXDAsynchronous communication
transmit
GND Ground - 0V - 23
PER_ASYNC_RXDAsynchronous communication
receive
GND Ground - 0V - 25
VCC Power supply +5V for PCB
Power Management
GNDD Ground for VCCD - 0V - 27
VCCD unregulated Power S upply for
PCB Digital
GNDD Ground for VCCD - 0V - 29
OTTLH20
ITTL-22
OTTL-24
-+5V-26
- +8V...+18
V
-28
VCCD unregulated Power S upply for
PCB Digital
GNDP Ground for VCCP - 0V - 31
VCCP unregulated Power Supply for
PCB PACER
GNDP Ground for VCCP - 0V - 33
Revision F Servicing Manual Dash Responder V1.0
2004768-001 Page 45 of 72
- +8V...+18
V
- +8V...+18
V
-30
-32
Page 46

GE Medical Systems
Information Technologies
Interface PCB Battery Management to PCB Digital
Name Description I/O Level Active Pin
VCCP unregulated Power Supply for
PCB PACER
- +8V...+18
V
-34
Smart Media Card
Connector Name SMARTCARD/
Interface Smart Media Card to PCB Digital
Name Description I/O Level Active Pin
GND Ground - 0V - 1
SMC_CLE Command Latch Enable I TTL H 2
SMC_ALE Address Latch Enable I TTL H 3
SMC_WE_ Write Enable I TTL L 4
SMC_WP_ Write Protect I TTL L 5
SMCDAT_0 Data, Command, Status Port I/O TTL - 6
SMCDAT_1 Data, Command, Status Port I/O TTL - 7
SMCDAT_2 Data, Command, Status Port I/O TTL - 8
SMCDAT_3 Data, Command, Status Port I/O TTL - 9
GND Ground - 0V - 10
GND Ground - 0V - 11
VCC +3,3V Power s upply - +3,3V - 12
SMCDAT_4 Data, Command, Status Port I/O TTL - 13
SMCDAT_5 Data, Command, Status Port I/O TTL - 14
SMCDAT_6 Data, Command, Status Port I/O TTL - 15
SMCDAT_7 Data, Command, Status Port I/O TTL - 16
LVD Low Voltage Detect 17
GND Ground - 0V - 18
SMC_RB_ Ready/Busy_ O TTL H/L 19
SMC_RE_ Read Enable I TTL L 20
SMC_CE_ Chip Enable I TTL L 21
VCC +3,3V power supply - +3,3V - 22
GND Ground - 0V - 23
SMC_ABSENT Card Detect O TTL H 24
Servicing Manual Dash Responder V1.0 Revision F
Page 46 of 72 2004768-001
Page 47

GE Medical Systems
Information Technologies
Analog PCB
Digital PCB
Connector Name DEFI/
(see description Analog PCB, page 40)
HV Capacitor
Connector Name KO_P/ and KO_M/
Interface Analog PCB to HV Capacitor
Name Description I/O Level
(measured
versus
GND)
KO_P High Voltage + (floating) - +2500V - (single)
KO_M HighVoltage - (floating) - -2500V - (single)
Active Pin
Pacer PCB
Connector Name PACE_P/ and PACE_M/
Interface Analog PCB to Pacer PCB
Name Description I/O Level
(measured
versus
GND)
PACE_P High Voltage + (floating) - max
+200V
during
pace
(+2500V
during
shock)
Active Pin
-(single)
PACE_M High Voltage - (floating) - max
-200V
during
pace
(-2500V
during
shock)
Revision F Servicing Manual Dash Responder V1.0
2004768-001 Page 47 of 72
-(single)
Page 48

GE Medical Systems
Information Technologies
Paddle Connector
High Voltage Connector
Connector Name S
HOCK_P/ and SHOCK_M/
Interface Analog PCB to Paddle connector (HV)
Name Description I/O Level
SHOCK_P High Voltage + (floating) - max
SHOCK _M High Voltage – (floating) - max
active Pin
(measured
versus
GND)
-(single)
+200V
during
pace
(+2500V
during
shock)
-(single)
-200V
during
pace
(-2500V
during
shock)
Paddle codes connector
Connector Name PC/
Interface Analog PCB to Paddle Connector (codes)
Name Description I/O Level Active Pin
HP_Charge Charge key from Paddle I 5V L 1
HP_Discharge Discharge key from Paddle I 5V L 2
Paddle4 Paddle code 4 I 5V L 3
Paddle6 Paddle code 6 I 5V L 4
GND Ground - 0V - 5
MISC Paddle code misc I 5V L 6
n.c. 7
n.c. 8
Servicing Manual Dash Responder V1.0 Revision F
Page 48 of 72 2004768-001
Page 49

GE Medical Systems
Information Technologies
Power Management
Connector Name BAT1/
InterfaceAnalogPCBtoPowerManagementPCB
Name Description I/O Level Active Pin
+12V, +12VPWR High current power supply - 12V - 1
+12V, +12VPWR High current power supply - 12V - 2
GNDPWR High current power supply - 0V - 3
GNDPWR High current power supply - 0V - 4
Speaker
Connector Name SPEAK1/
InterfaceAnalogPCBtoPowerManagementPCB
Name Description I/O Level Active Pin
Speak1 Speaker line 1 O - - 1
n.c. - - - 2
Speak2 Speaker line 2 O - - 3
Power Management PCB
Analog PCB
Connector Name BAT1/
(see description Power Management, page 49)
Digital PCB
Connector name DEFI/
(see description Analog PCB, page 49)
Pacer PCB
Analog PCB
Connector name PACE_P and PACE_M
(see description Pacer PCB, page 47)
Digital PCB
Connector name PACER/
(see description Pacer PCB, page 47)
Revision F Servicing Manual Dash Responder V1.0
2004768-001 Page 49 of 72
Page 50

GE Medical Systems
Information Technologies
10 Technical Specification
Operating Modes
non-synchronized (defibrillation on demand)
synchronized (cardioversion)
Energy Selection
by preselection, energy to be delivered into 50 Ohms is indicated as a numerical value:
• energy adjustable in steps, energy values as energy delivered into 50 Ohms (internal defibrillation:
energy limited to 50 Joules)
2
5
7
10
20
30
50
100
150
200
300
360 Joules
Autosequence
• possible deviation from selected energy less than permitted by IEC and AAMI DF-2
Defibrillator Charging
via capacitor, capacitor charging from battery
• capacitor charging time for energy setting of 360 J: typically 10 s
Defibrillation Shock
capacitor discharge via induction coil (Lown / Edmark); exponential pulse shape, monophase, damped
sinusoidal halfwave:
• pulse duration for external resistance of 50 Ohms approx. 2.6 ms in compliance with AAMI DF-2
Servicing Manual Dash Responder V1.0 Revision F
Page 50 of 72 2004768-001
Page 51

GE Medical Systems
Information Technologies
Discharge Circuit
Figure 11-1. Current discharge curve (360 J)
serial oscillating circuit in series with external resistance (patient):
• capacitance 34 µF
• inductance 26 mH
• equivalent resistance 11 Ohms
Defibrillation Pulse Output
isolated, no conductive connection with enclosure, open-circuit and short-circuit-proof as required by
AAMI DF-2:
• insulation test voltage 8 kV DC, t ype CF according to IEC 60601-2-4
Safety Discharge
capacitor discharge via internal load resistance:
• when the defibrillation shock is not triggered within 30 s of charging
• when the shock is triggered but the discharge circuit is interrupted, after approx. 0.2 s (e.g. when
the shock is triggered into open air)
• when the battery is full and the selected energy cannot be reached within 20 seconds
• in the presence of technical malfunctions
• when the battery is removed
• when the device is switched off
• when the electrode connector is removed
Test Features
• 5 indicators (on battery) indicating the battery charge level
• defibrillator test by discharging the stored energy into the integrated 50-ohm load resistance (max.
twice within 15 minutes)
• 3-digit display of t he delivered energy
• warning on LCD when discharge circuit is interrupted (e.g. pacer electrode not applied)
Revision F Servicing Manual Dash Responder V1.0
2004768-001 Page 51 of 72
Page 52

GE Medical Systems
Information Technologies
• automatic power-on self-test with error message
Synchronization
with ECG signal of either polarity via monitor:
• indicated by yellow LED
• trigger marks on monitor display
• in synchronized mode delivery of defibrillation pulse delayed by 15 ms max. after trigger pulse
from monitor (dela y between R-wave and sync pulse: refer to operator's manual of patient
monitor)
Pacemaker
• operating modes: Demand, Fix
• pacer rate: 30 to 200 ppm, adjustable in steps of 5 ppm, ± 1%
• pacer output: 0 to 200 mA ± 10% (0 to 500 Ohms), adjustable in steps of 5 mA
• pulse width: 20 ms, ± 0,5%
• pulse shape: monophase sq uare-wave pulse
• recovery time o f 50 ms after pulse delivery
Power Supply
from exchangeable NiCd battery
• rated voltage 12 V
• rated capacity 2.0 Ah
• battery charges either in the device or in the external charging unit ASU 3000 When charged in the
device, power supply from connected Dash
- charging voltage 9 to 18 V, DC voltage
- charging current 320 mA to 490 mA
- max. charge time of a depleted battery 6 hours
- op erating time per battery cha rge approx. 60 defibrillation shocks with 360 Joules each (into
50 Ohms)
2000, Dash3000, or Dash4000 patient monitor:
Operational Readiness
• seconds, incl. automatic self-test
Operating Position
horizontal
Type of Protection
protected against penetration of spray water and small objects: IP 23 (battery inserted, cable connected)
Environment
Operation
• operation under the following conditions considered to be normal:
Servicing Manual Dash Responder V1.0 Revision F
Page 52 of 72 2004768-001
Page 53

GE Medical Systems
Information Technologies
• temperature between 0 °C/32 °F and +50 °C/122 °F
• relative humidity between 5 % and 95 %, no condensation
• atmospheric pressure between 700 and 1060 hPa
Transport and Storage
temperature between –20 °C / –4 °F and +60 °C / 140 °F
relative humidity between 5% and 95%, no condensation
atmospheric pressure between 500 and 1060 hPa
Dimensions
• width 260 mm
• height 95 mm
• depth 250 mm
Weight
incl. battery: approx. 4.2 kg (battery weight approx. 1 kg)
Environmental Tests
• EMC requirements:
CISPR 11, class B
• shock test:
MIL-STD-810E 516.4 Procedure 1, ground equipment
• drop test:
IEC 68-2-32
• vibration test:
MIL 810E Cat. 10 and prEN 1789
• leakage current:
insulation according to ANSI/AAMI ES 1
Revision F Servicing Manual Dash Responder V1.0
2004768-001 Page 53 of 72
Page 54

GE Medical Systems
Information Technologies
11 Maintenance and Technical Inspection
Schedule
To make sure the defibrillator remains in proper operational and functional order, a good maintenance
schedule must be adhered to. The manufacturer’s reco mmendations in this regard is as follows:
Inspection—Operators should perform this prior to admitting each patient to the defibrillator. Service
personnel should perform this prior to servicing the defibrillator. As a general rule, the battery
conditioning program should be run as part of the inspection (internal conditioning program or
separate charging unit ASU 3000).
General cleaning—Operators should perform this prior to admitting each patient to the defibrillator.
Service personnel should perform this after servicing the defibrillator.
Checkout Procedures—These should be performed by qualified service personnel upon receipt of the
equipment, every year thereafter, and each time the defibrillator is serviced.
Leakage Current Tests—These should be performed by qualified service personnel upon receipt of
the equipment, every year thereafter, and each time the defibrillator is serviced.
Calibration—Calibration of t he shock energy measurement should be performed by qualified service
personnel as soon as the yearly performed accuracy check showed deviation of the shock energy
levels compared to those provided in the table on page 57. The calibration should also be
performed whenever a circuit board is removed, repaired or replaced in the defibrillator. The
calibration should also be performed if the software was updated.
Manufacturer Responsibility
Failure on the part of all responsible individuals, hospitals or the institutions, employing the use of this
defibrillator, to implement the recommended maintenance schedule may ca use equipment failure and
potential operator and patient health hazards. The manufacturer does not in any manner, unless an
Equipment Maintenance Agreement exists, assume the responsibility for performing the recommended
maintenance schedule. The sole responsibility rests with all individuals, hospitals, or institutions
utilizing the defibrillator.
Visual Inspection
Carefully inspect the defibrillator prior to each patient being admitted to the monitoring s ystem.
Follow theses guidelines when inspecting the equipment:
• Carefully inspect the defibrillator for obvious physical damage to the outer case, display screen
and controls. Do not use the defibrillator if physical damage is evident. Refer damaged
equipment to qualified service personnel for repair before using it again on a patient.
• Inspect all external connectors, top and rear, for degraded pins, prongs and connector housings.
Refer damaged equipment to qualified service personnel for repair before using it again on a
patient.
• Inspect all cable insulation, cable strain-reliefs and cable connectors for damage, cracks or
degradation. Refer damaged equipment to qualified service personnel for repair before using it
again on a patient.
• The defibrillator electrodes as well as handles must be free of any cream residues.
• Safety labels and inscriptions on the device are clearly legible.
General Cleaning
Clean external surfaces
The exterior surfaces may be cleaned with a lint - free cloth da mpened with one of these approved
solutions:
Servicing Manual Dash Responder V1.0 Revision F
Page 54 of 72 2004768-001
Page 55

GE Medical Systems
Information Technologies
• ammonia (diluted),
• Cidex,
• mild soap (dissolved), or
• sodium hypochlorite bleach (diluted)
Recommendations
The manufacturer recommends the following guidelines to avoid damaging of the defibrillator:
Dilute all cleaning solutions according to respective manufacturer recommendations.
Use a clean, dry, lint-free cloth to wipe off excess cleanin g solution after each application.
Do not pour water or cleaning solutions directly onto the device. Do not allow fluids to run into
crevices or connectors on the defibrillator.
Never use these cleaning agents:
• abrasive cleaners or solvents of any kind,
• alcohol-based cleaning age nt s,
• wax containing a cleaning substance,
• acetone, or
• betadine
CAUTION
Follow these cleaning instructions exactly. Failure to follow the instructions may melt, distort, or dull
the finish of the case, blur lettering on the labels, or cause equipment failures.
Checkout Procedures
The following pages contain the checkout procedures for the defibrillator. The purpose of the checkout
procedures is to provide service personnel with a method which can be used to verify operational and
functional performance of the monitor. Failure to attain any of the listed results indicates a potential
malfunction of the defibrillator.
Perform the checkout procedures upon receipt of the defibrillator, every twelve month thereafter, and
each time a circuit board is removed or replaced.
The checkout procedures are based on the assumption that the defibrillator being tested is used with
known good cables and test equipment. It also requires that the user be somewhat familiar with the
operation of all test equipment required for the checkout procedures. For more information concerning
the operation of these components, refer to the respective operator manual.
Testing Equipment
The following table lists t he manufacturer’s recommended test equipment, adaptors, and cables
necessary to successfully complete the checkout procedures. The checkout procedures were written for
the test equipment in the following table. If test equipment other than the manufacturer’s
recommendation is used, it may be necessary to slightly modify some test steps.
Following Testing Equipment is required:
• Calibrated Defitester (e.g. DNI Nevada or equivalent)
• Safety Tester for measurements according to IEC601
• Pacer Testadapter (220 101 01)
Revision F Servicing Manual Dash Responder V1.0
2004768-001 Page 55 of 72
Page 56

GE Medical Systems
Information Technologies
• Service Tool (2006861-001)
• Oscilloscope
• Defi paddles (217 333 01)
• Internal Defi electrodes (217 308 01)
• Electrode Cable for soft paddles (223 383 01)
Performance test
Power up test
• Insert a charged battery.
• Switch on the device by pressing t he O
• All LEDs should shortly flash once. (B
N-OFF key.
ATTERY CHARGE LED may or may not flash)
• The indicator of the On-Off key is illuminated when the device is turned on.
• Observe the display whether any error messages are displayed. The messages that are displayed
during a normal boot sequence are: S
C
OPYRIGHT GEMS IT year.
ELFTEST ...; DASH RESPONDER (software version);
• After the boot sequence has been successfully performed the device starts up with a selected
energy according to the settings for the autosequence mode.
Key Test
• Press both ENERGY SELECT keys simultaneously and then select SERVICE MODE,COMP TEST and
K
EY TEST.
Now press the following keys and verify the display entry:
Key Display
C
HARGE Charge
YNC Sync
S
NERGY SELECT Energy Select ∨
left E
right E
NERGY SELECT Energy Select ∧
HOCK Shock (left)
left S
RIGHT SHOCK Shock (right)
additional for Pacer Function
LEFT RATE (PPM)Rate∨
RIGHT RATE (PPM)Rate∧
LEFT OUTPUT (MA) Output ∨
RIGHT OUTPUT (MA) Output ∧
ACER ON/OFF Pacer On/Off
P
P
ACER MODE Pacer Mode
P
ACER PAUSE Pacer Pause
NOTE: For the test of the pacer keys press the keys at least 2 seconds.
Switch the Dash Responder off and on.
Servicing Manual Dash Responder V1.0 Revision F
Page 56 of 72 2004768-001
Page 57

GE Medical Systems
Information Technologies
Display Test
• Press both ENERGY SELECT keys simultaneously and then select SERVICE MODE,COMP TEST and
LCD T
EST.
• A checkered pattern will appear.
• Verify that no pixels, rows or columns are missing.
Detection of internal Electrodes
• Connect the internal Defi Electrode (217 308 01) to the Dash Responder. Increase energy with
E
NERGY SELECT key.
• Check if the energy selection is limited to 50J.
Discharge and speaker test
The correct release of the defibrillation shock can be checked by means of a test discharge. For this
test, the stored energy is discharged into the defitester.
• Connect the defib paddles (217 333 01) to the Dash Responder.
• Connect the adapter lead to the two contacts on the defitester.
• Using the E
• Press the C
with the C
NERGY SELECT key select 50 J, 100 J and 360 Joules; check each value twice.
HARGE KEY to initiate defibrillator charging (When using paddles, charging is initiated
HARGE/SHOCK key on the right paddle).
• When the defibrillator is charged, an intermittent audio signal sounds and the display shows the
charged energy le vel on the second line.
• Now trigger the shock immediately. To do so, simultaneously press the two S
HOCK keys. (When
using paddles, simultaneously press the two keys on the paddles)
• After the shock release, the audio signal stops and the delivered energy is displayed for 5 seconds
on the Dash Responder.
• According to the requirements of the IEC / AAMI standards, this value must be in the range as
shown in the following table.
If the discharge circuit is interrupted (cable defect), a safety discharge will be initiated within 200 ms
after the release of the shock. In this case ‘0J’ will be displayed as the deli vered energy.
Accuracy of Shock Energy
Selected Energy Energy Delivered
(Dash Re sponder
Energy Delivered
(Defibtester)
Display)
2 0–4 0,5–3,5
5 3–7 3,5–6,5
7 5–9 5,5–8,5
10 8–12 8,5–11,5
20 18–22 18,5–21,5
30 27–33 27,8–32,3
50 45–55 46,3–53,8
100 90–110 92,5–107,5
Revision F Servicing Manual Dash Responder V1.0
2004768-001 Page 57 of 72
Page 58

GE Medical Systems
Information Technologies
Selected Energy Energy Delivered
(Dash Re sponder
Display)
150 135–165 138,8–161,3
200 180–220 185,0–215,0
300 270–330 277,5–322,5
360 324–396 333,0–387,0
If the energy that has been charged is not within the selected limits, a calibration according to the
procedure found on page 20 has to be performed.
Energy Delivered
(Defibtester)
Pacemaker test
Pacemaker Test (With pacer testadapter)
The pacer testadapter (220 101 01) offers two possibilities for pacemaker testing, dependent of the
setting of the switch on the testadapter:
1. Pacing pulse detecting via LED (switch in upper position).
2. Pacing pulse measurement with an oscilloscope (switch in lower position). The testadapter
contains a resistor of 500 Ohms, that is wired between the connectors of the testadapter.
Do not actuate the Defib and Charge keys.
• Connect the pacer testadapter to the defib.
• Switch pacemaker on and select operating mode F
• Select the oscilloscope position of the testadapter switch and connect the osci to the testadapter.
• Using the + mA; -mA key select any pulse amperage.
• Using the +P/min; -P/min key select any frequency.
• Using the oscilloscope measure the drop in voltage across the internal measuring resistor.
Adjust the following values on the Dash Responder and verify the values measured by the oscilloscope:
DASH-Responder setup Values to measure
mA PPM mA ± 10% Pulsewidth
060- - -
5 60 5 20,0 60
50 120 50 20,0 120
150 120 150 20,0 120
IX.
PPM ± 1%
in ms ± 5%
200 120 200 20,0 120
• Calculate pulse amperage according to Ohm’s Law I = U/R
(Pulse amperage = measured voltage / measuring resistor 500 ohms).
Servicing Manual Dash Responder V1.0 Revision F
Page 58 of 72 2004768-001
Page 59

GE Medical Systems
Information Technologies
Error message C
HECK ELECTRODES appears when pulse current deviates from configured value (±
20% or ± 20 mA)
Defib Function Test and Pacer Option Test
The following tests are performed with the Service Tool (2006861-001). If the Dash Responder is
connected with a Dash Monitor this tests could also be done by means of the Dash Monitor.
TestsperformedwiththeTestTool TestsperformedwiththeDashMonitor
The below mentioned tests are performed when the Monitor
Interface Test described on page 22 will be performed.
Defib Tests Defib Tests
1. Periphery present test to Dash Monitor. 1. Periphery present test to Dash Monitor
2. Charging Status Test. 2. Charging Status Test
3. Monitor Detection Test. 3. Monitor Detection Test
4. Communication test to Dash Monitor. 4. Communication Test to Dash Monitor
Set the Dash Monitor on top of the Dash Responder, connect
the ECG Simulator to the Dash Monitor and power it up with
AC, use a 5- or 12-Lead cable.
HARGING LED lights yellow, both tests have passed.
If C
5. Synchronisation test for Signal from Dash Monitor. 5. Synchronisation Test for Signal from Dash Monitor
PressS
YNC key, if the SYNC LED on the Dash Responder
lights yellow and will be switched off for short in the rhythm
of the heart rate the 3 tests have passed.
6. Lead Fail/None Sync detection from Dash Monitor. 6. Lead Fail/None Sync detection from dash Monitor
Disconnect the RL (N) Lead, the message L
SYNC will appear on the Display of the Responder. The SYNC
LED on the Responder turns off
Pacer Option Tests Pacer Option Tests
7. Pacer on/off test. 7. Pacer on/off test
Switch pacer function on, and check, that the yellow P
ON/OFF LED is on, and the corresponding display frame for
Pacer will be displayed.
8. Pacer blank signal to Dash Monitor tested. 8. Pacer blank signal to Dash Monitor tested.
Set output to 5mA. Set pacer Mode so, that display shows
FIX and check that the Dash Monitor shows a ‘P’ and a
blinking ‘*’ on its display.
9. Detection of Telemetry ECG. 9. Detection of Telemetry ECG.
No special test needed, if item 6 has been performed
successfully.
EADS FAIL/NO
ACER
Battery conditioning test
On Dash Responder, switch Pacer- and SYNC- mode off.
Press both E
Revision F Servicing Manual Dash Responder V1.0
2004768-001 Page 59 of 72
NERGY SELECT keys simultaneously, select SERVICE MODE /BATT COND.
Page 60

GE Medical Systems
Information Technologies
Check that F/N
Start conditionin g and check that green C
While the battery is being charged, the yellow C
EW value is not below 60%. If it is below 60% exchange the battery.
HARGINGSTATUS LED is blinking.
HARGINGSTATUS LED is solid illuminated, it is off
during discharging the battery and it is blinking if t here is a charging problem.
Servicing Manual Dash Responder V1.0 Revision F
Page 60 of 72 2004768-001
Page 61

GE Medical Systems
Information Technologies
12 Electrical Safety Tests
Electrical safety tests provide a method of determining if potential electrical health hazards to the
patient or operator of the device exist.
To help you establish a systematic maintenance routine, GE Medical Systems recommends that you
perform all safety tests presented in this chapter
• upon receipt of the device,
• every twelve months thereafter,
• each time the main enclosure is disassembled or a circuit board is removed, tested, repaired, or
replaced
CAUTION
Failure to implement a satisfactory maintenance schedule may cause undue equipment failure and
possible health hazards. Unless you have an Equip ment Maintenance Contract, GE Medical Systems
does not in any manner assume the responsibility for performing the recommended maintenance
procedures. The sole responsibility rests with the individual or institution using the equipment. GE
Medical Systems service personnel may, at their discretion, follow the procedures provided in this
manual as a guide during visits to the equipment site.
Test Conditions
Electrical safety tests may be performed under normal ambient conditions of temperature, humidity,
and pressure.
Test Equipment
• Safety Tester for measurements according to IEC 601.
• Testing connector according to the following picture.
• Measuring Device
NOTES
The MD (measuring device) is the circuitry defined by the appropriate standard for measuring leakage
current.
The measuring devices, defined by various standard organizations (IEC, UL, etc.), produce almost
identical test measurement results.
Revision F Servicing Manual Dash Responder V1.0
2004768-001 Page 61 of 72
Page 62

GE Medical Systems
Information Technologies
Patient (Sink) Leakage Current Test
(Mains Voltage on the Applied Part)
This procedure only applies to Class I (grounded/earthed) equipment, and measures the leakage current
from a mains voltage source into each of the paddles.
The measurement should be made with a patient monitor connected to the defibrillator. Only in cases
where the defibrillator is used stand-alone the measurement can be performed with a service tool box
connected to the defibrillator. In this case the leakage current has to be measured at the ground plug of
the service box. Disconnect the service tool box from all other connections (e.g. PC, po wer supply
etc.).
WARNING
The following step will cause high voltage (120 VAC to 240 VAC) to appear at the PATN JACK on
the leakage tester. Do not touch the PATN JACK posts or paddle lead clips during this test as an
electrical shock will occur.
Referring to the electrical diagram, measurements have to be done under the following conditions:
• Polarity switch NORM and RVS
• GND switch GND closed
• If the Service Tool box is used, the GND plug of the service tools box has to be connected to the
GND plug on the leakage tester
1. Read leakage current indicated on DMM.
If the reading is greater than the appropriate specification below, the device under test fails this test and
should be repaired and tested again.
• 100 µA (0.05 volts on the DMM) at 120 – 240 VAC with external paddle electrodes.
• 50 µA (0.05 volts on the DMM) at 120 – 240 VAC with internal paddle electrodes.
NOTE
The 50 µA limit is according to ANSI/AAMI DF2. The leakage current is measured from each paddle.
2. Change the leakage tester polarity switch to the RVS position.
3. Read the leakage current indicated on the DMM. If the reading is greater than t he appropriate
specification below, the device under test fails this test and should be repaired and tested again.
• 100 µA (0.05 volts on the DMM) at 120 – 240 VAC with external paddle electrodes.
• 50 µA (0.05 volts on the DMM) at 120 – 240 VAC with internal paddle electrodes.
NOTE
The 50 µA limit is according to ANSI/AAMI DF2. The leakage current is measured from each paddle.
Servicing Manual Dash Responder V1.0 Revision F
Page 62 of 72 2004768-001
Page 63

GE Medical Systems
Information Technologies
4. Set the power switch on the leakage tester to OFF.
Revision F Servicing Manual Dash Responder V1.0
2004768-001 Page 63 of 72
Page 64

GE Medical Systems
Information Technologies
13 Spare Parts List
Device
Part Description Detailed Part Description Part No.
Spare Pcb. Analog Spare Pcb. Analog including 2 cable ties 7,5mm, 3
cable ties 2,5mm and 3 adhesive cable tie sockets
(high pot tested).
Spare Pcb. Digital Spare Pcb. Digital 2007311-001
Spare Ass. Power
Management
Spare Pcb. Pacer Spare Pcb. Pacer (high pot tested) 2007313-001
LCD Display LCD Display with backlight and connector 2003348-001
HV Capacitor
HV Capacitor
Battery Pack Battery Pack NiCD 2009219-001
Resistor Assembly Resistor Assembly for testload 2003960-001
Spare Assembly Power Management includes Pcb.
Power Management and Battery Compartment
HV Capacitor 34uF 5.3kV, order 2 cable ties P/N
92309686 separately. Replaced by 2026979-001
HV Capacitor 35uF 5.2kV, order 2 cable ties P/N
92309686 separately. Needs SW version 1.01 or
upwards.
2007050-001
2007312-001
90344988
2026979-001
Mechanical Parts for Upper Case
Part Description Detailed Part Description Part No.
Upper Case Upper Case, rubber gasket and labels have to be
ordered separately
Rubber gasket Rubber gasket for upper case, order length of 70cm 2004898-001
Rubber Gasket
Battery
Compartment
Spare Locking
Handle
Flat Washer Flat Washer for holding Locking Handle 2001814-001
Stop Part Plastic Yoke for directing Locking Handle 2003414-001
Slide Plastic Slide for front or back 2001787-001
Spring Leg Spring Leg (metal spring) for plastic slide 2006843-001
Bracket Metal Bracket on top side. 2001788-001
Rubber Gasket for Battery Compartment 2001793-001
Spare Locking Handle including Lever Arm, Handle
andSpringLeg
2001384-001
2007051-001
Servicing Manual Dash Responder V1.0 Revision F
Page 64 of 72 2004768-001
Page 65

GE Medical Systems
Information Technologies
Part Description Detailed Part Description Part No.
Label (Quick
Reference Guide)
Label (Quick
Reference Guide)
Label (Quick
Reference Guide)
Label (Quick
Reference Guide)
Label (Quick
Reference Guide)
Label (Quick
Reference Guide)
Label (Quick
Reference Guide)
Label (Battery Key) Label Battery Key (beside battery release knob) 2005470-001
Label (Dash2000,
3000, 4000 only)
Label (Quick Reference Guide) English 2004424-001
Label (Quick Reference Guide) German 2004425-001
Label (Quick Reference Guide) French 2004426-001
Label (Quick Reference Guide) Italian 2004427-001
Label (Quick Reference Guide) Spanish 2004428-001
Label (Quick Reference Guide) Swedish 2004429-001
Label (Quick Reference Guide) Dutch 2004430-001
Label (Dash 2000, 3000, 4000 only) 2005468-001
Frame Part Frame (internal) to hold connector to Dash 2002139-001
Mechanical Parts for Lower Case:
Part Description Detailed Part Description Part No.
Lower Case Lower Case, rubber feet, washer insulation and labels
have to be ordered separately.
Pad White Pad White (Rubber Foot) for Lower Case (4 are
needed)
Label Label (Defib/ Pacer Electrodes) 2005057-001
Label Label (Battery Type) German 2005065-001
Label Label (Battery Type) English 2005066-001
Label Label (Battery Type) French 2005067-001
Label Label (Battery Type) Italian 2005068-001
Label Label (Battery Type) Spanish 2005069-001
2001530-001
2005050-001
Label Label (Battery Type) Dutch 2005070-001
Label Label (Battery Type) Swedish 2005071-001
Plate Mount GCX Mounting Plate for GCX mounting 420001-001
Revision F Servicing Manual Dash Responder V1.0
2004768-001 Page 65 of 72
Page 66

GE Medical Systems
Information Technologies
Cover for Speaker Plastic Cover for Speaker 2001528-001
Bracket MTG
Capacitor
Cable Tie Cable Tie for fixing the HV Capacitor (7,5 x 360) 92309686
Washer Insulation Washer Insulation for Test Pins 2006374-001
Control Pin Control Pin (Test Pins) on backside 2001554-001
O-Ring O-Ring for Control Pin 92309604
Cover for speaker Plastic cover for speaker 2001528-001
Mechanical Parts for Front Case
Part Description Detailed Part Description Part No.
Front Case Assembly Front Ca se with Filter Pane, rubber gasket
Rubber Gasket Rubber Gasket for Front Case, order 70cm of length 2004898-001
Label Label for Dash Responder without Pacer English 2003287-001
Bracket for mounting the Capacitor (2 are needed) 2001556-001
2007052-001
and Front Label have to be ordered separately
Label Label for Dash Responder without Pacer German 2003288-001
Label Label for Dash Responder without Pacer French 2003289-001
Label Label for Dash Responder without Pacer Spanish 2003290-001
Label Label for Dash Responder without Pacer Swedish 2003291-001
Label Label for Dash Responder without Pacer Italian 2003292-001
Label Label for Dash Responder without Pacer Dutch 2003293-001
Label Label for Dash Responder with Pacer English 2003294-001
Label Label for Dash Responder with Pacer German 2003295-001
Label Label for Dash Responder with Pacer French 2003296-001
Label Label for Dash Responder with Pacer Spanish 2003297-001
Label Label for Dash Responder with Pacer Swedish 2003298-001
Label Label for Dash Responder with Pacer Italian 2003299-001
Label Label for Dash Responder with Pacer Dutch 2003300-001
Assy Keypad
manual
Page 66 of 72 2004768-001
Keypad for Dash Responder without Pacer 2005681-001
Servicing Manual Dash Responder V1.0 Revision F
Page 67

GE Medical Systems
Information Technologies
Part Description Detailed Part Description Part No.
Assy Keypad
manual w Pacer
Connectors and Cable Assemblies
Part Description Detailed Part Description Part No.
Assy Connector Connector Assembly to connect Dash Responder to
Connector RCPT
Electrodes
Cable Ass. Pcb.
Pacer
Cable Ass.
Capacitor
Miscellaneous
Part Description Detailed Part Description Part No.
Keypad for Dash Responder with Pacer 2005681-003
2004703-001
Dash Monitor
Connector Defib Electrodes with cable Assembly 2003413-001
Cable Assembly from Pcb. Analog to Pcb. Pacer, 1
cable tie 92308100 is needed separately.
Cable Assembly from Pcb. Analog to Capacitor, 2
cable ties 92308100 and 2 cable ties 92309686 are
needed separately.
2002548-001
2002549-001
Insulation P art Insulation backside of HV capacitor 2004866-001
Insulation Foil Insulation foil HV capacitor 2004865-001
Plastic Insulation Plastic Insulation connectorside of HV capacitor 2001527-001
ASU 3000 Charging Unit ASU 3000 for NiCd batteries
(external)
Tools
Part Description Detailed Part Description Part No.
Kit Service Tool Service Tool Kit for Dash 2000 and Dash Responder,
including Power supply 2000300-001, DRST Box
2005378, Software Disks 2006862-001, Connection
Cable 2233603.
Kit Upgrade Dash
Responder
Kit Upgrade Dash
Responder
Dash Responder Software V1. Kit is replaced by
2007647-003 Software V1.01.
Dash Responder Software V1.01. For download of
this software, the Service Tool Kit 2006861-001 is
needed.
70127901
2006861-001
2007647-001
2007647-003
Revision F Servicing Manual Dash Responder V1.0
2004768-001 Page 67 of 72
Page 68

GE Medical Systems
Information Technologies
Operator Manual
Part Description Detailed Part Description Part No.
Operator Manual V1 Operator Manual Version 1 Ger man 2002853-001
Operator Manual V1 Operator Manual Version 1 English 2002853-002
Operator Manual V1 Operator Manual Version 1 French 2002853-003
Operator Manual V1 Operator Manual Version 1 Italian 2002853-004
Operator Manual V1 Operator Manual Version 1 Spanish 2002853-005
Operator Manual V1 Operator Manual Version 1 Dutch 2002853-006
Operator Manual V1 Operator Manual Version 1 Swedish 2002853-007
Servicing Manual Dash Responder V1.0 Revision F
Page 68 of 72 2004768-001
Page 69

GE Medical Systems
Information Technologies
14 Master Record Index (see Appendix)
Revision F Servicing Manual Dash Responder V1.0
2004768-001 Page 69 of 72
Page 70

GE Medical Systems
Information Technologies
Servicing Manual Dash Responder V1.0 Revision F
Page 70 of 72 2004768-001
Page 71

GE Medical Systems
Information Technologies
15 Circuit Diagrams (see Appendix)
Revision F Servicing Manual Dash Responder V1.0
2004768-001 Page 71 of 72
Page 72

GE Medical Systems
Information Technologies
Servicing Manual Dash Responder V1.0 Revision F
Page 72 of 72 2004768-001
Page 73

Page 74

Page 75

Page 76

Page 77

Page 78

Page 79

Marquette Hellige GmbH
Not equipped in Version :
x1
2002316-001
x2
x3
x4
x5
Revision-No
ER21920
ER23599
MR26708
REVISIONS
Index
1
2
A
Date / Name
20.01.00/VRP
17.07.00/VRP
30.10.00/VRP
A03
DRAWN
APPROVED
ISSUED
D-79007 Freiburg
2002315-001
Date / Name
16.12.1999/VRP
23.12.1999/WHL
V. PLACKE
2002317-001
Sheet:
15
of
SCHEMATIC
ANALOG DASH-ADD-ON-DEFI
Thursday, September 16, 1999
$USER_CAE_B/daod_analog
Page 80

Marquette Hellige GmbH
Not equipped in Version :
x1
2002316-001
x2
x3
x4
x5
Revision-No
ER21920
ER23599
MR26708
REVISIONS
Index
1
2
A
Date / Name
20.01.00/VRP
31.07.00/VRP
30.10.00/VRP
A03
DRAWN
APPROVED
ISSUED
D-79007 Freiburg
2002315-001
Date / Name
16.12.1999/VRP
23.12.1999/WHL
V.PLACKE
2002317-002
Sheet:
25
of
SCHEMATIC
ANALOG DASH-ADD-ON-DEFI
$USER_CAE_B/daod_analog
Page 81

Marquette Hellige GmbH
Not equipped in Version :
x1
2002316-001 1
x2
x3
x4
x5
Revision-No
ER21920
ER23599
MR26708
ECO066497
ECO067648
REVISIONS
Index
2
A
B
C
Date / Name
20.01.00/VRP
31.07.00/VRP
30.10.00/VRP
28.01.01/VRP
13.08.01/VRP
A03
DRAWN
APPROVED
ISSUED
D-79007 Freiburg
20002315-001
Date / Name
21.12.1999/VRP
23.12.1999/WHL
V. PLACKE
2002317-003
Sheet:
35
of
SCHEMATIC
ANALOG DASH-ADD-ON-DEFI
$USER_CAE_B/daod_analog
Page 82

Marquette Hellige GmbH
Not equipped in Version :
x1
2002316-001
x2
x3
x4
x5
Revision-No
ER21920
ER23599
MR26708
REVISIONS
Index
1
2
A
Date / Name
20.01.00/VRP
31.07.00/VRP
30.10.00/VRP
A03
DRAWN
APPROVED
ISSUED
D-79007 Freiburg
2002315-001
Date / Name
23.12.1999/VRP
23.12.1999/WHL
V. PLACKE
2002317-004
Sheet:
45
of
SCHEMATIC
ANALOG DASH-ADD-ON-DEFI
$USER_CAE_B/daod_analog
Page 83

Marquette Hellige GmbH
Not equipped in Version :
x1
2002316-001
x2
x3
x4
x5
Revision-No
ER21920
ER23599
MR26708
REVISIONS
Index
1
2
A
Date / Name
20.01.00/VRP
21.07.00/VRP
30.10.00/VRP
A03
DRAWN
APPROVED
ISSUED
D-79007 Freiburg
2002315-001
Date / Name
21.12.1999/VRP
23.12.1999/WHL
V. PLACKE
2002317-005
Sheet:
of
SCHEMATIC
DASH-ADD-ON-DEFI ANALOG
$USER_CAE_B/daod_analog
55
Page 84

Page 85

Page 86

Marquette Hellige GmbH
Not equipped in Version :
x1
2000923-001
x2
x3
x4
x5
Revision-No
ER20398
MR25286
REVISIONS
Index
1
A
Date / Name
12.12.99/MLM
A03
DRAWN
APPROVED
ISSUED
D-79007 Freiburg
2000922-001
Date / Name
01.09.99/MLM06.07.00/MLM
03.09.99/CYS
M. Mueller
2000924-001
SCHEMATIC
DIGITAL DASH-ADD-ON-DEFI
Wednesday, December 30, 1998
$USER_CAE_A/dd_digital/design
Sheet:
of
51
Page 87

GE Medical Systems
Information Technologies GmbH
Not equipped in Version :
x1
2000923-001
x2
x3
x4
x5
Revision-No
ECO 065698
ECO 066217
ECO 066643
ECO 066001
ECO 067933
REVISIONS
Index
B
C
D
E
F
Date / Name
08.11.00/MLM
09.01.01/MLM
06.03.01/MLM
07.03.01/MLM
13.09.01/MLM
A03
DRAWN
APPROVED
ISSUED
D-79111 Freiburg
Munzinger Str. 3
2000922-001
Date / Name
01.09.99/MLM
03.09.99/CYS
M. Mueller
2000924-002
Sheet:
of
25
SCHEMATIC
DIGITAL DASH-ADD-ON-DEFI
$USER_CAE_A/dd_digital/design/control
[1998, 12, 29, 3]
Page 88

GE Medical Systems
Information Technologies GmbH
Not equipped in Version :
x1
2000923-001
x2
x3
x4
x5
Revision-No
ER20398
MR25286
ECO 065698
ECO 066001
ECO 067933
REVISIONS
Index
1
A
B
C
D
Date / Name
08.12.99/MLM
06.07.00/MLM
08.11.00/MLM
30.11.00/MLM
13.09.01/MLM
A03
DRAWN
APPROVED
ISSUED
D-79111 Freiburg
Munzinger Str. 3
2000922-001
Date / Name
01.09.99/MLM
03.09.99/CYS
M. Mueller
2000924-003
Sheet:
SCHEMATIC
DIGITAL DASH ADD-ON-DEFI
$USER_CAE_A/dd_digital/design/io
[1999, 1, 13, 4]
53
of
Page 89

Marquette Hellige GmbH
Not equipped in Version :
x1
2000923-001
x2
x3
x4
x5
Revision-No
ER20398
MR25286
REVISIONS
Index
1
A
Date / Name
03.12.99/MLM
A03
DRAWN
APPROVED
ISSUED
D-79007 Freiburg
2000922-001
Date / Name
01.09.99/MLM06.07.00/MLM
03.09.99/CYS
M. Mueller
2000924-004
Sheet:
SCHEMATIC
DIGITAL DASH-ADD-ON-DEFI
$USER_CAD_A/2000922-001/design/power_supply
[1999, 9, 6, 2]
54
of
Page 90

Marquette Hellige GmbH
Not equipped in Version :
x1
2000923-001
x2
x3
x4
x5
Revision-No
ER20398
MR25286
REVISIONS
Index
1
A
Date / Name
03.12.99/MLM
A04
DRAWN
APPROVED
ISSUED
D-79007 Freiburg
2000922-001
Date / Name
01.09.99/MLM06.07.00/MLM
03.09.99/CYS
M. Mueller
2000924-005
Sheet:
SCHEMATIC
DIGITAL DASH-ADD-ON-DEFI
$USER_CAE_A/dd_dig_save1/design/CPLD
[1999, 6, 30, 4]
of
55
Page 91

Page 92

Marquette Hellige GmbH
Not equipped in Version :
x1
2002440-001
x2
x3
x4
x5
Revision-No
ER22558
ER23632
MR25491
066505
REVISIONS
Index
1
2
A
B
Date / Name
03.04.00/WHL
04.08.00/WHL
07.02.01/WHL
14.03.01/WHL
A03
DRAWN
APPROVED
ISSUED
D-79007 Freiburg
2002439-001
Date / Name
29.03.00 / WHL
30.03.00 / GHH
W.LOEHNING
2002441-001
Sheet:
of
21
SCHEMATIC
POWER MANAGEMENT DASH-ADD-ON-DEFI
$USER_CAD_B/2002439/design
[2000, 3, 2, 5]
Page 93

Marquette Hellige GmbH
Not equipped in Version :
x1
2002440-001
x2
x3
x4
x5
Revision-No
ER22558
ER23632
MR25491
066505
REVISIONS
Index
1
2
A
B
Date / Name
03.04.00/WHL
07.02.01/WHL
24.04.01/WHL
A03
DRAWN
APPROVED
ISSUED
D-79007 Freiburg
2002439-001
Date / Name
29.03.00 / WHL04.08.00/WHL
30.03.00 / GHH
W.LOEHNING
2002441-002
Sheet:
of
22
SCHEMATIC
POWER MANAGEMENT DASH-ADD-ON-DEFI
$USER_CAD_B/2002439/design/control
[2000, 3, 2, 5]
Page 94

Page 95

Page 96

Marquette Hellige GmbH
Not equipped in Version :
x1
2001198-001
x2
x3
x4
x5
Revision-No
ER23591
MR26482
ECO065697
ECO066704
ECO066943
REVISIONS
Index
2
A
B
C
D
Date / Name
01.08.00/MLM
31.10.00/MLM
30.11.00/MLM
05.04.01/MLM
02.05.01/MLM
A03
DRAWN
APPROVED
ISSUED
D-79007 Freiburg
2001197-001
Date / Name
22.10.99/MLM
28.10.99/PHG
M. Mueller
2001199-001
SCHEMATIC
PACER DASH ADD-ON-DEFI
$USER_CAE_A/dd_pacer/design
[1999, 7, 13, 3]
Sheet:
of
11
Page 97

Page 98

Page 99

Page 100

gemedical.com
0459
World Headquarters
GE Medical Systems
Information Technologies, Inc.
8200 West Tower Avenue
Milwaukee, WI 53223 USA
Tel. +1 414 355 5000
1 800 558 5120 (US only)
Fax +1 414 355 3790
European Representative
GE Medical Systems
Information Technologies GmbH
Munzinger Straße 3
D-79111 Freiburg
Germany
Tel. +49 761 45 43 - 0
Fax +49 761 45 43 - 233
Asia Headquarters
GE Medical Systems
Information Technologies Asia;
24th Floor Shanghai MAXDO Centre,
8 Xing Yi Road, Hong Qiao Development Zone
Shanghai 200336, P.R. China
Tel: +86-21-5257-4650
Fax: +86-21-5208-2008
GE (China)Co., Ltd.
2019524-001 Rev B
 Loading...