

Page 1
1
USER MANUAL ACAM-002
Page 2

2
EEnngglliisshh………………………………………………………………………………………………………
…
3
3
DDeeuuttsscchh……………………………………………………………………………………………………...
.
221
1
NNeeddeerrllaannddss……………………………………………………………………………………………
…
446
6
FFrraannccaaiiss…………………………………………………………………………………………………….
.
663
3
РРууссссккиийй……………………………………………………………………………………………………...
.
881
1
SSppaanniisshh………………………………………………………………………………………………………
…
11005
5
Page 3

3
e
Thank you for choosing this camera. Please carefully read the manual before first use, and keep it at a safe place
for future reference.
All texts, images and screenshots, are according to the latest standards, however, the actual product might differ
slightly sometimes due to changes in production techniques, materials or product functionality.
For the best result please only use high-speed microSD card at Class10 or above for use in this camera.
Instructions for using the memory card
● When you place a microSD card in the camera, please format the memory card first via the on screen menu;
● Before plugging in or removing the memory card, please disconnect the power supply of the camera;
● Performance of the memory card will decline over time. In case of lowered performance, a new memory card
is needed;
● Don’t keep the memory card near strong electromagnetic or magnetic field, like speakers or receivers;
● Don’t use or keep the memory card in fast changing, very high or low temperatures;
● Keep the memory card clean and away from liquids. In case of contacting liquid, please dry it quickly with
soft cloth;
● Please note that the memory card can get a little warm after long-term usage, this is normal;
WWeellccoomme
PPrreeccaauuttiioonns
s
Page 4

4
Camera Maintenance
● When you don’t use the camera, store it in a clean and dry place, away from direct sunlight;
● If you need to clean the camera lens, first blow off any dust or dirt particles and than use a soft
cloth that is suitable for cleaning optical equipment to wipe the lens gently. Use only professional camera
cleanser to clean the lens. Do not use any organic solvent;
● Do not touch the lens surface with your fingers.
Page 5
5
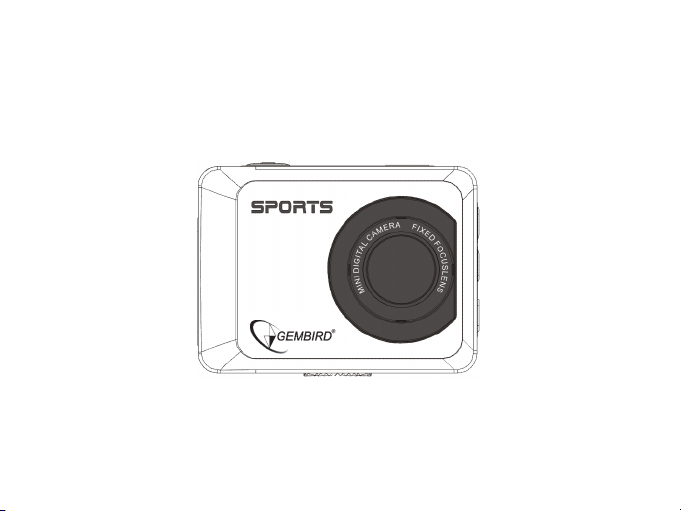
AAppppeeaarraanncce
e
Page 6

6
Page 7

7
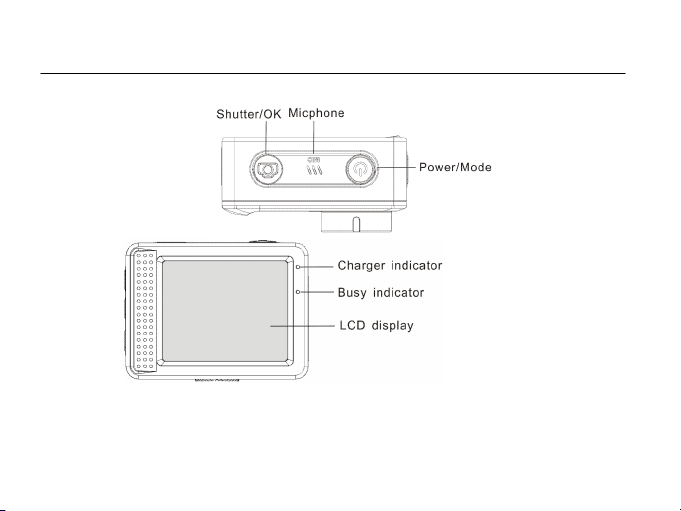
Key Functions and Indicators
Key/Indicator
Function
Power key
Power On/Off; switch camera mode between video, photo and playback
Shutter key
Start/stop Video recording, take photo; play/stop playing video file (Playback
mode); menu confirmation
MENU key
Open and exit from menu;Stop play video files (playback mode)
Up key
Digital zoom-in: select menu (after opening the menu); file page-up; pause
playing video (playback mode); Reverse quickly video (playback mode)
Down key
Digital zoom-out: select menu (after opening the menu); file page-down ;Fast
forward video (playback mode)
Charger indicator
Indicator lights up in red during charging, and turns off after charging is
completed.
Busy indicator
When the camera is busy (for example: during film recording, capturing,
automatic screen-off), the busy indicator will light.
Page 8

8
BBeeffoorreetthheeffiirrssttuusse
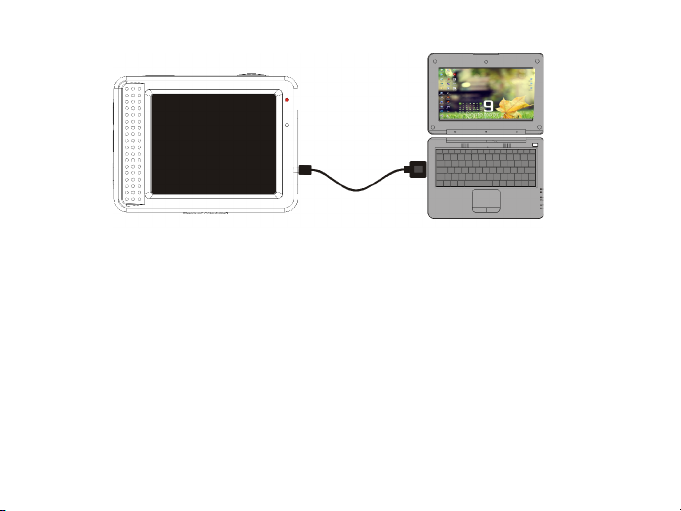
1.Charge the built-in lithium battery
The camera is equipped with built-in 3.7V lithium battery. Please the battery completely before the first use and
charge it whenever the camera has a low battery.
Connect the camera to computer for charging under shutdown status. The charging indicator will be on when
charging, and will be off when the battery is fully charged. Usually, the battery will be fully charged after 2-4
hours.
e
Page 9
9
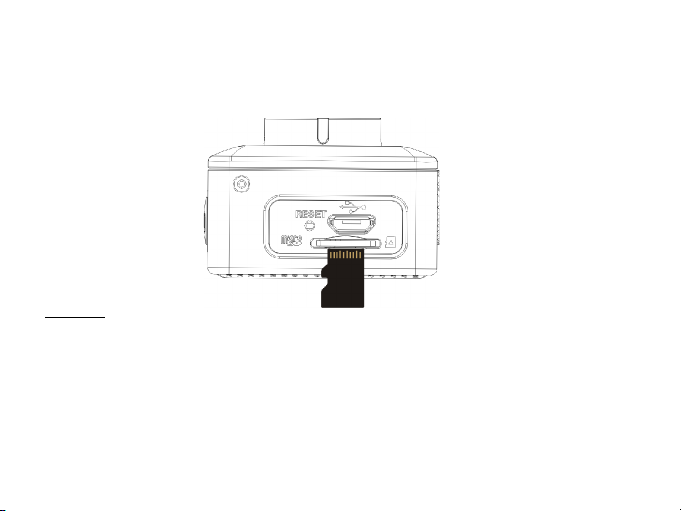
2. How to use the memory card
2.1. Properly insert the microSD card into the card holder as indicated on the camera body.
2.2. To remove the memory card, gently press the end of the card, the card will be ejected.
Note: The camera is not equipped with built-in memory. Please insert memory card before using. Before
using the camera, it is needed to format the memory card on the camera.
3. Startup and shutdown:
3.1 Startup: press the POWER key for 3 seconds, the camera will show startup screen and enters into POWER ON
state;
3.2 Shutdown: press the POWER key when the camera is under idle mode to shut down;
Page 10

10
3.3 Auto shutdown: the camera will be shut down automatically when the camera is under idle mode for a certain
time to save power. The default time for auto shutdown is 3 minutes.
3.4 Shutdown under low power: when the battery power is low, the LCD will indicate “ ”. Please charge the
battery in this case. When the icon turns red and flashes, the camera will be shut down automatically.
4. Function modes switching
The camera has 3 modes: photo mode, video mode, and playback mode. Use the power key to switch between
the modes after starting up.
Video mode: for recording videos;
Photo mode: for taking photos;
Playback mode: for playing back the current video.
5. Indicators
5.1 BUSY indicator: When the camera is working (e.g. recording, photographing, auto screen off etc.), the
indicator will light;
5.2 Charging indicator: In shutdown state, the burning indicator means the camera battery is being charged.
Page 11
11
6. Photo/recording mode
By default, the camera will startup in recording mode. Use the power key to switch to photo mode.
In video mode, press Shutter to start recording, and press Shutter again to stop recording.
In photo mode, press Shutter to directly take photo.
In both video- and photo mode, press Up/Down for digital zoom in/out.
6.1 Screen display in photo mode
1. Photo mode;
2. Three photos continuous shooting mode;
3. Self-timer mode;
4. Photo resolution;
5. Photo quality;
6. Available shooting count;
7. Icon of digital zoom;
8. Battery state;
9. Face detect;
Page 12
12
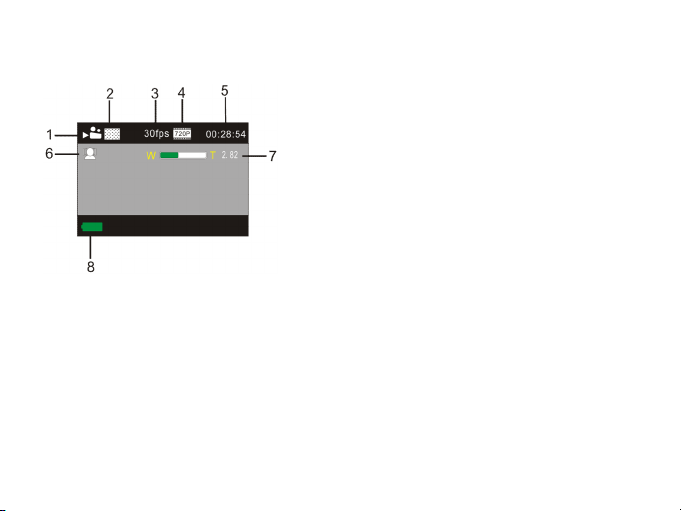
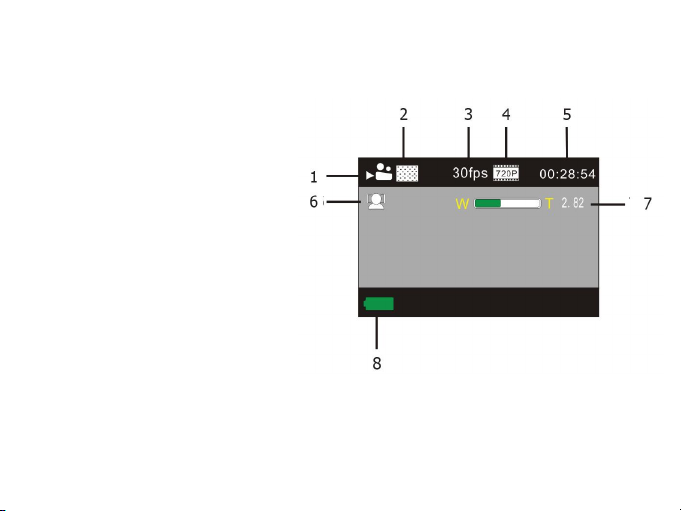
6.2 Screen display in recording mode
Note:
1. When recording HD or FHD video, use high-speed memory card, class 10 or above.
2. During recording the screen will automatically turn off for saving power. You can
shortly press the Power key or shutter key to turn the screen back on.
1. Video mode;
2. Video quality;
3. Video frame rate
4. Video resolution;
5. Available time to record;
6. Face detect;
7. Icon of digital zoom;
8. Battery state;
Page 13
13
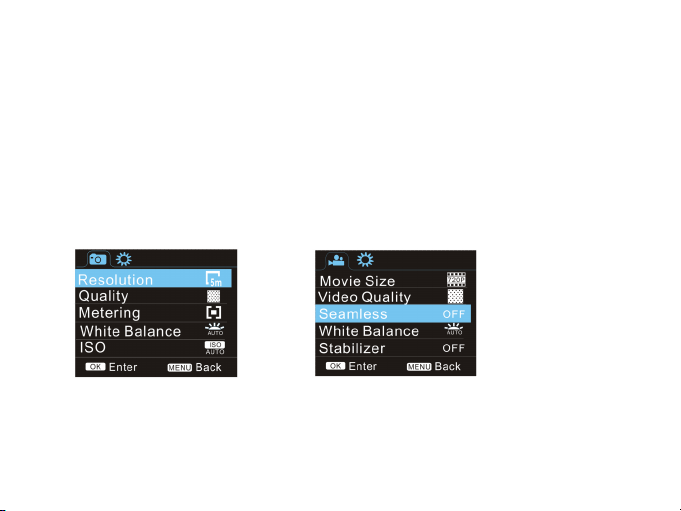
7. Video and photo mode Settings Menu
7.1 Menu display
In photo, video and playback mode, press the Menu key to open the menu, and then press Up/Down key to select
menu items and press the Shutter key to confirm selection or enter submenu. When selecting menu items, the
selected menu item will be marked blue.
In video mode you can use the "Seamless" menu setting to enable/disable loop recording. Video segments can be
set to lengths of 1/3/5 minutes. All video segments will connect seamlessly to each other. When the card is full,
the oldest video segment is automatically deleted and overwritten. This way the camera can continuously keep
recording video.
Photo mode menu Video mode menu
Page 14
14
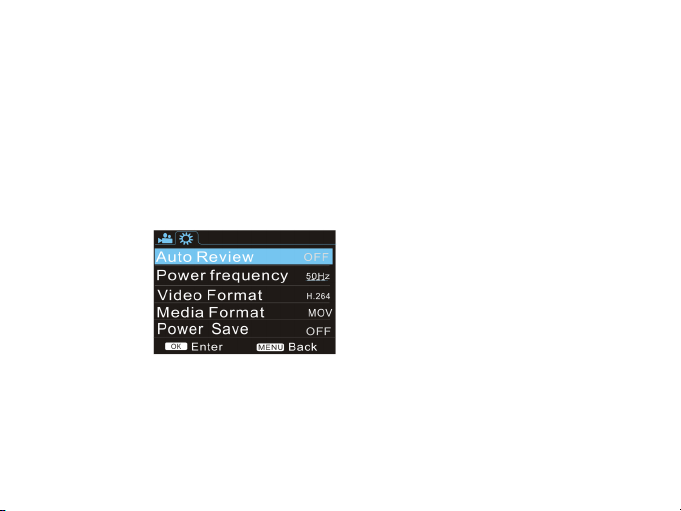
7.2 System Settings menu
Open the menu by pressing the Menu key and shortly press the power key to switch over to the system setting
menu. Press the Up/Down key to select menu items and press the Shutter key to confirm selection or enter
submenu. In the submenu, press Up or Down key to select menu item, and press Shutter to confirm. After
returning to the main menu, press Menu key to exit from the menu.
System menu
Page 15
15
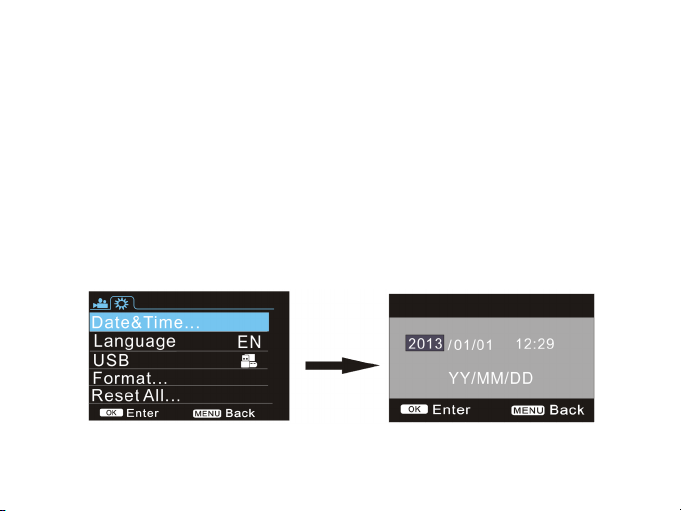
7.3 Setting date and time
Press the Menu key to open the menu, then press the Power key to switch to system settings menu and press
Shutter key to confirm. Press the Down key to the select “Date and time” menu item, and then press Shutter
key to enter the date/time settings window.
In the date/time settings window, press Power key to select items (date, time) to be adjusted, and then press Up
key or Down key to make adjustment, press Shutter key for confirmation when adjustment is completed. Press
Menu key to cancel setting and exit. Finally, press Menu key to exit from settings menu.
Page 16
16
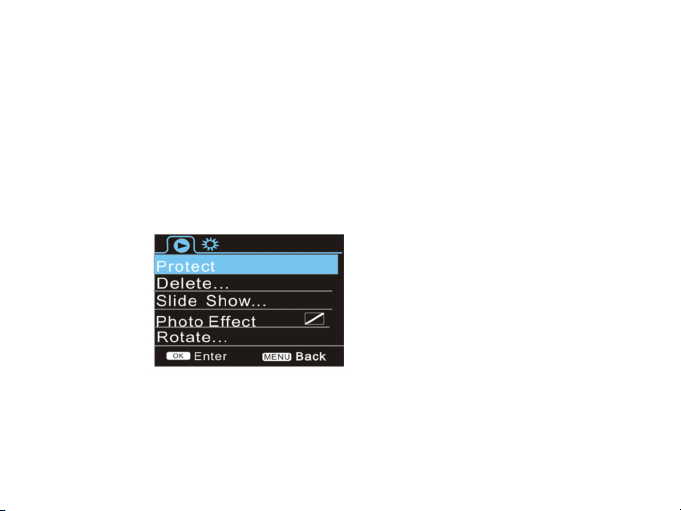
7.4 Playback mode settings menu
Put the camera into playback mode. Press the Menu key to open playback main menu, press Up or Down key
to select menu items and press Shutter key to enter submenu. In the submenu, again press Up or Down key for
selection, and press Shutter key to confirm. After returning to the main menu, press Menu key to exit from the
menu.
▲ Playback menu
Page 17
17
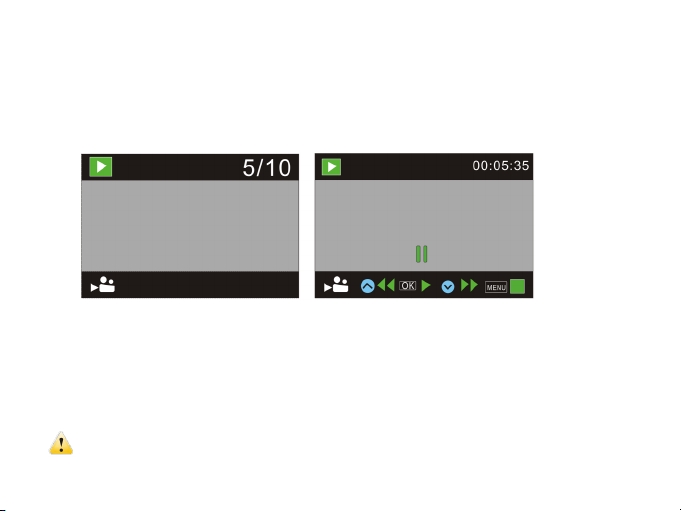
8. Playback mode
Press Power key to enter playback mode to browse photo/video files and play the videos recorded.
Press Up/Down key to select previous or next photo/video.
Play movie: Press the shutter button to start/pause play video, press the up/down key to reverse quickly /fast
forward playback, press the MENU button to stop play videos.
Video file playback Video pause mode
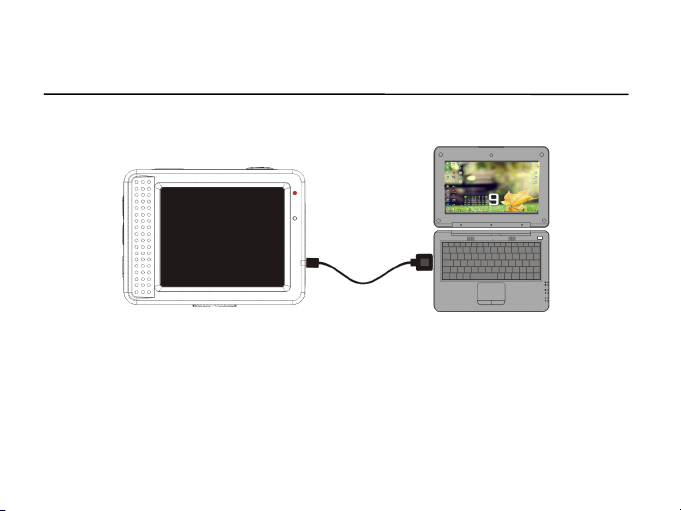
9. Connect to computer to download photo/video
When the camera is connected with the computer, select the ‘removable disk’ (MSDS) mode. There will be a
removable disk added in the Windows file explorer. The photo or video files will be stored in a folder named
“DCIM\100MEDIA” on this removable disk. Browse this file folder to select and copy files onto the hard disk
of your computer.
Note: During file transfer, it isn ot allowed to disconnect the USB cable or to remove the memory card to avoid loss of data.
Page 18

18
UUsseeCCaammeerraaFFuunnccttiioonns
s
TThheeAACCAAMM--000022ccaannaallssoobbeeuusseeddaasswweebbccaamm((vviiddeeoooonnllyy))oonnyyoouurrPPCC..IInnoorrddeerrttoouusseetthheewweebbccaammffuunnccttiioonn,
pplleeaasseeffoolllloowwtthheenneexxttsstteeppss:
11..CCoonnnneecctttthheeccaammeerraattooyyoouurrPPCCwwiitthhtthheessuupppplliieeddUUSSBBccaabblle
22..TTuurrnntthheeccaammeerraaoonnwwiitthhtthheeppoowweerrbbuuttttoon
33..tthheeccaammeerraaddiissppllaayywwiillllsshhoowwPPCCffuunnccttiioonnss((MMSSDDSSbbyyddeeffaauulltt)),,sseelleecctt““PPCCCCaammeerraa”
44..WWiinnddoowwsswwiillllnnoowwiinnssttaallllaallllnneeeeddeeddccaammeerraaddrriivveerrssaauuttoommaattiiccaalllly
55..YYoouuccaannnnoowwuusseetthheeAACCAAMM--000022aasswweebbccaammiinnaallllccoommmmoonnssooffttwwaarreetthhaattssuuppppoorrttsswweebbccaammuussee,,ee..gg.
SSkkyyppee.
:
e
n
y
.
,
”
.
Page 19

19
TTeecchhnniiccaallppaarraammeetteerrs
Image sensor
5.0 MP CMOS
Function mode
Video, photo, playback
Lens
F2.5 f=3.53mm
Digital zoom
8x
LCD screen
2.0” color LCD screen
Picture resolution
12M (4000 x 3000), 8M (3264 x 2448), 5M (2592 x 1944)
Video resolution
FHD (1920x1080@30fps),HD (1280X720@30fps) ,HD (1280X720@60fps)
Storage medium
MicroSD (TF) card, speed class 10 (Max. 32GB)
File format
JPEG (photo), H.264 (video)
USB port
USB 2.0
s
Page 20

20
Power supply
5V, 800 mA
Battery
Built-in 3.7V rechargeable lithium battery (700 mAh)
Operating system
requirements
Windows XP/Vista/7/8, Mac 10.2
Dimensions
58 x 44 x 23 mm
Weight
70 g
Note: The product design specifications are based on the latest information available while compiling this product
manual. All camera specifications and features are subject to change without further notice.
Page 21
21
ACAM-002
Full HD Action Cam mit
umfangreichem Zubehor
Benutzerhandbuch
Ver. 20140912
Page 22

22
Willkommen
Vielen Dank fur den Erwerb dieser Kamera. Dieses Benutzerhandbuch hilft Ihnen bei der richtigen
Verwendung und gibt Ihnen weitere Hinweise im Umgang mit diesem Produkt.
Alle Texte, Abbildungen und Screenshots stellen den zum Zeitpunkt des Drucks des Handbuchs
aktuellen Stand dar. Das akutelle Produkt kann auf Grund von Anderungen geringfugig abweichen.
Vorbereitung der Kamera
Fur bestmogliche Filmaufnahmen, nutzen Sie bitte microSD Karten der Klasse 10 oder hoher.
Verwendung der microSD Karte
• Nachdem Sie die microSD Karte in die Kamera eingesetzt haben, formatieren Sie diese bitte zunachst
uber das Display-Menu.
• Bevor Sie die microSD Karte entfernen oder einsetzen, unterbrechen Sie bitte zunachst die
Stromzufuhr zur Kamera.
• Die Lese- und Schreibeigenschaften der microSD Karte werden mit der Zeit nachlassen. Bitte ersetzen
Page 23

23
Sie im Falle von schlechter werdenden Aufnahmen die microSD Karte durch eine neue.
• Halten Sie die microSD Karte moglichst von Geraten mit magnetischen oder elektromagnetischen
Feldern fern. Dies betrifft zum Beispiel Lautsprecher, Funk-Empfanger usw.
• Setzen Sie Ihre microSD Karte moglichst keinen gro.en Temperaturschwankungen aus.
• Halten Sie Ihre microS Karte moglichst sauber und von Flussigkeiten fern. Sollte die Karte mit einer
Flussigkeit in Kontakt geraten, trocken Sie diese umgehend mit einem weichen Tuch.
• Bitte beachten Sie, dass es normal sein kann, dass die microSD Karte nach langerer Verwendung
etwas erwarmt ist.
Pflege der Kamera
• Verwenden Sie die Kamera fur eine Weile nicht, so lagern Sie diese bitte an einem trockenen,
sauberen Ort sowie nicht in direkter Sonneneinstrahlung.
• Mochten Sie die Linse der Kamera reinigen, pusten Sie bitte zunachst grobe Verunreinigungen
herunter und verwenden Sie anschlie.end ein weiches Tuch, welches zur Reinigung von Linsen oder
Page 24

24
Objektiven vorgesehen ist.
• Bitte beruhren Sie die Linse nicht mit Ihren Fingern.
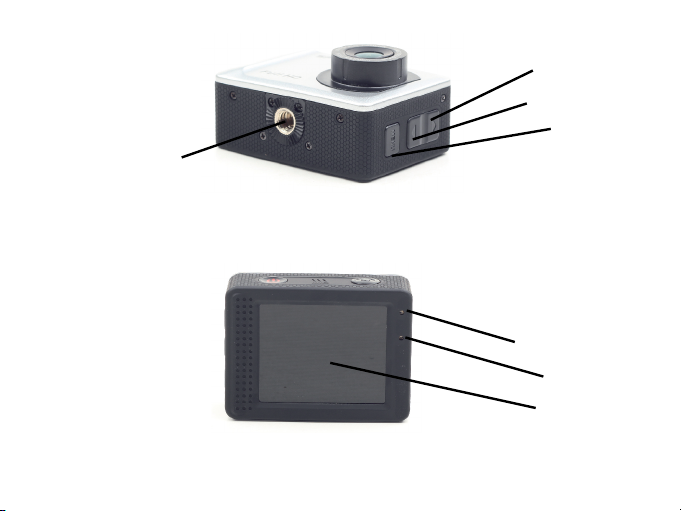
Gesamtansicht
Linse
microUSB
Anschluss
Power-Taste/Modus
Mikrofon
OK/Ausloser-Taste
microSD Slot
Reset
Page 25
25
Ladestatusanzeige
Statusanzeige
LCD-Bildschirm
Pfeiltaste hoch
Pfeiltaste runter
Menu-Taste
Gewinde fur Stativ
Page 26

26
Funktionen und Anzeigen
Taste/Indikator
Funktion
Power-Taste
Ein-/Ausschalter; Wechsel zwischen Kamera-, Video-,
Foto- und Wiedergabemodus
Ausloser
Starten/stoppen der Videoaufnahme, Foto aufnehmen;
Play/Stop im Wiedergabemodus; Bestatigung in der
Menuauswahl
Menu-Taste
Menu aufrufen und schlie.en; Wiedergabe stoppen (im
Wiedergabemodus)
Pfeil hoch
Hineinzoomen; Menuauswahl; Seite hoch; Pause (im
Wiedergabemodus); Zuruckspulen (im
Wiedergabemodus)
Page 27

27
Pfeil runter
Herauszoomen; Menuauswahl; Seite runter; Vorspulen
(im Wiedergabemodus)
Ladestatusanzeige
Leuchtet wahrend des Ladevorgangs rot auf und
erlischt, sobald der Ladevorgang abgeschlossen ist.
Statusanzeige
Ist die Kamera beschaftigt, zum Beispiel mit einer
Aufnahme, leuchtet diese Anzeige auf.
Vor der ersten Verwendung
Aufladen des internen Akkus
Die Kamera ist mit einem integrierten 3,7 V Akku ausgestattet. Bitte laden Sie den Akku vor der ersten
Verwendung vollstandig auf und ebenso, sobald die Leistung des Akkus sehr niedrig ist.
Page 28
28
Ist der Akku der Kamera vollstandig entladen, schlie.en Sie die Kamera mittels des beiliegenden
USB-Kabels an einen freien USB-Port Ihres Computers an. Wird der Akku aufgeladen, erscheint auf
dem Display die Ladestatusanzeige. Ist der Akku vollstandig aufgeladen, erlischt die Anzeige wieder.
Eine vollstandige Aufladung des Akkus benotigt circa 2 bis 4 Stunden.
Einsetzen der microSD Karte
Setzen Sie die microSD Karte wie auf der Kamera gezeigt vorsichtig ein.
Page 29
29
Um die Karte wieder zu entfernen, drucken Sie auf das Ende der Karte bis diese hervorsteht und
entnehmen Sie sie vorsichtig.
Hinweis:
Die Kamera hat keinen internen Speicher, bitte setzen Sie vor der ersten Verwendung eine microSD
Karte ein und formatieren Sie diese uber das Display-Menu.
Starten und Ausschalten der Kamera:
Page 30

30
• Starten: Drucken und halten Sie die Power-Taste fur etwa 3 Sekunden. Die Kamera startet
anschlie.end den Bereitschaftsmodus.
• Ausschalten: Ist die Kamera im Bereitschaftsmodus, drucken Sie Power-Taste, um die Kamera
auszuschalten.
• Automatisch ausschalten: Ist die Kamera im Bereitschaftsmodus und es findet keine Aufnahme statt,
schaltet sich die Kamera automatisch aus. Die voreingestellte Zeit, nach welcher sich die Kamera
abschaltet, betragt 3 Minuten.
• Ausschalten bei wenig verbleibender Akkuleistung: Ist die Leistung des Akkus nahezu aufgebraucht,
erscheint dieses Icon auf dem Display “ “.
• Beginnt diese Anzeige rot zu blinken, schaltet sich die Kamera automatisch aus.
Modus wechseln
Die Kamera verfugt uber 3 verschiedene Modi: Foto-Modus, Video-Modus und Wiedergabe-Modus.
Drucken Sie kurz auf die Power-Taste, um den Modus zu wechseln.
Page 31

31
Video-Modus: zur Aufnahme von Videos
Foto-Modus: zur Aufnahme von Fotos
Wiedergabe-Modus: zur Wiedergabe von zuvor aufgenommenen Bildern und Videos.
Indikatoren
• Statusanzeige: Ist die Kamera zum Beispiel mit einer Aufnahme beschaftigt, leuchtet diese Anzeige.
• Ladestatusanzeige: Ist die Kamera ausgeschaltet und diese Anzeige leuchtet auf, wird der Akku der
Kamera derzeit aufgeladen.
Foto-/Video-Modus
Wird die Kamera eingeschaltet, startet diese immer im Video-Modus. Um den Modus zu wechseln,
drucken Sie kurz auf die Power-Taste.
Um eine Videoaufnahme zu starten, drucken Sie bitte kurz auf die OK/Ausloser-Taste.
Um im Foto-Modus ein Foto aufzunehmen, drucken Sie bitte ebenso auf die OK/Ausloser-Taste.
Page 32

32
Um sowohl im Video- als auch im Foto-Modus zu zoomen, benutzen Sie bitte die Pfeiltasten.
1. Foto-Modus
2. 3 Bilder verbleibend im aktuellen Modus
3. Selbstausloser-Modus
4. Foto-Auflosung
5. Bildqualitat
6. Verbleibende Anzahl moglicher Bildaufnahmen
7. Zoomfaktor
8. Ladestatus
9. Gesichtserkennung
Page 33
33
Bildschirmanzeige im Video-Modus
1. Video-Modus
2. Videoqualitat
3. Video-Bildrate
4. Videoauflosung
5. Verbleibende Dauer moglicher Videoaufnahmen
6. Gesichtserkennung
7. Zoomfaktor
8. Ladestatus
Page 34

34
Hinweis:
1. Verwenden Sie zur Aufnahme von HD oder Full HD Videaufnahmen bitte eine microSD Karte der
Klasse 10 oder hoher.
2. Wahrend der Aufnahme wird sich automatisch der Bildschirm ausschalten, um Energie einzusparen.
Um den Bildschirm wieder einzuschalten, drucken Sie bitte kurz auf die Power-Taste.
Video- und Foto-Modus Einstellungen
Menuanzeige
Drucken Sie im Foto-, Video- und Wiedergabe-Modus kurz auf die Menu-Taste, um das Menu
aufzurufen. Wahlen Sie nun mittels der Pfeiltasten einen Eintrag aus und bestatigen Sie Ihre Wahl mit
einem Druck auf die OK/Ausloser-Taste.
Im Video-Modus konnen Sie im Menupunkt „Seamless“ auswahlen, in welchen Intervallen Videos
aufgenommen werden sollen. Zur Auswahl stehen 1, 3 und 5 Minuten. Ist die eingelegte Speicherkarte
Page 35

35
voll, wird automatisch die alteste Videodatei geloscht und uberschrieben.
Menuanzeige im Foto-Modus Menuanzeige im Video-Modus
Page 36

36
Systemeinstellungen
Offnen Sie zunachst das Menu mit der Menu-Taste und drucken Sie anschlie.end kurz auf die
Power-Taste, um die Systemeinstellungen aufzurufen. Wahlen Sie nun mit den Pfeiltasten die
gewunschten Optionen aus und bestatigen Sie Ihre Wahl mit einem kurzen Druck auf die
OK/Ausloster-Taste. Um das Menu wieder zu verlassen, drucken Sie bitte erneut die Menu-Taste.
Menu der Systemeinstellungen
Page 37

37
Datum und Uhrzeit einstellen
Offnen Sie zunachst das Menu mit der Menu-Taste und drucken Sie anschlie.end kurz auf die
Power-Taste, um die Systemeinstellungen aufzurufen. Wahlen Sie mittels der Pfeiltasten den Eintrag
“Date and time” aus und drucken Sie zur Auswahl die OK/Ausloser-Taste.
Wahlen Sie mittels der Power-Taste das gewunschte Feld (Datum, Uhrzeit) aus und stellen Sie
anschlie.end mittels der Pfeiltasten den gewunschten Wert ein. Bestatigen Sie Ihre Einstellungen mit
der OK/Ausloser-Taste. Drucken Sie anschlie.end die Menu-Taste, um das Menu wieder zu verlassen.
Page 38

38
Einstellungen des Wiedergabe-Modus
Stellen Sie die Kamera mittels der Power-Taste in den Wiedergabe-Modus. Drucken Sie anschlie.end
die Menu-Taste, um das Menu aufzurufen. Wahlen Sie nun mittels der Pfeiltasten den gewunschten
Eintrag aus und bestatigen Sie mit der OK/Ausloser-Taste. Haben Sie Ihre gewunschten Einstellungen
vorgenommen, drucken Sie anschlie.end die Menu-Taste, um das Menu wieder zu verlassen.
Menu des Wiedergabe-Modus
Page 39

39
Wiedergabe-Modus
Stellen Sie die Kamera mittels der Power-Taste in den Wiedergabe-Modus, um Video- und Bilddateien
auszuwahlen und anzusehen.
Wahlen Sie mit den Pfeiltasten die gewunschte Datei zunachst aus.
Um nun ein Video anzusehen, drucken Sie bitte die OK/Ausloser-Taste um die Wiedergabe zu starten
oder zu pausieren. Um die Wiedergabe zu beenden, drucken Sie bitte auf die Menu-Taste.
Page 40

40
Videodatei auswahlen Videodatei pausieren
Verbindung mit dem Computer
Um Dateien auf den Computer zu ubertragen oder von der Kamera zu loschen, verbinden Sie die
Kamera mit dem USB-Kabel und einem freien USB-Port Ihres Computers. Wahlen Sie anschlie.end den
“Removable Disc“-Modus (MSDS) aus. Die Kamera wird nun als Wechseldatentrager in Ihrem
Dateibrowser angezeigt. Aufgenommene Bilder und Videos befinden sich im Verzeichnis
“DCIM\100MEDIA”. Von diesem Verzeichnis aus konnen Sie Ihre Bilder und Videos wie gewohnt auf
Page 41

41
den Computer ubertragen.
Hinweis:
Um Datenverlust zu vermeiden, unterbrechen Sie die USB-Verbdinung zwischen Ka¬mera und
Computer wahrend der Datenubertragung nicht.
Kamera am Computer verwenden
Die Kamera kann auch also herkommliche Webcam am Computer verwendet wer¬den. Um die Kamera
als Webcam zu verwenden, gehen Sie bitte wie folgt vor:
1. Verbinden Sie die Kamera mittels des beiliegenden USB-Kabels mit einem freien USB-Port an Ihrem
Computer.
2. Schalten Sie die Kamera mit einem Druck auf die Power-Taste ein.
3. Wahlen Sie in dem nun erscheinenden Menu die Option “PC Camera” aus (vor¬ausgewahlt ist
MSDS).
4. Windows wird die Kamera automatisch erkennen und installieren.
Page 42

42
5. Die Kamera kann anschlie.end mit jedem beliebigenProgramm, das die Verwen¬dung einer Webcam
unterstutzt, verwendet werden. Zum Beispiel in Sprachchat anwendungen wie Skype.
Technische Spezifikationen
Bild Sensor
5 MP CMOS
Digitaler Zoom
8fach
Auflosung Video
max. 1920 x 1080 Full HD (30 fps)
Dateiformat Video
AVI
Dateiformat Bilder
JPEG
Linse
F2.5 f=3,53 mm
Unterstutzte Speicherkarten
TF/Micro SDHC (Klasse 10, max. 32 GB)
USB-Port
USB 2.0
USB-Kabellange
0,8 m
Stromversorgung
5 V DC bis zu 800 mA
Batterie
Integrierte Wiederaufladbare 3,7 V Lithium Batterie, 700 mAh
Page 43

43
Systemvoraussetzungen
Windows 7/8, Mac 10.2
Abmessung
58 x 44
Entsorgungshinweise:
Werfen Sie dieses Gerat nicht in den Hausmull. Unsachgema.e Entsorgung kann sowohl der Umwelt als
auch der menschlichen Gesundheit schaden. Informationen zu Sammelstellen fur Altgerate erhalten Sie
bei Ihrer Stadtverwaltung oder einer autorisierten Stelle fur die Entsorgung von Elektro-und
Elektronikgeraten.
Batterien und Akkus sind im entladenen Zustand in Altbatteriesammelgefa.e im Handel und bei
offentlich-rechtlichen Entsorgungstragern zu entsorgen. Bitte beachten Sie, dass eine vollstandige
Entladung der Batterie/des Akkus erst mit ublichem Gebrauchsende erreicht ist.
Garantieerklarung / Service
• Die Garantie betragt 24 Monate ab Verkaufsdatum an den Endverbraucher. Das Kaufdatum und der
Geratetyp sind durch eine maschinell erstellte Kaufquittung zu belegen. Bitte bewahren Sie
Page 44

44
Ihren Kaufbeleg daher fur die Dauer der Garantie auf, da er Voraussetzung fur eine eventuelle
Reklamation ist.
• Innerhalb der Garantiezeit werden alle Mangel durch den Hersteller entweder durch Instandsetzung,
Austausch mangelhafter Teile oder im Austausch behoben. Die Ausfuhrung der
Garantieleistung bewirkt weder eine Verlangerung noch einen Neubeginn der Garantiezeit.
• Eine Garantieleistung entfallt fur Schaden oder Mangel die durch unsachgema.e Handhabung oder
durch au.ere Einwirkung(Sturz, Schlag, Wasser, Staub, Verschmutzung oder Bruch)
herbeigefuhrt wurden. Verschlei.teile (z.B. Akkus) sind von der Garantie ausgenommen.
Page 45

45
Konformitatserklarung
Das Produkt ACAM-002 wurde getestet und stimmt mit den grundlegenden Anforderungen der
Richtlinie EMC (2004/108/EC) uberein. Die Konformitatserklarung kann auf unserer Website
http://www.gembird.de/ heruntergeladen werden.
Kunden-Service:
Telefon: +49(0)241 - 705152100
Telefax: +49 (0)2921 - 6710519
Hilfe-Forum: www.gembird-support.de
E-Mail: support@gembird.de
Web: www.gembird.info
Hausanschrift:
GEMBIRD Deutschland GmbH
Coesterweg 45
D-59494 Soest
Page 46

46
Handleiding ACAM-002 (NL/BE)
Page 47

47
m
Gefeliciteerd met de keuze voor deze ACAM-002 Full HD action camera van Gembird. Lees deze handleiding
goed door voor het eerste gebruik en bewaar deze voor later gebruik.
Alle in deze handleiding opgenomen teksten, foto’s, screenshots etc, zijn gebaseerd op de meest recente stand van
zaken. Door veranderingen in techniek, functies of materiaalgebruik etc, kan het uiteindelijke product mogelijk
licht afwijken.
Gebruik voor het beste resultaat altijd een high-speed microSD (SDHC) kaart van klasse 10 of hoger.
Gebruik van de geheugenkaart
● Als u een microSD geheugenkaart in de camera plaatst, formatteer deze kaart dan eerst met de formatteerfunctie
van de camera
● Schakel de camera uit en verwijder de USB kabel alvorens de geheugenkaart te plaatsen
● Geheugenkaarten kunnen kapot. Als de geheugenkaart niet meer goed functioneert, dient u deze te vervangen.
● Houd de geheugenkaart uit de buurt van magneten, zoals luidsprekers, winkelkassa’s of versterkers;
● Bescherm de geheugenkaart tegen sterk wisselende temperatuursomstandigheden
● Houd de geheugenkaar schoon en bescherm tegen water/vocht. Indien nat, snel drogen met zachte doek
● De geheugenkaart kan een beetje warm worden na langdurig gebruik, dit is normaal
WWeellkkoom
VVoooorrzzoorrggssmmaaaattrreeggeelleen
n
Page 48

48
Onderhoud van de camera
● Als u de camera voor langer tijd niet gebruikt, berg hem dan stofvrij op, beschermd tegen direct zonlicht
● Als u de cameralens wilt reinigen, blaas dan eerst stof en vuildeeltjes weg. Gebruik daarna een zachte doek die
geschikt is voor het reinigen van optische lenzen om de lens schoon te maken. Gebruik geen
schoonmaakmiddelen of oplosmiddelen voor het reinigen van de lens of de camera.
● Raak de lens niet aan met de vingers
OOvveerrzziicchhttvvaannddeeccaammeerra
a
Page 49

49
Page 50

50
Knoppen en indicators
Knop/indicator
Functies(s)
Power knop
Camera AAN/UIT schakelen en wisselen tussen video-, foto- en playbackmodus
Shutter knop
Start/stop video-opname, foto nemen, video afspelen (Playbackmodus), keuzes
bevestigen in het menu
MENU knop
Menu openen en sluiten, video afspelen stoppen (playbackmodus)
Up knop
Digitale zoom-in: navigeren in het menu; navigeren, terugspoelen en afspelen
pauseren in de playbackmodus
Page 51

51
Down knop
Digitale zoom-uit: navigeren in het menu; navigeren en vooruitspoelen in de
playbackmodus
Charger indicator
Brandt rood tijdens het laden van de batterij, gaat uit als de batterij vol is
Busy indicator
Brandt als de camera bezig is (b.v. tijdens het filmen)
2.Opladen van de ingebouwde lithium batterij
Deze camera heeft een ingebouwde oplaadbare 3.7 V lithium batterij. Het wordt aangeraden de batterij volledig
op te laden voor het eerste gebruik. Daarna kunt u de batterij opladen als deze (bijna) leeg is.
VVoooorrhheetteeeerrsstteeggeebbrruuiik
k
Page 52

52
Gebruik de meegeleverde USB-kabel voor het opladen van de batterij, bijvoorbeeld door deze aan te sluiten op
de USB-poort van uw PC. Tijdens het laden zal de laadindicator branden. Deze indicator gaat vanzelf uit zodra
het laden voltooid is. Een volledige laadcyclus zal doorgaans ongeveer 2-4 uur duren.
2. Plaatsen van de geheugenkaart
2.1. Plaats de microSD kaart in de kaartsleuf, in de richting/positie zoals aangegeven op de camera.
2.2. Om de kaart weer te verwijderen, druk u zachtjes op de kaart. De kaart komt dan vanzelf iets naar buiten.
LET OP: De camera heeft gee n ingebouwd geheugen. Plaats voor gebruik een geheugenkaart. Het wordt
aangeraden om de geheugenkaart de eerste keer te formateren in de camera.
Page 53

53
3. De camera aan- en uitzetten:
3.1 AAN: Druk op de AAN/UIT knop en houd deze 3 seconden ingedrukt. De camera laat nu het opstartscherm
zien en schakelt zichzelf in.
3.2 UIT: Druk 3 seconden op de AAN/UIT knop om de camera uit te zetten
3.3 Automatisch uitschakelen: Als de camera een tijdje niet gebuikt wordt, dan zal deze vanzelf uitschakelen.
Standaard gebeurt dit na 3 minuten.
3.4 Uitschakelen bij lege batterij: Als u dit “ ” icoon in het scherm ziet, dan is de batterij bijna leeg. Als u niet
tijdig de batterij oplaadt, dan zal het icoon rood gaan knipperen. Kort daarna schakelt de camera zichzelf
automatisch uit.
4. Wisselen tussen video- foto- en playbackmodus
De camera heeft 3 standen: videomodus, fotomodus en playbackmodus. Druk kort op de AAN/UIT knop om
tussen deze standen te wisselen.
Videomodus: Voor het opnemen van video’s
Fotomodus: Voor het nemen van foto’s
Playbackmodus: Voor het afspelen van eerder opgenomen video’s
Page 54

54
5. LED statusindicators
5.1 BUSY indicator: Als de camera met een taak bezig is (b.v. opnemen, scherm uitschakelen, etc.), dan zal deze
indicator oplichten.
5.2 Charging indicator: Deze LED indicator geeft aan de de batterij geladen wordt (als de camera uit staat).
6. Video- en fotomodus
De camera zal altijd opstarten in de video modus. Druk eventueel kort op de AAN/UIT knop om naar de
fotomodus te schakelen.
In de video modus drukt op de opnameknop om video-opnames te starten en stoppen.
In de fotomodus kunt u met een druk op de opnameknop een foto nemen.
In zowel video- als fotomodus kunt u met de pijltjestoetsen digitaal in- en uitzoomen.
Page 55

55
6.1 Display in fotomodus
10. Fotomodus
11. Tripple-shot / continu opname
12. Zelfontspanner
13. Fotoresolutie
14. Fotokwaliteit
15. Beschikbare ruimte (aantal foto’s)
16. Digitale zoom
17. Batterijstatus
18. Gezichtsherkenning
Page 56

56
6.2 Display in videomodus
Note:
1. Bij het opnemen in HD of FHD videokwaliteit, gebruik dan een geheugenkaar van klasse
10 of hoger.
2. Tijdens het opnemen gaat het scherm automatisch uit om de batterij te sparen. Druk
kort op de AAN/UIT knop om het scherm weer te activeren.
9. Videomodus
10. Videokwaliteit
11. Video framerate
12. Videoresolutie
13. Beschikbare ruimte (in opnametijd)
14. Gezichtsherkenning
15. Digitale zoom
16. Batterijstatus
Page 57

57
7. Instellingenmenu in video- en fotomodus
7.1 Menu openen
Zowel in video-, foto-, als playbackmodus drukt u op de MENU knop om het menu te openen. Gebruik de
pijltjestoetsen om door het menu te navigeren en druk op de OPNAME knop om een keuze te bevestigen. Een
geselecteerd menu-item is blauw gearceerd.
In de videomodus kunt u met behulp van de "Seamless" instelling de continu-opnamefunctie aan- of uitzetten.
Videosegmenten kunnen dan worden ingesteld op een lengte van 1/3/5 minuten. Als deze functie is ingeschakeld
neemt de camera de video’s op in fragmenten die naadloos in elkaar overlopen. Als de kaart vol is, dan wordt het
oudste segment overschreven, waardoor de camera continu kan blijven opnemen zonder dat de kaart ooit vol
raakt.
Fotomodus menu Videomodus menu
Page 58

58
7.2 Systeeminstellingenmenu
Druk op de MENU knop om het menu te openen en druk vervolgens op de AAN/UIT knop om naar het
systeeminstellingenmenu te schakelen en druk op de OPNAME knop om dit te bevestigen. Gebruik ook in het
submenu de pijltjestoetsen om te navigeren en druk op de OPNAME knop om een keuze te bevestigen. Als u
klaar bent drukt u op de MENU knop om het menu weer te verlaten
Systeeminstellingenmenu
Page 59

59
7.3 Datum en tijd instellen
Druk op de MENU knop om het menu te openen en druk vervolgens op de AAN/UIT knop om naar het
systeeminstellingenmenu te schakelen en druk op de OPNAME knop om dit te bevestigen. Gebruik de
pijltjestoetsen om “Datum en tijd” te selecteren en druk vervolgens op de OPNAME knop om deze keuze te
bevestigen.
In het datum/tijd instellingenscherm drukt u op de AAN/UIT knop om te wisselen tussen datum of
tijdsinstellingen en vervolgens op de pijltjestoetsen om de datum/tijd te wijzingen. Druk op de OPNAME knop
om te bevestigen. Als u klaar bent drukt u op de MENU knop om het datumscherm weer te verlaten.
Page 60

60
7.4 Playbackmodus menu
Zet de camera in playbackmodus en druk op de MENU knop om het menu te openen. Gebruik de
pijltjestoetsen om door het menu te navigeren en druk op de OPNAME knop om een keuze te bevestigen en/of
een submenu te openen. Gebruik ook in het submenu de pijltjestoetsen om te navigeren en druk op de
OPNAME knop om een keuze te bevestigen. Als u klaar bent drukt u op de MENU knop om het menu weer te
verlaten
▲ Playback menu
Page 61

61
8. Playbackmodus
Zet de camera in playbackmodus om eerder gemaakte foto’s en video’s te bekijken.
Gebruik de pijltjestoetsen om naar de volgende/vorige opname te gaan..
Video afspelen: Selecteerd e video en druk op de OPNAME knop om het afspelen te starten (of te pauseren).
Gebruik de pijltjestoetsen om snel terug- of vooruit te spoelen tijdens het afspelen. Druk op de MENU knop om
het afspelen te stoppen.
Video playback Video op pauze
9. Verbinden met een PC
Als de camera met een PC wordt verbinden via de meegeleverde USB-kabel, dan komt er een klein keuzemenu
in beeld. Kies voor de ‘removable disk’ (MSDS) modus als u de bestanden op de camera wilt inzien. Windows
zal de camera nu toevoegen als een apparaat voor verwisselbare opslag. De foto en videobestanden staan in de
map met de naam “DCIM\100MEDIA”. Bekijk de inhoud van deze map en sla desgewenst de bestanden op in
uw computer.
Page 62

62
LET OP: Tijdens het kopiëren, opslaan of verwijderen van bestanden op de camera mag u de
verbinding met de computer niet verbreken om dataverlies en/of beschadiging van de
geheugenkaart te voorkomen.
via de meegeleverde USB-kabel
een klein keuzemenu zien
AACCAAMM--000022aallsswweebbccaammggeebbrruuiikkeen
DDeeAACCAAMM--000022kkaannooookkaallsswweebbccaamm((aalllleeeennvviiddeeoo))ggeebbrruuiikkttwwoorrddeennbbiijjuuwwPPCC..VVoollggddeevvoollggeennddeessttaappppeennoommdde
AACCAAMM--000022aallsswweebbccaammtteeggeebbrruuiikkeenn:
66..VVeerrbbiinnddddeeccaammeerraammeettddeePPC
77..ZZeettddeeccaammeerraaaaaannmmeettddeeAAAANN//UUIITTkknnoop
88..DDeeccaammeerraallaaaattnnu
CCaammeerraa”
99..WWiinnddoowwsszzaallnnuuaalllleebbeennooddiiggddeewweebbccaammddrriivveerrssaauuttoommaattiisscchhiinnssttaalllleerreen
1100..UUkkuunnttnnuuddeeAACCAAMM--000022aallsswweebbccaammggeebbrruuiikkeenniinnddeemmeeeesstteessooffttwwaarreeddiieeggeebbrruuiikkmmaaaakkttvvaan
wweebbccaammffuunnccttiieess,,zzooaallssSSkkyyppee.
u
”
n
:
C
p
.
((MMSSDDSSiissssttaannddaaaarrddggeesseelleecctteeeerrdd)),,kkiieessvvoooorr““PPC
n
e
C
n
Page 63

63
Mode d’emploi, ACAM-002 (FR/BE)
Page 64

64
IInnttrroodduuccttiioon
Veuillez lire ce mode d’emploi avant utiliser votre ACAM-002. Ceci vous aidera à mieux connaitre votre appareil
de très haute technologie.
Les textes, images et copie écrans, sont selon la dernière révision / modification. Cependant la conception et les
spécifications sont susceptibles de modifications sans préavis.
Cet appareil accepte la carte mémoires de type MicroSD. Pour un bon résultat, n’utiliser une carte à la norme
Class 10 minimum.
Instruction de la carte de mémoires MicroSD.
● Insérez la carte MicroSD dans l’appareil, puis formater la carte via le menu de l’écran.
● Avant insertion ou retrait de la carte de mémoires. Veuillez mettre hors tension votre ACAM-002
● La Performance de la carte MicroSD peut être en déclin avec le temps. Ayez une carte en reserve.
● Ne pas conserver vos cartes MicroSD près de champs électromagnétique puissants ou source de chaleur..
● Et éviter des endroits chaud / froid, poussiéreux ou humide.
● Pendant l’utilisation, la carte MicroSD peut être légèrement chaude.
n
PPrrййccaauuttiioonns
s
Page 65

65
La Maintenance
● Si vous ne prévoyez pas d’utiliser votre ACAM-002 pendant une longue période, retirez sa batterie et carte
MicroSD et rangez l’appareil dans un endroit frais, sec et bien ventilé. Evitez les endroits ou sont stockés des
produits chimiques corrosifs.
● Après une longue période de stockage. Veuillez tester toutes ses fonctions avant de l’utiliser. Utiliser une poire
soufflante pour éliminer la poussière qui s’accumule sur l’objectif et n’utiliser que de produits nettoyants à
base de solvants organiques.
● La ACAM-002 renferme des circuits électroniques de haute précision. N’essayez jamais de le démonter et
évitez de toucher l’objectif ou le capteur avec vos doigts.
Page 66
66
NNoommeennccllaattuurre
e
Page 67

67
Page 68

68
Fonctions + Indicateurs
Indicateur
Fonction
Interrupteur
Touche On/Off (alim); commutateur de mode, vidéo, photo et lecture
Touche obturateur
Démarrage/Arrêt enregistrement vidéo, prendre photo; Lecture/Arrêt de lire
fichier vidéo; menu de confirmation
Touche MENU
Ouvrir et sortir de menu ; Arrêt de lire fichier vidéo (mode lecture)
Touche HAUT
Zoom de lecture numérique: sélectionner menu (après le mode menu); fichier
page-haut; pause lecture vidéo (mode de lecture); Retour vidéo rapide (mode de
visualisation)
Touche BAS
Zoom numérique : sélectionner le menu (après le mode menu); fichier page-bas;
Avance rapide vidéo (mode lecture)
Témoin de charge
Voyant rouge allumé pendant la charge et arrêt après pleine charge (100%)
Voyant “occupé”
Quand l’appareil en marche (exemple: pendant enregistrement, prise de vue, en
veille automatique), the voyant led « occupé » restera allumé.
Page 69

69
AAvvaannttllaammiisseeeennrroouutte
3.Charger la batterie (fournie)
L’appareil est livré avec une batterie rechargeable 3.7V au lithium. Veuillez charger la batterie avant chaque
utilisation.
Connecter votre appareil sur un ordinateur, le voyant LED est allumé lors du chargement. Prévoir entre 2 à 4
heures pour une charge à 100%.
e
Page 70

70
2. Utilisation de la carte mémoire
2.1. Insérez une carte microSD dans le support carte jusqu’à ce qu’elle se met en place avec un déclic.
2.2. Pour retirer la carte de mémoire, enfoncer la carte légèrement. L’éjection de carte est automatique.
Nota: L’appareil n’a pas de mémoires internes. Veuillez insérer une carte de type MicroSD avant la mise
en route. Et éventuellement la formatée.
3. Démarrage et Arrêt :
3.1 Démarrage : Appuyer sur la touche ON/OFF pendant 3 secondes. La mise sous tension peut prendre un certain
temps avant l’écran s’affiche.
3.2 Arrêt : Appuyer sur la touche ON/OFF pour l’arrêt.
Page 71

71
3.3 Arrêt Auto: L’appareil fera un arrêt automatique quand il est en mode veille et pendant certain temps en mode
ECO. Le temps par défaut pour arrêt automatique est 3 minutes.
3.4 Arrêt auto lors batterie faible : lorsque la batterie est faible, Sur l’écran ça affiche « ” ». Veuillez mettre en
charge votre appareil. Quand l’indicateur change de couleur en rouge et clignotant, votre appareil va
immédiatement en mode arrêt automatique.
4. Changement de modes
L’appareil a 3 modes : Photo, Video et Lecture. Après démarrage, utiliser la touche ON/OFF pour sélectionner
votre choix.
Mode Video : enregistrement image
Mode Photo : prendre des photos
Lecture : lire vos fichiers, video ou photo
5. Indicateurs
5.1 Occupé: Quand l’appareil est en fonctionnement (enregistrement, photo, mode éco, etc.), le voyant s’allume.
5.2 En charge : Pendant l’arrêt auto, le voyant indique que le chargement n’est pas terminé.
Page 72

72
6. Photo / mode enregistrement
Par défaut, l’appareil commence en mode enregistrement. Appuyer sur la touche ON/OFF pour mode photo.
En mode vidéo, Appuyer sur touche obturateur enregistrement puis la même touche pour arrêter.
En mode photo, Appuyer sur touche obturateur pour prendre une photo.
En mode video et photo, sélectionner HAUT / BAS pour la fonction Zoom numérique.
6.1 Affichage en mode Photo
19. Photo mode;
20. Three photos continuous shooting mode;
21. Self-timer mode;
22. Photo resolution;
23. Photo quality;
24. Available shooting count;
25. Icon of digital zoom;
26. Battery state;
27. Face detect;
Page 73

73
6.2 Affichage en mode enregistrement
Nota:
1. Pour les enregistrements vidéo en HD ou FHD. Veuillez utiliser les cartes MicroSD de
type Class 10 minimum.
2. Pendant l’enregistrement, l’écran s’arrêt automatiquement en mode ECO. Appuyer
sur la touche ON/OFF pour afficher l’écran.
17. Mode video;
18. Qualité video;
19. Video frame rate
20. Resolution vidéo
21. Temps restant
22. Detection visage
23. Indicateur Zoom numérique
24. Niveau de batterie
Page 74

74
7. Menu de réglages (Photo / vidéo)
7.1 Affichage du Menu
En mode photo, video ou playback, Appuyer sur la touche MENU pour faire votre choix, puis faire HAUT / BAS
pour sélectionner et la touche « Obturateur » pour confirmer votre sélection. Votre selection sera en
soulignement « BLEU ».
En mode vidéo vous pouvez désélectionner la fonction video en boucle en choisissant “Seamless”. La durée de
la Video peut être limitée à 1, 3 ou 5 minutes. Chaque video sera attaché ensemble. Lors de manque de place sur
la carte, le fichier moins récent sera automatiquement effacé et remplacer par un fichier plus récent et pouvoir
filmer en boucle.
Menu mode Photo Menu mode Vidéo
Page 75

75
7.2 Réglages du menu système.
Sélectionner le menu en appuyant sur la touche menu et un appuie rapid sur touche demurrage ON/OFF pour aller
aux réglages menu. Utiliser les touches HAUT/BAS pour sélectionner votre choix puis la touche « Obturateur »
pour confirmer. Dans le sous menu, sélectionner avec la touché HAUT ou BAS pour sélectionner votre choix puis
sur la touche « obturateur » pour la confirmation.
Après avoir retourné au menu principal, appuyer sur la touche Menu pour sortir.
Mode menu système
Page 76

76
7.3 Réglage de l’horloge
Apres avoir appuyé sur la touche menu, puis sur ON/OFF, votre Menu s’affiche sur l’écran. Naviguer avec la
touche “Down” vers “Date and time”, puis appuyer sur “obturateur” pour avoir la fenêtre en réglage DATE et
HEURE.
Dans la fenêtre de réglage “date / time”, appuyer sur “ON/OFF” pour sélectionner votre choix (date, heure) à
ajuster, puis les touches HAUT ou BAS, Et touche « Obturateur » pour la confirmation.
Ou touche Menu pour annuler et sortir du menu de réglages.
Page 77

77
7.4 Paramètre réglage, Mode lecture
Sélectionner votre appareil en mode “Lecture”. Appuyer sur la touche HAUT ou BAS pour votre choix de
réglages et touche « obturateur » pour aller au sous-menu.
Dans le sous-menu, avec les touches HAUT ou BAS pour la sélection et puis confirmer avec la touche
« obturateur ». Retourner au menu ou sortir du menu en appuyant sur la touche “menu”
▲ Menu “Lecture”
Page 78

78
8. Mode Lecture
Appuyer sur la touché “ON/OFF” pour entrer en mode de lecture. Puis sélectionner le fichier pour visualisation.
Utiliser les touche HAUT / BAS pour sélectionner un fichier Photo ou Vidéo.
Lecture : Appuyer sur la touche “obturateur” pour lire fichier vidéo, et la touche HAUT / BAS pour retour
rapide / avance rapide, Puis sur la touche MENU pour arrêter la lecture.
Lecture fichier Vidéo Mode pause Vidéo
9. Connecter sur un ordinateur pour échanger des fichiers photo ou vidéo
Quand votre appareil est connecté avec un ordinateur, sélectionner le mode ‘removable disk’ (MSDS).
L’icône “removable disk” va être ajouté automatiquement dans la fenêtre de Windows file explorer. Les fichiers
photo ou vidéo seront sauvegardé dans “DCIM\100MEDIA” dans la branche removable disk.
Nota: Pendant le transfère des fichiers, veuillez ne pas débrancher le câble pour éviter de perte de données.
Page 79

79
FFoonnccttiioonnssiinnccoorrppoorrййeessddaannsscceettaappppaarreeiil
l
LL’’AACCAAMM--000022ppeeuuttккttrreeuuttiilliissййccoommmmeeuunneewweebbccaamm((sseeuulleemmeenntteennvviiddййoo))ssuurrvvoottrreePPCC..MMaarrcchheeааssuuiivvrreeppoouurrlla
ffuunnccttiioonnwweebbccaamm.
.
1111..CCoonnnneecctteezzll’’aappppaarreeiillssuurrvvoottrreePPCCvviiaalleeccввbblleeUUSSBB((ffoouurrnnii)
1122..PPuuiissaalllluummeezzvvoottrreeAACCAAMM--000022,,aappppuuyyeerrssuurrllaattoouucchhййOONN//OOFFFF.
1133..LL’’ййccrraannvvaammoonnttrreerrlleessddiiffffййrreenntteessffoonnccttiioonnss,,ssййlleeccttiioonnnneerrllaaffoonnccttiioonn““PPCCCCaammeerraa”
1144..WWiinnddoowwssvvaammeettttrreeааjjoouurrlleessffiicchhiieerrssnnййcceessssaaiirreessppoouurrlleebboonnffoonnccttiioonnnneemmeenntt.
1155..PPuuiisslleeAACCAAMM--000022eessttpprrккttааffoonnccttiioonnnneerrccoommmmeeuunneewweebbccaammeettccoommppaattiibblleeaavveeccddeessaapppplliiccaattiioonns
ddiivveerrsseessccoommmmee;;SSkkyyppee…
…
)
.
a
”
.
s
Page 80

80
SSppeecciiffiiccaattiioonns
Capteur image
5.0 MP type CMOS
Mode
Video, photo, lecture
Objectif
F2.5 f=3.53mm
Zoom numérique
8x
Ecran LCD
2.0” couleur matrice active TFT
Resolution photo
12M (4000 x 3000), 8M (3264 x 2448), 5M (2592 x 1944)
Resolution video
FHD (1920x1080@30fps),HD (1280X720@30fps) ,HD (1280X720@60fps)
Support sauvegarde
Carte MicroSD (TF) , vitesse, class 10 (Max. 32Go)
Format de fichier
JPEG (photo), H.264 (vidéo)
USB
USB type 2.0
Alimentation
5V, 800 mA
Batterie
3.7V rechargeable batterie lithium (700 mAh)
Compatible
Windows XP / Vista / 7 / 8, Mac 10.2
Dimensions
58 x 44 x 23 mm
Poids
70 g
Nota: La conception et les spécifications sont susceptibles de modifications sans préavis.
s
Page 81

81
Руководство пользователя
Page 82

82
ННааззннааччеенниие
Спасибо вам, что выбрали эту камеру. Пожалуйста, внимательно прочитайте данное руководство перед
началом эксплуатации камеры и сохраните его в надежном месте для последующего использования.
В данном руководстве приведены самые последние сведения на момент его написания. Здесь приведены
снимки экранов и рисунки для знакомства с цифровой камерой прямым и подробным способом. В связи с
различиями между технической частью НИОКР и производственной партией изделий снимки экранов и
рисунки, приведенные в данном руководстве, могут иметь отличия от текущей модели камеры.
е
Page 83

83
ММееррыыппррееддооссттоорроожжнноосстти
Для данной камеры требуется высокоскоростная (мультимедийная) карта памяти TF Класса 4 или выше.
Инструкции по использованию карты памяти
● В случае первого использования недавно приобретенной карты памяти, если данные на карте памяти
не могут быть распознаны камерой, или изображения были сняты на другую камеру, пожалуйста, не
забудьте отформатировать карту памяти;
● Перед подключением или извлечением карты памяти, пожалуйста, вначале отключите питание
камеры;
● После нескольких циклов использования, производительность карты памяти будет снижена. В этом
случае необходимо приобрести новую карту памяти;
● Карта памяти – это чувствительное электронное устройство. Пожалуйста, не пытайтесь ее согнуть, и
оберегайте от падения и больших нагрузок;
● Не храните карту памяти в среде с сильным электромагнитным или магнитным полем, например, у
динамиков или телевизионного приемника;
● Не используйте и не храните карту памяти в среде со слишком низкой или высокой температурой;
● Держите карту памяти в чистоте и оберегайте от контакта с жидкостью. В случае контакта с
жидкостью, пожалуйста, протрите карту памяти мягкой тканью и высушите;
● Если карта памяти не используется, пожалуйста, храните ее в специальном футляре;
● Пожалуйста, учтите, что карта памяти нагревается после долгого использования, и это нормально;
● Не используйте карты памяти, которые до этого использовались с другими цифровыми камерами. Если
и
Page 84

84
вы все же используете карту памяти из другой камеры, пожалуйста, вначале отформатируйте её через
новую камеру;
● Не используйте карту памяти, которая была отформатирована через другую камеру или устройство для
чтения;
● Данные, записанные на карте памяти, могут быть повреждены в следующих случаях:
- Ненадлежащее использование карты памяти;
- Отключение питания или извлечение карты памяти во время записи, удаления (форматирования) или
чтения данных;
● Рекомендуем вам делать резервные копии важных данных с карты памяти на другие носители,
например, на гибкий диск, жесткий диск, компакт-диск (CD).
Уход за камерой
● Храните камеру в сухом темном месте, когда она не используется;
● Используйте специальную защитную крышку, чтобы не поцарапать линзу или дисплей;
● При чистке поверхности линзы камеры, сперва сдуйте пыль с поверхности, аккуратно протрите линзу
мягкой тканью или бумагой для очистки оптического оборудования. Используйте чистящее средство
для профессиональных камер, чтобы очистить линзу. Не используйте органические растворители;
● Не касайтесь поверхности линзы пальцами.
Page 85

85
ССииссттееммнныыееттррееббоовваанниия
При использовании цифровой камеры и при работе с ней, пожалуйста, учитывайте минимальные
системные требования к компьютеру для камеры. Настоятельно рекомендуем использовать при работе с
камерой компьютер с наилучшей конфигурацией оборудования для достижения оптимального результата.
Минимальные системные требования приведены ниже:
Системные требования
Операционная система
Windows XP, Windows Vista, Windows 7, Windows 8, Mac 10.2
Центральный процессор
Intel PIII667 или выше, либо аналогичный по производительности
Оперативная память
512МБ или выше
Звуковая карта и видеокарта
С поддержкой DirectX8 или выше
CD-драйвер
Скорость 4X или выше
Жесткий диск
Минимум 1ГБ свободного пространства
Другое
1 стандартный порт USB 2.0
я
Page 86

86
Функциональные особенности
Данная камера обладает различными характеристиками и функциями, такими как:
Цифровой видеорегистратор;
Цифровая камера (5 мегапикселей);
Запоминающее устройство большой емкости (съемный диск);
Камера для ПК;
Цифровое масштабирование 8X
Непрерывное видео
Page 87

87
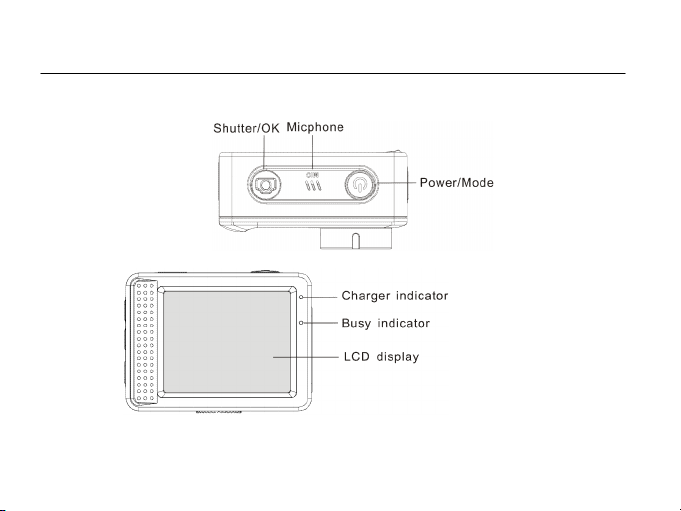
ВВннеешшннииййввиид
Shutter/OK – Затвор/OK
Micphone – Микрофон
Power/Mode –
Питание/Режим
Charger indicator – индикатор
подзарядки
Busy indicator – индикатор
занятости
LCD display – LCD-дисплей
д
Page 88

88
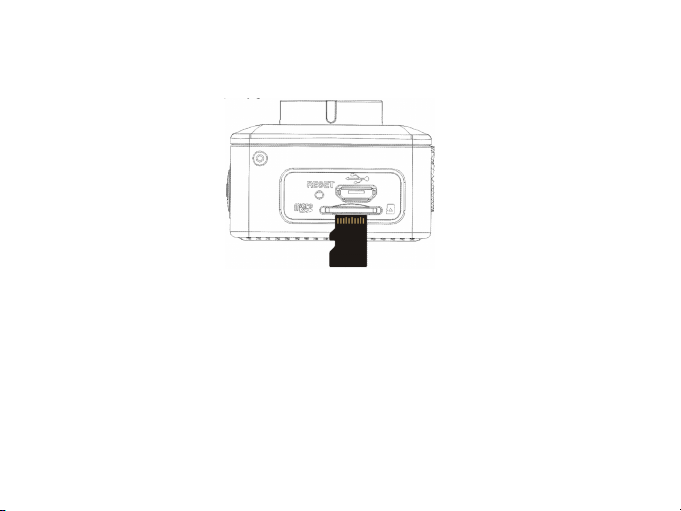
Reset – кнопка
сброса
Micro SD – разъем
Micro SD
Micro USB –
разъем Micro USB
UP – ВВЕРХ
Down – Вниз
MENU – МЕНЮ
Lens – Линза
Tapped hole for
tripod – Резьбовое
отверстие для
штатива-треноги
Page 89

89
Функции кнопок и индикаторы
Кнопка/Индикатор
Функция
Кнопка питания
Включает/выключает питание; переключение между режимами записи
видео, фотосъемки и воспроизведения
Кнопка затвора
Запись видео/фотосъемка; начало/остановка воспроизведения
видеофайла (режим воспроизведения); подтверждение в меню
Кнопка МЕНЮ
Открытие меню и выход из него; Остановка воспроизведения
видеофайла (режим воспроизведения)
Клавиша Вверх
Цифровое приближение: выбор пункта меню (после открытия меню);
пролистывание файлов на страницу вверх; пауза при воспроизведении
видео (режим воспроизведения); перемотка видео назад (режим
воспроизведения)
Клавиша Вниз
Цифровое отдаление; выбор пункта меню (после открытия меню);
пролистывание файлов на страницу вниз; перемотка видео вперед
(режим воспроизведения)
Индикатор подзарядки
Индикатор светится красным во время подзарядки, а после ее
завершения отключается (зарядка при отключенном питании)
Индикатор занятости
Когда камера занята (например, во время записи видео, фотосъемки,
автоматического отключения экрана), загорается индикатор занятости.
Page 90
90
ННааччааллооииссппооллььззоовваанниия
4. Зарядите встроенную литиевую батарею
Камера оборудована встроенной литиевой батареей 3,7В. Пожалуйста, убедитесь, что батарея в камере
заряжена и вовремя заряжайте её, если заряд закончится.
Подключите камеру в отключенном состоянии к компьютеру для подзарядки. Индикатор подзарядки
будет включен во время зарядки и выключится, когда батарея будет полностью заряжена. Как правило, на
полную зарядку батареи уходит 2-4 часа.
я
Page 91

91
2. Как использовать карту памяти
2.1. Вставьте карту памяти TF в слот памяти согласно инструкциям, указанным у слота памяти.
2.2. Чтобы извлечь карту памяти TF, аккуратно нажмите на конец карты памяти, и она будет извлечена.
Примечание: камера не имеет встроенной памяти. Пожалуйста, перед использованием вставьте
карту памяти. Необходимо также отформатировать карту памяти с помощью камеры перед её
использованием.
3. Запуск и выключение:
3.1 Запуск: нажмите кнопку POWER (питание) и удерживайте её в течение 3 секунд, на дисплее появится
экран запуска, и состояние камеры изменится на POWER ON;
3.2 Выключение: для выключения нажмите кнопку POWER (питание), когда камера находится в режиме
Page 92

92
ожидания;
3.3 Автоматическое выключение: камера будет выключена автоматически через некоторое время
пребывания в режиме ожидания, чтобы экономии энергии. Стандартное время автоотключения – 3
минуты.
3.4 Отключение при разрядке батареи: когда батарея разряжена, на LCD-дисплее будет показана иконка.
Пожалуйста, заряжайте батарею вовремя. Когда иконка становится красной и мигает, камера
автоматически выключается.
4. Переключение между функциональными режимами
У данной камеры есть 3 режима: режим фотосъемки, режим записи и режим проигрывания.
Используйте клавишу питания чтобы переключаться между режимами после запуска.
Режим записи: для записи видео;
Режим фотосъемки: для фотографирования;
Режим воспроизведения: для проигрывания текущего видео.
5. Индикаторы
5.1 Индикатор занятости (BUSY): Когда камера работает (т.е. записывает видео, фотографирует, её экран
Page 93

93
автоматически выключился, и т.д.), данный индикатор загорается;
5.2 Индикатор подзарядки: в отключенном состоянии светящийся индикатор означает, что батарея
заряжается.
6. Режим фотографирования/записи видео
Камера автоматически входит в режим записи.
Нажмите кнопку затвора (Shutter), чтобы начать запись, и снова нажмите кнопку затвора
(Shutter) для прекращения записи.
В режиме перезаписи/фотографирования, нажимайте кнопки Вверх/Вниз для цифрового
увеличения/отдаления.
Page 94

94
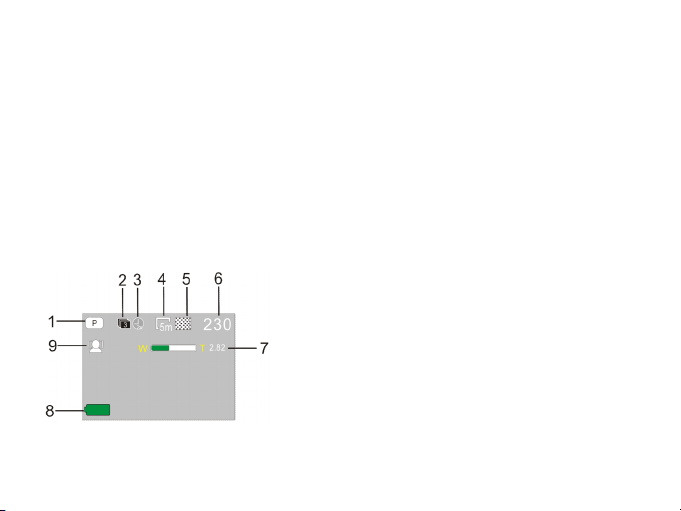
6.1 Экран в режиме фотографирования
28. Режим фотографирования;
29. Режим непрерывной съемки серии из
трех фотографий;
30. Режим автоспуска;
31. Разрешение фото;
32. Качество фото;
33. Доступное количество фотографий для
съемки;
34. Иконка цифрового масштабирования;
35. Состояние батареи;
36. Распознавание лиц;
Page 95

95
6.2 Экран в режиме записи видео
Примечание:
1. При съемке видео HD или Full HD, следует использовать высокоскоростную карту
памяти Класса 4 или выше.
2. Во время записи экран будет автоматически отключен для экономии энергии.
Пользователь может включить отображение экрана быстрым нажатием кнопки
питания (Power) или затвора (Shutter).
25. Режим видео;
26. Качество видео;
27. Частота кадров в видео
28. Разрешение видео;
29. Доступное оставшееся время для
записи;
30. Распознавание лиц;
31. Иконка цифрового
масштабирования;
32. Состояние батареи;
Page 96

96
7. Режим настройки меню
7.1 Экран меню
Находясь в режиме фотографирования, записи или воспроизведения нажмите на клавишу Menu (меню),
чтобы открыть меню, затем нажимайте кнопки Вверх/Вниз для выбора меню, нажмите клавишу затвора,
чтобы войти в раздел меню. После наведения выбранное меню будет подсвечено голубым цветом.
Для режима видео в меню будет доступна настройка Seamless (непрерывность), дополнительная
настройка, обеспечивающая сегментацию видео на фрагменты 1/3/5 минут: автоматическую остановку
записи текущего по истечении заданного времени и немедленную запись следующего видео. Когда
память на карте заканчивается, автоматически удаляется первое видео и начинается запись следующего.
Меню в режиме фотографирования Меню в режиме записи
Page 97

97
7.2 Настройка системного меню
После открытия меню нажатием соответствующей кнопки (Menu) нажмите на кнопку питания, чтобы
переключиться на настройки главного меню, нажимайте кнопки Вверх/Вниз для выбора меню, затем
нажмите кнопку затвора для подтверждения входа в выбранный раздел меню. В выбранном разделе
нажимайте кнопки Вверх/Вниз для выбора и нажмите кнопку затвора для подтверждения. После
возвращения в главное меню нажмите кнопку меню для выхода.
Системное меню
Page 98

98
7.3 Настройка даты и времени
Нажмите кнопку меню для открытия меню, затем нажмите кнопку питания для переключения на
системные настройки, после чего нажмите кнопку затвора для подтверждения. Нажимайте кнопку Вниз,
чтобы выбрать раздел «Date and time» (дата и время), затем нажмите на клавишу затвора для входа в
окно настройки.
В окне настройки нажмите кнопку питания для выбора раздела (дата, время), который хотите изменить,
затем настройте дату/время, нажимая Вверх/Вниз. Нажмите кнопку затвора для подтверждения после
завершения настройки или нажмите клавишу меню для отмены изменений и выхода. Наконец, нажмите
кнопку меню для выхода из режима настройки.
7.4 Меню настроек в режиме воспроизведения
Нажмите клавишу меню, чтобы открыть главное меню режима воспроизведения, нажимайте
Вверх/Вниз для выбора меню, нажмите клавишу затвора для входа в раздел меню. В разделе меню
нажимайте Вверх/Вниз для выбора и нажмите клавишу затвора для подтверждения. После
возвращения в главное меню нажмите клавишу меню для выхода.
Page 99

99
▲ Меню в режиме воспроизведения
Page 100

100
8. Режим воспроизведения
Нажмите кнопку питания, чтобы войти в режим воспроизведения для просмотра фотографий/видео,
проигрывания видео, записанного вашей камерой.
Нажимайте Вверх/Вниз для выбора следующего или предыдущего фото/видео.
Воспроизведение видео: нажмите на кнопку затвора для начала/паузы в проигрывании видео, затем
нажимайте Вверх/Вниз для быстрой перемотки назад/вперед, нажмите клавишу меню для остановки
воспроизведения.
Воспроизведение видео Пауза при воспроизведении видео
9. Подключитесь к компьютеру для скачивания фото/видео
Когда камера подключена к компьютеру и находится в режиме съемного диска, в окне «Мой компьютер»
появится съемный диск. Фотографии или видео могут хранится в папке DCIM\100MEDIA на съемном
 Loading...