

Page 1
DIGITAL KEY BOARDS
owners manual
ps1600
•English
Page 2
INSTRUCTION PERTAINING TO A RISK OF FIRE, ELECTRIC SHOCK, OR INJURY TO PERSONS.
Technical specifi cations are subject to change
The information contained in this manual are considered correct at the moment of printing. Generalmusic reserves the
right to change or modify any technical spec i fi ca tion with out prior notice or obbligation to upgrade existing units.
SPECIAL MESSAGES
IMPORTANT NOTE: To reduce the risk related to the correct and normal use of the instrument, all Generalmusic products are accuralety tested
in a safety laboratory. DO NOT modify the present unit, the safety standard and the correct instrument operativity could be com pro mised, and as
a further con se quence the warranty will be invalidated.
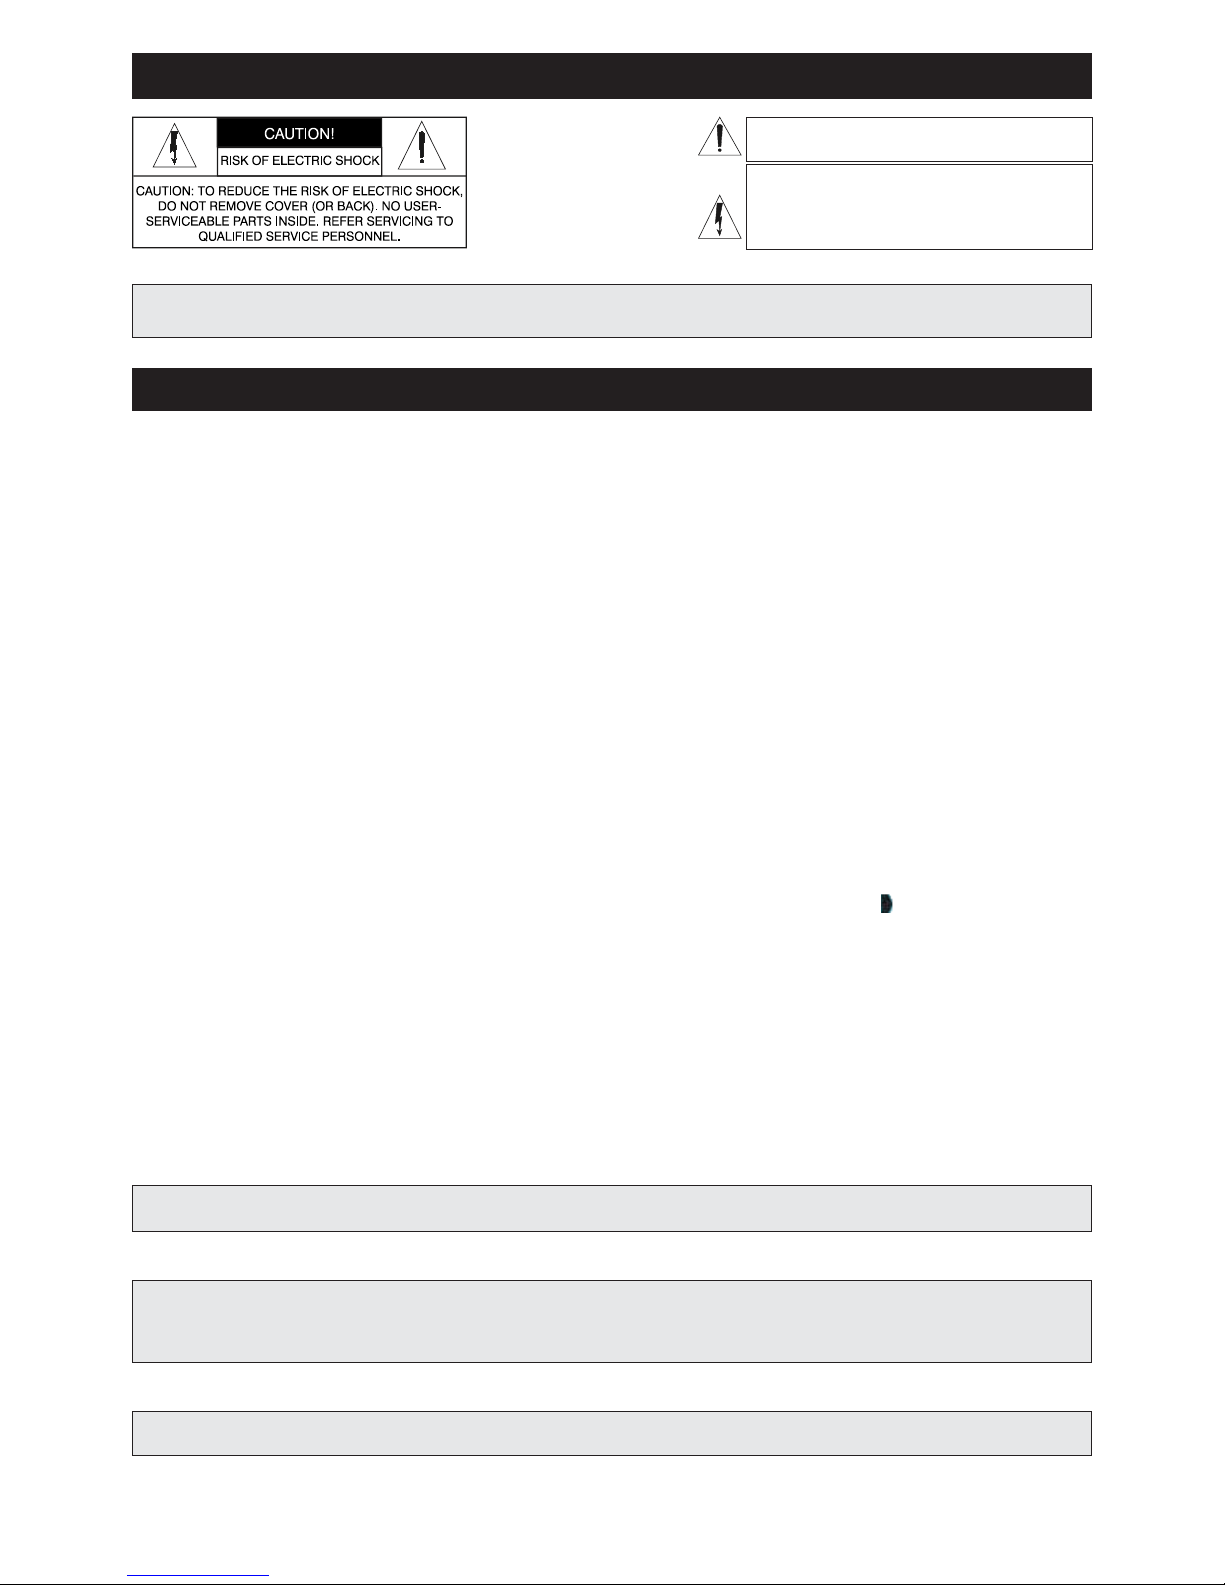
ALARM SYMBOLS:
Generalmusic electronics prod ucts
could present la bels sim i lar to that
dis played in this section. Please follow
ac cu rate ly the pre cau tions descripted
in the safety instructions.
The exclamation mark within an equi lat er al triangle is
intended to alert.
The lightning fl ash with arrowhead symbol, within an equilateral triangle, is intended to alert the user to the presence of
uninsulated “dangerous voltage” within the product’s enclosure that may be of suffi cient magnitude to constitute a risk of
electric shock to persons.
SAVE THESE INSTRUCTIONS
Generalmusic cannot be held responsible for damage caused by improper use or mod i fi ca tions to the
instrument, or data lost or destroyed
IMPORTANT SAFETY AND INSTALLATION INSTRUCTIONS
When using electric products, basic precautions should always be followed, including the following:
1. Read all the Safety and Installation instructions and explanations of Graphic Symbols before using the product.
2. This product must be earthed. If it should malfunction or breakdown, grounding provides a path of least resistance for electric
current to reduce the risk of electric shock. This product is equipped with a cord having an equipment-grounding conductor and a
grounding plug. The plug must be plugged into an appropriate outlet that is properly installed and earthed in accordance with all
local codes and ordinances.
DANGER:Improper connection of the equipment grounding conductor can result in a risk of electric shock. Check with a qualifi ed electrician or serviceman if you are
in doubt as to whether the product is properly grounded. Do not modify the plug provided with the product, if it will not fi t the outlet, have a proper outlet installed by a
qualifi ed electrician.
3. To reduce the risk of injury, close supervision is necessary when this product is used near children.
4. Do not use this product near water for example, near a bathtub, washbowl, kitchen sink, in a wet basement, or near a swimming
pool or the like.
5. This product should only be used by a stand or cart that is recommended by the manufacturer.
6. This product, either alone or in combination with an amplifi er and headphones or speakers, may be capable of producing sound levels that could
cause permanent hearing loss. Do not operate for a long period of time at a high volume level or at a level that is uncomfortable. If you experience
any hearing loss or ringing in the ears, you should consult an audiologist.
7. This product should be located so that its location or position does not interfere with its proper ventilation.
8. This product should be located away from heat sources such as radiators, heat registers, or other products that produce heat.
9. The product should be connected to a power supply only of the type described in the operating instructions or as marked on the product.
10. This product may be equipped with a polarized line plug (one blade wider than the other). This is a safety feature. If you are unable to insert the plug
into the outlet, contact an electrician to replace your obsolete outlet. Do not defeat the safety purpose of the plug.
11. The power-supply cord of the product should be unplugged from the outlet when left unused for a long period of time.
When unplugging the power _supply cord, do not pull on the cord but grasp it by the plug.
12. Care should be taken so that objects do not fall and liquids are not spilled into the enclosure through openings.
13. The product should be serviced by qualifi ed service personnel when:
A. The power-supply cord or the plug has been damaged
B. Objects have fallen, or liquid has been spilled into the product;or
C. The products has been exposed to rain or moisture
D. The product does not appear to be operating normally or exhibits a marked change in performance
E. The product has been dropped, or the enclosure damaged.
14. Do not attempt to service the product beyond that described in the user-maintenance instructions. All other servicing should be referred to qualifi ed
service personnel.
15. WARNING - Do not place objects on product power cord or place it in a position where anyone could trip over, walk on or roll anything over it. Do
not allow the product, or its bench, or its pedal board to rest on or to be installed over power cords of any type. Improper installations of this type
create the possibility of fi re hazard and/or personal injury.
16. Electromagnetic interference (RFI). This electronic product utilizes digital sampled wave processing technology (S.W.P.) that may adversely affect
radio/tv reception. Read FCC information inside back cover for additional information.
WARNING!
The illustrations and the screens of this manual are for instructional purposes only and may appear dif-
ferent from those on your instrument.
Page 3

MANUAL INDEX
MANUAL INDEX
Control Panel Page1
Styles Selection Area Page1
Display Area Page1
Sound Selection Area Page1
Connections Page2
The Headphone Jack Page2
The Aux. Out Jack Page2
The Midi In/out Page2
Summary Page3
Main Features Page3
Lower Voice Page5
The Split Point Page5
The Keyboard Function Page5
Accomp On Page5
Naming Page5
Voice L (Lower) Page5
Split Point(#f3) Page5
Voice R1/r2 Page5
Portamento Page6
Pitch Change Page6
Sustain Page6
Auto Accompaniment Page7
Using A Style (Drum Only) Page7
Select A Style Page7
Using Auto Accompaniment (All
Tracks)
Page8
A.b.c (Auto Bass Chord) Page8
Sync Start Page8
Accompaniment Section Page9
Accompaniment Operation Page10
Chord Recognize Page13
Volume Control Page14
Accomp Volume Control Page14
How To Adjust Page14
Keyboard Volume Page15
Adjust The Tempo Page15
How To Adjust Page15
Metronome Page16
One Touch Setting Page16
How To Recall A One Touch Setting Page16
Memory Page16
Select A Memory Page16
To Store A Memory Page17
Recall Your Memory Page17
Demo Page18
Song Page18
Album Page19
Function Page19
Transpose (Xpose) Page19
Tune Page19
Octave Page19
Beat Page20
Touch Page20
Split Point Page20
Portamento Time Page20
Pedal Sus Page21
Dsp On/off Page21
Reverb Type Page21
Reverb Level Page21
Chorus Type Page22
Chorus Level Page22
Local On/off Page22
Receive Page22
Transmit Page22
Default Parameters Page23
Disk Page24
Using Floppy Disks Page24
List Song Names Of Disk Page24
Playback Song Disk Page24
Disk Messages Page24
Disk Utility Page25
Play Mode Page25
Disk Format Page25
Delete Midi Page26
Delete Mem Page26
Load Midi Page27
Load Memo Page27
Disk Save Page28
Save Midi Page28
Save Mem Page28
Recording Page29
Realtime Recording Page29
Start Recording Page29
Stop Recording Page30
Auto Stop Page30
Manual Stop Page30
Playback Page30
Technical Specifi cation Page31
Appendix Page31
Page 4

Page 5
owners manual
ps1600
Page1
ALBUM
STYLE
ABC
SPLIT
DUAL
PORTA
TOUCH
SUSTAIN
MELODY OFF
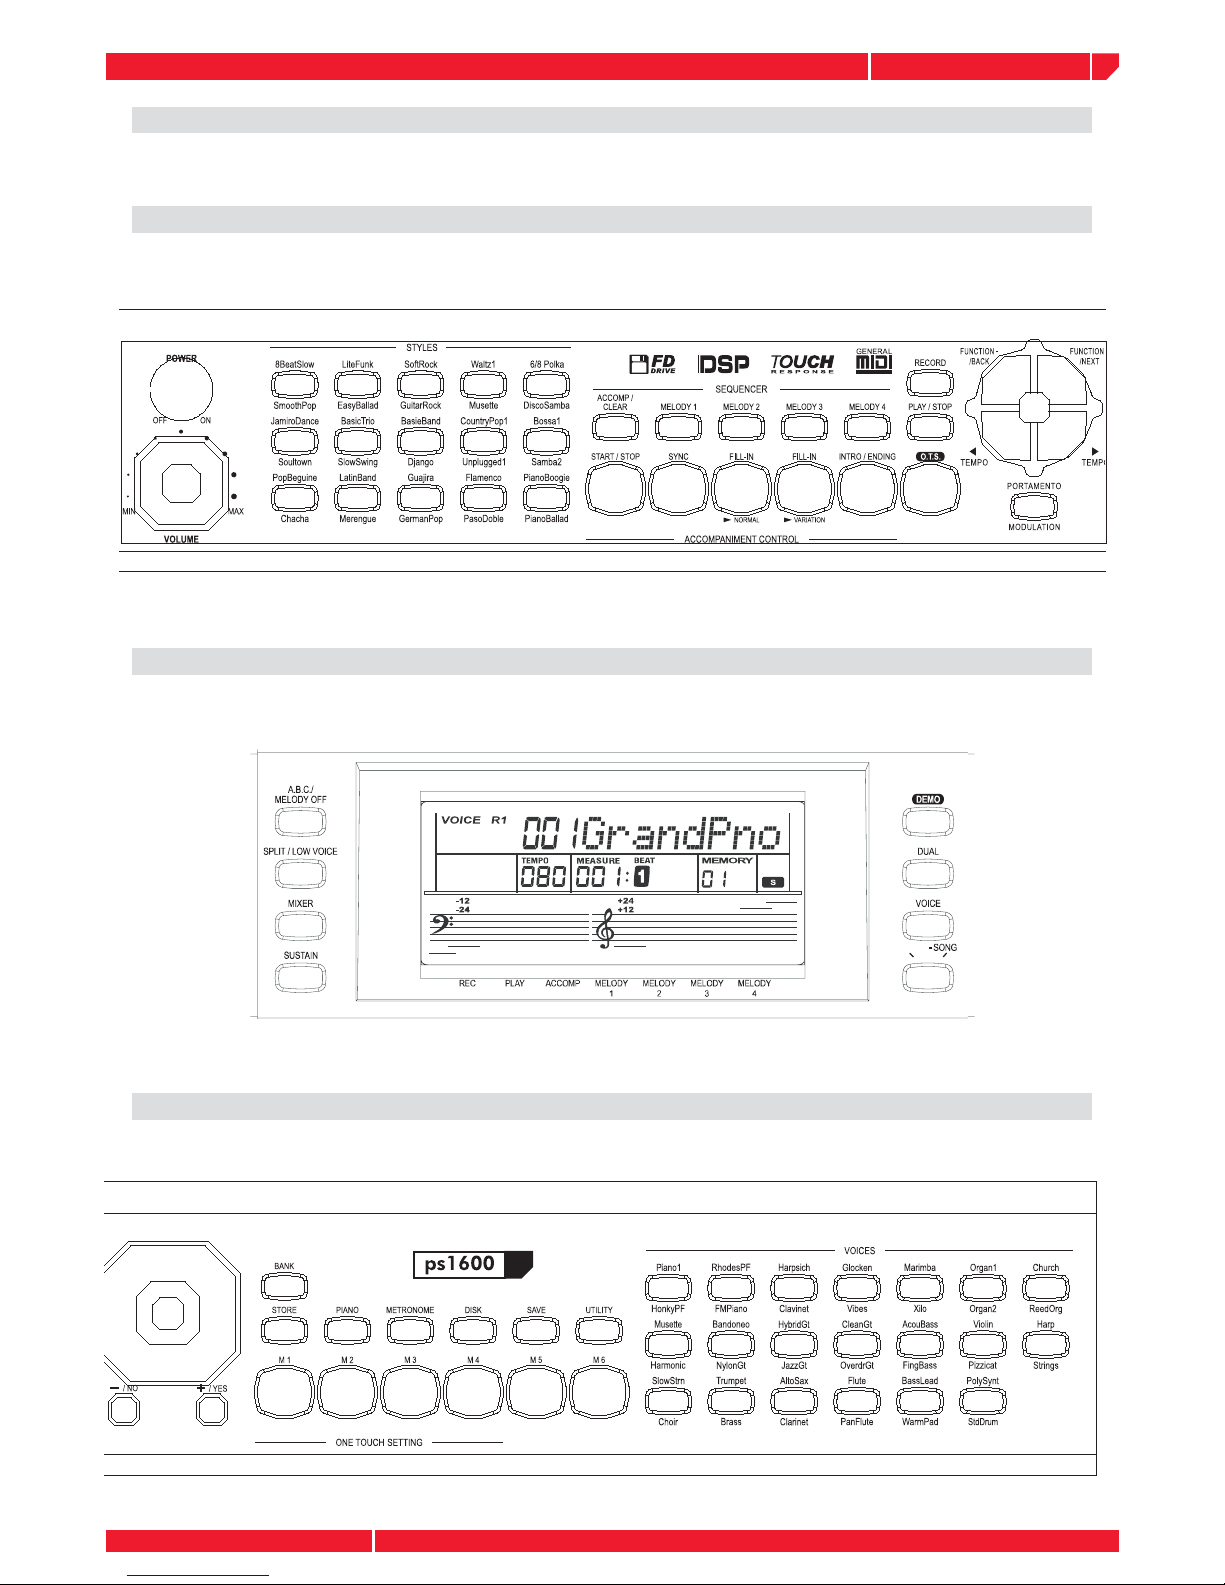
CONTROL PANEL
STYLES SELECTION AREA
DISPLAY AREA
SOUND SELECTION AREA
Page 6
owners manual
ps1600
Page2
PEDALS
MIDI OUTMIDI IN
AUX
OUT
AUX
OUT
MIDI OUTMIDIIN
PEDALS
MIDI OUTMIDI IN
AUX
OUT
AUX
OUT
Stereo
System
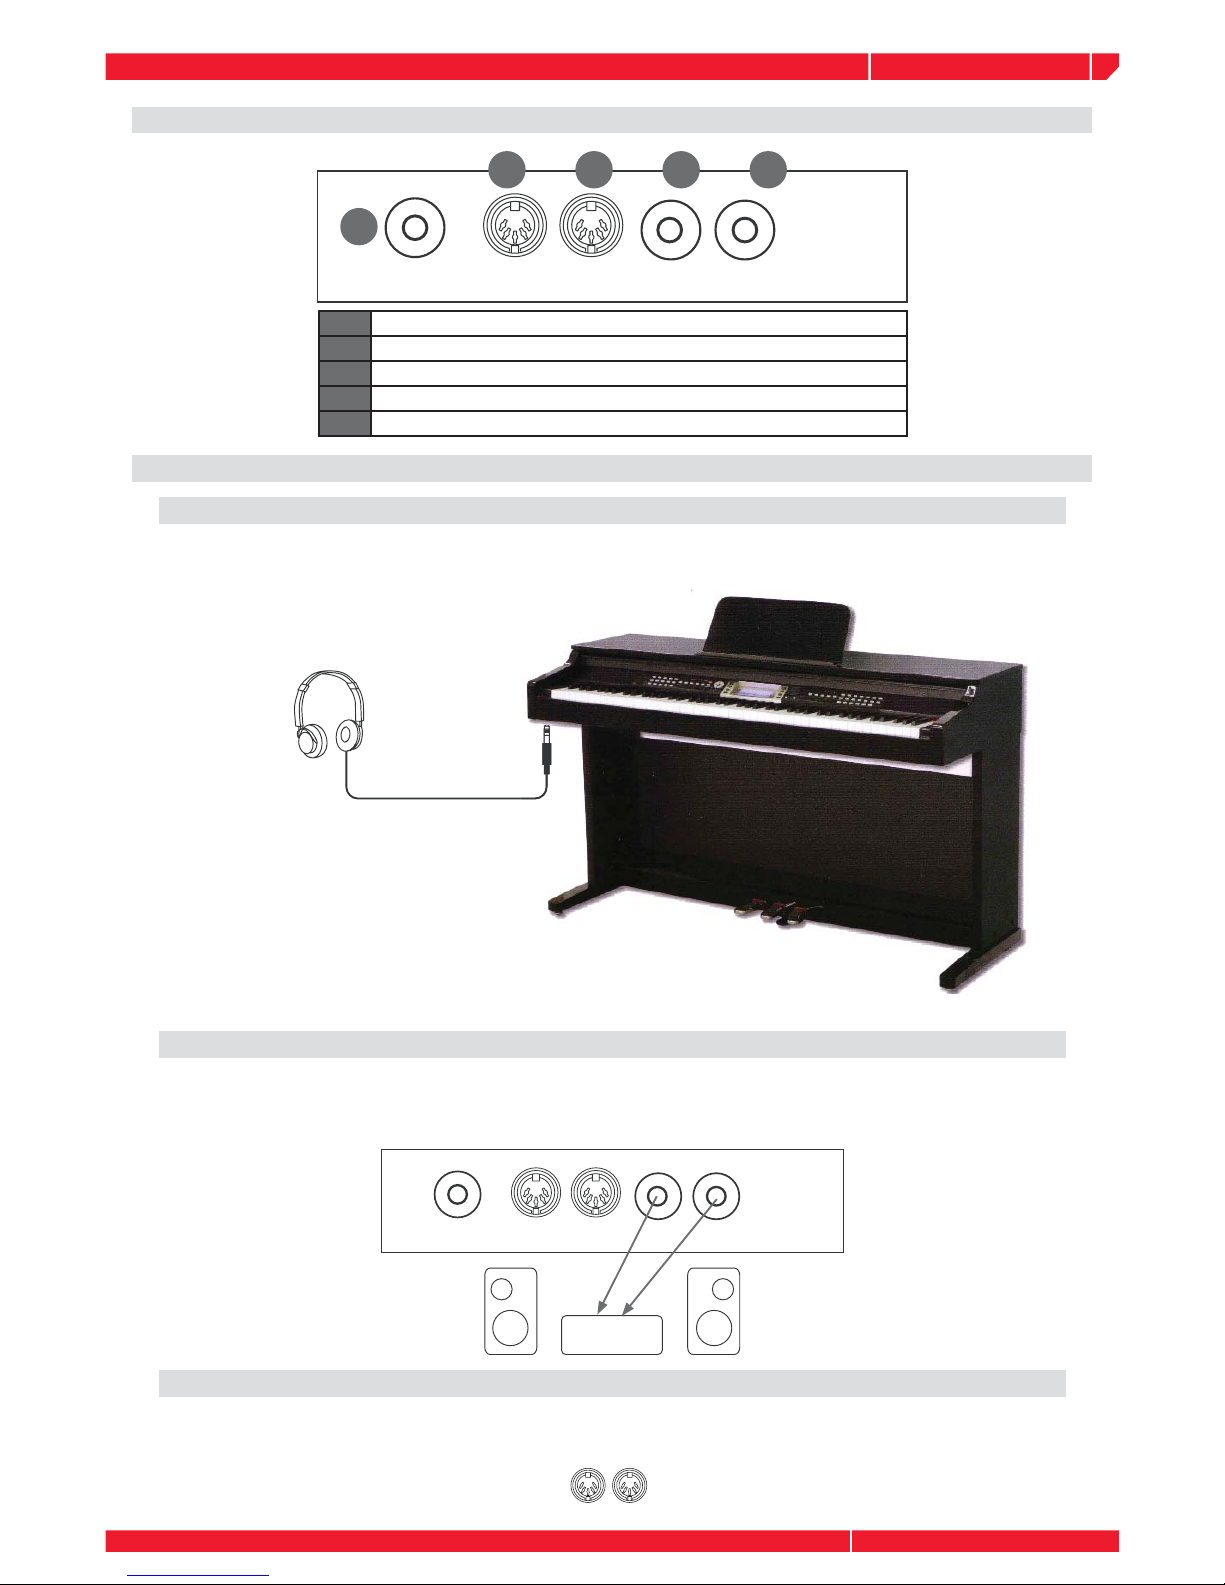
1 PIANO PEDALS CONNECTION (DAMPER SOFT SOSTENUTO)
2 MIDI IN
3 MIDI OUT
4 AUX OUT 1
5 AUX OUT 2
1
2 3 4 5
A pair of stereo headphones can be plugged into the PHONES jack for private practice or late
night playing. The internal speaker system is automatically turn off when the headphones is
plugged into the PHONES jack.
CONNECTIONS
THE HEADPHONE JACK
The AUX. OUT jack delivers the output of the keyboard for connection to an external amplifi er.
Using an audio cord, plug into AUX. OUT jack located on the rear panel. Then plug the other
end of the cord into LINE IN or AUX. IN of the amplifi er.
THE AUX. OUT JACK
The MIDI IN connector receives MIDI data from an external MIDI device. The MIDI OUT connector
transmit MIDI data generated by the electronic keyboard to an external MIDI device.
THE MIDI IN/OUT
REAR PANEL
Page 7

owners manual
ps1600
Page3
• 88 -Note weighted keyboard performance action - 3 levels of touch
• Multi-functional LCD which can display music notes.
• Use the +/- buttons or the DIAL to select voice, style or song.
• Function feature that include transpose, tune, octave, split point, pedal select, touch,
DSP, MIDI etc.
• 178 high quality voices, including 128 GM Voices •
• 100 auto accompaniment styles (96 orchestral + 4 Piano styles)
• 5 demo songs.
• 50 songs that also offer the "melody off" feature.
• 92 albums that provide easy classic listening music.
• 8 banks with 6 memories each .
• Both Single fi nger and fi ngered auto chord options.
• Recorder with 5 tracks--1 accomp track and 4 melody tracks.
• Pitch bend wheel with 12 level pitch bend sensitivity.
• Portamento and Modulation, 4 level portamento sensitivity.
• Mixer function including the volume adjustment of Voice R1, Voice R2, Voice L, Drum,
Bass, Chord1, Chord2, Chord3, Accomp.
• Pedal selection function including sustain, soft, accomp start, tempo tap, and memory
select.
• DSP function with editable Reverb type and level, Chorus type and its level.
• MIDI IN and MIDI OUT function.
• Dual, Lower voice, Sustain, Piano, O.T.S. (One Touch Setting) etc.
• Floppy disk drive allows you to play standard midi fi les (format 0/1), and save in
midi fi les format.
SUMMARY
• The ps1600 is a sophisticated yet easy to use digital piano. It has up to 178 voices,
100 styles (96 orchestral + 4 Piano styles), 5 demos, 92 albums and 50 songs.
• The ps1600 features a total of 178 high quality voices, including a stunning Grand Piano, a
multi- functional LCD which can display the music staff, along with other powerful features.
• The ps1600 features a fl oppy disk drive that allows you to play standard midi fi les (format 0,
format 1),
and saves midi fi les from recorded data.
• The elegant design and optional cabinet fi nishes makes the ps1600 a joy to own and play!
MAIN FEATURES
Page 8
owners manual
ps1600
Page4
ABC
SPLIT
DUAL
PORTA
TOUCH
SUSTAIN
MELODY OFF
ALBUM
STYLE
ABC
SPLIT
DUAL
PORTA
TOUCH
SUSTAIN
MELODY OFF
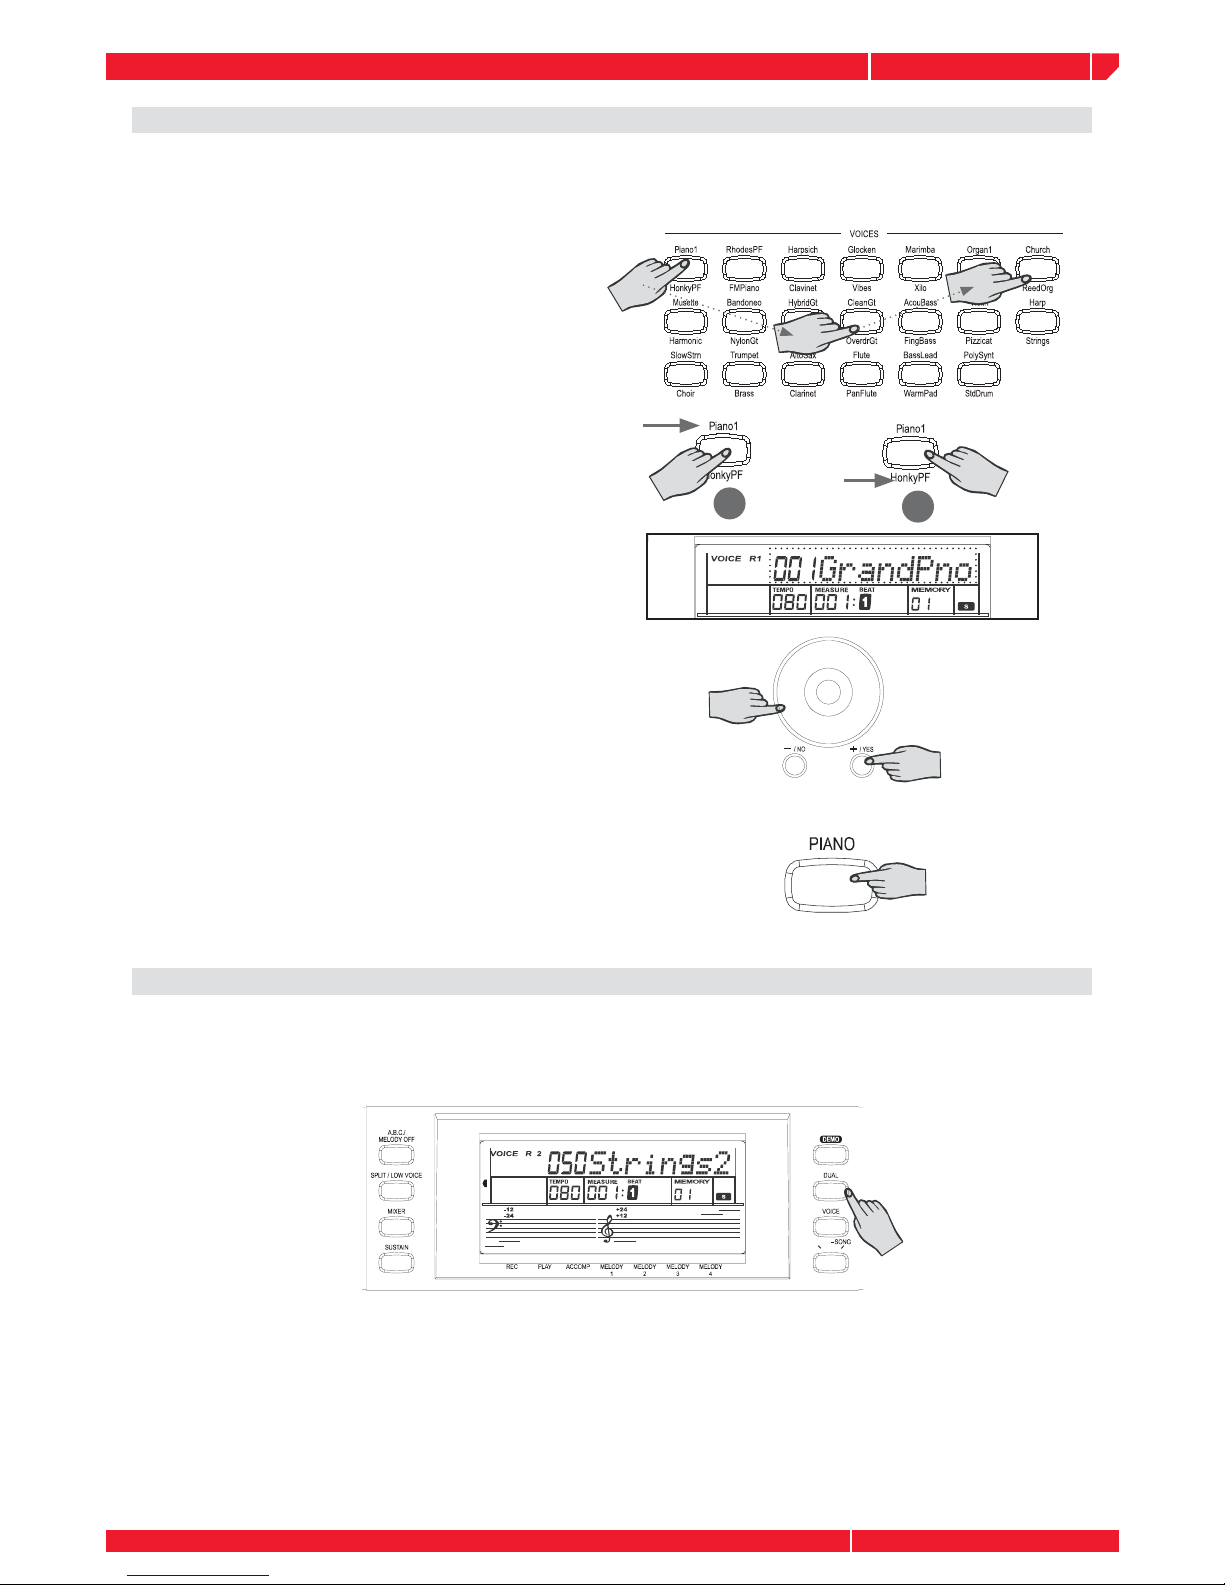
VOICES SELECTION
The voice mode features 178 authentic VOICES, including 128 General MIDI compatible sounds.
See APPENDIX VOICE LIST). The PS1600 allows you to easiely recall the VOICE in DIRECT mode
selection. The DIRECT SELECT mode uses the dedicated buttons in the right side area of the piano
for fast acess.
Press the [+/YES]/[-/NO] buttons o the DIAL to select the DUAL voice number. The default dual voice
number is No. 50: Strings2. Press the button DUAL again to turn off the DUAL VOICE mode.
Press any VOICE button to select the associated
sound
The recalled VOICE will sound across the entire
keyboard
Each VOICE button can select two different associated VOICES, for example the GPIANO1/HONKY
button. Pressing the button a fi rst time you'll get
the GPIANO1 VOICE, pressing the button again
you'll select the HONKY voice. The same result is
obtained for all the other buttons.
1
2
The display will show you the name and the number of the selected VOICE. You can consult the
complete VOICE list in the APPENDIX.
Selecting any of the VOICE buttons you directly
recall a VOICE tone (Gpiano, Epiano, Harpsi
etc.). Once you have recalled any VOICE by
pressing the associated button you can change
the selection by rotating the DIAL or using the
+/- buttons.
DUAL VOICE MODE
This mode allows you to play two VOICES (VOICE R1 + VOICE R2) at the same time for a layered
effect. Press the DUAL button key to turn the DUAL VOICE mode ON. the “ VOICE R2” and dual
fl ag are both illuminated. The dual voice name is also displayed on the LCD.
Pressing the PIANO button you’ll restore the PIANO sound from any previous VOICE selection.
Page 9
owners manual
ps1600
Page5
ALBUM
STYLE
ABC
SPLIT
DUAL
PORTA
TOUCH
SUSTAIN
MELODY OFF
SHIFT
DE
L
E
TE
BDE
GIKLNPQSUWXZ124689#%&( -@{ -
AC FH
J
MO RTV Y 0 3571
$
,
)
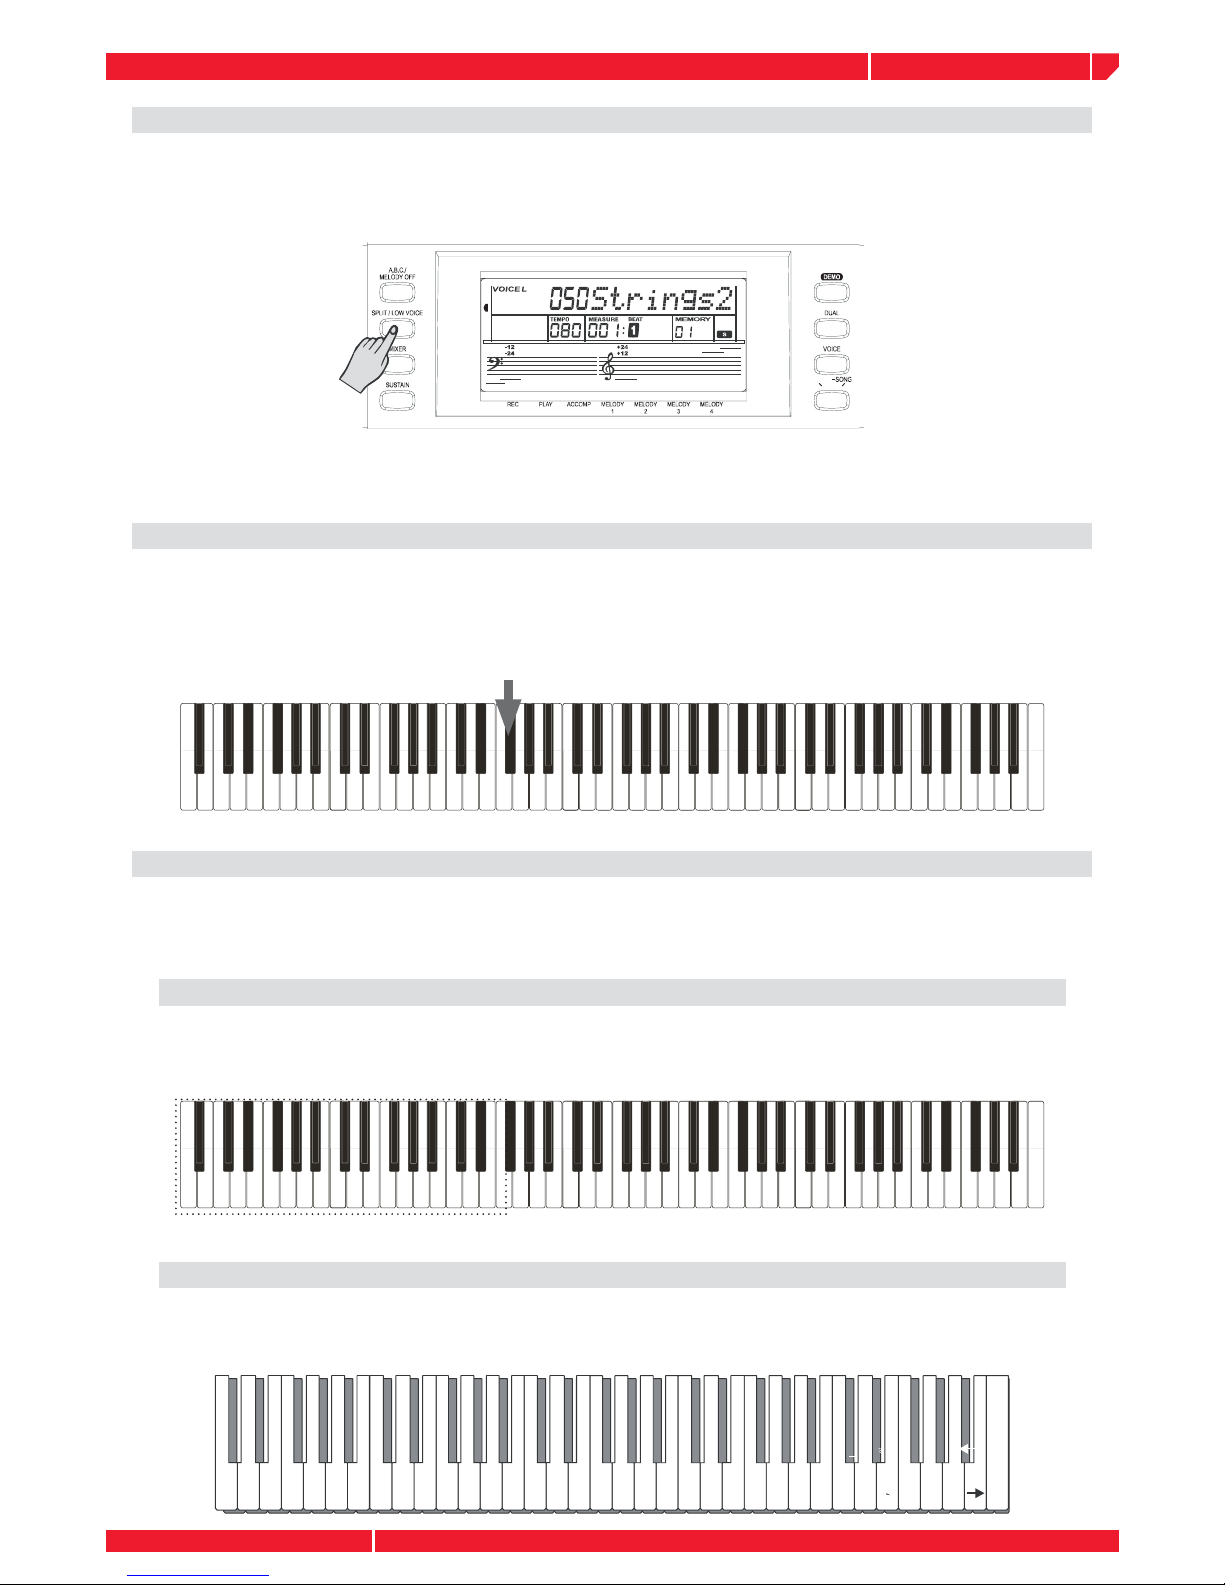
LOWER VOICE
This function allows to SPLIT the ps1600 keyboard in two parts: left and right area.
Press the SPLIT/LOW VOICE button to enable the LOWER VOICE. The LCD lights the lower voice
fl ag and displays “VOICE L” and the relative lower voice name.
Press the SPLIT/LOW VOICE button, or use the wheel or the keypad to select the lower voice
number. The default lower voice number is No. 50: Strings2. Press the button again to disable
the lower voice.
THE SPLIT POINT
In the SPLIT Voice mode, you can assign two different Voices to the keyboard sections, and play
one Voice with your left hand while your right hand plays another. The note F#3 is the default split
point. Any note may be set as the split point and stored in memory. (See function: SPLIT POINT
SELECT).
THE KEYBOARD FUNCTION
The keyboard not only plays three VOICES section (VOICE R1-R2-LOWER) at the same time,
but also has other necessary functions.
ACCOMP ON
The left area below the split point is the chord area by pressing the “A.B.C” button. The bass
and the chord voice will sound when playing the chord.
SPLIT POINT(#F3)
VOICE R1/R2VOICE L (LOWER)
NAMING
When you save a midi fi le, you can name this fi le with the keyboard. (See the following)
Page 10
owners manual
ps1600
Page6
FUNCTION
+
FUNCTION
-
ALBUM
STYLE
ABC
SPLIT
DUAL
PORTA
TOUCH
SUSTAIN
MELODY OFF
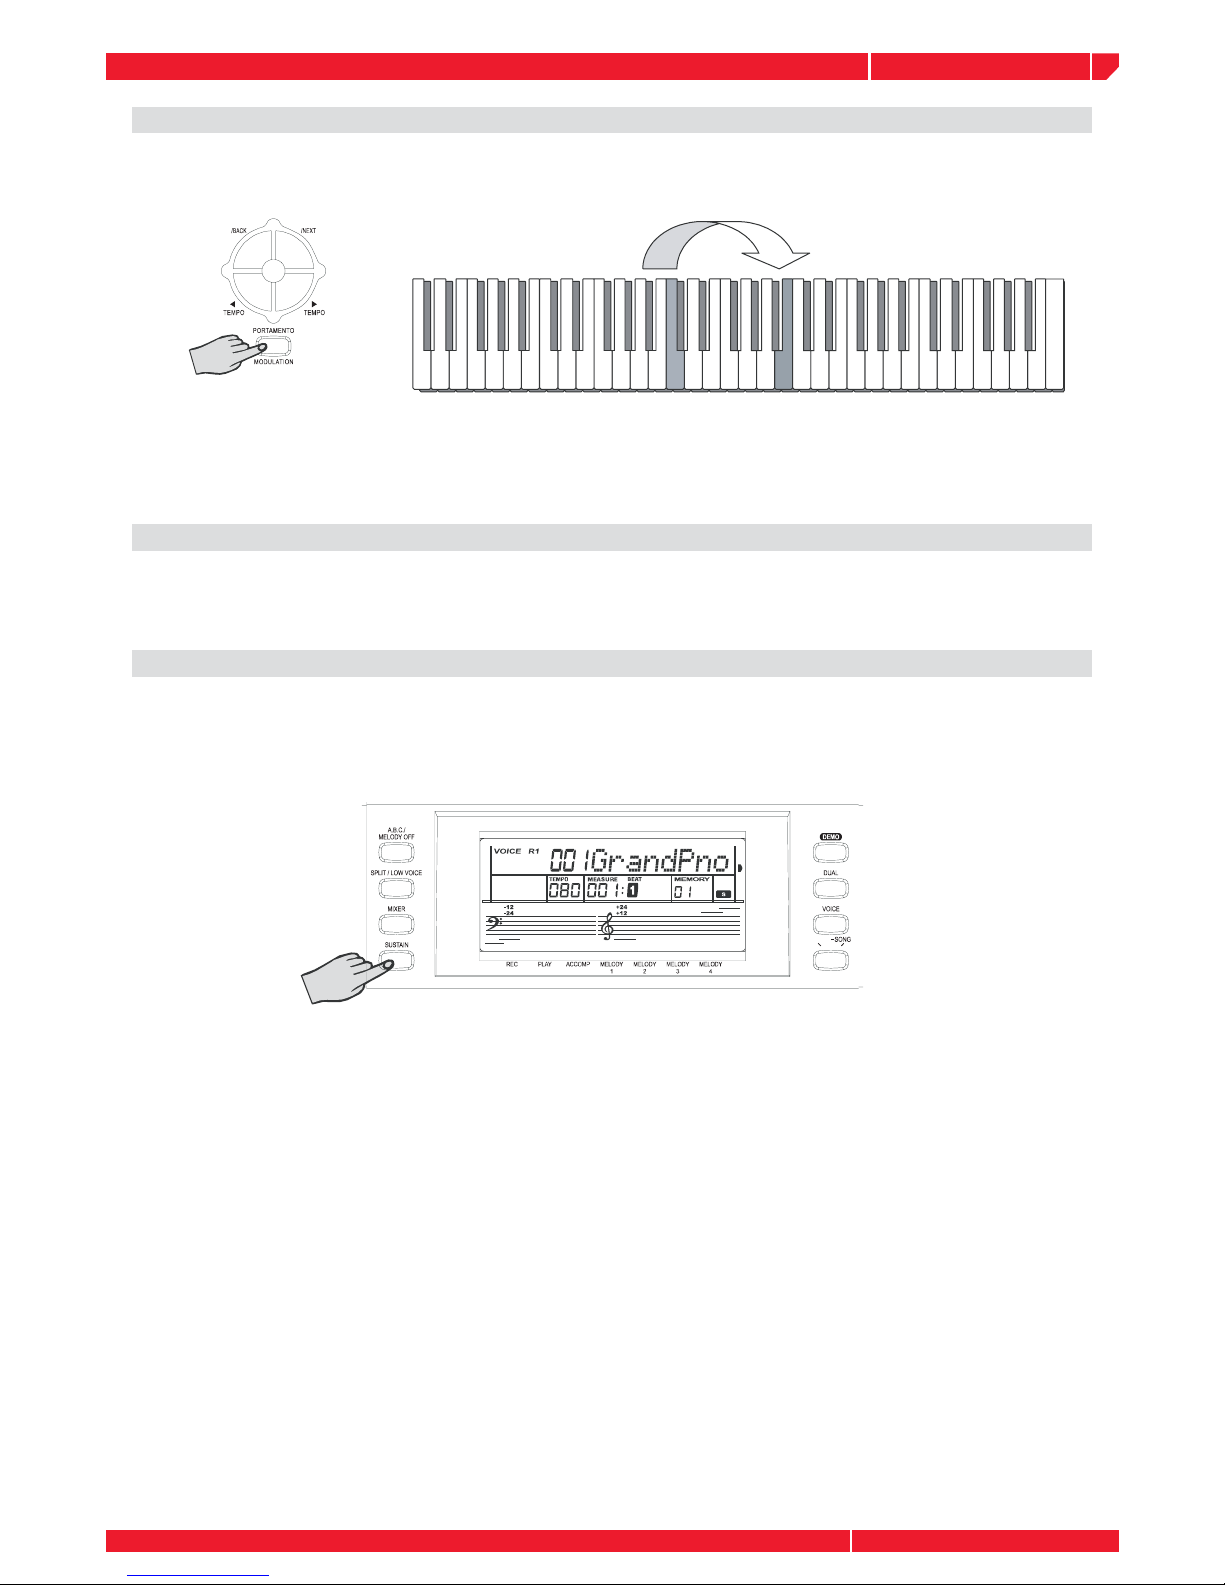
PORTAMENTO
To have portamento effect,press and hold [PORTAMENTO] button and play the keyboard.
There are four types of portamento time (0-3). The default time setting is 2. (You can modify the
portamento time with FUNCTION menu). Holding down the [PORTAMENTO] button before playing the keyboard. The note will have modulation effect.
PITCH CHANGE
You can also adjust the tuning, octave , and change the transposition (key) of the entire sound
with the Transpose and Tuning, Octave functions. (see FUNCTION menu ).
SUSTAIN
Press the [SUSTAIN] button to enable the SUSTAIN effect (the SUSTAIN icon will appear on the
display). All played notes on the keyboard will have a sustained effect. To turn off the SUSTAIN
effect, press the [SUSTAIN] button again.
Page 11
owners manual
ps1600
Page7
1 2
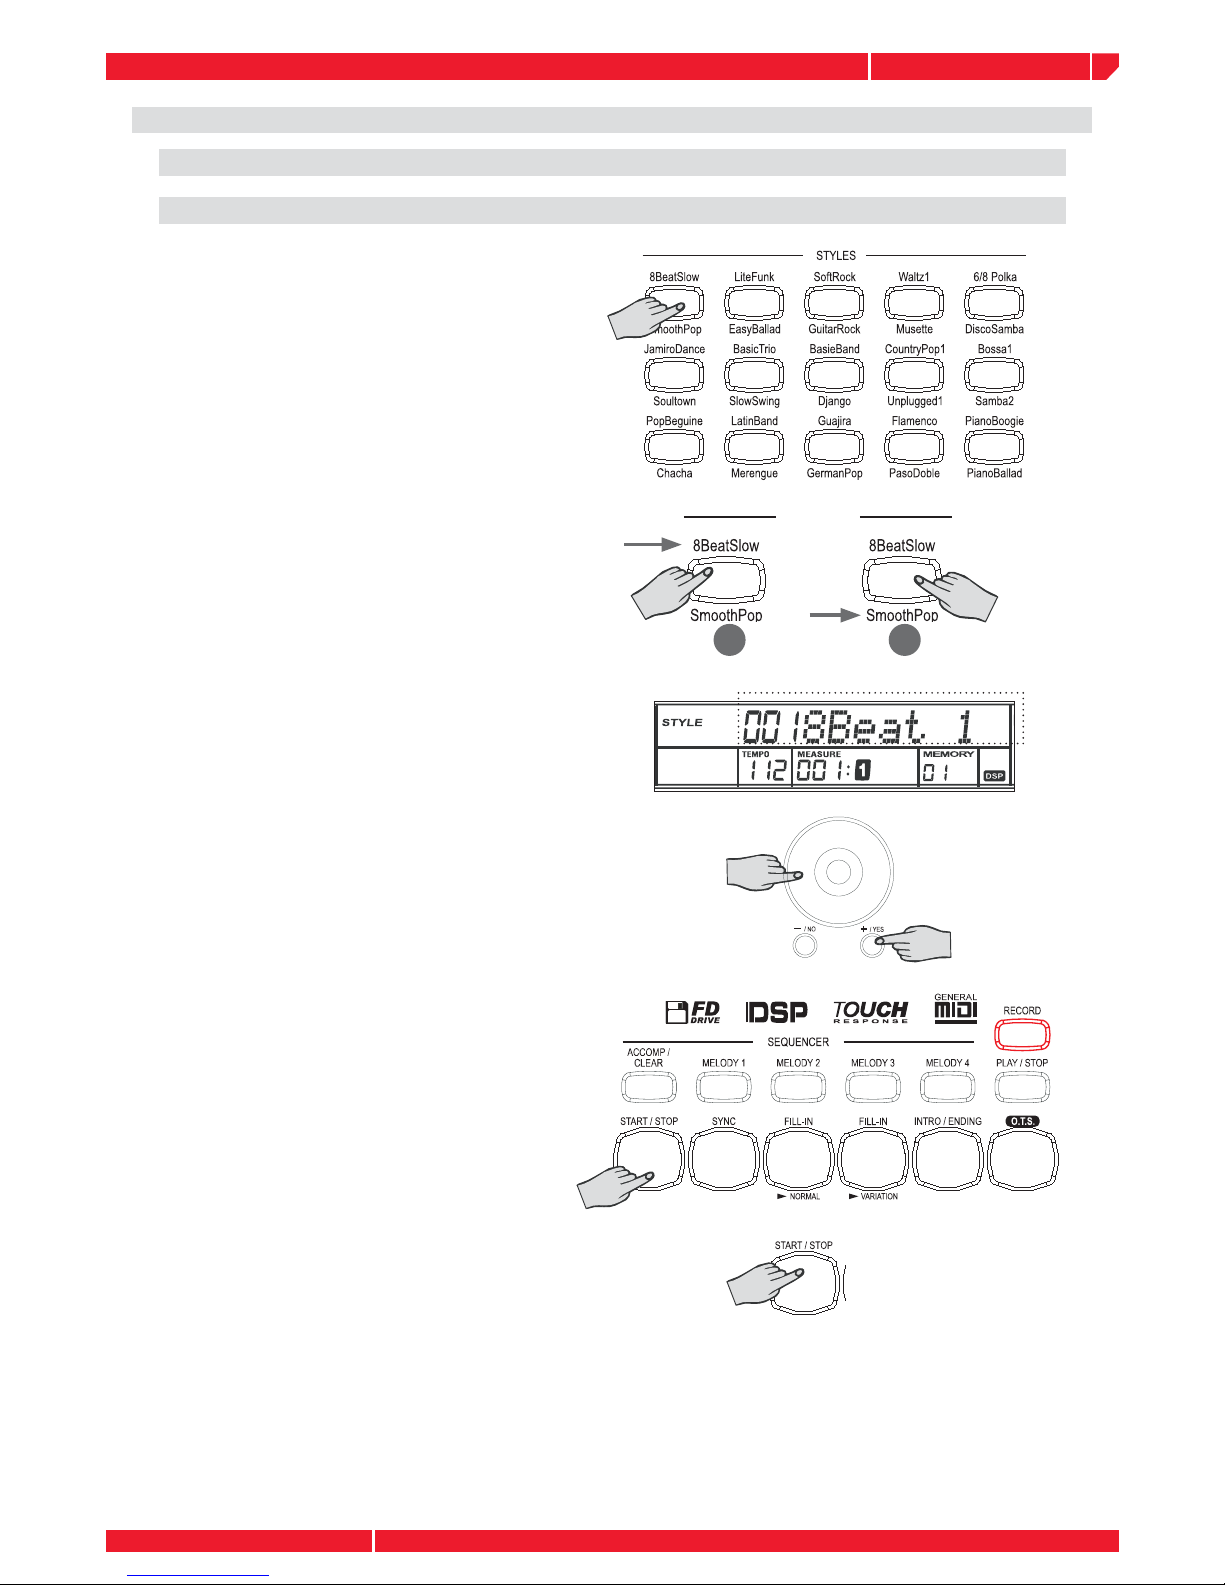
AUTO ACCOMPANIMENT
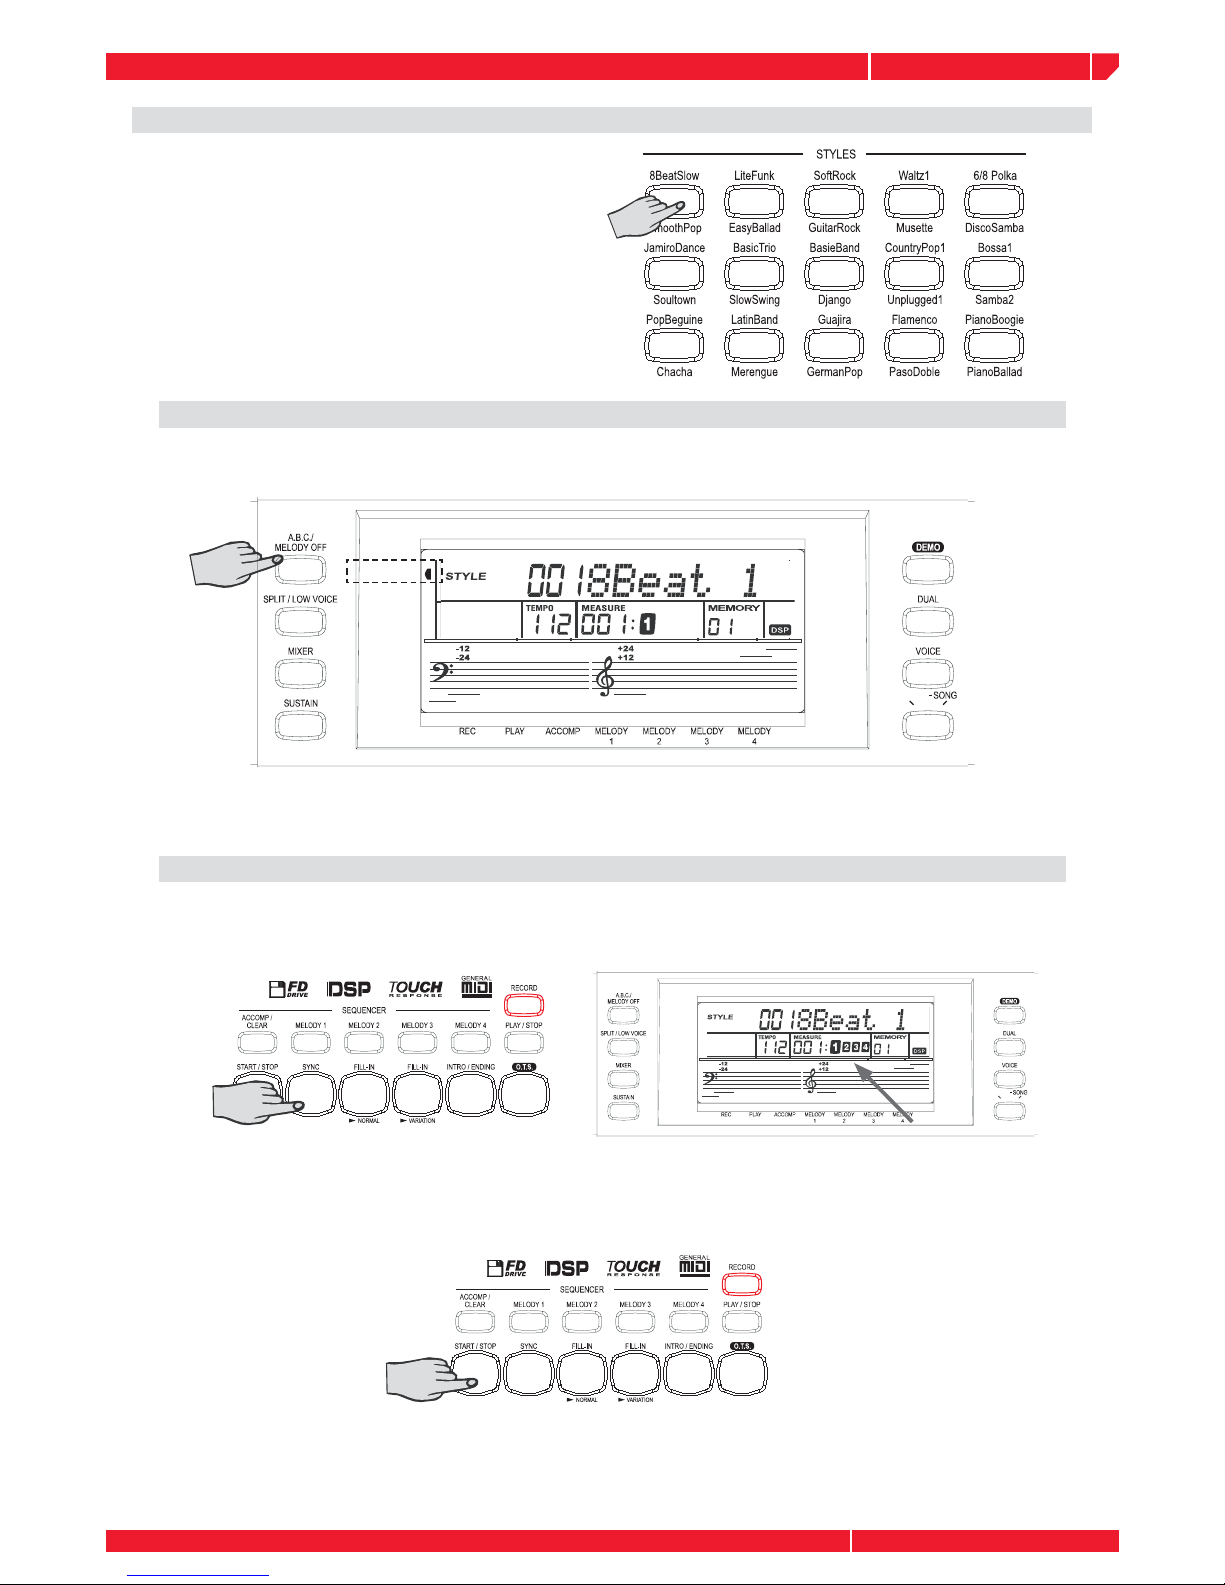
USING A STYLE (DRUM ONLY)
Press any of the STYLE buttons to recall the
associated STYLE
Press the [START/STOP] button to start playing the style (only drum).
Press the [START/STOP] button again to stop
playing the style.
SELECT A STYLE
As already explained for the VOICES, each button can select two different associated STYLES.
For example, pressing the 8BEAT SLOW button
the fi rst time you'll get the 8BEAT SLOW STYLE,
pressing this again you'll select the SMOOTH
POP STYLE.
The same is for all other style buttons.
The display will show you the name and the
number of the selected STYLE. You can consult
the complete STYLE list in the APPENDIX.
Once you have recalled any STYLE by pressing the associated button you can change the
selection by rotating the DIAL or using the
+/- buttons.
Page 12
owners manual
ps1600
Page8
ALBUM
STYLE
ABC
SPLIT
DUAL
PORTA
TOUCH
SUSTAIN
MELODY OFF
Any notes played on the left side of keyboard can be recognized as a chord. The recognized
chord name will be shown on the display.
ALBUM
STYLE
ABC
SPLIT
DUAL
PORTA
TOUCH
SUSTAIN
MELODY OFF
fl ash
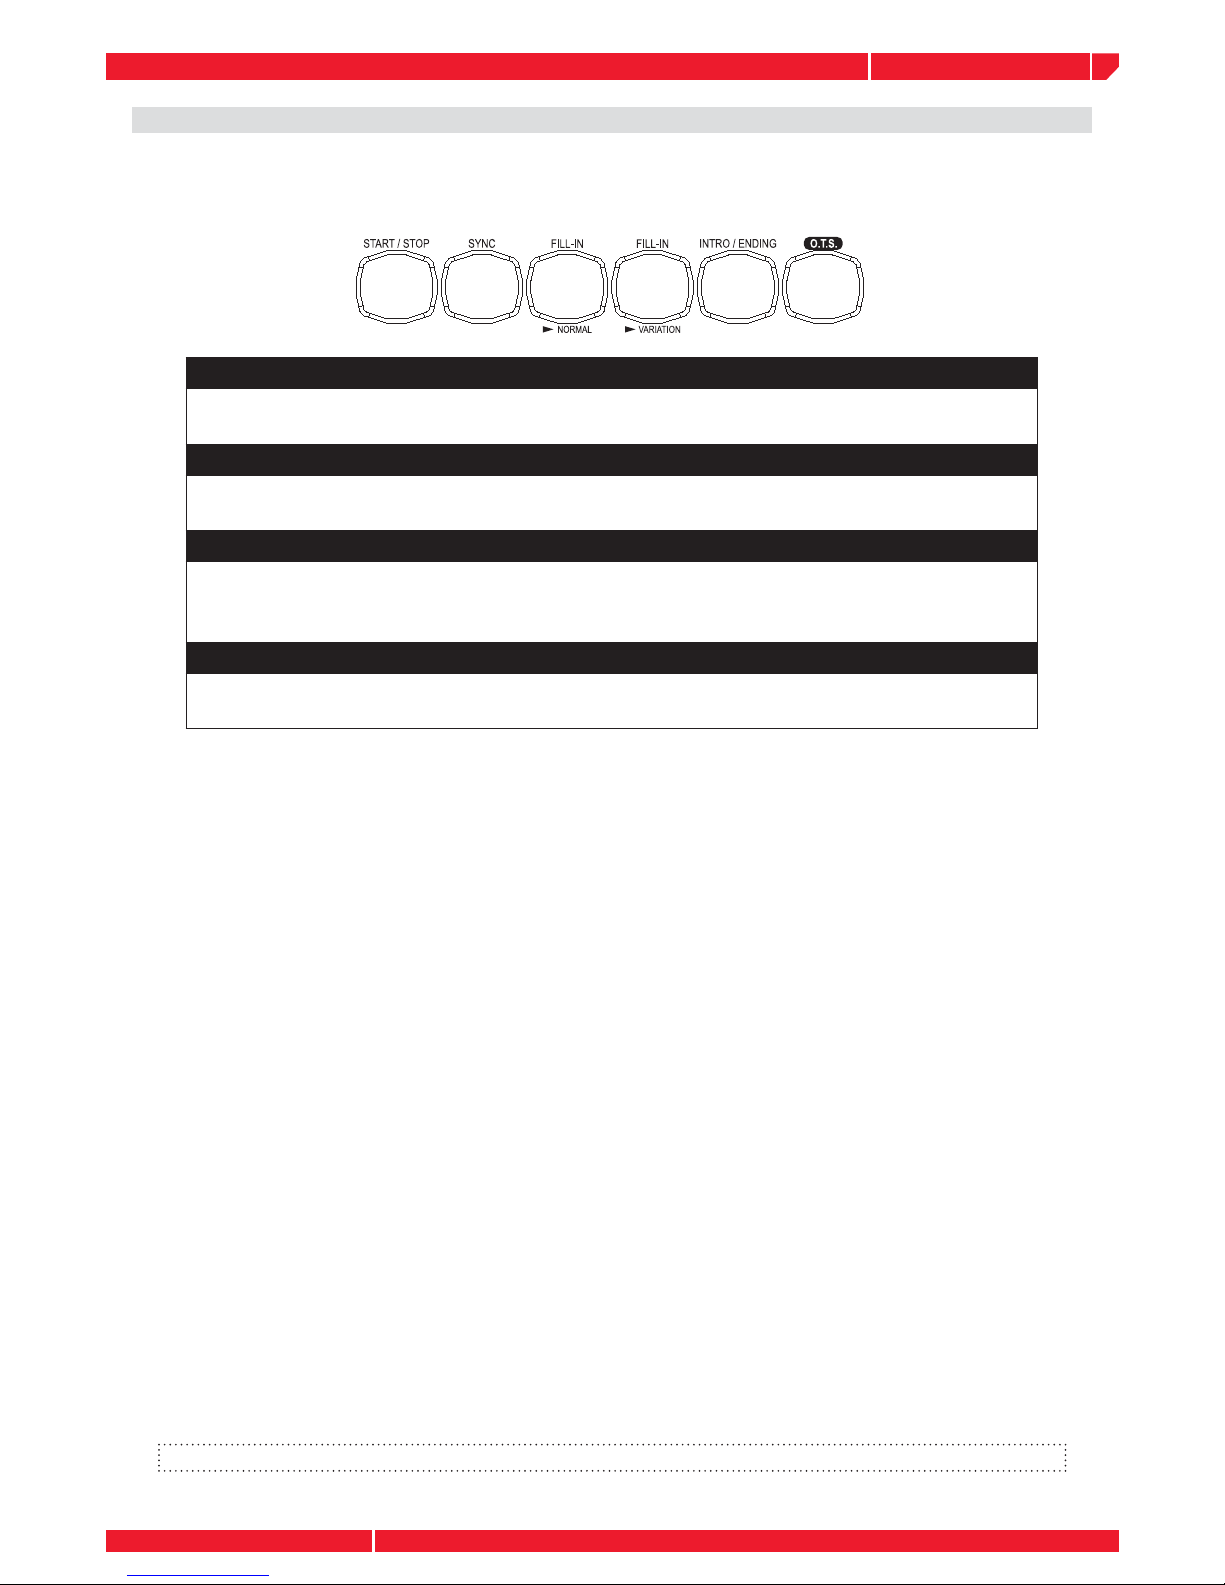
USING AUTO ACCOMPANIMENT (ALL TRACKS)
Select a STYLE
Press the [ABC MELODY/OFF] button after selecting the style.
A.B.C (AUTO BASS CHORD)
Press the SYNC button. The Beat display will fl ash at the current tempo when a synchronized
start mode has been selected.
SYNC START
The accompaniment style will start to play after playing on the keyboard.
Press the [START/STOP] button to stop playing the style.
Page 13
owners manual
ps1600
Page9
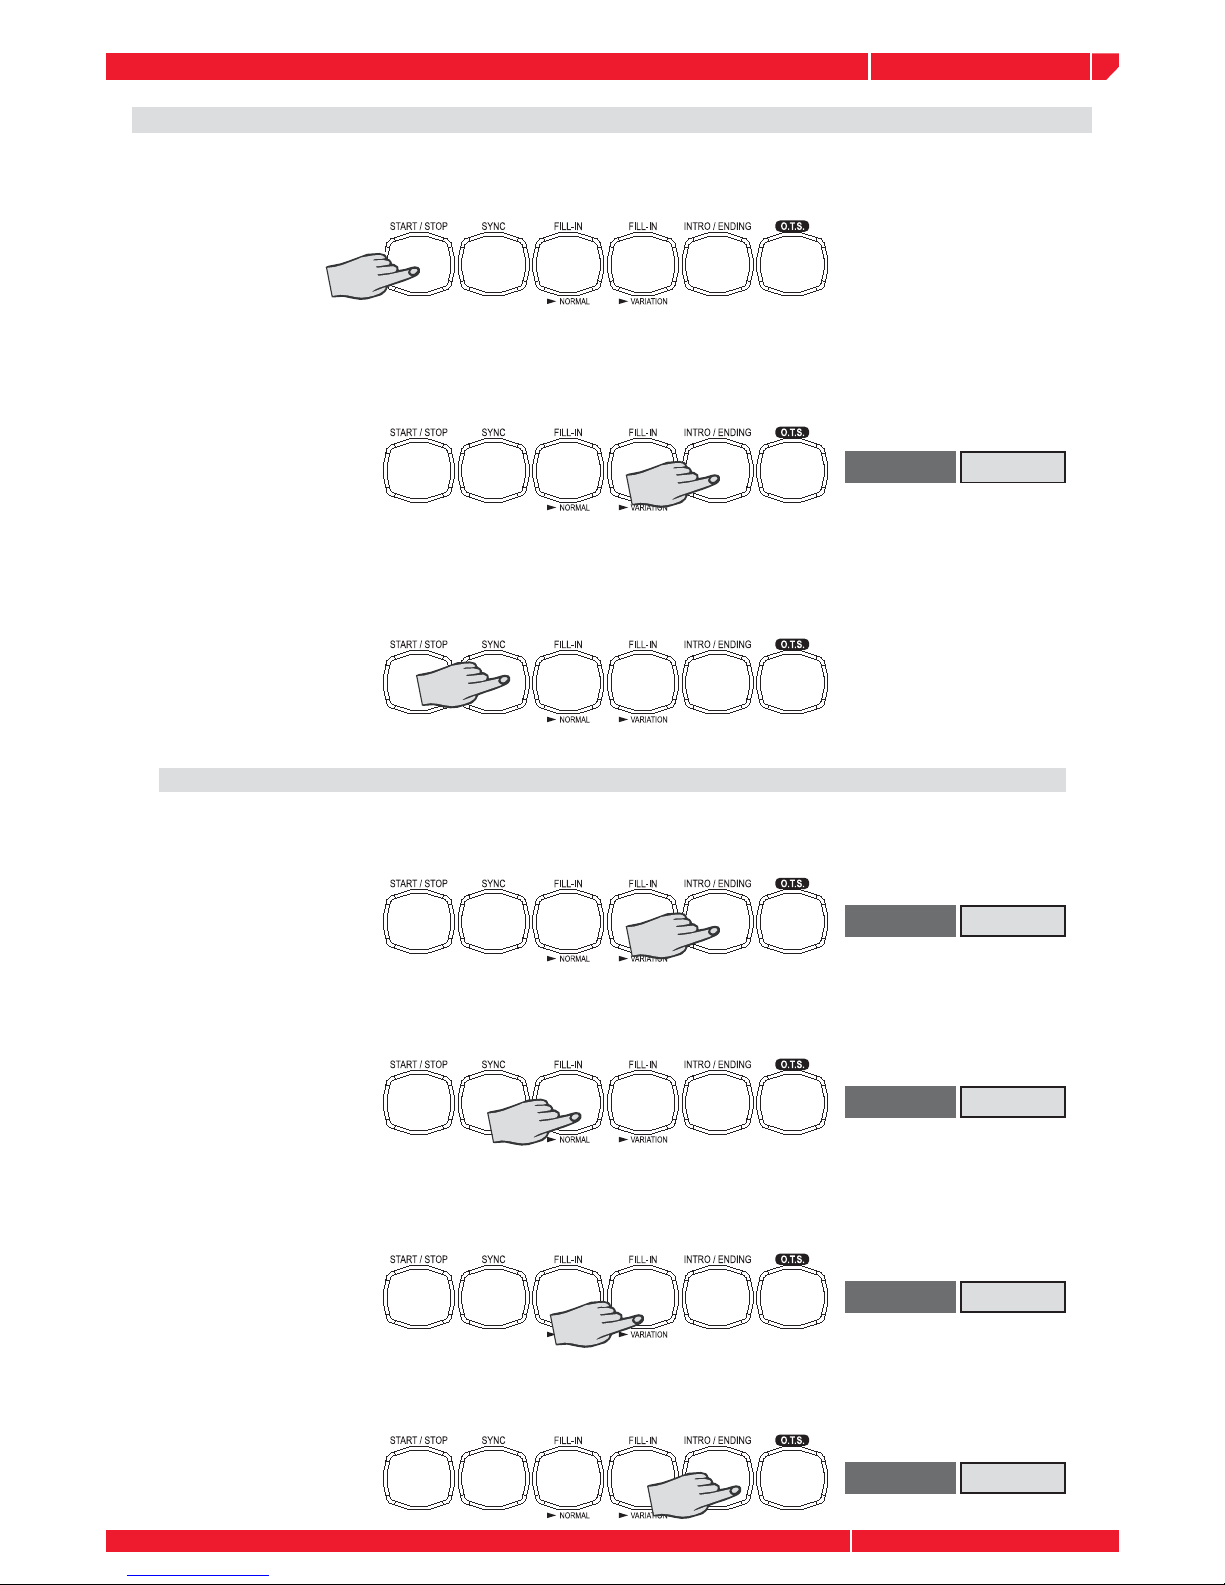
ACCOMPANIMENT SECTION
INTRO
Press the button before you start playing to select an intro section. The intro section [INTRO]
is followed by the main section.
NORMAL and VARIATION
There are two main sections, normal and variation. It has its own two or four measure
section.
FILL A and FILL B
While the accompaniment is playing, you can add fi ll in the rhythm/accompaniment by
pressing the [FILL A] or [FILL B] button. This automatically plays the fi ll section, and smoothly
leads into the next section-even if it is the same section.
ENDING
When you press the [ENDING] button, the piano plays the ending section appropriate for
the style
Accompaniment consists of INTRO, NORMAL (*), VARIATION, FILL A, FILL B, ENDING. Using different sections based on the structure of songs enable you to create a full and professionally
arranged song.
(*) Note: Styles -MAIN- or NORMAL sections are the same
Page 14
owners manual
ps1600
Page10
INTRO
DISPLAY
INTRO
DISPLAY
FILL A
DISPLAY
FILL B
DISPLAY
ENDING
DISPLAY
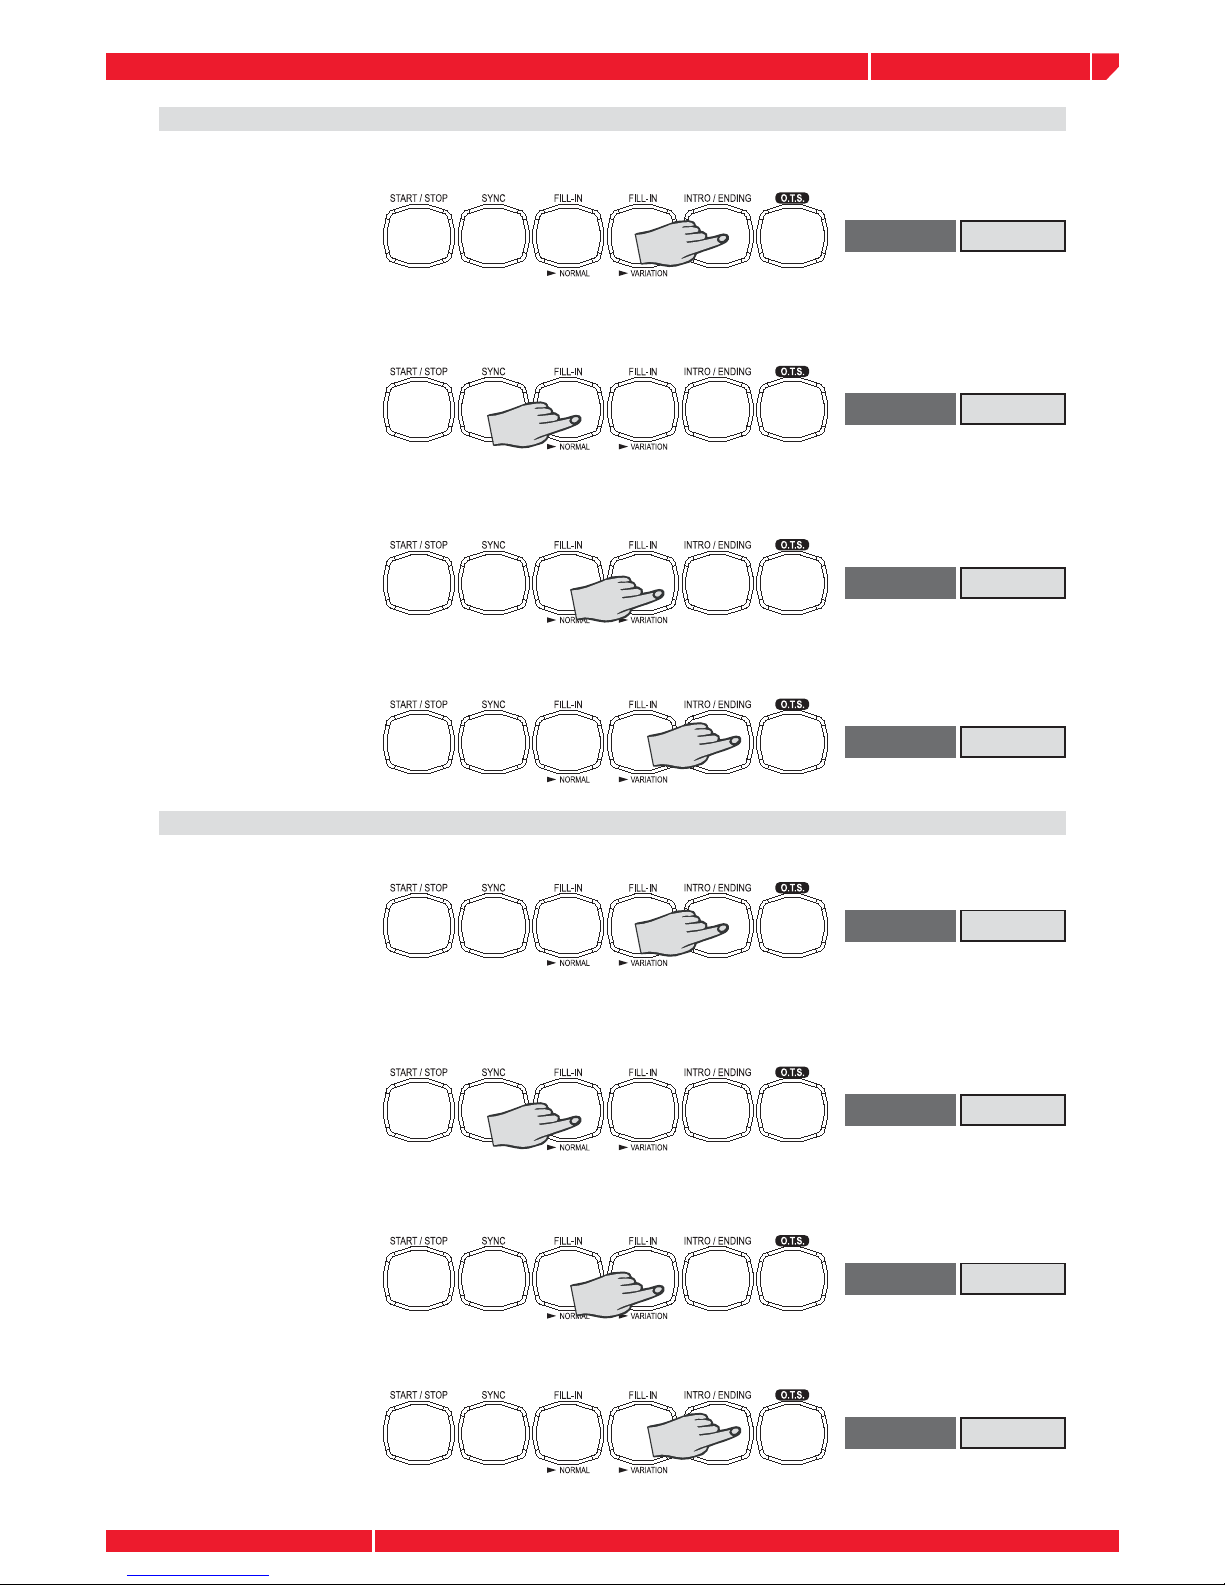
ACCOMPANIMENT OPERATION
Select a style and Start the accompaniment. The style will start immediately, by pressing the
START/STOP button, the Drum track will start playing without bass and chord accompaniment.
To start with an intro section: Press the INTRO button to actually start the intro section and
accompaniment. Once the intro section fi nishs, the selected main section is currently playing.
Sync Start: Press the SYNC button, The Beat display will fl ash at the current tempo. To start the
main section and accompaniment ,play any keys on the keyboard. (When A.B.C is turned on, play
a key or chord on the auto accompaniment section of the keyboard).
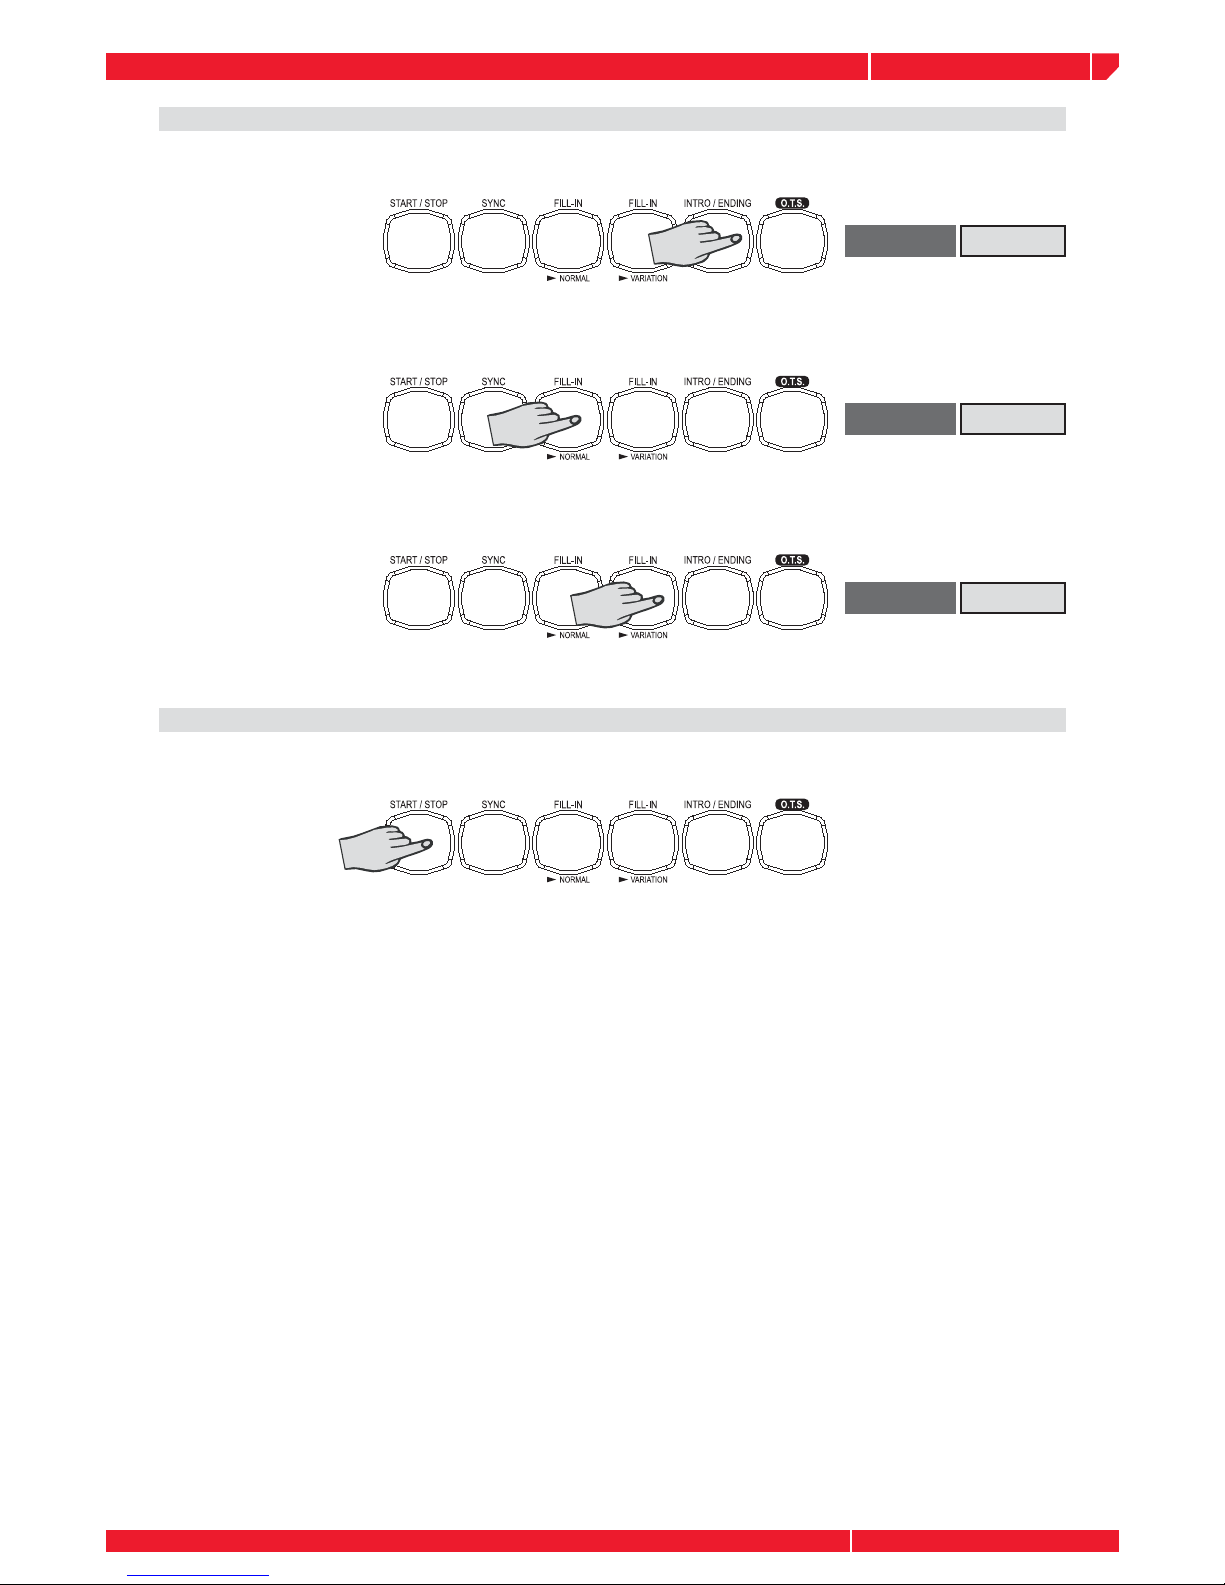
Playing the intro section, the display will fl ash INTRO
Pressing the INTRO button, the intro will begin from the fi rst beat of the next measure.
Press the FILL A button, the fi ll A will begin immediately and smoothly lead into the normal.
Press the FILL B button, the fi ll B will begin immediately and smoothly lead into the VARIATION.
The LED will light up above the button.
Press the ENDING button, the ending will begin from the fi rst beat of the next measure.
Page 15
owners manual
ps1600
Page11
INTRO
DISPLAY
FILL A
DISPLAY
FILL B
DISPLAY
ENDING
DISPLAY
INTRO
DISPLAY
FILL A
DISPLAY
FILL B
DISPLAY
ENDING
DISPLAY
Playing the Main (normal/variation) section, the display will show MAIN
Press the INTRO button, the intro will begin from the fi rst beat of the next measure.
Press the FILL A button, the fi ll A will begin immediately and smoothly lead into the
normal.
Press the button FILL B, the fi ll B will begin immediately and smoothly lead into the
VARIATION.
Press the ENDING button, the ending will begin from the fi rst beat of the next measure.
Playing the FILL section, the display will show FILL
Press the INTRO button, the intro will start from the fi rst beat of the next measure.
In FILL B section, press the FILL A button and the fi ll A will begin immediately and smoothly
lead into the normal.
In FILL A section, press the FILL B button and the fi ll B will begin immediately and smoothly
lead into the normal.
Press the ENDING button, the ending will begin from the fi rst beat of the next measure.
Note: holding down the [FILL A] or [FILL B] button, ps1600 will play the fi ll section all along.
Page 16
owners manual
ps1600
Page12
FILL A
DISPLAY
FILL B
DISPLAY
ENDING
DISPLAY
Playing the ENDING section, the display will show ENDING
Press the INTRO button, the intro will begin from the fi rst beat of the next measure.
Press the FILL A button, the fi ll A will begin immediately and smoothly lead into the normal.
Press the FILL B button, the fi ll B will begin immediately and smoothly lead into the VARIATION.
It is no effect by pressing the ENDING button.
Stop playing the style.
The accompaniment can be stopped at any time by pressing the [START/STOP] button.
Press the [ENDING] button if you want to go to the ending section and then stop. The ending
section will begin from the top of the next measure.
SYNC STOP: press the SYNC button, stop playing, and the synchronized start mode has
been selected.
Page 17
owners manual
ps1600
Page13
split point
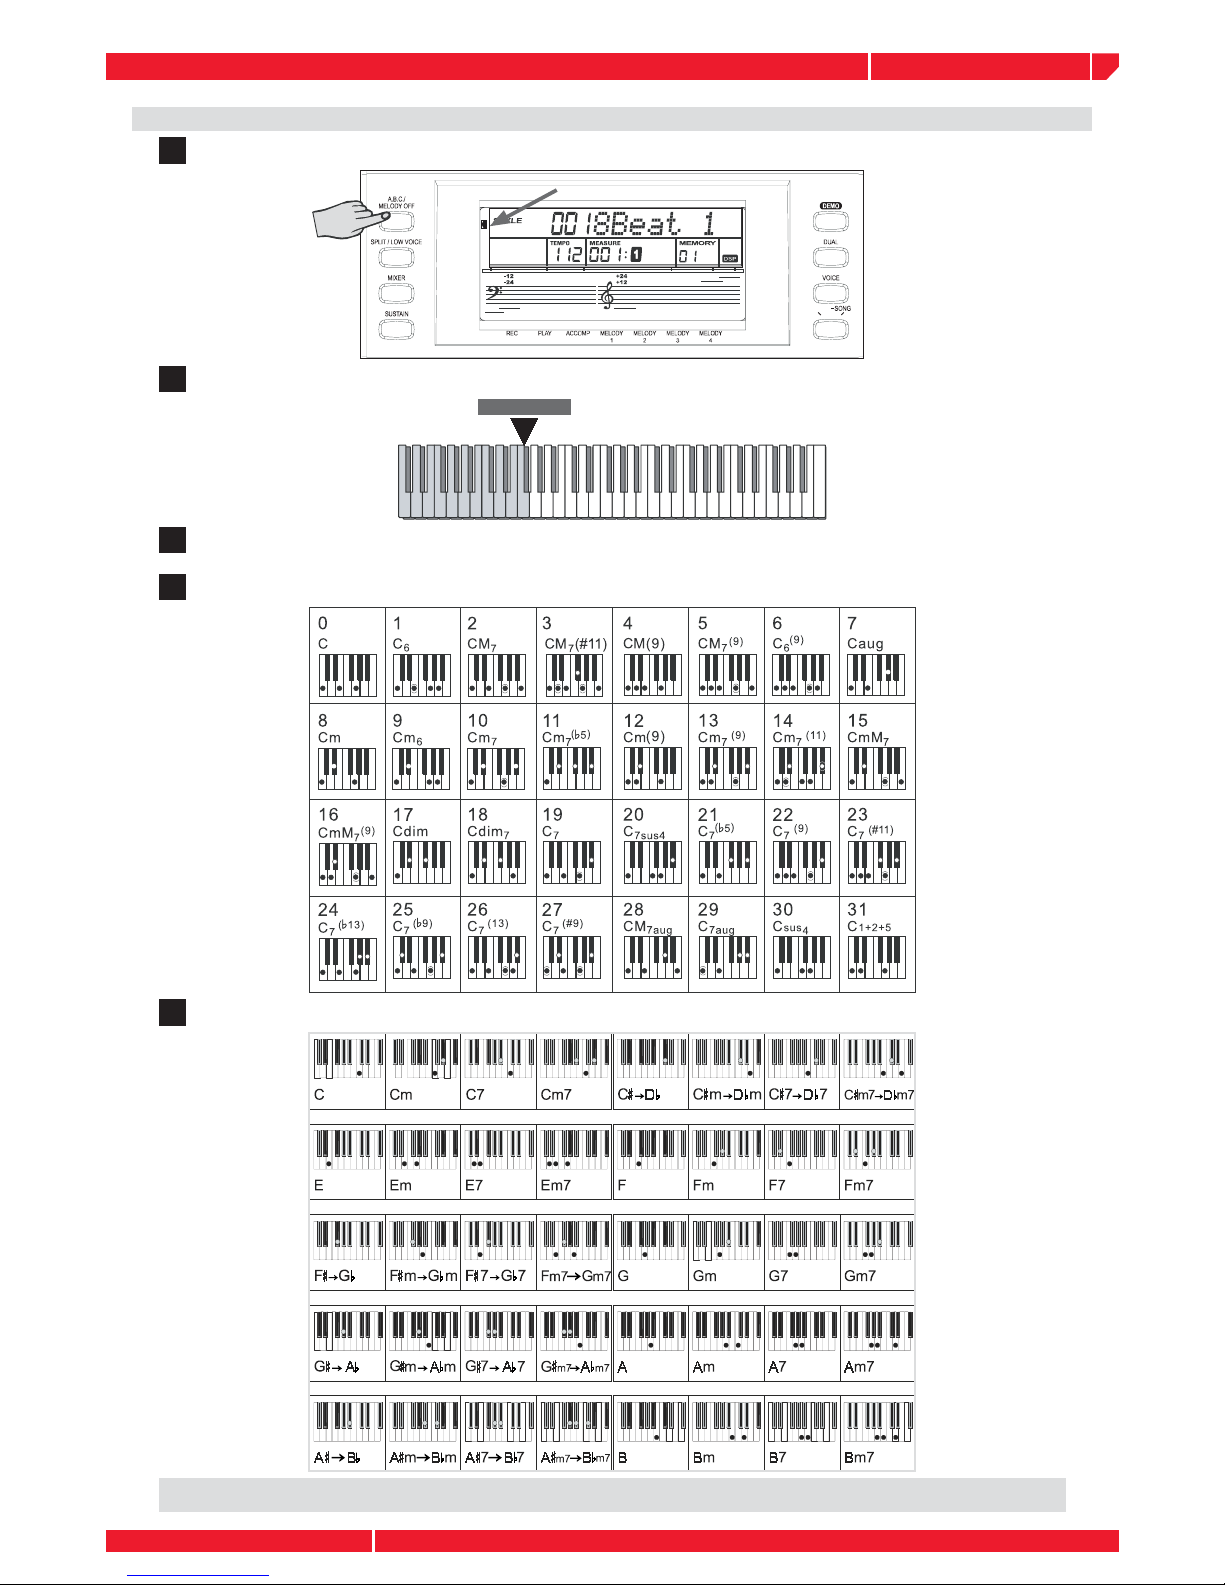
Note: When A.B.C is set to ON, press the keys to the left of the split point. Singer fi nger chords is recogniged next to fi ngered chords. If a chord has been recognized, you press one or more keys. The new chord will be recognized again.
ALBUM
STYLE
ABC
SPLIT
DUAL
PORTA
TOUCH
SUSTAIN
MELODY OFF
CHORD RECOGNITION
Press the ABC ON/OFF button, the A.B.C icon will appear next to “A.B.C” on the display.
1
Chords can be produced by pressing any keys below the split point.
2
You can change the chords of the accompaniment by playing keys on the auto accompaniment
section of the keyboard using either the “ Single Finger” or “Fingered” method.
3
Fingered Chords (the following chart):
4
Single Finger Chords (the following chart):
5
Page 18
owners manual
ps1600
Page14
ALBUM
STYLE
ABC
SPLIT
DUAL
PORTA
TOUCH
SUSTAIN
MELODY OFF
ALBUM
STYLE
ABC
SPLIT
DUAL
PORTA
TOUCH
SUSTAIN
MELODY OFF
FUNCTION
+
FUNCTION
-
VOLUME CONTROL
The ps1600 has 5 accompaniment tracks professionally arranged: CHORD 1, CHORD2,
CHORD 3, BASS, and DRUM. You can adjust the volume of each accompaniment track.
1 ACCOMP VOLUME CONTROL
TRACK CHANNEL RANGE DEFAULT
ACCOMP CH1, CH3, CH5, CH7, CH10 0 -127 112
CHORD 1 CH 1 0- 127 94
CHORD 2 CH 3 0- 127 98
CHORD 3 CH5 0- 127 94
DRUM CH10 0- 127 90
BASS CH7 0- 127 94
HOW TO ADJUST
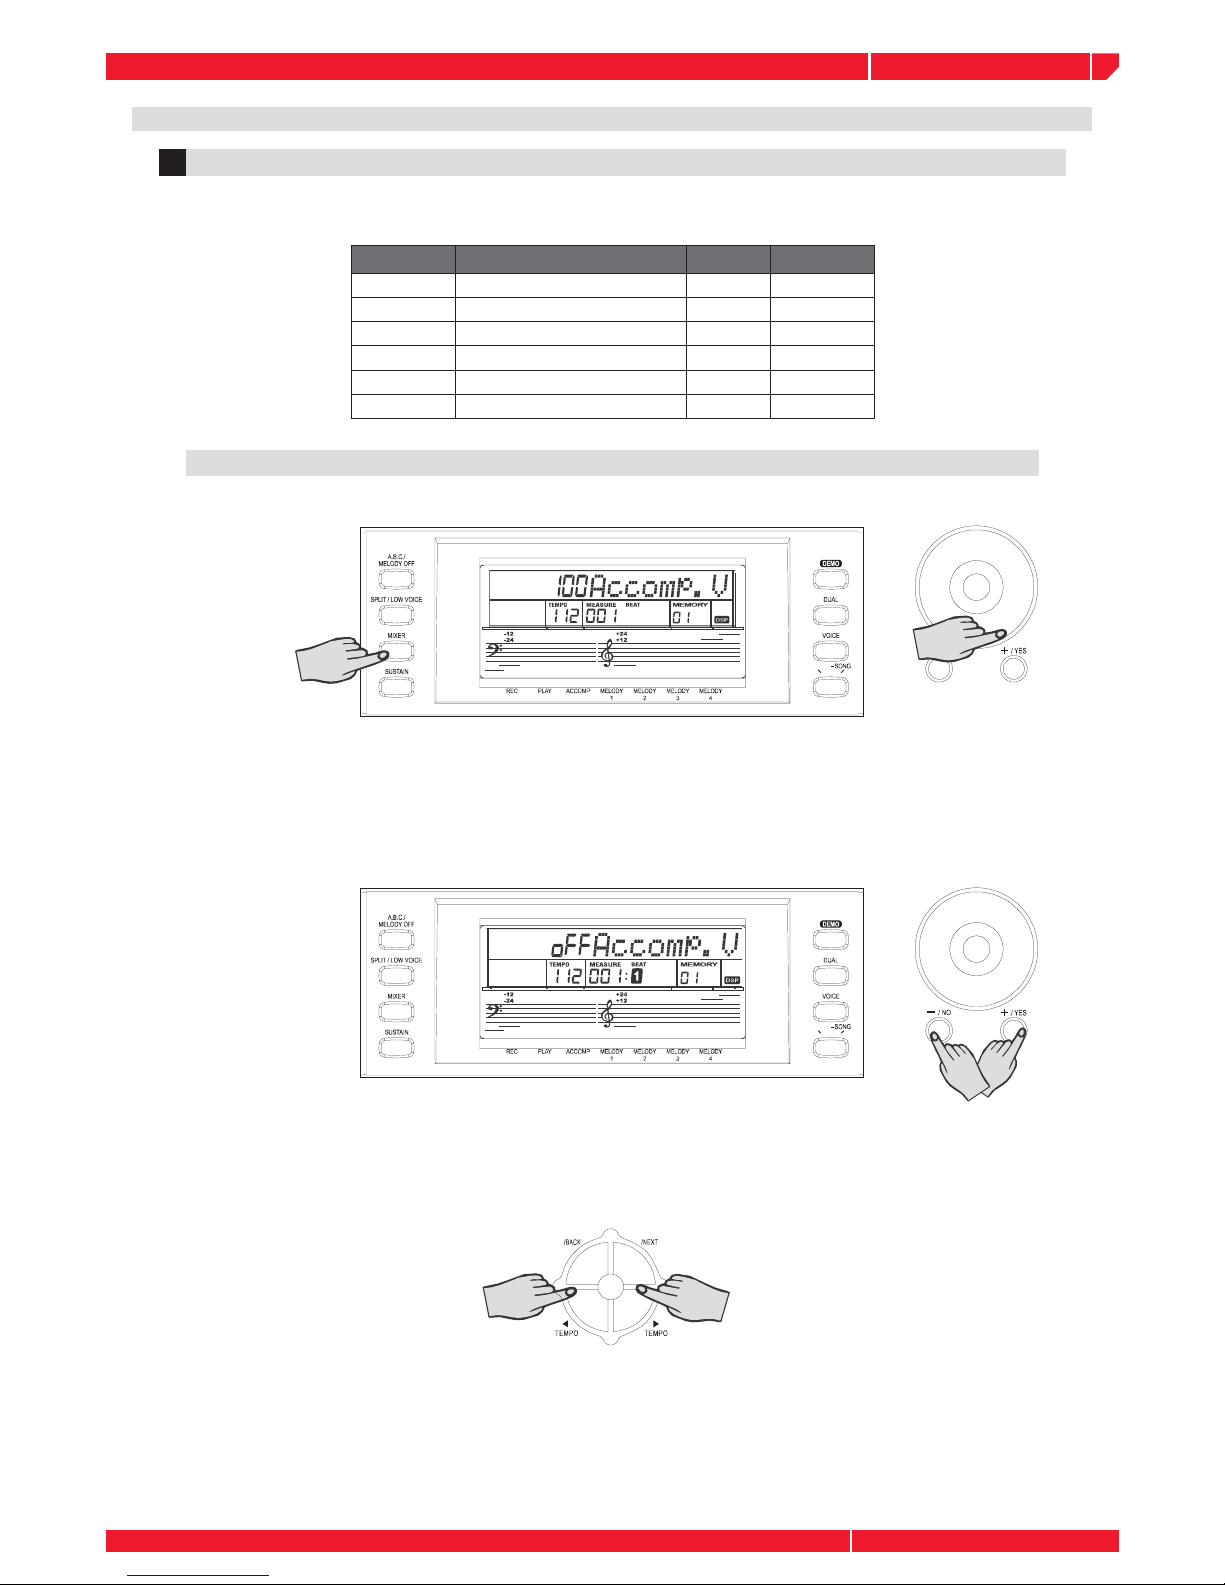
Press the MIXER button. LCD display “100 ACCOMP”
You can adjust the volume values of ACCOMP with the [+/YES] [-/NO] buttons, the DIAL.
The parameter range is from 000 to 127.
Pressing the +/- buttons at the same time will set the ACCOMP volume to 0. The LCD
display:”OFF ACCOMP”.
Adjust the volume with the control you prefer, the LCD displays” XXX ACCOMP”
Press the NEXT or BACK button to select track that you want to adjust. They are
CHORD 1, CHORD 2, CHORD 3, DRUM, BASS.
The volume adjustment of other tracks is the same as ACCOMP track. Press the MIXER
button to exit this mixer menu.
Page 19
owners manual
ps1600
Page15
ALBUM
STYLE
ABC
SPLIT
DUAL
PORTA
TOUCH
SUSTAIN
MELODY OFF
FUNCTION
+
FUNCTION
-
XXX VOICE 1
XXX VOICE 2
XXX LOWER
FUNCTION
+
FUNCTION
-
FUNCTION
+
FUNCTION
-
KEYBOARD VOLUME
The ps1600 has 3 keyboard SECTIONS: VOICE 1, VOICE 2, LOWER.
TRACK CHANNEL RANGE DEFAULT
VOICE 1 Ch 13 0 -127 112
VOICE 2 Ch 14 0- 127 80
LOWER Ch 15 0- 127 48
HOW TO ADJUST
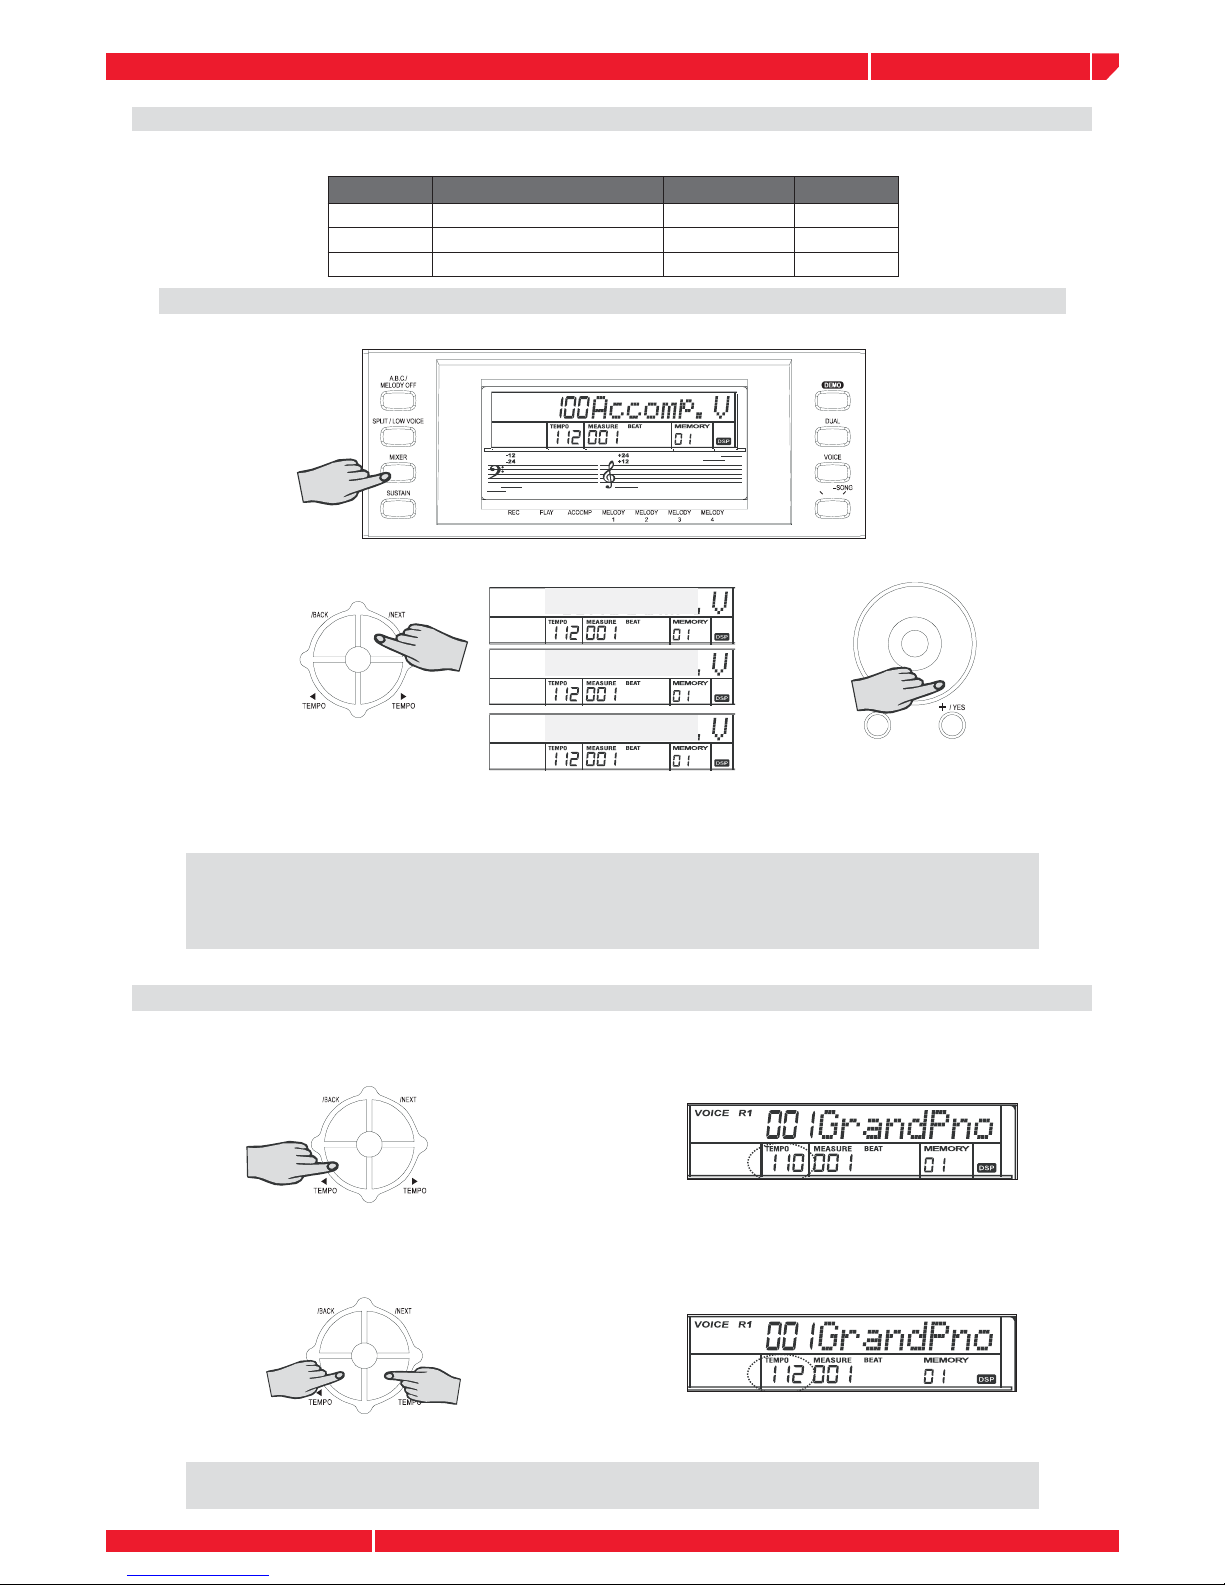
Press the MIXER button. LCD display “100 ACCOMP”
Press the NEXT or BACK button to select the section you want to adjust: VOICE 1, VOICE 2,
LOWER.
If you adjust the voice1 track, LCD displays “112 VOICE1”. You can adjust the volume values
of voice1 with the control you prefer.
Pressing the +/- buttons at the same time will set the voice1 volume to 0. LCD display “OFF
VOICE 1”. At that time, you can adjust the volume with the control you prefer the LCD display:”
XXX VOICE 1”. The volume adjustment of other track is the same as voice1 track. Press the
button to exit this mixer menu.
ADJUST THE TEMPO
Press the TEMPO + or TEMPO - button to adjust the tempo speed. The tempo can be adjusted in
the range of 30-280 bpm.
Holding down the [TEMPO+] [TEMPO-] buttons to adjust the tempo continuously. Pressing [TEMPO+]
[TEMPO-] at the same time will set the tempo value back to default value.
Note: Selecting the style when style stops, the tempo will change with the style automatically
to the default tempo. When style is playing, the tempo will not change with the style.
Page 20
owners manual
ps1600
Page16
ALBUM
STYLE
ABC
SPLIT
DUAL
PORTA
TOUCH
SUSTAIN
MELODY OFF
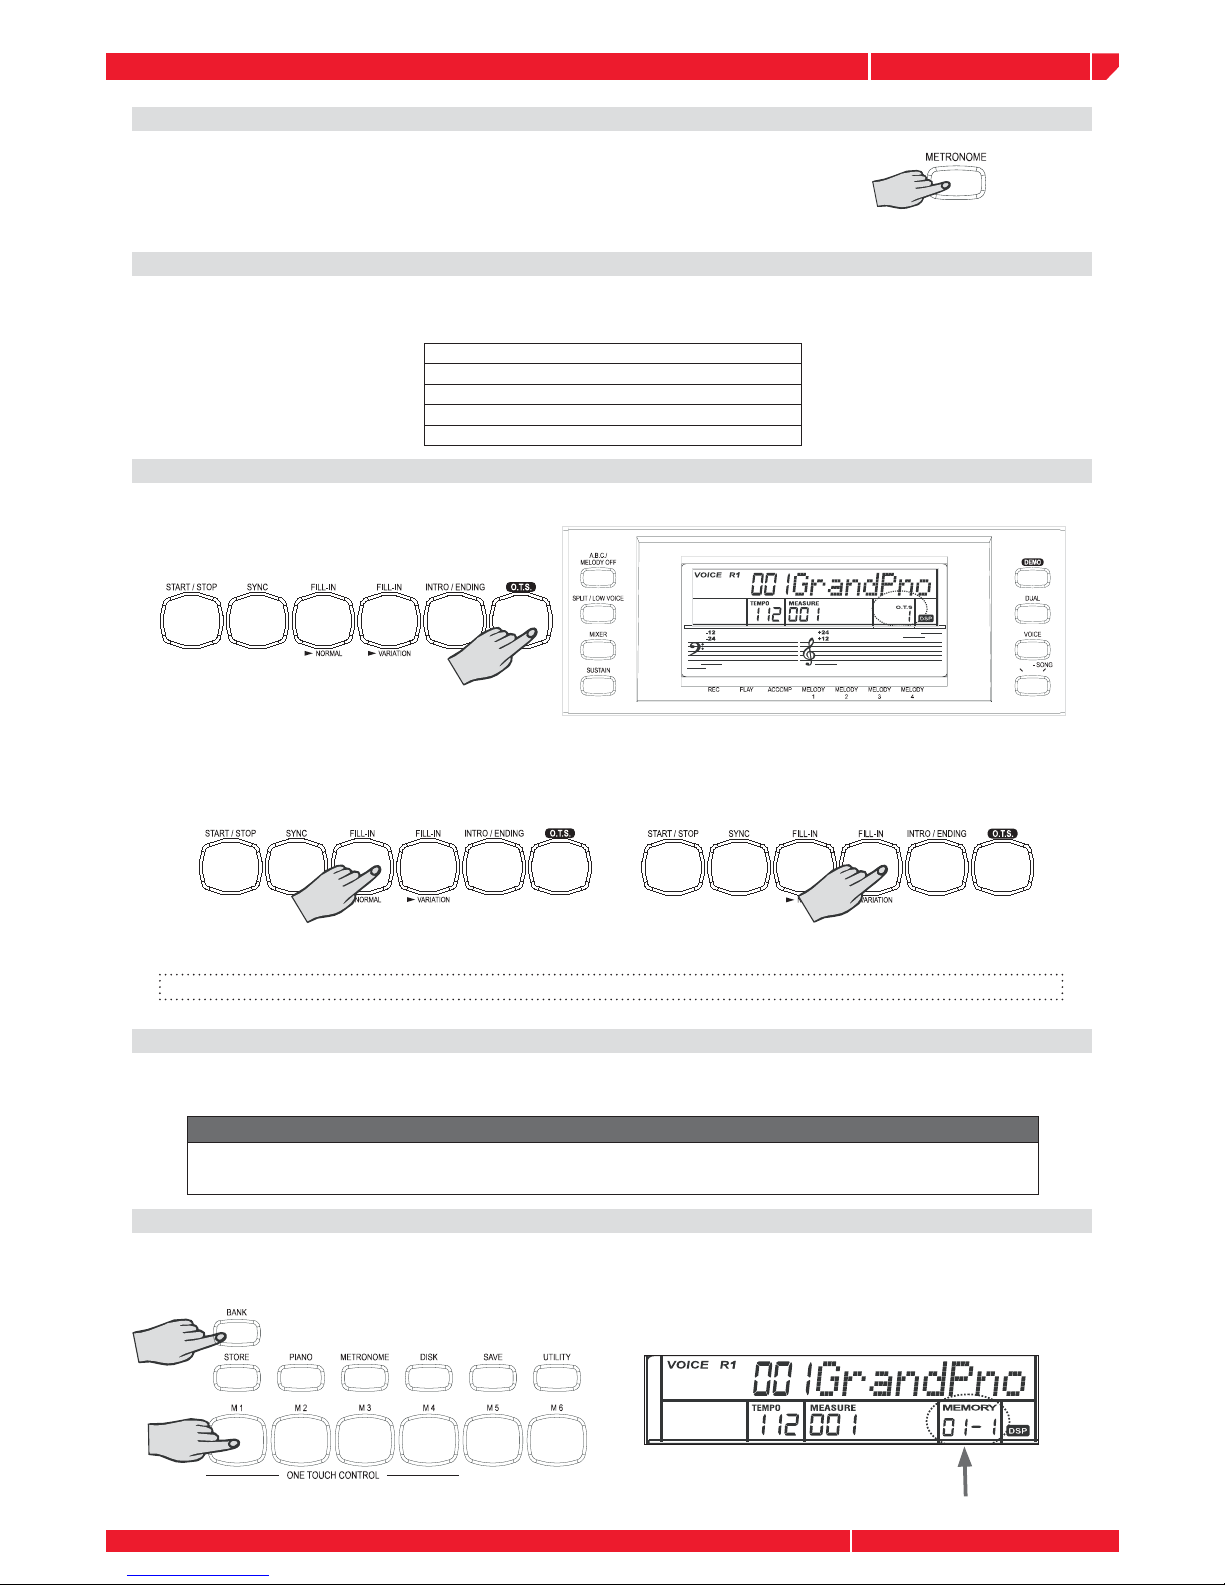
METRONOME
You can turn the metronome ON/OFF by pressing the button on the panel.
When you turn on the metronome, the metronome sound and style will
play at the same time.
Note: the time signature changes automatically when a style is selected.
One Touch Setting
One Touch Setting is powerful and convenient Style mode function that lets you instantly
reconfi gure virtually all setting of the instrument by touching of a single button.
Voice R1 number and volume
Dual function.
Voice R2 number and volume
REVERB and CHORUS type and level
Octave
HOW TO RECALL A ONE TOUCH SETTING
Recall any styles. Each style has four desired settings. Press the button. LCD displays O.T.S. and
turn A.B.C on automatically.
Press the [M1/M4] button, corresponding to the desired setting. LCD displays O.T.S.1-4. When
the style is playing, press [O.T.S.] to turn on the O.T.S. mode. It will insert a “Fill in” automatically.
Insert “FILL A” or “FILL B” according to the memory number.
Note: Pressing the [O.T.S.] key again the O.T.S. mode is switched OFF. The LCD displays “MEMORY”.
MEMORY
Memory feature can be used to memorize 32 complete control-panel setups (8 banks, 4 setups
each) that you can recall whenever needed.
Data stored in the Memory
Voice Right 1, Voice Right 2, Voice Left, Sustain, Style, Tempo, Function parameter, Mixer
parameter, ACCOMP volume, Octave.
SELECT A MEMORY
Press the [BANK] button to display: ” XXX MEM BANK”. Press the [M1] [M4] button to display 1-1
or 1-4.
Select the desired memory bank with the control you prefer: DIAL, [+/YES] [-/NO].
Page 21
owners manual
ps1600
Page17
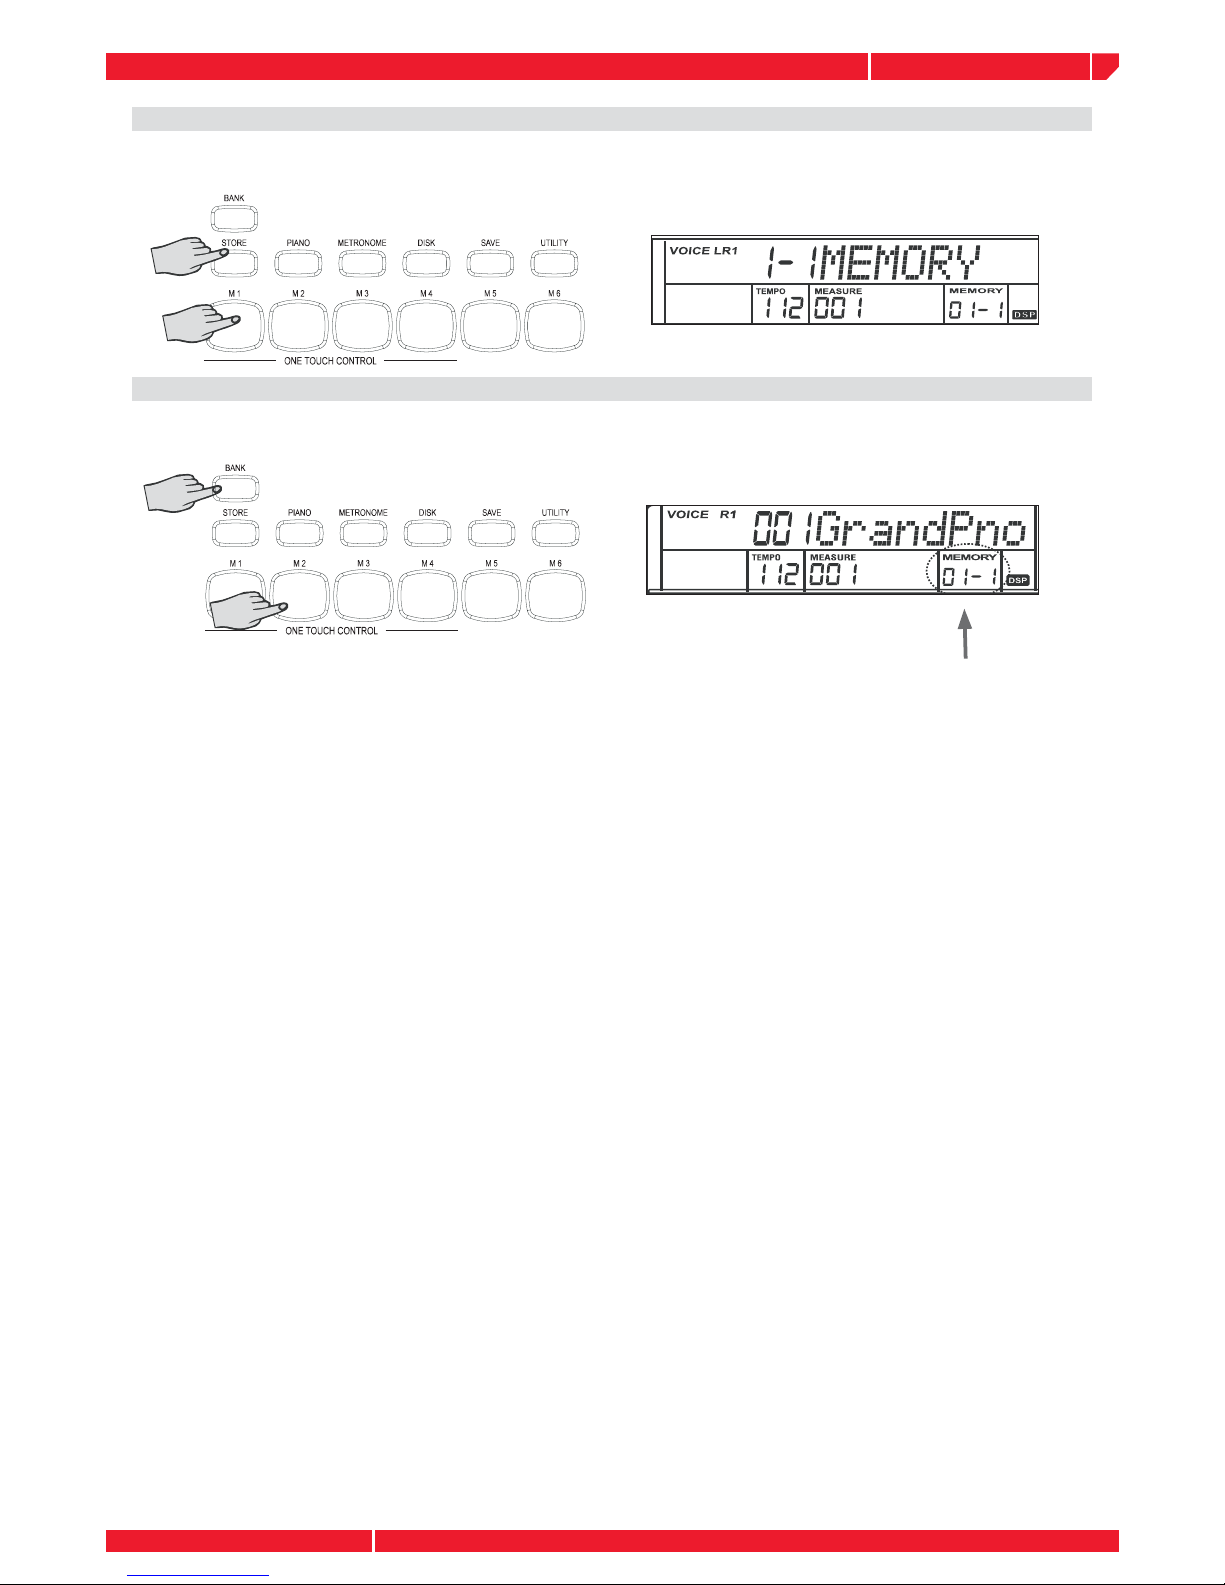
TO STORE A MEMORY
Holding down the [STORE] button and press the [M1]-[M4] button.You can store your desired
memory.
RECALL YOUR MEMORY
First select your desired memory bank and press the M1/M4 button. You can recall your desired
memory.
Page 22
owners manual
ps1600
Page18
ALBUM
STYLE
ABC
SPLIT
DUAL
PORTA
TOUCH
SUSTAIN
MELODY OFF
ALBUM
STYLE
ABC
SPLIT
DUAL
PORTA
TOUCH
SUSTAIN
MELODY OFF
ALBUM
STYLE
ABC
SPLIT
DUAL
PORTA
TOUCH
SUSTAIN
MELODY OFF
FUNCTION
+
FUNCTION
-
FUNCTION
+
FUNCTION
-
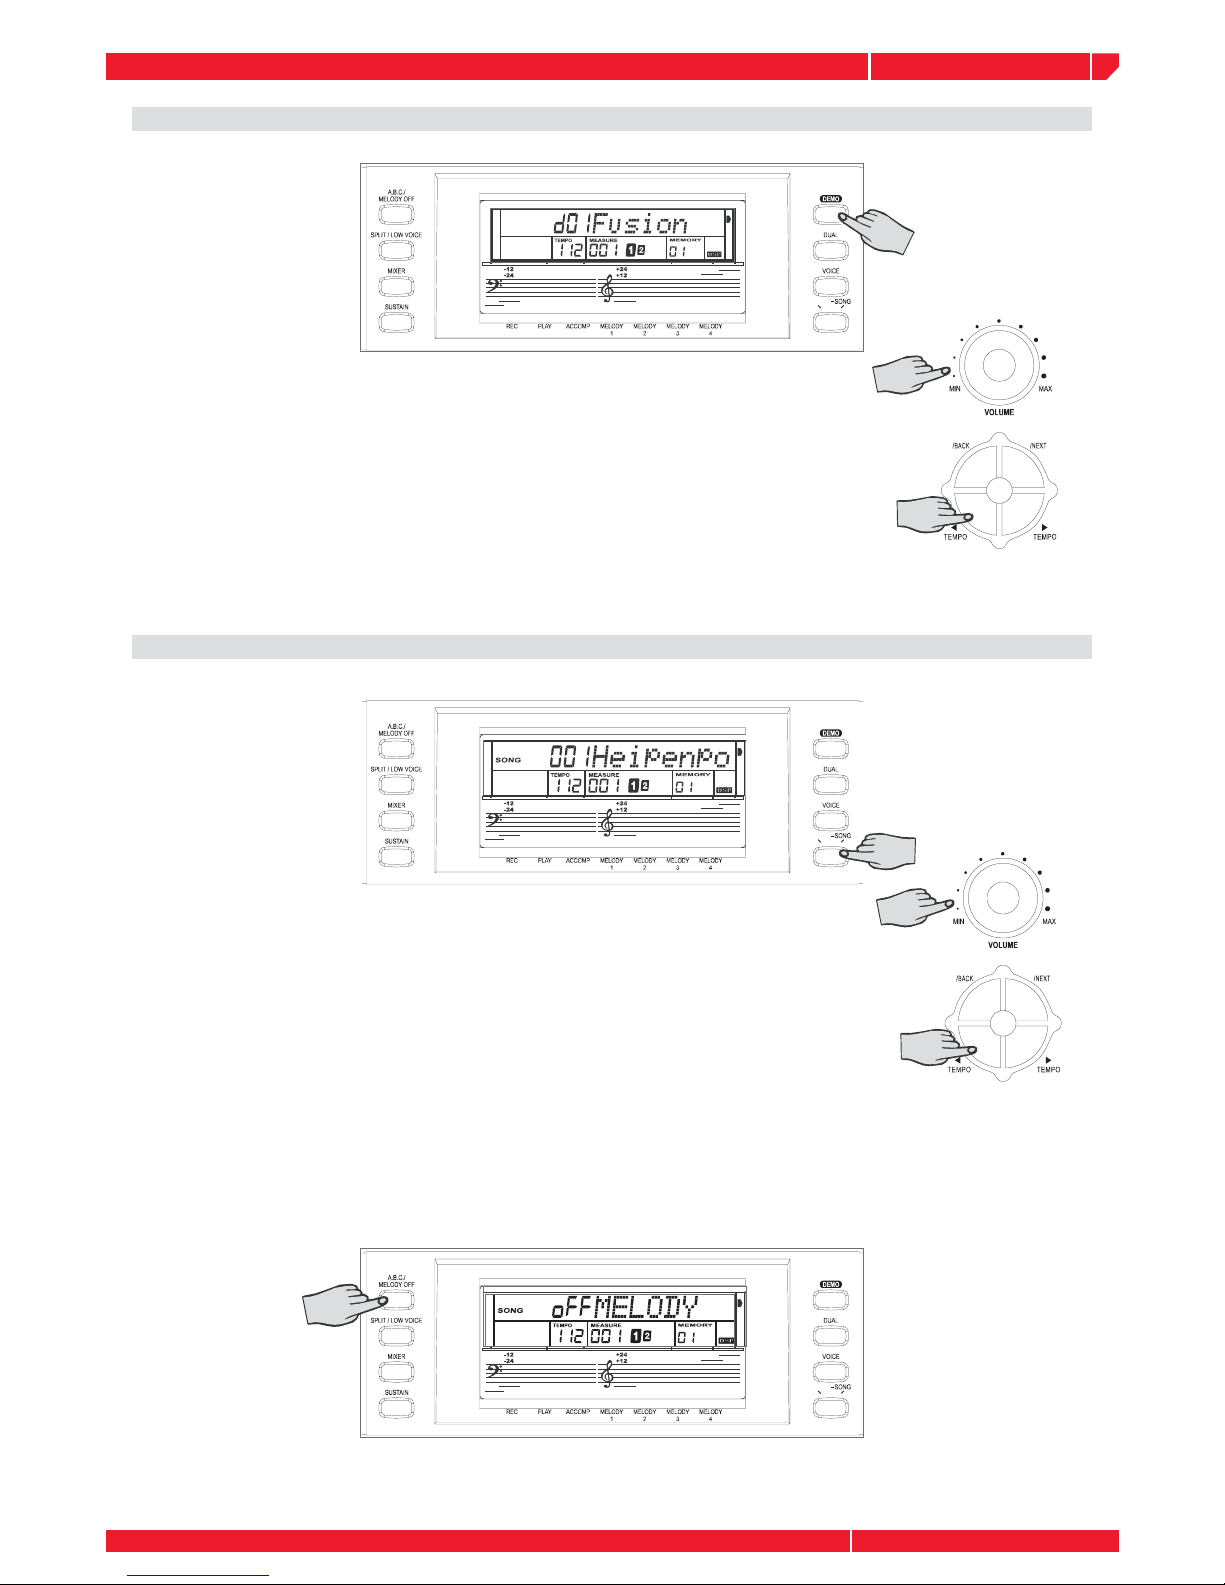
DEMO
Press the DEMO button to play demos
Use the VOLUME knob to adjust the volume of DEMO
Press the TEMPO+/TEMPO- buttons to adjust the tempo of the DEMO.
You can select the demo number with the control you prefer. To escape the demo mode,press the
[DEMO] or [START/STOP] buttons.
Note: Only above mentioned function key can be used in demo mode.
SONG
Press the SONG button to enter the SONG mode, 50 songs can be selected.
Use the VOLUME knob to adjust the volume of the SONG
Press the TEMPO+/TEMPO- buttons to adjust the tempo of the DEMO.
There are 50 SONGS in all. You can select the demo number with the control you prefer.
Press the SONG or START/STOP button to stop playing this song. Press the START/STOP button
again to play the current song looped.
Press the MELODY OFF button to turn off the SONG lead melody. You can play the note according to the LCD display.
There is an intro and measure hint at the begining of the song to help you play along.
Page 23

owners manual
ps1600
Page19
FUNCTION
+
FUNCTION
-
ALBUM
STYLE
ABC
SPLIT
DUAL
PORTA
TOUCH
SUSTAIN
MELODY OFF
FUNCTION
+
FUNCTION
-
FUNCTION
+
FUNCTION
-
FUNCTION
+
FUNCTION
-
ALBUM
92 well-known album songs are provided to you for performance without melody and chords. After
pressing the ALBUM button, four beats will fl ash simultaneously. Press any keys on the keyboard
below the split point, then the chord will be appeared on LCD. A preset voice is set to each album
song. You can press the VOICE buttons to change it.
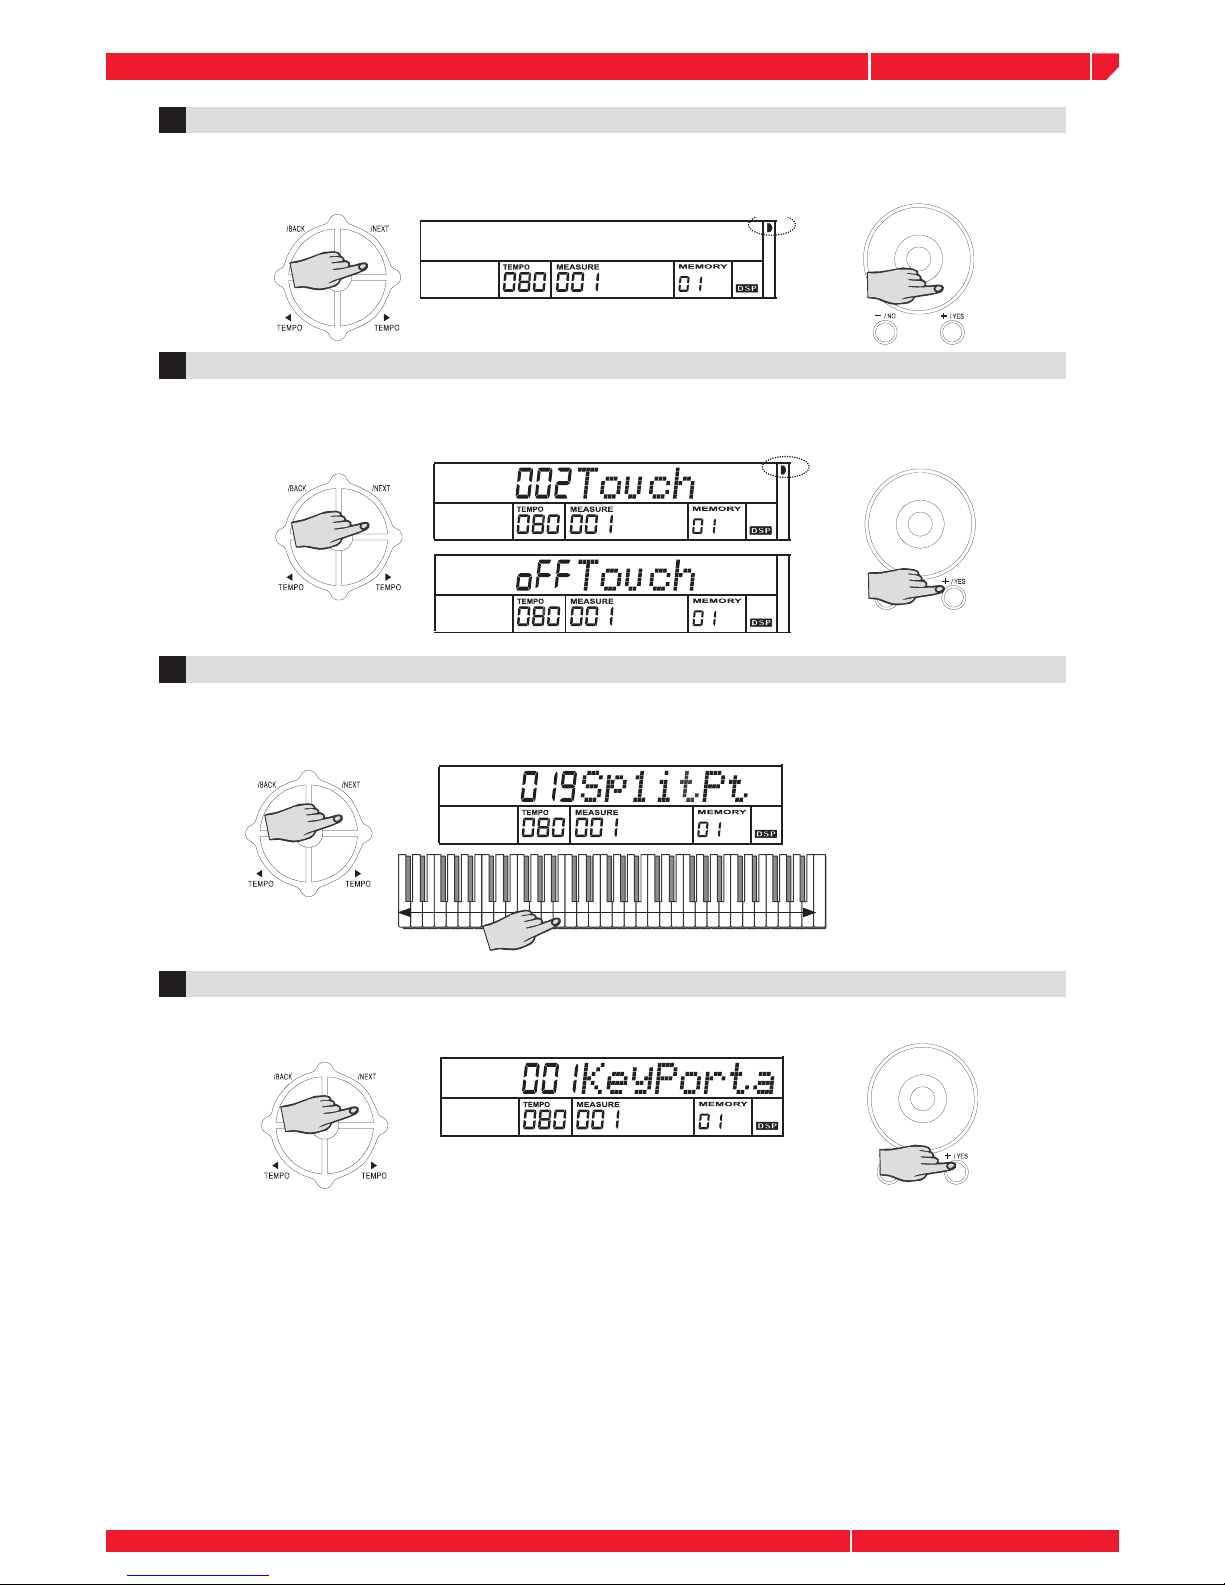
FUNCTION
Press the NEXT/BACK buttons to enter the FUNCTION menu.
TRANSPOSE (XPOSE)1
Press the button NEXT to select and adjust the TRANSPOSE parameter with the control you
prefer. Parameter Range:+/-12 semitones.
Note: X’pose 1:adjust the transpose parameter of voice1; X’pose 2: adjust the transpose parameter of voice
2; X’pose L: adjust the transpose parameter of voice L.
TUNE2
Press the NEXT button to select and adjust the TUNE parameter with the control you prefer.
Parameter Range: -50 to +50 cents.
OCTAVE3
Press the NEXT button to select and adjust the OCTAVE parameter with the control you prefer.
Parameter Range:-2 to +2.
Note: You can set the OCTAVE and TRANSPOSE parameters to VOICE1, VOICE2, VOICE L
separately. The TUNE parameters is set to VOICE 1 only.
Page 24
owners manual
ps1600
Page20
FUNCTION
+
FUNCTION
-
FUNCTION
+
FUNCTION
-
04 BEAT
FUNCTION
+
FUNCTION
-
FUNCTION
+
FUNCTION
-
TOUCH5
Press the NEXT button to select and adjust the TOUCH parameter with the control you prefer.
Parameter Range: from OFF to #3. If you select OFF, the TOUCH sign will not appear.
SPLIT POINT6
Press the NEXT button to select and adjust the keyboard SPLIT POINT with the control you
prefer. Press the corresponding key to adjust the split point. Parameter Range: from 1 to 88.
BEAT4
The BEAT function allows you to set a time signature (number of beats in a measure) for the
Metronome. The factory setting corresponds to 4 beats for every measure.
PORTAMENTO TIME7
Press the NEXT button to adjust PORTAMENTO time with the control you prefer. Parameter
Range: from 0 to 3.
Page 25
owners manual
ps1600
Page21
FUNCTION
+
FUNCTION
-
FUNCTION
+
FUNCTION
-
FUNCTION
+
FUNCTION
-
FUNCTION
+
FUNCTION
-
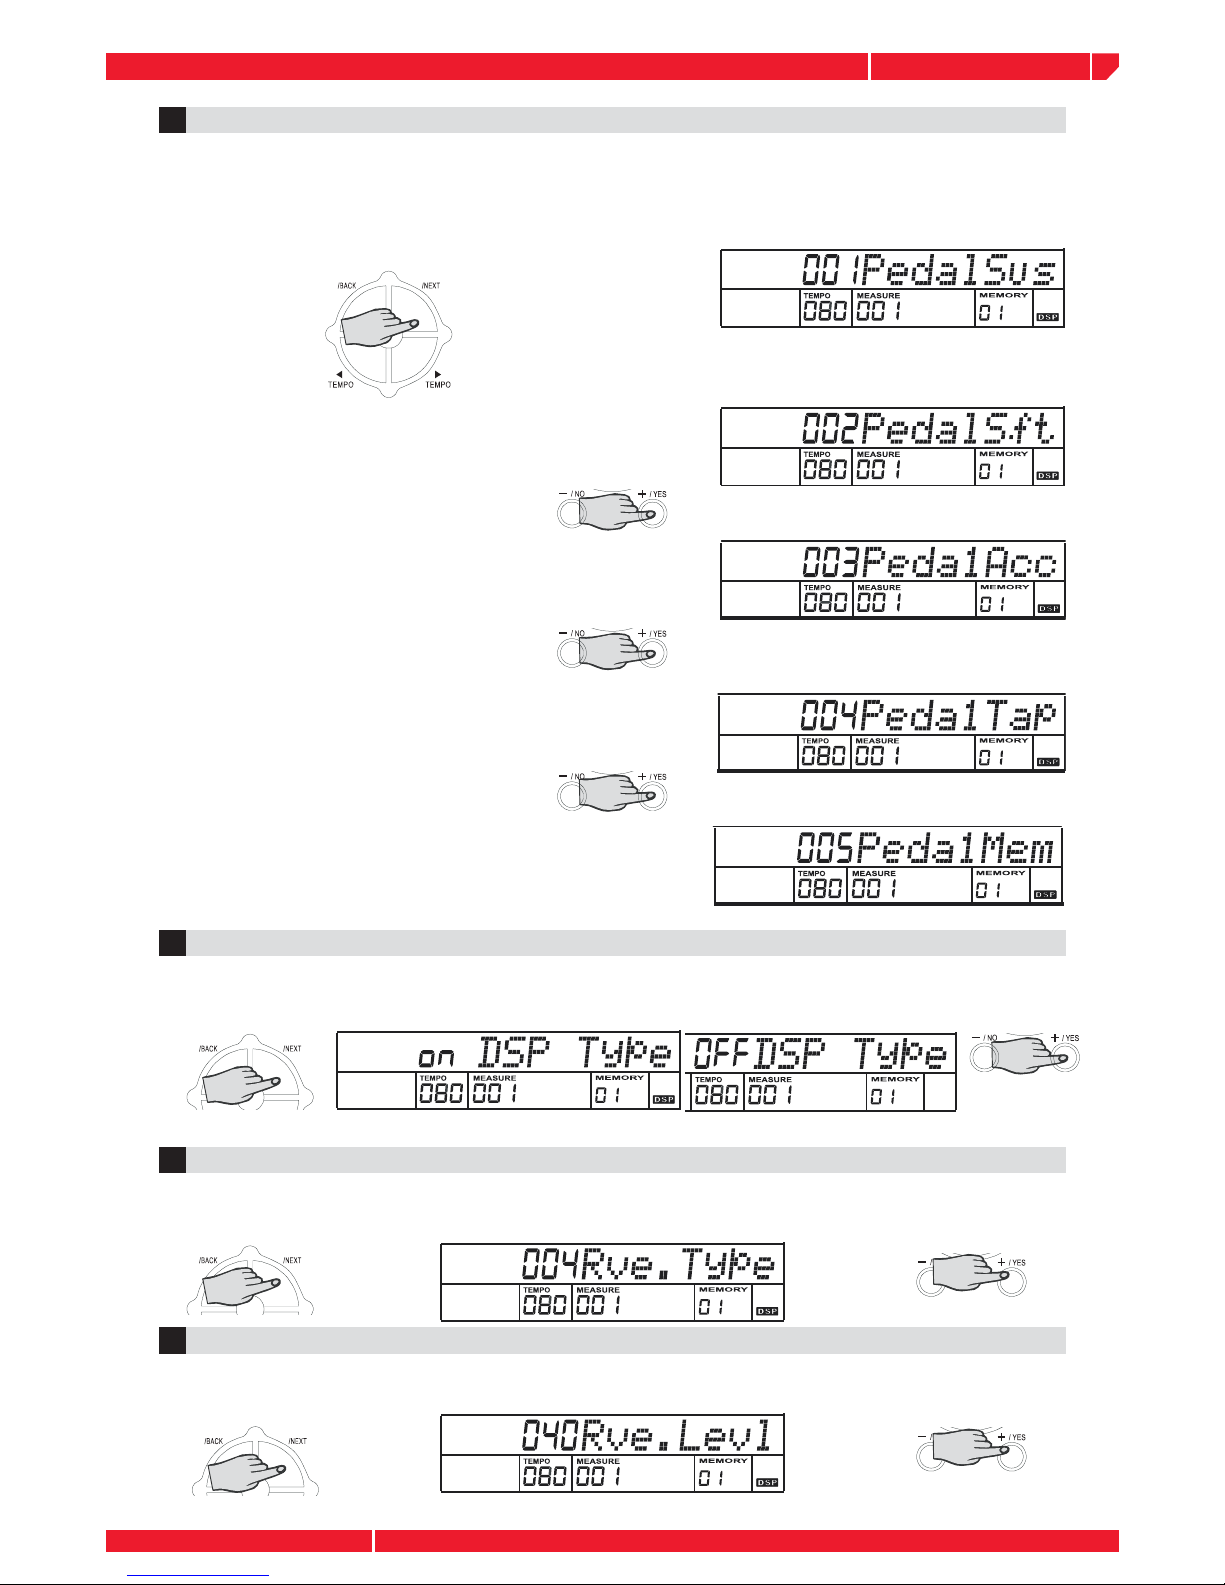
PEDAL SUS8
Press the NEXT button to adjust pedal parameter with the control you prefer. Parameter Range:
from 1 to 5: Sustain, Soft, Accomp, Tempo Tap, Memory.
The default pedal is the sustain pedal. All notes played on the keyboard have a sustained effect after stepping on the pedal.
All notes played on the keyboard have a soft
effect after you select the soft pedal.
Stepping on the pedal after you select the PEDAL
ACC pedal, it has the same function as pressing
the [START/STOP].
You can quickly adjust the tempo of songs,
demos, and styles by stepping the pedal four
times continuously after you select the PEDAL
TAP pedal.
You can select each memory by stepping on the
pedal after you select the PEDAL MEM function.
(A total of 32 memories ).
DSP ON/OFF
9
Press the NEXT button to turn the DSP ON/OFF with the control you prefer. If you turn DSP
off, the DSP sign will not appear.
Press the NEXT button to adjust REVERB TYPE parameter with the control you prefer. Parameter
Range: from 0 to 7.
10
REVERB TYPE
Press the NEXT button to adjust REVERB LEVEL parameter with the control you prefer. Parameter
Range: from 0 to 127.
REVERB LEVEL
11
Page 26
owners manual
ps1600
Page22
FUNCTION
+
FUNCTION
-
FUNCTION
+
FUNCTION
-
FUNCTION
+
FUNCTION
-
FUNCTION
+
FUNCTION
-
FUNCTION
+
FUNCTION
-
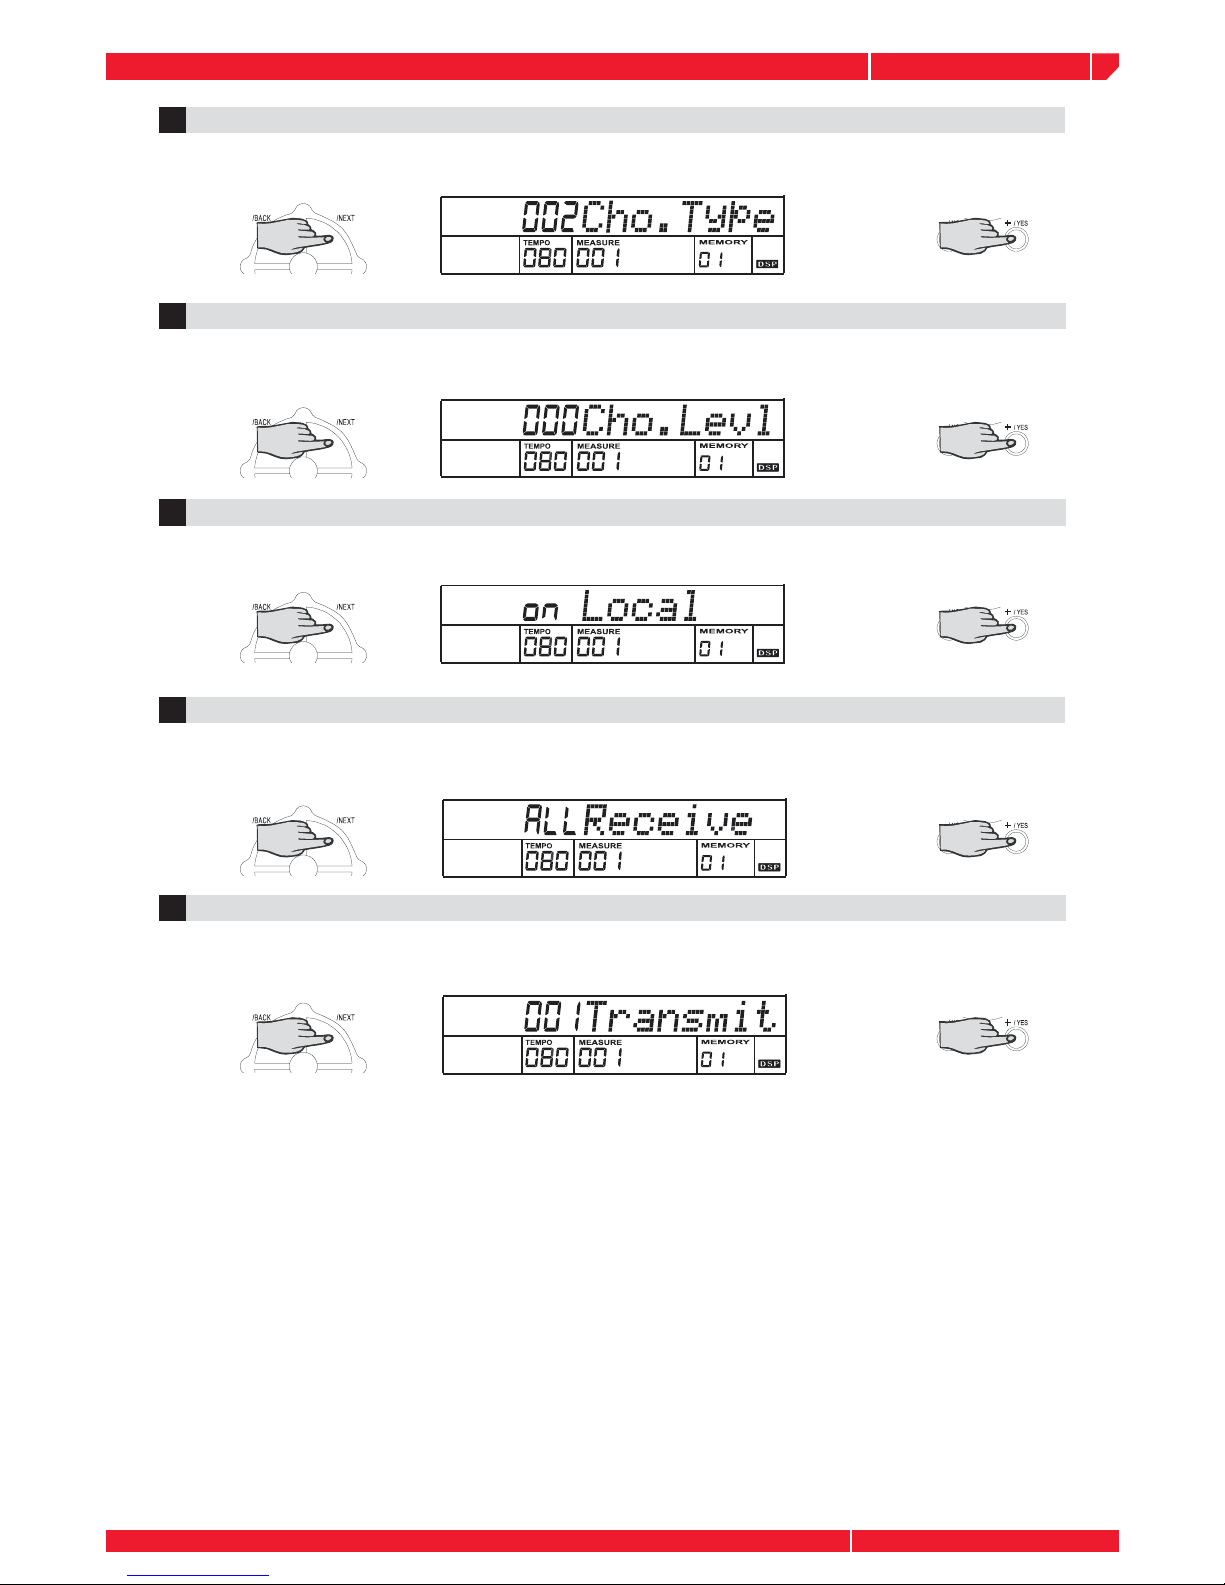
Press the button to adjust CHORUS TYPE parameter with the control you prefer. Parameter
Range: from 0 to 7.
Press the button to adjust CHORUS LEVEL parameter with the control you prefer. Parameter
Range: from 0 to 127.
Press the button to turn LOCAL ON/OFF with the control you prefer. Parameter Range: ON/
OFF.
CHORUS TYPE
12
CHORUS level
13
LOCAL ON/OFF
14
Press the button to adjust receive channel with the control you prefer. Parameter Range: 1- 16ALL. If you select All , the instrument can receive midi message from all (1-16) midi channel.
RECEIVE
15
Press the button to adjust transmit channel with the control you prefer. Parameter Range: 1-
16. Only select one channel to transmit the midi message at the same time.
TRANSMIT
16
Page 27
owners manual
ps1600
Page23
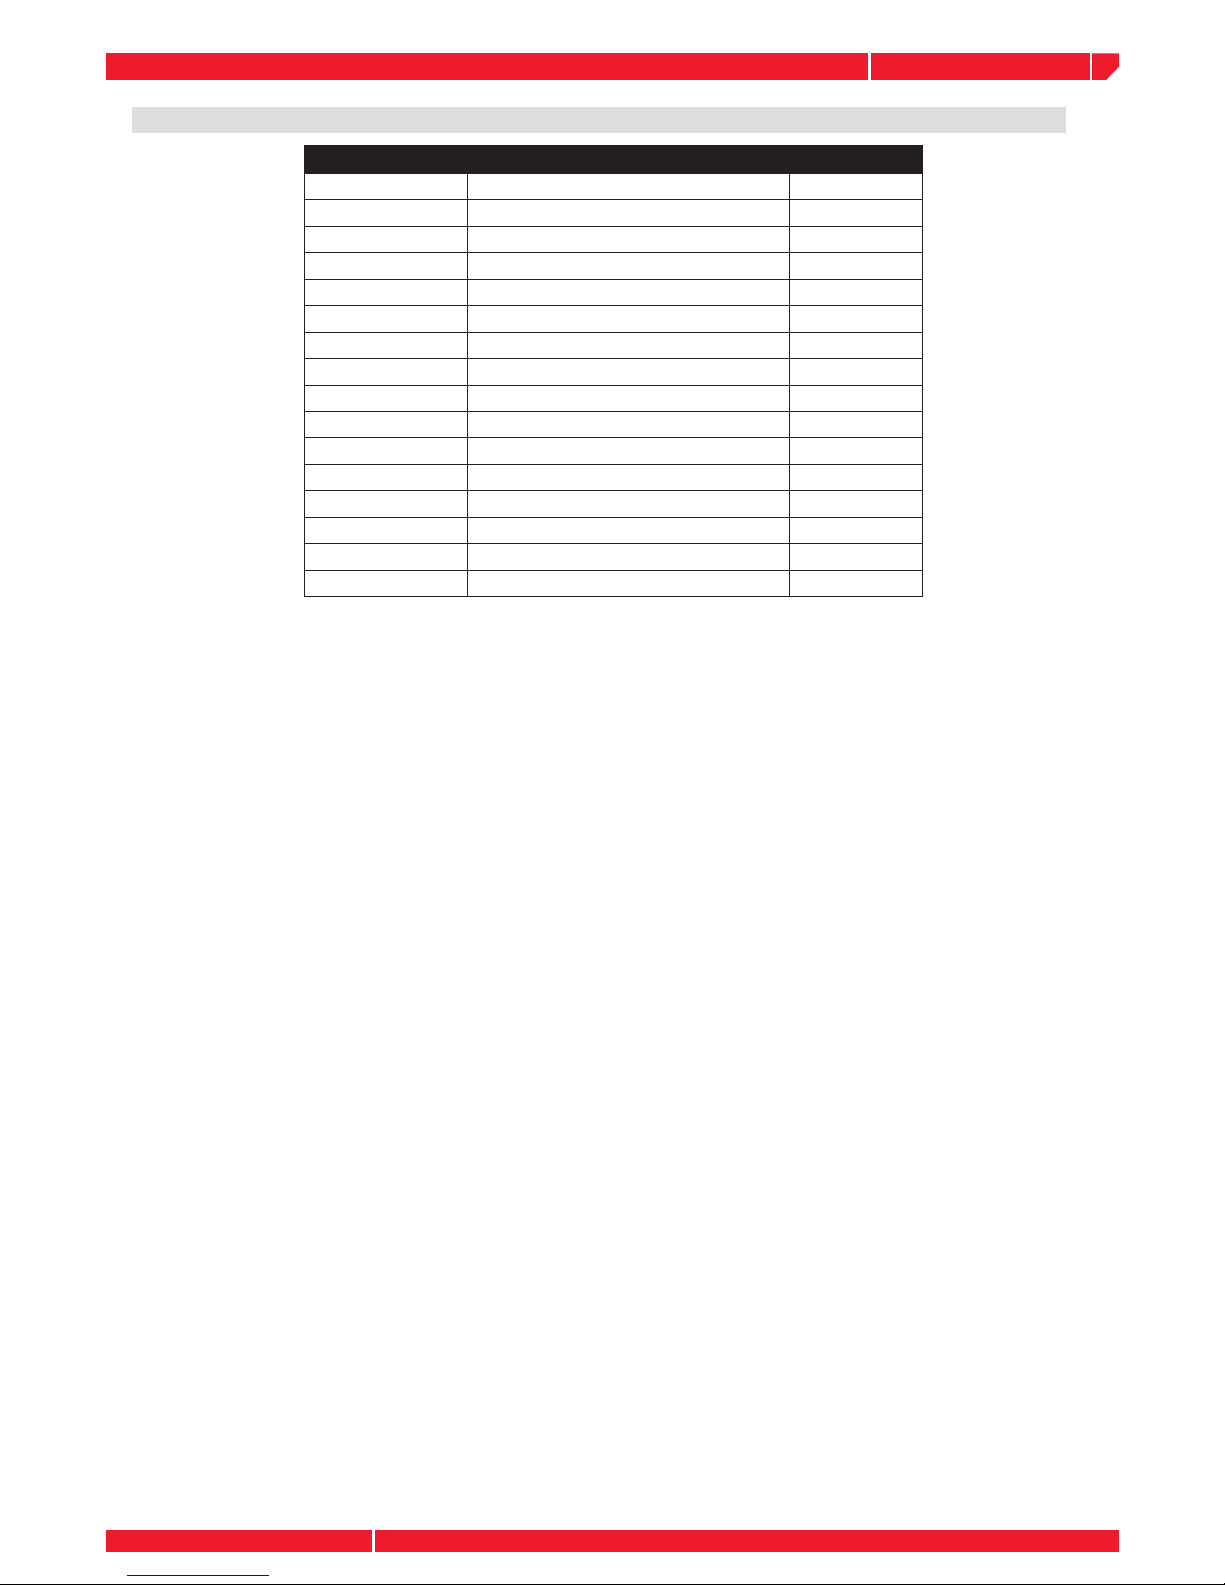
PARAMETER RANGE DEFAULT
XPOSE -12~12 0
TUNE -50~50 0
OCTAVE -2~2 0
BEAT 4
TOUCH OFF -1~3 2
SPLIT POINT 1-61 19
PORTAMENTO 0~3 2
PEDALSUS PEDALSUS,SOF, ACC, TAP, MEM PEDALSUS
DSP TYPE ON/OFF ON
REV. TYPE 0~7 4
REV. LEVL 0~127 40
CHO.TYPE 0~7 2
CHO. LEVL 0~127 0
LOCAL ON/OFF ON
RECEIVE 1~16 -ALL ALL
TRANSMIT 1-16 1
Default parameters
Page 28
owners manual
ps1600
Page24
ALBUM
STYLE
ABC
SPLIT
DUAL
PORTA
TOUCH
SUSTAIN
MELODY OFF
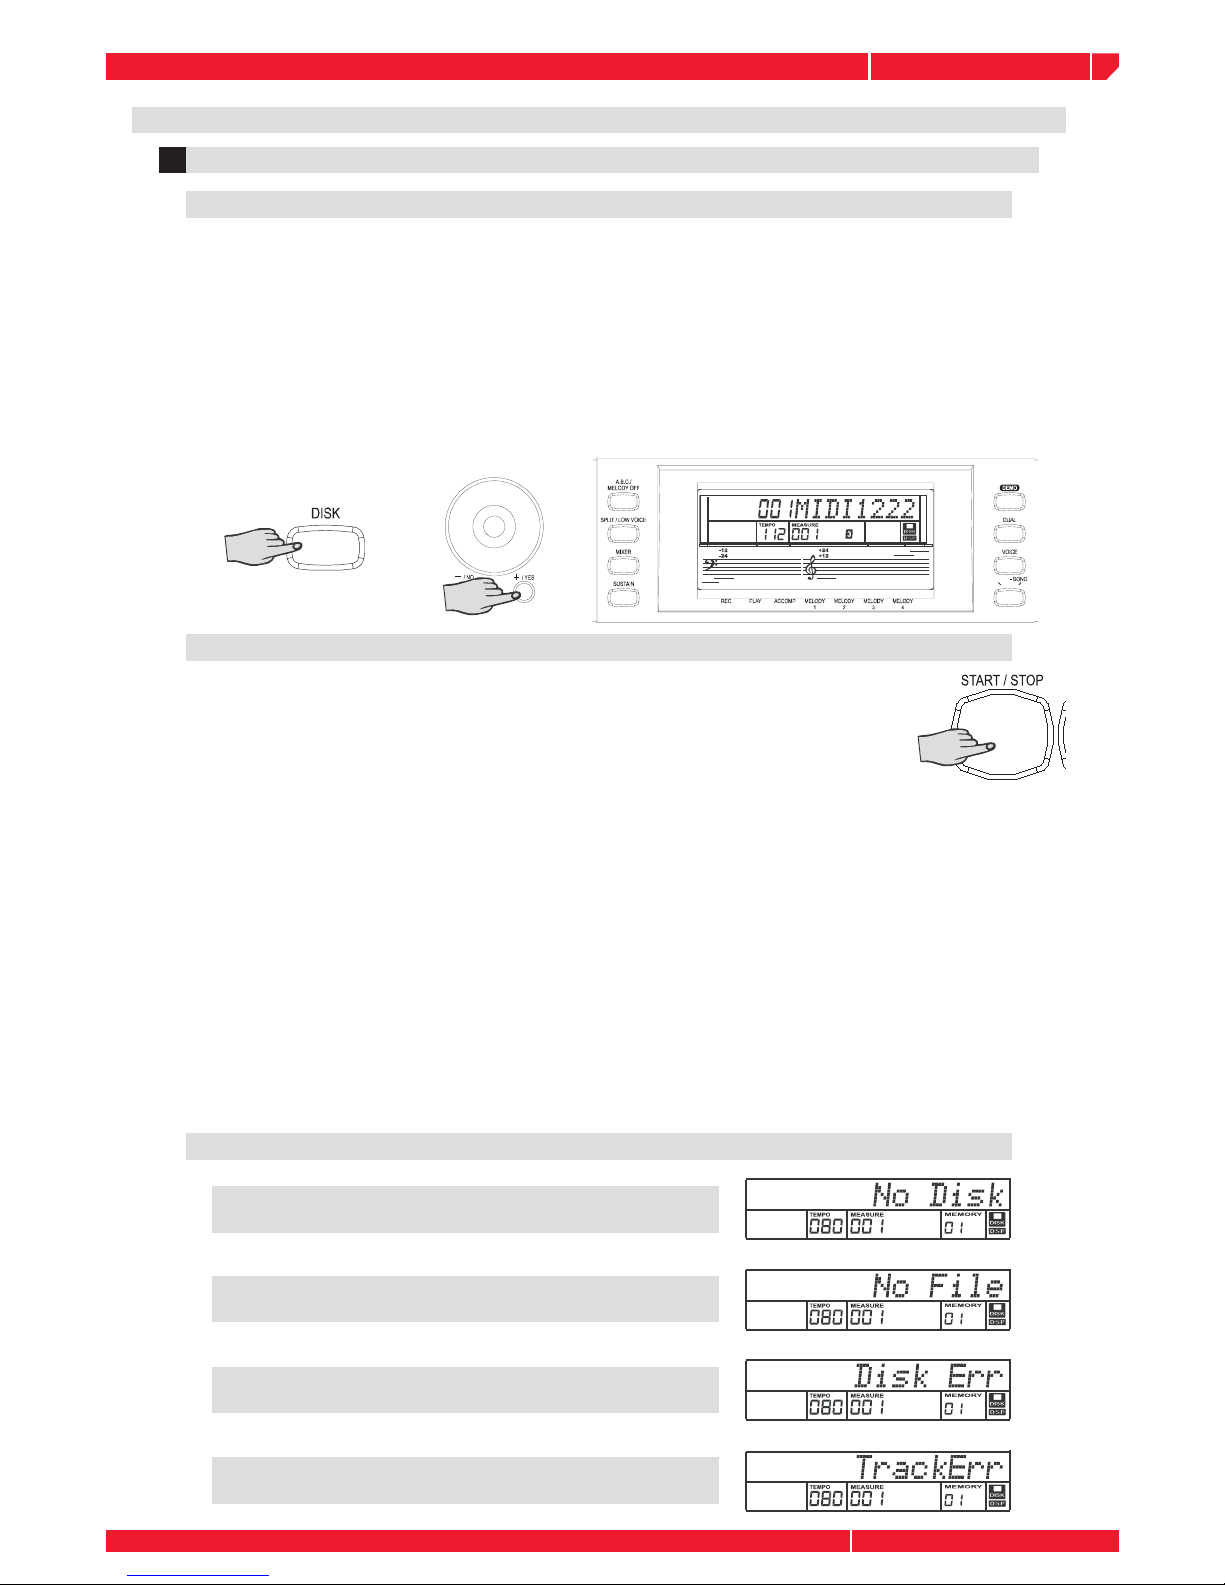
Insert the fl oppy disk that contains a standard midi fi le into the disk drive, and then press
the DISK Button.”WAIT....” will display and disk icon will fl ash on the LCD during loading
disk song names. After fi nishing this, a song name of disk and disk icon is displayed on
the LCD display. Only the names which extension are [.MID] in the disk will be displayed
and the max. number of letter is 8.
Disk
1
Using Floppy Disks
LIST SONG NAMES OF DISK
For example, if the midi song fi le is SONG1.MID, the LCD display appears SONG1. Press
the +/- number of button, and data dial to select the song names of disk you want to
playback. If there is no disk in disk drive,”No Disk” message appears on the LCD after
pressing the button.
Insert a FLOPPY in the drive, enter the DISK mode by pressing the DISK
button, select a song, then press the START/STOP button, to start the song
Playback. The Playback can be stopped immediately by pressing the START/
STOP button again.
PLAYBACK SONG DISK
If you want to change the number of disk song while a midi song is playing, you can
rotate the data dial and press the +/- buttons .The song playing will be stopped as soon
as the number of song is changed. Otherwise “Wait...” will display while disk is loading
until the MIDI starts to play and the song name appears on the LCD.
Flashing disk icon indicates the song data is loading or writing. Do not take out the fl oppy
disk from disk drive while disk icon is fl ashing. The disk icon will stop fl ashing and light it
after loading. There are enough memory to store the disk song data in ps1600. Playing
any one of disk song will load nothing after all disk songs data have been loaded.
The message “No Disk” will appear on the LCD taking out the fl oppy disk from the drive
in disk mode.
Caution: Do not take out fl oppy disk from disk drive while the disk icon is fl ashing.
Otherwise the disk will be damaged!
If no fl oppy disk is in the disk drive, the LCD will
display:”No Disk”.
If the fl oppy disk is empty or there is no fi les which
extension is mid, the LCD will display:”No File”.
If loading disk contains an error, the LCD will
display:”Disk Err”.
If the track of a playing song is greater than 64, the
LCD will display:”Track Err”.
DISK MESSAGES
Page 29
owners manual
ps1600
Page25
FUNCTION
+
FUNCTION
-
FUNCTION
+
FUNCTION
-
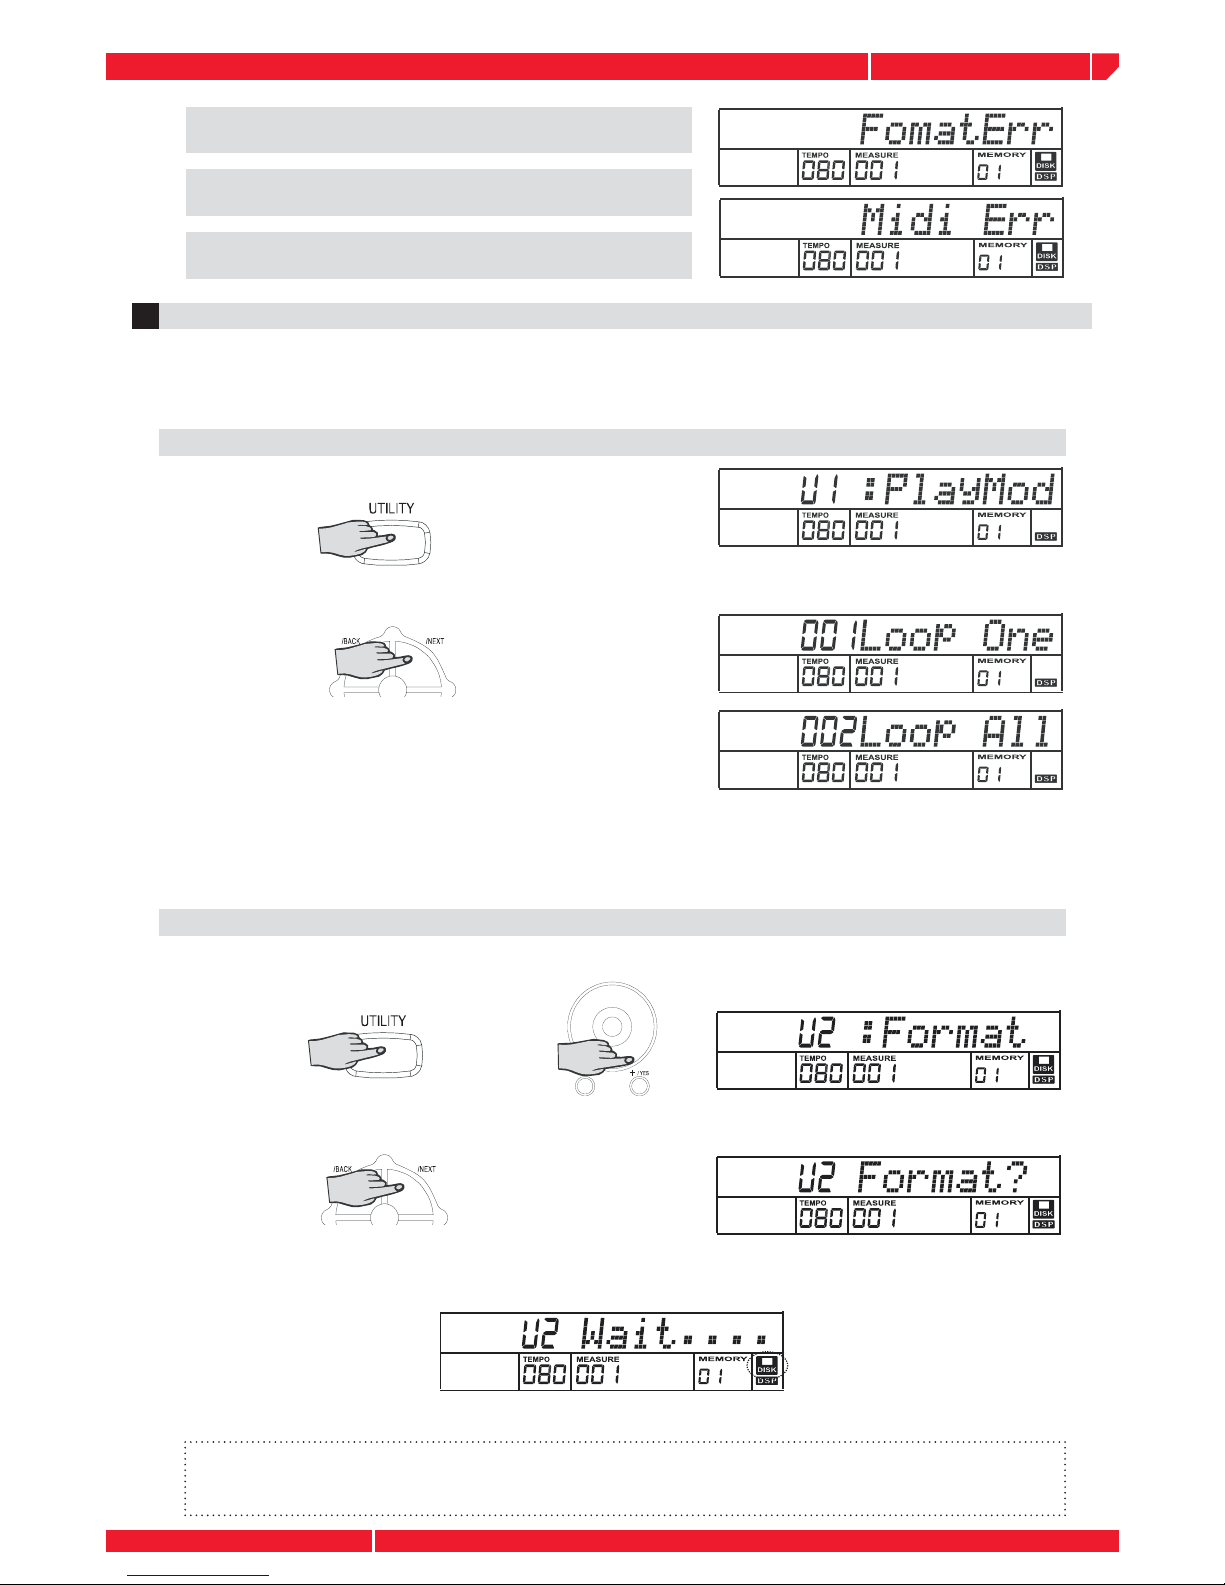
If the midi format of a playing song is format2,the
LCD will display :”Format Err”.
If the ticks in one beat of a playing song is greater than
1024 or less than 24, the LCD displays “Midi Err”.
If midi data is irregular, the LCD will display :”Midi
Err” or “Track Err”.
2
DISK UTILITY
Press the UTILITY button, the “Play Mode”,”Format” and “Delete” functions will be selected by the
+/- button and the DIAL. If you want to enter these disk functions, you can press the NEXT button.
If you want to exit, press the BACK button.
Press UTILITY button, the LCD will display
PLAY MODE
Press the NEXT button to enter Play mode: ”Loop One” appearing on the LCD indicates the disk
songs will playback repeatedly.
Press the [+] button or the DIAL, the “Loop All” indicates
the disk songs will playback from the fi rst songs to the
end and then return to start fi rst song again. Press the
the [-] button or the DIAL will appear “Loop One”.
Note: You can still receive MIDI data through the MIDI IN connector when the disk song is playing,
but it may cause unexpected errors . We suggest you do not playback disk songs and receive MIDI
data at the same time.
DISK FORMAT
Press the UTILITY button and then press the [+] button or rotate the DIAL, the LCD will display:
U2: FORMAT.
Press the NEXT button. The message ”FORMAT?” appears on the display.
Press the [+] button to execute the format operation (or press the [-] button to cancel ). The
message “WAIT..” appears and disk icon will fl ash on the display when format is in process.
Once the disk has been formatted,the message ”Format OK”will display on the LCD.
Note:
1.There will not be any action if you press any buttons when the disk is formatting.
2.When a write-protected disk is loading, ”Protect!” Will be displayed.
Page 30
owners manual
ps1600
Page26
FUNCTION
+
FUNCTION
-
FUNCTION
+
FUNCTION
-
DELETE MIDI
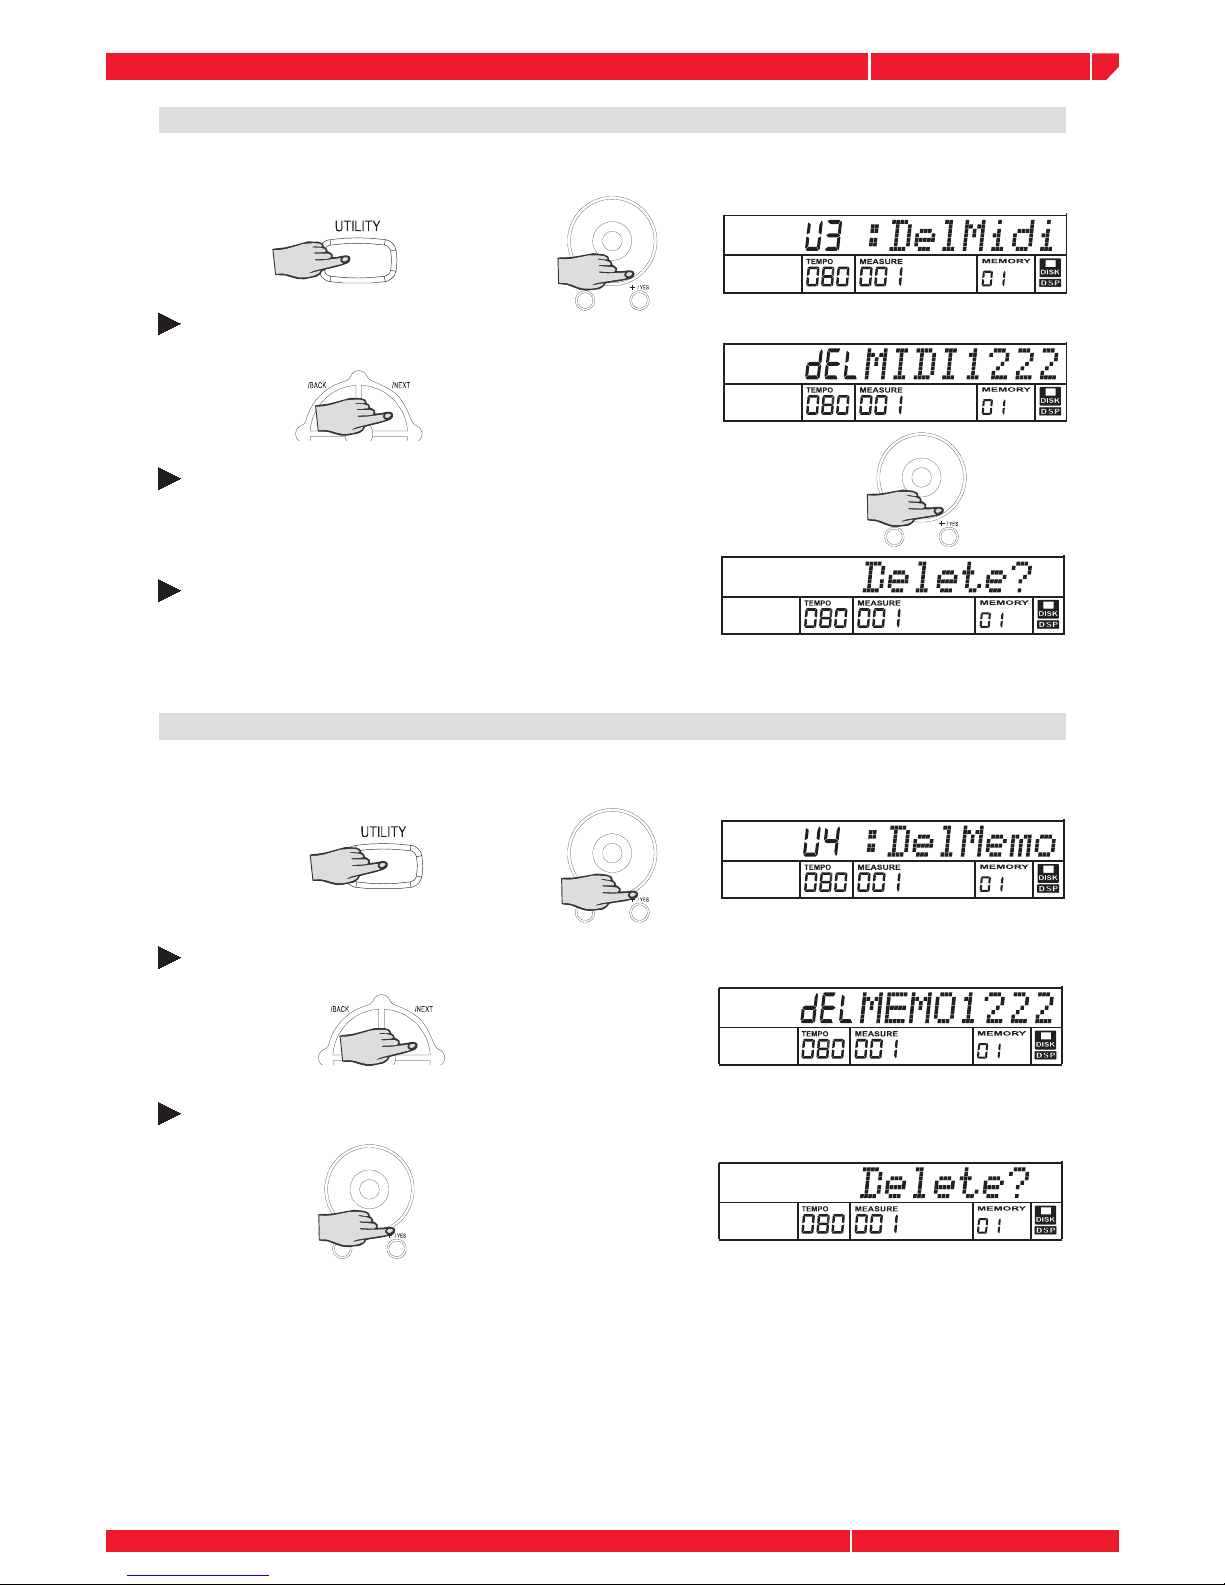
Select the disk midi deletion function by pressing the UTILITY and [+] button or rotate the DIAL.
The message ”DelMid” will appear on the display.
Press the NEXT button and the disk song name (.midi) will display.
Press the [+] button or DIAL to select the song you want to delete.
Press the NEXT button and LCD will display the message:
”DELETE ?”.
If you are sure, press the [+] button and the message “WAIT....” Will appear on the LCD. If you do
not want to delete the song, press the [-] button . Return to the step #2 after the step above.
DELETE MEM
Select the disk memory deletion function by pressing the UTILITY and [+] button or rotate the
DIAL. The message ”Del Memo” will appear on the display.
Press the NEXT button and the disk memory name (.mem) will display.
Press the [+] button or rotate the DIAL to select the memory you want to delete. Press the
NEXT button and LCD will display the message:”DELETE ?”.
If you are sure, press the [+] button and the message “Wait....” appears on the LCD. If you
do not want to delete the song, you can press the [-] button .Return to step 2 after the step
above.
Page 31
owners manual
ps1600
Page27
FUNCTION
+
FUNCTION
-
FUNCTION
+
FUNCTION
-
FUNCTION
+
FUNCTION
-
FUNCTION
+
FUNCTION
-
LOAD MIDI
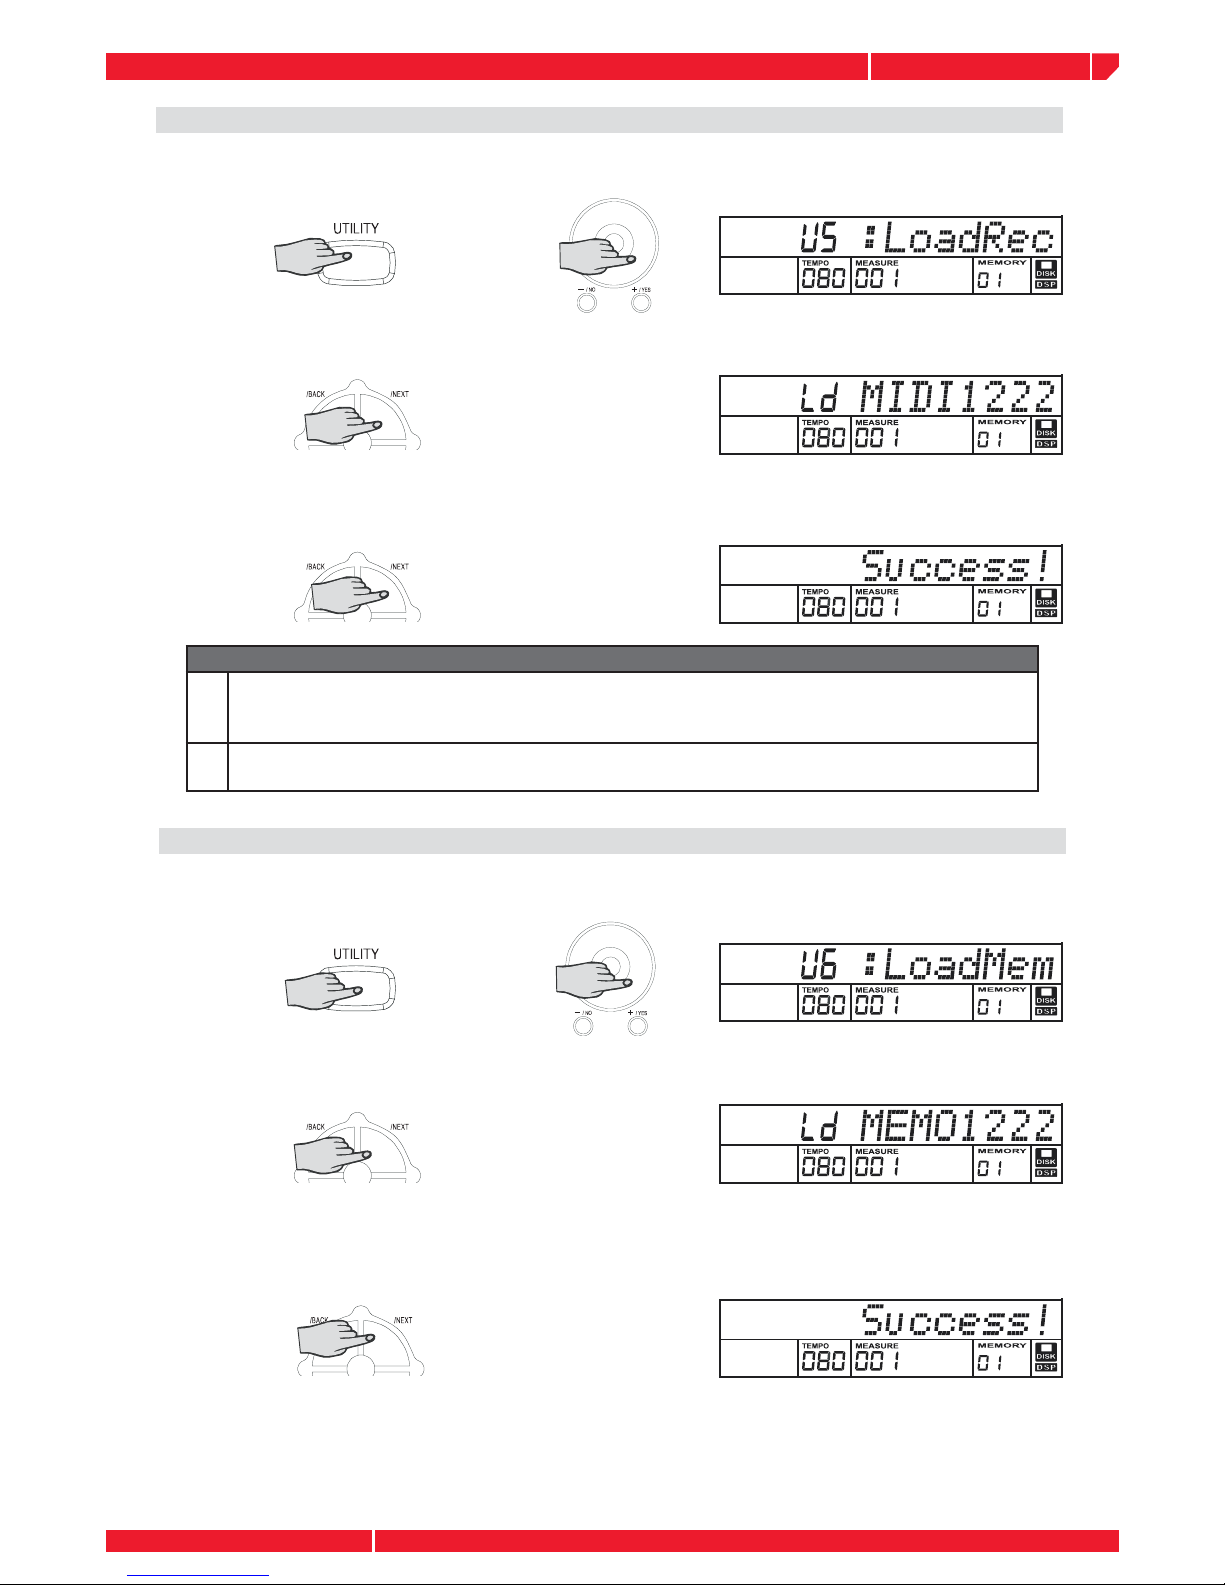
Select the load disk mid function by pressing the UTILITY button or rotate the DIAL ”.
The message "LoadRec" will appear on the display.
Press the [+] button and the saved disk mid name (*.mid) is displayed.
Press the [+] button or rotate the DIAL to select the mid you want to load. Press the NEXT button
and the LCD will display the message : ”Wait...” LCD will display as below when the MIDI song
is loading at the end.
Note
1
The Load MIDI function can be only used for the midi fi les saved directly by the keyboard. If
the midi fi les are saved from a PC or other midi devices, their names will be not displayed on
LCD and this function is disabled .
2
If you have loaded a MIDI fi le by this function, the recorded memory data will be overwirtten. you can continue to edit recorded data by step record or realtime record.
LOAD MEMO
Select the load disk memory function by pressing the UTILITY or [+] button or rotate the DIAL,
the message ”LoadMem” will appear on the display.
Press the NEXT button and the disk memory name (.mem) will be display.
Press the [+] button or rotate the DIAL to select the mem you want to load. Press the NEXT
button and LCD will display the message :”Wait...”. Once the loading is over the LCD will
display the message "SUCCESS1"
Note: This function is only used for the memory fi les
Page 32
owners manual
ps1600
Page28
FUNCTION
+
FUNCTION
-
FUNCTION
+
FUNCTION
-
3
Disk SAVE
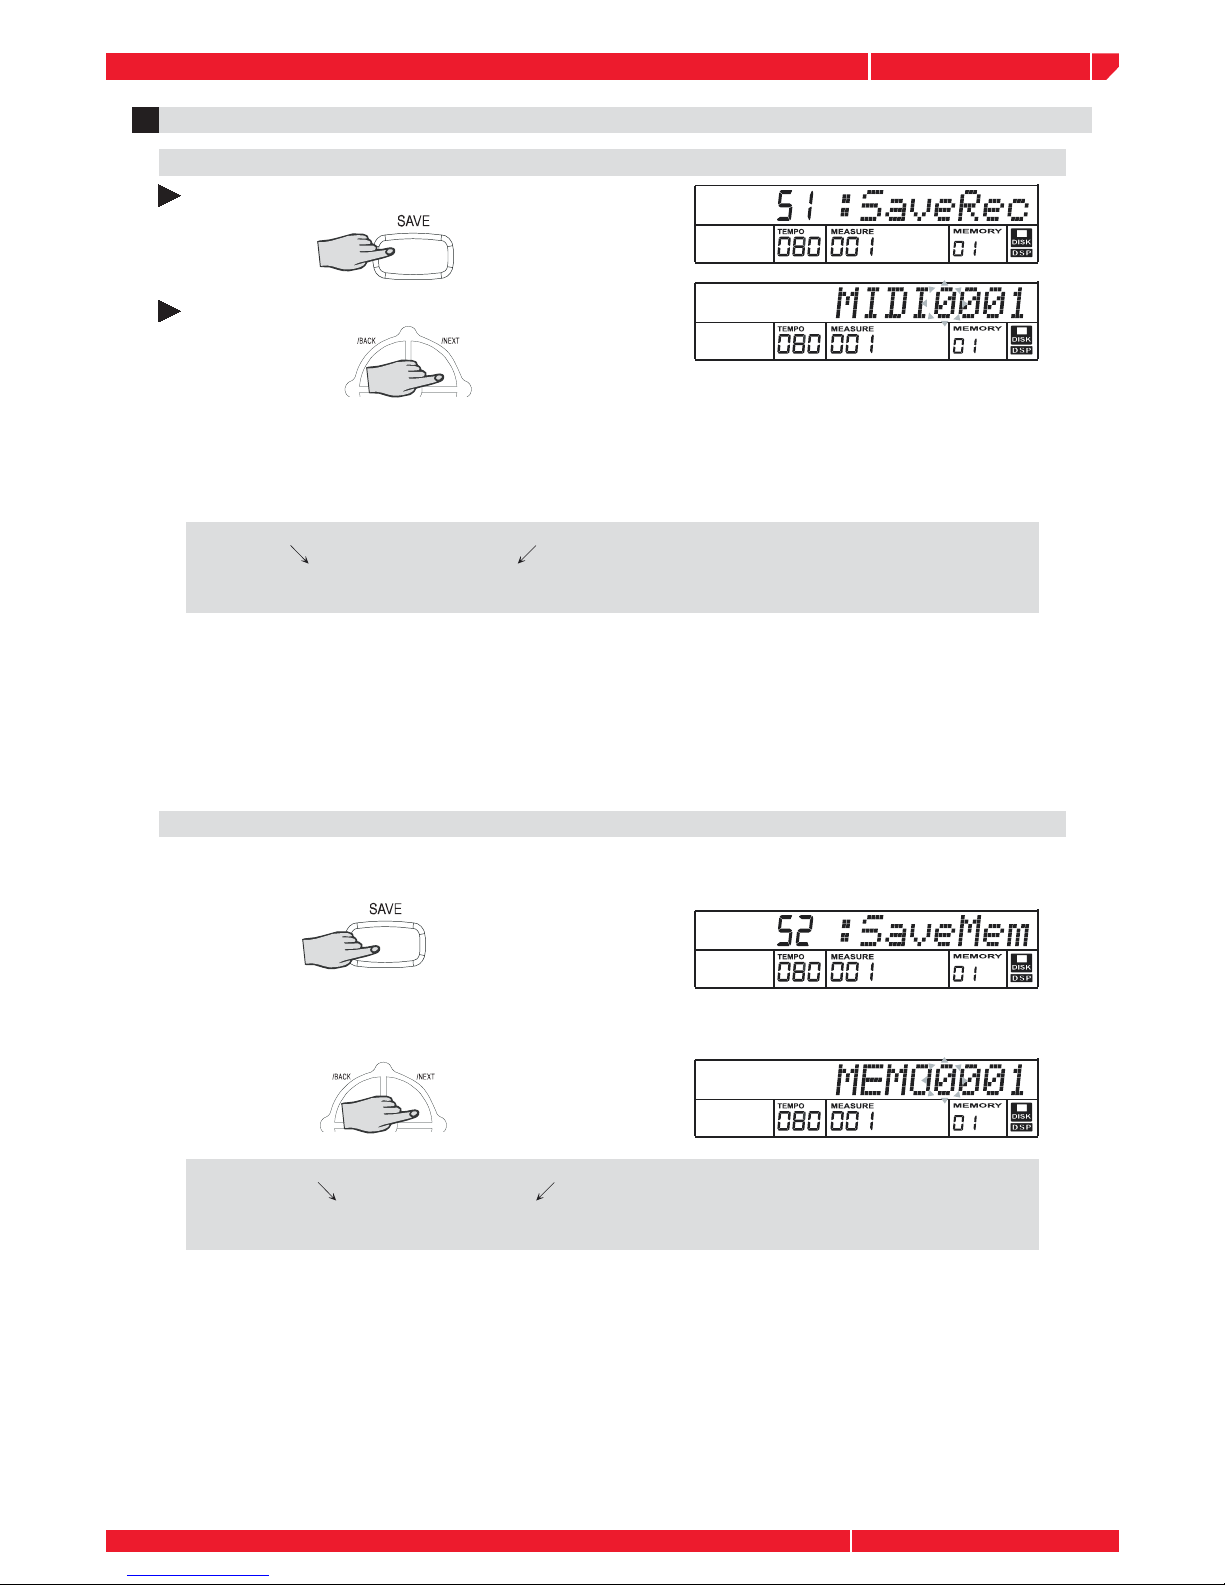
Press the SAVE button to select Disk Save mid menu.
SAVE MIDI
Press the NEXT button to enter the save midi fi le mode.
“MIDI0001” will appear on the LCD and the character “0” will fl ash.”H” will be changed by
keyboard. You can press some special keyboards keys to rename or delete it.
A standard midi format fi le will be saved in the disk. The fi le is always located in the root of
disk. This mid fi le can be continued to edit by MIDI function.
Input fi le name: If you want to enter a new name for the saved song, you can press the keyboard key [ ] or the keyboard key [ ] to move the position of character you want to modify
and then press the other special keyboard to name the song. A song name can consist of up
to 8 characters.
Press the NEXT button after entering new song name to confi rm. The message “OverWri?” will
appear on the LCD when there is a same song name in the disk. Press the BACK or [-] button
to rename . Press [+] button to overwrite the original fi le.
Note:
•The “DISK FUL” message will appear on the LCD if there is no more space in the disk.
•The LCD will display “Protect! “ if a write-protected disk is load.
•Press the [+]/[-],[BACK] or number button to return renaming song.
SAVE MEM
Press the SAVE button to select the Disk Save memory menu.
Press the NEXT button to enter save memory fi le mode. The LCD will display memory name.
Input fi le name: If you want to enter a new name for the new mem fi le, you can press the
keyboard key [ ] or the keyboard key [ ] to move the position of character you want to modify
and then press the other special keyboard to name the song. A mem name can consist of up
to 8 characters.
Press the NEXT button after entering new memory (mem) name to confi rm. The message
“OverWri?” will appear on the LCD when there is a same mem name in the disk. Press the
BACK or [-] button to rename . Press [+] button to overwrite the original fi le.
Note:
If there’s no disk inside the fl oppy driver, then there’s only “Play Mode” can be shown in
the utility menu. If there’s no memory fi les or record fi les in the disk, the related selections
would not be shown in the utility menu.
Page 33
owners manual
ps1600
Page29
ALBUM
STYLE
ABC
SPLIT
DUAL
PORTA
TOUCH
SUSTAIN
MELODY OFF
RECORDING
1
REALTIME RECORDING
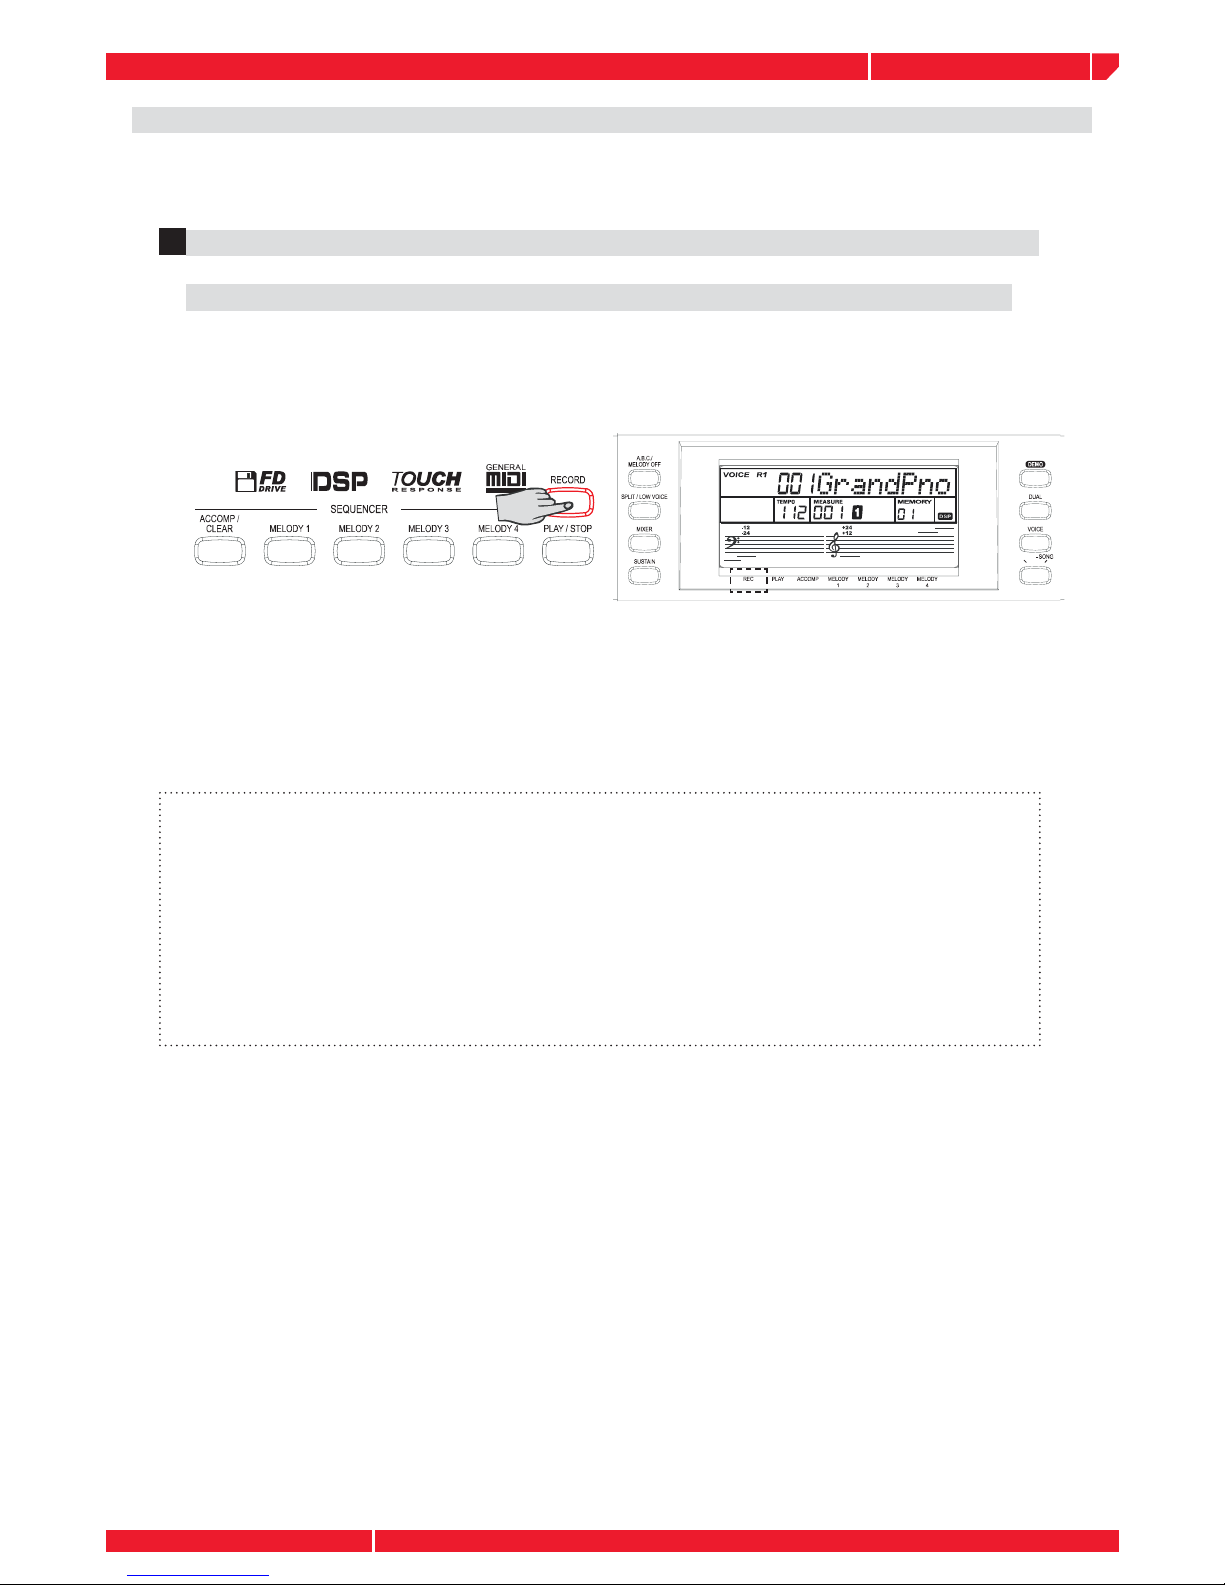
START RECORDING
One user song can be recorded, each song has 5 tracks (1 ACCOMP track, 4 MELODY tracks). The
song you have recorded can be saved to the fl oppy disk in Midifi le standard.
Press the RECORD button. The REC fl ag will appear on the LCD and enter realtime recording mode. The 4 beats will fl ash simultaneity on the LCD if you record accompany track. It
indicates waiting for record.
A track is automatically selected after entering the recording mode. You can also press melody
track buttons to select other tracks for recording.
The recording will start as soon as you play a note on the keyboard or press the START/STOP
button. The TEMPO data will display with current TEMPO value and the beat will appear when
turn on the LCD.
• If a track is started to record ,the data recorded before in this track will be deleted
and overwritten by new recorded data.
• If a track is started to record , the parameter of TUNE, TRANSPOSE will be
automatically resetted.
• You can turn on the metronome but it does not be recorded in user song when it is
recording.
• Press the START/STOP button to turn on or turn off the STYLE and do not exit record
mode when the keyboard is recording.
• Press the DEMO button to stop recording and switch to start playing demo song at
once, the recorded data in the keyboard will be lost.
Page 34
owners manual
ps1600
Page30
ALBUM
STYLE
ABC
SPLIT
DUAL
PORTA
TOUCH
SUSTAIN
MELODY OFF
STOP RECORDING
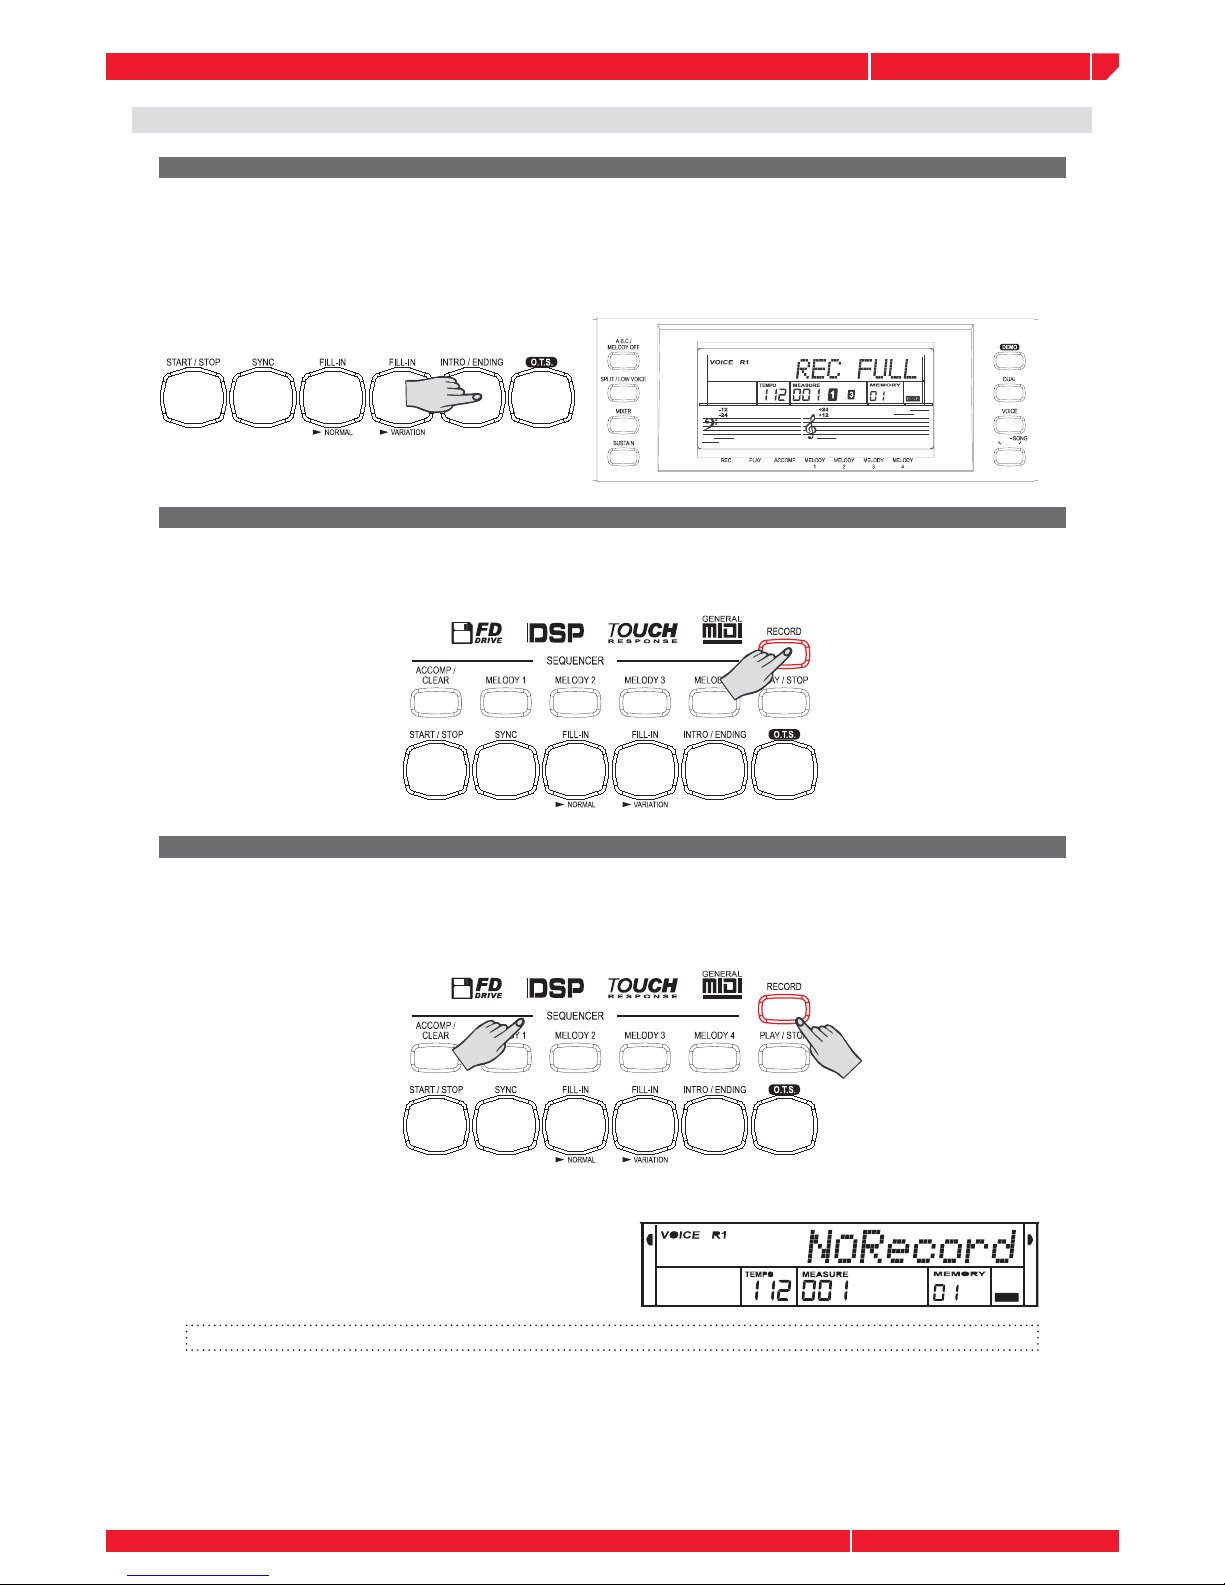
If the record memory is full in record mode, It will stop recording and exit record mode automatically . A style will be turned off at the same time. The “FULL” message will appear on the
LCD. It will also stop recording at the end of the style if pressing the ENDING button when
the STYLE is playing.
AUTO STOP
Pressing the RECORD button during the recording ps1600 will stop recording. If the recorded
track has data, the fl ag of this track will display on the LCD.
MANUAL STOP
PLAYBACK
Select track: press the [Melody1], [Melody4], [Accomp] button to select a record track. A lighting
fl ag of the track indicates the track you select. The fl ag of the track is not lighten , indicating
that there are no any record datas and the track is empty.
Playback: once you have selected the tracks press the [PLAY] button to begin playing .
If the USER SONG is empty or no tracks are not
selected, the LCD will display “NoRecord”. Press
the PLAY button to stop a playing song.
Caution: The recorded data will be clear after it power on or reset.
Page 35
owners manual
ps1600
Page31
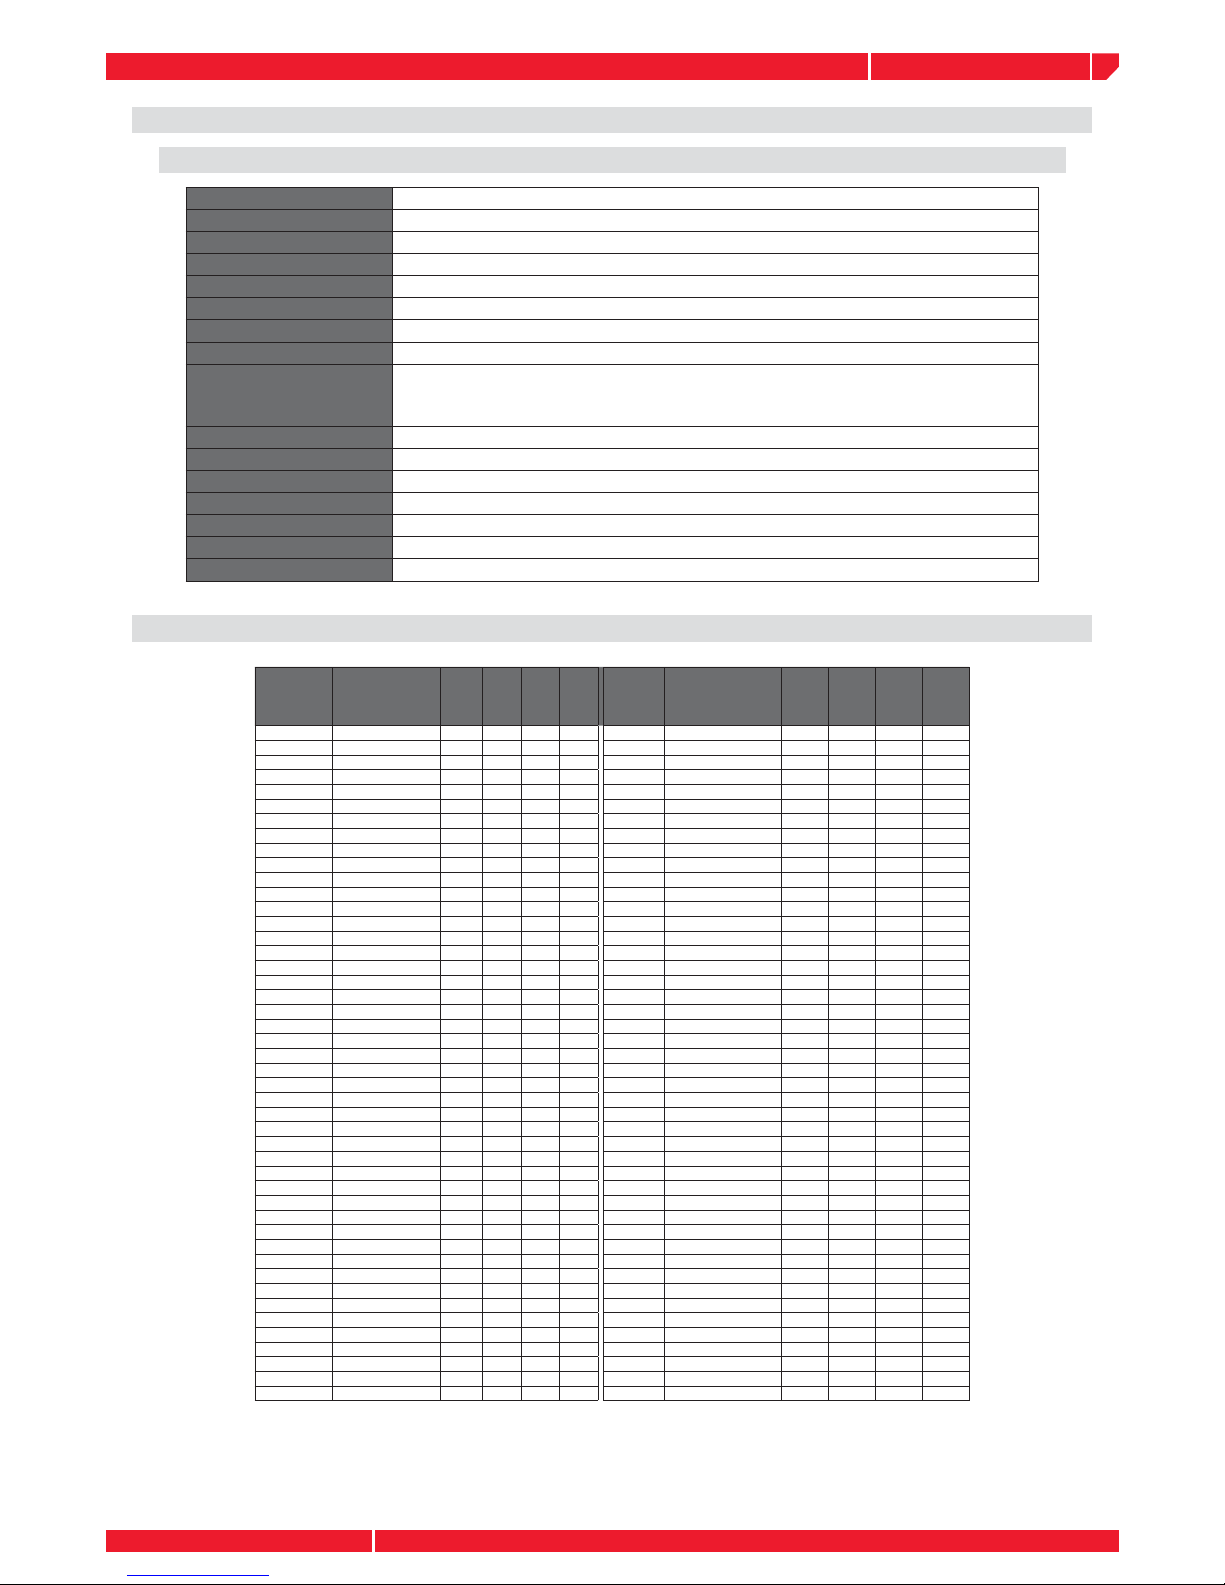
Keys
88 keys with Touch Response
Voices
178 voices (GM compatible)
Polyphony
64-note (max.)
Styles
100 styles (96 orchestral + 4 Piano styles)
Albums
92 albums
Accompaniment Control
Start/stop, Sync, Fill-IN A, Fill-IN B, Ending
Song
50 songs
DEMO Song
5 demo songs
Overall Control
Metro on/off, Transpose, Tune, Octave, Touch, Split Point, Key select, Portamento time,
Pad assign, DSP on/off, Reverb type, Reverb level, Chorus type, Chorus level, Local
on/off, Receive, Transmit, Default parameters, Default parameters
Sequencer
Realtime Record, Each record has 5 tracks (1 accomp track and 4 melody tracks)
MIDI
MIDI IN/OUT, channel receive or transmit
Disk
Play standard midi fi les, saves midi fi les from recording data
Speaker
25W + 25W
Connectors
Phones, Aux. Out, Pedals, MIDI IN/OUT
Weight
70 kg./154lbs
Dimensions
1380 (W) X 520 (D) X 830 (H) mm. - 54'' (W) X 20'' (D) X 32'' (H)
TECHNICAL SPECIFICATION
Family
Name
Preset Name Style#
Prg.
Ch.
(1-
128)
Bank
sel. 0
BPM Family
Name
Preset Name Style#
(01-96)
Realtime
Prg.Ch.
(1-128)
Bank
sel. 0
BPM
Pop/Rock DevotedToYou 16 2 0 115 Latin No. 5 Mambo 75 62 0 88
Pop/Rock OhCarolDiana 22 67 0 148 Latin CarlosSmooth 74 30 0 125
Pop/Rock Rockin’Clock 39 57 0 146 Latin Slightly Out 66 27 0 158
Pop/Rock Chuk B Good 20 30 0 173 Latin The Copa 5 19 0 127
Pop/Rock Shake Rattle 21 17 0 202 Latin Besame Molto 69 1 0 112
Pop/Rock Do The Twist 21 67 0 165 Latin One Note Sam 67 19 0 127
Pop/Rock Knockin Wood 23 62 0 124 Country RhinestoneBo 1 26 0 116
Pop/Rock Let’s Dance 21 18 0 173 Country CountryWoman 83 28 0 104
Pop/Rock Apache 69 28 0 146 Country Midnight Cby 7 26 8 110
Pop/Rock HonkyTonkGal 11 31 0 110 Country Low Places 6 28 0 118
Pop/Rock Go Surfi n’ 21 27 0 170 Country Stand By Man 62 27 8 98
Pop/Rock IfYouLeaveMe 17 61 0 91 Country Dukes o’Hazd 59 28 0 128
Pop/Rock Sleepwalkin’ 13 30 0 134 Country LetLoveFlow 58 26 8 108
Pop/Rock The Soul Man 23 62 0 124 Country On The Bayou 34 41 0 111
Pop/Rock Jailhouse 39 30 0 187 Country Magnifi cent7 61 49 0 139
Pop/Rock WhatevrIwant 19 31 0 128 Country Achy Breaky 62 28 0 128
Pop/Rock Elton’s Song 1 1 0 66 Classical Reed Flutes 64 74 0 154
Pop/Rock Love’s Power 13 5 0 63 Classical Air on G 1 69 0 75
Pop/Rock MsJones n’Me 6 65 0 92 Classical Greensleeves 28 75 0 111
Pop/Rock The Red Lady 16 74 0 69 Classical Troika 59 10 0 163
Pop/Rock She’s Lovely 3 23 0 121 Classical Canon in D 1 41 0 65
Ballroom Blue Danube 27 49 0 180 Classical Fur Elise 25 1 0 150
Ballroom Moonlight S. 50 72 0 87 Classical The Swan 30 43 0 88
Ballroom Millers Mood 52 62 0 181 Classical Symphony 40 59 49 0 211
Ballroom LastingWaltz 28 49 0 89 Classical Alla Turca 64 49 0 232
Ballroom SpanishGypsy 86 57 0 127 Classical William Tell 64 61 0 250
Ballroom Won’tBeCruel 39 62 0 190 Jazz ParisInApril 51 62 0 130
Ballroom JealousTango 32 24 0 122 Jazz Sept. In Rain 50 1 0 132
Ballroom SunnySideSt. 52 72 0 124 Jazz My Prince 53 12 0 138
Ballroom Mexican Hat 37 22 0 135 Jazz LeaveAutumn 49 1 0 151
Ballroom Beer Barrel 33 24 0 126 Jazz Another You 49 66 0 200
Ballroom Two For Tea 73 58 0 128 Jazz Close To You 50 61 0 102
International LasMananitas 28 57 0 149 Jazz SweetGeorgia 54 41 0 211
International Funiculi 37 26 0 135 Jazz An Easy Win 34 60 0 176
International La Biquina 88 57 0 181 Jazz 2 Feet 5 56 72 0 190
International Clari Polka 83 72 0 124 Jazz Raindrops 50 60 0 143
International Cielto Lindo 25 66 0 176 Party AuldLangSyne 28 49 0 162
International Pa Mujeres 70 22 0 90 Party HappyBirthday 28 57 0 104
International Munich 85 72 0 93 Party Merry Xmas 30 49 0 168
International VolverVolver 2 60 0 93 Party StarsStripes 27 62 0 104
International O Sole Mio 79 26 8 99 Party Marseillaise 34 57 0 112
International A Movie Star 81 90 0 120 Party Deutschland 81 62 0 85
Latin Spanish Eyes 79 1 0 113 Party GodSaveQueen 25 61 0 82
Latin Brasil 67 62 0 127 Party Hava Nagila 33 41 0 126
Latin Ipanema Girl 65 67 0 130 Party WeddingMarch 27 20 0 145
Latin Some Stupid 71 25 0 108 Party The Bride 27 62 0 177
ALBUMS LIST
APPENDIX
Page 36
owners manual
ps1600
Page32
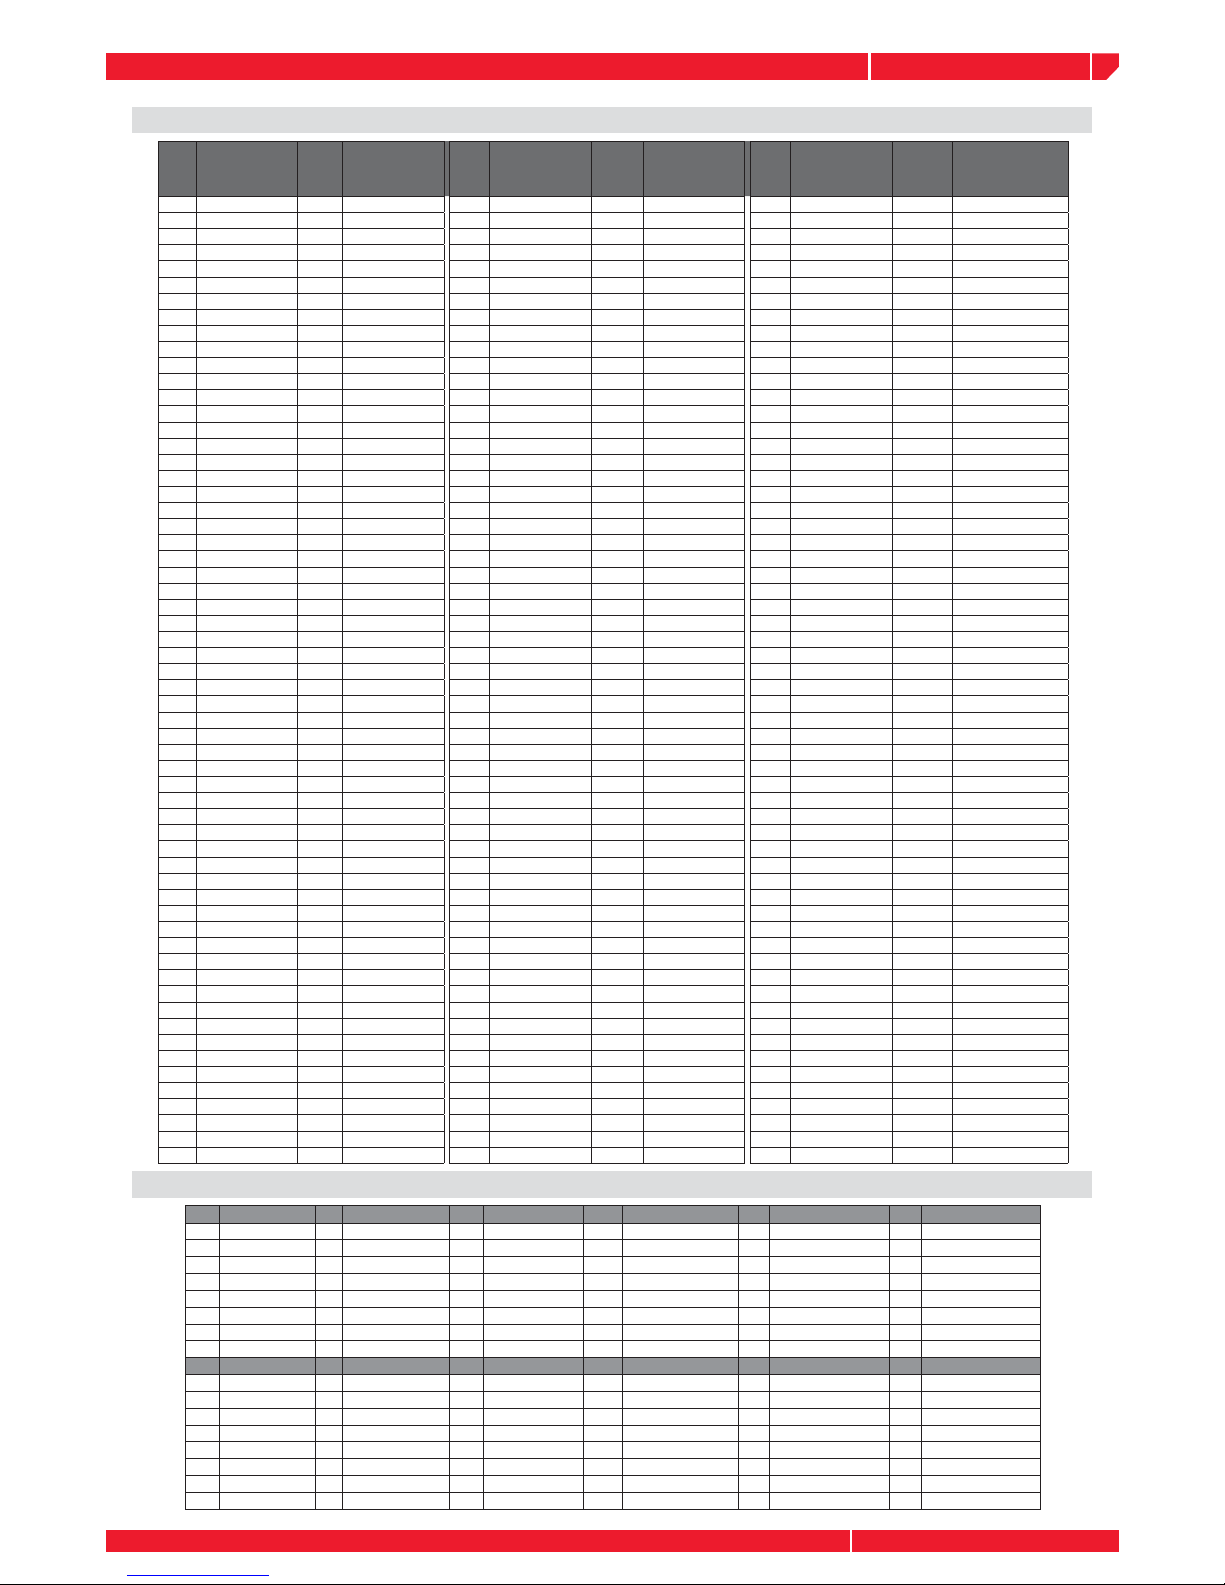
APPENDIX 1-VOICE LIST
APPENDIX 2-STYLE LIST
Display
Num.
SoundName
Patch
(ProgBank-
MSB)
Instr. / Drum-
Kit
Display
Num.
SoundName
Patch
(ProgBank-
MSB)
Instr. / Drum-
Kit
Display
Num.
SoundName
Patch
(Prog-
BankMSB)
Instr. / DrumKit
1 Piano1 0-0 Instrument 61 Fr.Horn 60-0 Instrument 121 FretNois 120-0 Instrument
2 Piano2 1-0 Instrument 62 Brass 61-0 Instrument 122 Breath 121-0 Instrument
3 Piano3 2-0 Instrument 63 SynBras1 62-0 Instrument 123 SeaShore 122-0 Instrument
4 HonkyPF 3-0 Instrument 64 SynBras2 63-0 Instrument 124 Birds 123-0 Instrument
5 RhodesPF 4-0 Instrument 65 Sopr.Sax 64-0 Instrument 125 Phone 1 124-0 Instrument
6 FMPiano 5-0 Instrument 66 Alto Sax 65-0 Instrument 126 Helicopt 125-0 Instrument
7 Harpsich 6-0 Instrument 67 TenorSax 66-0 Instrument 127 Applause 126-0 Instrument
8 Clavinet 7-0 Instrument 68 Bari.Sax 67-0 Instrument 128 Gun Shot 127-0 Instrument
9 Celesta 8-0 Instrument 69 Oboe 68-0 Instrument 129 STDdrum 0 DrumKit (ch.10)
10 Glocken 9-0 Instrument 70 Eng.Horn 69-0 Instrument 130 ROOMdrum 8 DrumKit (ch.10)
11 MusicBox 10-0 Instrument 71 Bassoon 70-0 Instrument 131 POWdrum 16 DrumKit (ch.10)
12 Vibes 11-0 Instrument 72 Clarinet 71-0 Instrument 132 ELECdrum 24 DrumKit (ch.10)
13 Marimba 12-0 Instrument 73 Piccolo 72-0 Instrument 133 ANLGdrum 25 DrumKit (ch.10)
14 Xilo 13-0 Instrument 74 Flute 73-0 Instrument 134 JAZZdrum 32 DrumKit (ch.10)
15 TubBell 14-0 Instrument 75 Recorder 74-0 Instrument 135 BRSHdrum 40 DrumKit (ch.10)
16 Santur 15-0 Instrument 76 PanFlute 75-0 Instrument 136 ORCdrum 48 DrumKit (ch.10)
17 Organ1 16-0 Instrument 77 Bottle 76-0 Instrument 137 SFXdrum 56 DrumKit (ch.10)
18 Organ2 17-0 Instrument 78 Shakuha. 77-0 Instrument 138 HarpsOct 6-8 Instrument
19 Organ3 18-0 Instrument 79 Whistle 78-0 Instrument 139 12strnGt 25-8 Instrument
20 Church 19-0 Instrument 80 Ocarina 79-0 Instrument 140 Hawai Gt 26-8 Instrument
21 ReedOrg 20-0 Instrument 81 SquareLd 80-0 Instrument 141 PhatSyn1 82-1 Instrument
22 Musette 21-0 Instrument 82 SawLead 81-0 Instrument 142 PhatSyn2 84-1 Instrument
23 Harmonic 22-0 Instrument 83 Calliope 82-0 Instrument 143 Sinus 126-15 Instrument
24 Bandoneo 23-0 Instrument 84 ChifLead 83-0 Instrument 144 Castanet 115-8 Instrument
25 NylonGt 24-0 Instrument 85 Charang 84-0 Instrument 145 Orch.BD 116-8 Instrument
26 HybridGt 25-0 Instrument 86 SoloVox 85-0 Instrument 146 GtCutNoi 120-1 Instrument
27 JazzGt 26-0 Instrument 87 Saw5th 86-0 Instrument 147 StrnSlap 120-2 Instrument
28 CleanGt 27-0 Instrument 88 BassLead 87-0 Instrument 148 KeyClick 121-1 Instrument
29 MutedGt 28-0 Instrument 89 Fantasy 88-0 Instrument 149 Rain 122-1 Instrument
30 OverdrGt 29-0 Instrument 90 WarmPad 89-0 Instrument 150 Thunder 122-2 Instrument
31 DistorGt 30-0 Instrument 91 PolySynt 90-0 Instrument 151 Wind 122-3 Instrument
32 HarmonGt 31-0 Instrument 92 SpaceVox 91-0 Instrument 152 Stream 122-4 Instrument
33 AcouBass 32-0 Instrument 93 BowGlass 92-0 Instrument 153 Bubbles 122-5 Instrument
34 FingBass 33-0 Instrument 94 MetalPad 93-0 Instrument 154 Dog 123-1 Instrument
35 PickBass 34-0 Instrument 95 HaloPad 94-0 Instrument 155 Gallop 123-2 Instrument
36 FretlBas 35-0 Instrument 96 SweepPad 95-0 Instrument 156 Bird 123-3 Instrument
37 SlapBas1 36-0 Instrument 97 IceRain 96-0 Instrument 157 Phone 2 124-1 Instrument
38 SlapBas2 37-0 Instrument 98 SoundTrk 97-0 Instrument 158 DoorCreak 124-2 Instrument
39 SyntBas1 38-0 Instrument 99 Crystal 98-0 Instrument 159 DoorSlam 124-3 Instrument
40 SyntBas2 39-0 Instrument 100 Atmosph. 99-0 Instrument 160 Scratch 124-4 Instrument
41 Violin 40-0 Instrument 101 Brightn. 100-0 Instrument 161 Windchim 124-5 Instrument
42 Viola 41-0 Instrument 102 Goblin 101-0 Instrument 162 CarEngin 125-1 Instrument
43 Cello 42-0 Instrument 103 EchoDrop 102-0 Instrument 163 Car Stop 125-2 Instrument
44 Contrabs 43-0 Instrument 104 StarThem 103-0 Instrument 164 Car Pass 125-3 Instrument
45 Tremolo 44-0 Instrument 105 Sitar 104-0 Instrument 165 CarCrash 125-4 Instrument
46 Pizzicat 45-0 Instrument 106 Banjo 105-0 Instrument 166 Soren 125-5 Instrument
47 Harp 46-0 Instrument 107 Shamisen 106-0 Instrument 167 Train 125-6 Instrument
48 Timpani 47-0 Instrument 108 Koto 107-0 Instrument 168 JetPlane 125-7 Instrument
49 Strings 48-0 Instrument 109 Kalimba 108-0 Instrument 169 Starship 125-8 Instrument
50 SlowStrn 49-0 Instrument 110 BagPipe 109-0 Instrument 170 BurstNoi 125-9 Instrument
51 SynStrn1 50-0 Instrument 111 Fiddle 110-0 Instrument 171 Laughing 126-1 Instrument
52 SynStrn2 51-0 Instrument 112 Shanai 111-0 Instrument 172 Scream 126-2 Instrument
53 Choir 52-0 Instrument 113 Tinkle 112-0 Instrument 173 Punch 126-3 Instrument
54 DooVox 53-0 Instrument 114 Agogo 113-0 Instrument 174 Heart Bt 126-4 Instrument
55 SyntVox 54-0 Instrument 115 SteelDrm 114-0 Instrument 175 Step 126-5 Instrument
56 Orch.Hit 55-0 Instrument 116 Woodblok 115-0 Instrument 176 Mach.Gun 127-1 Instrument
57 Trumpet 56-0 Instrument 117 Taiko 116-0 Instrument 177 LaserGun 127-2 Instrument
58 Trombone 57-0 Instrument 118 Melo.Tom 117-0 Instrument 178 Explosn. 127-3 Instrument
59 TubaBass 58-0 Instrument 119 Syn.Drum 118-0 Instrument
60 MuteTrum 59-0 Instrument 120 Rev.Cymb 119-0 Instrument
POP1 POP2 ROCK TRADITIONAL1 TRADITIONAL2 DANCE
01 8BeatSlow 09 LiteFunk 17 SoftRock 25 Waltz1 33 6/8Polka 41 DiscoSamba
02 8BtMedium 10 6/8Sweet 18 HeavyRock 26 Waltz2 34 Folk2/4 42 DiscoCha
03 8BeatFast 11 6/8Blues 19 80LiteRock 27 Real Vienna 35 ItalianFolk1 43 JamiroDance
04 8BeatLatin 12 EpicBallad 20 GuitarRock 28 SlowWaltz 36 ItalianFolk2 44 70sDance
05 8BeatPop 13 PopBallad 21 SurfTwist 29 Musette 37 Tarantella1 45 HouseDance
06 EasyPop 14 PopBallad12 22 Teenage50s 30 Mazurka1 38 Tarantella2 46 SoulTown
07 SmoothPop 15 BlueBallad 23 60sSoul 31 Mazurka2 39 Jive 47 OrchDisco
08 PopShuffl e 16 EasyBallad 24 80sBallad 32 Tango 40 HappyDance 48 GloryDisco
JAZZ COUNTRY LATIN1 LATIN2 WORLD1 WORLD2
49 BasicTrio 57 CountryPop1 65 Bossa1 73 ChaCha 81 GermanPop 89 Zeibekico
50 SlowSwing 58 CountryPop2 66 Bossa2 74 PopChaCha 82 PopWaltz 90 Syrtos
51 BasieBand 59 CountryBeat 67 Samba1 75 Mambo 83 PartyPolka 91 Kalamat
52 HotBigBand 60 CountrySwing 68 Samba2 76 Salsa 84 Boehmish 92 Tsamikos
53 JazzWaltz 61 CountryFox 69 Beguine1 77 Merengue 85 EgerWaltz 93 Turk9/8
54 Django 62 ModCountry 70 Beguine2 78 FastRhumba 86 PasoDoble 94 Turk7/8
55 Charleston 63 Unplugged1 71 PopBeguine 79 RhumbaClass 87 Flamenco 95 Turk5/8
56 Dixieland 64 Unplugged2 72 LatinBand 80 Guajira 88 Sevillana 96 Duek
Page 37
owners manual
ps1600
Page33
Chord Chord Name/[Abbreviation] Normal Voicing
Chord (C) Display
C
Major [M]
1-3-5 C C
C6
Major sixth [6]
1-(3) -5- 6 C6 C6
CM7
Major seventh [M7]
1-3-(5)-7 CM7 CM7
CM7#11
Major seventh sharp Eleventh [M7#11]
1-(2) -3-#4-(5) -7 CM7#11 CM7#11
Cmadd9
Major add ninth [Madd9]
1-2-3-5 Cmadd9 CM (9)
CM9
Major ninth [M9]
1-2-3-(5) -7 CM9 CM7 (9)
C6 9
Major sixth add ninth [6 9]
1-2-3-(5) -6 C6 9 C6 (9)
Caug
Augmented [aug]
1-3-#5 Caug Caug
Cm
Minor [m]
1-b3-5 Cm Cm
Cm6
Minor sixth [m6]
1-b3-5-6 Cm6 Cm6
Cm7
Minor seventh [m7]
1-b3-(5) -b7 Cm7 Cm7
Cm7b5
Minor seventh fl atted fi fth [m7b5]
1-b3-b5-b7 Cm7b5 Cm7b5
Cmadd9
Minor add ninth [madd9]
1-2-b3-5 Cmadd9 Cm (9)
Cm9
Minor ninth [m9]
1-2-b3-(5) -b7 Cm9 Cm7 (9)
Cm11
Minor eleventh [m11]
1-(2) -b3-4-5-(b7) Cm11 Cm7 (11)
CmM7
Minor major ninth [mM7]
1-b3-(5) -7 CmM7 CmM7
CmM9
Minor major ninth [mM9]
1-2-b3-(5) -7 CmM9 CmM7 (9)
Cdim
Diminished [dim]
1-b3-b5 Cdim Cdim
Cdim7
Diminished seventh [dim7]
1-b3-b5-6 Cdim7 Cdim7
C7
Seventh [7]
1-3-(5) -b7 C7 C7
C7sus4
Seventh suspended fourth [7sus4]
1-4-5-b7 C7sus4 C7sus4
C7b5
Seventh fl atted fi fth [7b5]
1-3-b5-b7 C7b5 C7b5
C7 9
Seventh ninth [7 9]
1-2-3-(5) -b7 C7 9 C7 (9)
C7#11
Seventh sharp eleventh [7#11]
1-2-3-#4-(5) -b7 or 1-(2) -3-#4-5-b7 C7#11 C7 (#11)
C7 13
Seventh thirteenth [7 13]
2-3-5-6-b7 C7 13 C7 (13)
C7b9
Seventh fl atted Ninth [7b9]
1-b2-3-(5) -b7 C7b9 C7 (b9)
C7b13
Seventh fl atted thirteenth [7b13]
1-3-5-b6-b7 C7b13 C7 (b13)
C7#9
Seventh sharp ninth [7#9]
(1) -#2-3-(5) -b7 C7#9 C7 (#9)
CM7aug
Major seventh augmented [M7aug]
1-3-#5-7 CM7aug CM7aug
C7aug
Seventh augmented [7aug]
(1) -3-#5-b7 C7aug C7aug
Csus4
Suspended Fourth [sus4]
1-4-5 Csus4 Csus4
C1+2+5
One plus tow plus fi ve [1+2+5]
1-2-5 C1+2+5 C
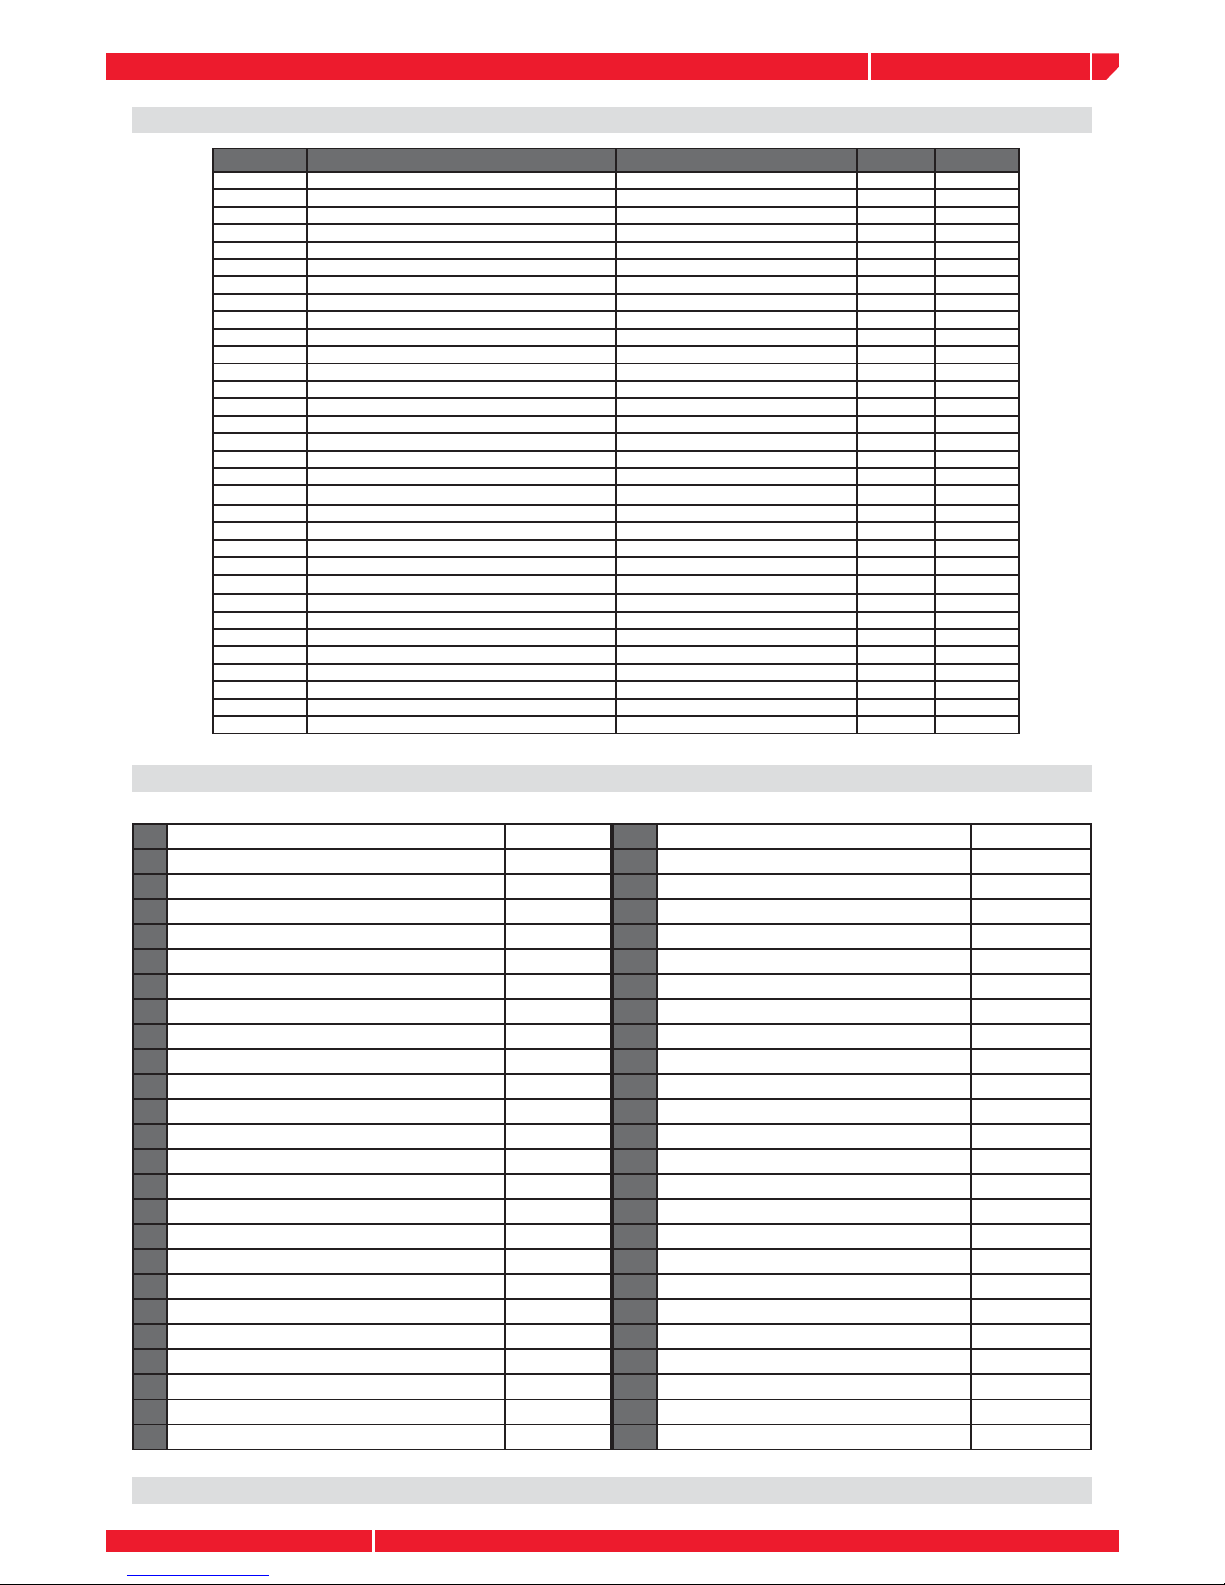
CHORD TABLE
SONG LIST
1
The Entertainer
S. Joplin
2
The Old Gray Mare
3
Brahms Lullaby
J. Brahms
4
Carmen
G. Bizet
5
The Stage Coach
6
Nocturne
F. Chopin
7
Back Arioso
J. S. Bach
8
Symphony No.45 "Farewell" Mov.1
F. J. Haydn
9
Heidenröslein
F. Schubert
10
German Dance No.6 In E
F. J. Haydn
11
Canon
Pachelbel
12
Sonata
W. A Mozart
13
Flute Sonata No 7 In A Minor Mov.4
G.F. Handel
14
Concerto In F Op.4 No.5 Mov.3
G.F. Handel
15
Turkey In The Straw
16
Old Black Joe
S. Foster
17
Rondo
W.A. Mozart
18
Londonderry Air
19
My Bonnie
20
Nocturne Op.15 No.2 In F#
F. Chopin
21
German Dance No.1 In D
F. J. Haydn
22
Red River Valley
23
Etudes Op.10 No.3 In E Major
F. Chopin
24
Troika
25
Nocturnes Op.62 No.2 In E
F. Chopin
26
The Sideway
Folk Song
27
Ave Maria
F. Schubert
28
Der Deitcher’s Dog
S. Winner
29
Joy To The World
30
Santa Claus Is Coming To Town
31
Silent Night
F. Gruber
32
Amazing Grace
33
Sippin Cider Through A Straw
34
Battle Hymne Of The Republic
35
Carry Me Back To Old Virginny
36
Oh Susanna
37
Old Floks At Home
38
Mazurka For Piano Op.6 No.1
F. Chopin
39
Rondo 1
W. A. Mozart
40
O’sole Mio
41
Nocturnes Op.32 No.2 In Ab
F. Chopin
42
Cello Concerto In D Mov.2 Adagio
F. J. Haydn
43
Chant San Sparoles Op.40 No.6
P. Tschaikowsky
44
German Dance No.5 In D
F. J. Haydn
45
Impromptu
F. Chopin
46
Nocturne
47
Minuet
48
Invention A 2 Voix
J.s. Bach
49
Gavotte
F. Gossec
50
Spring
F. Mendelssohn
Page 38
owners manual
ps1600
Page34
Function
T
ransmi
tted
Recognized Remarks
Basic Default
Channel Changed
1ch
1-16ch
ALL
1-16ch
Default
Mode Messages
Altered
X
X
***********
3
3
X
Note
Number: True voice
***********
Velocity : Note on
No te off
9nH,V=1-127
X 9nH,V=0
9nH,V=1-127
X (9nH,V=0;8nH,V=0-127)
Af ter key' s
Touch Ch' s
X
X
X
X
Pitch Bend
Control 0
Change 1
5
6
7
10
11
64
65
66
67
80
81
91
93
120
121
123
O
O
O
O
O
X
X
O
O
X
O
O
O
O
O
X
X
O
O
O
O
O
O
O
O
O
O
O
O
O
O
O
O
O
O
O
Bank Select
Modulation
Portamento Time
Data Entry
Volume
Pan
Expression
SustainPedal
Portamento ON/OFF
Sostenuto Pedal
Soft Pedal
Reverb Program
ChorusProgram
Reverb Level
Chorus Level
All SoundOff
Reset AllControllers
All Notes Off
Program
Change : true
O
***********
O
System Exclusive X
O
System : SongPosition
Common:Song Select
: Tune
X
X
X
X
X
X
System :Clock
Real Time :Commands
X
X*1
X
X*1
Aux :LOCAL ON/OFF
:All Notes Off
Messages :Active sense
:Reset
X
X
X
X
X
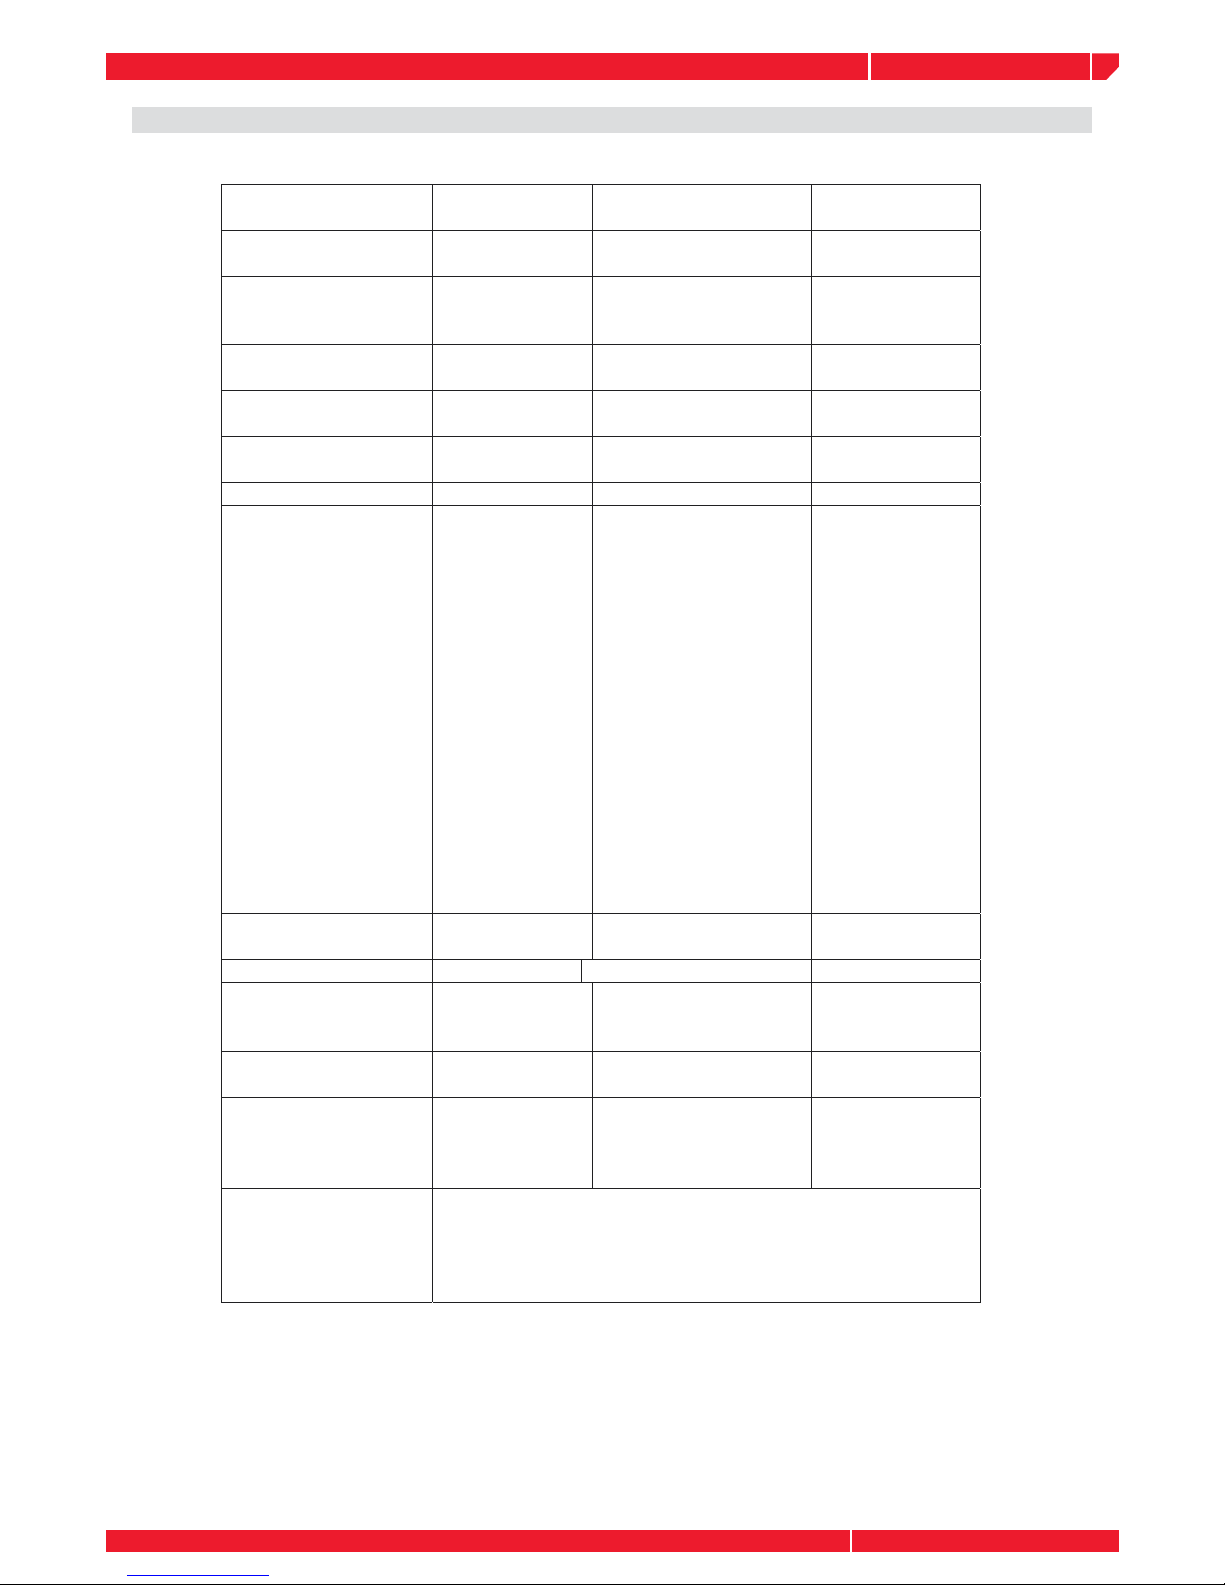
Notes: *1
When theaccompanimentis started, anFAH message is transmitted.When
accompanimentis stoped, an FCH message is transmitted.When an FAH
message is receiv
ed, accompanimentis started. When an FCH message
is received, accompanimentis stoped.
Mode 1: OMNION, POLY Mode 2 : OMNI ON, MONO : YES
Mode 3: OMNIOFF , POLY Mode 4 : OMNI OFF , MONO X : NO
O
0-127 0-127
0-127
O
0-127
MIDI IMPLEMENTATION CHART
Page 39

Note : This equipment has been tested and found to comply with the limits for a Class B digital device, pursuant to Part 15 of FCC Rules. These limits are designed to provide reasonable protection against harmful
interference in a residential installation. This equipment generates, uses, and can radiate radio frequency
energy and, if not installed and used in accordance with the instructions, may cause harmful interference
to radio communications.
However, there is no guarantee that interference will not occur in a particular installation. If this instrument
does cause harmful interference to radio or television reception, which can be determined by turning the
instrument off and on, the user is encouraged to try to correct the interference by one or more of the following measures:
•Reorient or relocate the receiving antenna.
•Increase the separation between the equipment and the receiver.
•Connect the equipment into an outlet on a circuit different from that to
which the receiver is connected.
•Consult the dealer or an experienced radio/TV technician for help.
CAUTION : Changes or modifi cations to this product not expressly approved by the manufacturer could
void the user’s authority to operate this product.
FEDERAL COMMUNICATIONS COMMISSION
Page 40
Generalmusic S.p.A. Via delle Rose, 12
47842 S.Giovanni in Marignano (RN) - Italy
Tel. +39 0541 959511Fax +39 0541 957404 www.generalmusic.com
STOCK CODE 271468
Specifi cations are subject to change without prior notice.
PRINTED IN CHINA
 Loading...