

Page 1
Owner’s manual
Page 2

General safety instructions
Power source
• Be sure that your local AC main voltage matches the voltage specified on the name plate before connecting to the mains.
• DC power cannot be used to power this instrument.
Handling the power cord
• Never touch the power cord or its plug with wet hands.
• Never pull on the cord to remove it from the wall socket, always pull the plug.
• Never forcibly bend the power cord.
• If the power cord is scarred, cut or broken, or has a bad contact, it will be a potential fire hazard or source of serious electric shock.
NEVER use a damaged power cord; have it replaced by a qualified technician.
If water gets into the instrument
• Remove the power cord from the wall socket at once, and contact the store where the unit was purchased.
• The top surface of your instrument should never be used as a shelf for flower vases and other containers which hold liquids.
Metal items etc. inside the unit
• Do not permit metal items or other materials to fall inside the unit. Metal items may result in electric shock or damage.
• Be especially careful with regards to this point when children are near the unit. They should be warned never to try to put anything inside, and
never to slide a hand into the unit.
• If articles do fall inside, remove the power cord from the wall socket at once and, if necessary, contact the store where the unit was purchased.
• As a general precaution, never open the unit and touch or tamper with the internal circuitry.
If the instrument plays in an abnormal way
• Turn off the power immediately, remove the power cord from the main outlet and contact the store where it was purchased.
• Discontinue using the unit at once. Failure to do so may result in additional damage or other unexpected damage or accident.
General user maintenance
• Clean the cabinet and keys of your instrument using a soft, clean, slightly damp cloth and polish with a soft, dry cloth.
• Never use industrial cleaners, detergents, abrasive cleansers, waxes, solvents or polishes as they may damage the instrument finish.
• Always turn off the power supply after use and never turn the unit on and off repeatedly in quick succession as this places an undue load on
the electronic components.
The information in this publication has been carefully prepared and checked. The manufacturers
however decline all liability for eventual errors. All rights are reserved. This publication may not
be copied, photocopied or reproduced in part or in whole without prior written consent from
Generalmusic S.p.A. Generalmusic reserves the right to apply any aesthetic, design or function
modifications it considers necessary to any of its products without prior notice. Generalmusic
declines all liability for damage to property or persons resulting from improper use of the
instrument.
© 1999 Generalmusic S.p.A. All rights reserved.
Page 3

○○○○○○○○○○○○○○○○○○○
Contents i
Contents
Introduction ....................................................................................... Intro. a
The Owner’s manual ......................................................................... Intro. a
Upgrading your instrument................................................................ Intro. b
SYSTEM RESET .............................................................................. Intro. b
• Quick Guide
• Instrument layout
Front panel PS1000/PS1300 .................................................................. 1. 1
Rear panel (connections) ........................................................................ 1. 3
The graphic LCD Display ........................................................................ 1. 4
• Selection, Navigation and Data Entry
Selection devices .................................................................................... 1. 5
Navigation and Data Entry devices ......................................................... 1. 5
Enter / Escape......................................................................................... 1. 5
Text entry................................................................................................. 1. 6
The Alphanumeric keyboard configuration.............................................. 1. 6
• Setting up and getting to know the instrument
Power switch and Headphones............................................................... 1. 7
Connecting a set of headphones ............................................................ 1. 7
Pedal Connection.................................................................................... 1. 7
Adjusting the General Volume of the instrument..................................... 1. 8
Using the Volume Pedal (optional).......................................................... 1. 8
Play with Auto Accompaniment Styles .................................................... 1. 9
Balance keyboard and accompaniment sounds ................................... 1. 10
The GRAND PIANO button................................................................... 1. 10
Demo Song ........................................................................................... 1. 11
Listen to the Demo Songs..................................................................... 1. 11
To listen to the chained demo songs..................................................... 1. 11
Multimedia............................................................................................. 1. 12
Selecting Sound Presets (ROM) ........................................................... 1. 13
The Sound Groups section ................................................................... 1. 13
Reconfiguring the Presets using the Keyboard Activators .................... 1. 15
The User Sound Presets....................................................................... 1. 16
Selecting the Programmable Presets.................................................... 1. 17
Playing with or without the Effects ........................................................ 1. 18
Transposing the instrument up or down................................................ 1. 18
Transposing a section in octave steps .................................................. 1. 19
Play All Songs ....................................................................................... 1. 20
Song Play - Direct from Disk ................................................................. 1. 20
Recording a Song Style ........................................................................ 1. 21
Page 4
○○○○○○○○○○○○○○○○○○○○○○○○○○○○○○○○○○○○○○○○○○○
ii Contents
• User Guide
Ch. 1 • Sounds
Sounds, the Sound Banks, 1-2-3 and MIDI Bank 6 ................................ 2. 2
Drumkits .................................................................................................. 2. 2
Samples .................................................................................................. 2. 2
Selecting single Sounds.......................................................................... 2. 2
Ch. 2 • The Presets
The Sound Presets ................................................................................. 2. 5
The RealTime Programmable Presets.................................................... 2. 5
Selecting Programmable Presets............................................................ 2. 6
Editing the Programmable Presets ......................................................... 2. 7
The Preset parameters ........................................................................... 2. 9
Store Preset .......................................................................................... 2. 10
To memorize changes to the current Prog. Preset................................ 2. 10
Save changes to a different Prog. Preset (or create a new one) .......... 2. 10
Changing the Prog. Preset name.......................................................... 2. 11
To restore the original Preset settings................................................... 2. 11
Ch. 3 • Styles
About the PS1000 Styles ...................................................................... 2. 12
The Style Preset.................................................................................... 2. 12
Enabling/disabling the automatic accompaniments .............................. 2. 12
The Single Touch Play button ............................................................... 2. 13
Selecting and playing the Styles ........................................................... 2. 13
Starting the Style................................................................................... 2. 15
Chord symbols ...................................................................................... 2. 15
The Style Volume and Balance............................................................. 2. 16
The automatic functions - Intro, Ending, Key Start, Key Stop,
Variation, Fill, Fade .......................................................................... 2. 17
Activate the automatic functions using a switch pedal .......................... 2. 18
The Arranger section............................................................................. 2. 19
Arrange On/Off...................................................................................... 2. 19
Memory ................................................................................................. 2. 19
Lower Memory ...................................................................................... 2. 19
Bass To Lowest ..................................................................................... 2. 19
The Style/Tempo Lock button................................................................ 2. 20
Style Lock.............................................................................................. 2. 20
Tempo Lock........................................................................................... 2. 20
The Style Tempo ................................................................................... 2. 20
Arrange Mode ....................................................................................... 2. 21
Fingered 1 ............................................................................................. 2. 21
Fingered 2 ............................................................................................. 2. 21
One finger ............................................................................................. 2. 21
FreeStyle............................................................................................... 2. 21
The Split Menu ...................................................................................... 2. 22
Split Point .............................................................................................. 2. 22
Chord Lock (ChoLock) .......................................................................... 2. 22
DSP Lock .............................................................................................. 2. 22
Metronome ............................................................................................ 2. 23
Harmony................................................................................................ 2. 23
Reverb and Chorus ............................................................................... 2. 24
Ch. 4 • Disk
Floppy Disk ........................................................................................... 2. 25
The Floppy Disk operations .................................................................. 2. 25
Incorporated functions........................................................................... 2. 25
Page 5

○○○○○○○○○○○○○○○○○○○
Contents iii
About Files ............................................................................................ 2. 26
Load ...................................................................................................... 2. 28
Load procedure ..................................................................................... 2. 28
Save ...................................................................................................... 2. 29
Delete.................................................................................................... 2. 31
Delete file procedure ............................................................................. 2. 31
Format................................................................................................... 2. 32
Disk format procedure........................................................................... 2. 32
Utility ..................................................................................................... 2. 33
General disk handling information......................................................... 2. 34
Ch. 5 • Song Styles
What is a Song Style?........................................................................... 2. 36
Song Style Recording ........................................................................... 2. 36
Recording a Song Style using a ROM Style ......................................... 2. 37
Recording an empty Song Style............................................................ 2. 38
Selecting and playing back Song Styles ............................................... 2. 39
Play along with the Song Style.............................................................. 2. 40
Clear Song Style ................................................................................... 2. 41
Ch. 6 • Songs
What is a Song?.................................................................................... 2. 42
The Song Preset ................................................................................... 2. 42
The Play all Songs button ..................................................................... 2. 42
Selecting and playing Songs................................................................. 2. 42
The Melody Off button........................................................................... 2. 43
Play along with the Song....................................................................... 2. 43
Programming the Song Preset.............................................................. 2. 44
Clear Song ............................................................................................ 2. 45
Displaying Lyrics ................................................................................... 2. 46
To display lyrics on an external monitor or domestic TV ....................... 2. 46
Ch. 7 • Digital Signal Processor
Assigning the effect types ..................................................................... 2. 47
Deactivating (bypassing) the effects ..................................................... 2. 48
Adjusting the Send levels...................................................................... 2. 48
Ch. 8 • Midi/General
To gain access to the Midi/General functions........................................ 2. 49
The General functions in detail ............................................................. 2. 50
MIDI and the MIDI functions.................................................................. 2. 53
What is MIDI?........................................................................................ 2. 53
The PS1000 MIDI interface................................................................... 2. 53
About MIDI channels............................................................................. 2. 54
The MIDIENT menu .............................................................................. 2. 55
Midi programming procedure ................................................................ 2. 55
Principal MIDI applications.................................................................... 2. 60
System Exclusive .................................................................................. 2. 62
Ch. 9 • Hard Disk (PS1300 only)
Load from Hard Disk partition ............................................................... 2. 65
Load procedure ..................................................................................... 2. 65
Partition information .............................................................................. 2. 66
Save to Hard Disk partition ................................................................... 2. 67
Save procedure..................................................................................... 2. 67
Creating a new partition (New Part) ...................................................... 2. 69
Delete.................................................................................................... 2. 70
Delete from Hard Disk partition ............................................................. 2. 70
Format................................................................................................... 2. 71
Page 6

○○○○○○○○○○○○○○○○○○○○○○○○○○○○○○○○○○○○○○○○○○○
iv Contents
Utility ..................................................................................................... 2. 72
Load Mode ............................................................................................ 2. 72
Copy File ............................................................................................... 2. 72
Hard Disk Protect .................................................................................. 2. 75
Hard Disk Format .................................................................................. 2. 75
Ch. 10 • Audio Vocal Processor (PS1300 only)
The A.V.P. interface............................................................................... 2. 77
Activating the AVP interface and adjusting the Mic/Line signal............. 2. 78
Processing the Mic/Line signals with the multi-effects processor ......... 2. 79
Using the Vocal Harmonizing functions................................................. 2. 79
Selecting the A.V.P. presets .................................................................. 2. 80
The A.V.P. functions .............................................................................. 2. 81
Vocal Track, Vocal Octave, Vocal Sustain............................................. 2. 81
Track Mute ............................................................................................ 2. 82
Mic/Edit functions .................................................................................. 2. 83
A.V.P. parameters memorized to the Presets........................................ 2. 84
A.V.P general parameters ..................................................................... 2. 84
•Reference Section
Technical Specifications PS1000 ........................................................ Ref. 3
Technical Specifications PS1300 ........................................................ Ref. 4
Index ..................................................................................................... Ref. 5
• Appendix
ROM Sound table (GM - GMX - Sample)............................................... A. 2
MIDI BANK 6 ROM Sound table ............................................................ A. 2
Style Table.............................................................................................. A. 3
User Style, Song Style, Song Tables ..................................................... A. 3
Programmable Presets Table................................................................. A. 3
Effect tables ........................................................................................... A. 4
Reverb table........................................................................................... A. 4
Chorus table.......................................................................................... A. 4
Drumkit tables ........................................................................................ A. 5
Recognized chords - example in the key of C........................................ A. 8
Recognized Control Change messages (MIDI Controllers) ................. A. 10
Control Change on tracks .................................................................... A. 10
Page 7
Introduction a
○○○○○○○○○○○○○○○○○○○○○○○
Introduction
Thank you for purchasing the new GEM Digital Piano Worstation PS1000/
PS1300 by Generalmusic.
Multimedia Facilities
The PS1000 and PS1300 are Multimedia Piano Workstations which offer several ways of interfacing with the instruments.
The new PS1000 and PS1300 are packed with an enormous database of
Sounds, Presets, Programmable Presets and Styles, to give musicians the essential tools for just about any situation.
Using the Karaoke feature, a group of singers can follow the lyrics projected on
a television (or other video projection device). A guitar player (or any other
electronic musical instrument) can connect to the Audio inputs and play through
the PS1000/PS1300 amplification system.
In addition to a floppy disk drive and all the features of the PS1000, the PS1300
has a Hard Disk and the Audio Vocal Processor. The PS1300 Hard Disk contains a large selection of User Styles, Songs, etc., while the Audio Vocal Processor provides vocal harmonizing capabilities.
The Owner’s manual
To ensure long, trouble-free operation, please read this manual carefully. It is
divided into three parts; a Guick Guide, a User Guide and an Appendix.
The Quick Guide introduces you to the functions of the control panel and shows
you how to move around the display. Graphical illustrations are included for
better understanding of these examples.
Once you are acquainted with the instrument’s basic functions, refer to the
User Guide to discover the full potential of your instrument.
The PS1000 functions explained in the manual are also intended for the PS1300.
The additional features provided by the PS13000 (Hard Disk and Audio Vocal
Processor) are explained in separate chapters at the end of the User Guide:
PS1300 Hard Disk
and
PS1300 Audio V ocal Processor
.
The Appendix contains various tables, MIDI information and an alphabetical
index.
Page 8
b Introduction
○○○○○○○○○○○○○○○○○○○○○○○○○○○○○○○○○○○○○○○
Some useful preliminary notes
Please read the following important preliminary notes before starting to play
your instrument.
Do not place floppy disks on top of speakers, near magnets, telephones, or
other sources of electromagnetic fields. The disk contents could be damaged.
Upgrading your instrument
T o implement new functions in your PS1000/1300, you can upgrade the instrument as described below.
1. Before turning on the PS1000/1300, insert the floppy disk containing the
latest release of the Generalmusic Operating System.
2. Turn on the instrument. The message “Load OS?” appears in the display.
3. Press ENTER to confirm (pressing ESCAPE cancels the operation).
4. After pressing ENTER, the display shows the message “Loading!”.
5. When the operation is complete, the PS1000/PS1300 is ready to play.
NB. To check the version of the Operating System, select the last page of the
MIDI/GENERAL function.
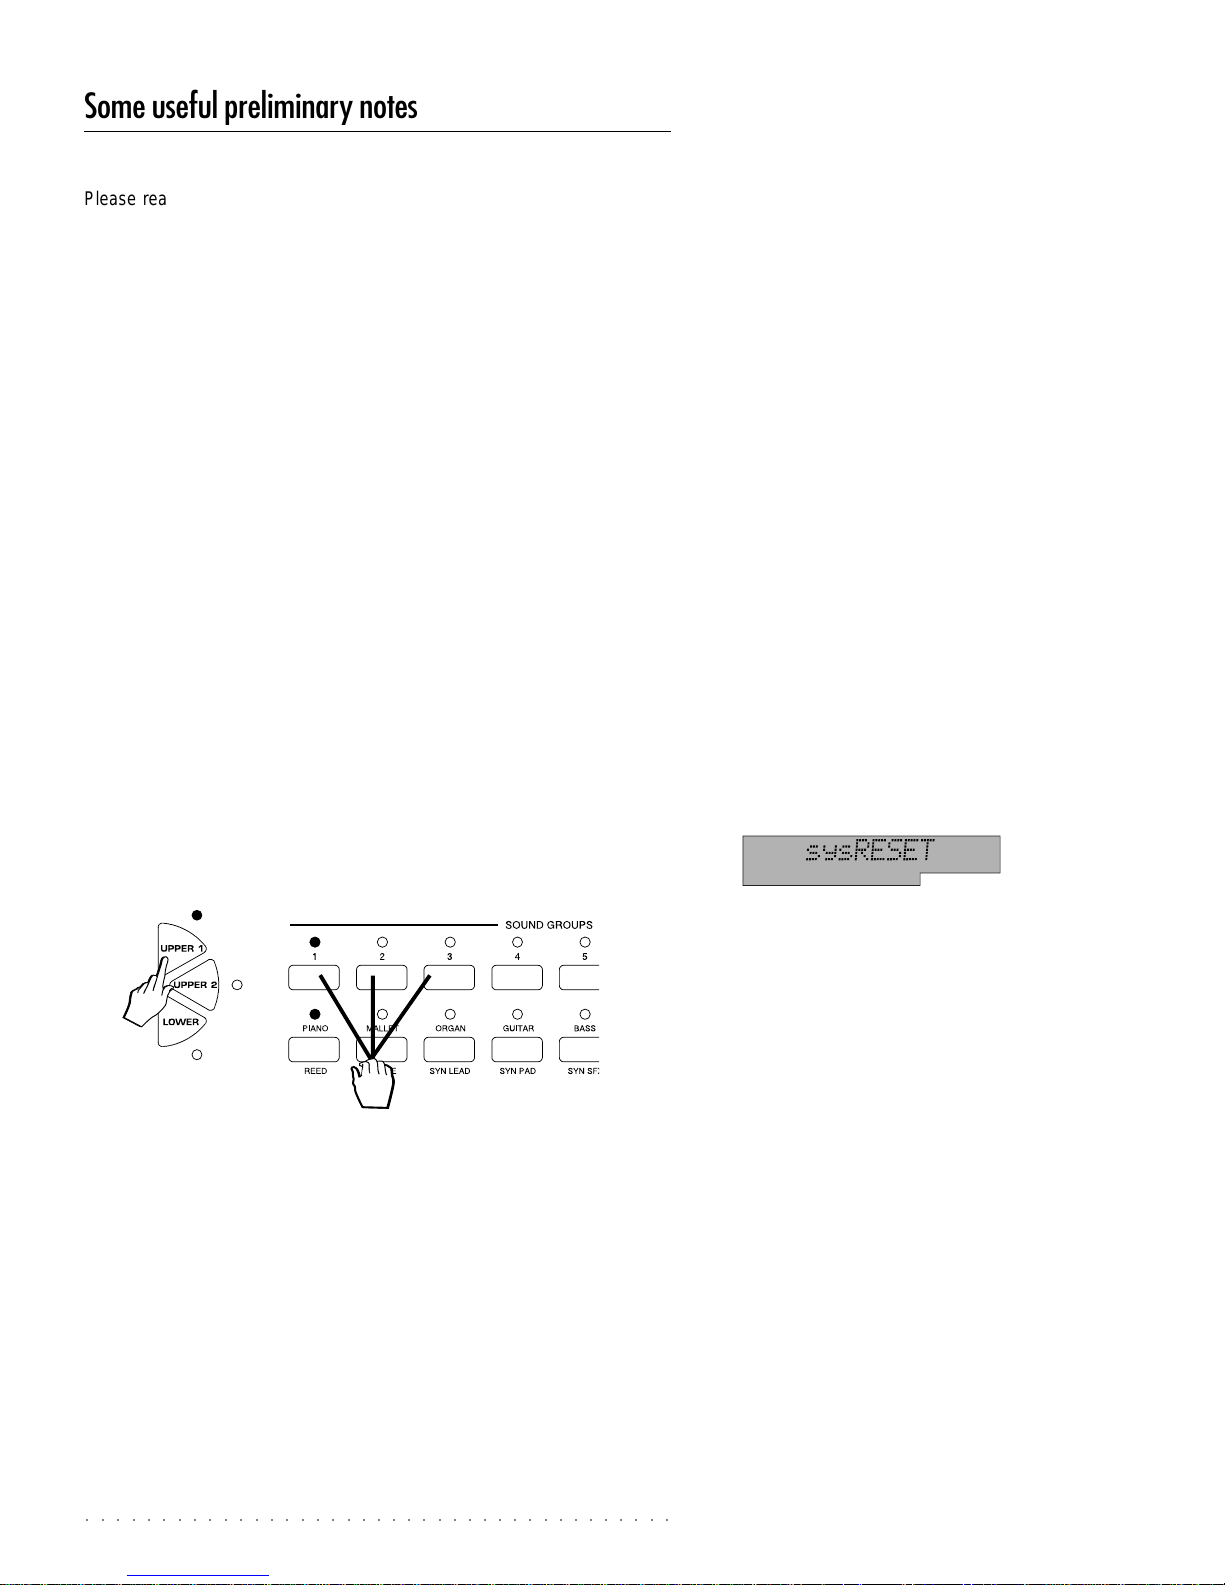
SYSTEM RESET
To restore the instrument’s factory set status (default settings), proceed as described below:
1. Hold down the UPPER 1 activator button (located to the right of the
display) and simultaneously press the top three buttons 1, 2 and 3 of the
SOUND GROUPS section.
The display shows the message “SysRESET” for a few seconds then sets
with the Grand Piano Preset ready for playing.
Warning
The Reset operation cancels all user-programmed data contained in the instrument’s RAM memory and restores it to the original factory conditions.
Page 9
○○○○○○○○○○○○○○○○○○○○○○○
Front/Rear Panel 1•1
Quick Guide
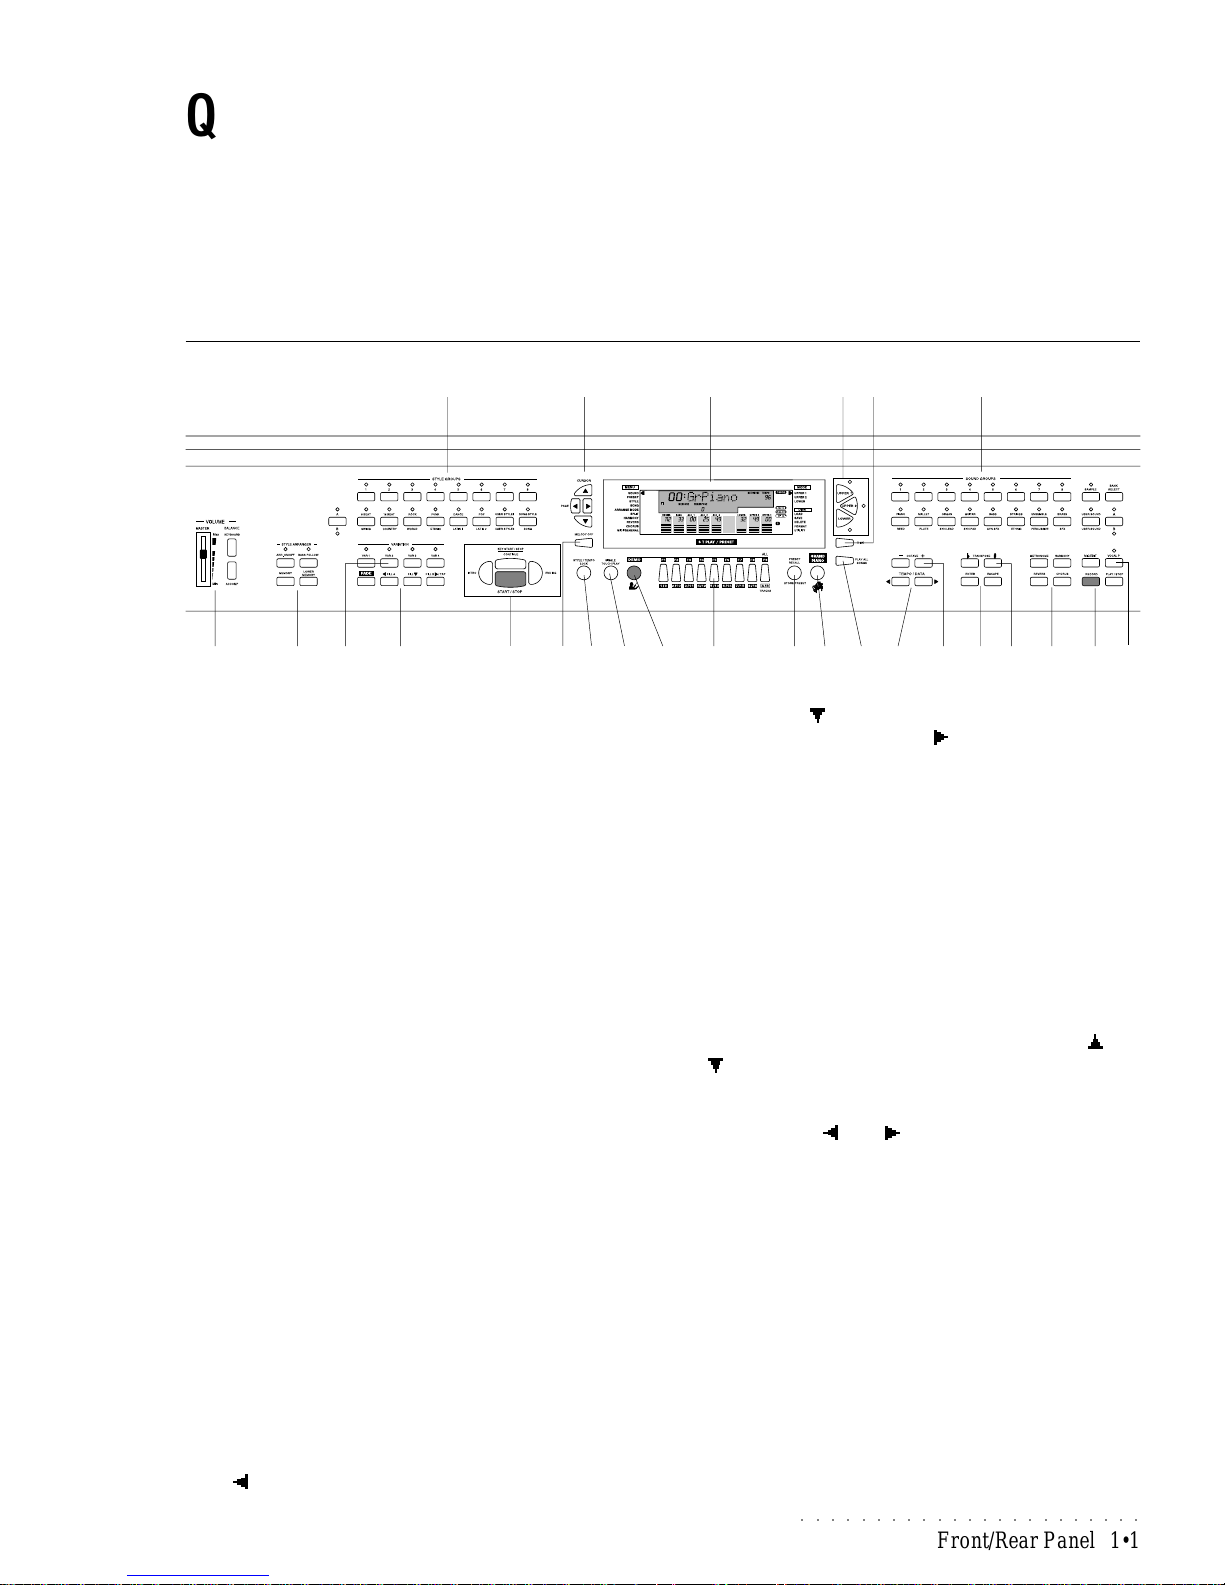
This chapter explains briefly what each button and control does on the Front panel of the PS1000/1300 and explains more about
the jacks and connectors of the Rear panel.
Following this you’ll find information about setting the instrument up and some basic operating instructions.
Instrument layout - Front panel PS1000/PS1300
1 VOLUME. MASTER: Adjusts the overall volume of the entire
instrument (headphones and the stereo Right/M-Left outputs). BALANCE: adjusts the balance between the Upper 1/
Upper 2/Lower sections and the automatic arrangements.
2 ARRANGER. 4 functions which control the Styles. AR-
RANGE ON/OFF: Enables (On) or disables (OFF) the Style
arrangements. Holding the button pressed gains access to
the Arrange Mode programming page where you can program the Chord recognition modes for the Style Accompaniment. MEMORY: When ON, releasing the keys from the
keyboard causes the Style accompaniments to continue
playing; when OFF, all accompaniments except the Drum
track stop instantly after key release. LOWER MEMORY: When
ON, the Sound assigned to the Lower keyboard track continues playing after releasing the keys; when OFF , the lower
sound stop instantly after key release. BASS TO LOWEST: when
On (LED on), the Bass track of the Style auto accompaniment follows the lowest left note of the chord played, allowing real time changes of the bass accompaniment according to the lowest note played. When Off, the bass track
follows the programmed pattern of the Style, regardless of
the chord inversion played.
3. STYLE GROUPS. Each button of the lower row corresponds to a “bank” of items, comprising the Style “family”
groups (8 Beat, 16 Beat, etc.), the User Style groups (1 &
2), a Song Style group and a Song group. Each button of
the upper row selects an item (Style, User Style, Song Style
or Song) from the current Group.
4 V AR 1, VAR 2, V AR 3, VAR 4: These buttons allow you to
switch from one Style V ariation to another.
5 FADE, FILL IN A, FILL IN, FILL IN B/TAP. FADE: Starts
and stops a Style with a gradual increase or decrease of
volume. Starting requires pressing the Start button. FILL IN
A [ ]: recalls a Fill pattern then moves to the previous Vari-
ation. FILL IN [ ]: recalls a Fill pattern then continues with
the same variation. FILL IN B [ ] / TAP: Fill In B: pressed
during Style play recalls a Fill pattern then moves to the
next variation. Tap: sets the Style playing speed by tapping on the button and starts the Style auto accompaniment automatically .
6 START/ST OP , INTRO, ENDING, KEY ST ART/CONTINUE.
START/STOP: starts and stops the playback of a Style, Song
Style or Song. INTRO: places the introduction of a Style on
“standby” before Style start. ENDING: Stops the Style with
an ending. KEY START: synchronizes the start of a Style
with a note (or chord) pressed on the lower keyboard area.
CONTINUE: pressed in Song or Song Style mode restarts the
Song Style or Song from the current stop point.
7 CURSOR/PAGE. Navigational arrows: the CURSOR [ ] and
[ ] buttons select the MENU functions shown on the left of
the display and the DISK functions shown on the right. The
black arrowhead in the display points to the selected function. The PAGE [ ] and [ ] buttons pass from one function
page to another.
8. DISPLAY . A colored, backlit, LCD (Liquid Crystal Display)
of the multi-function type that simultaneously displays and
provides access to several parameters. This user interface displays the current situation of the instrument at all
times, showing the On/Off status of several panel buttons
by means of display indicators and icons which turn on or
off. The surrounding markings on the left and right also
form part of the display area and are explained in detail in
the relevant chapter further ahead.
9. UPPER 1, UPPER 2, LOWER. The
Keyboard Activator
buttons activate (LED on) or mute (LED off) the respective
keyboard sections and, therefore, determine the configuration of the keyboard sounds.
45
3
21
7
6
89
10 11 15 241413 2522 232117 20
18 19
1612
25
Page 10
○○○○○○○○○○○○○○○○○○○○○○○○○○○○○○○○○○○○○○○
1•2 Front/Rear Panel
10.MELODY OFF. This button turns off the melody of a Song
Style or Song in playback, useful if a singer wants to sing
along with the backing only , or if you want to play the melody
yourself.
11.STYLE/TEMPO LOCK. STYLE LOCK: when ON, selecting
Presets recalls keyboard sounds only without changing
Style. When OFF , the Presets recall Styles and the sounds
for the keyboard and accompaniments. TEMPO LOCK: when
selected, the current Tempo setting is locked for all Style
changes (the display flashes the Tempo setting and the
message “Loc” alternately. When off, each Style recalls
memorized Tempo data.
12.SINGLE TOUCH PLAY. When On, Style-Preset sounds
are assigned to all the tracks (accompaniment and keyboard) when selecting Styles; Pressing this button also
turns on the ARRANGE ON/OFF button and MEMORY function.
Each Style also features 9 Single T ouch Play settings (keyboard sound configurations) recalled with the function buttons F1 - F9. When Off, selecting Styles recalls sounds for
the accompaniment sections only while those of the keyboard tracks remain unchanged.
13.DEMO. Gains access to the factory programmed demonstration Songs. After pressing Demo, use the buttons
F1…F8 to select the individual demo songs. Button F9
chains the 8 demo songs into a single melody.
14.FUNCTION BUTTONS F1 … F9 (1-16). These multi-function buttons operate according to the current mode. In Demo
mode, they select the Demo Songs. In Preset Recall mode,
they select Programmable Presets. In Style mode with Single Touch Play on, they select Single Touch Play settings.
In all play modes, these buttons select the tracks of the
current Preset, Style, Song Style or Song to enable them
for a change. In Song mode the two sets of numbers under
the buttons (1/9; 2/10, etc.) select the 16 tracks of the Song.
Button F9 toggles between track sets 01-08 and 09-16.
15. PRESET RECALL/STORE PRESET. PRESET RECALL: press
the button then use the Function buttons 1…9 to recall Programmable Presets from the current Preset Group In this
mode, the Programmable Presets can be modified and
saved to RAM Memory using the STORE PRESET function.
Other Preset Groups (7 groups in all) are selected with the
Octave +/– buttons. STORE PRESET: holding the button down
activates the Store Preset function which saves the modifications applied to the Programmable Presets in RAM
Memory and allows the Preset name to be changed. Modifications can be saved to the current Programmable Preset
or any other Prog. Preset destination. Modified Style Presets can also be stored to the same locations.
16.GRAND PIANO: Recalls the Grand Piano Preset for the
Upper 1 keyboard section for the entire keyboard extension and overrides the currently selected Preset, Style, Song
Style or Song. If the Style auto-accompaniments are playing, pressing the Grand Piano button does not stop the
rhythms.
17.PLAY ALL SONGS. If a Song or MIDI File is inserted in the
disk drive, this button triggers the playback of all the Songs
or MIDI Files directly from disk, playing them back one after the other as a medley.
18.DISK. This button gains access to the PS1000/1300 file
handling functions (Load, Save, Delete, Format, Utility) of
the on-board disk drive.
19.SOUND GROUP. These buttons select ROM Sound Presets (single, layer or split sound combinations), User Presets and Samples for the keyboard sections (Upper 1, Upper 2 and Lower). At any time, you can change the sound
configuration by changing the on/off status of the Upper 1,
Upper 2 and Lower keyboard selector buttons.
The Sound Bank button gains access the instrument’s 3
sound banks. The 2 User Sound Groups can memorize up
to 16 preferred single presets and the Samples bank (SMP)
can memorize up to 7 disk-based samples.
In section edit situations, the Sound Group converts into a
sound selection keypad which allows you to select sounds
from the instrument’s 384 ROM sound library.
20.TEMPO/DATA / buttons . The TEMPO/DATA buttons are
active for Tempo changes in Style, Song Style and Song
modes, or adjust values shown in the display when using
programmable functions.
21.OCTA VE +/–. Raises (+) or lowers (–) the pitch of the se-
lected track in octave steps, over a range of ± 2 octaves
(24 semitones).
22.ENTER, ESCAPE. ENTER confirms specified data in edit
situations. ESCAPE cancels specified data and/or escapes
from an edit situation.
23.TRANSPOSE b / #. Raises (#) or lowers (b) the pitch of
the instrument as a whole in semitone steps, over a range
of ±12 semitones. Pressing both buttons at the same time
resets the pitch to 0.
24.METRONOME, HARMONY, REVERB, CHORUS: METRO-
NOME activates/deactivates the metronome in Style, Song
Style and Song playback modes and in Song Style Record
mode. HARMONY enables/disables the melody harmony function according to the current Harmony Type. REVERB activates/deactivates the Reverb effect processor. CHORUS
activates/deactivates the Chorus effect processor (delay/
modulations). Holding the HARMONY, REVERB and CHORUS
buttons pressed allows you to enter into the edit of the corresponding function.
25. RECORD, PLAY/STOP (Sequencer). Two buttons dedicated to the recording and playback of Song Styles and to
the playback of Songs. RECORD: automatically sets the
sequencer for Song Style recording. Holding the button
pressed for a few seconds activates the Clear function to
cancel recording errors and parts not wanted (all, chord,
etc.). PLAY/STOP: starts and stops the recording and play-
back of the Song Styles and starts the playback of Songs.
26.MIC/EDIT, VOCAL P (model PS1300 only). Two buttons
which gain access to the functions of the Audio V ocal Processor (not available for PS1000).
(Not illustrated)
• DISK DRIVE: (Located on the extreme right hand side of
the control panel). Handles 3.5” double density (2DD) or
high density (2HD) floppy disks.
• PHONES JACK P ANEL: (Located on the LEFT side of the
instrument, under the keyboard). Accepts two headphones.
Connecting to the left jack excludes the internal speakers.
Page 11
○○○○○○○○○○○○○○○○○○○○○○○
Front/Rear Panel 1•3
Rear panel (connections)
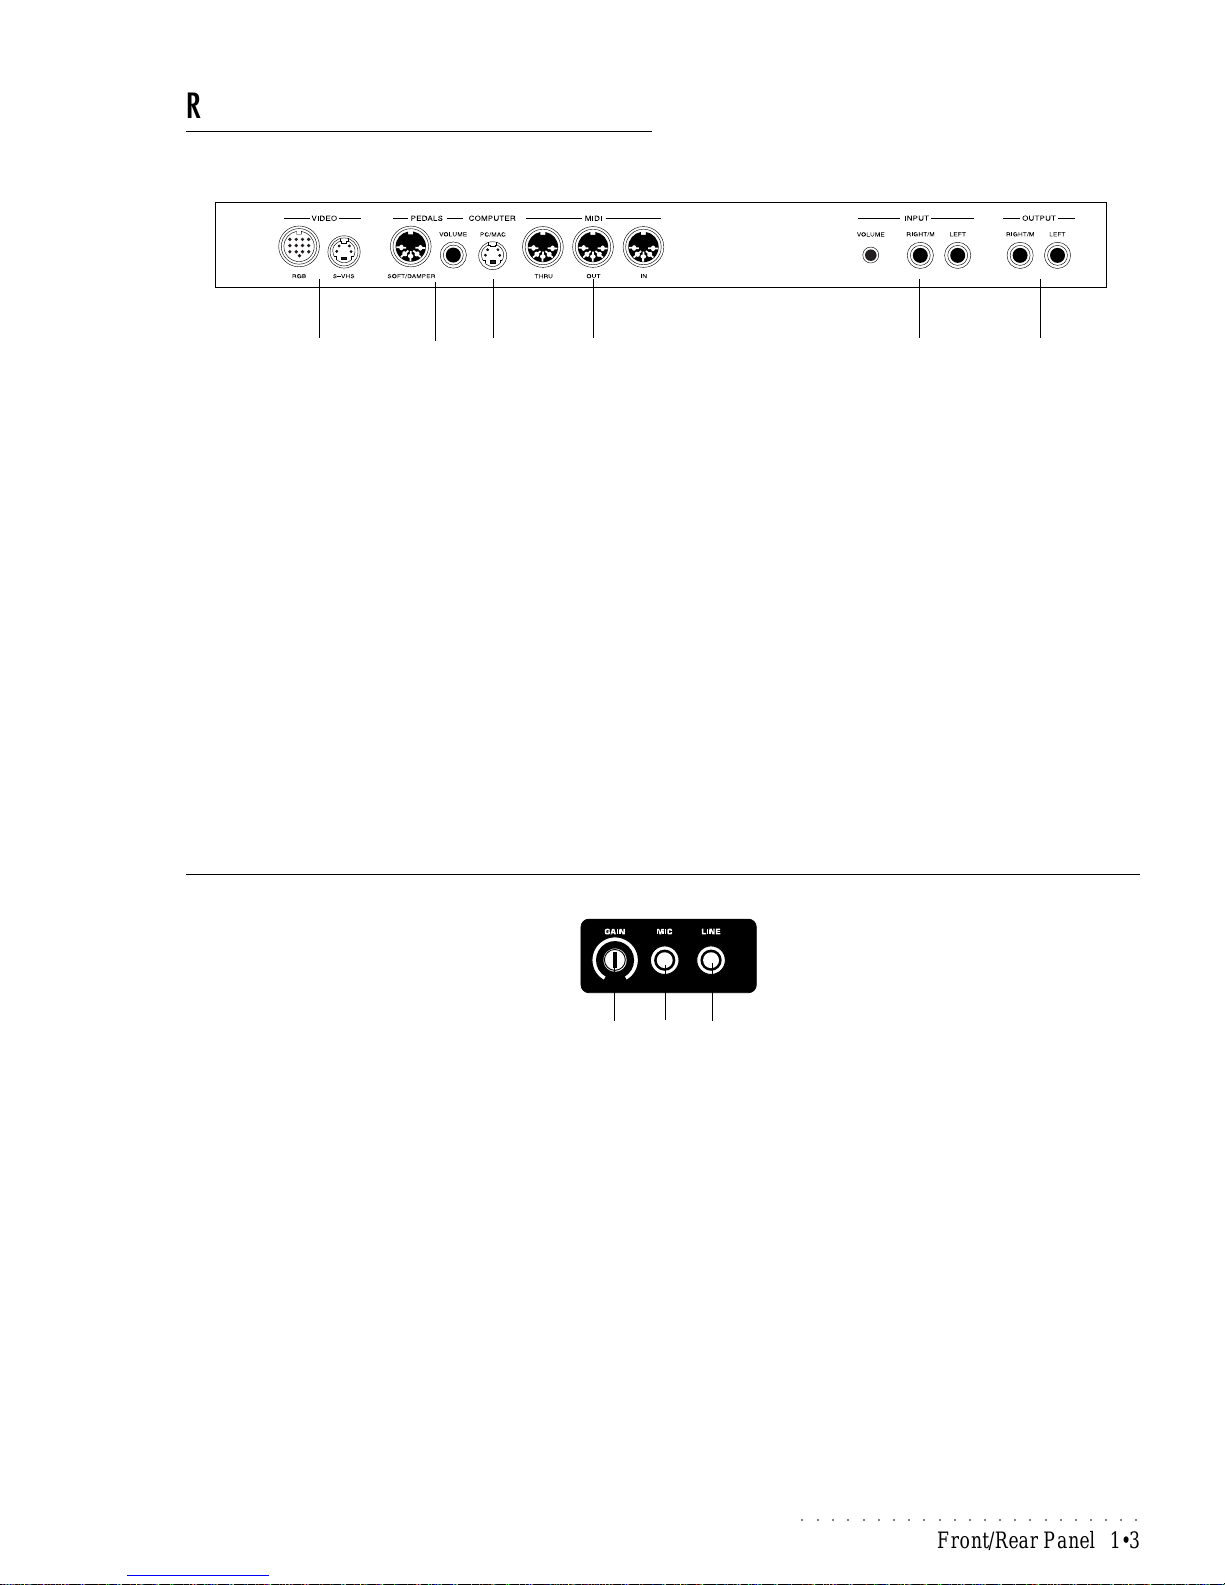
1. VIDEO (RGB, S-VHS). An Interface with RGB and S-VHS
ports which allows you to project song lyrics on a domestic
television or RGB monitor. A special RGB/SCART video
cable is supplied as a standard accessory .
2. PEDALS (SOFT/DAMPER, VOLUME). SOFT/DAMPER: The pedals
assembly consisting of two pedals (Soft and Damper) should
be connected to this connector. VOLUME: Connect an optional Volume pedal to this socket to control the overall volume of the instrument.
3. COMPUTER (PC/MAC). Allows direct connection of the instrument to a PC or Macintosh computer (or relative
compatibles) without the need to use a MIDI interface. The
PC or MAC setting needs to be set under the General menu
according to the type of computer being used.
4. MIDI IN/OUT/THRU: The Midi In, Out and Thru ports allow the
PS1000 to be connected to other MIDI devices (keyboard,
computer, expander, etc.).
5. INPUT (RIGHT/M-LEFT, VOLUME). RIGHT/M-LEFT: You can use
these two inputs to connect another instrument or sound
module to the piano. The output of the other instrument will
be mixed with the main signal of the PS1000/1300 and sent
to the Output, Speaker and Headphone jacks. If you are
connecting a mono signal then you should use only the
Right/Mono jack. VOLUME: The Volume control is used to
adjust the level of the input signal.
6. OUTPUT (RIGHT/M-LEFT). These two outputs are used to connect the instrument to another amplifier, mixer or recording
device in stereo. If you are connecting to mono equipment
(e.g. a guitar amplifier) then you should use only the Right/
Mono jack.
12
34 5 6
12
3
Audio Vocal Processor Interface (PS1300 only)
Installed under the keyboard only on model PS13000, the Audio Vocal Processor device consists of a twin gain control knob
and two jacks, Mic and Line.
1. GAIN. A twin control which allows you to indipendently adjust the level (volume) of the input signals as the MIC and
LINE jacks.
2. MIC. Connect any type of microphone to this jack. Connecting to the MIC jack allows you to process your own
voice with the instrument’s internal digital multi-effects processor, and duplicate your voice up to 4 times using the Vocal Processor’s vocal harmonizing options.
3. LINE. Allows you to connect a musical instrument, or other
audio device, such as a CD player, tape recorder , etc., which
you can play through the instrument’s amplification system,
processing the input signals with the instrument’s internal
digital multi-effects processor (Reverb/Chorus).
Page 12
○○○○○○○○○○○○○○○○○○○○○○○○○○○○○○○○○○○○○○○
1•4 Front/Rear Panel
The graphic LCD Display
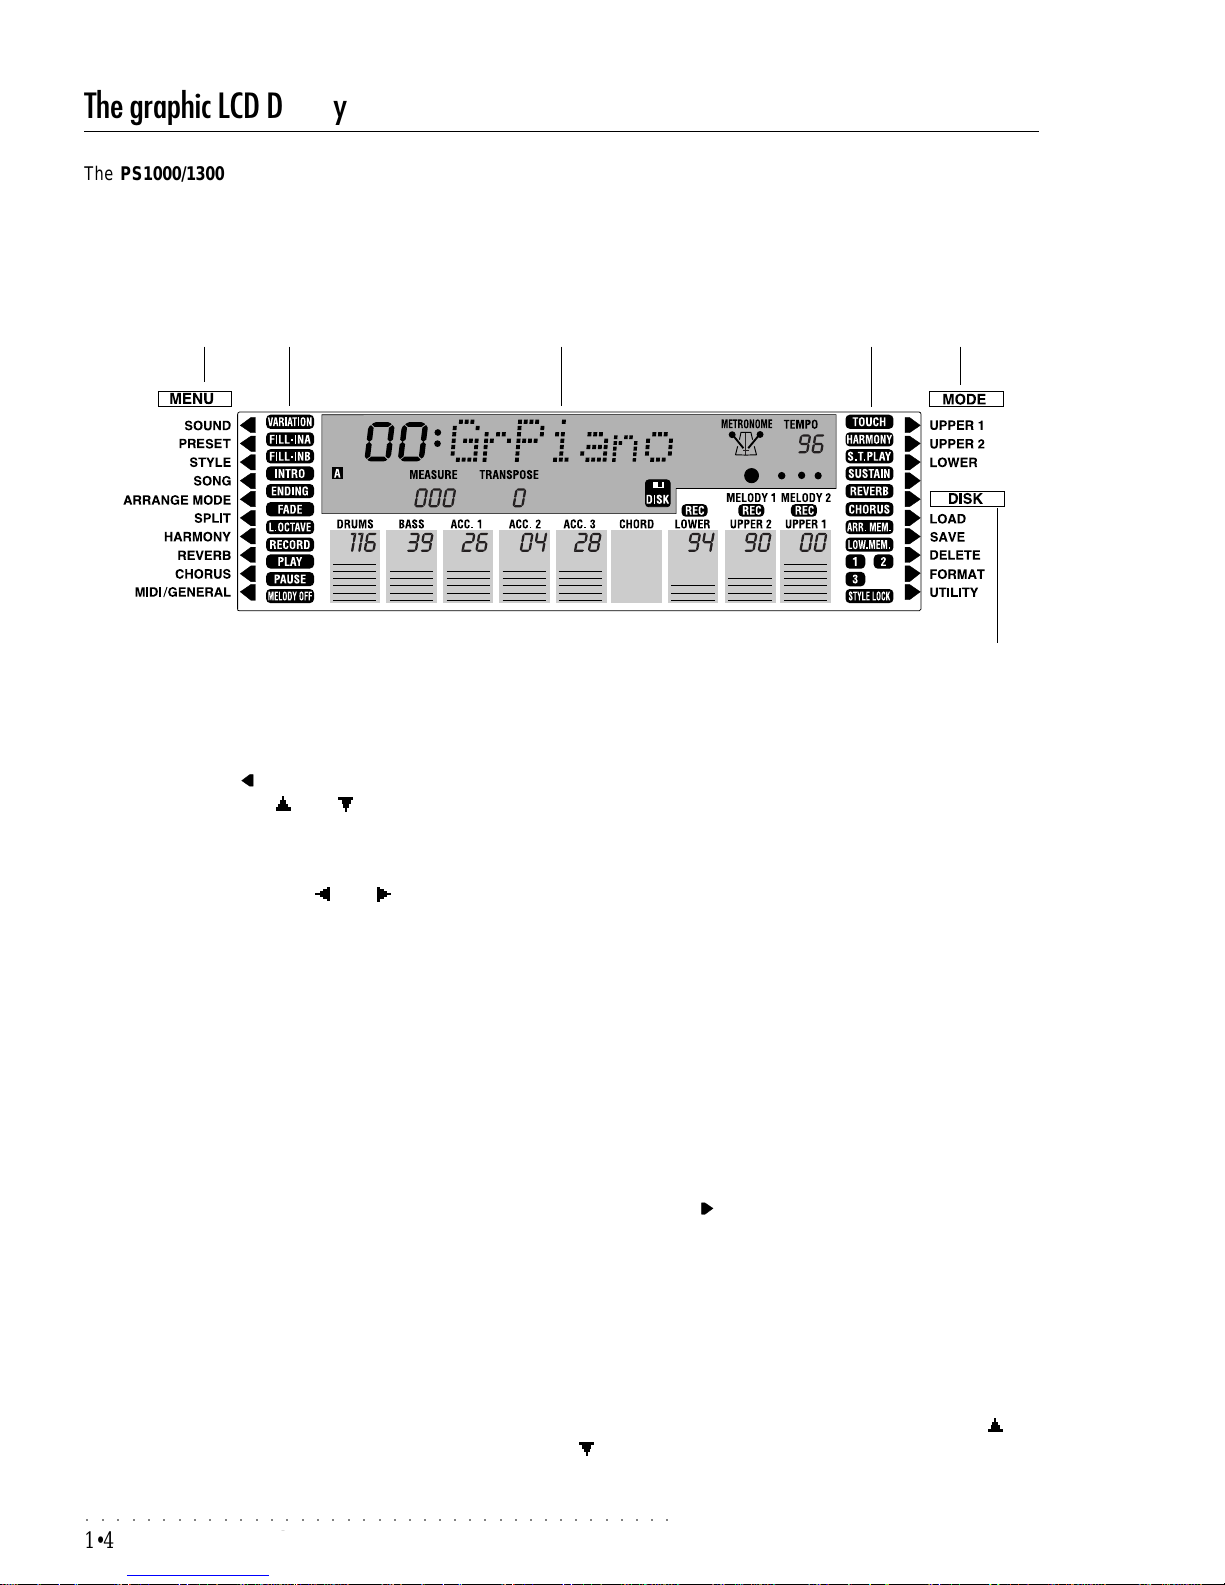
The PS1000/1300 has a large, three-colored, backlit liquid crystal display of the multifunction type which simplifies all your
operations. Each time you turn the instrument on, the display will show the Grand Piano Preset ready to play.
This user interface is divided into 6 zones:
• The Master Transpose setting;
• The sequencer measure counter;
• A 3-digit display showing the program change number of
the current Sound, Preset, Style or Song, or the value or
status of the current function;
• An 8-digit display showing the name of the current Sound,
Preset, Style, Song, or Function.
4) Function indicators (right)
These indicators show the on/off status of the corresponding
panel functions. For example, if you press the REVERB button repeatedly, the REVERB indicator turns off or on. When
on, the Presets are processed by the Reverb effect processor ,
when off, the Reverb effects are bypassed.
5) Mode
The three names, Upper 1, Upper 2, Lower, correspond to the
3 real time Keyboard Sections (or Tracks). When the right display arrowhead [ ] appears next to one of these three names,
the corresponding keyboard section is
Selected
and ready to
accept a change (of sound, volume, etc.). To move the arrowhead, press the corresponding
Keyboard Activator
button as
many times as necessary.
6) Disk
This is the list of operations available when working with Floppy
disks. Once you press the DISK button, the arrowhead points
automatically to the LOAD operation and the CURSOR [ ] and
[ ] buttons select the type of operation required (Load, Save,
Delete, Format, Utility).
1) Menu (left)
This is a list of functions which are accessed by moving the
cursor’s arrowhead [ ] next to the name of the desired function using the CURSOR [ ] and [ ] buttons. The movement
of the arrowhead is cyclic: once it reaches the top or bottom, it
continues its course by appearing at the other extreme end of
the list. Once selected, you can select the various parameters
of the function with the PAGE [ ] and [ ] buttons.
2) Indicators (left)
These indicators show the on/off status of the corresponding
panel buttons. For example, if you are playing a Style and
decide to change variation by pressing one of the Variation
buttons, the VARIATION indicator turns on for the entire transition period from one V ariation to another.
3) Central display area
This large area is further subdivided into several smaller zones:
• The Preset track zone showing the on/off status of the tracks,
the Program change number of the Sound assigned to the
tracks and the respective Volume level (shown as a bar
graph). In Style/Real Time mode, the tracks shown correspond to those of the Style accompaniments (Drums, Bass,
Acc. 1, Acc. 2, Acc. 3 and the real time keyboard (Upper 1,
Upper 2 and Lower);
• The type of chord played with the left hand for the accompaniment;
• The on/off status of the Metronome;
• The Tempo setting and relative beat pattern indicator;
• The Floppy Disk icon indicator;
The Display
12 3 4 5
6
MENU (left)
INDICATORS (left) CENTRAL
DISPLAY AREA
INDICATORS (right) MODE
DISK
Page 13
○○○○○○○○○○○○○○○○○○○○○○○
Front/Rear Panel 1•5
Selection, Navigation and Data Entry
Selection devices
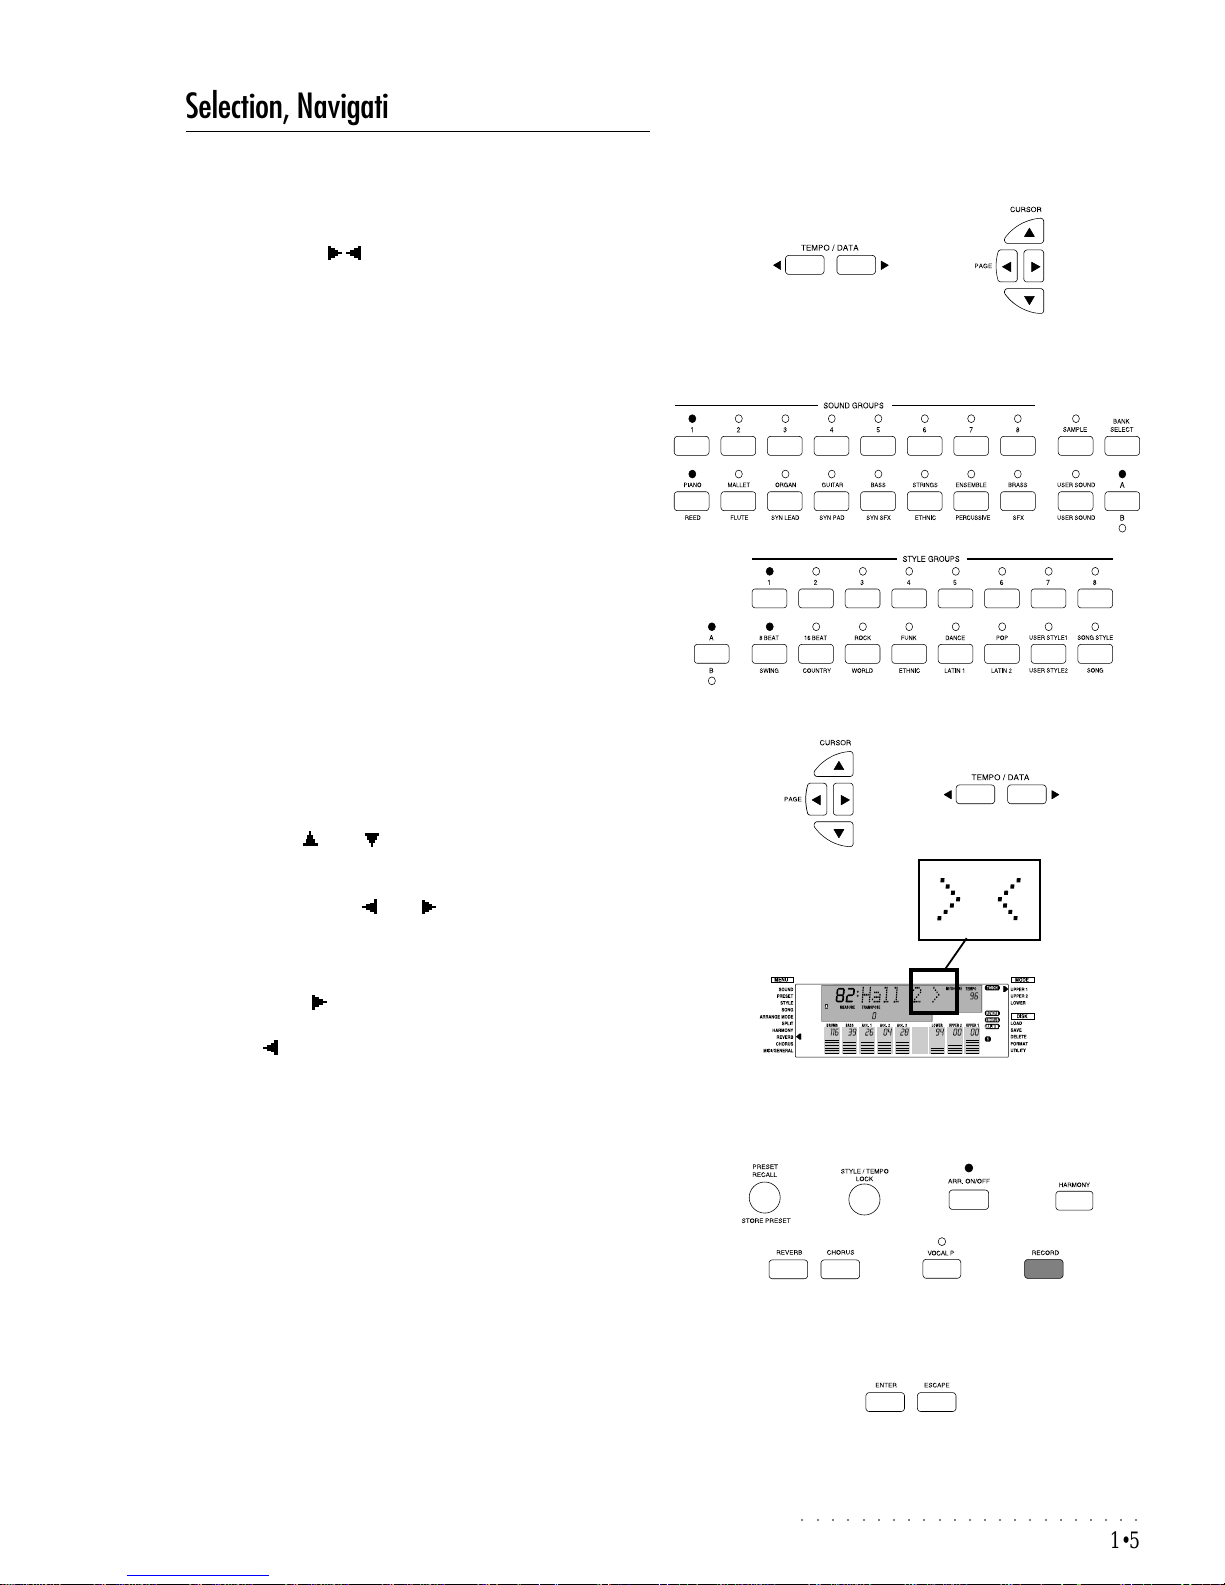
In the various play modes (Style/RealTime, Preset and Song),
the TEMPO/DAT A / buttons change the Tempo setting and
the CURSOR Up/Down buttons select the menu functions on
the left of the display .
The principal Sound Preset and Style selection devices in these
modes are:
• the Sound Groups section (on the right of the display);
• the Style Groups section (on the left of the display).
The Sound Groups section selects Sound Presets (ROM), or-
ganized in family Groups (Piano, Mallet, Organ, etc.) where
each group contains 8 Sound Presets (1-8). The Rom Presets recall factory set sound combinations, either in single, layer
or split form, for the Upper 1, Upper 2 and Lower keyboard
sections only.
The Style Groups section selects Styles (Rom and User), Song
Styles and Songs. The ROM Styles are organized in family
Groups (8 Beat, 16 Beat, Rock, etc.) where each group contains 8 Styles (1-8). The User Style, Song Style and Song
Groups also contain 8 elements per group.
Navigation and Data Entry devices
In the function Edit modes, the CURSOR buttons become the
principal navigation tools and the TEMPO/DA TA buttons operate as the principal data entry devices.
The CURSOR [ ] and [ ] buttons select the menu functions.
Once a Menu function is selected, in most cases it will consist
of several “pages”, each showing a parameter, which are selected using the P AGE [ ] and [ ] buttons. A small left or right
arrowhead (< / >) representing the cursors tell you at a glance
whether or not additional features are present.
The > arrowhead means that there are other features available
using the Page [ ] button. The < arrowhead means that no
other features are available but you can scroll backwards with
the Page [ ] button.
The parameter value or status (such as On/Off or PC1, PC2,
etc.), shown in the 3-digit display , is changed with the TEMPO/
DA TA buttons.
Several panel buttons, if held pressed for about 2 seconds,
gain direct access to the edit of the corresponding function.
These buttons are:
PRESET RECALL/STORE PRESET, STYLE/TEMPO LOCK,
ARRANGE ON/OFF, HARMONY, REVERB, CHORUS and
RECORD.
Enter / Escape
Generally, ENTER confirms an operation and the values assigned to modified parameters. In some function pages, Enter
confirms a parameter value and executes an operation (for
example, a Load operation in the Disk environment).
ESCAPE cancels a selected operation or the values assigned
to a selected parameter.
Selection, Navigation, Data Entry
Page 14
○○○○○○○○○○○○○○○○○○○○○○○○○○○○○○○○○○○○○○○
1•6 Front/Rear Panel
Text entry
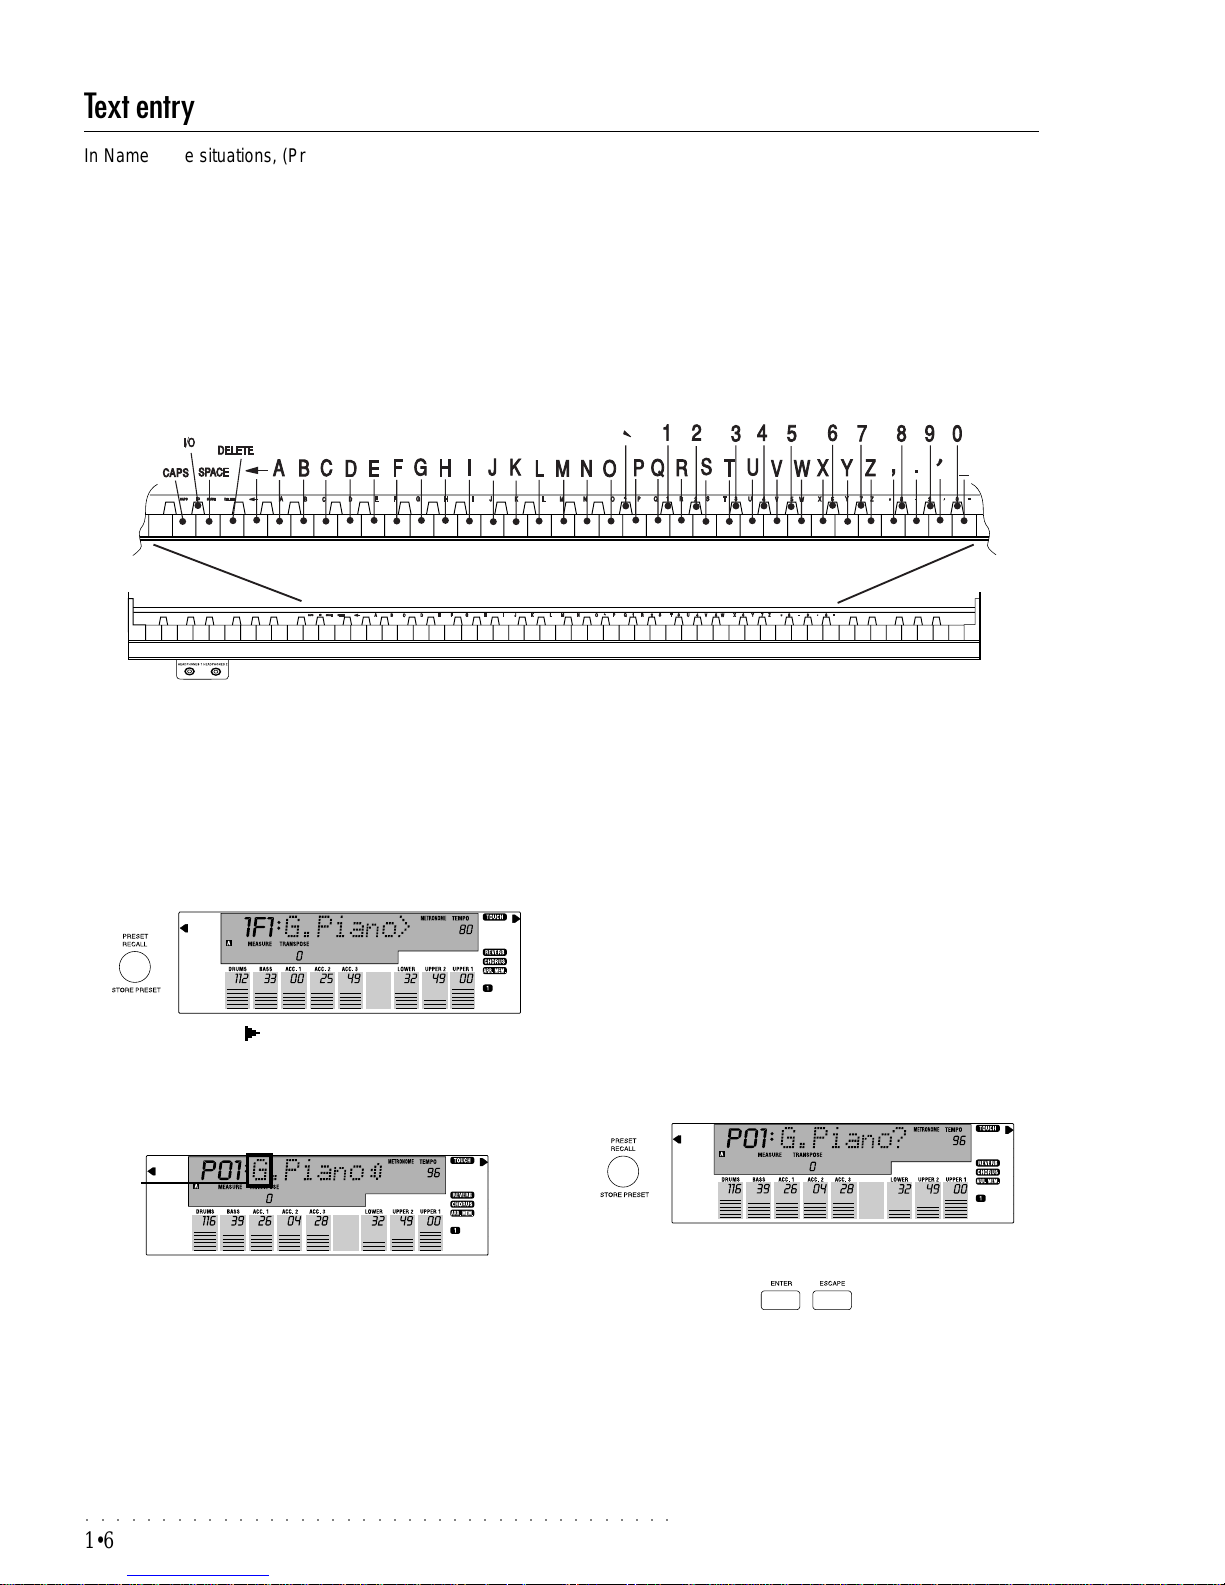
In Name Write situations, (Presets, User Styles, Song Styles, Disk files, etc.), the keyboard activates as a source of alphanumeric data where each note of the central zone of the keyboard corresponds to a letter of the alphabet, or a number.
The relative display shows a flashing active zone where a name of up to 7 characters can be inserted. Disk files accept up to 8
characters. In name write situations, the Octave + and – buttons move the flashing cursor (which marks the character entry
position) left or right.
The Alphanumeric keyboard configuration
The configuration of the alphanumeric data is shown in the
diagram below.
Name writing example
The procedure below explains how to write a name for a Programmable Preset. Use the same method for all other name
writing situations (Song Styles, Songs, etc.).
1. Press the PRESET RECALL button and select a Prog. Preset using the Function buttons F1-F9:
2. Press the PAGE [ ] button once to select the name write
page (refer to the Disk chapter for specific information on
file names in Disk mode).
The first character (in this case letter “G”) will flash, indicating that it is active for a change of letter.
3. You can move the flashing cursor (which marks the entry
position) right or left with the Octave + and – buttons.
4. Insert the desired characters using the keyboard. Each
note corresponds to a character or processing command:
The notes on the extreme left of the keyboard zone provide
word processing functions:
• D2: CAPS - Capital letters On / Capital letters Off;
• D#2: INS/OVER - toggles between Insert (I) and Overwrite
(O) mode; Insert inserts a character at the cursor position,
Overwrite replaces the character at the cursor position with
the new insertion. At the end of the name, the symbol “0”
or “I” indicates the current setting.
• E2: SPACE - inserts a space between two entries;
• F2: DELETE - cancels the selected character or the one
after;
• G2: <— (BACKSPACE) - cancels the previous character;
5. When you have written the name, hold down the STORE
PRESET button for an instant to save the name.
6. Press ENTER to confirm the operation and store the name.
Press ESCAPE to cancel the operation.
Text entry
Flashing
Page 15
○○○○○○○○○○○○○○○○○○○○○○○
Quick Guide 1•7
Setting up and getting to know the instrument
In this chapter, you’ll find step by step instructions on some basic functions that
will help you get to know your PS1000 right away.
Power switch and Headphones
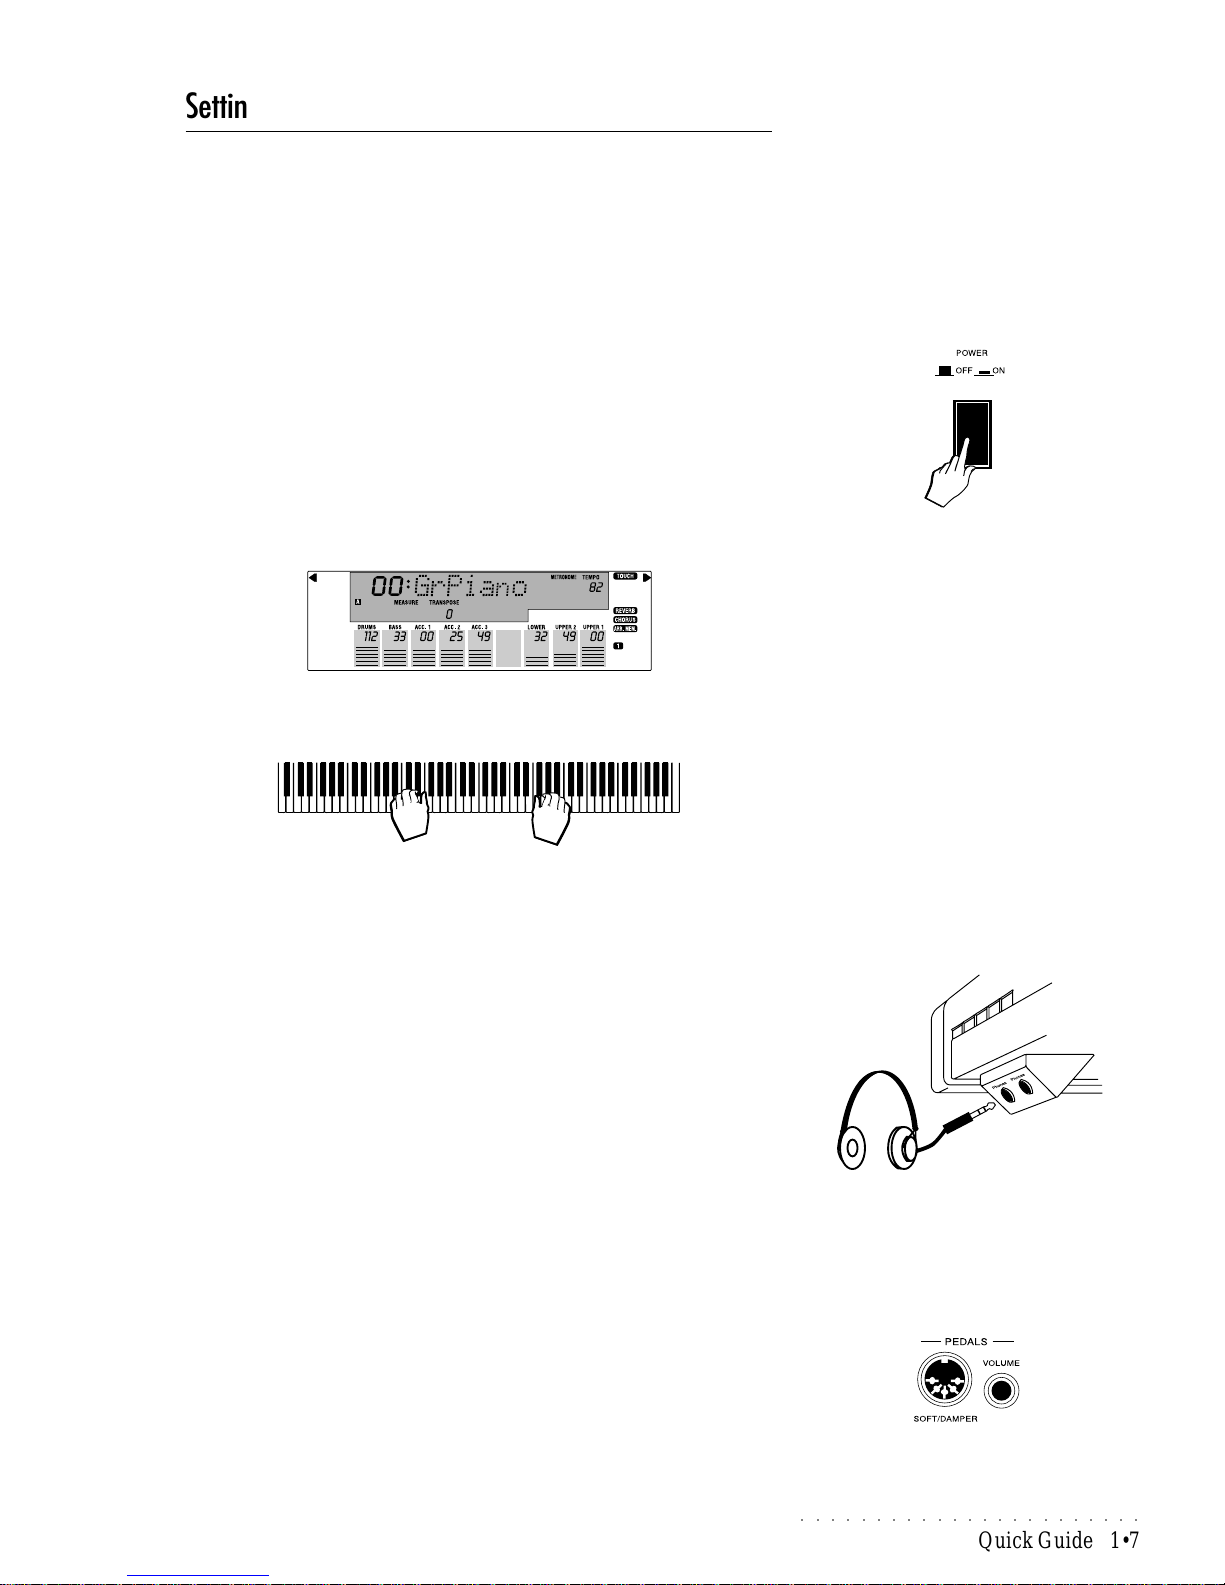
Turn the instrument on
1. Be sure that the power switch on the left key block is in the “OFF” position
before connecting the power cord.
2. Insert the instrument’s power cord into a suitable grounded wall outlet.
3. Press the power switch to turn on PS1000.
Shortly after, the instrument is ready to play the Grand Piano “Single” preset
(the starting Preset). The relative display looks like this:
In this power up condition, you will be able to play a piano sound (GrandPiano)
across the entire keyboard without carrying out other operations.
<------------------------- Grand Piano ------------------------>
Connecting a set of headphones
If you prefer to play with headphones for high quality personal monitoring, plug
a standard stereo headphone set (8 Ω) into one of the PHONES jacks. The
headphone jacks are located at the extreme left side of the rail which runs
beneath the keyboard.
Plugging a set of headphones into the left PHONES 1 jack excludes the internal speakers to allow you to play in total silence without disturbing others in the
same room. Plugging into the right PHONES 2 jack does not exclude the internal speakers.
Use the Master Volume slider to adjust the Headphones volume.
Pedal Connection
The PS1000 is fitted with two pedals, preset for Soft and Damper functions. Be
sure that the cable from the pedal assembly is connected to the SOFT/DAMPER
connector on the rear panel.
Soft : The Soft pedal (left) is a switch control pedal (On/Off) and affects
the timbre of the instrument such that it plays softer , allowing you
to continue using the same playing style at a lower volume. This
pedal is also function assignable.
Page 16
○○○○○○○○○○○○○○○○○○○○○○○○○○○○○○○○○○○○○○○
1•8 Quick Guide
Damper : The Damper pedal (right) applies the Sustain effect to all notes
released. If you release a note after depressing the Damper, the
note will proceed towards its natural decay according to the type
of sound played. The Damper is more effective with Piano type
sounds.
Note: for all piano type sounds, the notes of the uppermost keys (from E6
to C8) are automatically sustained, such as in an acoustic piano.
The Damper pedal can be independently enabled or disabled to react with
the keyboard sections of a Programmable Preset.
Both the Damper and Soft pedals can be independently assigned one of
several switch action functions (e.g. start/stop, fill, intro, ending, etc.).
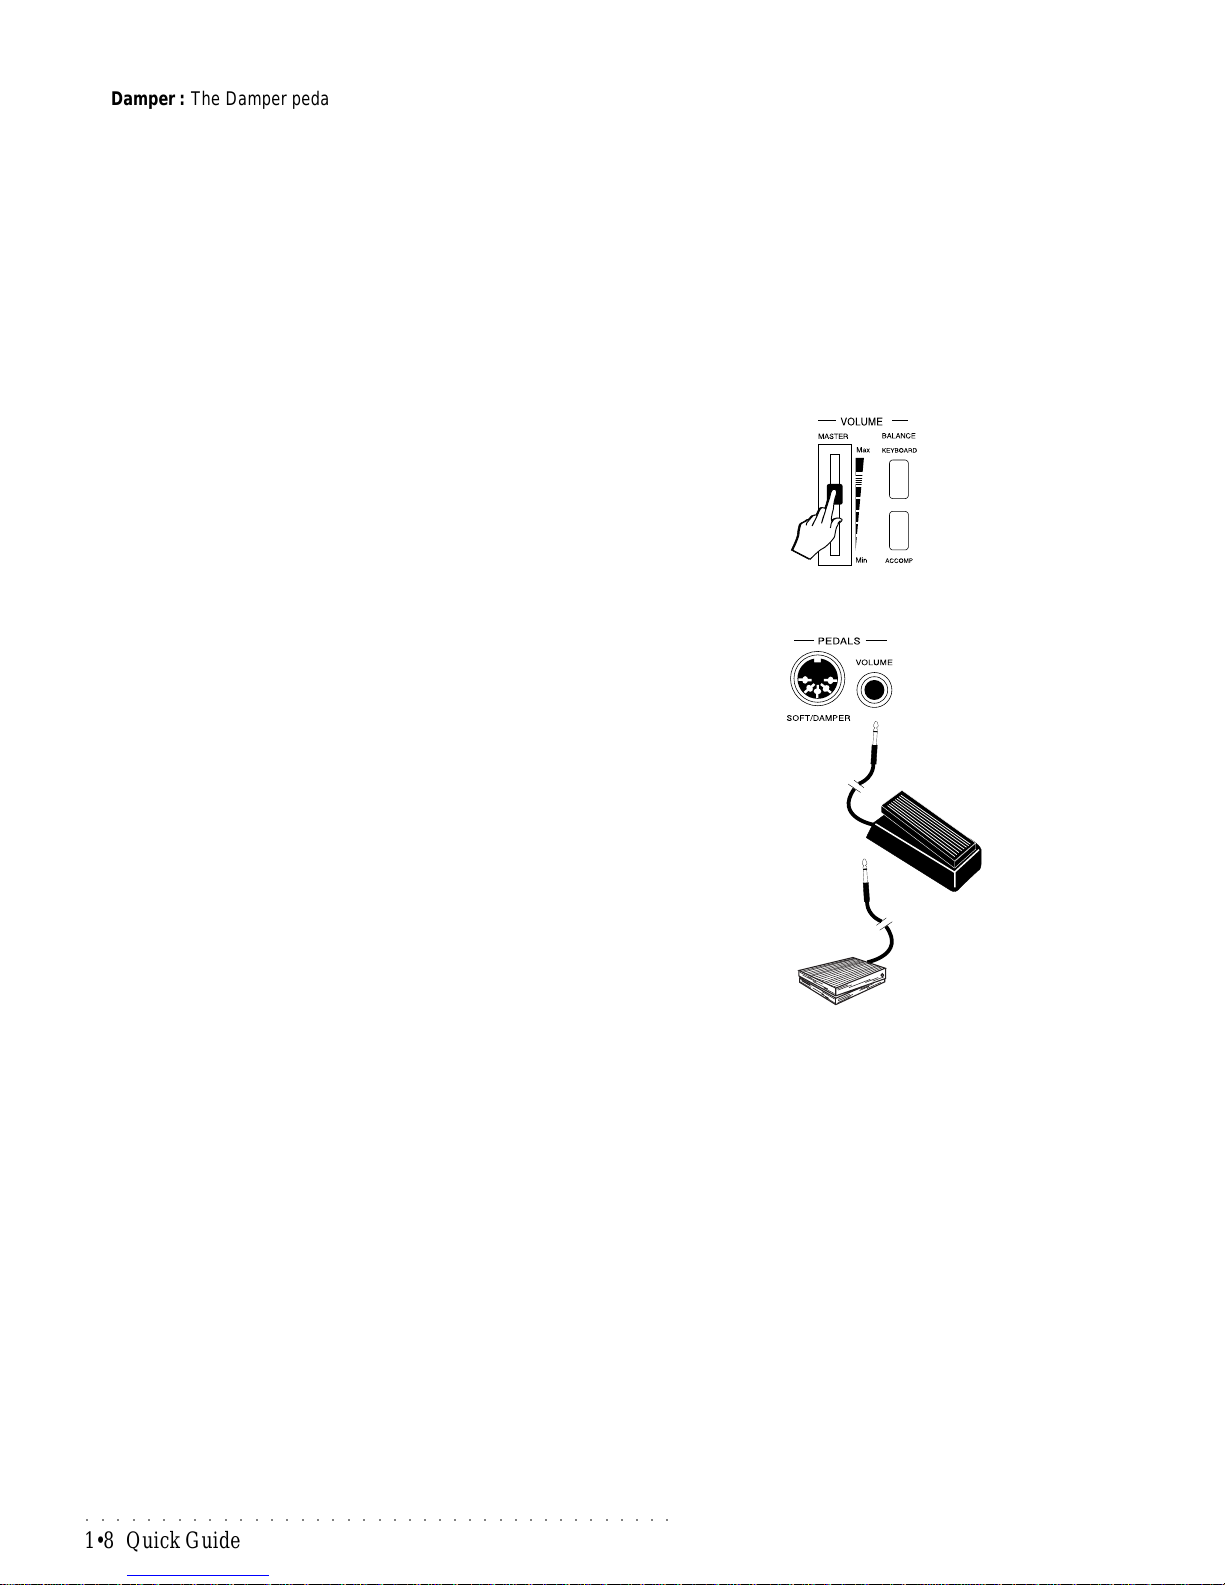
Adjusting the General Volume of the instrument
Y ou can adjust the volume of the instrument as a whole by using the MASTER
VOLUME slider.
This control increases or decreases the volume of the internal speakers, the
Headphones and the Output Left - Right/M jacks.
Using the Volume Pedal (optional)
If you have connected an optional Volume pedal to the VOLUME jack of the
rear panel PEDALS interface, you can adjust the Master Volume of the instrument with the pedal.
The Volume pedal (optional) can be independently enabled or disabled to react
with the keyboard sections of a Programmable Preset.
The Volume pedal jack can be programmed to accept a switch action pedal and
can be assigned one of several switch control functions (e.g. start/stop, fill,
intro, ending, etc.).
Page 17
○○○○○○○○○○○○○○○○○○○○○○○
Quick Guide 1•9
Play with Auto Accompaniment Styles
PS1000 has 96 auto accompaniment Styles with four Variations four Intros,
four Fills and four Endings for each Style. You can also load up to 16 disk
based User Styles of your choice into the 2 User Style banks available.
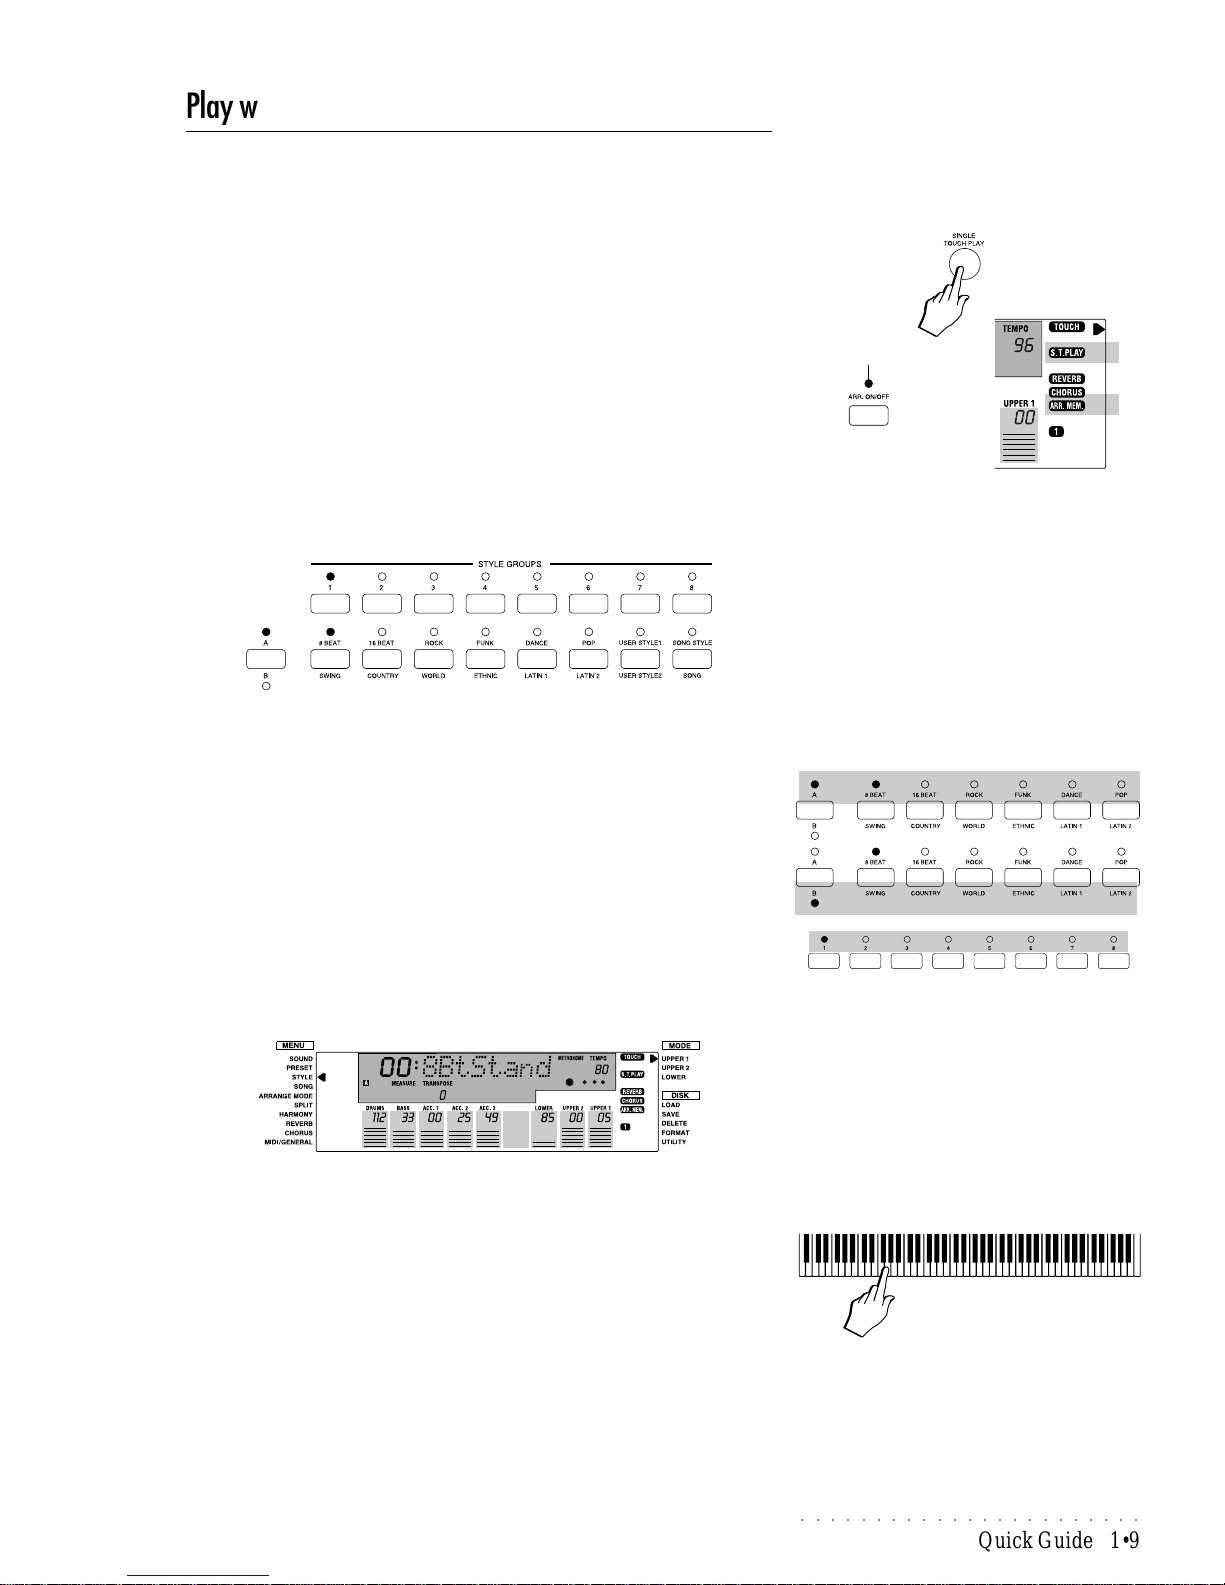
1. Press SINGLE T OUCH PLAY.
Pressing this button sets the instrument for Style play by automatically enabling the ARRANGE ON/OFF button (LED on) and the MEMORY function
(display indicator on). The KEY ST AR T function is also activated automatically .
When SINGLE TOUCH PLAY is on, the sounds memorized in the Style
Preset are assigned to all the tracks. Selecting a Style changes the sounds
of the accompaniment section as well as those of the keyboard sections.
2. A Style will already be selected for play, but you can select a different
one by pressing a button in the lower row of the STYLE GROUP section
(8 Beat, 16 Beat, Rock, etc.) followed by one of the top buttons (1-8).
You can select which Style Group names you want to select by using the
buttons of the lower row in conjunction with the A and B selector button to
the left of the Style Group.
When the LED of A is on, the lower row of buttons select the Style Group
names silkscreened above the buttons.
When the LED of B is on, the names silkscreened under the buttons are
selected.
The top row of buttons numbered 1 - 8 to select one of the 8 Style belonging
to the selected Style Group.
For example, Style n. 1 of the 8 Beat Group recalls the 8 Beat Standard
Style:
3. Play a single note (or a chord of at least three notes) on the lower keyboard zone (below the Chord Split Point note B3) to start Style play.
A single note (or chord) triggers a fully orchestrated auto accompaniment
pattern thanks to the KEY START function which allows you to start the
Style by playing a note or chord on the lower keyboard zone.
In default conditions, the chord recognition mode is set to “One Finger”
which allows you to play Styles using “one finger” chords on a split keyboard.
You can change the chord recognition mode from “One Finger” to “Fingered1”, “Fingered 2” or “Free”, either by selecting a Programmable Preset
or by entering the ARRANGE MODE options. See the ARRANGE MODE
function in the Styles chapter.
LED on
IMPORTANT
When you press the A/B Selector button to
switch from bank set A to bank set B (or vice
versa), the LED currently shown off will flash
for about 3 seconds, during which time you
must make your bank selection. If the LED
stops flashing, it will not be possible to switch
bank set.
Page 18
○○○○○○○○○○○○○○○○○○○○○○○○○○○○○○○○○○○○○○○
1•10 Quick Guide
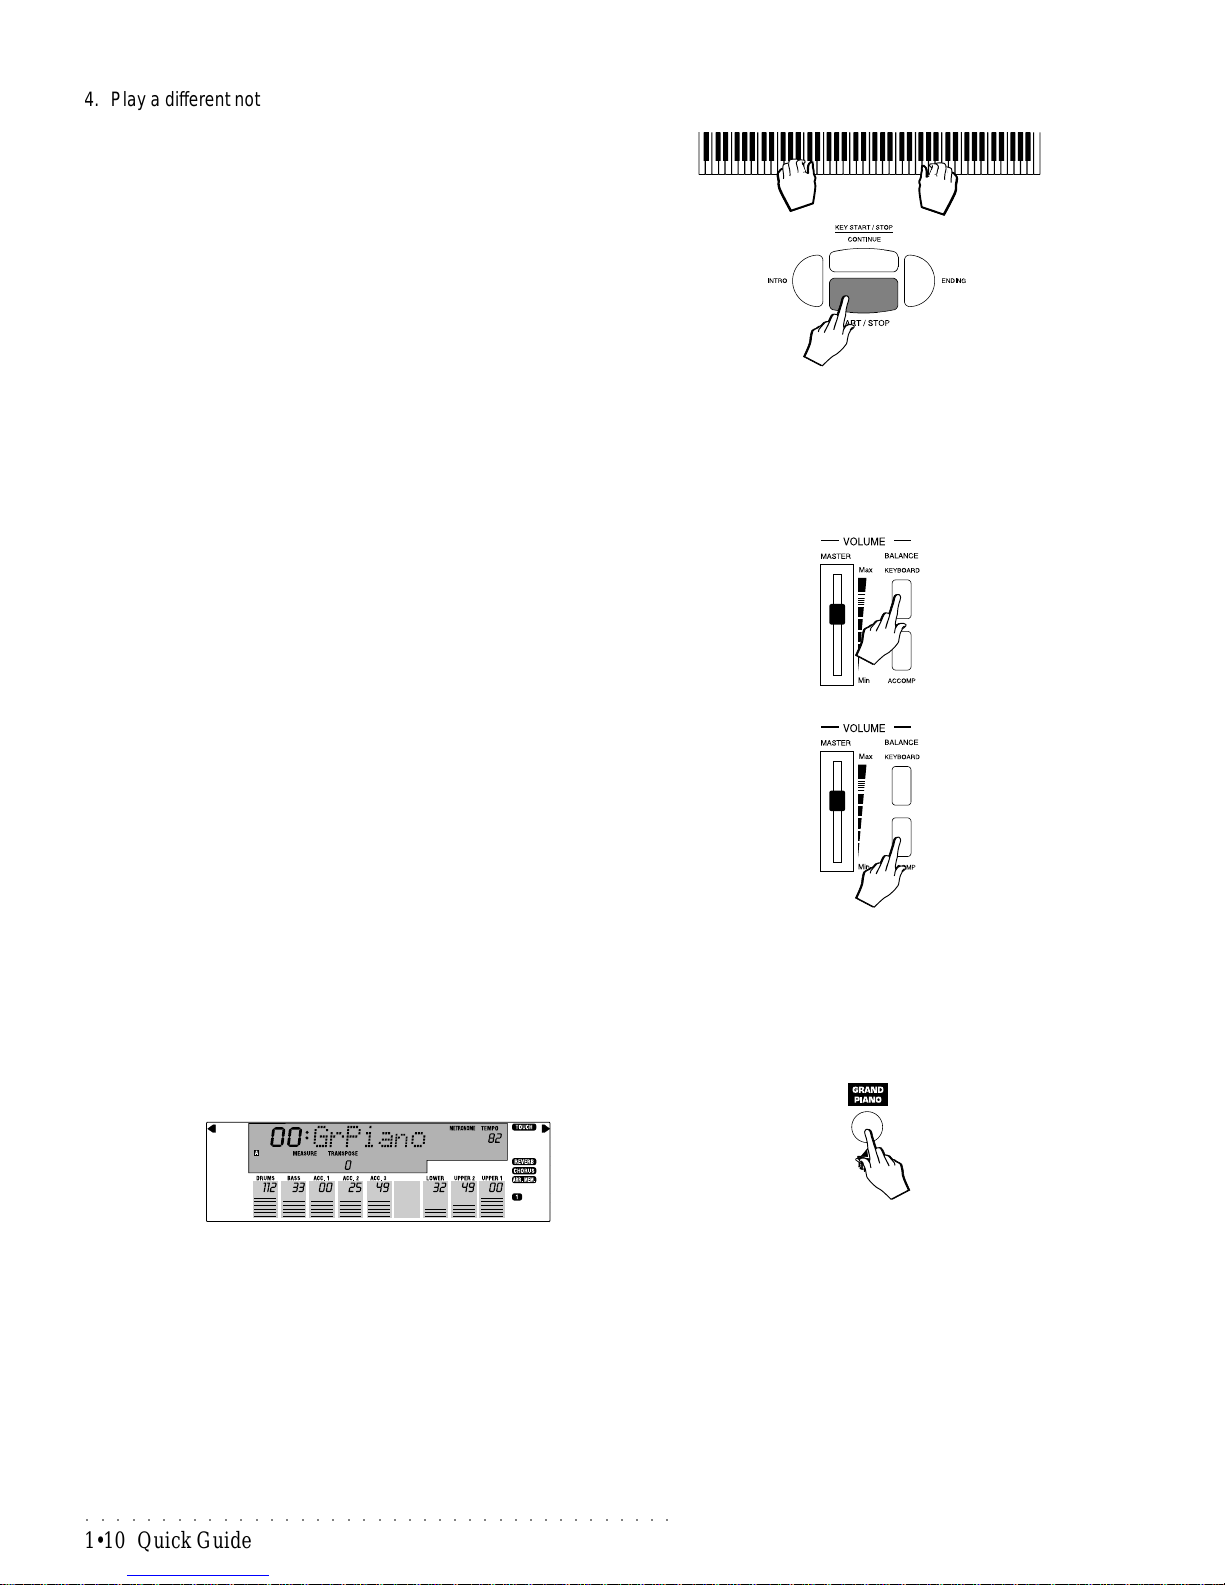
4. Play a different note (chord).
Note how the accompaniment pattern is transposed.
5. Start to play a melody with the right hand.
The combination of sounds that play and the current keyboard mode will
depend on the Style selected.
6. Stop the Style with Start/Stop or Ending.
If you use the Ending, the KEY START function is cancelled.
Styles are discussed in detail in the relative chapter afterwards.
Balancing the keyboard and accompaniment sounds
If you are playing using the Styles, you can adjust the volume of the keyboard
sounds and accompaniment sounds in real time using the BALANCE buttons
(in the VOLUME section). These buttons adjust the volume of one section with
respect to the other, creating a perfect balance between the two sections according to your requirements.
1. Press the KEYBOARD BALANCE button to increase the volume of the
keyboard sounds.
Holding the KEYBOARD BALANCE button down increases the volume of
the keyboard sounds continually and at the same time, decreases the volume of the accompaniment sounds proportionally.
Release the button when you obtain the required balance.
2. Conversely, press the ACCOMP BALANCE button to increase the volume of the accompaniment sounds.
Holding the ACCOMP BALANCE button down increases the volume of the
accompaniment sounds continually and at the same time, decreases the
volume of the keyboard sounds proportionally .
Release the button when you obtain the required balance.
The GRAND PIANO button
• Press the GRAND PIANO button.
The GRAND PIANO button always returns you to a single Piano sound
(Grand Piano Preset) playing across the full keyboard. All the LEDs of the
Sound Group will turn off.
The Grand Piano Preset recalls fixed parameter values (piano sound, volume, pan setting, Damper Physical Model effect) which cannot be modified
and saved to the same Preset. Any modifications that you make to this
Preset can be saved to the Programmable Presets.
Y ou may use the “Grand Piano” button as a ‘return to start’ button whenever
you wish to have only one sound active across all 88 keys.
If you are currently playing with the Styles, pressing the Grand Piano button
stops the auto accompaniment patterns, but not the rhythms.
Page 19
○○○○○○○○○○○○○○○○○○○○○○○
Quick Guide 1•11
Demo Song
Listen to the Demo Songs
Y ou can listen to the automatic playback of your PS1000 to get an idea of what
the instrument is capable of doing.
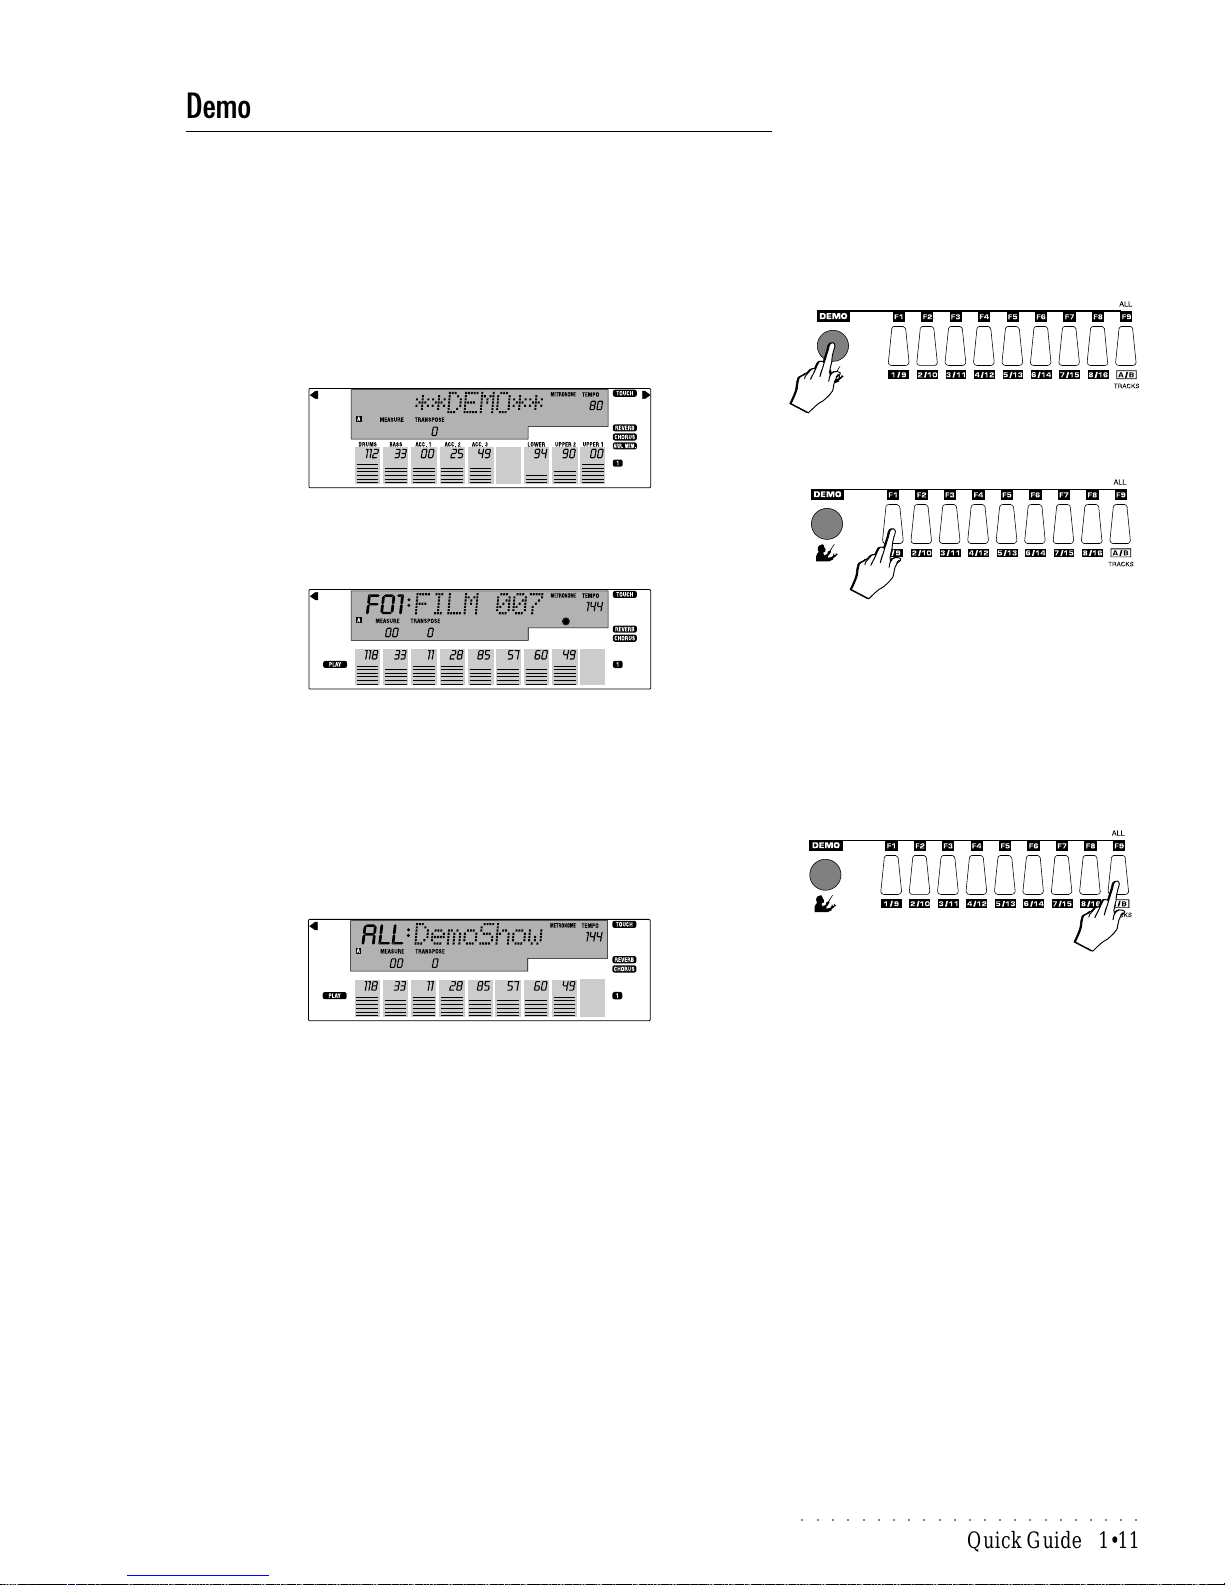
1. Press the DEMO button under the display to set the instrument to Demo
mode.
2. Select one of the 8 Function buttons under the display (F1…F8). In this
example we press F1.
The corresponding Demonstration Song will start to play . When it reaches
the end it will stop automatically.
Each Function button (F1 - F8) recalls a Demo Song.
To listen to the chained demo songs
3. Press button F9 to chain all eight demos (All:DemoShow).
Playback will start automatically from the first Song. The demo currently
playing will be shown in the display .
While the demo plays, all the buttons on the control panel (except DEMO,
the Function buttons and ESCAPE) and the keyboard will be temporarily
disabled.
4. To stop the Demo Song without closing the DEMO display, press the
corresponding Function button.
T o stop the Demo Song and escape from the DEMO mode, press DEMO or
ESCAPE.
Page 20
○○○○○○○○○○○○○○○○○○○○○○○○○○○○○○○○○○○○○○○
1•12 Quick Guide
Multimedia
PS1000 can project Lyrics onto an external monitor when playing PS Series
Disks. There are a large number of disks that project lyrics when played. If you
connect the RGB socket of the Video Interface to a domestic TV or computer
monitor, you can project the L yrics onto the external monitor. You may have to
load a Song into memory.
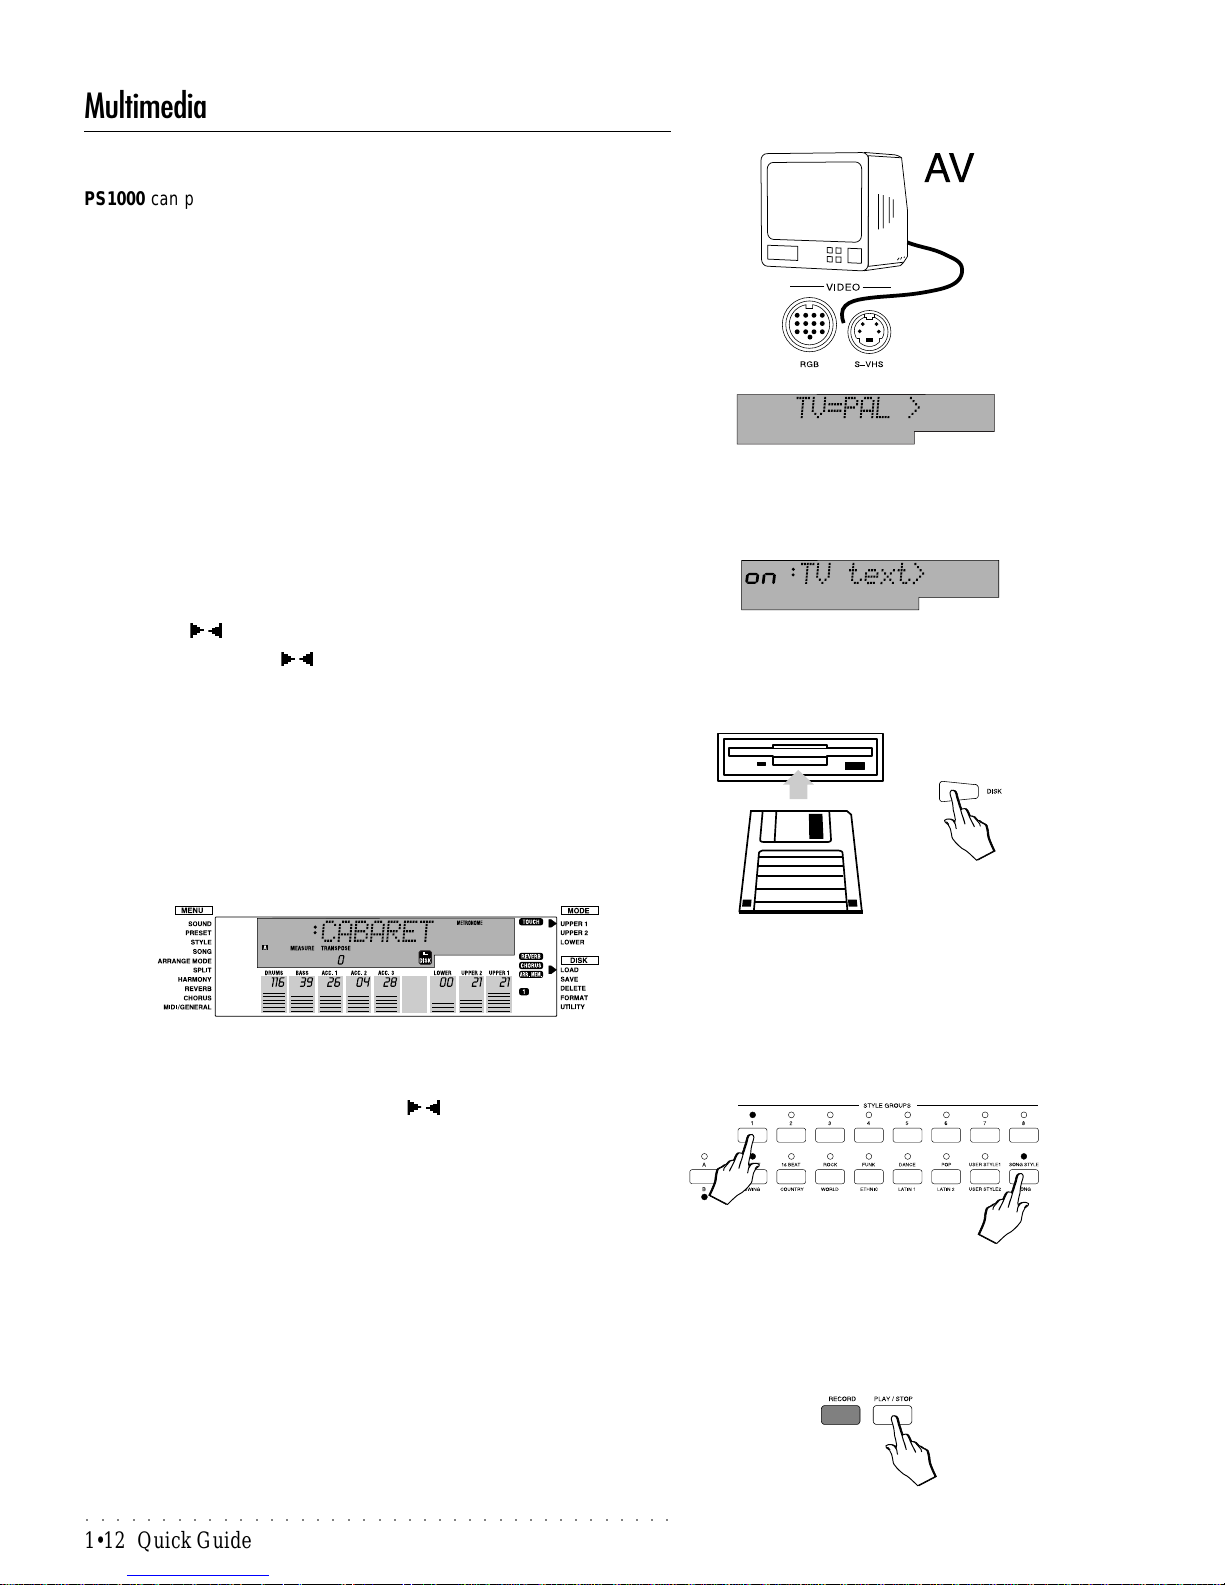
1. Connect the rear panel RGB (or S-VHS) connector of the VIDEO interface to a monitor or domestic TV.
PS1000 is supplied with a special RGB/SCART cable.
PS1000 is set by default to communicate with video systems conforming to
the PAL (European) standard.
If you are using the instrument in the U.S.A., be sure that the “TV” param-
eter is correctly set to the NTSC standard under the GENERAL function.
If your TV set has the S-VHS socket, use the rear panel S-VHS connector .
2. Go to the “TV Text” page under the MIDI/GENERAL menu function and
set the parameter to ON to enable the connection between the instrument and the TV set.
Use the Cursor Up/Down buttons to select the MIDI/GENERAL menu and
the P AGE / buttons to select the TV TEXT parameter.
Use the TEMPO/DA TA / buttons to toggle between the On and Off status.
3. T une the TV to the AV channel.
To select the AV channel, consult the owner’s manual of the television set.
Computer monitors or studio videos normally operate in AV mode.
4. Insert a disk containing PS Songs into the disk drive and press the DISK
button.
The DISK icon is displayed and the right display arrowhead points to the
LOAD function in the DISK menu. The name of the first Song available in
the disk is also shown at the center of the display .
(At this point, it is also possible to select the Fast Load option - refer to the
Disk chapter for more details).
5. Select a Song with the Tempo/Data / buttons, then press ENTER
twice to load the Song into memory (background loading).
The Song will be loaded to the first available location in song memory (in
the case of an empty song memory , the Song will load to button 1 of the
Song Group).
6. Press the SONG button in the Style Groups section and press button 1
of the top row of buttons 1-8 to select the Song.
Y ou may have to press the A/B button to activate the “B” LED before pressing the SONG button.
7. Press PLAY/STOP to start the playback.
The external monitor will scan the lyrics of the Song in synchronization with
the playback.
8. Stop the Song playback with START/STOP or STOP.
The Song lyrics will no longer be projected on the external monitor.
Note: If you are using the F AST LOAD option
(LoadMode=On), the instrument’s panel buttons and keyboard will be temporarily disabled
while data is loaded into memory.
IMPORTANT
When you press the A/B Selector button to
switch from bank set A to bank set B (or vice
versa), the LED currently shown off will flash
for about 3 seconds, during which time you
must make your bank selection. If the LED
stops flashing, it will not be possible to switch
bank set.
Page 21
○○○○○○○○○○○○○○○○○○○○○○○
Quick Guide 1•13
Selecting Sound Presets (ROM)
With the PS1000, you can quickly select the Sound Presets. These presets
contain single, layered and split sounds. There are a total of 128 permanent
(ROM) Presets and 16 User Programmable Sound presets.
The Sound Groups section
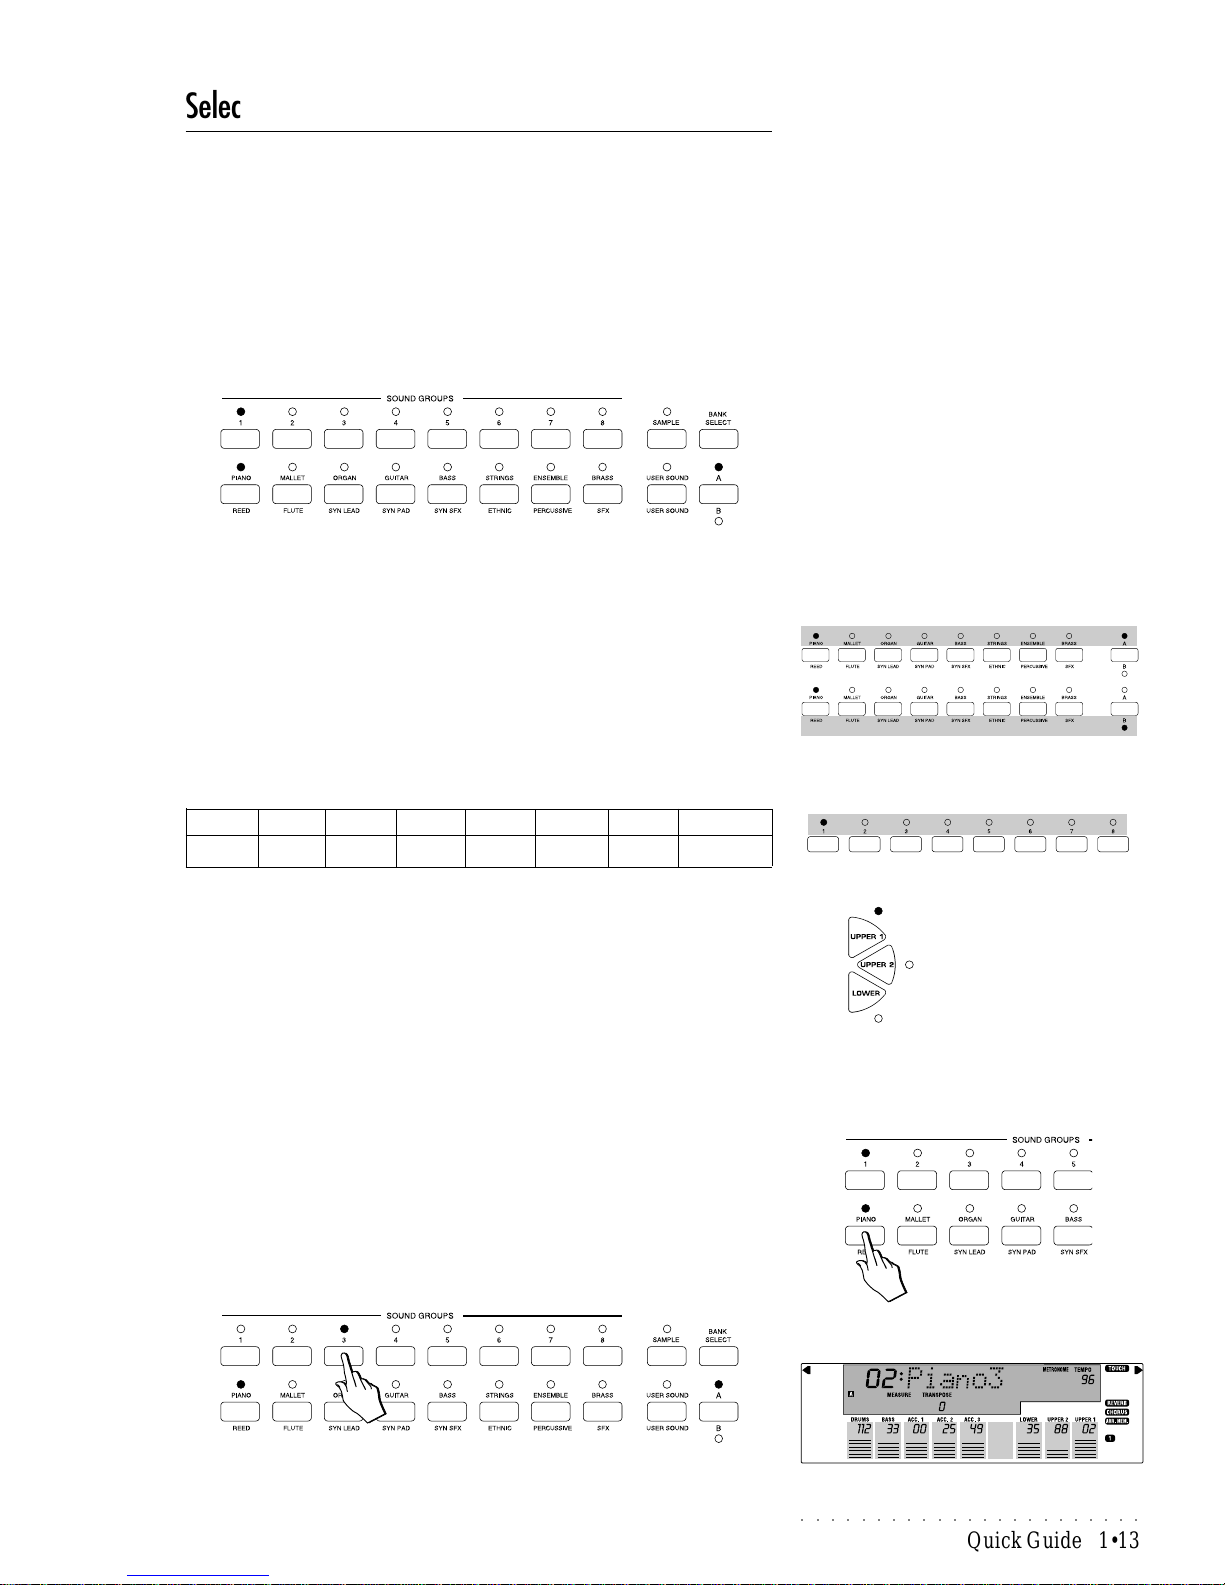
The Sound Presets are housed in the Sound Groups section which consists of
two rows of buttons.
The first 8 buttons of the lower row are Sound Group buttons, marked above
(piano, mallet, organ, etc.) and below (reed, pipe, syn lead, etc.) with sound
“family” names. The Sound Group selected depends on the status of the LED
of the A/B selector button on the extreme right of the group.
When LED A is on, the Group buttons select the names silkscreened above
them.
When LED B is on, the names selected are those under the buttons. To switch
from A to B, press the A/B selector button then press one of the Groups buttons.
The 8 buttons numbered 1-8 select 8 different Presets of the currently selected
Preset Group and are factory-set to recall Presets in the following manner:
12345678
Single Single Single Single Layer Layer Split Split
Each Preset of the current Group contains a memorized Single, Layer and Split
sound combination which you can recall in real time by activating the appropriate keyboard activator buttons (Upper 1; Upper 2, Lower). The Single Presets
activate the Upper 1 keyboard section across the entire keyboard. The Layer
Presets activate the Upper 2 section layered with Upper 1. The Split Presets
activate the Lower keyboard section (which splits the keyboard) together with
one or both the Upper sections.
When you select a Sound Group from the lower row for the first time after
turning on, Preset n. 1 of the upper row is automatically selected by default.
Example 1
1. If you select the Piano Group button, Preset 1 (GrandPiano) is recalled
automatically for the Upper 1 keyboard section.
LED A of the A/B selector button will be on as well as the LEDs of the PIANO
Group button and button 1.
2. Now select button n. 3 of the top row.
This will recall the Single Preset “Piano 3” from the same PIANO Group.
Keyboard Activator
buttons
IMPORTANT
When you press the A/B Selector button to
switch from bank set A to bank set B (or vice
versa), the LED currently shown off will flash
for about 3 seconds, during which time you
must make your bank selection. If the LED
stops flashing, it will not be possible to switch
bank set.
Page 22
○○○○○○○○○○○○○○○○○○○○○○○○○○○○○○○○○○○○○○○
1•14 Quick Guide
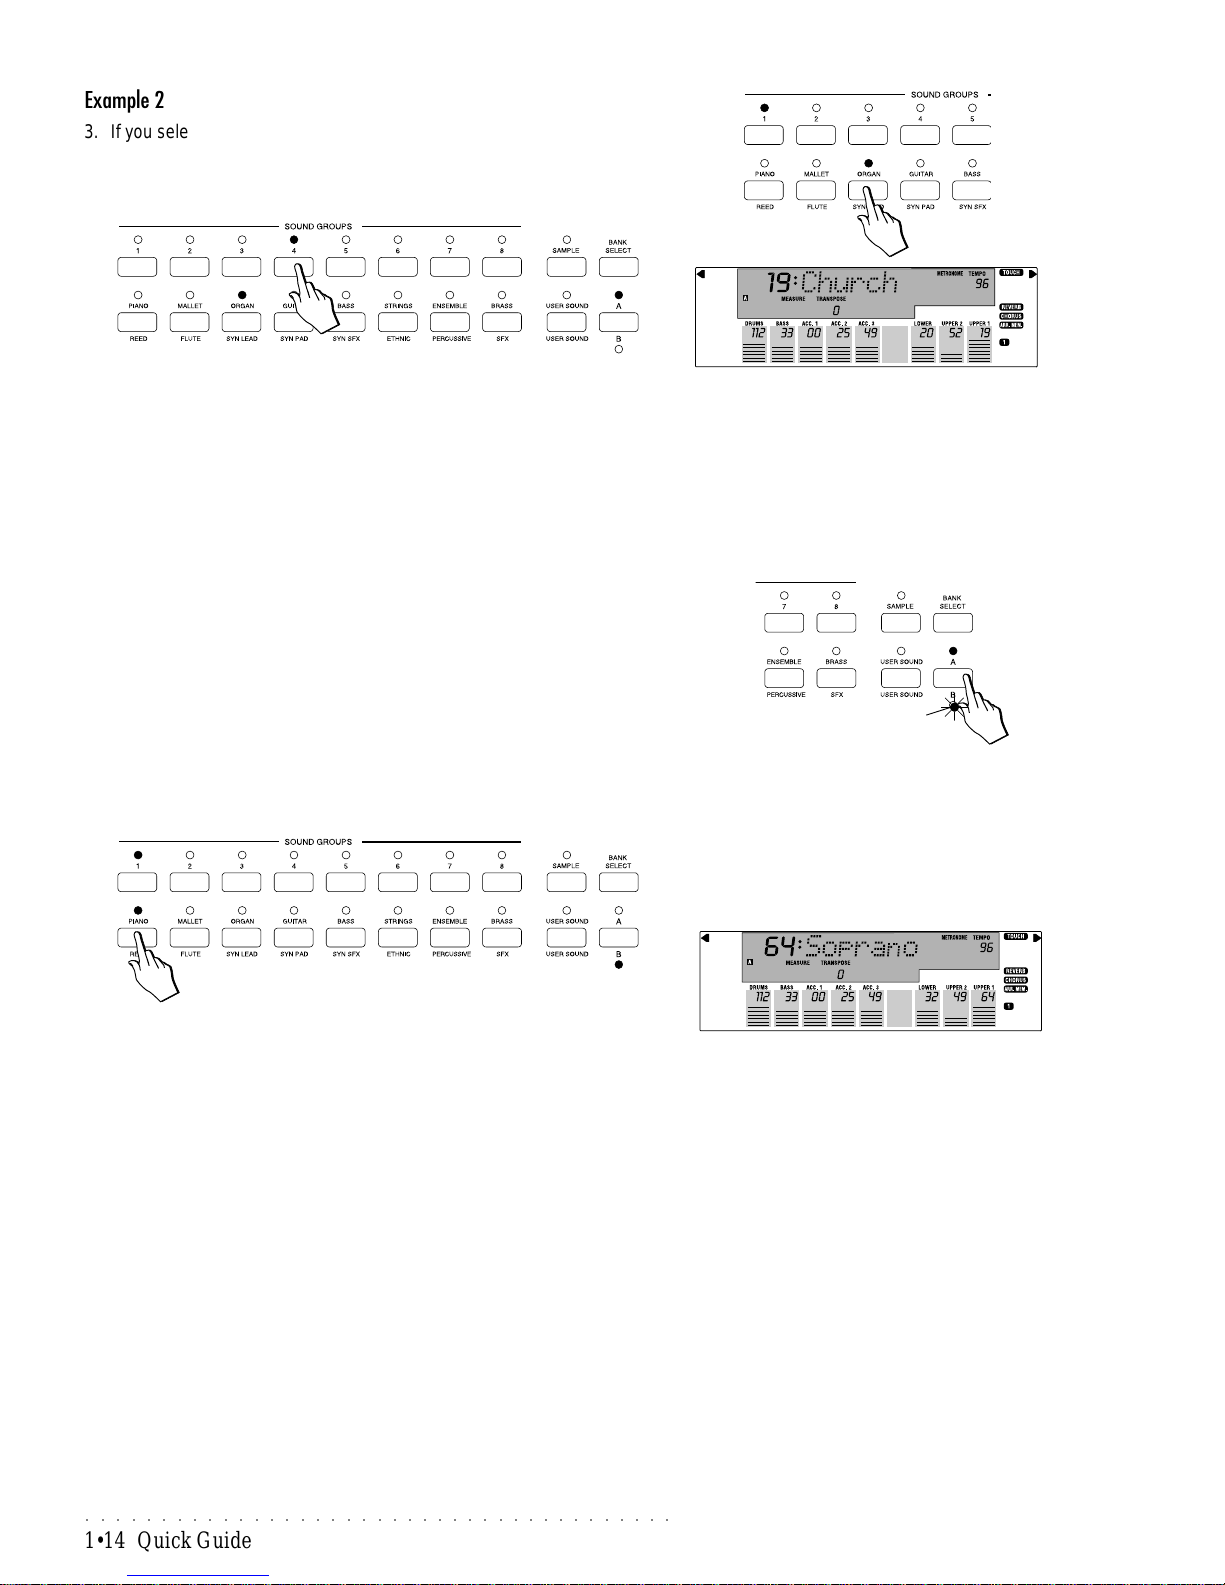
Example 2
3. If you select the ORGAN group button, Preset n. 1 of the top row activates
automatically , recalling the Single Preset “Organ 1”.
4. Now press button 4 and you recall the Single Preset “Church”.
Repeat the operations to select the other Presets, choosing the group names
from the set above the buttons (piano, mallet, organ, etc.).
The last Preset button selected for the current Preset Group remains memorized. For example, if you select the Piano Group button (as in the example
explained above), Preset 3 (Piano 3) will be recalled. If you now select the
Organ Group button, you will recall the Church Preset (button 4).
This system of memorizing the last selection made will help you recall your
preferred Presets quickly.
Example 3 (the A/B selector button)
5. Press the A/B selector button.
The LED of selector B will start to flash.
6. Now press one of the Group buttons, this time choosing one of the names
silkscreened below the buttons.
For example, if you press the button marked REED, Preset 1 (“Soprano
Sax”) will be recalled automatically for the Upper 1 section and the LED of
the B selector will turn on (LED A will turn off).
7. Continue your selections, this time choosing from the lower set of group
names (reed, pipe, syn lead, etc.).
To return to the A set of group names, press the A/B selector button and
choose one of the group names from the top set (piano, mallet, organ, etc.).
Assigning different sounds to the keyboard sections
All the selections you have made so far have recalled factory-set sound combinations. If you wish to change the sound assigned to one of the keyboard
sections, you must enter the edit of the section. Once edited, you can store
your changes either to the User Presets of the Sound Groups section, or the
Programmable Presets.
Section Editing is fully explained in the Programmable Presets chapter of the
User Guide.
B LED flashing
IMPORTANT
When you press the A/B Selector button to
switch from bank set A to bank set B (or vice
versa), the LED currently shown off will flash
for about 3 seconds, during which time you
must make your bank selection. If the LED
stops flashing, it will not be possible to switch
bank set.
Page 23
○○○○○○○○○○○○○○○○○○○○○○○
Quick Guide 1•15
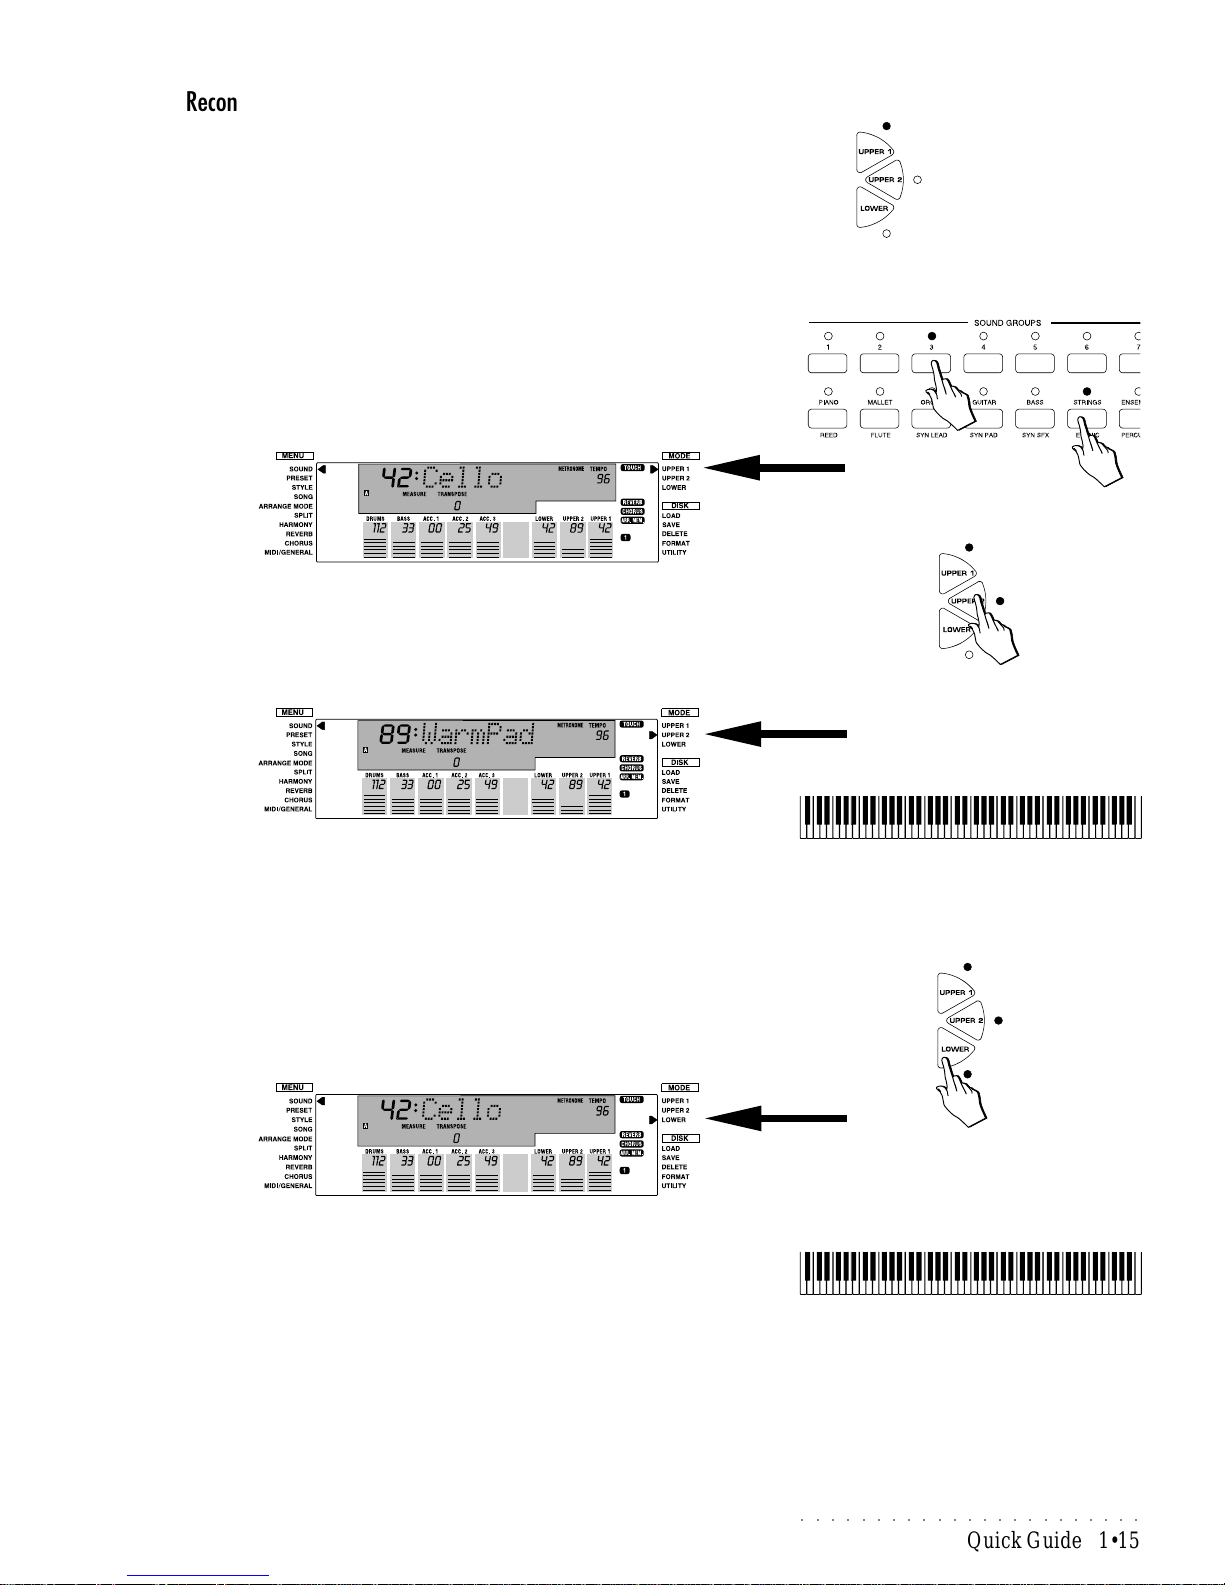
Reconfiguring the Presets using the Keyboard Activators
You have seen so far that at the touch of a button, you can select a Single
(buttons 1 - 4), Layer (buttons 5-6) or Split (buttons 7-8) Preset.
At the touch of a single button, you can also reconfigure the current Preset into
one of the other configurations using the three buttons, called “Keyboard Activators”, located to the right of the display (Upper 1, Upper 2, Lower).
The resulting Preset configuration changes are temporary , but you can memorize them to the Programmable Presets with the Store Preset procedure (see
the Programmable Presets chapter for specific details).
Example 4 - from Single to Layer
8. Select the Single Preset n. 3 from the STRINGS group (LED A on). You
will recall the Single Preset “Cello” assigned to the Upper 1 section.
9. Press the UPPER 2 button (LED on) and play a single note on the keyboard.
The right display arrowhead will point to the Upper 2 mode meaning that the
Upper 2 keyboard section is selected.
When you play , you will hear two sounds for every single note played. The
Upper 2 selector button introduces a second sound layered with the first (in
this case, Cello and Warm Pad).
Example 5 - from Layer (or Single) to Split
10.Continuing from point 9 above, press the LOWER selector button (LED
on) and play with both hands on the keyboard.
The right display arrowhead will now point to the Lower mode meaning that
the Lower keyboard section is selected.
The keyboard will be split into two parts, with a split point at note C4.
On the lower keyboard zone within the range A0 - B3, you will hear Cello
sound while on the right hand, across the note range C4 - C8, you will hear
the two layered sounds Cello and Warm Pad.
Whatever configuration you decide to play with remains memorized until
you change the configuration again, or until you select another Preset or
select the same one. It is also possible to deactivate all three keyboard
sections at the same time.
Keyboard Activator
buttons
<-------- Cello --------><----------- Cello ----------->
<-------- WarmPad -------->
<------------------------ Cello ------------------------>
<--------------------- Warm Pad -------------------->
Page 24
○○○○○○○○○○○○○○○○○○○○○○○○○○○○○○○○○○○○○○○
1•16 Quick Guide
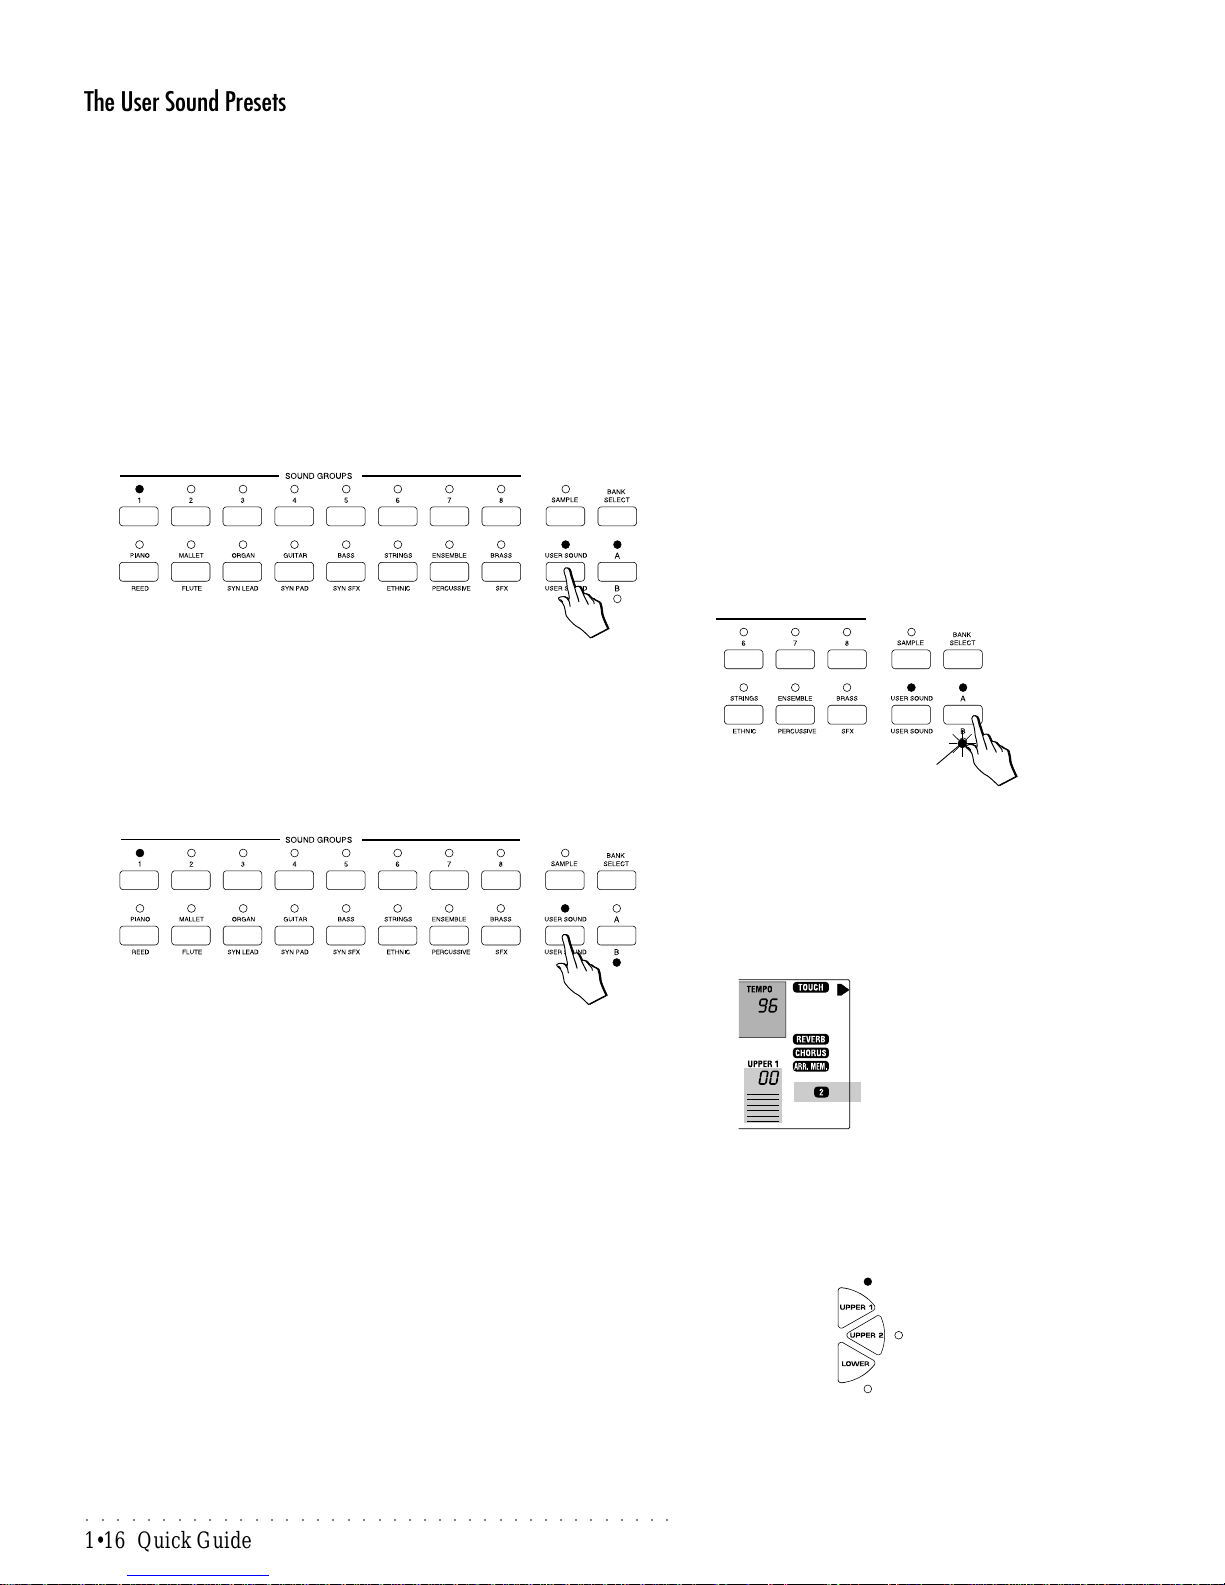
The User Sound Presets
The Sound Groups section offers an additional 16 User Presets under the User
Sound buttons (8 for group A and 8 for group B). The User Presets are factoryprogrammed to recall a selection of Single, Layer and Split Presets, but you
can program them to recall your preferred combination of sounds taken from
the PS1000 Sound library (444 sounds). How to program the User Presets is
fully expla˜.ed in the Sounds and Samples chapter of the User Guide.
Example 6 - User Preset selection
11 .Press the User Sound button.
The LED of the User Sound button will turn on.
The current LED of the Group buttons will be cancelled and only the LED of
button 1 will remain on, together with LED A or B of the A/B selector. In our
example below, led A is shown on.
The User Preset n. 1 of set A will recall a layered combination of GrandPiano
and SlowStrings across the entire keyboard section (Upper 1 + Upper 2).
12.Press the A/B Selector button to switch to the other set, in this case set
B, of the User Presets.
The LED of set B will start to flash.
13.Press the USER SOUNDS button again to confirm.
The LED of A will go off, LED B will turn on and button n. 1 will automatically
activate to recall the Single Preset “SaxNoise” from Sound Bank 2. The
current Bank number is shown in the bottom right hand corner of the display. More information regarding the Sound Banks can be found in the
Sounds and Samples chapter of the User Guide.
Continue the selections to listen to the User Presets recalled.
The last User Preset button selected remains memorized. For example, if
you select button n. 3 of the A set of User Presets, then select button 4 of
the B set, when you return to the A set, button n. 3 will be shown on.
This system of memorizing the last selection made will help you recall your
preferred User Presets quickly.
You can reconfigure the User Presets (from Single to Layer to Split) by
using exactly the same procedure explained under the heading
“
Reconfiguring the Presets using the Keyboard Activators
” on the previous
page.
It is also possible to change Sound and Sound Bank and save the changes
to the current User Preset. More about this feature on page 2.3 of the
Sound and Samples chapter of the User Guide.
Sound Bank 2
B LED flashing
IMPORTANT
When you press the A/B Selector button to
switch from bank set A to bank set B (or vice
versa), the LED currently shown off will flash
for about 3 seconds, during which time you
must make your bank selection. If the LED
stops flashing, it will not be possible to switch
bank set.
Note: From the panel, it is possible to select
384 Sounds from the PS1000 ROM Sound Library . The remaining 60 ROM Sounds housed
in Midi Bank 6 can be selected via MIDI from
an external controlling device.
Page 25
○○○○○○○○○○○○○○○○○○○○○○○
Quick Guide 1•17
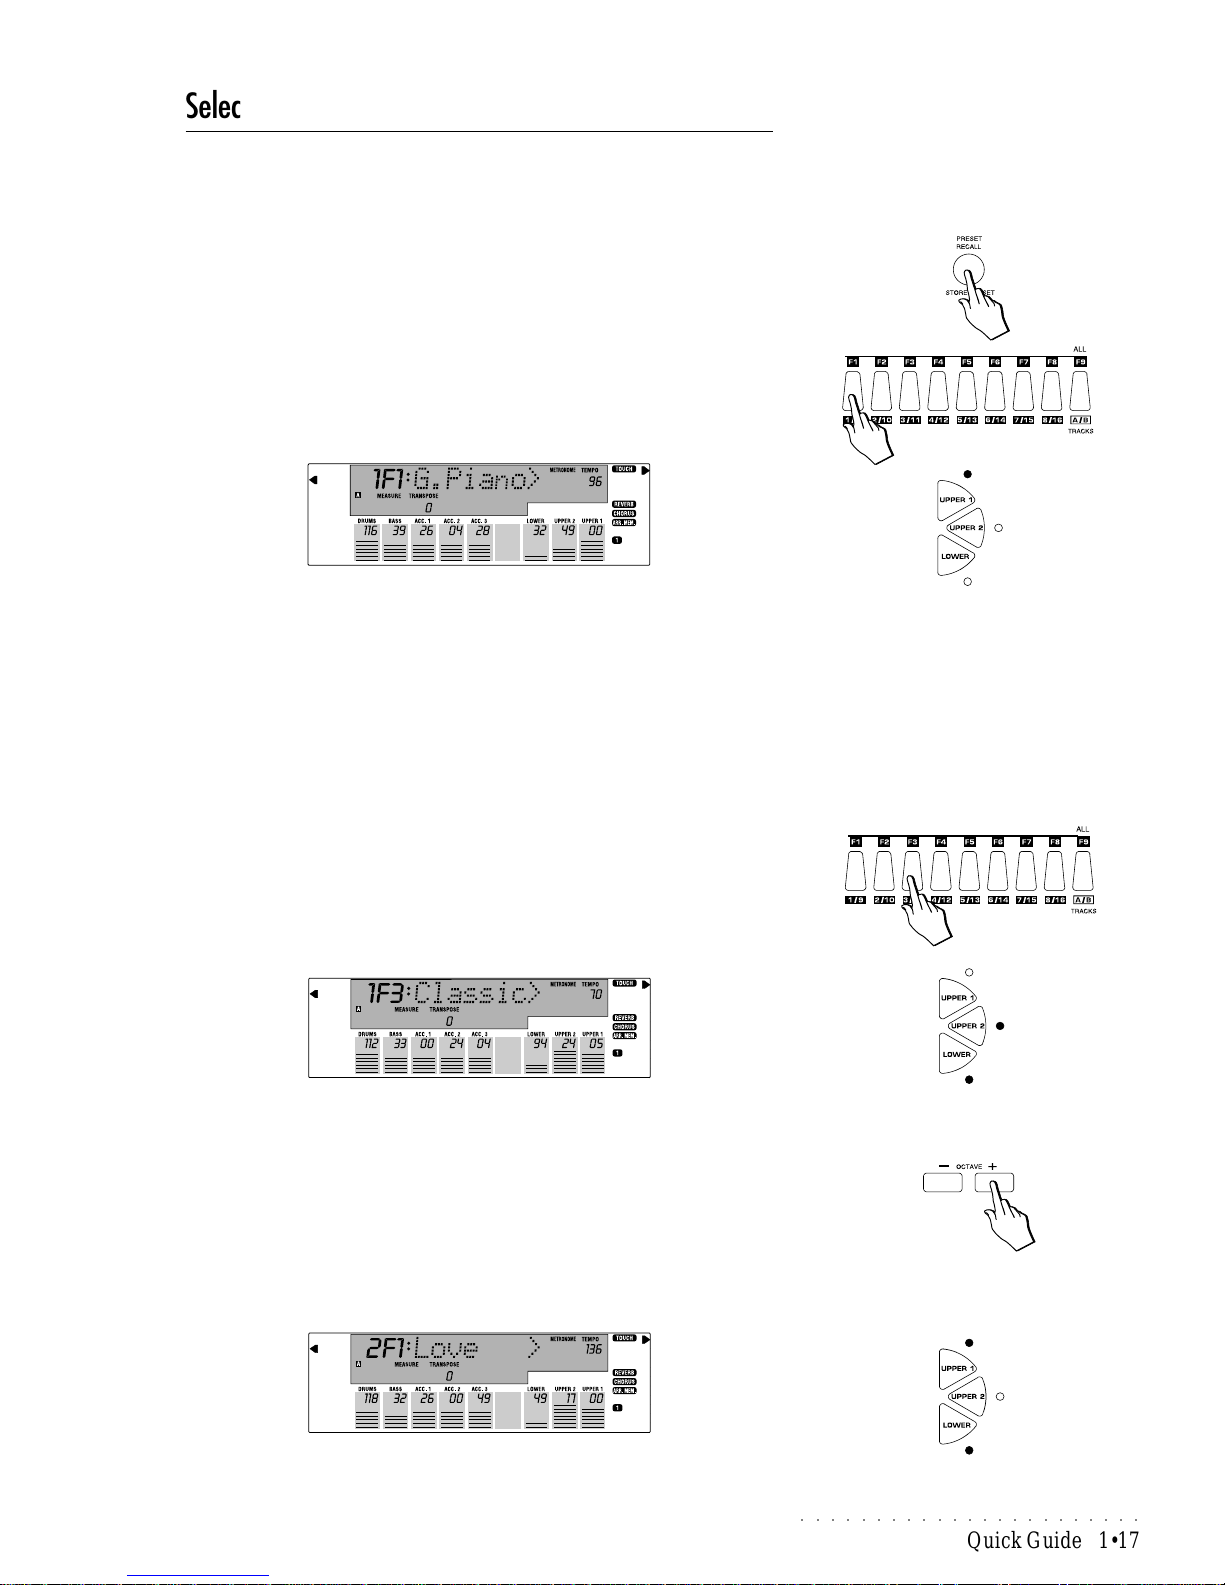
Selecting the Programmable Presets
The PS1000 contains 63 Programmable Presets organized into seven different
banks: 10 Presets are programmed at the factory and the other 53 are “empty”,
ready to be user-programmed.
1. Press the PRESET RECALL button.
Pressing this button sets the instrument for Prog. Preset selection and gains
access to the first Prog. Preset Group (1).
2. Press the Function button F1 under the display .
Pressing this button recalls the first Preset (F1) of the current Prog. Preset
Group. You will observe a change in the program change numbers of the
tracks and the status of the LEDs of the panel.
If you play on the keyboard, you will hear a single Piano sound (Grand
Piano) assigned to the Upper 1 section active across the entire keyboard.
The Prog. Preset F1 from Group 1 recalls a configuration of 8 sounds, three
for the keyboard sections and 5 for the Styles. The three keyboard sections
for real time playing are configured to play in Single mode, with the Grand
Piano sound assigned to the Upper 1 keyboard section across the entire
keyboard. The remaining 5 sounds are assigned to the sequencer and play
as automatic accompaniment when you play with the Style.
Also recalled in an appropriate Reverb effect and corresponding effect volume, a Style, a Style Variation and a Tempo setting (provided that Style
Lock and Tempo Lock are both off).
3. Press another Function button.
For example, press function button F3. Y ou will recall a Split Preset consisting of the SoloGuitar sound assigned to the Upper 2 section and the Halo
Pad sound assigned to the Lower section.
The Upper 1 section will be off and the keyboard will be split at note F#3.
A completely different panel setting will also be recalled.
4. Change Prog. Preset Group by using the Octave –/+ buttons.
The Octave + button scrolls the Prog. Preset Groups in increasing numerical order from 1 - 7. Use the [–] button to select the Prog. Preset Groups in
decreasing numerical order.
For example, press the Octave + button once to select Group 2 then select
the first Prog. Preset (F1) of the second Group.
Once again, the display information and panel status will change. You will
Page 26
○○○○○○○○○○○○○○○○○○○○○○○○○○○○○○○○○○○○○○○
1•18 Quick Guide
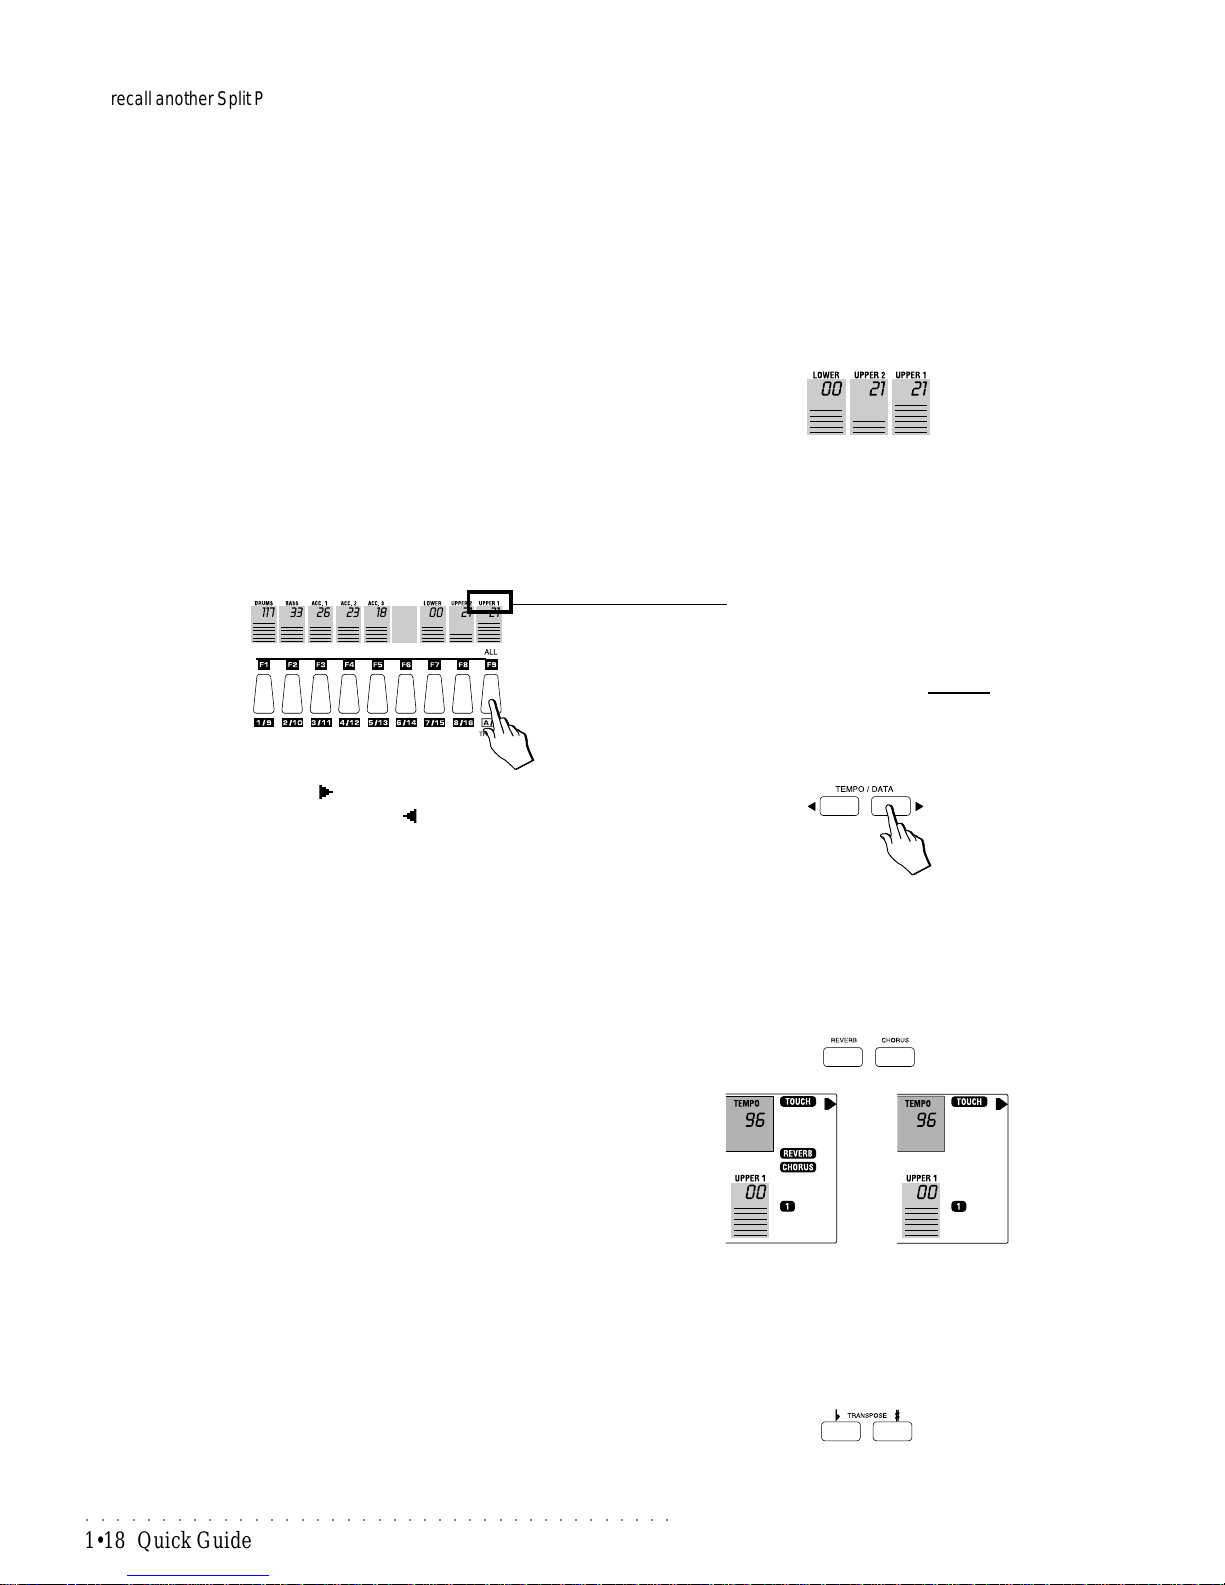
recall another Split Preset, this time with the Upper 1 and Lower sections on
and Upper 2 off.
Note that when you change Group, the preset of the previous group will
remain active until you select a new Preset from the new Group.
How to program your own Programmable Presets and memorize the settings with Store Preset is explained in Chapter 2, “Programmable Presets”
of the User Guide.
Changing the Volume balance between two sounds
If you are playing either in Layer or Split mode, you can adjust the volume of
any selected section in real time using the TEMPO/DA TA buttons. The current
Volume level of each section is graphically represented by a Bar graph under
the section names.
1. Press the Function button corresponding to the section whose volume
you wish to adjust.
In this example, we press F9 to select the Upper 1 section. The name of the
section, “Upper 1”, starts to flash for a few seconds.
2. Press the TEMPO/DATA [ ] button to increase the volume of the selected section, or the TEMPO/DATA [ ] button to decrease it.
A change in volume is shown by an alteration of the Bar graph; the higher
the Volume, the greater the number of horizontal lines.
3. Repeat the adjustment for other sections as required.
Playing with or without the Effects
Whether you are playing Sound Presets, Prog. Presets, Styles, etc., you’ll find
that in all cases, one or more effects will be applied to the sounds you are
playing. If you prefer to play without effects, you can instantly bypass the internal digital effects processors by deactivating the corresponding buttons
(REVERB and/or CHORUS).
When the corresponding display indicator is on, all the sounds of the current
Preset (ROM, Programmable or Style, etc.) will play with their programmed
effects.
When the corresponding display indicator is off, the sounds will play “dry” (without effects).
Transposing the instrument up or down
The TRANSPOSE b/# panel buttons allow real time pitch adjustments (transpositions) in steps of one semitone (range ± 12 semitones = 1 octave). The
transposition is global, affecting the instrument as a whole.
Reverb and Chorus on Reverb and Chorus off
VOLUME BAR GRAPHS
Note: The Volume of a keyboard section, or
any other track of the current Preset, can only
be changed when the section is selected (flashing). If the name of the section stops flashing,
the Tempo/Data buttons change the Tempo
setting in the display .
FLASHING SECTION
Page 27
○○○○○○○○○○○○○○○○○○○○○○○
Quick Guide 1•19
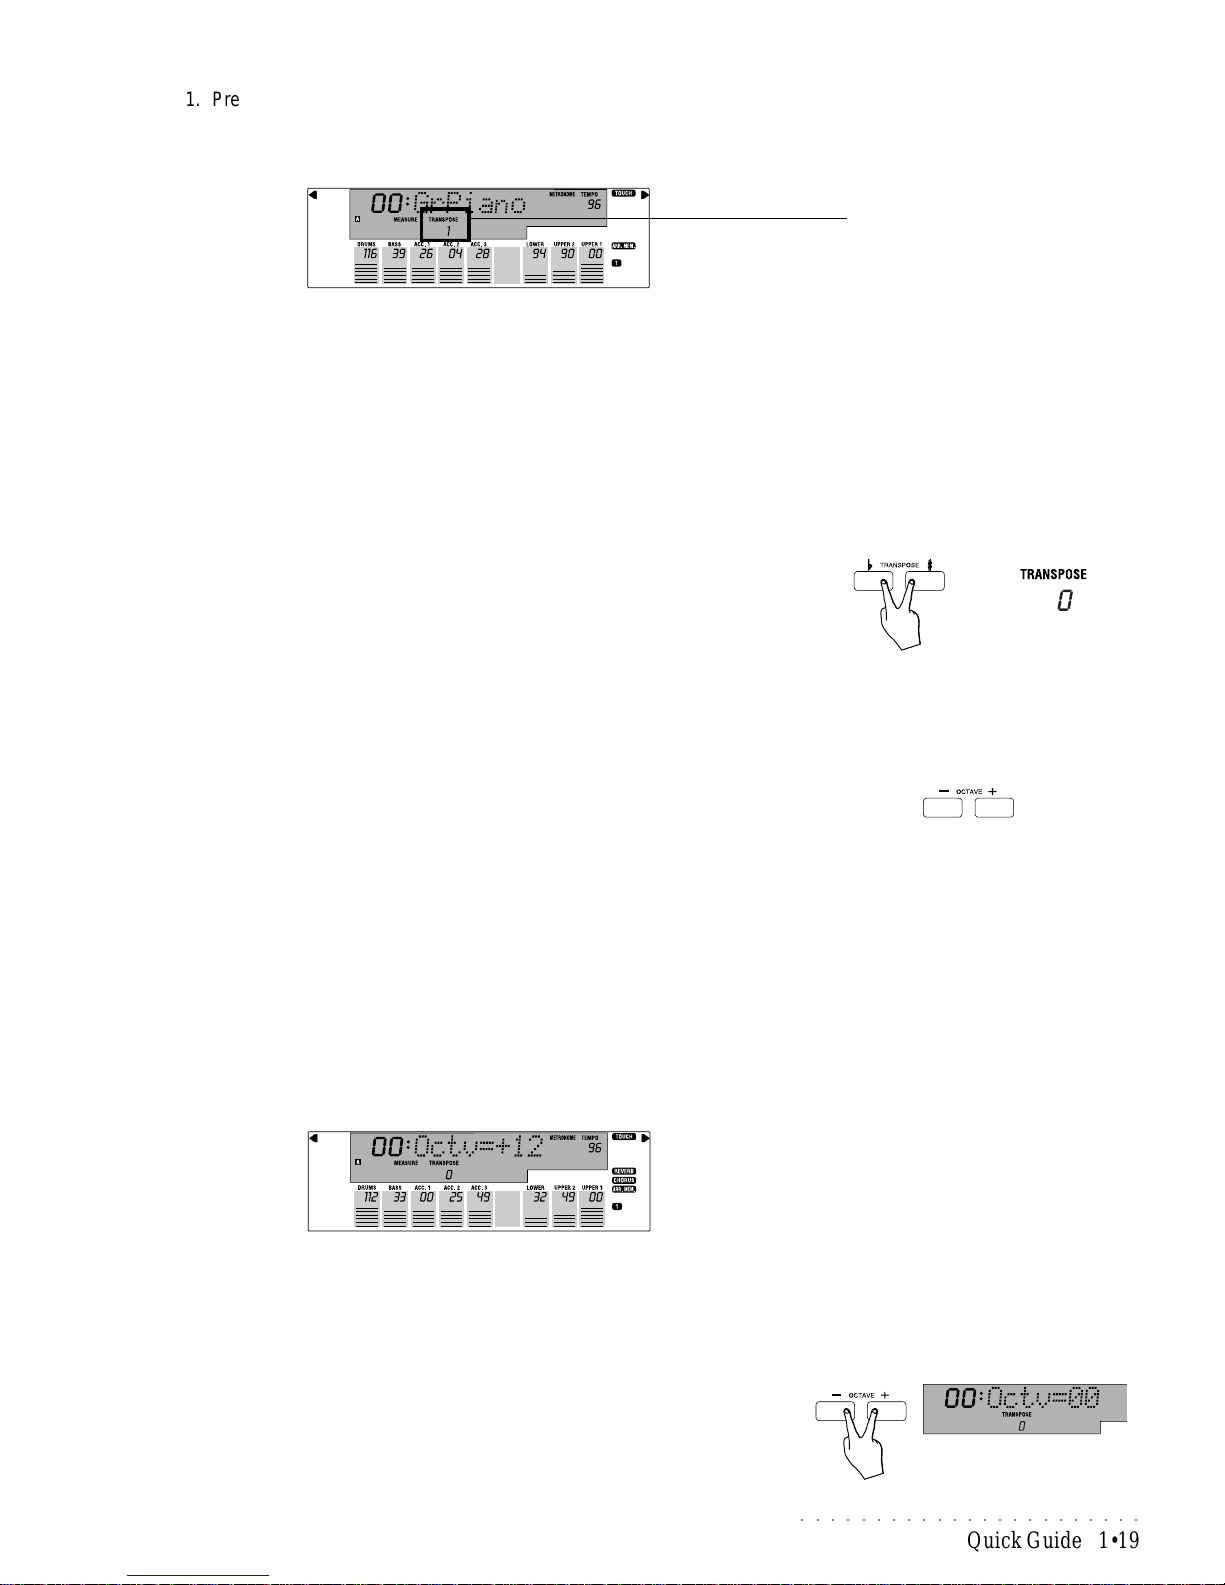
1. Press either TRANSPOSE # or TRANSPOSE b to raise (#) or lower (b)
the pitch.
The display example below shows a Transpose value of 1:
Play on the keyboard and you’ll hear that the pitch of the instrument is instantly raised (#) or lowered (b) one step. At the same time the display’s
TRANSPOSE section will show the current Transpose value (0 = standard
pitch).
Every time you press TRANSPOSE b the display shows a decrease of one
semitone.
Every time you press TRANSPOSE # the display shows an increase of one
semitone.
Holding either button pressed changes the value continually until the maximum transpose value of +12 or –12 is reached.
Clear the keyboard transpose setting
2 Press both TRANSPOSE buttons at the same time to reset the pitch to
normal.
Transposing a section in octave steps
In Style or Preset mode, the OCT AVE –/+ panel buttons allow real time octave
shifting of the current section up to a maximum setting of 2 octaves above or
below standard pitch. The transposition affects the current section only and not
the instrument as a whole.
In our example, the right display arrow is shown pointing to the Upper 1 section
and the Upper 1 LED is on, meaning that the section is selected for an octave
change.
1. Press either OCT A VE + or OCTA VE – to raise (+) or lower (–) the octave
setting.
Play on the keyboard and you’ll hear that the pitch of the current section is
instantly raised (+) or lowered (–) by one octave. At the same time the
display will show the new Octave value for a short period, then return to the
previous situation.
The display example below shows a setting of 1 octave (12 semitones).
Every time you press the OCT A VE – button the display shows a decrease of
one octave (up to – 24 semitones).
Every time you press OCTAVE + button the display shows an increase of
one octave (up to + 24 semitones).
Clear the Octave setting
2 Press both OCTAVE buttons at the same time to reset the pitch of the
current section to normal.
TRANSPOSE INDICATOR
Page 28
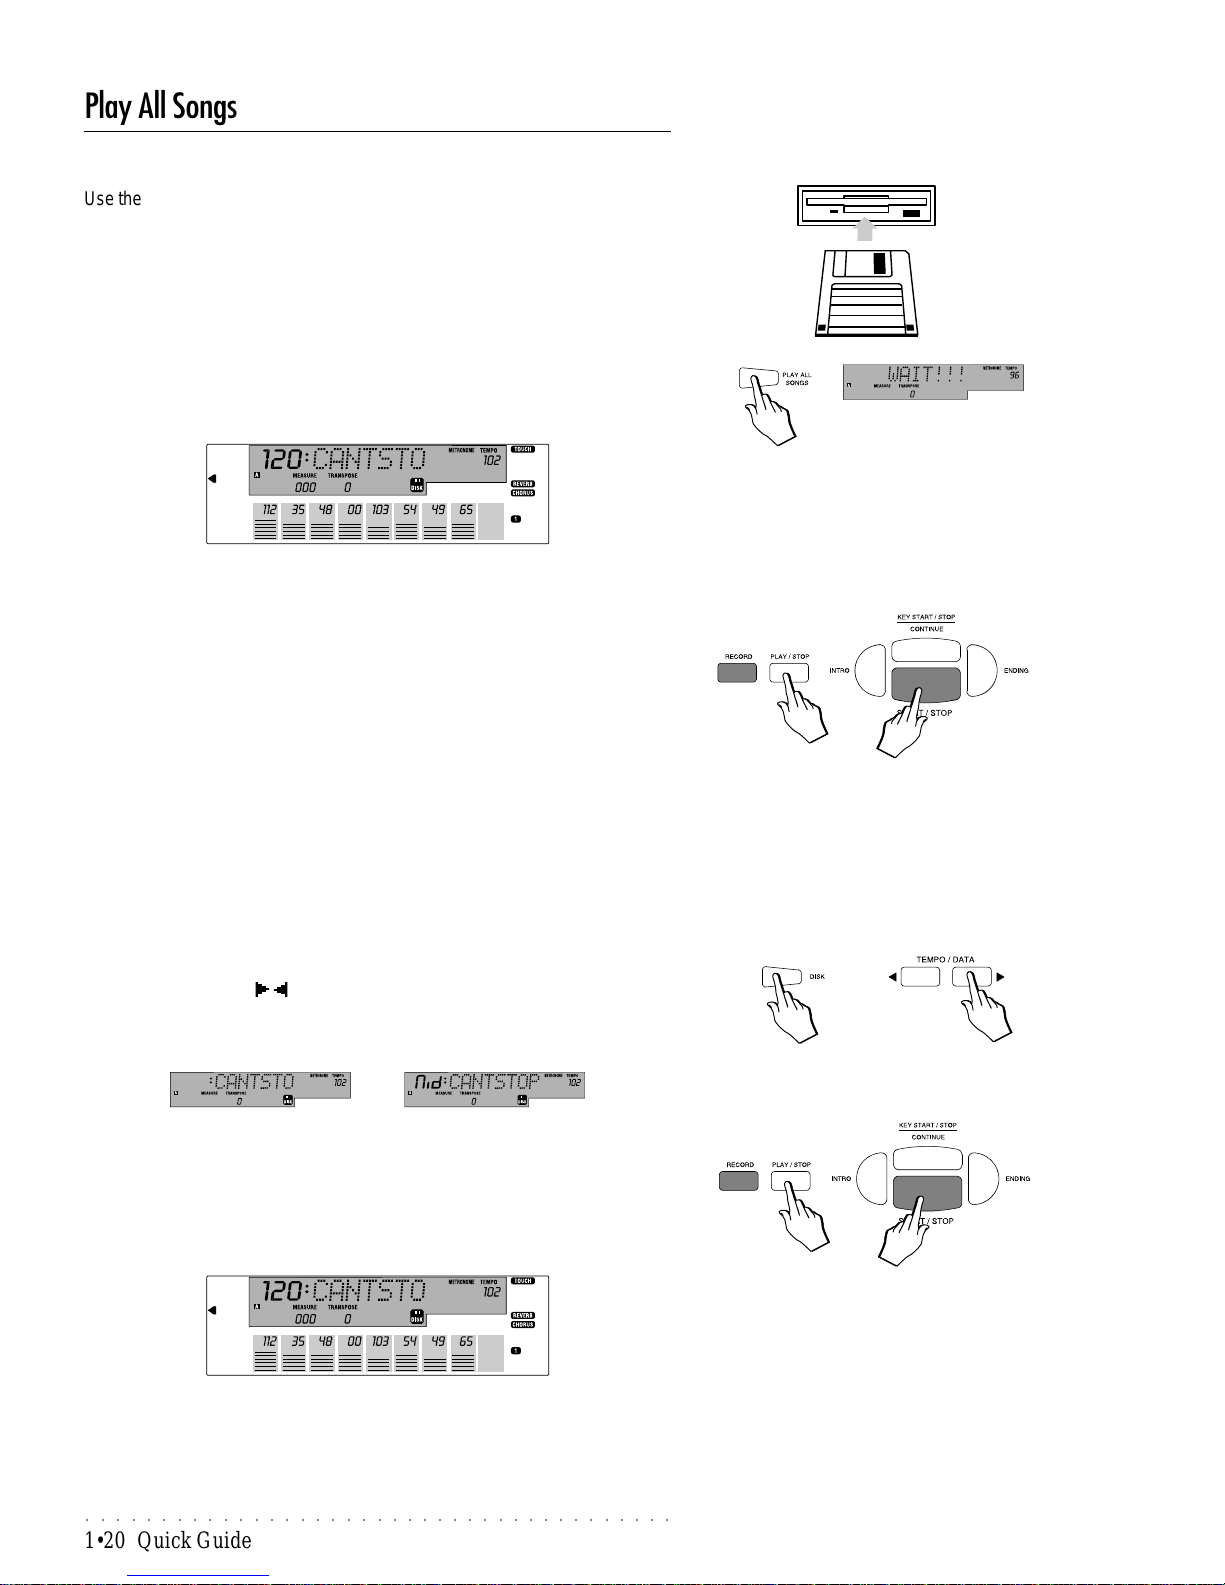
○○○○○○○○○○○○○○○○○○○○○○○○○○○○○○○○○○○○○○○
1•20 Quick Guide
Play All Songs
Use the PLAY ALL SONGS button (located under the DISK button to the right of
the display) to play all the Songs or MidiFiles directly from a disk. No need to
enter Disk mode; just insert the disk and press PLA Y ALL SONGS.
1. Insert a PS Songs disk or MidiFile data disk into the drive.
Check the disk label for the type of data contained on the disk.
2. Press the PLAY ALL SONGS button.
The message “Wait!!” appears for a few seconds and the PS1000 starts to
scan the disk contents. Shortly after a Song starts to play back and the
display shows the name of the Song.
When the first Song or MidiFile ends, a second sequence begins.
Playback continues non-stop until all the Songs or MidiFiles on disk have
been played. When the last Song or MidiFile reaches the end, playback
stops automatically .
3. You can stop the playback at any time by pressing the PLAY/STOP or
ST ART/STOP buttons.
Playback stops instantly .
Song Play - Direct from Disk
In addition to the PLA Y ALL SONGS feature, PS1000 also allows you to play a
preselected Song or MidiFile directly from disk, particularly useful for Song files
that are larger than the available sequencer memory .
The Demo disk supplied with PS1000 contains a Song file, but if you have a
Standard MIDI File data disk, you can use this instead of the supplied disk.
1. After inserting the disk into the disk drive, press the DISK button and use
the TEMPO/DAT A / buttons to select a Song or MidiFile.
Songs are identified by a short name while Midifiles show a name together
with the “Mid” extension.
2. After selecting the Song or MidiFile, press PLA Y/STOP or ST ART/STOP
to start the playback directly from Disk.
The message “Wait!!” appears for a few seconds then the name of the current Song is shown in the display . Shortly after , PS1000 enters Song mode
and playback begins.
3. To stop the playback at any time, press PLAY/STOP or START/STOP.
PS1000 exits Disk mode and returns to the mode selected before pressing
DISK. Don’t forget to remove the Floppy disk from the drive.
Note: How to load Songs to memory is explained in the Disk chapter.
Page 29
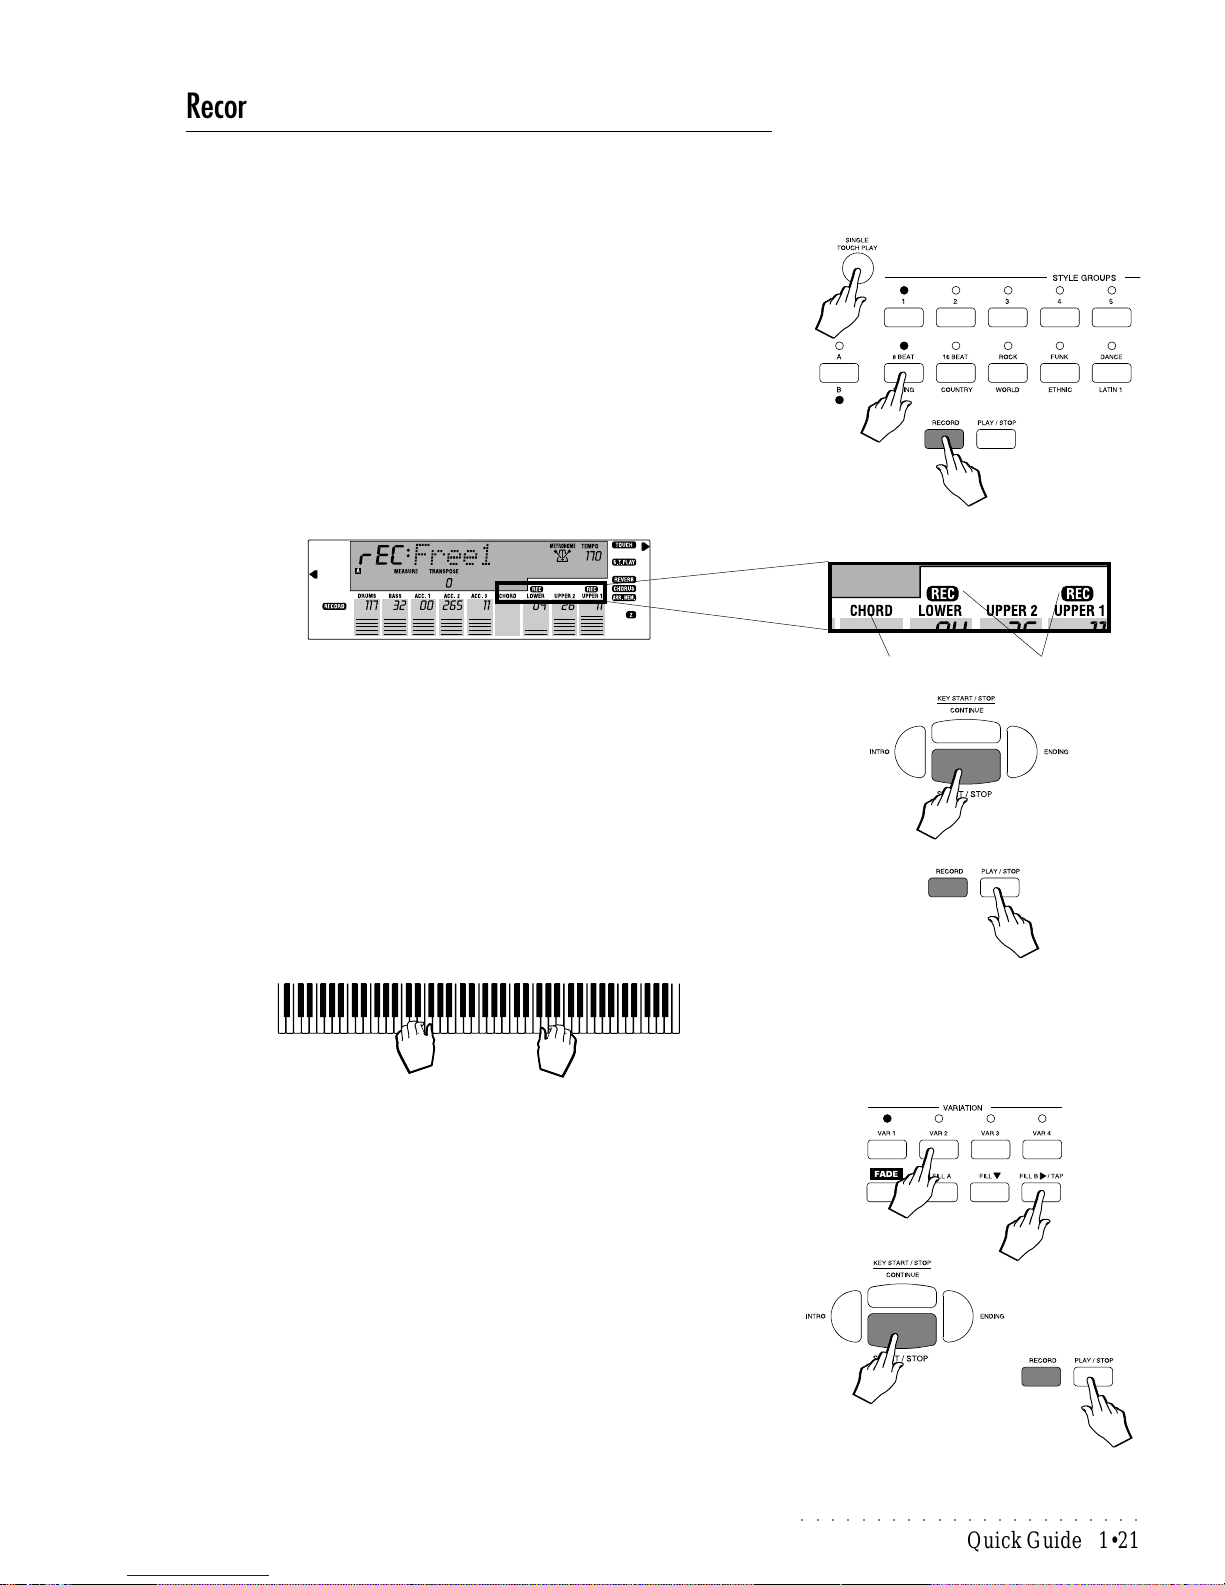
○○○○○○○○○○○○○○○○○○○○○○○
Quick Guide 1•21
Recording a Song Style
PS1000 allows you to record a simple 8 track song (Song Style) using a simple
recording method that uses existing Styles. In practice, the Song Style recording can record from 1 to 3 real time tracks accompanied by all the backing
tracks of a Style to create an 8 track Song Style.
This is the quickest and most direct recording method.
1. Press the SINGLE TOUCH PLAY button to set the PS1000 for Style Play.
2. A Style will already be selected, but you can select any one using the Style
Groups selection buttons.
3. Press the RECORD button.
The sequencer activates and sets one or more of the three keyboard tracks
for the recording by flashing the REC icon above the section names. The
CHORD track will also activate (flashing), indicating that the relative track is
ready to receive chord information.
The Metronome icon also activates, but if you want to record without the
metronome, press the METRONOME button on the right of the control panel.
4. Press either START/STOP or PLAY/STOP to start the recording.
Pressing START/STOP starts the sequencer and triggers the auto accompaniments of the Style when you press a note or chord on the lower key-
board area. If you don’t press a note, the drum track will start to play.
Pressing PLAY/STOP starts the sequencer and allows you to record the
keyboard track(s) only.
A metronome will beat time (drum sticks) and you will have a one measure
lead into the recording to get ready.
5. Start playing after the one bar lead.
Any notes you play during the lead-in will not be recorded.
During the recording, use the Style controls as you would when playing a
Style: use the Fills, change V ariation, select another Style, etc.....
6. When you have finished, stop the recording either with PLAY/STOP or
START/STOP.
START/STOP stops the recording of the Chord events while the
sequencer continues to be active for the keyboard tracks.
PLA Y/STOP stops the sequencer recording for both Chord and keyboard
track events.
7. Press RECORD or ESCAPE to escape the Sequencer.
The REC icons and the CHORD track stop flashing.
8. Listen to the Song Style playback by pressing PLAY/STOP.
Although PS1000 retains user-programmed data in the battery-backed RAM
memory after turning off, you can save recorded sequence data to floppy
disk for future use. The «Disk» chapter explains how to save data to Disk.
CHORD TRACK REC ICONS
Page 30

○○○○○○○○○○○○○○○○○○○○○○○○○○○○○○○○○○○○○○○
1•22 Quick Guide
Page 31
○○○○○○○○○○○○○○○○○○○○○○○
Sounds 2•1
User Guide
This section of the owner’s manual explains all you need to know about your
PS1000.
The subjects discussed here are:
1. Sounds, Samples and Drumkits.
2. Presets, User Presets and Programmable Presets.
3. Styles (ROM).
4. Disk.
5. Song Styles.
6. Songs
7. Digital Signal Processor.
8. Midi/General.
Page 32
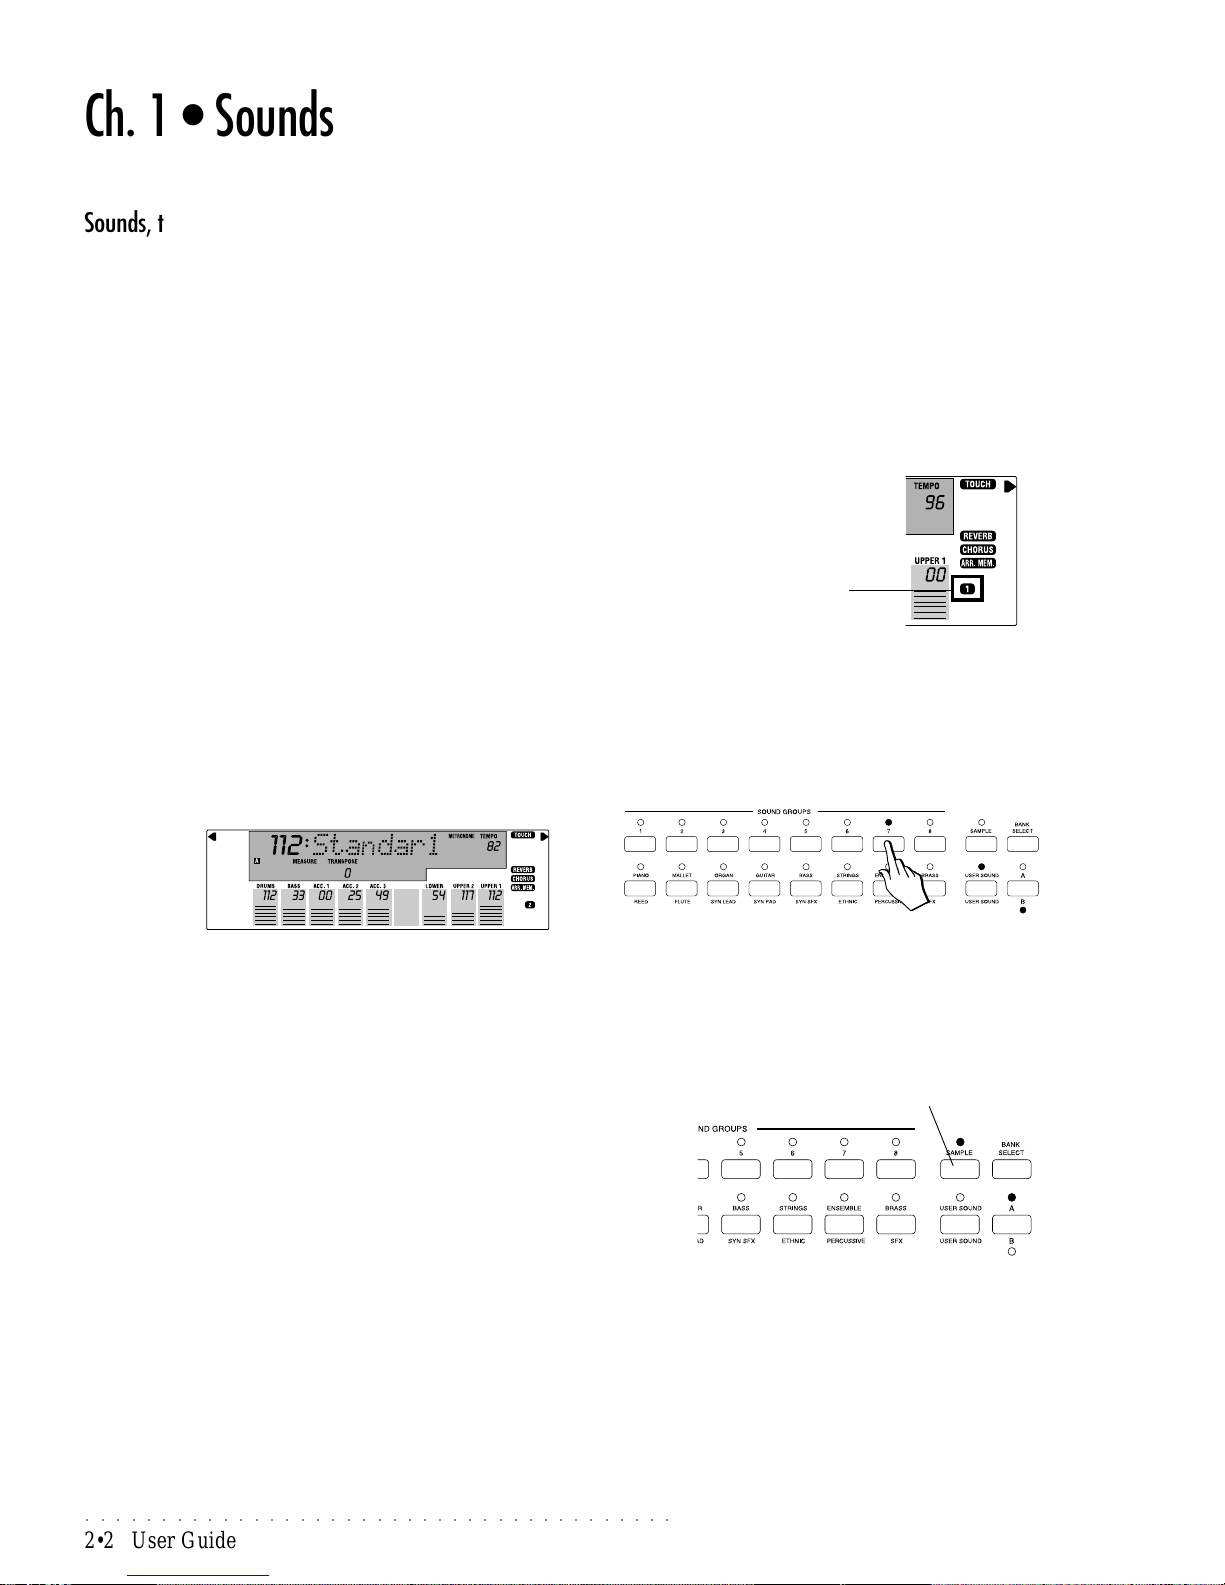
○○○○○○○○○○○○○○○○○○○○○○○○○○○○○○○○○○○○○○○
2•2 User Guide
Ch. 1 • Sounds
Sounds, the Sound Banks, 1-2-3 and MIDI Bank 6
The 444 PS1000 Rom Sounds have been divided into 4 “families” called
BANKS. Banks 1, 2 and 3 are selected from the panel. Bank 6 is “invisible”
and is selected via MIDI only, when using PS1000 in MIDI setups as a slave
device. The first Bank (1) contains the industry standard General MIDI sound
library . This family is designed to be used when the PS1000 is required to play
General MIDI song disks or when the instrument is being controlled by a computer program or some other device which requires a General MIDI sound library. The second and third Banks (2 & 3) contain sounds taken from
Generalmusic’s own extensive sound library. These sounds, along with the
sounds in Bank 1, ensure compatibility with Generalmusic’s own song library,
and also with song disks created on other Generalmusic instruments. All the
Sounds in Banks 1, 2 and 3 are organized into 16 instrument family Groups
(Piano, Mallet, Organ, etc.). The MIDI Bank 6 contains an additional 60 Sounds,
but these are not organized in instrument family groups. Refer to the MIDI
Bank 6 ROM Sounds table on page A.2 of the Appendix.
The current Bank number is displayed in the bottom right hand corner, to the
left of the Upper 1 track area.
Drumkits
Among the instrumental Sounds are also 17 Drumkits; 16 in the Percussive
Groups (B) Banks 2 and 3, Pr. Ch. 112 - 1 19, and 1 in Midi Bank 6, Pr. Ch 1 12.
For example, Preset n. 7 of the User Sound B group recalls the Standard Drumkit
assigned to the Upper 1 keyboard section.
If you play on the keyboard, you will hear each note play a percussive instrument sound.
Samples
The PS1000 can load new disk-based sound samples into memory (Sample
RAM memory) which can then be assigned to the Preset parts and Style tracks,
just like any other Sound. Access to the Samples Bank is via the SAMPLES
(SMP) button. Theoretically, up to 7 disk-based Samples can be loaded to
RAM memory (locations 1 - 7), but this will depend on the size of each sample.
Via MIDI, the Samples Bank corresponds to Bank 5, meaning that Samples
can be selected via MIDI by sending a CC00 message with value 5 and Program change values from 1 - 7 to the PS1000 from the master controlling device.
The Sample-RAM memory is backed by an internal battery which maintains
data after turning the instrument off.
SAMPLES BANK
BANK number
Page 33
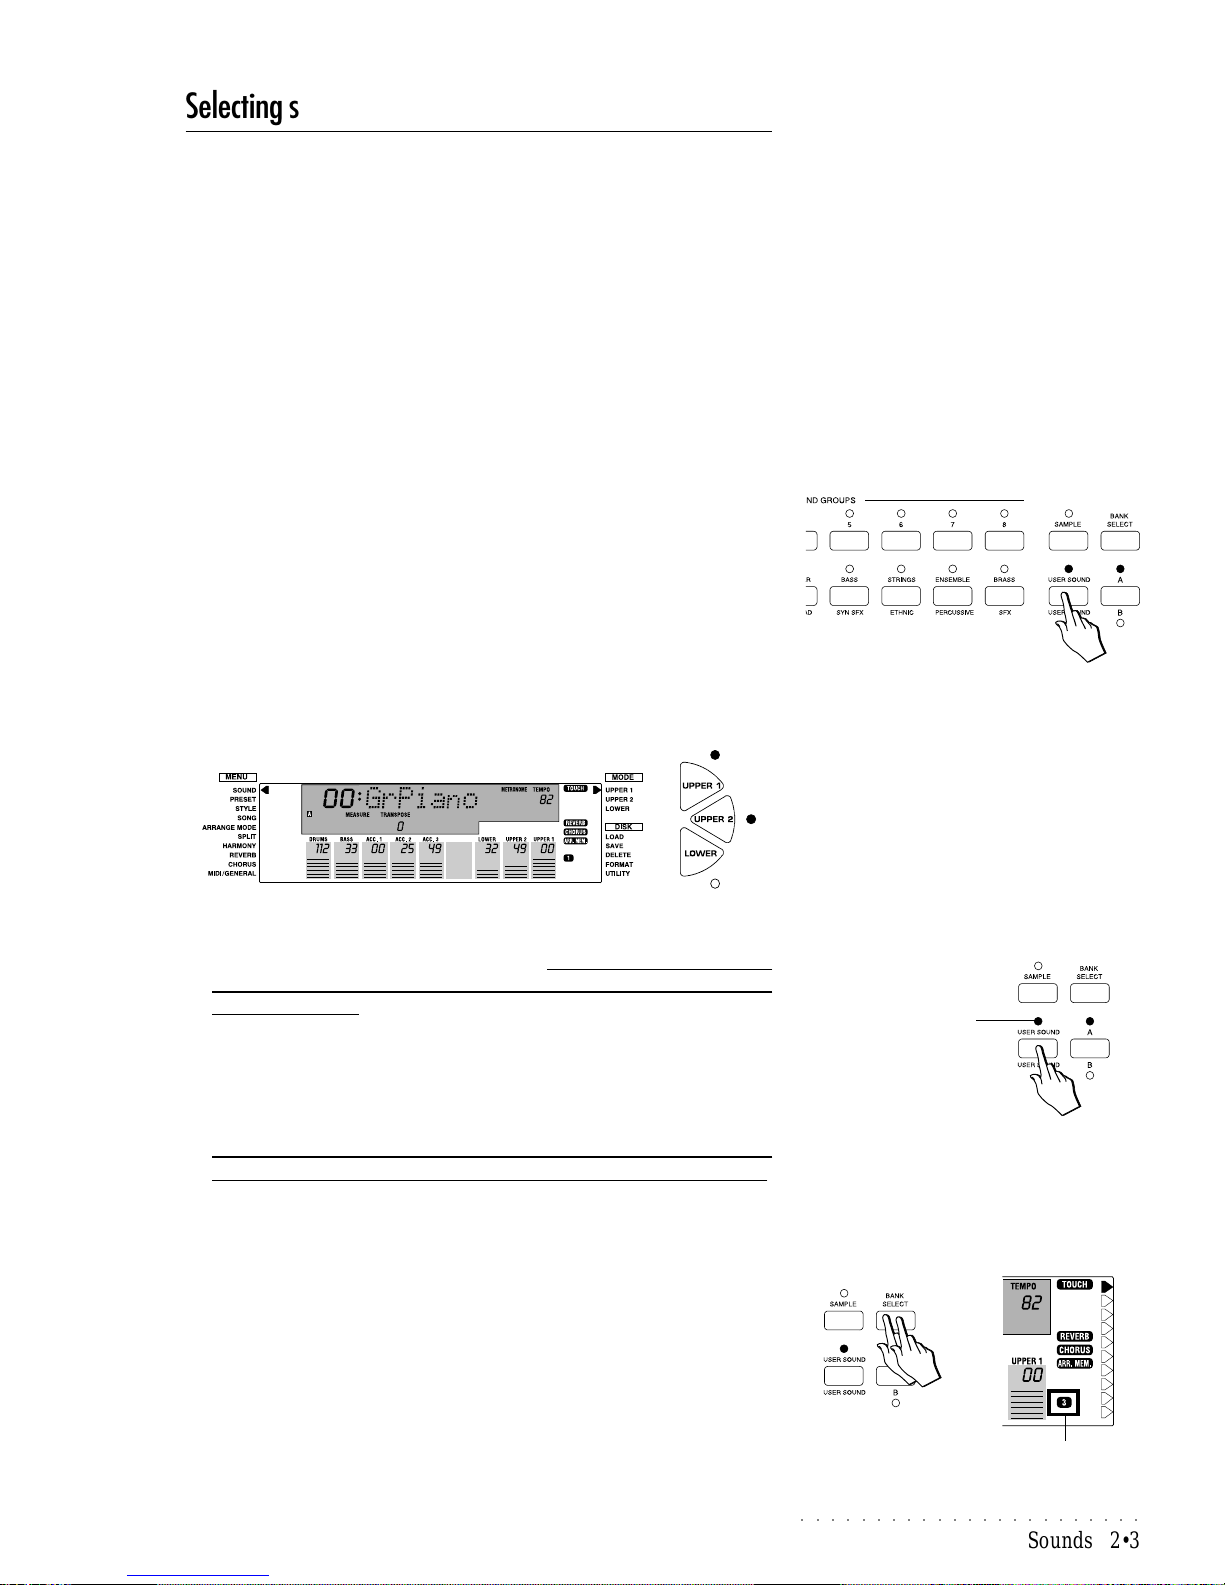
○○○○○○○○○○○○○○○○○○○○○○○
Sounds 2•3
Selecting single Sounds
In the Quick Guide, you learned how to select Single, Layer and Split Presets
which recall factory-set sound combinations, ready to play on the Upper 1,
Upper 2 and Lower keyboard sections.
If you want to modify a Preset so that it recalls your preferred sound combination (single, layer or split), you must select and activate one of the keyboard
sections in order that it may accept a change. Once changed, you can choose
to continue playing with your new combination without storing it to memory, or
to save it for future use. If you decide not to memorize the new setting, it will be
lost the instant you select another Preset.
The following example explains how to assign a different Sound to one of the
User Presets and memorize the new setting to the same User Preset. A similar
method is used to change the sounds of the Style, Song Style and Song tracks.
This is explained on page 2.7 of the Programmable Presets chapter.
Assigning a different Sound to a User Preset
1. Press the USER SOUND button on the extreme right of the SOUND
GROUPS section.
Regardless of which LED of the A/B selector is on, you will recall the last
selected User Preset of the current set (A or B).
2. If not already selected, select the User Preset n. 1 of the A set.
Y ou will recall a Layer Preset consisting of the GrandPiano and SlowStrings
sounds, assigned to the Upper 1 and Upper 2 sections respectively.
Both LEDs of the Upper 1 and 2 buttons will be on.
The right display arrowhead will be pointing to the Upper 1 section in the
Mode list, meaning that the Upper 1 section is currently selected and, therefore, ready to accept a change of sound. This is a general rule for the
keyboard sections; the arrowhead must point to the section whose sound
you wish to change.
3. Hold down the USER SOUND button until the corresponding LED starts
to flash.
The current keyboard section (in this case Upper 1) is placed “on-standby”,
ready to accept a change of sound.
At this point, the SOUND GROUPS section operates as a sound selection keypad allowing you to select a sound from any group and any bank.
If you are not sure of the exact location of your sound, refer to the Sound
Tables on page A.1 of the Appendix which list the Sounds in Program
Change/Bank Change order as well as Sound “Family” order .
For example, if you were to select the Sound Hawaiian Guitar, from the
tables you will see that this is a Bank 3 sound that resides in Preset n. 3 of
the Guitar Group.
4. Select a different bank by pressing the BANK SELECT button.
Each time you press this button you will scroll to the next Bank. In this
example, pressing the button once will select Bank 2 and pressing it a second time will select Bank 3. (If you press it again, you will return to Bank 1).
Note: MIDI Bank 6 cannot be selected from the panel using the Bank Select button.
FLASHING LED
BANK number 3
IMPORTANT
When you press the A/B Selector button to
switch from bank set A to bank set B (or vice
versa), the LED currently shown off will flash
for about 3 seconds, during which time you
must make your bank selection. If the LED
stops flashing, it will not be possible to switch
bank set.
Page 34
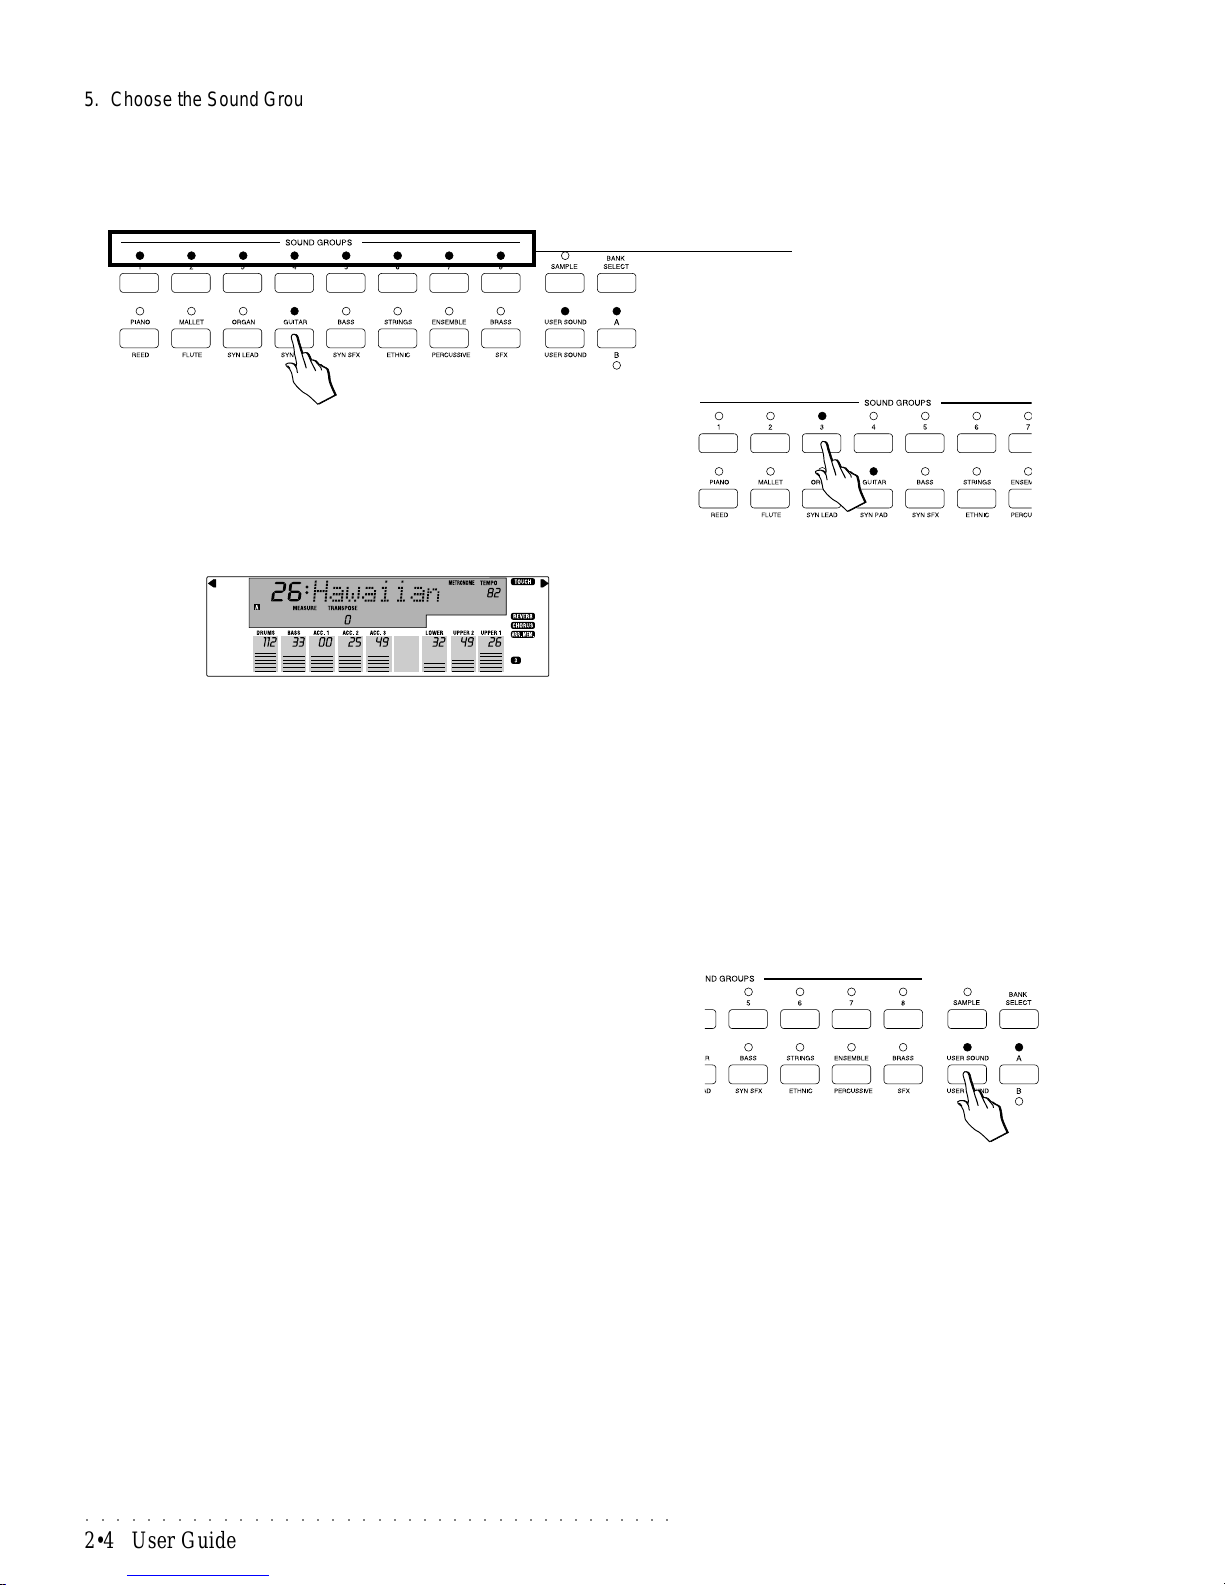
○○○○○○○○○○○○○○○○○○○○○○○○○○○○○○○○○○○○○○○
2•4 User Guide
5. Choose the Sound Group that houses the sound you are looking for.
In this case, we are recalling a Guitar Sound, therefore, check that you
have the A/B selector set for the A Groups, then press the GUITAR
GROUP button.
All the LEDs of the top row of buttons 1-8 will start to flash.
6. Select the Preset button that contains the Sound you wish to recall, in
this case, button 3.
All the LEDs of the top row of buttons will go off, except the one corresponding to the button pressed. The display will show the name of the Sound you
have just selected (in this case Hawaiian) assigned to the current section
(Upper 1):
The LED of the USER SOUND button will continue to flash as an indication
that you can continue changing sounds.
For example, you can change the sound of the Upper 2 section by pressing
the Upper 2 button twice (to select the section and move the arrowhead to
UPPER 2) and repeating the selection procedure described in points 4, 5
and 6.
The same applies to the Lower section (which in this case will be off). Press
the Lower button once (to activate the section and move the arrowhead to
LOWER) and select the desired sound.
Note: You can also select the keyboard sections using the corresponding
Function button (F7, F8, F9), but this method is best suited when you wish
to edit the Preset parameters. Refer to page 2.7 of the Programmable Preset chapter for more information.
7. When you have finished your selection, hold down the USER SOUND
button to confirm the new setting.
You can also confirm the new setting by pressing the ENTER button.
The USER PRESET will also memorize the on/off status of the keyboard
activators. Therefore, if the original setting was a Layer configuration, you
can, for example, memorize the corresponding Split setting with Upper 2
and Lower on and Upper 1 off.
The new User Preset will remain in memory even after turning the instrument off. The overall user-programmed configuration of the User Sound
Presets can be stored to disk for future use (refer to the Disk chapter for
more details). The factory-settings of the User Sound Presets can be restored at any time using the Init Presets procedure, explained on page 2.51
of the Midi/General chapter.
FLASHING LEDS
Page 35
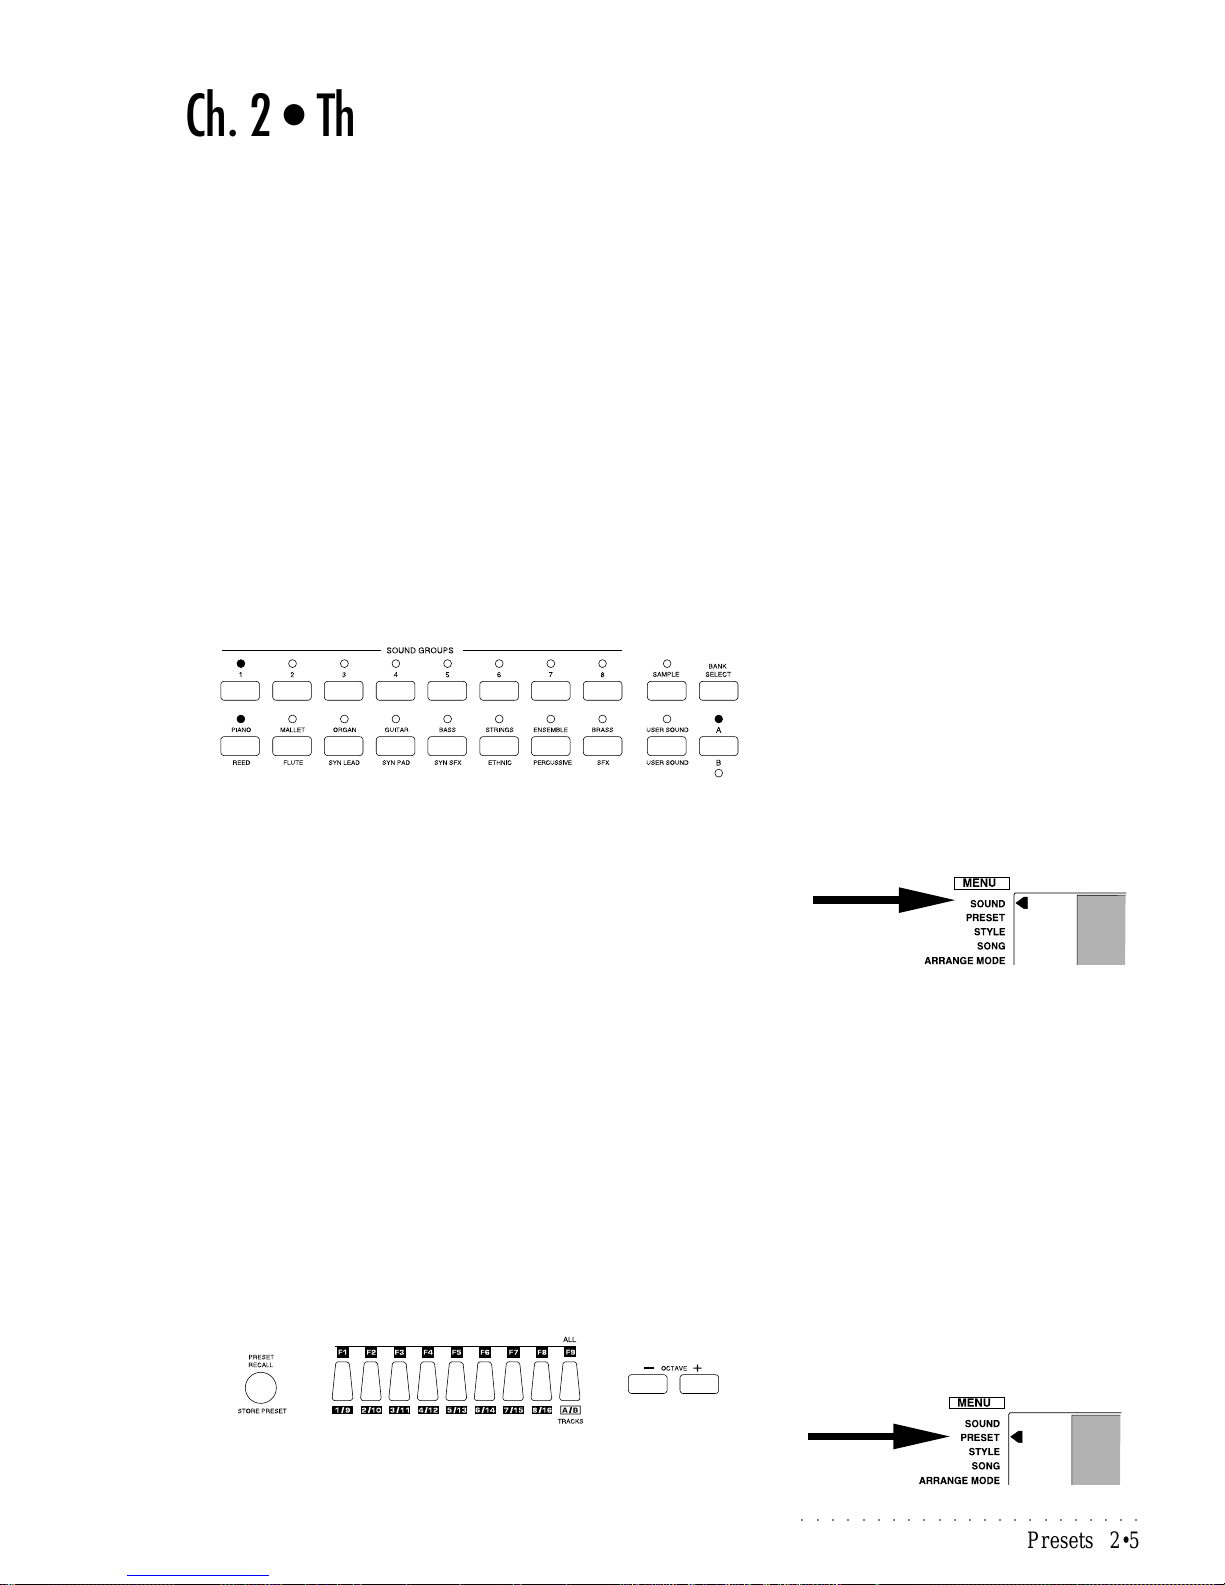
○○○○○○○○○○○○○○○○○○○○○○○
Presets 2•5
Ch. 2 • The Presets
About Presets
A Preset is a combination of up to 16 sounds (maximum) and various settings
(volumes, effects, effect levels, etc.). In a Preset, each sound is assigned to a
Part
, or
Track
. When talking of Presets, we use the term “Part” to describe the
smallest part of the Preset; when talking of the sequencer, we refer to the parts
as “Tracks” which the sequencer engages to generate the recordings (the Style
auto accompaniments, the Song Styles or Songs). A Preset can contain as
little as only one Part or as many as 16 Parts. By selecting a Preset, all the
settings memorized to the Presets are recalled in a single step.
The PS1000 contains two types of Presets:
a) the Sound Presets
b) the Programmable Presets
The Sound Presets
The Sound Presets are three-part (maximum) structures exclusively dedicated
to the three Keyboard sections (Upper 1, Upper 2, Lower) and are recalled
using the Sound Groups buttons.
The PS1000 contains 128 Presets in ROM (Read Only Memory) recalled as
single, split or layered sound combinations which incorporate factory-set volume and effect settings. An additional 16 User Sound locations are available
where you can store your preferred user-programmed sound settings.
In Sound Presets mode, the left display arrowhead is shown next to the SOUND
Menu function at all times.
On page 1.13 of the Quick Guide, you’ll find information regarding how the
Sound Groups section is organized and how to select the Sound and user Sound
Presets.
The RealTime Programmable Presets
The Programmable Presets are 16 part (maximum) structures, used to recall
sound combinations both for the realtime Keyboard sections as well as the
Styles. They also govern the way the Song Styles and Songs play. For more
information regarding Style Presets, Song Style Presets and Song Presets,
refer to the relevant chapters of the User Guide.
The PS1000 contains 63 Programmable Presets, organized in 7 Groups of 9
Presets each. Access to these Presets is via the PRESET RECALL button; the
individual Presets (F1- F9) are selected with the Function buttons under the
display, and the Preset Groups (1-7) are scrolled with the Octave [+] and [–]
buttons.
In Programmable Preset mode, the left display arrowhead is shown next to the
PRESET Menu function and all the LEDs of the Sound Groups section go off.
Page 36
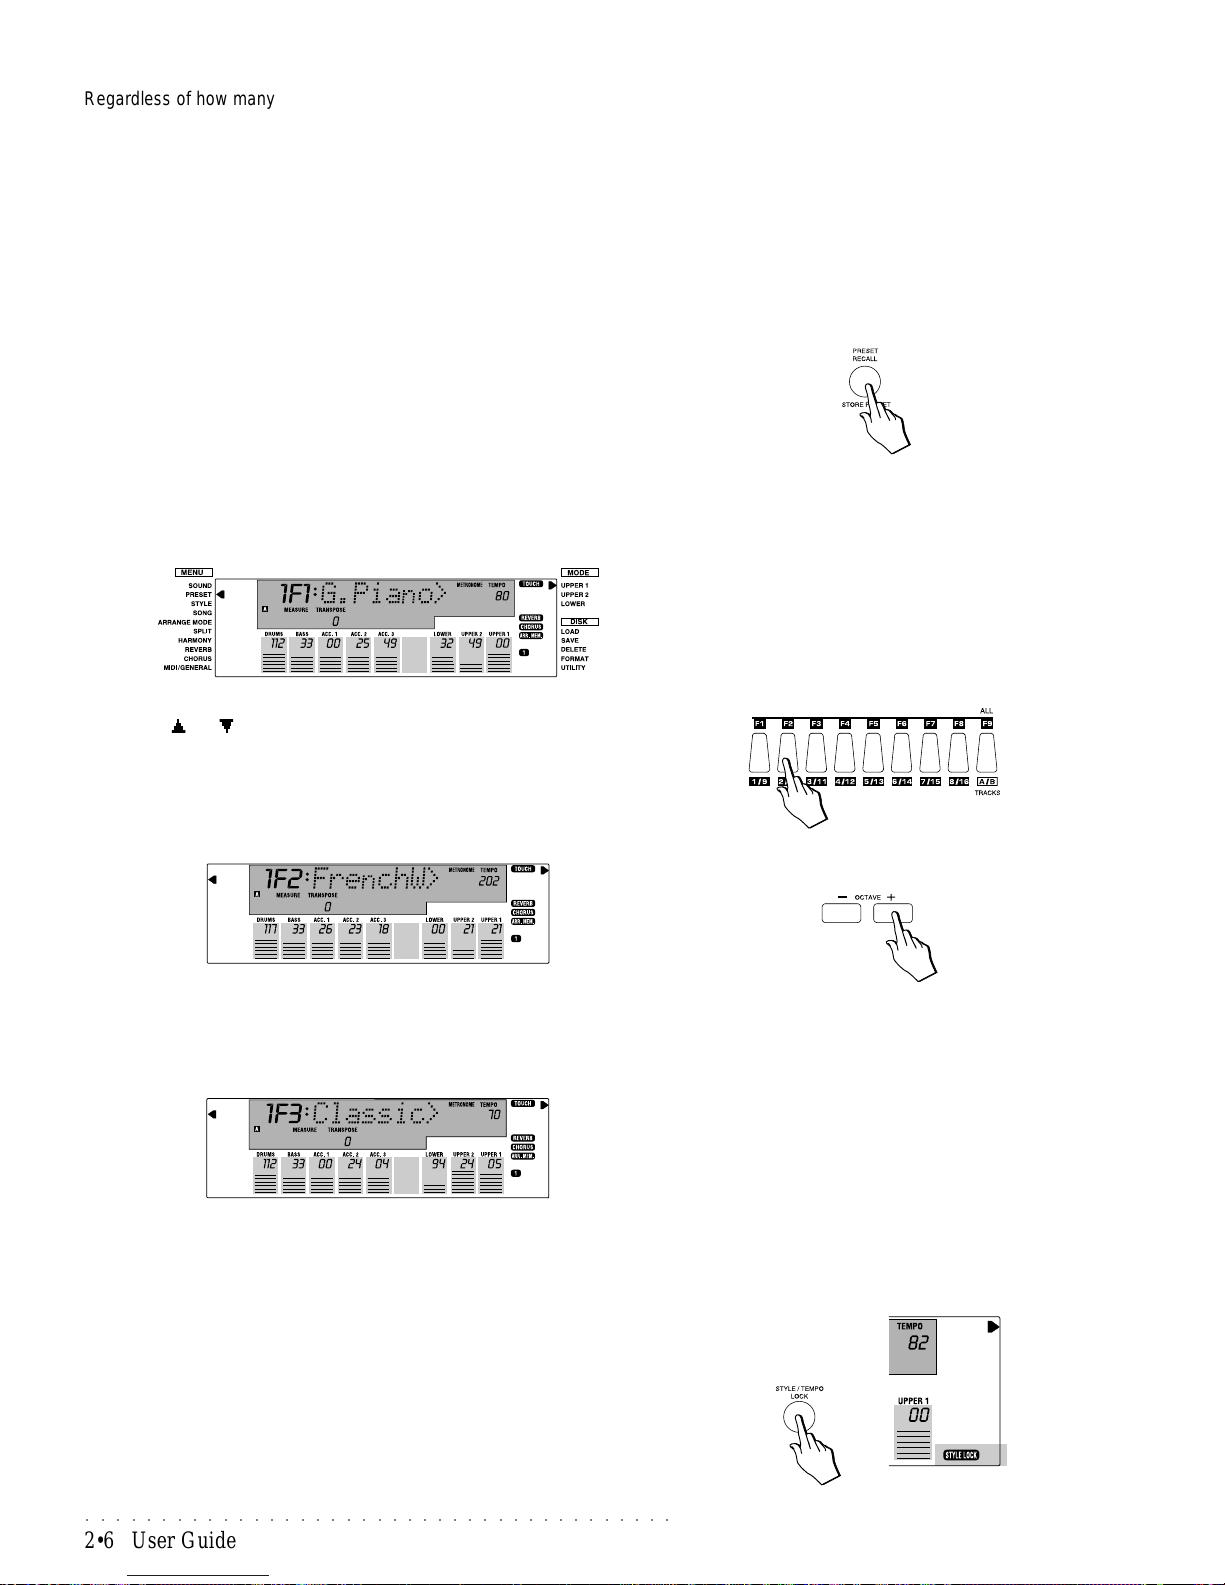
○○○○○○○○○○○○○○○○○○○○○○○○○○○○○○○○○○○○○○○
2•6 User Guide
Regardless of how many Parts the current mode is using, you will always be
able to view 16 Parts within your Programmable Preset. This is particularly
useful for MIDI setups because it allows the instrument to be used as a 16 part
sound generator, regardless of the current status. If you are playing in real time
or with the Styles, the configuration of parts 9-16 does not influence either playing mode, but if you are programming the PS1000 for use as a multi-timbral
slave device, all 16 parts are taken into consideration.
Selecting Programmable Presets
The PS1000 contains a selection of factory-set Programmable Presets and
several “empty” presets, ready to be user-programmed.
Select a Prog. Preset when you want to change the entire keyboard sound
combination and panel configuration, not just the keyboard sounds.
1. Press the PRESET RECALL button to activate Prog. Preset mode.
The left arrowhead will move to the PRESET Menu function and the display
will show the Group number, Preset number and name of the first Preset:
for example: 1F1:G.Piano - Group number 1, Preset number F1 and name
G.Piano.
You can also enter Prog. Preset mode by moving the arrowhead with the
Cursor [ ] or [ ] buttons. The result will be the same.
2. Select one of the 9 Prog. Presets of the current Group with the corresponding Function buttons (F1 … F9) under the display .
For example, if you press Function button F2, the Preset recalled will be
“1F2:FrenchW”.
3. To change Preset Group, press the Octave [+] and [–] buttons to select
the Preset Groups sequentially in increasing or decreasing order.
For example, if you press the Octave [+] button once, you will pass to the
second Group (2) showing the first Preset name, “Classic”:
Selecting Presets using the method described above can recall:
• combinations of up to 3 keyboard sounds;
• panel settings;
• Styles with corresponding V ariation and Tempo.
Style Lock and the Presets
We have already seen that the Styles and the Prog. Presets share the same
Preset, therefore, each time you select a Prog Preset, you can also recall a
Style. If you prefer to select the Prog. Presets without changing the Style auto
accompaniment patterns, activate the STYLE LOCK function. This is explained
on page 2.20 of the Style chapter.
Page 37
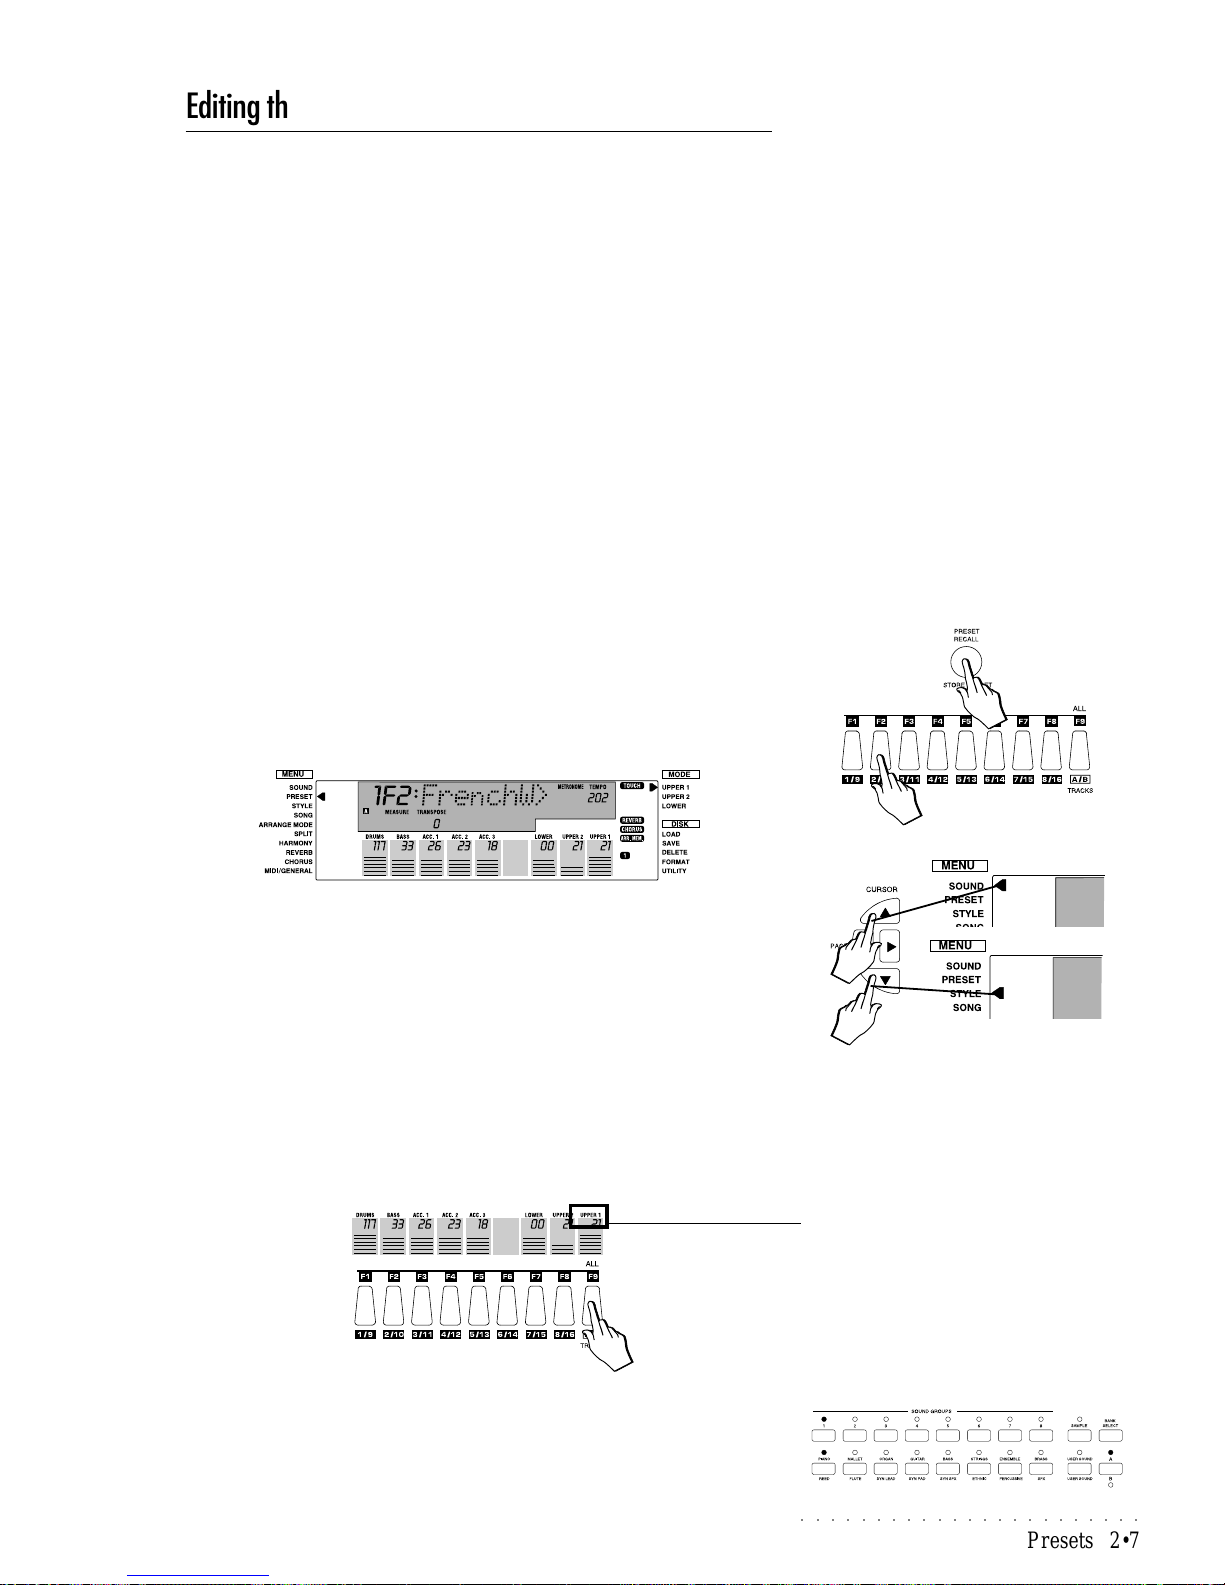
○○○○○○○○○○○○○○○○○○○○○○○
Presets 2•7
Editing the Programmable Presets
The 63 Prog. Presets contained in the PS1000 are all user-programmable. Although the selection of factory settings try to cover a range of user needs, you
may decide that one or more factory configurations require some changes to
suit your personal requirements. The changes you make to a Programmable
Preset are saved with the STORE PRESET button.
Preset programming tasks are very easy and they offer the possibility of making preferred sound combinations for realtime playing, Style playing and Song
Style recording.
Programming a Preset involves changing the panel settings and/or modifying
the Track (Part) parameters. For example, from the panel you can select a
different Style and V ariation, change the On/Of f status of the Reverb and Chorus buttons, etc.. Of the track parameters, you can change a sound assignment, adjust a volume, change an effect send setting, etc..
For changes in panel settings, it is acceptable to set the panel as required and
save the Preset to the same location. For changes of the features memorized
in one or more Parts, it is important to remember to exit Preset Mode in order to
“release” the Function buttons and so use them to select the Part that you wish
to change.
Let’s go through an example of how to make your own Programmable Preset.
Example: change the Sound and adjust the Volume level of the Upper 1 Part
of a Programmable Preset.
1. Press the PRESET RECALL button and select a Preset as already explained.
In this example we select Preset 2 (FrenchW) using Function button F2.
2. Move the left display arrow away from Preset mode with the Cursor Up
or Down buttons (pointing to either Sound or Style Mode).
In Preset mode, the Function buttons are used to select the individual Prog.
Presets, but to modify a part you must be able to select it with the corresponding Function button. After selecting the Preset that you want to change,
move the left display arrowhead away from the Preset Mode indicator using
the Cursor Up/Down buttons (the left display arrow must NOT point to Preset mode).
3. Press the Function button corresponding to the Part that you wish to
change.
In this case, press button F9 to select the Upper 1 Part. The name “Upper
1” will start to flash in the display.
4. Select a single Sound using the method described ion page 2.3 of the
Sounds and Samples chapter of the User Guide.
(Press the Bank Select button to select a Sound Bank, select the Groups
button which contains the desired sound and press the corresponding but-
FLASHING
Page 38
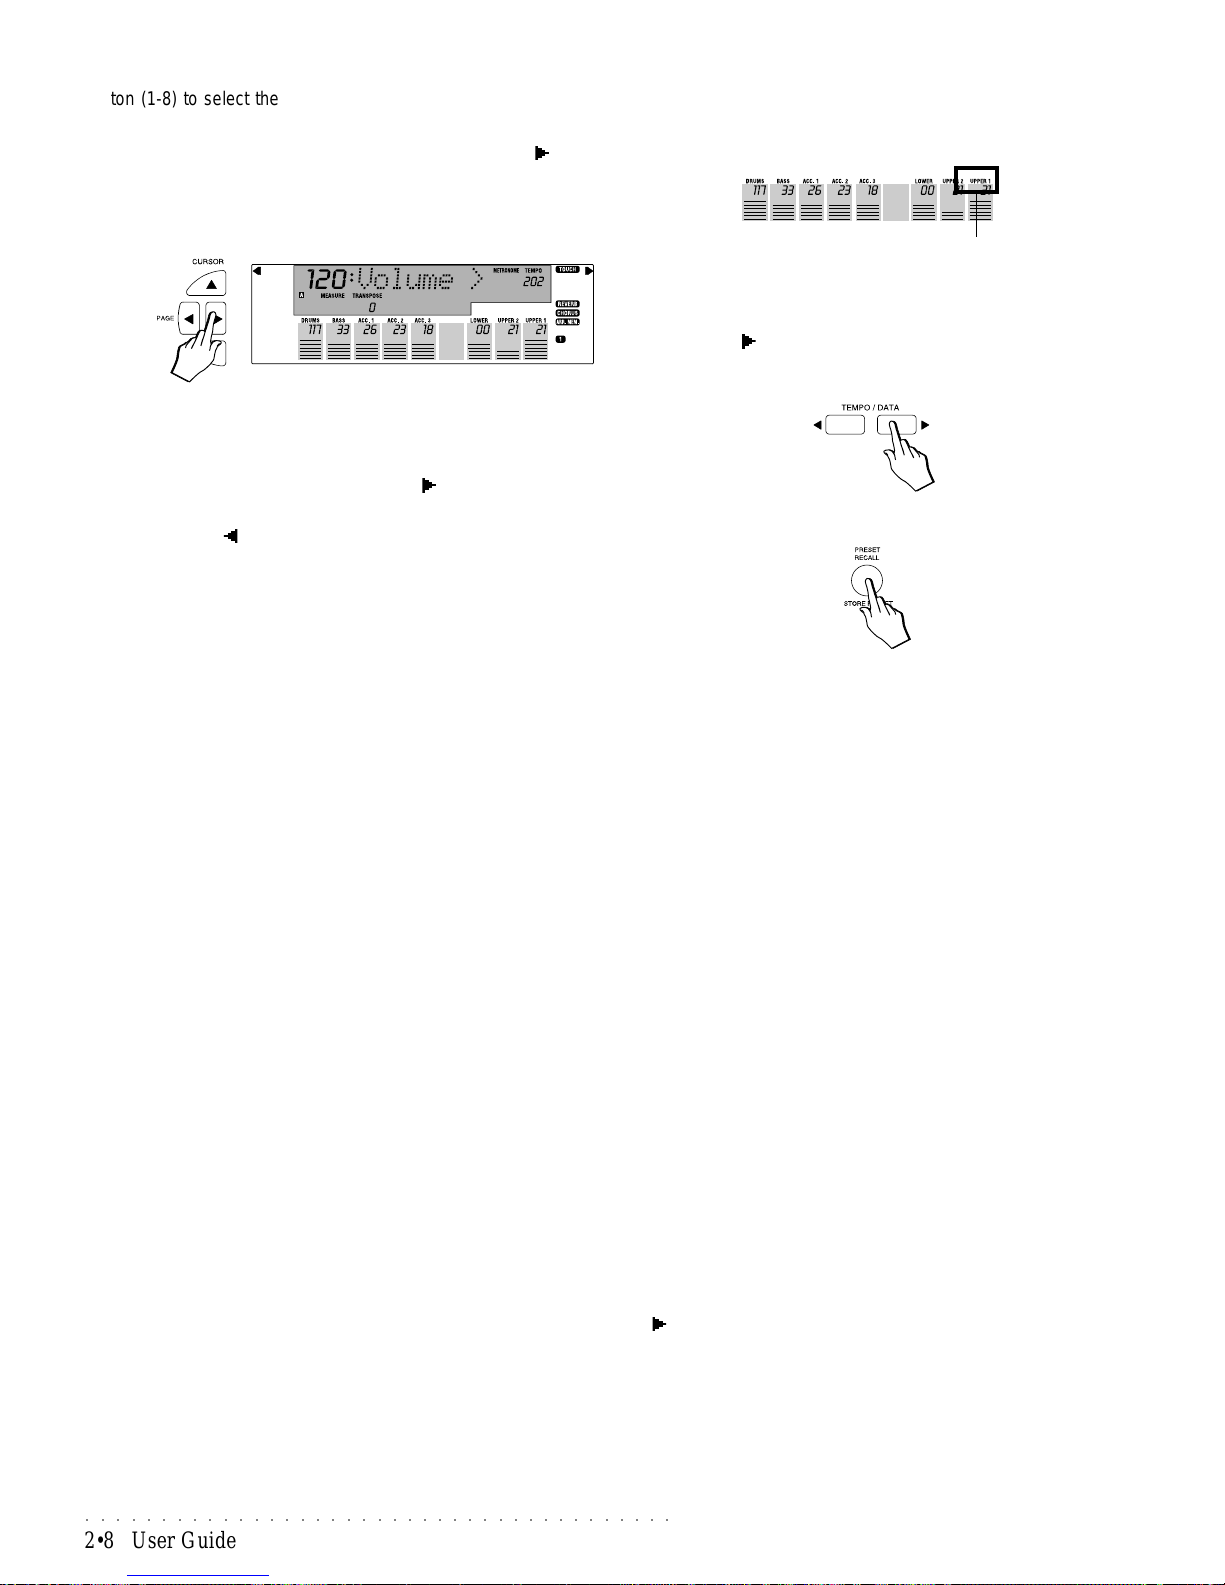
○○○○○○○○○○○○○○○○○○○○○○○○○○○○○○○○○○○○○○○
2•8 User Guide
ton (1-8) to select the individual sound. Use the Sound Tables listed on
page A.1 of the Appendix for reference.
5. While the Upper 1 Part is still flashing, press the Page [ ] button to enter
the first of several Preset functions (Volume).
The 3 digit display shows the Volume setting of the Sound assigned to the
current Preset Part (flashing).
.
6. Use the Tempo/Data buttons to change volume setting and play on the
keyboard at the same time to listen to the changes.
At this point you can select other Preset parameters (RevSend, ChoSend,
section Transpose, etc.) with the Page [ ] button and change the value
using the Tempo/Data buttons.
Use the Page [ ] button to step through the parameters in reverse order.
7. When you have finished programming the selected Part, repeat the procedure for other Parts, then memorize the changes using the STORE
PRESET button.
Refer to the Store Preset paragraph on page 2.10 of this chapter for complete details of the memorizing procedure.
Below follows a summary of changes that you can make to the Presets.
1. Change the Active/Mute status of the Real Time keyboard sections
(Upper 1, Upper 2, Lower).
Simply activate or deactivate the corresponding UPPER 1, UPPER 2 or
LOWER buttons. In this case, the corresponding function buttons (F7, F8,
F9) do not activate/mute the keyboard sections.
2. Change the active/mute status of the accompaniment Parts (Drum,
Bass, Acc1 Acc2, Acc3).
This change would affect Style playing only and not real time playing.
Press the corresponding Function button (F1 – F5) once to set the Part
flashing. Press the same button again to mute the Part. The name of the
Part will be cancelled from the display and the Sound number will start to
flash.
3. Assign sounds to the Parts.
Select a Part with the corresponding Function button (F1…F9) and assign a
Sound to the flashing section using the Sound Groups section as already
described on page 2.3 of the Sounds & Samples chapter.
4. Change the effects assigned to the Preset.
The effect type (Reverb or Chorus), the Reverb and/or Chorus On/Off status and the effect sends for each Part can be changed.
To change the effect type, refer to the Effects chapter.
T o change the on/of f status of the Reverb or Chorus, press the correspond-
ing buttons (the display indicators show the On/Off status).
5. Modify the Preset parameters of one or more Parts.
Select the Part whose parameters you wish to modify, press the Page [ ]
button to select the parameter and adjust the value (or status) with the
TEMPO/DATA buttons. Once you have modified the Part, select another
one and repeat the procedure.
When you have finished modifying the Preset, hold the STORE PRESET
button for an instant to save the modifications. See the STORE PRESET
procedure explained on page 2.10 of this chapter.
FLASHING
Important: Remember that when you change
Preset Parts, the instrument MUST NOT be
set to PRESET Mode - the left arrowhead of
the display MUST NOT indicate the PRESET
Menu function
.
Note: if the Upper 1 Part stops flashing, press
the function button again to activate the section and return to the Volume page with the
Page button.
Page 39
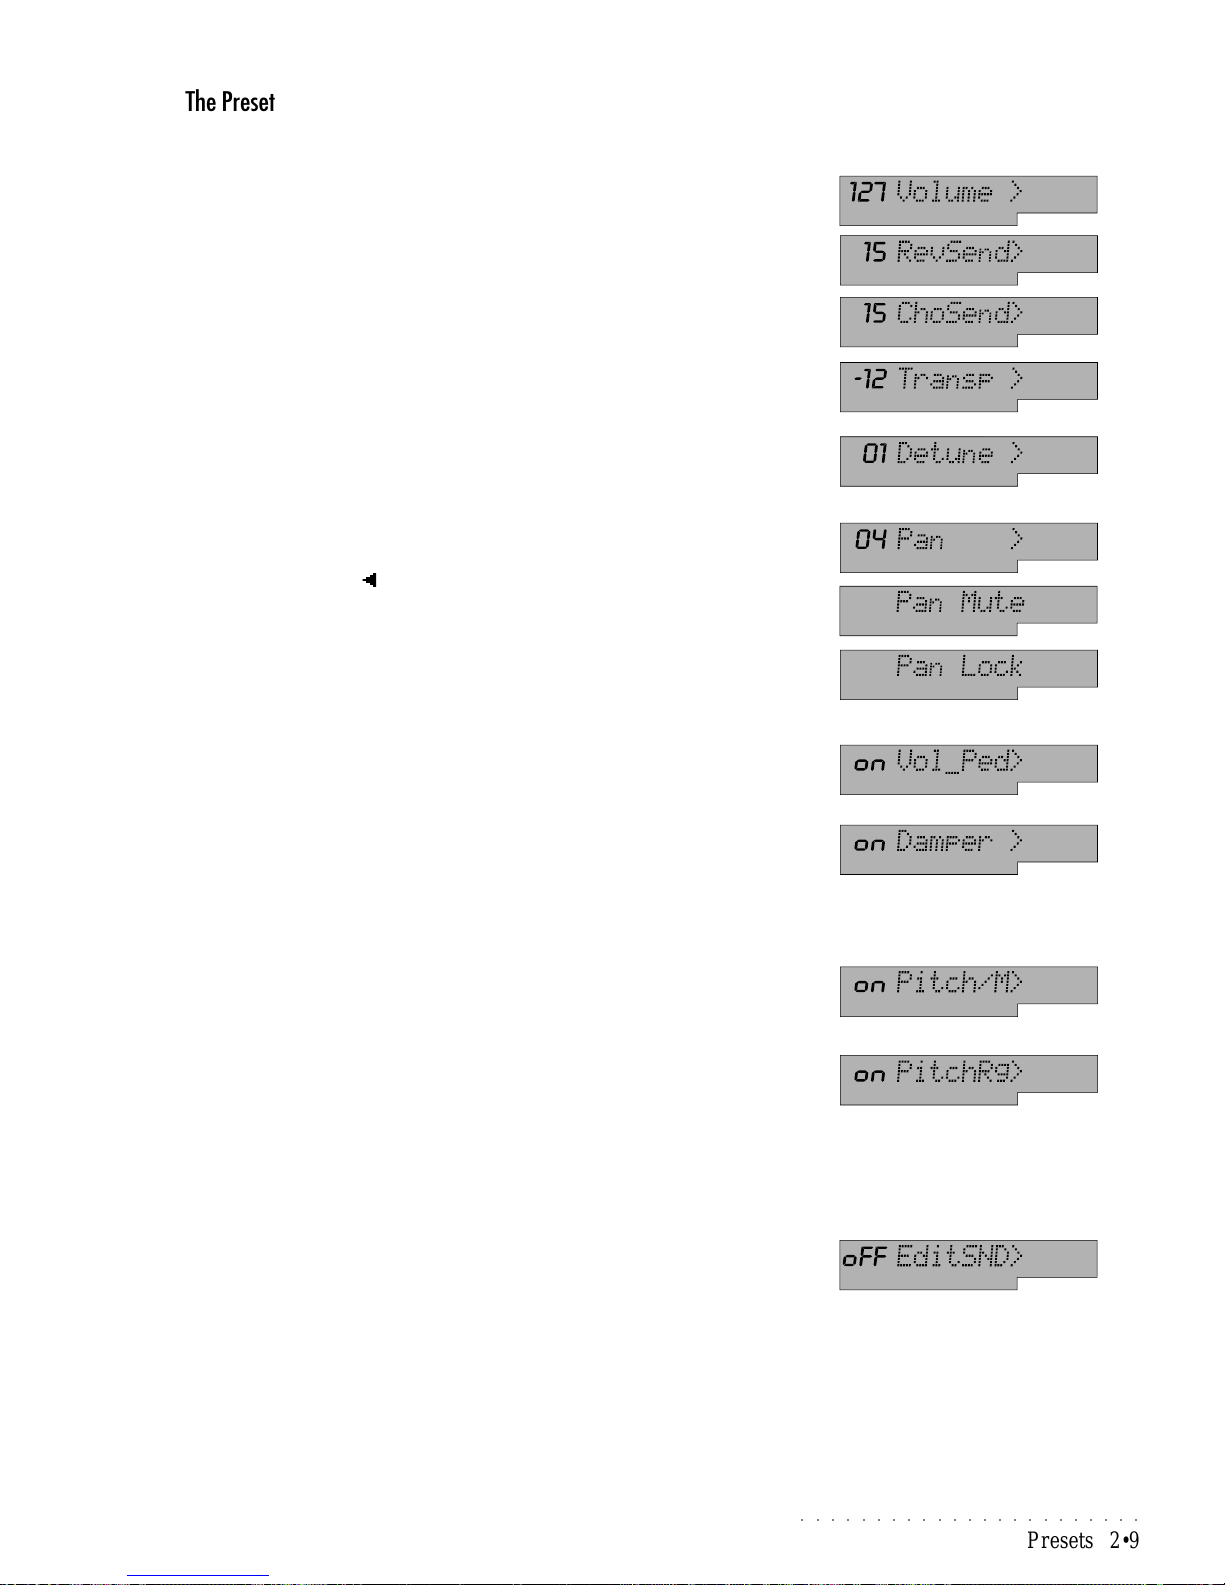
○○○○○○○○○○○○○○○○○○○○○○○
Presets 2•9
The Preset parameters
The following is a list of all the Preset parameters that you can select with the
Page buttons after selecting a Part:
VOLUME : (00-127) determines the volume of the track.
REVSEND: (00-15) determines the amount of Reverb effect applied to the track.
00 corresponds to no effect.
CHOSEND: (00-15) determines the amount of Chorus effect (modulation/delays) applied to the track. 00 corresponds to no effect.
TRANSP: (–24…0…+24) determines the transposition (up or down) that can
apply to the track. Each step corresponds to one semitone (max.
±
2 octaves).
DETUNE: (–63…0…+63) determines the fine tuning to apply to the track. Each
step is equivalent to 1/64th of a semitone.
PAN: (00…31 right, 00 center , 00…-31 left) determines the position of the sound
within the stereo panorama (left, right or center).
Using the Tempo/Data [ ] button, you can obtain the setting, Pan Mute; in this
situation the sound is not delivered either left or right; if the effects are active for
the Part, you will only hear the processed sound.
If a Part contains a Drumkit (which already incorporates individual pan settings
for the percussive sounds), the setting will default automatically to Pan Lock
and will not be able to be changed: in this case, P AN will be deactivated for the
Drumkit.
VOL_PED: (ON/OFF) enables or disables the keyboard tracks only for the action of the optional Volume Pedal (connected to the rear panel jack).
DAMPER: (ON/OFF) enables or disables the keyboard tracks only for the action of the Damper pedal (sustain effect).
Note: The Style accompaniment tracks cannot be individually enabled/disabled for the action of the Volume or Damper pedals. In Song mode, all the
tracks can be individually enabled/disabled for the action of the Volume and
Damper pedal.
PITCH/M: (ON/OFF) enables or disables the keyboard tracks only for the action of Pitch/Modulation messages received via MIDI.
PITCHRG: (00-12) determines the Pitch excursion for the bender message received via MIDI and affects the keyboard tracks only. With the 00 setting, the
Bender MIDI message does not affect the track; any value above 00 indicates
the pitch excursion expressed in semitones (example, 12 = one octave).
Note: The Style accompaniment tracks cannot be individually enabled/disabled for the action of the Pitch/M and PitchRg MIDI messages. In Song mode,
all the tracks can be individually enabled/disabled for the action of these MIDI
messages.
EDITSND: (ON/OFF) if a disk-based PS1500 format Song is loaded into memory ,
it may contain one or more edited sounds; the ON setting (default) allows you
to listen to the edited sounds in playback, while the OFF setting recalls the
sounds in their original form without the memorized modifications.
Y ou can escape from a Preset edit page at any time with Escape without losing
your temporary modifications.
If you decide to change Preset, however, you must save the modifications,
otherwise they will be lost when you select either another Preset or the same
one again.
Page 40
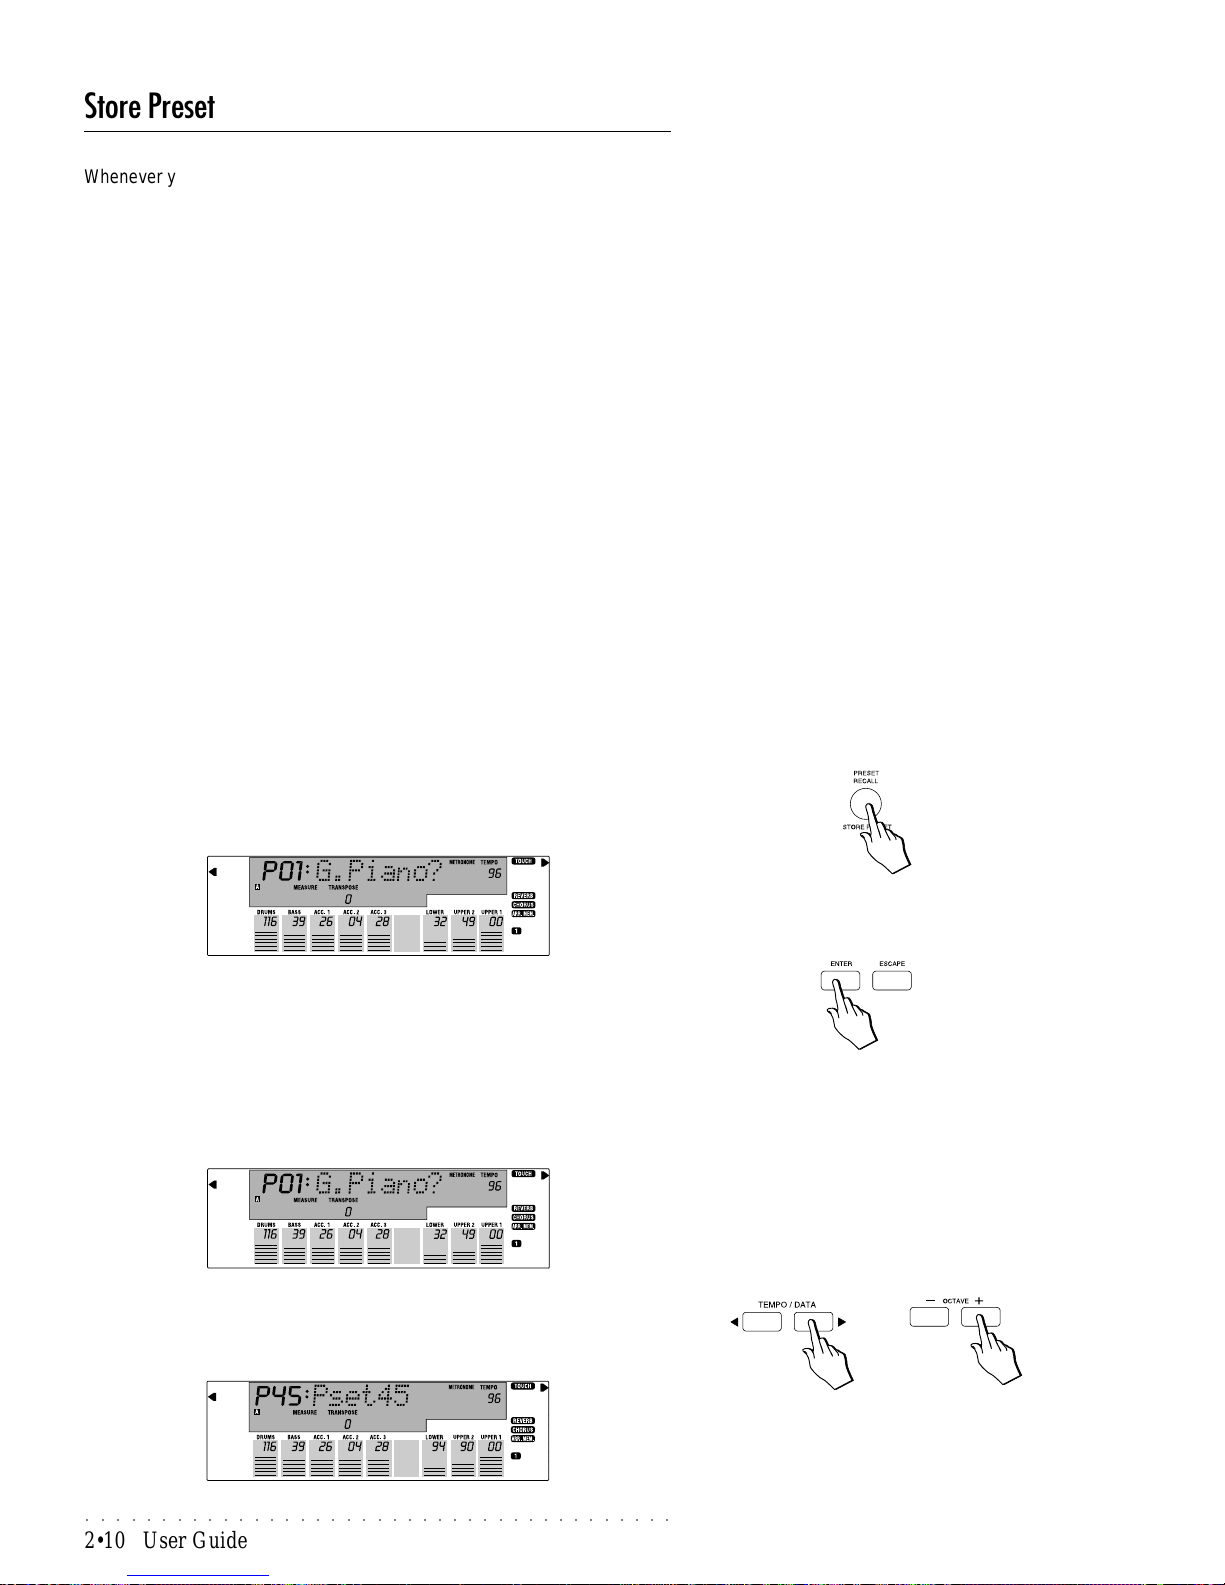
○○○○○○○○○○○○○○○○○○○○○○○○○○○○○○○○○○○○○○○
2•10 User Guide
Store Preset
Whenever you edit a Preset (Sound Preset, User Preset or Prog. Preset) you
will, at some point, decide that you either want to save your new Preset or
simply forget it and return to using the instrument as before. A modified Preset
that has not been stored to memory remains intact until you select another
Preset. To cancel a Sound Preset or User Preset change, simply select another Preset. To cancel a Prog. Preset change, return to Preset mode, choose
a different Prog. Preset and everything will be cleared.
If you decide you want to store your Preset into the instrument’s memory, the
next step will be to press the STORE PRESET button for an instant. The
STORE PRESET function allows you to store the changes you make in the
Sound Presets, the User Presets and the Prog. Presets to the desidered Prog.
Preset locations.
Even if you program all the factory Prog. Presets with new settings, the original
factory ones can be restored at any time with the INIT (restore) function. Before doing this, however, remember to save your Presets (and any other data)
to disk to avoid losing data that you have painstakingly programmed. Saving
Presets to Floppy Disk is explained in the Disk chapter.
You can also choose not to store your user-programmed Presets to disk by
taking advantage of the battery-backed RAM memory which retains data after
power down. Bear in mind, however, that if the batteries loose their charge, all
your programmed data stored in memory will be permanently cancelled.
To memorize changes to the current Prog. Preset
Use this method to store changes to the Prog. Presets.
1. Hold down the STORE PRESET button for a few seconds.
The display shows a question mark after the Preset name, “asking” you to
confirm the Preset.
2. Confirm the display confirmation request (?) with ENTER.
Save changes to a different Prog. Preset (or create a new one)
Use this method to store changes made to the Sound Presets, the User Presets and the Prog. Presets.
1. Hold down the STORE PRESET button for a few seconds.
2. Use the Tempo/Data buttons, or the Octave +/– buttons, to select a different Preset location.
The 3 Digit display area will show the selected Preset number (e.g. P45).
Note 1: The changes that you make to a
Sound Preset cannot be saved to the same
Presets because they are permanent configurations (ROM) and they cannot be overwritten.
Note 2: The changes that you make to a User
Preset cannot be saved to another User Preset location: you can only save the changes to
same User Preset, or to a Prog. Preset location.
Note 3: The changes that you make to a Prog.
Preset cannot be saved to a User Preset location.
Page 41
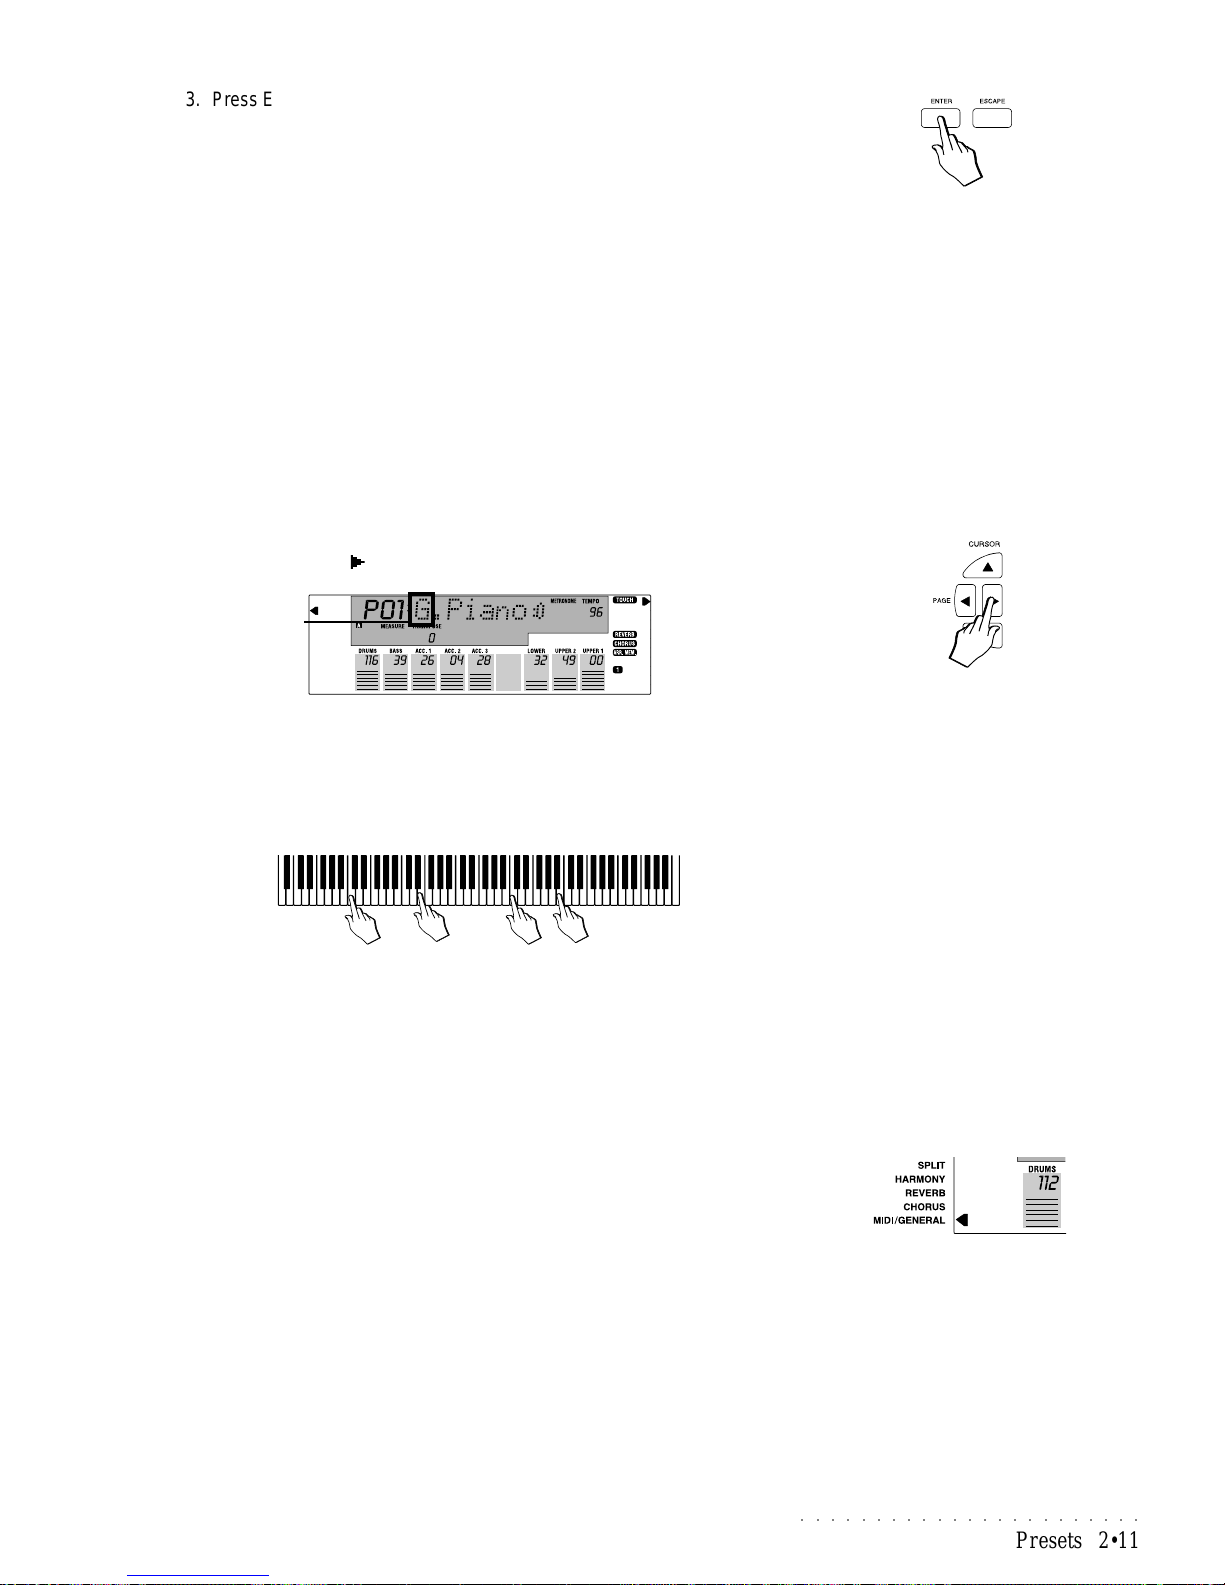
○○○○○○○○○○○○○○○○○○○○○○○
Presets 2•11
3. Press ENTER to confirm.
The Preset will be memorized to the selected location.
In the example shown in step 2, Preset 45 corresponds to Preset n. 9 of
Group 5.
If you press ESCAPE, the operation will be cancelled and the new Preset
will not be stored to RAM memory. It will, however, still be available until
you select another one or turn the instrument off.
Changing the Prog. Preset name
The 63 factory Prog. Presets are all identified with a name. When you save a
new Prog. Preset, it takes the name of the destination Preset. You can choose
to maintain the same name or change it. This operation must be carried out in
Preset mode (the left arrowhead pointing to the Preset Menu function).
To change the name of a Preset
1. With your Prog. Preset selected, check that the arrowhead to the left of
the display is next to the PRESET menu function.
2. Press the PAGE [
] to pass to the name write page.
The first letter of the name will be shown flashing to indicate the current
cursor position. The flashing letter is active for a change.
Use the Octave +/– buttons to move the flashing cursor right [+] or left [–].
3. Write the name by using the notes of the keyboard to enter the letter,
number or symbol at the cursor position.
Refer to the “Text Entry” paragraph on page 1.6 of the Quick Guide.
4. Save the name with the Store Preset function as already described.
To restore the original Preset settings
Under the MIDI/GENERAL Menu, you will find the INIT (initialize) procedure
which contains the option to restore the PRESETS to their original factory settings.
For detailed explanations, turn to page 2.51 of the MIDI/GENERAL chapter.
Flashing
Page 42
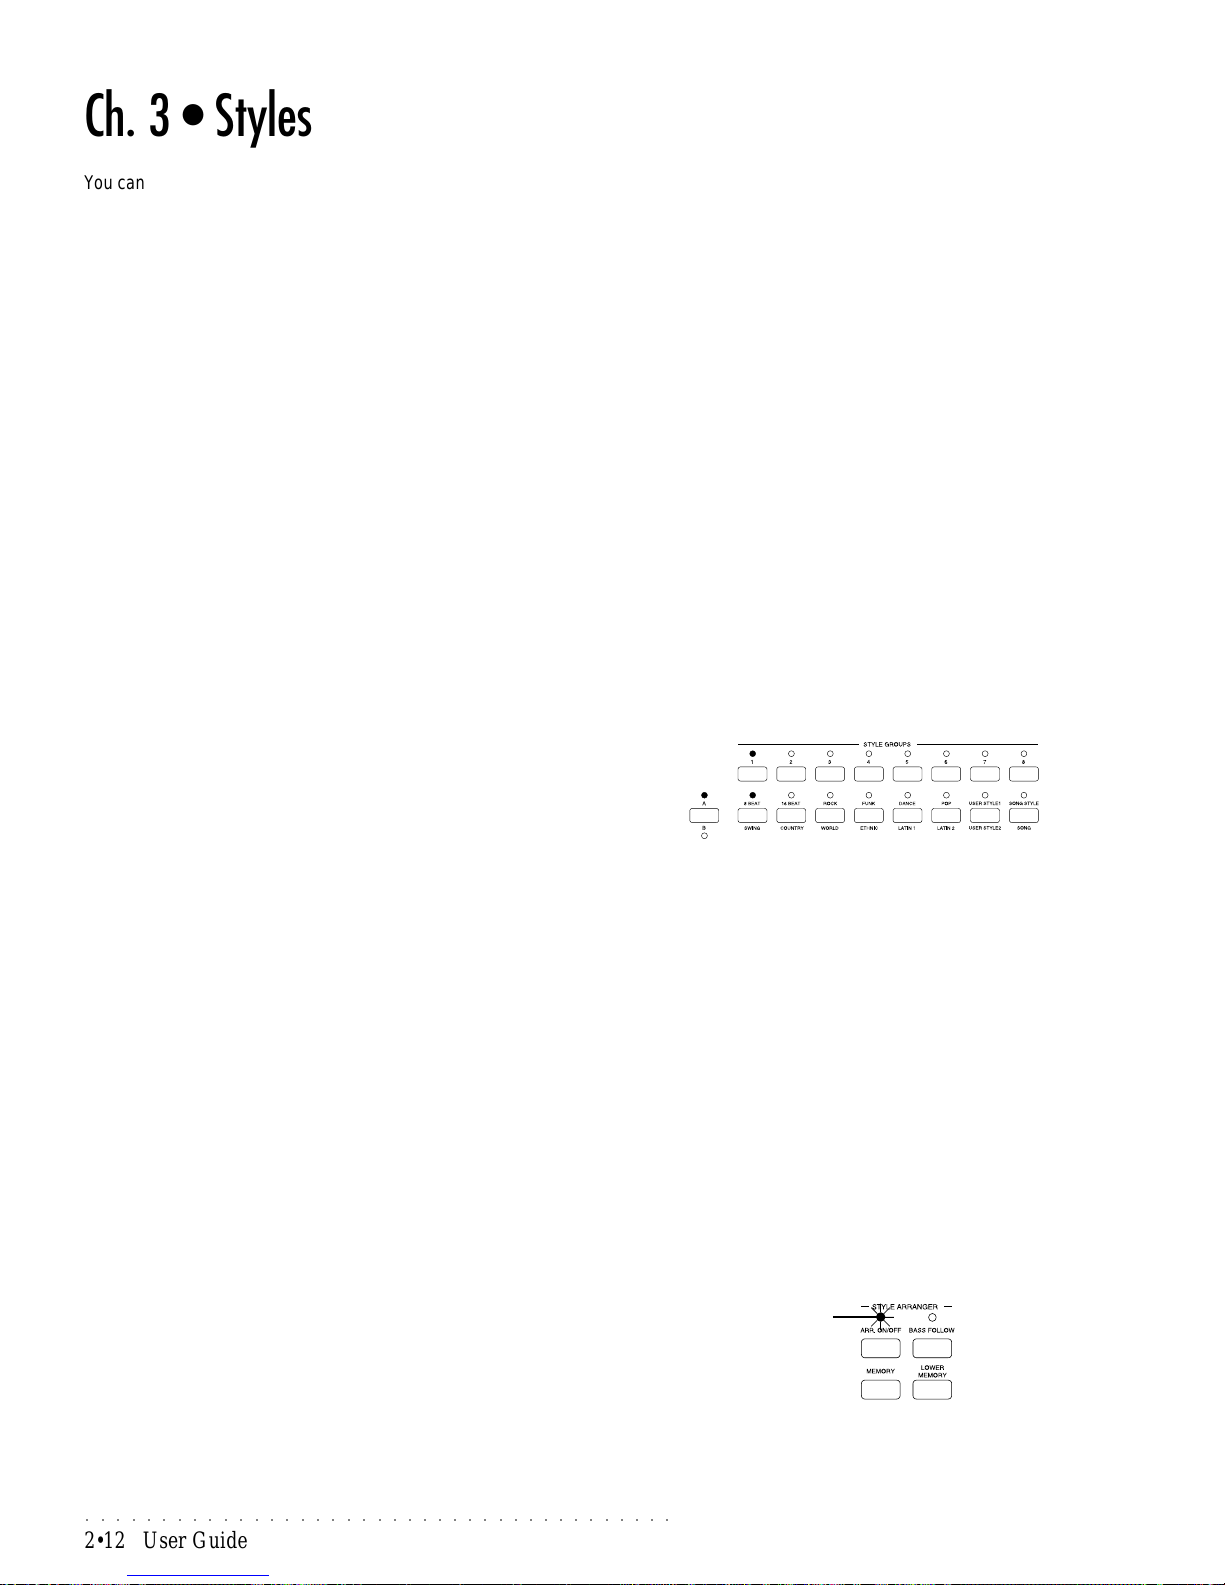
○○○○○○○○○○○○○○○○○○○○○○○○○○○○○○○○○○○○○○○
2•12 User Guide
Ch. 3 • Styles
Y ou can enjoy playing the keyboard sounds in real time while the PS1000 provides musical accompaniment, as if you were playing with a band of musicians.
The automatic arrangements are provided by the Styles.
This chapter explains how to select and play the Styles, how to use all the
automatic functions associated to Styles and how to save modified Styles to
the Programmable Presets.
About the PS1000 Styles
Styles are a collection of musical patterns representing many types of music.
Each Style has 4 V ariations, 4 Intros, 4 Fills and 4 Endings. A Style provides a
complete range of musical structures with which you can play whatever type of
music you prefer.
The automatic accompaniments of the Styles are are triggered by chord information received from the keyboard and the accompaniment patterns change to
suit the current chord. Each Style consists of 8 tracks: the first 5 are engaged
by the sequencer for the auto accompaniments, and the remaining 3 belong to
the real time keyboard sections. The 5 accompaniment tracks are divided as
follows: track 1 Drums (drum sets), track 2 BASS, tracks 3, 4 and 5 correspond
to ACC1, ACC2, ACC3 respectively (accompaniments 1, 2 and 3).
The PS1000 contains 96 permanent Styles in ROM (00 - 95) and can house an
additional 16 disk-based User Styles in RAM memory (96 - 1 1 1). These can be
loaded from disk in the PS format, or in previous series formats, such as WK3,
PK7 or CD.
The PS1000 Styles are housed in the STYLE GROUPS section and are arranged in groups of 8. Each Style “family” button (8 Beat, 16 Beat, etc.) gives
access to a selection of 8 Styles. Similarly, the two User Style buttons and the
Song Style and Song buttons each contain 8 related elements.
The Style Preset
Each Style is governed by its associated Style Preset which “carries” all the
data essential for the Style to play correctly. The Style Preset is an 8 part
(maximum) structure consisting of 3 realtime parts and 5 accompaniment parts
engaged by the sequencer (Drums, Bass, Acc. 1, Acc. 2, Acc. 3). In fact, the
Style Presets and the realtime Programmable Presets share the same Preset.
By means of the Arrange On/Off switch, you can switch from playing three
keyboard sections to playing 8 track Styles by simply turning on the Arrange
On/Off button, without recalling other data.
As we have already seen in the Presets chapter, each track of the Style Preset
can be independently programmed by adjusting the values of one or more Preset parameters.
Enabling/disabling the automatic accompaniments
The automatic accompaniments of the Styles are enabled by a single panel
button: ARRANGE ON/OFF .
If you activate this button (LED on), the current RealTime Prog. Preset will be
automatically enabled to play the Style memorized in the same Preset. The
keyboard will be split and the lower part under the split point will generate the
auto accompaniments according to the chords or notes that you play.
If the Arrange On/Off button is of f (LED off), the Style auto accompaniments will
be disabled, but you can play the keyboard sections of the current Prog. Preset
with the Drums track of the selected Style. In fact, if you press the big red
button START/STOP, you will trigger the Drums track of the current Style.
LED on
Page 43
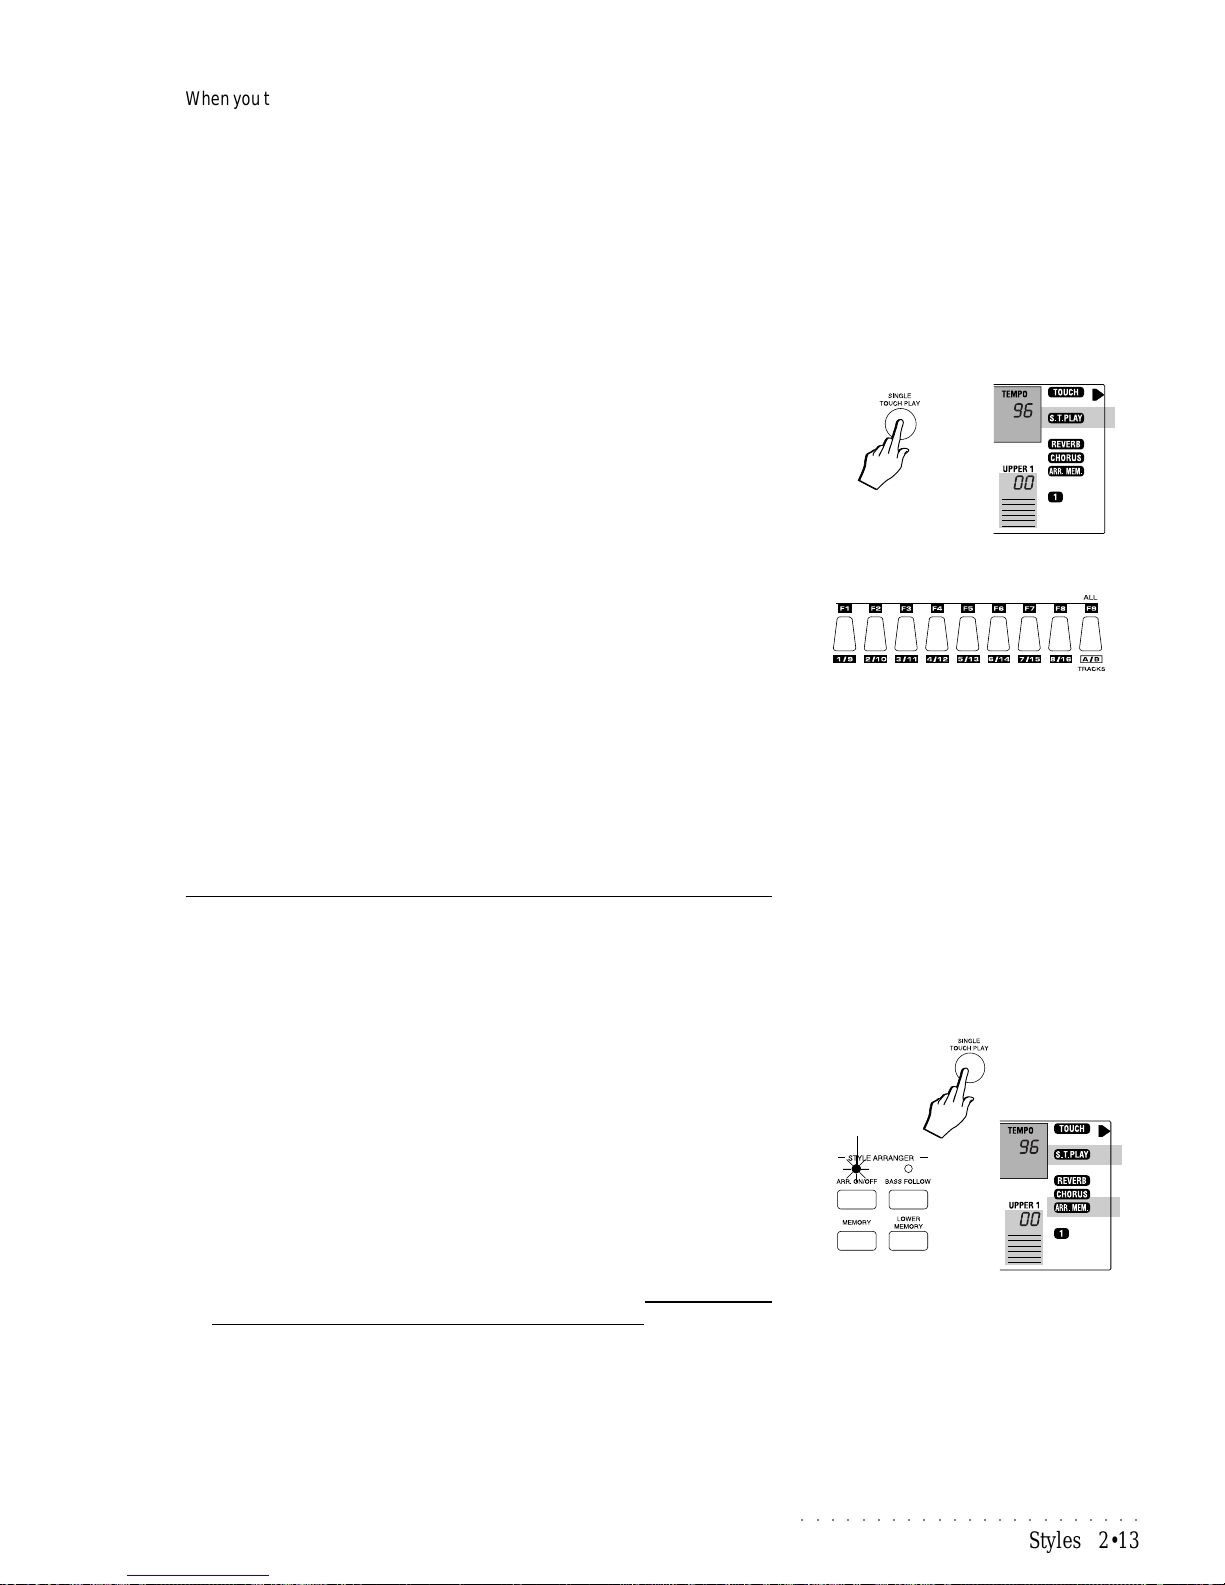
○○○○○○○○○○○○○○○○○○○○○○○
Styles 2•13
When you turn the instrument on for the first time, it will default to Style/RealTime
mode with the ARRANGE ON/OFF button deactivated (LED of f).
To enable the auto-accompaniments of the Style, you must activate the Arrange On/Off button - this you can do either manually (press the button) or
automatically by pressing the SINGLE TOUCH PLAY button.
Another method is to select a Prog. Preset which recalls the panel situation
corresponding to Arrange On/Off = On.
The Single Touch Play button
The SINGLE TOUCH PLA Y button, when on, assigns the sounds memorized in
the Style Preset to all the tracks. Selecting a Style changes the sounds of the
accompaniment tracks as well as the keyboard tracks. Pressing SINGLE
TOUCH PLAY automatically activates the ARRANGE ON/OFF button, the
MEMORY function and the KEY START button.
When SINGLE TOUCH PLAY is off, selecting Styles recalls only the Style accompaniment sections without changing the keyboard sounds.
The Single Touch Play settings
With SINGLE TOUCH PLAY on, the function buttons (F1 … F9) also recall 9
“Single Touch Play” panel settings for the Real Time keyboard sections.
Each ROM Style can play with 10 different Single Touch Play settings, one
recalled by the Single Touch Play button and 9 from each function button, for a
total of 900 panel and keyboard configurations. These are in addition to the 96
basic ROM configurations (one for each Style).
Let’s see at this point how to select and play the Styles.
Selecting and playing the Styles
There are two ways of selecting the Styles: directly by using the Style Groups
buttons, or indirectly by selecting a Programmable Preset.
Recall a Style from the STYLE GROUPS section
1. Press the SINGLE T OUCH PLA Y button (the corresponding display indicator turns on).
Pressing the S.T.PLAY button automatically activates the ARRANGE ON/
OFF button (LED on) and MEMORY function (display indicator on). The
KEY ST ART function is also activated (shown by the four beat pattern markers in the display).
When the S.T .PLAY function is on, whatever Style you select will always be
the ROM version, allowing you to draw information directly from the internal
memory, eliminating all the operations carried out on the panel.
If you choose not to activate SINGLE TOUCH PLAY, you can select Styles
without changing the sounds of the keyboard sections. In this case, you
must remember to activate ARRANGE ON/OFF manually.
2. Press one of the STYLE GROUPS buttons.
Select the desired group in conjunction with the A/B selector button to the
left of the Style Groups section.
Pressing a Group button for the first time will recall the Style from location
number 1, in this case 8 Beat Standard.
LED on
IMPORTANT
When you press the A/B Selector button to
switch from bank set A to bank set B (or vice
versa), the LED currently shown off will flash
for about 3 seconds, during which time you
must make your bank selection. If the LED
stops flashing, it will not be possible to switch
bank set.
Page 44
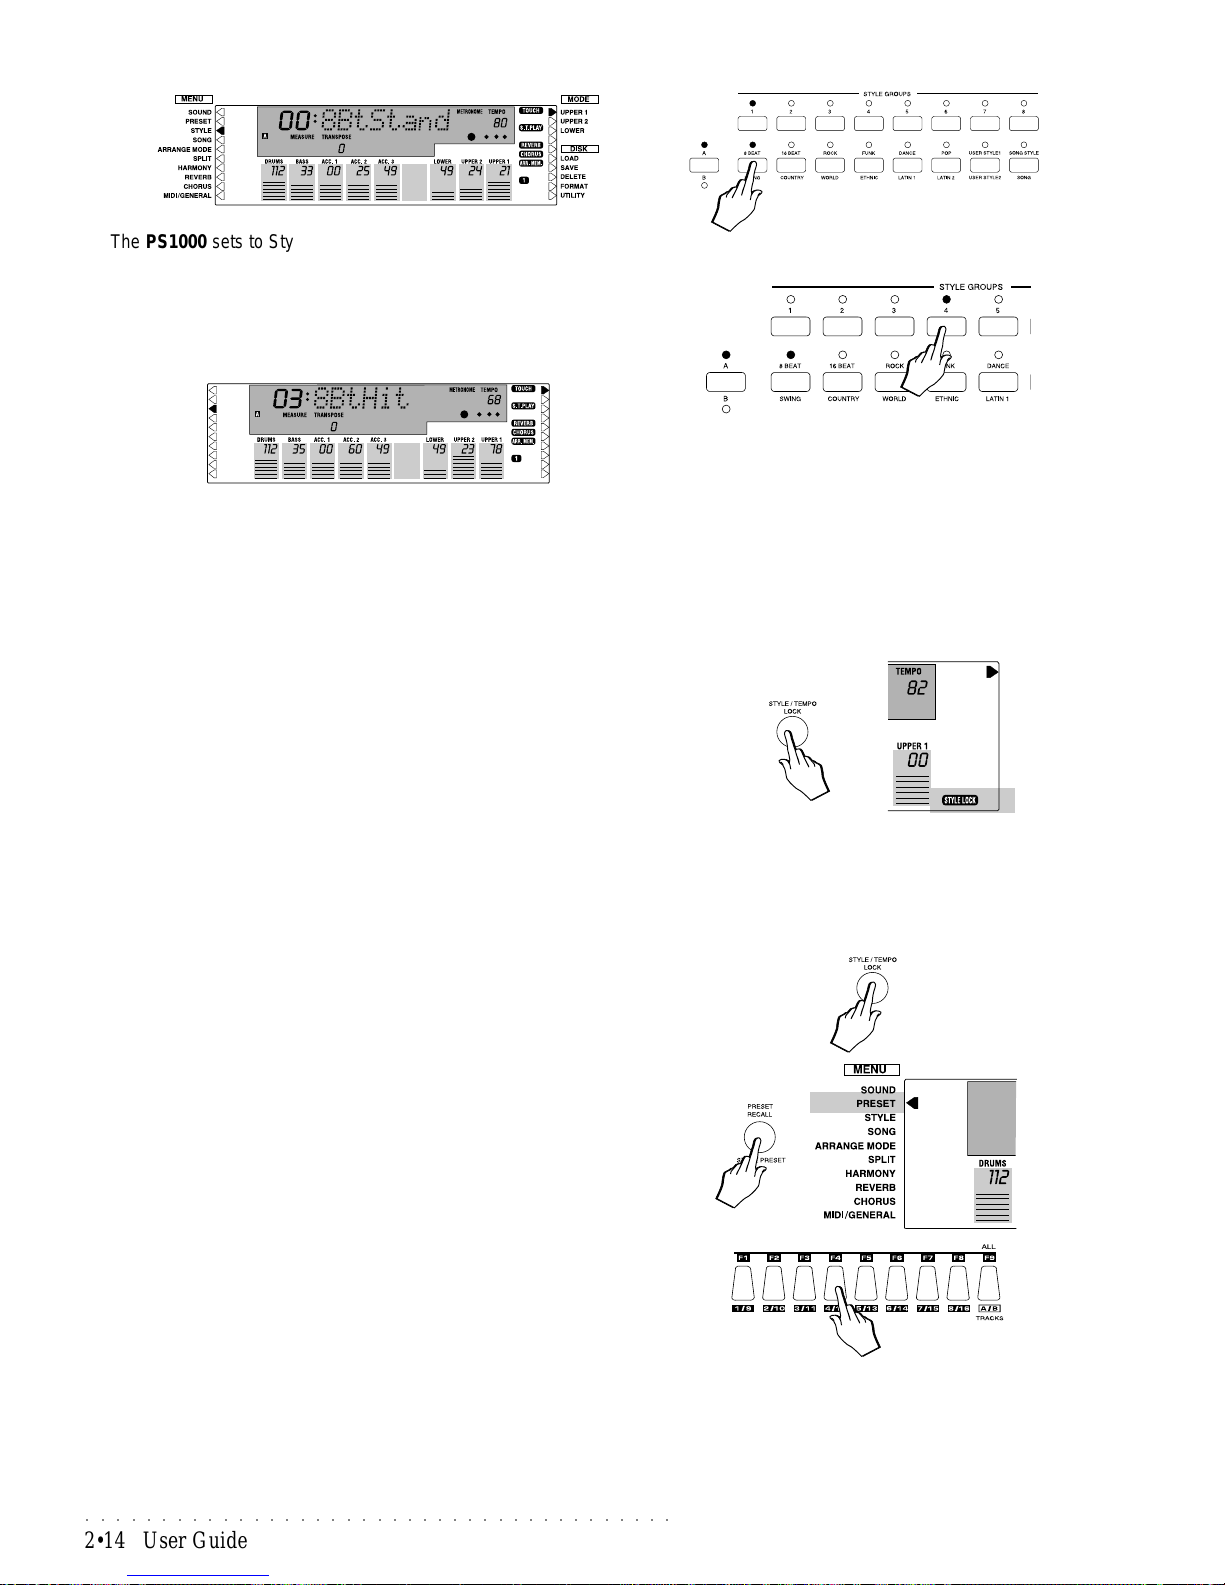
○○○○○○○○○○○○○○○○○○○○○○○○○○○○○○○○○○○○○○○
2•14 User Guide
The PS1000 sets to Style mode with the left display arrow pointing to the
STYLE Menu function.
3. Select a Style from the current Group by pressing one of the buttons
numbered 1 - 8.
In this example we select Style 03 8BeatHit (button n. 4 of the 8 Beat Group).
Recall a Style by selecting the Programmable Presets
The PS1000 leaves the factory with each of the first 10 Programmable Presets
programmed to recall a different Style and V ariation. The remaining 53 Presets
recall the same Style and V ariation, but you can program the Prog. Presets to
recall your preferred Styles.
Recalling Styles by selecting the Prog. Presets depends on the status of the
STYLE LOCK function. This function allows you to select Prog. Presets without changing the current Style. The Style Lock function is governed by the
STYLE/TEMPO LOCK button. See “The Style/Tempo Lock button” on page
2.20.
If STYLE LOCK is active (corresponding display indicator on), you can pass
from one Preset to another without changing the Style.
If STYLE LOCK is off, selecting Prog. Presets recalls the memorized Style,
V ariation and Tempo setting.
In this example, we recall the Styles using the Prog. Presets with Style Lock
Off.
1. If STYLE LOCK is on, turn it off.
When Style Lock is on, the display shows the relative indicator in the bottom
right hand corner. If the function is on, press the Style Lock/Tempo Lock
button (located to the left of the Single Touch Play button) to deactivate the
function.
2. Press the PRESET RECALL button to enter Preset mode and select a
Prog. Preset using the method described in the Presets chapter.
When you select a Prog. Preset to recall a Style, the SINGLE TOUCH PLA Y
function will automatically deactivate and the PS1000 will set according to
the memorized situation in the selected Preset.
If TEMPO LOCK is off, selecting the Preset also changes the Tempo.
The Style Lock/Tempo Lock button is explained in detail further ahead in
this chapter.
Note: In the Appendix on page A.3, you’ll find
a Style T able listing the ROM Styles available
for each Group.
Note: If you hold down this button for about 2
seconds, you will activate the TEMPO LOCK
function.
Page 45
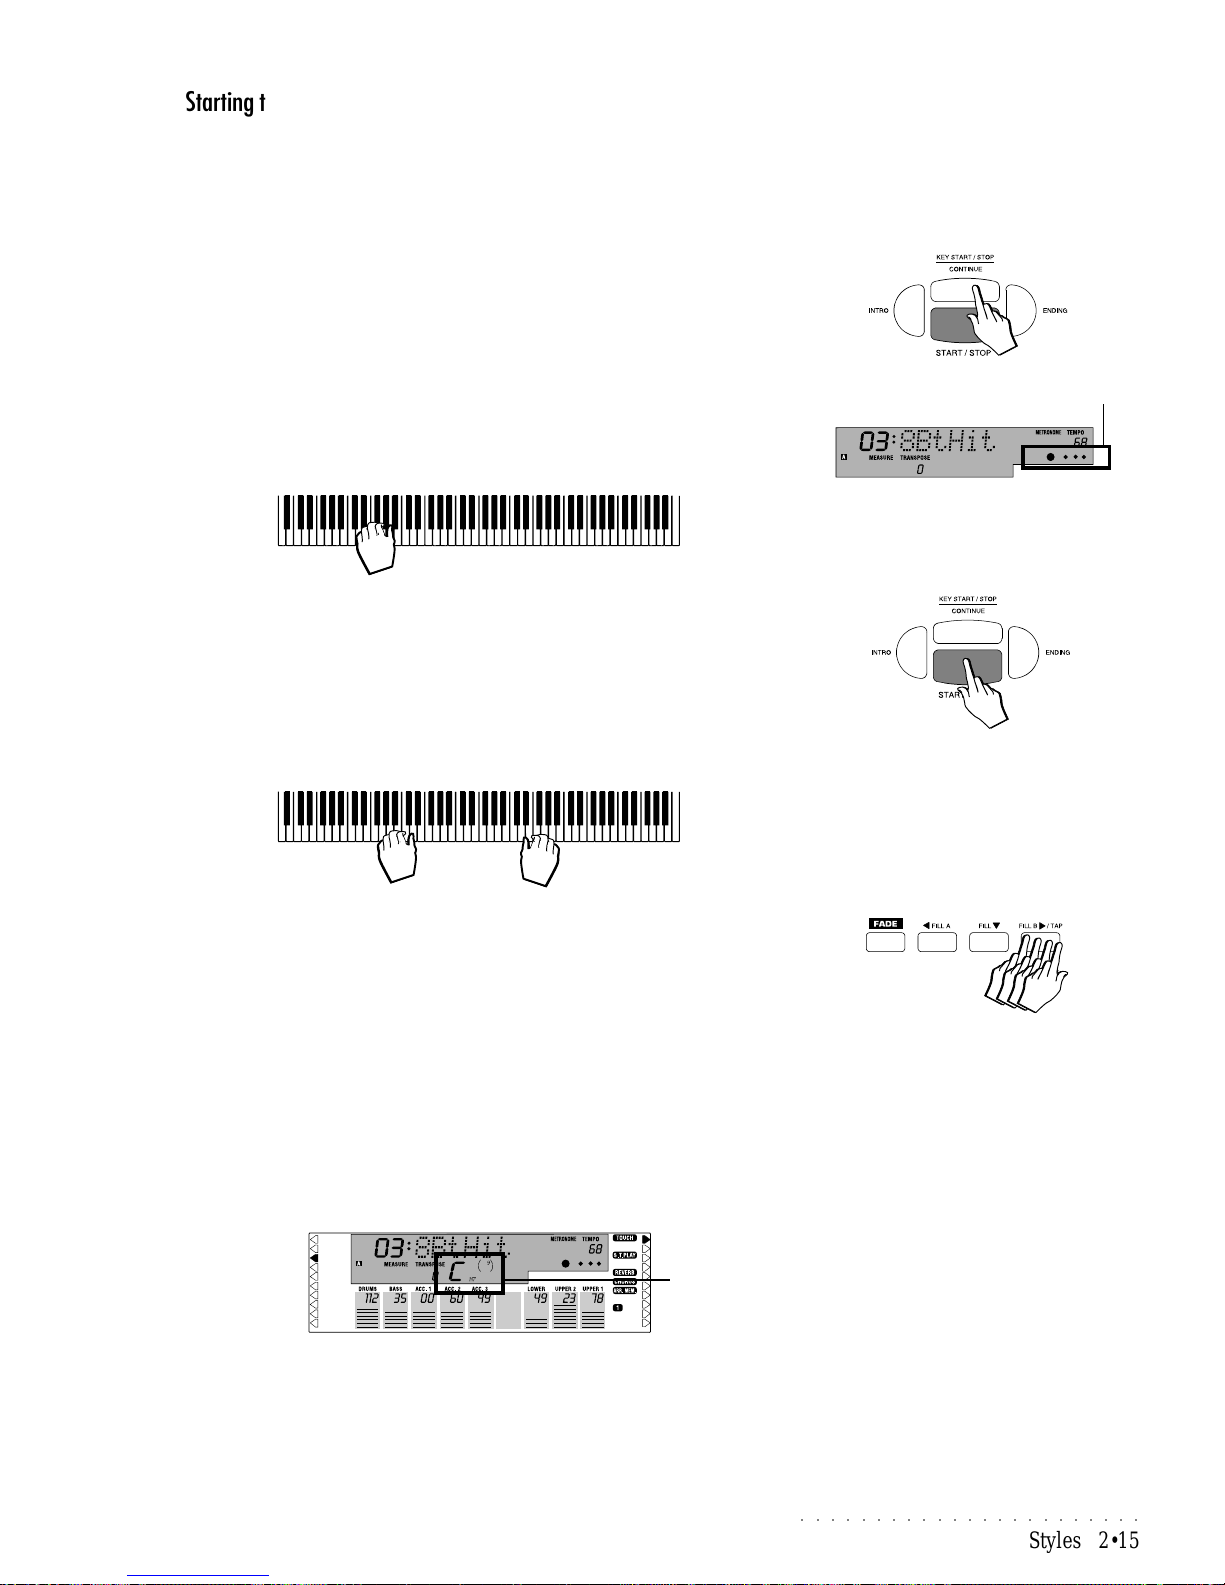
○○○○○○○○○○○○○○○○○○○○○○○
Styles 2•15
Starting the Style
Once you have selected the Style that you want to play , there are several different ways of starting the auto accompaniments.
Start the Style automatically with the KEY START function
The KEY START function synchronises the start of the auto accompaniments
with a note or chord pressed on the lower split keyboard.
1. If you select your Style with SINGLE TOUCH PLA Y active, the KEY STAR T
function will be automatically activated.
The display shows 4 “beat pattern” indicators under the metronome icon.
(If you opt to select your Style with S. T. PLA Y of f, press the KEY ST AR T
button to activate the function).
2. Play a note (or chord) on the lower half of the keyboard.
The Style accompaniment starts instantly .
Start the Style with the START/STOP button
1. Press the big red START / STOP button to start the Style.
You will trigger the Drums track.
2. Play with both hands on the keyboard.
Y ou will hear the automatic arrangements play according to the chord played
on the left hand, below the split point.
Start the Style automatically with the TAP TEMPO function
1. Beat time on the FILLB/TAP button to start the Style.
The Tempo established by tapping on the button is displayed and the Drum
track of the Style starts automatically .
The T ap T empo is also established according to the current Time Signature:
tap four times for 4/4, tap three times for 3/4 and so on.
Each tap on the button plays an acoustic sound (drumsticks).
Chord symbols
The recognized chord symbols appear on the main display, under the Style
name.
If an unrecognized chord is played, the chord symbol for the lowest note played
is shown and the auto-accompaniment plays a pattern that depends on the
current chord recognition mode (One Finger, Fingered1, Fingered2, Free). Refer
to the “Chord Recognition mode” paragraph further ahead in this chapter.
BEAT pattern indicators
CHORD
SYMBOLS
IMPORTANT: If a disk-based User Style contains less than 4 Variations (e.g. only 2), after
loading the Styles, be sure that the Variation
indicator in the display shows either Variation
1 or 2. This is to prevent total silence at Style
Start.
Page 46
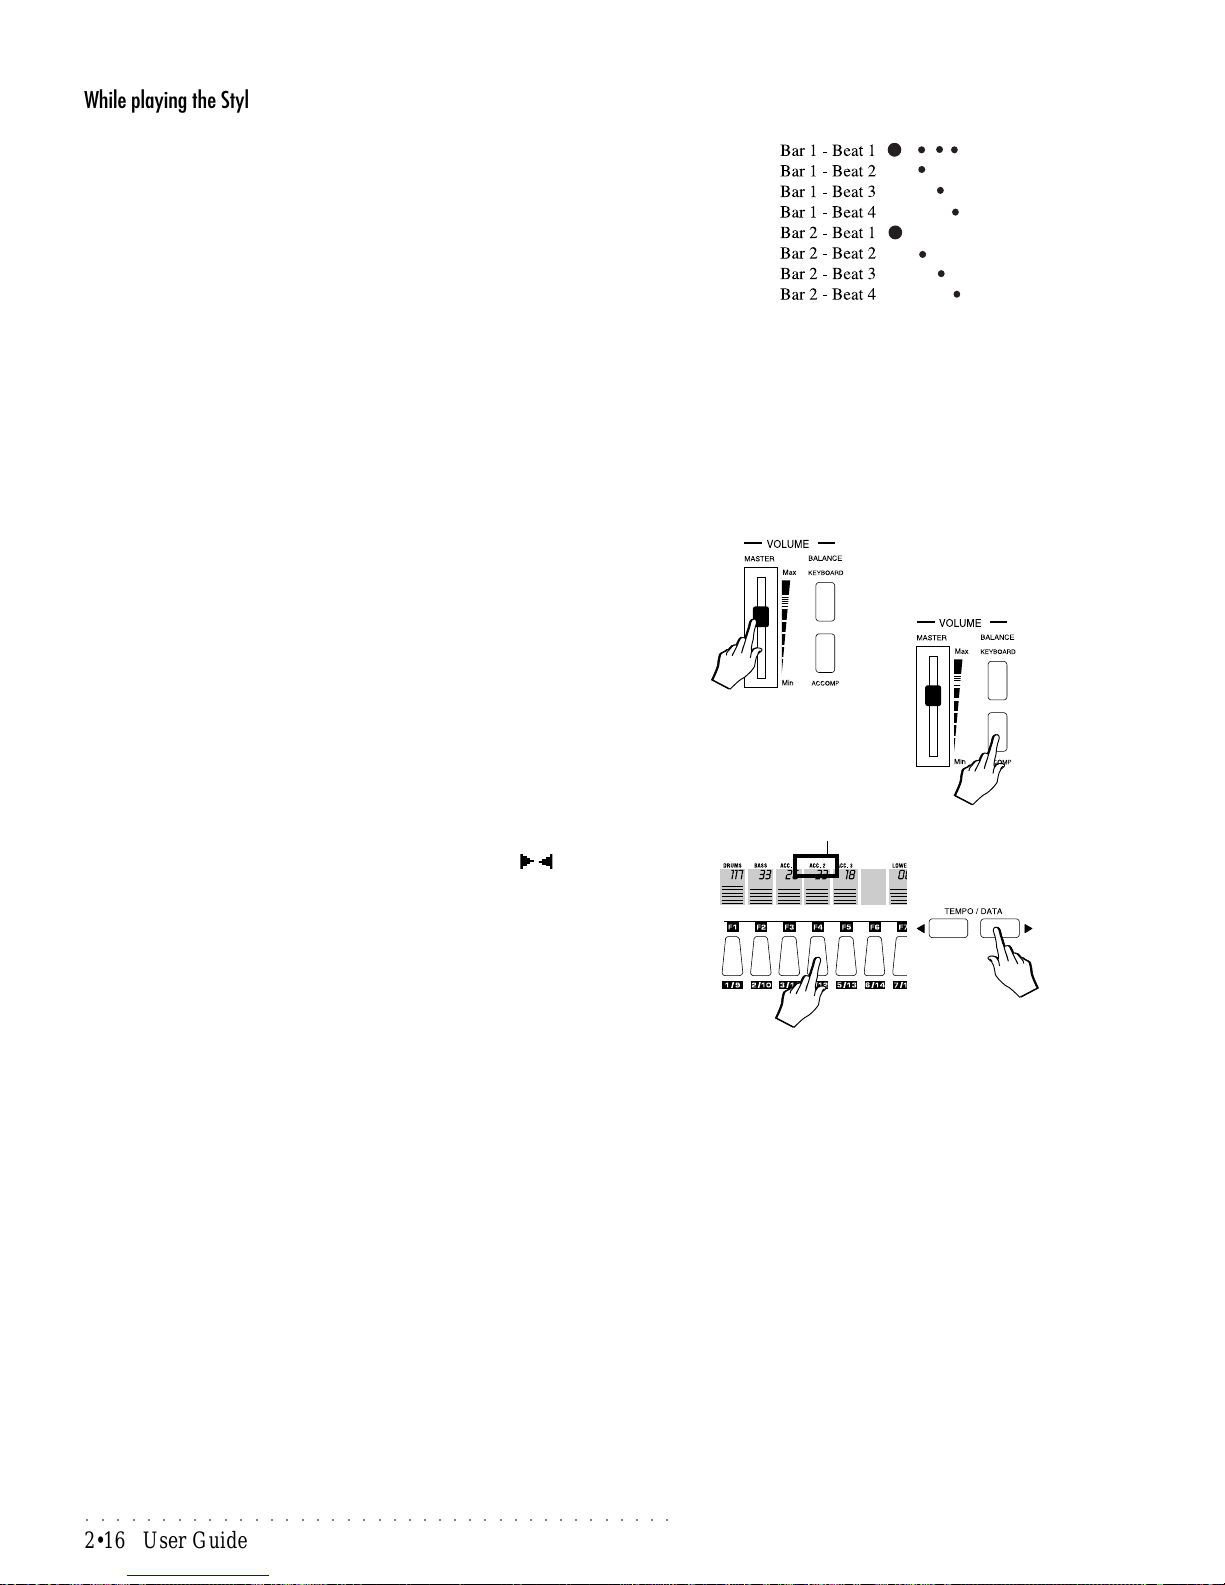
○○○○○○○○○○○○○○○○○○○○○○○○○○○○○○○○○○○○○○○
2•16 User Guide
While playing the Style
While you are playing, the Beat pattern indicator under the Metronome icon
monitors the beats of each bar. The first large dot represents the first beat of a
bar while the smaller ones indicate the second, third and fourth beat. For a
two-bar riff, the beat pattern sequence is as illustrated in the margin.
At ay time while you are playing, you can change Style, use the automatic
functions (Fill, Intro, Ending, etc.). Refer to the paragraph, “Using the automatic functions” on page 2.17 of this chapter.
Y ou can recall the Single Touch Play settings using the Function buttons F1-F9,
which change the RealTime sounds and Style variation (only if Single Touch
Play is on). Refer to the paragraph, “The Single Touch Play settings” on page
2.13.
Y ou can modify the real time sound configuration by intervening directly on the
corresponding Keyboard activators (Upper 2, Upper 1 and Lower). This procedure is explained on page 1.15 of the Quick Guide, under the paragraph,
“Reconfiguring the Presets using the Keyboard Activators”.
The Style Volume and Balance
Adjust the overall volume of the Style with the MASTER VOLUME panel slider.
If you have connected a Volume Pedal (optional), you can adjust the overall
volume or the section volume. Refer to the Midi/General chapter, page 2.50,
for information regarding how to program the Pedal Volume parameter for section volume control.
Use the BALANCE buttons to increase or decrease the Keyboard Sounds or
Accompaniment sounds accordingly . Refer to the paragraph, “Balancing Keyboard and Accompaniment sounds” on page 1.10 of the Quick Guide.
Adjusting the individual Sound volumes
You can adjust the volume level of the Style and Keyboard tracks independently, by selecting the track with the corresponding Function button (until the
name flashes in the display) and using the TEMPO/DATA / buttons.
Refer to the paragraph, “Changing the Volume Balance between two sounds”
for specific and illustrated details of the method. When adjusting the individual
sound volumes of the Style tracks, the important thing to remember is to deactivate the Single Touch Play button BEFORE selecting a track. When the Single Touch Play function is on, the Function buttons F1 - F9 select the Single
Touch Play settings of the current Style.
FLASHING SECTION
Page 47
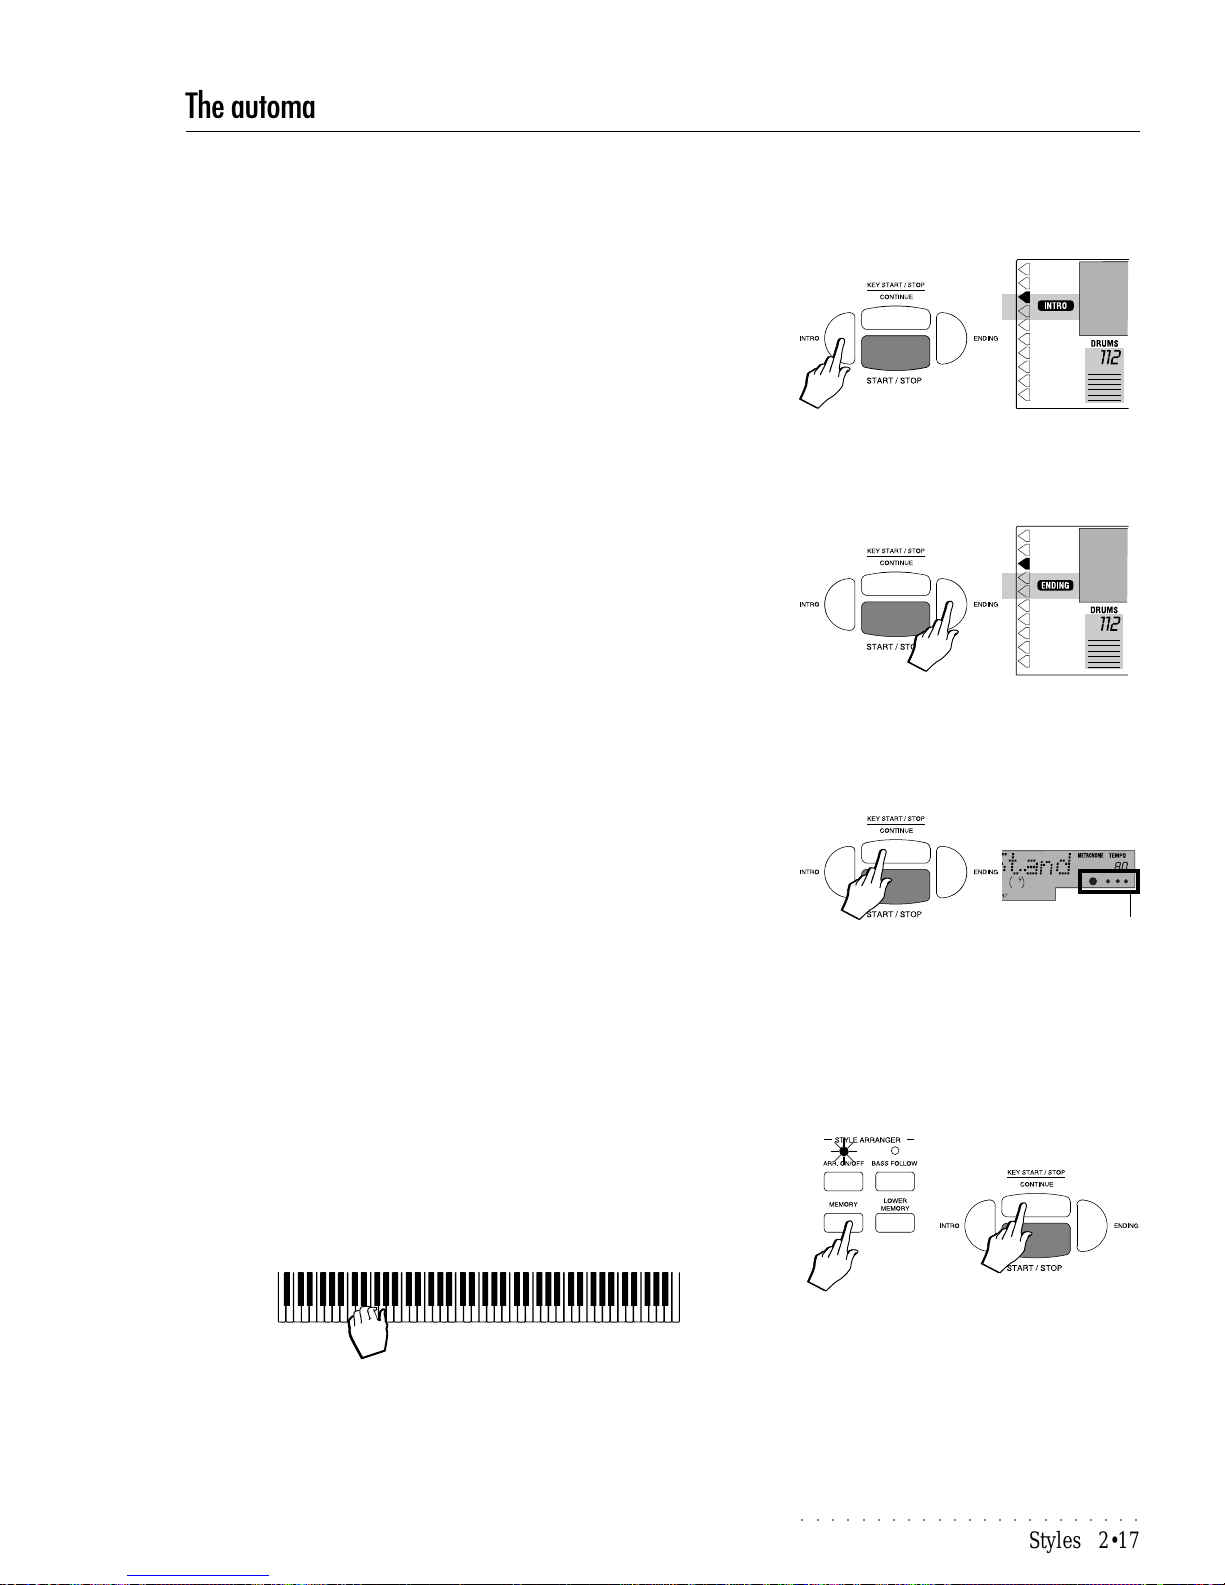
○○○○○○○○○○○○○○○○○○○○○○○
Styles 2•17
The automatic functions - Intro, Ending, Key Start, Key Stop, Variation, Fill, Fade
* Note: not less than one quarter of a second.
The Styles offer a wide selection of automatic functions.
INTRO
This button provides and introduction to the Style.
1. Press the INTRO button before starting the Style.
The display shows the corresponding indicator.
2. Start the Style using one of the start methods already described.
The Style starts with a one or two bar introduction.
INTRO can also play as a Fill In if pressed during Style play.
ENDING
Pressed while the Style is playing, this button stops a Style accompaniment
with an ending (“coda”).
1. While the Style is playing, press ENDING.
The corresponding display indicator turns on.
The Style stops with an ending phrase.
If you select another Style during the Ending cycle, the new Style starts at
the start of the next bar.
If you preset ENDING before Style start, it plays as an Introduction.
KEY START/STOP-CONTINUE
The KEY START function synchronizes the start of the automatic accompani-
ment with a note or chord pressed on the keyboard without having to press
START/STOP. You have already seen that when you press the Single Touch
Play button, KEY START activates automatically, shown by the 4 Beat Pattern
symbols under the Tempo setting on the display.
Once activated, KEY ST ART can be deactivated automatically either by pressing Start/Stop to start the accompaniment, or by stopping the Style with the
Ending button. T o deactivate manually , simply press the Key Start button again.
The KEY STOP function allows you play chords in staccato Style and maintain
them for the selected Style. The KEY STOP function only operates when the
Key Start function is active (Beat Pattern indicators on).
KEY STOP is useful when you want to play pieces that contain staccato parts
(introductions, codas, etc.). Try this function and listen to the ef fect obtained.
1. Set the instrument to play a Style (LED of the ARRANGE ON/OFF button on) and activate (if necessary) the KEY START function.
2. If on, deactivate the MEMORY function (display indicator off).
3. Play one or more chords in “staccato” style. The triggered arrangement
will stop instantly at release due to the deactivated MEMORY function.
4. Hold down a chord for an instant* then release it.
The chord will be held in memory automatically and the auto-accompaniment will continue playing as if the Memory function were on.
If you play another chord in staccato style, the auto-accompaniments will
stop playing as soon as you release the keys.
THE CONTUNUE FUNCTION
The CONTINUE function operates for Song
Styles and Songs only and is explained afterwards.
Beat Pattern
indicators
Page 48
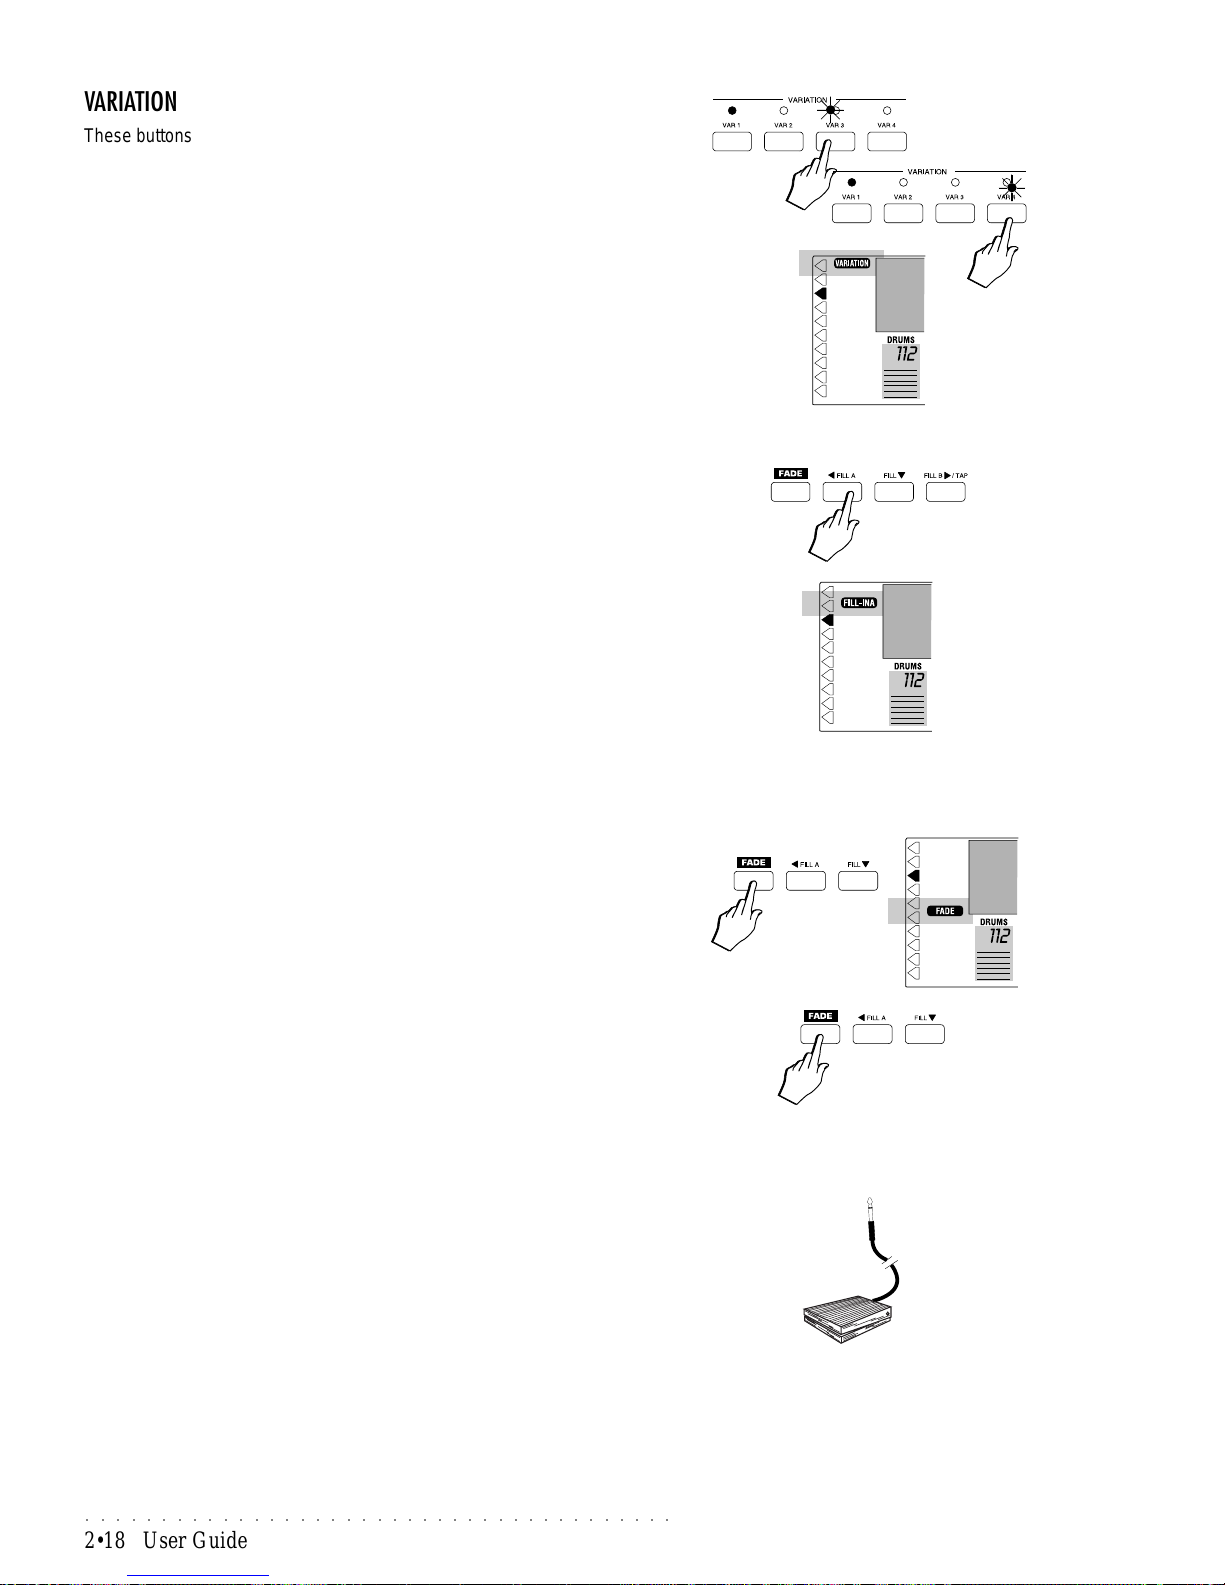
○○○○○○○○○○○○○○○○○○○○○○○○○○○○○○○○○○○○○○○
2•18 User Guide
VARIATION
These buttons control 4 different Variations of the same Style.
1. Before starting the Style, you can choose the starting V ariation by pressing the corresponding V ar button.
2. Start the Style using one of the start methods already described.
During Style play , you can switch from one V ariation to another by pressing
the corresponding buttons.
Each Variation has also an associated INTRO, FILL and ENDING.
Every time you change V ariation, the corresponding display indicator turns
on then turns off at the and of the variation cycle.
The same occurs if the V ariation change is effected with the Fills.
FILL
These buttons trigger a Fill In, or break of the current variation.
FILL A plays the fill then breaks into the previous variation.
The corresponding display indicator shows the Fill in use.
FILL plays the fill then continues with the current variation.
FILL B plays the fill then breaks into the next variation.
The corresponding display indicator shows the Fill in use.
By holding down a Fill button, the relative pattern repeats continually until
you release the button.
The Fills are normally one or two measures long.
Y ou can also preset a Fill before Style start in order to use it as an Introduc-
tion.
FADE
The FADE button allows you to start a Style with a volume fade in, or stop with
a volume fade out.
1. Press the button before starting the Style.
2. Start the Style using one of the start methods already described.
Y ou’ll hear the accompaniment volume gradually increase during the course
of 4 measures.
3. If you press FADE while the Style is playing, the volume will decreases
gradually to total silence and the Style stops automatically .
During the Fade cycle, the corresponding display indicator remains on.
Activate the automatic functions using a switch pedal
If you have assigned one of the switch-action functions to either of the two
pedals of the PS1000, you can activate the assigned function by pressing the
pedal.
The following switch-action functions can be assigned to the Damper or Soft
pedal, or to an optional switch pedal inserted into the rear panel Volume jack
previously programmed to accept a switch pedal:
Switch Upper 1/Upper 2; Start/Stop; Fill A; Fill; Fill B/Tap; Intro; Ending.
Refer to the General/Midi chapter, page 2.50, for explanations regarding how
to assign the switch action functions to the pedals.
Page 49
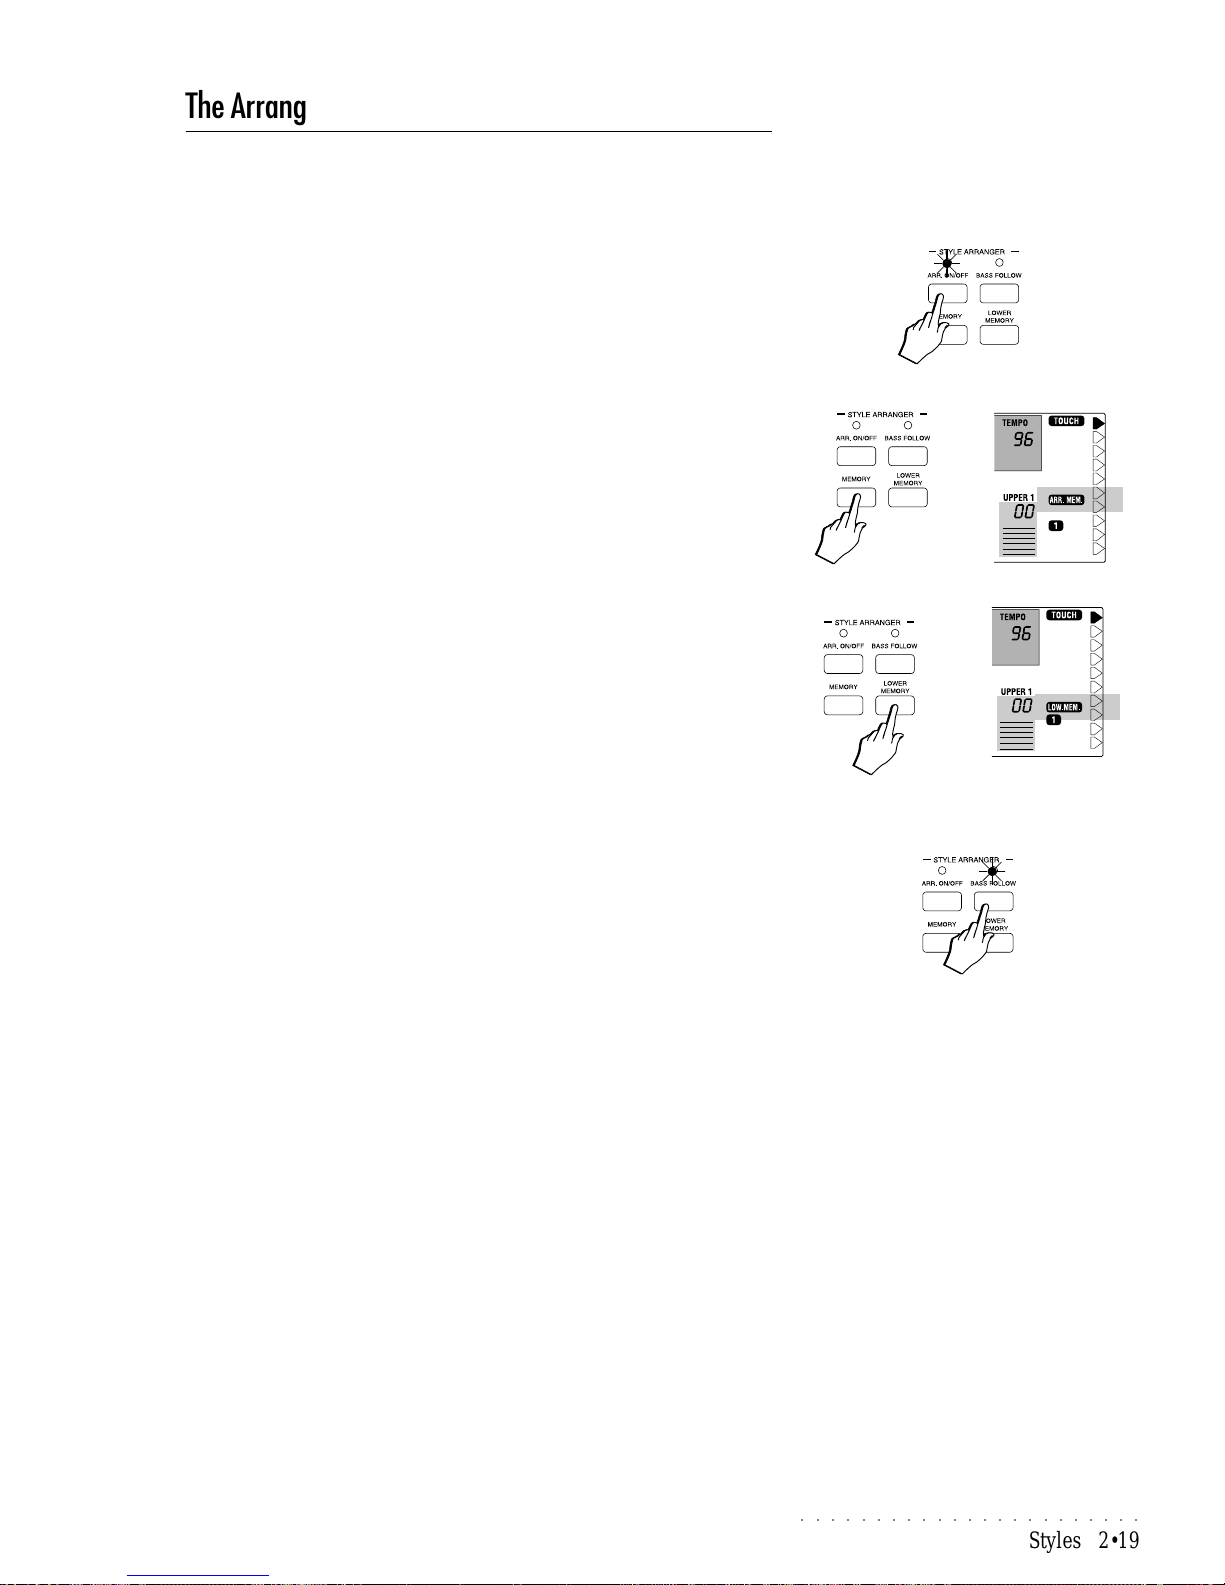
○○○○○○○○○○○○○○○○○○○○○○○
Styles 2•19
The Arranger section
This section contains buttons which enables the more important functions tied
to Style playing.
Arrange On/Off
When ARRANGE ON/OFF is on (LED on), all the Style accompaniment tracks
are enabled for play .
If this button is off, only the Drums track will play after the start.
Memory
When MEMORY is on (corresponding display indicator on), releasing your left
hand from the connected keyboard causes the bass and accompaniment sounds
to continue playing.
When off, releasing your left hand causes the accompaniment to stop.
Lower Memory
When LOWER MEMORY is on (corresponding display indicator on), releasing
your left hand from the keyboard causes the sound of the Lower keyboard
section (if active) to continue playing until you play other notes.
When off, releasing your left hand will cause the Lower sound to stop playing.
The Lower Memory function is useful to hold ‘pad’ sounds without using a Damper
pedal (which may be of more use to the right hand).
Bass To Lowest
If BASS TO LOWEST is on (LED on), the bass part of the auto accompaniment
plays around the lowest note of the current chord. If you play a different inversion of the same chord, the lowest note also changes resulting in a different
bass note.
If this function is off (LED off), the bass will follow the original programmed
pattern of the Style.
Bass to Lowest permits real time changes to the otherwise fixed bass pattern of
a Style, by playing different chord inversions.
Page 50
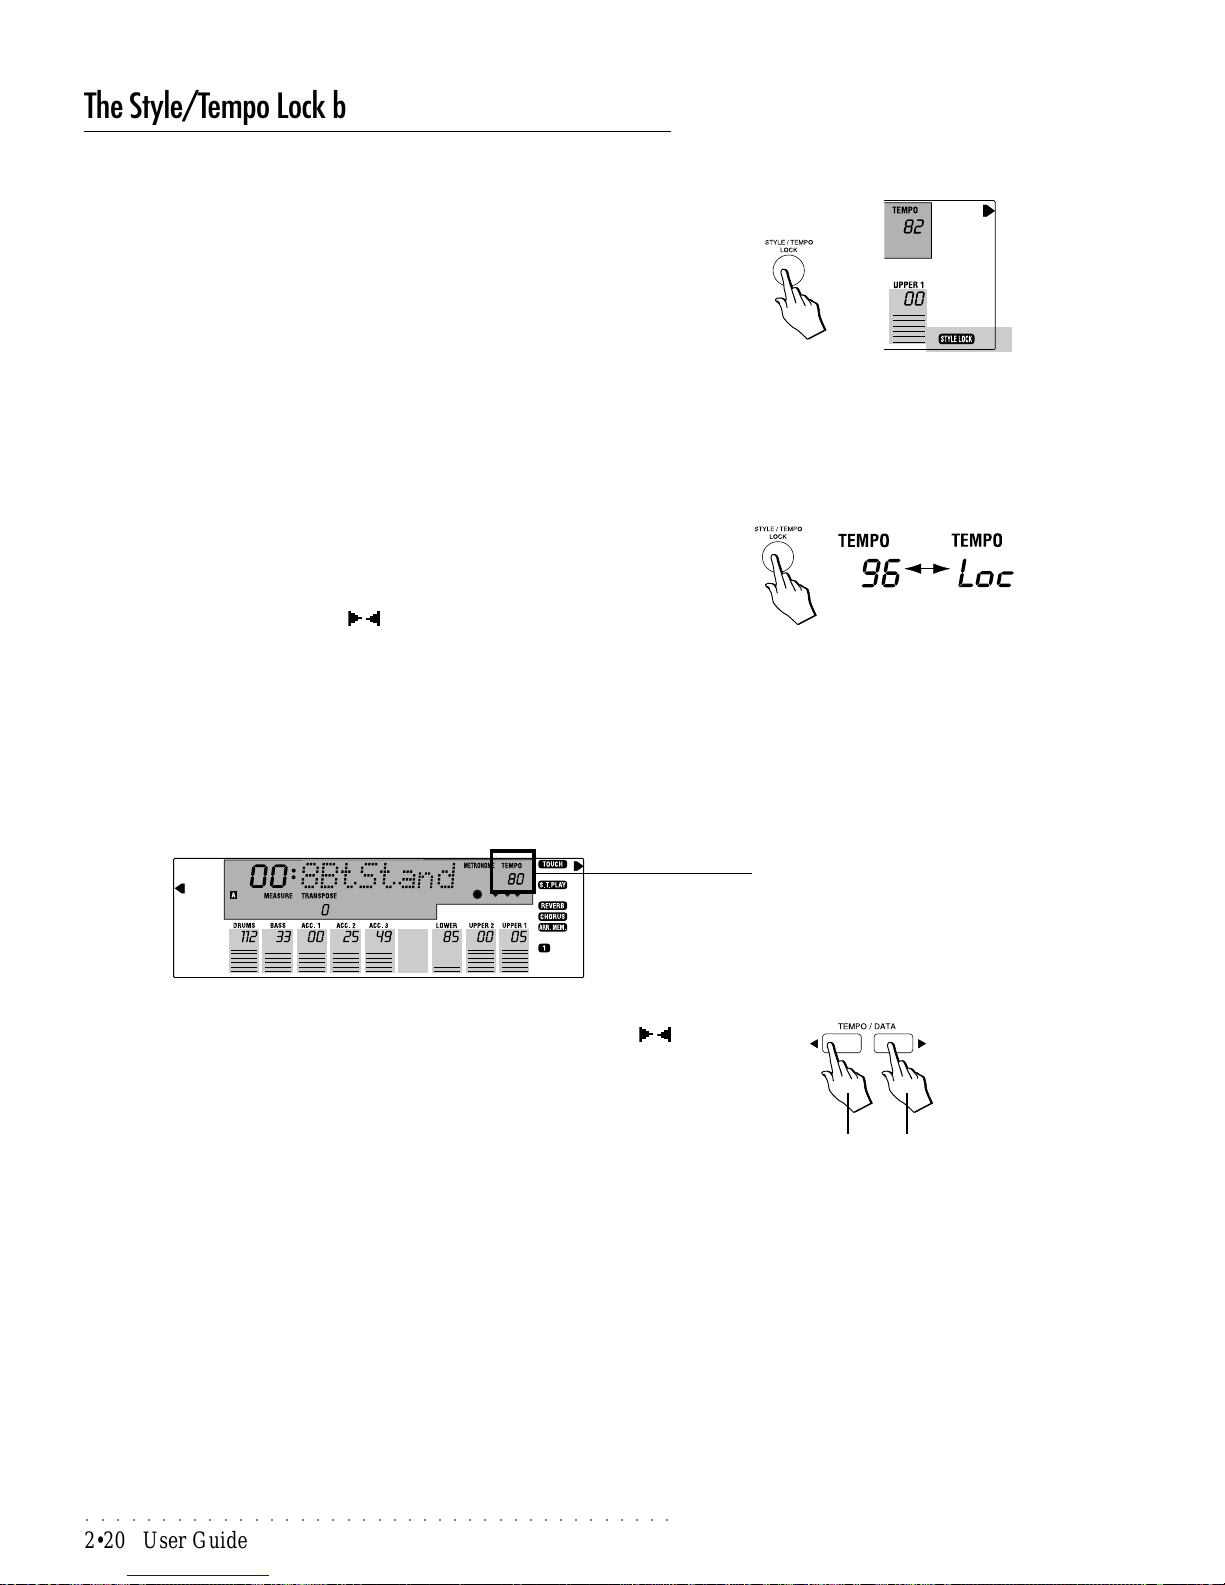
○○○○○○○○○○○○○○○○○○○○○○○○○○○○○○○○○○○○○○○
2•20 User Guide
The Style/Tempo Lock button
Style Lock
The STYLE LOCK function allows you to recall the Presets without changing
the Style.
With STYLE LOCK active (display indicator on), you can pass from one Programmable Preset to another without changing the Style.
Tempo Lock
The TEMPO LOCK function locks the current Style Tempo allowing you to recall Styles without changing the Tempo, regardless of the status of the Single
Touch Play button.
To activate TEMPO LOCK, hold down the Style/Tempo Lock button for about 2
seconds. When TEMPO LOCK is active, the Tempo setting alternates with the
word “LOC” in the top right hand corner of the display.
When Tempo Lock is on, the Tempo setting remains fixed for all subsequent
Style and Preset selections. It is always possible, however, to change the T empo
in real time with the TEMPO/DATA / buttons.
When TEMPO LOCK is off, the selection of a Style or a Prog. Preset recalls the
memorized Tempo setting.
TEMPO LOCK and STYLE LOCK can both be active at the same time.
The Style Tempo
Every Style that you select recalls a memorized playing speed, or tempo setting, which is shown in the top right hand corner of the display.
The Style Tempo can be changed in real time using the TEMPO/DATA /
buttons either before or after Style start and regardless of the status of the
TEMPO LOCK button.
The current tempo can be saved to a Prog. Preset. This provides you with
another possibility of setting the Tempo.
To recap, you can:
a) select the Style with Single Touch Play active to recall the original Tempo
setting stored in ROM,
b) recall a Style by selecting a Prog. Preset to recall a previously memorized
Tempo setting.
c) lock the current Tempo setting (except with the Tempo/data buttons) for all
Style changes by activating the Tempo Lock function.
Important: Remember that if a Style track is
flashing, the T empo/Datat buttons will change
the relative Volume.
Tempo increaseTempo decrease
TEMPO SETTING
Page 51
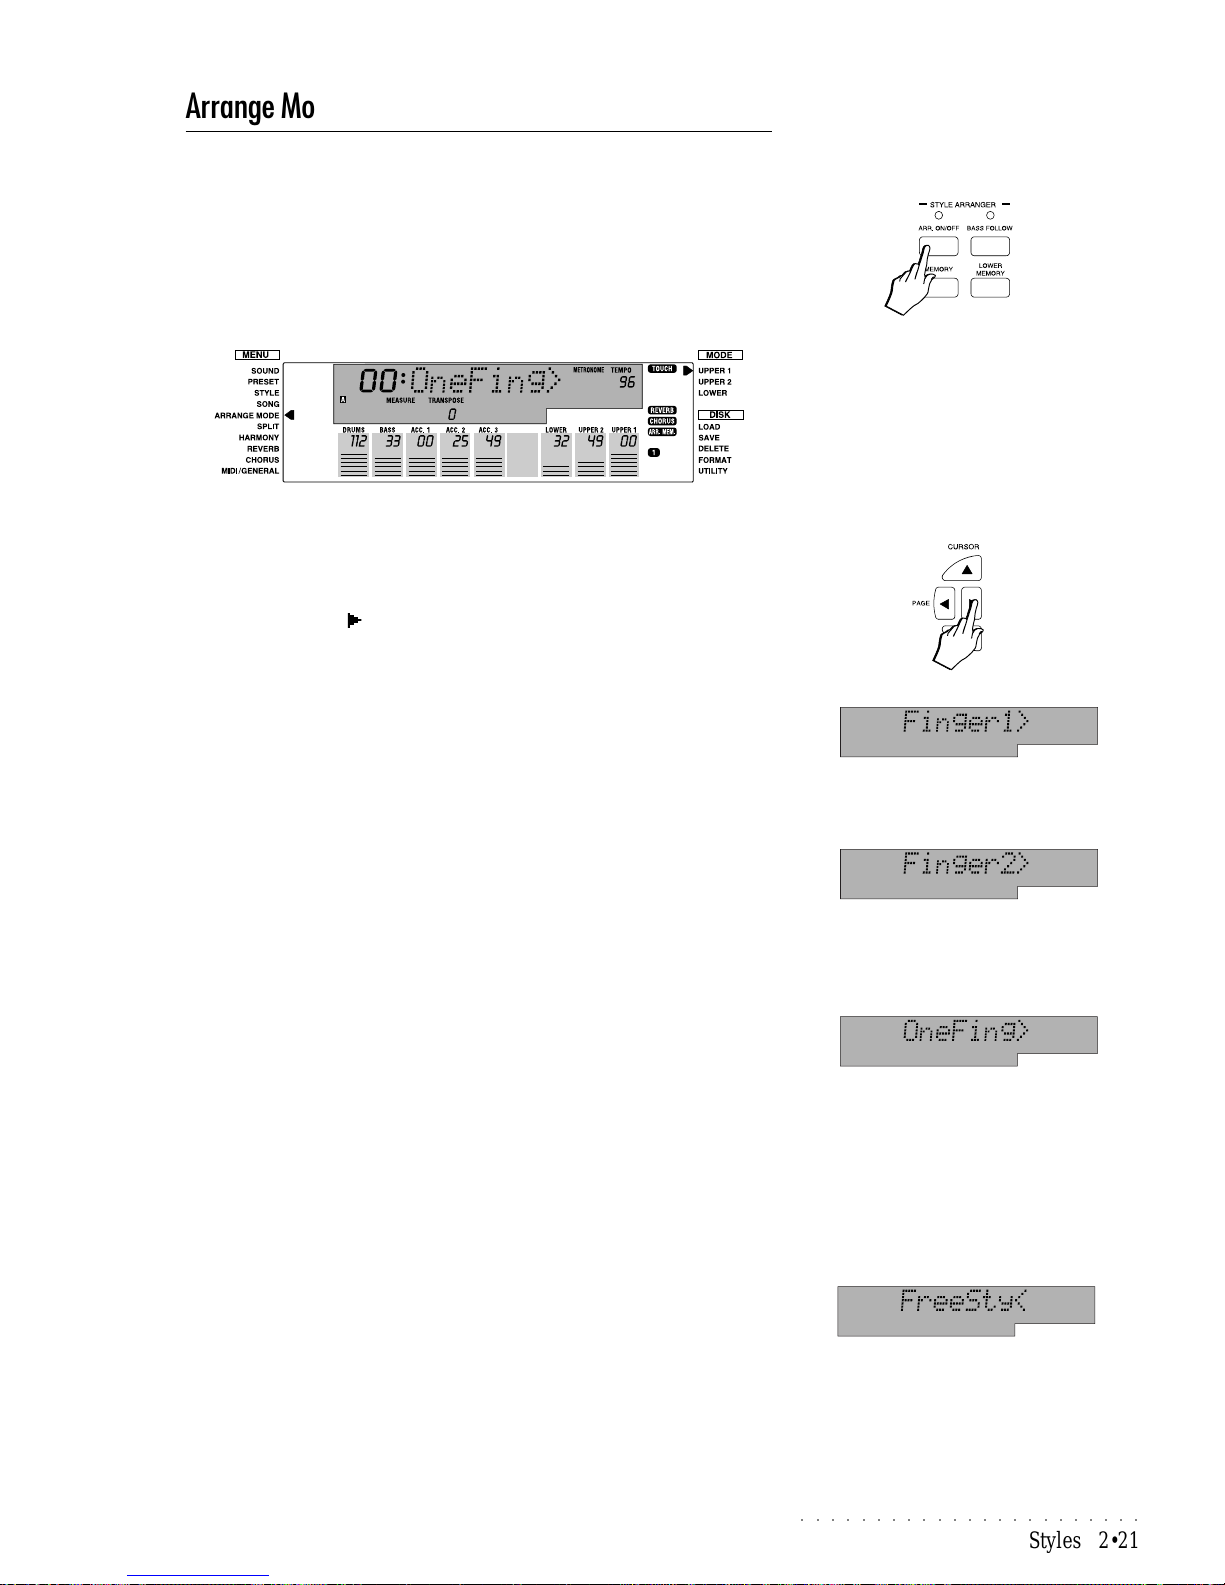
○○○○○○○○○○○○○○○○○○○○○○○
Styles 2•21
Arrange Mode
The PS1000 allows you to choose between several different Chord recognition
modes: FINGERED 1, FINGERED 2, ONE FINGER and FREESTYLE.
Use the following procedure to select the desired chord recognition option:
1. Select the ARRANGE MODE menu function by holding down the Arrange On/Off button for an instant.
This will gain access to the ARRANGE MODE menu:
You can also select the menu by moving the left black arrowhead so that it
points to the function.
The display shows the current chord recognition mode in large letters.
2. Press the PAGE button repeatedly to scroll through the options until
you reach the chord recognition option required.
Fingered 1
At least three notes must be played below the split point for the chords to be
recognized and trigger the auto accompaniment.
Fingered 2
The chord will play according to the actual notes pressed below the split point.
A three note chord will trigger the full accompaniment. With one or two notes,
the chord will be recognized but the accompaniment pattern will limit itself according to the notes actually played.
One finger
A single note played below the split point is recognized as the root of a major
chord.
• For a minor play the root and the minor third (e.g. C and Eb).
• For a diminished, play the root and the diminished fifth (C + Gb above or
below C).
• For a seventh play the root and the seventh (C + Bb above or below C).
• For a major 7th, play the root and the augmented seventh (C + B above or
below C).
FreeStyle
A three note chord is recognized anywhere on the keyboard, even above the
current split point. If you play one or two notes, the chord is not recognized and
the current accompaniment pattern does not change.
This chord recognition option allows you to play your melody anywhere along
the keyboard with the Upper 1 and /or Upper 2 keyboard sounds. Selecting
FreeStyle disables the Lower keyboard section, if active.
Note: Freestyle is particularly useful for Midi
Guitar controllers.
Page 52
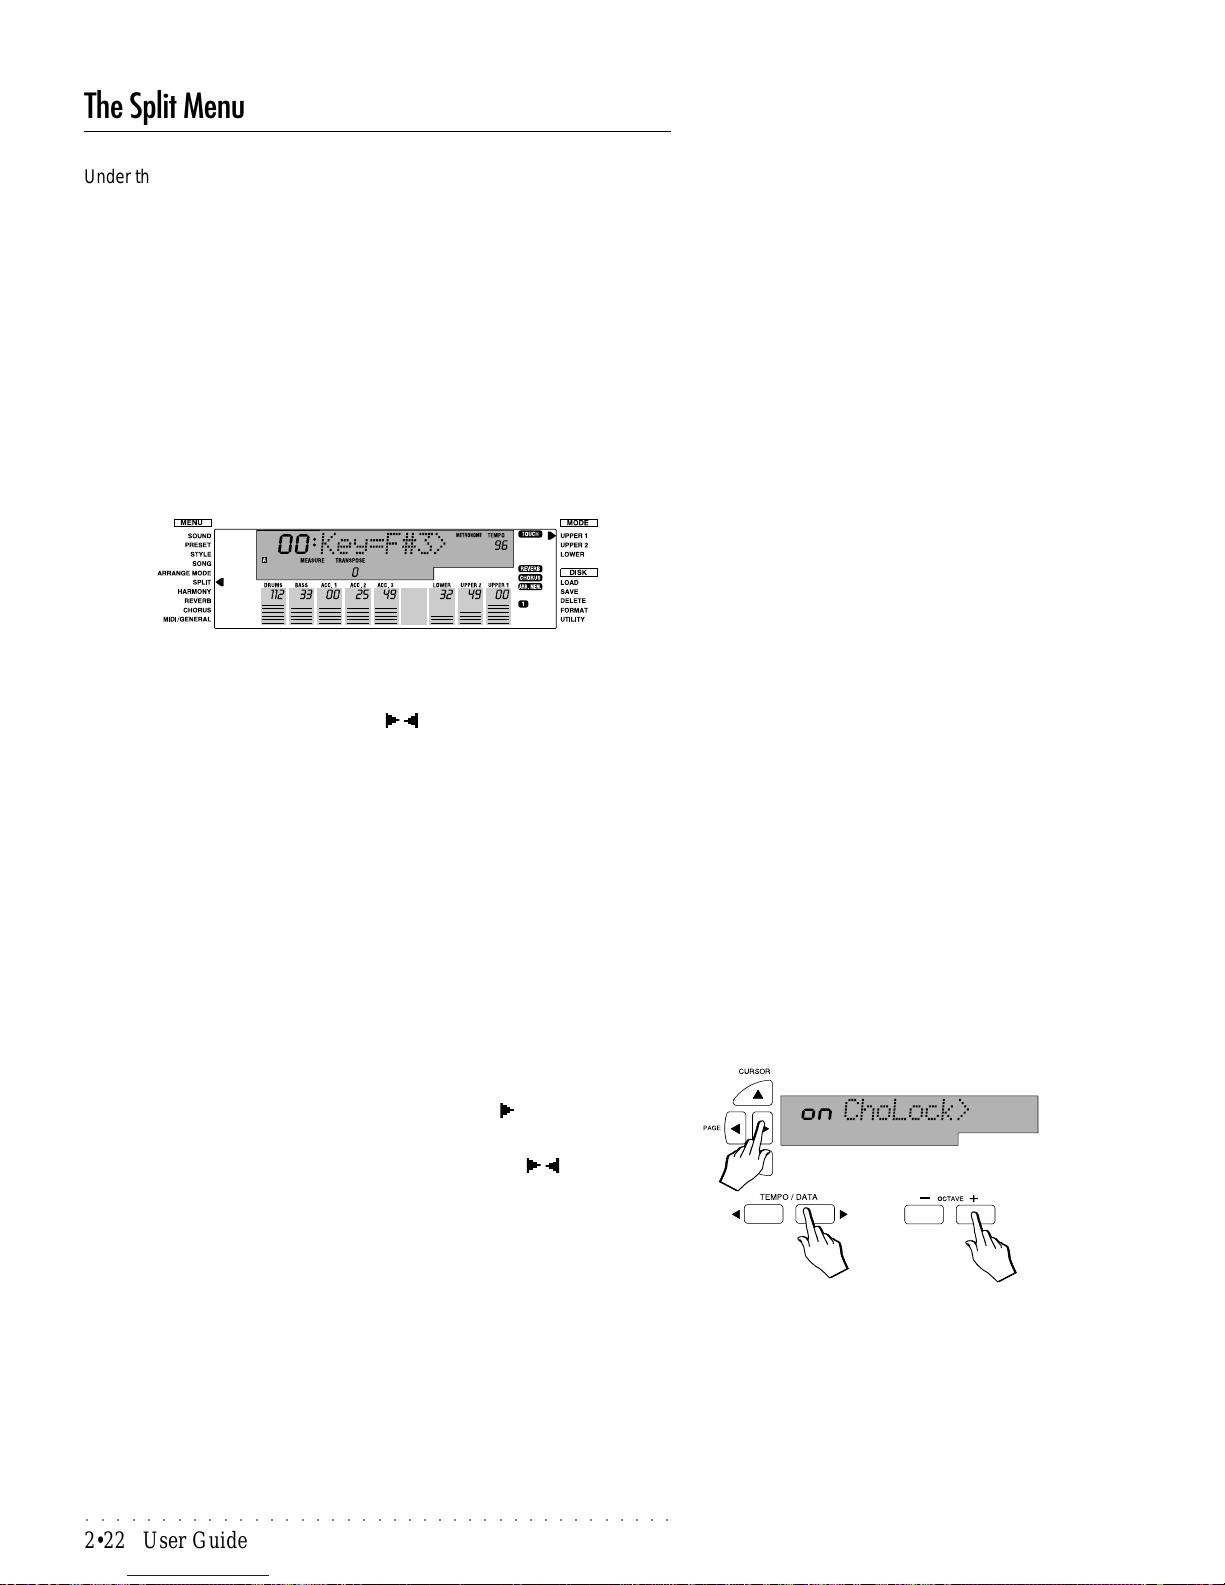
○○○○○○○○○○○○○○○○○○○○○○○○○○○○○○○○○○○○○○○
2•22 User Guide
The Split Menu
Under the SPLIT Menu are three options: Split Point, Chord Lock, DSP Lock.
Split Point
The Split corresponds to the point which divides the keyboard into two parts,
left (lower) and right (upper). The Split point can be set to any note of the
keyboard, allowing you to modify the extension dedicated to the chord recognition, increasing or decreasing the area as required.
By changing the Split point, you automatically modify the extensions of the
LOWER and UPPER keyboard sections.
1. Select the SPLIT menu function by moving the black arrowhead with the
Cursor buttons.
The display shows the current Split Point setting (F#3 default).
2. Select the new Split point by pressing the corresponding note on the
keyboard.
You can also use the TEMPO/DATA / or the Octave +/– buttons.
3. Press ENTER to confirm the new setting.
Pressing Enter exits the Split function and returns to the previous display.
Pressing ESCAPE leaves the function without memorizing the new setting.
The new split point remains in memory after power down, or until a new setting
is programmed. The setting is general for the entire instrument.
Chord Lock (ChoLock)
The Chord Lock function, when active (On), allows you to lock the current chord
notes even after key release, avoiding sudden lapses in the accompaniment
caused by inadvertently touching unwanted notes during a chord change. When
off, whatever notes are pressed even after releasing the keys are recognized
as a chord change. The default setting in ON.
The last Chord Lock On or Off setting remains in memory after power down.
1. Starting from the Split point display, press PAGE once to pass to the
“ChoLock” page.
2. Change the On or Off setting with the TEMPO/DATA / or the Octave
+/– buttons.
ON = Chord Lock enabled. The current chord is locked even after key
release. Pressing other notes does not affect the locked chord.
OFF = Chord Lock disabled. The original chord recognition system is restored. If you press other notes in the lower split area after key release, a
chord will be recognized according to the current recognition setting (one
finger, fingered, free, etc.).
DSP Lock
When the DSP Lock function is set to ON, the last selected Reverb and Chorus
effect remains fixed for all Style, Preset, or Song changes. This is a useful
feature, particularly when singing into a microphone where often a preferred
Page 53
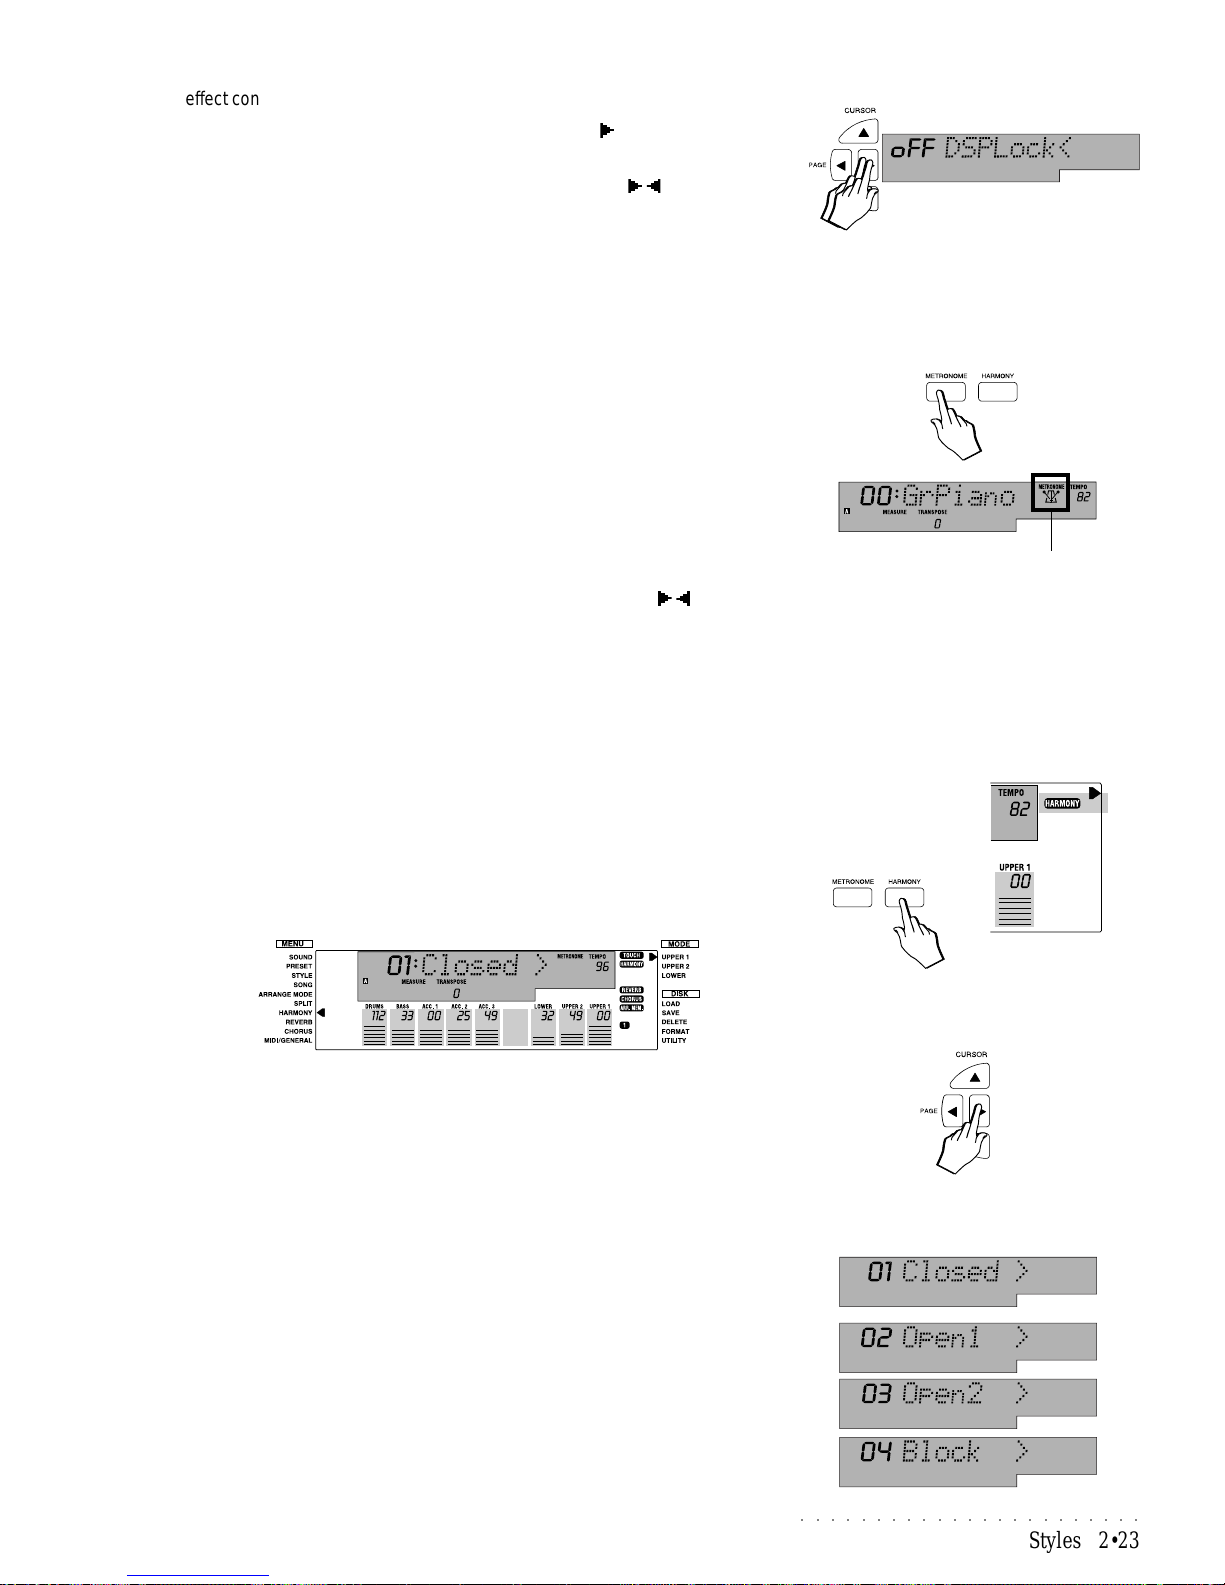
○○○○○○○○○○○○○○○○○○○○○○○
Styles 2•23
effect configuration needs to be maintained for all Preset or Style changes.
1. Starting from the Split point display, press PAGE twice to pass to the
“DSPLock” page.
2. Change the On or Off setting with the TEMPO/DATA
/ or the Octave
+/– buttons..
The default DSPLock setting is OFF.
METRONOME
PS1000 incorporates an independent Metronome which can be activated regardless of the current status of the instrument.
For example, if you want to play the Grand Piano Preset with the metronome,
or you want to practice playing with an acoustic guitar or other instrument, simply press the METRONOME button located on the right of the control panel
(above the REVERB button). The Metronome activates automatically.
If you want to listen to the play back of a Song with the metronome, press the
METRONOME button while the song is in play.
The display will show a Metronome icon to indicate that the metronome is active. The Metronome plays with the sound of “drumsticks”.
The Metronome tempo can be controlled with the Tempo/Data / buttons.
In Song Style Record mode, the Metronome activates automatically. If you
prefer to record without the Metronome, simply deactivate it by pressing the
METRONOME button.
HARMONY
Enables or disables the HARMONY function, a feature which can orchestrate
your playing, making simple one-note melodies sound as if they are being played
by a full orchestra. The corresponding display indicator turns on when HARMONY is active.
By holding down the HARMONY button for about 2 seconds, the display shows
the currently selected Harmony Type.
With the PAGE buttons, you can select the Harmony type that best suits the
kind of music that you are playing. The structure of the automatic harmony is
based on the current Harmony Type setting and operates only when the keyboard is split.
The types of Harmony available are divided into two categories: those that
depend on the note played below the split point, and those that are independent of the note played below the split point.
Harmony types that depend on the notes played below the split point:
Closed : the notes played on the left hand are added to the melody
note exactly as played. The harmonizing chord is a closed
(or tight) position (notes fall within the same octave).
Open 1 : same as close but with an open chord (notes spread over
2 octaves).
Open 2 : similar to Open 1 but with the notes played on the left
hand randomly assigned to the right.
Block : transforms the melody note into a full four or five note
chord, each note in perfect harmony .
METRONOME ICON
Page 54
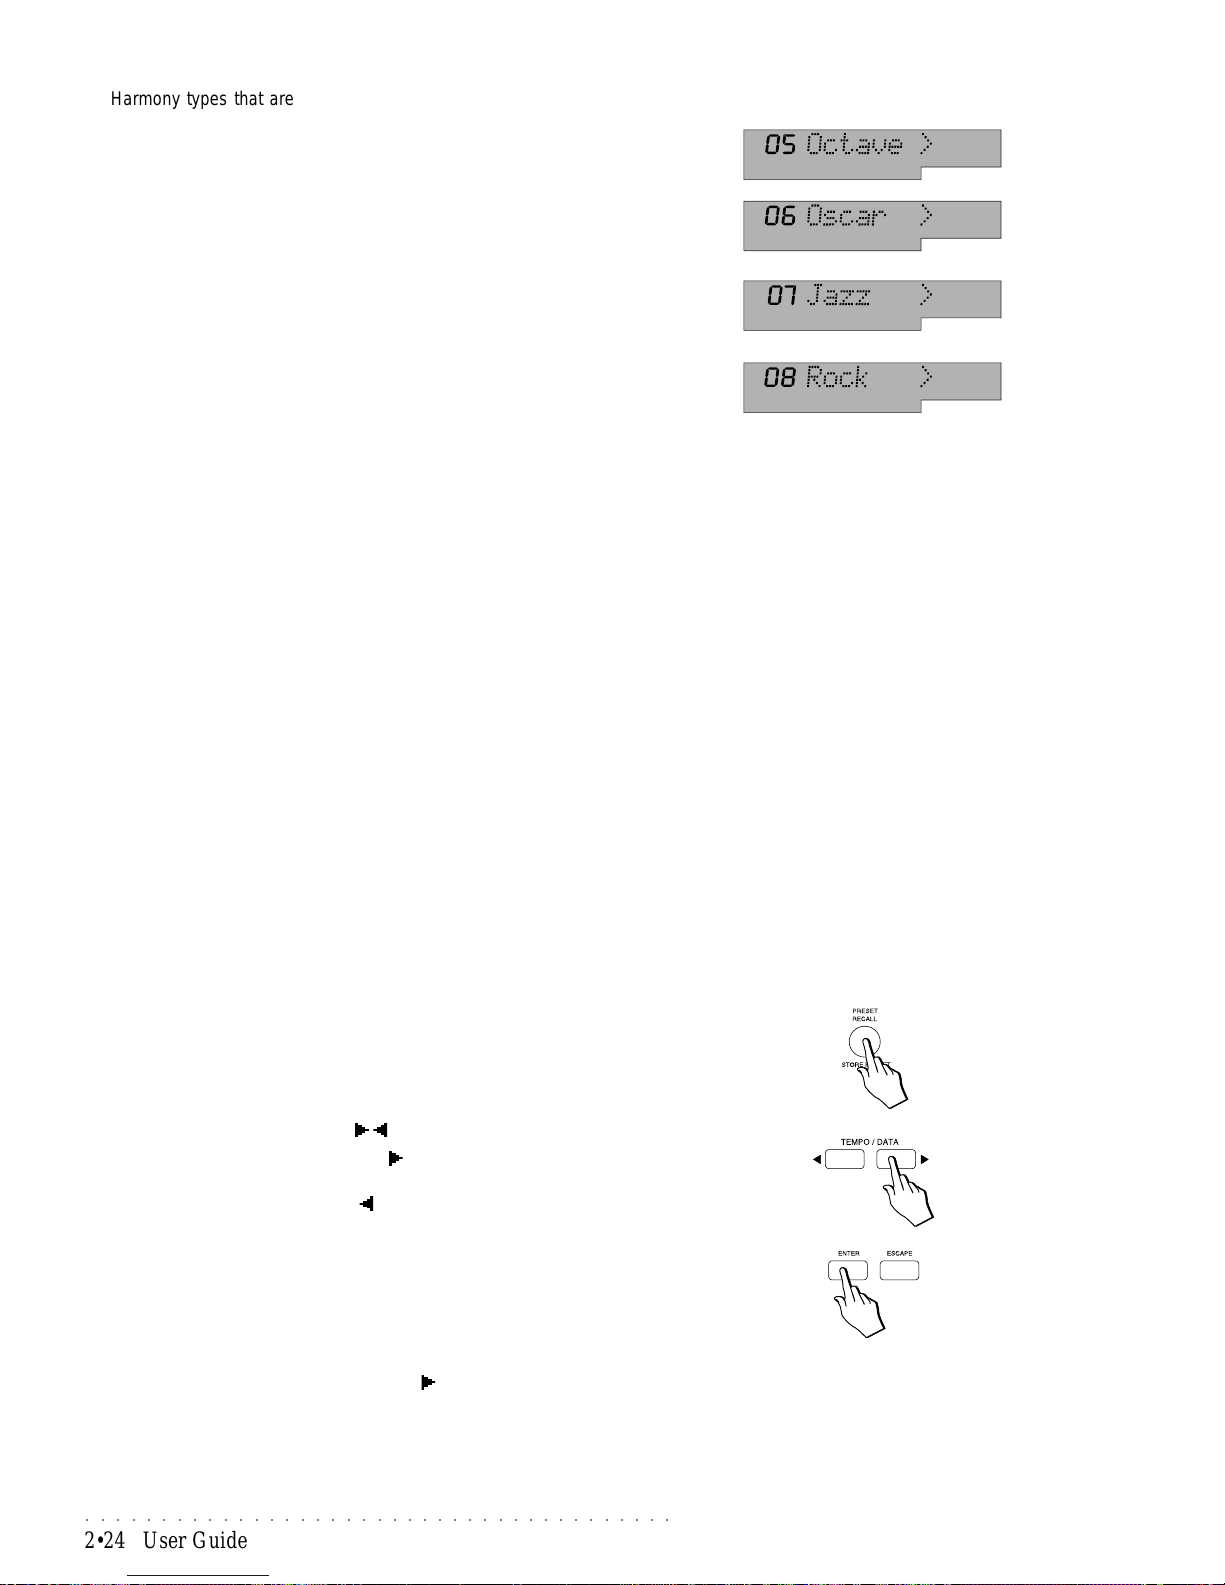
○○○○○○○○○○○○○○○○○○○○○○○○○○○○○○○○○○○○○○○
2•24 User Guide
Harmony types that are independent of the notes played below the split
point:
Octave : doubles the note of the right hand by playing an octave
higher. No left hand chord required.
Oscar : doubles the note of the right hand with a note two octaves
below. No left hand chord required. This structure is based
on the harmony typically used by the jazz musician Oscar
Peterson.
Jazz : adds two notes above the note played by the right hand,
at intervals of a fourth and a minor seventh. No left hand
chord required.
Rock : creates a three note chord consisting of the melody note,
a fifth interval and an octave interval (e.g. C-G-C’). No
left hand chord required.
Memorizing Styles to the 63 Programmable Preset locations (Ram)
Every Programmable Preset can contain a different Style, because the Prog.
Presets are able to memorize the panel configuration. Therefore, the Style,
Variation and Tempo setting selected at the moment of confirming the Store
Preset procedure is memorized to the Preset being saved.
The great advantage of memorizing the Styles to the Preset locations lies in the
fact that you will be able to modify the Style Preset recalled by a ROM Style,
because you cannot save changes to the ROM Style Preset. In addition to this,
by changing the status of the STYLE LOCK button, you will be able to change
Styles and keyboard sounds by selecting Presets with Style Lock off, or maintain the same Style and change keyboard sounds only with Style Lock On.
To make changes to the tracks of the current Style, it is important to remember
to deactivate the SINGLE TOUCH PLA Y button, because the Function buttons
F1 - F9 are required to select the Style tracks. (If Single Touch Play is on, the
Function buttons select the Single Touch Play settings). To modify the Style
track parameters, use the procedure explained in the Preset chapter, on page
2.7, under the title, “Editing the Programmable Presets”.
Memorizing procedure
Once you have modified the Style Preset recalled by the Style, (changed the
Tempo, assigned a different Sound to one a more tracks, edited one or more
Preset track parameters, etc.), you can save the modifications to any of the 63
Programmable Presets using the following method.
1. Press and hold the STORE PRESET button for a few seconds.
A confirmation request (?) appears after the current Preset name.
2. Select the destination Prog. Preset where you wish to save the modified
Style, using the TEMPO/DA TA / or OCTAVE +/– buttons.
If you hold down the TEMPO/DATA button (or OCTAVE + button), you
can scroll through all the 63 Prog. Preset at high speed in increasing numerical order. The Tempo/Data button (or Octave – button) scrolls the
Prog. Presets in reverse numerical order.
3. Once you have selected the desitination Prog. Preset, press ENTER to
confirm the operation.
The new Prog. Preset will take the number of the selected Preset and the
name of the first Preset in memory (G.Piano).
T o change the name, move the left display arrowhead so that it points to the
PRESET menu function, press the P AGE once to activate the name write
function and use the procedure explained on page 1.6 of the Quick Guide,
entitled, “Text Entry”.
Page 55
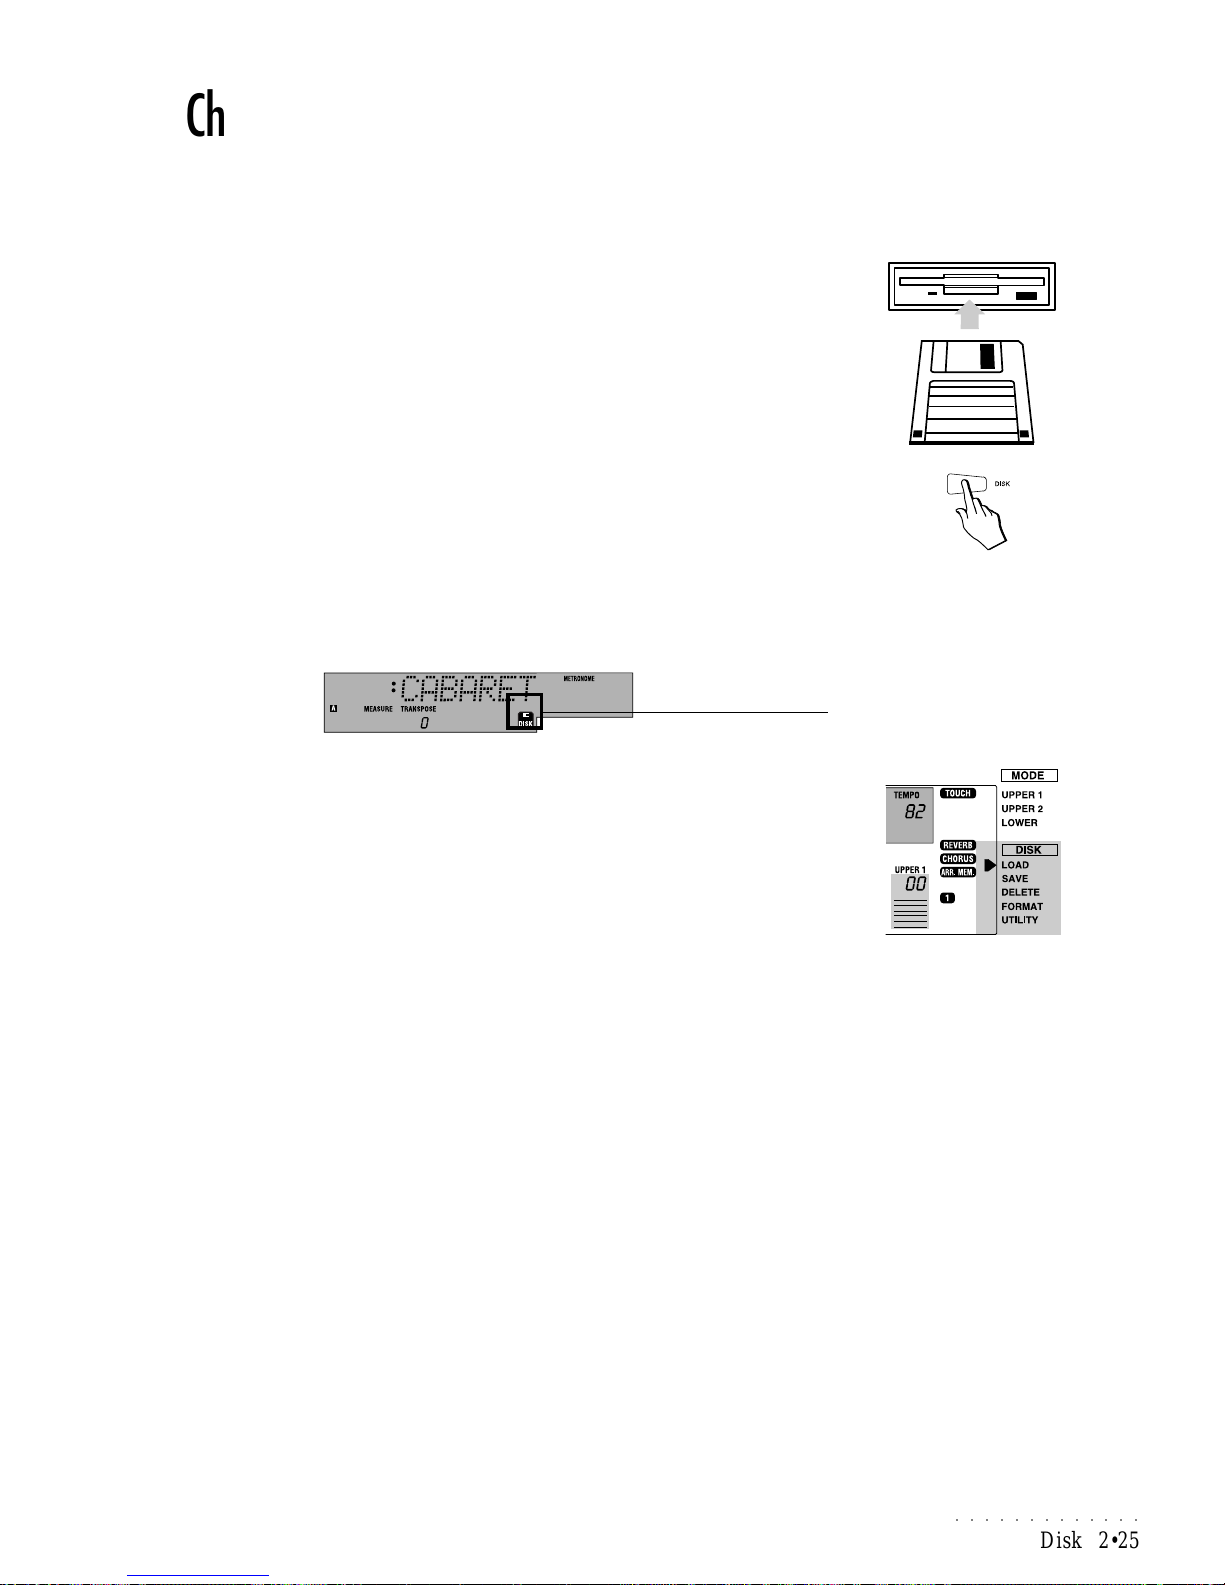
○○○○○○○○○○○○○
Disk 2•25
Ch. 4 • Disk
The PS1000 allows you to work with Floppy Disks which allow you to build
libraries of Sounds, Samples, Presets, Styles, Song Styles and Songs. At any
time, you can load your library data into the PS1000 RAM memory .
If this is the first time you are using Floppy Disks, you are recommended to
refer to the pages at the end of this chapter which discuss disk handling precautions, how to insert and extract disks and other general information.
Floppy Disk
When working with Floppy Disks, insert a disk into the drive and press the Disk
button. The PS1000 can work with MS-DOS formatted disks, either HD, (1.44
MBytes) or DD, (720 KBytes).
The Floppy Disk operations
Any file handling operation concerning the transfer of data to and from the main
memory, or the cancellation of files from Floppy Disks, takes place in the «Disk
mode» pages, entered by pressing the DISK button. Access to a Floppy Disk is
shown in the display by the appearance of a Disk icon.
The principal disk operations are spread across 5 pages:
1. LOAD : Loads data to RAM memory.
2. SAVE : Saves data from RAM memory to Floppy Disk.
3. DELETE : Cancels files from a Floppy disk.
4. FORMAT : Formatting procedure (total cancellation of a Floppy disk).
5. UTILITY : Slow or Fast Loading mode.
The selected disk function is shown by the right display arrowhead which points
to the name of the function.
To escape from DISK mode at any time during a disk operation, press ESCAPE.
Incorporated functions
In addition to the principal functions described above, the Disk/Hard Disk section incorporates three additional functions within the main disk operating structure: Load Mode (Slow/Fast loading), Preload and Play direct from disk.
Load mode
The Load Mode function allows you to choose between two loading speeds:
Slow (off) or Fast (on).
The Slow Load setting (default) allows you to load disk-based data in background (Preload) without temporarily disabling the panel controls during loading operations.
The Fast Load setting (on) allows faster loading times but does not permit background loading; the panel control are unavailable during fast load procedures.
The Load Mode option is found under the UTILITY Disk menu and is explained
further ahead in the manual.
Note: the Delete procedure operates on Diskbased files only, not on RAM memory.
DISK ICON
Page 56
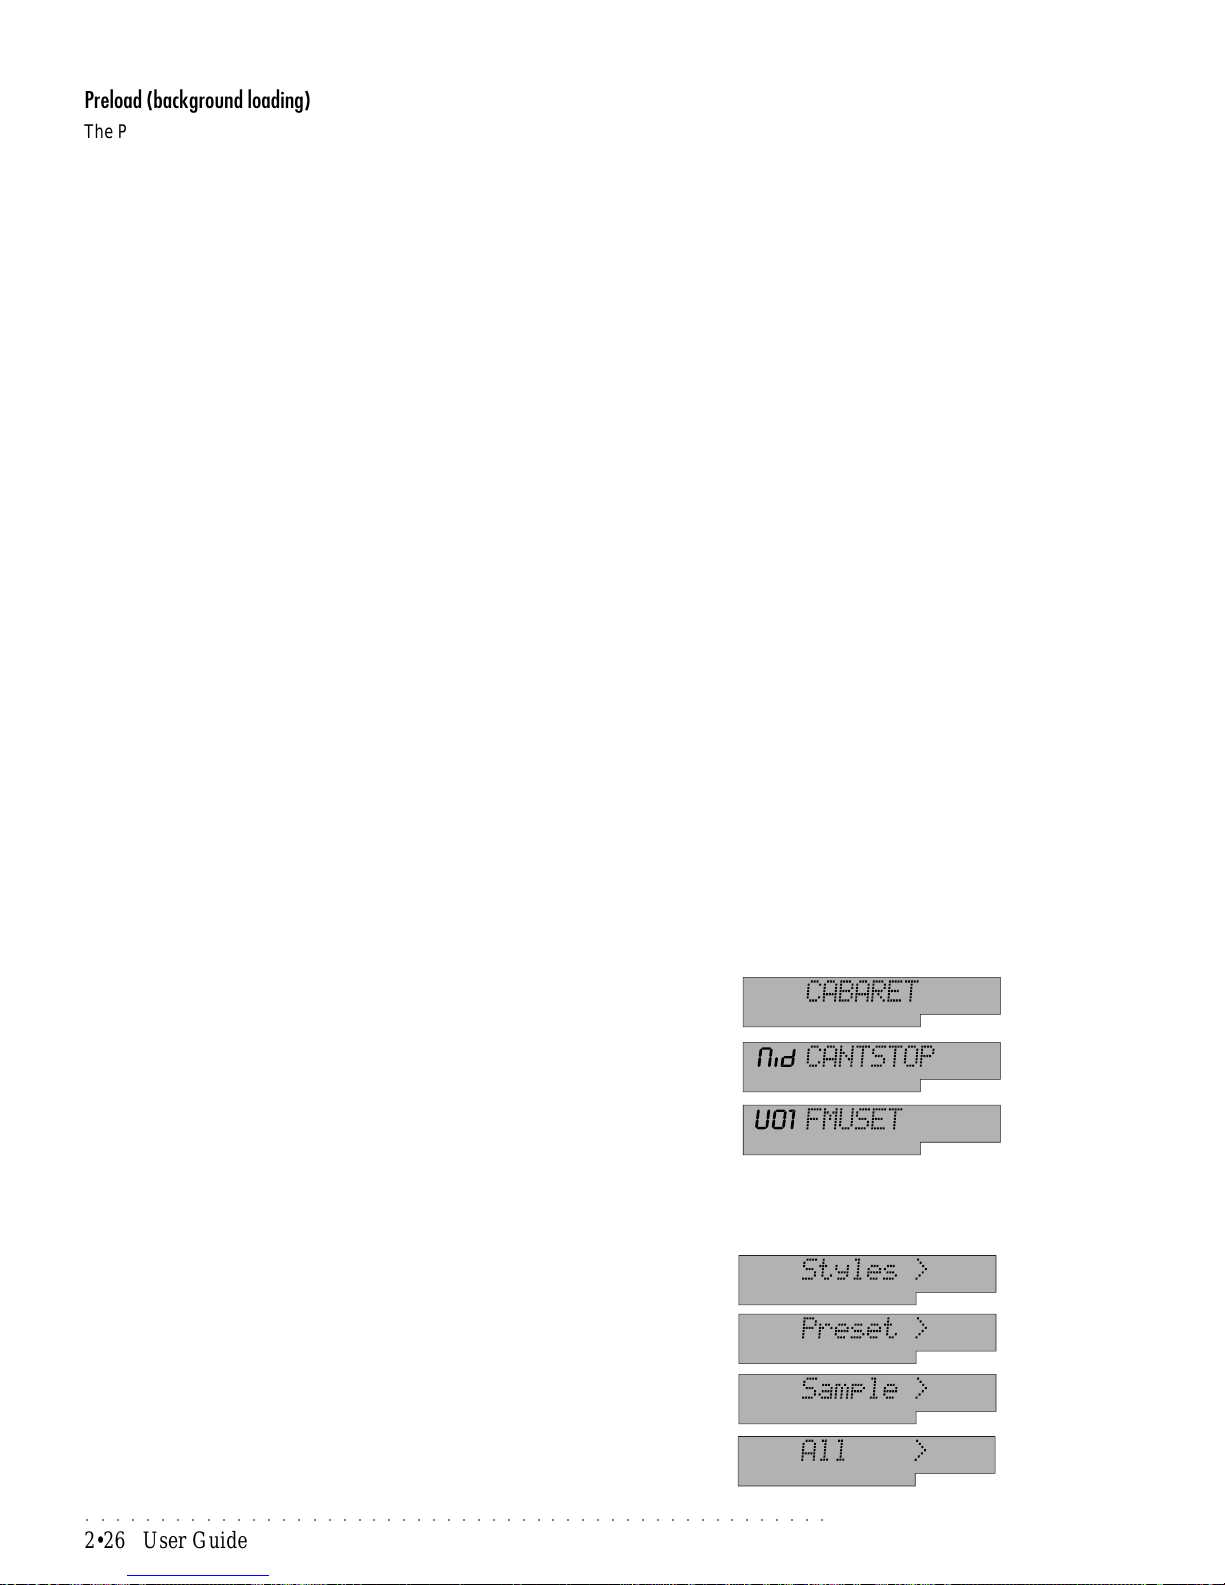
○○○○○○○○○○○○○○○○○○○○○○○○○○○○○○○○○○○○○○○○○○○○○○○○○○
2•26 User Guide
Preload (background loading)
The Preload operation loads Disk based data to the PS1000 memory while the
sequencer is playing without stopping it. The Preload method loads to the first
available free destination and works when the Load Mode is set to Off (Slow),
or when the sequencer is in Play.
Play direct from Disk
This function allows you to play a Song or MidiFile directly from a Floppy Disk
without loading the data to RAM memory , useful for Songs or MidiFiles that are
larger than the available space in the instrument’s memory.
The “Play All Songs” button plays all Songs or Midi Files present on Disk (see
the Songs chapter for further explanations).
About Files
Data is stored on Floppy disks in the form of
Files
. Files can be Songs, Song
Styles, Presets, User Styles and Samples. As well as its own file format, the
PS1000 can work with other Generalmusic file formats, such as GMX, WK, PK,
CD and non-Generalmusic formats such as Midi Files and Atari ST/Falcon.
PS1000 cannot work with non-Generalmusic files other than MIDI files stored
on Ms-Dos disks. The PS1000 will not recognize a disk of a format from another manufacturer.
Recognizing File types
File types are identified by a name (which appears in the 8 digit display area)
and an extension (shown in the 3 digit display area). In some cases, such as
User Styles, or Song files of the WK or PK format, only a name is shown with no
extension. In a Floppy disk, the file types available for selection are: SONG,
MIDIFILE, STYLE, STYLES, PRESET and SAMPLE. Also available is the ALL
option which allows you to load all the data present on disk to the instrument’s
memory.
Handling single files
If you choose one of the file types SONG, MIDI FILE or STYLE, you will be able
to handle (load, save or delete) a single file belonging to the type selected.
SONG: a SONG of the PS and WK format shows a name with no
extension.
MIDI F: a MIDI FILE shows the ‘Mid’ extension in the 3 digit dis-
play and a name in the 8 digit display.
STYLE: a USER STYLE shows an extension in the 3 digit display
corresponding to the User Style number: “U01, U02, etc.
up to U08 and a name in the 8 digit display.
Handling entire sections of files
If you choose one of the file types STYLES, PRESET , SAMPLE or ALL, you will
be not able to handle single files, but entire groups belonging to the type selected, or all the data on disk or in RAM memory (All).
STYLES: an entire group of User Styles (8);
PRESET: all 7 groups of the Prog. Presets (63) and 16 User Pre-
sets (User Sound 1 and User Sound 2);
SAMPLE: an entire group of Samples (the Sample-RAM memory
data);
ALL: all files housed in RAM memory (Presets, User Styles,
Song Styles, Songs, Samples).
NOTE: Access to the Floppy Disk is not permitted during a “Direct from Disk” playback
operation.
Page 57
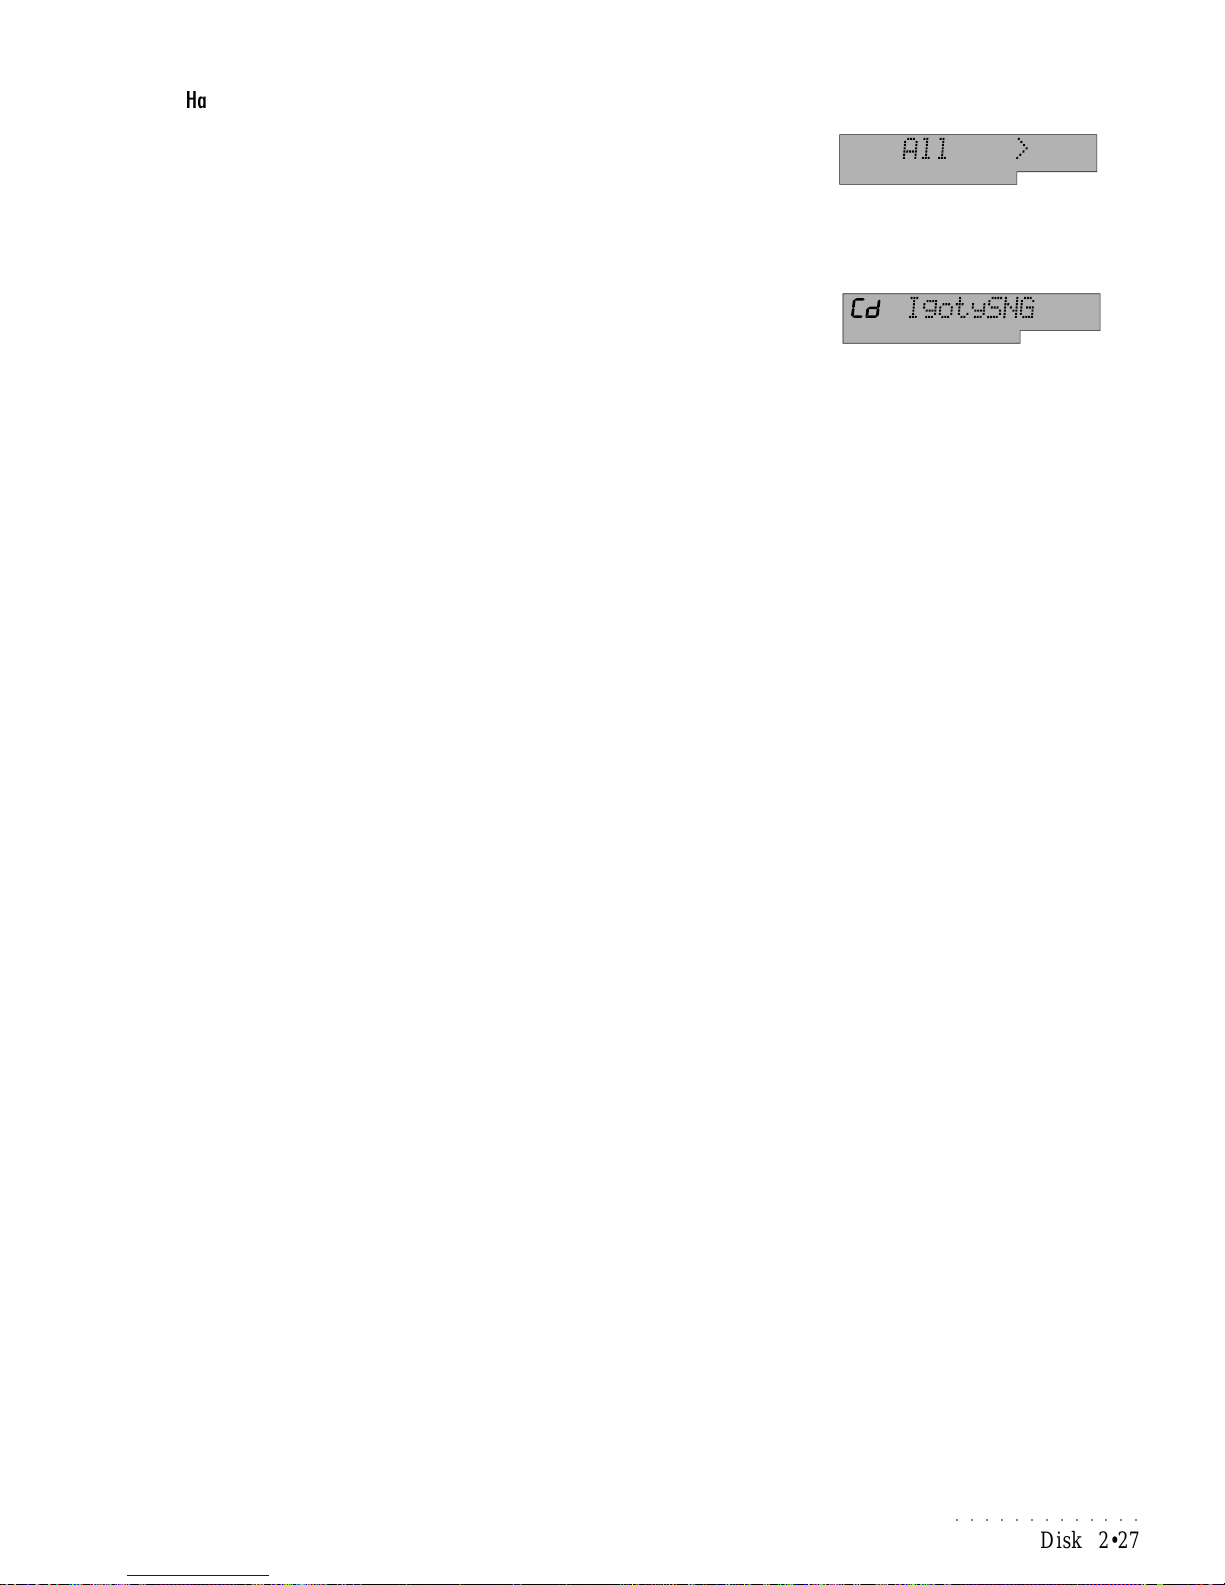
○○○○○○○○○○○○○
Disk 2•27
Handling Song Styles
Song Styles can be loaded into memory using the “Load All” procedure, saved
to disk using the “Save All” procedure and deleted from disk using the “Delete
All” procedure. This file type uses various different sections of the instrument
at the same time. Song Styles cannot be played back using the Direct From
Disk method.
Handling CD Series files
PS1000 is compatible with previous series CD SONG, STYLE and SAMPLE
files, but not CD SONG STYLES. For CD files, the 3 digit display area shows
the extension ‘Cd’, while the 8 digit display area shows the file name with one of
the three possible extensions: SNG, STY, SMP.
Handling MIDI files
A Standard MIDI File (MIDI F) is a storage format created to maintain data
compatibility among different devices complying with the Standard MIDI File
format. This format allows Songs to be exchanged between different instruments and computers. If a Song is saved as a MIDI file on an MS-DOS disk,
you can be certain that all the most recent generation of instruments and any
computers will be able to load and read that Song.
PS1000 reads format 0 and 1 MIDI files, and saves MIDI files in format 0.
General MIDI (GM)
General MIDI stipulates common standards regarding the listing of sounds,
Program Change numbers for sound selection, the percussive sound configuration in the Drumkits, the assignment of MIDI channel 10 to the drumkit track,
a minimum polyphony (24) and a maximum number of tracks (16). To facilitate
compatibility between different makes of instruments, MIDI files should be in
General MIDI standard, a common platform for sounds and the way they are
selected. In the PS1000, Sound Bank 1 and Drumkit Bank 2 are fully GM
compatible. PS1000 recognizes GM compatible MIDI Files thanks to a “Flag”
in the MIDI File (General MIDI ON). If this message is not detected, non-drumkit
sounds may be assigned to MIDI channel 10. To ensure correct loading of GM
compatible MIDI files that do not contain the “General MIDI ON” flag, the General MIDI parameter is set by default to ON under the “MIDI/GENERAL” menu
function.
GMX format
GMX is the manufacturer’s own standard set of sounds which are included in
every product. The first bank, Bank 1, of the PS1000 contains the industry
standard General MIDI sound library. The second and third Banks (2 & 3)
contain 256 sounds taken from Generalmusic’s own extensive sound library,
including the Drumkits.
FORMAT 0: all the tracks are mixed onto a
single track.
FORMAT 1: all the tracks remain separate
(multi-track).
Note: WK4/6/8 and PS2500 Songs disks
saved as MIDI Files are recognized only if the
WK Series data conforms to the GMX format,
a General MIDI extension exclusive to the
manufacturer which renders the first three
banks of all WK and PS Series units fully compatible.
Page 58
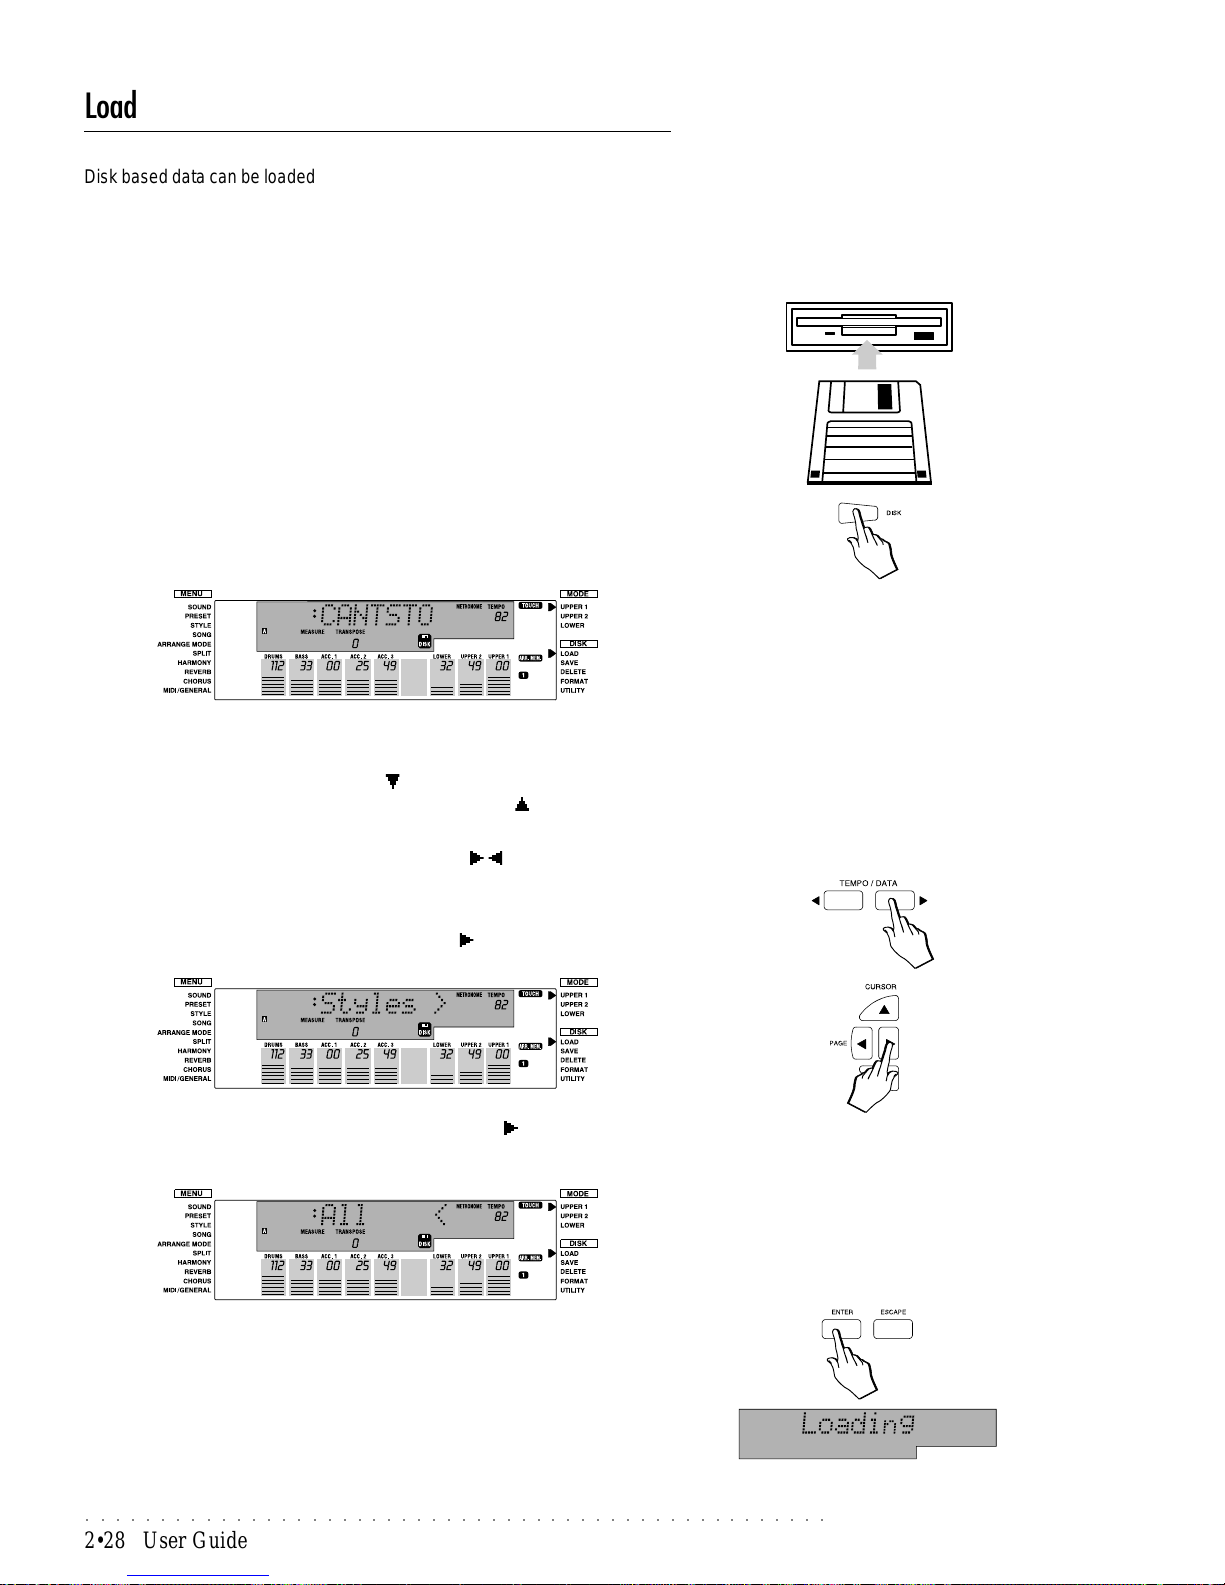
○○○○○○○○○○○○○○○○○○○○○○○○○○○○○○○○○○○○○○○○○○○○○○○○○○
2•28 User Guide
Load
Disk based data can be loaded into the PS1000 RAM memory using one of the
following methods:
• as single elements (Load Song, Load Style, Load MidiFile);
• as a set of files corresponding to Groups (Load Styles, Load Presets [7 Pro-
grammable Preset Groups + 2 User Sound Preset Groups], Load Samples);
• all the data contained in the disk previously loaded with the ALL procedure.
The PS, WK and PK Songs and MidiFiles can be played directly from disk
without loading the data to memory beforehand.
Load procedure
1. Insert the Floppy disk into the disk drive.
2. Press the DISK button.
The right display arrowhead is shown next to the LOAD function and a disk
icon will appear in the display.
The 8 digit display shows the name of the first file available on disk.
The load mode setting will be set by default to the slow mode (off), but you
can at this point choose to select the fast load mode (on) by selecting the
UTILITY function with the CURSOR button, seting the Load Mode to On
then returning to the LOAD menu with the CURSOR button. When the
Fast mode is set, the disk icon flashes.
3. Select the desired file with the TEMPO/DATA / buttons.
The Tempo/Data buttons select single elements (Song, Style, Midi File) as
well as the Preset and Sample file types.
4. To load the Styles file type, press the PAGE button.
5. To load all the files present on disk, press PAGE again to select the
ALL option.
6. Press ENTER.
The drive starts running and the message “Loading” flashes on the display
while the file is being loaded. When finished, the message disappears. The
file loads to the first available location in memory .
Clearly, the loading times differ from file to file and the loading times increase when you load file groups (Presets, Samples, User Styles). These
types of file are best loaded in background.
Note : If, at this point, you press PLAY/STOP,
ST ART/STOP or PLAY ALL SONGS, the Song/
MidiFile (or Songs/Midi Files) will start to play
directly from the floppy disk.
Page 59
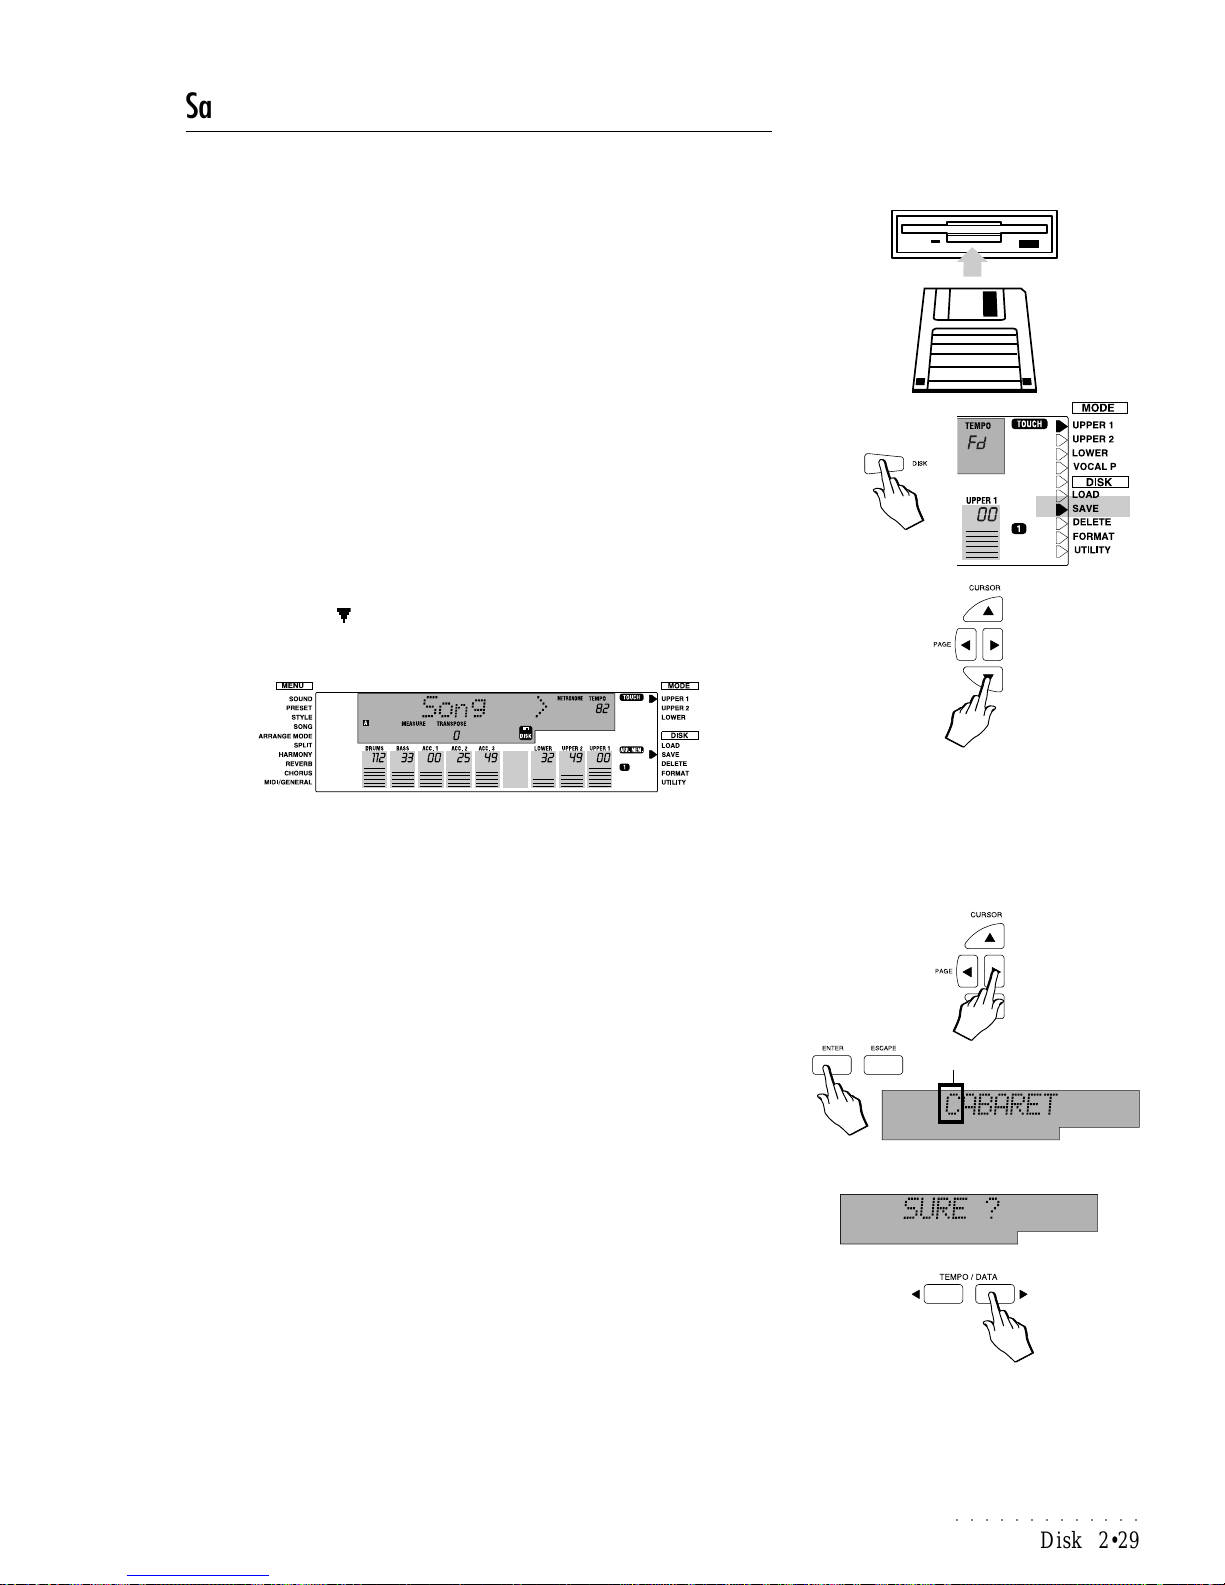
○○○○○○○○○○○○○
Disk 2•29
Save
PS1000 data can be saved using one of the following methods:
• as single elements: Song, Style (User), MidiFile;
• as a set of files corresponding to Groups: Styles (User), Presets (7 Programmable Preset Groups + 2 User Sound Preset Groups), Sample (entire
contents of the Sample RAM memory);
• all the data present in RAM memory (including Song Styles) using the ALL
option.
In order to save a single element, you can choose to save with the same name,
or specify a different one. To save Presets, Samples, Styles and all RAM memory
data (All), a name is not required.
Save procedure
1. Have newly formatted disk or a used disk ready , insert it in the drive and
press the DISK button.
The disk icon appears in the display as an indication that you are in Disk
mode.
2. Move the right display arrowhead next to the SAVE disk menu function
with the Cursor button.
The Song file type is shown in the display.
If the disk drive contains an unformatted disk, pressing SAVE prompts the
message “UNFORMAT”. Format the Disk and proceed.
If the disk is protected, pressing SAVE prompts the message, “PROTECTED”. Remove the protection and proceed.
If the disk is damaged, pressing SA VE prompts the message “CORRUPTED”.
Use a new or used disk and proceed.
3. Use the PAGE buttons to select a file type that you wish to save (Song,
Midi File, Style, Styles, Presets, Sample).
To save all the Ram data to disk, select the ALL option.
4. After selecting the file type, press ENTER.
If you select the Song, Midi F, or Style file type, the name of the single
element contained in RAM memory is displayed with the first letter flashing
(our example in the margin on the right shows a Song file). In this case,
proceed to the next step (5).
If you select the Styles, Preset or Sample file type or the ALL option, the
display shows the message “SURE?” as a confirmation request. In this
case, go directly to step 8.
5. If you are saving a single file, use the TEMPO/DATA buttons to scroll
through the files until you find that one that you want to save.
The first letter of the file name will continue to flash.
If you want to write a different name for the file, use the keys of the
keyboard to enter characters and the Tempo/Data buttons to move the
flashing cursor. (See “Text Entry” on page 1.6 of the Quick Guide).
If you want to save with the same name, proceed to the next step.
FLASHING
If a disk of an unknown format, such as Macintosh, is inserted in the drive, pressing DISK
prompts the message *
* * * * * * * *
. Change
to a recognized format disk and proceed.
Page 60
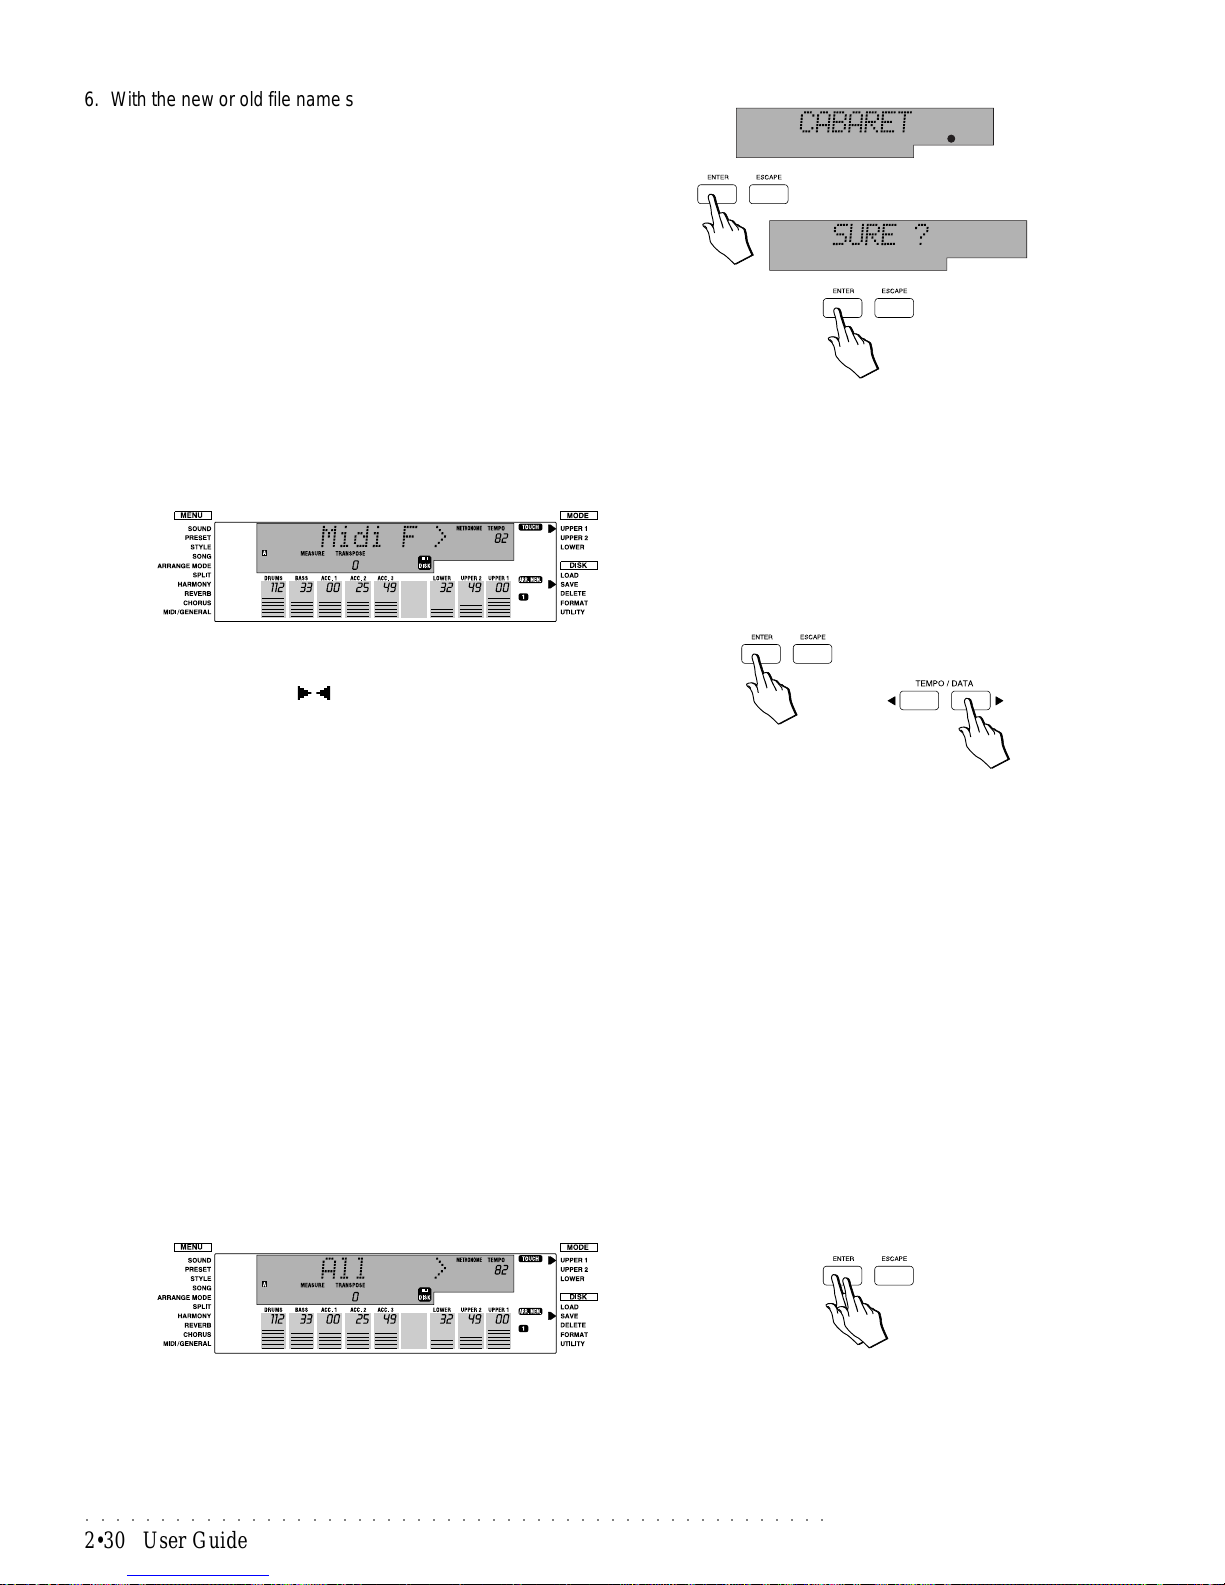
○○○○○○○○○○○○○○○○○○○○○○○○○○○○○○○○○○○○○○○○○○○○○○○○○○
2•30 User Guide
6. With the new or old file name showing, press ENTER.
A small flashing black circle appears to indicate that the file is ready to be
saved to disk. (At this point, it is still possible to change the name).
7. Press ENTER again.
The display shows the message SURE?
If the disk you are saving to contains a file with the same name, the display
will show the message, OverWrt?. If necessary, write a different name to
avoid overwriting the existing file with the same name.
8. Press ENTER to save the file to disk.
Saving MIDI Files
If you want your Songs to play on instruments of other manufacturers, or on
computers, you must save them as MIDI Files on disk (Ms-Dos or Atari format).
PS1000 saves Format 0 MIDI Files.
1. When saving a PS Song as a MIDI File, select the “Midi F” file type.
2. Press ENTER to gain access.
3. Use the TEMPO/DAT A / buttons to select the Song that you wish to
save as a MIDI File then proceed as explained in steps 6, 7 and 8 above.
Whether or not you use the same name, it will be saved as a MIDI file and
the “.MID” extension will be added to the name automatically .
To save General MIDI (GM) compatible MIDI Files, the General MIDI parameter should be set to ON (this parameter is ON by default; if you think
you have changes the status of this parameter, refer to the MIDI/GENERAL
chapter). Preset track parameters are converted to the corresponding MIDI
controllers (Bank Select MSB and LSB, Program Change, Volume, Pan,
Control Change 91 and 93 for the Effects).
If the original Song also contains a Lyrics track, this is converted into Lyric
events, and the resulting file takes the form of a Karaoke MidiFile.
All PS1000 Songs saved as MIDI Files conform to the GMX format, to maintain compatibility with all instruments of the PS, WK and SK Series instruments having an on-board Disk Drive.
Saving Song Styles
If you want to save Song Styles, you can only use the Save All command because Song Styles utilizes several different sections of the instrument at the
same time.
1. When saving Song Styles, select the “All” command.
2. Press ENTER twice to save the Song Style (and all other RAM memory
data) to disk.
Song Styles cannot be saved as Midi Files.
Page 61
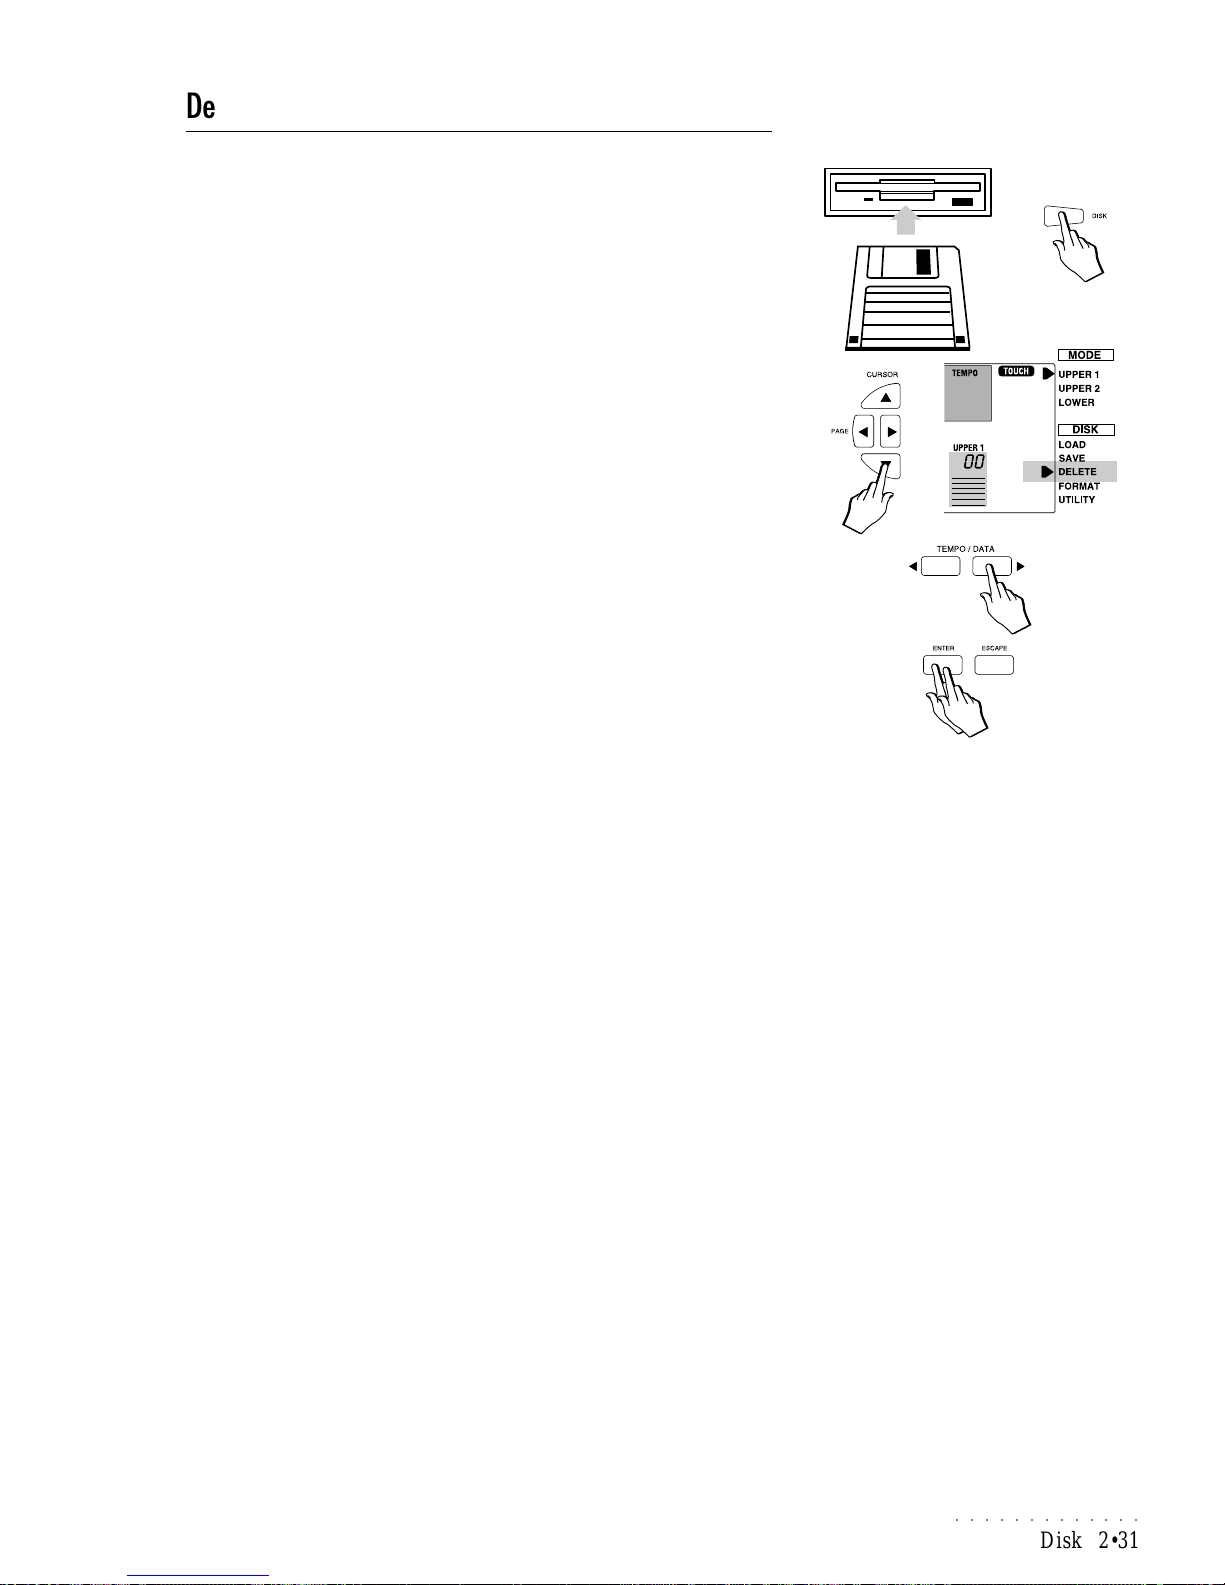
○○○○○○○○○○○○○
Disk 2•31
Delete
The Delete function allows the cancellation of a single file from a Floppy disk.
Delete file procedure
1. Insert the floppy disk containing the file to erase into the drive and press
the DISK button.
2. Move the right display arrowhead next to the DELETE disk menu function with the CURSOR down button.
3. Use the TEMPO/DAT A buttons to select the name of the file you wish to
cancel.
4. Press ENTER twice to cancel the file.
After a short period, the file on disk is cancelled.
Page 62
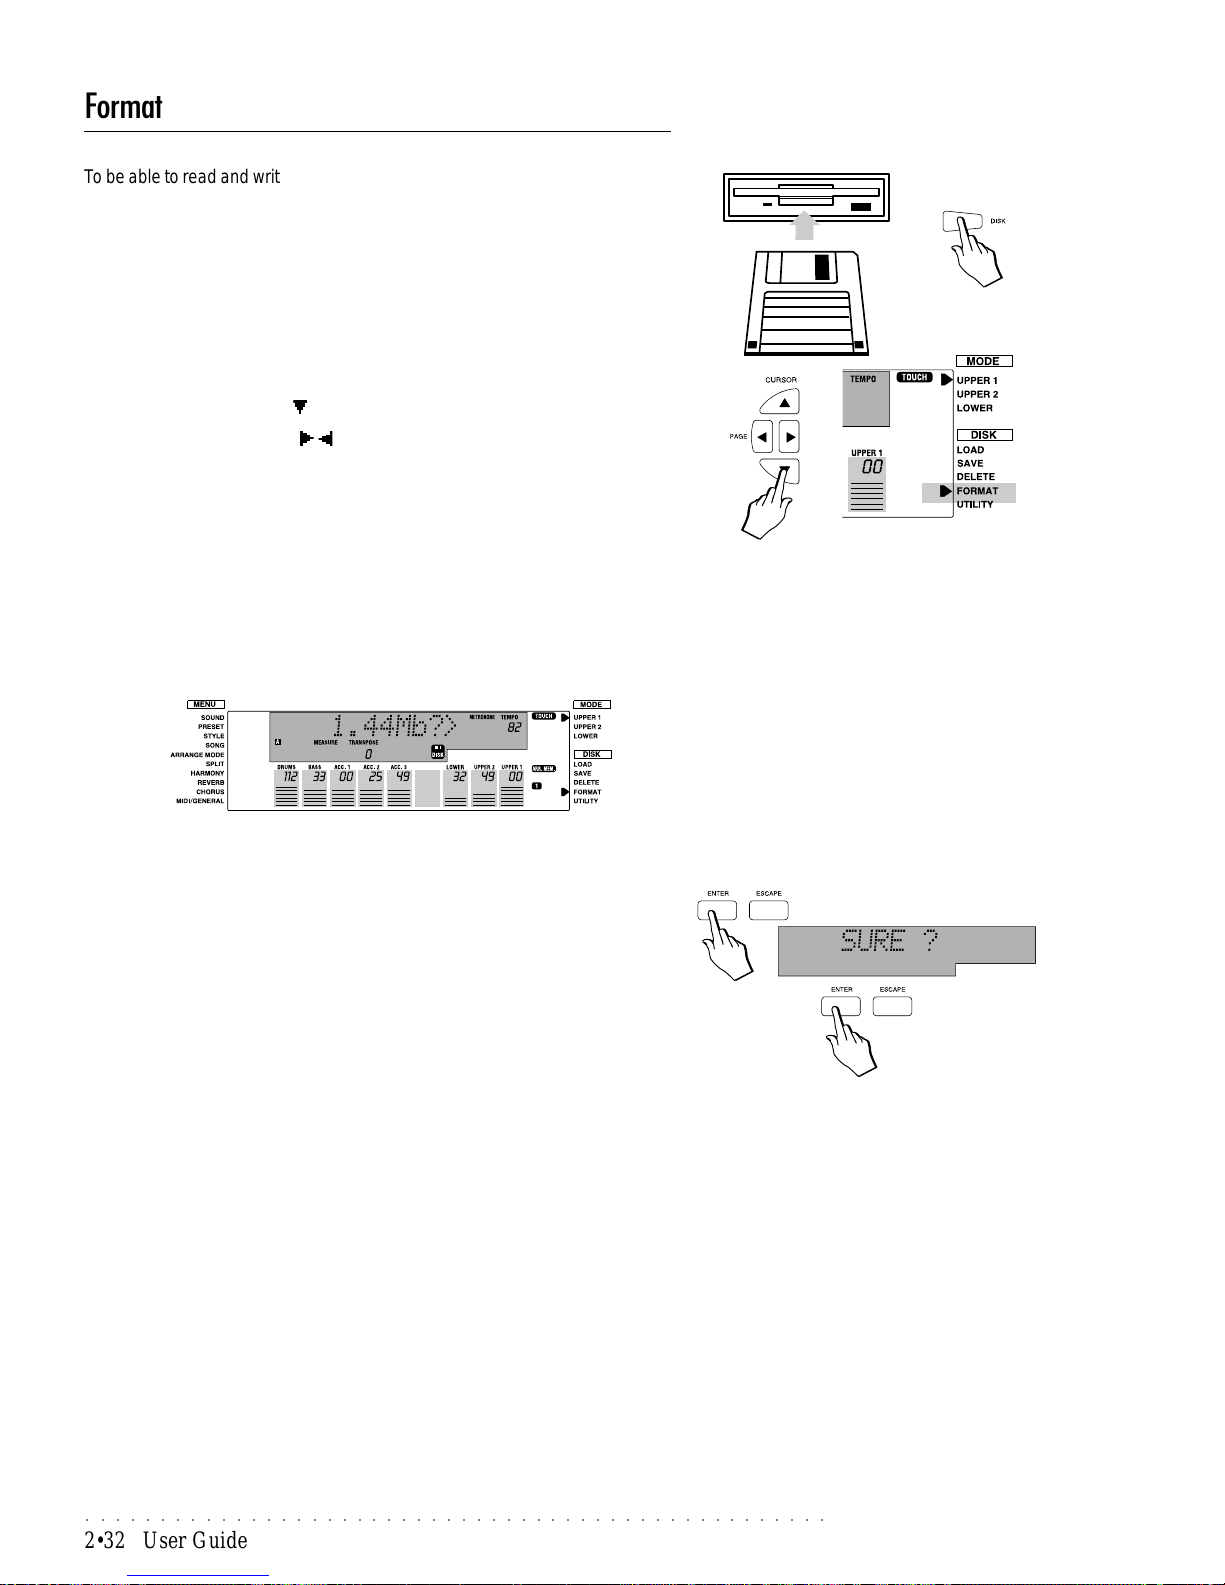
○○○○○○○○○○○○○○○○○○○○○○○○○○○○○○○○○○○○○○○○○○○○○○○○○○
2•32 User Guide
Format
T o be able to read and write data to disks, they must be of a format that PS1000
can recognize. If you try to use a disk of an incompatible format, the drive
prompts an appropriate message inviting you to retry with another disk.
Disk format procedure
1. Insert the floppy disk that you wish to format into the drive and press the
DISK button.
2. Move the right display arrowhead next to the FORMAT disk menu function with the CURSOR down button.
3. Use the TEMPO/DATA
/ buttons to select the format procedure re-
quired.
Two formatting operations are available.
Format 1.44 Mb
This operation formats a 3.5” HD floppy disk for PS1000 use with a capacity
of 1.44 Megabytes. The format is completely compatible with the standard
MS-DOS format to permit the exchange of files with the WK and PK Series
instruments, computers running MS-DOS, Windows, OS/2, Macintosh and
some models of Atari and Amiga.
Format 720 Kb
This operation formats a 3.5” DD floppy disk in MS-DOS/Atari ST format
(capacity 720 kilobytes).
4. Press ENTER.
The display shows the message “Sure?”.
5. Press ENTER again to start the formatting procedure.
If you press ESCAPE, the formatting process is cancelled.
Note: The formatting process can be carried
out regardless of the current mode. For example, you can format a disk while you are
playing a Style.
Page 63
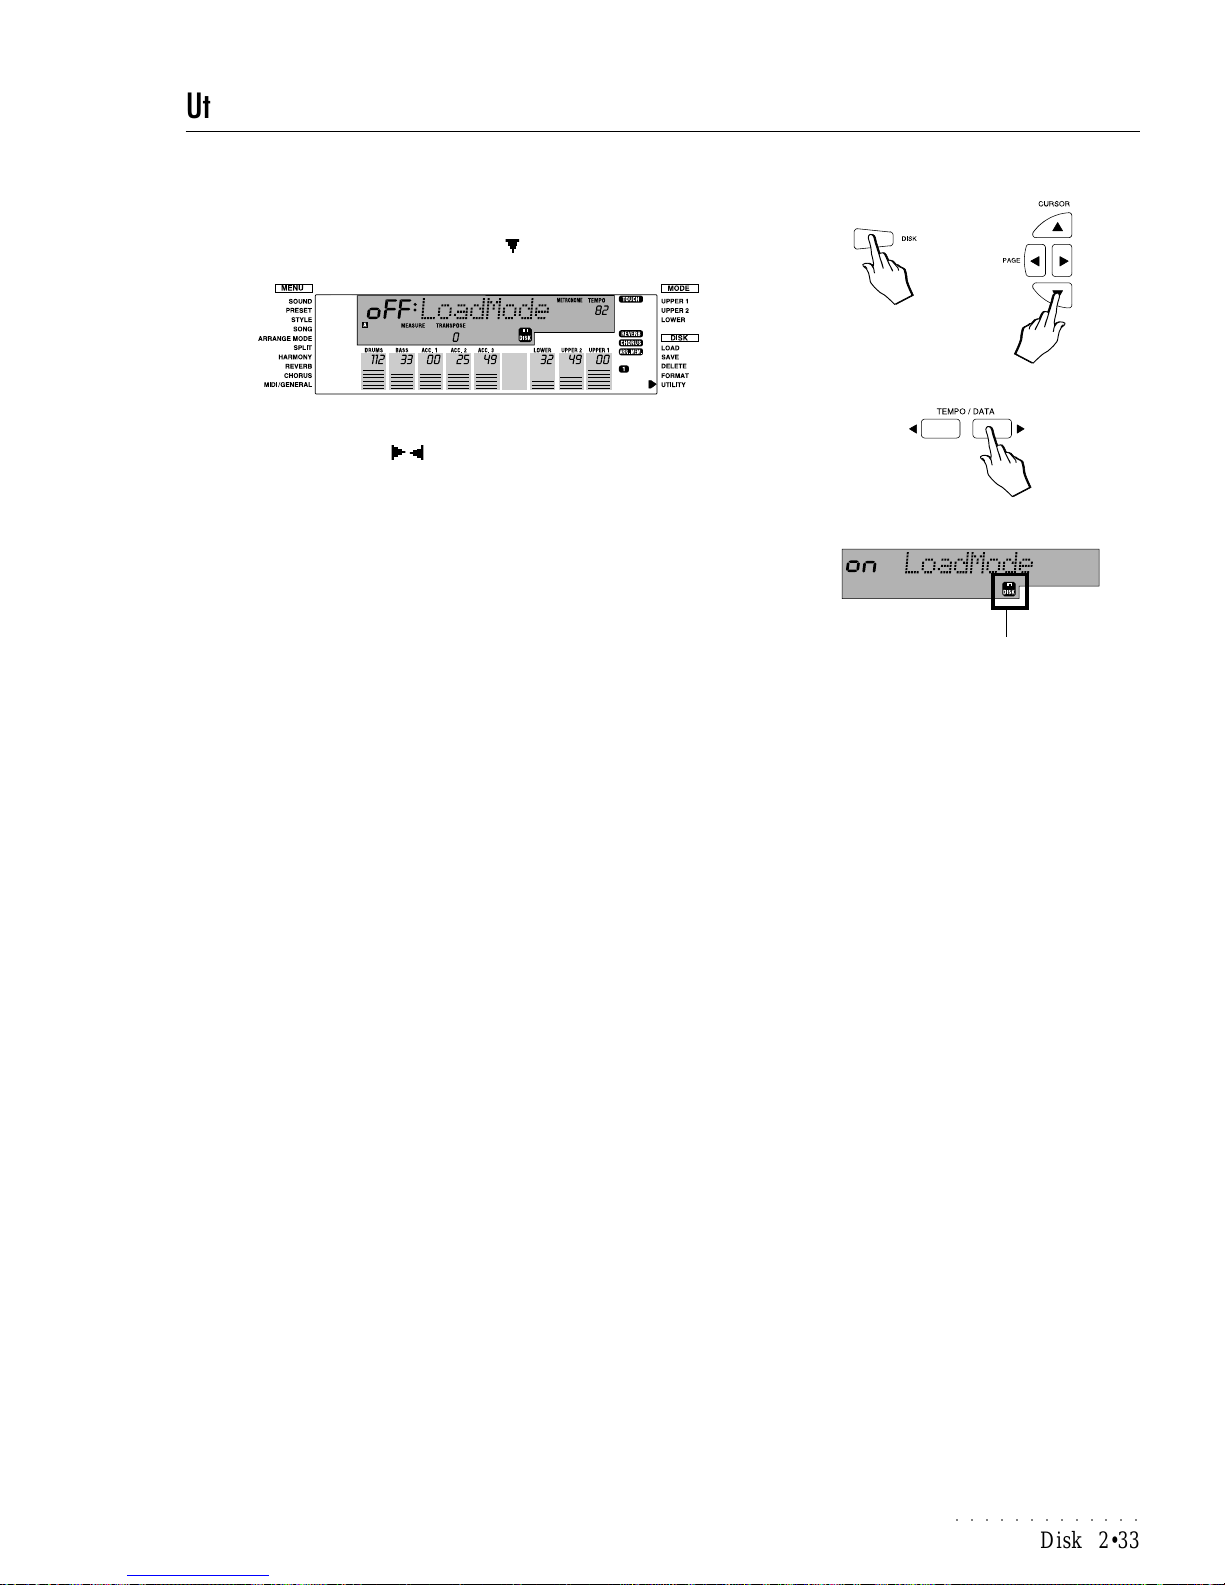
○○○○○○○○○○○○○
Disk 2•33
Utility
The Utility page contains the LOAD MODE option which provides 2 data loading speeds: SLOW and FAST.
1. After pressing the DISK button, move the right display arrowhead next to
the UTILITY function with the Cursor button.
2. Use the TEMPO/DA T A / buttons (or the Octave +/– buttons) to change
the LoadMode setting.
When Off, the Load Mode corresponds to the Slow speed which allows
background loading. In this mode, the disk icon on the display is shown as
a fixed image.
When On, the Load Mode corresponds to the Fast speed which reduces the
loading times. However, this option temporarily disables the panel controls
until the data has been loaded to memory . In this mode, the disk icon on the
display is shown flashing.
DISK ICON FLASHING
Note: The F AST option (LoadMode=On) cannot be selected if the Sequencer is in play.
Page 64
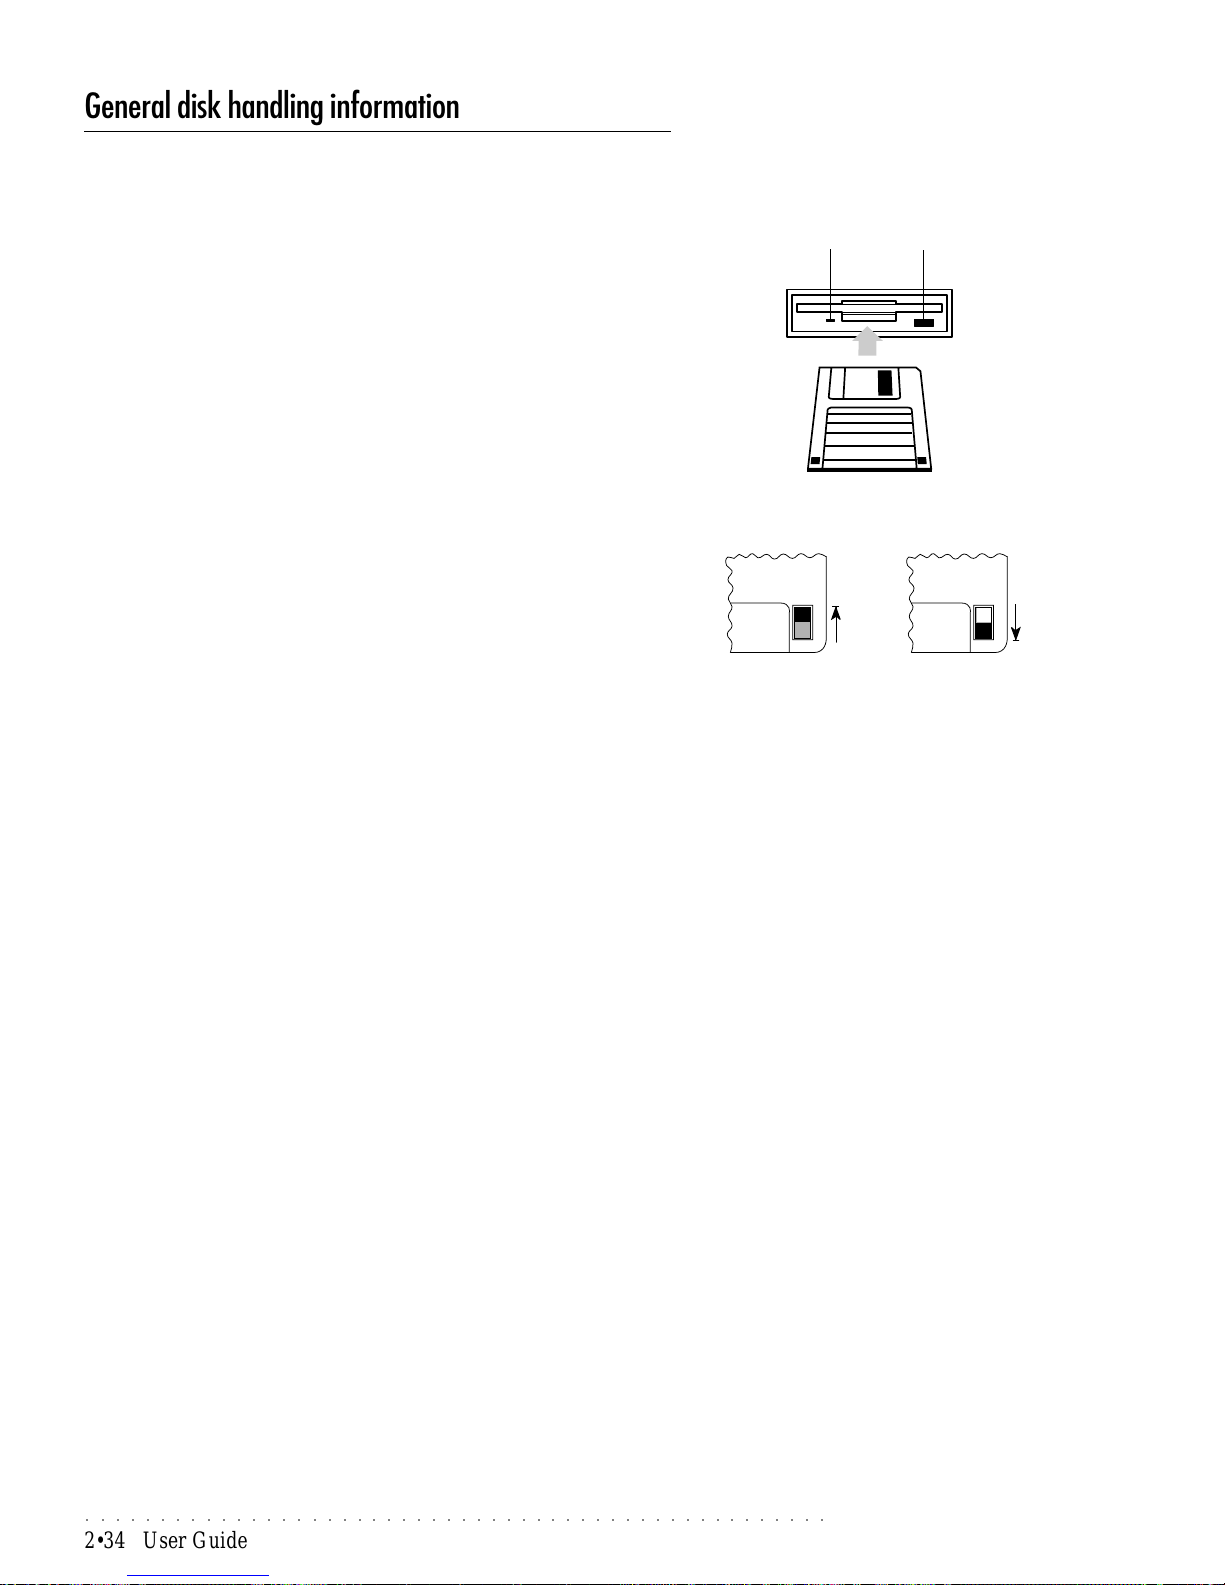
○○○○○○○○○○○○○○○○○○○○○○○○○○○○○○○○○○○○○○○○○○○○○○○○○○
2•34 User Guide
General disk handling information
If you’re new to working with floppy disks are not sure as to how you should
handle these delicate accessories, read this section for some useful information.
Inserting a Disk into the drive
Floppy disks must be inserted into the disk drive label side up and shutter first.
Push the disk firmly in until it “clicks” into place.
Avoid forcing a disk into the drive and hold the disk straight while inserting it.
Ejecting a Floppy Disk
Before ejecting a disk, make sure that the disk drive operating LED is off and
that the PS1000 display is not currently showing a disk operating message.
To extract the disk, press the eject button and remove the disk.
The Write Protect Tab
Floppy disks contain a write protect tab which allows you to protect valuable
data from being accidentally overwritten.
To prevent writing data to disk and so avoid accidental erasure, slide the tab
fully down to “open” the window.
To permit writing data to disk, slide the tab fully up to “close” the window.
Use a pen or other pointed object to set the tab as shown.
Handling Floppy Disks
When handling floppy disks, certain precautions should be taken to avoid damage and/or data loss.
• Do not open the metal protection shutter or touch the surface of a disk.
• Do not transport PS1000 with a floppy disk inserted in the disk drive. Vibrations may cause the disk drive head to scratch the disk, rendering it unusable.
• Do not store or place floppy disks in close proximity of television sets, computer monitors, loudspeakers, power transformers, or other devices that
are potential sources of magnetic fields. Doing so may render the disk
unusable.
• Do not store or place floppy disks in locations subject to extremes of temperature and humidity, direct sunlight, or excessive dust and dirt.
• Do not place objects on top of a floppy disk.
• Return disks to their protective cases after use.
Back-up copies
It is advisable to keep back-up copies of all your floppy disks. “Back-up” is
technical jargon for “a second copy” of a disk. Back-up copies of your data
stored in a safe place are extremely important, to safeguard against the loss or
damage to the originals, or against the loss of data contained in the instrument.
T o copy data from one disk to another , you always need to go through the RAM
memory first, loading the original to RAM memory then saving it to the destination back-up floppy disk.
Disk Drive Head Cleaning
After a prolonged period of use, disk save and load errors may become frequent due mainly to dirty disk drive heads, indicating that the disk drive head
may need cleaning. This can be done using a good-quality fluid-type head
cleaning kit for 3.5 inch (double-sided) disk drives. Do not use a cleaning kit
intended for single-sided disk drives.
1. Moisten the cleaning disk with cleaning fluid.
2. Insert the cleaning disk into the disk drive.
DISK NOT PROTECTED DISK PROTECTED
Disk Drive
operating LED
Disk eject
button
Page 65

○○○○○○○○○○○○○
Disk 2•35
3. Execute a load function. An error message will appear. This is normal.
4. After approximately 10 seconds, eject the disk.
NB. Do not use the disk drive for about 5 minutes.
Precautions to observe when using PS1000 disks with a computer
As occurs with the MS-DOS operating system, PS1000 assigns file names not
longer than 8 characters, plus an identifying extension of three characters.
In the Macintosh, OS/2 and Windows 95 systems, a file name can be longer.
When a name is modified on these types of computers, the following rules
should be observed:
• do not change the file extension because it identifies the file type and therefore, the relative structure.
• do not write names longer that 8 characters.
• do not insert spaces within a file name (e.g.: «MY FILE»). MS-DOS is
not able to recognize file names containing spaces. To separate a name
into two parts while retaining the MS-DOS compatibility , you must proceed
as follows:
separate two parts by the “underscore” symbol (e.g.: «MY_FILE»).
• do not assign two files the same name, one with uppercase letters and the
other with lowercase (e.g. «MYFILE» and «myfile»). MS-DOS and Atari
make no distinctions between uppercase and lowercase characters.
Page 66
○○○○○○○○○○○○○○○○○○○○○○○○○○○○○○○○○○○○○○○
2•36 User Guide
Ch. 5 • Song Styles
What is a Song Style?
A Song Style is an 8-track (max) Song created by recording a Style (Rom or
User) with the keyboard tracks (Upper 1, Upper 2, Lower). In practice, what
you normally do in real time with a Style (use the Intro, Fill, Ending, change
Style, etc.) is captured by the sequencer in Song Style Record mode to create
a Song Style. Song Styles offer an excellent means of preparing musical backgrounds for a soloist. For example, you can record two keyboard tracks (Upper
2 & Lower) with accompaniments, then use Upper 1 to play the melody in real
time with the Song Style in playback.
The events generated by the panel interventions are recorded in the COMMON
track. The chords that trigger the auto-accompaniments are recorded in the
CHORD track. The COMMON and CHORD tracks activate automatically when
you enter Song Style Record mode.
In many respects, Song Styles are similar to Songs but they do not contain a
Lyrics track and they cannot be saved as Midi Files.
The Song Style Preset
A Song Style is governed by a single associated Song Style Preset which determines how the Song Style plays. When you select an “empty” Song Style
and press the RECORD button, the recalled Song Style Preset automatically
configures the instrument to record a Style with 2 keyboard tracks activated for
the recording. Once you enter Song Style Record mode, you are free to select
the Style to record with, or you can program the Song Style Preset recalled by
the empty Song Style before entering the recording.
Song Style Recording
Y our PS1000 is not supplied with Song Styles in memory. To be able to select
Song Styles, you must either record them using the procedure explained on
page 2.38 of this chapter, or load disk-based PS1000 Song Styles using the
Load All procedure. PS1000 can house up to 8 Song Styles in the memory
locations 112 - 119. On page 2.39 you’ll find information regarding how to
select and playback Song Styles.
You can record a Song Style in two ways:
A. Select the Rom or User Style that you wish to use for the recording then
press the RECORD button.
In this case, you will record your Song Style using the Song Style Preset of
the element selected.
B. Select an empty Song Style location (Free), program the Song Style Preset
and press the RECORD button to start the recording.
In this case, you can program the Song Style Preset before entering Record
mode.
In both cases, a name for the Song Style can be entered as soon as you enter
Record mode.
Page 67
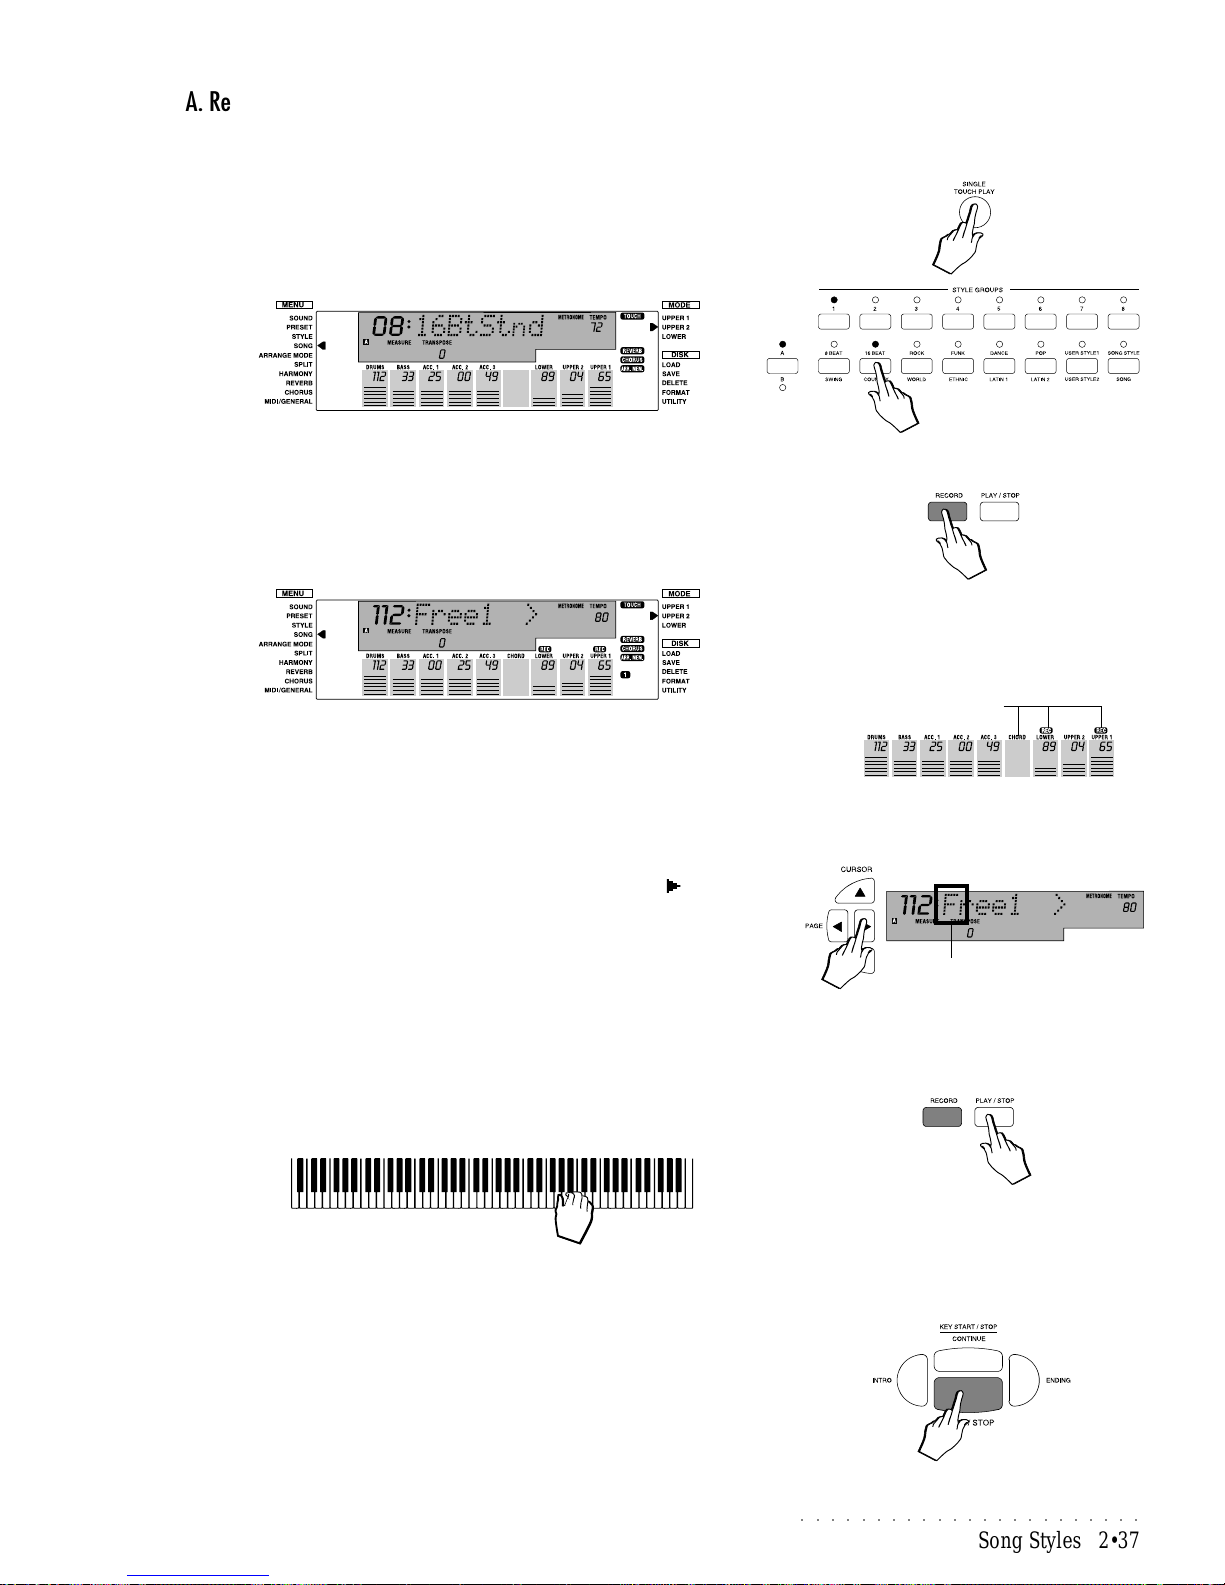
○○○○○○○○○○○○○○○○○○○○○○○
Song Styles 2•37
A. Recording a Song Style using a ROM Style
In this example, we select a ROM Style and enter Song Style Record mode.
Empty Song Styles are shown with the name, “Free”, but you can write a name
as soon as you enter Record mode.
1. Press the SINGLE T OUCH PLAY button and select a ROM Style.
In this example, we select Style 16 Beat Standard (button 1 of the 16 Beat
group).
The Arrange On/Off button will be on (LED on) and the MEMORY function
will be selected (display indicator on).
2. Press the RECORD button in the Sequencer.
The instrument sets to Song Style Record mode and shows the left display
arrowhead next to the SONG Menu function.
Two keyboard sections will be active and ready to record (a flashing “REC”
symbol will be shown above the Lower and Upper 1 tracks and the LED of
the relative activator buttons will be on).
The CHORD track will also be shown flashing (corresponding to function
button F6). This is the track that captures all Chord events played and
activates only if the Song Style is empty .
3. Insert a name for the Song Style by pressing the PAGE button and
writing the name using the keys of the keyboard.
The first letter of the “Free” name will start to flash. The name inserted
remains memorized without having to use the Store Preset button (as in
other name writing situations).
At this point you have two choices:
4A. Record keyboard events only:
Press PLA Y/STOP to start the sequencer and record the keyboard track
events only .
The Style accompaniments will not trigger with PLAY/STOP, even if you
play chords on the lower section of the keyboard. This allows you to record,
for example, some introductory bars without accompaniment. Y ou can then
introduce the accompaniments with Start/Stop.
4B. Record keyboard and accompaniment tracks:
Press the ST AR T/ST OP button and start playing with both hands.
FLASHING
Sections shown in
Record mode (flashing)
Page 68
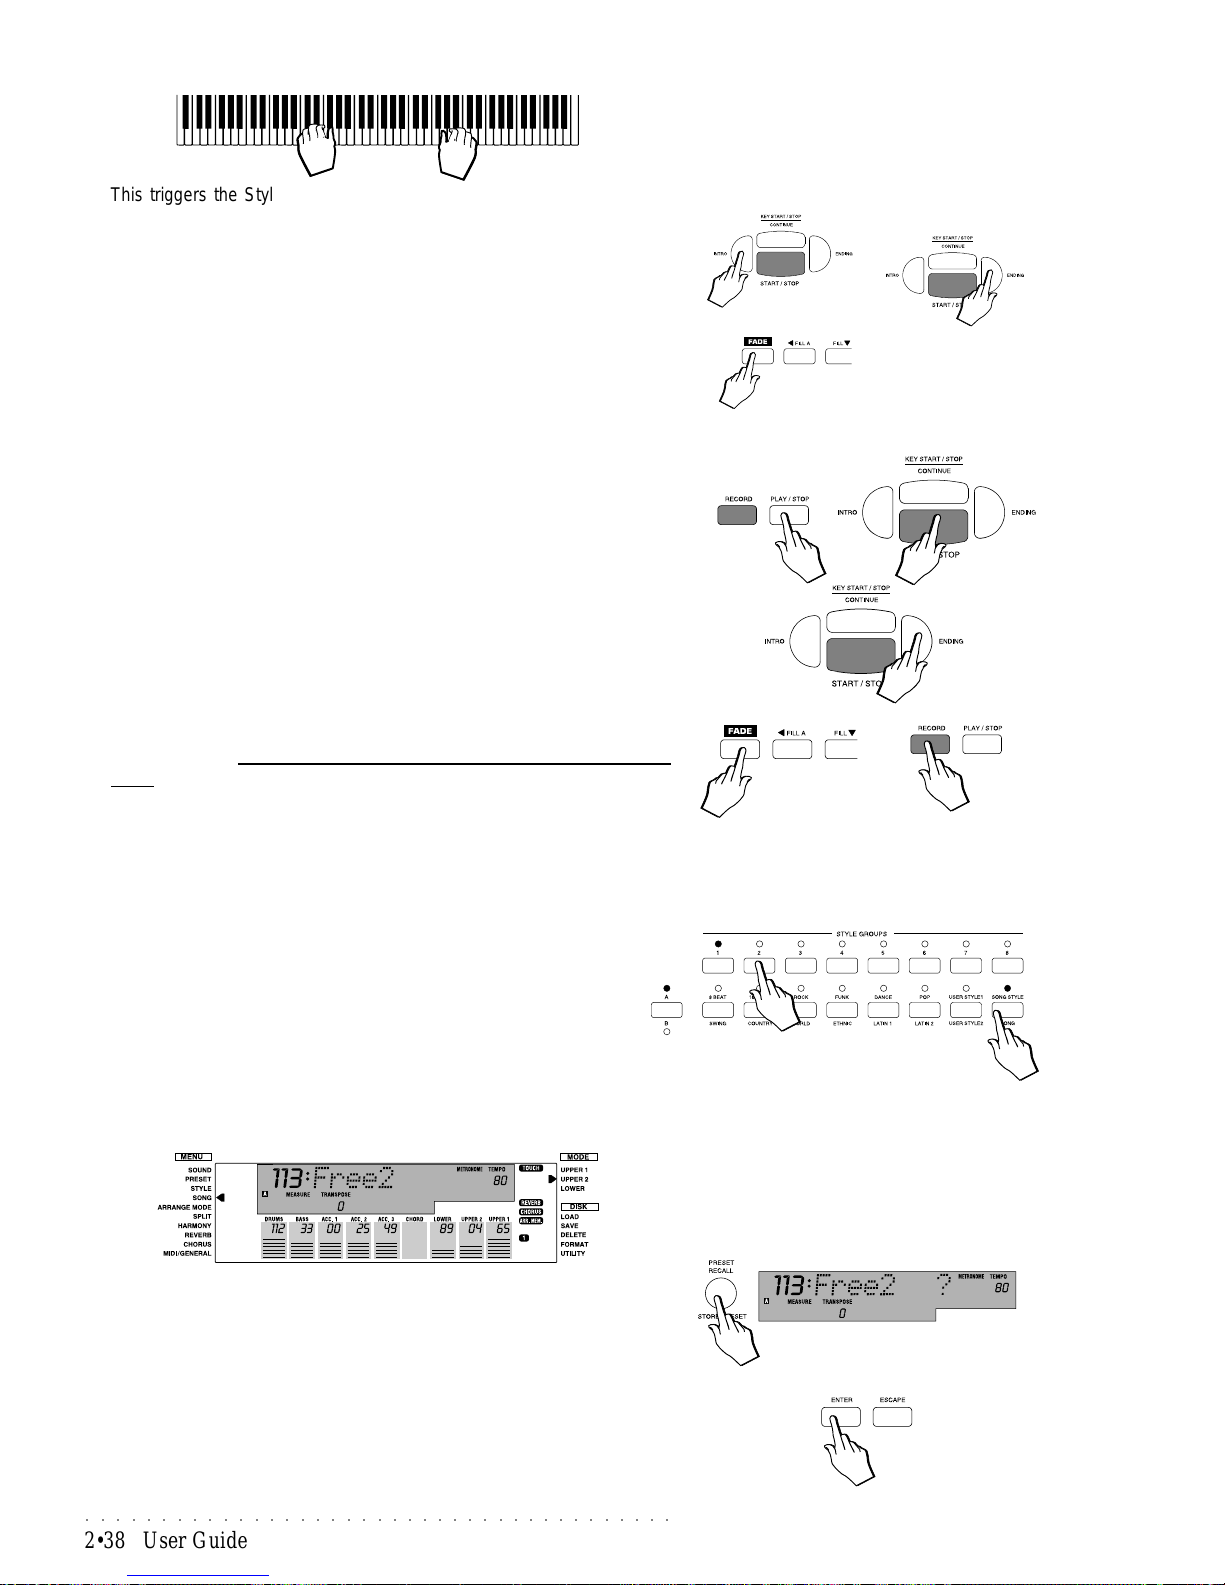
○○○○○○○○○○○○○○○○○○○○○○○○○○○○○○○○○○○○○○○
2•38 User Guide
This triggers the Style auto-accompaniments and allows you to start recording the Song Style.
You can also start the recording using one of the following options:
Press KEY START and start to play with both hands on the keyboard to
trigger the accompaniments automatically .
Press INTRO, FILL or ENDING before start to record the Song Style with
an introduction.
Press FADE followed by Start/Stop to start the accompaniments with a
gradual increase of volume.
5. Continue the recording as if you were playing with a Style.
• Use the Fills; Change Variation; Change Style; Adjust the Volumes; Use
the pedals (Soft, Damper); Change the sounds etc....
6. When you want to end your Song Style, you can either:
Stop the Sequencer with PLAY/STOP or START/STOP: this stops the
recording instantly and escapes record mode.
Stop recording the accompaniment tracks with ENDING: this stops the
recording when the ending phrase terminates and escapes record mode.
Stop the recording with FADE: this stops the recording with a gradual
fade of volume. In this case, press the RECORD button to escape record
mode.
B. Recording an empty Song Style
In this example, we select an empty Song Style and program the associated
Song Style Preset before entering Record mode.
1. Select an empty Song Style.
Check that LED A of the A/B selector is on. If not, press the A/B
selector button of the STYLE GROUPS section so that the A LED
starts to flash. While the LED is still flashing, press the SONG STYLE
Group button followed by one of the buttons marked 1 - 8 to select
an empty Song Style (Free).
In this example, we press button 2.
The left display arrowhead is shown next to the SONG Menu function.
2. Program the Song Style Preset using the method explained in the Presets
chapter of the User Guide, under the heading, “Editing the Programmable
Presets”.
After changing the Preset’s track parameters, save the changes made by
holding down the STORE PRESET button for an instant. The display shows
the confirmation request for the Song Style.
3. Press ENTER to confirm the new Song Style Preset.
IMPORTANT
When you press the A/B Selector button to
switch from bank set A to bank set B (or vice
versa), the LED currently shown off will flash
for about 3 seconds, during which time you
must make your bank selection. If the LED
stops flashing, it will not be possible to switch
bank set.
Page 69
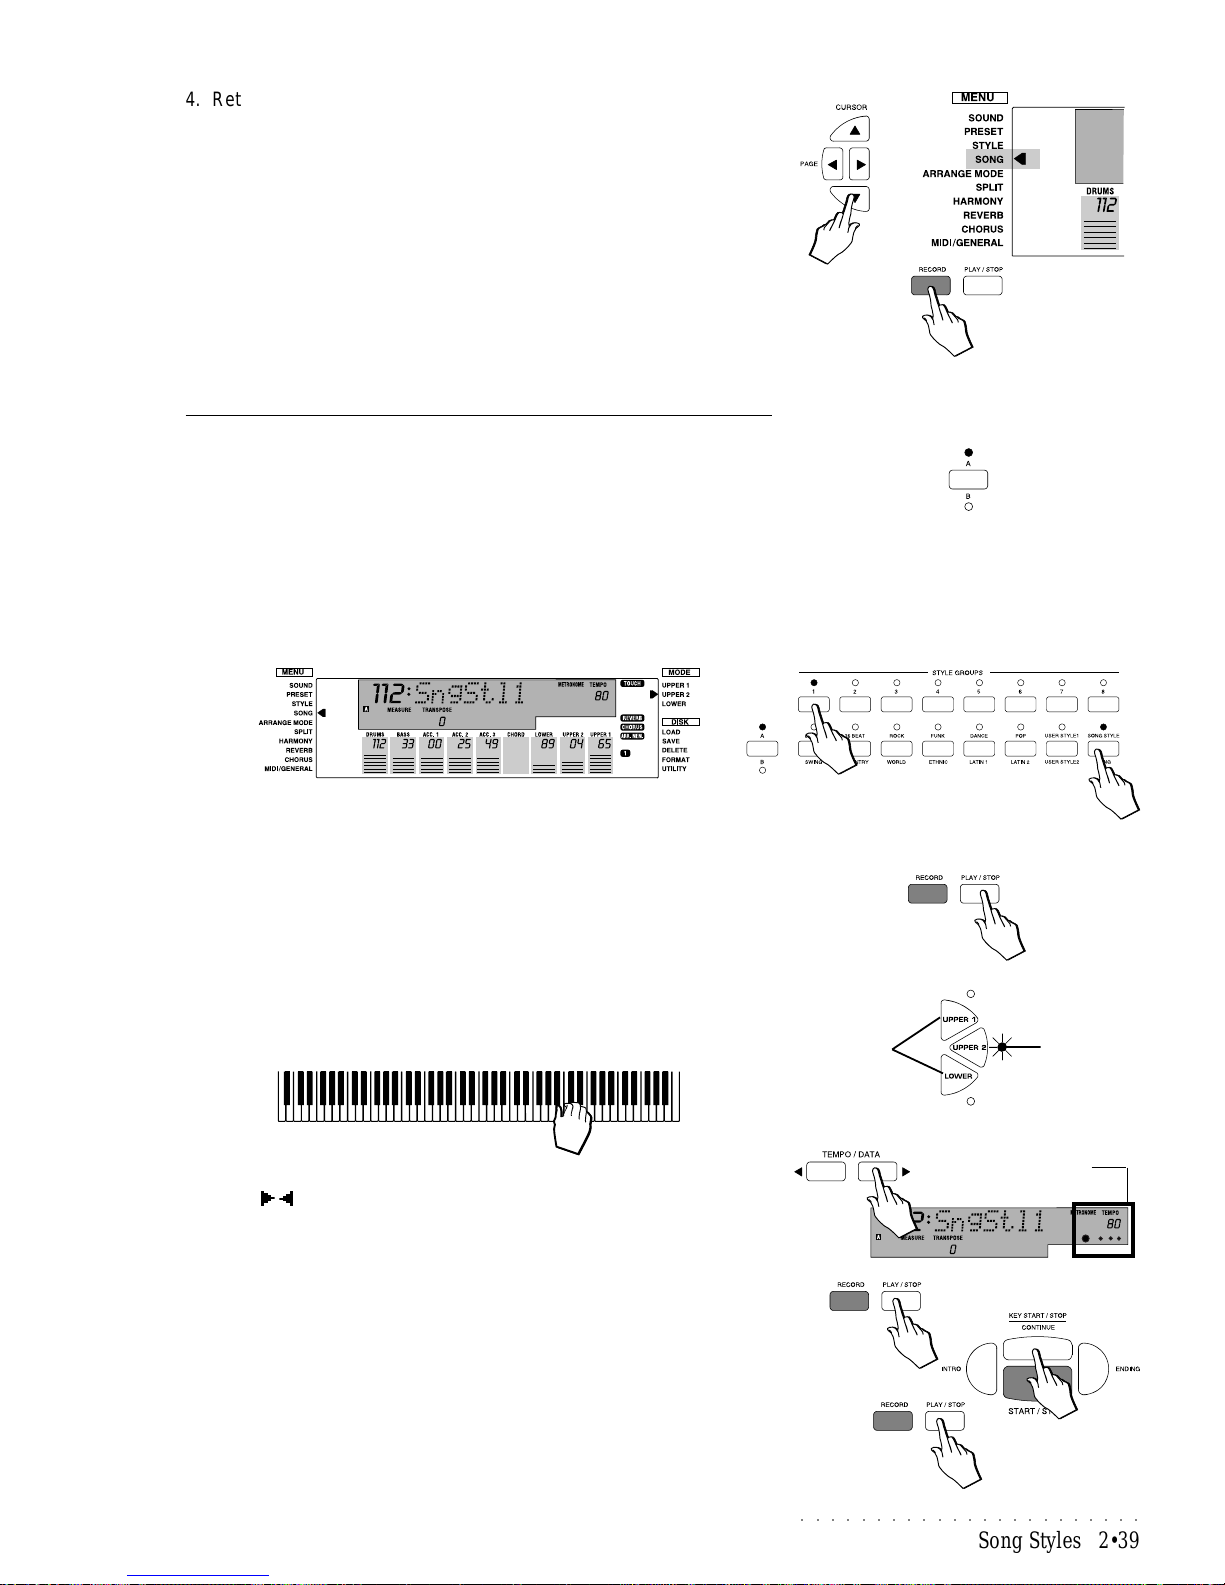
○○○○○○○○○○○○○○○○○○○○○○○
Song Styles 2•39
4. Return to the Song Style by moving the left display arrowhead down to
the SONG Menu function with the Cursor down arrow.
5. Press the RECORD button to enter Song Style Record mode and proceed
as already described in Steps 3, 4, 5 and 6 of the previous Record example.
Selecting and playing back Song Styles
Song Styles are selected using the SONG STYLE button of the Style Groups
section with LED A of the A/B selector button selected (LED ON).
1. Check that LED A of the A/B selector is on. If not, press the A/B selector
button of the STYLE GROUPS section so that the A LED starts to flash.
2. Press the SONG STYLE button to access the Song Style memory.
3. Press one of the buttons marked 1 - 8 to select a Song Style.
In the example, we press button 1.
The arrowhead to the left of the display moves automatically to the SONG
menu function and the name of the selected Song Style is shown in the 8
digit display .
4. After selecting the Song Style, press PLAY/STOP or START/STOP to
start the playback.
The Song Style starts to play.
Note: If you recall an empty location (Free), pressing PLA Y/STOP will have
no effect.
If one of the keyboard tracks are free (activator LED on), you can play along
with the Song Style (see “Play along with the Song Style” further ahead).
5. If you want to change the playback speed (Tempo), use the TEMPO/
DATA / buttons.
The Tempo is shown in the Tempo display area. While the Song Style is
playing, the beat pattern indicators monitor the beats of each bar and the
measure counter shows the current song position.
6. Press the PLAY/STOP (or START/STOP) button to stop the playback.
The Song Style stops at a precise point (see the Measure counter).
7. Press the CONTINUE button to start the Song Style from the point it was
stopped.
If, instead, you press the Play/Stop or Start/Stop again, the Measure counter returns to the Song Style start position (0) and the sequence starts again.
8. Press PLAY/STOP or START/STOP to stop the Song Style.
IMPORTANT
When you press the A/B Selector button to
switch from bank set A to bank set B (or vice
versa), the LED currently shown off will flash
for about 3 seconds, during which time you
must make your bank selection. If the LED
stops flashing, it will not be possible to switch
bank set.
Tempo and
Beat Pattern indicators
TRACK CAN
BE PLAYED
TRACKS CAN’T
BE PLAYED
Page 70
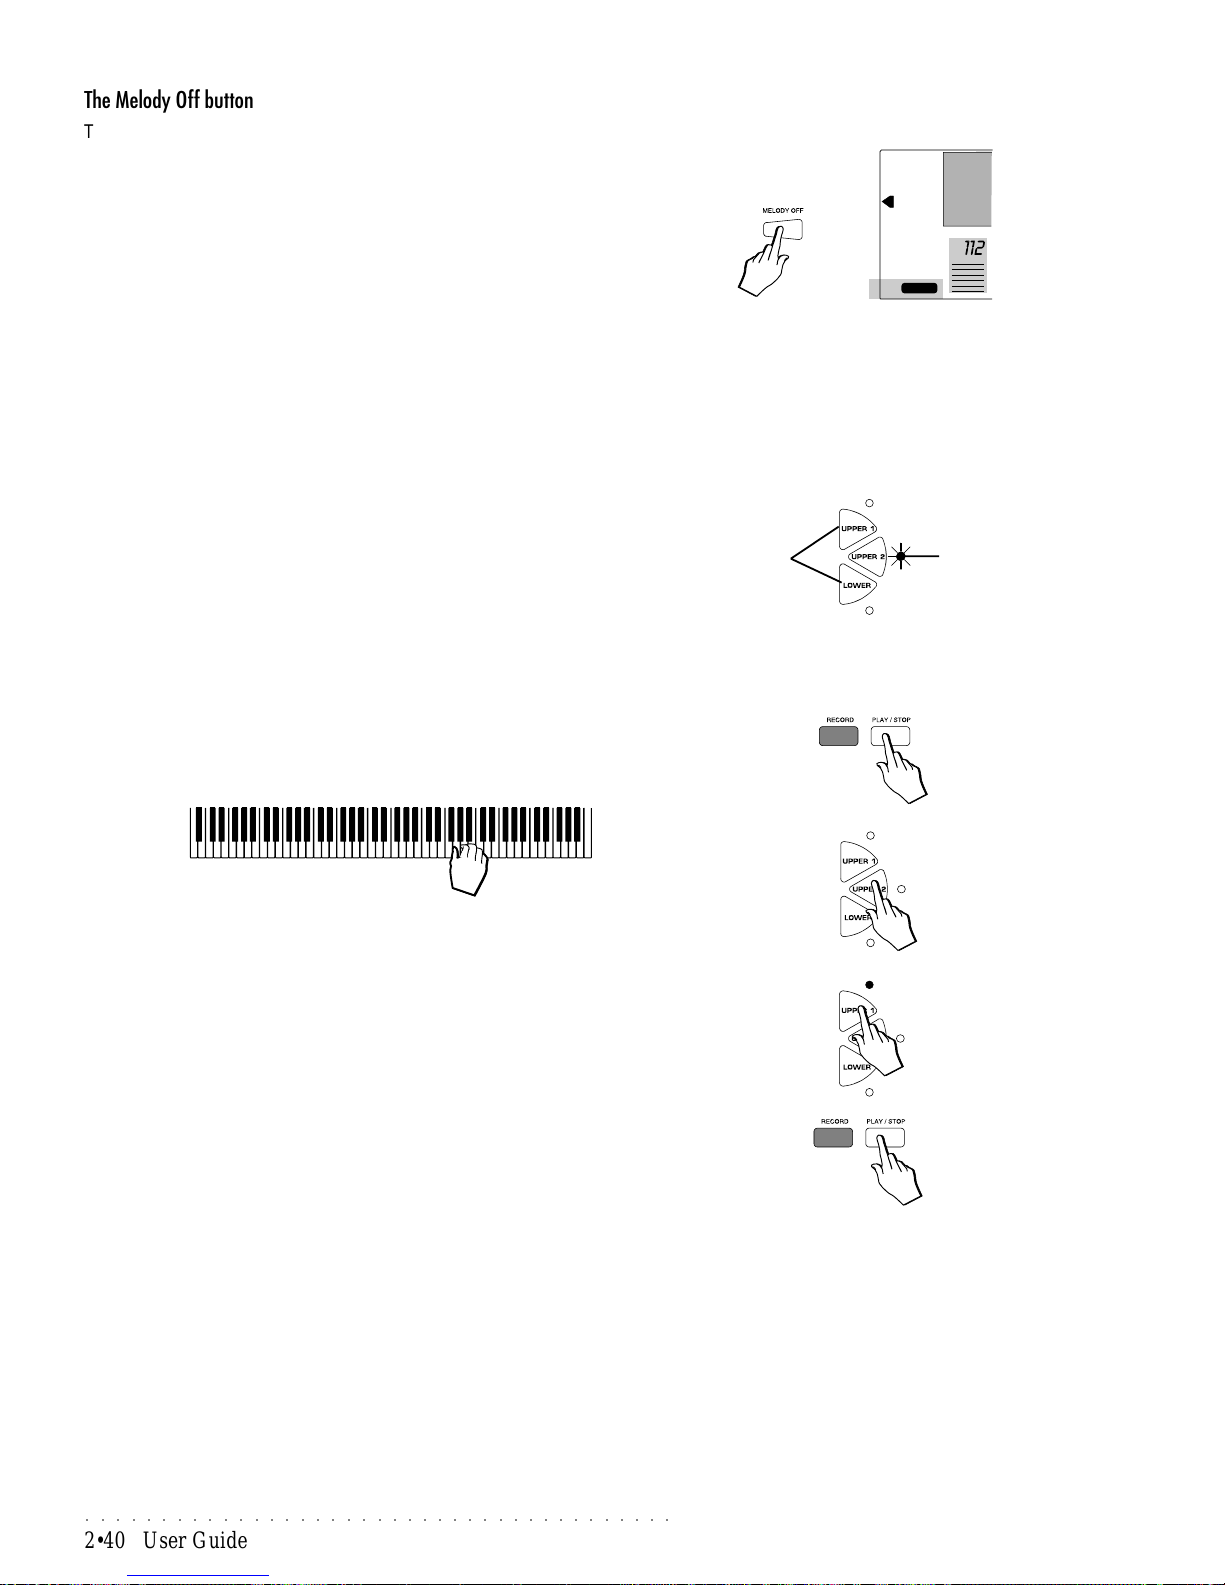
○○○○○○○○○○○○○○○○○○○○○○○○○○○○○○○○○○○○○○○
2•40 User Guide
The Melody Off button
The MELODY OFF function allows you to listen to the Song Style playback
without the melody , useful for a singer to sing along with the backing, or to play
along with the accompaniments.
1. While playing, press MELODY OFF to cancel the playback of the melody .
The corresponding display indicator turns on to show the activation of the
function.
2. Press MELODY OFF again to deactivate the function and restore the
melody to the Song Style.
Play along with the Song Style
Y ou can play along with the Song Style using the keyboard section not used in
the recording, in this case, Upper 2.
Y ou can also play a keyboard track used in the recording by disengaging it from
the sequencer.
Y ou can see at a glance which keyboard tracks have been recorded and which
haven’t by looking at the status of the keyboard activator LEDs (Upper 1, Upper
2, Lower):
The LED of the Upper 2 keyboard activator will be on, allowing you to play
the track play in real time;
The LEDs of the other keyboard tracks (Lower and Upper 1) will be off,
showing that they are engaged by the sequencer and cannot play in real
time.
1. With the Song Style selected, press PLAY/STOP (or START/STOP) to
start the playback.
2. Play along with the Song Style using the Upper 2 section.
Now press the Upper 2 button (LED off) to mute the section.
3. Disengage a keyboard track from the sequencer and play along with the
Song Style.
Press the keyboard activator corresponding to one of the engaged keyboard tracks to disengage it.. In this example, press UPPER 1 to turn on
the respective LED and play along with the Song Style.
Note: the accompaniment tracks can only be muted using the corresponding function buttons - they cannot be used for real time playing.
To re-engage a keyboard track to the sequencer, press the corresponding
button again (LED off).
4. Press PLAY/STOP (or START/STOP) to stop playback.
TRACK CAN
BE PLAYED
TRACKS CAN’T
BE PLAYED
DRUMS
VARIATION
FILL-INA
FILL-INB
INTRO
RECORD
MELODY OFF
Page 71
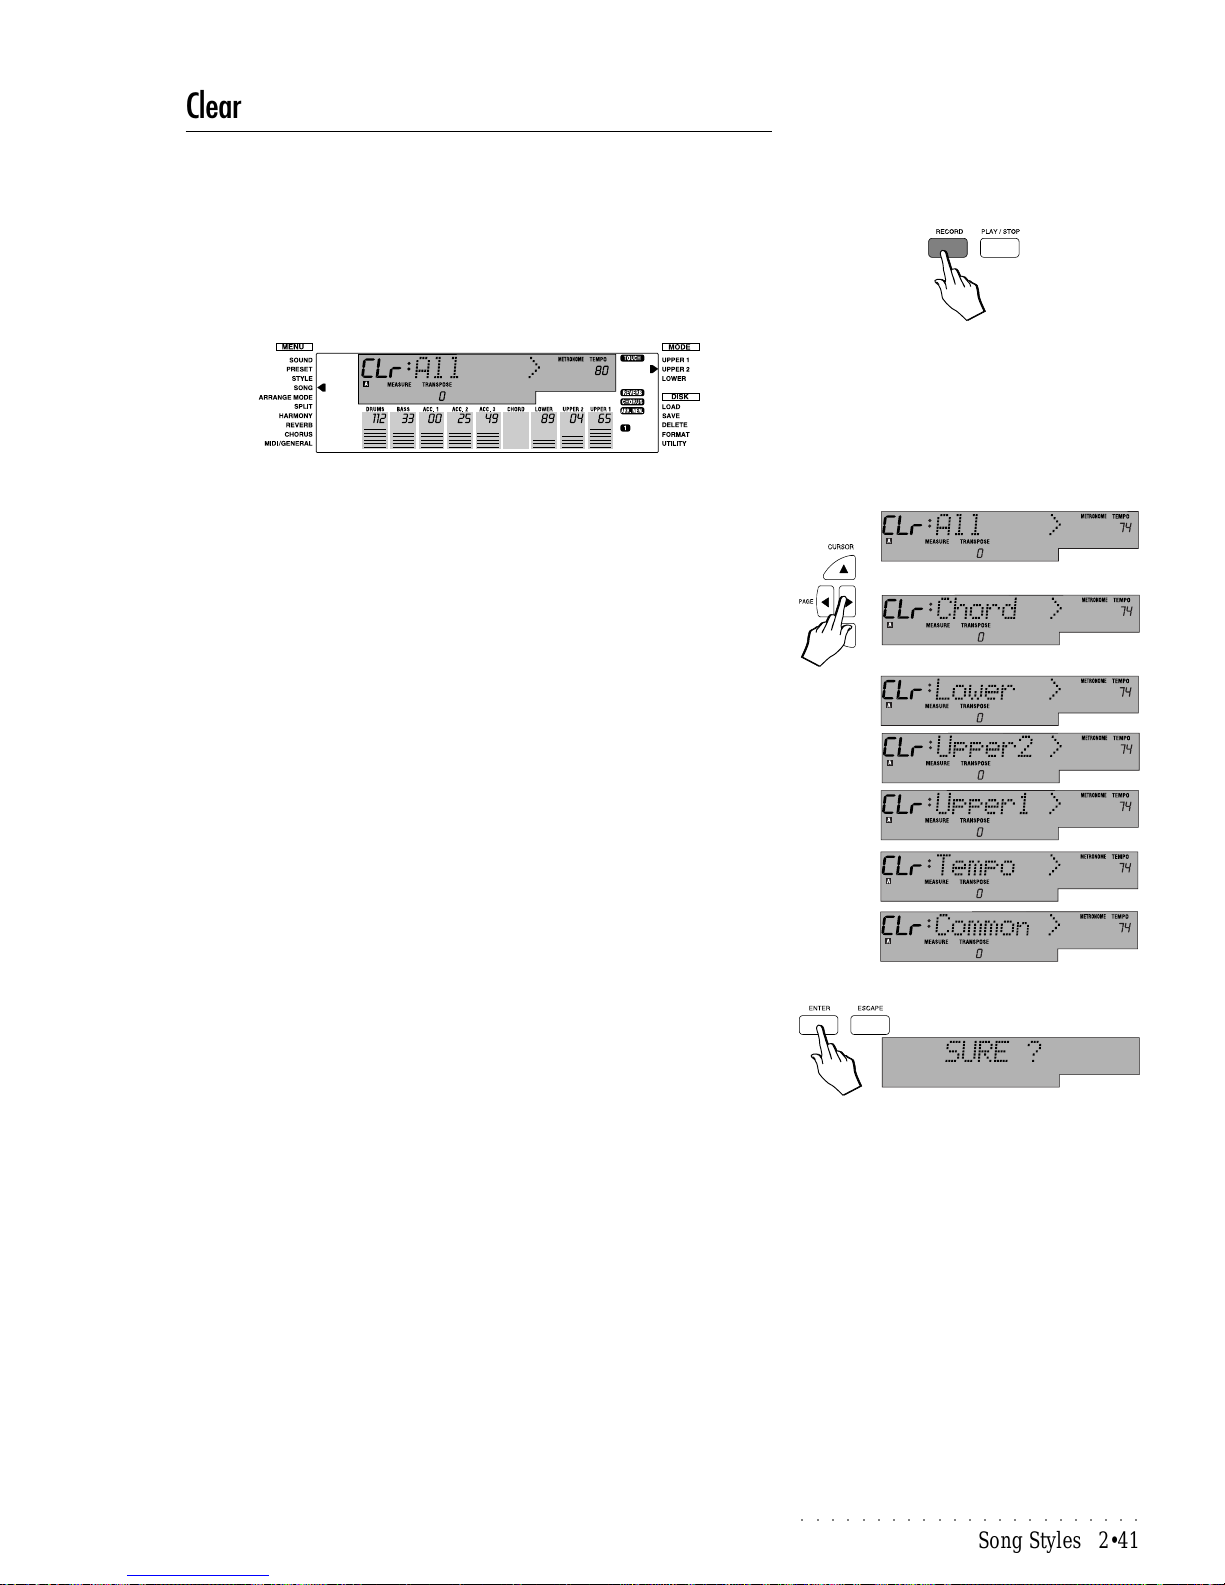
○○○○○○○○○○○○○○○○○○○○○○○
Song Styles 2•41
Clear Song Style
If the Song Style is not to your satisfaction, it is possible to intervene by cancelling some parameters by means of the CLEAR function. The CLEAR function
is carried out in RECORD mode.
1. With the Song Style selected, hold down the RECORD button for a few
seconds to gain access to the CLEAR function.
The first Clear option (All) is shown in the display:
2. Use the PAGE buttons to select the Clear option required.
ALL: Clears (initializes) all the recorded events of the SONG
STYLE except the last programmed Preset. In practice,
only the recorded sequences are cancelled from the last
recorded Song Style.
CHORD: When the CHORD track is empty, the name “CHORD”
starts to flash to indicate that it is ready to record chord
events. The Chord track can only be recorded once; if
you want to record the chord track again (to cancel wrong
events), you must clear the entire track with Clear CHORD.
LOWER: Cancels the Lower track.
UPPER 2: Cancels the Upper 2.
UPPER 1: Cancels the Upper 1.
TEMPO: Cancels all Tempo events captured in the T empo track.
COMMON: The Common track records all events generated by the
panel interventions effected during the recording (changes
of Var, Fill, etc.). Clear Common cancels all these type of
events from the recording.
3. Once you have selected the event type press ENTER.
A confirmation request appears (Sure?).
(Press ESCAPE to abort the operation).
4. Press ENTER again to confirm the Clear operation.
Y our recorded Song Styles remain intact in memory even after power down.
T o avoid unwanted cancellation, it is better to save your Song Styles to disk,
using the Save All command, for future use.
Page 72
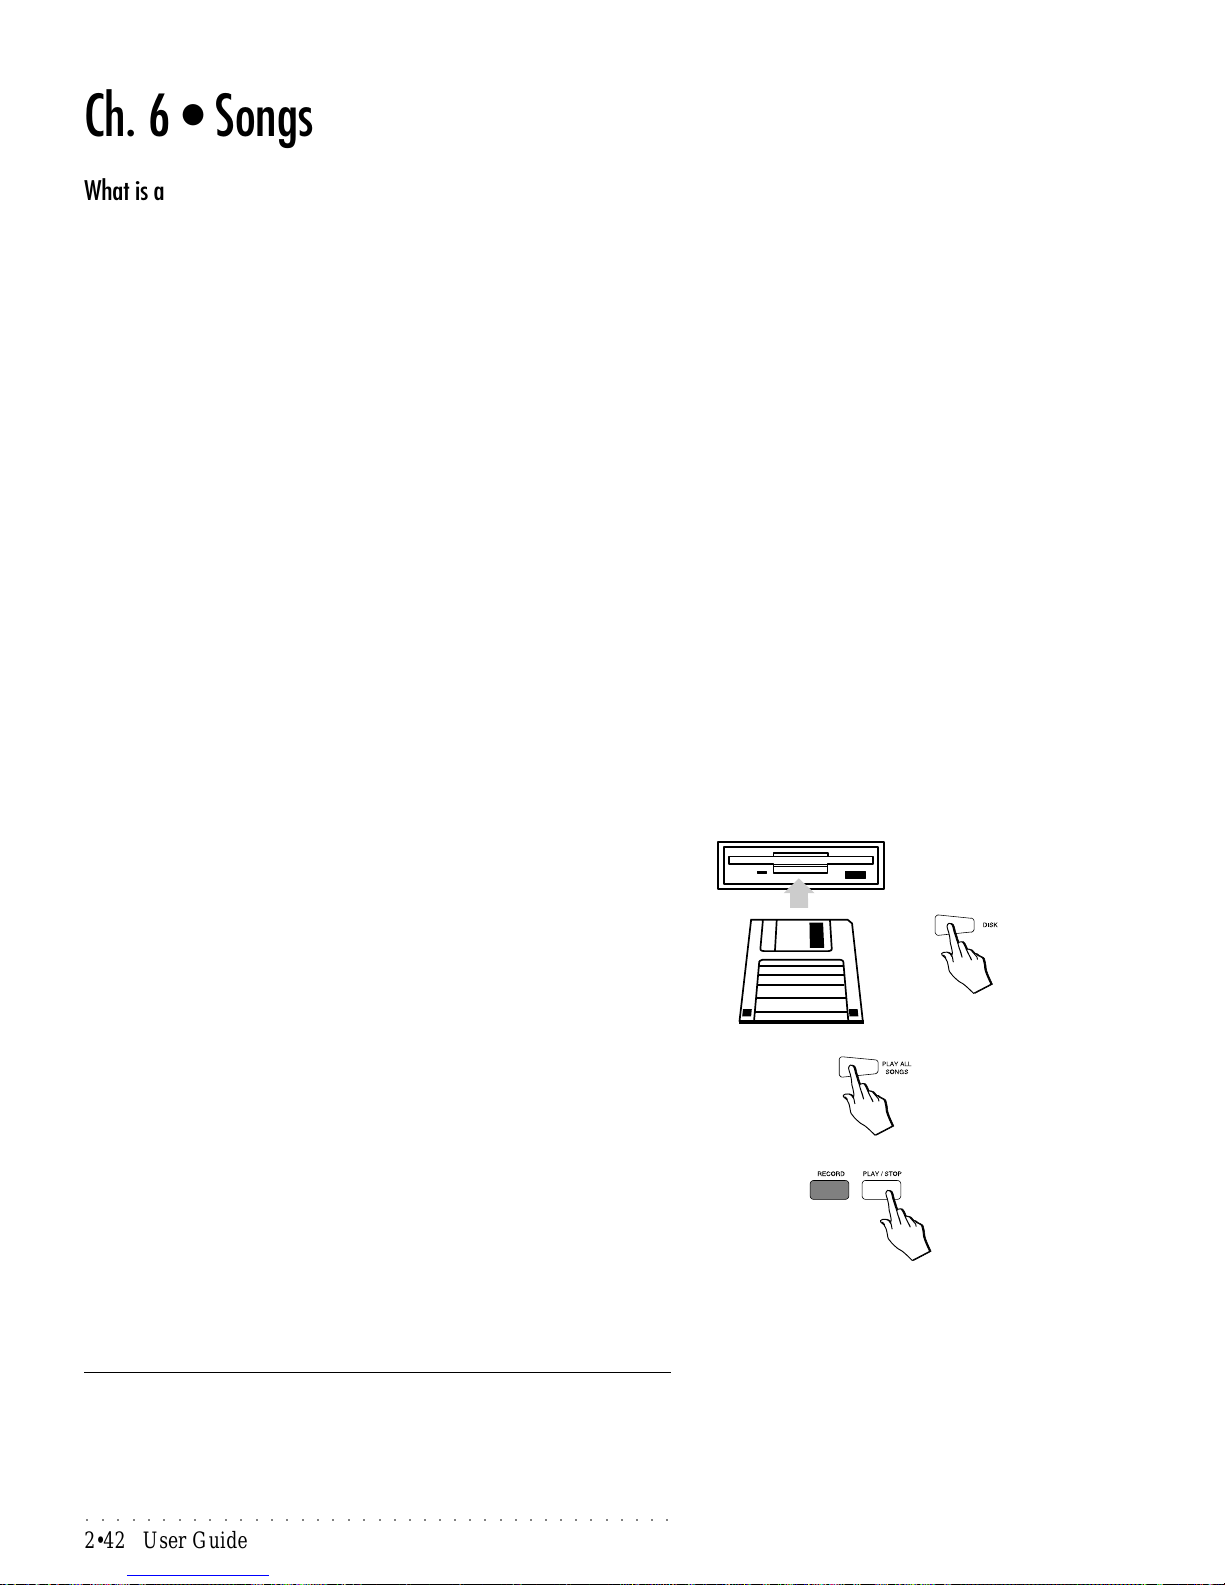
○○○○○○○○○○○○○○○○○○○○○○○○○○○○○○○○○○○○○○○
2•42 User Guide
Ch. 6 • Songs
What is a Song?
A Song is a multitrack recording of several instrumental parts, each corresponding to a track. It is possible to load disk-based Songs into the PS1000 RAM
memory of the following formats: PS, GMX, WK, PK, CD and Standard MIDI
File (SMF 0 and 1). Up to 8 Songs can be stored in the PS1000 Song memory
locations (120-127).
It is important to remember that PS1000’s on-board sequencer cannot record
Songs, but a Midi controlling device can record Songs using the PS1000 as a
16-part sound generator.
The Song Preset
Every PS1000 Song contained in memory is governed by its associated Song
Preset. When a disk-based Song is loaded, or saved as a MIDI File format, all
the track parameters of the associated Preset are converted into the corresponding MIDI messages (Program Change, Pan, Volume, ef fects).
The tracks of the Song Preset contain “MIDI events”; these correspond to several different types of MIDI messages. These messages are divided into Note,
Pitch Bend and Program Change messages, and a series of Control Change
messages which control aspects such as Bank change for the sounds, the Sustain pedal, Volume, the Pan and several other parameters. The MIDI events
contained in the tracks are not recordings of actual sounds, but messages which
communicate with PS1000’s internal sound generator. A Song is none other
than a list of MIDI events for each track. The PS Songs can consist of up to 16
tracks.
The Song Presets of Songs in memory can also be modified.
The Play all Songs button
If you have a PS1000 Songs disk, or have purchased a MIDI File data disk, you
can play back all the files with a single command, without having to load them
to memory beforehand. The PLA Y ALL SONGS button plays back all the Songs
or MIDI Files contained in the floppy disk one after the other.
1. Insert the Floppy Disk into the Drive and press the DISK button.
2. Press the PLAY ALL SONGS button.
After a short scanning period, the first Song or MIDI File on disk starts to
play.
Playback continues non-stop until all the Songs or MIDI Files on disk have
been played.
Playback stops automatically when the last Song or Midi File reaches the
end.
3. Press the PLA Y/STOP (or ST AR T/STOP) button to stop the current song.
Selecting and playing Songs
If your instrument does not have any Songs in memory, refer to page 2.28 of
the DISK chapter for explanations regarding how to load disk-based Songs to
memory.
Note: When you load disk-based Songs to
memory , they occupy the available destinations
in a cyclic manner. For example, if Song locations 112 and 113 are already occupied, the
next Song loads to location 1 14 and so on, until
all 8 slots are full (112-119). Once the Song
memories are occupied, when you load another Song, it occupies the first location, 112,
cancelling the existing song.
Page 73
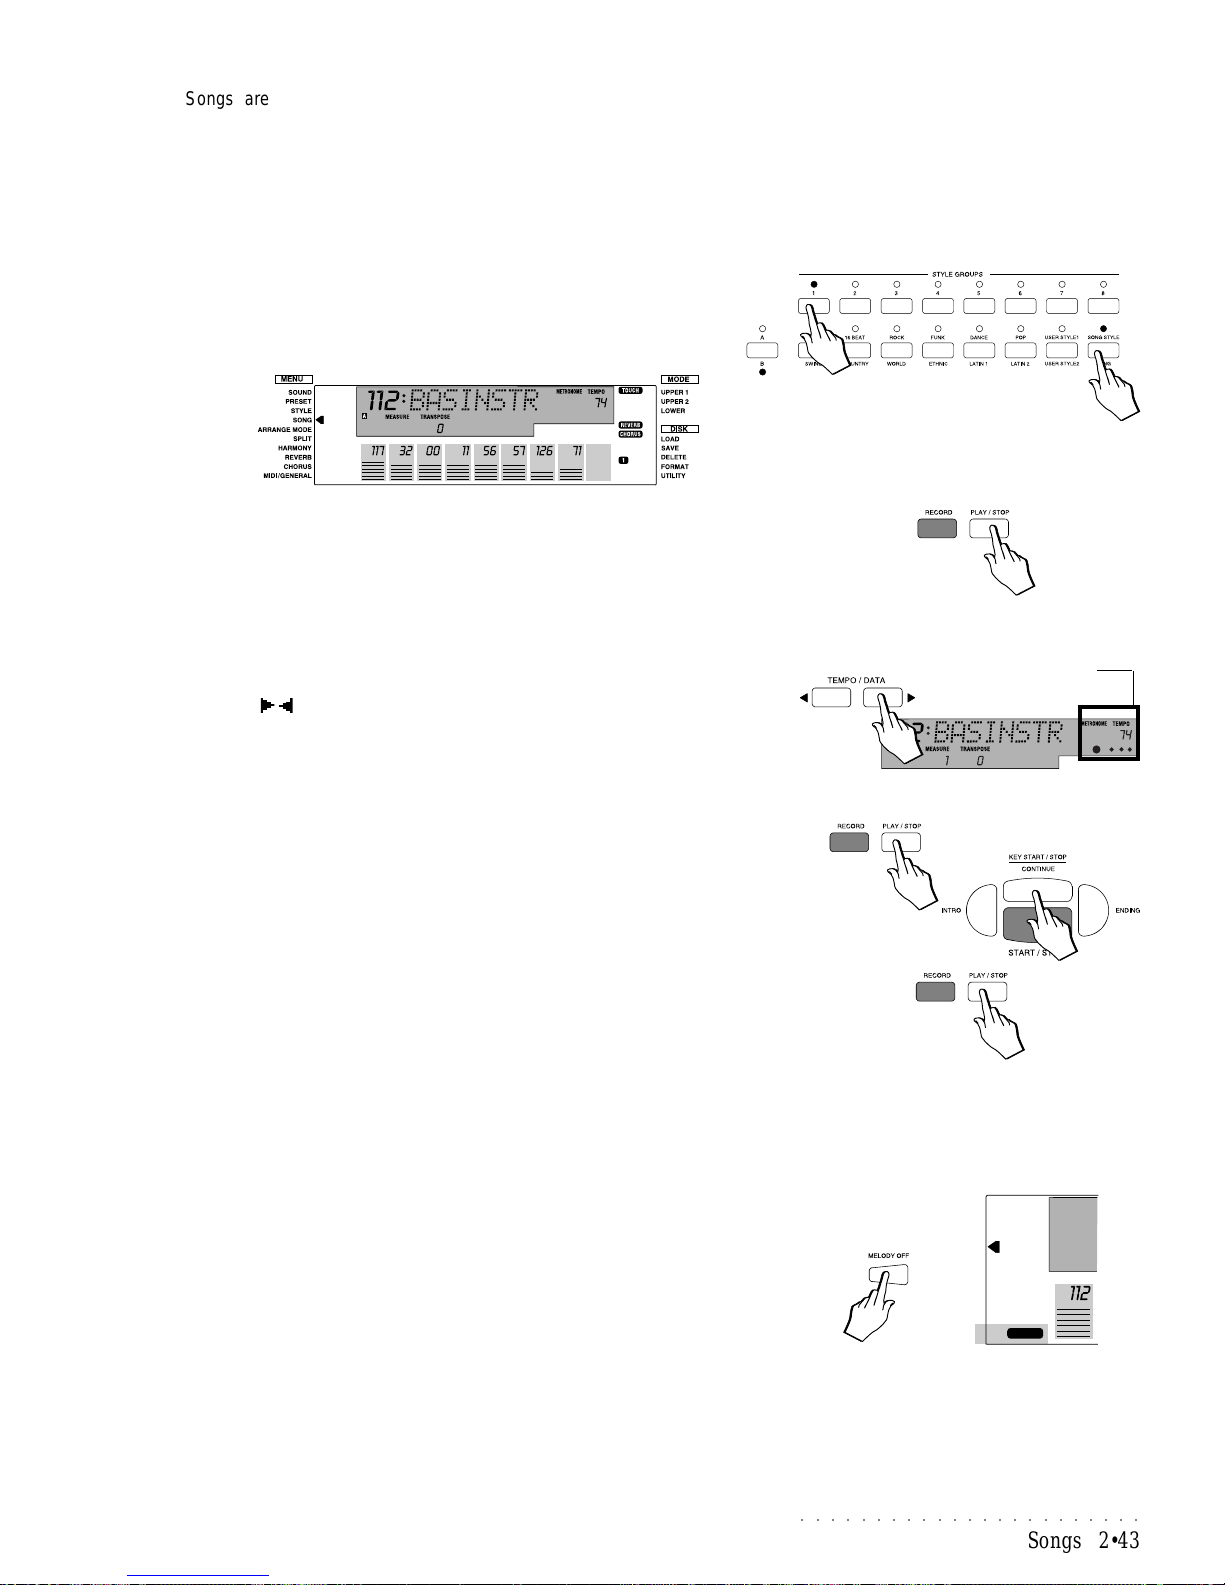
○○○○○○○○○○○○○○○○○○○○○○○
Songs 2•43
Songs are selected using the SONG button of the Style Groups section with
LED B of the A/B selector button selected (LED ON).
1. Check that LED B of the A/B selector is on. If not, press the A/B selector
button of the STYLE GROUPS section so that the B LED starts to flash.
2. Press the SONG button to access the Song memory.
3. Press one of the buttons marked 1 - 8 to select a Song.
In the example, we press button 1.
The arrowhead to the left of the display moves automatically to
the SONG menu function and the Song name is shown in the 8
digit display .
4. After selecting the Song, press the PLAY/STOP (or START/STOP) button to start the playback.
The SONG starts to play.
Depending on the Song selected, you may or may not have a free track to
play along with. Refer to the paragraph,” Play along with the Song” further
ahead.
5. If you want to change the playback speed (Tempo), use the TEMPO/
DATA / buttons.
The Tempo is shown in the Tempo display area. While the Song is playing,
the beat pattern indicators monitor the beats of each bar and the measure
counter shows the current song position.
6. Press the PLAY/STOP (or START/STOP) button to stop the playback.
The Song stops at a precise point (see the Measure counter).
7. Press the CONTINUE button to start the song from the point it was
stopped.
If, instead, you press Play/Stop (or Start/Stop) again, the Song pointer returns to the song start position (0) and the songs starts again.
8. Press PLAY/STOP (or START/STOP) to stop the song.
If you want to playback a Song or SMF File directly from disk without loading
the data to RAM memory, use the Direct from Disk method explained in the
Disk chapter, or use the Play All Songs button explained on the previous page.
The Melody Off button
The MELODY OFF function allows you to listen to the Song playback without
the melody, useful for a singer to sing along with the backing, or to play along
with the song.
1. During the Song playback, press the MELODY OFF button to cancel the
playback of the melody .
The corresponding display indicator turns on to show the activation of the
function.
2. Press MELODY OFF again to deactivate the function and restore the
melody to the Song.
Tempo and
Beat Pattern indicators
DRUMS
VARIATION
FILL-INA
FILL-INB
INTRO
RECORD
MELODY OFF
IMPORTANT
When you press the A/B Selector button to
switch from bank set A to bank set B (or vice
versa), the LED currently shown off will flash
for about 3 seconds, during which time you
must make your bank selection. If the LED
stops flashing, it will not be possible to switch
bank set.
Page 74
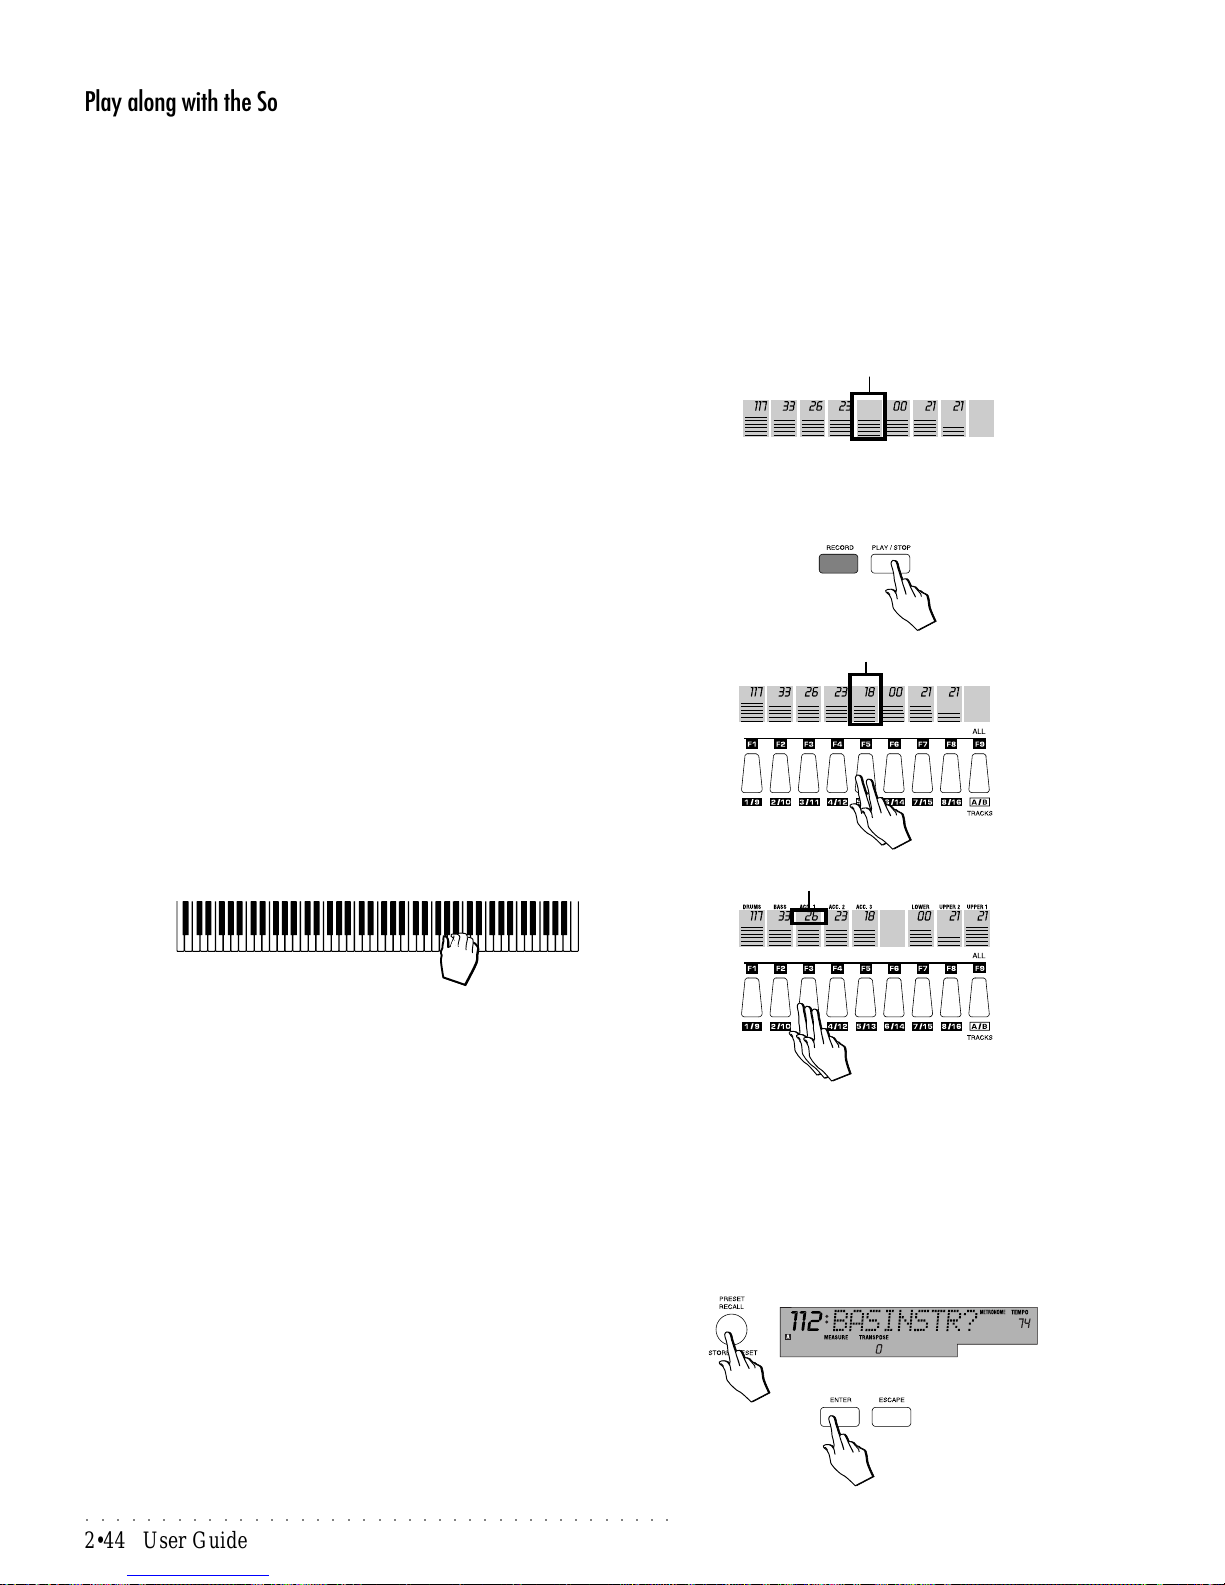
○○○○○○○○○○○○○○○○○○○○○○○○○○○○○○○○○○○○○○○
2•44 User Guide
Play along with the Song
Most of the Songs that you load into your PS1000 will have all or most of the
tracks engaged by the sequencer, while those not used will be mute, therefore
you will not be able to play along with the song.
PS1000 Songs can use up to 16 tracks. At any time, the display shows 8 tracks
(01-08). Using the Function button F9, you can toggle between track set A [0108] and track set B [09-16].
Y ou can check at a glance which tracks are used in the recording by looking at
the status of the tracks in the display . Those used in the recording will show a
Program Change number above the bar graphs. Those not engaged by the
sequencer will show only a bar graph.
If you want to play along with your Song, you can either:
A) Activate one of the tracks not used by the Song.
B) Disengage one of the tracks used by the Song
1. Select a Song and press PLAY/STOP to start the playback.
Check which tracks are not engaged by the sequencer (no Program change
number).
A. Activate one of the tracks not used by the Song
2. Press the Function button corresponding to a track not used by the Song
TWICE.
The Pr. Change number and bar graph of the track starts to flash to indicate
that the track is ready to play in real time.
B. Disengage one of the tracks used by the Sequencer
3. Press the Function button corresponding to an engaged track THREE
times.
The Pr. Change number starts to flash to indicate that the track is no longer
engaged by the sequencer and ready to play in real time.
4. Play along with the song.
5. To restore the track to its previous status, press the same Function button twice.
Programming the Song Preset
The Song Preset associated to the current Song can be modified, both for the
Sound assignments, as well as the track parameters: Volume, effect Sends,
Transpose, Detune, Pan, V ol Ped, Damper , Pitch/Mod, Pitch Range, Edit Sound
(see the Preset chapter for more details).
All 16 Tracks of the Song Preset are available. Use function button F9 to switch
from track set 01-08 [A] to set 09-16 [B]. The letter A or B shown in the display
tells at all times which track set is currently displayed.
1. With the Song selected, program the Song Preset using the method explained in the Presets chapter of the User Guide, under the heading,
“Editing the Programmable Presets”.
After changing the Preset’s track parameters, save the changes made by
holding down the STORE PRESET button for an instant. The display shows
the confirmation request for the Song.
2. Press ENTER to confirm the new Song Preset.
The modified Song Preset is stored to the current Song.
PR. CHANGE FLASHING
Track not engaged
by the sequencer
Note: The names associated to the Style
accompanient sections and those of the keyboard sections are not displayed in Song
mode.
FLASHING
Page 75
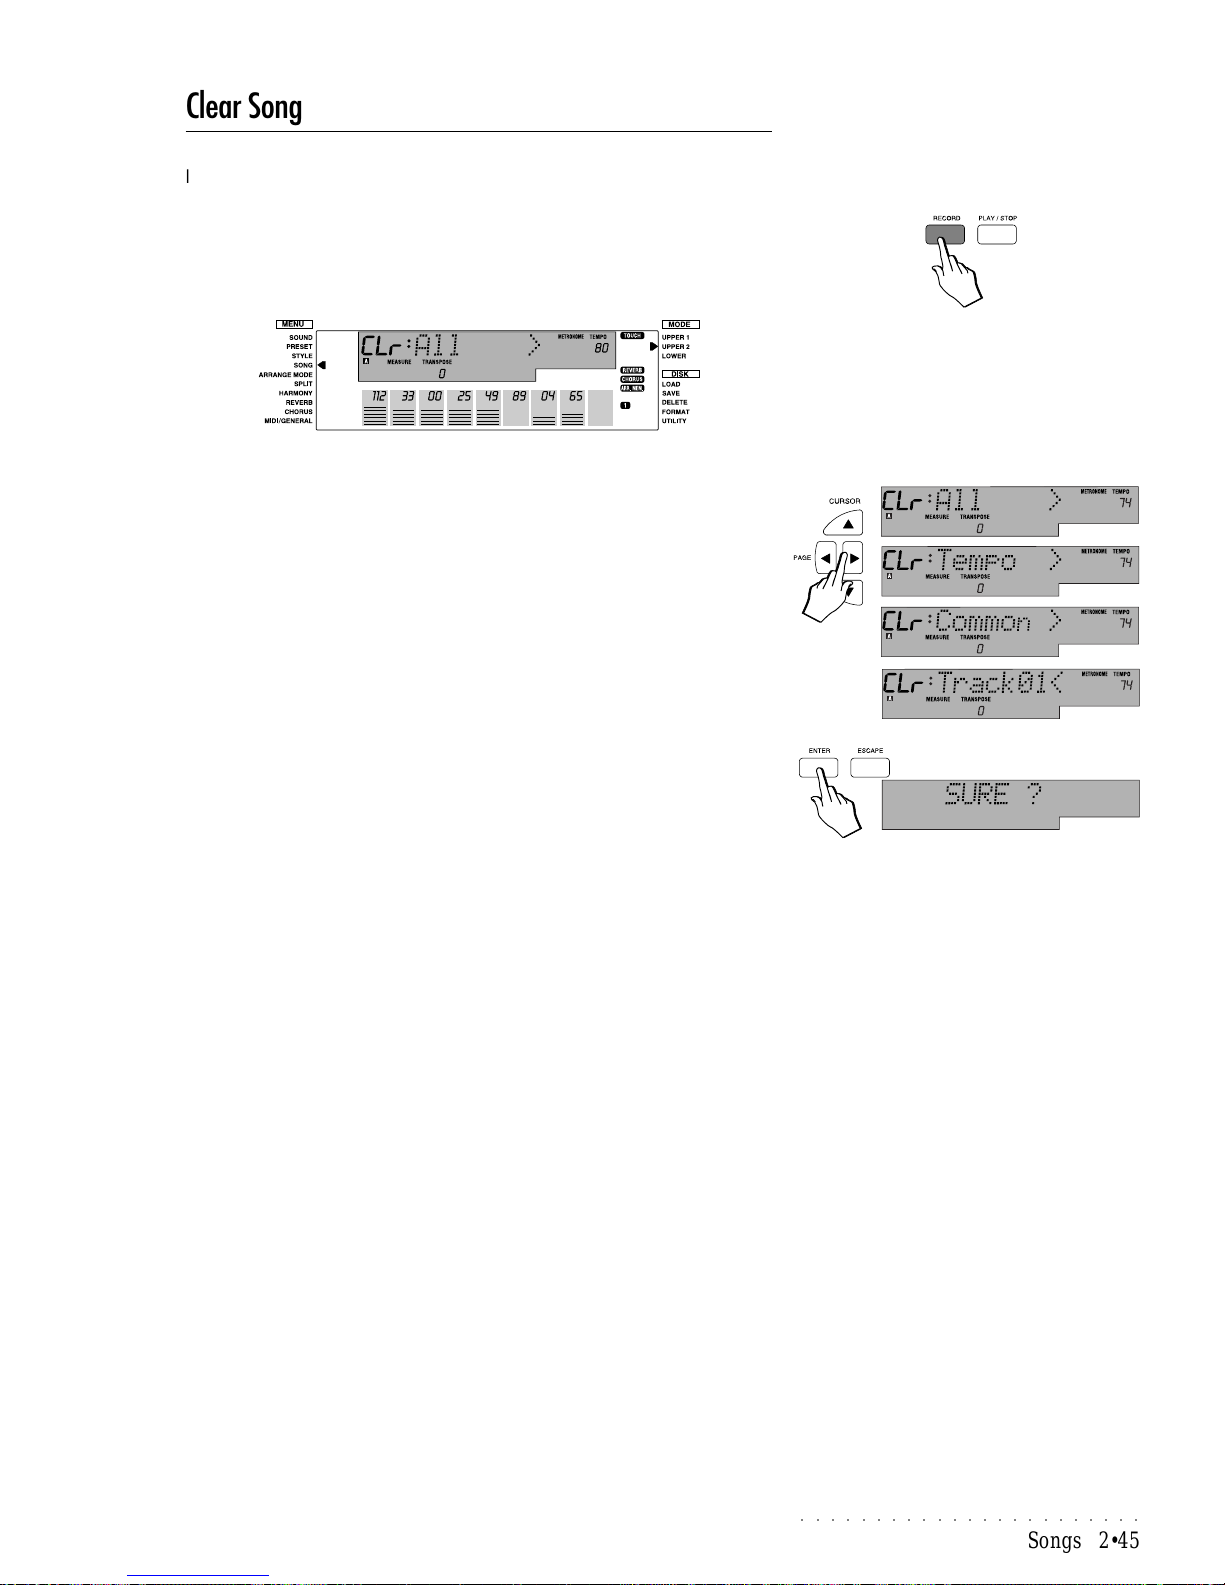
○○○○○○○○○○○○○○○○○○○○○○○
Songs 2•45
Clear Song
If you are not satisfied with how a track of a Song plays, you can cancel the
track using the CLEAR function.
1. Select the Song that you want to work on and hold down the RECORD
button (in the Sequencer) for about 2 seconds.
The first CLEAR option (Clear All) is displayed.
2. Use the PAGE buttons to select the Clear option required.
ALL : Clears (initializes) the SONG except the last programmed
Preset. In practice, only the recorded sequences are cancelled leaving the Song Preset intact.
TEMPO : Cancels any T empo changes that may have been recorded
in the Tempo track.
COMMON : Cancels all events from the Common track (for example,
Effect changes that may have been made at the time of
recording the Song).
TRACK 01 - 16 : Cancels the selected track. Use the T empo/Data buttons
to select other tracks.
3. Press ENTER.
A confirmation request appears (Sure?).
4. Press ENTER again to confirm the Clear operation.
Your Songs remain intact in memory even after power down.
Page 76
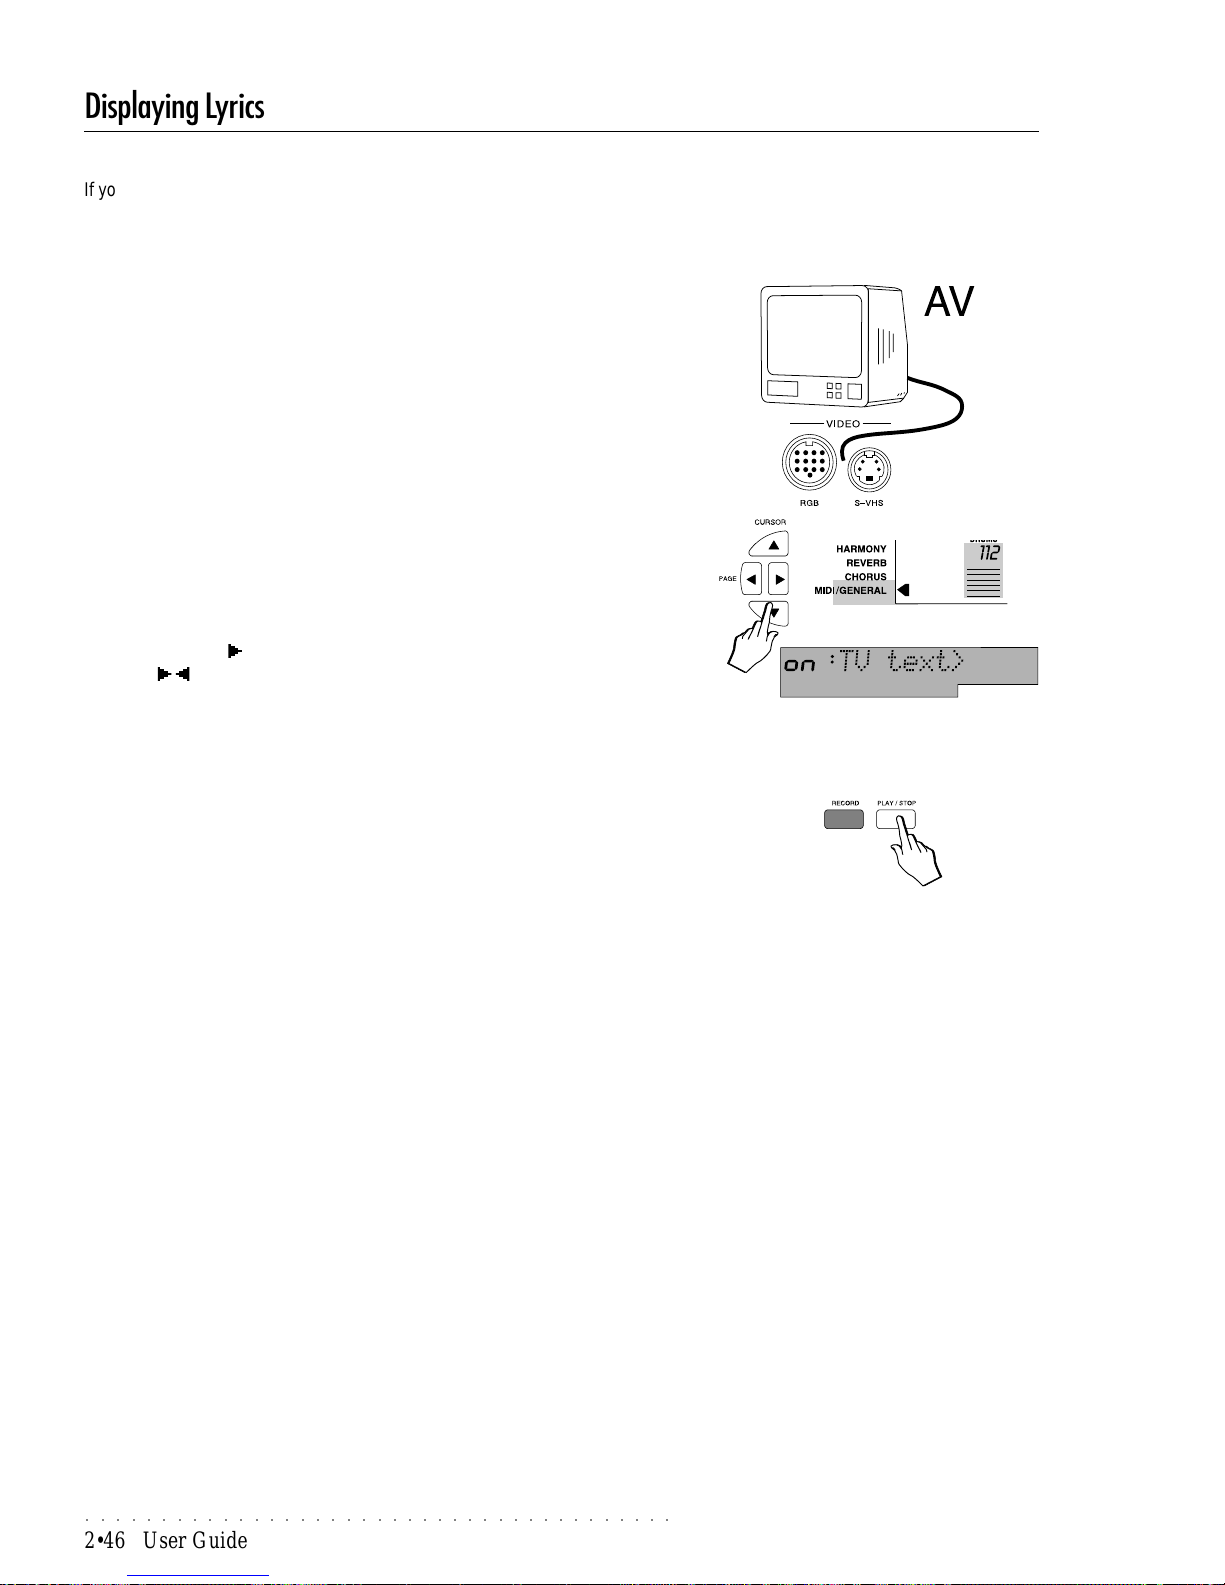
○○○○○○○○○○○○○○○○○○○○○○○○○○○○○○○○○○○○○○○
2•46 User Guide
Displaying Lyrics
If your Song contains a Lyrics track, an external monitor can show the lyrics in
playback, allowing you to sing along with the Song.
In public venues, the lyrics can be projected onto an external colour monitor for
the audience to sing along with (Karaoke application).
To display lyrics on an external monitor or domestic TV
1. Connect the RGB connector to the SCART socket of a domestic TV, or
the RGB socket of a computer monitor.
PS1000 is suplied with a special RGB/SCART video cable.
PS1000 is set by default to communicate with video systems conforming to
the PAL (European) standard.
For U.S.A. systems which use the NTSC standard, set the “TV” parameter
to NTSC under the MIDI/GENERAL function. If your TV set is fitted with the
S-VHS socket, use the PS1000 rear panel S-VHS connector.
2. Go to the “TV Text” page under the MIDI/GENERAL function and check
that the option is set to ON (default setting) to enable the connection
between the instrument and the TV set.
Use the PAGE button to select the TV Text page and use the TEMPO/
DATA / buttons to toggle between the On and Off status.
3. T une the TV to the AV channel.
To select the AV channel, consult the owner’s manual of the television set.
Computer monitors or studio videos normally operate in AV mode.
4. Select a Song using the method already described.
5. Press PLAY/STOP or START/STOP to start the playback.
The external monitor will scan the lyrics of the Song in synchronization with
the playback.
Page 77
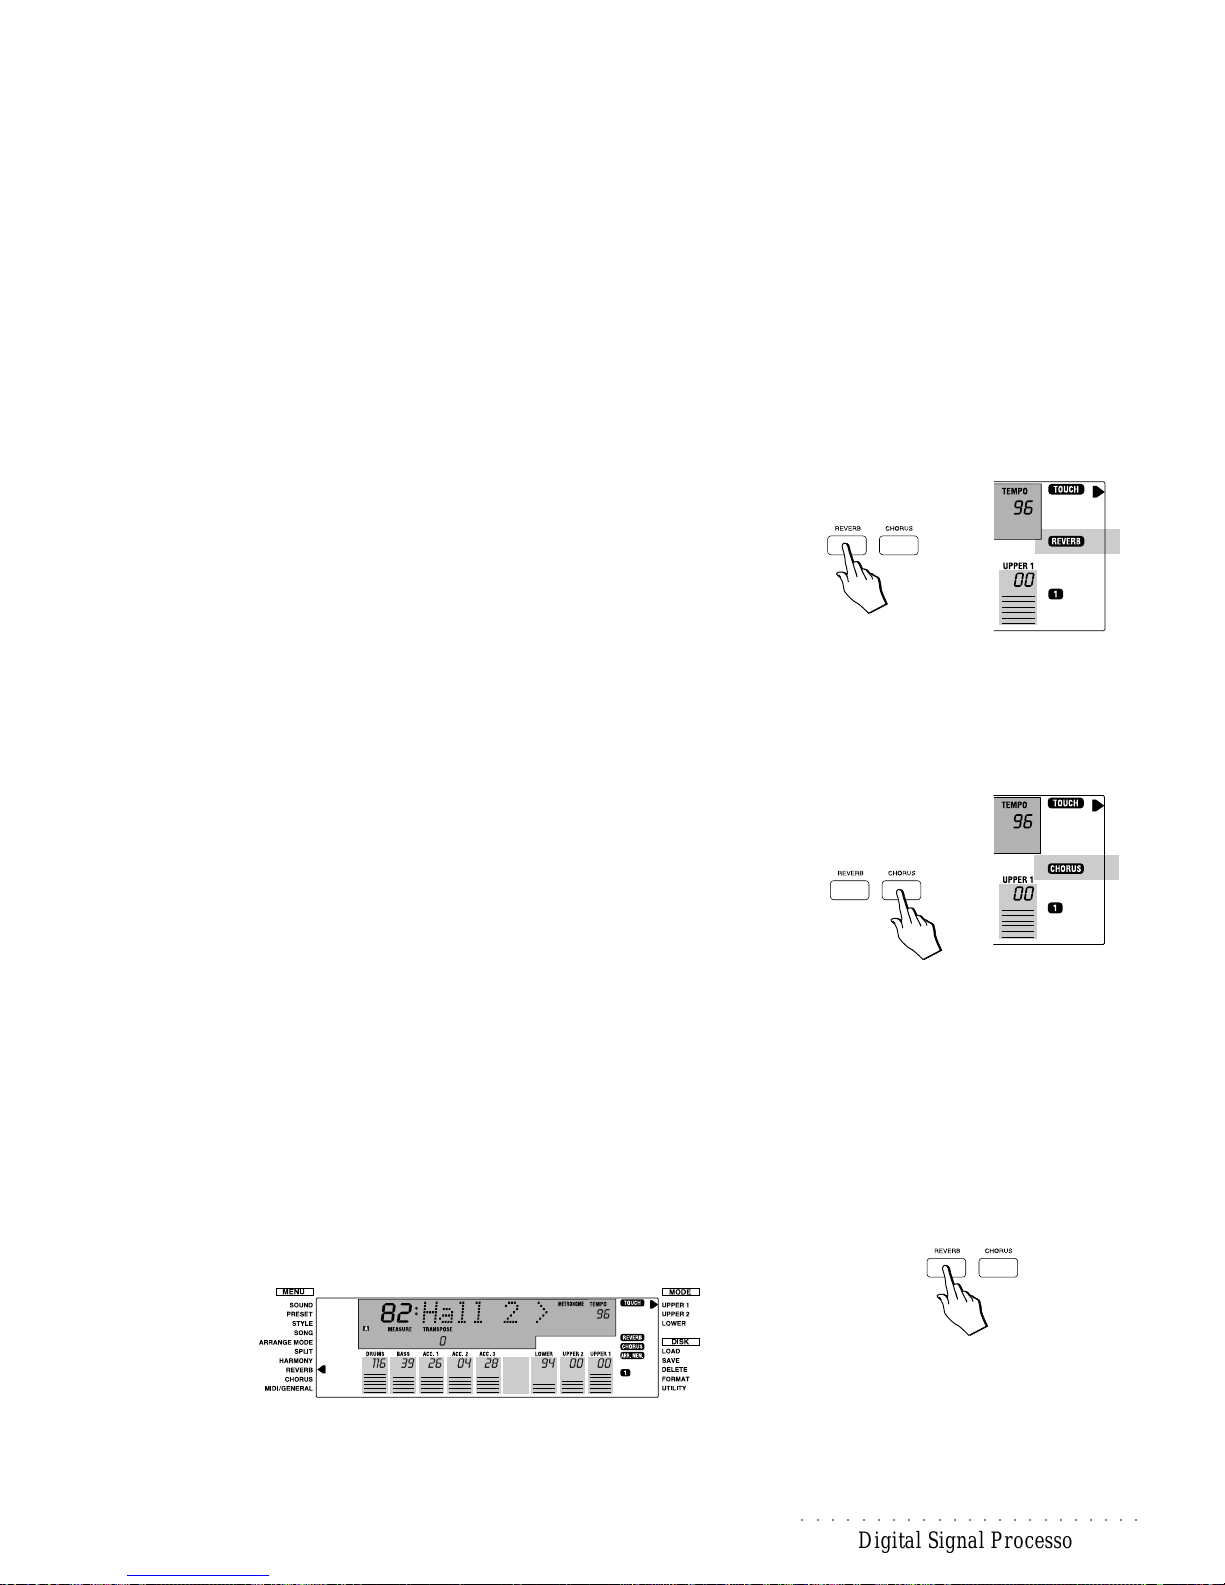
○○○○○○○○○○○○○○○○○○○○○○○
Digital Signal Processor 2•47
Ch. 7 • Digital Signal Processor
PS1000 allows you to route the Presets to the on-board multi-effects processor
which enhances the overall sound.
The Digital Signal Processor section consists of two units which process the
Presets with Reverbs and Delay/Modulation effects. Each processor has an
effect Send control to independently regulate the level (volume) of the effect for
each track of the current Preset.
The REVERB and CHORUS buttons are found in the group of buttons on the
right of the control panel.
REVERB
When the REVERB DSP is active (display indicator on), the current Preset is
processed by the assigned Reverb type. The overall ‘wet’ sound (processed)
can be heard through the headphones and is delivered from the stereo Left and
Right outputs.
When the REVERB DSP is deactivated (display indicator off), the Preset is not
processed by the assigned Reverb type and the sounds are therefore delivered
‘dry’.
Note: The Grand Piano Preset is not processed by the Reverb effect. When
you select and play the Grand Piano Preset, pressing the REVERB button to
activate the relative processor (display indicator on) does not add Reverb to the
Preset.
CHORUS
When the CHORUS DSP is active (display indicator on), the current Preset is
processed by the assigned modulating effect type. The overall ‘wet’ sound (processed) can be heard through the headphones and is delivered from the stereo
Left and Right outputs.
When the CHORUS DSP is deactivated (display indicator off), the Preset is not
processed by the assigned Chorus type and the sounds are therefore delivered
‘dry’.
Note: although you can add the Chorus effect and assign any of chorus effect
types to the Grand Piano Preset, you will not be able to memorize the effect
changes to the same Preset.
Assigning the effect types
Regardless of the current mode (Style/Real Time, Song Style, Song mode), the
method used to select and assign the effects to the current Preset is the same.
For the Reverb effects
1.Hold down the REVERB button to gain access to the Reverb DSP.
Note: The CHORUS processor contains
modulations and various delay/echo effects.
Also present is the ROT ARY effect which can
be changed from SLOW to FAST and vice
versa, using the ENTER and ESCAPE buttons.
Page 78
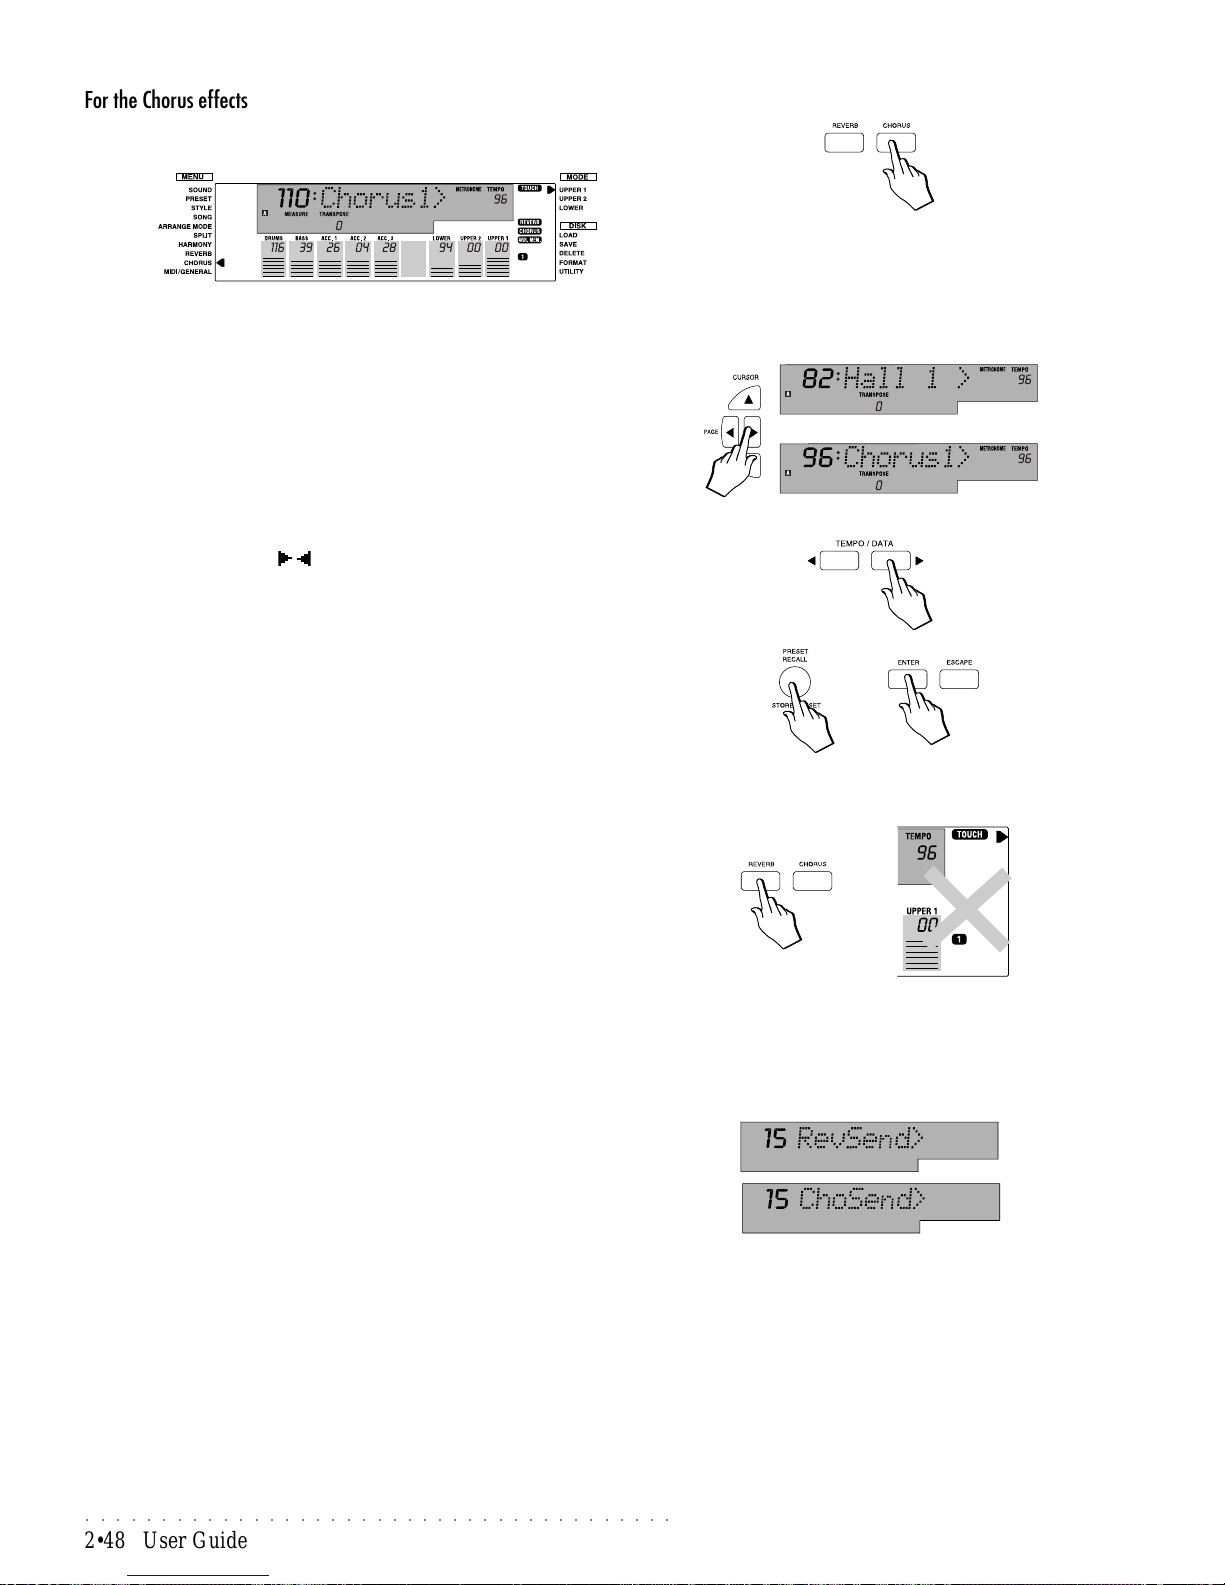
○○○○○○○○○○○○○○○○○○○○○○○○○○○○○○○○○○○○○○○
2•48 User Guide
For the Chorus effects
2. Hold down the CHORUS button to gain access to the Chorus DSP.
The left arrowhead moves next to the REVERB or CHORUS menu function.
The 8 digit display shows the name of effect type assigned to the current
Preset and the 3 digit display shows the general effect volume level.
3. Use the PAGE buttons to select a different effect type.
This method allows you to scroll through the effect types available. Both
DSP units (Reverb and Chorus) have 22 effect types to choose from.
One effect type from each DSP can be assigned to a Preset.
Change the general effect volume
4. Use the Tempo/Data / buttons to change the general effect volume.
Repeat the operations if necessary for the other DSP.
Save the effect types to the Preset
5. Hold down the STORE PRESET button for an instant and confirm the “?”
message with ENTER to save the changes to the current Preset.
If you select a different Preset, or select the same one again without saving
the changes, the newly assigned effects will be lost and the original settings
will be restored.
Deactivating (bypassing) the effects
You can bypass one or both effect types assigned to the current Performance
at any time.
• Press the REVERB or CHORUS button repeatedly to toggle between
the ON and OFF status.
The corresponding display indicator responds by turning on or off accordingly.
Adjusting the Send levels
Each track of the current Preset can be independently adjusted for the amount
of Reverb (RevSend) or Effect (ChoSend) applied.
RevSend : Controls the REVERB level for each track of the current
Preset.
ChoSend : Controls the CHORUS level for each track of the current
Preset.
How to set the Send parameters is explained in detail on page 2.7 of the Presets chapter, under the paragraph “Editing the Programmable Presets”.
Page 79
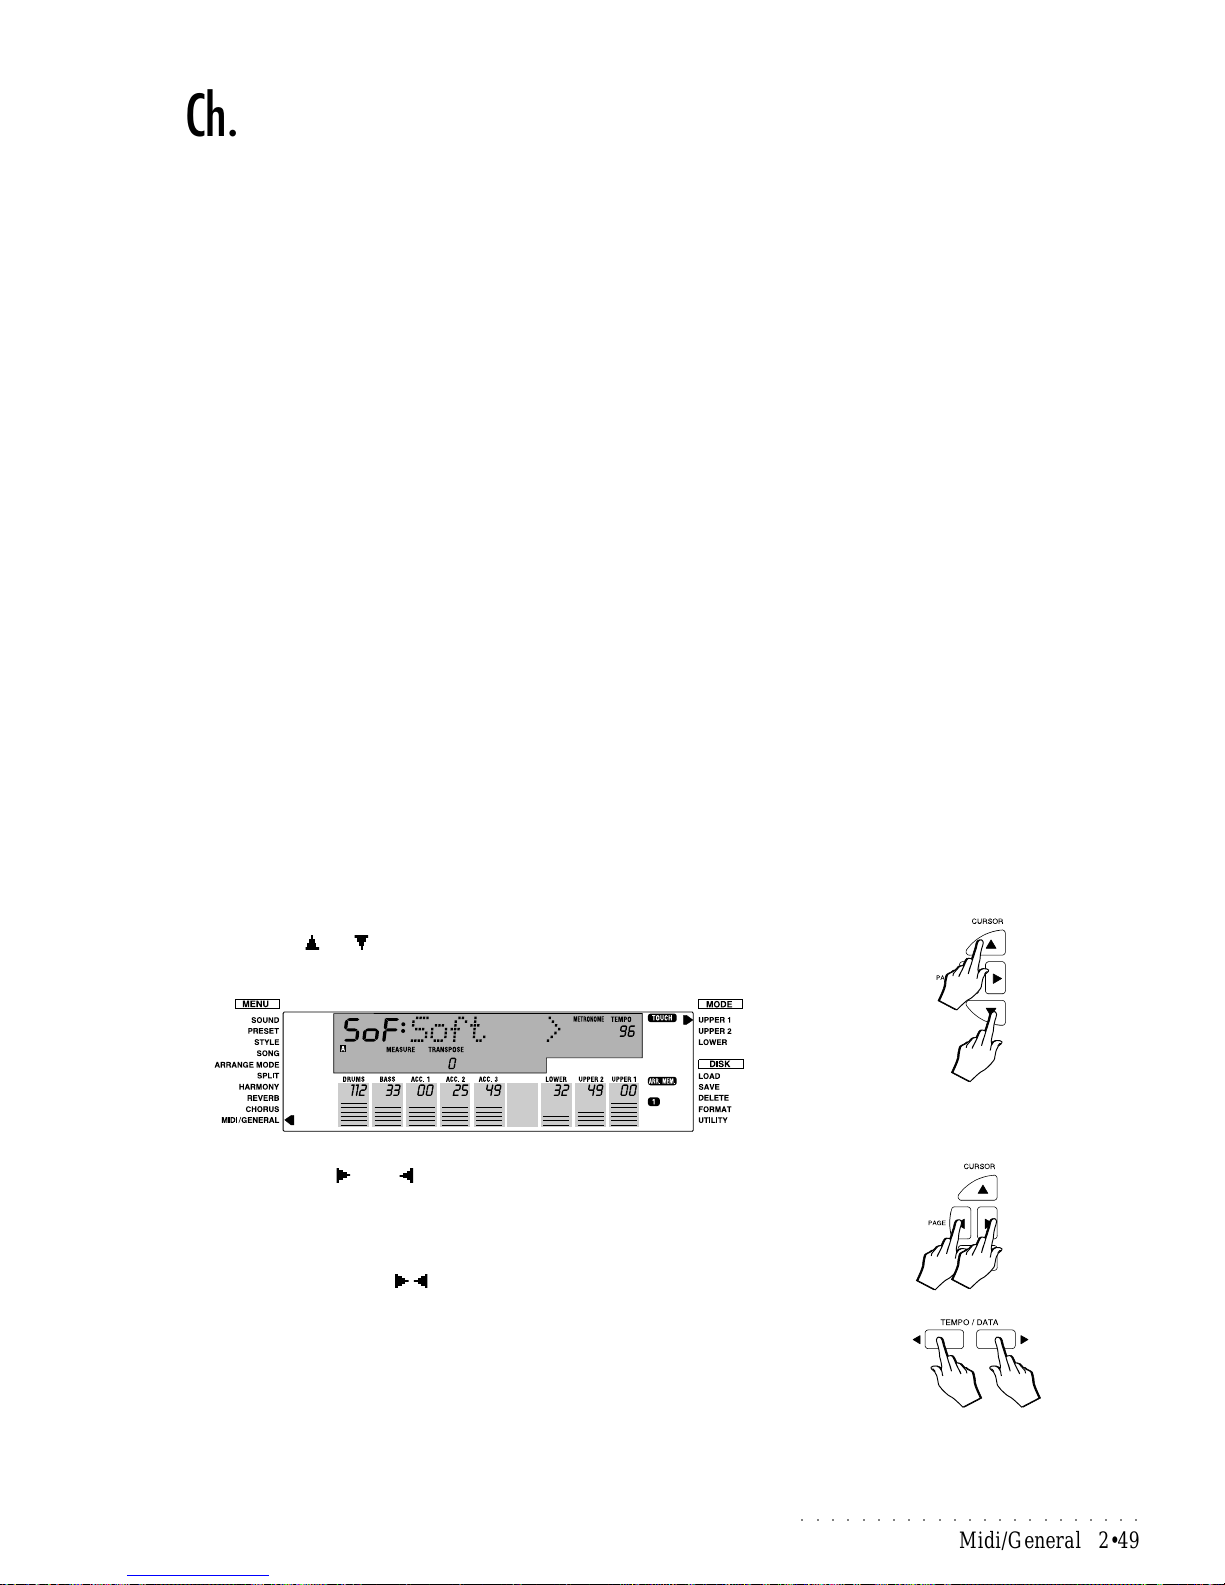
○○○○○○○○○○○○○○○○○○○○○○○
Midi/General 2•49
Ch. 8 • Midi/General
The Midi/General menu contains both the MIDI controls of the instrument and a
number of important General Control features.
The functions available are summarized as follows:
Soft Assigns a switch action function to the Soft pedal.
Damper Assigns a switch action function to the Damper pedal.
V olume Pedal Sets the Volume pedal (optional) to adjust the Overall
Volume or Section volume. It is also possible to program
the Volume jack to accept a Switch pedal and assign a
switch action function.
Tuning Controls the tuning of the instrument.
Key T ouch Adjusts the sensitivity of the keyboard for velocity changes.
Serial Port Sets the port for the type of computer being used (PC1,
PC2, MAC).
TV Set the video standard when connecting to a Television
set to project Song lyrics (PAL [Europe] and NTSC
[U.S.A.]).
TV:text Enables/disables the projection of Song lyrics on an ex-
ternal video device (TV , Monitor) connected to the instrument’s Video interface.
MIDI Gains access to several functions relating to the MIDI in-
terface.
Init Restores (entirely or partially) the instrument’s RAM
memory data to the original factory settings.
Last Sel Enables/disables the Last Selection Memory function.
Release Checks the version of the instrument’ s operating system.
To gain access to the Midi/General functions
1. Move the left arrowhead next to the MIDI/GENERAL menu function with
the Cursor [ ] or [ ] buttons.
The display shows the first function of the MIDI/General menu:
2. Use the PAGE [ ] and [ ] buttons to navigate through the pages of the
MIDI/General menu.
If you select the MIDI function, press ENTER to gain access to the relative
parameters.
3. Use the TEMPO/DAT A / buttons to change the value or status of the
selected parameter.
If you work on the MIDI parameters, press ESCAPE to exit the MIDI function and return to the MIDI/GENERAL menu.
The General settings and some MIDI settings remain memorized even after
turning the instrument off. Several MIDI settings can be memorized to the
Presets while others remain memorized after turning the instrument off.
Page 80
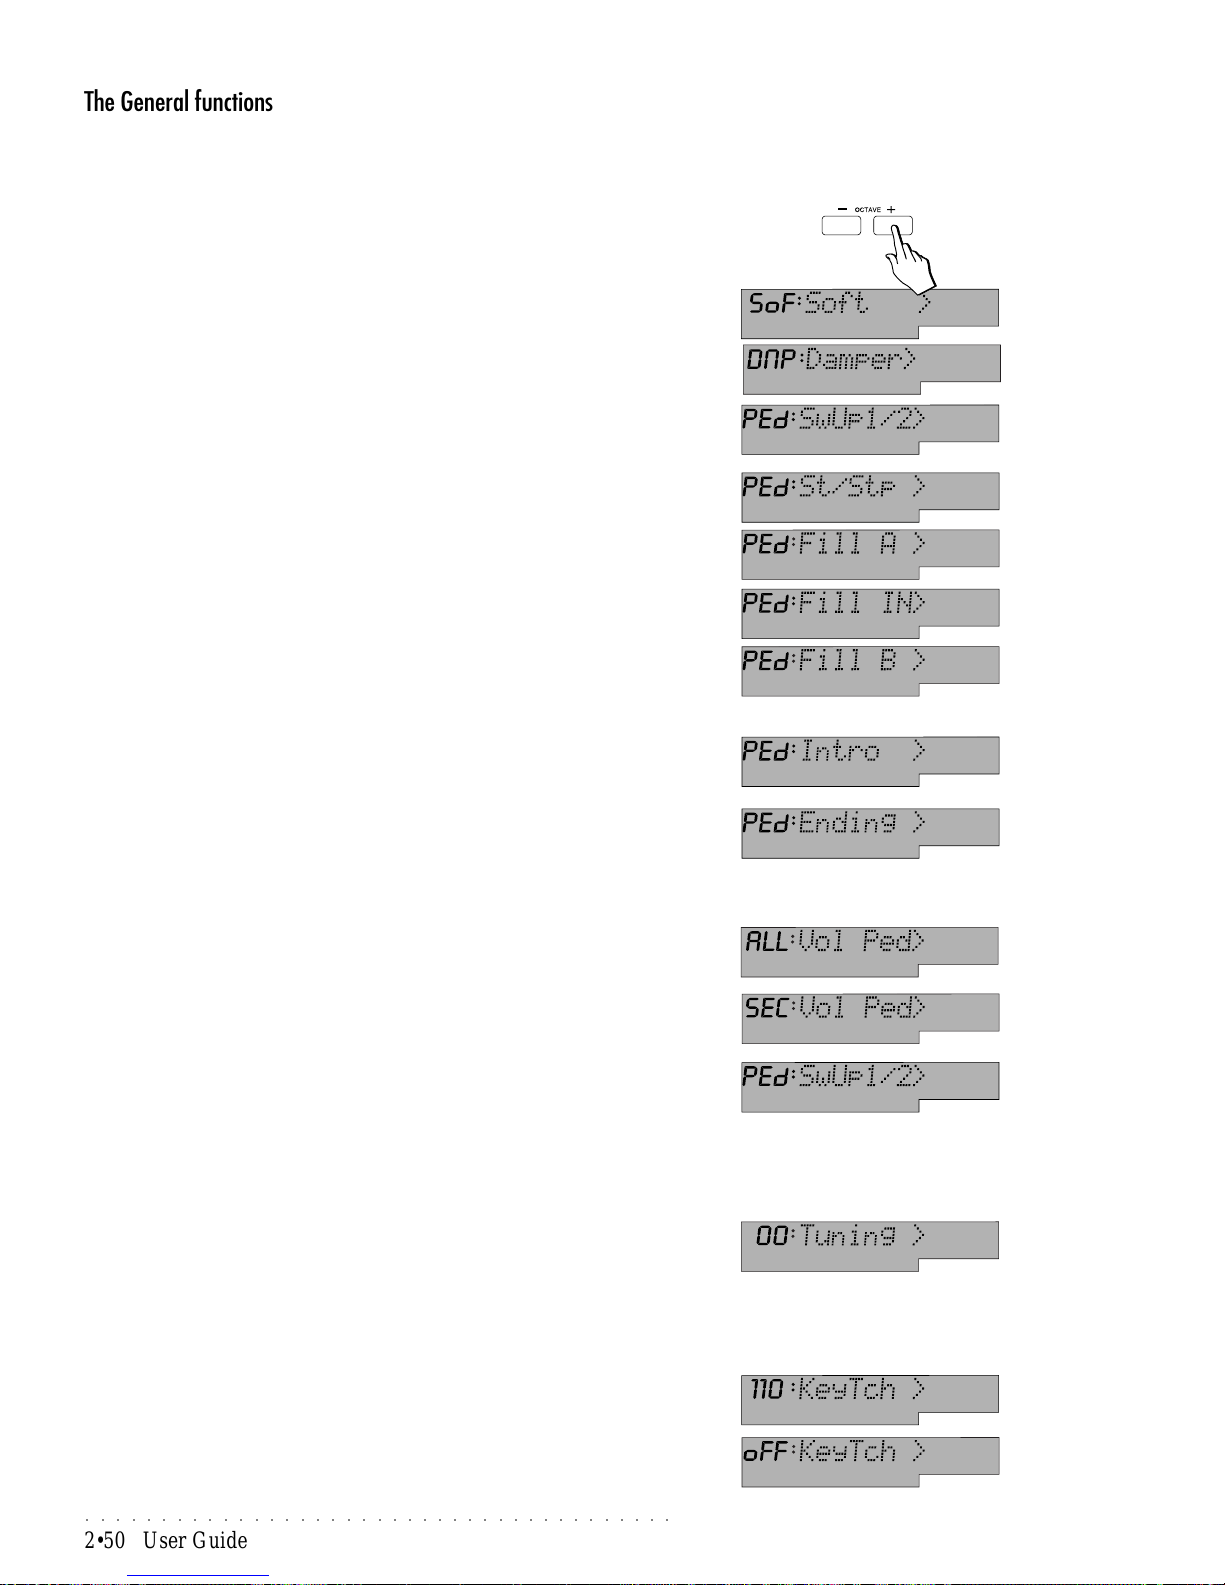
○○○○○○○○○○○○○○○○○○○○○○○○○○○○○○○○○○○○○○○
2•50 User Guide
The General functions in detail
SOFT and DAMPER
These two functions allows you to independently assign a switch action function to the Soft and Damper pedals. In default conditions, these two pedals
operate as Soft and Damper respectively .
After selecting the pedal you want to program, use the OCT AVE +/– buttons to
assign one of the following switch action functions.
Soft: the default setting of the Soft pedal. This function is exclusive to the
Soft pedal only .
Damper: the default setting of the Damper pedal. This function is exclusive to the Damper pedal only .
Ped:Sw Up1/2: allows you to switch from the Upper 1 and Upper 2 keyboard sections by pressing the pedal. This is useful to alternate between
the two sections in order change sound without interrupting your playing.
Ped:St/Stp: starts and stops the automatic accompaniments of the Styles.
Ped:Fill A: triggers the Fill A when playing with Styles.
Ped:Fill IN: triggers the Fill IN when playing with Styles.
Ped:Fill B/TAP: triggers the Fill B when playing with Styles. In Style Stop
status, the Pedal simulates the Tap Tempo function which allows you to start
the Style by tapping on the Pedal. See Tap Tempo in the Styles chapter.
Ped:Intro: presets the Intro of the current V ariation when playing with Styles.
If pressed while a Style is playing, the Intro plays as a fill.
Ped:Ending: triggers the Ending of the current V ariation.
VOLUME PEDAL
This function allows you to program the Volume pedal (optional) connected to
the rear-panel to operate as a continuous control pedal or switch action pedal
All: the default setting of the Volume pedal which controls the overall volume of the instrument.
Sec: select this setting to control the volume of single sections of a Preset
(the Preset’s keyboard tracks can be independently activated/deactivated
to the action of the section volume control).
Ped: select this setting to program the Vol Ped jack to accept a switch pedal.
Once you select the PED function with the Tempo/Data buttons, use the
OCTAVE +/– buttons to select the Switch action functions.
TUNING
This function allows the entire instrument to be tuned to match another instrument which may be slightly out of tune.
00:T uning: Use the Tempo/Data buttons (or the Octave +/ buttons) to adjust
the pitch of the instrument in steps of 1/64th of a tone through the range of
values –63 … 00 … +63. The 00 setting corresponds to standard A=440 Hz.
KEY TOUCH
This function allows you to adjust or disable the sensitivity of the instrument’s
keyboard for changes in key velocity.
KEYTCH: Use the Tempo/Data buttons (or the Octave +/ buttons) to adjust
the keyboard sensitivity (from 00-127) or disable it (Off). The higher the
value, the more force you need to apply to the keys to hear the sounds.
When Off, the TOUCH indicator in the display will cancel.
Page 81
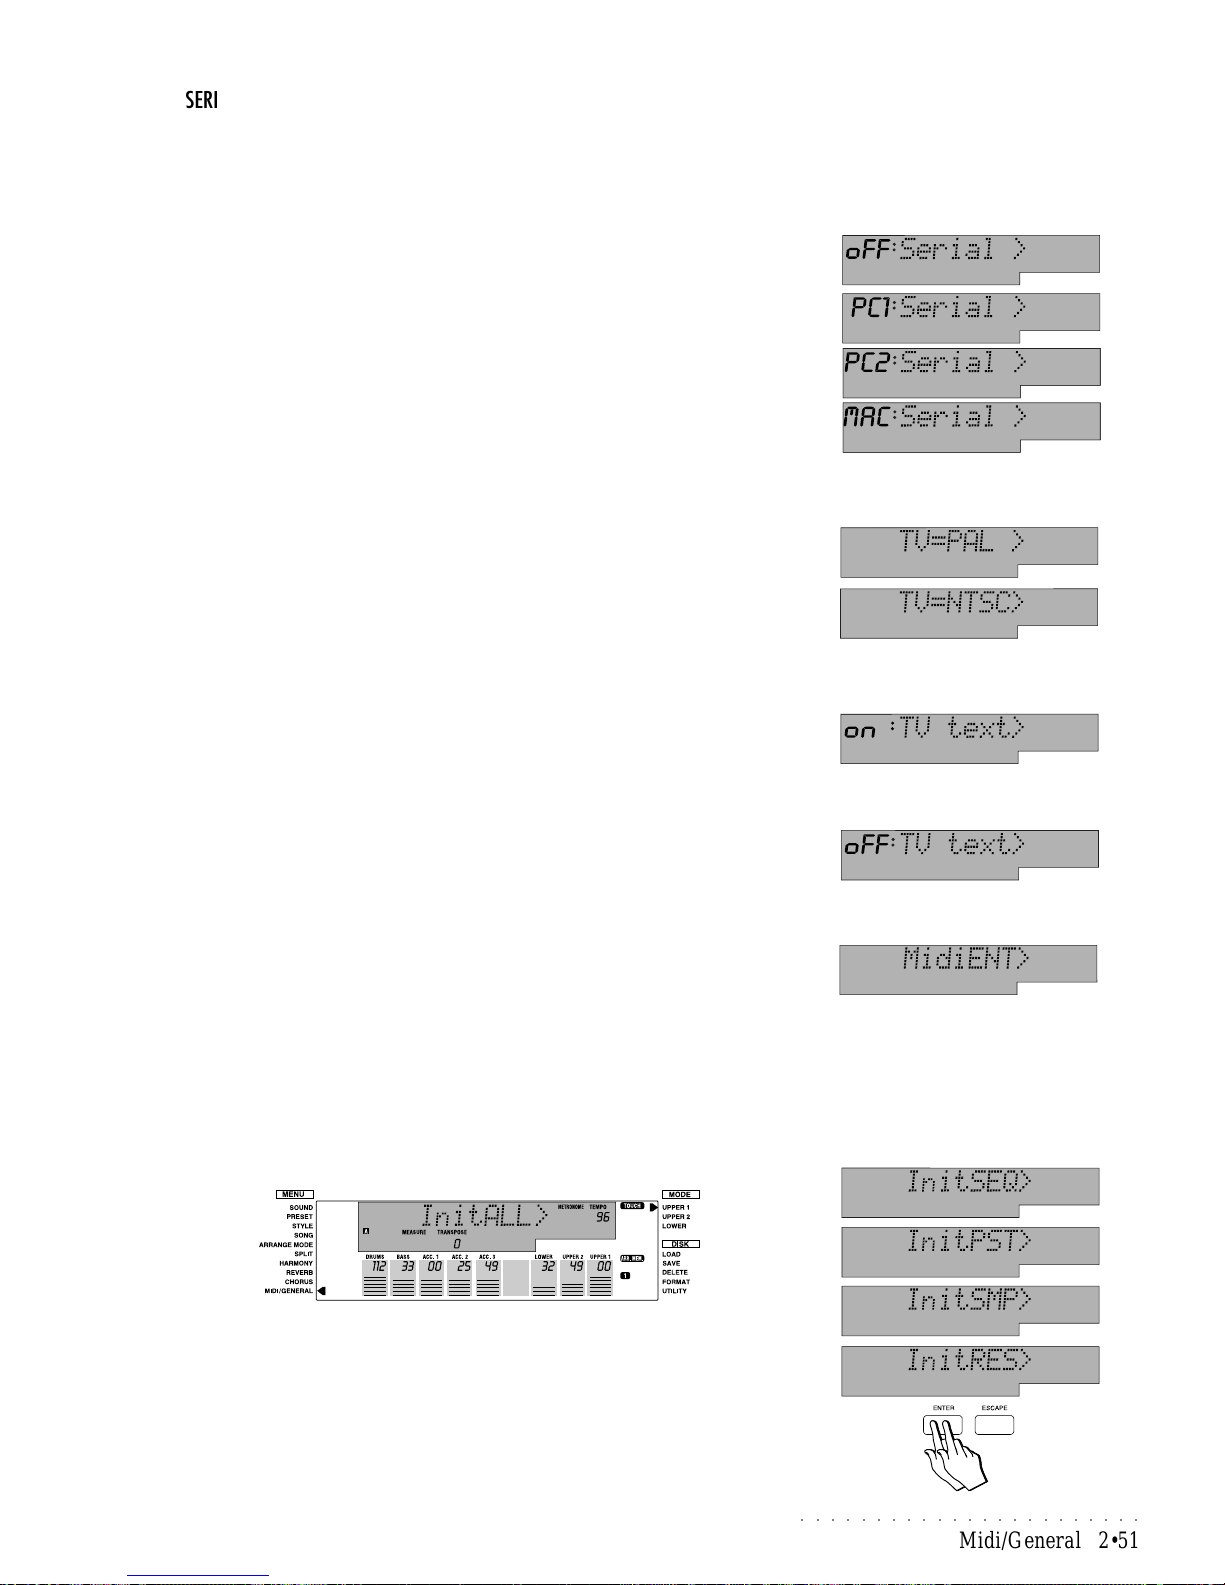
○○○○○○○○○○○○○○○○○○○○○○○
Midi/General 2•51
SERIAL
This function allows you to set the operating mode for the computer serial port on
the instrument’s back panel. This port allows two-way communication between
the PS1000 and a PC without the need for a MIDI interface. A cable to connect
the instrument to your PC or Macintosh can be obtained from your dealer.
Use the Tempo/Data buttons (or the Octave +/ buttons) to select the option
required.
Off: (default) All MIDI data is directed to the MIDI interface.
PC1: suitable for connection to a PC with 80386, or earlier processor. Only
use this mode if you have problems with PC2.
PC2: suitable for connection to a PC with 80486, Pentium or faster proces-
sor. Use this mode when possible.
MAC: suitable for any Macintosh computer.
TV
This function enables the video standard according to the television you connect to when using the PS1000 Karaoke function.
Use the Tempo/Data buttons (or the Octave +/ buttons) to select the option
required. The default setting is “PAL”.
PAL: The European standard (make sure to select this setting for Europe).
A special RGB/SCART Video cable is supplied with PS1000.
NTSC: The U.S.A. Video standard.
TV Text
This function enables or disables the PS1000 for the projection of Song lyrics
onto an external monitor or domestic TV set connected to the rear panel RGB
or S-VHS port.
Use the Tempo/Data buttons (or the Octave +/ buttons) to select the option
required. The default setting is “On”.
On: enables the instrument for the projection of songs lyrics.
Off: disables the instrument for the projection of songs lyrics.
MIDI
MidiENT: Contains 9 MIDI related parameters which can be accessed by pressing ENTER. How to select and modify these parameters is explained on page
2.55.
INIT (memory reset)
This function allows you to reset (initialize) the RAM memory of your PS1000
and restore the factory-set conditions. You can choose from the following options:
InitALL: clears the Sequencer, Preset and Sample memory in a single step
without escaping the current mode.
InitSEQ: clears the sequencer data.
InitPST: clears the user programmed Presets.
InitSMP: clears the Sample data contained in the Sample-RAM.
InitRES: Restores the memory to the factory-set conditions and sets the
istrument with the Grand Piano Preset selected and ready to play.
After selecting the parameter required, press ENTER twice to restore the
memory to the factory conditions.
Important: If you do not connect the Serial
port, this parameter must be set to OFF (default), otherwise the MIDI interface will remain
disabled for use.
IMPORTANT: The TV:T ext parameter must be
on to view lyrics on a TV or other external monitor.
Page 82
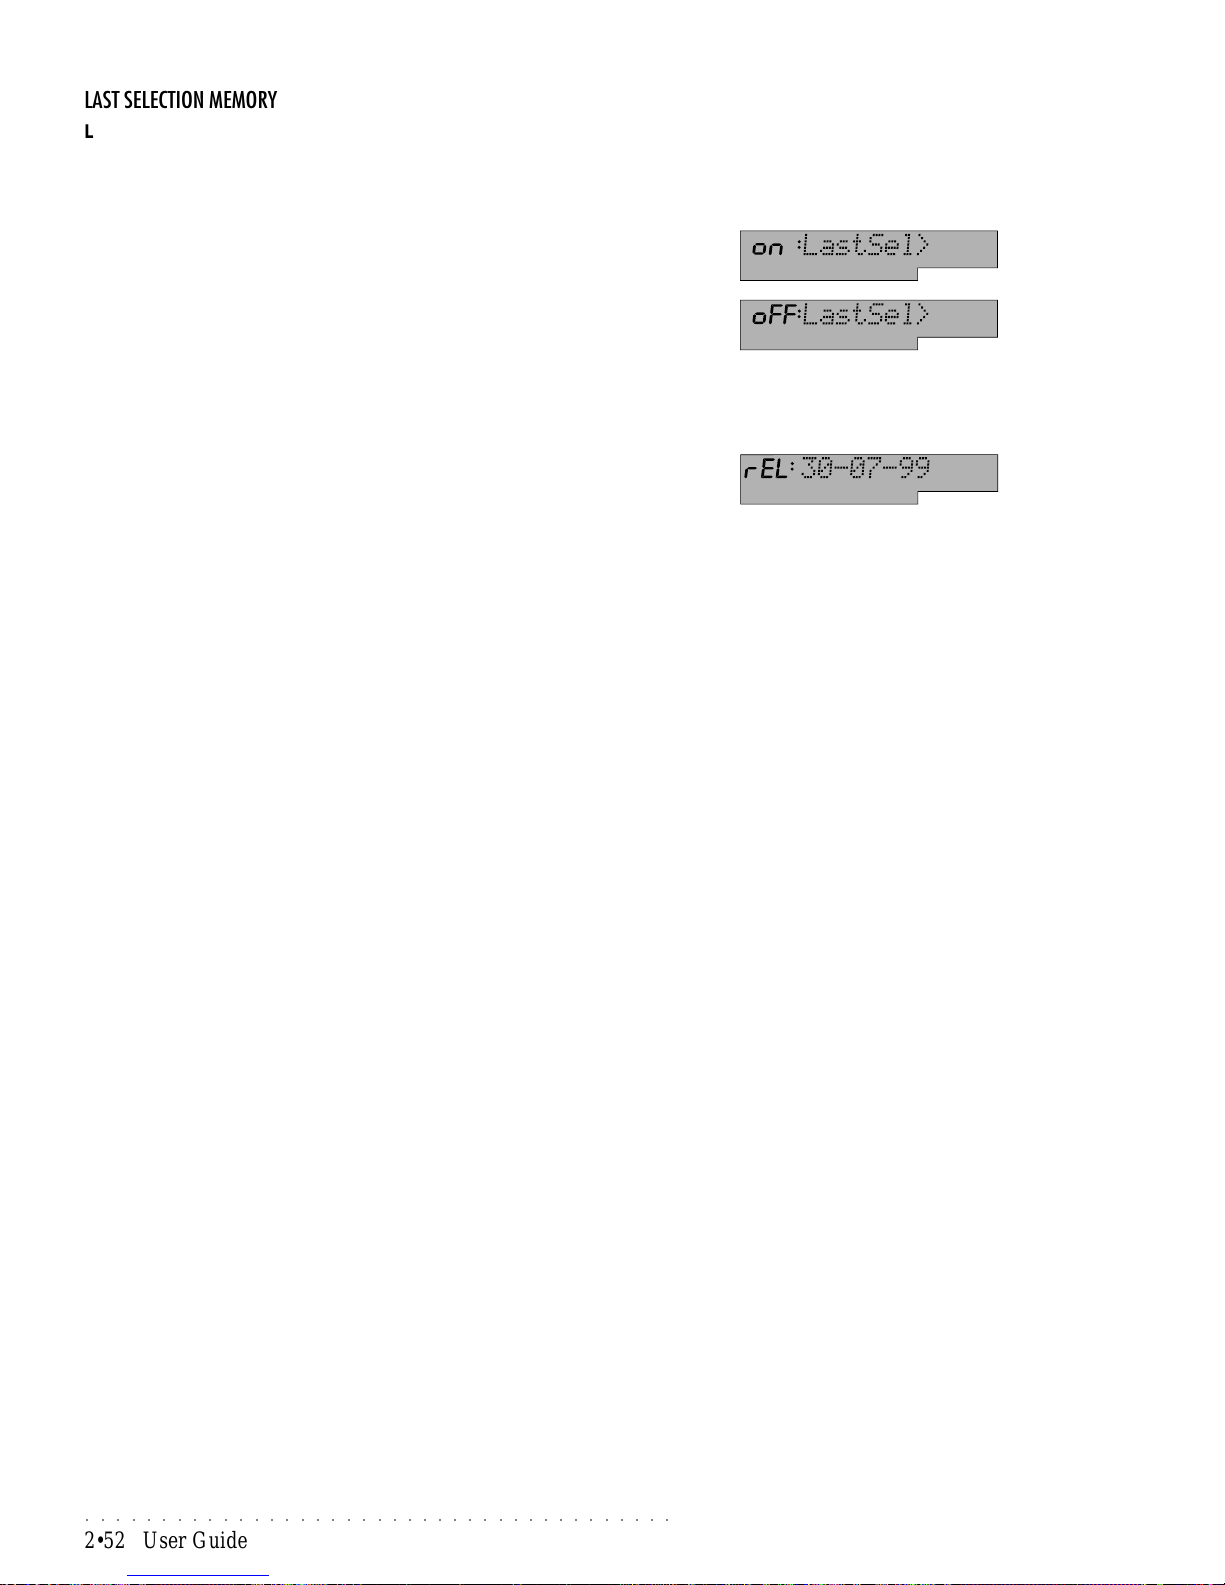
○○○○○○○○○○○○○○○○○○○○○○○○○○○○○○○○○○○○○○○
2•52 User Guide
LAST SELECTION MEMORY
LastSel: This function enables (on or disables (off) the Last Selection Memory
function.
On: With Last Selection Memory on, the last selection made in the Group
buttons of the Sound Groups and Style Groups sections are memorized.
For example, if you select button 4 of the Guitar Sound Group button, every
time you select the Guitar Group button, it will automatically recall the Preset n. 4. Similarly, it you select button n. 3 of the 16 Beat Style Group
button, every time you select the 16 Beat Style Group button, it will automatically recall the Style memorized in butotn n. 3.
Off: With Last Selection Memory Off, every time you select a Group button,
all the LEDs of buttons 1-8 will start to flash. The selection that you make
will not be memorized.
OPERATING SYSTEM VERSION
rEL: This function allows you to check the version of the last loaded PS1000
operating system.
Press ESCAPE to exit the General menu.
Page 83
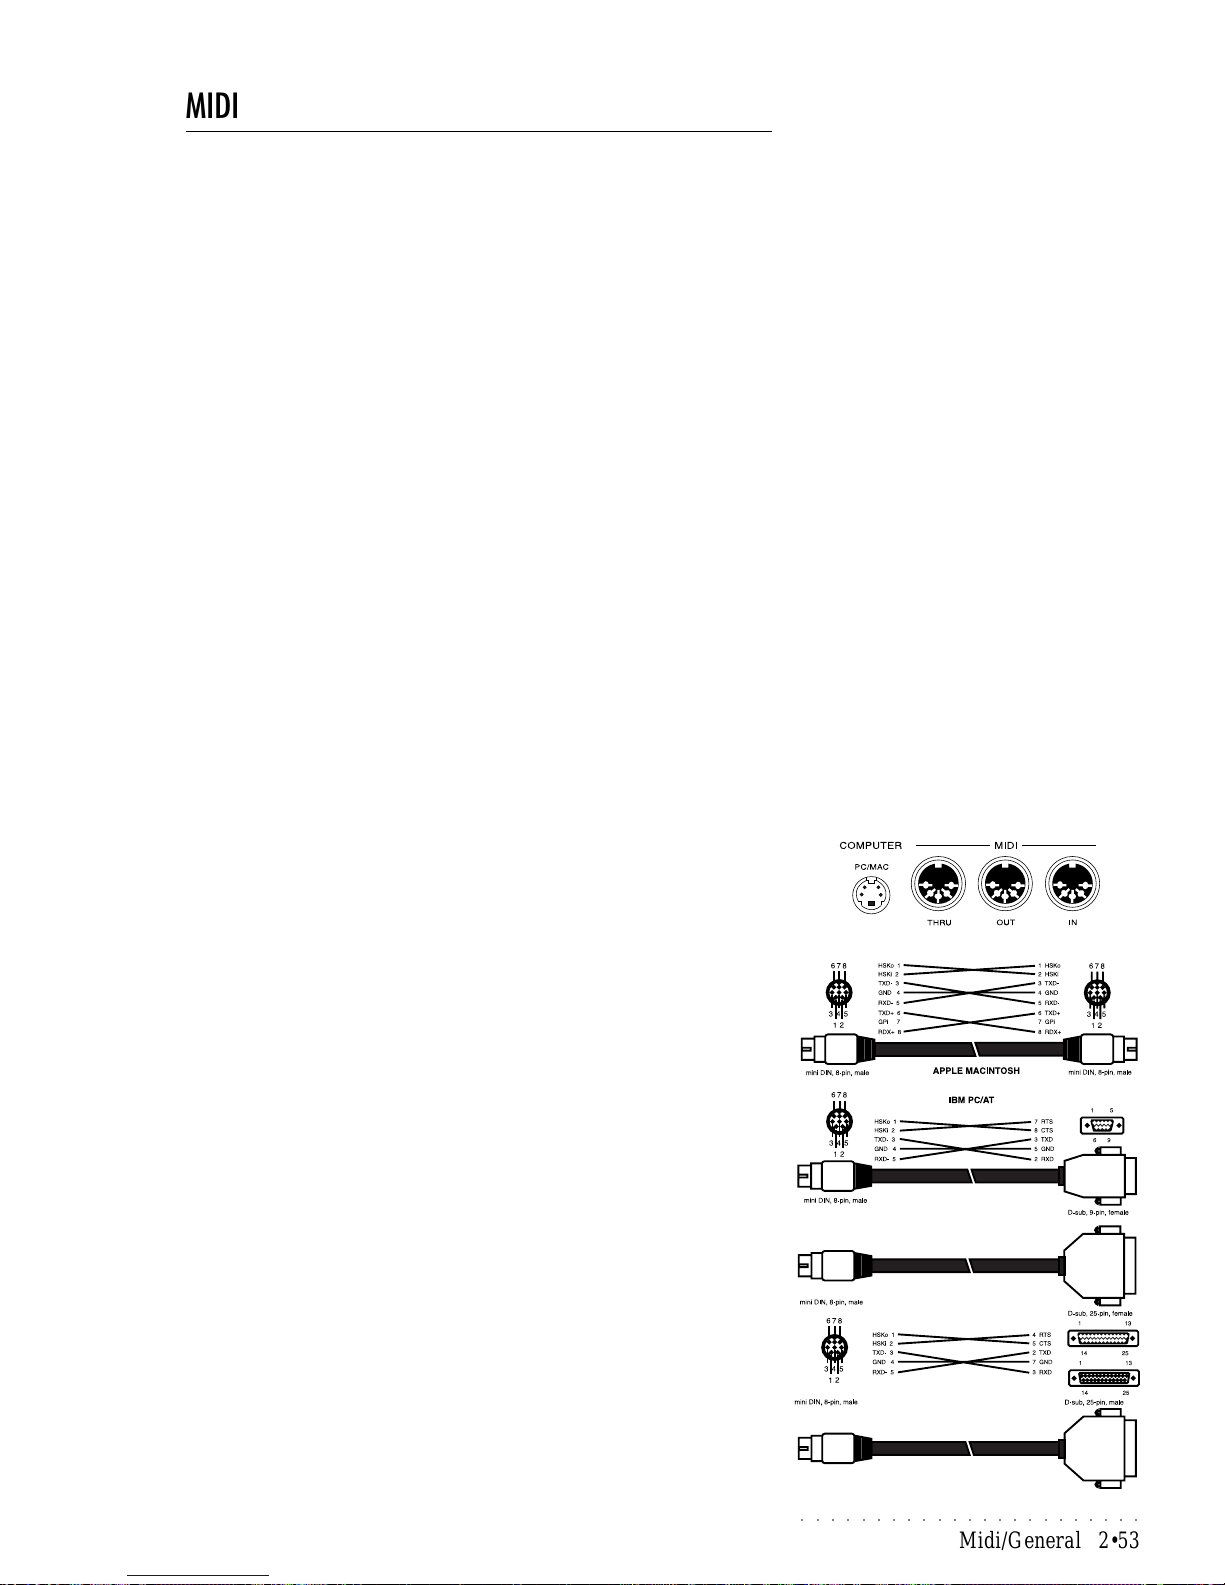
○○○○○○○○○○○○○○○○○○○○○○○
Midi/General 2•53
MIDI and the MIDI functions
What is MIDI?
MIDI is the abbreviation for “Musical Instrument Digital Interface”, a standard
interface used for communication between electronic musical instruments and
computers.
With MIDI it is possible to:
• use PS1000 as a master controlling device to control another instrument
(sequencer, expander, keyboard, etc.).
• control PS1000 using a master keyboard or another MIDI controlling device
(Guitar controller, Keyboard, Midi Piano, etc....);
• connect PS1000 to an external sequencer (computer) to program Songs
and Styles;
MIDI Connection rules
• An instrument which pilots another instrument is called the
Master
, while an
instrument that is piloted by a controlling device is called the
Slave
.
• The MIDI OUT of the master instrument is connected to the MIDI IN of the
slave instrument.
• Do not connect the same MIDI port between two instruments.
• When you connect external MIDI devices, the tracks of the external devices
and those of the PS1000 must be tuned to the same MIDI channels.
The PS1000 MIDI interface
PS1000 has a standard MIDI interface consisting of a MIDI IN, MIDI OUT and
MIDI THRU port.
The MIDI IN port receives MIDI data from an external controlling device.
The MIDI OUT port transmits data to an external device (computer , sequencer).
The MIDI THRU port allows the connection of several MIDI devices in series.
Connecting to the Midi interface allows you to control 16 MIDI channels.
The Computer port
The COMPUTER port allows two-way communication between the instrument
and a computer without the need of a MIDI interface. The communication takes
place via a single serial cable. When the COMPUTER port is in use, the MIDI
ports are disabled. Connecting to the COMPUTER port allows you to control
16 MIDI channels, as for the standard MIDI interface.
Apple Macintosh connection
The Macintosh (or compatible) must communicate at the velocity of 1 MHz.
Consult the owner’s manual of the sequencer software for relevant information.
Use the standard Macintosh serial cable. Connect one end of the cable to the
PS1000 and the other to the MODEM port of the Macintosh. Set the COMPUTER parameter under the General function to MAC.
PC IBM connection
The IBM-PC (or compatible) can communicate at the velocity of 31250 baud
(PC1) or 38400 baud (PC2) via the RS232 serial port.
Use standard serial cables DB8-DB9, DB8-DB25 to connect the PS1000 and
the PC’s serial port. Set the COMPUTER parameter under the General function to PC1 or PC2 as required.
Page 84
○○○○○○○○○○○○○○○○○○○○○○○○○○○○○○○○○○○○○○○
2•54 User Guide
About MIDI channels
PS1000 can receive MIDI data on 16 simultaneous MIDI channels, regardless
of the current mode. In transmission, PS1000 can transmit on 16 simultaneous
channels in Song mode only .
You can assign any MIDI channel (from 1…16) to each Preset track. A track
can also be excluded from MIDI by assigning the “Off” status. The MIDI channel configuration is independently programmable for each Preset and memorized with Store Preset.
Channel Lock
It is also possible to lock the MIDI configuration so that all Presets can be controlled via the same MIDI channel setting.
The Common and Chord channels
The Common Channel is primarily used for the receiving of Preset messages.
A Program Change message received on this channel will not change one of
the individual sounds on the PS1000, it will be interpreted as a Preset Change
message.
On the PS1000, assign a MIDI channel to the Common channel and set all
other channels off. The Common channel is enabled for reception only, not
transmission.
The Chord Channel is reserved primarily for the reception of chord information
in order to play the Styles. The Chord channel receives chord information from
a MIDI controlling device and control messages for the automatic accompaniments of the PS1000.
The two main uses of the Common and Chord channels are:
• to play the PS1000 keyboard sections (Upper 1, Upper 2, Lower) on a master keyboard. The master keyboard must transmit on the same channel as
the PS1000 Common Channel.
• to dedicate a special track in a sequencer or other instrument for the selection and control of PS1000 Styles, Presets, Songs, Effects and other functions (listed in the Appendix). In the external sequencer , a track is reserved
for the control data which is transmitted on the same MIDI channel assigned
to the PS1000 Common and Chord Channel.
Store the Common and Chord channel setting to the Preset with Store Preset.
MIDI numeration
The numeration of MIDI data usually adopts the system 0-127. Some instruments adopt the system 1-128. When you use devices that adopt a different
numeric system, you must remember to apply the appropriate conversion between one system and the other.
In Song mode, the factory set MIDI configuration of the Song Preset is the following:
Song track MIDI channel
1...16 1...16
In Style and Song Style modes, the MIDI configuration of the ROM Presets is the following:
Style track MIDI channel
Drums (F1) 10
Bass (F2) 2
Acc1 (F3) 3
Acc2 (F4) 4
Acc3 (F5) 5
Lower (F7) 6
Upper2 (F8) 7
Upper1 (F9) 8
Page 85
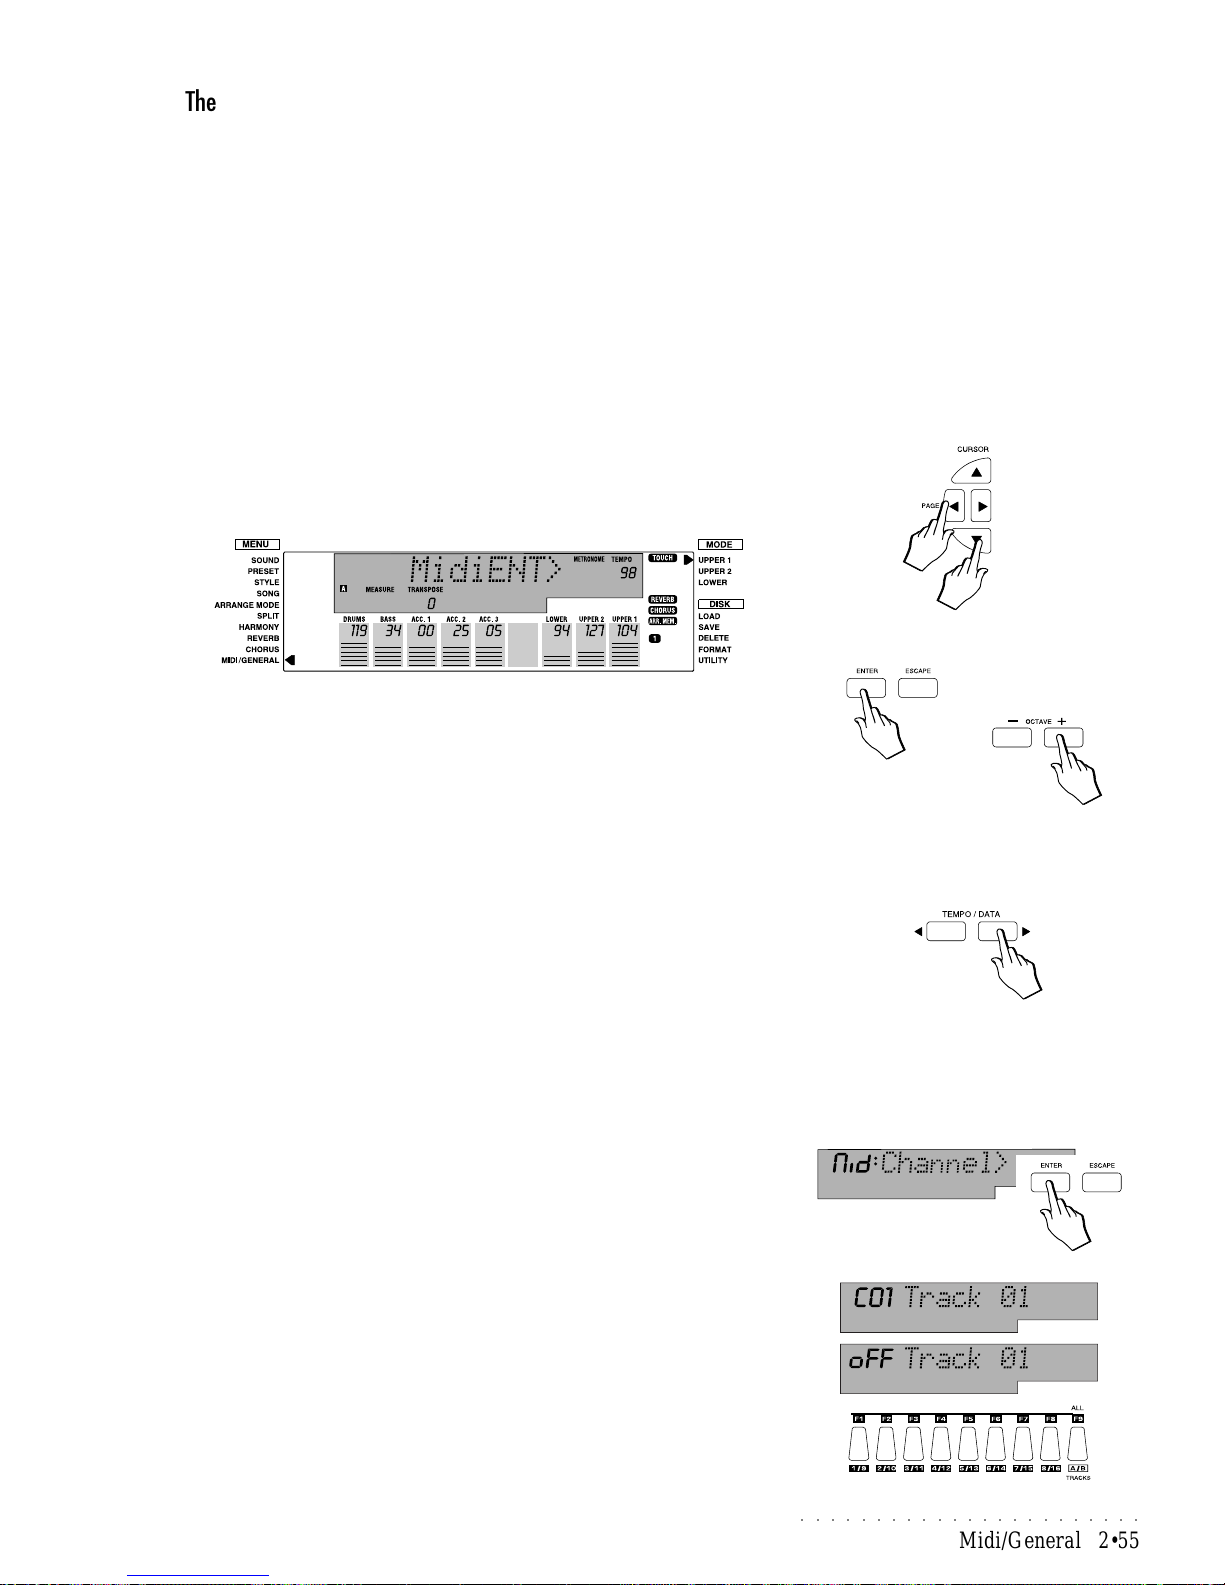
○○○○○○○○○○○○○○○○○○○○○○○
Midi/General 2•55
The MIDIENT menu
Under the MIDIENT menu are the functions which allow you to set the PS1000
for the kind of MIDI setup being used. Once accessed with ENTER, the MIDI
functions can be selected with the OCT AVE +/– buttons.
Channel, Local, Internal, G.Midi, Start/Stop, Chn.Lock, TranspIN, MidiSet
and Dump.
The CHANNEL and LOCAL functions are subdivided into several sub-pages
which are accessed with ENTER.
Once accessed, the relative parameters are selected with the OCTAVE +/–
buttons and modified with the TEMPO/DA T A buttons. Where applicable, T rack
parameters can be selected directly with the Function buttons F1 - F9.
Midi programming procedure
1. Select the MIDIENT menu under the MIDI/GENERAL menu.
Use the Cursor buttons to select the MIDI/GENERAL menu and the PAGE
buttons to select MIDIENT.
2. Press ENTER to access the MIDI menu
The display shows the first MIDI function available.
3. Use the OCTA VE +/– buttons to select the MIDI function required.
4. If you select the CHANNEL or LOCAL functions, press ENTER again to
gain access to the relative parameters.
The Channel and Local functions are further subdivided into additional subpages which are selected using the OCTAVE +/– buttons, or the Function
buttons F1 - F9.
4. Once selected, use the TEMPO/DATA buttons to change the value or
status of the parameter.
If you work on the Channel or Local functions, press ESCAPE to exit the
function and return to the selection of the other MIDI functions.
5. T o continue with other MIDI settings, use the OCTA VE +/– buttons to select
other MIDI functions.
The changes made under the CHANNEL and LOCAL functions can be saved
to the current Preset.
Channel
Use this parameter to assign a MIDI channel to the Preset tracks and to set the
CHORD and COMMON tracks.
To gain access to the parameters of the Channel function, press ENTER.
Assign a MIDI channel to the tracks
The 8 digit display shows the number of the track (e.g. track 01). The 3 digit
display shows the Channel number (C01 - C16) assigned to the track, or
the Off status for MIDI transmission/reception.
Select the tracks with the OCTAVE +/– buttons. Use the TEMPO/DATA
buttons to assign a MIDI channel to the track or to set the Off status.
Another way of instantly selecting a track is to press the corresponding
function button (F1 - F8). Use button F9 to toggle between track sets A (01-
08) and B (09-16).
Page 86
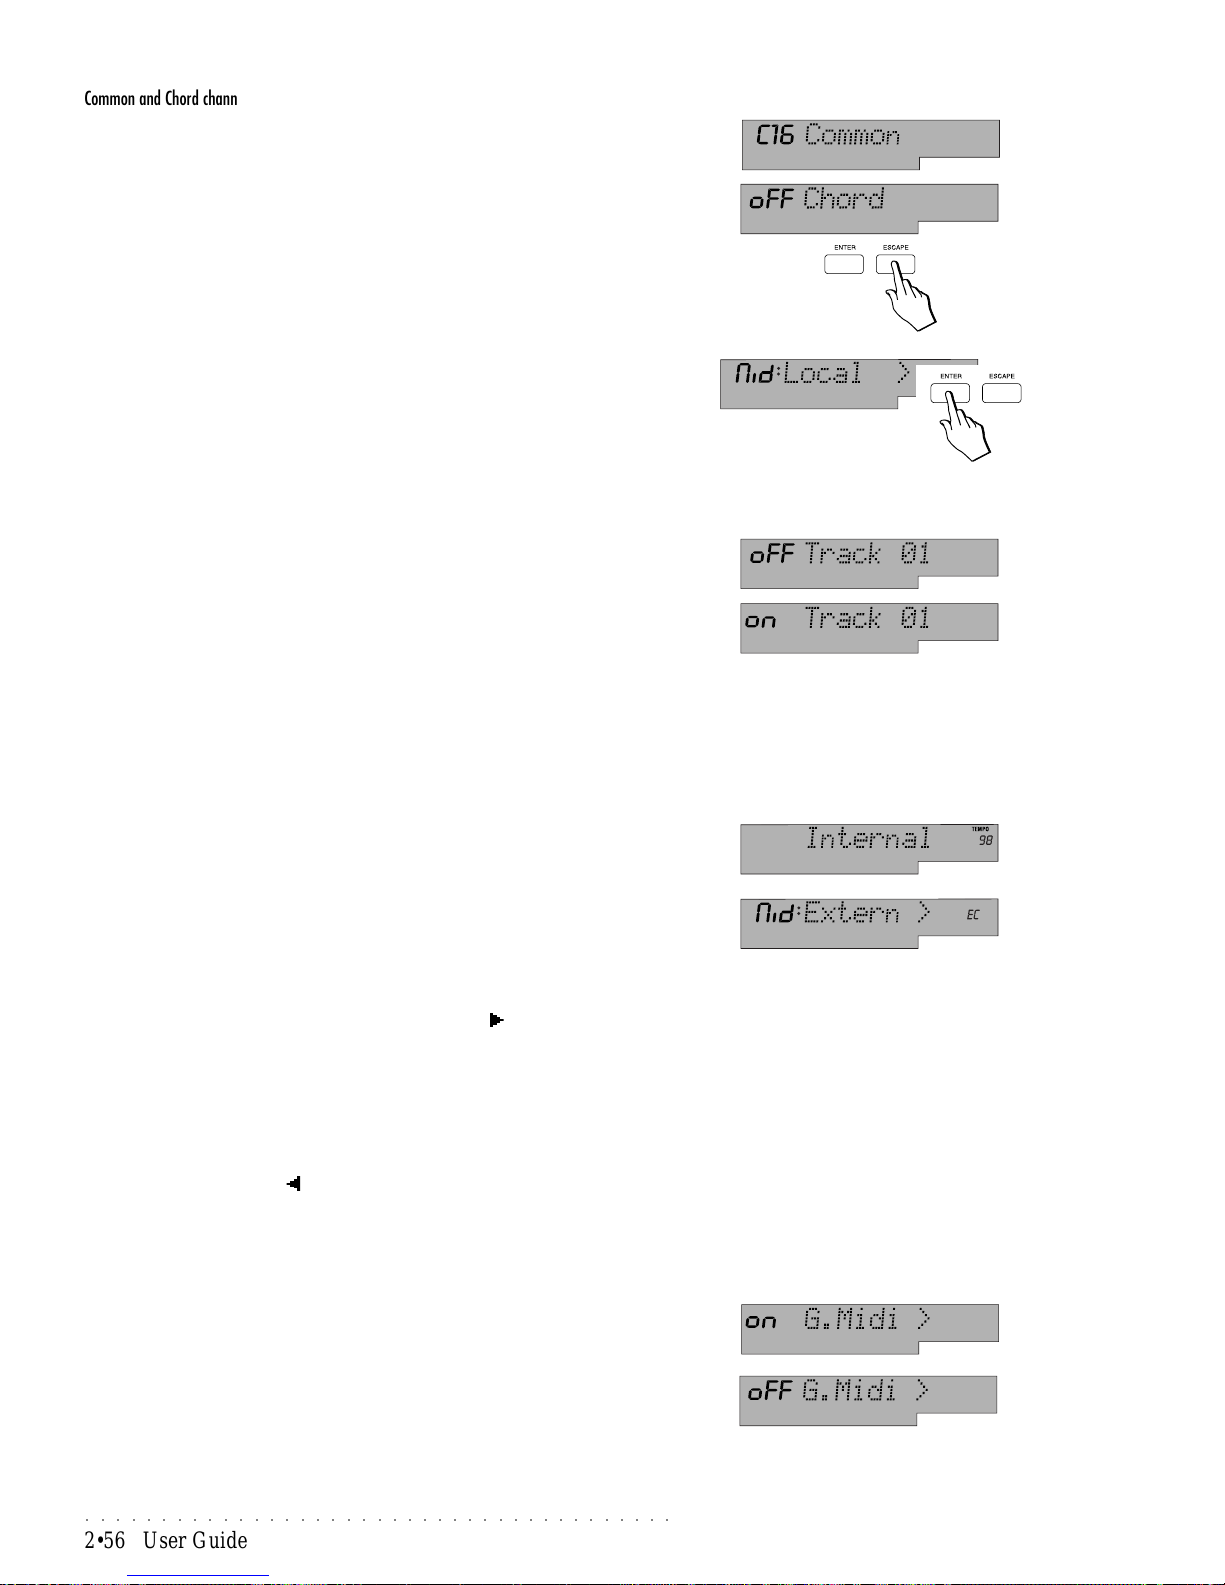
○○○○○○○○○○○○○○○○○○○○○○○○○○○○○○○○○○○○○○○
2•56 User Guide
Common and Chord channels
After track 16, the OCT A VE +/– buttons select the Common track followed
by the Chord track, both displayed with the associated channel number or
Off status.
Use the TEMPO/DATA buttons to assign a different MIDI channel or Off to
the Common and/or Chord tracks.
After setting the MIDI channels, press ESCAPE then use the OCTAVE +/–
buttons to continue with the selection of other MIDI functions.
Local
With the LOCAL (On/Off) function, you can decide whether or not each track of
the PS1000 controls the sound generator of each programmed section of the
sequencer (Style, Song Style, Song). It is possible to independently disconnect each track from the internal sound engine.
To gain access to this parameter press ENTER.
Set the Local parameter for each track
The 8 digit display shows the number of the track (e.g. track 01). The 3 digit
display shows the On/Off status for Local operation.
Select the tracks with the OCT AVE +/– buttons and use the TEMPO/DATA
buttons to set the On/Off status.
Another way of instantly selecting a track is to press the corresponding
function button (F1 - F8). Use button F9 to toggle between track sets A (01-
08) and B (09-16).
Once you have set your Local requirements, press ESCAPE to exit Local
and use the OCTAVE +/– buttons to select other MIDI functions.
Internal, External clock
This function allows you to select whether the PS1000 sequencer will synchronize to the internal clock or to an external clock.
Internal: the PS1000 Styles, Songs and Song Styles (sequencer) will syn-
chronize to the internal clock.
External: the PS1000 Styles, Songs and Song Styles (sequencer) will syn-
chronize to an external clock.
With External set, the PS1000 Tempo will correspond to the Tempo setting
of the external clock device (computer, sequencer) connected via MIDI to
the PS1000.
Select the option “External” with the TEMPO/DA T A button. With External
selected, the PS1000 Styles, Songs and Song Styles (sequencer) will synchronize to an external clock. The current Tempo setting will no longer be
shown but is will be replaced by the symbol “Ec” (External Clock) as an
indication that the instrument is set for External Clock operation. In this
case, the internal sequencer waits for a start message from the external
clock device.
Use the TEMPO/DATA button to set for Internal operation.
General Midi
The General MIDI function allows optimum compatibility with the General MIDI
standard. Before loading a G.M. file from Disk, check that this function is set to
On (default setting).
If you want to communicate via MIDI with non General MIDI instruments,
set this parameter to OFF.
Use the TEMPO/DATA buttons to toggle between ON and OFF.
To work via MIDI with the GMX standard, set the General Midi parameter
Off - this will allow you to use all the PS1000 sound banks and the 44 Effects.
Page 87
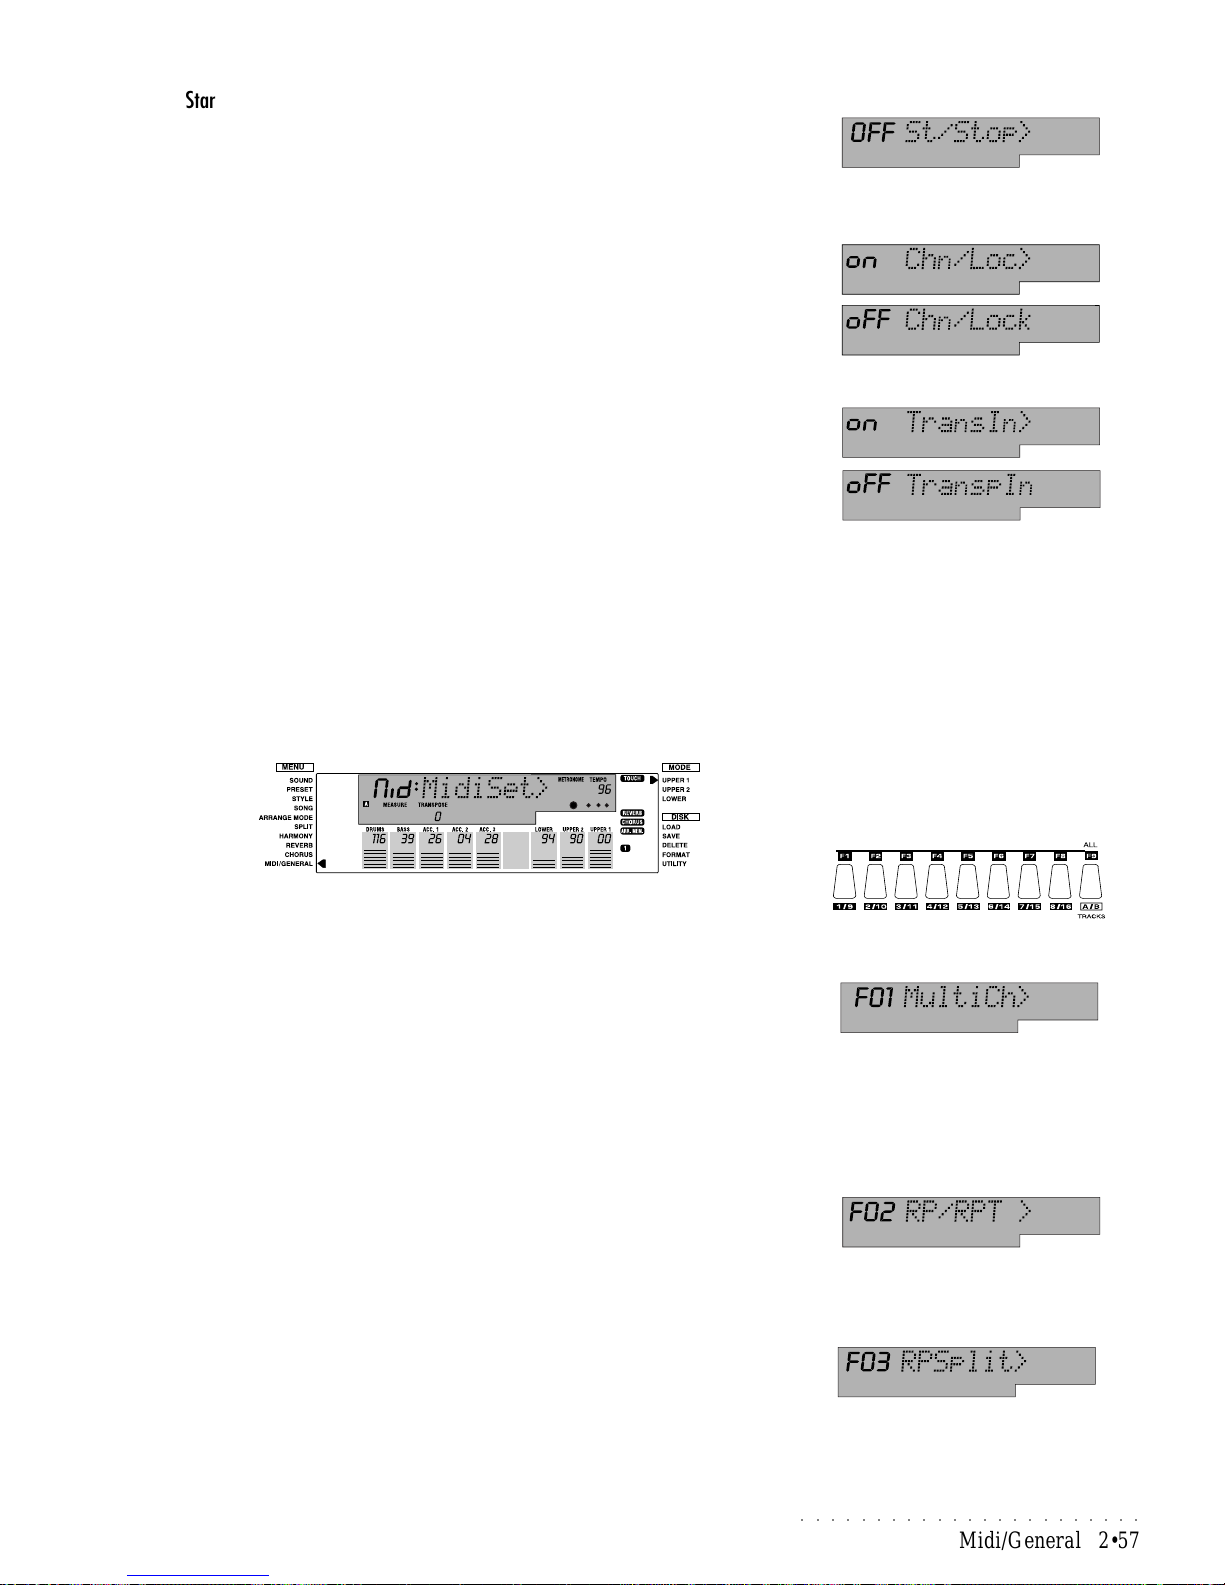
○○○○○○○○○○○○○○○○○○○○○○○
Midi/General 2•57
Start/Stop
This function selects whether or not the PS1000 will start with a Start command
received via MIDI from an external device (computer, sequencer).
Use the TEMPO/DATA buttons to toggle between ON and OFF.
Channel Lock
Normally, your MIDI settings are saved as a part of the current Preset (when
you press the Perf Store button), and each Preset can have its own distinct
MIDI settings. If, however, you want the current MIDI settings to remain in
effect, regardless of which Preset you select, turn the LOCK function to ON.
Use the TEMPO/DATA buttons to toggle between ON and OFF.
Transpose IN
This function allows the pitch shifting (in half steps) of the MIDI notes sent to
the PS1000 via the Master controller. To deactivate MIDI transposition, set the
parameter to OFF.
Use the TEMPO/DATA buttons to toggle between ON and OFF.
Midi Set
This function allows you to select a preset for the MIDI controlling device that
you intend using to pilot the PS1000. Thanks to this function, you can quickly
recall the MIDI setting best suited to the Midi controlling instrument (Sequencer,
Computer, Accordion, Piano, Keyboard, Guitar etc.).
The MidiSet presets automatically locks the current Midi channel settings (Channel Lock ON) to allow you to load any disk-based file to memory without affecting the MIDI settings and the MidiSet preset.
Once you have selected the MIDISET function, use the function buttons F1 - F9
to select the preset required.
MIDISET Presets (Midi Lock=ON)
• MultiCh (F1): All Channels from 01 to 16 open, Common = Of f, Chord = Off.
With the MultiChannel preset you can connect to an external Sequencer or
Computer to program your sequences using the PS1000 as the sound generator. Connect both MIDI IN and OUT ports of the PS1000 and set the Soft
Thru function of the Computer to ON.
In the PS1000, remember to set one track (for example, the Upper 1 keyboard section) for play with no split (Lower off and Arrange On/Off disabled).
• RP/RPT (F2): All Channels from 01 to 16 off. Common = 01, Chord = Off.
This preset allows you to connect the PS1000 to any digital Piano of the
Generalmusic RealPiano Series (RP and RPT) and control the PS1000 via
a single Midi channel. This will allow you to play the PS1000 panel configuration from the master device.
• RPsplit (F3): Drum = Off, Bass = Off, Acc1 = Off, Acc2 = Off, Acc3 = Off,
Lower = 02, Upper1 = 01, Upper2 = 01, Common = Off. Chord = 02. All
other channels = Off.
Set this preset if you connect the PS1000 to the Generalmusic RP100 and
RP200 digital pianos. With the three PS1000 keyboard sections muted, the
RP sound can be heard from the split point upwards. Remember to set the
split point in the master unit (consult the owner’s manual of the RP unit).
Page 88
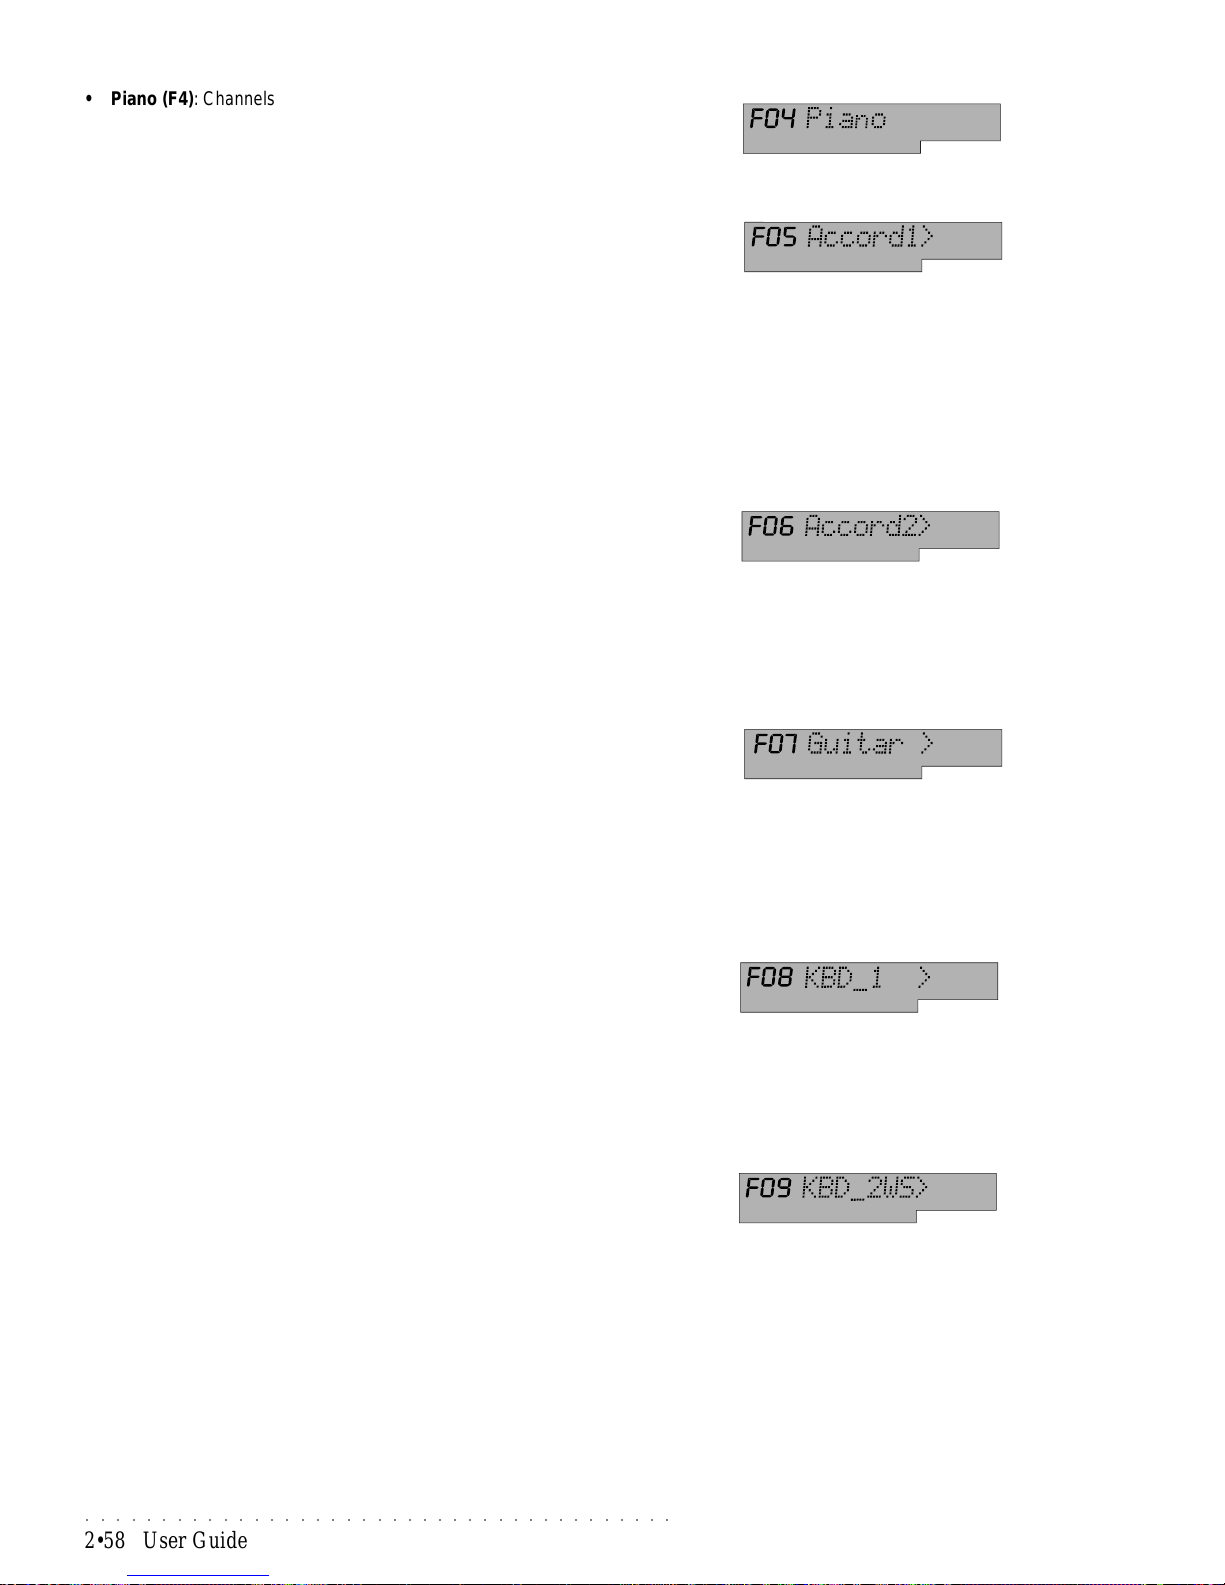
○○○○○○○○○○○○○○○○○○○○○○○○○○○○○○○○○○○○○○○
2•58 User Guide
• Piano (F4): Channels from 01 to 16 off, Common = 01, Chord = Off.
Use this preset when you connect to a MIDI Piano. This will allow you to
play the PS1000 panel configuration from the master device. This setting
can be used for Midi Pianos that transmit over one channel only.
• Accord1 (F5): Bass = 03, Lower = 02, Upper1 = 01, Upper2 = 01, Common
= Off, Chord = 02. All other channels = Off.
This preset allows you to use a MIDI accordion consistent with the standard
established for accordions. As well as the Midi channel settings, this preset
also sets the PS1000 control panel to operate as follows:
The “Bass to Lowest” function operates as a BASS ON/OFF: this allows the
accordionist to manually activate or mute the Bass section of the PS1000 at
will.
The “Lower” section operates as a Chords ON/OFF for the accordion when
the rhythm section is not playing. When the rhythm section is playing, the
notes of the Lower section are added to the auto accompaniments.
• Accord2 (F6): Drum = 10, Bass = 03, Acc1 = 05, Acc2 = 06, Acc3 = 07,
Lower = 02, Upper1 = 01, Upper2 = 01, Common = 16, Chord = 02. All
other channels = Off.
This preset provides:
a) exactly the same features as the Accord1 preset (explained above);
b) if the MIDI accordion is able to transmit Program Change messages, it is
possible to change the Styles of the PS1000 by sending program change
numbers 00-96 across the Common channel (Ch. 16).
• Guitar (F7): Upper1 = 01, Upper2 = 01, Common = off, Chord = 01. All
other channels = Off.
This preset is best suited for the connection of a MIDI guitar and allows you
to play the PS1000 panel configuration from the master device. The guitar
will be able to play the PS1000 Style chords and add the Upper 1 and Upper 2 sounds to those of the guitar. The Style chords will be recognized
when the guitar notes are played all at the same time and not in arpeggio
form. At least 3 note chords must be played and the Arrange Mode setting
should be either Fingered 1 or FreeStyle.
• KBD_1 (F8): Channels from 01 to 16 closed, Common = 01, Chord = Off.
The Keyboard1 preset allows you to connect the PS1000 to a MIDI key-
board and play the PS1000 panel configuration from the master device.
This preset is suitable for master keyboards capable of transmitting across
a single MIDI channel.
The KBD-1 preset is also best suited to the keyboards of the previous series WX instruments by Generalmusic.
• KBD_2WS (F9): Channels from 01 to 16 off, Common = 16, Chord = Off.
This preset is best suited for connection of the PS1000 to the previous
Generalmusic series WS keyboard and allows you to play the PS1000 panel
configuration from the master device.
This preset is suitable for master keyboards capable of transmitting across
a single MIDI channel.
Page 89
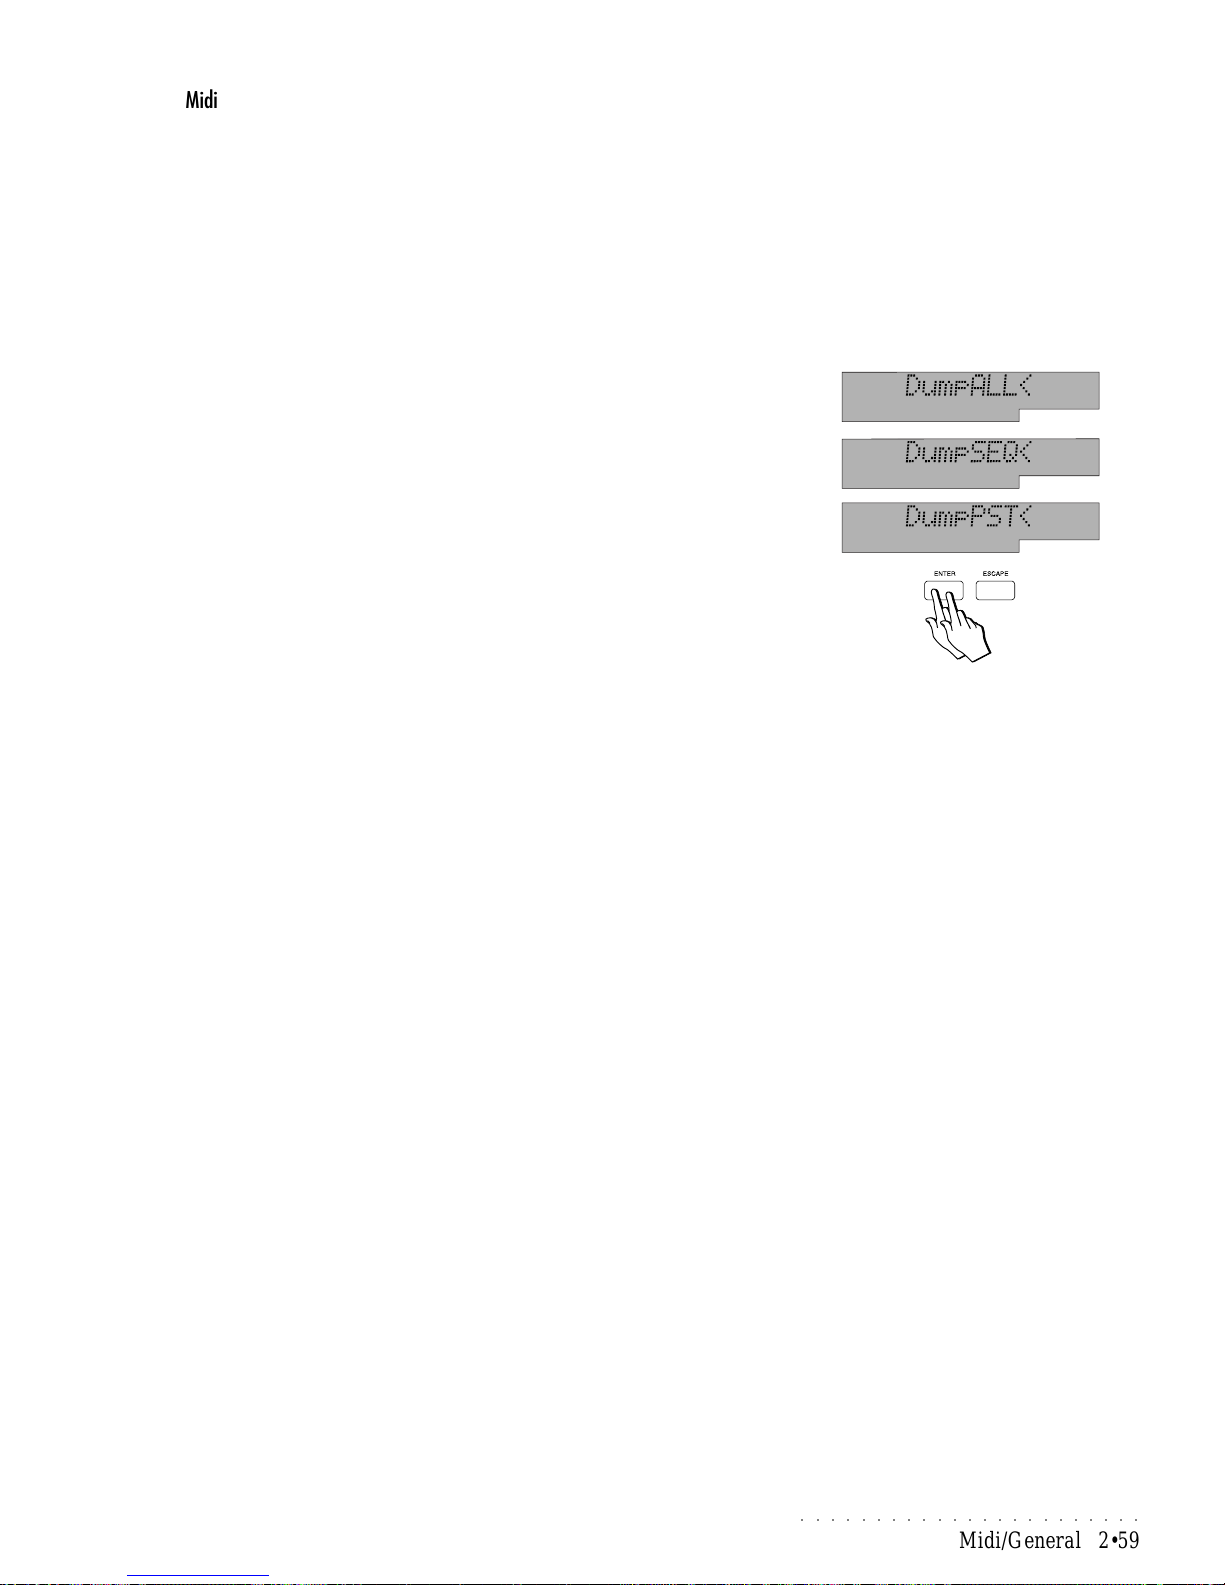
○○○○○○○○○○○○○○○○○○○○○○○
Midi/General 2•59
Midi Dump
The DUMP function allows you to transfer the contents of PS1000’s internal
memory to external storage devices, (such as Home P.Cs or MIDI Data Filers),
via MIDI.
You can choose to dump all the data currently stored in internal memory, or
select a partial dump (Sequencer or Preset).
MIDI Dump procedure
1. Connect the PS1000 MIDI OUT port to the MIDI IN port of the external
device.
2. Go into the Midi/General menu and select the DUMP function under the
MIDIENT menu.
3. Select which part of the memory you want to dump with the Tempo/Data
buttons.
DumpALL = the entire internal memory data;
DumpSEQ = user sequencer data only;
DumpPST = user Preset data only.
4. Start the recording procedure in the external device.
5. Press ENTER twice.
To receive a MIDI Dump
It is not necessary to prepare the PS1000 to receive a dump because it configures
itself automatically . Dumps can be received at any time and the data will immediately be available for use.
Connect the MIDI OUT of the external device to the MIDI IN of the PS1000 and
start the Dump from the external device.
Page 90
○○○○○○○○○○○○○○○○○○○○○○○○○○○○○○○○○○○○○○○
2•60 User Guide
Principal MIDI applications
Piloting an expander (or other keyboard) with PS1000
If you want to pilot another keyboard or expander using PS1000 as the Master
controlling device, connect the PS1000 MIDI OUT port to the expander’s MIDI
IN port.
Set PS1000 to operate in Real time mode in order to be able to play at least
three sounds at the same time (Upper 1, Upper 2 and Lower keyboard sections). In Song mode, only one track is made available for real time use.
With this setup, the MIDI messages generated by the PS1000 keyboard travel
from the PS1000 MIDI OUT port to the expander’s MIDI IN port. If you remembered to match the MIDI channels of both devices, you will hear sounds from
both devices.
If you want to listen to the expander’s sounds only and exclude the PS1000
sounds, you can either regulate the PS1000 track volumes to zero level, or you
can set the PS1000 tracks for “Local off” operation (see “Local”).
By setting all the keyboard tracks for Local Off operation, the keyboard is disconnected from the internal sound generator, but the keyboard messages are still
transmitted via the MIDI OUT, allowing you to hear the expander sounds only .
Using the PS1000 in Song Mode with a computer or sequencer
If you prefer to use a computer software sequencer to record your Songs in
order to use some of the advanced editing functions offered by the sequencer
software, here’s how to proceed. The idea is to use the PS1000 keyboard to
generate the MIDI messages to send to the computer’s sequencer which then
returns them to the PS1000 Sound generator.
• Connect the PS1000 MIDI OUT port to the sequencer’s MIDI IN port.
• Connect the Sequencer’s MIDI OUT port to the PS1000 MIDI IN port.
• Select the MultiCh MIDISET preset.
In this setup (Song mode), the MIDI messages generated by the PS1000 key-
board are sent from the PS1000 MIDI OUT, received at the MIDI IN of the
computer’s MIDI interface and recorded by the sequencer. When you launch
the Play command in the sequencer, the MIDI messages are sent via the computer’s MIDI OUT port to the PS1000 Sound generator via MIDI IN.
Via MIDI, you can send messages from the computer and perform all the operations that you would normally carry out on the PS1000 control panel. You can
change sounds, set volumes and pan levels, select and control the effects, etc..
When you send messages to select PS1000 Sounds, the selection message
must be received on the MIDI channel assigned to the track to which the Sound
is assigned. To select PS1000 Sounds, first send a Control Change 00 message (Bank Select) followed by a Program Change (PC) message. The Sound
table with corresponding MIDI selection messages is in the Appendix.
T o use the setup above, it is recommended to set the PS1000 track used as the
generator of keyboard data for “Local Off” operation.
Set the computer sequencer to retransmit (echo) to the PS1000 all the MIDI
messages received. The sequencer parameter that controls this function may
have a different name depending on the software in use. Some common names
are “echo on”, “echo back”, “patch thru”, “soft thru”, etc.
By setting the track used to send data to the computer for “Local Off” operation,
you disconnect communications between the PS1000 keyboard and its sound
generator. Consequently , PS1000 acts as a separate MIDI keyboard and independent sound generator. The echoing function of the sequencer allows you to
play the PS1000 sound generator from the PS1000 keyboard.
With the sequencer’s echoing function turned on and the PS1000 Local Off
parameter also set to ON, two notes will be played by the PS1000 sound generator for every single note generated by its keyboard.
Page 91
○○○○○○○○○○○○○○○○○○○○○○○
Midi/General 2•61
The Computer port
You can use the PS1000 COMPUTER port via a single serial cable instead of
the MIDI IN and MIDI OUT ports. The COMPUTER port disables the MIDI
ports if connected.
Piloting PS1000 with a Master Keyboard
Master keyboards are generally mute instruments (without sound generators)
and require external sound sources to produce sounds. The PS1000 sound
generator can operate as an external slave sound source for a master keyboard. The Master keyboard must transmit MIDI messages on the same MIDI
channel as the PS1000 Common channel. An instant setting can be achieved
by selecting the “KBD-1” MIDISET preset.
All Bank Select (CC00) and Program Change (PC) messages normally used to
select PS1000 sounds and transmitted on the Common channel are interpreted
as Preset Change, Style Change, Song Style Change or Song Change messages.
If you want to pilot the PS1000 as well as other instruments with the master
keyboard, connect the MIDI IN of the additional MIDI device to the MIDI THRU
of the PS1000.
Selecting Styles via MIDI Common
T o select a PS1000 Style from the master keyboard, you must send two control
change messages: Bank Select CC00: value 32 and CC32: value 0, followed
by a Program Change (PC) message with the values 00-95 (ROM Styles), 96111 (User Styles).
Controlling Styles via MIDI Common
The Style controls can be simulated by sending Control Change 80 or 81 messages to PS1000 via the Common Channel with the values shown in the tables
listed opposite (Style control; One Shot and On/Off).
If the master keyboard has programmable buttons, it is possible to assign them
some control messages and control all directly from the master.
Selecting the Effects via MIDI COMMON
To select the Effects from a Master Keyboard or computer via the Common
channel, you must send two Control Change messages relating to the Effect
change: CC16: 0 … 64, CC48: nn (number of the effect) with the values shown
in the table listed in the Appendix.
Note: Control Change 16 with value 0 selects the REVERB DSP, while with
value 64 selects the CHORUS DSP.
Control Change 48 must always be followed by the number of the effect type
required.
Selecting Songs, Song Styles or Presets via MIDI Common
T o select a Song, Song Style or Preset from the master keyboard, send a Bank
Select (CC00) and Program Change (PC) message via the Common channel
with the values shown in the tables listed opposite (Song RAM, Song Style
RAM, Preset RAM).
Selecting the Sound Banks via MIDI (Bk 1, 2, 3, 5, 6)
There are 5 Sound banks in the PS1000 which can be selected via MIDI using
the CC00 + bank value message and organized as follows:
Bank 1, 2, 3 correspond to the GMX sound map;
Bank 5 corresponds to the SAMPLES bank (1 … 8).
Bank 6 corresonds to the “invisible” bank containing 60 ROM Sounds.
Refer to the Appendix for the Sound lists and banks.
Style control V alue CC80 (One Shot)
Fill >< 00
Fill < 01
Fill > 02
Intro 08
Ending 16
V ar 1+2+3+4 24-27
Key Start 40
Fade In/Out 59
Rotary 61
Tempo increment 66
T empo decrement 67
Next Preset 68
Previous Preset 69
Style control Value CC81 (On/Off)
0 - 63 = OFF , 64 - 127 = On
Fill >< 00 64
Fill < 01 65
Fill > 02 66
Intro 08 72
Ending 16 80
Harmony ON/OFF 32 96
Arrange ON/OFF 33 97
Memory ON/OFF 37 101
Lower Memory ON/OFF 38 102
Key Start ON/OFF 40 104
S.T. Play ON/OFF 48 112
Style Lock ON/OFF 49 113
Tempo Lock ON/OFF 51 115
Fade In ON/OFF 59 123
Fade Out ON/OFF 60 124
Rotary ON/OFF 61 125
Song RAM (120-127)
CC00 CC32 PC
56 0 0-7
Song Style RAM (112-119)
CC00 CC32 PC
62 0 0-7
Preset RAM (0-63)
CC00 CC32 PC
48 0 0-62
Page 92
○○○○○○○○○○○○○○○○○○○○○○○○○○○○○○○○○○○○○○○
2•62 User Guide
SYSTEM EXCLUSIVE (Generalmusic System Exclusive)
Via MIDI, PS1000 is able to recognize several System Exclusive messages
that control parameters relating to the effects, master tunings and master transpose. The corresponding SysEx strings for the parameters are as follows:
REVERB CHANGE
F0,2F,30,01,00,00,00,13,00,vv,F7 (vv = from 00h to 15h) REVERB LEVEL
F0,2F,30,01,00,00,00,13,01,vv,F7 (vv= from 00h to 7Fh) REVERB TIME
F0,2F,30,01,00,00,00,13,02,vv ,F7 (vv= from 00h to 7Fh) CHORUS CHANGE
F0,2F,30,01,00,00,00,13,05,vv,F7 (vv= from 00h to 15h) CHORUS LEVEL
F0,2F,30,01,00,00,00,13,06,vv,F7 (vv= from 00h to 7Fh) CHORUS RATE
F0,2F,30,01,00,00,00,13,07,vv,F7 (vv= from 00h to 7Fh) CHORUS DEPTH
F0,2F,30,01,00,00,00,13,08,vv,F7 (vv= from 00h to 7Fh) MASTER TUNE
F0,2F,30,01,00,00,00,07,00,vv,F7 (vv= standard value 40h + / - 40h)
MASTER TRANSPOSE
F0,2F,30,01,00,00,00,09,02,vv,F7 (vv= standard value 18h + / - 18h
semitones)
IMPORTANT: All the numbers within the SysEx string must be expressed as
“HEXADECIMAL” codes. Specific midi channels are not required for system
exclusive messages.
Note: The reverb volume selected from the
instrument panel must be set to its maximum
setting (127).
Page 93
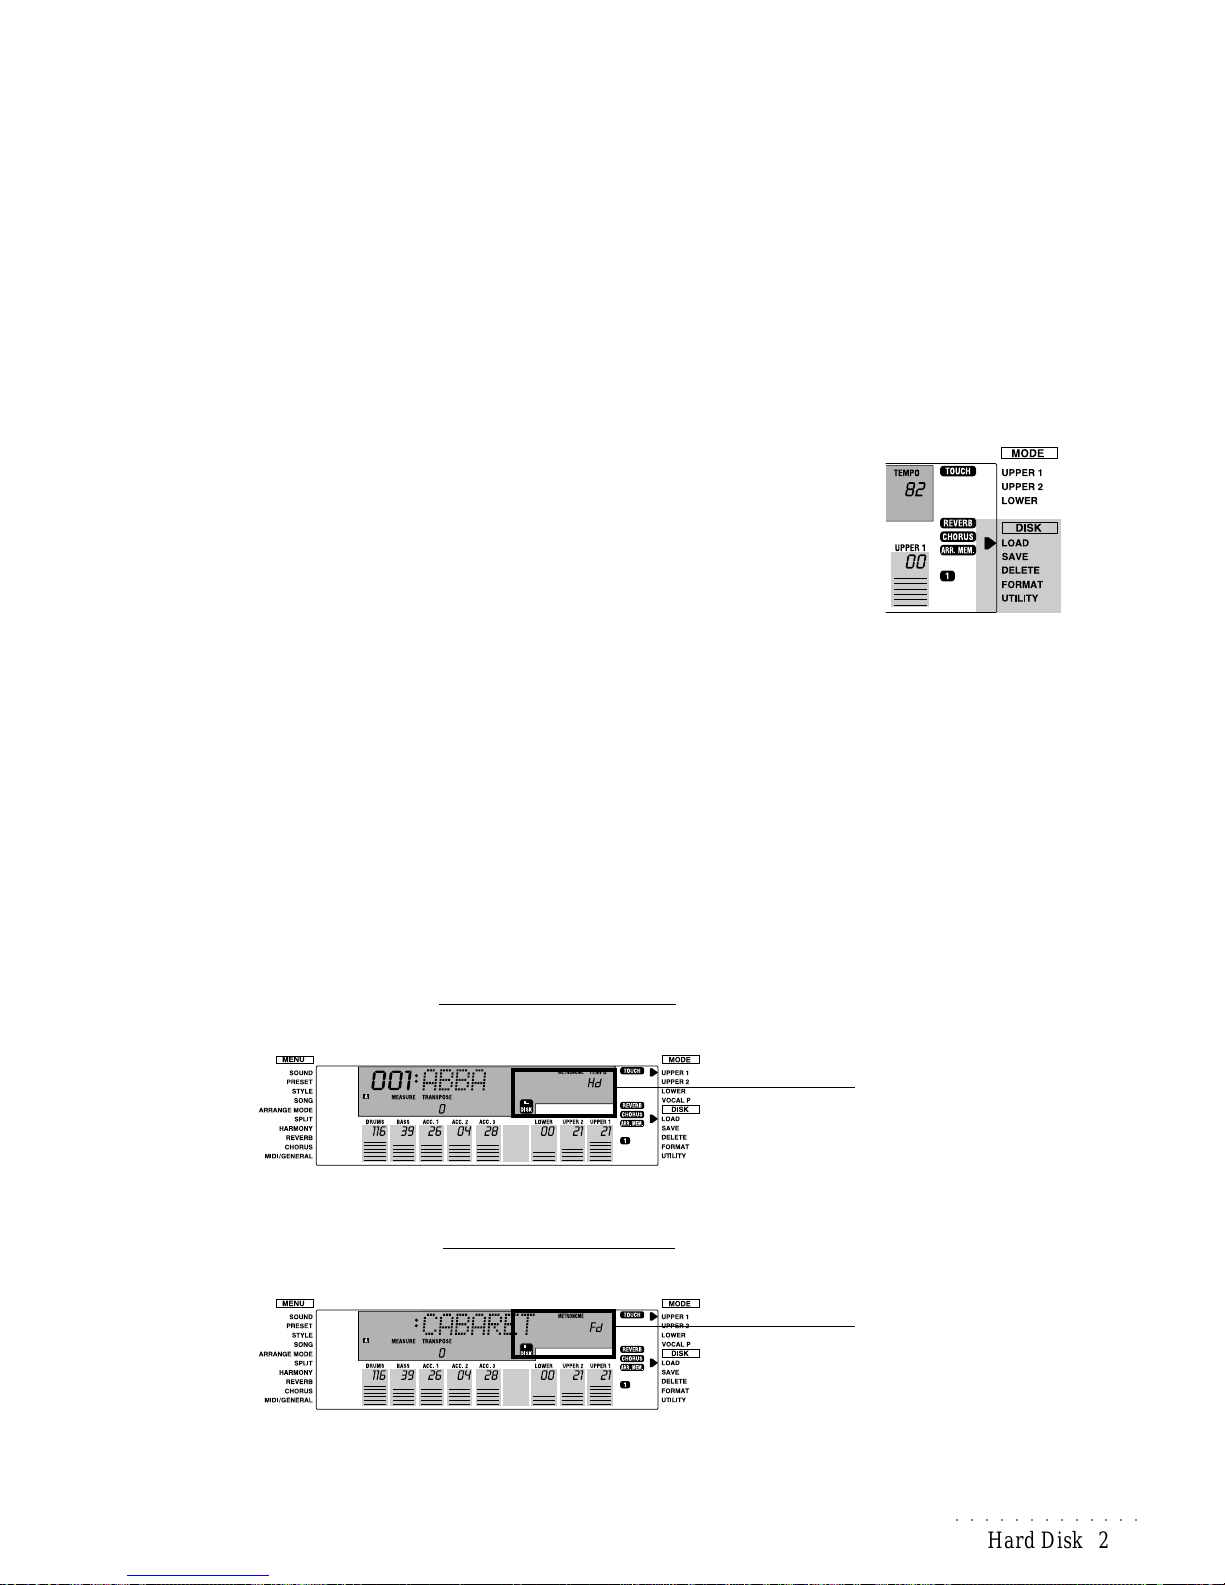
○○○○○○○○○○○○○
Hard Disk 2•63
Ch. 9 • Hard Disk (PS1300 only)
In addition to the Floppy Disk drive, the PS1300 allows you to work with an onboard Hard Disk. PS1300 has a 2.5" IDE type Hard Disk drive capable of
storing a large number of files (Songs, Presets, User Styles, Song Styles, Samples and Midi Files). The files are stored in
Partitions
: you can think of the Hard
Disk as being a large number of virtual floppy disks (partitions) which can be
accessed at high speed.
The Hard Disk functions
With the exception of the Utility function, the Hard Disk functions are identical to
those available when working with Floppy disks:
1. LOAD : Loads data from a Hard Disk partition to RAM Memory.
2. SAVE : Saves data from RAM memory to a Hard Disk partition.
3. DELETE : Cancels files from a Hard Disk partition.
4. FORMAT : Formatting procedure (total cancellation of a Hard disk
partition).
5. UTILITY : Load Mode (Slow/Fast load options) and a set of Copy
functions for single files and entire Hard Disk partitions,
Hard Disk protection and H.D. formatting.
Files and File Types
The Hard Disk operations recognize the same files and file types as those described in the Disk chapter of the User Guide. Refer to page 2.26 of the Disk
chapter for information regarding Files, how to recognize the various File types
and how the PS1300 Hard Disk handles files (single and multiple).
Access to the Hard Disk partitions
Access to the Hard Disk is via the DISK button. Press this button to gain access to the Hard Disk functions.
Access to a Floppy Disk or the Hard Disk is shown in the display by the appearance of a Disk icon and a symbol, depending on the device chosen.
Hard Disk mode
If you press the DISK button once with no disk inserted in the drive, the TEMPO
display area is temporarily replaced by the “Hd” symbol.
Floppy Disk mode
If you press the DISK button once with a disk inserted in the drive, the TEMPO
display area is temporarily replaced by the symbol “Fd”.
If a disk is inserted in the drive, access to the Hard Disk is obtained by pressing
the DISK button TWICE to override the floppy disk.
Fd and disk icon
Hd and disk icon
Note: If a Floppy disk is already inserted in
the drive, pressing the Disk button gains access to the Floppy Disk. T o override the Floppy
and go directly into the Hard Disk, press the
Disk button a second time.
Page 94
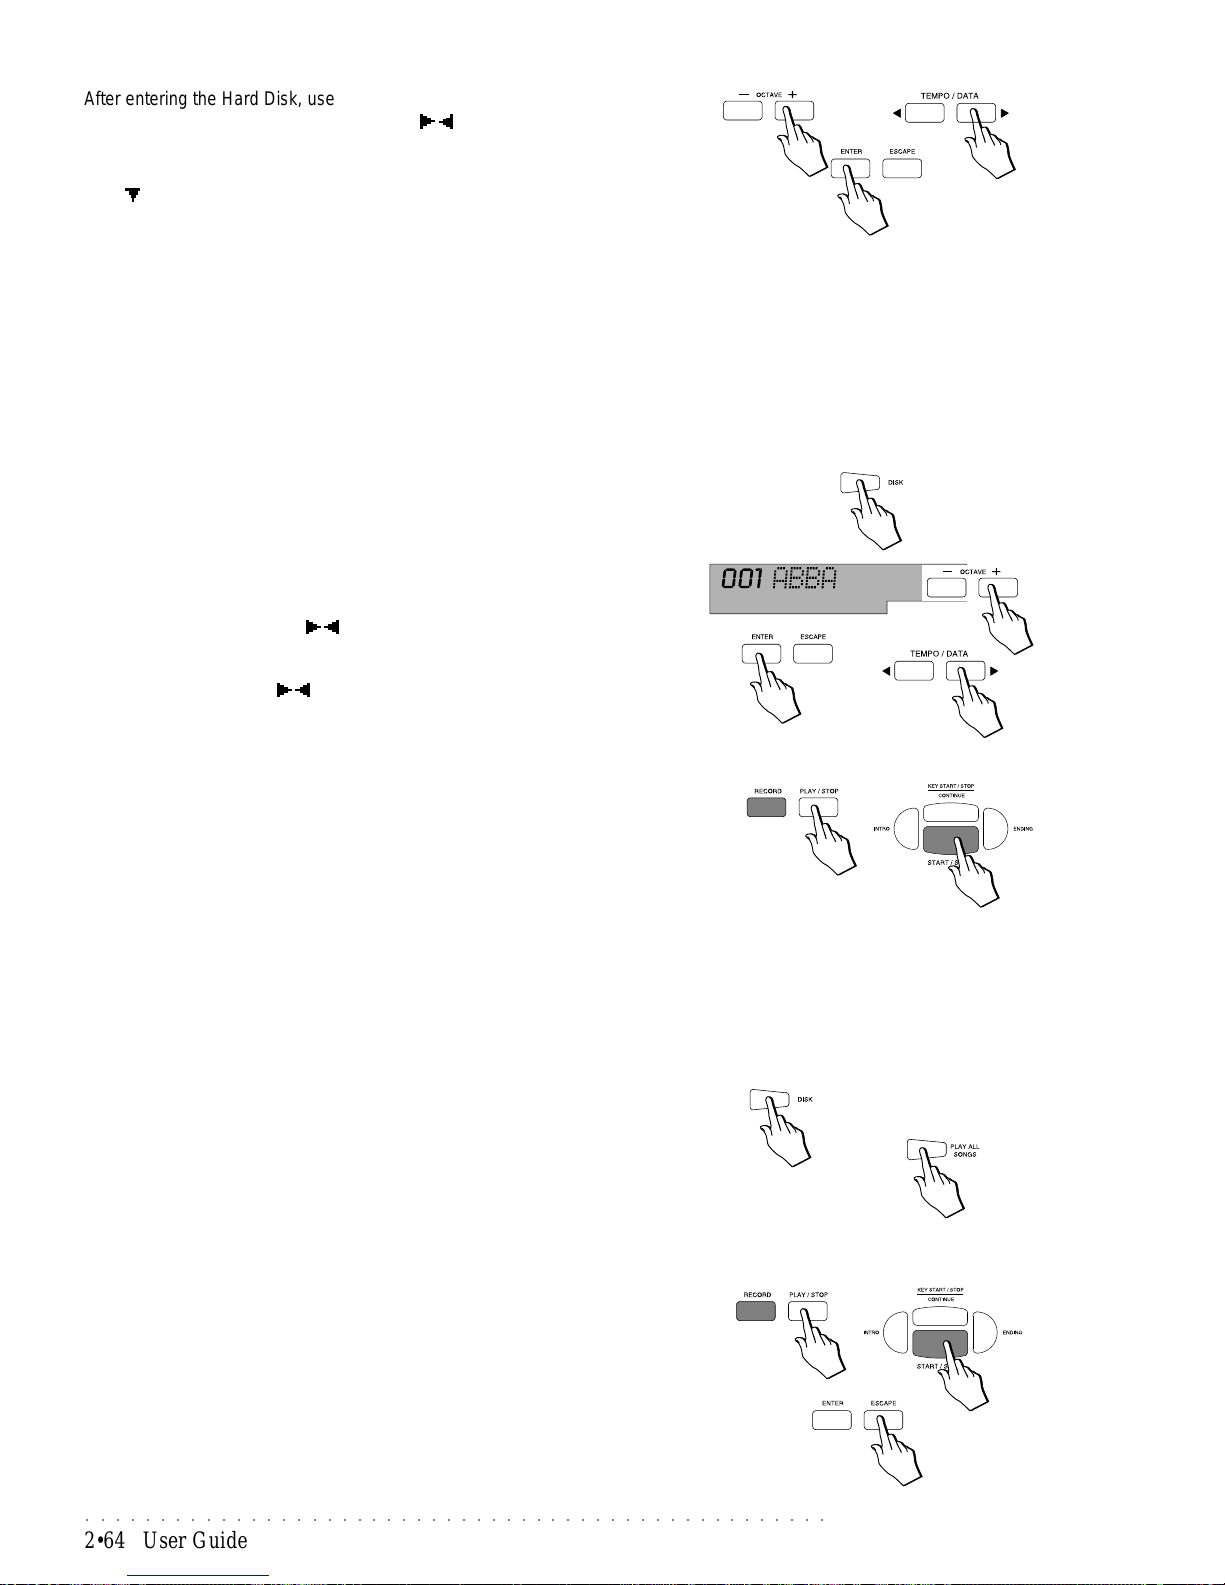
○○○○○○○○○○○○○○○○○○○○○○○○○○○○○○○○○○○○○○○○○○○○○○○○○○
2•64 User Guide
After entering the Hard Disk, use the OCTAVE +/– buttons to select the partitions in numerical order, or the Tempo/Data / buttons to select them in alphabetical order.
Once selected, press ENTER to gain access to the partition and use the CURSOR button to select the desired Hard Disk function.
The Tempo display area returns to normal when you proceed with one of the
relative HD operations (Load, Save, Delete, etc.).
Play direct from Hard Disk partition
The Slow/Fast load, Preload and Play direct from Disk features of the Floppy
disk also apply to the Hard Disk (see page 2.25 of the Disk chapter for information regarding the Slow/Fast and Preload functions). In the case of the Hard
Disk, the Play Direct function includes the additional step of selecting and accessing a Hard Disk partition before starting the Song. An example of how to
play a Song using the Direct from Disk method is shown on page 1.20 of the
Quick Guide. Here’s how to play a Song directly from a Hard Disk partition:
1. Press the DISK button to gain access to the Hard Disk.
If a Floppy disk is inserted in the drive, press the DISK button a second time
to override the disk and enter the Hard Disk.
2. Use the OCTA VE +/– buttons to select a partition.
The Octave +/– buttons select the partitions in numerical order. You can
also use the Tempo/Data / buttons to select them in alphabetical order.
3. Press ENTER to gain access to the partition.
4. Use the Tempo/Data / buttons to select a Song or Midi File.
Songs are identified by a short name while Midi Files show a name together
with the “Mid” extension.
5. Once selected, press the PLAY/STOP or START/STOP button to start
the Song or Midi File playback directly from the HD partition.
The message “Wait!!” will appear for a few seconds then the name of the
current Song is shown in the display . A Midi File will be converted into a PS
Song in order to be played. Shortly after, PS1300 enters Song mode and
playback begins.
6. To stop the playback at any time, press PLAY/STOP or START/STOP.
Play All Songs
The Play All Songs feature for Floppy disks, explained on page 1.20 of the
Quick Guide, also applies to the Hard Disk. In this case, all the Songs or Midi
Files contained in a
partition
are played one after the other. Just select and
gain access to a Hard Disk partition and press PLAY ALL SONGS.
1. Press the DISK button, select a partition and gain access with Enter , as
explained in points 1, 2 and 3 in the previous example.
2. Press the PLAY ALL SONGS button.
The message “Wait!!” appears for a few seconds and the PS1300 starts to
scan the partition contents. Shortly after a Song starts to play back and the
display shows the name of the Song. When the first Song or Midi File ends,
a second sequence begins. Playback continues non-stop until all the Songs
or Midi Files in the partition have been played. When the last Song or Midi
File reaches the end, playback stops automatically .
3. You can stop the playback at any time by pressing the PLAY/STOP or
ST ART/STOP buttons.
Playback stops instantly .
To escape from a HARD DISK partition at any time, press ESCAPE.
NOTE: Access to a Hard Disk parition is not
permitted during a “Direct from Hard Disk” song
playback operation.
Page 95
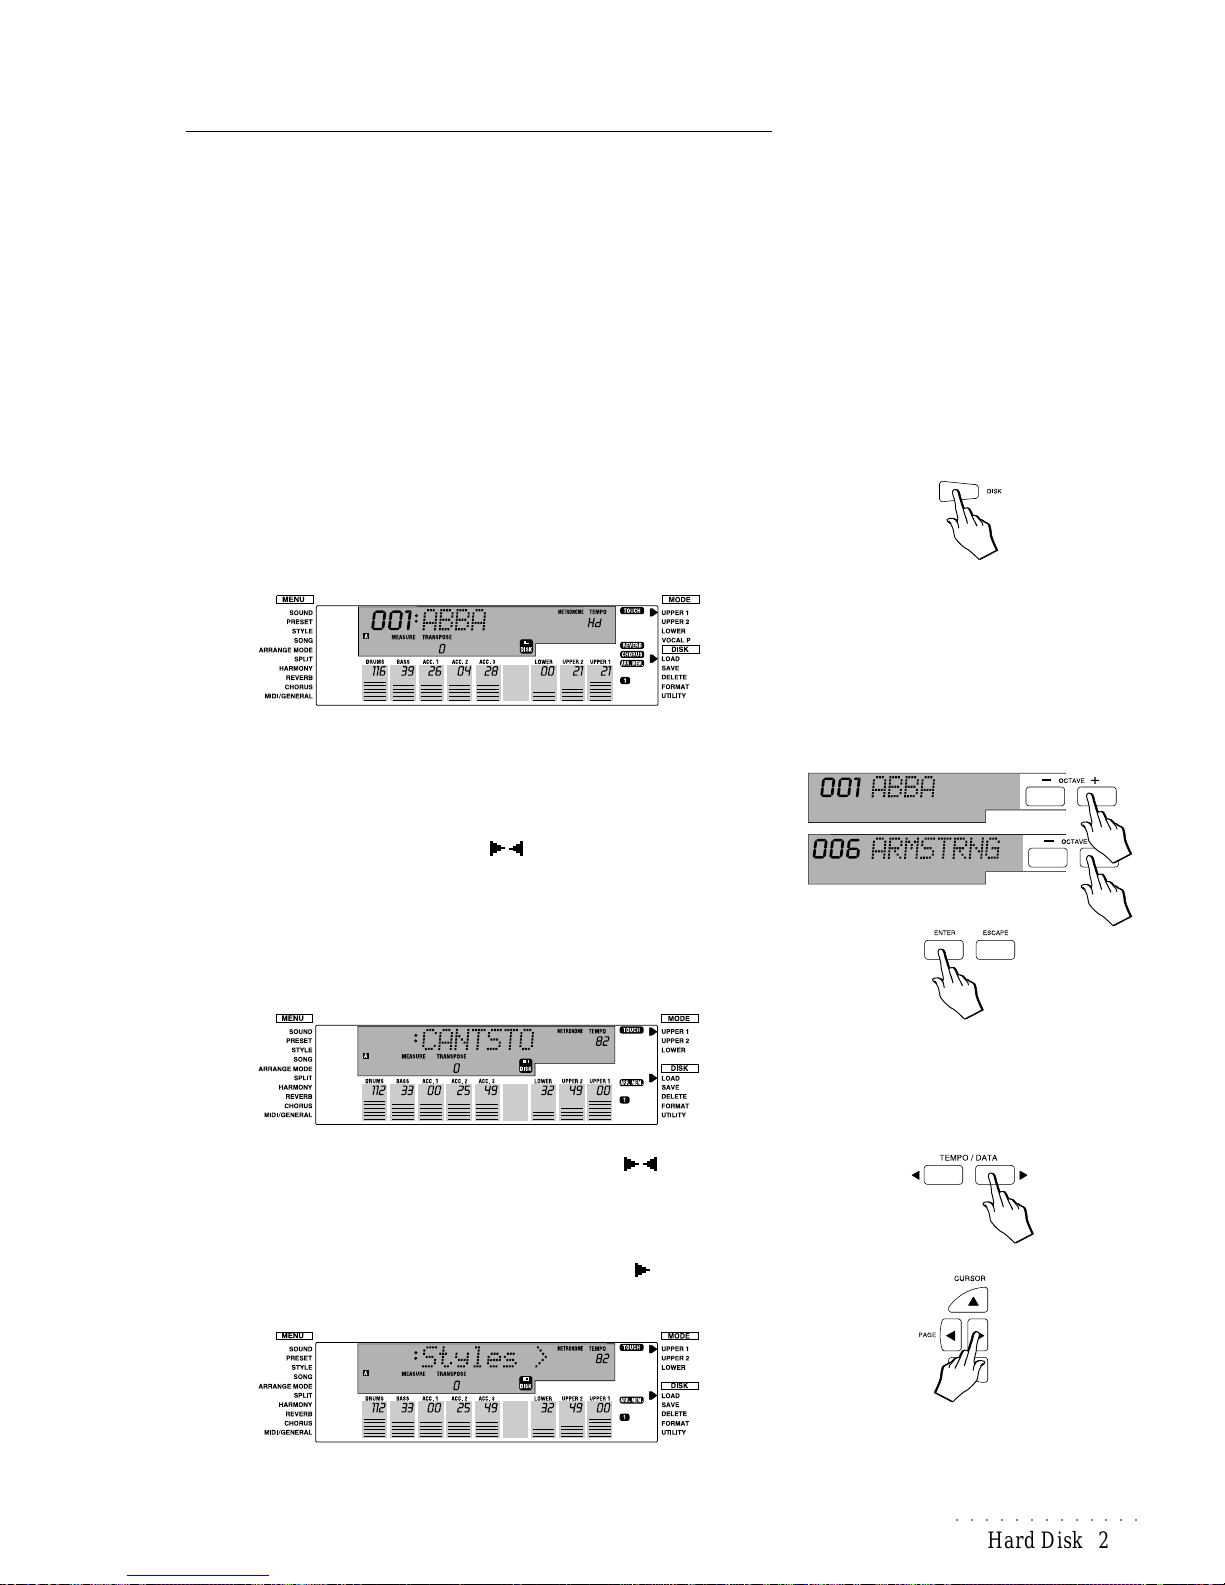
○○○○○○○○○○○○○
Hard Disk 2•65
Load from Hard Disk partition
Hard Disk Partition data can be loaded into the PS1300 RAM memory using
one of the following methods:
• as single elements (Load Song, Load Style, Load Midi File);
• as a set of files corresponding to Groups (Load Styles, Load Presets (Prog.
Presets + User Sound Presets], Load Samples);
• all the data contained in a partition previously loaded with the ALL procedure.
Load procedure
1. Press the DISK button.
If a Floppy Disk is already inserted in the Drive, press the DISK button a
second time to override the floppy and enter the Hard Disk
.
The Hd symbol will appear in the Tempo display area (as an indicator that
you are working with the Hard Disk and not with floppy disks), and the name
and number of the first partition available on Hard Disk will be displayed.
2. Use the OCT A VE +/– buttons to scroll through the Hard disk partitions in
numerical order.
The [+] button selects partitions in increasing numerical order, while the [–]
button selects them in decreasing numerical order.
You can also use the TEMPO/DATA / buttons to scroll the partitions in
alphabetical order.
3. Once selected, press ENTER to gain access to the files contained in the
partition.
The right display arrowhead is shown next to the LOAD function and the
first file contained in the partition is shown (in our example, a Song).
4. Select the desired file type using the TEMPO/DATA / buttons or the
Octave +/– buttons.
The Tempo/Data buttons select single elements (Song, Style, Midi File) as
well as the Preset and Sample file types from the Hard Disk partition.
5. To load all the User Styles as a group, press the P AGE button to select
the STYLES file type.
Note: The PS, WK and PK Songs and
MidiFiles can be played directly from Hard disk
partition without loading the data to memory
beforehand.
Note : If, at this point, you press PLA Y/ST OP,
ST ART/STOP or PLAY ALL SONGS, the Song/
MidiFile (or Songs/Midi Files) will start to play
directly from the hard disk partition.
Page 96
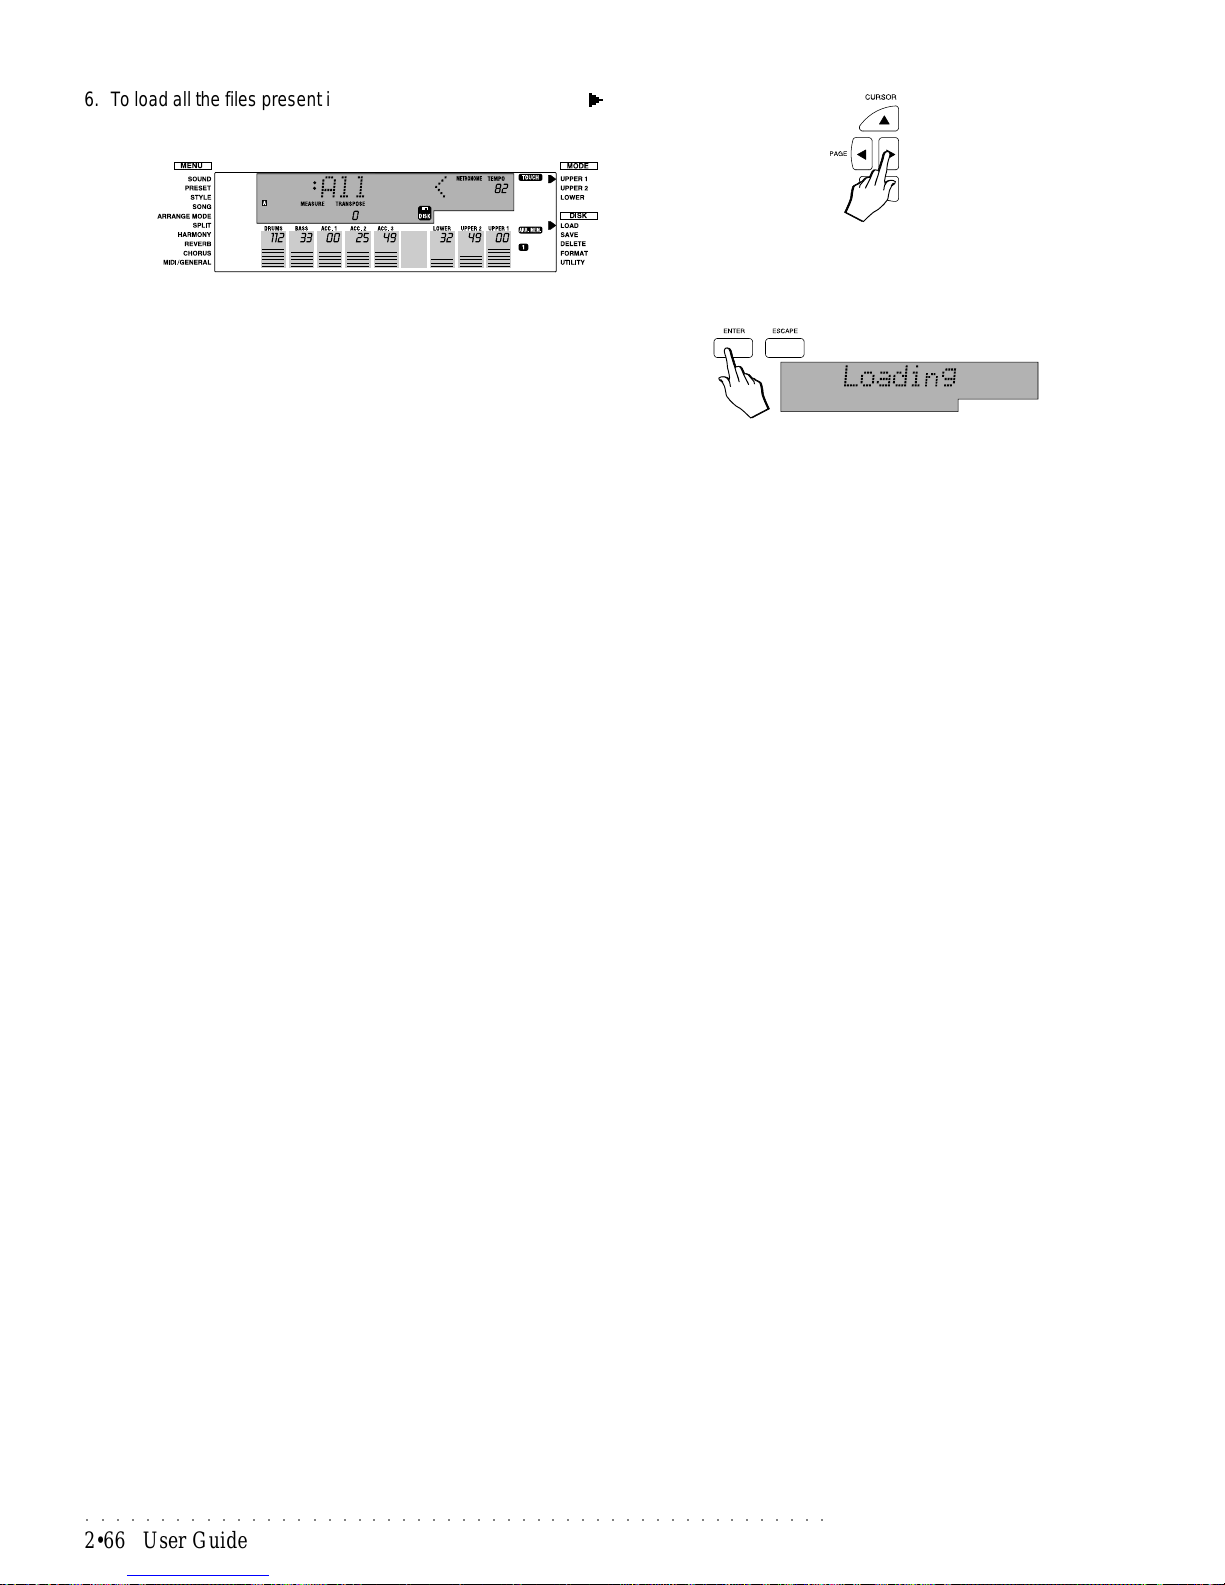
○○○○○○○○○○○○○○○○○○○○○○○○○○○○○○○○○○○○○○○○○○○○○○○○○○
2•66 User Guide
6. To load all the files present in the H.D. partition, press PAGE again to
select the ALL option.
7. Press ENTER
The Hard drive starts running and the message “Loading” flashes on the
display while the file is being loaded. When finished, the message disappears. The file loads to the first available location in RAM memory.
Partition information
Y our PS1300 has a Hard Disk containing several partitions, each housing a
large number of factory-programmed Songs, User Styles and Programmable
Presets which you can load into the instrument’s RAM memory at any time.
The capacity of a partition is equivalent to an HD floppy disk (1.44 Mb).
For information regarding the Hard Disk contents, you can refer to the tables in
the Appendix listing all the data contained in the partitions at the time of leaving
the factory.
Creating new partitions
On page 2.69 of this chapter, you will find information regarding how to create
new partitions.
Page 97
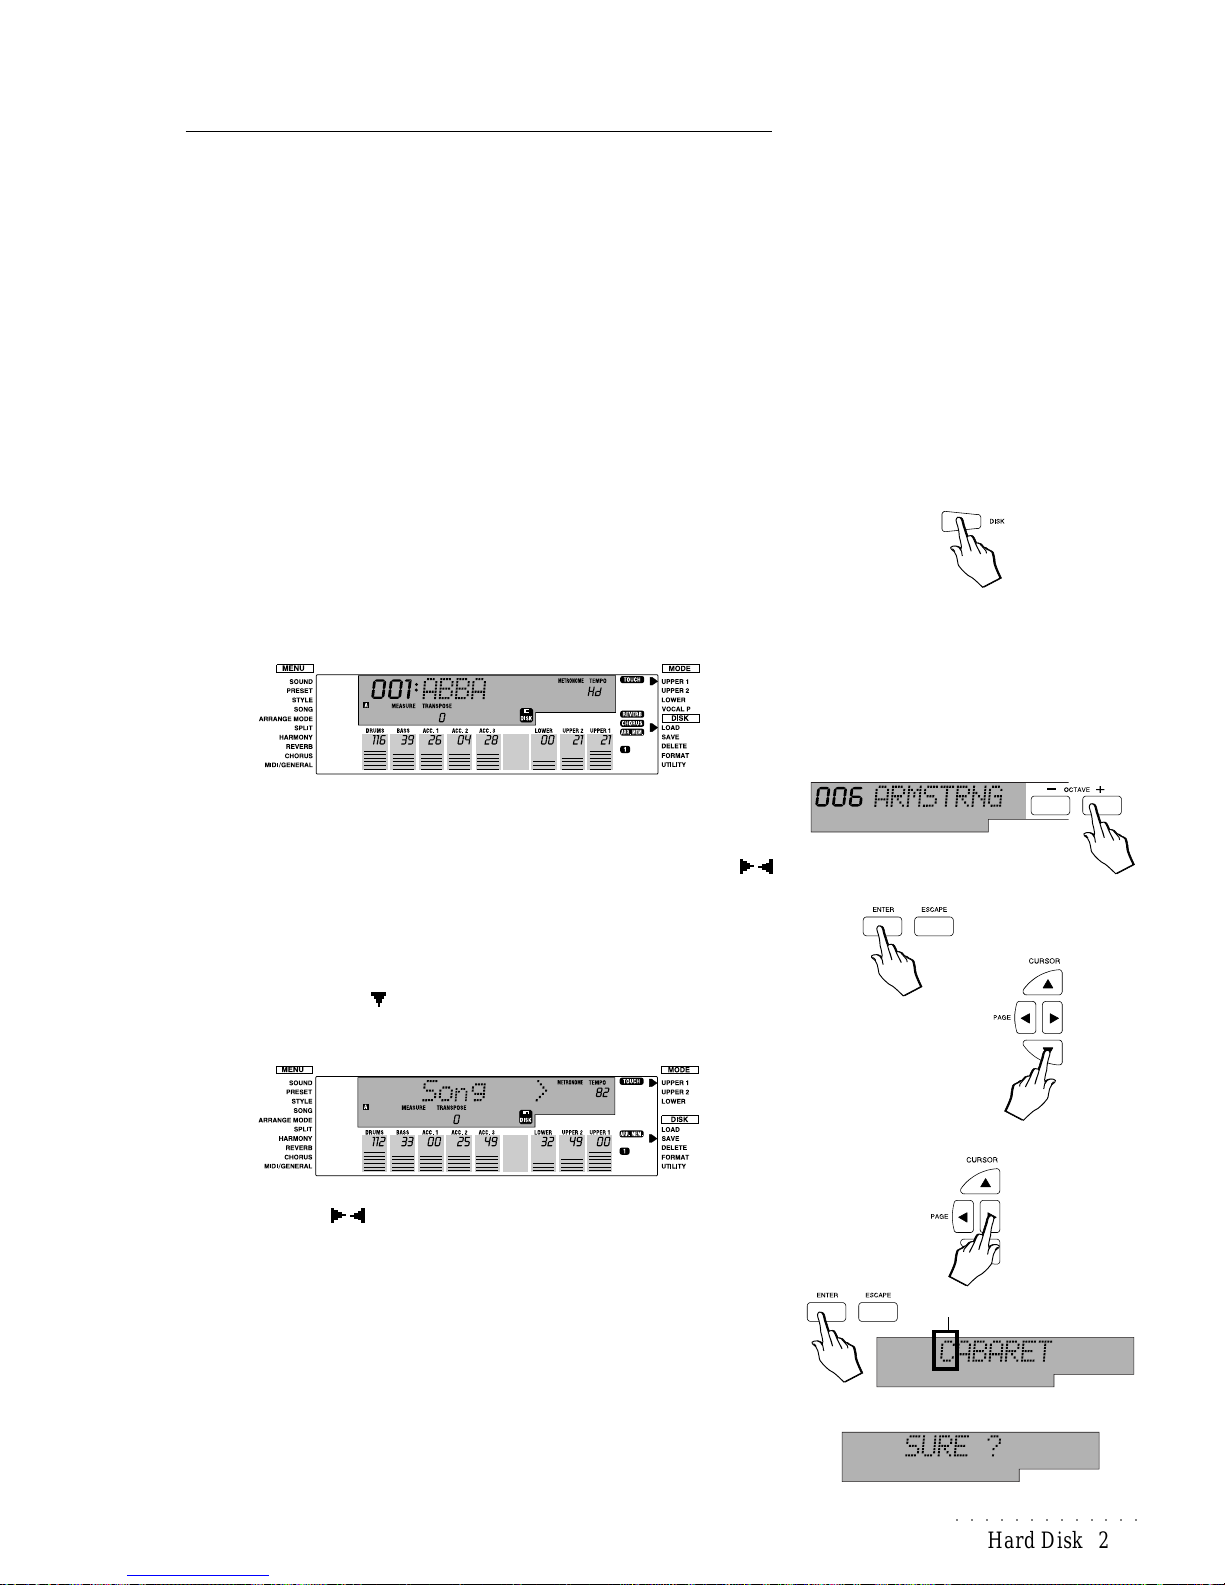
○○○○○○○○○○○○○
Hard Disk 2•67
Save to Hard Disk partition
PS1300 data can be saved to a Hard Disk partition using one of the following
methods:
• as single elements: Song, Style (User), Midi File;
• as a set of files corresponding to Groups: Styles (User), Presets (7 Programmable Preset Groups + 2 User Sound Preset Groups), Sample (entire
contents of the Sample RAM memory);
• all the data present in RAM memory (including Song Styles) using the ALL
option.
In order to save a single element, you can choose to save with the same name,
or specify a different one. T o save Presets, Samples, Styles and all RAM memory
data (All), a name is not required.
Save procedure
1. Press the DISK button once, or twice if a floppy disk is inserted in the
drive.
The Hd symbol appears in the Tempo display area together with a small
floppy disk icon and the name and corresponding number of the first partition available is displayed.
2. Use the OCT A VE +/– buttons to scroll through the Hard disk partitions in
numerical order.
(It is also possible to scroll in alphabetical order with the Tempo/Data /
buttons).
3. Once selected, press ENTER to gain access to the partition you want to
save your file to.
4. Move the right display arrowhead next to the SAVE Disk Menu function
using the CURSOR button.
The Song file type is shown in the display.
5. Use the PAGE / buttons to select a file type that you wish to save to
the selected partition (Song, Midi File, Style, Styles, Presets, Sample).
To save all the Ram memory data to the partition, select the ALL option.
6. After selecting the file type, press ENTER.
If you select the Song, Midi F, or Style file type, the name of the single
element contained in RAM memory is displayed with the first letter flashing
(our example in the margin on the right shows a Song file). In this case,
proceed to the next step (7).
If you select the Styles, Preset or Sample file type or the ALL option, the
display shows the message “SURE?” as a confirmation request. In this
case, go directly to step 10.
FLASHING
Page 98
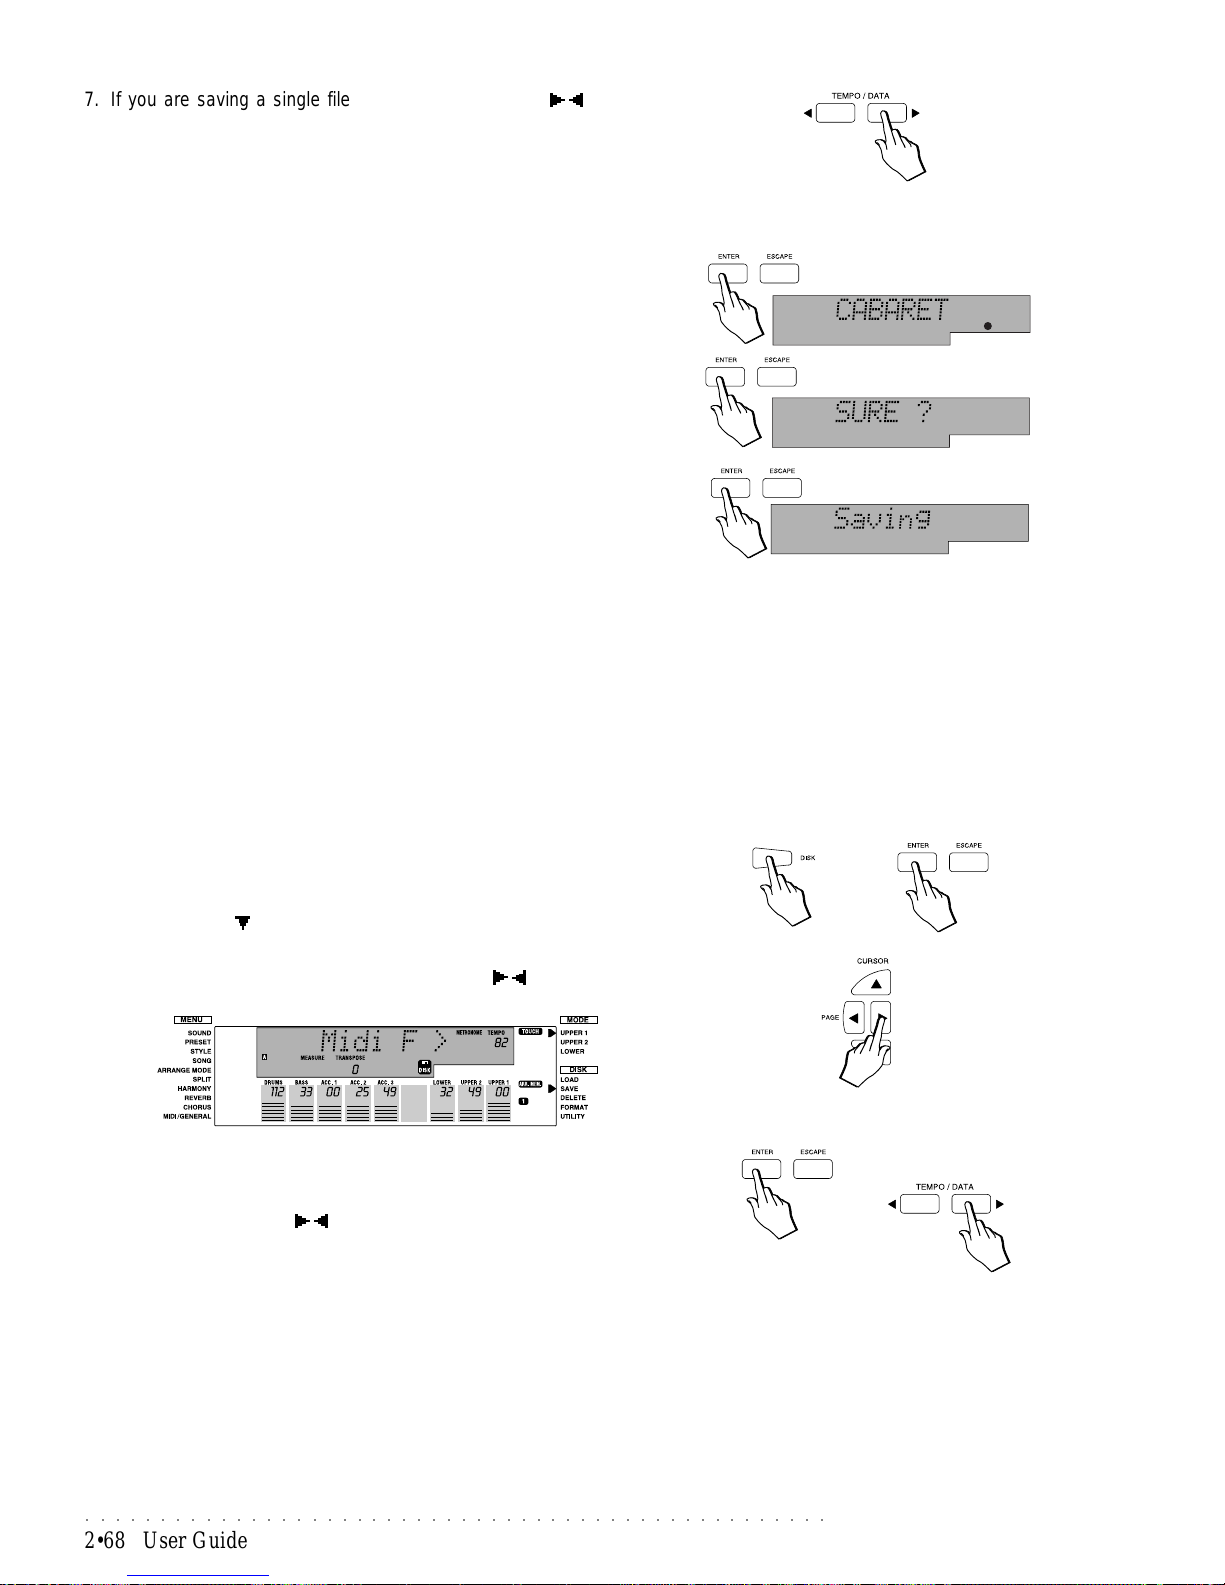
○○○○○○○○○○○○○○○○○○○○○○○○○○○○○○○○○○○○○○○○○○○○○○○○○○
2•68 User Guide
7. If you are saving a single file, use the TEMPO/DATA / buttons to
scroll through the files until you find that one that you want to save.
The first letter of the file name will continue to flash.
If you want to write a different name for the file, use the keys of the
keyboard to enter characters and the Tempo/Data buttons to move the
flashing cursor. (See “Text Entry” on page 1.6 of the Quick Guide).
If you want to save with the same name, proceed to the next step.
8. With the new or old file name showing, press ENTER.
A small flashing black circle appears to indicate that the file is ready to be
saved to disk. (At this point, it is still possible to change the name).
9. Press ENTER again.
The display shows the message SURE?
If the partition you are saving to contains a file with the same name, the
display will show the message, OverWrt?. If necessary, write a different
name to avoid overwriting the existing file with the same name.
10.Press ENTER to save the file to the partition.
Saving MIDI Files to a Hard Disk partition
If you want your Songs to play on instruments of other manufacturers, or on
computers, you must save them as MIDI Files on disk (Ms-Dos or Atari format).
PS1300 saves Format 0 MIDI Files. Saving MIDI Files to Floppy Disk is explained on page 2.30 of the Disk chapter.
Y ou can take advantage of the vast Hard Disk storage space to save your MIDI
Files and so create an organized library of MIDI files. Then, whenever required, you can quickly transfer your preferred Midi Files to MS-Dos formatted
Floppy disks using the Hard Disk copy features (under the Hard Disk UTILITY
menu). The various File Copy functions are explained on page 2.72 of this
chapter.
1. Press the DISK button once (or twice if a disk is inserted in the drive) to
enter the Hard Disk, select a Partition and press Enter to gain access, as
already explained in the Load and Save examples on the previous pages.
2. Use the Cursor
button to select the SA VE Disk Menu function.
3. To convert a PS Song into a MIDI File and save it to a Hard Disk partition, select the “Midi F” file type using the P AGE / button.
4. Press ENTER to gain access to the PS Song files that can be saved as
Midi files.
5. Use the TEMPO/DATA
/ buttons to select the Song that you wish to
save as a MIDI File then proceed as explained in steps 8, 9 and 10 in the
example at the top of this page.
Whether or not you use the same file name, it will be saved as a MIDI file
and the “.MID” extension will be added to the name automatically.
Saving Song Styles
If you want to save Song Styles to a Hard Disk partition, you can only use the
Save All command, because Song Styles utilize several different sections of
the instrument at the same time.
Page 99
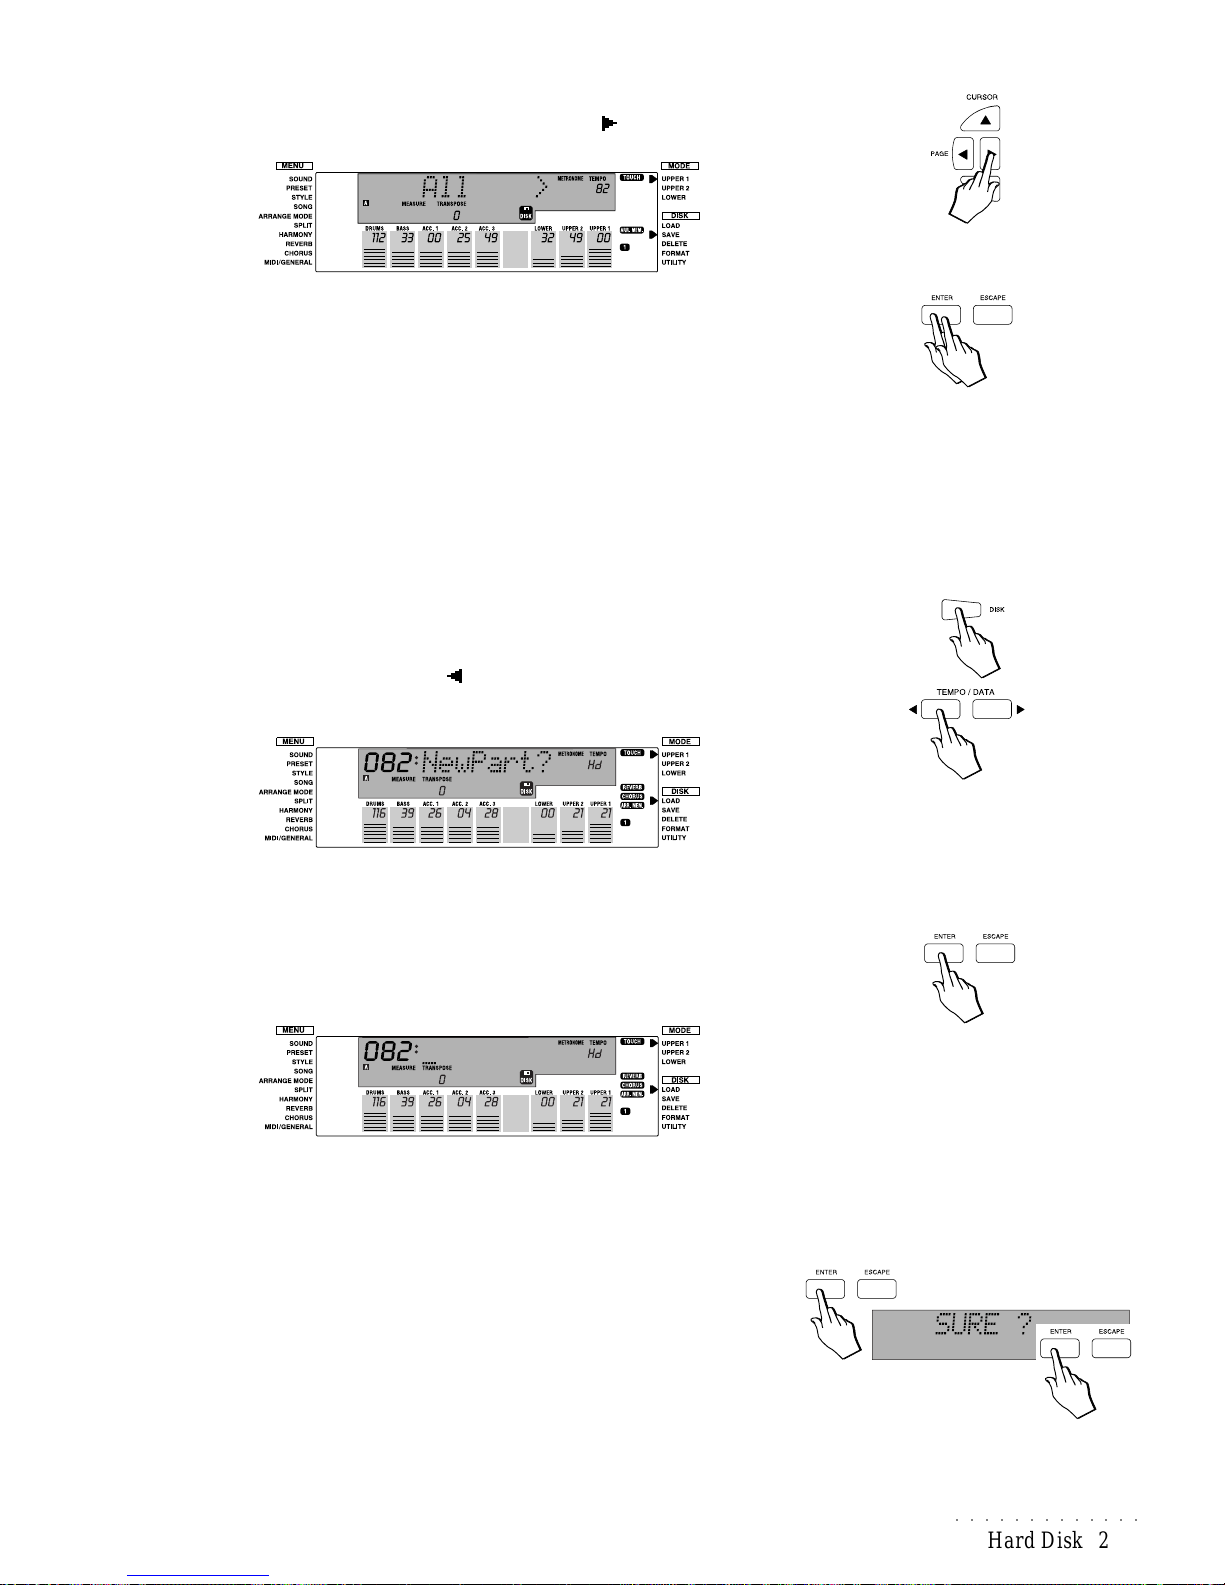
○○○○○○○○○○○○○
Hard Disk 2•69
1. After gaining access to the Partition where you want to save your Song
Styles, select the “All” command using the P AGE button.
2. Press ENTER twice to save the Song Style (and all other RAM memory
data) to the Hard Disk partition.
A Hard Disk partition cannot contain more than one ALL file type.
Song Styles cannot be saved as Midi Files.
Creating a new partition (New Part)
Your PS1300 has a Hard Disk with a large choice of partitions, each containing
a vast amount of data (refer to the Hard Disk content tables in the Appendix).
When saving data to the Hard Disk, you can create a new partition, useful if you
discover that those already present are full, or if you prefer not to cancel any
data already memorized to the factory partitions.
1. Press the DISK button once (or twice if a disk is inserted in the drive) to
enter the Hard Disk.
2. Hold down the TEMPO/DAT A
button until the display shows the mes-
sage: “New Part?”.
You can also select a New Part by holding down the Octave [+] button.
3. Confirm the New Part? request with ENTER.
The new partition will have no name, but a flashing underscore symbol will
appear indicating the position of the first letter of any name you wish to
insert.
4. At this point, you can insert a name for the new partition.
Use the keys of the keyboard to enter characters and use the Tempo/Data
buttons to move the flashing cursor.
(See the “Text Entry” example on page 1.6 of the Quick Guide).
5. Press ENTER.
The display requests confirmation of the operation with the message:
“SURE?”.
6. Press ENTER again.
After a short instant, the new Hard Disk partition will be created.
Page 100
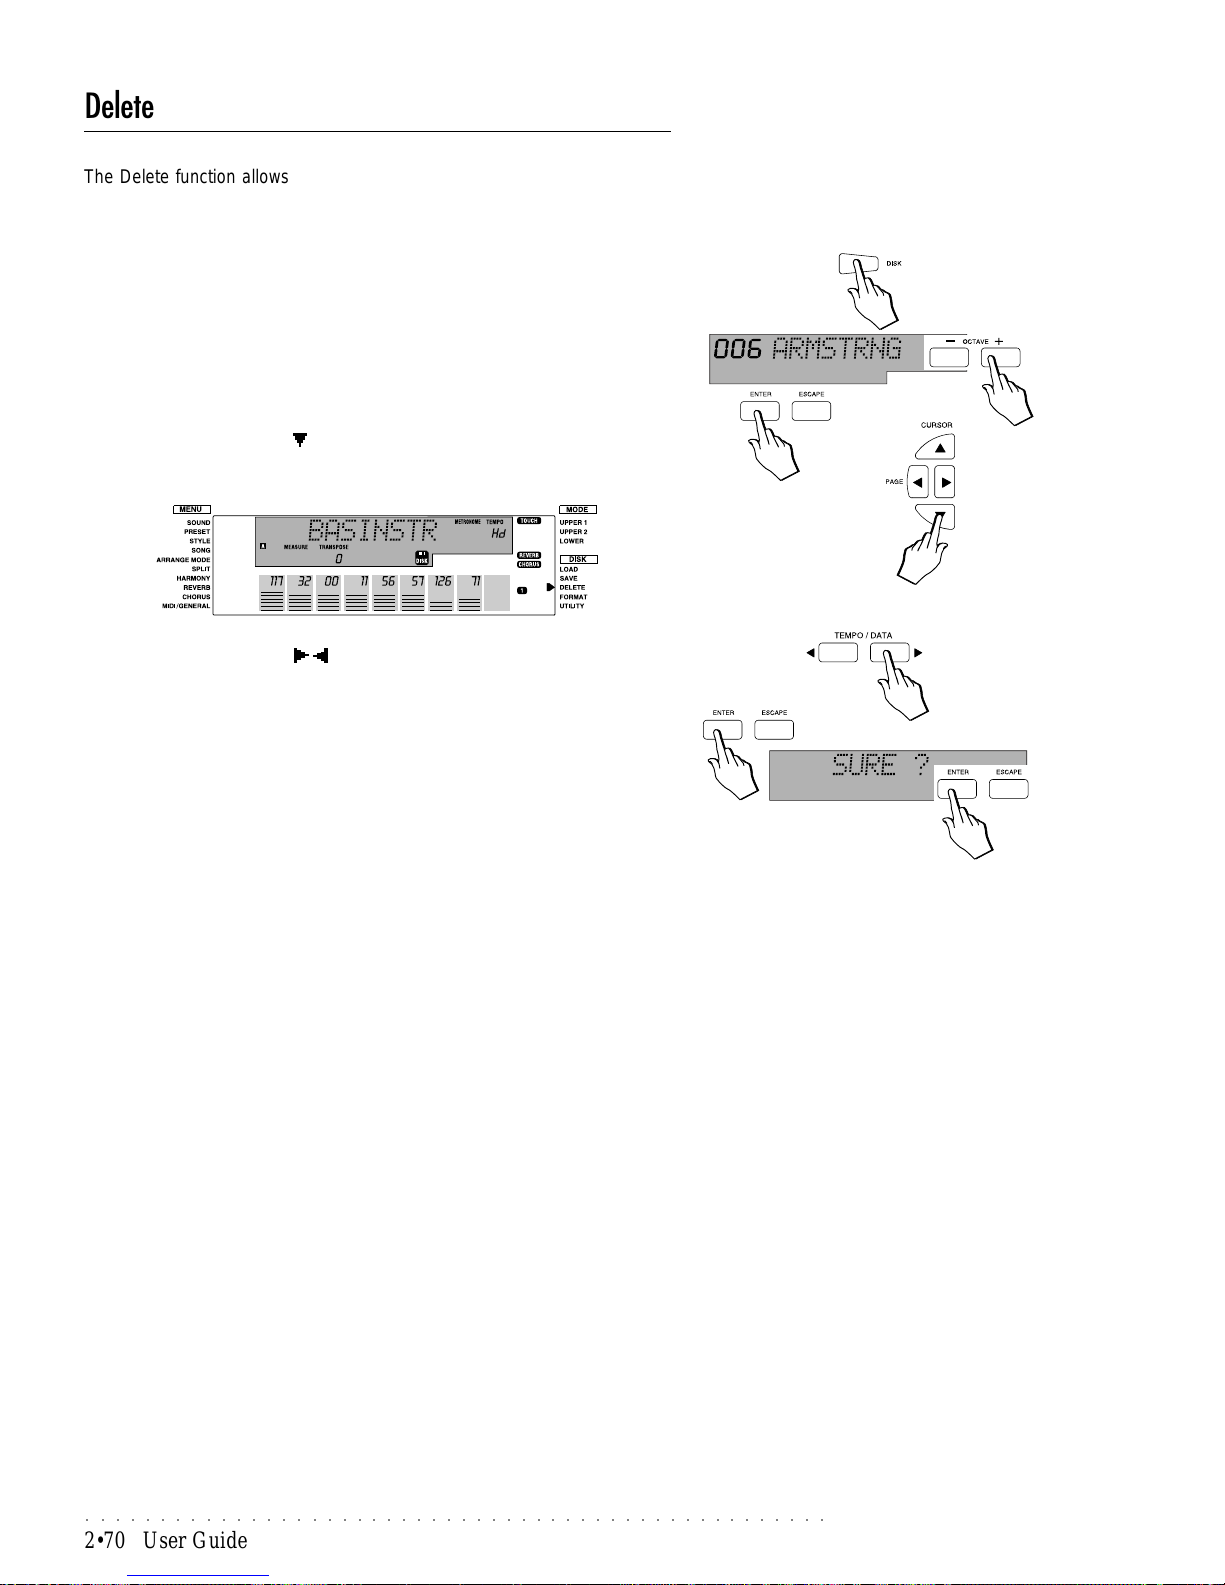
○○○○○○○○○○○○○○○○○○○○○○○○○○○○○○○○○○○○○○○○○○○○○○○○○○
2•70 User Guide
Delete
The Delete function allows the cancellation of a single file from a Hard Disk
partition.
Delete from Hard Disk partition
1. Press the DISK button once (or twice if a disk is inserted in the drive) to
enter the HARD DISK.
2. Select the partition you wish to work on (use the Octave +/– or Tempo/
Data buttons) and press ENTER to gain access.
3. Move the right display arrowhead next to the DELETE disk menu function with the CURSOR
button.
The example shows the name of a song file.
3. Use the TEMPO/DATA / buttons to select the file you wish to cancel
from the partition.
4. Press ENTER.
The display requests confirmation of the operation with the message:
“SURE?”.
6. Press ENTER again.
The file will be cancelled from the Hard Disk partition.
 Loading...