

Page 1
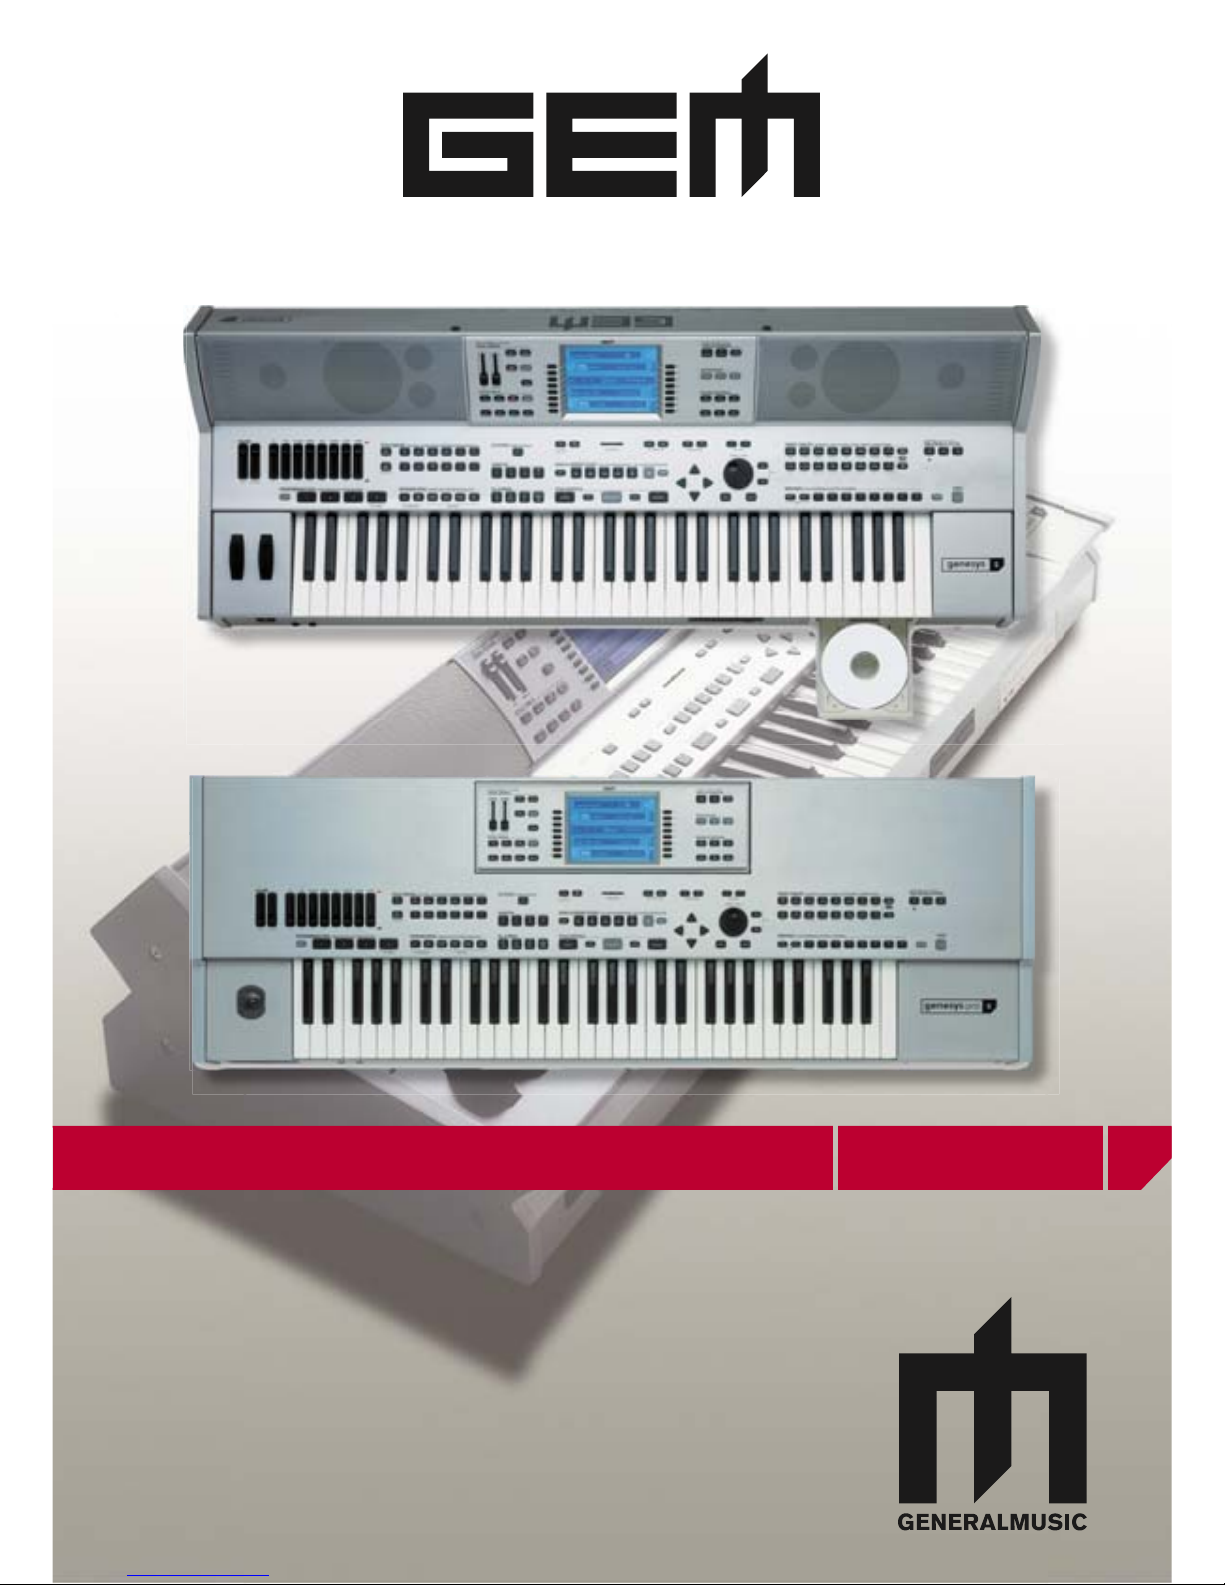
DIGITAL KEY BOARDS
•English/Italiano
manual addendum
genesys s
genesys pro s
Page 2
Technical specifi cations are subject to change
The information contained in this manual are considered correct at the moment of printing. Generalmusic reserves the
right to change or modify any technical spec i fi ca tion with out prior notice or obbligation to upgrade existing units.
SPECIAL MESSAGES
IMPORTANT NOTE: To reduce the risk related to the correct and normal use of the instrument, all Generalmusic products are accuralety tested
in a safety laboratory. DO NOT modify the present unit, the safety standard and the correct instrument operativity could be com pro mised, and as
a further con se quence the warranty will be invalidated.
ALARM SYMBOLS:
Generalmusic electronics prod ucts
could present la bels sim i lar to that
dis played in this section. Please follow
ac cu rate ly the pre cau tions descripted
in the safety instructions.
The exclamation mark within an equi lat er al triangle is
intended to alert.
The lightning fl ash with arrowhead symbol, within an equilateral triangle, is intended to alert the user to the presence of
uninsulated “dangerous voltage” within the product’s enclosure that may be of suffi cient magnitude to constitute a risk of
electric shock to persons.
SAVE THESE INSTRUCTIONS
Generalmusic cannot be held responsible for damage caused by improper use or mod i fi ca tions to the
instrument, or data lost or destroyed
IMPORTANT SAFETY AND INSTALLATION INSTRUCTIONS
When using electric products, basic precautions should always be followed, including the following:
1. Read all the Safety and Installation instructions and explanations of Graphic Symbols before using the product.
2. This product must be earthed. If it should malfunction or breakdown, grounding provides a path of least resistance for electric
current to reduce the risk of electric shock. This product is equipped with a cord having an equipment-grounding conductor and a
grounding plug. The plug must be plugged into an appropriate outlet that is properly installed and earthed in accordance with all
local codes and ordinances.
DANGER:Improper connection of the equipment grounding conductor can result in a risk of electric shock. Check with a qualifi ed electrician or serviceman if you are
in doubt as to whether the product is properly grounded. Do not modify the plug provided with the product, if it will not fi t the outlet, have a proper outlet installed by a
qualifi ed electrician.
3. To reduce the risk of injury, close supervision is necessary when this product is used near children.
4. Do not use this product near water for example, near a bathtub, washbowl, kitchen sink, in a wet basement, or near a swimming
pool or the like.
5. This product should only be used by a stand or cart that is recommended by the manufacturer.
6. This product, either alone or in combination with an amplifi er and headphones or speakers, may be capable of producing sound levels that could
cause permanent hearing loss. Do not operate for a long period of time at a high volume level or at a level that is uncomfortable.
7. This product should be located so that its location or position does not interfere with its proper ventilation.
8. This product should be located away from heat sources such as radiators, heat registers, or other products that produce heat.
9. The product should be connected to a power supply only of the type described in the operating instructions or as marked on the product.
10. This product may be equipped with a polarized line plug (one blade wider than the other). This is a safety feature. If you are unable to insert the plug
into the outlet, contact an electrician to replace your obsolete outlet. Do not defeat the safety purpose of the plug.
11. The power-supply cord of the product should be unplugged from the outlet when left unused for a long period of time. When unplugging the power
supply cord, do not pull on the cord but grasp it by the plug.
12. Care should be taken so that objects do not fall and liquids are not spilled into the enclosure through openings.
13. The product should be serviced by qualifi ed service personnel when:
A. The power-supply cord or the plug has been damaged
B. Objects have fallen, or liquid has been spilled into the product;or
C. The products has been exposed to rain or moisture
D. The product does not appear to be operating normally or exhibits a marked change in performance
E. The product has been dropped, or the enclosure damaged.
14. Do not attempt to service the product beyond that described in the user-maintenance instructions. All other servicing should be referred to qualifi ed
service personnel.
15. WARNING - Do not place objects on product power cord or place it in a position where anyone could trip over, walk on or roll anything over it. Do
not allow the product, or its bench, or its pedal board to rest on or to be installed over power cords of any type. Improper installations of this type
create the possibility of fi re hazard and/or personal injury.
16. Electromagnetic interference (RFI). This electronic product utilizes digital sampled wave processing technology (S.W.P.) that may adversely affect
radio/tv reception. Read FCC information inside back cover for additional information.
The illustrations and the screens of this manual are for instructional purposes only and may
appear different from those on your instrument.
INSTRUCTION PERTAINING TO A RISK OF FIRE, ELECTRIC SHOCK, OR INJURY TO PERSONS.
WARNING!
Page 3
Manual addendum index
Genesys s addendum manual index
Checking the operating system release
How to upgrade the operating system
Genesys s package contents
Genesys s introduction Page 1
Genesys s hardware new features
Genesys s connections
Genesys s control panel Page 2
Edit parts menu upgrade: Page 4
Edit parts menu: L+R mode
Edit parts menu: portamento Page 5
Edit parts menu: legato Page 6
The multipedal mode Page 7
Functions assignables to the multipedal switch Page 8
How to program a play list Page 9
Assign the mute to a pad of the sequencer tracks Page 11
Assign a user scale to a programmable pad Page 12
Create a user scale
Assign the user scale to a programmable pad Page 13
The MIDI set up Page 14
Technical specifi cations
Page 4
H
F
8
G
F
7
F
F
6
E
F
5
D F
4
C
F
3
B
F
2
A
F
1
H
F
8
G
F
7
F
F
6
E
F
5
D F
4
C
F
3
B
F
2
A
F
1
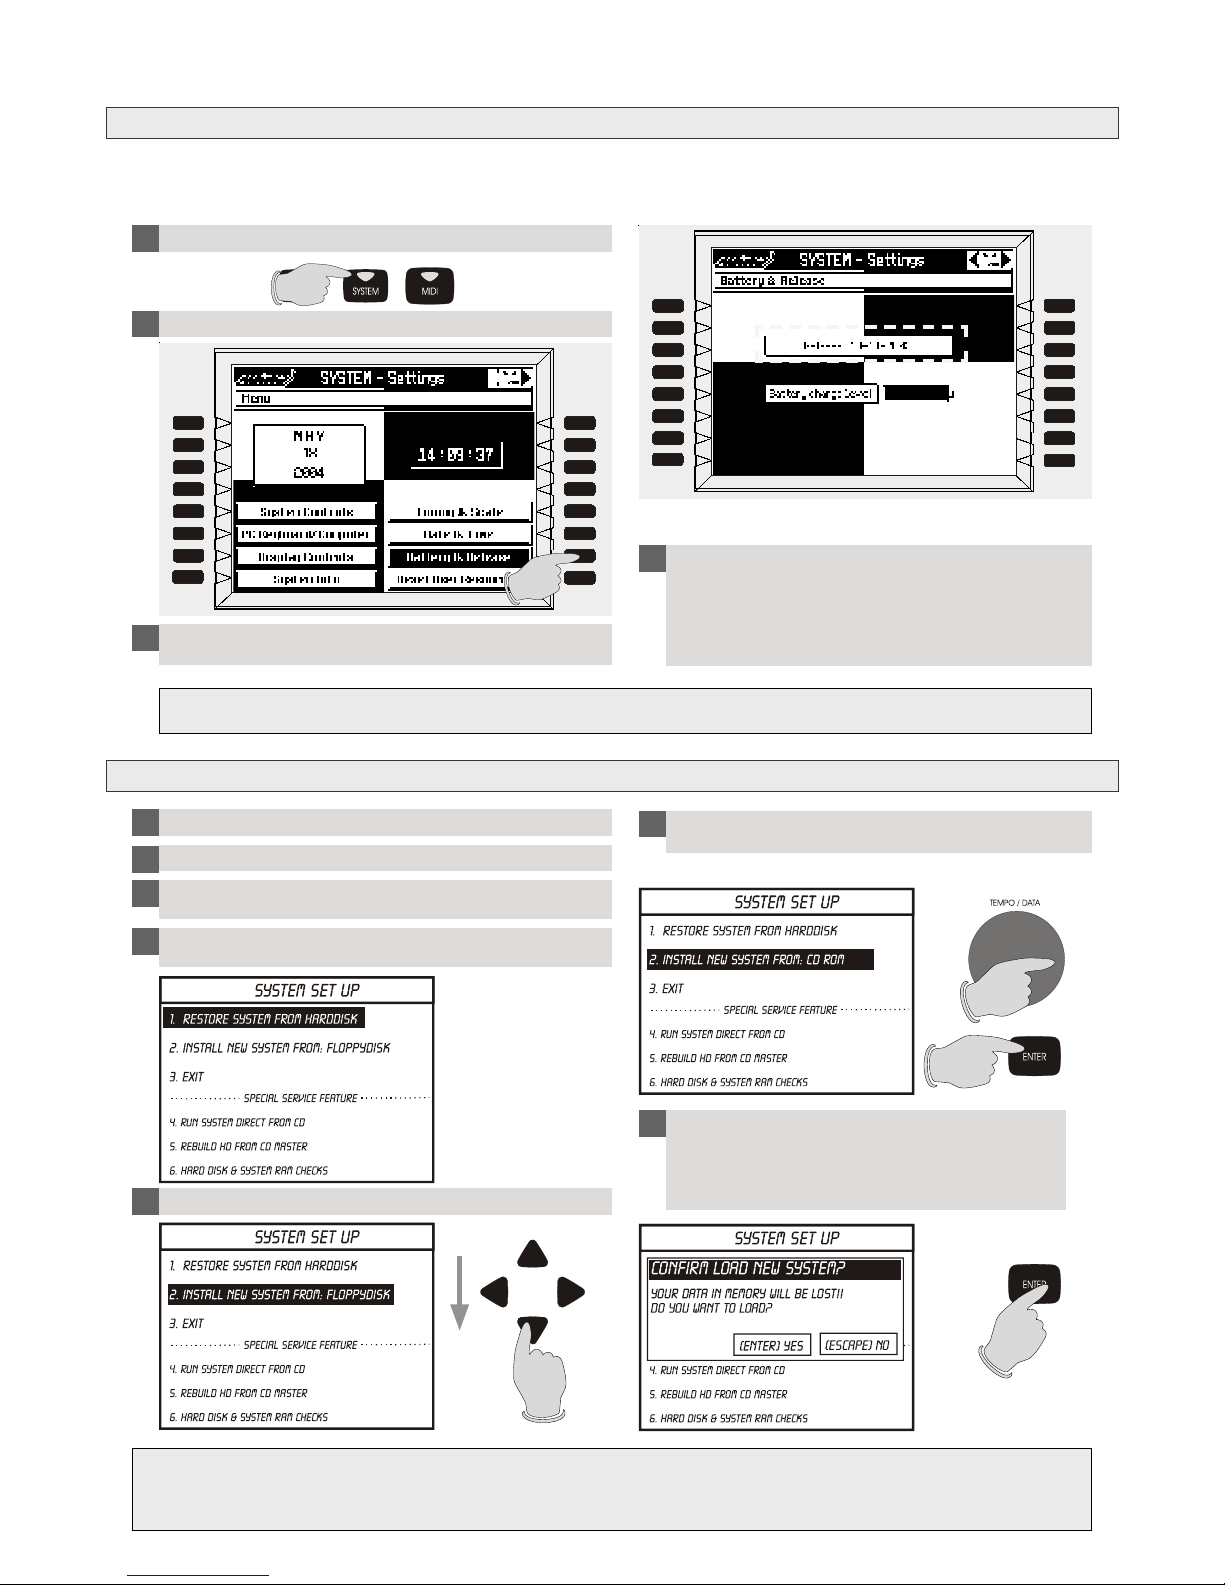
How to upgrade the operating system
Select the number 2, using the cursor button DOWN
4
The following SYSTEM SET UP screen appears in the
display:
Insert the operating system CD in the CD driver
1
Switch OFF the Genesys s
2
Switch on the instrument, rotating the ALPHA DIAL on
the panel at the same time.
3
5
Select the CD Rom as installation driver by turn the
alpha dial. Then press the ENTER button.
6
After the confi rm message, press ENTER again.
The upgrade will start. The upgrade will be
completed in a few minutes. Once the operation
is over, the main screen is showed on the
display.
7
NOTE: in the Genesys series there are two types of operating system upgrades:
1) Complete upgrade which contains new functions and implementations, optimizations, debug and musical resource
update (Sounds and styles). This type of upgrade due to its size is normally archived in a CD.
2) Upgrade patch. It consists of debug and optimization of the system without update the musical resource. Normally the
upgrade patch can be dowloaded from our websiste and easily transferred in a floppy disk to upgrade the Genesys.
Checking the operating system release
It is very important to install on board the latest operating system release of the instrument. For this reason fi rst
of all check the currently installed O.S. version:
Press the button SYSTEM on the control panel
1
The display show the SYSTEM setting main screen
2
Press F7 function button to select "BATTERY&RELEASE"
menu.
3
In the higher part of the display the currently installed
O.S. data is reported. Please compare this date with
the one of the O.S. CD included in the Genesys s
package. In case the CD has a later date, please
upgrade the instrument. Also check in our websiste:
www.generalmusic.com.
4
WARNING! Before you proceed with the upgrading, please save all personal data stored in the
internal memory of the Genesys s.
Page 5

Genesys s package contents
• Genesys s - Genesys pro s
• AC power cable
• Video connection RCA cable
• Microphone
• Operating system CD ROM
• Music CD ROM
• Owners manual
• Manual addendum
The illustrations and the screens of this manual are for instructional purposes
only and may appear different from those on your instrument.
Page 6

Page 7
introduction
Page1
manual addendum Genesys s
BBB AAA
MIDI In MIDI In
Genesys s Introduction
Congratulations for purchasing Genesys s ! You can now realize your full musical potential using the the most
advanced technology in a gear which is ideal for live performing. The present manual addendum contains
only the hardware and sofware improvement introduced in this version, about the others function please refer
to the Genesys/Genesys pro owners manual included in the keyboard package.
Genesys s hardware new features
The Genesys s features a 128MB global memory ram area. 64MB of this area are dedicated to the
standard Genesys/Genesys pro sounds database, further improved and upgraded. 32MB of new
high quality sounds are been loaded in memory. The remaining 32MB are for user memory, lo
load on board new sample in compatible formats.
Genesys s features an internal IDE 2,5’’ 20GB hard disk, increasing both the global storage
capacity of the instrument and the real time performing versatility.
Genesys s connections
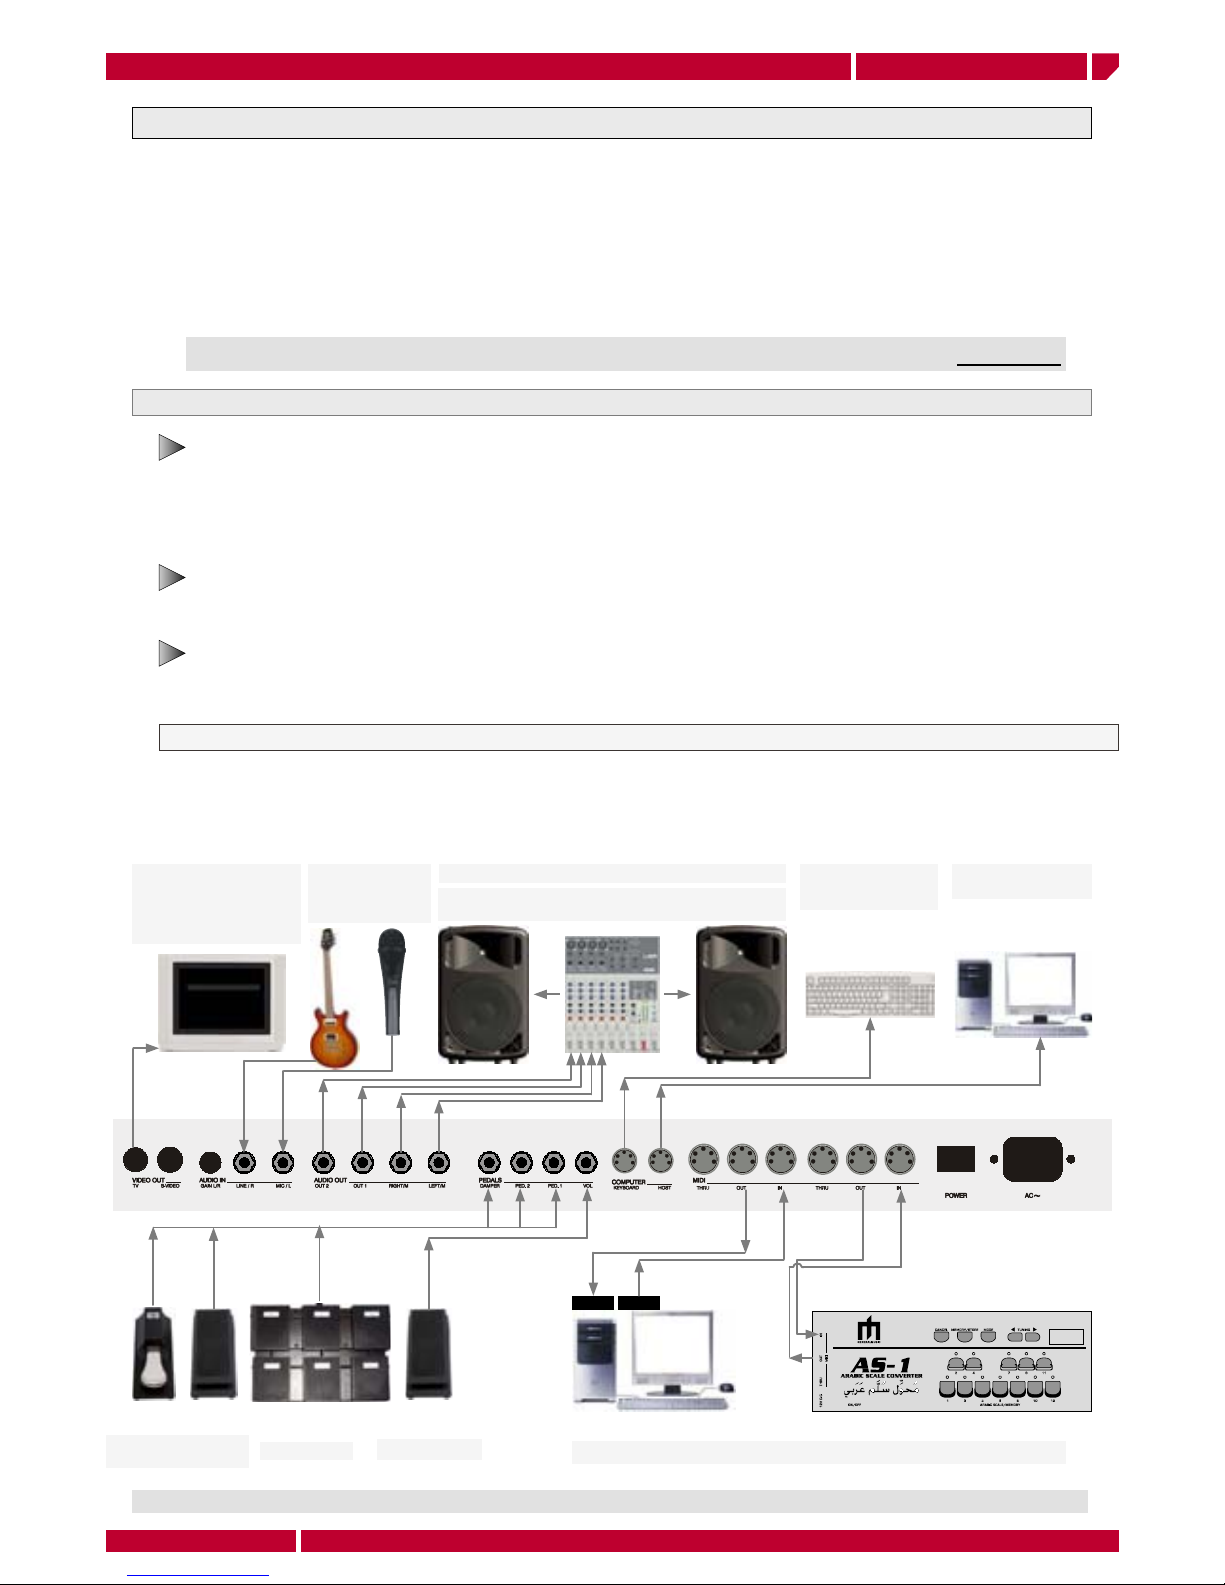
Connect the instrument to a proper AC socket using the apposite cable (included)
Connect the instrument to an external speaker system. It is preferable to use stereo connections [*]
Genesys s is a professional equipment. In order to obtain high quality audio performance, please use an
adeguate amplifi cation system.
VIDEO OUT connects a video
monitor or a TV to display the
multimedia contents of the
music files. (RGB or S-VHS
connection).
AUDIO OUT: RIGHT/M-LEFT/M main xp connections to an external
amplifi cation system
AUDIO OUT: OUT 1-OUT 2 auxiliary audio out of the instrument Connects a standard Pc
keyboard (Ps2) to the
workstation
Pc/Mac Serial connection
VOLUME pedal
Programmable pedals:
switch or continuos
MIDI interface (InOut-Thru) to connect a master midi instrument (keyboard, PC, or AS1)
LINE/R-MIC/L
connection for
external source with
gain control.
Multipedal unit
ATTENTION! The present manual addendum contains only the instructions relatives to the new
functions featured by the Genesys s and Genesys pro s. For all the others function please refer to
the included owners manual.
•In this manual we refer to both Genesys s and Genesys pro s models as: Genesys s
Lyrics,
Chords,
Score....
Genesys pro s features on board of a pitch bend modulation joystick to realtime control these
expressing parameters.
[*] Note: Genesys s features a powerful internal speaker system, the connection to an external p.a. system is facoltative
Page 8
introduction
Pa ge2
manual addendum Genesys s
Genesys s Control panel
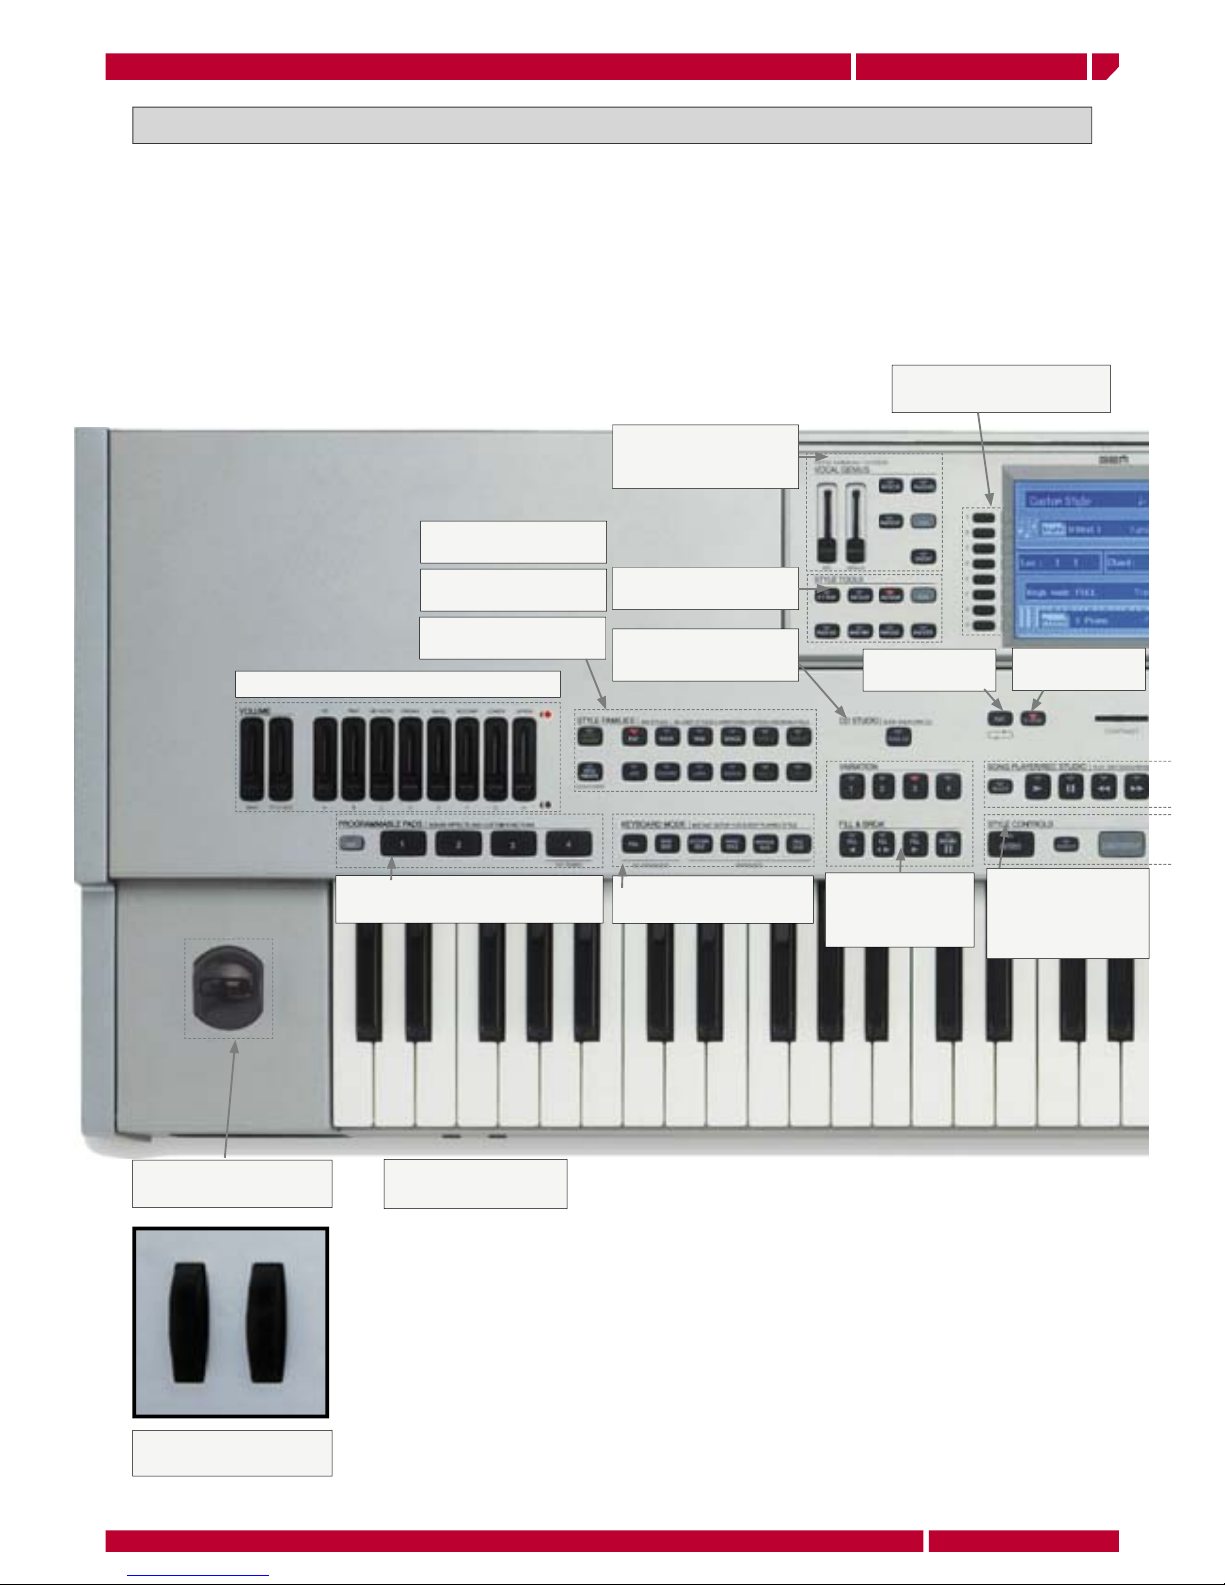
All the Genesys s functions are controlled from the control panel.
VOCAL GENIUS area
control the external signal
parameters and the vocal
processor set up.
The sliders control the volume of MIDI and audio
sections.
STYLE FAMILIES select the
style family you want to recall
VARIATION-FILL&BREAK
Allows the realtime
handling of the styles,
recalling the different
accompaniment patterns.
STYLE CONTROLS Recalls
the INTRO, ENDING parts
of a style and controls
the style activation mode:
START/STOP, SYNCRO,
RESTART.
STYLE TOOLS gives access to
the Styles fi ne tune parameters
an controls.
CD STUDIO a direct access
button to enter the CD burning
function of the instrument.
PROGRAMMABLE PAD a series of useful
realtime functions can be assigned to these
four buttons
HEADPHONES sockets to
connect two headphones to
the instrument
A to H function buttons, to select
or recall data inside the various
display menus.
PARTS shifts the
screen in song or
style musical parts.
D-HOLD enables/
disables the display
hold function.
MUSIC LIBRARY recals any of
96 programmed song set up
STYLE PRESET gives access to
the style preset area
KEYBOARD MODE real time
recals the keyboard set up you
prefer
The Joystick controls
Modulation and Pitch bending
Genesys s and Genesys pro s have the same control panel
Genesys s features Pitch Bend
and modulation wheels to
controls these parameters
Page 9
introduction
Page3
manual addendum Genesys s
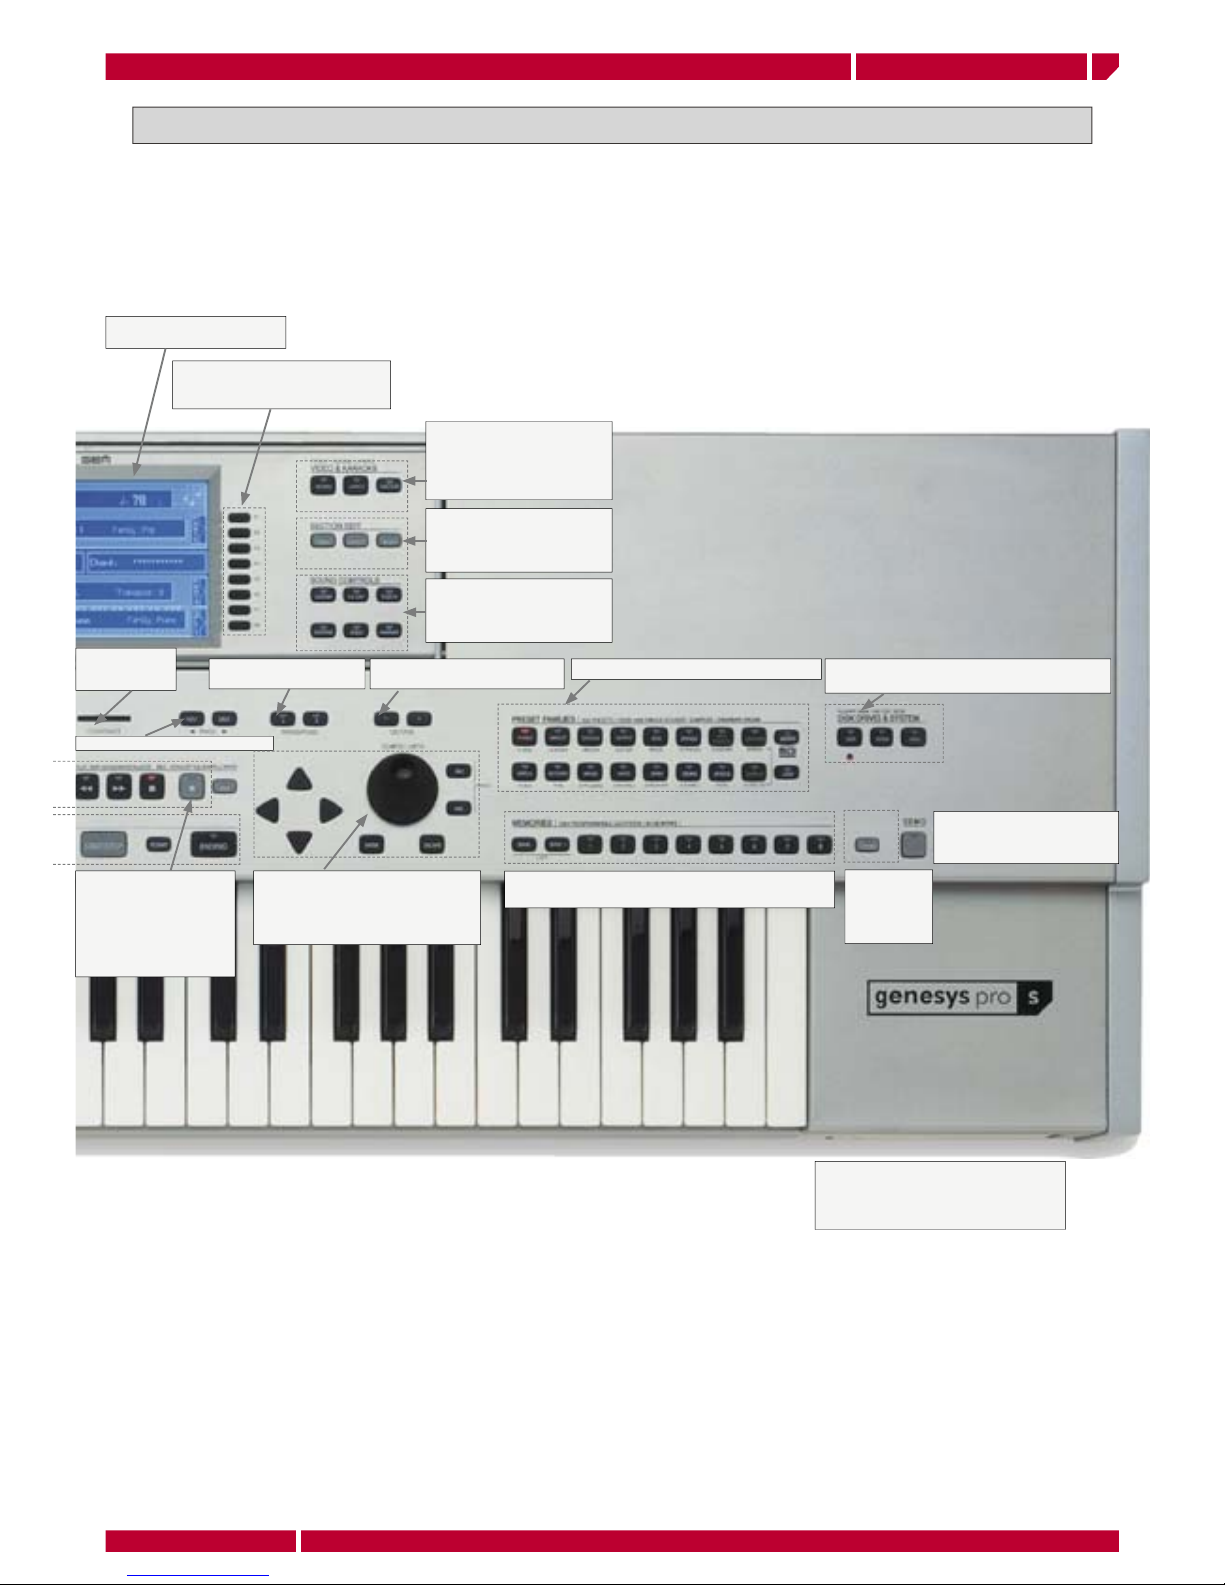
Recalls the Genesys s PRESET FAMILIES
INPUT DATA section: CURSOR buttons,
ENTER/ESCAPE buttons, INC/DEC
buttons, ALPHA DIAL, are the command
to enter or modifi es data in every section
of the Genesys s.
Genesys s Control panel
DISK DRIVES & SYSTEM gives access to the disks
menu, the system data editing and the MIDI setup
The SONG/PLAYER-
RECORDING STUDIO
section contols and
handles the song player
section, or the MIDI and
audio recording functions
as well.
The DEMO button starts
the demo(nstrative) song
sequence of Genesys s
CD-RW driver this unit allows to read
read or write CD (ROM or AUDIO
formats). It is also possible. to use
rewritable CD.
320x240 graphic LCD
backlit display
the F1 to F8 function buttons,
selects or recalls data inside the
display menu.
VIDEO & KARAOKE buttons
access and control the
multimedia fi les information
contained in the music fi le
such as: score, chord, lyrics
SECTION EDIT this section
allows to modify preset effect
and mixing parameters
programming.
SOUND CONTROLS direct
access buttons to realtime
control parameters such as
Sustain, FX bypass, Touch etc.
CONTRAST Sets
the display light
contrast.
PAGE switches the page of the menu
TRANSPOSE sets the
global transpose
OCTAVE moves the selected part
one octave higher or lower
MEMORIES allows to recall up to 1.024 different setting of
the entire instrument status
The STORE
buttons allows
to confi rm the
edited data in
memory
Page 10
H
F
8
G
F
7
F
F
6
E
F
5
D F
4
C
F
3
B
F
2
A
F
1
H
F
8
G
F
7
F
F
6
E
F
5
D F
4
C
F
3
B
F
2
A
F
1
H
F
8
G
F
7
F
F
6
E
F
5
D F
4
C
F
3
B
F
2
A
F
1
Edit parts upgrade
Pa ge4
manual addendum genesys s
Edit Parts menu upgrade
The Genesys s features some interesting functions in the EDIT PARTS menu, increasing the instrument versatility in
PRESET programming and editing.
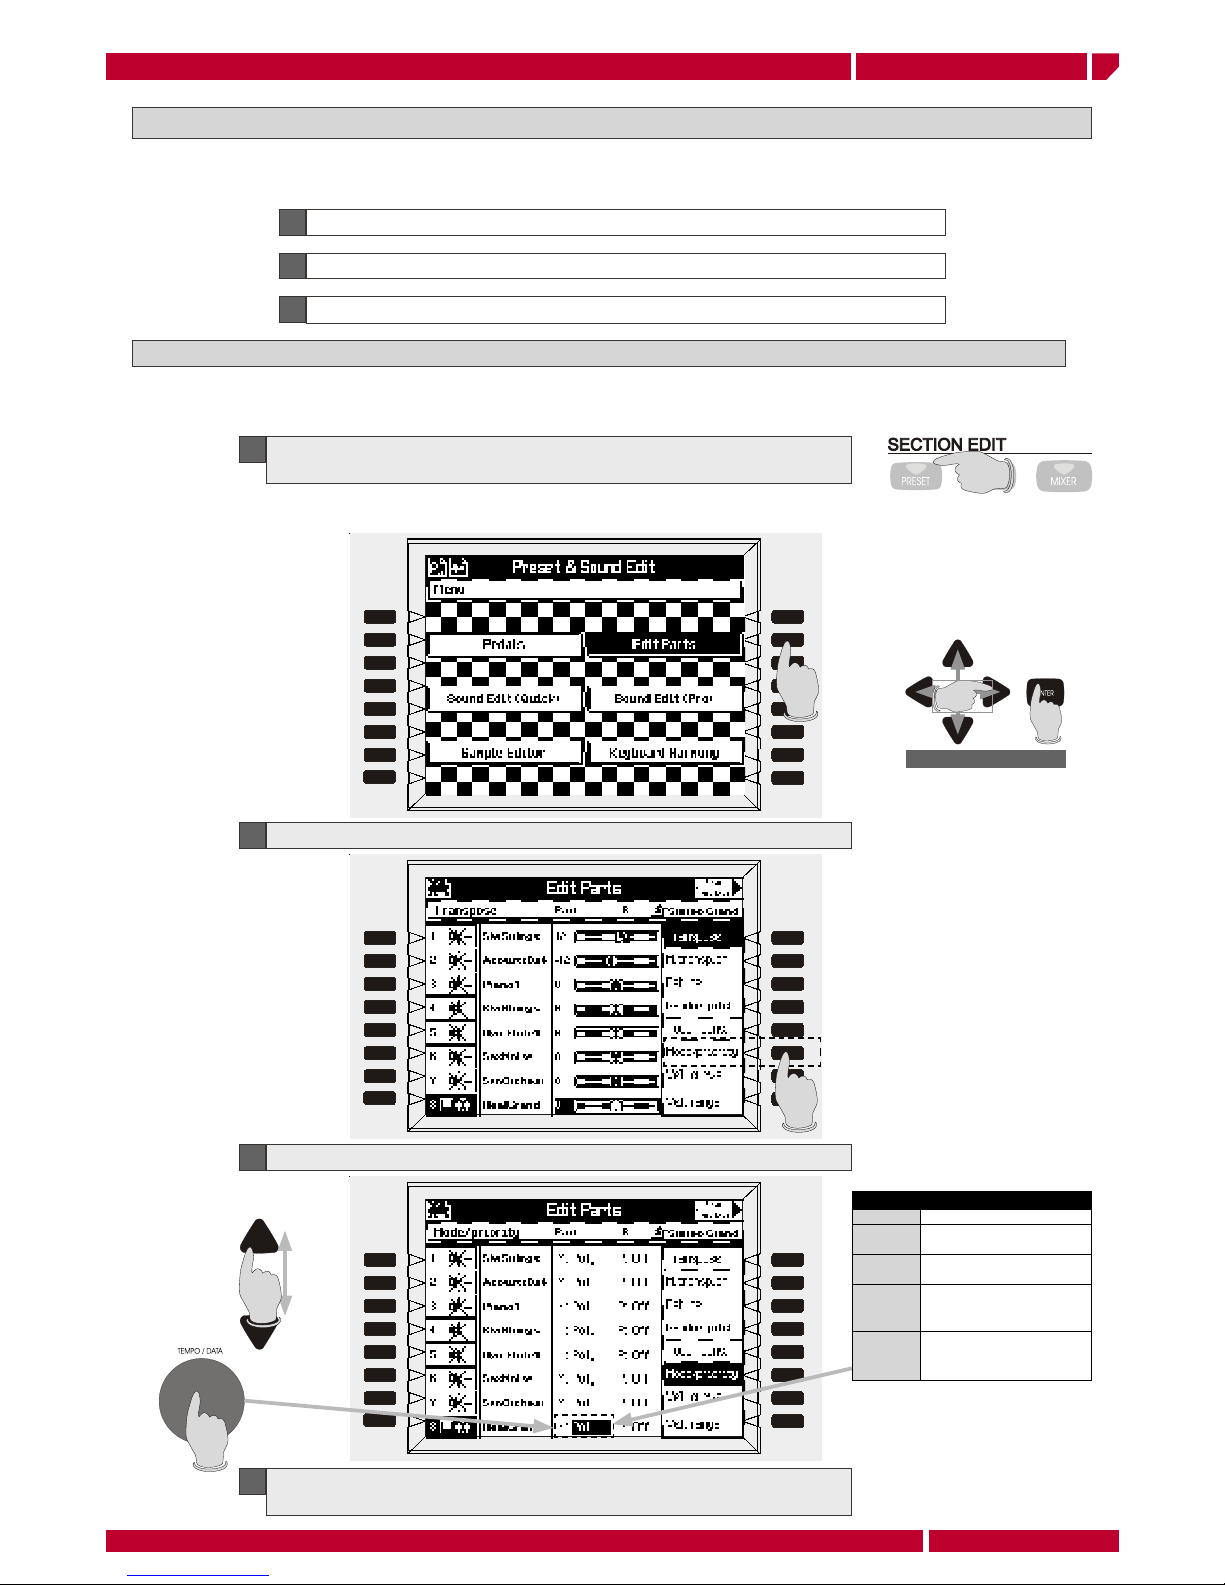
A
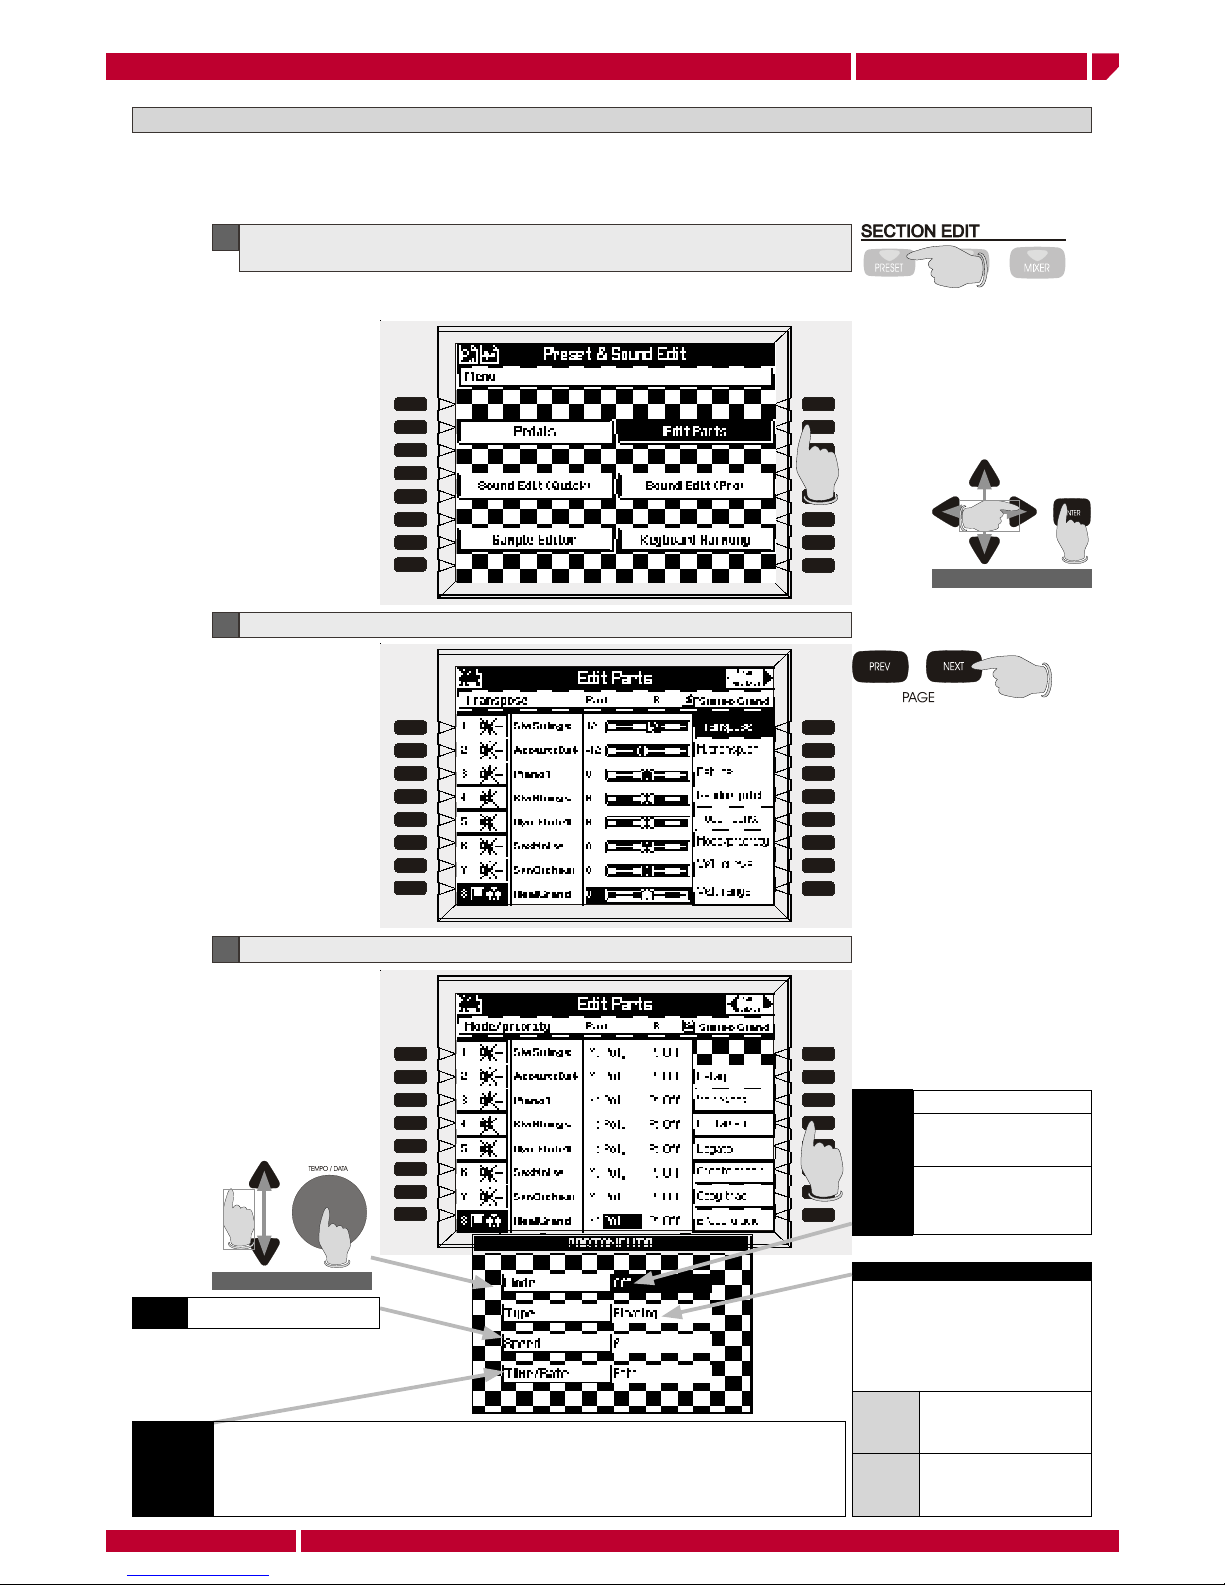
In the MODE/PRIORITY menu the new L+R Mode has been addeed
To select the EDIT PARTS menu can be also used the CURSOR to select and
the ENTER button to enter.
B
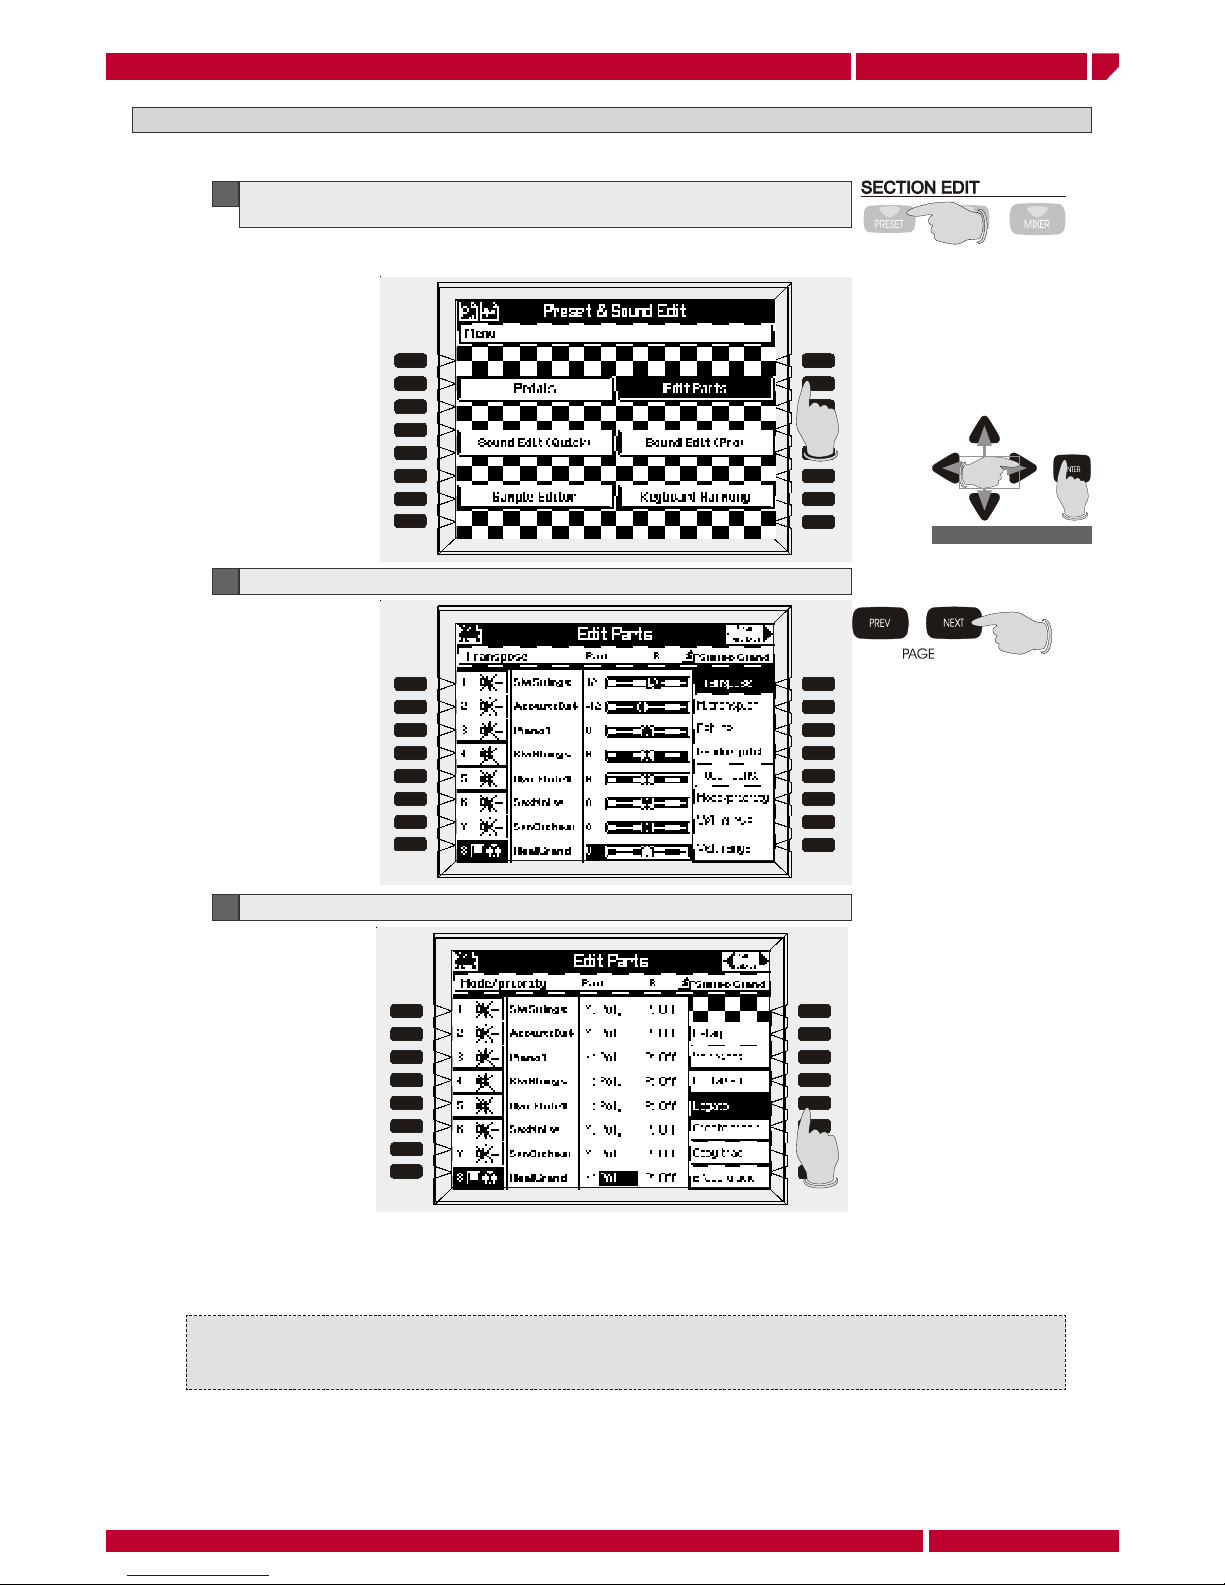
In the EDIT PARTS Page 2 menu the PORTAMENTO mode has been addeed
C
In the EDIT PARTS Page 2 menu the LEGATO mode has been addeed
EDIT PARTS MENU: L+R Mode
MODE PRIORITY TRACK VALUE
POLY The track play polyphonic
MONO L The track play in monophonic
mode with left priority
MONO R The track play in monophonic
mode with right priority
MONO T The track play in monophonic
mode with last playied note
priority
MONO
L+R
The track play in monophonic
mode with left + right
priority
1
Enter the EDIT PARTS menu pressing the PRESET button in the panel and then
the function button [F2]
2
Press the function button [F6] MODE/PRIORITY
3
The display shows the MODE/PRIORITY page set up
4
Select the PART using the UP/DOWN CURSOR and MODE/PRIORITY Mode
L+R by rotating the DIAL
navigation
The L+R priority mode allows to play a selected part of the Preset monophonic, triggering the notes played both
left and right side.
Page 11
H
F
8
G
F
7
F
F
6
E
F
5
D F
4
C
F
3
B
F
2
A
F
1
H
F
8
G
F
7
F
F
6
E
F
5
D F
4
C
F
3
B
F
2
A
F
1
H
F
8
G
F
7
F
F
6
E
F
5
D F
4
C
F
3
B
F
2
A
F
1
MODE
OFF no portamento
NORMAL portamento
creates a pitch slide whenever
a new note is played.
LEGATO activates the
portamento effect only when
a note is played while another
note is still being held.
navigation
TYPE
This feature only applies when, during the
course of sliding from one note to another,
you play an new note somewhere in
between the two, (which begins a separate
portamento, [pitch slide] of it’s own). The
TYPE setting controls where this new slide will
commence from
Floating
The new portamento will commence
from the pitch which the previous
portamento had reached when the
new key was pressed.
Re-Start
The new portamento will
commence from the ultimate
destination of the previous
portamento.
Edit parts upgrade
Page5
manual addendum genesys s
EDIT PARTS MENU: PORTAMENTO
To select the EDIT PARTS menu can be also used the CURSOR to select and the ENTER button to enter.
1
Enter the EDIT PARTS menu pressing the PRESET button in the panel and then the
function button [F2]
2
Press the button PAGE NEXT on the panel to select the Page 2 control menu
navigation
This menu allows to play a selected part of a PRESET using the PORTAMENTO. The portamento is a tipical execution
mode common beetwen the acoustic instrument (i.e. violin, human voice, trombone) and it consist of a frequency
shift sliding, playing different notes.
3
Press the function button [F4] PORTAMENTO, the control menu appears on the screen
TIME/RATE This control affects the way that the SPEED setting is interpreted. Setting this parameter to TIME, the SPEED value
controls the actual amount of time it takes to slide from any note to any other note regardless of the “distance”
in pitch between the two. Thus the time taken to slide between any two notes will always be the same. Setting to
RATE, the SPEED value controls the amount of pitch change per second. This means that the time it takes to slide
from one note to another depends entirely on the “distance” it has to travel between the two. This means that the
time taken to slide between any two notes will be different depending on which notes are played.
SPEED
Adjust the time taken for the
pitch slide to occur.
Page 12
H
F
8
G
F
7
F
F
6
E
F
5
D F
4
C
F
3
B
F
2
A
F
1
H
F
8
G
F
7
F
F
6
E
F
5
D F
4
C
F
3
B
F
2
A
F
1
navigation
H
F
8
G
F
7
F
F
6
E
F
5
D F
4
C
F
3
B
F
2
A
F
1
Edit parts upgrade
Pa ge6
manual addendum genesys s
EDIT PARTS MENU: LEGATO
This function cause the sound initial attack portion bypass, playing the keys in “LEGATO” mode.
To select the EDIT PARTS menu can be also used the CURSOR to select and the ENTER button to enter.
1
Enter the EDIT PARTS menu pressing the PRESET button in the panel and then the
function button [F2]
2
Press the button PAGE NEXT on the panel to select the Page 2 control menu
3
Press the button LEGATO [F4] on the panel. The function is now enabled
This function allows to obtain impressive results in wind and brass solo simulation. Try to select any of internal
Genesys s sound of these families and enable the function.
To memorize any of the functions described in these page it is enough to press the button STORE, select a
destination location (MEMORIES, PRESETS, STYLE PRESETS) for the current edited preset, then press ENTER.
For more details please refer to the STORE chapter in the owners manual.
Page 13
manual addendum
genesys s
multipedal mode Page7
H
F
8
G
F
7
F
F
6
E
F
5
D F
4
C
F
3
B
F
2
A
F
1
H
F
8
G
F
7
F
F
6
E
F
5
D F
4
C
F
3
B
F
2
A
F
1
H
F
8
G
F
7
F
F
6
E
F
5
D F
4
C
F
3
B
F
2
A
F
1
H
F
8
G
F
7
F
F
6
E
F
5
D F
4
C
F
3
B
F
2
A
F
1
H
F
8
G
F
7
F
F
6
E
F
5
D F
4
C
F
3
B
F
2
A
F
1
H
F
8
G
F
7
F
F
6
E
F
5
D F
4
C
F
3
B
F
2
A
F
1
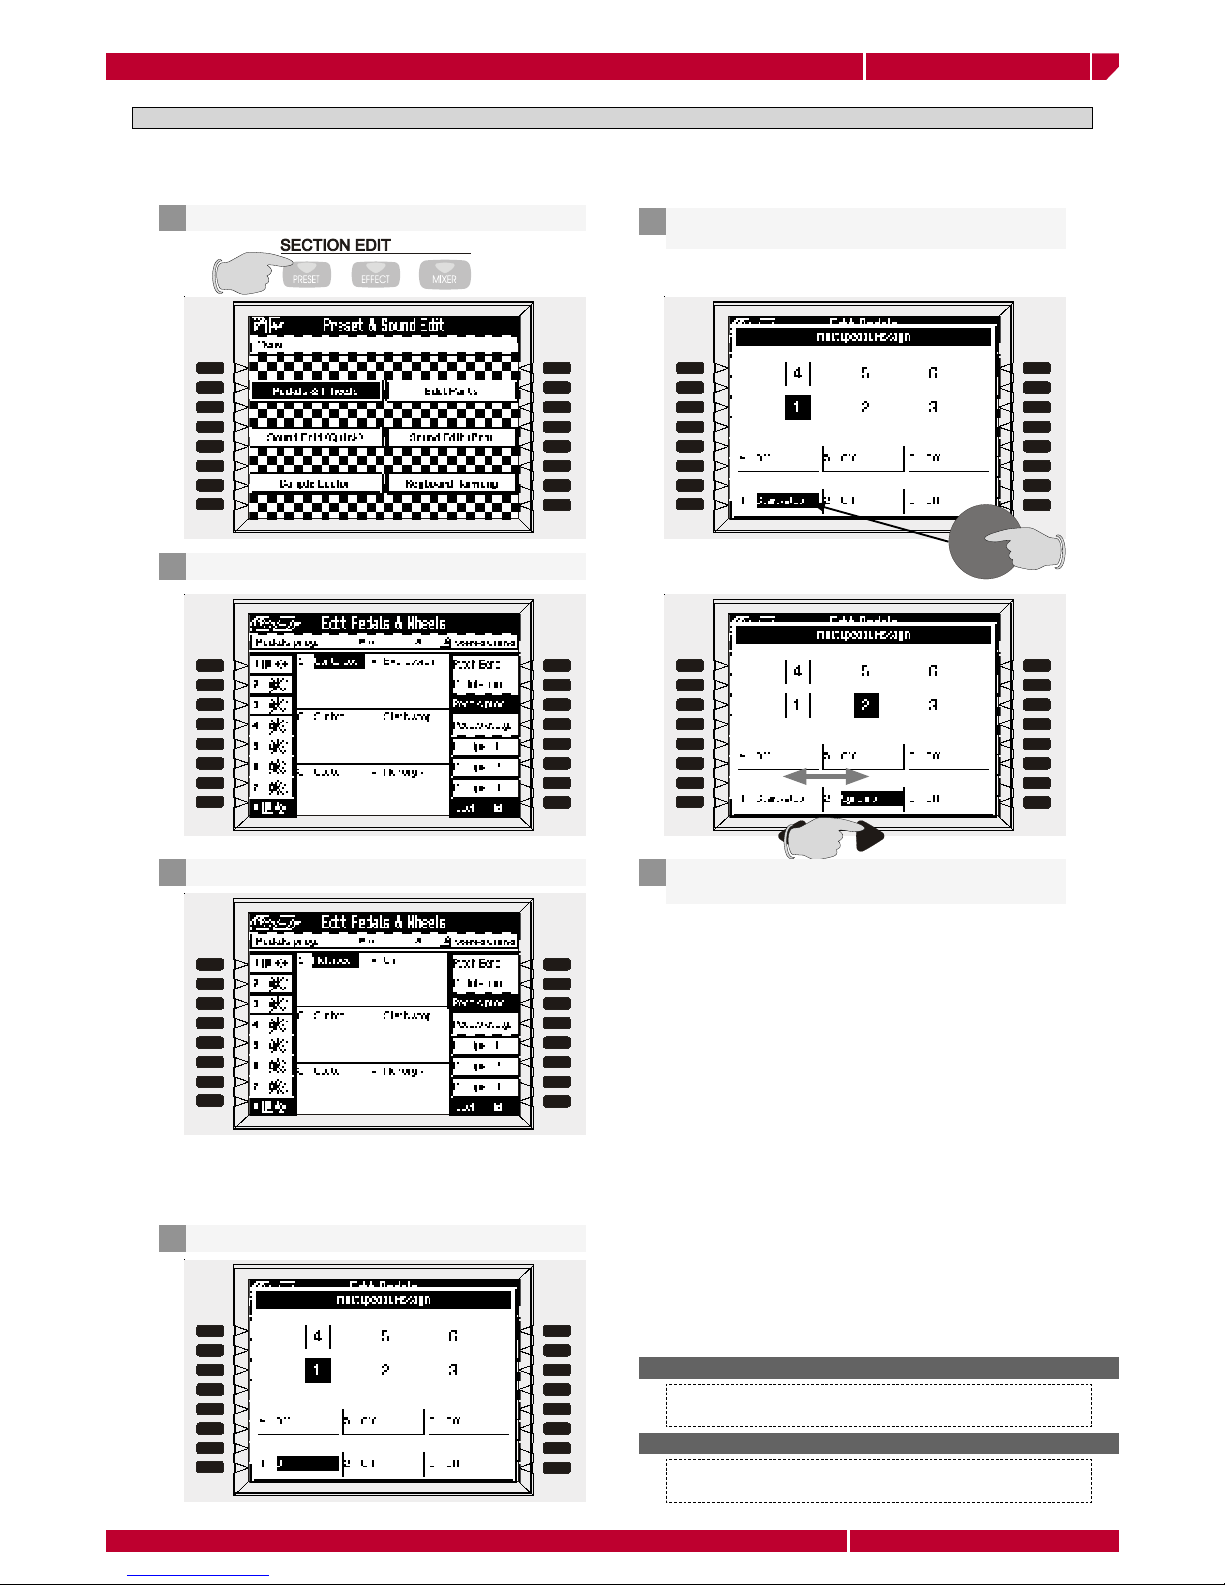
MULTIPEDAL MODE
The multipedal is a new pedal unit specially designed for genesys s. This unit has six switch pedals, and the genesys
s can connect up to three pedal units, from the rear panel pedal input jacks, up to eighteen programmable switch
pedals at maximum. In this way all the performers gain full controll of the genesys s realtime parameters.
Press the PRESET button in SECTION EDIT
1
To access the MULTIPEDAL mode functions an optional
MULTIPEDAL unit has to be connected to the genesys s.
NOTE:
in this example we assume the MULTIPEDAL connect
to the the input N.1 on the rear panel. Obviusly if you
have connect the MULTIPEDAL in a different input you
have to select the correspondent one.
DAMPER, SOFT and SOSTENUTO can not be assigned to
the single switch pedal in MULTIPEDAL mode.
WARNING!
Press the function button [B] or ENTER to enter the menu
2
Select MULTIPEDAL in the pedal 1 fi eld
3
Press the function button [F5] MULTIPEDAL 1
4
The display shows the MULTIPEDAL assign screen
Select the function you want to recall with pedal
by rotating the DIAL
4
It possible to check the function assigned to the pedal
simply pressing the relative footswitch.
Select another footswitch using the CURSOR, then
select the function with the dial
5
Repeat the operation until the 6 footswitch are assigned
to the function you want to control in realtime by the
MULTIPEDAL unit.
Page 14
multipedal mode
Page8
manual addendum
genesys s
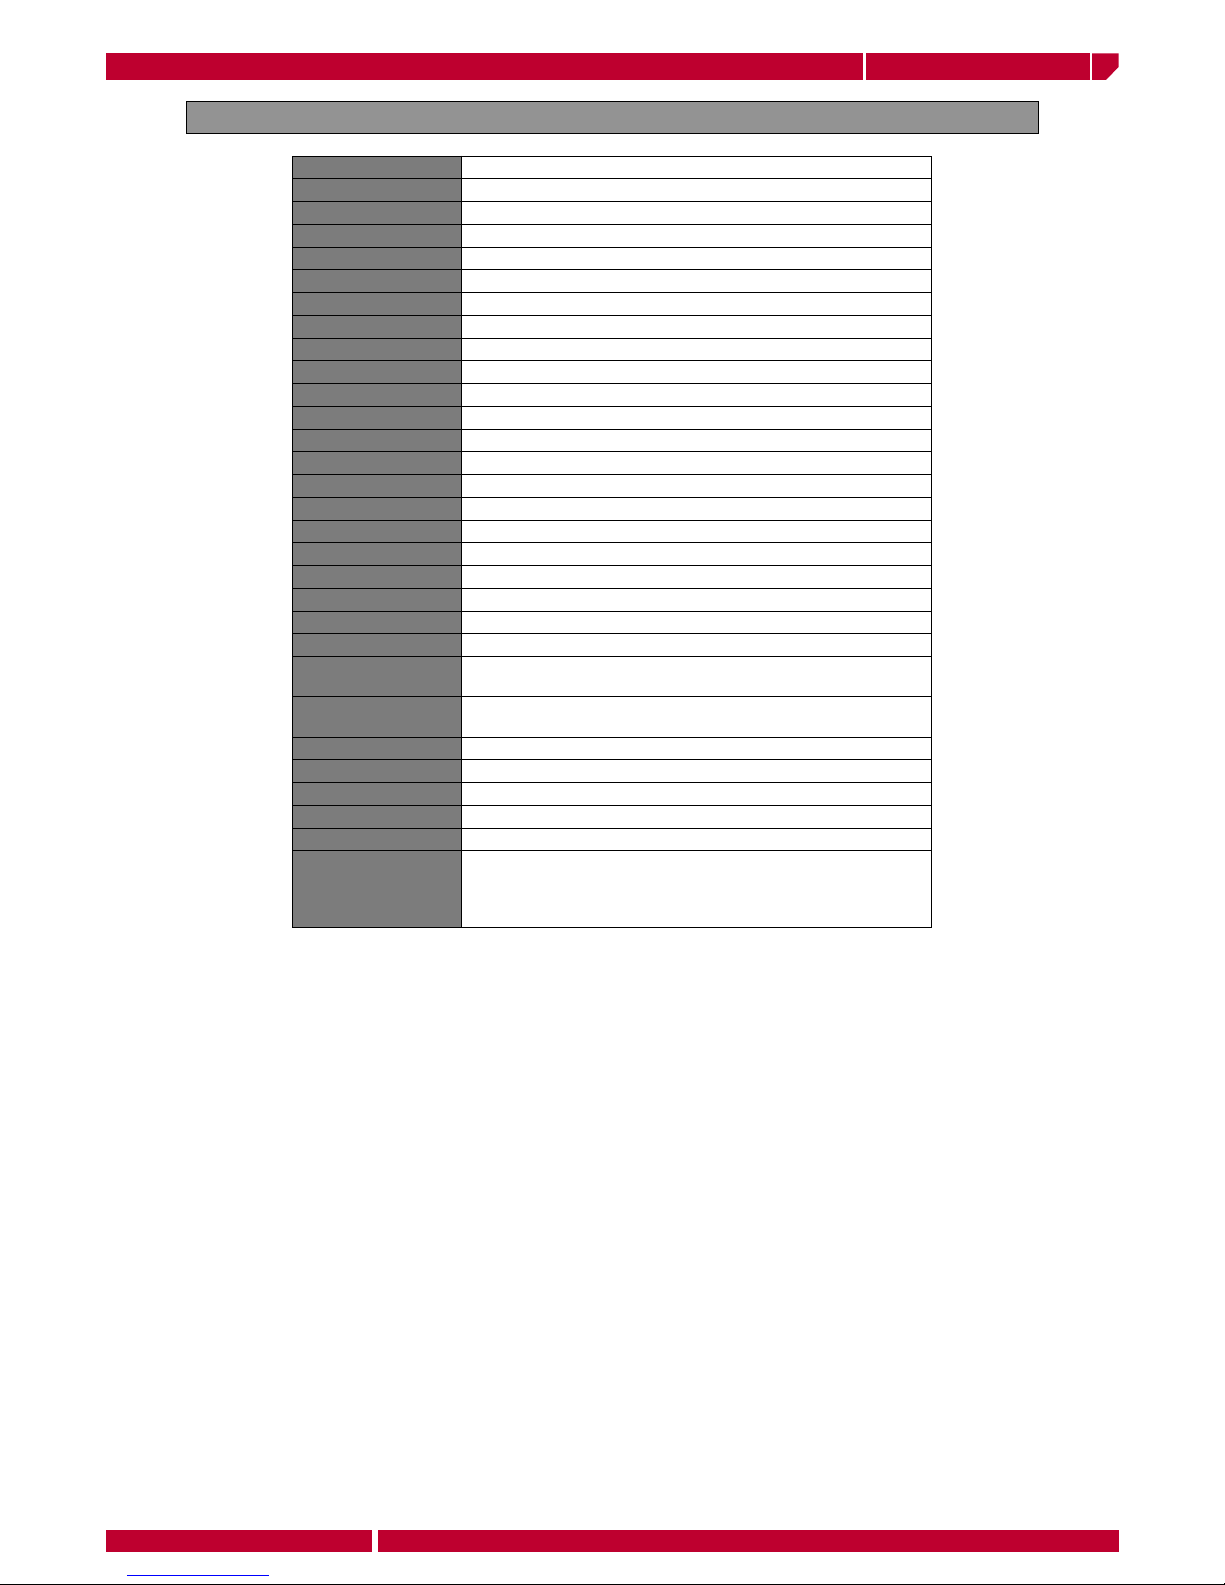
FUNCTIONS ASSIGNABLES TO THE MULTIPEDAL SWITCH
Off
No effect
Start/Stop
Simulates the Start/Stop button.
Synchro
Enable /disable the syncro function
Intro
Activates the Intro.
Fill <
Activates the Fill< function.
Fill =
Activates the Fill function.
Fill >
Activates the Fill> function.
Ending
Activates the Ending function.
Variation 1
Switches to Variation 1.
Variation 2
Switches to Variation 2.
Variation 3
Switches to Variation 3
Variation 4
Switches to Variation 4.
Var >
Switches to the next Variation.
Var <
Switches to the previous Variation.
Memory>
Advances to the next memories
Memory<
Advances to the previous memories
Harmony
Activates/deactivates the Harmony function
Bass Inv.
Enables/disables the Bass inv. function
Arrange On/Off
Activates/deactivates the Arranger
Fade In/Out
Activates/deactivates the Fade In/Out function.
Tempo >
Increases the Tempo setting by one unit at a time.
Tempo <
Decreases the Tempo setting by one unit at a time.
Punch
Activates/deactivates the Punch recording function during recording
operations.
Rotary s/f
Changes the speed of the Rotary effect from Slow to Fast or vice
versa.
Minor
Converts the currently held chord to the minor chord.
Dim
Converts the currently held chord to the diminished chord.
Min
7th Converts the currently held chord to the minor 7th chord.
Maj 7th
Converts the currently held chord to the Major 7th chord.
Voc. Genius on/off
Enable/Disable the vocal processor
Freeze Chord
Locks the current chord (pedal held), allowing you to play freely with
both hands across the entire key-board without triggering changes
in the Style auto-accompaniment. The function deactivates at pedal
release.
Page 15
manual addendum
genesys s
how to program a play list
Page 9
H
F
8
G
F
7
F
F
6
E
F
5
D F
4
C
F
3
B
F
2
A
F
1
H
F
8
G
F
7
F
F
6
E
F
5
D F
4
C
F
3
B
F
2
A
F
1
H
F
8
G
F
7
F
F
6
E
F
5
D F
4
C
F
3
B
F
2
A
F
1
H
F
8
G
F
7
F
F
6
E
F
5
D F
4
C
F
3
B
F
2
A
F
1
H
F
8
G
F
7
F
F
6
E
F
5
D F
4
C
F
3
B
F
2
A
F
1
H
F
8
G
F
7
F
F
6
E
F
5
D F
4
C
F
3
B
F
2
A
F
1
H
F
8
G
F
7
F
F
6
E
F
5
D F
4
C
F
3
B
F
2
A
F
1
H
F
8
G
F
7
F
F
6
E
F
5
D F
4
C
F
3
B
F
2
A
F
1
selection
data
confirm
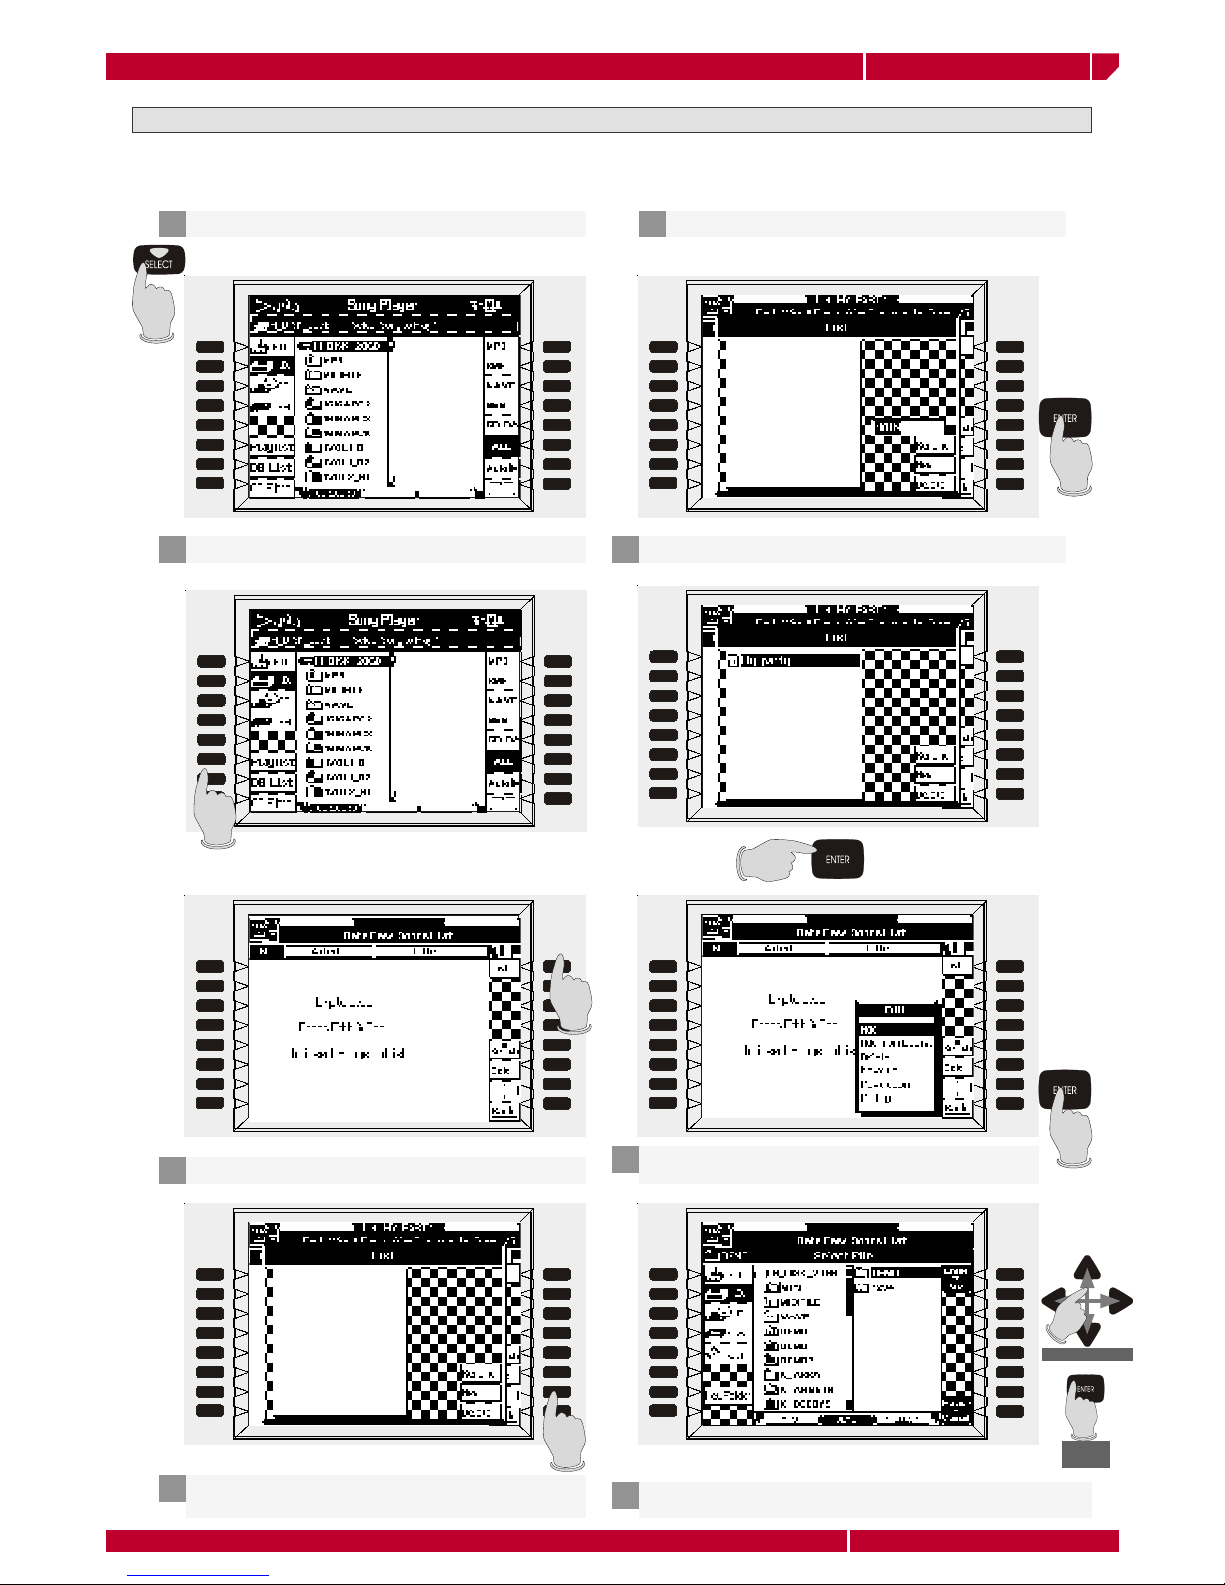
The PLAY LIST function permits to program a special selection from your music repertoire. For example, in case you
have to perform in a wedding party, then in a disco and next in a karaoke bar. Using the Play list you can easily
arrange the proper music selection for each type of performance, then store and recall it according to your needs.
How to program a PLAY LIST
Enter the SONG PLAYER pressing SELECT on the panel
1
Select PLAY LIST by pressing the function button [F]
2
The very first time you enable the function, the display
shows a screen like this
The new play list title appears in the screen, now press ENTER
6
Select any fi le from the hard disk using the CURSOR, then
press ENTER
8
Press the function button F1 [LIST]
3
Press the function button F7 NEW to create a new
play list
4
Type a name for the new play list, then press ENTER
5
Press the function button F7 EDIT, then select ADD. Press
ENTER to start adding fi les to the PLAY list
7
Page 16
how to program a play listPage10
manual addendum
genesys s
H
F
8
G
F
7
F
F
6
E
F
5
D F
4
C
F
3
B
F
2
A
F
1
H
F
8
G
F
7
F
F
6
E
F
5
D F
4
C
F
3
B
F
2
A
F
1
H
F
8
G
F
7
F
F
6
E
F
5
D F
4
C
F
3
B
F
2
A
F
1
H
F
8
G
F
7
F
F
6
E
F
5
D F
4
C
F
3
B
F
2
A
F
1
F
8
F
7
F
6
F
5
F
4
F
3
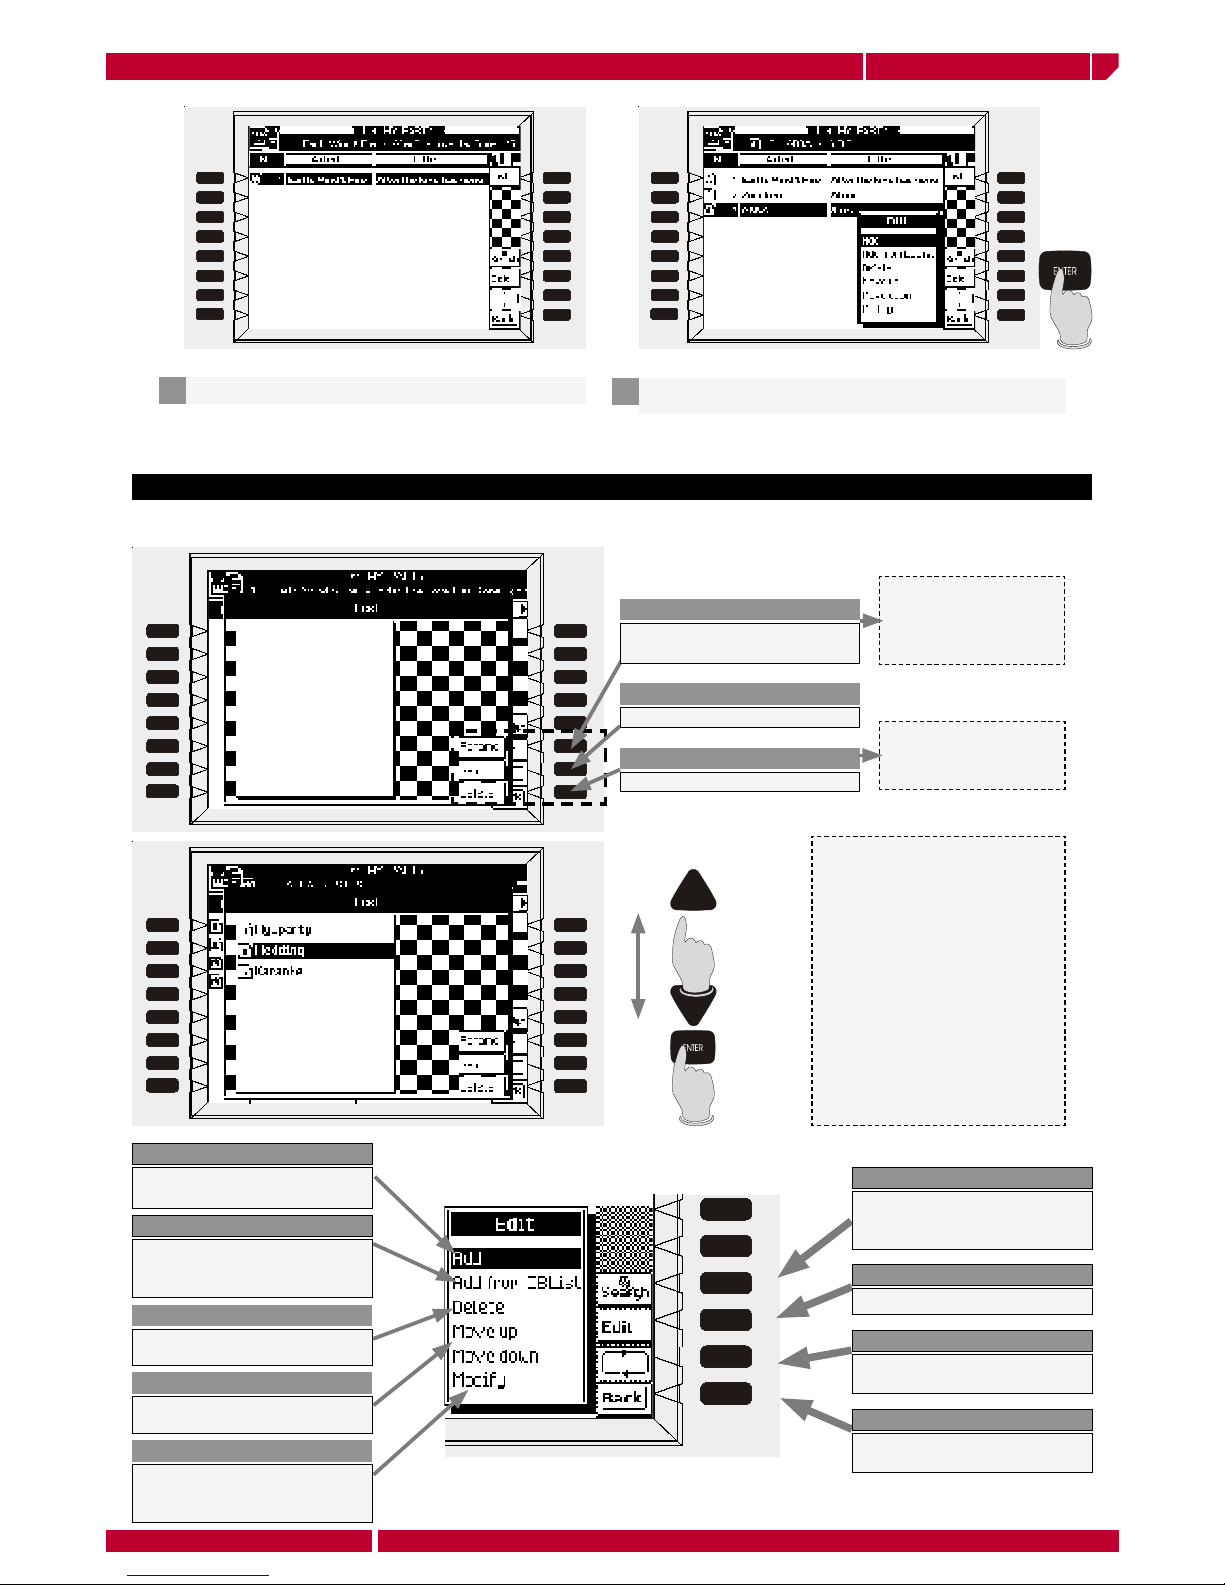
The first song is now added to the PLAY LIST
9
Repeat the operation as many time as you need, until the
list is completed.
10
Once the PLAY LIST is complete, the select and performing procedure is exactly the same as already described
as the DB LIST. For more details please refer to this part of the manual.
Descriptions
Descriptions
Lets analyze the play LIST managing screen page. This page is recalled by pressing the function button F1 LIST from the
main page
Allows to add and to rename
an already existing play list
Create a new Play list
Delete an existing playlist
F8 DELETE
F7 NEW
F6 RENAME
It is possible to create multiple play
lists, (Press the button F7, type the
name, press ENTER). Each playlist
can contain a special selection of
your repertoire, properly fitted
for each type of performance:
wedding, karaoke bar, disco etc.
Select them with the UP/DOWN
CURSOR and press the ENTER
button.
Select fi rst the playlist you
want to rename, press F6
RENAME, type the new
name, press ENTER.
Select fi rst the playlist you
want to delete, then press
F8 DELETE.
The PLAY LIST features a
search function, as the same
as the DB list
Enter the Play list edit menu
Allows to play in loop the
selected song
Returns the screen to the
main page
Adds music files from the
internal hard disk
Allows to add music files
already present in the DB
list
Allows to modify the number,
artist, title attributes of the
files
Shifts a position up/down a
selected file in the play list
Deletes a selected file from
the play list
DELETE
MOVE UP/DOWN
MODIFY
ADD FROM DB LIST
ADD
F8 BACK
F7 PLAY LOOP MODE
F6 EDIT
F5 SEARCH
Page 17
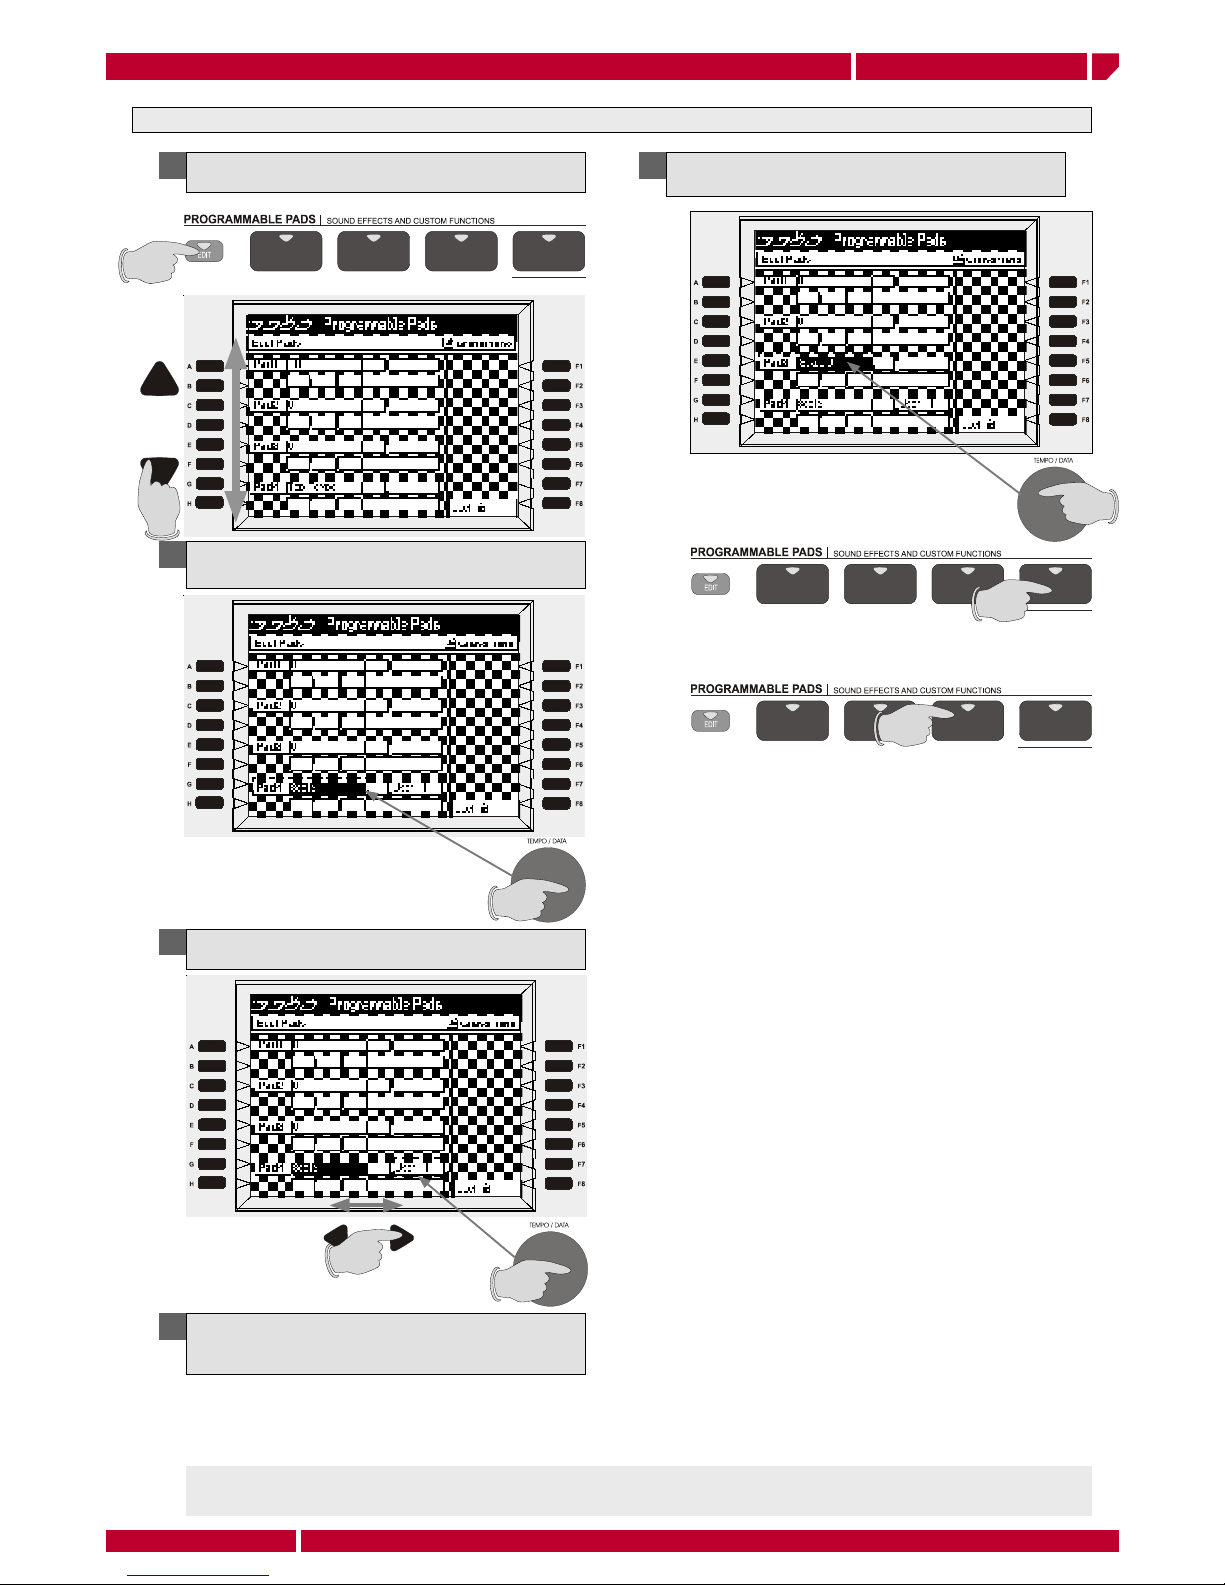
assign the mute to a pad
Page11
manual addendum genesys s
Assign the mute to a pad of the sequencer tracks
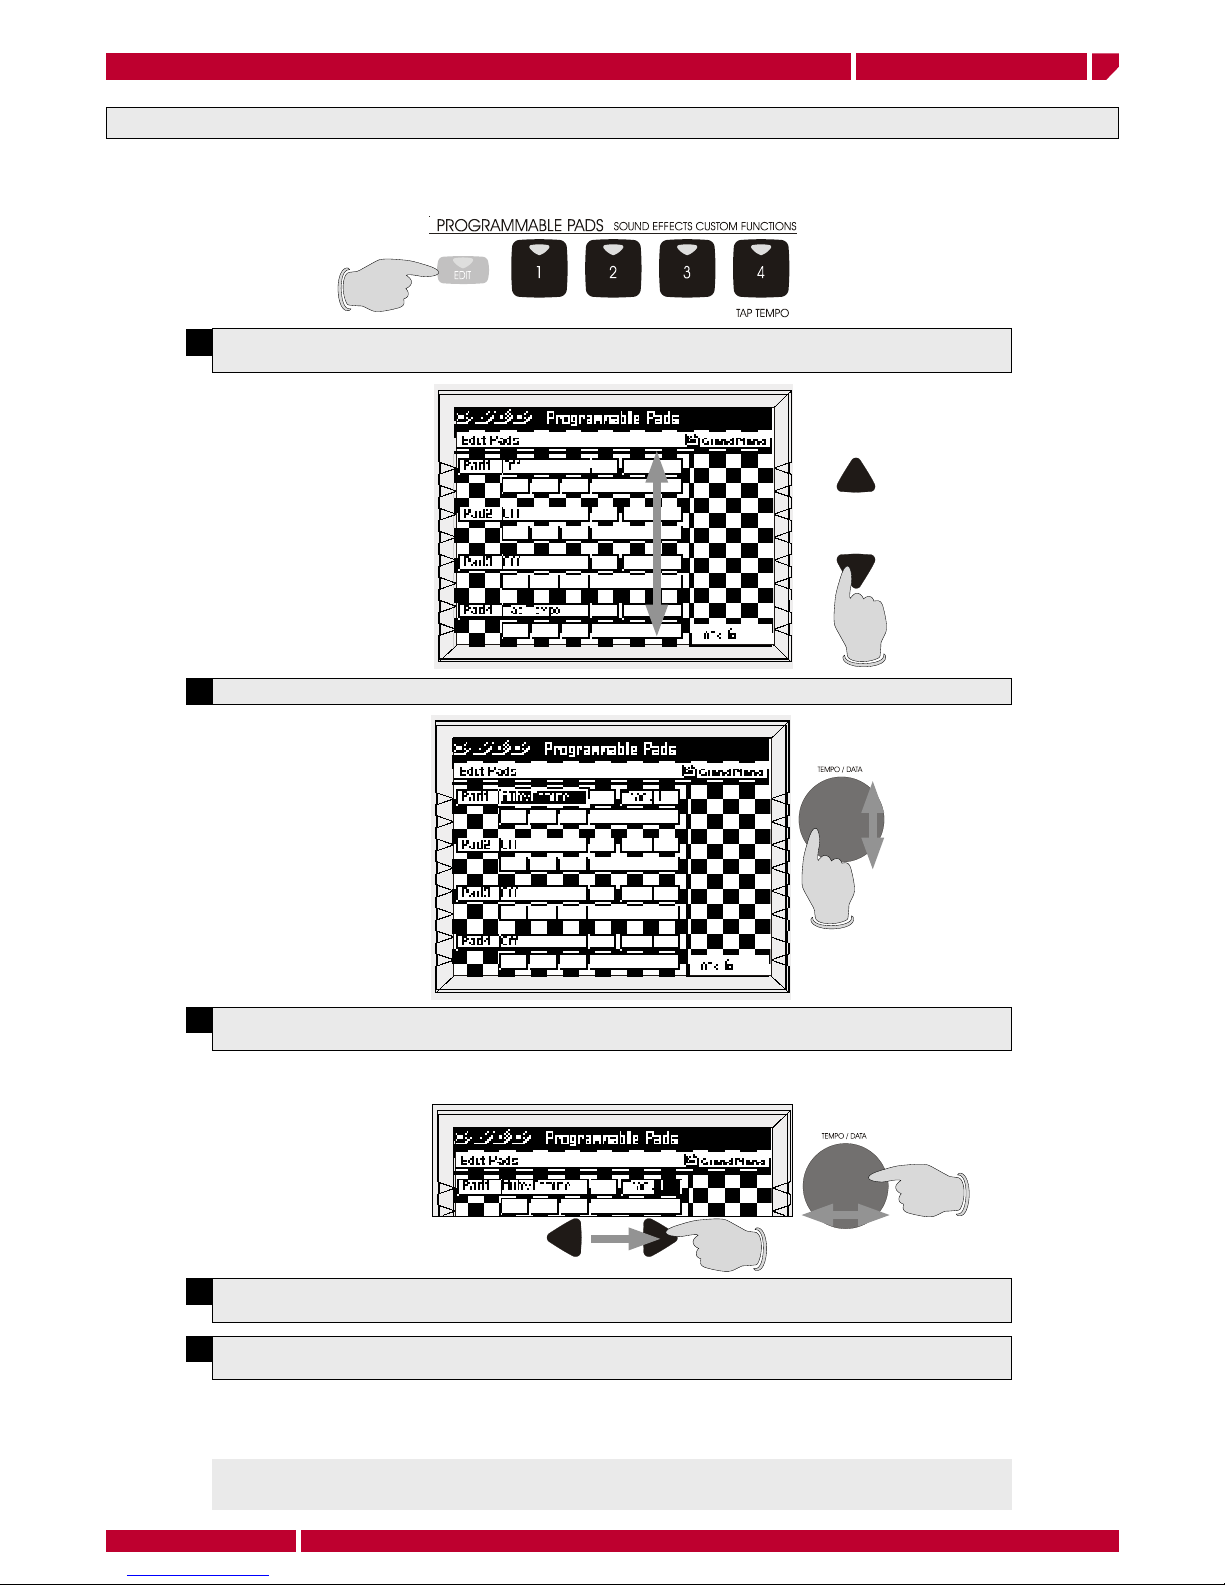
It is now possible to assign to one (or more) of the programmable pads the MUTE of any of the sequencer track, in
order to obtain a very powerful “Minus One” realtime function. Normally this function can be used to mute the lead
melody in a Song (track n. 4), but you can choose to mute any track of the sequencer (from 1 to 32).
1
Press the EDIT button in the programmable pads section. The edit page is shown on
the display.
2
Select the PAD to assign the mute function using the UP/DOWN CURSOR.
3
Once you have selected the PAD (n. 1 in this example), select the MUTE/DEMUTE
function by rotating the DIAL
The default mute channel is assigned to the #4, the track and the relative Midi channel, where the
lead track is memorized usually.
5
Then Use the DIAL to modify the value. You can assign any of the sequencer track
from #1 to #32.
4
Move on the TRACK field using the RIGHT CURSOR to modify the track you want to
mute
The operation can be repeated selecting different programmable pads, in this way you can prepare
different buttons to realtime perform with the Song Player section.
The programmable pad set up can be stored in one of the internal MEMORIES or handled in
realtime using the LOCK function [F8]. Please refer to the relative section in the owner manual.
Page 18
H
F
8
G
F
7
F
F
6
E
F
5
D F
4
C
F
3
B
F
2
A
F
1
SELECT
H
F
8
G
F
7
F
F
6
E
F
5
D F
4
C
F
3
B
F
2
A
F
1
assign an user scale to a pad
Page12
manual addendum genesys s
Assign an USER SCALE to a programmable pad
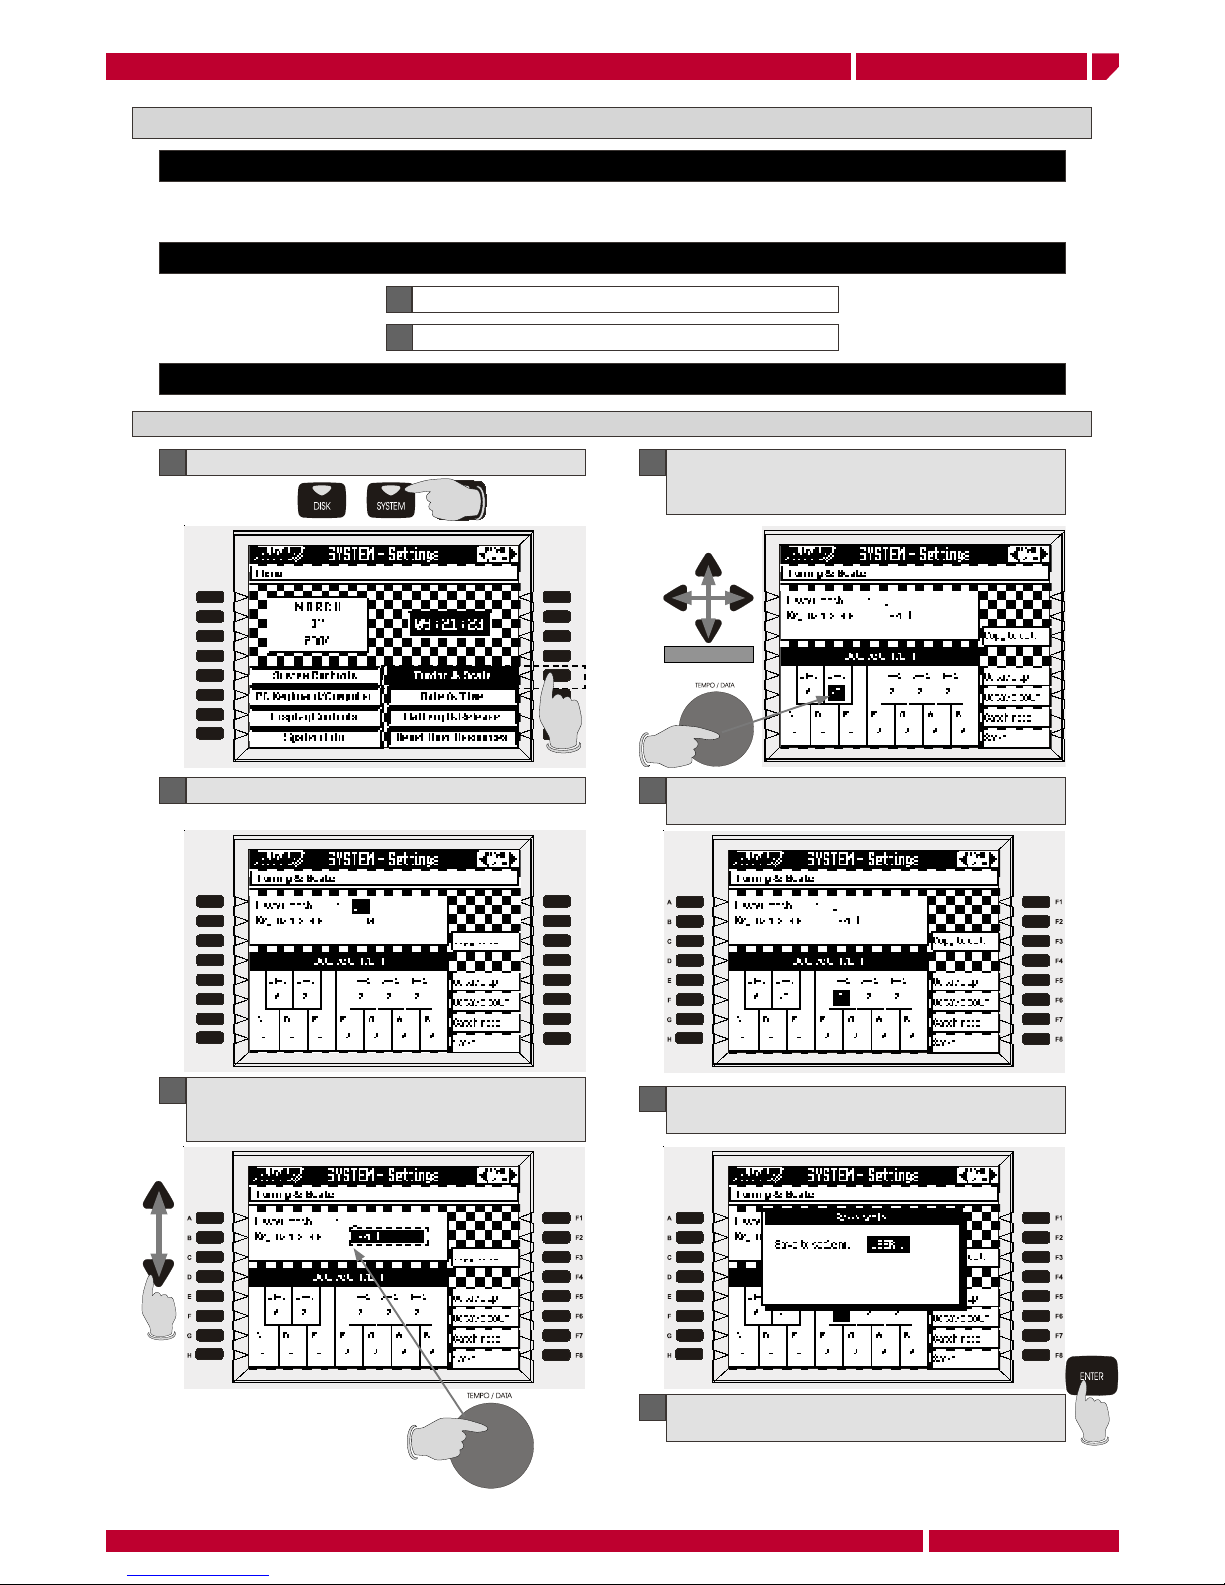
This function allows to assign to any programmable pad a custom temperament memorized in any of the
User scale memory locations.
Concept:
A Create or modify one (or more) USER SCALE
Steps:
Your custom scale pitch data are now memorized in
USER1 location. You can memorize other user scale
using the remaining locations (from 2 to 8)
Description
B Assign the USER SCALE to a Programmable Pad
Create an USER SCALE
1
Press the SYSTEM button on the panel
2
Press the TUNING&SCALE [F5] function button
3
Select KEYBOARD SCALE in the menu with the
DOWN CURSOR, then select USER1 by rotating
the DIAL
4
Select the note you want to detune using the
CURSOR, then input the new value by rotating
the DIAL (i.e. D#-1 in this example)
5
Repeat the detune operation selecting other
notes
6
Once you have fi nish to the detune the notes you
need, press the SAVE button [F8]
7
Select a USER scale to memorize your custom scale
(USER1 in this case) , then press ENTER
Page 19
1234
TAP TEMPO
1234
TAP TEMPO
1234
TAP TEMPO
assign an user scale to a pad
Page13
manual addendum genesys s
Press the EDIT button in the programmable pads
section. The edit page is shown on the display.
2
Select a PAD to assign the USER scale using the UP/
DOWN CURSOR. (the pad n.4 in this example)
3
Once you have selected the PAD, assign the SCALE
function by rotating the DIAL
Pressing now the PAD n.4 you realtime recall the temperament
you have programmed in the USER scale 1.
The programmable pad set up can be stored in one of the internal MEMORIES or handled in realtime enabling
the LOCK function [F8]. Please refer to the relative section in the owner manual.
Assign the USER SCALE to a Programmable Pad
1 5
select the PAD n. 3 with the CURSOR, assign
the SCALE OFF function by rotating the DIAL
Now it is possible to select another pad to assign
a different USER scale or the SCALE OFF function,
to restore the normal temperament during your
performance
Pressing the PAD n.3 (SCALE OFF) you restore the normal
temperament (EQUAL).
4
Moving on the next fi eld (USER 1) using the RIGHT
CURSOR you can select the USER scale memory to
assign to the PAD. (USER scale location from 1 to 8)
Page 20
the midi set up
Page14
manual addendum Genesys s
1
2
4
3
MIDI Out
MIDI In
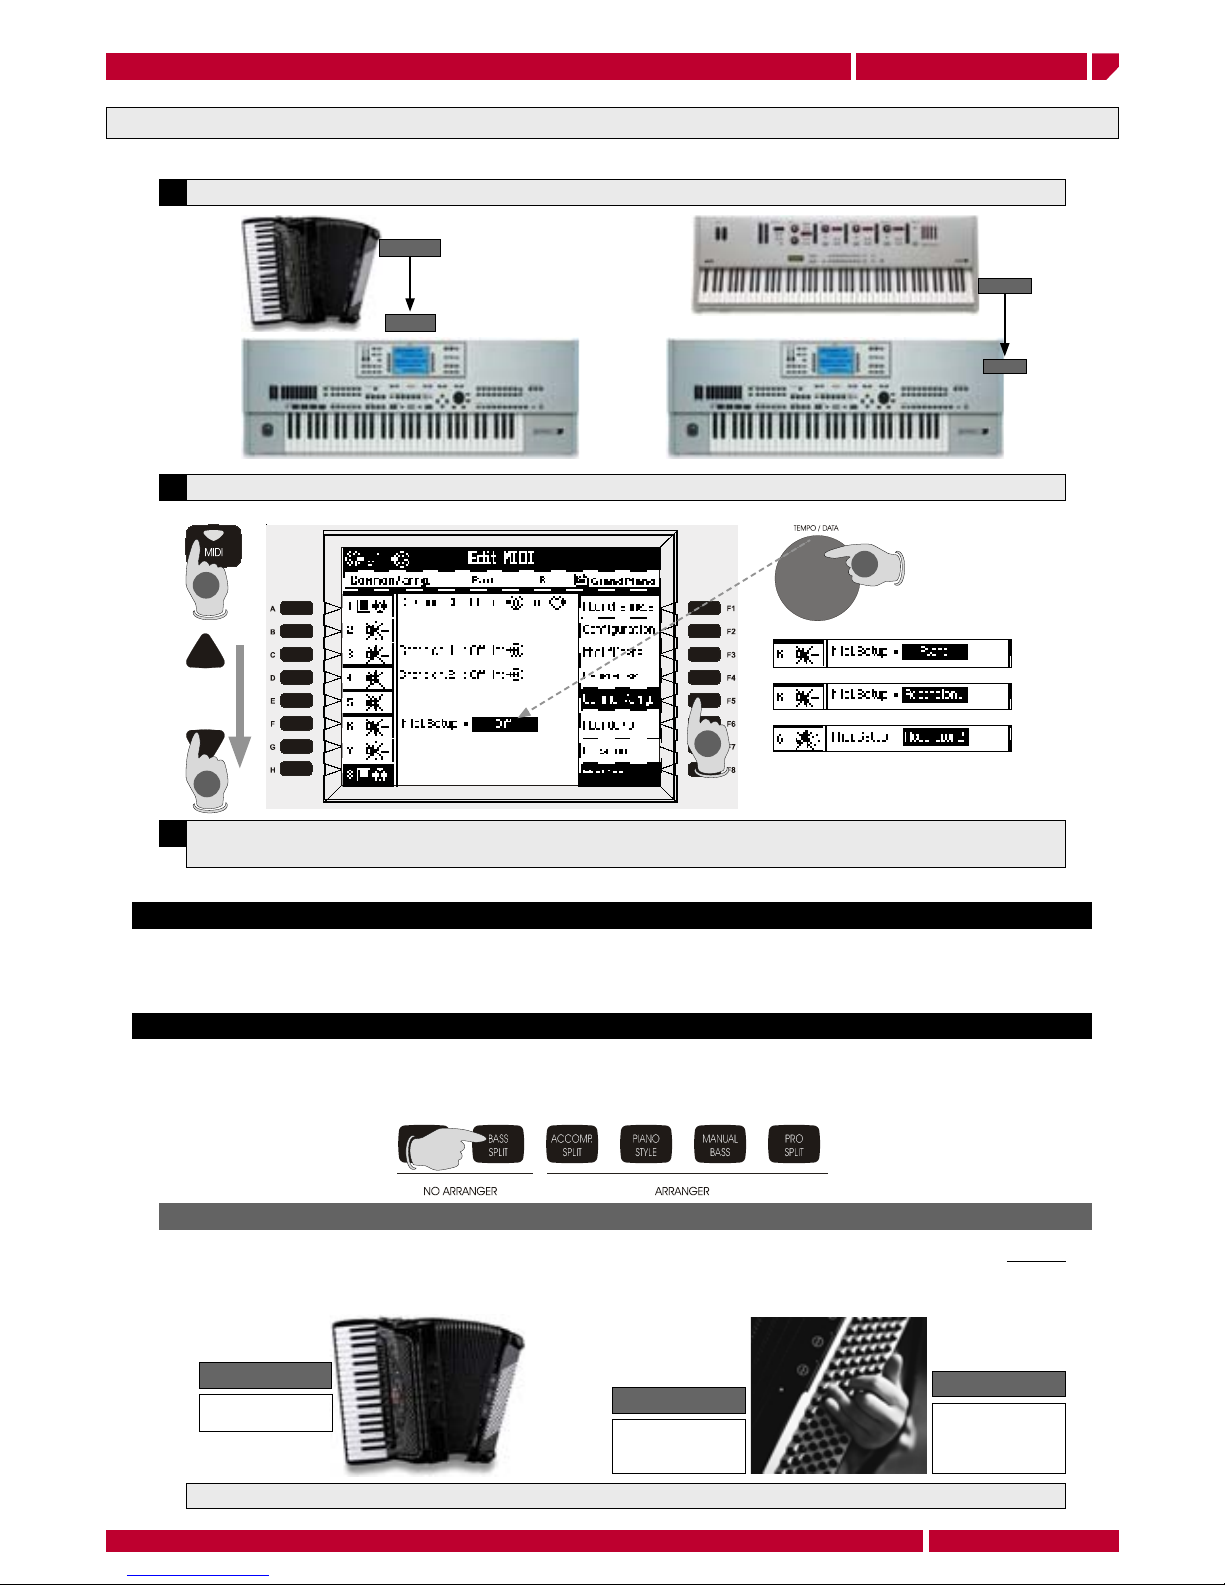
The MIDI set up
The MIDI Set Up is a function to simplify to the Genesys s the connection of an external MIDI device (digital piano or accordion).
1
Connect your MIDI controller MIDI Out to the Genesys s MIDI In
2
Press the MIDI button on the panel, then the function button [F5] COMMON/ARRG.
3
Select the field MIDI SET UP using the CURSOR DOWN. The default value of this parameter is OFF
(disabled). By rotating the DIAL you can select: PIANO, ACCORDION 1 and ACCORDION 2 set up.
ACCORDION 1
Enable the COMMON channel N.1 and the CHORD channel 2. This set up allows the following performance,
related to the KEYBOARD MODE pad selection. The BASS/SPLIT and MANUAL/BASS modes are properly
fi tted for a MIDI accordion.
SELECTING BASS/SPLIT
Enabling the accordion set up 1 the BASS/SPLIT mode allows to play your accordion in real time, (without
the arrangements), playing the current preset in the right hand keyboard, while the left hand can play the
bass in the fi rst two line of buttons, and the chord in the remaining lines of buttons.
With this set up it is possible to use the DRUMS track of each style, performing the accordion keyboards in realtime.
LEAD
Play the selected
PRESET
BASS
Play the BASS sound
recalled by the selected PRESET
CHORD
The chord play
the chord sound
recalled by the selected PRESET
PIANO
Enable the COMMON channel N.1. In this way it is possible to control the realtime functions of the Genesys s
(presets, styles, memories etc.) using an external MIDI keyboard, like a digital piano, by transmitting on a single
MIDI channel (N. 1 in this set up).
MIDI Out
MIDI In
Page 21
the midi set up
Page15
manual addendum Genesys s
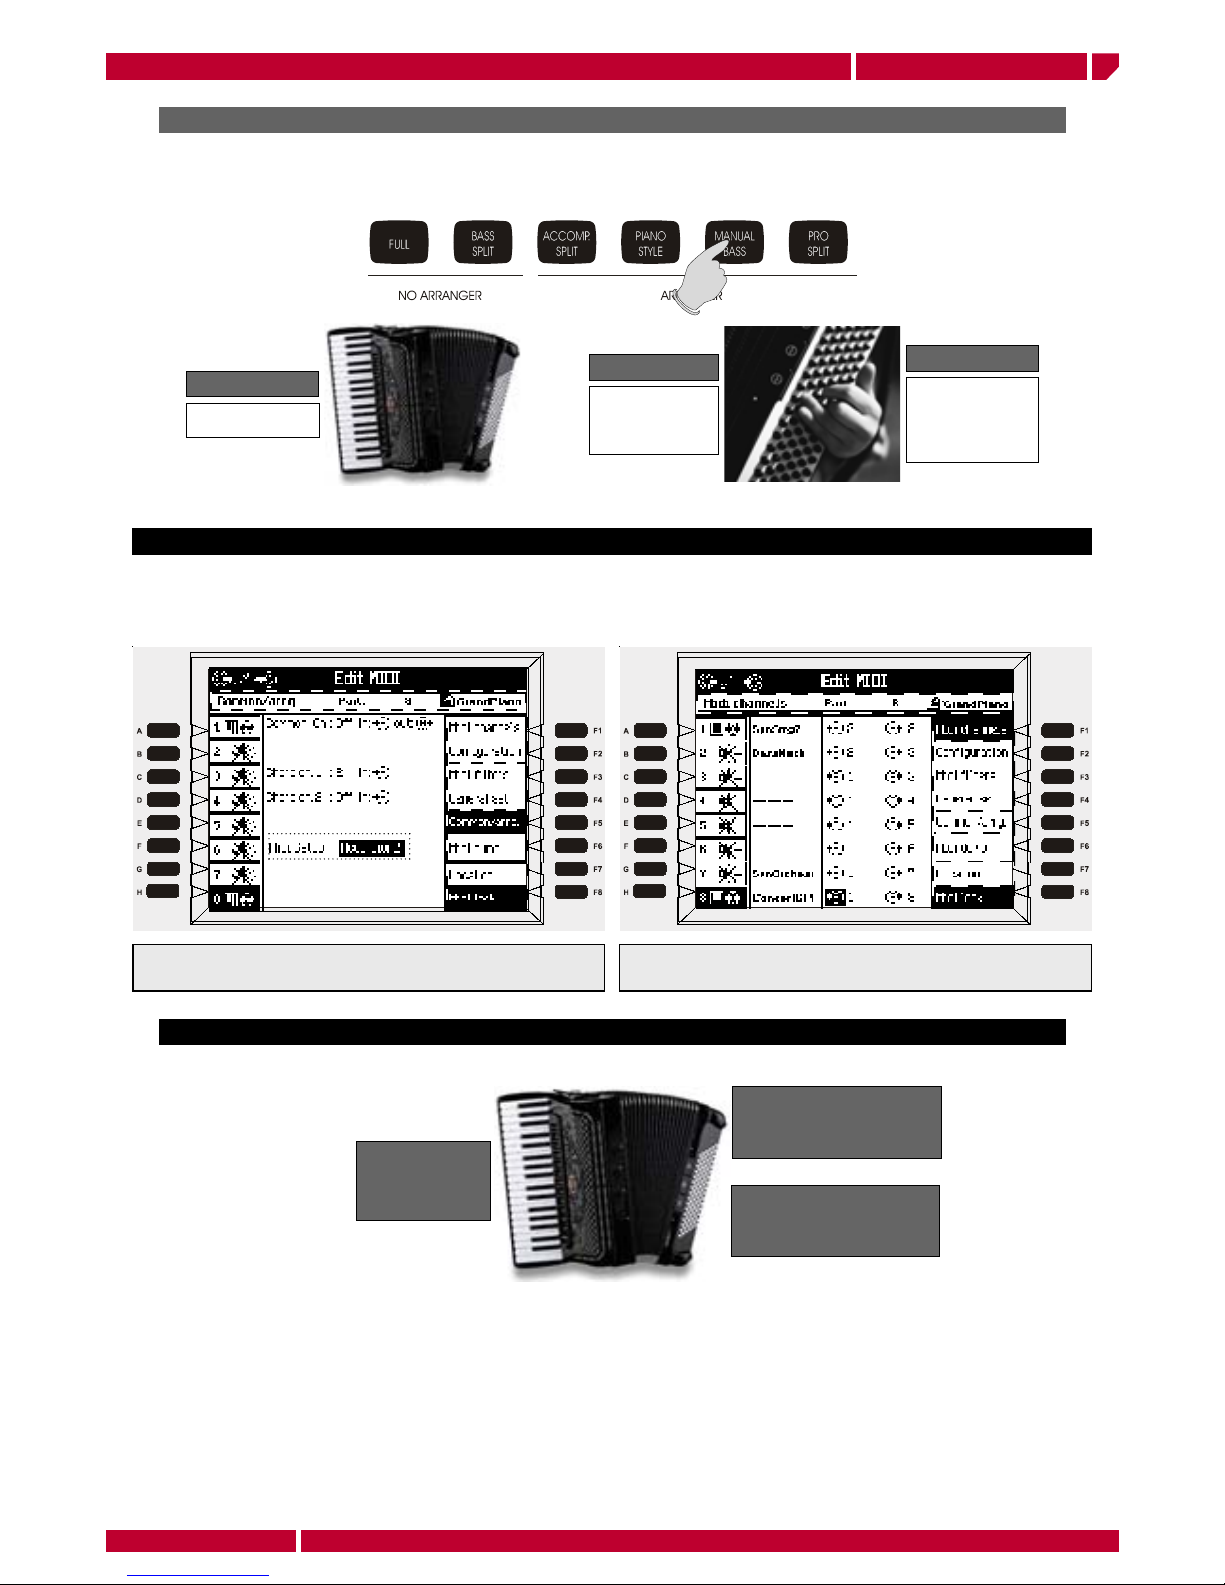
SELECTING MANUAL/BASS
Basically the MANUAL/BASS setting allows to perform in the same way as described above, but using the
styles arrangements. The chord lines played with the left hand lead the Genesys s chord recognizing system
of the styles section, while the bass parts are played in realtime using the fi rst two line of buttons.
LEAD
Play the selected
PRESET
BASS
Play the BASS
sound recalled
by the selected
PRESET
CHORD
The Playied chord
lead the arragement section of the
currently selected
style
ACCORDION 2
The ACCORDION set up 2 works without the activation of the MIDI common channel. In this case all the realtime
MIDI channels of the Genesys s are rearranged in order to lead the three accordion sections. Select the setup
you prefer according the the specifi cations of your MIDI accordion.
Select the ACCORDION SET UP #2 by rotating the
DIAL.
ACCORDION SET UP #2 MIDI Channel set up
MIDI ACCORDION STANDARD SET UP
Normally the most diffused MIDI accordion are set with the following default MIDI set up:
The right side
keyboard
Transmit on
MIDI ch. 1
The BASS lines of the left
keyboard Transmit on
MIDI ch. 2
The CHORD lines of the
left keyboard Transmit on
MIDI ch. 3
Page 22
GENESYS - S GENESYS –PRO S
keyboard
61 keys with velocity sensitivity and aftertouch 61 keys with velocity sensitivity and aftertouch
polyphony
64 notes max. 64 notes max.
sounds
128MB internal memory (64MB enhanced internal sound,
32MB new sounds, 32MB User), over 1.500 internal sounds,
more than 600 User sounds, 256 factory presets, 256 user
presets, sound edit quick, sound edit pro, sample editor
(new samples import).
128MB internal memory (64MB enhanced internal sound,
32MB new sounds, 32MB User), over 1.500 internal sounds,
more than 600 User sounds, 256 factory presets, 256 user
presets, sound edit quick, sound edit pro, sample editor
(new samples import).
memories
1.024 (8 locations X 128 Banks), 2.048 single touch play (8
per style)
1.024 (8 locations X 128 Banks), 2.048 single touch play (8
per style)
digital effect
Two assignable group DSP (A-B), with 24 programmable
reverb and 32 programmable effects each. 3D effect with
bass booster
Two assignable group DSP (A-B), with 24 programmable
reverb and 32 programmable effects each. 3D effect with
bass booster
operating mode
Full, bass split, accompaniment Split, piano style, manual
bass, pro split
Full, bass split, accompaniment Split, piano style, manual
bass, pro split
controls
pitch bend & modulation wheels, main volume slider, style/
seq volume slider, 8 multifunction sliders, 4 programmable
pads, 2 vocal genius sliders, part, display hold, display
contrast, page prev/next, dial, transpose, octave, cursor,
inc/dec, enter/escape, 16 function buttons, preset selection
pad, section edit, sound controls, memories selection, cd
studio, video& karaoke, disk drives & system, Demo
pitch bend & modulation joystick, main volume slider, style/
seq volume slider, 8 multifunction sliders, 4 programmable
pads, 2 vocal genius sliders, part, display hold, display
contrast, page prev/next, dial, transpose, octave, cursor,
inc/dec, enter/escape, 16 function buttons, preset selection
pad, section edit, sound controls, memories selection, cd
studio, video& karaoke, disk drives & system, Demo
display
graphic LCD 320 x 240 backlit with adjustable contrast graphic LCD 320 x 240 backlit with adjustable contrast
styles
256 factory styles, 64 user styles, 96 music library, 4
variation, 8 tracks (drums, bass, acc 1, acc 2, acc 3, acc 4,
acc 5, acc 6)
256 factory styles, 64 user styles, 96 music library, 4
variation, 8 tracks (drums, bass, acc 1, acc 2, acc 3, acc 4,
acc 5, acc 6)
styles control
start/stop, intro, ending, syncro, restart, variation (1-4),
fi ll >, fi ll<, fi ll<>, break, style presets, single touch play,
arranger on/off, arranger memory, edit, fade in/out, bass
inv, tempo lock, style lock, tap tempo
start/stop, intro, ending, syncro, restart, variation (1-4),
fi ll >, fi ll<, fi ll<>, break, style presets, single touch play,
arranger on/off, arranger memory, edit, fade in/out, bass
inv, tempo lock, style lock, tap tempo
sequencer
64 songs, 32 tracks, 250.000 events with microscope
editing
64 songs, 32 tracks, 250.000 events with microscope
editing
recording studio
play, stop, rec, rewind, ffwd, pause; mono/stereo hd
recording and sampling (16bit/44.1khz.)
play, stop, rec, rewind, ffwd, pause; mono/stereo hd
recording and sampling (16bit/44.1khz.)
song player
compatibility
wk songs, wx songs, smf with lyrics (gm1 & 2), .kar fi les ,
word box®, piano disk®, doc®, disklavier®, audio fi le:
mp3, mp3+lyrics, cd audio, wav fi les; mode: direct from
hard disk, fl oppy disk, cd or scsi, db list function, play list
function
wk songs, wx songs, smf with lyrics (gm1 & 2), .kar fi les ,
word box®, piano disk®, doc®, disklavier®, audio fi le:
mp3, mp3+lyrics, cd audio, wav fi les; mode: direct from
hard disk, fl oppy disk, cd or scsi, db list function, play list
function
vocal genius
microphone and external signal processor with independent
effects: 3 band programmable semi-parametric equalizer,
Mic limiter, N/L gate, programmable reverb and stereo delay
with separate send, up to 4 realtime parts vocal harmony,
talkover, edit menu
microphone and external signal processor with independent
effects: 3 band programmable semi-parametric equalizer,
Mic limiter, N/L gate, programmable reverb and stereo delay
with separate send, up to 4 realtime parts vocal harmony,
talkover, edit menu
fl oppy disk
load, save, erase, copy, format (720 kb,1.44 mb & 1.62Mb) load, save, erase, copy, format (720 kb,1.44 mb & 1.62Mb)
hard disk
built-in 20GB (2,5” eide) hard disk, hd recording and
sampling (16bit/44.1khz.)
built-in 20GB (2,5” eide) hard disk, hd recording and
sampling (16bit/44.1khz.)
CD Player/Burner
built-in CD-R/RW player/burner built-in CD-R/RW player/burner
connections
2 headphones, MIDI: In/Out/Thru X 2, computer keyboard
(PS2), computer Host, 3 programmable pedals, volume
pedal, audio Out: Right/M, Left/M, Out1, Out2, , Audio In:
Line/R, Mic/L with gain control, Video Out: TV, S-Video
2 headphones, MIDI: In/Out/Thru X 2, computer keyboard
(PS2), computer Host, 3 programmable pedals, volume
pedal, audio Out: Right/M, Left/M, Out1, Out2, , Audio In:
Line/R, Mic/L with gain control, Video Out: TV, S-Video
extras
video interface, upgradeable operating system (fd/cd), 2
CDs package included (1 operating system CD, 1 music CD
with up to 1000 songs + lyrics), 1 microphone included
video interface, upgradeable operating system (fd/cd), 2
CDs package included (1 operating system CD, 1 music CD
with up to 1000 songs + lyrics), 1 microphone included
amplifi cation
3 ways, 5 speakers, 20W+20W+40W subwoofer
dimensions (w x h x d)
1.150 x 217 x 404mm/45.2 x 8.5 x 15.9’’ 1.180 x 400 x 97mm/46.5 x 15.7 x 3.8’’
weight
27kg7/59.5lbs 19kg/41.8lbs
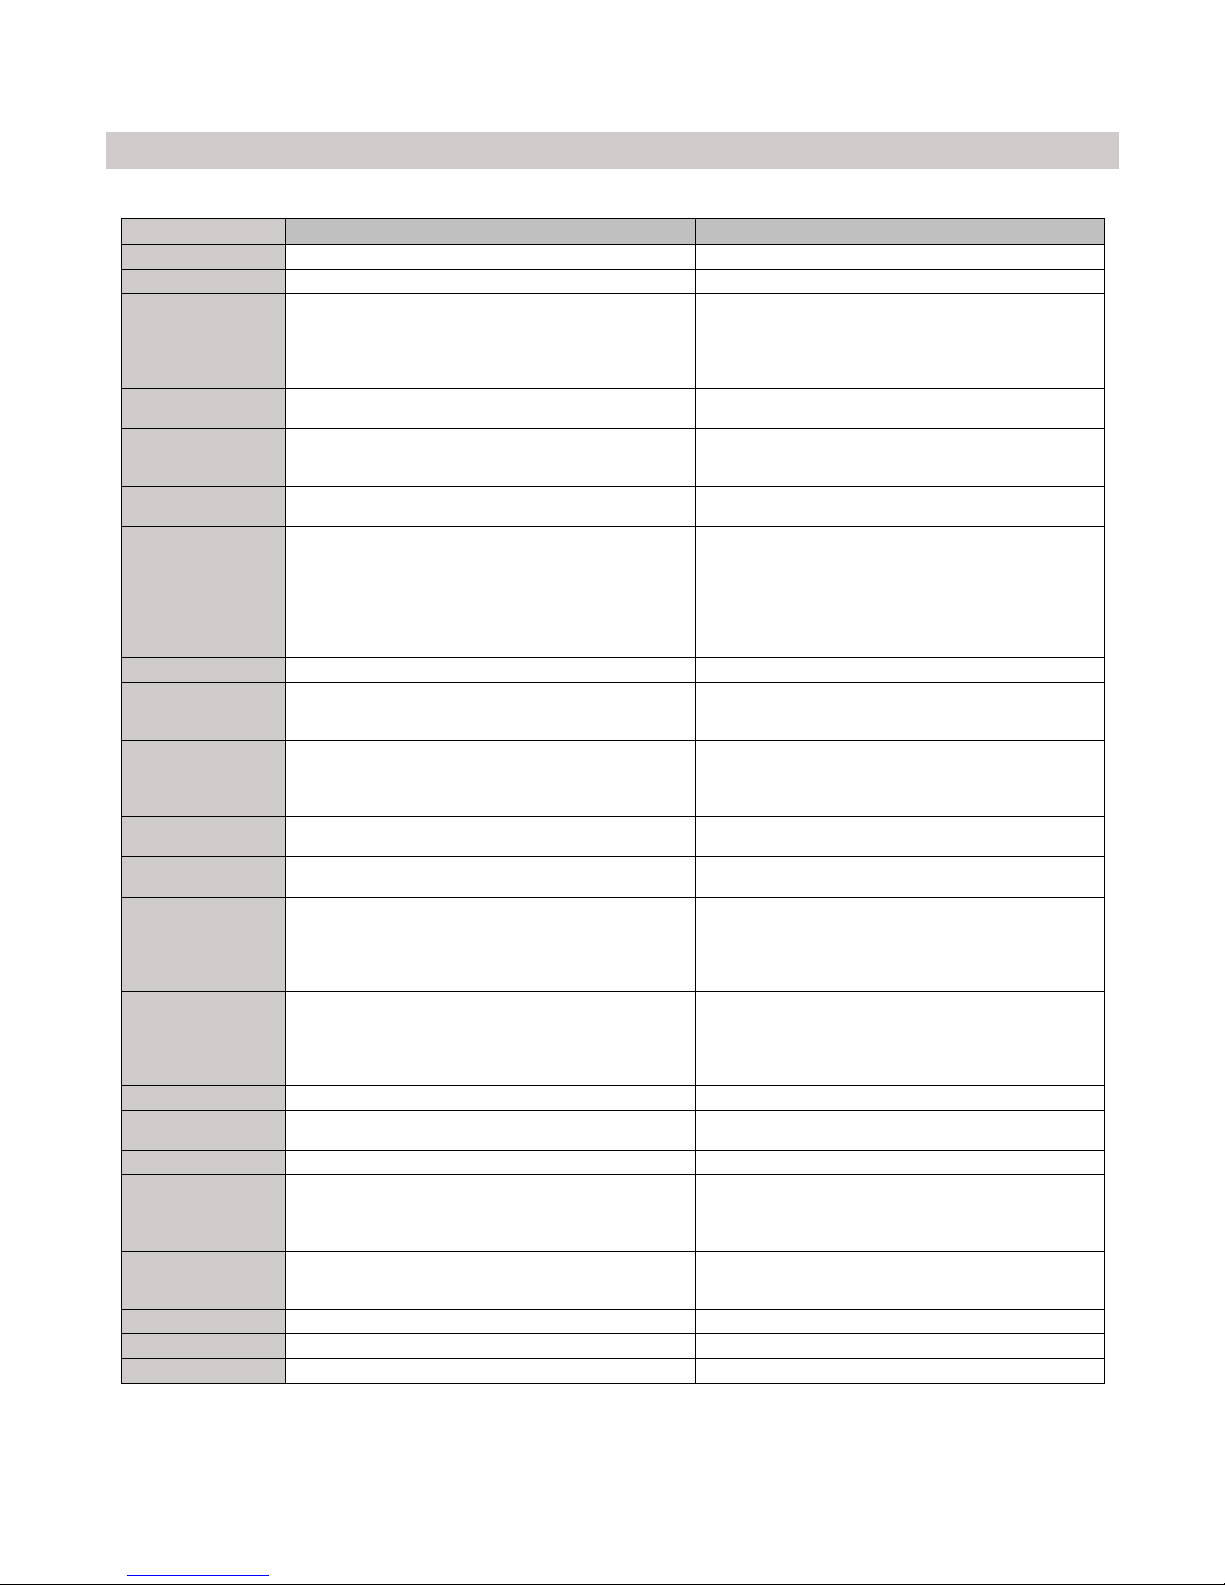
TECHNICAL SPECIFICATIONS
* Generalmusic reserves the right to change specifications without notice
Page 23

Note : This equipment has been tested and found to comply with the limits for a Class
B digital device, pursuant to Part 15 of FCC Rules. These limits are designed to provide
reasonable protection against harmful interference in a residential installation. This equipment generates, uses, and can radiate radio frequency energy and, if not installed and
used in accordance with the instructions, may cause harmful interference to radio communications.
However, there is no guarantee that interference will not occur in a particular installation.
If this instrument does cause harmful interference to radio or television reception, which
can be determined by turning the instrument off and on, the user is encouraged to try to
correct the interference by one or more of the following measures:
• Reorient or relocate the receiving antenna.
• Increase the separation between the equipment and the receiver.
• Connect the equipment into an outlet on a circuit different from that
to which the receiver is connected.
• Consult the dealer or an experienced radio/TV technician for help.
CAUTION : Changes or modifi cations to this product not expressly approved by the
manufacturer could void the user’s authority to operate this product.
FEDERAL COMMUNICATIONS COMMISSION
Page 24

Generalmusic S.p.A. Via delle Rose, 12
47842 S.Giovanni in Marignano (RN) - Italy
Tel. +39 0541 959511Fax +39 0541 957404 www.generalmusic.com
STOCK CODE 271428
Specifi cations are subject to change without prior notice.
PRINTED IN ITALY
 Loading...