

Page 1
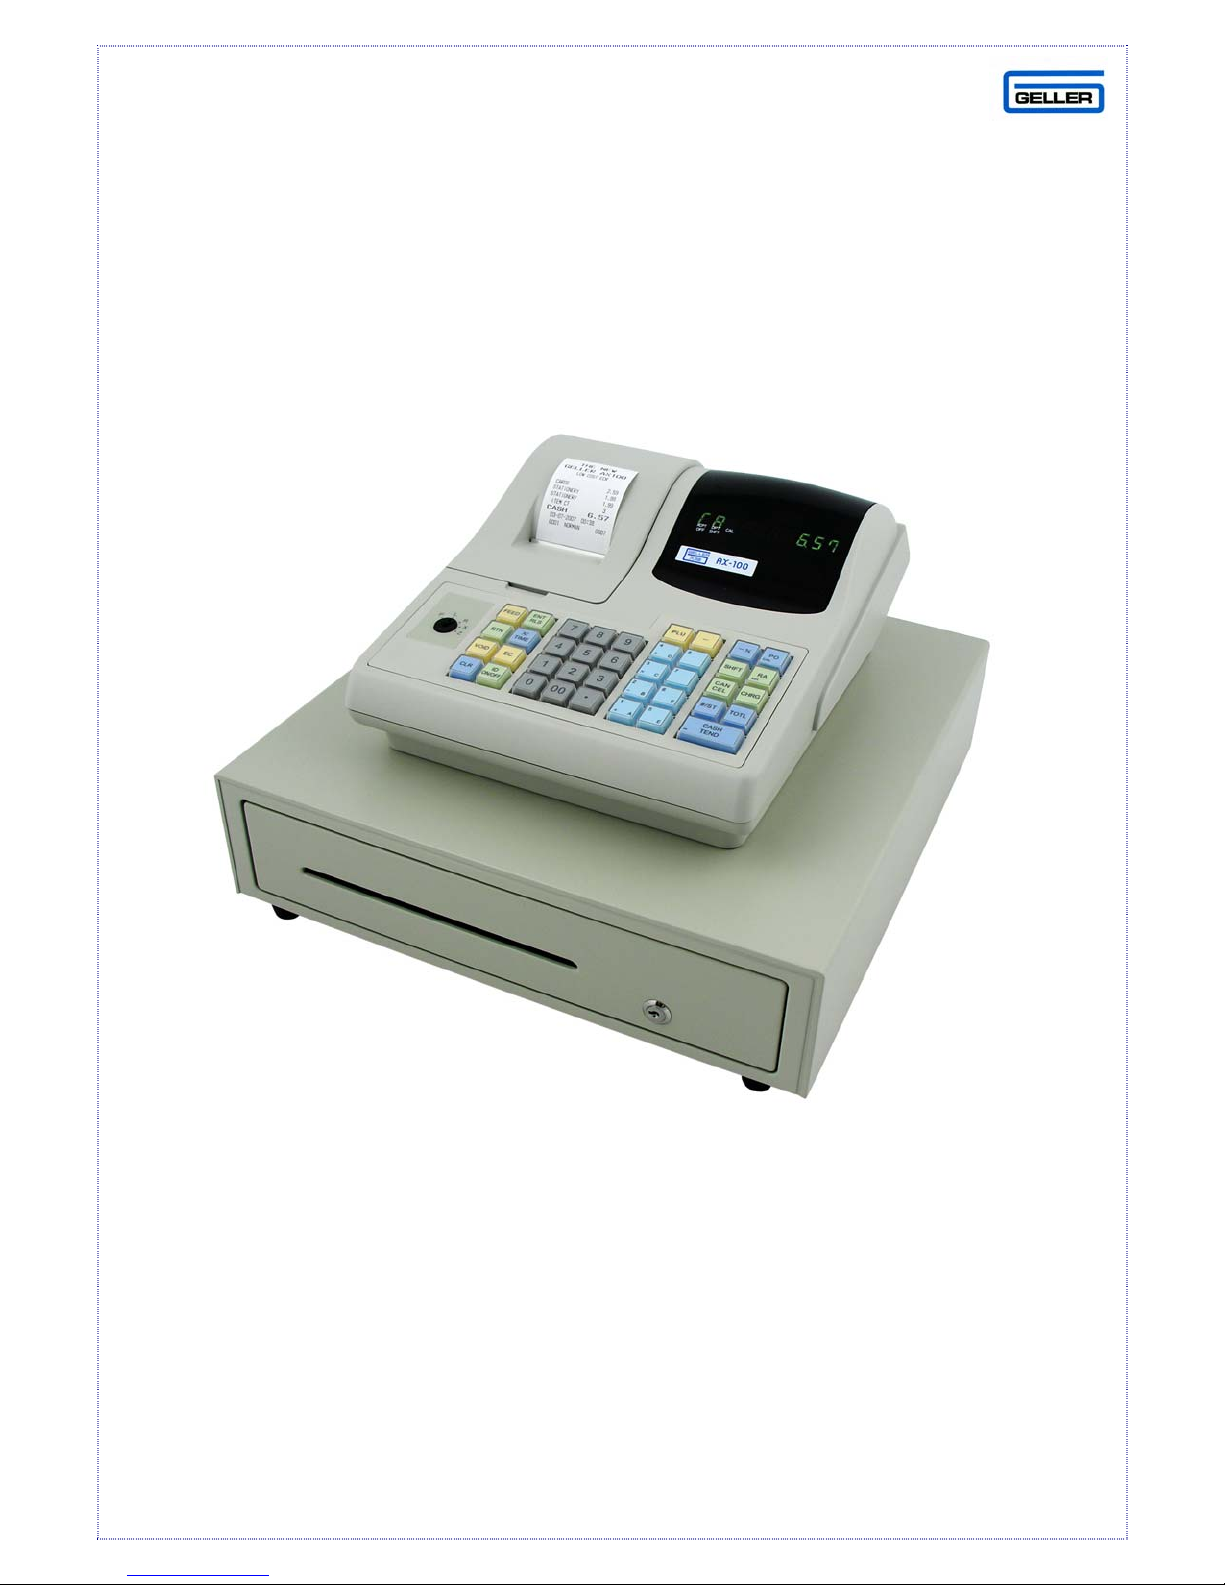
AX-100
AX-100 QUICK SET-UP GUIDE
Page 2

AX-100
QUICK SET-UP GUIDE
For further information please refer to the standard
Operating Manual supplied with the AX-100
AX-100 Features Covered in this Guide
9 16 Departments – Programmable Alpha
9 200 Plu’s – Programmable Alpha
9 58mm Single Station Audit Thermal Receipt Printer
9 Programmable Customer Receipt Header message and Trailer Message
9 Electronic Journal & Management Reports
9 PC Link ‘David’ Geller Utility for Programming
9 Soft Programmable Keyboard Layout
9 Tax Rates
9 Receipt On/Off toggle with optional Receipt after sale
9 Clerk IDs with Optional passwords
9 Programmable Transaction Names
9 Negative Items
9 Compulsory Cash Declaration
9 Training Mode
9 Calculator Mode
9 Management control with Passwords for reports and Void Functions
Optional - An AX-100 Comms kit is available from your dealer as an option
for programming the cash register via your PC. This includes a 2 metre Cable,
AX-100 David Utilities and supporting documentation.
1
Page 3

INDEX
DESCRIPTION Page
AX-100 FEATURES 1
PAPER ROLLS 3-4
PROGRAMMING LAYOUT 5
DIAGRAM EXPLANATION 6
INDEX 2
DATE AND TIME SETTINGS 7
FLAG SET-UP PROCEDURES 8
CHARACTER CODE TABLE 9
PROGRAMMING DEPARTMENTS 10
HALO – HIGH AMOUNT LOCK OUT 11
PROGRAMMING THE RECEIPT LOG 12-15
VAT/TAX PROGRAMMING 16
PASSWORDS 17-19
PROGRAM CONFIRMATION 20
ERROR CODES 21
REPORTS – End of Day Report Z1 22
REPORTS – Electronic Journal 23
DISPLAYING A REPORT 24
PC COMMUNICATIONS 25
CABLE CONFIGURATION 26
AX-100 DAVID UTILITY 27
GLOSSARY 28-32
2
Page 4
PAPER ROLLS
Installing the Paper Roll into your AX-100
Your cash register comes fitted with a thermal printer which uses a 58mm paper
roll. If a customer receipt is not always required, then there is a paper saving
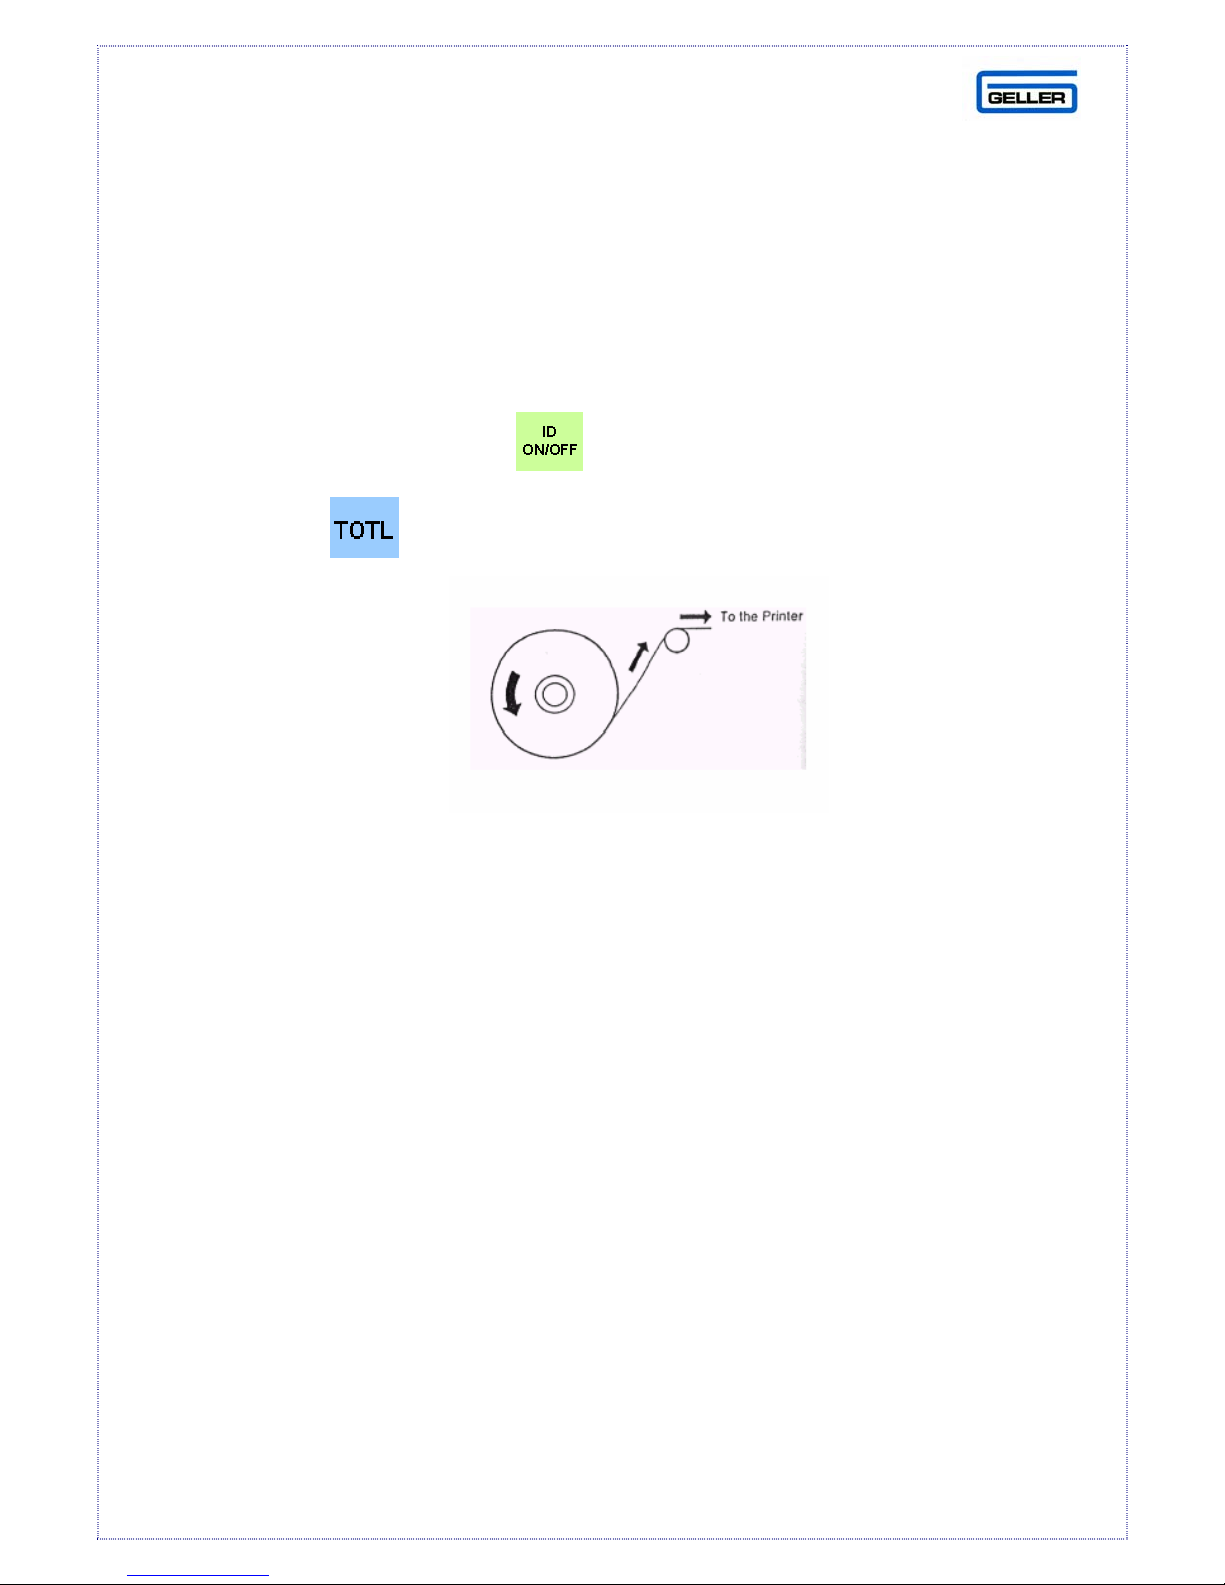
option available by pressing the button on the keyboard (this is indicated
by an LED on the display). A receipt is available on request after the sale by
depressing the button.
Fig 1
Before installing the paper roll, be sure to do the following:
Orient the paper roll so that it rotates in a counter clockwise direction, as shown in
above.
Note
1. As thermal paper is used, it has a right and wrong side for printing. If you
install it the wrong way round (the heat sensitive side away from the print
head) no printing will be possible.
2. Carefully avoid touching the metal paper cutter when removing the paper
cover, it is very sharp.
3
Page 5
Installing the Paper Roll for the Receipt
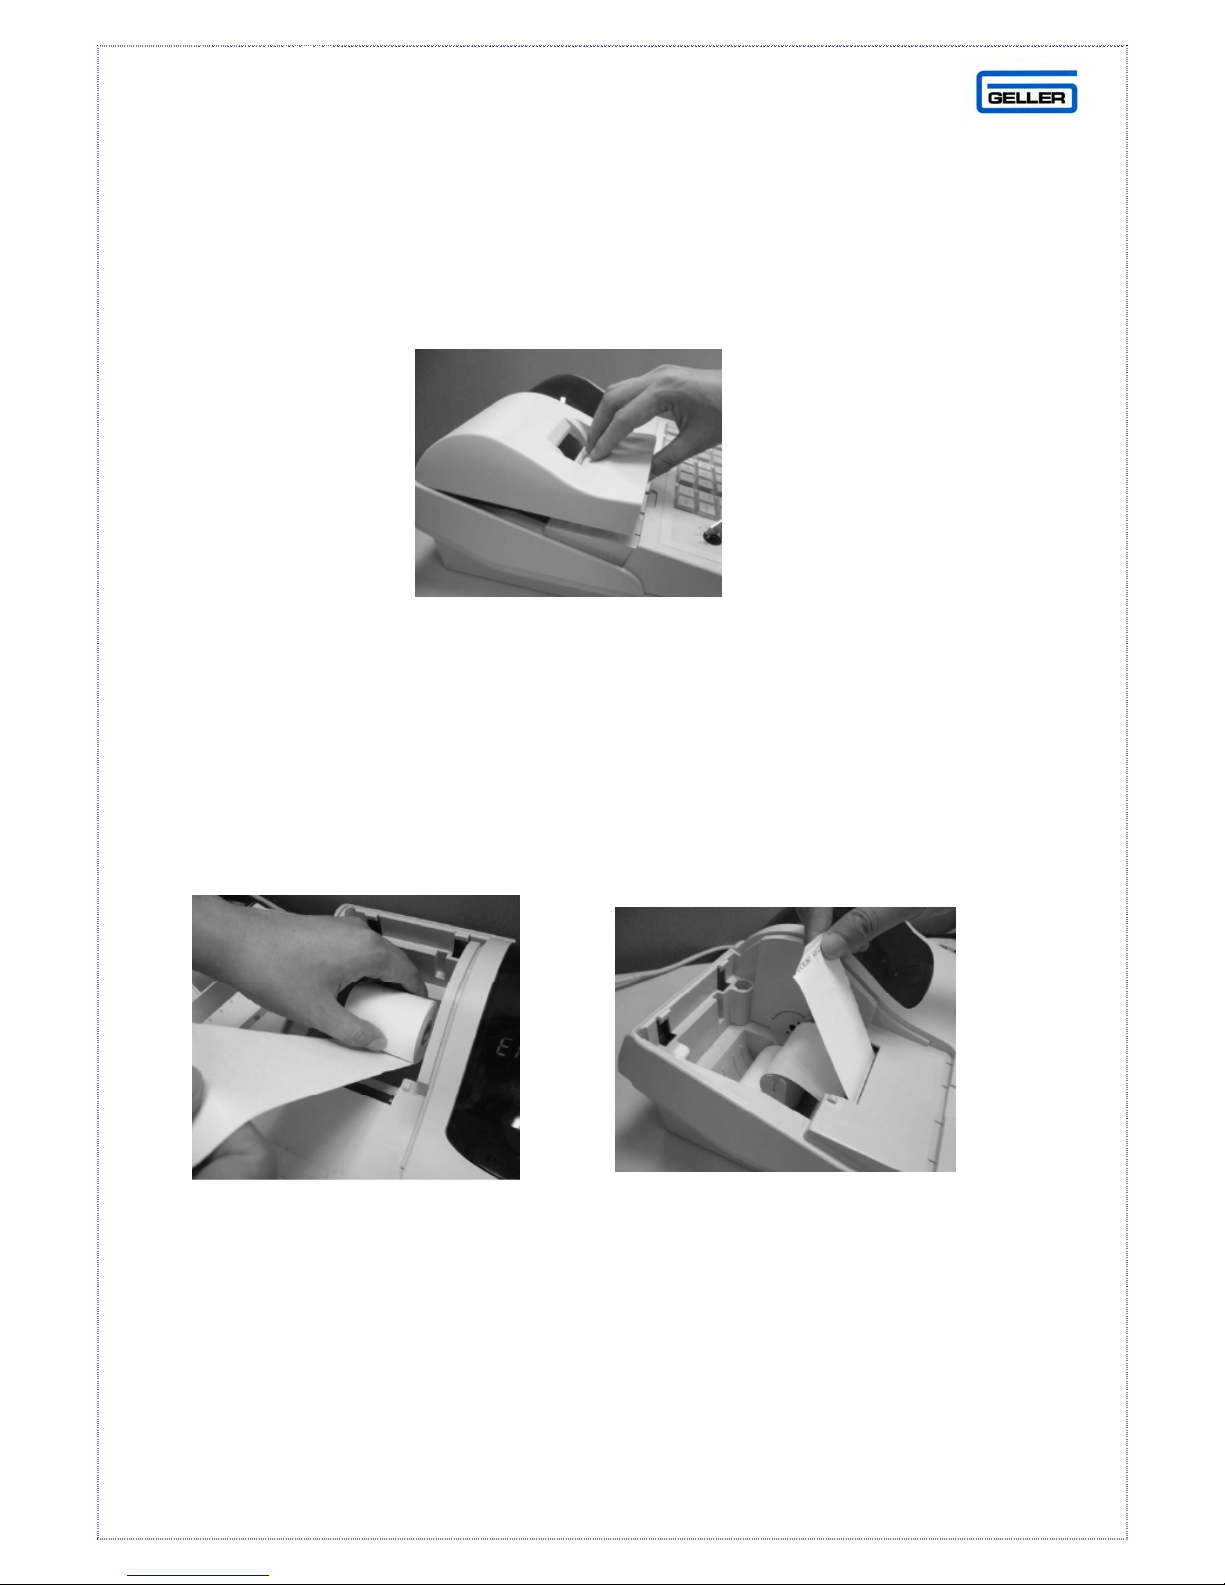
1. Ensure the Control lock is in the ‘R’ Position
2. Simply lift up the printer cover from the front as shown below in Fig 2
Fig 2
3. Set the paper roll gently into the paper location as shown in Fig 3
4. Insert the end of the paper roll into the paper entrance as shown in Fig 4
(At this point the paper will feed automatically into position)
5. Press and hold the FEED button until approx 30cm of paper has fed through
6. Replace the printer cover, ensuring that the end of the paper is fed through
the paper tear off slot correctly.
Fig 3 Fig 4
4
Page 6
PROGRAMMING LAYOUT
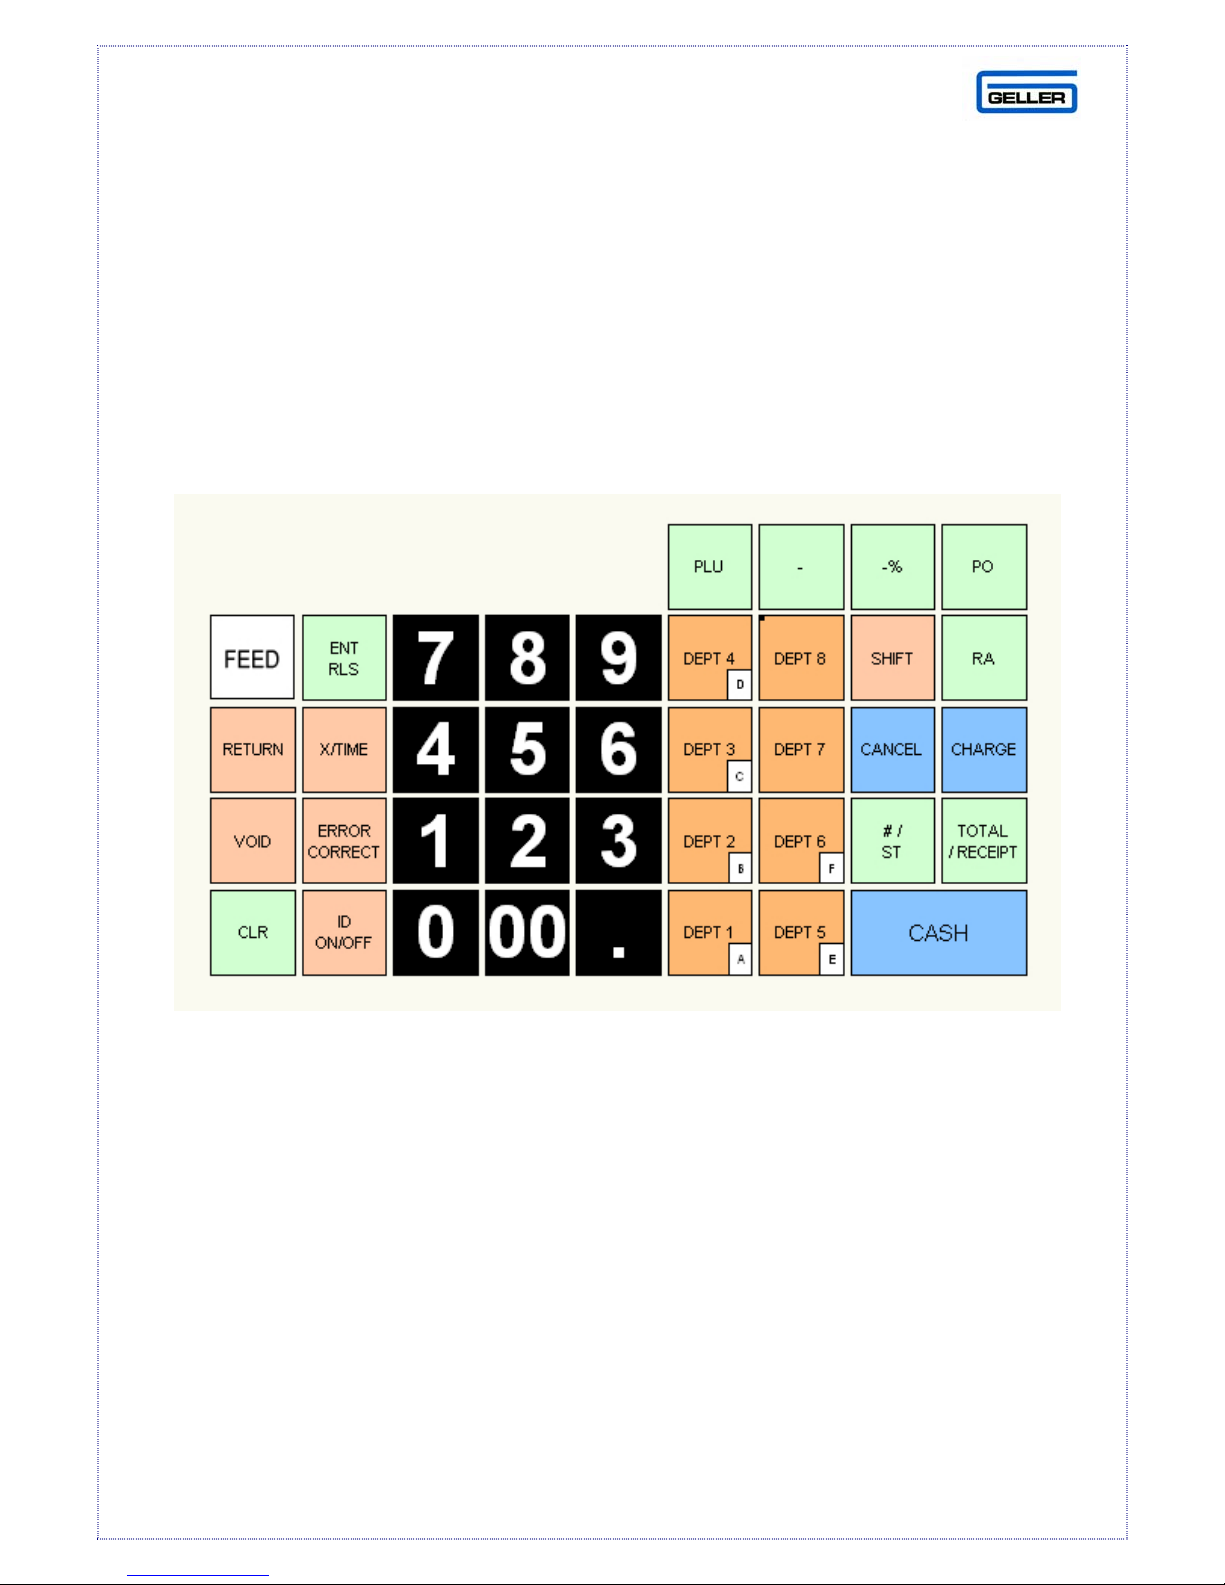
This is the default programming layout which is always activated when the key is
turned to the ‘P’ position. It is advisable to leave the function buttons in their
original positions. It will make it easier to follow the programming instructions.
5
Page 7
T
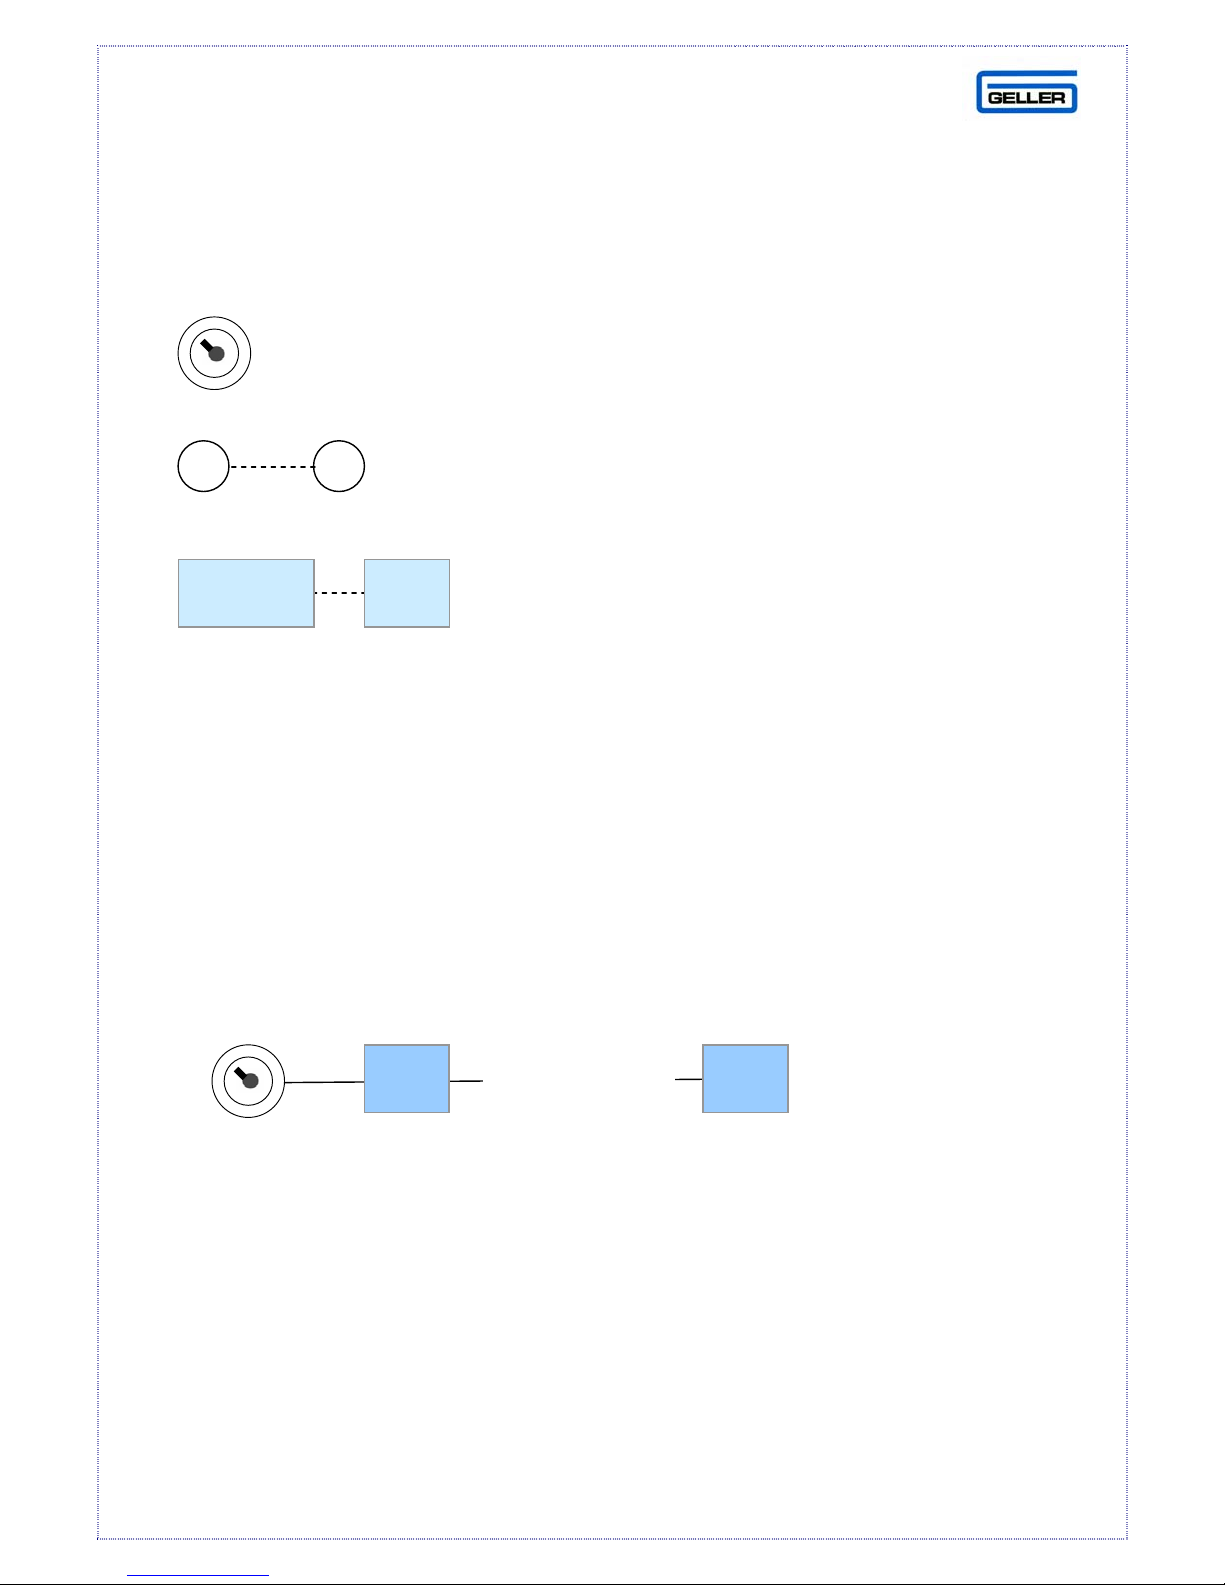
Diagram Explanation
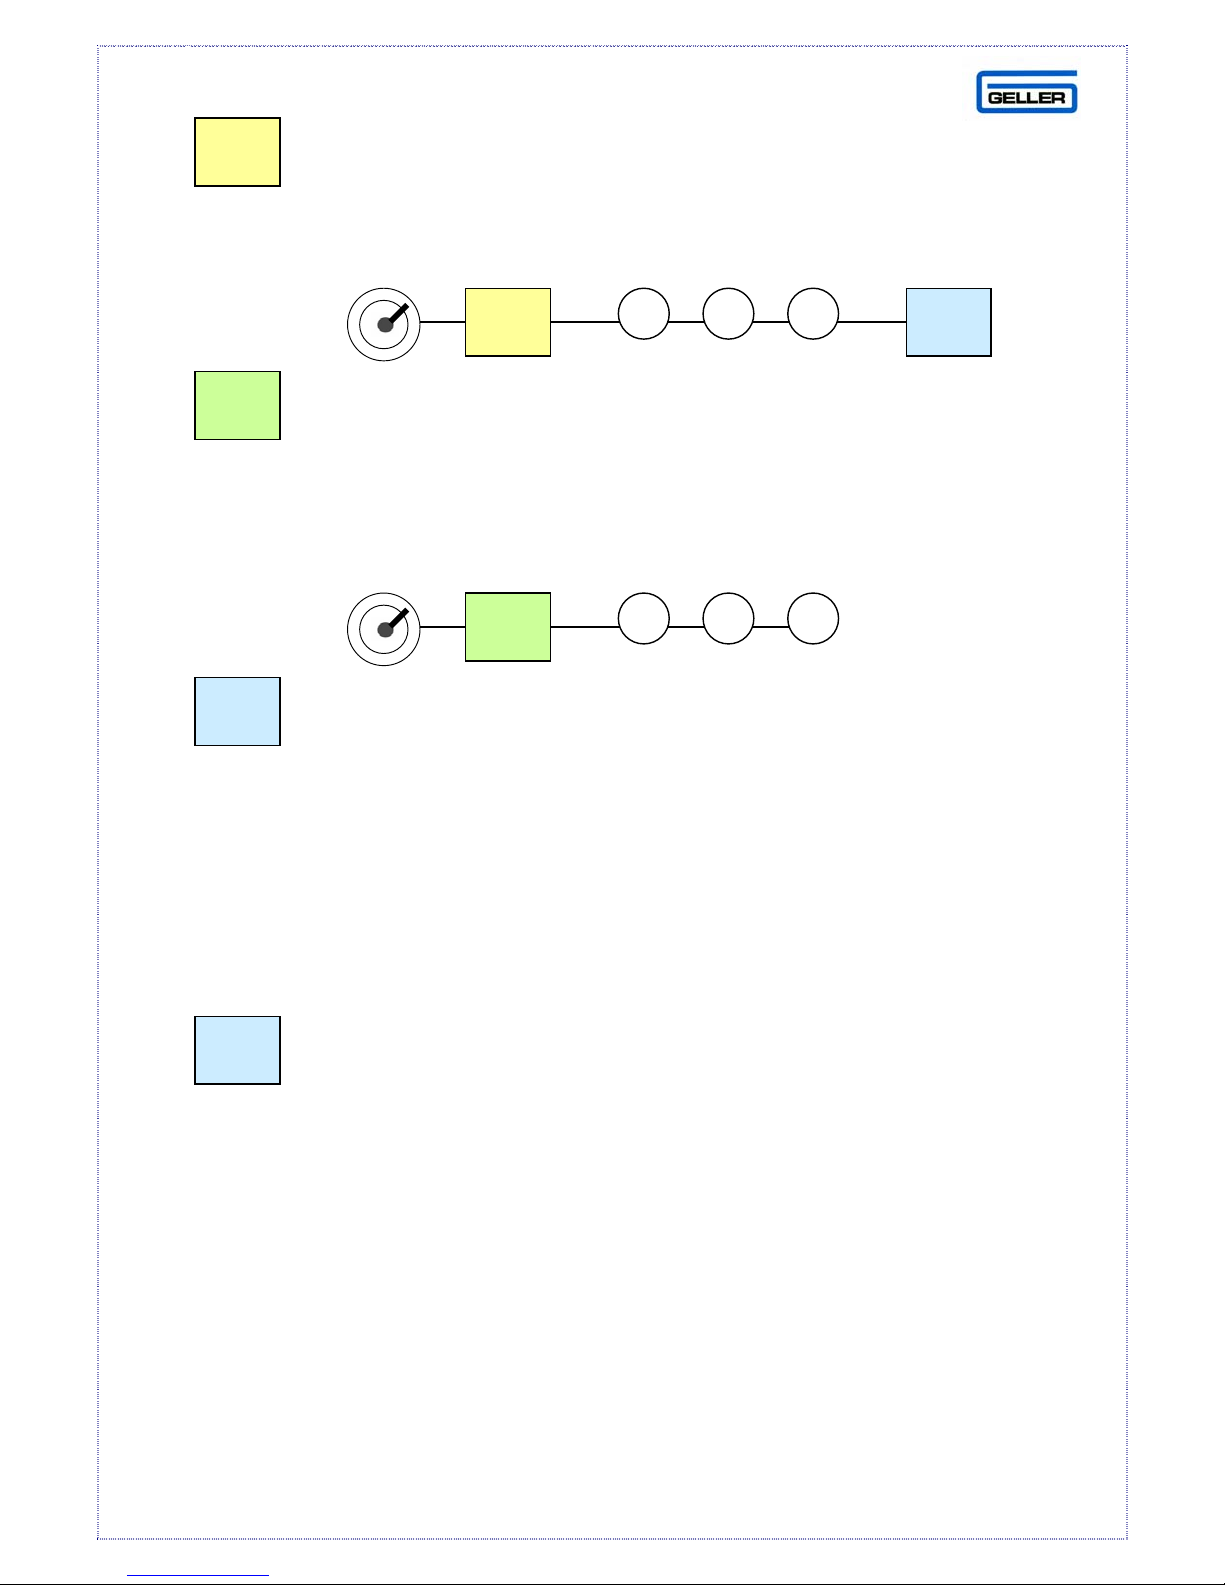
We have used simple diagrams to indicate programming procedures.
Indicates the Control Lock and the letter describes the position of the
key.
Indicates a numeric button, the number inside the circle is the
button required to be depressed.
CASH TEND
X/
IME
Indicates the function button required to be
depressed.
AX-100
SYSTEM CLEAR
WARNING
This procedure will clear all sales data and program settings
Power off by removing plug from wall socket!
CLR
(HOLD DOWN) (RELEASE AFTER 5 SECONDS)
The message ‘SYSTEM CLEAR’ will print on the receipt. The ECR’s memory
INSERT PLUG/
POWER ON
CLR
has now been cleared.
6
Page 8
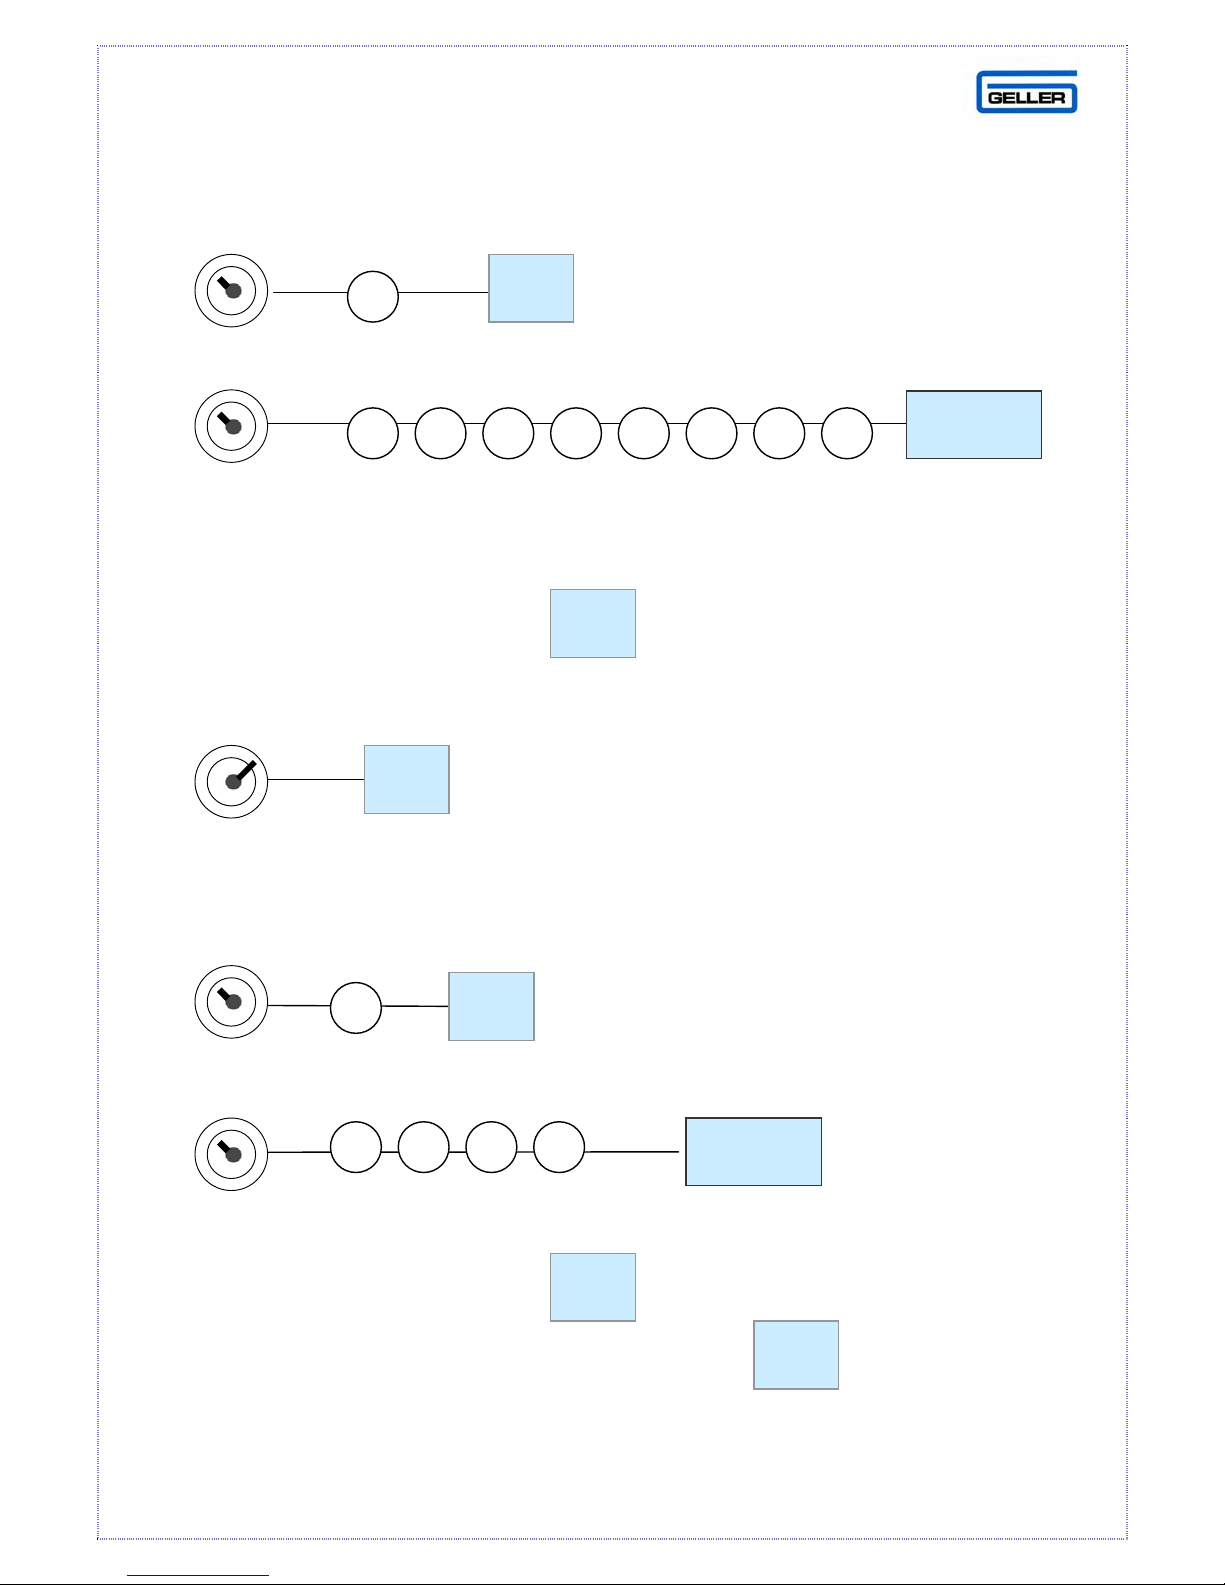
DATE &TIME SETTINGS
T
T
T
T
T
T
Setting the Date
X/
IME
Example: 20070320 = 20
th
March 2007
Note:
X/
To check the date, Press the button in the ‘R’ position. Press
again to show the Time.
X/
IME
IME
CASH
Setting the Time
Note
To check the time, Press the button in the ‘R’ position. The
Time will be shown on the display. Pressing the button again
toggles the date and time
:
X/
IME
CASH
X/
IME
X/
IME
7
Page 9
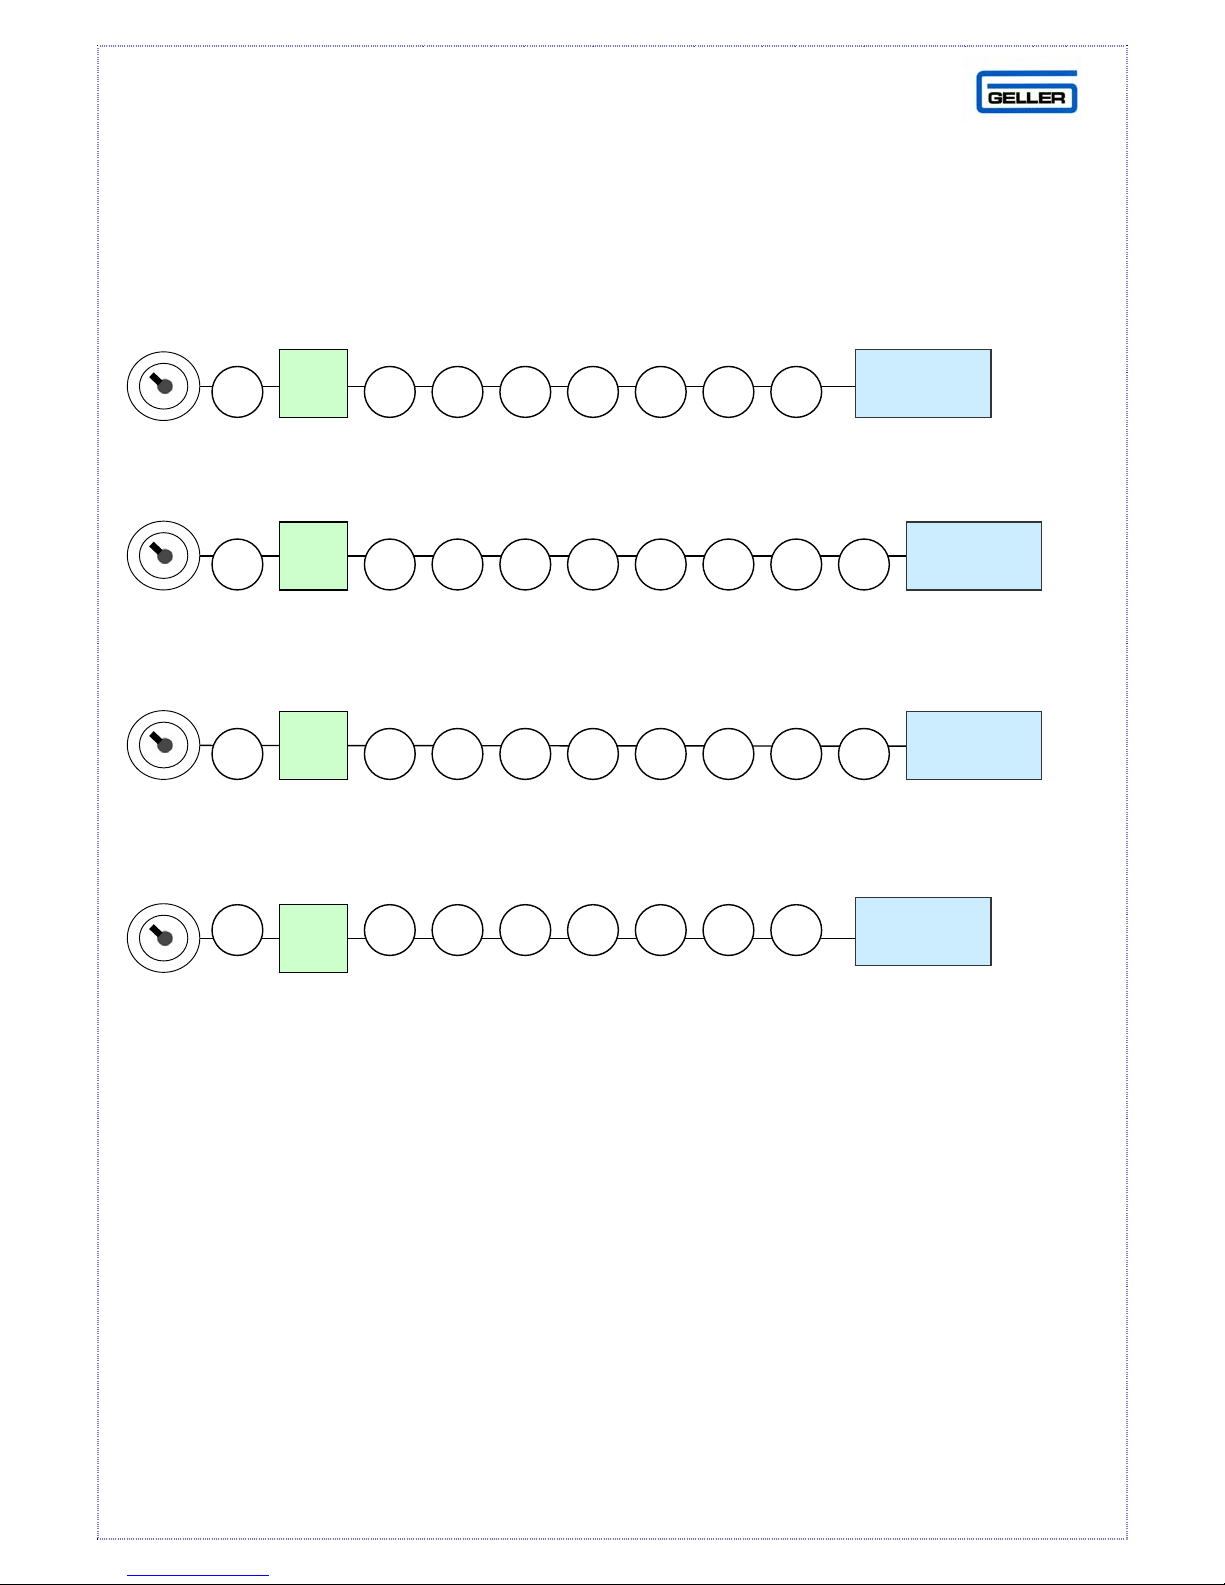
FLAG SET-UP PROCEDURE
The following flag settings will manually configure your AX-100
for a simple operation without the use of the David Software
RA
(Decimal point, receipt print)
RA
(Second receipt, programmable soft keyboard)
RA
CASH
CASH
CASH
(Date format, full size font print)
RA
CASH
(Card over tender, no electronic journal)
For an explanation of all the flags, please consult the manual
supplied with the machine.
8
Page 10

CHARACTER CODE TABLE
The character code table is used as a reference for text input via
Departments, PLUS, Receipt Logos, Clerk Names and Transaction Names
Select this character first
Example
To program the letter N, the value 4E should be entered
To program the letter T, the value 54 should be entered
To program a Space, the code 20 should be entered
To program a Double Size Character, the code 12 should be entered
9
Page 11
PROGRAMMING DEPARTMENTS
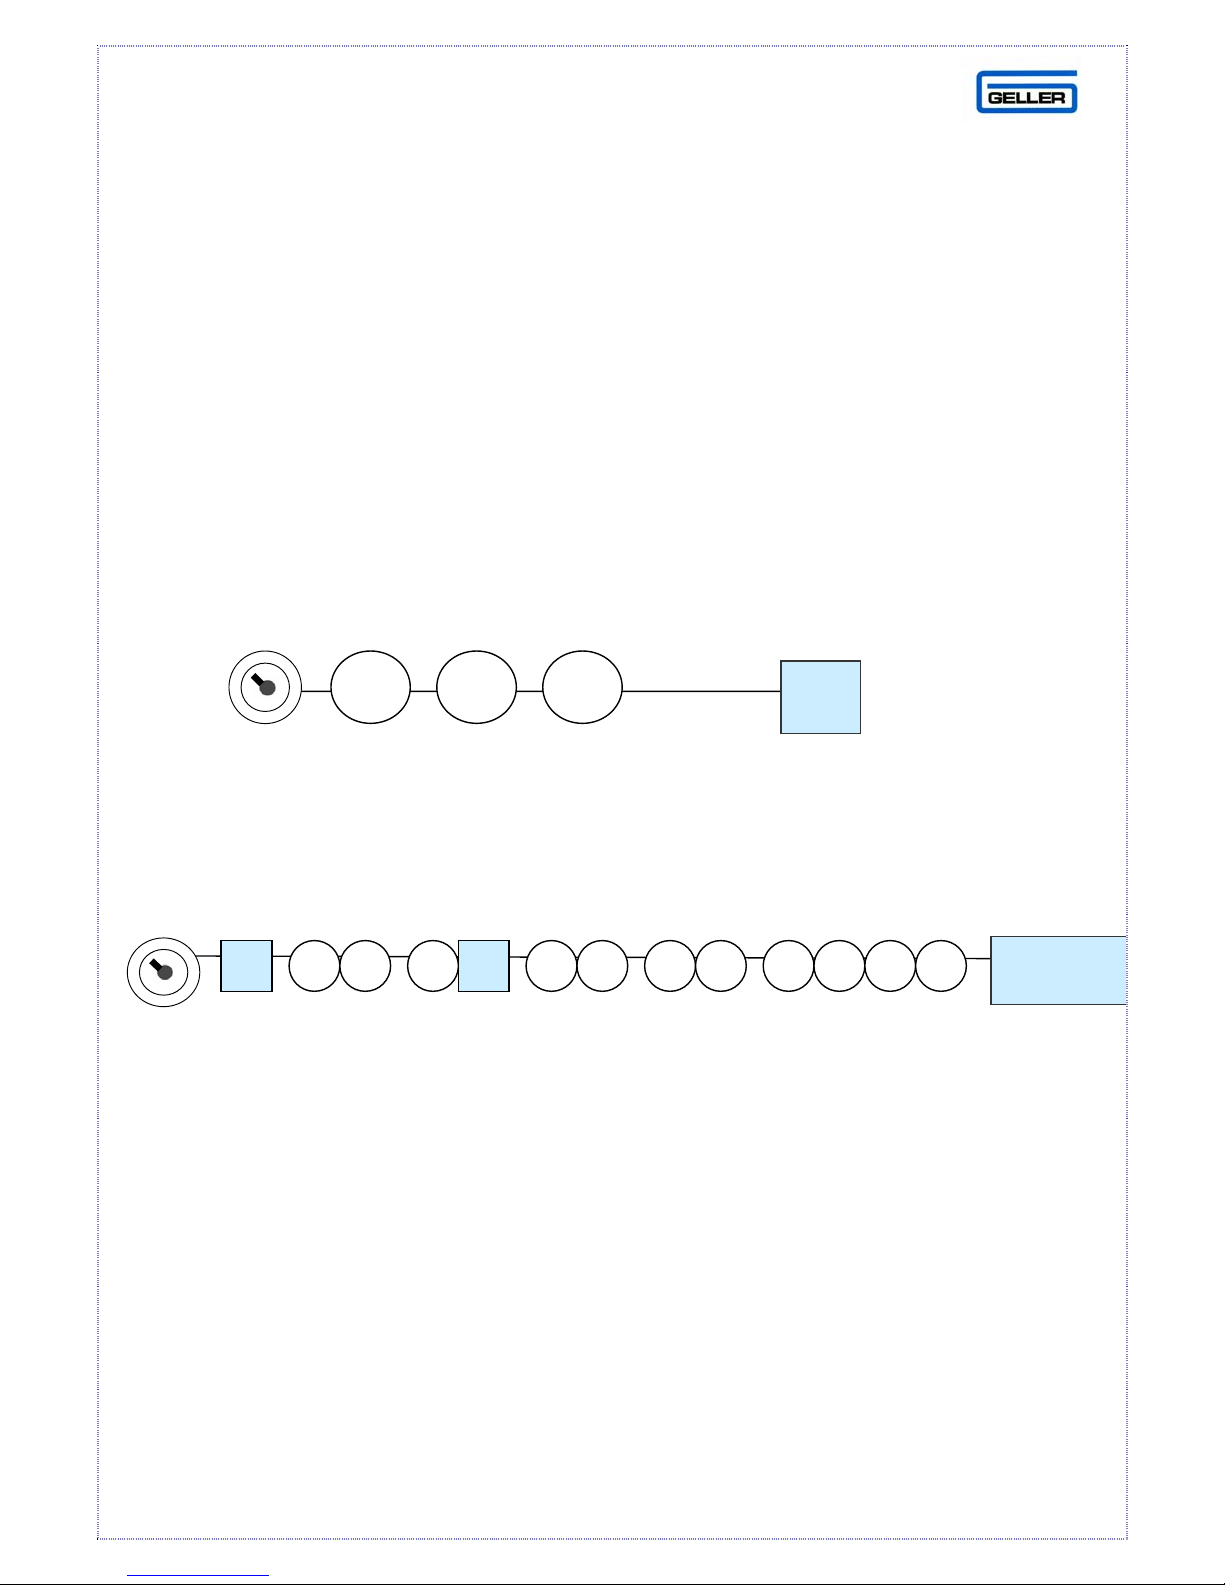
There are 16 programmable Departments on the AX-100. Each
Department can have an alpha-numeric name up to a maximum of 16
digits including spaces. They can also have a preset price, a High amount
lock out and a tax link. The following shows how to program a
Department with a name and a price.
For reference to the character code table which is used to program the
names please see page 9.
PROGRAMMING THE PRICE
0 1 0
1
The above example shows a preset price of £1.00 in dept 1.
PROGRAMMING THE NAME
1 F
C O F F E E
The above example programmes dept 1, to the name ‘coffee’.
It is of course quicker and simpler to use the optional utility if you have access
to a PC.
CASH
*The ‘F’ is the department 6 button which doubles as the ‘F’ character code in
the ‘P’ position.
10
Page 12
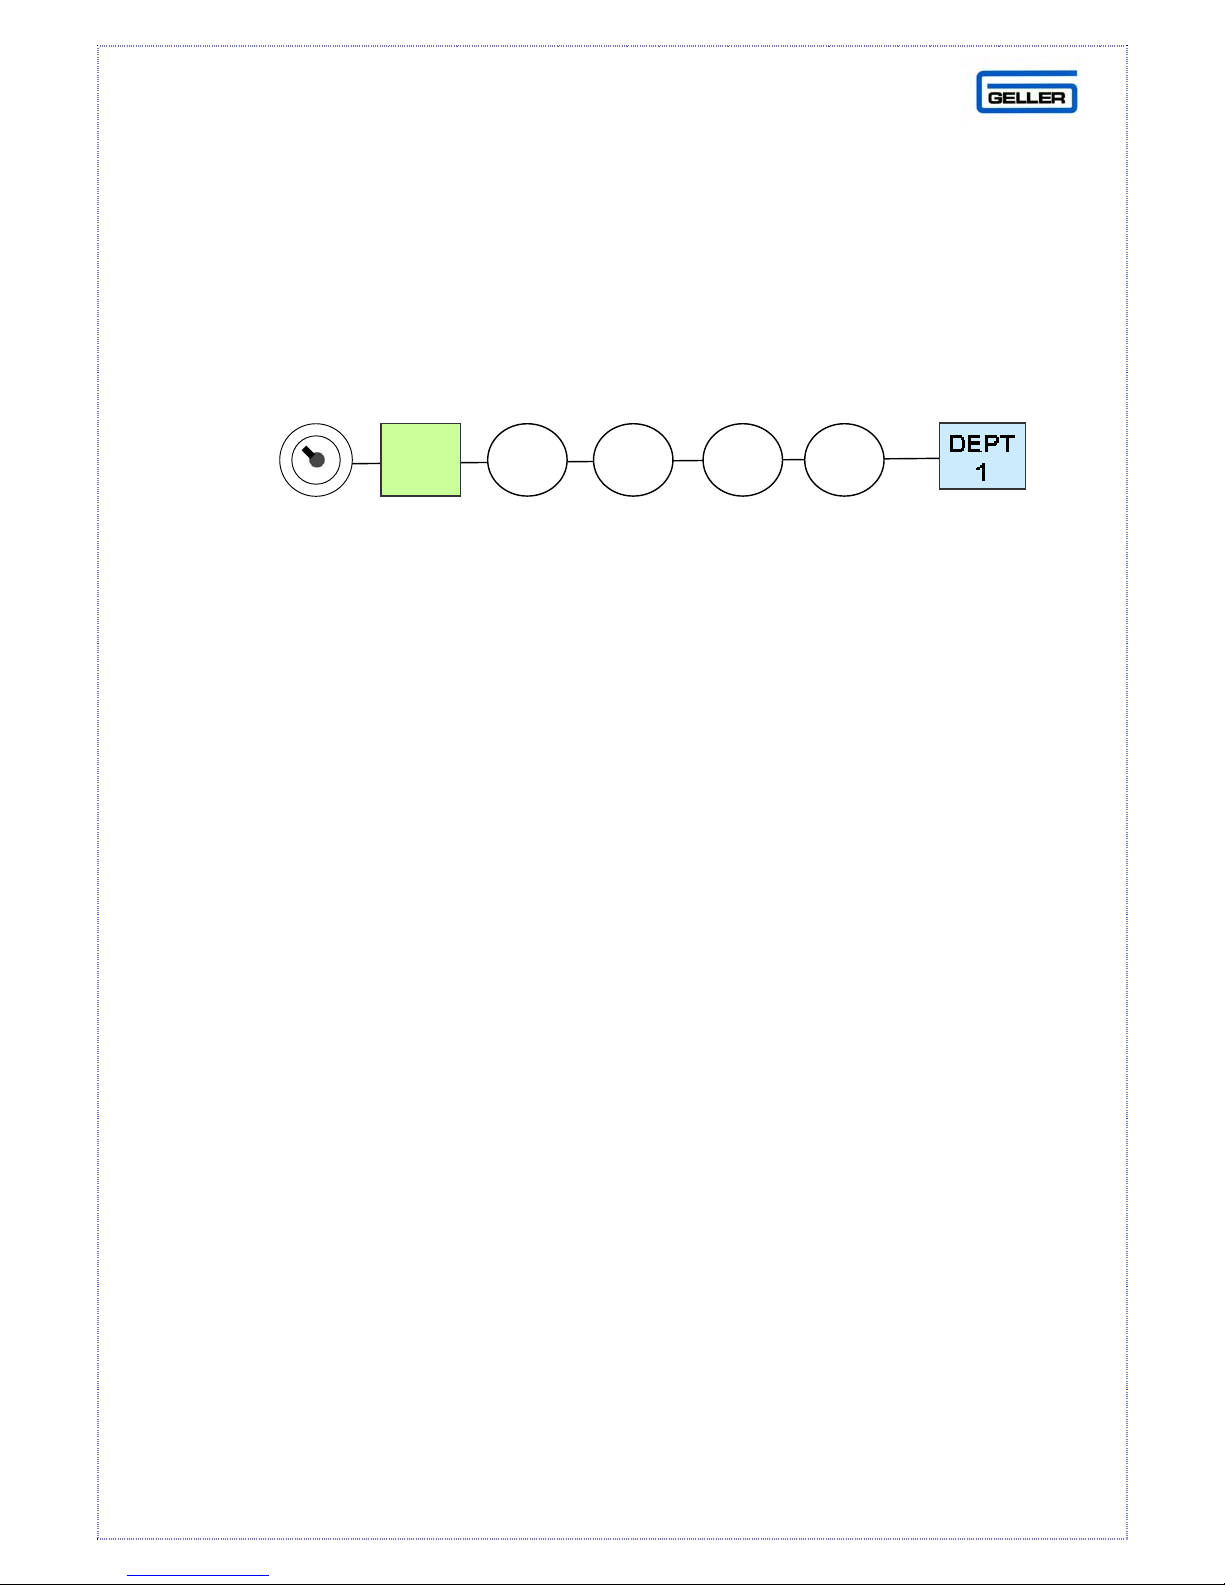
HALO - HIGH AMOUNT LOCK OUT
You can set a maximum monetry limit that can be entered into a Department.
The following example will program Department 1 to a maximum limit of 9.99
ENT
RLS
3 0 9
0
Please note the 0 0 as stated above is assuming there is no tax set. For tax
settings please see page 16.
Department Flags 4 & 5 control the digit limitation. Dept Flag 4 controls the total
length of digits of the Halo required. Department Flag 5 controls the highest value
of the Halo required.
Example 69.99 would be programmed as 4 6
(4 digits in length and the 4
th
digit highest number = 6)
Example 9.99 would be programmed as 3 9
(3 digits in length and the 3
rd
digit highest number is 9)
11
Page 13
T
T
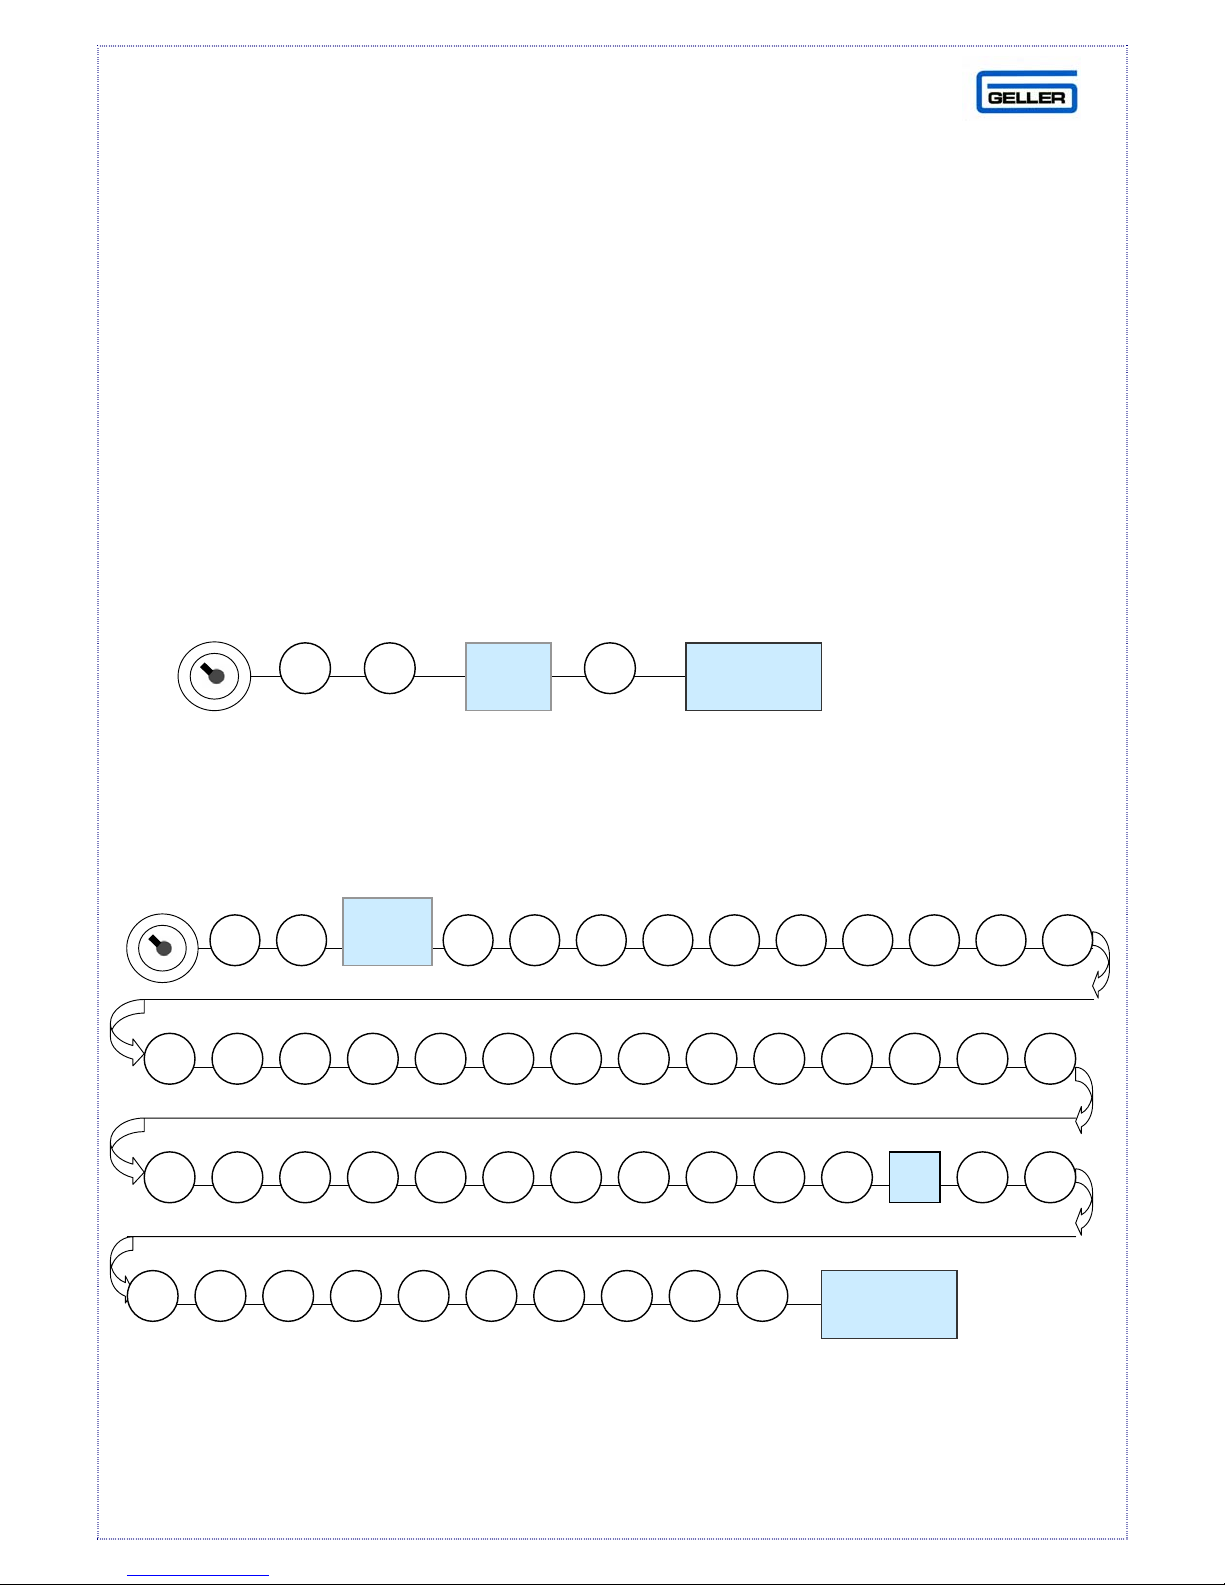
PROGRAMMING THE RECEIPT LOGO
The AX-100 has the capability of printing a customised text logo for the header
of the receipt and an additional commercial logo, which can be printed at the
end of the receipt. The AX-100 David Utility is the simplest way of
programming the header message. If it is necessary to program these
manually, then please do the following.
Receipt Logo (Header)
Number of Lines
You can enter any number 1-5 ‘1’ will allow one line ‘5’ will allow 5 lines of
X/
IME
CASH
header message.
st
Line
1
X/
IME
Using the alpha chart (Page 9) enter the text required followed by the CASH
D
CASH
button.
12
Page 14
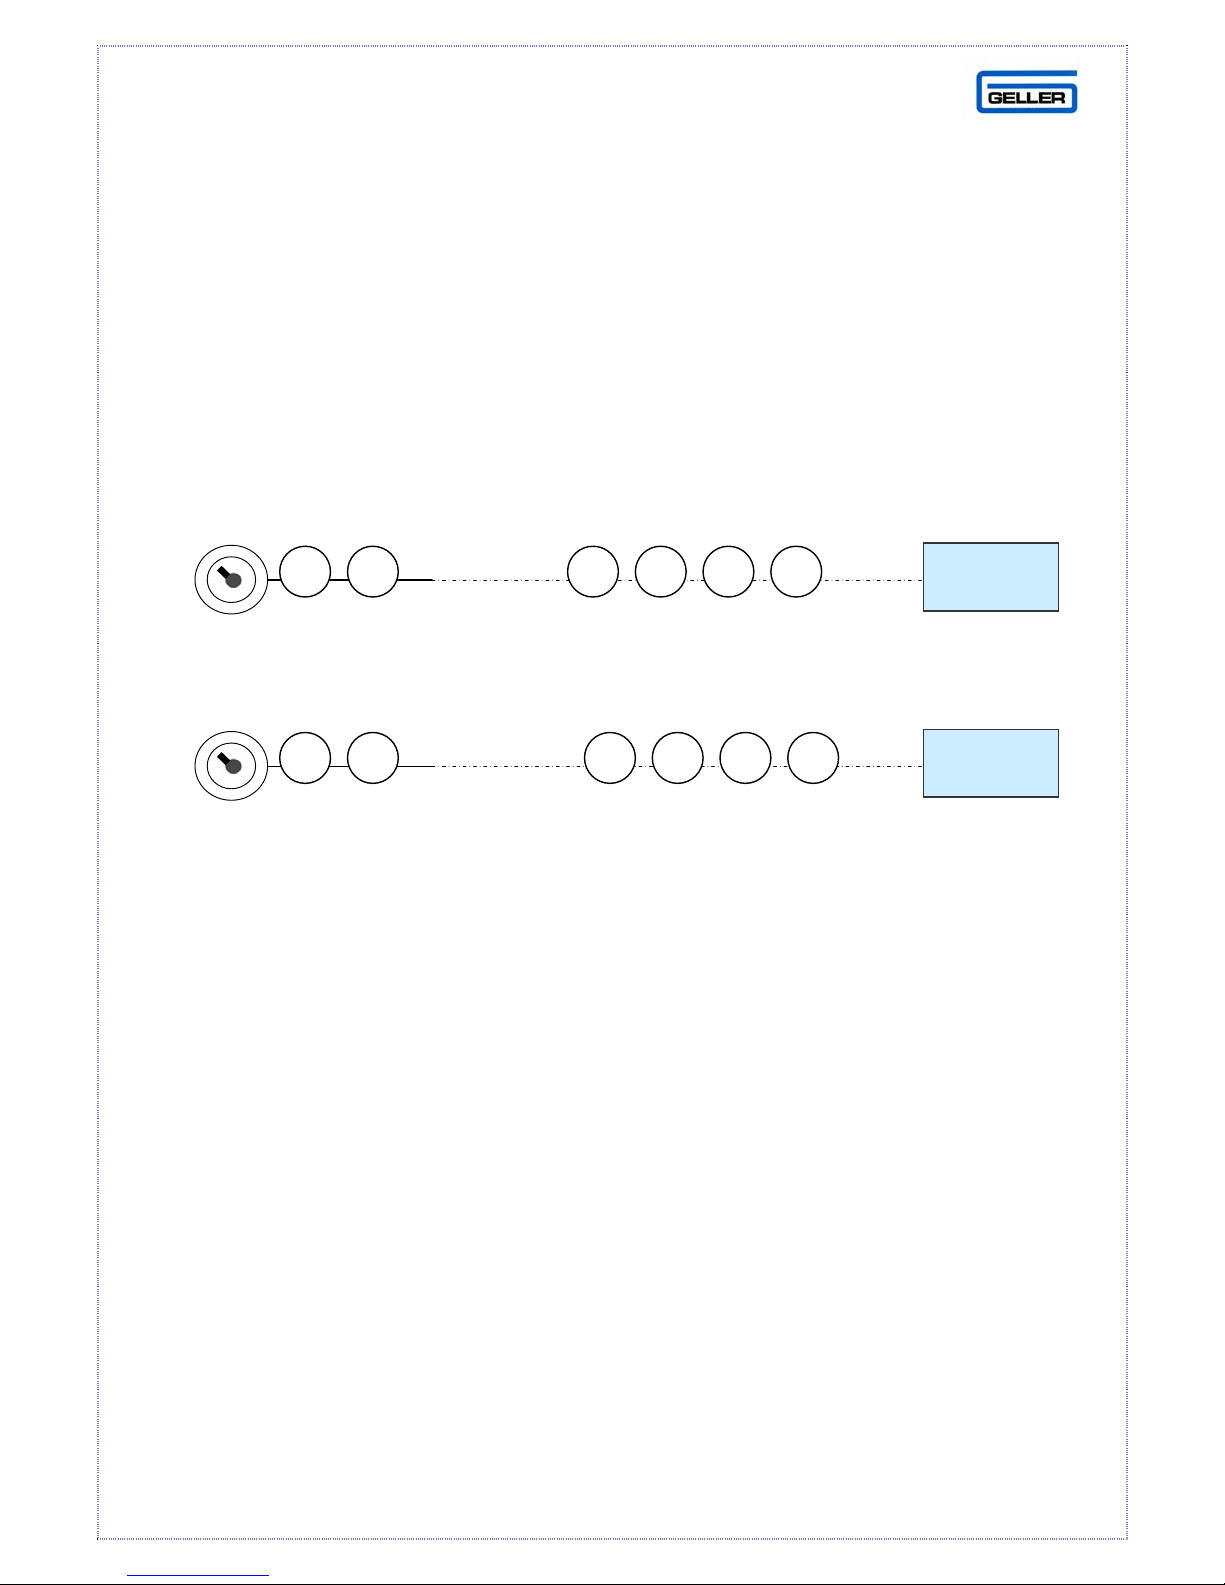
For spaces enter 20, For Double size characters enter 12
There are 24 single sized characters available per line.
To program the word AX-100 SYSTEM as in the example on the previous page,
you would place 6 spaces at the start and end of the word to centralise it.
20 20 20 20 20 20 41 58 31 30 30 20 53 59 53 54 45 4D 20 20 20
20 20 20
2nd Line
rd
3
Line
42 = 4
43 = 5
Y O U R C O D E
Y O U R C O D E
th
Line
th
Line
Etc
CASH
Etc
CASH
13
Page 15
T
T
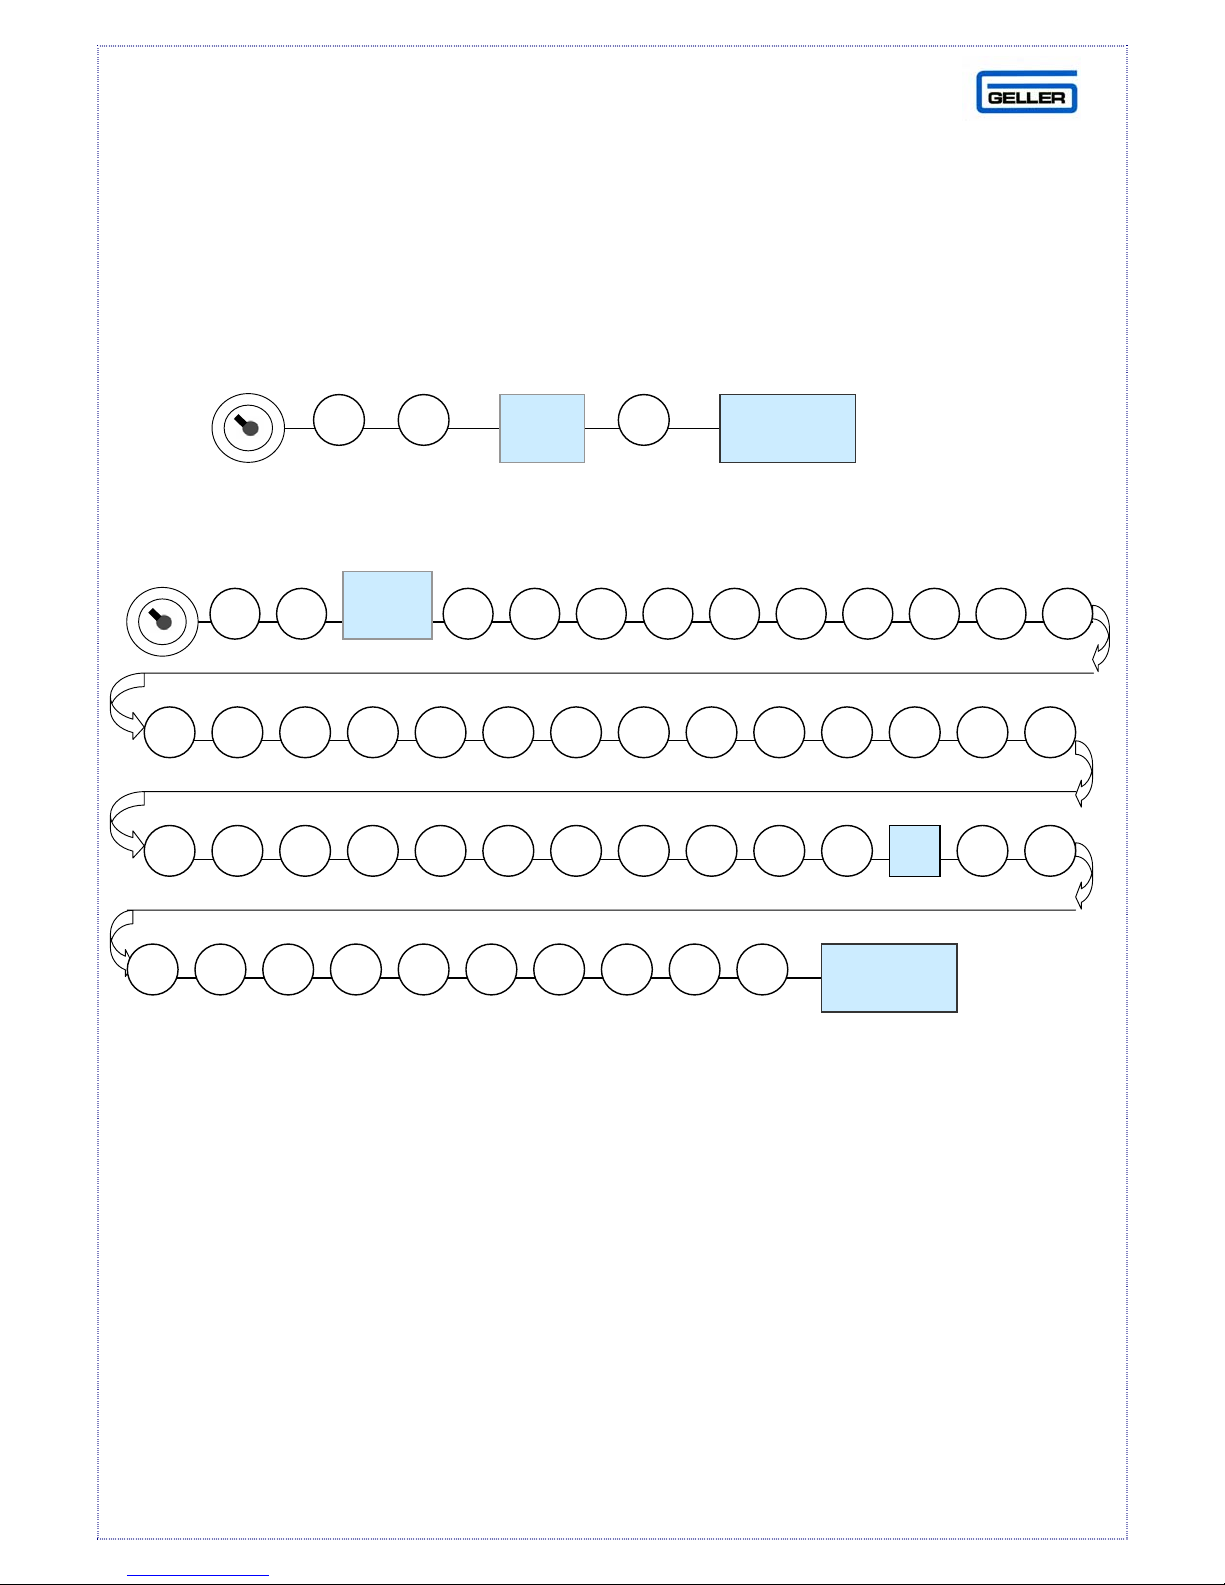
Commercial Logo (Trailer)
By setting Main Flag 4 bit 1 = 1, the commercial message will print at the
end of the receipt. For example “Your receipt please call again”
Number of Lines
st
1
Line
X/
IME
X/
IME
CASH
D
CASH
For spaces enter 20, For Double size characters enter 12
There are 24 single sized characters available per line.
To program the word AX-100 SYSTEM as in the example above, you would
place 6 spaces at the start and end of the word to centralise it.
20 20 20 20 20 20 41 58 31 30 30 20 53 59 53 54 45 4D 20 20 20
20 20 20
14
Page 16
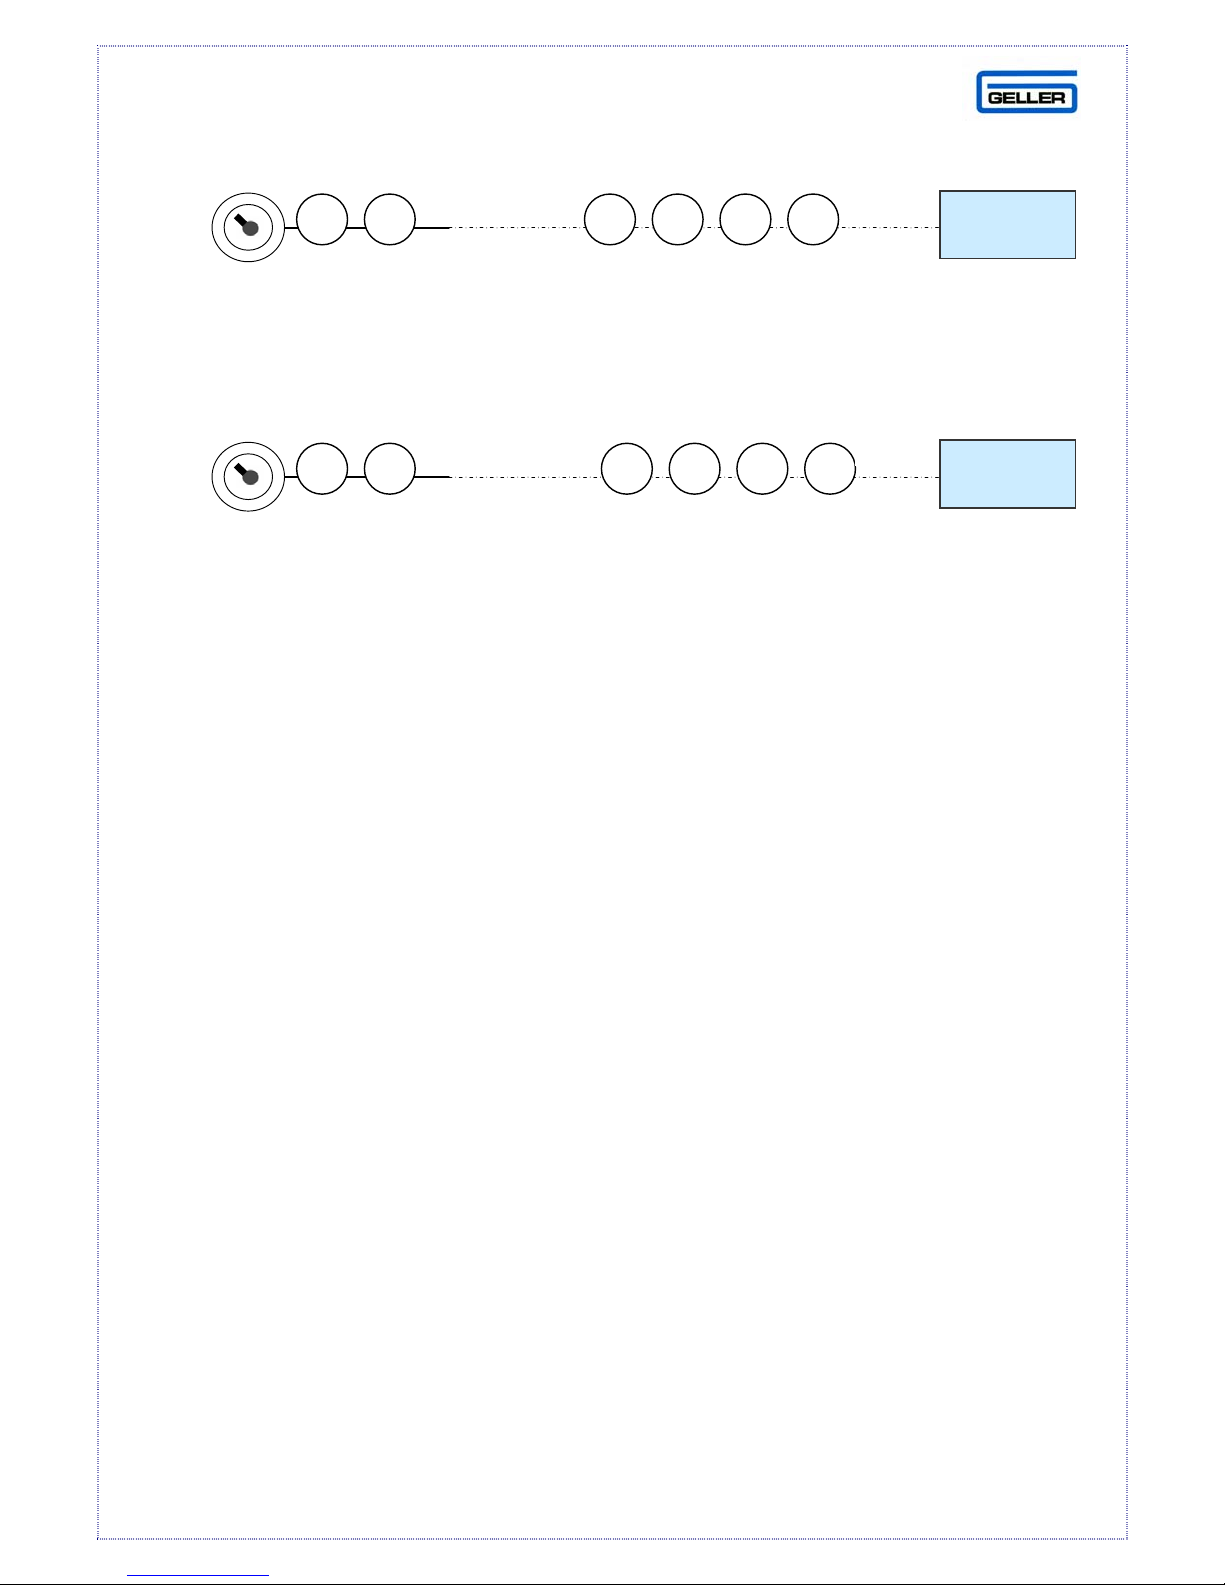
2nd Line
3rd Line
48 = 4th Line
49 = 5
th
Line
Y O U R C O D E
Y O U R C O D E
Etc
CASH
Etc
CASH
15
Page 17
T
T
T
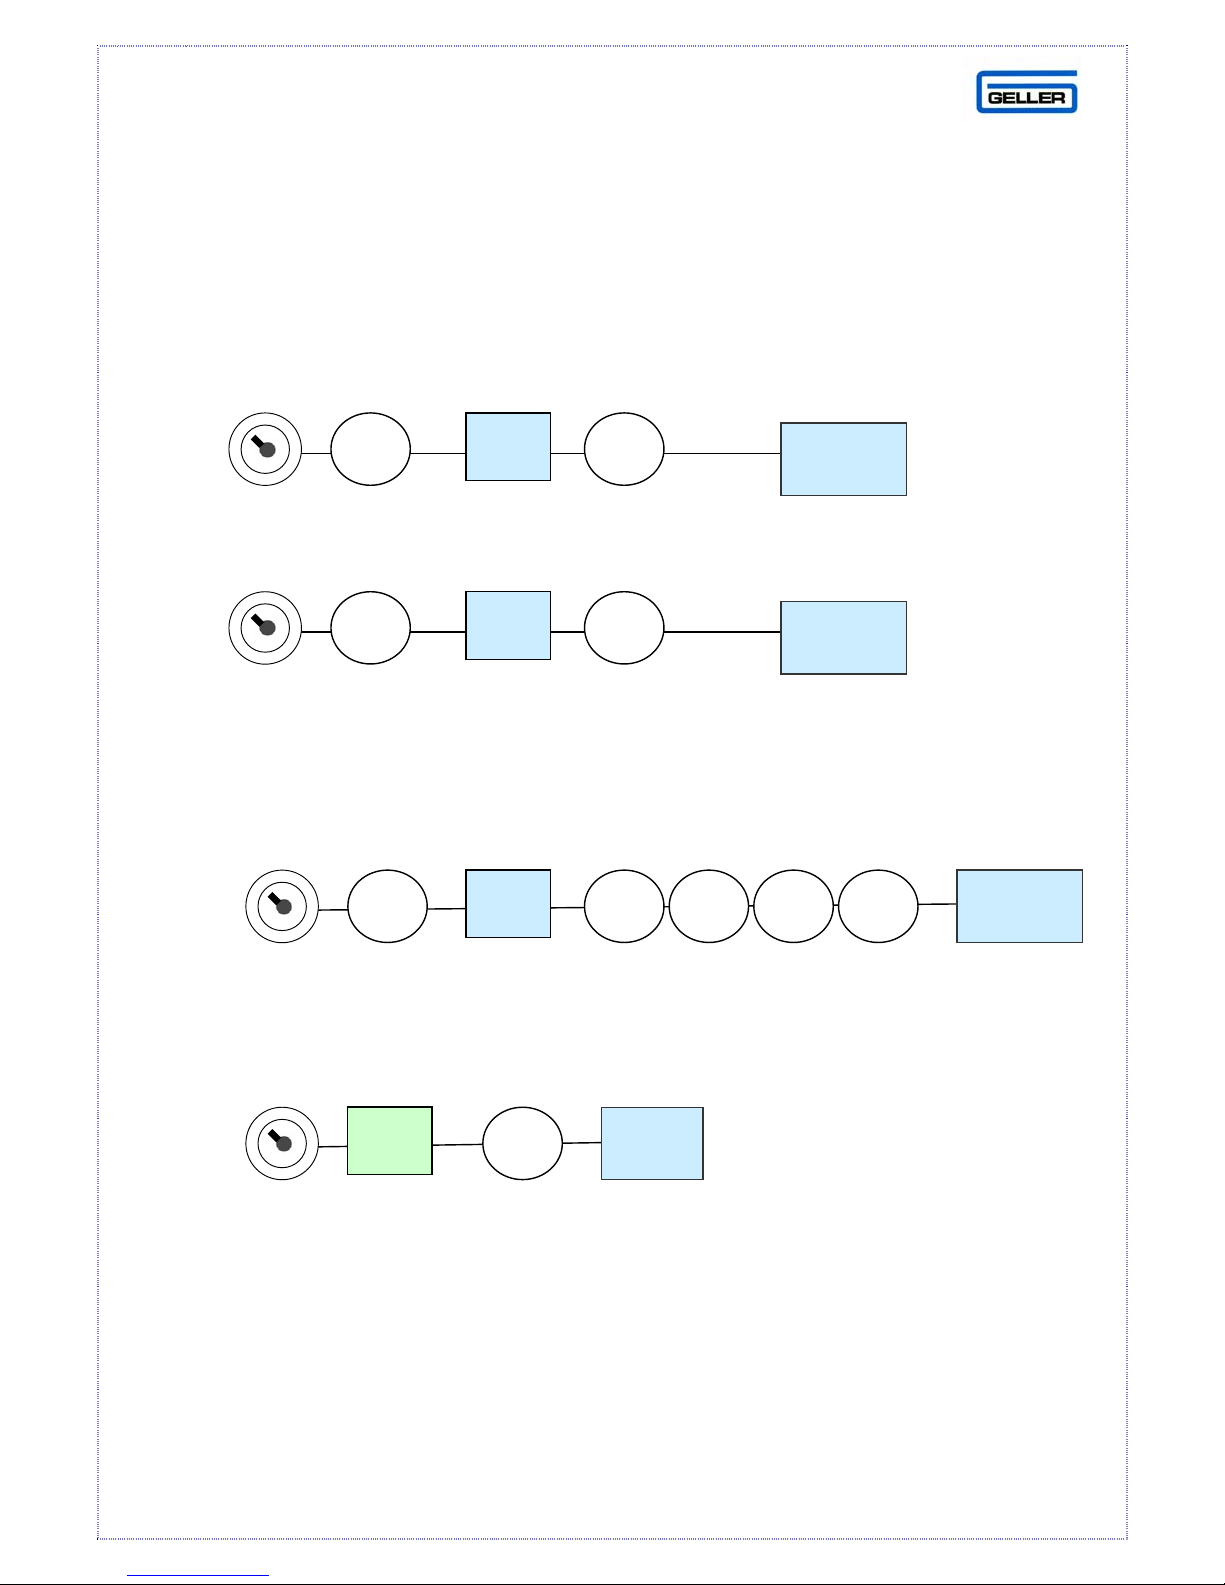
VAT / TAX PROGRAMMING
The AX-100 can have up to 4 tax rates. The following example will program
Department 1 and link it to a tax rate of 17.5%
SETTING THE TAX TYPE
5 1
PO
CASH
END
The above example will set the tax to be inclusive.
5 2
PO
CASH
END
The above example will set the tax to be added to the sale price.
SETTING THE TAX RATE
1 1
PO
7
.
5
The above example will set the tax rate to 17.5%.
CASH
END
ENT
The above example shows tax rate 1 being set to department 1
Note:
To test the tax has been programmed correctly, enter a sale of 1.00 into a
taxable Department and produce a Z report. The Tax value should be 15p if
tax is inclusive or 18p if tax has been added on.
To Print the tax rate on the receipt, set MF 5 = 101
LINKING TAX TO A DEPT
1
DEPT
1
16
Page 18
P
PASSWORDS
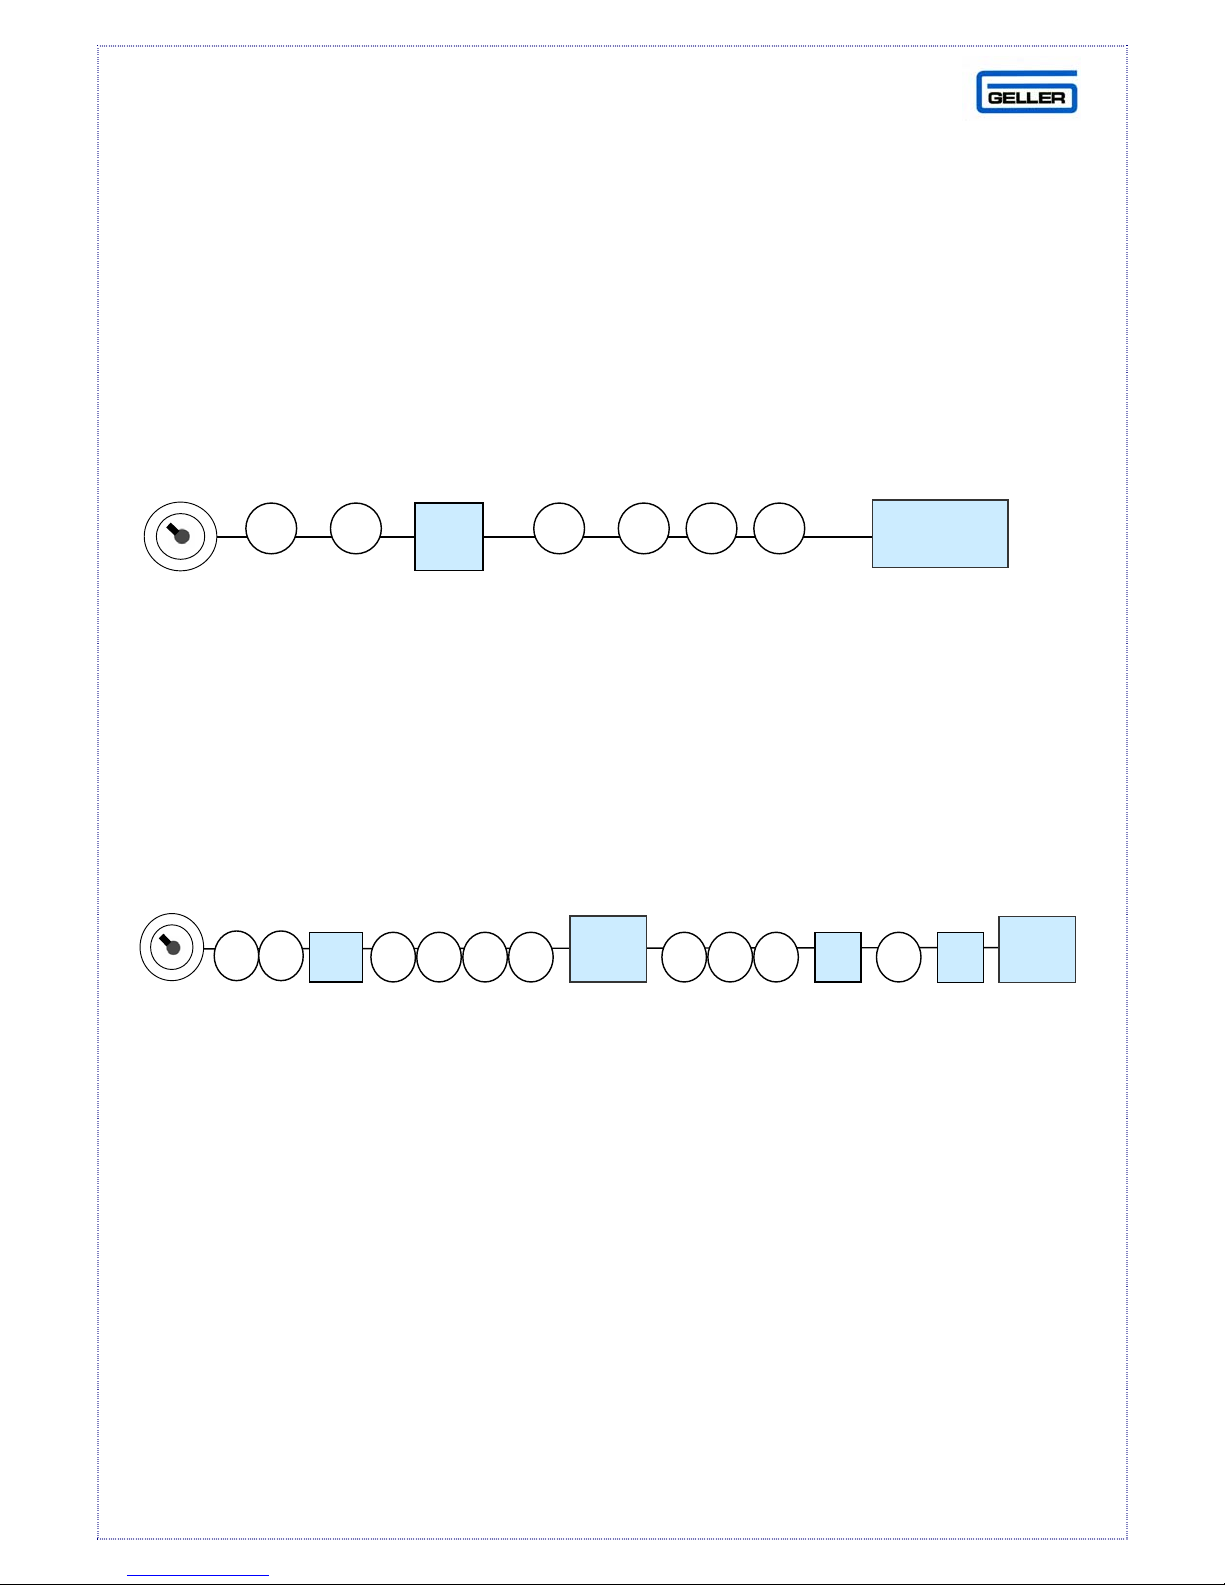
Programming Secret Clerk Passwords & Names
A maximum of 10 different clerk passwords can be set. Clerks must enter their
password prior to using the ECR in the ‘R’ position. The Names of each clerk
can also be programmed.
Notes:
PO
CASH
Clerk codes start at 13 so that clerk 1 = 13, clerk 2 =14, clerk 3 = 15 etc,. The
secret I.D. No. can be up to 4 digits. The above example shows clerk 1 being
set with an I.D. of 1234. IMPORTANT the last Clerk code is 22.
Clerks can also be set to show names by using the character code table (page
9)
PO
CASH
TEND
F
D
T O M
The example above shows that clerk 1 has a password of 1234 and his name is
Tom
CASH
TEND
17
Page 19
Setting Management Passwords
There are various management passwords, which are available for security
purposes. Report passwords (X & Z) can be set up to only allow managers to
take reports. Programming can be placed under management control as well as
Voids, Returns and Error Corrects.
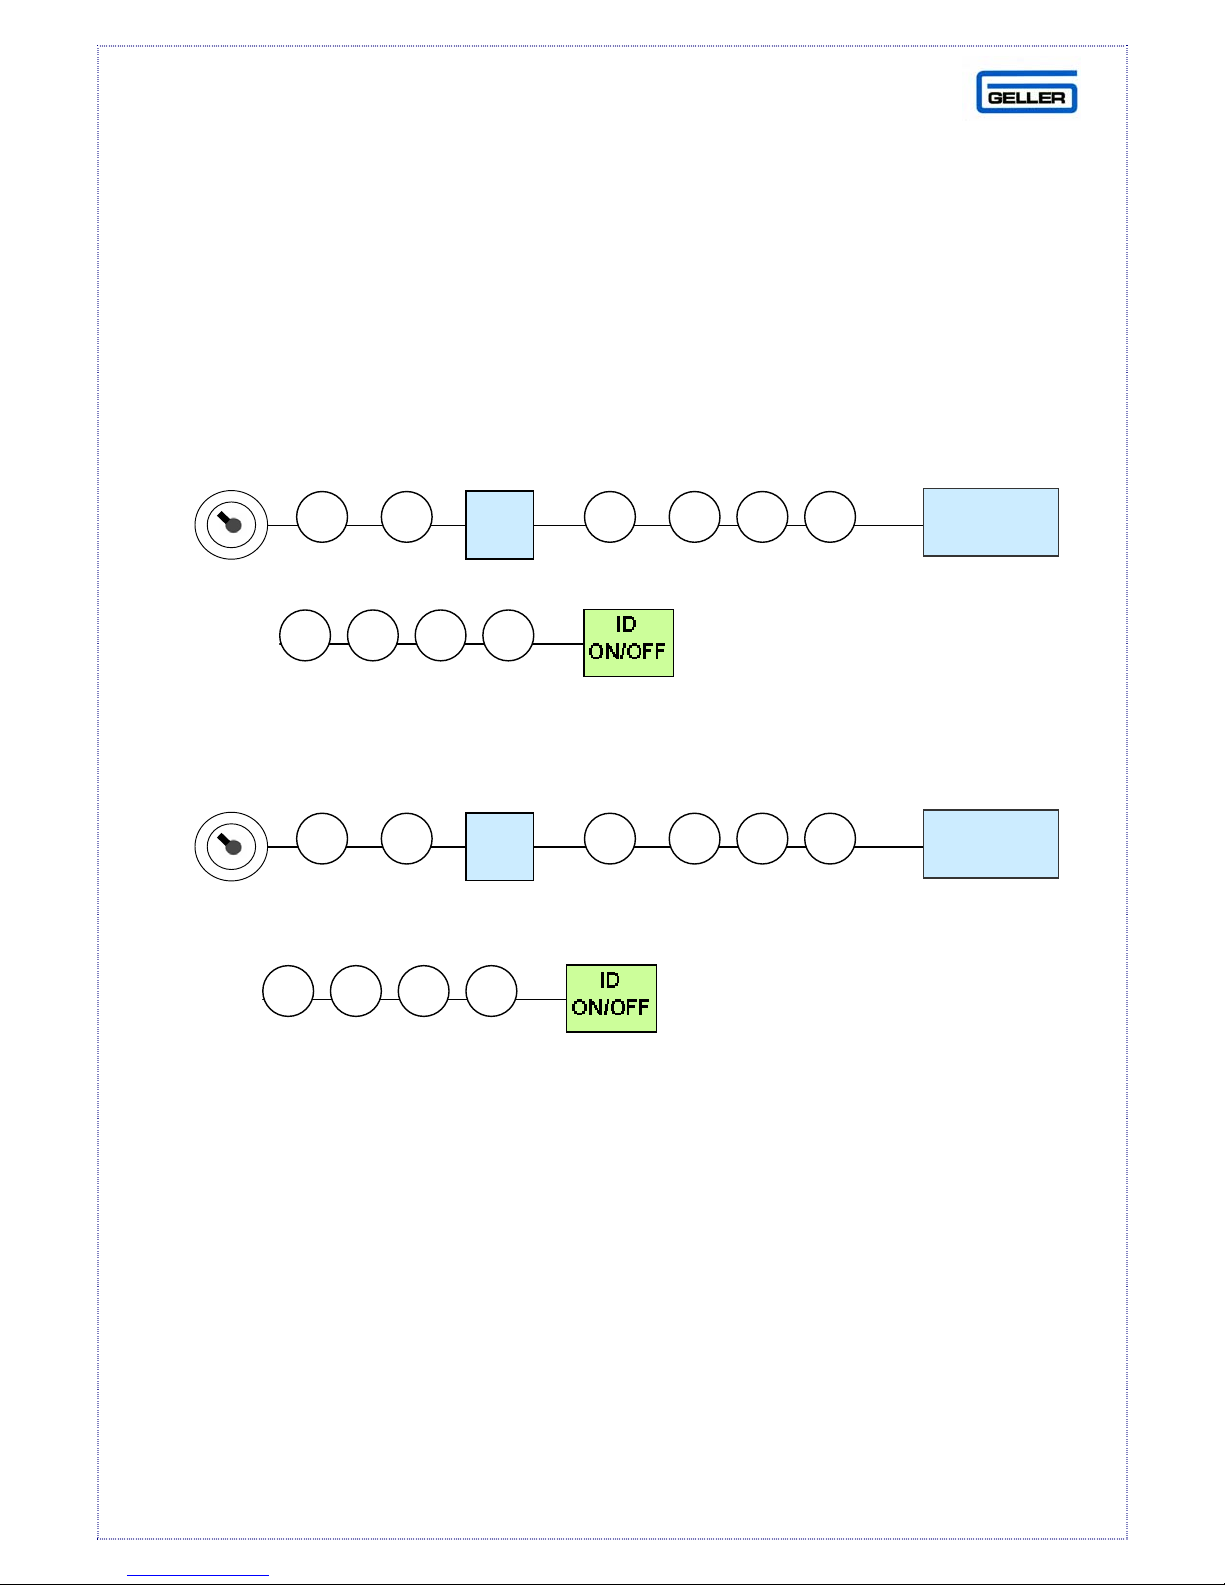
To Program the Password for X Reports
The above example shows 9999 set as the X report password. You will need to
PO
CASH
enter prior to taking a report.
To Program the Password for Z reports
PO
The above example shows 8888 set as the Z report password. You will need to
enter prior to taking a report
Note:
To use the manager’s password for reports, turn the button to the ‘X’ or ‘Z’
Position on the control lock and enter the manager’s password followed by the
ID ON/OFF button.
CASH
18
Page 20
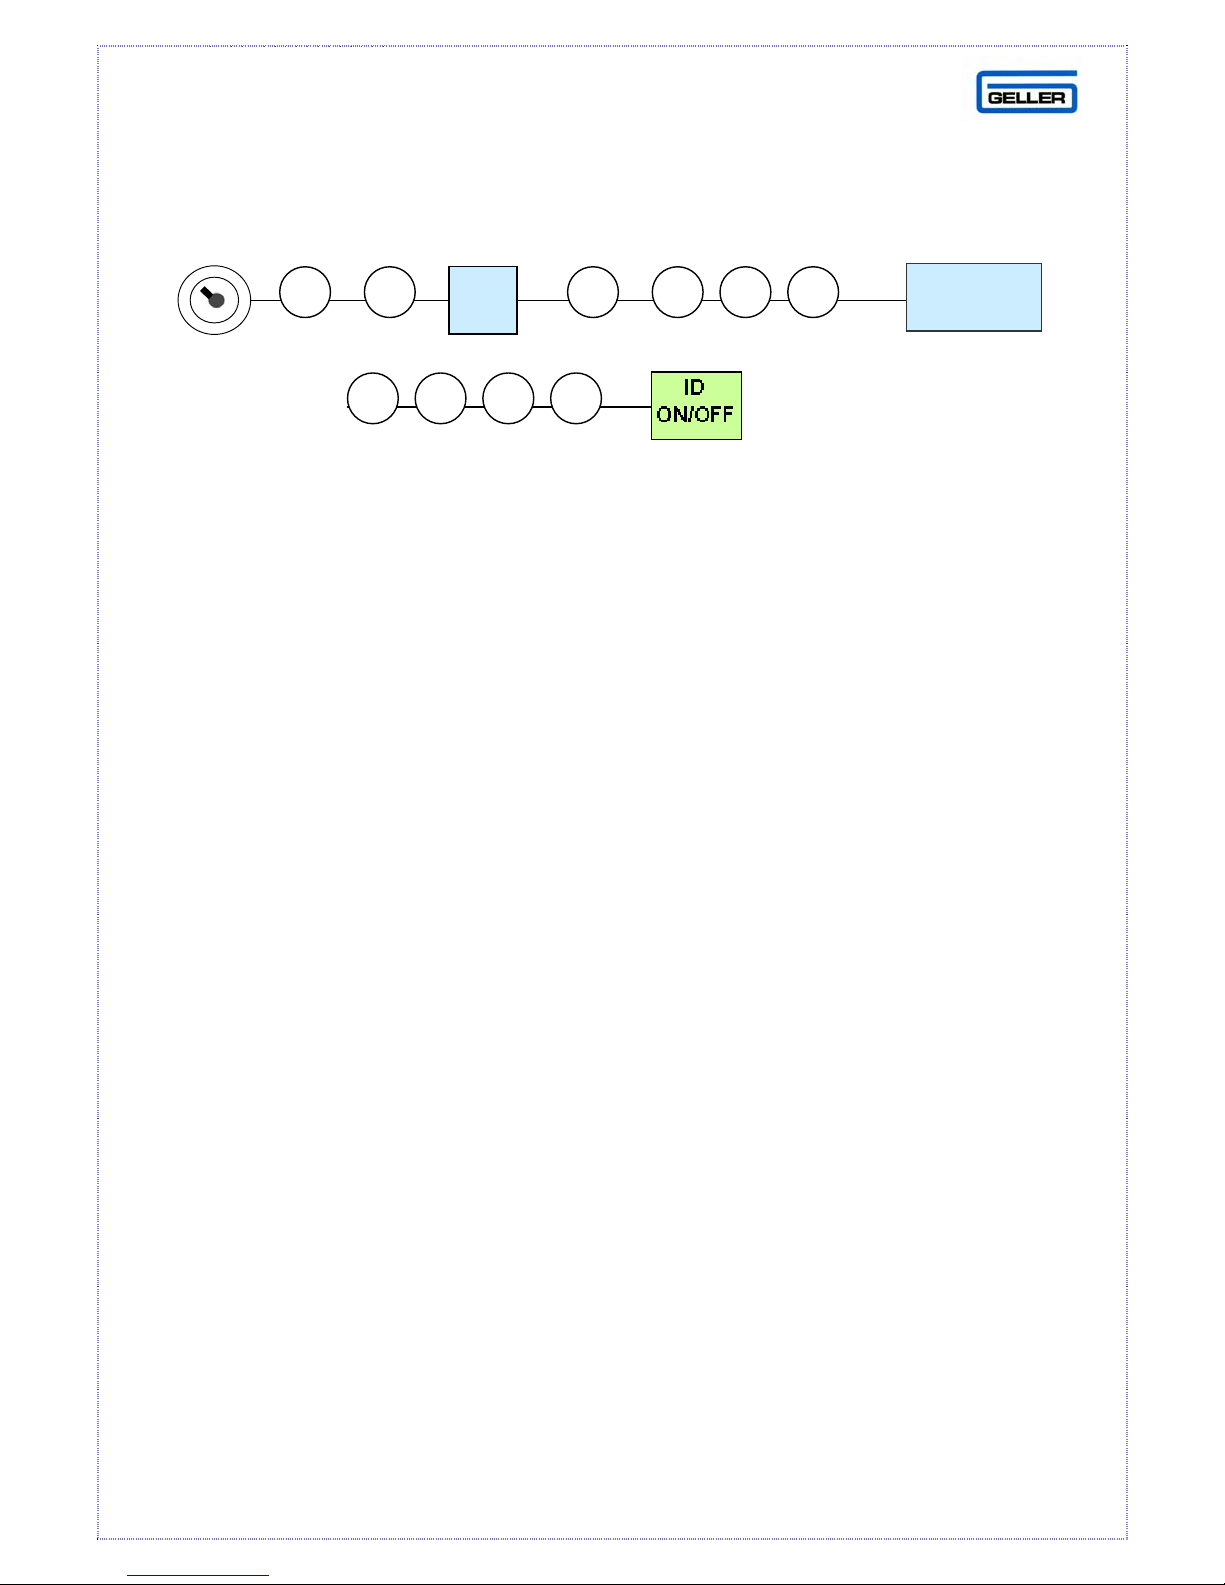
To Program the Password for the Programming Position
PO
CASH
The above example shows 6666 set as the programming password. You will
need to enter prior to programming.
Note:
To use the manager’s password for programming, turn the button to the ‘P’
position on the control lock and enter the manager’s password followed by the
ID ON/OFF button
To Program the Passwords for Voids, Returns and Error Corrects
• First ensure the X report password has been configured as explained above.
This will be the password that is used for the Void Management control. Also
ensure Main Flag 7 bit 3 has been set. (Enable Password for Void functions)
• To Void an item using Management Control, Simply enter the password and
press the VOID button. Resubmit the transaction to be voided and use the
appropriate method of payment.
• The Return button is used in exactly the same way as the VOID
• The EC button is used in a similar way. If a product is sold in error, Enter the
password followed by pressing the EC button
IMPORTANT
Please write down your password(s) and put them in a secure place. If you
cannot remember your password and have no access to it you will have to carry
out a full system clear and reprogram the machine.
19
Page 21
PROGRAM CONFIRMATION
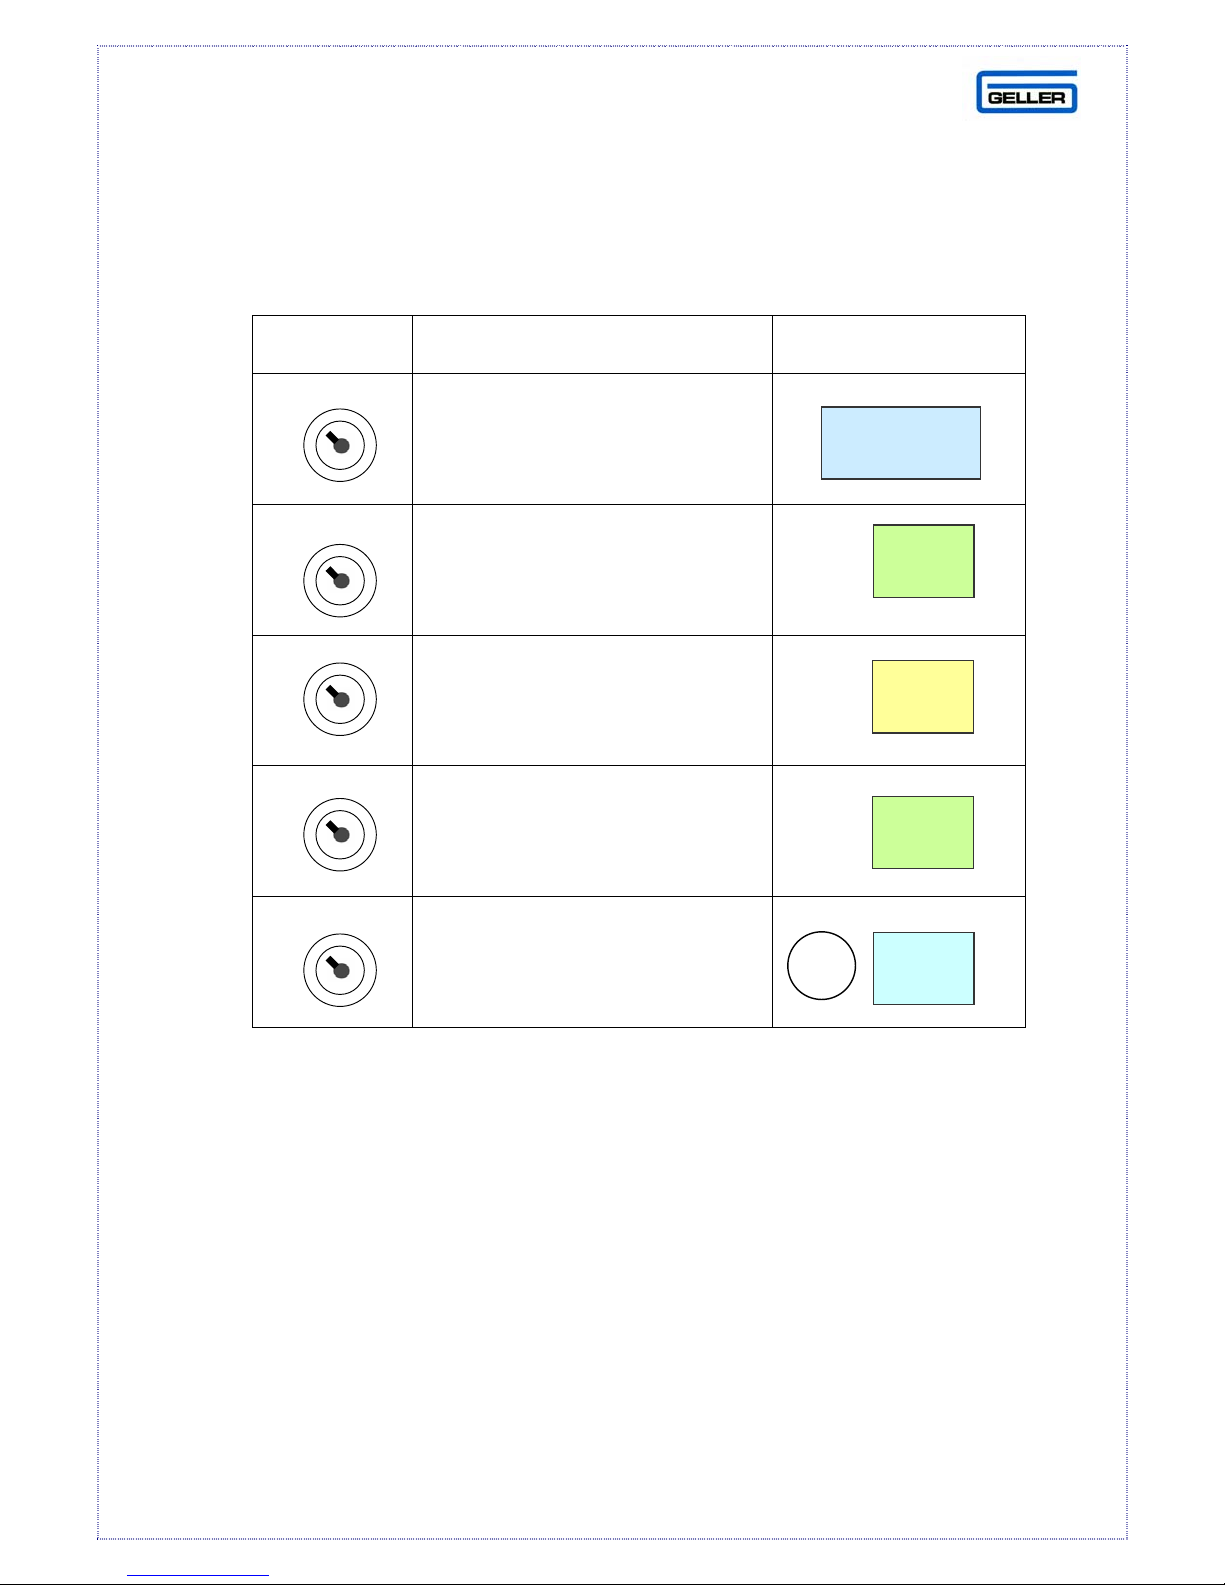
The following table contains information on printing program confirmation.
Please note all of the following are performed in the ‘P’ Position
Lock Confirmation Type Procedure (PRES)
Main Flags, Departments
Clerks, Passwords
PLU Confirmation
Keyboard
Transaction Words
CASH TEND
1
CHRG
PLU
RTN
TOTL
IMPORTANT
There are several buttons which are used in the programming position. We
recommend that you leave these buttons in their default positions. The AX-100
does have a soft keyboard, but when the key is turned to the ‘P’ position, the
default programming keyboard is loaded. See page 5 for the programming
layout and their positions.
20
Page 22
ERROR CODES
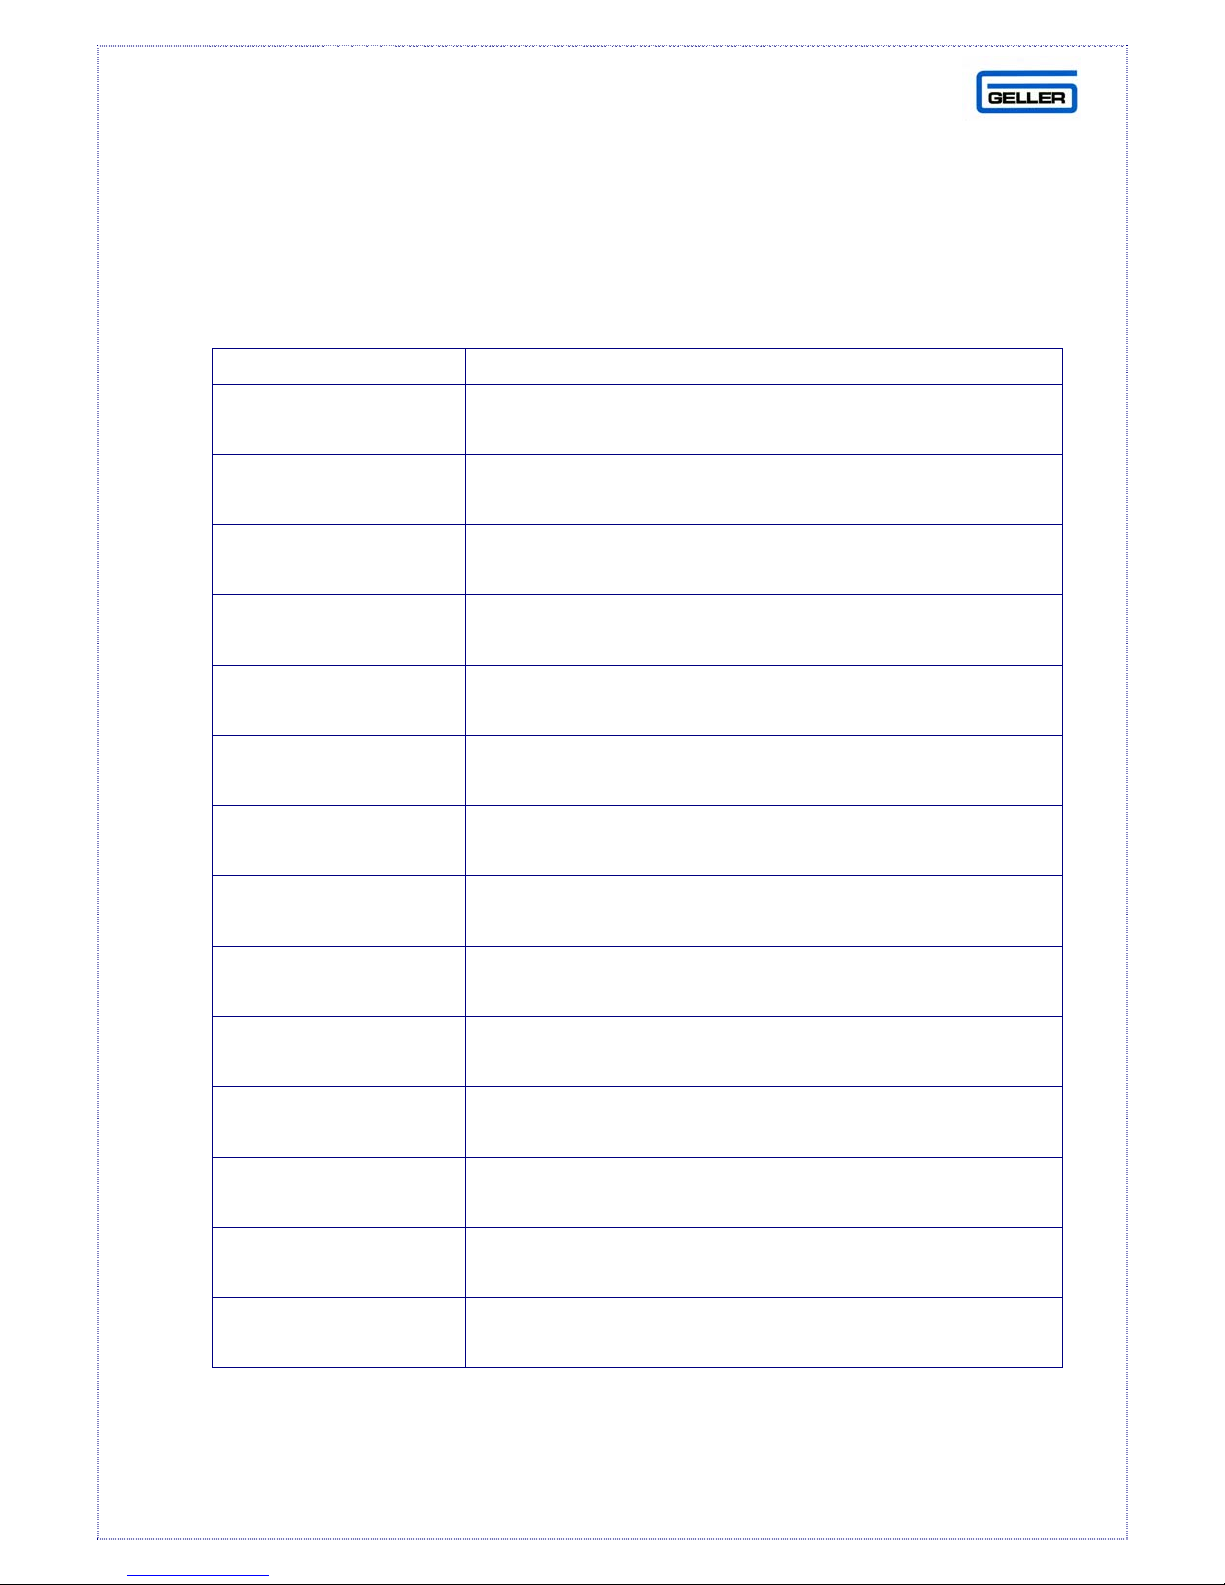
LIST OF ERROR CODES ON THE AX-100
ERROR CODE DESCRIPTION
E1
Incorrect key operation.
Press the CLR button to cancel
E2
E3
E4
E5
E6
E7
E8
E9
Ec
The amount entered is too large.
Press the CLR button to cancel and try again
The registration is not finished.
Press CASH to finalise the transaction
Password is required.
Press the CLR button and register by password
Clerk ID button required.
Press the CLR button and enter the Clerk ID
General error.
Press the CLR button and try again
Tender error. Press the CLR button and finalize
the transaction with a method of payment
ID ON/OFF has been pressed and the receipt is
ineffective See Main Flag 1 bit 8
The button has been turned from the ‘P’ position
before programming has been completed
The memory for the number of items has been
exceeded. Finalize the sale
Er
EP1
EP2
E
The report memory is full.
Print the Z 1 & Z2 reports
The printer head is too hot. The error will clear
once the printer head has cooled down
The printer is short of paper.
Please install a new paper roll
General error.
Press the CLR button and try again
21
Page 23
REPORTS
END OF DAY REPORT (Z1)
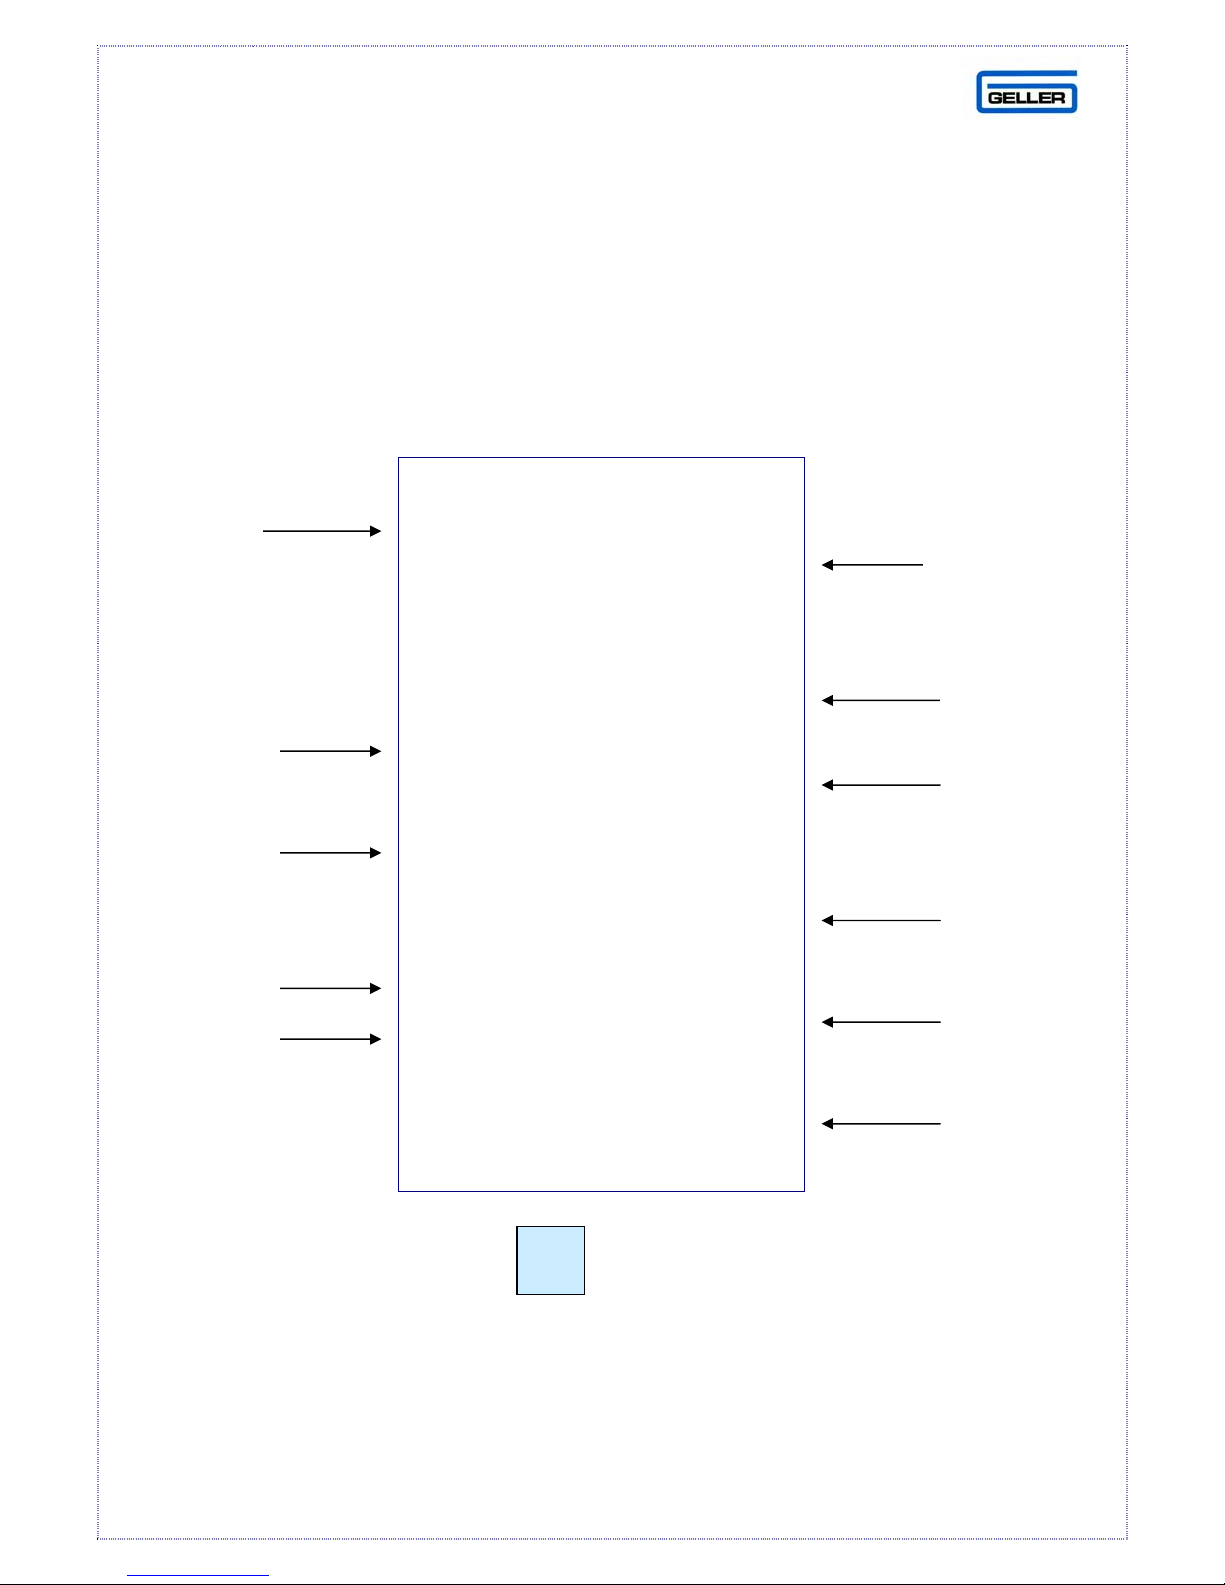
At the end of the trading day, a Z report will be taken to give a breakdown of all
financial transactions. Turn the key to the ‘Z’ position on the control lock and
press the CASH button
Here is an example of a Z report with detailed explanations of the totals
DEPT NAME
TOTAL INC
VOIDS
VOIDS
AMOUNTS
NON ADD
TOTAL
NON RESET
GRAND
TOTAL
***** Z1 REPORT *****
STATIONERY 6Q
24.00
CARDS 10Q
12.00
DEPT TTL 16Q
36.00
GROSS 37.00
NET TL 36.00
VOID 1N
1.00
CASH 36.00
NO SALE 7.50
RPRT CNT Z1 6
NRGT 135.67
06-03-2007 10:45
Clerk 1 – No Sale 5
DEPT TOTAL &
QTY
OVERALL DEPT
TOTAL & QTY
NET TOTAL,
CASH, CHQ,
CARD TTL
CASH
TOTAL
REPORT
COUNTER
OPEN
DRAWER
COUNTER
Please Note:
To take a Z2 report, press the button followed by the Cash. By
pressing the button before the Z1 report command will produce a Z2 report
equivalent
PO
22
Page 24

REPORTS
ELECTRONIC JOURNAL
The AX-100 has an electronic journal that memorises every line of a transaction on
your cash register. It has a memory length of 3500 lines before cycling back to the
start again. The journal is cleared when a Z full report is performed. To print the
electronic journal together with the full report set Main flag 7 bit 7 = 1. It is possible
to condense the print for reports only (including the journal) by setting MF bit 8 = 1
and MF 6 bit 6 = 0
23
Page 25
T
T
T
T
T
T
T
T
T
X X
X
X X X
X
X X
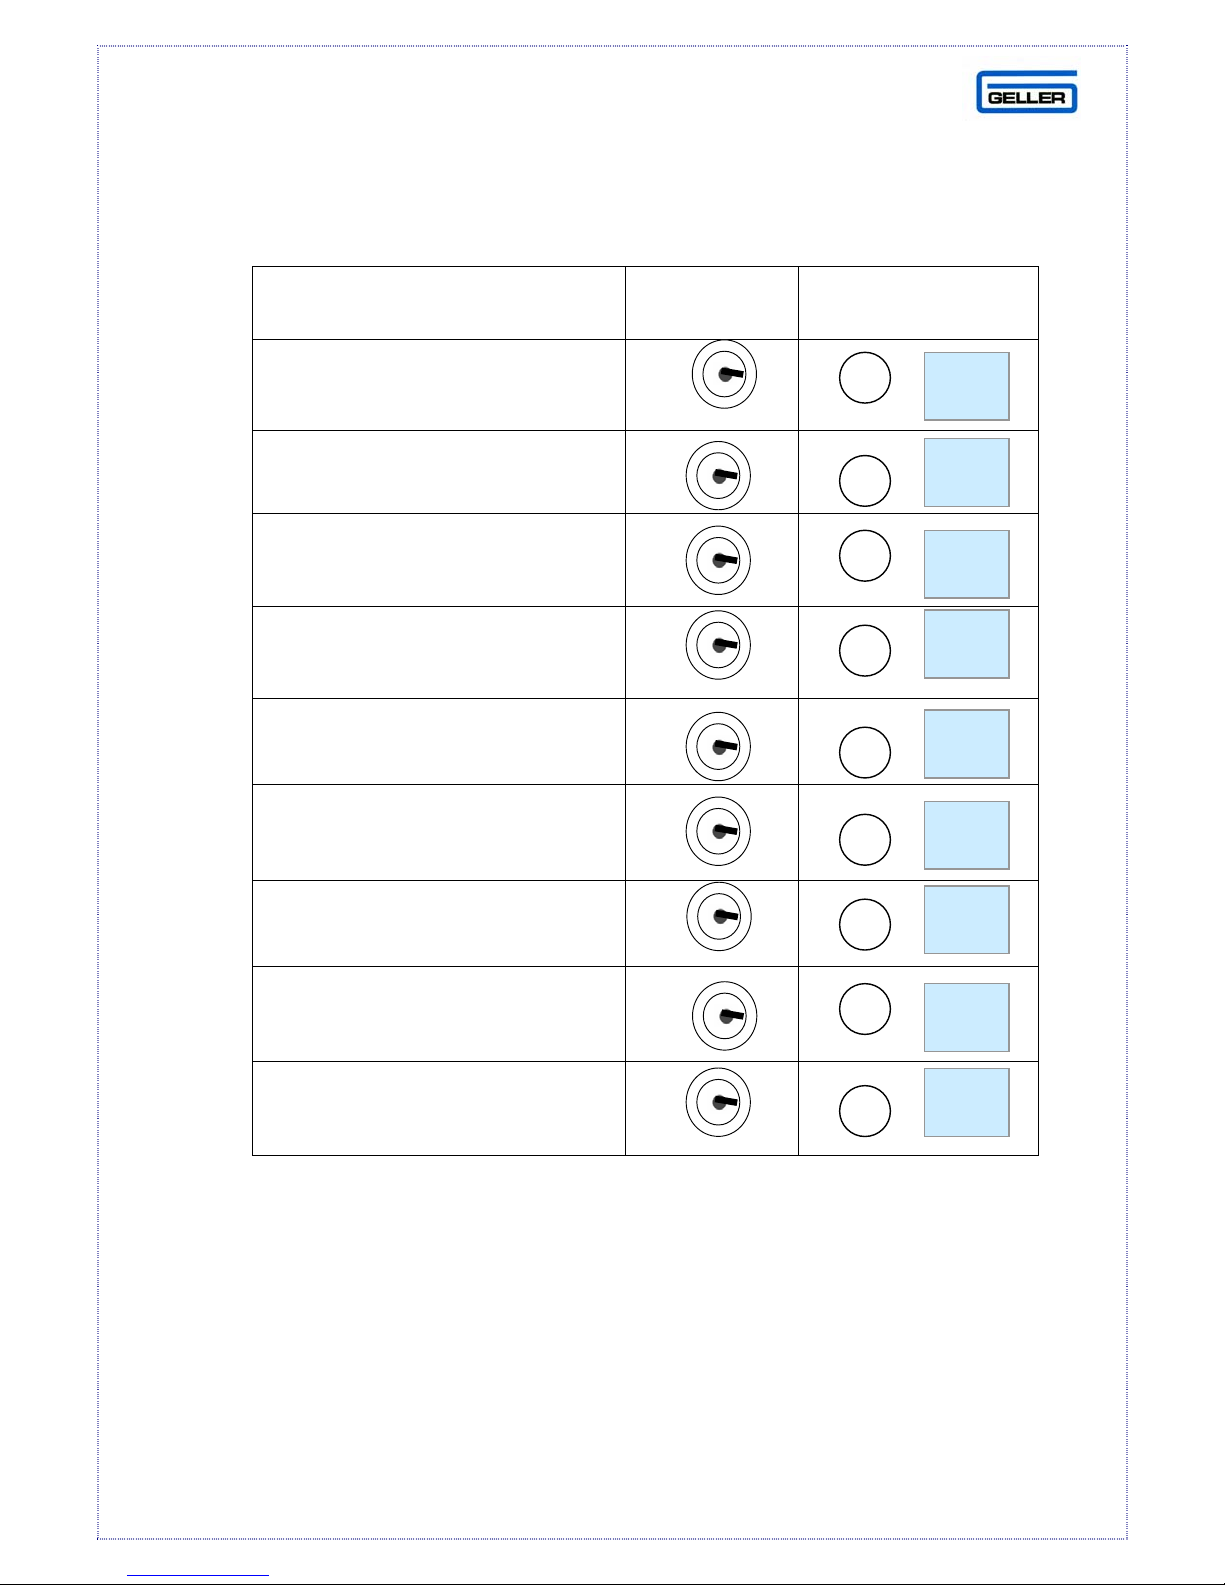
DISPLAYING A REPORT
It is possible to have the report total of your choice displayed on the ECR
To Display Lock Performed in the
“X” position
Net total
Cash total
Charge total
Cheque total
Coupon total
X/
IME
X/
IME
X/
IME
X/
IME
X/
IME
RA total
PO total
Cash In Drawer
Card Total
The most standard and popular reports are the Transaction, PLU, Clerk &
Hourly reports. Here is a list of other reports the AX-100 has to offer:
• Full Group Dept Report, Individual PLU Sales Report
• Individual PLU link to Dept / Full PLU Link to Dept report
X/
IME
X/
IME
X/
IME
X/
IME
• Individual Clerk Report / All Clerk Report
• Hourly Report, Training Report & Cash Declaration Report
24
Page 26

PC COMMUNICATIONS
The AX-100 has the capability to read / send programming data from a
Personal Computer. The AX-100 David Windows utility is available on the AX-
100 Geller CD and can also be downloaded/upgraded from our web site
www.geller.co.uk
The utility has a preloaded demo program for your use.
The keyboard for this demo is also pre-loaded on the AX-100 windows utility.
Note:
For further information on how to use the AX-100 David Utility, please see the
AX-100 David manual which can be loaded from the AX-100 Geller CD or the
Geller website www.geller.co.uk
Downloading a Demo to the AX-100
The 9 way PC Port at the rear of the AX-100 is automatically configured for PC
communications. The control lock on the cash register can be in any position
whilst communication takes place.
25
Page 27

CABLE CONFIGURATION
The cable used for communication to the AX-100 is a 9-Way to 9-Way lead.
The Geller stock code for this is E101 PL48. The Pin outs are listed below for
your reference.
9-Way Female to 9-Way Female
Lead No E101 PL48
2 - 3
3 - 2
4 - 6
5 - 5
6 - 4
7 - 8
8 - 7
9 - 9
Please Note
If your PC does not have a serial port, a USB to Serial converter can be used
in conjunction with this lead. Geller Stock code (E102 USB RS232)
26
Page 28

AX-100
DAVID UTILITY
KEY BENEFITS
• Program all important aspects of the cash register i.e. PLUs, Depts,
Clerks, Keyboard, Receipt Logo etc
• Create your keyboard template within David. Easy to modify if your
products are added to the system (Copy Buttons, Colours, Text) Picture
functions etc
• You can store the Cash Register program in David and send it to other
AX100 ECR’s if required.
• Software Updates via the Geller Website are available from within David
27
Page 29
T
O
GLOSSARY
The following list describes the AX-100’s
general terms and explanations for the
DEP
A department can be used for grouping purposes. When a product is sold,
it will report under the heading of the designated department that the
product is linked to ie Stationery. Departments are also placed on the
keyboard for manual price entry. Key in the amount and press the
relevant Department button
PLU
PLU stands for Price Look Up. These are the actual products that are sold
functionality of the machine
on the cash registers ie Pen, Pencil. The PLU must be linked to a
Department category to function.
HAL
HALO stands for High Amount Lock Out. This allows the user to program a
limit for each PLU/DEPT. ie an amount of no more than 10.00 can be
entered or sold for a designated product
ENT
Price Overide (Rls Button)
The Price Override feature allows the user to override the pre-set price of a
product.
HRG
After items have been registered, a method of payment can be selected.
The amount of money given by the customer can be entered and the
change given will be displayed. The totals report as cash in drawer,
cheque in drawer and card in drawer. These will all add up to the net total
when a report is taken.
28
Page 30
T
T
Each user (Clerk) can have their own unique password for operating the
Cash register. This is useful for security and for reporting purposes. The
Clerk ID button can also be used to toggle the receipt on and off.
# /
The #ST button has three functions (No Sale) this will open the drawer.
This will open the drawer.
The ST button is for for Sub Total. After registration of a few products, the
Sub total button when pressed will display the total amount due and print
on the receipt.
The # function is for entering a non-add reference number which can be
printed on the receipt.
TOTL
The total button is used to display the total amount due including any add
on taxes.
The Total button is also used for printing a receipt after sale.
X/
IME
The X-Time button is used for multiplication and also displaying the date
and time.
Example:
X/
IME
The button is also used for displaying the current date & time on the
display
29
DEP
Page 31
FC
The FC button is used for tendering in a foreign currency for example the
Euro.
RA
The RA button is the function for Received on Account. An amount that is
entered into the RA button as cash will increase the cash in drawer. A
popular use for this function would be to pay in a float.
Example:
RA
CASH
PO
The PO button is the function for Paid Out. An amount that is entered into
the PO button as cash will decrease the Cash in drawer. A popular use for
this function is a Float out system or to pay money out for expenses ie
Stamps
Example:
CAN
The Cancel button is used to Cancel the whole current transaction. All
items within the transaction will be voided automatically. Press Cancel at
PO
CASH
any point during the current transaction
EC
The Error Correct button will void the last item that was registered. Press
the EC button to void the last item sold within a sale.
30
Page 32
VOID
The Void button is used for voiding any item in the current transaction.
Example:
OID
RTN
The Return button is used for voiding any item that was registered in a
previous transaction, e.g. when goods are returned.
DEPT
Example
:
RTN
ISC
The Discount button is used to discount a whole amount from a transaction
total.
For example a 50p Coupon.
Simply enter the amount to be discounted and press the – button. The user
can pre-set the – button if required.
- %
The -% button is used to discount a percentage from either a single item or
a sub total of multiple items. The user can pre-set the -% button if required.
The +% button is used to add a percentage to either a single item or a sub
total of multiple items. The user can pre-set the +% button if required.
31
Page 33

LAG
This is for the Engineers use. Flags are settings of the AX-100 and can
change the way the machine works. Please do not alter these without
consulting your Geller dealer.
INIT
If in the unlikely event the ECR is in a “Lock up situation” i.e. not able to
produce a transaction or the machine is continuously bleeping then an
initialisation is required. Sometimes known as a ‘P’ Loop reset.
Turn the Button to the ‘P’ position on the control lock and power off
the ECR for 30 Seconds. Power on the ECR and turn the button back
to the ‘R’ position. The error will be cleared.
IMPORTANT
YSTEM
LEAR
A system clear should only be carried out after careful consideration.
This procedure will completely clear all of the memory and sales data
of the ECR
.
32
 Loading...