

Page 1
GE Energy
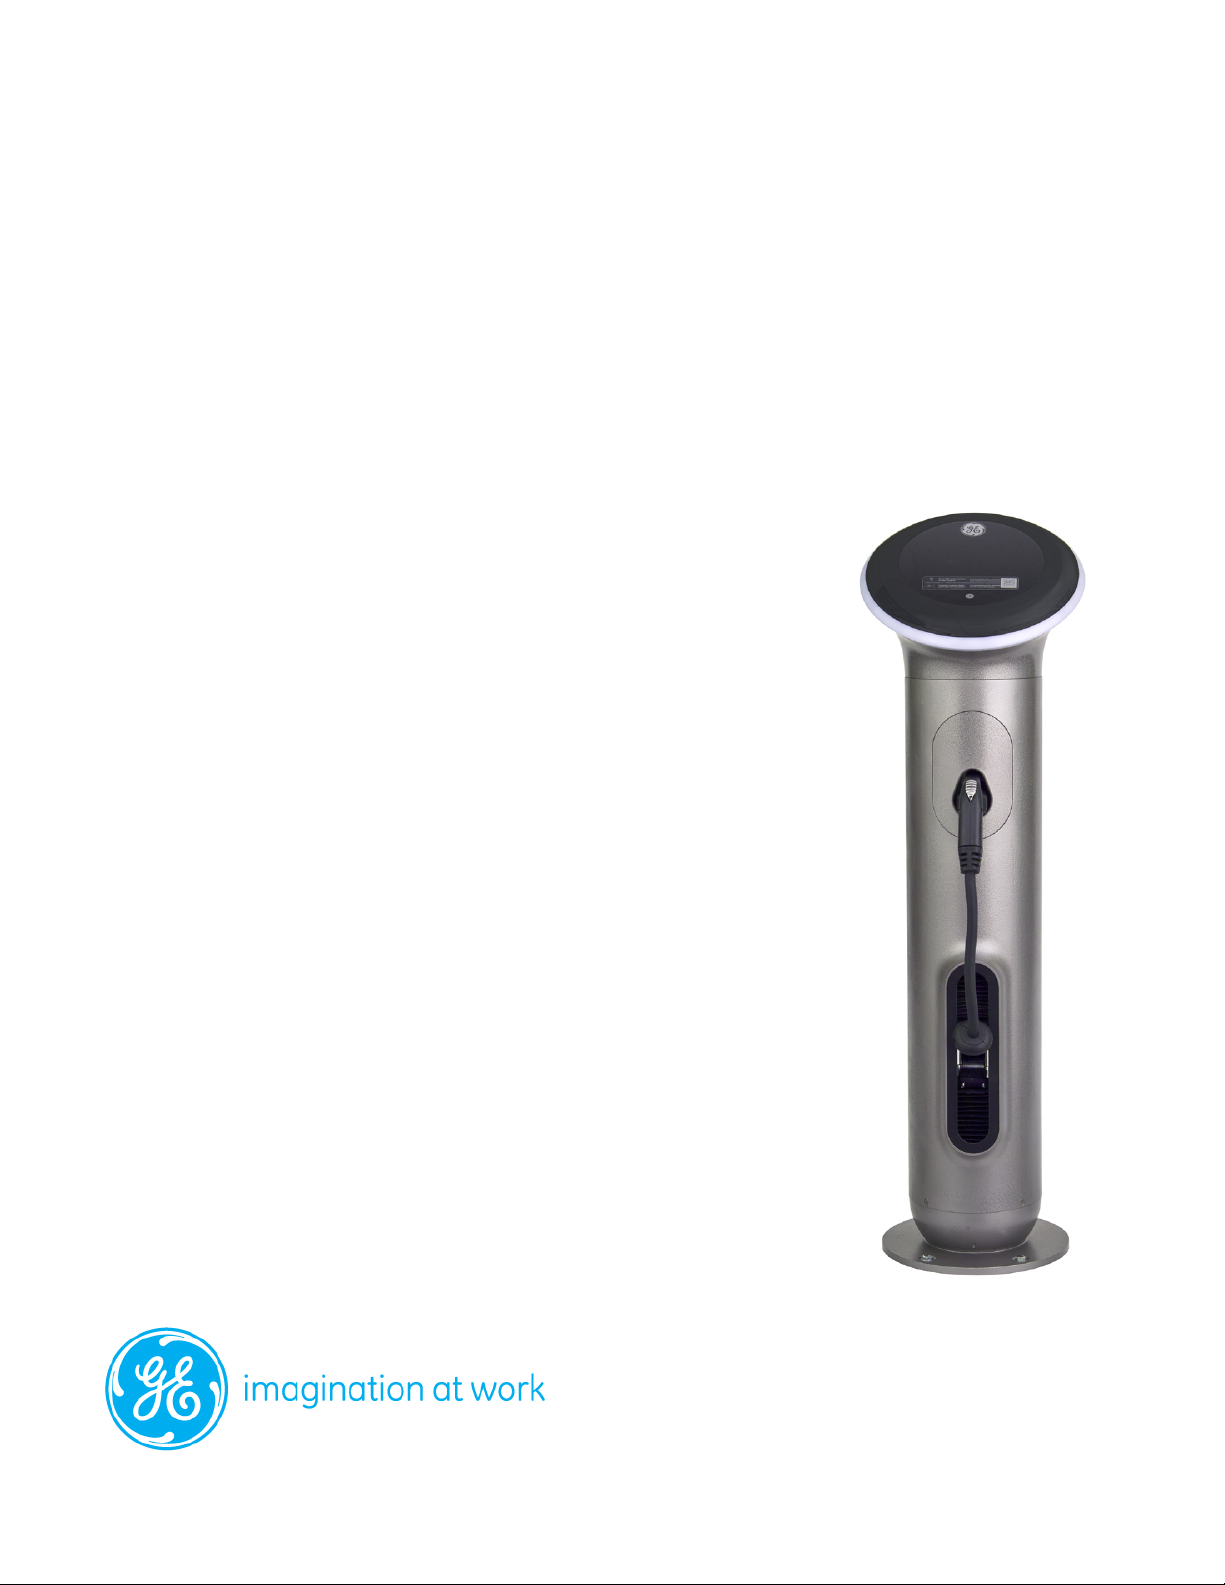
GE WattStation
EVSE Charger
Installation Manual
TM
Pedestal
Page 2

WattStation Pedestal Installation Manual
2
Table of Contents
1! Publications........................................................................................................................................................................................... 3!
2! Introduction ..........................................................................................................................................................................................4!
3! Important Safety Instructions ......................................................................................................................................................5!
3.1! Safety and Compliance................................................................................................................................................................... 5!
3.2! FCC Requirements .............................................................................................................................................................................6!
4! Grounding Instructions....................................................................................................................................................................7!
5! Installation Instruction..................................................................................................................................................................... 7!
5.1! Before Installing.................................................................................................................................................................................. 7!
5.2! Safety Requirements ........................................................................................................................................................................7!
5.3! Installation Overview and Specifications................................................................................................................................7!
6! Installation Requirements.............................................................................................................................................................. 8!
7! Torque Specification Table ............................................................................................................................................................8!
8! Installation and Maintenance Tools.......................................................................................................................................... 9!
8.1! Installation Tools.................................................................................................................................................................................9!
8.2! Maintenance tools.............................................................................................................................................................................9!
9! Field cable size.....................................................................................................................................................................................9!
10! Installation Procedure....................................................................................................................................................................10!
11! Communication ................................................................................................................................................................................16!
12! DuraStation Upgrade.....................................................................................................................................................................17!
13! Warranty ..............................................................................................................................................................................................18!
GE Energy ©2012 GE Company All Rights Reserved
2
Page 3

WattStation Pedestal Installation Manual
3
1 Publications
Ref. No. Title
DEH -41580 WattStationTM Pedestal User Manual
DEH -41581 WattStationTM Pedestal MODBUS Register Mapping Guide
Reference Documents
GE Energy ©2012 GE Company All Rights Reserved
3
Page 4
WattStation Pedestal Installation Manual
4
2 Introduction
GE wishes to thank you for choosing our EVSE (Electric Vehicle Supply Equipment) product. We are
committed to being the world’s leading supplier of EV chargers by providing the highest quality
products as well as the best documentation and product support available in the industry.
Compiled in this manual is a comprehensive set of documentation for your purchase. The manual
is designed to provide you installation, commissioning, preventative maintenance, trouble-shooting
and proper operating instructions for your GE Pedestal WattStation
complete review of the manual by your personnel prior to installation and subsequent operation of
the product.
Before proceeding to the instructions note that in this manual are several warnings, cautions and
notes which are highlighted in bold letters. Please take time to read these special instructions
because they contain important information regarding protection and safety of personnel and
equipment.
WARNING: Denotes operating procedures and practices that may result in
personal injury or loss of life if not correctly followed
CAUTION: Denotes operating procedures and practices that, If not strictly
observed, may result in damage to, or destruction of equipment.
TM
EV charger unit. We suggest
NOTE:: Notes call attention to information that is especially significant in
understanding and operating the equipment.
GE Energy ©2012 GE Company All Rights Reserved
4
Page 5
WattStation Pedestal Installation Manual
5
3 Important Safety Instructions
3.1 Safety and Compliance
-Read all the instructions before using
this product.
-This device should be supervised when
used around children.
-Do not put fingers into the electric
vehicle connector.
-Do not use this product if the flexible
power cord or EV cable are frayed, have
broken insulation, or any other signs of
damage.
-Do not use this product if the enclosure
or the EV connector is broken, cracked,
open, or show any other indication of
damage.
-This document provides instructions for
installation of WattStation
WARNING
TM
Pedestal EV
Charging Station and should not be used for any
other product. Before installing the EVSE (Electric
Vehicle Supply Equipment), you should review
this manual carefully and consult with a licensed
contractor, licensed electrician, or trained
installation expert to ensure compliance with
local building codes, climate conditions, safety
standards and state and local electrical codes.
-The EVSE should be installed only by a licensed
contractor, and/or a licensed electrician in
accordance with all applicable state, local and
national electrical codes and standards. The
EVSE should be inspected by a qualified installer
prior to initial use. Under no circumstances will
compliance with the information in this manual
relieve the user of his/her responsibility to
comply with all applicable codes or safety
standards.
-To reduce the risk of fire, replace only with
same type and rating of fuse.
-Risk Of Explosion: This equipment has internal
arcing or sparking parts, which should not be
exposed to flammable vapors. It should not be
located in a recessed area or below floor level.
GE Energy ©2012 GE Company All Rights Reserved
5
Page 6

WattStation Pedestal Installation Manual
CAUTION
- This device is intended only for
charging vehicles not requiring
ventilation during charging
- To reduce the risk of electric shock,
connect only to properly grounded
outlets
3.2 FCC Requirements
NN oo ttee:: This equipment has been tested
and found to compl
Class A digital device, pursuant to part
15 of the FCC Rules. These limits are
designed to provide reasonable
protection against harmful interference
when the equipment is operated in a
commercial environment. This
equipment generates, uses, and can
radiate radio frequency energy and, if
not installed and used in accordance
with the instruction manual, may cause
harmful interference to radio
communications. Operation of this
equipment in a residential area is likely
to cause harmful interference in which
case the user will be required to correct
the interference at their own expense.
I
Immppoo rrttaa nn tt:: Changes or modifications
to this pr
oduct not authorized by
y with the limits for a
- Do not use this product if there is any
damage to the flexible power cord or the
EV cable
- Risk of electric shock. Do not remove
cover or attempt to open the enclosure.
No user serviceable parts inside. Refer
servicing to qualified service person.
GE Energy could affect the EMC
compliance and revoke your authority to
operate this product.
Exposure to Radio Frequency Energy:
The radiated power output of the
optional IEEE 802.11b/g wireless radio
and optional cellular modem in this
device are below the FCC radio
frequency exposure limits for
uncontrolled equipment. This device
should be operated with a minimum
distance of at least 20 cm between the
IEEE 802.11b/g wireless and Cellular
antennas and a person’s body and must
not be co-located or operated with any
other antenna or transmitter by the
manufacturer, subject to the conditions
of the FCC Grant.
66 GGEE EEnnee rrggyy ©©2200 11 22 GGEE CC oommpp aa nnyy AAll ll RRii gghhttss RRee ssee rrvvee dd
Page 7

WattStation Pedestal Installation Manual
7
44 GGrroouunnddiinngg IInnssttrruuccttiioonnss
The EVSE must be connected to a centrally grounded system. The ground conductor entering the
EVSE must be connected to the equipment grounding lug inside the charger. This should be run with
circuit conductors and connected to the equipment grounding bar or lead on the EVSE. Connections
to the EVSE are the responsibility of the installer and purchaser, not GE and must comply with all
applicable electrical codes and ordinances.
5 Installation Instruction
5.1 Before Installing
Before any installation work is performed, study all drawings and instructions furnished by the
supplier for the particular installation.
These include arrangement drawings (front, end, and plan views), connections to the equipment that
may be required to meet any local codes (such as mats, screens, or railings) is not furnished.
5.2 Safety Requirements
• Eye protection with appropriate safety glasses.
• In the installation, be sure to not connect directly to power distribution network cables without
additional protection.
• When installing or performing maintenance on EVSE, ensure EVSE is not powered.
• Use appropriate tools for each function.
5.3 Installation Overview and Specifications
This document provides step-by-step instructions for installing the WattStation Pedestal EV
Charging Station.
Ensure that the EVSE is installed per Americans with Disabilities Act (ADA) Standards for Accessible
Design guidelines, refer to code of federal regulations document 28 CFR Part 36, sections 4.2 (Space
Allowance and Reach Ranges) and 4.4 (Protruding Objects).
Make sure that the EVSE unit is installed in an area where it has adequate Verizon 3G coverage at the
user site when using the cellular option on the charger.
Shaded installations are recommended for areas subject to temperatures approaching 50C (122F)
and high solar radiation (7.5 kWh/m2/day). Direct exposure under these conditions could affect long
term life of the unit.
7
GGEE EEnneerrggyy
©©22001122 GGEE CCoommppaannyy AAllll RRiigghhttss RReesseerrvveedd
Page 8

WattStation Pedestal Installation Manual
8
SCCRREEWW SSIIZZEE
6 Installation Requirements
WARNING:
WWaattttSSttaattiioonn sshhoouulldd bbee iinnssttaalllleedd oonnllyy bbyy aa lliicceennsseedd ccoonnttrraaccttoorr,,
aanndd//oorr aa lliicceennsseedd eelleeccttrriicciiaann iinn aaccccoorrddaannccee wwiitthh aallll aapppplliiccaabbllee
ssttaattee,, llooccaall aanndd nnaattiioonnaall eelleeccttrriiccaall ccooddeess aanndd ssttaannddaarrddss..
- Ensure that a dedicated circuit, capable of supplying 30A at 208-240 VAC, is available
- A recommended 40A upstream circuit breaker, located either in a panel board or load center,
should be used.
- GE WattStation EVSE unit has built in GFCI protection; do not provide any additional GFCI
protection upstream of the EVSE.
7 Torque Specification Table
S
PDB – Power Distribution Block for
Field Wiring
Ground lug 45 in-lb +/- 2 in-lb
Roller –M5x12, Cup Point set screw 18 in-lb +/- 2 in-lb
Brush – T-15 Driver size
(Tamperproof Head)
Brush bracket – M5 Hex Head 23 in-lb +/- 2 in-lb
Bellows bracket top – M5 Philips Head 23 in-lb +/- 2 in-lb
Bellows bracket bottom – M5 Philips Head 23 in-lb +/- 2 in-lb
Bellows plate – M3 Nut 18 in-lb +/- 2 in-lb
Wire trays top – M5 Hex Head 23 in-lb +/- 2 in-lb
Wire trays bottom– M5 Hex Head 23 in-lb +/- 2 in-lb
Anchoring bolts – ½” x 6” Hex Head 20 in-lb +/- 2 in-lb
TTaabbllee 11
TTOORRQQUUEE
TTOORRQQUUEE TTOOLL..
40 in-lb +/- 2 in-lb
23 in-lb +/- 2 in-lb
8
GGEE EEnneerrggyy
©©22001122 GGEE CCoommppaannyy AAllll RRiigghhttss RReesseerrvveedd
Page 9

9
Tyyppee
2
Tyyppee
3
Poowweerr wwiirreess::
GGrroouunndd wwiirreess
WattStation Pedestal Installation Manual
8 Installation and Maintenance Tools
8.1 Installation Tools
T
Slotted Screwdriver 3/16” or ¼”
CChhaarraacctteerriissttiiccss
Socket/Ratchet Socket sizes: M5
Electric Hammer Drill
Wire stripper, hammer, wrench and anchor bolts*
* Use 1/2” x 6” Hexagonal Sleeve Anchor bolts
8.2 Maintenance tools
T
Slotted Screwdriver 3/16” or ¼”
Drill Bit
Socket/Ratchet Socket sizes: M3, M5
9 Field cable size
Cu: 8 AWG, minimum 75 ° C wires
Cu: 8 AWG, minimum 75 ° C wires
WWAARRNNIINNGG:: Make sure power to
the EVSE is disconnected before
performing any task
P
TTaabbllee 2
CChhaarraacctteerriissttiiccss
T-15
TTaabbllee 3
CCoommmmuunniiccaattiioonn wwiirreess
CAT5 Ethernet cable
9
GGEE EEnneerrggyy
©©22001122 GGEE CCoommppaannyy AAllll RRiigghhttss RReesseerrvveedd
Page 10

WattStation Pedestal Installation Manual
10 Installation Procedure
SStteepp 11 :: Carefully unwrap the packaging and make
sur
e the following items are present:
o Wat
o Key for WattStation access door
o Installation Manual
o MODBUS Guide
o Provisioning card
o Mounting Template
SStteepp 22 :: When removing the EVSE fro
do not lift the EVSE by the plastic top assembly. When
the EVSE needs to be lifted, remove the access door
and disconnect the ground connection on the door.
Grip EVSE on the door opening of the shell and/or
EV cable exit on front of shell. After EVSE has been
placed in its desired location, reconnect the ground
connection on door and close the access door.
SStteepp 33 :: Check for any damage to the unit,
cord and c
If no damage is noticed, proceed to next step,
If damage is noticed, call 1-888-GE-RESOLVE.
S
Stteepp 44:: Locate area (concrete pad/ floor) for
EVSE unit
SStteepp 55 :: Install two conduits, one for power
(
nimum 1” Conduit), and one for communication
mi
(minimum 3/4” Conduit). Both Conduits should fit
Within a 4.75” diameter.
Allow approximately 4” length for each conduit
above the concrete level as shown in Figure 1.
Cut as necessary to final dimensions. Route
power conduit and communication conduit
through the center of the concrete bed,
appropriately. Make sure that, concrete top
surface and EVSE unit bottom dome baseplate
are flushed and parallel to flat ground surface.
onnector.
tStation Pedestal EVSE unit
m the packaging,
FFiigguurree -- 11
1100 GGEE EEnnee rrggyy ©©22 00 1122 GG EE CCoo mmppaannyy AAllll RRiigghh tt ss RReessee rrvvee dd
Page 11

WattStation Pedestal Installation Manual
111
Stteepp 66 ::
Fiigguurree –– 33
Fiigguurree –– 44
S
See figure 2 for reference. Template must be
Using provided template locate the 4 holes.
Removed after locating the holes
SStteepp 77:: Using a hammer drill and carbide tipped
drill bit, drill a hole (1/2” diameter) and at least
5 ½” to 6” deeper, see figure 3 for reference.
SStteepp 88:: Repeat step 7 for all remaining holes
SStteepp 99:: Clean out hole of all debris
SStteepp:: 1100 Install EVSE unit securely over Concrete
bed keeping conduits in center with four ½”-6”
anchor bolt holes on EVSE baseplate aligned
with concrete bed holes.
Check local codes to ensure compliance.
See figure 4 for reference.
FFiigguurree –– 22
F
F
1
GGEE EEnneerrggyy
©©22001122 GGEE CCoommppaannyy AAllll RRiigghhttss RReesseerrvveedd
Page 12

WattStation Pedestal Installation Manual
122
Stteepp 1111::
Fiigguurree –– 55
Fiigguurree -- 66
S
of the sleeve anchor
Set the nut flush with the top
SStteepp 1122:: Insert the sleeve anchor through
the EVSE Baseplate into the hole in
the concrete base until the washer
and nut are tight against the baseplate
SStteepp 1133:: Turn the nut until finger tight
SStteepp 1144:: Fasten anchor bolts to concrete
base, Torque bolts per specification Table 1
SStteepp 1155:: Use a Wrench to set the sleeve
anchor by turning the nut 3 to 4 full turns
F
F
1
GGEE EEnneerrggyy
©©22001122 GGEE CCoommppaannyy AAllll RRiigghhttss RReesseerrvveedd
Page 13

WattStation Pedestal Installation Manual
133
Fiigguurree -- 77
View after Installation
1
F
GGEE EEnneerrggyy
©©22001122 GGEE CCoommppaannyy AAllll RRiigghhttss RReesseerrvveedd
Page 14

WattStation Pedestal Installation Manual
144
Stteepp:: 1166
FFiigguurree -- 88
FFiigguurree -- 99
S
the key on back of the EVSE unit
Open the access door by unlocking
(Below Top cover assembly)
SStteepp:: 1177 Route the Power wires and Ground
wires as shown in the figure 9
IMPORTANT: WattStation is rated
for 208-240V AC, 30Amps, 1 Phase, 60Hz
power only. The EVSE must be connected
to a centrally grounded system, The ground
conductor should be run with power conductors
and connected to the equipment grounding
lug inside the charger.
Connections to the EVSE are the responsibility
of the installer and purchaser, not GE, and
such connections must comply with
all applicable electrical codes and ordinances.
Torque all the nuts as per the torque
specification in Table 1,
Refer Table 2 for recommended tools.
1
GGEE EEnneerrggyy
©©22001122 GGEE CCoommppaannyy AAllll RRiigghhttss RReesseerrvveedd
Page 15

WattStation Pedestal Installation Manual
155
Caabbllee rreeeell
[22..44]] PPoowweerr uupp tthhee uunniitt aass nnoorrmmaall,, uunniitt ccaann bbee rreettuurrnneedd ttoo nnoorrmmaall ooppeerraattiioonn
Fiigguurree -- 1100
Fiigguurree -- 1111
SStteepp 1188:: Connect L1 and L2 to the
PDB – Power Distribution Block
and ground wire to the ground
lug shown in Figure 10.
SStteepp 1199:: The CAT5 cable is connected to the
Ethernet port. It is recommended to run 2
CAT5 cables if there are future or current
plans to support communication daisy
chaining of GE WattStation Pedestals
F
1. Cable should not be extended beyond the red indicator line at the end of the cable. Pulling beyond this indicator
2. If cable becomes bound due to over-extension, the following steps must be followed to retract the cable before
1
C
F
WARNING
may cause the cable reel to bind, prohibiting retraction.
returning to normal operation
[2.1] Turn off the power
[2.2] Open the access door
[2.3] Manually rotate the cable reel in a counter-clockwise direction until the cable is fully retracted.
[
GGEE EEnneerrggyy
©©22001122 GGEE CCoommppaannyy AAllll RRiigghhttss RReesseerrvveedd
Page 16

WattStation Pedestal Installation Manual
166
Fiigguurree -- 1122
11 Communication
!
GE recommends that customers planning to use the GE WattStation Pedestal with the cellular option, who
want to ensure they will receive adequate coverage, should perform a site survey with a third party, as
cellular performance is strongly affected by exact location environment factors and orientation of the
pedestal, Figure 12 shows preferred orientations.
General line of sight cellular performance
F
1
GGEE EEnneerrggyy
©©22001122 GGEE CCoommppaannyy AAllll RRiigghhttss RReesseerrvveedd
Page 17

WattStation Pedestal Installation Manual
177
Fiigguurree –– 1122..11
12 DuraStationTM Upgrade
Ensure that, no power is connected to the DuraStation unit before the below steps are followed and also refer
the DuraStation user manual for detailed instructions.
1. Remove the access door on the back of the DuraStation kiosk unit by pressing the latch button
2. Take out the DuraStation kiosk by removing 1/2“ – 13 Nut and 1/2” Star washer as shown in the
figure 12.1
3. Take out the kiosk skirt by removing 1/2“ – 13 Nut and cut the threaded rods to the concrete bed
surface
4. Use the WattStation Pedestal template provided with the package to locate and drill new set of 4
holes (refer step 6 under section 10 in this manual)
5. Cut any conduit outside of center access hole (center of base) 4” above the ground (refer step 5
under section 10 in this manual)
6. Extend power wires and communication wire (if available) by about 18”
7. Follow step 2 and step 7 through step 19 under section 10 as outlined in this manual to complete
the installation
F
1
GGEE EEnneerrggyy
©©22001122 GGEE CCoommppaannyy AAllll RRiigghhttss RReesseerrvveedd
Page 18

WattStation Pedestal Installation Manual
188
GEE WWaattttSSttaattiioonn
thhrreeee ((33)) yyeeaarrss
noott
13 LIMITED WARRANTY FOR GE WattStationTM (Pedestal) (“this Warranty”)
WWAARRRRAANNTTYY
Any one or more of the following actions acknowledges
that you have read and agree to the terms of this
warranty agreement: Your use of the G
((PPeeddeessttaall)) packaged with this Instruction Manual (the
“Hardware”), online product registration of the
Hardware, or your return of the enclosed Registration
Card. GE’s warranty obligations for this Hardware
product are limited to the terms set forth in this Limited
Warranty and are limited by and subject to the
Exclusions and Limitations set out below.
GE warrants that this Hardware product shall be free of
defects in materials and workmanship under normal
use for a period of t
manufacture (the “Warranty Period”). If a defect in the
Hardware arises and a valid claim is received within
the Warranty Period, your sole and exclusive remedy
will be for GE, in its sole discretion and to the extent
permitted by law, to (1) repair the defect in the
Hardware at no charge, using new parts or refurbished
parts, or (2) exchange the Hardware with new or
refurbished hardware that is functionally equivalent to
the original Hardware, (the repaired Hardware and the
from the date of
exchanged hardware are called the “Remedied
Hardware”). Any Remedied Hardware product will be
warranted for the remainder of the original warranty
period or ninety (90) days from delivery to the
customer, whichever is longer. In order to receive the
remedy set forth above, you must contact GE during
the Warranty Period at 888-437-3765 and provide the
model number, serial number and date of purchase.
Upon GE’s determination that the Hardware product
should be returned to GE, return the Hardware and
include with each returned item of Hardware (i) a copy
of your original purchase invoice or receipt to verify
your warranty; (ii) your name, address, and telephone
number; (iii) the Return Materials Authorization
(RMA) number.
In addition to the foregoing Hardware product
warranty, during the Warranty Period, GE shall
also provide telephone (888-437-3765) technical
support assistance.
Please note that the above warranty obligations of GE
do n
apply to installation service of the Hardware.
1
GGEE EEnneerrggyy
©©22001122 GGEE CCoommppaannyy AAllll RRiigghhttss RReesseerrvveedd
Page 19

WattStation Pedestal Installation Manual
199
Immppoorrttaanntt::
EEXXCCLLUUSSIIOONNSS AANNDD LLIIMMIITTAATTIIOONNSS
This warranty applies only to the Hardware manufactured
by or for GE that can be identified by the “GE” trademark,
trade name, or logo affixed to it. This warranty does not
apply to any non-GE hardware product or any software,
even if packaged or sold with the Hardware. Software
distributed by GE with or without the GE brand name
(including, but not limited to system software) is not
covered under this warranty. Refer to the End User
Licensing Agreement accompanying the software for
details of your rights with respect to its use.
GE does not warrant that the operation of the Hardware
will be uninterrupted or error-free. GE is not responsible
for damage arising from failure to follow instructions
relating to the Hardware’s use.
This warranty does not apply to: (a) consumable parts,
such as batteries, or protective coatings designed to
diminish over time unless failure has occurred due to a
defect in materials or workmanship; (b) cosmetic damage;
(c) damage caused by use with non-GE products; (d)
damage caused by accident, abuse, misuse, liquid
contact, fire, earthquake or other external causes; (e)
damage caused by operating the Hardware product
outside the permitted or intended uses described by GE; (f)
damage caused by service (including upgrades and
expansions) not performed by GE, a GE-authorized service
provider, an authorized representative of GE, or a qualified
electrician; (g) a product or part that has been modified to
alter functionality or capability without the written
permission of GE; (h) defects caused by normal wear and
tear or otherwise due to the normal aging of the product;
(i) removed or defaced GE serial numbers; or (j) damage
caused by or via the network on which the Hardware
product is used including, but not limited to, any online
intrusion or attack.
I
Hardware in any way. Doing so may cause damage that
is not covered by this warranty. Only GE or a GE
authorized service provider should perform service on
the Hardware.
Do not open, take apart or disassemble the
TO THE EXTENT PERMITTED BY LAW, THIS WARRANTY AND
THE REMEDIES SET FORTH ABOVE ARE EXCLUSIVE AND IN
LIEU OF ALL OTHER WARRANTIES, REMEDIES AND
CONDITIONS, WHETHER ORAL, WRITTEN, STATUTORY,
EXPRESS OR IMPLIED. TO THE EXTENT PERMITTED BY
APPLICABLE LAW, GE SPECIFICALLY DISCLAIMS ANY AND
ALL STATUTORY OR IMPLIED WARRANTIES, INCLUDING,
WITHOUT LIMITATION, WARRANTIES OF
MERCHANTABILITY AND FITNESS FOR A PARTICULAR
PURPOSE AND WARRANTIES AGAINST HIDDEN OR LATENT
DEFECTS. IF GE CANNOT LAWFULLY DISCLAIM STATUTORY
OR IMPLIED WARRANTIES THEN TO THE EXTENT
PERMITTED BY LAW, ALL SUCH WARRANTIES SHALL BE
LIMITED IN DURATION TO THE DURATION OF THE EXPRESS
WARRANTY PROVIDED IN THS WARRANTY SECTION AND
TO THE REPAIR OR REPLACEMENT SERVICE PROVIDED IN
THIS WARRANTY SECTION AND EXCLUSIONS AND
LIMITATIONS PROVISION SUB-SECTION, IN EACH CASE AS
DETERMINED BY GE.
No oral or written information or advice given by GE or a
GE-authorized representative shall modify or extend any
warranty. If any provision is held to be illegal or
unenforceable, the legality or enforceability of the
remaining provisions shall not be affected or impaired.
EXCEPT AS PROVIDED IN THIS WARRANTY AND TO THE
MAXIMUM EXTENT PERMITTED BY LAW, GE IS NOT
RESPONSIBLE FOR DIRECT, SPECIAL, INCIDENTAL OR
CONSEQUENTIAL DAMAGES RESULTING FROM ANY
BREACH OF WARRANTY OR CONDITION, OR UNDER ANY
OTHER LEGAL THEORY, INCLUDING BUT NOT LIMITED TO
LOSS OF USE; LOSS OF REVENUE OR ACTUAL OR
ANTICIPATED PROFITS OR SAVINGS; LOSS OF, DAMAGE TO,
COMPROMISE OR CORRUPTION OF DATA; OR ANY
INDIRECT OR CONSEQUENTIAL LOSS OR DAMAGE
HOWSOEVER CAUSED INCLUDING THE REPLACEMENT OF
EQUIPMENT AND PROPERTY AND ANY COSTS OF
RECOVERING, PROGRAMMING OR REPRODUCING ANY
PROGRAM OR DATA STORED IN OR USED WITH THE GE
PRODUCT. THE FOREGOING LIMITATION SHALL NOT
APPLY TO DEATH OR PERSONAL INJURY CLAIMS, OR ANY
STATUTORY LIABILITY FOR INTENTIONAL AND GROSS
NEGLIGENT ACTS AND/OR OMISSION.
1
GGEE EEnneerrggyy
©©22001122 GGEE CCoommppaannyy AAllll RRiigghhttss RReesseerrvveedd
Page 20

WattStation Pedestal Installation Manual
200
Print one for each EVSE and keep this record in a safe location or inside the corresponding EVSE
* SAVE THESE INSTRUCTIONS*
The instructions do not purport to cover all details or variations in equipment nor to provide for every possible
contingency to be met in connection with installation, operation or maintenance. Should further information be
desired or should particular problems arise which are not covered sufficiently for the purchaser’s purposes, the
matter should be referred to the GE Company.
GGEE IInndduussttrriiaall SSoolluuttiioonnss
4411 WWooooddffoorrdd AAvvee..
PPllaaiinnvviillllee,, CCTT 0066006622
www.geindustrial.com
WattStationTM is a trademark of General Electric Company.
Information provided is subject to change without notice. Please verify all details with GE. All
Values are design or typical values when measured under laboratory conditions and GE makes
no warranty or guarantee, express or implied, that such performance will be obtained under
end-use conditions.
DEH – 41579A (4/12)
2
GGEE EEnneerrggyy
©©22001122 GGEE CCoommppaannyy AAllll RRiigghhttss RReesseerrvveedd
 Loading...