

Page 1
GE
Industrial Solutions
TM
WattStation
User Guide for the Owner
Second Edition
DET-763A
Connect
Page 2

Document History
Edition Date Description
DET-763 May, 2012 First edition
DET-763A January, 2013 Second edition
DET-763A
Page 3

Table of Contents
1.1 About this Guide . . . . . . . . . . . . . . . . . . . . . . . . . . . . . . . . . . . . . . . . . . . . . . . . . . . . . . . . . . . . . . . . . . . . . . . . . . . . . . . . . 3
1.1.1 Where to Begin . . . . . . . . . . . . . . . . . . . . . . . . . . . . . . . . . . . . . . . . . . . . . . . . . . . . . . . . . . . . . . . . . . . . . . . . . . . . . 3
1.1.2 Technical Specifications . . . . . . . . . . . . . . . . . . . . . . . . . . . . . . . . . . . . . . . . . . . . . . . . . . . . . . . . . . . . . . . . . . . . 3
1.1.3 Related Documentation . . . . . . . . . . . . . . . . . . . . . . . . . . . . . . . . . . . . . . . . . . . . . . . . . . . . . . . . . . . . . . . . . . . . .3
1.1.4 Internet Links . . . . . . . . . . . . . . . . . . . . . . . . . . . . . . . . . . . . . . . . . . . . . . . . . . . . . . . . . . . . . . . . . . . . . . . . . . . . . . . 4
1.1.5 Customer Support . . . . . . . . . . . . . . . . . . . . . . . . . . . . . . . . . . . . . . . . . . . . . . . . . . . . . . . . . . . . . . . . . . . . . . . . . . 4
1.2 Introduction to WattStation Connect. . . . . . . . . . . . . . . . . . . . . . . . . . . . . . . . . . . . . . . . . . . . . . . . . . . . . . . . . . . . . . 5
1.3 Accessing WattStation Connect. . . . . . . . . . . . . . . . . . . . . . . . . . . . . . . . . . . . . . . . . . . . . . . . . . . . . . . . . . . . . . . . . . . 7
1.3.1 Creating an owner account . . . . . . . . . . . . . . . . . . . . . . . . . . . . . . . . . . . . . . . . . . . . . . . . . . . . . . . . . . . . . . . . . 7
1.3.2 Logging on to WattStation Connect . . . . . . . . . . . . . . . . . . . . . . . . . . . . . . . . . . . . . . . . . . . . . . . . . . . . . . . . . 8
1.4 Monitoring the Dashboard. . . . . . . . . . . . . . . . . . . . . . . . . . . . . . . . . . . . . . . . . . . . . . . . . . . . . . . . . . . . . . . . . . . . . . .13
1.5 Setting Up and Managing your Charging Stations. . . . . . . . . . . . . . . . . . . . . . . . . . . . . . . . . . . . . . . . . . . . . . . . .14
1.5.1 Provisioning your charging station . . . . . . . . . . . . . . . . . . . . . . . . . . . . . . . . . . . . . . . . . . . . . . . . . . . . . . . . .14
1.5.2 Managing your charging station . . . . . . . . . . . . . . . . . . . . . . . . . . . . . . . . . . . . . . . . . . . . . . . . . . . . . . . . . . .16
1.5.3 Setting automatic notifications . . . . . . . . . . . . . . . . . . . . . . . . . . . . . . . . . . . . . . . . . . . . . . . . . . . . . . . . . . . . .19
1.6 Planning your Pricing Models. . . . . . . . . . . . . . . . . . . . . . . . . . . . . . . . . . . . . . . . . . . . . . . . . . . . . . . . . . . . . . . . . . . . .22
1.6.1 Adding a Pricing Rule . . . . . . . . . . . . . . . . . . . . . . . . . . . . . . . . . . . . . . . . . . . . . . . . . . . . . . . . . . . . . . . . . . . . . . 22
1.6.2 Editing a Pricing Model . . . . . . . . . . . . . . . . . . . . . . . . . . . . . . . . . . . . . . . . . . . . . . . . . . . . . . . . . . . . . . . . . . . . .24
1.7 Working with Users. . . . . . . . . . . . . . . . . . . . . . . . . . . . . . . . . . . . . . . . . . . . . . . . . . . . . . . . . . . . . . . . . . . . . . . . . . . . . .27
1.7.1 Authorizing Users and User Groups . . . . . . . . . . . . . . . . . . . . . . . . . . . . . . . . . . . . . . . . . . . . . . . . . . . . . . . . 27
1.7.2 Managing User Groups . . . . . . . . . . . . . . . . . . . . . . . . . . . . . . . . . . . . . . . . . . . . . . . . . . . . . . . . . . . . . . . . . . . .27
1.7.3 Managing User Accounts . . . . . . . . . . . . . . . . . . . . . . . . . . . . . . . . . . . . . . . . . . . . . . . . . . . . . . . . . . . . . . . . . .28
1.7.4 Setting Account Privileges . . . . . . . . . . . . . . . . . . . . . . . . . . . . . . . . . . . . . . . . . . . . . . . . . . . . . . . . . . . . . . . . .30
1.8 Managing Access Cards. . . . . . . . . . . . . . . . . . . . . . . . . . . . . . . . . . . . . . . . . . . . . . . . . . . . . . . . . . . . . . . . . . . . . . . . .32
1.8.1 Assigning Access Cards to users and user groups . . . . . . . . . . . . . . . . . . . . . . . . . . . . . . . . . . . . . . . . . . .32
1.9 Working with Reports. . . . . . . . . . . . . . . . . . . . . . . . . . . . . . . . . . . . . . . . . . . . . . . . . . . . . . . . . . . . . . . . . . . . . . . . . . . .34
1.9.1 Generating Owner Reports . . . . . . . . . . . . . . . . . . . . . . . . . . . . . . . . . . . . . . . . . . . . . . . . . . . . . . . . . . . . . . . . .34
1.9.2 Managing your Transactions . . . . . . . . . . . . . . . . . . . . . . . . . . . . . . . . . . . . . . . . . . . . . . . . . . . . . . . . . . . . . . . 36
1.10 Editing your Settings. . . . . . . . . . . . . . . . . . . . . . . . . . . . . . . . . . . . . . . . . . . . . . . . . . . . . . . . . . . . . . . . . . . . . . . . . . . . 39
1.10.1 Setting up your account . . . . . . . . . . . . . . . . . . . . . . . . . . . . . . . . . . . . . . . . . . . . . . . . . . . . . . . . . . . . . . . . . .39
DET-763A Table of Contents 1
Page 4

2 WattStation Connect
TM
for Owners DET-763A
Page 5

1 • GE WattStationTM Connect
NOTE
The GE WattStation™ Connect software is a web application that acts as the conduit
between the WattStation Charging Stations and its users.
1.1 About this Guide
The GE WattStation Connect Users Guide provides comprehensive instructions for
charging station owners to use the WattStation Connect web application.
Once a WattStation is installed, the owner must use WattStation Connect to provision
the charging station, set permissions for different user groups, apply pricing policies
(where applicable), and manage the business workflow to maximize revenues.
1.1.1 Where to Begin
To understand how to use WattStation Connect, it would be helpful to understand
how to:
• log in to WattStation Connect
• create an owner account
• provision your charging station
• set up users and user groups
• manage payments and permissions
• how to edit your settings
•how to handle errors
1.1.2 Technical Specifications
The WattStation Connect software is compatible with the following browsers in this
release:
• Windows Internet Explorer (version 8 and above)
• Safari (version 5.0 and above) on Macintosh
The WattStation Connect software is also available as a mobile application for EV
drivers using iPhone® and Android
In North America, WattStation Connect is compatible only with the WattStation pedestal
charging units. It cannot be used with WattStation Wall Mounts at this time.
TM
phones.
1.1.3 Related Documentation
The following document contains information relevant to WattStation Connect and
may be referred to in this guide.
• GE WattStation Pedestal EVSE Charger Operation and Maintenance manual
DET-763A WattStation™ Connect for Owners 3
Page 6

1.1.4 Internet Links
Your organization must have internet access to use these links. If you receive an error,
please contact your system administrator.
• Visit the GE website at www.ge.com
• For more information about GE’s EV Infrastructure Solutions, visit
www.geindustrial.com/ev
• For information about WattStation commercial and residential charging options,
visit http://www.geindustrial.com/products/static/ecomagination-electric-
vehicles
• To understand terms and concepts related to electric vehicles, visit http://
www.geindustrial.com/products/static/ecomagination-electric-vehicles/furtherreading.html
• To set up a PayPal account to authorize secure payments for your transactions,
go to www.paypal.com
1.1.5 Customer Support
Contact GE Customer Support in one of the following ways:
• Email: wattstation.support@ge.com
• Phone: 1-855-4GE-EVSE or 1-855-443-3873
Support is available seven days a week,
6:00 AM to 12.00 midnight Eastern Time.
• Web: Click Contact Us on WattStation Connect.
• Sales: Contact 1-800-431-7867.
4 WattStation™ Connect for Owners DET-763A
Page 7
1.2 Introduction to WattStation Connect
NOTE
GE WattStation Connect is a cloud-based web interface that allows you to manage
your WattStation pedestal charging units, users, and payments. WattStation Connect
is available as a web interface for charging station owners, and as a mobile
application on iPhone and Android for people who drive Electric Vehicles (EV).
For charging
station owners
WattStation Connect assists owners of WattStation charging units to:
• manage user accounts and privileges
• configure charging stations with rules to define pricing policies, station
availability, and Access Card authorization
• authorize employees to manage charging stations, handle maintenance, and
manage revenues
• define and send out automatic notifications about charging station behavior to
users
• generate reports to monitor energy use, charging station transactions, and
business activity
• edit account settings.
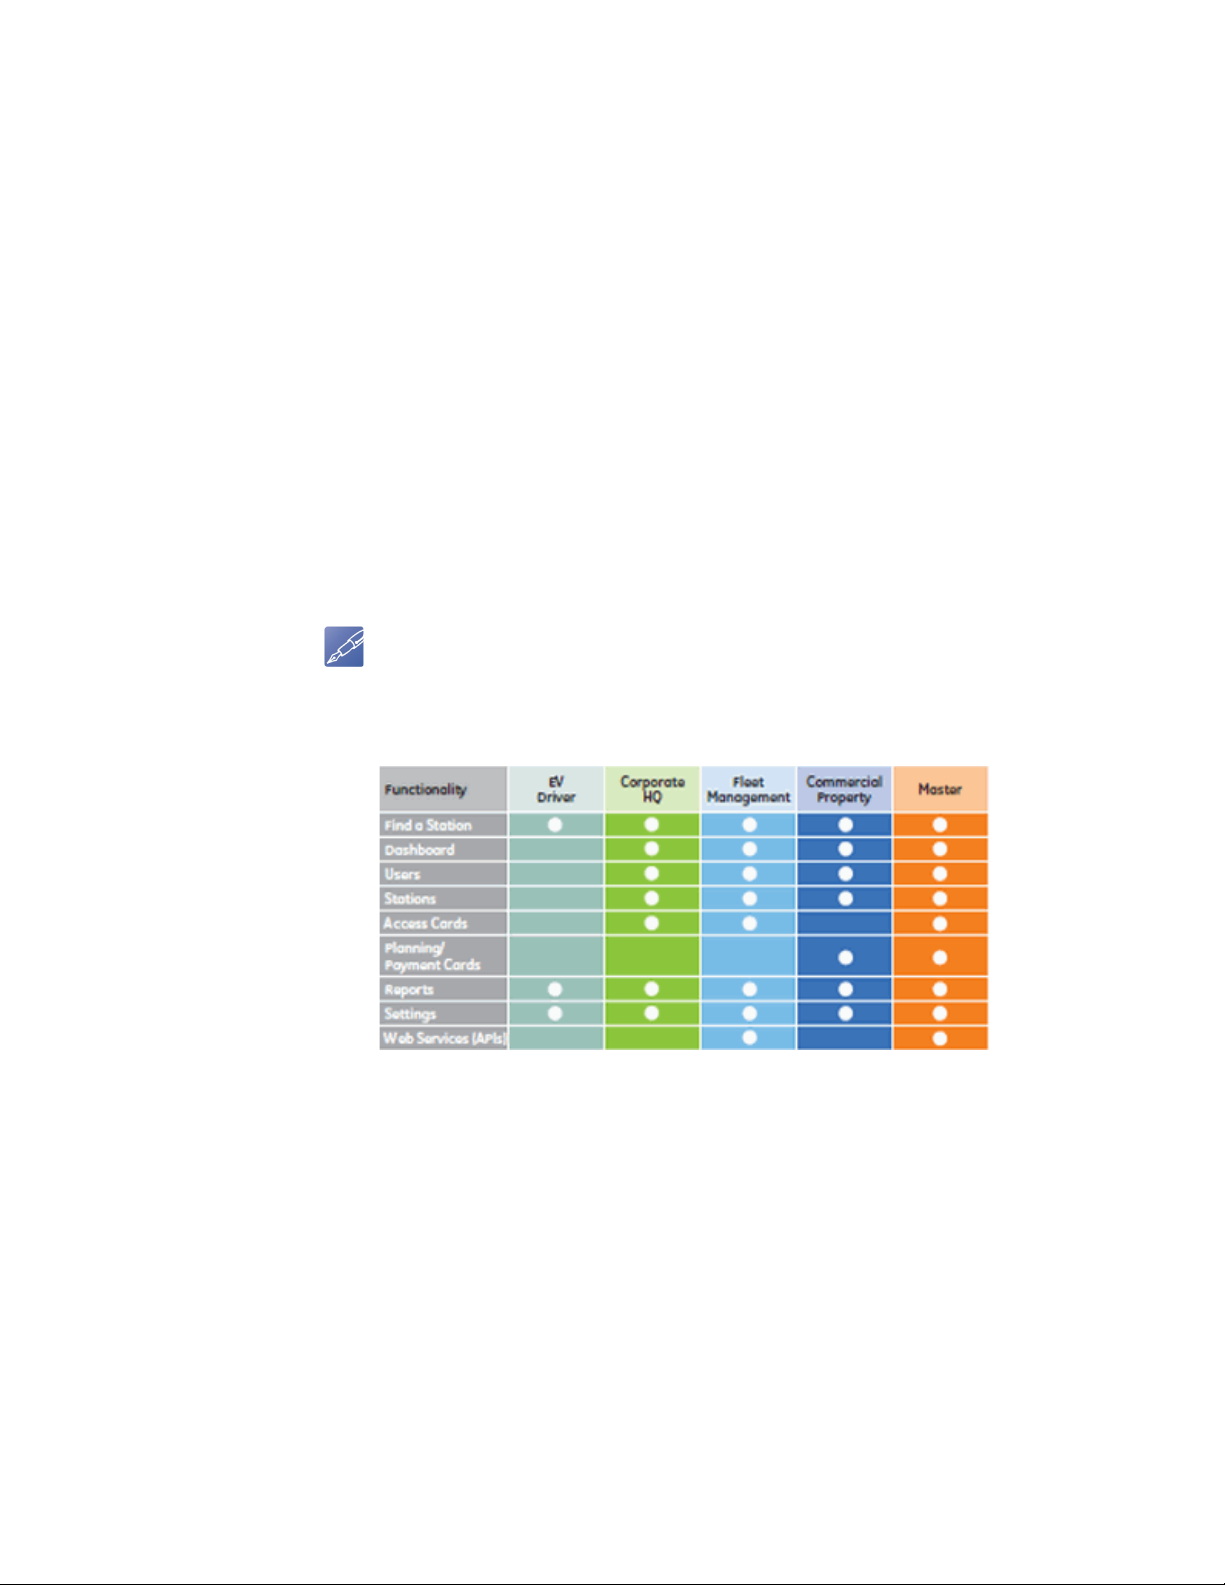
As a WattStation owner, you will have access to only those modules to which you have
subscribed. Different subscription packages provide access to different WattStation
Connect modules, as described below:
You can configure your account for authorization and payment options in one of the
following ways:
• Access Card Control: Private (free) use. You regulate access to your WattStations
by authorized personnel (corporate user) through the use of Access Cards. Cards
which are not authorized by the owner are rejected at the WattStation.
• Free Access: Public (free) use. No driver authorization required.
• Payment Card Control: Public (payment) use. You set different pricing options on
WattStation Connect, and driver selects an option and pays using a mobile
phone or a Payment Card.
• VIP mode: Public (payment) use + Private (free) use. You issue Access Cards to
authorized personnel, but the public charges cars at set payment options.
For EV drivers The WattStation Connect software enables the driver of the EV to:
DET-763A WattStation™ Connect for Owners 5
Page 8

• locate charging stations on a map view
• get point-to-point directions to the desired charging stations from their current
location
• view pricing options and availability of charging stations
• view transaction reports of payment and charging activity
• authorize secure payments through Payment Cards or mobile app to charge the
electric vehicle.
• manage account settings.
6 WattStation™ Connect for Owners DET-763A
Page 9
1.3 Accessing WattStation Connect
TIP
To start using WattStation Connect, follow these steps:
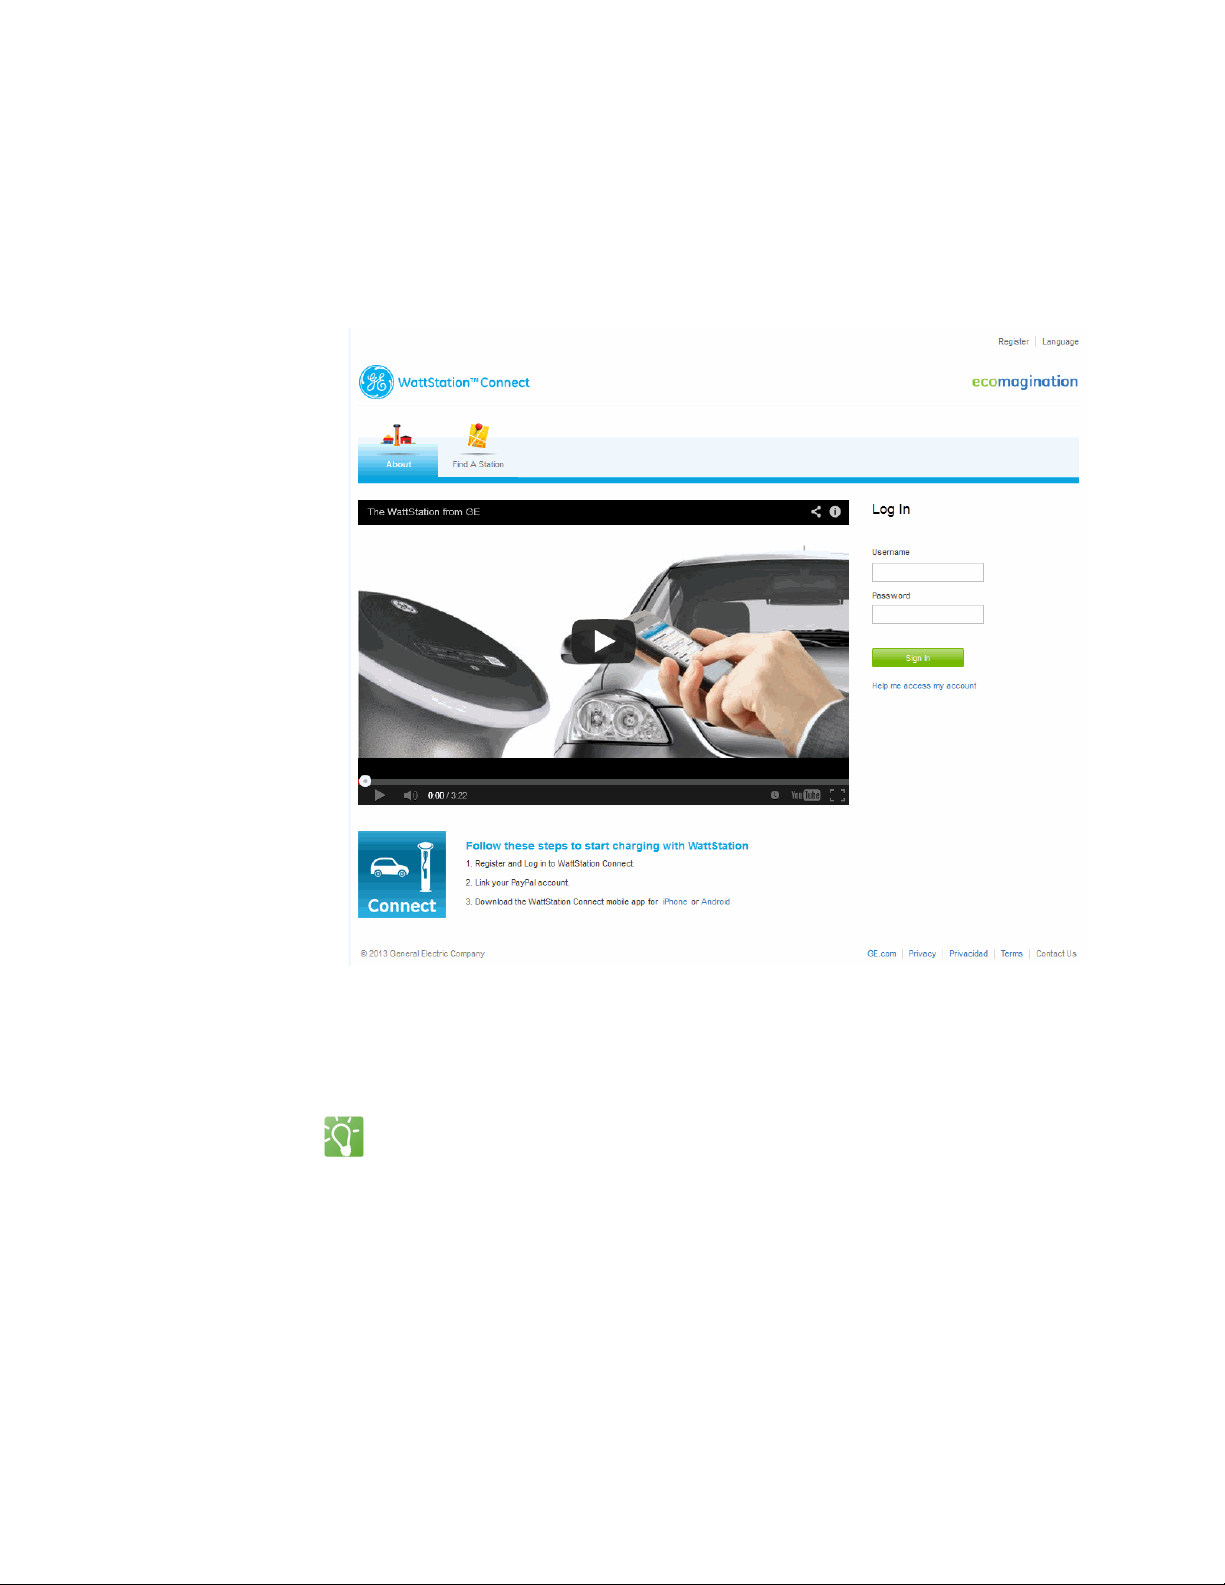
1. Make sure you are connected to the internet.
2. Open your browser and in the address bar, type: www.gewattstation.com.
The WattStation Connect home page displays.
The About tab is selected by default. On the About page, you can
• view a GE WattStation video.
• log on to WattStation Connect with your user name and password.
If you are a station owner, and this is the first time you are logging on to the web
application, you will need to create your Owner Account with GE. Follow the
instructions given below to create your account, and then continue to register and
log on to WattStation Connect.
1.3.1 Creating an owner account
To create an owner account, follow these steps:
1. Call GE Customer Support at 1-855-433-3873 or 1-855-4GE-EVSE. Provide your
Purchase Order number or Requisition number. A Customer Support
representative will validate your software license and your charging station
Serial Number (printed usually on the rating label) and the pole of the pedestal.
DET-763A WattStation™ Connect for Owners 7
Page 10

2. Provide the following details to Customer Support – owner name, preferred user
TIP
name, billing address or corporate address, a phone number, and a primary
email address. If the owner name is a business name, then you must also provide
the name of a contact person for this business.
3. Customer Support then creates an Owner account and sends you an email with
a link to your WattStation Owner account, your login credentials, and a
confidential PIN with which to provision the WattStation.
4. Log on to WattStation Connect.
You now have an established owner account. You also have installer privileges.
You can create a new user account using the Users > User Accounts tab, or assign
provisioning privileges to that account using the Users > Account Privileges tab. For
more information about User Accounts and Account Privileges, refer to Section 1.7
"Working with Users" in this guide.
1.3.2 Logging on to WattStation Connect
To select a language for the WattStation Connect display, click Language in the top
right corner of the screen.
To log on to WattStation Connect, follow these steps:
1. If you are a business employee and need to log in as a corporate user into your
business owner’s WattStation account, click Register at the top of the page.
The following page displays:
8 WattStation™ Connect for Owners DET-763A
Page 11
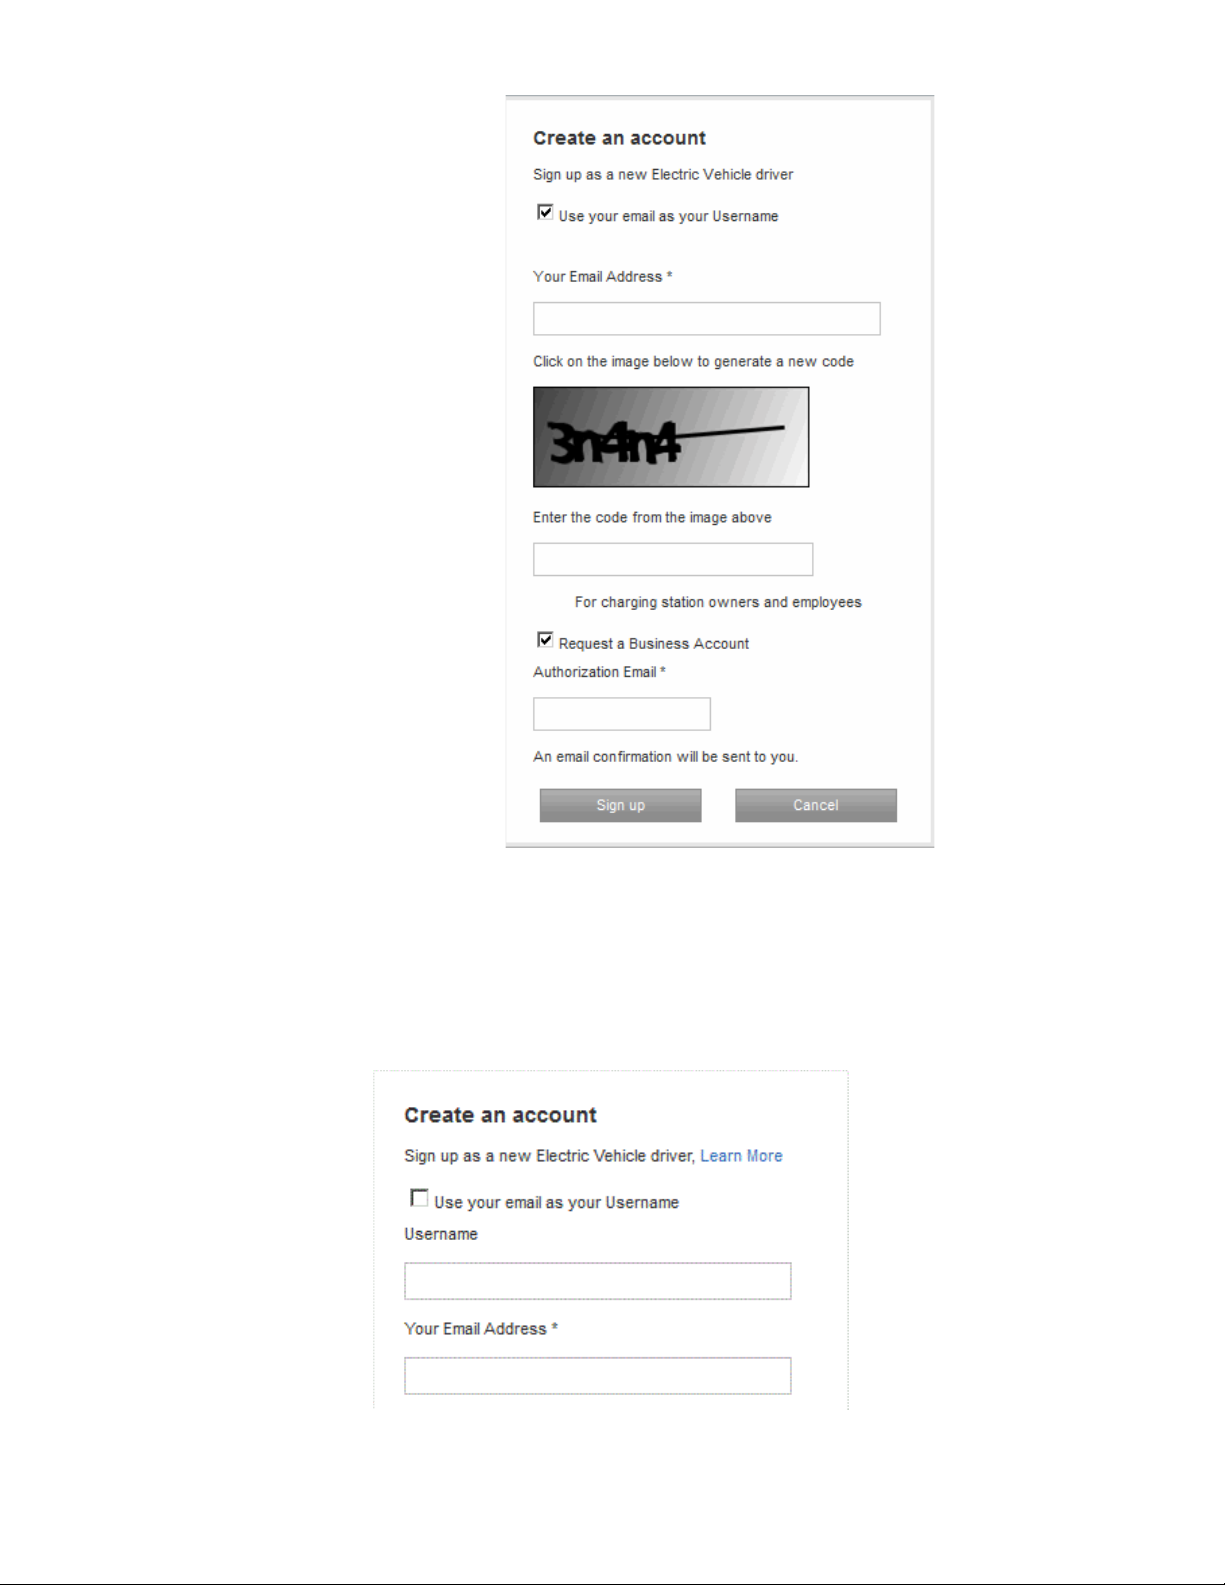
2. You have two options:
• Select Use your email as your Username if you do not wish to establish a
unique user name. (Optional)
• If you don’t select Use your email as your Username, a Username field
appears. Type a user name for yourself in the Username field.
3. Enter your email address in the Your Email Address field.
DET-763A WattStation™ Connect for Owners 9
Page 12

4. Enter the Captcha code. If the code is illegible, click on the code to generate a
TIP
new one.
If you need to request a business account, follow these steps:
1. Select Request a Business Account. The Authorization Email field displays only
if this option is selected.
2. Enter the owner’s email address in the Authorization Email field.
3. Click Sign up. Another window appears.
4. Enter your First Name, Last Name, and create a Password. Type your password
again to reconfirm your password. Your password can be alphanumeric, may
contain special characters, and should be between 8-12 characters in length. It
must also display a strength of at least ‘good’ on the password strength indicator
bar.
5. Type two security questions of your choice and their answers in the respective
fields.
6. Click Create Account.
An email is sent to the business owner that a Business Account has been requested. If
you are the business owner, you will see the request pending in the Users > Authorize
Users tab. Once you approve the request, your business representative will have
access to the newly established user account.
You can now assign privileges to that account using the Users > Account Privileges
tab. For more information about authorizing users and account privileges, refer to
Section 1.7 "Working with Users" in this guide.
If you are a registered user, follow these steps:
1. Enter your Username.
2. Enter your Password.
3. Click Sign In.
If you forget your user name or password, and have trouble logging in, click Help
me access my account. An account recovery window displays.
10 WattStation™ Connect for Owners DET-763A
Page 13
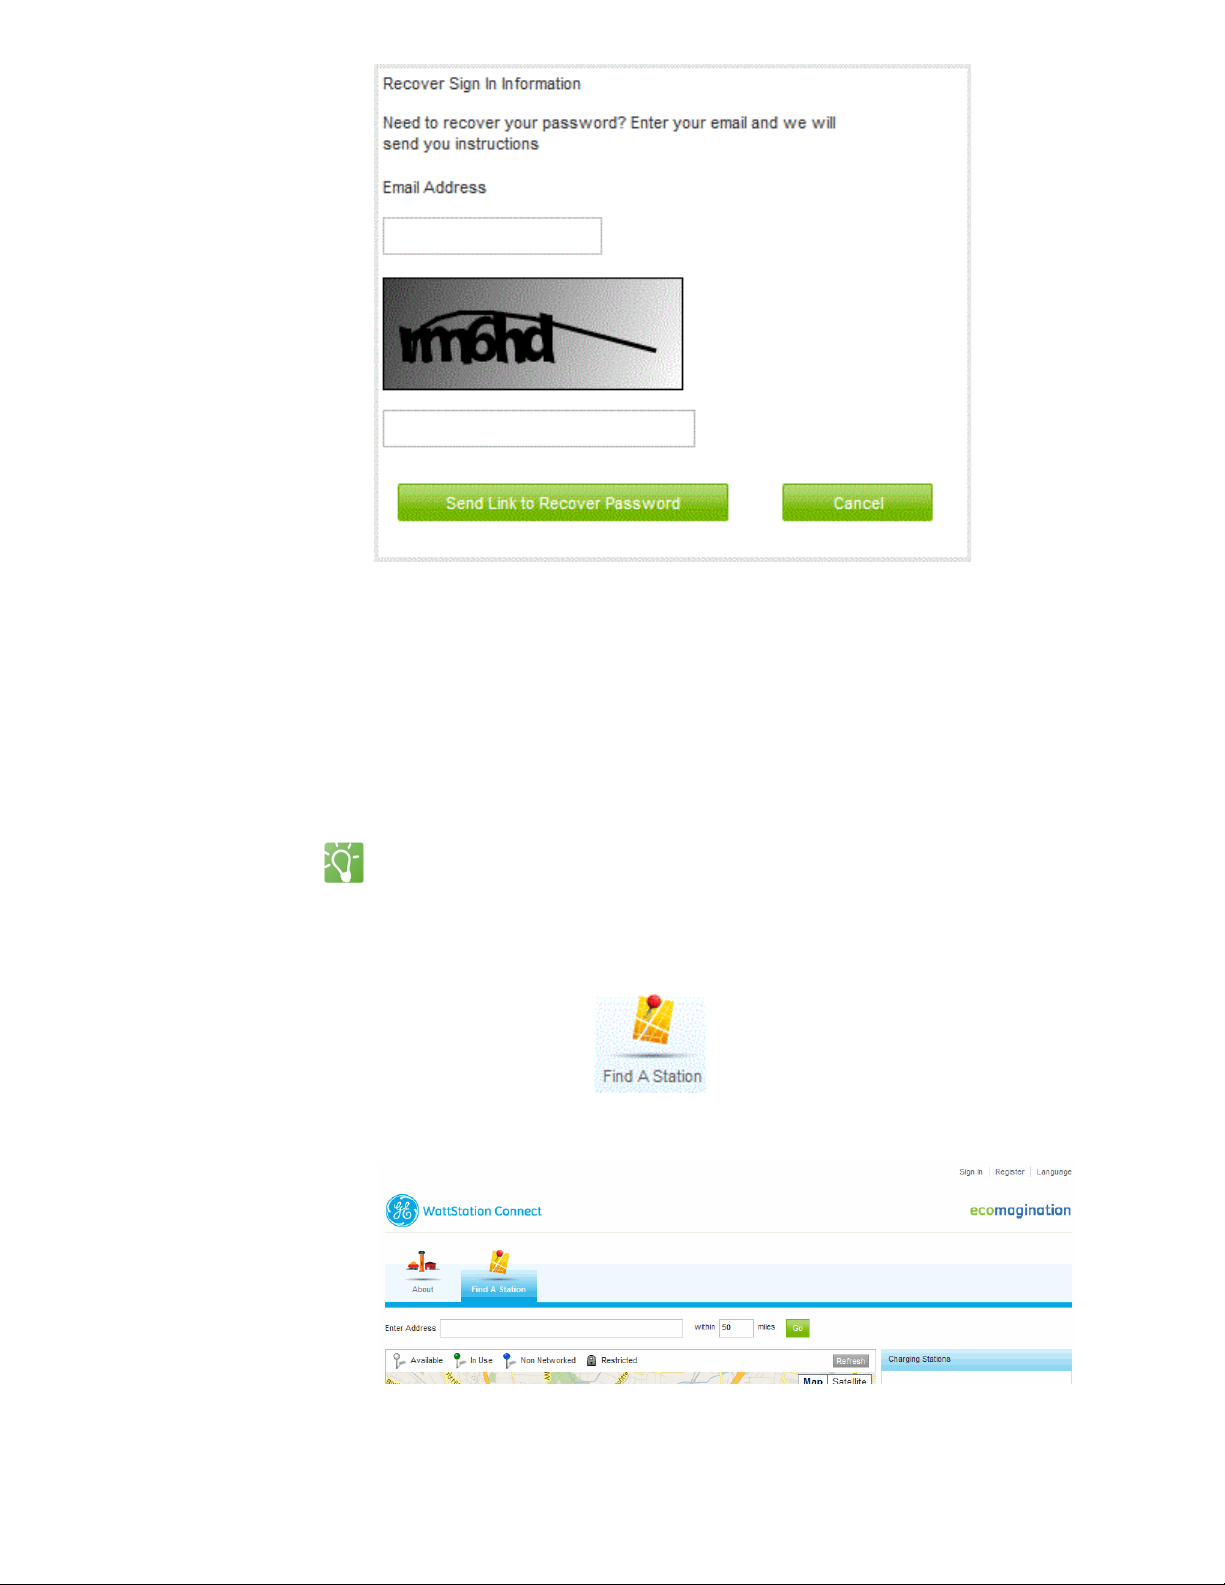
4. Enter your Email Address and the Captcha code. If you have trouble reading the
TIP
Captcha code, click on the code and it will automatically refresh to display a new
code.
5. Click Send Link to Recover Password. Your password will be emailed to you at
the email address you provided. You will be prompted to change your password
after the first use.
6. Click Cancel to exit this window.
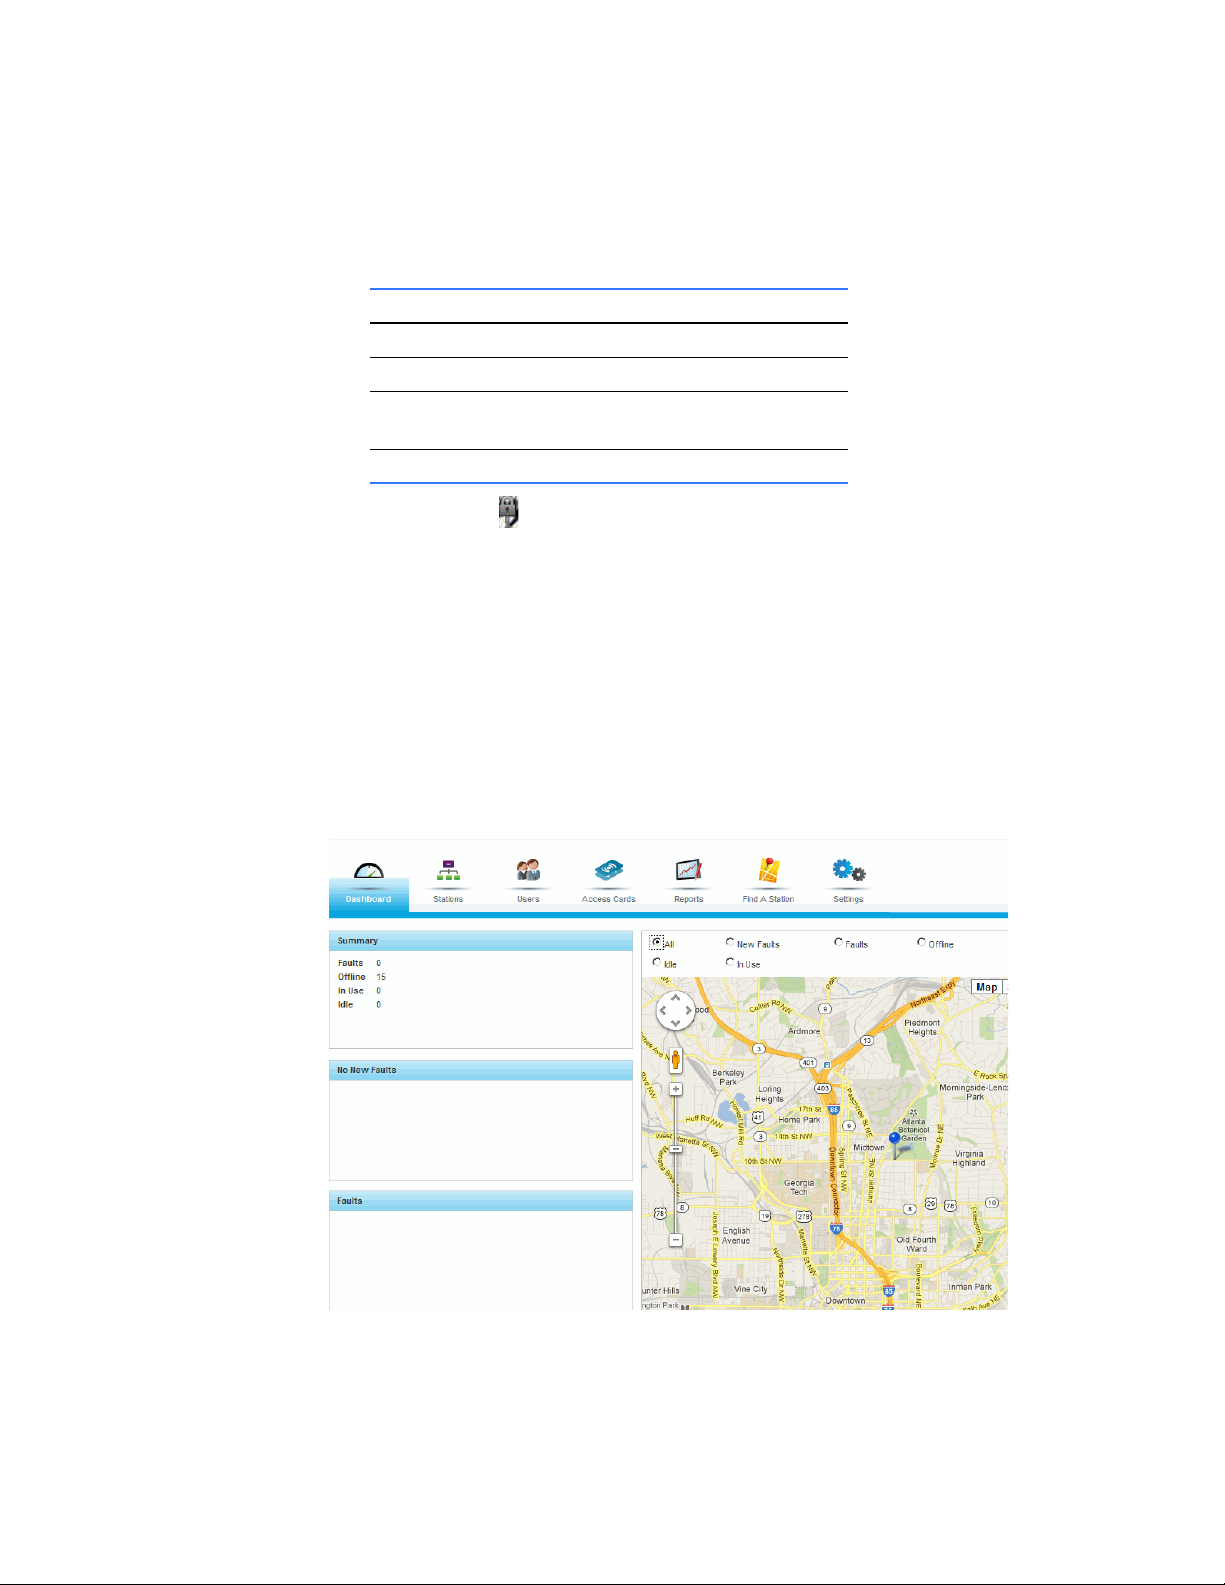
Even before you log in, you can search for a charging station near you.
To locate charging stations near you, view their pricing, and distance from your
station:
1. Click Find a Station tab
The following window displays:
2. Type your current location in the Enter Address field.
DET-763A WattStation™ Connect for Owners 11
Page 14
3. Enter within how many miles you wish to search for a charging station from your
current location.
4. Click Go.
The Google map changes to display locations close to the address you entered.
The left panel of the window displays the Google map with colored pins which
indicate the location of the charging stations and the status of each charging
station.
This color Indicates this status
White Available
Green In use
Blue Not in network - may or may not
be available
Red Fault
The lock icon indicates that a charging station is not publicly viewable. You
can toggle between the Map view and Satellite view on the Google map to
exactly pinpoint the charging station. The right panel on the window displays the
address of the charging station, price per charge, and the exact distance of the
charging station from your location.
5. Click Refresh to reload a page.
What’s Next You may now go back to the About tab to log in, or select Sign In on top of the page,
to log on to WattStation Connect.
Once you have logged on, you will see the Dashboard and other modules displayed.
12 WattStation™ Connect for Owners DET-763A
Page 15
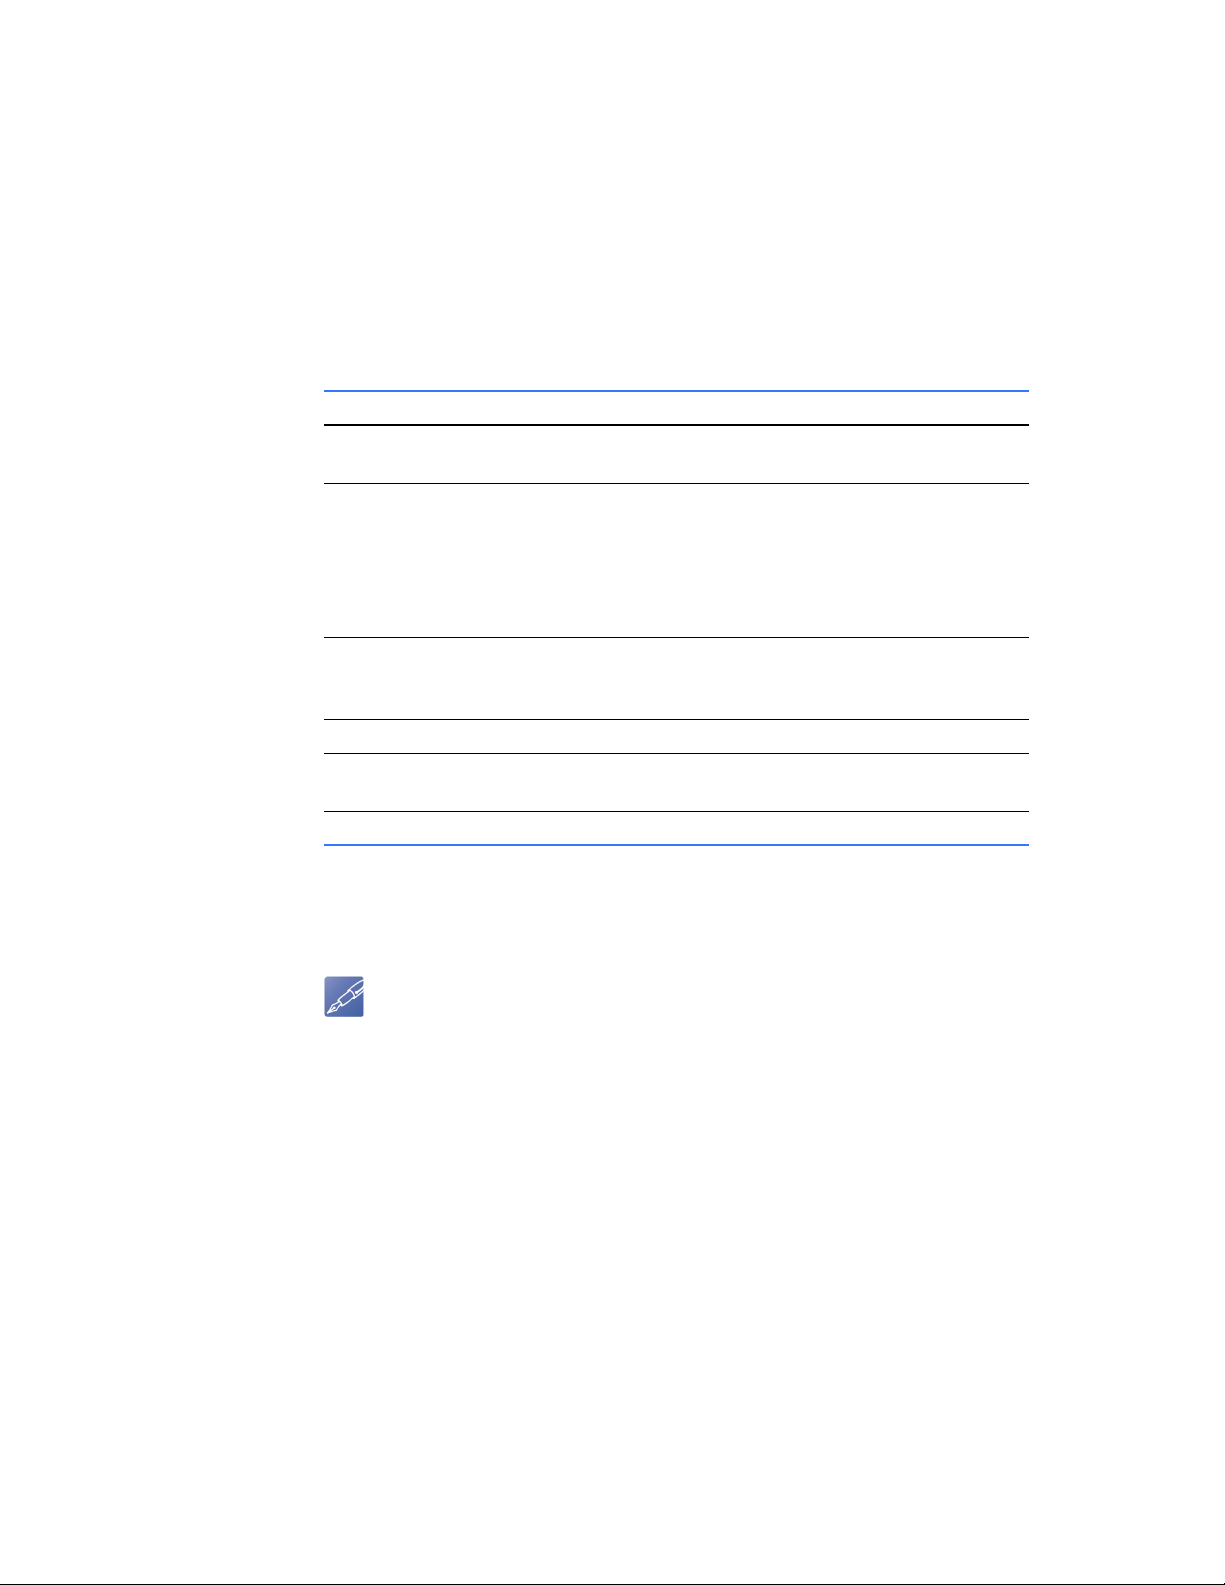
1.4 Monitoring the Dashboard
NOTE
When you log on to WattStation Connect , the Dashboard tab is selected by default. It
displays all your charging stations in a map view and gives you a visual summary of
activities related to your charging stations.
The left pane of the window summarizes faults such as existing or registered faults
and new faults. The right pane displays the map and tells you which charging station
is in use, available, or unavailable.
The table below describes what each status means.
This status Displays this information
All all your charging stations, irrespective of their
New Faults charging stations showing newly displayed faults
Faults charging stations with faults that have been
status.
that have not yet been acknowledged.
• Click confirm to acknowledge this fault and move
it to Faults.
• Click view to see which station is displaying the
fault, the status of a fault, and other details.
acknowledged and registered, and need to be
resolved.
Offline WattStation has lost internet connection.
Idle charging stations are not in use. They are available
to EVs for charging.
In Use charging stations are in active use.
What’s Next Click on any of the tabs on the homepage to access the functionality of each module –
Stations, Planning, Users, Access Cards, Reports, Find A Station, Settings.
You can only view those tabs for which have you have authorization.
DET-763A WattStation™ Connect for Owners 13
Page 16

1.5 Setting Up and Managing your Charging Stations
NOTE
The Stations module of WattStation Connect allows you to manage your charging
stations, provision them, and monitor their use.
To access the Stations module, click the Stations tab in the menu bar.
All functions associated with the Stations module will display in the task tabs Provisioning, Management, and Notifications.
Stations >
Provisioning
1.5.1 Provisioning your charging station
Use the Provisioning tab to register your charging stations with GE, to manage your
charging stations according to pre-defined business rules for pricing and availability,
and to set up automated notifications for the customer.
To access the Provisioning feature, click the Stations module on the main menu, and
then select the Provisioning tab on the task bar.
To set up and provision your charging station, follow these steps:
1. Click the Provisioning tab. The four steps required to complete the provisioning
process for a charging station are listed: Claim, Location, Details, Group.
2. In Step 1: Claim, enter the Serial Number of your WattStation pedestal or wall
mount charging unit.
You can locate the Serial Number for your charging station
unit on the Provisioning Card which was shipped to you along
with the WattStation unit. The unit serial number is also
provided on the rating label applied on your unit (which
contains information about the product and the voltage it
runs on). Customer Support will provide your confidential PIN
through an email message when you call to set up your
Owner’s account for the first time.
14 WattStation™ Connect for Owners DET-763A
Page 17

3. Enter the secure Provision PIN which was sent to you through an email message
TIP
NOTE
from Customer Support.
4. Click Claim.
WattStation Connect will identify if the Serial Number and Provision PIN you
entered are correct. If the information you entered is correct, you will
successfully claim the charging station.
5. In Step 2: Location, enter the Address for your charging station. Then click Look
up this address.
The Google map on the right displays the location you entered. You can also
drag and drop the pin on the map to update your station location.
The Latitude and Longitude fields will populate automatically when you look up
the address. These coordinates change when you change the location or move
the pin to a different location.
Toggle between the Map view and Satellite view buttons on the Google map to
pinpoint your exact location.
6. Click Next.
7. In Step 3: Details, enter the following information by typing or selecting an
option from the drop-down list given on each field:
In this field Enter or select this information
Station Name Enter a unique name for your
charging station.
Make GE is selected by default.
Model WattStation Pedestal is selected
by default.
Charging Level Level 2 charging is selected by
default. WattStation Connect
supports WattStation pedestals
offering the faster Level 2
capability.
Visibility Select Public if you want your
charging station to be accessible
to everyone or Private if want this
to location to remain private.
Time Zone Select the time zone in which your
charging station is installed.
8. Click Next.
9. In Step 4: Group, select a Station Group from the drop-down list.
If you are a first time owner, the Station Group list will appear empty. Once you have
provisioned your charging stations, your station will appear as an Unassigned Group
under the Stations >Management tab. Follow instructions given in
DET-763A WattStation™ Connect for Owners 15
Section 1.5.2
Page 18

"Managing your charging station", to name your Station Group and assign charging
NOTE
stations to your Station Group.
10. Click Provision. You have now successfully provisioned your charging station.
If you get this error message: The charging station has not been claimed. Please return to
step 1: Claim, you must start over with the correct Serial and PIN number.
1.5.2 Managing your charging station
Stations >
Management
Use the Management tab to manage station groups according to pre-defined rules of
your business workflow.
To access the Management feature on WattStation Connect, click the Stations
module on the main menu, and then select the Management tab on the task bar.
The Management page displays.
To create a new station group, follow these steps:
1. Click Create Group. A new row appears in the table in the left pane of the screen.
It displays two fields: New Group and Description.
2. Enter a unique Name for this new group and a description for the group. The
Description field is optional.
3. Click Save. The new station group is listed.
•Click edit to enter or change the name and description of your station
group. To add stations to this Station Group, refer to the column Station
Groups in step 8 below.
•Click delete to remove this group from the Station Group list.
•Click map to locate your station in a map view.
4. In the right pane of the screen, select to view one of the following:
• existing charging station groups from the Group drop-down menu
• All your charging stations on the map
• Unassigned charging stations.
5. Click on a pin on the map to see details about the charging station at that
particular location.
16 WattStation™ Connect for Owners DET-763A
Page 19

A details window displays the Device Name, Address, Status of that charging
station, Serial Number of the charging station, and the Station Group to which it
belongs. Select another station group from the Station Group drop-down if you
wish to change the assignment of this device.
6. Click the details link. Another page displays with more detailed information
about the charging station in the right hand pane:
DET-763A WattStation™ Connect for Owners 17
Page 20

TIP
Sometimes your station pins appear clustered on the map, and it becomes difficult
to differentiate multiple stations located at the same address. To address this issue,
follow these suggestions:
• If you have multiple WattStations in a parking lot , be sure give each station a unique
station name to identify them easily on the WattStation Connect web application.
• Locate them in separate parking spaces. When you do so, they will display their
location with different latitudes and longitudes on the WattStation Connect map. This
will help you decide if it displays clearly.
• Use the Station Management Details screen to correctly edit the pins on the
map. It may be helpful to use the Satellite view on the map and zoom in as
much as possible when you are placing your pins.
7. View the following information:
This field Displays this information
Status If this charging station is in use, faulted, offline,
has new faults, or is idle.
Firmware Version Version of the hardware/pedestal unit used as
a charging station with WattStation Connect.
Registration Date The date on which the charging station was
registered with GE.
Warranty Expiration The date on which manufacturer’s warranty on
the charging station expires.
Serial Number The serial number assigned to this charging
station.
8. Enter location-specific information in the remaining fields as shown:
In this field Edit this information
Station Name Enter a unique name for your charging station to
identify it.
Address (lookup) The location of the charging station. If you don’t
know the exact location, click lookup. The right
hand pane is populated with a map. Move the
pin to your exact location. WattStation Connect
will automatically fill in the address, latitude, and
longitude.
Longitude This field is automatically filled in when you enter
an address.
Latitude This field is automatically filled in when you enter
an address.
Time Zone The time zone in which your charging station is
located. This field is automatically filled in when
you enter an address.
Make Select the make of the charging station unit. For
example, GE.
Model Select the model of your charging station. For
example, WattStation Pedestal.
18 WattStation™ Connect for Owners DET-763A
Page 21

In this field Edit this information
Station Group Select which station group this charging station
should belong to.
9. Enter details about electricity and visibility options in the following fields:
In this field Enter or select this information
Max Current Enter the maximum current
allowed. For example, 30 amps.
Level (this is a readonly field)
Visibility Select Public if you want your
Charge level defined for this
WattStation.
Level 2: 240 volt AC charging is
supported at this time.
charging station group to be
publicly accessible or Private.
Note: When you set visibility to
Private, your station will show a
lock icon on your map. Other
users will not be able to view this
charging station on their maps.
Stations
>Notifications
1.5.3 Setting automatic notifications
Use the Notifications tab to set up automatic notifications that you or your managers
must receive from your stations about charging station faults and statuses.
To access the Notifications tab, click Stations on the main menu and then click
Notifications.
The Notification Management page displays.
Use this page to select which station or station group you wish to receive notifications
from; and which users must receive automatic notifications from your charging
stations.
DET-763A WattStation™ Connect for Owners 19
Page 22

To set up automatic notifications from your charging stations, follow these steps:
TIP
NOTE
1. Under Select a Station, click on the arrow next to a Station Group. The
selection expands to show which charging stations belong to this group.
Only when notifications are set for a Station Group, the and icons appear
highlighted. If notifications are not set for a Station Group, the icons appear grayed
out.
2. Select a station from this list.
If you do not select a station, you will not be able to select
users or create messages for your notifications. You will not
receive notifications if a station group is empty (that is, if no
stations are attached to this group).
3. Under Select Users to Receive Notifications, select the users who must receive
messages about faults and statuses of charging stations:
• Select All to view all users.
•Or select Filter By to view pre-defined user groups and users.
4. Click add to add a user to the list; click remove to remove a user from the list;
click clear to clear the list and start over; and click undo to undo your last action.
5. If you have already set notifications, then when you select a station, the following
fields get automatically populated:
• To Receive – The name of a user who manages the Station Group appears
in this pane.
• Enter Fault Messages and Enter Status Messages – A message template
automatically populates.
20 WattStation™ Connect for Owners DET-763A
Page 23

6. Under Enter Fault Messages, enter a fault message you wish to convey to the
NOTE
NOTE
user via email and SMS. You can use the template provided or create your own
message.
• To create your own message, click Clear. Enter a message that should be
conveyed to the user via email and SMS.
• To use the template, click Sample. Enter information for the <codes> listed
below:
<fault_code>: Enter a code for the fault.
<fault_time>: Enter a time when the fault occurred.
<station_name>: Enter the station name where the fault occurred.
<station_address>: Enter an address for the station at which the fault occurred.
The icon indicates a charging station fault message.
7. Under Enter Status Messages, define a status message for your charging
stations. You can use the template provided or create your own message.
• To create your own message, click Clear. Enter your own message that will
be conveyed to the user via email and SMS.
• To use the template, click Sample. Enter information for the <codes> listed
below:
<station_status_code>: Enter a status code for the charging station.
<status_time>: Enter a time when the status was generated.
<station_name>: Enter the station name for which the status is being conveyed.
<station_address>: Enter the station address.
The icon indicates a charging station status message.
8. Click Save.
You have now successfully set up which notification messages will reach which users
or user groups in a timely manner, as well as how you will stay notified about the
status of your charging stations.
DET-763A WattStation™ Connect for Owners 21
Page 24

1.6 Planning your Pricing Models
TIP
The Planning module of WattStation Connect enables you to configure, plan, and
remotely manage pricing policies to better attract business, and offer advantages to
your customers.
This module allows you to dynamically set pricing by user, and by station or station
groups. You can choose different pricing on different days such as weekends and
holidays to attract business. You can predefine several parameters and manage them
remotely to make sure that your pricing reflects your business goals.
You must set up your PayPal account (through the Settings tab) before you start
implementing any pricing models at your WattStation. If you do not have a PayPal
account set up, you will not be able to receive payments for any WattStation
transactions even if the pricing models take effect.
To access the Planning module, click the Planning tab in the menu bar. If this is the
first time you are setting up the Planning features, the following page displays:
Several parameters are listed in the pane on the left hand side. Use these parameters
to define your pricing rules. The right hand side of the page displays how each user or
station is set up with the pricing rules and when these rules are applied.
1.6.1 Adding a Pricing Rule
You can add, delete, or modify a pricing rule for different sets of users according to
different time and date patterns, and apply different pricing models to the pricing
rules.
To define a new pricing rule for a user, follow these steps:
1. Click the add icon from the task bar.
A new row appears under the Pricing Rules pane.
2. Click Stations or Station Groups in the left panel. A list of stations or station
groups will display. Drag and drop your selection to the Stations column which
reads ‘All’. The word ‘All’ will be replaced with a Station name or Station Group
name you selected. To remove your selection, simply click the delete icon on
the tab (not the icon at the end of the row).
22 WattStation™ Connect for Owners DET-763A
Page 25

You can also use the Search field to enter the name of a specific station or
TIP
NOTE
station group and display its details.
It may be helpful to create a new Pricing Model and a new
Date Pattern before you create a Pricing Rule.
Use the and icons in the task bar to do so.
Each column of the Pricing Rules table is a different color.
Blue denotes Stations or Station Groups; Violet denotes
Dates and Days; Green denotes the Price. You can only add
the correctly color-coded information from the left panel to
the corresponding column in the right panel.
3. Click Pricing Models in the left panel. It expands to display existing pricing
models (if any). Drag and drop a price pattern of your choice to the Price column.
The words ‘Free’ are replaced with the selection you made. You can also use the
Search field to enter the name of a specific pricing model and display its details.
If no pricing models are listed, create a new one. Click the icon on the task bar.
Name and create a pricing rule.
This pricing rule will display in the list of pricing models on the left hand side. For
example, create Pricing Model 1 with a flat rate of $5.00 per charging session.
For more information, see Section 1.6.2 "Editing a Pricing Model".
4. Click Date Patterns in the left panel. Drag and drop a date pattern of your choice
to the Date column. The words ‘All the time’ are replaced with the selection you
made. You can also use the Search field to enter the name of a date pattern and
display its details.
If no date pattern is defined, click the icon in the task bar to create a date
pattern for this pricing model. For example, you want to charge Pricing Model 1
at your WattStation every Saturday and Sunday. For more information, see
Section 1.6.2 "Editing a Pricing Model".
5. Click to save this pricing model. You will receive a confirmation message
‘Pricing Rules Saved’. You have now created a pricing model according to your
business model.
6. (Optional) Click the icon at the end of a row to completely delete a pricing
rule you have created.
When you add new pricing rules and create new pricing models, your Planning
module page displays color-coded like this:
DET-763A WattStation™ Connect for Owners 23
Page 26

1.6.2 Editing a Pricing Model
Editing a pricing
model from the
left pane
When you select the Pricing Models option in the left pane of the Pricing window,
information about all existing pricing models displays like this:
• Click the information icon to view the price per unit. Click OK to exit this
window.
• Click the delete icon to remove this pricing model from the list.
Creating Pricing
Rules using the
task bar icons in
the right pane
• Click the edit icon to make changes to the pricing model. When you click the
edit icon, this window displays:
• Edit the Name.
• Select an option – Pay Flat Rate, Pay As You Charge, or Pay by Time to assign
which pricing option you want to apply to this pricing model.
• Select one option as the default.
•Enter a Price for the Pay Flat rate, Pay As You Charge, and for Pay by Time
options.
•Click Save to save the changes you make to the pricing model.
•Click Cancel if you want to stay with the price which was already set.
Use the icons in the task bar above Pricing Rules as a quick way to create pricing
rules.
24 WattStation™ Connect for Owners DET-763A
Page 27

Click this icon To edit this
Pricing information.
When you click the pricing icon, the following window
displays:
1. Enter a pricing model name and make your selections to
set your pricing information.
• Pay Flat Rate: Enter a fixed price for each charging
transaction, regardless of the duration of the transaction.
The minimum amount you are required to enter for this
option is $1.00 per charge. For example, if you set a Flat
Rate at $10.00, then whether the driver charges his vehicle
for one hour or 6 hours, he would pay $10.00. Also select
Payment Card Use if you want to set the default use of a
payment card for this pricing option.
• Pay As You Charge: Enter a price for every hour your driver
charges at your station. For example, if you set this price at
$2.00 per hour, then if a driver charges his vehicle for 5
hours, he pays $10.00. If the driver unplugs his vehicle
before the hour is complete, the duration of the session is
rounded up to the next hour. The minimum amount you are
required to enter for this option is $1.00 per hour. Select
Payment Card Use if you want to set the default use of a
payment card for this pricing option.
• Pay by Time: Enter a fixed price and a maximum charge
duration for each charging transaction. For example, you
may set a price of $10.00 for a maximum duration of 4
hours. Then a driver will pay a maximum of $10.00 and
charge his vehicle for up to 4 hours. The minimum amount
you are required to enter for this option is $1.00 per hour.
The minimum charge duration you must enter is 0.25 hours
(or 15 minutes). Also select Payment Card Use if you want
to set the default use of a payment card for this pricing
option.
2. Click Create.
DET-763A WattStation™ Connect for Owners 25
Page 28

Click this icon To edit this
Day and Date information.
When you click the calendar icon, the following window
displays:
Enter the required information and click Create.
If you select the Recurring option in the window above, you
are required to enter more details:
Enter the required information and click Create.
You can now apply the date pattern to a pricing model.
Add a new row.
The Add icon enables you to add a new pricing model. See
Section 1.6.1 "Adding a Pricing Rule" for details.
Reload your information. If you have made changes to the
pricing model, and wish to keep those changes, click this
button only after you have saved your changes.
Save your changes to the pricing policies.
26 WattStation™ Connect for Owners DET-763A
Page 29

1.7 Working with Users
The Users module of WattStation Connect allows you to authorize users, establish
user accounts, create user groups, and assign different levels of account privileges.
To access the Users module, click the Users tab in the menu bar.
Users > Authorize
Users
Users > User
Groups
All functions related to the Users module will display – Authorize Users, User Groups,
User Accounts, and Account Privileges.
1.7.1 Authorizing Users and User Groups
Use the Authorize Users tab to manage system access to registered user accounts.
This tab is selected by default. Under Authorize Users, you see three other tabs –
Pending, Active, and Declined.
•Click the Pending tab to view registered accounts which have not yet been
granted access. When a user or employee sets up a business account, they send
you a request to authorize their account. Their request shows up in the Pending
tab. As the station owner, you can activate or deactivate this request.
•Click the Active tab to view registered accounts which have been granted
access. To deny access to a user account, click deactivate.
•Click the Declined tab to view registered accounts which have been denied
system access. To grant access for this user account, click activate.
1.7.2 Managing User Groups
Use the User Groups tab to manage user groups. User groups are sets of registered
accounts which can create logical organization for your system. For example you can
create user groups associated with geographical regions, job function, or business
unit.
To access User Groups, click the Users tab and then User Groups from the task bar.
From here, you can create a new user group, edit an existing user group, or delete a
user group.
To create a new user group, follow these steps:
DET-763A WattStation™ Connect for Owners 27
Page 30

1. Click Create. A new row appears in the table, listed generically as Name and
Description.
2. Click edit. The following window displays:
3. Enter a unique name in the Name field for the new user group. Enter a
description of this group in the Description field. Two additional panels appear –
one listing Account Holders and listing Accounts.
4. Click All or Filter By drop-down in the Account Holders panel. A list of users or
account holders will display.
5. Click on names of existing Account Holders and use the arrow buttons to assign
them to specific Accounts.
6. Select Save to add your new user group to the database. Select delete if you
wish to remove this group.
7. Click Refresh. You will see the new user group listed in the list of User Groups.
To edit an existing user group, follow these steps:
1. Click edit in a row with an existing user. Two columns appear – Account Holders
and Accounts.
2. Add or remove a user from the Account Holder(s) list to an existing Account
using the arrow buttons.
3. Select Save. Or select delete if you wish to discard your changes.
To delete an existing user group, follow these steps:
1. Select delete in the row that lists the user group you wish to remove from the
database. The user group is immediately deleted.
2. Click Refresh. The deleted row does not appear in the list of existing user groups.
1.7.3 Managing User Accounts
Users > User
Accounts
28 WattStation™ Connect for Owners DET-763A
Use the User Accounts tab to create a new user account, or edit and delete an
established user account from WattStation Connect. Depending on your system
setup, new users can create their own accounts when registering.
Page 31

To access User Accounts, click the Users tab and then User Accounts tab from the
task bar.
To create a new user account, follow these steps:
1. Click Create. A new row appears in the table, listed generically as Username and
Name.The bottom of the screen now displays the following fields:
2. Enter the required information.
In this field Enter this information
First Name First name of the user. Required field.
Last Name Last name of the user.
Username Enter an assigned user name – it can be the user’s
first name, last name, email address, or any distinct
user name of your choice. Required field.
Password Enter a strong password. Required field.
Primary Email Enter an email address that can be used as the
primary mode of written communication. Required
field.
Confirm Password Re-enter your password. The Password Strength bar
will indicate if you have created a strong password
for this user. Required field.
Primary Phone Enter a phone number.
3. Click Save.
4. Click Refresh. The new user account appears in the User Accounts list.
To edit an existing user account, follow these steps:
1. Select edit on a pre-existing account name. Information about the user displays.
2. Modify any information you need to change.
3. Click Save. Your changes are saved to the database.
4. Click Refresh. Your saved changes are now reflected in this list.
DET-763A WattStation™ Connect for Owners 29
Page 32

To permanently delete an existing user account, follow these steps:
NOTE
1. Select delete on the row that has the user account you wish to delete from your
records.
2. Click Refresh. The User Accounts list no longer contains the user account you
deleted.
1.7.4 Setting Account Privileges
Users > Account
Privileges
Use the Account Privileges tab to grant new account privileges, or modify existing
account privileges for your users and user groups.
To access Account Privileges, click the Users tab and then Account Privileges tab
from the task bar. The Account Holders page displays.
•The default view is All. You see all your users and user groups along with which
charging station activity they are authorized to manage.
• To see a specific list of users, select the users you want to see using the Filter By
drop-down menu.
Your user has access to only those tabs for which you set permissions on this page.
To assign new account privileges or edit existing ones, follow these steps:
1. Check or uncheck privileges as needed.
This field Indicates
Username The name of the account holder
User Management If this user has the authority to manage users
and user groups
Access Card If this user can access the Access Cards tab.
Station Provisioning If this user is authorized to provision the
charging stations.
Station Grouping If this user is authorized to set up station
grouping and set up business workflow based
on this. This is a feature of station
management.
Station Control If this user is authorized to manage other
station functions and details.
Reporting If this user is authorized to run reports.
Notifications If this user is authorized to set up automatic
notifications for your charging stations.
30 WattStation™ Connect for Owners DET-763A
Page 33

This field Indicates
Station Planning If this user has the privilege to set pricing and
availability of this charging station.
2. Click Save.
DET-763A WattStation™ Connect for Owners 31
Page 34

1.8 Managing Access Cards
TIP
The Access Cards module enables you to assign, authorize, and manage Access
Cards associated with individual users or user groups. Access Cards authenticate that
you can charge a vehicle. Use Planning > Access Cards to assign which Access Cards
can access a station and at which pricing option.
There are two types of cards – Access Card and Payment Card. The Access Card allows
a user to charge the electric vehicle free of cost. As the owner, you can scan and
assign Access Cards to an individual within your organization, or to a group of users.
The Payment Card (also called the WattStation
by EV drivers through outlets such as Amazon, to pay for charging at different
WattStations. These cards are not managed by station owners.
To access the Access Cards module, click the Access Cards tab on the main menu.
The following page displays:
TM
Connect Payment Card) is purchased
1.8.1 Assigning Access Cards to users and user groups
WattStation
Connect > RFIDs
32 WattStation™ Connect for Owners DET-763A
You may give Access Cards to your employees or authorized corporate users to use at
your charging stations. Make sure you assign the cards in a way that they can be read
by an Enrollment card reader (HID card reader) when using WattStation Connect. An
Enrollment card reader is a scanning device that can read RFID cards such as the
WattStation Access Cards.
GE recommends that all new Owners make a one-time purchase of the GE
Enrollment Reader, to scan Access Cards and automatically transfer their
information into WattStation Connect.
Page 35

To order an Enrollment Reader or Access Cards, call GE Sales at 1-800-431-7867, or send
email to wattstation.support@ge.com. Refer to product number EVWPR01 (Enrollment
Reader) or EVRCW10 (pack of 10 Access Cards) to place your order.
To assign Access Cards to users and user groups, follow these steps:
1. In Step 1: Assign Access Cards to Groups or Users, select any one View –
Groups or Users. The default view is Users.
2. Select a specific User or Group and move the user or user group to the column
titled Selected for assignment.
3. Use the Add, Remove, Clear, and Undo buttons to manage which users belong
to the Selected for assignment list.
4. Click Add to add a user to the list; click Remove to remove a user from the list;
click Clear to clear the list and start over; and click Undo to undo your last action.
5. In Step 2: Enter new Access Cards, click in the text box and scan the Access
Card code using a card reader (Enrollment Reader). The card code gets populated
in the text box. You will get an error message you did not scan the correct type of
Access Card.
Note that the encrypted code of the Access Cards may not match any number or
text printed on your Access Card.
6. Click Save.
The newly assigned Access Cards are now mapped with the correct users or user
groups. Now every time a user swipes an Access Card at a charging station, you
will be able to apply discounted or free pricing and monitor its use.
What’s Next Once you have assigned Access Cards to users or user groups, you can return to any
other module of WattStation Connect.
DET-763A WattStation™ Connect for Owners 33
Page 36

1.9 Working with Reports
The Reports module on WattStation Connect allows you to generate different types of
reports to monitor the activity of all your charging stations. It also provides transaction
summary and details for each transaction, and enables you to provide refunds if
necessary.
1.9.1 Generating Owner Reports
Reports > Owners Use the Owners tab to generate different reports for owners. You can select the type
of report you need from the multiple report types available through this module. You
can also select to run these reports for all stations, a specific station group, or an
individual station.
The following reports are available from this tab:
• Transaction Usage Report: This report includes data about the station or station
groups, the time at which a vehicle was plugged in at a charging station, energy
consumption for each transaction, total charge duration for a charging session,
type of transaction (through a mobile app, or with use of a payment card or
access card), revenue before GE fees, and total revenue after GE fees for a
selected time period.
• Revenue Report: This report includes data about the station or station groups,
number of transactions, number of RFID authentications, number of mobile
payments, and total revenue generated by the selected stations for a given time
period.
• Usage Report: This report includes information about the station or station
group, connect time, disconnected time, duration of charging, maximum peak
power consumption, average power used, and total power used in kWh.
• Fault Report: This report includes information about the station or station group,
all faults registered, number of severe faults, number of self-correcting faults,
and number of warning indicators.
To access the Owner tab, click the Reports tab on the main menu, and then the
Owner tab (if it is not already selected by default).
The following page displays:
To generate and print a report, follow these steps:
1. Select stations, time period, and the type of report you want to generate.
34 WattStation™ Connect for Owners DET-763A
Page 37

In this field Select this information
Select Choose an entity for which you
want to view a business report.
Select one of the following options:
• All Stations
• Station Group
• Individual Station
Report type Choose the type of report you
want to print for the entity
selected above.
Select one of the following options:
• Transaction Usage
• Revenue
• Usage
•Faults
Date range Enter a date range for which you
wish to generate a report. Click
the drop-down to see your options
– Today, Last Week, Last Month,
Past Year.
To select a different time range,
select dates on the calendar and
click Apply.
2. Click Generate.
The report loads in your browser.
DET-763A WattStation™ Connect for Owners 35
Page 38

3. Select PDF to export your report to a PDF format and print it, or click CSV to
export and print your report in an Excel format.
1.9.2 Managing your Transactions
Reports >
Transactions
Use the Transactions tab to view details for and manage individual transactions at a
particular station. You also use this tab to remit full or partial refunds when needed.
The Transaction tab allows you to view transaction details of a station by date range
— for the day, for a week, for a month, or for the past year.
To access the Transactions tab, click the Reports tab on the main menu, and then the
Transactions tab. The following page displays:
36 WattStation™ Connect for Owners DET-763A
Page 39

To view transaction details for a particular station, follow these steps:
1. In the Date Range list, select a time period for which you wish to view
transaction details. Click the drop-down to see your options – Today, Last Week,
Last Month, Past Year. To select a different time range, select dates on the
calendar. Click Apply.
2. Click Search.
The report loads in your browser. The following fields appear in the Transactions
Report pane of the window:
This field Indicates this
Transaction Id Unique ID for each charging
transaction at a particular station.
Transaction Date The date and time when a driver
plugged in a vehicle at this
charging station.
Driver Name of the driver (based on the
Access Card or Payment Card
used).
Amount Total amount spent by the driver
for this charging session.
Status Status of the transaction.
• Captured indicates that money
has been received and the
transaction is complete.
• Manual_Refund indicates that a
refund has been processed for
this transaction.
3. Select or highlight a Transaction Id in the Transactions Report column. Details
related to this transaction appear in the Transaction Details column on the
right:
This field Indicates this
Merchant Name Name of the station owner
Transaction Id Unique ID for the charging
transaction — corresponds to the
Transaction Id in the
Transactions Report pane.
Transaction Date The date and time when a driver
plugged in a vehicle at this
charging station. This corresponds
with the Transaction Date in the
Transactions Report column.
DET-763A WattStation™ Connect for Owners 37
Page 40

This field Indicates this
Status Status of the transaction. This
information corresponds with the
Status in the Transactions Report
column.
• Captured indicates that money
has been received and the
transaction is complete.
• Manual_Refund indicates that a
refund was processed for this
transaction.
Serial Number Serial number of the WattStation
at which the driver charged his
vehicle.
Location Address at which the WattStation
is located.
Driver Name of the driver (based on the
Access Card or Payment Card
used). This information
corresponds with the Driver in the
Transactions Report column on
the left.
Email Email address of the driver.
Amount Total amount spent by the driver
for this charging session.
Grant a refund for this transaction
Amount Enter a refund amount. The full
amount spent by the driver is
populated by default. Edit as
required.
Partial Refund Select this check box if the amount
being refunded is a partial refund.
4. Click Refund. A confirmation message appears. Click Yes to process the refund or
No to cancel.
• If you select Yes for a refund, the Status column in the Transactions Report
changes to Manual_Refund to indicate that you refunded some amount.
• If you select No for refund, the operation is cancelled.
What’s Next Once you have reviewed or printed your reports, you can return to any other module
of WattStation Connect.
38 WattStation™ Connect for Owners DET-763A
Page 41

1.10 Editing your Settings
The Settings module of WattStation Connect enables you to create an owner
account, define how you want to receive notifications, and enroll into a PayPal
payment application to manage payments for EV charging.
To access the Settings module, click the Settings tab on the menu bar. The following
window displays:
WattStation
Connect >
Settings
1.10.1 Setting up your account
To manage the display on your WattStation, establish your account, and manage
permissions and payment options via PayPal, follow these steps:
1. Enter information in the following fields:
In this field Enter or select this information
Owner Options
Display Name Enter a name you wish to display
on this WattStation (up to 32
characters). For example, your
business name.
Show owner name Select if you wish to display the
owner name.
Receive
notifications
2. Click Save.
Select if you wish to receive email
notifications for daily activity at
your WattStations (fleet summary)
and/or firmware updates.
DET-763A WattStation™ Connect for Owners 39
Page 42

3. In the next pane, enter the following information:
TIP
NOTE
This field Displays this information
My Account
First Name (optional) Enter your first name.
Last Name (optional) Enter your last name.
Username Enter a user name with which your will
identify yourself when you log in to
WattStation Connect. This is a required field.
Primary Email Enter an email address you can be reached
at for communication.
Phone (optional) Enter a phone number you can be reached
at.
Password Enter a password (8-12 characters) to
access the user account.
Confirm password Re-enter your password.
The Password strength bar indicates if you have set a strong password of
required length.
4. Click Save. An account profile will be set up or updated.
5. In the next pane, Business Headquarters Location, enter your business address.
Click Save. Your business profile will be set up or updated.
Be sure to enter at least a country name for the address to be saved without errors.
Next, create a PayPal business account to be linked to your WattStation transactions.
Owners must set up a PayPal business account to use for WattStation payments.
The Merchant Payment Information pane displays the following message:
40 WattStation™ Connect for Owners DET-763A
Page 43

6. Click Pay with PayPal. You are now directed to the PayPal web site.
7. Log in with your PayPal credentials or create a new PayPal account.
8. Click Agree and Continue on the PayPal Electronic Communications Delivery
Policy, if it displays.
9. Review your information on the following PayPal page and click Agree and
Continue.
You are then returned to the GE WattStation Connect home page.
DET-763A WattStation™ Connect for Owners 41
Page 44

TIP
If you take too long to review your PayPal account information and allow the PayPal
page to time out, you will not be able to return to the WattStation Connect page.
You must log in to WattStation Connect again.
Notice now that the Merchant Payment Information pane on the Settings page
changes to indicate that PayPal is now the automatic payment method for your
WattStation transactions.
You are now setup to receive payments through PayPal for all charging transactions
on your WattStations.
42 WattStation™ Connect for Owners DET-763A
Page 45

Glossary
Access Card A card you scan at a WattStation to access and use the charging station to charge
your vehicle. Typically, Access cards are given out by employers, building owners, and
businesses to their employees, tenants, or customers. This type of RFID card allows the
user to charge the vehicle free of cost.
Activation Date The date when a user account is activated.
Charger Level Charge level defined for this WattStation. The default 240 volt AC charging level (Level
2) is supported for WattStations and other commercial units.
Charge Card A type of payment card to be used at WattStations. This type of card allows the user to
charge an electric vehicle on a payment basis. Also known as Payment Card.
Corporate User An employee or individual authorized by the station owner to manage WattStations,
use Access Cards, or perform other business-related activities. A Corporate User
typically signs up for a business account during registration (which has to be
authorized by the station owner).
Driver . The driver of an electric vehicle. Drivers have limited access to WattStation Connect
functions.
Energy use Amount of energy consumption for a charging session, measured in kilowatt hours
(KWh).
EV Electric Vehicle.
Fault Operation failure for a WattStation. Fault notifications are communicated through
status messages and dashboard entries.
Flat Rate A fixed rate WattStation connection fee independent of the time taken to charge your
vehicle. For example, you pay a flat rate of $5 whether you charge for 1 hour or 6
hours.
Idle Status of a WattStation which is not in use and available to electric vehicles for
charging.
In Use Status of a WattStation which is currently charging an electric vehicle.
Max Current The maximum current permitted when provisioning a charging station. For example,
30 amps.
Networked
WattStations
WattStation units (pedestal or wall mount) that are linked to a network over the
internet.
Non-Networked
WattStations
Offline Status of a WattStation that has lost its Internet connection.
DET-763A Glossary 43
WattStation units (pedestal or wall mount) that operate in a standalone mode and do
not communicate any data over the internet.
Page 46

Owner/Owner
Account
Role assumed by the owner of one or more WattStation charging stations. The owner
account is set up by GE Support, and includes primary administrative privileges for the
WattStation Connect network.
Pay as you charge Fee based on the time spent connected to the WattStation. For example, if the Pay as
you charge fee is set at $2 per hour, if you charge your EV for 6 hours, you pay $12.
Pay by time Pricing option for a charging session based on a fixed price and a maximum charging
duration set for each session.
Pay flat rate Pricing option for a charging session based on a fixed price established for charging
an electric vehicle at a WattStation, regardless of the time taken to charge the vehicle.
Payment card An RFIDcard you scan at a WattStation to pay for charging your vehicle. WattStation
Connect Payment cards can be purchased through Amazon. Payment cards enable
you to link your WattStation account with a PayPal account to offer the convenience
of quick and secure payments.
Pricing Model Building block for a pricing rule, allowing you to store unit costs for re-use. For
example, you can create a pay-as-you-go model which adds costs as charging time
accrues.
Pricing Rule Rule created in the Planning module that combines a pricing model, station group,
user group, and date information for quick application on the network. For example,
you can create pricing rules to change the pricing models for a region during a
holiday.
Private Option selected limiting the charging unit’s visibility on the WattStation Connect
network to specified users. You can restrict visibility for personal or fleet use, for
example.
Privilege Defined level of account access within the WattStation Connect network. Sets of
privileges are assigned to each user account created in the WattStation Connect
network. Privileges control what the user can see and do upon logging into the
application.
Provisioning The process of registering a charging station with GE as part of your WattStation
Connect network.
Public Option selected making the charging station visible to all WattStation Connect
network members.
QR Code A 2D bar code applied on WattStation units (usually a square image with a black dots
pattern on a white background). Use any barcode reader app on a smart phone to
scan or read the WattStation QR code. The QR code contains information specific to
the WattStation charging unit and once scanned, identifies it in the system.
Registration Date The date on which the WattStation was registered with GE.
RFID Acronym for Radio Frequency Identification card, a card which can be scanned by a
WattStation to initiate a charging session. Access Cards and Payment Cards are RFID
cards that are linked to user and payment information in order to facilitate secure
charging transactions.
Serial Number The serial number assigned to a charging station.
44 WattStation
TM
Connect for Owners DET-763A
Page 47

Station WattStation Pedestal units represented in the WattStation Connect network.
Status Availability of a WattStation for use in a charging session.
Status bar iPhone or Android screen element displaying connectivity and battery charge.
Time The time zone in which a charging station is located.
User Account Individual account set up for the majority of WattStation connect users. User accounts
are governed by privileges, sets of permissions which control what they can see and
do upon logging into the application.
Visibility Visibility of a WattStation, designated public or private.
Warranty
Expiration
WattStation
Connect
WattStation
Pedestal
The date on which manufacturer’s warranty on the charging station expires.
Product name for the web application and mobile app used to conduct charging
sessions and communicate with the WattStation Connect network.
WattStation Pedestal Charger manufactured by GE.
DET-763A Glossary 45
Page 48

46 WattStation
TM
Connect for Owners DET-763A
Page 49

© 2013 GE Industrial Solutions. All rights
reserved.
An asterisk (*) indicates a trademark of GE and/
or its affiliates. All other trademarks are the
property of their respective owners.
Confidential Information - This document
contains Confidential/Proprietary Information
of GE Energy, GE Industrial Solutions, and/or its
suppliers or vendors. Distribution or
reproduction prohibited without permission.
THIS DOCUMENT AND ITS CONTENTS ARE
PROVIDED "AS IS", WITH NO REPRESENTATIONS
OR WARRANTIES OF ANY KIND, WHETHER
EXPRESSED OR IMPLIED, INCLUDING BUT NOT
LIMITED TO WARRANTIES OF DESIGN,
MERCHANTABILITY, OR FITNESS FOR A
PARTICULAR PURPOSE. ALL OTHER LIABILITY
ARISING FROM RELIANCE UPON ANY
INFORMATION CONTAINED HEREIN IS
EXPRESSLY DISCLAIMED.
GE Industrial Solutions
Information Centers
Americas:
1 888 437 3765
(WattStation Pedestal Technical Support)
1 855 4GE EVSE or 1 855 443 3873
(WattStation Connect Customer Support)
Additional Resources
For more information, please visit
the GE Industrial Solutions web site at:
www.geindustrial.com
 Loading...