

Page 1
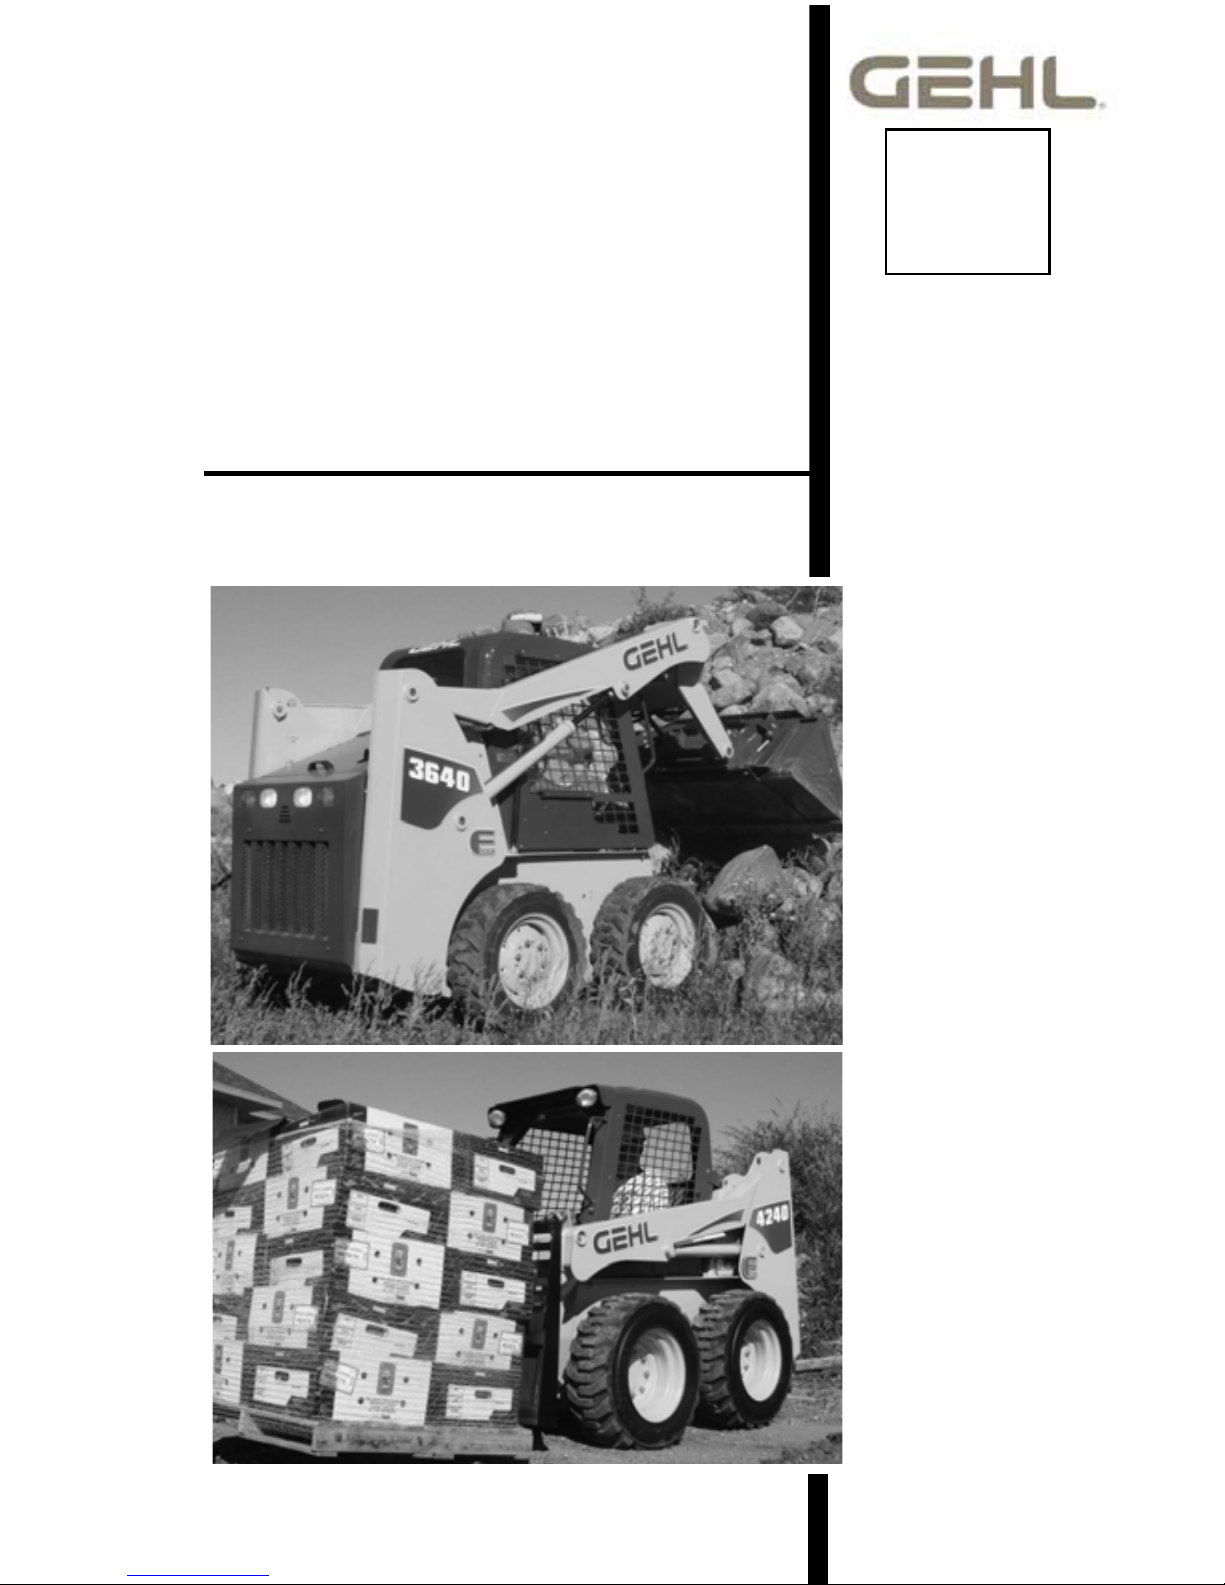
SL3640E
SL3840E (EU)
SL4240E
SL4240E (EU)
Skid-Steer Loaders
Operator’s Manual
Form No.
917334/
BP0310
English
Page 2
Gehl Company, in cooperation
with the American Society of
Agricultural Engineers and the
Society of Automotive Engineers, has
adopted this Safety Alert Symbol to
pinpoint precautions which, if not
properly followed, can create a safety
hazard. When you see this symbol in this
manual or on the machine itself, you are
reminded to BE ALERT! Your personal
safety is involved!
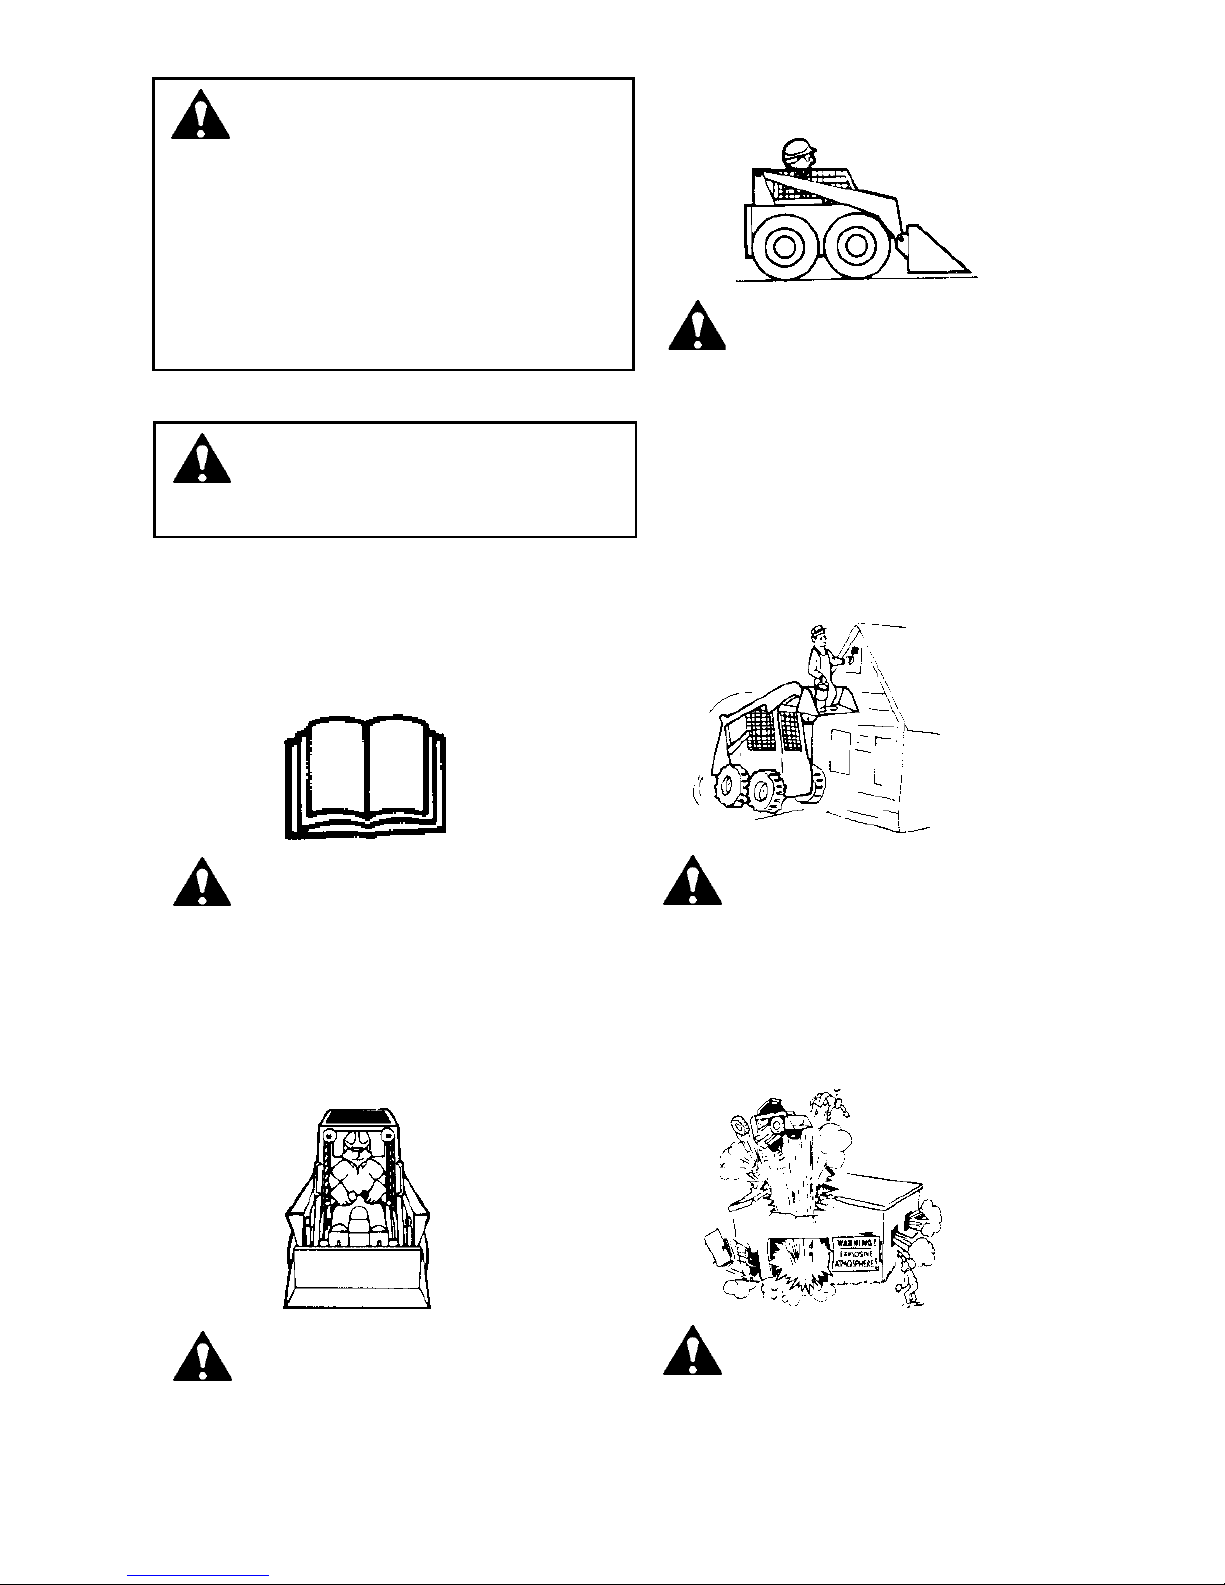
Operators must have instructions
before running the machine.
Untrained operators can cause
injury or death.
Read Operator’s Manual
before using machine.
CORRECT
Always fasten seatbelt
snugly . Always keep feet on
the floor/pedals when
operating loader.
CORRECT
Never use loader
without ROPS/FOPS.
Never modify the
ROPS/FOPS
structure.
WRONG
Never use the loader
to lift personnel.
WRONG
Do not use loader
around explosive dust
or gas, or where
exhaust can contact
flammable material.
WRONG
Page 3

Introduction . . . . . . . . . . . . . . . . . . . . . . . . . . . . . . . . . . . . 1
Safety . . . . . . . . . . . . . . . . . . . . . . . . . . . . . . . . . . . . . . . . 5
Controls and Safety Equipment . . . . . . . . . . . . . . . . . . . 17
Operation . . . . . . . . . . . . . . . . . . . . . . . . . . . . . . . . . . . . 31
Service . . . . . . . . . . . . . . . . . . . . . . . . . . . . . . . . . . . . . . 41
Troubleshooting . . . . . . . . . . . . . . . . . . . . . . . . . . . . . . . 57
Maintenance Schedule . . . . . . . . . . . . . . . . . . . . . . . . . . 67
Specifications . . . . . . . . . . . . . . . . . . . . . . . . . . . . . . . . . 71
Table of Common Materials and Densities. . . . . . . . . . . 76
Torque Specifications . . . . . . . . . . . . . . . . . . . . . . . . . . . 79
Index . . . . . . . . . . . . . . . . . . . . . . . . . . . . . . . . . . . . . . . . 81
SL3640E, SL3840E (EU) and SL4240E
Operator’s Manual
TABLE OF CONTENTS
All-Tach™ and Hydraloc™ are trademarks of Gehl Company.
Gehl
®
and Powerview® are registered trademarks of Gehl Company.
Loader Model Number
Loader Serial Number
Engine Serial Number
Page 4

EC DECLARATION OF CONFORMITY
1. Manufacturer: Gehl Company
2. Address: One Gehl Way
West Bend, WI 53095 U.S.A.
FAX: 262-334-6687
3. Technical Construction File Location:
Attn.: Quality Manager
915 SW 7th St.
Madison, SD 57042 U.S.A.
4. Authorized Representative: Gehl Europe GmbH
5. Address: Burgsteinfurter Damm 89
D-48485 Neuenkirchen/Rheine
GERMANY
6. We hereby declare that the model(s) listed below
conforms to EC Directives: 2004/108/EC (EMC),
97/23/EC (Pressure Equipment), 2006/42/EC
(Machinery) and 2000/14/EC (Noise Emission),
including all current amendments.
7. In accordance with EN/ISO Standards:
EN ISO 3450:1996, ISO 6165
8. Category: EARTH-MOVING MACHINER Y/
LOADERS/COMPACT
9. Model(s): 3840E, 4240E
10. Directive/Conformity Assessment Procedure/Notified Body:
2004/108/EC Type-test Self-certification
97/23/EC Self-certification ---------2006/42/EC Self-certification ---------2000/14/EC Annex VIII ± Full
Quality Assurance
TÜV Industrie Service
GmbH ± TÜV SÜD Group
Westendst. 199, D-80686
München GERMANY
Page 5

917334/BP0310 1
CHAPTER 1
INTRODUCTION
This Operator’s Manual provides the owner/operator information about maintaining and servicing SL3640E, SL3840E (EU) and SL4240E ski d-steer loader
models. More importantly, this manual provides an operating plan for safe and
proper use of the machine. Major points of safe operation are detailed in the
Safety chapter of this manual.
We ask th at you read and underst and the contents of this manu al completely and
become familiar with your new machine before operating it. See your auth ori zed
Gehl dealer if you have any questions concerning information in the manual,
require extra manuals or for inform ation concerning the availability of manuals
in other languages.
Throughout this manual, information is provided set in italic type and introduced
by the word Note or Important. Read carefully and comply with those messages
– it will improve your operating and maintenance efficiency, help avoid breakdowns and damage, and extend your machine’s life.
A manual storage box in the operator’s compartment holds the Operator’s
Manual and AEM Safety Manual (also available in Spanish). Please return the
manuals to this box and keep them with the unit at all times. If this machine is
resold, we recommend that these manuals be given to the new owner.
The attachments and equipment available for use with this machine have a wide
variety of potential applications. Read the manual provided with the attachment
to learn how to safely maintain and operate the equipment. Be sure the machine
is suitably equipped for the type of work to be performed.
Do not use this machine for any applications or purposes other than those
described in this manual or those applicable for approved attachments. If the
machine is to be used with special attachments or equipment other than those
approved by Gehl Company, consult your Gehl dealer. Any person using nonapproved attachments or making unauthorized modifications is responsible for
the consequences.
The Gehl dealership network stands ready to provide you with any assistance you
may require, including providing genuine Gehl service parts. All service parts
should be obtained from your Gehl dealer. Provide complete information about
the part and include the model and serial numbers of your machine. Record these
numbers in the space provided on the Table of Contents page, as a handy reference.
Gehl Company strives to continuously improve its products and reserves the right
to make changes and improvements in the design and construction of any part
without incurring the obligation to install such changes on any p reviously delivered unit.
If this machine was purchased “used”, or if the owner’s address has changed,
please provide your Gehl dealer or Gehl Compan y Service Department with the
owner’s name and current address, along with the machine model and serial
number. This will allow the registered owner information to be updated, so that
the owner can be notified directly in case of an important product issue.
Page 6

2 917334/BP0310
Loader Identification
1. Upright
2. Lift Cylinder
3. Tires
4. Front Work Lights
5. Handholds
6. Lift Arm
7. Auxiliary Hydraulic
Couplers
8. Tilt Cylinders
9. Attachment Bracket
1
2
3
4
5
6
8
9
7
1. Engine Cover
2. Tail Lights
3. Rear Work Lights
4. Rear Door
5. Roll-Over/Falling Object
Protective Structure
(ROPS/FOPS)
6. Restraint Bar
1
2
3
4
5
6
Page 7

917334/BP0310 3
Control/Indicator Symbols
Power Off Power On Engine Start
Hazard Flasher
Worklight
Worklight w/Flasher
Battery Charge
Parking Brake Read Operator’s
Manual
Horn
Volume – Full Volume – Half Full Volume – Empty
Pre-Heat Diesel Fuel
Lift Point
N
Neutral
Safety Alert
Chaincase Oil
Seatbelt – Lap Only
Engine Air Filter
Engine Oil Engine Oil Filter Engine Oil Pressure Fuel Filter
Engine Coolant
Temperature
Hydraulic System Hydraulic Oil
Temperature
Hydraulic Oil Filter Grease Lubrication
Point
Tie-Down
Machine Travel –
Forward
Machine Travel –
Reverse
Clockwise Rotation Counterclockwise
Rotation
Fast Slow Bucket – Lowe r
Bucket – Raise
Bucket – Float
Bucket – Rollback Bucket – Dump
Page 8

4 917334/BP0310
Notes
Page 9

917334/BP0310 5
CHAPTER 2
SAFETY
This safety alert symbol means Attention! Become alert! Your safety is
involved! It stresses an attitude of “Heads Up for Safety” and can be
found throughout this Operator’s Manual and on the decals on the machine.
Before operating this machine, read and study the follo wing safety information.
For further reference on the safe operation of skid-steer lo aders, Gehl Company
suggests that equipment owners obtain the Gehl “Skid-Steer Loader Safety”
video, which is available through Gehl dealers. In addition, be sure that everyone
who operates or works with this machine, whether family member or employee,
is familiar with these safety precautions. It is essential to have competent and
careful operators, who are not physically or mentally impaired, and who are thoroughly trained in the safe operation of the machine and the handling of loads. It is
recommended that the operator be capable of obtaining a valid motor vehicle
operator’s license.
The use of skid-steer loaders is subject to certain hazards that cannot be eliminated
by mechanical means, but only by exercising intelligence, care and common sense.
Such hazards include, but are not limited to, hillside operation, overloading, instability of the load, poor maintenance and using the equipment for a purpose for
which it is not intended or designed.
Gehl ALWAYS considers the operator’s safety when designing its machinery,
and guards exposed moving parts for the operator ’s protection. However, some
areas cannot be guarded or shielded in order to assure proper operation. Furthermore, this Operator’s Manual and decals on the machine warn of additional hazards and they should be read and observed closely.
Some photographs in this manual may show doors, guards and shields open or
removed for illustrative purpose s only. Be sure that all doors, guards and shields
are in their proper operating positions before starting the engine to operate the
unit.
Different applications may require optional safety equipment, such as a back-up
alarm, mirror, strobe light or an impact-resistant front door. Be sure you know
the job site hazards and equip your machine as needed.
“DANGER” indicates an imminently hazardous situation which, if not avoided, will
result in death or serious injury.
“WARNING” indicates a potentially hazardous
situation which, if not avoided, could result in
death or serious injury.
“CAUTION” indicates a potentially hazardous
situation which, if not avoided may result in
minor or moderate injury. May also alert against unsafe practices.
DANGER
WARNING
CAUTION
Page 10

6 917334/BP0310
Mandatory Safety Shutdown Procedure
Before cleaning, adjusting, lubricating, servicing the unit, or leaving it
unattended:
1. Move the drive control handle(s) to the neutral position.
2. Lower the lift arm and attachment completely. If the lift arm must be left in
the raised position, BE SURE to properly engage the lift arm support dev ice
(page 20).
3. Move the throttle to the low idle p osition, shut off the engine and rem ove the
key.
4. Before exiting, move the lift/tilt cont rol(s) to verify that the controls do not
cause movement of the lift arm or attachment.
Safety Reminders
Before Starting
¾ Do not modify the ROPS/FOPS unless instructed to do so in installation
instructions. Modifications such as welding, drilling or cutting can weaken
the structure and reduce the protection it provides. A damaged ROPS/FOPS
cannot be repaired – it must be replaced.
¾ To ensure safe operation, replace damaged or worn-out parts with genuine
Gehl service parts.
¾ Gehl skid-steer loaders are designed and intended to be used only with Gehl
attachments or approved referral attachments. Gehl cannot be responsible for
operator safety if the loader is used with a non-approve d at tachment.
¾ Remove all trash and debris from the machine each day, especially in the
engine compartment, to minimize the risk of fire.
¾ Always face the loader and use the handholds and steps when getting on and
off the loader. Do not jump off the loader.
¾ Never use starting fluid (ether).
¾ Walk around the machine an d warn all nearby personnel before starting the
machine.
¾ Always perform a daily inspection of the machine before using it. Look for
damage, loose or missing parts, leaks, etc.
Page 11

917334/BP0310 7
During Operation
¾ Machine stability is affected by: the load being carried, the height of the load,
machine speed, abrupt control movements and driving over uneven terrain.
DISREGARDING ANY OF THESE FACTORS CAN CAUSE THE
LOADER TO TIP, THROWING THE OPERATOR OUT OF THE
SEAT OR LOADER, RESULTING IN DEATH OR SERIOUS INJURY.
Therefore: ALWAYS operate with the seatbelt fastened and the restraint bar
lowered. Do not exceed the machine’s Rated Operating Load. Carry the load
low. Move the controls smoothly and gradually, and operate at speeds appropriate for the conditions.
¾ When operating on inclines or ramps, always travel with the heavier end of
the loader toward the top of the incline for additional stability.
¾ Do not raise or drop a loaded bucket or fork suddenly. Abrupt movements
under load can cause serious instability.
¾ Never activate the float function with the bucket or attachment loaded or
raised, because this will cause the arm to lower rapidly.
¾ Do not drive too close to an excavation or ditch; be sure that the surrounding
ground has adequate strength to support the weight of the loader and the load.
¾ Never carry riders. Do not allow others to ride on the machine or attachments,
because they could fall or cause an accident.
¾ Always look to the rear before backing up the skid-steer loader.
¾ Operate the controls only from the operator’s seat.
¾ Always keep hands and feet inside the operator ’s compartment while oper-
ating the machine.
¾ New operators must operate the loader in an open area away from bystanders.
Practice with the controls until the loader can be operated safely and
efficiently.
¾ Always wear safety goggles, ear and head protection while operating the
machine. Operator must wear protective clothing when appropriate.
¾ Exhaust fumes can kill. Do not operate this machine in an enclosed area
unless there is adequate ventilation.
¾ When you park the machine and before you leave the seat, check the restraint
bar for proper operation. The restraint bar , when raised, deactivates the lift/tilt
controls and auxiliary hydraulics, and applies the parking brake.
Maintenance
¾ Never attempt to by-pass the keyswitch to start the engine. Use only the jump
starting procedure detailed in the Operation chapter of this manual.
¾ Never use your hands to search for hydraulic fluid leaks. Inst ead, use a piece
of paper or cardboard. Escaping fluid under pressure can b e invisible and can
penetrate the skin and cause serious injury. If any fluid is injected into your
skin, see a doctor at once. Injected fluid must be surgically removed by a
doctor or gangrene may result.
Page 12

8 917334/BP0310
¾ Always wear safety glasses with side shields when striking metal against
metal. In addition, it is recommended that a softer (chip-resistant) m aterial be
used to cushion the blow. Failure to heed could lead to serious injury to the
eyes or other parts of the body.
¾ Do not smoke or have any spark-producing equipment in the area while filling
the fuel tank or while working on the fuel or hydraulic systems.
Potential Hazards
A skid-steer loader operator must ALWAYS be conscious of the work ing environment. Operator actions, environmental conditions and the job being done
require the full attention of the operator so that safety precautions can be taken.
ALWAYS maintain a safe distance from electric power lines and avoid contact
with any electrically charged conductor or gas line. Accidental contact or rupture
can result in electrocution or an explosion. Contact the North American One-Call
Referral System at: 1-888-258-0808 for the local “Digger's Hotline” numb er or
the proper local authorities for utility line locations BEFORE starting to dig!
Exposure to crystalline silica (found in sand, soil and rocks) has b een associated
with silicosis, a debilitating and often fatal lung disease. A Hazard Review
(Pub. No. 2002-129) by the U.S. National Institute fo r Occupational Safety and
Health (NIOSH) indicates a significant risk of chronic silicosis for workers
exposed to inhaled crystalline silica over a working lifetime. NIOSH recommends an exposure limit of 0.05 mg/m
3
as a time-weighted average for up to a
10-hr workday during a 40-hr workweek. NIOSH also recommends substituting
less hazardous materials when feasible, using respiratory protect ion and regular
medical examinations for exposed workers.
Safety Decals
The skid-steer loader has decals that provide safety information and precautions
around the loader. These decals must be kept legible. If missing or illegible, they
must be replaced promptly. Replacements can be obtained from your Gehl
dealer. New equipment must have all decals specified by the manufacturer
affixed in their proper locations.
New Decal Application
Surfaces must be free of dirt, dust, grease and foreign material before applying
the decal. Remove the smaller portion of the decal backing paper and apply the
exposed adhesive to the clean surface, maintaining proper position and alignment. Peel the rest of the backing paper and ap ply hand pressure to smooth out
the decal surface. Refer to the following pages for proper decal locations. Text
decals begin on page 9; no-text decals begin on page 12.
Page 13
917334/BP0310 9
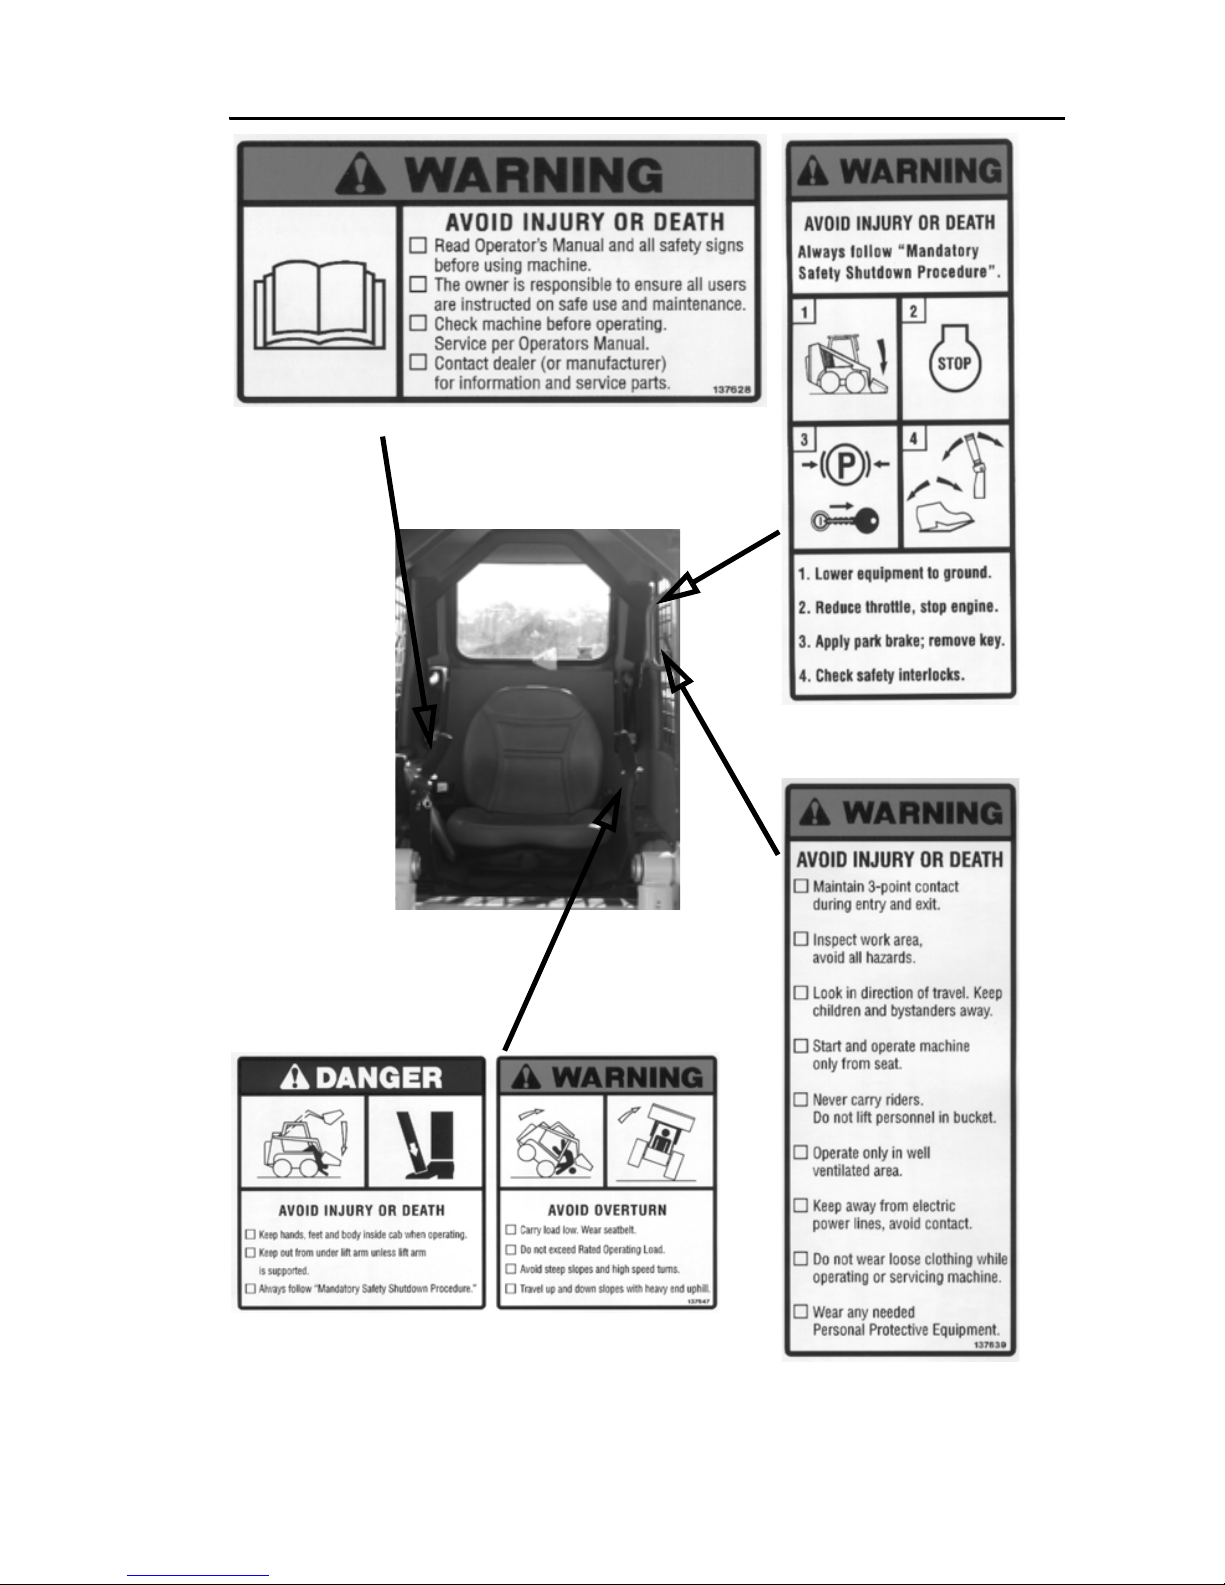
Safety Decals inside the ROPS/FOPS
137628 – Located on manual box, operator’s right
137683 – Located on
ROPS left panel
137647 – Located on operator’s lower left side
137639 – Located on
ROPS left panel
Page 14
10 917334/BP0310
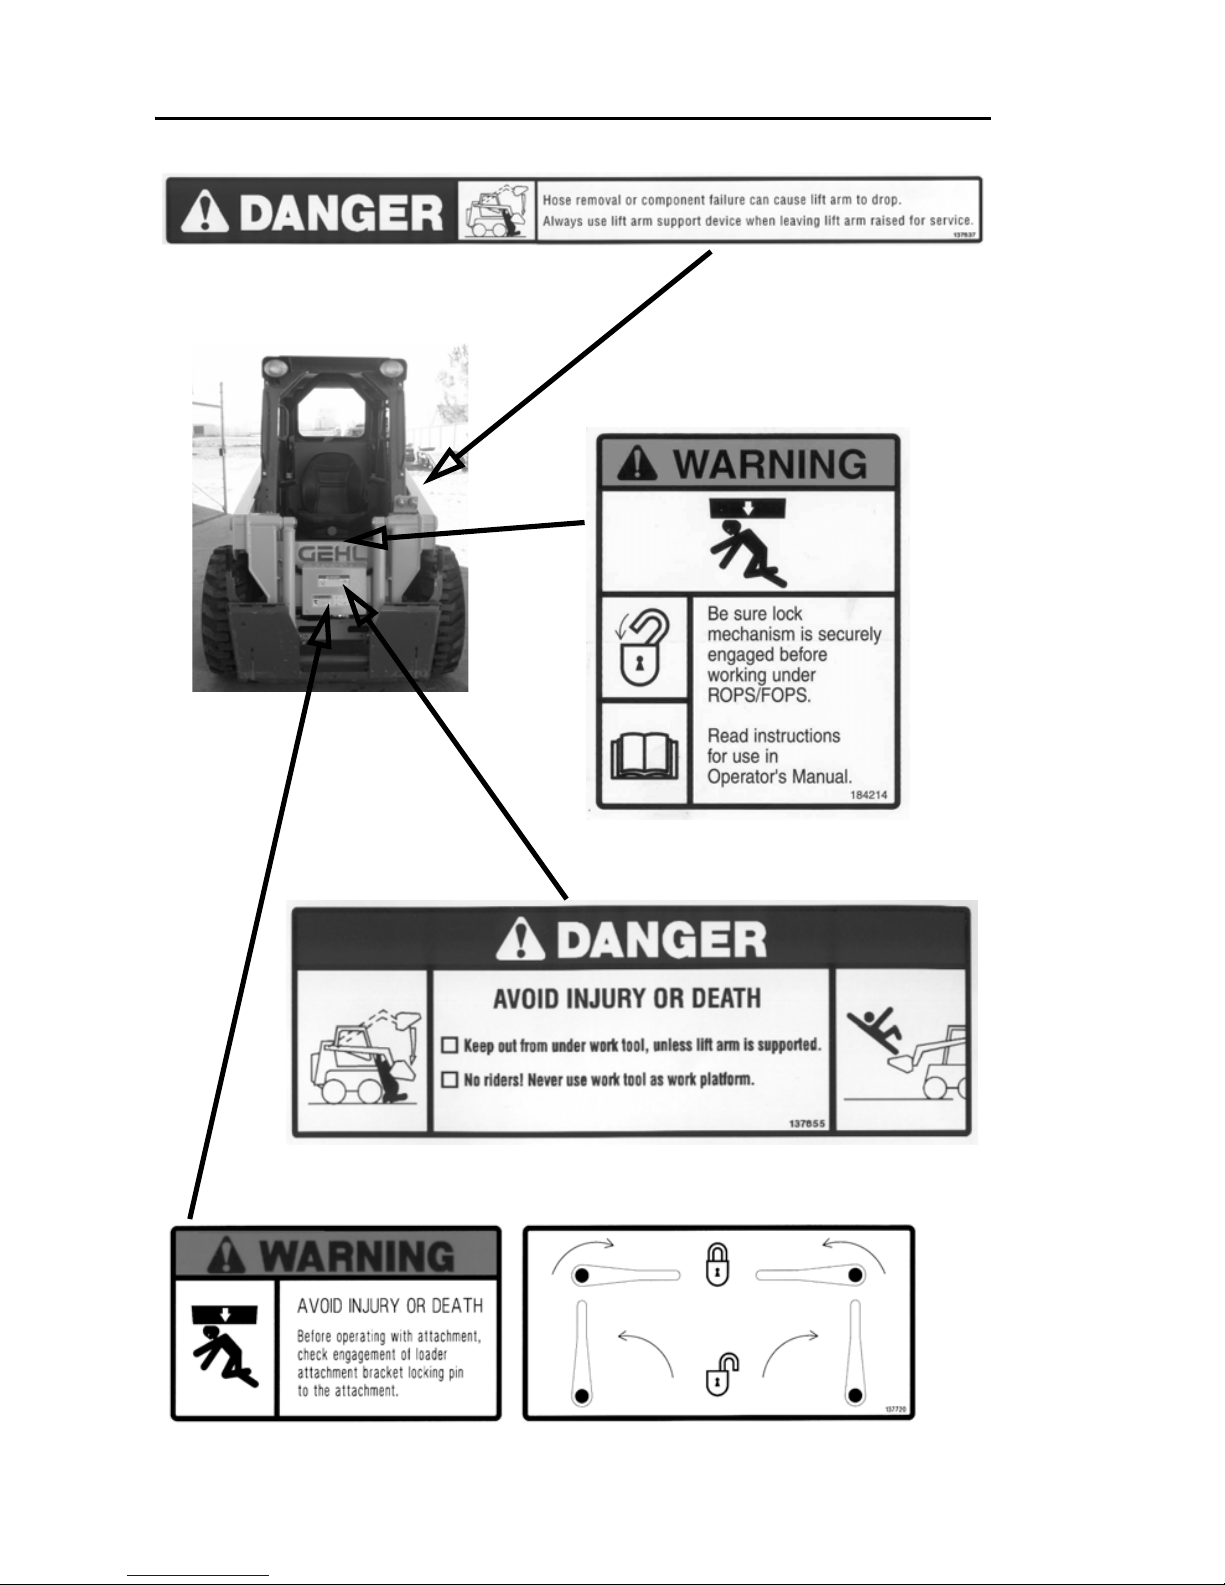
Safety Decals on the outside of the Skid Loader
137655 – Front of loader
137720 – Front of loader
184214 – Under ROPS
137637 – Lift arm support device, loader left side
Page 15
917334/BP0310 11
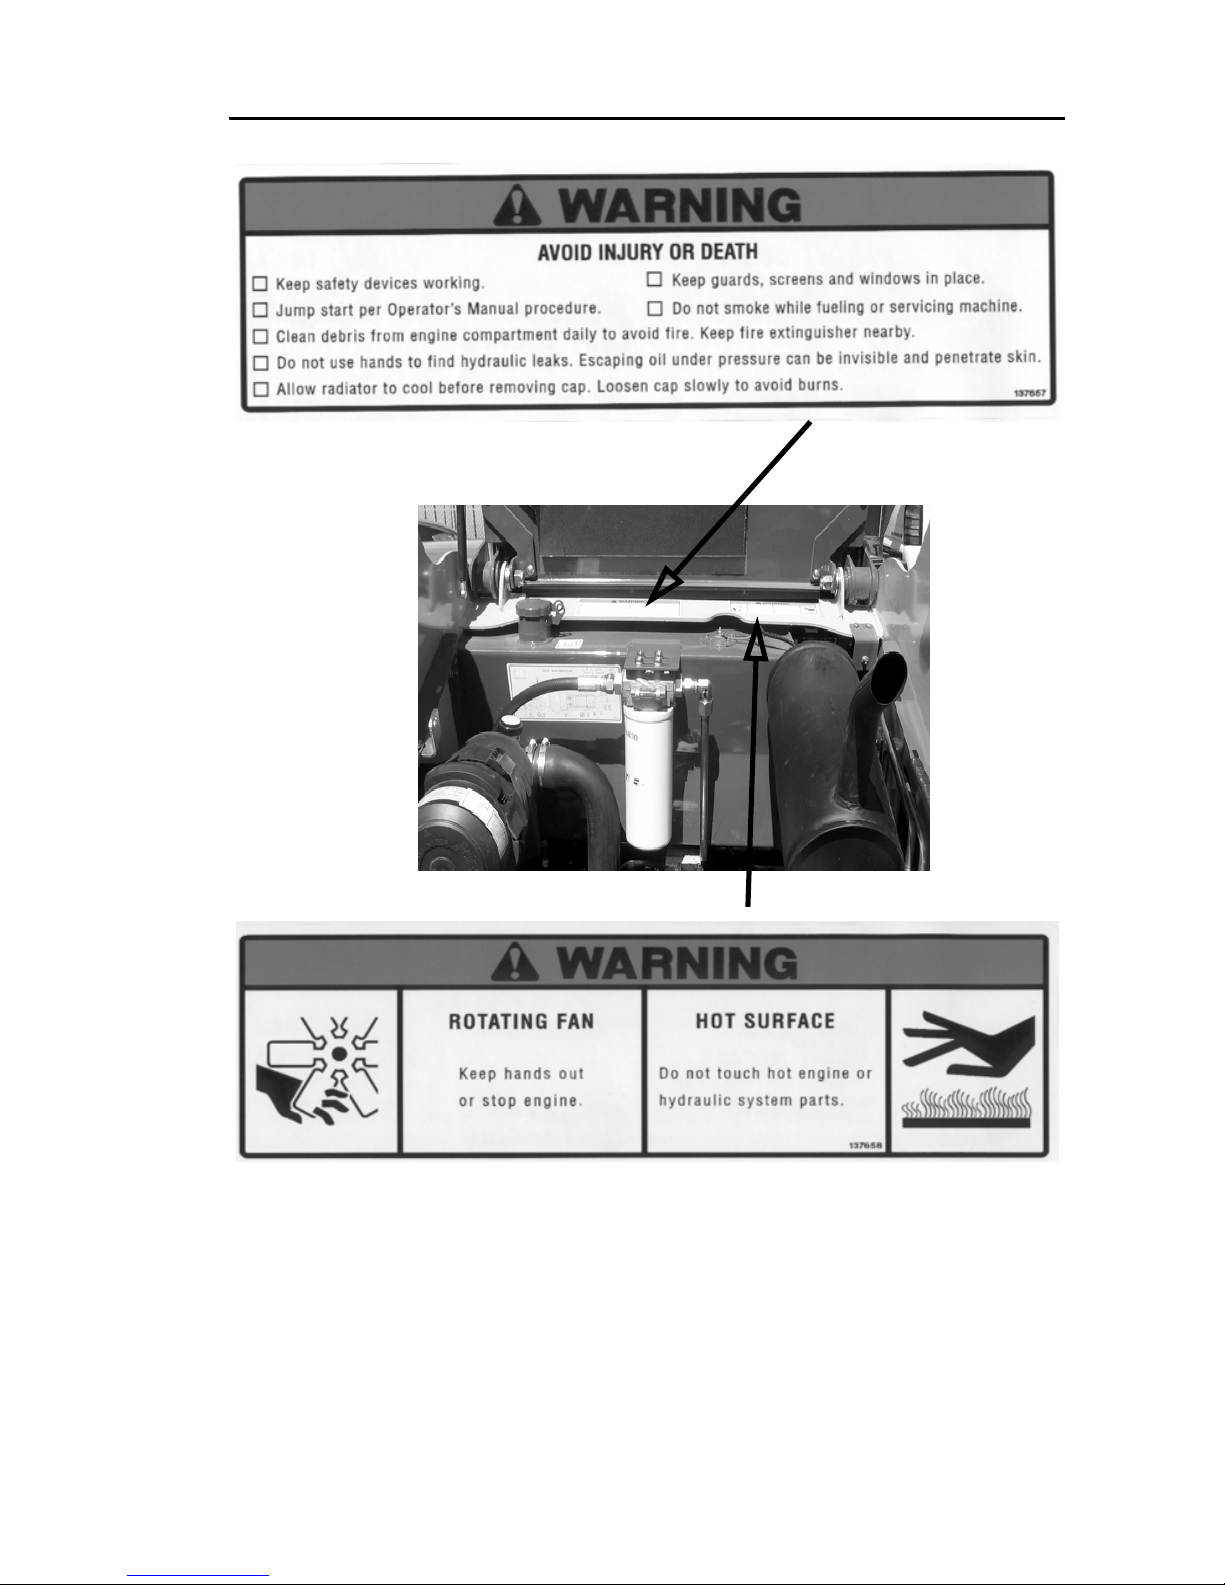
Safety Decals in the Engine Compartment
137657 – Right of hydraulic filter
137658 – On radiator
Page 16

12 917334/BP0310
ISO-Style (used Internationally)
Safety Decals inside the ROPS/FOPS
A – Crush hazard: Keep out from under lift arm unless lift arm is supported.
B – Crush hazard: Keep hands, feet and body inside cab when operating.
C – Forward tip hazard: Fasten seat belt. Carry load low. Do not exceed Rated
Operating Load.
D – Side tip hazard: Avoid steep slopes and high speed turns. Travel up and down
slopes with heavy end uphill.
Safety alert: Read Operator’s
Manual and all safety signs
before using machine. The
owner is responsible to ensure
all users are instructed on safe
use and maintenance.
137842 – Located on manual
storage box
137847 – Part of left
instrument panel
Safety alert: Always follow
“Mandatory Safety Shutdown
Procedure” in Operator’s Manual.
1 – Lower equipment to ground.
2 – Reduce throttle, stop engine.
3 – Apply parking brake; remove
key.
4 – Check safety interlocks.
137849 – Part of
left instrument
panel
Safety alert:
A – Check machine before
operating; Service per Operator’s
Manual. Contact dealer (or
manufacturer) for information and
service parts.
B – Maintain 3-point contact during
entry and exit.
C – Inspect work area. Avoid all
hazards. Look in direction of travel.
Keep children and bystanders away.
D – Start and operate machine only
from seat.
E – Keep away from power lines;
avoid contact.
F – Wear any needed Personal
Protective Equipment. Do not wear
loose clothing while operating or
servicing machine.
AB
C
D
E
F
137843 – Located on operator’s lower left side
ABCD
Page 17
917334/BP0310 13
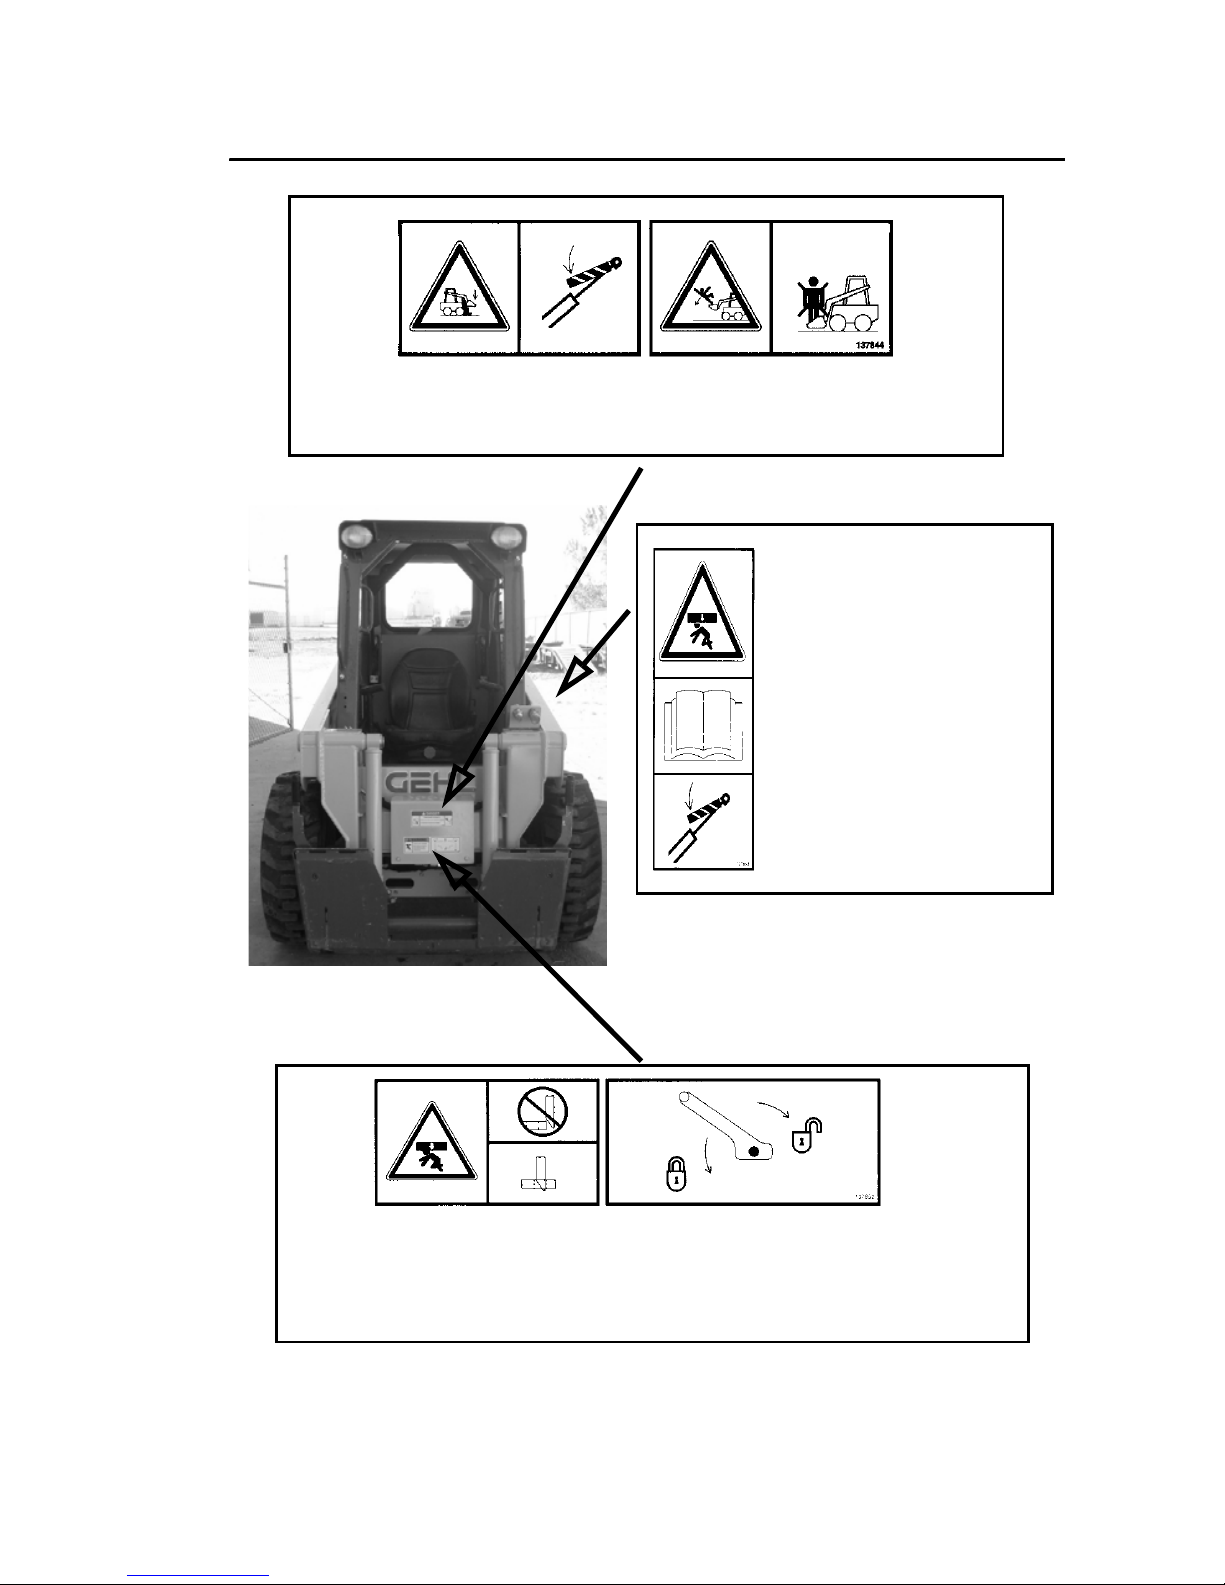
ISO-Style (used Internationally) Safety Decals
on the outside of the Skid-Steer Loader
137844 – Located on front of loader
137852 – Located on hitch (manual hitch loaders only)
A – Crush hazard: Keep out from under work tool unless lift arm is supported.
B – Fall hazard: No riders. Never use work tool as work platform.
Crush hazard: Before operating with attachment, check engagement of hitch
locking pin to the attachment:
A – Incorrect attachment engagement C – Lock hitch lever
B – Correct attachment engagement D – Unlock hitch lever
AB
A
B
C
D
137853 – Located on lift
arm support device
Crush hazard: Hose
removal or component
failure can cause lift arm to
drop. Always use lift arm
support device when
leaving arm raised for
service.
Page 18
14 917334/BP0310
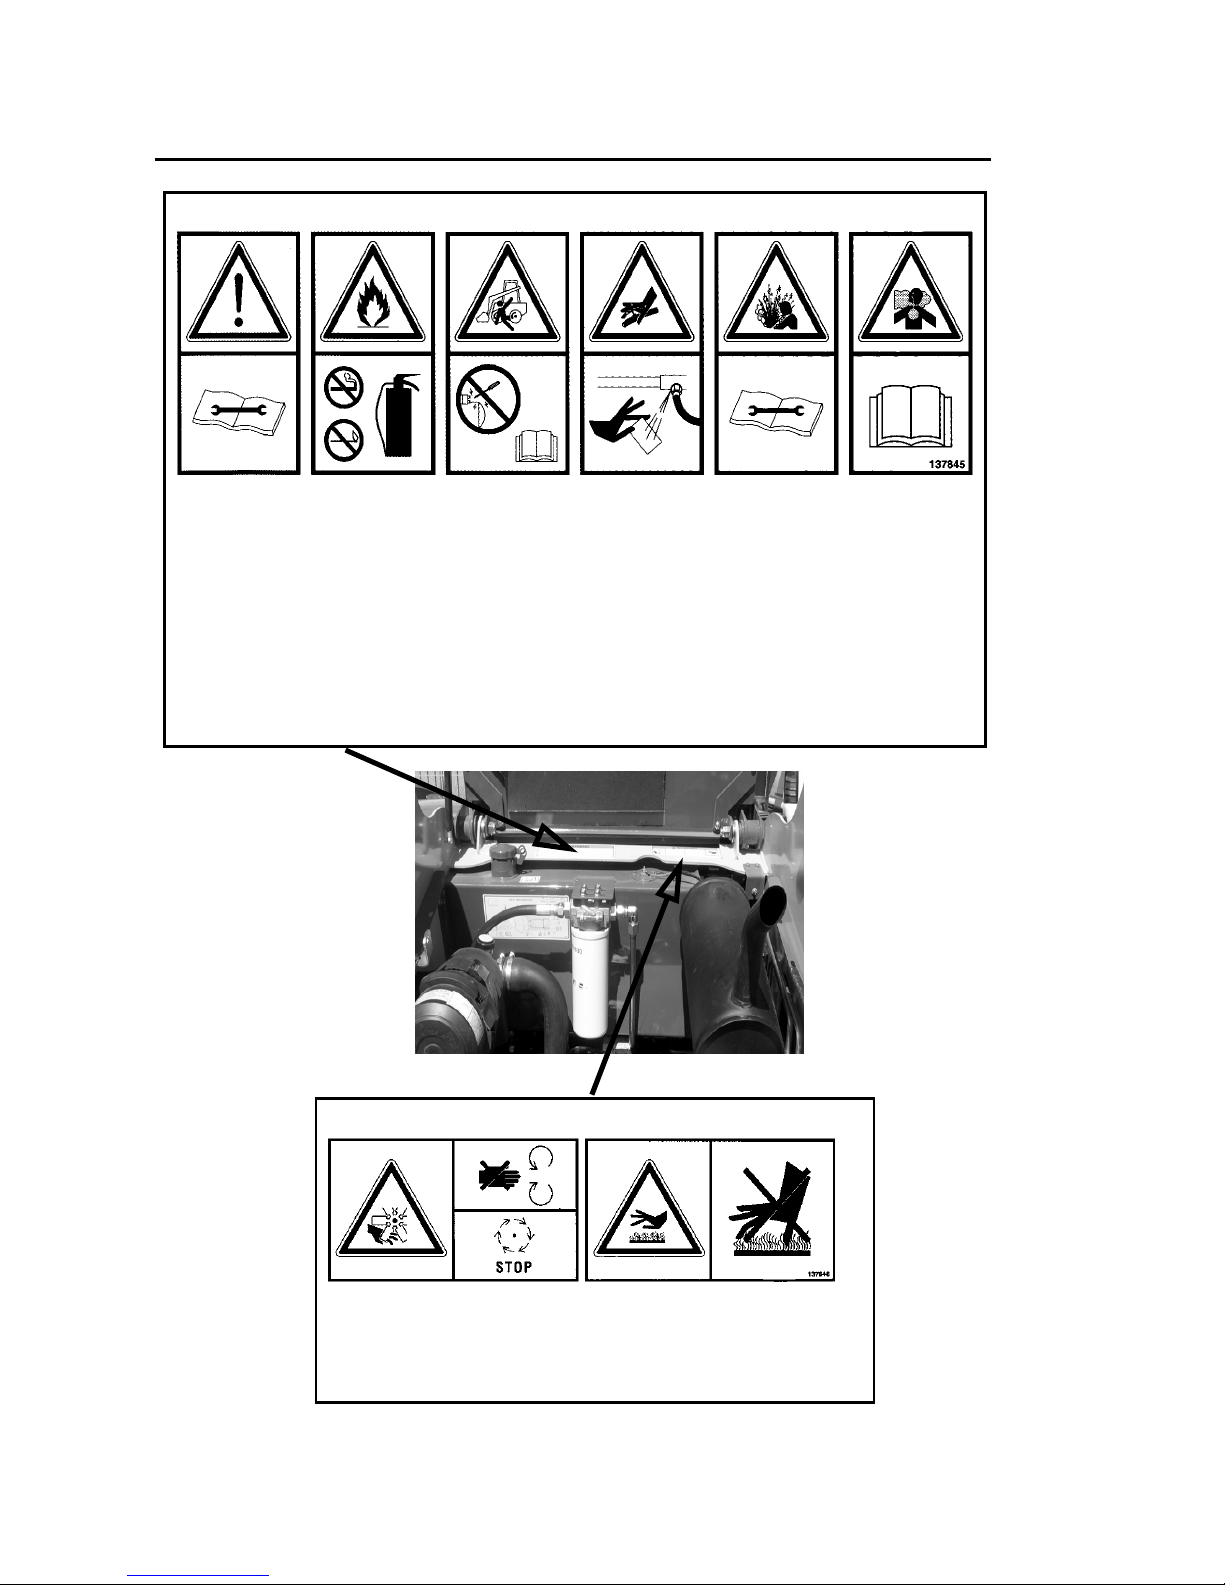
ISO-Style (used Internationally)
Safety Decals in the Engine Compartment
137845 – Located on cross member for frame
A – Safety alert: Keep safety devices in place and in working order. Keep guards, screens
and windows in place.
B – Fire hazard: Do not smoke while fueling or servicing machine. Clean debris from
engine compartment daily to avoid fire. Keep fire extinguisher nearby.
C – Run-over hazard: Jump-start per Operator’s Manual procedure.
D – Oil injection hazard: Do not use hands to find hydraulic leaks. Escaping oil under
pressure can be invisible and penetrate skin. Use a piece of cardboard to find leaks.
E – Burn hazard: Allow radiator to cool before removing cap. Loosen cap slowly to avoid
burns.
F – Suffocation hazard: Operate only in a well-ventilated area.
ABCD
EF
137845 – Located on cross member for frame
A – Rotating fan: Keep hands out or stop engine.
B – Hot surface: Do not touch hot engine or hydraulic
system parts.
AB
Page 19
917334/BP0310 15
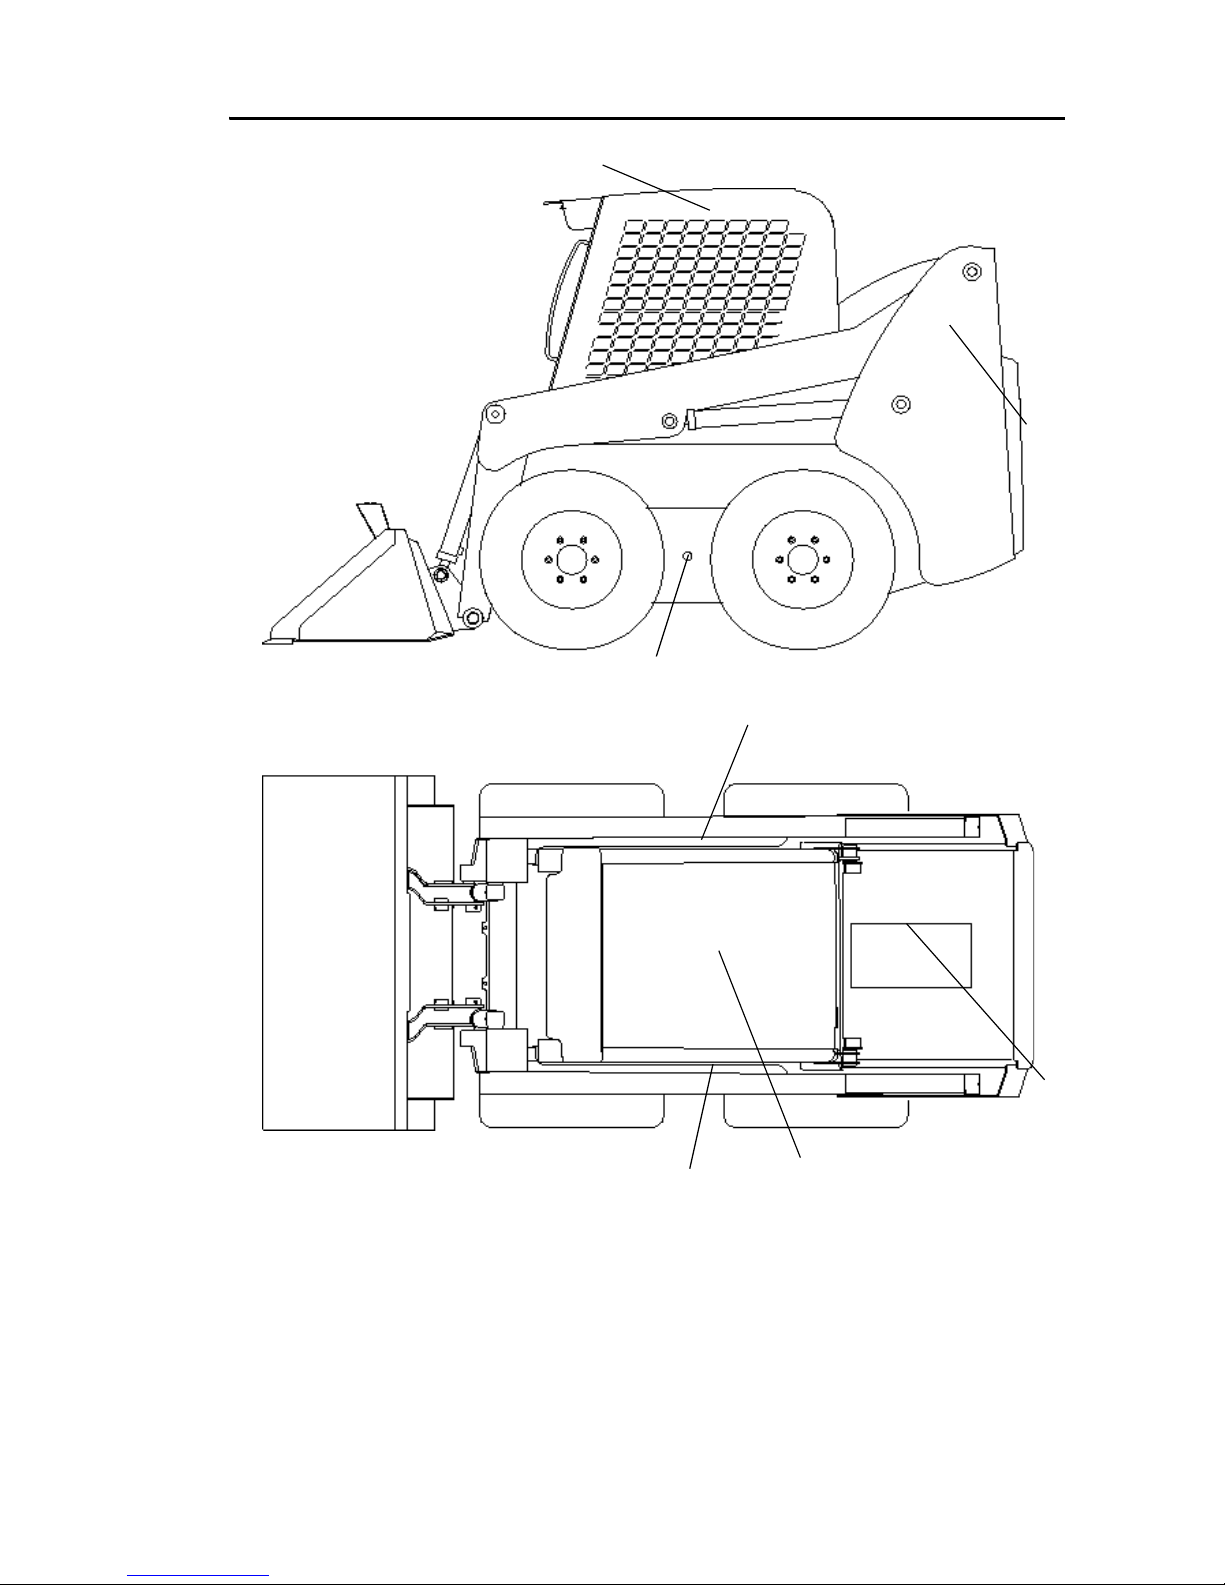
Product and Component Plate Locations
Product and Component Plates
1. Engine plate: with e.g. type designation, product and serial number
2. Operator protective system plate: with e.g. model, certification and operator protection
system serial number
3. Product plate: with Product Identification Number and e.g. model/type designation
4. Seat plate according to ISO 7096
5. Component plate rear drive axle: with e.g. product and serial number
6. Component plate front drive axle: with e.g. product and serial number
7. Component plate transmission: with e.g. product and serial number
1
4
6
5
7
2
3
Page 20

16 917334/BP0310
Notes
Page 21

917334/BP0310 17
CHAPTER 3
CONTROLS AND SAFETY EQUIPMENT
Become familiar with and know how to use all
safety devices and controls on the skid-steer
loader before operating it. Know how to stop loader operat ion before
starting it. This Gehl loader is designed and intended to be used
only with a Gehl attachment or a Gehl-approved referral attachment
or accessory. Gehl cannot be responsible for operator safety if the
loader is used with a non-approved attachment.
Guards and Shields
Whenever possible and without affecting loader operation, guards and shields are
provided to protect against potentially hazardous areas. In many places, safety
decals are also provided to warn of potential hazards and/or to display special
operating procedures.
Read and thoroughly understand all safety
decals on the loader before operating it. Do not
operate the loader unless all factory-installed guards and shields
are properly secured in place.
Operator Restraint Bar
Lower the restraint bar after entering the operator’s compartment. The restraint bar
is securely anchored to the ROPS. The restraint bar switch is wired in series with
the seat switch formin g an interlock for the lift arm, tilt, drive and starter circuits
(refer to the Safety Interlo ck Syste m topic on page 18 for more information).
Never defeat the operator restraint bar or seat
switch electrically or mechanically. Always
wear your seatbelt.
CAUTION
WARNING
WARNING
Page 22
18 917334/BP0310
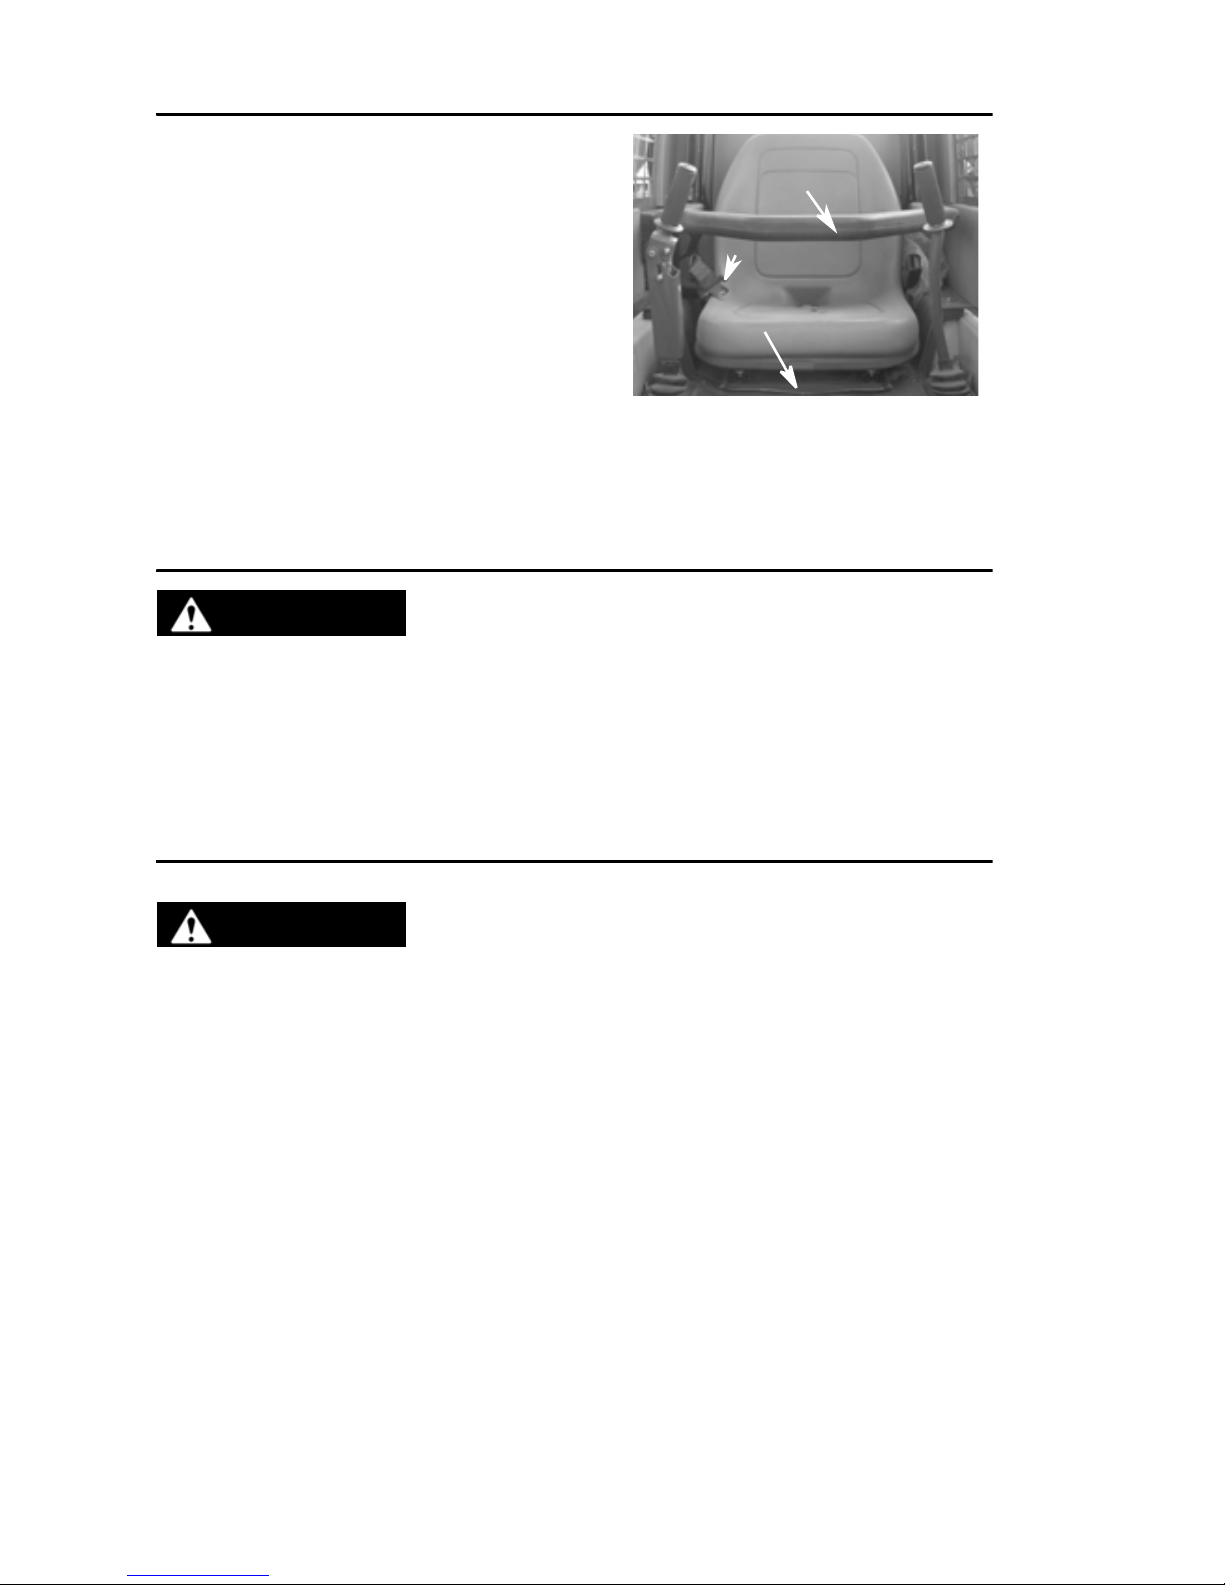
Operator’s Seat
The seat is mounted on rails for backward
or forward repositioning. A spring-loaded
latch handle activates the seat adjustment
mechanism.
Suspension seat (optional): A weight
adjustment knob is provided with this
seat for operator comfort.
Upper-Torso Restraint
ALWAYS wear the upper-torso restraint when
operating skid-steer.
The seat belt should always be fastened during operation.
Important: Inspect the seat belt(s) for damage before use, and replace if damaged. Keep seatbelt(s) clean. Use only soap and water to wash seat belt(s).
Cleaning solvents can cause damage to seatbelt(s).
Safety Interlock System
NEVER defeat the safety interlock system by
mechanically or electrically bypassing any
switches, relays or solenoid valves.
An interlock system is used on the loader for operator safety. Together with
solenoid valves, switches and relays, the interlock system:
¾ Prevents the engine from starting unless the operator is sitting on the seat and
the operator restraint bar is down.
¾ Disables the lift arm, attachment tilt and wheel drives when the operator
leaves the seat, turns the keyswitch to OFF or raises the restraint bar.
¾ Disables auxiliary hydraulic system when the restraint bar is raised or the
keyswitch is OFF.
Testing the Safety Interlock System
Before leaving a parked machine, check the safety interlock system for proper
operation:
Restraint Bar
1
2
3
Figure 1 Operator’s Seat
1. Restraint Bar
2. Seatbelt
3. Seat Adjustment Level
WARNING
WARNING
Page 23
917334/BP0310 19
With the engine running, raise the restraint bar. Move each of the controls.
There should be not more than a slight movement of the lift arm, attachment
and machine. If there is any significant movement, troubleshoot and correct the
problem immediately. Contact your dealer if necessary .
Seat Switch
With the engine off and the restraint bar lowered, unfasten the seatbelt. Lift
your weight up off the seat. Try to start the engine. If the engine starts, turn off
the engine, and troubleshoot and correct the problem. Contact your dealer if
necessary .
ROPS/FOPS
The ROPS/FOPS (Roll Over/Falling Object Protective Structure) is designed to
provide protection for the operator from falling objects and in case the loader tips
or rolls over, provided the operator is secured inside the ROPS by the seatbelt
and restraint bar.
Never operate the loader with the ROPS/F OPS
removed or locked back.
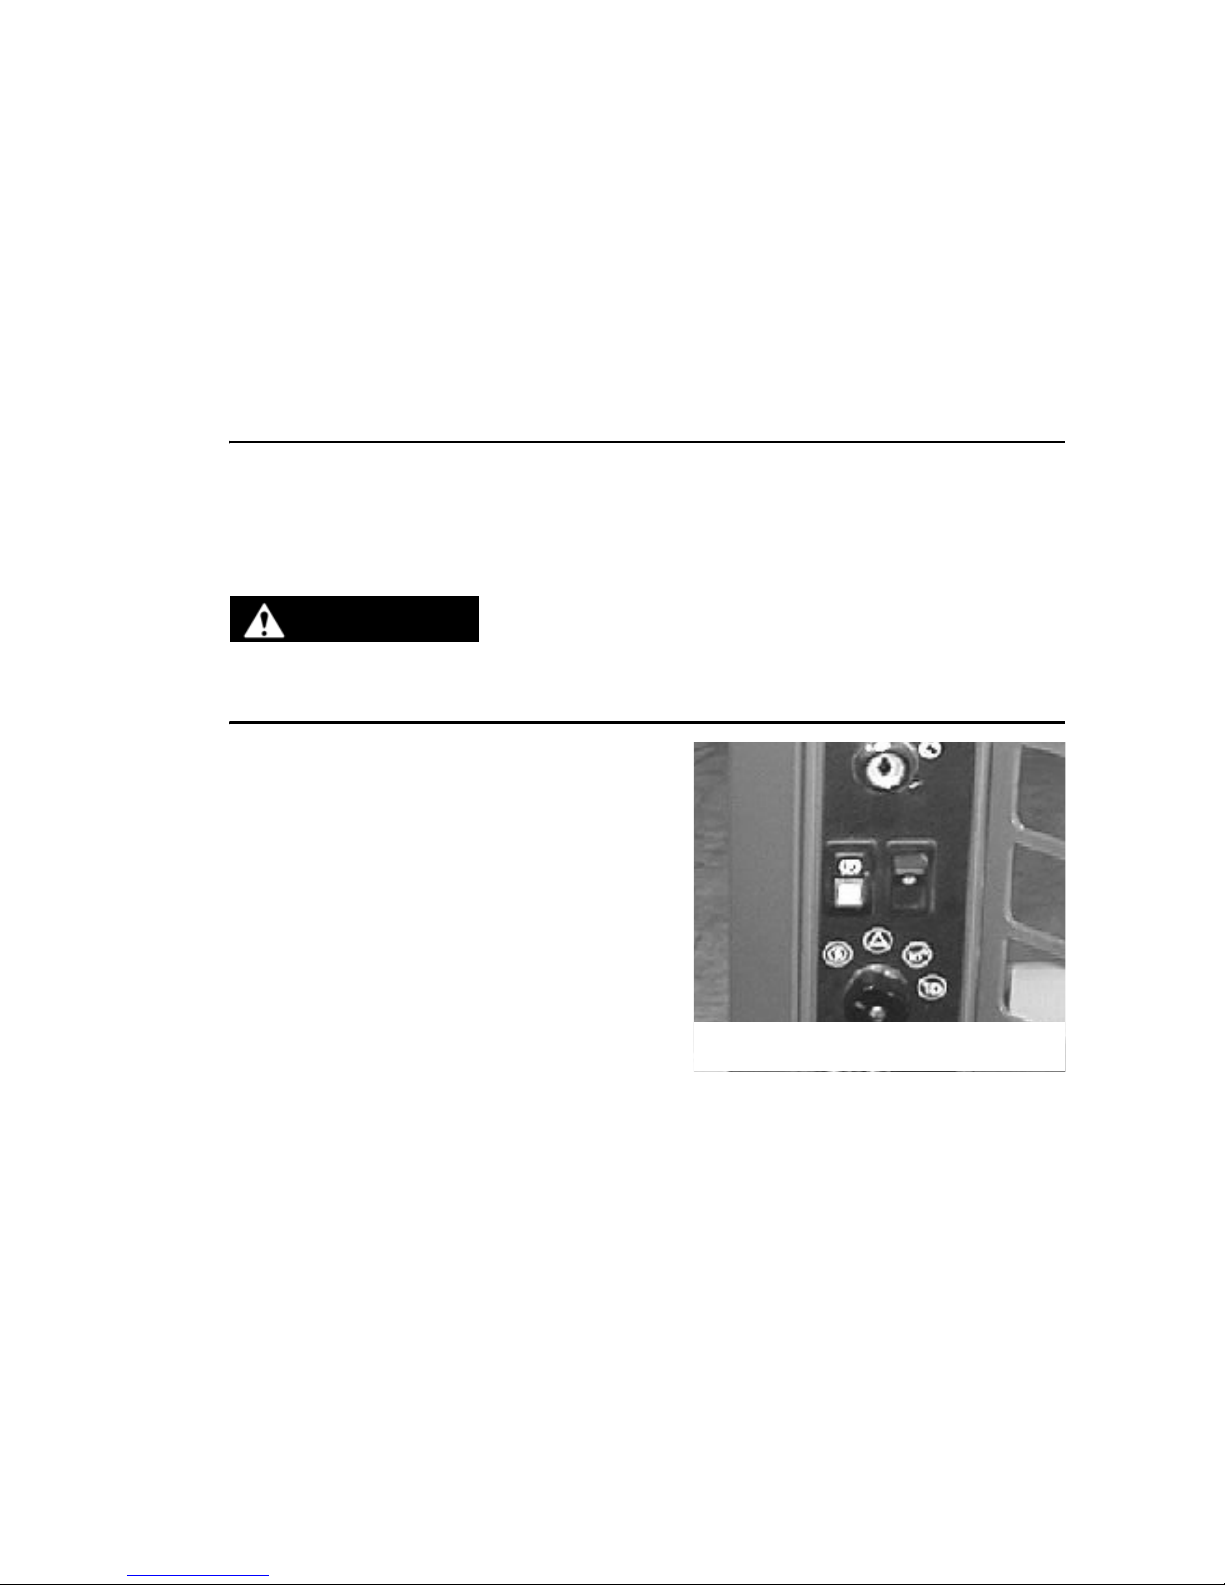
Parking Brake
This skid-steer loader is equipped with a
spring-applied hydraulic-released parking
brake. The parking brake engages when
the operator lifts the restraint bar, leaves
the operator’s seat or shuts off the engine.
The brake can also be applied manually
by using the switch located on the right
control panel of the ROPS. The red indicator on the switch lights when the parking
brake is applied.
WARNING
Figure 2 Parking Brake Switch
Page 24
20 917334/BP0310
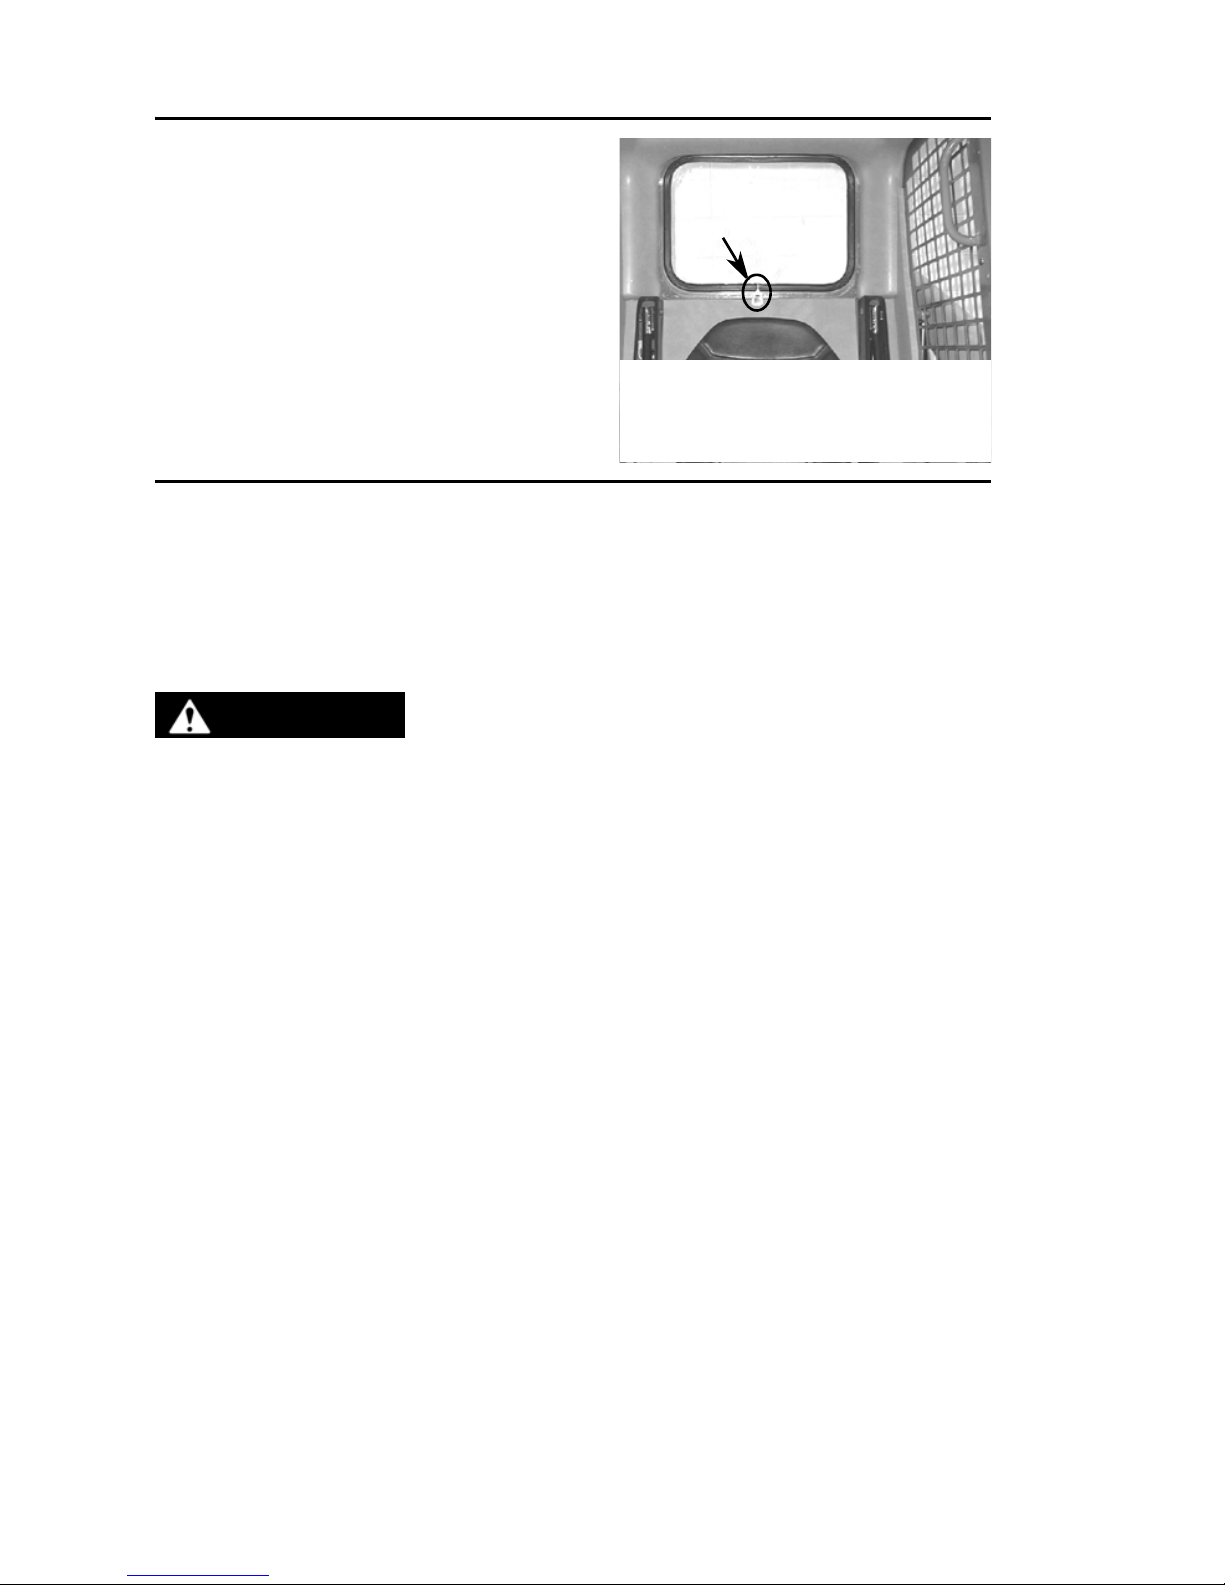
Rear Window Emergency Exit
The ROPS rear window has three functions: noise reduction, flying objects barrier and emergency exit.
To use the emergency exit, pull on the
yellow warning tag at the bottom of the
window and remove the seal. Push out the
window and exit.
Lift Arm Support Device
The lift arm support device on the left lift cylinder is used as a cylinder lock to
prevent the raised lift arm from unexpectedly lowering. Be sure to engage the
support device when the lift arm is raised for service. When the support device is
not being used, store it under the lift arm using the lock pin. The support device is
a safety device that must be kept in proper operating condition at all times. The
following steps ensure correct usage:
The safest method of engaging the lif t arm support device requires two people – one person
inside the loader and another person to engage the support de vice.
Note: With the keyswitch OFF and the solenoid valve working, the lift arm will
stay raised when the lift control is moved to lower the lift arm. If the valve does
not hold the lift arm and it begins to lower, do not leave the operator’s compartment. Instead, have someone store the support device for you. Then, contact your
Gehl dealer immediately to determine why the lift arm lowers while the keyswitch
is OFF.
Figure 3 Rear Window
Emergency Exit
1. Pull Tag
WARNING
Page 25

917334/BP0310 21
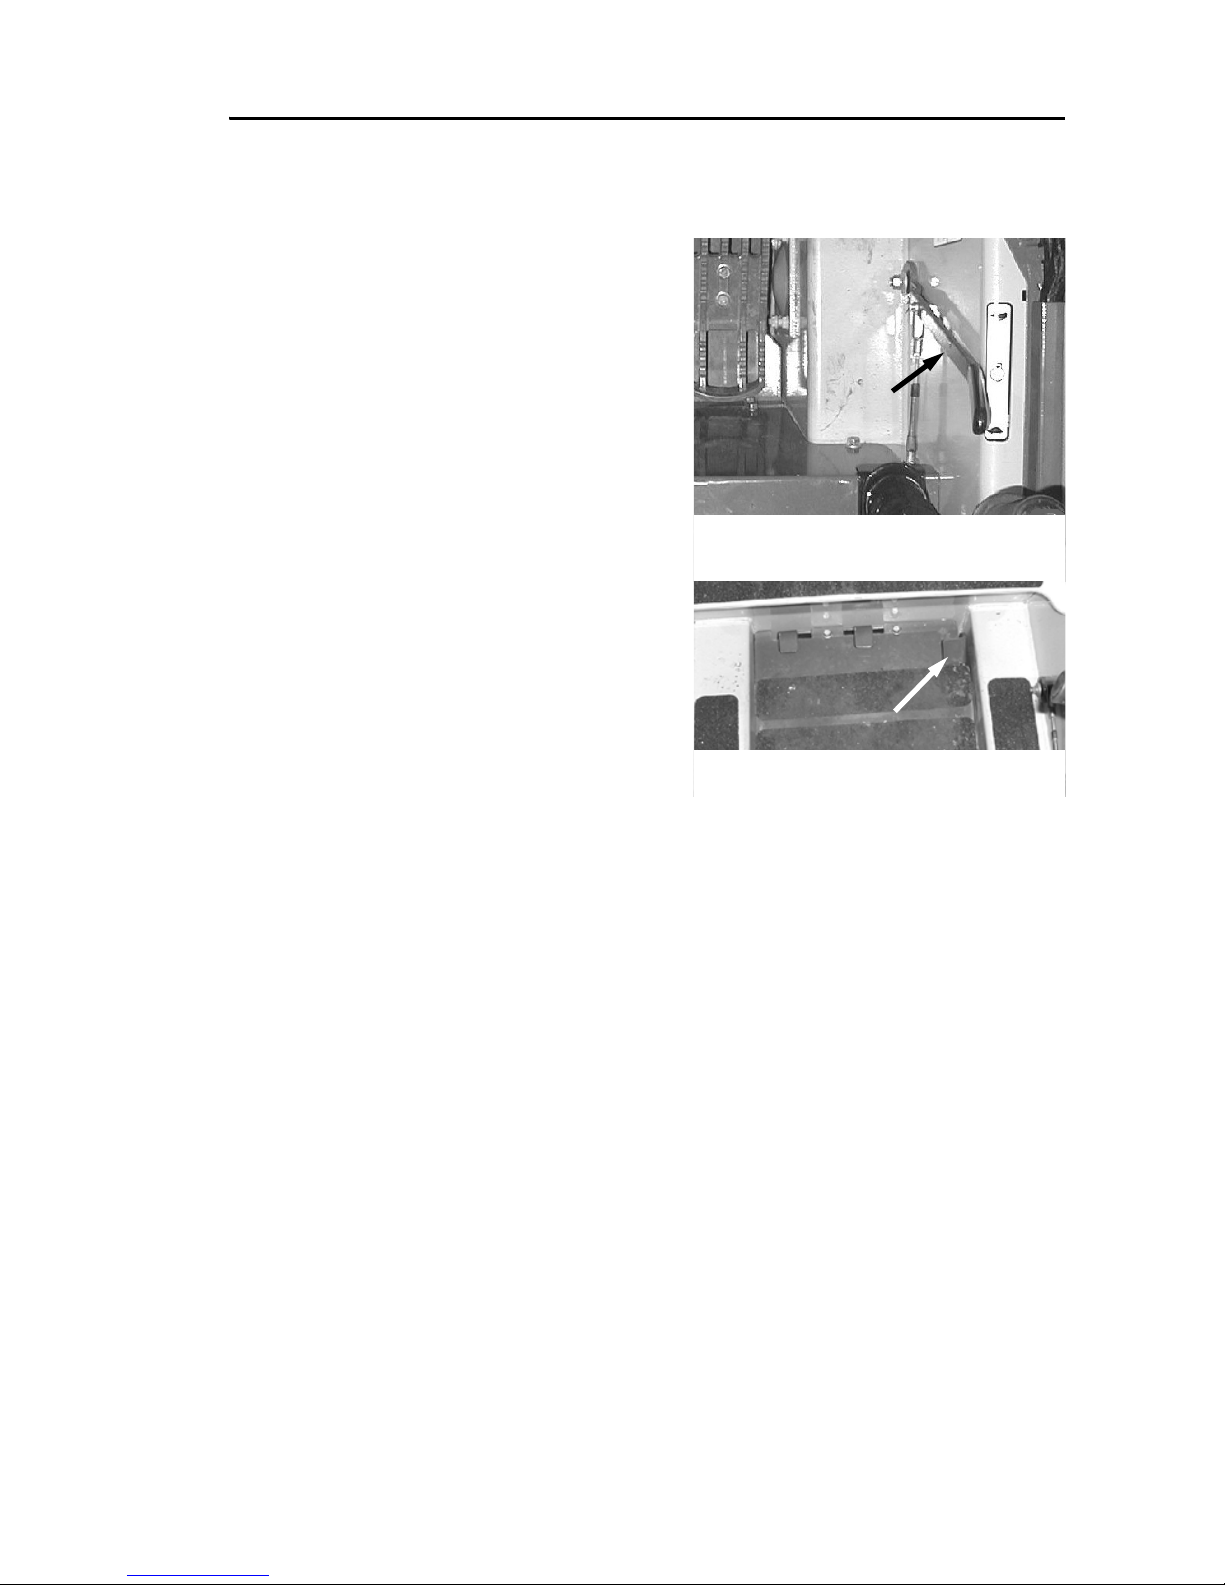
Engagement
Always engage the lift arm support device
before leaving the operator’s compartment to
work on the loader with the lift arm raised.
To engage the lift arm support device:
1. Lower the lift arm fully onto the
loader frame.
2. Stop the engine.
3. Leave the operator’s compartment.
Remove the lock pin holding the
support device up against the lift arm.
Allow the support device to drop
down into contact with the lift cylinder.
4. Return to the operator ’s compartment
and start the engine.
5. Raise the lift arm until the lift arm
support device drops over the end of the lift cylinder and around the cylinder
rod. Slowly lower the lift arm until the support d evice co ntacts the top en d of
the lift cylinder.
6. Be sure the support device is secure against the cylinder end. Then, stop the
engine, remove the key and leave the operator’s compartment.
WARNING
Figure 4 Lift Arm Support
Device Engaged
Page 26

22 917334/BP0310
Disengagement
Never leave the operator’s compartment to disengage the lift arm support device with the
engine running.
To ret urn the lift arm supp ort device to its
storage position:
1. Raise the lift arm completely.
2. Stop the engine, remove the key and
take it with you.
Before testing the loader, always clear people
from the area.
3. Before leaving the operator ’s compartment, be sure that the lift arm is being
held in the raised position by the solenoid valve.
4. To store the support device, raise it up until it contacts the lift arm. Slide the
lock pin through the support device and catch under the lift arm. Once the pin
is secure, flip the lock pin loop so that it locks the pin in.
Accessory Outlet
The optional 12-volt accessory outlet is located at the bottom of the left instru ment panel.
WARNING
Figure 5 Lock Pin
in storage Position
WARNING
Page 27
917334/BP0310 23
Engine Speed Control
A right-hand controlled throttle lever is provided on all models for adjustin g the
engine speed. Move the control forward to increase the engine speed and rearward to decrease the engine speed.
T-Bar Controls Only: A right-foot
operated accelerator pedal is provided to
control the engine speed. The pedal
linkage is spring-loaded to return to the
adjusted hand-operated throttle setting.
Figure 6 Throttle Lever
Figure 7 Foot Pedal (T-Bar)
Page 28

24 917334/BP0310
Instrument Panel
The instrument panel contains the following
switches and indicators. Symbols on the panel
represent various functions and conditions, and
are visible only when indicator lamps are on.
1. Hourmeter – Displays the total operating
hours on the loader.
2. Fuel Level Gauge – Displays the amount of
fuel in the tank.
3. Engine Coolant Temperature Gauge –
Indicates the engine coolant temperature.
Note: Items 4 through 9 are indicator lamps
which display the following:
4. Fasten Seatbelt – A momentary visual (and
audible) indicator to remind the operator to
fasten the seatbelt.
5. Engine Oil Pressure – Lights if the engine
oil pressure drops too low, warning the
operator to immediately stop the engine and
determine the cause for the pressure drop.
During normal operation, this indicator
should be OFF.
6. Battery – Lights if the charging voltage is
too high or too low. During normal operation, this indicator should be OFF.
7. Preheat Indicator Lamp – Lights when the
preheat switch is pressed. During normal
operation, this indicator should be OFF.
8. Engine Coolant Temperature – Lights if
the engine coolant becomes too hot, warning
the operator to stop the engine. Allow the
engine to cool, determine the cause for the
high temperature and correct the problem
before restarting the engine. During no rmal
operation, this indicator should be OFF.
9. Hydraulic Oil Temperature – Lights if the
hydraulic oil becomes too hot, warning the
operator to stop engine. Allow the hydraul ic
system to cool and determine the cause of
the high temperature. During normal operation, this indicator should be OFF.
1
2
3
4
5
6
7
8
Figure 8 Instrument Panel
9
10
11
12
13
14
Page 29

917334/BP0310 25
10.Keyswitch – In a clockwise rotation, these positions are:
OFF Position – With the key vertical, power from the battery is disconnected
to the controls and instrument panel electrical circuits. This is the only position the key can be inserted or removed from the keyswitch.
ON (or Run) Position – With the key turned one position clockwise from
vertical, power from the battery is supplied to all control and instrument panel
electrical circuits.
START Position – With the key turned fully clockwise, the electric starter
energizes, start the engine. Release the key to the RUN position after the
engine starts.
Note: The engine cannot b e started unless the operator is sitting in t he seat and
the restraint bar is lowered.
11. Parking Brake Switch – Used to manually apply the parking brake. The red
indicator on the switch lights when the parking brake is applied.
12.Light Switch – Controls all the lig hts on the loader. Symbols denote the four
positions of the light switch. In a clockwise direction these are:
•OFF
•Tail Lights ON
• Front Work Lights with Tail Lights ON
• both Front and Rear Work Lights
For the lights to function, the keyswitch must be in the RUN position.
13.Circuit Breakers – Four circuit breakers on the instrument panel protect the
loader’s electrical circuits.
Important: Do not attempt to defeat the circu it protection by jumping across a
circuit breaker or by using a higher amperage circuit breaker.
14. Accessory Outlet – 12-volt DC power outlet.
Page 30

26 917334/BP0310
T-Bar Controls
The Gehl loader may be equipped with
the T-Bar control option. The left T-Bar
controls the drive and the right T-Bar controls the lift/tilt.
Drive Controls
Forward, reverse, speed and turning
maneuvers are controlled by movement of
the left T-Bar. To go forward, push the
control forward; for reverse, pull the control rearward. To turn right, twist the control clockwise; to turn left, twist the control counterclockwise. For gradual turns, twist the T-Bar slightly clockwise or
counterclockwise. For sharp turns, twist the control fully clockwise or counterclockwise.
Moving the T-Bar farther from neutral increases the speed steadily to the maximum travel speed. Tractive effort decreases as speed increases. For maximum
tractive effort, move the T-Bar only slightly from the neutral position. The
engine will stall if the control is moved too far forward when loading the bucket.
Be sure the controls are in neutral before
starting the engine. Operate the controls gradually and smoothly. Excessive speed and quick control movements
without regard for conditions and circumstances are hazardous and
could cause an accident.
Lift/Tilt Control
Moving the lift arm and tilting the attachment are accomplished by movement of
the right T-Bar. To raise the lift arm, pull the control strai ght rearward; to lower
the lift arm, push the control straight forward. To tilt the attachment down-
ward, twist the control clockwise; to tilt the attachment up or back, twist t he
control counterclockwise.
Note: The speed of the lift/tilt motion is directly proportio nal to the amount of
T-Bar movement and engine speed.
To place the lift arm into the detent (“float”) position, push the right T-Bar all the
way forward into the detent. This position allows the lowered lift arm to “float”
while traveling over changing ground conditions.
Never push the lift/tilt T-Bar control into the
float position with the attachment loaded or
raised, because this will cause the lift arm to lower rapidly.
Figure 9 T-Bar Controls
1. Drive Control
2. Lift/Tilt Control
1
2
WARNING
WARNING
Page 31

917334/BP0310 27
Hand/Foot Controls
The Gehl loader may be equipped with
the hand/foot control option. The handles
control the drive and the foot pedals
control the lift/tilt.
Drive Controls
Forward, reverse, speed and turning
maneuvers are controlled by movement of
the control handles. To go forward, push
both handles forward; for reverse, pull
both handles rearward. For turning, move
one handle farther forward or rearward
than the other handle. Turn direction is
determined by which handle is moved the
farthest forward; to turn left, move the
right handle farther forward than the left handle. For sharp turns, move the handl es
in opposite directions.
Moving the handles farther from neutral increases the speed steadily to the
maximum travel speed. Tractive effort decreases as speed increases. For maximum
tractive effort, move the handles only slight ly from the neutral position. The engine
will stall if the controls are moved too far forward when loading the bucket.
Be sure the controls are in neutral before
starting the engine. Operate the controls gradually and smoothly. Excessive speed and quick control movements
without regard for conditions and circumstances are hazardous and
could cause an accident.
Lift/Tilt Controls
Moving the lift arm and tilting the attachment are accomplished by movemen t of
the foot pedals. The left pedal raises and lowers the lift arm; th e right pedal tilts
the attachment. To raise the lift arm, use your heel to push down on the left
pedal; to lower the lift arm, use your toes to push dow n on the left pedal . To tilt
the attachment downward, use your toes to push down on the right pedal; to tilt
the attachment up or back, use your heel to push down on the right pedal.
Note: The speed of the lift /tilt motion is directly proportional to the amount of
pedal movement and engine speed.
To place the lift arm in the detent (“float”) position, use your toes to push the left
pedal all the way down into the detent. This position allows the lowered lift arm
to “float” while traveling over changing ground conditions.
Never push the left pedal into the float position
with the attachment loaded or raised, because
this will cause the lift arm to lower rapidly.
Figure 10 Hand/Foot Controls
1. Left Drive Control Handle
2. Right Drive Control Handle
3. Tilt Control Foot Pedal
4. Lift Control Foot Pedal
1
2
3
4
WARNING
WARNING
Page 32

28 917334/BP0310
Auxiliary Hydraulic Controls
Auxiliary hydraulics are used with an
attachment that has a mechanism
requiring hydraulic power of its own.
Important: Always be sure the auxiliary
hydraulic control is in neutral before
starting the loader or removing the auxiliary hydraulic couplers.
Couplers are located on the left lift arm.
“A” port is pressure, “B” port is return
when the auxiliary control is in the detent
position (refer to page 34).
T-Bar Controlled Loaders
A foot pedal is used to control the direction of oil flow.
Figure 11 Auxiliary Couplers
A
B
Figure 12 T-Bar Auxiliary
Control
Page 33

917334/BP0310 29
Hand/Foot Controlled Loaders
The right handle controls the direction of
oil flow. A locking pin locks it in the up
position for continuous operation.
Attachment Mounting
The Gehl loader is equipped with a
two-pin All-Tach™ attachment bracket
for mounting a bucket or other attachment. Two latch levers secure the attachment. Rotate the levers until they are horizontal to engage the latch pins. Rotate the
levers until they are vertical to disengage
the latch pins.
To prevent unexpected attachment release
from the hitch, be sure to secure the lock pins
by rotating the levers downward into a horizontal position.
Figure 13 Hand/Foot
Auxiliary Control
Figure 14 All-Tach™
Attaching Mechanism (Hitch)
WARNING
Page 34

30 917334/BP0310
Notes
Page 35

917334/BP0310 31
CHAPTER 4
OPERATION
Before starting the engine and operating the
loader, review and comply with all safety
recommendations in the Safety chapter of this manual. Know how to
stop the loader before starting it. Also, be sure to fasten and properly adjust the seatbelt and lower the operator restraint bar.
Before Starting the Engine
Before starting the engine and running the loader, refer to the Controls and Safety
Equipment chapter and familiarize yourself with the various operating controls,
indicators and safety devices on the loader.
Starting the Engine
The following procedure is recommended for starting the engine:
1. Carefully step up onto the back of the bucket or attachment and grasp the
ROPS handholds to get into the operator’s compartment.
2. Fasten the seatbelt and lower the restraint bar.
3. Verify the following:
¾ the lift/tilt, drive and auxiliary controls are in their neutral positions,
¾ the brake is on.
4. Push the throttle forward to half speed.
Note: When the key is turned to the RUN position, an indicator will light on the
instrument panel and a buzzer will sound momentarily to remind you to check
that your seatbelt is fastened.
5. Turn the keyswitch to the START position.
Important: Do not engage the starter for longer than 15 seconds at a time.
Longer use can overheat and damage the starter. Allow the starter to cool for
20 seconds between uses.
After the engine starts, allow a sufficient warm-up time before attempting to
operate the controls.
Important: If the warning lights do not go off, stop the engine and investigate the
cause.
Cold Starting Procedure
Do not use starting fluid (ether) with preheat
systems. An explosion can result which can
cause engine damage, injury or death.
WARNING
WARNING
Page 36

32 917334/BP0310
1. Turn the key to the run position. If the preheat light on the right instrument
panel comes on, wait until it goes out.
2. Turn the key switch to the start position.
3. Repeat if engine does not start.
Stopping the Loader
The following procedure is the recommended sequence for stopping the loader:
1. Check that the drive control handle(s) is (are) in “neutral” position.
2. Lower the lift arm and rest the attachment on the grou nd.
3. Pull the throttle lever back to the low idle position (and/or take your foot off
the accelerator pedal for hands-only controlled machines).
4. Turn the keyswitch to the OFF position to shut off the engine.
5. Raise the restraint bar, unfasten the seatbelt and grasp the hand holds while
climbing out of the operator ’s compartment.
Note: The skid-steer loader is equipped with a spring-applied automatic parkin g
brake. The parking brake is engaged when the operator lifts the restraint bar,
leaves the operator’s seat, shuts off the engine or when the brake switch is
applied.
Parking the Loader
Park the loader on level ground away from traffic. If this is not possible, park the
loader across the incline and block the tires to prevent movement.
Jump Starting the Engine
If the battery becomes discharged or does not have enough power to start the
engine, use jumper cables and the following procedure to jump-start the loader
engine.
The ONLY safe method for jump starting with
a discharged battery is for TWO PEOPLE to
perform the following procedure. The second person removes the
jumper cables so that the operator does not have to leave the
operator’s compartment with the engine running. NEVER make
jumper cable connections directly to the starter solenoid of either
engine. DO NOT start the engine from any position other than on
the operator’s seat and then ONLY after being sure ALL controls
are in “neutral”.
Closely follow the procedure, in order, to avoid personal injury. In
addition, wear safety glasses to protect your eyes and avoid
leaning over the batteries while jump-starting.
DO NOT jump-start the battery if it is frozen, because it may rupture or explode.
WARNING
Page 37

917334/BP0310 33
Note: BE SURE the jumper battery is a 12-volt D.C. battery.
1. Turn the keyswitches of both vehicles to OFF, be sure the vehicles are in
“neutral” and NOT touching each other.
2. Connect the positive (+) jumper cable to the positive (+) battery terminal on the
disabled loader first. DO NOT allow the positive clamps to touch any metal
other than the positive (+) battery terminals.
3. Connect the other end of the positive jumper cable to the jumper vehicle’s battery positive (+) terminal.
4. Connect the negative (-) jumper cable to the jumper vehicle’s battery negative
(-) terminal.
5. Make the final negative (-) jumper cable connection to the disabled loader ’s
engine block or loader frame (ground) – NOT to the disabl ed batt ery’s negative
post. If connected to the engine, keep the jumper clamp away from the battery,
fuel lines and moving parts.
6. Start the loader. If it does not start at once, start the jumper vehicle engine to
avoid excessive drain on the booster battery.
7. After the disabled loader is started and running smoothly, have the second
person remove the jumper cables (negative (-) jumper cable first) from the
jumper vehicle’s battery and then from the disabled loader while being sure
NOT to short the two cables together.
Allow sufficient time for the skid-steer loader alternator to build-up a charge in
the battery before attempting to operate the loader or shut the engine off.
Page 38

34 917334/BP0310
Changing Attachments
To prevent unexpected attachment release
from the attachment bracket, be sure to properly secure the latch pins by rotating the latch le vers to a horizontal
position.
The skid-steer loader features a All-Tach™ attaching mechanism for mounting a
bucket or other attachment. Two latch levers secure the attachment.
Connecting an Attachment
1. Rotate the latch levers to a vertical
position to fully retract the latch pins.
2. Start the loader engine and make sure
the lift arm is lowered and in contact
with the loader frame.
3. Align the loader squarely with the
back of the attachment.
4. Tilt the attachment bracket forward
until the top edge of the bracket is
below the flange on the back side of
the attachment and centered between
the vertical plates.
5. Slowly drive the loader forward and, at the same time, tilt the attachment
bracket back to engage the flange on the back side of the attachment.
6. Stop forward travel when the flange is engaged, but continue to tilt the attach-
ment bracket back to lift the attachment off the ground.
7. Exercise the MANDATORY SAFETY SHUTDOWN PROCEDURE
(page 6).
8. With the loader engine OFF, leave the operator ’s compartment and rotate the
latch levers to a horizontal position to fully engage the latch pins.
Important: To check that the attachment is properly installed, apply down pressure to the attachment prior to operating.
Connecting Auxiliary Hydraulic Couplings
Note: With the engine OFF, key in the ON position and the restraint bar down,
the auxiliary hydraulic control can be moved to relieve any pressure in the
hydraulic system.
The hydraulic couplers are located on the left lift arm. “A” port is pressure, “B”
port is return when the auxiliary control is in the detent position.
WARNING
Figure 15 Hitch – disengaged
1. Latch Levers
2. Latch Pins
1
1
2
2
Page 39

917334/BP0310 35
Removing Attachments
1. Tilt the attachment bracket back until the attachment is off the ground.
2. Exercise the MANDATORY SAFETY SHUTDOWN PROCEDURE
(page 6).
3. Relieve any hydraulic pressure in the auxiliary and attachment lines.
a. Turn the key switch, but do not start the engine.
b. With the restraint bar down, move the auxiliary hydraulic control back and
forth. This will relieve the pres sure in the hydraulic system.
4. With the engine OFF, leave the operator’ s compartment, dis connect the auxil-
iary hydraulic hoses and rotate the latch levers completely vertical to fully
retract the latch pins.
5. Start the engine and be sure that the lift arm is fully lowered and in contact
with the loader frame.
6. Tilt forward and slowly back the loader until the attachment is free from the
loader.
Self-Leveling (optional)
The feature is designed to keep the attachment level while the lift arm is being
raised.
Using a Bucket
Always maintain a safe distance from electric
power lines and avoid contact with any electrically charged conductor or gas line. Accidental contact or rupture
can result in electrocution or an explosion. Contact the “Digger’s
Hotline” or proper local authorities for utility line locations before
starting to dig.
Driving over Rough Terrain
When traveling over rough terrain, drive slowly with the bucket lowered.
Driving on an Incline
When traveling up or down on an incline, travel with the heavy end pointing
uphill. Try to avoid traveling on an incline, but always travel with the bucket as
possible to maintain stability.
WARNING
Page 40

36 917334/BP0310
Loading a Bucket
Approach the pile with the lift arm fully
lowered and the bucket tilted slightly forward until the edge contacts the ground.
Drive forward, lifting the lift arm and
tilting back the bucket to fill it. Back
away from the pile.
Always carry the loaded bucket with the lif t arm
resting on the loader frame. For additional stability when operating on inclines, always travel with the heavier end
of the loader toward the top of the incline.
Digging with a Bucket
Approach the digging site with the lift
arm slightly raised and the bucket tilted
forward until the edge contacts the
ground. Break the ground by driving forward and gradually lowering the lift arm.
With the bucket filled, tilt the bucket
back, and back the loader away from the
material. Rest the lift arm against the
loader frame before proceeding to the
dumping area.
Dumping the Load onto a Pile
Carry a loaded bucket as low as possible until reaching the pile. Gradually stop
forward motion and raise the lift arm high enough so that the bucket clears the
top of the pile. Then slowly move the loader ahead, to position the bucket to
dump the material on top of the pile. Empty the bucket and back the loader away
while tilting the bucket back and lowering the lift arm.
Never push the controls into the float position
with the bucket or attachment loaded or raised,
because this will cause the lift arm to lower rapidly.
Figure 16 Loading
WARNING
Figure 17 Digging
WARNING
Page 41

917334/BP0310 37
Dumping the Load Into a Box
Carry the loaded bucket low and approach
the vehicle or bin. Stop your approach as
close to the side of the box as possible
while allowing for clearance to raise the
lift arm and loaded bucket. Next, raise the
lift arm until the bucket clears the top of
the box and move the loader ahead, to
position the bucket over the inside of the
box, slowly dump the bucket. After the
material is dumped, back away from the
box while tilting the bucket back and lowering the lift arm.
Dumping the Load Over an Embankment
Do not drive too close to an excavation or
ditch. Be sure the surrounding ground has ad e-
quate strength to support the weight of the loader and the load.
Carry the loaded bucket as low as possible while traveling to the dumping area.
Stop the loader where the bucket extends half-way over the edge of the embankment. Tilt the bucket forward and raise the lift arm to dump the material. After
the material is dumped, back away from the embankment while tilting the bucket
back and lowering the lift arm.
Scraping with a Bucket
For scraping, the loader should be operated
in the forward direction. Position the lift
arm down against the loader frame. Tilt the
bucket cutting edge forward at a slight
angle to the surface to be scraped. While
traveling slowly forward with the bu cket in
this position, material can flow over the
cutting edge and collect inside the bucket.
Leveling the Ground
Drive the loader to the far edge of the area
to be leveled. Tilt the bucket forward to
place the bucket cutting edge at a 30 to
45 degree angle to the surface to be
leveled. Then place the lift arm into the
“float” position and drive the loader rearward dragging the dirt and, at the same
time, leveling it.
Figure 18 Dumping Into a Box
WARNING
Figure 19 Scraping
Figure 20 Leveling the Ground
Page 42

38 917334/BP0310
Note: The float (detent) position for T-Bar controlled loaders is reached by
pushing the right handle all the way forward. For hand/foot controlled loaders,
use your toes to push the front of the left pedal all the way down.
Check that the work are a is clear o f pe op le and
obstacles. Always look in the direction of
travel.
Highway Travel
If it becomes necessary to move the loader a long distance, obtain and use a
properly rated trailer. For short distance highway travel, attach an SMV (Slow
Moving Vehicle) emblem (purchased locally) to the back of the loader. For
highway operation, obtain and install dual amber flashers or a strobe light. Check
state and local laws and regulations.
Lifting the Loader
The loader can be lifted using a single-point or four-point lift kit, which is available from your Gehl dealer.
• Before lifting, check the lift kit for proper installation.
• Never allow riders in the operator’s compartment while the
loader is lifted.
• Keep everyone a safe distance away from the loader while it is
lifted.
• Loader may only be lifted with an empty bucket or empty pallet
forks, or with no attachment. Never lift the loader with attachments other than those stated.
Lift equipment used and its installation is the responsibility of the party conducting the lift. All rigging MUST comply with applicable regulations and
guidelines.
1. Using suitable lift equipment, ho ok into the li ft ey es. Adjust the len gth of the
slings or chains to lift the loader level.
Important: As needed, use a spreader bar to prevent the slings or chains from
rubbing the sides of the ROPS/FOPS. (Four-point lift only)
Note: The loader my be slightly off level (10 degrees max.) when lifted,
depending on loader model and attachment (single-point lift only.)
2. Center the hoist over the ROPS/FOPS. To prevent shock loading of the equip-
ment and excessive swinging, slowly lift the loader off the ground. Perform all
movements slowly and gradually. As needed, use a tag line to help position the
loader.
WARNING
WARNING
Page 43

917334/BP0310 39
Storing the Loader
If your skid-steer loader is to be stored for a long period of time, the following
procedure is suggested:
1. Fully inflate the tires.
2. Lubricate all grease zerks.
3. Check all fluid levels and replenish as necessary.
4. Add stabilizer to the fuel per the fuel supplier’s recommendations.
5. Remove the battery, charge fully and store in a cool, dry location.
6. Protect against extreme weather conditions such as moisture, sunlight and
temperature.
Transporting the Loader
Park the truck or trailer on a level surface. Be
sure the vehicle and its ramps have the weight
capacity to support the loader. Make sure the vehicle surface and its
ramps are clear of debris and slipper y material that may reduce traction. Move the loader on and off the vehicle ramp slowly and carefully. Failure to follow these instructions could result in an overturn
accident.
Observe all local regulations governing
the loading and transporting of equipment. Ensure that the hauling vehicle
meets all safety requirements before
loading the skid-steer loader.
1. Place blocks at the front and rear of
the hauling vehicle’s tires.
2. If the loader has an attachment, lift it
slightly off the ground.
3. Back the loader slowly and carefully
up the ramp onto the vehicle.
4. Lower the loader attachment to the
vehicle deck, turn off the engine and
remove the key.
5. Fasten the loader to the hauling vehi-
cle at the points indicated by the tiedown decals.
6. Measure the clearance height of the
loader and hauling vehicle. Post the
clearance height in the cab of the vehicle.
WARNING
Figure 21 Front Tie
Down/Retrieval point
Figure 22 Rear Tie Down/
Retrieval point
Page 44

40 917334/BP0310
Notes
Page 45

917334/BP0310 41
CHAPTER 5
SERVICE
Before servicing the machine, unless expressly
instructed to the contrary, exercise the MANDATORY SAFETY SHUTDOWN PROCEDURE (page 6).
After service has been performed, be sure to restore all guards,
shields and covers to their original positions before resuming
loader operation.
This Service chapter details procedures for performing routine maintenance
checks, adjustments and replacements. Most procedures are referred to in the
Troubleshooting and Maintenance Schedule Schedule chapters of this manual.
Refer to the separate engine manual provided for engine-related adjustments,
lubrication and servicing procedures.
Note: All serv ice procedures, except those described under the “Dealer Services”
topic ar e owne r-operator r espo nsibili ties.
Important: More frequent service than the recommended intervals may be
required under severe operating conditions. You must decide if your operation
requires more service.
Important: Always dispose of waste lubricating oils and hydraulic fluids
according to local regulations or take to a recycling center for disposal. Do not
pour onto the ground or down the drain.
Dealer Services
The following areas of component service, replacement and adjustments require
special tools and knowledge for proper servicing and should be performed onl y
by your authorized Gehl skid-steer loader dealer: hydrostatic components,
hydraulic system gear pump, valves, cylinders, electrical com ponents (other than
the battery, circuit breakers).
WARNING
Figure 23 Engine Compartment
1. Air Cleaner
2. Muffler
3. Radiator/Cooler
4. Coolant Recovery Tank
5. Hydraulic Oil Filter
6. Engine Oil Dipstick
7. Engine Oil Fill Cap
8. Engine Oil Filter
9. Fuel Filter
10. Fuel Pump
11. Water Trap
1
5
2
3
7
6
9
10
4
11
8
Page 46

42 917334/BP0310
Tilting Back the ROPS/FOPS
For service, unbolt the two anchor bolts at
the front of the ROPS/FOPS and tilt it
back slowly, moving the control handles
out of the way. A gas-charged spring
helps tilt it back. A self-actuating lock
mechanism engages to lock the
ROPS/FOPS in a rolled-back position. To
lower the ROPS/FOPS, apply upward
force on it while pulling the lock mechanism handle toward the front of the
loader. Lower the ROPS slowly onto the
chassis, moving the control handles out of
the way. Reinstall the anchor bolts,
washers and locknuts.
Never operate the loader with the ROPS/F OPS
removed or locked back. Be sure the lock is
securely engaged when the ROPS/FOPS is tilted back. Properly support the ROPS/FOPS when unlatching the lock mechanism and lowering the ROPS/FOPS. Be sure to reinstall the ancho r bolts, washers
and locknuts be fore resuming loader operation.
Loader Raising Procedure
To raise the skid-steer loader so all four tires are off the ground, use the
procedure below:
Do not rely on a jack or hoist to maintain the
“raised” position without additional blocking
and supports. Serious personal injury could result from improperly
raising or blocking the skid-steer loader.
1. Using a jack or hoist capable of lifting the fully-equipped weight of the loader
(with all attached options), lift th e rear of the loader until the rear tires are off
the ground.
2. Stack wooden blocks under the flat part of the loader ch assis. They should
run parallel with, but not touch, the rear tires (Figure 25).
3. Slowly lower the loader until its weight rests on the blocks. If the tires still
touch the ground, raise the loader again, add more blocks and lower again.
4. Repeat Steps 1 through 3 for the front end. When the procedure is finished, all
four tires will be off the ground so they can be removed.
Loader Lowering Procedure
When service or adjustment procedures are complete, the skid-steer loader can be
taken down from the “raised” position. To lower the lo ader onto its tires:
Figure 24 ROPS Lock
Mechanism
WARNING
WARNING
Page 47

917334/BP0310 43
1. Using a jack or hoist, raise the front of the loader until its weight no longer
rests on the front blocks.
2. Carefully remove the blocking under
the front of the loader.
3. Slowly lower the loader until the front
tires are resting on the ground.
4. Repeat Steps 1 through 3 for the rear
of the loader. When the procedure is
finished, all four tires will be on the
ground and the blocks removed from
under the loader.
Replacement Parts
Note: Part numbers may change. Your Gehl dealer will always have the latest
part numbers.
Adjustments
Control Handles
The control handles do not require routine adjustment. Refer to the Service
Manual for the initial setup procedure.
Fuel Sender
The fuel sender, located in the fuel tank, sends a signal to the fuel gauge indicating the amount of fuel left in the fuel tank.
Check the fuel sender periodically to ensure that the mounting screws are tight
and that there is no fuel seepage around the gasket. If replacement is required,
apply an RT V or gasket sealant around the gasket when restoring the fuel sender.
Part Description Gehl Part No.
Air Cleaner Element, Primary 188814
Air Cleaner Element, Secondary 188817
Hydraulic Oil Filter Element 074830
Engine Oil Filter Element 137500
Fuel Filter Cartridge 182130
Figure 25 Blocked Loader
Page 48

44 917334/BP0310
Engine Speed Control
The throttle cable does not require routine adjustment. Refer to the Service
Manual for the initial setup procedure.
Besides throttle cable adjustment, the throttle lever friction pad pressure can be
readjusted if the throttle lever does not hold its position. Belleville washers and a
lock nut on the throttle lever are used for making this adjustm e nt.
Drive Chains
The drive chains do not require routine adjustment. Refer to the Service Manua l
for the initial setup procedure.
Lubrication
Listed below are the locations, temperature ranges and types of recommended
lubricants to be used when servicing this machine. Refer to the separate engine
manual for more information regarding recommended engine lubricants, quantities required and grades.
Refer to the following figure for grease fitting locations. Wipe dirt from the fittings before greasing them to prevent contamination. Replace any missing or
damaged fittings. To minimize dirt build-up, avoid excessive greasing.
Hydraulic System
Use Mobil DTE 15M or equivalent that contains anti-rust,
anti-foam and anti-oxidation additives, and conforms to ISO VG46.
Capacity: 8 U.S. gallons (30,0 liters)
Chaincases
Use SAE15W-40 motor oil.
Capacity (each side):
8 U.S. quarts (7,6 liters)
Grease Fittings Use lithium based grease
Engine
Below 32°F (0°C) – Use SAE Grade* 10 or 10W-30
Above 32°F (0°C) – Use SAE Grade* 15W-40
*Service Classification: API - CH-4/CI-4
Capacity: 3-cylinder: 7.6 U.S. quarts (7,2 liters)
4-cylinder: 9.0 U.S. quarts (8,6 liters)
Page 49

917334/BP0310 45
Engine Air Cleaner
Important: Failure to follow
proper filter servicing instructions
could result in catastrophic engine
damage.
The air cleaner consists of an outer
(primary) filter element and an
inner (secondary) filter element. An
air filter restriction indicator for
monitoring the condition of the elements is located on the right side of
the front of the air cleaner. If the air
filter becomes restricted, this indicator will turn red to warn the
operator that the element(s) require
service. Push the reset button
located on the end of the indicator
after fitting a clean element. For
replacement elements, refer to the
“Replacement Parts” topic (page 43).
Figure 26 Grease Every 10 Hours (or daily)
1. Lift arm pivots (2)
2. Lift cylinder pivots (4)
3. Tilt cylinder pivots (2)
4. Attachment Bracket pivots (2)
1
2
4
3
Figure 27 Dual-Element Air
Cleaner
1. Restriction Indicator
2. Element Housing
3. Inner Filter Element
4. Outer Filter Element
5. Element Cover
1
2
3
4
5
Page 50

46 917334/BP0310
Note: Before replacing the filter element(s), push the reset button on the indicator. Start the engine and adjust the throttle to full speed. If the indicator does
not turn red, do not replace the element(s).
The outer element should be replaced only when the restriction indicator turns
red. The inner element should be replaced every third time the outer element is
replaced, unless the outer element is damaged or the inner element is dirty.
Along with a daily check of the restriction indicator, check the air cleaner intake
hose and clamps, and the mounting bracket hardware to be sure they are properly
tightened.
Access
1. Open the rear door and engine access cover.
2. Unlatch the clamps on the air cleaner and remove the cover. Clean out any
dirt built up in the cover assembly.
Outer Element
1. Carefully pull the outer element ou t of the housing. Never remove the inner
element unless it is to be replaced.
2. Clean out any dirt built up in the housing. Leave the inner element installed
during this step to prevent debris from entering the engine intake manifold.
3. Replace the outer element.
Note: Gehl does not recommend cleaning the outer element.
4. Use a trouble light i nside the outer element to inspect for spots, pinholes o r
ruptures. Replace the outer element if any damage is noted. The outer element
must be replaced if it is oil- or soot-laden.
Inner Element
Note: Replace the inner element only if it is dirty or if the outer element has been
replaced three times.
1. Before removing the inner element from the housing, clean out any dirt built
up in the housing. Leave the inner element installed during this step to prevent debris from entering the engine intake manifold.
2. Remove the inner element.
Page 51

917334/BP0310 47
Reinstallation
1. Check the inside of the housing for an y damage that may interfere with the
elements.
2. Be sure that the element sealing surfaces are clean.
3. Insert the element(s), making sure that they are seated properly.
4. Secure the cover to the housing with clamps.
5. Check the hose connections and be sure they are all clamped and tightened
properly.
6. Reset the restriction indicator by pressing the reset button.
Engine Service
Check Engine Mounting Hardware
All bolts that secure the engine mounting brackets to the engine and the loader
frame should be checked and re-tightened as necessary.
Allow hot engine and hydraulic system components to cool before servicing.
Checking Engine Oil Level
Important: For new units, the initial oil
change should be after the first 50 hours.
Open the rear door and engine access
cover. Pull out the dipstick and check the
oil level. Markings on the dipstick represent FULL and LOW (add oil) levels.
Refer to the Maintenance Interval Chart
(page 67) for the service interval for
replacing the engine oil and filter.
WARNING
Figure 28 Oil Dipstick
and Fill Cap
1. Oil Dipstick
2. Oil Fill Cap
1
2
Page 52

48 917334/BP0310
Changing Engine Oil and Filter
1. Run the engine until it is at operatin g
temperature. Stop the engine. Remove
the rear belly pan.
2. Remove the drain plug.
3. From the engine compartment,
remove the oil filter. Clean the filter
sealing surface.
4. Put clean oil on the new oil filter
gasket. Install the filter and tighten 3/4
of a turn past the point where the gasket contacts the filter head.
5. Reinstall and tighten the drain plug.
6. Remove the oil cap and add the recommended oil. Refer to the “Lubrication”
topic in this chapter for oil specifications and capacities.
7. Start the engine and let it run for several minutes at low idle. Stop the engine.
Check for leaks at the oil filter, drain plug and remote oil drain hose. Check
the oil level. Add oil if it is not at the top mark on the dipstick.
For a replacement element, refer to the “Replacement Parts” topic (page 43).
Changing Fuel Filter
The engine has a fuel filter located on the left side of the engine. To change it:
1. Shut off the fuel supply by turning th e fuel shutoff valve on top of the water
trap.
2. Shut off return line by turning valve on the fuel tank.
3. Remove the fuel filter element.
4. Lubricate new fuel filter element gasket with diesel fuel.
5. Install and tighten the filter element one-half turn past point the where the
gasket contacts the filter head.
6. Turn shutoff valve on water separator to ON.
7. Turn on the fuel supply at fuel tank.
The engine is self-priming. To remove air before starting, turn the ignitio n key t o
the ON position for 30 seconds.
For a replacement element, refer to the “Replacement Parts” topic (page 43).
Figure 29 Rear Belly Pan
Page 53

917334/BP0310 49
Servicing Water Separator
Periodically check for water in water separator by checking level of float in water
separator bowl. If water is present:
1. Shut off the fuel supply by turning the fuel shutoff valve on top of the water
separator.
2. Turn nut to release the bowl from the valve head. Dispose remaining fuel and
water.
3. Clean bowl and filter element with warm water unt il all foreign material is
removed. Replace fuel filter if damaged. Refer to Parts Manual for p art num ber.
4. Place element onto valve head. Lubricate o-ring on bowl with diesel fuel and
place on valve head. Turn nut to tighten.
5. Turn on fuel supply.
Releasing Water from Separator
1. Check red float located in the water separator bowl. If red float is raised, open
valve on the bottom of the bowl to drain water.
2. Close valve quickly after float reaches the bottom of the bowl.
Spark Arrestor Muffler
Important: The loader is factory-equipped with a spark arrestor type muffler.
Muffler maintenance is required to keep it in workin g condition. Refer to local
laws and regulations for spark arrestor requirements.
1. Stop the engine, open the rear door and engine cover.
2. Remove the plug from the bottom of the muffler.
3. Block the outlet of the muffler with a non-combustible mate rial.
4. Start the engine and run it for 10-15 seconds.
5. Stop the engine and remove the blockage.
6. Put anti-seize coating on the plug.
7. Reinstall and tighten the plug.
Alternator/Fan Belt
Refer to the separate engine manual for setting proper belt tension. If the belt is
worn, cracked or otherwise deteriorated, replace the belt by following the procedure in the separate engine manual.
Page 54

50 917334/BP0310
Hydraulic System
Checking Hydraulic Oil Level
The loader has a dipstick located in the
engine compartment. Check the fluid
level with the lift arm lowered and the
attachment on the ground.
When hydraulic fluid is required, allow
the system to cool. Slowly remove the oil
fill cap, allowing the pressure to dispel
before removing the cap completely.
Add hydraulic fluid as required. Refer to
the Lubrication topic (page 44) for oil
recommendations. Replace the cap.
Changing Hydraulic Oil Filter
Before servicing the hydraulic filter, be sure
the lift arm is lowered.
1. Open the rear door and engine cover
to access the filter. Unscrew the filter.
2. Clean the surface of the filter housing
where the element seal contacts the
housing. Put clean oil on the rubber
gasket of the new filter element.
3. Install and tighten the filter element
3/4 of a turn past the point where the
gasket contacts the filter head.
4. For a replacement element, refer to the
Replacement Parts topic (page 43).
Changing Hydraulic Oil
The hydraulic oil must be replaced if it becomes contaminated, after major
repairs, and after 1000 hours or one year of use.
1. Remove the oil filler cap.
2. Install a catch pan of sufficient capacity under the oil reservoir (8 gallons
[30 liters])
3. Remove the drain plug located on the bottom left of the oil reservoir.
4. Remove and replace the hydraulic oil filter.
5. Reinstall the drain plug.
6. Refill the reservoir until the oil is between the two lines on the dipstick gauge.
7. Start the engine and operate the hydraulic controls.
Figure 30 Hydraulic Oil Service
WARNING
Figure 31 Drain Plug
Page 55

917334/BP0310 51
8. Stop the engine and check for leaks at the filter and reservoir drain plug.
9. Check the fluid level and add fluid if needed.
Cooling Systems
Important: Check the cooling system every day to prevent overheating, loss of
performance or engine damage.
Checking Coolant Level
1. Open the rear door. Check the coolant
level in the coolant recovery tank on
the inside of the rear door . The coolant
recovery tank must be 1/3 to 1/2 full
with a cold engine and 2/3 to 3/4 full
with a hot engine.
2. Allow the coolant to cool. Do not
remove the cap when the coolant is
hot. Serious burns may occur.
3. Add premixed coolant, 50% water and
50% ethylene glycol, to the recovery
tank if the coolant level is low.
Cleaning Cooling System
1. Park the loader on a level surface,
lower the lift arm and stop the engine.
Allow the engine to cool.
2. Open the rear door. Lift the engine cover.
3. Clean the radiator and oil cooler by blowing t hrough the fins with high pres-
sure water or air.
Note: Th e radiator can be tipped out for cleaning by loosening and rotating the
over-center links on each side. This will also help in cleaning the oil cooler.
Draining/Flushing Cooling System
1. Open the rear door. Lift the engine cover.
2. Slowly remove the radiator cap, allowing pressure to dispel before removing
completely.
Liquid cooling systems build up pressure as the
engine becomes hot. Before removing the radiator cap, stop the engine and let the system cool. Remove the radiator
cap only after the coolant has cooled. Remove the cap slowly or
severe burns may result.
3. Remove the drain plug and drain the coolant into a suitable container.
4. Replace the drain plug.
Figure 32 Cooling System
1. Recovery Tank
2. Radiator/Cooler
3. Drain Plug
1
2
3
WARNING
Page 56

52 917334/BP0310
Note: Protect the cooling system by adding premixed 50% water and 50% ethylene glycol to the system. This mixture will protect the cooling system to -34°F
(-36°C).
5. Fill the radiator fully and the recovery
tank half full with the premixed
coolant.
6. Reinstall the radiator cap.
7. Run the engine until it is at operatin g
temperature. Stop the engine and let it
cool. Check the coolant level. Add
more coolant if required.
Chaincases
The chaincase contains the drive
sprockets and drive chains. There are two
plugs in each chaincase. One is to drain
the fluid and the other is to check the fluid
level. Refer to the Maintenance Schedule
chapter (page 67) for change intervals.
Refer to the Lubrication topic (page 44)
for information on oil type and quantity.
Checking and Adding Oil
1. Park the loader on a level surface.
Stop the engine.
2. Remove the check plug from each
chaincase housing. If the oil can be reached with the tip of your finger, the oil
level is adequate.
3. If the level is low, add fluid through the check plug until the oil level reaches
the edge of the hole. Reinstall the check plug.
Draining Oil
1. Raise the rear of the machine to aid in draining the chaincases.
2. Remove the drain plug on each chaincase and drain the oil into a suitable
container.
3. Reinstall and tighten the drain plugs.
4. Refill the chaincases at the check plugs.
Seat and Restraint Bar Switches
Electrical switches in the seat and restraint bar must be closed (operator sitting in
the seat and restraint bar lowered) to complete the circuit and start the engine.
Figure 33 Check Plug
Figure 34 Drain Plugs
Page 57

917334/BP0310 53
Bucket Cutting Edge
The bucket cutting edge should be replaced when it is wo rn to within 1 in. (25 mm)
of the bucket body.
Wheel Nuts
Wheel nut torque must be checked before initial operation and every two hours
thereafter until the wheel mounting hardware torque stabilizes at the
recommended setting of 120-130 ft-lbs (161-175 N·m). When tires are removed
and replaced, this procedure must be repeated.
Tires
Rear tires usually wear faster than the front ones. To keep tire wear even, rotate
the tires from front to rear and rear to front.
It is important to keep the same size tire on each side of the loader to prevent
excessive wear on tires or other damage. If different sizes are used, each tire will
be turning at different speeds, causing excessive wear.
The tread bar of all tires must face the same direction.
Mounting Tires
Inflating or servicing tires can be dangerous.
When possible, trained personnel should
service and mount tires. To avoid possible death or serious injury,
follow the safety precautions below.
1. Be sure the rim is clean and free of rust.
2. Lubricate the tire beads and rim flanges with a soap solution. Do not use oil
or grease.
3. Use a clip-on tire chuck w ith remote hose and gauge, allowing you to stand
clear while inflating the tire. Do not place your fingers on the tire bead or rim
during inflation.
4. Never inflate beyond 35 psi (240 kPa) to seat the beads. If the beads have not
seated by the time the pressure reaches 35 psi (240 kPa), deflate the assembly ,
reposition the tire on the rim, lubricate both parts and re-inflate. Inflation
pressure beyond 35 psi (240 kPa) with unseated beads may break the bead o r
rim with explosive force sufficient to cause death or serious injury.
5. After seating the beads, adjust the inflation pressure to the recommended
operating pressure.
6. Do not weld, braze or otherwise attempt to repair and use a damaged rim.
WARNING
Page 58

54 917334/BP0310
Checking Tire Pressure
Correct tire pressure should be maintained for all tires to enhance operating
stability and extend tire life. Refer to the above chart for the proper inflation
pressure.
When installing tires, be sure they are the same size and style on each side of the
loader. Always replace tires with the same size as the original equipment.
Electrical System
Circuit Breakers
The circuit breakers for the loader are located on the right instrument panel.
There is also a 35-amp main circuit breaker located on the right side of the engine
compartment, directly behind the ROPS/FOPS.
Tire Size
Inflation Pressure
psi kPa
10 x 16.5 8-ply Heavy-Duty Flotation 60 414
27 x 8.5 –15 8-ply Heavy-Duty 60 414
27 x 10.5 – 15 8-ply Heavy-Duty 60 414
6.5 x 16 – 5.50 Solid Rubber - -
7.00-15 SS Chevron Narrow 8-ply 60 414
Page 59

917334/BP0310 55
Battery
Before servicing the battery or electrical
system, be sure the battery disconnect switch
(if equipped) is in the “OFF” position. If not equipped with a disconnect switch, disconnect the ground (-) terminal from battery.
The battery on the loader is a 12-volt, wet-cell battery. To access the battery,
open the rear door and lift the engine cover.
The battery top must be kept clean. Clean it with an alkaline solution (ammonia
or baking soda and water). After foaming has stopped, flush the battery top with
clean water. If the terminals and cable connection clamps are corroded or have a
build-up, disconnect the cables and clean the terminals and clamps with the same
alkaline solution.
Explosive gas is produced while a battery is in
use or being charged. Keep flames or sparks
away from the battery area. ALWAYS charge the battery in a wellventilated area.
Never lay a metal object on top of a battery, because a short circuit
can result.
Battery acid is harmful on contact with skin or fabrics. If acid spills,
follow these first-aid tips:
1. Immediat ely remove any clothing on which aci d sp il ls .
2. If acid contacts the skin, rinse the affected area with running
water for 10 to 15 minutes.
3. If acid contacts the eyes, flood the eyes with running water for 10
to 15 minutes. See a doctor at once. Never use any medication or
eye drops unless prescribed by the doctor.
4. To neutralize acid spilled on the floor, use one of the following
mixtures:
a. 1 pound (0.5 kg) of baking soda in 1 gallon (4 L) of water
b. 1 pint (0.5 L) of household ammonia in 1 gallon (4 L) of water
Whenever the battery is removed, be sure to disconnect the negative (-) battery terminal connection first.
WARNING
WARNING
Page 60

56 917334/BP0310
Notes
Page 61

917334/BP0310 57
CHAPTER 6
TROUBLESHOOTING
Electrical System
Problem Possible Cause Remedy
Entire electrical
system does not
function.
Battery disconnect switch is
OFF.
Turn battery disconnect
switch to ON.
15-ampere breakers tripped. Check circuit and locate
trouble before resetting
breaker.
Main wiring harness
connectors at rear of ROPS
not properly plugged in.
Check main harness
connectors.
Battery terminals or cables
are loose or corroded.
Clean battery terminals and
cables and retighten them.
Battery is faulty. Test battery and replace as
needed.
No instrument panel
lamps with keyswitch
turned to “ON.”
25 ampere breakers are
tripped.
Check circuit and locate
trouble before resetting
breaker.
Battery terminals or cables
are loose or corroded.
Clean battery terminals and
cables and retighten them.
Seatbelt buzzer not
sounding when key
turned to “ON,”
indicator lamps work
properly.
Buzzer is disconnected. Reconnect wires to buzzer.
Faulty buzzer. Replace buzzer.
Fuel gauge does not
work.
Faulty fuel gauge sender. Replace fuel gauge sender.
Faulty fuel gauge. Replace fuel gauge.
Loose wiring/terminal
connections.
Verify wiring connections.
Engine temperature
gauge does not work.
Faulty temperature sender. Replace temperature sender.
Faulty temperature gauge. Replace temperature gauge.
Loose wiring/terminal
connections.
Verify wiring connections.
Hourmeter does not
work.
Loose wiring/terminal
connections.
Verify wiring connections.
Faulty alternator. Repair the alternator.
Faulty hour meter. Replace hour meter.
Page 62

58 917334/BP0310
Starter will not
engage when key is
turned to START.
Seat or restraint bar switch
malfunctioning or not
activated.
Replace switches as needed.
If engine still doesn’t start,
contact your dealer.
Poor connections to starter
relay in instrument panel.
Verify relay connections.
Battery terminals or cables
loose or corroded.
Clean terminals, cables and
retighten.
Faulty starter relay in
instrument panel.
Contact your dealer.
Battery discharged or
defective.
Recharge or replace battery.
Starter solenoid not
functioning.
Troubleshoot circuit. Replace
the starter solenoid.
Ignition wiring, seat switch,
restraint bar switch, etc.
loose or disconnected.
Check wiring for poor
connections, broken leads;
repair wiring or connection.
Starter or pinion faulty. Remove starter;
repair/replace as needed.
Work lights not
functioning properly.
Single light doesn’t work:
Light bulb burned out, faulty
wiring.
Check and replace light bulb
as needed. Check wiring
connection to light.
No lights at all; 25-ampere
breaker tripped.
Check circuit and locate
trouble before replacing fuse.
Faulty light switch or poor
ground.
Replace light switch. Check
ground wire connections.
Lift/Tilt and/or drive
lock solenoids do not
work.
Wiring to solenoids
disconnected or faulty.
Troubleshoot circuit, repair.
Faulty seat or restraint bar
switch.
Contact your dealer.
Faulty solenoid valve coil. Contact your dealer.
Faulty hydraulic solenoid
relay in instrument panel.
Contact your dealer.
Electrical System
Problem Possible Cause Remedy
Page 63

917334/BP0310 59
Engine
Problem Possible Cause Remedy
Engine turns over
but will not start.
Engine cranking speed too
slow.
Battery requires recharging
or replacing, or, in cold
temperatures, pre-warm the
engine.
Auxiliary valve engaged. Return control valves to
neutral.
Fuel tank empty or faulty fuel
gauge sender.
Refill fuel tank. Replace fuel
gauge sender.
Glow plug module
malfunctioning.
Check connection and
voltage, replace as needed.
Fuel shut-off solenoid not
energizing.
Check electrical connections
and voltage to shut-off
solenoid.
Engine oil not warm enough. Install a pan heater.
Ambient temperature is too
low.
Install a pan heater.
Fuel pump not working. Contact your dealer.
Engine overheats.
Crankcase oil level too low or
too high.
Add or remove oil as
required.
Fan air circulation blocked or
restricted.
With engine OFF, remove
blockage or restriction.
Fan shroud improperly
positioned.
Contact your dealer.
Grade of oil improper or
excessively dirty.
Drain and replace with
proper grade new oil.
Exhaust restricted. Allow exhaust to cool,
remove restriction.
Air filter is restricted. Replace the filter(s).
Page 64

60 917334/BP0310
Hydrostatic System
Problem Possible Cause Remedy
No response from
either hydrostatic
drive or the lift/tilt
systems.
Hydraulic oil viscosity is too
heavy.
Allow longer warm-up or
replace existing oil with the
proper viscosity oil.
Hydraulic oil supply is too
low.
Check for low oil level in
reservoir. Add oil.
Drive coupling failure. Replace the coupling.
Traction drive will
not operate in either
direction.
Parking brake is engaged. Disengage parking brake.
Hydraulic oil supply is low. Check for low oil level in
reservoir. Add oil.
Control rod linkage
disconnected.
Check linkage connection at
control levers and neutral
centering mechanisms.
Reconnect linkage.
Low or no charge pressure. Contact your dealer.
Hydrostatic pump(s) relief
valves are malfunctioning.
Contact your dealer.
Sluggish response
to acceleration.
Air in hydraulic system. Cycle lift and tilt cylinders to
maximum stroke and
maintain pressure for a short
time to clear air from system.
Also check for low oil level in
reservoir, fill as needed.
Automatic parking brake
partially engaged.
Contact your dealer.
Hydraulic oil supply is too
low.
Check for low oil level in
reservoir. Add oil.
Low hydrostatic system
charge pressure.
Contact your dealer.
Drive motor(s) or hydrostatic
pump(s) have internal
damage or leakage.
Contact your dealer.
Page 65

917334/BP0310 61
Hydrostatic drive
is overheating.
Drive system overloaded
continuously.
Improve efficiency of
operation.
Lift/tilt or auxiliary system
overloaded continuously.
Improve efficiency of
operation.
Drive motor(s) or hydrostatic
pump(s) have internal
damage or leakage.
Contact your dealer.
Oil cooler fins plugged with
debris.
Clean oil cooler fins.
Loader being operated in a
high temperature area with
no air circulation.
Reduce duty cycle; improve
air circulation.
Hydrostatic System
Problem Possible Cause Remedy
Page 66

62 917334/BP0310
Hydrostatic System
Problem Possible Cause Remedy
Hydrostatic (drive)
system is noisy.
Hydraulic oil viscosity is too
heavy.
Allow longer warm-up or
replace existing oil with the
proper viscosity oil.
Air in hydraulic system. Cycle lift and tilt cylinders to
maximum stroke and
maintain pressure for a short
time to clear air from system.
Also check for low oil level in
reservoir, fill as needed.
Drive motor(s) or hydrostatic
pump(s) have internal
damage or leakage.
Contact your dealer.
Right side doesn’t
drive in either
direction. Left side
operates normally.
Rear hydrostatic pump arm
control shaft key missing.
Contact your dealer.
Relief valves on rear
hydrostatic pump
malfunctioning.
Contact your dealer.
Control rod linkage to rear
hydrostatic pump
disconnected.
Attach control rod linkage.
Right side doesn’t
drive in forward
direction.
Relief valve on rear
hydrostatic pump is
malfunctioning.
Contact your dealer.
Rear hydrostatic pump
malfunctioning.
Contact your dealer.
Left side doesn’t
drive in either
direction. Right side
operates normally.
Key missing on front
hydrostatic pump arm control
shaft.
Contact your dealer.
Relief valves on front
hydrostatic pump
malfunctioning.
Contact your dealer.
Control rod linkage to front
hydrostatic pump
disconnected.
Attach control rod linkage.
Left side doesn’t
drive in one
direction.
Relief valve on front
hydrostatic pump is
malfunctioning.
Contact your dealer.
Front hydrostatic pump
malfunctioning.
Contact your dealer.
Page 67

917334/BP0310 63
Hydraulic System
Problem Possible Cause Remedy
Lift/Tilt controls
fail to respond.
Hydraulic oil viscosity is too
heavy.
Allow longer warm-up or
replace with proper viscosity
oil.
Hydraulic oil level is low. Check oil level in reservoir. If
oil is low, check for an
external leak. Repair and
add oil.
Solenoid valve(s)
malfunctioning.
Check electrical connections
to lift solenoid and repair.
Restraint bar or seat switch
malfunction.
Check switches.
Auxiliary hydraulics
do not function.
Restraint bar is raised. Lower the restraint bar.
Lock solenoid malfunctioning Check electrical connections
to lock solenoid and repair
connections as needed. If
lock solenoid is still not
functioning properly, contact
your dealer.
Restraint bar switch
malfunctioning.
Check electrical connections
to restraint bar switch and
repair connections as
needed. If switch is still not
functioning properly, contact
your dealer.
Hydraulic cylinder
action is slow for lift
and/or tilt functions.
Low engine speed. Operate engine at higher
speed.
Hydraulic oil viscosity is too
heavy.
Allow longer warm-up or
replace existing oil with
proper viscosity oil.
Control linkage is restricted. Check for control linkage
restriction and adjust.
Hydraulic oil leaking past
cylinder piston seals.
Contact your dealer.
Worn gear pump. Contact your dealer.
Solenoid valve(s) could be
malfunctioning.
Check electrical connections
to lift solenoid and repair
connections as needed. If lift
solenoid valve is still not
functioning properly, contact
your dealer.
Relief valve in control valve
not functioning correctly.
(Squealing noise should be
evident while operating.)
Contact your dealer.
Page 68

64 917334/BP0310
Bucket does not level
on the lift cycle.
Self-leveling valve
misadjusted or
malfunctioning.
Contact your dealer.
Jerky lift arm and
bucket action.
Seat or restraint bar switch
malfunction.
Check electrical connections
to the switches. Replace as
needed.
Air in the hydraulic system. Cycle lift/tilt cylinders to
maximum stroke and
maintain pressure for short
time to clear air from system.
Oil in hydraulic reservoir is
low.
Check and add oil.
Bucket drifts
downward with tilt
control in neutral.
Oil leaking past tilt cylinder
seals (internal or external).
Contact your dealer.
Self-leveling valve is
malfunctioning.
Contact your dealer.
Leaking hydraulic hoses,
tubes, or fittings between
control valve and cylinders.
Inspect hoses and tubes,
tighten fittings. Replace
hoses or tubes as needed.
No down pressure
on the bucket.
Control valve in float
position.
Take control out of float
position.
Tilt cylinders are
malfunctioning.
Contact your dealer.
Relief valve in control valve
not functioning properly.
(Squealing noise should be
evident while operating.)
Contact your dealer.
Bucket will not tilt, lift
arms work properly.
Tilt solenoid valve
malfunctioning.
Check electrical connections
to tilt solenoid and repair
connections as needed. If tilt
solenoid valves are still not
functioning properly, contact
your dealer.
Tilt spool in control valve not
actuated or leaking.
Check valve control linkage
and/or tube connections to
valve.
Slow or no response
for bucket tilt, lift
works properly
(Hand/Foot units
only).
Pilot control lines have air in
them.
Bleed the pilot control line
from the main control valve.
Low charge pressure. Contact your dealer.
Linkage misadjusted
between right foot pedal and
pilot valve.
Readjust for full travel
without restriction.
Hydraulic System
Problem Possible Cause Remedy
Page 69

917334/BP0310 65
Lift arm does not
raise, bucket tilt
works properly.
Lift solenoid valve could be
malfunctioning.
Check electrical connections
to lift solenoid and repair
connections as needed. If lift
solenoid valve is still not
functioning properly, contact
your dealer.
Lift spool in control valve not
actuated or leaking.
Contact your dealer.
Lift arm doesn’t
maintain raised
position with lift
control in NEUTRAL.
Oil leading past lift cylinder
seals (internal or external).
Contact your dealer.
Oil leaking past lift spool in
control valve.
Contact your dealer.
Self-leveling valve
malfunctioning.
Contact your dealer.
Leaking hydraulic hoses,
tubes or fittings between
control valve and cylinders.
Inspect hoses and tubes,
tighten fittings as needed.
Replace as needed.
Lift arm will not lower
or raise.
Lift arm support device
engaged.
Raise lift arm and disengage
support device.
Lift solenoid valve
malfunctioning.
Check electrical connections
to solenoid. Repair or
replace as needed.
Restraint bar not lowered. Lower restraint bar.
Seat or restraint bar switch
malfunction.
Check electrical connections
to the switch. Replace switch
as needed.
Hydraulic System
Problem Possible Cause Remedy
Page 70

66 917334/BP0310
Notes
Page 71

917334/BP0310 67
CHAPTER 7
MAINTENANCE SCHEDULE
This Maintenance Interval Chart was developed to match the Service chapter of
this manual. Detailed information on each service procedure can be found in the
Service chapter. A Maintenance Log follows the chart for recording the maintenance performed. Recording the 10-hour (or daily) service intervals would be
impractical and is therefore not recommended.
Important: Under severe operating conditions, more frequent service than the
recommended intervals may be required. You must decide, based on your use, if
your operation requires more frequent service.
Perform the initial procedure at 2 hours then at “z” intervals.
Perform the initial procedure at 50 hours then at “z” intervals.
Perform the maintenance at 1000 hours.
Maintenance Interval Chart
Service Procedure
Maximum Interval
10 Hours
(or Daily)
250 Hours
500 Hours
(or Yearly)
Check Engine Air Cleaner Restriction Indicator
(page 45)
z
Check Engine Oil Level (page 47)
z
Check Hydraulic Oil Level (page 50)
z
Check Tire Pressures (page 54)
z
Grease Lift Arm, Hitch and Cylinder Pivots
(page 44)
z
Check Bucket Cutting Edge (page 49)
z
Check Seat and Restraint Bar Operation (page 52)
z
Check Coolant Level (page 51)
z
Clean Cooling System (page 51)
z
Check Wheel Nuts Torque (page 53)
z
Check Oil Level in Chaincases (page 52)
z
Clean Spark Arrestor Muffler (page 49)
z
Check Alternator/Fan Belt Tensions (page 49)
z
Change Engine Oil and Filter (page 48)
z
Change Hydraulic Oil Filter (page 50)
z
Check Battery (page 55)
z
Check Engine Mounting Hardware (page 47)
z
Change Fuel Filters (page 48)
z
Change Hydraulic Oil (page 50)
Change Chaincase Oil (page 52)
Drain/Flush Cooling System (page 51)
z
Page 72

68 917334/BP0310
Maintenance Log
Date Hours Service Procedure
Page 73

917334/BP0310 69
Maintenance Log
Date Hours Service Procedure
Page 74

70 917334/BP0310
Notes
Page 75

917334/BP0310 71
CHAPTER 8
SPECIFICATIONS
Loader Specifications
Specification 3640E/3840E (EU) 4240E
Operating Weight 4000 lbs. (1814 kg) 4600 lbs.(2087 kg)
Shipping Weight
2
3515 lbs. (1594 kg) 4065 lbs. (1844 kg)
Rated Operating Load
1
(capacity)
1. Operating load (capacity) rated for 3640E/3840E (EU): 55 in. (1397 mm) 10.5
ft
3
, (0.3 m3); 4240E: 61 in. (1550 mm) 11.7 ft3, (0.3 m3) dirt/construction bucket,
in accordance with SAE J818.
2. 3640E/3840E (EU) shipped with 27.0 x 8.50 - 15 tires; 4240E shipped with
10.00 x 16.5 tires
1050 lbs. (476 kg) 1350 lbs. (612 kg)
Engine
Make Yanmar Yanmar
Model 3TNV88-BKMS 4TNV88-BKMS
Displacement
100 in
3
(1,64 L) 133 in3 (2,19 L)
Power (net) 35 hp (26 kW)
@ 2600 rpm
46 hp (34 kW)
@ 2600 rpm
Peak Torque 80 ft.-lbs. (108 N·m)
@ 1200 rpm
103 ft.-lbs. (140 N·m)
@ 1200 rpm
Hydraulic System (theoretical)
Main Hydraulic System Pressure 2750 psi (190 bar) 2750 psi (190 bar)
Standard-Flow Rating 14.5 gpm (55 L/min) 16.5 gpm (62 L/min)
Electrical
Battery 12-Volt DC, 675 CCA 12-Volt DC, 675 CCA
Starter 12-Volt DC (2.3 Kw) 12-Volt DC (2.3 Kw)
Alternator 40 amperes 40 amperes
Capacities
Chaincase (each) 8 U.S. qts. (7,6 L) 8.0 U.S. qts. (7,6 L)
Crankcase 7.6 U.S. qts. (7,2 L) 9.1 U.S. qts. (8,6 L)
Fuel Tank 10.3 U.S. gal. (39 L) 12.4 U.S. gal. (47 L)
Hydraulic Reservoir 8 U.S. gal. (30 L) 8 U.S. gal. (30 L)
Sound (with Deluxe Sound Kit)
Pressure Level (Operator Ear) 85 dB(A) 85 dB(A)
Power Level (Environmental) 101 dB(A) 101 dB(A)
Page 76

72 917334/BP0310
Standard Features
¾ Choice control types:
T-Bar or Hand/Foot
¾ Fuel Gauge
¾ All-Tach™ Attachment System
(Universal-Type)
¾ Warning Lamps and Buzzer –
Engine and Hydraulic
Oil Temperature
¾ Battery Charge Indicator Lamp
¾ Low Oil Pressure Light and Buzzer
¾ Seatbelt Indicator Lamp and
Buzzer
¾ Coolant Temperature Gauge
¾ Hourmeter
¾ Manual-Control Hydrostatic Drive
¾ ROPS/FOPS- Level II – Approved
Overhead Guard
¾ Independent Hydraulic Reservoir
and Hydraulic Oil Cooler
¾ Foot (T-Bar Only) and Hand Throttle
¾ Operator Restraint Bar
with Armrests
¾ Engine Intake Air Pre-Heater
St arting Assist (Manual)
¾ Adjustable Seatbelt
¾ Lift Arm Support Device
¾ Hydraloc™ System – Brakes and
Interlock for Starter, Lift/Tilt
Cylinders, Auxiliary Hydraulics,
and Wheel Drives
¾ Dual Front and Rear Work Lights
¾ Removable Belly Plate and
Access Cover
¾ Dual-Element Air Cleaner with
Visual Indicator
¾ Vandalism Lock Provisions
¾ Top and Rear Windows
¾ Spark Arrestor Muffler
¾ Headliner and Acoustical Interior
¾ Adjustable Seat
¾ Front Auxiliary Hydraulics with
3/4-inch Flat-Faced Couplers
¾ Number 80K Drive Chain
¾ Powerview
®
Lift Arm
¾ Visual Hydraulic Filter Indicator
¾ Power Plug (12 V)
Optional Features
¾ Audible Back-Up Alarm
¾ Engine Block Heater
¾ Horn
¾ Suspension Seat
¾ Cab Door with Wiper and Dome
Light
¾ Sliding Side Windows
¾ Heater/Defroster
¾ Deluxe Sound Package
¾ 3-inch Wide Seatbelt – When
Required by Law
¾ Rear View Mirror
¾ Engine Auto-Shutdown System
¾ Interior Dome Light
¾ Centrifugal Pre-Cleaner
¾ Strobe Light
¾ Impact-Resistant Door
¾ Single-Point Lift Kit
¾ Four-Point Lift Kit
¾ Rear Counterweight
¾ Battery Disconnect Switch
¾ Fenders
¾ Bucket Bolt-On Cutting Edge
¾ Diesel Engine Exhaust Purifier
¾ Hydraulic Coupler Kit
¾ Self-Leveli n g Li ft Action
Page 77

917334/BP0310 73
Dimensional Specifications
SL3640E &
SL3840E (EU)
10.5 ft3 (0.3 m3) Bucket
w/27 x 8.5 x 15 Tires
inches mm
A Overall Operation Height – Fully Raised 139.6 3546
B Height to Hinge Pin – Fully Raised 108.1 2746
C Overall Height – to ROPS 70.3 1786
D Overall Length – Bucket Down 114.0 2896
E Dump Angle at Full Height
42
o
F Dump Height 84.5 2146
G Dump Reach – Bucket Full Height 22.8 579
J Rollback at Ground
29
o
M Rollback Angle at Full Height
99
o
O Seat to Ground Height 32.6 828
P Wheel Base – Nominal 34.5 876
Q Overall Width – Less Bucket 48.4/58.2 1229/1428
R Bucket Width – Overall 55.3 1404
S Ground Clearance – to Chassis (Between Wheels) 6.0 152
V Overall Length (Less Bucket) 88.9 2258
W Departure Angle
26
o
X Clearance Circle – Front (With Bucket) 69.4 1763
Y Clearance Circle – Front (Less Bucket) 44.1 1120
Z Clearance Circle – Rear 54.1 1374
Page 78

74 917334/BP0310
Dimensional Specifications
SL4240E
11.7 ft3 (0.3 m3) Bucket
w/10 x 16.5 Tires
inches mm
A Overall Operation Height – Fully Raised 141.1 3584
B Height to Hinge Pin – Fully Raised 110.0 2794
C Overall Height – to ROPS 71.9 1826
D Overall Length – Bucket Down 116.2 2952
E Dump Angle at Full Height
42
o
F Dump Height 84.5 2197
G Dump Reach – Bucket Full Height 20.8 528
J Rollback at Ground
29
o
M Rollback Angle at Full Height
99
o
O Seat to Ground Height 33.6 853
P Wheel Base – Nominal 36.7 932
Q Overall Width – Less Bucket 52.5/58.4 1334/1483
R Bucket Width – Overall 60.6 1539
S Ground Clearance – to Chassis (Between Wheels) 8.3 211
V Overall Length (Less Bucket) 91.1 2314
W Departure Angle
29
o
X Clearance Circle – Front (With Bucket) 69.2 1758
Y Clearance Circle – Front (Less Bucket) 43.4 1102
Z Clearance Circle – Rear 58.4 1484
Page 79

917334/BP0310 75
Capacities and Ratings
Note: Use the Table of Common Materials and Densities (page 76) for selecting
the appropriate bucket.
Dirt/Construction Buckets
Description Weight
Rated Operating Capacity
SL3640E/
SL3840E (EU)
SL4240E
55 in./10.5 ft
3
(1397 mm/0.30 m3)
235 lbs.
(107 kg)
1095 lbs.
(497 kg)
1383 lbs.
(627 kg)
60 in./10.0 ft
3
(1524 mm/0.28 m3)
252 lbs.
(114 kg)
881 lbs.
(340 kg)
1102 lbs.
(500 kg)
61 in./11.7 ft
3
(1549 mm/0.33 m3)
253 lbs.
(115 kg)
1082 lbs.
(491 kg)
1370 lbs.
(621 kg)
Construction with High Back Buckets
55.5 in./9.5 ft
3
(1410 mm/0.27 m3)
254 lbs.
(115 kg)
1061 lbs.
(481 kg)
1325 lbs.
(601 kg)
61.5 in./13.0 ft
3
(1562 mm/0.37 m3)
383 lbs.
(174 kg)
975 lbs.
(422 kg)
1214 lbs.
(551 kg)
Utility Buckets
55.5 in./13.5 ft
3
(1410 mm/0.38 m3)
313 lbs.
(142 kg)
1061 lbs.
(481 kg)
1325 lbs.
(601 kg)
61.5 in./15.2 ft
3
(1562 mm/0.43 m3)
335 lbs.
(152 kg)
826 lbs.
(375 kg)
1064 lbs.
(483 kg)
67 in./18.4 ft
3
(1701 mm/0.52 m3)
395 lbs.
(179 kg)
795 lbs.
(361 kg)
1000 lbs.
(454 kg)
Earth and Foundry Bucket
61.5 in./10.9 ft3 (1562 mm/0.31 m3)
331 lbs.
(150 kg)
1228 lbs.
(557 kg)
1469 lbs.
(666 kg)
Pallet Forks
15.75 in. (400 mm) Forks with
Backrest Rating per EN474-3
470 lbs.
(213 kg)
662 lbs.
(300 kg)
838 lbs.
(380 kg)
19.68 in. (500 mm) Forks with
Backrest Rating per EN474-3
470 lbs.
(213 kg)
616 lbs.
(279 kg)
775 lbs.
(352 kg)
24 in. (670 mm) Forks with
Backrest Rating per SAE J1197
470 lbs.
(213 kg)
575 lbs.
(261 kg)
526 lbs.
(239 kg)
Page 80

76 917334/BP0310
Table of Common Materials and Densities
Note: The densities listed are average values and intended only as a guide for
bucket selection. For a material that is not in the table, obtain its density value
before selecting the appropriate bucket.
Material
Density
lbs/ft
3
kg/m
3
Ashes 35-50 560-800
Brick-common 112 1792
Cement 110 1760
Charcoal 23 368
Clay, wet-dry 80-100 1280-1600
Coal 53-63 848-1008
Concrete 115 1840
Cinders 50 800
Coal-anthracite 94 1504
Coke 30 480
Earth-dry loam 70-90 1121-1442
Earth-wet loam 80-100 1281-1602
Granite 93-111 1488-1776
Gravel-dry 100 1602
Gravel-wet 120 1922
Gypsum-crushed 115 1840
Iron ore 145 2320
Lime 60 960
Lime stone 90 1440
Manure-liquid 65 1040
Manure-solid 45 720
Peat-solid 47 752
Phosphate-granular 90 1440
Potash 68 1088
Quartz-granular 110 1760
Salt-dry 100 1602
Salt-Rock-solid 135 2160
Sand-dry 108 1728
Sand-wet 125 2000
Sand-foundry 95 1520
Shale-crushed 90 1440
Slag-crushed 70 1120
Snow 15-50 240-800
Taconite 107 1712
Page 81

917334/BP0310 77
Bucket Selections
To use the table, find the material name and see what its maximum density is.
Then, multiply the loader rating of the attachment by the material density to
determine if the attachment can safely be used. See page 75 for a listing of
attachments and their loader ratings.
Note: Where the material density is listed as a range (snow at 15-50 lbs./ft
3
, for
example), always use the maximum density (50 lbs./ft
3
in this example) for
making calculations. Also, see the following examples.
Example 1: If snow (density of 15-50 lbs./ft
3
) is to be hauled using a
3640E/3840E model loader using Dirt/Construction Bucket, the bucket capacit y
is 10.5 ft
3
and the loader rating is 1050 lbs. Multiply the density of snow (50
lbs./ft
3
) by the capacity of the bucket (10.5 ft3) to achieve the weight being car-
ried (50 lbs./ft
3
x 10.5 ft3 = 525 lbs.). This number is less than the machine rating,
so you could safely use this bucket in this application.
Example 2: If potash (density of 1088 kg/m
3
) is to be hauled using a
3640E/3840E model loader using a 0.3 m
3
Dirt/Construction bucket, the bucket
capacity is 0.3 m
3
and the loader rating is 612 kg. Multiply the density of potash
(1088 kg/m
3
) by the capacity of the bucket (0.3 m3) to achieve the weight to be
carried (1088 kg/m
3
x 0.3 m3 = 326.4 kg). This number is less than the machine
rating, allowing safe use of this bucket in this application.
Page 82

78 917334/BP0310
Notes
Page 83

917334/BP0310 79
CHAPTER 9
TORQUE SPECIFICATIONS
Use these torque values when tightening hardware (excluding: locknuts, and
self-tapping, thread forming, and sheet metal screws) unless otherwise specified.
*All Torque Values are in ft-lbs. except those marked with an *, which are in-lbs.
For metric torque value (N·m), multiply ft-lbs. value by 1.355 or the in-lbs. value by
0.113.
UNIFIED
NATIONAL
THREAD
GRADE 2 GRADE 5 GRADE 8
DRY LUBED DRY LUBED DRY LUBED
8-32
8-36
10-24
10-32
19*
20*
27*
31*
14*
15*
21*
23*
30*
31*
43*
49*
22*
23*
32*
36*
41*
43*
60*
68*
31*
32*
45*
51*
1/4-20
1/4-28
5/16-18
5/16-24
66*
76*
11
12
50*
56*
9
9
9
10
17
19
75*
86*
13
14
12
14
25
25
9
10
18
20
3/8-16
3/8-24
7/16-14
7/16-20
20
23
32
36
15
17
24
27
30
35
50
55
23
25
35
40
45
50
70
80
35
35
55
60
1/2-13
1/2-20
9/16-12
9/16-18
50
55
70
80
35
40
55
60
75
90
110
120
55
65
80
90
110
120
150
170
80
90
110
130
5/8-11
5/8-18
3/4-10
3/4-16
100
110
175
200
75
85
130
150
150
180
260
300
110
130
200
220
220
240
380
420
170
180
280
320
7/8-9
7/8-14
1-8
1-12
170
180
250
270
125
140
190
210
430
470
640
710
320
360
480
530
600
660
900
1000
460
500
680
740
METRIC
COARSE
THREAD
GRADE 8.8 GRADE 10.9 GRADE 12.9
DRY LUBED DRY LUBED DRY LUBED
M6-1
M8-1.25
M10-1.5
8
19
37.5
6
14
28
11
27
53
8
20
39
13.5
32.5
64
10
24
47
M12-1.75
M14-2
M16-2
65
103.5
158.5
48
76.5
117.5
91.5
145.5
223.5
67.5
108
165.5
111.5
176.5
271
82
131
200
Page 84

80 204926/AP0407
GEHL COMPANY
WARRANTY
GEHL COMPANY, hereinafter referred to as Gehl, warrants new
Gehl equipment to the Original Retail Purchaser to be free from
defects in material and workmanship for a period of twelve (12)
months from the Warranty Start Date.
GEHL WARRANTY SERVICE INCLUDES:
Genuine Gehl parts and labor costs required to repair or replace
equipment at the selling dealer’s business location.
GEHL MAKES NO REPRESENTATIONS OR WARRANTIES OF
ANY KIND, EXPRESS OR IMPLIED (INCLUDING THE IMPLIED
WARRANTIES OF MERCHANTABILITY AND FITNESS FOR
PARTICULAR PURPOSE), EXCEPT AS EXPRESSLY STATED
IN THIS WARRANTY STATEMENT.
ANY OF THESE LIMITATIONS EXCLUDED BY LOCAL LAW
SHALL BE DEEMED DELETED FROM THIS WARRANTY
STATEMENT; ALL OTHER TERMS WILL CONTINUE TO APPLY.
SOME STATES DO NOT PERMIT THE EXCLUSION OF
LIMITATION OF THESE WARRANTIES AND YOU MAY HAVE
GREATER RIGHTS UNDER YOUR STATE LAW.
GEHL WARRANTY DOES NOT INCLUDE:
1. Transportation to selling dealer’s business location or, at the
option of the Original Retail Purchaser, the cost of a service call.
2. Used equipment.
3. Components covered by their own non-Gehl warranties, such
as tires, batteries, trade accessories and engines.
4. Normal maintenance service and expendable, high-wear items.
5. Repairs or adjustments caused by: improper use; failure to fol-
low recommended maintenance procedures; use of unauthorized parts or attachments; accident or other casualty.
6. Liability for incidental or consequential damages of any type,
including, but not limited to lost profits and expenses of acquiring replacement equipment.
No agent, employee or representative of Gehl has any authority to
bind Gehl to any warranty except as specifically set forth herein.
Page 85

917334/BP0310 81
INDEX
A
Accessory Plug . . . . . . . . . . . . 22
Adjustments
. . . . . . . . . . . . . . . 43
Control Handles
. . . . . . . . . 43
Drive Chains
. . . . . . . . . . . . 44
Engine Speed Control
. . . . 44
Fuel Sender
. . . . . . . . . . . . 43
Alternator/Fan Belt
. . . . . . . . . . 49
Attachments
. . . . . . . . . . . . . . . 29,
34
Auxiliary Hydraulic Controls
. . . 28
Hand/Foot Controlled
. . . . . 29
T-Bar Controlled
. . . . . . . . . 28
B
Battery . . . . . . . . . . . . . . . . . . . 55
Jump Starting the Engine
. . 32
Bucket Cutting Edge
. . . . . . . . 53
Bucket, Usage
. . . . . . . . . . . . . 35
Digging with a Bucket . . . . . 36
Driving on an Incline
. . . . . . 35
Driving over Rough
Terrain . . . . . . . . . . . . . . . 35
Dumping Into a Box
. . . . . . 37
Dumping Onto a Pile
. . . . . 36
Dumping the Load Over
an Embankment
. . . . . . . 37
Leveling the Ground
. . . . . . 37
Loading a Bucket
. . . . . . . . 36
Scraping with a Bucket
. . . . 37
C
Capacities and Ratings . . . . . . 75
Chaincases . . . . . . . . . . . . . . . 52
Checking and Adding Oil
. . 52
Draining Oil
. . . . . . . . . . . . . 52
Circuit Breakers
. . . . . . . . . . . . 54
Cold Starting Procedure . . . . . . 31
Control/Indicator Symbols
. . . . 3
CONTROLS and SAFETY
EQUIPMENT
. . . . . . . . . . . . . 17
Cooling System . . . . . . . . . . . . 51
Check Coolant Level . . . . . 51
Clean
. . . . . . . . . . . . . . . . . 51
Drain/Flush
. . . . . . . . . . . . . 51
D
Dealer Services . . . . . . . . . . . . 41
E
Emergency Exit . . . . . . . . . . . . 20
Engine Air Cleaner
. . . . . . . . . 45
Engine Mounting Hardware
. . . 47
Engine Service . . . . . . . . . . . . 45
Change Fuel Filter
. . . . . . . 48
Change Oil and Filter
. . . . . 48
Check Oil
. . . . . . . . . . . . . . 47
Engine Speed Control
. . . . . . . 23
G
Guards and Shields . . . . . . . . . 17
H
Hand/Foot Controls . . . . . . . . . 27
Drive Controls . . . . . . . . . . 27
Lift/Tilt Controls
. . . . . . . . . 27
Highway Travel
. . . . . . . . . . . . 38
Hydraulic System
. . . . . . . . . . . 50
Change Oil . . . . . . . . . . . . . 50
Change Oil Filter
. . . . . . . . 50
Check Oil Level
. . . . . . . . . 50
I
Instrument Panel . . . . . . . . . . . 24
INTRODUCTION
. . . . . . . . . . . 1
L
Lift Arm Support Device . . . . . . 20
Loader
Lifting
. . . . . . . . . . . . . . . . . 38
Lowering Procedure
. . . . . . 42
Raising Procedure
. . . . . . . 42
Storing
. . . . . . . . . . . . . . . . 39
Transporting
. . . . . . . . . . . . 39
Lubrication
. . . . . . . . . . . . . . . . 44
Page 86

82 917334/BP0310
M
MAINTENANCE SCHEDULE . 67
Maintenance Log
. . . . . . . . 68,
69
Mandatory Safety Shutdown
Procedure . . . . . . . . . . . . . . . 6
Model Identification . . . . . . . . . 2
O
OPERATION . . . . . . . . . . . . . . 31
Operator Restraint Bar . . . . . . 17
Operator’s Seat
. . . . . . . . . . . . 18
P
Parking Brake . . . . . . . . . . . . . 19
Parking the Loader
. . . . . . . . . 32
Potential Hazards
. . . . . . . . . . 8
R
Rear Window . . . . . . . . . . . . . . 20
ROPS/FOPS
. . . . . . . . . . . . . . 19
S
SAFETY . . . . . . . . . . . . . . . . . . 5
Safety Decals
. . . . . . . . . . . . . 8
New Decal Application . . . . 8
No-Text Decals
. . . . . . . . . 12
Safety Interlock System
. . . . . . 18
Testing
. . . . . . . . . . . . . . . . 18
Safety Reminders
. . . . . . . . . . 6
Self-Leveling
. . . . . . . . . . . . . . 35
SERVICE . . . . . . . . . . . . . . . . . 41
Spark Arrestor Muffler
. . . . . . . 49
SPECIFICATIONS
. . . . . . . . . . 71
Accessories . . . . . . . . . . . . 72
Standard Features
. . . . . . . 72
Starting the Engine
. . . . . . . . . 31
Before Starting
the Engine . . . . . . . . . . . . 31
Stopping the Loader
. . . . . . . . 32
Switches, Seat
and Restraint Bar . . . . . . . . . 52
T
Table of Common Materials & Densi-
ties
. . . . . . . . . . . . . . . . . . . . 76
Table of Common Materials
and Densities . . . . . . . . . . . . 76
T-Bar Controls . . . . . . . . . . . . . 26
Drive Controls
. . . . . . . . . . 26
Lift/Tilt Controls
. . . . . . . . . 26
Tires
. . . . . . . . . . . . . . . . . . . . 53
Checking Tire Pressure . . . 54
Mounting Tires
. . . . . . . . . . 53
TORQUE SPECIFICATIONS
. 79
TROUBLESHOOTING
. . . . . . 57
Electrical System . . . . . . . . 57
Engine
. . . . . . . . . . . . . . . . 59
Hydraulic System
. . . . . . . 63,
64, . . . . . . . . . . . . . . . . . 65
Hydrostatic System
. . . . . . 60,
62
W
WARRANTY . . . . . . . . . . . . . . 80
Wheel Nuts
. . . . . . . . . . . . . . . 53
Page 87

Never exceed rated
operating load.
WRONG
Always carry attachment
as low as possible. Do
not travel or turn with
the lift arm raised. Load,
unload and turn on flat
level surface.
WRONG
Never carry riders.
Keep bystanders away
from work area.
WRONG
Never modify equipment.
Use only attachments
approved for the loader.
WRONG
Never leave loader with
engine running or with
lift arm up. To park,
engage parking brake
and put attachment flat
on the ground.
WRONG
Page 88

© 2010 GEHL COMPANY
917334/BP0310 All Rights Reserved. PRINTED IN U.S.A.
WARNING
THIS OPERATOR’S MANUAL IS
PROVIDED FOR OPERATOR USE
DO NOT REMOVE FROM THIS MACHINE
Do not start, operate or work on this machine until you carefully read and thoroughly understand the contents of this
Operator’s Manual.
Failure to follow safety, operating and maintenance instructions can result in serious injury to the operator or bystanders, poor operation, and costly breakdowns.
If you have any questions on proper operation, adjustment or
maintenance of this machine, contact your dealer or the Gehl
Company Service Department before starting or continuing
operation.
Gehl Company One Gehl Way, P.O. Box 179, West Bend, WI 53095-0179 U.S.A.
www.gehl.com
California Proposition 65 Warnings
Diesel engine exhaust and some of its constituents are known to the State of California
to cause cancer and birth defects or other reproductive harm.
Battery posts, terminals and related accessories contain lead and lead compounds,
chemicals known to the State of California to cause cancer and birth defects or other
reproductive harm. Wash hands after handling battery.
®
 Loading...