

Page 1
VGA & Audio to HDMI
*Preferred
Scaler/Converter
EXT-VGAA-HD-SC
User Manual
Release A1
Page 2

Important Safety Instructions
1. Read these instructions.
2. Keep these instructions.
3. Heed all warnings.
4. Follow all instructions.
5. Do not use this product near water.
6. Clean only with a dry cloth.
7. Do not block any ventilation openings. Install in accordance with the manufacturer’s
instructions.
8. Do not install or place this product near any heat sources such as radiators, heat
registers, stoves, or other apparatus (including ampliers) that produce heat.
9. Do not defeat the safety purpose of the polarized or grounding-type plug. A polarized
plug has two blades with one wider than the other. A grounding type plug has two
blades and a third grounding prong. The wide blade or the third prong are provided for
your safety. If the provided plug does not t into your outlet, consult an electrician for
replacement of the obsolete outlet.
10. Protect the power cord from being walked on or pinched particularly at plugs,
convenience receptacles, and the point where they exit from the apparatus.
11. Only use attachments/accessories specied by the manufacturer.
12. To reduce the risk of electric shock and/or damage to this product, never handle or
touch this unit or power cord if your hands are wet or damp. Do not expose this
product to rain or moisture.
13. Unplug this apparatus during lightning storms or when unused for long periods of time.
14. Refer all servicing to qualied service personnel. Servicing is required when the
apparatus has been damaged in any way, such as power-supply cord or plug is
damaged, liquid has been spilled or objects have fallen into the apparatus,
the apparatus has been exposed to rain or moisture, does not operate normally,
or has been dropped.
15. Batteries that may be included with this product and/or accessories should never be
exposed to open ame or excessive heat. Always dispose of used batteries
according to the instructions.
ii
Page 3

Warranty Information
Gefen warrants the equipment it manufactures to be free from defects in material and
workmanship.
If equipment fails because of such defects and Gefen is notied within two (2) years from
the date of shipment, Gefen will, at its option, repair or replace the equipment, provided
that the equipment has not been subjected to mechanical, electrical, or other abuse or
modications. Equipment that fails under conditions other than those covered will be
repaired at the current price of parts and labor in effect at the time of repair. Such repairs
are warranted for ninety (90) days from the day of reshipment to the Buyer.
This warranty is in lieu of all other warranties expressed or implied, including without
limitation, any implied warranty or merchantability or tness for any particular purpose, all of
which are expressly disclaimed.
1. Proof of sale may be required in order to claim warranty.
2. Customers outside the US are responsible for shipping charges to and from Gefen.
3. Copper cables are limited to a 30 day warranty and cables must be in their original
condition.
The information in this manual has been carefully checked and is believed to be accurate.
However, Gefen assumes no responsibility for any inaccuracies that may be contained
in this manual. In no event will Gefen be liable for direct, indirect, special, incidental, or
consequential damages resulting from any defect or omission in this manual, even if
advised of the possibility of such damages. The technical information contained herein
regarding the features and specications is subject to change without notice.
For the latest warranty coverage information, refer to the Warranty and Return Policy under
the Support section of the Gefen Web site at www.gefen.com.
iii
Page 4

Contacting Gefen Technical Support
Technical Support
(818) 772-9100 (800) 545-6900
8:00 AM to 5:00 PM Monday - Friday, Pacic Time
Fax
(818) 772-9120
Email
support@gefen.com
Web
http://www.gefen.com
Mailing Address
Gefen, LLC
c/o Customer Service
20600 Nordhoff St.
Chatsworth, CA 91311
Product Registration
Register your product here: http://www.gefen.com/kvm/Registry/Registration.jsp
iv
iv
Page 5

Operating Notes
• Audio from the 2-channel analog input will be automatically embedded into the HDMI
output signal.
• By default, the current input and output resolution will be displayed whenever the
VGA & Audio to HDMI Scaler/Converter is disconnected from the source or display
or if a change in the video output settings are made. This feature can be disabled
through the Display Notify option See Display Notify (page 37) and the
#set_display_notify command for more information.
• When specifying a preset within the included set of command, the preset value will
always be displayed as one greater than the original value. See Using Preset Values
(page 52) for more information.
• Always make sure that the VGA & Audio to HDMI Scaler/Converter is running the
latest rmware. The Gefen Syner-G Software Suite is a free downloadable application
from Gefen that provides automatic download and installation of rmware upgrades for
this product.
Download the application here: http://www.gefen.com/support/download.jsp
VGA & Audio to HDMI Scaler/Converter is a trademark of Gefen, LLC.
© 2014 Gefen, LLC. All Rights Reserved. All trademarks are the property of their respective owners.
Gefen, LLC reserves the right to make changes in the hardware, packaging, and any accompanying documentation
without prior written notice.
Pb
This product uses UL or CE listed power supplies.
v
v
Page 6

Features and Packing List
®
Features
• Converts and scales VGA and L/R analog audio to HDMI
• Input resolutions up to 1920 x 1200 (WUXGA)
• Output resolutions up to 1080p60 and 1920 x 1200 (WUXGA)
• On-screen display (OSD) menu allows easy set-up and control
• Aspect Ratio Control: Full Screen, Panoramic, Letter/Pillar, Extract/Crop
• Test Pattern Generator for quick system conguration
• Embeds 2-channel analog stereo audio in HDMI signal
• Gefen Syner-G™ simplies in-eld rmware updates and advanced EDID
management including custom input timings
• USB port for use with Gefen Syner-G™
• Wide power supply operating range (6V to 24V DC)
• Locking power supply connector
• Surface mountable
Packing List
The VGA & Audio to HDMI Scaler/Converter ships with the items listed below. If any of
these items are not present in the box when you rst open it, immediately contact your
dealer or Gefen.
• 1 x VGA & Audio to HDMI Scaler/Converter
• 1 x 6 ft. VGA cable (M-M)
• 1 x 6 ft. 3.5mm mini-stereo cable
• 1 x 12V Power Supply
• 1 x Quick-Start Guide
vi
Page 7

Page 8

Table of Contents
1 Getting Started
Introduction............................................................................................................ 2
Installation ............................................................................................................. 4
Connection Instructions ................................................................................. 4
Sample Wiring Diagram ................................................................................ 4
2 Basic Operation
Menu System ........................................................................................................ 8
Displaying the Menu System ......................................................................... 8
Moving around within the Menu System ....................................................... 9
Output Resolution ....................................................................................... 12
Output Color ................................................................................................ 14
Output Mode ............................................................................................... 16
Contrast ....................................................................................................... 18
Brightness ................................................................................................... 19
Saturation .................................................................................................... 20
Hue .............................................................................................................. 21
Color Range ................................................................................................ 22
Color Temperature ...................................................................................... 23
Color Balance .............................................................................................. 24
Edge Enhance ............................................................................................. 25
Sharpness ................................................................................................... 26
Underscan/Overscan .................................................................................. 27
Aspect Ratio ................................................................................................ 28
Horizontal Mirror .......................................................................................... 29
Vertical Mirror .............................................................................................. 31
Horizontal Shift ............................................................................................ 33
Vertical Shift ................................................................................................ 34
Phase .......................................................................................................... 35
OSD Timeout .............................................................................................. 36
Display Notify .............................................................................................. 37
Input Resolution Information ....................................................................... 39
F/W Version ................................................................................................ 40
Factory Reset .............................................................................................. 41
Test Patterns ............................................................................................... 42
DIP Switch Conguration .................................................................................... 44
viii
Page 9

3 Advanced Operation
USB Interface ...................................................................................................... 48
Installing the Virtual COM Port .................................................................... 48
Commands .......................................................................................................... 50
Using Preset Values .................................................................................... 52
4 Appendix
Menu System Summary .................................................................................... 126
Default Settings ................................................................................................. 132
Surface Mounting Instructions ........................................................................... 133
Specications .................................................................................................... 134
Index.................................................................................................................. 135
Table of Contents
ix
Page 10

Page 11

VGA & Audio to HDMI
Scaler/Converter
1 Getting Started
Introduction............................................................................................................ 2
Installation ............................................................................................................. 4
Connection Instructions ................................................................................. 4
Sample Wiring Diagram ................................................................................ 4
Page 12
HDMI Out Up Dn Menu
EXT-VGAA-HD-SC
VGA & Audio to HDMI
Scaler/Converter
®
HDMI Out Up Dn Menu
EXT-VGAA-HD-SC
Introduction
Getting Started
Page Title
1 2
EXT-VGAA-HD-SC
HDMI Out Up Dn Menu
®
VGA & Audio to HDMI
Scaler/Converter
3 4 5 76
VGA In L/R In USB 12V DC Pwr
page | 2
Page 13

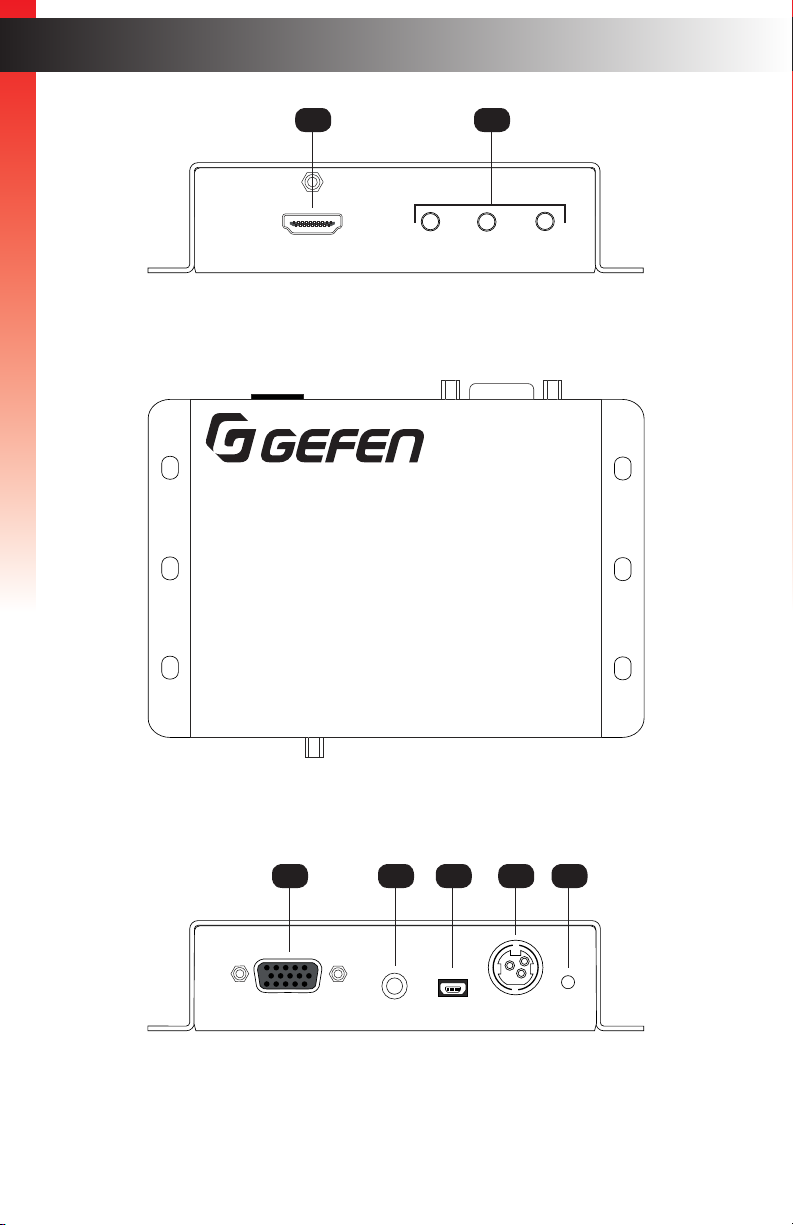
ID Name Description
1 HDMI Out Use an HDMI cable to connect a Hi-Def
2 Up, Dn, Menu These push-buttons are used to change
Getting Started
display to this HDMI port.
settings within the on-screen menu system.
See Menu System (page 8) for more
information.
Page TitleIntroduction
3 VGA In Connect the included VGA cable from
4 L/R In Connect the included 3.5mm mini-stereo
5 USB This mini-USB port is used for upgrading
6 12V DC Connect the included 12V DC power supply
7 Pwr Under normal operating conditions, this
source device (e.g. computer) to this port.
cable from this port to the audio output port
on the audio source device.
the rmware.
to this power receptacle.
LED indicator will glow bright blue.
page | 3
Page 14
Installation
Connection Instructions
► Video
1. Connect the included VGA cable from the video source (e.g. computer) to the VGA In
Getting Started
port on the VGA & Audio to HDMI Scaler/Converter.
2. Connect an HDMI cable from the HDMI Out port to an HD display.
► Audio
3. Connect the included 3.5mm mini-stereo cable from the audio source to the L/R In
port on the VGA & Audio to HDMI Scaler/Converter.
► Power
4. Connect the included power supply to the 12V DC power receptacle and connect the
power cord to an available electrical outlet.
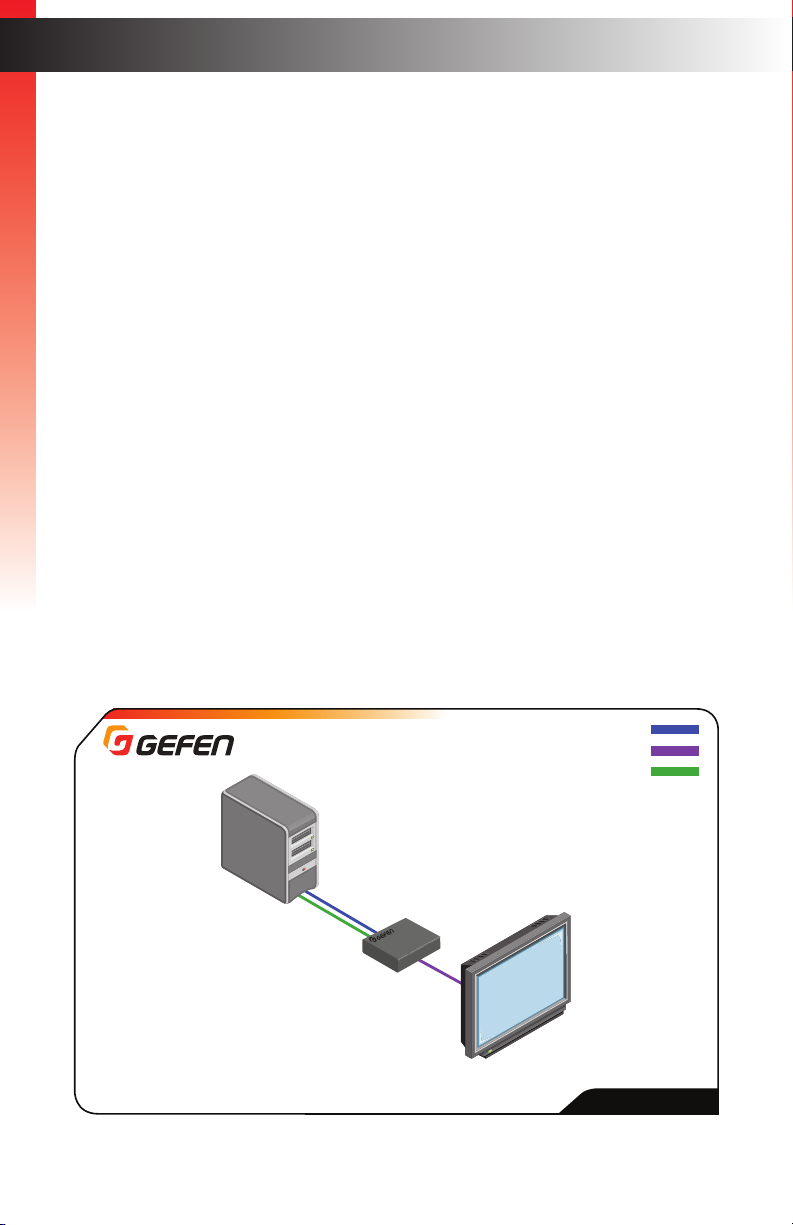
Sample Wiring Diagram
VGA & Analog Audio
Source
EXT-VGAA-HD-SC
Scaler/Converter
page | 4
VGA CABLE
HDMI CABLE
MINI STEREO AUDIO CABLE
HDMI Display
EXT-VGAA-HD-SC
Page 15

Page 16

Page 17

VGA & Audio to HDMI
Scaler/Converter
2 Basic Operation
Menu System ........................................................................................................ 8
Displaying the Menu System ......................................................................... 8
Moving around within the Menu System ....................................................... 9
Output Resolution ....................................................................................... 12
Output Color ................................................................................................ 14
Output Mode ............................................................................................... 16
Contrast ....................................................................................................... 18
Brightness ................................................................................................... 19
Saturation .................................................................................................... 20
Hue .............................................................................................................. 21
Color Range ................................................................................................ 22
Color Temperature ...................................................................................... 23
Color Balance .............................................................................................. 24
Edge Enhance ............................................................................................. 25
Sharpness ................................................................................................... 26
Underscan/Overscan .................................................................................. 27
Aspect Ratio ................................................................................................ 28
Horizontal Mirror .......................................................................................... 29
Vertical Mirror .............................................................................................. 31
Horizontal Shift ............................................................................................ 33
Vertical Shift ................................................................................................ 34
Phase .......................................................................................................... 35
OSD Timeout .............................................................................................. 36
Display Notify .............................................................................................. 37
Input Resolution Information ....................................................................... 39
F/W Version ................................................................................................ 40
Factory Reset .............................................................................................. 41
Test Patterns ............................................................................................... 42
DIP Switch Conguration .................................................................................... 44
Page 18

Menu System
Displaying the Menu System
The VGA & Audio to HDMI Scaler/Converter uses a built-in menu system to manage and
control all video features.
Basic Operation
Basic Operation
1. To display the menu system, press the Menu button on the front panel.
HDMI Out Up Dn Menu
2. The menu system will be displayed in the upper-left corner of the screen, as shown
below:
Gefen
Converter
----------------
1.Output Setup
1.Output Setup
2.Picture
3.Adjustment
4.System
5.Test Patterns
6.Exit
Output Resolu.
Output Color
Output Mode
<- Back
If the menu system is not used within the time interval specied by the OSD Timeout
setting, then the menu system will automatically be hidden. By default, the OSD
Timeout setting is 5 seconds. See OSD Timeout (page 36) for instructions on
setting the OSD Timeout value.
Menu controls
EXT-VGAA-HD-SC
(continued on next page)
page | 8
Page 19

Menu System
Moving around within the Menu System
1. There are six menu items within the main menu: Output Setup, Picture, Adjustment,
System, Test Patterns, and Exit.
2. The currently selected item within the main menu will always be highlighted in
Basic OperationBasic Operation
yellow.
3. Each item within the main menu, with the exception of Exit, contains a submenu.
The submenu, for each item in the main menu, is displayed automatically.
Gefen
Converter
----------------
1.Output Setup
2.Picture
3.Adjustment
4.System
5.Test Patterns
6.Exit
Output Resolu.
Output Color
Output Mode
<- Back
Current selection
Submenu
Main menu
4. Use the Up or Dn button to highlight the desired item within the main menu.
For example, if we press the Dn button three times, the System menu item will be
highlighted and it’s submenu will be displayed.
Gefen
Converter
----------------
1.Output Setup
2.Picture
3.Adjustment
4.System
5.Test Patterns
6.Exit
OSD Timeout
Display Notify
Input Res.Info
F/W Version
Factory Reset
<- Back
(continued on next page)
page | 9
Page 20

Menu System
5. To access the submenu for the highlighted item within the main menu, press the Menu
button a second time. When a submenu is activated, a green bar is used to indicate
the current selection. By default, the top submenu item will always be highlighted
once a submenu is activated.
Basic Operation
Basic Operation
Gefen
Converter
----------------
1.Output Setup
2.Picture
3.Adjustment
4.System
5.Test Patterns
6.Exit
OSD Timeout
Display Notify
Input Res.Info
F/W Version
Factory Reset
<- Back
6. Use the Up or Dn button to select the desired option within the submenu.
Gefen
Converter
----------------
1.Output Setup
2.Picture
3.Adjustment
4.System
5.Test Patterns
6.Exit
OSD Timeout
Display Notify
Input Res.Info
F/W Version
Factory Reset
<- Back
Current selection
7. To select the highlighted submenu item, press the Menu button.
For example, if we press the Menu button when the Input Res. Info option is
highlighted, the menu system will be hidden and the following will be displayed:
Input Res.Info
[ 1600x1200p60 ]
a
a
8. Press the Menu button to return to the menu system.
Gefen
Converter
----------------
1.Output Setup
2.Picture
3.Adjustment
4.System
5.Test Patterns
6.Exit
OSD Timeout
Display Notify
Input Res.Info
F/W Version
Factory Reset
<- Back
page | 10
Page 21

9. To exit the submenu and return to the main menu, use the Up or Dn button
to highlight the <- Back option.
Basic OperationBasic Operation
Gefen
Converter
----------------
1.Output Setup
2.Picture
3.Adjustment
4.System
5.Test Patterns
6.Exit
OSD Timeout
Display Notify
Input Res.Info
F/W Version
Factory Reset
<- Back
10. Press the Menu button to return to the main menu.
Gefen
Converter
----------------
1.Output Setup
2.Picture
3.Adjustment
4.System
5.Test Patterns
6.Exit
OSD Timeout
Display Notify
Input Res.Info
F/W Version
Factory Reset
<- Back
Menu System
11. To exit the menu system, use the Up or Dn button to highlight the Exit option:
Gefen
Converter
----------------
1.Output Setup
2.Picture
3.Adjustment
4.System
5.Test Patterns
6.Exit
12. Press the Menu button to select the Exit option.
13. The menu system is now hidden. To display the menu system again, press the
Menu button.
Information
By default, the menu system will automatically time-out if no action is
taken within 5 seconds. To exit the menu system manually (before the
time-out period), highlight the Exit option then press the Menu button.
See OSD Timeout (page 36) for more information.
page | 11
Page 22

Menu System
Output Resolution
Warning
Basic Operation
1. Press the Menu button on the front panel. The Output Setup option will be
highlighted.
2. Press the Menu button to access the Output Setup submenu. The Output Resolu.
option will be highlighted.
3. Press the Menu button to select the Output Resolu. option.
----------------
1.Output Setup
2.Picture
3.Adjustment
4.System
5.Test Patterns
6.Exit
Before changing this setting, make sure that the connected display can
support the selected output resolution. If an unsupported resolution is
selected, the unit will need to be reset using the DIP switch on the bottom of
the unit. See DIP Switch Conguration (page 44) for more information.
Gefen
Converter
Output Resolu.
Output Color
Output Mode
<- Back
4. The Output Resolu. selection box be displayed:
Output Resolu.
5. Use the Up or Dn button to select the desired resolution. For a list of available output
resolutions that are supported by the VGA & Audio to HDMI Scaler/Converter, see
Menu System Summary (page 126).
6. After the desired output resolution is selected, press the Menu button to conrm the
change.
7. After the output resolution has been changed, the current input and output resolution
will be displayed above the Output Resolu. selection box:
Input 1600x1200p60
Output 640x480p60
[ Auto-Detect ]
a
(continued on next page)
a
page | 12
Page 23

Information
The input/output resolution information dialog will only be displayed if Display
Notify is set to On. See Display Notify (page 37) for more information.
Basic Operation
8. After a few seconds, the input and output resolution information dialog will disappear.
9. The Output Resolu. dialog is still displayed:
Output Resolu.
10. Press the Menu button to return to the Output Setup submenu:
Gefen
Converter
----------------
1.Output Setup
2.Picture
3.Adjustment
4.System
5.Test Patterns
6.Exit
[ 640x480p60 ]
a
Output Resolu.
Output Color
Output Mode
<- Back
a
Menu System
11. Use the Up or Dn button to select the <- Back option.
12. Press the Menu button.
13. Use the Up or Dn button to select the Exit option
14. Press the Menu button to exit the main menu.
page | 13
Page 24

Menu System
Output Color
1. Press the Menu button on the front panel. The Output Setup option will be
highlighted.
2. Press the Menu button to access the Output Setup submenu. The Output Resolu.
Basic Operation
option will be highlighted.
3. Use the Up or Dn button to highlight the Output Color option.
4. Press the Menu button to select the Output Color option.
5. The Output Color selection box will be displayed:
Gefen
Converter
----------------
1.Output Setup
2.Picture
3.Adjustment
4.System
5.Test Patterns
6.Exit
Output Color
Output Resolu.
Output Color
Output Mode
<- Back
[ RGB ]
a
a
6. Use the Up or Dn button to select the desired color space.
7. After the desired color space is selected, press the Menu button to conrm the
change.
8. After the color space has been changed, the current input and output resolution will be
displayed above the Output Color selection box:
Input 1600x1200p60
Output 640x480p60
Information
The input/output resolution information dialog will only be displayed if Display
Notify is set to On. See Display Notify (page 37) for more information.
(continued on next page)
page | 14
Page 25

9. Press the Menu button to return to the Output Setup submenu.
Basic Operation
Gefen
Converter
----------------
1.Output Setup
2.Picture
3.Adjustment
4.System
5.Test Patterns
6.Exit
Output Resolu.
Output Color
Output Mode
<- Back
10. Use the Up or Dn button to select the <- Back option.
11. Press the Menu button.
12. Use the Up or Dn button to select the Exit option
13. Press the Menu button to exit the main menu.
Menu System
page | 15
Page 26

Menu System
Output Mode
1. Press the Menu button on the front panel. The Output Setup option will be
highlighted.
2. Press the Menu button to access the Output Setup submenu. The Output Resolu.
Basic Operation
option will be highlighted.
3. Use the Up or Dn button to highlight the Output Mode option.
4. Press the Menu button to select the Output Mode option.
5. The Output Mode selection box will be displayed:
Gefen
Converter
----------------
1.Output Setup
2.Picture
3.Adjustment
4.System
5.Test Patterns
6.Exit
Output Mode
Output Resolu.
Output Color
Output Mode
<- Back
[ Auto-Detect ]
a
a
6. Use the Up or Dn button to select between Auto-Detect, HDMI, or DVI.
7. After the desired output mode is selected, press the Menu button to conrm the
change.
8. The current input and output resolution will be displayed above the current output
mode selection.
Input 1600x1200p60
Output 640x480p60
Information
The input/output resolution information dialog will only be displayed if Display
Notify is set to On. See Display Notify (page 37) for more information.
(continued on next page)
page | 16
Page 27

9. Press the Menu button to return to the Output Setup submenu.
Basic Operation
Gefen
Converter
----------------
1.Output Setup
2.Picture
3.Adjustment
4.System
5.Test Patterns
6.Exit
Output Resolu.
Output Color
Output Mode
<- Back
10. Use the Up or Dn button to select the <- Back option.
11. Press the Menu button.
12. Use the Up or Dn button to select the Exit option
13. Press the Menu button to exit the main menu.
Menu System
page | 17
Page 28

Menu System
Contrast
1. Press the Menu button on the front panel. The Output Setup option will be
highlighted.
2. Use the Up or Dn button to highlight the Picture option.
Basic Operation
3. Press the Menu button to access the Picture submenu. The Contrast option will be
highlighted.
4. Press the Menu button to select the Contrast option.
Gefen
Converter
----------------
1.Output Setup
2.Picture
3.Adjustment
4.System
5.Test Patterns
6.Exit
Contrast
Brightness
Saturation
Hue
Color Range
Color Temp.
Color Balance
Edge Enhance
Sharpness
<- Back
5. The Contrast selection box will be displayed:
Contrast 50
a
6. Use the Up or Dn button to set the desired contrast level.
7. Press the Menu button to conrm the change and return to the Picture submenu.
8. Use the Up or Dn button to select the <- Back option.
9. Press the Menu button.
10. Use the Up or Dn button to select the Exit option
11. Press the Menu button to exit the main menu.
a
page | 18
Page 29

Menu System
Brightness
1. Press the Menu button on the front panel. The Output Setup option will be
highlighted.
2. Use the Up or Dn button to highlight the Picture option.
Basic Operation
3. Press the Menu button to access the Picture submenu. The Contrast option will be
highlighted.
4. Use the Up or Dn button to highlight the Brightness option.
Gefen
Converter
----------------
1.Output Setup
2.Picture
3.Adjustment
4.System
5.Test Patterns
6.Exit
Contrast
Brightness
Saturation
Hue
Color Range
Color Temp.
Color Balance
Edge Enhance
Sharpness
<- Back
5. Press the Menu button to select the Brightness option.
6. The Brightness selection box will be displayed:
Brightness 50
a
7. Use the Up or Dn button to set the desired brightness level.
8. Press the Menu button to conrm the change and return to Picture submenu.
9. Use the Up or Dn button to select the <- Back option.
10. Press the Menu button.
11. Use the Up or Dn button to select the Exit option
12. Press the Menu button to exit the main menu.
a
page | 19
Page 30

Menu System
Saturation
1. Press the Menu button on the front panel. The Output Setup option will be
highlighted.
2. Use the Up or Dn button to highlight the Picture option.
Basic Operation
3. Press the Menu button to access the Picture submenu. The Contrast option will be
highlighted.
4. Use the Up or Dn button to highlight the Saturation option.
Gefen
Converter
----------------
1.Output Setup
2.Picture
3.Adjustment
4.System
5.Test Patterns
6.Exit
Contrast
Brightness
Saturation
Hue
Color Range
Color Temp.
Color Balance
Edge Enhance
Sharpness
<- Back
5. Press the Menu button to select the Saturation option.
6. The Saturation selection box will be displayed:
Saturation 50
a
7. Use the Up or Dn button to set the desired saturation level.
8. Press the Menu button to conrm the change and return to the Picture submenu.
9. Use the Up or Dn button to select the <- Back option.
10. Press the Menu button.
11. Use the Up or Dn button to select the Exit option
12. Press the Menu button to exit the main menu.
a
page | 20
Page 31

Menu System
Hue
1. Press the Menu button on the front panel. The Output Setup option will be
highlighted.
2. Use the Up or Dn button to highlight the Picture option.
Basic Operation
3. Press the Menu button to access the Picture submenu. The Contrast option will be
highlighted.
4. Use the Up or Dn button to highlight the Hue option.
Gefen
Converter
----------------
1.Output Setup
2.Picture
3.Adjustment
4.System
5.Test Patterns
6.Exit
Contrast
Brightness
Saturation
Hue
Color Range
Color Temp.
Color Balance
Edge Enhance
Sharpness
<- Back
5. Press the Menu button to select the Hue option.
6. The Hue selection box will be displayed:
Hue 50
a
7. Use the Up or Dn button to set the desired hue.
8. Press the Menu button to conrm the change and return to the Picture submenu.
9. Use the Up or Dn button to select the <- Back option.
10. Press the Menu button.
11. Use the Up or Dn button to select the Exit option
12. Press the Menu button to exit the main menu.
a
page | 21
Page 32

Menu System
Color Range
1. Press the Menu button on the front panel. The Output Setup option will be
highlighted.
2. Use the Up or Dn button to highlight the Picture option.
Basic Operation
3. Press the Menu button to access the Picture submenu. The Contrast option will be
highlighted.
4. Use the Up or Dn button to highlight the Color Range option.
Gefen
Converter
----------------
1.Output Setup
2.Picture
3.Adjustment
4.System
5.Test Patterns
6.Exit
Contrast
Brightness
Saturation
Hue
Color Range
Color Temp.
Color Balance
Edge Enhance
Sharpness
<- Back
5. Press the Menu button to select the Color Range option.
6. The Color Range selection box will be displayed:
Color Range
7. Use the Up or Dn button to select between Limited or Full.
8. Press the Menu button to conrm the change and return to the Picture submenu.
9. Use the Up or Dn button to select the <- Back option.
10. Press the Menu button.
11. Use the Up or Dn button to select the Exit option
12. Press the Menu button to exit the main menu.
[ Limited ]
a
a
page | 22
Page 33

Menu System
Color Temperature
1. Press the Menu button on the front panel. The Output Setup option will be
highlighted.
2. Use the Up or Dn button to highlight the Picture option.
Basic Operation
3. Press the Menu button to access the Picture submenu. The Contrast option will be
highlighted.
4. Use the Up or Dn button to highlight the Color Temp. option.
Gefen
Converter
----------------
1.Output Setup
2.Picture
3.Adjustment
4.System
5.Test Patterns
6.Exit
Contrast
Brightness
Saturation
Hue
Color Range
Color Temp.
Color Balance
Edge Enhance
Sharpness
<- Back
5. Press the Menu button to select the Color Temp. option.
6. The Color Temp. selection box will be displayed:
Color Temp.
7. Use the Up or Dn button to select between Neutral, Cool, or Warm.
8. Press the Menu button to conrm the change and return to the Picture submenu.
9. Use the Up or Dn button to select the <- Back option.
10. Press the Menu button.
11. Use the Up or Dn button to select the Exit option
12. Press the Menu button to exit the main menu.
[ Neutral ]
a
a
page | 23
Page 34

Menu System
Color Balance
1. Press the Menu button on the front panel. The Output Setup option will be
highlighted.
2. Use the Up or Dn button to highlight the Picture option.
Basic Operation
3. Press the Menu button to access the Picture submenu. The Contrast option will be
highlighted.
4. Use the Up or Dn button to highlight the Color Balance option.
Gefen
Converter
----------------
1.Output Setup
2.Picture
3.Adjustment
4.System
5.Test Patterns
6.Exit
Contrast
Brightness
Saturation
Hue
Color Range
Color Temp.
Color Balance
Edge Enhance
Sharpness
<- Back
5. Press the Menu button to select the Color Balance option.
6. The Color Balance selection box will be displayed:
Color Balance
7. Use the Up or Dn button to switch between Red Ch., Blue Ch., and Blue Ch.
8. Press the Menu button to select the color channel to adjust.
Color Balance
a
9. Use the Up or Dn button to set the desired color balance setting.
10. Press the Menu button to conrm the change and return to the Picture submenu.
11. Use the Up or Dn button to select the <- Back option.
12. Press the Menu button.
13. Use the Up or Dn button to select the Exit option
14. Press the Menu button to exit the main menu.
[ Red Ch. 50 ]
[ Blue Ch. 50 ]
a
page | 24
Page 35

Menu System
Edge Enhance
1. Press the Menu button on the front panel. The Output Setup option will be
highlighted.
2. Use the Up or Dn button to highlight the Picture option.
Basic Operation
3. Press the Menu button to access the Picture submenu. The Contrast option will be
highlighted.
4. Use the Up or Dn button to highlight the Edge Enhance option.
Gefen
Converter
----------------
1.Output Setup
2.Picture
3.Adjustment
4.System
5.Test Patterns
6.Exit
Contrast
Brightness
Saturation
Hue
Color Range
Color Temp.
Color Balance
Edge Enhance
Sharpness
<- Back
5. Press the Menu button to select the Edge Enhance option.
6. The Edge Enhance selection box will be displayed:
Edge Enhance
7. Use the Up or Dn button to select between User, Off, Mid, or Max.
8. Press the Menu button to conrm the change and return to the Picture submenu.
9. Use the Up or Dn button to select the <- Back option.
10. Press the Menu button.
11. Use the Up or Dn button to select the Exit option
12. Press the Menu button to exit the main menu.
[ User ]
a
a
page | 25
Page 36

Menu System
Sharpness
1. Press the Menu button on the front panel. The Output Setup option will be
highlighted.
2. Use the Up or Dn button to highlight the Picture option.
Basic Operation
3. Press the Menu button to access the Picture submenu. The Contrast option will be
highlighted.
4. Use the Up or Dn button to highlight the Sharpness option.
Gefen
Converter
----------------
1.Output Setup
2.Picture
3.Adjustment
4.System
5.Test Patterns
6.Exit
Contrast
Brightness
Saturation
Hue
Color Range
Color Temp.
Color Balance
Edge Enhance
Sharpness
<- Back
5. Press the Menu button to select the Sharpness option.
6. The Sharpness selection box will be displayed:
Sharpness 0
a
7. Use the Up or Dn button to set the sharpness level. Larger values increase the
sharpness of the image.
8. Press the Menu button to conrm the change and return to the Picture submenu.
9. Use the Up or Dn button to select the <- Back option.
10. Press the Menu button.
11. Use the Up or Dn button to select the Exit option
12. Press the Menu button to exit the main menu.
a
page | 26
Page 37

Menu System
Underscan/Overscan
1. Press the Menu button on the front panel. The Output Setup option will be
highlighted.
2. Use the Up or Dn button to highlight the Adjustment option.
Basic Operation
3. Press the Menu button to access the Adjustment submenu. The Under/Over Scan
option will be highlighted.
4. Press the Menu button to select the Under/Over Scan option.
5. The Under/Over Scan selection box will be displayed:
Gefen
Converter
----------------
1.Output Setup
2.Picture
3.Adjustment
4.System
5.Test Patterns
6.Exit
Under/Over Scan
Aspect Ratio
H-Mirror
V-Mirror
H-Shift
V-Shift
Phase
<- Back
Under/Over Scan Off
a
a
6. Use the Up or Dn button to set the amount of overscan or underscan. Negative
values increase the amount of underscan. Positive values increase the amount of
overscan.
7. Press the Menu button to conrm the change and return to the Adjustment submenu.
8. Use the Up or Dn button to select the <- Back option.
9. Press the Menu button.
10. Use the Up or Dn button to select the Exit option
11. Press the Menu button to exit the main menu.
page | 27
Page 38

Menu System
Aspect Ratio
1. Press the Menu button on the front panel. The Output Setup option will be
highlighted.
2. Use the Up or Dn button to highlight the Adjustment option.
Basic Operation
3. Press the Menu button to access the Adjustment submenu. The Under/Over Scan
option will be highlighted.
4. Use the Up or Dn button to highlight the Aspect Ratio option.
5. Press the Menu button to select the Aspect Ratio option.
Gefen
Converter
----------------
1.Output Setup
2.Picture
3.Adjustment
4.System
5.Test Patterns
6.Exit
Under/Over Scan
Aspect Ratio
H-Mirror
V-Mirror
H-Shift
V-Shift
Phase
<- Back
6. The Aspect Ratio selection box will be displayed:
Aspect Ratio
7. Use the Up or Dn button to select between Source, 16:9, 4:3, or Stretch.
8. Press the Menu button to conrm the change and return to the Adjustment submenu.
9. Use the Up or Dn button to select the <- Back option.
10. Press the Menu button.
11. Use the Up or Dn button to select the Exit option
12. Press the Menu button to exit the main menu.
[ Source ]
a
a
page | 28
Page 39

Menu System
*Preferred
*Preferred
Horizontal Mirror
1. Press the Menu button on the front panel. The Output Setup option will be
highlighted.
2. Use the Up or Dn button to highlight the Adjustment option.
Basic Operation
3. Press the Menu button to access the Adjustment submenu. The Under/Over Scan
option will be highlighted.
4. Use the Up or Dn button to highlight the H-Mirror option.
5. Press the Menu button to select the H-Mirror option.
Gefen
Converter
----------------
1.Output Setup
2.Picture
3.Adjustment
4.System
5.Test Patterns
6.Exit
Under/Over Scan
Aspect Ratio
H-Mirror
V-Mirror
H-Shift
V-Shift
Phase
<- Back
6. The H-Mirror selection box will be displayed:
H-Mirror
7. Use the Up or Dn button to toggle between On and Off. When the H-Mirror
option is set to On, then the picture will be ipped horizontally (about the Y-axis).
H-Mirror
[ Off ]
a
[ Off ]
a
a
a
(continued on next page)
H-Mirror
page | 29
a
[ On ]
a
Page 40

Menu System
8. Press the Menu button to conrm the change and return to the Adjustment submenu.
9. Use the Up or Dn button to select the <- Back option.
10. Press the Menu button.
11. Use the Up or Dn button to select the Exit option
Basic Operation
12. Press the Menu button to exit the main menu.
page | 30
Page 41

Menu System
*Preferred
Vertical Mirror
1. Press the Menu button on the front panel. The Output Setup option will be
highlighted.
2. Use the Up or Dn button to highlight the Adjustment option.
Basic Operation
3. Press the Menu button to access the Adjustment submenu. The Under/Over Scan
option will be highlighted.
4. Use the Up or Dn button to highlight the V-Mirror option.
5. Press the Menu button to select the V-Mirror option.
Gefen
Converter
----------------
1.Output Setup
2.Picture
3.Adjustment
4.System
5.Test Patterns
6.Exit
Under/Over Scan
Aspect Ratio
H-Mirror
V-Mirror
H-Shift
V-Shift
Phase
<- Back
6. The V-Mirror selection box will be displayed:
V-Mirror
7. Use the Up or Dn button to toggle between On and Off. When the V-Mirror
option is set to On, then the picture will be ipped vertically (about the X-axis).
V-Mirror
[ Off ]
a
[ Off ]
a
a
a
(continued on next page)
V-Mirror
page | 31
[ On ]
a
a
Page 42

Menu System
8. Press the Menu button to conrm the change and return to the Adjustment submenu.
9. Use the Up or Dn button to select the <- Back option.
10. Press the Menu button.
11. Use the Up or Dn button to select the Exit option
Basic Operation
12. Press the Menu button to exit the main menu.
page | 32
Page 43

Menu System
Horizontal Shift
1. Press the Menu button on the front panel. The Output Setup option will be
highlighted.
2. Use the Up or Dn button to highlight the Adjustment option.
Basic Operation
3. Press the Menu button to access the Adjustment submenu. The Under/Over Scan
option will be highlighted.
4. Use the Up or Dn button to highlight the H-Shift option.
5. Press the Menu button to select the H-Shift option.
Gefen
Converter
----------------
1.Output Setup
2.Picture
3.Adjustment
4.System
5.Test Patterns
6.Exit
Under/Over Scan
Aspect Ratio
H-Mirror
V-Mirror
H-Shift
V-Shift
Phase
<- Back
6. The H-Shift selection box will be displayed:
H-Shift Off
a
7. Use the Up or Dn button to shift the picture to the left or to the right. Negative values,
move the image to the left. Positive values move the image to the right.
8. Press the Menu button to conrm the change and return to the Adjustment submenu.
9. Use the Up or Dn button to select the <- Back option.
10. Press the Menu button.
11. Use the Up or Dn button to select the Exit option
12. Press the Menu button to exit the main menu.
a
page | 33
Page 44

Menu System
Vertical Shift
1. Press the Menu button on the front panel. The Output Setup option will be
highlighted.
2. Use the Up or Dn button to highlight the Adjustment option.
Basic Operation
3. Press the Menu button to access the Adjustment submenu. The Under/Over Scan
option will be highlighted.
4. Use the Up or Dn button to highlight the V-Shift option.
5. Press the Menu button to select the V-Shift option.
Gefen
Converter
----------------
1.Output Setup
2.Picture
3.Adjustment
4.System
5.Test Patterns
6.Exit
Under/Over Scan
Aspect Ratio
H-Mirror
V-Mirror
H-Shift
V-Shift
Phase
<- Back
6. The V-Shift selection box will be displayed:
V-Shift Off
a
7. Use the Up or Dn button to shift the picture up or down. Negative values, move the
image upwards. Positive values move the image downwards.
8. Press the Menu button to conrm the change and return to the Adjustment submenu.
9. Use the Up or Dn button to select the <- Back option.
10. Press the Menu button.
11. Use the Up or Dn button to select the Exit option
12. Press the Menu button to exit the main menu.
a
page | 34
Page 45

Menu System
Phase
1. Press the Menu button on the front panel. The Output Setup option will be
highlighted.
2. Use the Up or Dn button to highlight the Adjustment option.
Basic Operation
3. Press the Menu button to access the Adjustment submenu. The Under/Over Scan
option will be highlighted.
4. Use the Up or Dn button to highlight the Phase option.
5. Press the Menu button to select the Phase option.
Gefen
Converter
----------------
1.Output Setup
2.Picture
3.Adjustment
4.System
5.Test Patterns
6.Exit
Under/Over Scan
Aspect Ratio
H-Mirror
V-Mirror
H-Shift
V-Shift
Phase
<- Back
6. The Phase selection box will be displayed:
Phase Auto
a
7. Use the Up or Dn button to adjust the phase.
8. Press the Menu button to conrm the change and return to the Adjustment submenu.
9. Use the Up or Dn button to select the <- Back option.
10. Press the Menu button.
11. Use the Up or Dn button to select the Exit option
12. Press the Menu button to exit the main menu.
a
page | 35
Page 46

OSD Timeout
1. Press the Menu button on the front panel. The Output Setup option will be
highlighted.
2. Use the Up or Dn button to highlight the System option.
Basic Operation
3. Press the Menu button to access the System submenu. The OSD Timeout option
will be highlighted.
4. Press the Menu button to select the OSD Timeout option.
5. The OSD Timeout selection box will be displayed:
Gefen
Converter
----------------
1.Output Setup
2.Picture
3.Adjustment
4.System
5.Test Patterns
6.Exit
OSD Timeout
OSD Timeout
Display Notify
Input Res.Info
F/W Version
Factory Reset
<- Back
[ 5sec ]
a
a
Menu System
6. Use the Up or Dn button to set the OSD timeout to Off or from any time interval
between 5 and 60 seconds, inclusive. The default setting is 5 seconds.
7. Press the Menu button to conrm the change and return to the System submenu.
8. Use the Up or Dn button to select the <- Back option.
9. Press the Menu button.
10. Use the Up or Dn button to select the Exit option
11. Press the Menu button to exit the main menu.
page | 36
Page 47

Display Notify
1. Press the Menu button on the front panel. The Output Setup option will be
highlighted.
2. Use the Up or Dn button to highlight the System option.
Basic Operation
3. Press the Menu button to access the System submenu. The OSD Timeout option
will be highlighted.
4. Use the Up or Dn button to highlight the Display Notify option.
5. Press the Menu button to select the Display Notify option.
Gefen
Converter
----------------
1.Output Setup
2.Picture
3.Adjustment
4.System
5.Test Patterns
6.Exit
OSD Timeout
Display Notify
Input Res.Info
F/W Version
Factory Reset
<- Back
Menu System
6. The Display Notify selection box will be displayed:
Display Notify
7. Use the Up or Dn button to toggle between On and Off. When Display Notify
is set to On, then the input/output resolution information dialog will be displayed,
momentarily, whenever the VGA & Audio to HDMI Scaler/Converter is disconnected
from the source or display:
Input 1600x1200p60
Output 640x480p60
In addition, the following operations also trigger the input/output resolution
information dialog: Output Resolution (page 12), Output Color (page 14), or
Output Mode (page 16). When set to Off, the input/output resolution information
dialog is never displayed.
[ On ]
a
(continued on next page)
a
page | 37
Page 48

8. Press the Menu button to conrm the change and return to the System submenu.
9. Use the Up or Dn button to select the <- Back option.
10. Press the Menu button.
11. Use the Up or Dn button to select the Exit option
Basic Operation
12. Press the Menu button to exit the main menu.
Menu System
page | 38
Page 49

Input Resolution Information
1. Press the Menu button on the front panel. The Output Setup option will be
highlighted.
2. Use the Up or Dn button to highlight the System option.
Basic Operation
3. Press the Menu button to access the System submenu. The OSD Timeout option
will be highlighted.
4. Use the Up or Dn button to highlight the Input Res. Info option.
5. Press the Menu button to select the Input Res. Info option.
Gefen
Converter
----------------
1.Output Setup
2.Picture
3.Adjustment
4.System
5.Test Patterns
6.Exit
OSD Timeout
Display Notify
Input Res.Info
F/W Version
Factory Reset
<- Back
Menu System
6. The current input resolution will be displayed in the Input Res. Info box.
Input Res.Info
7. Press the Menu button to return to the System submenu.
8. Use the Up or Dn button to select the <- Back option.
9. Press the Menu button.
10. Use the Up or Dn button to select the Exit option
11. Press the Menu button to exit the main menu.
[ 1600x1200p60 ]
a
a
page | 39
Page 50

F/W Version
1. Press the Menu button on the front panel. The Output Setup option will be
highlighted.
2. Use the Up or Dn button to highlight the System option.
Basic Operation
3. Press the Menu button to access the System submenu. The OSD Timeout option
will be highlighted.
4. Use the Up or Dn button to highlight the F/W Version option.
5. Press the Menu button to select the F/W Version option.
Gefen
Converter
----------------
1.Output Setup
2.Picture
3.Adjustment
4.System
5.Test Patterns
6.Exit
OSD Timeout
Display Notify
Input Res.Info
F/W Version
Factory Reset
<- Back
Menu System
6. The current version of rmware will be displayed in the F/W Version box.
F/W Version
7. Press the Menu button to return to the System submenu.
8. Use the Up or Dn button to select the <- Back option.
9. Press the Menu button.
10. Use the Up or Dn button to select the Exit option
11. Press the Menu button to exit the main menu.
[ V1.012 ]
a
a
page | 40
Page 51

Factory Reset
1. Press the Menu button on the front panel. The Output Setup option will be
highlighted.
2. Use the Up or Dn button to highlight the System option.
Basic Operation
3. Press the Menu button to access the System submenu. The OSD Timeout option
will be highlighted.
4. Use the Up or Dn button to highlight the Factory Reset option.
5. Press the Menu button to select the Factory Reset option.
Gefen
Converter
----------------
1.Output Setup
2.Picture
3.Adjustment
4.System
5.Test Patterns
6.Exit
OSD Timeout
Display Notify
Input Res.Info
F/W Version
Factory Reset
<- Back
Menu System
6. The Factory Reset selection box will be displayed.
Factory Reset
7. Use the Up or Dn button to toggle between No and Yes.
► If Yes is selected, then the VGA & Audio to HDMI Scaler/Converter will reset to
factory-default settings and will automatically reboot.
► If No is selected, then the VGA & Audio to HDMI Scaler/Converter will return to
the System submenu.
a. Use the Up or Dn button to select the <- Back option.
b. Press the Menu button.
c. Use the Up or Dn button to select the Exit option.
d. Press the Menu button to exit the main menu.
[ No ]
a
a
page | 41
Page 52

Menu System
Test Patterns
1. Press the Menu button on the front panel. The Output Setup option will be
highlighted.
Basic Operation
2. Use the Up or Dn button to highlight the Test Patterns option.
3. Press the Menu button to access the Test Patterns submenu. The White option will
be highlighted.
Gefen
Converter
----------------
1.Output Setup
2.Picture
3.Adjustment
4.System
5.Test Patterns
6.Exit
4. Use the Up or Dn button to highlight the desired test pattern.
5. Press the Menu button to select the highlighted test pattern.
White
Cross
Hatch
Color
Gray
Window
Off
<- Back
White
Cross
ColorHatch
(continued on next page)
page | 42
Page 53

Menu System
WindowGray
Basic Operation
6. Press the Menu button to return to the Test Patterns submenu and select a different
pattern.
7. To disable the pattern and view the source image, select Off from the Test Patterns
submenu.
page | 43
Page 54

DIP Switch Conguration
HDMI Out Up Dn Menu
EXT-VGAA-HD-SC
HDMI Out Up Dn Menu
EXT-VGAA-HD-SC
HDMI Out Up Dn Menu
EXT-VGAA-HD-SC
ON
1
On the bottom panel of the VGA & Audio to HDMI Scaler/Converter is a single DIP switch.
Remove the piece of colored tape to reveal the DIP switch bank.
Basic Operation
1
ON
By default, the DIP switch is in the OFF (1) position. The DIP switch should remain in this
position during normal operation.
DIP Switch Description
1 Factory reset
• Toggle the DIP switch from the OFF
(1) position to the ON position, then
back to the OFF (1) position.
Normal Operation
ON
1
ON
• DIP switch is in the OFF (1) position.
page | 44
1
Page 55

Page 56

Page 57

VGA & Audio to HDMI
Scaler/Converter
3 Advanced Operation
USB Interface ...................................................................................................... 48
Installing the Virtual COM Port .................................................................... 48
Commands .......................................................................................................... 50
Using Preset Values .................................................................................... 52
Page 58

USB Interface
Installing the Virtual COM Port
In order to control the VGA & Audio to HDMI Scaler/Converter using the following
commands, a virtual COM port must be installed on the computer that is connected to the
VGA & Audio to HDMI Scaler/Converter.
1. Install the Gefen Syner-G Software Suite. This software is available under the
Advanced Operation
Support > Downloads section of the Gefen website.
2. Connect a mini-USB-to-USB cable (not included) from the USB port on the
VGA & Audio to HDMI Scaler/Converter to an available USB port on the host
computer.
3. From the Windows Desktop, click the Start button, select Computer, then right-click
on Manage.
page | 48
Page 59

USB Interface
6. The Computer Management window will open.
7. In the left window pane, under System Tools, click Device Manager.
8. In the right window pane, locate Ports (COM & LPT). The device EXT-VGAA-HD-SC
will be displayed along with the COM port.
Use this COM port when conguring the terminal program (e.g. Hyperterminal).
Advanced Operation
Virtual COM Port
Set the terminal program to the following:
Description Setting
Baud rate
Data bits
Parity
Stop bits
Hardware ow control
19200
8
None
1
None
page | 49
Page 60

Commands
Command Description
#factory_reset
#fw_upgrade
#get_aspect_ratio
#get_brightness
#get_color_balance
Advanced Operation
#get_color_range
#get_color_temp
#get_contrast
#get_display_notify
#get_edge_enhance
#get_rmware_version
#get_horizontal_mirror
#get_horizontal_shift
#get_hue
#get_input_resolution
#get_osd_timeout
#get_output_color
#get_output_mode
#get_output_res
#get_phase
#get_picture_settings
#get_saturation
#get_sharpness
#get_test_patterns
#get_timing_preset
#get_uo_scan
#get_vertical_mirror
#get_vertical_shift
#get_video_output
#get_video_settings
#help
#reboot
#set_aspect_ratio
#set_brightness
Resets the unit to factory-default settings
Enables the rmware upgrade mode
Displays the current aspect ratio setting
Displays the current brightness setting
Displays the value of the specied color channel
Displays the current color range setting
Displays the current color temperature setting
Displays the current contrast setting
Displays the current display-notify setting
Displays the current edge-enhance setting
Displays the rmware version number
Displays the state of the horizontal mirror setting
Displays the state of the horizontal shift setting
Displays the current hue setting
Displays the current input resolution
Displays the current OSD timeout value
Displays the current output color space
Displays the current output mode
Displays the current output resolution
Displays the current phase setting
Displays the current picture settings
Displays the current saturation setting
Displays the current sharpness setting
Displays the currently active test pattern
Display the timing of the selected preset
Displays the current underscan/overscan value
Displays the current vertical mirror state
Displays the current vertical shift value
Displays the current video output settings
Displays the current video settings
Displays all available commands
Reboots the unit
Sets the aspect ratio
Sets the picture brightness
(continued on next page)
page | 50
Page 61

Command Description
#set_color_balance
#set_color_range
#set_color_temp
#set_contrast
#set_display_notify
Advanced Operation
#set_edge_enhance
#set_horizontal_mirror
#set_horizontal_shift
#set_horz_active
#set_horz_back_porch
#set_horz_front_porch
#set_horz_scan_rate
#set_horz_sync_polarity
#set_horz_sync_width
#set_horz_total
#set_hue
#set_osd_timeout
#set_output_color
#set_output_mode
#set_output_res
#set_phase
#set_pixel_clock
#set_saturation
#set_sharpness
#set_test_patterns
#set_uo_scan
#set_vert_active
#set_vert_back_porch
#set_vert_front_porch
#set_vert_refresh_rate
#set_vert_sync_polarity
#set_vert_sync_width
#set_vert_total
#set_vertical_mirror
#set_vertical_shift
Commands
Sets the color balance
Set the output color range
Sets the color temperature
Sets the picture contrast
Enables / disables display notications
Sets the edge enhancement
Sets horizontal mirror
Sets horizontal shift
Sets the horizontal active
Sets the horizontal back porch
Sets the horizontal front porch
Sets the horizontal scan rate
Sets the horizontal sync polarity
Sets the horizontal sync width
Sets the total horizontal pixels
Sets the picture hue
Sets the OSD (On-Screen Display) timeout
Sets the output color space
Sets the output mode
Sets the output resolution
Sets the phase adjustment
Sets the pixel clock
Sets the picture saturation
Sets the picture sharpness
Set the test pattern
Set underscan / overscan
Sets the vertical active pixels
Sets the vertical back porch
Sets the vertical front porch
Sets the vertical refresh rate
Sets the vertical sync polarity
Sets the vertical sync width
Sets the total vertical pixels
Sets the vertical mirror
Sets the vertical shift
page | 51
Page 62

Using Preset Values
When a command is entered, the VGA & Audio to HDMI Scaler/Converter will conrm the
entry by returning the function of the command and any parameters. There are several
commands which use a preset value as one of the parameters. When specifying a preset
value as a parameter, the returned preset value will always be one greater than the value
that was specied.
Advanced Operation
For example, if we look up the #get_timing_preset command, we will see that this
command accepts a single preset value, where param1 is a value from 0 to 5:
#get_timing_preset [param1]
If we set param1 = 2, then the return value will be displayed as 3:
#get_timing_preset 2
Preset 3
Hor Scan = 45.0
Hor Active = 1280
Hor Ft Porch = 110
Hor Sync W = 40
Hor Bk Porch = 220
Hor Total = 1650
Hor Polarity = +
Commands
Pixel Clk = 74.25
Ver Refresh = 60.0
Ver Active = 720
Ver Ft Porch = 5
Ver Sync W = 5
Ver Bk Porch = 20
Ver Total = 750
Ver Polarity = +
page | 52
Page 63

#factory_reset
Resets the unit to factory-default settings.
Syntax
#factory_reset
Advanced Operation
Parameters
None
Example
#factory_reset
RESET TO FACTORY DEFAULTS
Related Commands
Commands
#reboot
page | 53
Page 64

#fw_upgrade
Enables the rmware upgrade mode. We recommend that the Gefen Syner-G Software
Suite be used to upgrade the rmware.
Syntax
Advanced Operation
#fw_upgrade
Parameters
None
Example
#fw_upgrade
Waiting for rmware le to be received...
Related Commands
Commands
#get_rmware_version
page | 54
Page 65

#get_aspect_ratio
Displays the current aspect ratio setting.
Syntax
#get_aspect_ratio
Advanced Operation
Parameters
None
Example
#get_aspect_ratio
ASPECT RATIO IS Source
Related Commands
Commands
#get_video_settings
#set_aspect_ratio
page | 55
Page 66

#get_brightness
Displays the current brightness value.
Syntax
#get_brightness
Advanced Operation
Parameters
None
Example
#get_brightness
PICTURE BRIGHTNESS IS 52
Related Commands
Commands
#set_brightness
page | 56
Page 67

#get_color_balance
Displays the current color balance for the specied color channel.
Syntax
#get_color_balance param1
Advanced Operation
Parameters
param1 Color channel [0 ... 2]
param1 Description
0
1
2
Example
Red channel
Green channel
Blue channel
Commands
#get_color_balance 1
PICTURE COLOR BALANCE Green Channel IS 50
Related Commands
#set_color_balance
page | 57
Page 68

#get_color_range
Displays the current color range setting.
Syntax
#get_color_range
Advanced Operation
Parameters
None
Example
#get_color_range
PICTURE COLOR RANGE IS Limited
Related Commands
Commands
#set_color_range
page | 58
Page 69

#get_color_temp
Displays the current color temperature setting.
Syntax
#get_color_temp
Advanced Operation
Parameters
None
Example
#get_color_temp
PICTURE COLOR TEMPERATURE IS Neutral
Related Commands
Commands
#set_color_temp
page | 59
Page 70

#get_contrast
Displays the current contrast setting.
Syntax
#get_contrast
Advanced Operation
Parameters
None
Example
#get_contrast
PICTURE CONTRAST IS 68
Related Commands
Commands
#set_contrast
page | 60
Page 71

#get_display_notify
Displays the current display-notify setting. Refer to the #set_display_notify
command for more information about Display Notication.
Syntax
Advanced Operation
#get_display_notify
Parameters
None
Example
#get_display_notify
DISPLAY NOTIFICATIONS IS On
Related Commands
Commands
#set_display_notify
page | 61
Page 72

#get_edge_enhance
Displays the current edge-enhance setting.
Syntax
#get_edge_enhance
Advanced Operation
Parameters
None
Example
#get_edge_enhance
PICTURE EDGE ENHANCEMENT IS Off
Related Commands
Commands
#set_edge_enhance
page | 62
Page 73

#get_rmware_version
Displays the current rmware version.
Syntax
#get_rmware_version
Advanced Operation
Parameters
None
Example
#get_rmware_version
FIRMWARE VERSION IS V1.012
Related Commands
Commands
#fw_upgrade
page | 63
Page 74

#get_horizontal_mirror
Displays the horizontal mirror setting.
Syntax
#get_horizontal_mirror
Advanced Operation
Parameters
None
Example
#get_horizontal_mirror
HORIZONTAL MIRROR IS Off
Related Commands
Commands
#get_vertical_mirror
#set_horizontal_mirror
page | 64
Page 75

#get_horizontal_shift
Displays the current horizontal shift setting.
Syntax
#get_horizontal_shift
Advanced Operation
Parameters
None
Example
#get_horizontal_shift
HORIZONTAL SHIFT IS Off
Related Commands
Commands
#set_horizontal_shift
page | 65
Page 76

#get_hue
Displays the current hue setting.
Syntax
#get_hue
Advanced Operation
Parameters
None
Example
#get_hue
PICTURE HUE IS 50
Related Commands
Commands
#get_brightness
#get_contrast
#get_saturation
#set_hue
page | 66
Page 77

#get_input_resolution
Displays the current input resolution.
Syntax
#get_input_resolution
Advanced Operation
Parameters
None
Example
#get_input_resolution
INPUT RESOLUTION IS 1600x1200p60
Related Commands
Commands
#get_picture_settings
page | 67
Page 78

#get_osd_timeout
Displays the current OSD timeout value (in seconds).
Syntax
#get_osd_timeout
Advanced Operation
Parameters
None
Example
#get_osd_timeout
OSD TIMEOUT IS 5 SECONDS
Related Commands
Commands
#set_osd_timeout
page | 68
Page 79

#get_output_color
Displays the current output color space.
Syntax
#get_output_color
Advanced Operation
Parameters
None
Example
#get_output_color
OUTPUT COLOR SPACE IS RGB 4:4:4
Related Commands
Commands
#get_color_range
#get_color_temp
#set_output_color
page | 69
Page 80

#get_output_mode
Displays the current output mode.
Syntax
#get_output_mode
Advanced Operation
Parameters
None
Example
#get_output_mode
OUTPUT MODE IS Auto Detect
Related Commands
Commands
#get_output_color
#set_output_mode
page | 70
Page 81

#get_output_res
Displays the current output resolution.
Syntax
#get_output_res
Advanced Operation
Parameters
None
Example
#get_output_res
OUTPUT RESOLUTION IS 1400x1050 60Hz
Related Commands
Commands
#set_output_res
page | 71
Page 82

#get_phase
Displays the current phase setting.
Syntax
#get_phase
Advanced Operation
Parameters
None
Example
#get_phase
PHASE IS 26
Related Commands
Commands
#get_video_settings
#set_phase
page | 72
Page 83

#get_picture_settings
Displays the current picture settings. This command provides the same information
as consecutively executing the following commands: #get_contrast,
#get_brightness, #get_saturation, #get_hue, get_color_range,
#get_color_temp, #get_color_balance, #get_edge_enhance,
and #get_sharpness.
Advanced Operation
Syntax
#get_picture_settings
Parameters
None
Example
#get_picture_settings
PICTURE CONTRAST IS 50
PICTURE BRIGHTNESS IS 50
PICTURE SATURATION IS 50
PICTURE HUE IS 50
PICTURE COLOR RANGE IS Limited
PICTURE COLOR TEMPERATURE IS Neutral
PICTURE COLOR BALANCE Red Channel IS 50
PICTURE COLOR BALANCE Green Channel IS 50
PICTURE COLOR BALANCE Blue Channel IS 50
PICTURE EDGE ENHANCEMENT IS Off
PICTURE SHARPNESS IS 0
Commands
Related Commands
#get_brightness
#get_contrast
#get_color_balance
#get_color_range
#get_color_temp
#get_edge_enhance
#get_hue
#get_saturation
#get_sharpness
#set_brightness
#set_contrast
#set_color_balance
#set_color_range
#set_color_temp
#set_edge_enhance
#set_hue
#set_saturation
#set_sharpness
page | 73
Page 84

#get_saturation
Displays the current saturation value.
Syntax
#get_saturation
Advanced Operation
Parameters
None
Example
#get_saturation
PICTURE SATURATION IS 50
Related Commands
Commands
#get_contrast
#get_brightness
#get_hue
#get_color_range
#get_color_temp
#get_edge_enhance
#get_sharpness
page | 74
Page 85

#get_sharpness
Displays the current sharpness value.
Syntax
#get_sharpness
Advanced Operation
Parameters
None
Example
#get_sharpness
PICTURE SHARPNESS IS 0
Related Commands
Commands
#get_contrast
#get_brightness
#get_saturation
#get_hue
#get_color_range
#get_color_temp
#get_edge_enhance
page | 75
Page 86

#get_test_patterns
Displays the currently active test pattern.
Syntax
#get_test_patterns
Advanced Operation
Parameters
None
Example
#get_test_patterns
TEST PATTERNS IS Off
Related Commands
Commands
#set_test_patterns
page | 76
Page 87

#get_timing_preset
Displays the values for the specied timing preset.
Syntax
#get_timing_preset
Advanced Operation
Parameters
param1 Preset [0 ... 5]
Example
#get_timing_preset 1
Preset 2
Hor Scan = 45.0
Hor Active = 1280
Hor Ft Porch = 110
Hor Sync W = 40
Hor Bk Porch = 220
Hor Total = 1650
Hor Polarity = +
Commands
Pixel Clk = 74.25
Ver Refresh = 60.0
Ver Active = 720
Ver Ft Porch = 5
Ver Sync W = 5
Ver Bk Porch = 20
Ver Total = 750
Ver Polarity = +
Related Commands
#set_horz_scan_rate
#set_horz_active
#set_horz_front_porch
#set_horz_sync_width
#set_horz_back_porch
#set_horz_total
#set_horz_sync_polarity
#set_pixel_clock
d
#set_vert_refresh_rate
#set_vert_active
#set_vert_front_porch
#set_vert_sync_width
#set_vert_back_porch
#set_vert_total
#set_vert_sync_polarity
page | 77
Page 88

#get_uo_scan
Displays the current underscan or overscan value.
Syntax
#get_uo_scan
Advanced Operation
Parameters
None
Example
#get_uo_scan
UNDER/OVER SCAN IS OFF
Related Commands
Commands
#set_uo_scan
page | 78
Page 89

#get_vertical_mirror
Displays the current vertical mirror value.
Syntax
#get_vertical_mirror
Advanced Operation
Parameters
None
Example
#get_vertical_mirror
VERTICAL MIRROR IS Off
Related Commands
Commands
#get_horizontal_mirror
#set_vertical_mirror
page | 79
Page 90

#get_vertical_shift
Displays the current vertical shift value.
Syntax
#get_vertical_shift
Advanced Operation
Parameters
None
Example
#get_vertical_shift
VERTICAL SHIFT IS OFF
Related Commands
Commands
#get_horizontal_shift
#set_vertical_shift
page | 80
Page 91

#get_video_output
Displays the current video output settings. This command produces the same output
as consecutively executing the #get_output_res, #get_output_color, and
#get_output_mode commands.
Syntax
Advanced Operation
#get_video_output
Parameters
None
Example
#get_video_output
OUTPUT RESOLUTION IS 1400x1050 60Hz
OUTPUT COLOR SPACE IS RGB 4:4:4
OUTPUT MODE IS Auto Detect
Commands
Related Commands
#get_output_res
#get_output_color
#get_output_mode
#set_output_res
#set_output_color
#set_output_mode
page | 81
Page 92

#get_video_settings
Displays the current video settings. This command provides the same information as
consecutively executing the #get_uo_scan, #get_aspect_ratio,
#get_horizontal_mirror, #get_vertical_mirror, #get_horiziontal_shift,
#get_vertical_shift, and #get_phase commands.
Advanced Operation
Syntax
#get_video_settings
Parameters
None
Example
#get_video_settings
UNDER/OVER SCAN IS OFF
ASPECT RATIO IS Source
HORIZONTAL MIRROR IS Off
VERTICAL MIRROR IS Off
HORIZONTAL SHIFT IS OFF
VERTICAL SHIFT IS OFF
PHASE IS AUTO
Commands
Related Commands
#get_uo_scan
#get_aspect_ratio
#get_horizontal_mirror
#get_horizontal_shift
#get_phase
#get_vertical_mirror
#get_vertical_shift
#set_aspect_ratio
#set_horizontal_mirror
#set_horizontal_shift
#set_phase
#set_vertical_mirror
#set_vertical_shift
page | 82
Page 93

#help
Displays help on a specic command. If no command is specied (param1), then a list
of all available commands will be displayed.
Syntax
Advanced Operation
#help [param1]
Parameters
param1 Command (optional)
Examples
#help
#FACTORY_RESET
#FW_UPGRADE
#GET_ASPECT_RATIO
#GET_BRIGHTNESS
#SET_COLOR_BALANCE
#GET_COLOR_RANGE
#GET_COLOR_TEMP
#GET_CONTRAST
#GET_DISPLAY_NOTIFY
#GET_EDGE_ENHANCE
...
...
#SET_VERT_SYNC_WIDTH
#SET_VERT_TOTAL
#SET_VERTICAL_MIRROR
#SET_VERTICAL_SHIFT
Commands
#help #set_aspect_ratio
#SET_ASPECT_RATIO
Set aspect ratio
#SET_ASPECT_RATIO PARAM 1
PARAM 1= 0-3
0 - 16:9
1 - 4:3
2 - Stretch
3 - Source
page | 83
Page 94

#reboot
Reboots the unit.
Syntax
#reboot
Advanced Operation
Parameters
None
Example
#reboot
UNIT WILL REBOOT SHORTLY
Related Commands
Commands
#factory_reset
page | 84
Page 95

#set_aspect_ratio
Sets the aspect ratio of the output video signal. The default setting is 0.
Syntax
#set_aspect_ratio param1
Advanced Operation
Parameters
param1 Aspect ratio [0 ... 3]
param1 Description
0
1
2
3
Example
16:9
4:3
Stretch
Source
Commands
#set_aspect_ratio 1
ASPECT RATIO SET TO 4:3
Related Commands
#get_aspect_ratio
page | 85
Page 96

#set_brightness
Sets the brightness of the output video signal. The default setting is 50.
Syntax
#set_brightness param1
Advanced Operation
Parameters
param1 Brightness [0 ... 100]
Example
#set_brightness 58
PICTURE BRIGHTNESS SET TO 58
Related Commands
Commands
#get_brightness
#set_color_balance
#set_color_range
#set_contrast
#set_hue
page | 86
Page 97

#set_color_balance
Sets the color balance of the output video signal.
Syntax
#set_color_balance param1 param2
Advanced Operation
Parameters
param1 Color channel [0 ... 2]
param1 Description
0
1
2
param2 Intensity [0 ... 100]
Red
Green
Blue
Commands
Example
#set_color_balance 1 90
PICTURE COLOR BALANCE Green Channel SET TO 90
Related Commands
#get_color_balance
#set_color_range
#set_color_temp
page | 87
Page 98

#set_color_range
Sets the color range of the output video signal.
Syntax
#set_color_range param1
Advanced Operation
Parameters
param1 Color range [0 ... 1]
param1 Description
0
1
Example
#set_color_range 1
PICTURE COLOR RANGE SET TO Limited
Full (0 - 255)
Limited (16 - 235)
Commands
Related Commands
#get_color_range
#set_color_balance
#set_color_temp
page | 88
Page 99

#set_color_temp
Sets the color temperature of the output video signal.
Syntax
#set_color_temp param1
Advanced Operation
Parameters
param1 Color temperature [0 ... 2]
param1 Description
0
1
2
Example
Warm
Neutral
Cool
Commands
#set_color_temp 2
PICTURE COLOR TEMPERATURE SET TO Cool
Related Commands
#get_color_temp
#set_color_balance
#set_color_range
page | 89
Page 100

#set_contrast
Sets the contrast of the output video signal.
Syntax
#set_contrast param1
Advanced Operation
Parameters
param1 Contrast [0 ... 100]
Example
#set_contrast 40
PICTURE CONTRAST SET TO 40
Related Commands
Commands
#get_contrast
#set_brightness
#set_hue
#set_saturation
page | 90
 Loading...