

Page 1
Solar Powered Analogue and Digital Watch with Vibration Alarms
INTRODUCTION
Congratulations on purchasing your Geemarc Watch. This is a solar powered analogue and digital watch with 4 strong
vibrating alarms that are very easy to set.
Many useful options can be displayed on the LCD. These options can be lit up by the LCD backlight.
This watch has a Real “Single-Battery” Ana-Digit movement that always synchronizes the hands with the digital time.
It is important that you read the instructions below in order to use your Geemarc watch to its full potential. Keep this user
guide in a safe place for future reference.
For product support and help visit our website at www.geemarc.com
Telephone 01707 384438 fax 01707 372529
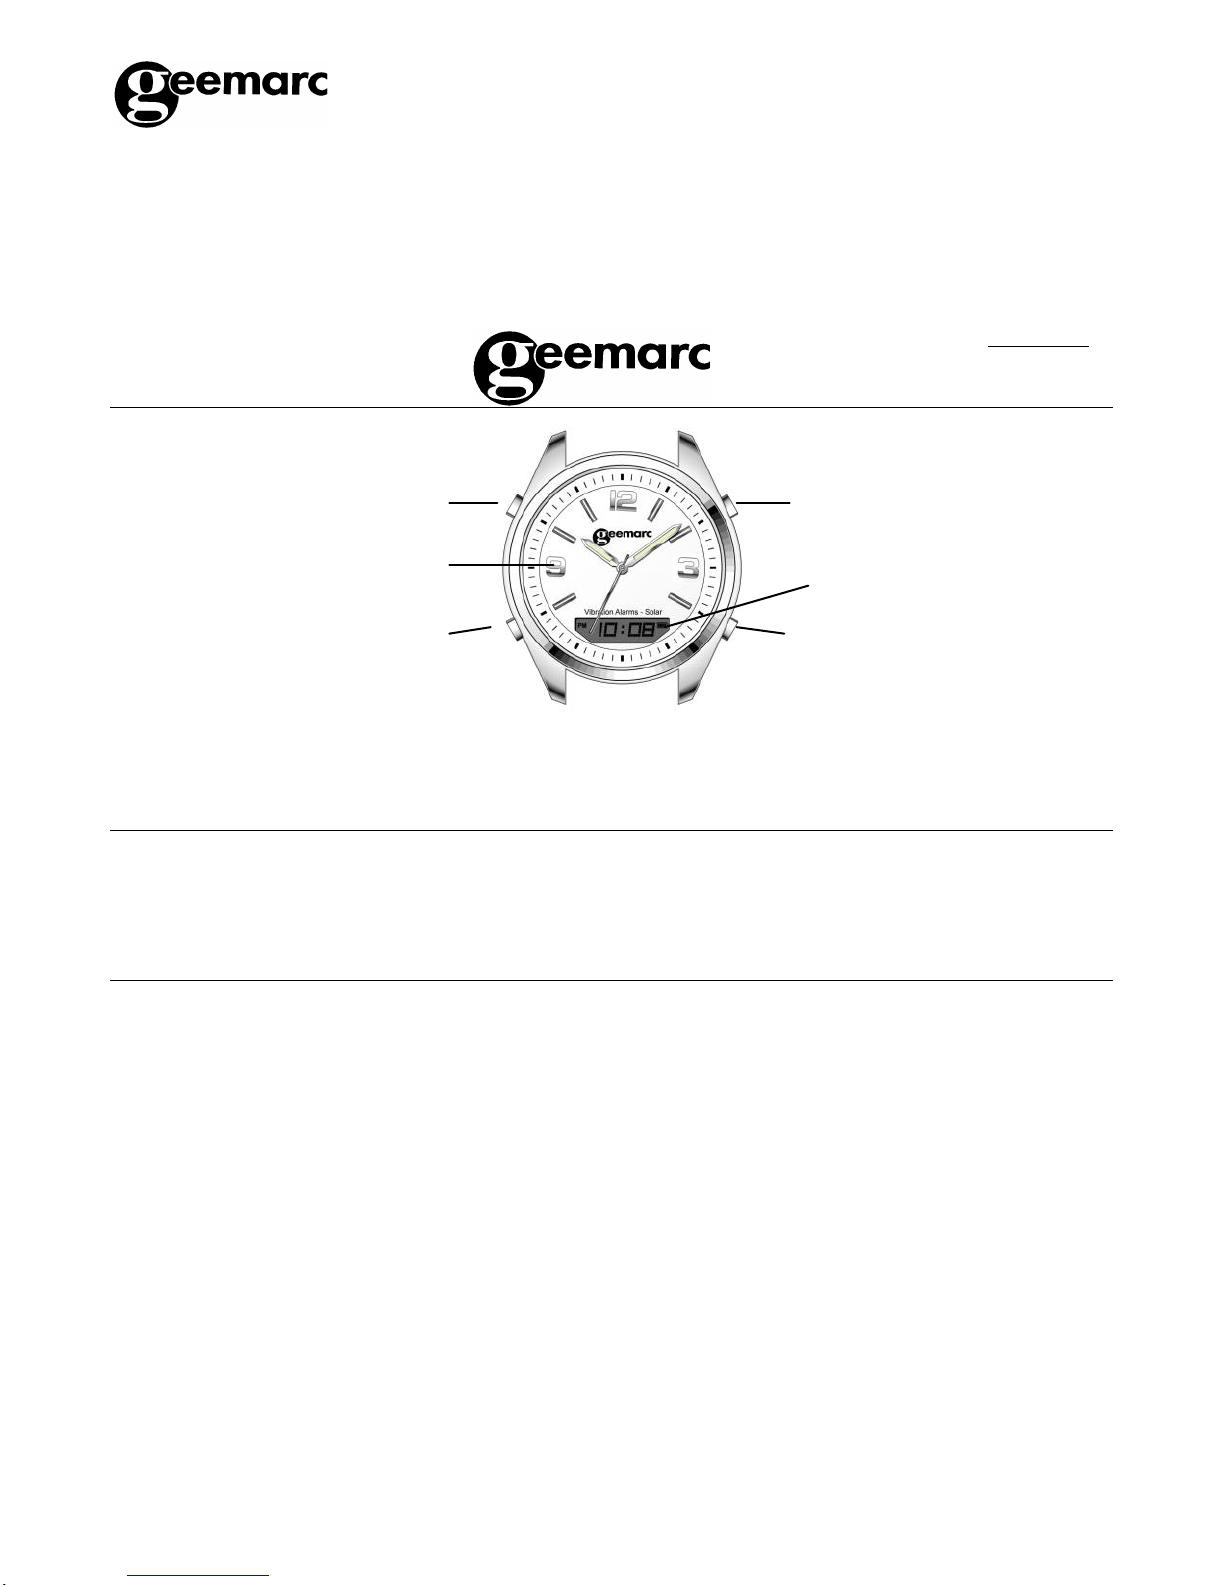
DESCRIPTION
General Description
SETUP
As the watch will arrive in sleep mode, you have to follow this procedure in order to wake up the watch.
SLEEP MODE
To Wake Up
1. Press any button for more than 3 seconds. This will wake up the watch provided that the battery level is normal.
2. After the watch wakes up, the hands will spin to until the time displayed matches the internal timekeeping.
Note: If the battery level is too low, the watch will not wake up and it will need charging first (see Charging the Watch).
Enter Sleep Mode
1. Press S1 first and then S2 (2 buttons are now being pressed simultaneously) for around 5 seconds until QSM is
displayed.
2. Release both buttons
3. Press S1. SLP is displayed.
4. The watch hands will spin and will stop at 12:00 am to sleep.
Charging the watch (Solar Watch Charger not included, but can be purchased separately)
This watch requires charging up. It can be charged either by exposure to sunlight or electric light
It is recommended that the watch is charged using the Geemarc professional solar watch charger. This delivers light
strength similar to direct sunlight in the summer but the watch remains cool throughout charging. Direct sunlight and
regular electric lamps can heat up the watch and this could cause damage to the watch or reduce its working life. Further
information about charging: Light passes through the watch dial and is converted to electric power by the solar panel
found underneath the dial. This electric power is used to recharge the rechargeable battery. The battery provides
continuous power to drive the watch and to maintain accurate timekeeping, even in total darkness. Light does not drive
the watch directly but it provides power for the rechargeable battery.
S1 Button
S2 Button
S4 Button
S3 Button
LCD Display
Analogue Display
Page 2
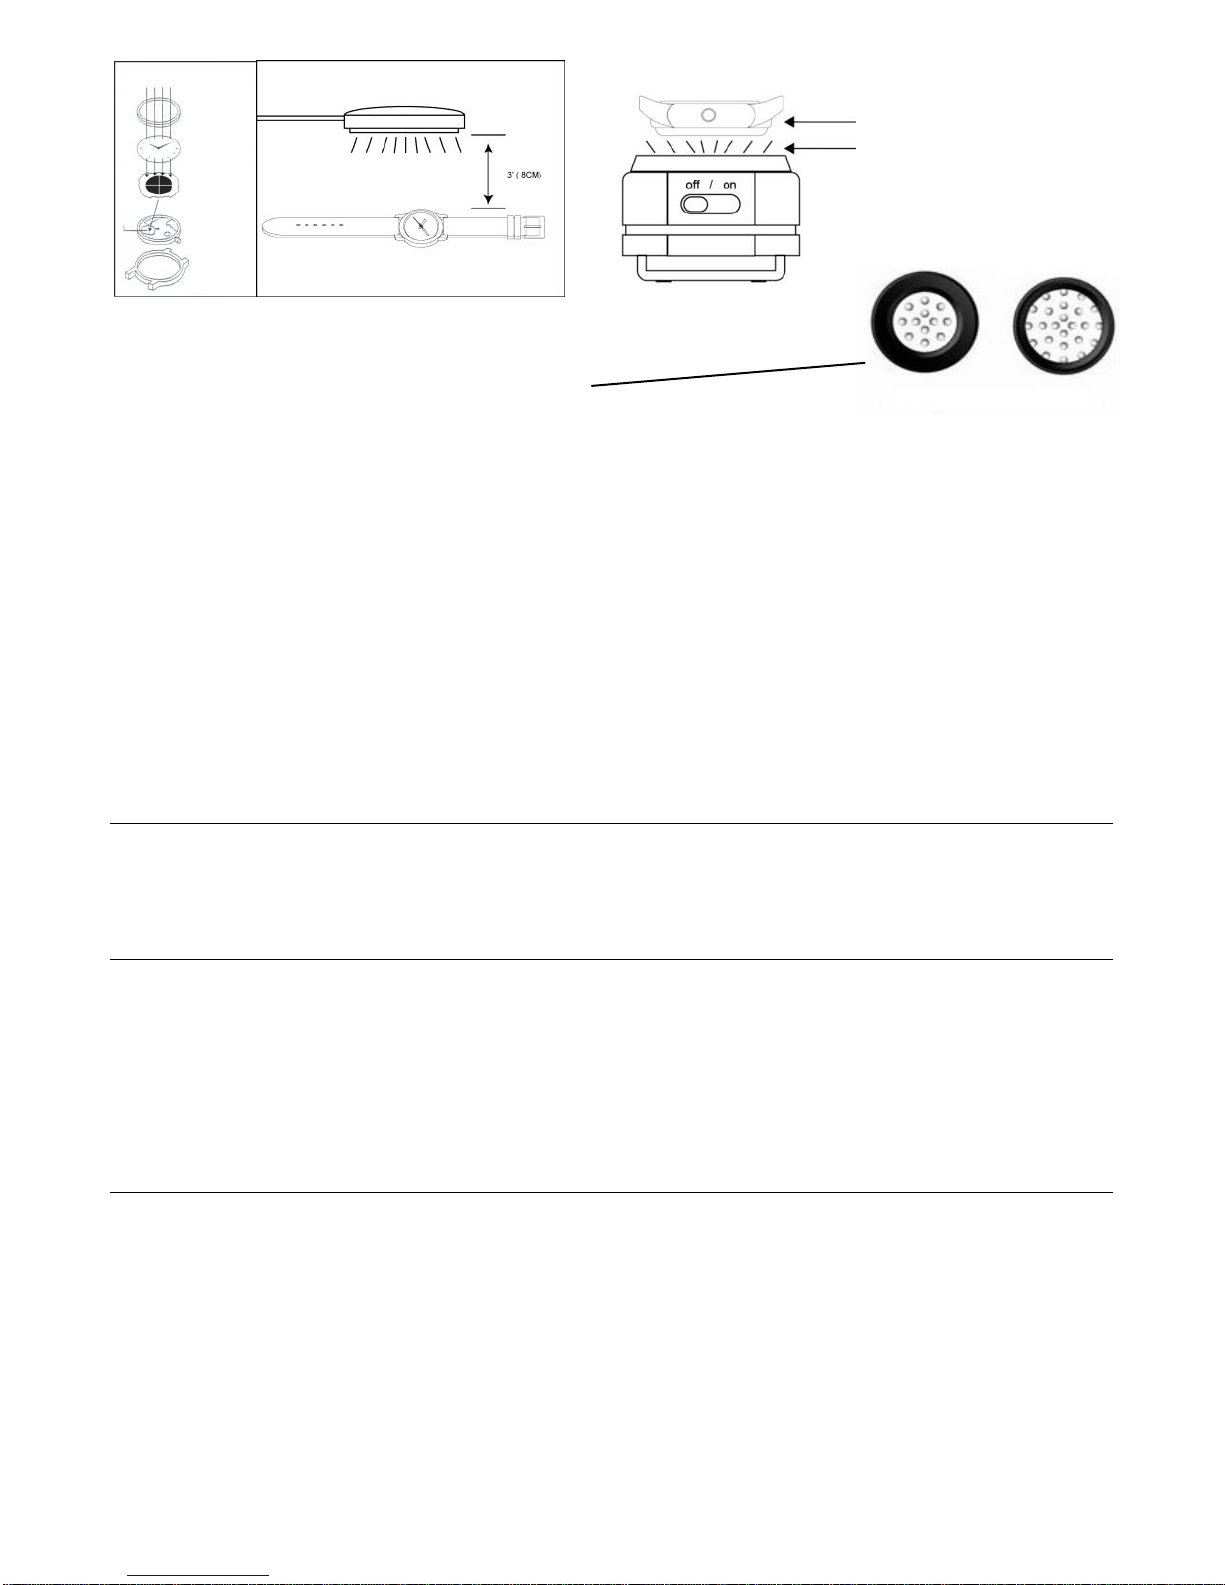
Using the Geemarc Professional Solar Watch Charger
Plug the USB of the Geemarc solar watch charger into a USB port on your computer.
Slide the On/Off Switch of the Geemarc solar watch charger to the On position.
Place your watch face down on top of the charger.
Use the appropriate rubber caps for the Cool LED Solar Charger
When the Battery level is low, the LCD shows a flashing empty battery and the second hand moves in 2 second jumps
every 2 seconds. The buttons on the watch will not work. If you do not charge up the battery at this point the hands will
eventually stop moving to save battery power. The hands will stop at 12 o’clock meanwhile the internal timekeeping is
maintained. When the watch has been charged sufficiently, the watch will automatically match the internal timekeeping.
Do not expect that your stopped solar watch will start to run once it is exposed to light! The watch will only start to run
once light charges up the battery to a certain level. The charging time varies depending on the strength of the light and the
level of charge found in the battery. If you do not recharge your watch for very long time, you will need to synchronize your
watch hands with the LCD time (see the Synchronize section) and then set the time and calendar according to the
instructions below.
Key Points about charging your watch:
1. Avoid recharging at high temperature (over 60 oC) e.g. placing it on a dashboard of a vehicle or too close to an
electric lamp. This can damage your watch.
2. Never allow the battery charge level to get close to empty. This can damage the battery and you will not be able to
recharge and therefore will have to replace the damaged battery.
Therefore, it is recommended that you charge your watch on a weekly basis with cool light.
SETTINGS
12/24 Hour Time Display on LCD
1. Press and hold S2 (the lower right button) for approximately 3 seconds. The display will show a flashing 12 H or 24 H
2. Press S1 to scroll through the two options (12H or 24H) and stop at the desired time format
3. Press S2 to Confirm and Exit
Language Selection on LCD (English or German)
1. Press and hold S2 (the lower right button) for approximately 3 seconds. A flashing 12 H or 24 H will be displayed
2. Press S2 again. A flashing ENG or GER will be displayed
3. Press S1 to scroll through the options (ENG or GER). ENG= Weekday displayed in English GER= Weekday displayed in German
4. Stop at the desired language
5. Press S2 to Confirm and Exit
Time and Calender Setting on LCD
The LCD time and Analogue time should be the same.
If they do not match, synchronize them by following the -“Synchronize Watch Hands” instructions before proceeding with the following time
setting instructions.
1. Press and hold S2 (the lower right button) for approximately 3 seconds. A flashing 12 H or 24 H will be displayed
2. Press S2 again. Flashing ENG or GER will be displayed
3. Press S2 again. A flashing hour digit will be displayed
4. Press S1 repeatedly to scroll to the correct hour
5. Press S2 to Confirm the selected hour. A flashing Minute digit will be displayed
6. Press S1 repeatedly to scroll to the correct minute
Solar Watch
Light
Lady size Man size
Page 3

7. Press S2 to Confirm the selected minute. A flashing Year digit will be displayed
8. Press S1 repeatedly to scroll to the correct Year
9. Press S2 to Confirm the selected Year. A flashing Month digit will be displayed
10. Press S1 repeatedly to scroll to the correct Month
11 Press S2 to Confirm the selected Month. A flashing date digit will be displayed
12. Press S1 repeatedly to scroll to the correct date
13. Press S2 to Confirm the selected date. A flashing Weekday will be displayed
14. Press S1 repeatedly to scroll to the correct Weekday
15. Press S2 to Confirm the selected Weekday
The watch hands will now spin to match the LCD time setting, if the time has been reset as above- Please WAIT until the watch resumes
normal operation i.e. when WAIT is no longer displayed on the LCD.
USING THE WATCH
LCD Display Selection
You can set the LCD to show either one of the following digital readings:
Time (hour, minute and seconds). You have the choice to display time in either 12 or 24 hour format
Battery Level
Weekday (in either German or English)
Date/Month
Month Date
To move between these options, keep pressing S2 (the lower right button) until you find the desired digital reading
LCD Backlight
Press S1 once to turn on the LCD backlight / the backlight will remain on for approximately 3 seconds.
Low Battery Warning
When the battery level is low, the LCD will show a flashing “Low Battery” icon. It is time to charge your watch (See Setup).
ALARM
You can set up to 4 separate alarm times on this watch. When an alarm is set off, the watch will vibrate. When the watch is vibrating the
analogue hands pause and the LCD will switch off. The vibrating alarm will stop after 15 seconds and then the LCD will be switched back on
and the analogue hands will move rapidly to the correct time.
Alarm Time Check
Press S3 once to show the first alarm time. If you press S3 again, the second alarm time will be displayed and so on until the fourth alarm
time has been displayed. The alarm ON/OFF icon is also displayed according to each alarm reading.
Press S3 once again to exit from the fourth alarm setting or else the watch will exit the alarm display and return to regular LCD display
automatically after 30 seconds.
Alarm Time Setting
1. Keep pressing S3 repeatedly until you see the alarm number you wish to set the time for (AL-1, AL-2, AL-3 or AL-4).
2. Wait 1 second and the LCD will show the alarm time
3. Press S2. The alarm time will start flashing
4. Press and Hold S1 to set the Alarm Hour
5. Press and Hold S2 to set the Alarm Minutes
6. Press S3 once to confirm and exit
The alarm is automatically set to ON when a new alarm time has been set.
Please note: the alarm time will display for 30 seconds and then Exit if no alarm setting is detected.
Setting Alarm On/Off
1. Keep pressing S3 until you get to the alarm number you wish to set On or Off (AL-1, AL-2, AL-3 or AL-4).
2. Wait 1 second and the LCD will show the alarm time
3. Press S4. This button can toggle between Alarm On or Off. When the Alarm is On, is displayed.When the Alarm is off, no alarm icon is
displayed.
4. Press S3 once to confirm and exit or the watch will exit by itself after 30 seconds from your last alarm time reading.
Page 4

Stop the Alarm
Press S1 (the upper right button) or S2 (the lower right button) once while the alarm is vibrating. This will stop the vibration alarm.
Snooze Mode
The watch enters Snooze mode automatically if the alarm is not stopped (as described in the Stop the Alarm section above). In snooze
mode, the alarm will ring for 15 seconds every minute for 5 minutes unless S1 or S2 is pressed.
Alarm Vibrator Check
Press and hold S4 for 3 seconds to ensure the vibrating alarm is working.
SYNCHRONIZE WATCH HANDS
Synchronise Analogue Time with LCD Time
Press and hold S2 (the lower right button) for approximately 3 seconds. A flashing 12 H or 24 H will be displayed
Keep pressing S2 a number of times further until HAND is displayed on the LCD
Press and hold S1 for approximately 5 seconds until the second hand is spinning rapidly. Release S1
When the spinning second-hand is driving the minute and hour hands closer to 11:59, stop the second-hand with one press of S1.
Then, keep pressing S1 briefly but repeatedly until all 3 hands align at 12 0’ clock position (If you accidentally go past 12, start this process
again). When all hands are aligned at the 12 0’clock position press S2 button briefly, to confirm the LCD displays WAIT and the second hands
will spin rapidly until all 3 hands match the LCD time The watch will resume normal operation automatically.
TROUBLESHOOTING
Why is the analogue time different from the LCD time?
Sometimes hard knocks or vibrations can cause the watch hands to move irregularly, and therefore the incorrect time is displayed. However,
the internal clock will be keeping accurate time. The watch hands need to be recalibrated. Please go to Synchronize Analogue Time with LCD
Time section for details.
Why is the second hand jumping in 2 second intervals?
When the battery level is low your watch runs one step every 2 seconds and the “Low Battery” icon flashes telling you to recharge your watch.
When the “Low Battery icon” is flashing, the vibration alarm and other button functions are disabled. It is time to recharge your watch.
BATTERY CHANGE
Battery Type
This watch uses a ML2032 rechargeable battery. Only trained jewelers or watch specialists should fit new batteries to avoid any damage to
the watch. Your Guarantee may become invalid if you open up this watch!
Instructions to Trained Person re Opening up the Watch
Carefully open the watch at the back. Ensure not to break wires that connect the watch module with the vibrator.
Pick up the battery spring and make sure you are not losing the waterproof seal.
Take out the battery and insert a new one (take heed of battery polarity and ensure to insert the correct way up).
Push the battery spring down.
Before you put the case-back on again, make sure the waterproof seal is correctly in place.
After Battery Replacement
After battery replacement, the second hand starts to run. Then simply follow Synchronize Analogue Time with LCD Time instructions.
GUARANTEE
Guarantee
From the moment your Geemarc product is purchased, Geemarc guarantee it for the period of 2 years. The guarantee does not cover
accidents, negligence or breakage to any parts. Batteries and straps not covered under warranty. This watch is designed and manufactured to
withstand up to 3 bars, but it is not designed for wearing while swimming or diving. In those cases, the watch is not covered under warranty.
The Geemarc guarantee in no way limits your legal rights. The product is covered by the legal guarantee of conformity as provided by
applicable law.
Important: YOUR RECEIPT IS PART OF YOUR GUARANTEE AND MUST BE RETAINED AND PRODUCED IN THE EVENT OF A
WARRANTY CLAIM.
After Sales Telephone Number: +44 (0) 1707 372372
EC Declaration:
This product respects the CE Marking. The declaration of conformity may be consulted at www.geemarc.
Geemarc Télécom SA
Parc de I’Etoile
2 rue Galilée
59791 GRANDE SYNTHE CEDEX
FRANCE
 Loading...