

Page 1
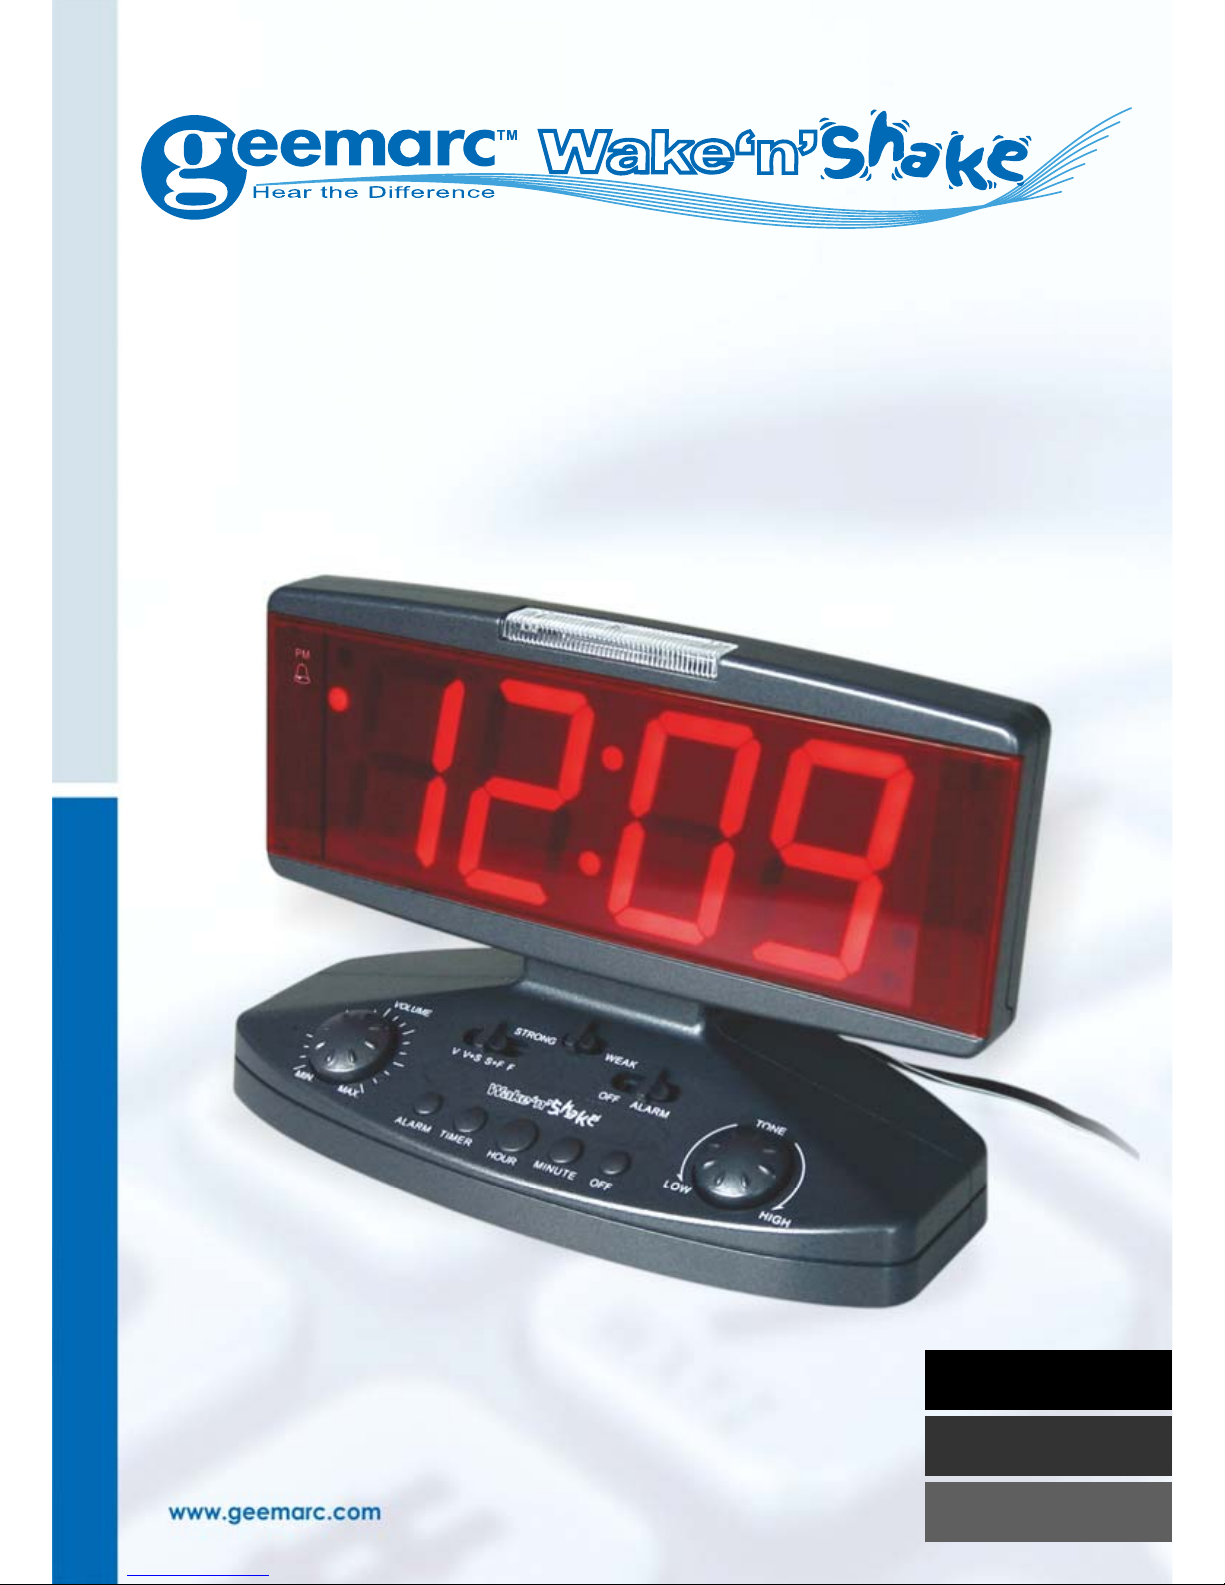
Large display alarm clock with shake
r
Réveil grand écran avec vibreu
r
Wecker mit Groß-Anzeige und Vibrationskissen
English P1
Français P11
Deutsch P21
Page 2
1
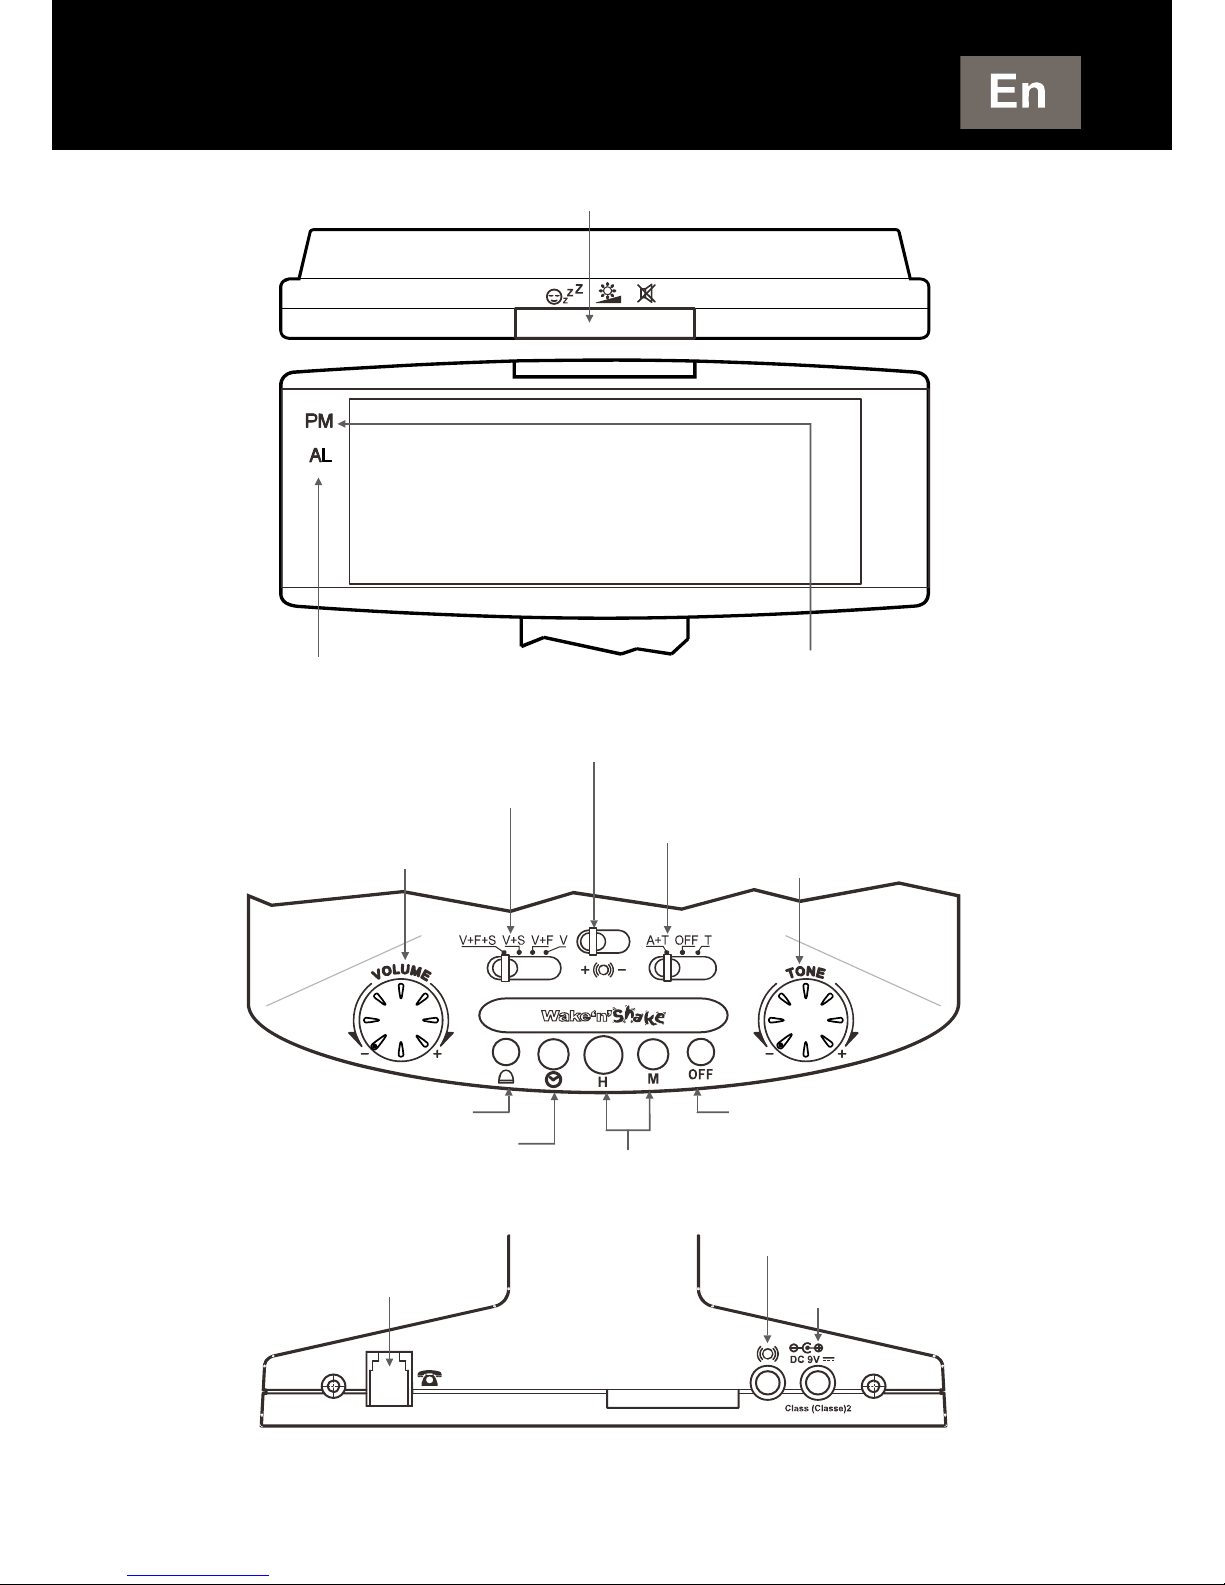
DESCRIPTION
Snooze key / Flash / Dimmer button
A
larm LED indicato
r
PM LED indicato
r
Shaker Lo / Hi switch
A
larm mode switch
A
larm+ring / Off / Ring
function
A
larm and ring
volume
A
larm tone
Set alarm
Set clock
Set hours & minutes
A
larm off for 24H.
(*)Modular jack
(*)Shaker jack
(*)Adaptor jack
(*) Classified TVN-3 according to EN60950 standard.
Page 3
2
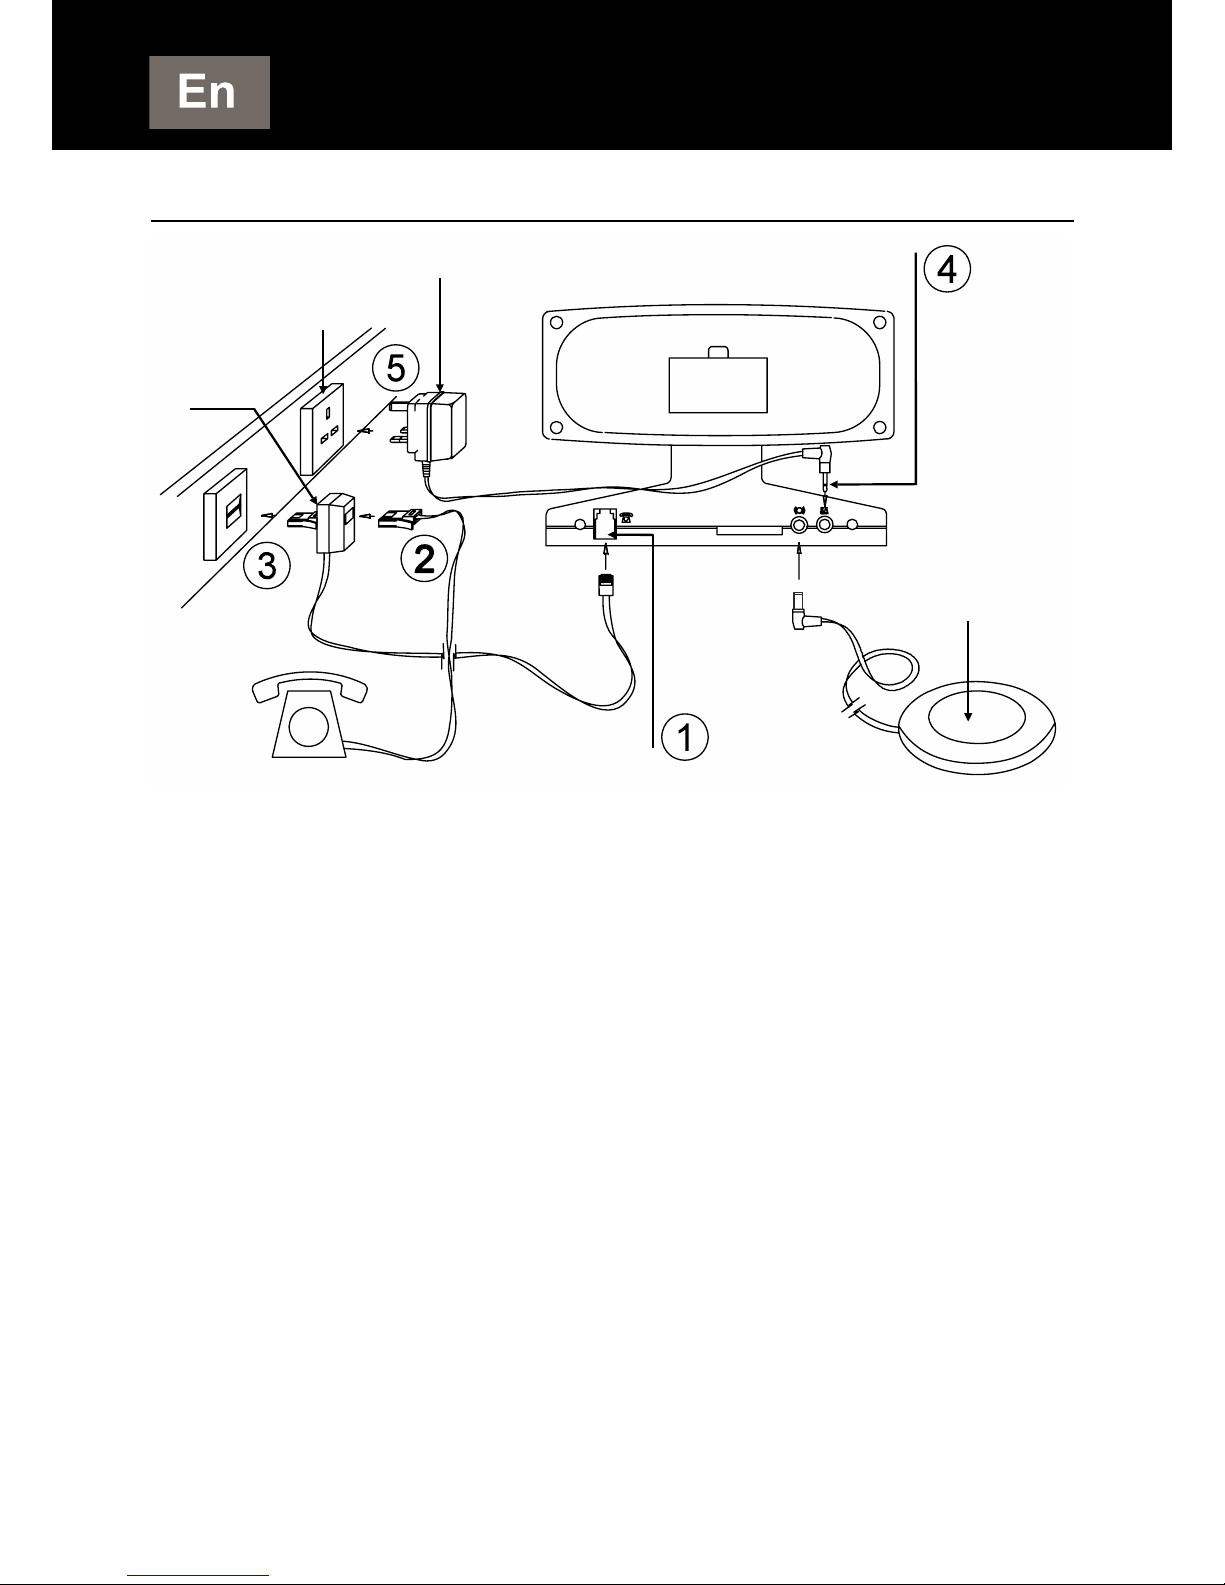
1- CONNECTING THE TELEPHONE
1 - Connect the PTT line cord.
2 - At your option you may connect your telephone in
the doubler plug.
3 - Connect the PTT doubler plug in the wall socket.
4 - Connect the adaptor line cord.
5 - Connect the adaptor in the wall socket. (**)
(**)Classified “hazardous voltage” ac cording to EN60950 standard.
Electrical connection: The apparatus is designed to operate at DC9V,
650mA. The power adaptor supplied operate from AC100 – 240V,
50/60Hz input.
The apparatus does not incorporate an integral power on/off switch.
To disconnect the power, either switch off supply at the mains
power socket or unplug the DC adaptor. When installing the
apparatus, ensure that the mains power socket is readily accessible.
Telephone connection: Voltages present on the
telecommunication network are classified TNV-3
(Telecommunication Network Voltage) according to the EN609 50
standard.
CONNECTION
(**)230V
PTT plug
DC Adapto
r
Shake
r
Page 4

3
2- SETTING THE TIME (
)
- Press and hold (set clock) button.
- Press H (hour) and M (minute) until correct hour and
minutes appear on the display.
- Release
(set clock) button.
- For p.m. hours, the p.m. indicator will appear on the
display near the inscription PM.
12 / 24 hour format
User can select which hour format to use. To select:
- Press and hold the H (hour) button for 6 seconds to
enter the hour selection mode, the display shows
“12H” or “24H”, then release the hour button.
- Press the H (hour) button to toggle between 12 or 24
hours.
Note: If no selection made within 4 seconds, the last
showed format will be chosen, and the clock will return
to normal time mode.
3- SETTING THE ALARM TIME ( )
- Press and hold (set alarm) button.
- Press H (hour) and M (minute) until correct hour and
minutes appear on the display.
- Release (set alarm) button.
- Press , H and M to reset the alarm clock to 12.
SETTING
Page 5
4
4- SETTING THE ALARM MODE
Put the function switch on A+T position.
Choose which alarm mode you wish to be awakened to
by moving the alarm mode switch to one of the following
selections:
V : only shaker activated
V+S : both sound and shaker alarm activated
V+F : both strobe light and shaker alarm activated
V+F+S : strobe light, sound and shaker alarm activated
Note: if user doesn’t use the V (shaker function), please
unplug the shaker plug from the clock.
When the alarm is set to one of the alarm modes, the
alarm indicator will appear on the display near the
inscription AL.
The table below shows how the alarm modes indicate
an incoming call from the alarm clock.
SETTING
Page 6
5
ALARM MODE ACTION ALARM CLOCK INCOMING CALL
SOUND Buzzer With pauses With pauses
SHAKER Vibrates With pauses With pauses
STROBE LIGHT Flashes With pauses With pauses
The default alarm duration time is 30 minutes. User can
adjust the alarm duration time from 1-59 minutes.
To adjust the alarm duration:
- Press and hold the set alarm button for 6
seconds to enter adjust mode. The clock show “30”,
release the set alarm button.
- Press the M button to adjust the alarm duration time to
the desired setting from 1 minute to 59 minutes.
- This new setting will become the new default, until
changed by user.
- If no action is take within 3 seconds, then the clock will
return to normal time mode.
SETTING
Page 7

6
5- SNOOZE KEY (
)
When the alarm mode you have chosen is switched on
the alarm time setting, pressing the button will stop
the alarm mode for approximately 9 minutes. The alarm
will then switch the alarm mode o again for a further 9
minutes. This sequence can be carried out for up to 59
minutes after which the alarm mode will be automatically
switched off.
User can adjust the snooze repeat time from 1-30
minutes.
- Press and hold the SNOOZE button for 4 seconds to
enter the snooze time adjust mode. When the clock
show “9” release the Snooze button.
- Press the M button to adjust the snooze time to the
desired setting from 1 minute to 30 minutes.
This new setting will become the new default, until
changed by user. If no action is take within 3 seconds,
then the clock will return to normal time mode.
6- SWITCHING THE ALARM OFF FOR 24H.
(OFF)
Press the alarm off button (OFF), the alarm will then
operate at the same time the next day. The alarm if not
switched off will continue to sound for up to 59 minutes
and then be automatically switched off.
SETTING
Page 8

7
7- RINGER On/Off SWITCH ( A+T / OFF / T )
- A+T (alarm + telephone): for the alarm and telephone
ring position.
- OFF: alarm and ring off.
- T (telephone): for the telephone ring position.
8- TELEPHONE OPERATION
- Ensure that the telephone has been set up in
accordance with the telephone userguide and has
been connected as shown in the installation section.
- Select the ringer On/Off switch on the A+T or T
position for the ring.
- Choose which of the alarm modes you wish to alert
you of your incoming telephone calls (see page 4: V,
V+S, V+F, V+S+F).
- When the alarm mode selected indicates there is an
incoming telephone call, lift the telephone handset and
answer the call. When you have finished the call
replace the handset and the alarm will be ready to
indicate the next call.
9- Dimmer Function ( )
There is a 5-level brightness control for the LED display.
In normal time model, press the Snooze button once to
change the display brightness. The brightness will cycle
from bright to dim then from dim to bright (the cycle
repeats)
NOTE : The dimmer function will not work when the
clock is in snooze mode.
SETTING
Page 9

8
10- VOLUME ( VOLUME )
Sets the volume of the ring and the alarm sound.
11- TONE ( TONE )
Sets the tone of the alarm sound.
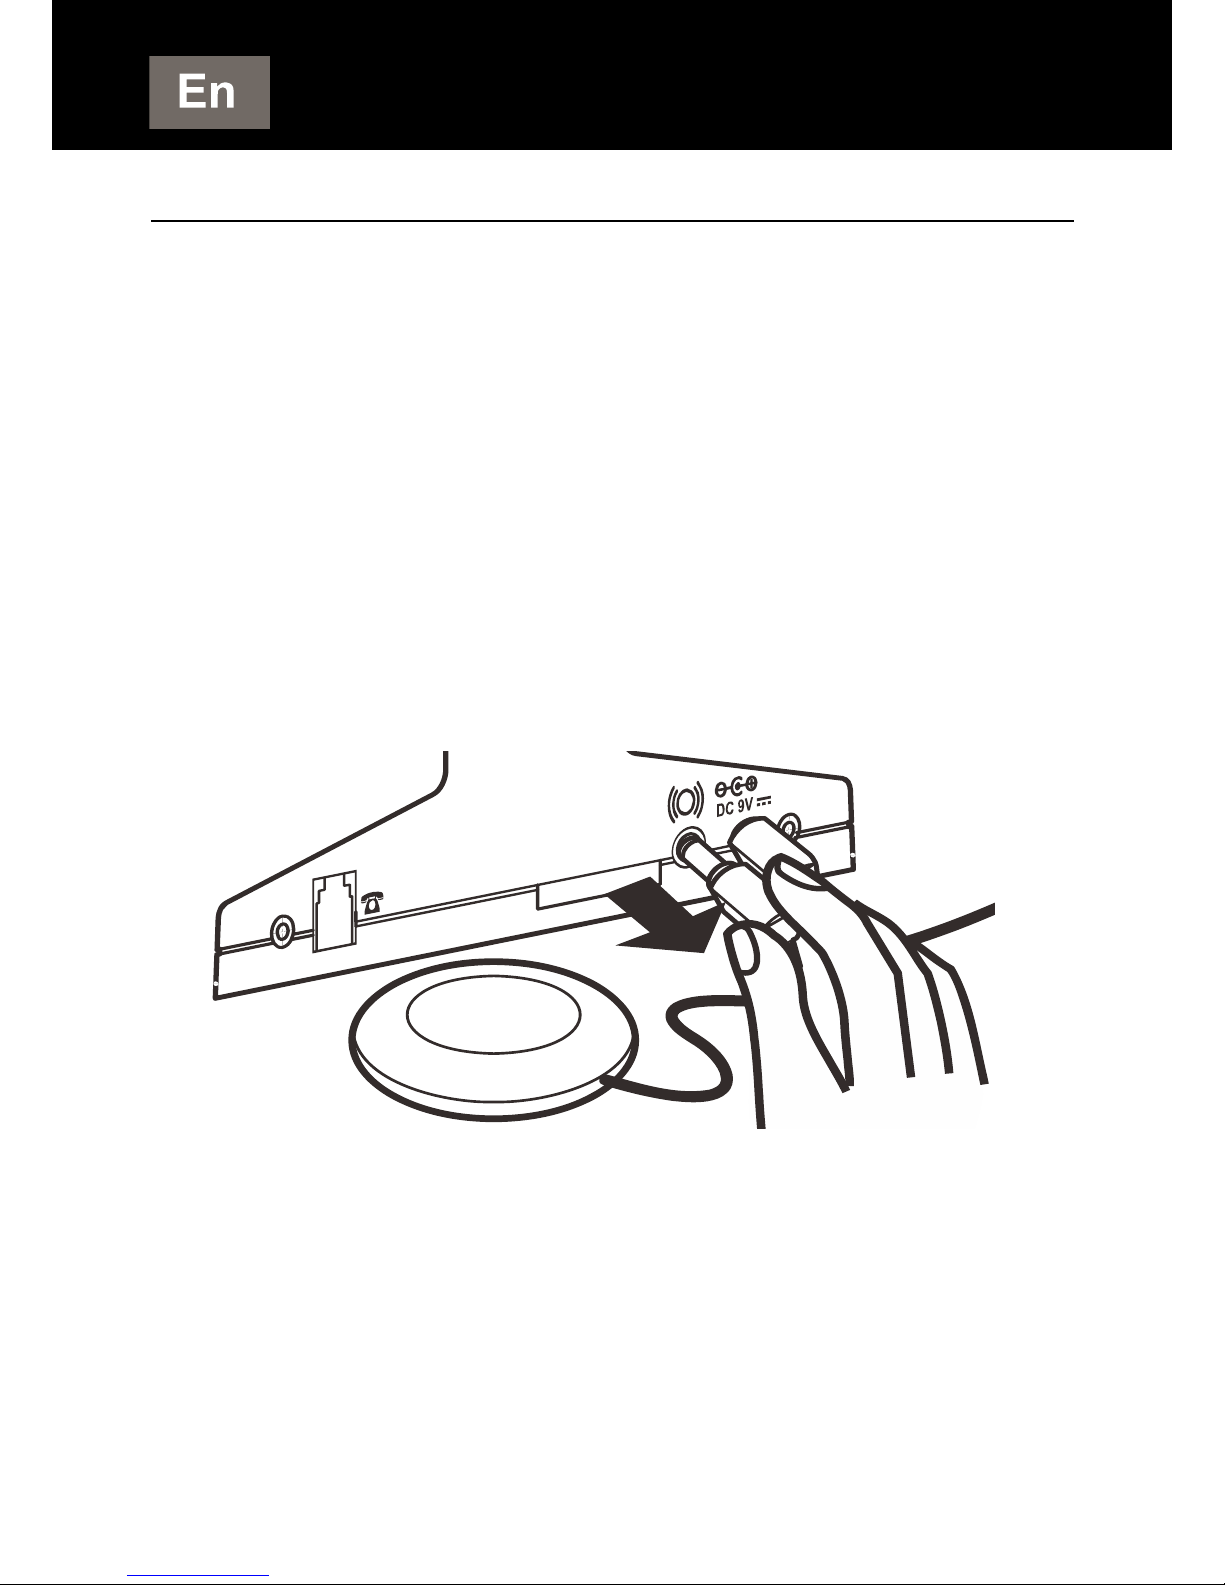
12- SHAKER SWITCH ( + _ )
Sets the motion of the shaker to Lo (-) or Hi (+).
13- BATTERY BACK- UP
It’s not necessary to insert a battery for the clock to
function. With battery back-up installed, the clock will
keep the time and alarm settings in the event of a power
cut or the DC adaptor being unplugged.
Check the battery condition after one year, replacing old
battery. A leaking battery can destroy your clock.
SETTING
Page 10

9
GUARANTEE
From the moment your Geemarc product is purchased,
Geemarc guarantee it for the period of one year.
During this time, all repairs or replacements (at our
option) are free of charge.Should you experience a
problem then contact our helpline or visit our website at
www.geemarc.com. The guarantee does not cover
accidents, negligence or breakages to any parts. The
product must not be tampered with or taken apart by
anyone who is not an authorised Geemarc
representative.The Geemarc guarantee in no way
limits your legal rights.
IMPORTANT: YOUR RECEIPT IS PART OF YOUR
GUARANTEE AND MUST BE RETAINED AND
PRODUCED IN THE EVENT OF A WARRANTY CLAIM.
Please note: The guarantee applies to the United
Kingdom only.
Declaration: Hereby Geemarc Telecom SA declares
that this product is in compliance with the essential
requirements and other relevant provisions of the Radio
and Telecommunications Terminal Equipment Directive
1999/5/EEC and in particular article 3 section 1a, 1b and
section 2.
The declaration of conformity may be consulted
at www.geemarc.com
Caution: Radio frequency interference may cause
discernible sound on the unit. The sound will end when
the interference stops.
GUARANTEE
Page 11

10
RECYCLING DIRECTIVES
The WEEE (Waste Electrical and Electronic Equipment)
has been put in place for the products in end of life are
recycled in the best way.
When this product is out of order, please do not put it in
your domestic waste bin.
Please use one of the following disposal options:
- Remove the batteries and deposit them in an
appropriate WEEE skip.
Deposit the product in in a appropriate WEEE skip.
- Or hand the old product to the retailer. If you purchase
a new one, they should accept it.
Thus if you respect these instructions you ensure
human health and environmental protection.
For product support and help visit our website at
www.geemarc.com
telephone 01707 384438
or fax 01707 832529
RECYCLING DIRECTIVES
Page 12

11
DESCRIPTION
Fonction sommeil / Flash / luminosité écran
Indicateur de l’état de
l’alarme
Indicateur des horaires
d’après-midi
Réglage du vibreur Faible / Fort
Sélection du mode alarme
A
larme + sonnerie / Arrêt /
Sonnerie
Volume de l’alarme
et de la sonnerie
Tonalité de l’alarme
Réglage de l’alarme
Réglage de l’heure
Réglage des heures et minutes
A
rrêt de l’alarme
pour 24H.
(*) Entrée téléphone
(*) Vibreur
(*) Adaptateur
(*) Classé TNT-3 selon la norme EN60950.
Page 13

12
(**) 230V
Prise PTT
Vibreur
DC Adaptateu
r
1- BRANCHEMENT DU TELEPHONE
1 - Branchez le cordon PTT.
2 - Branchez votre prise téléphonique dans la prise
double PTT.
3 - Branchez la prise double téléphonique dans votre
prise téléphonique murale.
4 - Branchez le cordon de l’adaptateur secteur.
5 - Branchez l’adaptateur secteur au réseau électrique.
(**)
(**)Classé “tension dangereuse” selon la norme EN60950.
Connection électrique: L’appareil est conçu po ur fonctionner sur 9V
DC, 650mA. L’adaptateur secteur fonctionne de 100 V AC à 240
V AC, 50/60 HZ.
Par précaution en cas de danger, le bloc alimentation secteur sert
de dispositif de sectionnement de l’alimentation 230V. Il doit être
installé à proximité du matériel et être aisément accessible.
Raccordement téléphonique: les tensions présentes sur ce réseau
sont classées TRT-3 (Tension de Réseau de Télécommunication)
au sens de la norme EN60950.
INSTALLATION
Page 14

13
2- REGLAGE DE L’HEURE (
)
- Appuyez et maintenez la touche
.
- Appuyez sur la touche H (heure) puis sur la touche M
(minute) pour régler l’heure.
- Relâchez la touche
.
- Un voyant s’allume sur l’écran près de l’inscription PM
lorsqu’il s’agit d’heures de l’après-midi.
Format de l’Heure 12 / 24
Vous pouvez choisir le type du format de l’heure:
- Restez appuyer sur la touche H (heure) pendant 6
secondes pour entrer dans le mode du format de
l’heure, l’écran affiche “12H” ou “24H”, puis relachez le
bouton.
- Appuyez sur la touche H (heure) pour passer du
format 12 à 24 heures.
Note: Si aucune sélection n’est faite avant 4 secondes,
le dernier format affiché est enregistré et l’heure
réapparait à l’écran suivant le mode choisi.
3- REGLAGE DE L’ALARME ( )
- Appuyez et maintenez la touche
.
- Appuyez sur la touche H (heure) puis sur la touche M
(minute) pour régler l’heure de l’alarme.
- Relâchez la touche
.
- Appuyez sur les touches , H et M pour remettre
l’alarme à 12H.
UTILISATION
Page 15

14
4- SELECTION DU MODE ALARME
Sélectionnez la fonction A+T sur le commutateur
arrêt/marche sonnerie.
Sélectionnez l’alarme par le commutateur 4 positions:
V : vibreur uniquement
V+S : vibreur et sonnerie
V+F : flash lumineux et vibreur
V+F+S: flash lumineux, sonnerie et vibreur activés
Note: si vous n’utilisez pas la fonction vibreur V,
déconnectez le vibreur du réveil.
Lorsque l’alarme est activée, un voyant s’allume sur
l’écran près de l’inscription AL.
Le tableau ci-dessous indique les différences de
fonctionnement selon le mode alarme choisi.
UTILISATION
Page 16

15
MODE ALARME ACTION REVEIL
APPEL
TELEPHONIQUE
SONNERIE Sonnerie Discontinu Discontinu
VIBREUR Vibre Discontinu Discontinu
FLASH LUMINEUX Clignote Discontinu Discontinu
Le temps de durée de l’alarme est de 30 min par défaut.
Vous avez la possibilité de le régler entre 1 à 59
minutes.
Pour régler la durée de l’alarme:
- Restez appuyer sur le bouton alarme pendant 6
secondes pour entrer dans le mode réglage. Le réveil
montre “30”, relachez le bouton alarme .
- Appuyez sur le bouton M pour régler le temps de la
durée de l’alarme souhaité entre 1 à 59 minutes.
- Ce nouveau réglage sera par défaut jusqu au prochain
changement.
- Si aucune action est réalisée pendant 3 secondes,
alors le réveil retourne en mode veille.
UTILISATION
Page 17

16
5- TOUCHE SOMMEIL (
)
Lorsque l’alarme est en fonctionnement, un appui sur la
touche arrête l’alarm e pendant 9 minutes. Après
l’arrêt, l’alarme se remet en service durant 9 minutes. Le
réveil s’arrête automatiquement suivant le temps
d’alarme programmé.
Vous pouvez ajuster le temps de la fonction sommeil
(Snooze) entre 1à 30 minutes.
- Restez appuyer sur la touche SNOOZE pendant 4
secondes pour entrer dans le mode de réglage. Quand
l’écran vous montre un “9”, relachez le bouton.
- Appuyez sur la touche M pour régler la durée de la
fonction sommeil (Snooze) entre 1 à 30 minutes.
Ce nouveau réglage sera celui par défaut jusqu’a un
changement. Si aucune action est réalisé pendant 3
secondes, alors le réveil retourne en mode veille
6- ARRET DE L’ALARME POUR 24H. (OFF)
Appuyez sur la touche OFF, l’alarme est arrêtée. Elle se
remettra en service le lendemain à la même heure.
L’alarme s’arrête automatiquement aprés 1 à 59
minutes suivant votre réglage (par défaut 30 min).
7- ARRET / MARCHE SONNERIE
(A+T / OFF / T)
- A+T (alarme + téléphone): alarme et détection de
sonnerie activés.
- OFF: arrêt de l’alarme et de la détection de sonnerie.
- T (téléphone): détection de sonnerie activée.
UTILISATION
Page 18

17
8- FONCTIONNEMENT AVEC UN
TELEPHONE
- Assurez-vous que votre téléphone fonctionne
correctement et effectuez le branchement de celui-ci
comme indiqué sur le shéma (p.12).
- Sélectionnez le mode alarme à l’aide du commutateur
4 positions.
- Activez la détection de sonnerie en positionnant le
commutateur A+T / OFF / T situé sur la face avant de
votre Wake N Shake sur la position T (Téléphone) ou
A+T (Alarme + Téléphone).
- Lorsqu’un appel téléphonique vous parvient,
décrochez votre téléphone pour parler à votre
correspondant.
9- REGLAGE DE LA LUMINOSITE DE
L’ECRAN
(
)
Il y a 5 niveaux de luminosité pour l’écran à LED. En
mode veille, appuyez sur le bouton sommeil (Snooze),
la luminosité change aprés chaque appui. La luminosité
du cycle passera du clair au sombre puis de faible à
intense (puis le cycle se répète).
NOTE: La fonction luminosité ne fonctionne pas en
mode sommeil (Snooze).
UTILISATION
Page 19

18
10- VOLUME ( VOLUME )
Réglage du volume de l’alarme et de la sonnerie.
11- TONALITE ( TONE )
Réglage de la tonalité de l’alarme.
12- REGLAGE DU VIBREUR ( + _ )
Réglage Faible (-) / Fort (+) du vibreur.
13- PILE DE SAUVEGARDE
La pile n’est pas nécessaire au fonctionnement de votre
Wake n Shake, elle permet simplement de sauvegarder
l’heure et le réglage de l’alarme en cas de microcoupure secteur.
Vérifiez l’état de la pile au moins deux fois par an.
UTILISATION
Page 20

19
GARANTIE
Cet appareil est garanti 1 an pièces et main-d'oeuvre.
La date d'achat figurant sur le ticket de caisse fera foi.
Cette garantie s'exerce sous réserve d'une utilisation
normale de l'appareil. Les dommages occasionnés par
les surtensions électriques, la foudre ou par un choc sur
l'appareil ne peuvent en aucun cas être couverts par la
garantie. En cas de problème fonctionnel et avant de
nous retourner votre appareil, contactez notre service
après vente de: 8h30 à 12h30 et de 14h00 à 17h00 du
Lundi au Jeudi et de 8h30 à 12h30 et de 14h00 à 16h30
le Vendredi au 03/28/58/75/99.
DECLARATION: Ce produit respecte les exigences de
compatibilité électro-magnétique et de sécurité
électrique demandées par la directive européenne
RTTE.
La déclaration de conformité peut être
consultée sur le site: www.geemarc.com
Par ailleurs, il est compatible avec les différents réseaux
téléphoniques européens (normes TBR21/37/38).
GARANTIE
Page 21

20
RECOMMANDATIONS POUR LE RECYCLAGE
La directive DEEE (Déchet d'Equipement Electrique et
Electronique) a été mise en place dans le but d'assurer
la collecte sélective en vue de la valorisation,
réutilisation ou recyclage des produits en fin de vie.
Lorsque votre produit ne fonctionne plus, ne le jetez pas
dans votre poubelle ménagère.
Suivez l'une des procédures décrites ci-dessous:
- Déposez les piles et votre ancien appareil dans un lieu
de collecte approprié.
- Ou rapportez votre ancien appareil chez le distributeur
qui vous vendra le nouveau. Il devra l'accepter.
Ainsi, si vous respectez ces instructions vous faites un
geste pour l'environnement et vous contribuez
à la préservation des ressources naturelles et à
la protection de la santé humaine.
Si vous avez besoin d'aide ou de soutien technique,
consultez notre site Internet: www.geemarc.com
Téléphone +33 (0)3 28 58 75 99
Ou Fax +33 (0)3 28 58 75 76
RECYCLAGE
Page 22

21
BESCHREIBUNG
Schlummertaste / Blitz / Dimmerknop
f
LED-Anzeige Alarm
LED-Anzeige
(
Uhrzeiten
zwischen 12.00 und 24.00 Uhr)
Vibrationsschalter Niedrig/Hoch
Schalter Alarmmodus
Schalter für Wecker +
Klingeln / Aus /
Lautstärke des Alarms
und Klingeltons
Weckfunktion
Einstellung Alarm
Einstellung Uhrzeit
Einstellung von Stunden &
Minuten
A
larm aus für 24 Std.
(*)Modularbuchse
(*)Anschluss für das
Vibrationskissen
(*)Anschluss für
den Adapter
(*)wird gemäß dem Standard EN60950 als TVN-3 eingestuft.
Page 23

22
(**)230V
PTT-Stecker
DC Adapte
r
Vibrationskissen
1- ANSCHLUSS DES TELEFONS
1 – Schließen Sie das PTT-Kabel an.
2 – Sie haben die Möglichkeit, Ihr Telefon mit der
Verdoppelungssteckdose zu verbinden.
3 – Stecken Sie die PTT-Verdoppelungssteckdose in die
Wanddose.
4 – Schließen Sie das Adapter-Kabel an.
5 – Stecken Sie den Adapter in die Wanddose. (**)
(**)wird gemäß dem Standard EN60950 als „gefährliche elektrische
Spannung“ eingestuft.
Stromanschluss: Das Gerät funktionniert unter folgenden
Stromspannung DC9V, 650mAh. Das mitgelieferte Netzteil hat
folgende Strommspannung AC100 – 240V, 50/60Hz In put.
Das Gerät verfügt über keinen integrierten Netzsch alter. Um den
Strom abzustellen, muss entweder die Stromversorgung an der
Netzsteckdose ausgeschaltet oder der AC-Adapter au sge zogen
werden.
Stellen Sie bei der Einrichtung des Gerätes siche r, dass die
Netzsteckdose leicht zugänglich ist.
Telefonanschluss: Die Spannungen auf dem
Telekommunikationsnetz werden gemäß dem Standard EN609 50
als TNV-3 (Netzspannung Telekommunikation) eingestuft.
ANSCHLUSS
Page 24

23
2- EINSTELLUNG DER UHRZEIT (
)
- Drücken und halten Sie die Taste (Einstellung
Uhrzeit).
- Drücken Sie die Tasten H (Stunde) und M (Minute), bis
die richtige Uhrzeit auf der Anzeige erscheint.
- Lassen Sie die Taste (Einstellung Uhrzeit) los.
- Für Uhrzeiten zwischen 12.00 und 24.00 Uhr erscheint
auf der Anzeige neben PM ein Kontrolllämpchen.
12 / 24 H Stundenanzeige
Sie können die Stundenanzeige auswählen.
Und zwar wie folgt:
- Die Taste H (Stunde) 6 Sekunden gedrückt halten um
das Einstellmodus zu aktivieren. Das Display zeigt
“12H” oder “24H”, dann die Taste H loslassen
- Die Taste H (Stunde) erneut kurz drücken um die
beliebige Stundenanzeige auszuwählen 12Std oder 24
Std.
NB: Wenn nach 4 Sek. keine Einstellung bestätigt
wurde, wird automatisch das letzte angezeigte
Stundenformat gespeichert. Dann geht das Display
automatisch wieder auf Uhrzeitanzeige.
3- EINSTELLEN DER WECKZEIT ( )
- Drücken und halten Sie die Taste
(Einstellung
Alarm).
- Drücken Sie die Tasten H (Stunde) oder M (Minute),
bis die richtige Uhrzeit auf der Anzeige erscheint.
- Lassen Sie die Taste (Einstellung Alarm) los.
- Drücken Sie , H und M, um den Wecker auf 12
Uhr zurückzustellen.
EINSTELLUNG
EINSTELLUNG
Page 25

24
4- EINSTELLEN DES ALARMMODUS
Stellen Sie den Funktionsschalter auf die Position A+T.
Wählen Sie aus, mit welchem Alarmmodus Sie geweckt
werden möchten, indem Sie den Alarmmodusschalter
auf eine der folgenden Möglichkeiten einstellen:
V : Nur das Vibrationskissen ist aktiviert
V+S : Der Ton und der Vibrationsalarm sind aktiviert
V+F : Der Blitz und der Vibrationsalarm sind aktiviert
V+F+S : Blitz-, Ton- und Vibrationsalarm sind aktiviert
Note: Wenn Sie das Vibrationskissen nicht nutzen,
stecken Sie der Stecker raus.
Wenn der Weckalarm auf einen der Alarmmodi
eingestellt ist, erscheint auf dem Display neben den
Buchstaben AL ein Lämpchen.
In der folgenden Tabelle sehen Sie, wie der Wecker bei
den verschiedenen Alarmmodi einen eingehenden Anruf
oder Weckruf anzeigt.
EINSTELLUNG
Page 26

25
ALARMMODUS AKTION WECKER
EINGEHENDER
ANRUF
TON Klingeln Mit Pausen Mit Pausen
VIBRATIONSKISSEN Vibration Mit Pausen Mit Pausen
BLITZLICHT Blitz Mit Pausen Mit Pausen
Die standar eingespeicherte Alarmdauer ist von 30
Minuten. Sie haben dennoch die Möglichkeit diese
zwischen 1-59 Minuten einzustellen, und zwar wie folgt:
- Der Klingelknopf 6 Sekunden lang gedrückt
halten, um das Einstellmodus zu aktivieren. Das
Display zeigt “30”, lassen Sie die Taste los.
- Der M Knopf drücken, um die Alarmdauer zwischen 1-
59 beliebig einzustellen.
- Diese Einstellung bleibt dann standard, bis sie von
Ihnen wieder geändert wird.
- Sollten Sie innerhalb 3 Sekunden keine Aktion
unternommen haben, kehrt der Wecker auf normale
Uhrzeitanzeige zurück.
EINSTELLUNG
Page 27

26
5- SCHLUMMERTASTE (
)
Wenn der von Ihnen ausgewählte Alarmmodus von
einer eingestellten Weckzeit ausgelöst wurde, können
Sie den Alarm durch Drücken der Taste für etwa 9
Minuten unterbrechen. Nach etwa 9 Minuten wird der
Alarm erneut ausgelöst. Diese Abfolge kann bis zu 1
Stunden andauern, danach wird der Alarmmodus
automatisch ausgeschaltet.
Sie können die Schlummerwiederholung zwischen 1-30
Minuten einstellen:
- Die Schlummertaste SNOOZE 4 Sekunden lang
gedrückt halten. Wenn das Display “9” zeigt, lassen Sie
die Taste los.
- Der M Knopf drücken, um die Wiederholzeit zwischen
1 Minute und 30 Minuten einzustellen.
Diese Einstellung bleibt dann standard, bis es von
Ihnen wieder geändert wird. Sollten Sie innerhalb 3
Sekunden keine Aktion unternommen haben, kehrt der
Wecker auf normale Uhrzeitanzeige zurück.
6- DEN ALARM FÜR 24 STUNDEN
AUSSTELLEN (OFF)
Schalten Sie den Alarm mit der entsprechenden Taste
(OFF) aus, am nächsten Tag wird der Alarm dann zu
der gleichen Zeit ausgelöst. Wenn der Alarm nicht
ausgestellt wird, dauert er 2 Stunden an und schaltet
sich dann automatisch aus.
EINSTELLUNG
Page 28

27
7- SCHALTER KLINGELTON AN/AUS ( A+T / OFF / T )
- A+T (Wecker + Telefon) : Für die Position Weckalarm
und Telefonsignal.
- OFF : Alarm und Klingelsignal ausgeschaltet.
- T (Telefon): Für die Position Telefonsignal.
8- TELEFONBETRIEB
- Stellen Sie sicher, dass das Telefon gemäß dem
Benutzerhandbuch eingerichtet und wie im Bereich
Installation gezeigt angeschlossen wurde.
- Stellen Sie den Schalter Klingelton On/Off auf die
Position A+T oder T für das Klingeln.
- Wählen Sie den Alarmmodus aus, der Sie über einen
eingehenden Anruf unterrichten soll (siehe Seite 24: V,
V+S, V+F oder V+F+S).
- Wenn der ausgewählte Alarmmodus einen
eingehenden Telefonanruf signalisiert, heben Sie den
Hörer ab und beantworten den Anruf. Wenn Sie das
Gespräch beendet haben, legen Sie den Hörer wieder
auf und der Alarm ist bereit für die Signalisierung des
nächsten Anrufs.
9- DIMMERTASTE ( )
Die Helligkeit des Displays verfügt über 5 Einstellstufen.
Drücken Sie die Snooze Taste, um diese einzustellen.
Diese kann beliebig eingestellt werden, von dunkel bis
hell und umgekehrt.
NB : Die Helligkeitseinstellung funktionniert nicht wenn
der Wecker sich im Schlummermodus befindet.
EINSTELLUNG
Page 29

28
10- LAUTSTÄRKE ( VOLUME )
Die Lautstärke des Klingel- und Wecktons wird
eingestellt.
11- TON ( TONE )
Der Alarmton wird eingestellt.
12- VIBRATIONSTASTE ( + _ )
Stellt die Bewegung des Vibrationskissens auf niedrig
(Lo) (-) oder hoch (Hi) (+).
13- BATTERIEPUFFERUNG
Für den Betrieb des Weckers ist keine Batterie
notwendig. Durch die installierte Batteriepufferung
speichert der Wecker im Falle eines Stromausfalls oder
bei Ausstecken des DC Adapters die Einstellung der
Uhrzeit und des Weckers.
Überprüfen Sie den Zustand der Batterie nach einem
Jahr und ersetzen Sie die alte Batterie. Eine
auslaufende Batterie kann Ihren Wecker beschädigen.
EINSTELLUNG
Page 30

29
GARANTIE
Auf Ihr Geemarc Produkt wird von Geemarc Telecom
SA eine einjährige Garantie ab Kaufdatum gemäß
diesen Garantiebestimmungen gewährt. Während
dieser Zeit werden im Garantiefall nach Wahl der
Geemarc Telecom SA Material-und Fabrikationsfehler
unentgeltlich beseitigt oder Ihr Geemarc Produkt
ausgetauscht. Bei Störungen oder Fragen wenden Sie
sich an unsere Hotline oder besuchen Sie unsere
Homepage www.geemarc.com. Von dieser
Herstellergarantie ausgeschlossen sind Schäden durch
unsachgemäße Benutzung, mangelnde Sorgfalt oder
Unfälle. Die Garantie erlischt bei Eingriffen von Dritten,
die von Geemarc Telecom SA oder deren
Vertriebspartnern dazu nicht ermächtigt wurden. Die
Geemarc Telecom SA Garantie schränkt Ihre
gesetzlichen Rechte in keiner Weise ein.
WICHTIG : IHR KAUFBELEG IST TEIL IHRER GARANTIE
UND MUSS AUFBEWAHRT UND IM GARANTIEFALL
VORGELEGT WERDEN.
Bitte beachten Sie: Die Garantie gilt nur für
Deutschland.
ERKLÄRUNG: Geemarc Telecom SA erklärt hiermit,
dass dieses Produkt die notwendigen Vorraussetzungen
sowie die weiteren betreffenden Bestimmungen der
Radio- und Telekommunikations Endgeräte
Bestimmungen 1999/5/EEC, insbesondere Artikel 3
Absatz 1a, 1b und Absatz 2, erfüllt.
Das Telefon benötigt eine Mindeststromstärke von
18mA in der Leitung.
Die Konformitätserklärung kann unter folgender Adresse
gefunden werden : www.geemarc.com/de
GARANTIE
Page 31

30
RECYCLING VORSCHRIFT
Die WEEE-Richtlinie (Elektro- und Elektronikaltgeräte)
wurde aufgestellt, damit Altgeräte auf beste Art und
Weise verwertet werden.
Wenn dieses Produkt defekt ist, werfen Sie es bitte nicht
in Ihren Hausmüll. Bitte nutzen Sie eine der folgenden
Entsorgungsmöglichkeiten :
- Entfernen Sie die Batterien und werfen Sie diese in
einen geeigneten Rücknahmecontainer.
Geben Sie das Produkt bei einer Altgerätesammelstelle
ab.
- Oder geben Sie das alte Produkt dem Händler zurück.
Bei Kauf eines neuen Geräts sollte der Händler das
Altgerät annehmen.
Wenn Sie sich an diese Anweisungen halten, stellen Sie
den Schutz der Gesundheit und Umwelt sicher.
Produktsupport und Hilfe erhalten Sie auf unserer
Webseite unter
www.geemarc.com/de
E-mail : kontakt@geemarc.com
RECYCLING VORSCHRIFT
Page 32

31
UGJWNS-V3_EnFrGe_v1.1
 Loading...