


GE Consumer & Industrial
Technical Service Guide
July 2009
Profi le 30-in.
Free-Standing
Double Oven Range
31-9187
PB978DP1BB
PB978SSP1SS
PB978TP1WW
LOWER OVEN
HR: MIN
VEN
O
PPER
GRIDDLE CONTROL
ON
OFF
HI/LO
OVEN
WARM
LIGHTS
CONTROL
LOCKOUT
HOLD SEC
SETTINGS
CLEAR
OFF
SELF
CLEAN
COOK
TIME
START
DELAY
START
TIME OF DAY
1=FROZEN 2=FRESH START TIME 1=POULTRY 2=MEATS
DOOR O WARM CLEAN TIME INSERT PROBE TEMP
1
6
1/2
ON
MELT
OFF
1/2
BURNER
ON
SIZE
OFF
U
UPPER OVEN
START
BROIL
BAKE
PIZZA
SET TEMP SET UPPER LOWER COOK TIMER SET TEMP
LOWER OVEN
START
BROIL
CONVECTION
BAKE
HI/LO
COOK
CLEAR
OFF
SELF
SLOW
PROBE
CLEAN
COOK
TRUETEMP
COOK
KITCHEN TIMER
5
4
3
TIME
2
7
TIMER
TIMER
OFF
ON
DELAY
0
9
8
START
TIME OF DAY
WARMING ZONE
SELECT
ON
OFF
1/2
ON
MELT
OFF
1/2
ON
BURNER
OFF
SIZE
GE Appliances
General Electric Company
Louisville, Kentucky 40225

IMPORTANT SAFETY NOTICE
The information in this service guide is intended for use by
individuals possessing adequate backgrounds of electrical,
electronic, and mechanical experience. Any attempt to repair a
major ap pli ance may result in personal injury and property
damage. The man u fac tur er or seller cannot be responsible for the
in ter pre ta tion of this in for ma tion, nor can it assume any liability in
connection with its use.
WARNING
To avoid personal injury, disconnect power before servicing
this prod uct . If electrical power is required for diagnosis or test
purposes, disconnect the power immediately after performing the
necessary checks.
RECONNECT ALL GROUNDING DEVICES
If grounding wires, screws, straps, clips, nuts, or washers used to
complete a path to ground are removed for service, they must be
returned to their original position and properly fastened.
All rights reserved. This service guide may not be reproduced in whole or in part
in any form without written permission from the General Electric Company.
GE Consumer & Industrial
Technical Service Guide
Copyright © 2009
– 2 –

Table of Contents
Capacitive Touch Glass .................................................................................................................................................19
Component Locator Views ...........................................................................................................................................10
Control Features ................................................................................................................................................................ 6
Control Panel .....................................................................................................................................................................19
Control Panel Assembly .................................................................................................................................................19
Cooktop Burner Controls ............................................................................................................................................... 6
Daughter Relay Board (DRM) .....................................................................................................................................17
Diagnostics and Service Information ......................................................................................................................22
Electrical Installation ....................................................................................................................................................... 9
Griddle Burner Control .................................................................................................................................................... 7
Hidden Bake Element ....................................................................................................................................................18
Installation ........................................................................................................................................................................... 8
Introduction ......................................................................................................................................................................... 4
Key Panel Test ....................................................................................................................................................................24
LIN Test ..................................................................................................................................................................................24
Main Logic Board .............................................................................................................................................................20
Main Logic Board Failure Codes ................................................................................................................................22
Nomenclature .................................................................................................................................................................... 5
Oven Components ..........................................................................................................................................................16
Oven Sensors ......................................................................................................................................................................25
Rear Cover Removal .......................................................................................................................................................16
Relay Boards Connector Locator Views .................................................................................................................13
Relay Board Voltages......................................................................................................................................................25
RPSM Aux Board ...............................................................................................................................................................17
RPSM Main Board ............................................................................................................................................................16
Sales/Demo Mode ............................................................................................................................................................ 8
Schematics and Wiring Diagrams ............................................................................................................................26
Self Clean .............................................................................................................................................................................. 7
Test Mode .............................................................................................................................................................................24
Thermal Cutout (TCO) .....................................................................................................................................................17
Warming Zone Control ................................................................................................................................................... 6
Warranty ..............................................................................................................................................................................29
– 3 –

Introduction
GE's second generation Profi le 30-in. free-standing double oven range is available with convection cooking in
the lower oven. These ranges feature electronic oven and surface unit controls that combine modern digital
technology with ease of operation. Their superior style and performance parallel many commercial ranges.
Electronically controlled oven heating elements - provide precise cooking control with fast preheating. •
Convection mode uses reverse-air convection •
technology - a bidirectional fan that works with a
dedicated third heating element to promote even
heat circulation.
Performance compensation for 208-volt •
installation boosts power as needed in multifamily
dwellings.
6.5 cu. ft. total capacity.•
Cooktop locked out during self-clean.•
New motorized self-clean door latch.•
Recessed convection, low-profi le broil elements, •
and hidden lower oven bake element.
Full-extension, self-cleaning, porcelain-coated •
racks that can be left in the oven during the selfclean cycle.
– 4 –

Model Number
Brand
P = Profi le
Nomenclature
P B 9 7 8 D P 1 B B
Product Color
WW = White
BB = Black
SS - Stainless Steel
Confi guration
B = 30-in. Range
Nomenclature
Feature Pack
Designates features–the higher
the number, the more features
The nomenclature plate is located on the
front left, behind the oven door.
Indicator for Engineering and
Product Service Only
Model Year Designator
Glass Color
Color Match Cook-Top
Serial Number
The fi rst two numbers of the serial number
identify the month and year of manufacture.
Example: AS123456S = January, 2009
A - JAN 2009 - S
D - FEB 2008 - R
F - MAR 2007 - M
G - APR 2006 - L
H - MAY 2005 - H
L - JUN 2004 - G
M - JUL 2003 - F
R - AUG 2002 - D
S - SEP 2001 - A
T - OCT 2000 - Z
V - NOV 1999 - V
Z - DEC 1998 - T
The letter des ig nat ing
the year re peats every
12 years.
Example:
T - 1974
T - 1986
T - 1998
The mini-manual is placed in an envelope
located inside the control panel.
– 5 –

Control Features
Cooktop Burner Controls
To use the cooktop burners:
Touch the 1. ON/OFF pad for the desired burner.
Use the +/- pads to select the desired power setting. Nineteen power levels are available (L, 1 through 9 2.
with ½ step increments, and H).
Touching the 3. MELT pad selects the low setting.
Some burners have multiple cooking zones. Touching the 4. BURNER SIZE pad after the burner is on selects
the desired burner size. If no selection is made, all cooking zones for that burner will be on.
Touch the 5. ON/OFF pad again to turn the burner off.
7
O
M
ELT
O
N
FF
B
URNER
S
IZE
Warming Zone Control
To use the warming zone:
Touch the 1. ON/OFF pad.
Touch the 2. SELECT pad for the desired setting (L/M/H).
Touch the 3. ON/OFF pad again to turn the warming zone off.
Warming Zone
Setting
Hi
6" Warmer
95%
5
O
O
N
FF
W
ARMING ZONE
M
Med
Lo
65%
36%
– 6 –
S
ELECT
O
O
N
FF

Griddle Burner Control
Griddle temperature is regulated by an algorithm built into the control. It takes into consideration the mass
of the griddle, temperature selection, and the on/off times of the front and rear burners to approximate the
customer setting, but it will vary somewhat with the quantity of food on the griddle.
Note:
Use only the griddle pan provided with the range.•
The non-stick coating on the griddle will degrade if exposed to temperatures above 550˚F.•
Do not clean the griddle in the self-clean oven.•
To use the cooktop griddle control:
Touch the 1. ON/OFF pad.
Use the +/- pads to select the desired temperature setting. Temperature settings range from 200°F to 2.
400°F in 25°F increments. The default setting is 375°F.
“PrE” will be displayed until the desired temperature is reached. The left front and left rear burners will 3.
cycle to maintain the selected temperature.
Touch the 4. ON/OFF pad again to turn the cooktop griddle off.
375
Self Clean
The self clean procedure on the double oven is virtually the same as on the pervious version with one
exception. When in clean mode, the cooktop is still locked out, but instead of using a cooktop lockout relay,
lockout is done electronically by the main logic board.
– 7 –

Installation
Sales/Demo Mode
The demo kit model number is PB978 Demo Kit - Electric Ranges with Backlit Touchkeys. The cord is available
as Pub 3-A029. There is no change to the cord; the only difference is how the cord is attached to this model
range.
The following features are disabled in Demo Mode:
Oven heating elements•
Surface burners•
Convection fan•
Door latch motors•
Caution: This kit must be installed by qualifi ed personnel only.
To install the demo kit:
Disconnect the ground strap from the range body (the strap must not contact the range structure or the 1.
ground wire).
Connect the green wire to the range body using the grounding screw.2.
Connect the single black wire with ribs or the gray stripe wire to the left terminal of the junction box.3.
Connect the larger of the two smooth black wires to the right terminal of the junction box and the smaller 4.
of the two smooth black wires to the center terminal.
The cord is to be plugged into a 120V, 60 Hz polarized and grounded outlet.5.
To remove the demo kit:
To reverse the above process, ensure that the ground strap is reconnected to the range body using the
grounding screw.
JUNCTION BLOCK
GROUND
STRAP
(MUST NOT
TOUCH RANGE
BODY)
Note: The black wire with ribs or gray
stripe is neutral
GREEN WIRE
BLACK WITH RIBS OR
GRAY STRIPE WIRE
BLACK WIRE
– 8 –

Electrical Installation
A "bAd LinE" will be displayed to signal a terminal block cord miswire. This error will also appear if 120
VAC is not present between MJ21-5 and MJ20-3. It will also appear if there is less than 200 VAC between
MJ20-1 and MJ20-3. MJ20 and MJ21 are both located on the RPSM main board. (See Schematics and Wiring
Diagrams
.)
bAd LinE
– 9 –

Control - Front View
Ovens - Front View
Component Locator Views
Control Panel
Broil Element
Incandescent Lamp
Bake Element
Broil Element
Halogen Lamp
Oven Temperature Sensor
Meat Probe Outlet
Halogen Lamp
Oven Temperature Sensor
Convection Fan and Element
Shown with oven doors removed
Hidden Bake Element
(Continued next page)
– 10 –

Control Boards
Part of Capacitive
Touch Glass
Shown in service position
Main Top
Left Front Element
Main Logic Board
Hot Surface Indicator Light Assembly
Part of Capacitive
Touch Glass
Dual 5 & 8 Inch
240 Volt
1100 Watts
2400 Watts
"Power Boil"
Left Rear Element
8 Inch
240 Volt
2000 Watts
12-Inch Tri-Ring
6" - 1050 Watts
9" - 900 Watts
12" - 1050 Watts
Warming
240 Volt
120 Watts
Warming Zone Element
240 Volt
3000 Watts
Tri-Ring Element
Right Rear Element
6 Inch
240 Volt
1500 Watts
– 11 –
(Continued next page)

Rear View
Capacitive Touch Assembly
Upper Oven Door
Lock Assembly
Oven Vent Tube
Upper Oven
Bake Element
Main Logic Board
TCO
Capacitive Touch Assembly
Upper Oven
Broil Element
RPSM Aux
Board
RPSM Main
Board
Lower Oven Door
Lock Assembly
Lower Oven Convection Element
Convection Fan Capacitor
Convection Fan Motor
Lower Oven
Broil Element
DRM Board
Hidden Bake Harness
Terminal Block
– 12 –

RPSM Main Board
Relay Boards Connector Locator Views
J7
K4
K5
K8
K11
K1
K13
K3
J21
J14
J10
J20
J7 - Broil Boost (Upper & Lower), Door Lock
Motor (Upper), Oven Lights, Door Switches
J10 - Cabinet Ground
J11 - Neutral
J14 - L1
J15 - Communications
J16 - Lock Switches
J17 - Communications
J20 - L1 & L2
J21 - Neutral
K1 - Upper Oven Light
K3 - Lower Broil, Lower Bake & Convection
Elements
K4 - Lower Oven Light
K7
K10
K14
J11
Relay Jumper Wire
Relay Jumper Wire
J17
J15
J16
K5 - Lower Broil Boost
K7 - Lower Bake & Convection Elements
K8 - Not Used
K10 - Convection Element
K11 - Upper Broil Boost
K13 - Upper Door Lock Motor
K14 - Double Line Break for Lower Bake, Lower
Broil, Convection & Lower Broil Boost
Elements
– 13 –
(Continued next page)

RPSM Aux Board
K1
K2
K6
J7
K4
K8
K11
K13
K5
J3
J2
J5
J14
J2 - RF Inner Element
J3 - L1
J5 - LR Element
J6 - L1
J7 - RF Center, RF Outer, CR, LF Inner,
& LF Outer Elements
J14 - L1
J17 - Communications
K1 - LF Inner Element
K2 - RF Inner Element
K4 - LF Outer Element
K5 - CR Element
K6 - LR Element
K8 - RF Center Element
K10 - Double Line Break for RF
& RR Elements
K11 - RR Element
J6
K10
J17
K14
K13 - RF Outer Element
K14 - Double Line Break for CR, LR,
&LF Elements
(Continued next page)
– 14 –

Daughter Relay Board (DRM)
J6
K1
K17
K18
J15
J24
J23
K12
K3
K7
J6 - Convection Fan, L1, &
Lower Door Lock Motor
J15 - Communications
J23 - L1
J24 - Convection Fan
K1 - Convection Fan
K3 - Upper Bake & Upper Broil Elements
K7 - Double Line Break for Upper Bake, Upper
Broil, & Upper Broil Boost Elements
K12 - Lower Door Lock Motor
K17 - Convection Fan
K18 - Upper Bake Element
– 15 –
(Continued next page)

Oven Components
Rear Cover Removal
To remove the rear cover:
Disconnect power to the range.1.
Pull the range out from its installation.2.
Remove and capture the hidden ¼-in. hex-head 3.
screw from the bottom of the cover.
Remove the ¼-in. ground screw and ground 4.
wire from the top of the cover.
Remove nine ¼-in hex-head screws that attach 5.
the panel to the range.
RPSM Main Board
To remove the RPSM main board:
Remove the rear cover. (See 1. Rear Cover Removal.)
Note: In the following step, do not remove the relay
jumper wires (orange wires) from the control board.
Mark and disconnect the control board wiring 2.
and wire harnesses.
Remove the four ¼-in. hex-head screws that 3.
attach the board to the oven.
Screw
Screw
Ground Screw
Hidden Screw
Pull the top of the cover away from the range 6.
and disengage the 3 cover tabs from the slots
near the bottom of the range.
Range Slot
Range Slot Range Slot
Jumper Wire
Jumper Wire
Cover Tab
Cover Tab
Cover Tab
– 16 –
Screw
Screw

RPSM Aux Board
Daughter Relay Board (DRM)
To remove the RPSM Aux board:
Remove the rear cover. (See 1.
Mark and disconnect the control board wiring 2.
and wire harnesses.
Remove the four ¼-in. hex-head screws that 3.
attach the board to the oven.
Screw
Rear Cover Removal.)
Screw
To remove the DRM board:
Remove the rear cover. (See 1.
Mark and disconnect the control board wire 2.
harnesses.
Squeeze the 4 compression tabs to release the 3.
board.
Ta b
Rear Cover Removal.)
Ta b
Ta b
Ta b
Thermal Cutout (TCO)
The upper and lower ovens are protected by a TCO
mounted on the rear of the cabinet. The TCO will
open if temperatures on the rear reach 150˚C/302˚F.
The TCO is a "one-shot" device and is not re-settable.
If open, all oven elements will be disabled.
Screw
Screw
– 17 –

Hidden Bake Element
Before disassembling the range to access the
hidden bake element, check the resistance of
the element by disconnecting the plug and
checking between the orange and yellow wires.
The resistance reading of a good element is
approximately 21.7Ω.
If the hidden bake element does need to be
changed, the procedure is the same as for the
previous version of the dual cavity oven.
Ω
COM
21.7Ω
V
/Ω
– 18 –

Control Panel Assembly
Control Panel
The controls for the oven system consist of a key
panel touch fi lm on glass assembly and a main logic
board with its model select resistor plug located in
the control panel.
The controls for the cooktop elements consist of
two burner touch boards connected to and working
through the main logic board.
The main logic board is connected via the LIN
serial wire to the Relay Power Supply Board (RPSM
Main) located on the back of the range, along with
a second relay board (RPSM Aux) and a smaller
Daughter Relay Board (DRM).
There are also RTD oven sensors and motor door
lock assemblies with position switches.
The upper and lower ovens are controlled by relays
found on the RPSM Main and DRM boards. (See
Wiring Diagram.)
Cooktop elements are controlled by relays found
exclusively on the RPSM Aux Board. (See Wiring
Diagram.)
No relay boards or line voltages are brought to the
control panel.
To remove the control panel:
Grasp the control panel and pull the bottom out, 5.
then lift the panel off the top 2 screws.
Place the control panel in the service position.6.
Service Position
Capacitive Touch Glass
A capacitive touch switch consists of two conductive
layers on opposite sides of an insulating material,
such as glass.
The 2 conductive layers create a capacitance that
decreases when a layer is touched by a human
fi nger.
Pull the range out approximately 6 inches from 1.
the wall.
Remove the fi ve ¼-in. hex-head screws that 2.
hold the top of the rear panel to the range.
Rear View
Place a protective cover on the main top of the 3.
oven.
4. Using a stubby or off-set Phillips-head
screwdriver, remove the 2 inverted screws that
attach the bottom of the control panel to the
range.
Interface circuitry is used on a touch switch to
convert the capacitance change into a usable
switching action to drive logic systems or to switch
analog signals.
To remove the capacitive touch glass:
Remove the ¼-in. hex-head screw that attaches 1.
the ground wire to the oven frame.
(Continued next page)
– 19 –

2. Place the control panel in the service position.
Control Panel.)
(See
3. Remove the main logic board. (See Main Logic
Board.)
4. Remove four ¼-in. hex-head screws that attach
the glass to the frame.
5. Lift the glass from the frame.
Main Logic Board
The main logic board is located inside the control
panel. The left- and right-side ribbon connectors
are replaceable components. The middle ribbon
connector is part of the capacitive touch glass.
To remove the main logic board:
Place the control panel in the service position. 1.
(See Control Panel.)
Mark and disconnect the 2 wire harnesses, 2.
mode/select plug and 3 ribbon connectors.
Remove the two ¼-in. hex-head screws that
attach the board to the metal frame.
Disconnect
Disconnect
Disconnect
Disconnect
Disconnect
Note: Make sure to transfer the model select plug to
the new board before applying power.
– 20 –
(Continued next page)
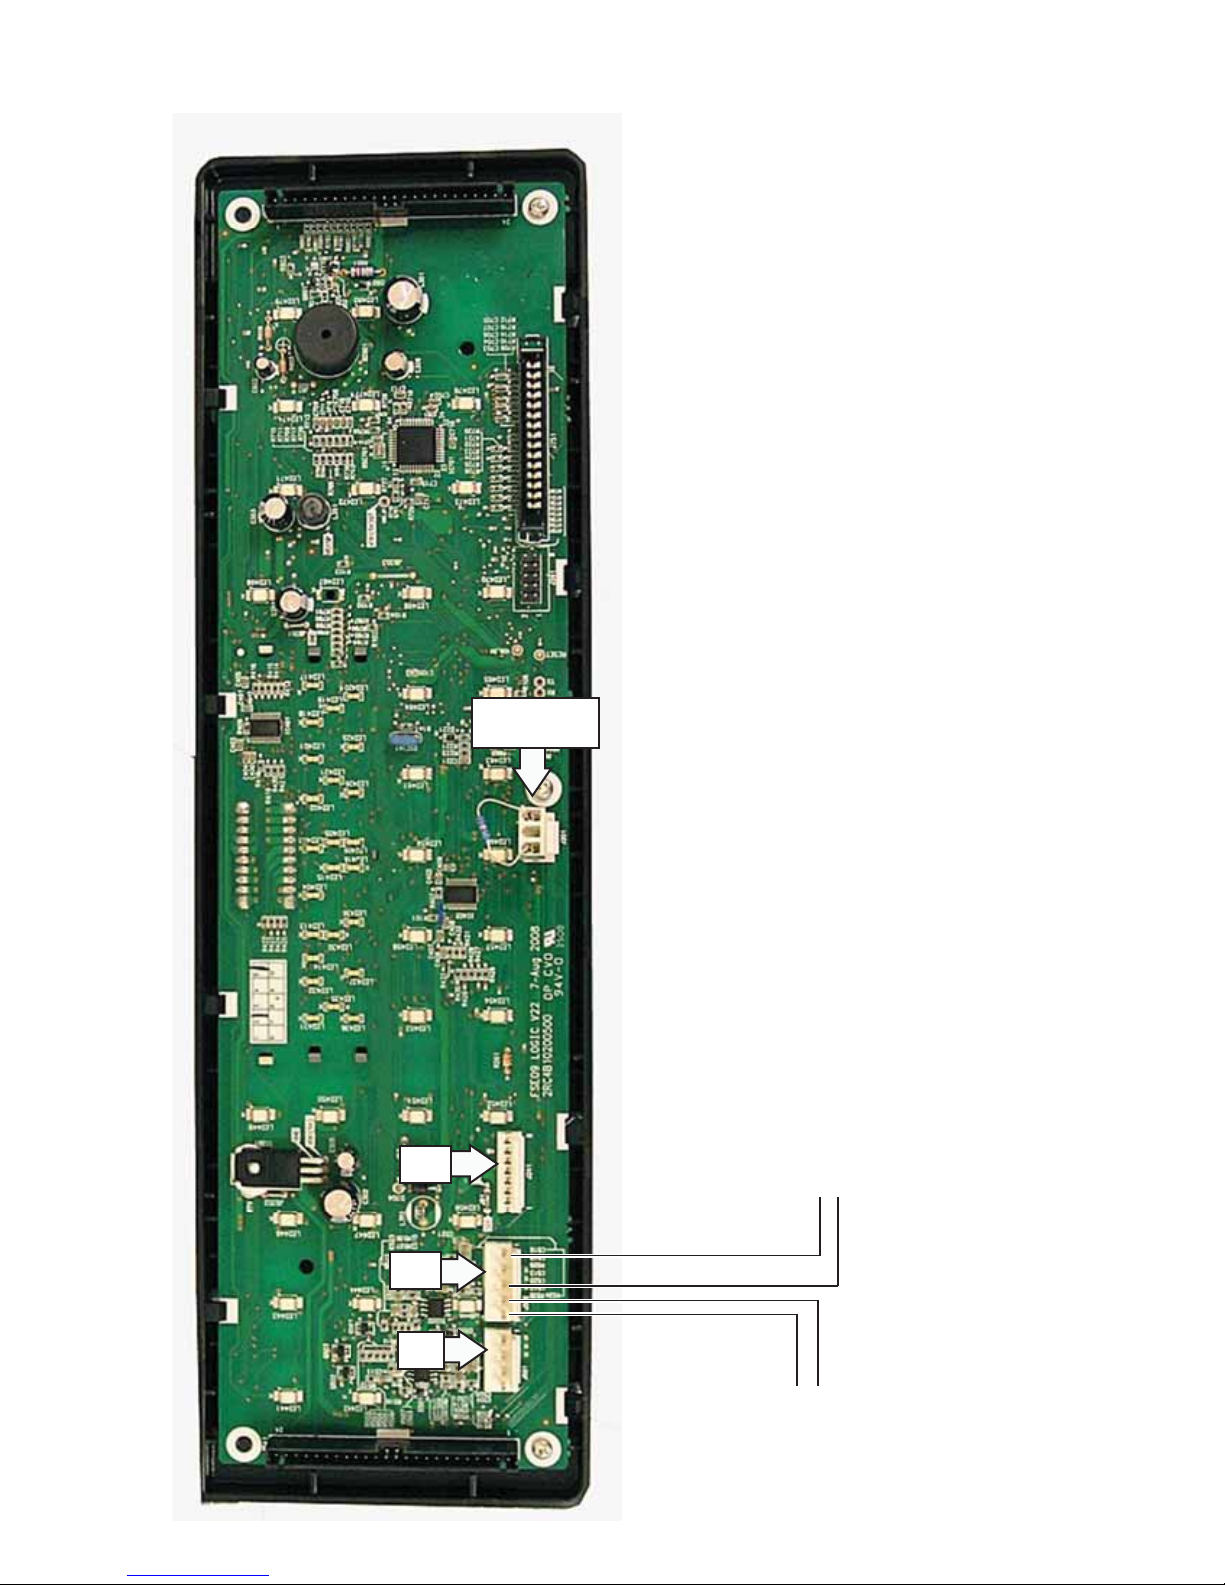
Main Logic Board
J241 - Cooktop and Oven Relay Control Boards
(LIN Serial)
J501 - Upper Oven Sensor
J502 - Meat Probe, Lower Oven Sensor
J241
J502
Model Plug
1180Ω
Lower Oven Sensor
J501
Meat Probe
– 21 –

Diagnostics and Service Information
Main Logic Board Failure Codes
F-codes are not shown on the display when they occur. They are stored in eeprom and can be retrieved by
pressing the TIMER ON + CLOCK + UPPER START pads together. The display then shows F-cd and prompts
for an UPPER or LOWER selection (1 is the upper oven and 2 is the lower oven). After an oven is selected, a
log is shown. Details of any one of up to 7 stored codes can be recalled by pressing a number pad. Press the
CLEAR/OFF pad to exit. The F-code log can be erased by pressing the 9 and 0 pads together while the log is
showing. (Only the log displayed is erased/cleared.)
Note: For the fi rst 3 minutes after power on, the F-code will show on the display.
F-CODE MEANING CORRECTION
F100 LED error on Burner Touch
Board (when equipped)
LEDs on Burner Touch Board operating properly.
Harness/header pins to Burner Touch Board.
F20x Temperature inside oven
cavity exceeds 600°F
with door unlocked
F21x Temperature inside oven
cavity exceeds 900°F
with door unlocked
F30x Shorted oven sensor
(under 950 ohms)
F31x Open oven sensor (over 2950
ohms)
F32x Temperature measurement
F33x
F40x Meat probe or jack shorted a) Probe should be ~10K ohms at room temperature.
F600 LIN comm error within Main
F610 LIN comm error to slaves, such
F611 LIN comm error to slaves, such
F612 Line power error detected by
F620 LIN comm error to/from RPSM
circuit redundancy check
within Main Logic Board bad
Logic Board
as RPSM
as RPSM
RPSM
Aux Board (when equipped)
a) Welded relay contacts.
b) High resistance in sensor connectors especially at sensor
in rear.
a) Disconnect sensor harness from control. Measure
resistance. Should be ~1100 ohms at room temperature
with 2 ohms per degree change.
b) Look for damaged harness terminals/pins if resistance
is OK.
Replace board.
b) Disconnect jack harness from control. Check for shorted
jack or harness. Center pin may be touching insulation
retainer.
a) Check for shorted J241 pin 2.
b) Replace board.
a) Check LIN wire in harness.
b) Replace RPSM board.
a) Check LIN wire in harness.
b) Replace RPSM board.
c) Replace Main Logic Board.
a) Check power line for dropouts.
b) Replace RPSM board.
Replace Aux board, especially if Main Board relays still
function.
F621 LIN comm error to/from RPSM
Aux Board (when equipped)
Replace Aux board, especially if Main Board relays still
function.
(Continued Next Page)
– 22 –

F-CODE MEANING CORRECTION
F622 Line power error detected by
RPSM
F70x CLEAR/OFF touch pad error a) Touch fi lm has a short.
F710 Any other touch pad error a) Touch fi lm has a short.
F720 Main Logic Board internal
touch key chip signal error
F730
F740
F750
F760
F770
a) Check power line for dropouts.
b) Replace RPSM board.
b) Main Logic Board fault.
b) Main Logic Board fault.
Replace Main Logic Board.
F780 60 Hz square wave not getting
to touch key chip on Main
Logic Board
F790 Main Logic Board internal
touch key chip signal error
F7A0 Main Logic Board internal
touch key chip signal error
F7B0 Main Logic Board internal
touch key chip signal error
F800 Main Logic Board memory
error
F810 Main Logic Board memory
error
F820 Main Logic Board EEPROM
memory error
F90x Door Lock Unlock-Home
signal became untrue during
cooking
F91x Door Lock Unlock-Home
signal became untrue during
clean
F92x Both the Lock-Home and
Unlock-Home switches are
closed simultaneously
a) Harness to J241 pin 4 open.
b) Replace Main Logic Board if voltage is OK to J241 pin 4.
OR
c) Replace Main RPSM Board if no voltage at RPSM J17 pin
9.
Replace Main Logic Board.
Replace Main Logic Board.
Replace Main Logic Board.
Replace Main Logic Board.
Replace Main Logic Board.
Replace Main Logic Board.
a) Lock motor cam switch faulty/loose.
b) Harness from lock motor to RPSM J16 open.
Note: Control will open/close relay several times trying to
"jog" the motor.
a) Lock motor cam switch is stuck closed. Replace
assembly.
b) Replace Main RPSM Board.
– 23 –

Key Panel Test
y
m
m
Touch each pad. Pads should light in response, except CLEAR/OFF and COOKTOP Pads. Each pad must be
individually tested. Number pads, +/-, etc., respond only after a function is selected.
LIN Test
Press the OVEN LIGHT pad. Corresponding relay(s) should click and oven lamps should respond. If successful,
LIN bus is not the cause of nonworking elements.
Test Mode
The entry to the test mode is available for 3 min. after power up by pressing 1 and 5 pads together. The
display will switch to "tEST".
Pressing the CLEAR/OFF pad exits the test mode.
When a test feature is selected, it remains for 10 seconds, then returns to the "tEST" standby.
Power On -> Push 1 + 5 ke
Key Display FOR 10 SEC Relay(s)
U START - Upper Conv Fan On 10 sec
L START - Lower Conv Fan On 10 sec
U BAKE - Upper Bake On with Upper DLB On 10 sec
L BAKE - Lower Bake On with Lower DLB On 10 sec
L CONV - Lower Conv On with Lower DLB On 10 sec
L PROBE Upper/Lower Probe Temp -
U BROIL - Upper Broil1 On with Upper DLB On 10 sec
L BROIL - Lower Broil1 On with Lower DLB On 10 sec
U CLEAN Upper/Lower Door State Upper Door On
L CLEAN Upper/Lower Door State Lower Door On
U COOK TIME Upper/Lower Oven Sensor Temp and ROM version -
L COOK TIME Upper/Lower Oven Sensor Temp and ROM version U DELAY TIME Model ID and EEPROM Checksu
L DELAY TIME Model ID and EEPROM Checksu
U OVEN LIGHT - Upper Oven Light On 10 sec
CLOCK All WING-L and WING R LEDs while held. -
TIMER ON Mini Light Box and 10 digits all LEDs -
TIMER OFF all WHITE key LEDS -
LOCKOUT - Energize Cooktop Lock relay (for non wing models) 10 sec
Normal Ttest Mode
Upper Conv Fan Direction On with Upper Conv Fan On 10 sec
Lower Conv Fan Direction On with Lower Conv Fan On 10 sec
10KEY 1 1 UBroil2 relay w/DLB for 10 sec
10KEY 2 2 LBroiul2 relay w/ D L B for 10 sec
10KEY 3 AC input voltage from RPSM J20 10KEY 4 AC inputs on RPSM J21. 5 bits. 10KEY 5 Buzzer level HI --> Md --> Lo 10KEY 6 6 10KEY 7 7 10KEY 8 Lin Slave1(RPSM) Program Version 10KEY 9 Lin Slave4(Aux) Program Version -
RF ON/OFF RF - g seg Cooktop DLB1 + RF-M + RF-I + RF-O for 10 sec
RF- RF - L Cooktop DLB1 + RF-I for 10 sec
RF+ RF - H Cooktop DLB1 + RF-I + RF-M for 10 sec
RF SIZE/SIMMER size LEDs x 3 -
RR ON/OFF RR - g seg Cooktop DLB2 only for 10 sec
RR- RR - L Cooktop DLB2+ RR for 10 sec
RR+ RR - H -
LF ON/OFF LF - g seg Cooktop DLB2 + LF-I + LF-O for 10 sec
LF- LF - L Cooktop DLB2 + LF-I for 10 sec
LF+ LF - H Cooktop DLB2 only for 10 sec
LF SIZE/SIMMER 1/2 in LF digit -
LR ON/OFF LR - g seg Cooktop DLB2 only for 10 sec
LR- LR - L Cooktop DLB2 + LR for 10 sec
LR+ LR - H Cooktop ALL RELAYS ON 30 sec
LR MELT 1/2 in LR digit -
WZ ON/OFF WZ - g seg Cooktop DLB2 + CR for 10 sec
WZ SELECT zero (0) in WZ digit -
– 24 –

Oven Sensors
Upper Oven room temp 1080 ohms
J501 Sensor Pins 1, 2 (white/black) clean temp 2650 ohms
Lower Oven room temp 1080 ohms
J502 Sensor Pins 1, 3 (white/red) clean temp 2650 ohms
ggg
DK18-
DK3-NO DK3-NC COM DK18-NO MJ7-2 DK7-COM MJ7-1 MJ7-12
to L2 to L2 to L2 to L2 to L2 to L1 to N to L1
Standby 0 240VAC 240VAC 0 0 120VAC 0 0
Broil, Upper* 240VAC 0 0 0 240VAC 240VAC 0 –
Bake, Upper* 0 240VAC 240VAC 240VAC 240VAC 240VAC 0 –
Door Motor, Upper 0 240VAC 240VAC 0 0 120VAC 120VAC** –
Oven Lamp, Upper – – – – – – – 120VAC**
*When calling for heat
**When motor or light is on
MK3-NO MK3-NC MK7-COM MK7-NO MK7-NC MK10-COM MK10-NO MK14-COM
to L2 to L2 to L2 to L2 to L2 to L2 to L2 MJ7-4 to L2 to L1 DJ-24 to N DJ6-1 to N DJ6-3 to N MJ7-8 to L1 DJ6-7 to N
Standby 0 240VAC 240VAC 0 240VAC 240VAC 0 0 120VAC 0 0 0 0 0
Broil , Lower* 240VAC 0 0 0 0 0 0 240VAC 240VAC 0 0 0 – 0
Bake , Lower* 0 240VAC 240VAC 240VAC 0 0 0 240VAC 240VAC 0 0 0 – 0
Convect , Lower* 0 240VAC 240VAC 0 240VAC 240VAC 240VAC 240VAC 240VAC See Convect Fan. – 0
Conv Fan CW See Convect Element . 120VAC 120VAC 0 – 0
Conv Fan CCW See Convect Element. 120VAC 0 120VAC – 0
Oven Lamp, Lower – – – – – – – – – – – – 120VAC** 0
Door Motor, Lower 0 240VAC 240VAC 0 240VAC 240VAC 0 0 120VAC 0 0 0 – 120VAC**
*When calling for heat
**When motor or light is on
AK2-COM AKB-NO AK13-NO AK11-NO AK5-NO AK6-COM AK1-NO AK4-NO AK10-COM AK14-COM
(J3) to L2 (J7-3) t o L2 (J7-1) to L2 (J7-2) to L2 (J7-4) t o L2 (J6) to L2 (J7-12) t o L2 (J7-8) to L2 to L1 to L1
Standby 0 0 0 0 0 0 0 0 120VAC 120VAC
Only RF, all rings* 240VAC 240VAC 240VAC 0 0 0 0 0 240VAC 120VAC
Only RR* 0 0 0 240VAC 0 0 0 0 240VAC 120VAC
Only LF, all rings* 0 0 0 0 0 0 240VAC 240VAC 120VAC 240VAC
Only LR 0 0 0 0 0 240VAC 0 0 120VAC 240VAC
Only Center* 0 0 0 0 240VAC 0 0 0 120VAC 240VAC
*Use HIGH setting to test.
The current software version of the main logic board will cause the cooktop to become inoperative if either of
the sensors open.
If either sensor opens and the fault code sets to epprom memory (this takes about 3 min.), the cooktop will
become inoperative until the sensor is replaced.
Relay Board Voltages
Legend for Ladder Wiring Diagram
Upper Oven
Lower Oven
Relays and connectors that begin with
MK, MJ RPSM MAIN board
DK, DJ Daughter relay board
AK, AJ RPSM AUX board
NOTE: Pin 1 on RPSM boards has a square solder pad.
are located on
Cooktop Voltage Table
– 25 –

Schematics and Wiring Diagrams
WARNING: Disconnect electrical power before servicing.
Caution: Label all wires prior to disconnection. Wiring errors can cause improper and dangerous operation. Verify
operation after servicing.
Wiring Diagram
– 26 –
(Continued Next Page)

Oven and Main Power Wiring
– 27 –
(Continued Next Page)

Cooktop Wiring
– 28 –

Warranty
All warranty service provided by our Factory Service Centers,
or an authorized Customer Care
®
technician. To schedule
service, visit us on-line at GEAppliances.com, or call
800.GE.CARES (800.432.2737). Please have serial number
Staple your receipt here.
Proof of the original purchase
date is needed to obtain service
under the warranty.
and model number availa ble when calling for service.
For The Period Of: GE Will Provide:
One Year Any part of the range which fails due to a defect in materials or workmanship.
From the date of the During this limited one-year warranty, GE will also provide, free of charge, all labor
original purchase and in-home service to replace the defective part.
What GE Will Not Cover:
I Service trips to your home to teach you how to use
the product.
I Improper installation, delivery or maintenance.
I Failure of the product if it is abused, misused,
or used for other than the intended purpose
or used commercially.
I Damage to the glass cooktop caused by use of
cleaners other than the recommended cleaning
creams and pads.
I Replacement of house fuses or resetting of circuit
breakers.
I Damage to the product caused by accident, fire, floods
or acts of God.
I Incidental or consequential damage caused by possible
defects with this appliance.
I Damage caused after delivery.
I Product not accessible to provide required service.
I Damage to the glass cooktop caused by hardened
spills of sugary materials or melted plastic that
are not cleaned according to the directions in
the Owner’s Manual.
EXCLUSION OF IMPLIED WARRANTIES—Your sole and exclusive remedy is product repair as provided in this Limited
Warranty. Any implied warranties, including the implied warranties of merchantability or fitness for a particular
purpose, are limited to one year or the shortest period allowed by law.
This warranty is extended to the original purchaser and any succeeding owner for products purchased for
home use within the USA. If the product is located in an area where service by a GE Authorized Servicer is not
available, you may be responsible for a trip charge or you may be required to bring the product to an Authorized
GE Service location for service. In Alaska, the warranty excludes the cost of shipping or service calls to your home.
Some states do not allow the exclusion or limitation of incidental or consequential damages. This warranty
gives you specific legal rights, and you may also have other rights which vary from state to state. To know
what your legal rights are, consult your local or state consumer affairs office or your state’s Attorney
General.
Warrantor: General Electric Company. Louisville, KY 40225
– 29 –
 Loading...