

Page 1
User Manual
TM
in.clear
clean water done right
Low maintenance
No chlorine
No chemicals to add
Page 2

in.clear user manual
Table of contents
Warnings ............................................................................................................................................................... 2
Introduction ......................................................................................................................................................... 5
How in.clear works ............................................................................................................................................. 6
in.clear dimensions ............................................................................................................................................. 6
Installation of in.clear .......................................................................................................................................... 7
In.clear installation scheme with circulation pump ........................................................................................ 7
In.clear installation with stand ........................................................................................................................... 8
Installing the in.k200 ........................................................................................................................................... 9
Keypad dimensions: ........................................................................................................................................... 9
Before starting .................................................................................................................................................... 10
in.clear operating modes .................................................................................................................................. 11
Start up procedure ............................................................................................................................................ 12
- Set the maintenance level .................................................................................................................. 12
- Determine the boost level ............................................................................................................................ 12
Keypad operations ............................................................................................................................................. 13
Troubleshooting ................................................................................................................................................ 14
Glossary .............................................................................................................................................................. 16
Cell cleaning ........................................................................................................................................................ 17
in.clear general specifications .......................................................................................................................... 18
11
Page 3
in.clear user manual
Warnings
WARNINGS:
Before installing or connecting the unit, please read the following.
• For Canada, in.clear must only be used with sodium bromide (BromiCharge) scheduled or registered under the
Pest Control Product Act. For USA, the sodium bromide (BromiCharge) must be registered under EPA.
• Read and follow this manual carefully and make sure to save it for later. This manual contains important information
on in.clear's installation, use and safety recommendations. It is your responsibility to install and use your in.clear
unit safely.
• In.clear must be connected to a circuit protected by a ground fault interrupter device (GFCI) in North America or
residual current device (RCD) having a rated residual operating current not exceeding 30 mA in Europe.
• Make sure all electrical power is off before installing the in.clear unit. If the supply cord is damaged, it must be
replaced by the manufacturer, its service agent or similarly qualified persons in order to avoid a hazard.
• Use only an electrical cord in good condition to power in.clear.
• Follow all aspects of the local and National Electrical Code(s) when installing the in.clear Automatic Bromine
Generator.
• Always clean or replace your filter cartridges at regular intervals, otherwise part of the bromine generated by in.clear
will only serve to oxidize the dirt accumulated in the filter.
• Do NOT add any other sanitation chemicals in the spa other than registered sodium bromide (BromiCharge). Do
NOT use any ozone or UV sanitizer.
• Operating the in.clear at reduced sodium bromide (BromiCharge) levels will shorten the life of the cell.
Maintaining overly high sodium bromide and bromine levels above recommended range can contribute to
corrosion of spa equipment and may damage components of the spa.
• Do not open the in.clear unit; there are no serviceable parts inside.
• Disposal of the product: the in.clear unit must be disposed of separately in accordance with the local waste
disposal legislation in force.
• This appliance is not intended for use by persons (including children) with reduced physical, sensory or mental
capabilities, or lack of experience and knowledge, unless they have been given supervision or instruction
concerning use of the appliance by a person responsible for their safety.
• To reduce the risk of injury, do not allow children to operate this device.
• In.clear may not be suitable for in ground spas, it may affect some materials used in their construction.
•The cell is installed after the heater in the circulation pump line.
• The appliance must be installed in a location that is inaccessible to a person in the bath or spa and must be located
or fixed so that it cannot fall into the bath or spa.
• The appliance is not intended for submersion but may be installed within the spa zone.
• A means for disconnection must be incorporated in the fixed wiring in accordance with the wiring rules.
Aeware®, Gecko®, and their respective logos are Registered Trademarks of Gecko Alliance Group.
in.k200™, and in.clear™, and their respective logos are Trademarks of Gecko Alliance Group.
BromiCharge™ and its logo are Trademarks of Bromitron Corporation.
All other product or company names that may be mentioned in this publication are tradenames, trademarks or
registered trademarks of their respective owners.
2
Page 4

in.clear user manual
• To reduce the risk of injury, do not allow children to operate this device.
• It is the responsibility of the user to test the spa water regularly to ensure that adequate amounts of bromine are
generated to achieve proper sanitizer levels. Heavy spa usage may require higher bromine output to maintain
proper free available bromine residuals.
• Check the expiry date of the test kit as test results may be inaccurate if used after that date.
• People with a medical condition should consult a physician before entering spa water.
• Women who are pregnant should NOT enter the spa.
• Maximum spa water usage temperature is 40°C. Bathing in spa water at 40°C should not exceed 15 minutes.
• For proper sanitation, spas must be completely drained periodically. The number of days between COMPLETE SPA
DRAINAGE is equal to the volume of the spa's water in liters, divided by 10 times the maximum number of daily spa
users. Refill spa with water and repeat DIRECTION FOR USE of the device.
- For a 1500 liters (400 US gallons) spa used by 2 adults twice a week: 1500 / (10 x (4/7)) = 262 days or 8 months
• In.clear is meant for a covered spa NOT swimming pools.
• Users should always shower before entering a spa.
3
Page 5

in.clear user manual
4
Page 6
in.clear user manual
Introduction
This user manual is an abridged version of the in.clear technical
manual. For more detailed information about the in.clear system
and about BromiCharge sodium bromide, please consult the full
manual at www.geckoalliance.com/inclear.
in.clear
clean water done right
Easy to use and built to last, the in.clear is one of the
most efficient water sanitization systems offered to the
spa and hot tub industry today. The in.clear generates
and releases bromine into the spa water, rapidly
destroying any microbiological contaminants such as
water borne bacteria, algae, and organic matter given off
by spa bathers.
The in.clear system eliminates the need to add bromine
or chlorine to your spa on a regular basis. The in.clear
system does not produce any offensive odors, it does
not cause eye irritation and it's easy to use, making it
the best choice for hot tub sanitization. Spas using the
in.clear system need very little maintenance, and in.clear
can be easily installed on new or existing spas.
Accessories
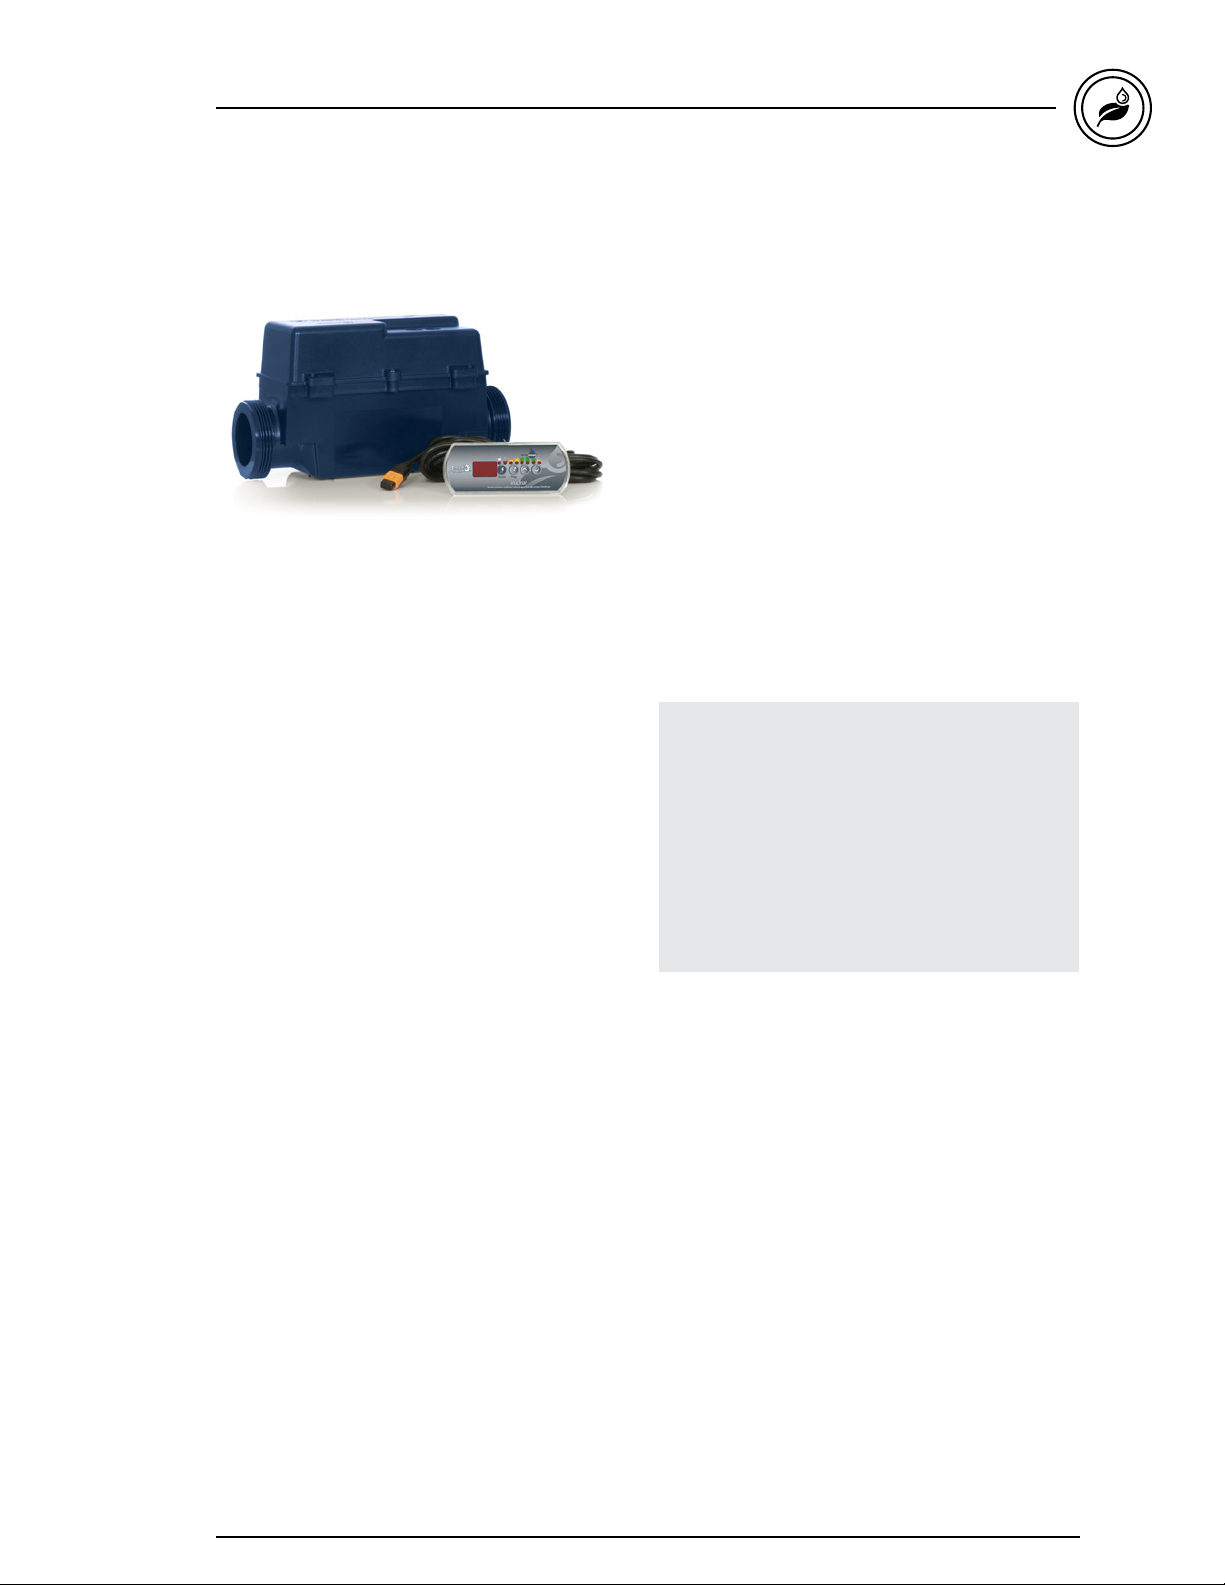
In order to use the in.stream system you must
also have the in.k200 keypad, and a government
approved sodium bromide product (BromiCharge).
Product numbers:
in.k200 keypad 0607-008010
BromiCharge 0699-300005
Test kit 0699-300008
5
Page 7
How in.clear works
When sodium bromide (BromiCharge) is added to
the water, it separates into sodium ions and bromide
ions. As the water passes through the in.clear bromine
generator, a low-voltage source supplies a current that
electrolytically reduces the bromine ions into bromine
which reacts with the water molecules to form free
bromine. Bromine is known to be a highly effective
bactericide and algaecide. This process releases
bromide ions back into the water for continuous
recycling until the the spa is emptied. It is important to
note that the amount of bromine needed will vary in
direct proportion to the number of bathers in the spa
(bather load).
in.clear user manual
Effects of bromine
• Bromine destroys waterborne bacteria.
• Bromine destroys algae in water
(e.g. Black, Green, Mustard).
• Bromine swiftly eliminates the presence of organic
matter left behind by spa users (e.g. oil, sweat, dead
skin cells).
• Because bromine doesn’t contain calcium, it can
be used to sanitize hard water without increasing the
calcium hardness.
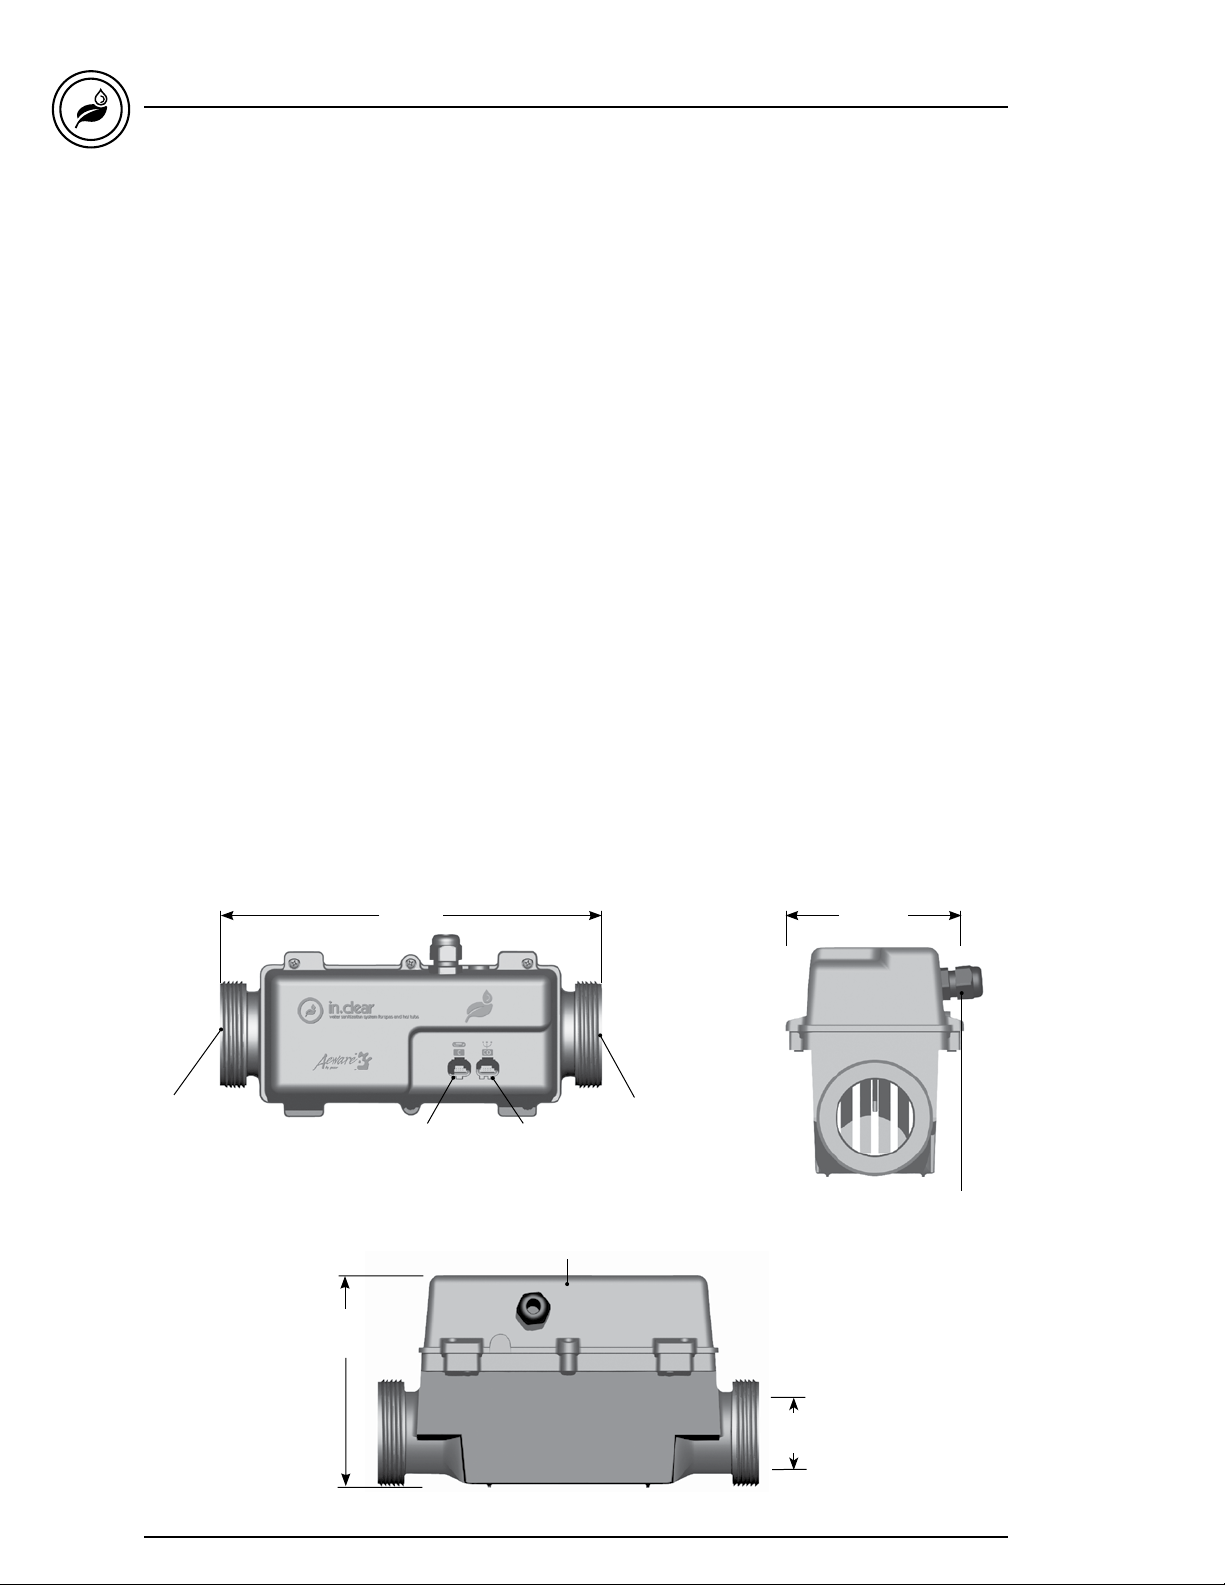
in.clear dimensions
10.9"
(277 mm)
Buttress threads
3-8 both ends
Comm. PortKeypad connector
Bromine in a spa
Bacteria requires a certain period of time before
forming into micro colonies and becoming attached
to a surface. Rapid elimination of bacteria is a key
element in the proper maintenance of the spa water.
In.clear achieves this while oxidizing odors, without
causing eye or skin irritation. In.clear enhances
the clarity and quality of spa water. For bathers this
translates into a more enjoyable warm water
therapy experience.
4.7"
(120 mm)
Buttress threads
3-8 both ends
Power input cable
Rugged plastic watertight enclosure
6.1"
(155 mm)
Inside diameter
2"
(50,8 mm)
6
Page 8
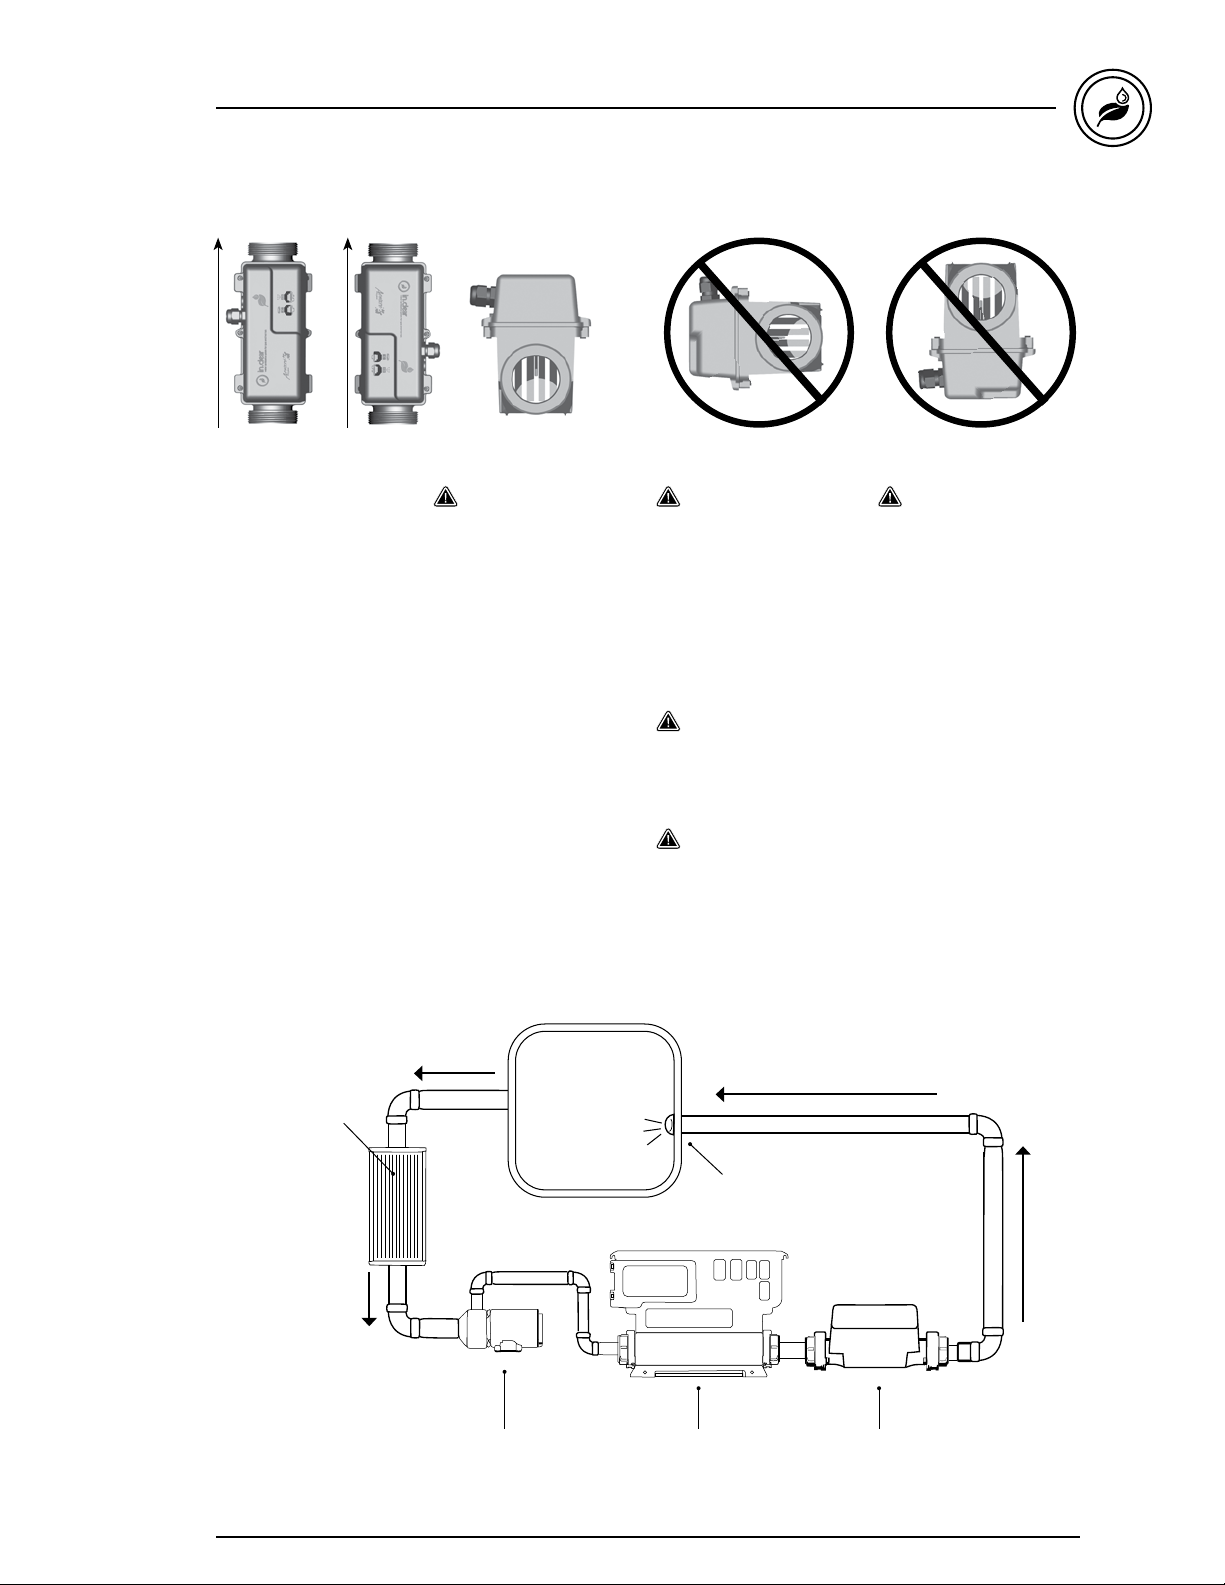
Water flow
in.clear user manual
Installation of in.clear
Installation
Empty water from the spa.
The in.clear unit must be
installed before the spa is
filled with water.
The in.clear unit must be
installed on the pressure
side of the circulation
pump (refer to Fig.A for
details). It should be
installed after the heater.
The in.clear system can
be installed in an upright
position or horizontally.
We do not recommend
installing the in.clear on
a spa equipped with a
dual-speed pump. The
in.clear works only when
the pump is running,
therefore the dual speed
pump will need to run
around 8-10 hours to
have optimum bromine
production. Running a
large pump for that period
of time may be difficult in
warm weather, without
overheating the spa.
The in.clear system
should be installed at the
pressure side on a 3 to 40
US GPM (11.4 to 151 l/min)
flow line. It's important
not to exceed 40 US GPM
(151 l/min) to prevent
excessive electrode wear
anddamage to the in.clear
unit.
For all types of
installation make sure
there are no kinks in
the plumbing and that
water flows.
Installing valves on both
sides of the in.clear may
help for maintenance
purposes.
Water flow must run
from bottom to top if
installed vertically.
Fig.A: in.clear installation scheme with circulation pump
If water flow is as low as
3 GPM (11.4 l/min) and
in.clear is to be installed
horizontally, an air gap
may be appear at the top
and this may decrease
the performance of the
unit. In that case, raise
the outlet about 1". The
exact location and the
method of installation
of the in.clear may
vary depending on the
plumbing design of
the spa.
spa filter
circulation pump
11 to 150 liters/min
(3 to 40 US GPM)
Note: The pressure in the piping must be at least 3 PSI when water is circulating
spa
heater
water jet
in.clear
7
Page 9
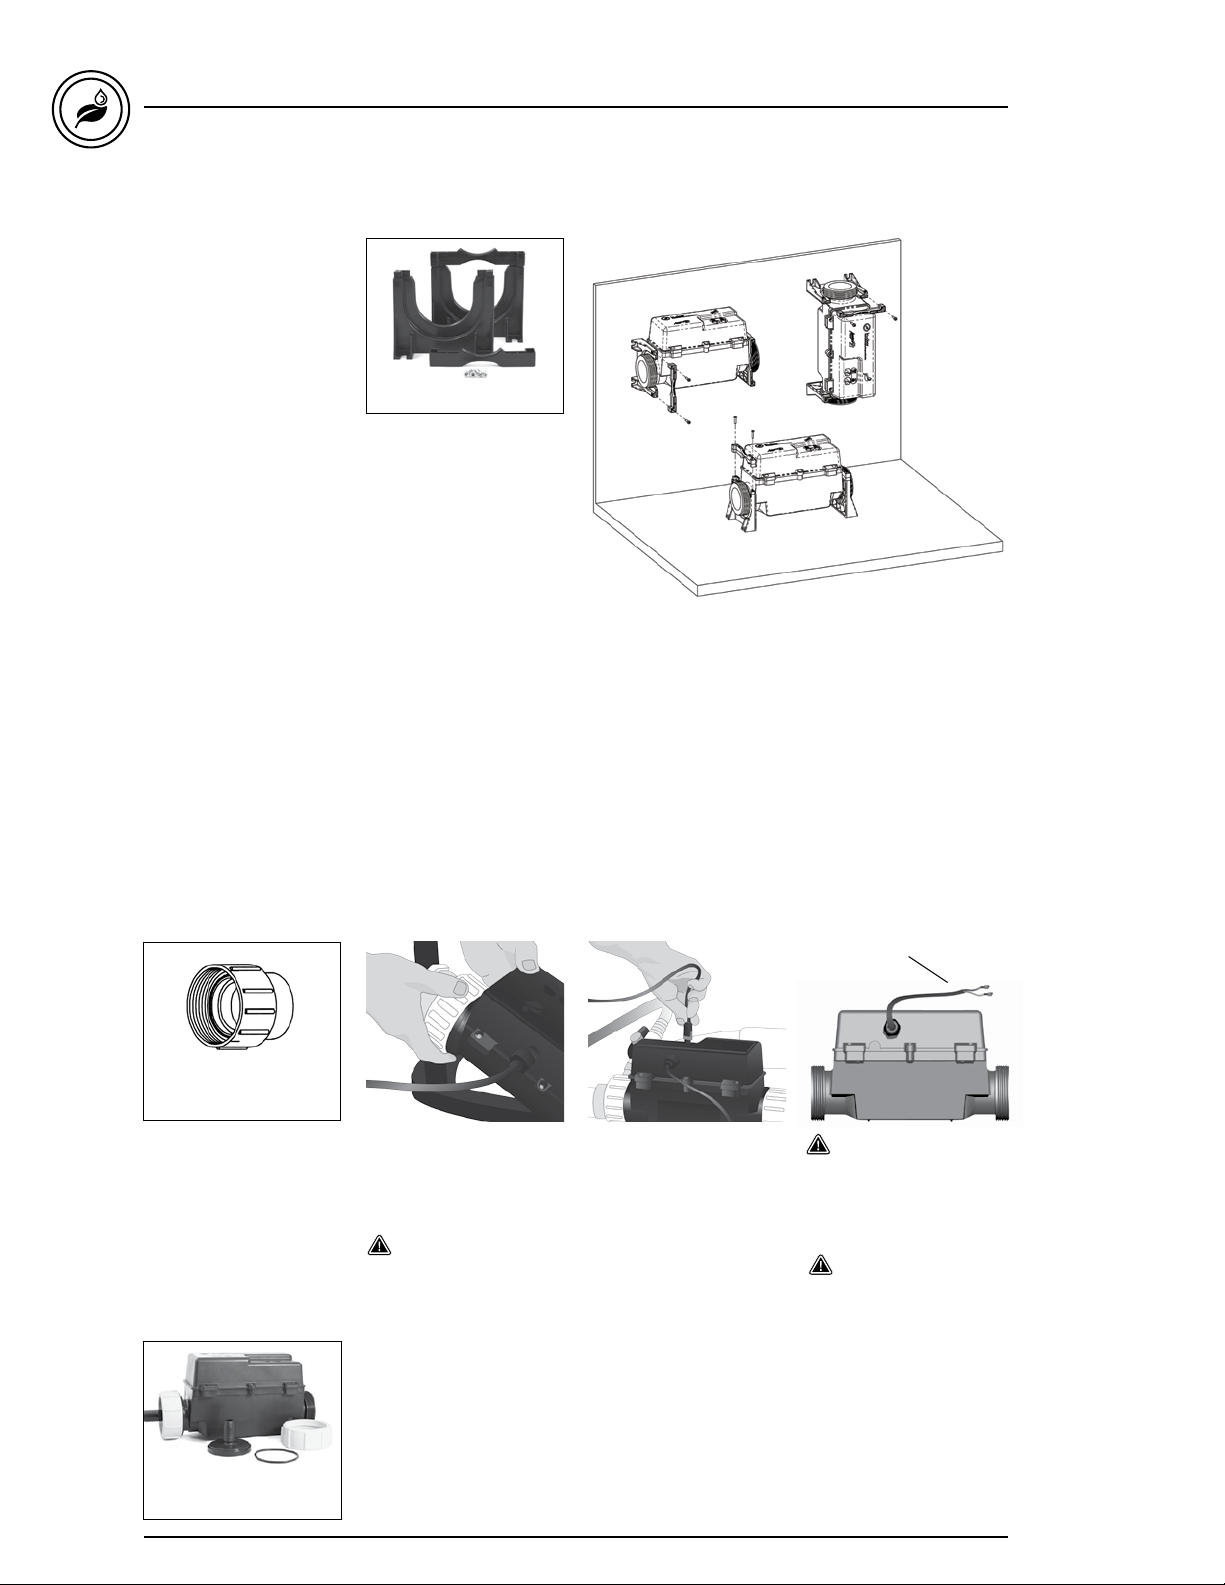
In.clear installation with stand
We have created a stand
that simplifies mounting
an in.clear bromine system
under a spa.
The stand can be used for
floor mounting and for wall
mounting.
This is a great way to hold
the in.clear in place and adds finesse to the look of
the final product.
The stand is compatible with in.clear and in.therm units
simply by changing the position of the top clamp.
The stand includes the required screws to mount
the device to the stand. The mounting screws to attach
the stand to the spa are not included.
The following material is recommended:
Gecko # 9920-101464
www.geckodepot.com
in.clear user manual
Floor and side mounting
4- # 10 screws of appropriate length with round, truss
or pan head.
4- washers 1/2 OD x 1/16” thickness
(12 mm OD x 1.5 mm).
Select the most appropriate location for in.clear and
firmly attach each stand to wooden base with 2 screws
backed by 2 washers.
Gecko
# 52202000
www.geckodepot.com
Use adapters to connect
the in.clear system to 3/4"
tubing or directly to 2"
tubing.
For an optimal connection
to spa plumbing, please
Slide the two plastic union
nuts over the in.clear unit's
threaded ends and tighten
the nuts.
Hand tighten!
Do not use tools!
note that we recommend
these compression fittings
& nuts.
Connect the in.k200
keypad to the unit (see
keypad installation section
of this manual for more
details).
Power cable
In.clear must be
protected by the same
ground fault interrupter
(GFCI) circuit as the spa
system
The input must be
240 V. A blinking “AC”
message on the keypad
means that the input signal
is not 240 V, probably
120 V. Please check
connection.
Gecko
# 0699-300007
www.geckodepot.com
8
Page 10
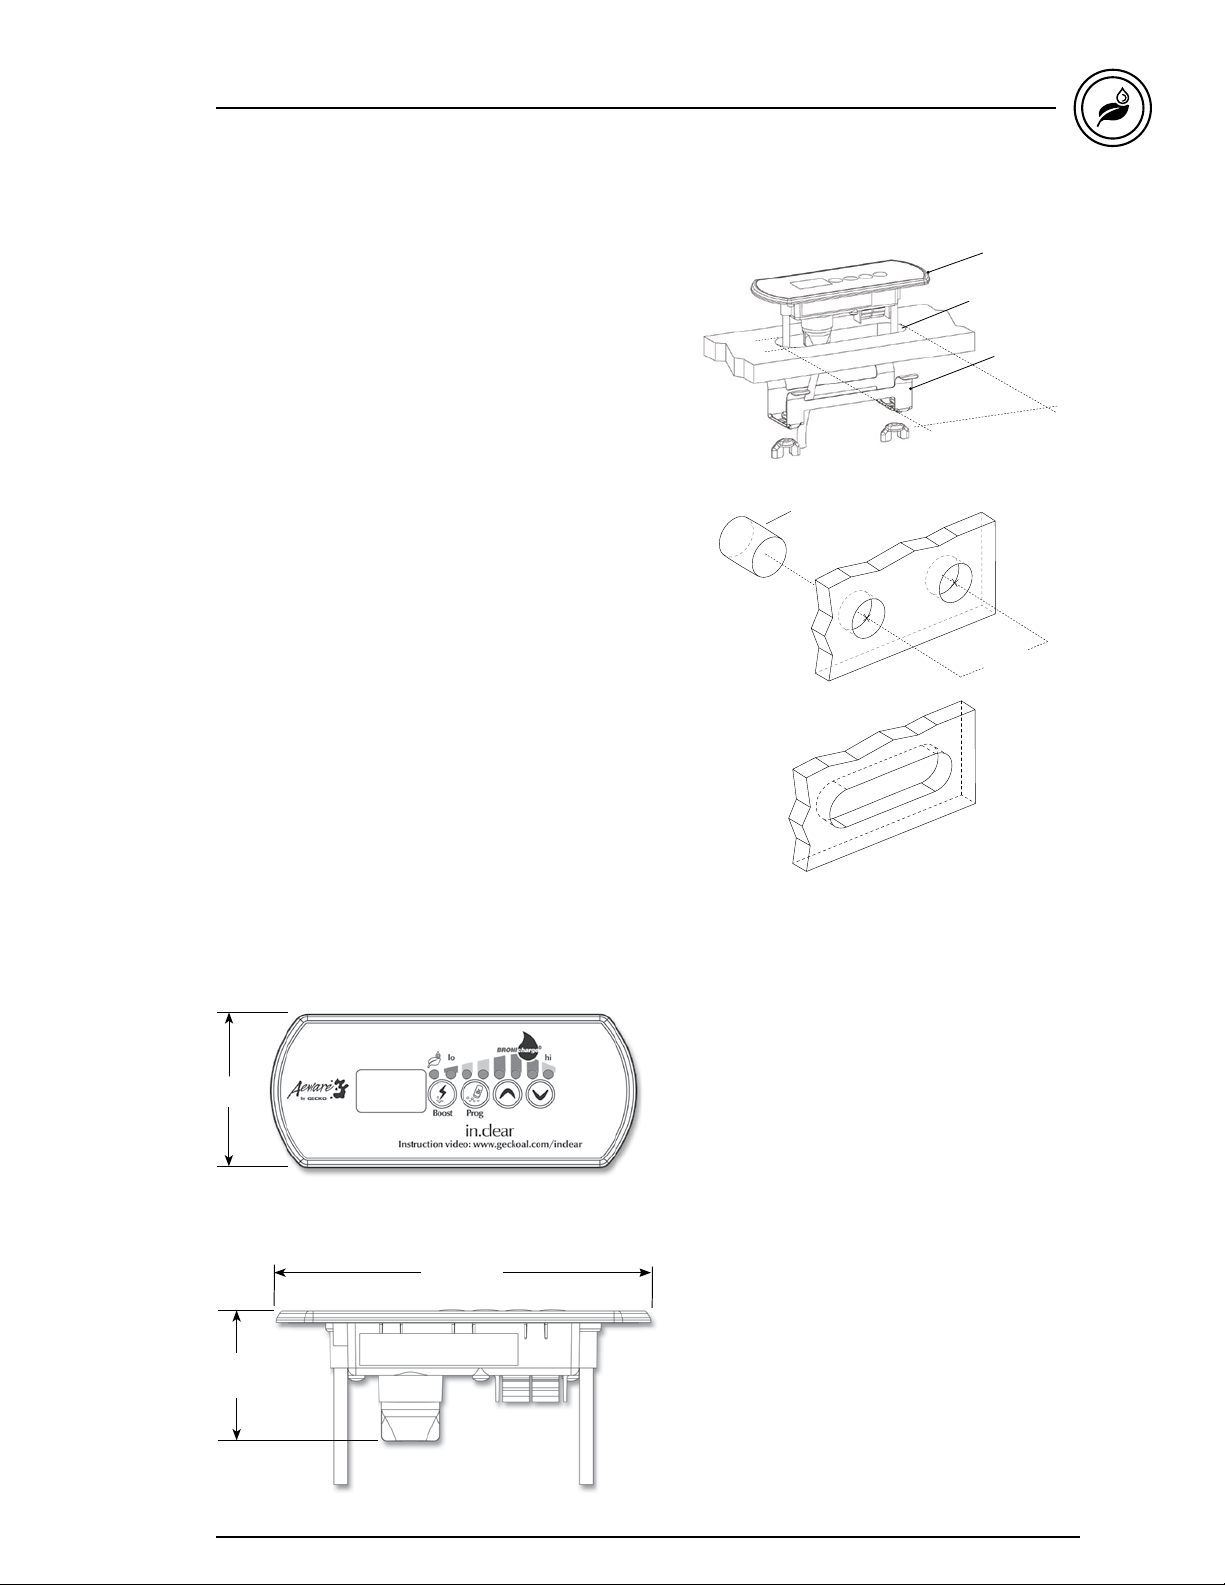
in.clear user manual
Installing the in.k200
The keypad should be installed directly onto the spa
(or very close to it) so that it is easily accessible to the
user. For a skirt mount installation the keypad should be
installed directly on a spa panel (make sure it is still easily
accessible to the user).
• To install the in.k200, drill two 25 mm (1”) diameter
holes at 67 mm (2 5/8”) from center to center
as illustrated.
• In the case of a skirt mount installation, start by
pilot drilling the hole centers using a 3 mm (1/8”) drill
bit, drilling from the finished side of the spa to prevent
chipping. Using the appropriate hole saw slowly drill
two 25 mm (1”) diameter holes at 67 mm (2 5/8”) from
center to center as illustrated.
• Cut out the material between the two holes
(see illustration).
• Clean the installation surface and route the keypad
cable from the wall cutout to the in.clear unit.
• Peel the adhesive gasket from the back of the keypad,
insert it in the cutout and align it correctly, then ensure
it's properly glued by gently pressing evenly on
the entire surface.
If the keypad is equipped with an optional holder plate
remove the two wing nuts from the back of the keypad
and remove the mounting bracket.
Insert the keypad into the opening you have cut out.
Put the mounting bracket and the wing nuts back on
their respective bolts and fix the keypad securely in place
(see illustration).
1"
(25 mm)
1"
(25 mm) dia.
drill
(25 mm)
Gasket with adhesive
∅ 1"
(25 mm)
Mounting
bracket
92 mm
")
5/8
(3
1"
∅
1"
∅
(25 mm)
2 5/8"
(67 mm)
Keypad dimensions:
2"
(51 mm)
1.7"
(43 mm)
4.750"
(120 mm)
Note: It is the installer’s responsibility to ensure that no
obstructions (cables, piping, etc.) are present below the deck at
the drill hole location.
Note: If the installation location is not perfectly even (e.g. wood
surface), make a silicone joint between the installation location
and the back of the unit to ensure a proper seal around it.
9
Page 11
Before starting
in.clear user manual
10
1. Drain and clean the spa
It's important to completely drain and clean the spa to
remove any solid residues accumulated on the surface
and inside or around the jet area. After draining the spa,
use spa cleaning products only. Household cleaners
contain additives such as phosphates which may affect
the bromine production. When the spa is clean, rinse it
off thoroughly with a garden hose.
It's extremely important to clean your filter cartridge
with a filter soaking solution or replace your filter
cartridges.
It is important that the spa is well cleaned and rinsed
prior to the startup of the new system. Some biofilms
may have formed in the spa that could prevent
the system from functioning properly. We strongly
recommend the use of a flushing product such
as Spa System Flush, Swirl Away or National
Chemistry Spa Purge to clean the plumbing even
if the spa is brand new.
2. Refill the spa
After the in.clear unit has been installed, check the TDS
(Total Dissolved Solids) of the water you'll use to refill the
spa. This can be done by your local spa dealer. The TDS
range should be within 50 and 400 PPM. When you're
certain the water is within the proper TDS range, refill
your spa.
If your TDS is higher than 500 PPM, ask your
spa dealer for additional information to help reduce
initial TDS.
DO NOT use water from a "Salt Water Softener"
system.
Make sure there is adequate flow and that no airlocks
are trapped in the unit's plumbing. If airlocks are formed,
start the pump and slowly loosen one of the union nuts
to release the air trapped in the plumbing. Tighten the
nut again after you are done.
3. Adjust water chemistry in the spa
Proper chemical maintenance of a spa is essential
for the health of bathers. Maintaining the quality of
the spa water within these specified values will enhance
your enjoyment of the spa and prolong the life of the
in.clear system.
For best results, adjust to the following water chemistry
parameters. Check these parameters periodically.
Total hardness (TH): between 150 and 200 PPM
Alkalinity: between 100 and 120 PPM
pH: between 7.2 and 7.8
Water chemistry should be balanced before adding
sodium bromide into the water. It's essential that the
water chemistry parameters are within the proposed
range to obtain optimal system performance.
High Calcium Hardness may lead to faster
calcification on the electrolytic plates.
4. Add sodium bromide (BromiCharge)
Water temperature between 90° and 100° F (32° and
38° C) helps dissolve sodium bromide and facilitates
maintenance level adjustment.
Start the pump to allow water to circulate and slowly add
sodium bromide (BromiCharge) uniformly in the spa by
simply pouring it from the container.
Add sodium bromide with at least a 98% of the active
ingredient concentration (BromiCharge), at a rate of
0.143 kg /100 liters of water.
Add sodium bromide with at least a 98% of the active
ingredient concentration (BromiCharge), at a rate of
1.2lb/100 US gallons of water.
Example, if your spa holds 1200 liters of water, add
1.72 kg of sodium bromide (12 X 0.143 kg).
If your spa holds 300 US gallons of water, add 3.6 lbs
of sodium bromide (3 X 1.2Lb).
Note: Your spa manufacturer can tell you how much water your
spa holds (in liters or gallons).
Other tips:
For Canada, in.clear must only be used with sodium
bromide (BromiCharge) scheduled or registered
under the Pest Control Product Act. For USA, the
sodium bromide (BromiCharge) must be registered
under the EPA.
Your warranty will be void if another product is used
as a substitute.
Do not inhale the product or get into your eyes!
First Aid instructions should appear on the label of
the registered sodium bromide container.
Do not use any other sanitation chemicals
(including shock) in the spa.
When adding fresh water to the spa, start a Boost
to help build a residual bromine bank.
Page 12
in.clear user manual
in.clear operating modes
Maintenance Mode:
Maintenance Mode keeps the bromine bank levels at
a stable and acceptable range when the spa is not being
used. Maintenance Mode is the “everyday” mode
and is automatically ON when the system is activated.
Maintenance level adjustment changes the rate at which
bromine will be released into the spa water.
Finding and setting the right maintenance level will keep
the residual bromine level between 3 and 5 PPM (the
recommended range) when the spa is not being used
or is left unused for an extended period of time. Once
the proper maintenance level is determined, keep the
same setting unless the spa conditions change
(change in water temperature, spa location etc).
Finding the right bromine generation level is a crucial
step for the in.clear system to be stable and effective.
The spa filtration should be set at a minimum
of 8hrs per day.
It is important to note that the in.clear system can
ONLY generate bromine when the water is circulating.
If you are having problems maintaining a stable level
of bromine, or determining the proper maintenance
level for your spa, you may have to increase the daily
filtering time. Longer filtration produces a more steady
level of bromine.
Boost Mode:
The Boost Mode should be activated every time you use
your spa. Boost Mode increases the bromine generation
rate to attack pollutants in the water and helps rebuild
the necessary residual bromine in the water after each
use of the spa. Pollutants are introduced to the water
by the bathers, causing the bromine levels to decrease.
Activating the Boost Mode when you enter the spa will
prevent inadequate bromine levels and will restore your
bromine to the proper residual level.
Finding the right Boost level is another crucial step for
the in.clear system to be stable and effective.
If water quality is not good after use, only the Boost
level should be adjusted, not the Maintenance level.
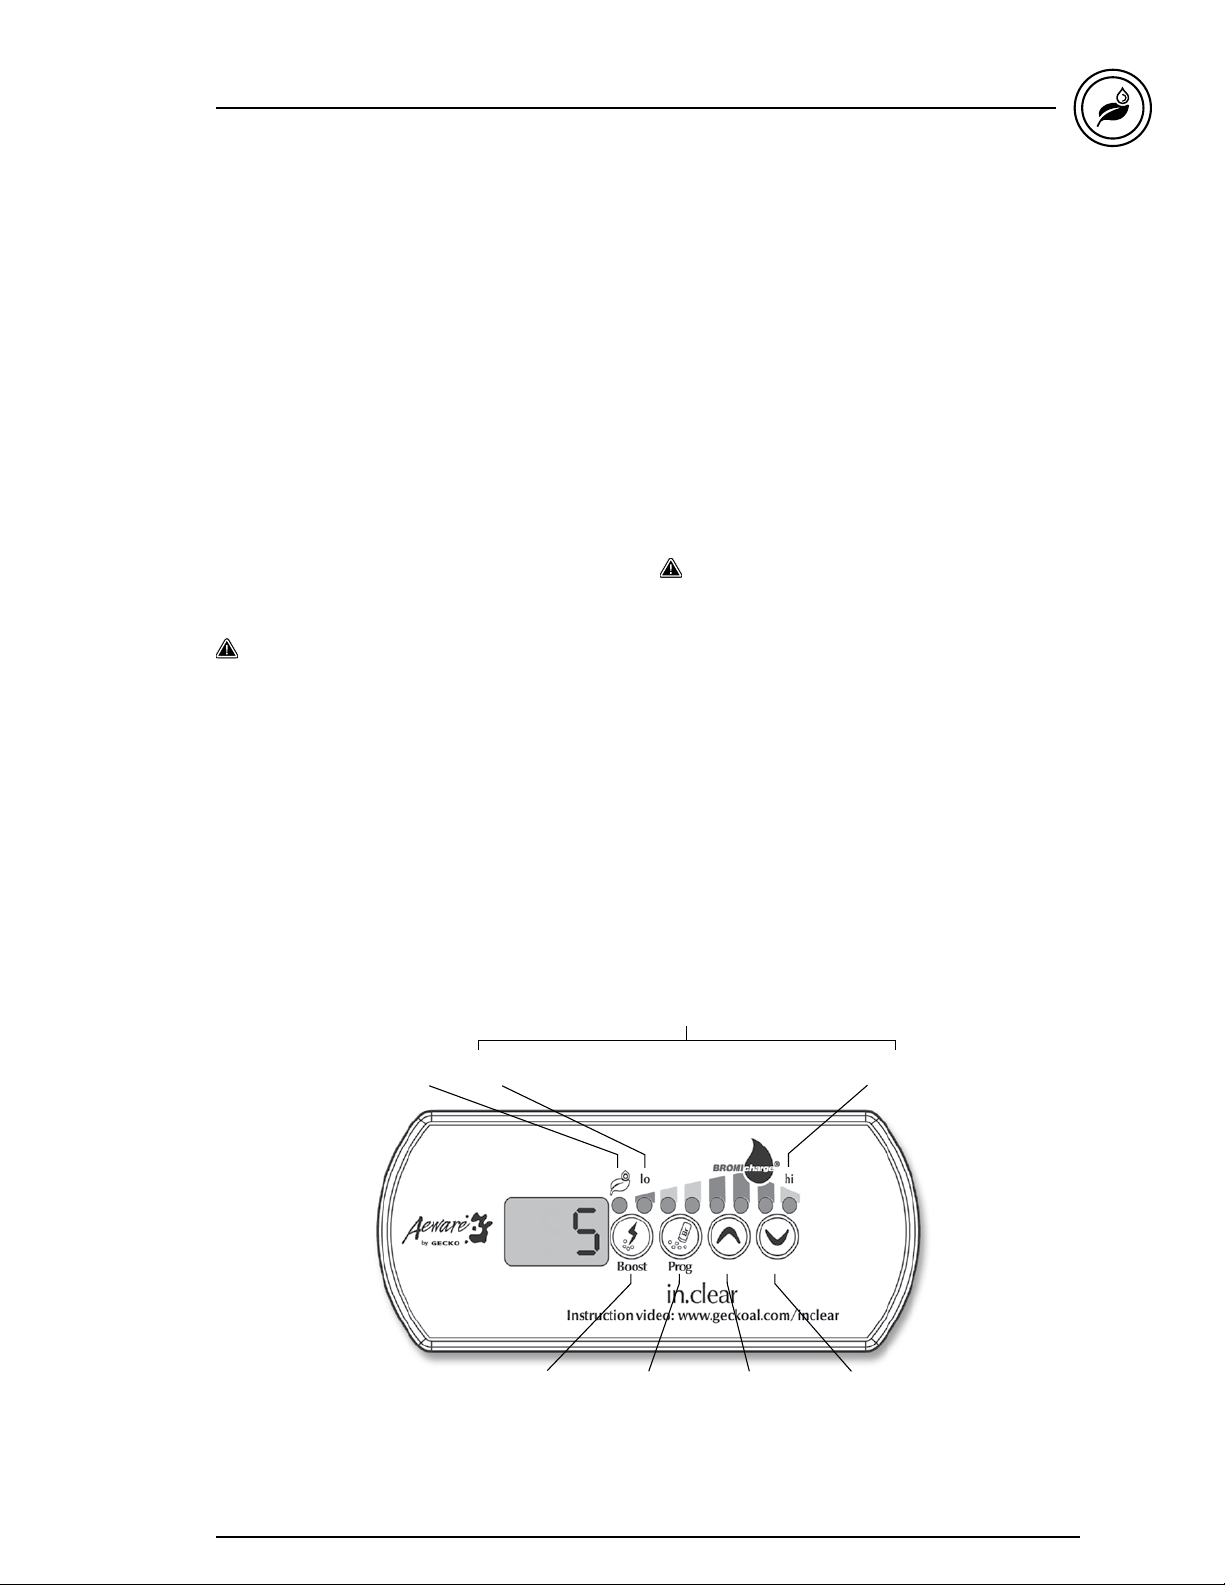
Keypad functions
Bromine
generator
ON indicator
lo
On/Off & Boost
key
BromiCharge gauge
Maintenance
Diagnostic
key
hi
Down keyUp key
11
Page 13

Start up procedure
in.clear user manual
Set the maintenance level
Determining the proper maintenance level for your spa is
an extremely important step. Using your spa while you're
establishing the residual will slow the process. Be patient.
Make sure you follow steps 1 through 4 previously
described before performing the following steps.
1. Power up your spa and activate the system by pressing
the Boost key .
2. Press and hold the Prog key for 2 seconds to
enter maintenance level adjustment mode. Your
maintenance value was set at the factory and should
read 15 to start.
Leave the in.clear system running for 24 hours to allow
the bromine level to stabilize. After that period, use
test strips to check the bromine level.
3. Bromine level should be between 3-5 PPM.
If the bromine level is within that range, you are ready
to use your spa. If the bromine level is above 5 PPM,
decrease the maintenance level. If the bromine level is
below 3 PPM, increase the maintenance level.
Use the Up and Down keys to adjust maintenance level.
The bromine generation rate ranges from 1 to 50, where
1 corresponds to the system’s minimum generating rate
and 50 corresponds to the maximum generation rate
allowed by the system.
Do NOT increase/decrease maintenance level in
steps greater than 2.
Setting the maintenance level to a value that's too
high can cause damage to your equipment.
Check bromine level and always test water before
entering the spa.
If the bromine level is higher than 5 PPM, lower
the maintenance level and turn off the system
until the bromine level is back below 5 PPM. Then,
restart the system and continue monitoring the
bromine level.
To lower the bromine level, expose your spa water to
the sun and activate all pumps for a few cycles.
Testing bromine levels with FAS-DPD drop count method
is more accurate than using test strips. Bromine FAS-DPD
is available at www.geckodepot.com under number
0699-300008.
Determine the boost level
Every time you use your spa, activate the Boost Mode.
As a rule of thumb, the Boost level corresponds to the
number of bathers using the spa. For example, activate
the Boost level to 2 indicators if two bathers are entering
the spa.
1. With the system in Maintenance Mode, press the
Boost key to activate the Boost Mode.
2. The keypad display will show a numeric value that
corresponds to the selected level. There are 8 possible
levels available with the Boost Mode. Set the Boost
level by using the up and down arrow to select the
number of bathers that use the spa.
3. Confirm the selection by pressing the Boost key again
or wait 5 seconds for the system to save the desired
level and activate the Boost Mode cycle.
Note: In.clear keeps your boost level in memory.
4. At the end of the Boost period, verify that the bromine
level has returned to the 3-5 PPM range. If the bromine
level is too low or too high after the Boost period, the
Boost level should be adjusted the next time the spa
is used. For example, if bromine level is higher than 5
PPM after a Boost of 2, lower the Boost level to 1 the
next time. Repeat these steps until you are able to
determine the ideal Boost level for your usage.
Note: Boost levels depend on the number of bathers using the
spa. We recommend you validate the Boost level after each use
to determine the ideal Boost level for all numbers of bathers.
Changing the water temperature setpoint of your
spa, or using the economy mode, could require a
change in the maintenance level of your in.clear.
Lower water temperatures may require a lower
maintenance level than higher temperature
setpoints. Please check your bromine level when
changing your temperature setpoint or using the
economy mode of your spa.
Never adjust the maintenance level of your in.clear
without allowing at least 24 hours following the end
of the Boost period. Boost cycles allow the residual
bromine level to stabilize. Bromine levels outside
the 3-5 PPM range may result from pollutants
following usage.
12
Page 14
in.clear user manual
Keypad operations
Boost key
The first press of the Boost
key turns the in.clear ON
and puts the in.clear into
maintenance mode. ON
appears on the keypad
display.
Press and hold the Boost
key for 2 seconds to turn
in.clear OFF. OFF will
appear on the keypad
display.
Press the Boost key once
while in maintenance
mode to adjust boost
settings.Pressing the Boost
key during a boost cycle
will cancel the remainder
of that boost cycle and
return the in.clear system
to maintenance mode.
The Bromine Generation
Indicator (LED), located
above the Boost key,
lights up when the cell is
producing bromine and is
OFF when no bromine is
being produced.
Note: The Bromine
Generation Indicator will blink
if the in.clear system cannot
generate bromine due to low
or no water flow.
Program key
Press and hold the
Program key for 2 seconds
to access maintenance
mode.
Once in maintenance
mode, press the Program
key again to access the
diagnostic mode.
Diagnostic mode
Diagnostic mode can be
used to periodically adjust
the BromiCharge level or
to check BromiCharge
keypad warnings and
errors.
Once in diagnostic
mode, an animation will
be displayed and within
10 seconds a numerical
value will be displayed.
The BromiCharge Gauge
will indicate the level of
sodium bromide in the
spa water.
Press the Prog key to exit
diagnostic mode or the
system will automatically
exit after 15 minutes.
+ / - Keys
Use the Up and Down
keys to adjust the
maintenance and boost
levels while in the
appropriate mode.
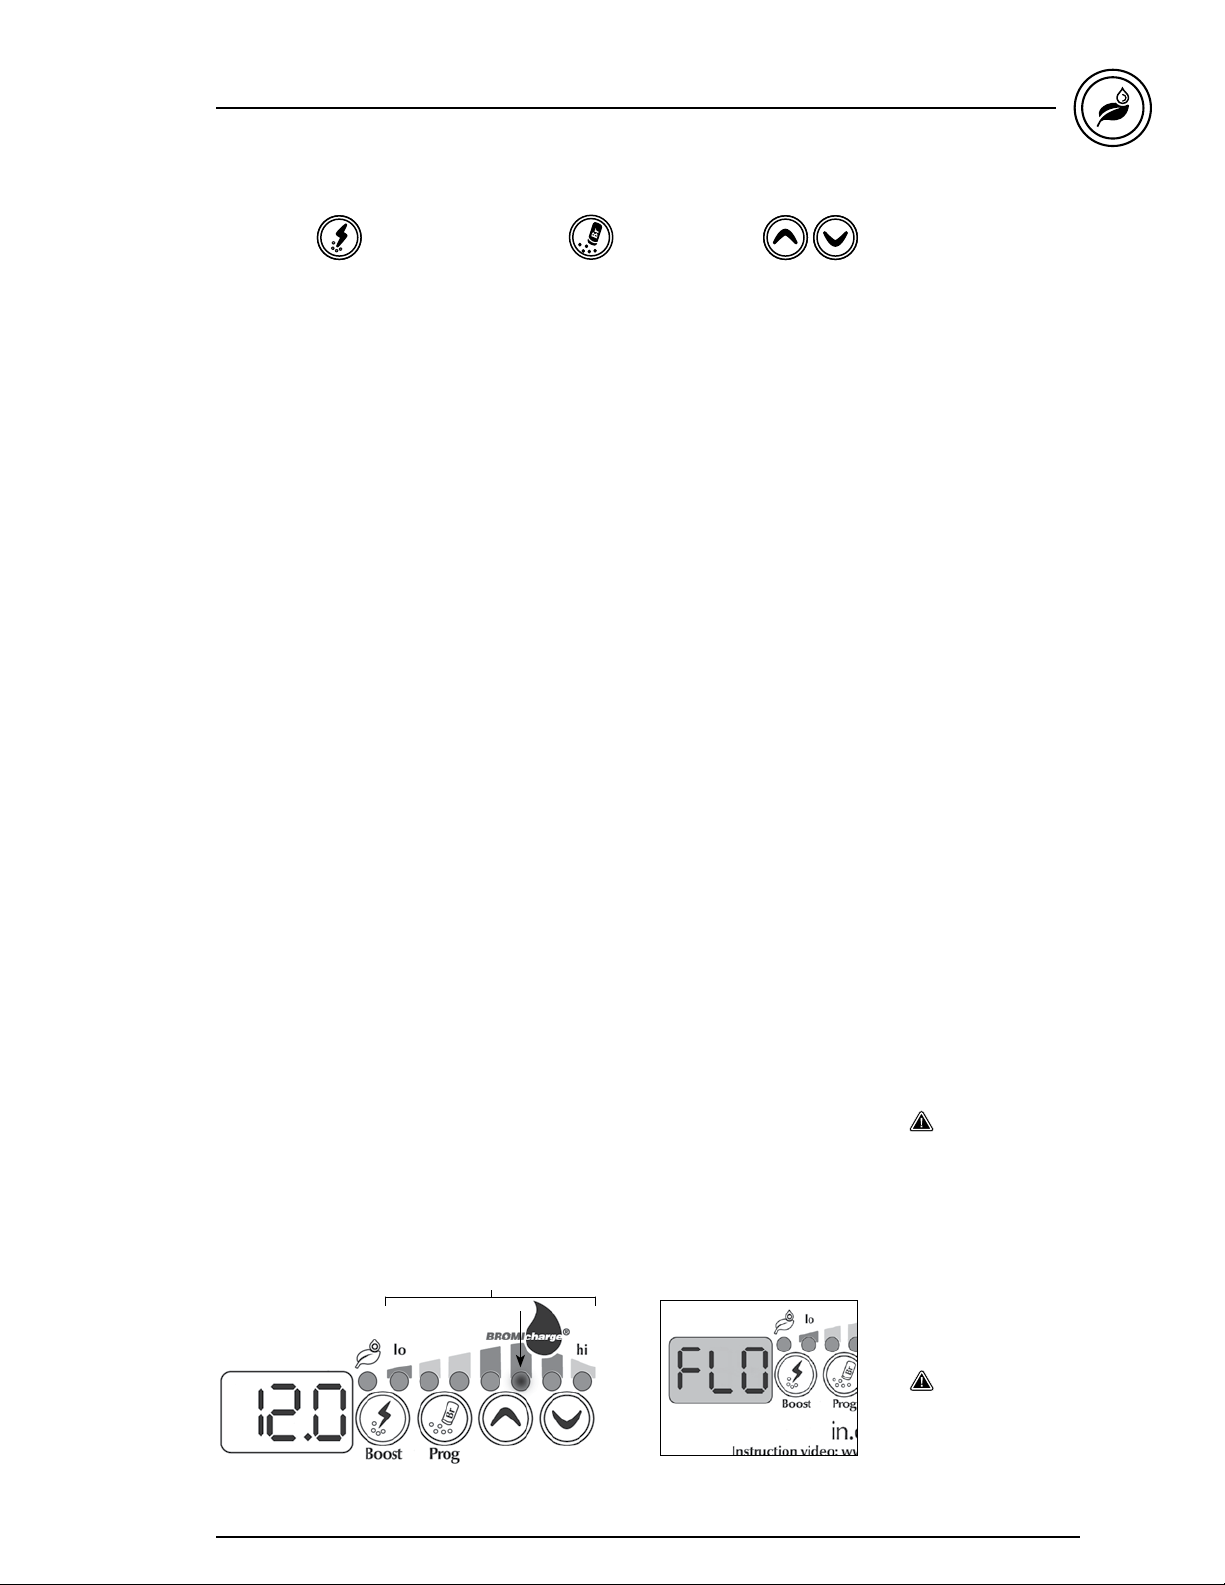
BromiCharge gauge (LEDs)
In Diagnostic mode, the BromiCharge gauge (LEDs) indicates the approximate
BromiCharge level of your spa water.
When adding BromiCharge, the gauge indicator will gradually shift to the right. When
adding clean water to the spa the indicator will shift to the left. In order to achieve the
proper level, start pumps and add 1 lb (454 g) at a time and always allow 5 minutes for
the gauge to react before adding more BromiCharge.
The green zone in the center area of the gauge and a 12.0 value should be targeted for
optimal performance.
BromiCharge gauge
Water must be
circulating through the
in.clear cell in order for
the Diagnostic Mode
to work. If no water
is circulating through
the in.clear unit, a FLO
message will appear
on the keypad display.
Make sure the pump
is circulating water
through the in.clear.
Be aware that
the gauge will
move according to
BromiCharge level.
Make sure your water
temperature is at least
32° C (90° F).
13
Page 15
Troubleshooting
in.clear user manual
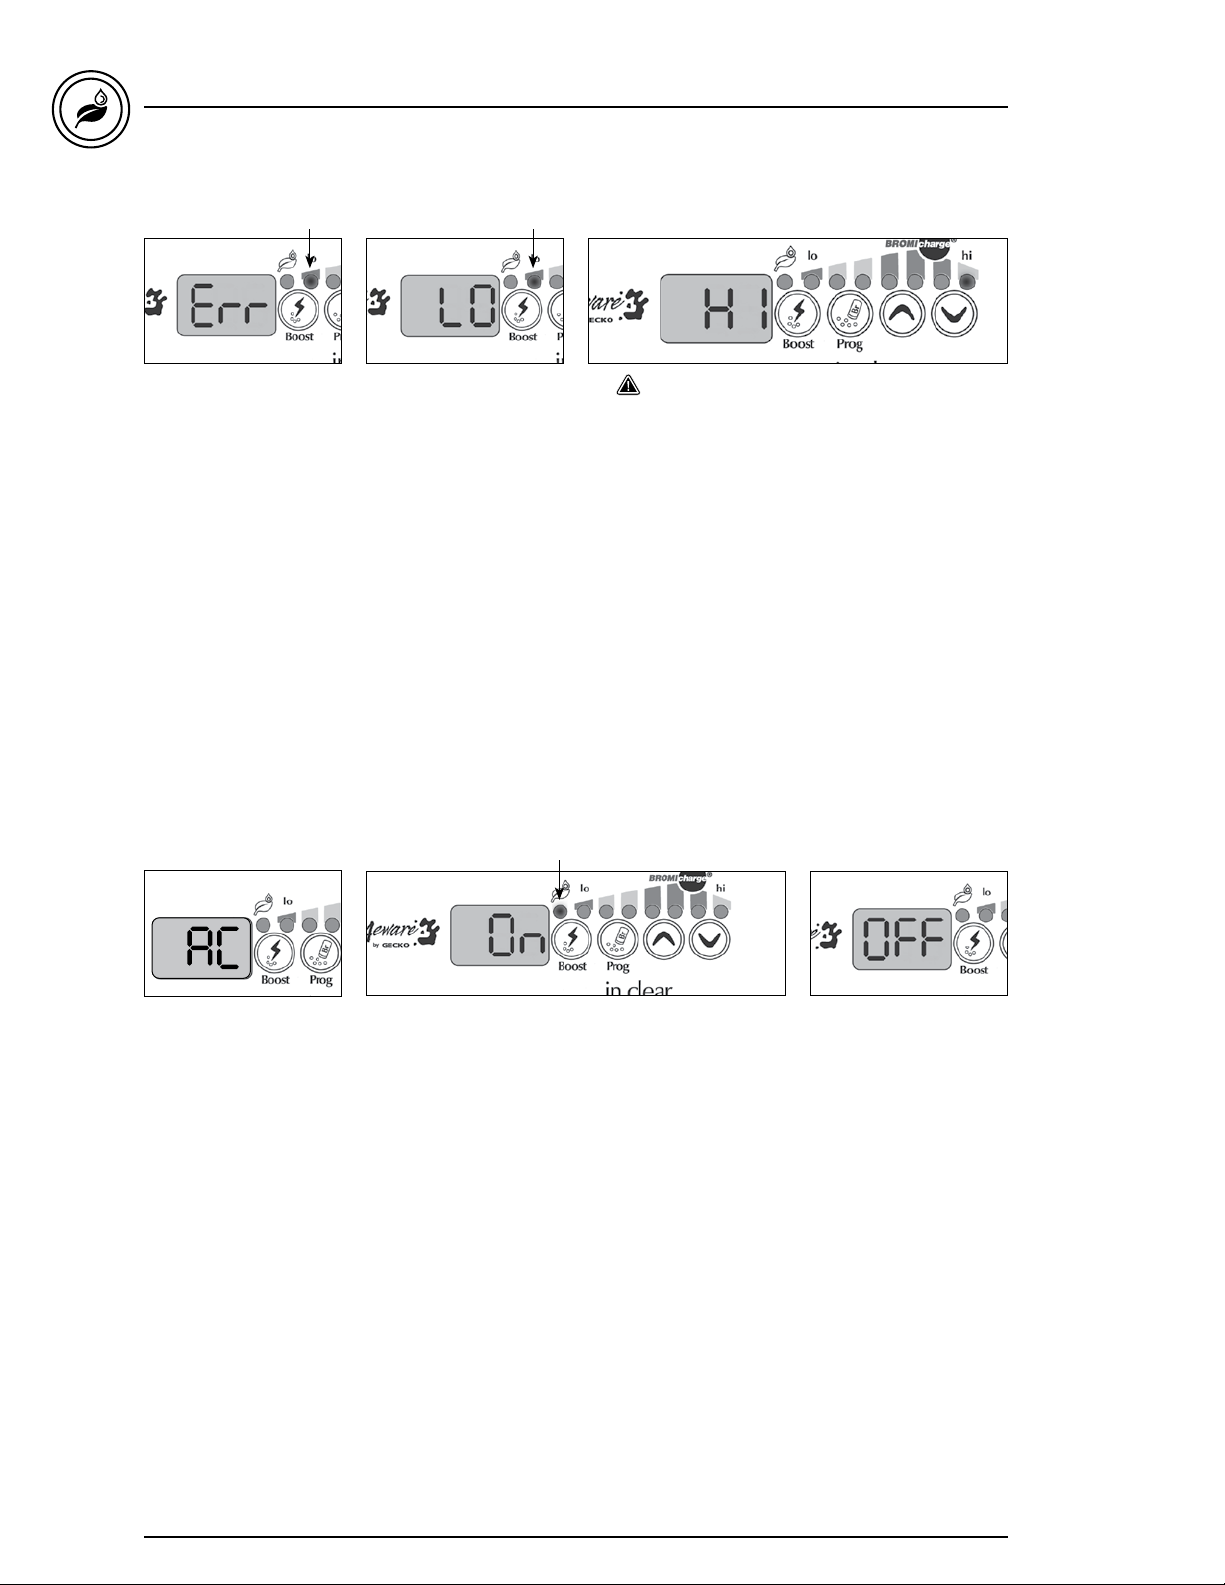
Low BromiCharge
Error
Low BromiCharge Error
(Err) occurs when the
BromiCharge level is too
low. The lo LED indicator
will blink when the error
is present. The in.clear
system will not generate
bromine until the Low
BromiCharge Error (Err)
is cleared.
To clear the Low
BromiCharge error (Err),
add BromiCharge to
the spa water. Let water
circulate for 5 minutes.
Activate diagnostic
mode and add more
BromiCharge until gauge
is back in the green zone.
Exit diagnostic mode.
Low BromiCharge
Warning
Low BromiCharge Warning
(Lo) indicates the need to
add BromiCharge to the
spa water.
In Diagnostic Mode, add
BromiCharge to the water
until the gauge reaches the
green zone to clear a Low
BromiCharge Warning (Lo).
If after adding
BromiCharge the
Low BromiCharge
Warning (Lo) or Low
BromiCharge Error (Err)
still occurs it could be
the result of:
• calcification of the
electrolytic plates;
• airlocks trapped
in the in.clear unit or
insufficient flow;
• internal pressure switch
problem.
High BromiCharge
Warning
High BromiCharge
Warning (Hi) occurs when
too much BromiCharge
is present in the water
or there is a high TDS
level (hardness, alkalinity,
organic compounds, etc).
To clear a High
BromiCharge Warning,
readjust the BromiCharge
content of your water in
Diagnostic Mode, into the
green zone by draining
some water from your spa
and adding fresh water.
Blinking “AC ”
A blinking “AC” message
displayed on the keypad
indicates that there is a
problem with the power
input. The most common
reason is that the in.clear
unit is supplied with 120 V
instead of 240 V. Please
make sure power cord is
connected properly to a
240 V source.
14
Bromine Generation
indicator blinking
A blinking Bromine
Generation LED means
that the system is unable
to generate bromine
because no water flow is
detected by the in.clear
system. This situation
is normal if no pump is
running and no water
is flowing through the
in.clear. However, if water
is circulating through
the in.clear unit, and the
Bromine Generation LED
is still blinking, make sure
that the in.clear is installed
on the pressure side of
the pump and that water
is flowing through the
in.clear unit.
Bromine Generation
indicator is off
The Bromine Generation
LED indicator is OFF
when there is no need
for bromine generation.
This situation is normal,
especially with low
maintenance level of
bromine generation set on
the keypad.
In.clear is turned off
The OFF message
indicates that the in.clear
is turned off.
Press the Boost key to
reactivate the in.clear.
Page 16

in.clear user manual
Low or no bromine reading
Make sure the maintenance level is properly set
according to the procedure described in the section
Set Maintenance Level. Make sure there is no error or
warning message on the display, the cell is activated
and that water is circulating properly through the cell.
Make sure water chemistry is in balance. Refer to
the section Adjust Water Chemistry in the Spa for
more details.
Test your spa water for phosphate to make sure there is
no contamination. Phosphates should never exceed 100
PPB. Phosphates can be introduced to your spa water by
household cleaners, soaps and lotions.
Change your filter or clean it with a filter cleaner and
rinse thouroughly with cold water.
Make sure the in.clear cell is not damaged and that no
calcium or lime deposits appear on the cell plates.
Clean your cell regularly.
Long recovery time after usage
Activate Boost Mode at the appropriate level every time
you use your spa. Refer to the section Determine the
Boost Level.
Heavy bather loads will require longer boost periods.
If bromine level is below 3 PPM following a boost
period, re-activate Boost Mode to bring the bromine
bank within 3-5 PPM.
Bromine bank should always be regenerated following
a boost period. If high Boost level does not regenerate
bromine bank properly, increase the daily filtration time.
If bromine production is still inadequate after following
all of the instructions above, biofilm deposits could
be causing the lack of bromine generation. Flushing
products such as Sea Klear Spa System Flush, Swirl Away
or National Chemistry Spa Purge have shown to be
effective for biofilm removal.
Q: Why is my spa water cloudy/oily?
A: If your spa becomes cloudy or oily due to bather
load perform an additional Boost and wait for
24 hours to see if conditions return to nornal. If the
problem persists consult a spa/pool dealer to have
your water balanced properly.
Q: Does the sodium bromide evaporate?
A: No. Sodium bromide is only lost through splash out,
leaks or when draining your spa.
Q: What should I use to clean my spa?
A: Always use a non-sudsing cleaner found at your spa store.
Q: When my in.clear bromine generator is off does the
sodium bromide continue sanitizing my spa?
A: No, the in.clear system does not sanitize if inactive. If
there is a residual bank of bromine, bromine continues
to sanitize the spa water. In.clear may be off at certain
times and the spa will still be fine and clean.
The sodium bromide is converted to bromine as it
passes through the electrodes of the in.clear system
and the pump associated with the in.clear is running.
15
Page 17

Glossary
in.clear user manual
TDS
Total Dissolved Solids
(TDS) is an expression for
the combined content of
all inorganic and organic
substances contained in a
liquid which are present
in a molecular, ionized or
micro-granular (colloidal
sol) suspended form.
Calcium Hardness (CH)
pH
pH (potential hydrogen) is
a measure of the acidity or
basicity of a solution.
Total Hardness (TH)
PPM
"Parts-per million"
notation is used to denote
relative proportions or
a comparative ratio in a
given measured quantity.
The expression "1 PPM"
means a given property
exists at a relative
proportion of one part per
million parts examined, as
would occur if a waterborne pollutant was
present at a concentration
of one-millionth of a
gram per gram of sample
solution.
Organic Matter
Total Alkalinity
Total Alkalinity or TA is a
measure of the ability of
a solution (such as water)
to neutralize acids to the
equivalence point of
carbonate or bicarbonate.
Bather Load
Calcium Hardness
describes the
concentration of calcium
in your spa water.
Total Hardness describes
the concentration of
calcium and magnesium
in your spa water.
Substances left behind
by spa users such as oil,
sweat and dead skin cells
that serve as "food" for
bacteria.
This term is used to
describe the number
of bathers using a spa,
combined with the length
and frequency of its usage.
The higher the bath usage,
the greater quantity of
chemicals needs to be
added to maintain the
same spa water quality.
16
Page 18
in.clear user manual
Cell cleaning
In.clear includes a self-cleaning feature to prevent scale
deposits on the graphite electrodes of the in.clear
system. However, deposits may still form due to hard
water. If that happens the cell should be cleaned in an
acidic solution.
All power must be disconnected before any service
procedure is performed.
Disconnect the communication cable and power cable
of the in.clear unit.
To clean the in.clear cell, follow these steps:
• To remove scales from the cell, we recommend
using phosphoric acid (non-diluted) as the preferred
cleaning product.
• Close the spa flow shut off valves. Unscrew both
unions from the unit and remove the cell from
the spa equipment compartment.
• Install the rubber washer and the plastic nut on the
threaded end of the cell. Tighten plastic nut firmly.
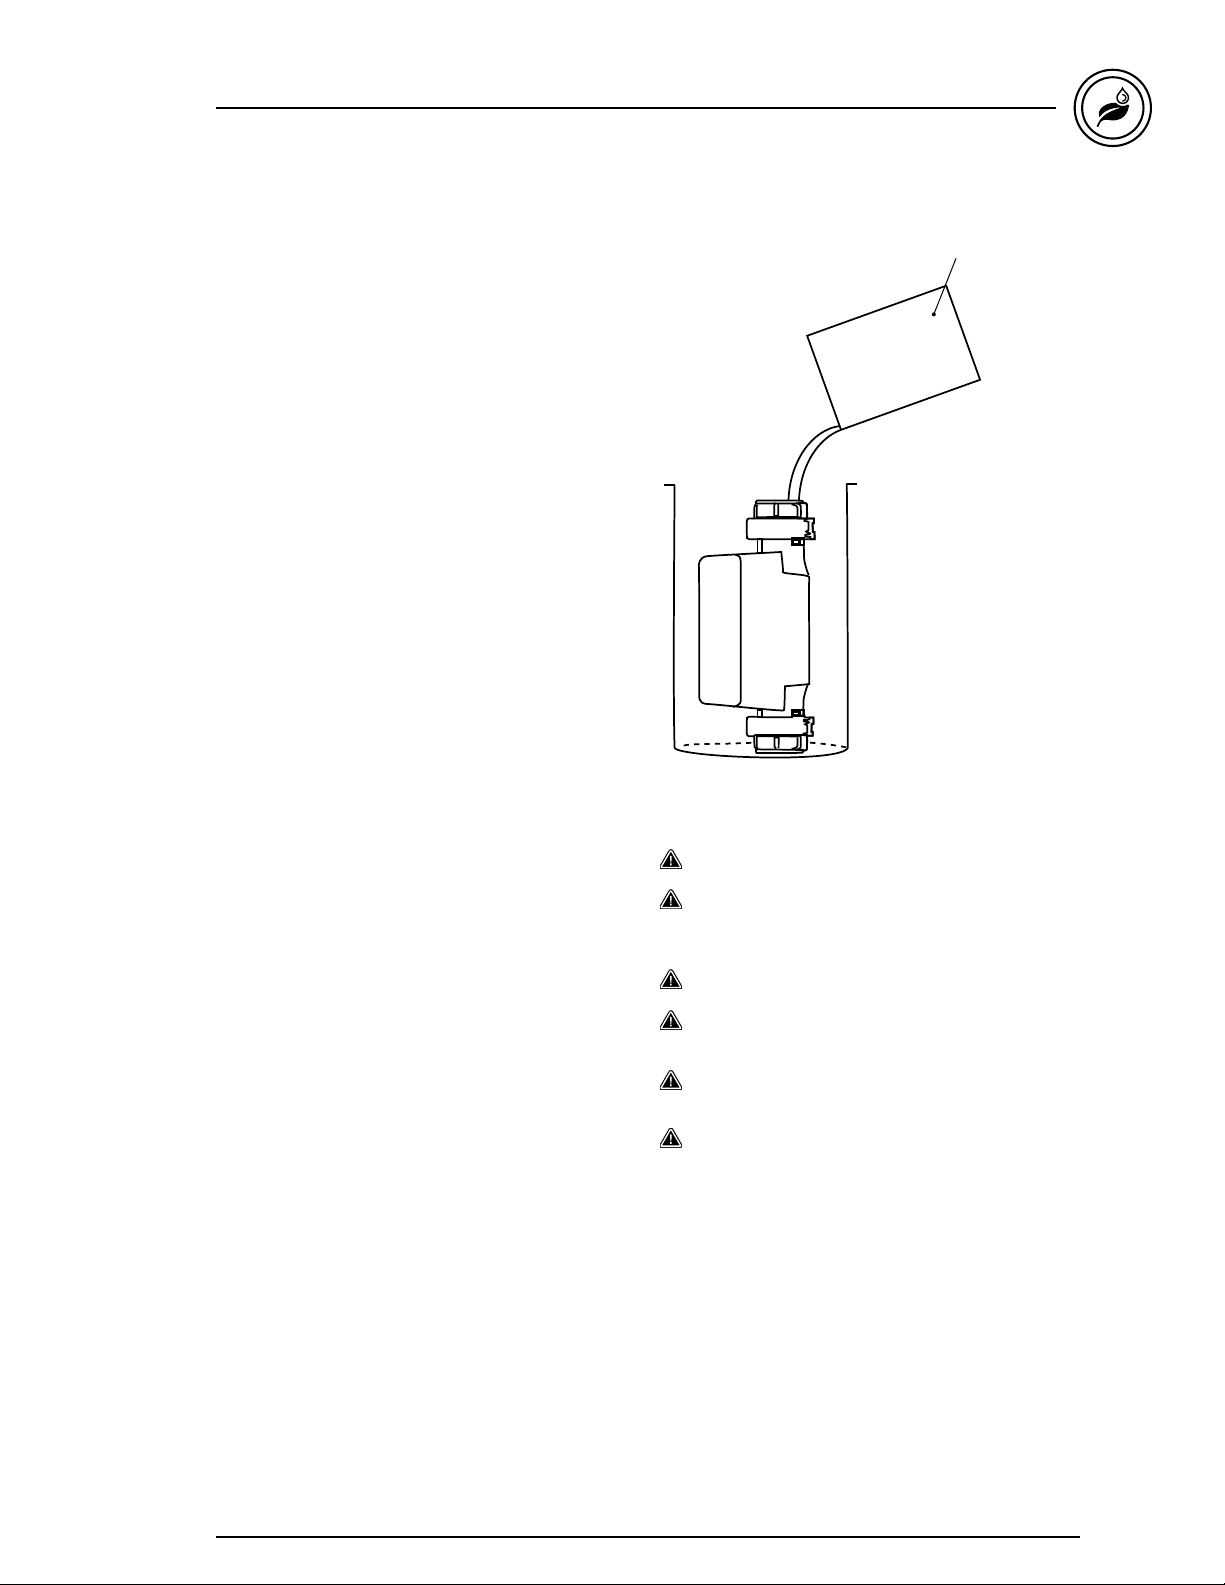
• Place the cell vertically with the cap end down into
a plastic 19 liters (5 U.S. gallon) bucket and carefully
pour the acid solution into the cell until the 4 plates
are covered (careful not to overflow). The acid
solution will begin to produce bubbles to clean
the electrodes.
A foaming action will follow, which is caused by
the scale deposits being dissolved from the plates.
If rigorous foaming action does not begin, the cell
does not need to be cleaned. Rinse and reinstall
the cell.
• Allow the electrodes to remain in the solution until
the foaming has stopped. However, DO NOT leave
in acid for more than fifteen minutes. Excessive acid
cleaning will damage the electrolytic cell.
• Pour the acid solution back into the bucket and rinse
the cell thoroughly with clean tap water. If deposits
are still visible, repeat operation for fifteen minutes
maximum (some acid may need to be added to
the solution).
Phosphoric acid
or muriatic acid
Refer to acid manufacturer's instructions.
Wear eye protection and rubber gloves during these
operations. Splashing or spilling acid can cause
severe personal injuries and/or property damage.
Always work in a well-ventilated area.
Always add acid to the water, never add water
to the acid.
Do not pour acid outside of the unit where
the connectors are located.
Never use acetic acid to clean the cell, as this will
cause permanent damage to cell components and
void the warranty.
• Remove the plastic nut and washer from the cell
and keep them for future cell cleaning.
• Rinse the in.clear with fresh water.
• Re-install the in.clear unit into spa system plumbing,
tighten all connections by hand. Open the spa flow
shut off valves.
• Reconnect the keypad and power cable.
• Turn power on and start up the pump. Check the
keypad to see that the bromine generation LED is
on and resume normal operation.
17
Page 19
in.clear general specifications
Environmental:
Operating temperature: 32˚F (0˚C) to 122˚F (50˚C)
Storage temperature: -13°F (-25°C) to 185°F (85°C)
Humidity: up to 85% RH, non condensing
Water Ingress protection: IPx5
in.clear electrical specifications:
Input rating : 230-240 V nominal (+ 5/- 10 %)
Frequency: 50/60 Hz nominal (+ 1. 5 / -1.0 Hz).
Operating current: 0.09 A (90mA)
in.clear flow rate: 3 US GPM (11.3 l/min) minimum flow rate (required)
40 US GPM (151 l/min) maximum flow allowed.
Mechanical:
Weight: 5.0 lbs (2.25 kg)
Dimensions (W x H x D): Chassis: 10.875’’ x 6.046’’ x 4.682’’ (276.2mm x 153.6mm x 119mm)
in.clear user manual
North America:
UL 1081 sixth Ed, UL 1563 Fifth Ed.
File: E305676
CSA No. 22.2 - 108-01 4th Ed.
EPA Reg. No. 8622-69-73578
EPA Reg. No. 69470-wv-2
Registration No. 29628 Pest Control Product Act - Canada
European:
EN/IEC 60335 - 2 - 60: 2003/2002
EN/IEC 60335 - 1: 2002/2001 (incl. Corr. & Am. up to 2006)
EN 55014-1
EN 55014-2
EN 61000-3-2
EN 61000-3-3
Australia / New Zealand:
AS/NZS 60 335.2.60: 2006+A1
in.k200 general specifications:
Environmentals:
Storage temperature: -22˚F (–30˚C) to 158˚F (70˚C)
Operating temperature: -4˚F (–20˚C) to 140˚F (60˚C)
Humidity: 100% condensing
18
Mechanical Specs:
Weight: 0.41 kg (0.9 lbs)
Dimensions (W x H x D): Front Panel:
4.75" x 2" x 1.7" (120 mm x 51 mm x 43 mm) Soft gasket
Standards: UV resistance (ASMT D4329)
UL, CSA, TUV and CE
Specifications and design are subject to change without prior notice.
Page 20
9919-101186-A
Rev. 08-2012
© Groupe Gecko Alliance Inc., 2012
All trademarks or registered trademarks
are the property of their respective owners.
450 des Canetons, Quebec City, QC, G2E 5W6 Canada, 1.800.78.GECKO
Gecko Alliance
9225 Stellar Court, Corona, CA 92883 USA, 951.667.2000
www.geckoalliance.com
Printed in Canada 08-2012
 Loading...