

Geberit AQUACLEAN TUMA COMFORT, AQUACLEAN TUMA CLASSIC Installation Manual

GEBERIT AQUACLEAN TUMA
COMFORT/CLASSIC
INSTALLATION MANUAL
MONTAGEANLEITUNG
INSTRUCTIONS DE MONTAGE
ISTRUZIONI PER IL MONTAGGIO

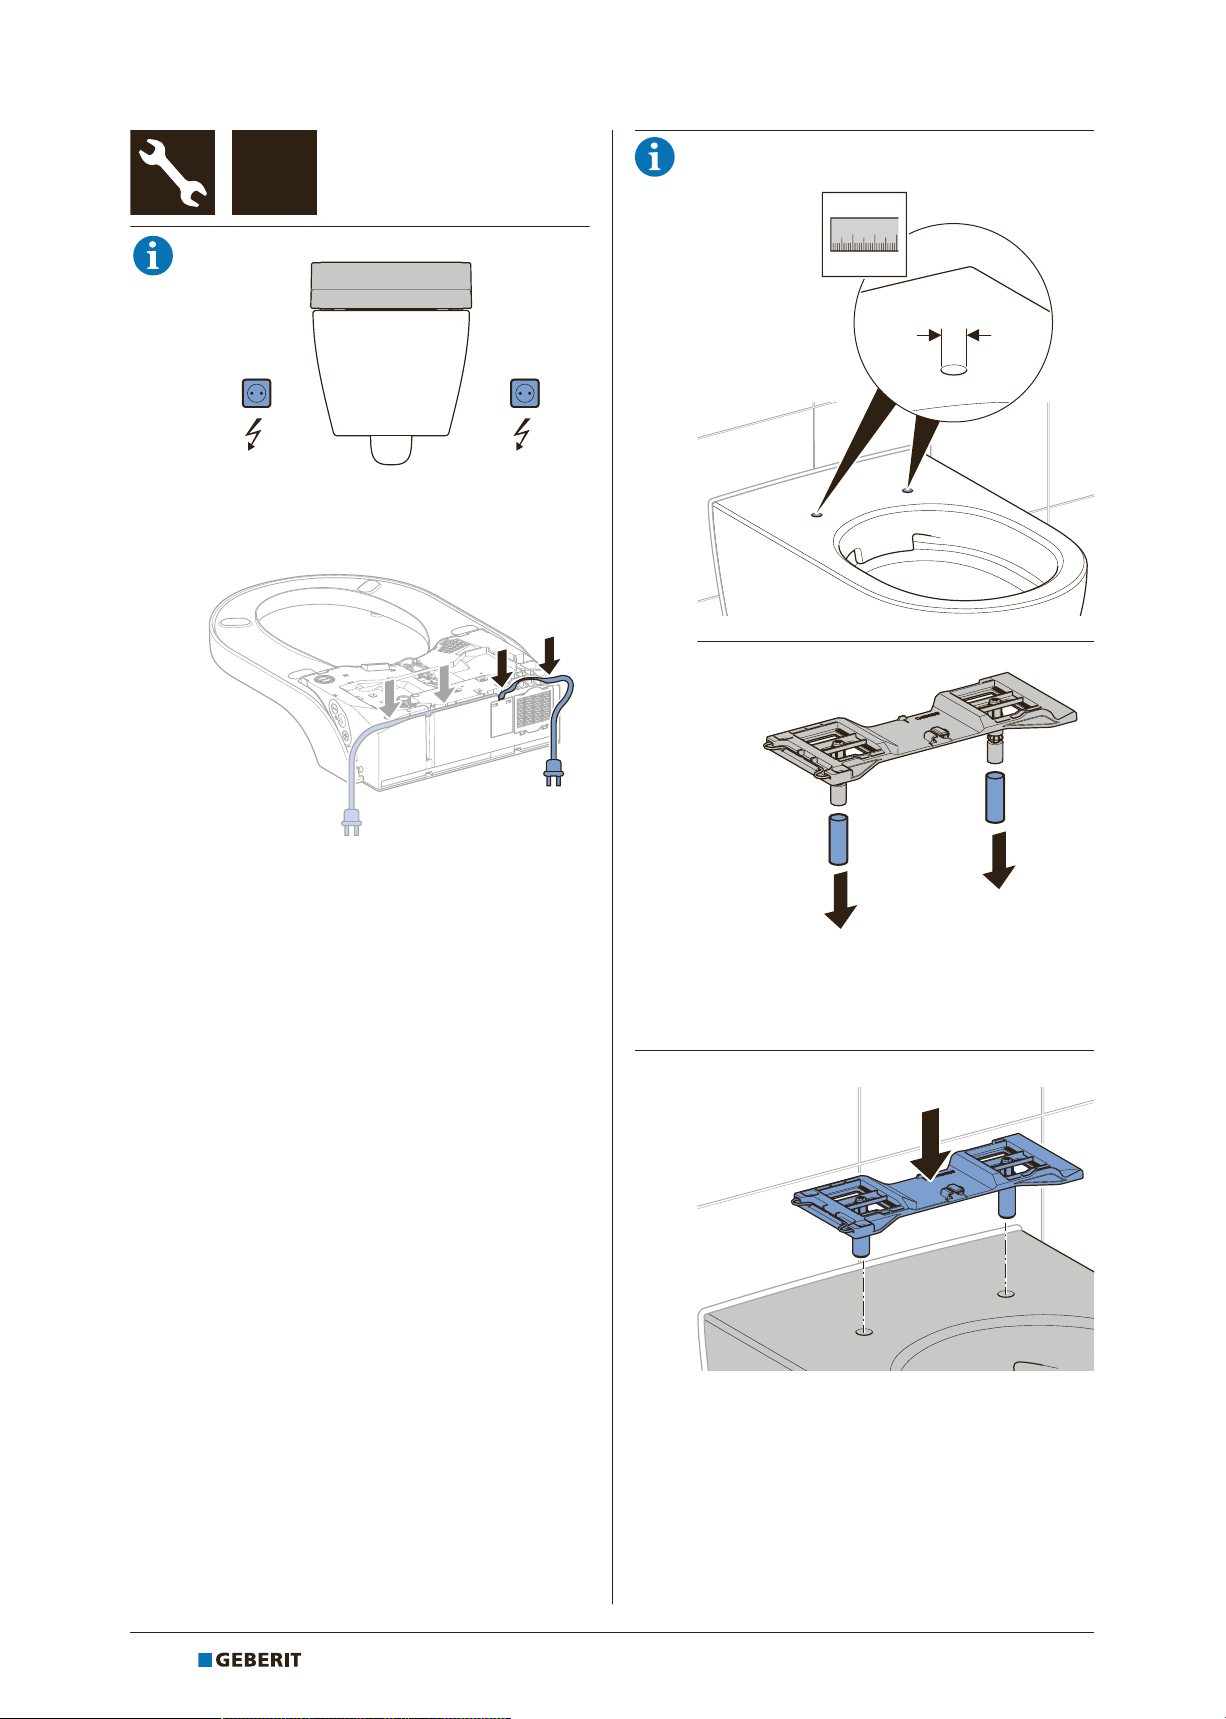
GEFAHR
Lebensgefahr durch elektrischen
Schlag
4 Gerät nur an Steckdosen oder
Festanschlüssen mit Schutzerdung
betreiben
DANGER
Danger of fatal electric shock
4 The device may only be operated at
power outlets or fixed connections with
protective earthing
DANGER
Danger de mort par décharge
électrique
4 Utiliser l'appareil uniquement lorsqu'il
est raccordé à des prises électriques ou
des branchements fixes avec mise à la
terre
PERIGO
Perigo de morte provocado por choque
elétrico
4 Utilizar o aparelho apenas em tomadas
ou ligações fixas com ligação à terra de
proteção
FARE
Livsfare på grund af elektrisk stød
4 Enheden må kun anvendes på stikdåser
eller fastopkoblede forbindelser med
arbejdsjording
FARE
Livsfare på grunn av elektrisk støt
4 Apparatet skal kun drives i stikkontakter
eller faste tilkoplinger med jordet
ledning
FARA
Livsfara p.g.a. elektriska stötar
4 Apparaten får endast anslutas till eluttag
eller fasta anslutningar med
skyddsjordning
PERICOLO
Pericolo di morte per scossa elettrica
4 Utilizzare l'apparecchio esclusivamente
con prese elettriche o allacciamenti fissi
provvisti di messa a terra
GEVAAR
Levensgevaar door elektrische schok
4 Apparaat alleen aan stopcontacten of
vaste aansluitingen met randaarding
gebruiken
PELIGRO
Peligro de muerte por descarga
eléctrica
4 Utilizar el dispositivo solamente en
salidas de corriente o conexiones fijas
con puesta a tierra de protección
VAARA
Sähköiskun aiheuttama hengenvaara
4 Laitetta saa käyttää vain
suojamaadoituksella varustetuissa
pistorasioissa tai kiinteissä liitännöissä
NIEBEZPIECZEŃSTWO
Zagrożenie życia na skutek porażenia
prądem
4 Urządzenie eksploatować wyłącznie po
podłączeniu do gniazdek elektrycznych
lub przyłączy stacjonarnych
wyposażonych w uziemienie ochronne
VESZÉLY
Életveszély áramütés következtében
4 A készüléket csak védőföldeléssel
rendelkező dugaszoló aljzatokkal vagy
rögzített csatlakozókkal üzemeltesse
27021599673220363-1 © 11-2017
967.305.00.0 (02)
3
NEBEZPEČENSTVO
Ohrozenia života zásahom elektrickým
prúdom
4 Prevádzka zariadenia je povolená len
vtedy, ak je pripojené k zásuvkám alebo
pevným prípojkám s ochranným
uzemnením
NEBEZPEČÍ
Ohrožení života elektrickým proudem
4 Zařízení provozujte připojené pouze na
zásuvky nebo pevná připojení
sochranným uzemněním
NEVARNOST
Smrtna nevarnost zaradi električnega
udara
4 Napravo lahko uporabljate samo, ko je
priključena prek vtičnice ali pri stalni
priključitvi z ozemljitvijo
TEHLİKE
Elektrik çarpması nedeniyle ölüm
tehlikesi
4 Alet sadece koruyucu toprak hattı olan
prizlerde veya sabit bağlantılarla
çalıştırılmalıdır
ОПАСНО
Опасность для жизни от удара
электрическим током
4 Устройство разрешено
эксплуатировать только от
штепсельных розеток или
неразъемных соединений с
защитным заземлением
危险
电击有致命危险
4 设备仅允许在插入电源插座或带保护性
接地的固定接头时运行
OPASNOST
Opasnost za život zbog strujnog udara
4 Uređaj puštajte u pogon samo na
utičnicama ili fiksnim priključcima sa
zaštitnim uzemljenjem
OPASNOST
Opasnost po život usled strujnog udara
4 Uređaj uključivati samo u utičnice ili
fiksne priključke sa zaštitnim
uzemljenjem
ОПАСНОСТ
Опасност за живота поради токов
удар
4 Работете с уреда само на контакти
или постоянни връзки със защитно
заземяване
PERICOL
Pericol de moarte prin electrocutare
4 Exploataţi aparatul doar cu alimentare
de la prize sau racorduri fixe cu
împământare de protecţie
4
27021599673220363-1 © 11-2017
967.305.00.0 (02)
5"
5"
5$
27021599673220363-1 © 11-2017
967.305.00.0 (02)
5
F
P
O
FP
$ FP
% FP
%
$
*HEHULW
$TXD&OHDQ
O
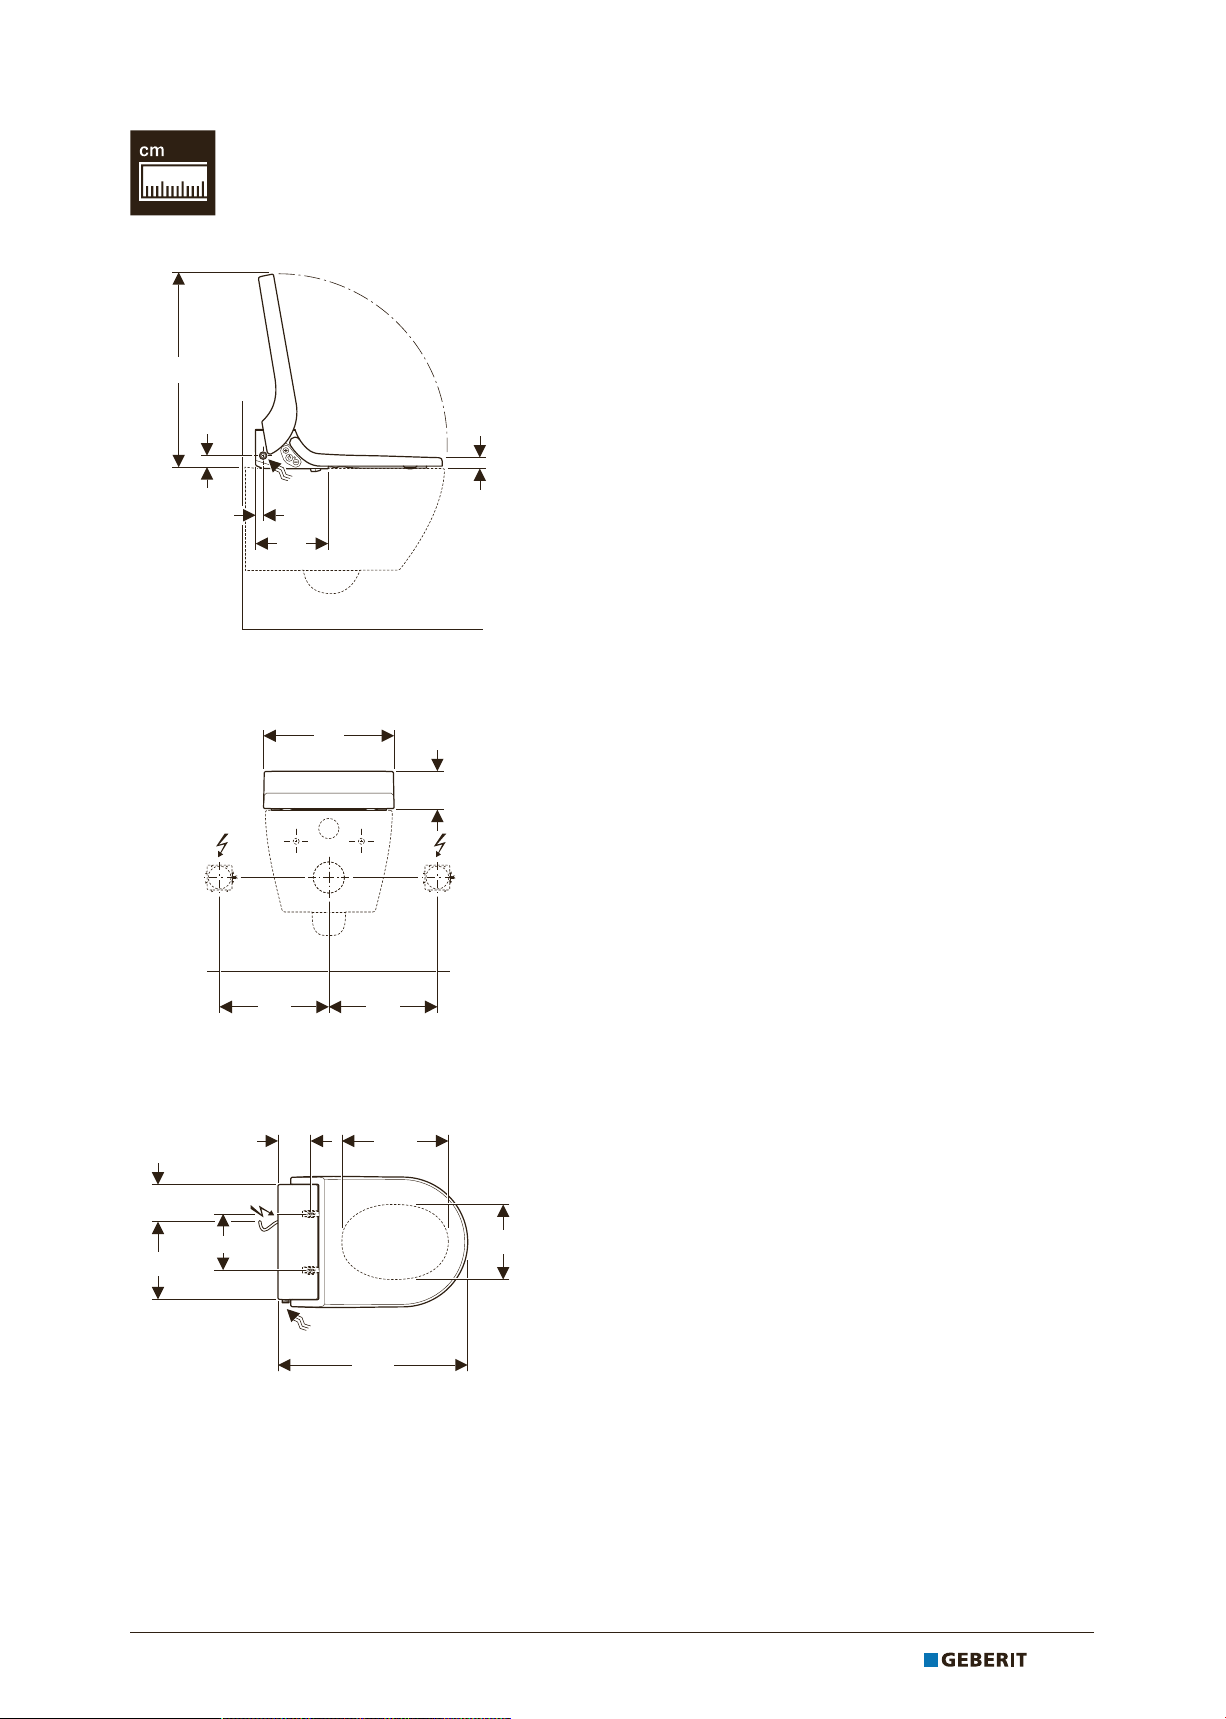
¡PP
FP
*HEHULW$TXD&OHDQ*HEHULW$TXD&OHDQ
%
$
FP
$%
6LJPD2PHJD+FP
2PHJD.DSSD+FPFP
*%
2PHJD3(;
6
27021599673220363-1 © 11-2017
967.305.00.0 (02)
5ôß
5ôß
²
²
27021599673220363-1 © 11-2017
967.305.00.0 (02)
7
1
%$
$
%
;PP
;
1
8
27021599673220363-1 © 11-2017
967.305.00.0 (02)
2
!
1)
4
5
3
27021599673220363-1 © 11-2017
967.305.00.0 (02)
9
6
T
2
1
2
10
3
27021599673220363-1 © 11-2017
967.305.00.0 (02)

Deutsch......................................................................................................................................................................
12
English .......................................................................................................................................................................
Français .....................................................................................................................................................................
Italiano........................................................................................................................................................................
Nederlands................................................................................................................................................................
Español......................................................................................................................................................................
Português ..................................................................................................................................................................
Dansk .........................................................................................................................................................................
Norsk..........................................................................................................................................................................
Svenska .....................................................................................................................................................................
Suomi .........................................................................................................................................................................
Polski..........................................................................................................................................................................
Magyar .......................................................................................................................................................................
Slovensky ..................................................................................................................................................................
Čeština.......................................................................................................................................................................
Slovenščina...............................................................................................................................................................
Hrvatski......................................................................................................................................................................
21
30
39
48
57
66
75
84
93
102
111
120
129
138
147
156
Srpski .........................................................................................................................................................................
Български.................................................................................................................................................................
Română .....................................................................................................................................................................
Türkçe ........................................................................................................................................................................
Pусский .....................................................................................................................................................................
中文 ............................................................................................................................................................................
165
174
183
192
201
210
27021599673220363-1 © 11-2017
967.305.00.0 (02)
11
DE
Funktionsprüfung
Gerät einschalten
WARNUNG
Gefährliche Spannung
Gefahr eines elektrischen Schlags durch
Wasser auf Strom führenden Teilen.
4 Den Abnehmebegrenzer
(Sicherheitsleine) zwischen Gerät und
Montageplatte vor dem Einschalten
montieren.
4 Nach dem ersten Einschalten das Gerät
nicht mehr schütteln oder kippen.
4 Das Gerät enthält Wasser. Vor dem
Lösen des Abnehmebegrenzers zu
Servicezwecken das Gerät über den
Netzschalter ausschalten.
ü Nach Abschluss des Einschaltvorgangs
leuchtet keine LED. Das Gerät ist im
Energiesparmodus.
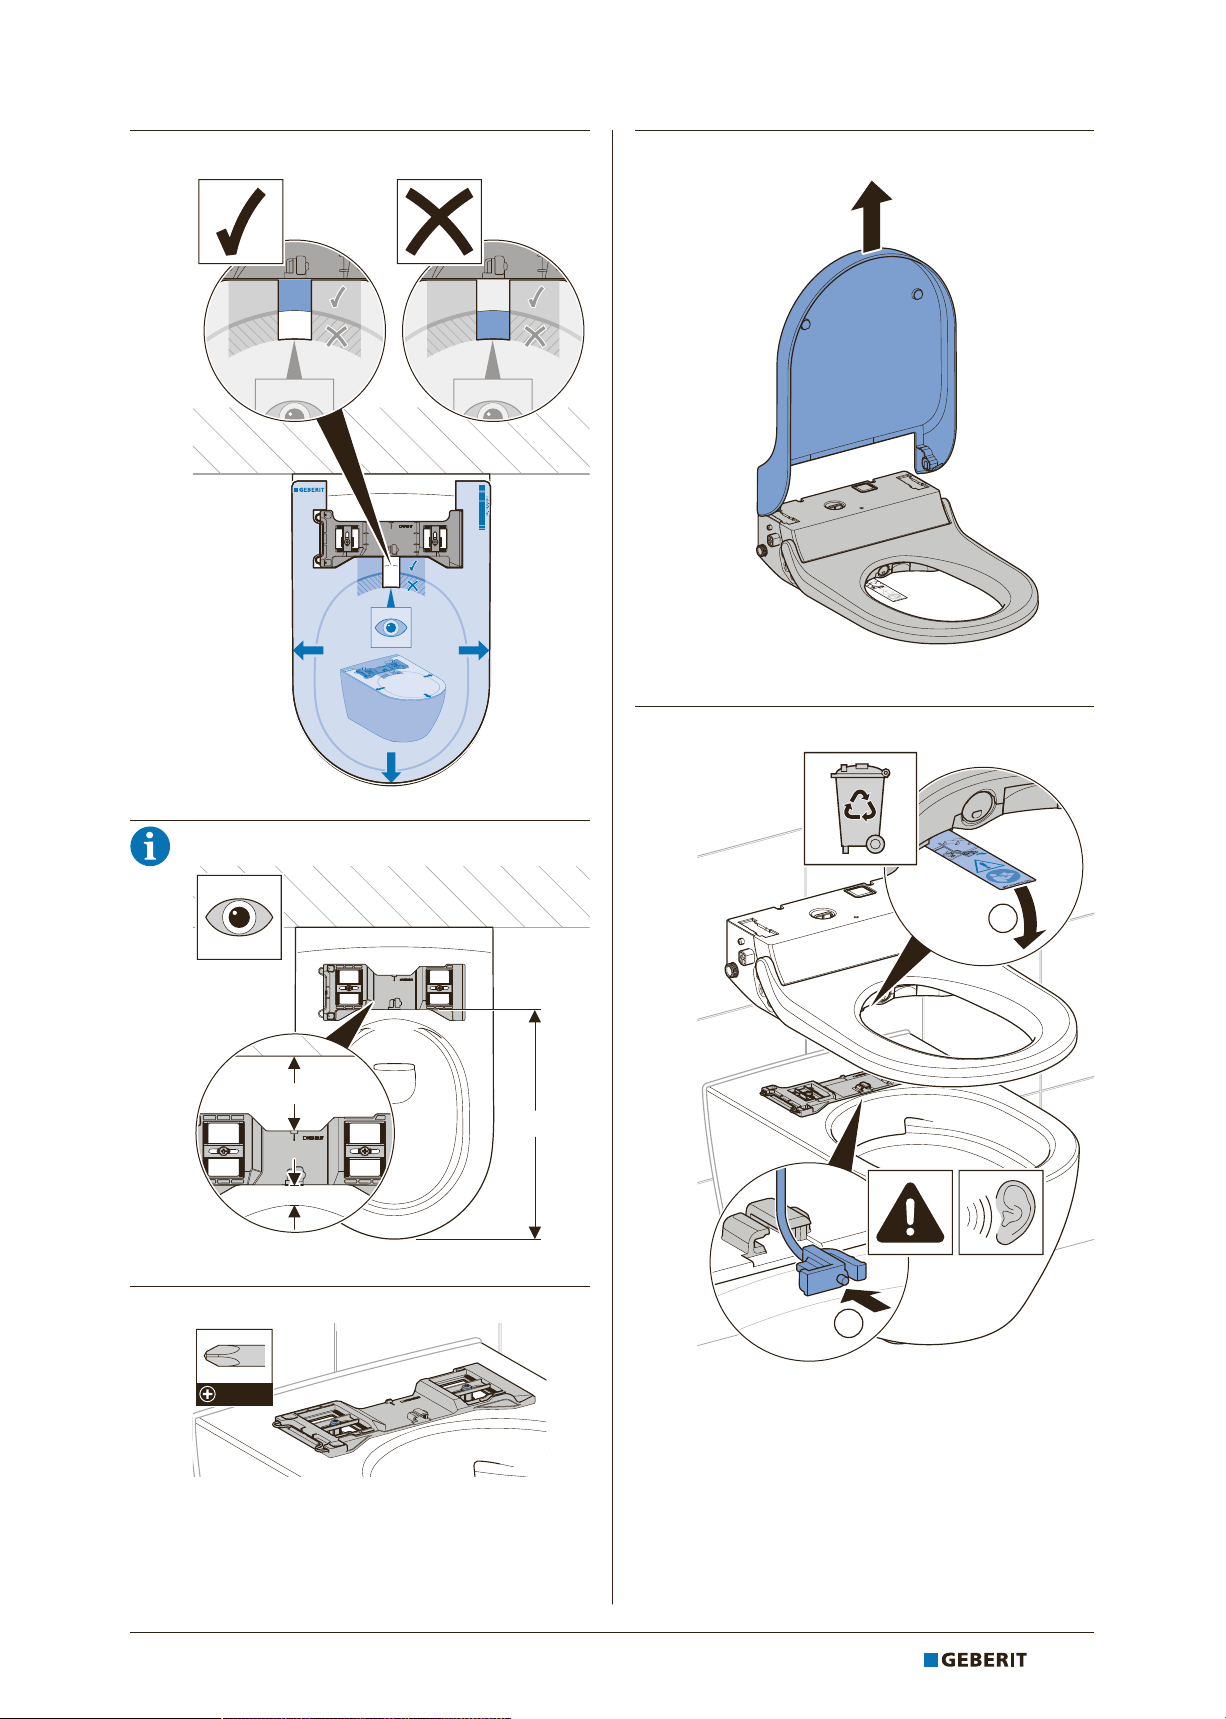
2 WC-Deckel einsetzen.
Voraussetzung
– Das Gerät ist montiert und angeschlossen.
– Der WC-Deckel ist abgenommen.
– Der Abnehmebegrenzer ist an der
Montageplatte korrekt eingerastet.
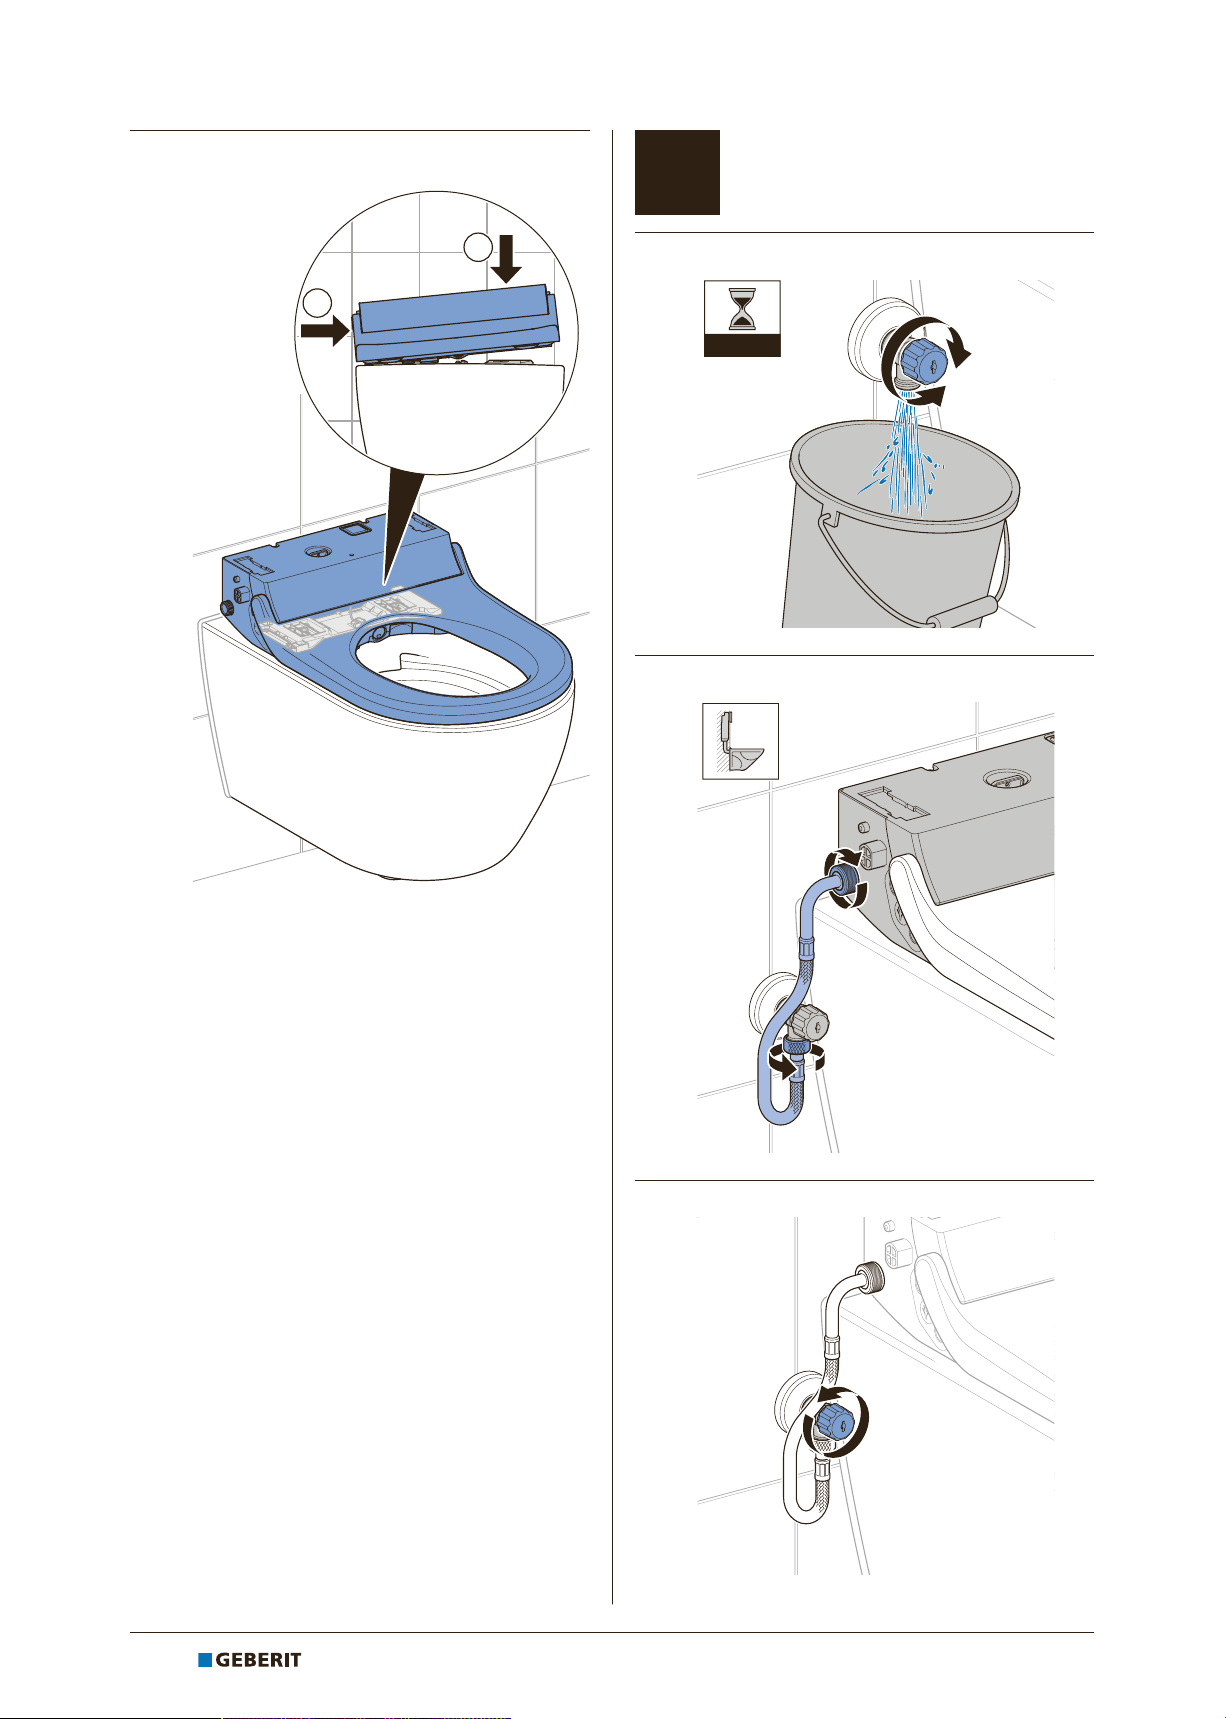
– Die Wasserzufuhr am Kugelhahn ist geöffnet.
– Der Spritzschutz ist montiert.
1 Gerät am Netzschalter einschalten.
Blinkt die LED rot, ist das Gerät defekt.
Keine Reparaturen am Gerät vornehmen.
Den Kundendienst informieren.
12
ü Nach etwa 5Sekunden blinkt die LED
am seitlichen Bedienfeld blau. Das Gerät
initialisiert sich.
ü Das Gerät führt eine Vorreinigung durch.
27021599673220363-1 © 11-2017
967.305.00.0 (02)
Benutzer simulieren
DE
WC-Sitz-Heizung prüfen
Dieser Abschnitt gilt nur für die Ausführung
Comfort.
Für die nachfolgenden Prüfschritte muss
der WC-Sitz wie dargestellt ständig berührt
werden, um einen Benutzer zu simulieren.
• Dabei leuchtet die LED am seitlichen
Bedienfeld blau.
4 Eine Hand flach auf die markierte Position
legen und dort halten.
Dieser Abschnitt gilt nur für die Ausführung
Comfort.
Voraussetzung
– Benutzer wird simuliert.
4 WC-Sitz-Heizung prüfen.
Ergebnis
ü Die LED am seitlichen Bedienfeld leuchtet blau,
und die Geruchsabsaugung läuft. Ein Benutzer
wird erkannt.
ü Die WC-Sitz-Heizung startet.
Die Geruchsabsaugung stoppt und die LED
erlischt, wenn kein Benutzer erkannt wird.
• Der Energiesparmodus ist aktiv.
Ergebnis
ü Nach einigen Sekunden Aufwärmzeit ist der
WC-Sitz gleichmässig, spürbar warm.
27021599673220363-1 © 11-2017
967.305.00.0 (02)
13
DE
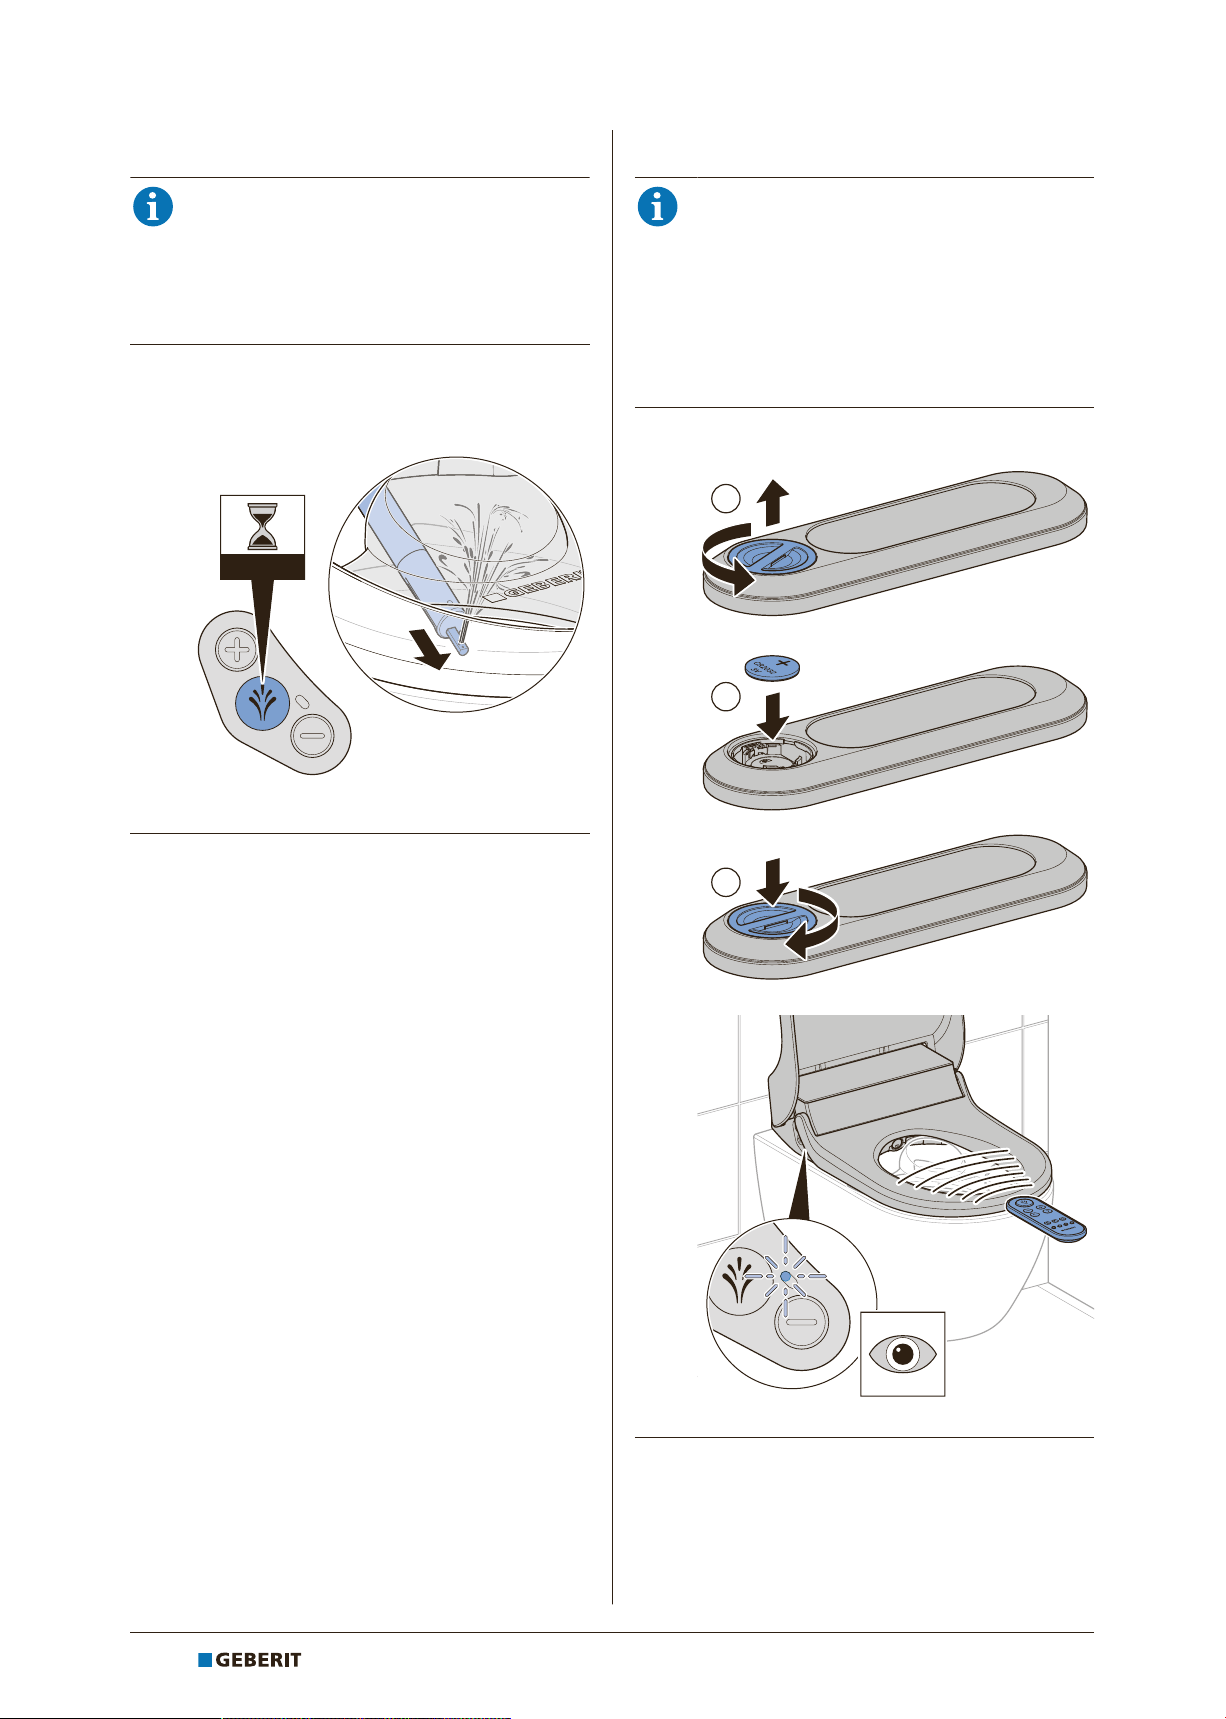
Analdusche prüfen
Voraussetzung
– Bei Ausführung Comfort: Benutzer wird
simuliert.
Ein Duschzyklus endet nach 50Sekunden.
Falls nötig, Duschzyklus neu starten.
1 Taste <Dusche> am seitlichen Bedienfeld
kurz drücken.
2 Verstellbarkeit der Duschstrahlstärke prüfen.
ü Das Gerät führt eine Vorreinigung durch.
ü Der Duscharm fährt aus.
ü Die Analdusche startet in
Oszillierfunktion. Eine geringe
Wassermenge läuft über den Überlauf in
die WC-Keramik. Die Analdusche ist für
50Sekunden aktiv.
3 Duschwassertemperatur prüfen.
Ergebnis
ü Das Duschwasser ist spürbar erwärmt.
ü Das Gerät führt einen Duschzyklus durch.
Erneutes Drücken der Taste <Dusche>
unterbricht den Duschzyklus.
ü Der Duscharm fährt nach Beendigung des
Duschzyklus ein.
ü Das Gerät führt eine Nachreinigung durch.
ü Die Föhnfunktion startet nach dem
Duschvorgang (Ausführung Comfort).
14
Bleibt das Duschwasser kalt, ist das Gerät
defekt. Kundendienst informieren.
27021599673220363-1 © 11-2017
967.305.00.0 (02)
Ladydusche prüfen
T
&5
DE
Fernbedienung aktivieren
Dieser Abschnitt gilt nur für die Ausführung
Comfort.
Voraussetzung
– Benutzer wird simuliert.
4 Taste <Dusche> am seitlichen Bedienfeld
für 2Sekunden drücken.
Dieser Abschnitt gilt nur für die Ausführung
Comfort.
Voraussetzung
– Das Gerät ist eingeschaltet.
– Die LED am seitlichen Bedienfeld leuchtet nicht.
Der Energiesparmodus ist aktiv.
4 Batterie einsetzen.
Ergebnis
ü Das Gerät führt eine Vorreinigung durch.
ü Der Duscharm fährt aus.
ü Die Ladydusche startet. Eine geringe
Wassermenge läuft über den Überlauf in die
WC-Keramik. Die Ladydusche ist für
30Sekunden aktiv.
ü Das Gerät führt einen Duschzyklus durch.
Erneutes Drücken der Taste <Dusche>
unterbricht den Duschzyklus.
ü Der Duscharm fährt nach Beendigung des
Duschzyklus ein.
ü Das Gerät führt eine Nachreinigung durch.
ü Das Gerät führt eine Nachreinigung durch.
ü Die Föhnfunktion startet nach dem
Duschvorgang.
27021599673220363-1 © 11-2017
967.305.00.0 (02)
Ergebnis
ü Das Gerät piept (1x).
ü Die LED am seitlichen Bedienfeld leuchtet für
einige Sekunden blau auf.
15
DE
Werden mehrere Geräte gleichen Typs in
unmittelbarer Nähe (z. B. im Hotelbereich)
installiert, muss die Fernbedienung einem
Gerät zugewiesen werden.
Fernbedienung prüfen
Dieser Abschnitt gilt nur für die Ausführung
Comfort.
Falls das Gerät nicht piept und die LED am
seitlichen Bedienfeld nicht für einige
Sekunden blau aufleuchtet, muss die
Fernbedienung neu zugewiesen werden.
Fernbedienung neu zuweisen
Dieser Abschnitt gilt nur für die Ausführung
Comfort.
Falls das Gerät über die Fernbedienung nicht
gesteuert werden kann, muss die Fernbedienung
neu zugewiesen werden.
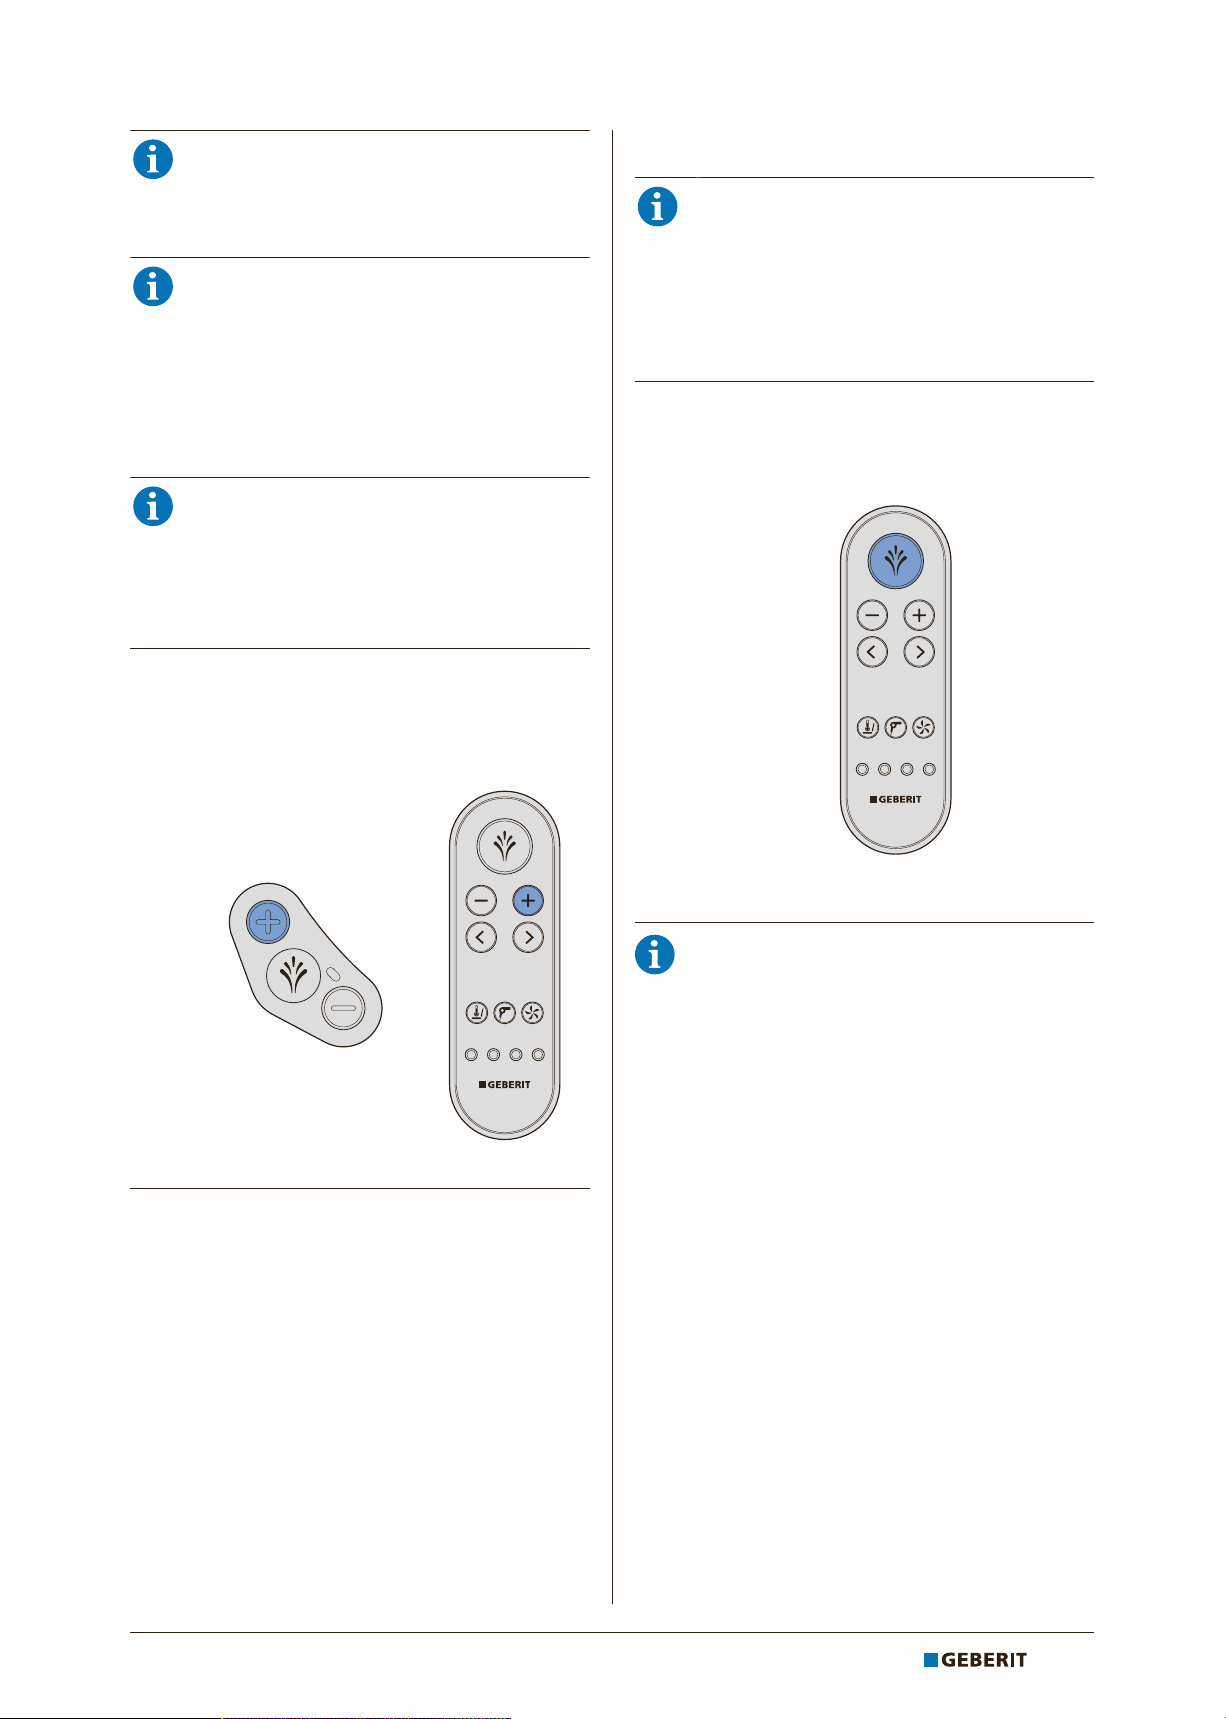
4 Gleichzeitig die Taste <+> auf der
Fernbedienung und die Taste <+> auf dem
seitlichen Bedienfeld für ca. 10Sekunden
drücken.
Voraussetzung
– Die Fernbedienung ist eingerichtet.
– Benutzer wird simuliert.
1 Taste <Dusche> kurz drücken, um die
Analdusche mit Oszillierfunktion zu starten.
Ergebnis
ü Das Gerät piept (1x).
ü Die LED am seitlichen Bedienfeld leuchtet für
einige Sekunden blau auf.
ü Das Gerät führt einen Duschzyklus
durch.
Ein Duschzyklus endet nach 50Sekunden.
Falls nötig, Duschzyklus neu starten.
16
27021599673220363-1 © 11-2017
967.305.00.0 (02)
DE
T
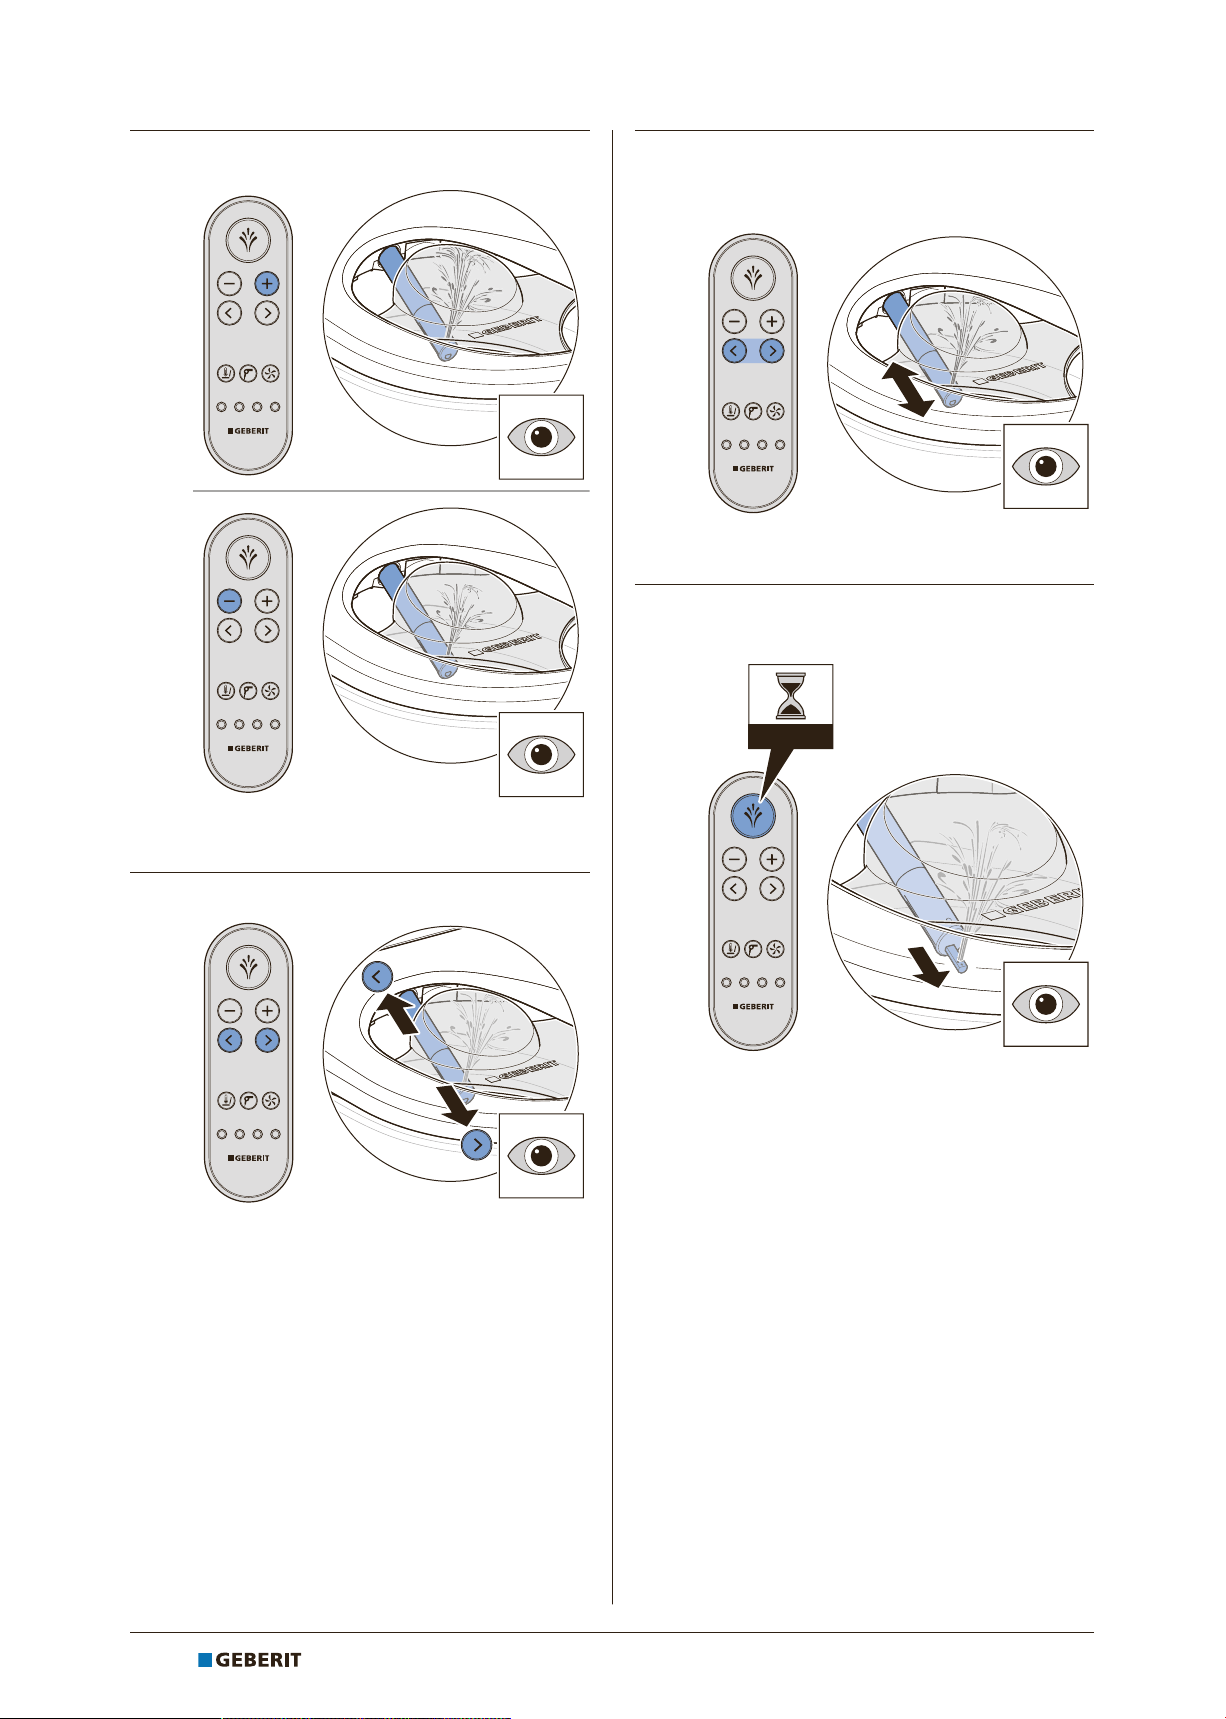
2 Tasten <+>/<-> prüfen.
4 Oszillierfunktion durch gleichzeitiges
Drücken der Tasten <rechts> und <links>
starten und stoppen.
ü Die Tastenkombination schaltet die
Oszillierfunktion ein und aus.
5 Taste <Dusche> für 2Sekunden drücken,
um die Funktion Ladydusche zu aktivieren.
ü Während des Duschzyklus lässt sich die
Duschstrahlstärke erhöhen und
verringern.
3 Pfeiltasten <links>/<rechts> prüfen.
ü Die Duscharmposition lässt sich
einstellen.
ü Das Gerät führt einen Duschzyklus
durch. Erneutes Drücken der Taste
<Dusche> unterbricht den Duschzyklus.
27021599673220363-1 © 11-2017
967.305.00.0 (02)
17
DE
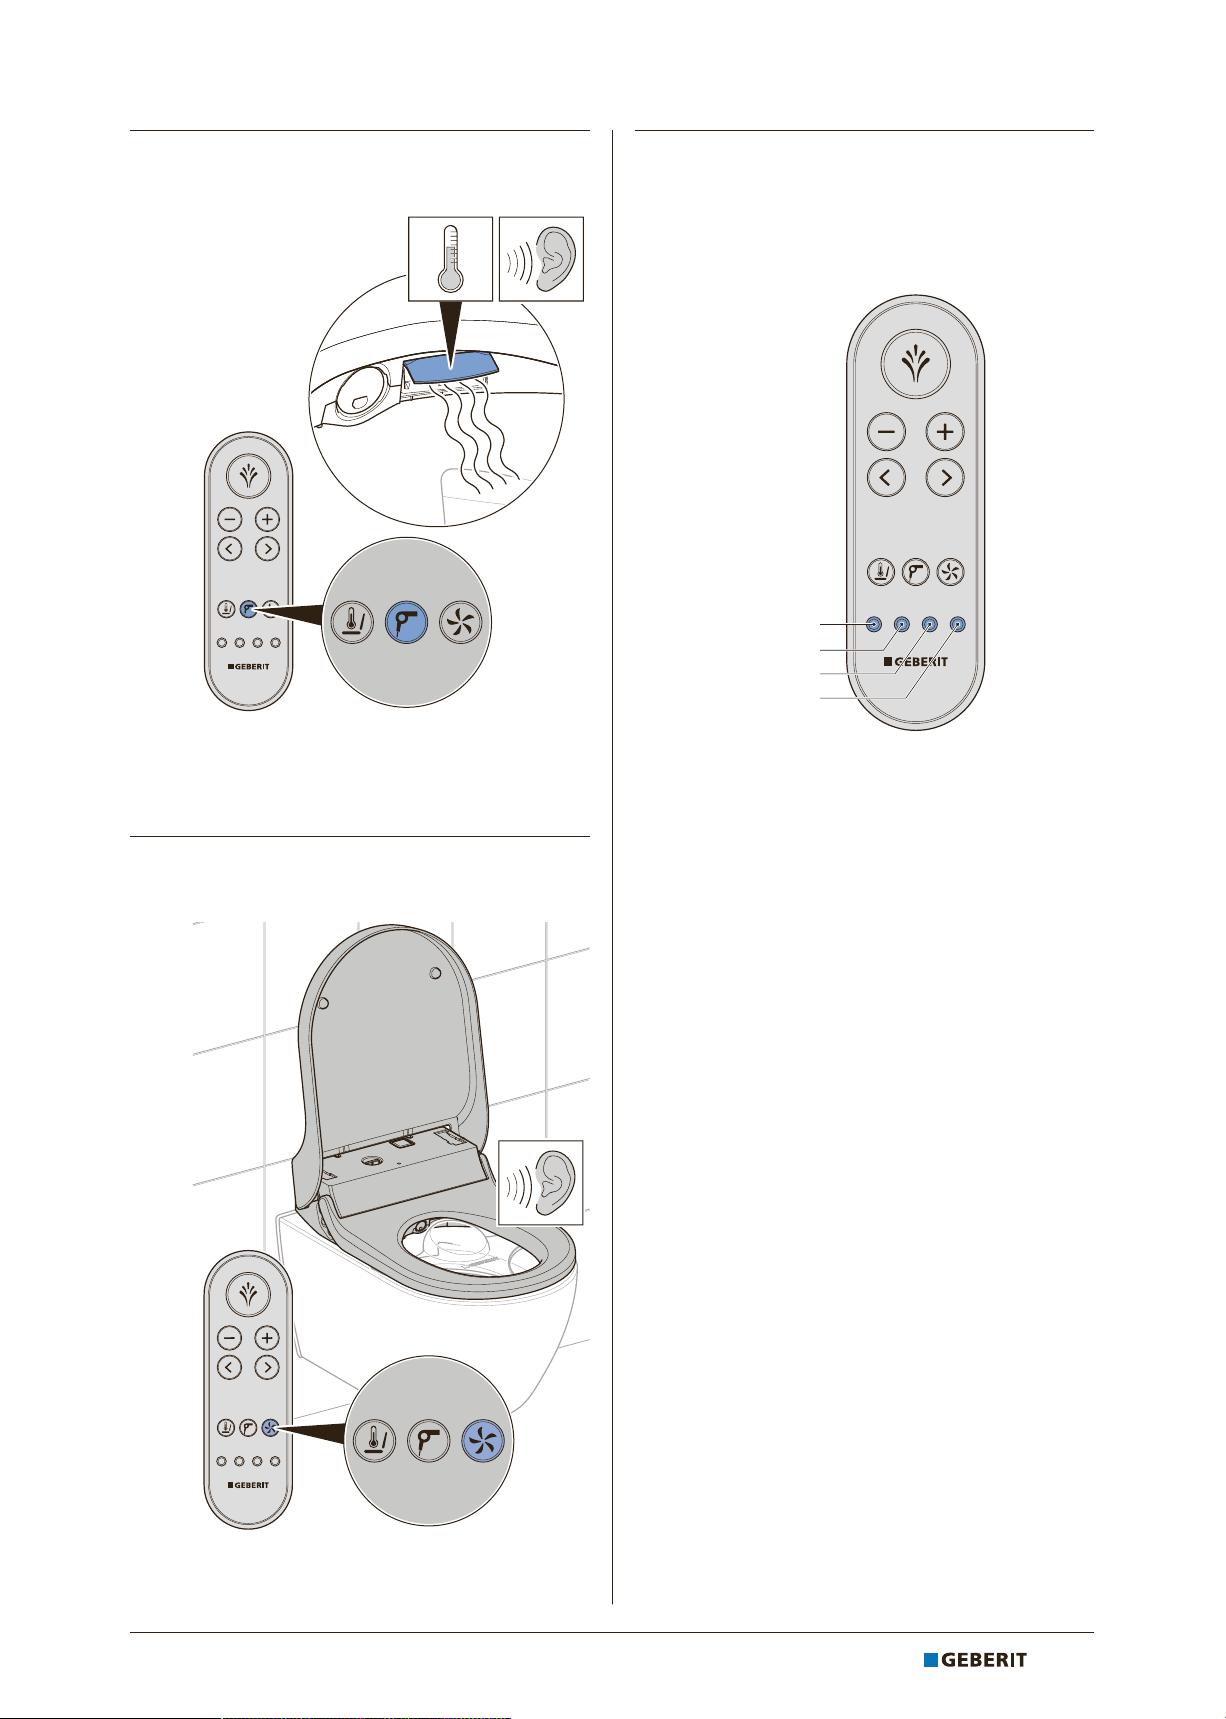
6 Föhnfunktion prüfen. Dazu Taste <Föhn>
kurz drücken.
ü Die Föhnfunktion startet, und die
Föhnklappe lenkt horizontal aus.
ü Erneutes Drücken der Taste startet/
beendet die Funktion.
8 Tasten <Benutzerprofil> 1–4 prüfen. Dazu
eine Analdusche auslösen und
nacheinander jede Taste drücken.
ü Jeder Taste <Benutzerprofil> ist eine
eigene Duschstrahlstärke und eine
Duscharmposition hinterlegt.
7 Funktion Geruchsabsaugung prüfen. Dazu
Taste <Geruchsabsaugung> kurz drücken.
ü Erneutes Drücken der Taste startet/
beendet die Funktion.
18
27021599673220363-1 © 11-2017
967.305.00.0 (02)
Inbetriebnahme
Gerät in Betrieb nehmen
Voraussetzung
– Die Funktionsprüfungen wurden erfolgreich
durchgeführt.
– Das Gerät ist korrekt eingerichtet.
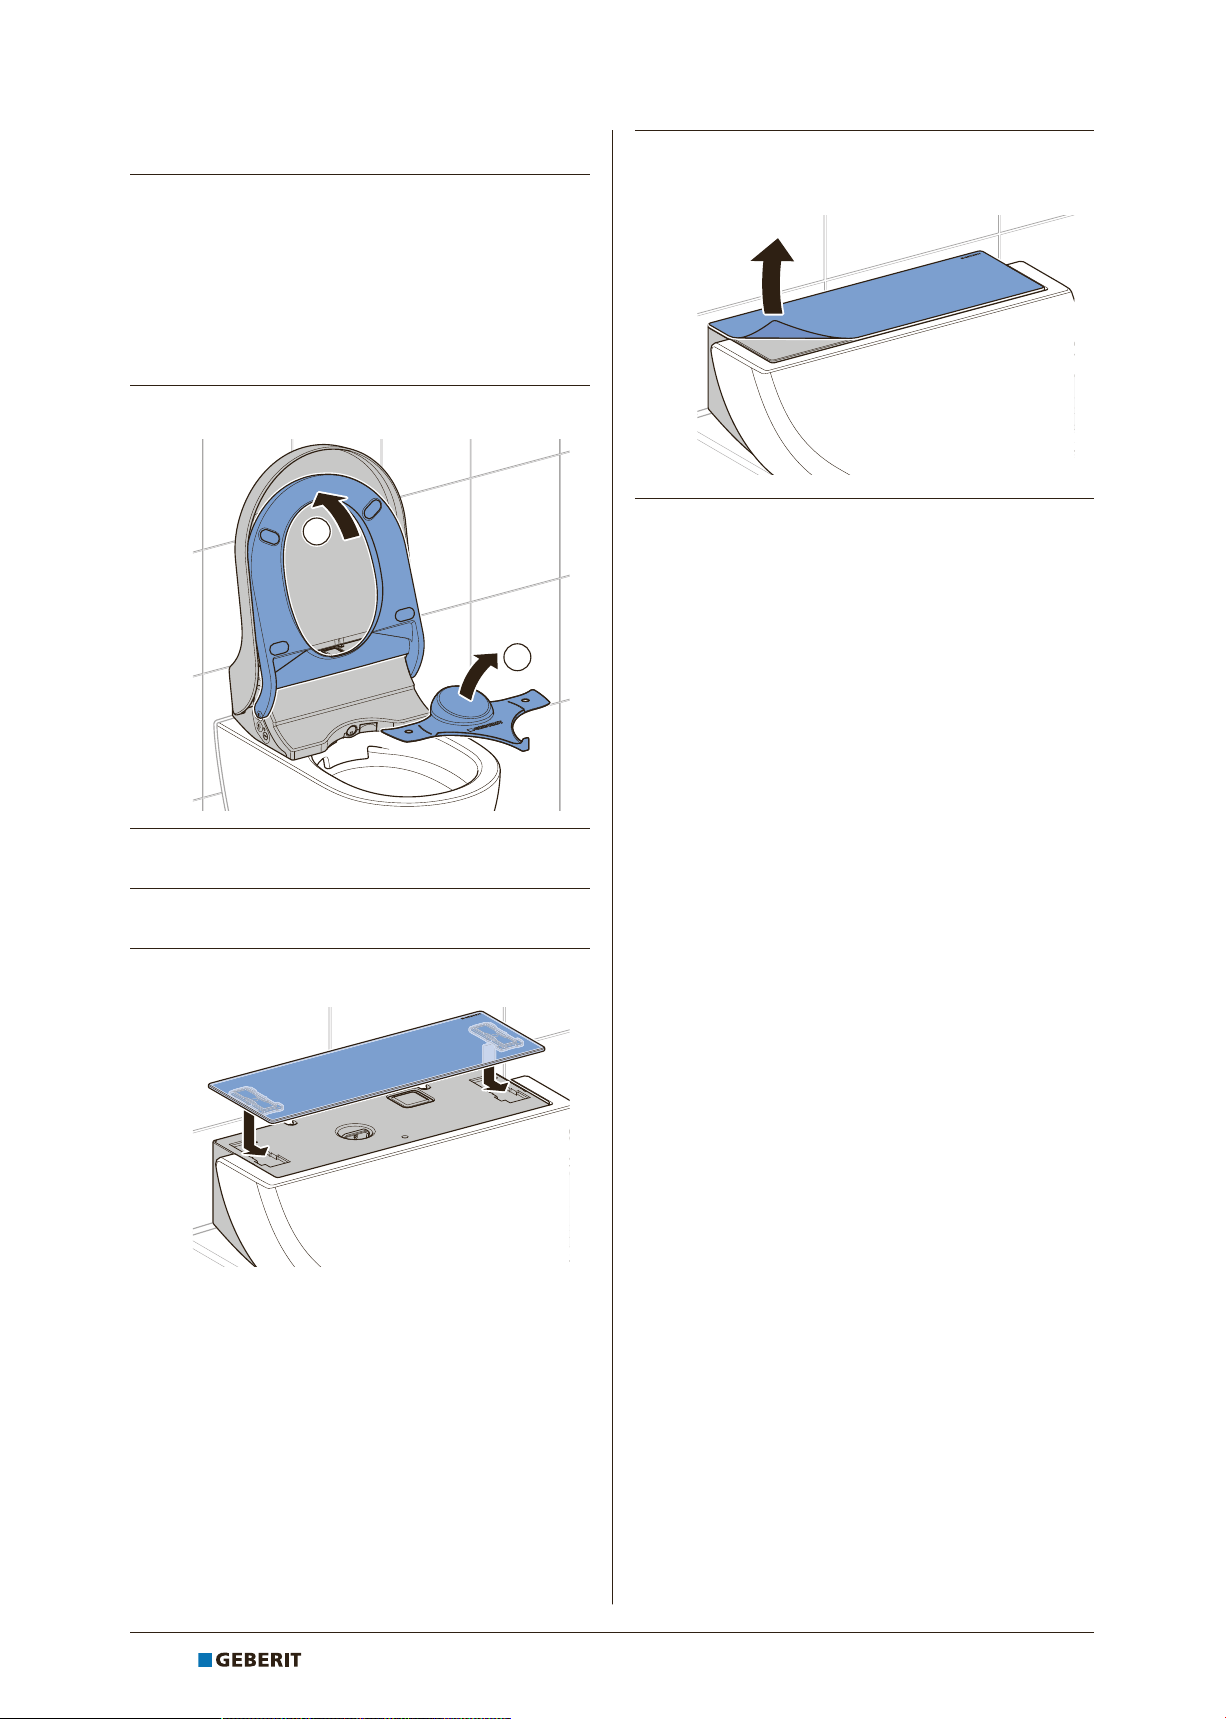
1 Spritzschutz entfernen.
DE
4 Designabdeckung montieren.
5 Schutzfolie der Designabdeckung entfernen.
2 Gerät reinigen.
3 WC-Sitz und WC-Deckel schliessen.
Ergebnis
ü Das Gerät ist betriebsbereit und kann dem
Kunden übergeben werden.
27021599673220363-1 © 11-2017
967.305.00.0 (02)
19
DE
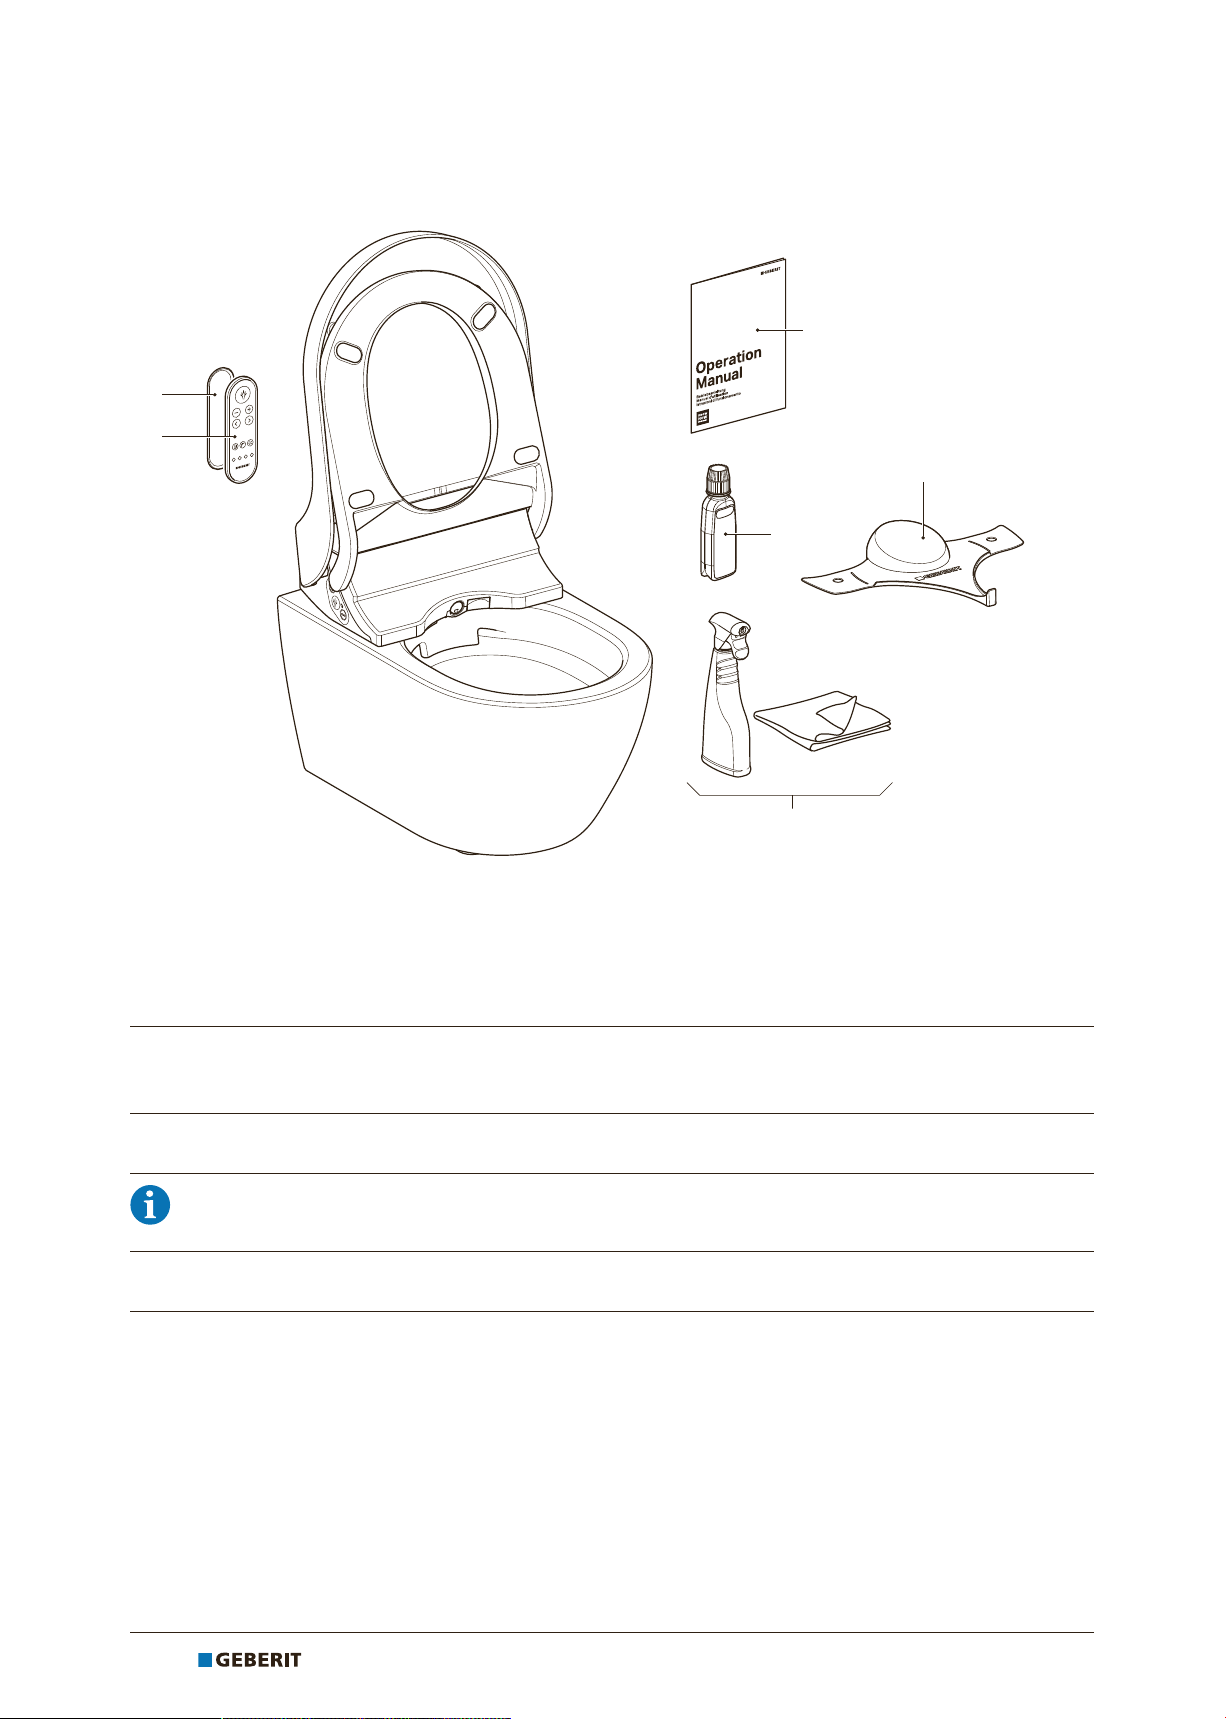
Das Gerät übergeben
1 Bedienungsanleitung
2 Geberit AquaClean Spritzschutz
3 Geberit AquaClean Entkalkungsmittel (Comfort)
4 Geberit AquaClean Reinigungsset (Comfort)
5 Fernbedienung (Comfort)
6 Wandhalterung Fernbedienung (Comfort)
1 Einen zweiten Seriennummernaufkleber für eine spätere Verwendung auf der letzten Seite der
Bedienungsanleitung aufkleben.
2 Den Kunden über Bedienung und Reinigung gemäss der Bedienungsanleitung instruieren.
Auf jährlichen Entkalkungszyklus hinweisen. Für detaillierte Informationen zur Bedienung und
Reinigung siehe Bedienungsanleitung.
3 Endkundenunterlagen und Lieferumfang vollständig übergeben.
4 Den Kunden auf die Garantieverlängerung durch Registrierung hinweisen. Informationen zu
Registrierungsmöglichkeiten siehe Bedienungsanleitung.
20
27021599673220363-1 © 11-2017
967.305.00.0 (02)
Function test
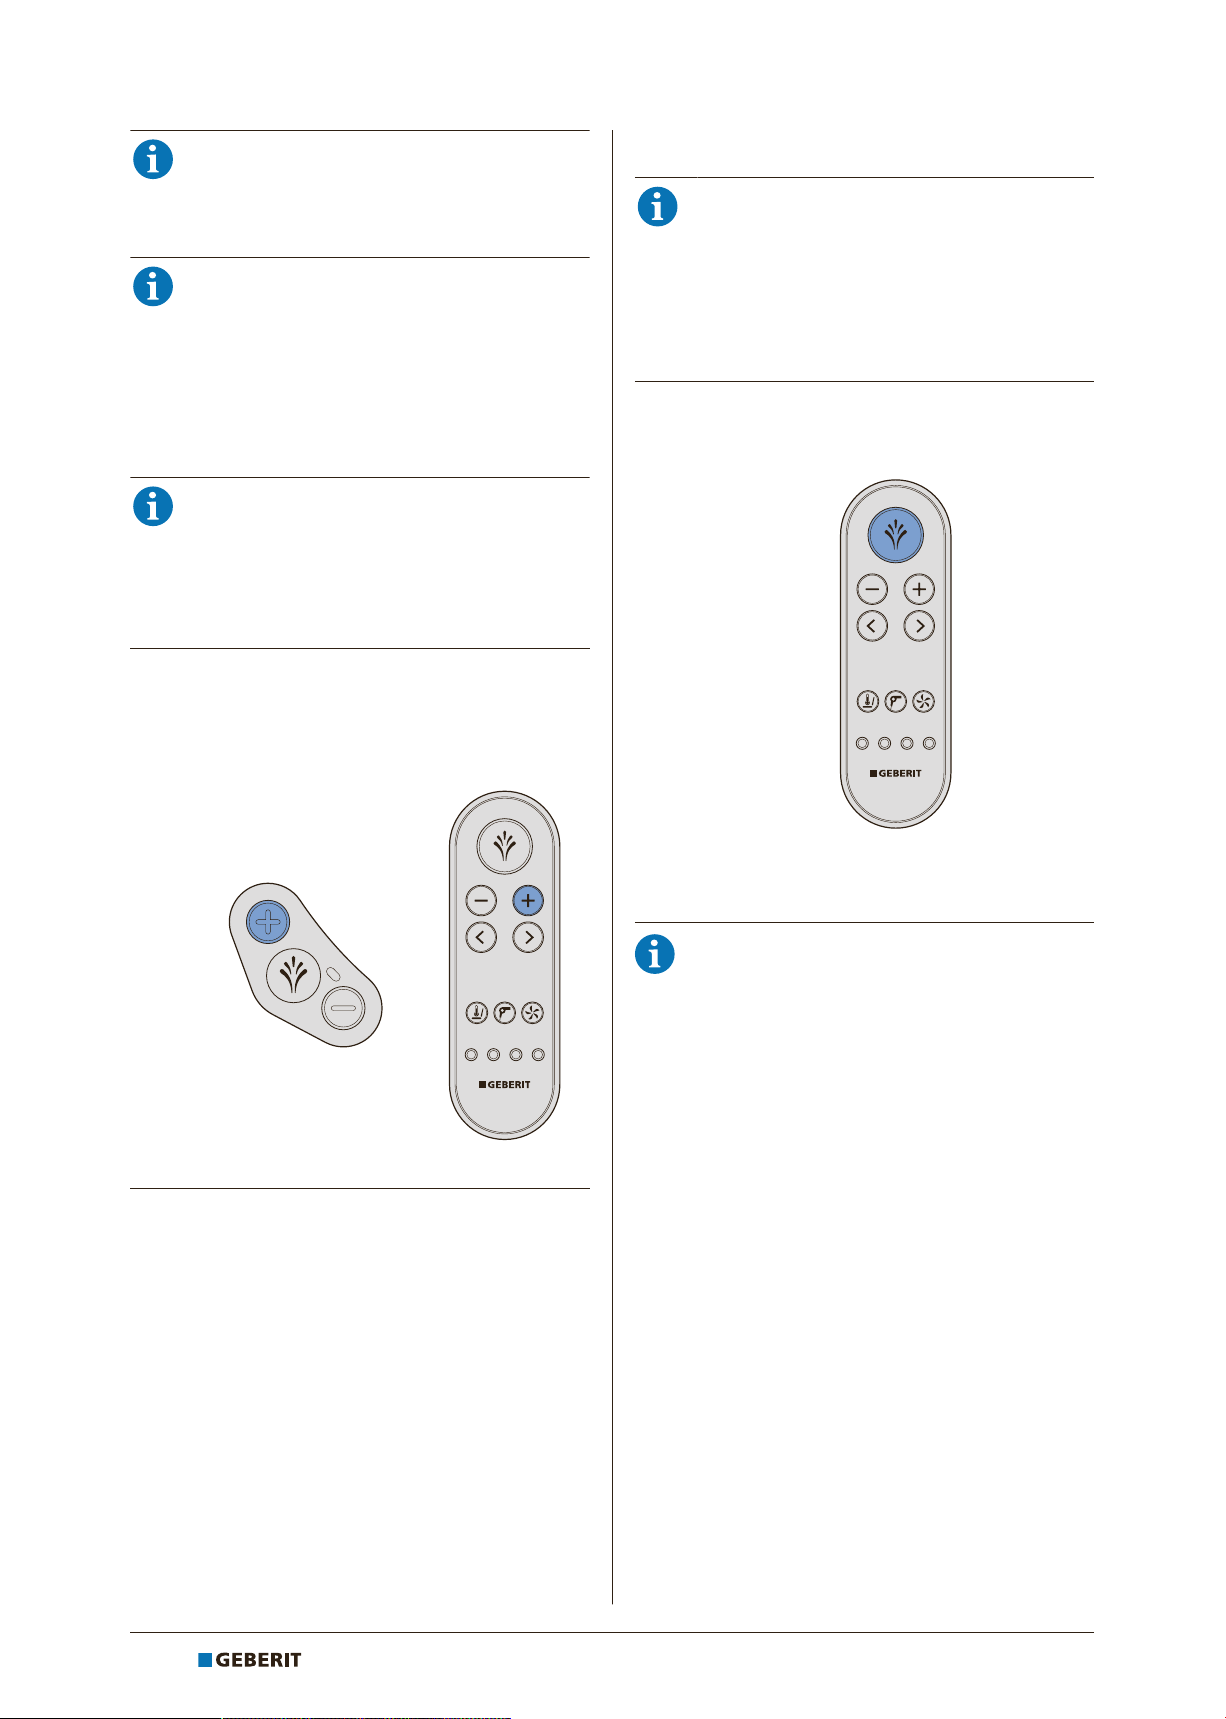
Switching on the device
WARNING
Hazardous voltage
Danger of electric shock due to water on
exposed live parts.
4 Mount the removal limiter (safety rope)
between the device and mounting plate
before switching it on.
4 After switching the device on for the first
time, do not shake or tilt.
4 The device contains water. Before
removing the removal limiter for service
purposes, switch off the device using
the power switch.
ü After the completion of the switch-on
EN
procedure, no LEDs are lit. The device is
in economy mode.
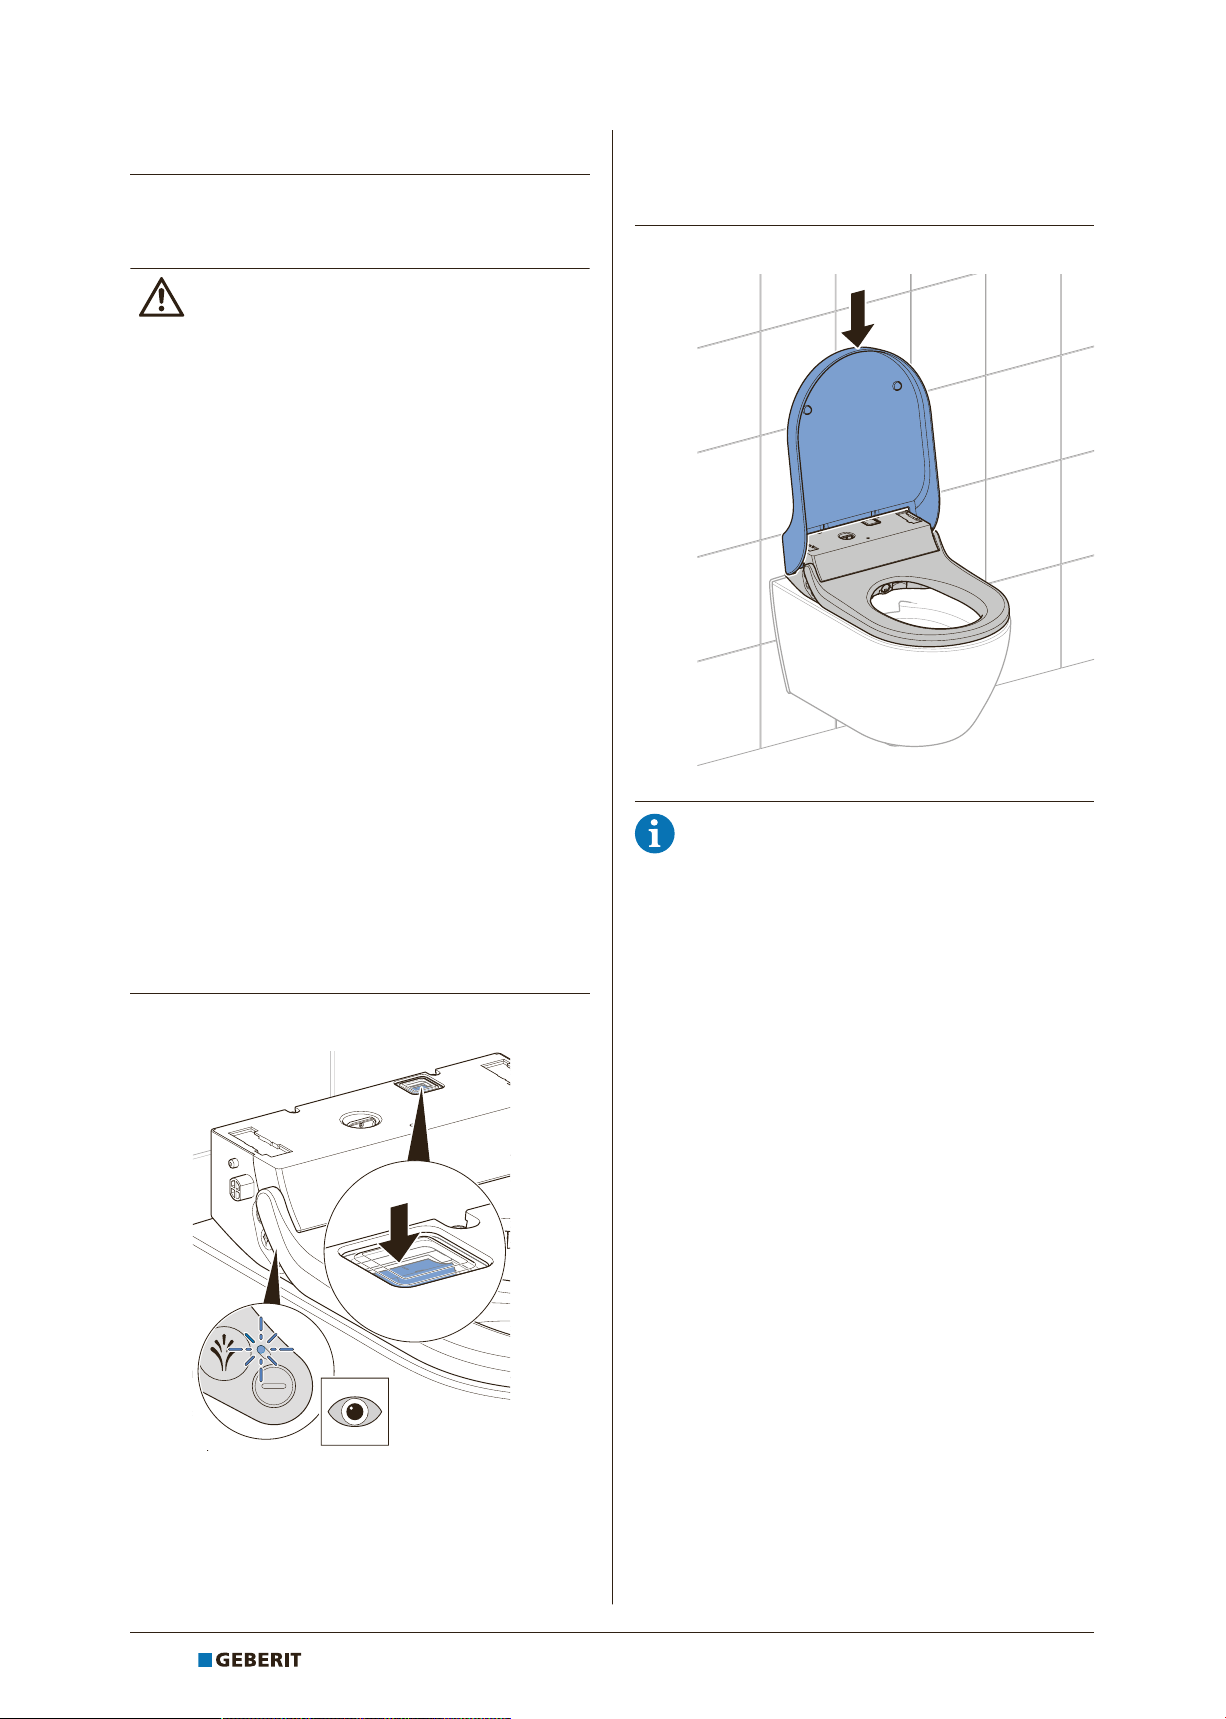
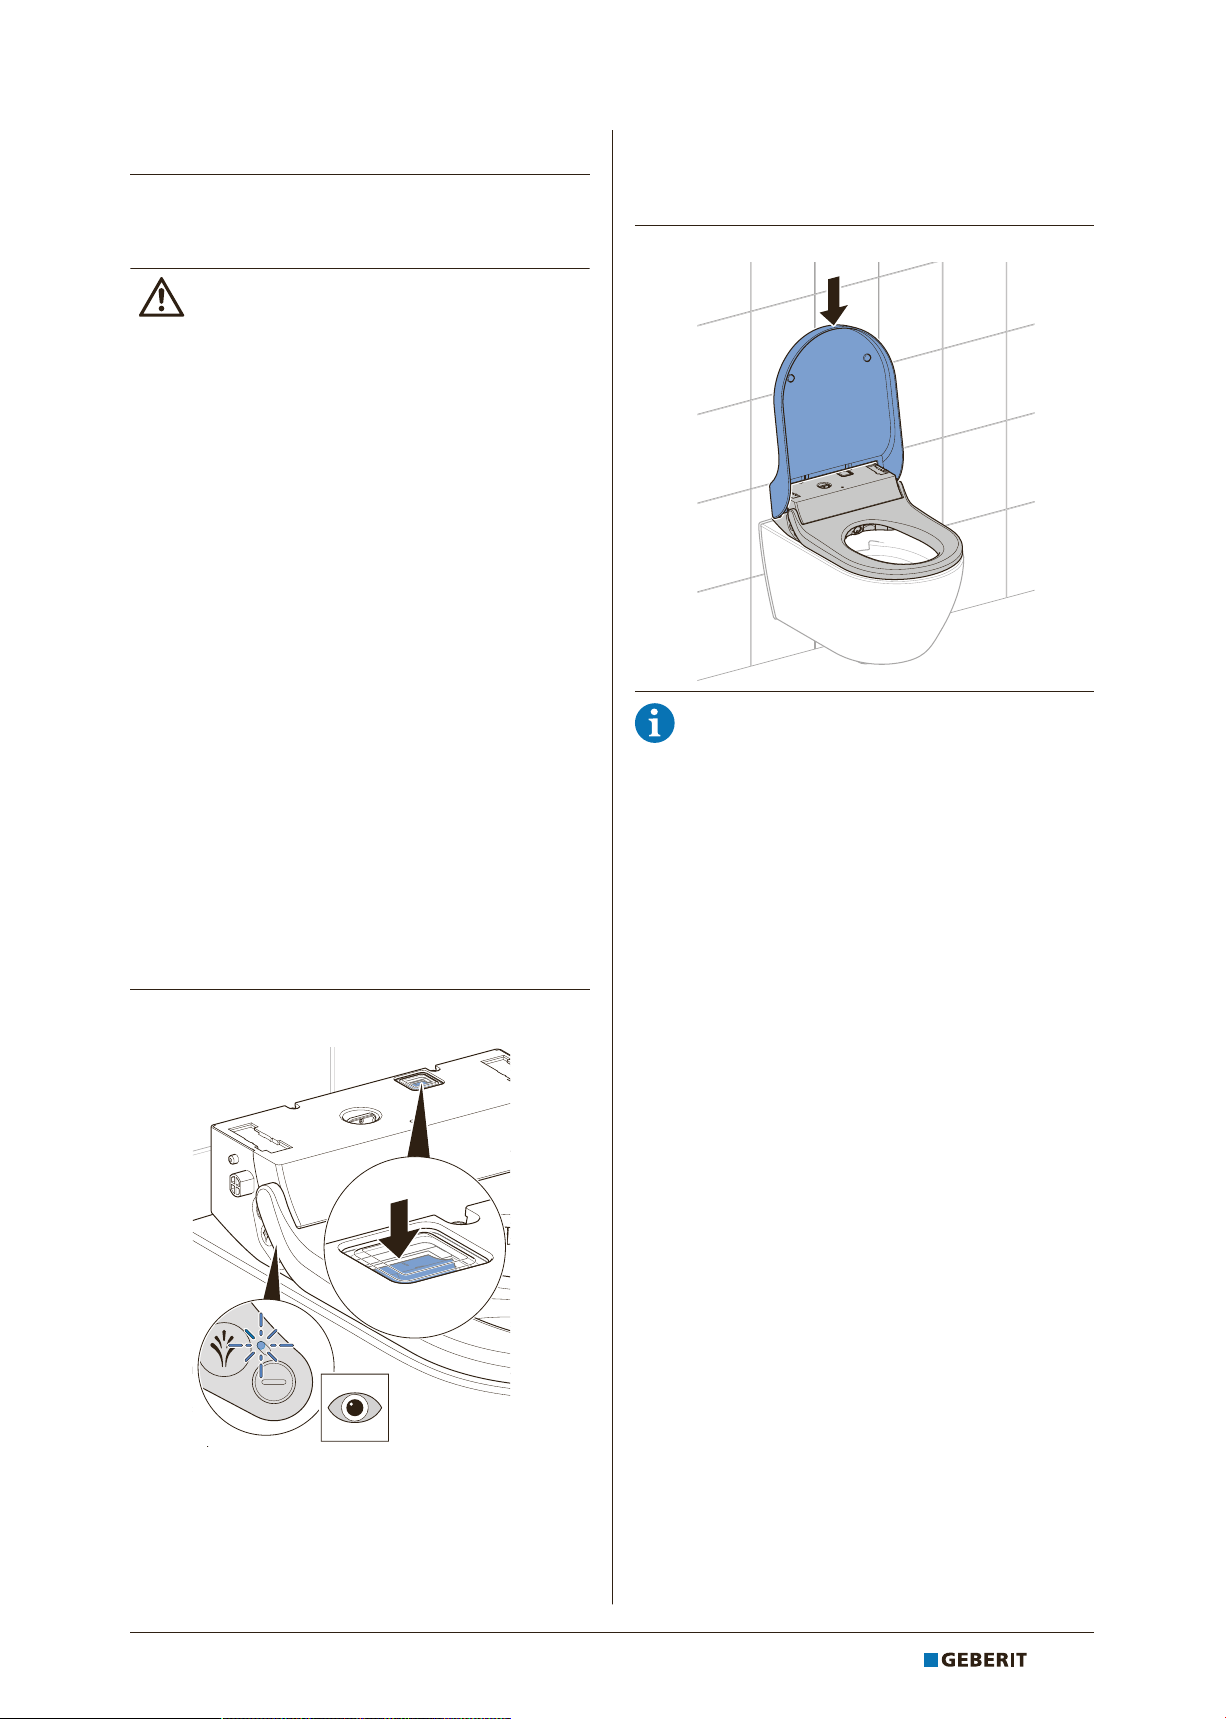
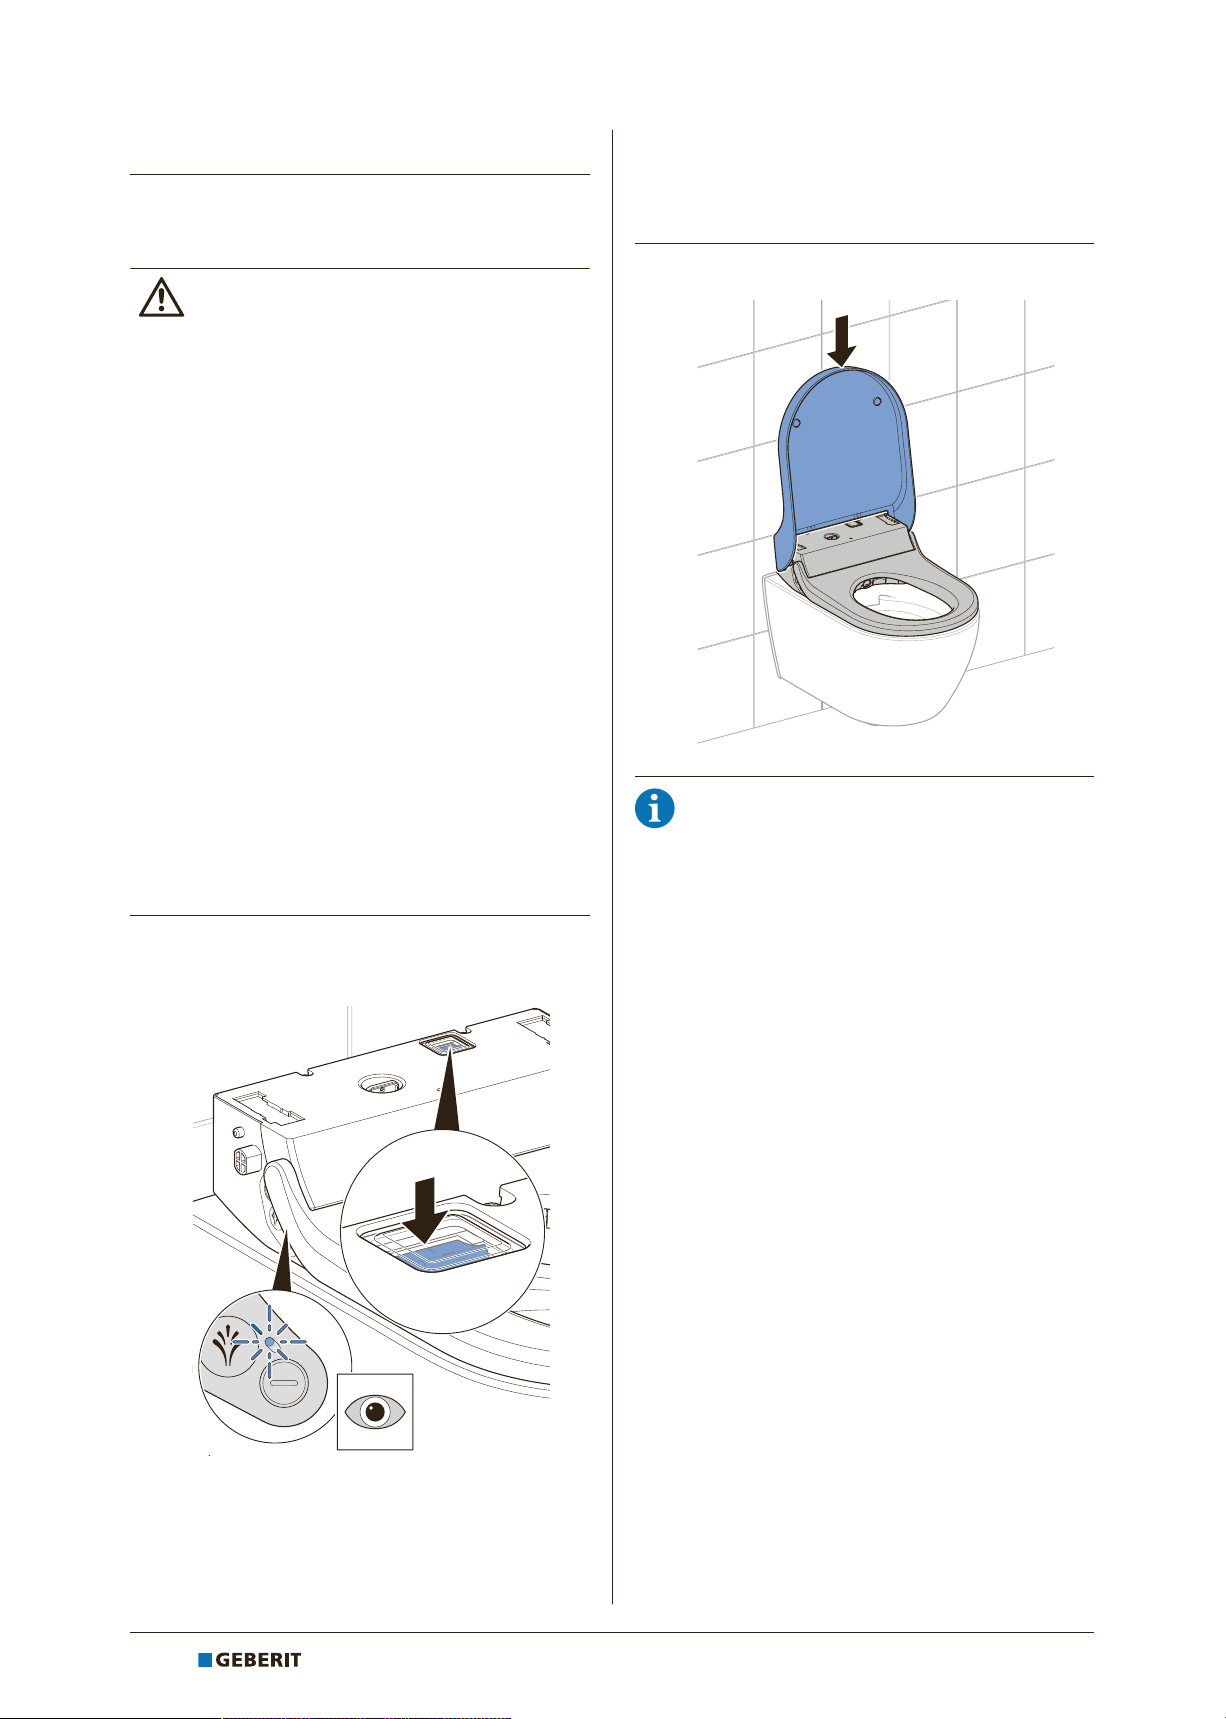
2 Insert the WC lid.
Prerequisite
– The device has been mounted and connected.
– The WC lid is removed.
– The removal limiter is correctly engaged on the
mounting plate.
– The water supply at the ball valve has been
opened.
– The spray shield has been mounted.
1 Switch on the device at the power switch.
If the LED flashes red, the device is
defective. Do not attempt any device repairs.
Inform customer service.
ü After about 5 seconds, the LED on the
lateral control panel flashes blue. The
device initialises.
ü The device performs prerinsing.
27021599673220363-1 © 11-2017
967.305.00.0 (02)
21
EN
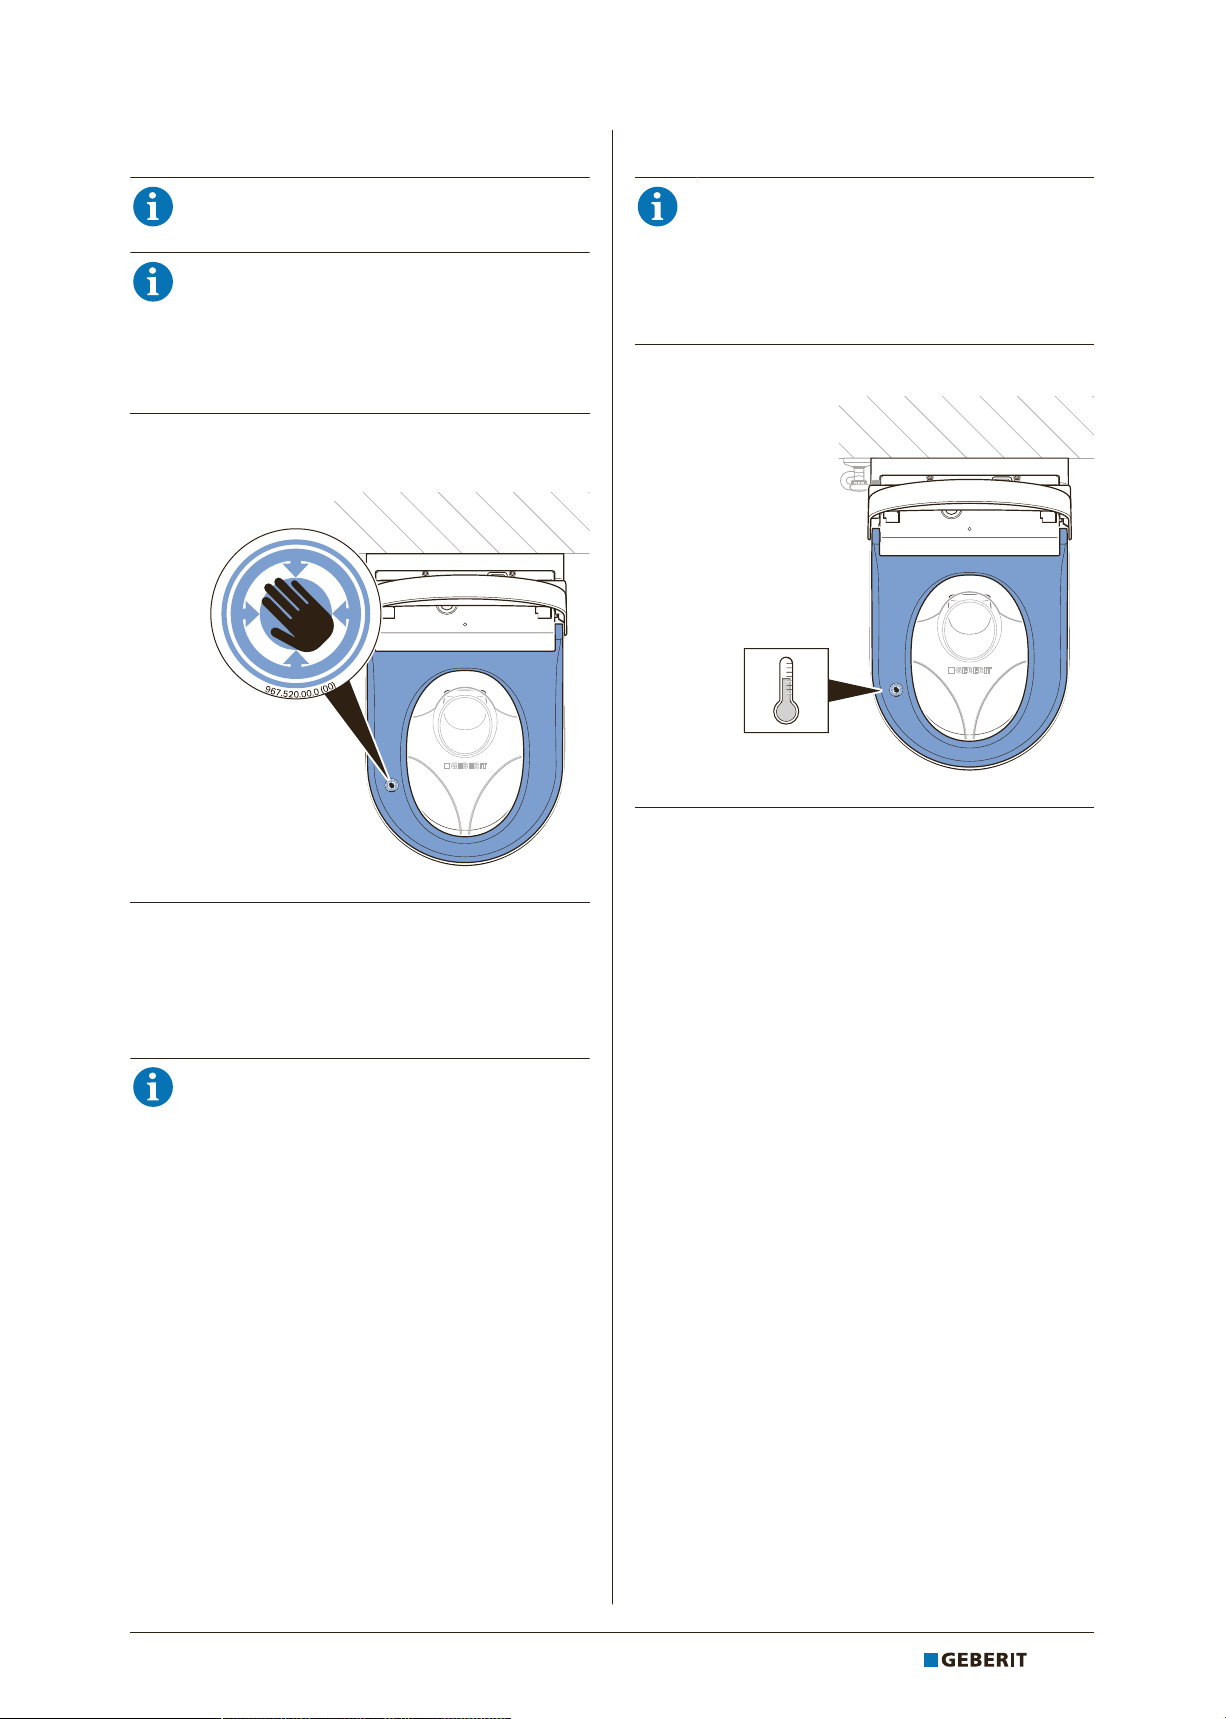
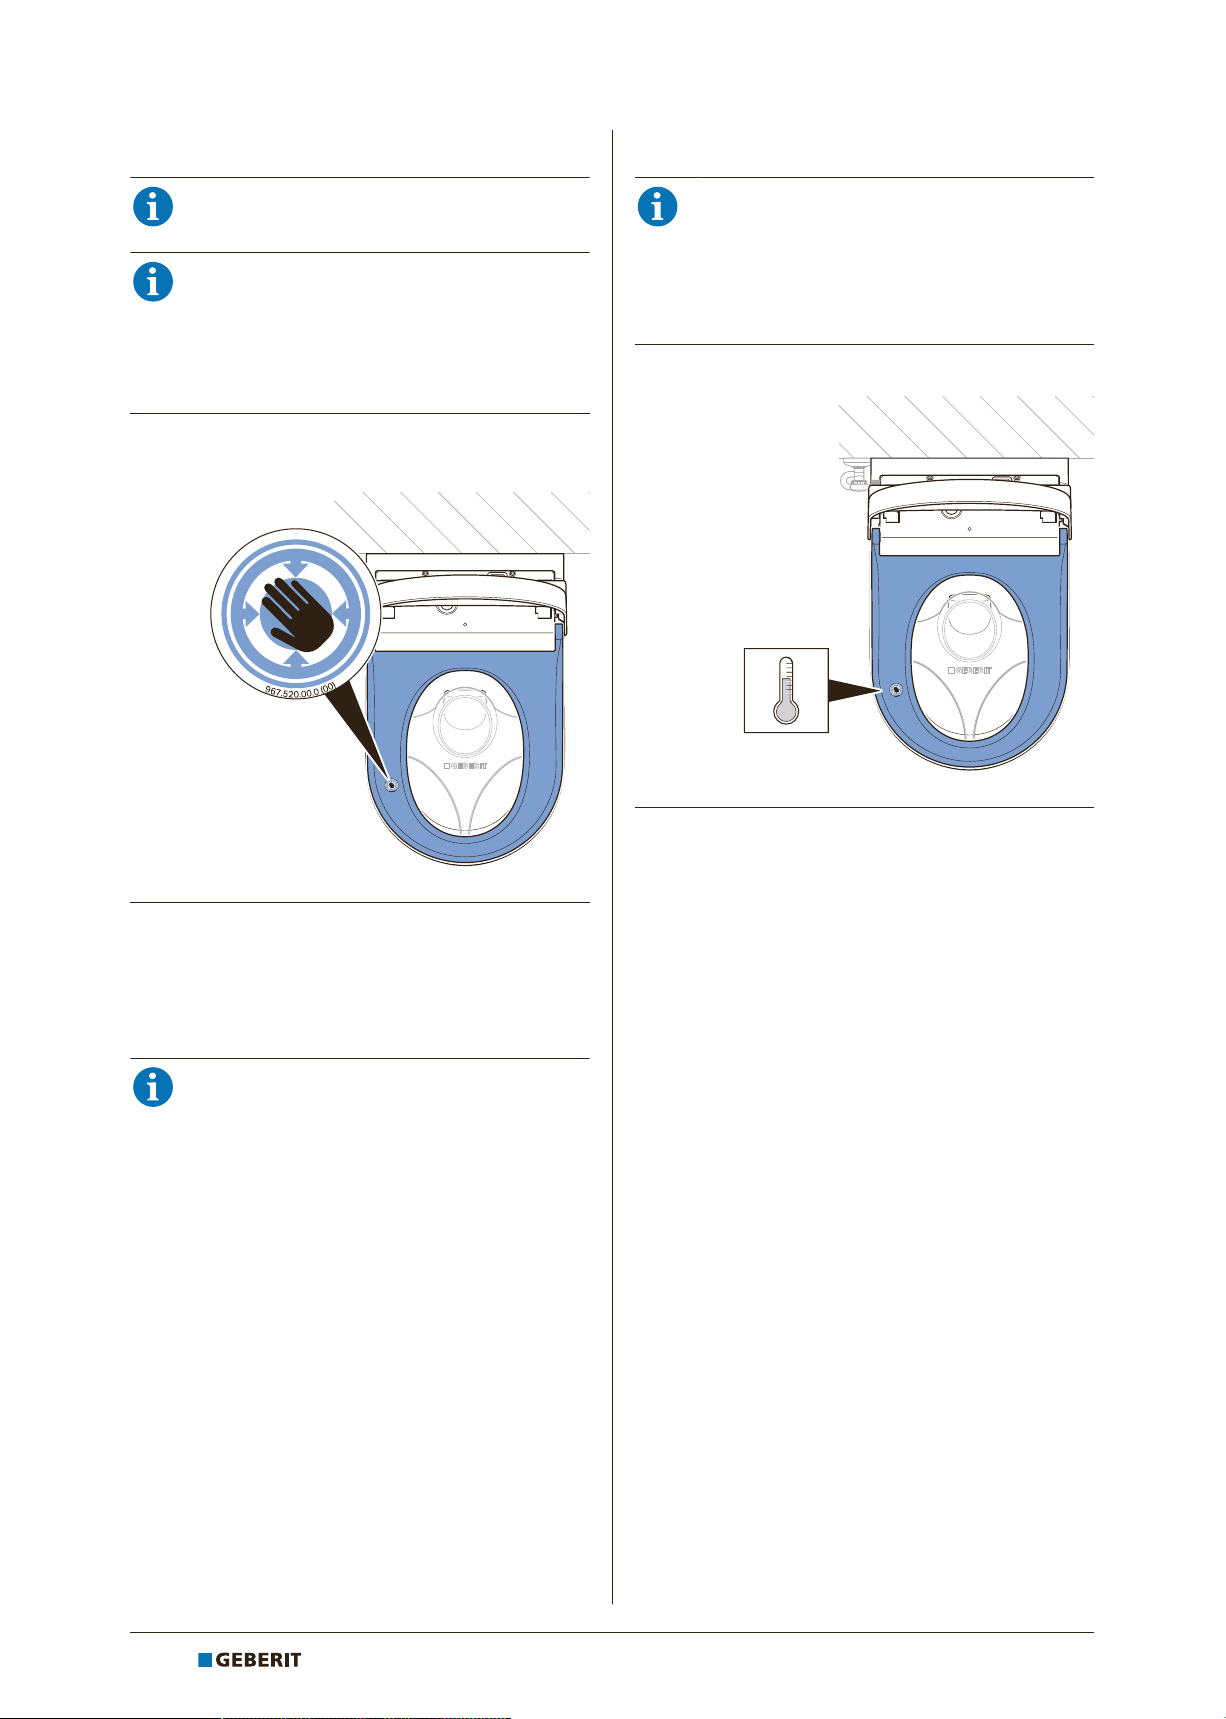
Simulating a user
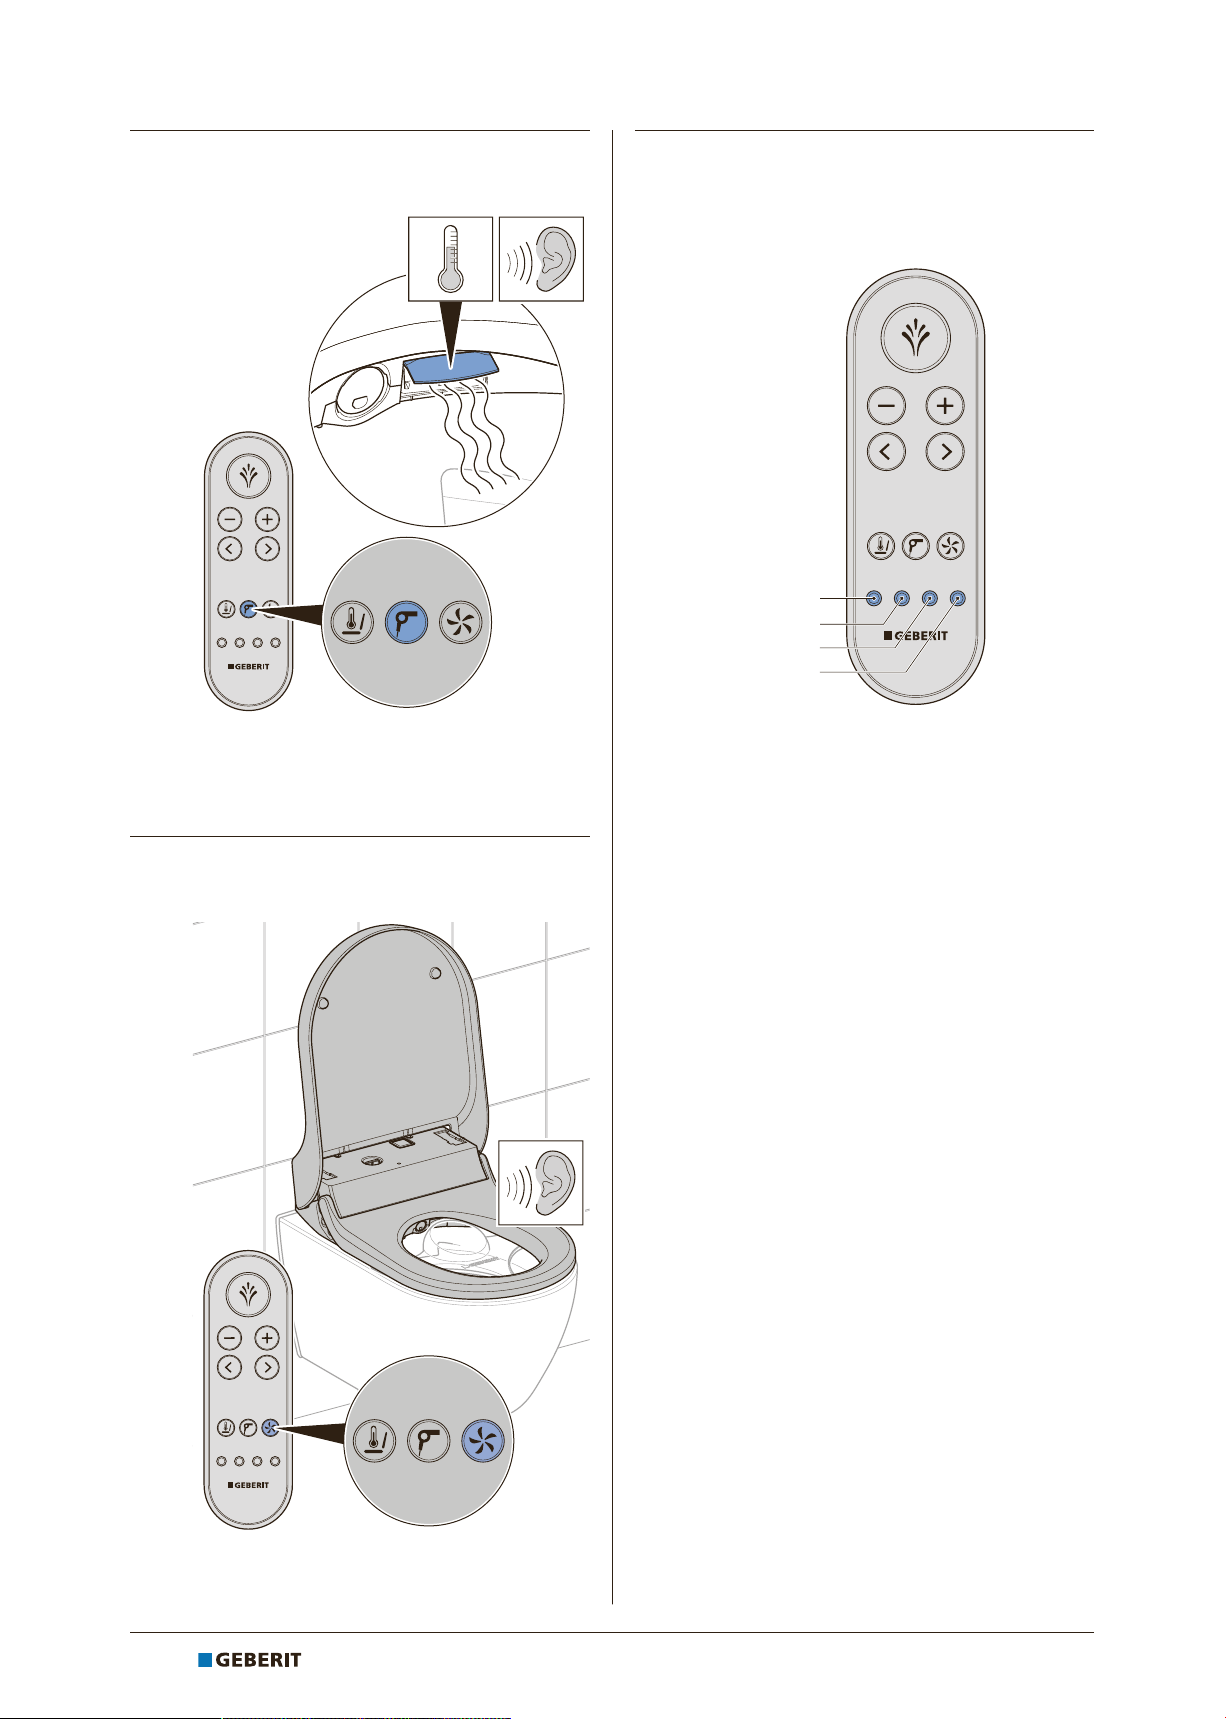
Testing the WC seat heating
This section only applies to the Comfort
model.
For the following test steps, contact must
be maintained with the WC seat as shown
in order to simulate a user.
• The LED on the lateral control panel will
light up blue.
4 Place a hand flat on the marked position and
keep it there.
This section only applies to the Comfort
model.
Prerequisite
– User is simulated.
4 Test the WC seat heating.
Result
ü The LED on the lateral control panel lights up
blue and the odour extraction unit runs. A user is
detected.
ü The WC seat heating starts.
The odour extraction unit stops and the
LED goes out if no user is detected.
• Economy mode is active.
Result
ü After a few seconds of warm-up time, the WC
seat is evenly and noticeably warmed.
22
27021599673220363-1 © 11-2017
967.305.00.0 (02)
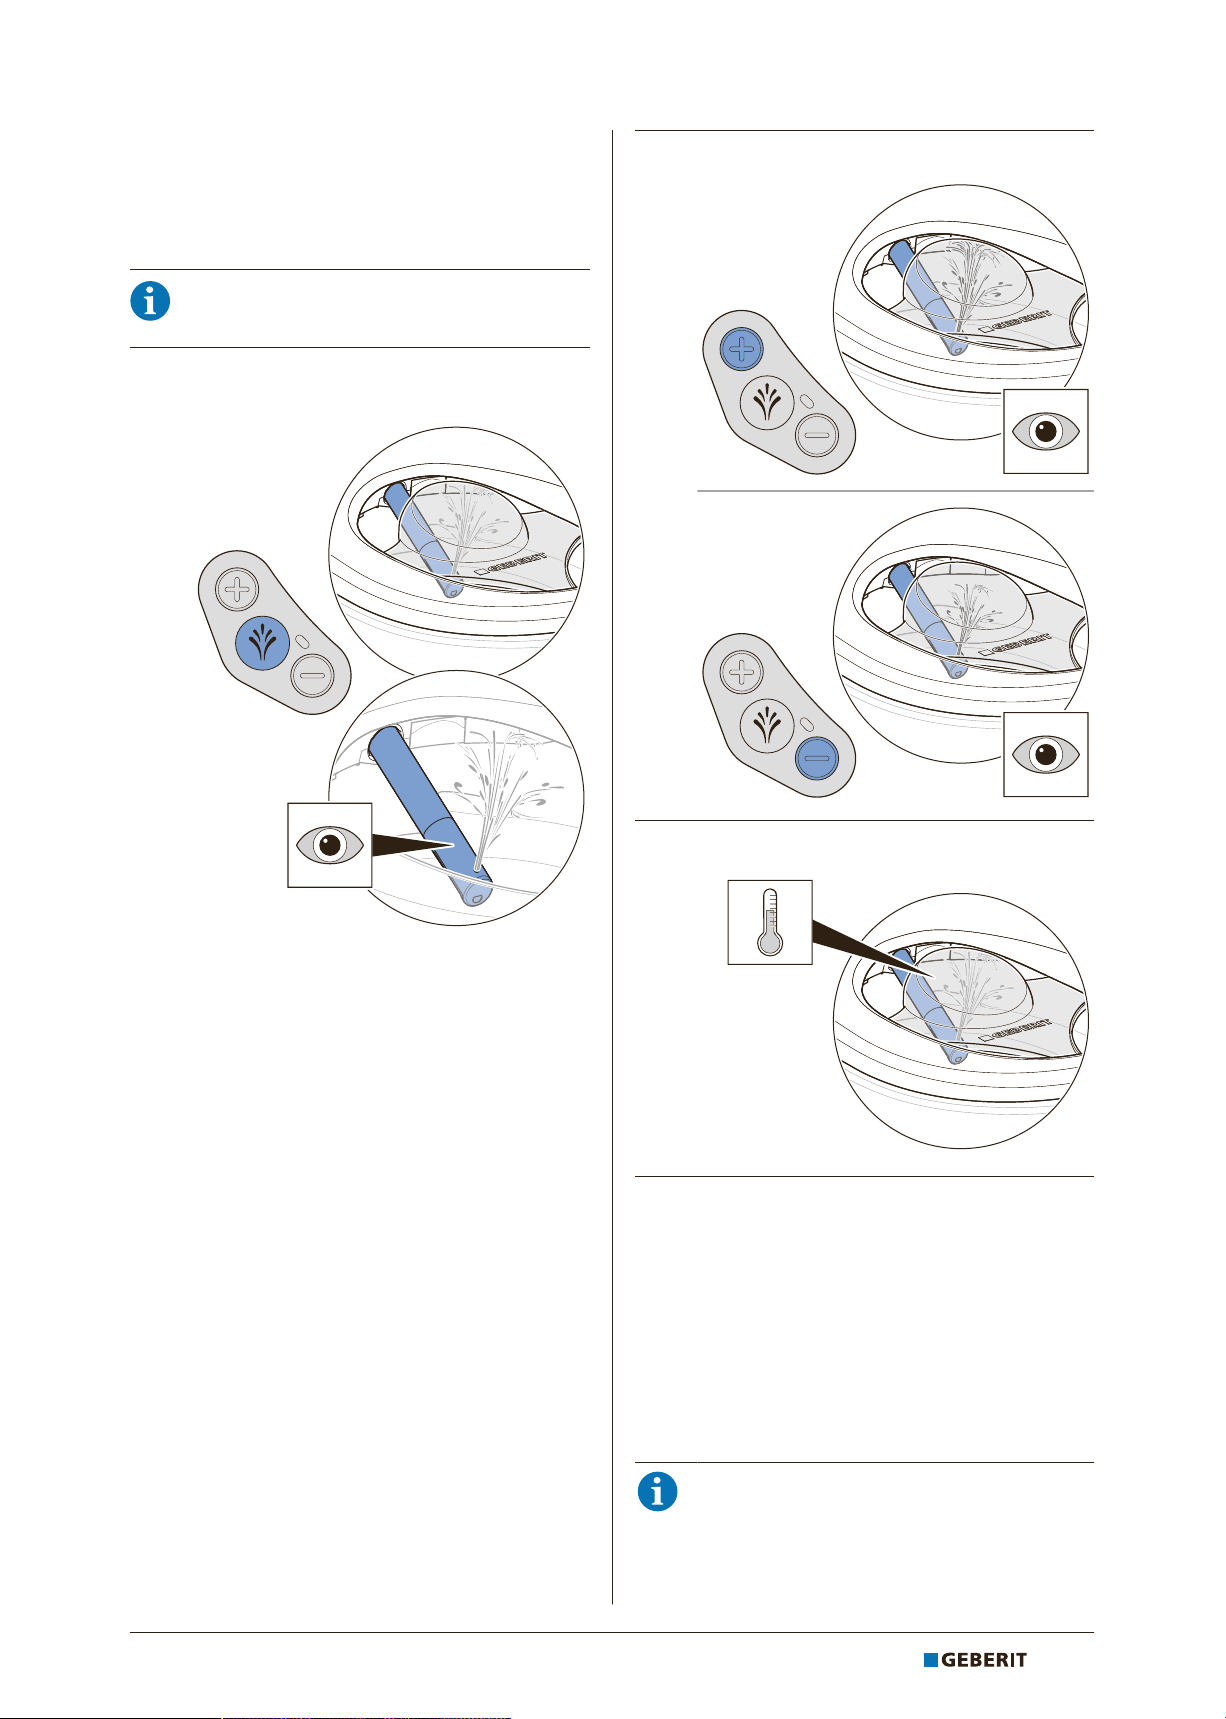
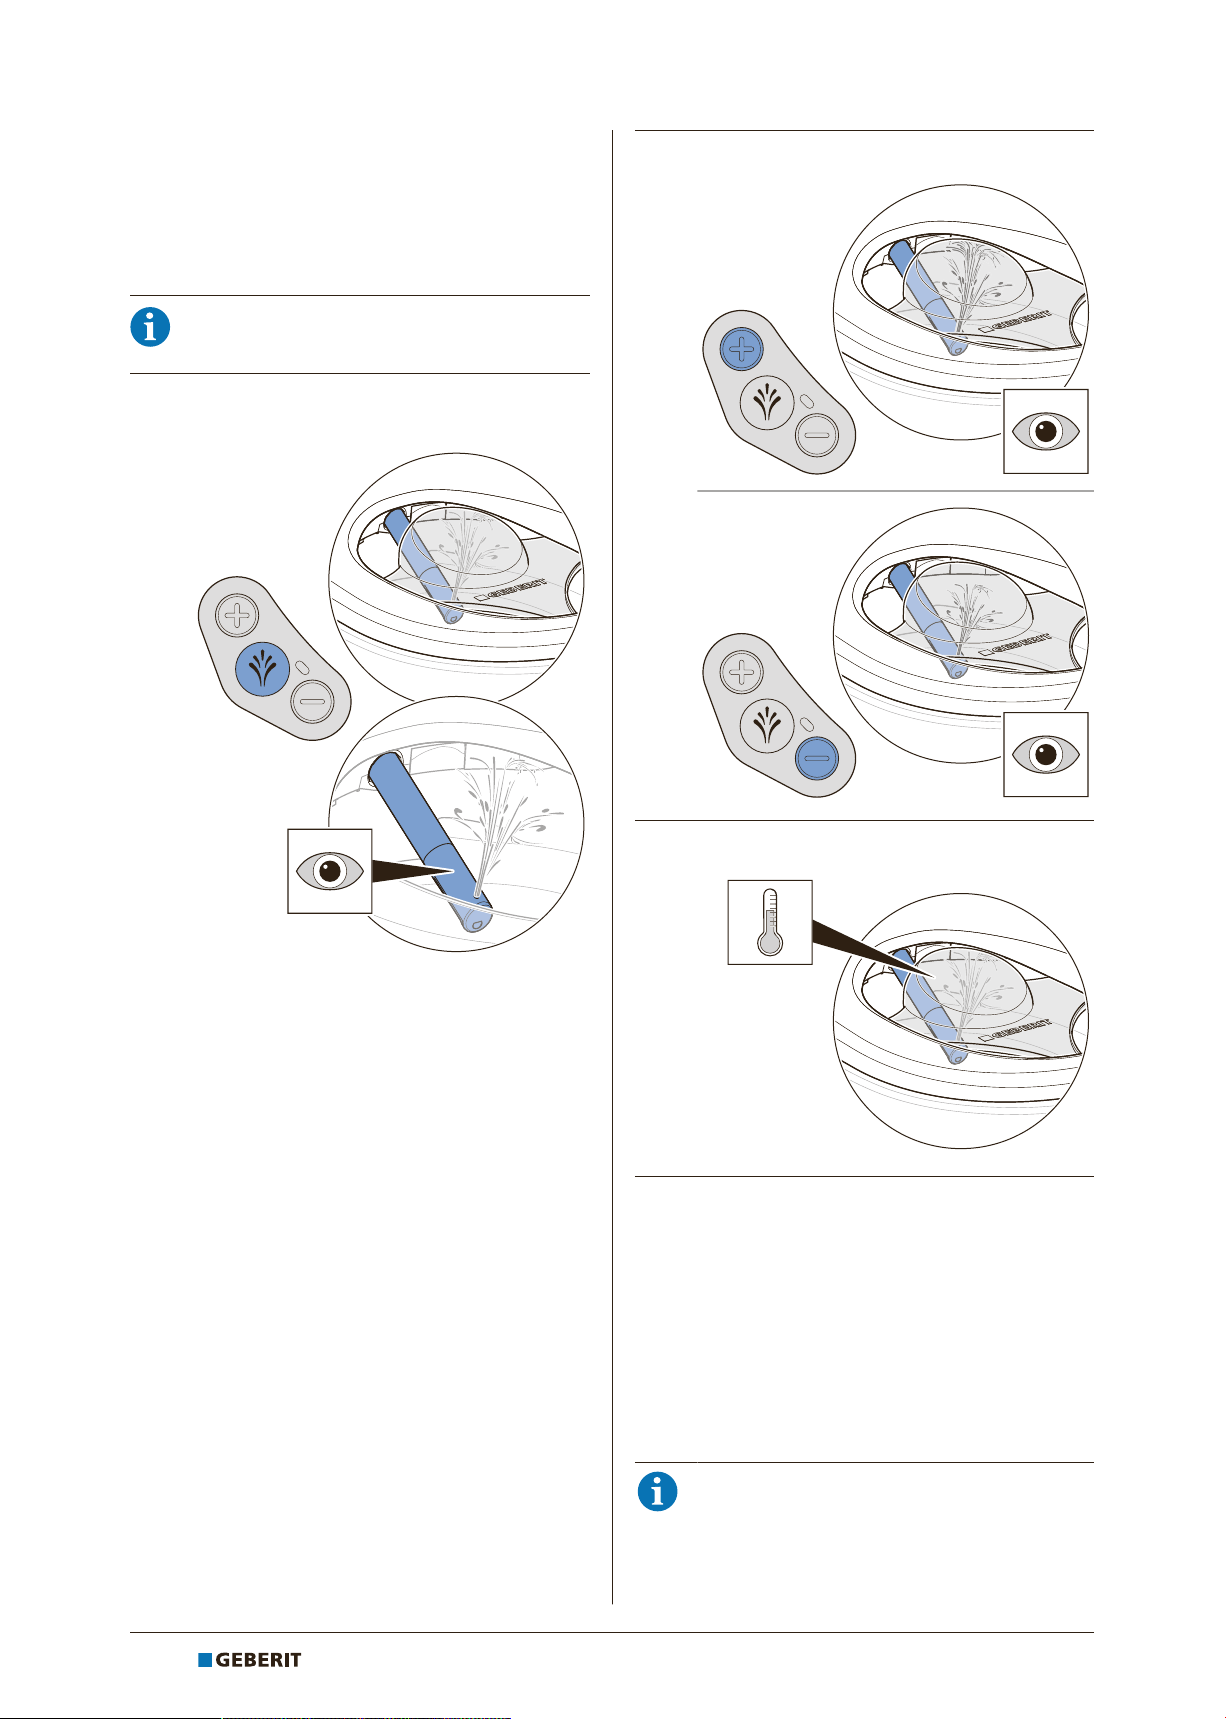
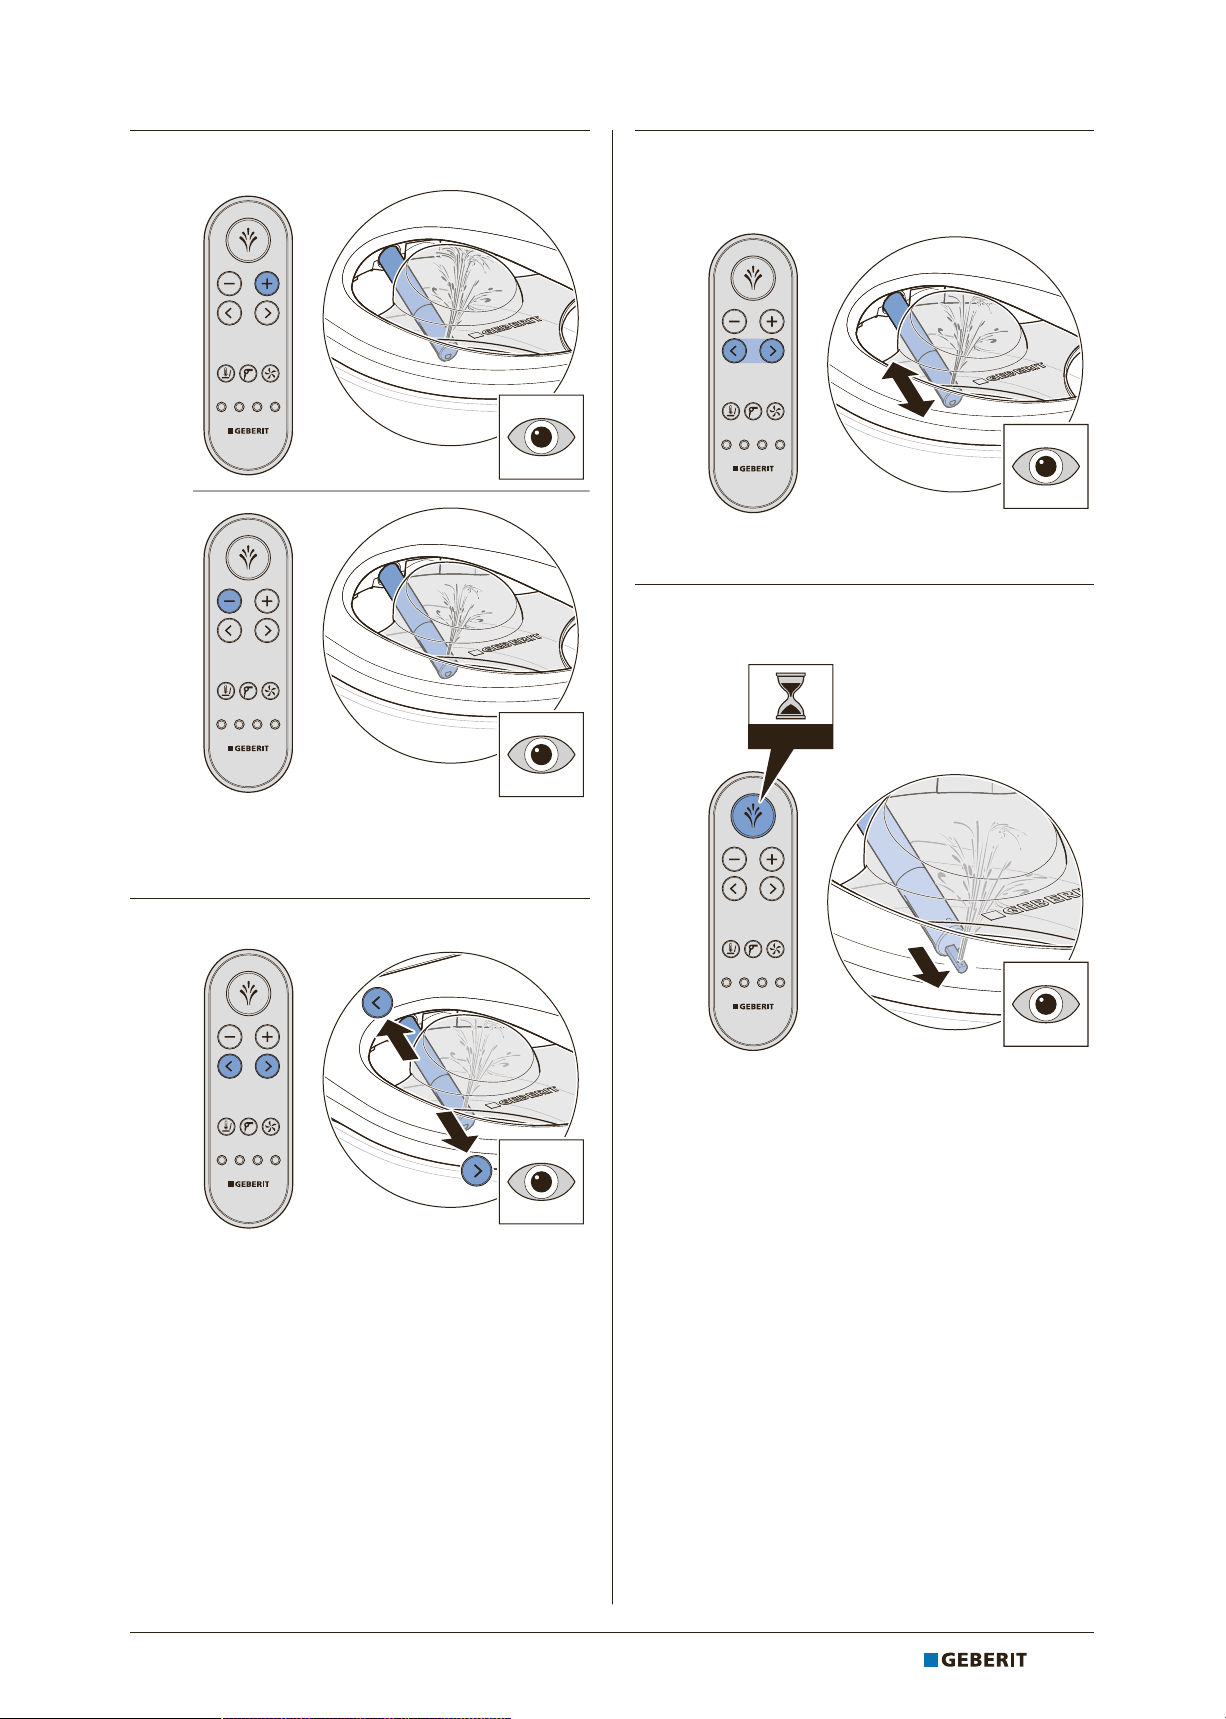
Testing the anal shower
Prerequisite
– Comfort model: User is simulated.
A shower cycle ends after 50 seconds. If
required, restart the shower cycle.
1 Briefly press the <Shower> button on the
lateral control panel.
EN
2 Test adjustability of spray intensity.
ü The device performs prerinsing.
ü The spray arm extends.
ü The anal shower starts in oscillating
function. A small amount of water drains
into the WC ceramic appliance via the
overflow. The anal shower is active for
50 seconds.
3 Test shower water temperature.
Result
ü The shower water is noticeably warm.
ü The device performs a shower cycle. Pressing
the <Shower> button again interrupts the
shower cycle.
ü After completing the shower cycle, the spray
arm retracts.
ü The device performs postrinsing.
ü The dryer functionality starts after the shower
procedure (Comfort model).
27021599673220363-1 © 11-2017
967.305.00.0 (02)
If the shower water remains cold, the
device is defective. Inform customer
service.
23
EN
T
&5
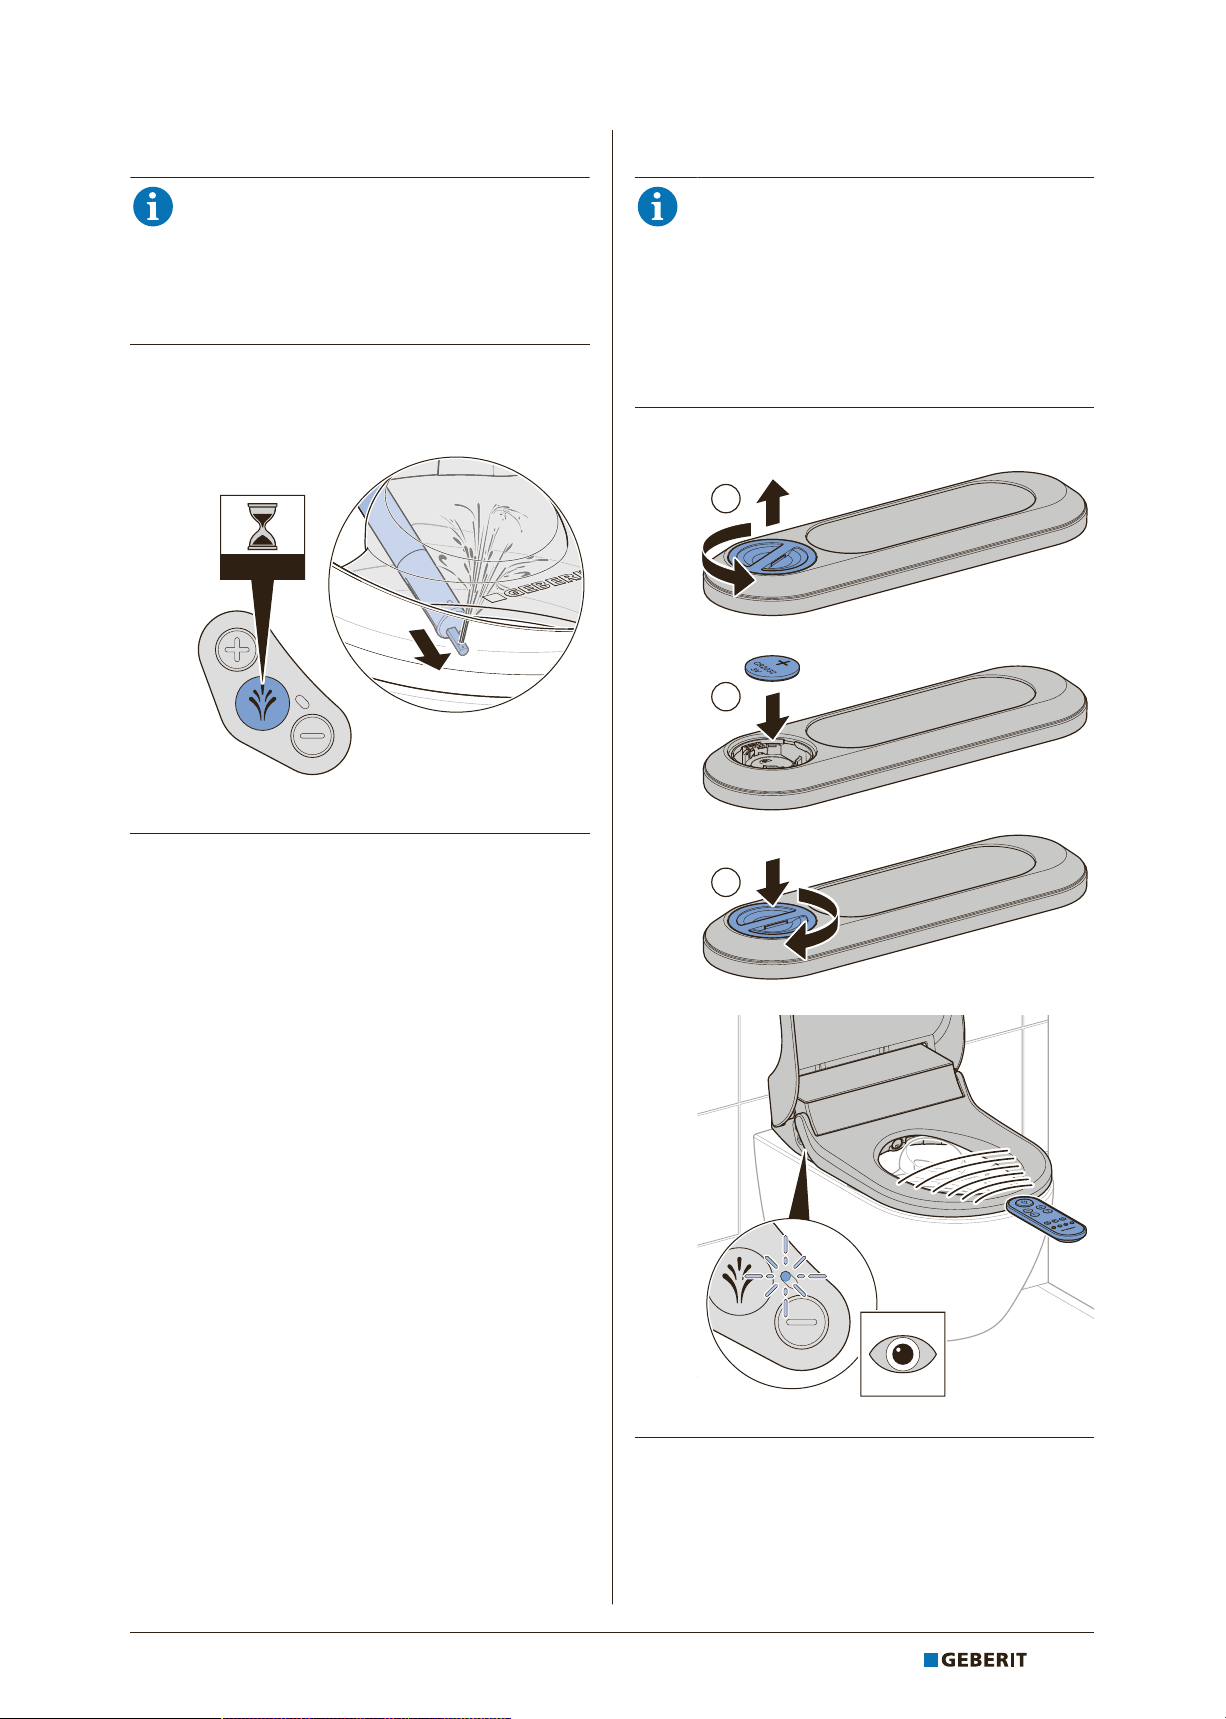
Testing the Lady shower
Activating the remote control
This section only applies to the Comfort
model.
Prerequisite
– User is simulated.
4 Press the <Shower> button on the lateral
control panel for 2 seconds.
This section only applies to the Comfort
model.
Prerequisite
– The device is switched on.
– The LED on the lateral control panel does not
light up. Economy mode is active.
4 Insert battery.
Result
ü The device performs prerinsing.
ü The spray arm extends.
ü The Lady shower starts. A small amount of
water drains into the WC ceramic appliance via
the overflow. The Lady shower is active for
30 seconds.
ü The device performs a shower cycle. Pressing
the <Shower> button again interrupts the
shower cycle.
ü After completing the shower cycle, the spray
arm retracts.
ü The device performs postrinsing.
ü The device performs postrinsing.
ü The dryer functionality starts after the shower
procedure.
24
Result
ü The device beeps (1x).
ü The LED on the lateral control panel lights up
blue for several seconds.
27021599673220363-1 © 11-2017
967.305.00.0 (02)
If several devices of the same type are
installed in immediate proximity (e.g. in
hotels), remote control must be assigned to
a device.
EN
Testing the remote control
This section only applies to the Comfort
model.
If the device does not beep and the LED on
the lateral control panel does not light up
blue for several seconds, then the remote
control must be re-assigned.
Re-assigning the remote control
This section only applies to the Comfort
model.
If the device cannot be controlled using the remote
control, then the remote control must be reassigned.
4 Press the <+> button on the remote control
and the <+> button on the lateral control
panel at the same time for approx. 10
seconds.
Prerequisite
– The remote control has been set up.
– User is simulated.
1 Press the <Shower> button briefly in order
to start the anal shower with oscillating
function.
Result
ü The device beeps (1x).
ü The LED on the lateral control panel lights up
blue for several seconds.
ü The device performs a shower cycle.
A shower cycle ends after 50 seconds. If
required, restart the shower cycle.
27021599673220363-1 © 11-2017
967.305.00.0 (02)
25
EN
T
2 Test the <+>/<-> buttons.
4 Start and stop the oscillating function by
pressing the <right> and <left> buttons
simultaneously.
ü The button combination switches the
oscillating function on and off.
5 Press the <Shower> button for 2 seconds in
order to activate the Lady shower function.
ü During a shower cycle, the spray
intensity can be increased or decreased.
3 Test the <left>/<right> arrow keys.
ü The spray arm position can be set.
ü The device performs a shower cycle.
Pressing the <Shower> button again
interrupts the shower cycle.
26
27021599673220363-1 © 11-2017
967.305.00.0 (02)
EN
6 Test the dryer functionality. Press the
<Dryer> button briefly.
ü The dryer functionality begins, and the
dryer flap moves horizontally.
ü Pressing the button again starts/ends the
function.
8 Test the <User profile> 1–4 buttons. You
can do this by activating the anal shower
and pressing every button one after the
other.
ü Every <User profile> button has its own
spray intensity and spray arm position
setting.
7 Test the odour extraction function. Press the
<Odour extraction> button briefly.
ü Pressing the button again starts/ends the
function.
27021599673220363-1 © 11-2017
967.305.00.0 (02)
27
EN
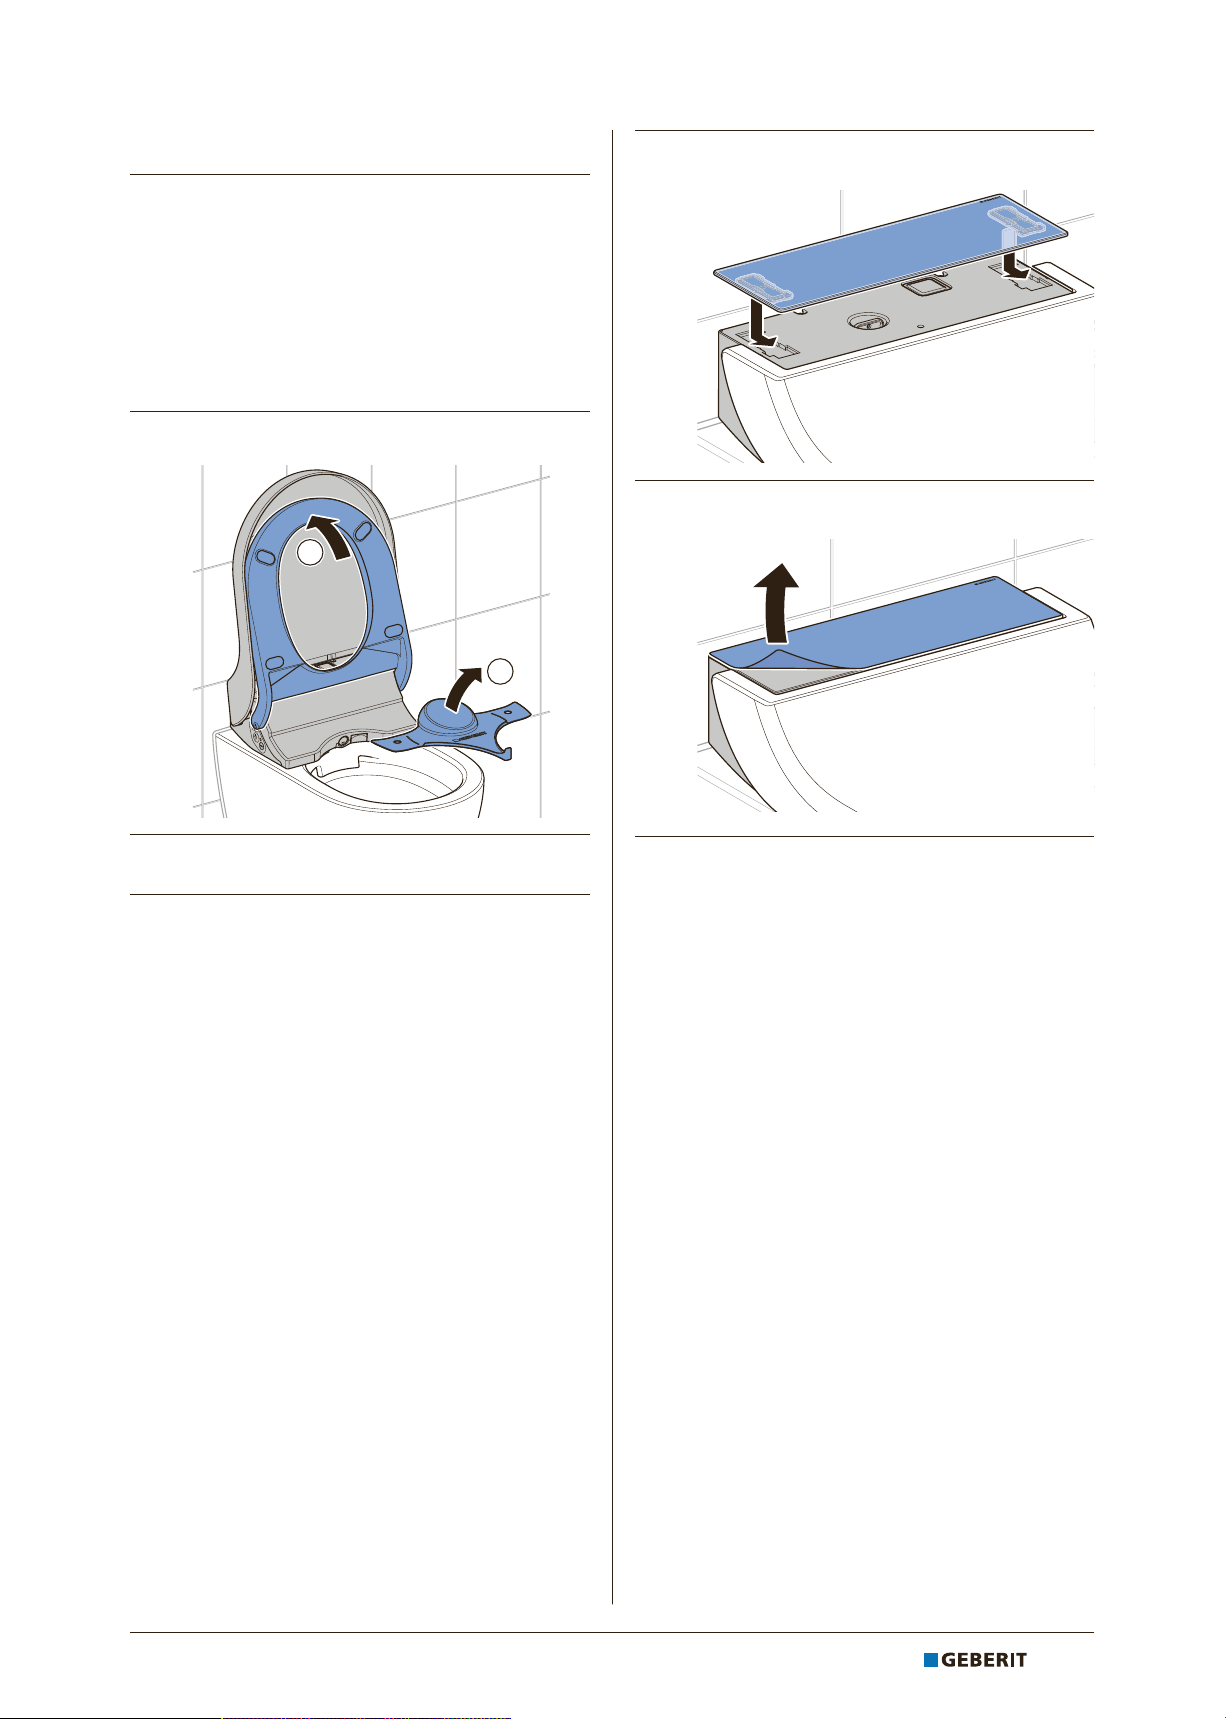
Commissioning
Putting the device into operation
Prerequisite
– The function tests were performed successfully.
– The device is installed correctly.
1 Remove the spray shield.
5 Remove the protective foil from the design
cover.
Result
ü The device is ready for operation and can be
handed over to the customer.
2 Clean the device.
3 Close the WC seat and WC lid.
4 Mount the design cover.
28
27021599673220363-1 © 11-2017
967.305.00.0 (02)
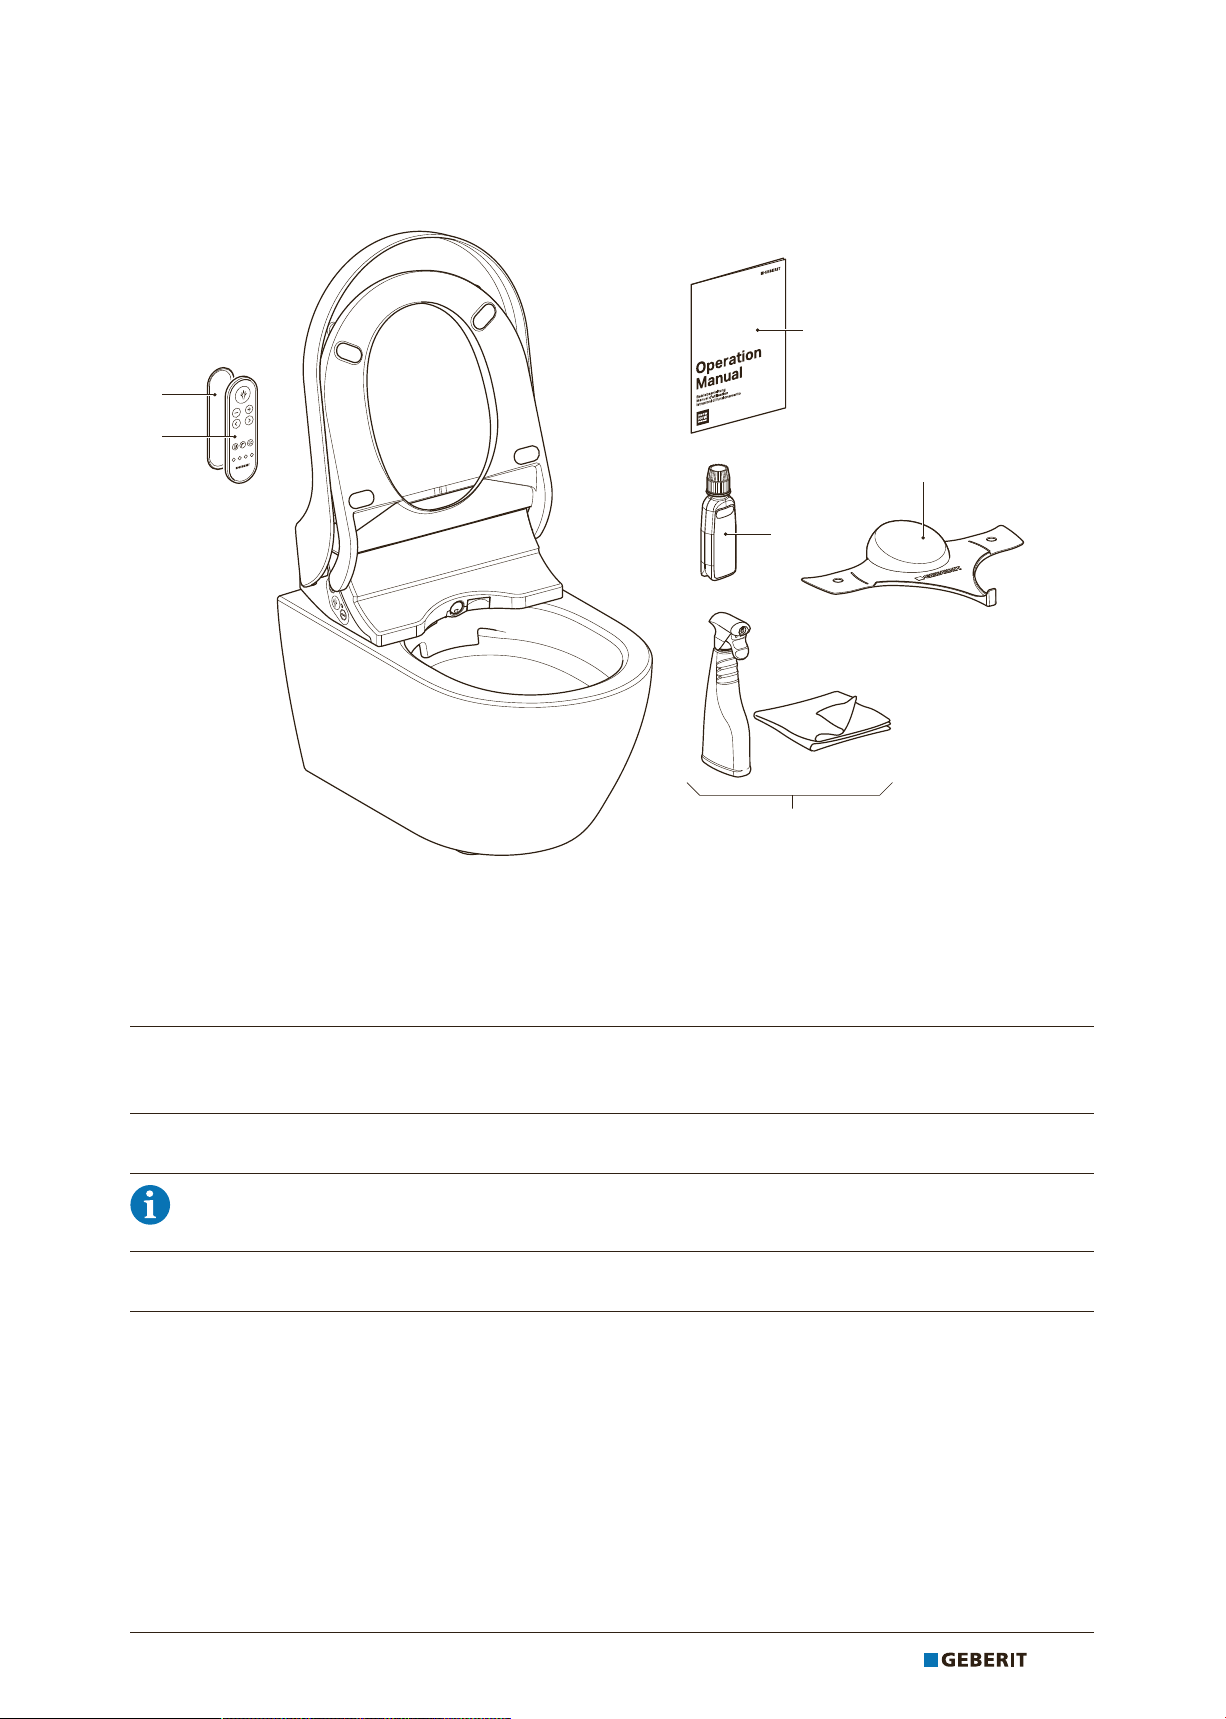
Handing over the device
EN
1 User manual
2 Geberit AquaClean spray shield
3 Geberit AquaClean descaling agent (Comfort)
4 Geberit AquaClean cleaning set (Comfort)
5 Remote control (Comfort)
6 Remote control wall-mounted holder (Comfort)
1 Attach a second serial number sticker to the last page of the user manual so that it is available for
later use.
2 Instruct the customer with regard to operation and cleaning, as per the user manual.
Provide information on the annual descaling cycle. For detailed information on operation and
cleaning, see user manual.
3 Hand over complete end user documentation and scope of delivery.
4 Refer the customer to the warranty extension during registration. For information on registration
options, see user manual.
27021599673220363-1 © 11-2017
967.305.00.0 (02)
29
FR
Test de fonctionnement
Mise en marche de l’appareil
ü
Aucun témoin lumineux n'est allumé
lorsque la procédure de mise en marche
est terminée. L'appareil se trouve en mode
économie d'énergie.
AVERTISSEMENT
Tension dangereuse
Risque de décharge électrique du fait de la
présence d'eau sur des pièces conductrices.
4
Monter le limiteur de retrait (cordon de
sécurité) entre l'appareil et la plaque de
montage avant la mise en marche.
4
Après la première mise en marche, ne
plus secouer ni basculer l'appareil.
4
L'appareil contient de l'eau. Débrancher
l'appareil par le biais de l'interrupteur
principal avant de détacher le limiteur de
retrait à des fins d'entretien.
Condition requise
L’appareil est monté et raccordé.
–
–
Le couvercle WC est retiré.
–
Le limiteur de retrait est bien encliqueté sur la
plaque de montage.
–
Le robinet à boisseau sphérique d’arrivée d’eau
est ouvert.
– Le cache de protection anti-éclaboussures est
monté.
2
Mettre le couvercle WC en place.
L'appareil est défectueux si le témoin lumineux
clignote en rouge. Ne pas entreprendre de
réparations sur l'appareil. Informer le service
après-vente.
1
Enclencher l'appareil par le biais de
l'interrupteur principal.
ü
Le témoin lumineux de la commande fixe
latérale clignote en bleu après 5secondes.
L’appareil s'initialise.
ü
L’appareil effectue un nettoyage avant
utilisation.
30
27021599673220363-1 © 11-2017
967.305.00.0 (02)
 Loading...