

Geberit 147.038 series User Manual
Bedienungsanleitung
Mode d’emploi
Istruzioni per l‘uso
User
Manual
User
Manual

DE Bedienungsanleitung 4
EN User Manual 12
FR Mode d’emploi 20
IT Istruzioni per l‘uso 28
NL Gebruiksaanwijzing 36
DA Betjeningsvejledning 44
NO Brukerhåndbok 52
SV Bruksanvisning 60
PL Instrukcja użytkowania 68
SK Návod na obsluhu 76
CS Návod k obsluze 84
RU Руководство по обслуживанию 92
3
B1290-001 © 04-2016
967.163.00.0 (01)
DE
4
B1290-001 © 04-2016
967.163.00.0 (01)
Information
Inhalt
Information ............................................................................................................................................................. 4
Das Wandbedienpanel auf einen Blick......................................................................................................... 4
So bedienen Sie das Wandbedienpanel ..................................................................................................... 5
Das Wandbedienpanel ist ohne Funktion................................................................................................. 10
Entsorgung........................................................................................................................................................... 11
Technische Daten.............................................................................................................................................. 11
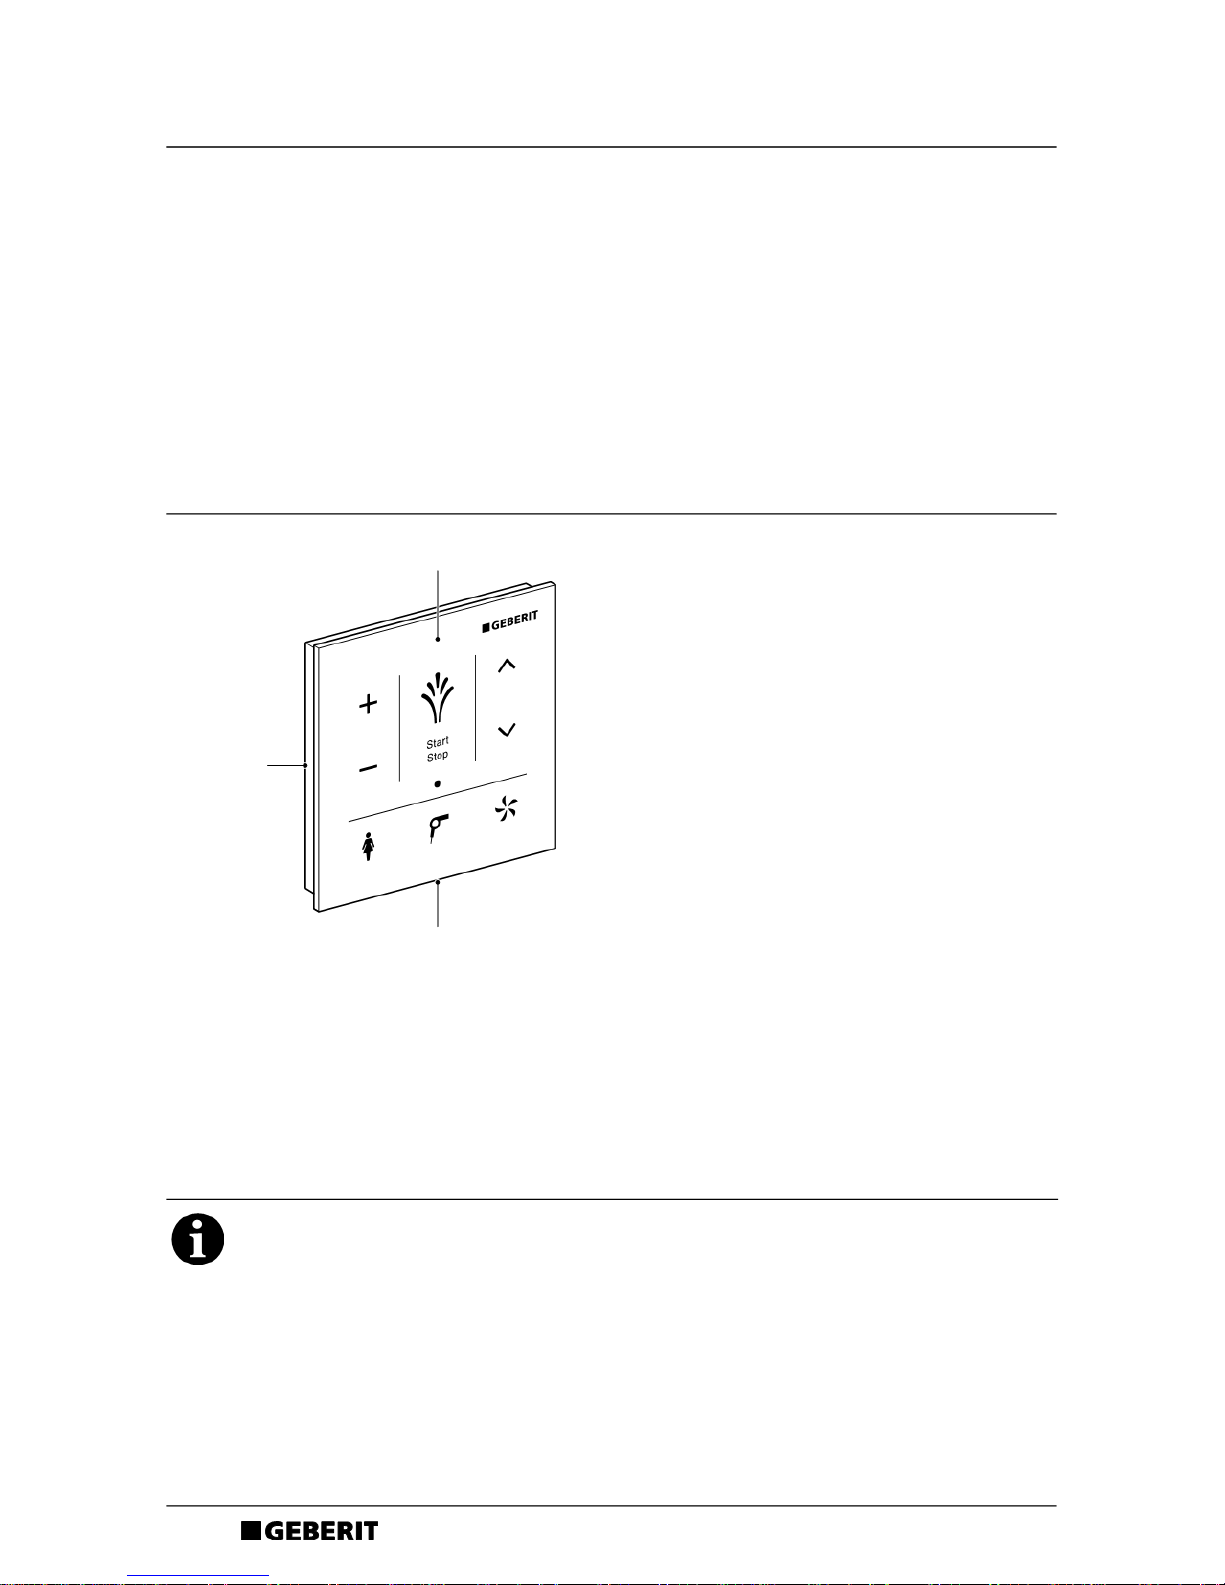
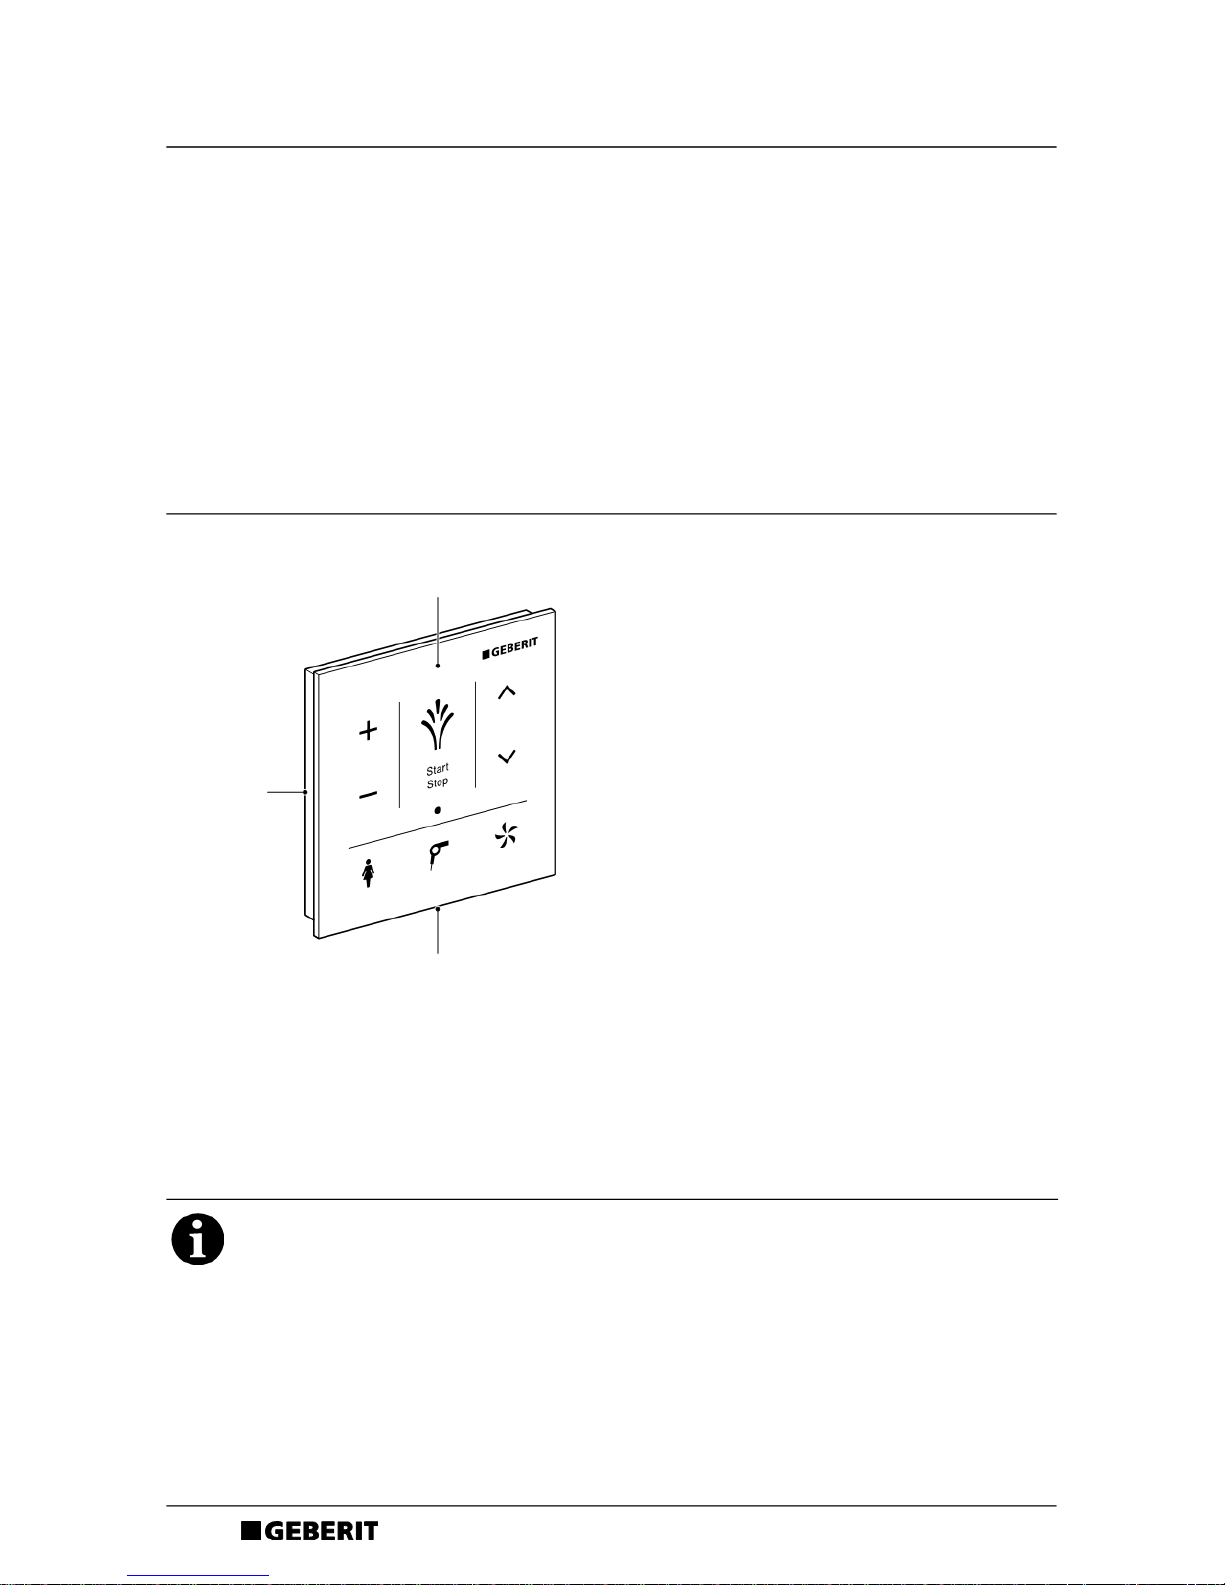
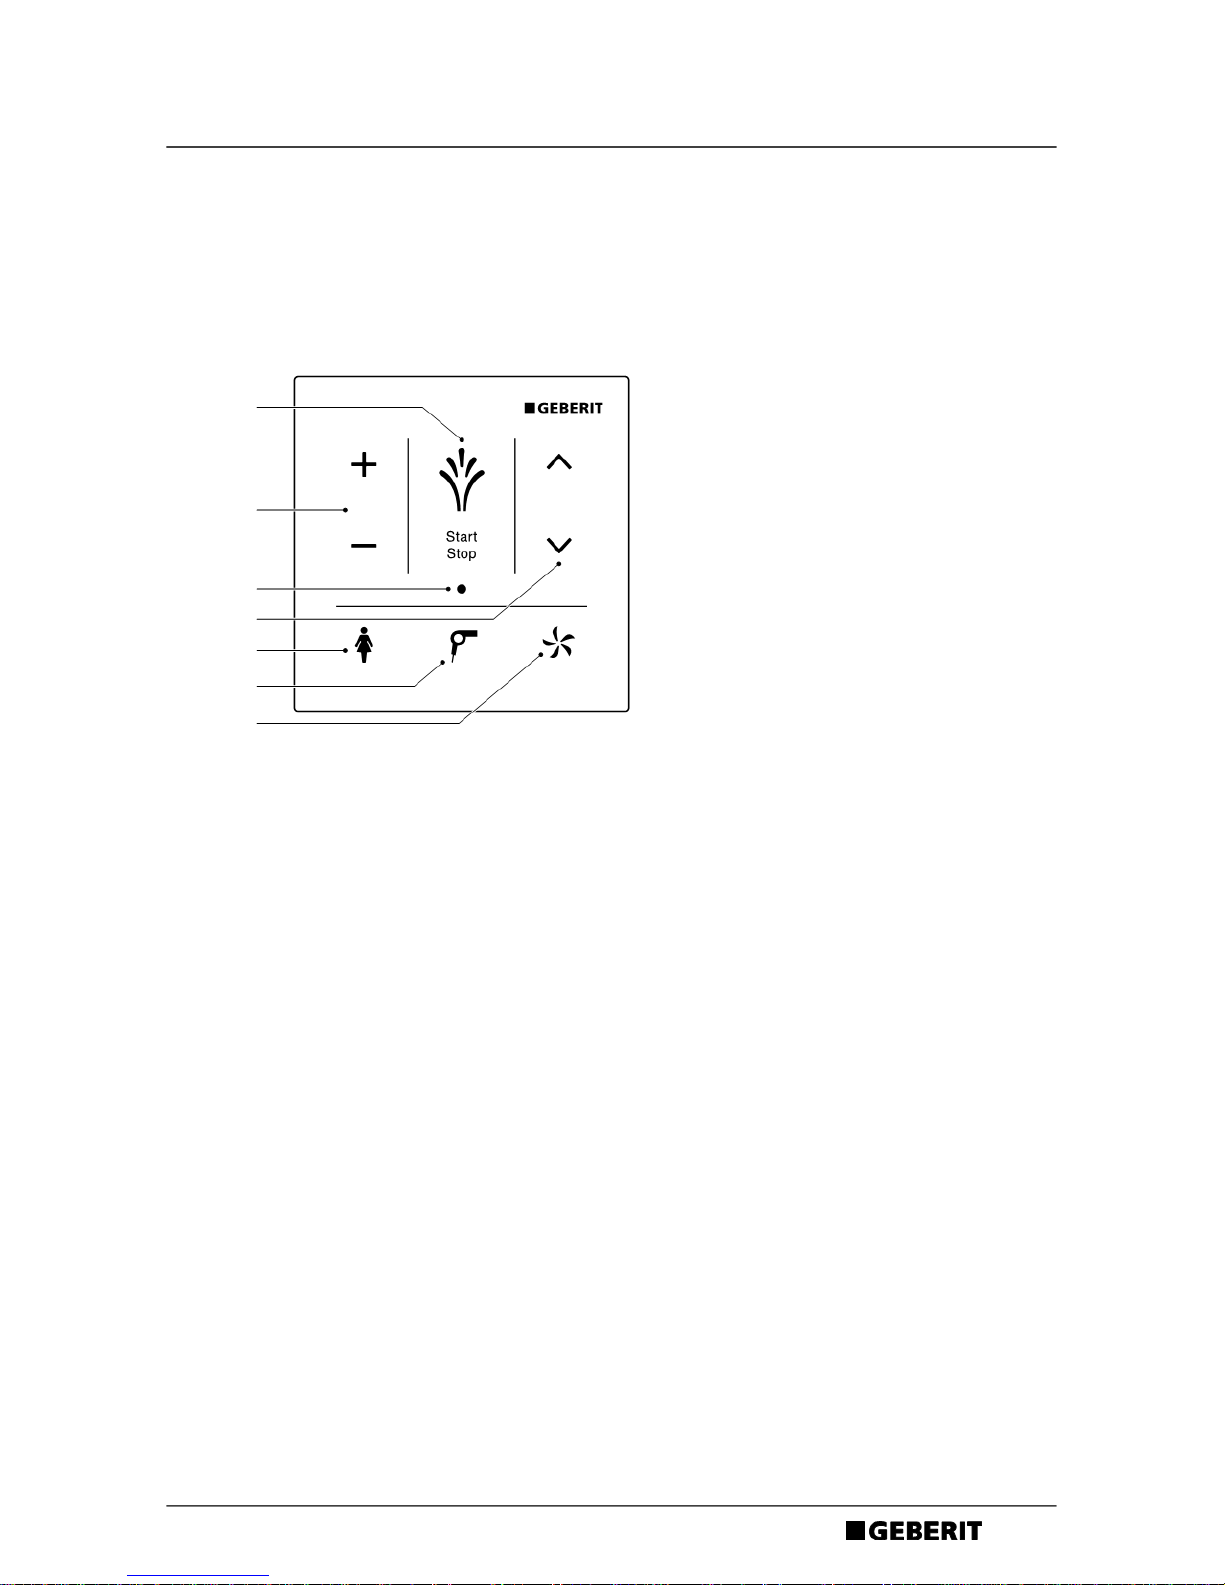
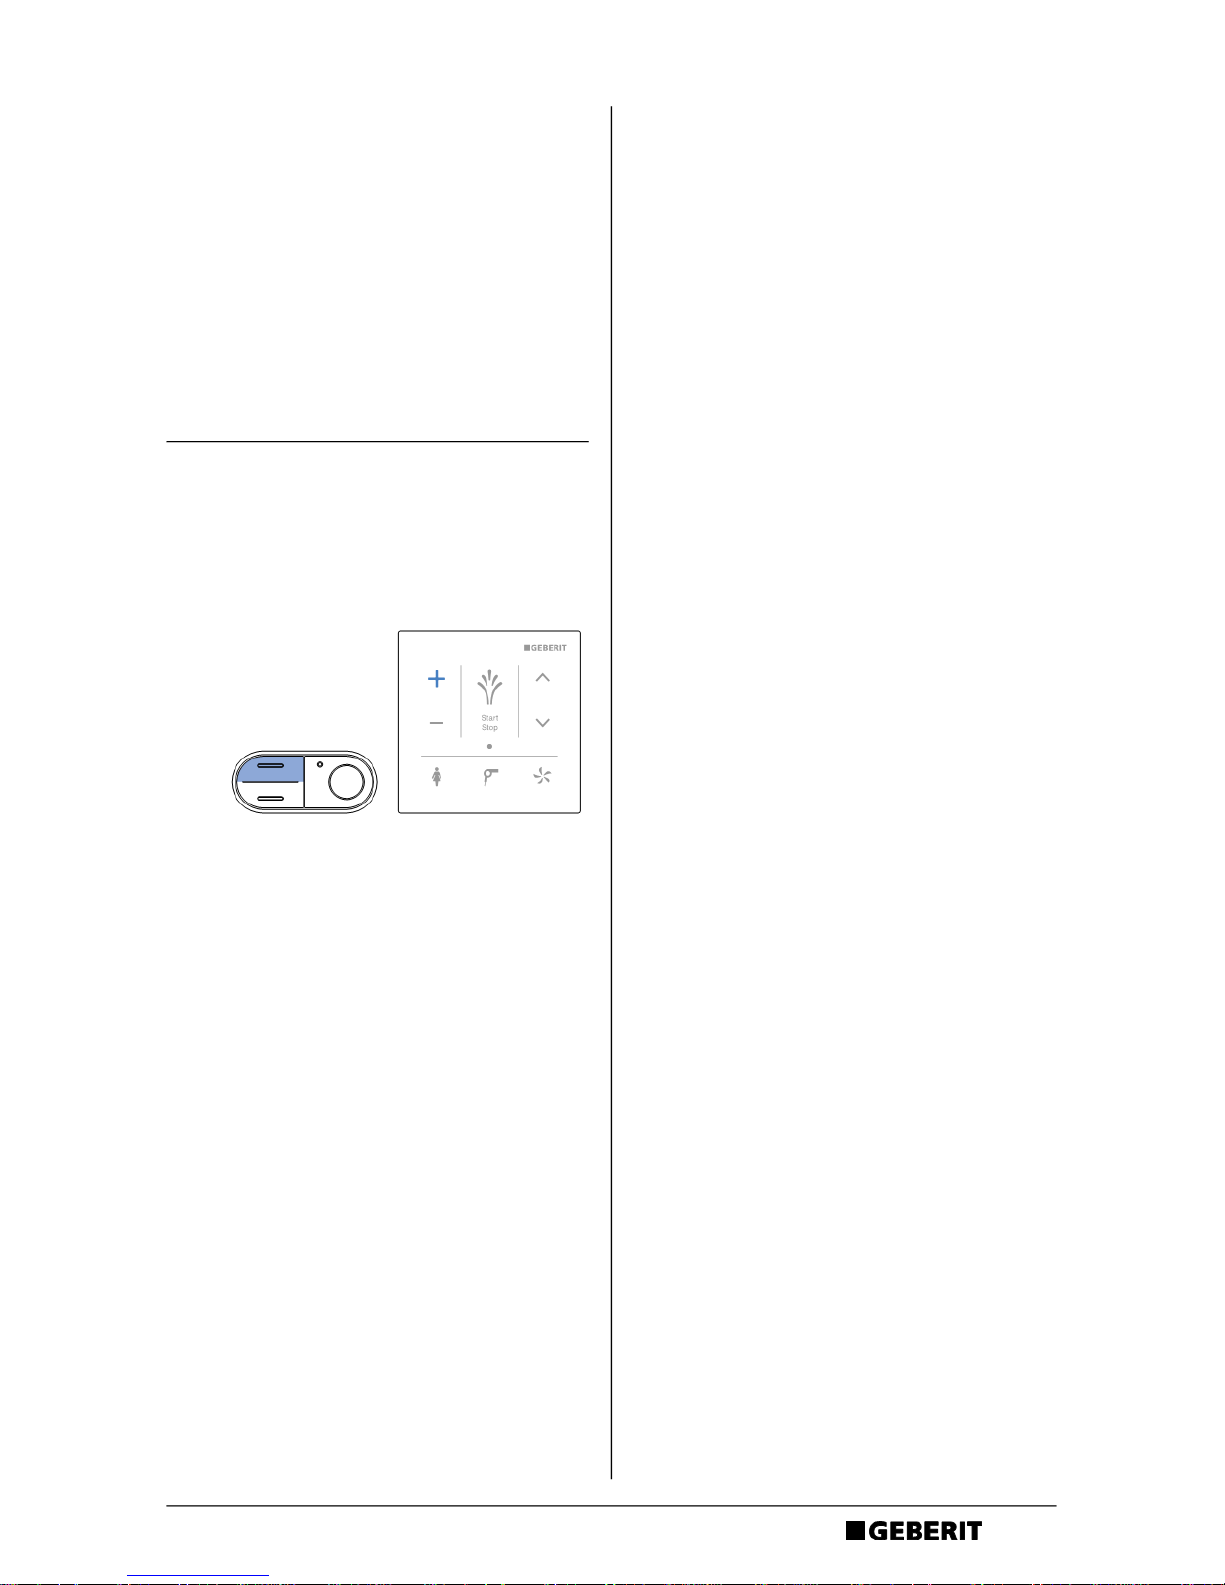
Das Wandbedienpanel auf einen Blick
1 Wandbedienpanel mit Anti-Fingerprint-Beschichtung, abnehmbar
2 Grundplatte für Wandmontage
3 Entriegelungsöffnung
0
Wandbedienpanel reinigen
Aggressive und scheuernde Reinigungsmittel können die Oberfläche beschädigen.
Setzen Sie ausschliesslich flüssige, hautfreundliche, milde Reinigungsmittel ein.
Das Geberit AquaClean Reinigungsset (Art.-Nr. 242.547.00.1) enthält ein
Reinigungsmittel, das gebrauchsfertig und optimal auf alle Geberit AquaClean
Oberflächen abgestimmt ist.
3
2
1
DE
5
B1290-001 © 04-2016
967.163.00.0 (01)
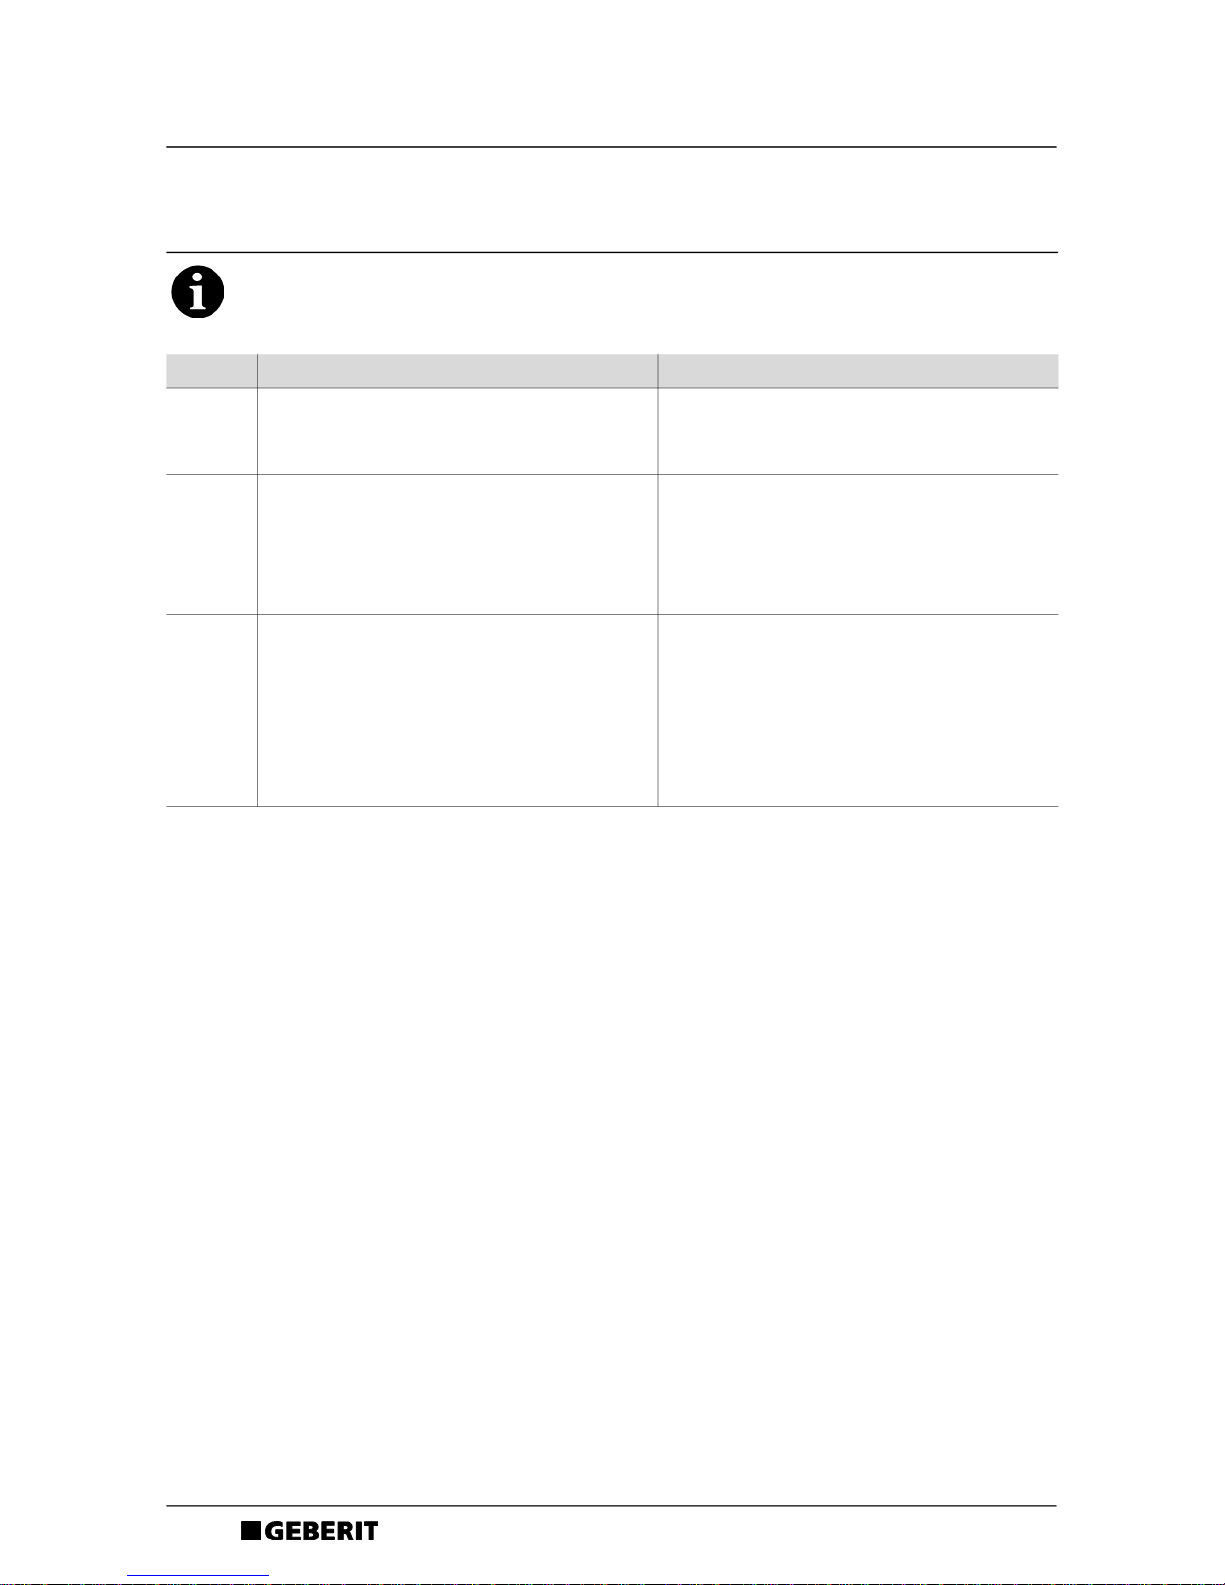
So bedienen Sie das Wandbedienpanel
Über das Wandbedienpanel können alle Funktionen des täglichen Gebrauchs bedient werden.
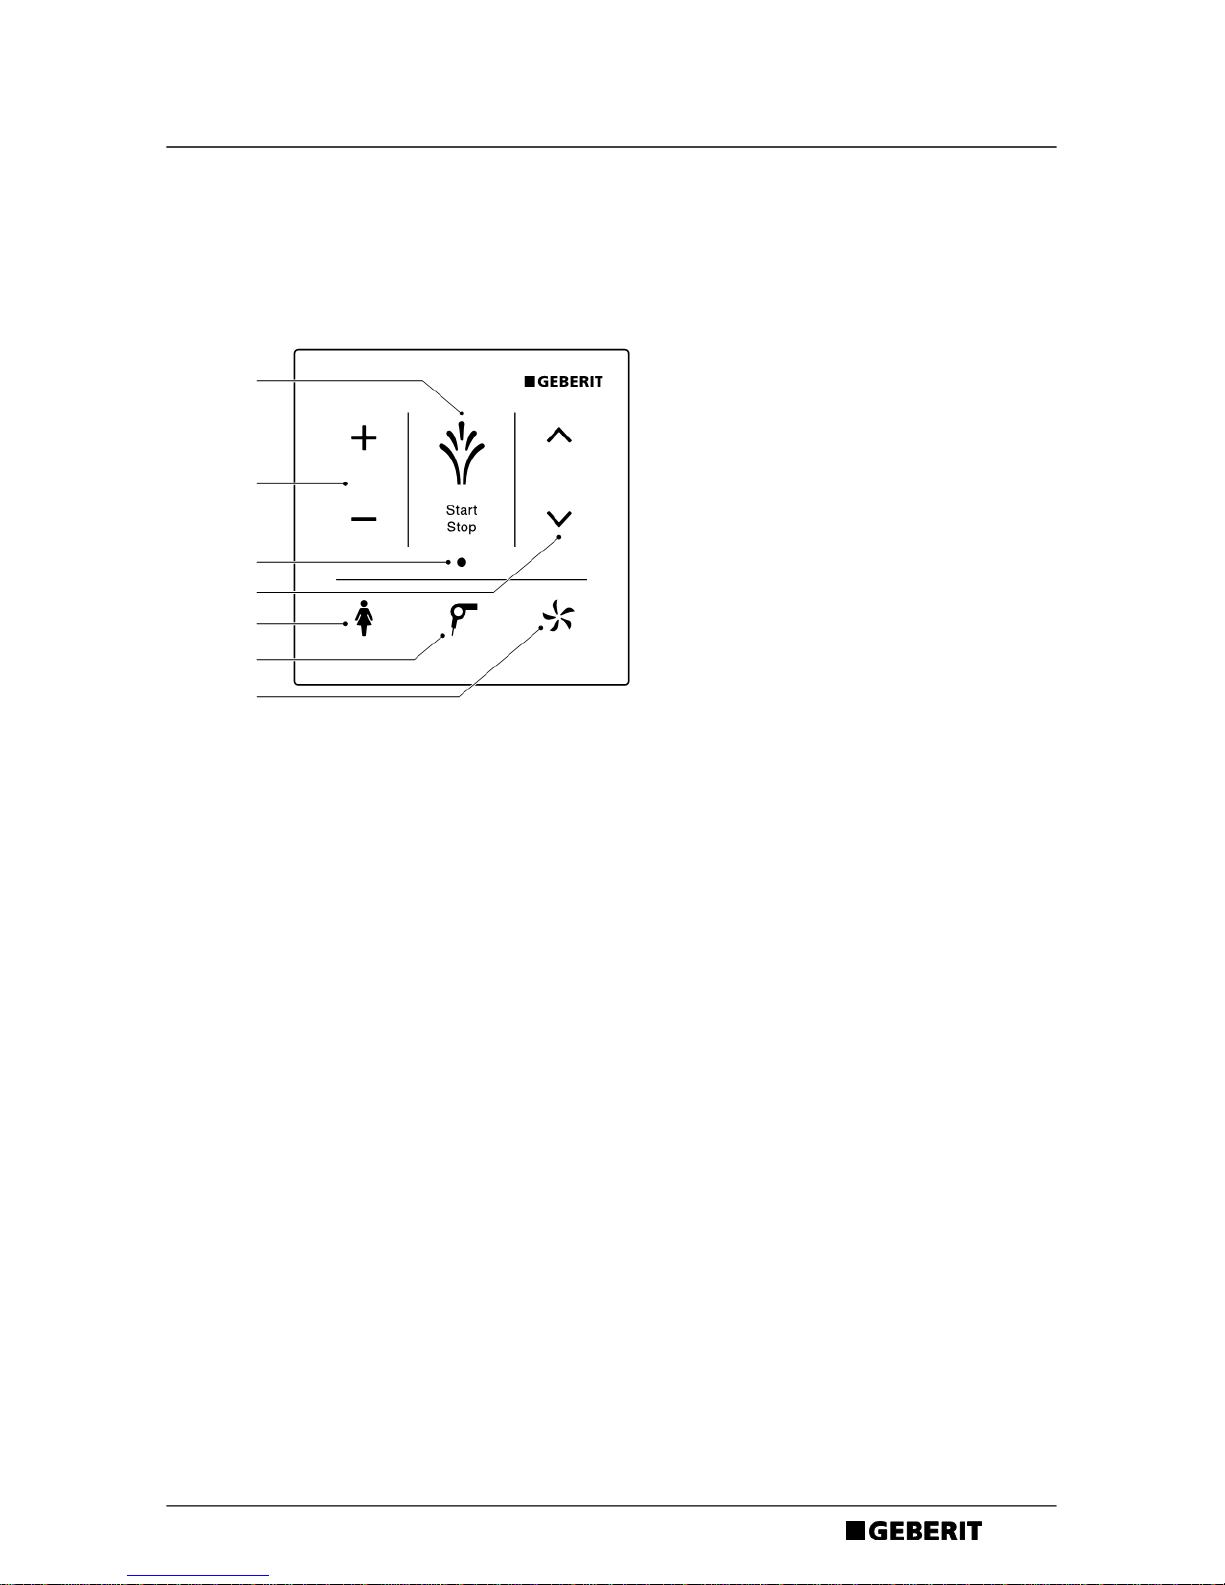
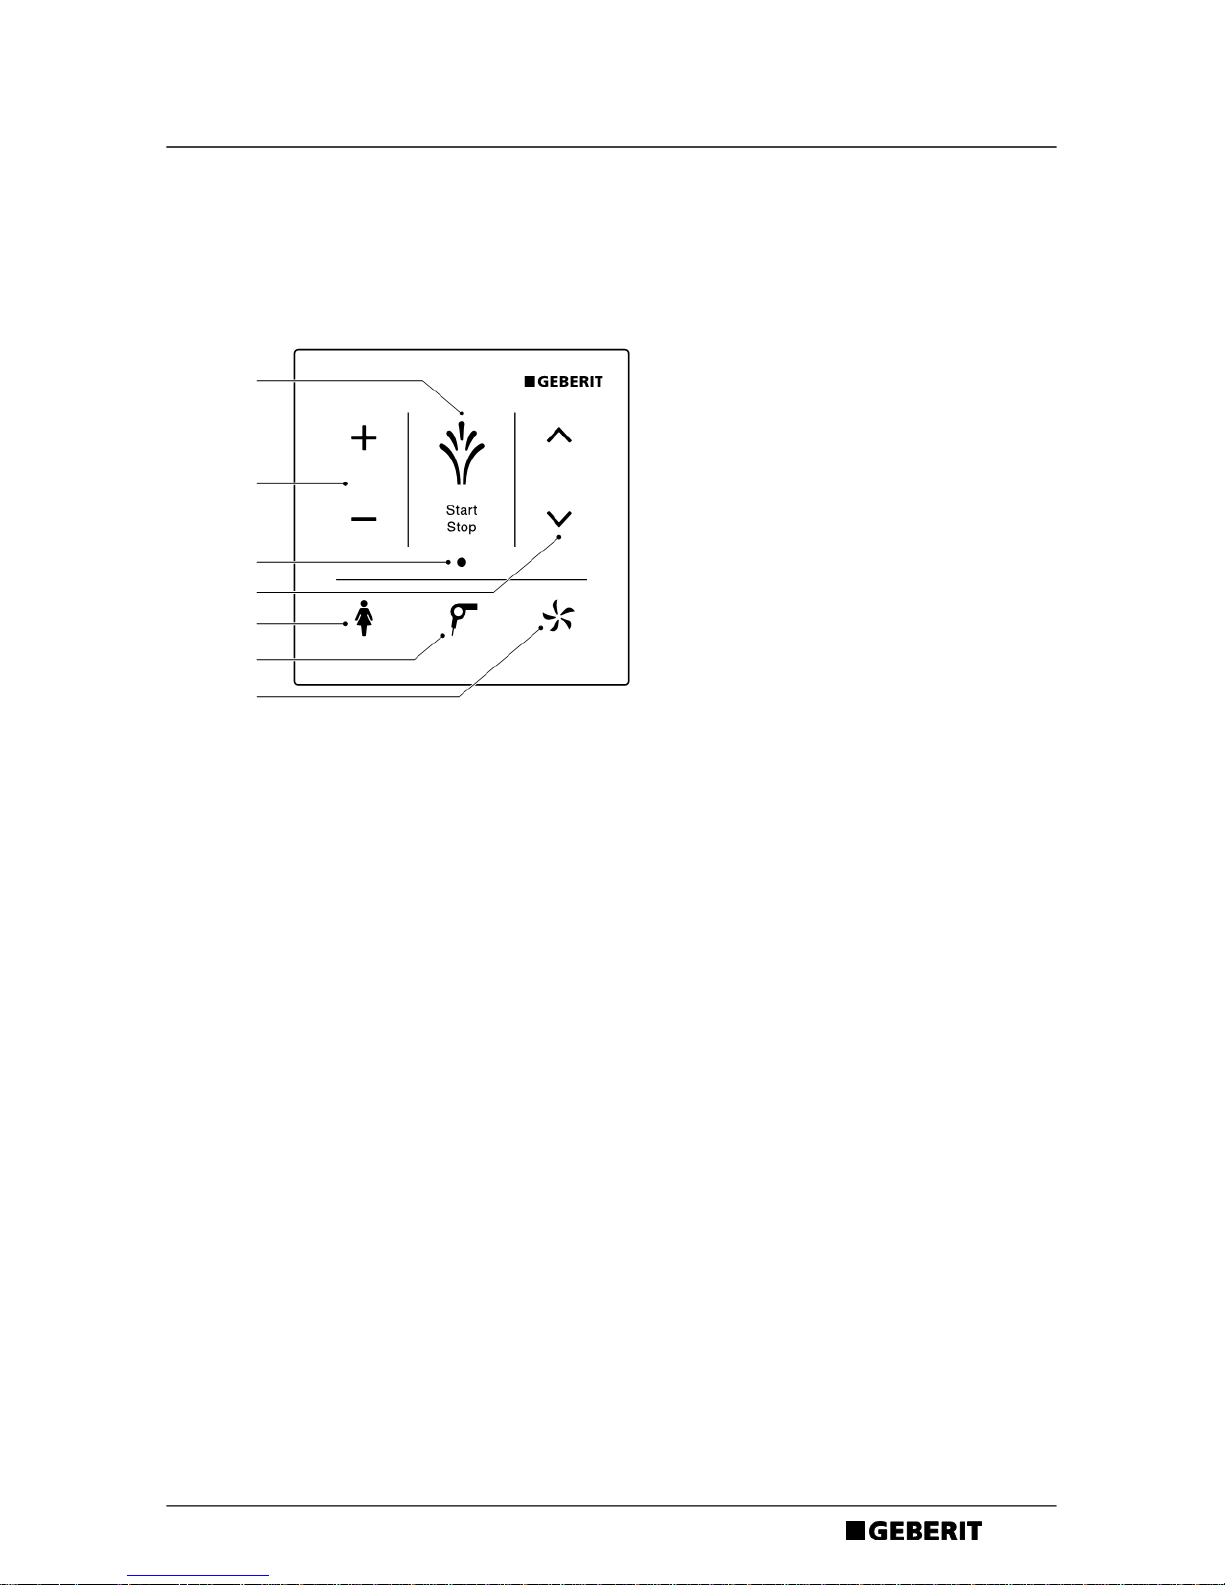
Wandbedienpanel im Überblick
1 Symbol <Dusche>: Analdusche starten und stoppen / Föhn und Ladydusche stoppen /
WC-Deckel heben und senken ( in der Ausführung Comfort)
2 Symbol < – > / < + >: Duschstrahlstärke verringern oder erhöhen
3 LED-Anzeige
4 Symbol <oben> / <unten>: Duscharmposition einstellen
5 Symbol <Ladydusche>: Ladydusche starten und stoppen
6 Symbol <Föhn>: Föhn starten und stoppen
7 Symbol <Geruchsabsaugung>: Geruchsabsaugung starten und stoppen
0
1
2
3
4
5
6
7
DE
6
B1290-001 © 04-2016
967.163.00.0 (01)
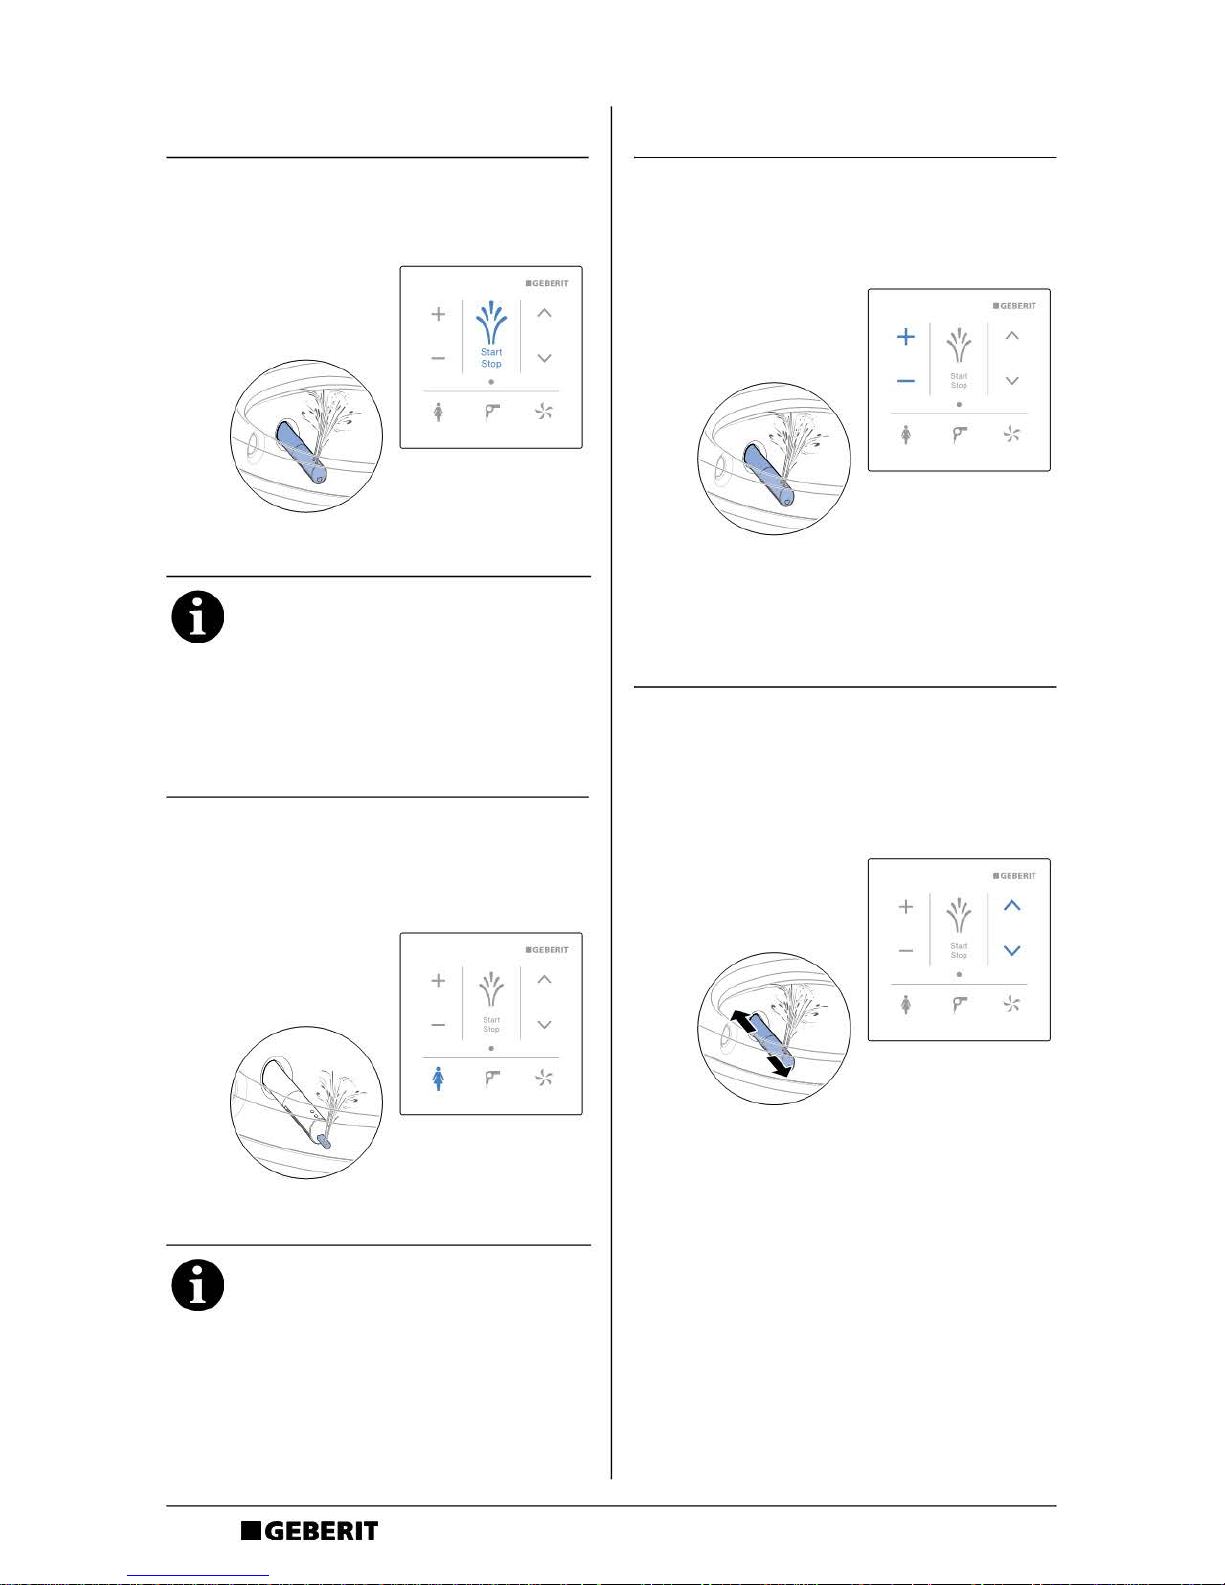
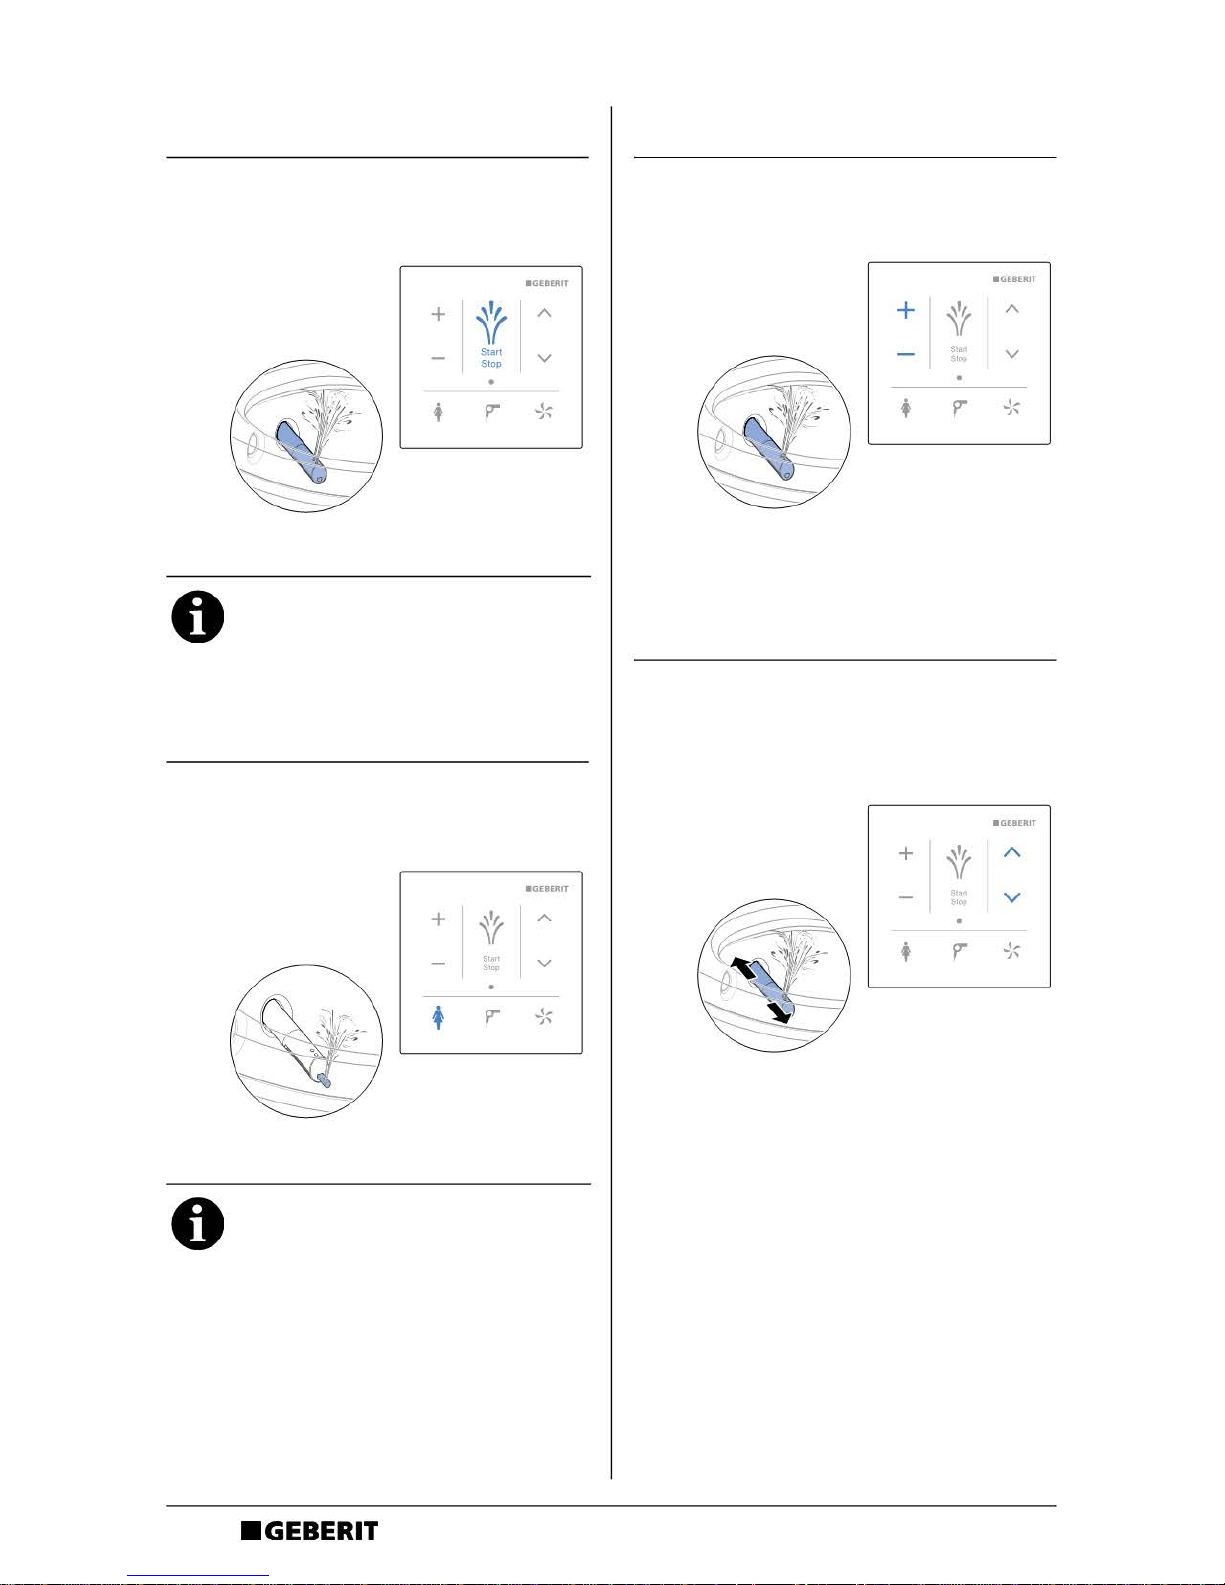
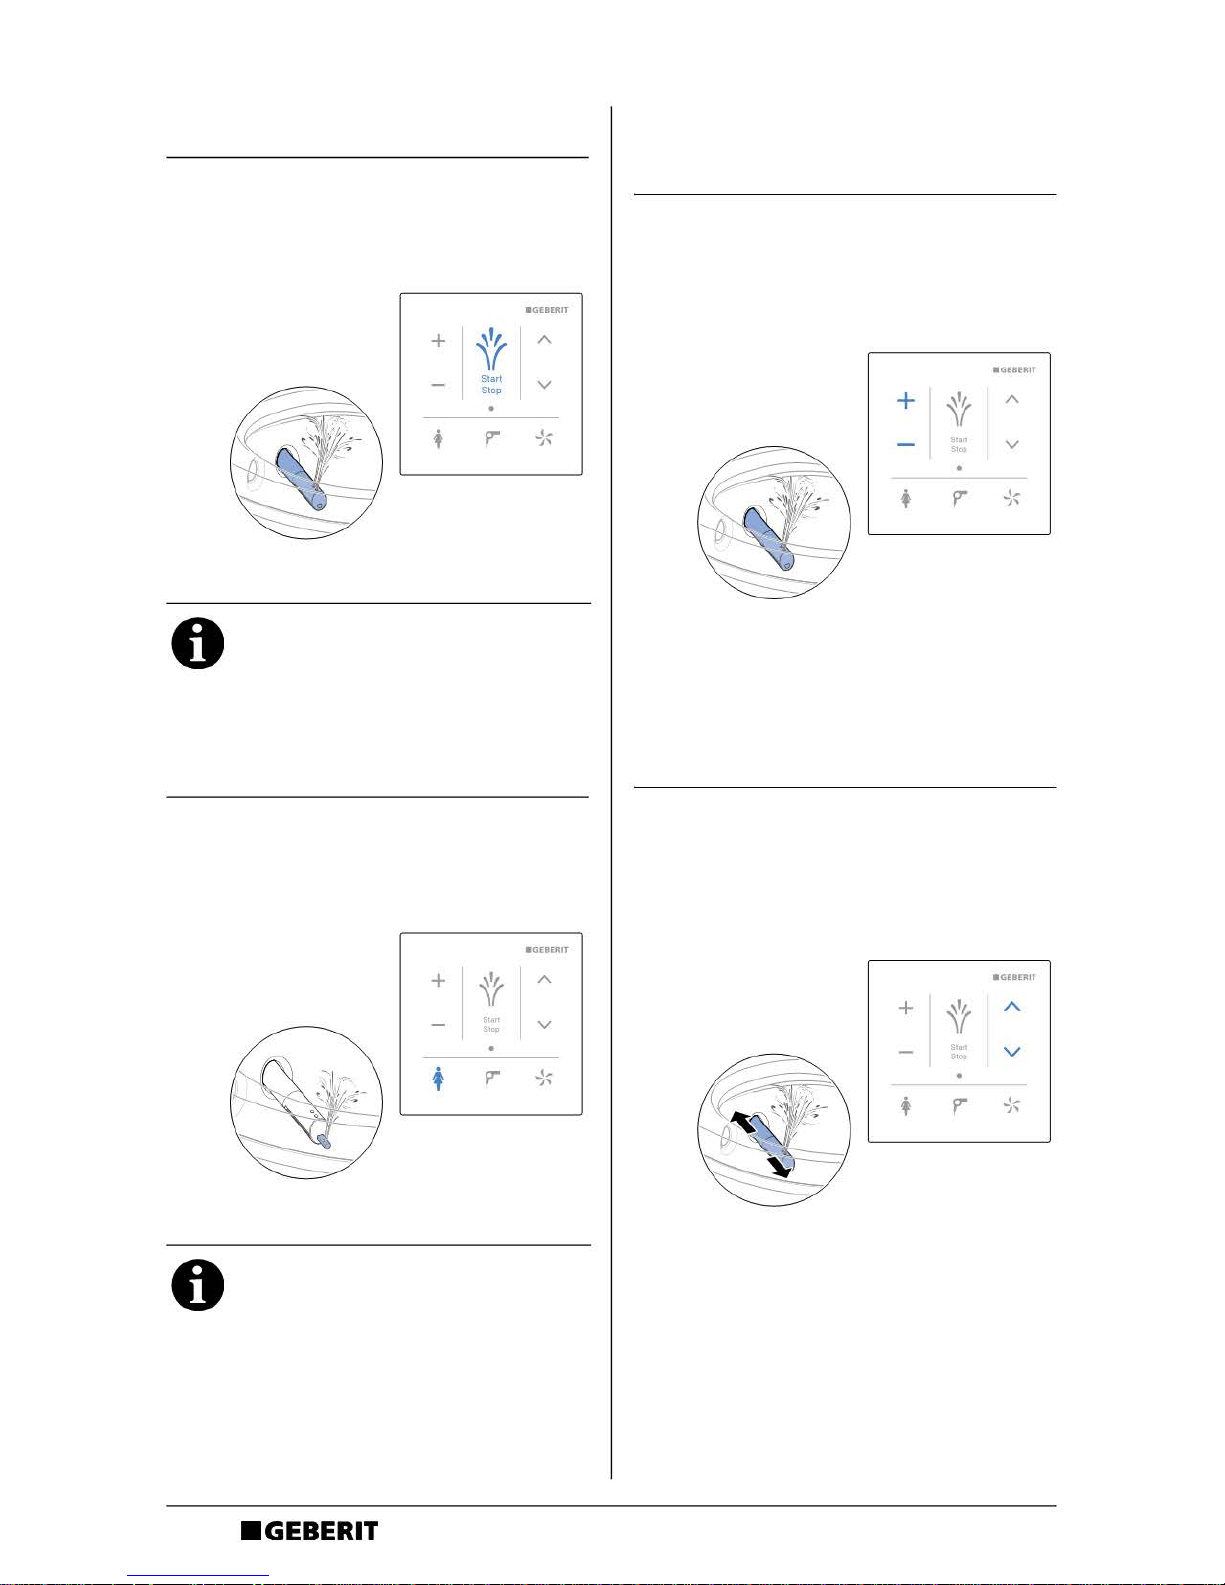
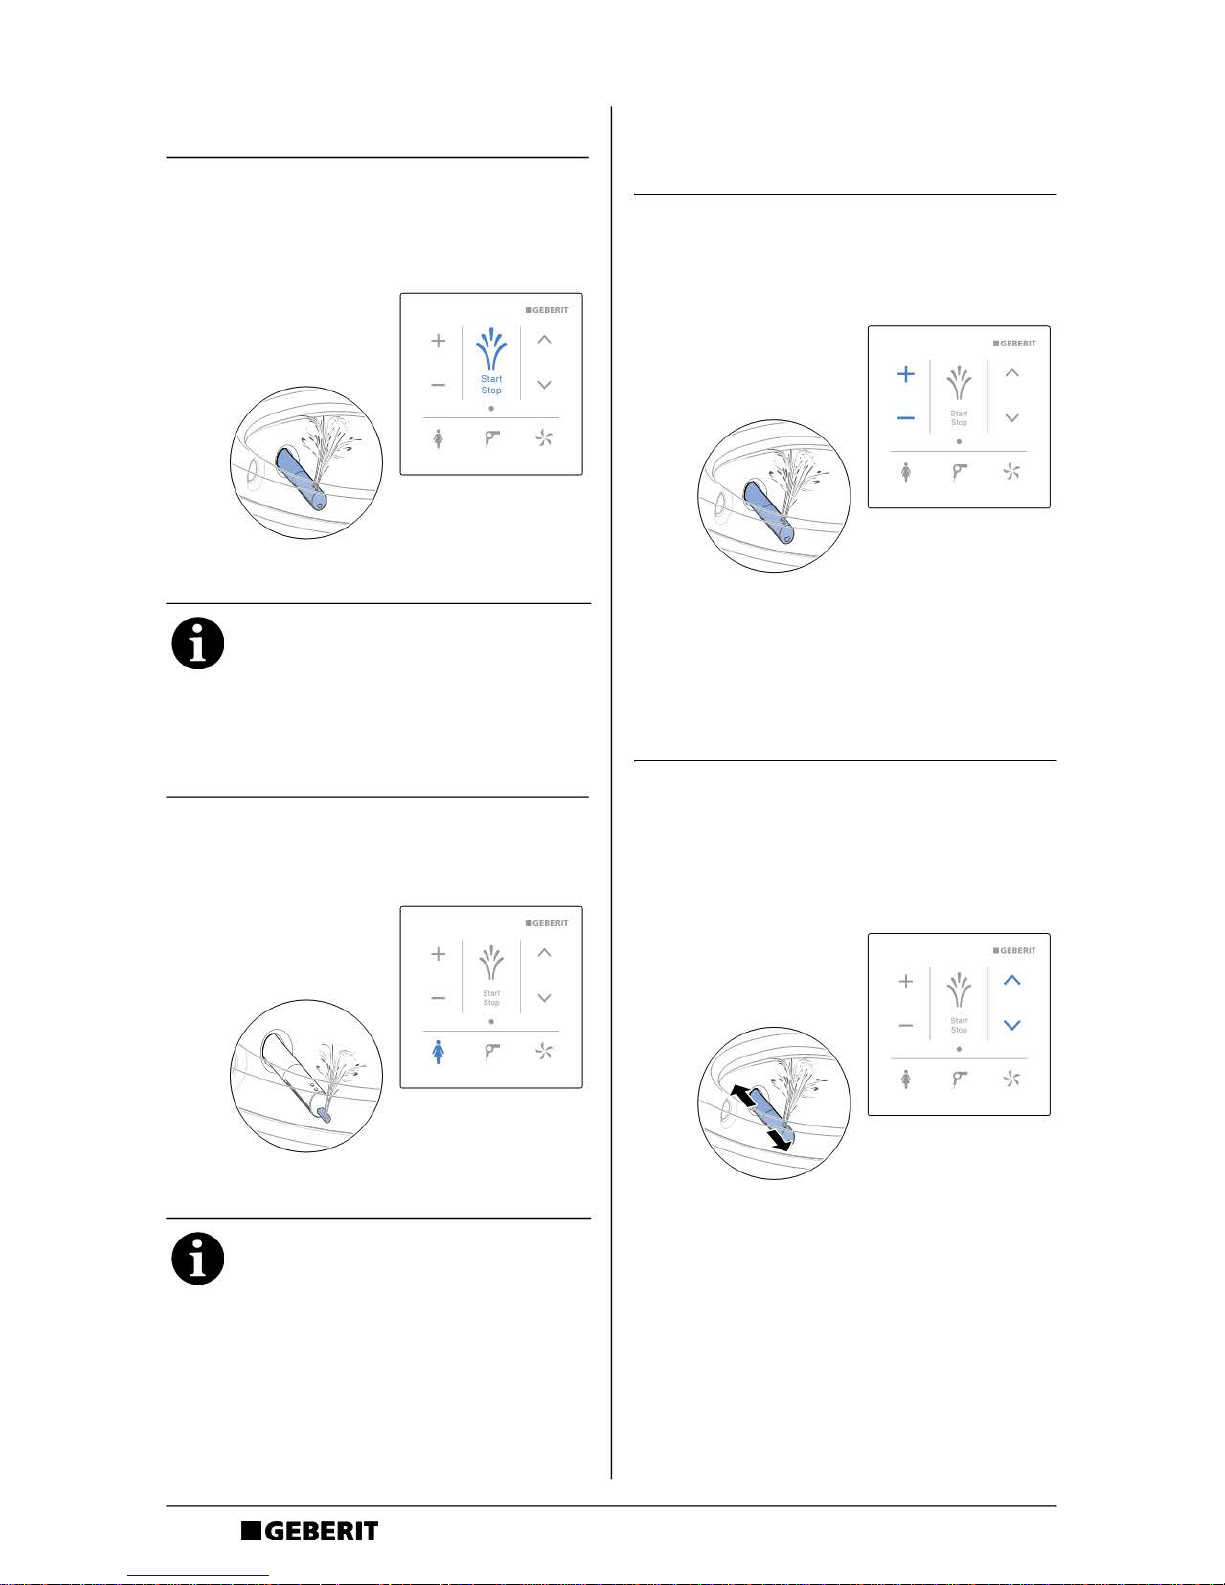
Analdusche benutzen
`
Berühren Sie einmal kurz das Symbol
<Dusche> auf dem Wandbedienpanel.
Ladydusche benutzen
` Berühren Sie das Symbol
<Ladydusche> auf dem
Wandbedienpanel.
Duschstrahlstärke einstellen
` Berühren Sie das Symbol < + >, um
die Duschstrahlstärke zu erhöhen,
oder < - >, um sie zu verringern.
Duscharmposition einstellen
` Berühren Sie das Symbol <oben>,
um den Duscharm nach vorne zu
bewegen, oder <unten>, um den
Duscharm nach hinten zu bewegen.
Berühren Sie das Symbol
<Dusche> erneut, um den
Duschvorgang vorzeitig zu
beenden.
Berühren Sie das Symbol
<Ladydusche> erneut, um den
Duschvorgang vorzeitig zu
beenden.

DE
7
B1290-001 © 04-2016
967.163.00.0 (01)
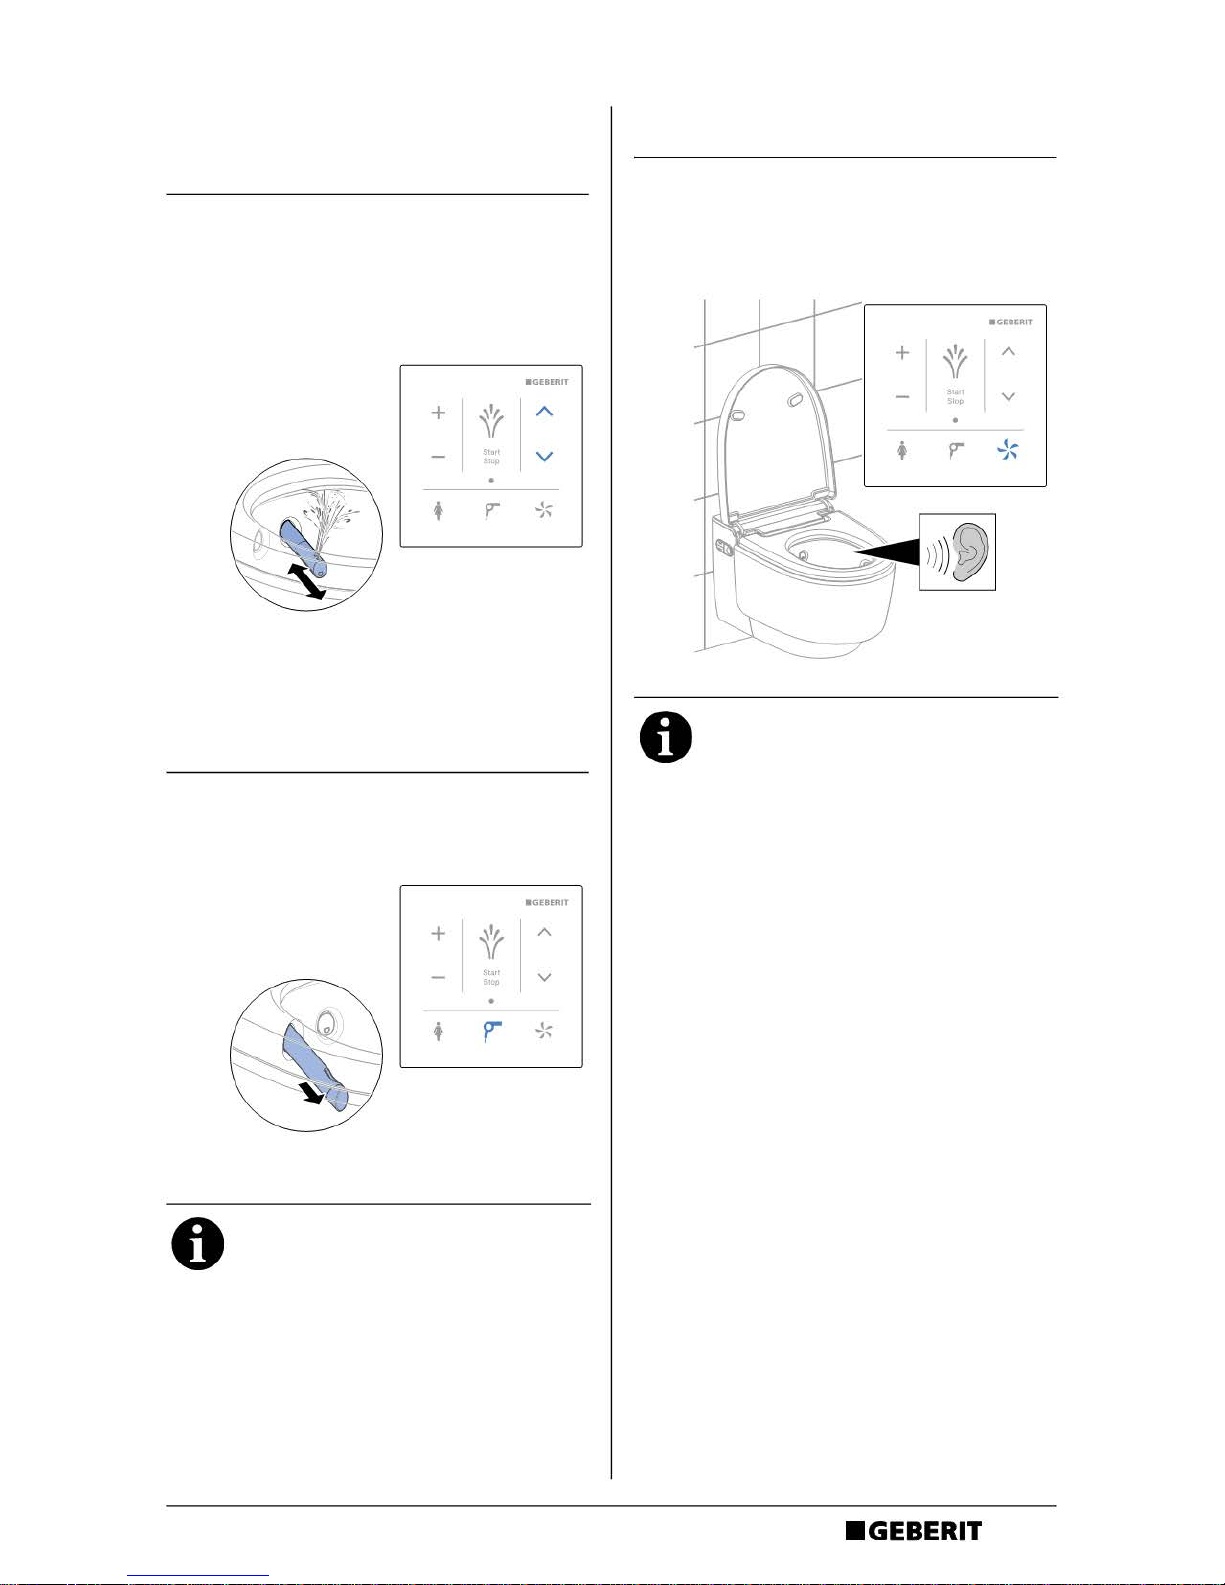
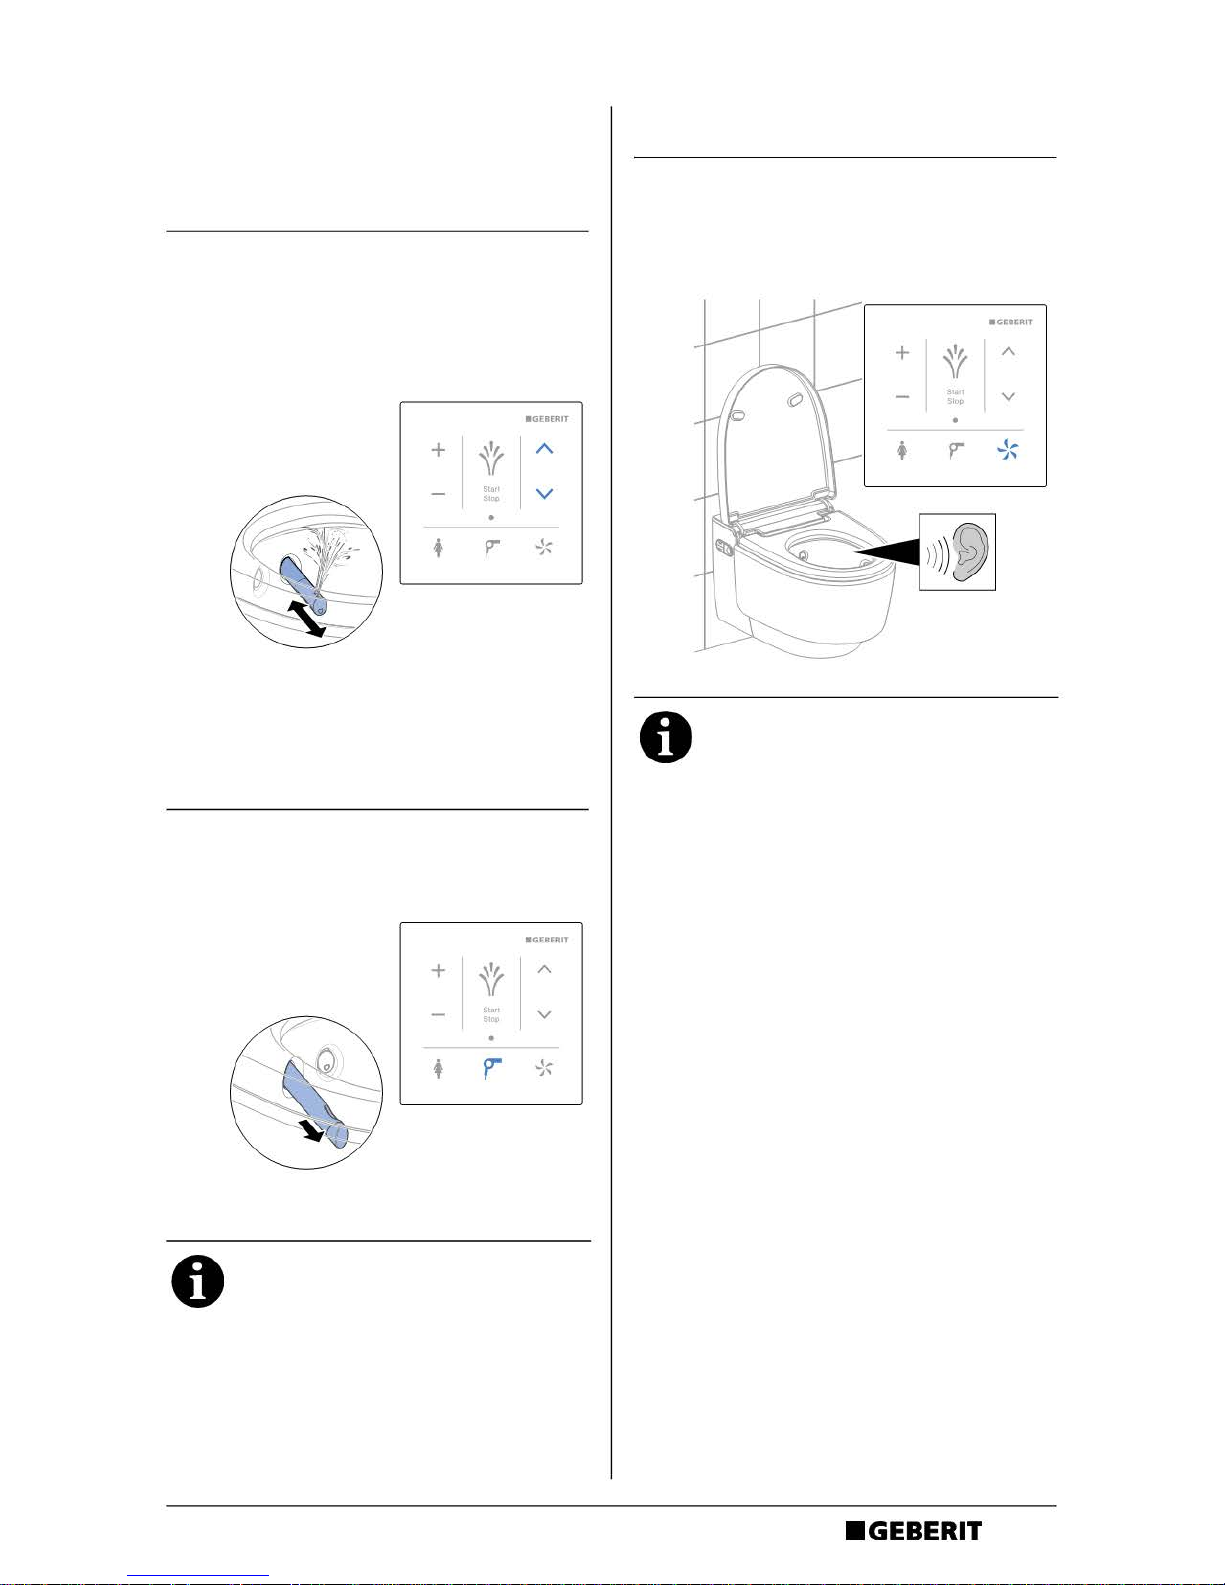
Oszillierbewegung der
Analdusche aus- und
einschalten
` Durch gleichzeitiges Berühren das
Symbol <oben> und <unten> lässt
sich die Oszillierbewegung aus- und
einschalten.
Föhn benutzen
` Berühren Sie das Symbol <Föhn> auf
dem Wandbedienpanel.
Geruchsabsaugung benutzen
` Berühren Sie das Symbol
<Geruchsabsaugung> auf dem
Wandbedienpanel.
Berühren Sie das Symbol <Föhn>
erneut, um den Föhnvorgang
vorzeitig zu beenden.
Berühren Sie das Symbol
<Geruchsabsaugung> erneut, um
die Funktion vorzeitig zu beenden.

DE
8
B1290-001 © 04-2016
967.163.00.0 (01)
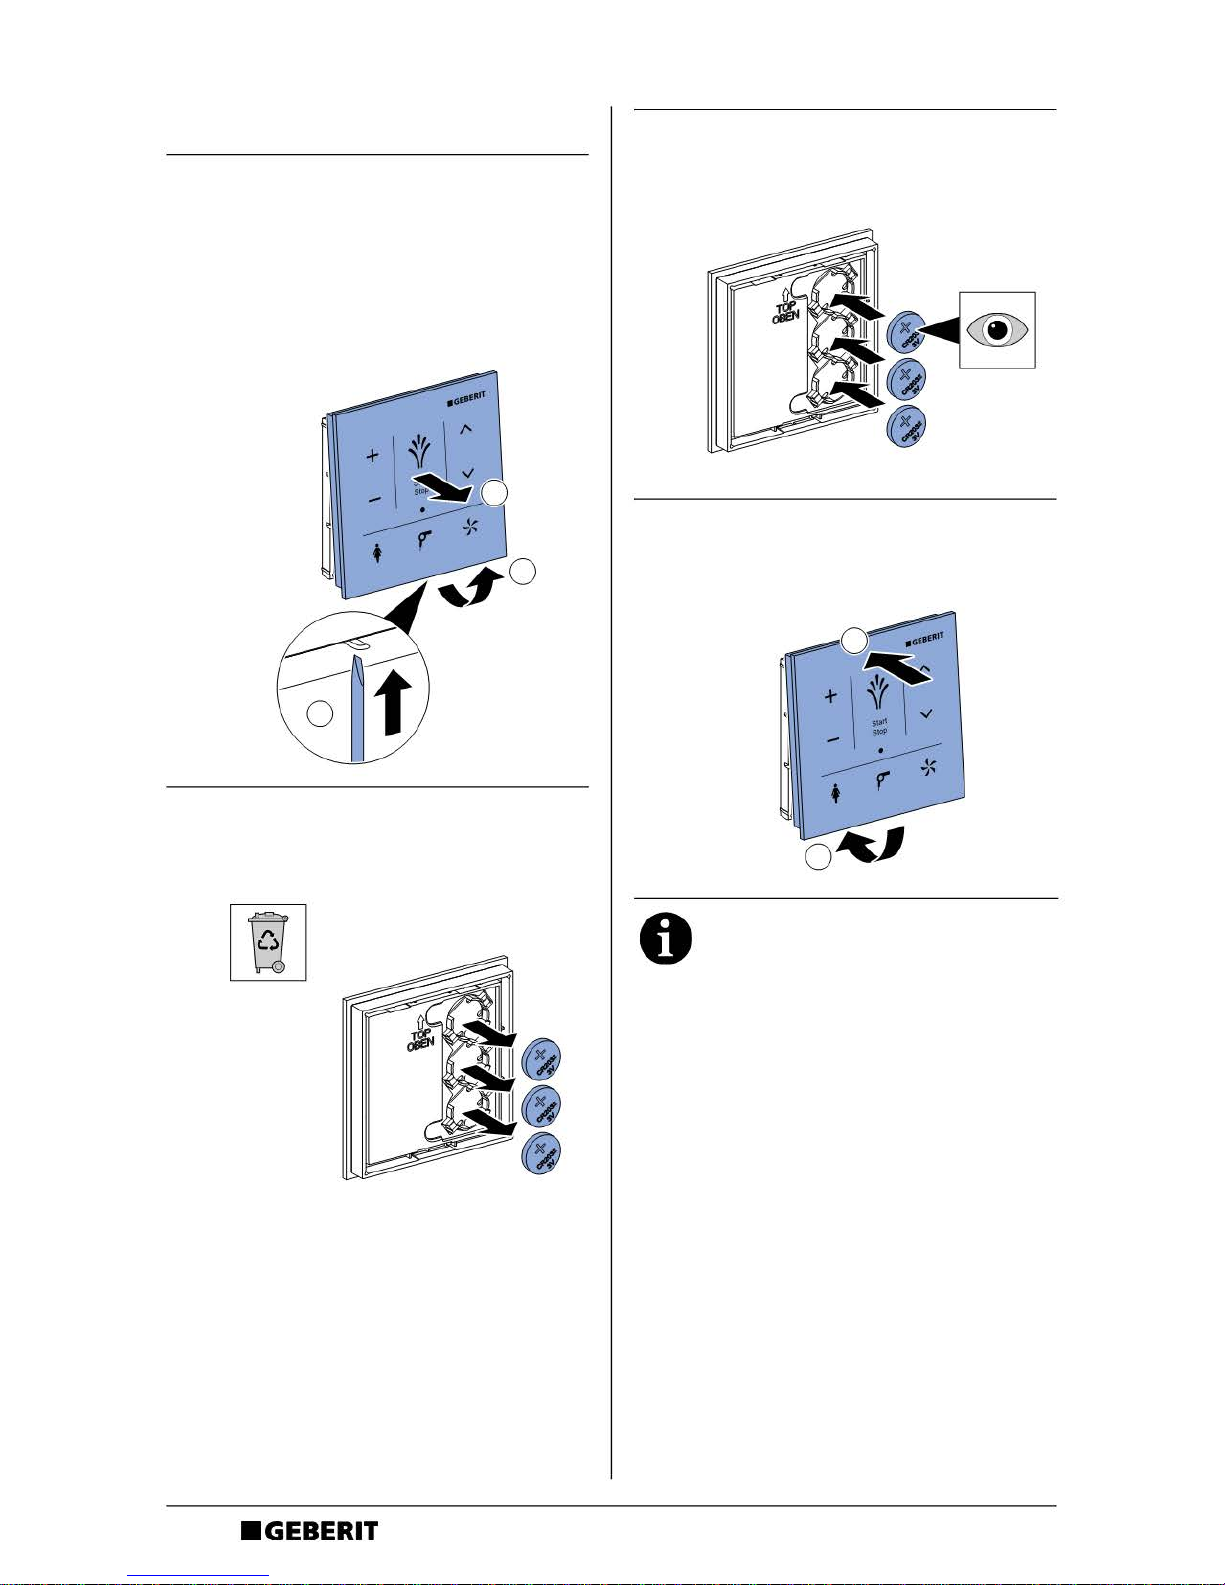
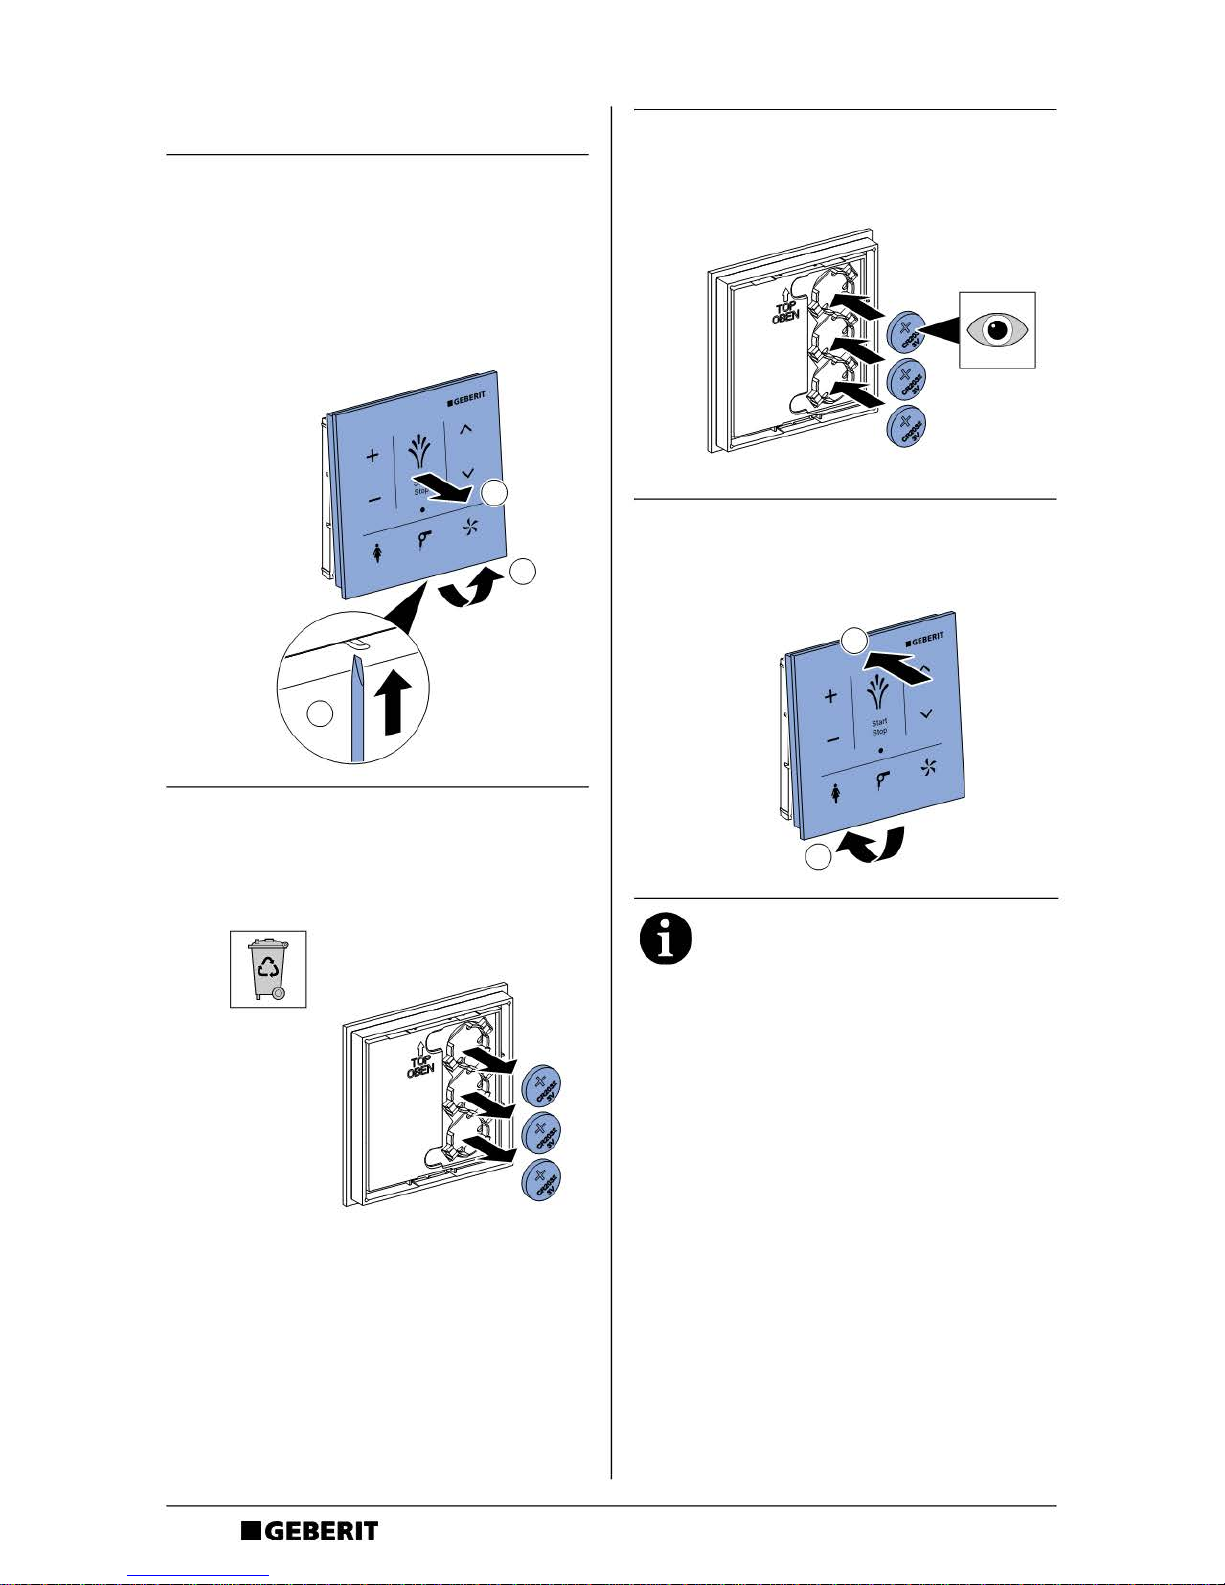
Batterien ersetzen
1 Verriegelung mit Schraubendreher
von unten entriegeln.
Im entriegelten Zustand:
Das Wandbedienpanel unten nach
vorne ziehen und von der
Grundplatte nehmen.
2 Entnehmen Sie die verbrauchten
Batterien. Entsorgen Sie die
verbrauchten Batterien fachgerecht.
3 Setzen Sie die neuen Batterien
(Typ CR2032) ein.
4 Setzen Sie das Wandbedienpanel
wieder auf die Grundplatte.
3
2
1
Prüfen Sie, dass das
Wandbedienpanel sicher auf der
Grundplatte eingerastet ist.
2
1
DE
9
B1290-001 © 04-2016
967.163.00.0 (01)
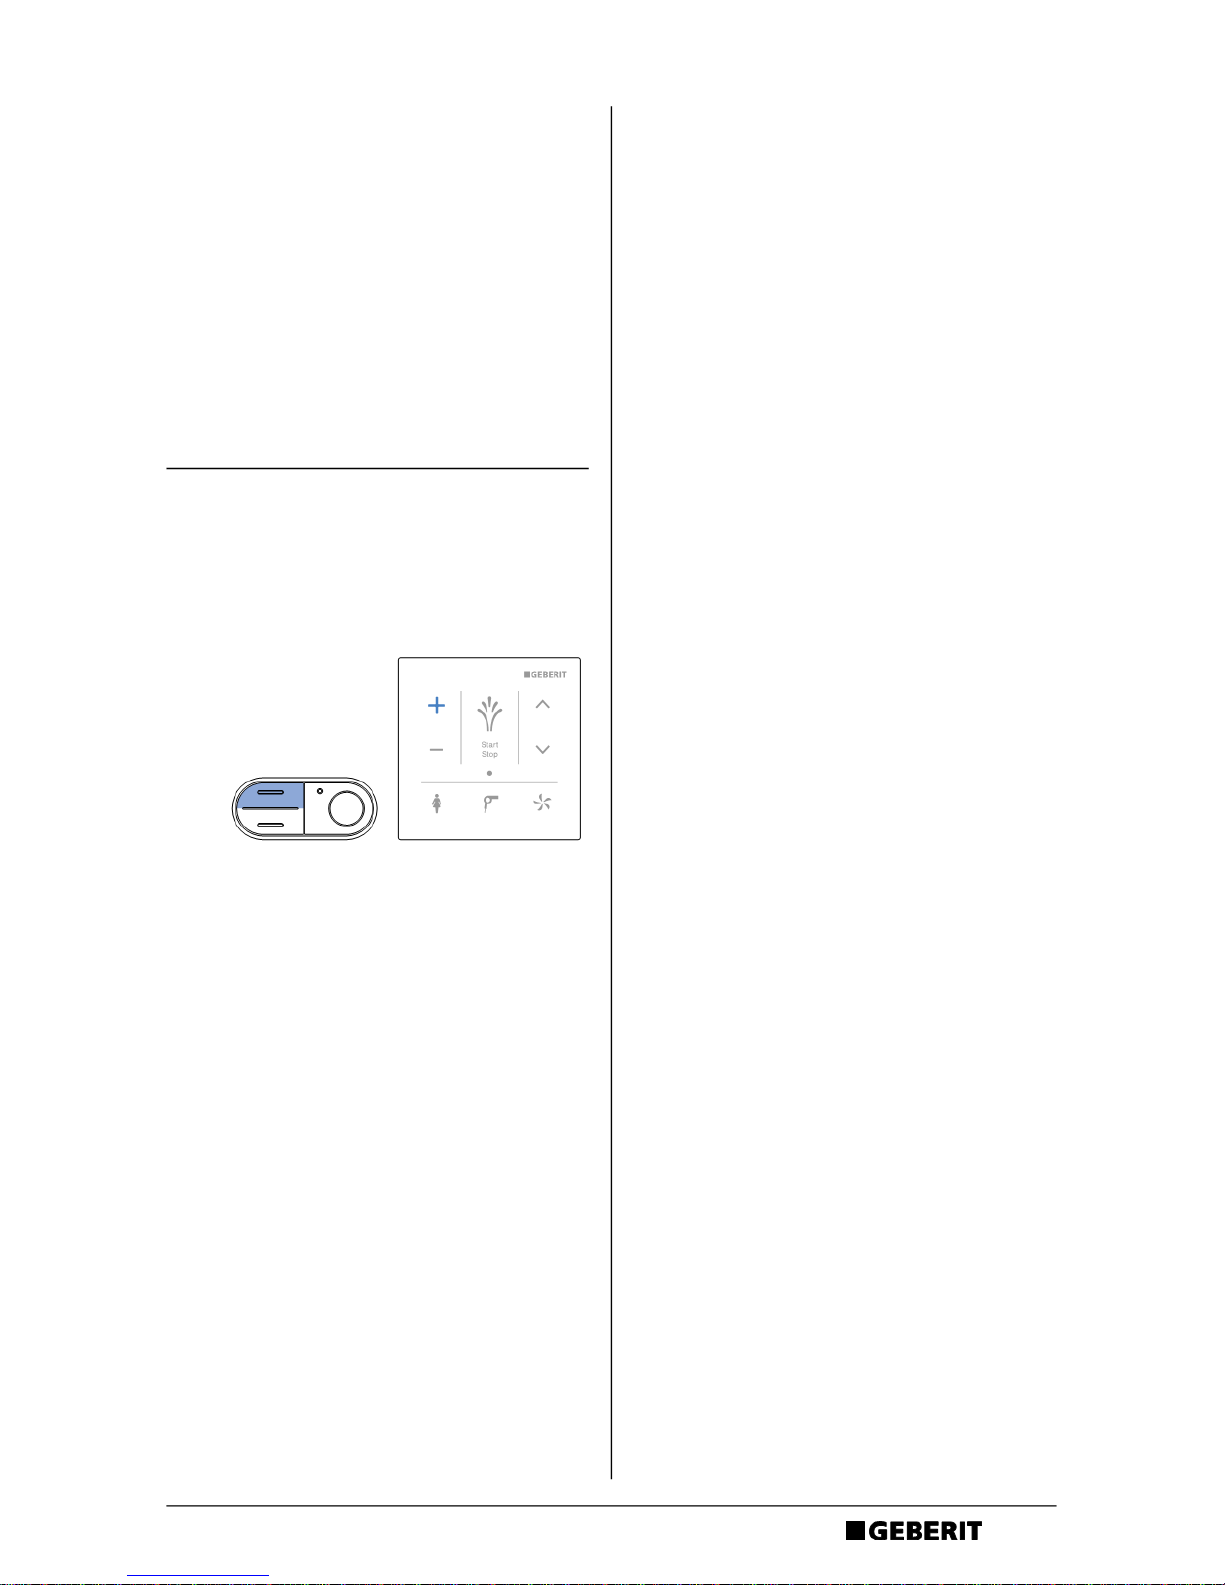
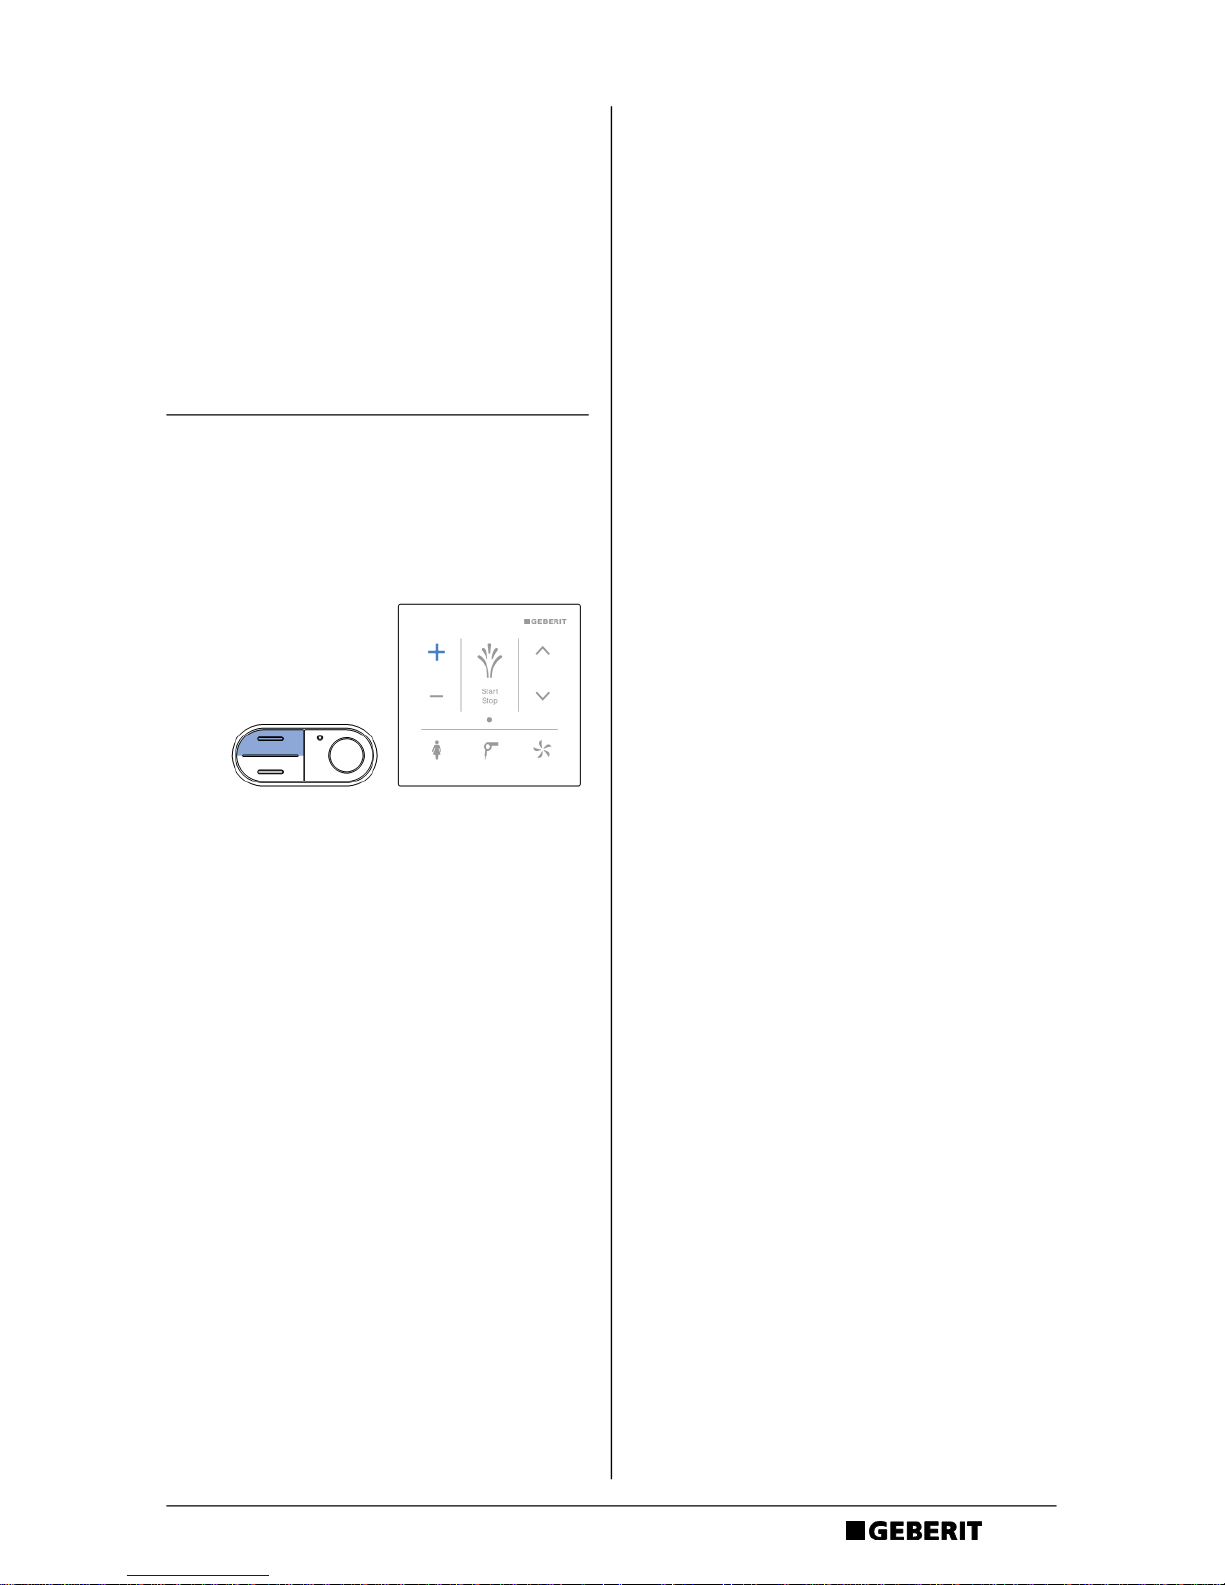
Wandbedienpanel zuweisen
(Pairing)
Voraussetzung
1. Zuerst die Grundeinstellungen des
Dusch-WCs über das Display der
Fernbedienung den eigenen
Bedürfnissen anpassen. Siehe
Bedienungsanleitung Geberit AquaClean
Mera.
2. Anschliessend das Wandbedienpanel
zuweisen.
` Gleichzeitig für mindestens
10 Sekunden das Symbol < + > auf
dem Wandbedienpanel berühren
und die Taste <oben> auf dem
seitlichen Bedienfeld drücken.
Resultat
Die LED-Anzeige leuchtet für
4 Sekunden [Pairing ok].
Das Dusch-WC lässt sich mit
dem Wandbedienpanel bedienen.
DE
10
B1290-001 © 04-2016
967.163.00.0 (01)
Das Wandbedienpanel ist ohne Funktion
Die nachfolgende Tabelle hilft Ihnen bei der Fehlersuche, wenn das Dusch-WC mit dem
Wandbedienpanel nicht bedient werden kann.
Das Dusch-WC kann weiterhin über das seitliche Bedienfeld bedient werden.
Schritt Problembeschreibung Fehlerbehebung
1 Die Batterien sind fast leer.
Die LED-Anzeige blinkt.
Batterien (Typ CR2032) ersetzen.
2 Die Batterien wurden ersetzt.
Die Bedienoberfläche des
Wandbedienpanels bleibt durch
Berührung inaktiv.
Wandbedienpanel neu zuweisen.
Siehe „Wandbedienpanel zuweisen
(Pairing)“.
3 Das Pairing ist fehlgeschlagen.
Die Bedienoberfläche bleibt durch
Berührung inaktiv.
Die LED-Anzeige blinkt zweimal, gefolgt
von einer kurzen Pause.
Wandbedienpanel neu zuweisen.
Siehe „Wandbedienpanel zuweisen
(Pairing)“.
DE
11
B1290-001 © 04-2016
967.163.00.0 (01)
Entsorgung
Inhaltsstoffe
Dieses Produkt ist konform mit den Anforderungen der Richtlinie 2011/65/EU RoHS
(Beschränkung der Verwendung bestimmter gefährlicher Stoffe in Elektro- und
Elektronikgeräten).
Entsorgung von Elektro- und Elektronik-Altgeräten
In Anlehnung an die Richtlinie 2012/19/EU (WEEE-II) sind Hersteller von Elektrogeräten
verpflichtet, Altgeräte zurückzunehmen und fachgerecht zu entsorgen.
Das Symbol gibt an, dass das Produkt nicht zusammen mit dem Restmüll entsorgt werden
darf. Altgeräte sind zur fachgerechten Entsorgung direkt an Geberit zurückzugeben.
Adressen der Annahmestellen können bei der zuständigen Geberit Vertriebsgesellschaft
erfragt werden.
Technische Daten
Batterietyp CR2032
Batterielebensdauer ca. 2 Jahre
Relative Luftfeuchtigkeit 10–100 %, regelmässig kondensierend
Raumtemperatrur 5–40 °C
EN
12
B1290-001 © 04-2016
967.163.00.0 (01)
Information
Contents
Information ........................................................................................................................................................... 12
The wall-mounted control panel at a glance............................................................................................ 12
How to use the wall-mounted control panel............................................................................................ 13
The wall-mounted control panel is without function ............................................................................ 18
Disposal ................................................................................................................................................................. 19
Technical data..................................................................................................................................................... 19
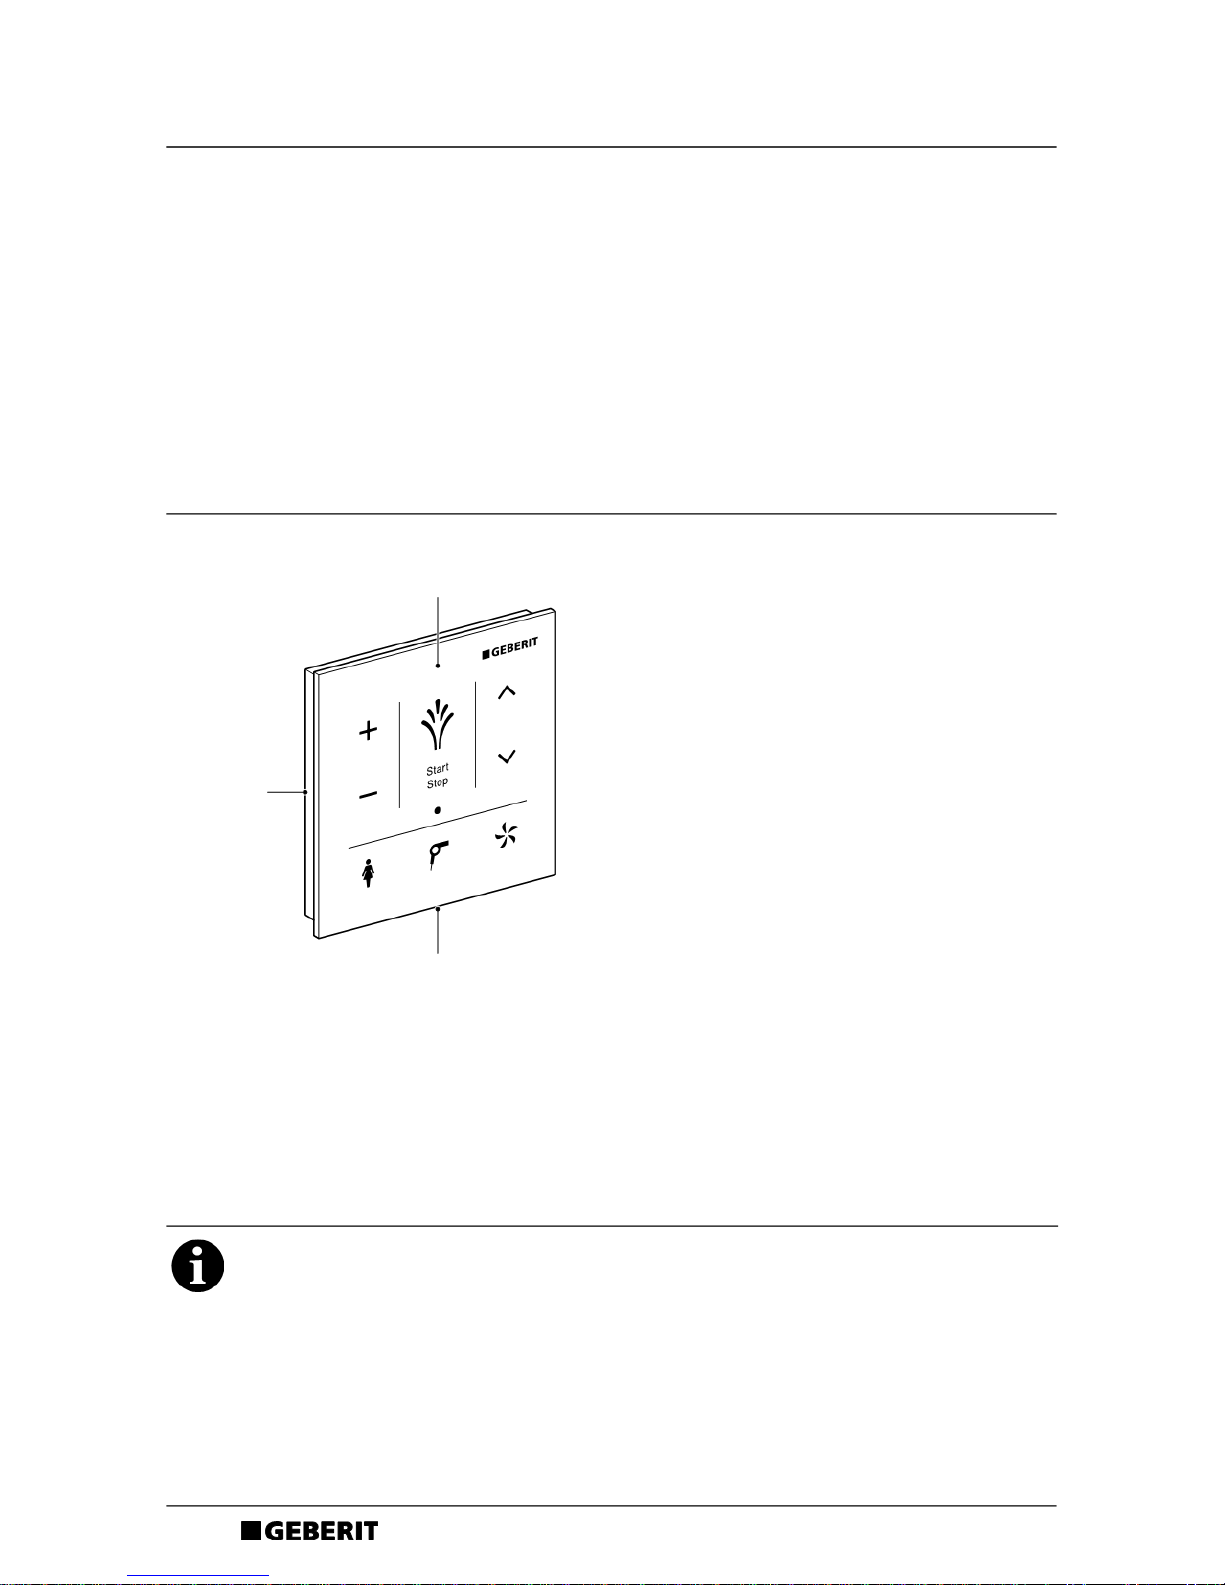
The wall-mounted control panel at a glance
1 Wall-mounted control panel with anti-fingerprint coating, removable
2 Mounting plate for wall mounting
3 Release opening
0
Clean the wall-mounted control panel
Aggressive and abrasive cleaning agents can damage the surface. Only use mild,
liquid cleaning agents that are kind to the skin. Geberit AquaClean cleaning set
(art. no. 242.547.00.1) includes a ready-made cleaning agent that is optimal for
cleaning all Geberit AquaClean surfaces.
3
2
1
EN
13
B1290-001 © 04-2016
967.163.00.0 (01)
How to use the wall-mounted control panel
All functions for daily use can be operated from the wall-mounted control panel.
Overview of the wall-mounted control panel
1 <Shower> symbol: start and stop anal shower / stop dryer and Lady shower / lift and lower
WC lid (in the Comfort model)
2 < – > / < + > symbol: decrease or increase spray intensity
3 LED display
4 <up> / <down> symbol: set the spray arm position
5 <Lady shower> symbol: start and stop the Lady shower
6 <Dryer> symbol: start and stop the dryer
7 <Odour extraction> symbol: start and stop odour extraction
0
1
2
3
4
5
6
7
EN
14
B1290-001 © 04-2016
967.163.00.0 (01)
Use the anal shower
` Briefly touch the <Shower> symbol
on the wall-mounted control panel.
Use the Lady shower
` Touch the <Lady shower> symbol on
the wall-mounted control panel.
Set the spray intensity
`
Touch the < + > symbol to increase
the spray intensity or < – > to reduce it.
Set the spray arm position
` Touch the <up> symbol to move the
spray arm forwards, or <down> to
move the spray arm backwards.
Touch the <Shower> symbol again
to stop the shower procedure early.
Press the <Lady shower> symbol
again to stop the shower procedure
early.
EN
15
B1290-001 © 04-2016
967.163.00.0 (01)
Switch the oscillating motion
of the anal shower on and off
` The oscillating motion can be
switched on and off by touching the
<up> and <down> symbols at the
same time.
Use the dryer
` Touch the <Dryer> symbol on the
wall-mounted control panel.
Use the odour extraction unit
` Touch the <Odour extraction>
symbol on the wall-mounted control
panel.
Touch the <Dryer> symbol again to
stop the drying procedure early.
Touch the <Odour extraction>
symbol again to stop the function
early.
EN
16
B1290-001 © 04-2016
967.163.00.0 (01)
Replace the batteries
1 Use a screwdriver to unlock the
interlock from the bottom.
When unlocked: pull the wallmounted control panel forwards
from the bottom and remove it from
the mounting plate.
2 Extract the used batteries. Dispose
of the used batteries appropriately.
3 Insert the new batteries
(type CR2032).
4 Reinsert the wall-mounted control
panel into the mounting plate.
3
2
1
Check that the wall-mounted
control panel is securely locked
into the mounting plate.
2
1
EN
17
B1290-001 © 04-2016
967.163.00.0 (01)
Assign the wall-mounted
control panel (pairing)
Prerequisite
1. Firstly, adjust the shower toilet's basic
settings using the remote control display
to suit your personal needs. See the
Geberit AquaClean Mera user manual.
2. Then assign the wall-mounted control
panel.
` Hold down the < + > symbol on the
wall-mounted control panel for at
least 10 seconds while also pushing
the <up> button on the side control
panel.
Result
The LED display lights up for
4 seconds [Pairing ok].
The shower toilet can be operated by
the wall-mounted control panel.
EN
18
B1290-001 © 04-2016
967.163.00.0 (01)
The wall-mounted control panel is without function
The following table will help you with troubleshooting if the shower toilet cannot be operated
using the wall-mounted control panel.
The shower toilet can also be operated using the side control panel.
Step Description of problem Fault clearance
1 The batteries are almost flat.
The LED display flashes.
Replace batteries (type CR2032).
2 The batteries were replaced.
The user interface of the wall-mounted
control panel remains inactive when
touched.
Re-assign wall-mounted control panel.
See “Assign the wall-mounted control
panel (pairing)”.
3 Pairing has failed.
The user interface remains inactive
when touched.
The LED display flashes twice, followed
by a short break.
Re-assign wall-mounted control panel.
See “Assign the wall-mounted control
panel (pairing)”.
EN
19
B1290-001 © 04-2016
967.163.00.0 (01)
Disposal
Constituents
This product meets the requirements of Directive 2011/65/EU RoHS (restriction of the use of
certain hazardous substances in electrical and electronic equipment).
Disposal of waste electrical and electronic equipment
In accordance with Directive 2012/19/EU (WEEE-II), manufacturers of electrical equipment
are obliged to take back old equipment and to dispose of it appropriately.
The symbol indicates that the product cannot be disposed of with non-recyclable waste. Old
equipment should be returned directly to Geberit, where it will be disposed of appropriately.
Please contact your responsible Geberit sales company for addresses to which equipment
can be returned.
Technical data
Battery type CR2032
Battery lifetime Approx. 2 years
Relative humidity 10–100%, regularly condensing
Room temperature 5–40 °C

FR
20
B1290-001 © 04-2016
967.163.00.0 (01)
Information
Sommaire
Information ........................................................................................................................................................... 20
Vue d’ensemble du tableau de commande mural ................................................................................. 20
Utilisation du tableau de commande mural.............................................................................................. 21
Le tableau de commande mural ne fonctionne pas ............................................................................. 26
Élimination............................................................................................................................................................. 27
Caractéristiques techniques ......................................................................................................................... 27
Vue d’ensemble du tableau de commande mural
1 Tableau de commande mural avec revêtement oléophobe, amovible
2 Plaque de base pour le montage mural
3 Ouverture de déverrouillage
0
Nettoyage du tableau de commande mural
Les produits de nettoyage agressifs et abrasifs risquent d'endommager la surface.
Employez exclusivement des produits de nettoyage doux et liquides, qui n'agressent
pas la peau. Le kit de nettoyage Geberit AquaClean (n° de réf. 242.547.00.1) contient
un produit de nettoyage prêt à l'emploi qui convient de manière optimale à toutes les
surfaces Geberit AquaClean.
3
2
1
FR
21
B1290-001 © 04-2016
967.163.00.0 (01)
Utilisation du tableau de commande mural
Le tableau de commande mural permet d’accéder à l’intégralité des fonctions lors de
l’utilisation quotidienne.
Aperçu du tableau de commande mural
1 Touche <Douchette> : Mise en marche et arrêt douchette / arrêt séchoir et douchette dame
/ lever et baisser couvercle WC ( pour le modèle Comfort)
2 Touches < – > / < + > : diminuer ou augmenter l’intensité du jet de la douchette
3 Témoin lumineux
4 Touches <haut> / <bas> : régler la position du bras de la douchette
5 Touche <Douchette dame> : démarrer et arrêter la douchette dame
6 Touche <Séchoir> : démarrer et arrêter le séchoir
7 Touche <Aspiration des odeurs> : démarrer et arrêter l’aspiration des odeurs
0
1
2
3
4
5
6
7
FR
22
B1290-001 © 04-2016
967.163.00.0 (01)
Utiliser la douchette
` Effleurez une fois brièvement la
touche <Douchette> sur le tableau
de commande mural.
Utiliser la douchette dame
` Effleurez la touche <Douchette
dame> sur le tableau de commande
mural.
Régler l’intensité du jet de la
douchette
` Effleurez la touche < + > pour
augmenter l'intensité du jet de la
douchette, et la touche < – > pour la
faire diminuer.
Régler la position du bras de la
douchette
` Effleurez la touche <haut> pour faire
avancer le bras de la douchette et
sur la touche <bas> pour le faire
reculer.
Effleurez à nouveau la touche
<Douchette> pour interrompre le
fonctionnement de la douchette.
Effleurez à nouveau la touche
<Douchette dame> pour
interrompre le fonctionnement de
la douchette.
FR
23
B1290-001 © 04-2016
967.163.00.0 (01)
Activer et désactiver le
mouvement oscillatoire de la
douchette
` Effleurez simultanément les touches
<haut> et <bas> pour activer et
désactiver le mouvement
oscillatoire.
Utiliser le séchoir
` Effleurez la touche <Séchoir> sur le
tableau de commande mural.
Utiliser l'aspiration des odeurs
` Effleurez la touche <Aspiration des
odeurs> sur le tableau de commande
mural.
Effleurez à nouveau la touche
<Séchoir> pour interrompre le
fonctionnement du séchoir.
Effleurez à nouveau la touche
<Aspiration des odeurs> pour
interrompre le fonctionnement.
FR
24
B1290-001 © 04-2016
967.163.00.0 (01)
Remplacer les piles
1 A l'aide d'un tournevis, déverrouillez
la fermeture par le bas.
Quand il est déverrouillé : tirez le
tableau de commande mural en bas
vers l'avant pour le sortir de la plaque
de base.
2 Retirez les piles usagées. Mettez au
rebut les piles usagées de manière
appropriée.
3 Posez les nouvelles piles
(type CR2032).
4 Reposez le tableau de commande
mural sur la plaque de base.
3
2
1
Vérifiez que le tableau de
commande mural est fermement
enclenché sur la plaque de base.
2
1
FR
25
B1290-001 © 04-2016
967.163.00.0 (01)
Connecter le tableau de
commande mural (pairage)
Condition requise
1. Commencez par adapter les réglages de
base du WC lavant à vos propres
nécessités à l'aide de l'écran de la
télécommande. Voir le mode d'emploi
2. Puis connectez le tableau de commande
mural.
` Durant au moins 10 secondes,
appuyez simultanément sur les
touches < + > du tableau de
commande mural et <haut> du
tableau de commande latéral.
Résultat
Le témoin lumineux s'allume durant
4 secondes [Pairing ok].
Le WC lavant se commande à l'aide
du tableau de commande mural.
Geberit AquaClean Mera / Maïra.

FR
26
B1290-001 © 04-2016
967.163.00.0 (01)
Le tableau de commande mural ne fonctionne pas
Le tableau qui suit fournit des indications pour rechercher les pannes si le WC lavant ne peut
plus être commandé depuis le tableau de commande mural.
Dans ce cas, le WC lavant peut toujours être commandé à l'aide du tableau de
commande latéral.
Étape Description du problème Dépannage
1 Les piles sont presque vides.
Le témoin lumineux clignote.
Remplacer les piles (type CR2032).
2 Les piles ont été remplacées.
La surface du tableau de commande
mural reste insensible à tout
effleurement.
Rétablir la connexion du tableau de
commande mural.
Voir le chapitre « Connecter le tableau
de commande mural (pairage) ».
3 Le pairage a échoué.
La surface de commande murale reste
insensible à tout effleurement.
Le témoin lumineux clignote deux fois
puis s'éteint.
Rétablir la connexion du tableau de
commande mural.
Voir le chapitre « Connecter le tableau
de commande mural (pairage) ».
FR
27
B1290-001 © 04-2016
967.163.00.0 (01)
Élimination
Substances
Ce produit est conforme aux exigences de la directive 2011/65/UE (limitation de l'utilisation
de certaines substances dangereuses dans les équipements électriques et électroniques).
Élimination des déchets d'équipements électriques et
électroniques
En référence à la directive 2012/19/UE (DEEE II), les fabricants d'appareils électriques sont
astreints à reprendre les appareils usagés et à les éliminer d'une manière appropriée.
Le symbole indique que le produit ne doit pas être jeté avec les déchets résiduels. Les
appareils usagés doivent être directement retournés à Geberit pour être éliminés de manière
appropriée.
Vous pouvez demander les adresses des centres de collecte auprès de la société de
distribution Geberit concernée.
Caractéristiques techniques
Type de pile CR2032
Durée de vie de la pile 2 ans env.
Humidité relative de l’air 10–100 %, condensation régulière
Température ambiante 5–40 °C
IT
28
B1290-001D79744-001 © 04-2016
967.163.00.0 (01)967.163.00.0 (00)
Informazioni
Indice
Informazioni.......................................................................................................................................................... 28
Il pannello di comando a parete in breve .................................................................................................. 28
Uso del pannello di comando a parete ...................................................................................................... 29
Il pannello di comando a parete non funziona......................................................................................... 34
Smaltimento......................................................................................................................................................... 35
Dati tecnici............................................................................................................................................................ 35
Il pannello di comando a parete in breve
1 Pannello di comando a parete con rivestimento anti-impronte, rimovibile
2 Piastra base per il montaggio a parete
3Apertura di sblocco
0
Pulizia del pannello di comando a parete
Detergenti aggressivi e abrasivi possono danneggiare la superficie. Impiegare
esclusivamente detergenti liquidi delicati che non irritano la pelle. Il set per la pulizia
Geberit AquaClean (art. no. 242.547.00.1) contiene un detergente che è pronto per
l’uso e adattato ottimamente per tutte le superfici Geberit AquaClean.
3
2
1

IT
29
B1290-001D79744-001 © 04-2016
967.163.00.0 (01)967.163.00.0 (00)
Uso del pannello di comando a parete
Dal pannello di comando a parete è possibile azionare tutte le funzioni quotidianamente
utilizzate.
Pannello di comando a parete in sintesi
1 Simbolo <Getto>: avviare e arrestare il lavaggio anale / arrestare l’asciugatore e il getto
Lady / sollevare e abbassare il coperchio del WC (nella versione Comfort)
2 Simbolo < – > / < + >: ridurre o aumentare l'intensità del getto
3 Indicatore LED
4 Simbolo <su> / <giù>: regolare la posizione dell’astina dell'erogatore
5 Simbolo <Getto Lady>: avviare e arrestare il getto Lady
6 Simbolo <Asciugatore>: avviare e arrestare l'asciugatore
7 Simbolo <Aspiratore di cattivi odori>: avviare e arrestare l'aspiratore di cattivi odori
0
1
2
3
4
5
6
7
IT
30
B1290-001D79744-001 © 04-2016
967.163.00.0 (01)967.163.00.0 (00)
Uso del lavaggio anale
` Toccare una volta brevemente il
simbolo <Getto> sul pannello di
comando a parete.
Uso del getto Lady
` Toccare il simbolo <Getto Lady> sul
pannello di comando a parete.
Impostazione dell'intensità del
getto
` Toccare il simbolo < + > per
aumentare l’intensità del getto o
< – > per ridurla.
Regolazione della posizione
dell’astina dell'erogatore
` Toccare il simbolo <su> per muovere
l’astina dell’erogatore in avanti o
<giù> per muovere l’astina
dell’erogatore indietro.
Toccare nuovamente il simbolo
<Getto> per terminare
anticipatamente il lavaggio.
Toccare nuovamente il simbolo
<Getto Lady> per terminare
anticipatamente il lavaggio.
 Loading...