

Page 1
Digital Photo
Frame 10.4” LCD
Model #:10-4DPF200
User’s Manual
PID 161299-109240
Rev. 070817
Page 2

All brand name and trademarks are the property of their respective owners
USER’S RECORD:
To provide quality customer service and technical support, it is suggested that you keep the
following information as well as your store receipt and this user’s manual.
Date of Purchase: ________________________________
Model Number: ________________________________
Serial Number: ________________________________
Product Rev Number (located below the UPC on the package): ____________________
FCC RADIATION NORM:
FCC
This equipment has been tested and found to comply with limits for Class B digital device pursuant
to Part 15 of Federal Communications Commission (FCC) rules.
FCC Compliance Statement
These limits are designed to provide reasonable protection against frequency interference in
residential installation. This equipment generates, uses, and can radiate radio frequency energy,
and if not installed or used in accordance with the instructions, may cause harmful interference to
radio communication. However, there is no guarantee that interference will not occur in television
reception, which can be determined by turning the equipment off and on. The user is encouraged
to try and correct the interference by one or more of the following measures:
Reorient or relocate the receiving antenna
Increase the separation between the equipment and the receiver
Connect the equipment into an outlet on a circuit different from that to which the receiver is
connected to.
CAUTION!
The Federal Communications Commission warns the user that changes or modifications to the
unit not expressly approved by the party responsible for compliance could void the user’s authority
to operate the equipment.
2
Page 3

PACKAGE CONTENTS:
Your new Digital Photo Frame will ship with the following items.
- 10.4” LCD Photo Frame(1 Black Acrylic and 1 Wood Frame)
- USB Extension Cable
- Power Adapter
- Remote Control
- User’s Manual & Warranty Information
SYSTEM SPECIFICATIONS:
Your new Digital Photo Frame complies with the following specifications.
- Screen Dimensions: 10.4 inches
- Resolution: 640X480
2
- Brightness: 350cd/m
- Contrast: 300:1
- Photo File Format: JPG
- Memory Card Formats: USB Flash Drive, SD, MMC, MS, and CF
- Video File Format: MPEG
- Music File Format: MP3
- Usage Options: Manual, Remote Control or Slideshow
- Power Supply: AC 100-240V DC12V
- Operating Temperature: -5C to +50C
- Max Power Consumption: 18W
- Supported Operating Systems: Windows
®
2000, XP, Vista
3
Page 4
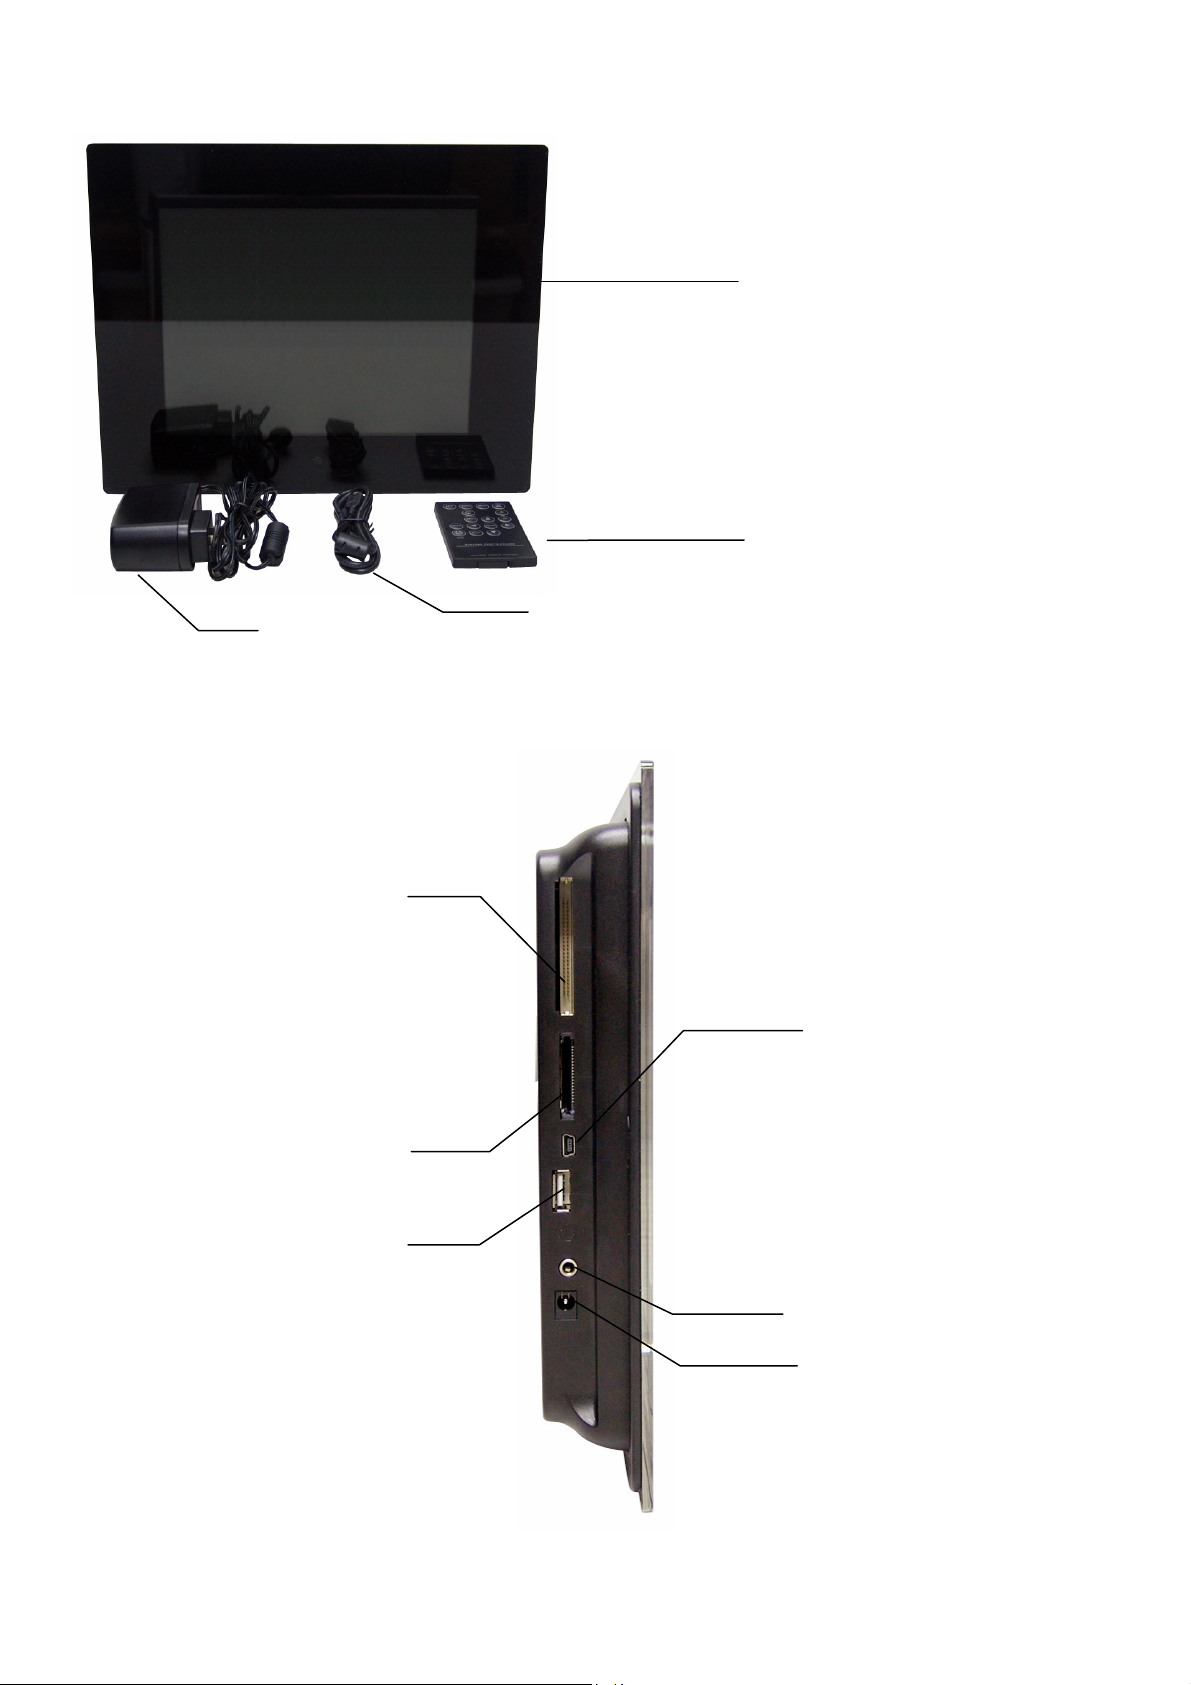
HARDWARE DESCRIPTION:
Switching Power
Adapter
Display Screen
Remote Control
USB Cable
CF Card Slot
SD/MMC/MS
Card Slot
USB mini-A port
(For connecting flash drive)
USB mini-B port
(For connecting to computer)
3.5 mm headphone jack
4
Power Jack
Page 5
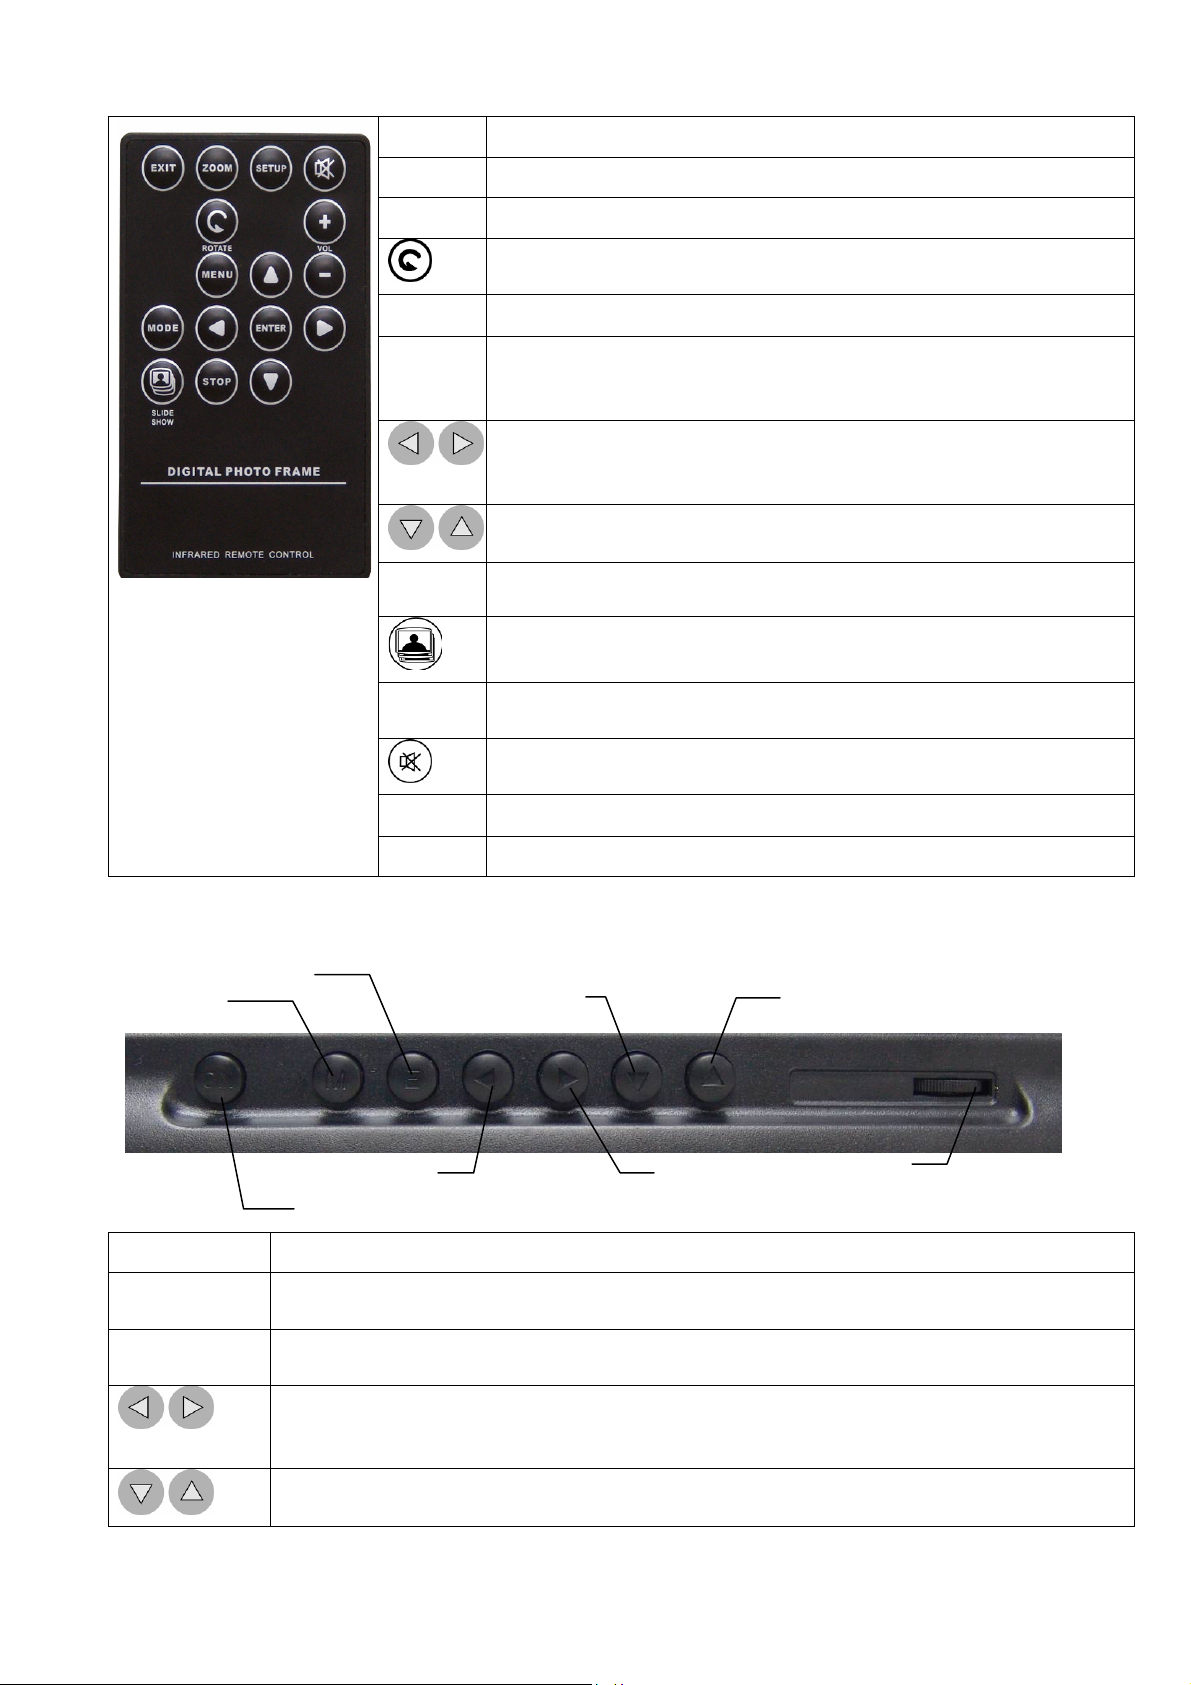
Remote Control
EXIT
ZOOM
SETUP
MENU
ENTER
MODE
STOP
Press to go back to the previous screen.
Press to zoom in.
Press to open the “Setting” menu.
Press to rotate the photo counter-clockwise 90 degrees
Press to open the operation mode menu.
Press to select an option, to save a changed setting in the
setup screen, or to open the control menu of a photo or
movie. Press this button to turn off the alarm.
Press to navigate left and right or pan to a photo’s right or
left after a photo has been zoomed in. Press to change the
photo displayed on the upper-left of the calendar.
Press to navigate up and down or pan to a photo’s up or
down after a photo has been zoomed in.
Press to switch between different modes of operation.
Press to immediately switch to slide show mode when
another mode is running.
Press to stop playing music or movie and turn back to the
previous screen while music or movie is being played.
Press to mute the sound.
+
-
Press to increase the volume.
Press to decrease the volume.
Built-in Control
MENU
ON/OFF
MENU
ENTER
ENTER
DOWN
LEFT RIGHT
ON/OFF SWITCH
Press to turn on or turn off your Digital Photo Frame.
Press to open the operation mode menu to select the desired operation for
your photo frame.
Press to select an option, to save a changed setting in the setup screen, or to
open the control menu of a photo or movie. Press to turn off alarm.
Press to navigate left and right or pan to a photo’s right or left after a photo has
been zoomed in. Press to change the photo displayed on the upper-left of the
calendar.
Press to navigate up and down or pan to a photo’s up or down after a photo
has been zoomed in.
UP
Volume
Control
5
Page 6
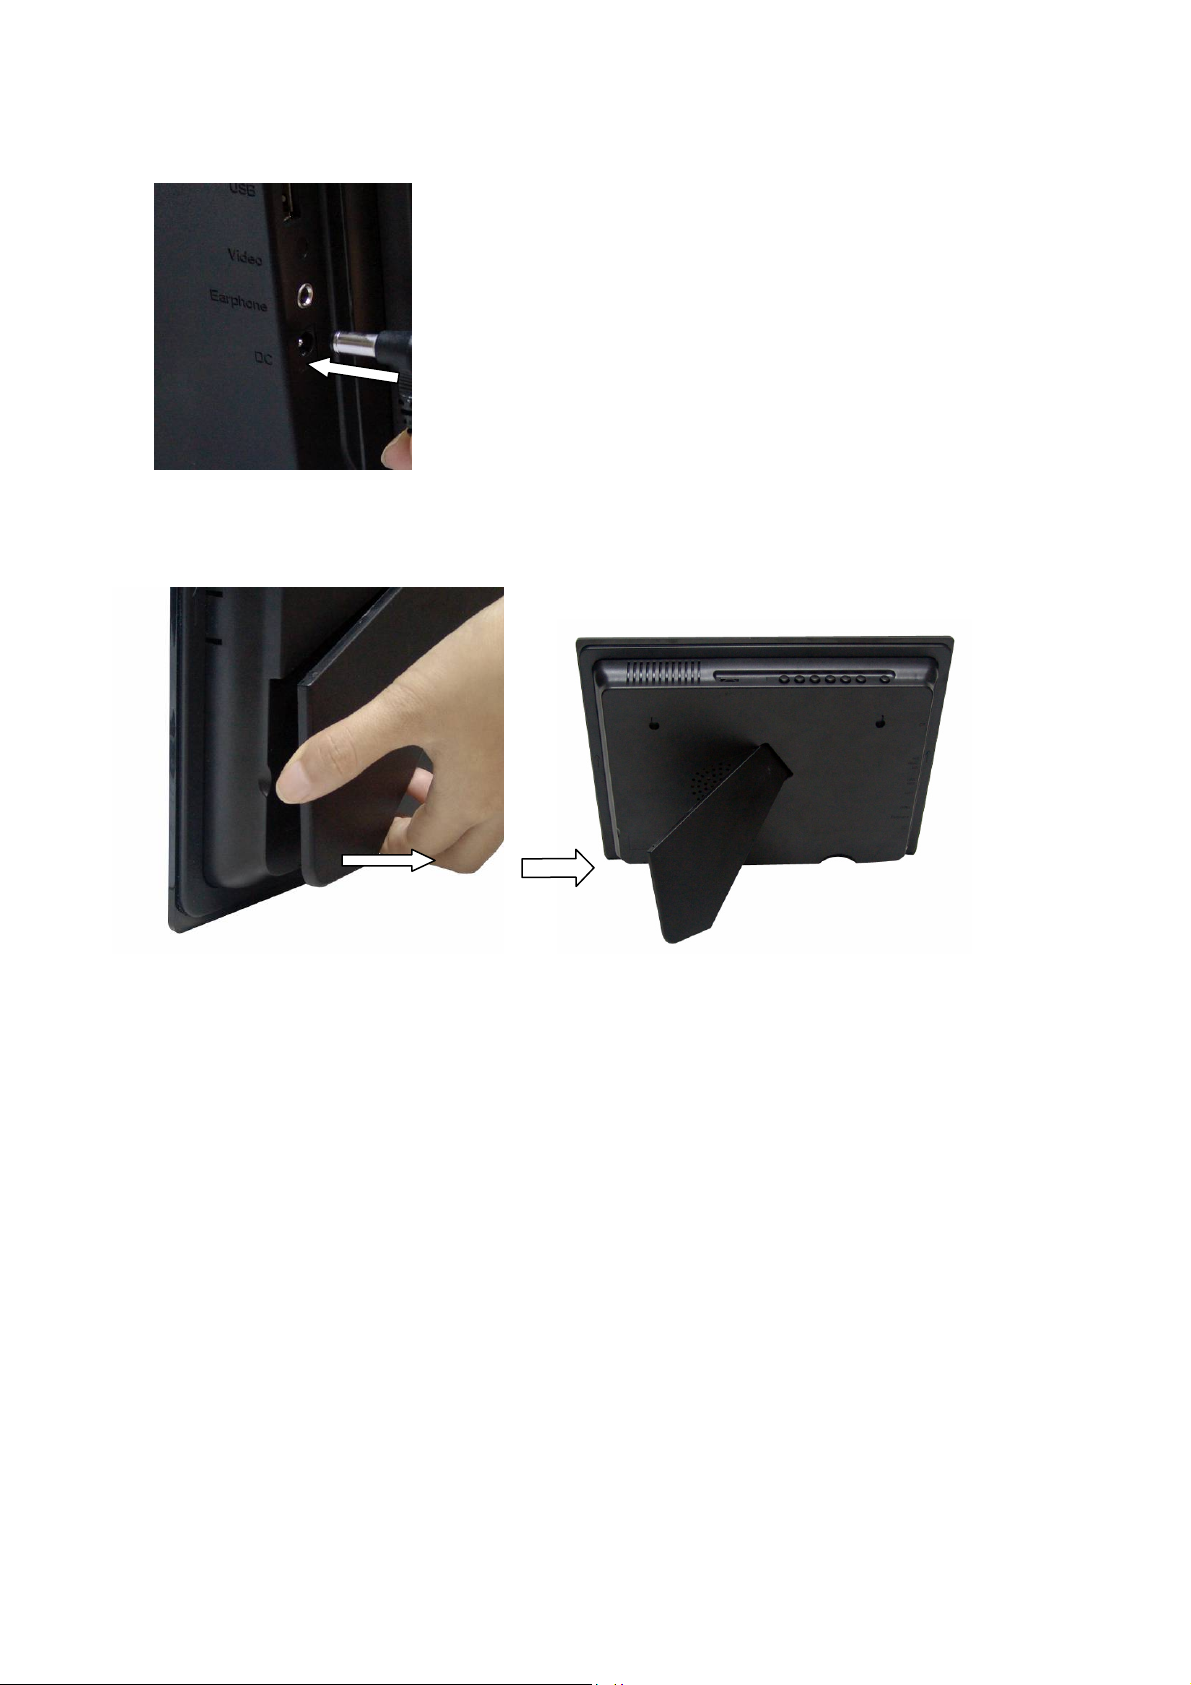
HARDWARE INSTALLATION:
1. Connect the power jack of the enclosed Switching Power Adapter to your Digital Photo
Frame, and plug the other end into an electric outlet.
2. Pull out the photo frame stand at the back of your Digital Photo Frame, and place your
Digital Photo Frame on a flat and steady surface.
3. Your Digital Photo Frame is now ready to be used.
6
Page 7
USING THE DIGITAL PHOTO FRAME:
1. Make sure that you have properly connected the Switching Adapter; refer to the Hardware
Installation instructions above if necessary.
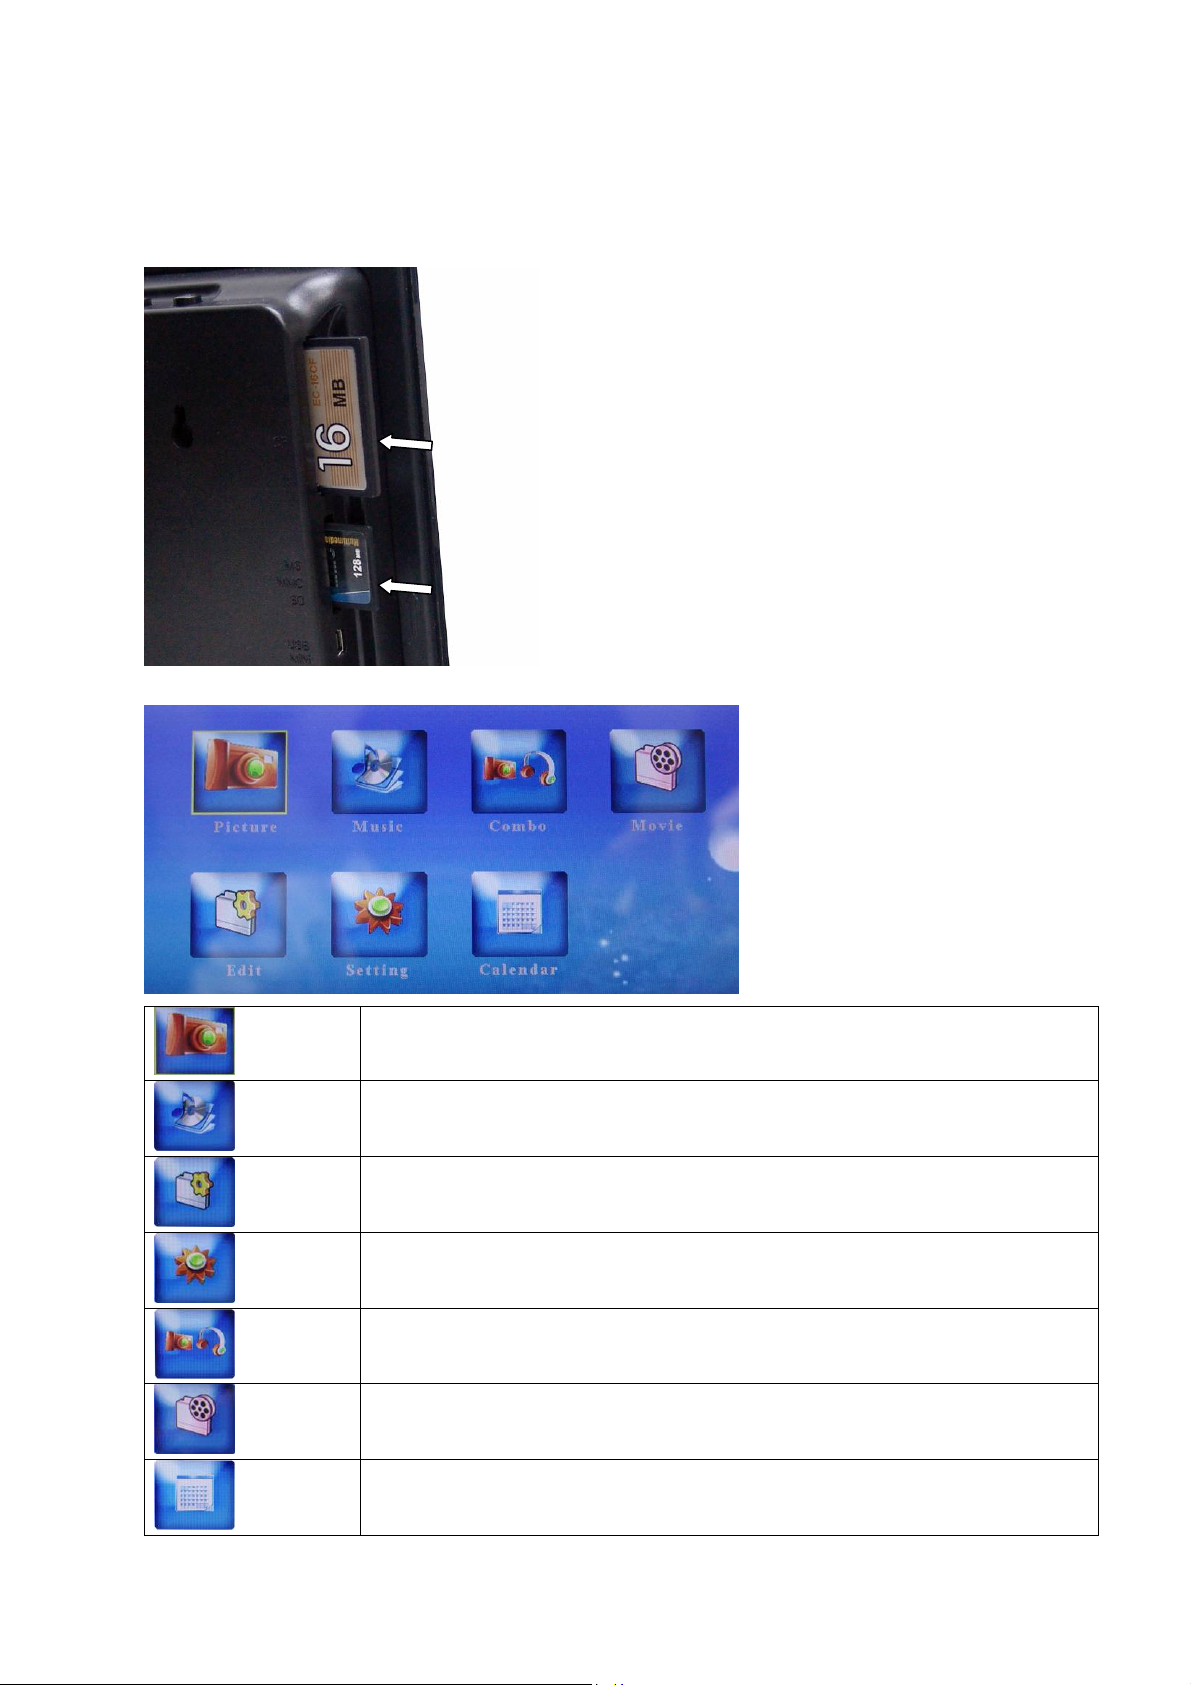
2. Carefully insert your memory card into the proper slot as shown below following the
orientation guide on the memory card.
3. Turn on your Digital Photo Frame and the operation mode menu will appear.
Select this function to view photos.
Picture
Select this function to play music.
Music
Select this function to play background music while viewing photos.
Combo
Select this function to play movie.
Movie
This function is for future maintenance or upgrades. There is no
Edit
Setting
Calendar
function for this icon on regular operation of the digital photo frame.
Select this function to open “Setting” menu.
Select this function to open the calendar.
7
Page 8
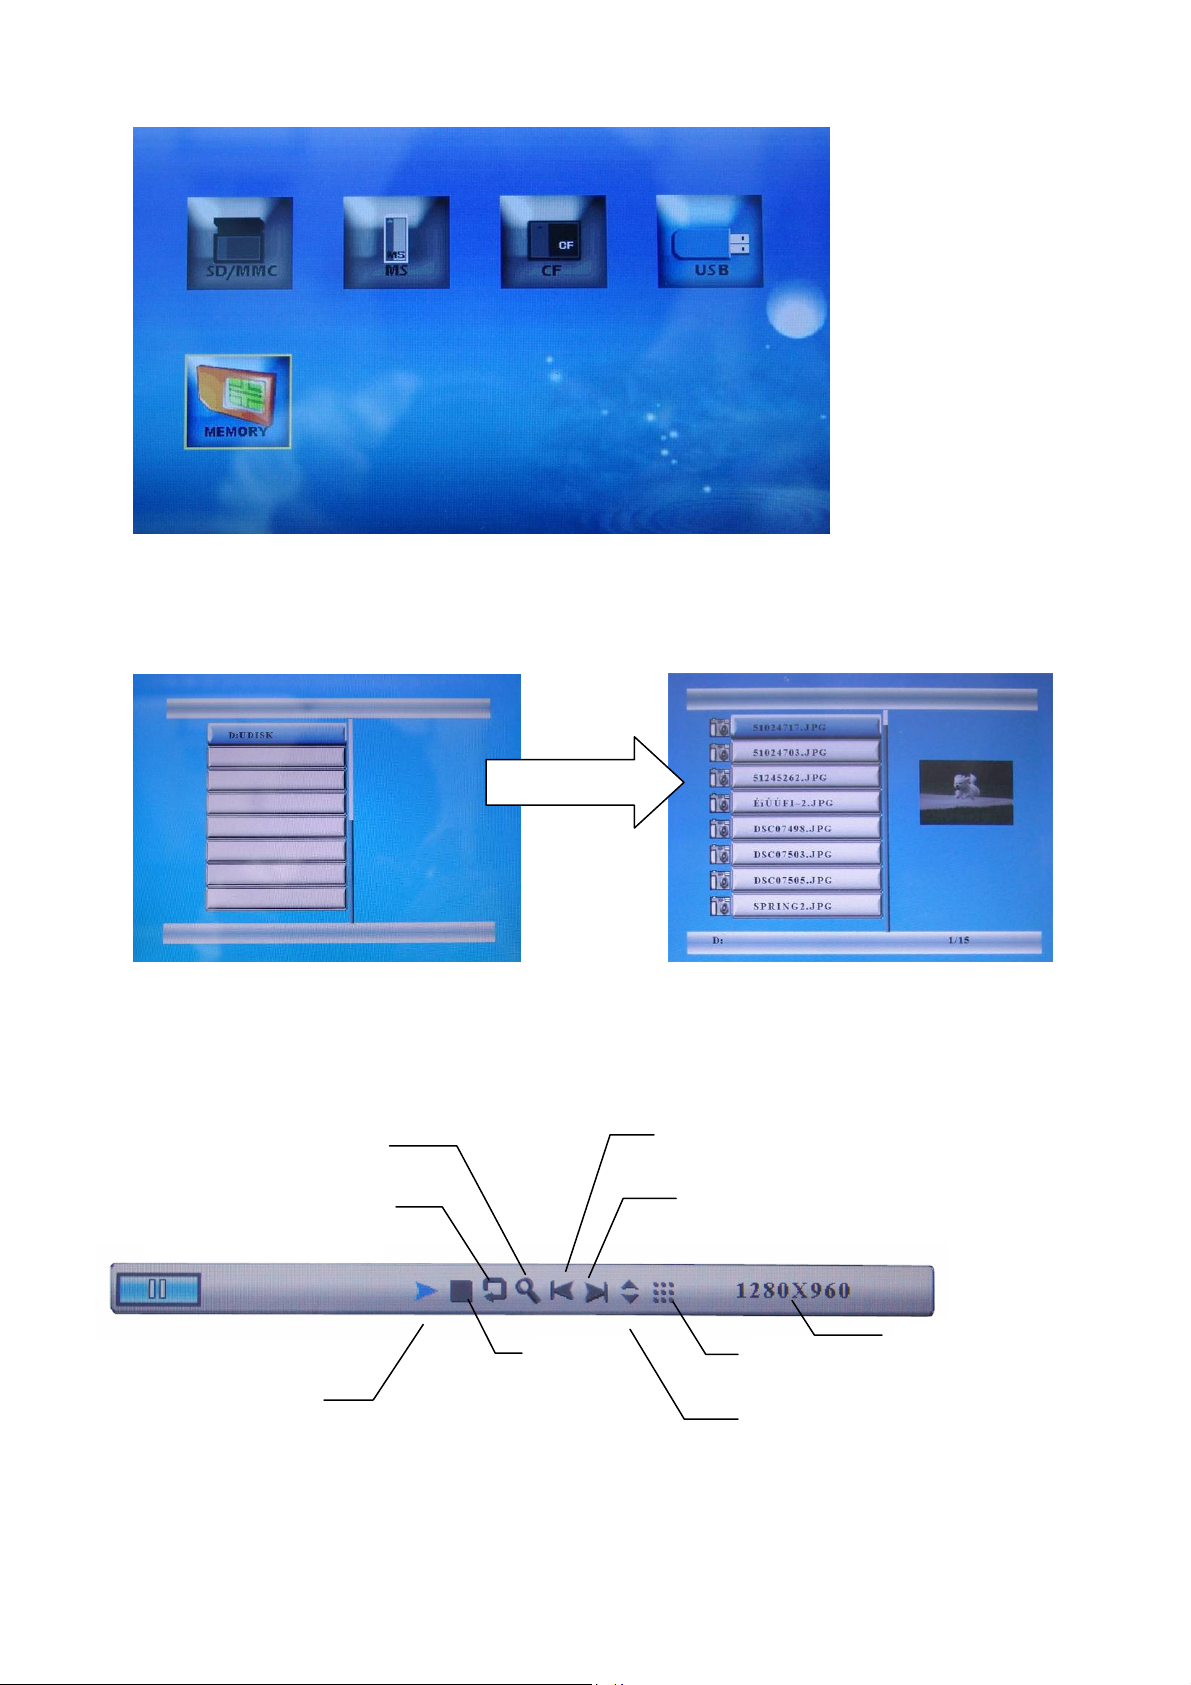
4. Use the enclosed Remote Control or the Built-in Control and select either “Picture”, “Music”,
“Combo”, or “Movie”, the following screen will show.
5. Select the memory that you wish to view your files from, then press “Enter” and “Exit” on the
remote control or “E” button of the Built-in Control to navigator through the files and folder of
your memory card or USB flash drive.
6. Pressing “Enter” on the remote control or “E” button of the Built-in Control while playing
photo, music or movie, the control menu of music will appear. The following is a brief
description of the control menus.
Photo control menu
Zoom in
Previous
clockwise
Stop
Rotate counter-
Next
Thumbnail
Resolution
Play/Pause
File
Information
8
Page 9
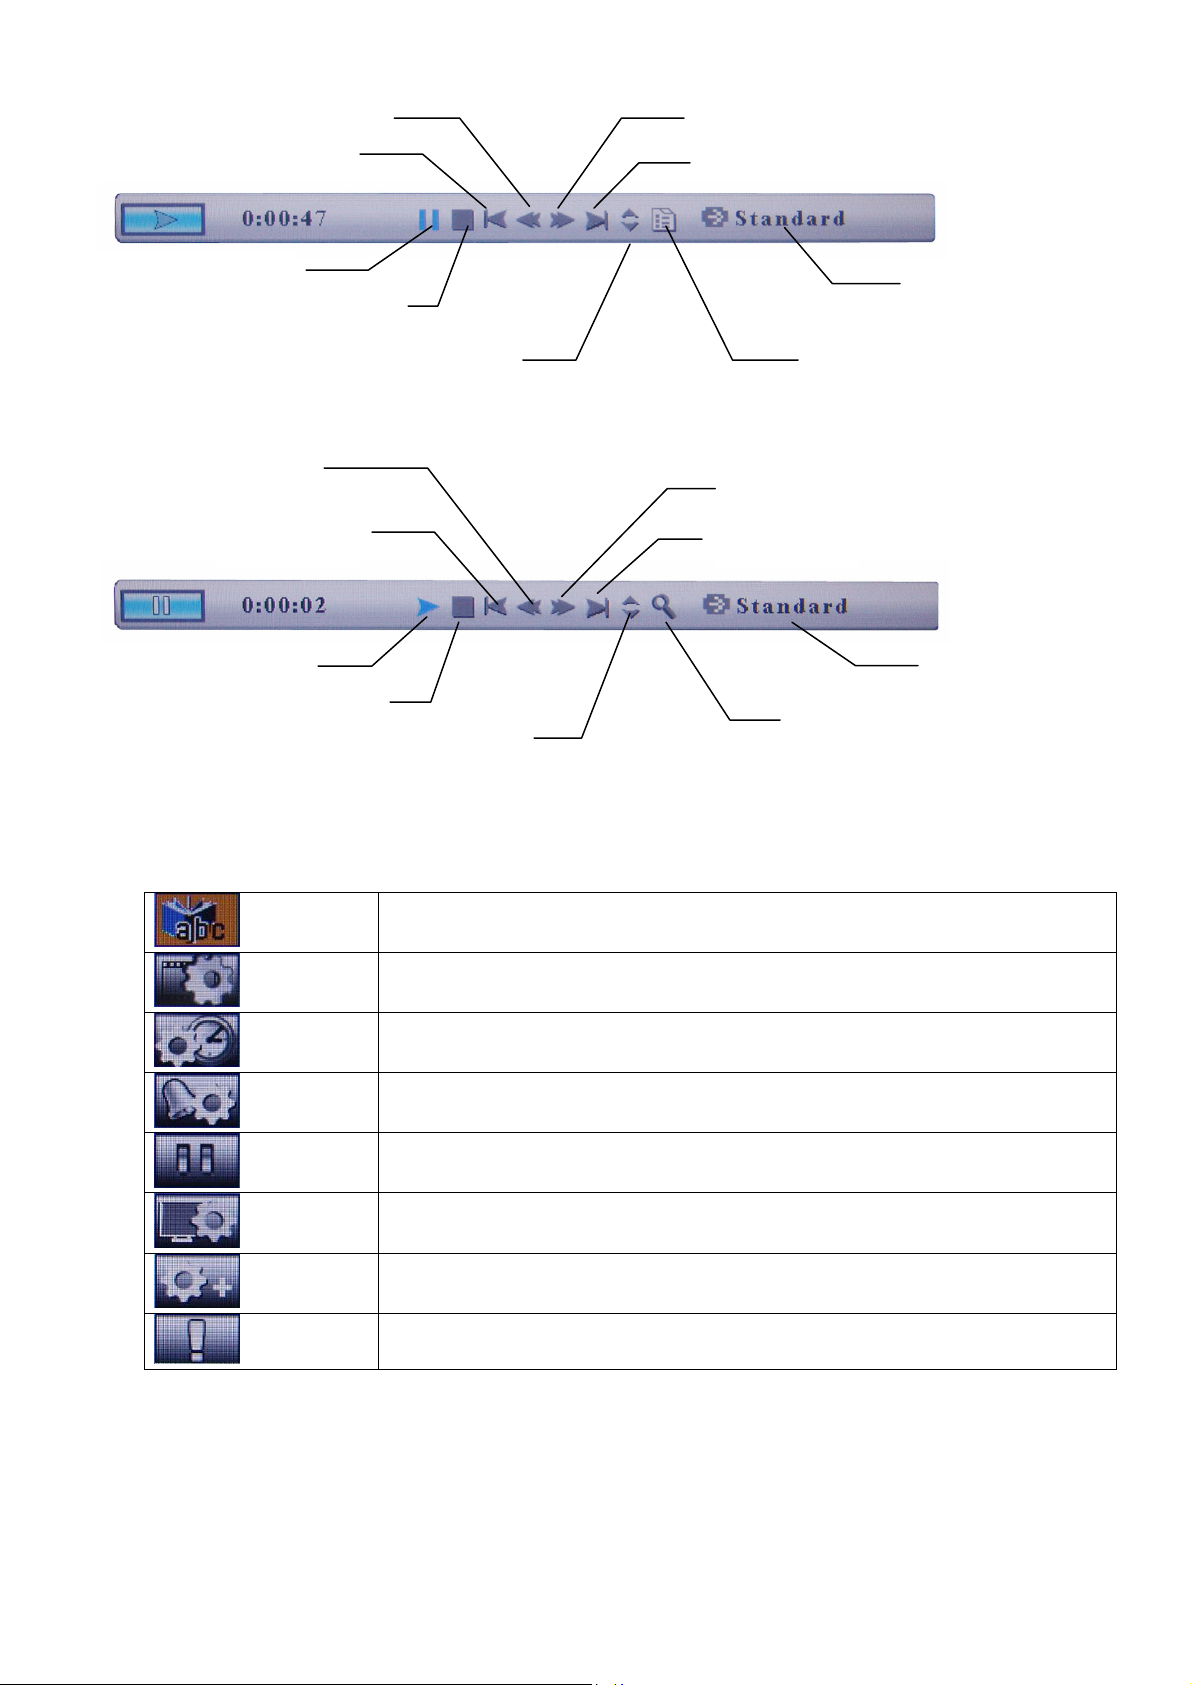
Music control menu
Rewind
Fast Forward
Previous
Next
Play / Pause
Stop
Playing Information
File Information
Playing mode
indication
Movie control menu
Rewind
Fast Forward
Previous
Next
Play / Pause
Stop
Zoom in
File Information
Playing mode
7. Select the “Setting” icon of the mode menu or press the “Setup” button on the Remote
Control to open the “Setting” Menu, the following option will show up to allow you to
configure your digital photo frame.
Select this to choose the language setting for your Digital Photo
Language
Frame.
Select this to set the time interval, displaying method, or display
Picture
sizing of the pictures
Select this to set the clock and calendar
Clock
Select this to set the alarm.
Alarm
Select this to set the start up operation mode when your Digital
Start Up
Photo Frame is turned on.
Select this to adjust the contrast, brightness and color of the
Screen
screen.
Select this to change all settings back to factory default settings.
Default
Select this to show the system information of your Digital Photo
Version
Frame.
8. Select the “Calendar” icon of the mode menu to view the calendar. The photo displayed on
the upper-left of the calendar is pictures stored in the internal memory. If you want to use
photos other than the ones pre-installed into your photo frame, please refer to the Adding
Pictures to the Internal Memory section of this manual.
9
Page 10
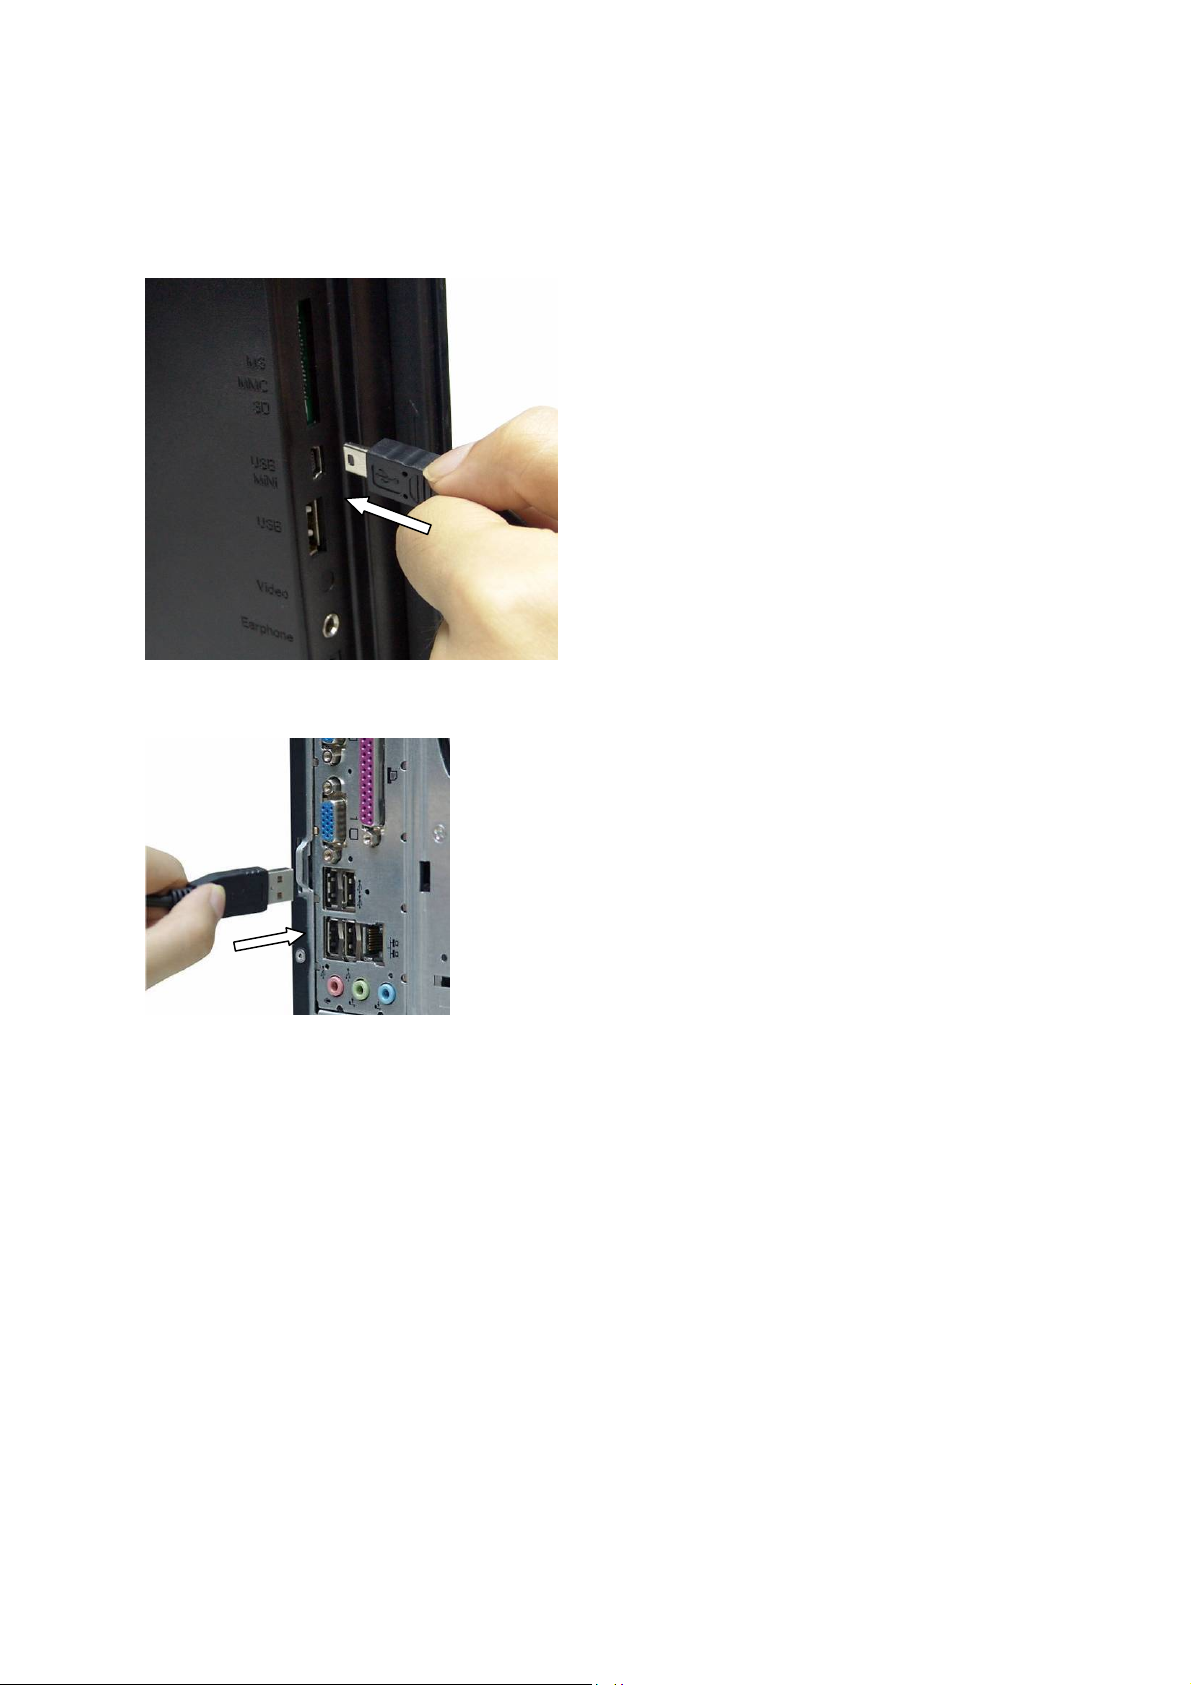
CONNECTING TO A COMPUTER:
1. Make sure all memory cards have been removed from your Digital Photo Frame and your
Digital Photo Frame is turned on. (Warning: Turning on the Digital Photo Frame after it has
been connected to a computer can cause irreversible damage to you digital photo frame.)
2. Turn on your computer.
3. Plug the USB mini-B connector end of the enclosed USB Cable to your Digital Photo Frame.
4. Plug the USB-A connector end of the USB Cable into an available USB port on your
computer.
5. You computer will detect and install the necessary drivers automatically.
6. Your Digital Photo Frame can now be used as a Card Reader.
ADDING PICTURES TO THE INTERNAL MEMORY
1. After you have successfully connected your digital photo frame to your computer following
the Connecting to a Computer section of this manual, there will be icons shown under
“My Computer” (“Computer” if you are using Windows
different drive letters assigned by your computer.
®
Vista) as “Removable Disk” with
2. Find the icon representing the internal memory of your photo frame. (Hint: the other
“Removable Disk” will appear blank if you selected the icons for the memory card slots
while not having a memory card in the slot. Find the icon that shows a capacity matching
your internal memory size. Double click on the icon.
3. You will see the pre-installed JPEG files in the internal memory. Simply copy the files of
the pictures you want to the internal memory by dragging and dropping the files onto the
internal memory windows.
10
Page 11
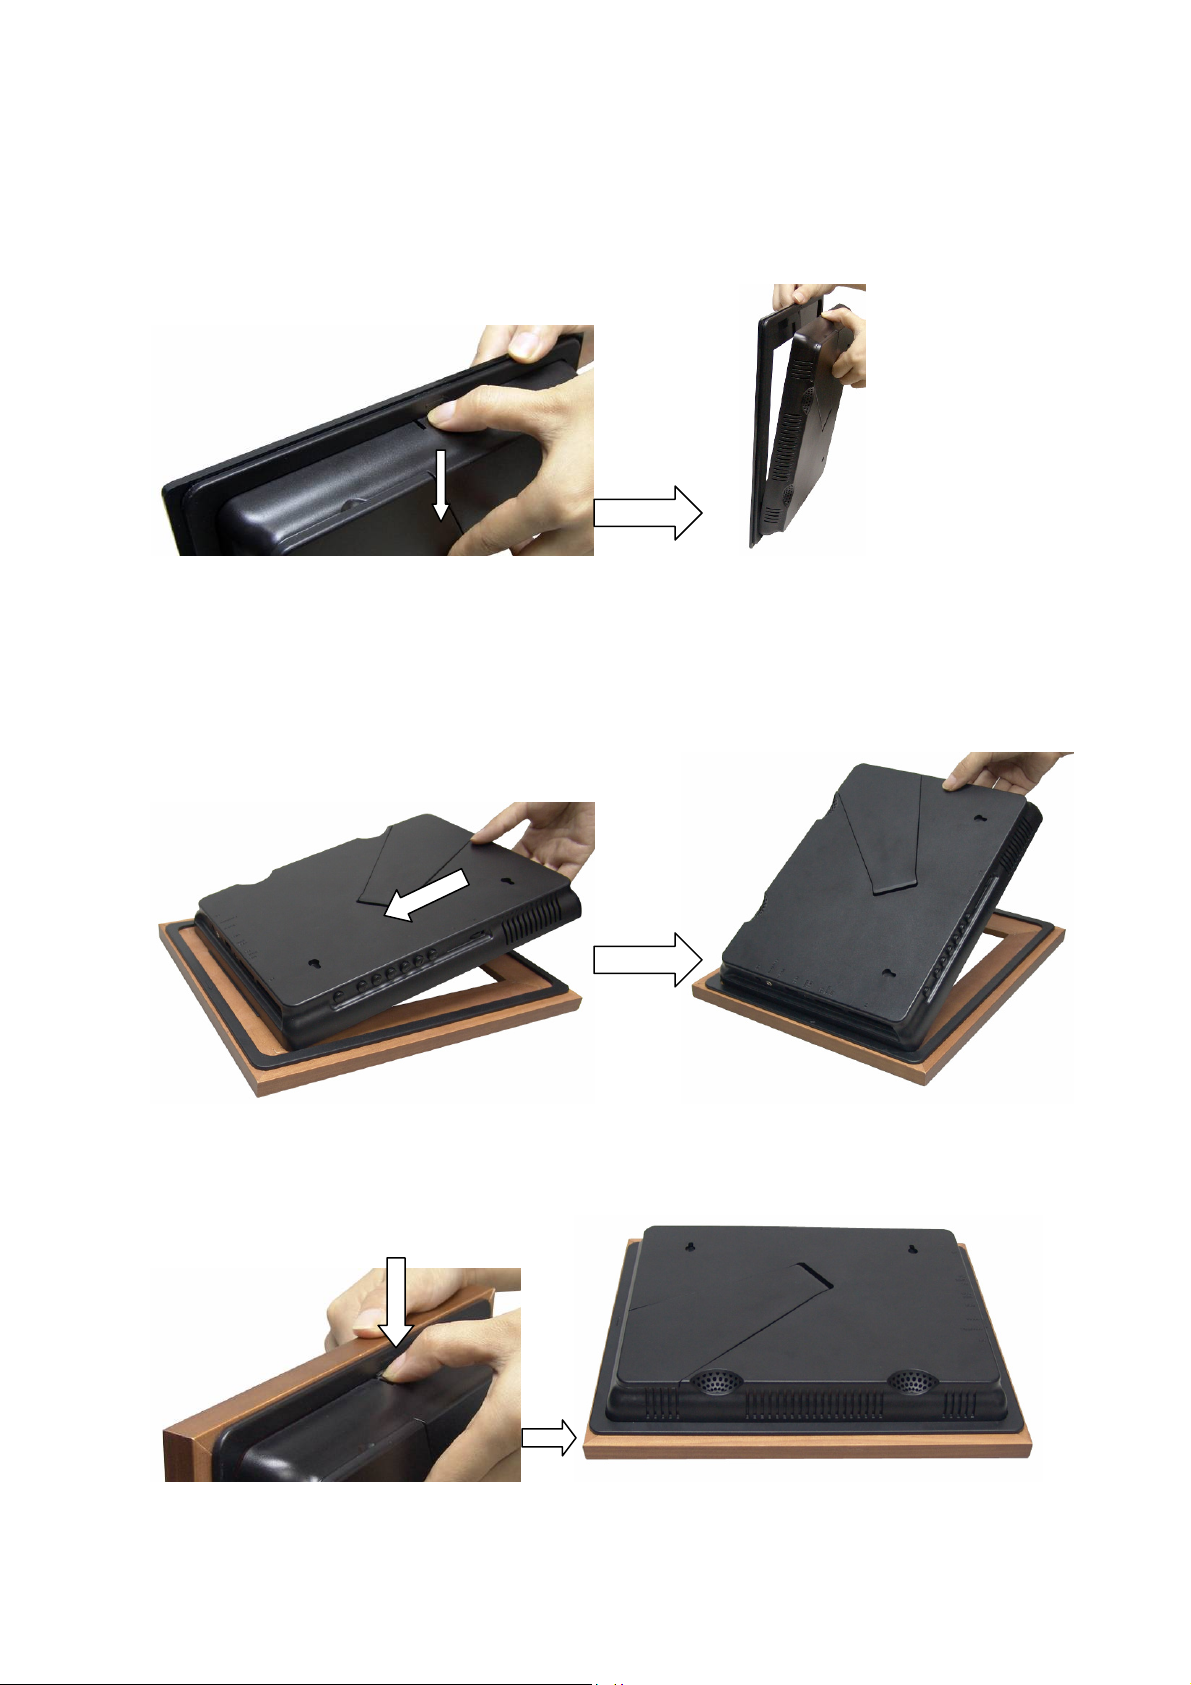
CHANGING THE OUTER FRAME:
To properly change the outer frame for your Digital Photo Frame, please follow the instructions
below.
1. Press the latch at the side of your Digital Photo Frame to separate the display screen from
the outer frame.
2. Place the wooden outer frame on the surface of a clean and flat surface. Match the side of
the photo frame that has the wider latch to the wooden frame to match the remote control
sensor lens with the sensor of the photo frame.
3. Press the latch at the other side of the photo frame until it securely locks to the wooden
photo frame.
11
Page 12

WARRANTY INFORMATION:
Gear Head, LLC warrants that this product shall be free from defects in materials and
workmanship one year. If the product is defective, Gear Head, LLC’s sole obligation under this
warranty shall be at its election, subject to the terms of this warranty, to repair or replace any parts
deemed defective. This warranty is for the exclusive benefit of the original purchaser and is not
assignable or transferable. THIS WARRANTY IS MADE IN LIEU OF ALL OTHER WARRANTIES,
EXPRESS OR IMPLIED, AND ANY IMPLIED WARRANTIES, INCLUDING THE IMPLIED
WARRANTIES OF MERCHANTABILITY AND FITNESS FOR A PARTICULAR PURPOSE, ARE
LIMITED TO THE TERMS OF THIS WARRANTY, UNLESS OTHERWISE PROHIBITED BY LAW.
Exclusions
To the fullest extent permitted by law, Gear Head, LLC expressly disclaims and excludes from this
warranty any liability for damages, including but not limited to general, special, indirect, incidental,
consequential, aggravated, punitive or exemplary damages, and economic loss (even if Gear
Head™ is informed of their possibility), third party claims against you, including for any loss or
damages, and claims or damages related to loss of, or, damage to, your records or data. This
warranty does not apply to any product the exterior of which has been damaged or defaced. This
warranty will be voided by misuse, improper physical environment, improper repair, acts of God,
war or terror, commercial use, and improper service, operation or handling.
Technical Support
Gear Head™ provides Technical Support Monday - Friday from 9:00 am – 5:30 pm Eastern Time.
Before calling, please make sure you have available the Model # (located on the front page of your
User’s Manual) and information regarding your computer’s operating system.
Please contact our technicians at
1-866-890-7115
Return Merchandise for Service
Any claim under this warranty must be made in writing to Gear Head, LLC, at the address provide
by our technician, within 30 days after the owner discovers the circumstances giving rise to any
such claim, and must include a copy of this warranty document, a receipt or copy of your invoice
marked with the date of purchase, and the original packaging. You may obtain service by calling
the technician for a Return Merchandise Authorization (RMA) number. The RMA number must be
prominently displayed on the outside of the shipping carton and the package must be mailed to
Gear Head™ postage prepaid.
12
 Loading...