

Page 1
®
GE Monogram
27" Outdoor Cooking Center
Grill Cart
Model ZX27CTYSS
Assembly Instructions
Before you Begin – Read these instructions completely and carefully.
Note To Installer: Be sure to leave these instructions with the Consumer.
Note to Consumer: Keep these instructions with your Use and Care Book for future reference.
If you have questions concerning the installation of
this product, call the GE Answer Center® Consumer
Information Service at 800.626.2000, 24 hours a day,
7 days a week.
If you received a damaged Grill Cart, you should
contact your dealer.
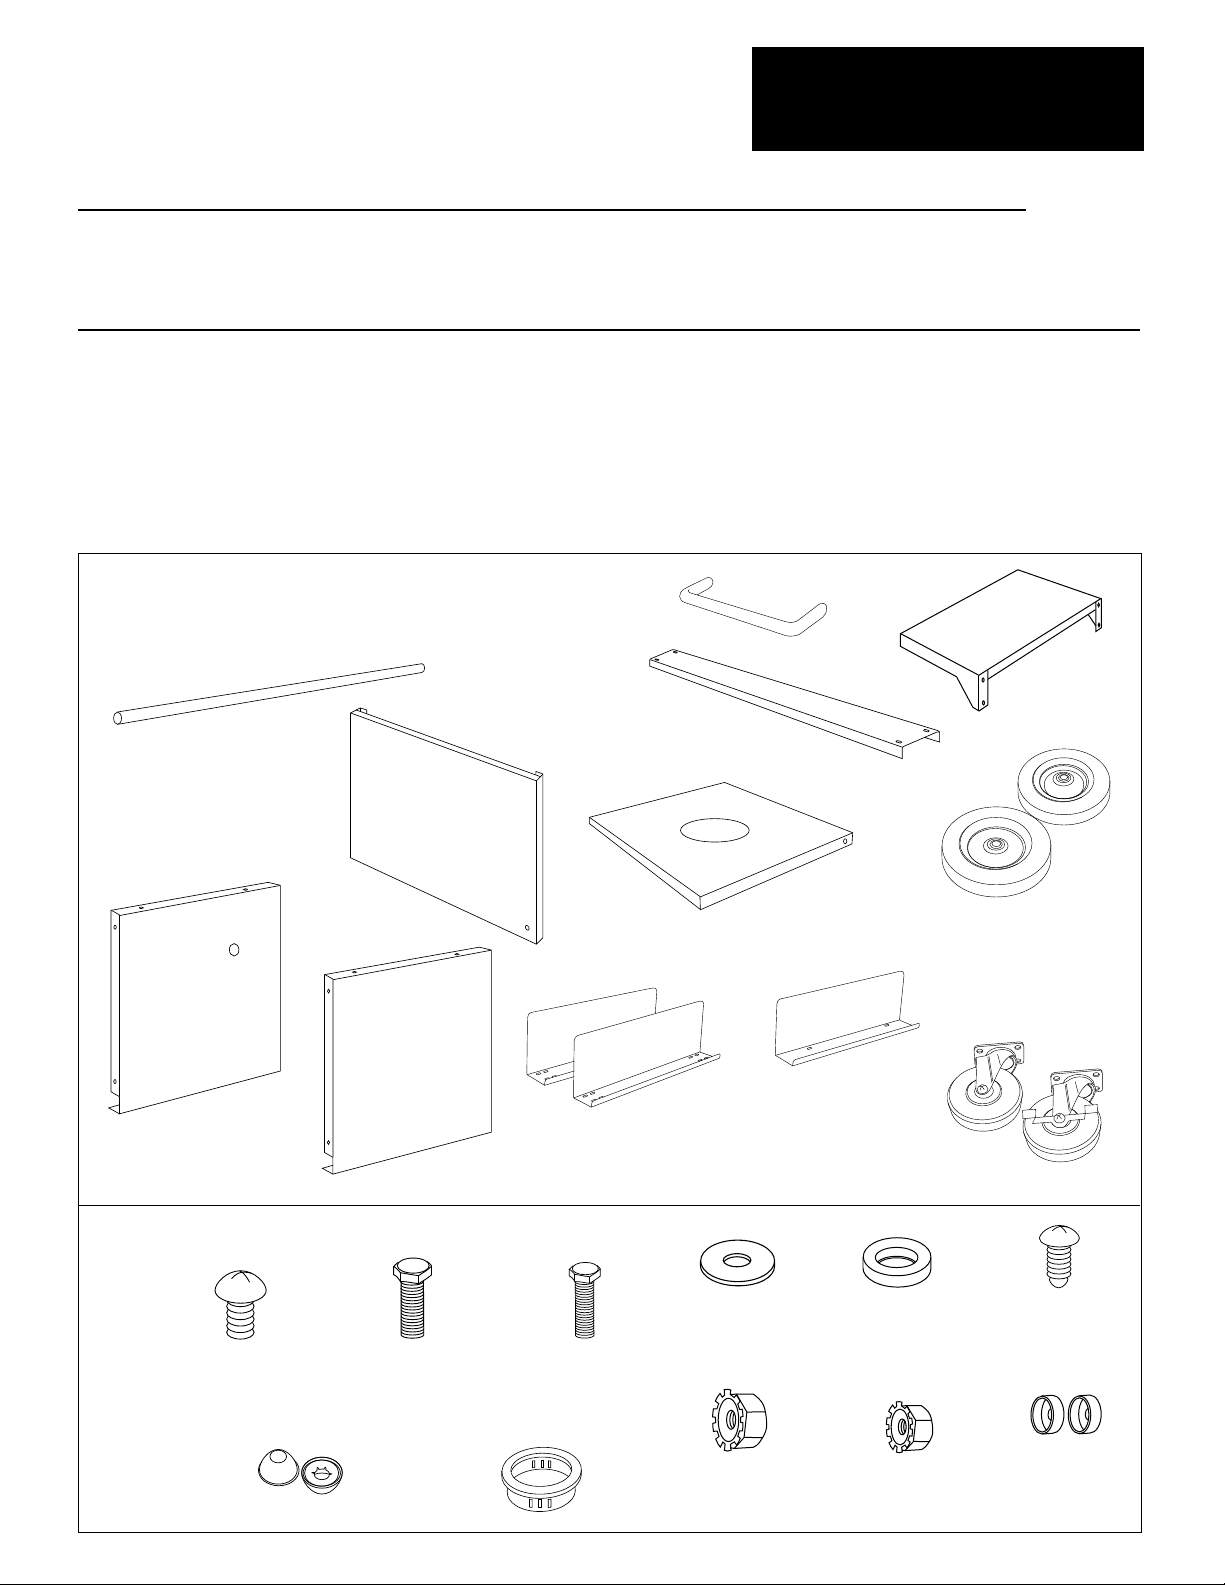
Step 1:
Open the box and remove the contents.
Remove packaging and protective film from
Remove
all parts.
Packaging
Axle
Front Panel
Assembly of this grill cart requires basic mechanical
skills. Proper assembly is the responsibility of the
installer.
NOTE:
This cart must be completely assembled before any
gas connections are made.
Shelf Handle
Shelf
Back Brace
Wheels
Bottom/Base Panel
Right Side Panel
Left Side Panel
Locate the hardware accessory package and check contents.
Phillips Head Screws
Count 10
8 required, 2 extra
Wheel Caps
Count 2
1/4-20 x 1/2 Bolts
Count 36
32 required, 4 extra
Black Plastic
Grommet
Count 1
1/4-20 x 3/4 Bolts
Count 2
no extra
Side Braces
8 required, 4 extra
32 required, 4 extra
#10 Washers
Count 12
1/4-20 Nuts
Count 36
Front Brace
1/4 Washers
Count 40
32 required, 8 extra
10-24 Nuts
Count 10
8 required, 2 extra
Caster
Caster with Lock
Self-tapping Screws
Count 2
Black Plastic
Bezels
Count 2
Page 2
Installation
27" Grill Cart Assembly
Tools
You Will
Need
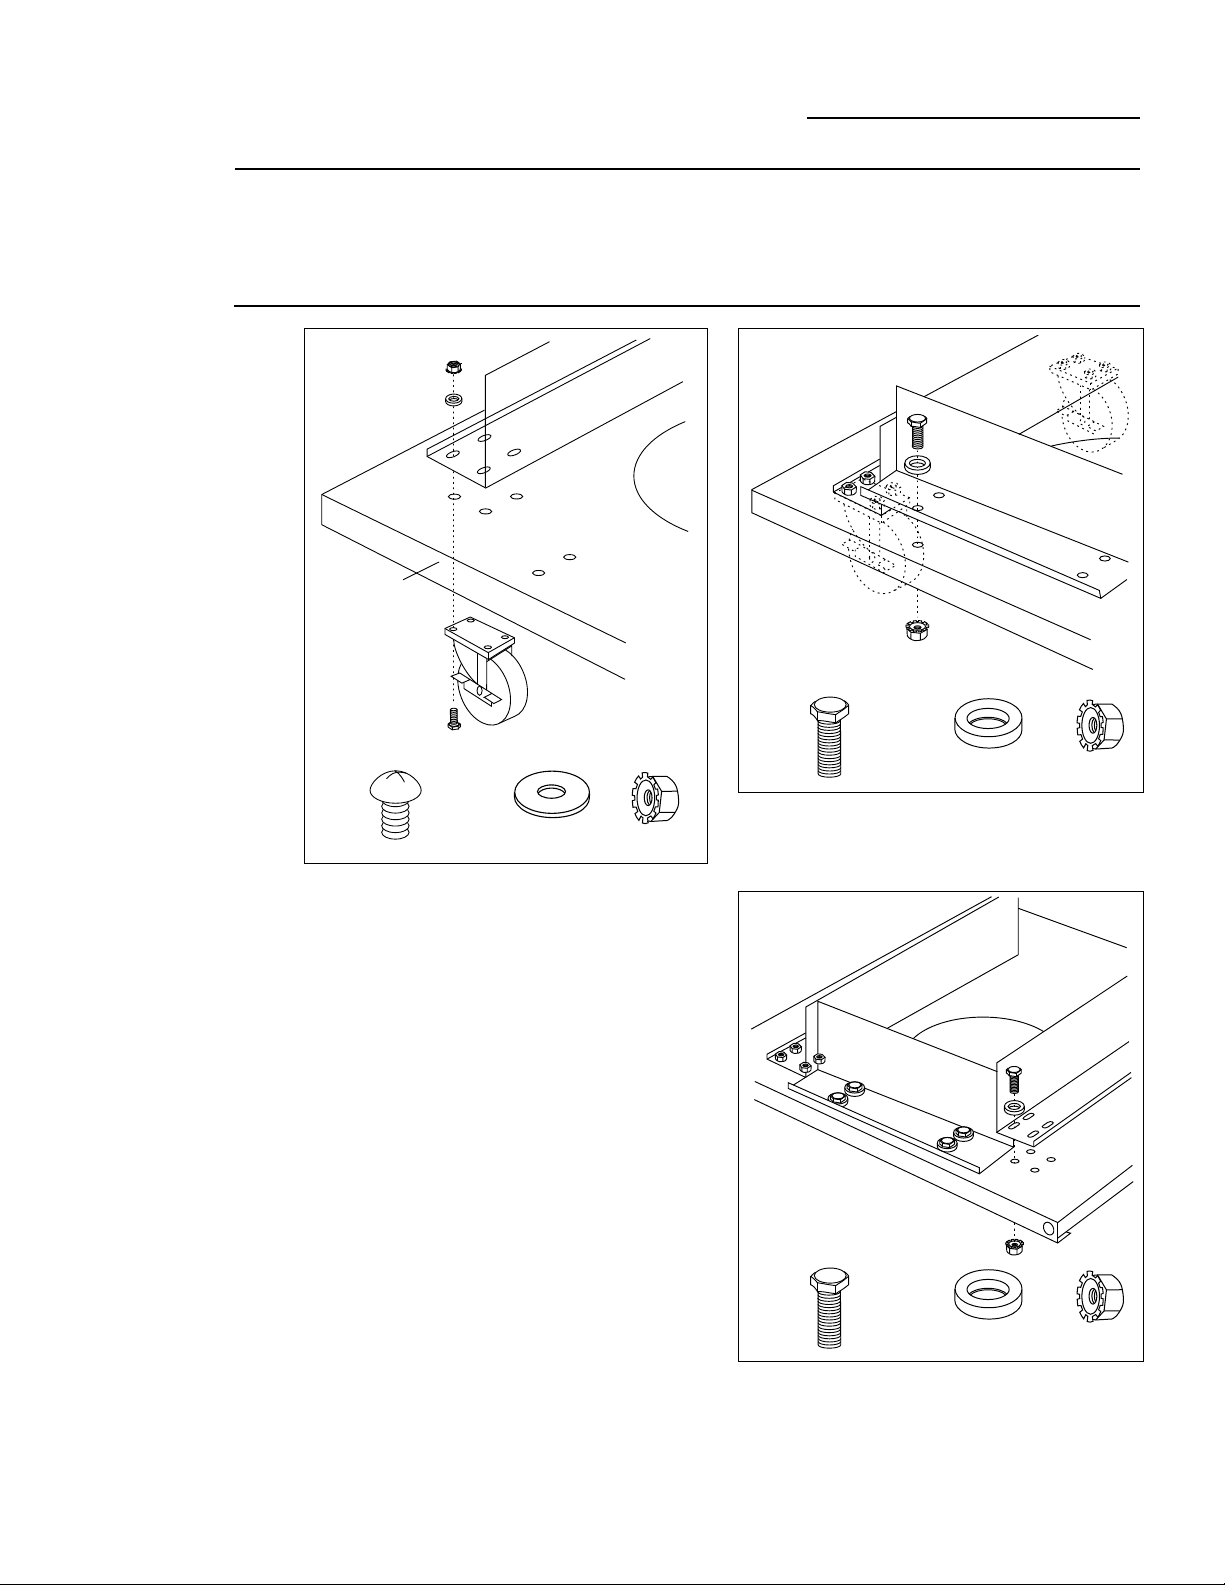
Step 2:
Install
Casters
and Braces
to Base
• Two 7/16" wrenches
• 3/8" wrench or socket
• Phillips head screwdriver
• Rubber or wooden mallet
• Gloves to protect against sharp edges
Bottom Panel
USE
8
EACH
Phillips
Head
Screws
#10 Washers
10-24 Nuts
CAUTION: The grill is extremely heavy. 2
people are required to lift and place the grill
onto the cart.
USE
4
EACH
1/4-20 x 1/2
Bolts
1/4 Washer
1/4-20 Nuts
•Install front brace to base with 4 bolts and
washers through the top and secure with
nuts on the bottom. Do not tighten.
•Locate the bottom/base panel and one side
brace.
•Place the front of the base towards you.
(The front side has 6 screw holes on each
side.)
•Select the caster with lock on the side.
•Place the caster below the front side of the
base, aligned with 4 screw holes.
•Place a side brace on top of the base at the
left side with screw holes aligned.
•Install 4 phillips head screws through the
caster into the base and through the brace.
•Secure screws with flat washers and nuts on
top of the brace. Do not tighten.
•Install the other caster to opposite end of
the brace following the same procedure.
USE
8
EACH
1/4-20 x 1/2
Bolts
1/4 Washer
1/4-20 Nuts
•Install right side brace to the base by
installing 8 bolts and washers through the
top and secure with nuts on the bottom.
Again, do not tighten.
•Adjust brace alignment by tapping and
sliding until corners meet. Tighten all
screws.
2
Page 3
Installation
27" Grill Cart Assembly
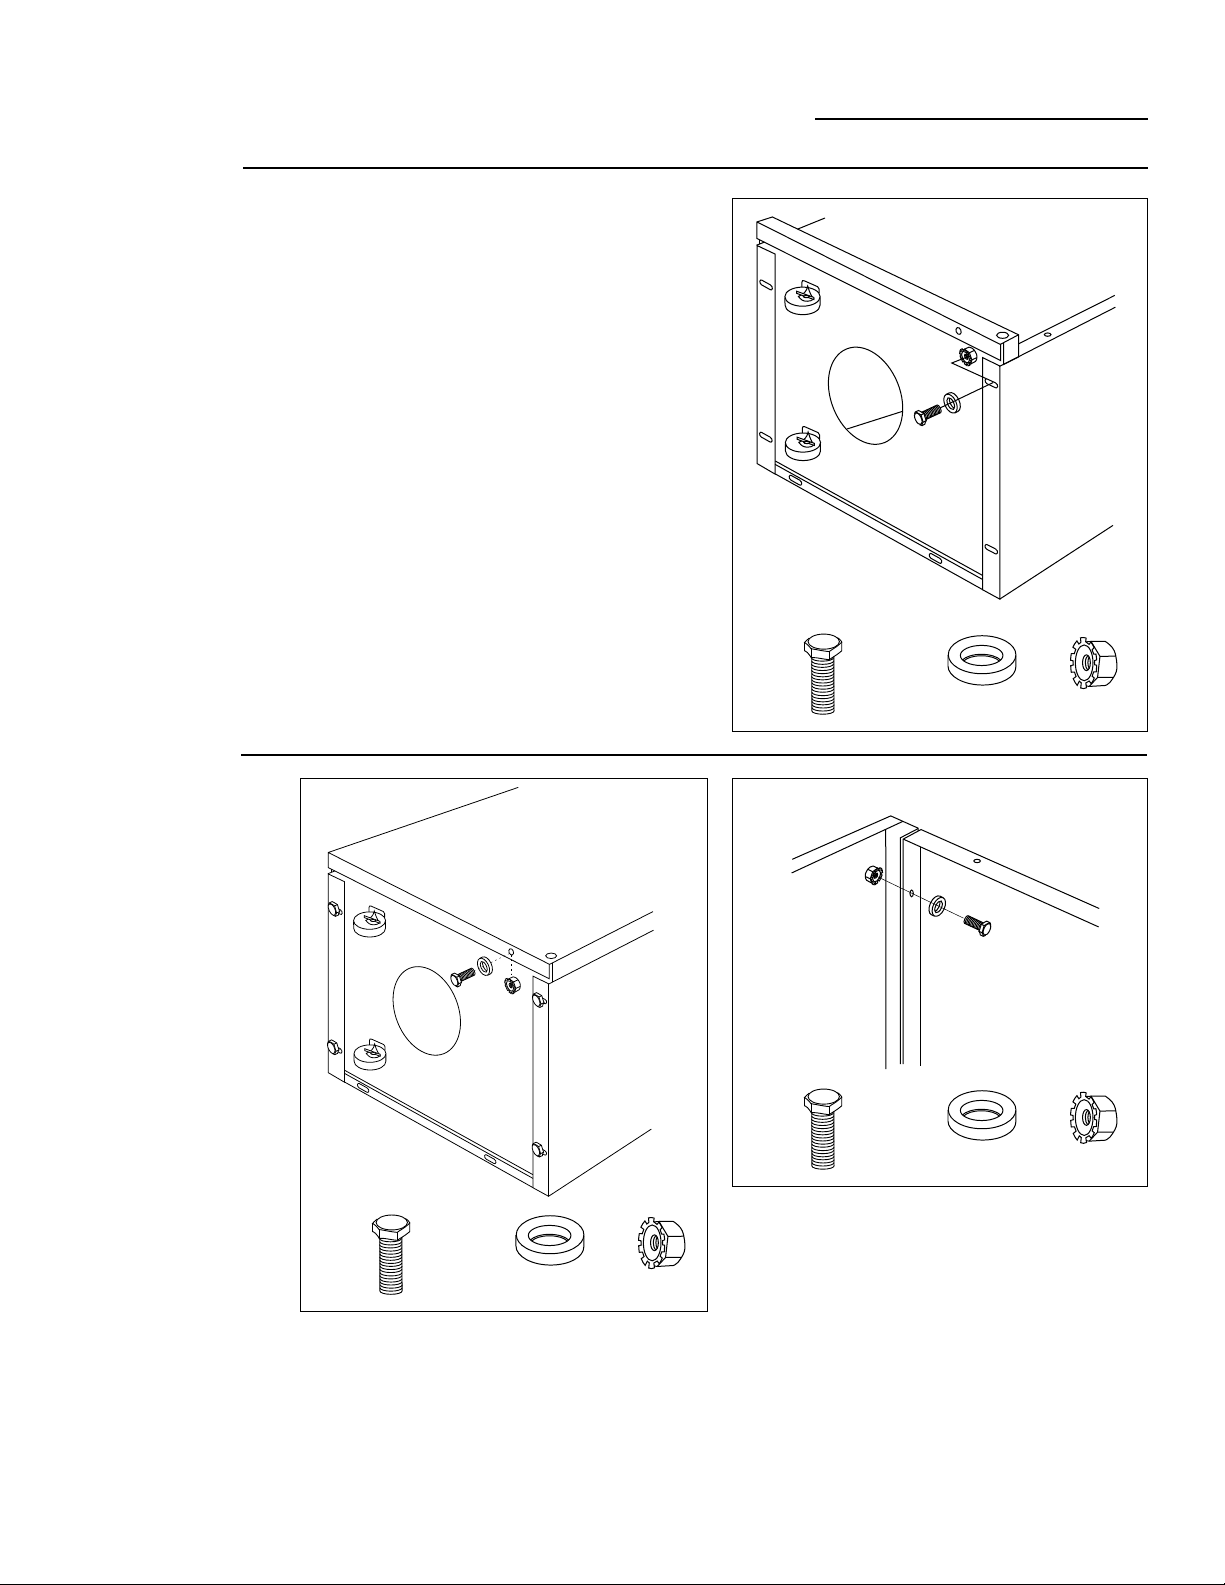
Step 3:
Install Side
Panels
to Base
•Flatten the carton to use as a pad.
•Stand the assembled base on end.
•Secure left and right side panels to the
bottom panel with 4 bolts, washers and nuts
(2 on each side). Note: Right side panel has
a hole near the center.
•Install bolt and washer from the bottom and
into the base, secure with nuts inside. Do not
tighten.
USE
EACH
Bottom Panel
Right Side Panel
4
1/4-20 x 1/2
Bolts
1/4 Washer 1/4-20 Nuts
Step 4:
Install
Front Panel
to Base
Front Panel
Bottom Panel
USE
2
EACH
1/4-20 x 1/2
Bolts
1/4 Washer 1/4-20 Nuts
•Place the front panel on the assembly. Install
bolt with washer from the bottom into the
base and secure with nuts. Do not tighten.
Front Panel
Side Panel
USE
4
EACH
1/4-20 x 1/2
Bolts
1/4 Washer 1/4-20 Nuts
•Stand the assembly up and bolt the front
panel to the side panels with bolts, washers
and nuts as shown. (2 on each side).
3
Page 4

Installation
Back Brace
Side Panel
27" Grill Cart Assembly
Step 5
Install
Back
Brace
Step 6
Check Panel
Alignment,
Tighten
Assembly
•Bolt back brace to side panels by installing
bolt with washer from the outside and
secured with nut on the inside. (2 bolts on
each side).
•Check to be sure all panels and holes in the
bottom right corner of the front panel are
correctly aligned.
•Tighten bolts by holding a 7/16" wrench on
bolt and turning nuts below with another
7/16" wrench.
•Snap grommet into the hole on the outside
of the right side panel.
USE
EACH
4
1/4-20 x 1/2
Bolts
1/4 Washer
1/4-20 Nuts
Step 7
Install
Wheels
•Place wheel cap onto axle and tap in place
with a mallot.
•Slide a wheel onto the axle with the flat side
against the cap and the spacer side (the
protruding side) towards the inside of the
cart.
•Slide the axle through the holes in the cart.
•Place second wheel onto the axle, with
spacer side against the cart, and tap wheel
cap with mallet to secure.
USE 2
WHEEL CAPS
4
Page 5

Installation
Self Tapping Screws
27" Grill Cart Assembly
Step 8
Mount Grill
to Assembled
Cart
Step 9
Install
Handle
on Shelf
CAUTION: Lock front caster on the cart to
prevent movement.
See installation instructions packed with the
grill. Remove packaging, drip tray, burner
grates and parts box.
CAUTION: The grill is extremely heavy. 2
people are required to lift and place the grill
onto the cart.
•Lower the grill onto the cart.
•Check to be sure the grill rests securely and
fits square on the cart.
•Secure the grill to the cart with 2 bolts,
washer and nuts on each side. The bolts may
be accessed from the back of the cart.
The shelf should be installed after the grill
has been secured to the cart.
•Place black plastic bezels onto the ends of
the handle.
•Hold the handle against the shelf and
secure with two 1/4-20 x 3/4" bolts as
shown.
USE
EACH
4
1/4-20 x 1/2
Bolts
1/4 Washer 1/4-20 Nuts
Step 10
Mount Side
Shelf to
Grill
•Hold the assembled shelf against the grill,
aligning screw holes.
•Install bolts and washer through the inside
of the grill, into the top of the shelf and
secure with nuts.
•Drive 2 self-tapping screws with washers into
the lower holes of the shelf and into the
grill.
USE
2
1/4-20x3/4
Bolts
USE
2
EACH
Flat Washer
1/4-20 x 1/2
Bolts
Self-Tapping
Screws
Use 2
Black Bezels
1/4-20 Nuts
5
Page 6

Notes
27" Grill Cart Assembly
6
Page 7

Notes
27" Grill Cart Assembly
7
Page 8

Monogram.
General Electric Company
Louisville, KY 40225
To obtain specific information concerning any
Monogram product or service, call GE Answer Center
®
consumer information service at 800.626.2000—any
time, day or night.
For Monogram local service in your area, call
1-800-444-1845.
NOTE: Product improvement is a continuing endeavor at General
Electric. Therefore, materials, appearance and specifications are
subject to change without notice.
Pub. No. 49-8840
Dwg. No. 164D3333P080
®
1997 GE Appliances
(N.D. 723) 4/97
10744
 Loading...