

Page 1
For answers to your Monogram,®GE Profile
Performance Series,™GE Profile,™GE,
Hotpoint and RCA appliance questions, call
GE Answer Center®service, 800.626.2000.
R
Listed by
Underwriters
Laboratories
Monogram.
™
Created 1/98
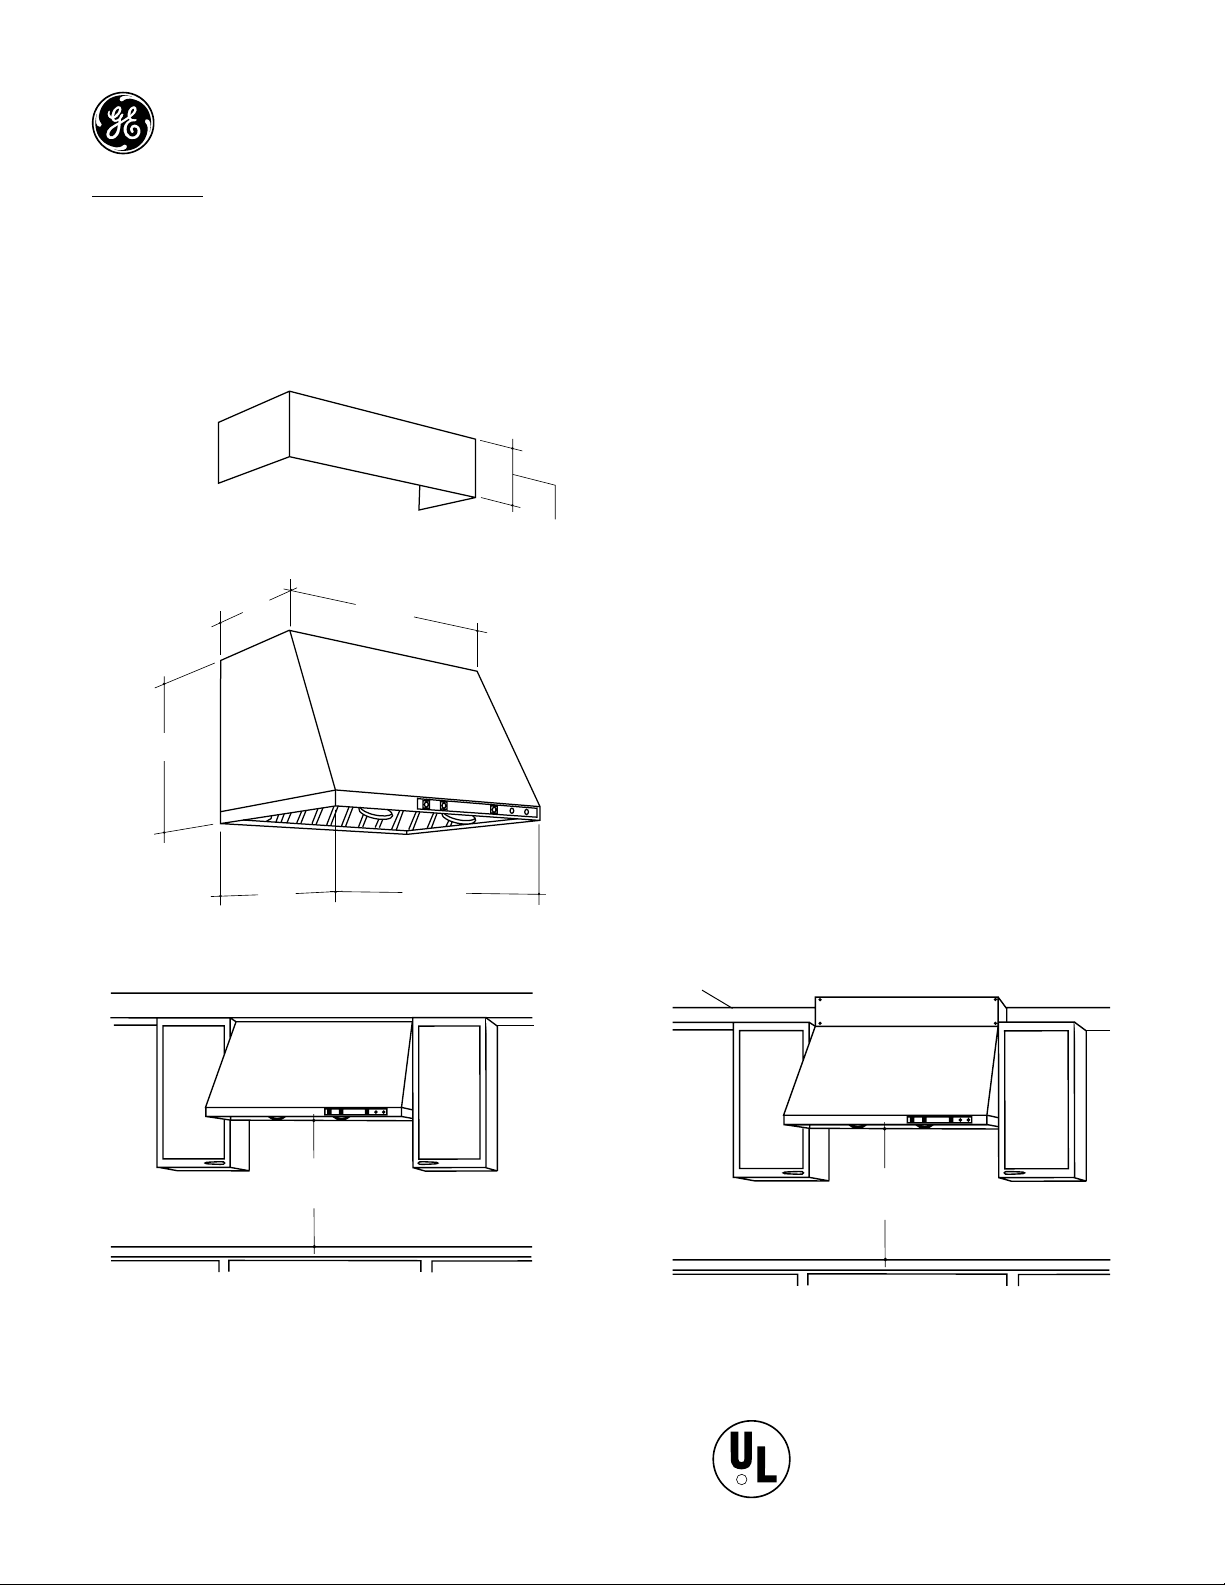
ZV370YSS—30" Professional Vent Hood
Dimensions and Specifications (in inches)
Accessories:
Before you Begin–Decorative duct covers are available
in 6" or 12" heights. the duct covers conceal the ductwork
running from the top of the hood to the ceiling or soffit.
Before you begin, you should determine the installation
height of the hood and order the correct size duct cover.
ZX6DC30YSS–6" high decorative duct cover
ZX12DC30YSS–12" high decorative duct cover
Dimensions and Clearances:
These vent hoods must be installed 30" min. and 36" max.
above the cooking surface. Installation will be easier if
the vent hood is installed before the range or cooktop
installation. These hoods can be installed into a soffit,
or when there is no soffit, they can be installed directly
onto a wall.
Note:
30” Hoods must use 7” round or 3-1/4”x12” duct.
18"
29-7/8"
25"
29-7/8"
12"
Optional 6" or 12"
Duct Cover
SOFFIT
SOFFIT INSTALLATION
30" MIN.
36" MAX."
WALL MOUNT INSTALLATION
Ceiling
30" MIN.
36" MAX."
Page 2
For answers to your Monogram,®GE Profile
Performance Series,™GE Profile,™GE,
Hotpoint and RCA appliance questions, call
GE Answer Center®service, 800.626.2000.
R
Listed by
Underwriters
Laboratories
Monogram.
™
Created 1/98
ZV370YSS—30" Professional Vent Hood
Dimensions and Specifications (in inches)
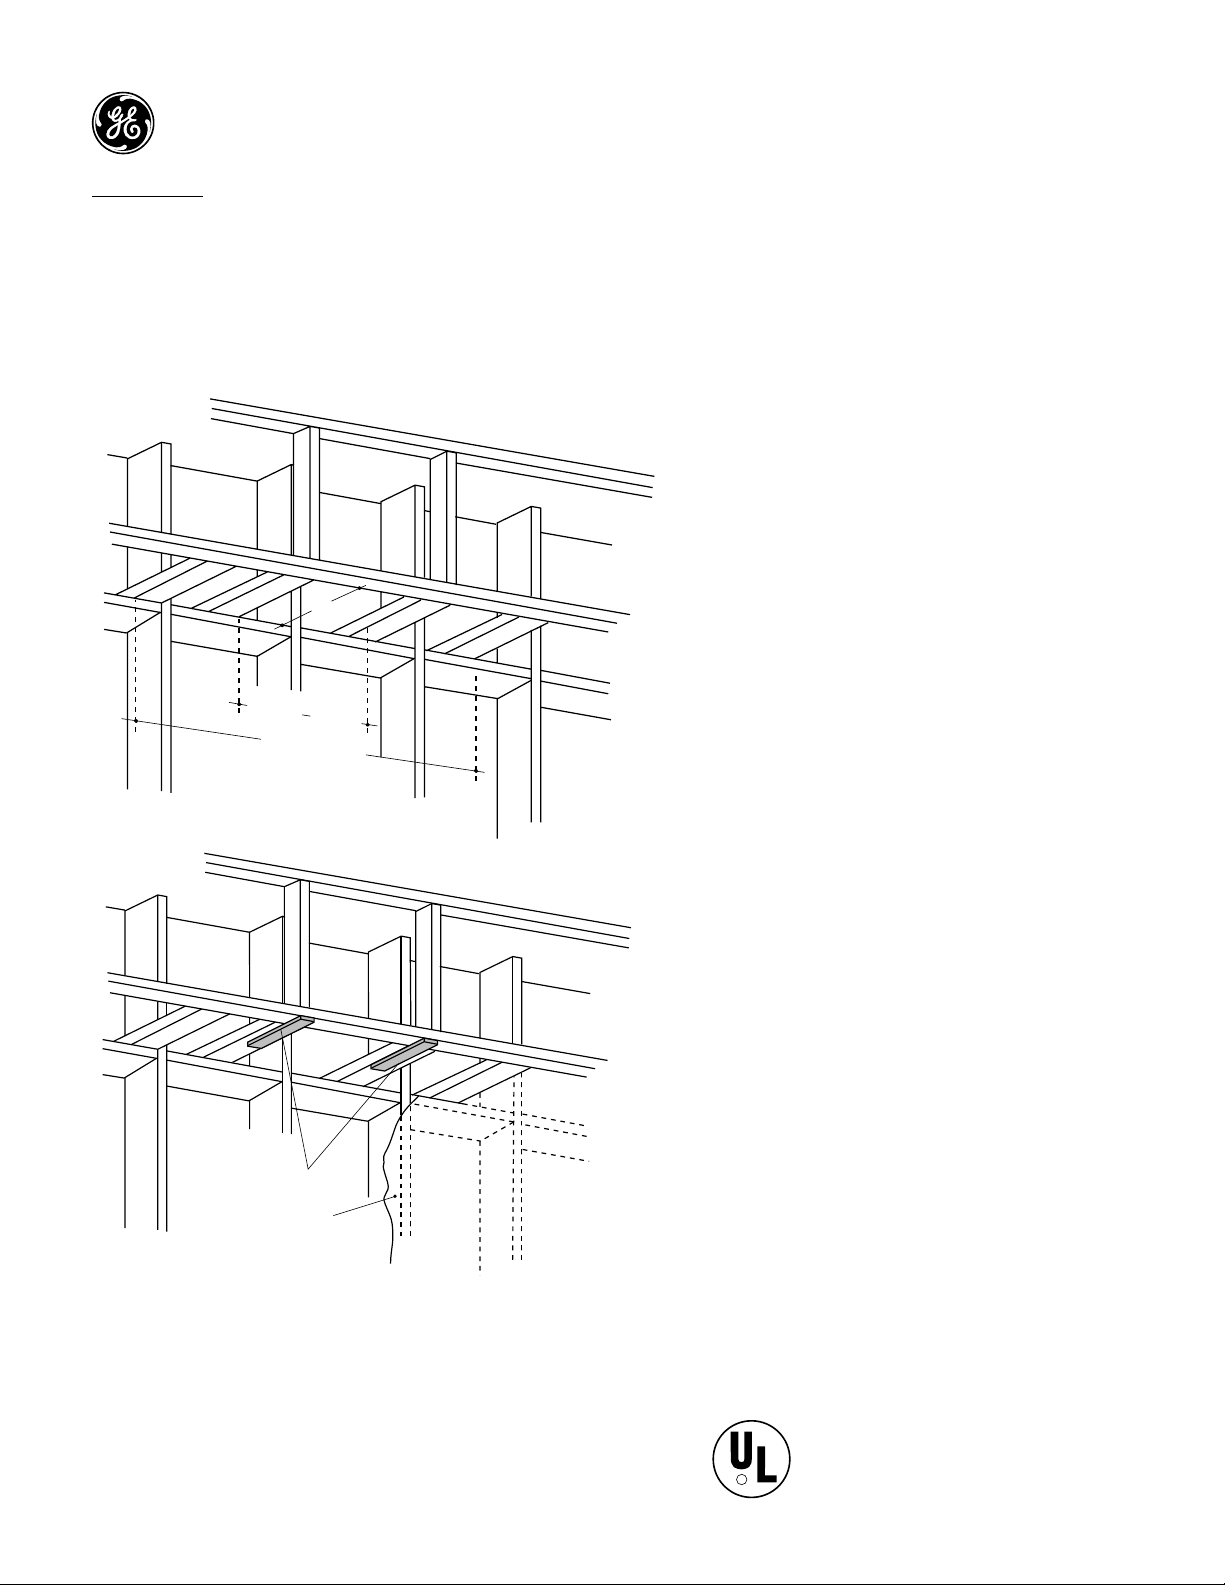
Soffit Framing:
We recommend that the vent hood and/or duct cover be
on site before final framing and wall finishing to more
accurately locate the ductwork and electrical service.
Note: If the top of the installation location does not meet
the soffit, use a 6" or 12" duct cover accessory
to conceal the duct run.
• The soffit should be constructed with 2 x 4s.
• Determine the installation location.
• Refer to “Soffit Installation” for mounting
screw locations.
• Mark the centerline of the installation.
• Add additional 2 x 4 studs at the locations illustrated.
• Allow 7" deep minimum opening below the soffit to
accommodate ductwork.
• Cut two wood shims, 2" x 10" x drywall thickness.
Secure to the bottom of the horizontal studs, flush with
the front, as illustrated. Note: If drywall is present, cut
away enough to expose studs.
Shims
Finished Drywall
Hood Width
10-11/16”
10-11/16”
7” Min.
Page 3

For answers to your Monogram,®GE Profile
Performance Series,™GE Profile,™GE,
Hotpoint and RCA appliance questions, call
GE Answer Center®service, 800.626.2000.
R
Listed by
Underwriters
Laboratories
Monogram.
™
Created 1/98
ZV370YSS—30" Professional Vent Hood
Dimensions and Specifications (in inches)
Wall Mount Framing:
Note: A decorative duct cover is available for wall mount
installations. The duct cover conceals the duct run from
the top of the hood to the ceiling. Choose the 6" or 12"
cover based upon installation height of the vent hood.
We recommend that the vent hood and decorative duct
cover be on site before final framing and wall finishing in
order to accurately locate the ductwork and electrical
service.
• Determine the location for installation.
• Mark the centerline of the installation.
Cut a sheet of plywood 30" wide and 18" high. If drywall
is installed, cut away enough to expose two vertical
studs, one on each side of the cutout. Secure the plywood
to the studs.
• Install additional aligning wall studs as illustrated.
No Additional
Wall Studs needed
Plywood Sheet
(Wall Hole Cut
Out x Drywall
Thickness)
Hood
Width
7" Min.
Additional
Wall Studs
Installed
Centerline of
Installation
Space
7" Min.
Hood
Width
8-15/16” 8-15/16”
C
L
6" or 12"
Duct
Cover
Ceiling Drywall
Rear View of Vent Hood
18"
Hood Centerline
6-1/2"
2-1/2"
6-1/2"
Page 4

For answers to your Monogram,®GE Profile
Performance Series,™GE Profile,™GE,
Hotpoint and RCA appliance questions, call
GE Answer Center®service, 800.626.2000.
R
Listed by
Underwriters
Laboratories
Monogram.
™
Created 1/98
ZV370YSS—30" Professional Vent Hood
Dimensions and Specifications (in inches)
Soffit Installation:
• Drill 3/16" pilot holes through the shims and into the
soffit studs.
• Hold the hood against the soffit and secure with six lag
screws with washers.
• For additional support and to minimize vibration during
operation, we recommend that the hood be secured to
the back wall.
• Drive lag screws through the rear panel of the hood
and into the wall studs.
Wall Mount Installation:
• Drill 3/16" pilot holes, approximately 1-1/2" deep, in
all mounting screw locations.
• Hold the hood in position and drive lag screws in top
left and right mounting holes.
Note: 5/16" hanger bolts can be used in the two top
locations. Place the hood onto the hanger bolts and
secure with nuts and washers.
• Install lag screws with washers in remaining
mounting holes.
Installation Information:
Before installing, consult installation instructions
(Pub. No. 49-8816) packed with product for current
dimensional data.
SOFFIT INSTALLATION
WALL MOUNT INSTALLATION
Ceiling
5-1/2"
5-1/2"
11-7/16"
12"
Junction
Box
30" Hood Top View - Front Side
7"
29-7/8"
Back Side
11-7/16"
4-1/4"
3/4"
3"
3"
2-7/8"
3-1/8"
2-1/2"
12-7/16" 12-7/16"
8-15/16”
8-15/16”
C
L
6" or 12"
Duct
Cover
Ceiling Drywall
30" Hood Rear View
18"
Mounting
Screw
Holes
6-1/2"
2-1/2"
6-1/2"
6”
6”
29-7/8”
Page 5

Monogram.
™
Created 1/98
ZV370YSS—30" Professional Vent Hood
Monogram
Features and Benefits
•Straight Side Design
• 30” Width
• 600 CFM Vertical Exhaust
• Variable Speed Fan Control
• 1 Removable Stainless Steel Filter
• 2 Halogen Lamps
• 7” Round Duct
• Model ZV370YSS—Stainless Steel
 Loading...