

Page 1
Owner's
Manual
30" Convection
Wall Oven
ZET1R - Single Wall Oven
ZET2R - Double Wall Oven
Four mural fi convection de
76 cm (30 po)
Manuel du propridtaire
ZETI R - Four mural simple
ZET2R - Four mural double
La section frm_aise commence it la page 55
Homo de conveccidn
de pared de 30"
Manual del propietario
ZETI R -Horno de pared simple
ZET2R - Homo de pared doble
La secci6n en espmiol empieza en la p_ina 105
monogram.com
49-80443 ]
11-07JR
Printedin the United States
Page 2
Consumer Information
I'ntroduction
Contents
Your new Monogram wall oxen makes an ( loquent statement of stxle, convenience and kitchen
planning flexibility. Whether you (:(lose it tot its purity of design, assiduous attention to delail--
or for both of these reasons--vou'll lind that your Monogram wall oven's superior blend of form
and flmclion will delight you (br years to coin<.
xt\_ur Monogram wall oven was designed to provide the flexibility to blend in with your kitchen
cabinetry Its sleek design can be b_am(full? integrated into the kitchen.
The in(bnnation on tile %llowing ()ages will help )ou operate and maimain _our wall oven
properl>
Care and Cleaning
Broiler Pan and Grid .................. 42
Control Panel ........................ 4(;
Light Bull) ........................... 45
Oven Door . ....................... 44, 4(;
Probe ............................... 44
Racks ............................... 43
Staink ss Steel Sm-fhces ................. 4(;
Favorite Recilx s ....................... 24
Help ................................ 36
Kitchen Timer . ....................... 25
Option Settings .................... 37-41
Amo Recipe TM Conversion .............. 39
Clock .............................. 37
Clock Blackout ....................... 38
Dei_mlt ............................. 41
Display Color ........................ 39
Consumer Services
B(f'ore 5.5)u Call For Service .......... 47, 48
Important Phone Numbers ............. 53
Model and Serial Numl)(rs ............... 3
Product Registration ([ .S.A.) ......... 49, 50
Product Registration (Canada) ........ 51, 52
Sa%W Instructions .................... 4-6
Warranty ............................ 54
Oven
Alunfinum Foil ...................... 9 14
Baking .............................. 11
Broiling .......................... 14, 15
Control Lo(kout ...................... 25
Conn-ols .............................. 8
Convection ........................ 18-21
Cook and Itold Option ................. 34
I)ehydrate Option ..................... 34
Delay Option ......................... 35
Fahr_ nheit or Celsius
"I_.*mperam re Selection ................ 38
Kitchell Timer Signal .................. 41
Language ........................... 39
Sound On/()(_ ....................... 40
Sound Volmne ....................... 40
Thermostat ......................... 37
Timer Signal ........................ 41
12-Itou r Shut-Off ..................... 38
Oven .............................. 7-10
Probe ......................... 16, 17, 20
Proofing ............................. 30
Racks ............................... 10
Roasting ............................. 11
Sabbath Option ....................... 36
Selt:-Cleaning Owm ................. 26-29
Timed Baking and Roasting .......... 12, 13
Timed ( onvection Baking and Roasting .22, 23
Two Temps Option .................... 33
Warming .......................... 31-32
[J[(Yg*)10
pvll (¢ive
shi[q)i oifihn and
pact zKing" lape
2
Carefully grasp a corner of tile pvotectivc shipping
fihn with your ring(p, and slowly p(el it fl-om the
appliance surl_me. I)o not use any sharp ilenls to
remove the fihn. Remove all of tile fihn be(bre
using the appliance for the fip_t dine.
To assure no damage is done 1o the finish of
the product, the sal:vst way to relllove the adhesive
fi-om packaging tap_ on new appliances is an
application of a household liquid dishwashing
deml_gent. Apl)ly with a soft cloth and allow
to soak.
NOTE: The adhesive mu.sl be _l_movedfi*mzal! pm l*.
11im*_zolbe_l_mov_,dq it is bat:ed o_.
Page 3
Consumer Intormation
Wall Oven
B@l_e
using your
wall oven
Write
down the
modal &
serial
"n_lmbers
R(a(I this manual carefully. It is int( nded to
hel l) you operat( and maintain )our new wall
o_en properly.
Ke(p it hand} lor answers to }our questions.
You'll find them on a label oil lll< front lefl
trim behind the oven door.
Fill out and return the Consumer Product
Registration Card that is packed with this
product.
If'you don'l understand something or need
more help, there is a list of toll-free consum_ r
selvice numbers inchlded ill tile back section
of lhis lnanual.
OR
Visit our Website at: monogTam.com
Before sending in this card, please write these
numbers here:
Modal Numb_ r
Serial Number
[ 7se these mlml)ers in ally correspondenc_ or
selvice calls conc(rning your wall oven.
I./'y014
received a
dam, aged
wall oven
Save time
d__ money
"Heed
service
Imm{diat_lv contact the deal(r (or builder)
that sold you tile wall oxen.
Beiore you request selwice, che(k the
Problem Solver in the back ot this lnanual.
To obtain s_ rvice, see th_ Collstnner Services
page in tile back ot this manual.
We're proud of our service and want you to be
pleased. If lot some reason you are not happy
with the ser_ic( you receiw, h_re are two st(i)s
1o follow tbr filrther help.
FIRST, contact tile peopl< who selviced }our
appliance. Explain why you are not pleased.
Ill most (ases, this will solve the probl(m.
It lisl* causes of minor operating l)roblems that
VOll Call corre(t VOllrself.
NEXT, if wm are still not pleased, write all the
details--inchlding your phon_ number--to:
Managen Cuslomer Relations
GE Appliances
Appliance Park
Louisville, KY 411225
Page 4

IMPORTANT SAFETY INSTRUCTIONS
IMPORTANT SAFETY NOTICE
• The California Safe Drinking Water
and Toxic Enforcement Act requires die
Governor of C_difornia to publish a list
ot slll_stances kllown to the state to cause
cancer, birth (let_.,cts or other rel)roductiw!
haml, and requires lyusinesses 1o warn
C!lStOlllers of pot( ntial expOsllre to Sl/(h
s/ib_,tances.
S I'; 7 Y ['1 2 CA U7 YONS
Vv'hen using your eleclrical appliances, b_tsic
safety precautions should be followed,
including the following:
• Be sure all packing materials are removed
from the oven before operating it to l>rex< nt
fire or smoke danlag< should the pinking
mawrial ignite.
• Use this appliance only for its intended use
as described ill this ()wner's Manual.
• Be sure your appliance is properly installed
and grounded by a qualified technician in
accordance with the proxided installation
instructions.
• Be sure the oven is securely installed in a
cabinet that is firmly attached to the house
structure. Ncwr allow an}ore' to (limb, sit,
stand or hallg Oil the ()',en door.
• Have the installer show you the location
of the circuit breaker or fuse. Mark it for _ls}
refcren_ t,.
• Do not attempt to repair or replace any part
of your wall oven unless it is specifically
recommended in this manual. All other
servicing should bc rcti.,rrcd to _1qu_lliti_ d
technician.
• Teach children not to play with the controls
or any other part ot tile! oxen.
• The fiberglass insulation in sdf-dean ovens
gives off a very small amount of carbon
monoxide during the cleaning cycle. Exposu r_
tan be minimized by venting with an open
window or using a ventilation fan or hood.
•IMPORTANT: Tl,eh, ,l h,,f
some birds is extremely sensitive to tile fumes
given off during lhe s_ If:cleaning c}cle of any
own. Mo_e birds to another w_ 11-_(ntilated
rooln.
• Always keep dish towels, dish cloths, pot
hohters and other linens a safe distance from
your oven.
• For your safety; never use your appliance
for warnting or heating the room.
• Do not store flammable materials in the oven.
• Always keep wooden and plastic utensils
and canned food a safe distance away from
your oven.
• Always keep combustible wall coverings,
curtains or drapes a safe distance from
your oven.
• DO NOT STORE OR USE COMBUSTIBLE
MATERIALS, GASOLINE OR OTHER
FLAMMABLE VAPORS AND LIQUIDS 1N
THE VICINITY OF THIS OR ANY OTHER
APPLIANCE.
• Do not let cooking _ea_se or oilier flammable
materials accumulate hi or near the ,a_all oven.
• Do not use water on grease fires. Never pick
up a flaming pan. Turn the controls oft.
Flam{ ill th( ()VEIl Call b( SlllotheFed
conlpletel 3 by closing lh_ oxen door and
turning tile oven off or by using a multi-
propose dry (heroical or fbam-type fire
extinguishen
• Never leave the oven door open when you
arc not wat(hing Ih( ovt.n.
4
Page 5

SAFETY PRECAUTIONS
IMPORTANT SAFETY INSTRUCTIONS
Do not use aluntinum foil to line oven
bottoms, except as suggested in this mmmal.
hnl_rop(,r installation of ahnninum foil may
result in a risk of electric shock or fire.
Cook meat and poultry thoroughly--meat to
at least an INTERNAL temperatur( of 160°F
and potduy to at least all INTERNAL
teml)erature ot 18(!°E Cooking to these
temperatures usually protects against
fk)o(Iborn( illn( ss.
• Before performing any service, DISCONNECT
THE OVEN POWER SUPPLY AT THE
HOUSEHOLD DISTRIBUTION PANEL BY
I_MOVING TIlE F[SE OR swrfcIIING
OFF TI IE CIR(I fI'I' BREAKER.
Do not leave chilth'en alone--childr( n should
not be left alone or unattended in all area
where an appliance is ill use. Th(y should
never be allowed to Kit or stand on any part
of tbe appliance.
Do not touch the heating elements or the
interior sin-face of the oven. These surlhces
may be hot enough to burn ev(n tllough tb(v
are clark in color. I)uring and alter use, do
not touch, or let clothing or other flammable
mat(rials contact, any intel_ior area of the
oven; allow sulticient lime t'_n-cooling first.
Potentially bot surfaces include the oven vent
openings and smlhces ileal- th( openings,
crevices around the oven do(n; file edges of
tbe door window and metal trim parts above
tile dool;
Remember: Tim inside surf,ice of the oven
may be hot wh(ll tb( door is open(d.
CAUTION: ITEMSOFINTEREST
TO CHILDREN SHOULD NOT BE STORED
IN CABINETS ABOVE AN OVEN--
CHILDREN CLIMBING ON THE OVEN TO
REACH ITEMS COULD BE SERIOUSLY
INJURED.
Never wear loose-fitting or hanging garments
wlfile using the appliance. Be earefill when
reaching tbr it(ms stored over tim oven.
Flammable material could be ignited it
brought ill contact with ovell beating
elements and may cause sew!re burns.
Use only th'y pot holders--moist or (lan_p
pot bolders on hot surtaces may result in
burns from steam. Do not let pot holders
touch hot heating (lements. I)o llOt use a
towel or other bulky cloth.
• Keep the oven vent unobstructed.
• Keep the oven free l¥om grease buildup.
• Stand away from the oven when openh N the
oven door. IIot air or steam which escapes can
cmls( burns to llands, lhce alld/or (yes.
After broiling, ah_ays take the broiler pan out
of the oven and clean it. I_(ffover grease in the
broiler pan (:all catch fire tb( next tim( you use
the pall.
• Large _ratdms or impacts to gl&ss doors can
lead to broken or shattered glass.
• Never leave jars or carL_of fat drippings in or
near your oven.
Page 6

SAFETY PRECAUTIONS
IMPORTANT SAFETY INSTRUCTIONS
• Children in walkers, or children crawling, can
be attracted to the rotmd oven door handle and
may _b mid open the oven door. This tan
resuh ill i_ljm? trom tile door being pulled
open on a child, or severe burns if the oven
is in use and hot.
• Do not hem unopened food coutainers.
Pressure could build up and tile container
could 1)urst, cruising all in juD'.
• Place tbe oven rack in the desired position
while the oven is cool. If racks must be handled
when hot, do not let pot holder contact tile
heating elements.
SEIJ '-CIJ 2ANING OVEN
• Do not dean the door gasket. The door gasket
is essenlial fin- a good seal. Care should be
taken not to rub, damage or move tile gasket.
• Do not use oven deaners. No commert ial oven
cleaner or (wen liner protective coating of any
kind should be used in or around ally part of
the o_en. Residue fiom ov(n cleaners will
damage the inside of the oven when the
self-clean cycle is used.
• Clean only parts listed in this Owner's Manual.
• Extending the rack to its fully open position is
a convenience in lifthN heavy foods. It is als.
a prc(aution against b/irllS t]-olll tou< hing
hot surlhces ot tile door or oven walls.
• When usitg cooking, or roasting, bags in the
oven, tollow tile mamlf_<turer's directions.
• Do not use your oven to dry new_papers.
If oveflleat(d, they can catch on fire.
• Do not use oven for a storage area. hems stored
in an oven call ignite.
• Do not leave paper products, cooking utensils
or food hi the oven when not in use.
• Do not allow anyone to climb, stand or hang
on the door. They could damage th_ oven or
cruise smere personal i11jury.
• Before self-deaning dm oven, remove tile
broiler pan, grid and other cookwarc.
• Be sure to wipe up excess spillage before
s'tarting the self_cleanillg operation.
• If the self-deaalh ,_ mode malfunctions, tu rn the
oven off and disconnect tile power suppl?: Ilaw
it smxiced b) a qualified technician.
• The oven racks may be deaned in the oven
durhag tim self-deaning cycle.
SAVE THESE INSTRUCTIONS
6
Page 7

Features of Your Wall Oven
Wall Ovell
ir_/brmation
A/_pea_zll_ce _tlc_ va_ 3. )
0
?
®
i
lu- n
c-sj _
i
Feature Index
Full Ext< nsion ()'_en Racks (3 in each _rven)
2 Broiler Pan mad G_id
3 Probe
4 Display
5 Probe Omlet
6 Halof{en Oven I if{hts
7 Oven Rack Supports (5 positio_Q
8 Convection Fan (op_'_at*'sdufftlg co_vectio_ cclohhg
9 Removable Oven Doo*
10 Oven Door Gasket
11 Bake Element (under the o.e*_ [loo_)
12 Broil Element
13 Automatic Oven Door I,ald/
14 Oven V_nt
Page
9, 10, 11, 14, 18, 19, 29, 30, 31, 32,
33. 34_ 43_ 45
14_ 19_ 42
14. 16. 17_ 20_ 26_ 44
8
16_ 20
45
101 29
11, 12, 13, 17, 18, 19,
20.22_ 23_ 31_ 34_ 35
44
46
42
14_ 18_ 42
271 28
5,9
Page 8
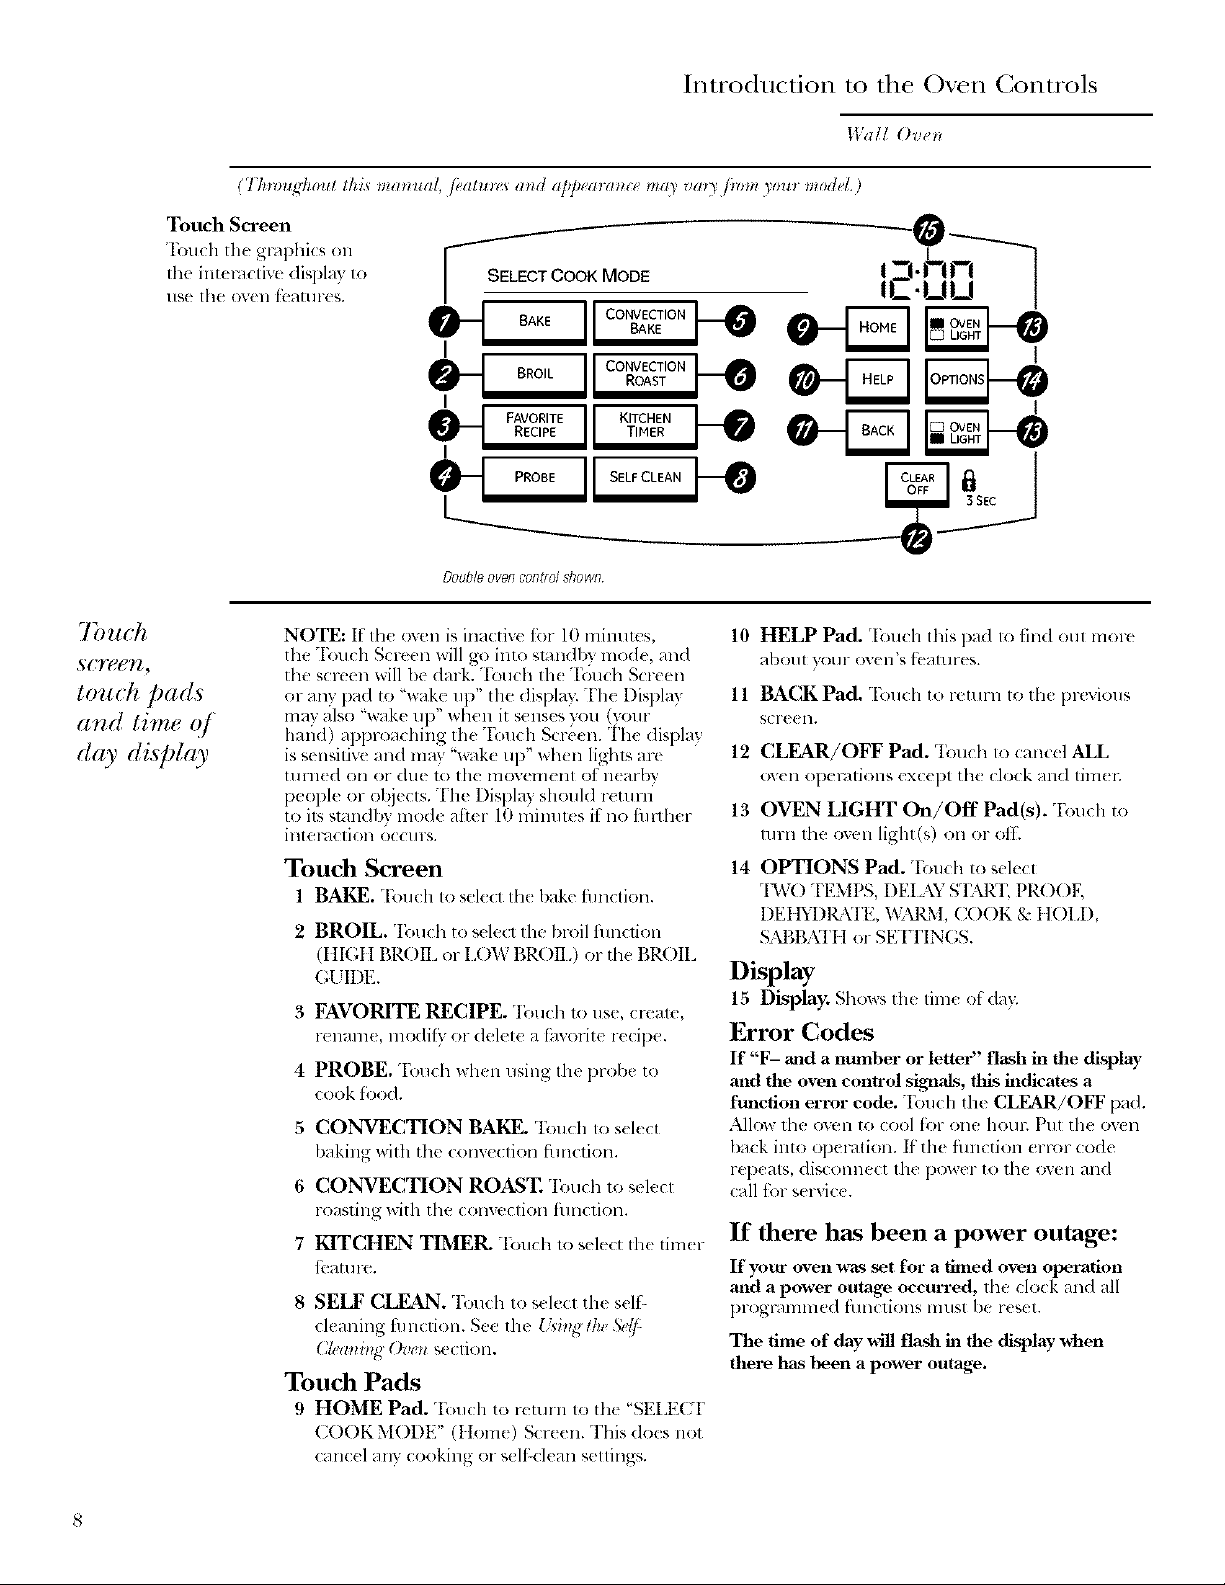
(77_roug]10ut this _larll.tl, /eatto_s arid a/_/_.tla_ce t_a) _a_) /}_._l 3oul _lodd.)
Touch Screen
'Ibuch the grq)hics O11
Ihe int(lxlclive display to
llSe [he OV(II l(_21tlll'es.
SELECTCOOKMODE
I
Doub]o ovofl control shown
Introduction to the Oxen Controls
IValI O l'etl
-0
i -j. nrt_-']
._.uu I
o iy2
s(:rgeyl,
to_t(h pads
a_d time ()/"
day display
NOTE: If tile own is inactive tor 10 mimltcs,
the "Ibuch Screen will go into slilndb} mode, and
the screen will 1)e dark. "Ibuch th( "Fou& Screen
or an} pad to "wake up" lhe displa> The Displ_l 7,
ran) also "wake Ul)" when it senses you ()'our
hand) approadling the "I'_)uch Screen. The display
is sensitiw and may %ake up" when light _,are
tllfll( d oil Of dlle 1o tile lnovenlent ot ll(al-bv
people or objects. The Display should r(tuni
to it?,smndbx lnod< after 10 mhlut_ s ii no tinlller
int(q_d£ tiOll O((H I'S.
Touch Screen
1 BAKE. T,,;_l(h Ic, sele,.t tll_ bake ihn(fion.
2 BROIL. Touch to sdecl the broil thnclion
(tIICIt BR()IL or II)W BROH,) or the BROIL
(;I IDE.
3 FAVORITE RECIPE. 'lbuch t<>use, create,
rename, nl_)di(v or delele a t_lvolite recil)e.
4 PROBE. Tou& when using the prolx to
cook l_i)od.
5 CONVECTION BAKE. Touch to sdect
baking with the convection fhnclion.
6 CONVECTION ROAST, 'Ibuch to select
roasting with the convectioll thnctiolL
7 KITCHEN TIMER. qbuch 1oselect the tim(r
fbaun>.
8 SELF CLEAN. %uch to s( lect the self-
cleaning t"11ncfion. See the {'d_g th_ 5)'t/-
(2tt>atlbg ()vel_ se( tion.
Touch Pads
9 HOME Pad. T_)uch to return to tile 'SELl{(7["
COOK MODE" (I Iotas) Screen. This do{s not
canc( 1any cooking or sdl:dean settings.
10
HELP Pad. 1buch this pad Io find oul more
a/)Ollt yotlr oven's t_'at!lres.
11
BACKPad.'ll)uch ,.)r_:urn oll( previous
S(71"eelL
12 CLEAR/OFF Pad. Touch to cancel ALL
OVCll opel_/tiOllS cXCCl)t th( clock and tiln_ 1;
13 OVEN LIGHT On/Off Pad(s). "Ibuch to
rum tht. o'_ell light(s) on or off.
14 OPTIONS Pad, "Ibu& to sele(t
"B,VO TEMPS, DEIAY S'I_.'I" PP.( )OF,
DFt tYDI_E'I:., WMZM, COOK g; tlOI.D,
SM),BATIt or SI_HTIN(;S.
Display
15 Display. Shoxss the lim_ of day.
Error Codes
If F- and a number or letter fla.sh in the display
and the oven control _g_aals, this indicates a
function error code. Touch the CLEAR/OFF l)_ld.
Allow the oven to cool f'or one hotn: Pill the oven
back into operation. It the flmction error (:ode
repeats, disconnect the power to the oven and
{:all tbr service.
If there has been a power outage:
If your oven B_ts set for a limed oven operation
mid a power outage occm'red, the clock and all
pl-Ogl_)lnllled t'IlllCliOllS lnllSt I)e [(set.
The time of day will flash in the display v&en
there has been a po, aer outage
8
Page 9
Baking Tips
[['(lii Ovet_
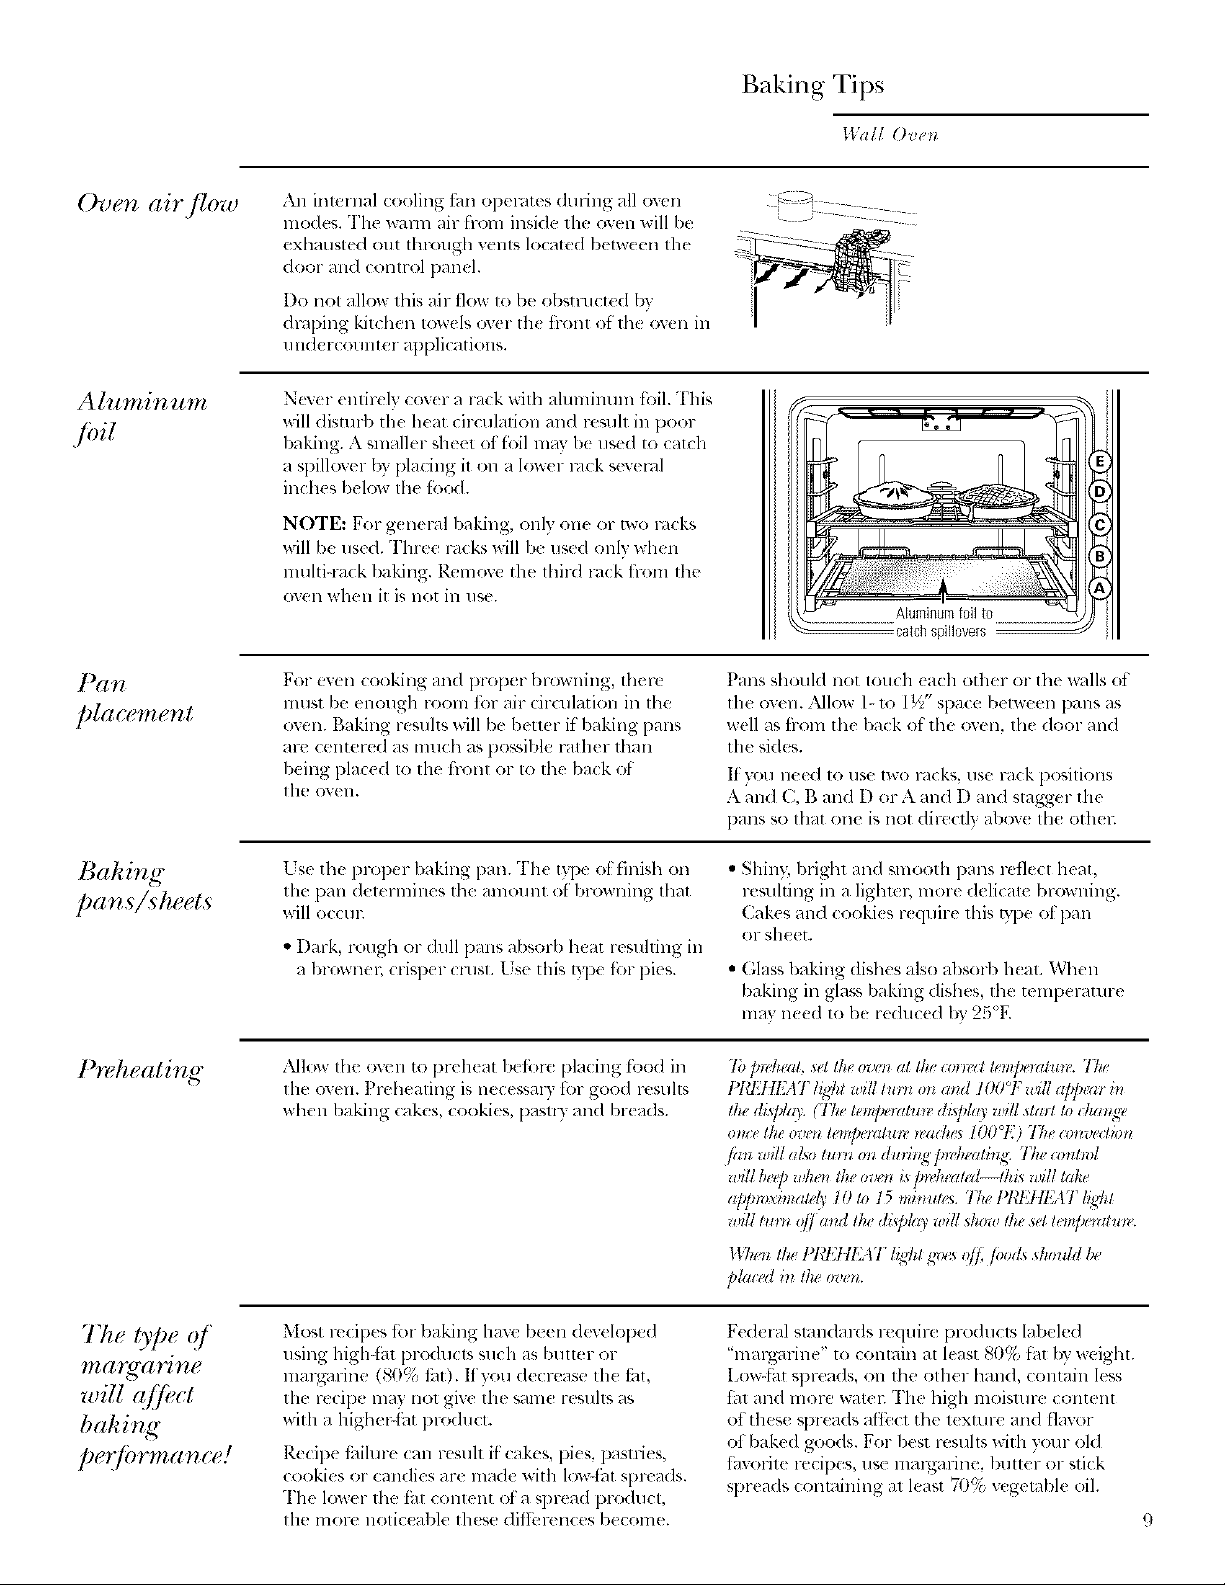
Oven airflow
An inlernal cooling thn operates duling all oven
lnodes. The wann air from inside the oven will be
exhausted out lhrough venb, located betw(en tile
door and control panel.
Do nol allow 1his air t]ox_ Io/)e (}bsnal(ted by
draping kitchen Iowels over th< fiont of lh{ o_,(:ll ill
11 lid( F( Olllltel applicatiollS.
Nmer entirely cov(r a rack with aluminum toil. This
will disturb tile heat circulation and re_,uh in poor
baking. A smaller sheet offMl ma 3 b( used to catch
a spillover bx placing it on a lower Fdck sevend
inches below the fbod.
NOTE: For g( nen,l baking, onh one or two rocks
will be used. Three racks will b( used only when
nmltiqa(k linking. P,cmca,e the fllird rack hom file
(Well whell it is llO[ in llSe.
For even cooking and proper browning, there
llltlst be enough room tot air drculation in lhe
oven. Baking resuhs will be better if'baking pans
are centered as nmch as po_,_ible rather than
being [)laced to lhe flxmt or to lhe back ot
lhe oven.
catch spill0vers
Palls should not touch (ach other or the walls ot
tile oven. Allow l- 1o 1½" space between lXmSas
well as tiom the back of' the oven, the door and
the sides.
If }'Oil lleed 1o rise two l_lcks, rise l-_l(k posilions
A and C, B and D or A and 1) and stagger the
pans so that on_ is not dire(fly al)ox( Ill{! othm:
Pre, heating"
Thetyped
llza _'_(I, IJ _?g¢
will affi+ct
baking
per fi.ma nce!
ks€ tl'l( prop( r baking pan. The type ol finish on
the pan d( teYlllilleS the alllOllll[ Of' I)l-Owllillg Ih_lt
win o((Hl;
• Dark, rough or dull pmls absorb heat resulting ill
a brox_nel; crisper crest. Lse this b'l x fi'_rpies.
dMI(}'W111(OV(II tO pr¢ h(at I)(fLre placing fbod in
the oven. Prehealing is n(cessal T R)r good Festlhs
_&hell baking cakes, cookies, pasll T and br( ads.
Most recipes tot baking have been developed
using higMbt products such as buuer or
lnar_arine (80% tilt). If you decrease th( ti_t,
the recipe may not giw: the same results as
with a highe_:t._t product.
Recipe [hilure can resuh if:cakes, pi(s, pastries,
cookies or candies are mad( with low4,1t spreads.
The lower the fat conlent ota spread product,
tile more noticeable these diflbrell(es become.
• Shin}; bright and ,,mooth pans reflect heat,
re',uhing in a liglm _; more delicate browning.
Cakes and cooki(s r(quire this tTpe ot pan
or sheet.
• Glass baking dishes also absorb h(s.L _Nhell
baking ill glass baking dishes, the teml)erature
may ne(d to be lxchl¢id by 25°F.
To ]m'keal, +e!the or<'. at lhe .. le+t ¢em/J++zlO_*l'.Tke
!_I8;tlE+IT lght will lurll 0_/a_ld IO0°F +l#lla]_]wa,_b+
the di@k(_'. U'ke tem[wratun dh/d(9' will sta*l Io ika*Ig_,
ira., the ov*'n let@emlu*_' _,alhes tOO°E) Tke I>_*vl'clbn
/atZ alg[ alSO tlg*'t_ 01_ dlz)'Jllg'[tl?,]l#al}tl<i gilg (onl*o[
wgl b_'ff)wtlet* the ov('t* i_p_vh_'alM lab will take
a/)/)_oximal@ t0 Io t 5 minulg_s. Ttw I_!{I:ttEAT blg]l*
wgl lurn off (rod lke dA/day will show the set lem[_emtml,.
117_e_*It. 17{l:111:,[1 hg]_lg_ s off, filods sh,/uh/be
p/al ed in tit; I*v_t*.
Fed(ral standards require producl_, labeled
"margmine" t_ contain al least 80% fht by weighl.
Low-tat spreads, oil the other hand, contain less
tht and more watel: The high moisture content
ot these spreads affect the texture and flavor
of baked goods. For best resuhs with your old
fhvorite recipes, use malgarine, huller or stick
spreads (onmining at least 70% vegetable oil.
• ) ) , , • • j
Page 10
Before You Begin
ll_dlOven
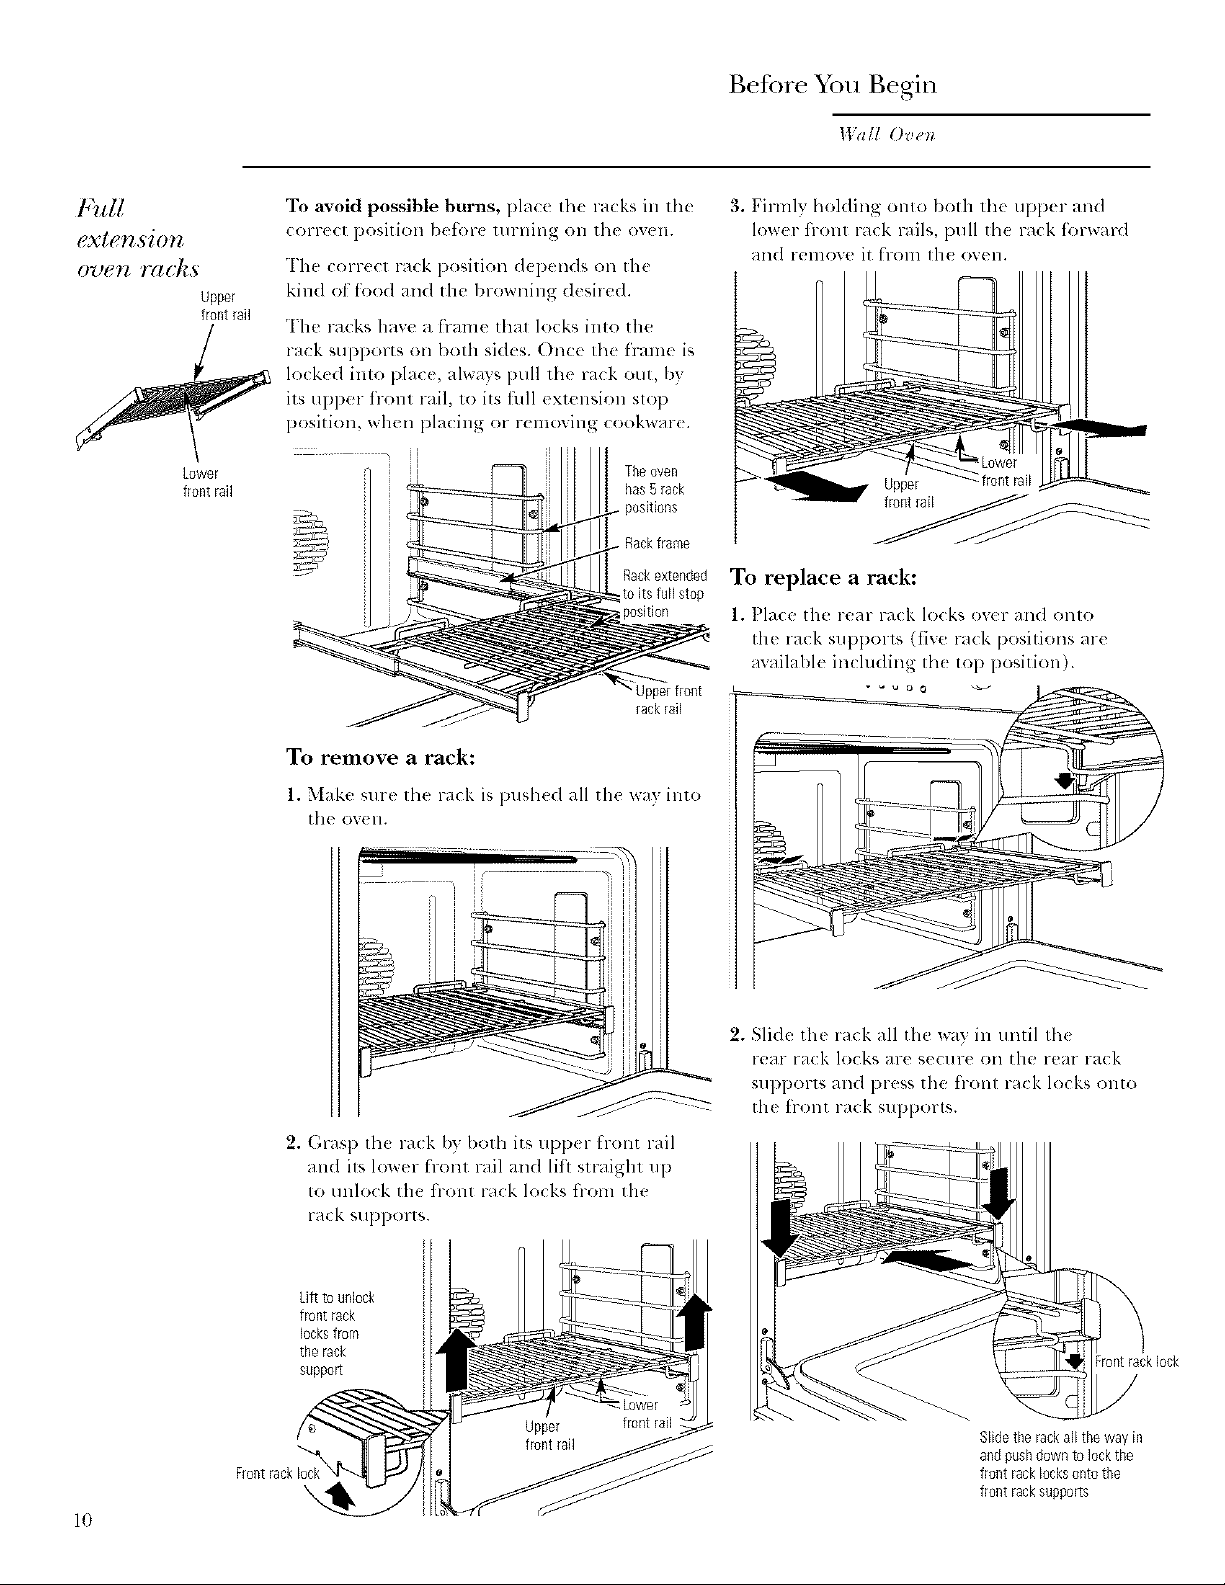
Full
extension
Upper
frontrail
Lower
frontrail
To avoid possible burns, place file racks in the
(orrect position/)et'or_ turning oll the oven.
The correct rack position depends on tile
kind ot tood and the browning desiTed.
The racks have a frame thai locks into tile
rack SUpl)orts on both sides. On(x th( l'ram{ is
locked inlo place, always pull Ill{? rack out, by
its ul)per front rail, 1o its full extension slop
position, when placing or r{ moxing cookwar_.
Theoven
has5 rack
positions
• Rackframe
Rackextended
toits full stop
Upperfront
rackrail
To renlove a rack:
3. Firmly holding OlltO both the upper and
lower flont rack rails, pull the rack tbrward
and relnove it from file oven.
To replace a rack:
1. Pla(e tile rear ra(k locks oxer and onto
the rack SUl)pOrl_ (live rack positions are
available inchlding lh( top position).
1. Makc sm'c the rack is push(d all the wa 5 into
the or{ 11.
2. Grasp the rack l)vboth its upper front rail
and ilk lower front rail and lilt straight up
to unlock the fiont rack locks from the
rack supports.
kifttounlock
front rack
locksfrom
the rack
suppo_
2. Slide the rack all the way in until th(
rear rack lo(ks are secure oil tile rear rack
supporb, and press the h-ont rack locks onto
the ti'ont rack supports.
Frontrack 10ck
Slidethe rackall thewayin
andpushdown to lockthe
front racklocksonto the
\
10
front racksupports
Page 11
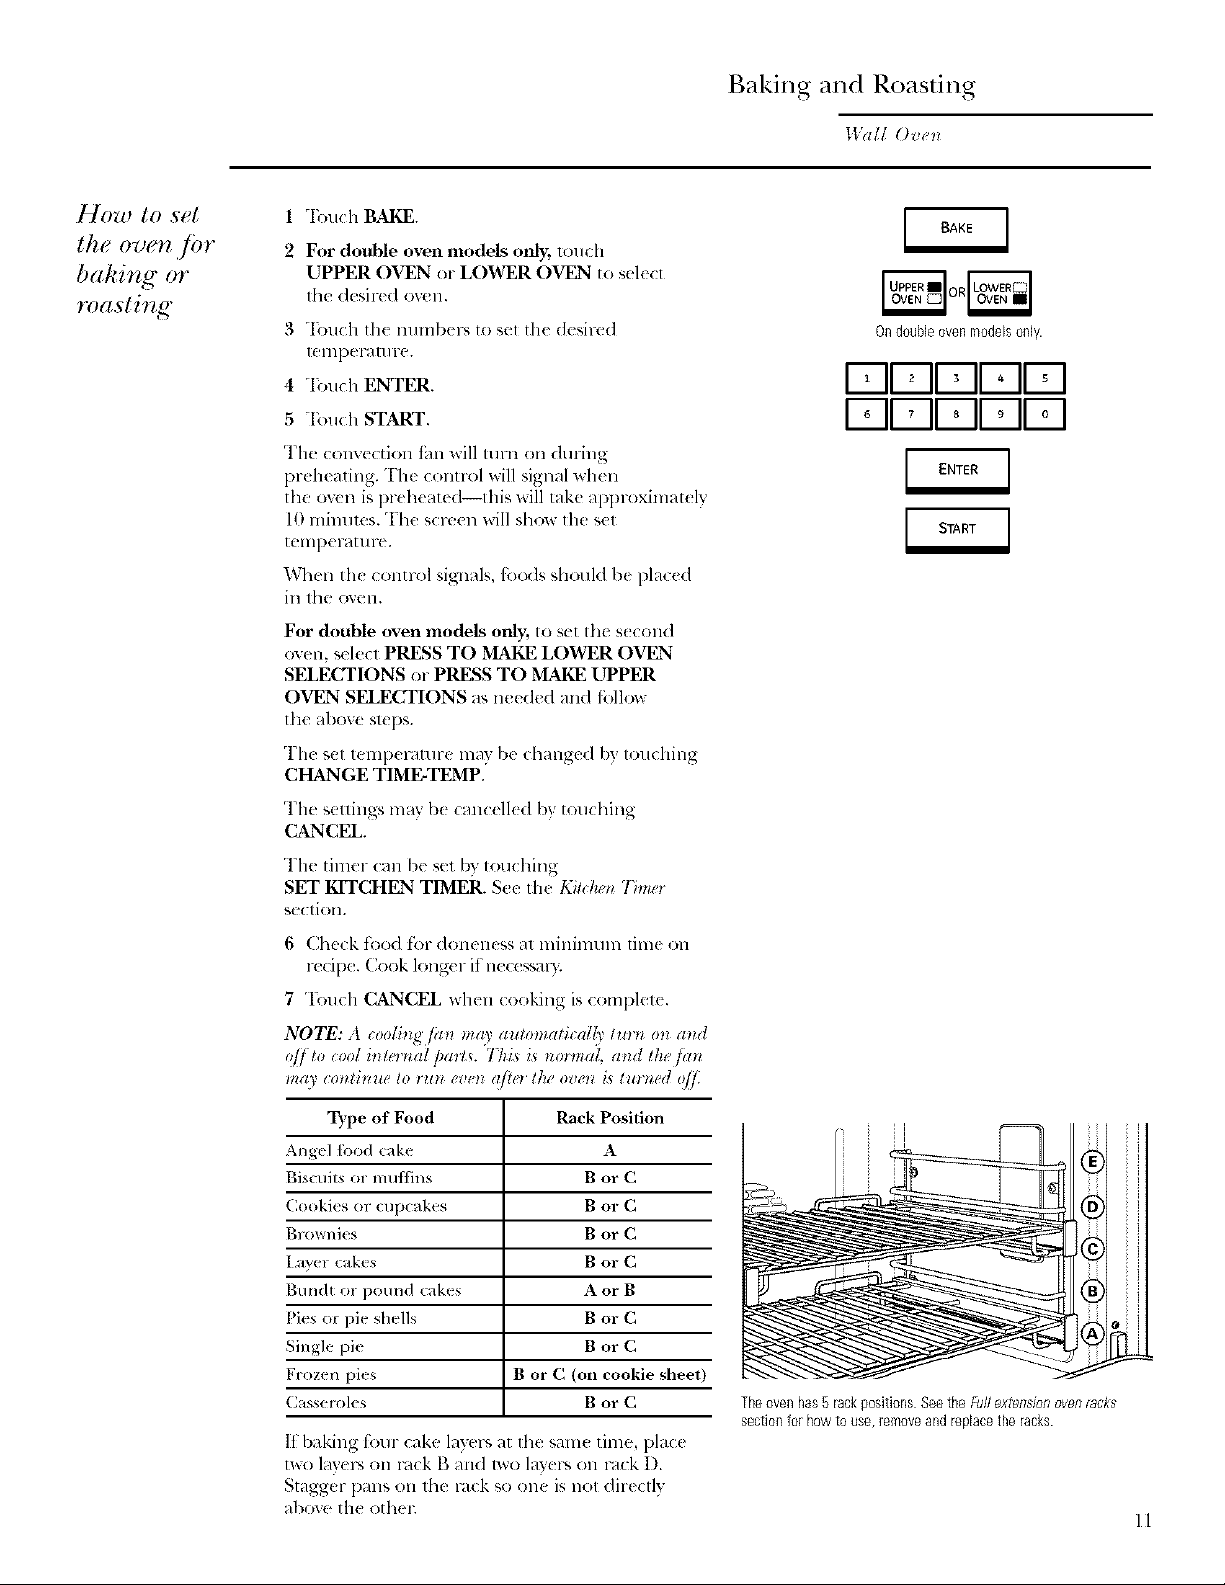
Baking and Roasting
Wail Ovet/
How to set
the oven jbr
bakingor
ro(zsting"
1 "Ibuch BAKE.
2 For double oven models only, 1(inch
UPPER OVEN or LOWER OVEN to select
the desir(d ov(n.
3 "[buch the numbep_ to sel tile desired
[el]ll)el_/llll-e.
4 "IbuchENTER
5 Tou(h START.
The convection fhn will mm on during
preheating. The control will signal when
the ow'n is preheated--this will take approximately
l0 minules. The screen will show Ihe set
tellll)eF_:it lille.
When the control signals, R)(×ls should b( plac(d
ill the o'_en.
For double oven models only; to set the s(cond
oven, select PRESS TO MAKE LOWER OVEN
SELECTIONS or PRESS TO MAKE UPPER
OVEN SELECTIONS as needed and %llow
the above stops.
The set temp(mmre may be (hmlgvd b} tou(hing
CHANGE TIME-TEMP.
On doubleovenmodelsonly.
I-ql-ql-ql oII I
I-ql-qU-II oIIoI
The sellings may b( cmlc(ll( d by tou(hing
CANCEL.
The timer can b( set by touching
SET KITCHEN TIMER. See th( Kii(:k_m7_lm'r
se( tiOll.
6 Check toed tbr doneness at minimum time on
recipe. Cook long('r if nece_sal3.
7 'I_)uch CANCEL when cooking is complet(.
NOTE: A coolkzg /an ma)' automatical{t' lm'x ml and
q// to cool in&,'rnaI pml_. 7hLs is no_vnag and theJan
lag0 i:ontbzue to ru_l eve_lalto the oven is turned off.
Type of Food Rack Position
Angel h)od cake A
Bis(afits or muffins B or C
Cookies or (up(akes B or C
Brownies B or C
I,aym (akes B or C
Bundt or pound cakes A or B
Pies o* pie shells B or C
Single pie B or C
Frozen pies B or C (on cookie sheet)
Casserol(s B or C
1t baking fern cake layers at tile sam( time, place
IXXO I_IV(17_ O11 l'_lck g alld 1we la}els Oll Fa(k I).
Stagger pmls on lh( Fackso one isllOl dir(ctlv
above tile ethel
Theovenhas5 rackpositions SeetheFullextension ovenracks
sectionfol how to use,removeandreplacethe racks.
ll
Page 12

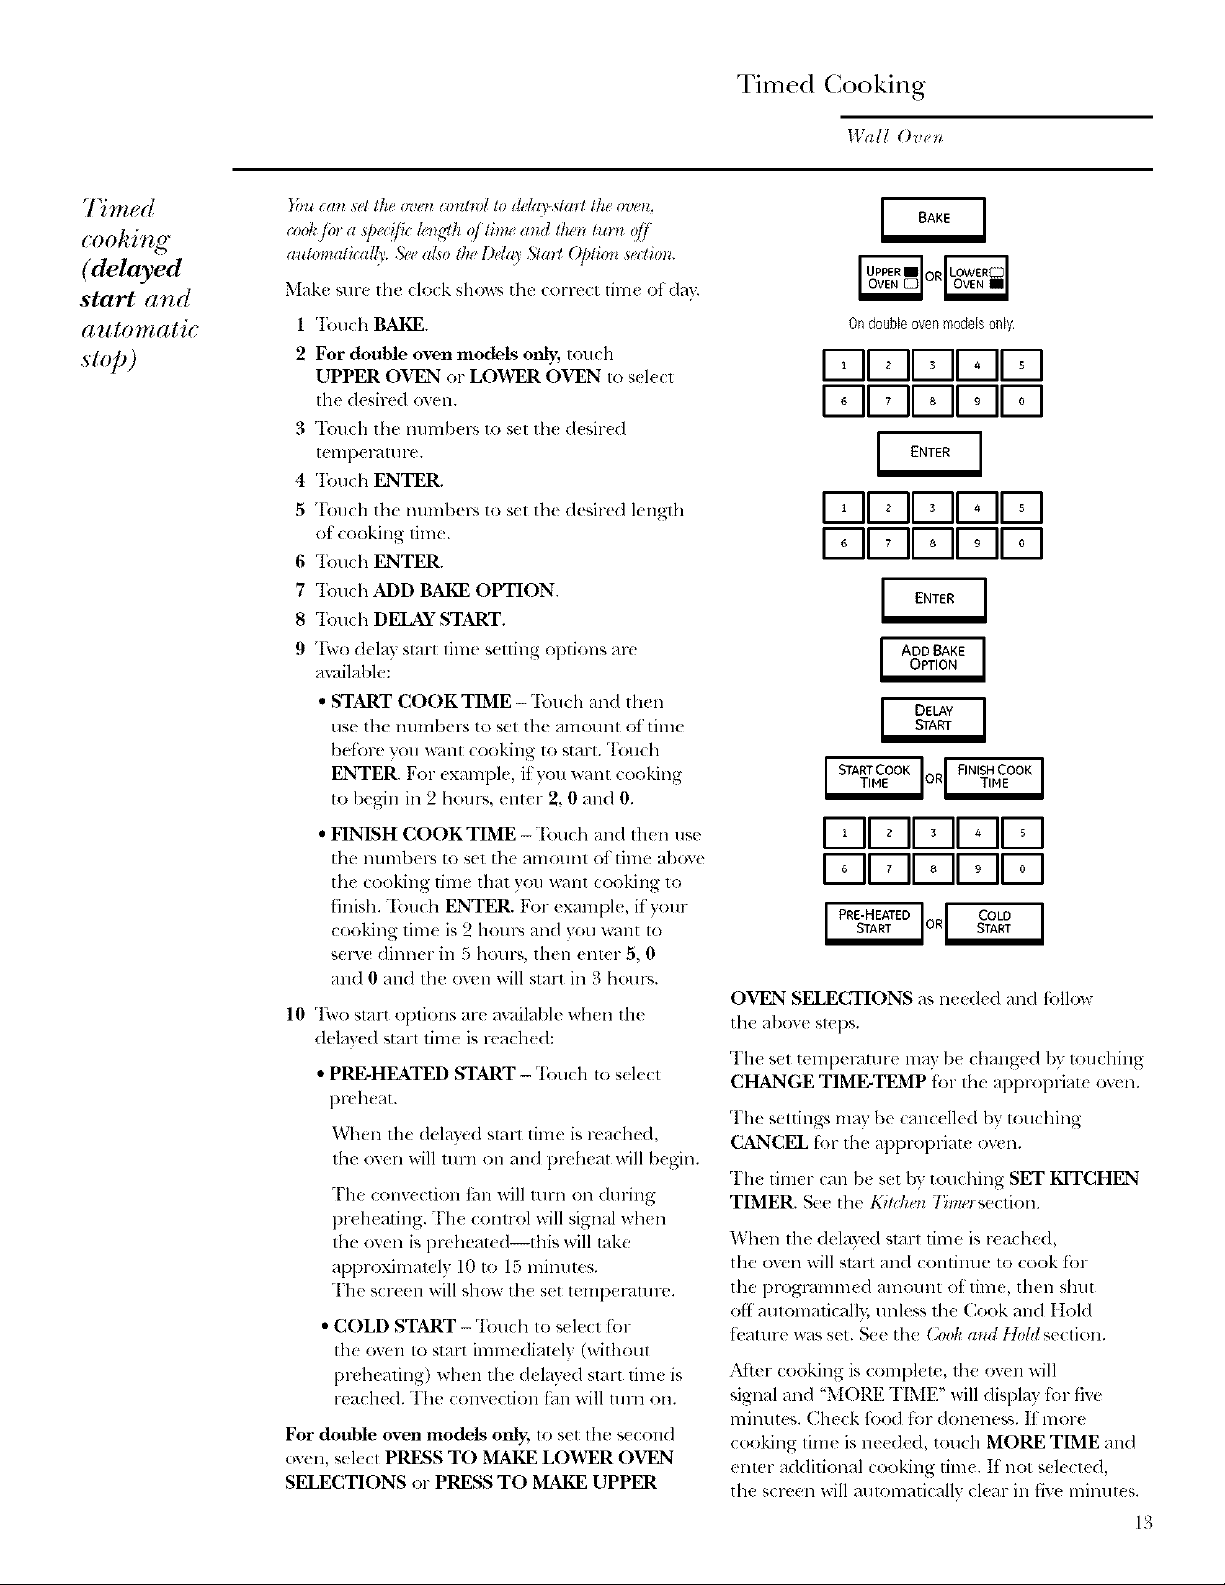
Timed Cooking
Wall Ovell
Timed
cooking
(immediate
start and
automatic
stop)
OIl doubk ov(_ models, )ou cm* use timed bakiltg i_
intt tlve_ wkite usiltg sd/_lhat_ ill tke olko;" Vm lall
a[w u,selimed bahi_< in bolh ove_ts at [he satire [1_/_'.
NOTE: Foods lkat spoil ea_il3_such as mi/k, e,_g:%
fi*k, stuffh*ff_, p0u/h 3'and/)o_1_ _koldd _zotbe
agowM to sil fin mow lhml l kou_ Im/ln_!o_ qfle*
coo]:i_tg:[{O0_tl le_@el allo_ _ p_o_zolgv l/re g'l_RIl]l o/
hmwqUI bacto'ia.
77zeove, i will tul t* o,* immedial@ arm i:ooh /or a
setect_d let*gilt, o_ tinu. ,1t the eltd o/t/te Iooki*zg lilac,
tlw ov(?t will lul_ o/] aulomaticaII).
Make SlIFethe clock shows ll_( correct tillle
of day.
1 "Ibuch BAKE.
2 For double oven models only, touch UPPER
OVEN or LOWER OVEN to s(lect the
desired oven.
3 Touch the mlmber_ to set the desired
teml)erature.
4 Touch ENTER.
5 "['tmch the mlmber_ to set the desired length
of cooking time.
6 "I)mch ENTER.
7 "I\vo immediate start and atnomatic stop
cooking options are available:
• PRE-HEATED START - Touch to preheat
the ove II.
The convection thn will mrn on during
preheating. The control will signal when
the oven is preheat(d--this will take
approximately 10 mimltes. The screen
will show the set temperature.
Wh(n the control signals, place food in
th( ov( 11.
"['he timed cook will not start until the oven
is preh(at_d and START is touched.
• COLD START - Touch to start the
oven immediatel) and cook tood without
preheating. The convection lira will tt/rll
on. Th( cook time will start immediatel}.
The ov(n will start and continue to cook fin-
the programmed amount of time, then shut
off automatically, unless the Cook and Itold
teature was s(t. See the Cooh aim Hold ()/Jtion
section.
On double oven models only.
I-qlq-II IIoII, I
Fqr=-Ii ii9iioI
1-711-711II°II I
r-qF-II II IIoI
For double oven models onl); to s(t the s(cond
oven, sele_ t PRESS TO MAKE LOWER OVEN
SELECTIONS or PRESS TO MAKE UPPER
OVEN SELECTIONS as needed and lbllow
the above steps.
The set t(nll_ raltn'e lIl_]y/)( ,.:l'lang((I by
touching CHANGE TIME-TEMP fi'n-the
al_l_ropriat( ox(n.
The s(llings nlay be canc¢ ll( d by touching
CANCEL for the appropriate ov(n.
"l'h( timer can /)( s_t /)y touching SET
KITCHEN TIMER. Se( the Kilch_l 77tmr
S( (TtiOll.
Mter cooking is c,.m_plete, th_ oven will signal
and "MORE TIME" will displa} for five minutes.
Che(k tbod fin- doneness. If" more (ooking time
is needed, touch MORE TIME _uld enter
additional cooking time. If not selected, the
screen will automatically dear in five lninut(s.
12
Page 13
Timed Cooking
Wall ()ve*_
77reed
cooking
(delayed
start and
automatic
tol,)
}_lucalt sg'tthe (_'t rl t:otzDolto (h k(]>slaH lhg_ove_z,
auiomaiica[(t. ,%<aZw Uw l)da 3 5;1a/70/dios_ s_cU0lt.
Mak( Sill'{} the clock shows the corlec[ time of day.
1 'Ibuch BAKE.
9 For double oven models only., touch
UPPER OVF2_ or LOANER OVEN to sd(ct
tile desired oven.
3 'Ikmch the num/x ps to set th( d(sir(d
[ellllJel_l[/i l-e.
4 'Ibuch ENTER.
5 Touch tb{ numbei-s to set the desired kngth
ot cooking time.
6 Touch ENTER.
7 Touch ADD BAKE OPTION.
8 Touch DELAY START.
9 "I\vo delay start lime seuing options are
available:
• START COOK T1ME -Touch and then
use tile lllllnbelS to set tile alllOl/llt ot time
befLre you _:lnt cooking to _tart. "Ibuch
ENTER. For example, ityou want cooking
tO [)eR-iIl ill 9 hollr%, ellter 2, 0 and 0.
• FINISH COOK TIME -Touch and then ll_,e
the llllmbers to set tile alllO!/llt of tiille above
the cooking time that you want cooking to
finish. Touch ENTER. For example, it your
cooking time is 2 houps and you want to
seswe dinner in 5 hour_, then enter 5, 0
and 0 and the oven will start in 3 houra.
10 Two start options are availabl( wh(n the
delav{d starl lim( is rea(h( d:
• PRE-HEATED START - Touch to s(lecl
pr(heat.
When the (lelayed st:-Ill tim( is reach((I,
th{ oxen x_ill ltlYll Oll ;inl:l l}l'C h(at will b(gin.
The conv(ction thn x_ill turn on dining
preheating. The (ontrol will signal wh(n
the o',c'n is preheat_ (I--this will take
approximately 10 to 15 lllilllltCS.
The screen will show the set lt:llll)el'dlll 1>.
• COLD START - Touch to select {hi-
the oven to start immediatel} (without
pivheating) wh(n the delav(d start time is
reached. The convection thn will turn on.
For double oven models only, to set the s(cond
oVeil, sele( I PRESS TO MAKE LOWER OVEN
SELECTIONS or PRESS TO MAKE UPPER
Ondoubleovenmodelsonly.
I-ql-711-711oII I
I-ql-711-mlloIIoI
FII-qFII oII I
I-q -11-711oIIoI
I-qF-IFII oII I
F-]F-]FTIIoIIoI
OVEN SELECTIONS as n{ ed(d and tollow
tile above Slel)s.
The sel temp(mture may b{ changed by louching
CHANGE TIME-TEMP l'Ol ill{: apl)ropriate ov{n.
The _,etting:, may b( canc(lled/)y touching
CANCEL i))r th_ al)l)rOl)l-iate ovell.
"I'h( timer can b( set by tou(hing SET KITCHEN
TIMER. See th( Ki durl 77reel se(llOn
When the delayed start time is reached,
the oven will start and contimle to cook lot
the programmed amount of time, then shut
off' aulomaticall); unless the Cook and IIold
tk_ature was set. See the (k)oh and [Iold section.
:M'ter cooking is complete, the oven will
signal and "MOI_.E TIME" will displa? for five
minutes. Check ti')(xl f_w doneness. 1t more
cooking time is needed, touch MORE TIME and
enter additional cooking time. If not selected,
tile screen will automati(allv clear in five minutes.
13
Page 14
groilin g
Wall Ove_
_()7lJ {o se[
the oven
,/br broiling
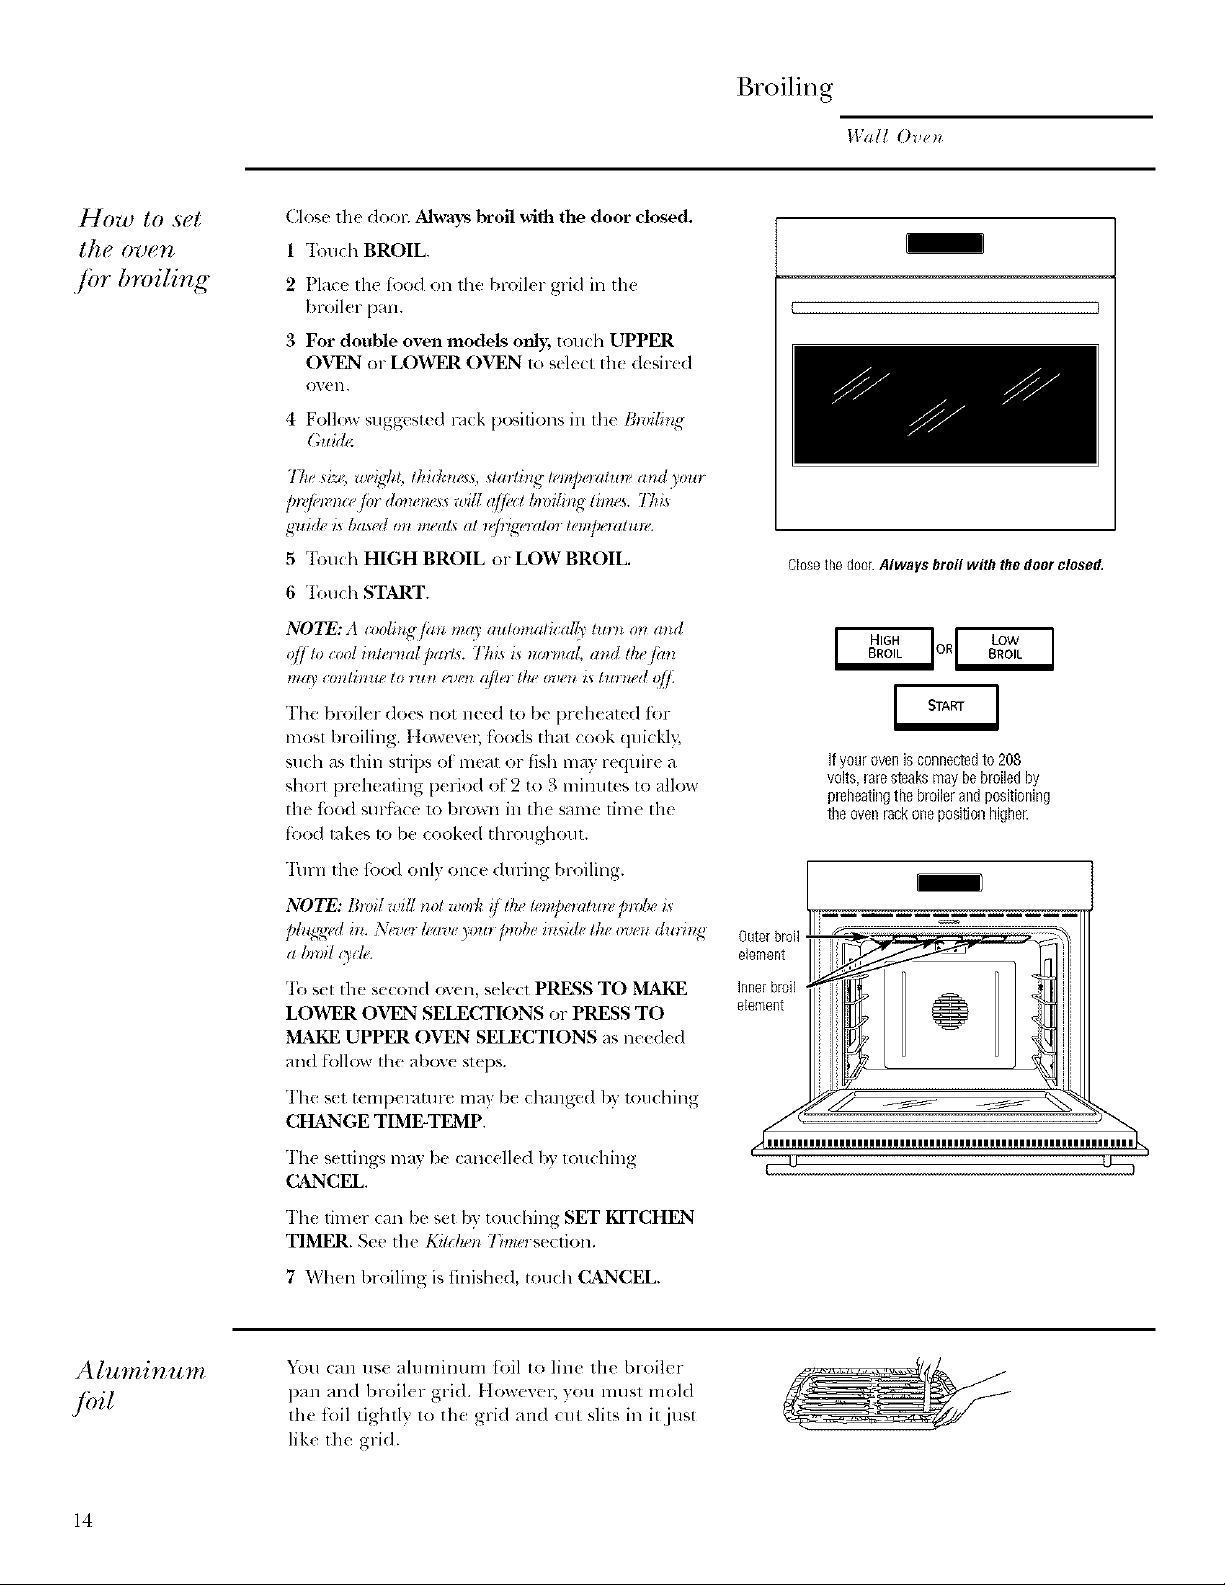
Close lhe d()(n_ Always broil with tbe door closed.
1 Touch BROIL.
2 Pla(c the lood on tile broiler grid ill the
broiler pan.
3 For double oven models only, touch UPPER
OVEN or LOWER OVEN it) select th( desirt d
ovell.
4 Follow suggested rock p(_ifions in th( lhvil;_lg
(htid_
The si_,. web,hi, lhidmess, startling h, npoz_lmv and yom
guide i_ ba_ed on tneaL_at _@4g_,lzilmte,@nzilu_e.
5 Touch HIGH BROIL or LOW BROIL.
6 "I'r_uch START.
NOTE: A ioolh_g Jan ma'; aulomalicalll' Inrn on and
o/] lo cool inlernal parl._. This is normal, and lhe finl
mat' cmlli_lue lo run _o_ afl_'_l/ : oven is [m'_wd qff.
The broiler does not need to be preheated ti:w
most broiling. Itow(wq; leeds that (ook quickl};
such as thin snips of meat or fish may require a
short prtqmating p(riod of 2 to 3 minutes to allow
the fbo(I surlhce 1o brown in th( same time the
ti-_odlakes lo be cooked throughout.
[ }
Closethe door Always broil with the door closed,
Ifyourovenisconnectedto208
volts,raresteaksmaybebroiledby
p_eheatingthebroilerandpositioning
theovenrackonepositionhighe[.
"Ihrn tile fbo(l only once du ring broiling.
NOTE: Broil wd/ nol w.lh _/thelemp¢,l,illm,pmbe is
pl,g_*,d h_.Never/,,ave3ompwbe h_@h,lheoven durh/g
a broil uih.
'Ih set tile second oven, select PRESS TO MAKE
LOWER OVEN SELECTIONS or PRESS TO
MAKE UPPER OVEN SELECTIONS as need(d
an(I tbllow file above steps.
The s(t tempm'4mre ma} b( changed by touching
CHANGE TIME-TEMP.
The seuings may be cancelled by touching
CANCEL.
The timer can be set by touching SET KITCHEN
TIMER. See tile K#lken Tbm,Ise(tion.
7 When Ixoiling is finished, touch CANCEL.
'_i)u can us( ahnninum foil to line the broiler
pan and broiler grid. ttowevel; you must mold
the foil tightly to the grid and cut slits in it just
like the grid.
14
Page 15
Broiling
IVaI/ O/,_ t/
Broilinff
g'uide
tim_x. This ,_ti(h"
£s based o_l mral_
lt!??l/)Pl(_llY_%
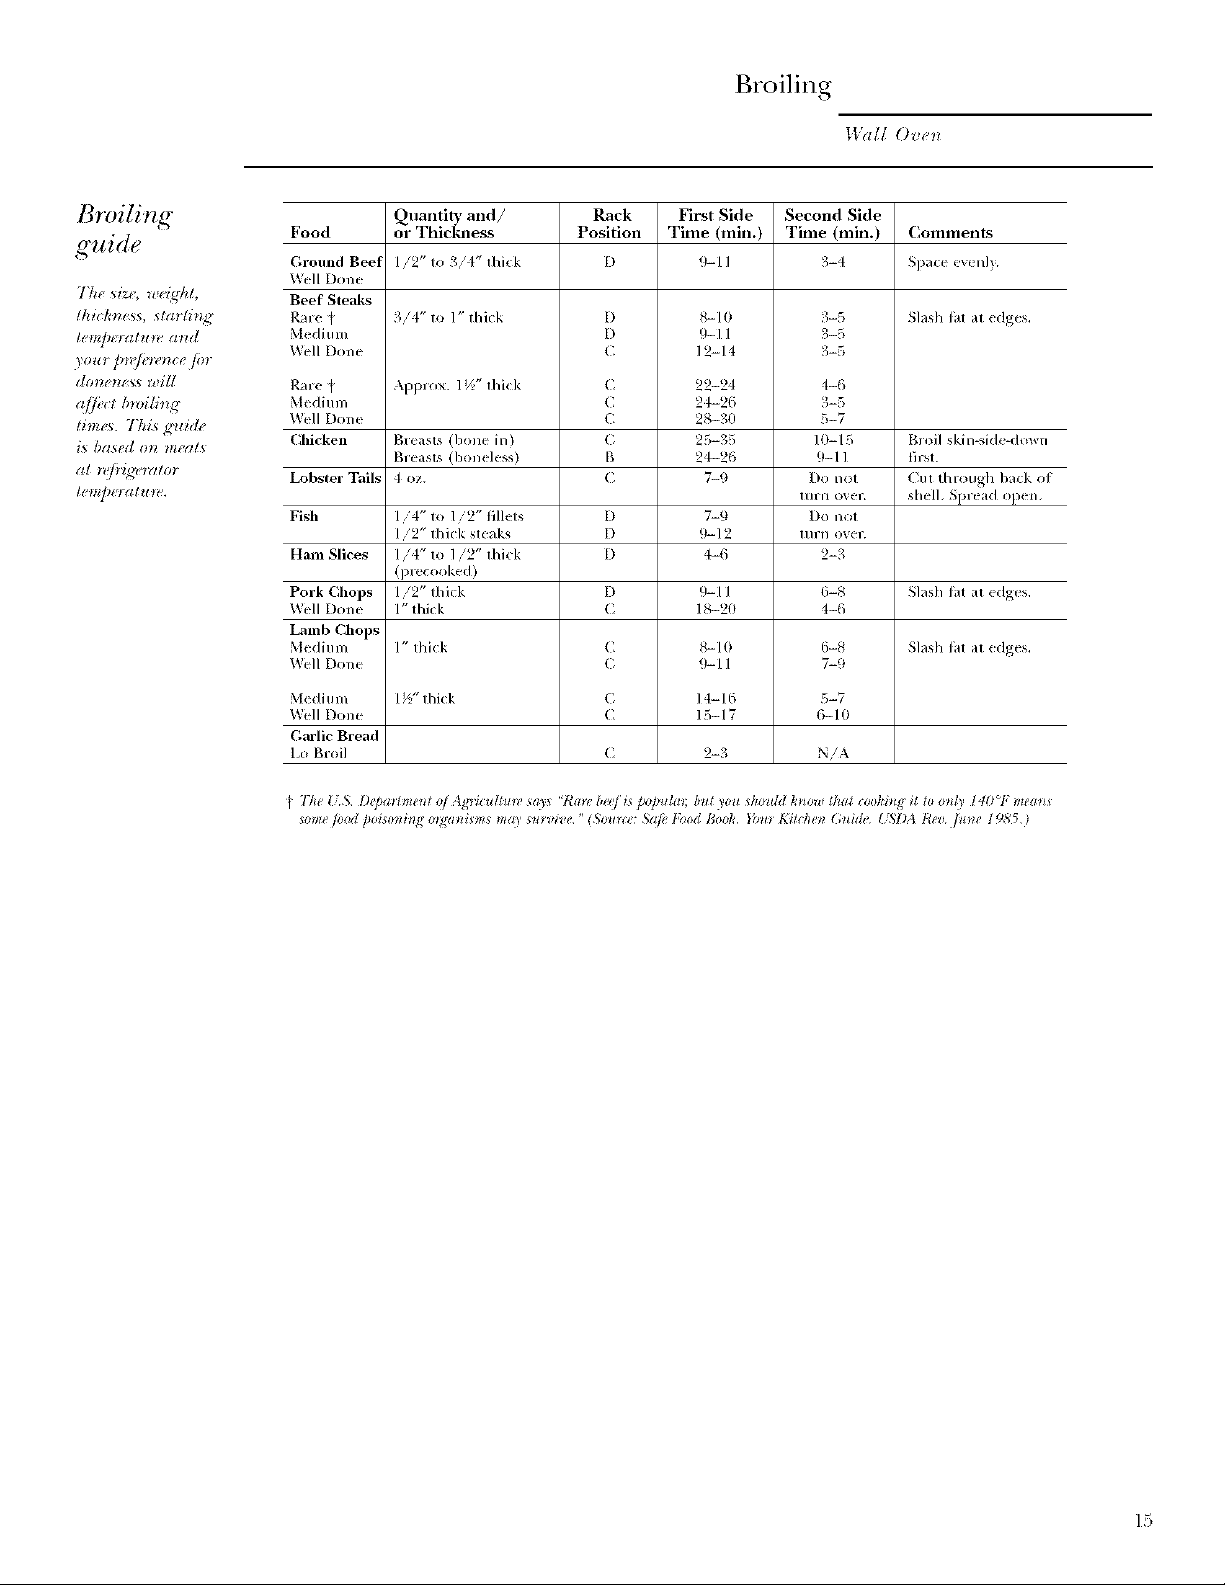
Food or ThicMaess Position Time (min.) Time (nfin.) Comments
Groimd Beet //2" to 3/4"thick D 9-11 3-4 Si)ace<v_nl ).
Wall I)on_
Beef Steaks
Rare _ 3/4" to 1" thick D 8-/0 :;-5 Slash lat at edges,
M< dimn D 9-1 I 3-5
Well l)one ( 12-14 3-5
Rare _ Applox. 1 ½" )hk;k C 22-24 4-6
Medium ( 2t-26 3-5
Well I)one f 28-30 5-7
Chicken B/easts (hone in ) C 25-35 ] 0-/5 BIoil skin-side down
Lobster Tails 4 oz, ( 7-9 Do not fill through hack ot
Fish //4" to 1/2" filkts D 7-9 Do I/<)t
Ham Slices //4" to ]/2" thick D 4-6 2-3
Pork Chops //2" thick D 9-11 6-S Slash lat at edges,
Well I)one /" thick ( 18-20 4-6
Lamb Chops
Medium /" thick C _-/(} 6-8 Slash lat at edges,
Well Done ( 9-11 7-9
M<dil_ m 1½" thick C lt-16 5-7
Well Done C 15-/7 6-10
Garlic Bread
1,o gloil C 2-3 N/A
Quantiiy and/ Rack First Side Second Side
gl easts (honeless) B 24-26 9-11 th'st.
tnr,/ (>_el", she/h Splead op<n+
/ /2" thick steaks D 9-12 ltn'l/ OVel
(plecooked)
771eU,S D@allmeld of....A_7_zultu_e ¢ars 'Ral_ ber[i¢ flJo_ulal but ?ou sho_dd hno_t thai toohb_, it to onll, 14 )°F mea*l_
_ome/ood poisoni_g o_ani_ms m_, s_l_,_,_ "(S<mroe:Sqfi_I;bod Bool_, }_1o¸Ki_(hen (;_ide _!_DA Rev _une 1985 i
15
Page 16
Using tile Probe tot Roasting
Walt Oven
7 mqmrature
probe
For man) toods, (Sl)(ciall) roasts and poultry,
interned food temper_mne is tile best test fin_
don( lleSS. The temperature Drobe takes the
guesswork out of roasting by cooking toods to
the exacl aloneness you want.
Lse ot prob(s other than tile one provided
with this l)rodu¢l lll_l}' r(suh in danmge to th(
probe.
1 se the bandies ot the probe and 1)lug when
ins( rting and l-emoving them [l-Ore Ihe nleat
alld o_,ell Olltl(l.
• To avoid danmging 1be probe, do not use
tongs Io pull on the cable when relnoving it.
• To avoid breaking the l)robe, make sure f'ood
is (omph'tely defrosled b(fore inserling.
• "1"0 prevent possible burns, do not unphlg
the l)rob( fiom th( outlet untillh( oven
has cooled.
• Nev(r leave the probe inside the oven
during a broil .r self-rleaning (y(le.
• [)(7) Hot store Ill( [)ro/)e ix] Ill( ()',ell.
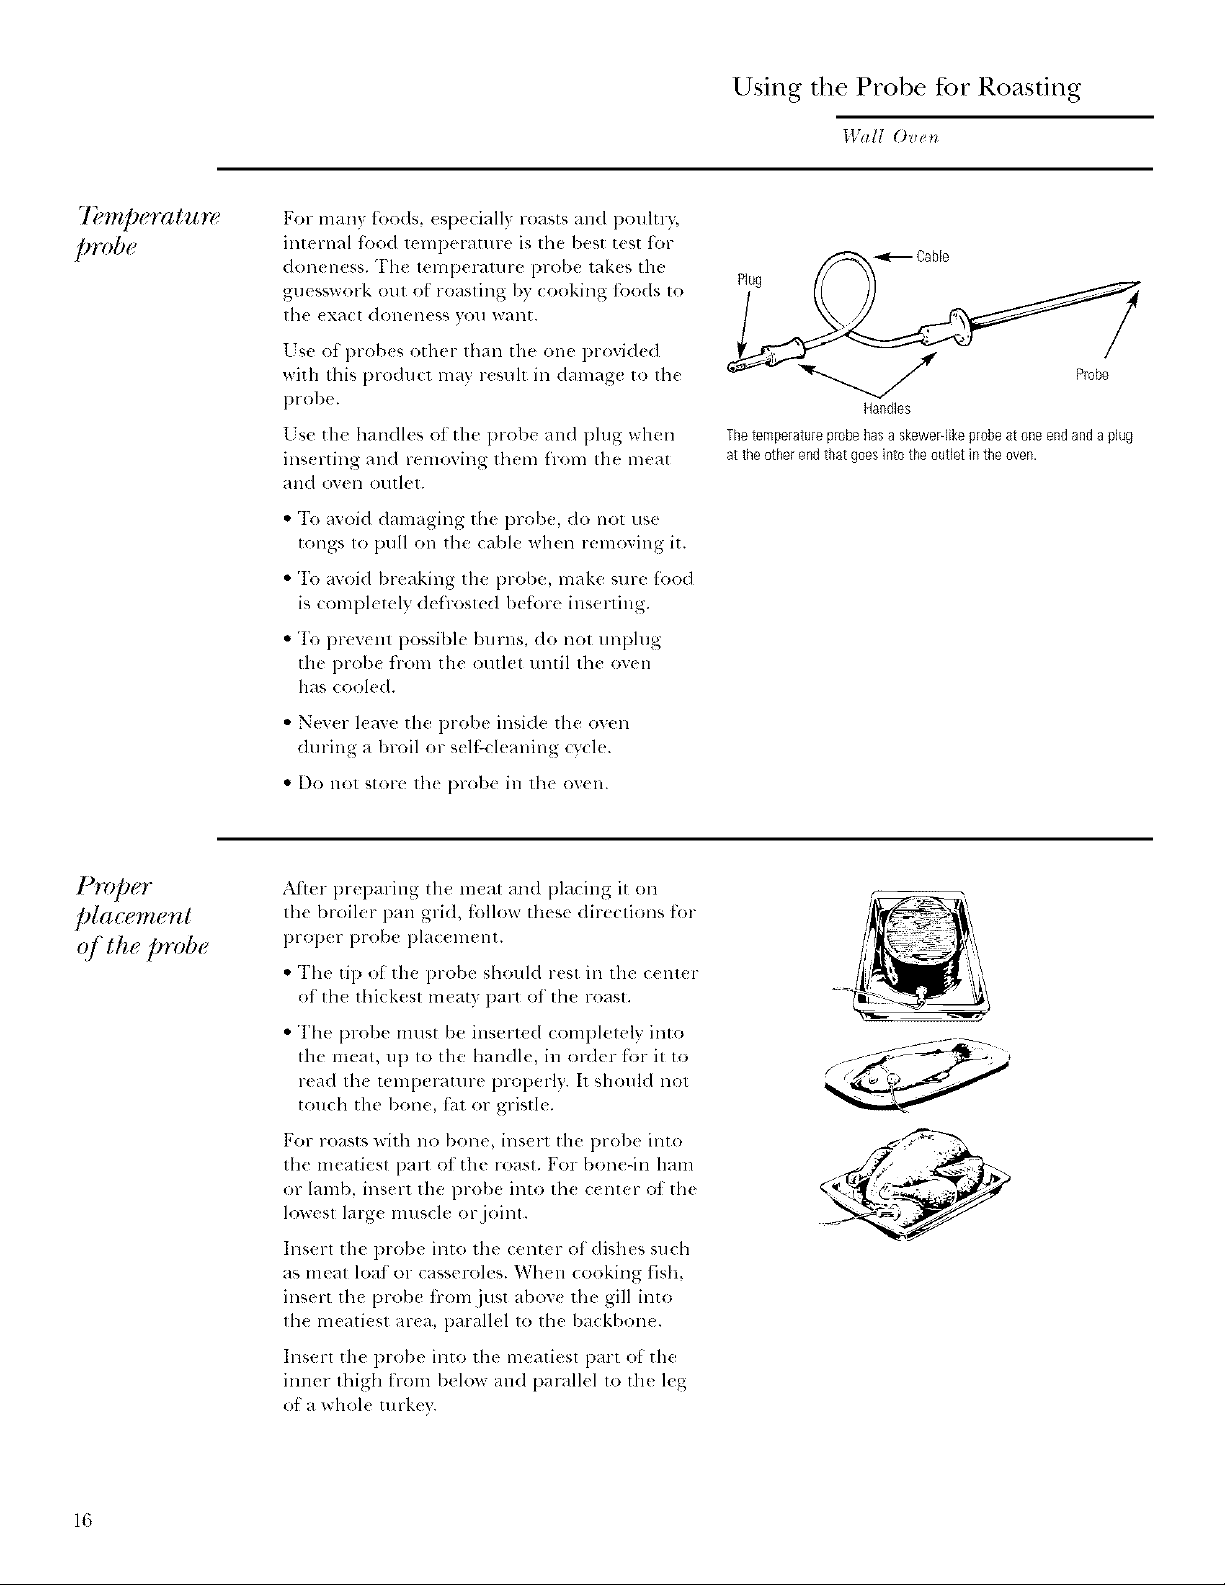
Cable
Plug
Handles
Thetemperatureprobehasa skewergikeprobeat oneendanda plug
at the otherend that goesintothe outlet in the oven.
placement
q/ the p vbe
Af'ter pr( paring the llle_ll and placing it on
th( broiler pan grid, _blkm th(s( dire(lions for
proper l)rob( l)l_lc(lllellt.
•Th¢ tip oYth( prob( should r¢st in tile c(nt(r
of tll( thkkest meaty part of tll_ roast.
• The probe must be inserted completel) into
the meat, u l) to tile handle, in order for it to
read th( tenlperature properl). It should not
touch tile bone, fat or gristle.
For roasts with no bone, insert tile probe into
the meatiest part ot tile roast. For bon(-in llam
or lamb, insert the probe into th( center ot the
lowest large muscle or joint.
Insert tile probe into tile center of dishes such
as meat loaf or casseroles. Wh(n (ooking fish,
insert the probe from just abov( the gill into
lbe meatiest area, parallel to the backbone.
Insert the probe into lb( meatiest part o[ tile
inner thigh Irolll b(low and parall(1 to the l{g
of a whol¢ turko,'.
16
Page 17
Using the Probe %r Roasting
Wail Ovet_
HOW to set
theovenbr
roasting"
when using"
the probe
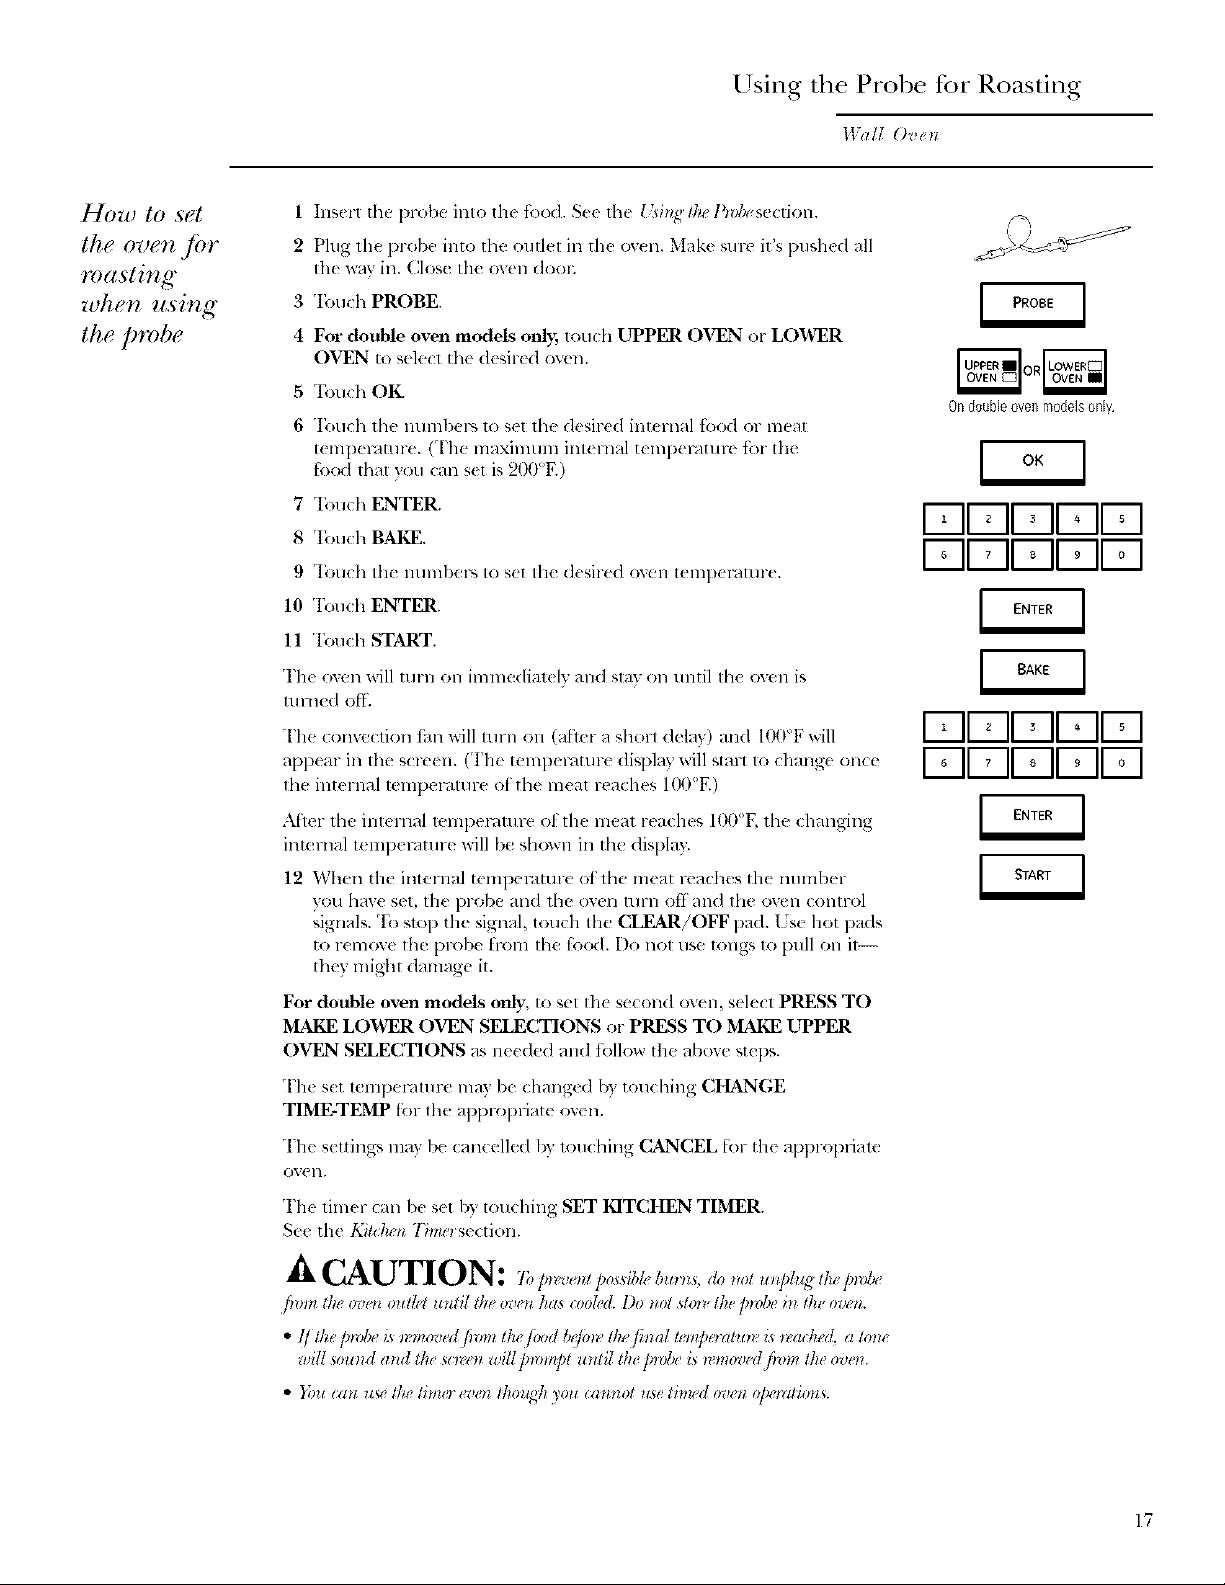
1 Insert the probe into tile tb_xl. See the Usi//g tk.,_/'w/wsecfion.
2 Plug tlle probe into tile omlet in the oven. Make sin> it's pushed all
the way in. Close tile oxen dooL
3 'Ibuch PROBE.
4 For double oven models only; touda UPPER OVEN or LOCATER
OVEN to select the desired oven.
5 "E:mch OK.
6 Touch the nundyers 1o set the desired intenml ti_(M or meat
temperature. (The maximum internal temperature tot the
food that you (:all set is 200°E)
7 Touch ENTER.
8 'Ibuch BAKE.
9 Touch tile numbers to s(t the (k sired oven tenlp(F, itln-e.
10 Tolleh ENTER.
11 rlbUdl START.
The o_en will turn on immediat(ly and slay on until tile oven is
mln{d off.
The convection tbn will turn Oll (aher a short delay) and 100"F will
appeal- ill the screen. (I'he temperature display will start to chang( once
file internal temperature ofthe meal reaches I(_FE)
Ondoubleovenmodelsonly
I' II_II_1[-71[-77
I _I1' II_1[-71[-77
I _II_II_1[-71[-77
I _I1' II_II-qlZ_
Aller tile internal mnlpel'alllre ot tile nleat reaches IO0°F, tile changing
intcnml t_ rap( l-,_mre will be shown ill the display.
12 When the internal tempec, lture otthe meat reaches th( number
you have set, the probe and the oven turn off and the ow'n control
signals. To su)p tile signal, touch the CLEAR/OFF pad. l Js_ hot pads
to r( move tim probe hom file fbod. Do 11ol use tongs to pull Oll it--
they might damage it.
For double oven models only, to set th( second oven, select PRESS TO
MAKE LOWER OVEN SELECTIONS or PRESS TO MAKE UPPER
OVEN SELECTIONS as ne(ded and tollow the above steps.
Th_ s(t temper, lture may be changed b) touching CHANGE
TIME-TEMP fbr file appropriate oven.
The settings Ilia} b( cancelled by louching CANCEL ti)r tile appropriam
ovell,
The timer call lye set b) touching SET KITCHEN TIMER.
See tile Kitchen "/_melsection.
A CAUTION: ",',,/.,_,,,,.,o,,_h_,.,,,,,,,._o,,,,,,.,/._,,_.,,/.,_,_,,
firm tlw ova,* outk, t until tke ov_,nhas _>oled. Do not sh,_ the pwbe i_l lke oven.
wilt souml aim tk_ s_m_n wilf ]m,mpt until tl : ]rod,, A _,mov_.d/wm ff,e ow.t_.
• }ira lan uv' lk._'litm'r ev('n l/ioug]l you (annol u.v, timed oven o]u'mlions.
17
Page 18

Using tile Convection Oven
Wall Ovell
Convection
Co&ware./or
convection
coohinff
hi a (OlW((liOll ovell, a liMl circlllates hot air
over, llllder alld al-Olll]d the _(_o(1.
Tiffs circulating hot air is evenly distributed
throughout tile oven cavity. As a result, toods
are inertly cooked and browned---often ill less
time witll COlWection heat.
NOTE: Tke convection/an will i)'l:/_,on and off
wkik, coot:big to besl distribute hol air in lhe ov_,n.
The conve_¢io_* /m_ shut_ off when the ore, doo_ is
@ened. 1)0 NOT k,ave the doo_ @en fi)_ Io_g p_,riod_
q/time whik, usi_lg i:onve!rlion coohhtg or you may
shorte_* the lift" o/the co_*vectio, heating deme_*t.
B(f'ore using your convection or( 11, check
to see if your eookware lemes room for air
circulation ill tile oven. Itvou are baking with
sew ral pans, leave space b;.,tween tllem. Also,
be sure tile pans do not touch each other or
the walls ot tile ox(n.
Paper and Plastic
Heat-resistant paper and plastic (ontainers that
are l(:colnill( llded f'oF /ISe ill reglllar oVellS Call
b( used ill convection ovens. Plastic cookwar(
that is heat-resistant 1o telnperatnres of 400°F
call also be used.
NOTE: Do no1 allo,a any paper or plastic Io COlll(
into c,nlla(t with the upper broil element.
Metal mad Gla_ss
Any Wl)( of cookware will work in your
COllVeCtion ovell. Howevel; metal palls heat th(
thstest and are r(comnlended for convection
baking.
Darkened or matt(-t'mished pans will bake
thst(r than shiny pans.
Glass or ceramic pails (ook more slowl};
Wh{n baking cookies, you will get the best
results if xou use a flat cookie slleel instead
of a pall with low sides.
For r(cip(s like oven-baked chicken, us_ a pan
with low sides, tIot air cannot circulate well
around fbod ill a pan with high sides.
Adapting"
rgci/)/<_;
]Uulti-rach
convection
bahing
18
Xi'OII (all llSe }'(Jill" [axolit( re(il)es ill Ill(:
COllVeclioll ove 11.
When comection baking, reduce baking
temperature liv 25°F or activate th( Auto
Recipe'" Conversion f(atule. See Auh)Rec@d'
Conv_,rffon in the .S/)eciaI Fealmz<_ o/}Sin" Oven
Conh_d s( ction.
XT¢eni:onvecliotl bakillg with otd} 1 Ixtch,fidI,Iw lke
ra(:k]?¢)sititlt_srelomme*lded in the { iillg ltu oven
_#([iot?.
Because heated air is circulated throughout
tile oven, foods call lie successfully baked usnlg
multiple racks.
Multi-rack 1)aking mav increase (:()ok times
slightly for some foods but tile overall resuh is
time sme(I. Cookies, muffins, 1)iscuits and other
quickbreads give ve W good results with muhi-
rack baking.
XVllen 1)aking, on ,3 ra('ks, plac( one rack in
tile thst (A) l)Osilion, Olle ill [h( tllird (C)
posilion alld Olle ill the fifth (E) position.
For two-rack baking, plat( one rack ill tlle
s((ond (B) ratk position. Pla(( th( olh(r ra(k
ill th( fi.)urtll (D) ra(k position.
Multbrack position
Page 19

( omection Baking or Roasting
IVallOvet/
HOW to set
the oven ,/br
conveclion
bahinff or
ma,stirzg
1 Touch CONVECTION BAKE or
CONVECTION ROAST.
2 For double oven models only, touch
UPPER OX_N or LOUVER OVEN to selecl
the desired ov(n.
3 Two rock options are available:
• SINGLE RACK- "I'oud_ tbr cooking tood
it(Ins on onl) one rack in convection bake.
• MULTI-RACK- _Ibuch lbr cooking tb_xl items
on more than one l-dck (i.e. 2 or 3 racks) at
the same time in Conw'ction Bake. See the
Mulli-l_ad_ (.m_vedio_z Baki_N se( tion tbr nlorc
intormation.
4 Toudl the mlmbers to set the desired
tempemmre.
fi; "l):mch ENTER.
6 "l):mch START.
The convection fhn will turn on during
preheating. The contr_)l will signal when the
oven is preheated--this will take approximately 10
nlinutes. Th( scr(en will show th_ set temperature.
When the conlrol signals, fbods should I)e placed
in tile oven.
For double oven models only, to set file second
oven, select PRESS TO MAKE LOWER OVEN
SELECTIONS or PRESS TO MAKE UPPER
OVEN SELECTIONS as needed and tbllow tile
above smi_.
The set mmperamre lnay be chmlged by touching
CHANGE TIME-TEMP fbr the appr_pliate ow, n.
The settings may be cancelled by touching
cD2qCEL for the appropfiam oven.
The timer eml be set tV touching SET KITCHEN
TIMER. See file Kii_ke_z 7_mosection.
Alier (ooking is complete, the oven will signal
and "MORE TIME" will display tot five nlinutes.
Check fbod tim-doneness. It more cooking time is
needed, touch MORE TIME and enmr additional
(ooking time. It nol selected, the screen will
am om;,tie_dly (lean
Ondoubleovenmodelsonly.
F-IFII +IIo11-71
I-qFII +II 1[-71
il
Theovenhas5 rackpositions Seethe Fullextensionovenracks
sectionfor how to use,removeand replacetheracks.
Convection
?O(l _[.it_{r
ti[),s
Lsing the broil( r pan and grid provided, heated
air will be circulated ovcl; under and around file
ti_od being roasted. The heated nit- heals in juices
quickl) tor a moist and tender interior while, at the
same time, creating a rich golden brown exterion
When you are convection roasting, it is impoltant
that vou use tile broiler pan and grid. "File pan is
us(d to catch grease spills and tile grid is used to
prevent grt, ase spallers and allow healed air 1o
circulate under tile lneal and increase browning
Oll tile llndel-side ot tile illeal OF pollltl}.
• Place tile grid on tile broiler pall.
Grid
[f /IIlll"lI¢l_lili_l'EIVi\"_\\_
Broilerpan
19
Page 20
Comection Roasting with the Probe
Wall O_,_,n
HOW to set
the oven.fi)r
convection
masting"
with the
probe
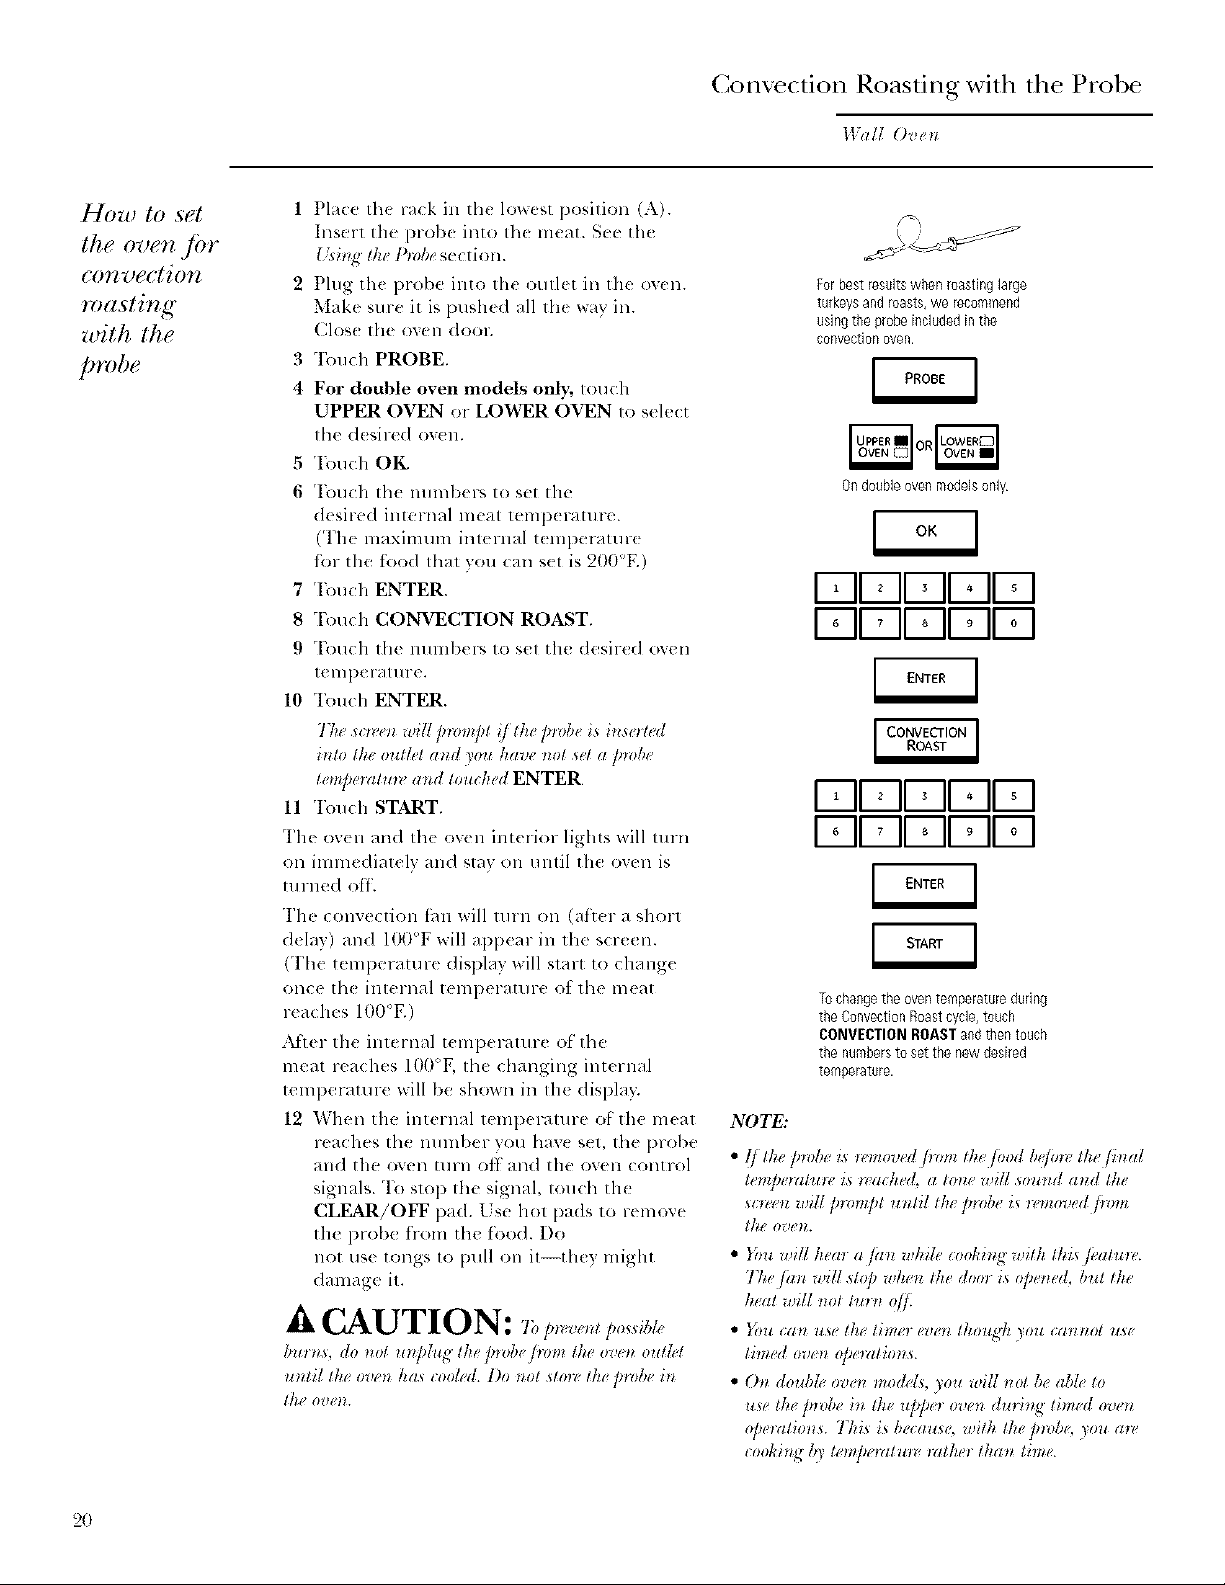
1 Place th( rack in the lowest position (A).
Insert tile pro[)( into th( meat. See the
t-gi_,gtke Probesection.
2 Plug the I)robe into the outlet ill tile oven.
Make sure it is pushed all the wav in.
Clos( the oven dool;
3 'Ibuch PROBE.
4 For double oven medals only, touch
UPPER OVEN or LOWER OVEN to select
the d(sired ov(n.
5 'I;_)uch OK
6 'I;:)uch Ill( numl)ers to set tile
desired internal meat teml)(ramre.
(Th( nmxinmm imernal t(mperatur(
fbr the food that you can s(t is 900°E)
7 q;_)u(:h ENTER.
8 "['ouch CONVECTION ROAST.
9 Touch tile nunll)el _, to set the desired oven
temperature.
10 Touch ENTER.
7tie so_,el_ will prompt i/the p_,be is inse_ted
_nlo lhe out/tt atzd you kav_, _zl)t w'la ])_zlb_"
te!n/_e_atu_v and toucked ENTER
11 Tou(h START.
Tim ov(n and th( ow'n interior lights will turn
on immc(liatclv and stay on until the o',un is
tu riled of[.
The convection fhn will tul'n Oil (att(r a short
d_lay) allt] 100°F will appear in the screen.
(The temperature displa 3 will start to change
once lh( inlernal temperature ot tile meat
reaches 100°E)
:M'ter the internal t(mperature ot the
meat reaches 100°K the changing internal
temperature will be shown in th( displa};
12 When the internal temperature of the meat
reaches lhe numl)er',ou hax( set, tile [)robe
and tile oven ulrn off and tile oven control
signals. To stop the signal, touch the
CLEAR/OFF pad. Lse hot pads to remo_e
the probe fiom the food. Do
llOt use tongs to pull on it--the? might
damage it.
_, CAUTION: 7_,!,,,.,,,.,,t/,,,_,_,z,
b.r>s, do not mtphg the pnlbe fiom the oven outM
until th* oven has cooled. 1)o not sto_, the probe in
thg OVe_h
NOTE:
temperatu_z, is _,ached. a lone wifi sound and Ike
*c_*'_,nwill prompt u*zliI lhg prd, e is _z,tnoved fi,,m
dig OgtglL
• }bu will hem a jan while, I:oohh_,_with lhisfl'atu_*,.
Tke /an will st@ when lhe door is @e_ed, but lhe
h('at will _zoltlnn @
• }}m can use the tim_ even thozg5 )ou cannot zt_e
timed ov_n op_ratim* s.
• On doubh" oven mo&_gs,)ou will not be abh to
use the p_ob_ in the z@_r oven dur'i_g timed oven
@eratio_s. This is because, with the pmb< )ou a*_'
I:oohi_g lO' te_@emtm_, rather than time.
Forbestresultswhen roastinglarge
turkeysandroasts,we recommend
usingthe probeincludedinthe
convectionoven.
Ondoubleovenmodelsonly
V-II _II_IIo1171
Ell' II°II9IV-I
I7-11_II_II° II-q
[7-11_II_II° II-q
Tochangetheoventemperatureduring
the ConvectionRoastcycle,touch
CONVECTIONROASTandthentouch
the numbersto setthe new desired
tempelature.
2O
Page 21
( omection Roasting
Walt Ove*_
Convection
roastb g
_uide
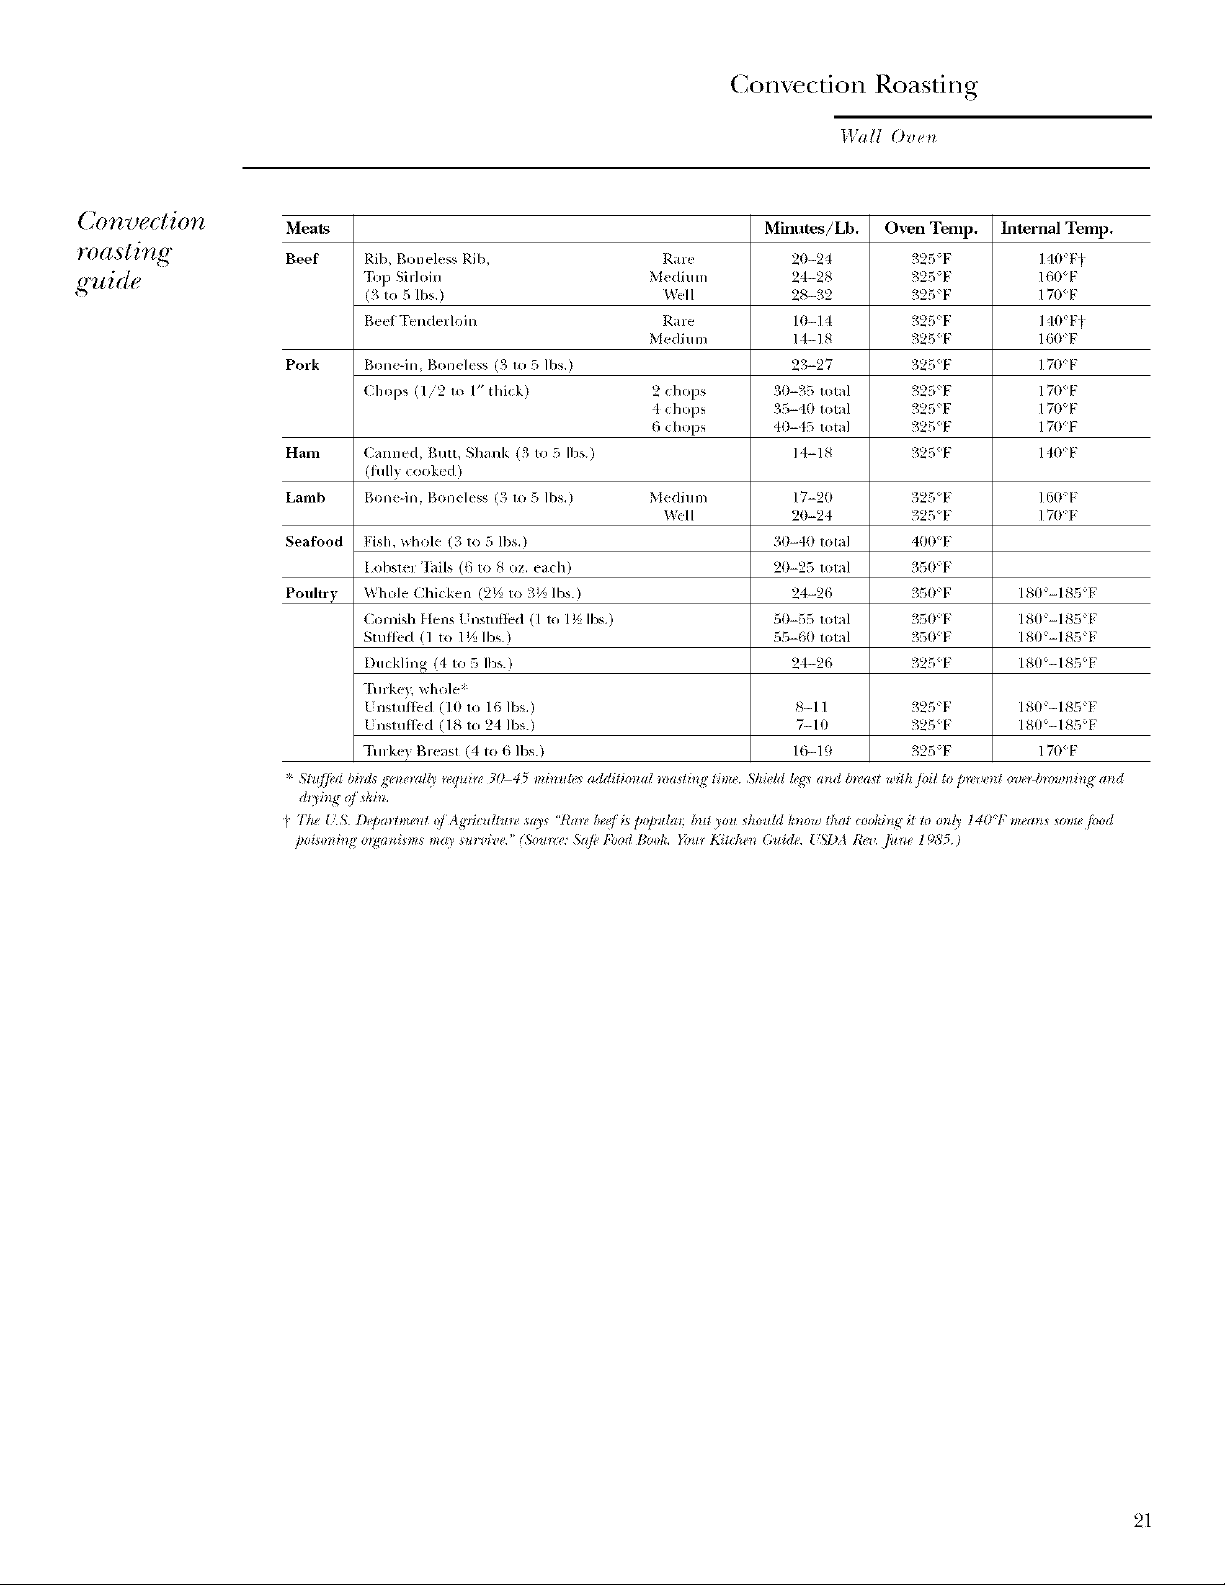
Meats Minutes/Lb. Oven Temp. Internal Temp.
Beef Rib, Boneless Rib, Rare 20-24 325"F 140F_
"I_p Silloin Medium 24-28 325°F 160°F
(3 to 5/bs.) Well 28-32 325°F 170_F
Beet Tenderloin Rare 10-14 325F 140F_
Medium 14-18 325_F 160F
Pork B{medn, Boneless (3 m 5 Ibs,) 23-27 32/',_F ] 70°F
(hops (I/2 m /" lllil;k) 2 chops 30-35 total 325"F 170_F
4 chops 35-40 lot_l 325'1: 170°F
6 chops 40-45 total 325_F 17OF
Ham (anned, Butt, Shank (3 to 5 Ibs.) 14-18 325_F 140F
(fillly cooked )
Lamb Bonedn, Boneless (3 m 5, Ibs.) Medium 17-20 325°F l tlO°F
Will 20-24 325°F 17OF
Seafood Fish, whole (3 to 5 Ibs,) 30-40 total 400"F
[ obslll "hils (0 to 8 oz, each) 20-25 Iolal 35OF
Poultry Whole Chicken (2_A to 3½ Ibs.) 24-26 350F /80 -185 F
( orl]ish f{ens I nsluttld ([ to / _'5Ibs.) 50-55 tol_tl 350:F /811:-185 F
Slullcd (1 m 1½ ]bs) 55-61t lotal 35OF /80-/85 F
Duckling (4 to 5 Ibs.) 24-26 325<F 180<-/85<F
1"urke} whole*
IJnslultcd (101o 161bs.) 8-11 325 F /80-185F
Unsmtli:d (18 to 24 Ibs.) 7-/0 325_F /80_-/85_F
Tud<e} gleast (4 to 6 Ibs.) 16-19 327_"F 170_F
* Slu][_'d bids _'e_ze_al[a_w*ti_g'3045 IIzilz*tle_addiliolzal _oaslil_g time Shim'hiI_g_alzd b*('a*twilh ]oil to p*_,_'/z_ov_'*b*rmmil_g and
21
Page 22

Timed Con ectiorl Cooking
Wall Ove*_
Timed
convection
cooking
(immediate
start and
autom, atic
. tol,)
22
0_* double ove_l modds, you call use timed bahhlg hi
ore, oven whih, ush_g sdJ-ch.a_z hz the oth_n, you can
also u_e lhned baking i_z both ove*z_ at the _atne t_m_,.
NOTE: Foods that _poit easif)'_such as mill, _qgs,
/;._h, stu/jhtK_, poull U a*M pork _houh! not be
allowed to sit fln" tnon _th(m 1 hour btJmv or (tfi_,r
.mki.g. Room tem/mzzt,ov pmt,wt_,_ the g'mwth
o/ ha_wt/td bal teria.
The oven will tuv_z on immediat@ a*zd cooh /o_ a
seh'cted h'ugYh <(time. At the e_zd _( the _oohi_lg time,
the ove_ will lmt_ oij automati(ally.
Mak( sure tile dock shows tile correct tinle
of da>
1 "lknlcll CONVECTION BAKE or
CONVECTION ROAST.
2 For double oven models onl?,; touch
UPPER OVEN or LOINER OVEN to select
the desired oven.
3 Two rack options are available:
• SINGLE RACK - Toucll fl)r cooking flood
it(ms on only one rack in convection bake.
• MULTI-RACK - "Ibucll tbr cooking tbod
items on nlore than one rack (i.e. 2 or 3
racks) at the same tinle in Come<tion
Bake. See the Mtdti-t_alk Convectio_zBakDig
section for lnore inlorlnation.
4 Touch the nmnbers to set the desired
tellll)( l-all1 r(*.
5 "I_)ucll ENTER.
6 Touch the nmnbers to set the desir(d lengfll
ot cooking tinle.
7 "Ibuch ENTER.
8 Two imm(diat( start and automatic slop
cooking options are available:
• PRE-HEATED START -"Ibuch to preheat
the ovell.
The convection thn will mrn on during
preheating. The control will signal when
file own is l)reh_ ated--tllis will take
at>proximat(ly 10 mimltes. Tile screen
will show the sel temperature.
Tile timed cook will not start until tile ov(n
is preheated and START is touched.
Wllen file control signals, fitods sllould /)(
placed ill the oven.
• COLD START - Touch to start the
oven immediatel) and cook tk,()(Iwithout
preheating. The convection thn will turn
on. The cook tinle will start immediatel>
The oven will start an(I continue to cook lot
the programnled amount of time, then shut of_
mltonlaticall}, unless tile Cook and IIold fcatm-e
was s(t. See the Cooh and Hohl @tilm s(ction.
Ondoubleovenmodelsonly
FqlTII IIoIFI
F FII II II-q
F FII IIoII-q
I-TIFII II II-q
For double oven models only, to s_t the s(cond
ovell select PRESS TO MAKE LOX_rER OVEN
SELECTIONS or PRESS TO M.Mg.E UPPER
OVEN SELECTIONS as needed and tbllow
the above st(ps.
"File set temperature lnay be clmnge(I /U
touching CHANGE TIME-TEMP tbr the
appropriate ovell.
The settings may be cancelled by touclling
CANCEL fin" the appropriate ov(n.
"File tinier can be s_t by touching SET
KITCHEN TIMER. See the Kitchen*71me_
sectioll.
_Mter cooking is conlplete, th( oven will signal
and "MORE TIME" will display tbr live miracles.
Check tbod tbr (lonem,ss. If nlore cooking time
is need(d, toul Ii MORE TIME and enter
additional (ooking time. It not sele_ te(I, the
screen will automatically (:lear in live nlinutes.
Page 23
Timed Convectiorl Cooking
Wall Ovell
77mad
(delayed
start and
automatic
_top)
}(lit t:(//t _gl [lie O'g]_lt t:OtIDD[ lo d#[gl_,-slatY []z# o_)(qL
It ohli, a Oel i/h le_ ,_h ol time alld tlu_z turn o/I
altltlmati( al(_. 57_ago t]. Dda) 5tro t Option sa:lio_.
Make su re Ihe clock shows 111( correct filll< ot: da)5
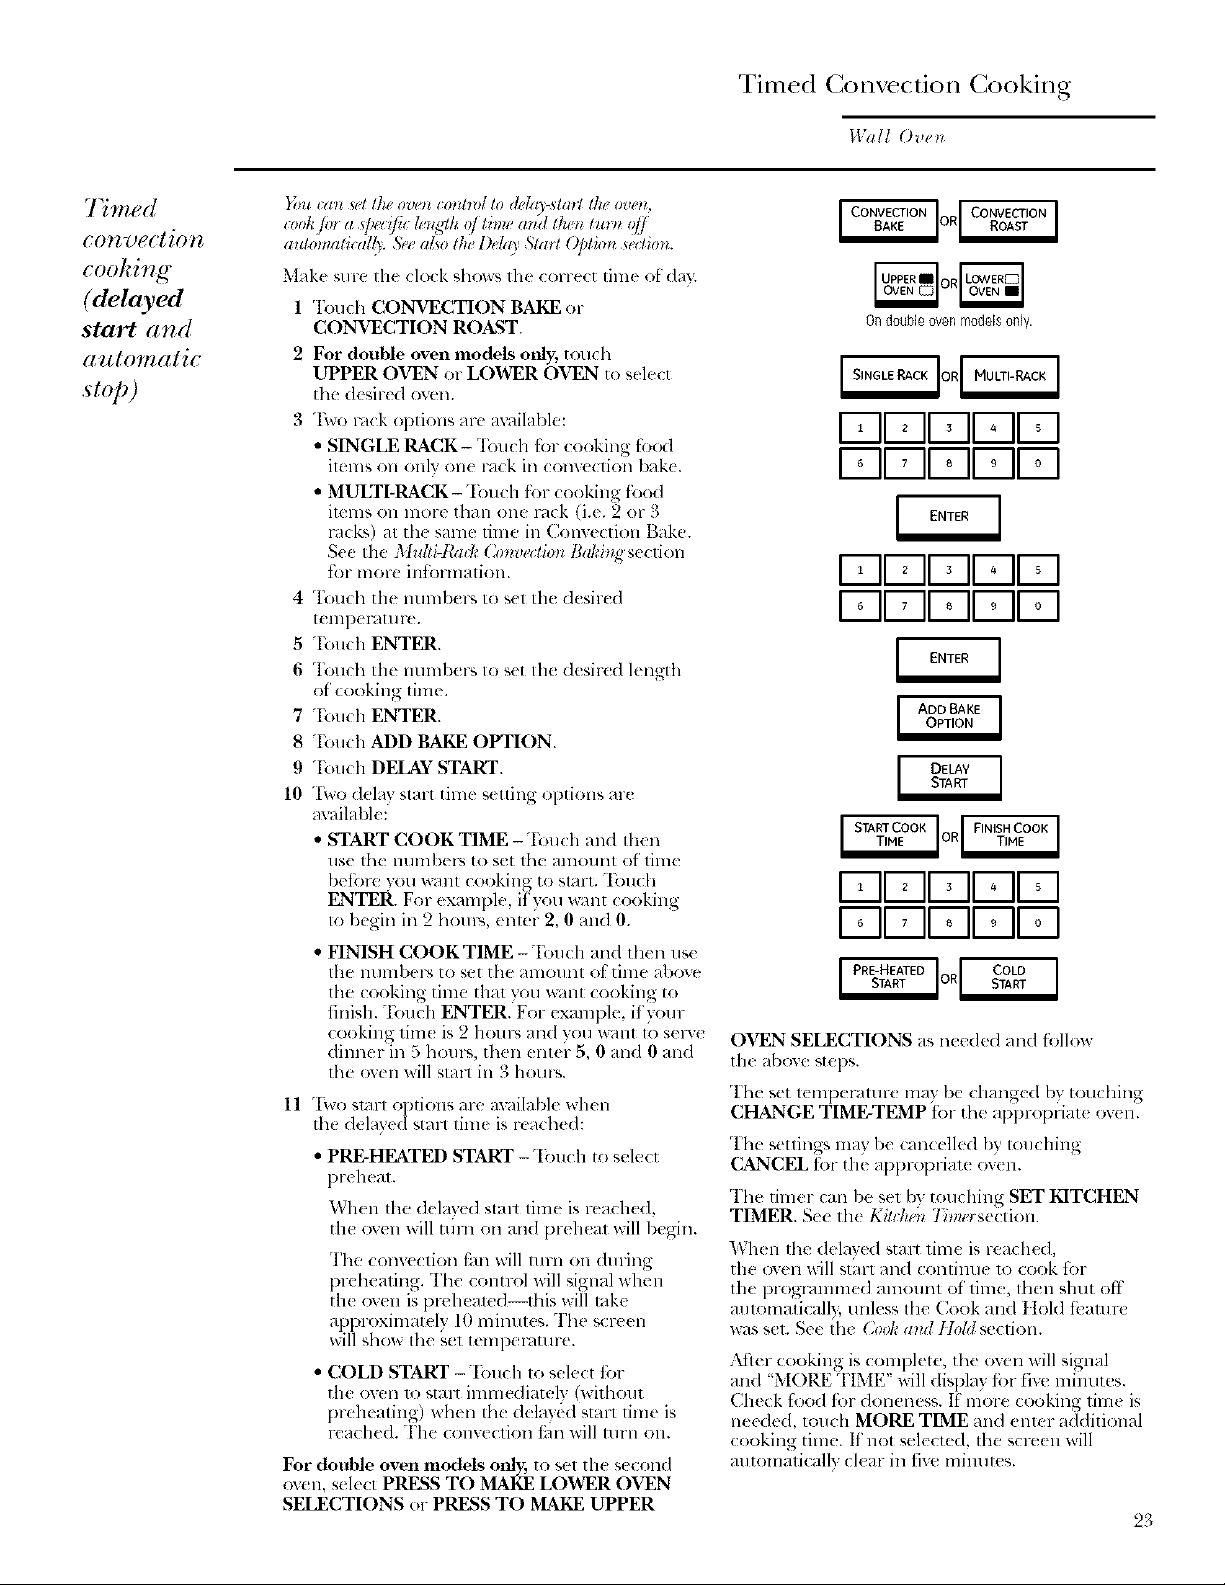
1 Touch CONVECTION BAKE or
CONVECTION ROAST.
2
For double oven models only, touch
UPPER OVEN or LOWER OVEN to select
tim desired oven.
"Hvo rock options are axailable:
• SINGLE RACK-Tou(h for (ooking fo(_l
ilems Oll olllv o11( 1-_1( k ill ( ollVe(lioll /)_)k(.
• MULTI-RACK-'Ibuch ibr cooking food
imms on more than one rock (i.e. 2 or 3
l',lck',) at th( same time in Convection Bake.
See the Multi-IbM: Convectio)* Baki,g section
fi)r more intbrm_Jtion.
4
T_)uch the lltlmb(rs to s(l th( d(sir(d
1( lllI)( YHIll re.
5
Touch ENTER.
6
Touch th( nunll)(!rs Io s(t Ill(! d(sired l(ngth
of cooking tim(.
7
"I'ou( h ENTER.
8
Tou(h ADD BAKE OPTION.
9
Touch DEIANSTART.
10
"[Xvodelay start tilne setting options are
m'ailable:
• START COOK TIME- Touch and then
use the llumbe_s to set the amom_t of lime
betoru vou _llt cooking to start. "lbu(h
ENTER. For example if you "_+alltcooking
to begin in 2 hours, emer 2, 0 mid 0.
• HNISH COOKTIME -Touch and then use
the lllllllbel% to set the al]lOllll[ of tillle above
tim cooking time that you xx:lnt cooking to
finish. Touch ENTER. For example, if your
( ooking tim( is 2 houp_ mad you xxTmt to selwe
dimmr in 5 horn'% then enter 5, 0 and 0 and
the oven will stal_ in 3 hours.
11 "[\w)qlitl-IOl)tions m-e available when
th_ ddav( d stall linle is r_ached:
• PRE-HEATED START -"I;mch to sele(t
pr(heal.
7 .... " • ,
X\hen the del,I) ed strut lll]]e ISle,lch(d,
the ov(n x_ill turn on and preh( al will begin.
The convection fan will turn on during
preheating. The (ontrol will signal when
the oven is preheawd--flfis will ink('
approximatdy 10 minutes. The screen
will show the set tempemtme.
• COLD START -"Ibuch to select tbr
the oven 1o strut immediately (without
preheating) when the dela}ed start time is
lynched. "['lie conv(cfion thn will tnrn o11.
For double oven models onl); to sel the second
oven, sel(ct PRESS TO MAKE LOWER OVEN
SELECTIONS or PRESS TO MAKE UPPER
Ondoubleovenmodelsonly.
I-qi_-II' II° II_I
171DI ' I1' II° I
I-qV-II _IIoII_I
I-qF-II°I1'II°I
I-qV-II, IIoIIsI
l-qEII °I1'II°I
OVEN SELECTIONS as needed and follow
th_ above steps.
The set t(lllpelatt/rt may be cllange(I by touching
CHANGE TIME-TEMP tot the appropfiat_ ov(n.
"I'h_ settings may be (ancelled by umching
CANCEL tot tile al)p_x)l)fiat_ ov(n.
The timer can be set by touching SET KITCHEN
TIMER. Se( th( Ki_dw**7_me_section
When lhe delayed strut time is readied,
the oven will st;irt and contilme 1o cook for
the progrmnmed amount of' tim{, then shut off
mltomaticall}, unless the Cook an(I IIold tbamrt
was set. See the (3)ok a)ul tlold section.
;'kfler cooking is complete, the oven will signal
and "MORE TIME" will display tbr fiw' minutes.
Check food fi._rdoneness. If' more cooking time is
neede(I, touch MORE TIME and enter additional
cooking time. If not selected, tim SCl-t*(11will
automaticall) clear in five mimltes.
23
Page 24
Favorite Recipes
IWalI ()ve_
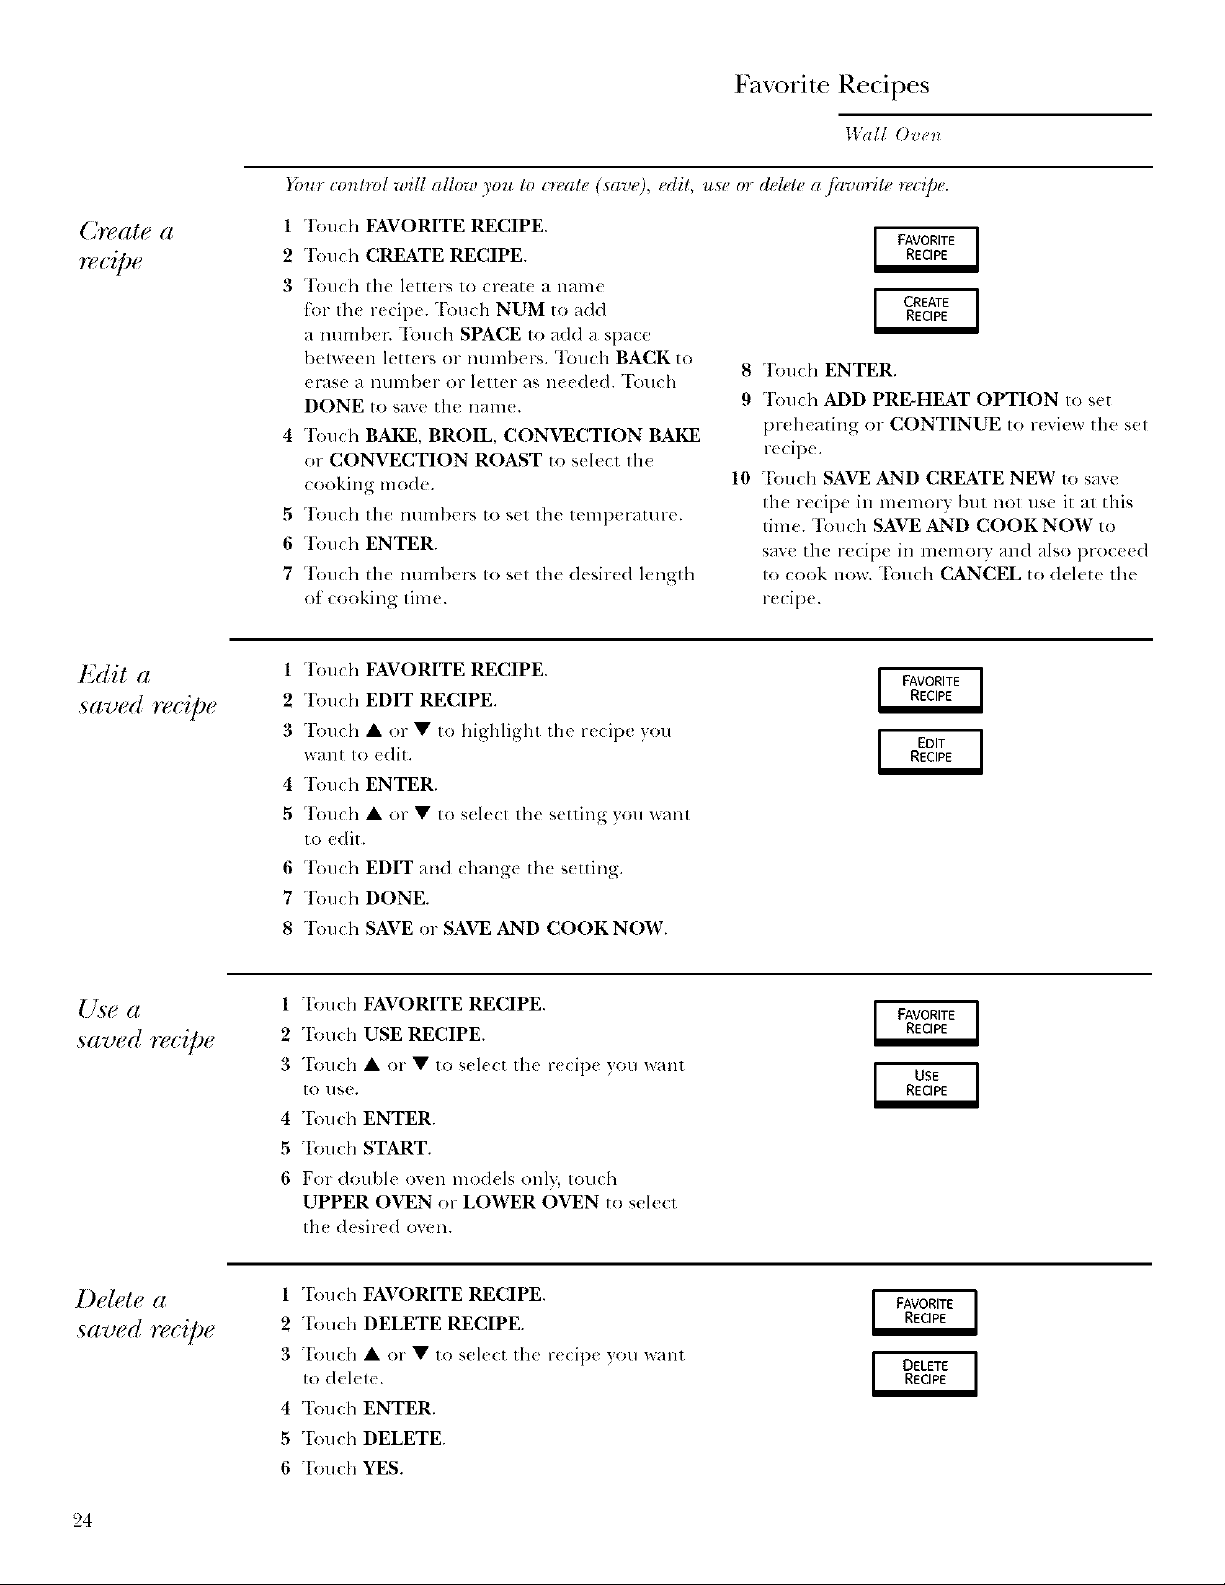
Your conhvl will allow you to c_eale (save), edit, use or delete a jhvorih_ n_c@e.
Create a
re(;iDe
Edit a
,saved recipe
1 "Ibuch FAVORITE RECIPE.
2 Touch CREATE RECIPE.
3 Touch the letters to create a name
torth( recipe. Touch NUM to add
a nunlber. "Iimch SPACE to add a space
between letter_ or numbers. Touch BACK to
erase a number or letter as needed. "I;.mch
DONE to save the naTn_.
4 Touch BAKE, BROIL, CONVECTION BAKE
or CONVECTION ROAST to select 111(
cooking mode.
5 "Iouch the numbers to s(t th( teml)er_lture.
6 'Ibuch ENTER.
7 Touch the numbers to set the desired lengfla
of cooking time.
1 "Ibuch FAVORITE RECIPE.
2 Touch EDIT RECIPE.
3 Touch • or • to highlight the recipe you
want to edit.
4 "Ibuch ENTER.
5 Touch • or • to select the setting you want
to edit.
6 'Ibuch EDIT and change lhe setting.
7 Touch DONE.
8 "I'(m( h SAVE or SAVE AND COOKNOW.
8 "Ibuch ENTER.
9 Touch ADD PRE-HEAT OPTION to set
pr(heating or CONTINUE to review the set
recipe.
10 Tou(h SAVE AND CREATE NEW to save
th( re(ipe in memory but nol use it at this
time. Touch SAVE AND COOK NOW to
save the recipe in memo_ y and also proceed
to cook now. T_nlch CANCEL to delete the
redpe.
Use a
,saved recipe
Delete a
saved reeipe
24
1 Touch FAVORITE RECIPE.
2 Touch USE RECIPE.
3 Touch • or • to sel((t the r((ipe }otl want
10 like.
4 "Ibu ch ENTER.
5 Touch START.
6 For double oven rood(Is only, touch
UPPER OVEN or LOWER OVEN to select
lh( desired oven.
1 "Ibu ch FAVORITE RECIPE.
2 Touch DELETE RECIPE.
3 Touch • or • to sel((t the r((ipe )ou want
1o delele.
4 'Ibuch ENTER.
5 "Ibuch DELETE.
6 Touch YES.
Page 25
Kitchen Timer and Control Lockout
Wall ()ve_*
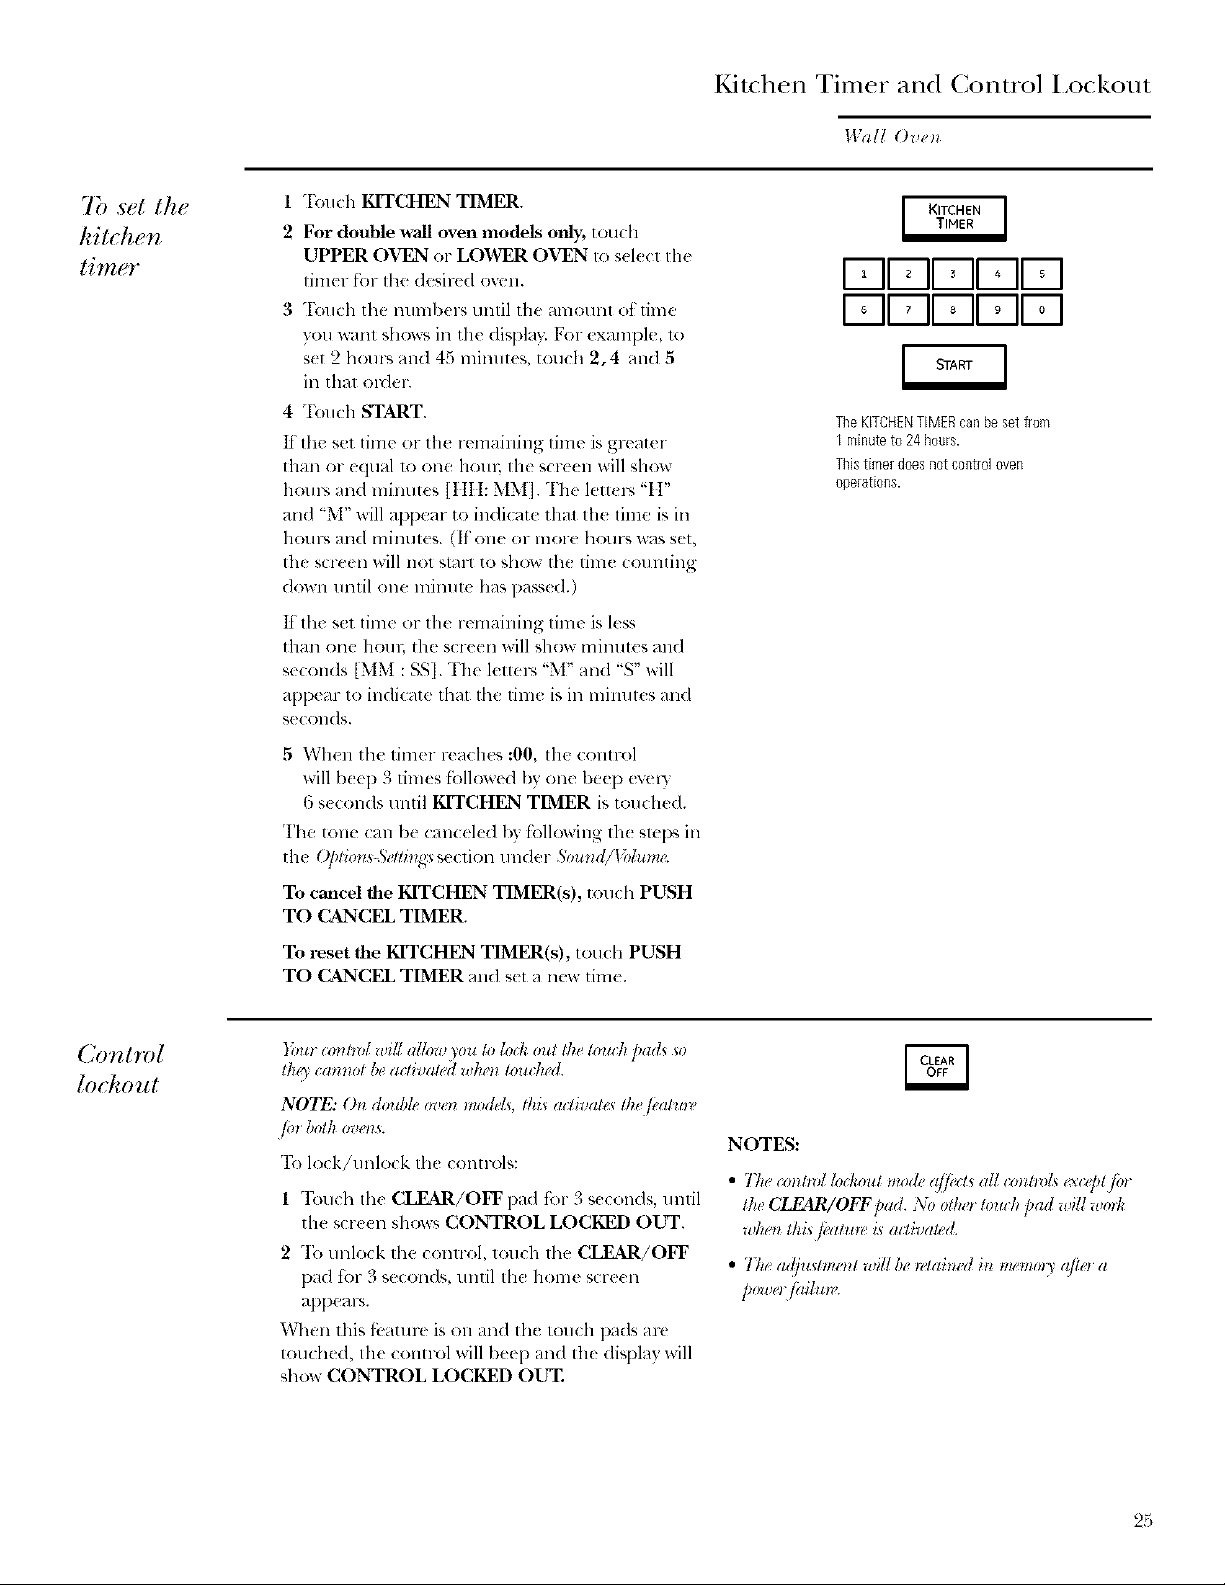
7b set the
kitchen
timer
1 Touch KITCHEN TIMER.
2 For double wall oven models only; touch
UPPER OVEN or LOWER OVEN to s(l(ct the
timer for file desired ow, n.
3 "['ouch tile numbers until the amount ot time
you want show _,ill tile displa}: For example, 1o
set 2 hours and 45 minutes, touch 2, 4 and 5
ill that el-def.
4 Touch START.
It the set time or the remaining time is greater
than or equal 1o one houl_ tile screen will show
hom'_ and minutes ]IIH: MM]. The letters "I l"
and "M" will al)pear to indi(ate that the time is in
hotll_ alld lllilltlles. (If Olle OF Ill(We ho!llN was set,
the screen will not stal_ to show the time counting
down until one minute has passed.)
It tile set time or the remaining time is less
than one hour, the screen will show minutes and
se<ends [MM : SS]. The letters "M" and "S" will
appear to indicate that the time is ill mimltes and
seconds.
5 When the timer reaches :00, lhe control
will b_e I) 3 times followed by one bee[) evel 3
6 s_tends tmtil KITCHEN TIMER is touched.
The tone can be can( eled by fbllowing th( Sml)S ill
tile @l_o_,_Selti_*g:_section under 5,mo,d/lhh_lm
To cancel the KITCHEN TIMER(s), touch PUSH
TO CANCEL TIMER.
FII II, II-qF-I
1-711,II 11-7-11-7-1
TheKITCHENTIMERcanbe set from
1 minuteto 24 hours.
Thistimerdoesnotcontroloven
operations.
To reset the KITCHEN TIMER(s), touch PUSH
TO CANCEL TIMER and set a new time.
}_na (onh?)Iwill alhm*)ou 1olod¢out the toultl pads so
th_3' cannot bea(¢ivaled wh(*ntoudwd.
NOTE: On double ¢r_:_,nnoddy, lhi_ m livata* the fl,allo_
/m both ov(>I:v
"1_tlock/unlock tile controls:
1 "l'_n/ch tile CLEAR/OFF pad fi.w 3 s< conds, until
the screen shows CONTROL LOCKED OUT.
2 To unlock Ill( control, touch the CLEAR/OFF
pad tot 3 seconds, until the home s(71e(II
appears.
When this tbature is on and the touch pads are
touched, tile control will beep and the diq)lay will
show CONTROL LOCKED OUT.
NOTES:
• The _(mtm/toga,out nod,, :qje,ls at/,mm,Zs ex.'/,t/o,
the CLEAR/OFF pad. No otho touch pad will worl¢
wtmn thiQeatu*_ is allivat_d.
• The adfi_stm:'i*t_*_itlben,tainM in mrtnor_'afioa
powoj<lih_m
25
Page 26
Self-Cleaning O_en
IVall()I,ell
The oven door must be closed and all
controls must be set correctly for the cycle
to work properly.
We recomm(nd venting your kilch(n xdth an
oi)(n window or using a vemilalion tm or hood
dtwing the first s(lf<lean c) cle.
Remove the broiler pan, broil( r grid, prob(,
all cookware and am' ahnnimlm foil from tll(
OV(!II,
The ox,( 11racks may r(main ill the ox(n during
the s,.dfkrl(aning cycle "_ithoul b(ing dmnaged.
DI) llOl rise a|)rasiv(s or oven (l(Hll( lS. Cleall
the lop, si(l(s and oulside of Ill( ov(n door wilh
soap and wat_ 1_
Make sm-e th( ov,.m light bull) ,.:,._xcr is in place
and tll( oxen light is oil
IMPORTANT: The heahh of' some birds is
exu-emelv sensitixe to file flnnes given off'
during the selt:-cleaning cycle ot any ov(n.
Mow_ 1)irds to another w(ll-v( ntilated room.
NOTE: Sd/:(2lea_z will m>/wod_ i/fhe t+m],'_zttm_
/)wb_ is plugged i_z ori/the 5abbath /i_atm_ is s_t.
• On doubl( oven models, you call s(t a (lean
(ycle ill both ovens at the same time. The last
oven set will amomaticall) d(lay its start mltil
th_ end of the first oven's clean cycle.
• On doubl( ov(n rood(Is, you can us( tinl_d
baking in one oven and s(likl(an ill the other
at the saln( lime.
CA UTION: N,.+,,,
uie_zsiZs m mq othe_ item_ o)l the ove_l floo_: There
is a heati, 2 deme_zt be)zeatk the ove)_ /loo_: l)tacb_
it+'n_so)_ the ove_z//oo_ ma_' i:au.s_,_he ovel_ to
ove_SeaL resul[b N i_ damag_, to the oven a_td
ri_h I!i damag_ o_ii+l, to cabbzels.
26
Page 27
Self-Cleaning Oven
Wall Ove_*
]_ozd to S(ft
the oven .fin
cleaning"
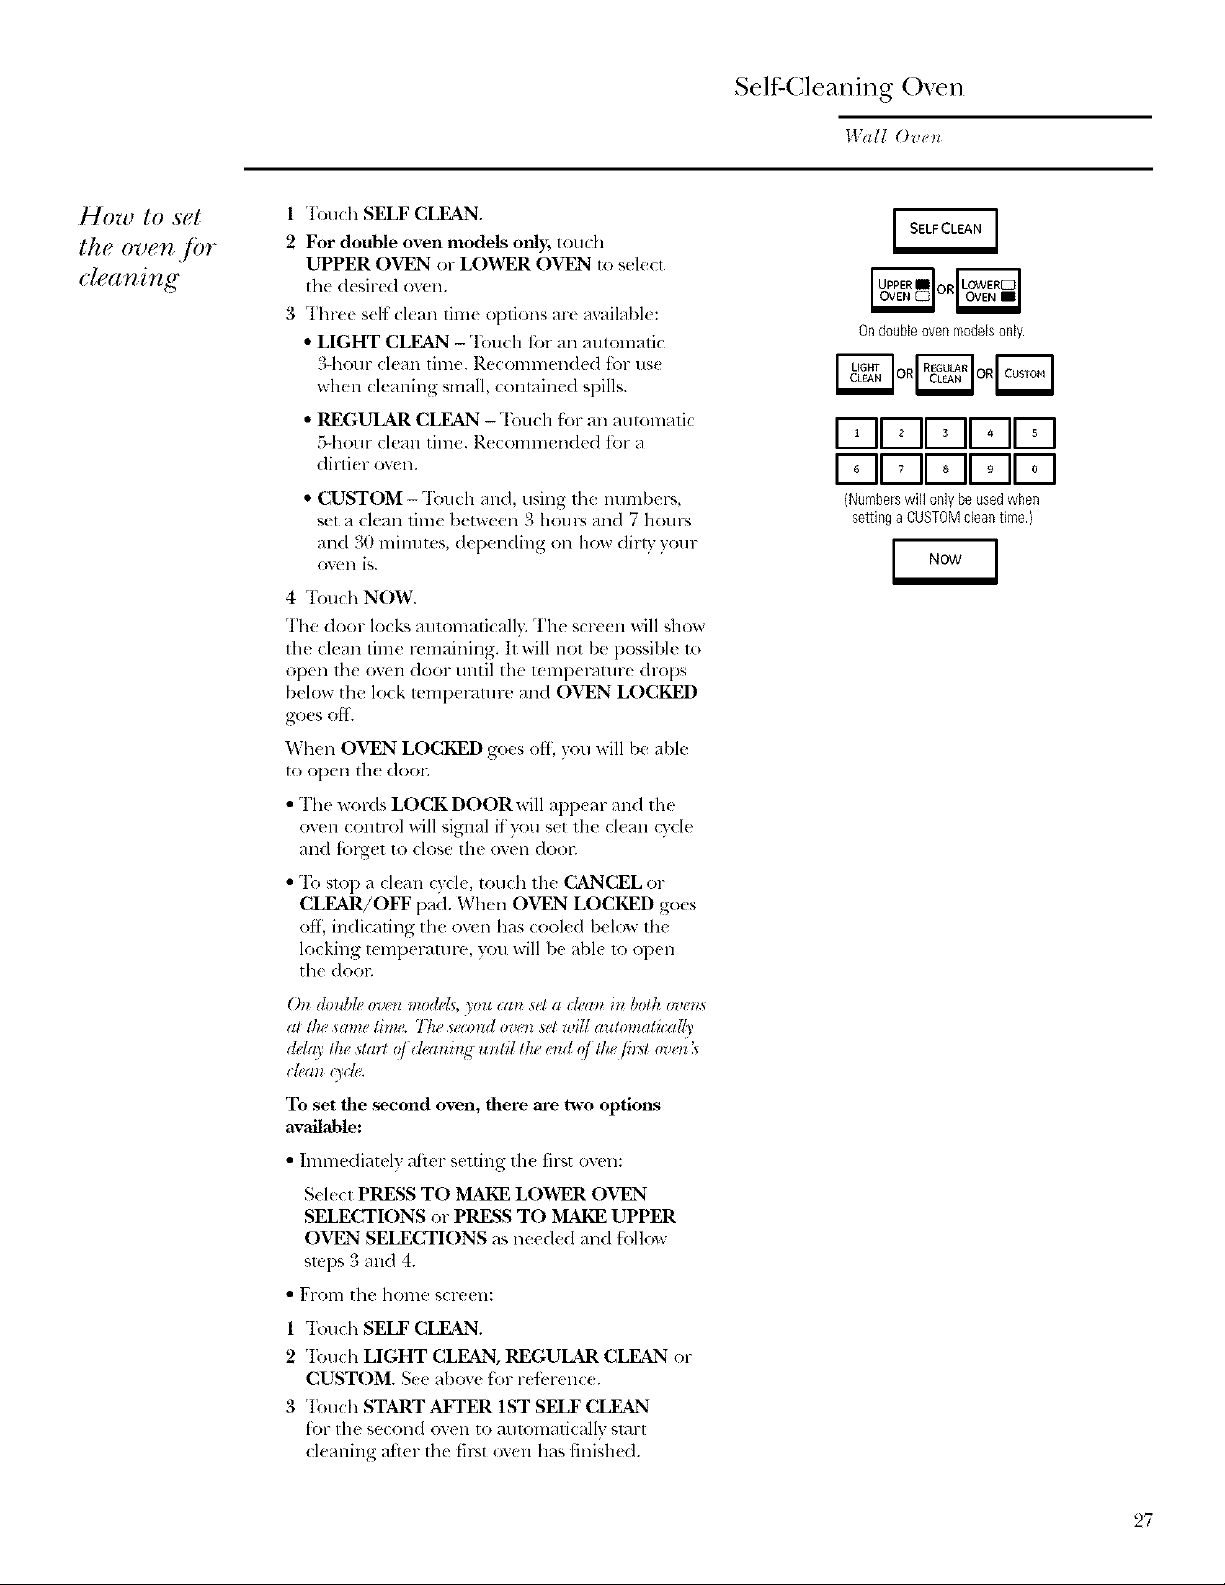
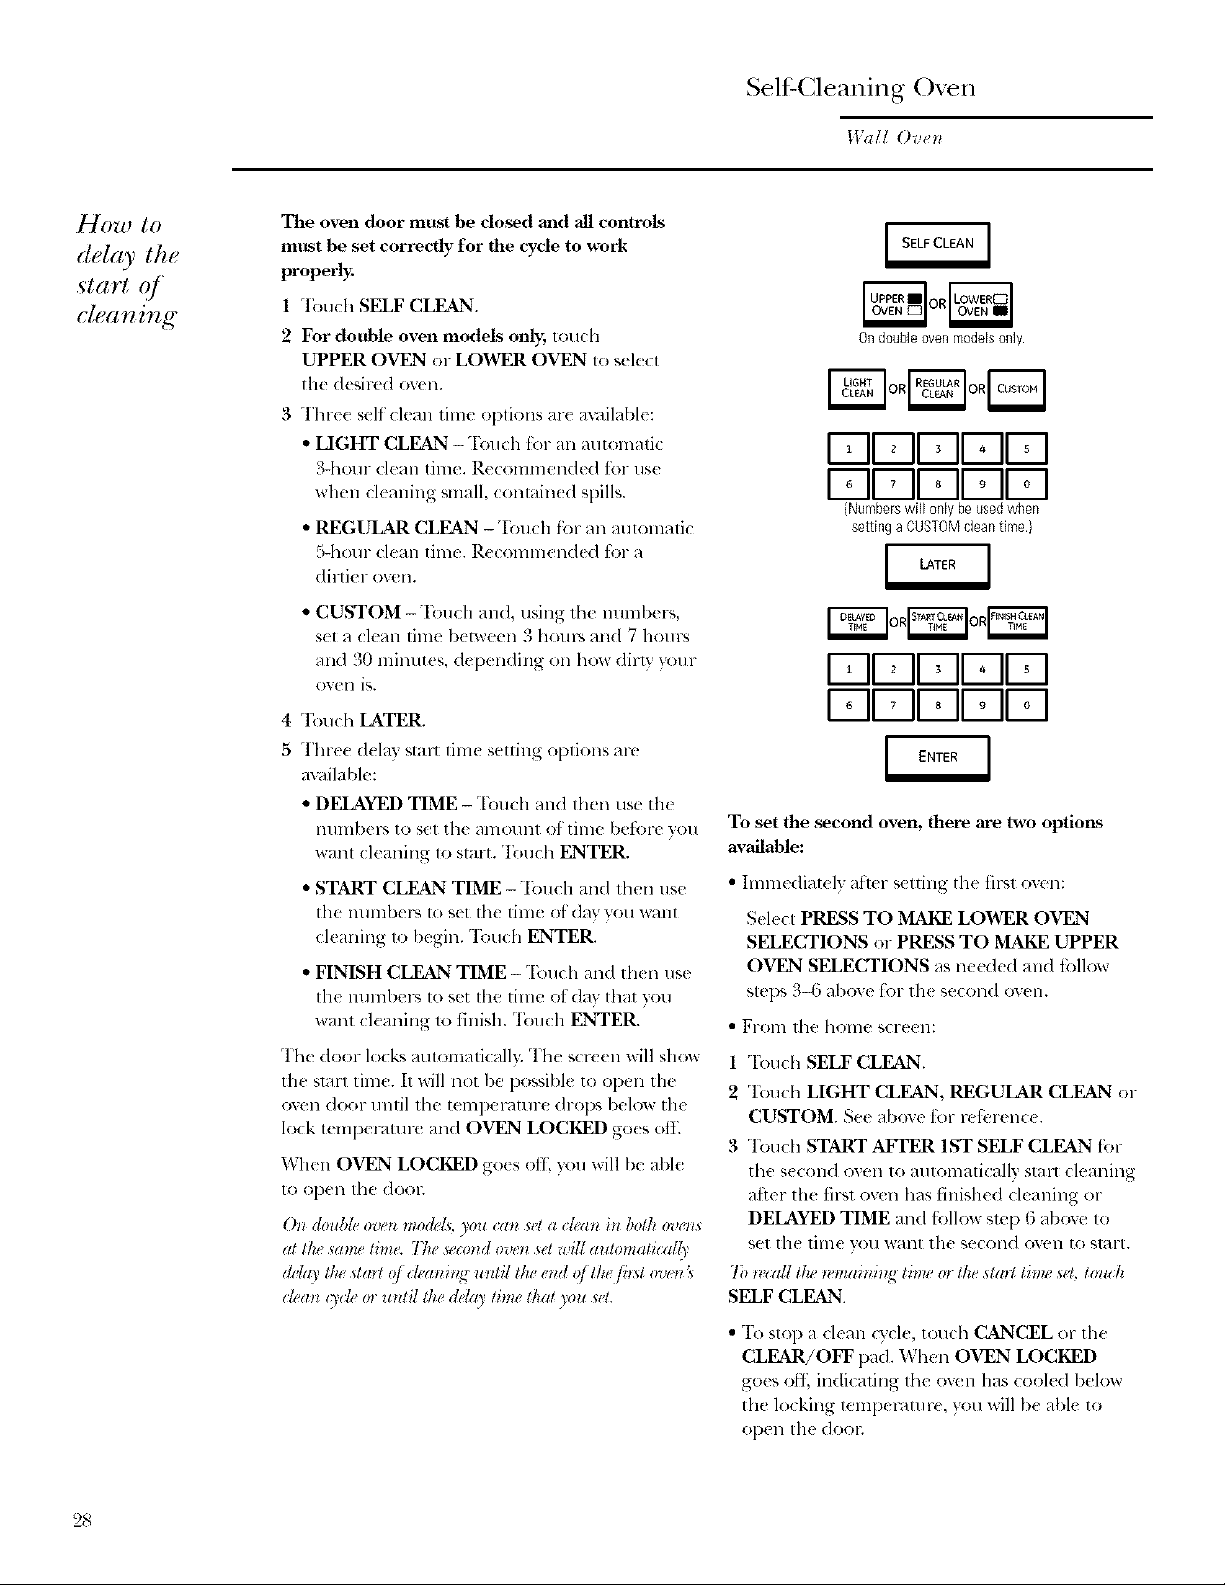
1 rlbuch SELF CLEAN.
2 For double oven models only; touch
UPPER OVEN or LOWER OVEN to select
the desired oven.
3 Three sell ckan time options are m:ail_lbk :
• LIGHT CLEAN - Touch tbr an aWomatic
.3-hour clean time. Recommended for use
when cleaning small, contained spills.
• REGULAR CLEAN -"Ibuch tbr an automatic
5-hour clean time. R( commended for a
dirti( r oven.
• CUSTOM- 'Ibuch and, using the mnnbers,
set a clean time between 3 hours and 7 houl_,
an(I 30 nfinutes, depen(ling on how dirty )our
OVell is.
4 Touch NOW.
The door locks automatically. The screen will show
the clean time remaining. It will llOt be possible 1o
open the oven door tlllEil the temp(c.lture drops
below the lock temperam re and OVEN LOCKED
g*_es otE
Wh(n OVEN LOCKED goes oft, you will be able
to open the dooE
• The words LOCK DOOR will appear and the
oven control will signal fl)'ou set the clean cycle
alld t;._l_et to close the (well dool;
• To slo1)a clean c)cle, touch the (_xJNCEL or
CLEAR/OFF pad. When OVEN LOCKED goes
oft; indicating the oven has cooled below the
locking temperaml>, you will be able u) open
the (1oo_;
Ondoubleovenmodelsonly.
uuQuu
uuDuu
(Numberswill onlybeusedwhen
s_tinga CUSTOMcleantime.}
(k_ double ove_ modd_, you _an set a d_'an in both (*ve,s
al tlw _ame ti,,.. T/w se.nzd oven setwill automati,dly
de&y the starl Iff d.('anhg until the #rid ?t llu. filst .voz X
trlg_a_*t)(b'.
To set the ,second oven, fllere are two options
available:
• Immediately atier setting th( first oven:
S(le(t PRESS TO MAKE LOWER OVEN
SELECTIONS or PRESS TO MAKE UPPER
OVEN SELECTIONS as needed and tbllow
swps 3 mid 4.
• FI'OlI] [he hollle screell:
1 "Iouch SELF CLEAN.
2 Tou(h LIGHT CLEAN, REGULAR CLEAN or
CUSTOM. See above tbr reterell((.
3 Totlch START AFTER 1ST SELF CLF=_,N
fbr the second oven to mm)m_ticallv start
cleaning afler the th_t oven has finMled.
27
Page 28
SelfXCleaning O_en
Wail Ore,
_O_AJ tO
delay the
start qf
cleaning
The oven door must be closed and '_ controls
milst be set correcily for the cycle to work
properly;
1
rI]-)tlch SELF CLEAN.
2
For double oven models only; tou(h
UPPER OVEN or LOWER OVEN to sele(t
tile (/esircd oven.
3
Thre( self clean time options ar( a_lilable:
• HGHT CLEMq -Tou_h for an automatic
3-hour dean time. Re(ommended fin- us(
when cleaning small, contain(d spills.
• REGULAR CLEAN -"Ibu(h for an atllolnalic
5-hour (l(an [lille, R( (OnllllCll(/{ (l t):)l" _9
dirtieroven.
• CUSTOM -Toucll and, using the nulnbers,
s(t a clean filne b(tween 3 holn_s and 7 hours
and 30 minutes, depending on how di m ?_)ur
ovell is.
45Touch LATER.
Thre( delay smlt lime setting oplions arc
a_dlable:
• DELAYED TIME -Touch and then use th_
nlnnber_ to set the amount ol time before you
want cleaning to stal-t. 'IT)rich ENTER.
• START CLEAN TD, IE -"Ik)llch and then use
the lllllllb( FS 10 S([ tile [illl( OI'(]_IV VO[I _V_III[
clealfing Io begin. 'lbuch ENTER.
• FINISH CLEAN TIME -Touch and tb(n usc
tile munbers Io s(t Ill( time olday tbylt yOll
wan1 cl(aning 1o finisll. 'lbuch ENTER.
The door lock_,autonmtically,. The screen will show
the start time. It will not be possible to open the
(wen door until the tempemtln-e drops below tile
lock temperami*: and OVEN LOCKED go(s off.
Wlien OVEN LOCKED go(s off, you will be able
to oiJell tbc (Iool.
(kl doubD"oven mod<_£,you can s_'la dean in bofh _nmlls
al l/w _alm"lilm'. T/u. w'lorzd oven set will autotn(IU,d{_
(May tlw _tmt oi <lealAn_ umil the e,d oi thg flm oven
dean 13cD>o u,til the dda 3' time thai 3ou sel.
Ondoubleovenmodelsonly.
1-711-711II°II I
1-71F-II"II°II° I
(Numberswill onlybeusedwhen
settingaCUSTOMcleantime.)
1-711-711' IIoII I
I-qF-II8II°II°I
To set the second oven, there are two optiorLs
available:
• hnln( diately afler setting tile first oven:
Select PRESS TO MAKE LOWER OVEN
SELECTIONS or PRESS TO MAKE UPPER
OVEN SELECTIONS _ls needed and tollow
stel_ 3-17 _lbove fi)r th( se(ond oven.
• Fr_)m the hollle Sct-eell:
1 'Ibuch SELF CLEAN.
2 "Iouch LIGHT CLEAN, REGULAR CLEAN or
CUSTOM. See above for rcfk_ren((.
3 rI'ouch START AFI_R 1ST SELF CLEAN for
the se(ond oxen to automali(ally stair (lemling
after the first ovcn has finished cleaning or
DELAYED TIME and tbllow stop 6 ab(wc to
set tile tillle yO!l watlt tile qecotld orel] [(l ql_tl-t.
To n'call the nm_ailfi_*gti,w <nthe stm_ lbn+ s_4,touch
SELF CLEAN
• "1\_stop a clean Q'cle, touch CANCEL or the
CLEAR/OFF pad. When OVEN LOCKED
goes off, indicating the oven has cool_ d below
the locking tempei-atur(, you will b( able to
open tile dooi;
28
Page 29

Self Cleaning Oxen
Wall Ovell
_._()!l ll]aV notice SOIII(_ while ash ill Ih(! t)v( 11.
Wipe it up with a damp cloth a£1er th( oven cools.
If 1he {}I(?11 is llO[ (lean _]fl(H- Oil( clean cy(le,
rel)eal Ihe cycle.
• You cannot s(t Ihe ov(n for (ooking until 1he
oven is cool enough f'_r lhe door 1o t/nloclq.
• \Virile the oven is s( lt:-cl(rifting, you can touch
CLOCK to display the liln( of daT,z To return to
the (lean (ounldown, tou(h SELF CLEAN.
• It"th¢ racks b(come hard Io slide, wip( th( rack
supports with cooking oil.
'2(.)
Page 30
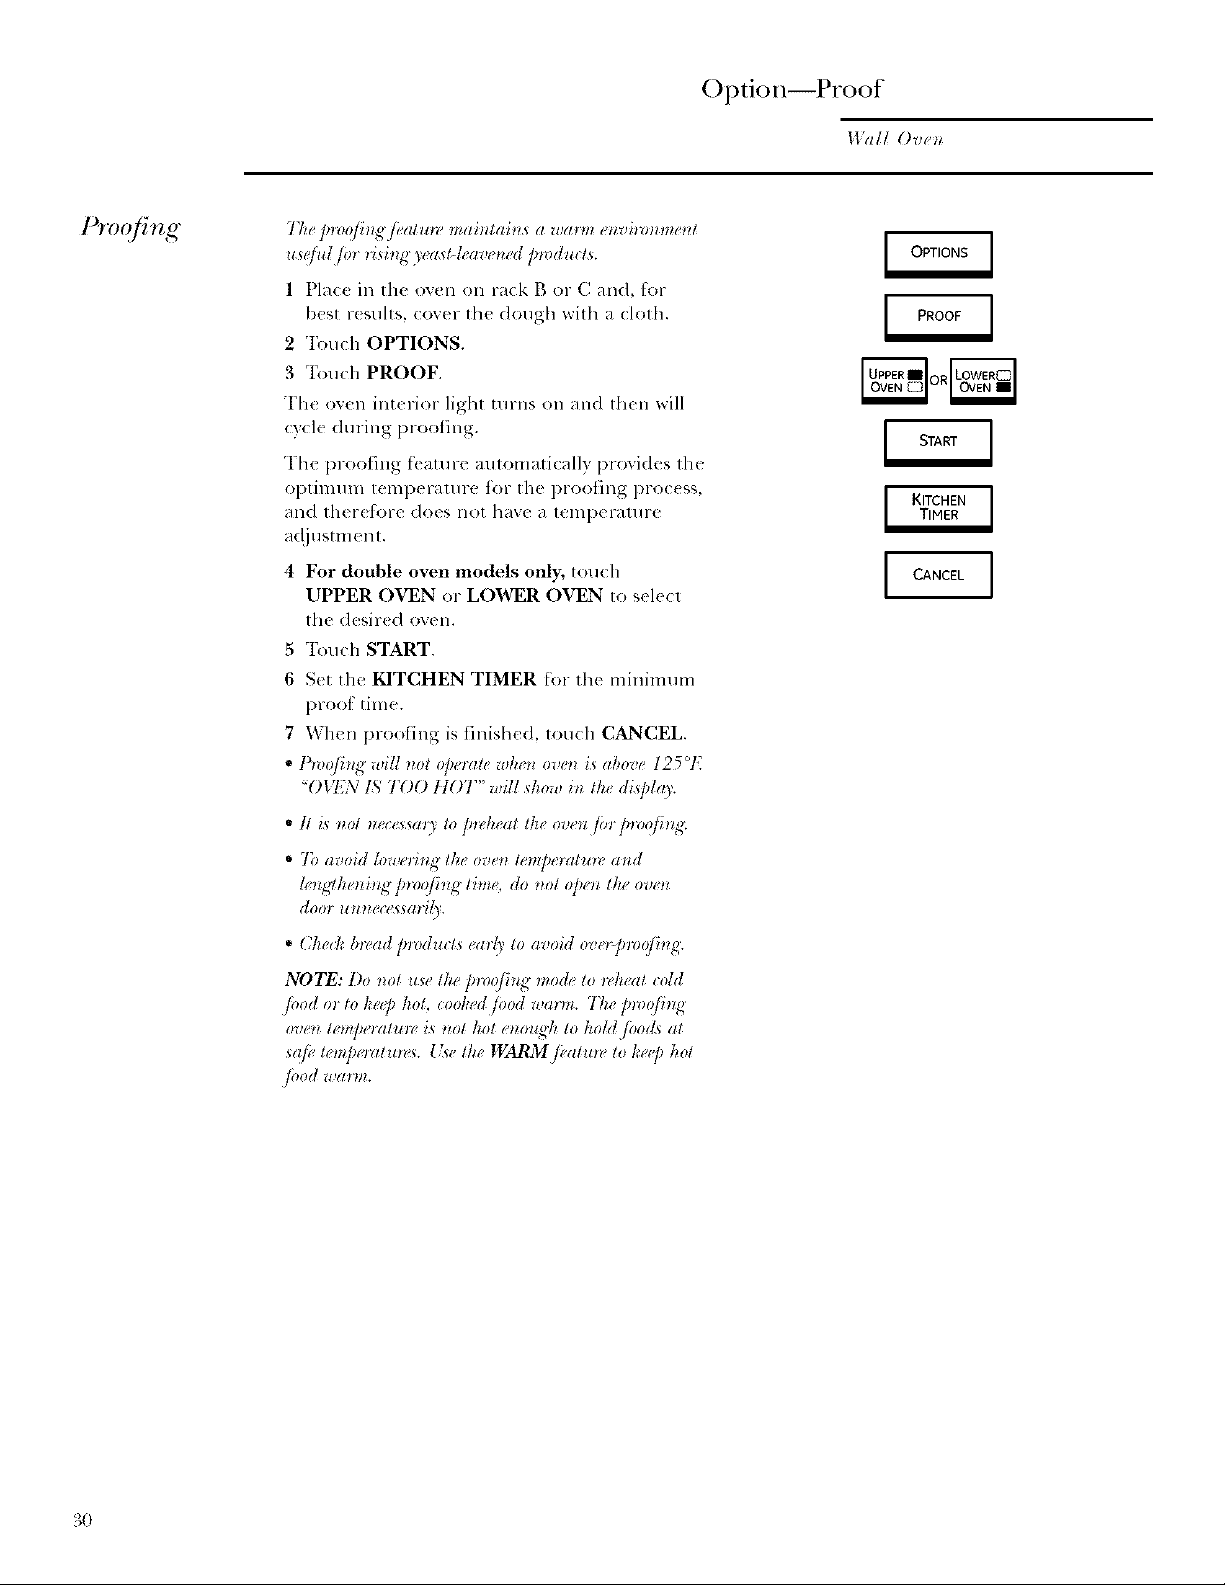
Option--Proof
IValI Oven
Proofing"
The p_t_qfi_*g/_'alun' mai)_tai_s a wa*m envi_rn*tne_*t
us@d fin risi_g ye_sl-k,ave*zd pr_dulrts.
1 Place in the oven on rack B or C and, for
best r(sults, cover the dough wilh a cloth.
2 'Ibuch OPTIONS.
3 "l;)uch PROOF.
"['h{ oven int_ riot light turns on and then will
(3cle during proofing.
The proofing feature automatically provides the
optimum temperature for the proofing process,
and ther(fi)re does not have a temperature
a(!justm( nt.
4 For double oven models only_ louch
UPPER OVEN or LOWER OVEN to select
th_ (lesir_d oven.
5 "l\mch START.
6 Set the KITCHEN TIMER for the mininmm
proot time.
7 When proofing is finished, touch CANCEL.
• Pwofi,g will _lot ofie_*ztewke_*oven is above 12501'.
"OVEN 1'_TOO tJOT" will _kow iu the di,_]day.
CANCEL ]
• I1 i_ m)l nec(<vsm7 to fi_z,heat the ovenflnfiroo/h%
• 7b avoid k)wo'ing the, oven lenq_e_at*m, and
k,lgtke_zhg ]n-oo/hlg lhm _,do nol opelz the ove_
* Che& bread p_t_duas ('arl_' to avoid ov_,>]m)qfi_*g.
NOTE: l)o _lotuse the p_z_ofing mode to _k_'at cold
/,,o_t,,, _oJ,_q,/,o_,_:,,,,/,,,_Uoo_t_,,(..._.T/.,/,,_,,q_,,g
ove_l lenl[_oal*l_z, iS _lOl ]tot enol_R]l tO hold./oods at
s(@ iempozztu_e*. 1ge i/re WARZvIi_,aiu_I,to/:e@ hot
/,,o(tu,ar.*.
3O
Page 31

Warming Warm can be acSvaled tokeq_hot, wol_Mfi_odswarm.
Tk_Qeatu_ _f_*oldef{VizM lo n'keat coM /ood.
1 "Rnlch OPTIONS.
2 Touch WARM.
3 For double oven models o_dy, louch
UPPER OVEN or LOWER OVEN to select
the desired oven.
4 'Ibuch to select HIGH, MEDIUM or LOW
a!ltolllatic set telllpel-atllle.
5 "Ibueh to select CRISP or MOIST, delx nding
on wheflmr you want the foods you are warming
to be crispy or moist.
6 "Ibuch START.
.Mlow time t;.n- the own to be l)_* heated:
LO_,¥ 8 minutes
MED 15 minums
HIGH 20 mimnes
NOTE: The (onve(tion /,m will luvn on dlo'kl,., C1¢1S1_
For double oven models olfly, to set tim s(cond
cwen, select PRESS TO MAKE LOWER OVEN
SELECTIONS or PRESS TO MAKE UPPER
()VEIN SELECTIONS as needed and tbllow
tbe al)ove slel)s.
The set t_ rupee',mire may be chang(d b} touclling
CHANGE TIME-TEMP for the appropriate oven.
The setting'_ may be cancdled by touclfing
CANCEL for th_ approl)riate oven.
The timer can be set by touching SET K1T_
TIMER. See the Kitl:ko_ Tbrwrset tion.
To Crisp Stale Items
• Place food in low-sid_ d dishes or pans.
• For best resuhs, place tim food imms in a single
laver. Do not stack.
• L,eme them llllCOV('l'ed.
• Preheat on LO_N setting.
• (beck crispnes,, after 45 nfimltes.
.\dd time as needed.
A CAUTION: z>,, 1,+,,,/,f,,od
warlni,g mode pn tno¢_,than 2 hom_i.
IMPORTANT NOTES:
• t"ood should h_,t:@l hot in #,s cootri_g ,mtaim, r o_
hzzll@nl,d to a he,ms@ w_vi)*g dab.
• t"ood in kva!-safl, glass and glas_ i('mmic pros ma3
riggeda h{q]l_'_I/n,rn>stat wiling a* goln/m_,d to /ood
i_*nwtat /)a*_v
• ]'}n moistfl)od_, covo" lhem with a*zove*>safl, lid m"
ahtnliltum /oil.
Option _3-trm
Wall Oven
Ondoubleovenmodelsonly.
• l:_ied(nc*iff@_odsdo Hot m'ed¢obe(ovg,_'d,but cml
be(ometoo dl) i/warmvdpn" too I,'.g:
• R@_,atM @e_zhlg q/th_ dora attom_ the hot aft to
__c(t/Jea)ld the /ood to loot.
• Allow extra tim()fin the tetnfiozztm_" i_si(h' the oven to
stabili_' (_b*_adding it_'m,s.
• [Uth Im W loa& it may he m,._smy to use a hi#wr
thl,rmastat setti_*gand I ovo somv o/ th_,Iol,kl,dfl)od
items.
• t¢_'mov,_se_v_i.g_fioon_,et., b@m,placi_*gcontahuns
in the ove_l,
• I)o _ol usepla*lic ,mtainos, lids o*/)b_stic wrap.
A CAUTION: id,0,
ffztatic z_._tp will null i/fila(_.d in the ovo*. kt_'tlz_d/)kzst_c
ma) not b_,_vmovablv and is nol .n)_'wd unde* you_
zty(ll'lglllt_'.
To _rarm Serving Bowl and PLates
7_)zvgt_w*wrvi_g bowls a_zd /dah_s, sel lht, co_*ttvIon
I.OIK
• [ 5se only heat-sat_ dishes.
•Plac( the empb dishes on th( rack. If you want
houer dishes or want 1o heat fine china, [)lease
check with tbe mamlfhcmrer of lhe dishes tbr
their maximum heat tolerance.
• Tim empty serving dish will heat while the oven
is preh(afing.
• Wh(n holding bot, cooked tb(×ls and wmming
eml)t } setxing dislws at tbe same time, plac( the
selving dishes on a high(r rack position and the
food Oll a lower rack i)osifilm.
A CAUTION: ,0t
l w pot hoM¢,ls m"mitts when _,movk*g hot di;k_av
31
Page 32

chart jbr
cris])./bods
Food Type
Bacon
Bread, hard rolls
Fried foods
Pies (two crusts)
Pizza
Potatoes, baked
Tortilla Chips
Tips:
• I.e;,v( food u ncow rt d.
Control Setting
HIGH
MEI)
HI(;]t
ME!)
MED
HI(;H
[ .()W
• Do not use plastic (onlain_ p__wplastic xwap.
• Preheat prior to tls{!.
()ption--Warl-n
Wail ()/,et/
lbmpey ature
seleclion
chart jor
moi,st joods
7)_h_ujJs_,erat diffe_rnt fi)ods kol. sd [he lem[Je_n[ure
to lhe /ood _zeeding the h_Jn,_t _etti_t_. Place the itet._
m't'di_g lke hi,In's[ selling on a h)wer r<wk and items
needling h_s heat on a)t _@e_ _ad¢.
Food T)q_e Control Setting
Beef, medium and well done* MEI)
Bread, soft rolls MED
Casseroles MED
Chili HI(;H
Cooked cereal MED
Eggs MED
Fish, seafood MEI)
Fruit MEI)
Gray}; cream sauces MED
Ham MED
Lamb MED
Pancakes, waffles I,OW
Pies (one crust) MEI)
Pork MED
Potatoes, mashed MED
Poultry ftl(;ft
Vegetables MED
* UM)A/I;SL5 *econzln,,nd_all inlolal tenlp_lalun o/145:'E as the inil_imum
32
_em_tmes
Tips:
• Cover fk_od wifla lid or alumimnn fkfil.
• Do not put wat(r in the o',en.
• Do not use plastic conlainel'_ or plastic wrap.
• Plx heal prior Io Ilqe.
Page 33

Option--Two Temps
Wall Ovell
r_ J
1_ o temps
{ke h_sd a fi_st tempemtun_ with a cooki_g time and
aAo a second temperatme with a seco_d looking t_tm,.
1 "D)uch OPTIONS.
2 "I'_mch TWO TEMPS.
3 For double oven models only, touch UPPER
OVEN or LOBrER OVEN to scl(ct the
d(sired oven.
4 "Ibuch the numbers to set the desired first
temperam re.
5 q%uch ENTER.
6 "Ibuch the mnnbers to s_t the d(sired
length of' the first cooking lime.
7 "Ibuch ENTER.
8 Touch BAKE, CONVECTION BAKE or
CONVECTION ROAST as desired.
9 It CONVECTION BAKE was s(l{ctc(1,
touch SINGLE RACK ibr one rack or
MULTI-RACK for IWo o1 three rack
co,._king.
10 +Ibu(h the numbers 1o set the desired
secolld tem])( l-attwe.
11 "D)uch ENTER.
19 "[buch the numbers to set the desired
length of the second cooking tim(.
13 +Ibu ch ENTER.
14 'Ibuch PRE-HEATED START
or COLD START.
Ondoubleovenmodelsonly
Iq-II_II+IIo1771
7-11,II+II9Irq
Iq-II_II3IIo1771
7-11,IIoII9IFq
1-711_II_IIo1771
Ell' II+II_1771
1-711_I1'IIo1771
Ell' II_II9II-q
33
Page 34

Options--Cook & Hold and Dehydrate
Wall Ove_*
Cooh and
hold
Dehydrate
34
)'bin"cc,whld has a {_& alzd ho/d fi,atu)v thai keq_s_cg_edjbods
u,armjbr @ tu 3 kcm_:saft:* Tim_*dBakit_g cnTimz,d I?oa.sli_g'
isjinist_d.
NOTE: Thi._ji,am_v _nz on6' heprogrammed to wo#_with
Tim_,dtlakittg cn 77m_&!¢oc_lir_g:(S'_ tlu, ( si_lgtlw tim:d
b&bg or thread*oastit_gfl,atmes <ectiol_.),_fio 7bned Bakil_g
o_Ti_d Roasthg ka_au&l_lati_a[{_,st@_?d at_d llw ,_,I()RI_
TIA'_" @ticm_mds,llu /_r0grammed{r_&a_d hold will
automatiud[3,stmt.
There are two _ays to activate this Dature for use alter
Timed Baking or Timed Roasting:
• After setting a Tiraed Bake or Timed Roast:
1 Touch ADD BAKE OPTION, ADD CONV BAKE
OI*HON or ADD ROAST OPTION depending on
the cooking mode you ate setting.
2 Touch COOK & HOLD.
3 Touch OK
4 Touch PRE-HEATED START or COLD START.
Ddo'drati¢m (!)*)'h_g.)£sa )n_thod (_p_?_ _b_gjruit_,
-uegelables, ked)_(nzd meal,_hy *_'m;rvit,gmo£_lu*_,sobacleria,
yeast and mohl ccoznotg_rm!a_ld q_oilt]w/_od. Z]*_"(_uetzttsl,s
an aul_mmtic w,lt+,mpt4rrfu_,and ttu,(rma_ectionja_z to _r*m(,_:('
moistu,e /h,_mltwfilods 1o(by <o_dpmserl_,tlwm. :Yolelhat i_lr)
t2 hours m<O'b *Wnh_dtl>(h3' _om:fc_M:.
Ag:cll_'glt(':n_d(znr@k:l:i@)rlnatiimo_Ibaaicfi)M(hykg g
(_,<,d<£,/_.:_,,,,>,o,,,_,_<d(_,op,.,-:,::,_.,,_u:,,,io,_:,.,-.i.d/':'.
To locateIkisqfjic:'b_)'ou_area,lo::kit:you)ld@hlm:
dilvg:lo)y[o_ltw (_utl(;'gr,_e('nzm_ltI_:itltt_ Io_de)ym)
('ott?_@ _(l)llt.
Durilg dehydm'ticm,you_ ovet_doo)mus! _:m:zinpm¢ial6'
op_ toalJzm@)rah cinulatlon(:tzdmoLstu_vr_,mcraaL
(i_:'tlw delg'draiicn_dcx)Blop,wtlid_ is it_ducted wilh you_ avi_I,
Wkold tlu dooropo@n ddlyd)rzticm.
1 Open the oven door;
2 Place the magnetic end of'the doorstop onto the
upper inside surfilce of fl_e oven doon
3 Close the oven (loo_; allowing the door to test ag',dnst
the doorstop.
4 Touch OPTIONS.
5 Touch DEHYDRATE.
6 For double oven models only, much UPPER OVEN
or LOWER OVEN ro select tile desired oven.
7 Enter the temperature (max. 200°F).
8 Tt)uch ENTER.
9 Touch START.
NOTES:
• 5lcm,thedool:st@i, a s@plm*'whennot m u,_:.
• (Lw0_@ i]u'doo)sl@/nrrvidgd zvilll your mu>r_atzdon6' u_,
lhedcx_)sl@wlIiledekyd)t:tfi_g.
• Do _u>lslcnelke (t:_nsl@ m Ne :rvelz.
• [_,melnb_r&at l]uflmpe)pn,pcnrttirn_,h_'z:tlzu?Izt:nzdstorage
.i:,od.,_.:._:,_,t;.d/o,-:/,_.</,,<d4t,.,,d:(,:/iv>'oi&i:.dli,.d.
• Set ttsing OPTIONS:
1 Touch OPTIONS.
2 T, mch COOK & HOLD.
'1 For double oven models onl); touch UPPER OVEN
ot LOlt*,T,R OVEN to select the desired oven.
4 TIruch ()I_
5 Touch BAKE, CONVECTION BAKE,
CONVECTION RO:gST (n TWO TEMPS.
6 Touch the numbel', to enter the tempel:aure(s) and
the time(s).
7 Touch ENTER.
8 Touch PREHEATED START o_ COLD START.
Placethe magneticendontothe upper
insidesurfaceoftheovendoo_Close
thedooragainstthedoorstop.
Dehydrating Helpful Tips:
•34u/llp[_,_:(l_.so[fimd cat_b"driedatoIietiI_,.
• !)o'i_g" tilrwwill i:a_)'d_?u_zdin£lnz_#:)zdflz_trns:
•amout_to/_fi)iMotzealkrad:
• ,;z*:slz:q:,:a_,dt/dd,',essqll;_)d
• lypeoj:hying'/raysuwd
• (rs_'j?):)d ]*II!sowgrfiI:I_1_'*c*u_}w%sl_(]IgASy0*o/oral
<_)(_(:)r¢t_i:eext<>l:_icm_e)'¢ia,,<:_ag_d(h'fl:rselectOr:g
fi:r_t-safl::hyh_gSt<O's.
To ordera replutement doorstop,callotn National
PartsCenter_t800.626.2002;,ndref_'ren_e
WB08T 10024.
Page 35

Option--Delay Start
Wall Ore**
Delayed
start and
aulomatic
.w,p
NOTE: FoMathai spoile(**i{v--sudlasmilh,(i_*s,
/hg _luffh_A_,poultU and/xnb_hould nvl beallowaltosit
br morelha_,1hornb,./bworafter_>ol{b_g:t "oomto@_qatm_
[nomolestll_,g_rv,ll/I(j Mmqul baclo'ia.
}bucrmsetlh_(raen(:o_ztwltodda3>stargtke_x_enin Bake,
(._mveclio_zEakeorConveclionRoastfl)ra _/m_i_II_IL@
o/limeandl/io_turn (_[a*aomatbal{_'.Also seeth_>77reed
Bd?hg and 77reedRoaslhg and lhe77rod Ccmvection
Bakk+gand Thm/dt'o<lsth+g*<!<:tbm.s.
Make sure the clock sho_x the correct time of dm
1 Touch OPTIONS.
2 Touch DELAYSTART.
3 For double oven models olfly, toucll UPPER OVEN
or LOWER OVEN to select d_e desired o_en.
Twodela) stmt time setting options ate available:
• START COOK TIME- Touct/and tben use the
numl.'el:sto set the amount of time before _ou
_<tntcooking m smm Touch ENTER.For
example, if)ou x_mt cooking to begin in
2hom_, enmr 2, 0 and 0.
• FINISH COOK TIME- Toucb and then use tim
numbers to set tbe amount of time be)_)nd tlle
time of dm that )ou x_vmtcooking to end. Touch
ENTER.For e_ample i_'itis 12:00,}our cooking
time is2 hom.'sand you xqmt to serve dinner at
5:00,then enmt 3, 0 and 0.
Touch BAKE,COI'_rECTION BAKEor
CONVECTION ROAST as desired.
6
Tooch the mlmbers to set the desired tenll)erature.
7
Toucll ENTER.
8
Toucll tlle numb(rs to set tlle desired I_ngth of
cooking time.
9
Toucll ENTER.
10
T_o start options ar_ available when th( dda)ed
start time isreacbed:
• PREHEATED START- Touch to select prehem.
"d,rhen the delayed smtt time is reached, tlle oven
_dllturn on and preheat _ill begin. The oven
inwrior ligllts will turn on and stay on until
file ovel/tLIF/IS Of]',
The convection tim _dll turn on during
preheating. The conn-ol _ill signal when the
oven is preheated--this will rake approximately
10 minutes. The screen will show the set
telll])elvtttlre.
• COLD START- Touch to select lot tile oven to
start immediatel) (_dtbout prebeaing) when the
delayed smlt time is r{_ched. The oven interior
ligh{swillturn on and stWon until the oven rams
oiE The convection Emwillalso turn on.
For double oven models only, to set the second (wen,
select PRESS TO MAKE LO_,_,_R OVEN SELECTIONS
ot PRESS TO MAKE UPPER OVEN SELECTIONS as
needed mid t;c_llm_tlle above steps.
Ondoubleovenmodelsonly.
I-ql -IFII oII I
I-ql-qrql iioI
I -IIZJ-;-IIoII I
171Fq -II IIoI
I-qDI-ql oII I
1711-ql -II IIoI
The set temperattn'e ma) be changed by touching
CHANGE TIME-TEMP tbr tile appropriate oxen.
The settings may be cancelled bytouching CANCEL
for the appropliate oxen.
The timer can be set b) touching SET KITCHEN
TIMER. See the Kit(hel_ Time, section.
\_q_en d_e dela}_d smtt time is reached, die oven will
start and contimle to cook tbr the pt_grmnmed amount
_fftime, then shut off automatically, unless the Cook
and Hold t;_attlre w_tsset. See the Co& and Holdsection.
,gtet cooking is complete the <wenwillsignal md
"MORETIk_" willdisplm for five milmtes. Check food
for doneness. If"more cooking time isneeded, touch
MORE TIME and enter additional cooking time.
If'not selected, the screen willautomatically clear
ill FIve minums.
_5
Page 36

• " 1
Opuons--=Sab )ath and Help
Watt Ovell
Sabbath
jot rv£ular
bakiw_/
r_astin F
(Desi¢>zed,/br
u_e on the
Jewish Sabbath
and
Holidays.)
modd_ )
77_e&tbbalh fialuw i:a,z b_ used fi_l bahi,_g'/,_mstitlg"
'_m/Ll! cat, no! be used/in i:otrl,el:litm, b!_lilD_g,
sel/-(lea _i rig"ol 1)dc0 St arl i:ookittg.
1 'l'ouch OPTIONS.
2 Toucb SABBATH.
After entering tile SABP,£I'II screen,
the toucll SCl'eell pads will 1101 SOllll(1, They
will change color to indicat< they are set.
3 For double oven models o_fl?,; touch UPPER
OVEN BAKE and!or LOWER OVEN BAKE
to select lbe desired oven(s).
4 Touch the numbers to s{t th{ d_sired
temperature between 170°F and 550°F.
No signal or temperature will b_ given.
5 Touch START.
6
After a random d_lay period of
approximately 30 s<conds to ] minute, the
oven will begin baking/roasting. Tbe touch
screen will not change and the oven light will
b< disabl_ d.
To a{!just th( oven tempcrature, repeal st{ }s 3,
4, 5 and 6.
To canc{l Ib( Sal)batll optiol'_, touch and llold
CANCEL HOLD 3 SEC fi:w three se( onds.
NOTES: CANCEL HOLD 3 SEC, CLEAR/OFF
and CANCEL are the only pads wbich are
immediately active during Sabbath baking.
These pads will cancel th( current bake
operation immediately after being pressed
an(l should onl} be pressed after SaI)bath _nds.
All other keys llave a delayed ell{ ct.
If' a power outage occurr(d whil( the oven was
in Sabbath, the ovell will automatically turn off
and stay off even when the power returns.
Sabbath mode will resume, but all}: bake
operation will be canceled.
NOTE: If a bake mode or a timed-bake mod_
is active prior to entering the Sabbad] mode,
those baking modes will slill be active after
entering the Sabbath mode. All other cooking
modes will be canceled after Sabbath lnode
begins.
_ AND/OR
I , II II 11731-;-I
I oII II 11731-71
Hdp./i at'ur
o •
ob
7buch this pad to find out mo_*"about 3our 0ve_'_
p'al?_vs.
1 "Ibucb the HELP pad.
2 Touch the • (up) or • (down) arrow to
s_lect the desired lcature.
3 "Ibucb ENTER.
4 Touch the • (down) arrow, if present, t(} see
all of the IIEI.P text.
5 Touch EXIT HELP to exit the IIEI_P screen.
Page 37

Options--_Settings
Wall Ove*_
A c(ju,st
the oven
thcrm, ostalm
Do it
yourself
};m m(ty jkM that your m'w oven i od,!s diffewml_ than
the ore, iZ_jda(_U. gise)om m_,, ov<,z p, a pw wed+.+to
become mme /amilim with it. Ii 3ou still thh_h 3our n<_v
ove_z zs too hot or tlm Iold. you (<nzadiu_l the ih¢_ww_lal
l)o _wt use th_,rmom+4e_, suck as thav fim_M i_
g+++<+a]' _toles, to dwd: l]u" ho_tpemllm_ vqg_lg o/ )oul
OVelZ. Tirade lk/+wtomeha'+ may Valy 2(L_O dt;q'w<+s.
NOTE: Tk+s adju._tme,zt will o.l_ <{fled balding
<rodma.stb_g t_m]mmtun<_: it does m)t a/fi'l t hnMh+g;
.mva tio++._ s@cteani++g t+.n]wtz_tm_+s.Tk+ adiushm+m
wig be_'tain<'<t in tn+,ntny qihn a p<,w_*_/aihm+
1 Touch OPTIONS.
2 _Ibuch ,SETTINGS.
3 "Ibuch TEMP SELECTIONS.
4 "Ibuch TEMPERATURE OFFSET.
5 The oven tempel-,itm-c can be a(!justed up to
(+) 35°F holier or (-) 35°F coolel; rlbuch + 1° •
or- 1° • to increase or decrcase th_ offset
lelllp(!l'_llll-t _ ill 1o increments.
6 When )ou have mad( the a_!justment, lOllch
OK and DONE. [se yl:,ur (:,v(n as you would
nonnall>
7b set the
clo&
The dod: musl be sd to the I:m'_,d time o/ d<oi<n
tlw <mtom<ltic<*veulbnh+g /h*z(lio_ Io w<nhpmpot>
Tlw time oj day (<tmwt hi, (ha_gvd <ho{zg a g_wd
Mt:kg <n's@lk'a_zi_g O'l&
1 rlbuch OPTIONS.
2 Touch SETTINGS.
3 Touch CLOCK
4 rlbuch TIME SETHNGS.
5 Three options are available:
• "Ib set a 12 hour (lay time: Touch 12 HOU1KS,
touch SET TIME, enter tile lime ill hotll'q all(l
lnimltes from 1:00 1o 12:59, touch AM or PM,
touch START and touch OK
• To set a 24 hour (milimly) time: "Ibuch
24 HOURS, lOllch SET TIME, enter tlle lime ill
hours mM minutes fFOlll 00:01 to 23:59, touch
START and tou(h OK
• "Ib set for daylight smiug>, time: "l\+uch
DAYLIGHT SAVINGS, 1ouch BACK 1 HOUR
t++fidl I)a(k one hour or umch FORWARD
1 HOUR to spring t'ol;vaixl one houl:
6 "Ibuch SET TIME.
7 T¢)tlch tilt' mmflyers 1o t,lltCl- the current time in
houl> and minutes.
8 Touch AM or PM.
9 "Ii-_uch ENTER.
I-v-II II0IFr-1
Ell' II II°IFq
Make sule thedock is setto the
correcttime of day.
37
Page 38

IVilh lhis @lion, shoubt you fi)_g_4 and h,avt' lhe
oven on, the I ont_)l will aulomaticalfy turll q// the
oven afl_,r 12 hom:s dm'h_g baki)lg /u_! lion_ or q/te_
3 kou_:_ dm'itg a broiI/unctk_n.
NOTE: On doubh oven model*, lkis activate* lhis
sp_cial /t'ahow fi_*bozh ove_ls.
Follow the st(ps below:
1 "D)uch OPTIONS.
2 Touch SETTINGS.
3 Touch 12 HR SHUT-OFF.
4 'Ibuch DEACTIVATED or ACTIVATED.
5 rIbllch OK.
Options--Settings
IVall ()ve_
Cloc/
blackout
Fa hn nheit
or ce£ius
temperature
selection
I/you would pr@n to bhu:k out the clolk dis[day,
fillllml the sl@s below.
1 Touch OPTIONS.
2 'D)uch SETTINGS.
3 "Dmch CLOCK.
4 "ILuch DISPLAY.
5 Tou(h ALWAYS OFF.
6 "ILuch OK
7 "ILuch OKugain.
NOTE: ]]the clol:h is zn th_ blach-ou! *nod< rou will
not be abh, lo u_e the !)ela_ gIzI_g I_ZlZtlZO_L
)'ou* ove)t conh_d is set to use the lgahn')theit
te_l/_e_atu_v self,ilion,s, hut 3'ou ;/za3 (:h<t_tg_,lhis lo use
the Cdsius selections.
1 "I_)uch OPTIONS.
2 Touch SETTINGS.
3 Touch TEMP SELECTIONS.
4 7)inch TEMPERATURE SCALE (°C-°F).
5 'I_)u(h °F fbr Fahrenheit or touch
°C tot Celsius.
6 "['ouch OK
7 Touch OKagain.
8 "I)mch DONE.
NOTE: O_z double o've_z modds, lhe new _etti_g will
alq)/y /m both ovens
38
Page 39

Options-_Settings
Wall Oven
Auto R_c_;e"
Conve_:sion
Language
Whe. usi_g convectio_ bah< the Auto t?z'd]_d"
Conw_:sion option wzl/ automalil al(_' i:o_zvelt elztetvd
!_ alar bahhlg [em/)azzttt_t<_ 10 i:onva:tio_ baki_lg
Only [he fi'allm" A activated, the _ct_e_l will show the,
actual convelled (n_htced) lem/_e_alun _. For exam!de,
i/yo,, _,,t,.-_,,-,wd., ,_,}l'_t,.,q..,_,_,,,_,o/35o7,"
and tou_ h START, the _ _v_'_lwill show CON a_*d
the ¢onw,_7_d tem/wralm_ o/ 325°E
NOTE: This o]dion do_s not I:onvol i:onvel:lio_z bahe
coold.g times, ont_ wg'l&zr bahi.g [et.J)az_turt<_.
To activate/deactivate the feature:
1 "l\)uch OPTIONS.
2 Touch SETTINGS.
3 'ILuch AUTO RECIPE CONVERSION.
4 Touch ON to tlll-ll the aulo conversion
option on or OFF to tllrll th_ option ott.
5 "l\)uch OK.
6 Touch DONE.
This @tio_ atlo_s )ou to choose E,gi_h, ,'_/m,Ah
or l')_'nch fi. the, touch _l'_'e_l.
1 "l\mch OPTIONS.
2 Tou(h SETTINGS.
3 Tou(h LANGUAGE.
4 'ILuch ENGLISH, FRANCAIS or ESPAlqOL.
5 "Iouch OK
Dislday color
This option allou*s ";ou lo i:hang_, lhe i:olm:_ iq lhe
[Olt(:]_ _tTIP#)I.
1 "l\mch OPTIONS.
2 "l\)uch SETTINGS.
3 Tou(h DISPLAY COLOR.
4 'Ibuch the desir_(l colors.
5 'Ibuch OK.
39
Page 40

Options--Settings
IVall ()ve_
Sound on/oii
7"h_s@lion allows you/o/ur, on or o// the be(jJ
sou_d _l'l_e_*a pad is toucked.
1 "l_)uch OPTIONS.
2 "Iouch SETTINGS.
3 'Ibuch SOUND/VOLUME.
4 'I'oudl SOUND ON/OFF.
5 "Ibu(h SOUND ON fi_r the p_ds to beep
wh(n touched or touch SOUND OFF to
elimimlte the beep when p_lds are tou(hed.
6 'I_)uch OK.
7 'Ibueh OKagain.
8 "l\mch DONE.
Sound volume This fl,atmz_ allows you/o adlust the sou_d volumes
to a more a.vplable vohtme. Tltere (m" fhn'_, possible
voh_me levels.
1 "I)mch OPTIONS.
2 "I)mch SETTINGS.
3 Touch SOUND/VOLUME.
4 Touch VOLUME.
5 "I\m( h HIGH, MEDIUM or LOW to s(lect
lh( pad sound level when touched.
6 "Ikmch OK.
7 Touch OKagain.
8 Touch DONE.
40
Page 41

• "" Qg'nal T]ds o])[io_*allows you to set lhe l)'/*e o/*ignat used
al lhe end o/ a timed Oc/_'.
1 Touch OPTIONS.
2 "I'¢mch SETTINGS.
3 Touch SOUND/VOLUME.
4 Touch TIMER SIGNAL.
5 Touch CONTINUE, 1 BEEP, 2 BEEP
or 3 BEEP.
6 "Ibu(h OK
7 Touch OKagain.
8 Touch DONE.
Options--Settings
Wail Ol,etl
Kilchen
timer sig'nal
SoundAJolume
d(¢izult
7"kis option allows you lo _et lhe t?'pe o/ _i_zaI used
ib_ lke /,'it(:ltelztillze_:
1 Touch OPTIONS.
2 Touch SETTINGS.
3 "IBuch SOUND/VOLLrME.
4 Touch KITCHEN TIMER SIGNAL.
5 Touch CONTINUE, 1 BEEP, 2 BEEP
or 3 BEEP.
6 Touch OK.
7 "Iouch OKagain.
8 Touch DONE.
Tlds @!ion* atflm_s you to au_omaticalf) set all
_ig'_zaZ_lo lhe d@lldt s(4ti_tg_.
1 "Ibuch OPTIONS.
2 Touch SETTINGS.
3 Touch SOUND/VOLUME.
4 Touch DEFAULT.
5 Touch OK.
6 "Ibu(h DONE.
41
Page 42
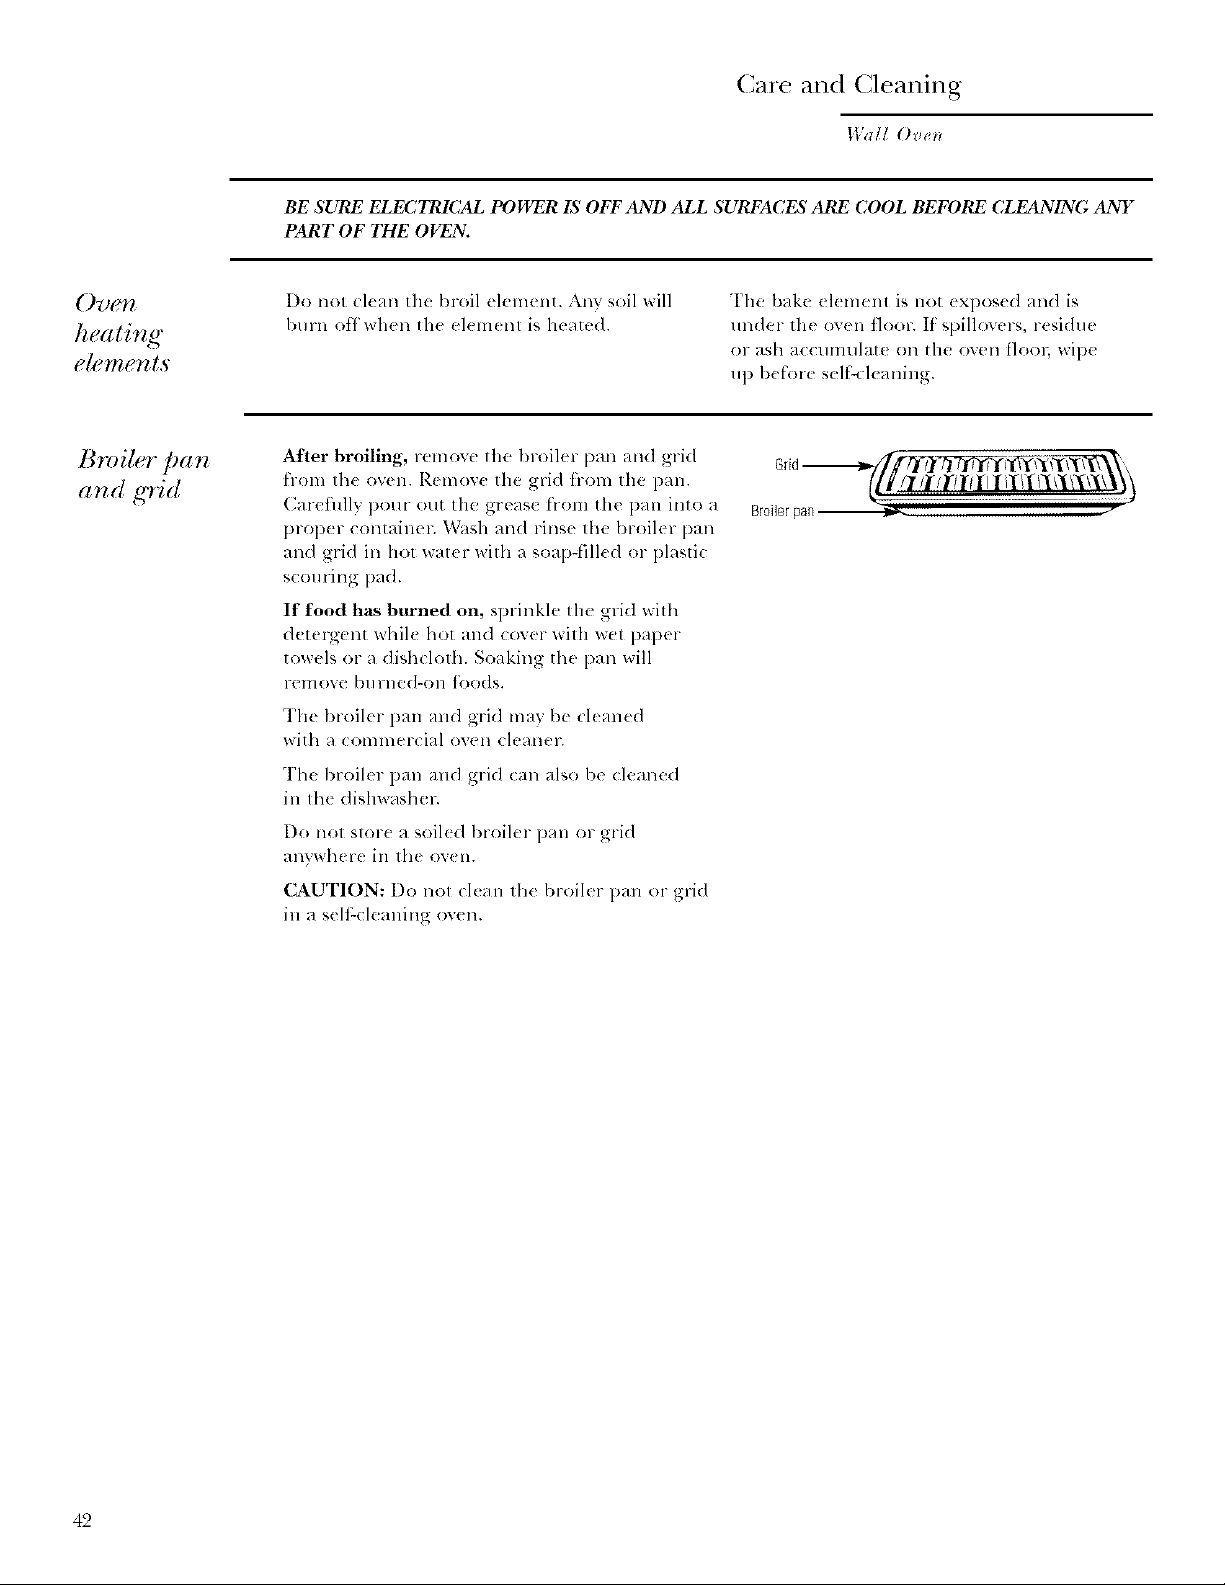
Care and Cleaning
Wall Ov_II
BE SURE ELECTRICAL POWER IS OFF AND ALL SURFACES ARE COOL BEFORE CLEANING ANY
PART OF THE OVEN.
07U#71
heating
eh m,ents
B roiler pan
and g'rid
1)o not cl(an tim broil <l(m(nt. AFIVsoil xdll
burn off,,vlven the el(re(hi is heated.
After broiling, remove tile broiler pan and grid
from the oven. Remov( the grid h-ore the pan.
Carefully pour out the grease fiom the pan into a
proper container. Wash and rinse the broiler pan
and grid ill hot water with a soap-fill(d or plasti(
scouring pad.
If food has burned on, sprinkle the grid wifll
dete_Nent while hot alld cover with wet paper
towels or a dishcloth. Soaking the pan will
relllOxe bllrned-on _}_o(Is.
The broiler l)an and grid may Ix cleaned
with a COllllllercial ()Yell clealleF.
'l'h( broikr pan and grid can also be cleaned
in Ih_ dislmasher.
Do not slot( a soil(d broiler pan or grid
allv_vhel'(_ ill lh( t)v( 11.
Tlle bake el(mere is not expos(d and is
under tile oven floor. If spillovers, residue
or ash accumulate on tile oven f]ool; wipe
up b(f'ore selfk leaning.
Broilerpan I_,
CAUTION: Do nol clean lhe broiler pan or grid
in a s(lf<leaning ow!n.
42
Page 43

Care and Cleaning
Wall Ove*_
Oven racks
The racks ma} remain in the oven during tile
self-cleaning <Tcle withoul being damaged.
Periodically, aher several self-cl(an cycles, tile
oven racks mav need to b( lubricated using
the Graphite Lubrication shipped with your
wall ovell. "I'r) order addiliona] Graphite
Lubrication, (Tall our National Parts Center
800.626.2002 and relk rence 1NB02T10303.
1 Remoxe rack fi-om tile oven. See the FIdl
ex!e_*_io_* ove_ _(t¢lg_ section.
2 Fully extend tile rack on a table or
countertop. Newspaper ma) b_ plac_d
underneath the rack for easy dean up.
If there is debris in the slide tracks, wipe
it away using a paper towel. NOTE: A_)'
g'la]_hih lubricalz¢ wi/wd awa_ must b<,_v/)lac<,d.
6 ()[)ell and close the rack several times to
disHibute the lubricant.
7 Replace tile cap oil the lubricant and shake
it again. Turn tile rack over and repeat st(ps
3, 4, Sand6.
®
® ®
Shake the graphite hlbricant betk)r( opening
it. Starting with left slide mechanism of the
rack, place t;,mr (4) small drops oI hlbricant
on tile lwo (2) bottom tracks ot the slide
dos( to the bearing carriers.
5 Rq)eat for the _ight slide nl_.challiSnl of
the rack.
Leftside
Rackup-side-down
Rackup-side-down
8 Close tile rack, turn rack right-side-up and
place in the ov(n. S(e tile lhd! ('xleltviolzov#lz
r(t&s s( ction.
Page 44
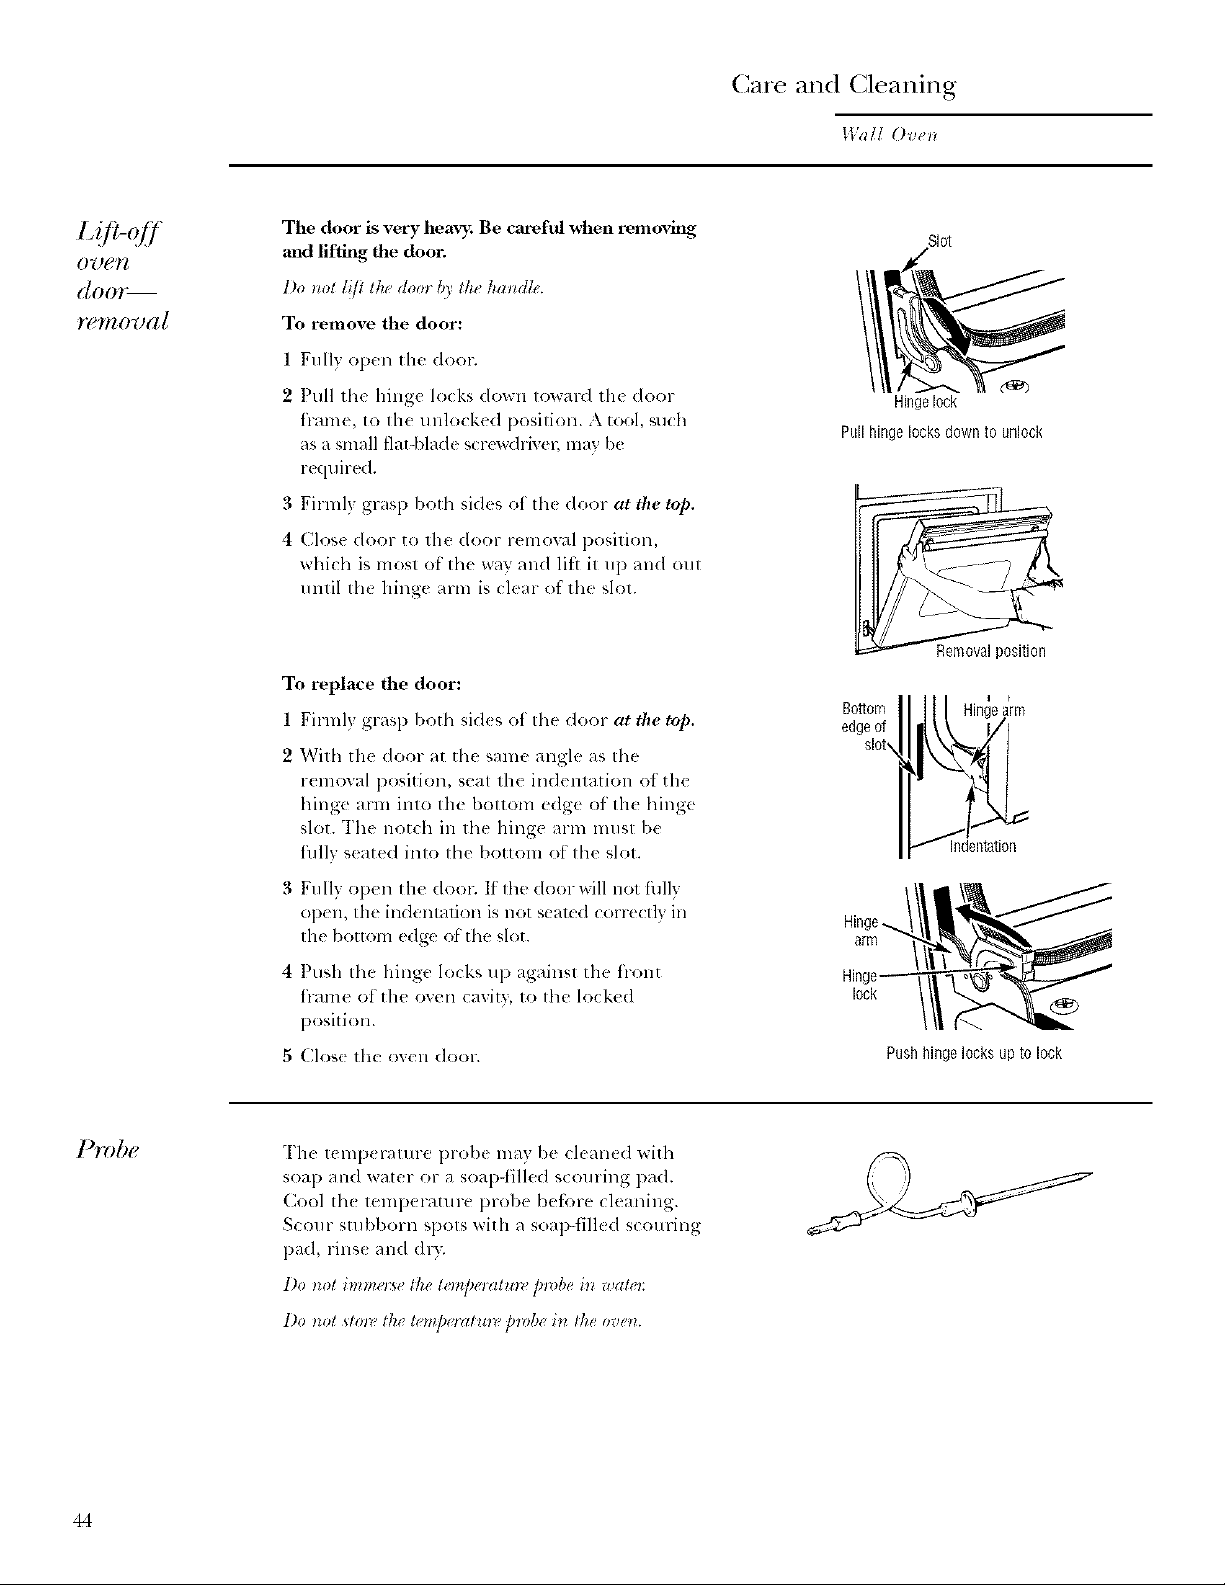
Care and Cleaning
IVall ()ve_
07)e1_
([007:_
The door is very heavy. Be careful when removing
and lifting the door.
1)o not lift the doov b)' the handk,.
To remove the door:
1 Fully open the door.
2 Pull the hinge lo(ks down toward the door
frmne, to Ih( unlocked position. A tool, su(h
_s a small flat-blade st rew(lrivel; may be
required.
g Firml} grasp both sides of th( door at the top.
4 Close door to the door remowd position,
whi(h is most of the w_l3 and lift it up and out
until th_ hinge arm is dear of the slot.
To replace lhe door:
1 Firml} grasp both sid(s of the door at the top.
'2With the door at the same angle as the
r(moval position, seat the indentation ot the
hinge arln into the bottom edge of th_ hinge
slot. The notch in the hinge arm must bc
fllllv seated into the bottom of the slot.
SI0t
Hingelock
Pull hinge locks down to unlock
Removalposition
BoSom 'ea_rm
edgeof
slot_
indentation
]hobe
3 Fully open the door. If tl_e door MI1 not fhlly
Ol)(n, the indentation is llOt seared correctly in
the bottom edge ot the slot.
4 Push the hinge locks up against the fl-ont
h-ame ot the oven caxity, to the locke(I
position.
5; Clos( the OVell door.
The temlx rature l)robe lnav be cl{ an{d with
soap an(I water or a soal>tilled scouring pad.
Cool Ill( temperature probe betbre cleaning.
Scour stubborn spots with a soal)-till{ d scouring
pad, rinse an(I (h>
Do not immo:se lhe to¢_[)el(Itmv p_)be i_ walel:
1)o not _lo_v lhe tem])oalmv ])_vbe i_* lhe overz.
arm
Push hinge locks up to lock
44
Page 45
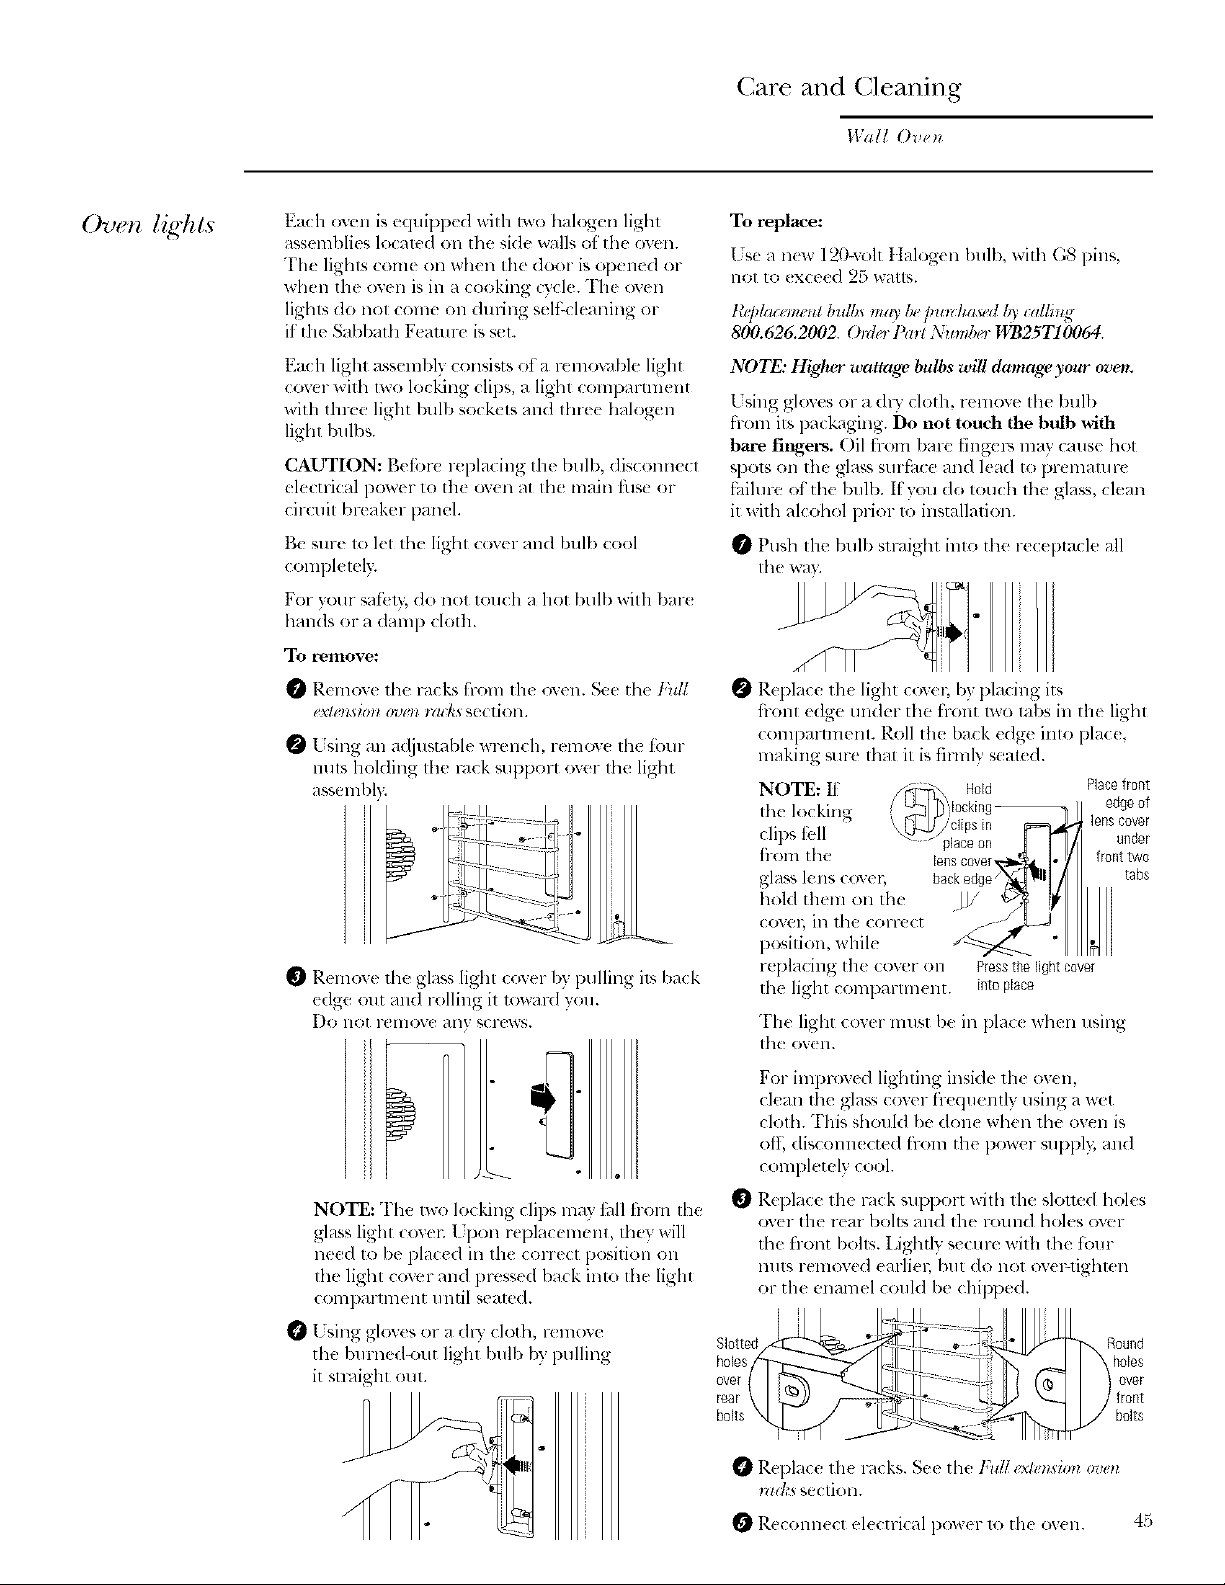
Care and Cleaning
Wall Oven
Oven lig'ht,s
Each own is equipped with two halogen ligbt
assemblies localed on tile side walls of' the own.
The lights come on when tile door is opened or
when the oven is ill a cooking c}cle. Tile oven
ligbls do not come on during selt:-deaning or
if tim Sabbath F_auux is set.
Each light assembly consists ot a removable light
cover witb lwo locking clips, a ligbt compartment
with tinco light bulb sockets and fine( halogen
light bulbs.
CAUTION: Befi)re replacing tile bulb, disconnect
electrical power to th( ov(n at the main fuse or
circuit breaker panel.
Be sure 1o let the light cover and bulb cool
COlnpletel>
For your saii.t>,do not touch a hot bulb with bar(
bands era damp cloth.
To remove:
Remove tbe l-acks from tile oven. See tbe ]"ul/
exloLsto_z (n2oz _adcs sectiolL
ksing an a(!i'dstable wrench, remov( Ill(! Ibm-
nuts hoMing the m_k support over tbe ligbt
asseml)l
To replace:
Use a new 120woh tialogen bulb, with G8 pins,
not to (xceed 25 watts.
tYpl..,me.t bul&_mrO'b,'pu_rha_,'d b3 .dli.g
800.626.2002. OMo Pint Nu)abo VfB25T10064.
NOTE: Higher wattage bulbs will damage your ownt,
Using gloves or a (IU cloth, remove the bull)
fi-om its packaging. Do not touch the bulb '_ith
bare filNers. Oil from bare fingcl_, may cause hot
spots on tim glass stlrl_hce and lead to premature
failure of tbe bulb. It you do touch tim glass, clean
it witb al(ohol plier 1o installation.
Push Ihe bull) sll'aigbl into the r( cel)ta(le all
tile wa).
Replace Ill( ligllt coy( l; by [)lacing its
fl-onl edge under tile h-ont two labs in the ligbt
comparunent. Roll the back edge into plat(,
making sme that it is firmly seated.
NOTE: It /_-_, H01d Placefront
th( locking ( LL'l_l_'l°ckir'g_ I ele_0ev_fr
.... _._Sr/clips in _ 1.4
c ps _ _-_ _ g _/ under
b-ore tbe ions covervt_0_ I-// fronttwo
glass lens (or( 1; backedge/N_d III] / tabs
.... placeon
b,,ldth ,l,,,. .LJ/ {t
coy(t, in lbe corre(t _ -o/ LJ I III
Remov( tbe glass lighl cove- 1)y p lg its back
(dee out and rolling it toward you.
[)O llOt I'(!InOVC all / SCl-UWS.
NOTE: Tbe 1we locking clips may tall from tile
glass light covet l Jpon replacement, they will
need to be placed ill file conect position on
tile light cover and pressed back into the light
(Ollll)alllllel]t lllltil seam(I.
t_ [sing gloves or a de,' cloth l-emo,,e
the burned-out light bull) b:, pulling
it straight out.
replacing the covcr Oll Pressthelightcover
tile light compartm(nt, intoplace
The light cover must I)e ill plac( when using
th( ov( II.
For improved lighting inside th( oven,
dean the glass cover frequently using a _(*t
cloth. This shouM l)e done wben tbe oven is
off; discoml(cted from tile power SUl)pl}; and
comph_tely cool.
Rq)lace the rack SUF,l>:n-twith llle slotted boles
ov(r the rein- bolts and tile round boles over
the front bolts. Lightly secure with the tour
nuts removed earlieg but (Io not ove>lighlen
or tile enamel couM be chil)ped.
0 Replace 111(rocks. See tbe t;)dI ('xl_usilnzo_'tll
_?_t]ts sectioll.
Reconnect el(ctrical l)OW( r 1o th_ ov( 11. 45
Page 46
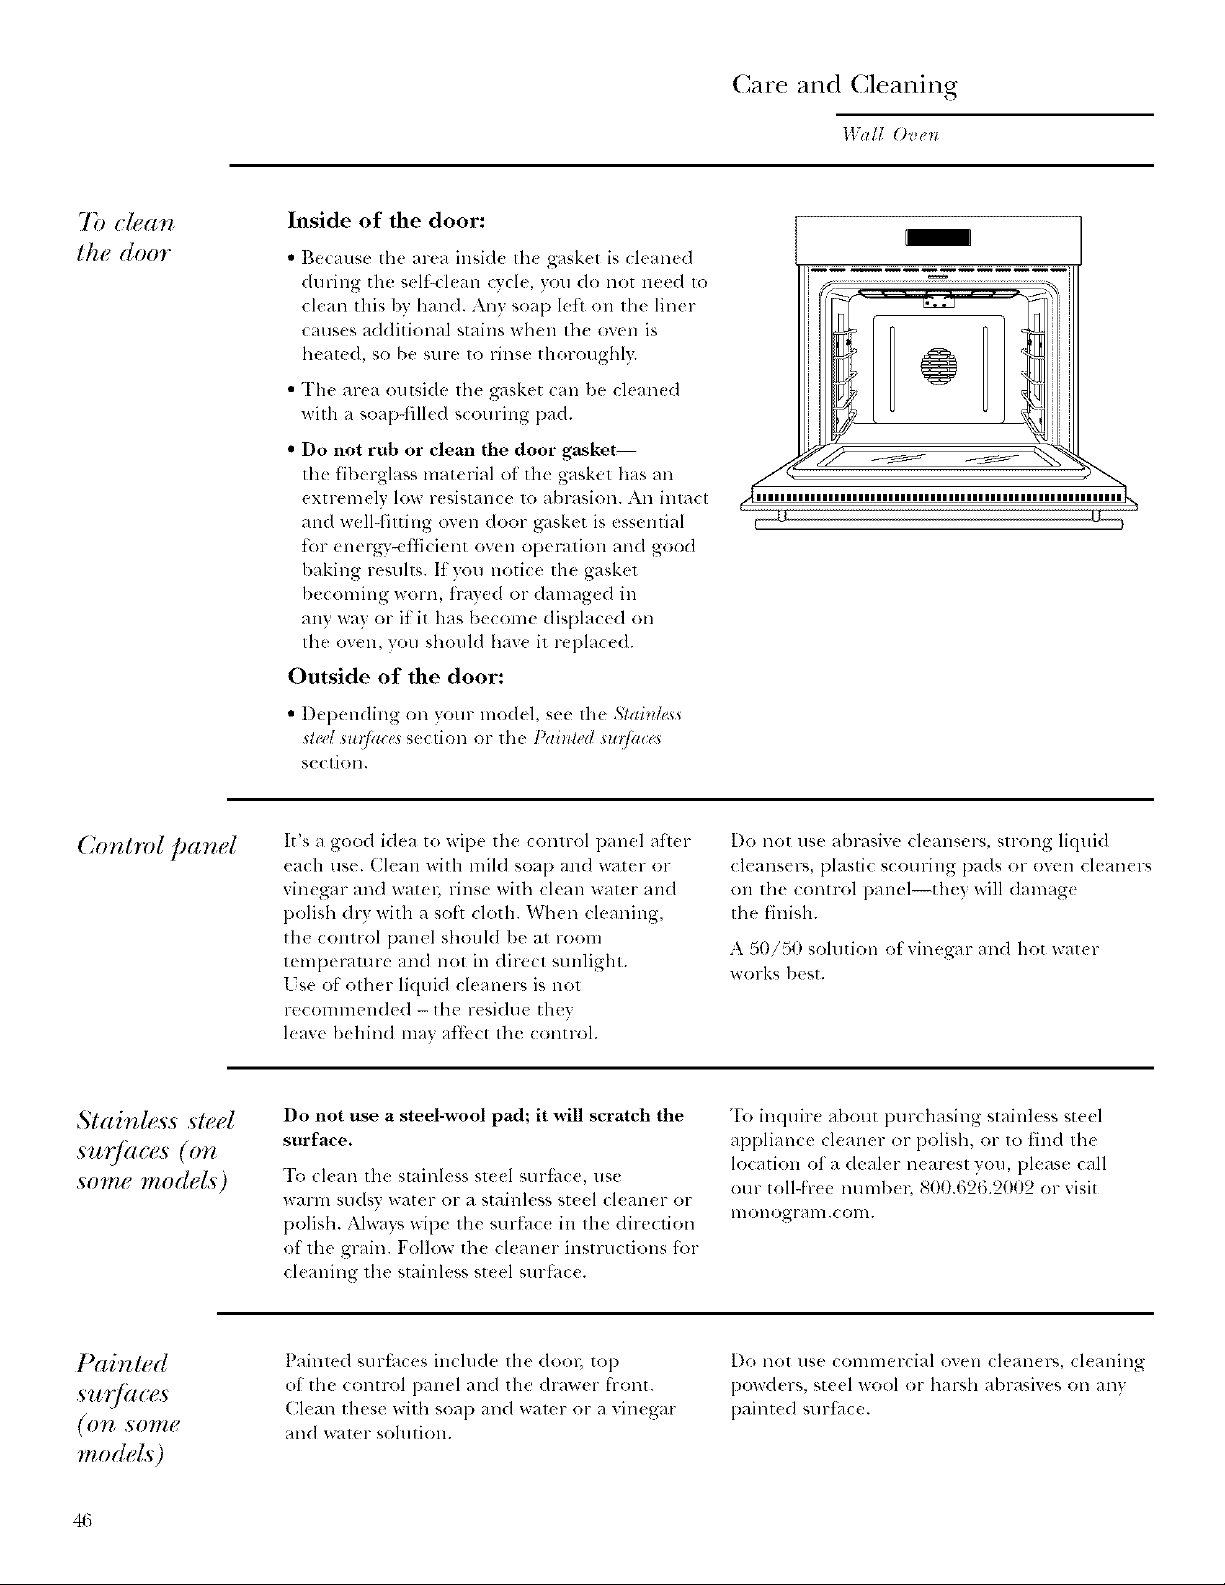
Inside of the door:
Care and Cleaning
Wail O_,et_
• Because the area inside th_ gask_ t is cleaned
during the s(lf-cl(an cycle, you do not need 1o
clean this by hand. Any soap left on the liner
causes additional stains whell th( oven is
heated, so be sure to rinse thoroughly.
• The area outside tile gask_ t can be clean{ d
with a soap-filled scouring pad.
• Do not rub or clean tile door gasket--
the fiberglass material of the gasket has all
extremely low r_ sistance to abrasion. An intact
and well-litting ovell door gasket is { ssential
for energTmflicient oven operation and good
baking results. It }ou notice the gasket
becoming worn, flaved I:,l"dalnaged in
any wa} or it it has become displaced on
the ovell, you should haw it replaced.
Outside of the door:
• I)epending on yore- nlodel, see tile StaitlI_ss
sled su!Jhl_,s se(tion or the Paillled *u@lc_*
s{ ction.
_mm mmmmm_mmmm
/.4
f{||||||||||||||||||||||||||||||||||||||||||||||||||||||||||lll_
c
Control panel
Stainless steel
surlizees(o'r
some model,s)
Painted
(on ,solIle
models)
It's a good idea to wipe the control panel after
each use. Clean with mild soap and water or
vinegar and wat_ l; rinse with clean water and
polish dr} with a sott cloth. When cleaning,
tile conn-ol panel should be at room
temperature and not in direct sunlight.
Use of other liquid cleaners is not
recommended - lhe residue they
leave [)(hind may atti,ct the control.
Do no| use a steel-wool pad; it win scratch the
sin-face.
To ckan the stainless steel surtilce, use
Wal-l_l st]dsy water or a stainless st{el cl_aner or
polish. Alwa?s wipe tile surfhc_ in tile direction
ot the grain. Follow the cleaner instructions tor
cleaning the stainless steel surI_ce.
Painted surthces inchlde tile dool; top
of tile control panel and the drawer front.
Clean these with soap and water or a vinegar
and water solutioIL
Do not use abrasive cleansers, sn-ong liquid
cleanser% plaslic scouring pads or oxen cleaners
on tile control panel--the} will (lamag<
the finish.
A 50/50 sohltion ot vinegar and hot water
x_ol-ks I)est.
"Ik)inquir{ about purchasing stainless steel
appliance cleaner or polish, or to lind th_
location of a dealer n_ arest 3ou, please call
our toll-tree numbeL 8tt0.62ti.2002 or visit
lllOnOgFa HI ,( Olll.
[)0 1101 llSe COllllll_q?_:ial o'xell cleall( Ys, cl{ anillg
I)owders, steel wool or harsh abl-asives Oll ally
l)aint< d surt ice.
Page 47
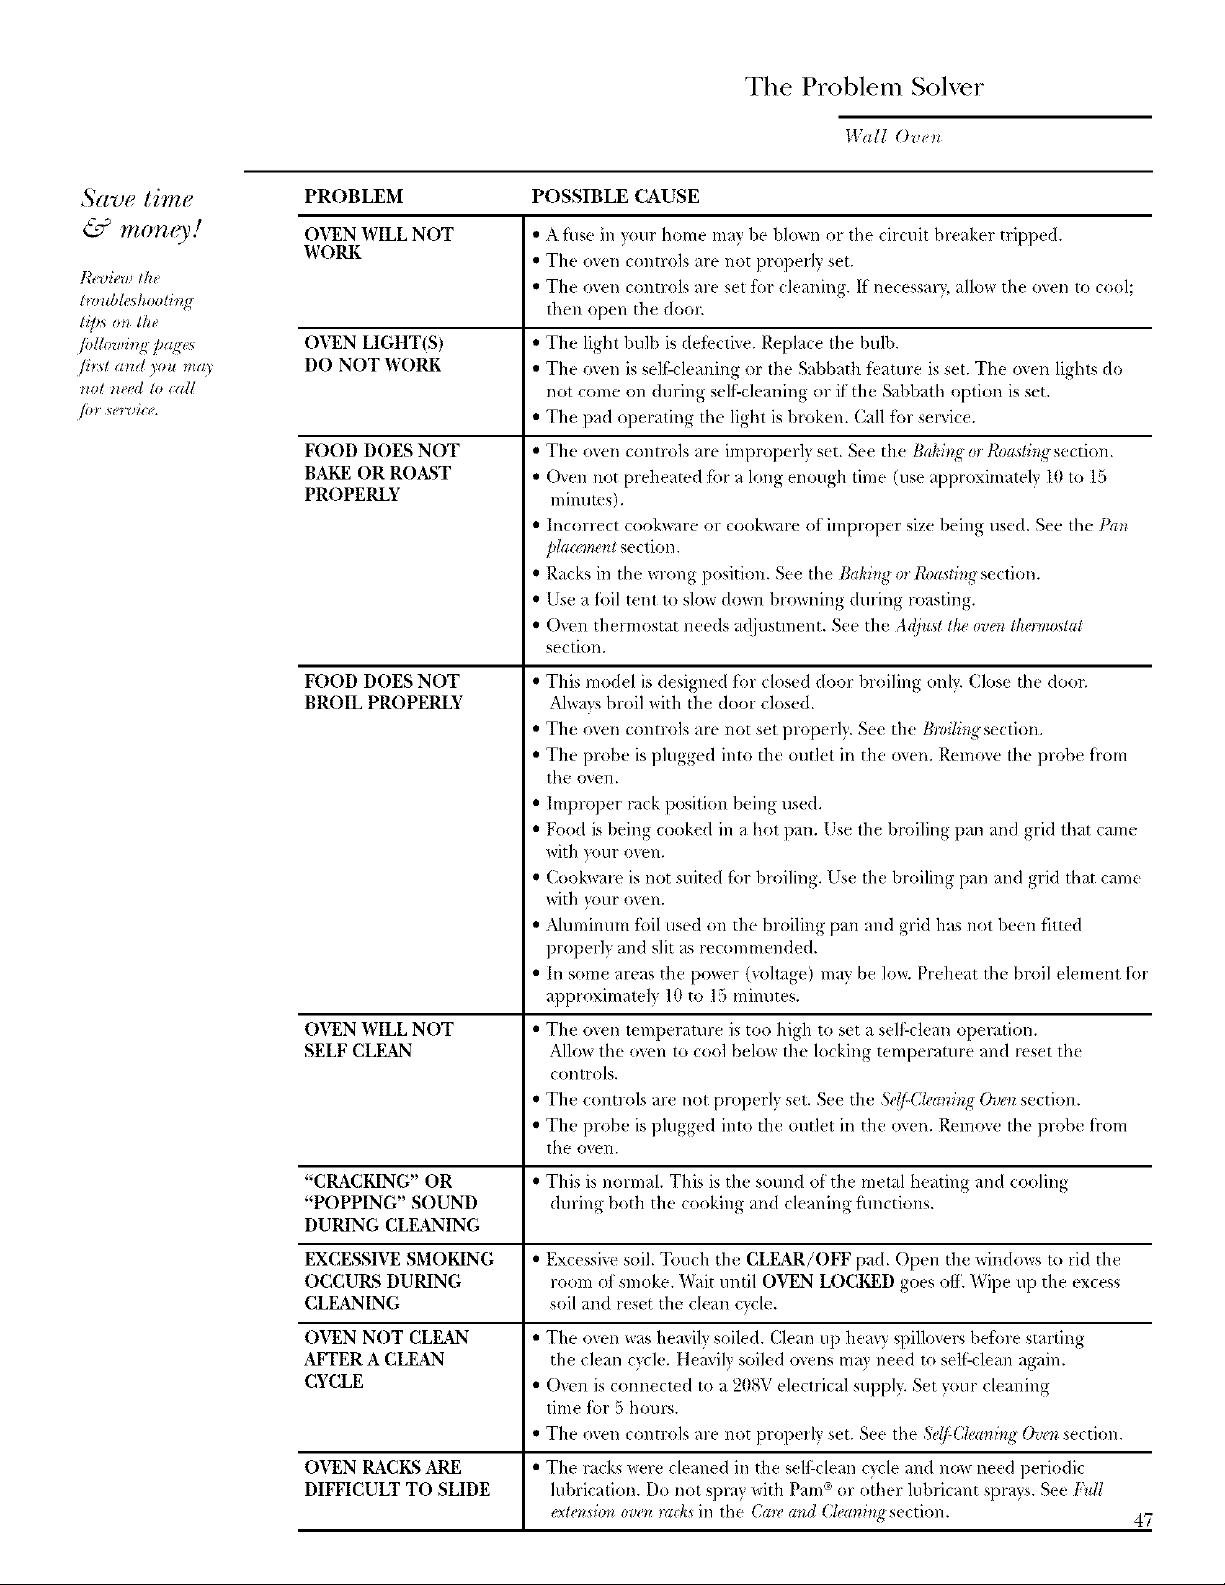
The Problem Solver
Wall Ove_
Save tim, e
!_+'_dew the
not need to <all
PROBLEM POSSIBLE CAUSE
OVEN WILL NOT
WORK
• A fllse in your home may he blown or the circuit breaker tripped.
• The o_en controls are not properly set.
• The oven controls are set _br cleaning. If necessa U, allo_ the oven to cool;
then ()pen the doo_:
OVEN LIGHT(S)
DO NOT WORK
• The light hu]b is deDctNe. Replace the bulb.
• The oven is sel_:-cleaning or the Sabbath t_,ature is set. The o_en lights do
not come on during selgcleaning or if the S;Jbbath option isset.
• The pad operating the light is broken. Call fi>rservice.
FOOD DOES NOT
BAKE OR ROAST
PROPERLY
• The men contro]s are improperly set. See the Baking o_I'oa,_titdsection.
• Oven not preheated f_l_a long enough time (use approximately 10to 15
mintltes).
• Incorrect cook_are or cookware of improper size being used. See tile Pa_
p/aa, ne_ztsection.
• Racks in the wrong position. See the 13_hi_Jgo_Roc_6ti_Jgsection.
• Ise a lbil tent to slow down browning during masting.
• Oven thermostat needs adjustment. See the Adjust theoven thermastat
section.
FOOD DOES NOT
BROIL PROPERLY
• This model is designed R)r closed door broiling onl). (:lose the doon
Alwaysbroil _dth the do<it closed.
• The oven controls are not set properly. See the thvili_ffsection.
• The probe is plugged into the outlet in the oven. Remove the probe fi'om
the oven.
• Improper rack position being used.
• Food is being cooked in a hot pan. Use the broiling pan and grid that came
with \otlr oven.
• Cookwate is not suited fbr broiling. Use the broiling pan and grid that came
with )our ow_n.
• Ahmfinum flfil used on the broiling pan and grid has not been fitmd
properly and slit _t_recommended.
• In some areas the power (w}ltage) ma} be lm_. Preheat the broil element tbr
approximately 10to 15 minutes.
OVEN WILL NOT • The o_en temperature is too high to set a self-clean operation.
SELF CLEAN Allow the ow=nto cool below the locking temperature and reset the
COil trois,
• The controls are not properly set. See the 5el/-Cl_c_ningOvoz section.
• The probe is plugged into the outlet in the oven. Remove the probe fi'om
the oven.
"CRACKING" OR • This is normal. This is the sound of the metal heating and cooling
"POPPING" SOUND during both the cooking and cleaning flmctions.
DURING CLEANING
EXCESSIVE SMOKING • Excessiw_soil. Touch the CLEAR/OFF pad. Open the windows to rid the
OCCURS DURING room ot smoke. Wait until OVEN LOCKED goes off. Wipe up the excess
CLEANING soil and reset the clean cycle.
OVEN NOT CLEAN • The oven _as heavily soiled. (lean up hemy spillovers befin'e starting
AFI'ER A CLEAN the clean q,_le. Heavily soiled o_ens mm need to self:clean again.
CYCLE • Oxen is connected to a 208\ electrical suppl). Set }our cleaning
time _br 5 hours.
• The oven controls are not proped} set. See the &,l]'-Cl_c_ningOven section.
OVEN RACI_SARE • The racks were cleaned in the sell:clean c,zle and now need periodic
DIFFICULT TO SLIDE lubrication. Do not spray with Pare®or other h_bficant sp_a}s. See Full
ede_lsio_love_lrad_sin the ( al_ and ( leaningsection. 47
Page 48

The Problem Solver
ll)dI ()ve_z
Save time
& money!
PROBLEM POSSIBLE CAUSE
DISPLAY '_,_,3,ILKqUP" * Tile DLspD) is equipped with a sensing te(hnok_g) th?Jt will "w?,ke up" when )uu
_ITHOUT TOUCHING l'I (xour band) applx)aches the Touch N'_cen. Tile dispk 9 is sensitite and mm
"wake up" _d/en lights are turned on os due to the movemem of nearby people
or ol?jects. The Displu} should return to its standby mode after 10 mintltes 1tno
fllrtller inm/acti(n_ occurs.
CLOCKAND TIMER • A filse in your home m_, be blow,hior the circuit breaker tripped.
DO NOT WORK Replace tile fhse or reset tile circuit breaker.
• Oven controls improperl) set. See tile 7? S_¢tke (2z_(t_and Kit('koz Timer mzd
()nzhr>lLod_outsections.
OVEN • Oven thermostat needs a(!jtlstment. See the ()ve?_tlu,_mmsatadjushl_nzt se(fion.
TEMPERATURE
TOO HOT OR
TOO COLD
OVEN DOOR _LL • Tile ovel/is too hot. ,_1o_+ file oven to cool below locking len/pe/',Jture.
NOT OPEN AFTER
A CLEAN CYCLE
LOCKDOOR • Tile self-cle_m c)cle has been sele(ted but tile door is not closed.
FLASHES IN Close the oven doo_.
THE DISPLAY
O_TNLOCI_D • Tile oven door is locked because the tempel_,lture inside tile oven has
IS ON WHEN YOU not dropped below die locking temperature. T_alcll the CLEAR/OFF
WANT TO COOK pad. Allow the oven to cool.
DISPLAY GOES • A |'rise hl }_)tlr home may be blown or the circuit br(_ker tripped.
BLANK Replace file filse or reset the circuit breaker.
• Tile clock is in the black-out mode. See die ()plilnl.s_dth_._ section.
DISPLAY FLASHES • Power tSihne. Reset die ck_k.
PROBEAPPEAI_S • This is reminding you to enwr a probe mmpevature after phlgging in the probe.
IN THE DLSPLAY Enter a probe temperature.
POI3T_R OUTAGE, • Power outnge or surge. Reset the ck_k. It the ow_n _x_lsill use, yotl must reset it
CLOCK FLASHES b) t_alching the CLEAR/OFF pad, setting the dock and resetting an cooking
fimction.
STEAM FROM • When using the convection feature, it is nom/al to see steam coming
THE VENT otlt of the o_en vent. As the mlmber of i'ack_ or _tmotlnt (ff f}._)(lI×dng
cooked incre_tscs, the amcamt of _isible smam will incrc_t'__.
"BURNING" OR "OILY" • This is normal in a new oven m_d will disappear in time.
ODOR EM1TFING
FROM THE VENT
STRONG ODOR * Tills is tenlpol_ll). All odor [iota the insulation alotmd the inside of tile
oven is nol-m:41tier the tirst few times the ow'n isused.
FAN NOISE • A cooling lira or a convection fro/(depending on file fimction you are using)
n/W ttlrn on. This is normal. Ti_e cooling thn uill turn on to cool inmrnN pattx
It ma} mn _ter file oven is turned ot{. The convection tim ma} c)_le on and off
until the flmction is oxer or the door is opened.
CONTROL SIGNALS • \bu tb_got to enter a bake temperature or cleaning time. Touch BAKE
AFFER ENTERING and desired temperature or SELF CLEAN and desired clean time.
COOKING TIME OR
DELAY START
F- AND A NUMBER • \i)u llave a thnction error code. T_uch the CLEAR/OFF p_d.
OR LETIER FLASH Allow the oven to cool tor one hotm Put die o'_en back into opev,@m.
IN THE DISPLAY • [t the flmction code repeats, disc(mnect all power to the oven fb_ at least
9_0 seconds _l[/d then leconnect poweE If the ttlnction el'lOf code repeats,
call for service.
CONTROL KEYS • The control panel is di m or there is residtle fiom liquid cleaners. Clean
ACT1VATE OR LCD the control punel with a fineg',w and water sohltion, and polish dl) with a soft
CHANGES SCREENS clotll. See tile (2alz,and Ck,czni_gsection.)
WHEN I OPEN
THE OVEN DOOR
Page 49

X_po±t:_r_m_aodmI
uog_x_s._o_l d.nlS_Ou_o
13npoa d aoumsuoD
saoue!lddv39
General Electric Company
Warranty Registration Department
P.O. Box 32150
Louisville, KY 40232-2150
IIIII P, cc
Ist CI;_ss
L_tt{r
St;m_p
Her{
49
Page 50

Consumer Product Ownership Registration
Dear Custom_ r:
Thank you for pur( basing our product and Ihank y ib- placing y,.nlr colfficl_ no,: in us. W( ar,_ pr,.nM to
llax'( }ou as a CllSlOllleF!
Follow these three steps to protect your new appliance investment:
Complete and mail
your CollSItlIIler
Product Ownership
Registration today.
Itave Ihe pea_e of nlind
1
Important: To ensure that your product is registered, mail the separate product registration card.
If the separate product registration card is missing, fold and mail the form below. No envelope is needed.
of knowing we can
conta(t you in the
unlikely event of a
sat_qy modificalion.
2
After complethlg this
registration, write your
model and serial ntmlbel_s
in this nmntml. _m _ill
need this int_rmafion
should you require sel_ice.
The setwice number in lhe
USA: 800.444.1845. In
Canada: 1.800.561.3344.
FOI,I) 1 tERE
Read yore" O_aer's
Manual careftdly, h will
help y(m op(late yore
new applbm(e properly.
3
Consumer Product Ownership Registration
Wall Oven
MI, [] Ms, [] Mrs. [] Mis_ []
Name I I I I I I I I I Name I I I I I I I I I I I I I I
Product Model Serial
s'_"_'I I
Add]_ ss I I I I I I I I I I I I I I I I I I I I I I I I I I
,pt#I , , , , , , , I
I I ' ,_i,, I
CJt} I I I I I I I I I I I I I I I I Slale L----l--.2 Cod_ I I I I I
l);lll Ph(ed
I,,[s/'] i ] Da, I i I Vt,atl i I Phont" I
_<lonth [ I I I I -- I I I I --I I I I
TAPE (]I OSEI)
N ]/ )e
5O
Page 51

Please place in envelope and mail to:
Veuillez mettre dans une enveloppe et envoyez _ :
OWNERSHIPREGISTRATION
P.O.BOX1780
MISSISSAUGA,ONTARIO
L4Y4G1
(FORCANADIANCONSUMERSONLY)
Page 52

i,,,i i
For Canadian _:
z
P',easeregisteryourproduott_enab',eust_contaotyou Veui',',ezenregis_'ervo_eproduitafindenous_rmot_ede
in1heremoteeventasafetynoticeisissuedforlhisproduct communiqueravecvoussiiamaisanavisdes_curi_concemant
andtoa',',owforefficientcommunicationundertheterms ceproduE_taE_misetdecommuniquerfacilementavecvousen
ofyourwarranty,should_heneedarise, vertudevo_egarar_e,silebesoins'enfaitseniJr.
REG;SERONqJNE: www.geapp;iances,ca MA;LTO: P.O.BOX1780,M;SS;SSAUGA
ENREGiSTREMENTSURiNTERNET)_:www.e;eotromenaEersge_ca POSTERA: ONTAR-'O,L4Y4G1
[3 MR./M C_ MRS./MM£. I FIRSTNAME/PR_NOM ,LASTNAME/NOM
D MiSS/MLLE.C_MS. , I
L L
r
STREETNO/N"RUEISTRE£TNAME/RUE IAF_NO/APR/RR#
Customers i
-- i I
"_ a a
{-_ll
--i i
_,,
i I
Pour',es
Consommateurs _ 11
Canadiens _',I
C_
O'Ff/ViLLE TPROViNCE =
I I
AREACODE/ iND.RE'G.I_TELEPHONE iE.-MAiL
I I
• ±
DIDYOUPURCHASEASERVICECONTRACTFOR]]41SAPHJANCE? YES/OUi113 iFYES/SiOUi:EXPiRATfON
AVEZ-VOUSACHE11_UNCONTRATDESERVICEPOURCETAPPAREiL? NO/NONC]
iNAMES EW DEALER/NOMDU ,' C ND
INSTA£LATIONDA_E/DA_D'INSTALLATION_ CORRESPONDENCE 113ENGbSN
y_A _,t DJ I
[] ido notw_shtoreceiveanypromo_onaioffersregardingth_sproduct,
[] Je nedeske_asre:evolrd'offrespromotbnneiiesconcemantceprodu&
_ CORRESPONDAN_ [] FP_NS SERiAk/$EFtiE
I
MODEL/MODELE
I
]
IPOSTALCODE/ POST_
¥A M O_J
;2
Page 53

Consumer Services
With the purchase of your new Monogram appliance, receive the
assurance that if you ever need information or ass£stance from GE,
we'll be there. All you have to do is call--toiL fre!!
GE Answer
Center _
In the U.S.A.:
800. 626. 2000
In-Home Repair
Service
In the U.&A.:
800. 444.1845
In Canada:
800.561.3344
For Customers
With Special
Needs...
In the U.S.A.:
800. 626. 2000
Whatever your question about any Monogram m_qor appliance, GE Answer Center"
information service is axailable to help. Your call--and your question--will be answered
promplly and courteously. And you can (:all any tim(. GE Answer Cente¢' service is open
24 hours a da), Monday through Satin-day.
OR
"_qsit ou r W( bsit ( a t : monogram.corn
bz Canada, call 1.800.561. _344.
It your Monogram appliance should ev(r require service, you (:all depend on Monogrmn
Pretbrred Selwice. Simpl 3 (:all 800.444.1845, where our Monogram Preh,rred Service
Sp(cialists are available 7 a.m. - l0 p.m. ET Monday through Friday and 8 a.m. - 6 p.m. ET
Saturday and Sunday to coordinate your s(rvice appointment.
bt Canada: _¢Ionday to FHday, 7:00 a.m. to 8:00p.m. and Saturday, 8:00 a.m. to 5:00p.m. EDST
GE offers, h-ee (>Icharge, a 1)rochure to assisl ill planning
a barrier-free kilch(n for l)(rsons wilh limit(d tool)lilly.
(_OllSlllllers _dth impaired hearing or spe_ ch who hm'e access 1()
a TDI) or a con's( ntional t(lelyl;*e',_ rit(r lll_ly (all 8t)0.TDD.(;EAC
(800.83.q,.4322) to request inlormalion or s(rvic(.
Service Contracts
In theU.&A.:
800.626.2224
ln Canada:
800.561.3344
Parts and
Accessories
In theU.&A.:
800.626.2002
In Canada:
800.561.3344
51)u call hme the secure t}.eling that GE Consumer Service will still be there after )our
warranty expires. Purchase a (;E contract while your warranty is still in eflbct and xou'll
receive a subslantial discount. With a lmlltiph T(ar contract, you're assured of limit(
s_rvice at today's pric(s.
Indixiduals qualified 1o selvice Iheir O_Vllal)pliances can have l)alls <)raccessori_ s s(nl directh'
IO Ih(ir home. Th( GE parts syslenl provid(s a( cess to over 47,01)0 parts...and all (;E (;enuin(
R(nm_al t arls ar( dilly warranled. VISA, MasterCard and Discover cards are accepled.
User maintenance instructions contained in this manual cover procedures intended to be
performed by any user. Other servicing generally should be referred to qualified service
personnel. Caution must be exercised, since improper servicing may cause unsafe operation.
)
Page 54

_wl:anty
Walt Ove_
YOUR MONOGRAM WALL OVEN WARRANTY
Staple sales slip or cancelled check here. Proof qf original purchase
date is needed to obtain service under warranty. Please have serial
number and model number available when calling for service.
WHAT IS
COVERED
From the Dale
Pur_ ha.se
WHAT IS NOT
COVERED
LIMITED ONE-YEAR WARRANTY
For on_ year flom date of original purchase, we will provi&, free of charge, parts and
service labor in your home to repair or repla< _ any part of the oven that fails be< ause of
a mmmthcturing deibct.
This warranty is i xtended to the original purchaser illl(I ally su((eeding owner fi)r produ¢ts
purchased for ordinary home tls_ in the 48 nlainland states, tlawaii, Washington, D.C. or Canada.
It the product is locat_._d in an area where ser_ke by.our Amhorized Serxicer is not available, you
Ilia) be r{ sponsihle t_l- a trip (harsh: or )'(}tl inav h( required to hring tIl_ produ(t to an Authoriz_ d
Service location tor service. In Alaska the warramv is the same el xcept that you must pay t_) ship the
prodHcl lo tile Sel-xice shop or tor tile s{rvi{e techlli(iall'S travel costs to VOHrhOllle.
All wmrantv s_ l-vice will be provided by our Factory Service Centers or bv our authorized (hlslomer
C{_l'{ ® servi(els dlllillg llOllllal workillg hotlrs.
Should your appliance need service, during warranty period or bevond, call 800.444.1845.
In Canada, call 1.8tI0.561.3344.
• Service trips m your home to teach you how
to use the product.
• Replacement of house fuses or resetting of
circuit breakers.
• Damage to the product caused by accident,
fire, floods or acts of God.
• Damage after delivery.
• Failure of the product if it is used for
other than its intended purpose or used
commercially.
• Improper installation, defivery or
maintenance.
If you have an installation problem, contact
your dealer or installer. You are responsible
for providing adequate electric'd, g_s,
exhausting and other connecting facilities
as described in the Installation Instructions
provided with the product.
• Incidental or consequential damage caused by
possible defects with this appliance.
• Product not accessible to provide required
service.
54
repair as provided in this Limited Warranty. Any impfied warranties, including the
impfied warranties of merchantability or fitness for a particular purpose, are fimited
I EXCLUSION OFIMPLIED WARRANTIES--Your sole and exclusive remedy is product
to one year or the shortest period allowed by law.
Seine statt.s/provillCeS do llOt allow tile exch/sioll or limitation ot incidental or consequelltJal
damages, so the ab(we limitation or exchlsion may not apply to you. This warranty giw*s you specific
legal rights, and you may also have mher rights which vary fi-om slate tO stateiproxince to province.
"I{)kaow what your legal rights me ill your state/province, consult yollr local or stateiproxincial
(OllSlnller attairs otlice or yollr staie's ,\ttorney (;elleral.
Warrantor in U.S.A.: General Electric Company,
Louisville, KY 40225
Warrmitor hi Canada: Mabe Canada Inc.
GE Consumer & Industrial
Appliances
General Electric Company
Louisville, KV40225
ge.com
Page 55

hfformation pour le client
Four mural
hmoduction
Contenu
Votre nouveml fbur mural Monogram ofl)-e un sl)le _loquent, une grande commodil_ et d( la
souplesse dans l'agencement de w_tre cuisine. Que vous le choisissi(z pore" la purett: de s{s lignes,
l'attenti(m assidue pour le ddtail ou ees deux raisons, vous constaterez que le mariage exceptionnel
de la forme et d( la f'onctiom_alit+: d( votre fimr mural Monogram vous apportera satistbction
l)(ndant de nombreuses ann6es.
Vote four mmal Monogram a Et_ concu pore vous ofl]ir la flexibilitt: vouhle permettant de
l'agencer k xos armoires. Son style 6R:gant perm(t de l'int6grer en route beatm: glvotre cuisine.
I='inhwmation des [)ages suivantes vous aidera a [hire tbnctiolmer et fi entretenir correclelnent
votre f'ollr lllllial.
Entretien et nettoyage
Ampoulcs (111fbur . .................. 98
Grilles ............................. 96
L_',chefrite et grille ................... 95
Porte du tour .................... 97, 99
Sonde ............................. 97
Surfhces en acier inoxidable ........... 9{1
"Ihbleau de commande ................ 99
Service h la clientble
Carte d'enregistrement du produit . . . 51-52
Consignes de s_cln-it_ .............. 57-5)9
Garantie ........................... 104
Nmn6ros de modbl( et de s&-ie ......... 56
Num&-os de t_l<_phone importants ..... 103
Solutions de probl{,mes .......... 100, 101
Four
Aide ............................... 89
Commandes ......................... 61
Cons( rver l(s aliments ( hauds ........ 84-85
Convection ....................... 71-74
Cuisson ............................. 64
Cuisson (t r6tissage minut& ......... 65, 6(i
Cuisson _t r6tissage
par convection minutes ............. 75-76
Fermentation ........................ 83
Four . ........................... 60-63
Four autonettoyant ................. 79-82
Gril ............................ 67, 68
Grilles ............................. 63
Minuterie de cuisine .................. 78
Option d( cuisson et de maintien de la
temp&ature ......................... 87
Option de d_part (litl(:l_ ............... 88
Option de d(:shychatation .............. 87
Option de r_glage de deux teml)(:ratures . .86
Option Sabbat ....................... 89
Papier d'aluminium ................ 62, 67
Recettes pr41'&-4es .................... 77
R_glage des options ................ 9(!4)4
Activation!d+;sactivation du signal
sonore des touches ................... 93
Arr&t automatique 12 hem-(s ........... 91
Conversion automatique de r(cettes ..... 92
Couleur de l'afi]chage ................ 92
Dissimulation d( l'horloge ............. 91
Horloge ........................... 90
Langue ............................ 92
ROglag(s par dOlhut .................. 94
S_lection des degn:s Fahr( nheit
ou Celsius .......................... 91
Signal de la mi*mterie ................ 94
Signal de la mimlterie de cuisine ........ 94
Thermostal ......................... 90
x&:dume ............................ 93
R&tissage ............................ 64
Sonde ........................ 69, 70, 73
Verrouillage d(s command( s ............ 78
Comment
reti'r<n_la
pelligule
d 7_xpddilion
de protectio,_
el l++rubar_
d _mb a llagv
Pincez asec soin entre vos doigts un coin
de la pellicule de protection pour 1'( xp&lition
{t d(:ta( hez-la lent+ment de la sm-th(e de
l'apl)m-eil. N'utilisez pas d'ol:_jets tranchanls
pour r(tir(r la pellicule. Retirez tome la
pellicule avant d'utiliser l'appareil pour In
premibre tiffs.
Pour s'assurer de ne pas endommager le tini
du produit, le meilleur moyen pour dScoller du
nou_el appareil l'adh_sif du ruban d'emballage
est d'appliquer du d_tergem liquide pour laver
la vaisselle. Appli<luez avec un chiffon doux et
laiss_z tremper.
REMARQUE : t'adtgs!] doit {4_' retire; de routes &s
pkYe*. IIne pom'.l l'_h_" _7I a (;t_;cult e_zpla.<
55
Page 56

Infbrmation pour le client
Four mural
Avant
d 'utiliser
voln_ jbur
_H,UY(I[
I T_S C_JgH_Z
le,s
Y__g_fl g_'FOS
de mode#
et de s&ie
Lisez altentivement ce manuel. L'infl_rmation
comenue darts ses pages vous aidera ?1tidr(
fonctionner et {i entretenir correctement votre
fbur mural.
Gardez-le fi port_e de la main pour r_:pondre
fivos questions.
Vo[Is les trOll'_el-ez S!IF /Ill( dtiquette sit!l_:e SIlF
la partie avant gauche de la garniture derri_,r(
la porte du fore;
Remplissez et lilites-nous pmwenir la carte
d'enregistrement du produit qui a(compagne
ce produit.
Si VOllS lie coll]prelleZ p_ts (el-taills poillts Oll
si VOIlS aYez besoill d'aide, VOllS troHverez illle
lisle de num&os de service fi la cliemble sans
[rais fi la se<tion arribre de ce lnanuel.
OU
Visitez notre site Web f_ l'adresse suivante :
nlonogram.com
Avant d'envoyer la carte, veuillez inscrire les
num6ros ci-dessous :
Num&-o de modble
Num_ro de sdri(
[Ttilis(z ces llllIllcros pollr toute
correspondance ou tOllt appel (le selvice au
st_jet d( _,otre (our mural.
Si 7JO_IS (tTJeZ
re(,'_turt,/bur
endomm, ag'd
(;ag'nez du
temps el
&onom, i,sez
Si %_O_lS
aw_z besoin
de se_wi(:e
d _nhvtien
O_l d(_
r@aratz m
Contactez imm&liatement le ddtaillant
(ou le fabricanl) qui vous a vendu le flmr
lllllT'al.
Avant toute demande de service, consult(z la
section Solution de problg, mes fi l'arribre de
Ce Hl_llltlel.
Pollr obtellir dtl s( rvice, reportez-vous allX
pages du service fi In client(de fi l'arri,2q-e de
ce lllalltlel.
XOllS SOll]ll]es fiefs de llotre servi< e (t llOllS
tenons 5 votre satisthction. Si pour quelque
raison que (e soil vous n',2,tes pas satisiait du
service rt%u, xoici dcux dtapcs ?1suix rt, pour
obtenir d( l'aide suppldmentaire.
D'ABORD, contactez les personnes qui
ont rdpar_ wm-e appa reil. Expliqu ez von-e
insalisf'action. I)ans la pluparl des _as,
cette ddmarche rdsoudra le probl,Sme.
\YOIIS y trollVel'eZ lille liste des Causes de
probl_'mes de follcfionnement mineurs que
rolls pot/vez CorFig(r Vi)llS-lll£,llle,
ENSUfFE, si vous n'_',tes tot_joura pas satislidt,
dcrivez lous les d&ails (sans oublier d'inscrire
votre mlmdro de tdl(Cphone) au :
ManageL Customer R(lations
GE Applianc(s
Appliance Park
Louisville, KY 40225
56
Page 57

MESURES DE SECURITE IMPORTANTES
AV1S IMPOR 7 N7" EN MA TIt,2RE DE
• Le CMifornia Safe Drinking Water and Toxic
Enforcement Act cxige que le gouverneur de
Calitornie publie unc liste de substanc_ s quc
l'on sait occasionner le cancer, des anomalies
cong&fitales oll (l'autr(s anomalies de
reproduction, et {xige que les entreprises
axertissent leurs clients des dangers que leur
fimt courir une (xposition ?1ces substanc(s.
MI 2SURES DE SECURITF
Pour utiliser des appareils 61ectrom6nagers,
vous devez sttivre des pr6cautions 616mentaires
de s6curit6, en particulier :
• Assurez-vous d'enlever tous les mat6riaux
d'emballage du four avant d( le mettr_ ell
marche, pour &iter tot/l danger d'in(endie
ou de dommage dfi fi la fimlde hi (es
mat_riaux d'_ mballage prennent t(u.
• N'utilisez cet appareil que pour Pusage auqud
il est destin6, comme expli(lu5 dans le pros{ nt
Manuel du propridtaire.
• A_,_surez-vousque votre appareil est bien install6
et ntis h la terre par un installat( ur qualitid,
confonn&nent aux dircctivcs d'insmllation
fburnies.
• Assurez-vous clue le four est bien install6 dmls
mm re,moire solidement fix6e h la chm_pente
de la r6sidence. Ne laissez personne grimpen
s'asst'oir Oll IIIOII[UI" Sll l" IH pOl'[C dl I _;.)11l_
ou s'y aglippel;
• Demandez 'al'il_,_t'_ateur de vorts montrer
l'emplacement du disjoncteur ou du fttsible.
ldentiiie>le pour pouwfir le tromer fhcilement.
• Ne tentez pas de r6parer ni de remplacer aucune
lZd6cedu four, a moins clue cda ne soit
recommand6 darts le pr&sent manuel. "I_mtatlll-e
se_vice (l'entretJen (Ioit #'tre assurd
par un rdpamteur (lualifi&
• Apprenez amxenfants 'ane pas jouer avec les
conmlandes ou loute autre piSce du f_u]:
• Ne hdssez jamais la porte du four ouverte
lol_que vous ne sulweillez pas l'appareil.
SECURITE
• L'isolement en fibre de verre darts les fours
auto-nettoyants 6met un trbs petit montant
de gaz carbonique pendant le cycle de
nettoyage. Vous pouxez r&luire votre
exposition 5 c( gaz en a&-ant, (n ouvrant
la lbn,3tre ou en utilisant un w ntilateur
ou une hotte d'adration.
•IMPORTANT :Cexlainsoiscaux
sont exlr{',mement sensibles fi la tinnde pr_hlite
pendant le pr_gr, lmme d'autonettoyage de
n'import( quel foul; Placez les oiseaux
dans une aulre l)i&ce bien a&-de.
• Gardez tot_ours les linges h vakuselle, les mitaines
de fotw et autres artides en tissu h tree distance
_curitaire de votre four.
• Pour votre _curit6, n'uflisez pas cet appareil
pour r6chauffer la pibce.
• Ne ra_, ez pgts de mat6riaux inflammables da_,_
le four.
• Gmxlez mujours les ustens'des en plastique et en
bois, de m6me que les aliments en cortserve, h
une distance s6curitaire de votre four.
• Gardez tot_ours les rev6tements muraux
combustibles, les rideaux et les tentures 5_une
distance s6curitaire de votre four.
• NE P_{g EMMAG_;INEZ OU UTILISEZ DES
MATI_RIELS COMBUSTIBLES, L'ESSENCE
OU LES AUTRES VAPEURS ET LES
LIQUIDES INFLAMMABLES )t PROXIMITI_
DE CECI OU AUCUN AUTRE APPAREIL.
• Ne lai_ez p_ts de gxaisse ou autres matibres
intlanmmbles s'accumtder dmls le four ou h
proximit6 de ce dernier.
• Ne tentez pas d'6tehMre des fetLx de graisse avec
de l'eau_ Ne soul(vez jamais une casserole en
flammes. Mett(z tousles r6glages en position ofl
(arr&).
"_ms pouvcz dt(indre conapl,_*tement les flmnmes
en f_,rmanl la porto du f'c_uret en &eignant
l'apparcil, ou en utilisant un extincteur chimklue
poudr( ou fi mousse.
57
Page 58

MESURES DE SECURITE IMPORTANTES
I p
MESURES DE SECUR17"E
• N'ul_sez pas de papier d'ahmfilfium pour
couvrir la sole du four, sauf de la facon indiqu6e
clans le pr&sent manuel Lne ufilisation
inad&luat( du papier d'aluminium peut
l)rdsenter des risques de chocs dlectfiques
oil d'incendie.
• FaRes cuire la viande et la w_laille h fond--la
t(mp&_mn-c IN_I'ERNE de la viand( doit btre
d'ml moins 16(1 oF, et celle de la volaille d'au
moins 180 °E I.a cuisson fices lcmI)6rannt s
lilt( Flies assl/re g( ll(_l',llelllell[ tllle bolllle
protection contre les intoxications alimentaires.
• Avant d'effectuer one r6paration, COUPEZ
TOUJOURS L'ALIMENTATION DU FOUR
AU PANNTAU DE DISTRIBLrrION EN
ENI,t:XAN'I' LE F[ SIt_LE O1 EN
DECLEN( I L\NT LE DISJONCTE/R.
• Ne lai_ez pas les enfants saris surve'fllance--
II tie fimtjamais laisser les enfimts s(uls ou sans
sulvcillance pr,3s de l'appareil, lol_,que cehli<i
tbnctionne. On doit _galement leur int_ r(li_v (1(
gfimper ou de s'asseoir sur l'apparcil.
• Ne touchez pas aux 616ments chauffmlts, lfi
aux patois du four. Ces surfhces peuvcnt i,trc
sutfisanmmnt chaud(s pour caus(r d(s b_fihlr(,s,
m&ne si elles ne sont pas rougvs. Pendant et
al)rbs l'utilisation, fhims en SOlnteqlle vos
v,Stement_ (t autrcs matdriaux inflammables ne
Vi{IlIlell[ pas {HI COlltact avcc l(s DHrois d!/ii)/ll_
Laisse]-les d'abord ref'roidil:
Les su rfhc(s _,usceptibles de devcnir chmldes
COlllprelllleilt llOtallllllell[ l'_vent rill ]_()tll" et les
surthces qui l'entourcnt, les asp&lids antour de
la porto du Ibm; la surf_me p&-iph&-ique du
hublot et les mouhues m6talliques atl-d(sstls
de la porto.
N'oubfiez pas : Les parois du t;.)ur peuvcnt ,3trc
chandes lol-_que vous ouvrez la polte.
•ATTENTION : NERANGEZPAS
DES ARTICLES QUI PRI_SENTENT UN
INTI_RET POUR LES ENFANTS, DANS LES
ARMOIRES SE TROUVANT AU-DESSUS D'UN
FOUR CAR CEUX-CI POURRAIENT
CRIMPER SUR L'APPAREIL POUR LES
ATrEINDRE ET RISQUERAIENT DE SE
BLESSER.
• Ne portez jamais de v6tements amples
lorsque vous utilisez cet appareil. Failes atmluion
lop_que vous prcnez des m-tkles mngds dmas les
arllloires all-{les_41s (111 _()!ll; Les [is_,IlS
inflammables p(uvcnt prendrc li,u ml contact
des surti_ces chaudes et causer de groves
hi, lures.
• N'utilisez clue des po'_a_es ou des nfitaines de
four sbclms---l(s poigndes ou mitaines de fk_tll-
humid(s ou mouilldes peuvcnt (miser des
brfilurcs de vapeun Ne laiss(z pas les poigndes
venir en contact axe(: les (_ldmenls chmlds.
N'utilisez pas de selwiellc ou autr( objet
encombnnlt en tissu ml li{u de nfitaines de fi)un
• Assurez-vous que l'6vent du four n'est jamais
obstru&
• Ne laissez pas s'accumuler de d6p6ts graisseux
dmis le four.
• Ne vous tenez pa.s/rop pr'es du four h)rsque vous
ouwez la porte. L'air chand et la vapeur qui s'en
_chappcnt pcuvcnt _)us b_fil( r los mains, le
xisage et les ycux.
• Aprbs le ,grillage, sorlez toujours la Fechefrite
du four et nettoyez-la. La gl'disse (lui S'CSt
a('cunnlh:e darts la l& heftire pourl_fit prt, ndre
@u la prochaine lois (lue vous utiliserez le fk)un
• De grandes 6grafignures ou des impacts sur la
sm'face vilr6e des portes peuvent entrahmr le
bris du verre.
• Ne lais_zjamais de pots h grais__ ou de bores
de conserve contenant des matibres grasses h
proximit6 de votre four.
58
Page 59

I •
MES URES DE SECUR/TE
• Les enfants en marchette ou les enfants qui
rampent peuvent 6tre attir6s par la poign6e
ronde de porte du four et peuvent la saisir, et
ahlsi ouvrir la porte. Cola pcut occasiomacr
une ouverture d( 1_ porte sur l'enfhnt ou
des bl_lm-es s&ieuses si le tour (st ell
fbnctionnem(nt et chmld.
• Ne fares pas chauffer de r6cipiem ferm&
L'accumulation de pression dans le r&:ipient
pest le tifirt _clatm; cm_sant ainsi des blesstuvs.
• Placez les dayelles h la hautem" d{.sir_ lorsque
le four est froid. Si xous devcz les manipul(r
lor',que le fbur est chmld, dvitez que vos lnitaines
de t;.)lll- elltrent ell COlltact avcc
los dl&nents du Ibm:
FOUR A UIDNt'2TTO YANT
• n est plus pratique de _tdever des plats
lourds lorsque la grille est entigerement ouverte.
Vous dvilcrez ainsi dr' vous blCdcr cn touch;rot
aux parois de la porte ou du fbul;
• Lorsque vous ufilisez des sachets pour la cuisson
ou le r&tissage, suixez les dircctixes du fhbricant.
• Ne faites pas s6cher de journaux dans le four.
S'ils surchmfll_:nt, ils risque nt de pren<hv feu.
• N'entreposez pas d'articles dais vo_e four.
lls pourr, tient pr(ndre fi.'u.
• Ne laissez pas de produits en papier, d'ustertsiles
de cuisson ou d'aliments dans le four lorsqu'il
n'est pa,s utilis&
• Ne laissez persoime grhnper ou monter
sur la porte du four, ou s'y agripper. Cela
poulc, tit endommager l'_ppareil ou <,user
de gc,wes ble_sur(s.
• Ne nettoyez pa_slejohat de la porte. C,e.joint
est essentM fi role bonne dtml( h_i16. I1fhm
_viter de le rdcur_ 1;de l'endommagcr ou
de lc ddplacc*;
• N'utilisez p&sde produits nettoyants
commerciattx pour le four. 11ne fast jamais
utiliser des produits nettoyants commerciaux ou
des enduits protectcul_ dans le t;.mr ou pN's d_s
l)ibces du fbul: Les r6sidus de ces produits
netto_mts (ntlommag(ront l'inldrieur du l_}_ur
lolStlue VOllS e_]}_ Ctllel-( z/111 alltOlletl_yag(L
• Ne nettoyez que les pi_ces indiqu6es dmls le
pr6sent manuel d'udlisation.
CONSERVEZ CES DIRECTIVES
• Avant de commencer l'autonettoyage, enlcvcz la
lg.chefrit_, la grille et mitres ustensiles (Ic cuisine.
• Avant de cmrmmncer l'autonettoyage, essuyez les
aliments renvers_s.
• Si le progxanune d'autonettoyage fonctionne real,
&cignez lc fbur et coupez l'alimentation
dle(nique. Faites r6parer l'appart.il par un
technicien qualitid.
• Vous pouvez nettoyer les dayettes du four
pendant le cycle d'auto-nettoyage.
_)
Page 60
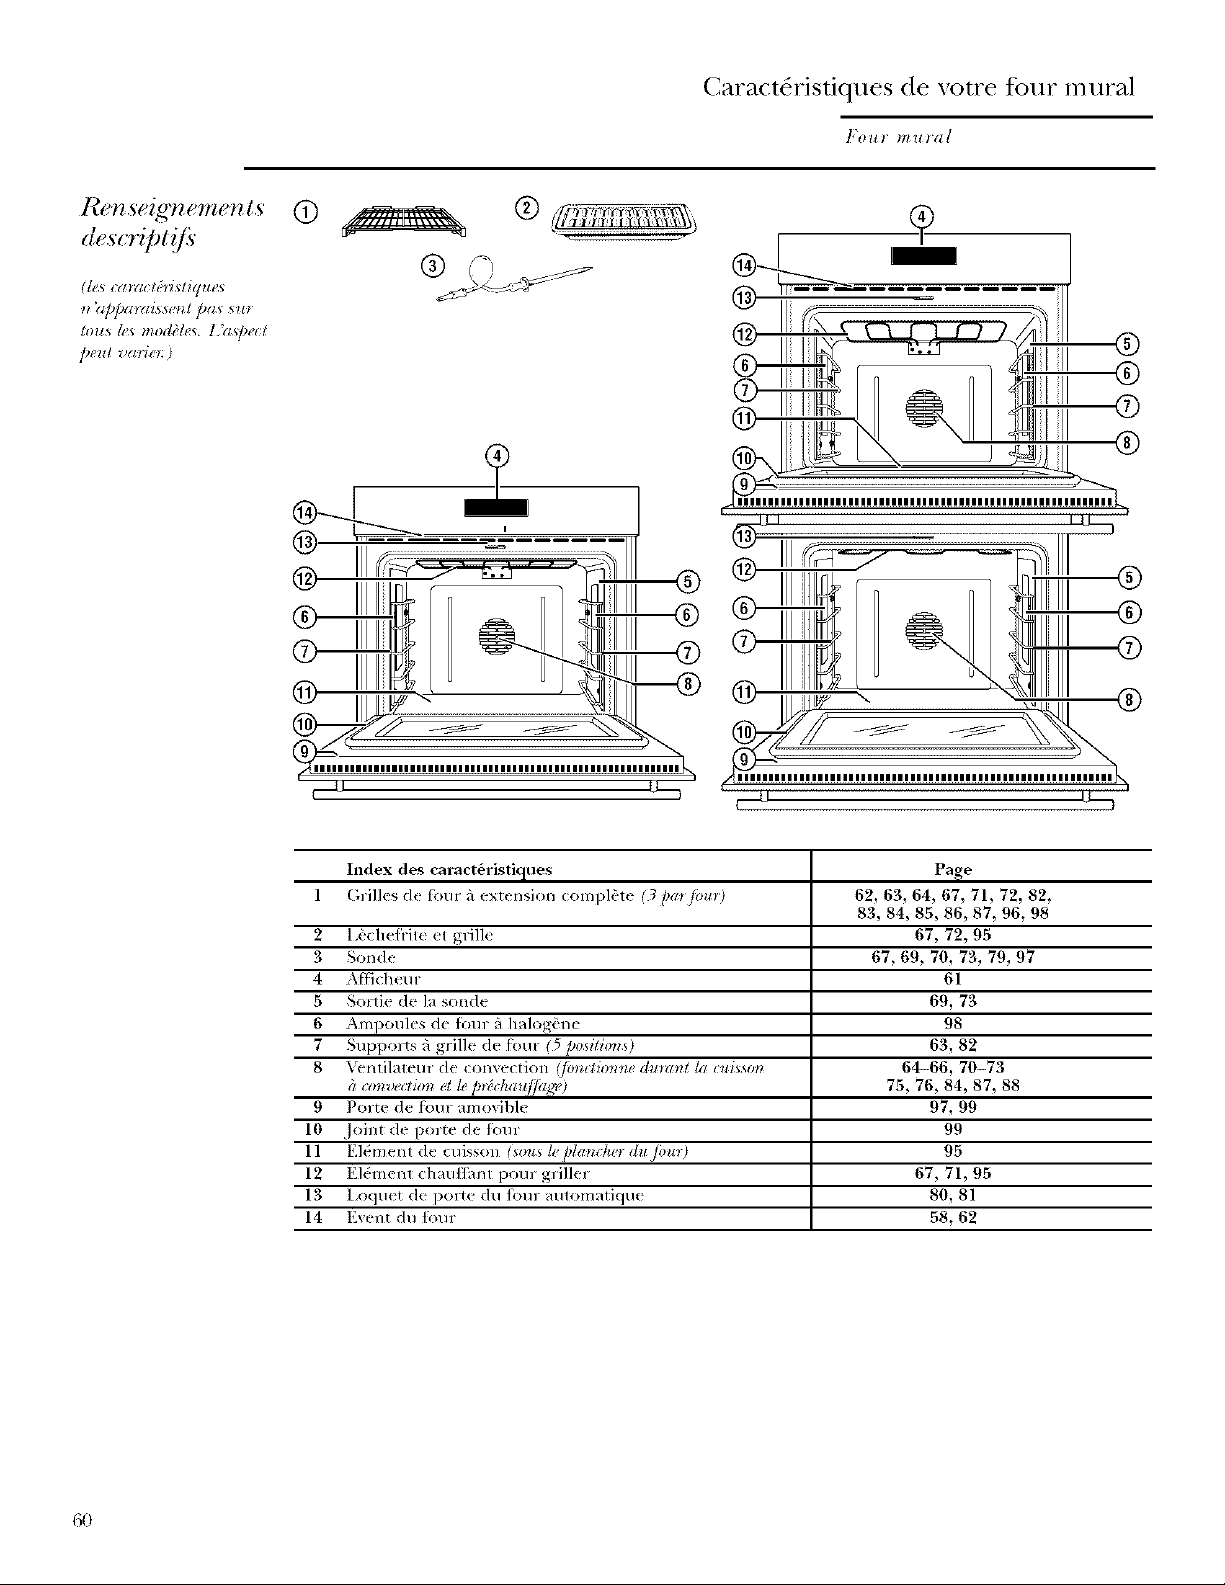
@sc*Vplff
tous h<smodifies, l.?z*pect
Caract&:istiques de votre four iiniral
];'t) l_t 1" 17_lllgl[
®
r--JJ I_- 7
Index des caract6ristiques Page
1 Grilles d< tbur fi extension _ompl,>le (3/)arfi)m) 62, 63, 64, 67, 71, 72, 82,
2 12'Olefl-i_e e_ gille 67, 72, 95
3 Sonde 67, 69, 70, 73, 79, 97
4 A fIichetn" 61
5 So*lie de la sonde 69, 73
6 Ampoules de t_ml fi halog_'ne 98
7 Suppo_'ts g grille d_ fore" (5 position, s) 63, 82
8 Ventila_euT de i:onvection IJo_io*t*le du_w_*t la cu£sson 64-66, 70-73
9 Porte de fore amovib/e 97, 99
10 Joint de porte de _tll 99
11 El&nerll de cuisson (sims h, plattdu,r &z/bin) 95
12 Ek:menl chauffant po/_ glillef 67, 7L 95
13 Loquet de porte d_l hmr aulomatiqu( 80, 81
14 Event du fimr 58, 62
83, 84, 85, 86, 87, 96, 98
75, 76, 84, 87, 88
@)
Page 61
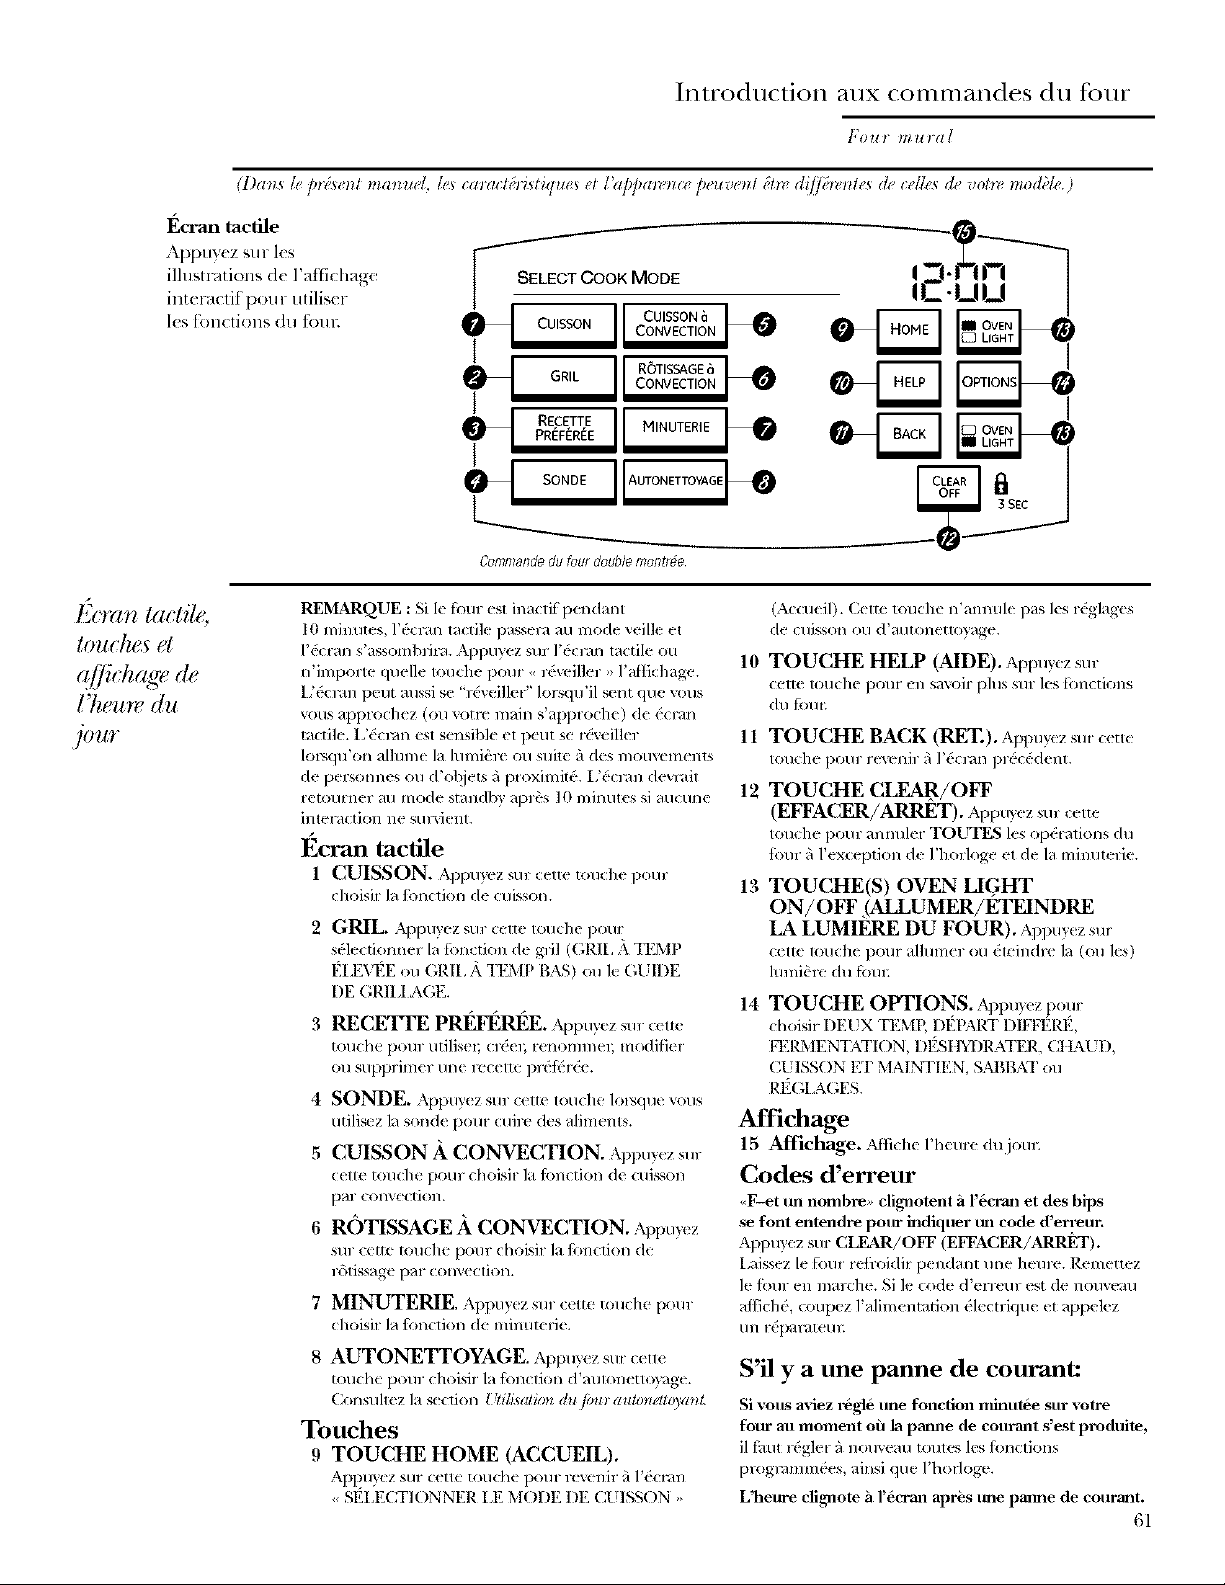
(Dans 5. i,A_m ma_ueI, b<sca_acl&isliques el I'appmvnce peuvenl /_ln.d!Tfi)_tlh<s de I:dI¢<sde votn" mod_;h'.)
F;cran tactile
Appuy_ z sur les
ilhlstl'dtions de l'attichage
interaclif pou r utiliser
les fonctions du ibm:
SELECT COOK MODE
CUISSON CONVECTION
GRIL CONVECTION
RECETTE I MINUTERIE
PREFEREE
SONDE IAUTONETTOYAGE
I CUISSON
I ROTISSAGE6
L_____
CommandeduTourdoublemontr#e
Introduction aux commandes du four
l;'{)1/1" 17_111(11
0
0
0
i
Ecmn tactile,
touche,_ el
q£ h'haffe de, ,_ c') ,,
17wmv du
jO_IT
REMARQUE : Si le four {sl inactif pendant
10 mimltes, 1Yx:l;m lactik p e,sm_ au mode veilh et
I'dcran s'a',sombdra. Appuyez sur l'dcrdn tactile ou l0
n'importe quelk touche pour <_r6veiIler ,>I'afik:hage.
['('c_;m peul anssi se "ldveillcl '' Io{>q/_'il sx,nt qoe _ous
v_ms approchez (oil votrc main s'approch( ) de dcl;m
motile. [ 'dcvan {:st sensible el peut se rdvciIler 11
Io£sq/l'orl ill]/]l//e la hll//i(_q t' Oll s/file _J des H/Ot/VCITIenP_
de persotme_ ou d'objets _'1pmximitd. I,'do;m devmit
rem/_mer au m(_le sm_ldbv aprSs 10 mimltes si mlcune 12
intel'd(t_on lie S/II'_*{( nL
l_cran tactile
1 CUISSON. Appuycz sul <cite to/idle pour
choisir la ]\;notion de c/fisson. 13
GRIL Appuy{ z su] cclte Iouche pour
st lectiolmer la timction d_ gril (GRIL ,?\qEMP
I_LEX,I_E ou À;R]I, .&TEMI ) B,¥";) ou le (;UII)E
I)E (;R]II AGE.
3
RECETrE PP,_RI_E. Appuy_ z sur cette
tOil(h( po/]]" tltJlis(fl; CI'(_el_ t(IaoYi]I]/el_ IYlOdl[](_l
ou supprimc runc IX_C{lie prd_ r&.
4
SONDE. Appuy{ z sur cclte touche lol,'sque wins
ufiliscz la strode pore cuirc des aliments.
5
CUISSON A CONVECTION. Appuyezsill"
_etm t(mche pour choisir la f{mction de cuJ_,son
pro ( Ol]V(tCtiOl/.
6
ROTISSAGE)i CONVECTION. Appmvz
sur cette touche pour choisir la hmcfion de
r6tissage pal- convection.
7
MINUTERIE. Appuy( z sill"c_lte to/Iche punlr
d/oisir la {onction de minut{ rk.
Affichage
8 AUTONETTOYAGE. @puyez sur ceue
touche pour choisir la fi)nction d'aulonetloy_ge.
Cons/fltez la ",torion Ullisa/bm du/ou_ au/o_,4touo_l.
Touches
9 TOUCHE HOME (ACCUEIL).
app/l_['Z SIll Ct_H_ ' tOHC[/_" pOHl" I'{W{H]iY _ l'('t F,m
,, SI_LECTIONNER LE MODE DE C[ ],";.";ON ,,
(Accueil). (kite touche t_'almtde pas Ics rdglag_ s
de (/]J,_son oH d'atltOl]( ([£)}'ag(f.
TOUCHE HELP (AIDE). Appwez st,,"
C(_11( tOil(he pOllY (1/ savolr pills Sill" ks [(}IaCtiOIaS
('|/I fo/IE
TOUCHE BACK (PET.). Appuy<zSill CCU_
Io/Ich_ potlr levi niy fi ]_d(]_D pr(_cdd_ nt.
TOUCHE ClEAR/OFF
(EFFACER/ARRET). Appuwzst,, c<tte
touche pour anrmler TOUTES les opdlations du
t_)ur gll'exceptJon de l'hoflogv et de la minuterie.
TOUCa-IE(S) OVEN LIGHT
ON/OFF ,(ALLUMER/ETEINDRE
LA LUMIERE DU FOUR). ,_l_pu_ zsu_
cttte tOLl(he poul alhnl-lCr ou (-t('il](ll(" la (ou los)
hlmi_'rc du f(ml:
14
TOUCHE OPTIONS. Appu?_z potlr
choisir DE[X TEMP, DI{PART I) IFH?_RI{,
Iq_RMENTATION, DI{St IYDRATER, C] L&LD,
CI ISSON ET MAINq'/E N, SABBAT oil
RI{GLAGES.
15 Affichage. Af]](hc l'h(tn'( ('lu joul.
Codes d'erreur
,,F--et tm nombre, clignotent h l%crm_ et des bips
se fore entendre pour indiqtmr _m code d'en_eun
Appuyez sur CLEAR/OFF (EFFACER/ARRET).
l,ai_,sez I( tim* tc|i'oidit p( ndarlt unc he/ire. Rcmcttez
le {_)/ll"en malvhe. Si ]e (()de d'errcu_ est de no/]v(_a/l
aifich(', coui×'z l'alimenmfion dlectrklue et appelez
Hllt _[xtliltet]i;
S'il y a une panne de courant:
Si votts aviez _g]O une fonctlOll mintaee sur votre
fotu" all moment off la patme tie courmlt s'est pmduite,
il f_fl/l I_g]cl _ notlv('a/I tollles les fimctions
plogvdmm&'s, airlsi quc I'hoHog_'.
L'hem-e clignote fi ]'oTan apr_s tree pmme de courant.
61
Page 62

Conseils de cuisson
£) oulemerzl
d'air dujour
Le papier
d'aluminium
Positionnement
des u_.s.s_ol_<s
Un w=ntilatemde tcfixfidissement interne tonctionne
dumnt tousles modes de cuisson du fl_tmL'air chaud
l'int&_ieurdn tour est &'acu_ pat"les &ents situ& entre
la porto et le tableau de commande.
Dans le c_sdes installations sous le compmil: ne placez
I:r_sde set,tetras sur ]e de_,mt du fim_;cat cela_iendvait
ol_struer I%coulement d'afi des _:vents.
Ne d@osez jamais une t_+uillede papier d'aluminium
sur tout(=la mfface d'une grille,caxcela aflectera la
ci_rulation de I'air chmld et donnera une cuKson
inad&luam. Vousponvez placer une petile t:euille
de papier d'ahlminium surune grille plac_:e_ quelques
pouces au-dessousde I'aliment que x_mstbites cuire afin
de recueillir ]es &:bordement+
REMARQUE x /s /ttls( _zgeneralene_t(t /re
ou deux grillesponr la cuisson g,Sn_:rale.Vousutiliserez
trois grilk=suniquement lotsque voust_fimsla cuis_m sur
phlsieurs grilles. P,efi*ezla tmisibme grille du _ialr
Iorsqu'elle n'est pas utilis&.
Pour une c_fisson unifi,rme et un bmnKsage correct,
il dolt y avoir suflisanmmnt d'espace pout la circulation
d'air dans le Ibm: Les r&ulmts de cuisson seront
mei]lems si ]es plats sont centr& aumnt que possible
dans le t_._urplutdt que d'btre plac& 5 l'avant ou _'t
]'at fibre du t}:itn:
recueillkles debordements
[*'s plats ne doivent ni se touchel; ni toucher aux
pmois du tout; Pt &_t)ez tm _pacement de 2,5 fi 3,75
cm (1 fi 1,5 po) entre les plats ainsi qu'avec l'arri_re,
la p<me et les cgtds du _i)ut:
Si _ous dm*ez utiliser deux grilles, utilisez les positions
A et C, Bet D ou Aet D et d&:alez Ds plats de manibre
_tce qu'ils ne soient pas di_ecmment l'un m_-dessus de
I'autre.
MouM de
plaque, s
pdlis. erie
Pr/chau /Jk g'e
Le type de
ma_Ka'rine
ulilis& a//k_te
la ui. :son!
62
1_tilisezles moules de cuisson appropri&, l,e txpe de
fini du moule dg:tmmine la quantitd de bl unis_ag*_qui
all l_a lieu.
• Les moules de couleur fimc_e, rugueux ou ternis
absofl)ent la ch tleur et il en r&ulmt;_une crofite plus
brunie et cmustillantc. Utilisezce t_pe de moule pour
les tartes.
Laissezle tour pr_:chmlfl;:rmant d'y placer
les aliments. Pour de meillem.srt:sultat_,il est
m:cessaire de pr_:chaulIbrle [6ur lots de la pr@aration
de b,,'ammlx,de biscuits, de pfifisserieset de pain.
Pomp_Mau//k_:_fl_z lep,*o"a"la&,rowl_,mp:mtme.
L'imliu&,tolumilwu_Pfi];H/_4T(/m;dmllffage)s?dlum_
<'tl'affldt_o"detem[,_;mtloekzdiquet00 °F_38 °(7).
Ca m@,;mtu,*,a/ficlgeccmu_+,,w,a d+cm<_ru,w/bh
+ + + + + o+
qu+ la t+l+lp+mtun du /ou* all+i+d t(X) ']"
La plupurt des recettes n_:cessitant une ctlisson exigc
l'ufilisation de produits fi torte teneur en mati{'_es
grasses, comme du bemve ou de la mmgarine (80 %
de mati&es grasses). Si rOllS dimimlez la quantivt: de
gras, vous pourriez ne pas obtenir les m&nes r&ulmts
qu'avec un produit fi p/us forte mneut en matii_tcs
grasses.
Vous pouvez mtcr _+)tle recetle de gfitem_, de tmtc,
de pgttisseries, de biscuits ou de fi'iandis_s brsque
_ous utilisez de la graisse tartinable fifaible mneur
en matibres grasses. Ph_s la teneur en matibres gn_ses
d'une graisse mrtinable est tZaible,phls la di{t_:wnce
est appr,Sciable.
• Lesm<xllesbrillant_, de conleur claire et fisses
rcfl_tent la chaleur et ilen rt:sulmm un bmnissag___
phls dair et plus d_licat. C'est le bpe de moule ou de
plaque a pfitisseriequ'il thut utiliser pore les gfireaux
et lesbiscuits.
• Lesplats de cuisson en verre abs*)rbentmlssila
chaleur. Pour les plats de cuismn en vene, il peut btrc
n&essaire de r_:duirc la tcmp_mm_e de cuisson de
25 °F (14 °C).
_73 C].) Le -_u,_tilageur?_ccmva:tionse_! au_,sio_m(m:lw
lo_ du p_M,al!/fl_g+_La commaml_,dmelImsi_l_<+ls0m)re
(/,it,),,,,+,li,i q,../,.j,,,,, ++"q,,i
10a 15mh_ut+,s.L'iMical<*urlmni_zeuxPI_;I_AT
(pgdm*ff/agv)s'g_ldnt+tl'qfficheurimliqueI_ztemp+;mtuw
!iesaN_.rzt_p_._el_l_1_plaa_sdartslebu_ unebh que
le-vo)'a_+tNmineuxt>tff_HI_4T@{<hat¢[fizge_s'('stt;ld_l.
En vem_ des nonnes ff.d&'dlcs,lesptx_duits_tiquet&
comme _tant de la ,,margarine>,doixent contcni* au
moins 80 % de m_Obresgr,_sses.Par contre, losgraisses
tartinables "_fidble tenm_r en mati;'res grasses
contiennent moins de gn_ et plus d'<m. Ia tbrte
tenem en eau de ces gr,dsses mrfinables altccm la
texture etla savem des produits de Nallangerie. Pour
obteniv de boris r,Ssultatsavecvos anciennes recettes
pr_)l_r@s,tltilisezde la marg_wine,du L'eurreou de
lagr_fissefimrtiner contenant an moins 70 % d'lmile
xt:g_t,le.
Page 63

Avant d'utiliser votre four
Fou_ t*_u_al
Grille_ de
,/i,u,ra
exte. sio
compl }te
Rail avant
sup_deur
Rail avant
inf_rieur
Afin d'6vi,_er de vous brfiler, placez les grilles a
la b(:mn( position avant d< mettre le tk)tlt {n
lnal-( he,
La position de grille correct( &:pend du type
d'aliment et du brunissage &'.sir_.
I.e cadre des gnlles s'adapte aux supports _1
grille des deux cat, s. £n_ Ibis le cadre de grille
en place, utilisez le rail axant sup_rieur de In
grill_ pour tircr c_lle-ci cn posilion d'_xtension
(7o1111)1(_1(, loFsqtle x,OllS plac{ z Oll relil_( z tin l:)lal
(](f CIIiSS()II.
:: ..... > [ Lefour
' i comporte5
positionsde
irilles
Grilleen
J'extension
Pour enlever une grille :
1. Assurezwous que la grille: est bien au fond
du fbmz
3. Alors qu( vous tenez refinement les rails
avant sup_riem et iut_ri_ ul; tir_z la g_ill{ vers
l'avant et retirez-la du Ibm:
Railavant
superieur [nf6Reur
Pour remettre une grille en place :
1. Placez les m_canism_s de w:rrouillag_ arrff, re
par dessus et sur les supports g_grille (<inq
positions d( grille sore possibles y compris la
position sup4rieu re).
2,
Verro@lageavantde la grille
Saisissez la grille 5 la lois par son rail avant
sup&iem- <t son rail avant inikh-iem- et
soulevezqa wrs le haut de mani{,r_ 5
d(_senclencher les n%canisnaes de
verrouillage avant de la grille des supports
figrille.
Sou]evez pour
desenclencherles
mecanismesde
verroui%geavant
de la grilledes
supports_ grifle
2. Glissez la grilk compl{*tt meat en plac_
.jusqu'fi ce que les m&:anismes de vcrrouillage
an-i,Sre & la grille soi_nt bien fixg,s sur ks
supports arri{qe de grille et poussez les
m(.canismes de _ rrouillage avant d_ la grill_
sur l(s supports avant de grill(.
Glissezla grille completementvers
I'[nt_deuret poussezversle basde
mani#ie_ endencherles
mecanismesdeverrouillage avant 6_'_
surles supportsavantde la grille
VerrouiHage
avantde la grille
Page 64

(]uJsson et r6tissage
Fottl l_lttla/
Comment
17{,._i[gT 'II_t2G
( ItLS'SO_ Olt
un r&Lssag' ¢
1 Appuyez sur la louche CUISSON.
2 Sur les mod'eles a f,mtr double setdement,
appm ez sin- FOUR SUPI_R. ou FOUR INFI_R.
pour (hoisir le fbtm
3 ,\ppuyez sur les lou(hes numdriques pour rdgler
la tempdmmre voulu(.
4 Appuyez sur la u)uche ENTRER.
5 Appuyez surla louche DISPART.
Le ventilateur (le (onve('fion s'allumem dtlFdlll
le pr6chmflthge. [ n( signal sonorc indiqueFa (lUe
le prdchatfllhge du four est lelmin6 ; cela peul
prendre environ [0 minutes. L'_cran af'fich_ l-,t
le r_glage de temp&-atm-c.
Les alim( nts doiv( nt 6trc mis au four au signal
SOllOl'(.
Pour rdgler le deuxibme Ibm- (sur les modbles
g four double seulement), sdlel tionnez
ENFONCER POUR REGLER LE FOUR
INFI_RIEUR ou ENFONCER POUR RI_GLER
LE FOUR SUPI_RIEUR salon les besoin% puis
suiv(z les drapes (i-dessus.
Le rdglagc (le temp&ature peut ,3tre modilid en
appu3=mt sur CHANGER LA D_TEMP.
Les rdglag(s peuvent i',tl-t_anmlh:s en appuyant sur
ANNULER
Le r_glage de la milmlerie s'eff(ctue ell ai)l)uyanl
su r REGLER LA MINUq_RIE. Consultez
la section Millutel_<
6 V6rifiez la nourrilure au temps minimum
indiqu_ dans la 1-(_((I1(. Poursuiv_ z la (uisson
Surlesmode[esatourdoubleseulement
FTqF-IIoIII
FqFqF-IIoIIoI
7 Appuy(z sur ANNULER un{ ibis la cuisson
t,._rmin&.
NOTE : Un ve)_tifalem peut v_ melOf au¢omalique,wl*l
_'_zmgn_l*epore l@vidi* &s pil;(z_si_zlern_:*.Cetle situatimz
_!sttout a fizit mn)nak'. I.e wqztital_ntr fleu[ amlk*uer (h,
/onctiomto m_me hnaque h,/ou_ est _;l_'h*t.
Type d'aliment Position de la gldlle
Gfiteau des anges A
Bis(/fit_ ou muft'ins B ou C
Biscuits ou petits gfiteanx B ou C
Carrds au chocolat B ou C
Gfiteaux fi diages B on C
(;fileaux I/_loulds et A Oil B
quallc-quatls
"Eules el {onds de tall(! B 011 C
/_ne settle tarte B ou C
q?ltles congeldes B ou C (sur plaque h
pfitisserie)
(:assetoles B ou C
Si vous cuisez en m£,me temps quatre 6rages
de gfilt, au, placez deux 6tages sur In grille B (t
deux 6tagvs sur In grille D. Distribuez les 6rages
de gfimau sur les grilles (le mani,2,re fi ce qu'aucun
lie soit directement au<lessus d'un autre.
Lefour gossede5 positionsdegrille Reportez-vous_ lasection
Grillesde tour_ exte/lsioncomplotopourlesinstructionssur
I'utilisation, I'enl_vementet la remiseen placedesgrilles.
Page 65

minulerie
(mise en
marclle
immediate
et arr_,l
autom, atique)
&o" h<smodbk_s iQoul doubh', yogaspour< ulili.wl
ta cugsm* mbzut/e dm*s u_ /bu* tout en pmc[dant
_2l'a_tto_zH&_'ag_" davis l_tuhe, ou ellm_e [a i:u£sson
mi_mh;<,da_s k.s deux /ouls _imullan[!_wnt.
NOTE : N. lai_ iamais &s atime_*tscommedes
pmdldts [aitio_. du poisson, d_/a /m_,'. & kt volailh'
d du po_v_jmsopengfa_d p/tzs d'une ]wlof avanl ou
a/m'_sta _ugson. i.o_Hu_ .'s alimena*so,It bzAsk h
ta l_.'mphuhm_rh.la pib.', .4a /av_wi_ehzpmtifl;mtion
d,.tmd h'k's nol:avv
Lepta* v_met _,J*mm_:k_iymddial,.menl et fimcliom*e
k"fimr , Dd_*laldomal_q_wmzozL
A_sul-eTwousque l'hofl(ge affiche la bonne heure.
1 .\ppuyez sur la touche CUISSON.
2 Sttr les mod'eles Rfour double .settlement,
appuyez sur FOUR SUPER. ou FOUR INFER.
pour choisir le fou_:
3 Appuycz sur les 1ouches num&-iques pour
rOgler 1_1lump&amre voulue.
4 .\ppuyez sur la u)uche ENTRER.
5 Appuyez sur les 1ouches mlmdriques pour
rOgler In &lrOe de cuisson ddsirde.
6 .\ppuyez sur la louche ENTRER.
7 Deux options de d_part imm&liat et d'arr&
automatiqtm de la cllissola sollt disponibles :
• DISPART APRI_S PRI_CHAUFFAGE -
Al_puT,'(zsur cette ttm(h< pour pr& hatflfer
le ibm:
I.e VClltilatulll-de COIIV( C1iO11 s'aUlllllel_l
dumnt 1{ prdchauff_gv. [ne signal sonor_
indiquera que le pr6chauflhge du tbur
est lemming; cela peut prendre emir<m
l0 minutes. L'_cnm affich{ rale rdglage
de mmp&aulre.
Au signal sonore, plac(z l(s alim(nts dans
k foul;
La cuisson n]hl_.ll_i( ne d(hl]arl-(:l-aqu'un( tk*is
1_pr&:hauflhge tel-lllill( t (1 la lollche DEPART
elflbn(de.
• DISPART a FRO[D - Appuyez sur cette touche
pour d&narrer le four immddiatement et
ctfire la nourriture sans pr(_chmlt}hge.
Le ventilateur de convection se metmt en
marche. Le d&:ompte de la dur_e de cuisson
colnlllellCe allssi ilnlll(;diatelllellt.
Cuisson et r&tissage minutds
]Q) 1/1" Hlllr(I/
Surlesmodelesa fourdoubleseulement.
1-711-711IIo11-71
f7117-11IIo11-71
1-71f711IIo11-71
fTIFTII IIo11-71
Pour rdgler le deuxil,me 5_ur (stu- les modbles
fi)ur double settlement), s_le(tionnez ENFONCER
POUR RI_GLER LE FOUR 1NFERIEUR ou
ENFONCER POUR RI_GLER LE FOUR
SUPERIEUR selon les I)esoins, l)uis suivez
les dtapes ci-dessus.
Le r_glag( (1( l(lllp(_FaltlYe i)elll &tl'( modifi_ y:n
appuym_t sur la tou(h_ CI4_NGER LA DUREE-
TEMP du four appropri&
Les r_glages l)euvenl 6tl'e anmllds en appu)ant sur
la touch{ ANNULEt du four approprid.
L( r_glage d( la mimlt_ l-i_s'< M:ctue {n appuyant
sur REGLER LA M1NUTERIE. (_onsullez
la seclion Mitlz&'*#.
Une ibis la cuisson levminSe, le four dmelll_a
un signal sonore et le message <<TEMPS StPP. ,,
s'aflichera pendant cinq minutes. V&-ifiez le d(gr8
de o.lissol'_,:le la nOtUTiture. Si du temps de
cuisson suppl@_(ntaire est rcquis, appuyez
stir In touche TEMPS SUPP. et entrez du temps de
cuisson suppl_memairc. Si cette fonction n'est pas
s_lectionn_e, l'&:_-,ms'ei_hce|a amomatiquement
au bout de (inq minutes.
Le 5_ur va d&naner et pou rsuivrt la cuisson
pendant la p&iode progl-,mnn_e, puis il s'arr&era
automatiquem(nt, saul si la ionction Cuisson et
maintien a _1_ s_lectionnt_e. Consuhez la s(ction
()prior*_uis_o_*('Imak*tie_*.
(K)
Page 66

Cuisso_
(_uisson et r6tissage mirmt_s
(raise en
marche
diffw_e et
_rr_l
_zutom_ztiqu_O
attlo_tlali_ltW_tlg_lzt. (,))_vtllgz az_ssi Ig_ sa llo*l l)@gr* ! di//_;_Z
.\ssur(_z_vous que l'horloge attiche 1_I)onl_e heur(.
1 ,\ppuy_'z s_n-CUISSON.
2 Sur les mod,bles a foist double settlement,
appuy_,z sut FOUR SUPI_R. OHFOUR INFI_R.
pour choisir le tiltll:
3 Al)puyez sur les t*_uches mm_driques potlr rdgkr
la lelllp_21wttUl( V{)lllll{.
4 ,\ppu}s'z s_n-ENTRF_.
5 Appuyez sur les l*)uches mm_(:ri(lues potlr rdgl(r
la durde (le cuisscm (Idsirt;(!.
,\l)puyez sur ENTRER.
Appuyez sur AJOUTER OPTION CUISSON
AU FOUR
Al)puy('z sur DEPART DIFFI_RI_.
Deux ()[)tions (k! r6gH_ge de d(:parl dill_r6 SOIIt
disponibles :
• DF_BUT DE LA CUISSON - Appuvez sur
la t()uch(, puis ser_(,z-vous des touches
num(.rot(.es pour ent_t.i le (l(qai qui l)rd(ddera
le (/(q_ut de la r uisson. Appuyez sur ENTRER.
P_/i _'X('lllple, si vot/s soullail___zqu(' 1_/c//isson
d_bute dans 2 heur('s, entr('z 2, 0 et O.
• FIN DE LA CUISSON - Appuyez stir la touche
puis sx,rv(.z-vous des lot_ches mlm(q-otdes potlr
elllrer la pdriode t_)tale au terme (le laq_/elle
la cHisson pl-_*ndra fin. Ai)p_l}_.z sur ENTRER
Par exemple, si xx)tre tenlps de cuisson est de
hetlFes et q//e VO[ISsot/h_/itPz seIvil le r(,p_ts
(lans 5 heur_s, elltrt_z 5, 0 et 0 et le toui
d6nlarrer_ (lalls _ heur_'s.
10
Detlx oplions d(! d(.part sont dispol_ibles une li)is
le (/('lai (Ill (Idpart (litt('Id dcould :
• DISPART APRILS PRI_CHAUFFAGE - Appu3'_.z
stir hi u)u(he pour (hoisir le pl-(-dlaut[zlgt!.
the ti_is le d_51ai(111d6part ditt}Sr(_('(:o'_llt;,
1( [imr s'alHmlera et le prdchautlagt'
COil llneiicel-a.
g(' stqnilateur (le convection se mettra en
mard_e (hnaln 1(! pr_:chautt_ge. [lie signal
son(H-_, in(liquera que le prdchat/tti_gc du tour
est ternlin(, : cela l)el/t prelldre ellVirOll
10 £115 minute,s. I2ggc*'dn attichera le r(.glagc
d( telnp(,rat/irt _.
• DEPART h FROID - ,\l)puT,_'zsur cell_ • t(*/Iche
p(HIl" que le t_)llF d('lll_llTe imllledi_llelllelll
(sans pr('chauttage) une lois le ddlai de d('part
difldr_ dcoul£'. He "_*,ntilat*!ur d_ COllV(,clion
se lnettl_/ell nlaiche.
Pour rdgler le det/xiiqne f_)ur (sur les modeles h four
dottble seulement), stZle_tiom_ez ENFONCER POUR
RI_GLER LE FOUR INFERIEUR otl ENFONCER
POUR RI_GLER LE FOUR SUPI_RIEUR sel(Hl
les besoins, ptlis stliv('z le_sdrapes d<l(!ssus.
r-ql-qF-II oII I
FqfqF-II IIoI
r-qfqF-II oII I
Fql-qF-II IIoI
i-qF-IF-II oII, I
FqF-IF-II IIoI
El' rdglage (le tempdratnr(, petn tatlX,ino(lifie }11
apptly;mt stir la touche CHANGER LA DUREE-
TEMP du ti_ur approprid.
I.t's rdglages peuv{qlt £_tr(•anlmlOs eI_ appuyam stir
la touche ANNULER ([u t_uI" approprid.
gt• rdglage de la nlilluteii( s'etik.ctlle ell appuyaln
stir REGLER LA MINUTERIE Constdmz la sectioil
Erie f_is le ddlai (le ddpart (lift(q'(' dcotdd, le linlr
',_/de]n_/rrel- et po1HN/li',vt' 1_/cuissOll pe]ld_/]lt
la pdriode pt ogramnlde, puis il s'arr&tera
aut<nnatiquement, sa_t si la t_nctio_ Cuissoll et
maimien a t;l_ s_:lectioml_:e. Consult( z la se_cli(m
Wile lois la cuisson telmillde, le ti_tlr dlneltl_l
/m signal sonort, et le message ,_"IEMPS S{PP ,,
s'a[l]chel_t pell(lallt cinq lnilllHes. Vdrifiez le degr0
(le ct/isson de la ll(l//iTitt/Ie. Si d//tt_lllps (le ctlissoll
stq)pl_lnentair(, est rt.quis, appu}*.z sur la t_)u(:he
TEMPS SUPP. et _HllIez (hi temps de ct/is'-x)n
st/ppldmentair_ _.Si cetle f_m(:tionn'est pas
st21ectiollll(ie, l'_cl-all s'ett_cera allt(Hllatiqllenlellt
at/ boul de (inq lnilltltes.
Page 67

Grillage
]?0 It K I11 It I (l [
(;om men !
,ffrillag'e dar s
volre fimr
Ferlnez kl porte. Faites toujom-s vos g_illades la porte
ferm6e.
1 Xplmvez sur GRIL
2 Placcz la nourriun-e sur une grille de r6fissage
(lans une lbchetiim.
3 Sur les mod61esa four double setdement, appuyez
surFOURSUPER, ouFOURINFER, pour choisir
le Ibm:
4 Sui_ez les :,uggesfions du (,lddv dvg'JilklX_
cono.!mant hi l:,ositioll de la grille.
vas ]?_r!/_rr'I_l_ &" t'/dsson i_?/kwlztz_lzl [a dw_:_ &"g_i//agl_
5 Appu?_'z sur GRIL h TEMP I_LEVI_E ou GRIL
h TEMP BAS.
6 Appu)x'z sur DISPART.
atttomaliqtwm_lzt par (l_ ()'des (t("mm_ /l(_a__z'qflou_
nJmidk l_._pii.,.s i_t_.r'm:s. C_.])/,;nonl/nw (_stnormal el
h"v_'lztikll_'zo" flv_l! iontin .n Oflnl(?k)nne_ m['ltw aln_s
Ix' gril lie ndcessite pas tie pr6(:hautlhgc (lans la
plupart des cas. Cependant. les alilnenls qui cuisent
l-al)idt'ment, colnille I(!S t]lleS lani_.res de vi_lllde o!1
de poisson, i)euvcnt n&:essimr tree blqwe p_qio(le d_
pt ('chautfi_gu de 2 il 3 minums i)our s'as,qlrer de leur
[)lqlllisselllellt lorsque la ClliSSOl] set_ tel-lllill(_e.
"I'Olll'llitZles alilnenls une s_ule ibis Mrs du grillage.
RF_4ARQUE : [_ r6ti_agv n( fi)nl liolzne_l pas d la so,d_
Fermezla porte.Fermeztoujours la porte/orsque vous
cuishtezau grilloi_
Sivotlefourestaliment6paruncoulant
de208volts,vouspouvezfaile g@erles
bifteckssaignantsenfaisantprechauffer
le fouretenplagantla grilledufour
uncranplushaut.
Papier
d alumznzum
Pour r6gler le deuxibm 9 fbm: s_lectionnez
ENFONCER POUR REGLER LE FOUR
INFERIEUR ou ENFONCER POUR RI_GLER
LE FOUR SUPI_RIEUR selon ks besoins, puis suivez
les drapes ci-(lessus.
[x_ rdglag( de k_lnpdlatHre I)eut ira!! modifid cn
appu) ant sur CHANGER LA DUREE-TEMP.
Les rdglages peuv_ nt ,2qre ammlds en appuyant sur
ANNULER.
Lq rdglage de la lninuterie s't_tf(!ctue en al)l)uyant sur
REGLERLAM1NUTERIE. Consultez la section
Mintzte_:
7 L(}l'SqllLr ]e I(_)liss_lg( esl tel-lllill£', _lpl)tly(z stir
ANNULER.
x_'(IllSI)ouvez uiiliser dtl papier (l'allll]lillil/lll ( Olllllle
(l_mbhlrc pour la lbcheffite et sa grille. Pa_ corm-c,
urns devez placer le papier bien ajusld sur la grille el
(Idcouper des tbntes semblables ficelles tie la grille.
67
Page 68

Grillage
Four mural
La tail[I, h"poid_,
de d_;pa_t et
(I]/rcte*vl b" temps
de L,>iL (,r ,_'uide
eM bas_; su_
It'svialldex
/_ trm[,Fmlu_v
de _jrig, eralr_:
Aliment
glen cult d'g'paisseu r
Biftecks
Saignant _ 3/4 fi 1 po (/,9 fi 2,5 cm) l) 8-10 3-5 lncisez le gras
A point de _paissetn" I) 9-11 3-5 aux bonds.
Bien clair C 12-14 3-5
Saignant _ Em_ ] ½ po (3,8 cm) C 22-24 4-6
A point d'_paissel_r C 24-26 3-5
Bien clft C 28-30 5-7
Poulet Poilrine de poulet (avec os) C 25-35 10-15 (;rillez pearl vet
Queues de homard 4 oz, (0,11 kg) C 7-9 Ne pas Coupez fi tra_ers
Poisson Filets de I/4 fi //2 po I) 7-9 Ne pas
Trmlches de 1/4 fi 1/2 po (0,6 fi 1,3 cm) I) 4-6 2-3
jalnbon d'_paissel_r (tom cldt)
C6tele_es de porc I/2 po (1,3 cm) d'_paisseur I) 9-11 6-8 Incisez le gras
Bien cuit 1 po (2,5 cm) cl'_paisse/_ ¸ (: 18-20 4-6 aux boMs.
C6telettes d'agaleau
A point 1 po (2,5 cm) cl'_palssel_l ¸ C 8-10 6-8 Inclsez le gras
Bien cuit (; 9-11 7-9 aux boMs.
point 1½ po (3,8 cm) d'_palssem: C 14-16 5-7
Bien clfit C 15-17 6-10
Pain h Fail C 2-3 Nil)
Grillade rain.
_uantit6 et (ou)
epalsseur
Poitrine de poulet (d_sosst:e) B 24-26 9-11 le has d'abord.
(0,6 fi 1,3 cm) retot_rner.
Filets d'_paisseur de I) 9-12
1/2 po ( 1,3 cm )
Hauleur de
la ga'ille
D
Premier
c6t6 (nfin.)
9-11
Deuxibme
c6t_ (rain.)
3-4
I elO_lrl_el;, ]a coqtlJ]le,
Commentalres
EspacezBoeuf hache 1/2 fi 3/4 po (1,3 fi 1,9 cm)
Ouvrez,
Page 69

Utilisation de la sonde pour la cuisson
I)ans le cas de nombr(ux aliments, plus
l)articuli_q-ement darts (elui des r6tis el de la
volaille, la temp_ratm-e interne de l'uliment
constitue le m_illeur moven d'_n d_aluer la
cuisson. Grfic( 5 la sonde thermique, [)lus
bcsoin dc dcxincr la durde du r6tissagc.
Si xous utilisez une auu-e son(l( que celle
fburnie mec votre fore; cela pourrait
l'('Hd Olll lllag( l',
Saisissez la sonde par In poign_e lorsque vous
l'insdrez darts la viande el la vofite du f}mr et
lorsque vous l'en reth-ez.
• PollI lit _ pas t'lldOllllllagCl-VOtlX" son(It,
n'utilis(z pas de pinces pour tirer sill" le (:ill)l(
lorsqu( vous l'enlevez.
• .\ssurez-xous ¢lue l'alim( nt est complblement
d_ congel_ avant d'insdrer la sonde, afin
d'_viter de la tassel\
• Pour 6viter tout risque de 1)rfihlres, lie
d_branch(z la sonde de la prise qu( lorsqu(
le fimr a refi-oidi.
t:ou_ mural
C_ble
Fiche
Poign_s
Lasondethermiqueressemble_ unebrochepouwuea uneextrdmit6
d'unefiche quevousdevezbrancherdansla priseamenageedans la
voatedutour.
Posith)nnement
c(wrect de la
SO'O(]#
• Ne laissez jamais votre sond( fi l'int_rieur du
four lors d'un c}cle de (uisson au grilloir ou
d'autonettoyage.
• Ne laissez [)as la son& darts le fO//l;
Apff's m'oir pr(_par_ la viande et l'avoir placde
sur une grille darts une lg,cheflite, suivez les
drapes ci-dessous pour bien positi(mn_ r la
Sollde.
• La poime de la sonde doit £,tre plac_e au
centre d_ la partk la phls _paiss_ d( la viande
du r/_ti.
• La sonde dolt £'tre insdrde compl{*tement darts
la viande, jusqu'fi la poign6e, pour qu'elle
puisse indiquer la tempdratur( correctement.
Elle ne devrait [)as toucher l'os, le gras ou le
cartilage.
Darts le (:as d'un r6ti d6sossO, insdrez la sond(
darts la partie coupde, darts la r_gion la phls
charmle. I)ans le cas d'un jambon ou dhm gigot
axec os, insdrez la sonde jus(lU'all centre du
muscle inR:Heur le phls gros ou d(
l'articulation.
Ins&-ez la sond( au centre du plat, par <xempl(
un pain de viande ou tllle (asserole. Pour la
cuisson du l)oisson, insdrez la sondejuste au-
dessus des branchies, darts la pattie la phls
charnu(, paralli, l(ment ?1l'ar(',t(.
Ins6r(z la sonde darts la partie la plus charnue
de l'int&i_ ur de la cuisse, par le dessous et
parall_,lement au pilon d( la dinde.
Page 70

Utilisation de la sonde pour la r6tissage
Comme_7I
r@'ler,rz
*6tLs.sagv avec
la so',de
thermique
1 Ins_rez la son(l( dans la nourrilur(. Consuh¢ z la s_:clion { ?itisa¢io, d_
/Taw/n(h.
2 Bmnchez la sonde dallS la prise amdnag_e dans le ibm-. A_,sulw-vous
qu'dle est bien bnmch_e. Reti,rmez la pol_( du Ibm;
3 :\ppuyez _,ur SONDE.
4 Sur los modules 'a four double settlement, appu}ez sur FOUR
SUPER. ou FOUR INFER. pour choisir le Ibm;
5 Al@u}ez sur OK.
6 Appuyez sur les touches mnn_riques pour l-t_gler la temp&-ature
interne souhait_e de la nourriulre ou de la viande. (La temp&-4ture
interne maximale de la llollrl-itllr0 que vous pouvcz rdgler est 2(R) °F
[93 '(:1.)
7 Appuycz sur ENTRER
8 Appu}ez sur CUISSON.
9 Appuyez sur les touches num(_riques pour l-6gler la teml)&'ature de
['(_tn d(_sirde.
10 Appuy(z sur ENTRER.
11 Appuyez sur DISPART.
Ix! _))111"S'_llhllll( l'a imm(dia (ment el le r(Sl(!l'a jHs(l!l'_i (¢ qu'il soit
_l(ilH.
Le vcnfilateur d( conw,cfion se mettm ell real\he (apr{,s un brt*f d_lai)
et 100 'F (38 °C) appam/tm fil'Ocran. (L'atlichage de la temp&-4turc
commencera fi changer une fbis que la tempdrature intern( de la viande
atwindm 100 <'F138 <'C].)
Lorsque la tenlp&-,itm-e interne de la viande aura atteint 100 °F (38 °C),
l'dvohltion d( la mmpdramre interne s'afl](hem _ l'dcmn.
12 Lora(lue la tem[)_l'4tlux' interne de la viande atteint cello que vous
av(z rdgl_e, le four s'dteint et un signal sonore se fhit entendre.
Pour thire cesser ce signal, appuyez sur la louche CLEAR/OFF
(EFFACER/ARRET). P.elirez la sonde de la viande fil'aide de
poignl:es ou de mimines de ti)m: N'utilisez [)as d_ pinces pour
In rt,tircr--vous rb,tluez d( l'endonmmgen
Pour vdgler le deuxi{ me tkmr (sur los mod'eles a four double seulement),
s_lectionn( z ENFONCER POUR RI_GLER LE FOUR INF_dEUR.
ou ENFONCER POUR RI_GLER LE FOUR SUPI_RIEUR. solon
los l)esoins, puis suivez los _tal)es ( i-de,,sus.
I.e r_glag( d( temp&-,jtm-c pout 6trc modifi_ en appuyant sur la touch_
CHANGER LA DUREE-TEMP du fbur approprid.
Los rdglages peuvent _,tre annulds ell appu)anl sur la touche ANNULER
du Rmr applop*i&
Le r(_glage de la minuterie s'eflbctue en appu>nt sur RI_GLER
LA MINUTERIE. Consultez la section M_mlerh:
Surlosmo@bsafourdoubleseulement
F-IF-IEII oII I
F-II-qF-II oIIoI
FIFIEII oII I
FIF-IFII oIIoI
7O
Page 71

Ufilisafion du flour ;I convection
Fou_ tnu_al
Ventilateur
de
convection
C(z,vsemle,s
/)OggF [(1
cuisso par
coT"_vectio_t
[)_/IqS 1111 lili/l" _i ( OlIV_.!ctioll, Fair (hat/d ch'_ 111( a/I-
(/eSSlly,, atl-des_)HS et alltOHI" des al]lllelltS _Face
Iill '_elltilatetll-.
ISair esl ainsi (listribu_ unitorm_;ment darts toute Ii
cavit( s du t_uI: Pal" cons('quellt, les aliments sont cuits
unitorlnt:ment et doit:s _l l)oint--_'t la (lur(_e d(
( lliSSOl] ('St soll_ellt phls ( OllII( • qllt • dallS HII t_)llF
ordinaire.
REMARQUE : ls *._lltilatel_*d<,(o_z_(Holl_ reel
Axvtntd'utiliser x<}tretour fi c<mvection, vt:riflez s'il y
a SHl]]_lllllllellt d'espa(e aHtOlll" (It! VOtI'(' plal d(
(lliSSOl] pOHl" asstivel- lille 17_)1111(! Cil-(lll2tli()ll (/e Fair
(lans le tT)ul:Sisous utili'-x_zplusieurs plals, laissez
de l'espace entre eux. ,'\ssurez_wms6gal_nlent qu'ils
ll'ell[Y(Hl[ [[)aS ell COllla( 1 H_ec (l'aHlIes ( aSSelT)l(!s Oil
avec les patois du t_)tu:
Papier el plasfique
\'ous potlvez utiliser darts le ti)//l- i_iC()IIX'e([i()ll
Its conle_lants de plastique ou de l)apier rOsismnt
fila chaleug ieconllll_tll(/_s pal leur tabricani pour
utilisation darts un Rmr or(/inaire, gt's plats de
C/lisson ell plastiqllt' F(qsigtallt ,I 1111( [elll[)('lallll-t •
_/_400 F (200 () conviennent 6galement.
REMARQUE : ne laiss(z a/ICIlIlpapier ou plasti(lue
en contact avec l'61Omenl (k grillagt, ,,up&riwu:
M6tal et verre
X%uspouvez ufili_!r l]'impoIle quel type de plats
tie cuisson darts xotre tour ficonvection. "IT)utvfois,
ce sont les plat,',etatmSmlqui chauftent k phls
mpi(lement. Ils sont (/'ailleurs recomman(/6s
polly la ClliSS()II pat COllV(_gtiOll.
1,,s plals de (Ol11{ 1/1" t_)IIC_V OII _H/ t]lli lllal asslll-¢'llt
une cuisson FflUsrapide que les plats luisanls.
ld.s plals ell vell{" t)/i ell COl-alniqt]( ass/lIt*n[
1111e ctlisSOll ph/s lellte.
Lorsque x_ms pr_Sparezdes biscuits, vous obtiend_*_z
de meilleurs r6suhals si _)tls utilisez une plaque _'_
biscuit plate plu(6l qu'un moule _lbords has.
Dans Ivcas de (el-tallies re(ettes, (olllllle Iv poulet at/
tirol, ufilisez un plat dont lesparois _ml peu 61ex6es.
L'air chaud lie peul cirt lllei ad6quatelnent autouI
de l'aliment lorsq_le celui-ci esl plac(_(/alls 111]plat fl
patois 61es(_es.
ad@ler vos
recette.s
CuLvson ('t.
convection
ave(: plu,sieurs
g illes
\_*tlS; pol/vez _,X)tlS seivil- de xos Iecettt_s pF_t(ql'ue_;
(/_/llS le t_)Hr a COl]VectJOll.
Polll cI/ile _'_convt'( tioIl, I¢;(hlisvz la teHlpelattlIe d(
cuisson de 25 F (14 (2) ou ufili'-x*zla tonciion tie
10*l*czlkz"gl(o_?z,g'(Ih>navecu_w*eld_',<_ilh',a&q)lezI,
<h,lo,,_:
l'_ta]11 dolllle (111{l'ail- chatlf]_ cilclll<_ ii
tlaVel-sle lbuf, les illinlents peuvent &(l('cults
ad6quatemen( sur plusieurs grilles.
El' lllOlltallt de telllps l-t*qllis polll ctlile ave(
plusieurs grilles peut 16g{,rement augmenter pour
Cel'l_JllS alilnellts, lily,is darts 1'_ llS;ellll)le _._)[is
gagnerez du romps. X_msobtiendrez d'excellents
r6suhats ell cuisant it convection a_ec plusivurs grilles
les biscuits, les rout}ins, les petits gfilemlx el les petiis
pains.
(,)uand x_)tlscuisez avec g grilles, placez une grill(
en premV're position (A), une grille en troisi_',me
position (C) et une grille en cinqui{_lne position (E).
convelsion Auto Recipe (auto-recetm). (]onsultez
Pour cuire avec deux grilles, placez une grille en
(leuxi{qne position (B) et Fautre en quau-i&nle
positi(m (D).
Position do plusieursgrilles
71
Page 72

Cuisson et r&tissage par comection
Commenl
n_g'ler u ne
r&issage par
convecdon
1 Appu}(z sur la toucheCLqSSON h
CONVECTION ou ROTISSAGE h
CONVECTION.
2 Sin"les modules h four double setdement,
appuycz sur FOUR SUPI_R. ou FOUR 1NFI_IL
F<iur (hoisir h' _bun
3 Deux opfiOl'lSde grille sont disl),.)nibles :
• GRILLE SIMPLE-Appuycz sur cette tou( he
pour (uire les aliments sur une seule grill( lol,-s
d(' LI (I/iSSOII l)_/r COllVe(tion.
• MULTI GRILLES -Appuyez sur cette touche
pour cuire l(s alim{ nts sur plus d'une grille
(c.-6-d. 2 ou 3 grilles) simultan(hnent lor_ de
In ClliSqoll par COllVeCtioll. Colls!lltez la sectiOll
Cuhw_l pa_ i:omJedionsur phlsielas g_iltespoln
plus d'infinmation.
4 Appuyez sur les touches mlm&iques pour
rdgl_r lat< mpdmtnre d&irde.
5 Al)D/yez sur ENTRER.
6 Al}pu)ez sur DISPART.
ge Xelllilalt'tlr de conxe( liOll Se lnettl'd Ell I]IalX he
durdnt le prdchmdthgc. [ne signal sonore
indiquel;i que le prdchauti2tge du tour est
termin_ ; cela peut prell(h> environ 10 minutes.
L'_cl-dn affichem le rdglage de t(mpdrature.
Les aliments doivent £,tre mis ml t'<an-ml signal
s()nore.
Surlesmodelesafourdoubleseulemen*
1-711-711II°II I
1-711-;-IIII°II° I
Conseil, s
r li, ,sage par
( OIIT)g( l iO?Z
72
Pour rdgler 1( deuxi,Sme tour (sin" les modules
h four double seulemen0, s6le(tionnez
ENFONCER POUR RI_GLER LE FOUR
INFI_RIEUR ou ENFONCER POUR RI_GLER
LE FOUR SUPI_RIELrR seh:)n les besoins, puis
suivez les _tapes ( i-(lessus.
Ix rdglag( de lellllXtl'alllr( I)(Ut btre modifid }n
apl)u}ant sur la Iou(h( CHANGER LA DURF£_
TEMP du four al)l:woprid.
I.es rdglages l)elr_(nt {!Ire annul&s en apl)uyanl sln-
la lOll(he ANNULEt dll l'ollr al)propri&
Erautilisant la l{,chefritc _t sa grille pour r(3tii; l'air
l-_chatlll-(: circ!lle all-dessllS, all-(less(IllS (t at/tOIlF
des aliments pendant le r&issage. L'air rdchanl];5
entbrme lesflls rapi& m{ nt, ce qui donne un
intdri_ ur tendre et jmeux lout en crdant tm
extdrieur d'tln brtln dor( _.
Lorsque vous thites r¢,tir par convection, il est
important d'ufilis_ r la l,Scheh-ite et sa grille. La
lbchefi-ite sert it recueillir les & oulem_ nts de gnus
et la grille sert _'1emp£,cher les dclaboussurcs d_
gins et fiperlnettre _'1Fair rdchauf[}5 de circuler
Lefour possede5 positionsde grille Regortez-vous_ [asection
Grillesde four_ e_tensioncomplOtepourles instructionssur
I'utilisation, I'enl6vementet la remiseen placedesgrilles.
Ix rdglag( de la minuleri( s'(ft_x?lu( (n apl)tlyant
sur REGLER LA MINUTERIE. ())nsultez la
s(ction Mimdo'i_.
l_ne lois la cuisson terminde, 1_four dmettra un
signal sonorc et le message ,, TEMPS SI PE ,,
s'atlichera pendant cinq minutes. V&ifiez 1_degrd
de cub,son de la nourliture. Si du temps de
cuisson supph:naentaire est rcquis, appuyez sur
la touche TEMPS SUPP. et emrez du temps de
cuisson supl)l&nentaire. Si cette tonction n'est [)as
s_:lectionnde, l'dcmn s'ef[ilcera automaliquement.
Grille
iP }ql!*l¢ UT, t bt x/\X/'_\ \_t
LOchefdte
sous la viande el d'ainsi augmenter 1( bru nissage
sur le dessous & la viande ou de la volaill<.
• Placez la grille sur la l&chetrite.
Page 73

R6tissage par comection a_ec la sonde therrnique
(_ommen 1
"0
regleru'n
r&i.ssagepar
( OIH)g( I _olz
avecla ,soude
lhermique
1 Plac(z la grille (n posilion inf&-ieure (A).
Ins6rez la sond( dans la viande. (_OllSllllez
la section [)ilisali0tz (le kt sotzde.
2
Branchez la sonde dans la prise am&mg4e
dans le ioul; Assurez-x ous qu'elle est bien
enfonc6e dans la prise. Fermez la porte
du four.
3 Appuyez sin SONDE.
4 Sur les modbles _tfore" double seulement,
appl!yez sur FOUR SUPI_R. ou FOUR
INFER. pour choisir le fbur.
5 Appuy(z sur OK
6 Appuyez sur les touches mlm6riques
pour r6gler la temp6ratm-e interne (le
la viande (lUe vous souhaitez atteindre.
(La temp6rauwe interne maximale de
la nourriture que vous pouvez r6gler
est 200 'F 193 °C[.)
7 Appuy(z sur ENTRER.
8 Appuyez sur ROTISSAGE 'a
CONVECTION.
9 Appuyez sur les touches numdriqu(s pour
rdgl(r la temp6rature de four d6sir6e.
10 Appuyez sur ENTRER.
LTc_a_latficho, un ,zessa_*"*i la *o_ldeesl
insd_:t"da)z_ la /ariseet que vous n 'a_le:pa_ _!qlt:
[a tem[t&aiun, de [a sonde _*i ap/nOd sur
ENTRER
11 Appuy(z sur DEPART.
Le tour et les hlmi,bres internes du f):)ur
s'alhmleront imm6diatement et le resteront
jusqu 7, ce que le hmr soit 6teint.
Le Velltilat( IIr de CoIIvectioll Se lllettl-a _!ll
marche (aprSsunbretddlai) (t 100 F(38°C)
apparaitra fi l'6cnm. (L'aflichage de la
telllperatHl-e COlllllleil(era _1 Challger lllle t_)is
que la tempdratm-e interne de la viande
atteindra 100 'F 138 °C].)
Lors(llle la [elllpeYalllre illl(rlle (1( la xiall([(
att_inl l()t)'_ " "
F (e as _a >N'C), la t(mpdratur(
intern( r&dl( de l'alimenl _st aflich_e fi l'6cran.
12 Lorsque la temp6raulre interne de
In viande atteinl celle que vous avez rdglde,
le four s'dteint et un signal sonore se fi,it
enten(h-_. Pour arr,3ter ce signal, appu)ez
sur CLEAR/OFF (EFFACER/ARRET).
[ tilisez des poign_es ou des mitaines de
four pour retirer la sonde de l'aliment.
N'utilisez pas de pinces pore- la retir( r
car cela risque d( 1'_ndommag( n
A MISE EN GARDE
&!iler lout risque d,. brhbm.s, _led/'/mml:/wz pas kl
sondt, d_"*aprise ava_*t que ll'iom ail nJmidi. Ne
laissez pa,s ta w_lde dmls & lo*o:
_ )
Pourobtenirde bonsresultatslots du
_6tissagede dindesetde roils
deglandedin_ension,nousvous
iecommandonsd'utiliser lasonde
foumieavecvotrefour _convection
Surlosmodelesafourdoubleseulement
I -Irll II°II' I
V-IV-IIoII°II° I
17-117-11IIoII I
17-117-118II°II°I
Pourmodifier[ateml_raturedufour
pendantle I6tissageparconvection,
appeyezsurR(}TISSAGE
CONVECTION,peissurlostouches
numedquespourl@er lanot_7elJe
temperatured_siree.
NOTE:
• Si vous *_4in_ kl so_lde (k"t'athmml awnl[ que At
ts*tttj_s;tzztu_,flnall_ air _;t{attei_lt¢, zt_letonality: ,ss"
/slit enh, lzd_ el 171:_an affzche_a un mawag_.fizsqu'?l
(,. que vous enD'vie: la sonde du /,lu_:
• P_'_zda_zt[a i:uL_son, vous e_zh'ngl_'zD"ventilaleur
/<mlrlio_lne_: Ce venti/atezo s'm'_ae k>rsque vous
owl!fez ta prate, mais lTk;me_l[ chauffmU demetm.
alhcmZ
mitutt&, mais vllus pouvsz uiiliser ta mh_uteri_'.
• Sto It's modbk<s abm- doubD, yore ne pour_< pas
utifi,w_ /a sonde darts le lour su].:rieu* pe)M(mt wn
fi>nctio)lm.me)*t tni_lulA En s:/pt,.vec I. sonde,
VOUS(:tZiS< en /mllrlio_* de la tet./)s;lalu_z., et pa_
du temps. 73
Page 74

R6tissage pat comection
l"our mural
(;uide de
rdti, sag'e par
convection
Viande Mhmtes/lb Temp. du fol_ Temp. interne
Boeuf ( 6tes, entrecdt_, S}fignant 20-24 325 :F (163 "C) 140 °F (60 C)_
Porc D('soss_: ou non (3 fl 5 Ib [/,4 fl 2,3 kg]) 23-27 325 _F (163 _C) 1711 °F (82 _C1
ambon En conselve, soc, iarret (3 fi 5 I11 [1,4 :, 2,3 kg], cuil) 14-18 325 _F 1163 _C) 1t0 °F (60 _C)
_kgnean I)('sossd ou non (3 2_5 Ib [1,4 fi 2,3 kg]) 2_pofilt 17-20 325 F 1163 °C) 160 °F 171 ()
Fruits Polssom entiel (3 fl 5 Ib [/,4 fi 2,3 kg]) 30-40 atl lotal 400 _F (20t _C)
rle lller
Volaille Poulel lmtier (2½ fi 3_/-' ]b [ 1,1 21 1,6 kg]) 24-26 350 _F ( 177 _C) I80°-I85 F 182_5 C}
ham de surlonge A point 24-28 325 _F (163 _1) 160 °F (71 _1)
(3., 5 Ib [/,4 _ 2,3 kg]) glen trill 28-32 325 "F (163 _() 170 _F (82 ()
Filet 5,_.fignant 10-14 395 <F 1163 '() 140 F (60 _()_
A poim 14-18 325 °F 1163 °() /60 °F 171 °()
C61elettes (I/2 fi 1 po 2 c6telettes 30-35 au lotal 325 _F 1163 _11) 17tt °F (82 _C)
[1,3 5 2,5 cm] d'@aissel_r) 4 (6te/(ttes 35-40 atl total 325 F 1163 °C) 170 °F (82 C)
6 cgtelettes 40-45 all total 325 _F 1163 °C) 170 F (82 _()
gien cull 2/)-24 325", °F 1163 °() 170 °F (82 °()
Qtleues de homald (6 fi 8 oz 10,17 fl 0,22 kg] oh.) 20-25 atl tolal 350 _F ( 177 _C)
Poulels de ( omotlaille_ non I;u_:is ( I fi 1½ Ib [0,45 h 0,7 kgl) 5t/-55 atl total 350 °F (177 °C) 180 -ISF_F 182°_5 C}
Farcis (/ fi P/_ Ib [/t,45 5 11,7 kg]) 55-60 atl total 3511 F 1177 °C) 180°-I85 F182 _% °C)
Canard (4 fi 5 Ib [/,8 .i 2,3 kg]) 24-26 325 F (163 °() I80°-185 _F (8T_5 °C)
Dinde, enti_+l I *
Non t_r(;il 1/0 fi 16 Ib [4,5 fi 7,3 kg]) 8-11 325 F 1163 C) 180-I85 F (_2°_5 °C)
Non tsrcie (18 ,, 24 Ib [8,2 5 /0,9 kg]) 7-/0 395 _F 1163 '11) 180°-185 _F 182°_% °C)
Poitline de dinde (4 fi 6 Ib [/,8 2_2,7 kg]) 16-19 325 _F 1163 °C) 170 °F (82 ()
* ll[(lut gz)lwl(ll_tlerltalloltge_111du_" de niliss(Igl"de _0 0 45 _dnltl_'_polll I(_volclill_,/a_vieProl@'z h'_pil_,_set hi [_o[¢ne (l_,('_dl_p@ie_
d_u_i_i_ p_mr_i_ ¸ u_ b_iss_r_ _'_(_s!f et _ _h_'_l _ 1__z.
_(_volrqlle _q_e _l temp_(_tl_ i_llel_e_ _ vi(_ll_ (_th'i_tsell_mel_l 140 _160 °C_ (e_i_l_ mic_o_lism_ Iluisib_ pour _ sa_ll__les_ll _(Is
74
Page 75

Cuisson et r6tissage pat comection minutes
Cui,s:wn et
r&_sage par
convection
minuN_
(raise en
marche
immediate
et arr_l
automatique)
Sul les modbles k/bur doubll, vous pouvz_z ulliser
la (nis_lm lni?luh;e dans u?l /ou_ Iou¢ en p_lMdanl
_)l_autonetloyage dan_ l'aulw, ou _r_cole la cuisson minul&
NOTE : Ne laissez jamais de_ aliments comme de_ produits
laili_:s, du poi_wn, de la /_l_e, de la volailk, et du pow
njm_er [wudanl plu_ d'une hi.me avant ou a/m:_ la cui_son.
lio_:_que (es alimeut_ wnt lais _& _) la lemplhatu_l, rl_.
la pii'(_; cda /avoff_e la pwlij&ation de bad(hie_ noch)_'s.
Ll Cbur se roll (_ mmlhl imm;:diat_mem d fi)ncdonne
pendant hi du_e _;gh_e. ]I la / n d_ hz dlm;e (h, _uissorz,
,I\SSIIY( Z-VOIIS (Itle ]'hol'log_ ;t_](']/( la bonne h(tll'(.
1 Appu?,_ z sur la louche CUISSON h
CONVECTION ou ROTISSAGE h
CONVECTION.
2 Sur les modbles fi four double seulement, appuy(z
sur FOUR SUPI_R. ou FOUR INFI_R. pour (hoisi_
l( four.
3 Deux options de gdlk sont disponibles :
• GRILLE SIMPLE- Appuy¢ z sm (etl_ Ix)uch(
pot/Y ctliYe l(s a]il//ents Sill" [Ine S(/llc grille lots
de la CIli,%sOI/ l)_ll ((}l/Ve([ioI/.
• MULTI GRILLES - Appuyez su_ cette touche
pour ctfilc les aliments sur plus d'une grille
(c.-'_-<l. 2 ou 3 grilles) simultan&/mnt lo_s de
1H CI/JXM)I] par (orlveclion. (ions/lit( Z l_l St'eliot/
Oti_s(_ par amveciiolz sul plnsieul_ _fl/l!s potl r phls
d'in{i)rmalion.
4
Appuy(z sur les touch(s mira( riques poul 16gler
1_/ t( I_l_l)( I'_[(ll'(" xouhl(.
5
Ap,ml)ez sur kl Iouche ENTRER.
6
App/lyez S/]l" l(_s totl(hes I]/ll]/I."l'i(]l.l(S pOllY r(}gl( I
la durde de (uisson ddsirde.
7
Al),ml)ez sin" la touche ENTRER.
8
l) x it" asdt de)a t" n(d'at (I da _1
automatique de la cuisson sont disponibl(s :
• DISPART API_S PRI_CI{a_UFFAGE - Appuyez
Sill" C(llt touche pour prdchautt? r le [otm
IX V(:lltJ]atCtlr (l(: conv(?(?liol_ s'a]hlrl/(ru (Itlt_nl
le l)r(!chautt_ge, tla_ signal s(mo_( ialdiquera
qu( 1( prdchauffage du four (:st t(rmind; cela
peul prendr( envilot] 10 mimltes. I)&:ran
affichera 1( rdglage de tempd_attn{.
I,a C(liSSOI] Illil/Ijlde ]/( ddlIl;tl'l'( l';l qll_Illle Ibis
h l)r(!chauflhge terrain0 (I la I(;/Ich(_ DISPART
enfi:mcde.
Au sJgn;_l sonor(, p];_c(?z I(s alim( nts darts
h tk)ur.
• DISPART h FROID - ,\pl:my( z sur cette IOtlche
potlr d_l//a/Ter ]e {OILY Ji//l/lediaterl_eDl (l cHir{
It nourrituH sans prdchault tge. I,e ventilateur
d( (()I_x,((tion S( I/_(llra en I//_/Y(711(_.
I,( (h (ompt( de la din'de d( ctfisson
(Ol//llq(l/(( H/]ssi ilTim{}diat(_mel/t.
Surlesmod6[esafourdoula[eseulement
i=-II II IIo1[--7-1
17, II II IFI
i -II II IIo1I--7-1
Ell' II II 1[-7-1
I,e fOUl" va d(_l/_lal'l'l F et po/irM/ivre la ci/JSSOl/
pendant la pdriode programmde, puis il s'ar_i-tera
automatiquement, smlf si la flmction Cuisson et
mainli(n a dt(- s61(ctionnde. Consultez la section
Pour rdgler le deuxi_'-me fbtl_ (sur les modifies
h four double seulement), sdl(clionnez ENFONCER
POUR RI_GLER LE FOUR INFI_RIEUR
ou ENFONCER POUR RI_GLER LE FOUR
SUPI_RIEUR selon les besoins, puis suiez
les 6tapes (i-d(ssus.
I,{ rdglage de lenq)dratur( peut 51re moditi6 en
appu?,ant sur la touda_ CHANGER LA DURI_E-
TEMP dn four approprid.
I,{s _dglages p( uvenl _11"( almulds (n appuyanl sur
la touche ANNULER du tour approp_i_:.
L{ rdg_lag(: de la minulerie s'el-fcCl/le en app/i)at_l
sur REGLER LA MINUTERIE. Consultez la s(ction
Minute*e.
/_ne lois la cuisson wrminde, le tour 6mettra
tm signal sonote et le message ,, TEMPS S[PP ,
s'atficheta pendant cinq mimltes. V&ifiez le degn:
de cuisson de la nourrialr_. Si du temps de cuisson
suppl(_mentai_e est requis, appuyez sm la touche
TEMPS SUPP. et entrez du temps de cuisson
supph:mentaire. Si cette f()l/(:li()*/ n'est pas
sdlectionnde, l'6cran s'effacera aulomatiquement
atl bo/it (It (:il/(] ll/]DIIt(s.
75
Page 76

Cuisson et r6tissage pat comection minutes
Cuiswon et
nTKv_a_epar
convection
minuhTs
(raise en
marche
diff&& et
april
automatique)
Foil_polly< i.l_.,2_l._,le*#1 comlnal+& du lbul paul ql. lelbu*
_t'mdte tlz malUu, h ul+eheute pt;d_e, Jol_c#omzepoldal+t ull+ dut_
)lgddlel_nb_g,;_?uiss'&'iwe, auloma& uei_ul_t.iCo_zsultezau_i
_kS/ll_z-_o/is qtle I'horloge atfkhe la bolllle h[ life+
1 Appuy z sur la Iouche CUISSON 'a CONVECTION
ou ROTISSAGE iI CONVECTION.
2
Sur les modifies a four double s}_ldement, appu}vz sur
FOUR SUPER. ou FOUR INFER. pour choisir le fimr.
3
l)eux options de grille sont disponibles :
• GRILLE SIMPLE- Appu?:cz sur cette touche
pour c/lire les aliments sill une seule grille lois
de la (/fisson par conv(.(tiOll,
• MULTI GRILLES - Appu?:cz sur cette tvmche pour (uire
les aliments stu phls d'une grille (c.-'l-d. 2 oil 3 grilles)
Sillltlhal/(q//erll ]Ol+S de la cui._son par corlve(tion+
Consuhez la section (h+lss(mpI_ .ma_lio?z sm /d+_ff:,u_s
grilh,spo/u plus d'infi_nnatkm+
4 Apl:myez sur les Iouches ntm/driqtms pour rdgler
la [em])eral/ire \olllue+
5 Appmcz s/u ENTRF_.
6 Appu}ez sur les Iouches nlm/&iqlms pour rdgler la dlll('e
de cuK_on ddsirde+
7 Appmcz s/u ENTRER.
8 Appu?cz s/u AJOUTER OPTION CUISSON
AU FOUR.
9 Appu} _z m r DEPART DIFFERI_.
10 I)eux optiorls de rdglaRc de dfpal* diff&+ sont
disponibles :
• DEBUT DE LA CUISSON - \ppu)cz sur la toud/e puis
seweT-w>us des touches num('rot_es pour entlvl le d_lai
qui pldcddera le ddbut de la cui._on+ Al_l:m)cz sul
ENTRF_. Pm exemple, si vous souhaitez que la cuisson
ddbute dans 2 heures, entrez 2, 0 et 0.
• FIN DE LA CUISSON- Appu_,cz sur la touche
puis SelW('7-vou s dcs lot/c]les n!lll/er Ok_lL's pO!lr entl ('r
la pdriode totale au tenne de laquelle la cuisson prendla
fin. Appu\cz sur ENTRER,Pm exemple, si votre lemps
de (!liSSOll (st de 2 he!ll-es et qtle roils souhaitez selvir
le mpas dans 5 heulcs, el/llcz 5, 0 el 0 el le fbl/I
d&narrela dans 3 heures.
11
I)eux options de ddpart sonl disponibles un_ Ibis k ddlai
du ddpart diflg'rd &ould :
• DISPART APREs PRI_CHAUFFAGE- AI_pu}_z Sill"
la lOll(he pO/ll choisi_ k pt('chauflag_.
In€ Ibis l( d_lai du d('pal_ clitt_rd ('_ouk:, le fbnr
s'a/hlll/era el k pl+{;(:lla/l[t_tg_ COl]/ll/_ I/C(la+
i,e Vel3tilaletll d( convectioll S( I//etlla (:ll real(h( dtlranl
le pr&hauflitge. Une signal sonole indkluera que le
prdclaanflhge du Ibm esl telmind : cela peut pit ndre
cmirlm l0 minules. [ '&:ran aftk:hera le idglag( de
te]llpdratu_ e+
• DF_PART h FROID - App!ly¢ z Stll (etl{ touche i)o/11
que le fbur d_:manx immddiatcment (sans i)r('dlauiIT_gQ
un( this k ddlai de ddpart ditt_'rd &:ould. i,e ventJlatem
de (Ol/Ve(tiOl/se i//e[[17a (n i//arghe+
Pour i_gler le deuxi{.me [bur (sur les modules h four double
seulement), sdlecfionnez ENFONCER POUR REGLER
LE FOUR INFERIEUR ou ENFONCER POUR RI_GLER
LE FOUP. SUPERIEUR selon les besoins, puis suiwz les dtapes
ci<lessus.
y
Surlesmodulesafourdoubleseulement
I-;-II-;-II-=II+II+I
l-ql-;-ll-7110II01
I-;-II=-II-;-II+II+I
I=-I[ U-II 0II01
I-;-II-;-II+II+II+I
I-;-II °II°II°1
[,c i('glagv de len/p_:l'atUl+t peut +'tre modifi_ en appmant sur
la touche CHANGER LA DUREE-TEMP du R>/n+appropri&
i,cs i_glagvs peuvent _'tre amnlld's en aplm\ant Sill"I_ touche
ANNULER du fbul appmprid.
[,c i('fataRv de la mirmterie s'dt_ cme en apl:m>nt sur
REGLER LA MINUTERIE. Consuhez la section Mi,utg'_a
Une Ibis le ddlai de ddpalI difl{:ld ('could, le tirol va ddmarlel
et poursuivre la cuis.son pendant la i%riode plogramm&:, puis
il s'am"t ela antomatkl/lement, saul si la Ionction C/fi_son €1
mainfien a ('t_ s_lectionn_e. Consultez la section (hd_o_/d
mainlie_*.
Une Ibis la cuisson temfin&:, le fl)tJl dml ttla un signal sonora
et le me ssa_v <."IEMI)S S(PE ,>s'aflichem pendant cinq
mimltes. V(.ri[k z le degld de cui._son de la noulfitnre.
Si du temps de cuisson suppldmentailc esl rcquis, appmcz
s/u la lOtl(he TEMPS SUPP. et enll cz du temps de ctlisson
suppldmentailc. Si cetle Ibrlcfion n'est pas sdlecfionnde,
]'_cran s'ettilcela autonlatiqtlenlenl all bo/It de cinq I//ilI[II£:S+
76
Page 77

1 Appuyez sur RECETFE PRI_F_RI_E.
2 Appuy_ z su r CRI_ER RECETrE.
3 Appuyez sur les touches alphabdtklues pour
crder un nora de re(ette. Appu?ez sur NUM
pore- ajouter un chifti-e. Appuyez sur ESPAC.
pour ;!jouter un espa_ e entre les lettres ou l(s
chifli_ s. Appuyez sur RET. pour supplimer une
lettre ou till chitfre an besoin. Appuy_ z sur
PRINT pour enregJstrcr le nonL
4 Appuyez sur CUISSON, GRIL, CUISSON
CONVECTION ou ROTISSAGE _t
CONVECTION p(an- choisir le mode
de CtliSSOll.
5 ,\l_puyez sur les touches lmm&-klues pour
r_gler la temp&-amre.
6 Appuyez sur ENTRER.
7 Appuyez sur les touches num_riques pour
rdgler la p&iode de cuisson ddsirt:e.
Recettes pr_f_r_es
/_'0/L 1" 11//I 1"(I
8
Al_puT,vz sur ENTRER.
9
Appmvz sur AJOUTER LE PRI_CHAUFFAGE
pour rdgler k prdchauti_age ou sur
CONTINUER pour rdviser la rcc(tte rdgl_e.
10
Appuyez sur SAUVEGARDER Err CRI_ER
UNE NOUVELLE pore- sauvegarder la rec(ttt
en m&noire sans l'utiliser ?1ce nloment-ci.
Appuyez sur SAUVEGARDER El" Dt_BUTER
LA CUISSON pour sauvegarder la recette en
mdmoire et procdder h la cuisson mainmnant.
Appuy_ z su r ANNULER pour stlpprim_ r
la l-e( erie.
Mod!fier
_I,TI[:""Fg(TC[lg
sa,lveg'ardde
Uiiliser
_17_2g rg(:ld,[g
sauv_a_zl_e
1 Appuyez sur RECETFE PRI_F_RI_E.
2 Appuy_z sur MODIFIERRECETTE.
3 Appuyez sur • ou • pour dloisir 1_1re<eue que
w:)us souhaitez modifiel:
4 ,\ppuy_z sur ENTRER.
5 Appuyez surA ou • pour choisir le r6glage que
vous souhaitez modifie_;
6 Appuyez sur MODIFIER puis modifiez 1(
rdglage.
7 Appuy(z sur PRI_T.
8 Appuyez sur SAUVEGARDER ou
SAUVEGARDER ET DI_BUTER LA CUISSON.
1 Appuyez sur RECETFE PRI_F_d_E.
2 .\ppuy_z sur LrrlLISER RECETrE.
3 Appuyez sur • ou • pour choisir
1_1rt cette que vous souhaitez utilise_;
4 .\ppuy_z sur ENTRER.
5 Appuyez sur Dt_PART.
6 Sur les mod('les 5 fbm double seulement,
appuyez sur FOUR SUPI_R. ou FOUR INFER.
pour choisir le _)tll;
Supprimer
zt ftg "F(?(:#t{#
sa'uw<g'ard&
1 Appuy_z sur RECEITE PR_RI_E.
2 Appuyez sur SUPPRIM. RECETI'E.
3 Appuyez surA ou • pour choisir
la re< ette qll(, vo(is so(ih_litUz SllpDl-ilnul;
4 Appuyez sur ENTRER.
5 ,\l>puy_z sur SUPPRIMER.
6 Appuyez sur OUI.
77
Page 78

In mi'r uterie
Mirmterie et xerrouillage des commandes
1 Al)puyez sur MINUTERIE.
2 Sur les modules h fore" double settlement,
al)l)U)eZ sin- FOUR SUPI_R. ou FOUR
INFI_R. pour choisir la minut{rie du four
ddsir_.
3 Apptlyez sur les touches numt:rotdesjusqtl'fi
ce que la pdriode d&sir&es'atTlche £1l'dcran.
Pal-exemple, pour une p4riode de 2 heures
et 47>lnillllt(s, appu)(z sur 2, 4 et 5 darts cet
ordre.
4 Appuyez sur DISPART.
Si la p6riode rdgl0e ou restante est sup_ri_ ure
oil dgale {'lune h(ure, l'_cran ai]'ichera les
heures et les minutes [Htl: MM[. Les letH-es
- II ,, et <,M ,, apparaitront pour indiquer qu_
la p_riode s'aft'iche darts le fl)rmat hetlres et
minut(s. (Si une oil phlsietlrs heures onl dt6
r_gh:es, l'Jcran ne commencera fi effcctuer
le d_:compte qu'au bout d'une milmt(.)
Si la p_rio(le r_glde ou restante est ini;Srieure
fi une hem-e, l'_cran affichera les minutes et
les secondes [MM : SS[. tes lettres . M ,>et <_S
. apparaitront pour indiquer (lu_ la p6_iode
s'affiche (lallS le f'_n-mat minutes et se(;ondes.
1-711-711IIo11-7-1
1-711-711IIo11-71
kafonction MINUTERIEpeut
_tre rog[Oepouruneperiodede
1 minutea 24 heures
I.aminuteriene contr_lepas
lesoperationsdu four.
5 Lor_,que la minuterie atteint :00,
la commande/_dt cnten(h-e 3 bips suivis
d'tln biI) routes les 6 secondes jtlsqu'fi c( (lue
la touche MINUTERIE soit enfoncd(.
La long,lit& l}eut {qle r_duile all sill:rice {n
stliVUilllles 6lap(s (1( la _,(clioll ()[)tiotls-l?_{glao_s
SO*IS.Sil_*/l<lt*?ze.
Pour mmtder la (ou les) minuterie, al)puyez sur
ANNULER MINUTERIE.
Pour remettre la (ou les) minuterie h z6ro,
al)l)uT,ez sur ANNULER MINIJrERIE (t rdgl(z
tin(! notlx(lle l)_riod_ el( temps.
}>rrouillaffe
de,_
co?H,lrl,a l_d_<s
tmzlzi/'*_hce qltWk<s*lepztiss__t pas _1_!altivh<sq_ta*ld
RE$1_RQUE : Poul &s mod_k<sh /bur d,l_lbk,, (,etl_
Jtlt_(:litl_est al liv_;eslo [t<s(h!_t_/ll_t_:s.
Pour v( rrouill{ r/d(x(rrouiller les comlnand_ s :
1 .\ppu}ez sill"CLEAR/OFF (EFFACER/ARI_T)
pendant 3 secon(les, jus(lu'fi ce que l'dc_vln
afliche COMMANDE VERROUILL_7,E.
2 Appu}ez sill" CLEAR/OFF (EFFACER/ARRET)
p(n(lant 3 s(condes, jusqtl'_'l (:e que l'ecl"dll
d'accueil appm_,it.
_)tlm_(Iceue ca_',_cld_istiqueest bl',mchde et les
t,,_tl,.:Plessont appu)_es, la commande thit tin siR-hal
sx*_oreet COMMANDE VERROUILLEE ;tllpa_',lil
Sill" l'(qCl_lll.
NOTES :
t,'siom,m*zd_s, sa(I/ ta toull, e CLFAR/OFF
(EFFACER/ARRET). _lzg:u_*_aull_'toul:h_
ite/<)_zltiol_*_,_zh)_sqzl_'c_4l_'/<mltiol_est a(¢iv_;_<
L (I]ttgl(171( tz( ?_ g(t t 17 t?t_ t?tll_!_ (Ip_ g ]Zltl[ /)(ZtZ*Zt S
(]_ tOltlgltl[.
78
Page 79

Four autonettoyant
Four mural
Pour que le programme fonctionne ad6quatement,
il faut que la porte du fore- soit fernl6e et que
toutes les commandes soient r6_6_ correctement.
NOll _,VOtlS l-eCOllllllalldolls d>_lSS!ll-el -
une ventilation ad6(luate en (mxrant
une t'en_tr( ou en utilisant tm _entilateur ou
une hotte (le cuisine au cours du prenlier
alltOllettoyage.
Retirez du four la l_,chetvite, la grille de
la l,Schefrite, Ix sonde, tousles ustensiles
de cuisson (t le papier d'ahmlinium.
Les grilles du four peuvent demeurer dans
le four pendant le cycle d'autonettoyag( sails
&re endommag_es.
N'utilis(z pas de mati_'.res abrasives ou de
nettovants _'1t}ml-. Nettoyez le dessus, les cg_t_s
et l'ext6rieur de la porte du tbur avec du savon
et d( l'(au.
Assurezwous que le capot de la lamp( du Ibm
est bien en place et que la lampe est 6teinte.
IMPORTANT : Certains oiseaux sont
extr,2qnenlenl sensibles k la fiml6e produile
pendant le programme d'autonettoyage d(
n'imporle quel Ibm; Placez les oiseaux darts
une autre l)i_,ce bien a&-_e.
REMARQUE : La /ilm:fio>+A t+fomll+wzge
Ile /tml:tio+*m,ra pas si la somle _,_tbrain:hA,
or; la fi)t_ctio_z Sabbal _:sl_q._l_e.
• Sur l(s nlo(I,51es fifour double, vous pouvez
r6gler un cycle de n(ttoyage darts les d(ux
fours sinmhan&nent. Le dernier tour rdgld
art( ndra antomatiquenlenl la fin du cycle
de nettoyage (hi pr(mier four avant d(
d6marrer son propr( cycle.
• Sur les nlod,51(s fi hmr double, vous pouvez
utilis(r sinmhan&31ent la cuisson minut6e
darts ml tbur (t l'autonettoyag( darts l'mm-e.
it MISE EN GARDE :
Xe mett_,_jan*ai_ d'uste_*_il_, de cuM_*e ou tout aut_"
article en has du /om: ll y a u)* dl/'me_t de chau/fitg_"
sous k"pla_z(:ko du /ou_: E_ /_la_a_zl (t_:sarlich, s e_*
has du /om; vous risqz,'z d >,t*zzbl_.'_u.e su_t:ha_l/fi"
duff)m; qlti peut causer des dommtg>* au /tmr et
risque d'_,ndommago ou de brfiko k_s a_tnoin'_
Page 80

Four autonettoyant
(20 m men t
r@'lerle
po.r
le _+ettoyage
1 .\l)[)tl}ez sur AUTONETTOYAGE.
2 Sur les mod'eles it four double settlement,
apl)u)'ez sur FOUR SUPI_R. oll FOUR INFI_IL
p(an- choisir le tL_m:
3 Wl-f)isoDtions d'atltonettop_ge sont dispolfibles :
• NETrOYAGE LINGER - ±\l)ptlyez +,ur
Ct'[t(' lOll(hi' I)(IIlF t'l_l('(tll( g 1111 ll_'[[O}"d_('
mltomatique de 3 heures. Re(ommand( _
lorsqu'il s'agit de nettoyage des d6bordemenls
limit6s A une surt_,ce restreinm.
NETTOYAGE RI_GULIER - Appuyez sur
cette tOll(he l)OllF ef[('(tll_ r 1111 nelto}_age
automatique de 5 hetn-es. Recommandd
pour un ti>ur phls encl-ass_.
PERSONNALISI_ - .\i)puT,_+z sur cette tollche
et fi l'aide des tou( hes llllnlel-ott;es, rdglez
une pdriode de nettoyage de 3 .i 7 heurcs et
30 minutes, selon le degrd d'encrassement
du fi)ul:
4 ±\ppuyez sur MA1NTENANT.
La porte se verrouille atnomatiquement. 124c_vm
attichel",l le d6compte de la pdriode de nettop_ge.
On ne peut pas omrir la porte du f_)ur si
la teml)t:r_ltur_, n'est pas descen(lue solls
la teml)t:r_lturt , de verrouillage et si le mesv_ge
FOUR VERROUILLI_ s'affiche.
Lol-S(lU< la i))tlclJotl FOUR VERROUILLI_ S(l_/
d_s_tcliv_e, X,OllS DOllrI'(Z OllVl'iF la pOl'[(:.
• Le message VERROUILLER LA PORTE
s'afl]ch( 1",_et la COlnmande du fotn- dmellra
un signal si vous r_glez un c}_le tie nett_)yagc et
oubli_ z de f_,rmer la porte ,:lu f_)ul;
• Pour mettrc fin fi till cycle de nettoyage, api)u}ez
_ur la touche ANNLrLER ou CLEAR/OFF
(EFFACER/.MIRI_T). korsqu( 1( message FOUR
VERROUILLE s(l_ d_sactivde, indiquant (lue
le finn- s'est rclioidi sous la temp_l-,mlr(' de
verlollill_/g_:, rOllS selez (11 lll(_s,tlle d'ollvl-it-
la l)orte.
Sur[esmod¢lesafourdoubleseulement.
l-ql-711+IIoII-q
I-ql-ql +II II-q
A l)arur de l (cmnd _ccll+.:ll (Itom{)
1 ,\l)pt]yez sur AUTONETrOYAGE.
2 .\l:,puy_ z sur NETTOYAGE LINGER
NETrOYAGE REGULIER ou
PERNONNALISE R,..pol rez:-vou s
_lt_x r_f_:l'_nces ci-(lessus.
3 Appuyez sur COMMENCERAPRI_S
LE 1ER AUTONETI'OYAGE p(lu r
1_d_clenchement atm_mati(lue
du netto)'_lge du deuxi&me fi)ur
une fkfis termin_ celtli du premieL
80
fl*>)_i#'_/ozo a,ta_zl (t+,ddnz(o)_,l so_*p_W_, _z(,tll{_(ig(,.
Deux options sont dispo_fibles pour r6gler
le deuxi_me foul" :
• ]mm(,dialement apr&s le l-t¢glage
du prt+mier fi)ur :
Sdlectionncz ENFONCER POUR RI_GLER
LE FOUR INF_/IEUR ou ENFONCER pOLrR
RI_GLER LE FOUR SUPI_RIEUR selon
les besoins, Duis suivez l('s duq)es 3 ct 4.
Page 81

l 'a utonettoyag'e
Pour que le programme foncfionne ad6quatement,
il faut que la porte du four soit ferm6e et que toutes
les commandes soient r6gldes correctelnent.
1 Appu) ez sur AUTONETrOYAGE.
2 Surles modules a four double seulement, appmez sur
FOUR SUPER.ou FOUR INFFJLpour (hoisirle fotu:
3 Troisoptions d'autonettovagv rout disponibles :
• NE'ITOYAGELINGER-Appu}vzsur cette touche
pour etfectuer un uettovag*_automatique de 3 heures.
RecommandO/orsqu'ils'agit du nettoyagede
d(%oMementslimitdsiiune zone restreinte.
• NETrOYAGE RI_GULIER - Appuyez sur cette touche
pour eit_,ctuer ur/r/etto_age autor/mtique de 5 heules.
Recolumande potll" till fOllY plus en(?l_ts_.
• PERSONNALtSE-Appuyezsur cette touche et ii
I'akle des touches num(.rot(.es,r,Sglezurle p(.fiodede
netto)age de 3_'J7heures et 30 minutes, selon le degr(_
!deno ssern{/td [tt :
4 AppuvezsurPLUS TARD.
5 Troisoptions de rOglag*•de d@all dilf_:lds_mt
disponibles:
• HEUREDE DEPART- Appu',vzsur la touche
puis selTe7:_o/isdes touches nulnOlot_espoul eutrer
le d01aiqui prg,c0denl le dO)utdu nettoyag*,.Appuwz
sur ENTRER
• D_U3T_ L'AUTONETrOYAGE - Appu_,ez
Sill" la tOtlche pills _q-t ez-\o/P; des touches ntlm(wot_es
pour 1_Sglerl'heure du ddbut du netto}age.Appu)ez
sur ENTRER.
• TFA_flNERL'AUTONETrOYAGE- Appu}ezsur
la tOtlche p/liSselw(%vousdes touches num_lot_es
pour rdgler I'heure de la filldu nettoyage.Appu)ez
sur ENTRER
H_porte se verrouilleautomatiquement, i.'dcmn attichem
I'heure du d(:but.On ne peut pa_,ouvlir laporto du fimr si
la mmp@,mlren'est pasdesceudue sous la temp@ltme de
verrouillag*•et sile messag*,FOUR VERROU]IJ_
s'atfiche.
I.orsque la fi:mctiouFOUR VERROUIIJ_ sela d(_sactivde.
_OtlS potlrrez OlJVl_r I_1 portc.
Four autonettoyant
]'Otll t?lttl'(t
Surlesmod61esa fourdoubleseulement.
LIIZILII ILl
LdrC-lLdl ILd
• ,_pa_.irde l'('cl',md'accueil (Home) :
1 Appuyez sur AUTONETrOYAGE.
2 Ap.puvez sur NETrOYAGE LI_GER, NETrOYAGE
REGULIER ou PERSONNALISE. Repo_1ez:-vousaux
r_5t&ences ci-de'_sus.
3 Appuyez sur COMMENCERAPRI_S LE 1ER
AUTONETTOYAGE p,.mr le d&le_;cl;eme_;t
automafique du netto_g_ •du deuxibme tour tmc lois
mm/in_ cehfi du premier ;ou sur ItEURE DE DEPART
puis suivez I'_mpe 6 ci-de_.suspour rdgler l'heure du
ddmarn,ge du detlxi_me toul:
P,,*_@b._ 1..,d;.,*@¢ed. m@* o. lYw._r.& d@a_¢,@_0,e_
sul AUTONETFOYAGE.
• POll/mettle fill ;'t tlUc}cle de nettoDlge, appu;}_z S{ll
ANNULER ou CLEAR/OFF (EFFACER/ARRET).
1,irsque la torlctlon FOUR XTR/ROUILLE sm'a
ddsacti_(_e,iudiquant que le Ibm s'est refioidi sous
la tempel_ffu/e de verrouillag.,, vo/is _'lez en mestl/e
d'ouvfir la l*_.e.
Deux options sont disponibles pour rdgler le deuxieme
four :
• Imm&liatement aprOsle r_glagedu premier four :
S(_lectionnezENFONCER POUR RI_GLERLEFOUR
INFER.ou ENFONC£RPOUR REGLERLEFOUR
SUP_ selon les besoms, puls s/mez les etapes a l)
cMessuspour le deuxibme fbuc
81
Page 82

Four autonettoyant
Fou_ mural
Aprks
l 'au Ion etto_ a{re
"_'OIIS Fell]Hl'q/l('r( Z llll ])l?ll dl? C('lldle ])]Hllche
darts le fi:mr. Essuvezqa avec un linge humide
lorsque 1_ four a r(froidi.
S'il n'sie des taches blamrkes, /aile>&_ di_fla_rl_
£ l'a_de (t!u_z talnfio_z ?¢rdl u_n savo_z_zeux. Ri_z(_*:£
fired avec u_e sohtliml d'_'au et (k" vi*zag)_. If s 'ag_t
gz:m:rateme_*t de _:sidus de sel qui _*edAfla*a_sse_*t
]JaS10_:_ (tl_ ['azzlo_zdlo) ag_,.
Si le four n'est [)as propre apr,Ss un premier
n(ttoyage, plo_raillllleZ _1 llOllVeall llll
auton( ttoyage.
Moils lie [)ouvt*z l)l'Ogl'Hllllllel" Ht/Clllle
fkmction de clliSSOll tant que le fkmr n'a pas
suffisamment reh-oi(li pour (lUe vous puissiez
d6verrouiller la porle.
Pendant un programme d'autoneuo?age,
vl:,us pouvez appuyer sur HORLOGE pour
at]]cher l'heure. Pour r(venir a la durOe
rdsidu(lle d'mltonettoya,ge, appuyez sur
AUTONETTOYAGE.
Si les grilles du tlmr glissent difficilement,
essuvez les bords d(s grilles du f;.mr mec
l'huile de cuisson.
82
Page 83

b?¢rmental io n
1 Placez la pfit_ dans le four sill" la grille B ou C
et rocomrez-la awc un linge pour de nleilleurs
r&ultms.
2 Appuy_ z sur OPTIONS.
3 Apptlyez sur FERMENTATION.
LI hnni_,re int_lieure du tbur s'allume et p_lss_ l_
par des (3"cles d'_dlumage-extin( tion durant la
ti..m_entation.
I_ fbnction de f;_'nnenmlion procure
automati(luelnent la telnp(;l_lture optimale
demand& par le processus de tbnnenlatiol_ et par
consequent _lle n'est pas lnunie d'un contr61e
de la tenlp&ature.
4 Sur les mod'eles _ four double seulement,
appuyez sur FOUR SUPER. ou FOI.J]/INFER.
pour choisir le fDul:
._ Appuycz sur Dl_PART.
6 R_glez la tou&e MINUTERIE ;ila dur& de
tk_rnlenmtion mininl_lle.
7 Ix)r'_<luela t_'rmentaion est termin_e, appuyez
sur la lou<:he _ER.
• l.afirnw*ztatio_z _z_/(,*ctiom*o_t pa_ si la tet_z]Daalv
dlt./ilm" _<st_/IpDT_m_._7125 °l" (52 °(,'). I._ l_._s_ag_
t:01 "A>77_()1>(;ttA {7)s 'ai/idlel zl a 171:lzl_z.
• l_aie,'l**.'*mztiatie _k:_s.si!_.pas de/_k:llalq/_.l l.'fi)m:
) * • _ •
• l ore e*,_lo d abas.sso Ia lt!t#p[_*_thm_ g{ttIbm `el aill.si
o _ > • )
aztg'*_t_ltto"ta dm_:t d* ta /ers**_!*_tatim_,tt ozlV!_<pas
[a i)ls_gtdtl film imlli>tv_l.
Option Fermentation
1"0 II I t?_ II I'a
ANNUKR ]
REMARQUE : :\' t7"¢_/ _, letz_oded_[_¢l_etmztitltz
h_salir/_'*ztslimits.La /et*_/_&tlal_"detm_elztatio_z
h_salir/w_ztsOdes ler_t/d_mtal_ssfm<_,f.)ili,sezla l,>_zlrlTo_*
CHAUD pou_gratel h's alD_e_zt_#l_ illa*d.
83
Page 84

Rdo'lag'e du
Option--Chaud
l"ou_ mural
COTZSg_2(_Y
M aliments
chauds
1 Apptl} t:z stir OPTIONS.
2 Appuyez sur CHAUD
3 Siw les mod61es h four double _ulelnent, appuyez sul
FOUR SUP_ ou FOUR INN, poul choisir k lotto
4 Appuyez stir ELEVr£E, MOYENNE ou BASSE poor
le rdglagl aulolnalique de la lelnp('ralm-c.
5 Appu)<:z sur CROUSTILLANT ou TENDRE, salon que
_ous souhailcz oblcnir des alilnenls croustillants oll Icndres.
6 Appn)ez sul DF_PART.
Laissez le tbul se pl('chauflbl :
BASSE 8 minutes
MO_T2qNE 15 inil/llws
ELEVEE 20 ininut{ s
REMM_QUE:keve_z:i&te*_rdecom:::*io,se._e,_J:t .m_#_v
Pour i('_ler le (leu×i('me tour (sur les mod61es 'afolu" double
setdemen0, s61ecliolmez ENFONCER POUR REGLER LE
FOUR INF_RIEUR ou ENFONCER POUR RI_GLER LE
FOUR SUP_RIEUR selon h's bcsoins, puis suivcz les ('tapes
(:i-de%/Is.
1x"I_glage de temp&atulc peu[ ('trc modifi("en appuvant sur
la louche CHANGER LA DURE_TEMP du filul appmpfi('.
1x'si('glages peuvem (qm annul('s en appusam sur la touche
ANNULER du Ibm applopfi('.
1,_r_glage de la minutefie s'eltEctu( en appu_vmtsur
REGLER LA MINUTERIE,Consuhcz la secdon MbzuleHe.
Pour rendre les aliments rmnollis plus ¢xoulillmlts
• pl_t£_-z I_1 IIOIIITit fife ditHs IIn(" il_sj_ql_ • Oil IIl/_ _ C_I_CI'OI(" illlX
boMs peu (qe\ ('s.
• Pour de m(illctus icstlllals, disposez les aliments en tree
scule cotlche. Ne les empilez [_s.
• 1M_se>les fi d(_cotlvell.
• Pl('chauflbz le lout au I_glage BASSE.
• Apr('s 45 nfillUleS, x('fifiez si la noulyiltll,." est cmusfillanle.
Augmcntcz la p('riode au bcsoin.
lVlISEEN GARDE :
.\7,,e_ml_ t_'ls I:_ali,l(_ts &,s b pmr :ll ,m&, de _Mla@iIl:n
REMARQUES IMPORTANTES :
Ds ali.u nts doiv_n_ _1_.#mhi_ chards &t_zsh u_ 16Hid':nt&
_v_issonou tm.@tA &In_un pk_t dr _:Ivke_AislalTld lu :]Igt#_
• 12._:di.:nt_p/m£ d:m_d,,_iasseo/:senvl,rm(men .:lamique
r:ds/anl_.:)htchal_lu n&_ssi:_nt un _!gk(g_du _/:_r,losl::_p&_ d_,_:
SUFlesmod_(es9fourdoub(e_eu[ement
• fl n'e_liresob/{¢:aoi_e&wcgm,:i#les(di.le*l/sfi_ls(mcroquan&
.ridsik _isqztozt&(h,_,enfitnq,aseess'&,o.*_Mm*_f[Apemhmt
• L'ouvei:wl,_:/:::&dehlpmt_,hdsse :chappI'_l'ahd.zmlel_/u,kl/t
I:_aliln_,llt_.
• Si &* nlilnent_ *ont _vyj/mYA.alklue_ ztn peu ]dus de h.rlq_apoul
• tt'.hv_:z h,_u.sl:.sile_,,illb_.s _)s:>il;eta,)availdg'place_
• N'ulilis:zpasde_olt_elt:wl_ccmvellbsol:/.4h,ubs:*1p/astig/u_:
A MISEEN GARDE:
LI'_amtemmt_,com:eM_.s.u /wl/ii_lh'se_IphI_tiquevo._/imdr:,s71s
_o,1/dac& davis/ep._l: t.e ptmlique Jondu _i_qt., d':tre i,i/,ossilde :_
enh',,,._g ¢vlg*,siluatkm _lkst/).samv(.r/epas/agal(mlie,
Po_a" lx_clla,tffer les bols et plats de service
:) 13A,V.St_,
• I tilisezuniql,ement de la xaKsellequi r6sisie h la chaleul:
• Placez la _ti_s(lievide sur la grille. Si vous sonhahez
r('chautlbr laxaisselle da_mlage, ou si cell{>ciest en
porcclaine, v('lJtlez_ Iol& race maxilna]e flla cha/eur
auplbs des labricants.
• 1a _fi_sellede sc_dce fide se 16chautl{'ra pendant
le pr6chauflitge du tbul:
• Lor_lu'ils se tromcnt (nselnble darts le fbtm placez ks plats
de selxk:{ rides sur la grille stlp('fietne et les aliments cults
chauds sur la grille inl('fieul_.
MISE EN GARDE :
L:Ivai__elh,/wlgd:volirh_si/;:tu&:.("lili_(_lh.s/)o_W_:(.soulh,_
84
• (;ouvwz Yei:di,t:lt_ humides aver u_ iimvellb, qui va au/bu_ ou
Page 85

7?zbleau de
sdlection des
tempdratures
pour les
aliments
crontillants
Option--Chaud
]"ou_ mural
ta lemp_;mture en fimcZio_t (h"t }dime_lZ qui n/'c_,ssite
le I@lag_, h plus _;lev_;.Place_ h,s alitmtlZs qui
nh _<vsia,nt U r_g_l_lg_,l_,plus/'5,v_; sm la grille
iHfiSrieun , et _eux on[ besoin de moins de ikaleu*
sur At gwitle s_@_;!')eu_a
Type d'afiment Rbglages en fonction
Aliments frits I_I,EVI_E
Bacon I_I EV171E
Croustille au mffis BASSE
Pain, pains mollets durs MOYEN
Pizza M()'_T_N
Potatoes de terre, au four I_I EVI_E
Tartes (deux crofites) M()YI_N
Conseils :
• Lais',ez l_s aliments fid_couvcm
" N'utilisez pas de contenants ou pellicules (11 plastique.
• Prdchmdti,z le four a_mt l'utilisafion.
7hbleau de
s,_lection des
tempdra tu res
pour les
aliments
_IZO_IS
Pou* gin#e* chau& di[/ibr_*lsl_]Jesd }dime_lts, _{q{_<
la tem[J_)alu_*,e_l/on(:tio_ de 17dinzent qui n&:g_site
Ie I*{g'Iag_,Ieplus _Tevi_.]Yacez >s aIitntt?l* qui
n&_ssife_lZte r@t_zgete plus I;h'v_;sur ta gritS_
iqfi;rleu,_ et (t'ux olt_ besoin de moins de chall,ur
_u_la grille _z@/'rh,ma
Type d'aliment Rbglages en fonction
Agmeau MOYEN
Boeuf, m6dinm et bien cult* MOYEN
Casseroles M()YEN
C6rOale ofite MO_N
Chili I_I EVI_IE
Cr_pes, gaufres BASSE
Fruits MO'_'EN
Jambon MOYF_N
Lbgtmles M()YEN
Oeufs MO_N
Pain, pains mollets mous MOYEN
Poisson, fmfits de mer M()_,'EN
Pommes de terre, pil6es MOYEN
Porc MOYEN
Sauces, sauces a la crbme M()YEN
Tartes (une crofite) MOYEN
Volaille I_I EVI_IE
* [;blg*ani_me USDA/b'SLS _e_vmmande role h,mf&atu*e i**lone cb 145 _T'
(_3 °C) pour _ _u_son minima_ _ boeuf {_ un &e_nom_
vian_ Dour _ie_ ¸h,_ len_&a_u_ i_ne_
Coll_ils ;
• Recouvrez les aliments d'un couvercle ou de papier
d'ahlminium.
• Ne metmz [)asd'eau darts le ti)m:
• N'utilisez pas (le conlt, nanls ou pellicules en plasfique.
• Prdchaufli:z k fBtu avant l'utilisation.
85
Page 86

l "/ihs_ g_,tl_"opliorzpott__t_socioszur_*_asiw_,m_,tzld_,tzx
1 Appu:_s_zsur OPTIONS.
2 .\ppuyez sur DEUX TEMP.
3 Stir les mod61es 'afot_c double settlement,
appuyez sur FOUR SUPER. ou FOUR INFI_R.
poul- choisil-le f;')ul:
4 Appu:_s.zsur les tollches num(:riques pour
l-_gler la prelni&_v temp_lvltm-e.
5 .\ppuy_z sur ENTRER.
6 Appu:_*z sin- les touches numOli(lueS pour
l-t:glel-la pl-enfib,> pt:l-iode de ( uisson d_sil-t:e.
7 Appuyez sur ENTRER.
8 Appuyez sur CUISSON, CUISSON
CONVECTION ou ROTISSAGE
CONVECTION au besoin.
9 Si CUISSON RCONVECTION a 416choisi,
appu:,_,z sur GRILLE SIMPLE pour une
cuisson sm- une gHlle, ou sur MULTI
GRILLES pour d_ux ou tl-ois glilles.
10 .\ppuyez sur les touches num_ri(lues pour
l'_glel-la deuxi_qne temp_l'auuv.
11 .\ppuyez sur ENTRER.
12 Appuyez sur les lou(hes mlm_:riques pour
r6gler la deuxi{qne p_riode de CtliSSOll.
13 .\ppuyez sur ENTRER.
14 .\ppuy¢z sur DF_PARTAPRES
PRI_CHAUFFAGE ou Dt_PART b_FRO1D.
()ption--Deux temp_atures
Fott I l_l tt I'll [
_00_
Surlosmodelesafourdoubleseulement
r-_I-_F-II oii _i
DF-]FII oIIoI
FqFqF-IIoII_I
Fqr-qF-lloIIoI
FqFqF-IIoII_I
Fqr-qF-lloIIoI
8_
FqFqF-IIoII_I
Fqr-qF-lloIIoI
Page 87

Cuisson et
( OTI.W_,_J(I[iOtl
au chaud
Options--Cuisson et maintien et dOshydrater
a*_chol.t qui collselve au dffmd leaathl¢c'daolil@laqu})_lvi_&low
NOTE :[ims ne1)ouv_¢pJvgl_lm_u,rcellefl.*d;o, qu hv_"_u£_*ol_
:hmg& ou*[,tix_g_ge, imdd. (Co_mdl_¢lasectionl tilisath.z& &
<viss<mg & _)/i_+ag<,ii*i_***/+_l), {)le/blsque la#l*isso**mi*l_*/*;_,ou1.,
Ih_is_a,g_IIlil_ut_a automa@uei_ul_*_ _sdelqla Id /bltgtiOIt 71gMPS
S{ 7_1_s'_<_ld(;sadivd<c'ed uu /ou & lufillzclio_zdl,ivisson:/
,u_iltti_*_&.la/n@*_l=*u_d; d_,zal_: at@ma@un_zellg,
11y a deux lacons d'activcr celte hmction apr{'s
la cui_on ou le mli_e mflnlt& :
• Aprbs avoir r6gl{' _me c_fis'son nfinut6e
ou _m r6tissage nfinut_' :
1 Appuyez sur AJOLq'ER OPTION CUISSON
AU FOUR, AJOU'IT_ OPTION CUISSON
A CONV. on AJOUTER OPTION DE ROTISSAGE selon
le mode de tuisson que vous idgk z.
2 Apl:m}czstn CIRSSON ETMAINTIEN.
Four mu_aI
3 Appmcz sur OK
4 -\ppu}cz sur DEPART APRES PRECHAUFFAGE ou
DEPART h FROID,
• R_'glez a pardr du menu OPTIONS :
1 Appmcz sur OPTIONS.
2 Appu3 ez sur CUISSON ET MAINTIEN,
3 Sur les mod('les fi tour double senlem_ nt, appu}_:z sur
FOUR SLrPF_-R.ou FOUR INFER. pour choisil k f_tll:
4 Al_pmcz sur OK
5 Al_puwz sur CUISSON, CUISSON h CONVECTION,
ROTISSAGE h CONVECTION ou DEUX TEMP.
6 Appmcz sur ks tollchcs nun/d'fiques pour enllcl la (on Its)
Iel//pel'alllre et la (ou les) p('fiode.
7 Appmcz sur ENTRER.
8 Appu)ez sur DEPART APRES PRECHAUFFAGE on
DEPART h FRO1D.
D&hydrater
La ddsh)drah_fion (_c;chc{gl,)t,d urn, ml;lhod:& p)fsn g*aJi(md_,sfi td&
&_ /_lr*les, des tu'd_esel ib,a _&lgdgs q_ amffah, h _dim lYumdd#_
& [adm a u, que &l MI:&9,a, I,ahvmea el lea_l:_k_ssull<__u,pI&_ellt
/_mgtm*u_e d*dollffd_q*ttq_eldaJllS_qde > ,,n_ffla/,,ur a cgntvt,c/h)lt
j)om @u&,r I;m_lidig tb,aalilnl.lrtaaJbl (h"&s_ctln el bs pr;s(_,_r_:
,\:ot_ q_ _l/aul /,,bssde 12 ]wutm /_lmrs_ /let certail_sali_rto_s,
I:('l*d:ortla d*;sh)dt_#at;oll.& po17_,du Jblu doll dem*_ul,I
pm6d/eIIlelt_o_vo/, /_om [wnlldhv O I?m d,,,cm ulo et
a I'/umidit: de sD,_uael:
Uli/isl_&bul&qui :_1:..q.:s: av.l:b flmr/a,ur l_!llh
10uwez la po*te du flmr,
2 Placez I'extl('mil( _magn(qique ck la but('e sul la sulfhcc
interne supdfieult de la porte du tbu/;
3 gcmlez la pork" dtl tblll: ell laissant cclh_ci i cposci7 COllIFt:
la btu(%.
4 Appu}cz sm OPTIONS.
5 Appu}cz sur DESHYDRATER,
6 Sur les lnodiqes R fotJr double settlement, appllyez sur
FOUR SUPER. ou FOUR INFM/. pOtll choisil k fi)tlr.
7 Emrez la [ell/p_l'dtllF( _ (max. 200 <'F 193 _(1),
8 Appu}cz sur ENTRER.
9 Appu}ez stu DISPART.
RFAIARQUES :
• lbm,4*_/a&tl_"&ns un/i:t si_quatzd db tie_erl/ms.
•(Tilis:_uliiqunIIn_t&bu/&qzdesta,I&_sea_wh,/uma
Placez['exb_mit6magn@que
de[a buteesurlasurfaceinterne
sul_rieuledelaportedu four•
Fermezlaporteconttela butte.
Conseils utiles s_wla dbsh}_hntion :
• tl estpa_ffb/_"& sMler&la/i,tnl_ _u_pht_)'ur_g'_ilh,_
• lw lempa & @huj,_,d@eMra & ph_,@>ursfact:_us:
• ' • . •
A *tblimpas _z e[ v]_at_to _zm tm#g',lel*I d Im slolkagt
ad:qua/_ sollt :,sq'?tlid_plmt _ra di_ la quldild i,l la sl+nl,l:(h'_
a/itgwldasddltq.
Pollr coHill/arlder lille blllt;_: d( i-echange, COllln/tl//iqll ez ave(
notre Ccnh-enational de pisces au 1.800+661.1616 en
memionnant la rdi'.rence WB08T10024.
87
Page 88

Option--D part diff r
Fotll t?_ttl(t
I)@art
di fi@det
a'r_wt
a ul, o_ al i(lue
88
NOTE : ,M,&i_s*'@_maisdea ali,lel_ls _onww d*,ap_lMIt;lslai&l:s,
I/*_ pOiSSOl_, d," /*; /¢DTe, all' k *,()It*ill# el dl_ 4.10gl ttJ)(Ist_l /)e?_gJg*_t /)IltS
d%l_eheu_ m_alT/islta/)_l_ la tuition. Lo_lJue _es aliments son*
lai_+,,;_?+la l+'nlpFlatl_r+,d("hipi&_,,_,la /avcnT++_la ?rdiff,m_i_r_ld,;
])(I_[X;IT_'SI*ot'T1)(_s,
Assur< z-vous qtle I'lleui* du jotll altkM('e pll I'llollog_ esi
(iOl'l_ (71{,
1
Aptm}cz stn OPTIONS.
2
Appuyez stll DISPARTDIFFFRE.
3
Sur les mod}les h fol_r double settlement, appu_cz stn
FOUR SUPER. otl FOUR INFER. pour daoisir le four.
I)eH× options de rdgqage de d('pa_i dilt('l(" soni
tlispo_fibles :
• DEBUT DE LA CUISSON- Appu}_'z stn la tonche
ptliS se/veT-_,OtlS dt*s to/iches rltlll/_:l-Olees pOill entl-el
Ic d61ai qui p_('c6dera le d6but de la cuisson. Appmcz
sul ENTRER. Pa_ exelnple, si _tls souhaitez que
la cui,_son d6bute clans 2 hem cs, ent_cz 2, 0 et 0.
• FIN DE LA C1JISSON - Appu?:cz st_r la touche puis
serveT-_,Ol/S d_s l_ltl(he5 rltlll/elot('es poiii _/j(]ttll_*r la
p_lhode qui t1,.17_en solte que la ctlisson prendra fin 5
I'heme sotlhaill:{, en tenant C()l]/pl_ _ ely:l'heult du jour
el du temps de cuisson, Appuyez sur ENTRER. Si, par
exemple, il est pl('seniement 12:00, que votre pdlJode
de ClliSS(l/I cSl de 2 hetll-es et que vous sotlhaJtcz S(;l%ir
le i t'l:_ts fi 17:00, a/ols enncz 3, 0 el 0.
5
Apt)uy(zstu CUISSON, CUISSON h CON_'ECTION
ou ROTISSAGE h CONVECTION atl b(soin,
6 Appu_cz sur les touches iIIIm{i]qlles pore" i6gler
la tempdrattne d('si_('e.
7 Appuyez sul ENTRER.
8 Appu?cz stir les tollches mln/_:l_Cllles pol/r i_gler
la p('liode de clli_son d('silt:e,
9 Appuyez sul ENTRER.
10 l)eux options de d('pan sont tlisponibles tlne lois le ddlai
chl d@art difl(q ("6cot116 :
• DEPART APRES PRt_CHAI._FAGE - Appu_cz stir
la mtlche potlr dloisir le p_chaut/itge. {Jne [_is le d61ai
dtl d@a_t ditJf_'l("dcould, le li_ur s'allume_a el le
l)l('(l/aullhg( (Ol//lllellCel'd. i *:s hulli{'res inll-rnes (lu
tbur s'allumelont et le restelont jllsqtl'5 cc qtle le R)tn
soit ('teil/l.
ix vorllilateur de C(2,11v('clJon se///ellra ell n/al-che
dllrant le prdchatltlage. Une signal sonore indiquera
que le pl('chat_lLtge du tbur {:st temlind ; cela peru
prerldre emilx>n l 0 mhautes+ iSdclan aqichela le r('gtaRv+
de temp_rattnc.
• D_F_PART_lFROID - \ppuyez sur eette Iou_ he pour que
le t_nlr dU'marre ilnln('diat_ merit (sanspr_:cllatilhgc)
till{ ti)is It"ddlai d( d@a_l diltT'ld ('Cotllt:. l*'s hlmi{los
i]llen/es dtl It)Ill" s'alhll//€ ront (I le I_;S[(?l'Olll jtlsqtl'fi
C( qllO l( tkiIIl" SOil el( Jill+ [,_? V(l/IJlal_?llr d( COl/X(ctJOll
s( moltra atISSi (l/ l//ar(he.
Surlesmodeles_fourdoubleseulement
I-qlTIFII oII I
I-7-r-lfTII oIIoI
FII- IFII oII I
I- II -IFII oIIoI
[7-11"-71[=-IIoII I
I- II- IF-II oIIoI
Pour i t:g]er le detlxidme t;bur (stu" les modules _ ,four double
selflement ),;_61ecliolmez ENFONCER POUR REGLER LE
FOUR INFERIEUR ou ENFONCER POUR REGLER LE
FOUR SUPI_RIEUR seh:m les besoins, p_lis suivez les dlapes
( i<lessus.
[,e r('glage de It nlp£,l'_lttlr{ i)etlt {_ql-_moditi( _en apptlyalll stir
la IO/IclIc CHANGER LA DUREE-TF_IP dtl t))lll appl'Ol)lJd.
[ ,es reglagos pell<l(?l/[ £'[r{: alllltll{;s (l/ ai)pll}'alll Silt ]a Iotl( ho
ANNI.,R£1/dll t{)tlr ipprol)fi('.
1,%I('glage de la minulelJe s'e{/{_citle en appuyani stu
REGLER LA MINUTERIE. (]onsuhez la seclion 11ilzltt_rrie.
Une [_3is I( d_lai de d('pari dilti:rd dcotll(', le littlr x;t cl_lna_rer
el poulxui le la _tlisson pendanl la p_lJode p_ogrammt:e, ptlis
il s'aIT*)tc_a aul_tlnatiquemenl, satlf si la tbnction Cuisso_ el
m;dnlien a 61d sdle(:tionn_e. ( onsultez la sec:tiorl (h_sslll*el
mahgi_la
Lne lois la cuisson telanirlde, le tbur dmettla tin signal sono_e
et le mc_sage ,<TEMPS S! PI_ ,, s'alIichera pendant cirlq
nlinlues. _,_lifiez le d<grd ely:cuissoll de la itoun:itnrc. Si
du Icmps tie ctfisson supi!ldmenlaire est requis, apitust'z
sul la lOtlche _PS SUPP. el el/ll cz (hi Iclnps de ctli%son
suppldmentailc. Si eerie tlm(;tiol_ rl'est p0.s s_le(:fionnde,
I'd(Tan s'et]itcela aul£)l//afiqllell/enl au botlt tie cinq I//inllles.
Page 89

Options--Sabbat et Aide
Fotzr t_l_zl(t[
/Vl ode
Sabbat--
Comment
*z_ler la
euisson/le
r_;tissaffe
rdffu li(_ _
(Concu pour
/,e_/_lc_sjuives
et le Sabbat.)
(,sur certains
rood/des)
Ibus ne pour< u¢itA*,le mode"&ddm& quepore *'l*b_"
ou pore _)ti_:ibz*_m_pouv*_ pa_ F.61iso pore
tO?l'lqt:_O_L ,_Yl[[tq (lltlOl?g[llq#! OH ??lg_[l_" #?l ??tal_:]lg _711
,lode di/p;/.
1 Appuyez sur OPTIONS.
2 .\l)puyez sur SABBAT.
Lne tois fil'_cran SABBNI, les touches
n%mettront pas de umalit6s. Elles changevont
de couleur pour indiquer qu'(lles sont r6gl6es.
3 Stir les mod61es h four double seulement,
appu} ez sur CUISSON DANS LE FOUR
SUPERIEUR ou CUISSON DANS LE FOUR
INFI_RIEUR pour choisir le(s) fbur(s).
4 Appuyez sur l(s lOllch(s mnn&qques l)our
r_glel: la temp&_mlre d(lsir(le entr( 170 'F
(I 350 °F (77 "F el 288 °F). Aucun signal
Oll telnperatl/re lie sel-Oll[ dollll_S.
5 Appuy(z sur DF,PART.
6 Aprbs une ddlai al_atoire d'environ 30 se( ondes
;'l1 minute, le tl)t/l commencel-,, la cuisson/
le r6tissage. L'dcmn tactile ne changcra pas
et la hlmi,3re du t;.nlr s'dmin(h-,i.
Pour vdgl( r la lempdmlure du fbul; r6pdtez
ks Oapes 3, 4, 5 (t 6.
] OllF anlluleF 1 option _a])l)at, lllailllelleZ
enfbnc6e la touche ANNULER ENFONCER
3 SEC l)ell(lalll trois s(COll(les.
REMARQUES : ANNUI_R ENFONCER 3 SEC,
CLEAR/OFF (EFFACER/ARRET) el ANNULER
SOIII les seules tO!l(?hes illlll](_dial( Ill( lit attires
})ell(lalll la ctlissoII S;ll)bal. Ces lotl( hes
alllllllel-Olll la c!/issoII ell COl/l-S il]llll(_diatelllelll
apt-_!savoir (_t_enfoncdes et doivent £.lre
ellt}.)ll(des tllli(lllenletll al)l-{*s la t511 rill Sal)[)al.
"[})!It(S, les autres totlches ont un eff(t relar(ld.
Si une coupure de coin-ant se pl-oduil pendant
que le tbur est (n mode Sabbat, il s'dteindm
aulomatiquement el r(,stm-a dmint, m('qne al)rbs
le reu_ur (!tl courant. I.e ln(_le Sal)ba* rel)rendm,
lllais, tOllte ClliSSOll Sela alllllllee.
REMARQUE :Si un mode d_ cuisson ou
un mode (le cui-_son programmde est actif avant
de passer en mode Sabbat, ces modes de cuisson
resteront actifg aprbs le passage en mode Sabbat.
"['ousles mitres modes de cuisson seront annulds,
aprSs le colnln( ncelnent du mode Sabbat.
Aide Apim3< sm ceg¢et0.che pour e_*savor ph_ssu_
k<sfi)llcliotlsdu ibul:
1 Al)puyez sur la touche HELP.
2 Appu)vz sur les fl;*ches • (hm/t)
ou • (has) pour choisir la lonction d6sir6e.
3 Al)puyez sur ENTRER.
4 Appu?s*z sur la flSche • (bas),
si die esl prdsenlc, pour consulter tout 1( texlc
de l'aide.
5 Appuyez sur ASSISTANCE POUR SORTIE
pour (luiu( r l'&cran ,MI)E.
8{)
Page 90

Options--Rdglages
Fottl l_lttla[
R@'Iaw de la
commande (/e
tenq)dra l_cre--
j?tites-le vous-
mdme._
IIeslpossiblequevoust_vm)i_.zquedan_vvl_vnouveau
tim* la _vt£s_mzest dijfl;iwz> qlw daus "_vt_vauck_rl lbu_: {"tili*_
vot_l_nlmveau /our pt_utaut qu@u_ _,mah_,s a/hz d_, vmls
/anzil alisel avel *lnQly*_d onnom_t. Si vous lwuvgz q,u.
la t¢_n/)dmtmv dzms vogue nouveau fino _:_ttwp dl_>o&¢ou t_q_
ha,w5 "oousilouv_ _!_,ger[a (wmtmml<_ dz lem i)dmllnv vou s-
1 App<,_'z sin" OPTIONS.
2 Ap[m}_'z sm" RI_GLAGES.
3 Appu)cz sur SI_LECTION DE LATEMPI_RATURE.
4 Appt/}_z stir TEMPI_RATURE MODIHI_E.
5 ta tcmpd/atll/C du four peul £'trc mlgmentdc (+) ou
diminude (-) dans une ptx_pollion allanljusqu'_ 35
°E Appuyez sur + I ° • ou - 1° • pour augmemer ou
dimkme_ la temp{:taltltc pro irlc_dments de 1.
6 I,o_S(lUe la mod_icafion est _crmin_e, appuyez
sur OK p_fis PRET. 1tilisez *otrc Rmr (omme w>us
]e f('l ]eZ nol i//alel*lenl.
ETIOU
Pour r@'ler
l'ho_log'e
Pou* tt u* /*s dis/?asili_:}&" (klwzomi4ra_l,, automali(i u¢<sdu /oul
/_mc/ionm._zt (ol_l.(t_'nze_zt,vous &:vl_ I_t('_ l 7ulrhN*.i_ la bomze
heine. 11 ?l?:stpas possible de modi/iz,_ l 7wu_e au ._t d _
1 Appuycz mr OPTIONS.
2 AH)uy(z sur RI_GLAGES.
3 Appu} cz sul HORLOGE.
4 Appuycz sur RI_GLAGES DE L'HEURE.
5 Trois options sont disponibles :
• Pot/r _glet I'hetlrc all ti)rmaI 12 henws : Appuyez snt
12HEURES, pui_,sur REGLER L'HEURE, emrez Its
heures et les mimlt_ s deptfis l:00jusq_Ffi 12:59,
appu}x'z sur AM ou PM, _ur DEPART puis sur OK
• Potn" rdgle_ l'h(urc all tLmnat 24 henws : Appny_ z sm
24 HEURES, I)_N sur REGLER L'HEURE, emrcz les
hetll ('set les I_ljnutcs depuis 00:01,j/Isqtl'fi 23:59,
appup:z s_r DEPART puis sur OIL
• Pore" rdgle_ fi l'he_m" av, mc_:e : Apptm-z sur HEURE
AVANCEE, puis su_ RECULER D'UNE HEURE
pour rcculer dhme heu_c ou sur AVANCER D'UNE
HEURE pour axancel d'une heuw.
6 Appn}vz sm RI_GLER L'HEURE.
7 Appuyez stir les louches mm_dfiq_ms po_l enlrcr
] hel]r(" COUl'dllt(" en he/IreS gl l//il//]tes.
8 Apl:nly(z sm AM ou PM.
9 Appuycz sur ENTRER.
[ZlTII-ql oII I
IZ I- IU-II IIoI
9O
Assurez-vousque ['horlogeestr6gloe
labonnehoure
Page 91

()ptions--ROglages
Four mural
A'?wdt
automatique
12 heures
Dissimulation
de 17mrlog'e
(,*da, (?a,itec(u_lddrAUqu_; _i vous oublJ(_ le pnlr _4D,la£st_
alhom 5, la _ommamD, l'_;t_,iu&_ aulmtulUqlu, merlt ap_:i_
12 tu_#r_ pmdanl Milan(lions (h, oU_son, ou (@i_ 3 lu_ures
REMARQUE : Slu h s modd(_s d flm* d_mble, o41<@_ncUon
q_da[_ est activ_, su_ l_,s<t_,uxfou?_.
Suiw'z les drapes ci_lessous :
1 Appu)cz stir OPTIONS.
2 Apl:m)_:z _,tl+I_GLAGES.
3 Apl)u)cz _,m ARRETAUTOMATIQUE 12H.
4 Appuyez ,_ur DI_kCTIYI_ ou ACTIYE.
5 Appuycz sur OK.
51vou_ p_{/3mzdAsD_zul_>rl'(_]ickaL_r,d_,171orhN_¢,suivez
1 Appuycz sur OPTIONS.
2 Appuvez _,m RI_GLAGES.
3 Appuvez _,tl_ HORLOGE.
4 i\ppuvez su t AFFICHAGE.
5 Appuvez su r TOUJOUI_S A ARRET.
6 Appuvez su_ OK
7 Appuvez sut OK', nomcatl.
REMARQUE_ : 1_)_:_71u"171orlo_v,e_t _{@_e<a It mod_
<,_>xUn<tz<m..,vm_s _mpouv_.z uti/i_('_ h@mdD,_l de m_e en
7 m[ e)qt'ure
Fahrenheit
ou Cdsius
U)llv <ommanrh: ¢,sg_(_dh.pou_ a/fidto la tem[_smtuo__coz(D_l;s
I)_h_elU_eit, ma£s vous poul,(_ mMifie_ a,tte _Tediou qjh_ d_
l X_i]/cDeleu <h;_+:s@'Lsiu_.
1 :kppu) cz sm OPTIONS,
2 Appu)cz su_ RI_GLAGES.
3 Apptm=z sur SI_LECTION DE LA TEMPI_RATURE.
4 Apptm'z sur I_CHELLE DE TEME (°C-°F).
5 Apptm=z gut °F pour des degtds en Fahrt nheit ou stir
°C pour des degrds _n (k=lsius.
6 Appuy(z sur OK.
7 Appuyez sur OK_I n(*tweat/.
8 ,_])])tl}'(z sur PI_T.
REMARQUE : Pmo [_,smod_h<si) ji)ur doubh,, le _loul)lau
91
Page 92
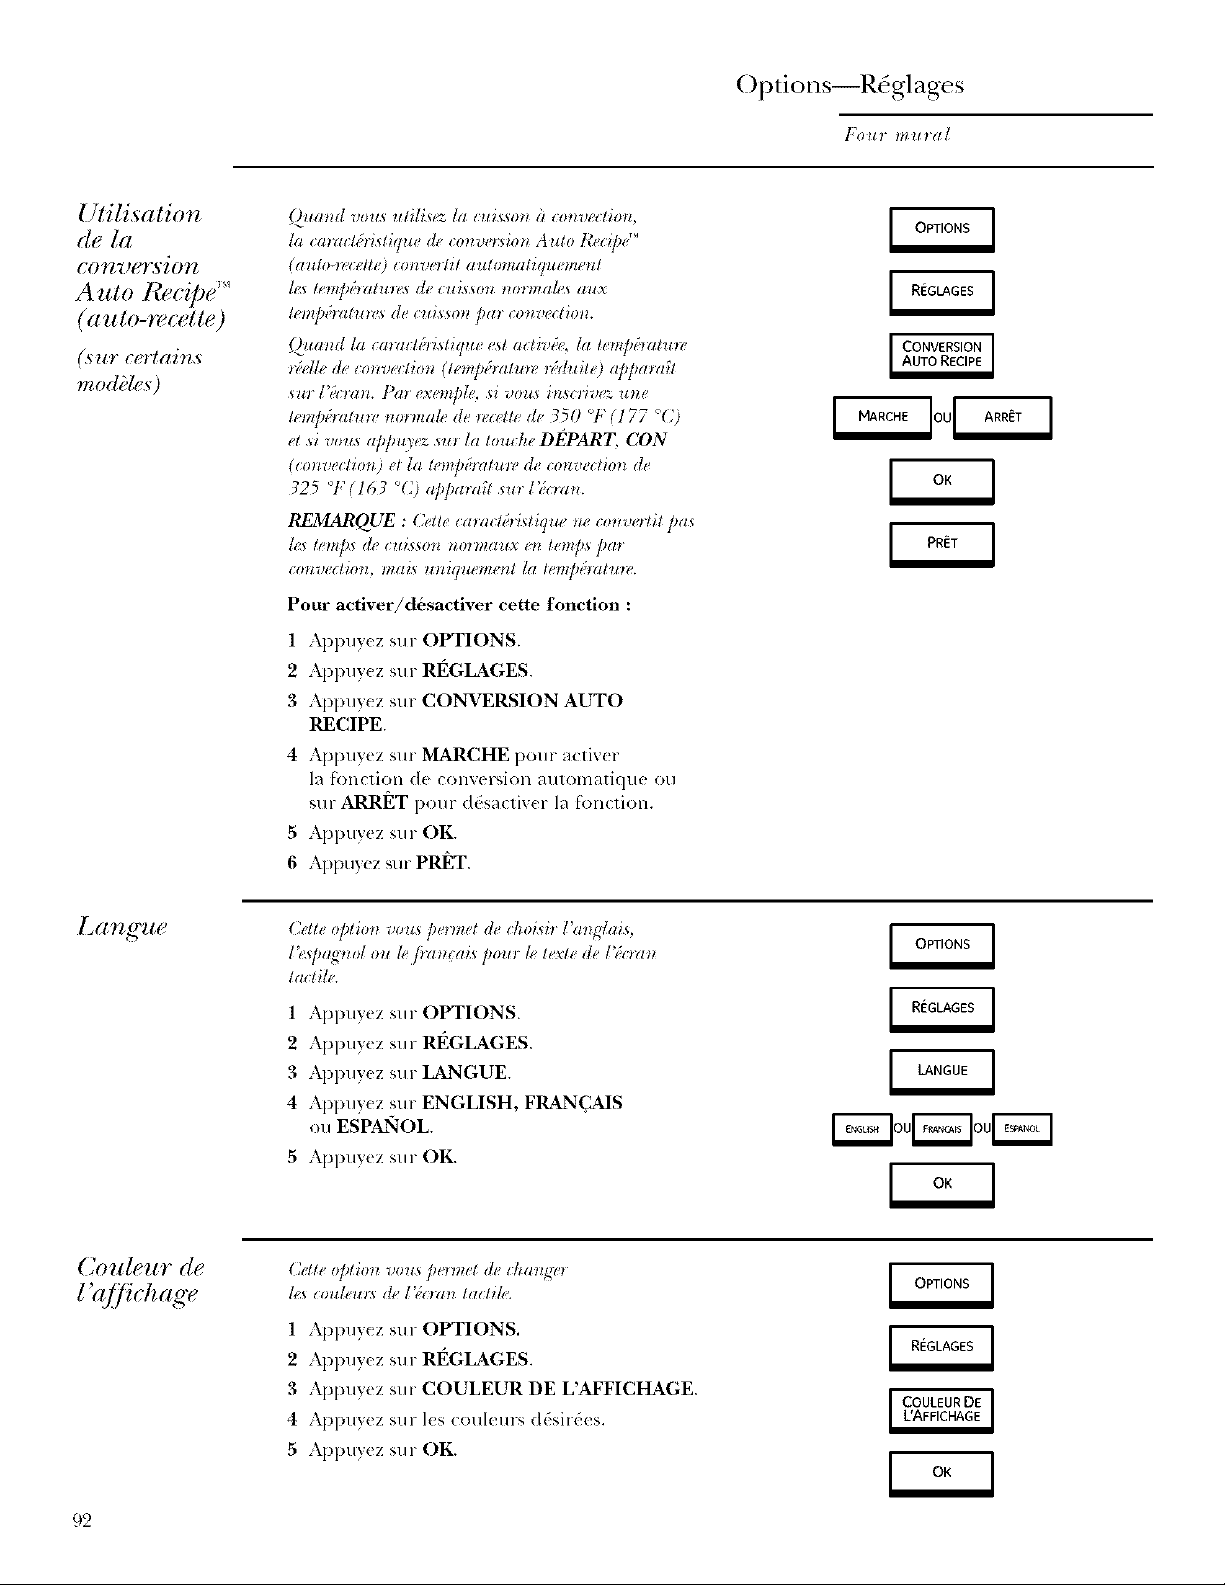
Ulilisation
de la
conversion
Auto R++cipe"
(auto-recette)
Options--Rd_glages
Fotll t?_ttl'(t[
h_ camct_;ris¢iqu_, (k, co_w,_ don Auto t_ecipd"
(aulo-_vl:eit_') i;o_zwolil aldomaliqneme_zl
/_s te_@_;tzztlo_,s de cuis_on _wrm<des aux
/e_@_;tz_tures de cui,ss0n/mr convections.
Qum_d ta camc¢_b4s¢iqlt_ es¢ activate, la t_m]dmtuw
+'<;ell<><k+i:onw+!:lion (l++wp+balun"++;<tuil+')<l)t)/*a><lil
_ur I'_:cmn. Pm exe>@le, _i vous i_scrive: u_ze
!e_@_;mtu_' m)_+tmte de _,l ette de 350 V" (177 °@
et si vous aHm?.++csul Ia touche DEPART, CON
(tonveclion) el la t<,mp_)atlt_ de convection de
725 °1:(167 %;) @/)arait sur l'_:o_n.
REMARQUE : (2ett_calacUristique _zecotlvertit p<ls
cm_v.:tio+l,mais ulliquemerlt la lemj)dmtum.
Pour activer/d6sactiver cette fonction :
1 A1)l>u)ez sin OPTIONS.
2 Al)l:m?( z sur RI_GLAGES.
3 Appu)+ z sur CONVERSION AUTO
RECIPE.
4 Appuyez sur MARCHE pour activ(r
In fkmction de comersion automatique ou
Sl/l"ARRI_T pour ddsmtiv(r la fon(tiOll.
5 Appuyez sur OK.
6 Al_pU} ez sur PRINT.
(>tt_ optiotl vous p+rmel (h choidl l'atl_tais,
' I"f l >"
ta<til_,.
1 Appuyez sur OPTIONS.
2 Appuyez sur RI_GLAGES.
3 A1)puyez sur LANGUE.
4 Apl)uy(z sin ENGLISH, FRANC_S
ou ESPANOL.
5 Appuyez sur OK.
Cell_,@/loll you+ ])+'rmet de i:hal/_e_
1 Appuyez sur OPTIONS.
2 Appuyez sur Rt_GLAGES.
3 ,\ppuyez sur COULEUR DE L'AFFICHAGE.
4 ,\ppuyez sur lest ouleurs d&irdes.
5 Appuyez sur OK.
92
Page 93

()ptions--ROglages
Fottl lllttla[
So_
marche/arr:,t
C:tte@:io_tvouspo'me:d'adiverou dedAactiv_l D"
s_g'nal _ontn_ qui se i:ti! entet_d!_ it ta p_itltt d'ut_e
[O_gX:]tg.
1 Appuyez sur OPTIONS.
2 Appuyez sur RI_GLAGES.
3 Appuyez sur SON/VOLUME.
4 Appuyez sur SON MARCHE/ARRI_T.
5 Appuyez sur SON EN MARCHE pour _utiwn
le sigmd sonore 1i6 5 hi pression d'une
touche oil slit SON ARRI_T pour ddsactixer
ce signal.
6 Appuyez sur OK.
7 Appuyez sur OKk nouv¢ au.
8 Appuyez sur PRINT.
VO[?UI¢Z(: C: e /tlttc ton p:rmet d'qiuster te volume _ tol
_liveau plu_ al !@/abh!. 77_/1sItivealt_ de volume
peuvent _1_:s:;Ieclion_t{s.
1 Appuyez sur OPTIONS.
2 Appuyez sur RI_GLAGES.
3 Appuyez sur SON/VOLUME.
4 Appuyez sur VOLUME.
5 Appu)_ z sur I_LEVI_E, MOYEN ou BASSE
pour le choisir le niveml du xolume li_ fi
l'en_)llCelllellt des tOllches.
6 Appuycz sur OK
7 Appuyez sur OK?I nouvcau.
8 AI)I)u)_ z sur PRl_T.
93
Page 94

Options--ROglages
Fottl lllttla[
Sig_ml de
la min'ule'rie
Sz_&yzalde la
mznuterie de
cuisine
Cetl_@tioll vous p*_rm*4d_ I_!,@_le (_,p_de _ig_al
qui re_mm_ a la /}ll d'u_ 9(@ m_llut_.
1 Appuyez sur OPTIONS.
2 Appuyez sur RI_GLAGES.
3 Appuyez suv SON/VOLUME.
4 Appuyez sin SIGNAL DE
LA MINUTERIE.
5 Appuyez sur CONTINUER, 1 BIP,
2 BIPS ou 3 BIPS.
6 Appuyez sur OK.
7 Appuyez sur OK_', nouveau.
8 Appuyez sur PRINT.
C_4te opliotl vou,s /)o'm_4 de I_;t{kr k _3])_,de siKmd
qui _ela a_socid _ la n_inulerk, de cuisb_.
1 Appuyez sur OPTIONS.
2 Appuyez sur RI_GLAGES.
3 Appuyez sur SON/VOLUME.
4 Appuyez sin SIGNAL DE
LA MINUTERIE.
5 Appuyez sur CONTINUER, 1 BIP,
2 BIPS ou 3 BIPS.
6 Appuyez sur OK.
7 Appuy(z sin" OKfi nomeml.
8 Appuyez sur PRINT.
Son et volume
par d@zut
94
(2_41_opliotl vou.s /)o'm_4 de @kr aulomaliqm, m('m
¢llzlslet _ig'lla ux aux _z!elages pal (l@m¢.
1 Appuvez sin OPTIONS.
2 Appuvez sur RI_GLAGES.
3 Appuvez stir SON/VOLUME.
4 Appuv(z sin PAR DI_FAUT.
5 Appuvez sin OK.
6 Appuwz sin-PRInT.
Page 95

#
El&ne_ts
chauffh.ls
j,ur
Entretien et nettoyage
]'Olll t?_ltl'(t
AVANT DE NETTO _R UNE PIECE QUELCONQUE DU FOUR, ASSUREZ-VOUS QUE
L'ALIMENTATION ELECTRIQUE A ETE COUPEE ET QUE TOUTES LES SURFACES DE
L'APPAREIL ONT REFROIDI.
N+ lmltoy+ z pas l'+l&n+ nt du gril. "[kmte salelE
brfilera lorsque l'_l_menl sera +haufl_.
Apr6s avoir grill6, retirez la lbcheffite et
sa grille du _bur. Retirez In grille de la l,Scheh-ite.
Versez dElicatement In graisse de la lg.cheliit_
dans un contenant appropri& Lawz et rincez
In lbchefl-ite et sa grille dans l'eml chaude avec
un tampon _'lr&:ur_ r de plastique ou imbi/)_
de SaVOll,
L'_l&nent de cuisson n'est pas expos_ et
se trouxe sous le fond du tk)tn; S'il _ a des
d_versements ou de la t endre accunml_e
sin- le tond du foul; essu}(z l_ tout mant
l'autonettoyage.
L_chefrite
Si des aliments brfilbs se trouvent sur la grille,
saupoudrez-la de ddt< rgent tandis qu'elle est
chaude et couvrezqa d'_ssuie-tout ou d'un linge
?_vaisselle. Faire tr_ ml)er la l_.chefl-ite _liminera
les aliments cults.
La 16chef rite et sa grille se lavent ave(:
un d_tergent commercial pour [Otll-.
I.a l/'cI'lefl_ite et sa grille se la'_ nt aussi
au lave-vaisselle.
Ne rangez pas la lbchefrite et sa grille dans
le four alors qu'elles sont sales.
MISE EN GARDE : ne netto?ez pas la l,Scheh-ite
et sa grille dans un fkmr autonettoyant.
{)5
Page 96

Entretien et nettoyage
l:ou_ mural
du.p ur
Les g_illes peuvent _.trelaiss_es dans le %ur pendant
le c>vle d'autonetlo)age sans hire endommag_es.
Pd_iodiquenl+ nt, apr_,s plusi(u_s cycles
d'autonettoyage, il peut 0tre ndcessaire de hlbrifier
les grilles du +;->urh l'aide du lubrifiant au graphim
a(colnpagllallt votre _i)t/l" mllral. Pollr (Olnlnalld( F
du lubrit]ant au graphim additionnel, appelez le
(;emre national des pig,ces au 1.800.626.2002 et
lnelltionn( z le nuln_ro de l(:t'(,lence WB02T10303.
1 Retirez la grille du f'+nnzR+portez-vous _ la
section Grill_ <te/b_r a exte_ion _:o_@ll;le.
20uwez la grille enti{,rement et posez-la sur tree
table ou un comptoil; Du pat)ier journa] peut _tre
plac_ sous la grille pour fi*ci]iter le netl_#age.
3 S'il y a des d6bris darts les glissi_'_res,essuw:z-les5
I'aide d'un essuie-tout. REMARQUE : tout lldJrifiant
au £raphilequevou_ enl_+_ezdolt +:ht,remplacl;.
%at +
60uvrez et refk,rmez la grille l)hlsieurs tills
afin de r_partir le lubriflant.
7 Rel)lac_ z le capuchon sur 1_ contenant de
hlbriiiant el secou(z-le encore une lois.
Retournez la grille el rdp_lez les _lapes 3, 4,
Set6.
® ®
4 Secouez le contenant de lubrifiant au graphite
a_ant de l'omtit; En commengant pat le cdtd
gauche du m6canisme de glissement de la grille,
placez quatre (4) petites gouttes de hlbrifiant sur
les deux (2) glissibres du bas prbs des bottlers de
roulelnent.
C{3tegauche
Grilletourn_eversle haut
5 Rdpdtez pour le m_canisme de glissement
droit de la grille.
cotg gauche
Grilletourn_evers le bas
® ®
C6tedroit
_m
®
j
Grilletourneevers le bas
8 Fermez la grille, retournez la grille vers le
ham et replacezqa darts le four. Reportez-
vous fi la section (;rill_ <f_'/b_ra exte_z_o_
complbt+<
9 Rdl)dtez les +tapes ci-dessus pour clla(l++e
grille.
REMARQUE : _l_vaporisez pa* de Pain +`ozl lout
autre tubrifia_zl <i_aporise_:
96
Grilletourneeversle haut
Page 97

Entretien et nettoyage
Four mural
Enh?veme t de
la porte du
bur enla
enl mment
La porte est tries lourde. Faites attention quand
vous l'enlevez ou vous la soulevez.
,Y*,souD,ve: iamais D_po_t(,pa* sa po[¢m;e.
Enlievement de la porte :
10uvrez conlpl_',tenlent la porte.
2 Tirez les verrous de charni_qes vers
I'm-mature de In porte, en position
d4verrouill_e. In outil, COmlne m_ tournevis
fi lame plate, peut i;tre ndcessaire.
3 "['_nez fk,rnmm{ nt les deux c6tds &¢ haut d(
la porte.
4 Reiermez la porte fi la position d'enl&v(m(nt
de la porte, ce qtfi veut dire presqu(
compl,St(nlent et soulevezqa vers le haut [)Iris
V(l'S l'extdrieurjusqu'?l ce que le bras
d'articulation soit entibrement sorti de
la railmre.
Remise en place de la porte :
1 'Ik'nez l;m-mement les deux cSt(_s du haut de
la porte.
Pento
%rr0us docharniere
_rezon baslosverrousdescharnieles
pourdeverrouiller
Positiond'enlevement
[xtromite
dela
lento,,
So,tT d#
2 Avec la porte all nl{;lne angle que pour
l'enlever, mettez le renfoncement du bras de
charni,2q-e darts l'ar{'.te du has (le In tbnte de
charni,Sre. Le renfimcemeln du bras de
clmrni,Sre doit ,2.trebien install_ darts le has
de la t'enle.
3 Ouvrez compl,Stement la porte.
Si la porte ll'est pas complbtenient ouverte,
l'ind(nlation ne repose pas bien fil'extr_mitd
ini>rieure de la f_ rite.
4 Potlssez les verrollS (le (hal-lli_q-e COIltFe
l'armature d( devant du trou du Ibm; en
position verrouilh:e.
5 Fermez la porte du [OUl;
Lavez la sonde thernfique awc de l'eau
SW_Olllle/ise Oil Illl taIllpoIl £'1 r_c[Ir( 1
saxonneux. Laissez refroidir In sond( awmt d(
la laver. Faites disparaitre les tach(s tenaces
avec till talnpoll }'1 rcC/ll-el savolllle/IX, ]lifts
rincez et s&:hez.
Ronforoement
charni_re
charniere
Poussezverslehautlesverrousdescharnieres
pourverrouiller
Ne phmg*<pas la son(D,lh_,lmique dans I?au.
Nem_/g_(<p(_sla *lmde U,,'rmiq,e dm*s D,fimn
97
Page 98

Entretien et nettoyage
]'OH I t?_H I(d
AmpouM
du./bur
Chaque hmr esl nmni de deux uniltts d'ampoule
h hak>g,Sne sim4es sur les patois latdrales du four.
Les anlpoules s'allunlent lorsque la porte est
ouverte Oil lorsque le [})llr exectlte tlll cycle de
cuisson. Eel anlpoules du fLur n( s'allumenI pas
pour le c) cle d'autoneltoyage ousi le four est
r_gl(, fi la fimction du sabbat.
Chnque unitd d'ampoul( compr_ nd till couvercle
de lampe amovible sur lequel se trouvent deux
m(.canismes de verrouillage, u n compartim(nt de
lampe darts lequel se trouvent trois culots (t trois
aml)oules fi halog,3ne.
MISE EN GARDE : a_ant de _cmplacer une ampoule,
d(_btanchez l'alimerltatiol:l _lectrique au four a rot:me le
i)mmeau de fllsibles ou de disjoncteurs.
.\_su rez:vous de laisser le couvercle el l'ampoule
refloidir compl_,tement.
Pour votre s(ictlril_, ne manipulez ires d'ampoule
chaude fi mains hues oil avec un chiflbn humide.
Pour retirer :
Retirez les grilles du f;r)uLRepol_ezwous 5 la
section ( hTlD'sdt@m* d oxh,nsio)*ilml]dbt_
_\ l'aide d'tlll( cld fi molette, rctirez les quatre
dcrous qui nlaintiennent le suppoll glgrille pap
dessus l'unitd de la lampe.
_ R( tir(z le (:OIIV( 1"( le ([( lalnp,._ *.!ll '_(!ri( (It til-}llil
xers 1'_xt&ieur son rebord arri&-e et en k
[iliS_lllt lotil( r ,,ers xOtiS, ae l-etilez _ltl(711ile vis.
RF_IARQUE : hs l)inces de fixation i)ourraient
tomb( r du couveide de verre. Apr,2_sle
renlplacenlenl, elles dm ront ,Strcplacdes darts la
bonne position sur le couvercle de la lampe et
rdinsdrdes darts le compartiment de la lampe en
les enloncant bien ell place.
Portez des gants ou utilisez un chittim propre
et retirez l'aml)oule grill6e ell tilant pour In
fbire sortil:
Pour remplacer :
Utilisez une nouvelle mnl)oule fi halogbne (le 120
voh% fi broches G8, sans d6passer 25 watts.
kesawpoull'_ de >mplaomlent /lt,_allnt i;h* actlet&sI'n
a])pda zt > 800.626.2002..VIom;w dt pi&l : FVB25T10064.
RE_V-ARQUE : h,s mnpouh, s d'b#enslt_; supdrlemv
endommag*_nt votre foun
Portez des gains ou utilisez un (hitibn propre et
rethvz l'anlpoule de son emballage. Ne muchez pas
l'ampoule h doig_ nus. L huile de vos doigis peru
(auser des points chauds sill" la surliu e tie verre et
causer le grillage pr(,matur6 de l'ampoule. Si x_ms
lDu£hez le ',l)l-le, netto}e/-le avec tie l'al(ool avalit
l'installation.
Entimcez l'ampou/e darts le culot jusqu'au tired.
_1_.( )la({ z le COtW(r(le tie hi lalll )e, ell )la{allt SOil
/xn-(I _lVallt SOilS l_s detlx lallOllett(?s (/aIls le
COlllpartilnellt (l( la 131]ll)e. i_olllez le rebol-(]
al ri(q(! eli )1{1((, Oil )rel]_ilil Soili (It VOltS HSstlr(r
(ltl al)ptl ( ) (}It (I1 I)a(e.
REblARQUE :
si les )inces _-,rTZGZ_ Racezle
efix ](3 ( _ ri))Tenezles_ N rebord
sont tombees _,.jab_ p _ .
du couvercle J I / . .
, . pacesu e oela
de!,lent,lle, Io,,t,ie o,,
malntel/ez-les ducouverole,J_ 1_ lesdeux
sur le couxercle, de la lentille ./'I ir languettes
dans la bonne JQ J_c_._ avant
position, pendant __ IRtII
que _ous replacez Appuyezsurlecouvercledela
le couvercle stir le lentillepourlefixerenplace
(ompartilnent de la lampe.
[A' ( Otl',er('le (It' la lanlpe dolt (ffl'(' eli })late
lorsque le Ibm- est mis eli mar(he.
Pour till meilleur dclairage fil'intOrieur du Ibm;
netto}vz ti&luenmmnt le couvercle vitrd fi l'akle
d'un chifti>n huniide. Cela devmii i_tre tait
loP_(lue le timr (!st dteilit, ddbranch_ (le
l'alimentation el complblemenl refl-oidi.
Replacez le supporl _'_grille de mani,3re fi ce que
les trOllS (wales se retFoHV{qlt 13ar</essus l_s
IX_lllolls arritwt, et les tl'OtlS Folids par</essus les
IN)U1OIiSavant. Fixez ldgarelnent il l'aide des
(iUatle ('crous que VOIIS Hvez letirds
l)l (ic(idelnlnellt, in?liS lie _,(,ri ez l)as lro l) cal cel}l
pounait endomnmger l'6mail.
' ' incesde _ . , avantdu
fxa onen couvercle
{)S
P,eplacez les grilles. Reporlez-vous fi la s( cti( m
_ lte/)ran(hez le (Olll'dllt {leclrique all tittle
Page 99

Entretien et nettoyage
Polo"
nettoyer
la porte
L'int6rieur de la porte :
• Puisquc la section 5 l'int&-ieur (111joint st"
ncttoie durant h, cych. d'autonettoyage, aucun
besoin d_ le nettoyer _'1la main. 'Ibm savon
laiss_ sin In doublme pourra causer des taches
additionnelles lorsque le four _st chaufl_, alors
assurez-vous d_ bien la rincen
• kas(ction _ l'ext_ri(m-dujoinl s( netloient
_IV(?( lln [_/1_11)Oll _'1 l-(_(lll(?l - d,2 _ renll)li de SaVOII.
• Vous ne devez ni frottez ni netloyez le joint de
porte; le mat6riau de fibre de v<rre du joint a
une tl-,2.staible r6sistance a l'abrasion. [ n joint
de porte intact el bien _Jjust6 est essentiel pour
ol)tenir un bon rendem(nl _nergt:tique et de
DOllSrdsultats de cuisson Si vous remarquez
qu'il devient us_, s'effiloche, est endommag_:
de quelque {a_on ou a _t(: d(:l)la((: sur la
porte, w:msdewiez le remplacen
L'ext6rieur de la porte :
• En tonction de volre mo(l&le, reportez-vous
?_la section &z_Jag>_e_*aciel i*zox3'datd_"ou
Surlhl l,s fieint_,_.
_mm mmmmm_mmmm
/4
¢,_IIIII III III III III III III III III III III III III III III III IIIIIIIIlllJ-%
ino, 'dable
(sur certains
mo{hT(<s)
SI!_{'f(IClgS
peinles
(,sur certains
modules)
11est conseill6 d'essuyer le lableau
de commande apr6s chaque utilisation.
Netto?ez-l¢ avec till sawHl doux {[ d12 l'eau,
ou une sohltion d'eau et de vinaigre. Rincez
_ll'eau claire el essu3 ez ave<: tm linge doux.
Pour nettover le tableau de contr¢_le, vous
devez 1_ laisser fiteml)(:ramre ambianle,
et ne pas l'exposer directem_ nt au sok il.
L'utilisation d'autres nettoyants liquid_ s n'est
pas recommandde - le d_p{')l r_siduel pourrait
afff_ct(r le tonctionn(ment de contrgle.
N'utilisez p*ts de tampons de laiim d'acier; ils
pourraient rayer la sttrface.
Pour nettovcr la surfi_ _ cn aci_r inoxydabk,
utilisez de l'ean chaude savonneux ou un
produit nettoyant ou cire fi acier inoxydable.
Essuyez tot{jom-s la surt.lce dans le sens du
grain. Suivez les instructions du produit
llettovallt pour ll(tlover 1_1 s(IrfHc( (11 a(ier
inox}dable.
Les surl_hces peint(s inchlent la porte, le dessus
du tableau (le commandeet l'avant du tiroir.
aettoyez-les axec (hi qaVOll et de l'eau 011 lille
sohltion de vinaigre <t d'eau.
N'utilisez pas de produits nettoyants abrasi{k,
de produits nettoyants liquides puissants,
de tampons fir_cur_ r en plastique ou
de prodllits nettovants COllllnel-CiallX
pour 1_Ibm" sur le tableau de comnmnde--
ces produits endonmmgeront le tini.
[ n( SOIl/tiOll (Olllell_ll[ _/lll}?ln[ (l'(_)/I (|l}?l!l(l(
(tu_ d( vinaigre esl la m(illeure.
Pour savoir COmlllellt acheter le produit netto}=mt
ou le cire pour apparcils _lectrom&lagera en acier
inoxydable, ou pour connahre les coordolmdes
du ddtaillant 1_plus pl_.s de chez vous, veuillez
appeler notre lmm&o sans frais :
1.800.561.3344 ou visitez notre sit< Web
in OllOglillll.coln.
N'utilisez pas de netto_ ant commercial pour le
fbu_; (It poudres de nettoyage, de lain( d'acier
ou d'abrasiig forts sur quelque surthce peinte
qu< ce soit.
Page 100

PROBL_;ME CAUSE PROB:d_LE
Sohitions de probl&mes
l"ou_ n_u_al
t :m[ s et
(;<n_l&,z d 'at)oyd
LE FOUR NE • I n fklsible in'ut i'tve grille ou un di,_ion(lem peu t _t_e ddclen(hd darts le
FONCTIONNE PAS palmeau de veto _d_id{ nee.
• [,_S (:o/nlllal/dt's dtl t))tll Hi' son[ p_lg rdgldcs COIIt'(t_//i'llL
• l,es (:ommandes du tl)tlr sent idgl('es p(l_l_ l'autonetto)age. Si besoin _st, laissez
h"t_)ul refi-oidil; ol/vl'ez ensuite la porte.
LA LAMPE DU FOUR NE • [,a lampe est d('l_-€ltleuse. Remplalez Fampoule.
S'ALLUME PAS • [,e ti)ur ell},'cl ue un cycle d'ilutonelto_ age ou il est rdgl_ sur la (_>)lction Sabba)h.
CUISSON OU ROTISSAGE
INADI_QUATS DES
ALIMENTS DANS
LE FOUR
GRILLAGE INADEQUATS
DES ALIMENTS DANS
LE FOUR
LE PROGl_42_IME
D'AUTONETTOYAGE
NE FONCTIONNE PAS
SONS DE ,, CREPITEMENT
OU ,, Dq_CLATEMENT ,,
ALT COURS DE
L'ALrFONETrOYAGE
FUMEES F_XCESSIVES • Quantitd excessiw: de salet6. Appuyez sin" CLEAR/OFF (EFFACER/ARRET).
AU COURS DE Ouvrez les (}.'n_tt es pour dissiper la Iumde. Attendez q_le lv message FOUR
L'AUTONETrOYAGE VERRO1JILLE soil dteint. Essuyez I'exc?'s de saletd, el programm{ z
LE FOUR N'EST PAS • [e fo/Ir dtail tr{'s sale. Essuyez le surph_s de saletd avanl de pvog_ammel
PROPRE APRES ]'autonello)ag(. I,orsq_e I( i_:)tlr <sl Iris sale, il peut _lre nd(:(ssaJre
L'ALrrONETI'OYAGE de programmer un a/itte mllonelto?age.
LES GRILLES • Les grilles ont t:td nello>6es ?. I'aide dtl cycle d'autonetio}age ei il esl mainle_mlt
DU GLISSENT temps d'cfIccltlel tree hlbritication p_riodiqtle. Nc los apolisez pas de Pare *_ou
DIFHCILEMENT d'un aulre lubliliant fi vapolisel. Repollez_w:ms 5 la section Gr_ll*,sd_,fi>_*(levtg,nsion
l,(s Lm_pes dtl (kmr ne s';dhllnen) pts pendant I'autoneltoy tg_ ell si le fistlr est rdgl("
5 la IT>n_tion Sabbath.
• [,a louche qui actionne la lampe du tour es) ddl_'ctueuse. Appelez un r_paratenl
• [,(S C()l_ln/al_des dH I()/ll" nO SOl]l pas legl_es (OTl-e(lel]le]li. teporle/-_o/is _'1]a so( tJoll
( _£s_0n ou [¢_)liasagre.
• i,e tbul n'a pas pr6chaufld suftisal_'_n/enl Iongtemps (laisser emilvm 10 fi 15 i_'dnutes).
• I)es plals de c_li_on ne converlanl pas on des plals de cuisson de mauvaise taille sonl
tltilis{s, l<cportez-x ous fi la section I_osito_*nenleut des fllala,
• Les grilles sonl darts la mauvaise position. I<cporle/-xous fi la section Cuis_0_ ou
• Reccnlvrez les alimenl_ de papier d'aluminiuln pot)r r tlenlir le brllnissage lots dtl
r61issag_'.
• [,( th( rl//oslai d/I tk)/ll- doll _'tre @lsl('. Rel:)Ort( z-*ons 5 la se(:tiol/ I{_gl)tgv
• (.c mod,>le est con_u pour tree i_:n'te fkwmde. FcHnez la l:)O_te. (;rillez
tol_jotn's axe(: la porto fc_-mde.
• [,es (:Omlllandes dtl t()tlr ne sonl pas r('gldes (:Olre(:te/nelll, tep(llleT-vous ii la section
• I,a sonde est branchde (laa_s le fk)ur. Enlevez la sonde du fi*ur.
• Grille placde fi une hm_lem- inaddquale.
• Alimenls cults clans un pen de c_is_on chaud. { lilisez la I(-chehite et sa grille
(:Ol//p/ises av(c volre til[ll.
• Plat de cuis._on qui ne conxient pas aa_ glillag{. [ lilisez la I(-chefrite et sa grille
COl/IprJses ave( XOtlTet()tll.
• l,e papi(r d'ahlminium utilis(" sur la Ibcheliile el sa glille n'a pas dl_ ajl_std
correctement et n'a pas ('td Ii'_du tel que recommandt:.
• Darts (:ertai_( s t(-gi(ms, la tension de l'a]ime_tati(m peut £'tre basse.
FaJles prd(:hat_ffer l'_:h%nerll chauf_,m) envilon l0 fi 15 nlimltes.
• 1_ tempt:lature dtl toter est t*op _qevde po/It pouvoir _dgle_/m a/it<metloyag*'.
Laissez la tempdlat_lle du t])ul descendle sous la tempdratule de verlouillage
el leihites le i('glage des commandes.
• Comma_(les real _dgl('es. \_)ir la se(:tiol/ ].}*ll_aul<.qa,ID)y:¢l_L
• I,a sonde est branchde da_s la plJse (tu foul: Relirez la sonde (tu Iou_:
• lie ph(q_om&ne est normal. Ces bruil_ sent produits par le mdlal sous I'effet
de la chalem el t-Ill refioidissement pendant les tonctions de cuisson
el (I 'a/Iton( rio} age.
notlvea/i l'a/it ol_ettovage.
• [,e ti)ur (st branchd 5 tlne source d'alimentation dlectlique de 208 \. Rdglez le lemps
d'autonettoyage 5 5 heures.
• [,es colnmandes dtl t_)llr ne sont pas rdgldes co_rectement, g<)i]- la section I')no
alzlo_*_://o)w_zL
co*ll/)l{lede la section t{*_t_eYiene*) etll_aLre.
1(_)
 Loading...