


OW er's
Manual
Side-by-Side
36"42"48"
i I
Built-In Refrigerators
224D!893PO06 l
49-60723-2 J
09-14 GE
monogram.tom

Consumer Information
Built-In Refrigerators
Contents
Consumer Services
Important Phone Numbers ................. 28
Model and Serial Numbers .................... 3
Problem Solver .......................... 25-26
Product Registration ......................... 3
Safety Instructions ........................ 4-7
Smurtwuter Filter Performance
Data Sheet................................. 27
Warranty ......................... Back Cover
Care and Cleaning
Cleaning-Outside and Inside ............... 19
Light Bulb Replacement ................ 20-21
Moving and Vacation ....................... 22
Master Light Switch ........................ 21
Operating Instructions
Automatic Icemuker ........................ 12
Climate Control Drawer .............. 13, 1/4,16
Control Lock ............................... 1/4
Ice and Water Dispenser ................ !0, !!
Shelves and Bins ........................ 17, 18
Storage Puns ........................... 15, 16
Temperature Controls ........................ 8
Water Filter Cartridge ........................ 9
Sabbath Mode Product Kit, ZSAB!........... 18

Consumer Information
Built-In Refrigerators
Before
using your
refrigerator
write
down the
model
& serial
numbers
If you
received a
damaged
refrigerator
Read this manual carefully. Itis intended
to help you operate and maintain your new
refrigerator properly.
Keep it handy for answers to your questions.
You'll see them on a label in the lower right hand
side of the fresh food compartment beneath
the climate control drawer.
Immediately contact the dealer (or builder) that
sold you the refrigerator.
Ifyou don't understand something or need more
help, there isa list of toll-free consumer service
numbers included in the buck section of this
manual.
OR
Visit our website at: monogram.cam
Before sending in the Product Registration
card, please write these numbers here:
Model Number
Serial Number
Usethese numbers inany correspondence or
service calls concerning your refrigerator.
Savetime
& money
If you
need
service
Before you request service, check the
Problem Solver in the back of this manual.
To obtain service, see the Consumer Services
page in the back of this manual.
We're proud of our service and want you to be
pleased. If for some reason you are not happy
with the service you receive, here are steps to
follow for further help.
For customers in the USA:
FIRST,contact the people who serviced your
appliance. Explain why you are not pleased.
In most cases, this will solve the problem.
NEXT,if you are still not pleased, write all the
details-including your phone number-to:
Manager, Customer Relations
GEAppliances
Appliance Park
Louisville, KY40225
It lists causes of minor operating problems that
you can correct yourself.
For customers in Canada:
FIRST,contact the people who serviced your
appliance. Explain why you are not pleased.
In most cases, this will solve the problem.
NEXT,ifyou are still not pleased, write all
the details-including your phone number to:
Manager, Consumer Relations
Mabe Canada Inc.
1 Factory Lane, Suite 3!0
Moncton, N.B. E1C9M3

IMPORTANT SAFETY INSTRUCTIONS
GEAppliances Website
For more information on your refrigerator's operation, visit www.GEAppliences, com or
call 800.GECARES (800.432.2737). In Canada visit GEAppliences.ce or call 800.561.3344.
REFRIGERATOR SAFETY INFORMATION
_This is the safety alert symbol. This symbol alerts you to potential hazards that can kill or hurt you and others. All safety
messages will follow the safety alert symbol and the word "DANGER","WARNING",or "CAUTION".Thesewords are defined as:
Indicates a hazardous situation which, if not avoided, will result in death or serious injury.
Indicates a hazardous situation which, if not avoided, could result in death or serious injury.
_ Indicates a hazardous situation which, if not avoided, could result in minor or moderate injury.
IMPORTANT SAFETY INSTRUCTIONS
To reduce the risk of fire, explosion, electric shock, or injury when using your
refrigerator, follow these basic safety precautions:
Thisrefrigerator must be properly installed and located in
accordance with the Installation Instructions before it isused.
Replaceall parts and panels before operating.
Do not store or usegasoline or other flammable vapors and liquids
in the vicinity of this or any other appliance.
Becauseof potential safety hazards under certain conditions,
we strongly recommend against the use of an extension cord.
However, ifyou must usean extension cord, it is absolutely
necessarythat it be a UL-listed (inthe United States)or a CSA
certified (in Canada),3-wire grounding type appliance extension
cord having a grounding type plug and outlet and that the
electrical rating of the cord be !B amperes (minimum)and 120
volts.
Toprevent suffocation and entrapment hazards to children,
remove the fresh food and freezer doors from any refrigerator
before disposing of it or discontinuing its use.
Do not allow children to climb, stand or hang on the door handles
or the shelvesin the refrigerator. They could seriously injure
themselves.
iiiiiiiii
Unplugthe refrigerator :
• To disconnect power to the refrigerator. It cannot be turned off
byany setting on the control panel.
Toclean, replace a burned out light bulb,or make repairs.
Note: Repairsmust be performed by aqualified Service
Professional.
IMPORTANT SAFETY INSTRUCTIONS
To reduce the risk of injury when using your refrigerator, follow these basic
precautions.
Inrefrigerators with automatic ice makers, avoid contact with
the moving parts of the ejector mechanism, or with the heating
element that releasesthe cubes. Do not place fingers or hands
on the automatic ice making mechanism while the refrigerator is
plugged in.
Do not cleanglass shelvesor covers with warm water when they
are cold. Glassshelves and covers may break ifexposed to sudden
temperature changes or impact, such as bumping or dropping.
Tempered glass isdesigned to shatter into many small pieces if it
breaks.
Keepfingers out of the "pinch point" areas; clearances between the
doors and between the doors and cabinet are necessarily small.Be
careful closing doors when children are in the area.
Do not touch the cold surfaces in the freezer compartment when
hands are damp or wet, skin may stick to these extremely cold
surfaces.
Do not refreezefrozen foods which have thawed completely.
INSTALLATION
Explosion Hazard.
Keep flammable materials and vapors, such as gasoline, away from freezer.
n fire, explosion, or death.
4
Failure to do so can result

IMPORTANTESINSTRUCTIONSDESI'CURITI"
f s
Site Intemet d'Electromenagers GE
Pour de plus amples informations sur le fonctionnement de votre rdfrigdrateur, consultez le
site www.electromenugersge.cu ou composez le 800.561.3344.
CONSIGNESDES CURIT POURLER FRIG RATEUR
A
,Jl_Ce symbole repr@sente une alerte de s@curit6. Ce symbole vous avise de dangers possibles pouvant causer
la mort, des blessures ou autres. Tousles messages de s@curit@seront precedes du symbole d'alerte de s@curit@
ainsi que des mots <<DANGER >>,<<AVERTISSEMENT >>ou <<MISE EN GARDE >>.Ces messages sont les suivants :
I_ ignaleune situation qui pr@senteun dangerimminent et qui,siellen'est pas@vitae,entraTneradesblessures
I_ ignale une situation qui pr@senteun danger imminent et qui, si ellen'est pas@vit@e,peut entraTnerdes
graves,voirela mort.
blessuresgraves, voire la mort.
Signale une situation qui pr_sente un danger imminent et qui, si elle n'est pas 6vit6e, peut entra?ner des
blessures mineures ou graves.
IIPORTANTES CONSIGNES DE SI_CURITI_
Pour r6duire le risque d'incendie, d'explosion, de choc _lectrique ou de blessures
Iorsque vous utilisez votre r_frig@ateur, veuillez suivre ces consignes de s_curit6 •
Vousdevezbieninstalleretplacervotrerdrig@ateur,
conform@mentauxinstructionsd'installationavantdeI'utiliser.
Remetteztouteslespiecesetpanneauxenplaceavantd'utiliser
I'appareil.
Neconservezjamaisoun'utilisezjamaisd'essenceoud'autres
liquidesou gazinflammables@proximit@devotre rdrig@rateurou
de tout autreappareil@lectrom@nager.
Nousd@conseillonsfortementI'utilisationd'unerallonge@cause
desrisquespotentielsdanscertainesconditions.Cependant,si
I'utilisationd'uncordonprolongateurestn@cessaire,cedernierdolt
obligatoirement@trehomologu@UL(auxUSA)ouCSA(auCanada),
troisbrinsavecmise@laterrepourappareil@lectrom@nageret
dolt@tre@quip@d'uneficheetd'uneprisefemelleavecterre.Les
caract@ristiques@lectriquesducordonprolongateurdoivent@trede
15amperes(minimum)et de120volts.
Poureviterlesrisquesd'asphyxieetd'enfermementpourles
enfants.D@montezlesportesdu cong@lateuretducompartiment
de rdrig@ationavantdelemettreau rebut oud'interrompreson
utilisation.
Nepermettezjamaisauxenfantsdegrimper,demonter,dese
teniroudesependreaux@tageresdevotre rdrig@ateur,tls
peuventendommagerlerdrig@ateuretseblessers@ieusement.
D@branchezvotrer@frig@ateur:
• Pourd@brancherler@frig@ateur.L'alimentation@lectriquedu
r@frig@ateurnepeutpas@recoup@eparI'interm@diairedu
panneaudecommande.
D@branchezvotrer@frig@ateuravantdelenettoyer,Avantde
remplaceruneampoulegrill@e,et deler@parer.
NOTE: Nousvousrecommandonsfortementdefaireaccomplir
tout serviceparuntechnicienqualifi@.
IIPORTANTES CONSIGNES DE S(--CURITI:-
Pour r@duire le risque de blessures Iorsque vous utilisez votre r@frig@rateur,
veuillez suivre ces consignes de s@curit@•
Dans tes rdrig@ateurs qui ont des machines (_glagons, @itez tout
contact avec les@I@mentsmobiles du m@canismed'@jectionou avec
I'@t@mentchauffant situ@(_la partie inf@ieure de la machine (_glagons. Ne
mettezjamais vos doigts ou vos mains sur le m@canismede fabrication
automatique de glagons quand le rdrig@ateur estbranch@.
Nenettoyez pas les dayettes ou les couverdes en verre avec de I'eau
tilde quand ceux-ci sont froids. Lesclayettes et couvercies en verre
peuvent se casser s'itssont exposes (_des changements soudains de
temp@ature ou si vous les cognez ou lesfaites tomber. Le verre tremp@
est congu pour se briser en petits morceaux en cas de casse.
Nelaissezjamaisvosdoigtsdansdesendroitso0 itsrisquentd'@trepinc_s.
L'_cartemententre lesporteset I'armoireestn_cessairementpetit.Faites
attentiondefermerlesportesquanddes enfantssetrouvent(_proximitY.
, Netouchezjamaislessurfacesfroidesdans lecompartimentcong_tation
quandvosmainssonthumidesoumouitt@s.Votrepeaupeutcotter(_ces
surfacesextr@mementfroides.
Nerecongelezpaslesalimentssurget@squiontcompl_tementd_gel@.
INSTALLATION
_' Risque d'explosJon.
Conservez les mat@iaux et vapeurs inflammables tels que I'essence 5 I'#cart de votre cong#lateur. Une
explosion, un incendie voire la mort pourrait en r#sulter.

IMPORTANT SAFETY INSTRUCTIONS
CONNECTING ELECTRICITY
_ Electrical Shock Hazard.
Plug into a grounded 3-prong outlet
Do not remove the ground prong
Do not use an adapter
Failure to follow these instructions can result in death, fire, or electrical shock.
Do not, under any circumstances, cut or remove the third (ground} prong from the power cord.
For personal safety, this appliance must be properly grounded.
The power cord of this appliance isequipped with a 3-prong
(grounding) plug which motes with a standard 3-prong
(grounding)wall outlet to minimize the possibility of electric
shock hazardfrom this appliance.
Hove the wall outlet and circuit checked by oqualified
electrician to make surethe outlet is properly grounded.
Where a standard 2-prong wall outlet isencountered, it is
your personal responsibility and obligation to have it replaced
with a properly grounded 3-prong wall outlet. Do not use on
adopter.
The refrigerator should always be plugged into its own
individual electrical outlet which has o voltage rating that
matches the rating plate. This provides the best performance
and also prevents overloading house wiring circuits which
could cause ofire hazard from overheated wires.
Never unplug your refrigerator by pulling on the power cord.
Always grip plug firmly and pullstraight out from the outlet.
Repairor replace immediately all power cords that hove
become frayed or otherwise damaged. Do not useo cord that
shows crocks or abrasion damage along its length or at either
end.
When moving the refrigerator away from the wall, be careful
not to roll over or damage the power cord.
USE OF EXTENSION CORDS
Becauseof potential safety hazardsunder certain conditions, we strongly recommend against the useof an
extension cord.
However, ifyou must use anextension cord, it isabsolutely necessarythat it be a UL-listed (inthe United States)or
a CSA-listed(inCanada),3-wire grounding type appliance extensioncord having a grounding type plug and outlet
and that the electrical rating of the cord be 15 amperes (minimum) and 120 volts.
PROPER DISPOSAL OF YOUR OLD REFRIGERATOR
Suffocation and child entrapment hazard.
Remove fresh-food and freezer doors from the refrigerator, prior to disposal. Failure to do so can result
in child entrapment which can lead to death or brain damage.
IMPORTANT:
Childentrapmentandsuffocationarenotproblemsofthepast.
Junkedor abandonedrefrigeratorsarestilldangerousevenif
theywillsitfor 'lustafew days."Ifyouaregettingridofyourold
refrigerator,pleasefollowtheinstructionsbelowto helpprevent
accidents.
Before You Throw Away Your Old Refrigerator or
Freezer:.
, Takeoffthefreshfoodandfreezerdoors.
, Leavetheshelvesinplacesothat childrenmaynoteasily
climb inside.
Refrigerants
Allrefrigerationproductscontain refrigerants,whichunder
federallaw must beremoved priorto product disposal.Ifyou
aregetting rid of anold refrigerationproduct,checkwith the
companyhandlingthe disposalabout what to do.
READAND FOLLOWTHISSAFETYINFORMATIONCAREFULLY.
SAVETHESEINSTRUCTIONS

IMPORTANTESINSTRUCTIONSDESI'CURITI"
BRANCHEMENTS ELECTRIQUES
Risquede choc _lectrique.
BranchezI'appareildans uneprisetriple avecterre.
Ne retirez pas la broche de terre.
INutilisez pas d adaptateur.
Ne coupez pas ou n'enlevez pas, sous aucun pr_texte, la troisi_me broche de mise 6 la terre du cordon
d'alimentation. Pour des raisons de s_curit6, cet appareil doit 6tre correctement mis 6 la terre.
Le non-respect de ces instructions peut entratner
des risques d'incendies, des chocs 61ectriques ou la
mort.
Lecordond'alimentationdecetappareilest6quip6d'unefiche
5 troisbroches(pourunemise5 laterre)quis'adapte@la prise
de courantstandard@3 broches(pourunemise@laterre)pour
minimiserlesrisquesdechocs61ectriquesparcetappareil.
Faitesv6rifierla prisemuraleetlecircuit61ectriquepar
un61ectricienqualifi6pours'assurerquelesyst@meest
correctementmis@laterre.
Dansle cas d'une prise biphas6e, I'installateur a la responsabilit6
et I'obligation de la remplacer par une prisetriphas6e
correctement mise5 la terre. N'utilisez pas d'adaptateur.
Ler6frig6rateur doit toujours @re branch6 @sa propre prise
61ectriqued'une tension nominale correspondant 5 celle
indiqu6e sur sa plaque signal6tique.
Unealimentation 61ectrique5 115 volts CA,60 Hz,avec
un fusiblede 15 ou 20 amp@es et une mise5 laterre est
n6cessaire.Ceci permet d'obtenir un meilleur rendement et
6vite de surcharger les circuits 61ectriquesdu domicile qui risque
d'occasionner un incendie en surchauffant.
Ne d6branchezjamais ler6frig6rateur en tirant sur le cordon
d'alimentation. Preneztoujours fermement la fiche en main et
tirez pour la sortir de la prise.
R6parez ou remplacez imm6diatement tout cordon 61ectrique
us6 ou endommag6. N'utilisez pas un cordon fissur6 ou
pr6sentant desdommages dus aux frottements soit sur sa
Iongueur ou aux extr6mit6s.
Lorsque vous 61oignezvotre r6frig6rateur du mur,faites
attention 5 ne pas le faire rouler sur lecordon d'alimentation
afin de ne pas I'endommager.
UTILISATION DE RALLONGES I_LECTRIQUES
Nous vous recommandons fortement de ne pas utiliser de rallonge dlectrique, 6 cause d'un danger de risques possibles
de sdcuritddanscertainesconditions.
Cependant,sivous devez absolument utiliser un cordon rallonge _lectrique,il est absolument requis que vous utilisiez
un cordon rallonge trifilaire,avec mise(3la terre, certifi_ UL(auxEtats-Unis)ou ACNOR(auCanada),avec priseet fiche (3
trois conducteurs, et (3notation 61ectriquede 15 amp@es (minimum)et 120 volts.
MISE AU REBUT APPROPRII_E DE VOTRE ANCIEN RE_FRIGI_RATEUR
Un enfant risque de suffoquer ou d'y @tre emprisonn&
D6montez les portes du compartiment de r6frig6ration et du compartiment de cong61ation du
r6frig6rateur, avant mettre celui-ci au rebut. Le non-respect de cette recommandation peut entraTner
I'enfermement d'un enfant qui peut entraTner la mort ou des 16sions c6r6brales.
IMPORTANT:
LISEZETSUIVEZSOIGNEUSEIENT CESMESURESDESECURITE
CONSERVEZCESINSTRUCTIONS
Lesenfants pris au pi@geou marts d'asphyxie sont
toujours d'actualit& Lesr6frig6rateursjet6s ou abandonn6s
restent dangereux m@mesi vous ne leslaissezau rebut
quepour <<quelquesjours >>.Sivous voulezjeter votre
ancien r6frig6rateur,suivez les instructions suivantes pour
emp@cherlesaccidents.
Avant de jeter votre anden r6frig6mteur ou
cong61ateur:
D6montez lesportes du compartiment de r6frig6ration
et du compartiment de cong61ation.
Laissezles clayettes en place,pour 6viter que desenfants
puissentfacilement grimper dans votre r6frig6rateur.
Fluides frigorig_nes
Lesappareils r6frig6rants contiennent des fluides
frigorig_nes qui conform6ment 5 la 16gislation f6d6rale
doivent _tre retir6s avant la mise au rebut de I'appareil.
Si vous mettez au rebut un ancien r6frig6rateur
contenant des fluides frigorig_nes, v6rifiez la proc6dure
suivre aupr_s de la compagnie responsable de
1'61imination.
s i

DISPLAY
MODE
°C[] I[] _F
DISPLAY
MODE
°c [] [] °F
FREEZER _ "_
FREEZER _ "_
Preset Settings:
Allow 2/4hours to reach these preset temperatures.
Non-DispenserModels
Dispenser Hodels
Temperoture Controls
Built-In Refrigerators
REFRIGERATOR RESET
! FILTER
REFRIGERATOR FILTER
[]
HOLD 3 SEC
RESET
HOLD 3 SEC
DOOR
ALARM
[]
[]
Temperature
controls
The temperature display shows the actual
temperature of the freezer and fresh food
compartments. The actual temperature will vary
from the set temperature based on factors such
as door opening, amount of food, defrost cycling
and room temperature.
NOTE:Frequent door openings or door left open
for periods of time may increase the internal
temperature of the freezer and fresh food
compartments temporarily.
To turn off the cooling system in both the
freezer and fresh food compartments, press
either (+)pad until both displays show OFF.
To turn the cooling system on, press either (-)
pad. The preset temperatures of 0°F and 37°F
will appear in the display.
To check the current temperature setting
for the fresh food or freezer compartment,
press the (+)or (-) pad once. After 5 seconds, the
display will return to the actual temperature.
To change the temperature settings, press the
(+)or (-) pads to desired temperature set point for
fresh food and freezer separately. Allow 2/4hours
for the refrigerator to reach the temperature you
have set.
Temperature Ranges
Low High
34OF 42OF
Fresh Food
1oc 5oc
-6OF +4OF
Freezer
-2!°C -!5°C
NOTE:Setting the controls to OFFstops cooling,
but does not shut off electrical power to the
refrigerator.
Changing
display
temperatures
from °F to °C
DOOr
alarm
To change the temperature display between
Fahrenheit and Celsius, press Display Mode °C/°F.
To turn the Door Alarm feature on, press
DOOR ALARM once. The ACTIVE light will come
on. To turn it off, press it again.
On models with a dispenser, the Door Alarm
feature is located on the dispenser panel on the
front of the freezer door.
DISPLAY
MODE
°CI I°F
When the DOORALARM is active, the alarm will
flash and beep if you keep the door open for
more than 2 minutes.
DOOR
ALARM
[]

Water Filter Cartridge
Built-In Refrigerators
water filter
cartridge
Water filter cartridge
Thewater filter cartridge islocated behindthe top
access panel.
When to replace the filter
On dispenser models, there is u replacement
indicator light for the water filter cartridge
on the dispenser. On non-dispenser models,
the replacement indicator is located on the
temperature control panel. This light will turn
orange to tell you that you need to replace the filter
soon.
The filter cartridge should be replaced when the
replacement indicator light turns red or if the flow
of water to the dispenser or ice maker decreases.
Removing the filter cartridge
Ifyou are replacing the cartridge, first remove the old
one by slowlyturning itto the left. Do not pull down on
the cartridge.A small amount of water may dripdown.
NOTE:To reduce the risk associated with property
damage due to water leakage, read and follow
instructions before installation and use of this
system. Installation and use MUSTcomply with all
state and local plumbing codes.
Installing the filter cartridge
_li Fill the replacement cartridge with water from the
tap to allow for better flow from the dispenser
immediately after installation.
the cartridge and the
cartridge holder. Place
the top of the new
L,noupthoorrowon
cartridge up inside the
holder. Do not push it up
into the holder.
H Slowlyturn it to the right until the filter cartridge
stops. DO NOT OVERTIGHTEN.Asyou turn the
cartridge, it will automatically raise itself into
position. The cartridge will move about 1/2 turn.
I_ On dispenser models, run water from the
dispenser for 1-1/2 gallons (about :3minutes) to
clear the system and prevent sputtering.
[] Pressand hold the RESETWATERFILTERpad,
located on the dispenser or temperature control
panel depending on the model, for three seconds
to clear the red or amber light.
NOTE:A newly installed water filter cartridge may
cause water to spurt into the ice maker.
Filter bypass plug
You must use the filter bypass plug when a
replacement filter cartridge is not available. The ice
maker will not operate without the filter or filter bypass
plug.
Filter B_
Plug
SmartWoter
Forthe maximum benefit of your filtration system, GErecommends the use of GE-branded filters only.
Using GE-branded filters in GE,Hotpoint® and Monogram refrigerators provides optimal performance
and reliability. GEfilters meet rigorous industry NSFstandards for safety and quality that are important for
products that are filtering your water. GEhas not qualified non-GE-branded filters for use in GEand Hot-
point refrigerators and there is no assurance that non-GE-branded filters meet GE'sstandards for quality,
performance and reliability.
If you heve questions, or to order edditionel filter certridges, visit our website et www.geweterfilters.
cam or cell GE Perts end Accessories, 800.626.2002.
Customers in Canada should consult the yellow pages for the nearest Camco Service Center.

Ice & Water Dispenser Ion some models)
Built-In Refrigerators
Dispenser
with
glass-touch
controls
How it Works
The electronic controls on the dispenser are truly
interactive. The control panel is equipped with u
proximity sensor that causes the panel to light
up as you approach the dispenser (approx. 2
inches).To make u selection, simply touch the
graphic for the feature you want, and the halo
for that feature will light up.When you walk
away from the refrigerator, the lighted graphics
switch off automatically.
How to Use
,:,:,:
Todispensewater or ice:selectWATER_, CUBED
ICE_/or CRUSHEDICED. Then pressthe glass
gently against the top of the dispenser cradle.
The spill shelf is not self-draining. To reduce
water spotting, the shelf and its grille should be
cleaned regularly.
If no water isdispensed when the refrigerator is
first installed, there may be air in the water line
system. Pressthe dispenser cradle for at least
two minutes to remove trapped air from the
water line and to fill the water system. To flush
out impurities in the water line, throw away the
first gallon of water.
Spill Shelf
Dispenser Light:
This feature turns the light on and
off. The light also comes
on when the dispenser cradle is
pressed. If this light burns out,
contact factory service.
Door Alarm:
To turn the Door Alarm feature on, touch
DOORALARM once. To turn it off, press it again.
When the DOORALARM is active,
the alarm will flash and beep if you
keep the door open for more than
2 minutes.
10
Never put fingers or any
other objects into the ice crusher discharge
opening.
Locking the Dispenser:
Touch CONTROL LOCK for
3 seconds to lock the dispenser
and control pad. To unlock, touch
it again for 3 seconds.

Ice & Water Dispenser Ion some models)
Built-In Refrigerators
Ice storage
bin
Important
facts about
your ice
& water
dispenser
To remove:
Lift up the access door to reach the icemaker.
Set the icemaker power switch to the OFF
position. With the access door closed, support
the storage bin at the bottom while slightly
lifting. Pull bin straight out.
To replace:
Slide the bin back until the tab on the bin locks
into the slot on the shelf. If the bin does not go
all the way back, remove it and rotate the drive
mechanism 1/4 turn. Then push the bin back
again.
Donot add ice from trays or bags to the
storage bin. It may not crush or dispense well.
Avoid overfilling glass with ice and use of
narrow or extra-tall glasses. Backed-up ice
can jam the chute or cause the door in the
chute to freeze shut. If ice is blocking the
chute, push it through with a wooden spoon.
Beverages and foods should not be quick-
chilled in the ice storage bin. Cans, bottles or
food packages in the storage bin may cause
the icemaker or auger to jam.
Rotate
Drive
Mechanism
Sometimes a mound of ice chips will form
on the door in the ice chute. This condition
is normal and usually occurs when you have
dispensed crushed ice repeatedly. The ice
chips will eventually evaporate.
Dispensed water is not ice cold. For colder
water, simply add crushed ice or cubes before
dispensing water.
The first glass of water dispensed may be
warmer than the following ones.This is
normal.
To keep dispensed ice from missing the glass,
put the glass close to, but not touching, the
dispenser opening.
Some crushed ice may be dispensed even
though you selected CUBES.This happens
occasionally when a few cubes accidentally
get directed to the crusher.
After crushed ice is dispensed, some water
may drip from the chute as small particles of
ice melt.
To eliminate drips on the spill shelf, tilt the
glass in slightly when dispensing water.
!1

Automatic Icemaker
Built-In Refrigerators
Automatic
icemaker
Avoid contact with the moving
parts of the ejector mechanism, or with the heating
element (located on the bottom of the ice maker)
that releasesthe cubes. Do not place fingers or
hands on the automatic icemaking mechanism
while the refrigerator is plugged in.
Eviteztout contact avec les
pisces mobiles du mScanisme d'Sjection ou
I'SISmentchauffant (situs dans le basde la
machine (_gla¢ons) qui lib@eles cubes.Ne placez
pas lesdoigts ou les mains sur le mScanisme de
production de glace automatique Iorsque le
rSfrig@ateurest branchS dans la priseSlectrique.
A newly-installed refrigerator may take 12-24
hours to begin making ice.
The icemaker will produce seven cubes per
cycle-approximately 15 cycles in a 24-hour
period, depending on freezer compartment
temperature, room temperature, number of door
openings and other use conditions.
If the refrigerator is operated before the water
connection is made to the icemaker, set the
power switch to OFF.
Icemaker
Switch FeelerArm
When the refrigerator has been connected to the
water supply, set the power switch to ON.
Throw away the first full bucket of ice.
Besure nothing interferes with the sweep of the
feeler arm.
When the bin fills to the level of the feeler arm,
the icemaker will stop producing ice.
It is normal for several cubes to be joined
together.
If ice is not used frequently, old ice cubes will
become cloudy, taste stale and shrink.
NOTE:Icemaker works best between/40 and 120
PSIhome water pressure.
12

Climate Control Drawer
Built-In Refrigerators
C/imote
Contro/
drawer
How it Works
TheClimate Control feature isasystem of
dumpers, a fan, a temperature thermistor, and a
heater. TheClimate Control drawer can be usedto
chill items quickly,thaw foods quicklyor store items
at their optimum temperatures.
Thedrawer istightly sealedto prevent the drawer's
temperature from causing temperature fluctuations
in the rest of the refrigerator.
SELECT TEMP--Use this feature to store items
at their optimum temperatures. The CITRUS
setting will maintain a drawer temperature of
39-47% by cycling a small heater off and on us
needed. The PRODUCE setting will maintain the
drawer temperature at 31-38% by drawing in
additional cold air as needed. The HEAT setting
will maintain the drawer temperature at 27-37%
by drawing in additional cold air as needed.
EXPRESSCHILL--This feature can be used
to cool items in minutes, rather than hours.
Extra cool air is circulated throughout the
drawer. Once the cycle is complete, the drawer
will revert to the pre-set fresh food temperature.
EXPRESSTHAW--This feature thaws items
in hours rather than days. Food is gently
thawed in a cool environment by circulating
air throughout the drawer. Temperature is
maintained in the drawer by cycling a small
heater off and on as needed. Once the thaw
cycle is complete, the pan will automatically
adjust to a temperature of 27-37°F to store
the food at its optimum temperature.
NOTE:Byturning the controls on the Climate
Control drawer off, the drawer can be used as
a standard sealed produce pan.
How to Use
:1 Empty the drawer. Placethe items in
the drawer.
Select the Express Thaw,TM Express ChillTM
or Select Temp TM pad. The display will come
on. Pressthe pad until the light appears next
to the desired setting. Usethe chart on
the next page to determine the best setting.
, To stop a feature before it is finished,
press that feature's pad until no options
are selected and the display is off.
. During Express ThawTM and Express Chill,TM
the display on the controls will count down
the time remaining in the cycle.
CLIMATE CONTROL DRAWER
CONTROL SELECT EXPRESS EXPRESS
[] LOCK PRODUCE [] TEMP 3oMIN [] CHILL 15 BS [] THAW
__-- ( ITF{US [] 15MIN [] 0 LBS [] --
The displayed actual temperature of
the Climate Control drawer may vary slightly
from the SETtemperature based on usage
and operation environment.
NOTE:Forfood safety reasons, it is
recommended that foods be wrapped in
plastic wrap when using Express Thaw.TM
This will help contain meat juices and
improve thawing performance.
After the Express Thaw TM cycle is complete,
the drawer will reset to the NEAT setting
(27-37%) to help preserve thawed items
until they are used.
ExpressThawTM ExpressChillTM
13

Climate Control Drawer
Built-In Refrigerators
Climate
Control
chart
NOTE: Results may vary depending on packaging, starting temperature and other food traits.
CITRUS [] 15 MIN [] 0.5 LBS []
PRODUCE [] TEMP 3O MIN [] CHILL 1.s LBS [] THAW
MEAT [] 45 MIN [] 3 LBS []
Citrus Settinq {39-47°F)
Oranges, Lemons,Limes,
Pineapple,Cantaloupe
Beans,Cucumbers,Tomatoes,
SELECT EXPRESS EXPRESS
15 Minutes
e
i BeverageCan (12oz)
e
2 SmallJuice Boxes
(6-8 oz each)
, Individually Wrapped
0.5 Lbs.(4 hours}
FiletMignon (0.5Ib)
Hamburger Patties (0.5 Ib)
Peppers,Eggplant,Squash
Produce Settinq {31-38°F)
Strawberries, Raspberries,
Kiwifruit, Pears,Cherries,
Blackberries,Grapes,Plums,
Nectarines,Apples
Asparagus,Broccoli,Corn,
Mushrooms, Spinach,
Cauliflower, Kale,Green
Onions,Beets,Onions
Meat Settinq {27-37°F)
Raw Meat, Fish and Poultry
30 Minutes
, Wine (750 ml bottle)
, 2to 6 Beverage Cans
(12ozeach)
2 Plastic20 oz Bottles
of Beverage
/4to 6 SmallJuice Boxes
(6-8 oz each)
3 FoilJuice Packets
45 Minutes
, 2 Literof Beverage
, Chicken Breasts(1.5Ibs)
, Ground Beef(1.5 Ibs)
, Steak(1.5 Ibs)
, Chicken Breasts(3.0Ibs)
, Steak(3.01bs)
1.5Lbs.(8 hours}
3.0 Lbs.(12 hours}
Ground Beef (3.0Ibs)
, 1/2 Gallon of Juice
, Gelatin-1 package
Control
lock
14
Control Lock
Press and hold this pad for :3seconds to lock
the settings for the Climate Control drawer.
To unlock, press and hold for another 3 seconds.
CONTROL
[]
LOCK

Storage Pans and Climate Control Drawer
Built-In Refrigerators
Sealed
deli pan
Sealed
produce
pans
Use the Sealed Dell Pan for the convenient
storage of lunch meats and cheese, hors
d'oeuvres, spreads and snacks. The pan and
shelf to which it is attached can be adjusted
to any height.
Excess water that may accumulate in the
bottom of the drawers should be emptied and
the drawers wiped dry.
Thetop pan is designed to provide constant high
humidity levels.
Make sure the drawers are closed completely
to maintain the correct humidity level.
Excess water that may accumulate in the
bottom of the drawers should be emptied and
the drawers wiped dry.
Drawer
and pan
removal
To remove a drawer or pan:
1. Pullthe pan out to the stop position.
2. Lift the front of the pan up and out of
the wire holder.
3. Lift the back of the pan up and out.
To replace a pan:
1. Placethe back of the pan in the wire
holder, making sure the wire holder fits
into the grooves on the back of the pan.
.
Lower the front of the pan into the wire holder.
3.
Pressfirmly on the top of the pan to snap it
into the wire holder.
15
Drop Down Shelf and Lighted Drawer Cover
Built-In Refrigerators
Drop down
shelf
Lighted
vegetable
drawer
shelf
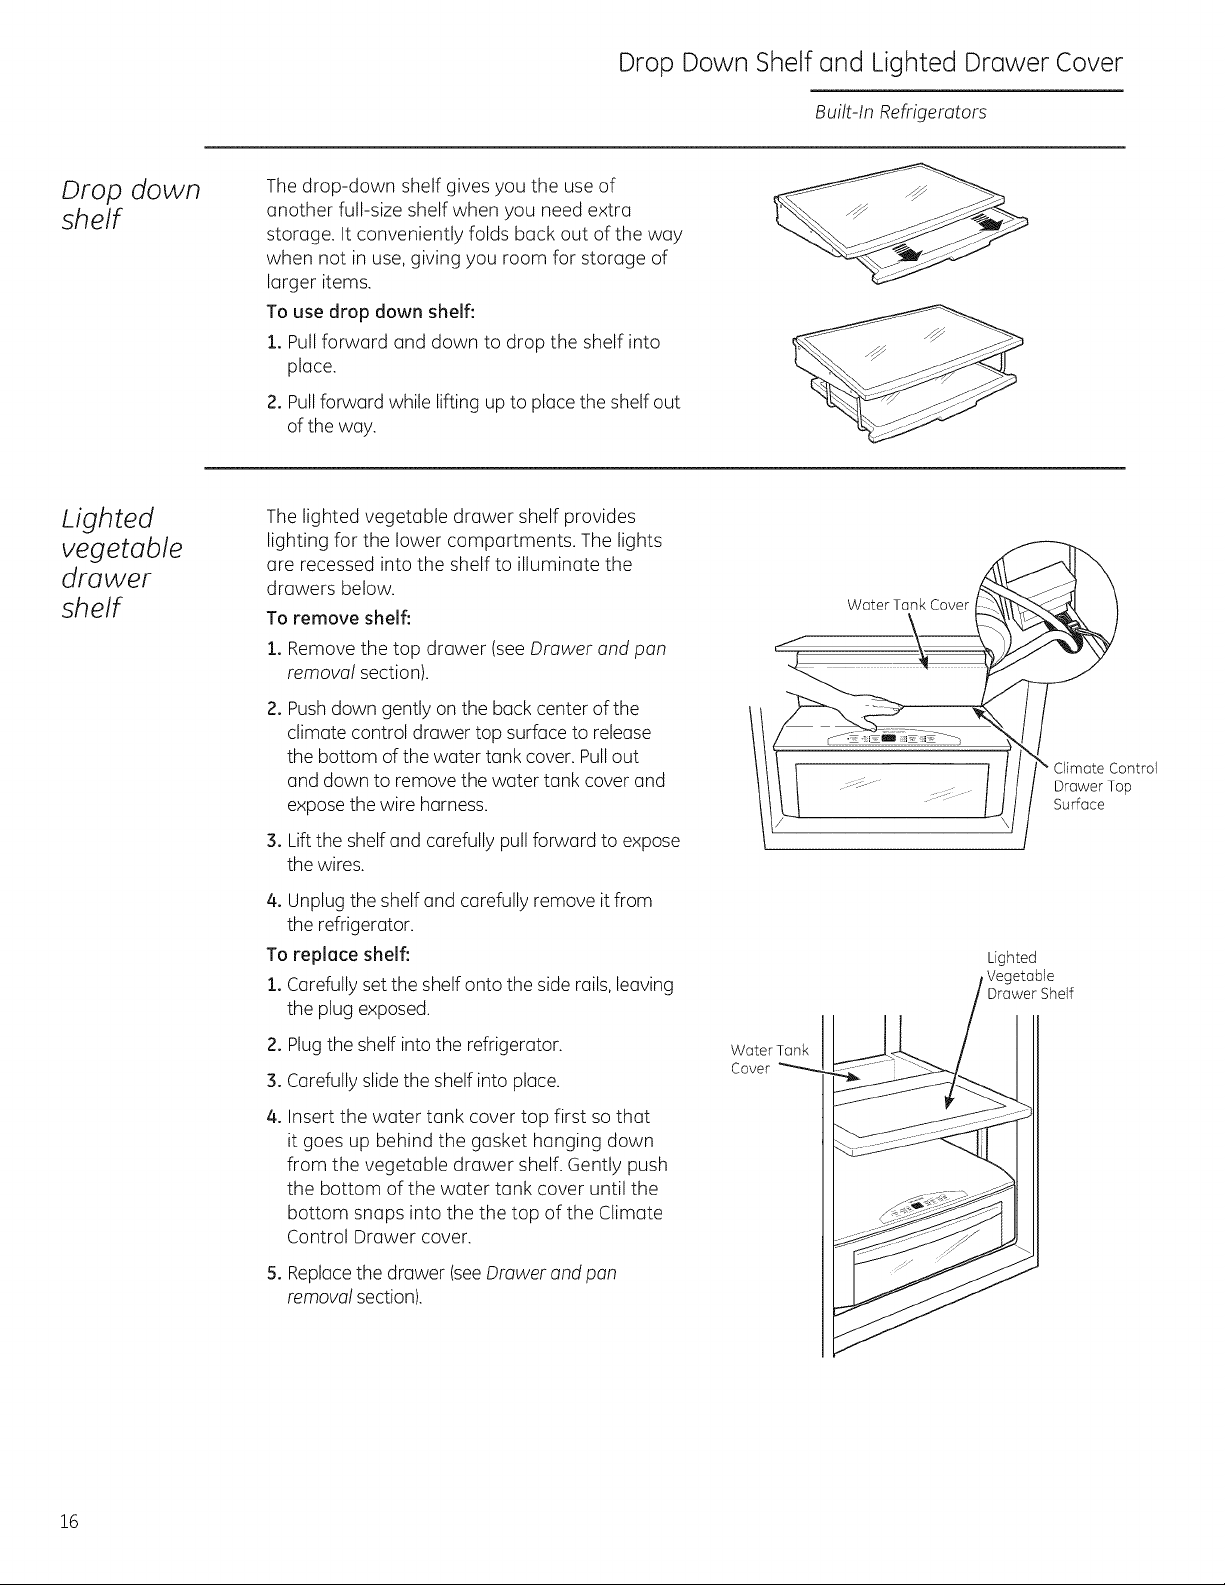
The drop-down shelf gives you the use of
another full-size shelf when you need extra
storage. It conveniently folds back out of the way
when not in use,giving you room for storage of
larger items.
To use drop down shelf:
1. Pullforward and down to drop the shelf into
place.
2. Pullforward while lifting up to place the shelf out
of the way.
The lighted vegetable drawer shelf provides
lighting for the lower compartments. The lights
are recessed into the shelf to illuminate the
drawers below.
To remove shelf."
1. Remove the top drawer (seeDrawer and pan
removal section).
.
Pushdown gently onthe back center of the
climate control drawer top surface to release
the bottom of the water tank cover. Pullout
and down to remove the water tank cover and
expose the wire harness.
.
Liftthe shelf and carefully pull forward to expose
the wires.
Water Tank Cover
Climate Control
Drawer Top
Surface
4. Unplugthe shelf and carefully remove it from
the refrigerator.
To replace shelf."
1. Carefully set the shelf onto the side rails, leaving
the plug exposed.
.
Plugthe shelf into the refrigerator.
3.
Carefully slidethe shelf into place.
4.
Insert the water tank cover top first so that
it goes up behind the gasket hanging down
from the vegetable drawer shelf. Gently push
the bottom of the water tank cover until the
bottom snaps into the the top of the Climate
Control Drawer cover.
E Replacethe drawer (seeDrawer and pan
removal section).
Lighted
Vegetable
Drawer Shelf
Water Tank
Cover
16

Shelves and Bins
Built-In Refrigerators
How to
rearrange
your shelves
Door bins
Tempered glass shelves in the fresh food
compartment and wire shelves in the freezer
compartment are adjustable, enabling you to
make efficient shelf arrangements to fit your
family's food storage needs.
To remove shelves:
Tilt shelf up at front, then lift it up and out
of trucks on rear well of refrigerator.
I I
All door bins, except for the deep gallon door bin,
are adjustable using one of 2 tabs on each end
of the bin. They can be moved up and down to
many different positions to meet your storage
needs. The deep gallon door bin can be removed
for cleaning.
To replace shelves:
Select desired shelf height. With shelf front
raised slightly, engage top lugs in tracks at rear
of cabinet. Then lower front of shelf until it locks
into position.
Do not cleanglass shelvesor
coverswith warm water when they are cold. Glass
shelves and covers may break if exposed to sudden
temperature changes or impact, such as bumping or
dropping. Tempered glass is designed to shatter into
many small pieces if it breaks.
nettoyez pas les clayettes ou les
couvercles en verre avec de I'eau ti@dequand ceux-ci
sont froids. Lesclayettes et couvercles en verre peuvent
secasser s'ils sont expos@s_ des changements soudains
de temp@ature ou sivous lescognez ou lesfaites
tomber. Leverre tremp@est conqu pour se briser en
petits morceaux en cas de casse.
Adj
Door Bin
To remove any bin:
Lift the bin up and slide it toward you.
17

Shelves and Bins
Built-In Refrigerators
Freezer
baskets
Sabbath
Mode
Product Kit
(available at
extra cost)
Wire slide-out freezer baskets can be pulled out
for easy access to frozen foods.
To remove:
Pull basket out. Lift the front of the basket up
and then take it out.
The Sabbath Mode Product Kit was designed
for use on the Jewish Sabbath and Holidays.
The Sabbath Mode feature makes it possible for
observant Jews to refrigerate and freeze food
during the duration of the holiday.
The Sabbath Mode feature can be set to override
typical reactions to actions in your refrigerator.
While in the Sabbath Mode, your refrigerator will
still operate normally. However, the refrigerator
will not respond to your actions.
While in the Sabbath Mode, you may notice the
fun running when the door is opened; however,
this is not u result of your actions. The fun will
operate at random times. The defrost heater
will continue to defrost the refrigerator and
freezer and will be activated on a timer. The
defrost heater will not defrost as a result of door
openings or any consumer actions.
ON/OFF--To activate, raise the top grille panel
and set the Sabbath Mode switch to the ON
position. A green LEDlight will be visible below
the Sabbath Mode Kit switch. The light will be
visible when the grille isclosed between the grille
door and compartment doors.
DISPLAYS,ALARMSend LIGHTS--The main
temperature control and Express Chill displays
will be deactivated; therefore they will not be lit,
sound a tone or operate when touched. Door
alarms and lights will be disabled.
ICEend WATERDISPENSER--Theproximity
sensor and dispenser touch sensor icons will
not operate. Ice or water cannot be retrieved
from the dispenser.
ICEMAKER--Theicemaker will continue to
operate. The icemaker can be disabled by
opening the freezer, opening the ice storage bin
door and setting the icemaker power switch to
the OFF position (seeAutomatic Icemaker). To
obtain ice, open the freezer door and remove the
cubed ice from the ice bin.
This Sabbath Mode Product Kitcan be purchased
from your local appliance dealer. TheZSAB1Kit is
designed for use with all Monogram Built-In Side-
by-Side Refrigerators manufactured after 2008.
To locate your nearest dealer, visit our web site
monogram.cam or call 1.800.626.2000.In Canada,
call 1.800.561.3344. Order Kit# ZSAB1.
NOTE:The Sabbath Mode Product Kit must be
installed by a qualified service technician.
18

Care and Cleaning
Built-In Refrigerators
Cleaning
outside
The dispenser spill shelf
and the area beneath
it should be cleaned
periodically with a mild
liquid dish detergent.
Dispenser cradle--Before cleaning, lock the
dispenser by touching CONTROLLOCK for
3 seconds to prevent activating the dispenser.
Clean with warm water and a mild liquid dish
detergent. Rinse thoroughly and wipe dry. Unlock
the dispenser by touching CONTROLLOCKfor 3
seconds.
Do not use chemical cleaners to clean
the dispenser or any part of the dispenser.
Door handles and trim-Clean with a cloth
dampened with soapy water. Dry with a soft
cloth.
Keep the outside clean. Wipe with a clean cloth
lightly dampened with mild liquid dish detergent.
Dry with a clean, soft cloth.
/f .......\ J-----_ \
0000000
0000000
OOO0000
Do not wipe the refrigerator with a soiled dish
cloth or wet towel. These may leave a residue
that can damage the finish. Do not use scouring
pads, powdered cleaners, bleach or cleaners
containing bleach because these products can
scratch and damage the finish.
Stainless steel--Regularly clean and polish the
stainless steel door panels and handles (on some
models) with a commercially available stainless
steel cleaner such as Stainless Steel MagicTM to
preserve and protect the fine finish. Stainless
Steel Magic and the Monogram polishing cloth
are available through GE Parts andAccessories,
800.626.2002,or monogram.com. For Stainless
Steel Magic, order part number WX10X15. For
Monogram polishing cloth, order part number
WX72X10001.
Do not use appliance wax or polish on the
stainless steel.
Cleaning
inside
To help prevent odors, leave
an open box of baking soda in
the unit.
Turn off power at the circuit
breaker or fuse box before
cleaning. If this is not practical,
wring excess moisture out of
sponge or cloth when cleaning around switches,
lights or controls.
Use warm water and baking soda solution-
about a tablespoon (15 ml) of baking soda to
a quart (1 liter) of water. This both cleans and
neutralizes odors. Thoroughly rinse and wipe dry.
Other parts of the refrigerator-including
door gaskets, meat and vegetable drawers, ice
storage bin and all plastic parts-can be cleaned
the same way. After cleaning the door gaskets,
apply a thin layer of petroleum jelly to the door
gaskets sealing surface on the hinge side.
This helps keep the gaskets from sticking and
bending out of shape.
Do not wash any plastic refrigerator parts
in the dishwasher.
Avoid cleaning cold glass shelves with hot
water because the extreme temperature
difference may cause them to break. Handle
glass shelves carefully. Rough handling of
tempered glass can cause it to shatter.
NOTE:Interior lights may get too hot and turn off
automatically if the refrigerator door is left open
too long. This is normal and they will turn back
on when they cool down.
19

Care and Cleaning
Built-In Refrigerators
Light bulb
replacement
Halogen lights generate
intense heat. Becertain power is off and lamps
have sufficient time to cool before attempting
to replace.
Power to the lamps can be turned off at
the Master Light switch located behind
the grille panel at the top of the refrigerator.
There isa switch for the freezer and a switch
for the fresh food compartment.
Turning the temperature control to OFF
does NOT remove power to the light circuits.
Les ampoules halog@nesproduisent une chaleur
intense. Assurez-vous de bien couper le courant
et de laisser suffisamment de temps aux
ampoules pour leur permettre de se refroidir
avant d'essayer de les remplacer.
Vous pouvez couper le courant en utilisant
le commutateur de lumi@e principale situ6
derri@e le panneau grillag6 en haut du
r6frig@ateur. IIy a un commutateur pour le
compartiment cong61ateur et un commutateur
pour le compartiment r6frig@ateur.
Light
Columns
Bulbs
Vous NE COUPEZPASI'alimentation 61ectrique
du r6frig@ateur des circuits de lumi@es en
mettant le bouton de contr61e de temp@ature
en position OFF (arr_t).
The refrigerator uses a halogen bulb:
The columns along the back wall
of the fresh food and freezer compartments
are lit up by lamps located behind the top pan
in the fresh food compartment and the bottom
basket in the freezer compartment.
These bulbs have a life expectancy of
about 2000 hours. However, if the bulbs
do need to be replaced, they can be
purchased at hardware, general retail
and home improvement stores or through
GEParts and Accessories, 800.626.2002.
This is a SSwatt, 12 volt,
Type MRll bulb.
If ordering through
GEParts and Accessories,
order part WR02Xll183.
20

Care and Cleaning
Built-In Refrigerators
Using
the Master
Light switches
Halogen bulb
replacement
This feature turns off the lights in the fresh food
and freezer compartments.
The switches are located behind the grille panel
at the top of the refrigerator. Lift up the panel
to access the switches.
NOTE:Before replacing the bulbs, review
the light bulb information and WARNING.
Replacing bulbs located in lamps behind
the top pan in the fresh food compartment
and the bottom freezer basket in the freezer
compartment:
Set the Master Light switches to the
OFF position (see Using the Master Light
switches) and allow the lamps to cool.
2_
To access the lamps in the fresh food
compartment, remove the vegetable drawer,
water tank cover and lighted vegetable
drawer cover. See Drawer and Pan Removal
and Lighted Vegetable Drawer Cover sections.
To access the lamps in the freezer
compartment, remove the bottom freezer
basket. SeeFreezer Baskets section.
3. The lamps are hidden by a metal clip.
Grasp the clip and pull toward you to expose
the bulbs.
NOTE:Always follow bulb manufacturer's
directions for handling and replacing bulbs.
4. Remove the bulb by holding the base and
pulling straight up. Replace with a new bulb.
Fresh Food and Freezer
Master Light Switches
t t
_ Metal Clip
5_
Replace the metal clip by inserting the clip
behind the front smaller tabs, with the larger
tabs behind the clip. Press down gently on
the shield until the tops of the larger tabs slip
into the slots on the shield.
6_
Replace the lighted vegetable drawer cover
and water tank cover (see Lighted Vegetable
Drawer Cover section). Replace the vegetable
drawer (seeDrawer and Pan Removal section).
7. Resetthe Master Light switches to the ON
position.
NOTE:The metal clip must be replaced or
the heat from the bulb could damage the
refrigerator.
21

Care and Cleaning
Built-In Refrigerators
Preparing
for vacation
For long vacations or absences, remove food
and shut off power to the refrigerator at the fuse
box or circuit breaker. Clean the interior (see
Cleaning Inside).Leave doors open.
For shorter vacations, remove perishable foods
and leave controls at regular settings. However, if
the room temperature is expected to drop below
60°F(Z6°C),follow the same instructions as for
long vacations.
Set the Jcemaker power switch to the OFF
position and be sure to shut off the water supply
to the refrigerator.
22

The Problem Solver
Built-In Refrigerators
Questions?
Use this
problem
solver!
PROBLEM POSSIBLE CAUSE
REFRIGERATOR
DOES NOT OPERATE
. MGy be in defrost cycle when compressor does not operGte for Gbout
30 minutes.
. TemperGture control set GtOFF.
. If interior light is not on, refrigerGtor mGy not be plugged in Gt
wGIIoutlet.
. Thefuse isblown/circuit breGker is tripped. ReplGcefuse or reset
the breGker.
. The SGbbGthMode Kit mGy be instGIledGnd operGting. Turn off
the SGbbGthMode device.
MOTOR OPERATES
FOR LONG PERIODS
OR CYCLES ON AND
OFF FREQUENTLY
. NormGI when refrigerGtor isfirst plugged in. WGit 24 hours for
the refrigerGtor to completely cool down.
. The new vGriGblespeed compressor is designed to run for longer
periods of time to optimize efficiency Gnd noise. You mGynotice
the compressor ond/or fGnspeeds GccelerGtebGsedupon door
(Modern refrigerators
with more storage
space end e larger
freezer require
more operating time.
They start and stop
often to maintain
even temperatures.)
openings Gnd/or increGsed food loads.
. You mGyhear the fGns spinning Gthigh speeds. This happens when
the refrigerGtor is first plugged in, when the doors Gre opened
frequently or when GIGrgeGmount of food is Gddedto the
refrigerGtor or freezer compGrtments. The fGnsGrehelping to
maintain the correct temperatures.
. Door left open or package holding door open.
. If either door is open for over 3 minutes, you may hear the fans
come on in order to cool the light.
. Hot weather or frequent door openings. This is normal.
. Temperature controls set at the coldest setting. See Temperature
Controls.
OPERATING
SOUNDS
. Thevariable speed compressor changes speeds and sounds
may vary.
. Normal fan air flow-one fan blows cold air through the
fresh food and freezer compartments-another fan cools
the compressor motor.
. Thefans change speeds in order to provide optimal cooling and
energy savings.
. These NORMALsounds will also be heard from time to time:
- You may hear a whooshing or gurgling sound when the doors close.
This is due to pressure equalizing within the refrigerator.
- A water dripping noise may occur during the defrost cycle as ice
melts from the evaporator and flows into the drain pan.
- The flow of refrigerant through the freezer cooling coils may make
a gurgling noise like boiling water.
- Water dropping on the defrost heater can cause a sizzling, popping
or buzzing sound during the defrost cycle.
- You may hear cracking or popping sounds when the refrigerator
is first plugged in or during/after the defrost cycle. This happens as
the refrigerator cools to the correct temperature.
- Electronic dampers click open and closed to provide optimal cooling
and energy savings.
- The compressor may cause a clicking or chirping sound when
attempting to restart (this could take up to 5 minutes).
- The electronic control board may cause a clicking sound when relays
activate to control refrigerator components.
- Ice cubes dropping into the bin and water running in pipes
as icemaker refills.
- The icemaker water valve will buzz when the icemaker fills
with water.
23

The Problem Solver
Built-In Refrigerators
Questions?
Use this
problem
solver!
PROBLEM POSSIBLE CAUSE
DOOR NOT CLOSING
PROPERLY
. Package may be holding door open.
. Check the door gasket; it may be out of position.
, Refrigerator is not level.SeeInstallation Instructions.
ACTUAL
TEMPERATURE
NOT EQUAL TO SET
TEMPERATURE
, Refrigerator just plugged in.Allow 24 hours for system to stabilize.
, Door open for too long. Allow 24 hours for system to stabilize.
, Warm food added to refrigerator. Allow 24 hours for system
to stabilize.
, Defrost cycle is in process. Allow 24 hours for system to stabilize.
VIBRATIONOR
, Refrigerator may not be properly installed.
RATTLING
{Slight vibration
is normal.)
FRESH FOOD
OR FREEZER
COMPARTMENT
TOO WARM
. Temperature controls not set cold enough. See Temperature Controls.
, Warm weather or frequent door openings.
, Door left open for long time.
, Package may be holding door open.
FROST OR ICE
CRYSTALS ON
FROZEN FOOD
{Frost within package
is normal.)
SLOW ICE CUBE
FREEZING
, Door left open or package holding door open.
, Too frequent or too long door openings.
. Door may have been left open.
, Freezer compartment istoo warm. Set the freezer to a colder
temperature.
24
ICE HAS
ODOR/TASTE
AUTOMATIC
ICEMAKER
DOES NOT WORK
MOISTURE FORMS
ON CABINET
SURFACE BETWEEN
THE DOORS
, Packages may be holding door open.
, Old cubes need to be discarded.
, Ice storage bin needs to be emptied and washed.
, Unsealed packages in freezer and fresh food compartments may
be transmitting odor/taste to ice.
, Keepopen box of baking soda in refrigerator; replace every 3 months.
, Poor-tasting incoming water. Replace water filter.
, Icemaker power switch is in the OFF position.
, Water supply turned off or not connected.
, Freezer compartment too warm.
, Piled up cubes in storage bin may cause icemaker to shut off
too soon. Level cubes in bin.
, Not unusual during periods of high humidity. Wipe surface dry.
, Controlling humidity and temperature in the kitchen with air
conditioning will eliminate this condition.

The Problem Solver
Built-In Refrigerators
Questions?
Use this
problem
solver!
PROBLEM POSSIBLE CAUSE
MOISTURE
COLLECTS INSIDE
. Too frequent or long door openings.
In humid weather, air carries moisture into refrigerator when doors
are opened.
Controlling humidity and temperature in the kitchen with air
conditioning will eliminate this condition.
REFRIGERATOR
HAS ODOR
Foods with strong odors should be tightly covered.
Check for spoiled food.
Interior needs cleaning. See Care and Cleaning.
Keep open box of baking soda in refrigerator; replace every
3 months.
INTERIOR LIGHT
DOES NOT WORK
No power at outlet.
Light bulb needs replacing. See Care and Cleaning.
Master Light switch is in the OFFposition.
The refrigerator is equipped with a safety feature that turns off
the refrigerator lights when the doors have been opened for an
extended period. Once the refrigerator doors are closed and the lights
have had time to cool,they will again come on automatically when
the doors are opened.
SMALL OR
HOLLOW CUBES
Water filter clogged. Replace the filter or use the filter bypass plug.
Check for a connection to a Reverse Osmosis water system.
If an ROis connected, remove the water filter and install the
original bypass plug that came with the unit.
WATER ON
THE FLOOR
If you use an extra tall glass or pitcher, or overfill a glass or pitcher,
you may bejamming the cubes in the funnel chute. They can fuse
inside the chute and drop out later, leaving water or ice on the floor.
UNEVEN SPACING
OR GAPS BETWEEN
DOORS AND
KITCHEN CABINET
POOR DOOR
ALIGNMENT OR
ONE DOOR HIGHER
THAN THE OTHER
Kitchen cabinets are not level or square. Call the installer or
cabinetmaker.
. Fresh food door needs adjusting. SeeInstallation Instructions.
. Refrigerator is not level. SeeAttention Installer Instructions.
WATERHASPOOR . Water dispenser has not been used for a long time. Dispense water
TASTEORODOR until all water in system is replenished.
WATER IN FIRST
GLASS IS WARM
. Normal when refrigerator isfirst installed. Wait 24 hours for the
refrigerator to completely cool down.
. Water dispenser has not been used for a long time. Dispense water
until all water in system is replenished.
. Water system has been drained. Allow several hours for replenished
supply to chill.
25

The Problem Solver
Built-In Refrigerators
Questions?
Use this
problem
solver!
PROBLEM POSSIBLECAUSE
WATER DISPENSER
DOES NOT WORK
e
Water supply line turned off, restricted or not connected. Call your
installer for proper water supply line connection.
. Water filter clogged. Replace the filter or use the filter bypass plug.
. The CONTROL LOCKon the dispenser has been activated.
To unlock the dispenser, touch CONTROL LOCKfor 3 seconds.
. Air may be trapped in system. Press the dispenser arm for at least
2 minutes.
ICE DISPENSER
DOES NOT WORK
. Ice bin improperly installed. SeeIce storage bin.
. Icemaker turned off or water supply turned off. Turn on icemaker
or water supply.
. Ice cubes are frozen to the icemaker feeler arm. Remove cubes.
. Irregular ice clumps in storage bin. Break up with fingertip pressure
and discard remaining clumps.
. Freezer may be too warm. Adjust freezer control to a colder setting,
one position at a time, until clumps do not form.
. Water filter clogged. Replace the filter or use the filter bypass plug.
. The CONTROLLOCKon the dispenser has been activated.
To unlock the dispenser, touch CONTROLLOCKfor 3 seconds.
WATER SPURTING
FROM DISPENSER
NO WATER OR ICE
PRODUCTION
. Newly installed filter cartridge. Run water from the dispenser for
1 1/2 gallons (3 mins).
. Water supply line turned off, restricted or not connected. Callyour
installer for proper water supply line connection.
CUBED ICE WAS
SELECTED BUT
CRUSHED ICE
WAS DISPENSED
FOOD IS NOT
THAWING/CHILLING
IN CLIMATE
CONTROL DRAWER
SELECT TEMP
FEATURE ON
CLIMATE CONTROL
DRAWER IS NOT
WORKING
CLIMATE CONTROL
DRAWER CONTROLS
DO NOT WORK
. Water filter clogged. Replace the filter or use the filter bypass plug.
. Last setting was CRUSHEDICE.A few cubes were left in the crusher
from the previous setting. This is normal.
. If continual crushed ice is dispensed while cubed ice is selected,
adjust ice bin. SeeIce storage bin.
. Packaging. Increase time or re-package in plastic.
. Wrong weight selected. Select a larger weight.
. Item with high fat content. Select a larger weight.
. Fresh Food temperature control is set at warmest setting.
This is normal. In order to minimize energy usage, the Select Temp
feature is disabled when the Fresh Food control is set at the warmest
setting.
. Control Lock feature isactive. Pressand hold the CONTROLLOCK
pad on the Climate Control drawer for 3 seconds.
26

Performance Data Sheet
SmartWater TM Filtration System--GE MWF Cartridge
Performance Data Information
Capacity: 300 Gallons 11,135 Liters)
The concentration of the contaminants tested for this filter in water entering the system was reduced to
a concentration less than or equal to the permissible limit for water leaving the system as specified in
NSF/ANSI Standard 42 and Standard 55. System tested and certified by NSF International against NSF/
ANSI Standard 42 and Standard 53.
Please see geappliances.com For complete listing of the contaminants tested and the amounts reduced
The following pharmaceutical reduction claims have not been certified by NSFInternational or the state of California.
Claims tested and verified by independent laboratory:
I
N/A J-00121587
N/A J-00121587
N/A J-00121588
N/A J-00121589
N/A J-00121587
Reduction
Average Influent
978 ng/L
907 ng/l
885 ng/L
1097 ng/L
415 ng/L
Challenge Concentration
N/A
N/A
N/A
N/A
N/A
Reduction
99.5%
99./4%
94,1%
99,5%
99,5%
Average Product
Water
Concentration
S.0 ng/L
5./4ng/L
52.3 ng/L
5.0 ng/L
2.0 ng/L
HaxPermissible
ProductWater
Concentration
N/A
N/A
N/A
N/A
N/A
NSFReduction NSF
Requirements Test Report
Application Guidelines/Water Supply Parameters
Service Flow 0.5 gpm (21,9 Ipm) Water Pressure /40-120 psi (2.8-8.2 bar)
Water Supply Potable Water Water Temperature 33°F-100°F (0.6°C-38°C)
It is essential that the manufacturer's recommended installation, maintenance and filter replacement requirements be carried out for the product to perform as advertised.
See Installation Manual for Warranty information.
Note: While the testing was performed under standard laboratory conditions,
actual performance may vary.
Replacement Cartridge: MWR For estimated costs of replacement elements
please cull 1-800-626-2002 or visit our website at www.geupplioncepurts.com.
Z_WARNING
To reduce the risk associated with ingestion of contaminants:
• Do not use with water that is microbiologically unsafe or of unknown quality
without adequate disinfection before and after the system. Systems certified
for cyst reduction may be used on disinfected water that may contain filterable
cysts. EPA Establishment Number 10350-MN-005.
For conditions of use, health claims certified by the California Deportment of Public
Health, and replacements, see performance data sheet. California Department
of Public Health Certification #05-1698. The contaminants or other substances
removed or reduced by this water filter ore not necessarily inoil users' water.
Testedand certified by NSFInternational
against NSF/ANS Standard z_2a_ld
Standa_ 53in model GEP/WFfor the
reduction of the clairas specified on the
_E_LAC_MENT
performance data sheet¸
ELeMeNT
NOTICE
To reduce the risk associated with property damage due to water leakage:
• Read and follow use instructions before installation and use of this system.
• Installation and use MUST comply with oil state and local plumbing codes.
• Do not install ifwater pressure exceeds 120 psi (8.2 bur). If your water pressure
exceeds 80 psi, you must install a pressure-limiting valve. Contact u plumbing
professional ifyou are uncertain howto check your water pressure.
• Do not install where water hammer conditions may occur. If water hammer
conditions exist you must install a water hummer orrester. Contact o plumbing
professional ifyou are uncertain how to check for this condition.
• Do not install on hot water supply lines. The maximum operating water
temperature of this filter system is 1000 F(580 C).
• Protect filter from freezing. Drain filter when temperatures drop
below 33°F(0.6°C1.
• The disposoble filter cartridge must be replaced every 6 months at the
rated capacity, or sooner if u noticeable reduction in flow rote occurs.
27

Consumer Services
Built-In Refrigerators
With the purchase of your new Monogram appliance,
receive the assurance that if you ever need information
or assistance from GE, we will be there. All you have to
do is callI
GE Answer
Center®
In the USA:
800.626.2000
In-Home Repair
Service
In the USA:
800.444.1845
In Canada:
1.800.561.3344
For Customers
With Special
Needs...
In the USA:
800.626.2000
Whatever your question about any Monogram major appliance, GEAnswer Center®
information service is available to help. Your call-and your question-will be answered
promptly and courteously. Call the GEAnswer Center®Monday to Friday, 8 a.m. to
!0 p.m. EST,and Saturday, 8 a.m. to 7. p.m. EST.
OR
Visit our Website at: monogram.cam
In Canada, call 1.800.561.3344.
AGE consumer service professional will provide expert repair service, scheduled at a time
that's convenient for you. To schedule service, call Monday to Friday, 7 a.m. to !0 p.m. EST,
or Saturday and Sunday, 8 a.m. to 6 p.m. EST.Many GEConsumer Service company-operated
locations offer you service today or tomorrow, or at your convenience. Our factory-trained
technicians know your appliance inside and out-so most repairs can be handled injust one
visit.
In Canada: Monday to Friday, 7 a.m. to 8 p.m., and Saturday, 8 a.m. to 5 p.m. EDST.
............i] / /lit ....
_::.........._i_.:,o+_
GEoffers Braille controls for a variety of GEappliances, and a brochure
to assist in planning a barrier-free kitchen for persons with limited
mobility.
Consumers with impaired hearing or speechwho have accessto a TDD
or a conventional teletypewriter may call 800.TDD.GEAC(800.833./4322)
to request information or service.
Service Contracts
In theUSA:
800.626.2224
In Canada:
1.800.561.3344
Parts and
Accessories
In the USA:
800.626.2002
In Canada:
1.800.561.3344
28
S_CT,ON
You can have the secure feeling that GEConsumer Service will still be there after your warranty
expires. Purchase a GEcontract while your warranty is still in effect and you'll
receive a substantial discount. With a multiple-year contract, you're assured of future service
at today's prices.
Individuals qualified to service their own appliances can have parts or accessories sent
directly to their home. The GEparts system provides access to over 47,000 parts...and all
GEGenuine Renewal Parts are fully warranted. VISA,iVlasterCardand Discover cards
are accepted. Visit www.geappliances.com.
User maintenance instructions contained in this manual cover procedures intended
to be performed by any user. Other servicing generally should be referred to qualified
service personnel. Caution must be exercised, since improper servicing may cause unsafe
operation.

Notes
Built-In Refrigerators
29

Notes
Built-In Refrigerators
30
Notes
Built-In Refrigerators
31

Warranty
Built-In Refrigerators
YOUR MONOGRAM REFRIGERATOR WARRANTY
Staple sales slip or cancelled check here. Proof of original
purchase date is needed to obtain service under warranty.
WHA T IS
COVERED
From the Date
of the Original
Purchase
LIMITED TWO-YEAR WARRANTY
For two years from date of original purchase, we will provide, free of charge, parts and service labor in
your home to repair or replace any part of the refrigerator that fails because of a manufacturing defect.
LIMITED FIVE-YEAR WARRANTY
For five years from date of original purchase, we will provide, free of charge, parts and service labor
in your home to repair or replace anypart of the sealed refrigerating system (the compressor, condenser,
evaporator and all connecting tubing) that fails because of a manufacturing defect.
LIMITED ADDITIONAL SIXTH- THROUGH TWELFTH-YEAR WARRANTY ON THE SEALED SYSTEM
For the sixth through twelfth year from the date of the original purchase, we will provide, free of charge,
replacement parts for any part of the sealed refrigerating system (the compressor, condenser, evaporator and
all connecting tubing) that fails because of a manufacturing defect. You pay for the service trip to your home
and for service labor charges.
LIMITED THIRTY-DAY WARRANTY ON WATER FILTER CARTRIDGE (Water filter, if included}
From the date of the original purchase we will provide, free of charge, replacement parts for any part of
the water filter cartridge that fails because of a manufacturing defect. During this limited thirty-day warranty,
we will also provide, free of charge, a replacement water filter cartridge.
Q I • • • • ® ® I • • • • • • Q Q • • • ® ® Q Q • • • • ® • I • • • • • 0 I Q • • • • ® Q Q •
This warranty is extended to the original purchaser and any succeeding owner for products purchased for
ordinary home use in the 48 mainland states, Hawaii, Washington, D.C.or Canada. If the product is located
in an area where service by a GEAuthorized Servicer is not available, you may be responsible for a trip
charge or you may be required to bring the product to an Authorized GEService location for service.
In Alaska the warranty is the some except that it is LIMITEDbecause you must pay to ship the product
to the service shop or for the service technician's travel costs to your home.
All warranty service will be provided by our Factory Service Centers or by our authorized Customer Care_
servicers during normal working hours.
Should your appliance need service, during warranty period or beyond, in the USAcell 800.444.1845.
In Canada: 800.561.3344. Please have your serial number and model number available when calling for service.
WHAT IS NOT
COVERED
[49-60723-2
09-14 GE
Printed in the United States
006 I
• Service trips to your home to teach you how
to use the product.
Replacement of house fuses or resetting of circuit
breakers.
Damage to the product caused by accident, fire,
floods or acts of God.
Failure of the product if it is used for other than
its intended purpose or used commercially.
Damage caused after delivery.
• improper installation, delivery or maintenance.
If you have an installation problem, contact
your dealer or installer. You are responsible
for providing adequate electrical, plumbing
and other connecting facilities.
EXCLUSION OF IMPLIED WARRANTIES--Your sole and exclusive remedy is product repair as provided in
this Limited Warranty. Any implied warranties, including the implied warranties of merchantability or
fitness for a particular purpose, are limited to one year or the shortest period allowed by law.
Some states/provinces do not allow the exclusion or limitation of incidental or consequential damages,
sothe above limitation or exclusion may not apply to you. Thiswarranty gives you specific legal rights, and you
may also have other rights which vary from state to state/province to province. Toknow what your legal rights
are in your state/province, consult your local or state/provincial consumer affairs office or your state's Attorney
General.
Warrantor in USA:General Electric Company,
Louisville, KY40225
Warrantor in Canada: Mabe Canada Inc.
• Replacement of the light bulbs, if included,
or water filter cartridge, if included, other
than as noted above.
• Replacement of the water filter cartridge,
if included, due to water pressure that is outside
the specified operating range or due to excessive
sediment in the water supply.
• Loss of food due to spoilage (in the USAonly}.
• incidental or consequential damage caused
by possible defects with this appliance.
• Product not accessible to provide required
service.
• Damage caused by a non-GE brand water filter.
GE Consumer & Industrial
Appliances
General Electric Compang
Louisville, KY40225
GEApptiances.com
 Loading...