

Page 1
ZIC360NX
6"
Wall View
Electrical
Area
84-1/2" max
83-1/2" min
Finished
Opening
75" From
Floor to Bottom
of Electrical
Area
10"
5"
3 1/2"
5"
3 1/2"
24" Cutout Depth
35-1/2"
Finished Width
2-5/16"
Note: Icemaker
water connection
is at the front.
Cold Water
Supply
25"
Min. to
Wall
130°
130° Door Swing
23-7/8"
Behind
Frame
36-3/4"
90°
90° Door Swing
4" Min. to Wall
5" Min. for Professional Models
2-5/16"
75" From
Floor to Bottom
of Electrical
Area
84-1/2" max
83-1/2" min
Finished
Opening
71-1/2" Finished Width
Electrical
5"
3-1/2"
24" Cutout
Depth
Water Supply
Wall View
24-3/16"
26"
6"
10"
10"
Water Supply
26"
5"
3-1/2"
*84" From
Floor to
Top Frame
35"
Case Width
*83-1/2"
at
Rear
Case Depth:
25-3/8" Framed Models
25-3/4" Stainless Steel Models
Depth Including Handles:
26-7/8" Framed Models
27-3/4" Stainless Steel Models
36"
Frame to Frame Width
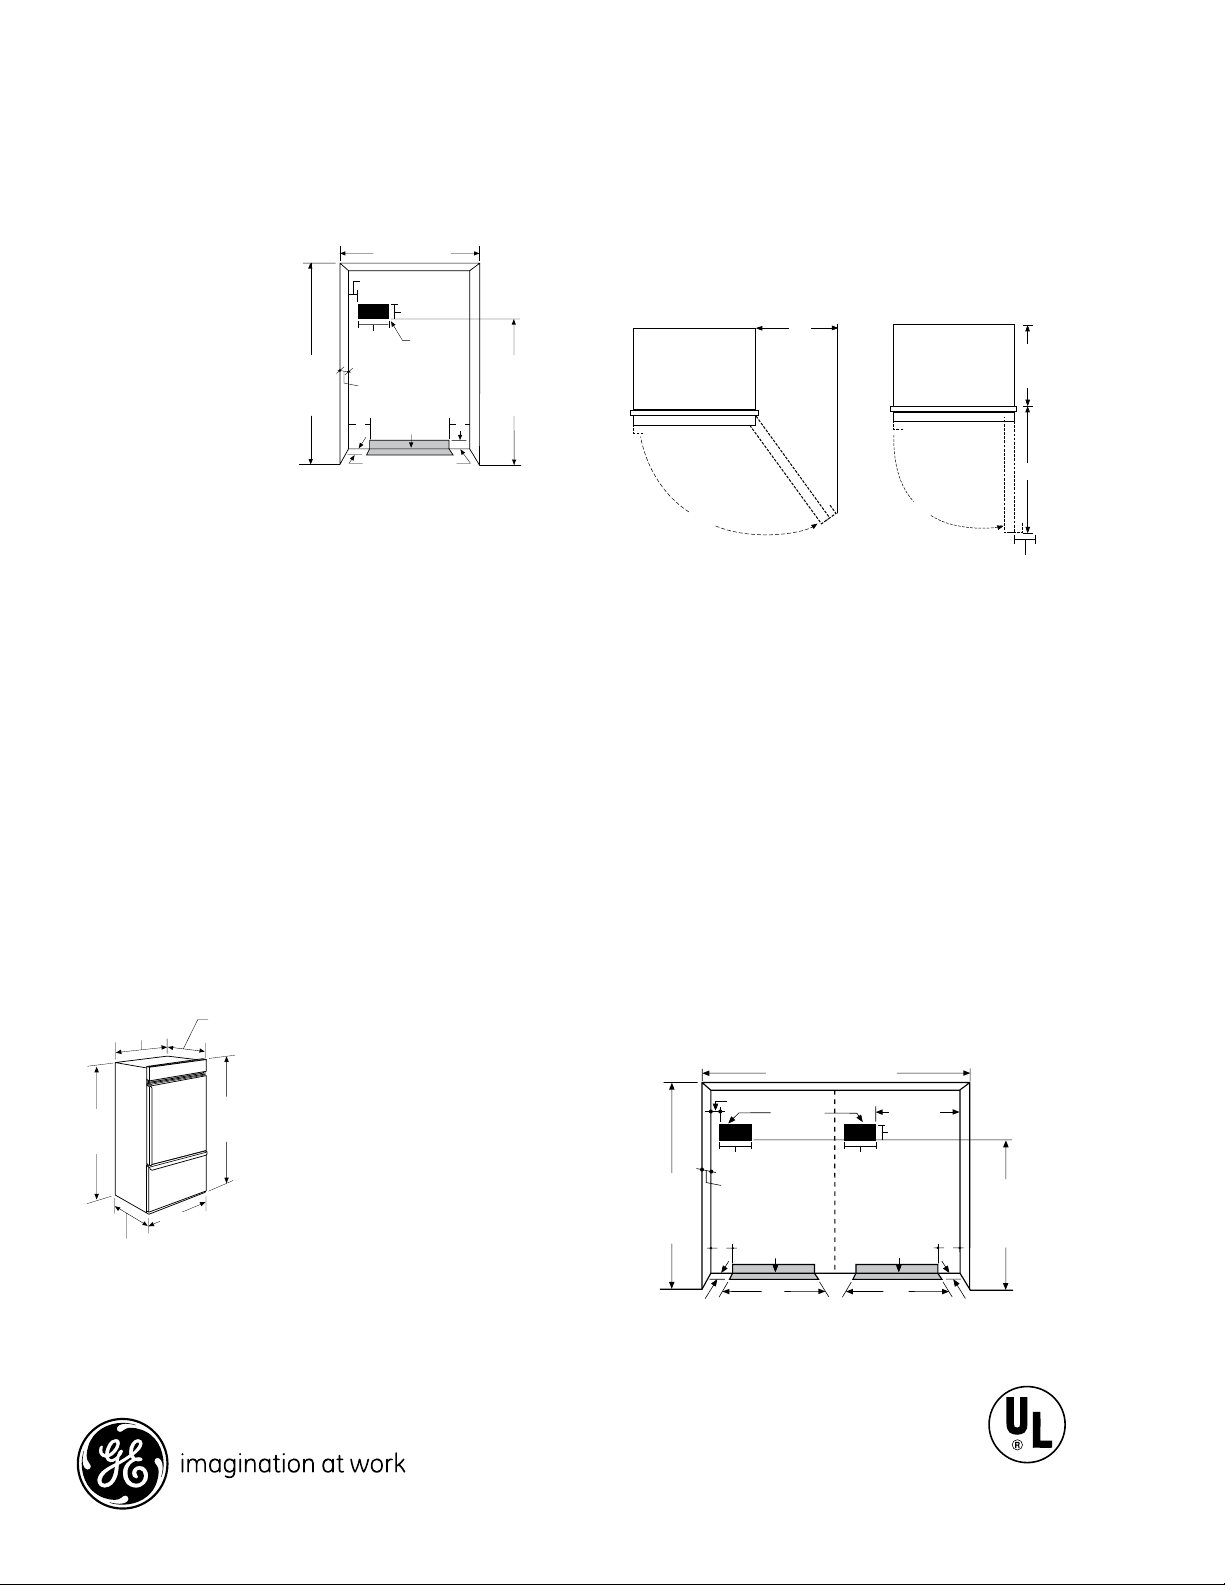
GE Monogram® 36" Built-In Side-by-Side Refrigerator
Dimensions and Installation Information (in inches)
The Installation Space
The finished cutout width
must be 35-1/2".
The cutout depth must be 24"
The refrigerator will project forward, slightly beyond adjacent
cabinetry, depending on your installation.
The cutout depth beneath a soffit
When installed beneath a soffit, the soffit cannot exceed the
24" installation depth shown. The top case trim overlaps the
bottom of the soffit.
Electrical
A 115V, 60Hz., 15 or 20 amp power supply is required. An
individual properly grounded branch circuit or circuit breaker
is recommended. Install a properly grounded 3-prong
electrical receptacle recessed into the back wall. Electrical
must be located on rear wall as shown.
Note: GFI (ground fault interrupter) is not recommended.
Water Line
All models are equipped with an automatic icemaker. The
water line can enter the opening through the floor or back
wall. Route GE SmartConnect™ Kit or 1/4" O.D. copper tubing
between the cold water line and the water connection
location at the front of the refrigerator. The installation of an
easily accessible shut-off valve in the water line is required.
Product Dimensions
Door Swing Clearances
The installation must allow for clearances to adjacent walls or
cabinets. These refrigerators are equipped with a 2-position
door stop. The factory-set 130° door swing can be adjusted to
90° if clearance to adjacent cabinets or walls is restricted.
Allow 25" minimum clearances for a full 130° door swing.
Allow 15" for pan removal.
• 4" minimum clearance is required when the door swing is
adjusted to 90°. If the 90° door stop position is used, pan
access is maintained, but pan removal is restricted.
• See door swing illustrations to determine interaction with
adjacent cabinets or countertops.
ZUG2, ZUGSS2 Unified Grille Panel Kit
• If you are installing two refrigerators side by side, the
installation space must be 71-1/2" wide.
Note: Additional cutout width may be required when side
panels are used. Add side panel thickness to the finished
cutout to calculate rough-in width.
• The water and electrical locations for each product must
be located as shown.
• A separate 115V, 60Hz., 15 or 20 amp power supply is
recommended for each product.
For answers to your Monogram,® GE Profile™ or
GE® appliance questions, visit our website at
ge.com or call GE Answer Center® service,
800.626.2000.
* Shipping Height. The
refrigerator can be adjusted to
fit into a cutout that is 83-1/2"
min. to 84-1/2" max. height. The
top case trim at the front is 1/2"
higher and will overlap upper
cabinetry or soffit. Use leveling
legs and wheels for a maximum
1" height adjustment.
Specification Created 6/08
Listed by
Underwriters
Laboratories
110112
Page 2
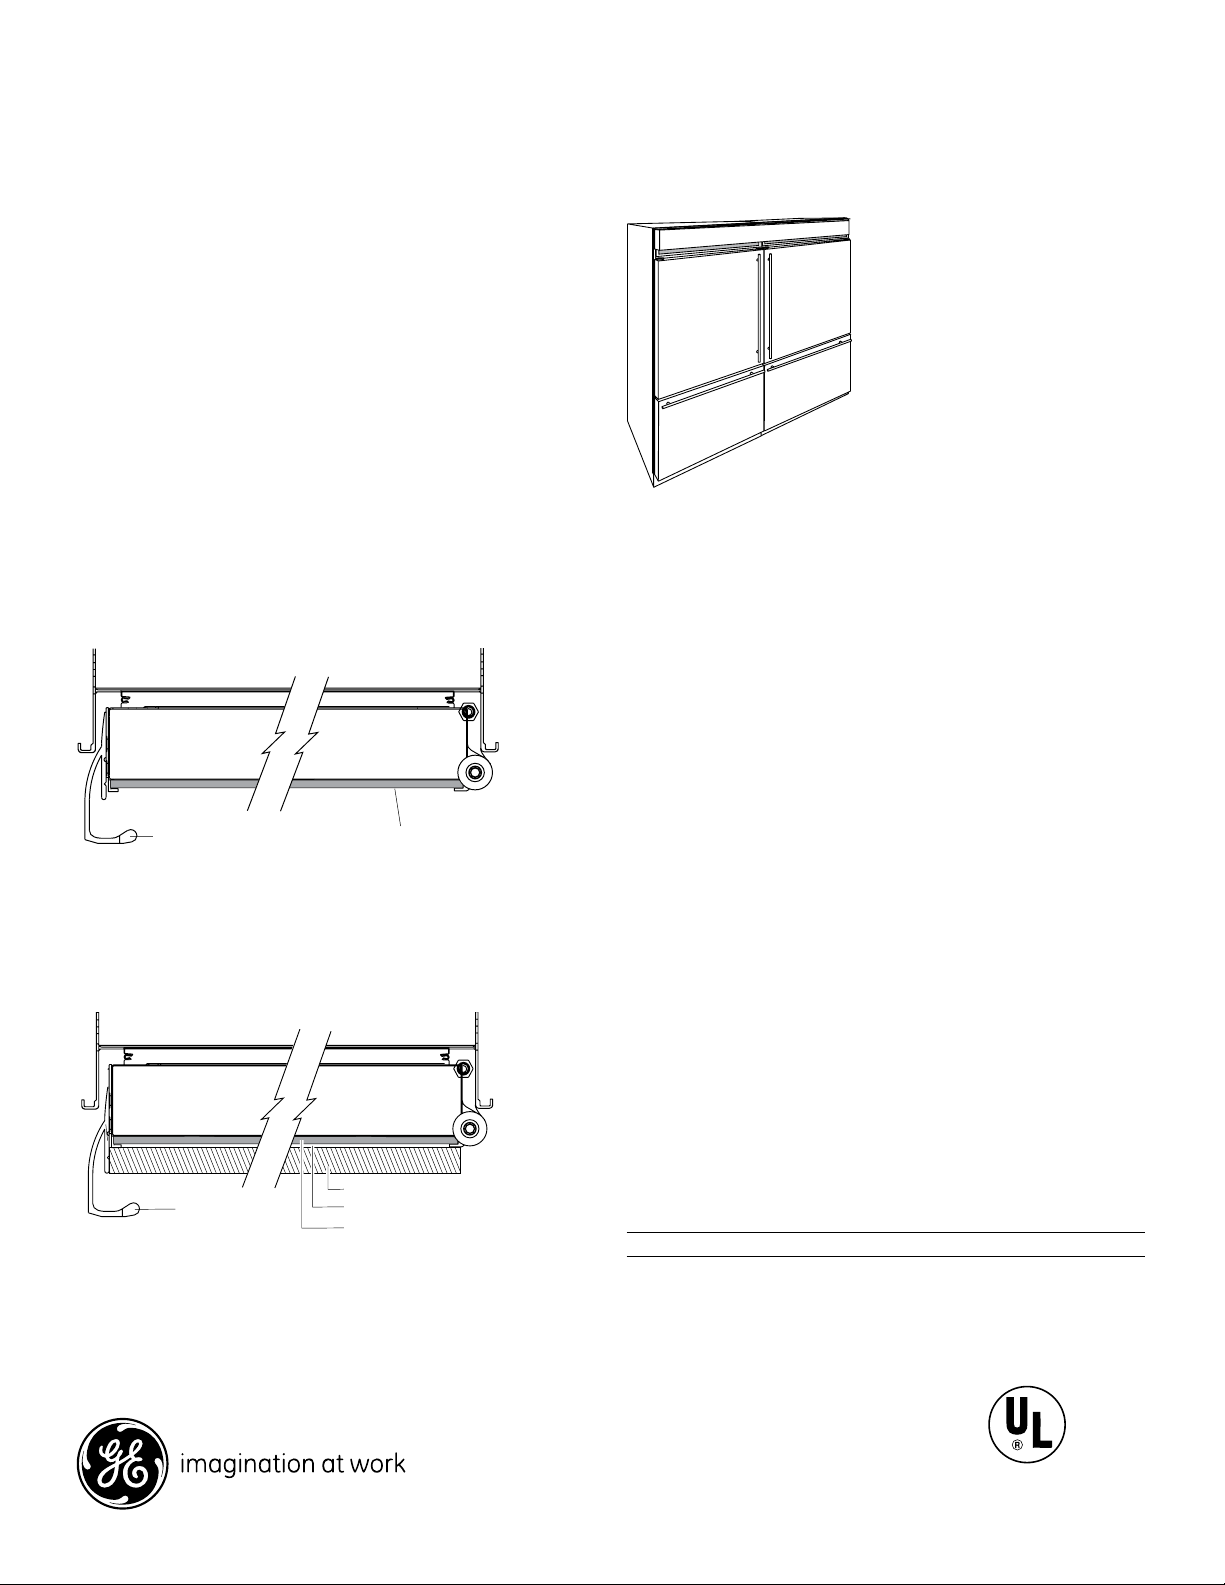
ZIC360NX
Standard Door Handle
Framed Panel
Standard
Door Handle
3/4" Overlay Panel
1/4" Thick Backer Panel
.10" Thick Spacer Panel
GE Monogram® 36" Built-In Side-by-Side Refrigerator
Dimensions and Installation Information (in inches)
Customization Basics: Framed or Overlay Panels,
Custom Handles and Accessory Kits
These bottom-freezer refrigerators are factory set for a left
or right door swing. The door swing is NOT reversible. Choose
an RH model with hinge on the right side; the door swings
left to right. Choose an LH model with hinge on the left side;
the door will swing right to left.
Trimmed Refrigerators
ZIC360NXLH, ZIC360NXRH
Trimmed refrigerators are designed to be customized with
decorative panels. Field-installed custom door and grille
panels are required.
Framed Panels
You may install 1/4"-thick custom panels from your cabinet
manufacturer. The decorative panel or accessory panel
slides into the factory-installed trim.
Standard supplied handles shown in 1/4" panel position.
Overlay Panels
You may also choose to install custom overlay panels from
your cabinet manufacturer. This design provides a seamless
appearance which integrates smoothly with surrounding
cabinetry.
Left-Hand
Door Swing
Door Handles
The supplied handles can be adjusted to accommodate both
framed or overlay panels. Custom handles of your choice,
supplied by your cabinetmaker, can also be installed. If
desired, you may order ZKHCSS2 Monogram® Stainless Steel
Tubular Handle Kit for overlay panels.
Side Panels
Side panels must be used whenever the sides of the
refrigerator will be exposed.
Optional Accessory Kits
ZKHCSS2: Monogram Stainless Steel Tubular Handle Kit and
Handle Side Trim for custom handles. For use on 3/4" custom
panels.
ZUG2: For side-by-side installation of two trimmed bottomfreezer refrigerators. This kit provides for the installation of
a unified custom grille panel to span the width of two units
using a framed or overlay panel.
ZUGSS2: For side-by-side installation of two stainless steelwrapped bottom-freezer refrigerators. This kit provides a
unified stainless steel grille panel to span the width of two
units.
Accessory Panels
Black acrylic and stainless steel accessory panels are
available from your Monogram supplier. Panels are cut to
size and ready to install. These panel kits must be ordered
separately.
Door Swing
Right-Hand
Standard supplied handles shown in 3/4" overlay panel position.
For answers to your Monogram,® GE Profile™ or
GE® appliance questions, visit our website at
ge.com or call GE Answer Center® service,
800.626.2000.
Black Stainless Steel
ZPBC360 ZPSC360
Specification Created 6/08
Listed by
Underwriters
Laboratories
110112
Page 3

ZIC360NX
1/4"
Panel
Door/
Drawer
5/16"
Trim
Reveal
Overlay
Panel
1/4"
Backer
Panel
Door/
Drawer
.10"
Spacer
Fresh Food
Panel
Freezer Drawer
Panel
D
C
A
B
Grille Panel
Spacer Panel
Overlay Panel
Backer Panel
A
B
Grille Panel
GE Monogram® 36" Built-In Side-by-Side Refrigerator
Dimensions and Installation Information (in inches)
1/4" Framed Panel Dimensions
If you choose to install framed
panels, they must be cut to the
dimensions shown. The panels
will slide into the frame on the
door, drawer and grille.
If the custom panel is less than
1/4" thick, and it fits loosely
in the door frame, it can be
backed up with a piece of
filler material or foam tape to
improve the fit.
Important Note: Maximum
weight for fresh food panel is 50
pounds, 30 pounds for freezer
drawer panel and 11 pounds for
the grille panel.
3/4" Overlay Panel Dimensions
For a more custom appearance,
overlay panels may be installed
on trimmed models. The overlay
panel must be secured to a 1/4"thick backer panel which slides
into the trim. A spacer panel 0.10"
thick must be placed between the
overlay and backer panel.
.250" + .10" + .750" =
1.100" Total Panel Thickness
Center each panel
over the other.
Assemble the
panels with glue
and screws. Screws
must be countersunk into the backer
panel.
NOTE: Left-to-right offset is not always equal to top-tobottom offset.
Framed Panel Dimensions (in inches)
A (Width) B (Grille Ht.) C (FF Ht.) D (FZ Ht.)
1/4" Framed Panel 33-7/8 8-7/8 46-1/16 21-7/8
3/4" Overlay Panel Dimensions (in inches)
A (Width) B (Grille Ht.) C (FF Ht.) D (FZ Ht.)
1/4" Backer Panel 33-7/8 8-7/8 46-1/16 21-7/8
.10" Spacer Panel 32-1/2 7-5/8 44-11/16 20-1/2
3/4" Overlay Panel 34-1/8 9 46-5/16 22
For answers to your Monogram,® GE Profile™ or
GE® appliance questions, visit our website at
ge.com or call GE Answer Center® service,
800.626.2000.
ZUG2 Grille Panel Dimensions
The ZUG2 Unified Grille Panel Kit will accept a framed or
overlay grille panel.
• Assemble the overlay panel in the same manner as the
door and drawer panels.
Framed Panel Dimensions
A (Width) B (Height)
1/4" Framed Panel 69-7/8" 8-7/8"
Overlay Panel Dimensions
A (Width) B (Height)
1/4" Backer Panel 69-7/8" 8-7/8"
.10" Spacer Panel 68-1/2" 7-5/8"
3/4" Overlay Panel 70-1/8" 9"
Listed by
Underwriters
Laboratories
Specification Created 6/08
110112
Page 4

ZIC360NX
1/4"
1/2"
3/4"
1"
1-1/4"
1"
3/4" Overlay
Panel
(Nominal Size)
Stainless Ste
e
l
1/4"
1/2"
3/4"
2"
1-1/4"
1-1/2"
1-3/4"
3"
2-1/4"
2-1/2"
2-3/4"
1/4"
1/2"
3/4"
Door
23-7/8" From
Rear of
Refrigerator
1"
Refrigerator
Case
Trim
GE Monogram® 36" Built-In Side-by-Side Refrigerator
Dimensions and Installation Information (in inches)
Advance Planning for Built-In Custom Bottom-Freezer Refrigerators
Use this page to determine
door swing interaction
with adjacent cabinets or
countertops.
Frameless Cabinets: The case trim overlaps cabinets at
the top and sides. Therefore, frameless cabinets may
require filler strips to prevent interference with cabinet
door swing. The opening must allow for filler strips.
Top View
130° Door Swing
(Optional setting)
Scale 1:1
For answers to your Monogram,® GE Profile™ or
GE® appliance questions, visit our website at
ge.com or call GE Answer Center® service,
800.626.2000.
Listed by
Underwriters
Laboratories
Specification Created 6/08
110112
Page 5

ZIC360NX
1/4"
1/2"
3/4"
1"
1-1/4"
1/4"
1/2"
3/4"
1"
1-1/4"
1-1/2"
23-7/8"
From Rear of
Refrigerator
3/4" Overlay
Panel
(Nominal Size)
Case Trim
Refrigerator
Door
Stainless Steel
GE Monogram® 36" Built-In Side-by-Side Refrigerator
Dimensions and Installation Information (in inches)
Advance Planning for Built-In Custom Bottom-Freezer Refrigerators
Use this page to determine
door swing interaction
with adjacent cabinets or
countertops.
Frameless Cabinets: The case trim
overlaps cabinets at the top and
sides. Therefore, frameless cabinets
may require filler strips to prevent
interference with cabinet door swing.
The opening must allow for filler strips.
Top View
90° Door Swing
(Optional setting)
Scale 1:1
For answers to your Monogram,® GE Profile™ or
GE® appliance questions, visit our website at
ge.com or call GE Answer Center® service,
800.626.2000.
Listed by
Underwriters
Laboratories
Specification Created 6/08
110112
Page 6

ZIC360NX
GE Monogram® 36" Built-In Side-by-Side Refrigerator
Dimensions and Installation Information (in inches)
Features and Benefits
• Custom Appearance - Allows personalization
with cabinet-compatible panels an custom
handles
• Upfront Electronic Controls with Digital Readout
- Allows precise temperature settings and are
positioned for maximum ease of use
• Humidity Controlled Vegetable Compartments
and Sealed Snack Pans - Help maintain
freshness and help preserve foods longer
• Adjustable, Spill Proof Glass Shelves - Make it
easy to customize storage to handle foods and
containers of various sizes
• 2 Sealed Deli Pans with Full-Extension Slides
• Six Adjustable Door Bins - Offer added storage
flexibility
• GE Water™ Filtration System - Delivers clean,
great tasting ice
• Model ZIC360NXRH – Right-handed door swing
(Door panels required)
• Model ZIC360NXLH – Left-handed door swing
(Door panels required)
For answers to your Monogram,® GE Profile™ or
GE® appliance questions, visit our website at
ge.com or call GE Answer Center® service,
800.626.2000.
Specification Created 6/08
110112
 Loading...