

Page 1
GE Monogram ®
Owner's Manual
ZUZU_. _l_OTlO_rFa _l. €0_1_
Digital
Radiant Cooktop
Page 2
Consumer Information
Di_'itat Ra<tiat_t Cooktop
Your new Monogram ( ooktop makes an e]oquem statement of s@e, convenience and kitchen
planning flexibility. Whed_er you chose i_for i_s pmi b' of design, assiduous a_endon _o derail-
or for bodl of these reasons-you'H find dial your Monogram ( ooklop's superior blend of form
and _kmcdon will dehgh_ you fo; years to (ome.
Your Monogram cook_op was designed _o provide die flexibility _oblend in wid_ your kit( hen
(_d)ineu-y. Its sleek design tan be bemnifi_lly imeg;_ted into d_e kit(hen.
The infom_adon on d_e following pages will help you operate and maintain your (ooktop properly.
Corzterzts
Care and Cleaning
Control Panel ............................ 17
Gb_ss ( ooktop Cleaning ................ 15, ] 6
Consumer Services
Important Phone Numbe_ s ............... 20
Model m_d Serial Numbe; ............... 3, 22
Problem Solver ........................ 1S, 19
Produ( t Regimadon .................... 3, 21
Safety lnmu(dons ....................... 4-6
W;H:r_mt7 ............................. 23, 24
Using Your Cooktop
B_idge Sm f_ce Unit ....................... 1(_
l-)u_dSmtsce U nit .......................... 9
Features of Your Cooktop .................. 7
Error Codes .............................. 12
Locked Mode ............................. S
Touch Comro]s ........................ 8-12
W;Hn_er Smt,_( e U nit ..................... 11
Page 3

Read dfis manual careflflly. It is intended to
help you operate and maimair_ your new
( ooktop properly.
Keep it handy for answers to your questions.
Kyou don't understand something or need
more help, there is a list of tol14_ee (onsumer
service numbers included in the back se( tion
of this manual.
OR
Visit our Webshe at: www.monogram.com
Write down
the mode[
serial numbers
ff you received
a damcq ed
eookt@
Save time
You'll find d_em on }_label under the cooktop.
Fill out and _eturn the Consumer Produ( t
Registration Card that is packed with this
product, If'you cannot find it, })]ease sent]
in the duplicate card printed in the back of
this manual,
Immediately contact the dealer (or buik]er)
that sold you tl_e c(_(_ktop,
Before you request service, chet:k the Problem It lists causes of minor operating problems that
Solver in the back of this manual, )ou (:an correct yourself,
Before sending in this card, please write these
numbers here:
Model Number
Serial Number
Use these numbers in any (::orresponden( e or
service calls (:ont:ernh]g your (:ooktop,
To obtain service, see the Consumer Sel-vices
page in the back ofthis manual.
We're proud of our service and want you to be
pleased. If for some reason you are not happy
with the service you receive, here are two steps
For custome_ in the USA :
FIRST, contact d_e peop]e who serviced your
apphance. Explain why you are not p]eased. In
most cases, this will soh-e the problem.
NEXT, ffyou are still not pleased, write all d_e
details-including your phone number-to:
Manager, Customer Relations
Appliance Park
Fro-customers in Canada:
FIRST, contact die people who serviced your
appliance, Explain why you are not pleased, In
most (ases, dfis will solve the problem.
NEXT, ffyou are still not pleased, write all the
details-including your phone number-to:
Manager, Consumer Relations
Cam co In c.
l Factory !_ane, Suite 310
Moncton, N.t_,.El C 9M3
Page 4

IMPORTANT SAFETY INSTRUCTIONS
SAFETYPRE CAUTIONS
When ush_g ele( tricM applbmces, basic safety
1)5ecautior_s should be followed, including
• Read all instructions before using your
cooktop.
• Have the installer show you the location of
the circuit breaker or fuse. Mm'k it fbr easy
reference,
°Use this appliance only for its intended use
as des(fibed in this mamml.
°Be sure your appliance is properly installed
and grounded by a qualified te{ hnician in
accordance with the provided iustallafion
iu strl](d (51-1s.
• Do not attempt to repair or replace arty
part of your cooktop unless it is specifically
recommended in this manual. All other
servicing should be re_i_rred to a qualified
tedmiciam
"Before performing any service,
DISCONNECT THE COOKTOP POWER
SUPPLY AT THE HOUSEHOLD
DISTRIBUTION PANEL BY REMOVING
THE FUSE OR SWITCHING OFF THE
CIRCUIT BREAKER.
°Do not leave children alone-chik]ren shouk] not
be left alone 05 unattended in an mea where
an appliance is iu use. They should never be
allowed to sit or stand on any part of the
appliance.
°When using an electrical appliance near
the cooktop, be sure that the (:or(] of the
appliance does not come into contact
with the stufface area.
°Never wear loose-flttlng or hanging garments
while using the appliance. Be careflJ when
reachiug for items stored in cabiuets over the
cooktop. Flaummble material couk] be
ignited if brought in contact with a ]lot
smface unit an(] umy cause severe burns.
"Use care when touching the cooktop. The
glass surface of the cooktop will retain heat
aher the couwols ]lave been msued off.
• For your safety, never use your appliance for
warming or heating the room.
° Use only dry pot holders-moist or damp pot
holders on ]lot surfaces umy resuh in burns
fiom steam. Do not letpot holders touch a
]lot surf_ce unit. Do not use a towel or other
bulky (:lodl in pla(e of a pot holder, Such
cloths (:an catch the on a ]lot surf_ce uuit,
• Do not store flammable materials near
the cooktop.
"Keep the hood and grease filters clean to
maintain good venting and to avoid ga'ease fires.
"DO NOT STORE OR USE COMBUSTIBLE
MATERIALS, GASOLINE OR OTHER
FLAMMABLE VAPORS AND IaQUIDS IN
THE VICINITY OF THIS OR ANY OTHER
APPLIANCE.
• To prevent surface units from accidentally
being turned on, especially by chikben or
pets, lock the cooktop when it is not iu use
and before cleaning.
°Do not allow anyone to climb, stand or hang
on the cooktop.
•CAUTION: rFEMSOF
INTEREST TO CHILDREN SHOULD NOT
BE STORED IN CABINETS ABOVE A
COOKTOP--C_IIa)REN CLIMBING ON
THE COOKTOP TO REACH ITEMS
COULD BE SERIOUSLY INJURED.
°Do not let cooking grease or other flammable
materials accumulate on the cooktop.
• Do not use water on grease fires. Never pick
up a flaming pan. Turn thecontrols off.
Smother a flaming pan on a sur/ace unit by
covering tile pan completely widl a weiI-
fittiug lid, cookie sheet or flat tray. Use a
multi-purpose dry chemical or foam-upe fire
Flamiug grease outside a pan can be put
out by covering it wid_ baking soda or, if
available, by using a umld-purpose dry
chemical or foam-type fire extinguisher.
Page 5
SAFETYPRE CAUTIONS
• Clean the cooktop with caution. If a wet
sponge or clodl is used to wipe spills on a hot
smfh(e uni< be ( >_refiJ to _void stemn burns.
Some cleansers can produce noxious fhmes if
applied to a hot surf_ce.
NOTE: We recommend that you avoid wiping
any surf_ce mlit areas undl alley have cooled
and the indicator ligb has gone off. Sugar
spills are die excel)don to dlis. Please see die
(;lass Cooktop Cleaning secdon.
When die cooktop is cool, use only the
recommended cleaning cream to (;lean die
cooktop.
• Do not operate the surface units if the glass is
broken. Spillovers 05 cleaning soludon umy
penetrate a broken cooktop and create a risk
of electrical shock. Contact a qualified
technhJan if your glass cooktop breaks.
• Do not touch the surface units. These
surf_ces may be hot enough to bmn even
though alley are dark in color. During and
afier use, do not touch, or let clodling or
odler flammable materials comac< die
surf_ce mJts or areas nearby surfi_ce mlits;
allow sufficient dine for cooling first
Potentially hot su(ti_ces include tile cooktop
and areas fi_cing the cooktop.
°Never leave the surface units unattended at
high heat settings. Boilovers cause smoking
and greasy spillovers that may catch on tire.
°Use proper pan slze-select cookware having
flat bottoms large enough to (;over die sm__ce
unh's headng area. The use ofundersized
cookware will expose a pordon of the smf_ce
unit to direct contact and may result in
ignidon of clodling. Proper relationship of
cookware to sm__ce mlh will also improve
efficiency. See die Cookware Tips secdon of
dlis manual.
. Cook meat and poultry thoroughly--meat
to at least an INTERNAL temperature of
160°F. and poultry to at least an INTERNAL
temperature of 180°F. Cooking to these
temperatures usually protects against
foodborne illness.
• Only certain types of glass, glass-ceramlc,
earthenware or other glazed containers are
suitable for cooktop cooking; others may
break because of the sudden change in
temperature.
"To minimize the possibility of burns, ignidon
of flammable materials an d spillage, ttle
handle of a container should be turned
toward tile center of tile cooktop widlom
extending over nearby smf_ce units.
°Always keep combustible wall coverings,
curtains or drapes a safe distance aw_y from
your cooktop.
•Always keep dish towels, dish cloths, pot
holders and other linens a safe distance away
• Do not leave paper products, cooking utensils
or food on the cooktop when not in use.
•Avoid scratching the glass cooktop. The
cooktop (;an be s(ratched widl items such as
sharp instruments, rings or odler jeweky and
°Never use the glass cooktop surface as a
cutting board.
°Do not place or store items on top of the glass
cooktop surface when it is not in use.
°Be careful when placing spoons or other
stirring utensils on glass cooktop surf]_ce
when it is in use. They may become hot and
could cause burns.
°Avoid heating an empty pan. l)oing so may
damage die cooktop and die pan.
°Do not allow water, other liquids or grease
to remain on die cooktop or comrol panel.
°Always heat fat slowly, and watch as it heats.
• Clean only parts listed in this manual.
• Keep cooktop clean and free of accumulation
of grease or spillovers which may ignite.
• Before removing pots and pans, be sure to
turn the surface unlt(s) off.
Page 6

IMPORTANT SAFETY INSTRUCTIONS
SAFE TY F'RE CA UTIONS
°To minimize the possibility of bums, always
be certah_ that the (ontrols for all surface
units are at the OFF position, that the
( ooktop is locked and that the endre glass
smf_ce is cool before attempting to (:lean
the (ooktop.
"Always keep wooden and plastic utensils
and canned food a safe distan(e away from
your t ooktop. They mW bet tree hot and
could cause bmns.
"Never heat unopened food containers.
Pressure buildup may make container burst
and cause injury.
• Teach children not to play with controls or
any other part of the cooktop.
"Always rum the surface unit controls off
before removing the cookware,
"Carefully watch for spillovers or overheating
of foods when frying at high or medium high
temperatures.
•When flaming foods under the hood, turn the
fan on.
• Never try to move a pan of hot fat, especially
a deep fi_t flyer. Wait umil the fat is cool.
• Use little fat for effective shallow or deep fat
frying. Filling the pan too ti_ll of fi_t(:an cause
spillovers when food is added.
°If a combination of oils or fats will be used
in frying, stir together before beating, or as
L_ts melt slowly.
• Use a deep fat thermometer whenever
possible to p_evem overbearing fat beyond
the smoking point.
°Never leave jars or cans of fat drippings on or
near your cooktop.
• To avoid possible damage to the cooking
surface, (to uot apply the (:leaning cream to
the glass surfi_ce when it is hot,
•After cleaning, use a dry cloth or paper towel
to remove all the cleaning cream residue.
°Read and follow all instructions and wamlngs
on the cleaning cream labels.
• Foods for frying should be as dry as possible.
Frost on frozen foods or moisture on flesh
foods can cause hot fat to bubble up and over
the sides of the pan.
READ AND SAVE THESE
INSTRUCTIONS
Page 7
Dgsigft
information
Features of Your Cooktop
Digital Radiant Cookgop
®
0
ZEU36WMR
ZEU365
®
ZEU304
@
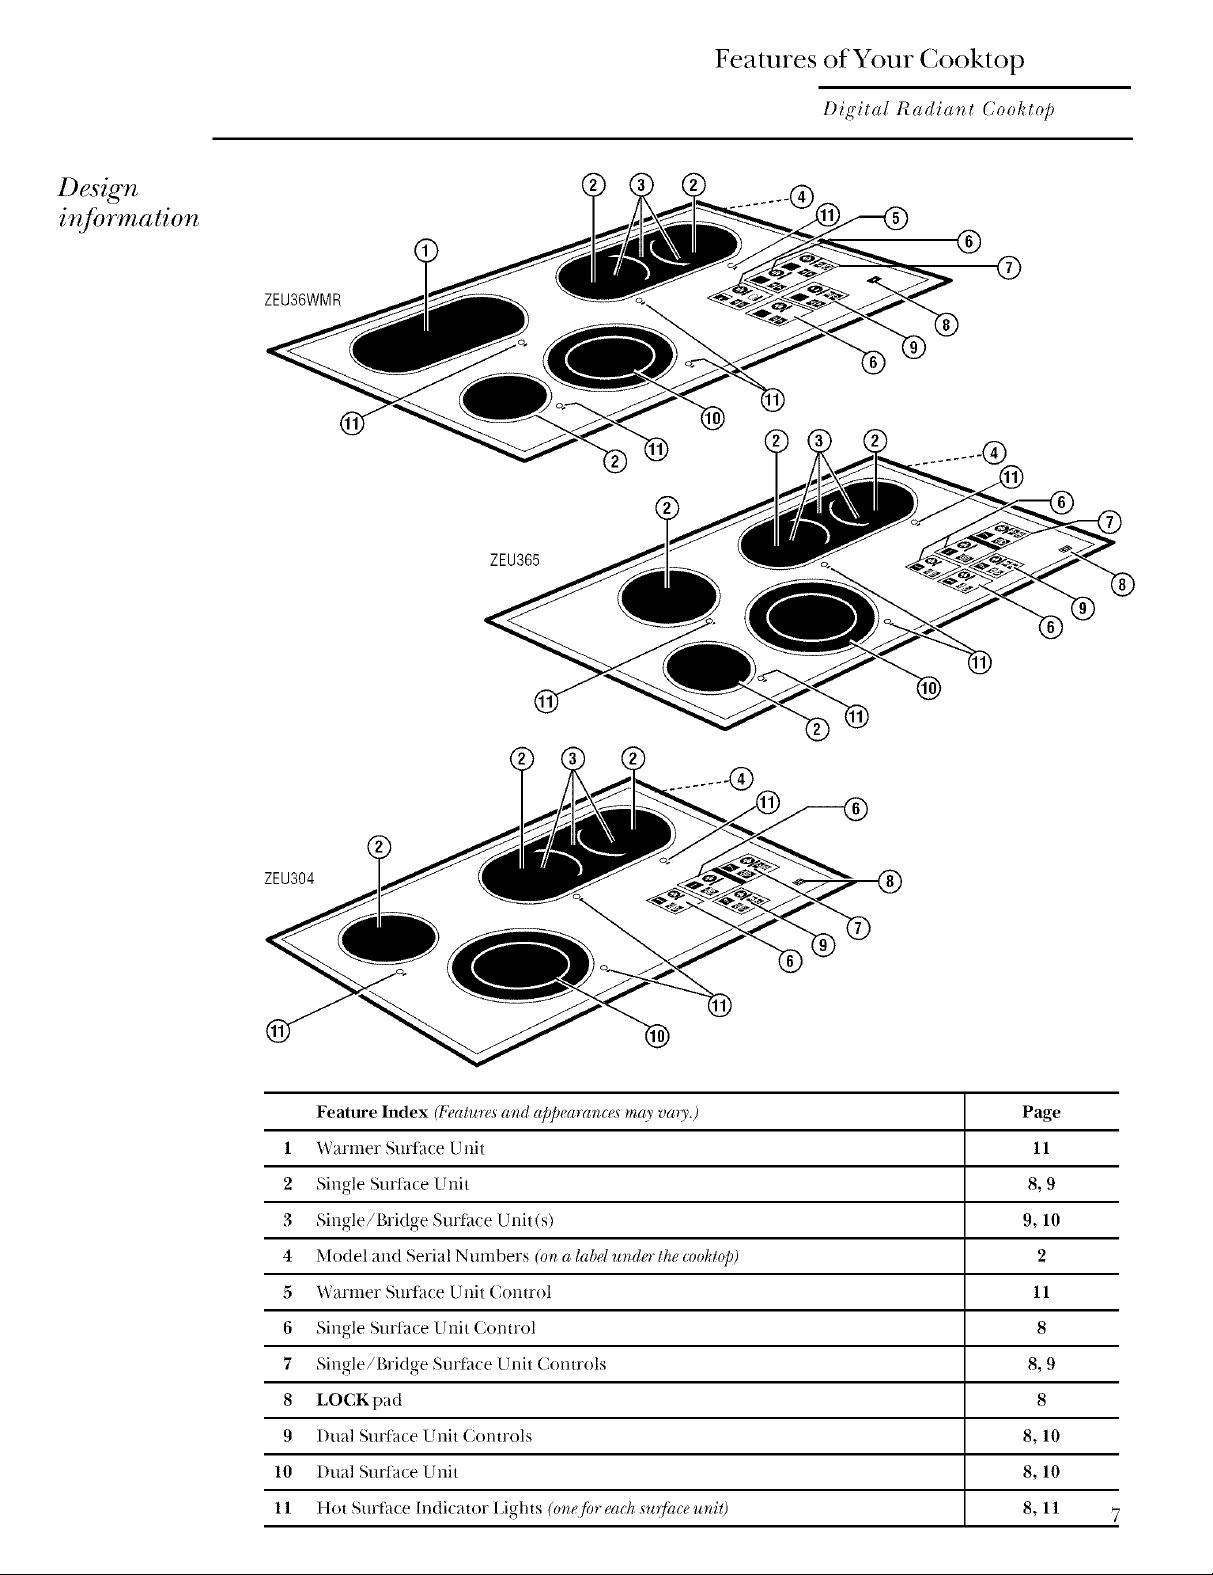
Feature Index (]_?atu_vs and appearances may vau.) Page
1 Warmer Surlace Unit 11
2 Sim,-le Surtace Unit 8, 9
o
3 Single/Bridge Surtitce Unit(s) 9, 10
4 Model and Serial Numbers ((m a labd undo' the _vohtop) 2
5 Warmer Surti_ce Unit Control 11
6 Sinole Surtace Unit Control 8
o
7 Single/Bridge Surtitce Unit Controls 8, 9
8 LOCKpad 8
9 l)ual Surtace Unit Controls 8, 10
10 l)ual Surtace Unit 8, 10
11 Hot Surface Indicator Lights (o)_efineach su{J(,ceuniO 8, 11 7
Page 8
Touch Controls
Digital Radia_t Cookto/_
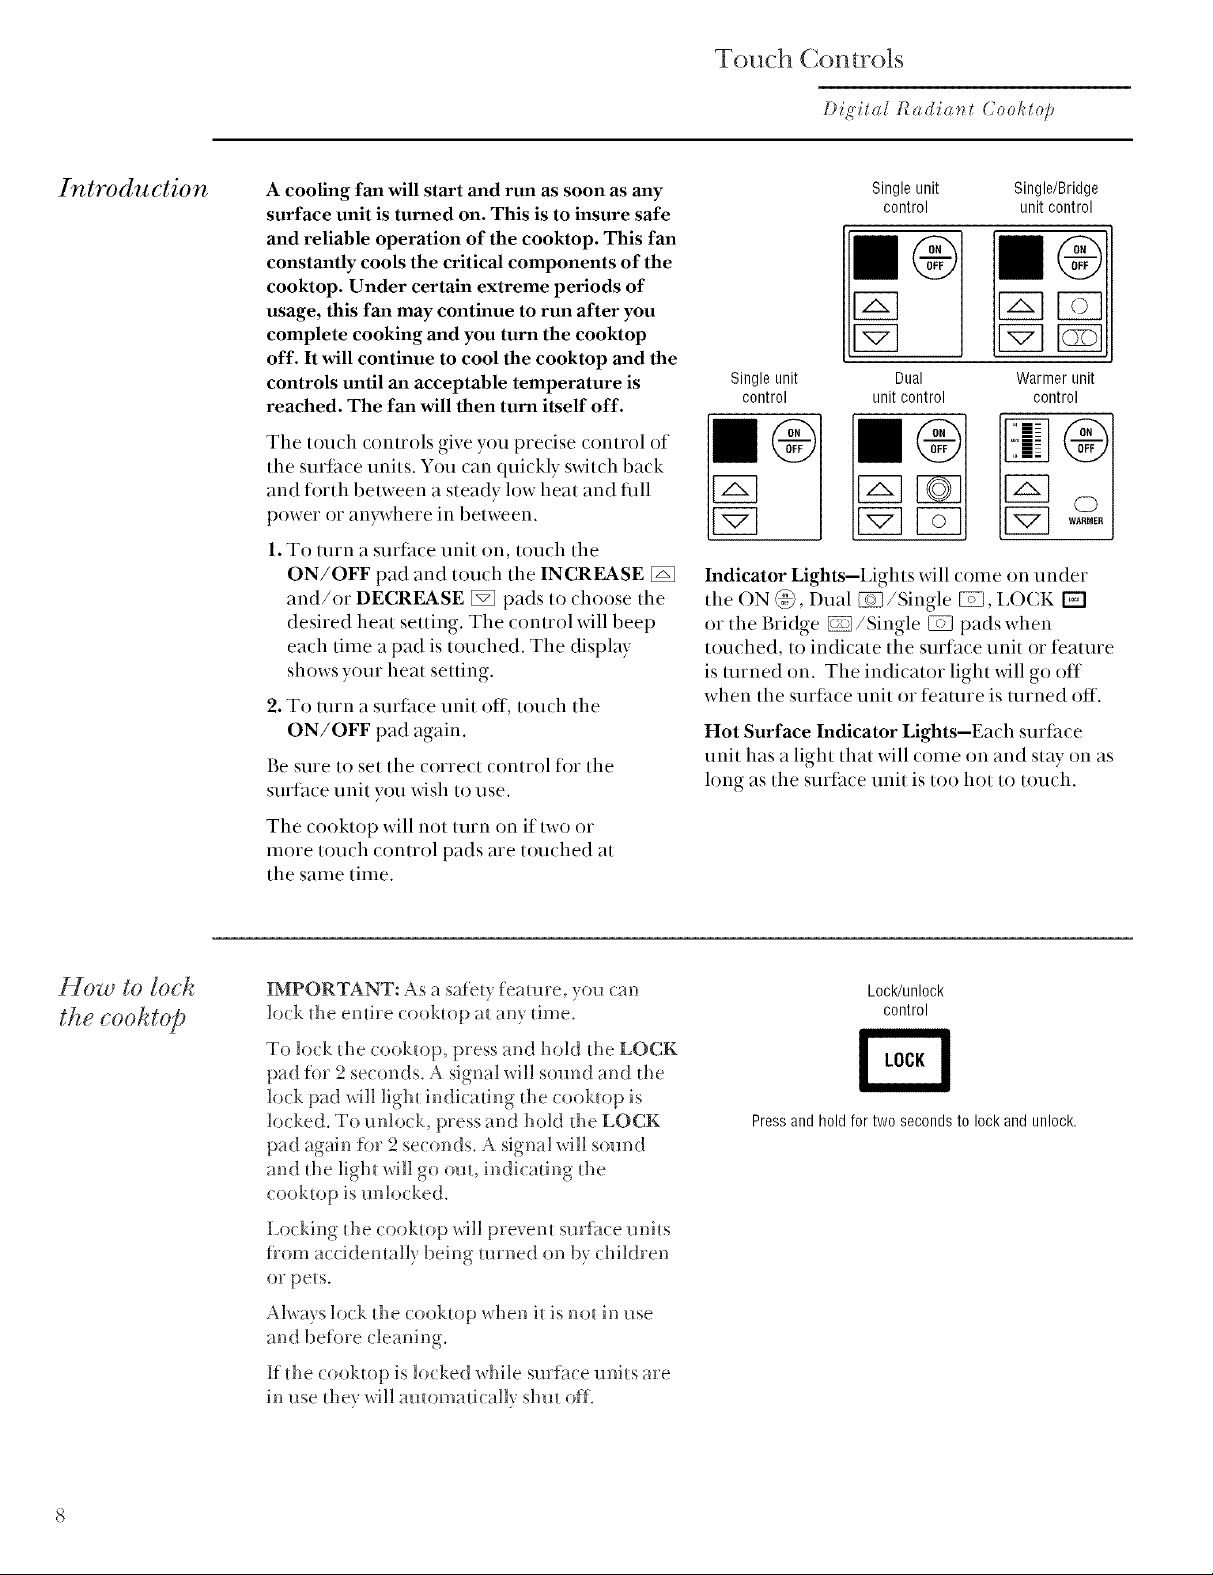
Introduction
A coofing fan will start and run as soon as any
surface unit is turned on. This is to insure safe
and reliable operation of the cooktop. This fan
constantly cools the critical components of the
cooktop. Under certain extreme periods of
usage, this fan may continue to run after you
complete cooking and you turn the cooktop
off. It will continue to cool the cooktop and the
controls until an acceptable temperature is
reached. The fan will then turn itself off.
The touch controls give you precise control of
the smlace units. You can quickly switch back
and forth between a steady low heat and fifll
power or an}nvhere in between.
1. To mrn a surt/ice unit on, touch the
ON/OFF pad and touch the INCREASE
and/or DECREASE [_] pads to choose the
desired heat setting. The control will beep
each time a pad is touched. The display
shows your heat setting.
2. To mrn a surtace unit off, touch the
ON/OFF pad again.
Be sure to set the correct control for the
smlace unit you wish to use.
Single unit
control
Single unit
control
Dual
unitcontrol
Single/Bridge
unit control
Warmerunit
control
®
Indicator Lights--I,ights will come on under
the ON _), Dual _/Single _, LO(K D
or the Bridge _/Single _ pads when
touched, to indicate the smtace unit or feature
is turned on. The indicator light will go off
when the surface unit or ligature is turned off.
Hot Surface Indicator Lights--Each surface
unit has a light that will cr)me rm and stay rm as
hmg as the surfilce unit is too hr)t tr) touch.
The cooktop will not turn on if two or
more touch control pads are touched at
the same time.
IMPORTANT: As a safe_y feature, you can
lock _he entire cooku)p a_ any time.
To lock the cooktop, press and hoM the LOCK
pad for 2 seconds. A signal will som_d and _he
lock pad will ligh_ indicadng d_e cook_op is
locked. To unlock, press and hokt d_e LOCK
pad again _hr 2 seconds. A signal will sound
and _he ligh_ will go out, indicating _he
Locking the cooktop v,ill prevent surfhce milts
flom accidemally being turned on by children
or pe_s.
Always lock d_e cook_op when i_ is no_ in use
and be_hre cleaning.
If _he cooku_p is locked while smface units are
in use they will amomafically shut o_t.
Lock/unlock
control
Pressand hold for two seconds to lock and unlock,
Page 9

si 7,gle
su i ce unit
L To mrn a sm f_ce m6t on, tou(h the
ON/OI_T pat] an(] tou(h the INCREASE [_
and/or DECREASE [_ pads to choose die
desired hea_ se_dng. The display shows your
2. To mrn a s:_rfi_ce mli_ off, _ouch die
ON/OFF pad again.
NOTE: ff yo_ to_ch the ]NC]_EASE pad fi_:_/the
su!;/ace u_it wi[[come o_ at the higSes/ (N) heat
settling'.(,/}o_ toud_ the L)ECf_I?ASIZpad fir_t the
sui;/ace_it wi[[(_)meo_ at the [owg_/(L) heat settling:
There are eleven heat se_dngs ranging trom
Low (L) to High (H) to choose tiom.
Using the
dual surface
unit
Tile dual surface unit has two cooking sizes to
select tiom so you can match tile size of tile unit
to tile size of tile cookware you are using.
To use the dual surface unit:
1. Touch tile ON/OFF pad ti)r the dual
surface unit.
2. To use tile small surface unit, touch the small
surfa(e unit pad. The unit will only heat tile
>uea inside tile smaller dr(le.
To use tile large surlhce unit, touch the large
suriilce unit pad. The unit will heat the entire
area contained by the larger circle.
3. Touch the INCREASE [_ and/or
DECREASE [_ pads to choose the
desired heat setting. The display shows
your heat setting.
NOTE: !/you touch the 1NCREA51'_pad /h:_t /lze
,s_q]a(eunit will come on at llzehighest (H) heat
s_tting',lf you louch the l)ECREA51'_ pad first the
,s_@ta_unit wia come on at lhe &we,st(L) heat ,setting
There are eleven heat settings ranging fiom
Low (L) to High (H) to choose fiom.
4. To turn a surthce unit off, touch the
ON/OFF pad again.
@
Touch this pad to use
-- the large surface unit.
__ Touch this pad to use
the small surface unit.
Page 10

Using the
bridge
surface
units
separately
rear
Center )
element
Touch Controls
Digital Radia_t Cookto/_
Right
rear
J element
Using the
bric] e
sur)f zce unit
To use each circular element separately:
1. Touch tile ON/OFF pad.
2. Touch the INCREASE [_ and/or
DECREASE [_ pads to choose the
desired heat setting. The display shows
your heat setting.
NOTE: l/you touch the INCREA51_2pad fir_t lhe
sui]hce unit will come on at Ne higgu,,_t(14)heat
,s_,ttir_g:lj'you &ug'hNe Dl'2CREA51_2pad fi*:_tthe
,s_!jica,unit will come on at lhe lowest (L) heat ,setting:
There are eleven heat settings ranging flom
Low (L) to High (H) to choose tiom.
3. To mrn a surthce unit off, touch the
ON/OFF pad again.
Center
rear --
element
Right
rear
element
Touch these Touch these Touch this pad
pads to use padsto increase to use the right
the center or decrease the rear element
rear element heatsetting, separately.
separately.
NOTE: 7)_u,s_the rig'ht element ,_@aratelyuse the
rig'ht rear contro£ and louch the 0 pad. 7)_use
the cenler element separalHy u,s_,the center
*gar conDD[,s_
_0
Bridge
The corm o]s (m-i be used to (reate an oblong
heated area.
Because ofits bigger dimensions, larger pans
can be used on _he bridge smface unit.
Choose pans tha_ match the bridge surf_ce
refit area as closely as possible.
To use the bridge element:
1, Touch the ON/OFF pad.
2. Touch the bridge @ pad.
3. Touch d_e INCREASE [_ and/or
DECREASE [_ pads to choose the
desired heat setting. The display shows
your hea_ setting.
q
These controls
cannot beused
whenthe bridge
surface unit is
being operated.
NOTE: ff )'ou tou& the iNCRIL451_2 pad fir_t the
suU'ace unit will come on at the h_ghest (H) heot
setti_g: /,/)'o. to.oh the DliCRliASE /_ad /%_t' tke
s.U',oce ._fit will come o_ at the Iowesl (L) heat settling.
There are e]even heat settings ravaging from
Low (L) to High (H) to choose t?om.
4. To tmn a surf_ce refit o_1, touch d_e
Touch these
pads to increase
or decrease the
heatsetting.
Touch this pad to
use both elements
combined with the
bridge element
between them.
Page 11

Coohing
y,uide /br
using heat
setting_
High (H)-Quick start for cooking; brings water
to a boil
Medium High (7-9)--Fast fiT, pan broil;
maintains a fhst boil on large amom_ts offoo&
Medium (4-6)--Sam4 and brown; maintains a
slow boil on large amom_ts of%od.
Medium Low (2-3)-Cook after starting at
high; cooks wid_ litde water in ( ove_ed pan.
Low (1)--Steam rice, cereal maintains serving
temperature of most foods. Slow cooking and
Lowest (L)--Keeps food warm, mehs chocolate
an d butter.
NOTE: l!the cookt@ is co_zect'ed to 208 volts you
will _otice wine b_crease i_ cookb_g times.
' At high or medim_ high settings, hexer leaxe
food m_attended. Boilox ers cause smoking;
greasy spillovers ma) catch on fhe.
' When a surfa(e unit is turned on, the unit (:an
be seen glowing red within a few seconds
especially flit is set at 8-HI (H). The red glow
of the smTfhcemilts will (ycle to maintain the
selected heat setting. Wid_ poor cookware,
you will see f_equem cycling of the smface
unit. (;ood, fiat cookware will minimize d_e
cycling. See d_e Cookware Tips section.
' It is safe to place hot cookware t_om the oxen
or smface milts on tl_e glass-ceramic smface
when it is cool.
NOTE: Cooht@ [(.'m/)eratu*vs inc_vase with [he
n_mber q/ sut)_ce units that a_v on. With 3 or mow
t_nils t_w_ed on, s_qjoce #m/)eraltm.'s at(, higT_so be
car@d whe_ to_chD_g"the coohto/). The hot s_q)&ce
b_dicator tig,St(s) will r(.'mab? gt q/'/(.'rthe s_qI'(tce t_it
is ((/ _til the su!;/o(vis coot e_o_g5 to touch.
Using" the
WARMER
surface unit
(on ,some modd9
The WARMER smlace unit keeps aheady
heated fi)od warm until ready to serve. The
WARMER is not fi)r cooking fi)od.
1. Touch the ON/OFF pad fi)r the WARMER
surfitce unit.
2. Using the INCREASE [_ and/or
DECREASE [_ pads choose the desired
heat setting. The indicator lights show your
heat setting.
3. To turn a surtace unit off, touch the
ON/OFF pad again.
WARMER GUIDE
14 (1()) Cas_u-oles, plates!lffi)od, TV dinners,
meats, vegetables and breads
57 (MED) Sauces and stews
89 (HI) _lups and beverages
Covo"all/bM._ bd,,.,"wa_,d wilh /bil or a lid.
WARMER
(D
Page 12

Touch Sensor Controls
Digital R_i<ti_i_t (7ookt@
CTTOT COO[€
Ifan ellor octursin the (ontro] operation,
all the displays will flash "E" or "F" anti the
cooktop will beep.
To correct:
L Touch any ON/OFF pad to reset the
control.
2, if this corre( ts the problem, set the
control to the desired setting to begin
After a power fifilure, when power is restored,
the unit will show flashing "8" in the COlm-ol
displays fbr a fFw seconds and then return to
the normal OFF positioIL
If a momentm T power fifihne occurs during
cooktop use all suifhce units _dll tuin off and
will stay offwhen power is restored. When
power is first restored the cooktop displays will
flash all 8's fi)r a few seconds during which
time the COlm-ol will be checking the circuits
tbr proper operation. Set the COlm-ol to the
desired setting to begin cooking again.
3. If d_e error is not (leafed, allow the ( ooktop
to cool completely.
4. After cooling, touch any ON/OFF p_d again
to reset the control.
5. if' the error is still not cleared, turn off the
cooktop power at die circuit breaker or fl_se
box for one minute.
6, if the error reappears turn off the ( ooktop
power and (:all for service.
12
Page 13

Cookware Tips
Digital Radia_g ( ookgop
The following information will help you choose
cookware which will give good performance°
Stainless Steel: r(.'commended
Especially good wid_ a sandwich dad bouom.
The sandwich bottom combines d_e benefits of
stainless s_ee] (appearance, dmabih b" and
smbilily) with lhe advanlages of ahmlimm_ or
topper (heal ( ondutlion, even heat
Aluminum: heovy weigkt n.'commended
Good conduclivily. Aluminum residues
somelimes appear as srrauhes on d_e cooklop,
bm can be removed it cleaned hmnediale]y,
Because of' ils ]ow me]ling poim, thin weighl
a]uminllnl shon]d nol be used,
Copper Bottom: r(.:commended
Good performance, bm copper may leave
residues which can appear as scrauhes, The
residues can be removed, as h)ng as d_e cooklop
is cleaned immediale]y,
However, do not ]el these pols boil d_T,
Ove_ heated metal can bond lo glass (ooklops.
An overheated copper bouom pot will leave a
residue d_al will permanendy slain d_e cooklop
if not removed immediately.
Porcelain Enamel Covered Cast Iron:
r(.'comme.ded
Good conduclivib'. As long as lt_e cookware is
covered complelely whh porcelain enamel, riffs
cookware is recommended. Casl iron relains
heal, maximizing energy efiicien(y, and
provides smoodi, even heal dislribmion.
Caution is recommended for cast iron
cookware Ileal is nol completely covered with
smoolh porcelain enamel, as il may scratch d_e
Glass-ceramlc: .sab[(.',b.t not r(.'(:omme.ded
Poor performance. May scralch d_e surface.
Stoneware: .sable, but _wt rt.'comme.ded
Poor })efformance. May scralch d_e surface.
How to
check pan
Use of correct cookware can affect the cooking
performance and cleaning of your cooktop.
The correct cookware reduces the temperature
of the cooktop surtime and minimizes the
chance of spillovers burning onto the cooktop.
You must use pans with perfectly flat bottoms.
Some pans may have om'ed or rounded bottoms
or may be warped. Ifyou are unsure of the
flatness of your pans you may do this quick test.
Turn your pan upside down on tile cotmtertop,
place a ruler fiat against the pan snrthce. The
bottom of the pan and the straight edge of the
ruler should fit flush against each other all the
way across. Turn the ruler a tifll 360 degrees,
checking fin any space between the ruler and
the bottom of the pan.
Another simple test to determine even heat
distribution across the cookware bottom is to put
one inch of water in the pan. Bring the water to
a boil and observe the location of bubbles as the
water starts to boil. Good fiat cookware will have
an even distribution of bubbles over the bottom
surtime area of the pan. Bubbles localized in
only a portion of tile bottom indicate uneven
contact of tile pan to tile surthce unit, uneven
heat transfer or an unsuitable pan.
Use pans that match tile diameter of tile surfilce
unit. Cooking performan(e will not be as good
if the cookware is either smaller or larger than
the surlace unit.
Panswith rounded, curved, ridged or warped
bottoms are not recommended.
Checkpans for flat bottoms by
using astraight edge.
_3
Page 14

Cookware Tips
Digital Radia_t Cookt@
For best
results
• Place rmly (hT pans rm the surface units. Do
not plate lids rm the surfil(e units, partk ularly
wet lids.
• Do not use woks that have support rings. This
type of wok will not heat on glass surface units.
• We recommend that you use only a flat-
bottomed wok. They are available at your
local retail store. The bottom of the wok
should have the same diameter as the
surface unit to insure proper contact.
• Some special cooking procedures require
specific cookware such as pressure cookers,
deep tat flyers, etc. All cookware must have
fiat bottoms and be the correct size.
Do not placewet pans on the glass cooktop.
Do not use woks with support rings on the glass cooktop.
Use fiat-bottomed woks on the glass cooktop.
Special
cautions
for glass
coohtops
•Never cook directly rm the glass. Ahvays use
cr)okware.
•Ahvays place the pan in the center r)f the
surface unit you are cr)oking rm.
• Do not slide cookware across the cr)oktop
be(ause it can scrat(h the glass-the glass is
scratch resistant, not scratch proof.
• Don't store hea'_T items above the cooktop.
If they drr)p rmto the (ooktop, they (an
cause damage.
_4
• 1)r) nr)t use the surfhce as a cutting board.
Page 15

Observe the
Home Canning Tips
Digital Rodio_t Coofit@
following"
points in
canning
Note: Flat-bottomed
canners are required
for glass cooktops
Pots that extend beyond 1 inch of tile surihce
unit's circle are not recommended ii)r most
smthce cooking. However, when canning _dth
water-bath or pressure canner, larger-diameter
pots may be used. This is because boiling water
temperatures (even under pressure) are not
harmflfl to the cooktop surthces surrounding
the surfhce units.
HOWEVER, DO NOT USE I,ARGE
DIAMETER CANNERS OR OTHER L4RGE
DIAMETER POTS FOR FRYING OR
BOILING FOODS OTHER THAN WATER.
Most syrup or sauce mixtures-and all types of
tiying-cook at temperatures much higher than
boiling water. Such temperatures could
eventually harm the glass cooktop surtace.
1. Be sure the canner fits over the center of the
surthce unit. If your cooktop or its location
does not allow the canner to be centered on
the surthce unit, use smaller diameter pots
tot good canning resuhs.
Flat-bottomed canners nmst be used. Do not
use canners with flanged or rippled bottoms
(often fimnd in enamehvare) because they
don't make enough contact with the surtace
units and take a long time to boil water.
.
When canning, use recipes and procedures
tiom reputable sources. Reliable recipes
and procedures are available tiom the
manuthcmrer of your canner; manutacmrers
of glass jars tot canning, such as Ball and
Kerr; and the United States Department of
Agricuhure Extension Service.
Right! Wrong!
4. Remember that canning is a process
that generates large amounts of steam.
To avoid burns flom steam or heat, be
caretul when canning.
NOTE: If your house has low voltage, canning
may take longer than expected, even though
directions have been careflflly tollowed. The
process time will be shortened by:
(1) using a pressure canner, and
(2) starting with HOT tap water for tilstest
heating of large quantities of water.
CAUTION:
• Safe canning requires that harmful
microorganisms are destroyed and that the
jars are sealed completely. When canning
foods in a water-bath canner, a gentle but
steady boil must be maintained for the
required time. When canning foods in a
pressure canner, the pressure must be
maintained for the required time.
•After you have adjusted the controls, it is
very important to make sure the prescribed
boil or pressure levels are maintained for the
required time.
• Since you must make sure to process the
canning jars for the prescribed time, with no
interruption in processing time, do not can
on any cooktop surface unit if your canner is
not flat.
If the bottom of your canner is not flat, the
surface unit can overheat, triggering the
temperature limiter to cycle the unit off
for a time. This will stop the boil or reduce
the pressure in the canner.
What is a
temperature
limiter?
The cooktop surthce units have temperature
limiters that prevent the glass cooktop flom
getting too hot.
The Temperature I,imiter may cycle the units
off ti)r a time if:
•The pan boils (hy.
•The pan bottom is not fiat.
•The pan is off center.
•There is no pan on the unit.
15
Page 16

G ass Cooktop (Jeanmg
l)ig'itat Radia_t Cookto/)
use cleaning
Dur ,ed-on
ONLY use the the recommended cleaning
cream, Cerama Bryte ®, on the glass cooktop.
Other creams may not be as effective.
To mahmdn and prolec_ die sm_hce ofyour glass
cookl.op, foih_w _hese sleps:
L Before you use tile (ooktop for the first dine,
(lean it whh ( leaning cream_ This helps
prole( _ _he lop and makes (lean-up easier,
2, l-)aiIyuse of die cooklop deaning cream _dll
help keep die cook_op looking new.
3° Shake d_e ( leamng (ream well Apply a fi_w
&ops of d_e cream dh e(dy _od_e cook_op.
WARNT?NG : I)A;)L{ GE to yoar glass .su:!7"acemay
oc__r i,/yo_ _tse,scr_b pads oth_._rthan BLUE &:otch-
Brige:' M_dti-Pa_/_ose X'o Scragc/_.scrub @onges by
3M.
L Allo_ d_e (:ook_op _o cool,
2, Spread a _ew drops of Cerama B_)_e _o d_e
en_he 1)ill'l-led residue area,
4o Use a paper _oweI o_ sponge _o dean d_e enlhe
NOTE: It is va 3' im/)ortang that you DO N'OT heat
the cook{@ u_gil it ha.s bee_ cleansed thoroag'hly.
Cleanyour¢ooktepafter
each spill,
He_v_
burned-on
residue
3, Using die scrub sponge, rub die residue
area, appl}ing pressure as needed.
4, Ifan} residue remains, repeal lhe sleps hs_ed
abo_e as needed.
5, For addilional prole(:_iorh afler all residue
has been remo_ ed, polish lhe enlire surf_(e
wi_h ( erama B_T_e and a paper _owel,
WARNING: I)AA:L_IGE to you r g'la._ssu@_(:emay
oc( ar if you a.se .scrub pads otho" than BLUE Scotch-
th'ite <_Mu Ill-Purpose 5"_ &ratch scrub .spo_zgesby
3M.
1. Alh)w tile cooktr)p to cool.
2. Spread a few drops r)f Cerama B_yte_'tr) the
entire burned residue area.
3. Hold tile razor scraper at approximately
a 45 ° angle against the glass surtace and
scrape the soil. It will be necessary to apply
pressure to the razor scraper in order to
remove the residue.
4. Keep a small amount r)f crealil r)n tile residue
}IS yOll s(rape.
5. After scraping with the razor scraper, use
the s(rub sprmge tr) remr)ve any remaining
residue.
Scotch-Brite®Multi-Purpose
NoScratchscrubsponge
6. Fr)r additirmal protectirm, after all residue
has been remr)ved, pr)lish the entire surtilce
with ( erama Bryte 'Pand a paper tr)wel.
NOTE: Razor blade is packed bzverted ibr.sa/bly
rr,aso_zs. P_%r to u.s< the blad,_ rn'u.stberotated and
_vbzserted i_zto slot. l)o not use a d'ull or _zicked blade.
The RAZORSCRAPERis available
through our Parts Cente_ See
instructions under"To Order Pa_s"
section on next page,
Page 17

Metal mat_s
and scratches
1. Be (arefu] not to shde pots and pans across
yore cooktop, h _dll leave metal markings
on d_e (ooktop smt_ce.
These marks are removable using d_e
(leaning (ream wid_ a s(vub sponge
,
If pots wid_ a dfin overlay of abm_imm_
or copper are allowed to boil dry, d_e
overlay may leave black dis( oloration
This shouM be removed immediately
before heating again or the dis(oloration
may be permanent,
Glass Surface - Potential for Permanent Damage
WARNING : Corol.[[y check the bottom o/po _s /or
rou<_Imess [h(it wo.h/ scrotch the cookto/_,
Our tesdng shows that iflyou are cooking
suga U ._pidts
and melted
plastic
high sugar mixtures such as jelly or fiMgv
and have a spillover, it can eause permanent
damage to the,glass surface unless the spillover
is immediately removed,
1, Tm:n off aH smTa( e milts afiF( ted by the
spillover. Remove hot p_ms.
2. Wearing an oven mitt:
a, Use the razor s( raper to move the spill
to a cool area on the cooktop.
b, Remove the spill with paper towels.
To Order Pa,?s To order ( eralna Bryte 'Pcrealn and the razor
scraper, please call our toll-flee number
800-626-2002.
3. Any remaining spillover should be left until
d_e surfime of d_e (ooktop has ( ooled.
4, Don't use the smtace units again m_til all of
d_e residue has been completely remove(L
NOTE: .{i/)itl'i_tg"m"i_de_tai'imt i_ g,rleJ<_.sssu_)<tce
has ab'ea@ O(:CUl"red, the <vot</oi_g/oss w_[Ihave to
berv/d<.vd, M this case, semite wil[ be _ecessaU.
Cerama B)_yte ® Cream .... # WX10X300
Razor Scraper . ......... # WX5 X 1614
Kit ................... # WB64X5027
(Kit include,s crectm and razor,scmpeO
17
Page 18

The Problem SoNer
Digital Radia_t Cookt@
Questions ?
Use this
problem
solver!
PROBLEM POSSIBLE (LAUSE
FAN SOUND A (:()oling fan _ill s_ar_and rm_ as soon as any smface m_i_ is turned
on, This is t(_ insme sa_e and reliable operation of fi_e (:ooku_p.
"E" OR "F" FLASH
IN ALL OF THE
DISPLAYS
SURFACE UNITS WILL
NOT MAINTAIN A
ROLLING BOIL OR
FRYING RATE IS NOT
FAST ENOUGH
COOKTOP
FEELS HOT
FOODS COOK
SLOWLY
SURFACE UNITS
DO NOT WORK
PROPERLY
Ifall displays flash eid_er "E" 05 "F" d_ere is an error in d_e operation
of d_e control due to overheating or od_er (:a!_ses. To attempt to (:lear
the error, touch any ON/OFF pad. If the error continues and if the
cooktop has been in use, allow it to cool completely. After cooling
touch any ON/OFF pad again. If d_e displays still show the error,
disconnect all power to d_e cooktop for one minme. If"E" or "F"
error reappears, disconnect power to fi_e cooktop and (:all hsr service.
You must use pans which are absoh_tely flat. If light (an be seen
between the pan bouom and a suaight edge, d_e smfT_ce units
will not uansfer heat properly.
Pan bouoms should closely match fi_e diameter of fi_e surf_ce
unit selected.
The glass cooku)p smfaces may seem hotter than you are used u).
This is normal. Make sure flat-bottomed pans are used.
Improper cookware being use(L Pan bottoms should be flat, fairly
heavy weight and the same diameter as the smf_ce m_it selected.
If d_e cooktop is connected to 208 Volts, you will notice some
increase in cooking times.
Difiicuh 7 may be in die main distribution panel of die house,
caused by a blown cooktop-circuit fi_se, a tripped cooktop-circuit
breaker, the main ti_se 05 fi_e main circuit breaker, depending on
the nature of the power supply. Ira circuit breaker is involved,
reset it. If the control box _ses rinses, d_e cooktop filse (a caru:idge-
type) should be changed, BUT ONIX BY SOMEONE FAMILIAR
WITH ELECTRICAL CIRCUITS. Illafter performing one of these
procedmes, the rinse blows or circuit breaker uips again, (:all
for service.
18
TOUCH CONTROLS
DO NOT WORK
NOTE: Aflar/me_t [(.vmnLsor condomi_i,m ow_m_:_shouId ask their
b.i[di_g mam_g_,me_ttop@rm this (Deckb('/im:ca[l'i_g"/or s(*mice.
Cooktop smL_ce unit conuols are not properly set, 05 the wsong
control is set for the smf_ce refit you are using.
Cooktop m_y be locked. Press the LOCK pad for2 seconds.
The touch controls may be weL Dry them with a (:lean paper towel
Tmn off d_e power to d_e cooktop at the circuit breaker or rinse box
for one minute. Tmn power back on and check if cooktop works.
If not, (:all for service.
Page 19

Questions ?
Use this
problem
so[ver.P
PROBLEM POSSIBLE CAUSE
FREQUENT CYCLING hr_correct cookware used. Use only flat cookware t(5minimize cyding_
OFF AND ON
OF RADIANT
SURFACE UNITS
SURFACE UNKFS DO You may not n55dce the surface units glowing
NOT GLOW RED a higher heat setdng.
TINY SCRATCHES
OR METAL MARKS
(may appear as craehs)
OR ABRASIONS ON
PAD[ANT COOKTOP
GLASS SURFACE
AREAS OF
DISCOLORATION
OR DARK STREAKS
ON THE COOKTOP
PLASTIC MELTED See the (;lass Surfhce-Potendal iin Permanent Damage se( don in the
TO THE SURFACE (;lass Cooktop (;leaning secdon.
PKFTING (OR A hot sugar mixture was spilled on the cooktop. (;all a qualitied
OF THE COOKTOP
Incorrect cleaning methods have been used, cookware with rough
bouoms have been used, 05 coarse pardcles (salt 05 sand) were
between d_e cookware and d_e surf_ce of the (:ooktop. Use
re(ommended cleaning procedures, be sure cookware bottoms and
cookware are clean before use, and use cookware with smooth
bottoms. Tiny scratches are not removable but will become less visible
in dine as a result ofcleaning.
Marks fi:om aluminum and copper pans as well as mineral deposits
fiom water or food can be removed with d_e cleaning cream.
Hot surfi_ce on a model with a white glass cooktop. This is normal.
The surfi_ce may appear discolored when it is hou This is temporary
and will disappear as d_e glass cools.
Food spillovers should alw_ys be cleaned before the next use of the
co(sktop, ibllowing the (:leaning instmcdons in the (;lass Cookusp
technidan for replacemenu
_9
Page 20

Cowsumer Se_ices
Dis'ira[ Radiang ( ooDtop
With the purchase of your new )_onogram appliance, receive the
assurance that if you ever need infi_rmation or assistance from GL
we'll be there, All you have to do is call-toll-free!
GE Answer
Center °
In the USA :
800.626.2000
h_-Home Re_air
Service
ln the U8A:
800.444.1845
15lCanada:
1.888.880.3030
For Customers
With Special
Nee&'°.°
In the USA :
800.626.2000
Whatever your question _d)om ally Monogram m_!ior appliance, GE Answer CenteK _
info] marion seivice is available to help. Yore ( all-and yore question-will be answered
prompdy ail(] ( omteously. Ail(] you tan tall ally time. GE Answer Center: service is open
24 horns a day, 7 days a week.
In Canada_ call 1,888,880,3030,
OR
Visit ore \Vebsite at: www.monogram.com
AGE (onsm]]er seivice professional will provh]e expert ]epaiv service, scheduled at a time
that's (onven]em fo] you. Many GE ( onsm]]er Service ( ompany-ope]ated locations ofies
you service today or tomorrow, or at you; convenience (7:00 a.m. to 7:00 p_m. weekdays,
9:00 a.m_ to 2:00 p.m. Sams days)_ Om f)!( tory-ts ained teclmidans know yore appliam e
insh]e ail(] OUt--SO most repairs tail be handled in just one visit.
II
GE offers, free of charge, a brochme to assist hi plannhsg a
bar]%>hee kitchen fo]" pe]sons whh limited mobil]t}.
Consm]]ers _ith impafied hearing ov spee(h who have access Io
a TI-)I-) (n" a (onx emional teletype_riter may (:all 800-TI-)D-(IEA(
(800-833-4322) to sequest infom]afion os servit:e.
Service Contracts
In the USA :
800.626.2224
In Canada :
1.888.8803030
Parts and
Accessories
In the USA :
800.626.2002
15l Canada :
1.888.880.3030
20
"'°1
You can have the secme feeling that (iE Consm]]er Sev_i( e will still be the]e after yore
walsan[}' expires, lm( base a (_E (s)ntl'a( t _hile }sins v<aFFan[} iS Still ill ef_e(t and }'(sll ]]
set ehe a substantial d]st tsunt. -\\qth a s]]!lltiple-'_, eaF ( ()nlYa([ }'(sll'se asstlFed (st' _HI!IFe
lndivk]uals qualified to sel\_ce d]efi own appliances can have par_s or ac( essofies sent direcdy
to theft home. The GE paris system provides access to over 47,000 pasts_.and all GE Genuine
Renewal Parts are fkslly wmrained. VISA, Mastes Card ail(] Dis(over cmds me accepted.
User maintenance instructions contained in this manual cover procedures intended to be
performed by any user. Other servicing generally should be referred to qualified service
personnel. Caution must be exercised, since improper servicing may cause unsafe operation.
Page 21

_zpo& lPZl,__umaodmI
uo.n a .s o i d.ulsaou o
!3npoa d aoumsuo D
saoue!lddV39
IIIII
['lace
l st Class
Letter
Stamp
Here
General Electric Company
Warranty Registration Department
P.O. Box 32150
Louisville, KY 40232-2150
21
Page 22

Consumer Product Ownership Registration
Dear Customer:
Thank you fi)r purt:hasing our product and thank you fi)r placing your confidence in us. We are proud to
have you as a tTusloi]ler!
Follow these three steps to protect your new appliance investment:
and mail
your Consumer
Product Ownership
Registration today.
Have the peace of mind
Of kl-lowino we can
contact you in the
unlikely event of a
satety modification.
After completing this
registration, write your
model and serial numbers
in this manual. You will
need this int_)rmation
should you require service.
The service number in the
USA: 800.444.1845. In
Canada: 1.888.880.3030.
Read your Owner's
Manual carefully.
It will help ?xm
operate your new
appliance properly.
Important: To ensure that your product is registered, mail the separate product registration card.
If the separate product registration card is missing, fold and mail the form below. No envelope is needed.
F()I_I) HEllE
Consumer Product Ownership Registration
Refrigerator
Nil-.[] Ms. [] Mrs. [] Miss []
FirstI Il_a_I I
Name I I I I I I I I I Nanle I I I I I I I I I I I I I I
Product Model Serial
S_reetI I
Address I I I I I I I I I I I I I I I I I I I I I I I I I I
Apt.#1 I I I I I I I I
I I I' I_pI I
(;it} i i i i i i i i i i i i i i i i State Code I I I I I
Dale l>la(ed
.,_l i I, I Yearl' I _.m,,erl'_'°neI,, I-I,, I-I,,, I
Month _ l)a}
Louisville, KY40225
......................................................... -_y>_
ww_monogram com
TAPE CI_()SEI)
22
Page 23

Warranty fbr customers in the USA
Digital Radiant Cooht@
YOUR k/IONOGRA114 COOKTOP WARRANTY
Staple sales slip or cancelled cheek here° Pro¢_of original
purchase date is needed to obtain service under warranty.
WHA T IS
COVERED
From the Date
of O'rigir al
Pwrchase
WHAT IS NOT
COVERED
FULL ONEoYEAR WARRANTY
For one year from date of original purchase,
we will provide, _iee of charge, parts and
se_vi( e labor in yore home to repair or
replace any part of the cooktop that fails
be( ause of a manuB_cmring defe( t.
FULL FIVE-YEAR WARRANTY
For five years fl:om (late of original pro:chase,
we will provide, tiee of charge, parts and
se_vi( e labor in yore home to repair or
replace the %Howing if they _i] be( ause
of a manuf_cmring deDct:
A replacement glass co&t@ if it should: (:rack
due to thermal sho( k; dis( olor; or if the
paueH_ wears off.
A replac_ent radiantsu*face unit if it shoukt
bmn out.
• Service trips to your home to teach you
how to use the produ( t.
• Improper instalbtion.
If you have an installation problem,
contact your dealer or installer. You are
responsible fl_r providing adequate
electrical, gas, exhausting and other
connecting tacilities as described in the
Installation Instructions provided with the
product.
• Replacement of house fl_ses or resetting of
circuit breakers.
• Damage to the glass cooktop caused
by the use of cleaners other than the
recommended cleaning creams.
This warranty is extended to the original
purchaser and any su(:ceeding owner for
produ( ts purchased for o_dina U home use
in the 48 mainland states, Hawaii and
Washington, D.(L In Alaska the warranty is
the same except that it is IJMITEI) because
you must pay to ship the product to the
service shop or for the servi( e te(hni(ian's
travel (osts to your home.
All warranty servi( e will be provided by ore
Fa( to_y Service Centers o_ by om _authorized
(ustomer Care :_servicers dming normal
working horns.
Should your appliance need service,
dining warranty period or beyond, call
800-444-1845,
• Damage to the glass cooktop cm_sed by
hardened spills of sugm y materials or
mehed plastic that are not cleaned
according to the directions in the Owner's
Manual.
• Damage to the product due to nfisuse or
abuse.
• Faihne of the pro(h_ct if it is used fin.
other than its intended purpose or used
commercially.
• Damage to product caused by accident,
fire, floods or acts of God.
_,,\;_RIL_NTOR IS NOT RESPONSIBLE
FOR ( ONSEQUENTIAL DAMAGES.
Some states do not allow the exclusion or limitation ofincidental or consequential damages,
so the above limitation or exclusion may not apply to you. This warranty gives you specific
legal rights, and you may also have other rights which vary flom state to state.
To know what your legal rights are in your state, consult yore local or state conam_er affairs
otiice or yore state' s Attorn ey Gen eral.
Warrantor: General Electric Company. If further help is needed concerning this warranty,
write: Manager--Customer Relations, GE Appliances, Louisville, KY 40225
23
Page 24

Warranty for customers in Canada
Dig'igal Radia_g Cool'top
YOUR MONOGRAM COOKTOP WARRANTY
Staple sales slip or cancelled check here. Proof of original
purchase date is needed to obtain service under warranty.
WHAT IS
COVERED
From the Date
of the O_gir_al
Purchase
WHAT IS NOT
COVERED
FULL ONE-YEAR WARRANTY
For one year flora date of original purchase,
we xdll provide, flee of charge, parts and
sevvice labor in your home to repair or
replace any par{ of the cooktop that fails
because of a manufacturing defect.
*aaaaeeeeeeeeeeeeeeeeeeeeooooooooooooooooooooeee*
FULL FIVE-YEAR WARRANTY
For five years flom date of original purchase,
we will provide, fiee of charge, parts and
sevvice labor in your home to repair or
replace the fi)llowing if they fail because
of a manufacturing defect:
A replacementgtass cooktop if it should: crack
due to thermal sho_ k; dis_ olor; or if tile
pattetn _veats off,
A replacement radiantsmface unit if it should
burn out.
• Service trips to your home to teach you
how to use tile product.
• hnproper installation.
If you have an installation problem,
contact your dealer or installer. You are
responsible for providing adequate
electrical, gas, exhausting and other
connecting facilities as described in the
Installation Instructions provided with the
product.
• Replacement of house fl_ses or resetting of
circuit breakers.
• Damage to tile glass _ooktop _aused
by the use of cleaners other than the
recommended cleaning creams.
This warranty is extended to tile original
purchaser and any succeeding owner for
products purchased for ordina U home use
in the 48 mainland states, Hawaii and
Washington, D.C. In Alaska the warranty is
the same except that it is LIMITED becm_se
you must pay to ship the proch_ct to the
service shop or tor the sevvice technician's
travel costs to your home.
All warranty service will be provided by our
Facto U Service Centers or by our authorized
(ustomer Card _servicers during normal
working hours
Should your appliance need sevvice,
during warranty period or beyond, call
800-444-1845.
• Damage to tile glass cooktop cm_sed by
hardened spills of sugar y materials or
mehed plastic that are not cleaned
according to the directions in the Owner's
Manual.
• Damage to the product due to misuse or
abuse.
• Failure of the pro(h_ct if it is used fin
other than its intended purpose or used
commercially.
• Damage to product caused by accident,
fire, floods or acts of God.
WARtL_kNTOR IS NOT RESPONSIBLE
FOR CONSEQUENTIAI_ DAMAGES.
24
Some provinces do not allow the exclusion or limitation of incidental or consequential
damages, so the above limitation or exclusion mW not apply to you. This warranty gives you
specific legal rights, and you mW also have other rights which vmy flom province to
province.To know what your legal rights are in your province, consuh your local or
provincial consumer affairs office.
Warrantor: Camco Inc. If further help is needed concerning this warranty, write: Manager,
Consumer Relations, Camco Inc., 1 Factory Lane, Suite 310, Moncton, N.B. E1C 9M3.
ZEU304
Pub No. 49-8894-2 ZEU36WMR
PartNo. 164D3333P129-2 ZEU365
12-00 JR Printed in the United States
 Loading...