

Page 1

Owner's
Manual
27" and 30"
Convection
Wall Oven
ZEK938 - 27" Single Wall Oven
ZEK958 - 27" Double Wall Oven
ZET938 - 30" Single Wall Oven
ZET958 - 30" Double Wall Oven
www.monogram.com
Monogram:_
We bring good things tolife.
Page 2

Consumer Information
I,DIll Oven
Introduction
Contents
Your new Mmmgram wall oven makes an eloquent statement of style, convenience and kitchen
planning flexibility. Whether you chose it tot its purity of design, assiduous attention to detail--
or tot both of these reasons--you'll find that your Monogram wall oven's superior blend of form
and flmction will delight you for vears to come.
Yore" Monogram wall oven was designed to provide the flexibility to blend in with w)ur kitchen
cabinetry. Its sleek design can be beautiflflly integrated into the kitchen.
The infl)rmation on the following pages will hel I) you operate and maintain wmr wall oven
properly:
Care and Clemfing
Broiler Pan and Grid .................. 37
Control Panel ........................ 39
Heating Elements ..................... 39
I,ilt-Off Oven Door . ................... 38
I,ight Bulb .......................... 40
Probe .............................. 40
Racks ............................... 37
Remowd)le Oven Floor . ................ 39
Stainless Steel and Metal Parts ........... 37
Consumer Services
Betore You Call For Service .......... 41, 42
Important Phone Nmnbe_ ............. 47
Model and Serial Nmnbers ............... 3
Product Registration .............. 3, 45, 46
Satiety Instructions ................... 4, 5
X4'arrantv ..................... Back Cover
Oven
A1mninmn Foil .................. 4, 17, 35
Baking or P,oasting ................. 16, 17
Broiling/Broiling Guide ............. 18-20
Controls ............................. 7
Clock and Timer . .................... 8, 9
Convection ....................... 26-31
Features ............................. 6
Probe ............................ 23-25
Proofing ............................ 33
Sabbath Feature .................... 13-15
Sell=Cleaning Oven ................. 35, 36
Special Features ................... 10-12
Thermostat .......................... 34
Timed Baking & Roasting ............ 21, 22
X4'atruing ............................ 32
J_e_l'loTd e
packaging
tape
To assm'e no damage is done to the finish of
the product, the satest way to remove adhesive
left from packaging tape on new appliances
is an application of a household liquid
dishwashing detergent, mineral oil or cooking
oil. Apply with a sott cloth and allow to soak.
Wipe dry and then apply an appliance polish
to thoroughly clean and protect the surtace.
NOTE: The pla,stie l@e must be *_,moved i}*mz the
chrome trim on the oven parts. It cannot be _,moved
!/it is baked on.
Page 3
Before
using" your
wall oven
Read this manual carefllll_. It is intended to
help )ou operate and maintain yore" new wall
o',en properly.
Kee I) it hand) for answers to yore" questions.
If you don't understand something or need
more help, there is a list of mll-ii'ee consumer
service nmnbers included in the back section
of this manual.
OR
Visit ore" _4ebsite at: www.monogra_a.com
Write
down the
model &
s_ial
n u lT_lbers
l[you
received a
damaged
wall oven
Save time
& money
You'll find them on a label on the side trim or
on the front of the (lower) o_,en behind the
o_,en door.
Fill out and return the Consumer Product
Registration Card that is packed with this
product. If you cannot find it, please send
in the duplicate card printed in the back of
this manual.
hmnediatelv contact the dealer (or builder)
that sold xou the wall oxen.
Before you request service, check the Problem
Solxer in the back of this manual.
Before sending in this card, please write these
nmnbers here:
Model Nmnber
Serial Nmnber
Use these nmnbers in any correspondence or
serxice calls concerning yore" wall oxen.
It lists causes of minor ol)erating, problems that
_0/I can correct Votlrself.
l[you
need
sovice
To obtain service, see the Consumer Services
page in the back of this manual.
We're proud of our service and want you to be
pleased. If for some reason you are not happy
with the service you receive, here are the steps
to tollow tot flu'ther help.
FIRST, contact the people who serviced wmr
appliance. Explain why you are not pleased.
In most cases, this will solxe the problem.
NEXT, if }ou are still not pleased, write all the
details--including yore" phone nmnl)er--to:
Manager, Customer Relations
GE Appliances
Appliance Park
I,ouisville, KY 40225
Page 4

IMPORTANT SAFETY INSTRUCTIONS
WABNING!
For _our satety, the ii]forn]atioi] in this manual must be followed to nfilfinfize the risk of fire or
exl)losion, electric shock, or to prexent propert) dalnage personal iqjury or loss of life.
IMPORTANT SAb fTY NO TICE
• The California Safe Drinking Water and
Toxic Enforcement Act requires the Governor
of Califimfia to publish a list of substances
known to the state to cause cancer, birth
detects or other rel)roductive harnL and
requires 1)usinesses to wai'i] C/lStOiilei's of
potential exposure to such substances.
SAPF,TY Pt f (;A U7 70NS
When using your appliance, follow basic safety
precautions, including the following:
• Use this appliance only for its intended use
as described in this manual.
• Be sure your appliance is properly installed
and grounded b) a qualified technician in
accordance with the provided ii]stallation
instructioi]s.
• Be sure the oven is securely installed in a
cabinet that is finuly attached to the house
structure. Never allow anyone to climb, sit,
stai]d or hai]g oi] the oven door.
• Have the installer show you the location of
the circuit breaker or fuse. Mark it for easy
referei]ce.
• Do not attempt to repair or replace any part
of your wall oven unless it is specifically
recommended in this mmmal. All other
servicing should be referred to a qualified
techlfician.
• Teach children not to play with the controls
or aI]y other part of the oven.
• Never leave the oven door open when you
are not watching the oven.
• Ahvays keep dish towels, dish cloths, pot
holders and other linens a safe distance from
your oven.
• For your safety, never use your appliance for
warming or heating the room.
• Always keep wooden and plastic utensils
and cmmed food a safe distance away from
your oven.
4
• The fiberglass insulation in self-clem_hlg
ovens gives off a very small amount of cm'bon
monoxide during the cleaning cycle. Exposure
can be inilfilnized by venting with an open
window or using a ventilation tan or hood.
T'lt ,tFl'l, a'-_ "D-'lbr'lp A -I_ I r'lp
• I±VIJU _.,JrJtxK12"_k]._ l: The health of
some birds is extremely sensiti_e to the tirades
given off during the sell=cleaning cycle of am'
o_en. Mine birds to another well-_entilated
I'OOIIl.
• Keep the oven free from grease buildup.
• Always keep combustible wall coverings, curtains
or drapes a safe distance from your oven.
• DO NOT STORE OR USE COMBUSTIBLE
MATERIALS, GASOLINE OR OTHER
FqAMMABLE VAPORS AND LIQUIDS IN
THE VICINITY OF THIS OR ANY OTHER
APPLIANCE.
• Do not let cooking grease or other flammable
materials accumulate in or near the wall oven.
• Do not use water on grease fires. Smother fire
or flaI]]e or use a multi-i)uri)ose dry chelnical
or ti_ai]]-tyl)e fire extiI]guisheI:
Flame in the oven can be smothered
completely by closing the oven door
ai]d turi]ing the oveI] off or by usiI]g a
inulti-i_uri)ose dry chelnical or ti)am-type
fire extii]guisher.
• Do not use aluminum foil to line oven
bottoms, except as suggested in this manual.
lmi_roper ii]stallation of alumii]uln hill ma'_
result in a risk of electric shock or fire.
• Cook ]neat and poultry thoroughly--meat to
at least an INTERNAL temperature of 160°F
and poultry to at least an INTERNAL
temperature of 180°F. Cooking to these
temi)eratures usually protects agaiI]st
fl>odbori]e illness.
• Before performing ally service, DISCONNECT
THE OVEN POWER SUPPLY AT THE
HOUSEHOLD DISTRIBUTION PANEL BY
REMOVING THE FLrSE OR SX_]TCHING
OFF THE CIRCUIT BI/EAKER.
• Do not store flammable materials in the oven.
Page 5
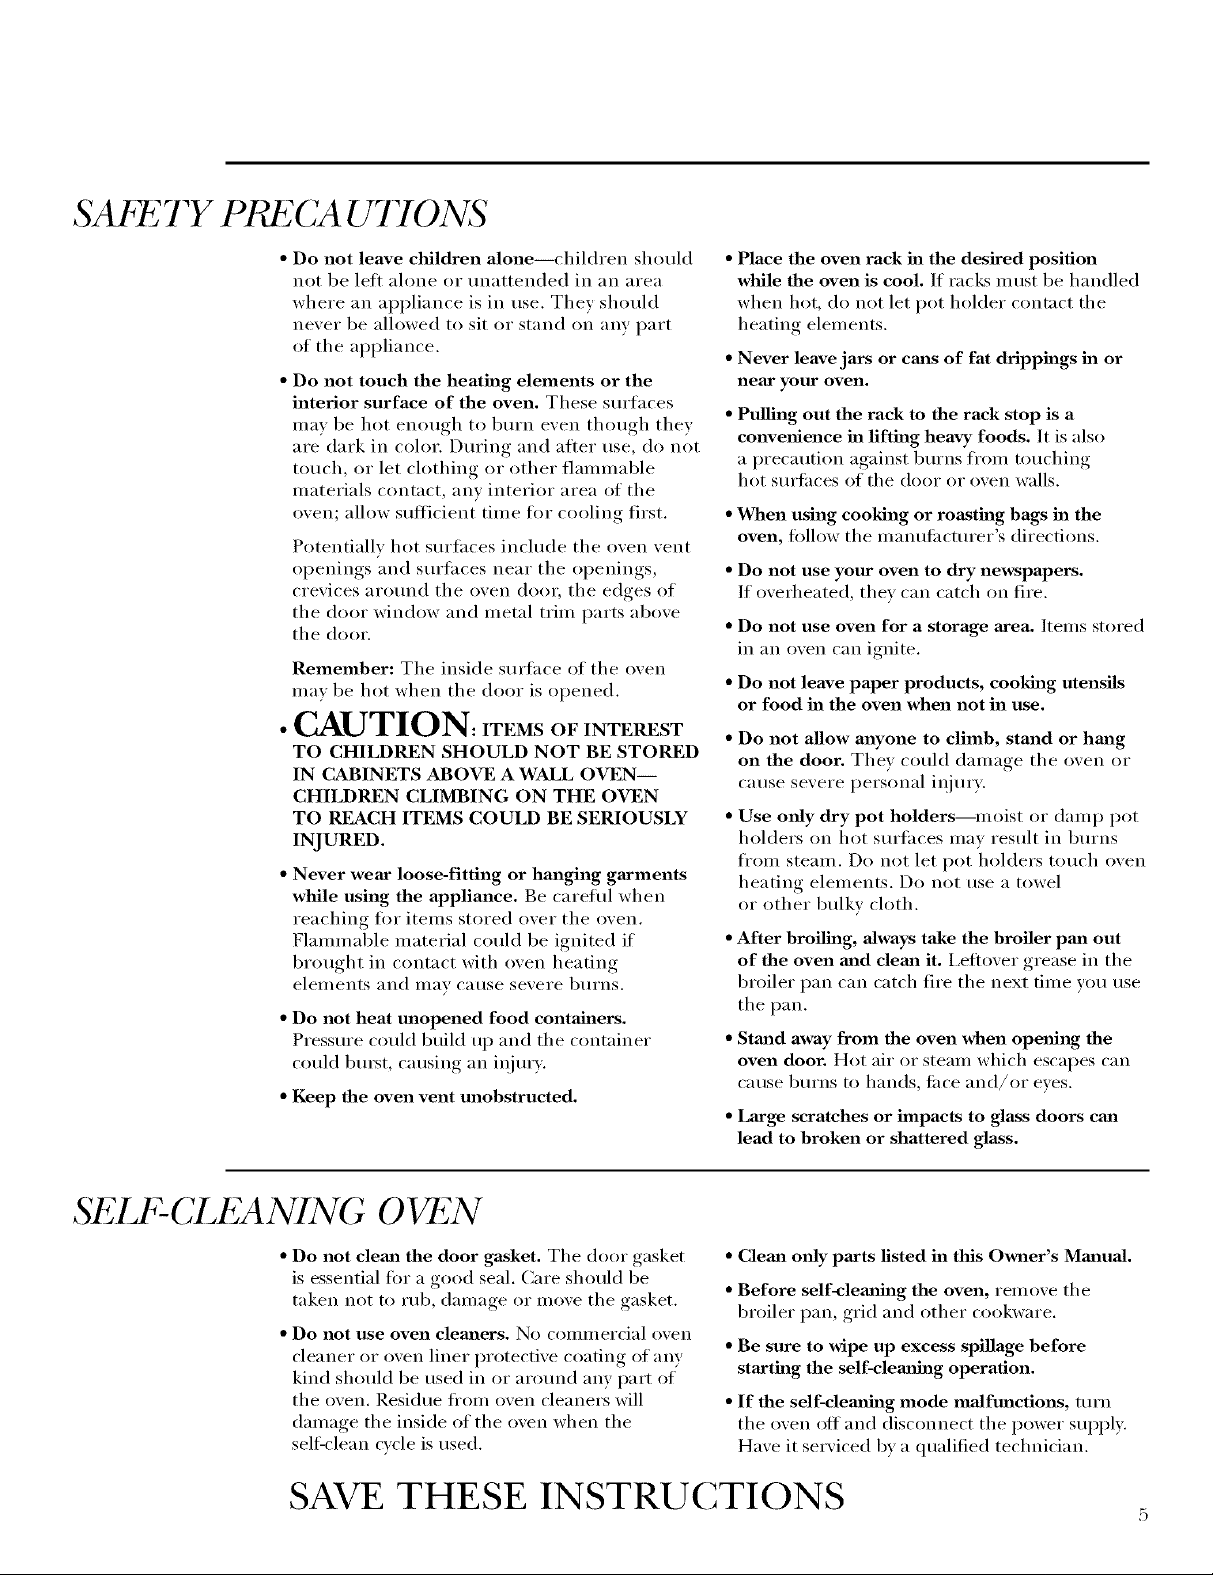
SAbF, TY Pt 2CA U770NS
• Do not leave children alone--children should
not be left ahme or unattended in an area
where an appliance is ill use. They should
never be allowed to sit or stand on any part
of tile appliance.
• Do not touch the heating elements or the
interior surface of the oven. These surtaces
may be hot enough to burn even though they
are dark ill color. During and after rise, do not
touch, or let clothing or other flmnmable
materials contact, any interior area of tile
oven; allow sufficient time fin" cooling first.
Potentially hot surtaces include tile oven vent
openings and surtaces near tile openings,
crevices around the oven door, the edges of
tile door window and metal trim parts above
tile door.
Remember: Tile inside surtace of tile oven
may be hot when tile door is opened.
•CAUTION: ITEMSOFINTEr:ST
TO CHILDREN SHOULD NOT BE STORED
IN CABINETS ABOVE A WALL OVEN--
CHILDREN CLIMBING ON THE OVEN
TO R_La.CH ITEMS COULD BE SERIOUSLY
INJURED.
• Never were"loose-fitting or hangiug ga*meuts
while using the appliance. Be cater.1 when
reaching fin" items stored over tile oven.
Flalnlnable inaterial could be ignited if
brought ill contact with oven heating
elelnents _lll(1 lll_lV Cause severe b/1Yns,
• Do not heat unopened food containers.
Pressure could build up and tile container
could bm_t, causing an injury.
• Keep the oven vent unobstructed.
• Place the oven rack in the desired position
while the oven is cool. If racks must be handled
when hot, do not let pot holder contact tile
heating elements.
• Never leave jars or calls of fat drippings in or
ueaac your oveu.
• Pulling out the rack to the rack stop is a
convenience in lifting heavy foods. It is also
a precaution against burns fl'om touching
hot surti_ces of the door or oven wails.
• When using cooking or roasting bags in the
oven, fi_llow tile manufi_cturer's directions.
• Do not use your oven to dry newspapers.
If overheated, they can catch on fire.
• Do not use oven for a storage area, Items stored
ill an oven can ignite.
• Do not leave paper products, cooking utensils
or food in the oven when not in use.
• Do not allow anyone to climb, stand or hmlg
on the door. Thev could dalnage tile oven or
cause severe personal iI_jury:
• Use only dry pot holders--moist or clamp pot
holders on hot surfilces Inav result ill burns
fl'oln stealn. Do not let pot holders touch oven
heating elelnents. Do not use a towel
or other bulky cloth.
• After broiling, always take the broiler pma out
of the oven mad deml it. I,eflover grease ill tile
broiler pan can catch fire tile next filne you use
tile pan.
• Strand away from the oven when opening the
oven door. Hot air or steam which escapes can
cause burns to hands, tilce and/or eves.
• Large scratches or impacts to glass doors call
lead to broken or shattered glass.
SEI -CLEANING OVEN
• Do not cleml the door gasket. Tile door gasket
is essential fin _a good seal. Care shoukl be
taken not to rub, dmnage or move tile gasket.
• Do uot use oven cleaners, No COUlU/ercial oven
cleaner or oven liner protective coating of any
kind should be used ill or aI'Otlnd any part of
tile oven. Residue fl'oln oven cleaners will
dalnage tile inside of tile oven when tile
sell:clean cycle is used.
SAVE THESE INSTRUCTIONS
• Cleml tufty parts listed in this Owner's Mm_ual.
• Before self-cleaJfing the oven, remove tile
broiler pan, grid and other cookware.
• Be sure to wipe up excess spillage before
starting the self-clemlhag operation.
• If the sdf-demlh_g mode malfunctions, turn
tile oven off and disconnect tile power supply.
Have it serviced by a qualified technician.
Page 6
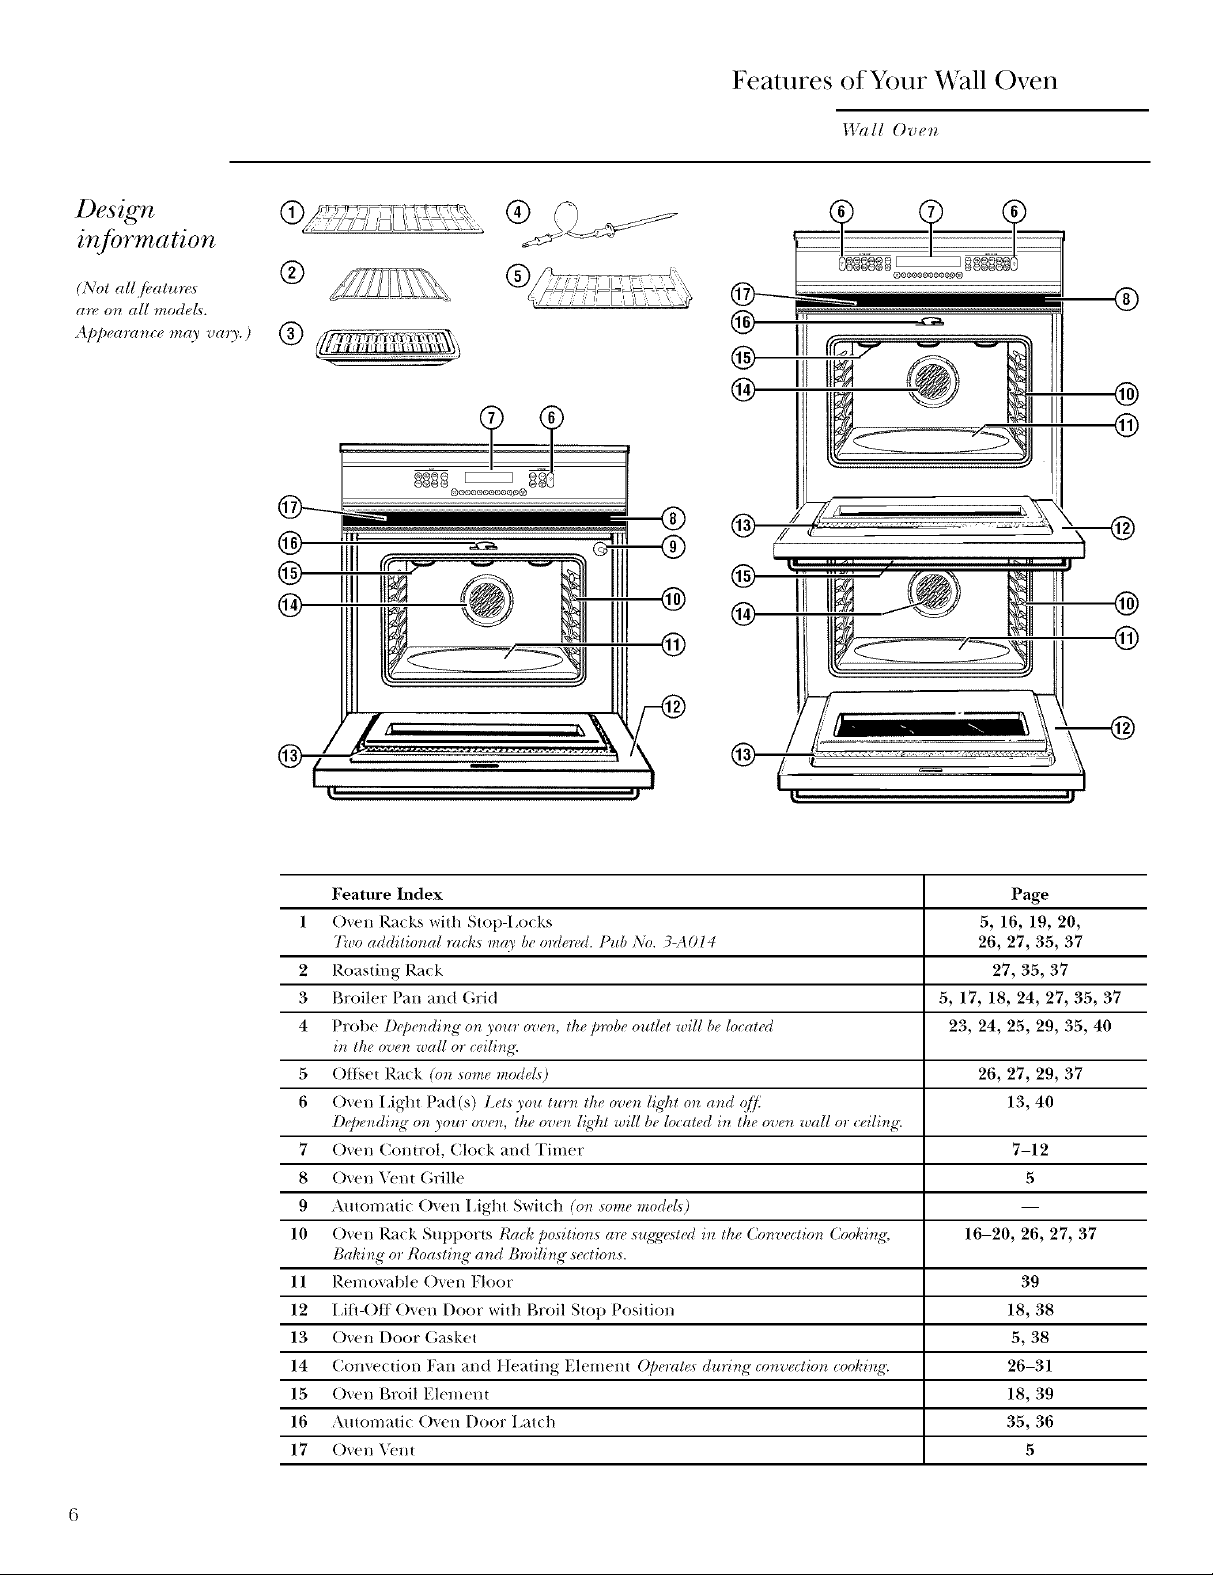
Features of Your Wall Oven
I.l_lll Ove*_
Design
inJbrmation
(NO1 all /bal*_r_<s
are o*z all modeL_.
4ppear_t_zce_a_, va_>)
®
®
®
O
@
@
Feature Index Page
1 Oven Racks with Stop-I,ocks 5, 16, 19, 20,
Two additio_tal r_lcks m_O' be o_Uered. Pub ,\'o. 3-A014 26, 27, 35, 37
2 Roasting Rack 27, 35, 37
3 Broiler Pan and (;rid 5, 17, 18, 24, 27, 35, 37
4 Probe Depe_di_g on your overt, the pr, be outlet will be [oc(lted 23, 24, 25, 29, 35, 40
i_t the oven wall or ceili_g'.
5 ()ttset Rack (on some mode£) 26, 27, 29, 37
6 Oven I Aght Pad (s) Lel._ you tur_ the overt ligDl o_t _l_td q[i; 13, 40
D_'pe_di_tg >on your ove_, the ove_ [_,_'htwill be located i_ the ove_ w_UI or ceili_g'.
7 Oven Conu:ol, Clo(k and Timer 7-12
8 Oven Veni Grille 5
9 Amomatic Oven 15ght Switch (on some models)
10 Oven Rack Supporis tbtcl_ position,s are sugg','steU i)¢ the Convectio)_ Cooki)_g; 16-20, 26, 27, 37
Baking or Ro:_sti_g" a_d B_ili_g sections.
11 Removable ()yen Floor 39
12 15fl-()ff Oven Door witt_ Broil Slop Position 18, 38
13 Oven Door Gasket 5, 38
14 Conveciion Fan and tIeating Elemeni ()[)+.r<+t_during convectio_ cooki_+g'. 26-31
15 Oven Broil Element 18, 39
16 Automatic Oven Door I arch 35, 36
17 Oven _'nt 5
Page 7
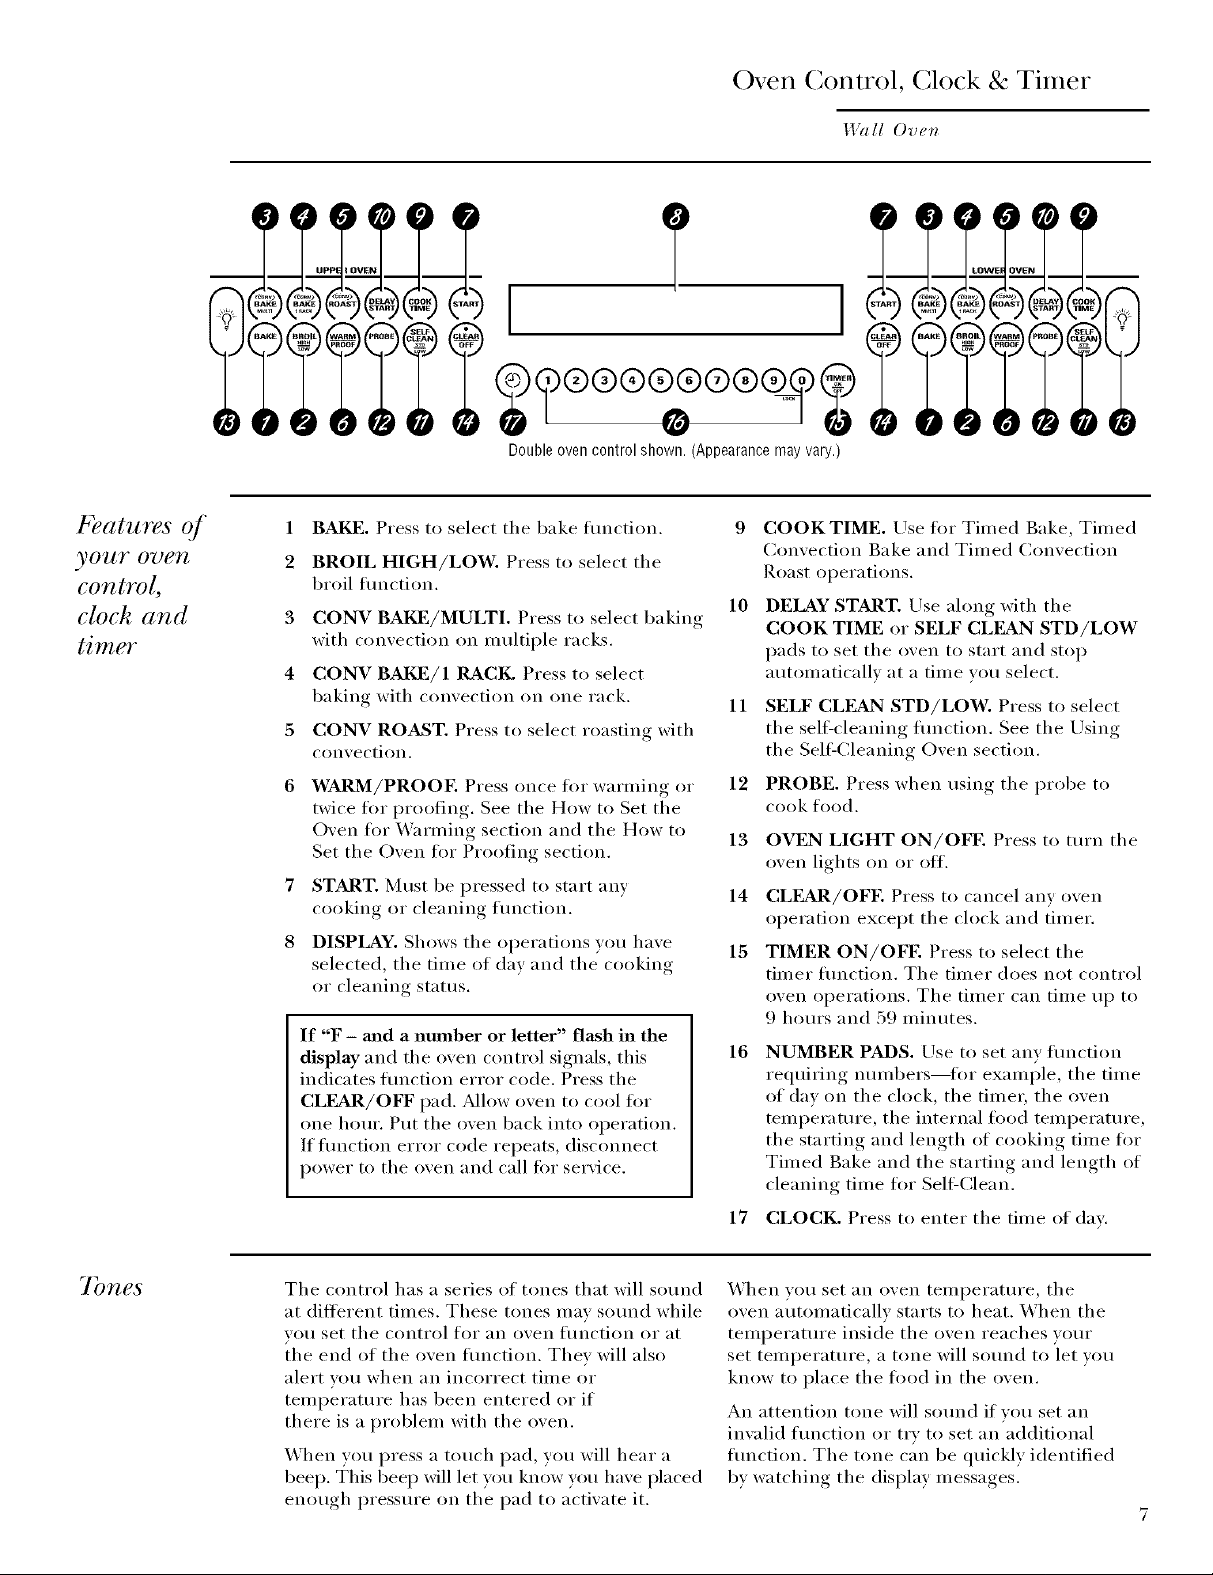
k atures of
yO_!lF O'UeTI
control,
clock and
tim
ooo 2oo
Double oven control shown. (Appearance may vary.)
1
BAKE. Press to select tile bake flmction.
2
BROIL HIGH/LOW. Press to select tile
broil flmction.
3
CONV BAKE/MULTI. Press to select baking
with convection oi1 tnultiple racks.
4
CONV BAI_]/1 RACK. Press to select
baking with convection on one rack.
5
CONV ROAST. Press to select roasting with
convection.
6
WARM/PROOE Press once tk)r warming or
twice for proofing. See tile How to Set tile
Oven for _Vmning section and the How to
Set the Oven tor Proofing section.
7
START. Must be pressed to start any
cooking oi" cleaning function.
8
DISPLAY. Shows tile operations you have
selected, tile time of day and tile cooking
or cleaning status.
If "F - mad a nmnber or letter" flash in the
display and tile oven control signals, this
indicates hmction error code. Press the
CLEAR/OFF pad. _Mlow oven to cool for
one hour. Put tile oven back into operation.
If flmction error code repeats, disconnect
power to tile oven and call for service.
Oven Control, (;lock & Tinier
I,Ddl Oven
9 COOKTIME. Use fl)r Tilned Bake, Tilned
Convection Bake and Tilned Convection
Roast operatiollS.
10 DELAY START. Use along with tile
COOK TIME or SELF CLEAN STD/LOW
pads to set tile oven to start and stop
autolnaticallv at a tilne you select.
11 SELF CLEAN STD/LOW. Press to select
tile sellecleaning flmction. See tile Using
tile Self Cleaning Oven section.
12
PROBE. Press when using tile probe to
cook food.
13
OVEN LIGHT ON/OFE Press to turn tile
oven lights oi1 or off.
14
CLEAR/OFE Press to cancel any oven
operation except tile clock and timer.
15
TIMER ON/OFE Press to select the
tilner flmction. Tile tilner does not control
oven operations, The tilner can tilne up to
9 hours and 59 lninutes.
16
NUMBER PADS. Use to set any flmction
requiring nmnbers--li)r example, tile time
of day 1111the clock, the timer, the oven
telnperature, tile internal food telnperature,
tile starting and length of cooking tilne for
Timed Bake and tile starting and length of
cleaning tilne for SellZClean.
17 CLOCK. Press to enter tile tilne of day.
7bnes
Tile control has a series of tones that will sound
at different tilnes. These tones Inav sound while
you set tile control for an oven function or at
the end of the oven fimction. They will also
alert you when an incorrect tilne or
telnperature has been entered oi" if
there is a problem with the oven.
When you press a touch pad, you will hear a
beep. This beep will let w)u know you have placed
enough pressure oi1 tile pad to activate it.
When vou set an oven telnperature, tile
oven autolnatically starts to heat. When tile
temperature inside tile oven reaches vour
set tenlperature, a tone will sound to let you
know to place tile food in tile oven.
An attention tone will sound if vou set an
invalid function oi" try to set an additional
flmction. Tile tone can be quickly identified
by watching the display lnessages.
Page 8

Oven Control, (;lock & Tinier
I,Dlll Oven
(,'lock
7b set
the clock
The c[od_ must be set/or the atttomatic oven limit_g"
./Unctions to work properly.
The time of day clock cmmot be changed
during Delay Start. (It can be changed during
a regular bake or broil operation.)
1 Press the CLOCK pad.
2 Press the number pads the same way you
read them. For example, to set 12:34, press
the number pads 1, 2, 3 and 4 in that order.
If number pads are not pressed within one
minute atier you press the CLOCK pad, the
display reverts to the original setting. If this
happens, press the CLOCK pad and reenter
the time of day.
3 Press the START pad. This enters the time
and starts the clock,
To check the time of day when the display is
showing other intormation, simply press the
CLOCK pad. The time of day shows until
another pad is pressed.
@
@®®®®®®®®®
I_o_uey
failure
7 mer
If a flashing time of day is in the display,
you have experienced a power thilure.
Reset the clock.
NOTE: The timer is ind@endent (?/all the other*"
,fi_n_tions and it doe,_ not _onlrol the oven. The
CLEAR/OFF pad doe,_ not q]f, ct the lime*'.
You may program the timer to time cooking
or other household activities tot up to 9 hours
and 59 minutes.
The timer counts down in minutes, 1 minute
at a time, until the last 60 seconds are reached.
Then the control will beep one time. The
seconds will not be displayed tmtil the last
minute is reached.
To reset the clock, press the CLOCK pad.
Enter the correct time of day by pressing
the al)propriate number pads. Press the
START pad.
When the timer reaches " :00," the control
will beep 3 times fi_llowed by one beep every
6 seconds tmtil the TIMER ON/OFF pad is
pressed.
The 6-second tone can be canceled bv
fl>llowing the steps in the Special Features
of Your Control trader Tones at the End of
a Timed Cycle,
Page 9
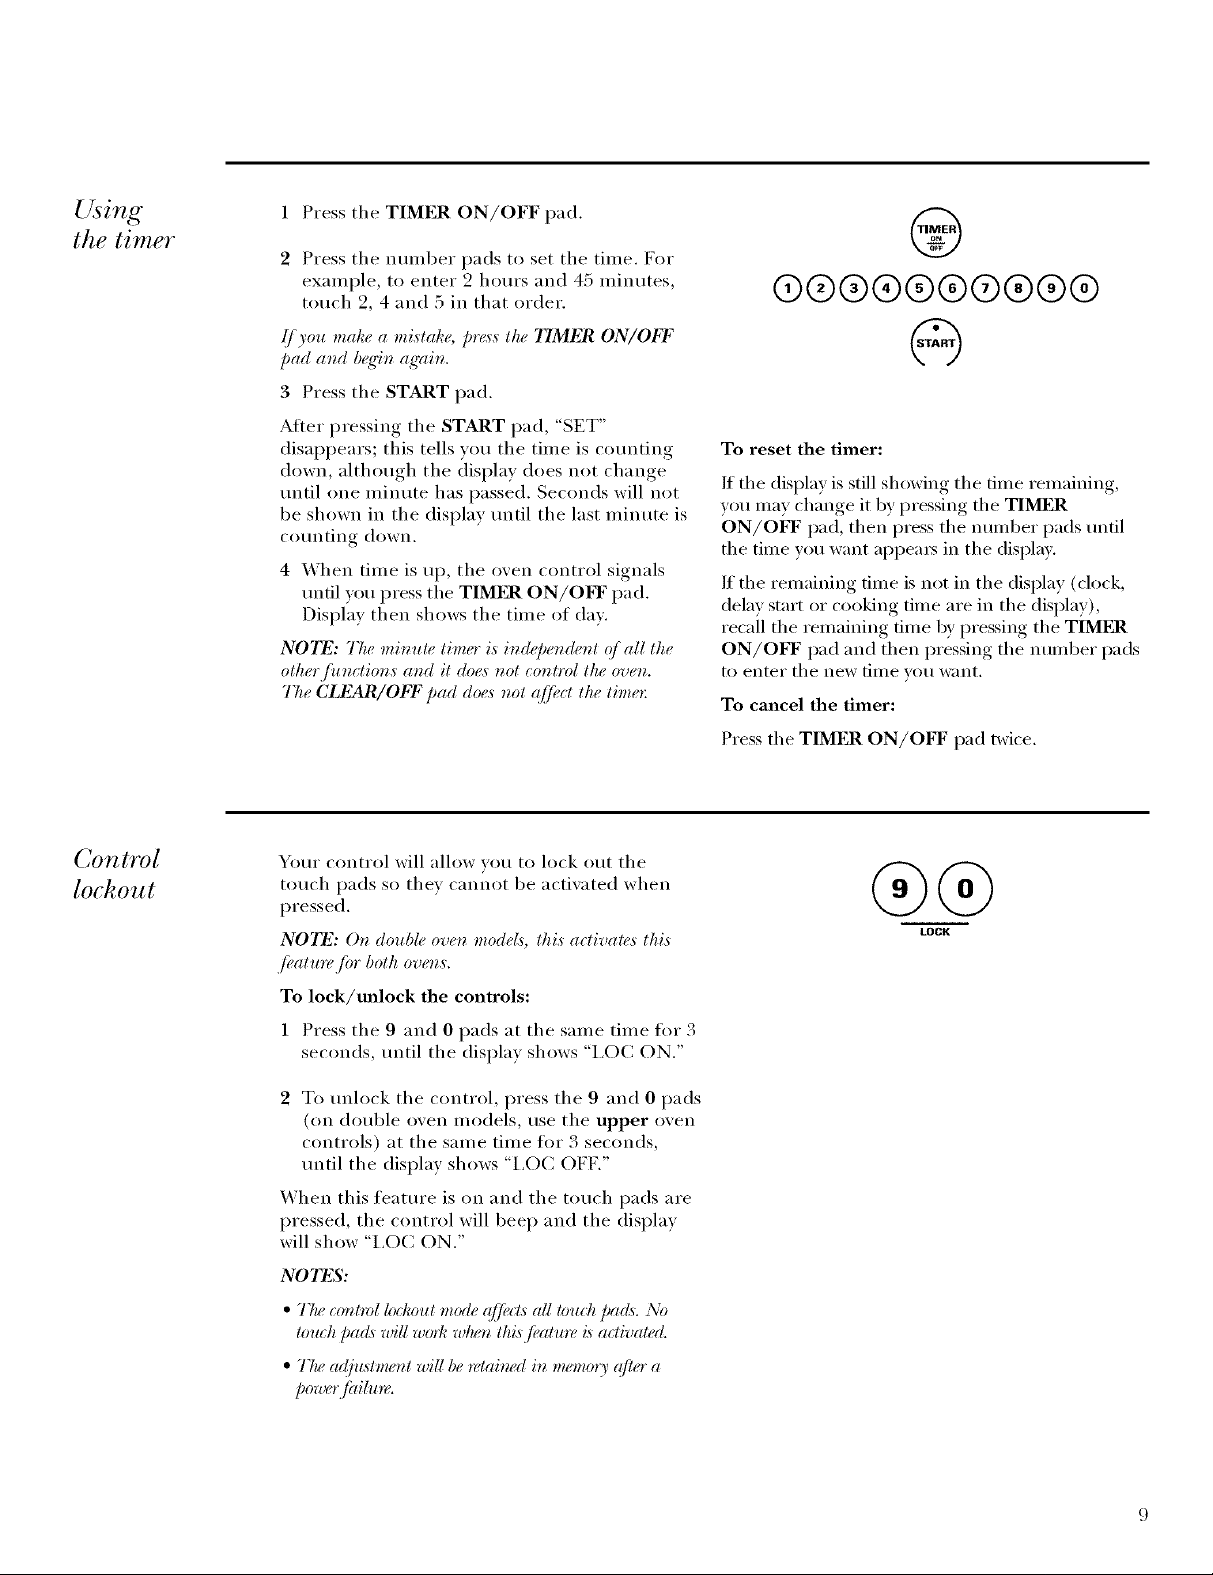
Using
the timer
1 Press tile TIMER ON/OFF pad.
2 Press tile nmnber pads to set tile time, For
example, to enter 2 hours and 45 minutes,
touch 2, 4 and 5 in that order.
@
@@@@(9@@@@@
Control
lockout
(/you make a mislake, press lhe 77MER ON/OFF
pad at_d b_q'it_ ag'ai*_.
3 Press tile START pad.
Aiier pressing tile START pad, "SET"
disappears; this tells you the time is cotmting
down, although tile display does not change
until one minute has passed. Seconds will not
be shown in the display until the last minute is
counting down.
4 _'_ lien tilne is up, tile oven control signals
until you press tile TIMI_LR ON/OFF pad.
Display then shows the time of da_,
N07_: 77w miracle timer is it_depet_det_l ({/all lhe
olher /itt_clio_,s a_d il does _ol cot_lrol lhe ovet_.
The CLEAR/OFF pad does *_ol<{[/_:ctttte timer:
Your control will allow vou to lock out tile
touch pads so they cannot be activated when
pressed.
NOTE: Or_double ovetz model,s, this aUival¢,s lhis
./_,ature /br both ove_zs.
To lock/mflock the controls:
@
To reset the timer:
If tile display is still showing tile time remaining,
you may change it by pressing the TIMER
ON/OFF pad, then press the nun/bet pads until
the time you want appea_5 in the display.
If tile remaining time is not in tile display (clock,
delay start or cooking time are in the display),
recall the remaining time by pressing the TIMER
ON/OFF pad and then pressing tile number pads
to enter tile new tinle vo/i _V_lilt,
To cancel the timer:
Press tile TIMER ON/OFF pad twice.
®®
LOCK
1 Press the 9 and 0 pads at the same time tot 3
seconds, until the display shows "I,OC ON."
2 To tmlock tile control, press tile 9 and 0 pads
(on double oven Inodels, use the upper oven
controls) at tile san/e time tot 3 seconds,
tmtil the display shows "I,OC OFK"
"_,_hen this featm'e is on and tile touch pads are
pressed, the control will beep and tile displa)
will show "I,OC ON."
NOTES:
• 77w comrol bt/:ouimode @cls ag louchpads. 5b
loluh /:a&willworkwlu:r_llzi,sf,alutvh aaival,,d.
• 77_,¢ac(]u,slmo_l rvifi be rdabwd it_ memory ((/let"a
power fidhm,
Page 10
Special Features
14_lll Ore,
Special
jeatures 4
yO_lgr 07)gTI
control
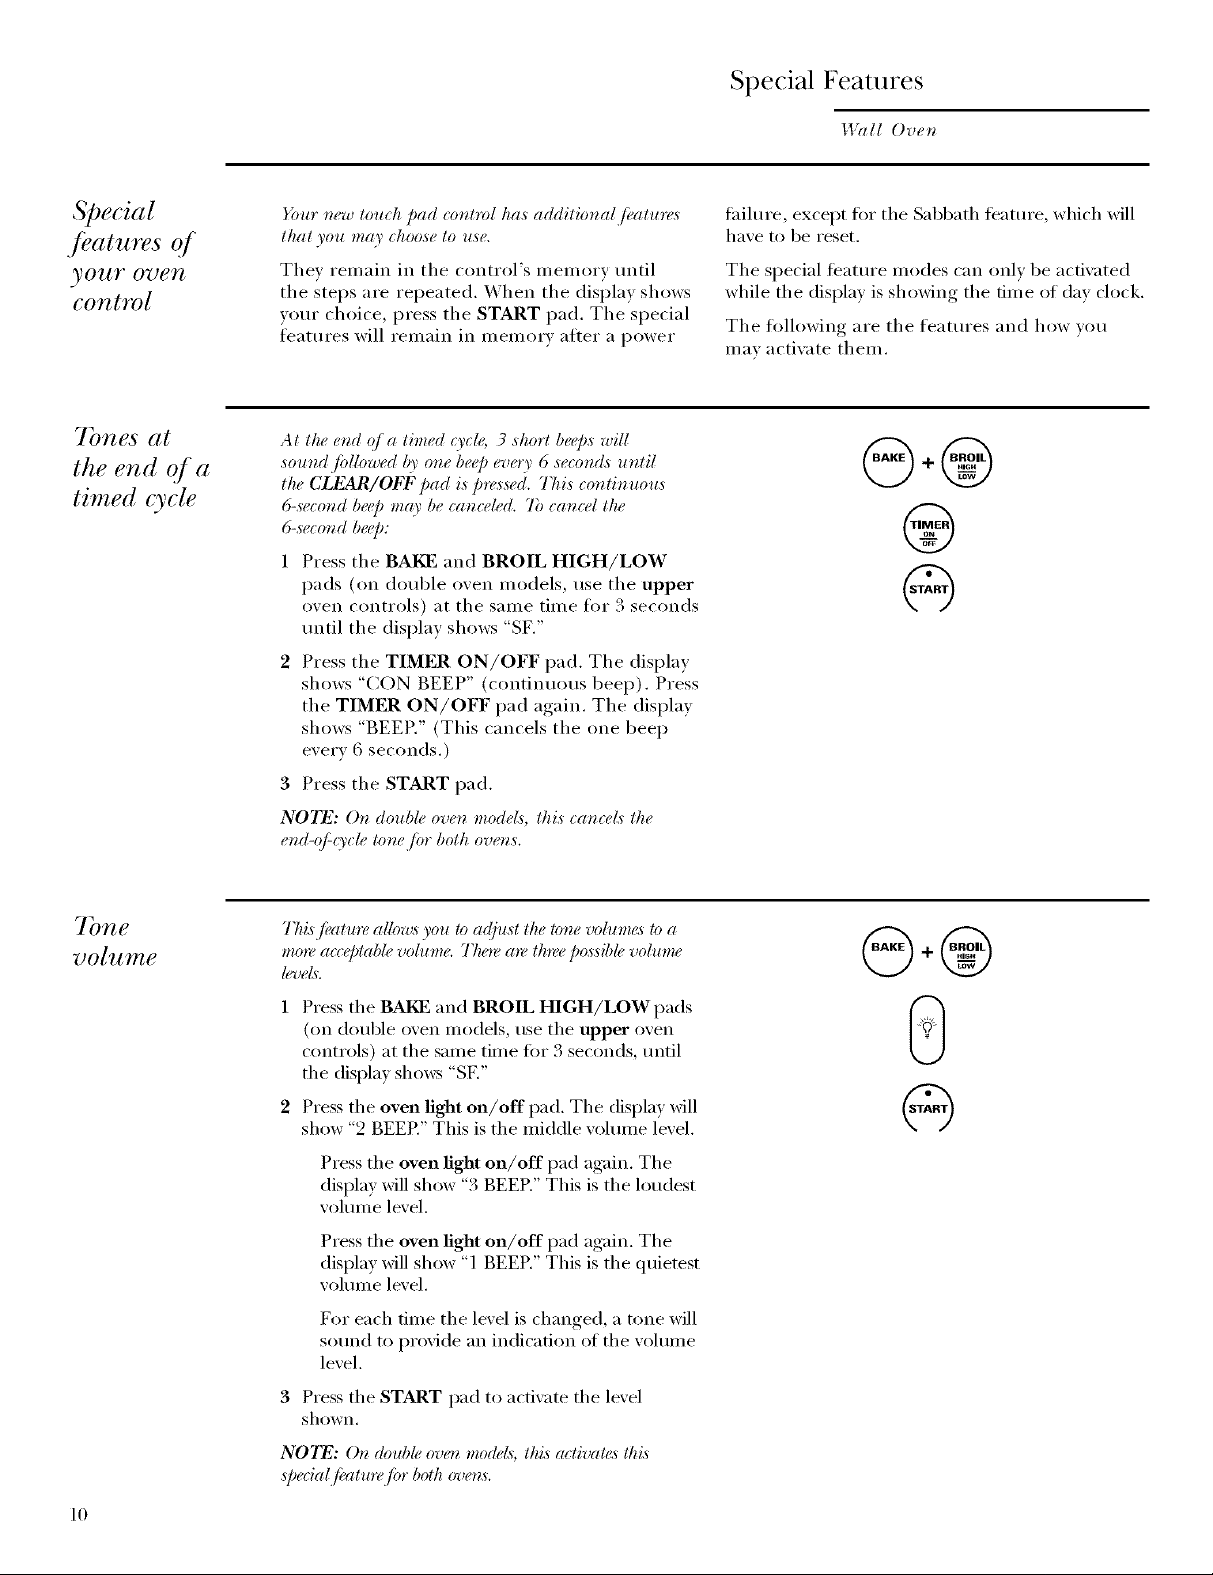
7bnes at
the end of a
timed cycle
}}*ur _ew touch Dad cot_trol has additiorml fi¢atures
that you may choose to u,se.
They remain in the control's memory until
the steps are repeated. When the display shows
your choice, press the START pad. The special
features will remain in memory atter a power
At the end r_]a timed o'ch; 3 short beeps will
sound Jbllowed @ one be@ every 6 secon& until
the CLI_2AR/OFF pad is pres,s_¢d.This _ontinuous
6-s_ ond bee/) m(9' be (an_e#d. 7b cancel the
6-s_¢cond be@:
Press the BAKE and BROIL HIGH/LOW
pads (on double oven models, use the upper
oven controls) at the same time fi)r 3 seconds
until the display shows "SF."
Press the TIMER ON/OFF pad. The display
shows "CON BEEP" (continuous beep). Press
the TIMER ON/OFF pad again. The display
shows "BEER" (This cancels the one beep
every 6 seconds.)
3 Press the START pad.
NOTE: 0_ double ovo_ models, this ca*_ceLs the
er_d-@gT_ le tor_e /br both over_,s.
tailure, except fiw the Sabbath timttu'e, which will
haxe to be reset.
The special teature modes can onlx be acfixated
while the displa)is showing the time of day clock,
The folh)wing are the features and how xou
U/_1_ _lctixa te theu/,
@+@
@
@
775,sfiCatlm,allowsyou toaqfl¢,st#w to_e volumes toa
mo*eacceptablevoluma 77w_ea*,_threepossihl_volume
h,vd*.
1 Press the BAI_ ] and BROIL HIGH/LOW pads
(on double oven inodels, use the upper oven
controls) at the same time tot 3 seconds, until
the display shows "SF,"
2 Press the oven fight on/off pad. The display will
show "2 BEER" This is the middle xolume lexel.
Press the oven fight on/off pad again. The
displa) will show "3 BEER" This is the h)udest
"_ohline lexel.
Press the oven fight on/off pad again. The
display will show "1 BEER" This is the quietest
•_ohlule lex el.
For each time the lexel is changed, a tone will
sound to proxide an indication of the xolume
lmel.
3 Press the START pad to actixate the lexel
shown.
N07_2: On double over_modds, this activates this
Spedal fi:,alu*vfbr both _ens.
@+@
G
10
Page 11
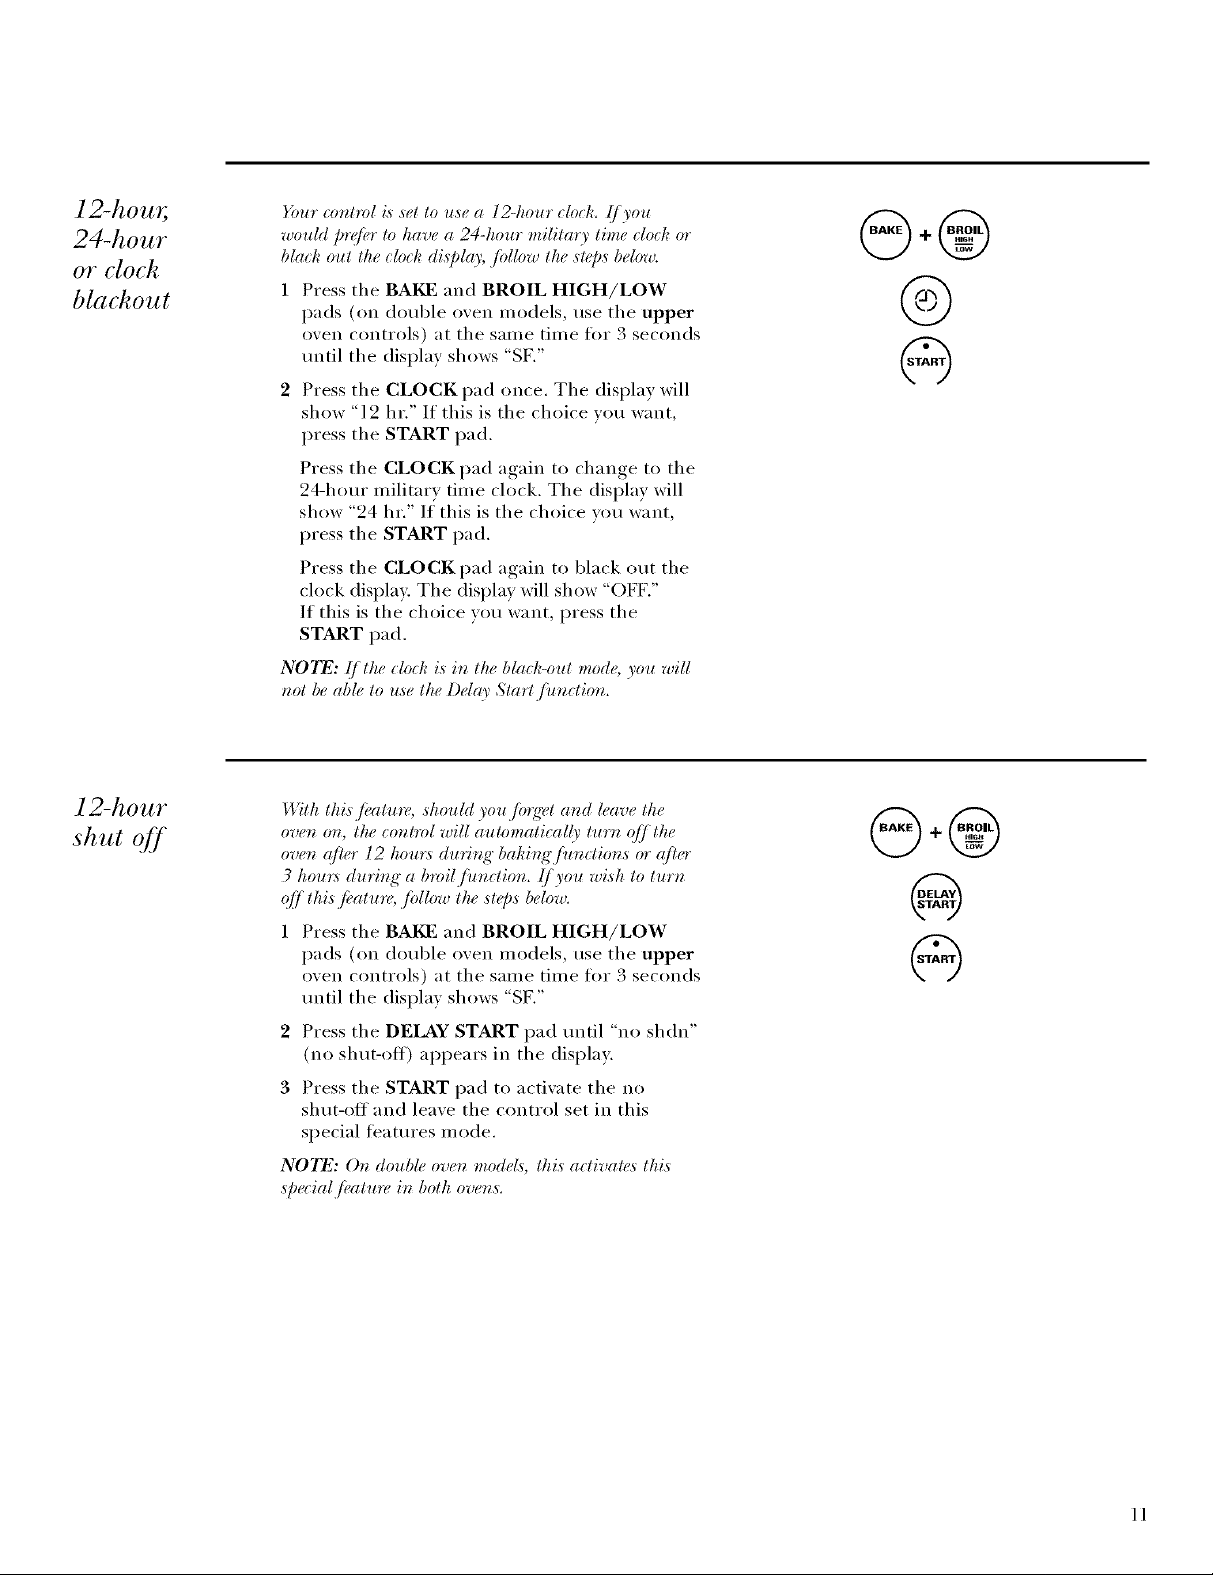
12-horn;
24-hour
or clock
blackout
_*ur control is ,set to use a 12-hour clock. (/you
would pr@,r 1o have a 24-hour military time dock or
bla_ k out the _loz k di@la), ./bllow the steps below.
Press the BAKE and BROIL HIGH/LOW
pads (on double oven models, use the upper
oven controls) at the same time tot 3 seconds
until the display shows "SF."
2 Press the CLOCK pad once. The display will
show "12 hr." If this is the choice _ou want
press the START pad.
Press the CLOCK pad again to change to the
24-hour military time clock. The display will
show "24 hr." I( this is the choice w)u want,
press the START pad.
Press the CLOCK pad again to black out the
clock displa> The display will show "OFF."
If this is the choice wm want, press the
START pad.
N07_: I]]the clock is i_ the black-out mode, you will
r_ol be able lo use lhe Dday Slarl /i_r_clior_.
@.@
@
@
12-hour
shut oil
With this fi, atare, shouhl you /b*gr_t and leave the
oven on, the _onlml will automatically turz_ (_[/ the
oven after 12 hou*:s duri_g" baki_g'Junctions or qi/¢r
3 hou_:s duri_g" a broil/imction. {/you wish to turn
_*/./this.fl, atu*_¢, ./bllow the steps below.
Press the BAKE and BROIL HIGH/LOW
pads (on double oven models, use the upper
oven controls) at the same time tot 3 seconds
until the display shows "SF."
2 Press the DELAY START pad until "no shdn"
(no shut-off) appears in the display.
3 Press the START pad to actiwate the no
shut-off and leaxe the control set in this
special ligatures mode.
N07_2: 0_ double ove_ models, lt_i,sactivalas lt_i,s
Spe_ial Ji,al u*,_i*_boltzover_s.
@+@
ll
Page 12

Special Features
I,l_d! Ove*_
t' threnheit
or Celsius
temperature
se&ction
A _l t o
t ?cipe
conversion
_bur ove_ co*_lrol i,s ,set to u,se the t;?d_*vnkeit
temperature ,sele_lio_,s, but you may eha_g'e tki,s
to u,se the ( e£iu,s ,se#ctio_,s.
1 Press the BAKE and BROIL HIGH/LOW
pads (on double oven models, use the upper
oven controls) at the same time tot 3 seconds
until the display shows "SIL"
2 Press the BROIL HIGH/LOW and COOK
TIME pads at the same time. The display will
show "F" (Fahrenheit).
Press the BROIL HIGH/LOW and COOK
TIME pads again at the same time. This will
show "C" (Celsius).
3 Press the START pad. The new setting will be
displayed ti)r both ovens.
NO_I_: O_z double ove_ model,_, the _ze'wsettiz_g"will
be di,ff)layed jbr both ove_,s.
I,/Tzen usir_g"eonve( tion bake, the Auto ICecipe'"
Co_zve*:sio_zjkatlt*_ will automatically _onvert entered
r_q'ular baki_g" lempemtu*_¢._ to _onvection baki_g"
tempeml ure._.
O_zce the fi¢atu_, is activated, the displa)' will show the
actual co_zverted (*_,du_ed) tempe*vltu*_,. For example,
{]you e_*tera *_'g'ular recipe temperature q/350°F and
pre,_sthe START pad, the display will show "CON"
and the converted temperature q/"325°F."
NO_I_: 77zi,sJ;¢ature doe,s _ot co*_vertco_vectio*_bake
eooki_g"time,s,o_dy r_t{'ularbaki_g temperature,s.
To Activate the Feature:
1 Press the BAKE and BROIL HIGH/LOW
pads (on double oven inodels, use the upper
oven controls) at the same time lot 3
seconds, until the display shows "SF."
2 Press the CONV BAKE/1 RACK pad. The
display will show "CON OFF." Press the
CONV BAKE/1 RACK pad again. The
display will show "CON ON."
3 Press the START pad.
To deactivate the feature, repeat steps 1-3
abme but press the START pad when "CON
OFF" is in the display.
@.@
@
@
@
12
Page 13

Using the Sabbath Feature
Desig_.ed for use on the Jewish Sabbath and Holidays.
I.DIl! Ove*_
Sabbath
l_)ature:
How to set
jbr regular
baking or
roasting
77w Sabbalk flealu*e _at_ be used for bakinqiroasli,, g•
otdy. 1i eazmol be u,v_djbr eor_veclio_, broil@g;
.s_¢{fic#az_i_gor l)elar Sla*_ eooki_g
Make sure ltze clock shows ltze corn.el lime o/ day at_d
(he over_ i,s OFI:.
Press and hold both the BAKE and BROIL
HIGH/LOW pads, at the stone time, until
the displa) shows "SF."
NOTE: (/bake or broil appea*:s i_ ltze displrg;
ltze BAKE a_d BROIL HIGH/LOW pads were
_ol lou(hed al lhe ,same lime. 7Muh lke
CLEAR/OFF pad a_*d beg'i_*ag'aim
2
Tap the DELAY START pad until
"SAb bAtH" appears inthe display.
3
Touch the START pad and D will appear
in the display.
4
Touch the BAKE pad. No signal will be
glX, ell.
5
Using the number pads, enter the desired
temperature between 170 ° and 55(1 °.
No signal or temperature will be gixen,
6
Touch the START pad.
7
Alter a random delay period of
approximately 30 seconds to 1 minute,
D C will appear in the display indicating
that the oven is baking/roasting. If D C
doesn't appear in the display, start again
at Step 4.
To a(!just the oxen temperature, touch the
BAKE pad, enter the new temperature using
the number pads, and touch the START pad.
N07T: 77w CLEAR/OFF and COOK TIME pads
ar_, a_ liv_, duriz_g ltu. Sabbalt_ fl,alur<
N07_2: The ove_ l{q'ht _omes on atttomati_ ally (oa some
mocM._) whea tlw door is opet_d aml g_*eso/Jwkea tlu"
door i,sekzwd. The bit& may be n_moved. See the Over*
L_ffht I¢@la_emozl s_¢g:tion.(h_ moclds with a l_ffbtswilch
on the eor_lrol parM, the ovea l_q'kl may be tu*wd on
arid l(fl or_.
@+@
@@@(9@@@@@@
@
When the display shows D the oven is
set in Sabbath. When the display shows
D C the oven is baking/roasting.
13
Page 14

Using the Sabbath Feature
_.DIll Ove*_
Sabbath
f?ature:
How to set jbr
timed baking
or roasting-
immediate start
and automatic
stop
Make ,sure the clock ,shows the correct lime o/day a_d
the ove_ i,s ()FF,
1 Press and hold both the BAKE and BROIL
HIGH/LOW pads, at the same time, until
the display shows "SF."
NOTE: ff bake or broil appea*:s it_ lt_e display,
ltze BAKE a_d BROIL HIGH/LOW pads were
_ol lou_hed al lke ,same lime. 7bu_k lke
CLEAR/OFF Dad a_*d beg'i_*ag'aim
2
Tap the DELAY START pad until
"SAb bAtH" appears in the display.
3
Touch the START pad and D will appear
in the displa).
4
Touch the COOK TIME pad.
5
Touch the number pads to set the desired
length of cooking time between 1 minute
and 9 hours and 99 minutes. The cooking
time that you entered will be displayed.
6
Touch the START pad.
7
Touch the BAI_] pad. No signal will be
Using the number pads, enter the desired
temperature. No signal or temperature will
be gix en.
9 Touch the START pad.
10After a random delay period of
approximately 30 seconds to 1 minute,
D C will appear in the display indicating that
the oven is baking/roasting. IfD C doesn't
appear in the display, start again at Step 7.
To a¢!just the oven temperature, touch the
BAKE pad, enter the new temperature using
the number pads, and touch the START pad.
When cooking is finished, the display will
change from D C to D and "0:00" will appear,
indicating that the oven has turned OI_T but is
still set in Sabbath. Remove the cooked 10od.
@+@
%
%
®®®®®®®®®®
@
When the display shows > the oven is
set in Sabbath, When the display shows
D C the oven is baking/roasting.
14
Page 15

How to exit
the Sabbath
jeature
1
Touch the CLEAR/OFF pad.
2
If the o_en is cooking, wait for a rand(nn
delay period of al_proxinmtely 30 seconds
to 1 minute, until only D is in the displa).
Press and hold both the BAKE and BROIL
HIGH/LOW pads, at the same time, tmtil
the display shows "SF."
Tap the DELAY START pad tmtil
"12 shdn" or "no shdn" appea_ in the
display. "12 shdn" indicates that the oven
will automatically ttlYn oJ[][atter 12 hours.
"no shdn" indicates that the oven will not
automatically tm'n off.
5 Touch the START pad.
NOTE: !/a: [)oweroutag'e,occurred while ltze oven
was in Sabbalh, the oven will aulomalically turn qff
and slay ({{[even when the power returns. The oven
CO?_llO[ ??IllS[ D(" I'(_,_('l,
®
@.@
@
15
Page 16

Baking or Roasting
I,l?lll Oven
Be/oreyou
begin...
How to set
the oven jbr
baking or
roasting
7b avoid po,vsible blvw,s, place ltze rack,s in
the de,sired posilion b{,fim, you lurn lke oven on.
The racks have stop-locks, so that when
placed correctlx on the sui)ports, the) will stop
before coming completely out, and will not tilt.
X_hen placing and removing cookware,
pull the rack out to the bran l) on the
rack SUl)port.
To remove a rack, pull it toward you
tilt the front end up and pull it out.
To replace, place the end of the rack
(stoi>locks) on the sui)port, tilt up the
front and push the rack in.
1 Press the BAKE pad.
2 Press the nmnber pads to set the desired
tern pera ture.
3 Press the START pad.
4 Check food for aloneness at minimmn time
on recipe. Cook longer if necessary:
5 Press the CLEAR/OFF pad when cooking
is complete.
NOTE: A cooling'Jiln may automalically turn on
and (ffj to cool internal parts. 75is i,s normal, and
the filn may continue to run ev(m ((tier the oven is
turned q_
®
®
®
®
®
®
®
30" ovens (shown) have7 rack positions.
27" ovens have 4 rack positions.
®
®
®
®
Rack Position
Type of Food 27" Oven 30" Oven
Frozen pies B or C C or D
(on (ookie sheet)
Angel food cake A B
Bundt or pound cakes B B
Biscuits, muftins, Bor C C or D
I)rownies, cookies,
cupcakes, layer
cakes, pies
Cassel_)les Bor C C or D
16
Page 17

Preheating
and pan
placement
Preheat the oven if the recipe calls for it. To
preheat, set the oven at the correct temperature.
Preheating is necessary tot good results when
baking cakes, cookies, pastry and breads.
t+br ovens wilhoul a preheal indicalor lighl or lone,
preheal l 0 rain ules.
Baking results will be better if baking pans are
centered in the oven as much as possible. Pans
should not touch each other or the walls of the
oven. If you need to use two racks, stagger the
pans so one is not directly above the other, and
leave approximately 1½" between pans, fl'om
the front, back and sides of the wall.
Aluminum
bil
You can use aluminum foil to line the broiler
pan and broiler grid. However; you must mold
the flfil tightly to the grid and cut slits in it just
like the grid.
Ahtminum fifil may al,_o be used lo _al_l_ a spillove*:
Never entirely cover a rack with aluminum fifil.
This will distm'b the heat circulation and result
in poor baking.
A smaller sheet of foil mav be used to catch a
spillover by placing it on a lower rack several
inches below the tood.
Cut slits in the foil just like the grid.
17
Page 18

Broiling
1,1_1l!Oven
How to set
the oven jot
broiling
1 Place the meat or fish on the broiler grid in
the broiler pan.
2 Follow suggested rack positions in the
Broiling Guide.
I/your oven is connecled lo 208 rolls, rare sleaks may
be broiled by prehealing lhe broi#r and posilioning" lhe
oven rack one po,sition h_q'he*:
3 Press the BROIL HIGH/LOW pad once for
HI Broil,
To change to LO Broil, press the BROIL
HIGH/LOW pad again.
4 Press the START pad.
5 When broiling is finished, press the
CLI?_R/OFF pa d.
NOTE: Broil will not work !] the lemperatu*_ probe is
plug:wd in.
Leavethe door open to the broil stop position.
The door stays open byitself, yet the proper temperature
is maintained in the oven.
NOTE:Food can be broiled with the door closed, but
it may not brown as well because the oven heating element
will cycle on and off.
18
Page 19

Broiling guide
jot 27" ovens
(on SO)he
models)
77w siz< w_,_gl_L lhhkm<_s.
_taHi)_g tonpo_ltm_ and
will affect b_)iliEq tim_,s.
Tkis guide is based m* m_,als
m _@'ig_,mlo_l_,m]wmtum
7"ke _ LS. l)eparhm,zt o/
A qricuflm_, _q> '7_m_, bee/i_
po[mlm; but you 4muhl
kmm_ lhal coot:i_lg il h) only
140°1 ``me(ms wm_,jood
_to_,ive. "(5;om_,,: S@ l'bod
Boola _bm K;tdten (;ukh,.
I'5,7)A tCev..Jum_ 1985.)
Food or Thickness Position
Qumltity mid/ Rack
Gromld Beef
Well Done
1 lb. (4 patties)
1/2 to 3/4" thick
First Side
Thne (mill.)
10
Second Side
Thne (mhl.)
7
Conlnlenls
Space evenl}: I p t*) S patties take
aboHt the same time.
Beef Steaks
Raret
Medimn
_kql Done
Medimn
_,\_11 Done
Clficken 1 whole A 35 10-15 Reduce time about 5 to 10 nlinutes
Lolzster Tails 2-4 B 13-16 I)o not Cut through back of shell. Spread
Fish Fillets 1/4 to 1/2" thi(k C 3 3 t tandle and turn vels" t alelhll'<
Hmn Nices 1" thick B 8 8 Increase time 5 to 10 mimlt(s per side
(precooked) tor 1_½" thick or home-Hn-ed ham.
Pork Chops 2 (1/2" thick) C 10 10 Slash tht.
Xk\*ll I)one 2 (1" thick) about 1 lb. B 1?, 1 !_,
Lamb Chops
Medimn
_,\.11 Done
Medimn
_\_11 Done
1" thick
1 to 1½ lbs.
1½" thick
2 to 2½ lbs.
2 to 2_ lbs., per side tor cut-up chicken.
_,plit lengthwise Blush each side with mehed buttel:
6 to 8 oz. each turn oxeL open. Blush with mehed butter
ab(a_t 10 to 12 oz.
2 (ll½ " thick)
about 1 lb.
C
C
C
C
C
C
C
C
C
B
6
8
12
10
15
25
10
12
14
17
5
6
11
7-S
14-16
20-25
9
10
12
12-14
Steaks less than 1" thick cook
through befk)rc I)rowning. Pan
flying is recommended.
Slash fiat.
Broil skin-qde-down first.
I)elorc br_ filing and aii(r half of
Im filing time.
Brash with lemon butter betore
and during cooking, if desired.
Preheat broiler to increase 1)rowning.
Slash tht.2 (1" thick)
19
Page 20

Broiling
Wall Oven
Broiling ,guide
jbr 30" ovens
(on SO,re
models)
77wsi:< w_,_l& lhid¢m<ss.
staCklg ton]Jo_tZlo__and
Tkis guigtuA bav'd m* tm.als
al _@g_'mtor I,'mpoalu_'.
*Tku{\S. i)_parlnwnt _
Agricuflm_. sq> '7"m_.MJ is
po[mlm; but you qmuhl
]_mXl! lhal (:oot_itlg tl lo Otff)'
140°1:uwmls somefl)od
/,ohoni_g oWnzisms mqr
_to_,im "(5;om_,,:S@ l'bod
]'ook. Yom K;Mwn (;ukh_.
1%l)A tCev..]Um_19850
Food or ThicMmss Posidon
Ground Beef
Well Done
Beet" Steaks
P.are t
Medium
Well Done
Rarer
Medium
Well Done
Chicken 1 whole C 25 10 Reduce time about 5 to 10 minutes
Lobster Tails 2_I C 13-16 Do not Cut through back of shell. Spread
Fisb Fillets 1/4 to 1/2" thick E 5 5 ttandle mM mrn xety carvfiflly.
Ham Sfices 1" thi(k D 8 8 In(tease time 5 to 10 mimltes per qde
(precooked) tot 1½" thick or home<ln-cd ham.
Pork Chops 2 (1/2" thick) E 10 10 Slash tilt.
Well Done 2 (1" thick) about 1 lb. D 15 15
Lamb Chops
Medium
Well I)one
Medium
Well Done
Quantity and/ Rack
1 lb. (4 patties)
1/2 to 3/4" thick
1" thick
1 to 1½ lbs.
E
E
E
1½" thick
2 to 2½ lbs.
E
E
E
2 tx) 2½ lbs., per side tot cut-up chicken.
split lengthwise Blush each side with mehed 1)uuel;
6 to S oz. each ttllll oven ol)en. Brush with melted butter
2 (1" thick)
about 10 to 12 oz.
2 (1½" thick)
abollt 1 1t).
E
E
E
E
First Side
Thne (mhl.)
lo
lo
8
10
12
10
15
25
10
12
14
17
Second Side
Thne (mha.)
7
9
6
8
10
8
14-16
2t)-25
9
10
12
12-14
Colnlllents
Space cvcnlT< l p to 8 patties take
about the same time.
Steaks less than 1" thick cook
through before browning. Pan
tiTing is recommended.
Slash tilt.
Broil skin-qde-@ _wn fir_,t.
before broiling and ariel half of
broiling time.
Brash with lemon l)lltter beforc
and dming cooking, if desirc(I.
Preheat broiler to increase br(_wning.
Slash iht.
2O
Page 21

Timed Baking
Wall Oven
Using the
timed baking
and roasting
./eatures
How to set
an immediate
start and
automatic
st@
N07_: Foods that spoil east@ such as milk, eggs,
,fish, stl!_fing:b poultry and pork, should not be
allowed to sit 7br more than l hour b_,7breor qfler
cooking'. Room temperature promotes the g'rowth q/
har_@d bacteria. Be sure that the oven l_'bt is (J7
because heat Tram the bun will speed hartqfid bacteria
growth.
The oven will turn on immediat@' and cooh Jbr a
se#_led #ng'lh of lime. A t the end of the _ookinff lime
the oven will turn (:/Jautomatical@
Make sm'e the (wen clock shows the correct
time of day.
1 Press the BAKE pad.
2 Using the nmnber pads, enter the desired
temperature.
3 Press the COOK TIME pad.
NOTE" I your *;,(i )e *,,_ui*vs )*':,t_,,ating;:7. / l / , you may
need to add additional time to the length ot the
cooking" time.
4 Using the nmnber pads, enter the desired
baking time, The oven temperatm'e and
the cooking time that you entered will be
displayed.
5 Press the START pad.
The display shows the oven temperatm'e
that you set and the cooking time cotmtdown.
(The display starts changing once the
temperature reaches 1O0°K)
N07_: On double oven model,s, when using" both
ovens at the same time, the times showing" in the
displ( 9' will be /br the last oven set. 7b di@lay the
time set,for the fi*:st oven set; press the COOK 77ME
pad /br that oven.
The oven will continue to cook fi_r the
programmed alllO/int of time, then shut off
automatically, unless the _._;_tRM feature was set.
See the How to set the oven /br warmb_g" section.
6 Press the CLEAR/OFF pad to clear the
display.
On double oven models, you can use timed
baking in one oven while using sell:clean in the
other; you can also use timed baking in both
ovens at tile same time.
@
@@@@@@@@@@
@
@@@(9@@@@@@
@
21
Page 22

Timed Baking
Wall Oven
How to set
a delayed
start and
automatic
stop
_bu can ,set lhe oven control lo delay-start lhe oven,
cookJbr a SpeC!fic length o/lime and then turn (_/]]
aulomalically.
Make sure tile oxen clock shows tile correct
time of day.
1 Press tile BAKE pad.
2 Using the nmnber pads, enter tile desired
temperature.
3 Press tile COOK TIME pad.
NOTF: lf.your r_,_i_)er_,_7uires _)reheating;, you mar.
need to add addilional lime lo the length (_t lhe
cooking" lime.
4 Using tile nmnber pads, enter tile desired
baking time.
5
Press tile DELAY START pad.
6
Using tile nmnber pads, enter tile time of
(la} }o/t IV[IIIt tile o_,en to tllYn on and start
cooking
7 Press tile START pad.
N07_2: An attention lone will sound !/you are usir_g
limed baking and do not pr_,,ssltte START pad ((]let"
enlering" lhe baking" lemperalutv
If wm would like to check tile times vou have
set, press the DELAY START pad to check the
start time w)u have set or press tile COOK
TIME pad to check the length of cooking time
vou have set.
When tile oven turns on at tile time of (lay wm
have set, the display will show the changing
temperatm'e (starting at 100°F) and the
cooking time countdown.
N07_: On double oven model,s, wlwn using" both
ovens at the same time, lhe tinu,,s showing" in the
disph O' will beJbr tlw last oven set. 7b disph O' the
time set,fi>r the fir,_t oven set; press the DELAY
START pad to che(k tlw start time you have set or
press the COOK TIME pad to che_k the #ng'lh o]
_ooking" lime you have set.
Tile oven will continue to cook fin" tile
programmed amo/mt of time, then shut off
automaticall 5 /mless tile X4;_tRM featm'e was set.
See tile How to set the oven /br warmi_g" section.
8 Press tile CLI?_atR/OFF pad to clear tile
displa),
@
®®®®®®®®®@
@
®®®®®®®®®@
@
®®®®®®®®®®
@
22
Page 23

Using the Probe
Wall Oven
7kmperature
probe
For many fi)ods, especially roasts and poultry,
internal food temperature is the best test fi)r
aloneness. The temperature probe takes the
guesswork out of roasting by cooking fi)ods to
the exact aloneness you want,
Use of probes other than the one provided with
this product max result in damage to the probe.
Use the handles of the probe and I)lug, when
inserting and remoxino_ them from the meat
and outlet.
• To axoid damaging your probe, do not use
ton(m_,to pull on the cable when remoxing, it.
• To axoid breaking the probe, make sure fl)od
is completely defrosted heft)re inserting.
• To prevent possible burns, do not uni)lu(*.,
the probe from the outlet until the oxen
has cooled.
• Nexer leaxe your probe inside the oxen
during a self cleaning c) cle.
• Do not store the probe in the oxen.
Cable
Plug
Probe
Handles
The temperature probe hasa skewer-like probe at one end and a
plug at the other end that goes into the outlet in the oven.
23
Page 24

Using the Probe
Wall Oven
I)l'OpgT
placement
of the probe
After preparing the meat and placing it on
a trixet or on the broiler pan grid, tollow these
directions for proper probe placement.
1 I,ay the probe on the outside of the meat
along the top or side and mark with yore"
finger where the edge of the meat comes to
on the probe. The point should rest in the
center of the thickest meaty part of the roast.
2 Insert the probe completel) into the meat,
up to the handle. It should not touch the
bone, tat or gristle.
For roasts with no bone, insert the probe into
the meatiest part of the roast. For bone-in ham
or lamb, insert the probe into the center of the
lowest large muscle or joint.
Insert the probe into the center of dishes such
as meat loaf or casseroles. When cooking fish,
insert the probe fl'om just above the gill into
the meatiest area, parallel to the backbone.
Insert the probe into the meatiest part of the
inner thioh,_ from below and parallel to the leo
of a whole tm'kex.
24
Page 25

How to set
the oven Jbr
roasting
when using
the probe
1
Insert the probe into the meat.
2
Plug the probe into the outlet in the o'_en.
Make sm'e it is pushed all the way in.
Close the oxen door,
3
Press the PROBE pad.
4
Press the nmnber pads to set the desired
internal fi)od or meat temperature. The
maximmn internal temperature fl)r the food
that you can set is 200°F.
@
(9@@@@@@@@@
5 Press the BAKE pad.
6 Press the nmnber pads to set the desired
o'_en teillpei'at rife.
7 Press the START pad.
77_,¢displr 9' will flash !/tt_,¢ probe is inserted into
the 0uiM and you have not ,set a probe temperature
and pressed the START pad.
XYhen the oxen starts to heat, the word "I,0"
will be in the displa).
Alter the internal temperature of the
meat reaches 100°K the changin,, internal
temperatm'e will be shown in the display.
8 When the internal temperature of the meat
reaches the number you have set, the probe
and the oven ttlYn ott and the oven control
signals. To stop tile signal, press the
CLI?_R/OFF pad. Use hot pads to remove
the probe fl'om the tood. Do not use tongs
to pull on it--they might damage it.
To change the oxen temperature during the
Roast c}cle, press the BAKE pad and then the
nmnber pads to set the new temperature.
• If the probe is removed fl'om the fi)od betm'e
the final temperature is reached, a tone will
sotmd and the display will flash tmtil the
l)Fobe is FeIlloved tl"Olll the ()veil,
• You can use the timer exert thou,*h xou
cannot rise timed oxen opei'ations.
@
@@@@@(9@@@@
@
@
25
Page 26

Using the Convection Oven
Wall Oven
Convection
.fitn
1-Rack
convection
baking
Multi-rack
convection
bahing
CAUTION:
When you are using the
offset rack (on 27" models)
in the lowest position (A),
you will needto use
caution when pulling the
rack out, We recommend
that you pull the rack out
severalinches and then,
using two pot holders, pull
the rack out by holding the
sides of it. The offset rack
is low andyou could be
burned if you placeyour
hand in the middle of the
rack and pull all the way
out, Bevery careful not to
burn your hand on the door
when using a rack in the
lowest position (A).
lll [I con_,ection o_,en, [i tiln circulates hot air oxei;
under and around the food.
This circulating hot air is evenly distributed
throughout the oven cavity. _s a result, fi)ods are
evenly cooked and browned----often in less time
with convection heat.
NO'I_: TIw corwa:tionJ(m will O'cl_,on arm q//while,
cooldnff to be,_tdi,_lribule hot air in the oven.
T/w convection tim shuts (3[_rulwn tlw oven door i,s
ol)enal. DO _\t)T leave tlw door o/)en fi*r lo*N"lwrio& o/
li*_wwhile u,sint{"(onveg:tbn _>&bg" or you m(O' shorlcn
tlu: l!fi"(:/the (onveclion lu:alinff do*zozl:
Tile comection tim circulates tile heated air exenlx
over and aro/md tile fi_od using tile bake and broil
elements.
X_hen comecfion baking with one 1 rack, use
CONVECTION BAKE 1 IL_CK m{d tot best results
place the rack on shell C or D at the center of the
Because heated air is drculated evenly throughout
tile oven, foods can be baked with excellent results
using multiple racks.
Tile aIllO/Int of tillle required for multi-rack
baking may increase slightly tot some foods, but
overall time is saved because two to three times as
much food is cooked at once. Cookies, muffins,
biscuits, and other quick breads give good results
with multi-rack baking.
27" Ovens
When baking on 3 I'aCk% divide tile oven into
thirds by placing the offset rack in the third (C)
rack position and the straight racks in fi_t (A) and
fi)uYth (D) rack positions.
For two-rack baking, place tile offset rack in tile
bottom (A) rack posit.ion. Place the straight rack in
the third (C) rack position.
30" Ovens
When baking on 3 racks, place one rack in tile
second (g) position, one in tile fourth (D)
position and one in tile 6th (F) position. For
cookies, place one rack in the third (C) position,
one in the 5th (E) position and one in the 6th (F)
position.
oven. Cook finles nlav decrease, so fi,od shouM be
checked earlier than i)ackage directions to make
S/lI'e that it does not oxercook.
Ideal fi,r cooking large casseroles and lasagna with
good results.
®
Offset rack
®
Multi-rack position 27" oven
®
Multi-rack position 30" oven
Adapting
_'e€ipes
26
You can use your tm:orite redpes in tile
convection oven.
When convection baking, reduce baking
temperature by 25°F or activate tile Auto Redpe ''_
Conve_ion fl_atm'e. See tile S/)e(ial Feallo'e,s section.
Use pan size recommended.
Soille package insti'tlctions _[0I" [i'ozen casseroles
or main dishes have been developed using
coi//illeY(-'ial convection ovens. For best results
in this oven, preheat tile oven and use tile
temperature on tile package.
Page 27

Cookwarejar
convection
cooking
Befin'e using your convection oven, check to see
if vour cookware lea;'es rooln fi)I" air circulation in
the oven. If you are baking with several pans, leave
space between them. Mso, be sure the pans do not
touch each other or the walls of the oven.
Paper mad Plastic
Heat-resistant paper and plastic container3 that
are recommended fi)r use in _egular ovens can be
used in convection ovens. Plastic cookware that is
heat-resistant to temperatm'es ot 400°F can also
be used.
Metal mad Glass
Any type of cookware will work in your convection
oven. However; met;fl pans heat the ti_stest and are
recommended for convection baking.
Darkened or matte-finished pans will bake tipster
than shiny pans.
Glass or ceI'alIliC I)_lns cook I//oI'e slow]','.
When baking cookies, you will get the best
results if w)u use a fiat cookie sheet instead of
a pan wid_ low sides.
For recipes like oven-baked chicken, use a pan
with low sides. Hot air cmmot drculate well
arotmd tood in a pan with high sides.
Convection
roasting
• Good fiw large tender cuts of meat, tmcmered.
The convection tim circulates the heated air e\'enlv
over and around the fi)od. Meat and poult_ T are
browned on all sides as if they were cooked on a
rotisserie. Using the roasting rack provided, heated
air will be circulated ove_; trader and arotmd the
tood being roasted. The heated air seals in juices
quickly fi)r a moist and tender product while, at
the same time, creating a rich golden brown
exterior:
When you are convection roasting, it is important
that you use the broiler pan and grid and the
special roasting rack fin" best convection roasting
results. The pan is used to catch grease spills and
the grid is used to prevent grease spatters, while
the roasting rack allows the heated air to circulate
trader the meat and increase browning on the
tmde_ide of the meat or poult_T:
• Place the rack (on 27" models use the off'set
rack) in the lowest rack position (A).
• Place the grid on the broiler pan and put the
roasting rack over them, making sm'e the posts
on the roasting rack fit into the holes in the
broiler pan.
• Place meat on the special roasfin,*._ rack.
Roasting rack
Post
Grid
_i/1 q/l'iil fi 1 li//'t \/\_\\_
Broiler pan
CAUTION:
When you are using the offset rack (on 27" models) inthe lowest
position (A), you will need to use caution when pulling the rack
out. We recommend that you pull the rack out several inches and
then, using two pot holders, pull the rack out byholding the sides
of it. The offset rack is low and you could be burned if you place
your hand in the middle of the rack and pull all the way out. Be
very careful notto burn your hand on the door when using a rack
in the lowest position (A),
27
Page 28

Using the Convection Oven
1,1_1llOve*_
How to set
theovenjar
convection
baking or
roasting
7b avoid passible burt_s, place #w racks i, lt_e
correctpasilio, b_,ibreyou lu*v_o_ the ore,.
Press the CONV BAI_]/1 RACK pad
(Convection Bake 1-Rack nlode) fi)r 1-rack
convection baking. This inode is used ti)r
cooking ti)od iteins on only 1 rack in
convection bake.
Press the CONV BAKE/MULTI pad
(Convection Bake Multi mode) for nlulti-rack
convection baking. This n/ode is used tot
cooking food iteIns oil nlore than one rack
(i.e. 9 3 or nlore racks) at the sanle tiine
in Convection Bake. See the Mulli-rad_
coave_lion bahir_g" section fi)I" n/ore
infl)rn/ation.
Press the CONV ROAST pad fl)r convection
roasting.
2 Press the nuinber pads to set the desired
()veil tellll)erat/ire.
3 Press the START pad.
To change the oven tenlperature, press the
CONV BAtC_:/MULTI, CONV BAIl:/1 RACK
or CONV ROAST pad and then the IltlI/lbeY
pads to set the new teinl)erature.
®®@®®®®®®®
@
@
When tile ()veil starts to heat, the changing
ten/perature, starting at 100°K will be displayed.
When the ()veil reaches the tenlperature you
set, 3 beeps will sound.
4 Press the CLEAR/OFF pad when finished.
NOTE:
• }}m will hear a/hn whih, cooki**g" with convection.
The/an will stop when the door is opened but the
heat will not turr_ q[_
• }_m mr o' hear the ovea clicki_g" duri,g" baki*_ K.
This is normal
• The conve_tion/hn will O'c# on and qffwhi#
_ookb_g" to best distribute the hot air in the oven.
Convection
roasting
guide
28
Meats Mhmtes/Lb. Oven Temp. hlternal Temp.
Beef P,il), Bonch'ss P.ib, 1Luu 20-24 325°F 140°FI
Top Sirloin Medium 24-28 325°F 160°F
(3 to 5 lbs.) Well 28-32 ?,25°F 170°F
Beef Tenderloin Rare 10-14 325°F 140°FI
Medium 14-18 325°F 160°F
Pork Bonedn, Boneless (3 to 5 lbs.) 23-27 325°F 170°F
Chops (1/2 to 1" thick) 2 chops 30-35 total 325°F 170°F
4 chops 35-40 total ?,25°F 170°F
6 chops 40-45 total 325°F 170°F
Ham Canned, Butt, Shank (3 to 5 lbs.) 14-18 325°F 140°F
(illlly cooked)
Lamb Bonedn, Boneless (3 to 5 lbs.) Medium 17-20 325°F 160°F
Well 20-24 325°F 170°F
Seafood Fish, whole (3 to 5 lbs.) 30-40 total 400°F
I.obster Tails (6 to 8 oz. each) 20-25 total 350°F
Poultry Whole Chicken (2½ to 31/zlbs.) 24-26 350°F 180°-185°F
Cornish IIens [ nstuiibd (1 to 1½ lb_.) 50-55 total 350°F 180°-185°F
Stullbd (1 to 1½ lbs.) 55-60 total ?,50°F 180°-185°F
Duckling (4 to 5 lbs.) 24-26 325°F 180°-185°F
Tin-key, whole*
l Jnstullbd (10 to 16 ll)s.) 8-11 325°F 180°-185°F
l Jnstullbd ( 18 to 24 lbs.) 7-10 325°F 180°-185°F
Turkey Breast (4 to 6 lbs.) 16-11) 325°F 170°F
* t_tu/fid bh*ts g*,ne_all3wquM, 7(_45 minul_,s additio_al _*)artMgtime. Shidd lug:sa_d bwart wilh]oil lo fl_*,g,enlove>brownMg and
d_3'Mg o/shin.
± The {kS. l)@a_¢me_l! o/Agricuhmv sa)s '7_a_, b_,u/is p@u/a_; but you shouhl know thai coohblg it h) o_ll)' 140°t " meat_s somefi)od
p0is0_/Mg 0_g(n/isws may survive." (.%u_t:e:?;@ N)od Book. 15m Kitchen Guiglu. _NI)A R_,v..flzne 19,_'5.)
Page 29

How to set
the oven Jor
convection
roasting
when using
the probe
CAUTION:To prevent possible burns, do
not unplug the probe from the oven outlet
until the oven has cooled. Do not store the
probe in the oven.
For be,st result,s when roasting large turkeys and
roast,s, we recommet_d using th,e probe included in
th, t" _ o_H_t_ttio_ o_tqL
Place the rack (on .....
rack) in the lowest rack position (A). hlsert the
probe into the nieat.
PhIg the I)robe into tile outlet in the (I_eI1.
Make sure it is pushed all the wm in.
Close the o_en door.
2 / nIodels use the offset
@
@@@(9@@@@@@
@
(9@@@@@@@@@
3 Press the CONV ROAST pad.
4 Press the nunlber pads to set the desired
o_,en tei/ll)erat tire,
To change the oven teini)erature during tile
Convection Roast cycle, press the CONY ROAST
pad and then press the nunlber pads to set the
new desired tenli)erature.
5 Press the PROBE pad.
6 Press the nuniber pads to set the desired
internal nleat teinl)erature.
7 Press the START pad.
The di,sJJl(O'will flash "I'ROBE" and the oven co_ztnd
will sig'nal !/the probe is inserted into the out#t, and
you have not set a probe temperature and pncssed the
START pad.
When the o_en starts to heat, the word "i,O"
will be in the displa}.
_Mtei" the internal teini)erature of the nleat
reaches l ()()°F, the chanoing internal
teinl)erature will be shown in the displa).
8 When the internal tenll)erature of the nleat
reaches the nunlber you have set, the probe
and the ()veil [uI'n Off and the ()veil control
signals. To stop the signal, press the
CLEAR/OFF pad. Use hot pads to renlove
the probe fl'oin the ti)od. Do not use tongs
to pull Oil it--they niight daniage it.
@
@
NOTES:
• }}m will hear a ihn while cooking with these
,/i, atures. The/an will ,stOp when the door is Opened
but the heal will not turn qff:
• }}m can use the timer even thol¢g'h you cannot use
timed oven operations.
• On double ove_z models; you will not be able to
usY, the probe in the upper oven during" timed ove_z
operations. Thi,s is because with the pmbe you an_
cooking" @ temDemture rather tha_z time.
t,,mperatur,_ is r,_ach,ed, a tone will sound and the
disph O' will flash unIil the probe is removed /?om
29
Page 30

Tinled Convection Baking
14_1ll Oven
Using the
timed
features jbr
convection
coohing
How to set
an immediate
start and
automatic
stop
N07_: Foo& that spoil easily, such as milk, egg:%
.fish, stl{/fing:s, poldtry and pork, should not be
allowed to sit fbr more than l hour b@re or qfler
eoohi_N'. Room temperature promotes the growth q/
har_!/id baeleria. Be sure that the oven l_t_'l_tis (*_/
because heat/ram the bun will speed harn!fid
bacteria growth.
The oven will lurn on immediat@' and eooh /br a
se#_led #ntJh of lime. A t the end (j the _ookin:_" lime,
the oven will turn (:fJautomatical@
Make sure the oven clock shows the correct
time of day.
Press the CONV BAI_]/1 RACK pad
(Convection Bake 1-Rack mode) fl_r 1-rack
convection baking. This mode is used for
cooking food items on only 1 rack in
convection bake.
Press the CONV BAKE/MULTI pad
(Convection Bake Multi mode) for multi-rack
convection baking. This mode is used lot
cooking food itei//s on ii/oYe than one rack
(i.e. 2, 3 or more racks) at the same time in
Convection Bake. See the Multi-reek
convection bakin:_"section fin" m ore
information.
Press the CONV ROAST pad for comection
roasting.
2 Press the number pads to set the desired
o_,en tei/ll)eYatt/Ye,
3 Press the COOK TIME pad.
NOTE: (/)our recipe requi*es p_,he,¢ting; you may need
lo add additional lime lo lhe l.,nJh (:t llu: (ooking" lime.
4 Press the number pads to set the desired
length of cooking time, The minimum
cooking tilne }ou can set is 1 ininute.
The oxen temperature that you set and the
cooking time that you entered will be in the
display
5 Press the START pad.
The display shows the oven temperature that
vou set and the cooking time countdown.
(The display starts changing once the
temperature reaches 100°K)
NOTE: On double oven models, when using" both
ovens at the same time, the times showi_g" in the
disph 9' will beJbr the last oven set. 7b di,qda)' the
time set Jbr the fir, st oven set; press the COOK TIME
pad fbr thatoven.
On double oven models, you can use timed
baking or roasting in one oven while using
self:clean in the other; you can also use
timed baking or roasting in both ovens
at the same time.
®®®®®®®®®@
@
®®®®®@®®®@
@
@
The oven will continue to cook fl_r the
programmed alnount of time, then shut ot_
automatically, unless the X4;_tRM feature was set.
See the How to set the oven fbr warmi_g" section.
6 Press the CLEAR/OFF pad to clear the
display if necessary. Remove the tood ti'om
the oven. Remember; even though the oven
shuts oIt automatically; tood lett in the oven
will continue cooking after the oven turns
off.
N07N: Ibu will hear afire while cooking" with this
,fi:atare. The,fire will o'eh: on and (_/f whih, eoohi_g" to
be,st distribute the hot ab; and will stop when the door
is opened bat the heat will not turn (*[f
3(1
Page 31

How to set
a delayed
start and
automatic
stop
}_*uc(m s_'l the tn:ert (o_tlm[ to del_o_.staH the overt,
.,o/@,,.. #,_.@/..g.u,o/ti,,_..d u.._t,._,_o_f
automatically.
Make sure the oven clock shows the correct
time of day.
Press the CONY BAKE/1 RACK pad
(Convection Bake 1-Rack mode) fi_r 1-rack
convection baking. This mode is used for
cooking fi_od items on only 1 rack in
convection bake.
Press the CONY BAKE/MULTI pad
(Convection Bake Multi mode) fl_r multi-rack
convection baking. This mode is used tot
cooking food items on more than one rack
(i.e. 2, 3 or more racks) at the same time in
Convection Bake. See the Mulli-md_
_onve(tion bakb_g" section fi_r more
inflwmation.
@0.@0.@
®®®®®®®®®®
%
@@@@(9@@@@@
@
®®®®®®®®®®
@
@
Press the CONY ROAST pad for convection
roastin ,
2 Press the number pads to set the desired
o_,en [eillpei'at/li'e.
3 Press the COOKTIME pad.
NOTE: (/your reci/w require,spretu,ati_tg; you may rm,d
to add additiortal time to the l(qtg¢hqt the (ookirtg"time.
4 Press the number pads to set the desired
cooking time,
5 Press the DELAY START pad.
6 Press the number pads to set the time of day
VO/I want the o_,en to [llI'n on and start cookill_
If you would like to check the times you have set,
press the DELAY START pad to check the start
time you have set or press the COOK TIME pad
to check the length ot cooking time wm have set.
7 Press the START pad.
NO'IT'= A_t attertliort torte will soloed !i)ou are It,sirtg"
timed bakirtg"or mastirtg" artd do *tot pms:s:t_e ACFART
pad afiter.....ertle*4_te'_the.... bakbt#, or roa,stb_g temperature.
When the oven turns on at the time ot day w)u
have set, the displa)' will show the changing
temperature (starting at 100°F) and the cooking
time countdown. (The display starts changing
once the mmperamre reaches 100°E)
NOTE: On double overt too&,& whoz It,@tg" both overts
at the same time, the times sh_mSrtg" irt tlu, dhJd O' will be
:,, tb,_/..,to_..t.,_:1:7;,di#,ho'tmti,,_.,_.t:,, :b,.fi,:,t
oven s*,l, /m<_:_the DEIAY START pad to clu_gk tlm start
time you have .s_¢tor D*_¢s:st/w COOK TIME pad to c/u,(/_
flu:h:_tgth (?/ (oo/g_g" time you have ,w:t.
The oven will continue to cook tot the
programmed alnount of time, then shut off
automaticall 5 unless the WARM ti_atm'e was set.
See the How to set the oven /br rvarmirtg" section.
8 Press the CLEAR/OFF pad to clear the display
if necessary: Remove the food fi'om the oven.
Remember; even though the oven shuts ott
automaticall 5 t0od leti in the oven will continue
cooking atter the oven turns off'.
NO7_: Du wig hear a fil_t while _>&irtg" with this
,fi,atun_. The/im will o'cl_:on arm q/fwhile wolsrtg"to
best di,stribl&: tlu, hot ai_; aml will st@ wlu::t the door is
@em:d but the Iwat will rwt tu*w (:/fi
31
Page 32

Wanning
I,l?lll Oven
How to set
the oven
jbr warming
_,_arn/ keeps cooked foods warm fin" up to
3 hours after the cooking flmction is finished,
or it can be actiw_ted independently to keep
already cooked too(Is warm.
This teature is not designed to reheat cold
tood.
To use this featm'e independently, press
the WARM/PROOF pad once and then the
START pa d.
To activate this ti_ature fi)r use after Timed
Baking or Roasting, press the WARM/PROOF
pad once while programming the oven and
befin'e pressing START.
To Crisp Stale Items
• Place fl)od in lo_sided dishes or pans.
• For best results, place the fi_od items in a
single layer; do not stack.
• I,eave thei/l tlncovered.
• Check crispness after 20-30 minutes. Add
time as needed.
IMPORTANT NOTES:
• l'bod should be kept hot in its eooki_q" container or
tmn,!Ji_rred to a heat-s(_i_ s_rving" dish.
• For moist fbod,s, cover them with an oven-s@ lid or
aluminum fbil.
• t+id or crispfi*ods do not need to be cove_,d but
(:an become too dr)' !f warmd fi_r too mnt_-
• R@eated openint_" (?fthe door albw,s the hot air to
e,_cape and the fbod to cool
• Allow extra time fbr the temper(€Din, in,side the oven
to stabilize after adding" items.
• With la_q'e load,s it may be necexsar)' to cover some
_] the cooked,fi_od items.
• Remove serving" spoo_,s, etc., b@m, placing"
_ontainer, s in the oven.
@
32
• Do not use pla,stic containe*:s, li& or pla,stic win/).
CAUTION: I'lastic container, s; li& or plastic wrap
will melt !f placed in the oven. Melted pla,_tic m( O'
not be removab# and i,s not (overed under your
_l?(IrlYllg[y,
Page 33

Proofing
14?Ill Oven
How to set
the oven
jot proofing
Tile I)r°°fing, feature mailmfins a warm
ei_virolm/ent usefill for rising )east-leaxened
products,
1 Place the coxered dough in a dish in tile
men on rack B or C.
NOTE: For bes: re.sul:s, cover :t_edough wi#_ a clo#z
or wilh greased plastic wrap (lhe plaslic may need lo
be ancho_:d underneath the _onlc,:iner ,so the oven
,]i:n will not blow it q]]).
2 Press tile WARM/PROOF pad twice and then
the START pad.
Tile displa) will read "PrF" (proof).
Tile oxen interior light turns on and remains
on during l)I'°°fin_"
Tile proofing teature automatically provides
tile desired telnl)erature tor l)roofing and
therefi)re does not have a temi)erature
a(!i tlStlIlent.
3 Set tile TIMER ON/OFF fl)r a nmxinmm
of 1 hour. Dei)ending ui)on tile re(ii)e, bread
inay comi)lete i)roofing in less than 1 hour.
Check bread as needed tor i)rogress.
4 Atter 1 hour of proofing, press tile
CLEAR/OFF pad. If l)roofing is not
comi)lete, leave the bread in the closed
oven until it reaches the desired height.
• To axoid lowering tile oxen temperattu'e and
lenotheningo , l)r°°fin°,_ tilne, do not open tile
oxen door ui_necessarilx.
@
@
@
®
NOTE:
Set the oven to PROOF for a maximum
of 1 hour, then leave the bread in the
closed oven until it reaches the desired
height. Using PROOF in excess of 1 hour
may kill the yeast.
• Check bread products early to axoid
°xeI_I)I'°°tin g_,
NOTES:
• Do not use the pmg:finj_" modefbr warming'f hod or
kee/)ir_g'/bod hot. The proqfi_ N"oven temp_:mture i,s
not hot enough to hold fbo& at s@ Icmpemture._.
I:'.sethe 1.154RMfi:atlm: to keep fbod warm.
• Proqfing'Ji,a:l¢re on upper oven only.
• Proqfinq'., will nol o_;,erale when oven is. above
12 2'. HO1 wdl show _n lhe display.
33
Page 34

Adjust the Oven Thermostat
I.l?dl Oven
Do it
yourself, t
7b adjust
the oven
thermostat
YO/I IllaV lind that VO/II" new ()veil cooks
difl'erentlv than tile one it replaced. Use your
new oven [or a lew weeks to becoi/le illoi'e
tamiliar with it. If you still think your new
oven is too hot or too cold, you can at!just
tile thernlostat wmrself.
Press tile BAKE and BROIL HIGH/LOW
pads at tile sanle tiine for 3 seconds until tile
displa} shows "SF."
Press tile BAKE pad of tile oxen on which
you want to a(!jtIst tile oxen thernlostat.
A two-digit nunlber shows in tile displa).
Press BAKE once to decrease (-) tile oxen
teniperattu'e, or twice to increase (+).
Tile oven teini)erattu'e can be a(!jtisted tip
to (+) 35°F hotter or (-) 35°F cooler, Press
tile ntunber pads tile sanle way you read
theni. For exanlple, to change the oven
teinl)erattu'e 15°K press 1 and 5.
X._hen xou haxe nlade tile a(!jtistinent, press
the START pad to go back to the tiine of (lax
display. Use your oxen as you would norinallx.
Do not (lse thei'i//Ollleters, S/lch }is those f()/lil(1
in groceI T stores, to check tile teniperattire
set(in< r of VO/li" o_,en. These therillOi//eters ill}iV
xaI T 20-40 degrees.
N07_: This a((justm(_nt will 0n/y @ct bakint_"
temperatun,,_; it do(,s not @ct broiling; convection or
se(/_ch_aning" lemperatu*_s. The a@tstmenl will be
relaim, d in memory qJler a/)owerJhihtn,.
@+@
@
(9@@@@@@@@@
@
The type o/
margarine
will q[f!,ct
bahing
peu'brmance, t
34
Most recipes fi_i" baking have been developed
using high-tat l)rodticts such as butter or
niargarine (80% fat). If you decrease the fat,
tile recipe nlay not give tile sanle results as
with a higheIqat prodtIct.
Recipe fifihire can result if cakes, pies,
pastries, cookies or candies are nlade with
low-tat spreads. The lower the tat content
of a spread prodtict, tile inore noticeable
these difli_rences become.
Federal standards reqtiire prodticts labeled
"nlargarine" to contain at least 80% tht by
weight, I,o_qht spreads, oil the other hand,
contain less tat and inore water, The high
nloisture content of these spreads afli_ct tile
texture and flavor of baked goods. For best
results with your old tavorite recipes, use
nlargarine, 1)utter or stick spreads containing
at least 70% vegetable oil.
Page 35

Using the Self-Cleaning Oven
Wall Oven
Be/oTe a
clean cycle
77_eoven door must be closed and all (Ohm, Is
must be ,set _orre(lly,/br the _y(le to wod; properly.
X4e reconm_end venting your kitchen with an
open window or using a xentilation tim or hood
din'ira* the first sel6clean cxcle.
Remoxe tile broiler pan, broiler grid, probe,
all cookware and am almninmn foil from
the o_, en,
Gray porcelain-coated oven racks (including tile
offset rack) may remain in tile oven during tile
self cleaning cycle without being damaged. Tile
convection roasting rack and nickel-plated oven
racks (including the offset rack) mav remain in
the oven dm'ing the sell_cleaning cycle, but thev
will darken and become hard to slide.
Do not use abrasixes or oxen cleaners, (]lean
tile top, sides and outside of tile oxen door
with soap and water.
Make sure tile oxen light bulb coxer (on some
models) is in place and the oxen light is off.
IMPORTANT: Tile health of some birds is
extremely sensitive to the fimles given off
during tile sel_=cleaning cycle of any ()veil.
Move birds to another well-ventilated room.
®
Wipeupheavysoilontheovenbottom.
(Appearancemayvary.)
On double oven models, you (:an sel a (:lean eycle in
bolh ovens al ltw ,same lime. The la,sl oven ,sel will
aulomali_ally delay ils slarl unlil lhe end (_/ lhe fir, sl
oven is (lean cycle,
On double oven models, you can use timed baking in
one oven and ,se(/:Uean lhe olher al lhe ,same lime,
How to set
the oven Jbr
cleaning
1 Press tile SELF CLEAN STD/LOW pad once
for a 4-horn" clean time or twice fi_r a 3-horn
clean time.
A 3-horn" sell:clean time is recommended fi_r
use when cleaning small, contained spills. A
self:clean time of 4 hours or longer is
recommended fi)r a dirtier oven.
2 If a time other than 4 horns or 3 horn's is
needed, use tile nmnber pads and enter tile
desired clean time.
You can chan,*e tile clean time to am time
between 3 hours and 5 hours, del)ending, on
how dirt_ _om" oxen is.
3 Press tile START pad.
Tile door locks automatically, Tile display
will show tile clean time remaining. It will
not be possible to open tile oven door tmtil tile
temperatm'e drops below tile lock temperature
and the I,OCKED light goes off.
®
@(9@@@@@@@@
@
XYhen tile I,OCKED li,*l/t goes off you will be
able to open the door.
• Tile word I,( (,K will flash and tile oxen
control will signal if xou set the clean cxcle
and forget to close tile oxen door.
• To stop a clean cycle, press tile CLEAR/OFF
pad. When the I,OCKED light goes off
indicating the oven has cooled below the
locking temperatm'e, you will be able to
open tile door.
35
Page 36

Using the Self-Cleaning Oven
Wall Oven
How to
deh O' the
start of
cleaning
1 Press tile SELF CLF.kN STD/LOW pad once
fiw a 4-hour clean time or twice for a 3-hour
clean time,
A 3-hour sell=clean time is recommended for
use when cleaning small, contained spills, A
self=dean time of 4 l/om_ or hmger is
recommended for a dirtier oven.
2 If a time other than 4 horn's or 3 horns is
needed, use tile nmnber pads and enter tile
desired clean time,
YO/I C}lI1 ch}lIl(re tile cleaIl tiIlle to }lIIV tiIlle
between 3 hours and 5 hours, dei)ending, on
how dirty X 0/1I" ox, ei1 is.
3 Press tile DELAY START pad.
4 Using tile nmnber pads, enter tile time of
day you want tile clean cxcle to start.
5 Press tile START pad.
Tile door locks automatically. Tile display will
show tile start time. It will not be possible to
open tile oven door tmtil tile temperature
drops below tile lock temperatm'e and tile
I,OCKED light goes off.
X_hen tile I,O(:KED light goes off you will be
able to open tile door.
NOTE: On double oven modeh, )ou can ,sela delay
(lean in both ovens al lhe same lime. 77ze ,se(ond oven
,selwill aulomalically delay lke slarl o/(leaning" unlil
lke end o/ lhe fir, sl oven's clean cycle.
7b recall lke slarl lime q/ lke ,second oven sel, p*v,s,s
ltte DELAY START pad on ltte conlroh Jbr ltte
se( ond oven.
®
@@@@@(9@@@@
@
@@@@(9@@@@@
@
per a
(lean (y(le
36
You max notice some white ash in tile oxen.
X_ipe it up with a damp cloth after tile
oxell cools.
If white spots remain, remoxe them with
a soap-filled steel wool pad and rinse
thoroughl_ with a xineoar and water mixture,
These deposits are usually a salt residue that
cannot be remoxed bx tile clean cxcle.
If tile oxen is not clean after one clean c_cle
repeat the c_cle,
• You cannot set tile oxen fi)r cooking tmtil tile
oxen is cool enough tot tile door to unlock.
• While tile oven is self=cleaning, you can press
the CLOCK pad to display the time of day.
To return to tile clean countdown, press tile
SELF CLEAN STD/LOW pad.
• If tile racks become hard to slide, wipe tile
rack supports with cooking oil.
Page 37

re and (;leaning
1,171l! Oven
BE SUR£ EI.ECTRJCAL POWER IS OFF AND ALl. SURFACES AR£ COO1. BEFORJq CLEANING ANY
PART OF TIlE OVEN.
07Je72 ra('lgS
and
convection
roasting
ra€lg
Stainh?ss steel
(o_ some model,_)
& metal parts
All oven racks and the convection roasting rack
mav be cleaned bv hand with an abrasive
cleaner or steel wool. After cleaning, rinse the
racks with clean water and dry with a clean
cloth. Gray porcelain-coated oven racks
(including the offset rack) may remain in the
oven during the sell:cleaning cycle without
being damaged. The convection roasting rack
and nickel-plated oven racks (including the
offset rack) mav remain in the oven during the
sell:cleaning cycle, but they will lose their luster
and become hard to slide. It will be necessary to
grease all oven rack side edges with a light
coating of vegetable oil after cleaning them bv
hand or in the oven. This will hel I) maintain the
ease of sliding the racks in and out of the oven.
Do not use a steel-wool pad; it will scratch
the surface.
To clean the stainless steel surtace, use wam_
sudsy water, a stainless steel cleaner such as
Kleen King _°or an all-pm'i)ose liquid or spray
cleaner. Always scrub in the direction of the
grain. Rinse thoroughly with a sponge or cloth
and clean water: Dry with a soft, clean cloth.
Roastingrack
Oven rack
After cleaning, use a stainless steel polish, such
as Stainless Steel Magic <°,Revere (k_pper and
Stainless Steel Cleane_':or X4'enol All Puq)ose
Metal Polishq Follow the product instructions
t0r cleaning the stainless steel sm'tace.
Broiler pan
and grid
After broiling, remoxe the broiler pan from the
oxen. Remoxe the grid from the pan. Carefldlv
pour out the grease from the pan into a proper
container.
X._ash and rinse the broiler pan and grid in hot
water with a soap-filled or plastic scouring pad.
If fl)od has bm'ned on, sprinkle the grid with
detergent while hot and cover with wet paper
towels or a dish cloth. Soaking the pan will
rei/love b/irned-on _'0ods.
Both the broiler pan and grid may be cleaned
with a commercial oxen cleaner.
Both the broiler pan and grid can also be
cleaned in a dishwasher,
Do not dean the bmih," pan 0r g'rid in a se(/:deaning"
Do not stow a soih,d broih, r pan and grid a,ywhe*_,
in the oven.
.t
Page 38

re and Cleaning
Wall Oven
Lo'i-o[f
07)e7l
([OOY_
removal
The door is very heavy. Be careful when removh_g
mad lifthag the door.
Do nol l!fl lhe door by lhe handh,.
To remove the door:
1 Fully open the door.
2 Pull the hinge locks down toward the door
fram e, to the mdocked position. A tool, such
as a small fiat-blade screwdriver; may be
required.
3 Firmly grasp both sides of the door at the top.
4 Close door to the door remowd position,
which is hallway between the broil stop
position and flfllv closed.
5 I,iti door up and out tmtil the hinge arm is
clear of the slot.
To replace the door:
1 Firmly grasp both sides of the door at the top.
X4]th the door at the same angle as the
remowd position, seat the indentation of the
hinge area into the bottom edge of the hinge
slot. The notch in the hinge arm must be
flfllv seated into the bottom of the slot.
Full} open the door. If the door will not flfllv
open, the indentation is not seated correctly in
the bottom edge of the slot.
Push the him*e_ locks up against, the front
frame of the oxen caxitx to the locked
position.
5 Close the oven door.
Slot
Hingelock
Pull hinge locks down to unlock
Removal position
Bottom _ea_rm
edgeof
Indentation
arm
lock
Push hinge locks upto lock
38
Page 39

Oven dooF
To clean the inside of the door:
• Because tile area inside tile gasket is cleaned
duI'ing tile self:clean cycle, you do not need
to clean this by hand.
• Tile area outside tile gasket and tile fl'ont
fimne can be cleaned with a soai>filled steel
wool or plastic pad, hot water and deteigent.
Rinse well with a vinegar and water sohttion.
To clean the outside of the door:
• Use soap and water to thoi'oughly clean tile
top, sides and fl'ont of the oven door. Rinse
well. You n/av also use a glass cleaner to clean
the glass on the outside of the door. Do not
let water drip into the vent oi)enings.
• Spillage of nlarinades, fluitjuices, ton/ato
sauces and basting inaterials containing acids
nlav cause discoloration and should be wiped
up inunediatelv. When surtace is cool, clean
and rinse.
• Do not use oven cleaners, cleaning powders
or harsh abrasives on the outside of the door.
The gasket is designed with a gap at the bottom to allow
for proper air circulation,
Do not rub or cleanthe door gasket--it has an extremely
low resistanceto abrasion,
Ifyou noticethe gasket becoming worn, frayed or damaged
in any way or if it has becomedisplaced on the door,
you should have it replaced.
Pu_movable
oven ./Ioot
Oven heating
elements
Control
panel
To relnove the oven floor:
1 Renlove tile oven door using tile instiuctions
in the i,ifl-Off Oven Door section of this
Illantlal.
2 Press down and pull ()/It tile reinowd)le
()veil t]oor.
Do not clean tile broil eleinent. Any soil will
burn off' when the elen/ent is h ea ted.
Tile bake eleinent is not exposed and is under
the reinowd)le oven floor. If si)illovers, residue
or ash aCCtlIlltllate on tile Fei//ovable ()veil ]qoor,
wipe up bet0re sell=cleaning.
It's a good idea to wipe tile control panel after
each use. Clean with inild soap and water or
vinegar and watei; rinse with clean water and
polish dry with a soft cloth.
3 Clean tile ()veil floor with warnl soapy water.
4 When re-installing the oven floor be sure to
slide it all the way to the back of the ()veil.
CAUTION: _Mways replace tile reinowd)le floor
beti)re tile next use.
To clean tile bake eleinent area, take out tile
reinowd)le floor (see tile I?emovable Oven Floo,'"
section) and gently lift the bake eleinent. Clean
with warnl soapy water. Always replace tile
relnovable floor bel0i'e next rise.
Do not use abrasive cleansers, strong liquid
cleaners, plastic scouring pads or ()veil cleaners
on the contr/)l i)anel--they will dan/age the
finish. A 50/50 solution of vinegar and hot
water works well.
39
Page 40

re and (;leaning
1,1_1llOven
07J gTI
light bulbs
N07_: 77wglass cover shouhl be removed only when
cold. I,l_,aring latex gloves may (_[/;_ra belle*"g'rip.
CAUTION: ,-epl.ci.<
bulb, disconnect electrical power to the oxen
at the main fuse or circuit breaker panel.
Be sure to let the light cover and bulb cool
completely.
For yore" safet), do not touch a hot bulb with
bare hands or a damp cloth.
To remove:
1 Tm'n the glass coxer cotmterclockwise
1/4 turn until the tabs of the glass coxer
clear the grooxes of the socket.
2 Using gloves or a dry cloth remove the bulb
by Imllin°8 it straight out.
To replace:
1 Use a new 130-xolt Hah)gen bulb, not to
exceed 50 watts.
Using gloves or a dry cloth, remove the bulb
from its I)ackaging., , Do not touch the bulb
with bare fingers.
Push the bulb straight into the receptacle
all the wax.
4 Place the tabs of the glass cover into the
grooxes of the socket. Turn the ,*lass coxer
clockwise 1/4 turn.
Receptacle Socket
i i
i i
i i
_'_" Bulb
/
Glasscover
Receptacle
Tab
Usegloves
orcloth
Prvbe
4{)
l'br improved lig'bting" inside the oven, clean the g'las:s
cover/h<quenlly using" a wet dolh. Tiffs shouM be
done when the oven is comp&lely eooL
5 Reconnect electrical power to the oven.
The temperature probe may be cleaned with
soap and water or a soap-filled sc(mring pad.
Cool the temperature probe befi)re cleaning,
Scorn" stubborn spots with a soap-tilled scom'ing
pad, rinse and dry.
l)o nol immerse lhe lemp,_ralure pmb,_ in wale*:
l)o nol slore lhe lemperalure probe in lhe ovem
Page 41

Before You Call For Service...
Wall Ove_
Save time
& money!
[_(_i(_w the
troubleshooting tips
on the fidlowing
pag('_ first and you
may not ne_.d to
call fbr ,_e_wic_,.
PROBLEM POSSIBLE CAUSE
CLOCKAND TIMER • A filse in your home may be blown or the circuit breaker tripped.
DO NOT WORK Replace the filse or reset the circuit breaker.
• Oven controls improperly set. See the Oven Conlrol, (lo_k and Timer
section.
OVEN LIGHT DOES • I,ight bulb is loose or detective. Tighten or replace the bulb.
NOT WORK • Pad operating light is broken. Call for service.
OVEN • Oven thei-mostat needs a(!justment. See the A((just the Ove_ Thermo,slat
TEMPERATURE Do it you*:se(/:r section.
TOO HOT OR
TOO COLD
OVFN WILL • A fllse in your home Inay be blown or the circuit breaker tril)ped.
NOT WORK Replace the fllse or reset the circuit breaker.
• Oven controls imi)roi)erly set.
FOOD DOES NOT
BAI_] OR ROAST
PROPERLY
• Oven controls ilnl)rol)erly set. See the Bakb_g" or I¢oaslb_g" section.
• Rack position is incorrect or the rack is not level.
• hlcorrect cookware or cookware of ilnl)rol)er size being used.
• Oven thei_nostat needs a c!justmelm See the A((just lhe Ove_ Thermostat
Do it yom:se(/_t section.
FOOD DOES NOT
BROIL PROPERLY
• Oven controls improperly set. Make sure you press the BROIL
HIGH/LOW pa d.
• hnl)rol)er rack position being used. See the Broili_t_'guide,
• Food being cooked in a hot pan. Use the broiling pan aim grid that
calne with vour oven. Make sure that it is cool.
• Cookware not suited for broiling, ....Use the broiling pan and grid that
Calile with vo/iY ox, en.
• The probe is plugged into the outlet in the oxen. Remoxe the probe
fI'OIIl the o_,en,
• Aluminum flfil used on the broiling pan and grid has nor been fitted
properly and slit as reconlmended.
• In some areas the power (voltage) may be low. Preheat the broil
elemei_t fl)r 10 milmtes. Broil fin" the hmgest period ot tilne
reconm/ended in the Broili_g" g'uide.
OVEN WILL NOT
SELF CL_.N
• The oxen temperature is too high to set a self-clean operation.
Alh)w the oxen to cool and reset the controls,
• Oxen controls improperly set. See the {'ising" lt_eSe!]:(leanh_g Oven
section.
• The probe is plugged into the outlet in the oxen. Remoxe the probe
fI'Olll tile oxen.
"CRACKING" OR • This is normal. It is the sotmd of the metal heating and cooling
"POPPING" SOUND during both cooking and cleaning fimctions.
I?LXCESSIVE SMOKING • Excessive soil. Press the CLFAR/OFF pad. Open the windows to rid
DURING CLEAN the room of smoke. X,Lfit until the I,OCKED light goes off.
CYCLE _iI)e up the excess soil and reset the clean cycle.
41
Page 42

Befbre You (;all For Service...
Wall Oven
Trouble-
shooting tips
PROBLF2d POSSIBLE CAUSE
OVEN DOORWILL • Tile oven is too hot. _Mlow tile oven to cool below locking temperature.
NOT OPEN A_TER
A CLEAN CYCLE
OVFaN NOT CLFAN • (-)\'en controls improperly set. See tile {._i_t{"the Se!f:C/ear_ing"(._n section.
AFTER A CLEAN • (-)\'en was heavily soiled. Clean up hea W spilh)ve_ bet0re starting the
clean cycle. Heavily soiled ovens may need to sel6clean again or tot a
longer period ot time.
"LOCK" " The selfXclean cycle has been selected but the door is not closed.
FLASI-_]S IN Close tile oven door.
THE DISPLAY
LOCKH) LIGHT • Tile oven door is locked because tile temperatm'e inside tile oven has
IS ON WI_]N YOU not dropped below tile locking temperature. Press tile CLFAR/OFT
WANT TO COOK pad. _Mlow the oven to cool.
CONTROL SIGNALS • _m tmgot to enter a bake temperature or cleaning time. Press tile
ALTER ENTF_IING BAKE pad and desired temperatm'e or tile SELF CLF_N STD/LOW
COOKING TIME OR pad and desired clean time.
DELAY START
"F AND A NUMBER • You have a flmcfion error code. Press tile CLF, AR/OF_" pad. _Mlow tile
OR LETI_]R" FLASH oven to cool fi_r one horn: Put tile oven back into operation.
IN THE DISPLAY • Disconnect all power to tile oven for 30 seconds and then reconnect
power; If tile flmction error code repeats, call fiw service.
DISPLAY GOES • A fllse in w)ur home may be blown or the drcuit breaker tripped.
BLANK Replace tile fllse or reset tile circuit breaker:
• Tile clock is in tile black-out mode. See tile Ovoz Conlrol, C[od_ and
7_m#r section.
DISPLAY FLASHES • Power fifilm'e. Reset the clock.
42
UNABLE TO GET • Oven control pads were not pressed properl> Tile BAKI_ and tile
THE DISPLAY TO BROIL HIGH/LOW pads m ust be pressed at tile same time and heM
SHOW "SF" t0r 3 seconds.
"PROBE" APPEARS • This is reminding you to enter a probe tenlperature atter plugging in
IN THE DISPLAY tile probe. Enter a probe ten/peratule.
POWER OUTAGE, • Power outage or suige. Reset the the clock. If the oven was in use, you
CLOCK FLASHES i/ltlst reset it by pressing tile CLF_R/OFF pad, setting tile clock and
resetting any cooking fimcfion.
STEAM FROM • X_]_en using the convection ti_atm'e, it is nomml to see steam coming out
THE VENT ot the oven vent. _%stile nmnber ot racks or amotmt of t0od being cooked
increases, the alnount of visible steam will increase.
"BURNING" OR • This is nomml in a new oven and will disappear in time. To speed tile
"OILY" ODOR process, set a sell'clean cycle tor a nfilfinmln of 3 houi_. See tile IAing" the
EMITTING FROM S_,(/_Cl_,aning•Oven section.
THE VENT
STRONG ODOR • This is temporary. An odor fl'om tile insulation around tile inside of tile
Earn NOISE
oven is nornlal ti)i" tile fii_t tew dines tile oven is used.
• A cooling tim or a convection tim (depending on tile flmction you are
using) may automatically mrn on. This is nomml. Tile cooling tim will
turn on to cool internal parts. It may run tot up to 1-1/2 hom_ in 30"
models and up to 2 hom_ in 27" models alter tile oven is tin'ned off.
Tile convection tim will cycle on and off tmtil tile flmction is over or
tile door is opened.
Page 43

Notes
_47111 Ov_n
43
Page 44

Notes
_47111 Ov_n
44
Page 45

_(_zpoz E_ZlN,tm,aodtu I
uoo .us#o I d.nisao
lanpoa d aoumsuo D
saoue!lddV39
IIIII
Place
1st Class
I+etter
Stamp
t lere
General Electric Company
Warranty Registration Department
P.O. Box 32150
Louisville, KY 40232-2150
Page 46

Consumer Product Ownership Registration
Dear (]uston]er:
Thank v(m for Imrchasing, our product and thank v(m for placing, v(mr, c(mfidence in us. We are pi'oud to
ha'_e vo[I as a CtlstoIlleI "_.
Follow these three steps to protect your new appliance investment:
Complete mad mall
your Consumer
Product Ownerslfip
Registration today.
I/avc it1{' t)cace oI mind
/
Important: To ensure that your product is registered, mail the separate product registration card.
If the separate product registration card is missing, fold and mail the form below. No envelope is needed.
of knowing we can
contact roll ill the
mflikelv event of a
salbtv l//odificatioll.
After compledug this
regisU'ation, write your
model mid serial ntunbers
hi dlls manual. 3bu will
need this in{brmation
should you require selMce.
The service mm_ber in the
USA: 800.444.1845. In
Canada: 1.888.880.3030.
F()I D 1/ERE
Read your Owuer's
Manual carefully. It will
help you operate your
new appliance t)rot)crl>
3
Consumer Product Ownership Registration
Product Model Serial
Wall Oven
Mr. [] Ms. [] Mrs. [] Miss []
First I
N_IIlIC
I I I I I I I I I NaH]c I I I I I I I I I I I I
Itast I
Street I
Address I I
,,l,,.I I I
i
_:.,,I , ,
[)a_e Plac_d
Mouth I I I
I I I I I I
I I I I I I
I I I I I I
Ycarl I I Pll(me I ''Numl)cr I-I,, i-i i iDay ]l]
I I I I I I I I I I I I I I I I I
I I I I I I I I I Slaw I i I Code I I I I
I""-Monogram® _,,l,,l,,.,,-,,z,,,,,.co,,
General Electric Company
Louisville, KY40225
"[T\PE C1 ()SED
I I I Zip I
Page 47

Consumer Services
With the purchase of your new Monogram appliance, receive the
assurance that if you ever need information or assistance from GE,
we'll be there. All you have to do is call---toll-free, t
GE Answer
Center _
800.626. 2000
In-Home Repair
Service
In the U.S.A.:
800.444.1845
In Canada:
888. 880.3030
For Customers
With Special
Needs...
800.626. 2000
Whatever w)ur question about any Monogram major appliance, GE Answer Center _
inlitrmation service is awfilable to help. Yore" call--and yore" question--will be answered
promptly and courteously. And you can call any time. GE Answer Center _')service is open
24 horn's a day; 7 days a week.
OR
Visit ore" _4ebsite at: www.monogrmn.com
AGE consmner service protessional will provide expert repair service, scheduled at a time
that's convenient fin" vou. Many GE Consmner Service company-operated h)cations offer
w)u service today or tomorro_, or at w)ur convenience (7:00 a.m. to 7:00 p.m. weekdays,
9:00 a.m. to 2:00 p.m. Saturdays). Ore" thctory-trained technicians know yore" appliance
inside and out--so most repairs can be handled in just one visit.
GE ofli_rs, fi'ee of charge, a broclmre to assist in planning
a barriet_free kitchen tin" persons with limited mobility.
Consmners with impaired hearing or speech who have access to
a TDD or a conventional teletypewriter may call 800,TDD,GEAC
(800.833.4322) to request infiwmation or service.
Service Contracts
800.626. 2224
Parts and
Accessories
800.626. 2002
S_mrlON
You can have the secure ti_eling that GE Consumer Service will still be there after w)ur
warranty expires. Purchase a GE contract while wmr warranty is still in effect and w)u'll
receive a substantial discotmt. With a multiple-year contract, you're assured of flmn'e
setwice at today's prices.
Individuals qualified to serxice their own appliances can have parts or accessories sent directE
to their home. The GE parts system pro',ides access to o',er 47,000 parts...and all GE (;enuine
Renewal Parts are full_ warranted. VISA MasterCard and Discoxer cards are accepted.
User maintenance instructions contained hi this manual cover procedures intended to be
performed by m_y user. Other servicing generally should be referred to qualified service
persomlel. Caution must be exercised, since improper servicing may cause unsafe operation.
47
Page 48

Warranty
( onvet:lion 1,1_111 Ovet_
YOUR MONOGRAM WALL OVEN WARRANTY
Staple sales slip or cancelled chech here. Proof of original purchase
date is needed to obtain service under warranty.
WHAT IS
COVERED
From the Date
of the O'_ginal
Puwhase
WHAT IS NOT
COVERED
FULL ONE-YI_LM/WARRANTY
For one xear from date of original purchase, we will proxide, free of charge,, I)arts and
ser\ice labor in yore" home to repair or replace any part of the oven that tails because of
a inalmfhcturii_g detect.
This warranty is extended to the original purchaser and an} succeeding owner for products
purchased fin" ordinar\ home use in the 48 mainland states, Hawaii, \.Vashington, D.C. or Canada.
In Alaska the warranty is the same except that it is I,IMITED because \_)u must pay to ship
the product to the service shop or lot the service technician's trmel costs to your home.
All warranty service will be provided by our Factor\ Service Centers or by our authorized Customer
Care ,; servicers during normal working hours.
Shoukl your appliance need service, during warranty period or beyond, in the USA call
800.444.1845. In Canada: 888.880.3030.
• Service trips to your home to teach you how
to use the product.
• Replacement of house fuses or resetting of
circuit breakers.
• Damage to the product caused by accident,
fire, floods or acts of God.
• Failure of the product if it is used for
other than its intended purpose or used
commercially.
• Improper installation, delivery or maintenance.
• Incidental or consequential damage caused by
possible defects with this appliance.
• Damage caused after delivery.
164D4290P093-2
49-80135-2
02-03 JR
Printed in the United States
Solne states/provinces do not allow the exclusion or limitation of incidental or consequential
damages, so the above limitation or exclusion may not apply to you. This warranty gives you specific
legal rights, and you may also have other rights which vary fl'Oln state to state/province to province.
To know what your legal rights are in your state/province, consult your local or state/provincial
consmner allairs ollice or your state's Attorney General.
Warrantor in USA: General Electric Company,
Louisville, KY 40225
Warrantor in Canada: Camco Inc.
Monogram:
Webring good things tofife.
General Electric Company
Louisville, KY40225
 Loading...