

Page 1
OWHeF'S
Manual
30" Convection
Wall Oven
ZET1 - Single Wall Oven
ZET2 - Double Wall Oven
ge,eom
@
Monogram:
Page 2
Consumer Inff}rmation
Wall Ovet_
hmvduction
Contents
Your new Monogram wall oven makes an eloquent statement of style, convenience and kitchen
planning flexibilit> Whether you chose it fl)r its purity of design, assiduous attention to detail--
or flw both of these reasons--you'll find that your Monogram wall oven's superior blend of form
and hmction will delight you fin" years to come.
Yimr Monogram wall oven was designed to provide the flexibilit_ to blend in with your kitchen
cabinetr> Its sleek design can be beautitully integrated into the kitchen.
The inflwmation on the following pages will help you operate and maintain your wall oven
properly.
Care and Cleaning
Broiler Pan and Grid .................. 36
Oven Door . ...................... 38, 40
Oven Lights ........................ 39
Probe ............................. 38
Racks .............................. 37
Consumer Services
Important Phone Nmnbers ............ 47
Model and Serial Nmnber . .............. 24
Problem Solver ................... 41, 42
Product Registration ............. 3, 45, 46
Satiety Instructions ................... 4-9
_u'ranty ........................... 48
Oven
Aluminum Foil ................. 13, 16, 25
Baking/Roasting ..................... 15
Broiling ......................... 16, 17
Clock .............................. 31
Controls ............... 11, 15, 16, 17, 19, 21,
23, 25, 26, 27, 28
Control I,ockout ....................... 31
Convection Cooking ............... 20-25
Featm'es ............................ l 0
Probe .................. 12, 18, 19, 23, 38
Proofing ............................ 28
Racks .............................. 14
Sabbath Feature ...................... 35
Sel_2Cleaning Instructions ........... 29, 30
Special Features ................... 33-35
Thermostat A{!justment ................ 33
Timed Cooking ................... 26, 27
Timer .............................. 32
t_? _l OgJe
pa&c ¢ing
tape
Carefully grasp a corner of the protective
shipping fihn with yore" fingers and slowly peel
it fl'om the appliance surfitce. Do not use any
sharp items to remove the film. Remove all
of the film beflwe using the appliance flw
the first time.
To assure no damage is done to the finish
of the product, the sMest way to iemove
the adhesive from packaging tape on new
appliances is an application of a househ{}ld
liquid dishwashing detergent. Apply with a
sott cloth and allow to soak.
N()7N: Tke adh_:sive must be *Pmoved.fi_)m all
/)arts. It (annot be *Pmoved !lit is baked on.
Page 3
Consumer Inff)rmation
I.l?H/ Ovet_
Be[bre
using your
wall oven
-Write
down the
model &
serial
nu?Ytbers
Read this manual carefulb:. It is intended to
help you operate and maintain your new wall
oven properly.
Kee I) it handy tin" answers to your questions.
You'll find them on a label on the front left
trim behind the oven door.
Fill out and return the Consssmer Product
Registration Card that is packed with this
product.
If you don't mlderstand something or need
more help, there is a list of tolMi'ee consmner
service nmnbers included in the back section
of this manual.
OR
Visit our Website at: ge.com
Before sending in this card, please write these
nmnbers here:
Model Number
Serial Number
Use these llHI/lbers ill an} corresposldellce or
service calls concerning ?our _<_11oxen.
[./you
received a
damawd
wall oven
Save time
& money
[./you
need
service
Immediatel} contact the dealer (or builder)
that sold }ou the wall oxen.
Before )ou request service, check the
Problem Solver ill the back of this manual.
To obtain sesMce, see the Consmner Services
page in tile back of this manual.
We're proud of ore" service and want you to be
pleased. If ,%r some reason wm are not happy
with the seixice wm receive, here are two steps
to ti)llow ti)r tm'ther help.
FIRST, contact tile people who serviced your
appliance. Explain why you are not pleased.
Ill most cases, this will solve the problem.
It lists causes of minor ol)erating, problems that
}OSS Call correct }ourself.
NEXT, if you are still not pleased, write all the
cletails--including your phone mmfl)er--to:
Manager, Customer Relations
GE Appliances
Appliance Park
Ixmisville, KY 40225
Page 4
IMPORTANT SAFETY INSTRUCTIONS
IMP OR 7A N 7 SAFE7T NO 77CE
" The California Safe Drinking Water
and Toxic Enforcement Act requires tile
Governor of Califln'nia to publish a list
of substaslces kllowll to tile state to cause
cancer, birth detbcts {)5"other reproductive
harm, and requires businesses to warn
custoI//ers of potential expostlre to Stlch
substances.
SAP> 7T PRE CA U770NS
When using your electrical appliances, basic
safety precautions should be followed,
including the following:
, Be sure all packing materials are removed
from the oven befl)re operating it to prevent
fire or smoke damage should tile packing
material ignite.
* Use tiffs appliance only for its intended use
as described in this Owner's Manual.
* Be sure your appliance is properly installed
and grounded b} a qualified technician in
accordance _ith tile provided installation
instrtsctios_s.
" Be sure the oven is securely installed in a
cabinet that is firmly attached to the house
structure. Never allow anyone to climb, sit,
stand or hang on tile oven door.
* Have the installer show you the location of
the circuit breaker or fuse. Mark it fin" easy
re_erellce,
* Do not attempt to repair or replace amy part
of your wall oven unless it is specifically
recommended in tiffs manual. All other
servicing should be reterred to a qualified
technician.
* Teach children not to play with the controls
or lilly other part o_ tlle ovesl.
* Never leave the oven door open when you
are not watching tile oven.
" The fiberglass insulation in self-cleaaa ovens
gives off a very small amount of carbon
monoxide during the cleaning cycle.
Exposm'e call be minimized by venting
with all open window 05" using a ventilation
tim 05" hood.
. IMPORTANT: Tile heahh of
some birds is extremeh sensitive to tlle fmnes
gixen off dm'ing tile sel_:cleaulng c) cle of an)
oven. Move birds to another well-ventilated
rooI//
*Always keep dish towels, dish cloths, pot
holders and other linens a safe distance from
your oven.
" For your safety, never use your appliance
for warming or heating the room.
, Do not store flammable materials in the
oven.
*Always keep wooden and plastic utensils
and canned food a safe distance away from
your oven.
*Always keep combustible wall coverings,
curtains or drapes a safe distance from
your oven.
, DO NOT STORE OR USE COMBUSTIBLE
MATERIALS, GASOLINE OR OTHER
FLAMMABLE VAPORS AND LIQUIDS IN
THE VICINITY OF THIS OR ANY OTHER
APPLIANCE.
* Do not let cooking grease or other flammable
materials accmnulate in or near the wall oven.
, Do not use water on grease fires. Never pick
up a flaming pan. Turn tile controls off.
Flame in tile oven call be smothered
completely by closing tile oven door and
turning tile oven off or by using a muhi-
purpose dry chemical or %am-type fire
extinguisher.
Page 5
MESURES DE SECURITE IMPORTANTES
AVIS IMPOR 7ANT EN MA 77Et 2 DE SECUtUTF2
" Le California Safe Drinldng Water and Toxic
Enforcement Act exige que le gouvernem" de
Califl)rnie publie line liste de substances que
l'on salt occasionner le cancel des anomalies
cong6nitales on d'autres anomalies de
reproduction, et exige que les entreprises
avertissent leurs clients des dangers que lem"
font courir line exposition _'tces substances.
MES UP 2S DE SECUPJT?2
Pour utiliser des appareils (}lectrom&nagers,
vous devez suivre des prScautions 61(}mentaires
de s&curit6, en partictdier :
, Assurez-vous d'enlever tous les mat(}riaux
d'embaJlage du four ax:mt de le mettre en
marche, pore" &'iter tout danger d'incendie
ou de dommage clC_5 la fum_e sices
mat6riaux d'emballage prem_ent tim.
, N'nfilisez cet appareil que pour l'usage auqud
il est destin(}, comme expliqu(_ dans le prg_sent
Manuel du propfi6taire.
, Assurez-vous qne votre appaaceil est bien install(}
et mis 5.la terre par im insmllatet*r qualifi6,
confimn&nent aux directives d'installation
fl)m'nies.
, Assurez=votts que le four est Men install(} darts
tree axmoire solidement flx&e 5.la cha_pente
de la r6sidence. Ne laissez pel_om_e gfimpeL
s'asseoir Oil I/lOll[el" Sill" la porte (hi [()ill.
ou s'y agrippei:
, Demaaadez 5.l'installateur de vous montrer
l'emplacement du disjoncteur ou du fusible.
IdentifieMe pour pouufir le trouver thdlement.
, Ne tentez pas de r6pamer ni de remplacer
auctme pi(}ce du four, 5.moins que cela ne soit
recommaJad(} drafts le pr6sent manuel. T(_ut
autre service d'entretien dolt 6tre assm'6
par un r6palateur qualifi6.
, Apprenez aux enfaaats 5.ne pasjouer avec les
comma_des ou toute autre pibce du ibm:
" Ne laissez ja_mais la porte du four ouverte
hn_que vous ne sm'veillez pas l'appareil.
" L'isolement en fibre de verre dans les fours
auto-nettoyaaats &met tm tr(}s petit montant
de gaz caxbonique pendant le cycle de
nettoyage. Vous pouvez r(4duire w)tre
exposition 5 ce gaz en a0rant, en (mvrant
la ibn_tre ou en utilisant un ventilateur
ou une hotte d'a(4ration.
.IMPORTANT: Ce,t .n
sont exti_mement sensibles 5 la iron<% produite
pendant le programme d'autonettoyage de
n'importe quel fi)m _.Placez les oiseaux
dans une autre pi&ce bien a(4r(%.
, Gardez toujours les linges 5.vaisselle, les
mitaJnes de four et autres articles en tissu 5. tree
distance s6curitaJre de votre four.
, Pour votre s6curit6, n'ufilisez pas cet appaJceil
pour r6chauffer la pi(}ce.
, Ne rangez pas de mat6riaux inflammables dans
le four.
, Gm_dez toujours les ustensiles en plastique et en
bois, de m6me que les aliments en conserve, 5.
tree distance s(}curitaire de votre four.
, Gaxdez toujours les rev6tements muraux
combustibles, les rideaux et les tentures 5.tree
distance s6curitak_e de votre four.
, NE PAS EMMAGASINEZ OU UTILISEZ DES
MATI_:RIELS COMBUSTIBLES, L'ESSENCE
OU LES AUTRES VAPEURS ET ElLS
LIQUIDES INFLAMMABLES A PROXIMITIg]
DE CECI OU AUCUN AUTRE APPAREIL
, Ne laissez pas de graisse ou autres mati(}res
inflammables s'accumuler da_s le four ou 5.
proximit& de ce dernier.
, Ne tentez pas d'(}teindre des feux de graisse
avec de l'eau. Ne soulevezjamais tree casserole
en flammes. Mettez tons les r_glages en position
off (arr_t).
Vires pouvez _teimh'e compl&tement les
flammes en fellllal/t la porte du fimr et en
<4teignant l'apparei[ ou en utilisant im
extincteur chimique 5 poudre ou 5 mousse.
Page 6
IMPORTANT SAFETY INSTRUCTIONS
SAH 2 7T PPd 2CA U77ONS
* Do not use aluminum foil to line oven
bottoms, except as suggested in this manual.
Improper installation of aluminum f6il may
result in a risk of electric shock or fire.
* Cook meat and poultry thoroughly--meat to
at least an INTERNAL teml)eramre of 160°F
and p{mlt_ T to at least an INTEP.NAL
temperature of 180°E Cooking to these
temperatures usually protects against
foodborne illness.
"Before performing any service,
DISCONNECT THE OVEN POWER
SUPPLY AT THE HOUSEHOLD
DISTRIBUTION PANEL BY REMOVING
THE FUSE OR SWITCHING OFF THE
CIR(2UIT BREAIZER.
* Do not leave children alone--children should
not be left alone or mmttended in an area
where an appliance is in use. They should
never be allowed to sit or stand on any part
of the appliance.
* Do not touch the heating elements or the
interior surface of the oven. These surthces
may be hot enough to burn even though they
are dark in color. During and atter use, do
n(xt touch, or let clothing or other flammable
materials contact, any interior area ot the
oven; allow sufficient time fl)r cooling first.
Potentially hot smthces include the oven vent
openings and surthces near the openings,
crevices around the oven do(n, the edges of
the door window and metal trim pax_s above
the door.
. CAUTION: ITEMS OF INTEREST
TO CHILDREN SHOULD NOT BE
STORED IN CABINETS ABOVE AN
OVEN--CHILDREN CLIMBING ON THE
OVEN TO REACH ITEMS COULD BE
SERIOUSLY INJURED.
, Never wear loose-fitting or hanging garments
while using the appliance. Be careful when
reaching li)r items stored over the oven.
Flammable material could be ignited if
brought in contact with oven heating
elements and may cause severe btlrlls.
" Use only dry pot holders--moist or damp
pot hoklers on hot sm'thces may result in
burns ti'om stealn. Do not let pot holders
touxh hot heating elements. Do not use a
towel or other bulky cloth.
* Keep the oven vent unobstructed.
" Keep the oven free from grease buildup.
* Stand away from the oven when opening the
oven door. Hot air or steam which escapes ran
cause burns to hands, titce and/or eyes,
*After broiling, always take the broiler pan out
of the oven and dean it. Lett{wer grease in the
broiler pan can catch fire the next time you
use the pan.
* Large scratches or impacts to glass doors cam
lead to broken or shattered glass.
* Never leave jars or cams of fat drippings in or
near your oven.
Remember: The inside surthce of the oven
may be hot when the door is opened.
Page 7
MESURES DE SECURITE IMPORTANTES
MES Ut 2S DE SECUt 7
, N'ufilisez pas de papier d'aJuminittm pour
couvrir la sole du four, sauf de la facon
indiqu6e dazas le pr6sent manuel. Une
utilisation inad(4quate du papier d'aluminium
peut presenter des fisques de chocs (qectriques
ou d'incendie.
, Faites cuire la viaznde et la volaJlle 5.fond la
temp(q'amre INTERNE de la viande dolt &tre
d'au moins 160 °F, et celle de la volaille d'au
moins 180 °E Ia cuisson i?tces temp(q'amres
internes assure g(4n(q'idement tree bonne
protection contre les intoxications alimentaires.
, Avant d'effecmer tree r6paacafion, COUPEZ
TOUJOURS L'ALIMENTATION DU FOUR
AU PANNEAU DE DISTRIBUTION EN
ENLEVANT I,E FUSIBI,E OU EN
DI_(;LENCHANT LE DIS]ONCTEUR.
" Ne laissez pas les enfaaats sans surveillance--
ll lie fimtjamais laisser les enfimts seuls ou sans
surveillance pros de l'appareil, lol_que celui-ci
timcfionne. On dolt (_galement leur interdire de
grimper ou de s'asseoir sur l'appareil.
" Ne touchez pas attx 616ments chauffaaats, ni
attx paacois du four. Ces smfimes pement &tre
suflisamment chaudes pore" causer des b* filures,
re&me si elles ne sont pas rouges. Pendant et
aprbs l'ufilisation, fidtes en sorte que vos
v6tements et auties mat6riaux inflammables ne
viennent pas en contact avec les patois du Ibm:
Laissez-les d'abord refl'oidir
Les surtimes susceptibles de devenir chaudes
comprennent notamment l'&'ent du tour et les
surfimes qui Fentourent, les asp(4rit(4s autour de
la pol_e du ibm; la sul_itce p&_iph&_ique du
hublot et les mouhn'es m6talliques au-dessus
de la polq_e.
N'oubliez pas : Les parois du fimr peuvent 6tre
chaudes l(n_que ",'otis ouvrez la porie.
ATTENTION •
, . NE RANGEZ PAS
DES ARTICLES QUI PRI)_SENTF2qT UN
INT_?,R_7,T POUR LES ENFANTS, DANS LES
ARMOIRES SE TROUVANT AU-DESSUS
D'UN FOUR C_ CEUX-CI POURRAIENT
GRIMPER SUR L'APPARHL POUR LES
ATTEINDRE ET RISQUERAIENT DE SE
BLESSER.
, Ne portez jmnais de v6tements amples
lorsque vous utilisez cet appacreil. Faites
attention loi_que vous prenez des aiqricles rang&
dans les am_oires au-dessus du tbm: Les fissus
inflammables peuvent prendre tbu au contact
des sm_hces chaudes et causer de gn_ves
brfilures.
, N'ufilisez que des poign6es on des mitaJnes de
four s6ches--les poigng_es ou mitaines de lbur
humides ou mouill(4es pemvnt causer des
brfilures de vapem: Ne laissez pas les poign(%s
venir en contact avec les (q(4ments chauds.
N'utilisez pas de serviette ou autre objet
encombrlmt en tissu au lieu de mitaines de tism'.
, Assurez-vous que l'6vent du four n'est jmnais
obstrn6.
" Ne laissez pas s'accumuler de d6p6ts graisseux
daaasle four.
" Ne vous tenez pas trop pr6s du four lorsque
VOltS ouvrez la porte. L'air chaud etla ``:q)eur
qui s'en 0chappent pement v(ms b*fller les
mains, le visage et les veux.
"Apr&s le grillage, sortez toujours la l_chefrite
du four et nettoyez-la. Ia graisse qui s'est
accum ul0e dans la l_chetiJte pourrldt prendre
Du la prochaine ibis que vous utiliserez le thin:
" De grandes 6gratignures ou des impacts sur la
surface vitr6e des portes peuvent entraJner le
bris du verre.
, Ne laissez jamaJs de pots 5.graisse ou de boites
de conserve contenaaat des matibres grasses 5.
proximit6 de votre four.
Page 8
IMPORTANT SAFETY INSTRUCTIONS
SAFE 7T PRE CA UTIONS
" Children in walkers, or children crawling, can
be attracted to the round oven door handle
and may grab and open the oven door, This
call result in il_iury from the door being pulled
open on a child, or severe burns if tile oven
is in use and hot.
* Do not heat unopened food containers.
Pressure could build up and the container
could burst, causing all il_jurv.
* Place the oven rack in the desired position
while the oven is cool, If racks must be handled
when hot, do not let pot holder contact tile
heating elements.
SEI_ -CI3 2ANING OVEN
" Do not dean the door gasket. Tile door gasket
is essential fl)r a good seal. (;are should be
taken not to rub, damage or move tile gasket.
* Do not use oven cleaners. No coi/ll/lercia] o', ell
cleaner or oven liner protective coating of any
ldnd should be used in or around any part of
tile oven. ResMue Kom o\ en cleaners will
damage the inside of the oven when the self-
clean cycle is used.
" Clean only parts listed in this Owner's Manual.
, Extending the racl< to its fully open position is
a convenience in lifting heavy foods. It is also
a precaution against burns fl'om touching
hot sm/hces of tile door or oven walls.
"When using cooMng or roasting bags in the
oven, fi_llow the manufimmrer's directions.
, Do not use your oven to dry newspapers.
If oveflleated, they can catch on fire.
" Do not use oven for a storage area. Items
stored ill all oven call ignite.
, Do not leave paper products, cooldng utensils
or food in the oven when not in use.
" Do not allow anyone to climb, stand or hang
on the door. They could damage tile (wen or
cause severe personal ii_jury.
, Before self-clea_ng the oven, remove tile
broiler pan, grid and other cookware.
, Be sure to wipe up excess spillage before
startling the self-clea_ing operation.
, If the self-deaxting mode malfunctions, turn
tile oven off and disconnect tile power supl)ly.
Have it serviced bv a qualified technidan.
, The oven racks may be deaaaed in the oven
during the self-cleaaaing cycle.
SAVE THESE INSTRUCTIONS
Page 9
MESURES DE SECURITE IMPORTANTES
Md 2SURES DE CURH >2
" Les enfaJats en mm'chette ou les enfazats qui
rampent peuvent 6tre atth'6s pax la poign6e
ronde de porte du four et peuvent la saJsir, et
aJnsi ouvrir la porte. (ela peut urcasiom_er
lille oux eYttu'e de ]a porte StlF ]'ellfiult Oil
des brfih_res s(4rieuses si le four est en
fimctionnement et chaud.
, Ne fMtes pas chauffer de r6dpient ferm&
I,'aceumulation de pression dans le r(4cipient
peut le fldre (4clatel; causant ainsi des blessures.
, Placez les dayettes g la hauteur d6sir6e lorsque
le four est froid. Si w_us de\ ez les manipuler
lo*_que le fi)ur est chaud, &'itez que vos
mitaines de ilk}ill" entrellt ell contact avec
les _l_ments du ibm:
FOUR A UTONETTO YANT
, I1 est plus pratique de soulever des plats
lourds lorsque la grille est enti6rement ouverte.
VOus &'iterez ainsi de w_us b* filer en touchant
aux patois de la porte ou du fi)m;
" Lorsque vous utilisez des sachets pour la cuisson
on le r6tissage, suivez les directives du fitbricant.
, Ne faJtes pas s&cher dejournaux daaas le four.
S'ils surchauflent, ils fisquent de prendre feu.
"N'entrepusez pas d'a_rtides darts votre four.
Ils [)ourraient prendre fbu.
" Ne laissez pas de prodmts en papier,
d'ustensiles de euisson ou d'aJiments darts le
four lorsqu'il n'est pas ufilis&
, Ne laissez personne grimper on monter
sur la porte du four, ou s'y agripper. Cela
I)ourrait endommager l'appareil ou causer
de graves blessures.
" Ne nettoyez pas le joint de la porte. Cejoint
est essentiel 5 line bom_e <4tanch_it_. ]1 fittlt
&'iter de le rg_cure_; de l'endommager ou
de le d_placel:
, N'utilisez pas de produits nettoyaJats
eommerciaux pour le four. I1ne fimtjamais
utiliser des produits nettoylmts commerdaux on
des enduits protectem_ dans le fi)ur ou pros des
pibces du fi_tm I,es _(_sidus de ces produits
netto_;mts endommageront l'intg_fieur du tbur
lol_que x_ms eflectuerez un autonettoyage.
" Ne nettoyez que les pibces indiqu6es darts le
pr6sent maJaud d'ufilisation.
CONSERVEZ CES DIRECTIVES
, Avaaat de commencer l'autonettoyage, enlex ez la
l&chefi_ite, la grille et autres ustensiles de cuisine.
, AvaJat de commencer l'autonettoyage, essuyez
les aliments renvers8s.
, Si le programme d'autonettoyage foncfionne
maJ, &eignez le fimr et coupez l'alimentation
(qectrique. Faites rt4parer l'appareil par un
technicien qualifi(4.
"Vous pouvez nettoyer les dayettes du four
pendant le cycle d'auto-nettoyage.
Page 10
(NO1 all fi,alt_rt, s
ar_, oTz all models.
4ppearaTzce ma 3 va*3. )
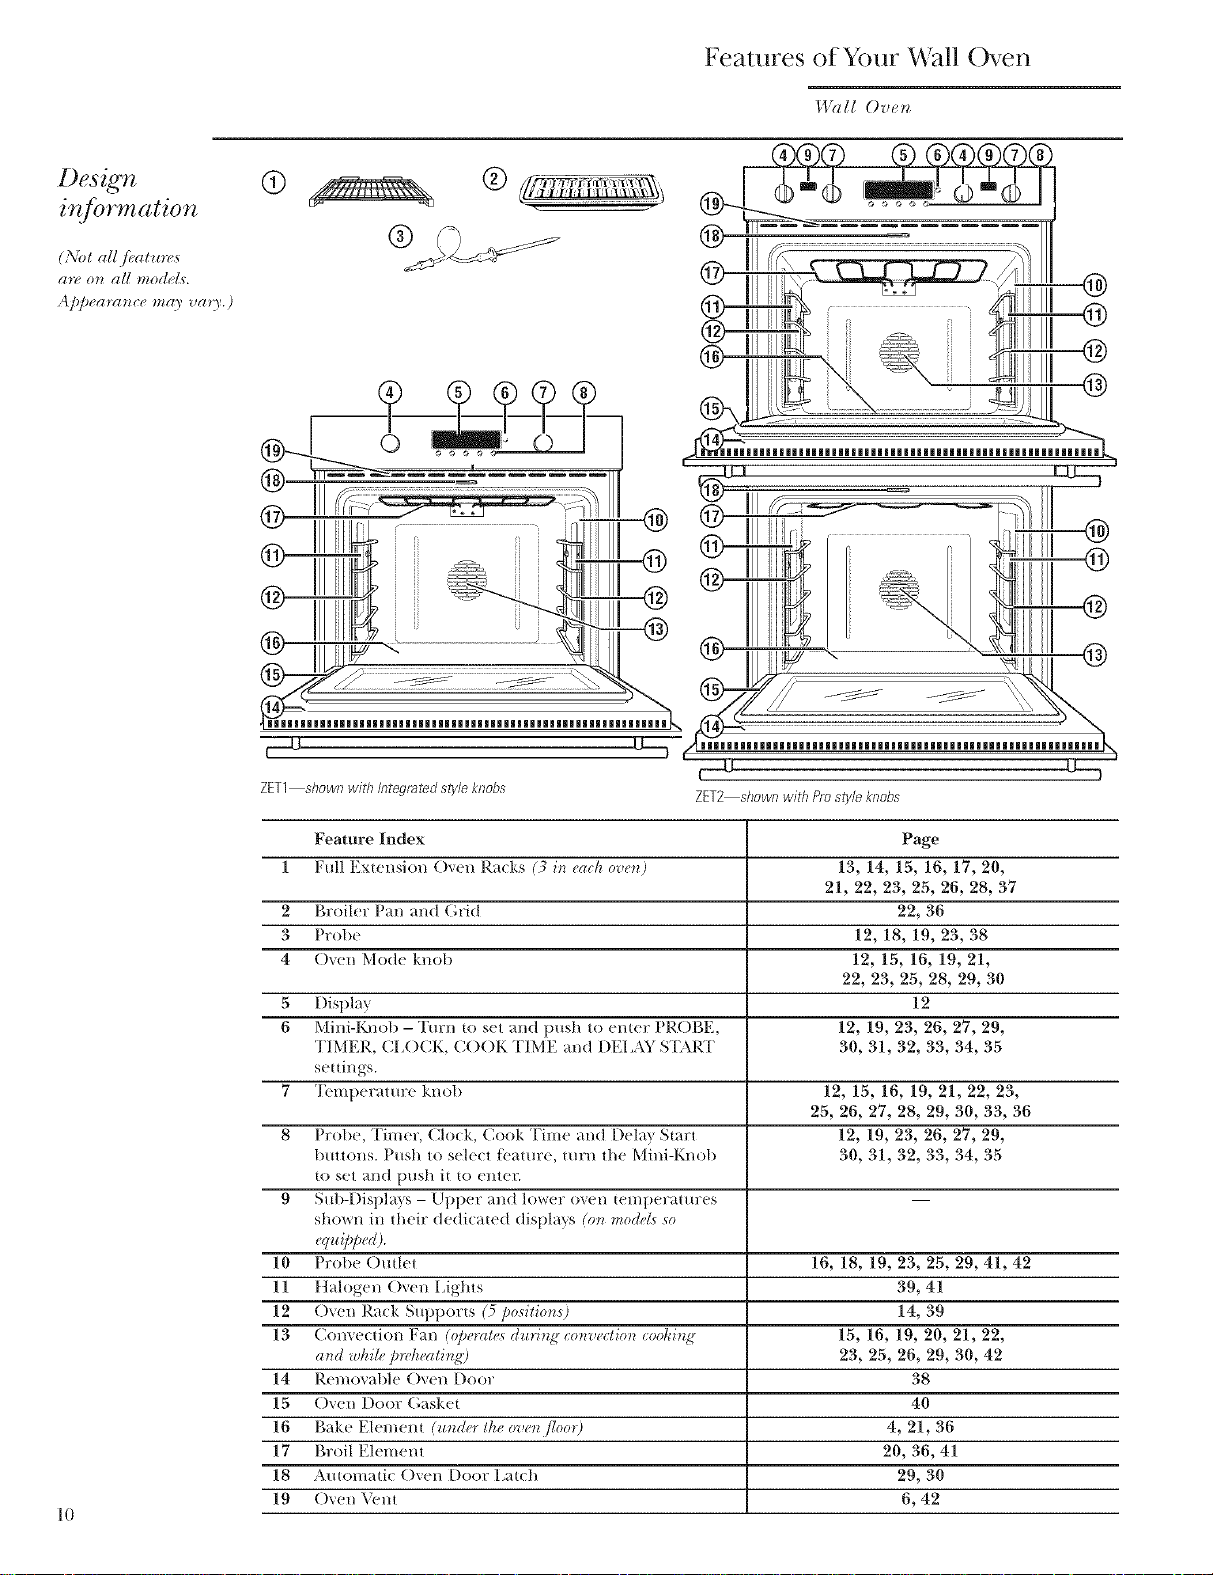
Features of Your Wall Oven
_,l?d! Ove_
®
@_& L Looo I
III1|11|1|11|1111|11|1|11|1111|11|1111|11|1|11|1111|11|1|11|1
ZET1 showl_with #_tegmtedstylekl_obs
Feature Index Page
1 Full Extension ()v_n Racks (3 irt each oven) 13, 14, 15, 16, 17, 20,
21, 22, 23, 25, 26, 28, 37
2 Broik r Pan and Grid 22, 36
3 Probe 12, 18, 19, 23, 38
4 ()_en Mode knob 12, 15, 16, 19, 21,
22, 23, 25, 28, 29, 30
,5 Display 12
6 Mini-Knob - Turn to set and push to enter PROBE, 12, 19, 23, 26, 27, 29,
TIMER, CL()CK, C()()K TIME and [)EI.\Y START 30, 31, 32, 33, 34, 35
s_ ttings.
7 T_mperamre knob 12, 15, 16, 19, 21, 22, 23,
25, 26, 27, 28, 29, 30, 33, 36
8 Probe, Timer, Clock, Cook Time and [)elm Start 12, 19, 23, 26, 27, 29,
buttons. Push to sekct Ibatur_, turn the Mini-Knob 30, 31, 32, 33, 34, 35
to set and push it to emer.
9 S/fl)lDispla}s - Upper and lower oxen temperatur_ s
shown in their dedicated displays ((m mode£ so
_'quipped).
10 Probe ()utk t 16, 18, 19, 23, 25, 29, 41, 42
11 Halogen Oven I,ights 39, 41
12 ()Yen Rack Supports (5 positio)ts? 14, 39
13 Convection Fan (@erat_._ duri_g" co_mectior_ coohi_g" 15, 16, 19, 20, 21, 22,
arid whi/,, pre/u,ati_tg? 23, 25, 26, 29, 31), 42
14 Removable ()v_n Door 38
15 Oven Door Gasket 40
16 Bake Element (under the o*ven/'/oo_ 9 4, 21, 36
17 Broil Element 20, 36, 41
18 Automatic ()yen Door Iatch 29, 30
10
19 ()_en Veto 6, 42
Page 11
/_atures qf
yO_llr OVert
cont vl,
clock and
timer
(Not ag
.[eatures
arg 07_ all
models.
Appearance
may vary.)
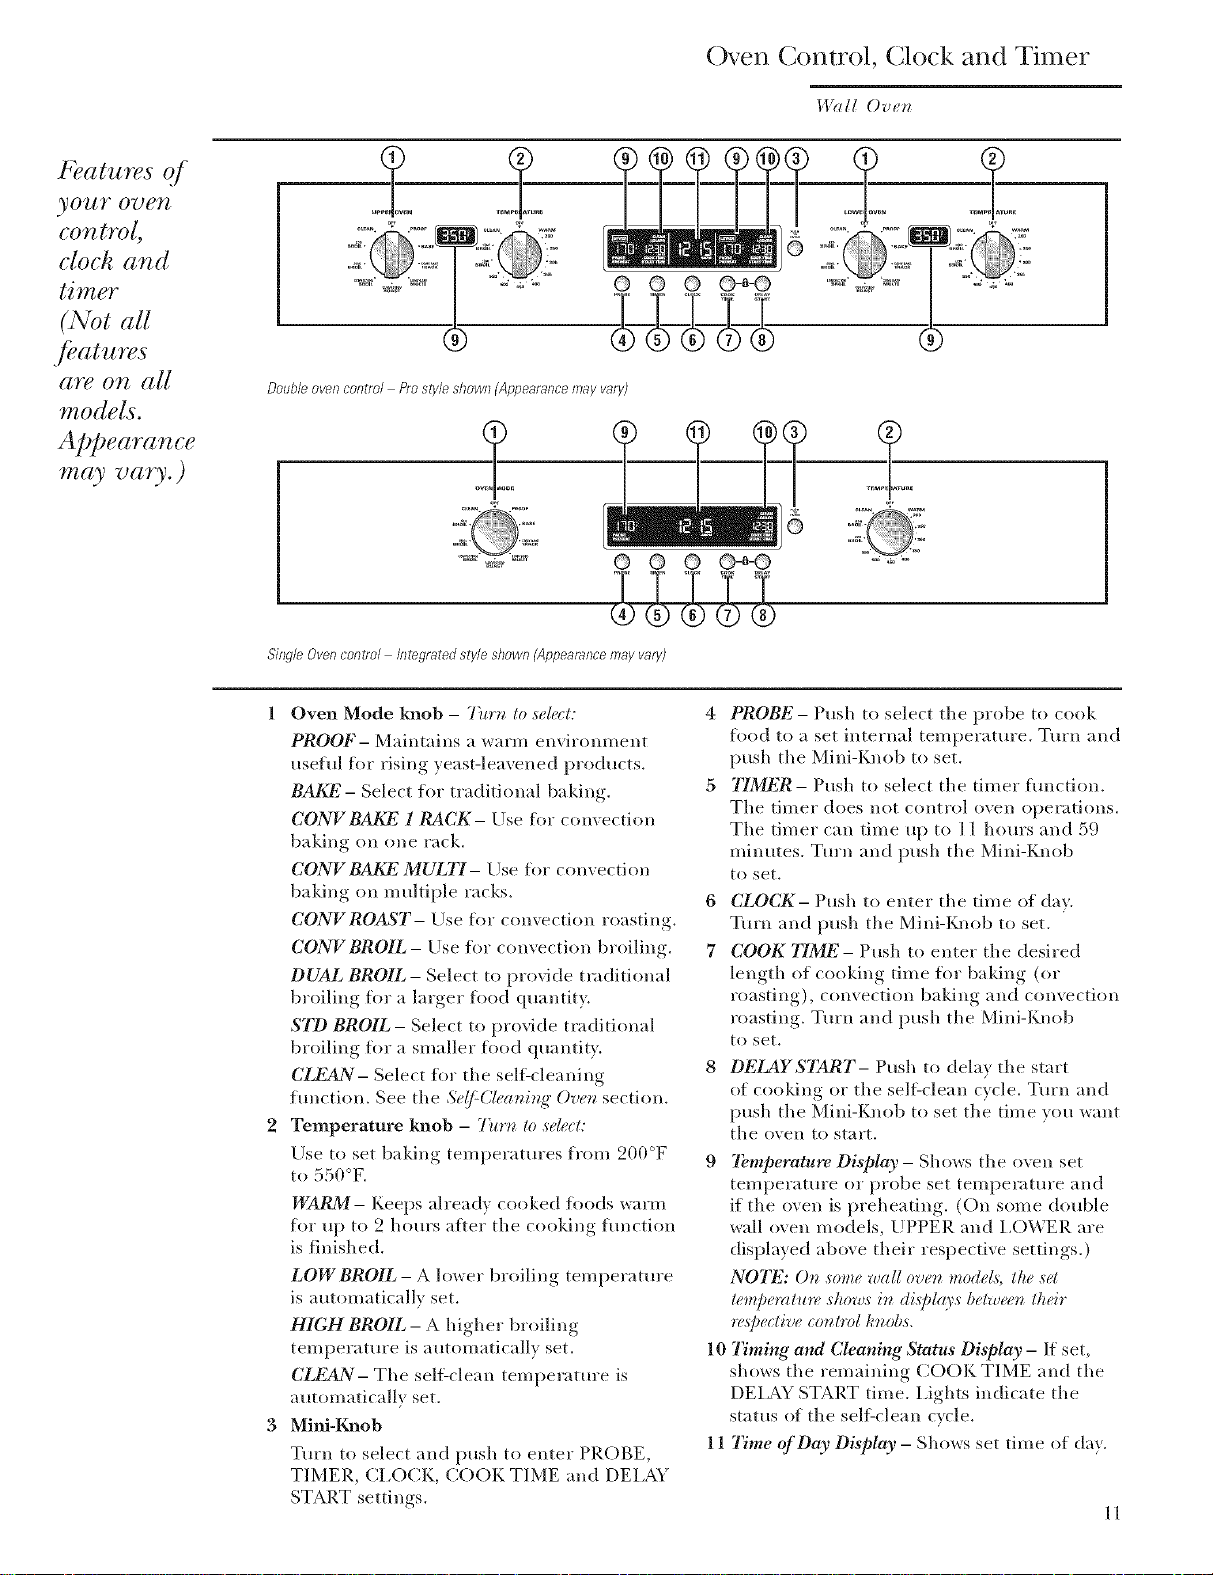
Oven Control, Clock and Timer
I,I?lll Ovez_
Double oven control Pro style shown (Appearance may vary)
o.
©
Single Oven control Integrated style shown (Appearance may vary)
1 Oven Mode knob - 7)tt'n to select:
PROOF- Maintains a warm envir(mment
useful fl)r rising yeast-leavened products.
BAKE- Select for traditional baking.
CONV BAKE 1 RACK- Use flw convection
baking on one rack.
CONVBAKE MULTI- Use fi)r convection
baking on multiple racks.
CONVROAST- Use fbr convection roasting.
CONVBROIL - Use fiw convection broiling.
DUAL BROIL - Select to provide traditional
broiling fiw a larger fl)odquantity.
STD BROIL - Select to provide traditional
broiling fl)r a smaller fi)odquantily.
CLEAN- Select flw the self:cleaning
hmction. See the Se(f:C/eaning" Oven section.
2 Temperature knob - 7)_*'n to sale(t:
Use to set baking temperatures from 200°F
to550°K
WARM- Keeps already cooked %ods warm
for up to 2 hours after the cooking itmction
is finished,
LOWBROIL - A lower broiling temperature
is automatically set.
HIGH BROIL - A higher broiling
temperature is automatically set.
CLEAN- The self:clean temperature is
autom atically set.
3 Mini-Knob
Turn to select and push to enter PROBE,
TIMER, CI,OC3_, (;()OK TIME and DELAY
START settings.
PROBE- Push to select tile probe to cook
fi)od to a set internal temperature. Turn and
push the Mhli-Knob to set.
7_MER- Push to select the timer hmction.
The timer does not control oven operations.
The timer can time up to 11 horn's and 59
minutes. Turn and push the Mini-Knob
to set.
6
CLOCK- Push to enter the time of clay.
Turn and push the Mini-Knob to set.
7
COOK 77ME- Push to ellter the desired
length of cooking time %r baking (oF
roasting), convection baking and convection
roasting. Turn and push the Mini-Knob
to set.
DEIAYSTART- Push to delay the start
of cooking or the sell:clean cycle. Turn and
push the Mini-Knob to set the time you want
the oven to start.
9 Temperature Display - Shows tile oven set
temper;ittlre or probe set telllper;lttlre Hlld
if the oven is preheating. (On some double
wall oven models, LIPPER and LOWER are
displayed above their respective settings.)
NOTE: On some wall ovet_ model,% tke set
#mpe*_mz*v show,s in dLsJ)la3'sbetween their
*v,sJ)ectivecontrol knobs.
10 Timi_lg and Cleani_Tg Status Display - If set,
shows the remaining CO()K TIME and the
DELAY START time. Lights indicate the
status oftile self-clean ryrle.
11 77me of Day Display - Shows set time of clay.
11
Page 12
Controls Over_,_ew
I,l?d[ Oven
Introduction
to the oven
controls
CLEAN • PROOF
CONVECTION _NV BARE
BRO|L o MULTi
For all modes except Proof, the o'_en _dll not
operate unless both the Oven Mode and the
Temperature knobs are set. See table.
Mode Knob Temperature Knob
PROOF ()FF
gAIG( WARM to :_:_0°F
C()NV BAKE/1 ILkCK WARM to 550'F
C()NV BAKE!MUI 3"I WARM to 550'F
C()NVECTI()N!R()AST WARM to 550'F
C()NVECTI()N!BR()II_ Ill(It orI_()WBR()II,
DUAI_ BR()II HIGH or I _()W BR()II
STD BR()II_ HI(H or I_()W BR()II,
CI _EAN CI ,EAN
OFF
CONVECTION
ROAST
OvenMode knob
=,BAKE
® CONV BAKE
1RACK
OFF
CLEAN WARM
®
5OO 4_0 ° 400
Temperatureknob
To cancel a rearm'e, turn either the Oven
Mode knob or the Temperature knob to OFE
To cancel PROOF, turn the Oven Mode knob
to OFF.
Introduction
to the probe
temperature
set and time
controls
Doubleovendisplayshown
PROBE TINTER CLOCK
Push the PROBE, TIMER, CLOCK, COOK
TIME or DELAY START butt(ms and set them
by tm'ning and pushing the Mini-Knob. See
each respective section lbr details.
PUSH
TO
[_TER
Mini-Kneb
Turn to select
Push to enter
COOK DELAY
TiME START
The Mini-Knob will select in increments of 1, 5
or 10 depending on how thst it is turned. Tm'n
it clockwise to increase probe set temperatures
and time or counterclockwise to reduce them.
Push to set.
See the Control lockout section for ho,_ to lock
and unlock the controls.
12
Page 13
Baking Tips
Wall Ov_,_
Overzairflow
Aluminum
bil
An internal cooling tim operates during all oven
modes. Tile warm air fi'om inside tile oven will be
exhausted out through vents located between tile
door and control panel.
Do not allo_ this air flo_ to be obsti ucted b)
dra )ino ldtchen to_els o_er tile fl'ont of tile o\en
in undercounter applications.
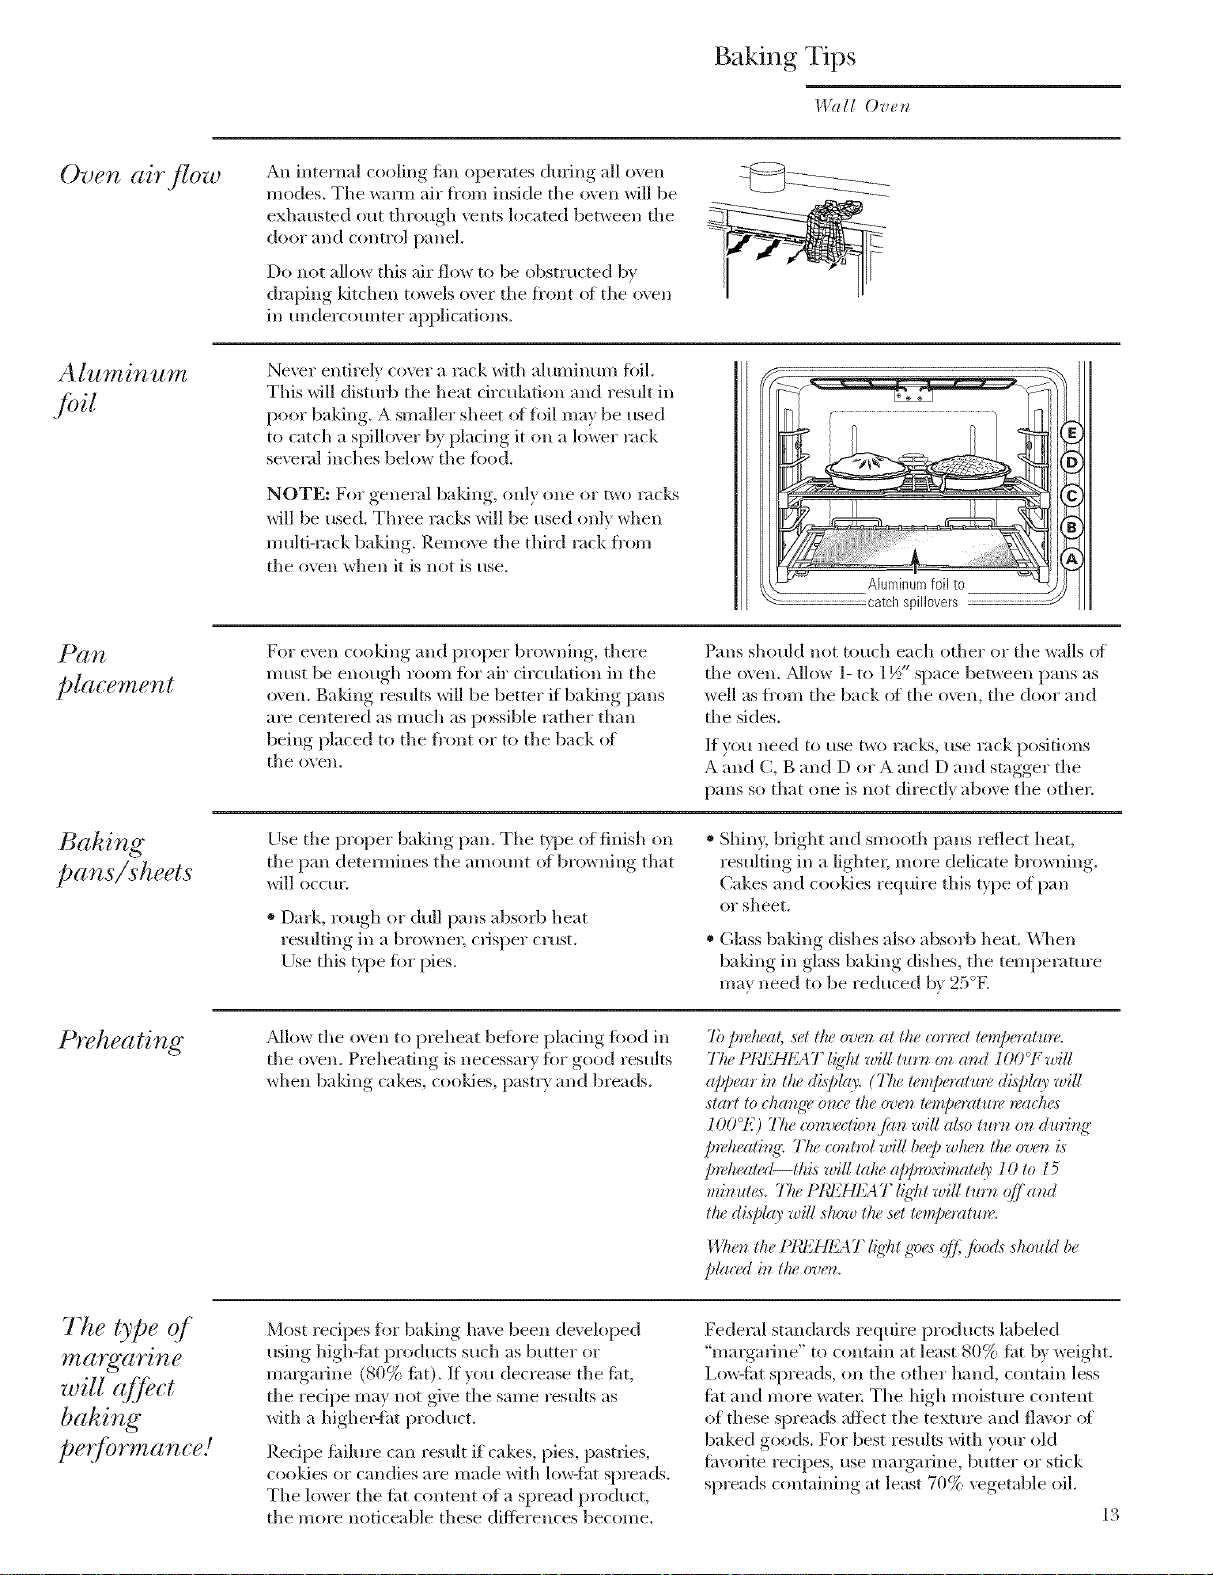
Never entirely co\vr a rack xdth aluminum foil.
This will disturb tile heat circulation and result ill
poor baking. A smaller sheet (ff flfil may be used
to catch a spillo\ er by placing it on a lower sack
several inches below tile ibod.
NOTE: For general baldng, only one or P,vo lacLs
will be used, Three mcLs will be used only when
multi-rack baking. Remo\v tile third rack fl'om
tile oven when it is not is use.
For e\vn cooldng and proper browning, there
must be enough room fi)_ air drculation ill tile
(wen. Baldng results will be better if baking pans
are centered as much as possible rather than
being placed to tile fl'ont or to tile back (ff
tile ()veil,
catch spillovers
Pans should not touch each ()tiles" or tile wails ot
tile o\en. _dlow 1- to 1½" space between pans as
well as fi'om tile back (ff tile o\vn, tile door and
tile sides.
/f_,oss Ileed to ssse g_,() I'acl<% use rack positions
A and C, B and D or A and D and stagger tile
pans so that one is not direcfl} above the other
Bahing
pans/sheets
Preheating
Thetypeo/
margarine
will q[/ ct
bahing
pe /bvma nce!
Use tile proper baldng pan. Tile t}])e of finish on
tile pan detel_nines tile amount of browning that
will occur.
* Dark, rough or dull pans absorb heat
resulting ill a brownes; csJsper cHsst.
Use this bpe fiw pies.
_Mlow tile oven to preheat befi/re placing fi)od in
tile oven. Pieheating is necessm'_ fi)* good results
xdlen baldng cakes, cooldes, pastr} and breads.
Most recipes flw baking have been de\ eloped
using high-fi_t products such as butter or
margarine (80% fia). If you decrease tile fst,
tile redpe may not gi_e tile same results as
with a highe>tht product,
Redpe fiulure call result if cakes, pies, pastries,
cooldes or candies are made with low-tht spreads.
Tile lower tile fi_t content of a spiead product,
tile more noticeable these differences become.
* Shin), bright and smooth pans reflect heat,
resulting in a lightei; more delicate browning.
Cakes and cooldes require this type of pan
or sheet,
* (;lass baking dishes also absorb heat. _qlen
bakin-,,_ ill ,glass baking, dishes, tile temperature
ma} need to be reduced b} 2: ]_.
7b p*elu,al, set ttw ove_ at the (orra:t I_m/wmtlm,.
Tim Iq_I_HE,4T l{@l wig tu*'_ o_zand I O0°F wig
a/q)eav h_ tlu, display. (The I_s@_>mt,m,disJ)lay will
IO0°E) The _>nvectb_l filn wig also tu*vz oz_duz'it_A,"
p*eheatb_g: The cozmol wig b(@ w/wn the ov_q_is
preheated--this wig take a/)[)roximaMy l 0 to l 5
minutes. The I>l'd'iHl{,4T l_gflt wig tmvz q[/ and
thv di@l( O'wig show thv set tem/,_,mllu'<
I47_e_the PI_d'2HI'2ATl{@t goes (?/,_fi*o& should be
placed i_ the ovo_.
Federal standards require products labeled
"margmine" to contain at least 80% fi_t by weight.
I.ow-fi_t spIeads, on tile other hand, contain less
fi_t and more watel: Tile high moisture content
of these spreads affect tile texture and flavor ot
baked goods. For best results with your old
fhvofite recipes, use margarine, butter or stick
spreads containing at least 70% vegetable oil
13
Page 14
Before You Begin
1,19111Ovet_
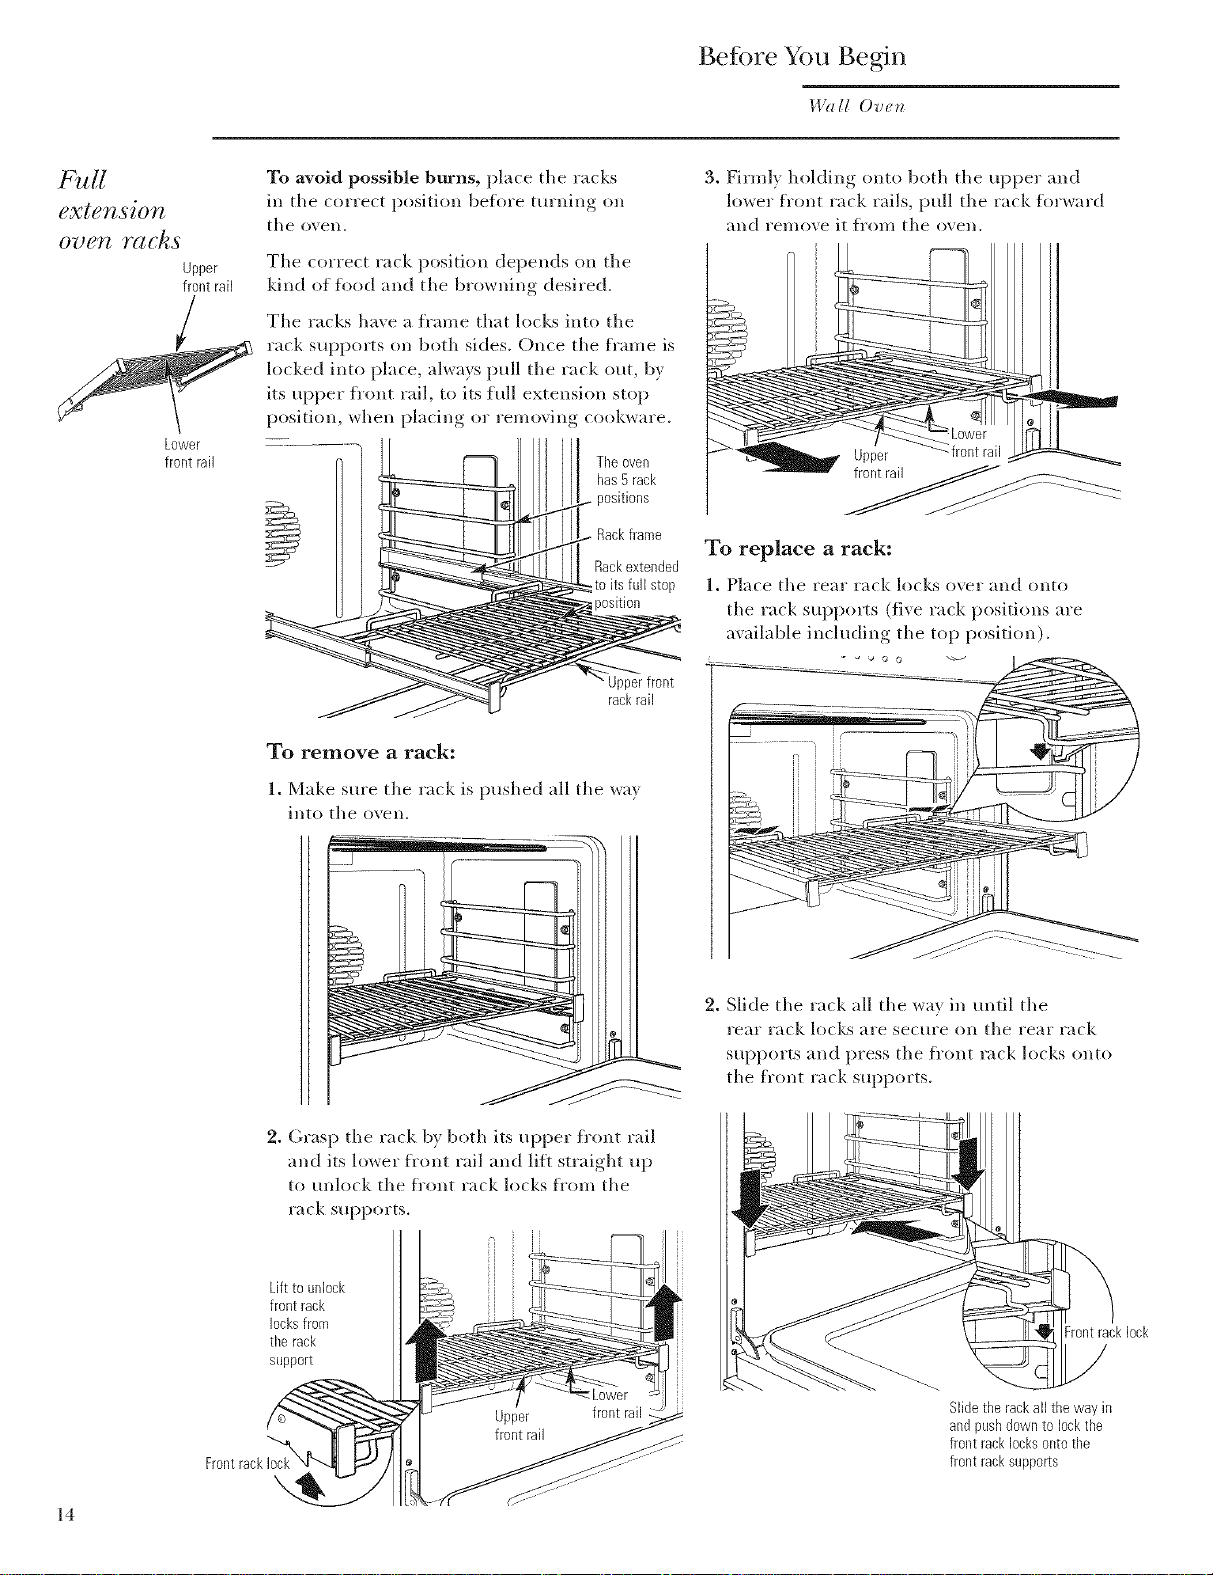
PTull
extension
ouen Y(I_(']gs
Upper
frontrail
Lower
frontrail
To avoid possible burns, place tile racks
ill tile correct position beflwe turning on
tile oven.
Tile correct rack position depends sill tile
kind of fl)od and tile browning desired.
Tile racks haxe a frame that locks into tile
rack supports on both sides. Once tile frame is
locked into place, always pull tile rack out l)_
its upper front rail, to its full extension stop
position, _,_hell l)lacin°_ or renloving, cook_#are.
Theoven
has5 rack
lositions
Rackextended
_toitsfullstop
_osition
Upperfront
rackrail
To remove a rack:
3. Firml} holding onto both tile upper and
lo',_er front rack rails, pull tile rack forward
alld I'en/oxe it [i-(111/ tile ovell.
Upper _frontrail
To replace a rack:
1. Place tile rear rack locks over and onto
tile rack supports (fixe rack positions are
available including tile top position).
1. Make sure the rark is pushed all the wa_
into the oven.
2. Grasp tile rack bv bodl its upper fi'ont rail
and its lower fl'ont rail and lilt straight up
to unlock the fi'ont rack locks fi'om tile
rack supports.
Lift to unlock
front rack
locksfrom
the rack
support
2. Slide tile rack all tile way m {mtil tile
rear rack locks are secure sill tile rear rack
supports and press tile ti'(mt rack locks onto
tile fi'ont rack supports.
Frontracklock
Slidetherackall the way in
andpushdown to lockthe
front racklocksonto tl_e
Front rack
front racksupports
14
Page 15
Baking
I,l?lll Oven
How to set
the oven./br
baking
CLEAN • PROOF
CONVECTION CONV BARE
BRO|L • MULT|
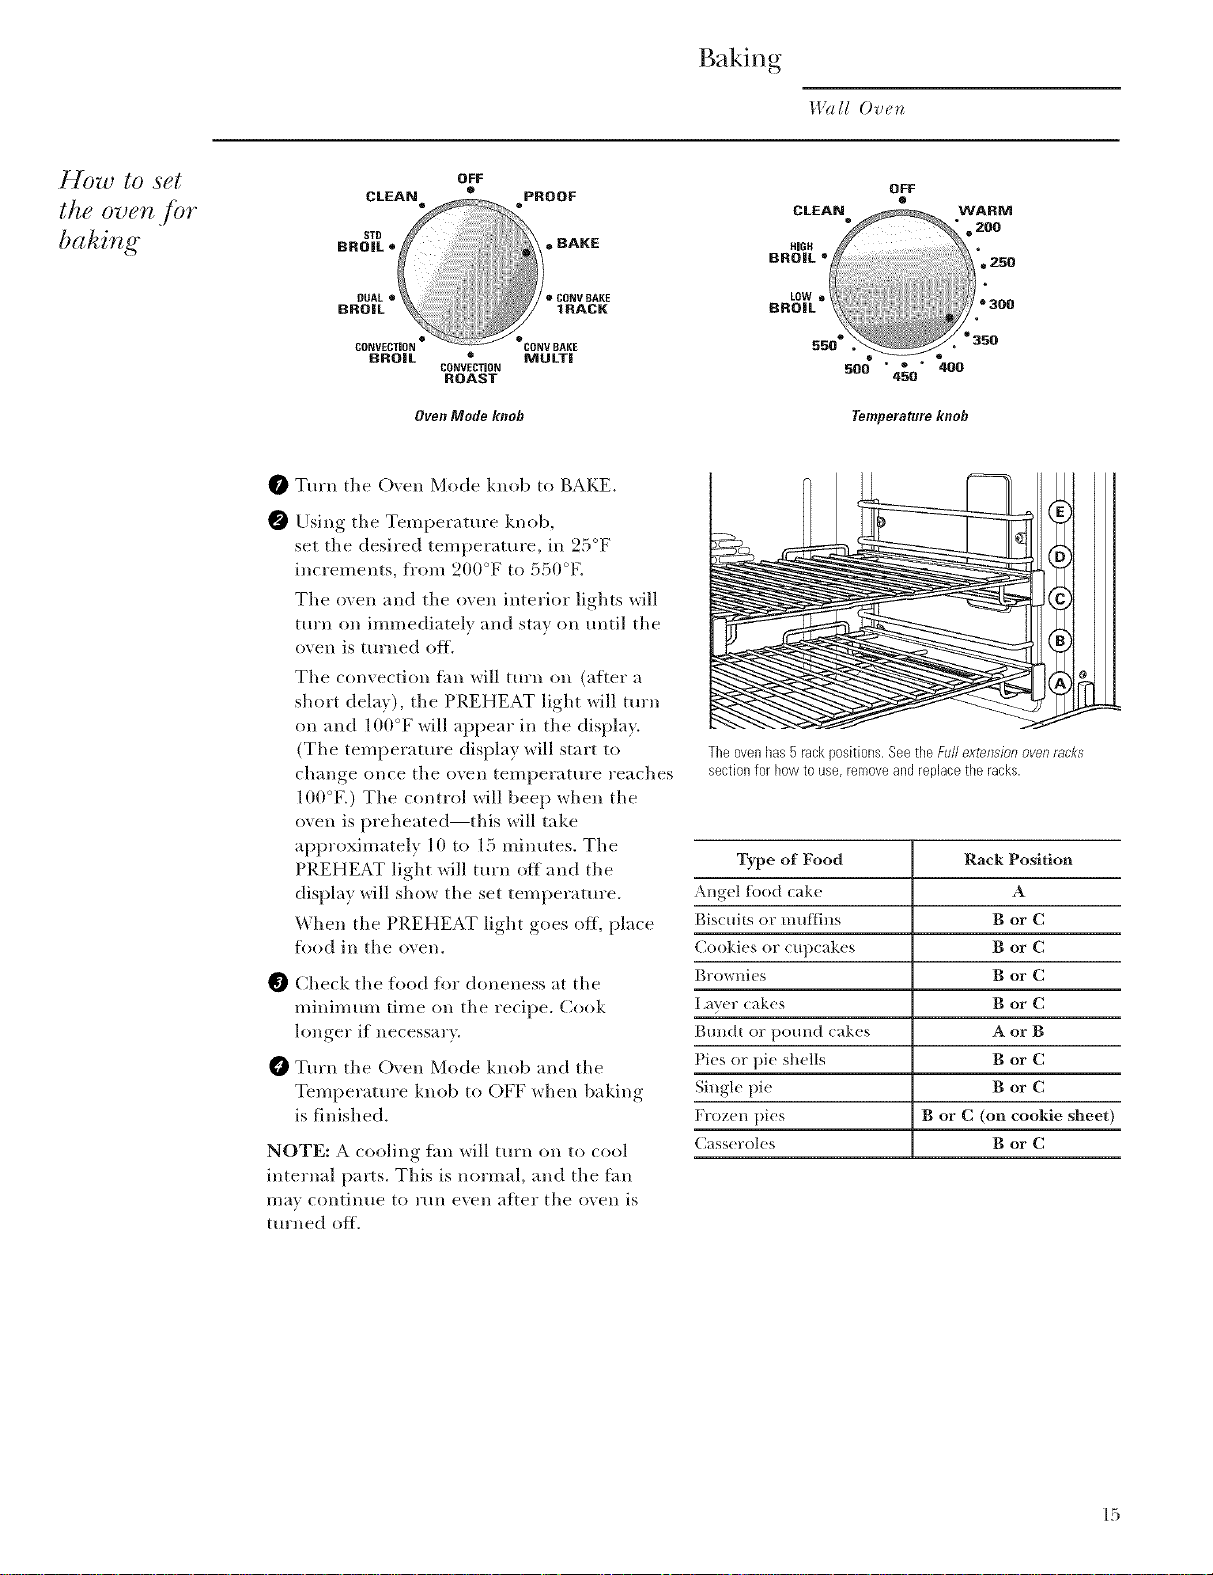
Turn tile O'_en Mode knob to BAKE.
0
@
Using tile Temperature knob,
OFF
CONVECTION
ROAST
OvenMode knob
set tile desired temperature, in 25°F
increments, fi'()m 200°F to 550°E
Tile 5)\en and tile oven interior lights will
turn on immediately and stay on until tile
oven is turned ott.
Tile convection tim will turn on (atter a
short delay), tile PREHEAT light will mrn
on and 100°F will appear in tile display.
(Tile temperature display will start to
change once the oven temperature reaches
100°El Tile control will beep when the
oven is preheated--this will take
approximately l 0 to 15 minutes. Tile
PREHEAT light will turn off and tile
display will show tile set temperature.
When the PREHEAT light goes off, place
fl)od in tile oven.
Check tile fl)od fl)r aloneness at tile
minimum time on tile recipe. Cook
longer if necessary.
l_ Turn the Oven Mode knob and the
Temperatm'e knob to OFF when baking
is finished.
NOTE: A co()]ing tim will turn on to cool
internal parts. This is normal, and tile thn
l/laY contint/e to I'[111 evell after tile ()veil is
turned off.
OFF
®
500 " e • 400
450
Temperature knob
The ovenhas5 rackpositions.Seethe Fullextensionovenracks
sectionfor how to use,removeandreplacetheracks.
Type of Food Rack Position
Angel Iood cake A
giscuits or muffins B or C
Cookies or cupcakes B or C
growni(s B or C
I av(r (akes B or C
gml(tt or pOuE/d cakes A or B
Pies or pie shells B or C
Singl( pie B or C
Frozen pies B or C (on cookie sheet)
Cass(roles B or C
15
Page 16

Broiling
Wall Oven
Int vduction
to broiling
Different broil elements are used in each
broil mode as described below. There are
3 ditterent broil modes, each providing a HI
and a LO setting.
. The HI setting call be used to seal in
juices or provide intense browning or
charring when needed (a higher rack
is generally used).
* The LO setting call be used when fl)ods
need adequate browning and also need to
be thoroughly cooked through (a lower
rack is used tot large food items such as
pork tenderloin or London Broil).
Dual Broil - Both tile inside and outside
broil elements are used ill this broil mode.
Use this mode fk)r fidl broiler pan fi)od loads.
See tile How to set the oven /br broilit_t{"section.
HI - Full broiler pan - hamburgers; roast
vegetables such as whole peppers, eggplant,
corn, assorted oat vegetables, kabobs and ve W
thin meats such as smoked pork chops
LO - Full broiler pan - fish fillets
Std Broil - ljses the inner element only -
rise tk)r smaller food loads. See tile How to set
the 0"ue_/br b*oilit_g"section.
© ©°©
c-u u-n
Aluminum
/oil
HI - Small rood quantity- (2-4) hamburgers
or 1/2"-1" pork chops or steaks
LO - Small fl_od quantity- (2-4) chicken
breasts or fish fillets
Convection Broil - Uses both the inside
and outside broil elements and tile convection
fhn. See tile How to set the oven fin _otme(tio*_
broilit_K section.
HI - 1½"-2" thick steaks, London Broil
and chicken breasts (seals in juices without
overbrowning)
LO - Large pork tenderloin or beef roast
(pro\ ides adequate browning along with
thorough cooking)
You call use aluminum fl)il to line tile broiler
pan and broiler grid. However, you must mold
the fl)il tightly to the grid and cut slits in it just
like the grid.
16
Page 17

Broiling
I.l?ll[ Oven
How to set
the oven
fbr broiling
OFF
o
CONVECTION CONVBAKE
BRBIL • MULTI
CONVECTION
ROAST
Oven Mode knob
0 If tile meat has tht or gristle around tile
edge, cut vertical slashes through both
about 2" apart. If desired, tile fi_t may be
trimmed, leaving a layer about 1/8" thick.
Place the meat or fish on tile broiler pan
and grid. Always use tile grid so that any
fht will drip into the broiler pan; otherwise
the juices may become hot enough to catch
Oil {ire.
_ Positioll rack ill ovell.
Close the door. Always broi! with the door
dosed.
OFF
o
500 " • * 400
450
Temperature knob
I !
Tm'n the Oven Mode knob to DUAL
BROIL (fl)r larger food quantities) or STD
BROII_ (fl)r smaller %od quantities).
Turn the Temperature knob to I,OW
BROIL or HIGH Broil. The broiling
temperature will be automatically set.
LO or HI will appear in the display
depending on the automatic broil
temperature selected.
The o\ en and the oven interior lights will
turn on immediately and stay on until the
oven is turned off.
When broiling is finished, turn the
Oven Mode knob and the Temperature
knob to OFF.
NOTE: A cooling tim will turn on to cool
interred parts. This is normal, and tile thn
lnav COlltint/e to Ytlll even atter tile ()veil is
turned off.
gloss the door. Always broil with the door closed.
The broiler does not need to be preheated
li)r most broiling. However, foods that rook
quickly, such as thin strips of meat or fish
may require a short preheating period of
2 to 3 minutes to allow tile fl)od surthce to
brown in the same time the food takes to
be cooked throughout.
Turn the fl)od only once during broiling.
NOTE: Broil will not work if the temperature
pIobe is plugged in. Never leave vour probe
inside the oven during a broil cycle.
17
Page 18

Using the Probe tbr Roasting
7Ernperature
probe
For many foods, especially roasts and poultry,
internal _bod temperature is the best test _i)r
doneness. The temperature probe takes the
guesswork out of roasting by cooking lbods to
the exact d(meness you want.
Use of probes other than the one provided with
this product may result in damage to the probe,
Use the handles of tile probe and plug when
inserting and removing them fl'om the meat
and oven outlet.
* To avoid damaging the probe, do not use
tongs to pull on the cable when removing it.
* To avoid breaking the probe, make sure tood
is completely defl'osted before inserting.
* To prevent possible burns, do not unplug
tile probe fl'om the outlet tmtil the oven
has cooled.
* Nexer leave the probe inside the oxen
dm'ing a broil or sell'cleaning c}cle.
* Do not store the probe in the oxen.
Plug
Probe
Handles
Tbetemperatureprobehasa skewer-likeprobeat oneendanda plug
attbe other endtbat goesintotbe outlet in theoven.
D_Dper
placement
of the probe
_Mter preparing the meat and placing it on
the broiler pan grid, follow these directions for
proper probe placement.
* The tip of the probe shonld rest in the center
of the thickest meaty part of the roast,
* The probe must be inserted completely into
the meat, up to the handle, in order ti)r it to
read the temperature properly. It should not
touch the bone, tht or gristle,
For roasts with no bone, insert the probe into
the meatiest part of the roast, For bone-in ham
or lamb, insert the probe into the center of the
lowest large muscle or joint.
Insert the probe into the center of dishes such
as meat loa_ or casseroles. When cooking fish,
insert the probe fl'om just above the gill into
the meatiest area, parallel to the backbone.
Insert the probe into the meatiest part of the
inner thigh from below and parallel to the leg
of a whole turke>
18
Page 19
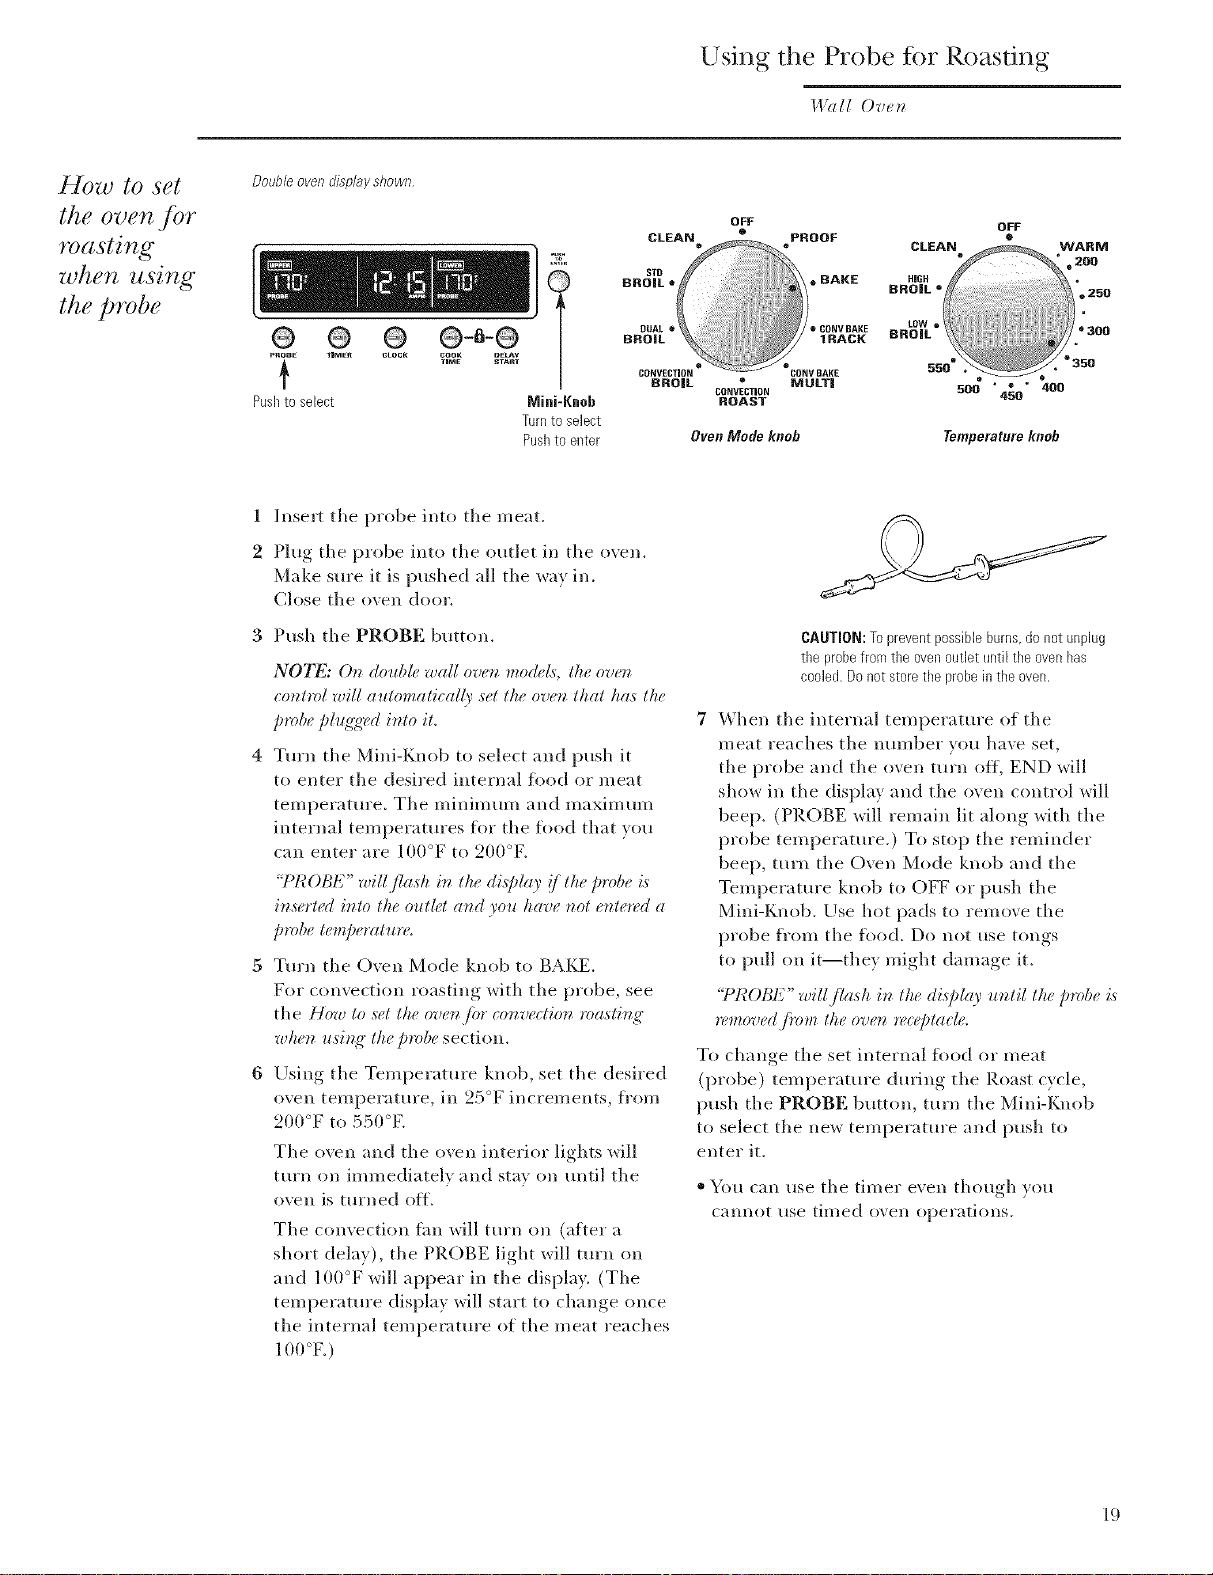
Using the Probe tbr Roasting
I.l?d[ Ovum
HOw to set
the oven fbr
roasting
when using
the probe
Doubleovendisplayshown
@ @ @
{
Pusbto select Mini-gneb
Turntoselect
Pusbtoenter
1 Insert the probe into tile meat.
2 Plug tlle probe into tile outlet in tile oven.
Make sure it is pushed all the way in.
Close tlle oven door.
3 Push tile PROBE breton.
NOTE: O_z double wall oven mo@£, the ov_,t_
control will automath ally set the oven that has the
probe ph_g:wd into it.
Turn tile Mini-Knob to select and push it
to enter tile desired internal fi)od or meat
temperature. Tile minimum and maxim um
internal temperatures for the fl_od that you
call enter are 100°F to 200°K
"I'I_OBE" will f/as/_ i_ the di@/ay !/the p*ol,, is
it_serted it_to the outlet at_d you have not e_zte*_,da
probe temperatlu'<
Turn the Oven Mode knob to BAKE.
For convection roasting with tlle probe, see
tile How to set the 0ve_/br cotlvectiotl Foa,stitl,_"
whe_ using" the probe section.
Using the Temperature knob, set the desired
oven temperature, ill 25°F increments, fi'om
200°F to 550°E
Tile oven and tile oven interior lights will
turn on immediately and stay on until tile
oven is turned off.
Tlle convection tim will turn on (;d,ter a
short delay), tile PR()BE light will turn on
and 100°F will appear ill tile display. (Tile
temperature display will start to change once
tile internal temperature of tlle meat reaches
_OO°F.)
OFF
BROIL MULT|
CONVECTION
ROAST
OvenModeknob
CAUTION:Topreventpossiblebums,donot unpklg
tbe probefrom tbe ovenoutlet until the ovenhas
cooled.Do notstore tbe probeinthe oven.
7 When tile internal temperature of tlle
I/lear renches tlle ntlI//ber yo/l hnve set,
tile probe and tile oven ttlrn Oi;{, END will
show in tlle display and tlle oven control will
beep, (PROBE will remain lit along with the
probe temperature,) To stop tile reminder
beep, turn tlle Oven Mode knob and tile
Temperature knob to OFF or push tlle
Mini-Knob. Use hot pads to remove tile
probe fl'om tlle food. Do not use tongs
to pull on it--they might damage it.
"I'I'?OBE" will flash in the displl O' u_ztil the probe is
*_'moved /mm the ov_'_ *_,_e[)ta_#.
To change the set internal tbod or meat
(probe) temperature during the Roast cycle,
push tlle PROBE button, turn the Mini-Knob
to select tile new temperature and push to
enter it.
* You can use tlle timer even though you
canllot use timed oven operations,
500 " " " 400
Temperature knob
OFF
45O
19
Page 20

Using the Com,'ection Oven
I.l?ll[ Ov_n
Convection
fan
Co&ware.liar
convection
cooking
hi a convectioil ();'ell, a ]_;lIl circtllates hot air
over, under and around die %od.
This circulating hot air is evenly distributed
tllroughout tile oven cavity. As a result, foods
are evenly cooked and browned--often in less
time with convection heat.
NOTE: The _onve_tion jim wil! _7_1_on a_zd otj
whi# _ookiz_g" to be.st distribute hot air in the oven.
The _onvectio_z./?ln skids oil lvh_z the ove_ door is
oDened. DO NOT #ave the door op_,_ ./br long" periods
o/time whi# usiz_g" conveUion _ooki_g" or you may
short_+_z the l!/k o/ the _onveUion heati_g" e#ment.
Beiore using your convection oven, check
to see if voHr cookware leaves room for air
circulation in the oven. If you are baking witll
several pans, leave space between diem. Also,
be sure the pans do not touch each other or
tile walls of tile oven.
Paper and Plastic
Heat-resistant paper and plastic containers that
are recoIllxl/ended tk)i" Hse in reg//1;(r ()veils olin
be used in convection ovens. Plastic cookware
tllat is heat-resistant to temperatures of 400°F
call also be used.
NOTE: Do not allow an_ paper or plastic to come
into contact with the upper broil elenlent,
Metal and Glass
Ally t) pe of cookware will work ill your
convection oven. However, metal pans heat tile
fhstest and are recommended ior convection
baking,
Darkened or matte-finished pans will bake
fhster than slliny pans.
(;lass or ceramic pans cook more slowly.
When baking cookies, you will get the best
results if you use a flat cookie sheet instead
of a pan with low sides.
For recipes like oven-baked cllicken, use a pan
with low sides. Hot air cannot circulate well
around ti)od in a pan with high sides.
l-Each
convection
baking
Multi-rack
convection
baking
2O
YOu can use xour fiivorite recipes ill the
Co(l*` ectiolI ()*,ell.
When convection baking, reduce baking
temperature by 25°E No temperature
ac!jtlstment is necessary when convection
roasting.
lJse pan size recommended.
When convection baking with only 1 rack,
use CONV BAIZE I IL_CK and for best results
place the lack on rack position B ol C at die
center of tile oven. Cook times may decrease,
so food should be checked earlier than
package directions to make sure tllat it
does SlOt overcook.
Because heated air is circulated evenlx
throughout tile oven, foods can be baked
with excellent restdts using multiple racks.
The amount of time required flw multi-rack
baking may increase slighdy tot some fl)ods,
but overall time is saved because two to tllree
times as m uc/l iood is cooked at once.
Some package instructions fl_r fi'ozen
casseioles or main dishes have been developed
using commercial convection ovens. For best
results in this oven, preheat tile oven and use
the temperature on the package.
Ideal for cookino hr-e casseroles and l'lsa,,n't
*,dth good results.
Cookies, mtlffins, biscuits and other quick
breads give good results with multi-rack baking.
Page 21

Com/ectlon Baking
I,l?d[ Oven
How to set
the oven.Jbr
convection
baking
OFF
BROIL MOLT|
CONVECTION
ROAST
OvenMode knob
Convection Baldn,, is ideal for evenb browned
baked _bods cooked on ,sinole_ or multiple racks,
\\lien set on Convection Bake, the rear bake
element and the fire operate whenever the oven
is heating.
Turn tlle Oven Mode knob to CONV BAIZE/
1 IL¢CK (Com:ecfion Bake 1-Rack mode) tot
1-rack convection baldng. This mode is used
for cooldng tbod items on only 1 rack in
comection bake.
Turn tlle Oven Mode knob to CONV
BAIZE/MUlTI ((_omectkm Bake Multi
mode) fi)rmulti-rack convection baking.
This mode is used fi)rcooldng fi)od items on
mo*e than one rack (i.e. 2, 3 or more racks)
at tlle same time in Convection Bake. See tlle
,\hdl i-rack conve( tion balding'section fist more
intbrmation.
Using tile Temperature knob, set tlle desired
temperature, in 25°F increments, fi'om 200°F
to :)a0 K
Type of Food Rack Position
Biscuits (1 rack) B or C
Biscuits (2 racks) A & C or B & D
Mullins and Cup(akes (l rack) B or C
Msdlins and Cupcakes (2 racks) A & C or B & D
Cookies (1 rack) B or C
Cookies (3 racks) A, C & E
2-I_aver Cakes (1 ra(k) B or C
4-I_aver Cakes (2 racks) A & C or B & D
1 Frozen Pie (l rack) B or C
on eooMe sheet)
2 Frozen Pies (2 racks) A & C or B & D
on cooMe sheet)
Cass(roles (l ra(k) B or C
12" Frozen Pizza (1 ratk) B or C
2-12" Frozen Pizzas (2 racks) A & C or B & D
Roasting (large cuts of meat, A, B or C
turkeys, etc.)
OFF
500 " _ ' 400
450
Temperatureknob
Tlle oxen and tlle oven interior lights *rill mrn
(m immediatel} and sta} on until tlle oxen is
turned off.
Tile convection tim will mrn on (after a
short delay), tlle PREHEAT light will turn
on and ] 00°F will appear ill tlle display.
(The temperature display will start to change
once the o\vn temperatm'e reaches 100°K)
Tile control will beep when tile oven is
i)reheated--this will take approxhnately 10 to
15 minutes. Tile PREHEAT light will turn off
and tlle disi)lay will show tile set temperature.
When tlle PREHEAT light goes off; [)lace ii)od
ill tile (wen.
Check tlle fl)od fiw aloneness at tlle minimum
time on the redpe. Cook longer if necessary.
l_ Tm'n tlle ()\vn Mode knob and tile
Tempeiamre knob to OFF when convection
cooldng is finished.
NOTE: A cooling tim will turn 1111[Ocool internal
parts. This is mmnal, and tlle fire ma} continue to
1"{511 evesl ai[eF tile ovesl is tHFned off.
The ovenhas5 rackpositions.Seethe Fullextensionovenracks
sectionfor how to use,removeandreplacetheracks.
NOTE: These rack positions are suggestions--
use racks _dlich give best results. Racl<s A and D
•/re allothel" stl *_*estion
21
Page 22
Com/ectlon Roasting
I.l?dl Ove_
How to set
the oven./br
convection
roasting
OFF
CLEAN PROOF
CONVECTION CONV BAKE
BROIL • MULTi
o
CONVECTION
ROAST
BAKE
• CORVBAKE
IRACK
OvenModeknob
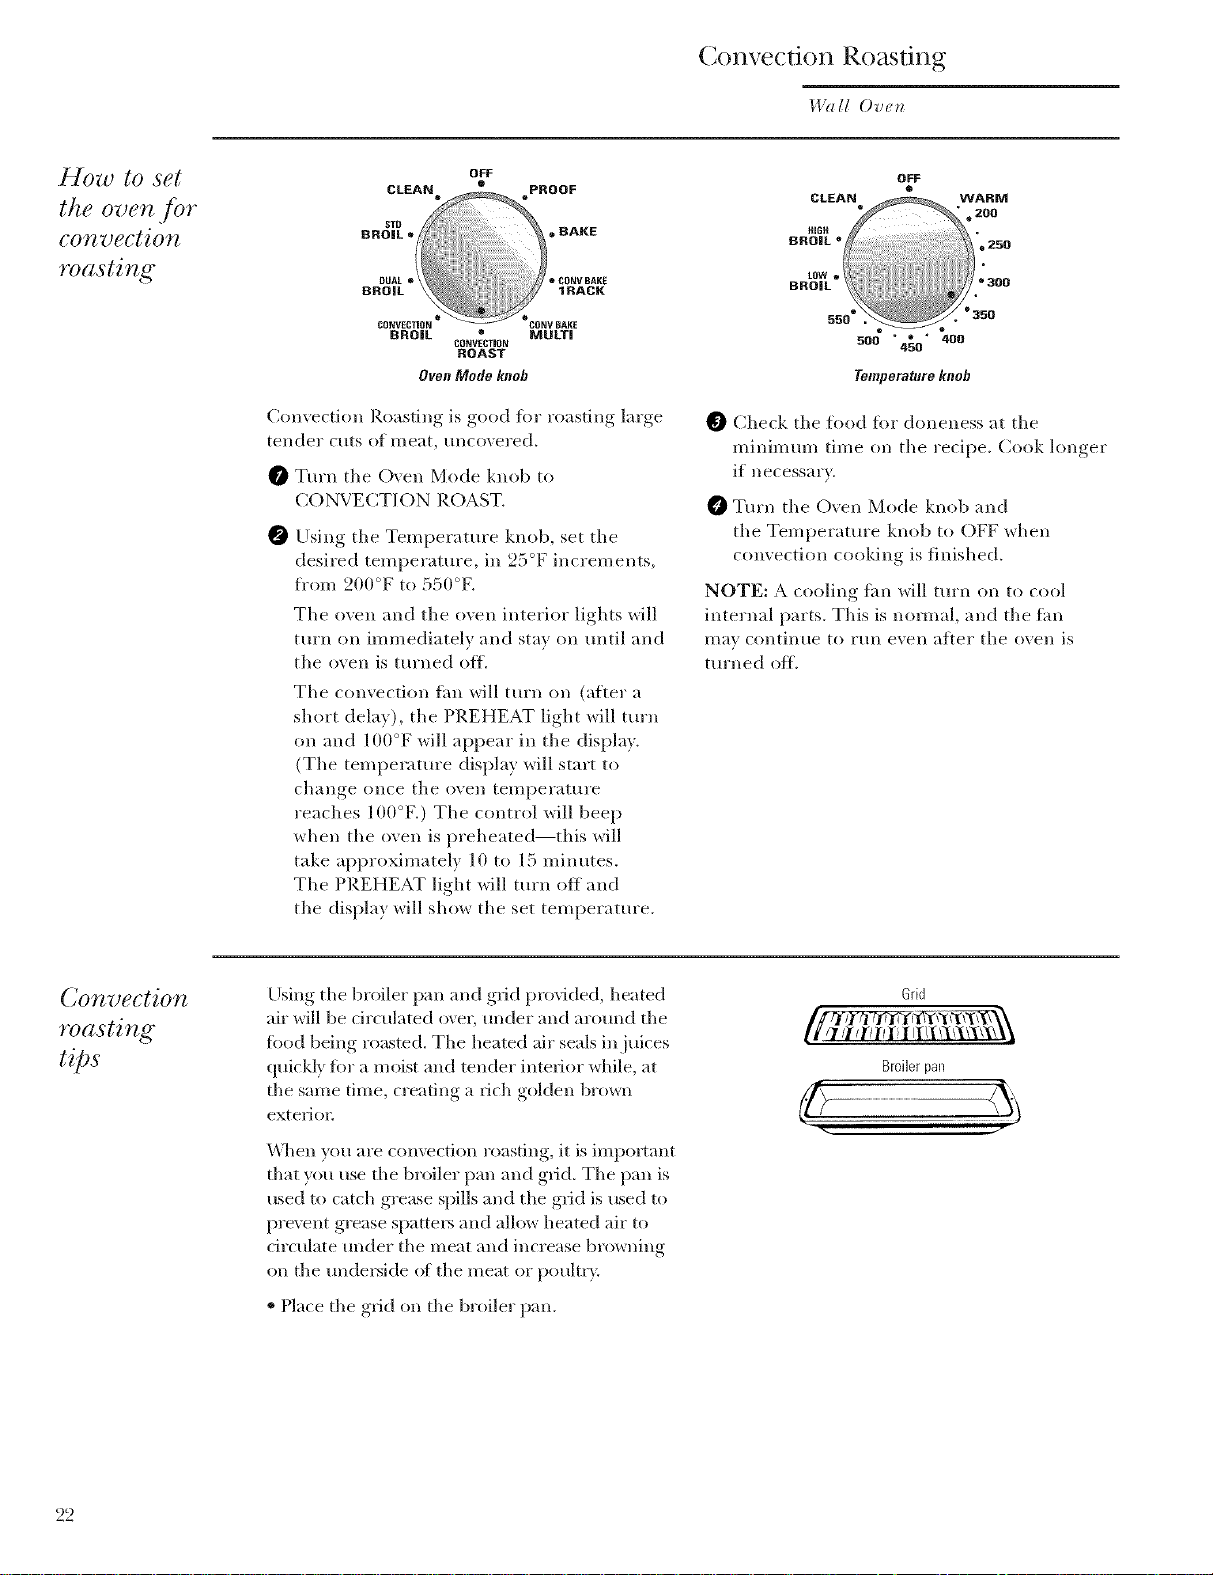
Convection Roasting is good for roasting large
tellder cllts of I//eat, iiIlCO'_el'ed.
O Turn the Oxen Mode knob to
CONVECTION ROAST.
Using tile Temperature knob, set tile
desired temperature, ix* 25°F increments,
fi'om 200°F to 550°F.
Tile oven and tile ()vex* interior lights will
turn on immediately and stay on until and
the oven is turned off.
The convection thn will turn on (a4,ter a
short delay), the PREHEAT light will turn
on and 100°F will appear in tile display.
(Tile tempelature display will start to
change ()lice tile ()veil telnperature
reaches [ 00°F.) Tile control will beep
when the oven is preheatedlthis will
take approximately [ 0 to 15 minutes.
The PREHEAT light will turn off and
the display will show tile set temperature.
OFF
500 " o • 400
450
Temperature knob
Check the food for aloneness at tile
minimum time on tile recipe. Cook longer
if necessary.
Tm'n tile Oven Mode knob and
tile Temperature knob to ()FF when
convection cooking is finished.
NOTE: A cooling thn will turn on to cool
internal [)arts. This is nomml, and tile thn
may COlltillt/e to rllll evell atter tile ()veil is
turned off.
Convection
roasting
tips
22
Using tile broiler pan and grid provided, heated
air will be dreulated o\er, under and around the
food being roasted. The heated air seals in juices
quickly for a moist and tender interior while, at
tile same time, creating a rich golden brown
extelJol:
\\lien you are comvction roasting, it is impo*_ant
that you use the broiler pan and glid. Tile pan is
used to catch grease spills and the grid is used to
pre\ ent grease spatters and allow heated air to
drculate under tile meat and increase browning
on the undel_ide of the m eat or potlltry.
* Place tile grid on tile broiler pan.
Grid
Ill#'!lllfill_{l'l_'ik'Ix'l\\,_
Broilerpan
Page 23
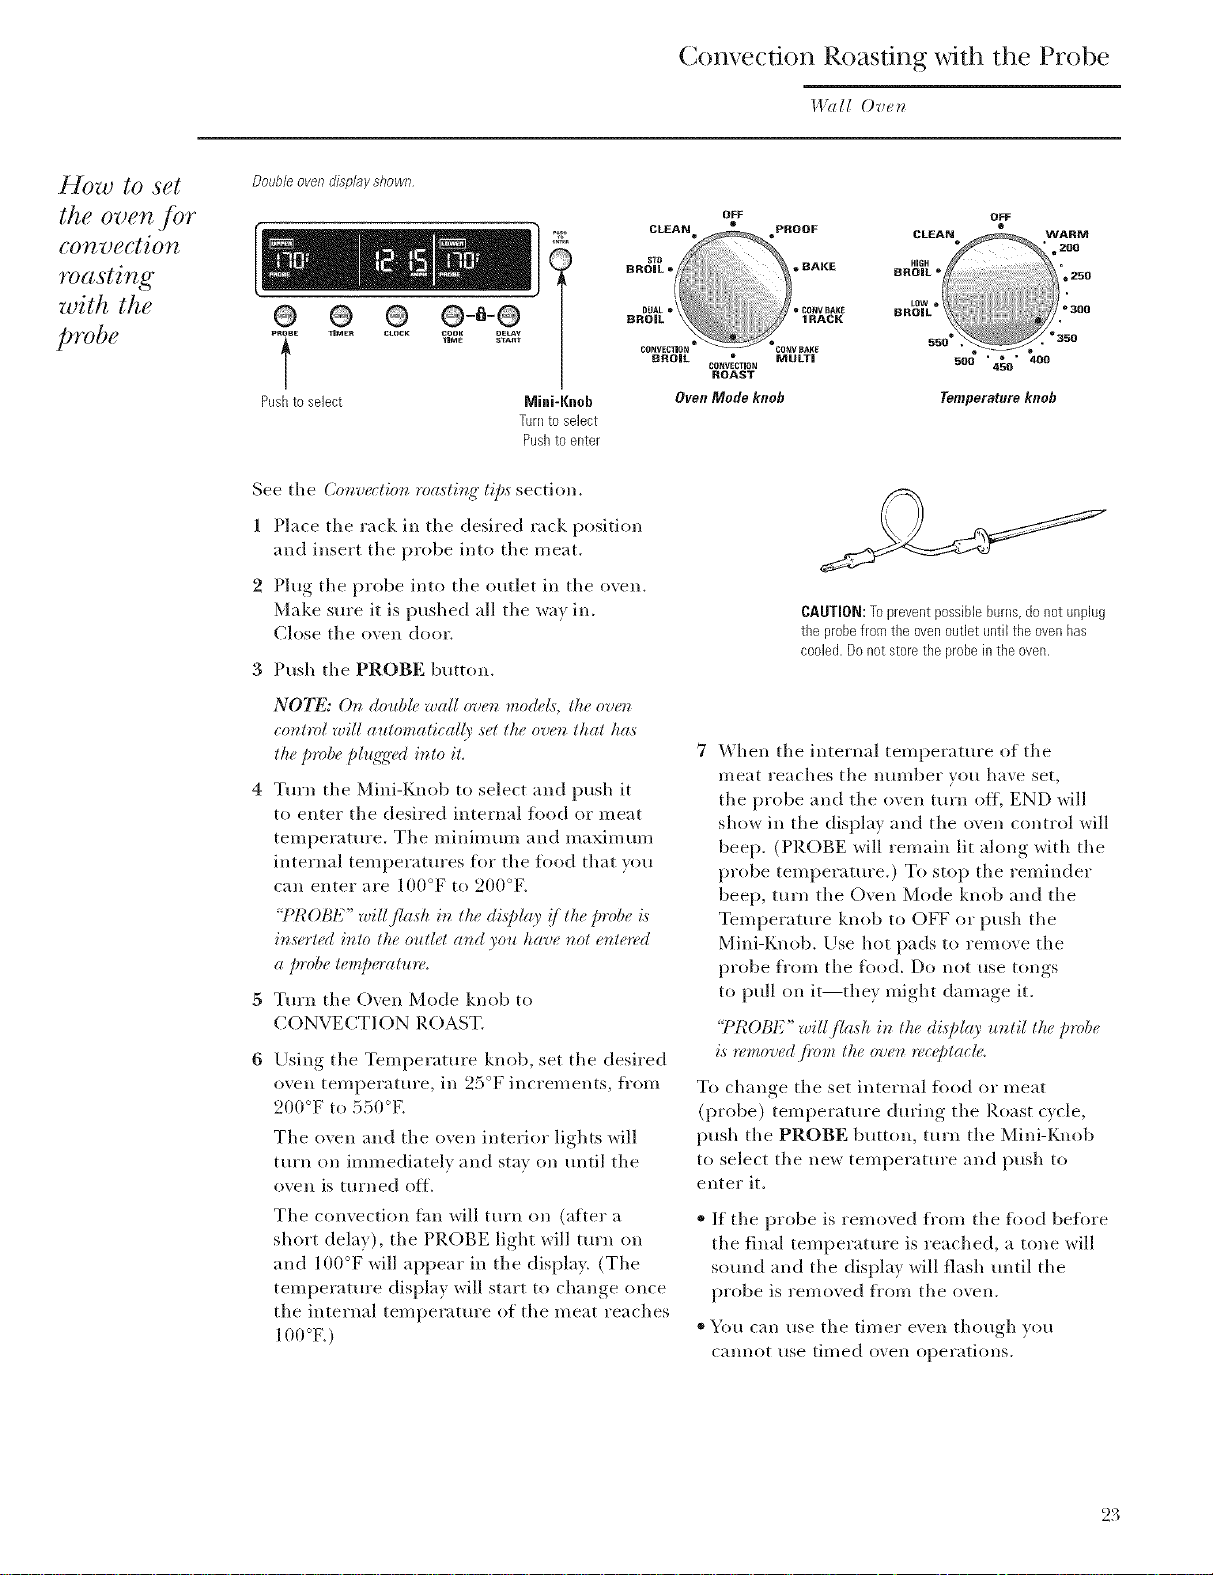
Com,'ection Roasting with the Probe
I,l?d[ Ovum
HOw to set
the oven Jbr
convection
roasting
with the
probe
Double oven display shown
@ @ ®
T
Pushto select
See the Convection mastit_g" tips section.
1 Place the rack in the desired rack position
and insert the probe into the meat.
2 Plug the probe into the outlet in the ovem
Make sm'e it is pushed all the way in.
Close the oven door.
3 Push the PROBE button.
NOTE: On doub& wall ove_z medals, the ov_z
control will automaticall), set the ove_ that has
the/)robe /)lu_'ed,, b_to it.
4 Tm'n the Mini-Knob to select and push it
to enter the desi*ed internal food or meat
temperature. The minimum and maxim um
internal temperatures f_)r the iood that you
can enter are 100°F to 200°K
"I'I_OBE" will flash bz tlu_ disph 0 !/the pm/,_ is
h_serted h_to the outlet at_d you have _ot e_te**.d
a probe tempe*wtu*_,.
5 Turn the Oven Mode knob to
CONVECTION ROAST.
Using the Temperature knob, set the desired
oven temperature, in 25°F increments, fl'om
200°F to 550°E
The oven and the oven interior lights will
tm'n on immediately and stay on tmtil the
oven is turned off.
The convection fhn will turn on (after a
short delay), the PROBE light will turn on
and 100°F will appear in the displa> (The
temperature display will start to change once
the internal temperature of the meat reaches
_oom)
Mini-Kneb
Turnto select
Pusbto enter
CLEAN o PROOF
BROIL MULT|
o_
CLEAN WARM
BROIL _ .250
LOW i
BROIL =300
HIGH _@
5,_ _350
CONVECTION
ROAST
OvenMode knob
CAUTION:Topreventpossibleburns,donot unplug
tbe probefrom tbe ovenoutlet until the ovenhas
cooled.Do notstore the probeinthe oven.
7 When the internal temperature of the
l//eat re;iches tile IiHl//1)er yoH hilve set,
the probe and the oven turn off, END will
show in the display and the oven control will
beep. (PROBE will remain lit along with the
probe temperature0 To stop the reminder
beep, turn the Oven Mode knob and the
Temperature knob to OFF or push the
Mini-Knob. Use hot pads to reFaove the
probe fl'om the fi)ocl. Do not use tongs
to pull on it--they might damage it.
"I'I_OBE" will flash in the display u_ztil the probe
is removed./mm the oven tee@tat&
To change the set internal ti_od or meat
(probe) temperature during the Roast cycle,
push the PROBE button, turn the Mini-Knob
to select the new temperature and push to
enter it.
* If the probe is removed fl'om the lbod before
the final temperature is reached, a tone will
sotmd and the display will flash tmtil the
probe is removed fl'om the oven.
®¥otl can rise the timer even though yotl
cam_ot use timed oven operations.
Temperature knob
OFF
®
' = 200
4OO
450
23
Page 24
( onvectlon Roasting
Wall Ovt, n
Convection
roasting
,guide
Meats Minutes/Lb. Oven Temp. Internal Temp.
Beef Rib, P,oneless Rib, Rare 20-24 325'F 140'F}
Top Sirloil'_ Medium 24-28 325°F 16t)' F
(3 to 5 lbs.) x3,kql 28-32 325"F 170'F
B(*e{_h*11(]e rloi 1"1 RHre 10-14 325"F 140"F)
Med iu m 14-18 325°F 16tPF
Pork Boneqn, Bonele,v_ (',I to 5 lbs.) 23-27 325<F 17t)"F
Chops (1/2 to 1" thi(k) 2 chop'_ 30-!35 total 325<F 17t)°F
4 chops 35-40 total 325"F 170<F
6 chops 40-45 total 325'F 17t)°F
Ham Canine(I, Butt, Shank (3 to 5 lbs.) 14-18 325<F 14t)°F
(fu lly cooked)
Lamb Boneqn, Boneless (3 to 5 lbs.) Medium 17-20 325"F 16t)'F
"_\\*11 20-24 325'F 17t)°F
Seafood Fish, whole (3 to 5 lbs.) 30-40 total 400"F
Lobstel %dls (6 to 8 oz. each) 20-25 total 350°F
Pouhry Whole Chicken (2V_to 3J/-,lbs.) 24-26 350°F 180<-185<F
Colnish ttens k nstufl_'(1 (1 to 1½ lb%.) 50-55 total 350°F 180'-185<F
Stuflcd (1 to 1:/_lbs.) 55-60 total 351)°F 180<-185<F
I)uckli ng (4 to 5 lbs.) 24-26 325°F 180<-185<F
Tu lkey, whole*
[ nst t/f{_*(/(10 to 16 11)'<) 8-11 325/T 180°-185°F
L nstuflbd (18 to 24 lbs.) 7-10 325°F 180<>-185<>F
Tulke_ Breast (4 to 6 ll)s.) 16-1{) 325<>F 17t)°F
24
Page 25
Convection Broiling
How to set
the oven Jbr
convection
broiling
CLEAN • PROOF
CONVECTION CONVBAKE
BROIL • MULTi
OFF
CONVECTION
ROAST
OvenMode knob
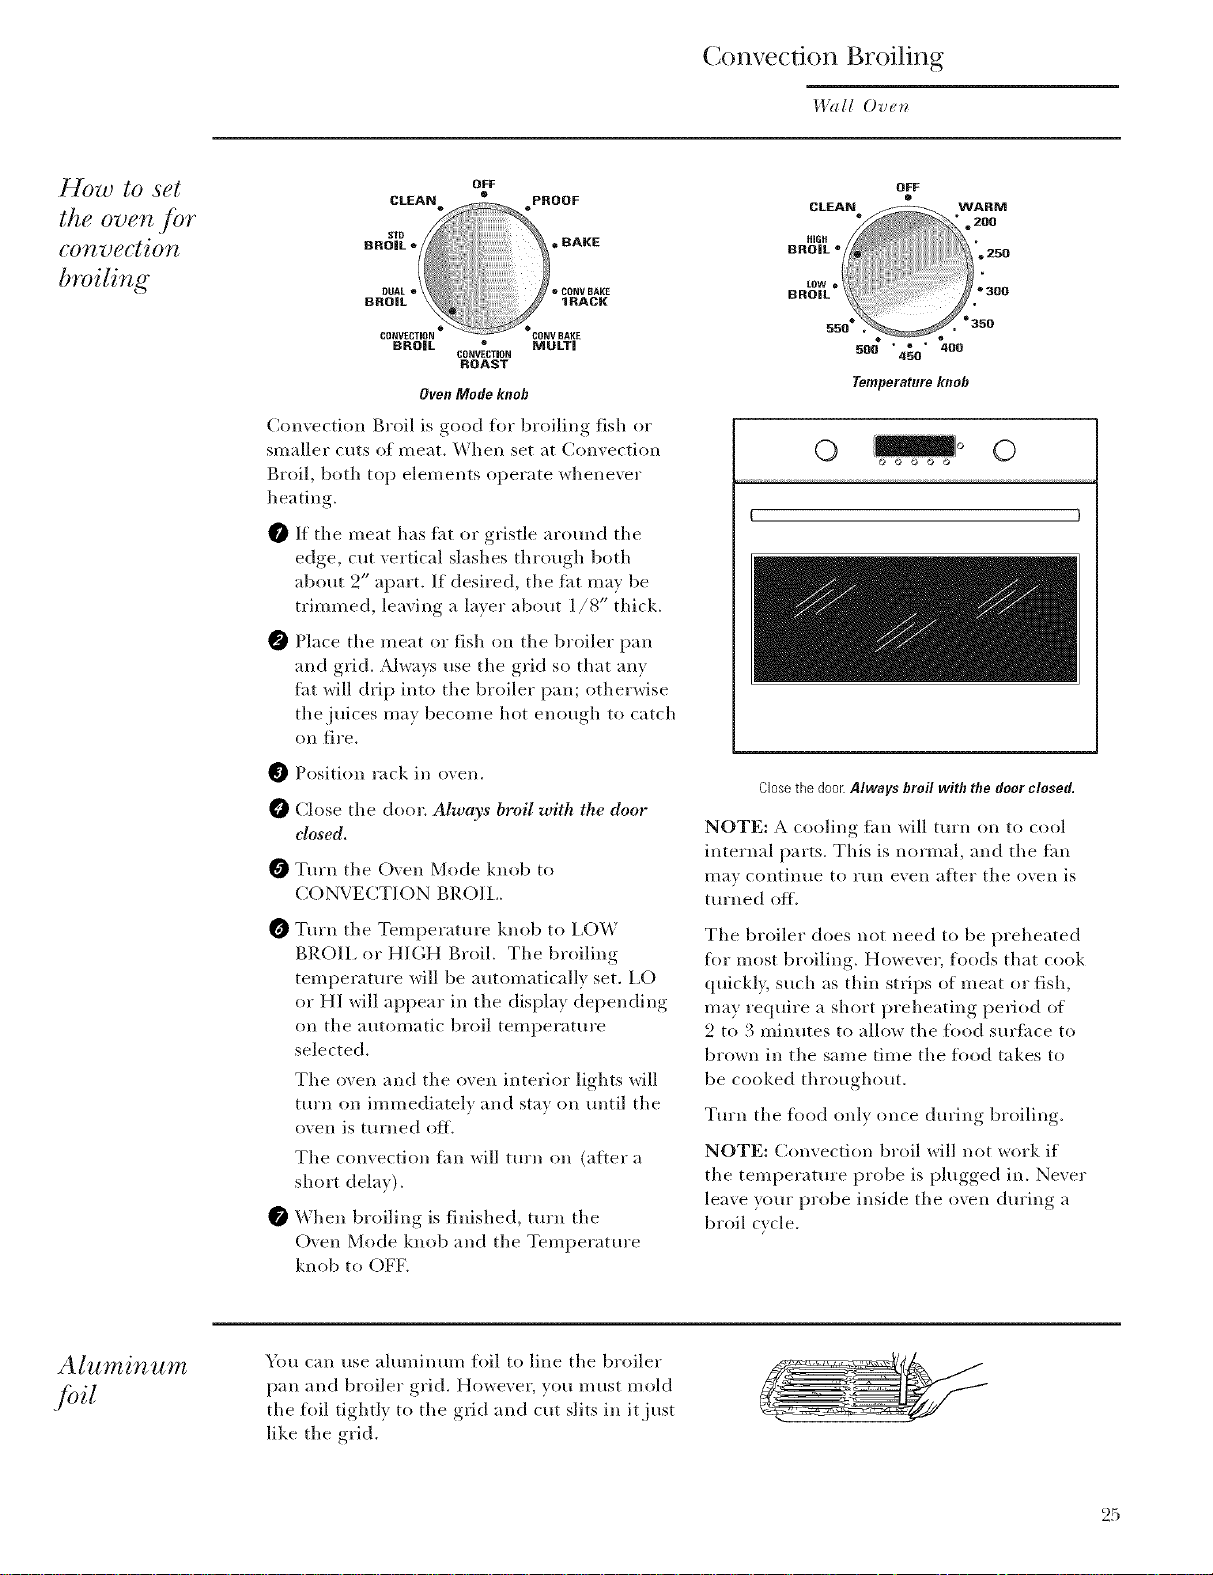
Convection Broil is good fl)r broiling fish or
smaller cuts of meat. When set at Convection
Broil, both top elements operate whenever
heating.
O If the meat has tht or gristle around the
edge, cut vertical slashes through both
about 2" apart. If desired, the fi_t may be
trimmed, leaving a layer about 1/8" thick.
Place the meat or fish on the broiler pan
and grid. Always use the grid so that any
,*hi will drip into the broiler pan; otherwise
the juices may become hot enough to catch
on fire.
OFF
CLEAN - WARM
NIGH
BROIL * ". 250
LOW •
BRO|L '_300
550 ° * 350
o
500 ° , w • 400
450
Temperatureknob
200
0 ©
_ Positioll rack ill ()','ell.
Ch/se the door. Always broil with the door
closed.
Turn the Oxen Mode knob to
CONVECTION BROIL.
Turn the Temperature knob to I,OW
BROIL or HIGH Broil. The broiling
temperature will be automatically set. LO
or HI will appear in the display depending
on the automatic broil temperature
selected.
The oven and the oven interior lights will
turn on immediately and stay on until the
()veil is ttlrlled o,_t.
The convection thn will turn on (after a
short delay).
When broiling is finished, turn the
Oven Mode knob and the Temperature
knob to ()FE
CJ0se ths door. Always broil witb tbe door o/osed.
NOTE: A cooling tim will turn on to cool
internal parts. This is normal, and the thn
I/lay contintle to rtln even after tile ()veil is
turned off.
The broiler does not need to be preheated
fl)r most broiling. However, foods that cook
quickly, such as thin strips of meat or fish,
may require a short preheating period of
2 to 3 minutes to allow the filed surihce to
brown in the same time the filed takes to
be cooked throughout.
Turn the %od only once during broiling.
NOTE: Convection broil will not work if
the temperature probe is phlgged in. Never
leave yore" probe inside the oven during a
broil cycle.
Aluminum
/bil
You can use aluminum fl)il to line the broiler
pan and broiler grid. However, you must mold
the fl)il tightly to the grid and cut slits in it just
like the grid.
25
Page 26

Timed Cooking
1.1%1/ Ove_
7 rned
coohitzg
(immediaw
start and
automatic
stop)
Double eve/?display shown
PROBE TIMER CLOCK
Timed cooking allows yon to set the oven
to turn on immediately, cook for a selected
length of time and turn off automatically.
To set the oven to turn on immediately and
turn off automatically:
NOTE: Befi)re beginning, make sure the clock
shows tile correct time of day.
To avoid possible burns, place tile racks
in tile correct position bet)re turning on
tile ()veil.
Turn tile Oven Mode knob to tile desired
0
cooking function.
NOTE: Timed cooking cannot be set fl)r
tile Broil or Proof features.
Using tile Temperature knob,
set tile desired temperature, ill 25°F
increments, fl'om 200°F to 550°E
Tile oven and the oven interior lights will
turn on immediately and stay on until tile
()veil ttlrns ott.
Tile convection tim will turn on (alter a
short delay), the PREHEAT light will turn
on and 100°F will appear ill the display.
(The temperature display will start to
change ()lice tile ();'ell temperattlre reaches
lO0°E) Tile control will beep when the
oven is preheated--this will take
approximately l 0 to 15 minutes. Tile
PREHEAT light will tm'n oft and the
display will show tile set temperature.
When the PREHEAT light goes off, place
food in tile oven.
Push tile COOK TIME btltton.
©
COOK DELAY
TI_E START
Push to select Mini-Knob
Turn to select
Push to enter
Turn tile Mini-Knob to select and push it
to enter tile desired length of cooking time.
(The maximum cooking time is 9 hours
and 59 minutes. Tile minim um cooking
time is 1 minute.)
The display will show (2OOK TIME and tile
cooking tin/e countdowIl.
NOTE: Tile cook time coundown will start
immediately.
Tile oxen x_ill continue to cook for tile
l)r°graI/lI//ed( aI//O{lll[ ot time, then ttlrll ()J[]_
automaticallx.
To recall tile cook time, push tile COOK
TIME button. To ch'moe,_ it, turn and push the
Mini-Knob.
At tile end of timed cooking, tile oven
will turn oft, 0:00 will flash quickl> END
will show in the display and the oven
control will beep. To stop the reminder
beep, turn tile Oven Mode knob and
tile Temperature knob to OFF.
NOTE:
* Tile WARM (175 ° shows ill tile display)
temperature setting of this oven is available
to keep hot cooked fl)ods wam_. Food kept
in tile oven longer than two hours at these
low temperatures may not be satb to eat.
* Foods that spoil easil> such as milk, eggs,
fish, stuffings, poultr} and pork, should not
be allowed to sit fi)r more than one hour
befl_re or alter cooking. Room temperature
promotes the growth of ha*mtul bacteria.
26
NOTE: If your recipe requires preheating,
you may need to add additional time to tile
length of cooking time (approximately 10
to 15 minutes).
Page 27

Timed
coohirzg
(delayed
start and
automatic
stop)
DoubleovendLsTolayshown
®
PROBE TIMER
Timed cooldng with DELAY START allows
yon to set the oven to turn on at the time of day
you set, cook for a selected length of time and
turn off automatically. DEI AY START cannot
be used with tile Sabbath ieature.
To delay the start of cooking:
NOTE: BMore beginning, make sure tile clock
shows tile correct time of day.
To avoid possible burns, place the racks
in tile correct position bMore turning on
tile oven.
NOTE: Timed cooldng camlot be set fi_I"the
Broil or Proof features,
Push tile DELAY START button. Tile current
time ot day will flash ill tile display.
0_ doubh_ rr_¢_ mo(h_& [)usl_ th_ DEIAY START
button on_ to set the u/)/wr ov¢_ a_M twic_ to set the
b,)'glrPF 07)(!?L
Turn tile Mini-Knob to select and push it to
ellter tile tiil/e ot da_, _,o/I _,#allt tile ()*,'ell to
ttlrll Oll ;/11(1 start cooldn_
Push the COOK TIME button.
NOTE: if your redpe requires preheating, you
may need to add additional time to the length ot
cooldng time (approximately 10 to 15 minutes).
l_ Turn tile Mini-Knob to select and push it
to enter tile desired length of cooldng time.
(Tile ma_mum cooking time is 9 hours and
59 minutes. Tile minimum cooldng time
is 1 minute.)
Turn the Oven Mode knob to tile desired
cooldng flnlction.
Using tile Tempemtme knob,
set tile desired temperature, in 25°F
increments, fi'om 200°F to 550°E
To recall tile start time, push tile DI_Y START
button. To change it, turn and push tile Mini-
Knob. To recall the cook time, push tile COOK
TIME button. To change it, turn and push tile
Mini-Knob.
Tile display will return to tile time of day and
show START TIME indicating the oven is set.
When the stm't time is reached the o\en and
tile o\en interior lights will turn on.
NOTE: Tile cook time countdown will stai_t
when the delay start time is reached. The display
will show COOK TIME and tile cooldng time
COtllltdown.
Tile o\en will continue to cook fiw tile
progrlmlmed amount of time, then turn off
automatically.
At tile end of timed cooldng, tile oven
will ttlrn Off; 0:00 will flash quicldy, END will
show ill tile display and the oven control will
beep. To stop the reminder beep, turn tile
Oven Mode knob and tile Temperature
knob to OFK
On doubh_ rrg_¢r_mo(h_Ls;you can use timc,d bahh_g"in
both ov(_s at the same tim(_. 7)z*'t_ttw Ovet_ Mo(h_ knob
at_([ tlw 7i_m/)o_tlm, lumb o/the sg,(7omlrfL)('F2& the
(h'sh'ed setdt_g_. Push the COOK TIME buttot_ (rod
tu*vz a_d push the Mini-Kt_ob to ent¢*: I'lcsh t/w
DEIAY START button (rod tu*w a_d push the
M_ni-K*mb Io (,r_t(,*:
NOTE:
* Tile _'X;_,I_M(175 ° shows ill tile display)
tempeniture setting of this oven is available to
keep hot cooked foods warm. Food kept ill tile
oven longer than two hotllN at these low
tempel_lttlres lIlil}' II(}t be sate to eat.
* Foods that spoil easil), such as milk, eggs, fish,
stuffings, poultry and pork, should not be
allowed to sit tot more than one hour beibre or
afl:er cooMng. Room temperature promotes tile
gro_v_h of hannfld bacteria.
27
Page 28

Proofing
I,l?lll Oven
How to set
the oven fbr
proofing
CLEAN
STB
BROIL =
DUAL o
BROIL
CONVECTION CBNVBAKE
BROIL e MULTi
OvenMode knob
The proofing ieature maintains a warm
eEEviromnent usehll fl)r rising yeast-leavened
products.
Place the covered dough in a dish in the
oveEl Oil rack A.
O Turn the Oven Mode knob to PROBE The
display will show PrF (proof). Proofing will
not operate wheEEoven is above 125°E Tile
display will show "too hot". AHow the oven
time to cool,
OFF
e
CONVECTION
ROAST
CONVBAKE
1RACK
NOTE: Do lEOt use tile proofing mode
fl)r warming fl_od or keepiEEg iood hot.
The proofing oven temperature is not hot
enough to hokl fl)ods at sate temperatures.
Tile _vX;A,RM temperature setting of this
oven is available to kee I) hot cooked fl)ods
warm. Food kept in tile oven longer than
tWO hoHl'S at these low tel/lpel'ilttll'es may
not be safe to eat.
NOTE: For best results, cover tile dough with
a cloth or with greased plastic wrap (tile plastic
may need to be anchored tmderneath tile
fl'ont of tile container so tile oven fhEEwill
not blow it off).
Tile proofing teatm'e automatically provides
tile optimmn temperature flw tile proofiEEg
process; therefl)ie the Temperature knob does
not affect the proof temperatm'e.
The oven interior lights cvde BEEand off UEEtil
tile Oven Mode knob has been turned to OFE
Set tile TIMER for tile minimmn proof
time, as a renEinder to check food.
_hen proofing is finished, turn tile Oxen
Mode knob to OFE
* To avoid lowering the oven temperatm'e and
lengthening proofing time, do not opeEE tile
oveIl door tlllllecessal'ily.
* Check bread products early to avoid
ovel_l) roo_] I1 _ .
28
Page 29

Self Cleaning Oven
I.Val[ Ovum
How to set
the oven./br
cleaning
The oven door must be closed and all controls
must be set correctly for the self-clean cycle to
work properly.
We recommend venting your kitchen with
all open window or using a ventilation tim
or hood during tile first self-clean cycle.
* Clean soil fl'om the fl'ame around the oven
door and outside the door gasket. These
areas must be cleaned by hand.
* Do not clean the door gasket by hand as this
could damage it.
* Wipe up excess grease and other food spills
with a damp cloth. This will minimize the
amount of smoke created during self:
cleaning.
* Remove all cookware, broiler pan, grid,
probe and any ahoninum foil fi'om tile oven.
* The oven racks may be left in the oven
during tile self-clean cycle.
CLEAN • PROOF
OFF OFF
* Make sure the oven fight lens and lens frame
are in place.
* Do not use commerciaJ oven cleaners,
abrasives or oven protectors in or near the
self-cleaning oven.
IMPORTANT: Tile health of some birds is
extremely sensitive to the fumes given off
during the self:cleaning cycle of any oven.
Move birds to another well-ventilated room.
NOTE: Self'Clean will not _ork if the
temperatm'e probe is I)lugged,, in or if tile
Sabbath feature is set.
0_ double ove_ models, you car_ ,set a (:lea_ cycle
i_ both ove_s at the same time. 77_e last o'ue_ ,set will
automatically delay its start u_til the e_d (j the,fi_:st
o'ue_ 's (:lea_ cycle.
0_ double ove_ models, you cat_ use timed baki_g" it_
o_e o'ue_ (rod se(/=_lea_ b_ the other at the same time.
Ooubleovendisplayshown
RRQ|L MULTi
CONVEClBO_
ROAST
OvenModeknob
500 " * " 400
450
Temperatnreknob
Turn the Oven Mode knob to (2LEAN.
Turn the Temperature knob to CLEAN.
The oven is set to clean till" its normal clean
time of 5 hours. (If a clean time less than
5 hours is needed, turn the Mini-Knob to
the clean time desired.) Push to enter it.
You call change the clean time to any
time between 3 and 5 hours, in 15 minute
increments, depending on tile amount of soil
in your oven.
NOTE: The Mini-Knob must be pushed for the
self=clean Qcle to start.
If x(/ur o',en is connected to a 208V electrical
suppl_ "_e recommend that ?ou set }our clean
time for 5 hem's.
If I,OCKED flashes ill tile displa), the self:clean
cxc]e has been selected but the door is not
closed. (_]ose the oven d(/or.
® ® @ 0- -0
P_ZOBE TIMEB CLOC'X COOK OELAy
liME START Mini-Kn0b
Turntosebct
Pushtoenter
The displa} will show (:LEAN and the clean
time remaining.
As the oven heats to the clean temperature,
the door will lock automatically. The LOCKED
light will mrn on. The display will show the
clean time remaining. It will not be possible
to open tile oven door until the temperature
drops below the lock temperature and tile
I_OCKED light goes off.
After the clean cycle is complete and
the oven has cooled, END will show ill the
display and the I_OCKED light will ttlrll
off. Turn the Oven Mode knob and tile
Temperature knob to OFF.
To stop a clean cycle, turn the Oven
Mode knob and the Temperature knob
to OFE When the LO(:KED light goes oft,
indicating the o\ en has cooled below the
locking temperature, you will be able
to opell tile door.
29
Page 30

Self Cleaning Oven
I.l_ll[ Ovum
How to
delay the
start of
cleaning
Doubleovendi,s731ayshown
Yon can set the oven to delay the start of clemfing,
clean for a selected length of dine and tuna off
automatically.
NOTE: Befiwebe_oning, make sure tile clock shows
the correct tin/e of day
Tunl tile Oven Mode knob to CI£AN.
Turn tile O_en Temperature knob to CI_EAN.
The o_en will be set to clean %r its normal clean
fin/e of 5 hours. (If a clean fin/e less than 5 hours
is needed, turn tile Mini-Knoll to the clean tinle
desired.) Push to enmr it.
You can change the clean time m any tin/e bemeen
3 and 5 hours, in 15 nlinum increments, depemling
on tile }ltnOtlIlt of soil ill V_)fir o\en,
NOTE: Tile Mini-Knob n/ust be pushed tor tile
self-clean cxcle to be set.
Push tile DHAY START button. Tile current time
of (tar *dll flash in the displa?.
0_ double ov_z modds; push the DELAY
START butto_z once to set the upper oven and
twice to set the lower ovem
Tunl tile l\,lini-_lob to select and push it to enter
the tllne of day _,Otl want the ()Xell to tnrll (111 and
start cleaning.
NOTF: Tile Mini-Knob must be pushed for tile
sell:clean Qcle to be set to start at the tin/e of day
entered.
Tile oven is mm set to tm_n on at the tinle of (la} "_ou
set and clean tor the set anlount of clean time.
OFF
BROIL
CONVECTffiN 500 ' _ ' 4,00
ROAST 450
MULTi
OFF
OvenModeknob Temperatureknob
If_our, oven is connected to a 208\ electrical suppl?, we
reconlnlend that _ou set _our clean tin/e for 5 hours.
If I,OCI,IED flashes in tile displa}, tile self-clean c}cle
has been selected but the door is not closed. Close the
O_,ell door,
To check tile start tinle, push tile DEI AY ST_M{T
button. To change it, turn and push tile Mini-Knoll.
The displ_9 will sh(m SZM{T TIME. "v\llen tile start
tin/e is reached, the oxen will turn on autolnaticallv
The display _dll sh(m C[,EAN and tile clean tin/e
remaining.
_k4the oxen heats to the clean temperature, tile door
_dll lock amomaticallv. Tile I,OCKED light _villtoni on.
_le displa? *dll sh(m die clean tin/e remaining.
It will not be possible to open the o',en door until tile
temperature drops belo*v the lock tenlpemmre and fl-te
I,OCI{ED light goes ofll
3J_er tile clean cycle is complete and file o_en
has cooled, END will sl/o_ ill tile displa! and
file I,OCKED light will turn olil Turn file Mode
Selector and tile Temperature knobs to OFF.
To stop a dean cycle, turn tile Mode Selector and
tile Temperam*e knobs to OFF. \_]len the I,OC/<ED
light goes off, indicating tile oven has cooled belo_ tile
locking ten/penlture, you _dll be able to open tile dooi:
NOTE: On doubleo_(,elzmodd,_,you can sd a d&0 dean
bt botho'oo_,sat thesame &m,. 7)rot lhe (k_oz Mode k_tob
and lhe 7b@eratu_e knob q/ lhe second ove_zto (;IJL4,\_
7he se_>ndoven sel will aubm_ati('al6 d&0 &eslarl <)/
dea_b g' until gt_ee_zd(ftke /hst _r_,e_i_dean Oc&
lie? a
clean cycle
3O
You may notice some wltite ash in the oven. _,'\qpeit tip
_qth a danlp cloth atier tile oxen cools.
If wNte spots remain, *_mo',e fllem with *_mn su(tsv
_:ttel" and rinse thoroughly with a vineg:u" and _ter
nlixture. These deposits are usuall} a salt residue that
cannot be remo\ed b_ the clean Qcle.
If the oven is not clean after one clean cycle, repeat
tile ©cle.
"_iimcannot set tile oven tor cookino until tile oven is
cool enough for tile door to unlock.
Page 31

If a flashing time of day is in the display,
you ha'_e experienced a power fidlm'e.
Reset the clock.
(;lock and Control Lockout Features
I.Dlll Ove_
Clock
7b set
the clock
Cont" rol
lockout
The clock must be sd /br the automati_ oven timinq"
./hmtio_.s to work properly.
The time of da_ clock cannot be changed
during Delay Start. (llt can be changed during
a regular bake or broil operation.)
1 Push tile CLOCK button.
2 Turn tile Mini-Knob to select tile time of day
and push it to enter.
NOTE: While setting,, tile time will roll
around from AM to PM.
,Mlows you to lock out all controls so that
tile ()yen Mode knob, Temperature knob and
tile control panel buttons cannot be activated
when set.
NOTE: On double oven models, this activates this
,/batl_*_,/br both ove_s.
To lock/unlock the controls:
1 Push and hold tile COOK TIME and
DELAY START buttons at the same time
fi)r 3 seconds mltil the control beeps and
the display shows "I,oc." After locking tile
controls, the time of clay will appear in the
displa).
To unlock, push and hold tile (;()OK TIME
and DEI,AY START buttons at the same time.
("i,oc" will appear in the display). Hold fl_r
3 seconds until tile control beeps and "I,oc"
disappears fi'om tile displa>
\¥hen this feature is on and tile controls are
attempted to be set, tile displa} will show "I,oc."
NOTES:
Doubleovendisplayshown
® ® ®
P_OBE TIME_ CIOC_ COOK OE_AV
nra_ START
Pushto
select
Doubleovendisplayshown
@ ®
T_v_T
Pushandholdat
thesametimeto
lock/unlock
]8
Mini-I(neb
Turn to select
Push to enter
©
* lJ [o:ked while a _ooking;, _[catting', o*' timed.fi¢n_ tion
are i_ @emtion, they wig be _a_ el/,,d.
• 77_.:a@tstment will be *etained in memory qfiera
power jidlu *a
31
Page 32

Timer Feature
Timer
NOTE: 77_etimer is ind@endent _/ all the other
,fit_gctio*g,sat_d it does t_otco_tml the ovet_.
YOu max, In'°gram, tile timer to time cooking
or other household activities for up to 11 hours
and 5(.) minutes.
To set the timer:
1 Push tile TIMER button.
2 Turn tile Mini-Knob to select tile length of
time for tile timer up to 11 hours and 59
minutes and push to enter it.
On double oven models, a second timer may be ,set by
p_,ssing the "HMER butto_ twi_e.
Tile timer display will show hours and minutes
counting down ] minute at a time fl'om 24
hours to 1 hour. It will then change to show
minutes and seconds counting down tmtil tile
last minute is reached. Tile control will beep
and tile display will show seconds until tile
timer counts down to :00.
_hen tile timer reaches :00, the control
_ill beep 3 times followed b} one beep ever',
6 seconds until tile TIMER button is pushed,
Tile 6-second tone can be cancelled b}
following tile steps in 7bnes at the er_d o/ a
timed _yde in tile Spe(ial Featlm's section.
To cancel the timer:
1 Push tile TIMER button.
Doubleovendisplayshown
pROBE TIMER (:;LOCK
Pushto select
COOK OELAY
TIME START
To
T
IVlini-Kneb
Turnto select
Pushtoenter
2 Turn tile Mini-Knob to :00 and push to enter.
32
Page 33

Special Features
_.l?lll Oven
Special
.[eatures of
yOUr O_}gT_l
co_tvol
O_}eT_l
thermostat
acl]ustment
_blo' oven has additional Special I%atu*vsthat you
may choose to l_se.
Tile) remain in tile control's memory until
the steps are repeated. The Special Features
will remain in memor)aRer a power fifilure.
Either tile Oven Mode knob and/or tile
Temperature knob must be turned
to OFE
_m moO'find that your mcw oven cooAsd!ffi_*w_tl3' than
the om_it _J)la_ _,d.L_seyour new <_z fi_*'afbw w_@_to
Iwcome morefilmiliar with iL ,Jyou stig tbi_d_your m_w
<rv_q_is too hot or too cold, you _a_za@_st the th_¢rmo,s_t
)'OlO'3('(fi
To adjust the oven thermostat:
1 Push and hokl tile PROBE and DELAY START
buttons at the same time tbr 4 seconds until tile
display sho_vs SF (Special Features).
2 Push the PROBE button. A "0" will show ill the
displa>
()n double "wallo'v(,t_modds; a "0" will show it_
both tlu" t@_>rand Io'w_,rover_di@ho's. I>ush thv
PROBE button a 2rid time ("{'I'I'I_R" wig show in
tbv display) to svt tlu_upper ove_, a_d push PROBE
a 3M time ("kOl4/7_R" wig sh(_ari_ tbv di@l<o') to
set thv Iowt,r ovtq_.
3 Tm'n tile Mini-Knob to ac!iust tile oven
them_ostat up to 35°F hotte_ >_ (-) 35°F coole_
in 1°F increments.
4 Push tile Mini-Knob to enter )ore" choice.
0_ double oven models, either the O'vet_ Mode knob or
the 7"empe_tlov k_ob will have to be turned to Olqgfbr
each o've_.
N07_: 1,17fibh_ tbv S])a:ial I,_,atums rood6 !/ tlw
M_zi-Km*b is not pusbvd to tq_l_,ra choice qfier 60
se_omls; the mode wig be _am dh,d (without chang_',s)
and tbv time _ff&O' wig *eturn to thv dh])ho'.
The following are tile features and how }ou
ma) activate them.
Doubleovendisplayshown
(
@ @ ® ®-a-@
l 2. Push to choose.
1. Push and i_0[d at the same time to enter/exit SF.
5 Push and hold tile Mini-/Znob fiw 5 seconds
to e_t SF (Special Features) and return to tile
time of da? clock.
Do not use [hel'_/loi/leteFs, Stlch as those [k/[llld ill
g_ocer} stores, to check tile temperature setting of
your o;en. These thennomete_ may '_;u}' 20-40
degrees.
N07_: This a@*slment wig only q[fi,ct baiting"
tem!)e_r_ture,s;"it does not q]f& t b*oi&_g; <onvedion
or se(/:chca_fir_g"#m/)_¢*rztu*_¢s.Tbv adjl_stme_zt "wig
be retait_d it_ memo*)' qf!er a l)<rw_,rf?fihu'<
3.Mi.i-
gneb
Pusl_to
enterchoice
7bnes at
the erzd of a
timed Uc&
At thv end of a timg,d o'cle, 3 short bet¢)swill souml
,fidl<rwedby one bee!)_'v_U 6 s_u<md,sIoztil the 7IMER
butlon is pusbvd. Tiffs _ontinuou,s 6-se_vnd be@ m_O' be
_m_ ellvd. 7b u_u:d thv&se,md be@:
1 Push and hold tile PROBE and DELAY START
buttous at the same time 16r 4 seconds until the
displa) shows SF (Special Features).
2 Push tile TIMER button to choose between:
con SF bEEP - Continuous Beeps - Reminder
beeps will sotmd after a timed wcle has ended
until tile TIMI_]R button is pushed.
SF bEEP - No beeps - Tile reminder beeps
after a timed cycle is cancelled.
3
Push tile Mini-Knob to enter your choice.
Push and hokl the Mini-Knob _6r 5 seconds
4
to exit SF (Special Features) and return to tile
time of clay clock.
Double oven disT_layshown
@ @-a-@
2.Pushtochoose.
t ' .....f
1. Push arid I_oldat the same time to enter/exit SF.
N07_: On doubly oven models, tiffs cam:eh the
e_d-qf:o,_bto_vfi>;both ovens.
3.Ni.i-
Rnob
Pushto
enterchoice
33
Page 34

Special Features
_.l_lll Oven
i 2-hou,;
24-hour
or clock
blackout
_bur eontml i,sset to use a 12=hour eloeh, g/you
would p_;/i_*'to have a 24-hou*' milita* 3' time eloek o*'
blaek out the eloek display, ,/blhfgu the steps bdow.
1 Push and hold the PROBE and DELAY
START buttons at the same time fl)r
4 seconds until tile display shows SF
(Special Features).
2 Push the CLOCK button to choose between:
12 hr - 12 hour clock with AM and PM.
24 hr - 24 hour clock - military time.
OFF- blacks out tile clock fl'om tile display.
3 Push tile Mini-Knob to enter your choice.
4 Push and hold tile Mini-Knob fin" 5 seconds
to exit SF (Special Features).
N07_: lithe eh)ek i,s in the b[de[_-oltt 1node, )'O/t will
_ot be ab# to use the Delay Start jimdion.
77_i.sfi3atlm, allow.s you to ac{fl_.stthe tone volunu'.s to c_
mort aeeeptab[_:zolun_ Then_ are tln_e po.vsibg volt_n_
bve[s.
1 Push and hold tile PROBE and DELAY
START buttons at tile same time fl)r
4 seconds until the display shows SF
(Special Features).
2 Push the COOK TIME button to choose
between:
1 SF bEEP- Quietest Beep Volume.
2 SF bEEP- Middle Beep Volume.
3 SF BEEP- Loudest Beep Volume.
Push the Mini-Knob to enter your choice.
4 Push and hold tile Mini-Knob fl_r 5 seconds
to exit SF (Special Features) and return to
the time of clay clock.
NO_I_: 0_ doub& oven model, s, this a_tival#,s this
spe_ial fi_atlm, /br both oven.s.
Doubleovendisplayshown
@
PROEJE TmMER CLOCK COOK DELAY
2. Push to choose.
PushandIloidat thesametimetoenter/exitSF.
Doubleovendis731ayshown
@ @
......,........ ooo,7
Pushandholdatthesametimetoenter/exitSF.
2.Pushtochoose.
_u_n
3. Mini-
Knob
Pushto
enterchoice
Pus_
3.Mini-
Rn0h
Pushto
enterchoice
.4
Page 35

Special Features
_.1%11Oven
Sabbath
f;qature,
12-hour
shut-o/for
no shut-oil
IATththis fi, atu**,, should you,]b*]get a_zd I(,ave the
ove_z o_, the control trill automati_ all 3,tu*'_z_(f the
ove_z q]?er 12 hou*:s duri_g" bahi_g']}_zctio_,s. Ijyou
wish to turn q/j this ji, ature, jbl/o'a_ the steps be/o'a_.
Push and hold tile PROBE and DELAY
START btlttons at tile same time fklr
4 seconds until tile display shows SF
(Special Features).
2 Push tile DELAY START btltton to choose
between:
12 SF Shdn - Tile o_en *_ill automaticall}
turn off after 12 hot,rs.
no SF Shdn - Tile oven will not
automatically turn off after 12 hot/rs.
SAbbAth - Designed fi)r use on the Jewish
Sabbath and Holidays.
Tile Sabbath feature call be used _k)r
baking/roasting only. It cannot be used fk_r
convection, broiling, self:cleaning or Delay
Start cooking.
When tile Sabbath Feature is set, tile
oven light and all audible beeps will be
disabled. Tile feature will also provide a
random delay period, of approximately
30 seconds to 1 minute, before tile oven
will turn on once it is set to BAKE.
Double oven display shown
PROBE TIMER CLOCK COOK DELAY
2. Push to choose.
PushandIloidat thesametimetoenter/exitSF.
_us_
3.Mini-
Knob
Pusllto
enterchoice
3 Push tile Mini-Knob to enter your choice.
4 Push and hold the Mini-Knob for 5 seconds
to exit SF (Special Features) and return to
the time of clay clock.
NOTE: O_z doub& o_en models, this a_ti'_at_s this
spe_ial fi_atur_ i_ both o_e_,s.
35
Page 36
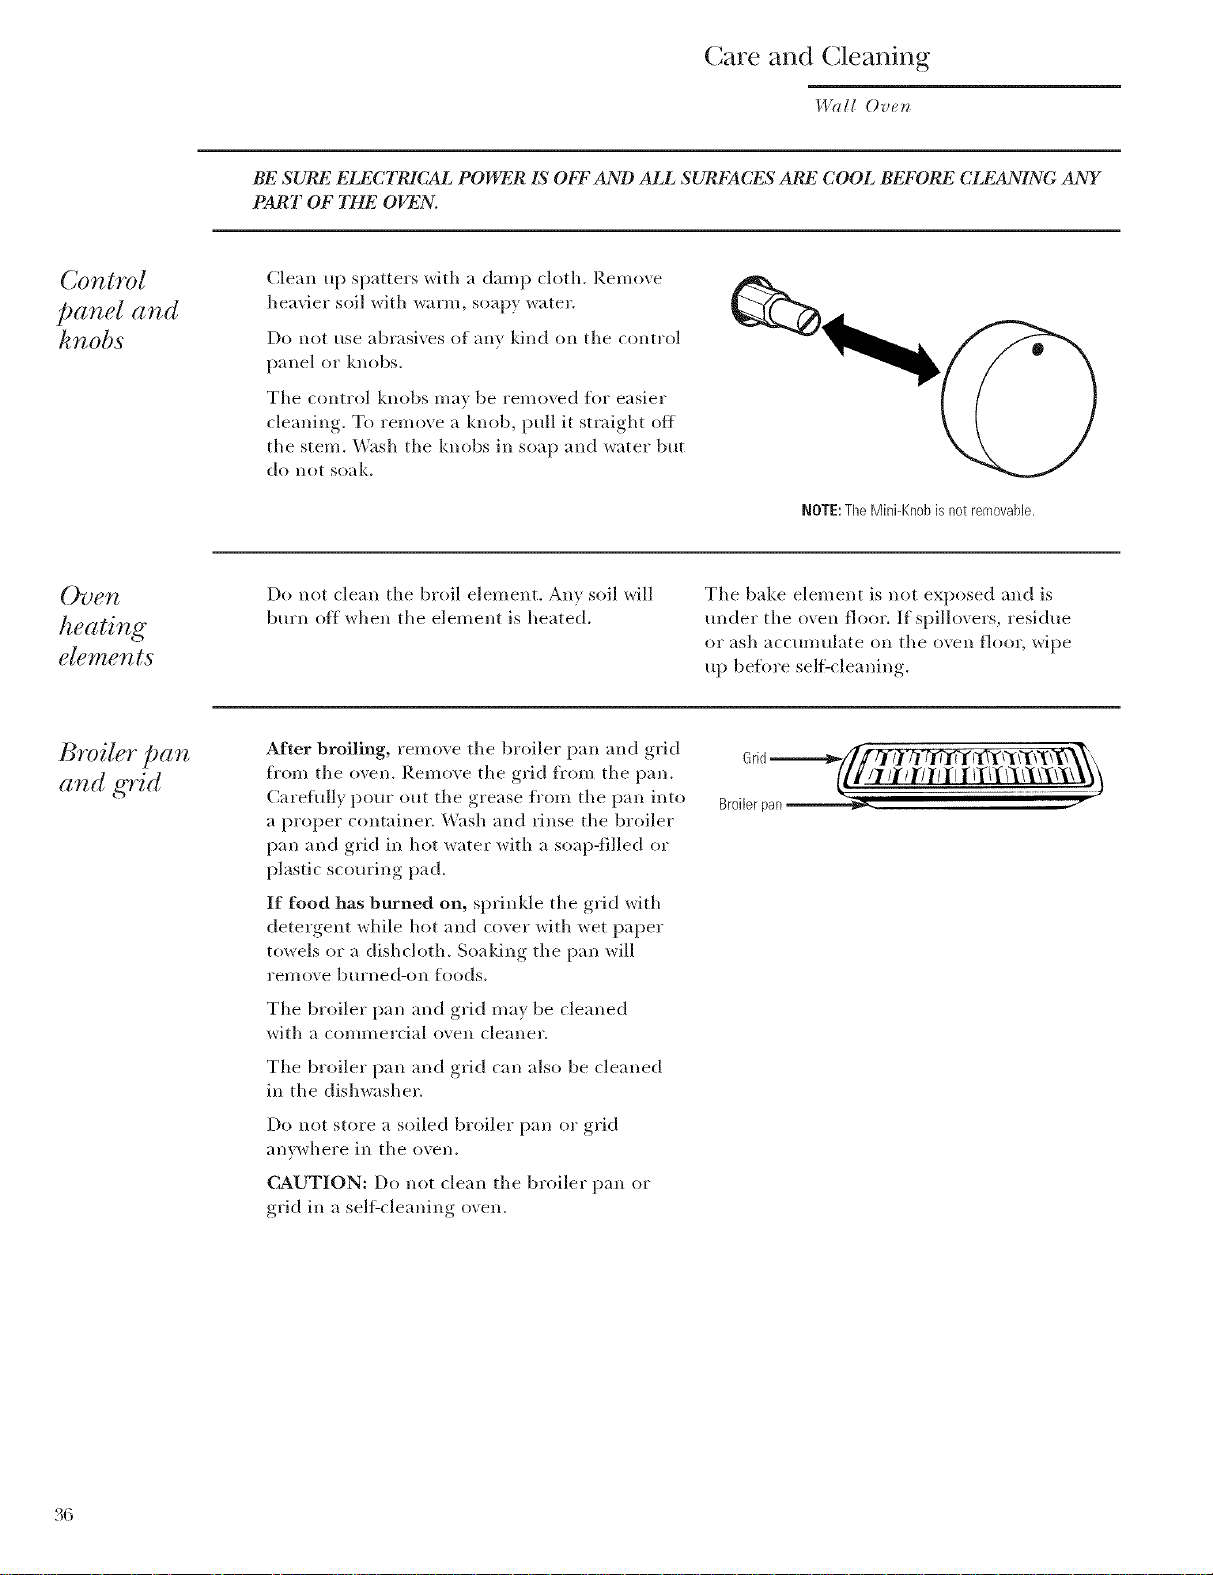
(;are and (;leaning
BE SURE ELECTRJCAL POWER IS OFF AND ALL SURFACES AR_2 COOL BEFORE CLEANING ANY
PART OF THE OVEN.
Control
panel and
knobs
Ouen
heating
elements
Broiler pan
and gTid
Clean up spatters with a damp cloth. I_emove
heavier soil with warns, soapy water.
Do not use abrasives of any kind on the control
panel or knobs.
The control knobs may be removed tot easier
cleaning. To remove a knob, pull it straight off
the stem. Wash the knobs ill soap and water btlt
do not soak.
Do not clean tile broil element. An} soil *_ill
burn off when the element is heated.
After broiling, remove the broiler pan and grid
t/"om the oven. Remove the grid fi'om the pan.
Carefully pour out the grease f/"om the pan into
a proper container. _'\hsh and rinse tile broiler
pan and grid in hot water with a soap-filled or
plastic scouring pad.
If food has burned on, sprinkle the grid with
detergent while hot and cover with wet paper
towels or a dishcloth. Soaking the pan will
rel//ove btlrlled-on foods.
NOTE:The Mini-Knobis notremovable.
Tile bake element is not exposed and is
trader the oven floor. If spillovers, residue
or ash accmnulate on the oven floor, wipe
up be%re self-cleaning.
Grki_,,-///[ ]'j¢/]["f'/-_d"li'f 1"14,'1(/'I'd'lit\"I[\'_!( \
{l_//I/l'/T/tqI liTil/l//\'{\/\\_ t
Broiler pan ===========l_ ....i
Tile broiler pan and grid may be cleaned
with a con/i//ercial oXell clealler.
Tile broiler pan and grid can also be cleaned
in the dishwasher.
Do not store a soiled broiler pan or grid
allv_Ahere in tile ()*,ell.
CAUTION: Do not clean tile broiler pan or
grid in a selfZcleaning (r_en.
• (l
Page 37
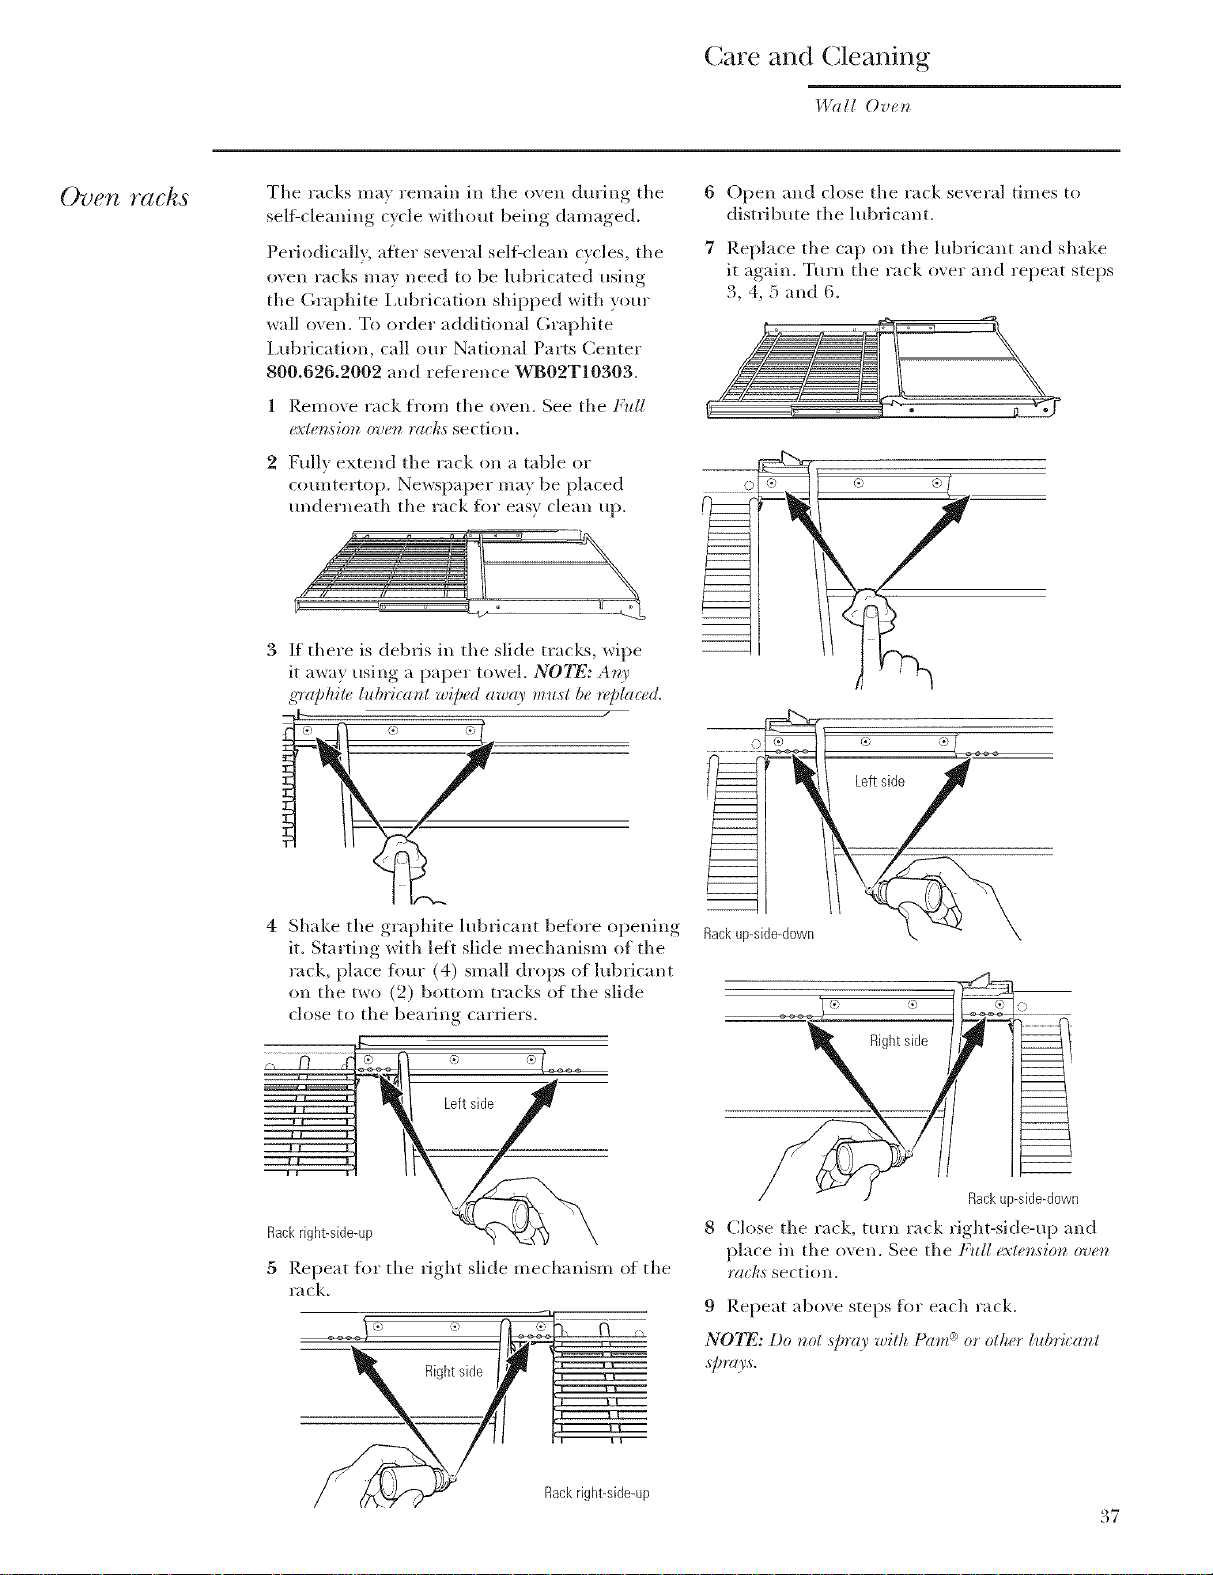
(;are and (;leaning
Wall Ov¢_
Oven racks
The racks may remain in the oven during the
sell'cleaning cycle without being damaged.
Periodically, after several seli_clean cycles, the
oven racks may need to be lubricated using
the Graphite Lubrication shipped with your
wall oven. To order additional Graphite
Lubrication, call ore" National Parts Center
800.626,2002 and retbrence WB02T10303.
1 Remove rack from the oven. See the Full
(.x'tet_,sio*zo*uet_re(ks section.
2 Fully extend the rack on a table or
countertop. Newspaper may be placed
underneath the rack fin" easy clean up.
If there is debris in the slide tracks, wipe
it away using a paper towel. N07_: At U
,@'aphite lubricant wiped aw( O' must be _q)la_ed.
6 Open and close the rack several times to
distribute the lubricant.
7 Replace the cap on the lubricant and shake
it again. Turn the rack over and repeat steps
3, 4, 5 and 6.
® Let
Shake the graphite lubricant before opening
it. Starting with left slide mechanism of the
rack, place Ibur (4) small drops of lubricant
on the two (2) bottom tracks of the slide
close to the beating carriers.
Leftside
Rackright-side-up
5 Repeat fl_r the fight slide mechanism ot the
rack,
_® ®
Rightside
Leftside
Rackup-side-down
®
Right side
Rackup-side-down
8 Close the rack, turn rack right-side-up and
place in the oven. See the Full ex'tension ove_z
IYI('/¢Asection.
9 Repeat above steps fl_r each rack.
N07_: Do not s/m O' with Pare a')or other lubricant
S/)_I)'S.
Rackright-side-up
37
Page 38
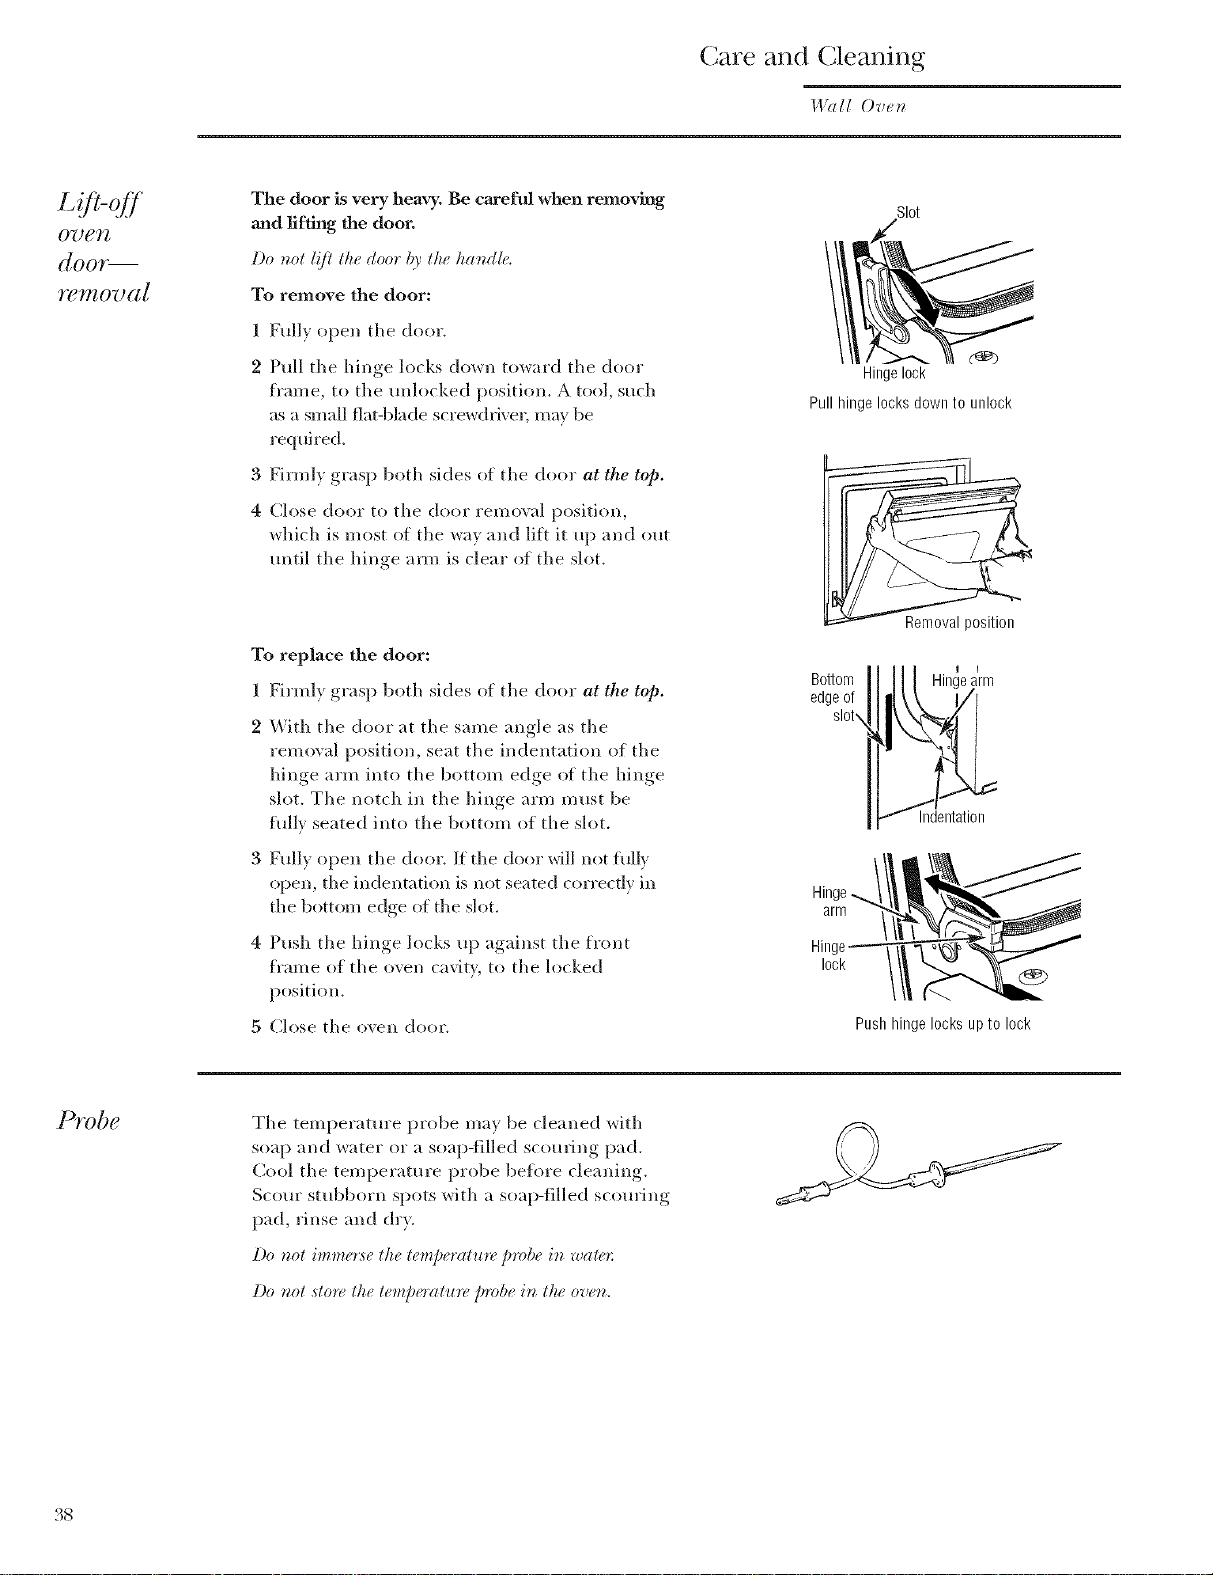
(;are and (;leaning
Wall Ov_,_
([OOY_
FelYtOT} (IJ
The door is very heavy. Be cm'eful when removing
and lifting the door.
Do not I!fi tke door b3' tke kandh,.
To remove the door:
1 Fully open the door.
2 Pull the hinge locks down towaId the door
fl'ame, to the unlocked position. A tool, such
as a small fiat-blade screwdvh'er, may be
required.
3 Firmly grasp both sides of the door at the lop.
4 Close door to the door reI/lo\ al position,
which is most of the way and lift it up and om
tmtil the hinge a*m is clear of the slot.
To replace the door:
1 Firmly grasp both sides of the door at the top.
2 With the door at the same angle as the
remo\al position, seat the indentation of the
hinge arm into the bottom edge of the hinge
slot. The notch in the hinge arm must be
fully seated into the bottom of the slot.
3 Fully open the door. If the doo_ will not hilly
open, the indentation is not seated correctly in
the bottom edge of the slot.
Slot
d_b
Hinge lock
Pull hinge locks down to unlock
Bottom earm
edgeof
Indentation
Hinge..._/!
_PYobg
38
4 Push the hinge locks up against the front
fl'ame of the oven cavity, to the locked
position.
5 (;lose the oven door.
The temperature probe may be cleaned with
soap and water or a soap-filled scouring pad.
Cool the teml)eramre probe beflwe cleaning.
Scour stubborn spots with a soap-filled scom'ing
pad, rinse and dry.
Do not imme*se the tempemtu*v probe in ware*:
Do not sto*v the temp(,rature probe in the oven.
lock //I
Push hinge locks up to lock
Page 39

(;are and (;leaning
1.19111Ov¢_
Overzlights
Each oven is equipped with two halogen light
assemblies h)cated on tile side _dls of tile o\en.
Tile lights come on when tile door is opened or
when tile oven is ill a cooldng cycle. Tile oxen
lights do not come on during self:cleaning or
if tile Sabbath Feature is set.
Each light assembly consists of a rein (_vable light
cover with two locking clips, a light compartment
with three light bulb sockets and three halogen
light bulbs.
CAUTION: Befiwe rei)lacino_ tile bulb,
discomlect electrical po*_er to tile oxen at tile
main fuse or circuit breaker panel.
Be sure to let tile light cover and bulb cool
completel}.
For )our safety, do not touch a hot btdb with bare
hands or a damp cloth.
To remove:
Remoxe tile racks from tile oxen. See tile Fidl
(!XtFILSlOII O'gl('ll Ya( /¢5 sectioll.
Using an a(!justable wrench, remove tile fi)ur
nuts homing the rack suppm_ over tile light
assembly.
Remove tile glass light cover b} pulling its
back edge ()sit and rolling it to*</rd ?ou.
Do Ilot reI/lo_e Hill scre_vs.
To replace:
[)se a new 120-volt Halogen bulb, with (;8 pins,
not to exceed 25 watts.
R¢/dacementbulbs may bepu,ckzl,sedb3,calliug
800.626.2002. Or(&rPart Nu mbo' WB25Tl O064.
N07N: H(gher wattage bulbs will damage your oven.
Using gloves or a chy cloth, remove tile bulb
fl'om its packaging. Do not touch the bulb with
baJee fingers. Oil fl'om bare fingel_ may cause hot
spots on tile glass suHitce and lead to premature
fifihu'e of tile bulb. If you do touch tile glass,
clean it with alcohol prior to installation.
Push tile bulb stndght into tile receptacle all
tile way.
Replace tile light co\'el; by plating its
fl'ont edge under tile flont two tabs ill tile
light comparmlent. Roll tile back edge into
place, maldng sure that it is firmly seated.
NOTE: If _ Hold Placefront
tile lorldng( t__ )!10cking_ edgeof
• . ' clipsin
[hps fell _Q-_ppiace on_ lenSunderCOVer
froll/ tile lensc0ver_&. - / fronttwo
glass lens co;el, backedge/Ni__!1 / tabs
iioldthenloil _' _ /
tlle.,,e,; i. tile
correct position, /-_:___ "
while repladng tile Pressthe %bt cover
cover on tile light intoplace
coI//parti//ellt.
Tile lieht,, coxer must be in place *allen usin,,.
tile ()veil.
l
NOTE: Tile two loddng clips may fidl fl'om
tile glass light cove_; Upon replacement, they
will need to be placed ill tile correct position
on tile light cover and pressed back into tile
light compartment until seated.
Using gloves or a (h)' cloth, remove
tile burned-out light bulb by pulling
it straight out.
For improved lighting inside tile oven,
clean tile glass cover frequently using a wet
cloth. This should be done when tile oven is
ofl_ disconnected fl'om tile power suppl> and
completely cool.
Replace tile rack suppoxl with tile slotted
holes over tile rear bolts and tile round holes
over tile fl'ont bolts. I,ightly secure with tile
fimr nuts removed earliei; but do not eyed
tighten or tile enamel could be chipped.
Slotted Round
boles holes
over over
rear front
bolts bolts
Replace tile racks. See tile Fidl extension
O*Ug?/
rac/¢_ssection.
Recomlect electrical power to tile oxen.
39
Page 40

Care and Cleaning
Wall Ov_,_
7b clean
the door
Inside of the door:
* Because the area inside the gasket is cleaned
during the self'clean cycle, you do not need to
clean this by hand. Any soap left on the liner
causes additional stains when the oven is
heated, so be sure to vh_se thoroughly.
* The area outside the gasket can be cleaned
with a soap-filled scouring pad.
" Do not rub or clean the door gasket--
the fiberglass material of the gasket has an
extremely low resistance to abrasion. An intact
and well-fitting oven door gasket is essential
fl)r energDetticient oven operation and good
baking results. If wm notice the gasket
becoming worn, fl'ayed or damaged in
any way or if it has become displaced on
the oven, you should have it replaced.
Outside of the door:
'_ Del)ending, on }(mr model, see the 5"tainle,s,s
,steel ,slff_?l_ e,s section or the Pai_ted ,slff_h_ e,s
section.
@
Stainless steel
su #ces (on
some models)
Painted
s_tgrfaces
(on so_z€
modeS)
Do not use a steel-wool pad; it will scratch the
surface.
To clean the stainless steel surfitce, use
warm sudsy water or a stainless steel cleaner or
polish. _Mways wipe the surfime in the direction
of the grain. Follow the cleaner instructions flw
cleaning the stainless steel surthce.
Painted surfitces include the doo,; top
of the control panel and the drawer f_'ont.
Clean these with soap and water or a vinegar
and water solution.
To inquire about purchasing stainless steel
appliance cleaner or polish, or to find the
location of a dealer nearest you, please call our
tollfree number, 800.626.2002 or visit ge.com.
Do llOt use coi/n/lercial o_,ell cleaIlers, clealliIlO
powders, steel wool or harsh abrasives 011 all}
painted sm'thce.
40
Page 41

The Problem Solver
_,I?ll[ Oven
Save time
& money, t
trouble_ boo tiTtg"
tips on the
fidlowi_tg pa_<_
first a!_d you ma)
not ne(,d to cal!
PROBLEM POSSIBLE CAUSE
OVEN WILL NOT •
WORK •
A thse in your home igI_/}be blown or the circuit breaker tripped.
The o_en controls are not properly set.
o
The men controls are set fl)r cleaning. If necessar}, allow the oven to cool;
then open the dora;
o
Make sure the O\en Mode knob is set to gAKE and the Temperature knob
is set toa tell/perattlre.
OVEN LIGHT(S)
DO NOT WORK
o
The light bulb is detective. Replace the bulb.
o
The oven is self-cleaning or the Sabbath teatnre is set. The oven lights do
/1o1 coine oll during sell:cleaning or if the Sabbath feature is set.
FOOD DOES NOT
BAI_] OR ROAST
PROPERLY
o
The o_en controls are improperly set. See the Baking'or Roa,_tin_'section.
o
Oven not preheated fi)r a hmg enough time (use approximatel} I0 to 15
inintltes).
o
Incorrect cookware or cookware of improper size being used. See the Pan
placement section.
o
Racks in the wrong position. See the Baki_" or I{oasIing"section.
o
Use a fl)il tent to slow down browning during roasting.
o
Oven thermostat needs a(!justment. See the ()r_enthermo,_talad/u,_tment
section.
FOOD DOES NOT
BROIL PROPERLY
o
This model is designed h)r closed door broiling only. Close the door. Always
broil with the door closed.
o
The o_en controls are not set at BROII, See the Broiling section.
o
The probe is plugged into the outlet in the o_en. Remme the probe ti'om
the o\en.
o
hnproper rack position being used.
o
Food is being cooked in a hot pan. rise the broiling pan and grid that came
with VO(lr()veil
o
Cook_are is not suited flw broiling. Use the broiling pan and grid that came
with VO(lr oven,
o
Numinum fi)il used on the broiling pan and grid has not been fitted
properly and slit as recommended.
o
In some areas the power (voltage) ma_ be low. Preheat the broil element
for approximately 10 to 15 rain utes.
o
The probe is plugged into the outlet in the oven. Remove the probe fl'om
the oven.
OVEN WILL NOT
SELF CLI_N
o
The oven temperature is to() high to set a self:clean operation.
Allow the oven to cool below the locking temperature and reset the
controls.
• The controls are not properly set. See the Sd/_(;leani_g Oven section.
"CRACKING" OR
"POPPING" SOUND
• This is normal. This is tile sound of the metal heating and cooling
during both the cooking and cleaning functions.
DURING CL_LkNING
EXCESSIVE SMOKING
OCCURS DURING
CL_ING
OVEN NOT CLEAN
AFTER A CL_SkN
CYCLE
• Excessive soil. Turn the Oven Mode and the Temperature knobs
to OFE Open tile windows to rid the room of smoke. _Elit until tile locked
door indicator light goes off. Wipe up excess soil and reset the clean cycle.
• The oven was heavily soiled. Clean up hear} spillovers beibre starting
the clean Qcle. Hemily soiled mens inav need to self:clean again.
• O_en is c(mnected to a 208V electrical supply. Set our cleaning
time flw 5 hours.
• The men controls are not properly set. See the Sd/_Cleaning" Oven section.
OVEN RACKS ARE The racks were cleaned in the self:clean cycle and now need periodic
e
DIrT/CULT TO SLIDE lubrication. Do not spray with Pare °':'or other lubricant spra}s. See Full
exlerlsiorl 0ve_t i_/c'hsin the Care arid Clearlirlg section.
41
Page 42

The Problem Solver
1:I%11Oven
Save time
& moneff
PROBLEM POSSIBLE CAUSE
CLOCK AND TIMER . A fuse in your home may be blown or the circuit breaker tripped.
DO NOT WORK I_eplace tile fuse or reset the circuit breaker.
• Oven controls improperly set. See the (;It)tic and Timer sections.
OVEN * Oven thermostat needs ac!justment. See the Oven thermostat
TEMPERATURE a(!jltstme_t section.
TOO HOT OR
TOO COLD
OVEN DOORWILL * The oven is too hot, Pdlow the oven to cool beh)w h)cldng temperature.
NOT OPEN AI_TE_
A CLE&N CYCLE
LOCKED * The selgclean cycle has been selected btlt the door is not closed.
FLASHES IN Ch)se the o\vn do(m
THE DISPLAY
LOCKED LIGHT * The t)\ en door is lo( ked be(ause the temperature inside the riven has
IS ON WHEN YOU not dropped beh)w the locldng temperature. Turn the Oven Mode
WANT TO COOK and the Temperature knobs to (-)FF. _Mlow the o\vn to cool.
F9FLASHES * The riven has a hmction error code. Turn tile Oven Mode and the
IN THE DISPLAY Tenq)erature knobs to OFK _Mlow tile oven to cool fi)r one horn; Put tile
()veil back into operiltion,
• Disronnect all power to the oven fi)r 30 seconds and then reconnect
powel; If the hmction error code repeats, call fi)r sela'ice.
DISPLAY GOES * A fuse in your home may be bh)wn (Trthe drcuit breaker tripped.
BLANK Replace tJ_e fuse (Trreset the circuit breakel;
• The clock is in the black-out mode. See the S/)edal Igeatun_ssection.
DISPLAY FLASHES * Power fidlure. Reset the clock.
UNABLI_7, TO GET * Tile PROBE and the DELAY START btlttosls l//tlSt be pushed at the
THE DISPLAY TO same time and hekl fi)r 4 seconds.
SHOW ST
"PROBE" APPEARS * This is reminding you to enter a probe temperature after plugging in
IN THE DISPLAY the probe. Enter a [)*'()be temperature.
POWER OUTAGE, * Pt)wer outage or stage. Reset the the clock. If the oven _ls in use, you
CLOCK HASI-_]S must reset it by pushing the CLOCK btltton, turning and pushing the
STEAM FROM * When using the convection _bamre, it is nomml to see steam coming
THE VENT ()tit of tile oven vent. _&stile number of racks 05"amount tit fl)od being
"BURNING" OR * This is normal in a new oven and will disappear in time.
"OILY" ODOR
EMITFING FROM
THE VENT
STRONG ODOR * This is temporm T. An odor fl'om the insulation arotmd the inside ot the
FAN NOISE * A cooling tim or a convection tim (depending on tile flmction you are
Mini-Knob to enter.
cooked increases, the amount of visible steam will increase.
oven is n(mnal fl)_ the fil_t tbw times the o\vn is used,
using) inav turn oil. This is nollnal. The cooling tim will tm'n on to cool
internal parts. It may mn after the o\en is turned ofl_ The convection fire
may cvrle on and off tmtil the flmction is over or the door is opened,
42
Page 43

Notes
43
Page 44

Notes
Page 45

,x_V4d
O_Ig_ xo8 "O'd
Auedmo3 _!1_oa1::7Imaua9
GEAppliances
Consumer Product
Ownership Registration
Important Mail Today
Page 46

Consumer Product Ownership Registration
Dear C,ustomer:
Thank xou for })urchasing, our product and thank xou for placing ?our confidence in us. _'_e are proud to
have }ou as a C/lSton]el'!
Follow these three steps to protect your new appliance investment:
£
Complete and mail
your Consumer
Product Ownership
Registration today.
Have die pea(e oi miml
of knowing we can
conta(t you in the
mdikely evem of a
sat_'ty modification.
After completing this
registration, write your
model aald serial numbers
in th_s manual. "_bu will
need this inlbrmation
should v(m reqttire serxice.
The service *mmber in the
USA: 800.444.1845. ]i]
Canada: 1.888.880.3030.
Important: To ensure that your product is registered, mail the separate product registration card.
If the separate product registration card is missing, fold and mail the form below. No envelope is needed.
F()I ,l) I [ERE
Consumer Product Ownership Registration
Product Model
Wall Oven
*_11". [] NIs. [] *_11"S. [] _liSS []
First
NaIlle _ lastN _ll/le
Slreet
Addr_ ss
Serial
£
Aim #
C ? Stow I I I Code
Dale Pla<< d
,n_l i I'l_om,I I_l I_l I
] ]ZiP ] ]
Read your Owner's
Manual carefully. It will
help y(m operat_ yore:
n_w al)l)liance properl>
TAPE CI ,()SED
46
Page 47

Consumer Services
I,l?ll[ Oven
With the purchase of your new Monogram appliance, receive the
assurance that if you ever need information or assistance from GE,
we will be there. All you have to do is call toll-free!
G E Answer
Center ®
In the USA:
800.626.2000
In-Home Repair
Service
In the USA:
800.444.1845
In Canada:
1.888.880.3030
For Customers
With Special
Needs'...
In the USA:
800.626.2000
Whatever yore" question about any Monogram major appliance, GE Answer Centei _:
inflmnation service is available to help. Your call--and your question--will be answered
promptly and courteously. And you can call any time. GE Answer (:enter _ service is open
24 hours a da> 7 days a week.
OR
Visit our Website at: ge.com
In Canada, call 1.888.880.3030.
AGE consumer service professional will provide expert repair service, scheduled at a time
that's convenient fl_r you. Many GE Consmner Service compan}_operated locations ofl_br
you service today or tomorrow, or at your convenience (7:00 a.m. to 7:00 pan. weekdays,
9:00 a.m. to 2:00 p.m. Saturdays). Our fhctorv-trained technicians know your appliance
inside and Otlt--so lnost repairs can be handled in just one visit.
GE otters a brochure to assist in planning a barfie>fi'ee ldtchen flw
persons with limited mobility.
,' ztU;17
...... r "'°1
s_oN
Consumers with impaired hearing or speech who have access to a
TDD or a conventional teletypewriter may call 800.TDD.GEAC
(800.833.4322) to request inflwmation or service.
Service Contracts"
In the USA:
800.626.2224
In Canada:
1.888.880.3030
Parts and
Accessories
In the USA:
800.626.2002
In Canada:
1.888.880.3030
You can have tile secure teeling that GE Consumer Service will still be there after wmr
warrlmt_ expires. Pro'chase a GE contract while your warranty is still in etfect and you'll
receive a substantial discount. With a m ultiple-year contract, you're assured of future
service at today's prices.
Individuals qualified to service their own appliances call have parts or accessories sent
directly to their home. Tile GE parts system pro\ ides access to over 47,000 parts...and
all GE Genuine Renewal Parts are fully warranted. VISA, MasterCard and Discover cards
are accepted.
User maintenance instructions contained in this manual cover procedures intended to be
performed by any user. Other servicing generally should be referred to qualified service
personnel. Caution must be exercised, since improper servicing may cause unsafe operation.
47
Page 48

Warranty
_,l?ll[ Oven
YOUR MONOGRAM WALL OVEN WARRANTY
Staple sales slip or cancelled check here, Proof of original purchase
date is needed to obtain service under warranty. Please have serial
number and model number available when calling for service,
WHA T IS
COVERED
From the Date
of the O_¢ina/
Purchase
WHAT IS NOT
COVERED
LIMITED ONE-YEAR WARRANTY
For one year from date of original purchase, we will provide, fl'ee of charge, parts and
service labor in wmr home to repair or replace any part of the oven that ihils because of
a mamlihctufing defect.
* • ® ®. • _® • • ® e ® ®.. e ®® ® ® ® ® • ® • • • ®® ® ® ® • m® ® ® ® ®® ®. ® • e®. ® ® ®® • • ® e e® ®. ® ®® ®.. e _® •. ® • ® ® ®. e _® ® • • ® m®® * e ®® • • ® • ® ® ® * e o® ® ® •
This waliant) is extended to the original purchaser and an) succeeding owner fi)r products
purchased for ordinarx home use in the 48 mainland states, Hm_aii, X\_shingtou, D.C. or Canada.
If the product is located in an alea where service bx our Autholized Servicer is not a_ailable, you
ma) be responsible lot a trip charge or you max be required to bring the product to an Authorized
Service location tot service. In Alaska the warrant_ is the same except that }on must pal to ship the
product to the service shop or tin" the service technician's travel costs to xotu" home.
All warrantx serxice will be proxided b) our Factor) Serxice Centers or b) our authorized Customer
Care: servicers dinting normal working laours.
Shoukt )our appliance need service, din'lug warrant} period or be)end, in the EISA call
800.444A 845. In Canada: 888.880.3030.
• Service trips m your home m teach yon how
to use the product.
, Replacement of house fuses or resetting of
circuit breakers.
" Damage to the product caused by accident,
fire, floods or acts of God.
, Damage after delivery.
* Failure of the product if it is used for
other thm'_ its intended purpose or used
commercially.
• Improper installation, delivery or
maintenance.
If you have an installation problem, contact
your dealer or installer. You are responsible
for providing adequate electrical, gas,
exhausting and other connecting facilities
as described in the Installation Instructions
provided with the product.
• Incidental or consequential damage caused by
possible defects with this appliance.
, Product not accessible to provide required
service.
49-80325 ]
12-05 JR
Printed in the United States
EXCLUSION OFiMPLiED WARRANTiES--Your sole and exclusive remedy is product
repair as provided in this Limited Warranty. Any implied warranties, including the
implied warranties of merchantability or fitness for a particular purpose, are
limited to one year or the shortest period allowed by law.
Some states/provinces do not allow the exclusion or limitation of incidental or consequential
damages, so the above limitation or exclusion ma) not appl) to )on. This warrant} gives )on specific
legal rights, and xou ma_ also ha_e other rights which vat) li'om state to state/province to province.
To know what }our legal rights are in }our state/province, consult }our local or state/pro_ lucia/
consmner atIifirs office or )ore" state's Attorne) General.
Warrm'_tor in USA: General Electric Compm'_y,
Louisville, KY 40225
Warrantor in Canada: Camco Inc.
GE Consumer & industrial
Applionces
Generol Electric Compon_
Louisville, KY 40225
ge.cem
 Loading...