

GE ZPRASHANT, ZET2RM3SS, ZET2RM2SS, ZET1RM3SS, ZET1RM1SS Owner’s Manual
...
Owner's
Manual
30" Convection
Wall Oven
ZET1R - Single Wall Oven
ZET2R - Double Wall Oven
Four mural fi convection de
76 cm (30 po)
Manuel du propridtaire
ZETI R - Four mural simple
ZET2R - Four mural double
La section frm_aise commence it la page 55
Homo de conveccidn
de pared de 30"
Manual del propietario
ZETI R -Horno de pared simple
ZET2R - Homo de pared doble
La secci6n en espmiol empieza en la p_ina 105
monogram.com
49-80443 ]
11-07JR
Printedin the United States
Consumer Information
I'ntroduction
Contents
Your new Monogram wall oxen makes an ( loquent statement of stxle, convenience and kitchen
planning flexibility. Whether you (:(lose it tot its purity of design, assiduous attention to delail--
or for both of these reasons--vou'll lind that your Monogram wall oven's superior blend of form
and flmclion will delight you (br years to coin<.
xt\_ur Monogram wall oven was designed to provide the flexibility to blend in with your kitchen
cabinetry Its sleek design can be b_am(full? integrated into the kitchen.
The in(bnnation on tile %llowing ()ages will help )ou operate and maimain _our wall oven
properl>
Care and Cleaning
Broiler Pan and Grid .................. 42
Control Panel ........................ 4(;
Light Bull) ........................... 45
Oven Door . ....................... 44, 4(;
Probe ............................... 44
Racks ............................... 43
Staink ss Steel Sm-fhces ................. 4(;
Favorite Recilx s ....................... 24
Help ................................ 36
Kitchen Timer . ....................... 25
Option Settings .................... 37-41
Amo Recipe TM Conversion .............. 39
Clock .............................. 37
Clock Blackout ....................... 38
Dei_mlt ............................. 41
Display Color ........................ 39
Consumer Services
B(f'ore 5.5)u Call For Service .......... 47, 48
Important Phone Numbers ............. 53
Model and Serial Numl)(rs ............... 3
Product Registration ([ .S.A.) ......... 49, 50
Product Registration (Canada) ........ 51, 52
Sa%W Instructions .................... 4-6
Warranty ............................ 54
Oven
Alunfinum Foil ...................... 9 14
Baking .............................. 11
Broiling .......................... 14, 15
Control Lo(kout ...................... 25
Conn-ols .............................. 8
Convection ........................ 18-21
Cook and Itold Option ................. 34
I)ehydrate Option ..................... 34
Delay Option ......................... 35
Fahr_ nheit or Celsius
"I_.*mperam re Selection ................ 38
Kitchell Timer Signal .................. 41
Language ........................... 39
Sound On/()(_ ....................... 40
Sound Volmne ....................... 40
Thermostat ......................... 37
Timer Signal ........................ 41
12-Itou r Shut-Off ..................... 38
Oven .............................. 7-10
Probe ......................... 16, 17, 20
Proofing ............................. 30
Racks ............................... 10
Roasting ............................. 11
Sabbath Option ....................... 36
Selt:-Cleaning Owm ................. 26-29
Timed Baking and Roasting .......... 12, 13
Timed ( onvection Baking and Roasting .22, 23
Two Temps Option .................... 33
Warming .......................... 31-32
[J[(Yg*)10
pvll (¢ive
shi[q)i oifihn and
pact zKing" lape
2
Carefully grasp a corner of tile pvotectivc shipping
fihn with your ring(p, and slowly p(el it fl-om the
appliance surl_me. I)o not use any sharp ilenls to
remove the fihn. Remove all of tile fihn be(bre
using the appliance for the fip_t dine.
To assure no damage is done 1o the finish of
the product, the sal:vst way to relllove the adhesive
fi-om packaging tap_ on new appliances is an
application of a household liquid dishwashing
deml_gent. Apl)ly with a soft cloth and allow
to soak.
NOTE: The adhesive mu.sl be _l_movedfi*mzal! pm l*.
11im*_zolbe_l_mov_,dq it is bat:ed o_.
Consumer Intormation
Wall Oven
B@l_e
using your
wall oven
Write
down the
modal &
serial
"n_lmbers
R(a(I this manual carefully. It is int( nded to
hel l) you operat( and maintain )our new wall
o_en properly.
Ke(p it hand} lor answers to }our questions.
You'll find them on a label oil lll< front lefl
trim behind the oven door.
Fill out and return the Consumer Product
Registration Card that is packed with this
product.
If'you don'l understand something or need
more help, there is a list of toll-free consum_ r
selvice numbers inchlded ill tile back section
of lhis lnanual.
OR
Visit our Website at: monogTam.com
Before sending in this card, please write these
numbers here:
Modal Numb_ r
Serial Number
[ 7se these mlml)ers in ally correspondenc_ or
selvice calls conc(rning your wall oven.
I./'y014
received a
dam, aged
wall oven
Save time
d__ money
"Heed
service
Imm{diat_lv contact the deal(r (or builder)
that sold you tile wall oxen.
Beiore you request selwice, che(k the
Problem Solver in the back ot this lnanual.
To obtain s_ rvice, see th_ Collstnner Services
page in tile back ot this manual.
We're proud of our service and want you to be
pleased. If lot some reason you are not happy
with the ser_ic( you receiw, h_re are two st(i)s
1o follow tbr filrther help.
FIRST, contact tile peopl< who selviced }our
appliance. Explain why you are not pleased.
Ill most (ases, this will solve the probl(m.
It lisl* causes of minor operating l)roblems that
VOll Call corre(t VOllrself.
NEXT, if wm are still not pleased, write all the
details--inchlding your phon_ number--to:
Managen Cuslomer Relations
GE Appliances
Appliance Park
Louisville, KY 411225

IMPORTANT SAFETY INSTRUCTIONS
IMPORTANT SAFETY NOTICE
• The California Safe Drinking Water
and Toxic Enforcement Act requires die
Governor of C_difornia to publish a list
ot slll_stances kllown to the state to cause
cancer, birth (let_.,cts or other rel)roductiw!
haml, and requires lyusinesses 1o warn
C!lStOlllers of pot( ntial expOsllre to Sl/(h
s/ib_,tances.
S I'; 7 Y ['1 2 CA U7 YONS
Vv'hen using your eleclrical appliances, b_tsic
safety precautions should be followed,
including the following:
• Be sure all packing materials are removed
from the oven before operating it to l>rex< nt
fire or smoke danlag< should the pinking
mawrial ignite.
• Use this appliance only for its intended use
as described ill this ()wner's Manual.
• Be sure your appliance is properly installed
and grounded by a qualified technician in
accordance with the proxided installation
instructions.
• Be sure the oven is securely installed in a
cabinet that is firmly attached to the house
structure. Ncwr allow an}ore' to (limb, sit,
stand or hallg Oil the ()',en door.
• Have the installer show you the location
of the circuit breaker or fuse. Mark it for _ls}
refcren_ t,.
• Do not attempt to repair or replace any part
of your wall oven unless it is specifically
recommended in this manual. All other
servicing should bc rcti.,rrcd to _1qu_lliti_ d
technician.
• Teach children not to play with the controls
or any other part ot tile! oxen.
• The fiberglass insulation in sdf-dean ovens
gives off a very small amount of carbon
monoxide during the cleaning cycle. Exposu r_
tan be minimized by venting with an open
window or using a ventilation fan or hood.
•IMPORTANT: Tl,eh, ,l h,,f
some birds is extremely sensitive to tile fumes
given off during lhe s_ If:cleaning c}cle of any
own. Mo_e birds to another w_ 11-_(ntilated
rooln.
• Always keep dish towels, dish cloths, pot
hohters and other linens a safe distance from
your oven.
• For your safety; never use your appliance
for warnting or heating the room.
• Do not store flammable materials in the oven.
• Always keep wooden and plastic utensils
and canned food a safe distance away from
your oven.
• Always keep combustible wall coverings,
curtains or drapes a safe distance from
your oven.
• DO NOT STORE OR USE COMBUSTIBLE
MATERIALS, GASOLINE OR OTHER
FLAMMABLE VAPORS AND LIQUIDS 1N
THE VICINITY OF THIS OR ANY OTHER
APPLIANCE.
• Do not let cooking _ea_se or oilier flammable
materials accumulate hi or near the ,a_all oven.
• Do not use water on grease fires. Never pick
up a flaming pan. Turn the controls oft.
Flam{ ill th( ()VEIl Call b( SlllotheFed
conlpletel 3 by closing lh_ oxen door and
turning tile oven off or by using a multi-
propose dry (heroical or fbam-type fire
extinguishen
• Never leave the oven door open when you
arc not wat(hing Ih( ovt.n.
4

SAFETY PRECAUTIONS
IMPORTANT SAFETY INSTRUCTIONS
Do not use aluntinum foil to line oven
bottoms, except as suggested in this mmmal.
hnl_rop(,r installation of ahnninum foil may
result in a risk of electric shock or fire.
Cook meat and poultry thoroughly--meat to
at least an INTERNAL temperatur( of 160°F
and potduy to at least all INTERNAL
teml)erature ot 18(!°E Cooking to these
temperatures usually protects against
fk)o(Iborn( illn( ss.
• Before performing any service, DISCONNECT
THE OVEN POWER SUPPLY AT THE
HOUSEHOLD DISTRIBUTION PANEL BY
I_MOVING TIlE F[SE OR swrfcIIING
OFF TI IE CIR(I fI'I' BREAKER.
Do not leave chilth'en alone--childr( n should
not be left alone or unattended in all area
where an appliance is ill use. Th(y should
never be allowed to Kit or stand on any part
of tbe appliance.
Do not touch the heating elements or the
interior sin-face of the oven. These surlhces
may be hot enough to burn ev(n tllough tb(v
are clark in color. I)uring and alter use, do
not touch, or let clothing or other flammable
mat(rials contact, any intel_ior area of the
oven; allow sulticient lime t'_n-cooling first.
Potentially bot surfaces include the oven vent
openings and smlhces ileal- th( openings,
crevices around the oven do(n; file edges of
tbe door window and metal trim parts above
tile dool;
Remember: Tim inside surf,ice of the oven
may be hot wh(ll tb( door is open(d.
CAUTION: ITEMSOFINTEREST
TO CHILDREN SHOULD NOT BE STORED
IN CABINETS ABOVE AN OVEN--
CHILDREN CLIMBING ON THE OVEN TO
REACH ITEMS COULD BE SERIOUSLY
INJURED.
Never wear loose-fitting or hanging garments
wlfile using the appliance. Be earefill when
reaching tbr it(ms stored over tim oven.
Flammable material could be ignited it
brought ill contact with ovell beating
elements and may cause sew!re burns.
Use only th'y pot holders--moist or (lan_p
pot bolders on hot surtaces may result in
burns from steam. Do not let pot holders
touch hot heating (lements. I)o llOt use a
towel or other bulky cloth.
• Keep the oven vent unobstructed.
• Keep the oven free l¥om grease buildup.
• Stand away from the oven when openh N the
oven door. IIot air or steam which escapes can
cmls( burns to llands, lhce alld/or (yes.
After broiling, ah_ays take the broiler pan out
of the oven and clean it. I_(ffover grease in the
broiler pan (:all catch fire tb( next tim( you use
the pall.
• Large _ratdms or impacts to gl&ss doors can
lead to broken or shattered glass.
• Never leave jars or carL_of fat drippings in or
near your oven.

SAFETY PRECAUTIONS
IMPORTANT SAFETY INSTRUCTIONS
• Children in walkers, or children crawling, can
be attracted to the rotmd oven door handle and
may _b mid open the oven door. This tan
resuh ill i_ljm? trom tile door being pulled
open on a child, or severe burns if the oven
is in use and hot.
• Do not hem unopened food coutainers.
Pressure could build up and tile container
could 1)urst, cruising all in juD'.
• Place tbe oven rack in the desired position
while the oven is cool. If racks must be handled
when hot, do not let pot holder contact tile
heating elements.
SEIJ '-CIJ 2ANING OVEN
• Do not dean the door gasket. The door gasket
is essenlial fin- a good seal. Care should be
taken not to rub, damage or move tile gasket.
• Do not use oven deaners. No commert ial oven
cleaner or (wen liner protective coating of any
kind should be used in or around ally part of
the o_en. Residue fiom ov(n cleaners will
damage the inside of the oven when the
self-clean cycle is used.
• Clean only parts listed in this Owner's Manual.
• Extending the rack to its fully open position is
a convenience in lifthN heavy foods. It is als.
a prc(aution against b/irllS t]-olll tou< hing
hot surlhces ot tile door or oven walls.
• When usitg cooking, or roasting, bags in the
oven, tollow tile mamlf_<turer's directions.
• Do not use your oven to dry new_papers.
If oveflleat(d, they can catch on fire.
• Do not use oven for a storage area. hems stored
in an oven call ignite.
• Do not leave paper products, cooking utensils
or food hi the oven when not in use.
• Do not allow anyone to climb, stand or hang
on the door. They could damage th_ oven or
cruise smere personal i11jury.
• Before self-deaning dm oven, remove tile
broiler pan, grid and other cookwarc.
• Be sure to wipe up excess spillage before
s'tarting the self_cleanillg operation.
• If the self-deaalh ,_ mode malfunctions, tu rn the
oven off and disconnect tile power suppl?: Ilaw
it smxiced b) a qualified technician.
• The oven racks may be deaned in the oven
durhag tim self-deaning cycle.
SAVE THESE INSTRUCTIONS
6

Features of Your Wall Oven
Wall Ovell
ir_/brmation
A/_pea_zll_ce _tlc_ va_ 3. )
0
?
®
i
lu- n
c-sj _
i
Feature Index
Full Ext< nsion ()'_en Racks (3 in each _rven)
2 Broiler Pan mad G_id
3 Probe
4 Display
5 Probe Omlet
6 Halof{en Oven I if{hts
7 Oven Rack Supports (5 positio_Q
8 Convection Fan (op_'_at*'sdufftlg co_vectio_ cclohhg
9 Removable Oven Doo*
10 Oven Door Gasket
11 Bake Element (under the o.e*_ [loo_)
12 Broil Element
13 Automatic Oven Door I,ald/
14 Oven V_nt
Page
9, 10, 11, 14, 18, 19, 29, 30, 31, 32,
33. 34_ 43_ 45
14_ 19_ 42
14. 16. 17_ 20_ 26_ 44
8
16_ 20
45
101 29
11, 12, 13, 17, 18, 19,
20.22_ 23_ 31_ 34_ 35
44
46
42
14_ 18_ 42
271 28
5,9
(77_roug]10ut this _larll.tl, /eatto_s arid a/_/_.tla_ce t_a) _a_) /}_._l 3oul _lodd.)
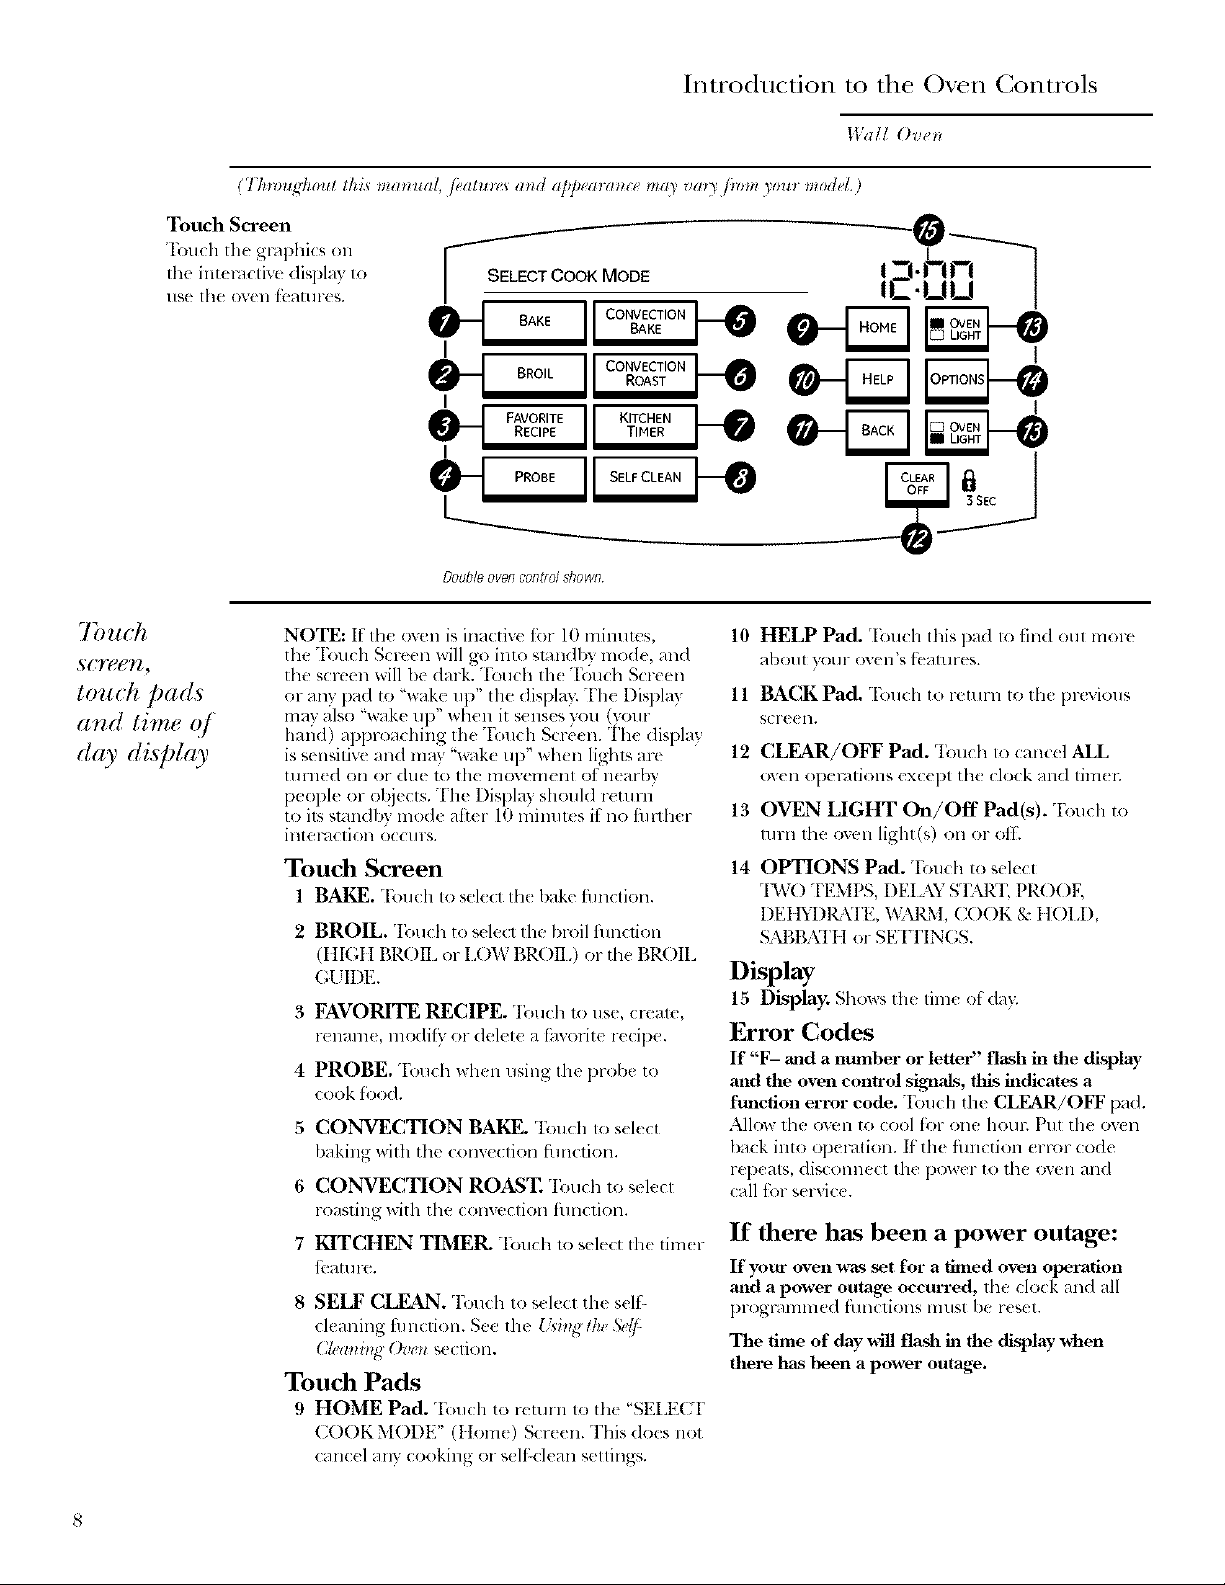
Touch Screen
'Ibuch the grq)hics O11
Ihe int(lxlclive display to
llSe [he OV(II l(_21tlll'es.
SELECTCOOKMODE
I
Doub]o ovofl control shown
Introduction to the Oxen Controls
IValI O l'etl
-0
i -j. nrt_-']
._.uu I
o iy2
s(:rgeyl,
to_t(h pads
a_d time ()/"
day display
NOTE: If tile own is inactive tor 10 mimltcs,
the "Ibuch Screen will go into slilndb} mode, and
the screen will 1)e dark. "Ibuch th( "Fou& Screen
or an} pad to "wake up" lhe displa> The Displ_l 7,
ran) also "wake Ul)" when it senses you ()'our
hand) approadling the "I'_)uch Screen. The display
is sensitiw and may %ake up" when light _,are
tllfll( d oil Of dlle 1o tile lnovenlent ot ll(al-bv
people or objects. The Display should r(tuni
to it?,smndbx lnod< after 10 mhlut_ s ii no tinlller
int(q_d£ tiOll O((H I'S.
Touch Screen
1 BAKE. T,,;_l(h Ic, sele,.t tll_ bake ihn(fion.
2 BROIL. Touch to sdecl the broil thnclion
(tIICIt BR()IL or II)W BROH,) or the BROIL
(;I IDE.
3 FAVORITE RECIPE. 'lbuch t<>use, create,
rename, nl_)di(v or delele a t_lvolite recil)e.
4 PROBE. Tou& when using the prolx to
cook l_i)od.
5 CONVECTION BAKE. Touch to sdect
baking with the convection fhnclion.
6 CONVECTION ROAST, 'Ibuch to select
roasting with the convectioll thnctiolL
7 KITCHEN TIMER. qbuch 1oselect the tim(r
fbaun>.
8 SELF CLEAN. %uch to s( lect the self-
cleaning t"11ncfion. See the {'d_g th_ 5)'t/-
(2tt>atlbg ()vel_ se( tion.
Touch Pads
9 HOME Pad. T_)uch to return to tile 'SELl{(7["
COOK MODE" (I Iotas) Screen. This do{s not
canc( 1any cooking or sdl:dean settings.
10
HELP Pad. 1buch this pad Io find oul more
a/)Ollt yotlr oven's t_'at!lres.
11
BACKPad.'ll)uch ,.)r_:urn oll( previous
S(71"eelL
12 CLEAR/OFF Pad. Touch to cancel ALL
OVCll opel_/tiOllS cXCCl)t th( clock and tiln_ 1;
13 OVEN LIGHT On/Off Pad(s). "Ibuch to
rum tht. o'_ell light(s) on or off.
14 OPTIONS Pad, "Ibu& to sele(t
"B,VO TEMPS, DEIAY S'I_.'I" PP.( )OF,
DFt tYDI_E'I:., WMZM, COOK g; tlOI.D,
SM),BATIt or SI_HTIN(;S.
Display
15 Display. Shoxss the lim_ of day.
Error Codes
If F- and a number or letter fla.sh in the display
and the oven control _g_aals, this indicates a
function error code. Touch the CLEAR/OFF l)_ld.
Allow the oven to cool f'or one hotn: Pill the oven
back into operation. It the flmction error (:ode
repeats, disconnect the power to the oven and
{:all tbr service.
If there has been a power outage:
If your oven B_ts set for a limed oven operation
mid a power outage occm'red, the clock and all
pl-Ogl_)lnllled t'IlllCliOllS lnllSt I)e [(set.
The time of day will flash in the display v&en
there has been a po, aer outage
8
Baking Tips
[['(lii Ovet_
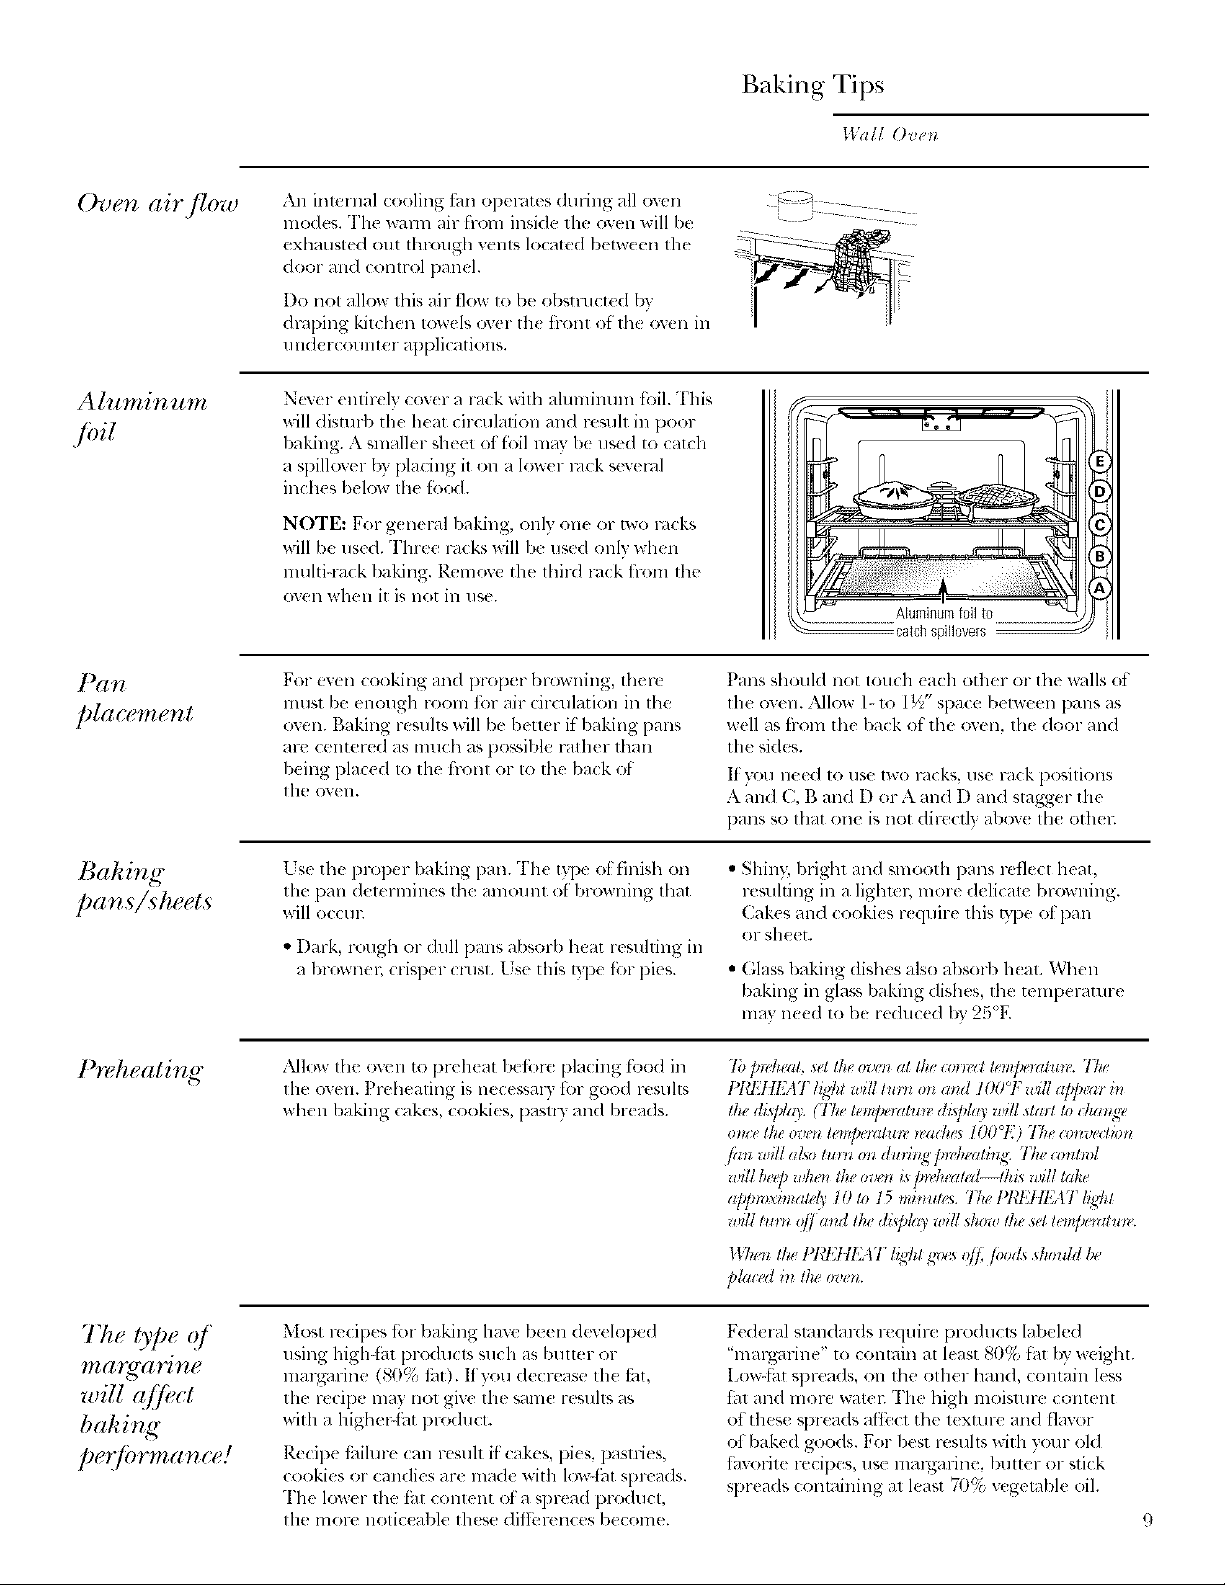
Oven airflow
An inlernal cooling thn operates duling all oven
lnodes. The wann air from inside the oven will be
exhausted out lhrough venb, located betw(en tile
door and control panel.
Do nol allow 1his air t]ox_ Io/)e (}bsnal(ted by
draping kitchen Iowels over th< fiont of lh{ o_,(:ll ill
11 lid( F( Olllltel applicatiollS.
Nmer entirely cov(r a rack with aluminum toil. This
will disturb tile heat circulation and re_,uh in poor
baking. A smaller sheet offMl ma 3 b( used to catch
a spillover bx placing it on a lower Fdck sevend
inches below the fbod.
NOTE: For g( nen,l baking, onh one or two rocks
will be used. Three racks will b( used only when
nmltiqa(k linking. P,cmca,e the fllird rack hom file
(Well whell it is llO[ in llSe.
For even cooking and proper browning, there
llltlst be enough room tot air drculation in lhe
oven. Baking resuhs will be better if'baking pans
are centered as nmch as po_,_ible rather than
being [)laced to lhe flxmt or to lhe back ot
lhe oven.
catch spill0vers
Palls should not touch (ach other or the walls ot
tile oven. Allow l- 1o 1½" space between lXmSas
well as tiom the back of' the oven, the door and
the sides.
If }'Oil lleed 1o rise two l_lcks, rise l-_l(k posilions
A and C, B and D or A and 1) and stagger the
pans so that on_ is not dire(fly al)ox( Ill{! othm:
Pre, heating"
Thetyped
llza _'_(I, IJ _?g¢
will affi+ct
baking
per fi.ma nce!
ks€ tl'l( prop( r baking pan. The type ol finish on
the pan d( teYlllilleS the alllOllll[ Of' I)l-Owllillg Ih_lt
win o((Hl;
• Dark, rough or dull pmls absorb heat resulting ill
a brox_nel; crisper crest. Lse this b'l x fi'_rpies.
dMI(}'W111(OV(II tO pr¢ h(at I)(fLre placing fbod in
the oven. Prehealing is n(cessal T R)r good Festlhs
_&hell baking cakes, cookies, pasll T and br( ads.
Most recipes tot baking have been developed
using higMbt products such as buuer or
lnar_arine (80% tilt). If you decrease th( ti_t,
the recipe may not giw: the same results as
with a highe_:t._t product.
Recipe [hilure can resuh if:cakes, pi(s, pastries,
cookies or candies are mad( with low4,1t spreads.
The lower the fat conlent ota spread product,
tile more noticeable these diflbrell(es become.
• Shin}; bright and ,,mooth pans reflect heat,
re',uhing in a liglm _; more delicate browning.
Cakes and cooki(s r(quire this tTpe ot pan
or sheet.
• Glass baking dishes also absorb h(s.L _Nhell
baking ill glass baking dishes, the teml)erature
may ne(d to be lxchl¢id by 25°F.
To ]m'keal, +e!the or<'. at lhe .. le+t ¢em/J++zlO_*l'.Tke
!_I8;tlE+IT lght will lurll 0_/a_ld IO0°F +l#lla]_]wa,_b+
the di@k(_'. U'ke tem[wratun dh/d(9' will sta*l Io ika*Ig_,
ira., the ov*'n let@emlu*_' _,alhes tOO°E) Tke I>_*vl'clbn
/atZ alg[ alSO tlg*'t_ 01_ dlz)'Jllg'[tl?,]l#al}tl<i gilg (onl*o[
wgl b_'ff)wtlet* the ov('t* i_p_vh_'alM lab will take
a/)/)_oximal@ t0 Io t 5 minulg_s. Ttw I_!{I:ttEAT blg]l*
wgl lurn off (rod lke dA/day will show the set lem[_emtml,.
117_e_*It. 17{l:111:,[1 hg]_lg_ s off, filods sh,/uh/be
p/al ed in tit; I*v_t*.
Fed(ral standards require producl_, labeled
"margmine" t_ contain al least 80% fht by weighl.
Low-tat spreads, oil the other hand, contain less
tht and more watel: The high moisture content
ot these spreads affect the texture and flavor
of baked goods. For best resuhs with your old
fhvorite recipes, use malgarine, huller or stick
spreads (onmining at least 70% vegetable oil.
• ) ) , , • • j
Before You Begin
ll_dlOven
Full
extension
Upper
frontrail
Lower
frontrail
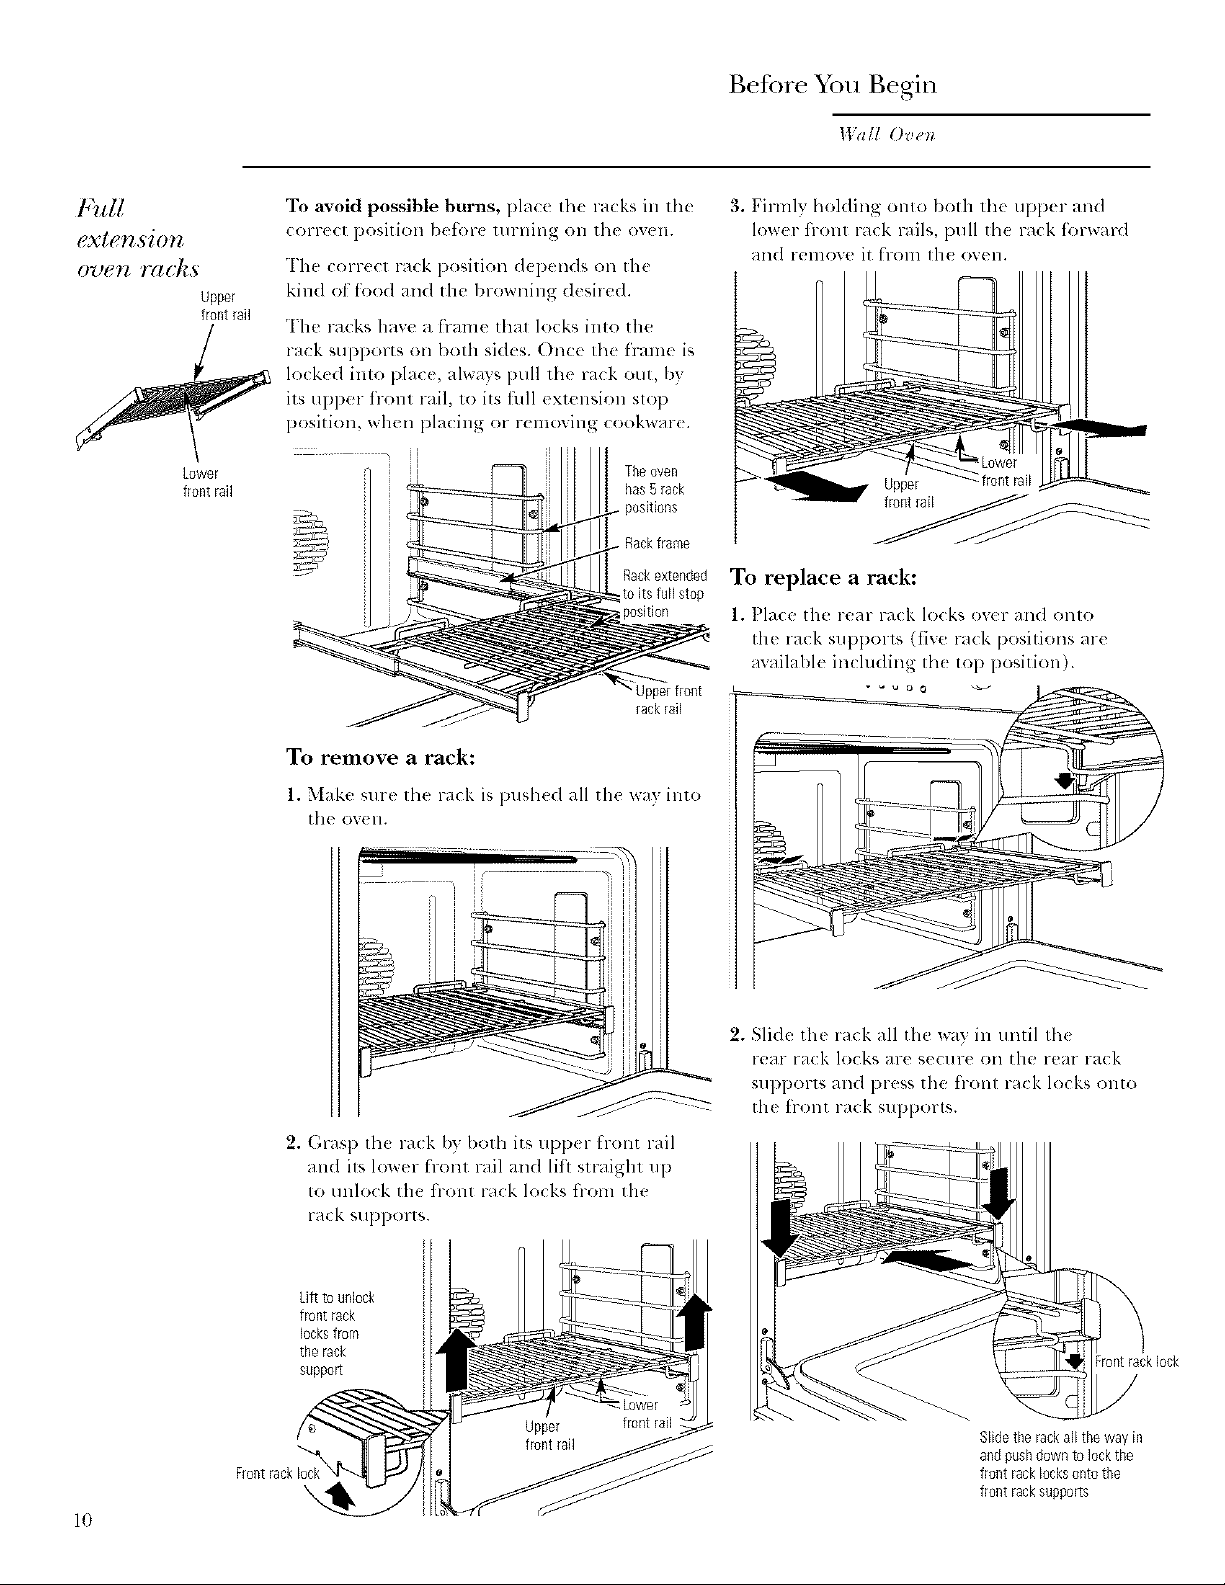
To avoid possible burns, place file racks in the
(orrect position/)et'or_ turning oll the oven.
The correct rack position depends on tile
kind ot tood and the browning desiTed.
The racks have a frame thai locks into tile
rack SUpl)orts on both sides. On(x th( l'ram{ is
locked inlo place, always pull Ill{? rack out, by
its ul)per front rail, 1o its full extension slop
position, when placing or r{ moxing cookwar_.
Theoven
has5 rack
positions
• Rackframe
Rackextended
toits full stop
Upperfront
rackrail
To renlove a rack:
3. Firmly holding OlltO both the upper and
lower flont rack rails, pull the rack tbrward
and relnove it from file oven.
To replace a rack:
1. Pla(e tile rear ra(k locks oxer and onto
the rack SUl)pOrl_ (live rack positions are
available inchlding lh( top position).
1. Makc sm'c the rack is push(d all the wa 5 into
the or{ 11.
2. Grasp the rack l)vboth its upper front rail
and ilk lower front rail and lilt straight up
to unlock the fiont rack locks from the
rack supports.
kifttounlock
front rack
locksfrom
the rack
suppo_
2. Slide the rack all the way in until th(
rear rack lo(ks are secure oil tile rear rack
supporb, and press the h-ont rack locks onto
the ti'ont rack supports.
Frontrack 10ck
Slidethe rackall thewayin
andpushdown to lockthe
front racklocksonto the
\
10
front racksupports
Baking and Roasting
Wail Ovet/
How to set
the oven jbr
bakingor
ro(zsting"
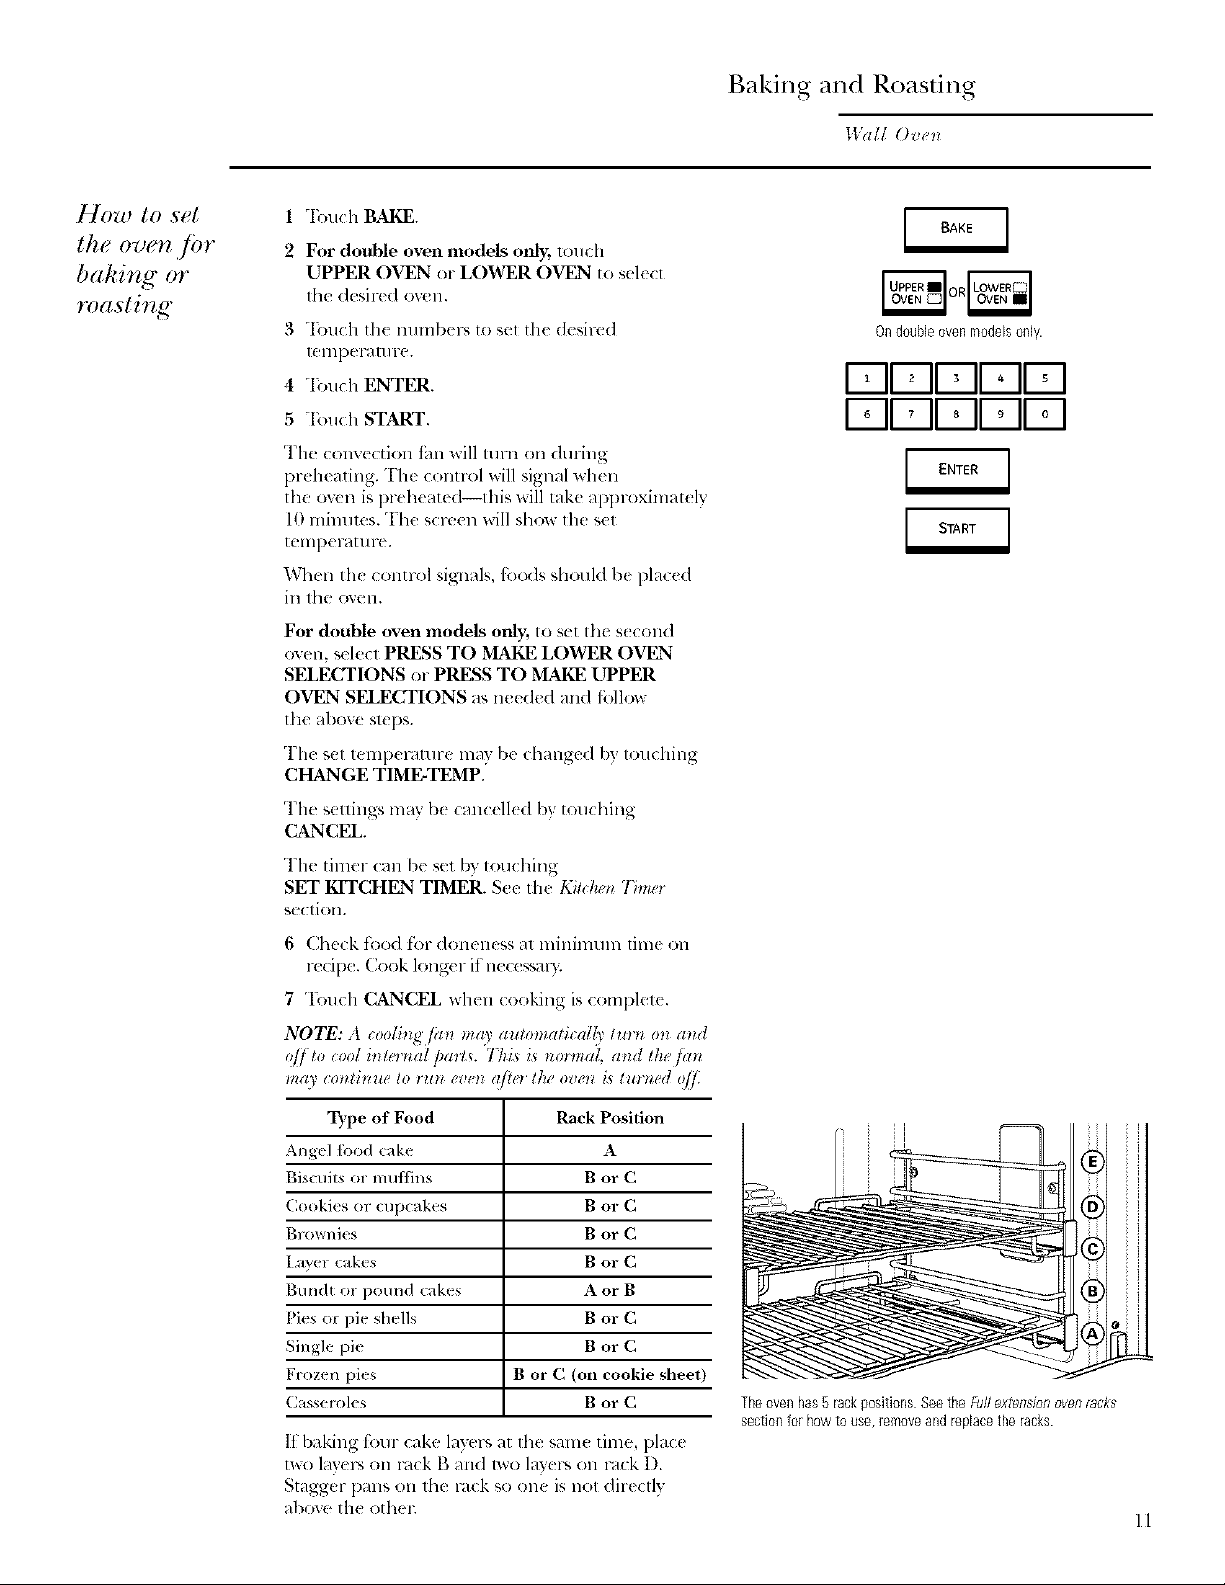
1 "Ibuch BAKE.
2 For double oven models only, 1(inch
UPPER OVEN or LOWER OVEN to select
the desir(d ov(n.
3 "[buch the numbep_ to sel tile desired
[el]ll)el_/llll-e.
4 "IbuchENTER
5 Tou(h START.
The convection fhn will mm on during
preheating. The control will signal when
the ow'n is preheated--this will take approximately
l0 minules. The screen will show Ihe set
tellll)eF_:it lille.
When the control signals, R)(×ls should b( plac(d
ill the o'_en.
For double oven models only; to set the s(cond
oven, select PRESS TO MAKE LOWER OVEN
SELECTIONS or PRESS TO MAKE UPPER
OVEN SELECTIONS as needed and %llow
the above stops.
The set temp(mmre may be (hmlgvd b} tou(hing
CHANGE TIME-TEMP.
On doubleovenmodelsonly.
I-ql-ql-ql oII I
I-ql-qU-II oIIoI
The sellings may b( cmlc(ll( d by tou(hing
CANCEL.
The timer can b( set by touching
SET KITCHEN TIMER. See th( Kii(:k_m7_lm'r
se( tiOll.
6 Check toed tbr doneness at minimum time on
recipe. Cook long('r if nece_sal3.
7 'I_)uch CANCEL when cooking is complet(.
NOTE: A coolkzg /an ma)' automatical{t' lm'x ml and
q// to cool in&,'rnaI pml_. 7hLs is no_vnag and theJan
lag0 i:ontbzue to ru_l eve_lalto the oven is turned off.
Type of Food Rack Position
Angel h)od cake A
Bis(afits or muffins B or C
Cookies or (up(akes B or C
Brownies B or C
I,aym (akes B or C
Bundt or pound cakes A or B
Pies o* pie shells B or C
Single pie B or C
Frozen pies B or C (on cookie sheet)
Casserol(s B or C
1t baking fern cake layers at tile sam( time, place
IXXO I_IV(17_ O11 l'_lck g alld 1we la}els Oll Fa(k I).
Stagger pmls on lh( Fackso one isllOl dir(ctlv
above tile ethel
Theovenhas5 rackpositions SeetheFullextension ovenracks
sectionfol how to use,removeandreplacethe racks.
ll

Timed Cooking
Wall Ovell
Timed
cooking
(immediate
start and
automatic
stop)
OIl doubk ov(_ models, )ou cm* use timed bakiltg i_
intt tlve_ wkite usiltg sd/_lhat_ ill tke olko;" Vm lall
a[w u,selimed bahi_< in bolh ove_ts at [he satire [1_/_'.
NOTE: Foods lkat spoil ea_il3_such as mi/k, e,_g:%
fi*k, stuffh*ff_, p0u/h 3'and/)o_1_ _koldd _zotbe
agowM to sil fin mow lhml l kou_ Im/ln_!o_ qfle*
coo]:i_tg:[{O0_tl le_@el allo_ _ p_o_zolgv l/re g'l_RIl]l o/
hmwqUI bacto'ia.
77zeove, i will tul t* o,* immedial@ arm i:ooh /or a
setect_d let*gilt, o_ tinu. ,1t the eltd o/t/te Iooki*zg lilac,
tlw ov(?t will lul_ o/] aulomaticaII).
Make SlIFethe clock shows ll_( correct tillle
of day.
1 "Ibuch BAKE.
2 For double oven models only, touch UPPER
OVEN or LOWER OVEN to s(lect the
desired oven.
3 Touch the mlmber_ to set the desired
teml)erature.
4 Touch ENTER.
5 "['tmch the mlmber_ to set the desired length
of cooking time.
6 "I)mch ENTER.
7 "I\vo immediate start and atnomatic stop
cooking options are available:
• PRE-HEATED START - Touch to preheat
the ove II.
The convection thn will mrn on during
preheating. The control will signal when
the oven is preheat(d--this will take
approximately 10 mimltes. The screen
will show the set temperature.
Wh(n the control signals, place food in
th( ov( 11.
"['he timed cook will not start until the oven
is preh(at_d and START is touched.
• COLD START - Touch to start the
oven immediatel) and cook tood without
preheating. The convection lira will tt/rll
on. Th( cook time will start immediatel}.
The ov(n will start and continue to cook fin-
the programmed amount of time, then shut
off automatically, unless the Cook and Itold
teature was s(t. See the Cooh aim Hold ()/Jtion
section.
On double oven models only.
I-qlq-II IIoII, I
Fqr=-Ii ii9iioI
1-711-711II°II I
r-qF-II II IIoI
For double oven models onl); to s(t the s(cond
oven, sele_ t PRESS TO MAKE LOWER OVEN
SELECTIONS or PRESS TO MAKE UPPER
OVEN SELECTIONS as needed and lbllow
the above steps.
The set t(nll_ raltn'e lIl_]y/)( ,.:l'lang((I by
touching CHANGE TIME-TEMP fi'n-the
al_l_ropriat( ox(n.
The s(llings nlay be canc¢ ll( d by touching
CANCEL for the appropriate ov(n.
"l'h( timer can /)( s_t /)y touching SET
KITCHEN TIMER. Se( the Kilch_l 77tmr
S( (TtiOll.
Mter cooking is c,.m_plete, th_ oven will signal
and "MORE TIME" will displa} for five minutes.
Che(k tbod fin- doneness. If" more (ooking time
is needed, touch MORE TIME _uld enter
additional cooking time. If not selected, the
screen will automatically dear in five lninut(s.
12
Timed Cooking
Wall ()ve*_
77reed
cooking
(delayed
start and
automatic
tol,)
}_lucalt sg'tthe (_'t rl t:otzDolto (h k(]>slaH lhg_ove_z,
auiomaiica[(t. ,%<aZw Uw l)da 3 5;1a/70/dios_ s_cU0lt.
Mak( Sill'{} the clock shows the corlec[ time of day.
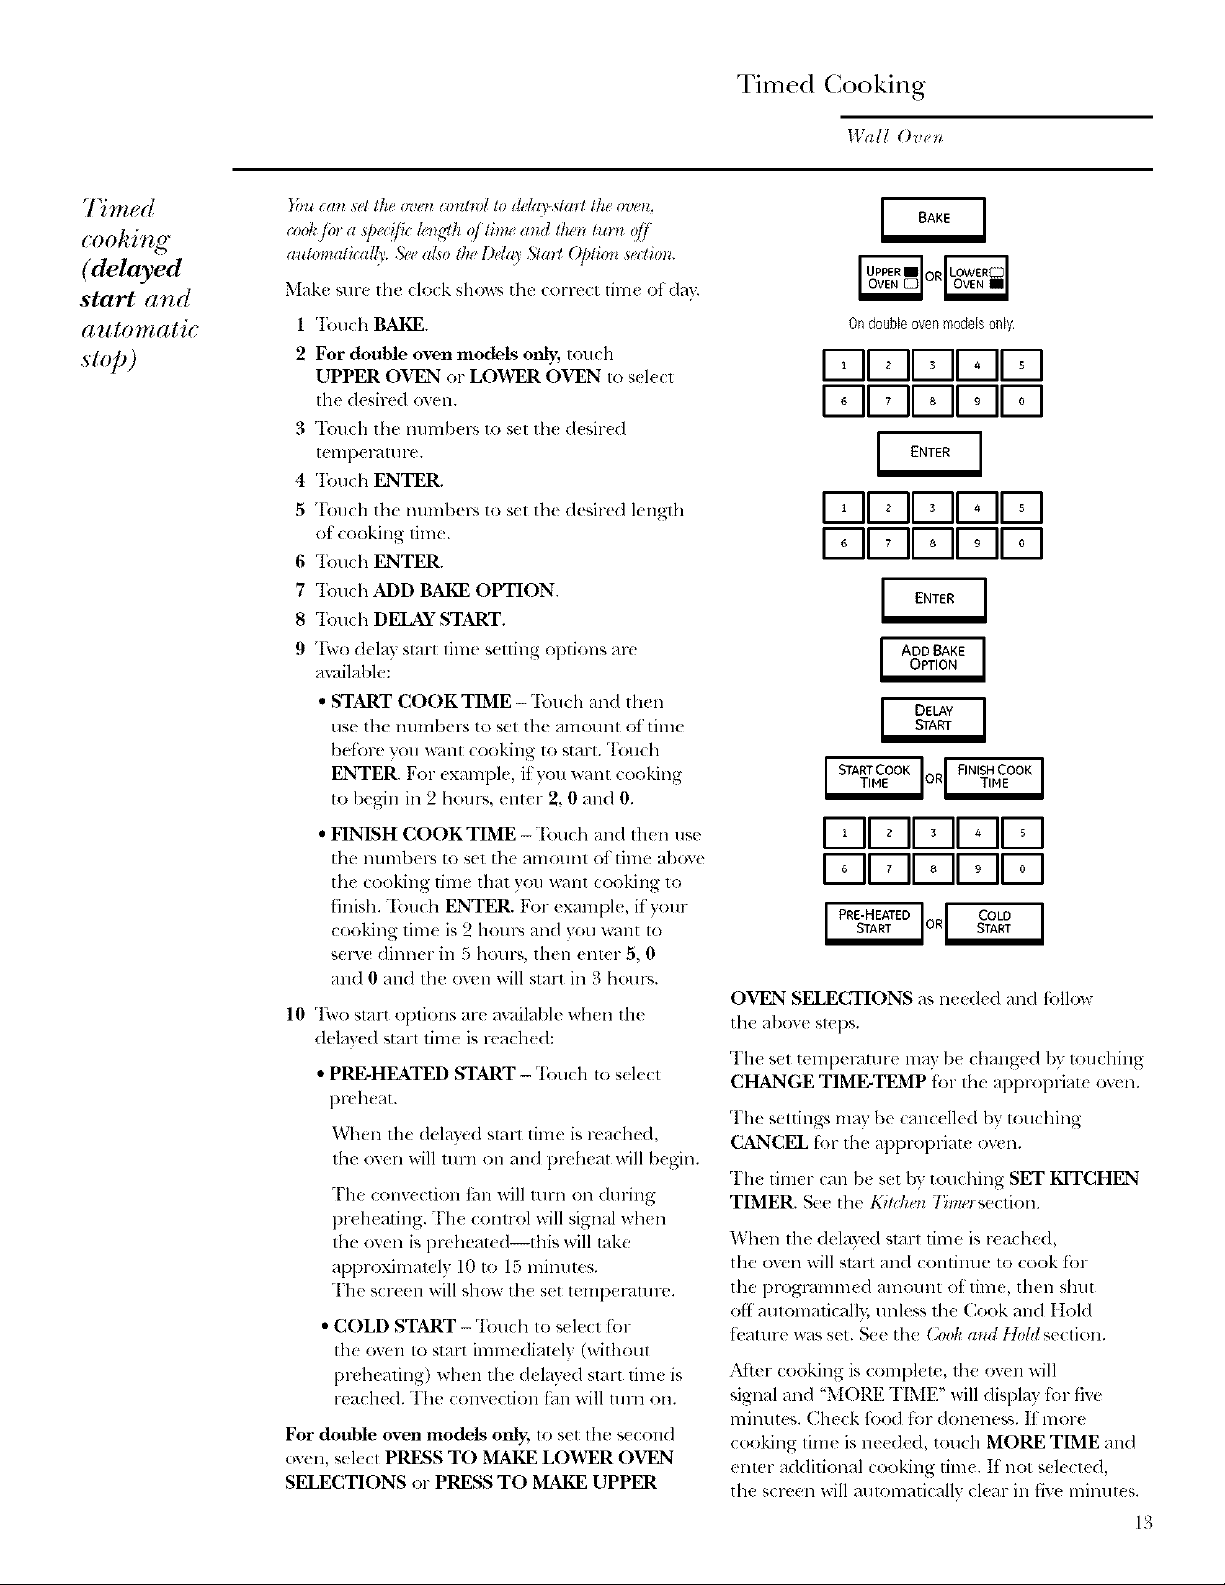
1 'Ibuch BAKE.
9 For double oven models only., touch
UPPER OVF2_ or LOANER OVEN to sd(ct
tile desired oven.
3 'Ikmch the num/x ps to set th( d(sir(d
[ellllJel_l[/i l-e.
4 'Ibuch ENTER.
5 Touch tb{ numbei-s to set the desired kngth
ot cooking time.
6 Touch ENTER.
7 Touch ADD BAKE OPTION.
8 Touch DELAY START.
9 "I\vo delay start lime seuing options are
available:
• START COOK T1ME -Touch and then
use tile lllllnbelS to set tile alllOl/llt ot time
befLre you _:lnt cooking to _tart. "Ibuch
ENTER. For example, ityou want cooking
tO [)eR-iIl ill 9 hollr%, ellter 2, 0 and 0.
• FINISH COOK TIME -Touch and then ll_,e
the llllmbers to set tile alllO!/llt of tiille above
the cooking time that you want cooking to
finish. Touch ENTER. For example, it your
cooking time is 2 houps and you want to
seswe dinner in 5 hour_, then enter 5, 0
and 0 and the oven will start in 3 houra.
10 Two start options are availabl( wh(n the
delav{d starl lim( is rea(h( d:
• PRE-HEATED START - Touch to s(lecl
pr(heat.
When the (lelayed st:-Ill tim( is reach((I,
th{ oxen x_ill ltlYll Oll ;inl:l l}l'C h(at will b(gin.
The conv(ction thn x_ill turn on dining
preheating. The (ontrol will signal wh(n
the o',c'n is preheat_ (I--this will take
approximately 10 to 15 lllilllltCS.
The screen will show the set lt:llll)el'dlll 1>.
• COLD START - Touch to select {hi-
the oven to start immediatel} (without
pivheating) wh(n the delav(d start time is
reached. The convection thn will turn on.
For double oven models only, to set the s(cond
oVeil, sele( I PRESS TO MAKE LOWER OVEN
SELECTIONS or PRESS TO MAKE UPPER
Ondoubleovenmodelsonly.
I-ql-711-711oII I
I-ql-711-mlloIIoI
FII-qFII oII I
I-q -11-711oIIoI
I-qF-IFII oII I
F-]F-]FTIIoIIoI
OVEN SELECTIONS as n{ ed(d and tollow
tile above Slel)s.
The sel temp(mture may b{ changed by louching
CHANGE TIME-TEMP l'Ol ill{: apl)ropriate ov{n.
The _,etting:, may b( canc(lled/)y touching
CANCEL i))r th_ al)l)rOl)l-iate ovell.
"I'h( timer can b( set by tou(hing SET KITCHEN
TIMER. See th( Ki durl 77reel se(llOn
When the delayed start time is reached,
the oven will start and contimle to cook lot
the programmed amount of time, then shut
off' aulomaticall); unless the Cook and IIold
tk_ature was set. See the (k)oh and [Iold section.
:M'ter cooking is complete, the oven will
signal and "MOI_.E TIME" will displa? for five
minutes. Check ti')(xl f_w doneness. 1t more
cooking time is needed, touch MORE TIME and
enter additional cooking time. If not selected,
tile screen will automati(allv clear in five minutes.
13
groilin g
Wall Ove_
_()7lJ {o se[
the oven
,/br broiling
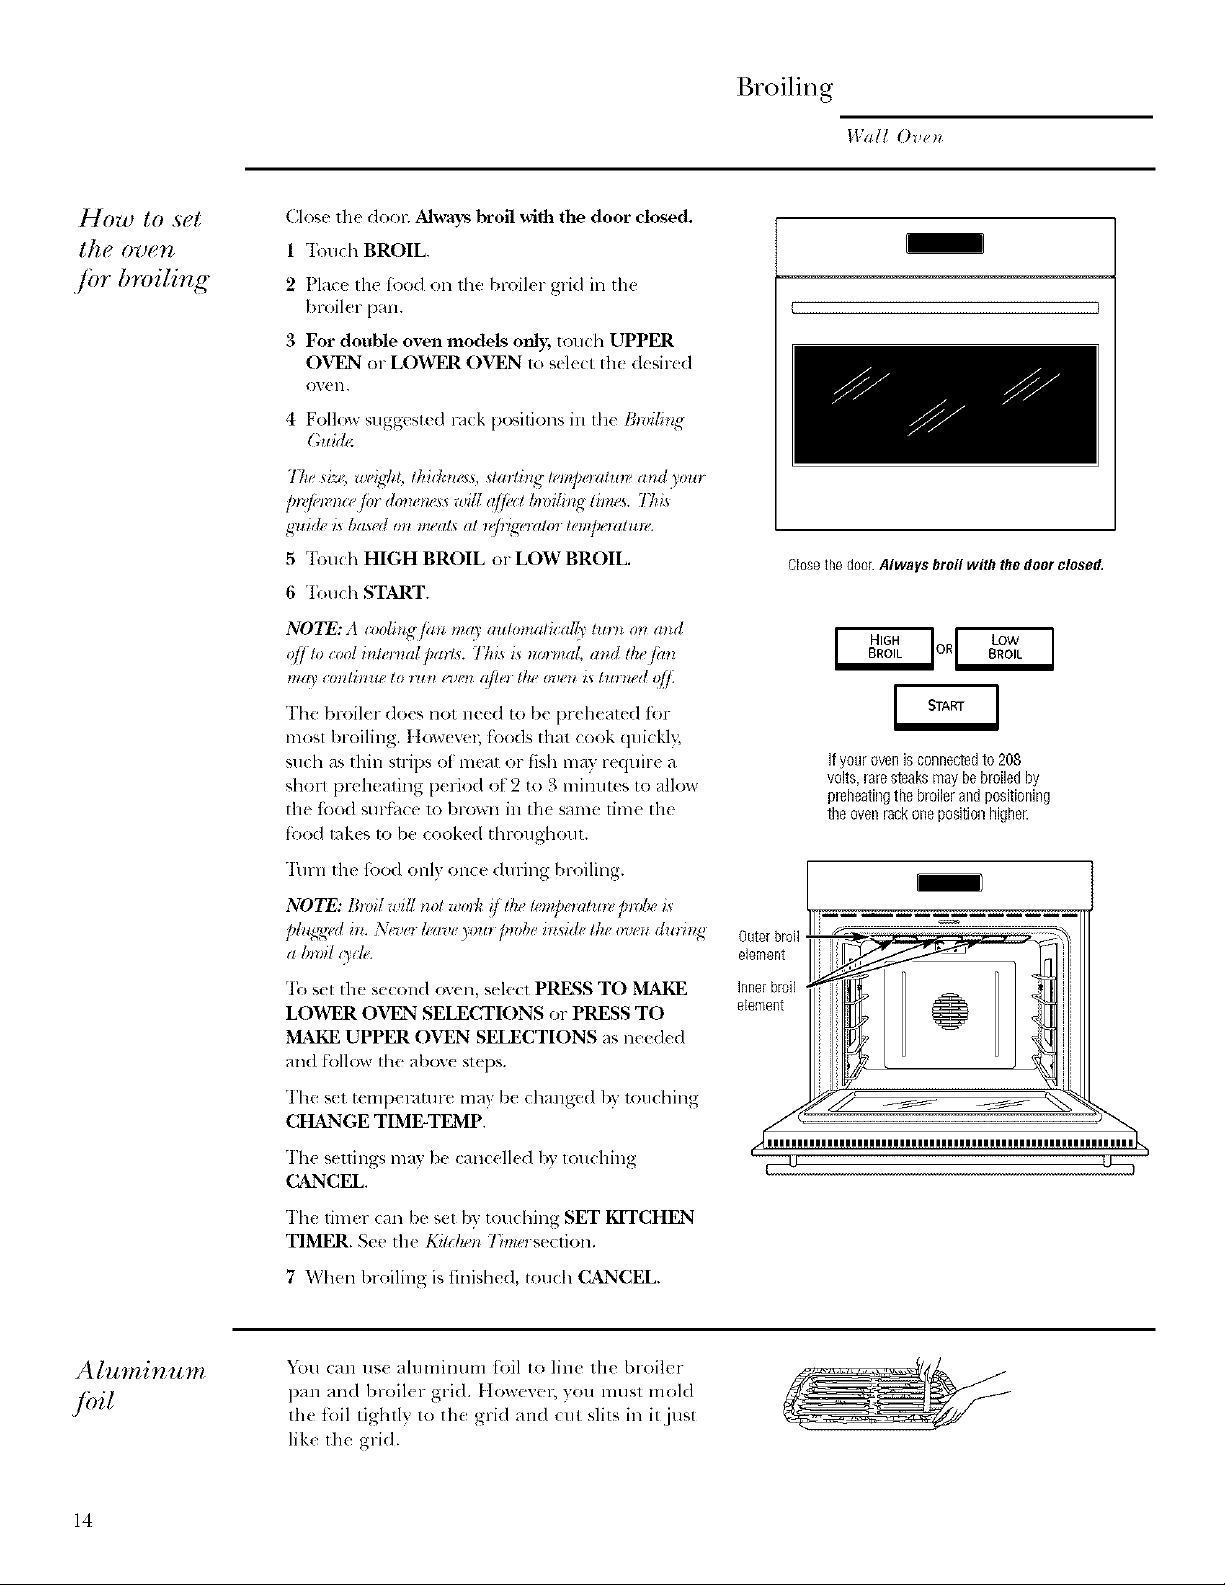
Close lhe d()(n_ Always broil with tbe door closed.
1 Touch BROIL.
2 Pla(c the lood on tile broiler grid ill the
broiler pan.
3 For double oven models only, touch UPPER
OVEN or LOWER OVEN it) select th( desirt d
ovell.
4 Follow suggested rock p(_ifions in th( lhvil;_lg
(htid_
The si_,. web,hi, lhidmess, startling h, npoz_lmv and yom
guide i_ ba_ed on tneaL_at _@4g_,lzilmte,@nzilu_e.
5 Touch HIGH BROIL or LOW BROIL.
6 "I'r_uch START.
NOTE: A ioolh_g Jan ma'; aulomalicalll' Inrn on and
o/] lo cool inlernal parl._. This is normal, and lhe finl
mat' cmlli_lue lo run _o_ afl_'_l/ : oven is [m'_wd qff.
The broiler does not need to be preheated ti:w
most broiling. Itow(wq; leeds that (ook quickl};
such as thin snips of meat or fish may require a
short prtqmating p(riod of 2 to 3 minutes to allow
the fbo(I surlhce 1o brown in th( same time the
ti-_odlakes lo be cooked throughout.
[ }
Closethe door Always broil with the door closed,
Ifyourovenisconnectedto208
volts,raresteaksmaybebroiledby
p_eheatingthebroilerandpositioning
theovenrackonepositionhighe[.
"Ihrn tile fbo(l only once du ring broiling.
NOTE: Broil wd/ nol w.lh _/thelemp¢,l,illm,pmbe is
pl,g_*,d h_.Never/,,ave3ompwbe h_@h,lheoven durh/g
a broil uih.
'Ih set tile second oven, select PRESS TO MAKE
LOWER OVEN SELECTIONS or PRESS TO
MAKE UPPER OVEN SELECTIONS as need(d
an(I tbllow file above steps.
The s(t tempm'4mre ma} b( changed by touching
CHANGE TIME-TEMP.
The seuings may be cancelled by touching
CANCEL.
The timer can be set by touching SET KITCHEN
TIMER. See tile K#lken Tbm,Ise(tion.
7 When Ixoiling is finished, touch CANCEL.
'_i)u can us( ahnninum foil to line the broiler
pan and broiler grid. ttowevel; you must mold
the foil tightly to the grid and cut slits in it just
like the grid.
14
Broiling
IVaI/ O/,_ t/
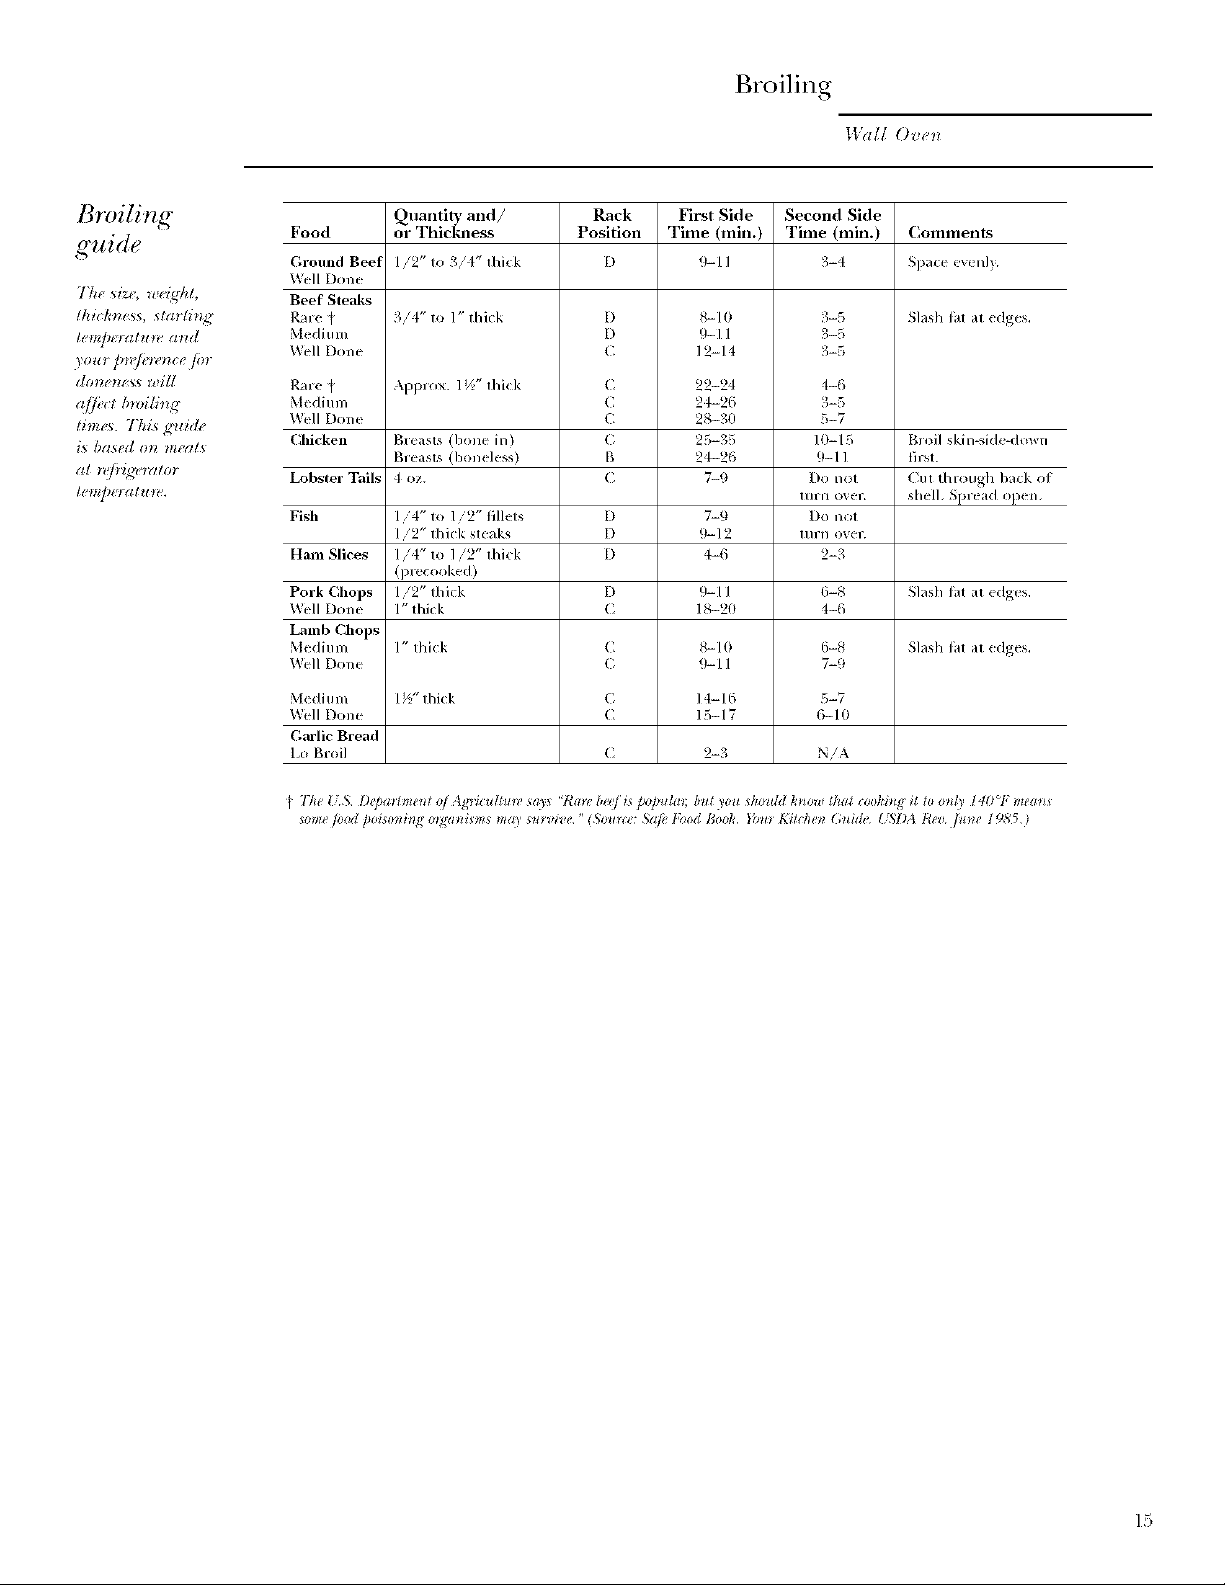
Broilinff
g'uide
tim_x. This ,_ti(h"
£s based o_l mral_
lt!??l/)Pl(_llY_%
Food or ThicMaess Position Time (min.) Time (nfin.) Comments
Groimd Beet //2" to 3/4"thick D 9-11 3-4 Si)ace<v_nl ).
Wall I)on_
Beef Steaks
Rare _ 3/4" to 1" thick D 8-/0 :;-5 Slash lat at edges,
M< dimn D 9-1 I 3-5
Well l)one ( 12-14 3-5
Rare _ Applox. 1 ½" )hk;k C 22-24 4-6
Medium ( 2t-26 3-5
Well I)one f 28-30 5-7
Chicken B/easts (hone in ) C 25-35 ] 0-/5 BIoil skin-side down
Lobster Tails 4 oz, ( 7-9 Do not fill through hack ot
Fish //4" to 1/2" filkts D 7-9 Do I/<)t
Ham Slices //4" to ]/2" thick D 4-6 2-3
Pork Chops //2" thick D 9-11 6-S Slash lat at edges,
Well I)one /" thick ( 18-20 4-6
Lamb Chops
Medium /" thick C _-/(} 6-8 Slash lat at edges,
Well Done ( 9-11 7-9
M<dil_ m 1½" thick C lt-16 5-7
Well Done C 15-/7 6-10
Garlic Bread
1,o gloil C 2-3 N/A
Quantiiy and/ Rack First Side Second Side
gl easts (honeless) B 24-26 9-11 th'st.
tnr,/ (>_el", she/h Splead op<n+
/ /2" thick steaks D 9-12 ltn'l/ OVel
(plecooked)
771eU,S D@allmeld of....A_7_zultu_e ¢ars 'Ral_ ber[i¢ flJo_ulal but ?ou sho_dd hno_t thai toohb_, it to onll, 14 )°F mea*l_
_ome/ood poisoni_g o_ani_ms m_, s_l_,_,_ "(S<mroe:Sqfi_I;bod Bool_, }_1o¸Ki_(hen (;_ide _!_DA Rev _une 1985 i
15
Using tile Probe tot Roasting
Walt Oven
7 mqmrature
probe
For man) toods, (Sl)(ciall) roasts and poultry,
interned food temper_mne is tile best test fin_
don( lleSS. The temperature Drobe takes the
guesswork out of roasting by cooking toods to
the exacl aloneness you want.
Lse ot prob(s other than tile one provided
with this l)rodu¢l lll_l}' r(suh in danmge to th(
probe.
1 se the bandies ot the probe and 1)lug when
ins( rting and l-emoving them [l-Ore Ihe nleat
alld o_,ell Olltl(l.
• To avoid danmging 1be probe, do not use
tongs Io pull on the cable when relnoving it.
• To avoid breaking the l)robe, make sure f'ood
is (omph'tely defrosled b(fore inserling.
• "1"0 prevent possible burns, do not unphlg
the l)rob( fiom th( outlet untillh( oven
has cooled.
• Nev(r leave the probe inside the oven
during a broil .r self-rleaning (y(le.
• [)(7) Hot store Ill( [)ro/)e ix] Ill( ()',ell.
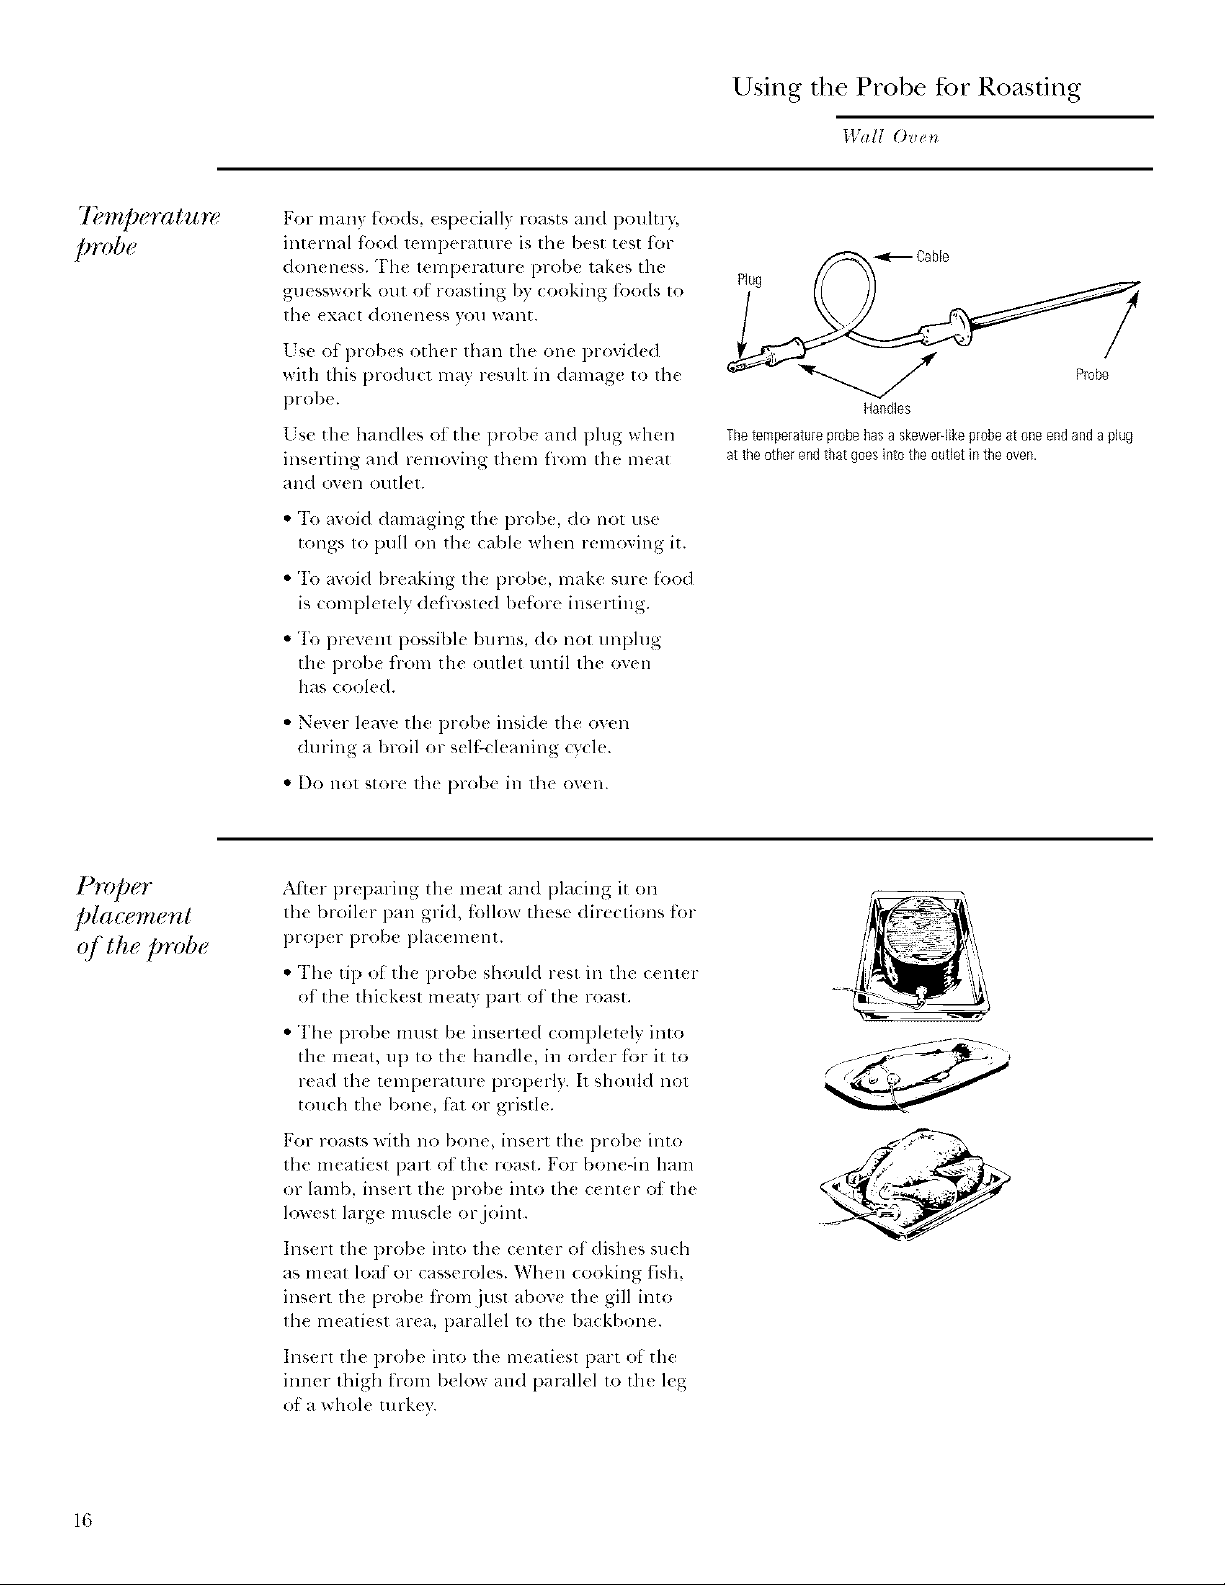
Cable
Plug
Handles
Thetemperatureprobehasa skewergikeprobeat oneendanda plug
at the otherend that goesintothe outlet in the oven.
placement
q/ the p vbe
Af'ter pr( paring the llle_ll and placing it on
th( broiler pan grid, _blkm th(s( dire(lions for
proper l)rob( l)l_lc(lllellt.
•Th¢ tip oYth( prob( should r¢st in tile c(nt(r
of tll( thkkest meaty part of tll_ roast.
• The probe must be inserted completel) into
the meat, u l) to tile handle, in order for it to
read th( tenlperature properl). It should not
touch tile bone, fat or gristle.
For roasts with no bone, insert tile probe into
the meatiest part ot tile roast. For bon(-in llam
or lamb, insert the probe into th( center ot the
lowest large muscle or joint.
Insert tile probe into tile center of dishes such
as meat loaf or casseroles. Wh(n (ooking fish,
insert the probe from just abov( the gill into
lbe meatiest area, parallel to the backbone.
Insert the probe into lb( meatiest part o[ tile
inner thigh Irolll b(low and parall(1 to the l{g
of a whol¢ turko,'.
16
Using the Probe %r Roasting
Wail Ovet_
HOW to set
theovenbr
roasting"
when using"
the probe
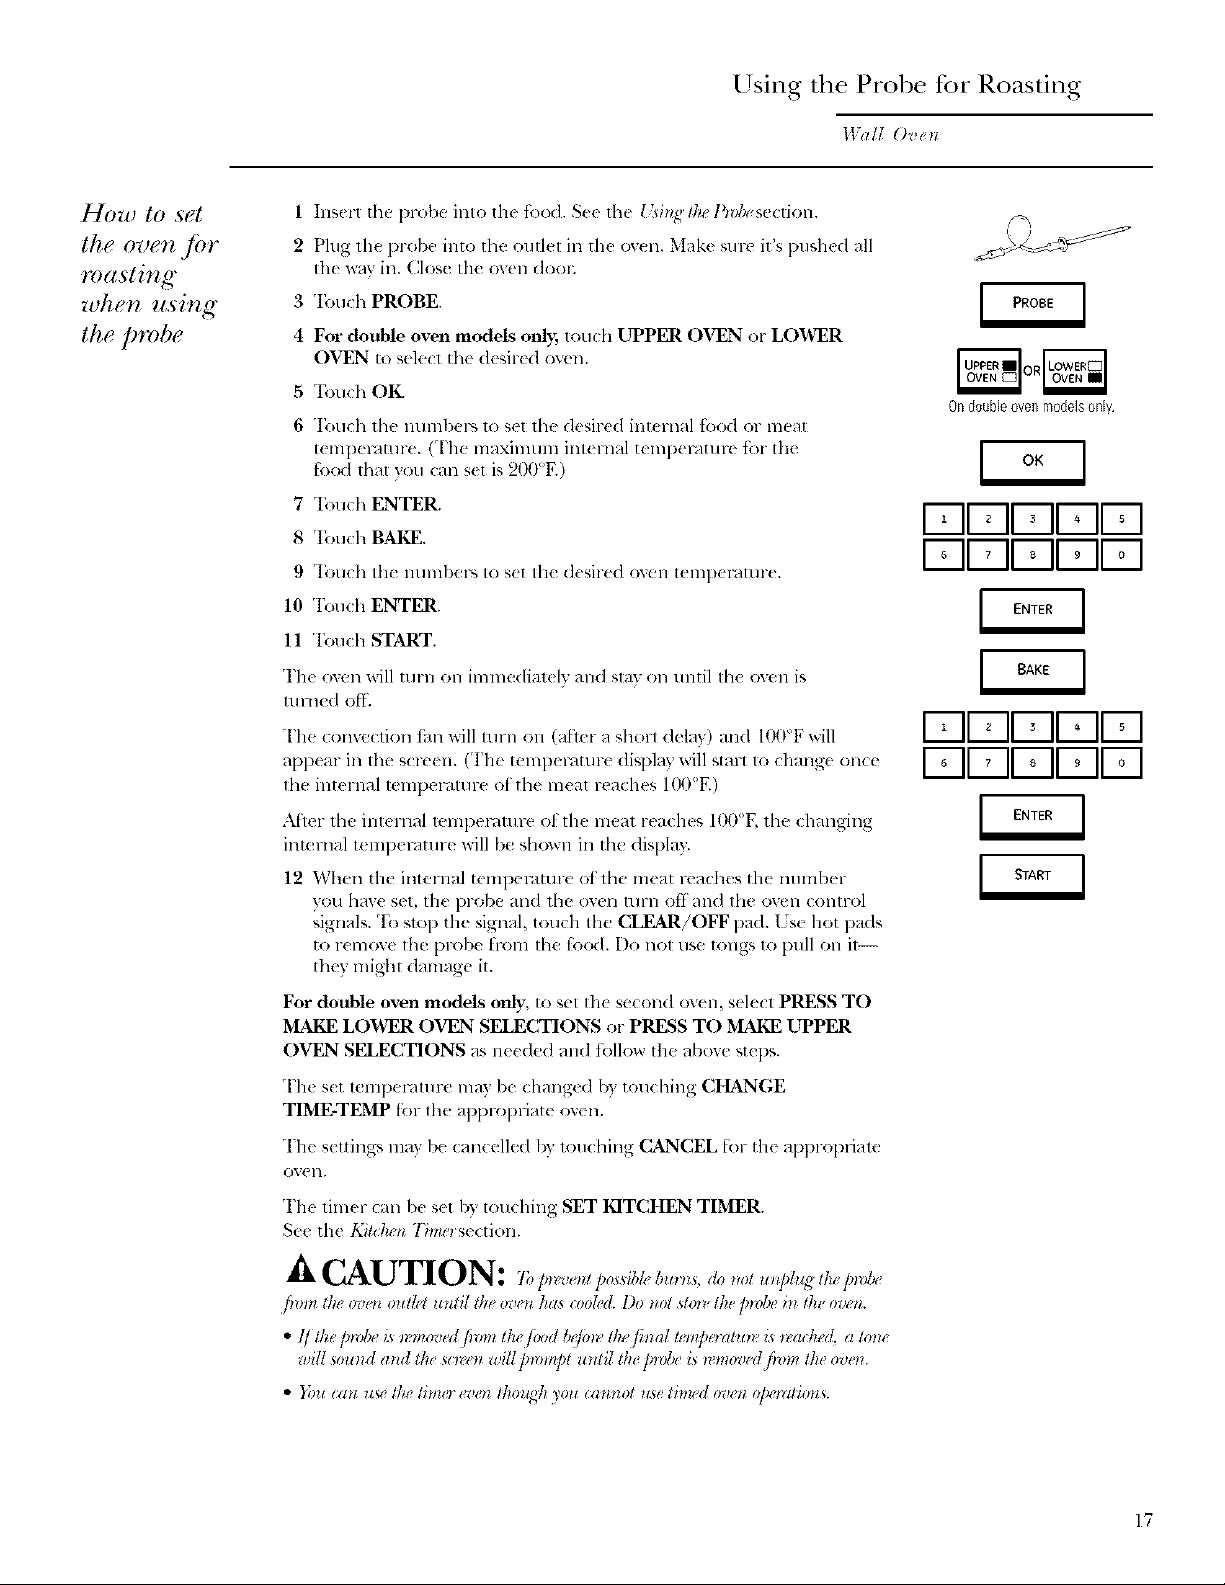
1 Insert the probe into tile tb_xl. See the Usi//g tk.,_/'w/wsecfion.
2 Plug tlle probe into tile omlet in the oven. Make sin> it's pushed all
the way in. Close tile oxen dooL
3 'Ibuch PROBE.
4 For double oven models only; touda UPPER OVEN or LOCATER
OVEN to select the desired oven.
5 "E:mch OK.
6 Touch the nundyers 1o set the desired intenml ti_(M or meat
temperature. (The maximum internal temperature tot the
food that you (:all set is 200°E)
7 Touch ENTER.
8 'Ibuch BAKE.
9 Touch tile numbers to s(t the (k sired oven tenlp(F, itln-e.
10 Tolleh ENTER.
11 rlbUdl START.
The o_en will turn on immediat(ly and slay on until tile oven is
mln{d off.
The convection tbn will turn Oll (aher a short delay) and 100"F will
appeal- ill the screen. (I'he temperature display will start to chang( once
file internal temperature ofthe meal reaches I(_FE)
Ondoubleovenmodelsonly
I' II_II_1[-71[-77
I _I1' II_1[-71[-77
I _II_II_1[-71[-77
I _I1' II_II-qlZ_
Aller tile internal mnlpel'alllre ot tile nleat reaches IO0°F, tile changing
intcnml t_ rap( l-,_mre will be shown ill the display.
12 When the internal tempec, lture otthe meat reaches th( number
you have set, the probe and the oven turn off and the ow'n control
signals. To su)p tile signal, touch the CLEAR/OFF pad. l Js_ hot pads
to r( move tim probe hom file fbod. Do 11ol use tongs to pull Oll it--
they might damage it.
For double oven models only, to set th( second oven, select PRESS TO
MAKE LOWER OVEN SELECTIONS or PRESS TO MAKE UPPER
OVEN SELECTIONS as ne(ded and tollow the above steps.
Th_ s(t temper, lture may be changed b) touching CHANGE
TIME-TEMP fbr file appropriate oven.
The settings Ilia} b( cancelled by louching CANCEL ti)r tile appropriam
ovell,
The timer call lye set b) touching SET KITCHEN TIMER.
See tile Kitchen "/_melsection.
A CAUTION: ",',,/.,_,,,,.,o,,_h_,.,,,,,,,._o,,,,,,.,/._,,_.,,/.,_,_,,
firm tlw ova,* outk, t until tke ov_,nhas _>oled. Do not sh,_ the pwbe i_l lke oven.
wilt souml aim tk_ s_m_n wilf ]m,mpt until tl : ]rod,, A _,mov_.d/wm ff,e ow.t_.
• }ira lan uv' lk._'litm'r ev('n l/ioug]l you (annol u.v, timed oven o]u'mlions.
17

Using tile Convection Oven
Wall Ovell
Convection
Co&ware./or
convection
coohinff
hi a (OlW((liOll ovell, a liMl circlllates hot air
over, llllder alld al-Olll]d the _(_o(1.
Tiffs circulating hot air is evenly distributed
throughout tile oven cavity. As a result, toods
are inertly cooked and browned---often ill less
time witll COlWection heat.
NOTE: Tke convection/an will i)'l:/_,on and off
wkik, coot:big to besl distribute hol air in lhe ov_,n.
The conve_¢io_* /m_ shut_ off when the ore, doo_ is
@ened. 1)0 NOT k,ave the doo_ @en fi)_ Io_g p_,riod_
q/time whik, usi_lg i:onve!rlion coohhtg or you may
shorte_* the lift" o/the co_*vectio, heating deme_*t.
B(f'ore using your convection or( 11, check
to see if your eookware lemes room for air
circulation ill tile oven. Itvou are baking with
sew ral pans, leave space b;.,tween tllem. Also,
be sure tile pans do not touch each other or
the walls ot tile ox(n.
Paper and Plastic
Heat-resistant paper and plastic (ontainers that
are l(:colnill( llded f'oF /ISe ill reglllar oVellS Call
b( used ill convection ovens. Plastic cookwar(
that is heat-resistant 1o telnperatnres of 400°F
call also be used.
NOTE: Do no1 allo,a any paper or plastic Io COlll(
into c,nlla(t with the upper broil element.
Metal mad Gla_ss
Any Wl)( of cookware will work in your
COllVeCtion ovell. Howevel; metal palls heat th(
thstest and are r(comnlended for convection
baking.
Darkened or matt(-t'mished pans will bake
thst(r than shiny pans.
Glass or ceramic pails (ook more slowl};
Wh{n baking cookies, you will get the best
results if xou use a flat cookie slleel instead
of a pall with low sides.
For r(cip(s like oven-baked chicken, us_ a pan
with low sides, tIot air cannot circulate well
around fbod ill a pan with high sides.
Adapting"
rgci/)/<_;
]Uulti-rach
convection
bahing
18
Xi'OII (all llSe }'(Jill" [axolit( re(il)es ill Ill(:
COllVeclioll ove 11.
When comection baking, reduce baking
temperature liv 25°F or activate th( Auto
Recipe'" Conversion f(atule. See Auh)Rec@d'
Conv_,rffon in the .S/)eciaI Fealmz<_ o/}Sin" Oven
Conh_d s( ction.
XT¢eni:onvecliotl bakillg with otd} 1 Ixtch,fidI,Iw lke
ra(:k]?¢)sititlt_srelomme*lded in the { iillg ltu oven
_#([iot?.
Because heated air is circulated throughout
tile oven, foods call lie successfully baked usnlg
multiple racks.
Multi-rack 1)aking mav increase (:()ok times
slightly for some foods but tile overall resuh is
time sme(I. Cookies, muffins, 1)iscuits and other
quickbreads give ve W good results with muhi-
rack baking.
XVllen 1)aking, on ,3 ra('ks, plac( one rack in
tile thst (A) l)Osilion, Olle ill [h( tllird (C)
posilion alld Olle ill the fifth (E) position.
For two-rack baking, plat( one rack ill tlle
s((ond (B) ratk position. Pla(( th( olh(r ra(k
ill th( fi.)urtll (D) ra(k position.
Multbrack position

( omection Baking or Roasting
IVallOvet/
HOW to set
the oven ,/br
conveclion
bahinff or
ma,stirzg
1 Touch CONVECTION BAKE or
CONVECTION ROAST.
2 For double oven models only, touch
UPPER OX_N or LOUVER OVEN to selecl
the desired ov(n.
3 Two rock options are available:
• SINGLE RACK- "I'oud_ tbr cooking tood
it(Ins on onl) one rack in convection bake.
• MULTI-RACK- _Ibuch lbr cooking tb_xl items
on more than one l-dck (i.e. 2 or 3 racks) at
the same time in Conw'ction Bake. See the
Mulli-l_ad_ (.m_vedio_z Baki_N se( tion tbr nlorc
intormation.
4 Toudl the mlmbers to set the desired
tempemmre.
fi; "l):mch ENTER.
6 "l):mch START.
The convection fhn will turn on during
preheating. The contr_)l will signal when the
oven is preheated--this will take approximately 10
nlinutes. Th( scr(en will show th_ set temperature.
When the conlrol signals, fbods should I)e placed
in tile oven.
For double oven models only, to set file second
oven, select PRESS TO MAKE LOWER OVEN
SELECTIONS or PRESS TO MAKE UPPER
OVEN SELECTIONS as needed and tbllow tile
above smi_.
The set mmperamre lnay be chmlged by touching
CHANGE TIME-TEMP fbr the appr_pliate ow, n.
The settings may be cancelled by touching
cD2qCEL for the appropfiam oven.
The timer eml be set tV touching SET KITCHEN
TIMER. See file Kii_ke_z 7_mosection.
Alier (ooking is complete, the oven will signal
and "MORE TIME" will display tot five nlinutes.
Check fbod tim-doneness. It more cooking time is
needed, touch MORE TIME and enmr additional
(ooking time. It nol selected, the screen will
am om;,tie_dly (lean
Ondoubleovenmodelsonly.
F-IFII +IIo11-71
I-qFII +II 1[-71
il
Theovenhas5 rackpositions Seethe Fullextensionovenracks
sectionfor how to use,removeand replacetheracks.
Convection
?O(l _[.it_{r
ti[),s
Lsing the broil( r pan and grid provided, heated
air will be circulated ovcl; under and around file
ti_od being roasted. The heated nit- heals in juices
quickl) tor a moist and tender interior while, at the
same time, creating a rich golden brown exterion
When you are convection roasting, it is impoltant
that vou use tile broiler pan and grid. "File pan is
us(d to catch grease spills and tile grid is used to
prevent grt, ase spallers and allow healed air 1o
circulate under tile lneal and increase browning
Oll tile llndel-side ot tile illeal OF pollltl}.
• Place tile grid on tile broiler pall.
Grid
[f /IIlll"lI¢l_lili_l'EIVi\"_\\_
Broilerpan
19
Comection Roasting with the Probe
Wall O_,_,n
HOW to set
the oven.fi)r
convection
masting"
with the
probe
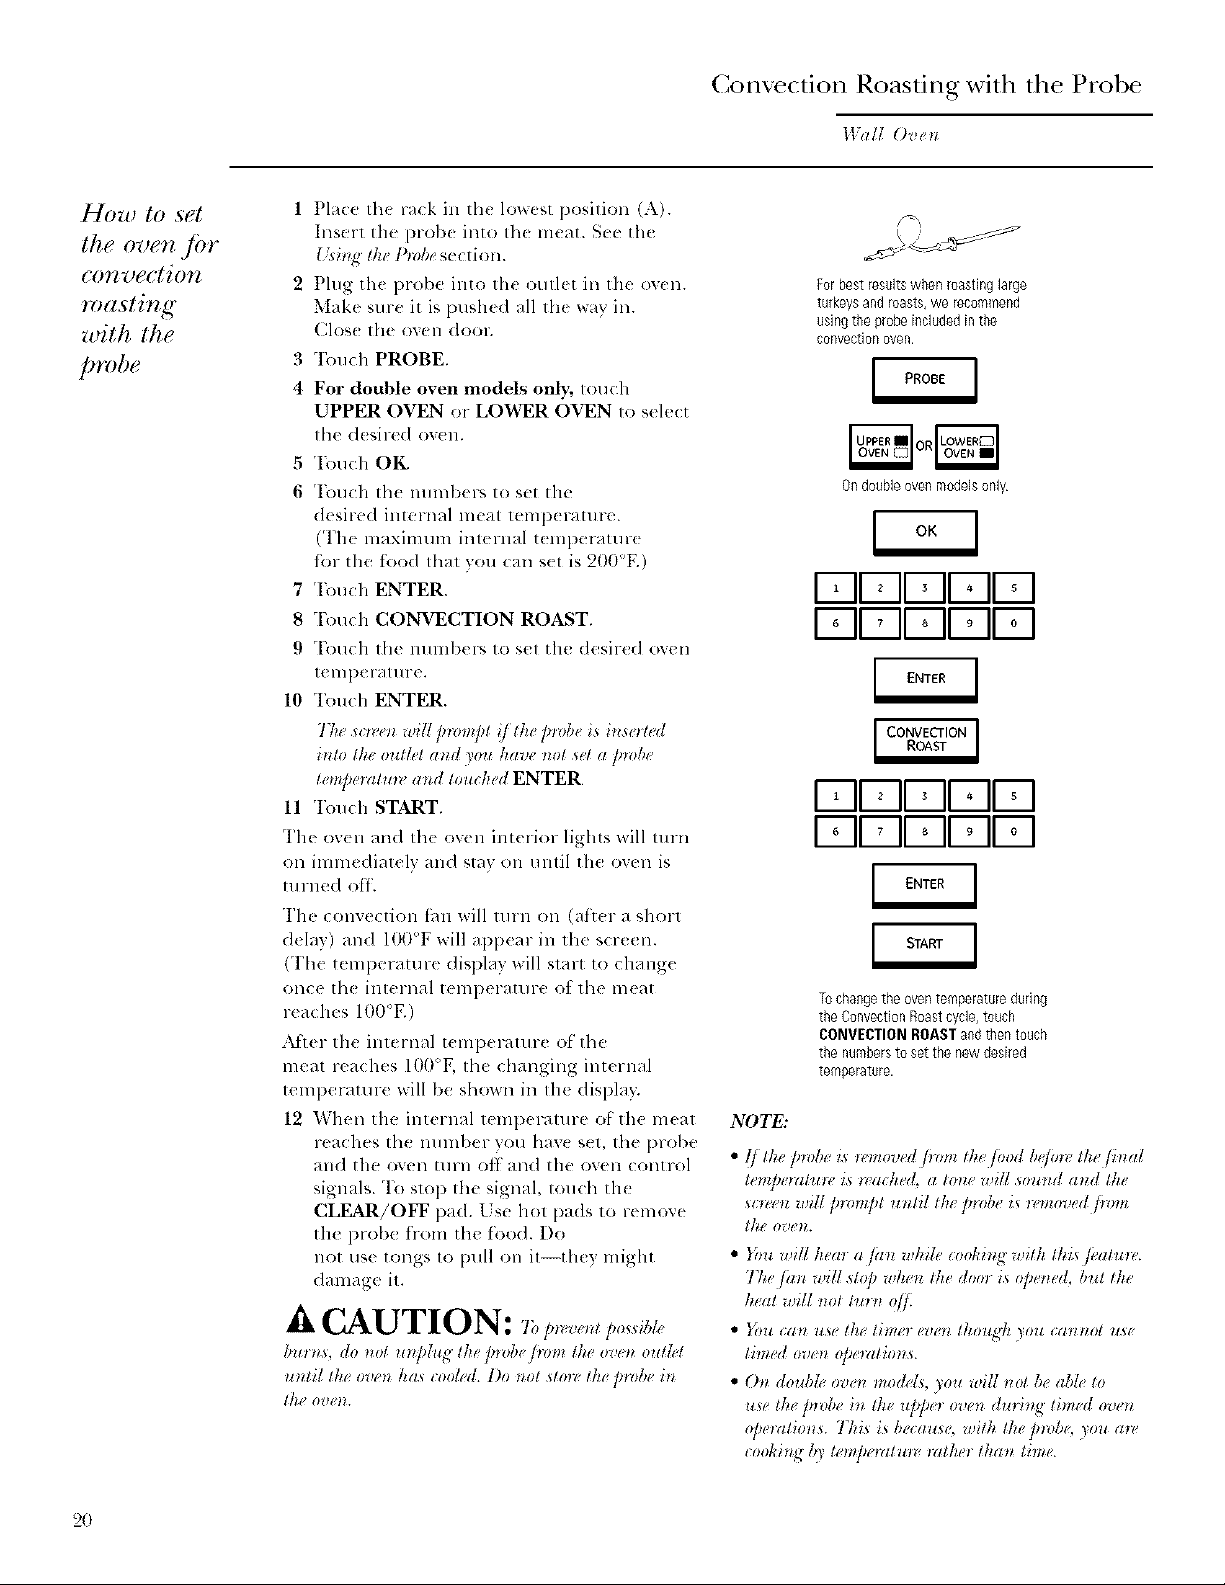
1 Place th( rack in the lowest position (A).
Insert tile pro[)( into th( meat. See the
t-gi_,gtke Probesection.
2 Plug the I)robe into the outlet ill tile oven.
Make sure it is pushed all the wav in.
Clos( the oven dool;
3 'Ibuch PROBE.
4 For double oven medals only, touch
UPPER OVEN or LOWER OVEN to select
the d(sired ov(n.
5 'I;_)uch OK
6 'I;:)uch Ill( numl)ers to set tile
desired internal meat teml)(ramre.
(Th( nmxinmm imernal t(mperatur(
fbr the food that you can s(t is 900°E)
7 q;_)u(:h ENTER.
8 "['ouch CONVECTION ROAST.
9 Touch tile nunll)el _, to set the desired oven
temperature.
10 Touch ENTER.
7tie so_,el_ will prompt i/the p_,be is inse_ted
_nlo lhe out/tt atzd you kav_, _zl)t w'la ])_zlb_"
te!n/_e_atu_v and toucked ENTER
11 Tou(h START.
Tim ov(n and th( ow'n interior lights will turn
on immc(liatclv and stay on until the o',un is
tu riled of[.
The convection fhn will tul'n Oil (att(r a short
d_lay) allt] 100°F will appear in the screen.
(The temperature displa 3 will start to change
once lh( inlernal temperature ot tile meat
reaches 100°E)
:M'ter the internal t(mperature ot the
meat reaches 100°K the changing internal
temperature will be shown in th( displa};
12 When the internal temperature of the meat
reaches lhe numl)er',ou hax( set, tile [)robe
and tile oven ulrn off and tile oven control
signals. To stop the signal, touch the
CLEAR/OFF pad. Lse hot pads to remo_e
the probe fiom the food. Do
llOt use tongs to pull on it--the? might
damage it.
_, CAUTION: 7_,!,,,.,,,.,,t/,,,_,_,z,
b.r>s, do not mtphg the pnlbe fiom the oven outM
until th* oven has cooled. 1)o not sto_, the probe in
thg OVe_h
NOTE:
temperatu_z, is _,ached. a lone wifi sound and Ike
*c_*'_,nwill prompt u*zliI lhg prd, e is _z,tnoved fi,,m
dig OgtglL
• }bu will hem a jan while, I:oohh_,_with lhisfl'atu_*,.
Tke /an will st@ when lhe door is @e_ed, but lhe
h('at will _zoltlnn @
• }}m can use the tim_ even thozg5 )ou cannot zt_e
timed ov_n op_ratim* s.
• On doubh" oven mo&_gs,)ou will not be abh to
use the p_ob_ in the z@_r oven dur'i_g timed oven
@eratio_s. This is because, with the pmb< )ou a*_'
I:oohi_g lO' te_@emtm_, rather than time.
Forbestresultswhen roastinglarge
turkeysandroasts,we recommend
usingthe probeincludedinthe
convectionoven.
Ondoubleovenmodelsonly
V-II _II_IIo1171
Ell' II°II9IV-I
I7-11_II_II° II-q
[7-11_II_II° II-q
Tochangetheoventemperatureduring
the ConvectionRoastcycle,touch
CONVECTIONROASTandthentouch
the numbersto setthe new desired
tempelature.
2O
( omection Roasting
Walt Ove*_
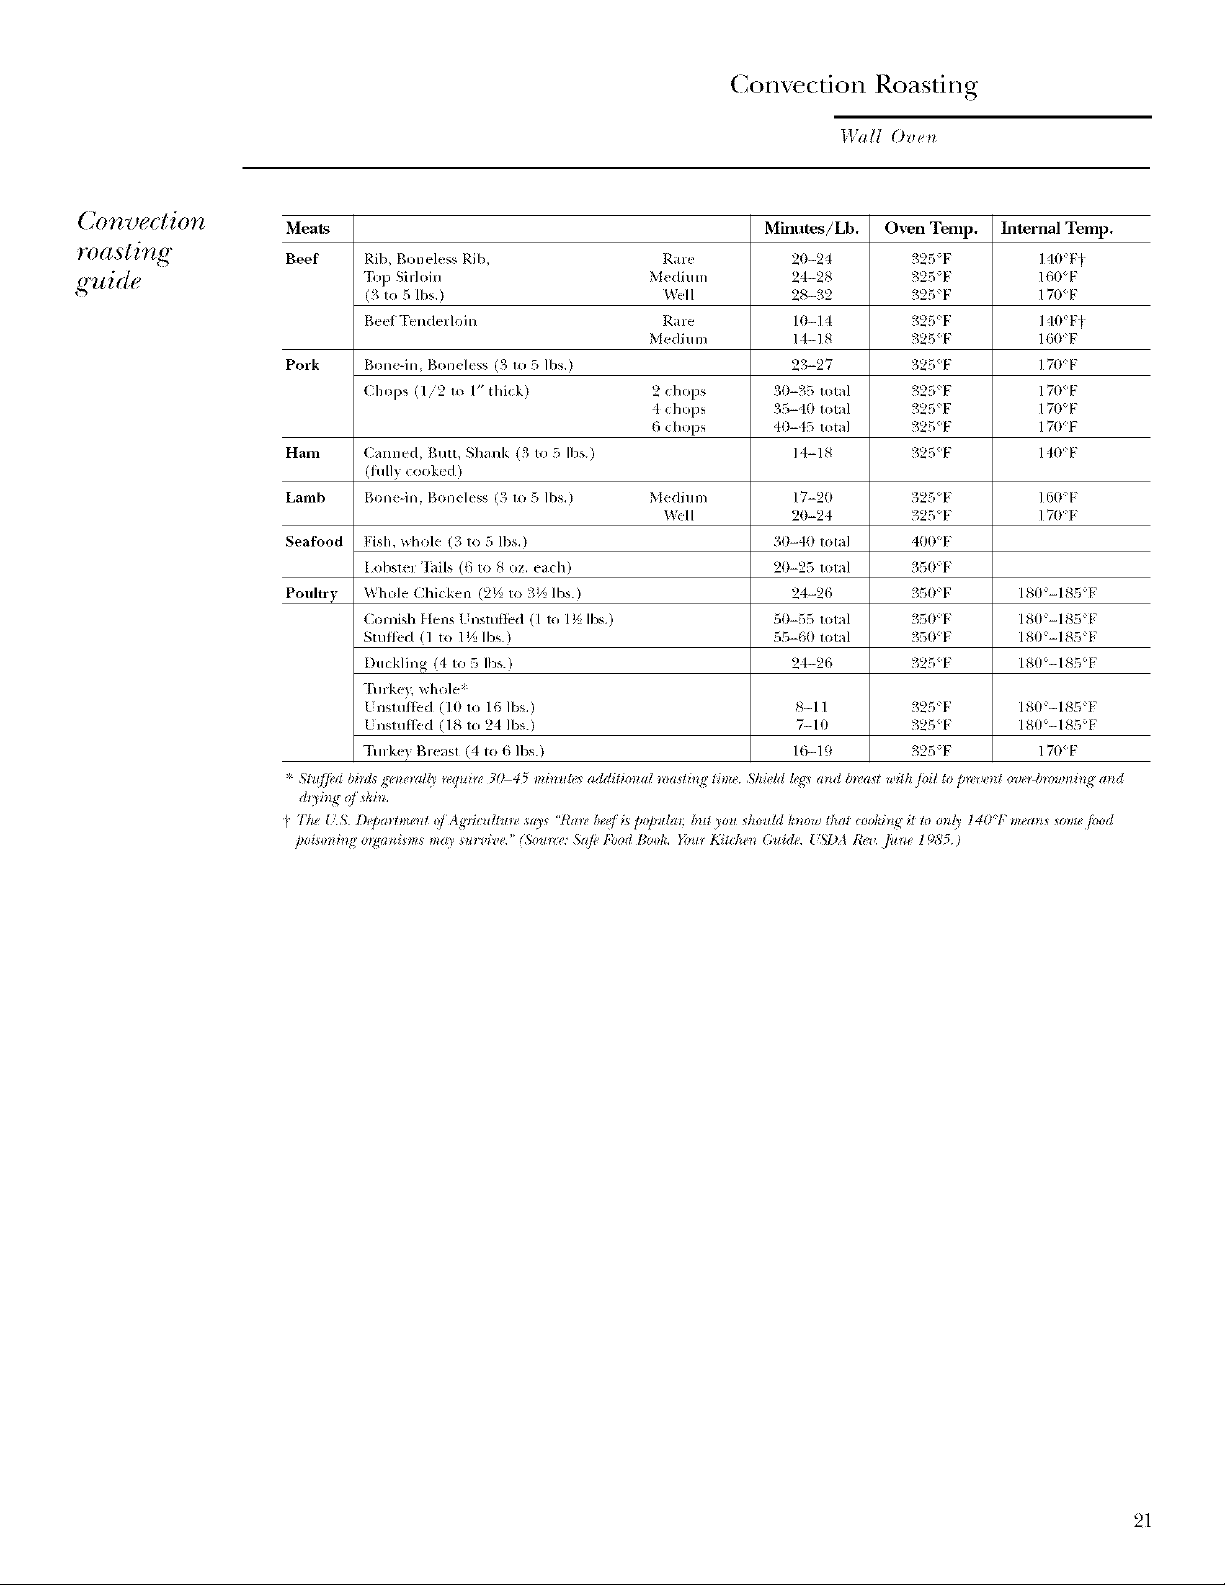
Convection
roastb g
_uide
Meats Minutes/Lb. Oven Temp. Internal Temp.
Beef Rib, Boneless Rib, Rare 20-24 325"F 140F_
"I_p Silloin Medium 24-28 325°F 160°F
(3 to 5/bs.) Well 28-32 325°F 170_F
Beet Tenderloin Rare 10-14 325F 140F_
Medium 14-18 325_F 160F
Pork B{medn, Boneless (3 m 5 Ibs,) 23-27 32/',_F ] 70°F
(hops (I/2 m /" lllil;k) 2 chops 30-35 total 325"F 170_F
4 chops 35-40 lot_l 325'1: 170°F
6 chops 40-45 total 325_F 17OF
Ham (anned, Butt, Shank (3 to 5 Ibs.) 14-18 325_F 140F
(fillly cooked )
Lamb Bonedn, Boneless (3 m 5, Ibs.) Medium 17-20 325°F l tlO°F
Will 20-24 325°F 17OF
Seafood Fish, whole (3 to 5 Ibs,) 30-40 total 400"F
[ obslll "hils (0 to 8 oz, each) 20-25 Iolal 35OF
Poultry Whole Chicken (2_A to 3½ Ibs.) 24-26 350F /80 -185 F
( orl]ish f{ens I nsluttld ([ to / _'5Ibs.) 50-55 tol_tl 350:F /811:-185 F
Slullcd (1 m 1½ ]bs) 55-61t lotal 35OF /80-/85 F
Duckling (4 to 5 Ibs.) 24-26 325<F 180<-/85<F
1"urke} whole*
IJnslultcd (101o 161bs.) 8-11 325 F /80-185F
Unsmtli:d (18 to 24 Ibs.) 7-/0 325_F /80_-/85_F
Tud<e} gleast (4 to 6 Ibs.) 16-19 327_"F 170_F
* Slu][_'d bids _'e_ze_al[a_w*ti_g'3045 IIzilz*tle_addiliolzal _oaslil_g time Shim'hiI_g_alzd b*('a*twilh ]oil to p*_,_'/z_ov_'*b*rmmil_g and
21

Timed Con ectiorl Cooking
Wall Ove*_
Timed
convection
cooking
(immediate
start and
autom, atic
. tol,)
22
0_* double ove_l modds, you call use timed bahhlg hi
ore, oven whih, ush_g sdJ-ch.a_z hz the oth_n, you can
also u_e lhned baking i_z both ove*z_ at the _atne t_m_,.
NOTE: Foods that _poit easif)'_such as mill, _qgs,
/;._h, stu/jhtK_, poull U a*M pork _houh! not be
allowed to sit fln" tnon _th(m 1 hour btJmv or (tfi_,r
.mki.g. Room tem/mzzt,ov pmt,wt_,_ the g'mwth
o/ ha_wt/td bal teria.
The oven will tuv_z on immediat@ a*zd cooh /o_ a
seh'cted h'ugYh <(time. At the e_zd _( the _oohi_lg time,
the ove_ will lmt_ oij automati(ally.
Mak( sure tile dock shows tile correct tinle
of da>
1 "lknlcll CONVECTION BAKE or
CONVECTION ROAST.
2 For double oven models onl?,; touch
UPPER OVEN or LOINER OVEN to select
the desired oven.
3 Two rack options are available:
• SINGLE RACK - Toucll fl)r cooking flood
it(ms on only one rack in convection bake.
• MULTI-RACK - "Ibucll tbr cooking tbod
items on nlore than one rack (i.e. 2 or 3
racks) at the same tinle in Come<tion
Bake. See the Mtdti-t_alk Convectio_zBakDig
section for lnore inlorlnation.
4 Touch the nmnbers to set the desired
tellll)( l-all1 r(*.
5 "I_)ucll ENTER.
6 Touch the nmnbers to set the desir(d lengfll
ot cooking tinle.
7 "Ibuch ENTER.
8 Two imm(diat( start and automatic slop
cooking options are available:
• PRE-HEATED START -"Ibuch to preheat
the ovell.
The convection thn will mrn on during
preheating. The control will signal when
file own is l)reh_ ated--tllis will take
at>proximat(ly 10 mimltes. Tile screen
will show the sel temperature.
Tile timed cook will not start until tile ov(n
is preheated and START is touched.
Wllen file control signals, fitods sllould /)(
placed ill the oven.
• COLD START - Touch to start the
oven immediatel) and cook tk,()(Iwithout
preheating. The convection thn will turn
on. The cook tinle will start immediatel>
The oven will start an(I continue to cook lot
the programnled amount of time, then shut of_
mltonlaticall}, unless tile Cook and IIold fcatm-e
was s(t. See the Cooh and Hohl @tilm s(ction.
Ondoubleovenmodelsonly
FqlTII IIoIFI
F FII II II-q
F FII IIoII-q
I-TIFII II II-q
For double oven models only, to s_t the s(cond
ovell select PRESS TO MAKE LOX_rER OVEN
SELECTIONS or PRESS TO M.Mg.E UPPER
OVEN SELECTIONS as needed and tbllow
the above st(ps.
"File set temperature lnay be clmnge(I /U
touching CHANGE TIME-TEMP tbr the
appropriate ovell.
The settings may be cancelled by touclling
CANCEL fin" the appropriate ov(n.
"File tinier can be s_t by touching SET
KITCHEN TIMER. See the Kitchen*71me_
sectioll.
_Mter cooking is conlplete, th( oven will signal
and "MORE TIME" will display tbr live miracles.
Check tbod tbr (lonem,ss. If nlore cooking time
is need(d, toul Ii MORE TIME and enter
additional (ooking time. It not sele_ te(I, the
screen will automatically (:lear in live nlinutes.
Timed Convectiorl Cooking
Wall Ovell
77mad
(delayed
start and
automatic
_top)
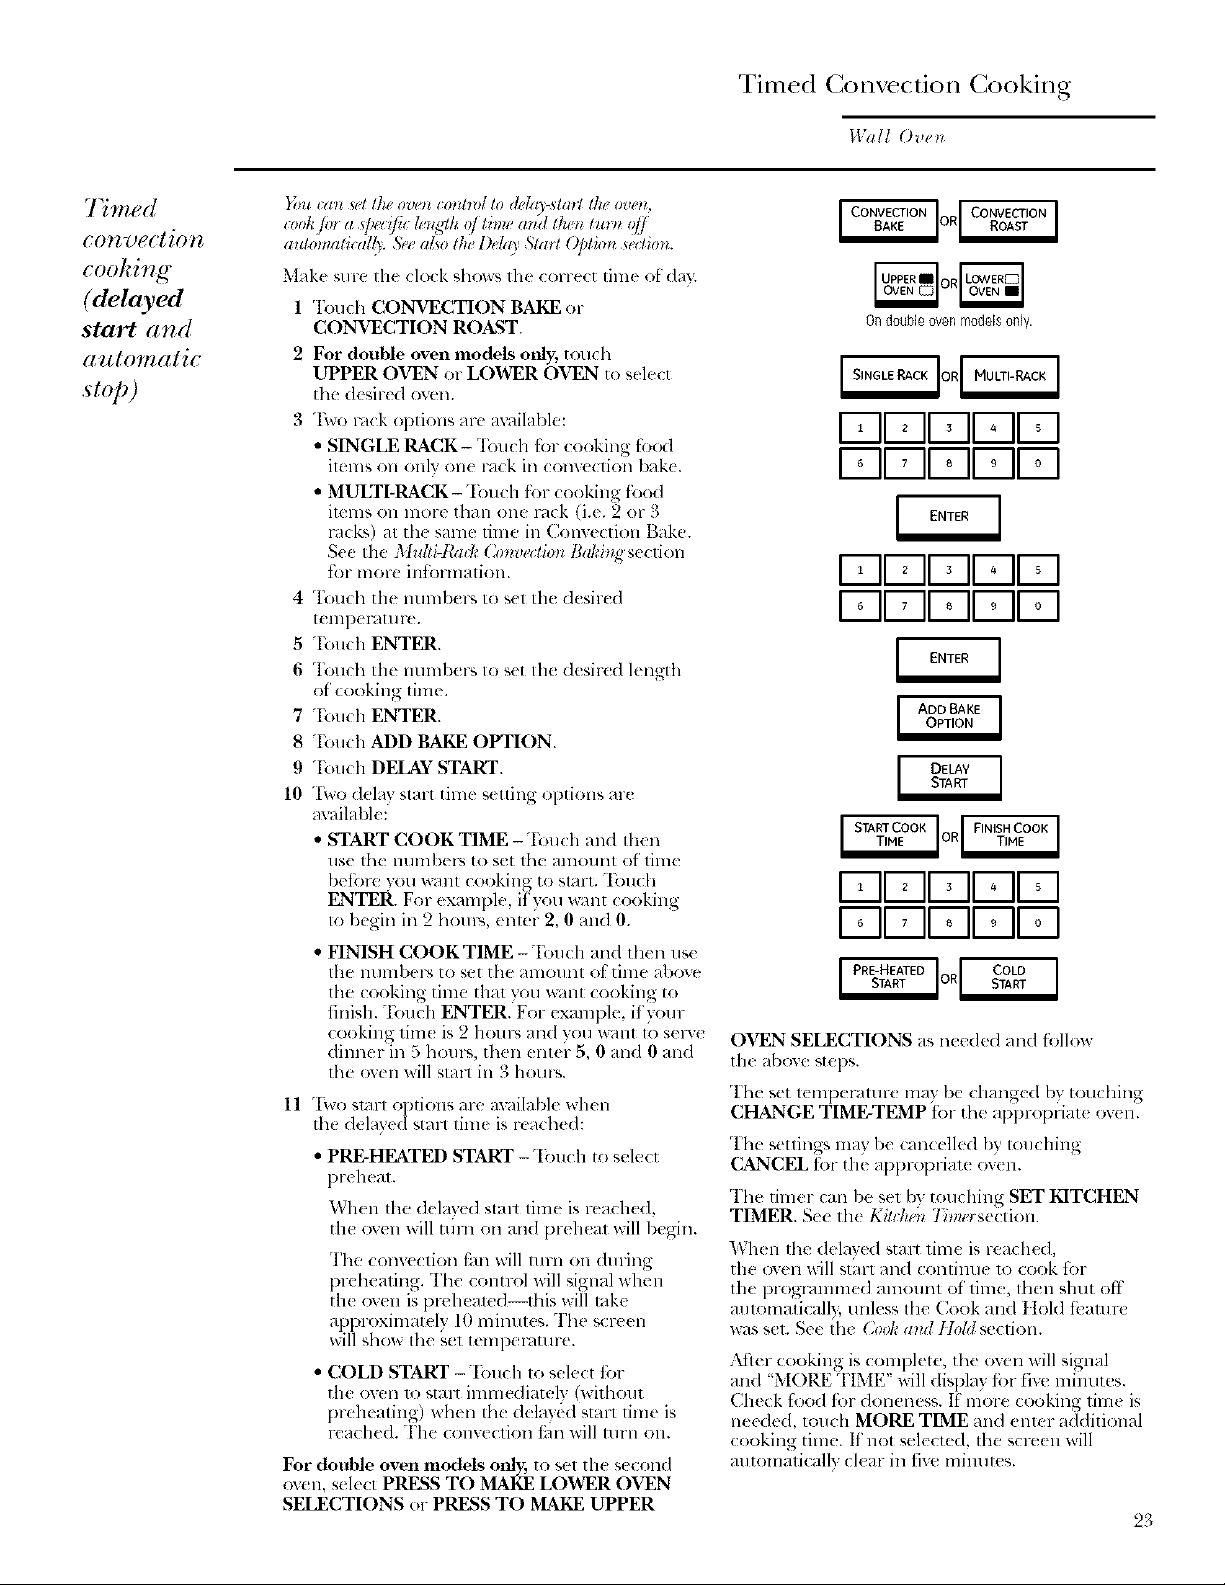
}(lit t:(//t _gl [lie O'g]_lt t:OtIDD[ lo d#[gl_,-slatY []z# o_)(qL
It ohli, a Oel i/h le_ ,_h ol time alld tlu_z turn o/I
altltlmati( al(_. 57_ago t]. Dda) 5tro t Option sa:lio_.
Make su re Ihe clock shows 111( correct filll< ot: da)5
1 Touch CONVECTION BAKE or
CONVECTION ROAST.
2
For double oven models only, touch
UPPER OVEN or LOWER OVEN to select
tim desired oven.
"Hvo rock options are axailable:
• SINGLE RACK-Tou(h for (ooking fo(_l
ilems Oll olllv o11( 1-_1( k ill ( ollVe(lioll /)_)k(.
• MULTI-RACK-'Ibuch ibr cooking food
imms on more than one rock (i.e. 2 or 3
l',lck',) at th( same time in Convection Bake.
See the Multi-IbM: Convectio)* Baki,g section
fi)r more intbrm_Jtion.
4
T_)uch the lltlmb(rs to s(l th( d(sir(d
1( lllI)( YHIll re.
5
Touch ENTER.
6
Touch th( nunll)(!rs Io s(t Ill(! d(sired l(ngth
of cooking tim(.
7
"I'ou( h ENTER.
8
Tou(h ADD BAKE OPTION.
9
Touch DEIANSTART.
10
"[Xvodelay start tilne setting options are
m'ailable:
• START COOK TIME- Touch and then
use the llumbe_s to set the amom_t of lime
betoru vou _llt cooking to start. "lbu(h
ENTER. For example if you "_+alltcooking
to begin in 2 hours, emer 2, 0 mid 0.
• HNISH COOKTIME -Touch and then use
the lllllllbel% to set the al]lOllll[ of tillle above
tim cooking time that you xx:lnt cooking to
finish. Touch ENTER. For example, if your
( ooking tim( is 2 houp_ mad you xxTmt to selwe
dimmr in 5 horn'% then enter 5, 0 and 0 and
the oven will stal_ in 3 hours.
11 "[\w)qlitl-IOl)tions m-e available when
th_ ddav( d stall linle is r_ached:
• PRE-HEATED START -"I;mch to sele(t
pr(heal.
7 .... " • ,
X\hen the del,I) ed strut lll]]e ISle,lch(d,
the ov(n x_ill turn on and preh( al will begin.
The convection fan will turn on during
preheating. The (ontrol will signal when
the oven is preheawd--flfis will ink('
approximatdy 10 minutes. The screen
will show the set tempemtme.
• COLD START -"Ibuch to select tbr
the oven 1o strut immediately (without
preheating) when the dela}ed start time is
lynched. "['lie conv(cfion thn will tnrn o11.
For double oven models onl); to sel the second
oven, sel(ct PRESS TO MAKE LOWER OVEN
SELECTIONS or PRESS TO MAKE UPPER
Ondoubleovenmodelsonly.
I-qi_-II' II° II_I
171DI ' I1' II° I
I-qV-II _IIoII_I
I-qF-II°I1'II°I
I-qV-II, IIoIIsI
l-qEII °I1'II°I
OVEN SELECTIONS as needed and follow
th_ above steps.
The set t(lllpelatt/rt may be cllange(I by touching
CHANGE TIME-TEMP tot the appropfiat_ ov(n.
"I'h_ settings may be (ancelled by umching
CANCEL tot tile al)p_x)l)fiat_ ov(n.
The timer can be set by touching SET KITCHEN
TIMER. Se( th( Ki_dw**7_me_section
When lhe delayed strut time is readied,
the oven will st;irt and contilme 1o cook for
the progrmnmed amount of' tim{, then shut off
mltomaticall}, unless the Cook an(I IIold tbamrt
was set. See the (3)ok a)ul tlold section.
;'kfler cooking is complete, the oven will signal
and "MORE TIME" will display tbr fiw' minutes.
Check food fi._rdoneness. If' more cooking time is
neede(I, touch MORE TIME and enter additional
cooking time. If not selected, tim SCl-t*(11will
automaticall) clear in five mimltes.
23
Favorite Recipes
IWalI ()ve_
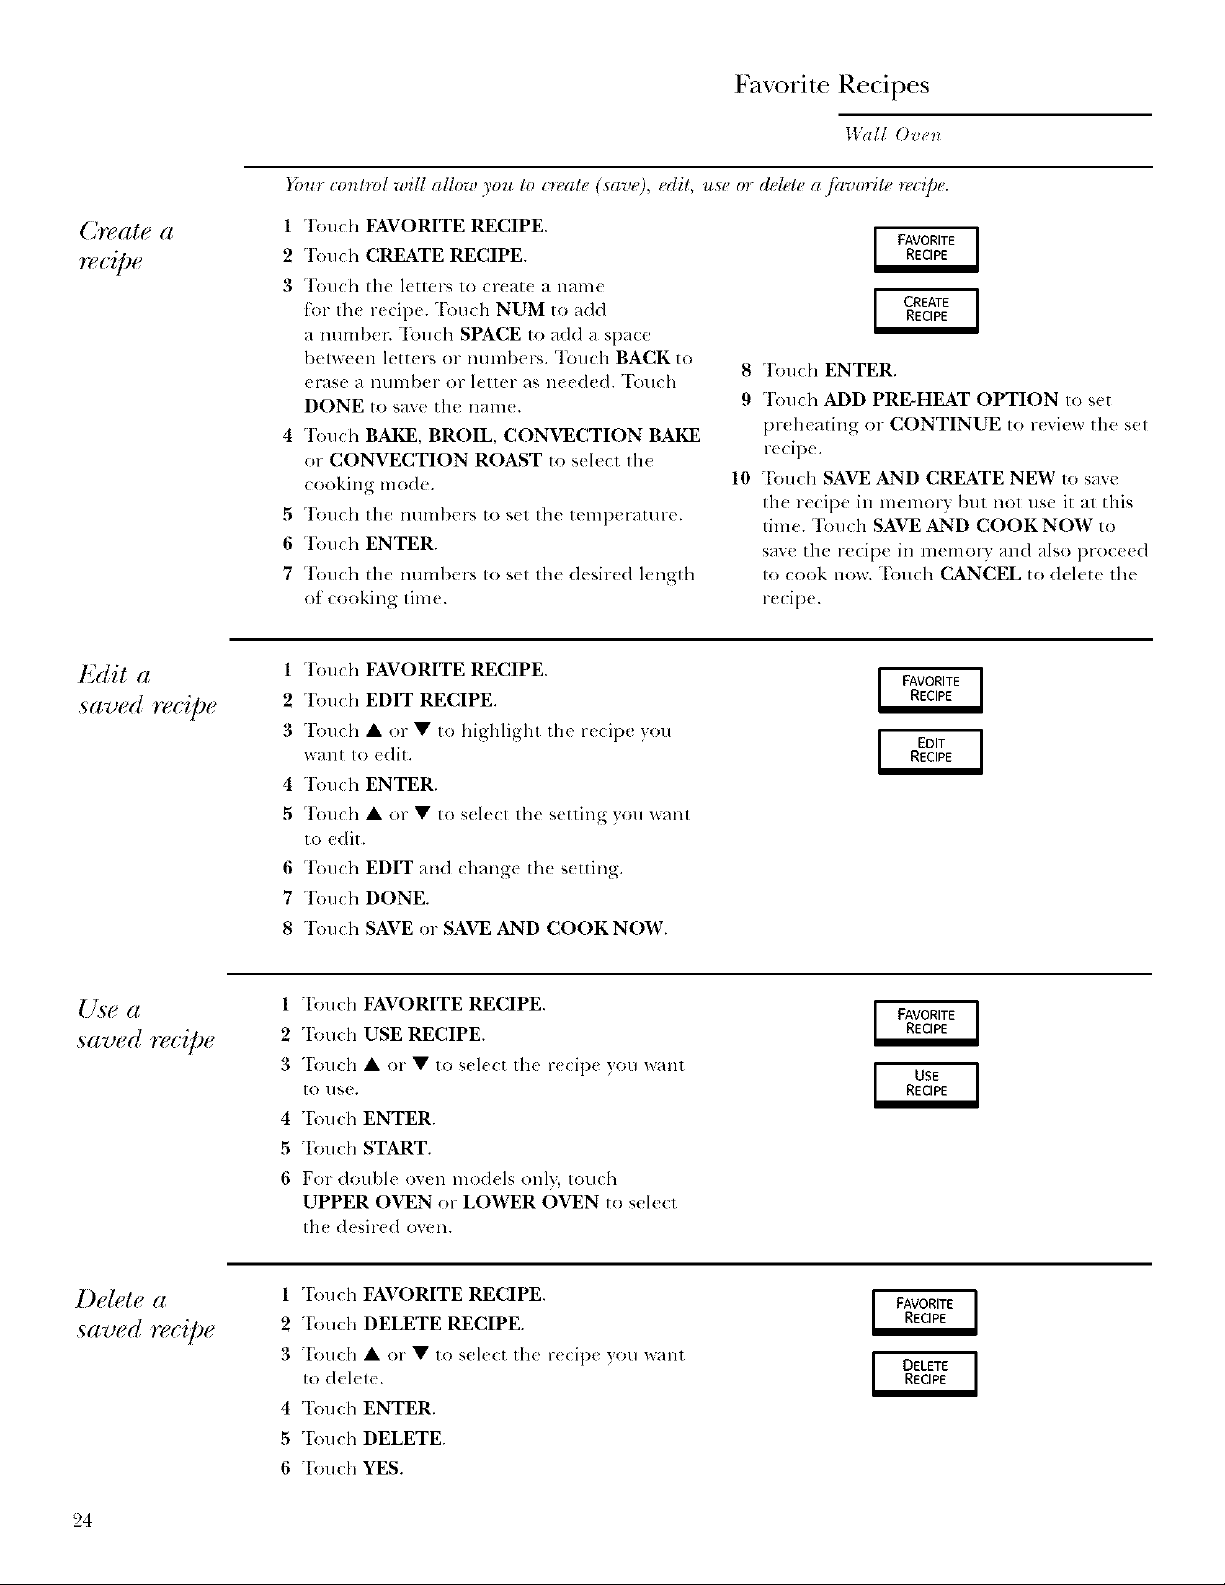
Your conhvl will allow you to c_eale (save), edit, use or delete a jhvorih_ n_c@e.
Create a
re(;iDe
Edit a
,saved recipe
1 "Ibuch FAVORITE RECIPE.
2 Touch CREATE RECIPE.
3 Touch the letters to create a name
torth( recipe. Touch NUM to add
a nunlber. "Iimch SPACE to add a space
between letter_ or numbers. Touch BACK to
erase a number or letter as needed. "I;.mch
DONE to save the naTn_.
4 Touch BAKE, BROIL, CONVECTION BAKE
or CONVECTION ROAST to select 111(
cooking mode.
5 "Iouch the numbers to s(t th( teml)er_lture.
6 'Ibuch ENTER.
7 Touch the numbers to set the desired lengfla
of cooking time.
1 "Ibuch FAVORITE RECIPE.
2 Touch EDIT RECIPE.
3 Touch • or • to highlight the recipe you
want to edit.
4 "Ibuch ENTER.
5 Touch • or • to select the setting you want
to edit.
6 'Ibuch EDIT and change lhe setting.
7 Touch DONE.
8 "I'(m( h SAVE or SAVE AND COOKNOW.
8 "Ibuch ENTER.
9 Touch ADD PRE-HEAT OPTION to set
pr(heating or CONTINUE to review the set
recipe.
10 Tou(h SAVE AND CREATE NEW to save
th( re(ipe in memory but nol use it at this
time. Touch SAVE AND COOK NOW to
save the recipe in memo_ y and also proceed
to cook now. T_nlch CANCEL to delete the
redpe.
Use a
,saved recipe
Delete a
saved reeipe
24
1 Touch FAVORITE RECIPE.
2 Touch USE RECIPE.
3 Touch • or • to sel((t the r((ipe }otl want
10 like.
4 "Ibu ch ENTER.
5 Touch START.
6 For double oven rood(Is only, touch
UPPER OVEN or LOWER OVEN to select
lh( desired oven.
1 "Ibu ch FAVORITE RECIPE.
2 Touch DELETE RECIPE.
3 Touch • or • to sel((t the r((ipe )ou want
1o delele.
4 'Ibuch ENTER.
5 "Ibuch DELETE.
6 Touch YES.
Kitchen Timer and Control Lockout
Wall ()ve_*
7b set the
kitchen
timer
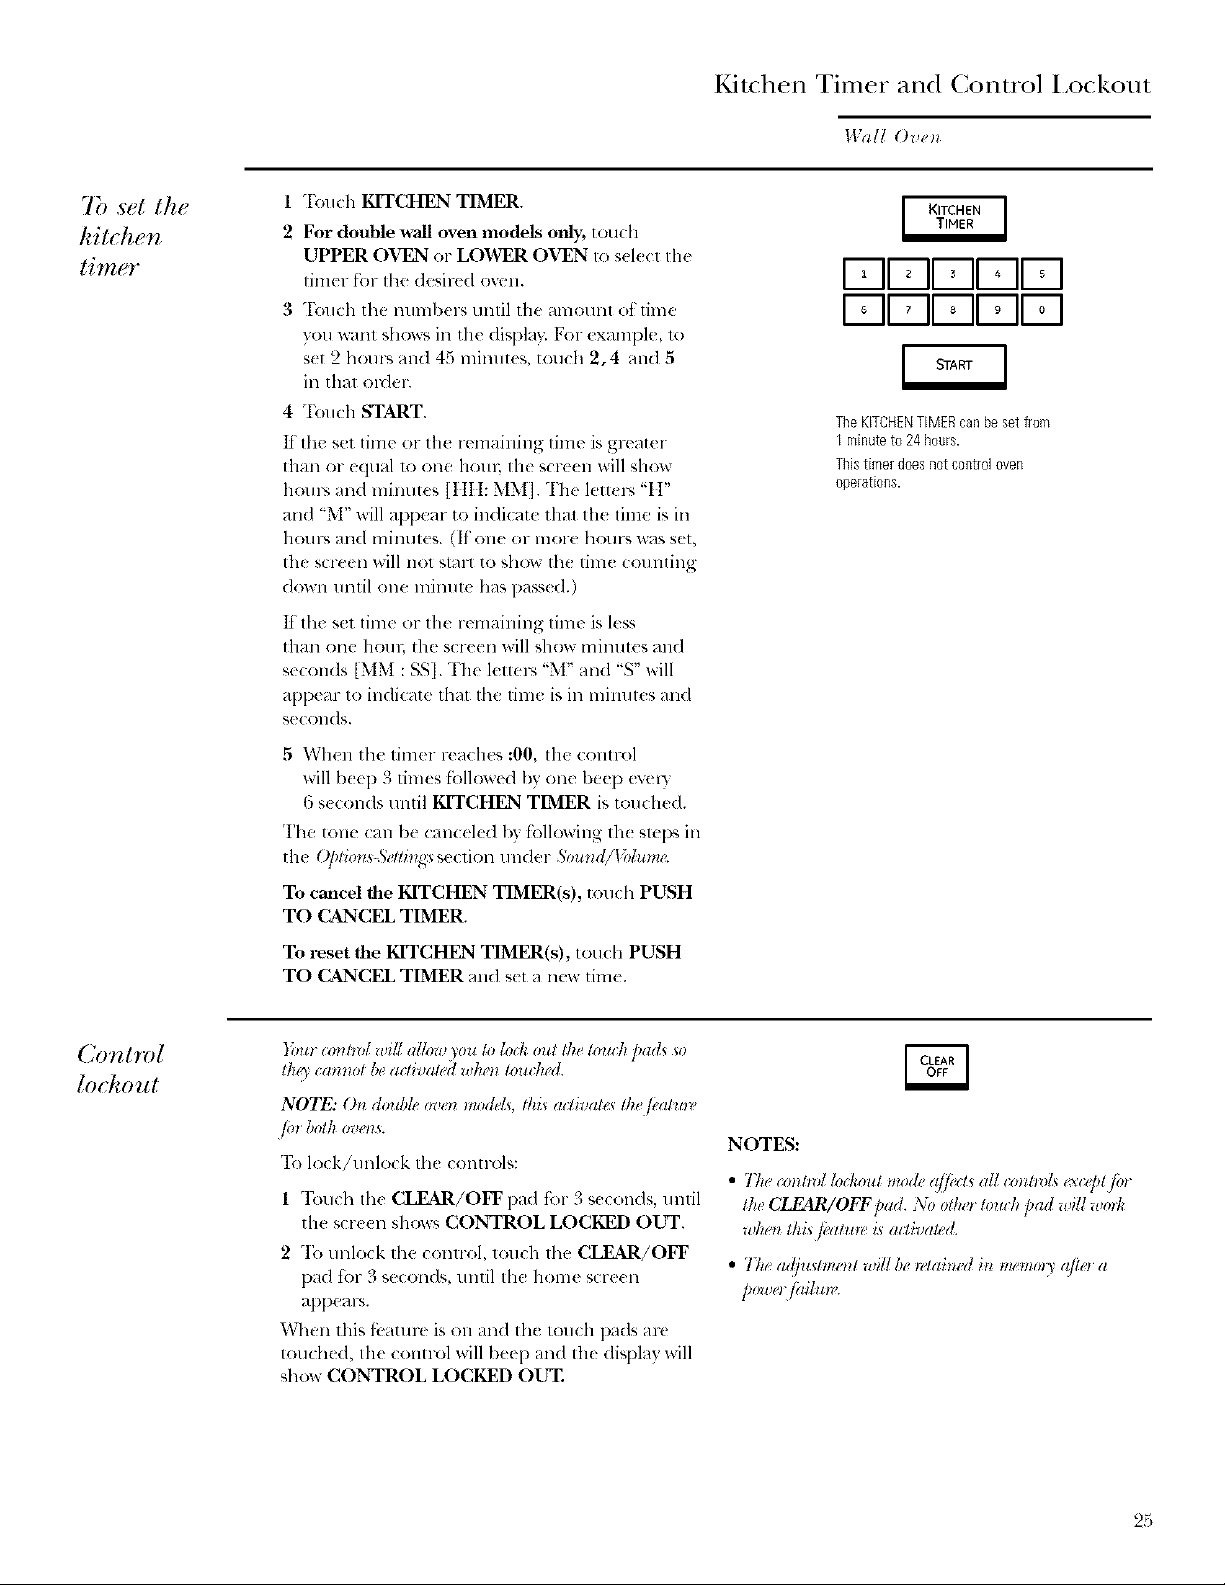
1 Touch KITCHEN TIMER.
2 For double wall oven models only; touch
UPPER OVEN or LOWER OVEN to s(l(ct the
timer for file desired ow, n.
3 "['ouch tile numbers until the amount ot time
you want show _,ill tile displa}: For example, 1o
set 2 hours and 45 minutes, touch 2, 4 and 5
ill that el-def.
4 Touch START.
It the set time or the remaining time is greater
than or equal 1o one houl_ tile screen will show
hom'_ and minutes ]IIH: MM]. The letters "I l"
and "M" will al)pear to indi(ate that the time is in
hotll_ alld lllilltlles. (If Olle OF Ill(We ho!llN was set,
the screen will not stal_ to show the time counting
down until one minute has passed.)
It tile set time or the remaining time is less
than one hour, the screen will show minutes and
se<ends [MM : SS]. The letters "M" and "S" will
appear to indicate that the time is ill mimltes and
seconds.
5 When the timer reaches :00, lhe control
will b_e I) 3 times followed by one bee[) evel 3
6 s_tends tmtil KITCHEN TIMER is touched.
The tone can be can( eled by fbllowing th( Sml)S ill
tile @l_o_,_Selti_*g:_section under 5,mo,d/lhh_lm
To cancel the KITCHEN TIMER(s), touch PUSH
TO CANCEL TIMER.
FII II, II-qF-I
1-711,II 11-7-11-7-1
TheKITCHENTIMERcanbe set from
1 minuteto 24 hours.
Thistimerdoesnotcontroloven
operations.
To reset the KITCHEN TIMER(s), touch PUSH
TO CANCEL TIMER and set a new time.
}_na (onh?)Iwill alhm*)ou 1olod¢out the toultl pads so
th_3' cannot bea(¢ivaled wh(*ntoudwd.
NOTE: On double ¢r_:_,nnoddy, lhi_ m livata* the fl,allo_
/m both ov(>I:v
"1_tlock/unlock tile controls:
1 "l'_n/ch tile CLEAR/OFF pad fi.w 3 s< conds, until
the screen shows CONTROL LOCKED OUT.
2 To unlock Ill( control, touch the CLEAR/OFF
pad tot 3 seconds, until the home s(71e(II
appears.
When this tbature is on and the touch pads are
touched, tile control will beep and the diq)lay will
show CONTROL LOCKED OUT.
NOTES:
• The _(mtm/toga,out nod,, :qje,ls at/,mm,Zs ex.'/,t/o,
the CLEAR/OFF pad. No otho touch pad will worl¢
wtmn thiQeatu*_ is allivat_d.
• The adfi_stm:'i*t_*_itlben,tainM in mrtnor_'afioa
powoj<lih_m
25
Self-Cleaning O_en
IVall()I,ell
The oven door must be closed and all
controls must be set correctly for the cycle
to work properly.
We recomm(nd venting your kilch(n xdth an
oi)(n window or using a vemilalion tm or hood
dtwing the first s(lf<lean c) cle.
Remove the broiler pan, broil( r grid, prob(,
all cookware and am' ahnnimlm foil from tll(
OV(!II,
The ox,( 11racks may r(main ill the ox(n during
the s,.dfkrl(aning cycle "_ithoul b(ing dmnaged.
DI) llOl rise a|)rasiv(s or oven (l(Hll( lS. Cleall
the lop, si(l(s and oulside of Ill( ov(n door wilh
soap and wat_ 1_
Make sm-e th( ov,.m light bull) ,.:,._xcr is in place
and tll( oxen light is oil
IMPORTANT: The heahh of' some birds is
exu-emelv sensitixe to file flnnes given off'
during the selt:-cleaning cycle ot any ov(n.
Mow_ 1)irds to another w(ll-v( ntilated room.
NOTE: Sd/:(2lea_z will m>/wod_ i/fhe t+m],'_zttm_
/)wb_ is plugged i_z ori/the 5abbath /i_atm_ is s_t.
• On doubl( oven models, you call s(t a (lean
(ycle ill both ovens at the same time. The last
oven set will amomaticall) d(lay its start mltil
th_ end of the first oven's clean cycle.
• On doubl( ov(n rood(Is, you can us( tinl_d
baking in one oven and s(likl(an ill the other
at the saln( lime.
CA UTION: N,.+,,,
uie_zsiZs m mq othe_ item_ o)l the ove_l floo_: There
is a heati, 2 deme_zt be)zeatk the ove)_ /loo_: l)tacb_
it+'n_so)_ the ove_z//oo_ ma_' i:au.s_,_he ovel_ to
ove_SeaL resul[b N i_ damag_, to the oven a_td
ri_h I!i damag_ o_ii+l, to cabbzels.
26
Self-Cleaning Oven
Wall Ove_*
]_ozd to S(ft
the oven .fin
cleaning"
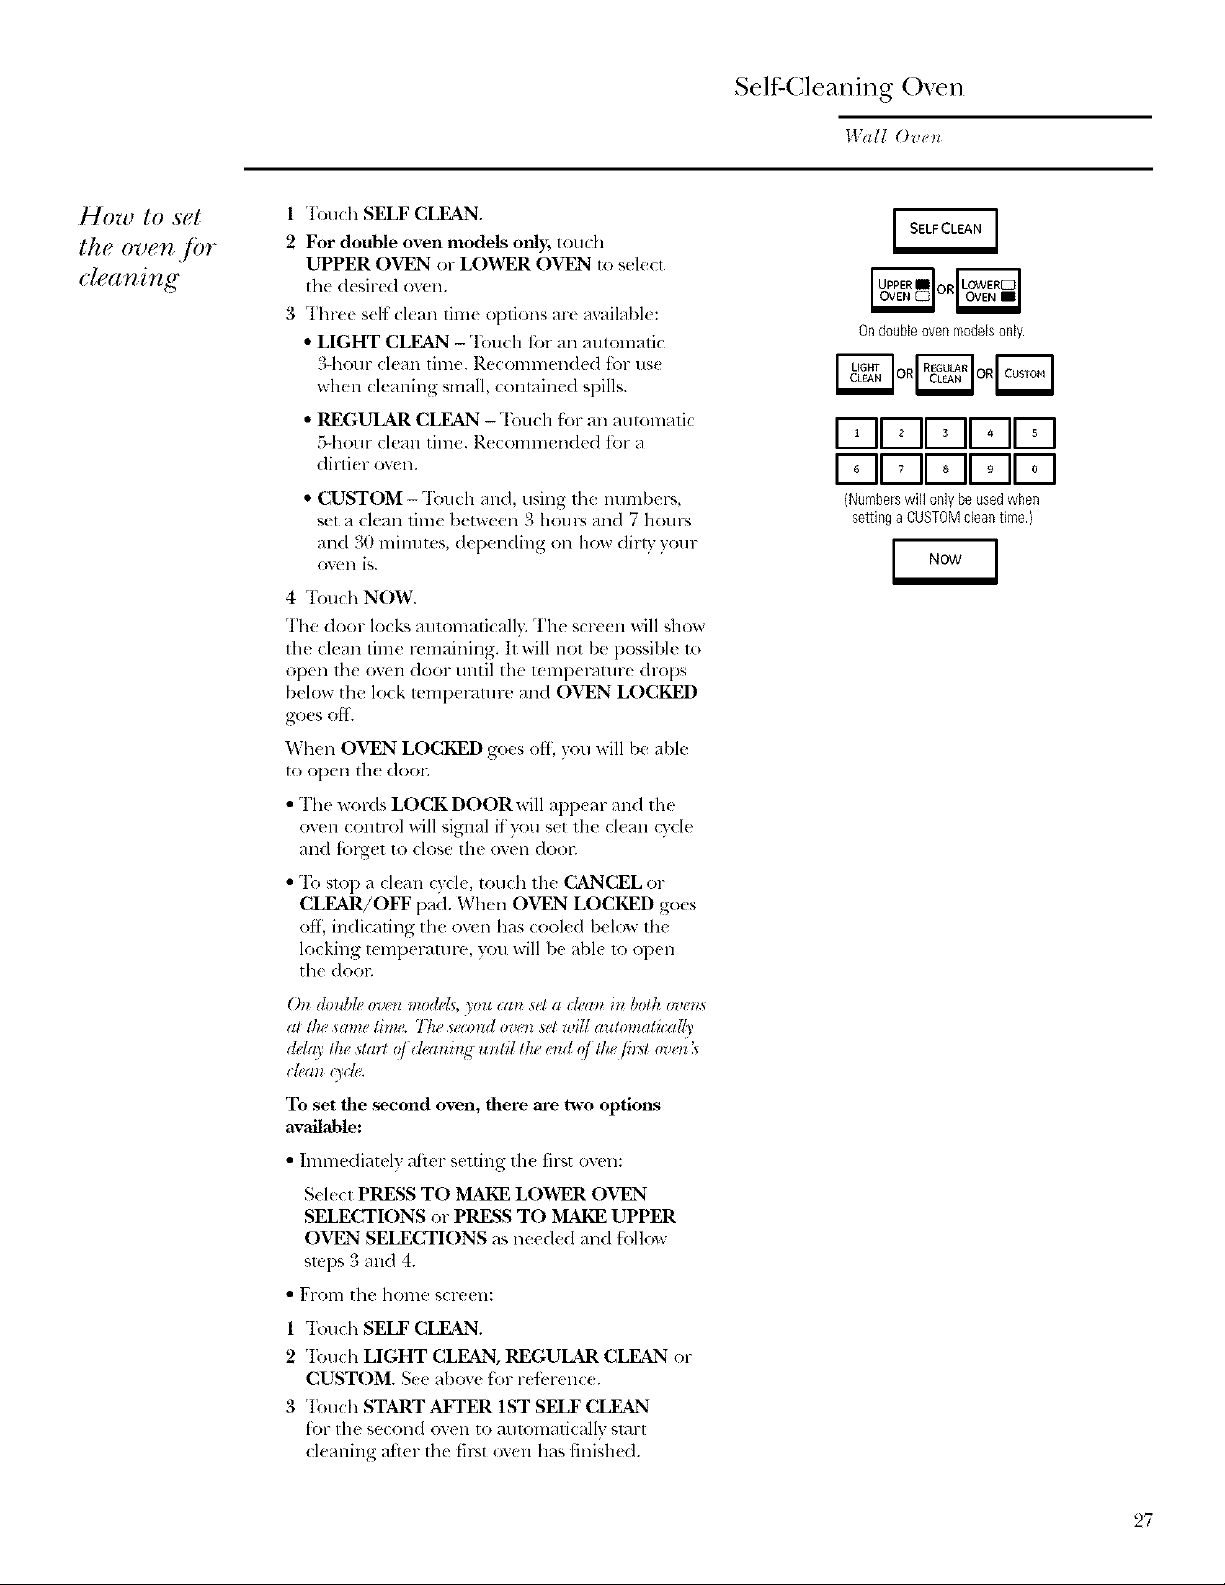
1 rlbuch SELF CLEAN.
2 For double oven models only; touch
UPPER OVEN or LOWER OVEN to select
the desired oven.
3 Three sell ckan time options are m:ail_lbk :
• LIGHT CLEAN - Touch tbr an aWomatic
.3-hour clean time. Recommended for use
when cleaning small, contained spills.
• REGULAR CLEAN -"Ibuch tbr an automatic
5-hour clean time. R( commended for a
dirti( r oven.
• CUSTOM- 'Ibuch and, using the mnnbers,
set a clean time between 3 hours and 7 houl_,
an(I 30 nfinutes, depen(ling on how dirty )our
OVell is.
4 Touch NOW.
The door locks automatically. The screen will show
the clean time remaining. It will llOt be possible 1o
open the oven door tlllEil the temp(c.lture drops
below the lock temperam re and OVEN LOCKED
g*_es otE
Wh(n OVEN LOCKED goes oft, you will be able
to open the dooE
• The words LOCK DOOR will appear and the
oven control will signal fl)'ou set the clean cycle
alld t;._l_et to close the (well dool;
• To slo1)a clean c)cle, touch the (_xJNCEL or
CLEAR/OFF pad. When OVEN LOCKED goes
oft; indicating the oven has cooled below the
locking temperaml>, you will be able u) open
the (1oo_;
Ondoubleovenmodelsonly.
uuQuu
uuDuu
(Numberswill onlybeusedwhen
s_tinga CUSTOMcleantime.}
(k_ double ove_ modd_, you _an set a d_'an in both (*ve,s
al tlw _ame ti,,.. T/w se.nzd oven setwill automati,dly
de&y the starl Iff d.('anhg until the #rid ?t llu. filst .voz X
trlg_a_*t)(b'.
To set the ,second oven, fllere are two options
available:
• Immediately atier setting th( first oven:
S(le(t PRESS TO MAKE LOWER OVEN
SELECTIONS or PRESS TO MAKE UPPER
OVEN SELECTIONS as needed and tbllow
swps 3 mid 4.
• FI'OlI] [he hollle screell:
1 "Iouch SELF CLEAN.
2 Tou(h LIGHT CLEAN, REGULAR CLEAN or
CUSTOM. See above tbr reterell((.
3 Totlch START AFTER 1ST SELF CLF=_,N
fbr the second oven to mm)m_ticallv start
cleaning afler the th_t oven has finMled.
27
SelfXCleaning O_en
Wail Ore,
_O_AJ tO
delay the
start qf
cleaning
The oven door must be closed and '_ controls
milst be set correcily for the cycle to work
properly;
1
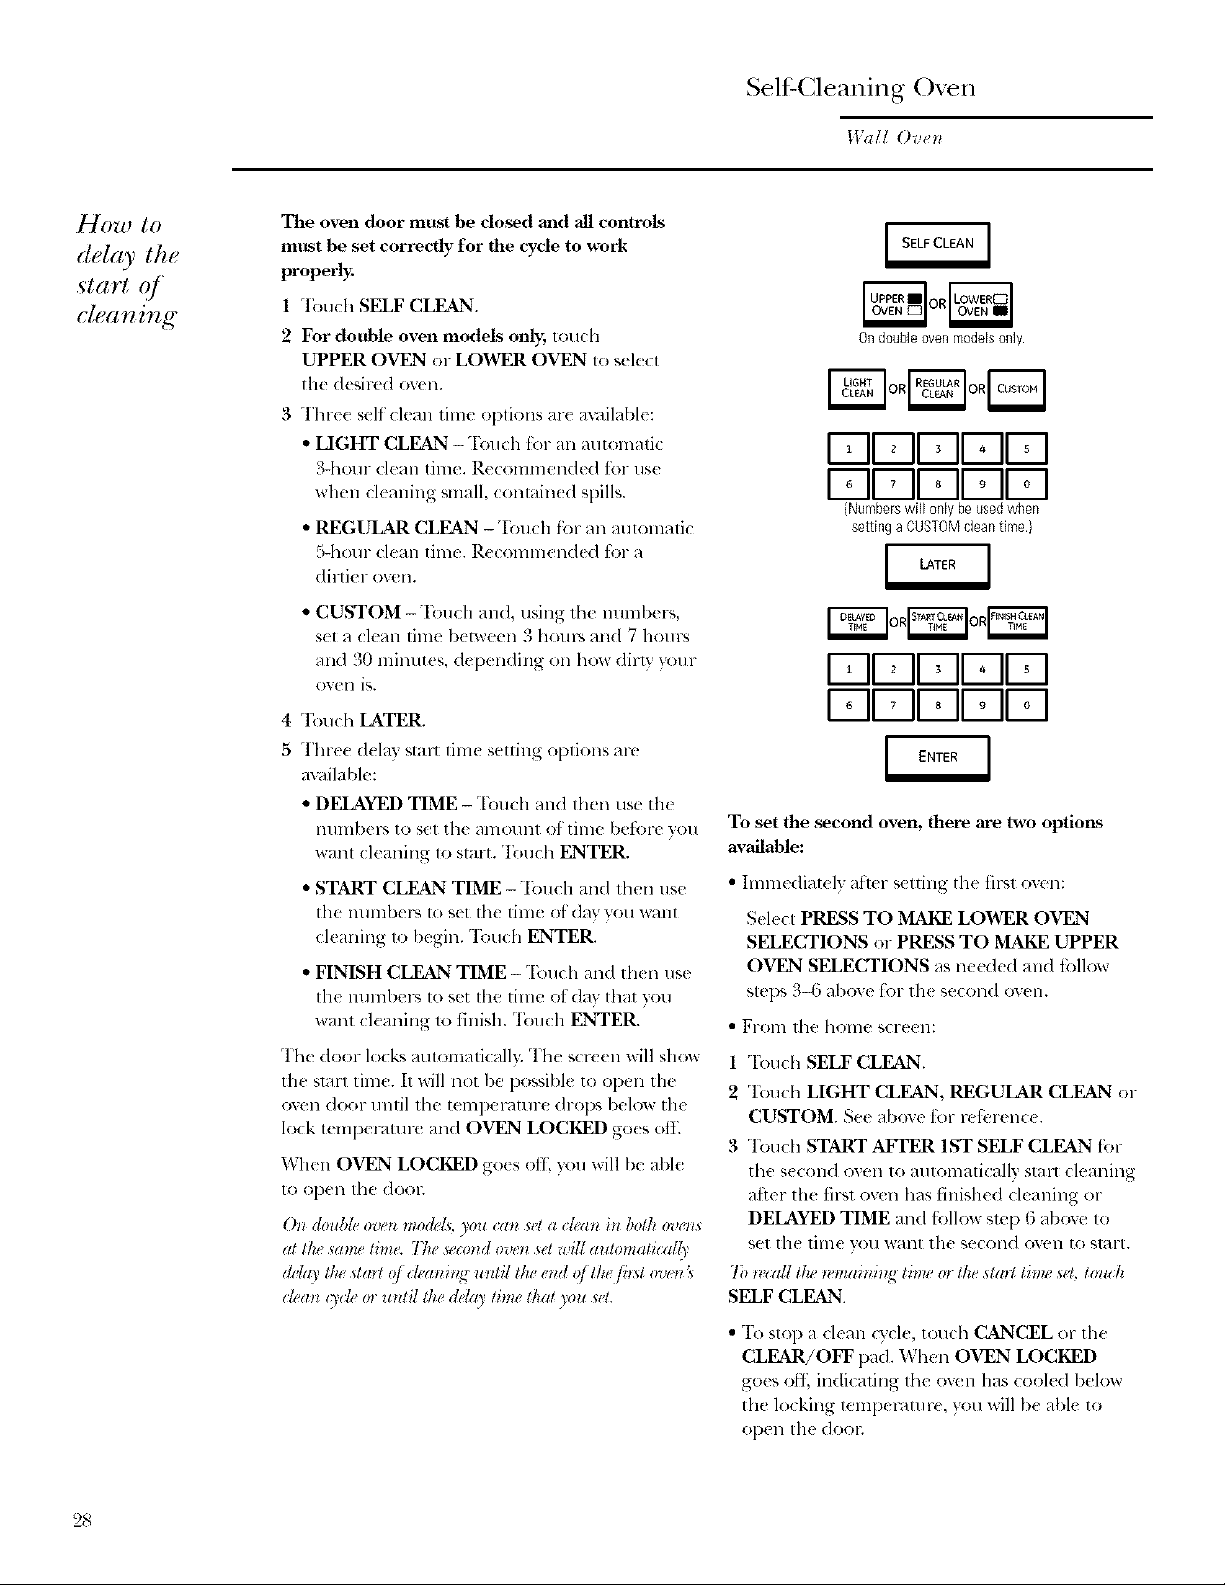
rI]-)tlch SELF CLEAN.
2
For double oven models only; tou(h
UPPER OVEN or LOWER OVEN to sele(t
tile (/esircd oven.
3
Thre( self clean time options ar( a_lilable:
• HGHT CLEMq -Tou_h for an automatic
3-hour dean time. Re(ommended fin- us(
when cleaning small, contain(d spills.
• REGULAR CLEAN -"Ibu(h for an atllolnalic
5-hour (l(an [lille, R( (OnllllCll(/{ (l t):)l" _9
dirtieroven.
• CUSTOM -Toucll and, using the nulnbers,
s(t a clean filne b(tween 3 holn_s and 7 hours
and 30 minutes, depending on how di m ?_)ur
ovell is.
45Touch LATER.
Thre( delay smlt lime setting oplions arc
a_dlable:
• DELAYED TIME -Touch and then use th_
nlnnber_ to set the amount ol time before you
want cleaning to stal-t. 'IT)rich ENTER.
• START CLEAN TD, IE -"Ik)llch and then use
the lllllllb( FS 10 S([ tile [illl( OI'(]_IV VO[I _V_III[
clealfing Io begin. 'lbuch ENTER.
• FINISH CLEAN TIME -Touch and tb(n usc
tile munbers Io s(t Ill( time olday tbylt yOll
wan1 cl(aning 1o finisll. 'lbuch ENTER.
The door lock_,autonmtically,. The screen will show
the start time. It will not be possible to open the
(wen door until the tempemtln-e drops below tile
lock temperami*: and OVEN LOCKED go(s off.
Wlien OVEN LOCKED go(s off, you will be able
to oiJell tbc (Iool.
(kl doubD"oven mod<_£,you can s_'la dean in bofh _nmlls
al l/w _alm"lilm'. T/u. w'lorzd oven set will autotn(IU,d{_
(May tlw _tmt oi <lealAn_ umil the e,d oi thg flm oven
dean 13cD>o u,til the dda 3' time thai 3ou sel.
Ondoubleovenmodelsonly.
1-711-711II°II I
1-71F-II"II°II° I
(Numberswill onlybeusedwhen
settingaCUSTOMcleantime.)
1-711-711' IIoII I
I-qF-II8II°II°I
To set the second oven, there are two optiorLs
available:
• hnln( diately afler setting tile first oven:
Select PRESS TO MAKE LOWER OVEN
SELECTIONS or PRESS TO MAKE UPPER
OVEN SELECTIONS _ls needed and tollow
stel_ 3-17 _lbove fi)r th( se(ond oven.
• Fr_)m the hollle Sct-eell:
1 'Ibuch SELF CLEAN.
2 "Iouch LIGHT CLEAN, REGULAR CLEAN or
CUSTOM. See above for rcfk_ren((.
3 rI'ouch START AFI_R 1ST SELF CLEAN for
the se(ond oxen to automali(ally stair (lemling
after the first ovcn has finished cleaning or
DELAYED TIME and tbllow stop 6 ab(wc to
set tile tillle yO!l watlt tile qecotld orel] [(l ql_tl-t.
To n'call the nm_ailfi_*gti,w <nthe stm_ lbn+ s_4,touch
SELF CLEAN
• "1\_stop a clean Q'cle, touch CANCEL or the
CLEAR/OFF pad. When OVEN LOCKED
goes off, indicating the oven has cool_ d below
the locking tempei-atur(, you will b( able to
open tile dooi;
28

Self Cleaning Oxen
Wall Ovell
_._()!l ll]aV notice SOIII(_ while ash ill Ih(! t)v( 11.
Wipe it up with a damp cloth a£1er th( oven cools.
If 1he {}I(?11 is llO[ (lean _]fl(H- Oil( clean cy(le,
rel)eal Ihe cycle.
• You cannot s(t Ihe ov(n for (ooking until 1he
oven is cool enough f'_r lhe door 1o t/nloclq.
• \Virile the oven is s( lt:-cl(rifting, you can touch
CLOCK to display the liln( of daT,z To return to
the (lean (ounldown, tou(h SELF CLEAN.
• It"th¢ racks b(come hard Io slide, wip( th( rack
supports with cooking oil.
'2(.)
Option--Proof
IValI Oven
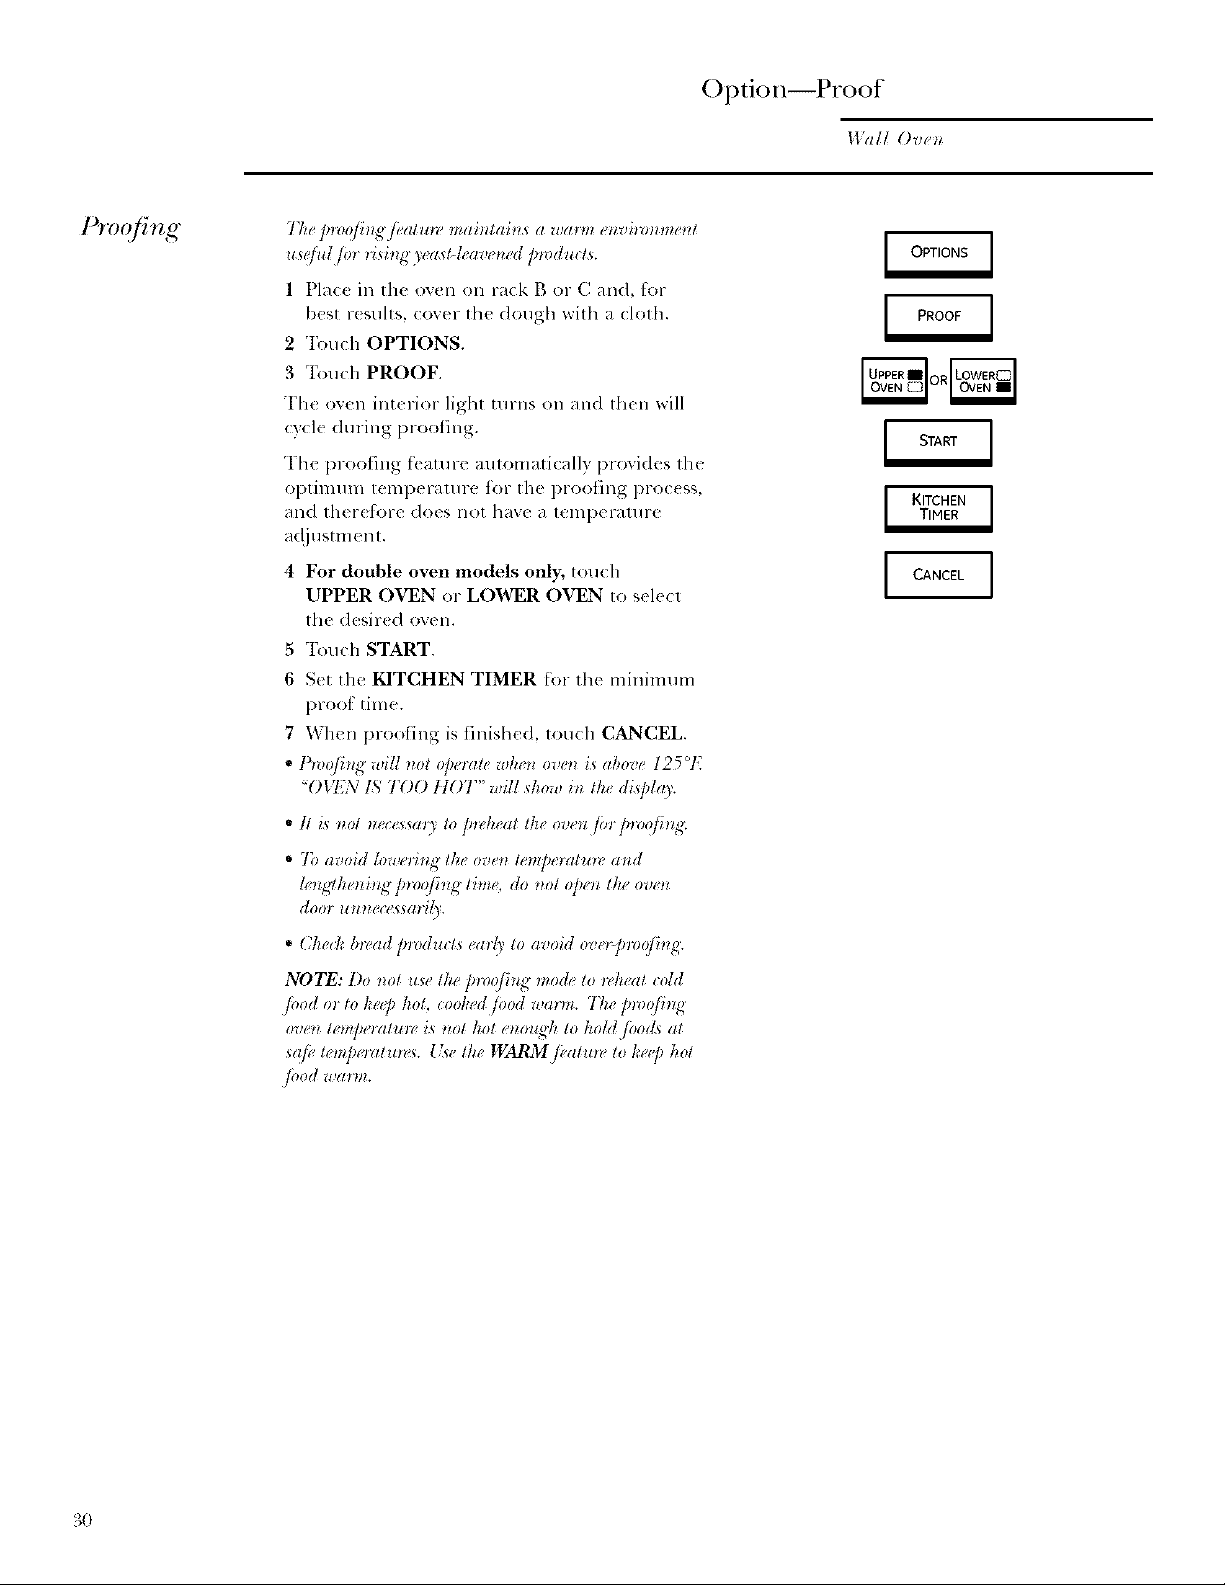
Proofing"
The p_t_qfi_*g/_'alun' mai)_tai_s a wa*m envi_rn*tne_*t
us@d fin risi_g ye_sl-k,ave*zd pr_dulrts.
1 Place in the oven on rack B or C and, for
best r(sults, cover the dough wilh a cloth.
2 'Ibuch OPTIONS.
3 "l;)uch PROOF.
"['h{ oven int_ riot light turns on and then will
(3cle during proofing.
The proofing feature automatically provides the
optimum temperature for the proofing process,
and ther(fi)re does not have a temperature
a(!justm( nt.
4 For double oven models only_ louch
UPPER OVEN or LOWER OVEN to select
th_ (lesir_d oven.
5 "l\mch START.
6 Set the KITCHEN TIMER for the mininmm
proot time.
7 When proofing is finished, touch CANCEL.
• Pwofi,g will _lot ofie_*ztewke_*oven is above 12501'.
"OVEN 1'_TOO tJOT" will _kow iu the di,_]day.
CANCEL ]
• I1 i_ m)l nec(<vsm7 to fi_z,heat the ovenflnfiroo/h%
• 7b avoid k)wo'ing the, oven lenq_e_at*m, and
k,lgtke_zhg ]n-oo/hlg lhm _,do nol opelz the ove_
* Che& bread p_t_duas ('arl_' to avoid ov_,>]m)qfi_*g.
NOTE: l)o _lotuse the p_z_ofing mode to _k_'at cold
/,,o_t,,, _oJ,_q,/,o_,_:,,,,/,,,_Uoo_t_,,(..._.T/.,/,,_,,q_,,g
ove_l lenl[_oal*l_z, iS _lOl ]tot enol_R]l tO hold./oods at
s(@ iempozztu_e*. 1ge i/re WARZvIi_,aiu_I,to/:e@ hot
/,,o(tu,ar.*.
3O
 Loading...