

Page 1

Owner's
Manual
Countertop
Microwave Oven
ZEM200 Series
ge,com
Monogram:
Page 2
Consumer Infbrmation
Cou_zterto/) Microwave Over_
Introduction ¥otlr new Monogram Illicrowave oven nlakes an eh)quent statement of style, collvelliellce and
kitchen planning flexibility. Whether you chose it fl)r its pm'ity of design, practical cooking tbatures
or assiduous attention to detail--or fl)r all of these reasons--you'll find that yore" Monogram
microwave oven's superior blend of fi)nn and function will delight you fi)r years to come.
The infl_rmation on the fl)llowing pages will help you operate and maintain your microwave
()veil properly.
Contents
Adapter Plugs ......................... 7
Aluminum Foil .................. 5, 15, 22
Appliance Registration .................. 3
Auto Featm'e ......................... 17
Auto Defrost ....................... 17
Care and Cleaning .................... 23
Consumer Services .................. 3, 27
Cooking ( ontrols ..................... 10
Extension Cords ....................... 8
Features of Your Oven .................. 9
Gromiding Instructions ................. 7
Microwave-Sa/b Cookware ............... 6
Model and Serial Number Ix)cation ....... 3
Other Features .................... 20, 21
Child i_ocbOut ..................... 20
(;lock ............................. 20
Cooking Complete Reminder . ......... 20
Delay Start ......................... 21
Help .............................. 20
P.eminder. ......................... 21
Scroll Speed ........................ 20
Start/Pause ........................ 20
Tim ei" On/Off ...................... 21
Tm'ntable .......................... 21
Power I_evels ......................... 11
Precautions to Avoid Possible Exposure to
Excessive Microwave Energy ............. 2
Problem Solver ....................... 24
Product Registration ................ 25, 26
Time Features ..................... 12-16
Add 30 Seconds ..................... 16
Expi ess Cook ...................... 16
Time Cook ...................... 12, 13
Time Defrost .................... 14, 15
Sensor Featm'es ................... 18, 19
Beverage .......................... 18
Chicken/Fish ....................... 19
Popcorn ........................... 18
Potato ............................ 19
Reheat ............................ 19
Vegetable .......................... 19
Safew histructions ................... 4-8
_u'ranty ..................... Back Cover
PRECAUTIONS TO AVOID POSSIBLE EXPOSURE TO
EXCESSIVE MICROWAVE ENERGY
(a) Do Not Attempt to operate this oven with the
door open since opel>door operation can result
in harlnflfl exposure to inicrowave energy.
It is inq)ortant not to deli_at or taluper with
the satetv interh)cks.
(b) Do Not Place any object between the oven front
lace and the door or alh)w soil or cleaner residue
to accumulate on sealing surtaces.
(c) Do Not Operate the oven if it is dalnaged. It is
particularly importalat that the oven door ch)se
properly and that there is no dalnage to the:
(1) door (bent),
(2) hinges and latches (broken or loosened),
(3) door seals and sealing surlaces.
(d) The Oven Should Not be at!lusted or repaired bv
anyone except properly qualified service pei_onnel.
Page 3
Be/bre
using
_o_r
oven
Read this manual carefully. It is intended to
help you operate and maintain your new
lilicrow;ive ();'ell properly.
Kee I) it handy for answers to your questions.
-Write
down the
model &
serial
numbers
][you
received a
damaged
ove;vl
Save time
& mon_
See the Featm'es of Your Oven section fl)r
model and serial nmnber location.
These nmnbers are also on the Consmner
Product Ownership Registration Card
included in this manual.
hmnediatel) contract the dealer (or btfilder)
theft sold ?ou the (wen.
Before xou request service, check the Problem It lists causes of minor operating problems their
Solver in the lx_ck of this manual. "}ou can correct yore'self.
Before sending in this card, please write these
nmnbers here:
Model Nmnber
Serkd Nmnber
Llse these re(tubers in an} correspondence or
service c_dls o " _ " "
C Ilcerlllllg }O[ll ll]lcrowaxe ovell
][you
71eed
service
To obtain service, see the Consmner Services
page in the back of this manual.
We're proud of our service and want you to be
pleased. If for some reason you are not happy
with the setMce you receive, here are the steps
to follow fm further help.
FIP.ST, cont_lct the people who serviced yore"
appliance. Explain why you m'e not ple_sed.
In most cases, this will solve the problem.
NEXT, if you are still not pleased, write all the
details--including your phone nmnbel_to:
Managec (:ustomer Relations
GE Appliances
Appliance Park
Louisville, KY 40225
Page 4
IMPORTANT SAFETY INSTRUCTIONS
SAFETY PRECAUTIONS
When using electrical appliances, basic satety
precautions should be fl)llowed, including tile
fl)llowing:
ik WARNING-To reduce tile
risk of burns, electric shock, fire, injury
to persollS or expos)ire to excessive
microwave energy:
, Read and follow the specific "Preca utions
to Avoid Possible Exposm'e to Excessive
Microwave Energy" on page 2.
, This appliance must be grounded. Connect
only to properly grounded outlet. See
Grounding Instru(tions section on page 7.
, Install or locate this appliance only in
accordance with the provided Installation
Instructions.
* Be certain to place the front surface of the
door three inches or more back from the
countertop edge to avoid accidental tipping
of the appliance in normal usage.
, Use this appliance only for its intended
use as described in this guide. Do not use
corrosive chemicals or _apors ill this
appliance. This microwave o\ ell is specifically
designed to heat, dry or cook %od, and is
not intended fl)r laboratory or industrial use.
* Do not cover or block amy openings on
the appliance.
, Do not store tiffs appliance outdoors. Do not
use this product near water--tor example,
ill a wet basement, near a swimming pool,
near a sink or in similar locations.
, This microwave oven is not approved or
tested for marine use.
* Do not immerse power cord or plug in water.
* Keep power cord away from heated surfaces.
, Do not motto) the microwave oven over
or near amy portion of a heating or cooking
appliance.
" Do not mount tiffs appliance over a sink.
, Do not store aaaything directly on top of the
microwave oven surface when the microwave
oven is in operation.
, Do not let power cord hang over edge of
table or counter.
, Do not operate this appliance if it has a
damaged power cord or plug, if it is not
working properly or if it has been damaged
or dropped. If the power cord is dmnaged,
it must be replaced by General Electric
Service or an authorized service agent using
a power cord available from General Electric.
, See door surface cleaning instructions in the
Care and Cleaning section(s) of this manual.
, This appliance must only be serviced by
qualified service personnel. Contact nearest
authorized serxice thcility for examination,
repair or a({justment.
"As with any appliance, close supervision is
necessary when used by children.
" To reduce the risk of fire in the oven cavity:
-- Do not overcook food. Carefully attend
appliance when paper, plastic or other
combustible materials are placed inside
tile oven to thcilitate cooking.
-- Remove wire twist-ties and metal handles
from paper or plastic containers beflwe
placing them ill tile oven.
-- Do not use the oven for storage purposes.
Do not leave paper products, cooking
utensils or fl)od ill tile oven when not ill use.
-- If materials inside oven ignite, kee I) oven
door closed, turn oven off and discomlect
power cord, or shut off power at the fuse or
circuit breaker panel. If the door is opened,
tile fire may spread.
-- Do not use the Sensor Features twice
ill succession on tile same food portion.
If fl_od is undercooked alter tile first
corm)down, use Time Cook fl)r additional
cooking time.
Page 5
ARCING
FOODS
If you see arcing, press the CLEAR/OFF pad
mid correct the problem.
Arcing is tile inicrowave teim ti)i" sparks in tile
oven. Arcing is caused by:
• Metal or foil touching the side of the oven.
• Foil not molded to food (upturned edges
act like m_tennas).
• Operating the microwave with no food inside
for more than a minute or two may cause
damage to the oven and could start a fire.
It increases tile heat around tile magnetron
and can shorten tile lite of tile oven.
• Hot foods and steam can cause burns.
Be careful when opening any containers (if
hot ti)od, including popcorn bags, cooking
pouches and boxes. To prevent possible
iI_jury, direct steam away fl'om hands and thce.
, Foods with unbroken outer "skin" such as
potatoes, sausages, tomatoes, apples, chicken
livers and other giblets and egg yolks shouhl
be pierced to allow steam to escape din'big
cooking.
• Do not overcook potatoes. They could
dehydrate and catch fire, causing damage
to yotlr ove*l.
• Some products such as whole eggs and
sealed containers--till" example, closed jars--
are able to explode and should **lit be
heated ill this microwave oven. Stlch use of
tile microwave oven couhl result in iI_jury.
• Do not boil eggs in a microwave oven.
Pressure will build up inside egg yolk and will
cause it to bm'st, possibly resulting in i_jury.
• Avoid heating baby food in glass jars, even
with the lid off. Make sm'e all inihnt _i)od is
thoroughly cooked. Stir ti/od to distribute
the heat evenly. Be careful to prevent scalding
when warming formula. The container inav
feel cooler than tile fiwInula really is. Always
test tile fl)rmula bed)re feeding tile baby.
• Do not defrost frozen beverages in na_rrow-
necked bottles (especially carbonated
beverages). Eve** if the container is opened,
pressure can build up. This can cause tile
container to bm'st, possibly resulting in ii_jury.
• Metal, such as twist-ties, poultry pins or
gold-rimmed dishes in the microwave.
• Recycled paper towels containing small metal
pieces being used in the microwave.
SAFETY FACT--Superheated water,
I,iquids, such as watei; cottee or tea, are able
to be overheated beyond the boiling point
without al)l)earing to be boiling. Visible
bubbling or boiling when the container is
relnoved froln tile ulicrowave oven is not
always present. THIS COUI,D RESUI,T IN
VERY HOT I,IQUIDS SUDDENLY BOIl,IN(;
OVER WHEN THE CONTAINER IS
DISTURBED OR A SPOON OR OTHER
UTENSIl, IS INSERTED INTO THE I,IQUID.
To reduce tile risk of ii_jury to i)ersons:
-- Do not overheat tile liquid.
-- Stir tile liquid both before and halt\vav
through heating it.
-- Do not use straight-sided containers with
narrow necks,
--Alter heating, allow tile container to stand
ill tile ulicrowave oven li)r a sht/rt tin/e
betore renloving tile container.
-- Use extreule care when inserting a spoon
or other utensil into tile container.
• Cook meat and poultry thoroughly--uleat
to at least an INTERNAl, teull)erature of
160°F and poultry to at least an INTERNAl,
teuli)erature of 180°1. (_ooking to these
teuli)eratures usually protects against
toodborne ilhless.
• Do not pop popcorn in your microwave oven
unless it is in a special n/icrowave popciirn
accessory or tlnless roll use l)Ol)corn labeled
tor rise iI1 ulicrowave ()veils.
Page 6
IMPORTANT SAFETY INSTRUCTIONS
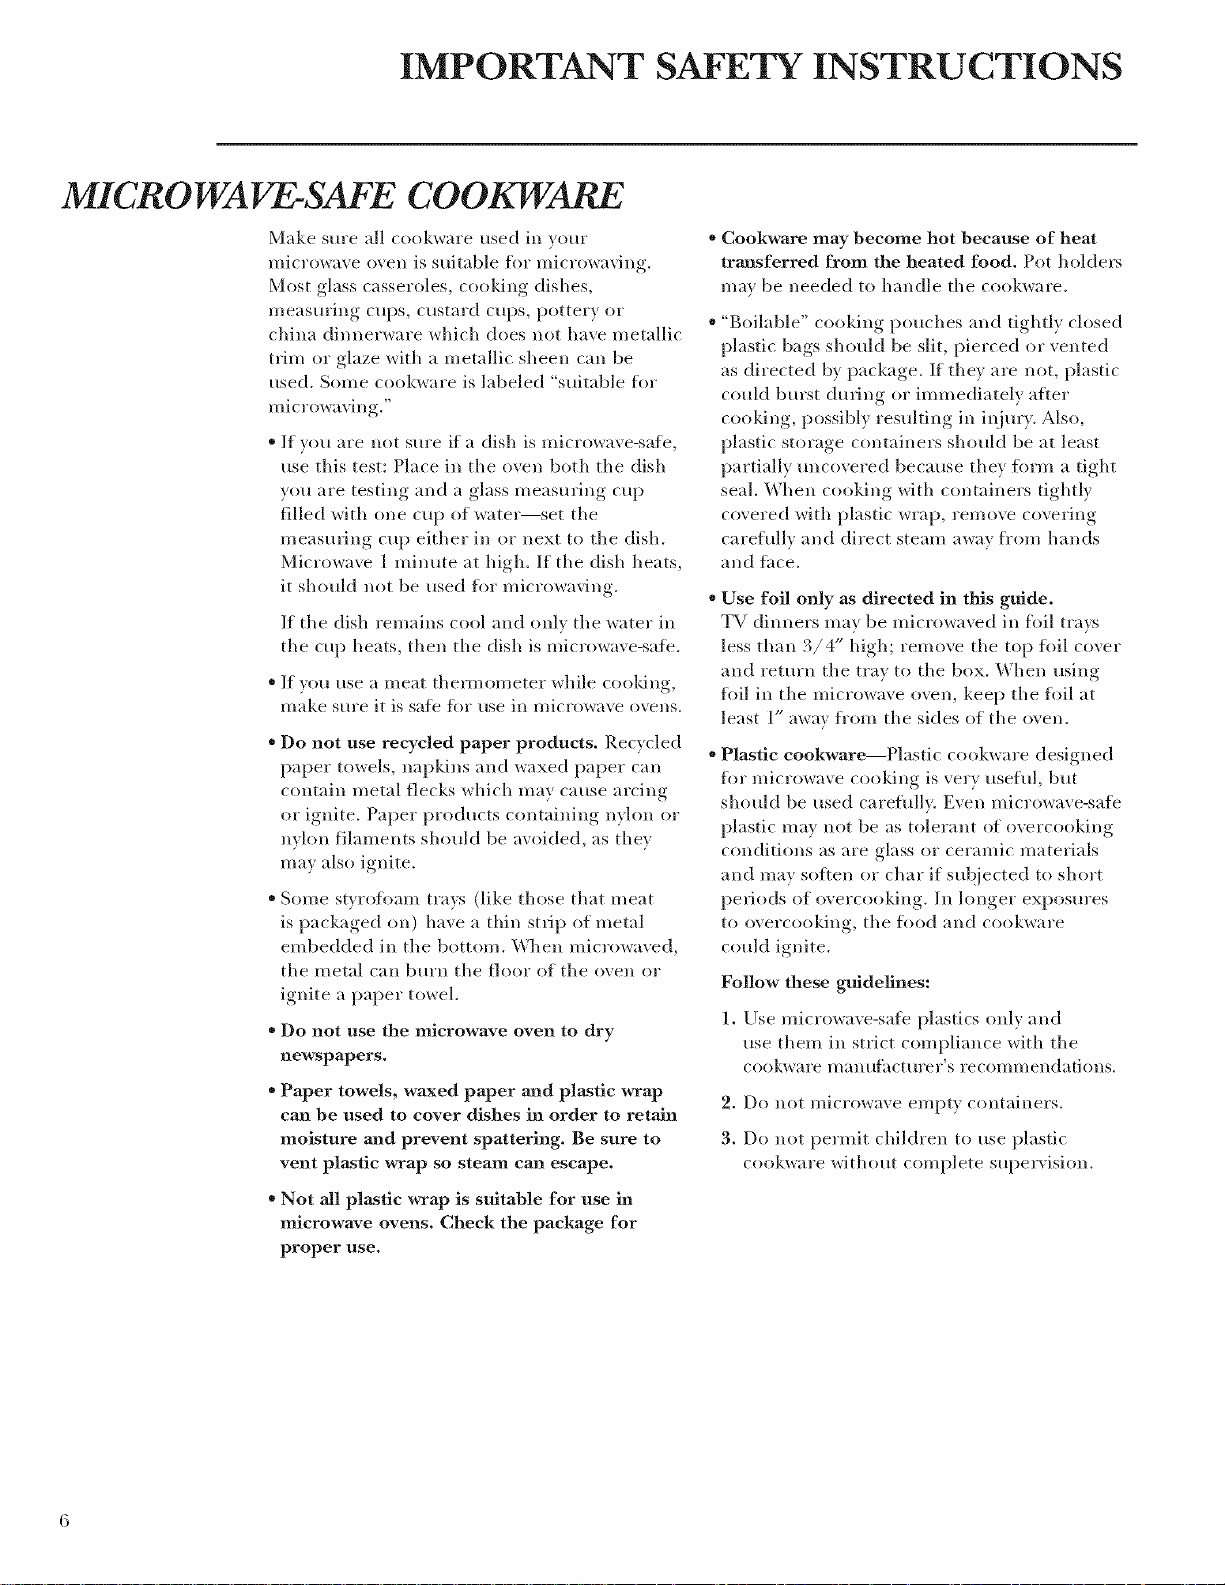
MICROWAVE-SAFE COOKWARE
Make sure all cookware used in yore"
microwave oven is suitable flir microwaving.
Most glass casseroles, cooking dishes,
measuring cups, custard cups, pottery or
china dinnerware which does *lot have metallic
trim or glaze with a metallic sheen ca** be
used. Some cookware is labeled "suitable for
I//i CrOWel Vi 51 g."
" If you are not sure if a dish is microwave-sate,
use this test: Place in the oven both the dish
you are testing and a glass measuring cup
filled with one cup of wates_set the
measuring cup either in or next to the dish.
Microwave 1 minute at high. If the dish heats,
it should not be used fl)r microwaving.
If the dish remains cool and only the water in
the cup heats, then the dish is microwave-saSh.
, If you use a meat thenmm*eter while cooldng,
make stls"e it is satb fi)r rise in l/,icrowave ovesis.
, Do not use recycled paper products. Recycled
paper towels, napkins and waxed paper can
contain metal flecks which may cause arcing
or ignite. Paper prodHcts containing nylon {)5"
nvhm filaments should be avoided, as they
mav also ignite.
" Some styroflmm trax:s (like those that meat
is packaged on) have a thin strip of metal
embedded in the bottom. When microwave&
the metal ca** bm'n the floor of the oven {)5"
ignite a paper towel,
" Do not use the microwave oven to dry
newspapers.
, Paper towels, waxed paper and plastic wrap
can be used to cover dishes in order to retain
moisture a_ad prevent spattering. Be sure to
vent plastic wrap so steam can escape.
, Cookware may become hot because of heat
traaasferred from the heated food. Pot holdel_
may be needed to handle the cookware.
" "Boilable" cooking pouches and tightly closed
plastic bags should be slit, pierced or vented
as directed by package. If they are not, plastic
could burst during or immediately after
cooking, possibly resulting in ii_ju U. Also,
plastic storage containers should be at least
partially tmcovered because they fl)rm a tight
seal. When cooking with containers tightly
covered with plastic wrap, remove covering
carehfllv and direct steam away fl'om hands
and ihce.
" Use foil only as directed in this guide.
TV dinners may be microwaved in fl)il trax:s
less than 3/4" high; remove the top tbil cover
and return the tray to the box. When using
foil in the microwave oven, kee I) the flfil at
least 1" away fi'om the sides of the oven.
, Plastic cookware--Plastic cookware designed
for microwave cooking is very usehfl, but
should be used carehfllv. Even microwave-safe
plastic may not be as tolerant of overcooking
conditions as are glass or ceramic materials
and may soften or char if subjected to short
pel_iods of overcooking. In longer exposm'es
to overcooking, the food and cookware
could ignite.
Follow these guidelines:
1. Use microwave-sate plastics only and
use them in strict compliance with the
cookware manufhcturer's recommendations.
2. Do not microwave empt_ containers.
3. Do not permit children to use plastic
cookware without complete supervision.
" Not all plastic wrap is suitable for use in
microwave ovens. Check the package for
proper use.
Page 7
GR 0 UNDING INS TR UC TIONS
-&WARNIN G-h.proper.se
of the grounding plug can result in a risk
of electric shock.
This appliance nmst be grounded. In the
event of an electrical short circuit, grounding
reduces the risk of electric shock by providing
an escape wire tor the electric current.
This appliance is equipped with a power cord
having a grounding wire with a grounding plug.
The plug must be plugged into an outlet that is
properly installed and grounded. (Fig. 1)
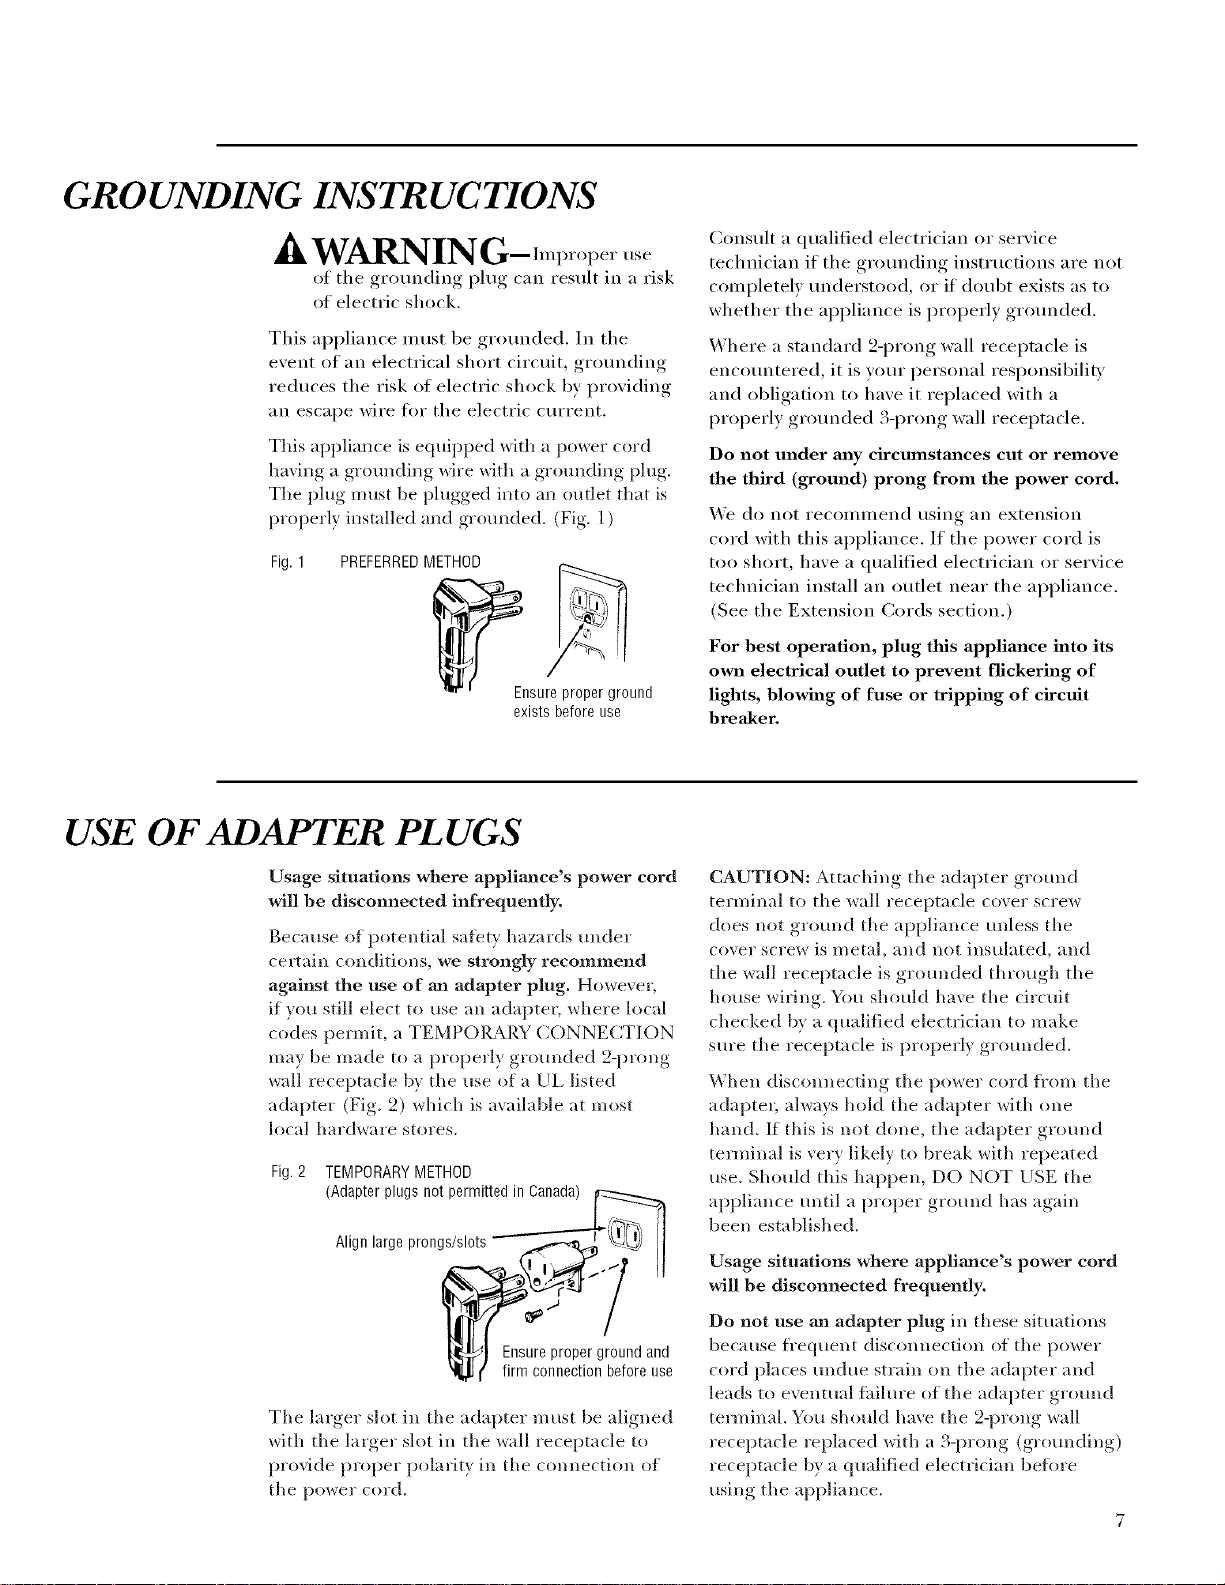
Fig, 1
PREFERREDMETHOD
_nsure propergr?_' r_und
exists before use
Consult a qualified electrician or service
technician if the grounding instructions are not
completely tmderstood, or if doubt exists as to
whether the appliance is properly grounded.
Where a standard 2-prong wall receptacle is
encountered, it is your personal responsibili_'
and obligation to have it replaced with a
properly grounded 3-prong wall receptacle.
Do not under ally circumstances cut or remove
the third (ground) prong from the power cord.
_'e do not recommend using an extension
cord with this appliance. If the power cord is
too short, have a qualified electrician or service
technician install an outlet near the appliance.
(See the Extension Cords section.)
For best operation, plug this appliance into its
own electrical outlet to prevent flickering of
lights, blowing of fuse or tripping of circuit
breaker,
USE OF ADAPTER PLUGS
Usage situations where appliance's power cord
will be disconnected infrequently.
Because of potential sMbtv hazards under
ce**ain conditions, we strongly recommend
against the use of an adapter plug. However,
if you still elect to use an adapter, where local
codes permit, a TEMPORARY CONNE( TION
mav be made to a properly grounded 2-prong
wall receptacle bv the use of a UL listed
adapter (Fig. 2) which is available at most
local hardware stores.
TEMPORARYMETHOD
Fig. 2
(Adapter plugs not permitted in Canada) _,_
Align large prongs/slots _li !_ ]l
_1 Ensure proper ground and
( firm connection before use
The larger slot in the adapter must be aligned
with the larger slot in the wall receptacle to
provide proper polarity in the connection of
the power cord.
CAUTION: Attaching the adapter ground
terminal to the wall receptacle cover screw
does not grotmd the appliance unless the
cover screw is metal, and not insulated, and
the wall receptacle is grotmded through the
house wiring. You should have the circuit
checked by a qualified electrician to make
sure the receptacle is properly grounded.
When disconnecting tile power cord fl'om the
adapter, always hold the adapter with one
hand. If this is not done, the adapter gIotmd
terminal is very likely to break with repeated
use. Should this happen, DO NOT USE the
appliance until a proper grotmd has again
been established.
Usage situations where appliance's power cord
will be disconnected frequently.
Do not use an adapter plug in these situations
because fl'equent disconnection of the power
cord places undue strain on the adapter and
leads to eventual fifilure of the adapter ground
terminal. D)u should have tile 2-prong wall
receptacle replaced with a 3-prong (grounding)
receptacle by a qualified electrician beibre
using the appliance.
7
Page 8

IMPORTANT SAFETY INSTRUCTIONS
USE OF EXTENSION CORDS
A short power supply cord is provided to reduce
the risks resulting fi'om becoming entangled in
or tripping over a longer cord.
Extension cords may be used if'win are careful
in using them.
If an extension co_d is used--
1. The marked electrical rating of the cord set
o_ extension cord should be at least as great
as the electrical rating of the appliance.
2. The extension cord i_ltlSt be a grounding-
type 3-Mre cord and it mtlSt be plugged into
a 3-slot outlet.
3. The longer cord should be arranged so that
it will not drape over the cotmtertop or
tabletop M_ere it can be pulled on by
children or tripped over tmintentionall_.
If xou use an extension cord, the interior light
may flicker and the blower sound may w_r_
when the microwave oven is on, Cooking times
may be longer, too,
SAVE THESE INS TR UC TIONS
Page 9
Features of Your Oven
( ounterlop Microwave Oven
Throug'hout
this manual,
,f_,atures and
appearance
Itztly _(ll" 7
,f)'OIII flO ttl"
model
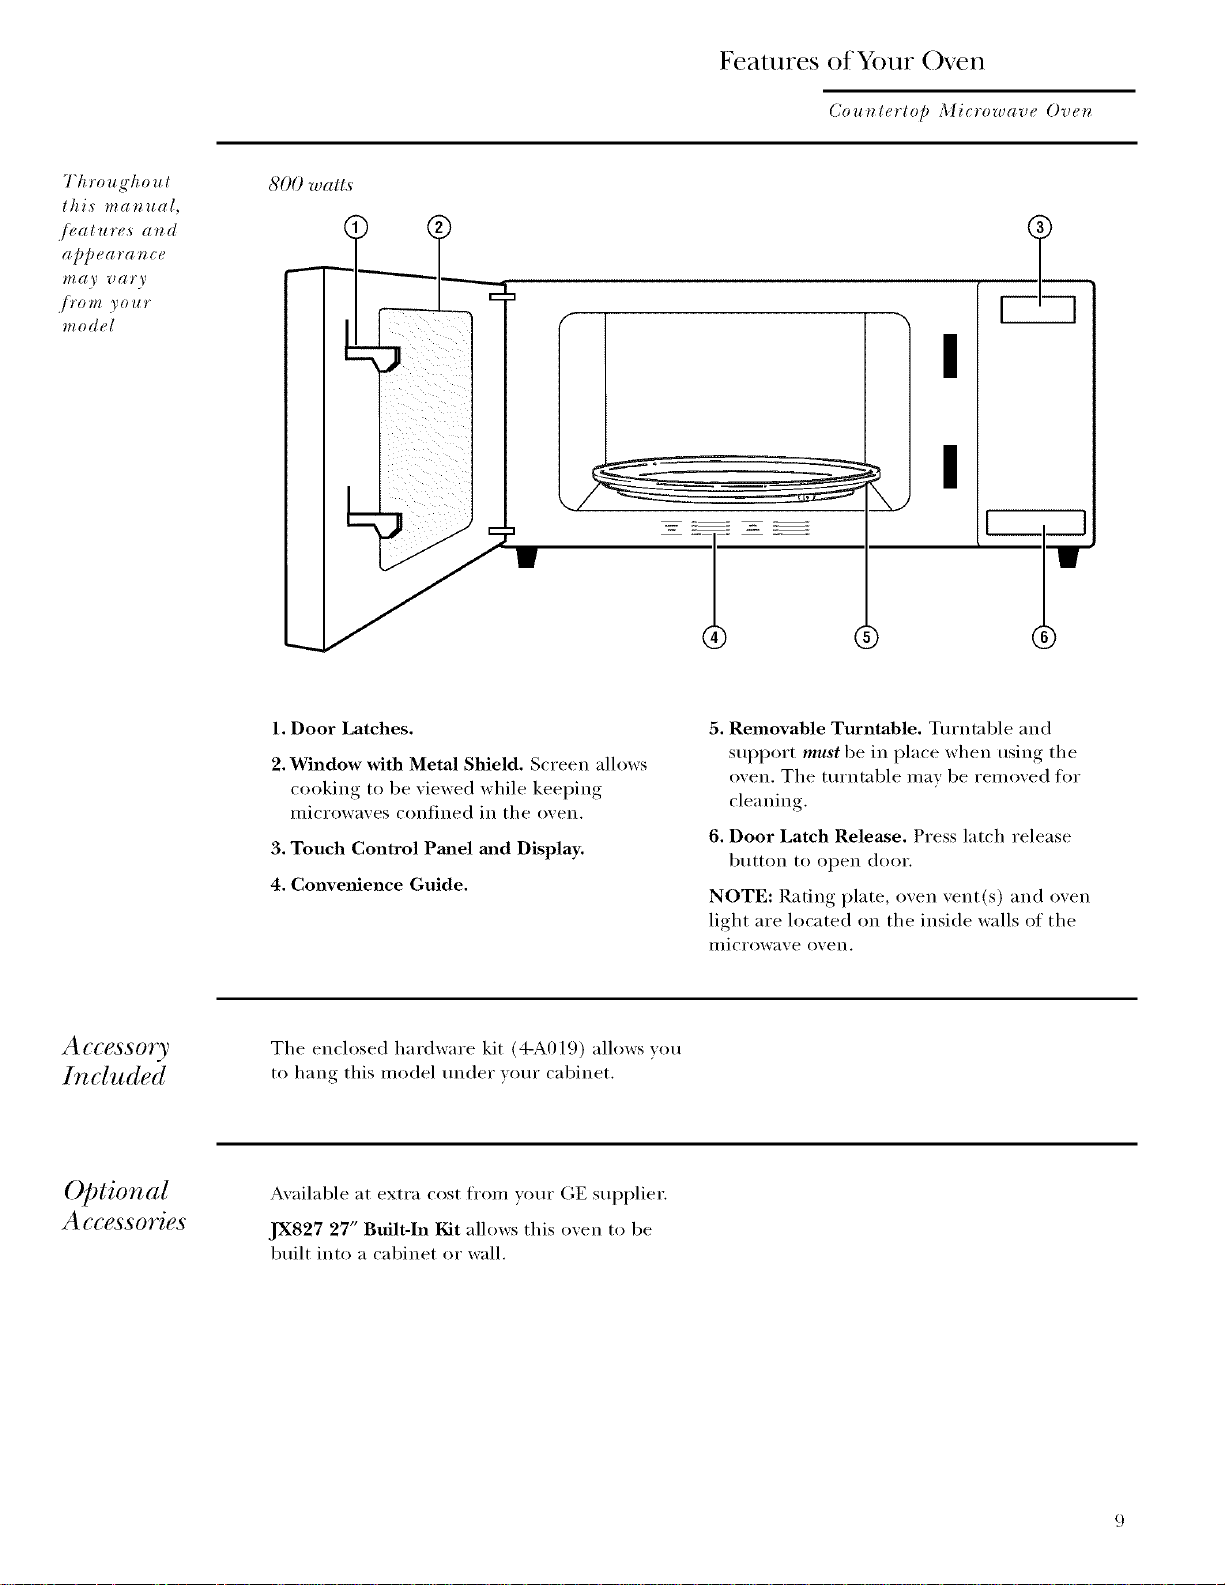
800 watts
I ,L
1. Door Latches.
2. Window with Metal Shield. Screen allows
cooking to be viewed while keeping
i/lici'owa;'es Colllilled ill the ()veil,
3. Touch Control Pmael m_d Display.
4. Convenience Guide.
5. Removable Turntable. Turntable and
support must be in place when using tile
oven. Tile turntnble may be removed fl)r
cleaning.
6. Door Latch Release. Press latch release
b/lttoIl to opeIl door.
NOTE: Rating plate, ()veil vent(s) and ()veil
light are located on tile inside walls of tile
InicI'ow[Ive ()veil,
A ccessory
Included
Optional
Accessories
Tile enclosed hardware kit (h-A0] 9) allows you
to hang this model trader your cabinet.
Available at extra cost fl'om yore" GE supplier,
Jx827 27" Built-In Kit allows this oven to be
built into a cabinet or wall.
Page 10

}_) ll (7(1*1
Gooking Gontrols
( ountertop Mi_rowa'ue O'ue_
time, with the
S('?ISOr ,f_!(ItHf(!S
or with the _luto
DEFROST
TiME COOK AUTO/TiME
®®®
Check the Convenience Guide before you begin.
1. Time Features
Press
TIME COOK
Press once or twice
DEFROST AUTO/TIME
Press twice
EXPRESS COOK
ADD 30 SEC
POWER LEVEL
Enter
Am ount of cooking tim e
Am ount of defl'osting tim e
Starts immediately!
Starts immediately]
Power level 1-10
T
DEFROSTAUTO/TIME ]
2. Sensor Features
Press
POPCORN
BEVERAGE
REHILAT
CHICKEN/FISH
Press once (chicken pieces)
Press twice (fish fillets)
POTATO
VEGETABLE
Press once (fl'esh vegetables)
Press t*_ice (fl_ozen vegetables)
Press three times (camaed vegetables)
3. Auto Feature
Press
DEFROST AUTO/TIME
Press ()lice
10
Enter
Starts immediately!
Starts immediately!
Starts immediately!
Starts immediately!
Starts immediately! more/less time
Starts immediately! more/less time
Enter
Food weight
Option
more/less time
more/less time
more/less time
Page 11

(;hanging the Power Level
Cou_zterto/) Mi_rowa'ue Oven
Variable
Po_ver
Levels l- ! 0
How to Change Power Level
The power level may be entered or changed
immediately after entering the featm'e time fkw
Time Cook, Defl'ost or Express Cook. The
power level may also be changed during time
CO/lntdown.
1. Press TIME COOK or select Time Defl'ost.
2. Select cooking or defl'osting time.
3. Press POWER LEVEL.
4. Select desired power level 1-10.
5. Press START.
Variable power levels add flexibilit_ to yore"
microwave cooking. Tile power levels on your
microwave oven can be compared to the
sur_hce units on a range. Each power level
gives you microwave energy a certain percent
of the time. Power level 7 is microwave energy
70% of the time. Power level 3 is energy 30%
of tile time. Most cooking will be done on
High (power level 10) which gives you
100% power.
Power level 10 will cook fitster but ik_od may
need more fl'equent stirring, rotating or
turning over. A lower setting will cook more
evenly and need less stirring or rotating of
tile fi)od.
Some lk)ods may have better flavor, texture or
appearance if one of the lower settings is used.
Use a lower power level when cooking tbods
that have a tendency to boil oveg such as
scalloped potatoes.
®®
®
®
Here are soi//e exal//ples of rises fk)r 'GHJOIIS
power levels:
POWER LEVEL BEST USES
High 10 Fish, bacon, vegetables,
boiling liquids.
Med-High 7 Gentle cooking of meat
and poultry; baking
casseroles and reheating,
Medium 5 Slow cooking and tenderizing
such as ste_s and less tender
cuts of I'_leat.
Rest periods (when the microwave energy
cycles off) give time t_r tlle fi)od to "equalize"
or transfer heat to the inside of the fk_od. An
example of this is shown with power level 3--
the defrost cycle. ]f microwave energy did not
cycle off, tile outside of the fk)od would cook
beiore tile inside was defrosted.
ix)w 3 Deli'osting without cooking;
simmering; delicate sauces,
Warm 1 Keeping ti_od warm without
ovel cooking; softening butter.
ll
Page 12

Time Features
Cou_ztertop Microwave Ov¢_
7 me Cook
Time Cook I
Allows you to microwave ii_r any time up to
99 minutes and 99 seconds.
Power level 10 (high) is autonmtically set,
but you may change it ior more flexibility.
1. Press TIME COOK.
2. Enter cooking time.
3. Change power level if vou don't want full
power. (Press POWER I,EVEL. Select a
desired power level 1-10.)
4. Press START.
You may open the door dm'ing Time Cook
to check the food. Close the door and press
START to resume cooking.
Time Cook II
Lets you change power levels automatically
dm'ing cooking. Here's how to do it:
1. Press TIME COOK.
,
Enter the fi_t cook time.
TIMECOOK ]
®®
®®
@
3.
Change the power level if you don't want
hill power. (Press POWER I_EVEI. Select
a desired power le\el 1-10.)
4. Press TIME COOK again.
5, Enter the second cook time.
6,
Change the power level if you don't want
fidl power. (Press POWER LEVEl. Select
a desired power level 1-10.)
7. Press START.
At the end of Time Cook I, Time Cook II
CO{lllts down.
12
Page 13

CooMng Guide for Time Cook
NOTE; Use power level 10 (High) unless otherwise noted.
Vegetable
Amount Time Comments
Asparagus
(t]'esh si)ears )
(tkr)zen spears)
Beans
(lk'esh gr(en)
(lk'ozen green)
(tk'ozen lima)
Beets
(t_'esh, whok)
Broccoli
(l_'esh cut)
(t]'esh spears)
(lk'ozen, chopped)
(l]'ozen spears)
Cabbage
(l}'esh)
(wedges)
Carrots
(lk'esh, sliced)
(l_'ozen)
Cauliflower
(llower(ts)
(lk'esh, whole)
(n'ozen)
Corn
(l]'ozen kernel)
Corn on the cob
(fl'esh)
(fl'ozen)
Mixed vegetables
(n'ozen)
Peas
(lk'esh, shelled)
(l_'ozen)
Potatoes
(['resh, c Hl)ed,
white)
(l_'esh, whole,
sw(et or white)
Spinach
(li'esh)
(l]'ozen, chopped
and kal)
Squash
(l]'esh, SHl/U/ler
and yellow)
(wime_; acorn
or l)utlerntll )
1 lb.
10-oz. packag(
1 lb. (ut in half
10-oz. i}ackag(
10-oz. packag(
1 tItlnch
1 lmneh (IV_ to 1_/2lbs.)
1 tiunch (IV_ to 1_/2lbs.)
10-oz. packag(
10-oz. packag(
1 medium head (abom 2 lbs.)
1 lb.
10-oz. packag(
1 medium head
1 medium head
10-oz. package
10-oz. package
1 to 3 ears
1 ('alp
2 to 6 (ars
10-oz. package
2 lbs. unshell(d
10-oz. package
4 potatoes
(6 to 8 oz. each)
1 (6 to 8 oz.)
10 to 16 oz.
10-oz. package
1 lb. sliced
1 to 2 squash
(about l lb. (aeh)
7 to l 0 iIlill.,
Med-High (7)
,T to 8 mill.
12 to 17 inhl.
.3 to (.}rain.
.5 to 9 rain.
18 tO 2.5 rain.
7 to ] 0 IIIJlL
9 to ] 3 mill.
8 to l ] IllhL
7 to l 0 mill.
9 to 14 min.
9 to 17 mill.
5 to 8 min.
4 to 8 min.
3 to 5 min.
l)(r {ar
5 to 7 min.
2 to 4 rain.
p(r (alp
4 to 8 min.
9 to 12 mill.
4 to 8 min.
l l to 14 rain.
2 to 5 min.
5 to 8 min.
5 to 8 min.
4 to 7 min.
7 to 11 min.
In ] ½-qt. oblong glass baking dish, place 1/4 cup water.
Rotate dish al_er half of time.
In l-qt. casserole.
In 1½-qt. cass(role, l}lac( 1/2 {:lq} water.
In 1-qt. casserole, plat:( 2 tabl(spoons uat(]2
In l-(t t. casserole, place 1/4 cup water.
In 2-qt. casserole, place 1/2 cup water=
In 2-qt. casserole, place 1/2 cup watel:
In 2-qt. oblong glass baking dish, pla(e 1/4 cup water.
P,omte dish at_er half of time.
In l-qt. casserole.
h] l-qt. cass(rol(, place 3 talil(spoons war(l:
In 1½- or 2-qt. cass(role, [)lace 1/4 cut) wat(12
In 2- or 3-qt. casserole, place 1/4 cup warm2
In 1½-qt. casserole, l}lac( 1/4 {:lq} water.
h[ l-qt. cass( rol(, plat:( 2 tabl(spoons war([2
h/2-qt, casserol(, place 1/2 cup water2
In 2-qt. casserole, place 1/2 cup water.
In 1-(it. cass(rol(, plat( 2 talil(spoons wat(]2
/n 1-qt. cass(rol(, l)lac( 2 tal)lespoons water.
In 2-qt. ol)long glass baking dish, place corn. If corn
is in husk, use ]lo water; if corn has I)een husked,
add 1/4 cup water. Rearrang( ali(r half of time.
Place in 2-qt. oblong glass I)aking dish.
Coxer with vented plas6e wral). Rearrange al_er
half of time.
/n 1-qt. cass(rol(, l)lac( 3 tal)lespoons water.
In l-qt. casserok, place l/4 cup wale_2
/n 1-qt. cass(rok, plac( 2 tal)lespoons water.
Peel and cm imo 1 inch cub(s. Place in 2-qt.
casserole with l/2 (u I) water. Stir alier half of time.
Pier(e with cooking Iork. [}lace in th( oven, 1 inch
al)art, in circular arrangemem. I _et stand 5 minutes.
In 2-qt. casserok, place washed si)inach.
/n l-qt. cass(rol(, l)lac( 3 tal)lespoons water.
In 1½-qt. casserole, place l/4 cup water.
Cm in half and r(moxe fibrous inembranes, li/2-qt.
ol)loi]g glass baking dish, place squash eut-si(le-(lown.
"Iilrn cul-side-u 1) aller 4 mi]mtes.
13
Page 14

Allows you to defrost for a selected length of
time. See the Defrosting Guide for suggested
times. (Auto Defrost is explained in the Auto
Feature section.)
1. Press DEFP, OST AUTO/TIME twice.
2. Enter defl'osting time.
3. Press START.
4. Turn fl)od over when the oven signals.
5. Press START.
Power level is automatically set at 3, but can be
changed. You can defl'ost small items quickly
by raising the power level atter entering the
time. Power level 7 cuts the total defl'osting
time in about half; power level 10 cuts the total
time to approximately 1/3. However, food will
nee(1 more fl'equent attention than usual.
Time Features
Cot_zte*top Micro'wave O'u¢_
DEFROSTAUTO/TIME ]
®®
At one half of selected defl'osting time, the
oven signals "TURN." At this time, turn fl)od
over and break apart or rearrange pieces tor
more even defl'osting. Shield any warm areas
with small pieces of foil. The oven will
continue to dei/"ost if you don't open the
door and turn the fl)od.
A dull thumping noise may be beard during
deti'osting. This is normal when oven is not
operating at High power.
Defrosting Tips
* Foods frozen in paper or plastic can be
defl'osted in the package. Closed packages
should be slit, pierced or vented AFTER
fl)od has partially defl'osted. Plastic storage
containers should be partially tmcovered.
* FamilDsize, prepackaged fl'ozen dinners can
be deii'osted and microwaved. If the fl)od is
in a till containec transibr it to a microwave-
sate dish.
@
* For more even defl'osting of larger foods,
such as roasts, use Auto Det/"ost. Be sm'e
large meats are completely defl'osted bet)re
cooking.
* Foods that spoil easily should not be allowed
to sit out fl_r more than one horn" after
defl'osting. Room temperature promotes
the growth of harmful bacteria.
* When defl'osted, food should be cool bm
sottened in all areas. If still slightly icy, return
to the microwave very briefly, or let it stand
a iew minutes.
14
Page 15

Defrosting Guide
Food Time Comments
Breads, Cakes
Bread, buns or roils (l 1)iece) 1/2 rain.
Sweet rolls (al)prox. 12 oz.) 2 to 4 rain. Rearrange after half of time.
Fish and Seafood
Fillets, frozen (1 Ill.) 8 to 12 rain.
Shellfish, small pieces (1 lb.) 5 to 8 rain. Pla(e l/Iock in cass(rol(.
Turn o_er and br(ak lip aller first half of time.
Fruit
Plastic pouch--1 or 2 3 to 7 rain.
(1 t)-oz, pa(kage)
Meat
Bacon (1 lb.)
Franks (1 lb.)
Ground meat (1 Ill.)
Roast: beef, lamb, veal, pork
Steaks, chops and cutlets
3 to 6 rain.
3 to 6 min.
5 to 8 min.
10 to 16 illii/, per Ill.
5 to 10 rain. l/er Ill.
Plac( unop(ned package in ov(n. I (t stand 5 mim_tes after deli'osting.
Place m_opened l/ackage ill o_en. Microwave just until li:anks can lie
separated, l,(t stand 5 mimnes, if necessar}, to COml/lete del}:osting.
Turn meat over alier first half of time.
[Is( power lev(1 _\,r;trlIl (1).
Pla(e mlwrapped meat in cooking dish. "rHri/ o\er al/(r lirst half
of time and shield warm areas with loll. Alier second half ot time,
separate pieces with table knilb. I,et stand to COml)h te deli'osting.
Poultry
Chicken, broiler-fryer, cut up
(2_/_,to 3 Ills.)
Chicken, whole (2½ to 3 lbs.)
Cornish hen
Turkey breast (4 to 6 lbs.)
16 to 22 rain.
22 to 28 rain.
9 to 16 rain. l/er Ill.
5 to 10 rain. l/er Ill.
[)lace wrapped chicken in dish. Unwrap and turn over after first
half of time. Al_er second half of tilne, separate pieces and place ill
cooking dish. Microwave 2-4 mim_tes mor(, if necessary. 1(t stand
a lbw minutes to finish deli'osting.
[)lace wrapped chicken in dish. Al_er first half of time, unwrap
and turn chicken over. Shi(ld warm areas with loll. To (omplele
del}:osting, run cool water in cavity mull giblets can be r(moved.
[)lace mlwrapped hen ill o\eI/llreast-side-/_p. "Ihrn o_(r aller lirst half
of time. Run cool water in ca_it\./mtil giblets can be remo_ (d.
Pla(( mlwrapped breast in microwa_e-satb dish llreast-sid(-down.
,\ller lirst half of time, turn breast-side-up and shield warm areas
with loll. Del_'ost Ior second half of time. l.et stand 1-2 hours in
r(l_'igerator to COml/lete del}:osting.
15
Page 16

Time Features
( ountertop Microwave Ove_
Express Cook
Add 30
Seconds
This is a quick way to set cooMng time for
1-6 minutes.
Press one of the Express Cook pads (fl'om
1 to 6) for 1 to 6 minutes of cooking at power
level 10. For example, press the 2 pad Jti_r
2 minutes of cooking time.
The power level can be changed as time is
counting down, Press POWER LEVEL and
enter 1-10.
You can use this feature two ways:
• It will add 30 seconds to the time c(mnting
down each time the pad is touched.
• It can be used as a quick way to set
30 seconds of cooking time.
® ®®
®®
®
16
Page 17

Tile Defl'ost Auto/Time feature gives you two
wa}_s to defl'ost fl'ozen fl)ods. Press DEFROST
AUTO/TIME once for Auto Defi'ost or twice
fl)r Time Defi'ost.
Use Auto Defl'ost fl)r meat, poultry and fish.
lJse Time Defl'ost fl)r most other fi'ozen foods.
Auto Defi'ost automatically sets tile defi'osting
times and power levels to give even defi'osting
results fl)r m eats, poultry and fish.
1. Press DEFROST AUTO/TIME once.
Auto Feature
Cou_ztertop Microwave O'v¢_
DEFROSTAUTO/TIME ]
®®
®®
2. Llsing tile conversion guide below, enter
food weight. For example, press pads I and
2 for 1.2 pomlds (1 pound, 3 ounces).
3. Press START.
(Time Defl'ost is explained ill tile Time
Features section.)
There is a handy guide located on tile inside
i/'ollt of tile ();'ell.
* Remo\ e meat Dora package and place on
microwave-sate dish.
* Twice during defl'ost, tile oven signals
"TUI_N." At each "TIJI_.N" signal, turn tile
fl)od over. Remove defl'osted meat or shield
warm areas with small pieces of flfil.
*_Mter defl'osting, most meats need to stand
5 minutes to complete defl'osting. I,arge
roasts should stand fl)r about 30 minutes.
Conversion Guide
If tile weight of fl)od is stated in pounds and
O/lIICeS_ tile o/lIICeS IlltlSt be converted to
tenths (.1) of a pound.
OtllICeS Po/lllds
1-2 .1
3 .2
4-5 .3
6-7 .4
8 .5
9-10 .6
11 .7
12-13 .8
14-15 .9
@@
@
@
I
I
Guide
17
Page 18

Sensor Features
Cou_zte*'top Microwave Ovet_
Humidity
SeTISOr
P@corn
N07_: Do not us_,
thi,sfi_ature twice in
succession on the
sameJbod portior*--
it mrO' resull in
SgZ](q7¢[)' OZ_g)7 OO/¢g([
or burr*t Jbod.
The Sensor Features detect the increasing
hmniditv released during cooking. The oven
auton/atically a(!justs the cooking time to
WlI'io/IS [yl)es and auio/lnts of too(l,
Do not use the Sensor Features twice in
succession on the same tood portion--it may
result in severely overcooked or burnt tood.
If tood is undercooked after the countdown,
use TIME COOK tot additional cooking time.
• The proper containers and covei_ are
essential tot best sensor cooking.
• Always use microwave-safe containers and
cover them with lids or vented plastic wrap.
Never use tight-sealing plastic covers--
they can prevent steam fl'om escaping and
cause fi)od to overcook.
• Be sure the outside of the cooking container
mid the inside of the microwave oven are
dry beti)i'e placing ti)od in the oven. Beads
_ff moisture turning into stealn can inislead
tile sensoE
To use the Popcorn feature:
1. Follow package instructions, using Micro
Cook if the package is less than 3.0 ounces
or larger than 3.5 ounces. Place the package
of popcorn in the center of the inicrowave.
2. Press POPCORN. The oven starts
iuunedia telv.
If wm open the door while "POPCORN" is
displayed, "SENSOR ERROR" will appear.
Close the dora; press CI,EAR/OFT and
begin again.
If food is undercooked after the countdown
use TIME COOK tot additional cooking time.
During the Popcorn cycle, the turntable will
rotate, stop, then rotate again. This feature
provides Ol)tiumln results.
How to Adjust the Popcorn Program to
Provide a Shorter or Longer Cook Time
If w)u find that the brand of popcorn you
use underpops or overcooks consistently;
you can add or subtract 20-30 seconds to
th e a Utoln a tic popping time.
Covered
Vented
Dry off dishes so they don't misleadthe sensor.
Lesstime Moretime
To add time:
Afier pressing POPCORN, press 9 immediately
alter the oven starts for an extra 20 seconds.
Press 9 again to add another 10 seconds (total
30 seconds additional tilne).
To subtract time:
After pressing POP(_ORN, press 1 immediately
after the oven starts for 20 seconds less cooking
tilne. Press 1 again to reduce cooking tilne
another 10 seconds (total 30 seconds less tilne).
BgT)_(I,_g
NOTE: Do not u,s*¢
thisJkattu_¢ twice in
SIICCP,£_IO_ OH t[z(¢
sa*_w/bod portio,--
it mr9' n_sull in
S_¢_(¢fe@ 07_(¢f(:00]¢('([
or burnt fi*od.
18
Press BEVEIL_GE to heat a cup of coffee or
other beverage.
Drinks heated with the Beverage feature may be
very hot. Remove the contMner with care.
If food is undercooked after the countdown use
TIME COOK tot additional cooking time.
Page 19

How to
Change the
Automatic
Settings
Reheat
NOTK Do :zot I_se
thi.L]i,atl_re t'_vhe i_
sau,._sion on the
sa,zejbod portion--
it may >_ult bz
SgT)gf_![y 07)gl_ OO[fg([
or bl_r,t jbod.
You can at!just tile cooking tinIe fl)r tile
tollowing features to suit your i)ersonal taste.
To reduce time by 10%:
Press ] after the feature pad.
To add 10% to cooking time:
Press 9 after tile teature pad.
Tile Reheat IeatuI'e reheats single se_Mngs of
previously cooked fl)ods or a plate of leftovers.
1. Place covered %()d in tlle oven. Press
REHEAT. Tlle oven starts iinmediatel_.
2. Tlle oven signals when steam is sensed and
tile time renlaining begins counting down.
Do not open tlle oven door until tiIne is
cornering down. If tlle door iS opened, close
it and press START iminediately.
After removing food from the oven, stir,
if possible, to even out the temperature.
Reheated foods may have wide variations
in temperature. Some areas may be
extremely hot.
If fl)od is not hot enough after tile countdown
use TIME COOK for additional reheating
tiIne.
Lesstime Moretime
Some Foods Not Recommended for Use With
Reheat
It is best to use Tiine Cook for these fi)ods:
* Bread prod ucts.
*Foods that must be reheated uncovered.
*Foods that need to be stirred or rotated.
*Foods calling fl)r a dry look or crisp surfilce
after reheating.
• K
Chzchen/ zsh
NOJK Do not Itsv
thi.Lfi:atu_v twi_e in
succe._sion on the
sa,zeJbod portion--
it may mull i_z
S(¢_:(q_(¢[J O_:gfl OO[_g([
or b***_z:f>od.
Potato
NOTE: Do not It,sv
thi.Lfi:atltre twi_ e in
sa(e._sion on the
sa_neJbod portio_z--
il m:O' re,_ull in
s(:vd_:l)' OVd_ OO]Cd[
or blmz: J ood.
Vegetable
N07_: Do _zot It.sv
thi.Lfi:atltre twi_ e in
sau:._sion on the
sa,ze /bod po*Tion--
it m:O'*v._ult in
S:Og,:e{_; OV_:rg oo[¢d[
or Imr,t Jbod.
Use tile Chicken/Fish teature to cook 1-8
pieces of chicken or 4-16 ounces of fish.
1. Place covered chicken or fish ill the oven.
Press CHICKEN/FISH once fl)r chicken
pieces or twice fl)r fish. The oven starts
ilnmediatel>
2. The oven signals when stealn is sensed and
the tinie reniaining begins counting down.
The Potato teature cooks 1/2-2 lbs. of potatoes.
1. Pierce skin with ti)i'k and place potatoes on
tile turntable. If cooking three or inore
potatoes, arrange ill a star i)attern.
2. Press POTATO. The ()veil starts imlnediatelv:
The ()veil signals when stealn is sensed and
the tinie relnaining begins counting down.
Use tile Vegetable feature to cook 4-16 ounces
of fl'esh, fl'ozen or canned vegetables.
1. For fl'esh vegetables, add 2 tablespoons of
water per serving. For fl'ozen vegetables,
tolh)w package instructions fl)r adding water.
Cover with lid or plastic wi'ap. Place vegetables
in the ()veil.
.
Press VEGETABLE once fl)r flesh vegetables,
twice fi)r frozen vegetables or three tinies
ti)i" canned vegetables. Tile oven starts
imniediately. The ()veil signals when stealn is
sensed and tilne reuiaining is counting down.
@
Do not open the oven door until tiIne is counting
down. If tile door is ol/ened, ch)se it and press
START ilmnediately. If fl)od is undercooked
after tile countdown use TIME COOK fi)r
additional cooking tinie.
Do not open the ()veil door until tiIne is counting
down. If the door is oi/ened, close it and press
START iinmediatel}: If fi)od is undercooked
after tile countdown use TIME COOK for
additional cooking tinie.
For fresh mid frozen vegetable features only,
you can a(!just tile autoinatic setting (on solne
inodels). See directions above.
Do not ol)en tile ()veil door tlntil tillle is counting
down. If tile door is ol)ened, close it and press
START ilmnediately. If fi)()d is undercooked
after tile countdown use TIME COOK ti)i"
additional cooking tiine. 19
Page 20

The HEI,P pad displa?s feature information
and helpful hints. Press HEI,P, then select a
feature pad.
Other Features
(ountertop Mi,'rowave Oven
Cooking
Complete
Remi_zder
Child
Lock-Out
To remind vou that you have tood in the oven,
the oven will display "FOOD IS REAIYf" and
beep once a mim_te until you either open the
oven door or press CI_EAR/OFK
You may lock the control panel to prevent the
microwave fi'om being accidentally started or
used by children.
To lock or unlock the controls, press and
hold CLEAP,/OFF tor about 3 seconds.
When the control panel is locked, an "L"
will be displayed to the extreme right.
Display To turn the clock display on or oil; press and
hold 0 %5" about 3 seconds. The Display
On/()ff ii_ature cannot be used while a
cooking ieature is in use. DISPLAYON/OFF
@
Clock
Scroll @eed
Start/l ause
2O
Press to enter the time of clay or to check
the time of clay while microwaving.
1. Press CI_OCK.
2. Enter time of day.
3. Select AM or PM.
4. Press START or CLO(_K.
The scroll speed of the display can be
changed. Press and hold the _,]/PM pad
about three seconds to bring up the display.
Select 1-5 %r slow to fhst scroll speed.
In addition to starting many flmctions,
START/PALISE allows you to stop cooking
without opening the door or clearing the
display.
CLOCK
AM/PM
SCROLL SPEED J
@
Page 21

Reminder
The P,eminder fl_ature can be used like all
alarm clock, and call be used at ally time, even
when the oven is operating. The Reminder
time call be set up to 24 hours later.
1. Press REMINDER.
2. Enter the time wm want tile oven to remind
you. (Be sure the microwave clock shows the
correct time of day.)
3. Select AM or PM.
4,
Press REMINDER. When Reminder signal
occurs, press REMINDEP, to turn it oflLTile
Reminder time ma) be displa) ed b} l)ressin°"
REMINDER.
Delay Start Dela} Sta** allo_s }(m to set tile microwave
to delay cooking up to 24 hours.
1. Press DELAY START.
NOTE: Tile "REM" indicator will remain lit
to show that the Reminder is set. To clear the
Reminder befl_re it occurs, press REMINDER,
then 0. Tile "REM" indicator will no hmger
be lit.
7Vmer
o, /off
Turntable
2, Enter tile time you want tile oven to start.
(Be sure the microwave clock shows the
correct tim e of day.)
3. Select AM or PM.
4. Select an) combination of Defrost
Auto/Time and Time Cook.
5. Press START.
Timer On/Off operates as a minute timer and
can be used at any time, even when the oven
is operating.
1. Press TIMER ON/OFF.
2, Ellter time }oft Vv_/ll[ to co{lll[ (lov_'ll,
3. Press TIMER ON/OFF to start.
For best cooking results, leave tile turntable
(m. It can be turned ofl_ for large dishes. Press
TURNTABI,E to tm'n tile turntable (m or off,
Tile Delay Start time will be displa}ed plus
"DS." Tile oxen _ill automaticall} start at tile
delax ed time.
Tile time of da} ma} be displa) ed b} l)ressim"
CLO(_K.
TIMER
ON/OFF
When time is up, tile oven will signal. To turn
off the timer signal, press TIMER ON/OFF.
NOTE: Tile timer indicator will be lit while
tile timer is operating.
l TURNTABLE]
ON/OFF ]
Sbmetimes the turntable can become too hot to
touch. Be carehd touching the turntable
during and after cooking.
21
Page 22

Microwave Terms
( out_tertop Microwave O'oet_
Arcing Arcing is tile microwave term ibr sparks ill the
oven. Arcing is caused by:
* Metal or foil touching the side of the oven.
* Foil that is not molded to fl_od (upturned
edges act like antennas).
Covering
Covers hold in moisture, allow for mol'e exert
heatin,, and reduce cookin,, time.
O O
Shielding In a regular oven, you shield chicken breasts
or baked f_)ods to prevent ove>browning.
When microwaving, you use small strips of fi_il
to shield thin pa*ls, such as the tips of wings
and legs on poult,> which would cook befiwe
larger parts.
'_Metal such as twist-ties, poultr 5 pins, gold-
rimmed dishes.
* Recx cled papel" towels containing small metal
pieces.
Venting plastic x_rap or coxering xdth wax
paper allows excess steam to escape.
Standing
7 me
_hen xou. cook *_ith regular, ovens, foods such Standing time is especiall) important in
as roasts or cakes al"e allo,#ed to Stalld to fillish n/icro,<ax e cooking. Note that a microwaved
cooking or to set. cake is not placed on a cooling rack.
Venting Alter covering a dish xdth plastic wrap, )ou
vent the l_lastic wral _ b_, tm'ning, back one
COl'llel" so excess steaI// can escape.
22
Page 23

An occasional thorough wiping with a solution
of baldng soda and water keeps the inside fi'esh.
UNPLUG THE CORD BEFORE CLILANING
ANY PART OF THIS OVEN.
(;are and (;leaning
Cou_zte*'top Microwave Ov¢_
How to
Ch?an the
Inside
How to
Ch?an the
Outside
Walls, Floor, Inside Wh_dow, Mode Stirrer
Cover and Metal and Plastic Parts on the Door.
Some spatters can be removed with a paper
towel, others Inay require a dam l) cloth.
Remove greasy spatters with a sudsy cloth,
then rinse with a daln l) cloth. Do not use
abrasive cleaners on oven walls. NEVER USE
A COMMERCIAl, OVEN CI,EANER ON ANY
PART OF YOUR MI(_RO_4%_VE OVEN.
Removable Turntable and Turntable Support.
T(5 i)revent breakage, do not place the turntable
into water just aDer cooking. Wash it careflfllv
in warln, sudsy water or in the dishwashei:
The turntable and SUl)port can be broken if
drol)ped. Relnend)er, (1(5not operate the oven
without the turntable and support in place.
Do not use cleaners containing mnmonia or
alcohol on the microwave oven. Ammmfia or
alcohol can damage the appearance of the
microwave.
Case. Clean the outside of the nficrowave
with a sudsv cloth. Wipe the window clean
with a dam I) cloth.
l
Control Panel and Door. Wipe with a dami)
cloth. Dry thoroughly. Do not use cleaning
sprays, large anlounts of soap and water,
abrasives or shar l) objects on the panel--
thev can damage it. Solne paper towels
can also scratch the control panel.
Door Surface. It's inq)ortant to kee I) the
area clean where the door seals against the
microwave. Llse only nlild, non-abrasive soaps 55i"
detergents applied with a sponge (5I"sod ch)th.
Rinse well.
Stainless Steel. Do not use a steeLwood pa&
it will scratch the surface. To clean the stainless
steel surthce, use a hot, damp cloth with a inild
detergent suitable fl)r stainless steel surtaces.
Lrse a clean, hot, dam I) cloth to renlove soap.
Dry with a dry, clean cloth. Always scrub lightly
in the direction of the grain.
23
Page 24

Before You (;all For Service
(ountertop Microwave Oven
Questions ?
Use this
problem
SO[_)eT"
PROBLEM POSSIBLE CAUSE
OVEN WILL NOT
COME ON
* A fuse in your home may be blown or the circuit breaker tripped.
Replace tuse or reset circuit breaker.
" Unplug your microwave oven, then plug it back in.
* Make sm'e 3-prong plug on oven is fully inse_led into wall receptacle.
CONTROL PANEL
LIGHTED, YET OVEN
WILL NOT START
,, Door not secnrely closed.
" START must be pressed aRer entering cooking selection.
* Another selection entered ah'eady in oven and CI.EAR/OFF not
pressed to cancel it.
" Make sm'e you have entered cooking time after pressing TIME (:()OK.
" CI.EAR/OFF was pressed accidentall> Reset cooking program and
press START.
* Make sure wm entered fl_od weight aRer pressing ALITO DEFROST.
"SENSOR ERROR"
APPEARS ON
DISPLAY
"LOCKED" APPILARS *
ON DISPLAY
" During Popcorn, Beverage, P,eheat, Chicken/Fish, Potato or
Vegetable program, the door was opened beflwe steam could be
detected. Close the dora; press (:LEAR/()FF and begin again.
®
Steam was not detected in maximmn time. Use Time Cook to heat
f()l" l//ore time.
The control panel has been locked. (When the control panel is
locked an "L" will be displayed.) Press and hold (;LEAR/OFF %r
about 3 seconds to mflock the control panel.
FOOD AMOUNT TOO
LARGE FOR SENSOR
o
Sensor Reheat is for single sesMngs of recommended %ods. Use
Time Cook for large amotmts of food.
REHEAT
All these things are normal with your microwave oven:
®Steam or vapor escapillg fron/ arotslld
the door.
* Some TV/radio interference might be
noticed while using your microwave 55\en.
It's similar to the interference caused bv
* I,ight reflection around door or outer case.
"Dimming oven light and change in blower
sound may occm" while operating at power
levels other than high.
* Dull thumping sound while oven is
operating.
other small appliances and does not indicate
a problem with yore" oven. Plug the
microwave into a different electrical circuit,
too\ e the radio or TV as fitr away fl'om the
microwave as possible or check the position
and signal of the TV/radio antemm.
* Turntable starts and stops automatically
during Popcorn.
24
Page 25

GE Service Protection Plus rM
GE, a name recognized _x<wldwide fbr quality and dependability, of;_ers you
Service Protection Plus '"--comprehensive protection on all your appliances--
No Matter What Brand!
Benefits Include:
• Backed by GE
• All brands covered
• Unlimited service calls
• All parts and labor costs included
• No out-of-pocket expenses
• No hidden deductibles
• One 800 nmnber to call
You _ill be complete b s_tisfied x_ith ore" service protection or }on m_} request }our mone} lx_ck
on the remaining value of yore" contn_ct. No questions asked. It's that simple.
Protect your refl'igerator, dishwasher, washer and d_Ter, range, TV, VCR and much more--any brand!
Plus there's no extra charge fk)r emergency service and low monthly financing is available. Even icemaker
coverage and _k_od spoilage protection is o_tbred. You can rest easy, knowing that all your valuable
household products are protected against expensive repairs.
Place ,otlr confidence in (;E and r;dl us in the U.S. toll-free at _UU.DZD.ZZZzt:
for I/lore illforI//a[iOll.
*MI lmlnds <:ov_ led, up m 20 }'_ar_ old, in Ih_ cominemal U.S.
We'll CoverAny Appliance.
Anywhere. Anytime.
,_ (Jill hel-e
Please place in envelope and mail to:
General Electric Company
Warranty Registration Department
EO. Box 32150
Louisville, KY 40232-2150
25
Page 26

Consumer Product Ownership Registration
Deal Customer:
Thank you for purchasing our product and thank you for placing your confidence in us.
'_'e are proud to ha_e you as a customer!
Follow these three steps to protect your new appliance investment:
Complete and mail
your Consumer
Product Ownership
Registration today.
tlave tile peace of
mind of knowing wc
CHII COlltact VOI/ ill
the unlikely event of a
safi,ly modification.
After mailing tile
registration below,
store this document
ill a sati' place. It
contains inlormation
you will need should
you require service.
Our selwice number is
800 GE CARES
(800.432.2737).
Read your Owner's
Malmal carefilllv.
It will help you
operate your lle'*_
appliance properly.
Model Number Serial Number
, , , , , , I I , , , , , , , I
Important: If you did not get a registration card with your
product, detach and return the form below to
ensure that your product is registered, or register
online at ge.com.
.................................................................................................. _(Mt h(r{
Consumer Product Ownership Registration
Serial Number
Model Number
Ms. M*>,. Mixs
Fir,,1 ] I Lasl]
Name I I I I I I I I I Nanl(! I I I I I I I I I I I I
SI r{ (!1 ]
Addr(ss I I I I I I I I I I I I I I I I I I I I I I I I
Apt. # ] I I
CiB' ] I I
l)a_e Placed
In Use III
Monlh
GE Consumer & Industrial
Appliances
General Electric Compang
Louisville, KY40225
ge.com
26
I I I I I I E-lnailAd(h_!_ss*
_,iar I I I Phon(
* Please provide your e-mail address to receive, via e-mail, discounts, special otlbrs and other
important communications fl-om GE Appliances ((;EA).
Check here if you do not want to receixe communications from GEA's careflfllv selected
p_lrt llers.
FAIL[ RE TO COMt}IA_TE AND RE'F[ RN TIIIS CARD DOES NOT DIMINISII Y()[ R
WARRAN'I5 _ RIGIH'S.
For more inlormation about GEA's priva{ 3 and data usage polic 5 go to ge.com and (:lick on
'Pri_acv t}olicv" or call 800.626.2294
Nunll)(!r I I I
I ] (2)de I I I I
I-I,, I-I , , ,
I I I I I I I
Zip I
I
I
Page 27

Consumer Services
With the purchase of your new Monogram appliance, receive the
assurance that if you ever need information or assistance from GE,
we'll be there. All you have to do is call--toll-free?
G E Answer
Centd _
800.626.2000
In-Home Repair
Service
800.444.1845
For Customers
With Special
Needs...
800.626.2000
Whatever your question about any Monogram major appliance, GE Answer Center _'
inflmnation service is available to help. Your call--and wmr question--will be answered
promptly and courteousb:. And you can call any time. GE Answer Cente? Dservice is open
24 hours a day, 7 clays a week.
AGE consmner service protessional will provide expert repair service, scheduled at a time
that's convenient fl)r you. Many GE Consmner Service compan}=operated locations offer
you service today or tomorrow, or at your convenience (7:00 a.m. to 7:00 pan. weekdays,
9:00 a.m. to 2:00 p.m. Saturdays). Our fhctorwtrained technicians know your appliance
inside and out--so most repairs can be handled in just one visit.
............_1 I /I I _
_.,o,
GE offe_ Braille controls for a varlet) of GE appliances, and a
brochm'e to assist in I _ " _ _ barrml_free kitchen for persons
*dth limited mobilit*.
)1 _llllln <r / " "
........U,77
_7
..... '_" ggg2="L_
Consmners with impaired hearing or speech who haxe access to
a TDD or a conventional telet?pewriter ma} call 8(/0.TDD.GEA(_
(8011.833.4322) to request inf(mnation or service.
Service Contracts"
800. 626. 2224
Parts and
Accessories
800.626.2002
S_e_N
You can have the secure teeling that GE Consumer Selwice will still be there atter yore"
warrant_ expires. Purchase a GE contract while your warranty is still in effect and you'll
receive a substantial discount. With a multiple-year contract, you're assured of future
service at today's prices.
Individuals qualified to service their own appliances can have parts or accessories sent direct.Iv
to their home. The GE parts system provides access to over 47,000 parts...and all GE Genuine
Renewal Parts are fully warranted. VISA, MasterCard and Discover cards are accepted.
User maintenaaace instructions contained in this manuaJ cover procedures intended to be
performed by any user. Other servicing generally should be referred to qualified service
personnel. Caution must be exercised, since improper servicing may cause unsafe operation.
27
Page 28

WARRANTY
YOUR MONOGRAM MICROWAVE OVEN WARRANTY
Staple sales slip or cancelled check here. Proof of original
purchase date is needed to obtain service under warranty,
WHATIS
C 0 VERED
WHAT IS NOT
COVERED
LIMITED ONE-YEAR WARRANTY
For one vear_ from date of origimd, purchase, _e will proxide, free of charge, , parts and
service labor in _our home to repair or replace any part of the microwave oven their iails
because of a manufilcturing defect.
LIMITED ADDITIONAL FIVE-YEAR WARRANTY
For tile second throuoh_ tile fifth _ear from d_lte of original_ purch;_se, we _ill provide,
free of charge, a rep1;_cement magnetron tube if tile m;_gnetron tube fhils because of
a mauufactm'ing defect. You pax for am service kd)or ch'a" ,es
o
Service trips to your home to teach you
bow to use the product,
o
Replacement of house fuses or resetting
of circuit breakers.
o
Damage to product caused by accident,
fire, floods or acts of God.
o
Product not accessible to provide
required service.
o
Failure of the product or damage to the
product if it is abused, misused (for
example, cavity arcing from wire rack or
* Damage caused after delivery,
* Improper installation, delivery or
maintenance.
If you have an installation problem,
contact your dealer or installer, You are
responsible for providing adequate
electrical, exhausting and other
connecting facilities.
Incidental or consequential damages
caused by possible defects with tiffs
appliance,
metal/foil), or used for other than the
intended purpose or used commercially,
DE68-O2426A
49-40493
01-06 JR
Printed in Malaysia
EXCLUSIONOFIMPLIEDWARRANTIES--Yoursole andexclusiveremedyis productrepair
asprovidedin thisLimitedWarranty.Anyimpliedwarranties,includingtheimpliedwarranties
ofmerchantability or fitnessfora particularpurpose,arelimitedto oneyearortheshortest
period allowed bylaw.
This warrant_ is extended to tile original purchaser and any succeeding owner for produrts
pro'chased fi)r home use within tile USA. If tile product is located ill all area wheie service
by a GE Authorized SeiMcer is not a_dlable, you may be responsible flw a trip charge or you
may be required to bring the product to an Authorized GE Service Location fl_r service. In
Alaska, the warnmty exdudes the service calls to your home.
Some states do not allow tile exclusion or limitation of incidental or consequential damages,
so the above limitation or exclusion may not apply to v(m. This warranty gives you specific
legal rights, and you may also have other rights which x:_ry ii'om state to state. To know what
your legal rights are ill v(mr state, consult your local or state consumer aflhirs office or your
state's Attorney General.
Warrantor: General Electric Company. Louisville, KY 40225
GE Consumer & Industriol
Applionces
General Electric Compon U
Louisville, K¥ 40225
ge.com
 Loading...