

GE ZDBT240PABS, ZDWT240PABS Installation Guide
Installation
Instructions
If you have questions, ca!l800.626,2000orvisit ourwebsite at:ww.monogram.com
Wine Reserve
ZDWT240
and
Beverage Center
ZDBT240
DesignGuide
With InstallationInstructions
Monogram:
Safety Information
BEFORE YOU BEGIN:
Read these instructions completely and carefully,
IMPORTANT - S_,,e_heseinst,uctions
for local inspector's use.
IMPORTANT - Obse,,e_,ll_.,eH_ing
codes and ordinances.
Note to Installer - Be sure to leaxe these
instructions with the Consumer.
Note to Consumer - Keep these instructions with
xour (-)wner's Manual for flmue reference.
WARNING - his li ,n ere.stbe
properly gmtmded. See "(;rom_dinf', page 4.
AVERTISSEMENT -
Cet appareil &fit _tre correctement raise _'lla terre.
Consulter <<Mise _'l la terre>>, page 4.
lf)ou recei',ed a damaged wine reserxe or beverage
center, you should immediately contact your dealer
or builder.
Skill Level - Installation requires basic mechanical
skills. Proper installation is the responsibility of the
installer. Product taihu'e due to improper installation
is not covered trader the GE Appliance _\'arrantv.
WARNINGS:
• Use this appliance only for its intended pm])ose.
• Immediately repair or replace electrical service
cords that become frayed or damaged.
• Uni_lug the trait heft)re cleaning or making repairs.
• ]_epairs should be made by a qualified service
technician.
AVERTISSEMENT :
• ll ne taut utiliser cet appareil que pour l'usage
pore" lequel il a _t_ construit.
• I1 taut r_parer ou remplacer imm&liatement tout
cordon d'alimentation _lectrique efliloch_ ou
endommag¢:.
• D_brancher le bar ou le r_fl'ig_rateur a vin a\m_t
le nettoyage ou route intervention.
• I,es r_i_arations doivent _tre taites par tm
technicien qualifi_.
For Monogrmn local service in your area, call
1.800.444.1845
For Monogrmn service in Canada, call
1.888.880.3030
For Monogram Parts m_d Accessories, call
1.800.626.2002.
_v. monogram.coin
CONTENTS
DesignGuide
The Installation Space............................3
Product Clearances ................................3
InstallationInstructions
Tools,Hardware .......................................4
Groundingthe Product ...........................4
StainingWood Drawer Fronts...............4
Step 1,RemovePackaging ....................4
Step 2,Leveling........................................5
2
Step3, ConnectPower ...........................5
Step4,Slide Productinto Cutout..........5
Step 5,ChangetheToekick....................5
Step6, SetTemperatureControls .........5
Design Guide
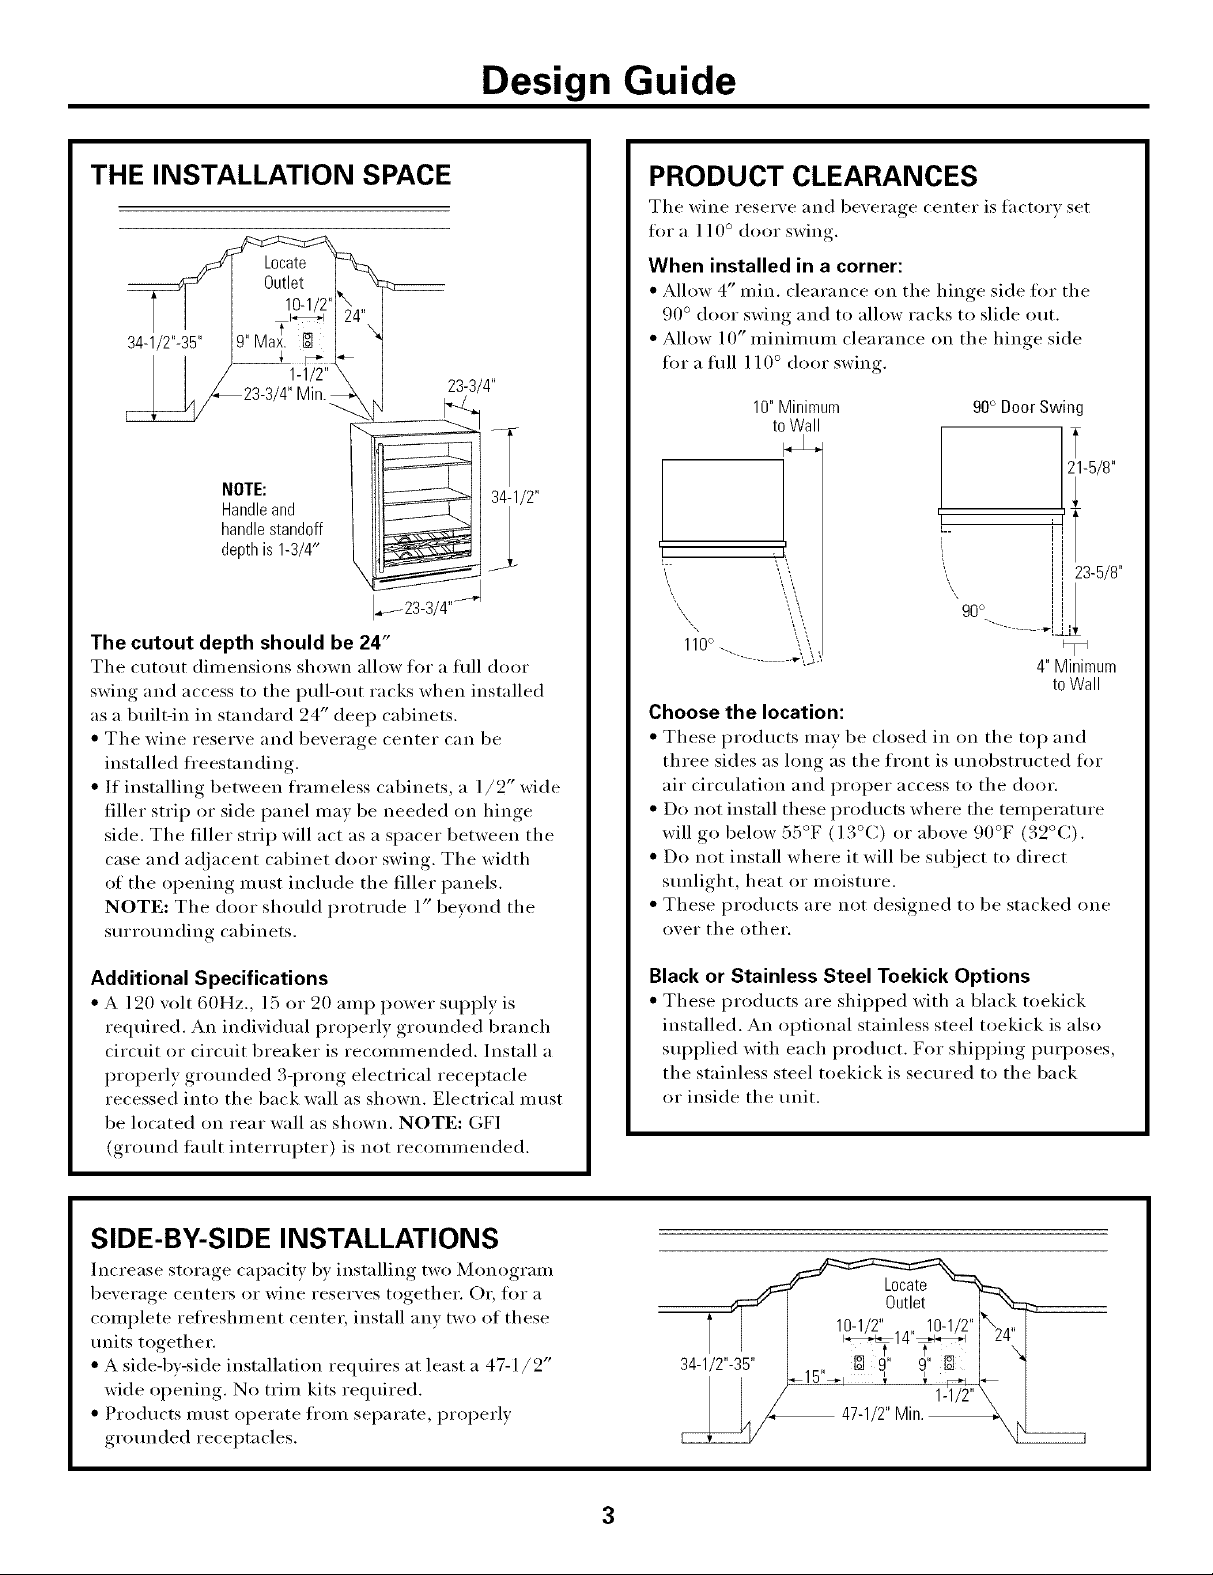
THE INSTALLATION SPACE
34-1/2"-35"
23-3/4"
Handle and
handle standoff
depth is 1-3/4"
I.,_J 23-3/4"f"
The cutout depth should be 24"
The cutout dimensions shown allow hn" a full door
swing and access to the pull-out racks when installed
as a built-in in standard 24" deep cabinets.
• The wine reserve and beverage center can be
installed fl'eestanding.
• If installing between frameless cabinets, a 1/2" wide
filler strip or side panel may be needed on hinge
side. The filler strip will act as a spacer between the
case and ac!iacent cabinet door swing. The width
of the opening must include the filler panels.
NOTE: The door should protrude 1" beyond the
sm'rounding cabinets.
PRODUCT CLEARANCES
The wine reserve and beverage center is thctorv set
fin" a l l 0 ° door swing.
When installed in a corner:
• Allow 4" rain. clearance on the hinge side Ira" the
90 ° door swing and to allow racks to slide out.
• Allow 10" minimum clearance on the hinge side
for a flfll 1 10 ° door swing.
10" Minimum
to Wall
i
, L
110° .. \
Choose the location:
• These products may be closed in on the top and
three sides as long as the front is unobstHtcted fi)r
air circulation and proper access to the door.
• Do not install these products where the temperature
will go below 55°F (] 3°C) or above 90°F (32°C).
• Do not install where it will be subject to direct
stmlight, heat or moistm'e.
• These products are not designed to be stacked one
over the other.
90° Door Swing
1-5/8"
iI
i! 23-5/8"
4" Minimum
to Wall
Additional Specifications
• A 120 volt 60Hz., 15 or 20 amp power supply is
required. An individual l)roperly grotmded branch
circuit or circuit breaker is recommended. Install a
properly grotmded 3-prong electrical receptacle
recessed into the back wall as shown. Electrical m ust
be located on rear wall as shown. NOTE: OF]
(grotmd tault interrupter) is not recommended.
SIDE-BY-SIDE INSTALLATIONS
Increase storage cai)acit.v by installing two Monogram
beverage centers or wine reserves together. Or, for a
complete refl'eshment center, install any two of these
traits together.
• A side-by-side installation requires at least a 47-1/2"
wide opening. No trim kits required.
• Products must operate fl'om separate, i)roperly
grotmded receptacles.
Black or Stainless Steel Toekick Options
• These products are shii)ped with a black toekick
installed. An optional stainless steel toekick is also
suI)plied with each product. For shiI)ping pm'I)oses,
the stainless steel toekick is secured to the back
o;cinside the unit.
1_14"_10-1_/2" [ _24 '' [
34-1/2"-35"
47-1/2" Min.
3
 Loading...