

Page 1

Owner’s
Manual
Dishwasher
ZBD6800K
ZBD6880K
ZBD6890K
Page 2

2
Consumer Information
Dishwasher
Your new Monogram dishwasher makes an eloquent statement of style, convenience and kitchen
planning flexibility. Whether you chose it for its purity of design, practical features or assiduous
attention to detail—or for all of these reasons—you’ll find that your Monogram dishwasher’s
superior blend of form and function will delight you for years to come.
The information on the following pages will help you operate and maintain your dishwasher
properly.
If you have any other questions, visit our Website at: www.monogram.com
Introduction
Contents
Appliance Registration . . . . . . . . . . . .3, 23, 24
Care and Cleaning . . . . . . . . . . . . . . . . . . . .15
Consumer Services . . . . . . . . . . . . . . . . . .3, 19
Model and Serial Number Location . . . . . . .3
Operating Instructions . . . . . . . . . . . . . . .6–14
Control Panel and Operation . . . . . . . .6–8
Water Temperature . . . . . . . . . . . . . . . . . .9
Rinse Agent . . . . . . . . . . . . . . . . . . . . . . . .9
Dish Preparation Prior to Loading . . . . . .9
Detergents . . . . . . . . . . . . . . . . . . . . . . . .10
Dishwasher Racks . . . . . . . . . . . . . . . .11–14
Problem Solver . . . . . . . . . . . . . . . . . . . .16–18
Safety Instructions . . . . . . . . . . . . . . . . . . .4, 5
USA Warranty . . . . . . . . . . . . . . . . . . . . . . . .21
Canada Warranty . . . . . . . . . . . . . . . . . . . . .22
Page 3

3
Consumer Information
Dishwasher
Before
using
your
dishwasher
Read this manual carefully. It is intended to
help you operate and maintain your new
dishwasher properly.
Keep it handy for answers to your questions.
If you don’t understand something or need
more help, there is a list of toll-free consumer
service numbers included on the Consumer
Services page in the back section of this
manual.
OR
Visit our Website at: www.monogram.com
Write
down the
model &
serial
numbers
You can locate your model and serial numbers
on the tub wall just inside the door.
Before sending in the card, please write these
numbers here:
Model Number
Serial Number
Use these numbers in any correspondence or
service calls concerning your dishwasher.
If you received
a damaged
dishwasher
Immediately contact the dealer (or builder)
that sold you the dishwasher.
Save time
& money
Before you request service, check the Problem
Solver in the back of this manual.
It lists causes of minor operating problems that
you can correct yourself.
If you
need service
To obtain service, see the Consumer Services
page in the back of this manual.
We’re proud of our service and want you to be
pleased. If for some reason you are not happy
with the service you receive, here are steps to
follow for further help.
For customers in the USA:
FIRST, contact the people who serviced your
appliance. Explain why you are not pleased.
In most cases, this will solve the problem.
NEXT, if you are still not pleased, contact us
on our website, write all the details—including
your phone number—or write to:
Manager, Customer Relations
GE Appliances
Appliance Park
Louisville, KY 40225
For customers in Canada:
FIRST, contact the people who serviced your
appliance. Explain why you are not pleased.
In most cases, this will solve the problem.
NEXT, if you are still not pleased, write all the
details—including your phone number—to:
Manager, Consumer Relations
Camco Inc.
1 Factory Lane, Suite 310
Moncton, N.B. E1C 9M3
Page 4

Junked or abandoned dishwashers are
dangerous…even if they will sit for “just a
few days.” If you are getting rid of your old
dishwasher, please follow the instructions below
to help prevent accidents.
Before You Throw Away Your Old Dishwasher:
•Take off the door of the washing compartment
or remove the door latch keeper (as shown).
4
IMPORTANT SAFETY INSTRUCTIONS
WARNING!
For your safety, the information in this manual
must be followed to minimize the risk of fire,
explosion, electric shock, or to prevent property
damage, personal injury, or loss of life.
•Do not tamper with controls.
•Do not abuse, sit on, or stand on the door or
dish rack of the dishwasher.
•Do not discard a dishwasher without first
removing the door or removing the door latch.
•Do not store or use combustible materials,
gasoline or other flammable vapors and
liquids
in the vicinity of this or any other appliance.
•Do not allow children to play inside, on or with
this appliance or any discarded appliance.
•Do not allow children to play around the
dishwasher when opening and closing the door
due to possibility of small fingers being pinched
in the door.
WATER HEATER SAFETY
Under certain conditions hydrogen gas may be
produced in a water heater that has not been
used for two weeks or more. HYDROGEN
GAS IS EXPLOSIVE.
If the hot water has not been used for two
weeks or more, prevent the possibility of
damage or injury by turning on all hot water
faucets and allowing them to run for several
minutes. Do this before using any electrical
appliance which is connected to the hot water
system. This simple procedure will allow any
built-up hydrogen gas to escape. Since the gas
is flammable, do not smoke or use an open
flame or appliance during this process.
PROPER DISPOSAL OF THE DISHWASHER
WARNING! RISK OF CHILD ENTRAPMENT
Door latch
keeper
Page 5

5
PROPER INSTALLATION AND MAINTENANCE
This dishwasher must be properly installed
and located in accordance with the Installation
Instructions before it is used. If you did not
receive an Installation Instructions sheet with
your dishwasher, you can receive one by visiting
our Website at www.monogram.com
.
• Connect to a grounded metal, permanent
wiring system; or run an equipmentgrounding conductor with the circuit
conductors and connect to the equipmentgrounding terminal or lead of the appliance.
• Improper connection of the equipmentgrounding conductor can result in a risk
of electric shock. Check with a qualified
electrician or service representative if you are
in doubt whether the appliance is properly
grounded.
• Use supply conductors rated at least 75º C
(167º F).
• Dispose of discarded appliances and shipping
or packing material properly.
• Do not attempt to repair or replace any part
of your dishwasher unless it is specifically
recommended in this manual. All other
servicing should be referred to a qualified
technician.
• To minimize the possibility of electric shock,
disconnect this appliance from the power
supply before attempting any maintenance.
NOTE: Turning the dishwasher off does not
disconnect the appliance from the power
supply. We recommend having a qualified
technician service your appliance.
Use this appliance only for its intended purpose as
described in this Owner’s Manual.
CAUTION: Contents washed in Anti-
Bacterial cycle may be hot to the touch. Use care
before unloading.
• Use only powder, tabs or liquid detergents or wetting
agents recommended for use in a dishwasher and
keep them out of the reach of children. Cascade®,
Cascade Complete®and Electrasol®Automatic
Dishwashing Detergents and Jet-Dry®and Cascade
Rinse Aid®rinse agents have been approved for use
in all Monogram Dishwashers.
• Using a detergent that is not specifically designed for
dishwashers will cause the dishwasher to fill with suds.
• Locate sharp items so that they are not likely to
damage the door seal.
• Load sharp knives with the handles up to reduce the
risk of cut-type injuries.
• Do not wash plastic items unless marked dishwasher
safe or the equivalent. For plastic items not so marked,
check the manufacturer’s recommendations.
• Non-Dishware Items: Do not wash items such as
electronic air cleaner filters, furnace filters and paint
brushes in your dishwasher. Damage to dishwasher
and discoloration or staining of dishwasher may
result.
• Do not touch the heating element during or
immediately after use.
• Do not operate your dishwasher unless all enclosure
panels are properly in place.
• Close supervision is necessary if this appliance is used
by or near children.
• Load light plastic items so they will not become
dislodged and drop to the bottom of the
dishwasher—they might come into contact
with the heating element and be damaged.
WHEN USING YOUR DISHWASHER
READ AND FOLLOW THIS SAFETY INFORMATION CAREFULLY.
SAVE THESE INSTRUCTIONS
IMPORTANT SAFETY INSTRUCTIONS
Page 6

6
Dishwasher
Control
Settings
1. Wash Cycles Use the arrow pads to scroll through the wash cycles. The light above or next to
the selected pad will be ON to indicate which WASH CYCLE has been selected.
NOTE: This dishwasher is equipped with an ExtraClean™Sensor with automatic
temperature control; therefore, cycle length and time may vary depending on
soil (heavy, medium, light) and temperature conditions.
ANTI Heavy 10.0 gallons, 93 minutes
BACTERIAL Medium 8.6 gallons, 90 minutes
Light 7.2 gallons, 90 minutes
This cycle raises the water temperature in the final rinse to sanitize your
dishware. The cycle length will vary depending on the temperature of your inlet
water.
NOTE: The Anti-Bacterial cycle is monitored for sanitization requirements.
If the cycle is interrupted during or after the main wash portion or if the
incoming water temperature is so low that adequate water heating cannot
be achieved, the sanitizing conditions may not be met. In these cases, the
sanitized light will not illuminate at the end of the cycle.
NOTE: NSF certified residential dishwashers are not intended for licensed food
establishments.
COOKWARE Heavy 11.4 gallons, 95 minutes
Medium 10.0 gallons, 71 minutes
Light 10.0 gallons, 66 minutes
This cycle is meant for heavily soiled dishes or cookware with dried-on or
baked-on soils. This cycle may not remove burned-on foods. Everyday dishes are
safe to be used in this cycle.
NORMAL Heavy 9.9 gallons, 74 minutes
Medium 7.0 gallons, 61 minutes
Light 5.6 gallons, 48 minutes
This cycle is for medium/heavily soiled dishes and glassware.
SPEED CYCLE Heavy 9.3 gallons, 36 minutes
(on some models)
Medium 7.2 gallons, 36 minutes
Light 5.7 gallons, 33 minutes
This cycle is for everyday dishes and glassware.
CHINA Heavy 10.0 gallons, 49 minutes
CRYSTAL Medium 7.2 gallons, 36 minutes
Light 7.2 gallons, 36 minutes
This cycle is for lightly soiled china and crystal.
You can locate
your model
number on the
tub wall just
inside the door.
Throughout this
manual, features
and appearance
may vary from
your model.
8
1 43
2
5 6
7
910
1 3
2
5 6
7
910
NSF INTERNATIONAL
Meets NSF Standard 184 Sanitization and Cleaning
performance of household spray-type dishwashers.
R
E
S
I
D
E
N
T
I
A
L
Control Panel
ZBD6890
ZBD6800 and ZBD6880
Page 7

7
GLASSES Heavy 10.0 gal., 45 min.
(on some models) Medium 7.2 gal., 33 min.
Light 7.2 gal., 32 min.
This cycle is specifically designed for glasses.
PLASTICS Heavy 9.9 gal., 119 min.
CYCLE Medium 7.0 gal., 106 min.
(on some models) Light 5.6 gal., 93 min.
This cycle is specifically designed to reduce the risk of melting plastic items
and improve plastic drying for dishwasher safe plastic items.
RINSE ONLY Heavy 2.9 gallons, 7 minutes
Light 1.4 gallons, 3 minutes
For rinsing partial loads that will be washed later. Do not use detergent with
this cycle.
2. DELAY START — This option will allow you to delay the start time of any wash cycle for up to
24 hours (depending on model).
• Select the delay start time you want by pressing the DELAY START pad.
Multiple or continuous pressing will increment the delay hours. Select the
number of hours you want to delay the start of the cycle. Then press
START/RESET.
• After closing the door, the machine will count down and automatically start
at the correct time.
NOTE: To cancel the DELAY START selection before the cycle begins, press
the DELAY START pad until the display is blank. Pressing START/RESET will
not cancel delay hours.
3. ADDED HEAT — When selected, the cycle will run longer with heating elements on to improve
both wash and dry performance.
NOTE: Cannot be selected with RINSE ONLY cycle.
4. PRE WASH — For use with heavily soilded and/or dried-on, baked-on soils. This option
(on some models) MUST be selected PRIOR to starting the cycle. This option adds 16 minutes
to the cycle time.
NOTE: Cannot be selected with RINSE ONLY cycle.
5. HEATED — When selected, turns the drying heater and fan on for fast
DRY drying. This option will extend the cycle time by 30 minutes for
the ANTI-BACTERIAL cycle, 38 minutes for the NORMAL cycle and
COOKWARE cycle, 8 minutes for the SPEED cycle, 15 minutes for the
PLASTICS cycle and 30 minutes for all other cycles. When this is NOT
selected, the fan will turn on to dry your dishes without added heat—and
energy is saved.
NOTE: Cannot be selected with RINSE ONLY cycle.
6. LOCK — You can lock the controls to prevent any selections from being made. Or you
can lock the controls after you have started a cycle.
Children cannot accidentally start the dishwasher by touching pads with this
option selected.
To lock the dishwasher, press and hold the HEATED DRY pad for 3 seconds.
To unlock the dishwasher controls, press and hold the HEATED DRY pad for
3 seconds. The light above the LOCK will turn off.
Dishwasher
Control Panel/Operation
Page 8

8
7. Status Indicator Lights
(indicators vary by model)
The Status display tells you what is happening while the dishwasher is in
operation and may flash, indicating a malfunction. The lights will come ON,
indicating the sequence of the dishwasher operation.
SENSING Displayed while the ExtraClean™Sensor is measuring the amount of soil and
temperature of water. The dishwasher will adjust the selected cycle to achieve
optimal performance.
ADD-A-DISH Displayed during prewash indicating that dishes added now will still be
cleaned.
WASHING Displayed during prewash, main wash and rinse periods.
DRYING Displayed during HEATED DRY.
SANITIZED Displayed when cycle has met sanitization conditions.
CLEAN Displayed when a wash cycle is complete and enhancements are complete.
8. Time Remaining Display (on some models)
During operation, the display shows the minutes remaining until the cycle is complete. The
display may adjust the remaining time while the Sensing light is on. During a delay start, the
display will show hours of time remaining until the cycle starts.
9. START/RESET
START — After selecting the cycle and desired enhancements, press the START/RESET
pad to ready the dishwasher to begin the cycle. Close the door to start the
cycle or begin the DELAY START countdown. When the cycle starts, the water
fill begins and approximately 60 seconds later the wash action begins.
The dishwasher will always display your last selection and enhancements. If
you don’t want to change the settings, simply press the START/RESET pad to
ready the dishwasher and close the door to begin the cycle.
NOTE: If the START/RESET light is flashing, the cycle has been
interrupted by pressing the START/RESET pad. Light will quit flashing
after the dishwasher automatically drains out the water.
Also, if a power failure occurs NORMAL and HEATED DRY will automatically
be programmed. Make any new selections and press the START/RESET pad
to begin the new cycle.
RESET — Open the door slowly to prevent splash-out. Press the START/RESET pad
to cancel the cycle and close the door. Dishwasher will pump out and turn off
after 70 seconds.
NOTE: If the START/RESET light is flashing, close the door until the water
pumps out (this takes approximately 70 seconds) and the light stops flashing.
When the light stops flashing, the dishwasher can be reprogrammed and
restarted.
10. Clean — The CLEAN light is illuminated and a double beep will sound when the
selected cycle and enhancements are complete. You may remove the dishes
at any time. Note the high-efficiency fan will run quietly for 30 minutes to 4
hours (depending on selected cycle) after the CLEAN light is illuminated to
continue drying the dishes. This can be interrupted by opening the door and
pressing any keypad.
NOTE: To turn off the double beep indicator (or re-activate it if it was
previously disengaged), press the HEATED DRY pad 5 times within 3
seconds. A triple beep will sound to indicate the end-of-cycle beep option
has been toggled.
Dishwasher
Control Panel/Operation
Page 9

9
Using the dishwasher
Dishwasher
Water Temperature
The entering water must be at least 120°F
(49°C) and
not more than 150°F (66°C), for
effective cleaning and to prevent dish damage.
Check the water temperature with a candy or
meat thermometer. Turn on the hot water faucet
nearest the dishwasher, place the thermometer
in a glass and let the water run continuously into
the glass until the temperature stops rising.
Use a
Rinse
Agent
A rinse agent improves dry performance,
reduces spots and prevents new film build-up
on your dishes, glasses, flatware, cookware
and plastic. Jet-Dry®and Cascade Rinse Aid
®
are recommended rinse agents for Monogram
Dishwashers.
The rinse agent dispenser holds 3.5 oz. of rinse
agent. Under normal conditions, this will last
approximately one month. Try to keep it full,
but do not overfill.
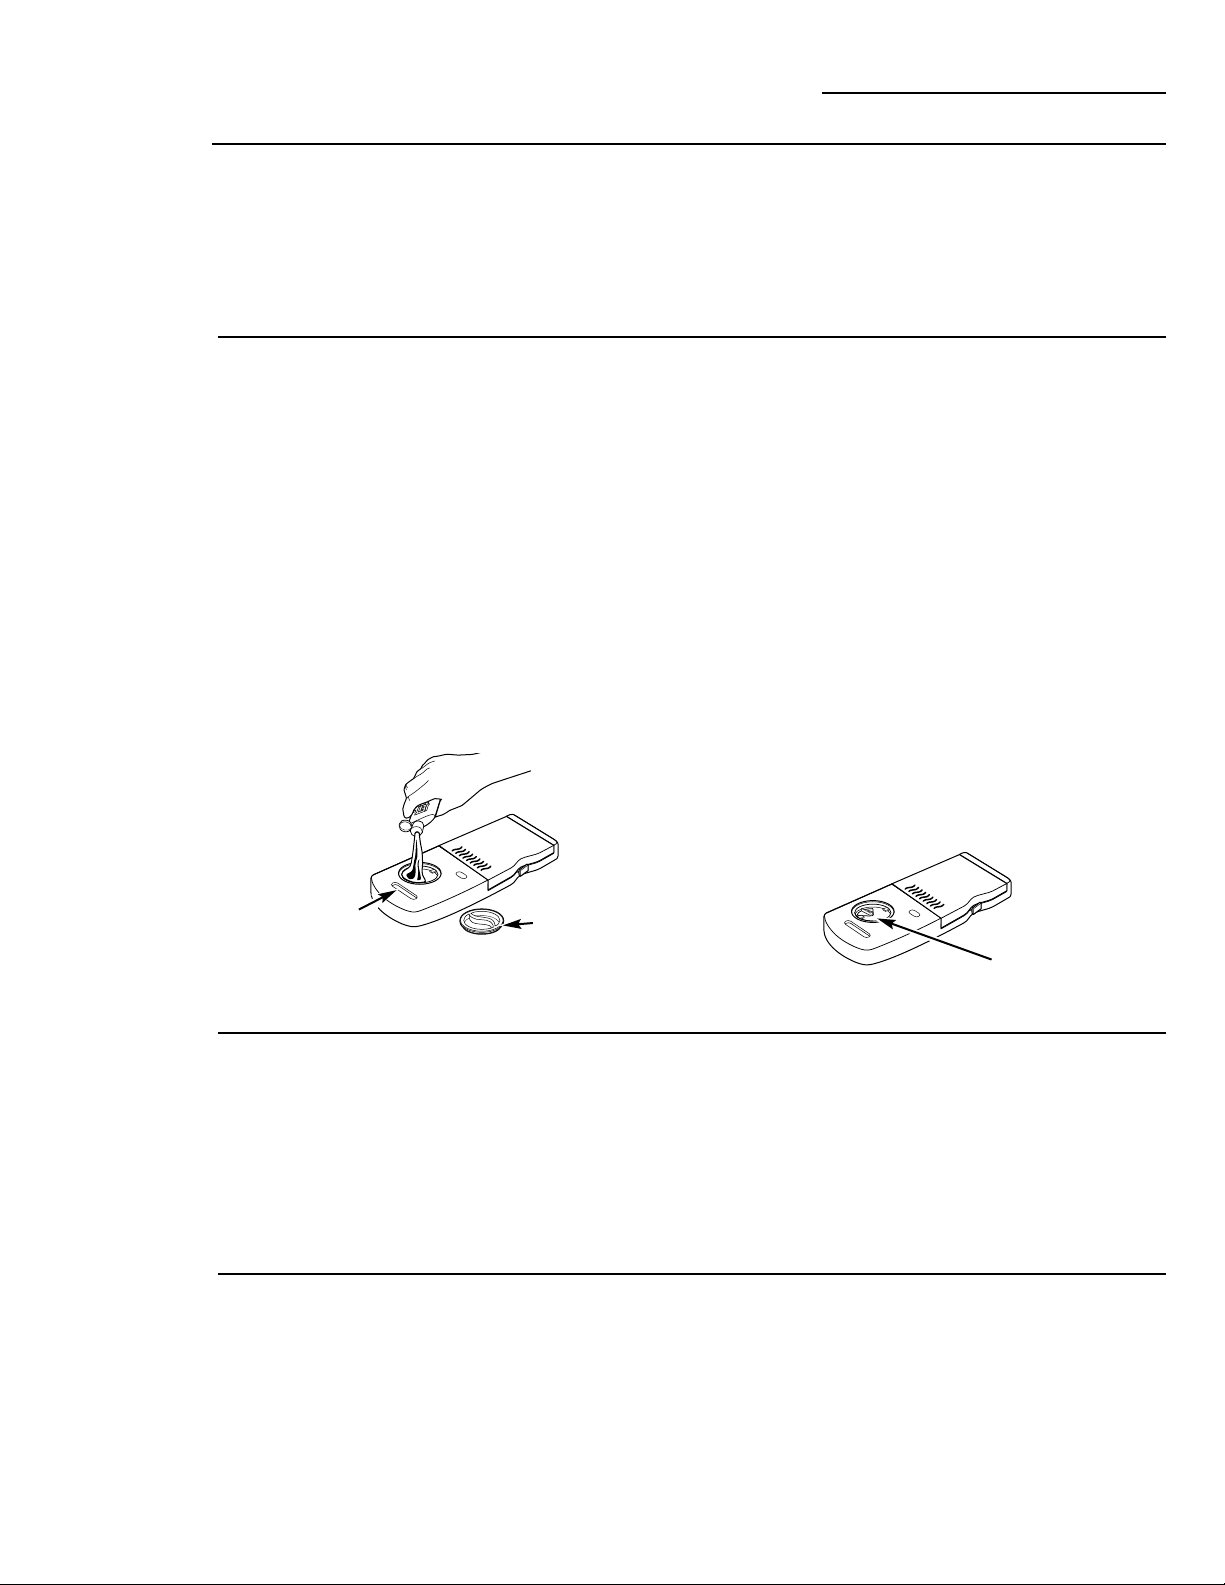
To fill the rinse agent dispenser, make sure the
dishwasher is fully open.
Turn the dispenser cap to the left and lift it
out. Add rinse agent until the indicator window
shows full.
Clean up any spilled rinse agent with a damp
cloth. Replace the dispenser cap.
The amount of rinse agent released into the
final wash can be adjusted. The factory setting
is at the midpoint. If there are rings of calcium
(hard water) spots on dishes, try a higher
setting. If there is foaming, use a lower setting.
To adjust the setting, remove the dispenser cap;
then turn the adjuster counterclockwise to
increase the amount of rinse agent.
Rinse agent
adjuster
Indicator
window
Dispenser
cap
Dish Preparation Prior to Loading
• No prerinsing of normal food soil is required.
• Scrape off hard soils, including bones,
toothpicks, skins and seeds.
• Remove large quantities of any remaining
food.
• Remove leafy vegetables, meat trimmings and
excessive amounts of grease or oil.
• Remove acidic food soils that can discolor
stainless steel.
Forget to
Add a
Dish?
A forgotten dish can be added any time before
the main wash.
1. Open the door slightly.
2. Wait until the water spray action stops. Steam
may rise out of the dishwasher.
3. Add forgotten dishes.
4. Close the door.
Page 10

10
Use only detergent specifically made for use
in dishwashers. Cascade®, Cascade Complete
®
and Electrasol®Automatic Dishwashing
Detergents have been approved for use in all
Monogram Dishwashers. Keep your powdered
detergent fresh
and dry. Don’t put detergent
into the
dispenser until you’re ready to wash
dishes.
All wash cycles except RINSE ONLY require
detergent in the main and pre-wash cup. The
amount of detergent to use depends on
whether your water is hard or soft. With hard
water, fill the main wash section and pre-wash
section completely. With soft water, fill both
sections halfway. When using automatic
dishwashing detergents tabs, simply place one
tab in the main wash section and close.
Protect your dishes and dishwasher by
contacting your water department and asking
how hard your water is. Twelve or more grains
is extremely hard water. A water softener is
recommended. Without it, lime can build up in
the water valve, which could stick while open
and cause flooding. Too much detergent with
soft water can cause a permanent cloudiness of
glassware, called etching.
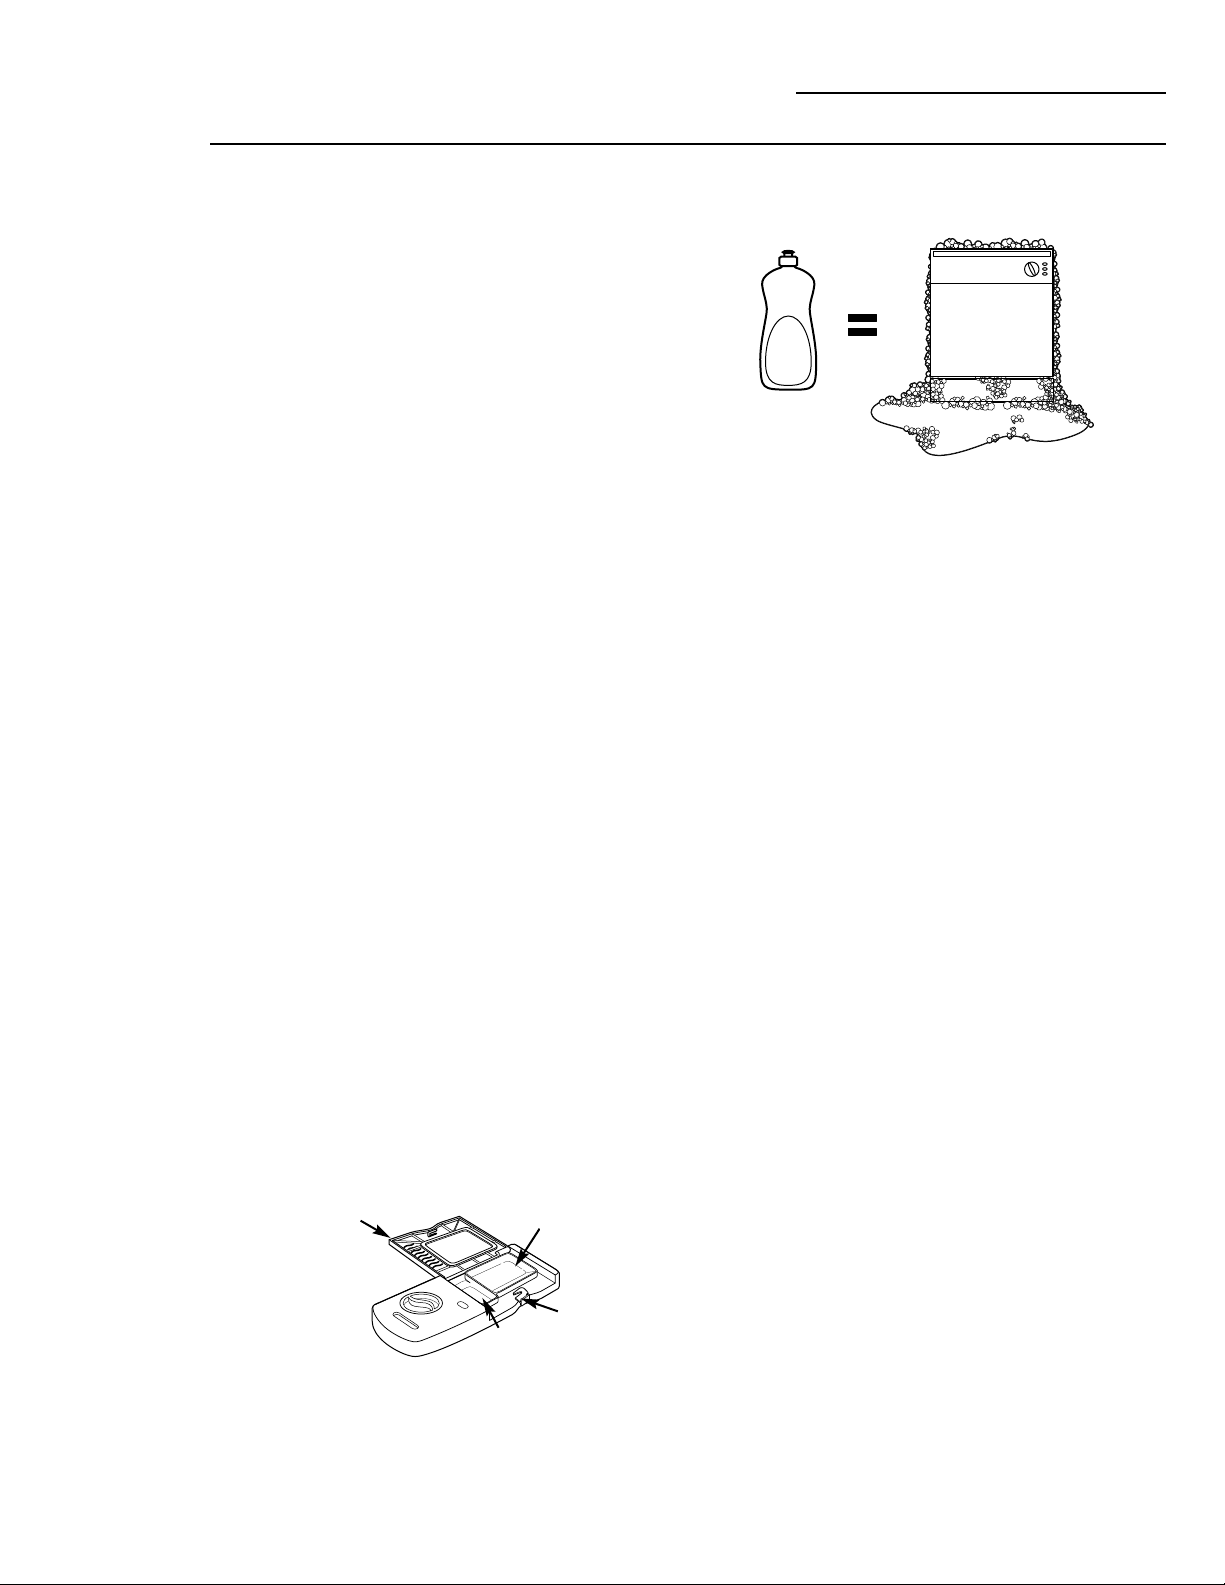
To fill the dispenser, if the dispenser is closed,
open the cover by depressing the cover latch.
Fill the Main Wash Section with detergent. Fill
the Pre-wash section if needed. Then close the
dispenser cover.
It is normal for the cover to open partially when
dispensing detergent.
Do not use hand dish detergent.
NOTE: Using a detergent that is not
specifically designed for dishwashers will
cause the dishwasher to fill with suds. During
operation, these suds will spill out of the
dishwasher vents, covering the kitchen
floor and making the floor wet.
Because so many detergent containers look
alike, store the dishwasher detergent in a
separate space from all other cleaners. Show
anyone who may use the dishwasher the correct
detergent and where it is stored.
While there will be no lasting damage to the
dishwasher, your dishes will not get clean using
a dishwashing detergent that is not formulated
to work with dishwashers.
Detergents
Pre-wash
section
Cover
Cover
latch
Main wash
section
Using the dishwasher
Dishwasher
Page 11

Loading the Racks
Dishwasher
Upper Rack
Features and appearance of racks and
silverware basket may vary from your model.
Although the upper rack is for glasses, cups
and saucers, pots and pans can be placed in
this rack for effective cleaning. Cups and
glasses fit best along the sides and should be
placed open-end down. This is also
a secure place for dishwasher plastics.
The utility shelf (on some models) may be
placed in the up or down position to add
flexibility. A wine glass holder secures wine
glasses for best washability.
Some models have contoured metal cup
shelves that can secure up to 12 wine glasses
(as shown).
Because wine glasses come in various sizes,
after loading, slowly push in the rack to make
sure they will clear the top of the dishwasher.
The upper rack is good for all kinds of
odd-shaped utensils. Saucepans, mixing bowls
and other items should be placed face down.
Fold-down tines (on some models) provide
flexibility for extra-large and hard-to-fit items.
Secure larger dishwasher-safe plastics over 2 tines
when possible.
Make sure small plastic items are secure so they can’t
fall onto the heater.
Be sure that items do not protrude through the bottom
of the rack and block rotation of the middle spray
arm. This could result in poor wash performance
for items in the upper rack.
Check to make sure that no items will block rotation
of the wash arm.
11
Page 12

To load flatware, simply push the adjustable
handle to either side (on some models).
Put flatware in the removable basket with fork
and knife handles up to protect your hands.
Place spoons in the basket with handles down.
Mix knives, forks and spoons so they don’t nest
together. Distribute evenly. Small plastic items,
such as measuring spoons and lids from small
containers should go in the bottom of the
silverware basket with the silverware on top.
The one-piece silverware basket can be
placed in the front, right side or back of the
lower rack.
A variety of options are available regarding the
three-piece silverware basket (on some models)
in your dishwasher. The complete basket is
designed to fit on the right side of the lower
rack. Additionally, each end of the basket is
removable to add loading flexibility to
accommodate flatware and lower rack
capacity needs.
The lids of both end and middle baskets
(on some models) can be closed to contain
small items. Long items can be placed on the
utility shelf in the upper rack.
The standard position of your adjustable rack
is “up” which allows for maximum clearance for
your taller items in the lower rack. If you have
taller wine glasses, tumblers or other items to
place in the upper rack, you may want to adjust
the rack to the lower position.
To lower the rack, support the weight of the
rack with your hands as shown and press both
finger pads about 1/4″ toward the inside of the
rack as indicated and guide the rack down to
its lower position.
To raise the rack to the “up” position, pull up
on the center of the rack side frame until the
rack locks into place.
Loading the Racks
Dishwasher
12
Adjustable
Upper Rack
(on some
models)
Silverware
Basket
Don’t let any
item extend
through bottom.
To remove end baskets, grasp the basket
at opposite corners and slide apart.
One-piece basket (on some models)
Three-piece basket (on some models)
Page 13

Cutlery Tray
The cutlery tray holds up to 4 large knifes such as
a carver, chef’s knives, bread knife, etc., that are
too tall to fit in the silverware basket.
Hook the tray onto the rear of the upper rack.
Lay the knives between the guides (as shown).
Bowl Tines
The special large-bowl tines in the lower rack add
flexibility to your loading pattern. They are useful
for serving bowls or other large bowls.
To use the bowl tines, fold down the 2 rows of flex
tines in front of the bowl tines and load bowls just
as you would in the upper rack.
You can remove the upper rack to allow space for
large items in the lower rack.
To remove the upper rack, push thumb tab out
and remove the front end caps on each side of
the rail.
Pull the rack straight out and off the rails.
Replace the end caps, then push the rails all the
way back into the dishwasher. Slide the shower
nozzle attachment over the spout.
Then fill the lower rack and begin your cycle.
NOTE: Nozzle must be in place with upper rack
removed. If not installed properly, poor wash
performance and noise will result.
NOTE: Don’t forget to remove the shower nozzle
attachment before you replace the upper rack.
13
Lower Rack
The lower rack is best used for plates, saucers and
cookware. Large items such as broiler pans and
baking racks should go along the left-hand side.
Load platters, pots and bowls along the sides, in
corners or in the back. The soiled side of items
should face the center of the rack. If necessary,
oversized glasses and mugs can be placed in the
lower rack to maximize loading flexibility.
Also, be careful not to let a portion of an item
such as a pot or dish handle extend through the
bottom rack. This could block the wash arm and
cause poor washing results.
Fold-down tines (on some models) provide
flexibility for extra-large and hard-to-fit items.
The tines may be left in the up position or folded
down to customize the lower rack.
Shower nozzle
attachment
These tines fold down
Large-bowl tines
Remove the
Upper Rack
Extra Rack
Features
(on some
models)
Loading the Racks
Dishwasher
Remove end cap
Push thumb tab
Page 14

14
Follow
these
guidelines
for loading
10 and 12
place settings
Loading the Racks
Dishwasher
Features and appearance of racks and silverware baskets may vary from your model.
Upper Rack—10 place settings Lower Rack—10 place settings
Upper Rack—12 place settings Lower Rack—12 place settings
Page 15

15
Care and Cleaning
Dishwasher
Exterior
To clean the control panel use a lightly dampened cloth then dry thoroughly. To clean the
exterior painted panels use a good appliance polish wax.
Never use sharp objects, scouring pads or harsh cleaners on any part of the dishwasher.
The stainless steel panels can be cleaned with CERAMA BRYTE®Stainless Steel Appliance
Cleaner or a similar product using a clean, soft cloth. You can order CERAMA BRYTE®Stainless
Steel Appliance Cleaner
through GE Parts by calling 800.626.2002 (for U.S. only). In Canada, call
1.888.880.3030.
Protect
Against
Freezing
If your dishwasher is left in an unheated place during the winter, ask a service technician to:
1. Cut off electrical power to the dishwasher. Remove fuses or trip circuit breaker.
2. Turn off the water supply and disconnect the water inlet line from the water valve.
3. Drain water from the water inlet line and water valve. (Use a pan to catch the water.)
4. Reconnect the water inlet line to the water valve.
The Air
Gap
An air gap protects your dishwasher against
water backing up into it if a drain clogs. The air
gap is not a part of the dishwasher. It is not
covered by your warranty. Not all plumbing
codes require air gaps, so you may not have one.
The air gap is easy to clean.
1. Turn off the dishwasher and lift off the
chrome cover.
2. Unscrew the plastic cap and clean with
a toothpick.
Interior
The stainless steel used to make the dishwasher tub and inner door provides the highest reliability
available in a GE dishwasher. If the dishwasher tub or inner door should be scratched or dented
during normal use, they will not rust or corrode. These surface blemishes will not affect their
function or durability.
Check the air gap any time your dishwasher
isn’t draining well.
Two types of
air gaps
Page 16
16
PROBLEM POSSIBLE CAUSE WHAT TO DO
Control panel lights go Time too long between • Each pad must be touched within 30
off when you’re setting touching of selected pads seconds of the others. To relight, touch any
controls pad again, or unlatch and relatch door.
Noise Some of the sounds you • Detergent cup opening.
will hear are normal
• The motor stopping during the drying
period.
• Water draining out of the tub immediately
after you touch START/RESET pad.
• Dry fan running.
Utensils are not secure • Make sure everything is secured in
in the rack or something dishwasher.
small has dropped into
the rack
Motor hums • Dishwasher has not been used on a regular
basis. If you do not use your dishwasher
often, set it to fill and pump out once every
week. This will help keep the seal moist.
Detergent left in Dishes are blocking the • Reposition the dishes.
dispenser cups detergent cups
Water standing in the This is normal • A small amount of clean water around the
bottom of the tub outlet on the tub bottom at the back of the
tub keeps the water seal lubricated.
Water won’t pump out Drain is clogged • If you have an air gap, clean it.
of the tub
• Check to see if your kitchen sink is
draining well. If not, you may need a
plumber.
• If the dishwasher drains into a disposer,
run disposer clear.
Suds Correct detergent • Use only automatic dishwasher detergents
wasn’t used to avoid sudsing. Cascade®, Cascade
Complete®and Electrasol®dishwasher
detergents have been approved for use
in all Monogram dishwashers.
• To remove suds from the tub, open the
dishwasher and let suds dissipate. Add 1
gallon of cold water to the tub. Pump out
water by starting any cycle and then resetting
the unit after 10 seconds. See Control Panel
section. Repeat if necessary.
Rinse agent was spilled • Always wipe up rinse agent spills
immediately.
Stained dishwasher Detergent with colorant • Some detergents contain colorant (pigment
parts was used or dyes) that will discolor the tub interior
with extended use. Check the detergent
cup for signs of any discoloration. If cup is
discolored, change to detergent without any
colorant. Cascade®, Cascade Complete®and
Electrasol®dishwasher detergents have been
approved for use in all Monogram
dishwashers.
Some tomato-based foods • Use of the RINSE ONLY cycle after adding
can stain the dish to the load can decrease the level of
staining.
• GE also recommends Cascade®Plastic
Booster™to help remove these types of
stains.
Before You Call For Service
Dishwasher
Questions?
Use this
problem solver
Page 17

17
Questions?
Use this
problem
solver
PROBLEM POSSIBLE CAUSE WHAT TO DO
Dishes and flatware Lower inlet water • Make sure inlet water temperature is correct
not clean temperature (see Using the Dishwasher section).
• Run water at the nearest faucet prior to
starting the diswasher to insure optimal water
temperature.
Water pressure is • Turn on a facucet. Is water coming out
temporarily low more slowly than usual? If so, wait until
pressure is normal before using your
dishwasher.
Air gap is clogged • Clean air gap.
Improper rack loading • Make sure large dishware does not block the
detergent dispenser or the wash arms.
• Glasses and dishes must face the spray arms.
Spots and filming on • Use Jet Dry®or Cascade Rinse Aid®rinse
glasses and flatware agent to remove spots and prevent new film
buildup.
• Install water softener.
• To remove stubborn spots and pre-existing
film from glassware:
1Remove all metal utensils from the
dishwasher.
2Do not add detergent.
3Select the COOKWARE cycle.
4Start the dishwasher and allow to run for
18 to 22 minutes. Dishwasher will now be
in the main wash.
5Open the door and pour 2 cups (500 ml)
of white vinegar into the bottom of the
dishwasher.
6Close the door and allow to complete the
cycle. If vinegar rinse doesn’t work: Repeat
as above, except use 1/4 cup (60 ml) of
citric acid crystals instead of vinegar.
Cloudiness on glassware Combination of soft water • This is called etching and is permanent.
and too much detergent To prevent this from happening, use less
detergent if you have soft water. Wash
glassware in the shortest cycle that will get
it clean.
Water temperature • Lower the water heater temperature.
entering the dishwasher
exceeds 150°F (66°C)
Black or gray marks on Aluminum utensils have • Remove marks with a mild, abrasive
dishes rubbed against dishes cleaner.
Extremely hard water
Low inlet water
temperature
Overloading the dishwasher
Improper loading
Old or damp powder
detergent
Rinse agent dispenser
empty
Too little detergent
Before You Call For Service
Dishwasher
Page 18

18
Questions?
Use this
problem
solver
PROBLEM POSSIBLE CAUSE WHAT TO DO
Yellow or brown film Tea or coffee stains • Remove the stain by hand, using a solution
on inside surfaces of 1/2 cup bleach and 3 cups warm water.
CAUTION: Before cleaning
interior, wait at least 20 minutes after a
cycle for the heating element to cool
down. Failure to do so can result in burns.
An overall yellow or brown • A special filter in the water supply line is
film can be caused by iron the only way to correct this problem.
deposits in water Contact your GE dealer or a water softener
company
White film on inside Hard water minerals • GE recommends Jet Dry®Dishwasher
surfaces Cleaner to help remove some hard water
and mineral stains.
• For extreme staining, clean the interior by
applying dishwasher detergent to a damp
sponge. Wear rubber gloves. DO NOT use
any type of cleanser other than those
recommended or dishwasher detergent
because it may cause foaming or sudsing.
Cascade®, Cascade Complete®and
Electrasol®Automatic Dishwashing
Detergents have been approved for
use in all Monogram Dishwashers.
Dishes don’t dry Low inlet water • Make sure inlet water temperature is
temperature correct (see Using the Dishwasher
section).
• Select ADDED HEAT.
• Select HEATED DRY.
Rinse agent dispenser is • Check the rinse agent dispenser.
empty
Dishwasher won’t run Fuse is blown, or the • Replace fuse or reset circuit breaker.
circuit breaker tripped Remove any other appliances from the
circuit.
• Try resetting the START/RESET pad.
Wall switch • Check for a wall switch that the dishwasher
(some installations) is in might be connected to. A wall switch is
the “off” position required by electrical codes in some
localities. Turn the switch “on” if it is “off.”
Steam This is normal • Steam comes through the vent on the
bottom of the door during drying and
when water is being pumped out.
Sanitized light does not The door was opened and • Do not interrupt the cycle anytime during
illuminate at the end of the cycle was interrupted or after main wash.
the cycle (Anti-Bacteria during or after the main
cycle only) wash portion
The incoming water • Raise the water heater temperature to
was too low 120°F (49°C).
Before You Call For Service
Dishwasher
Page 19
19
Consumer Services
Dishwasher
With the purchase of your new Monogram appliance, receive the
assurance that if you ever need information or assistance from GE,
we’ll be there. All you have to do is call—toll- free!
GE Answer
Center
®
In the USA:
800.626.2000
Whatever your question about any Monogram major appliance, GE Answer Center
®
information service is available to help. Your call—and your question—will be answered
promptly and courteously. And you can call any time. GE Answer Center®service is open
24 hours a day, 7 days a week.
OR
Visit our Website at: www.monogram.com
In Canada, call 1.888.880.3030.
In-Home
Repair Service
In the USA:
800.444.1845
In Canada:
1.888.880.3030
A GE consumer service professional will provide expert repair service, scheduled at a time
that’s convenient for you. Many GE Consumer Service company-operated locations offer you
service today or tomorrow, or at your convenience (7:00 a.m. to 7:00 p.m. weekdays, 9:00 a.m.
to 2:00 p.m. Saturdays). Our factory-trained technicians know your appliance inside and out—
so most repairs can be handled in just one visit.
Service Contracts
In the USA:
800.626.2224
In Canada:
1.888.880.3030
You can have the secure feeling that GE Consumer Service will still be there after your
warranty expires. Purchase a GE contract while your warranty is still in effect and you’ll
receive a substantial discount. With a multiple-year contract, you’re assured of future
service at today’s prices.
Parts and
Accessories
In the USA:
800.626.2002
In Canada:
1.888.880.3030
Individuals qualified to service their own appliances can have parts or accessories sent directly
to their home. The GE parts system provides access to over 47,000 parts…and all GE Genuine
Renewal Parts are fully warranted.
User maintenance instructions contained in this manual cover procedures intended to be
performed by any user. Other servicing generally should be referred to qualified service
personnel. Caution must be exercised, since improper servicing may cause unsafe operation.
For Customers
With Special
Needs…
In the USA:
800.626.2000
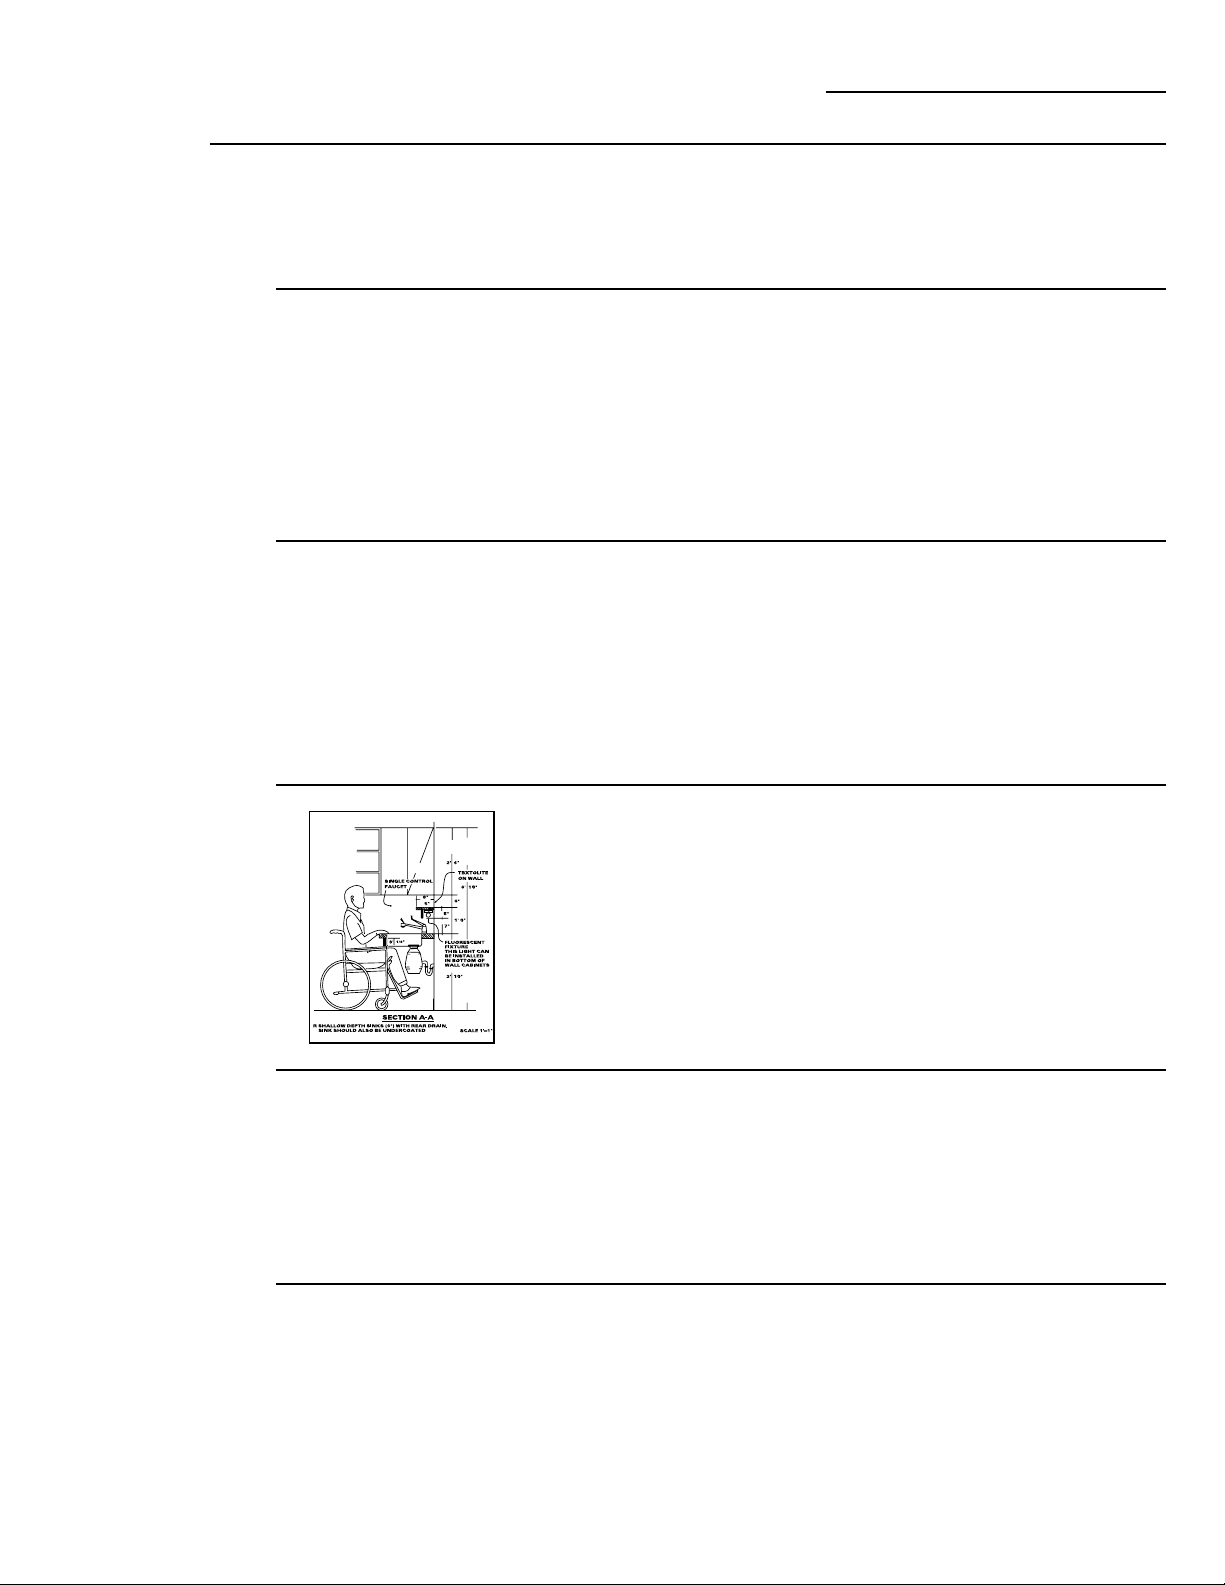
GE offers Braille controls for a variety of GE appliances, and a
brochure to assist in planning a barrier-free kitchen for persons
with limited mobility.
Consumers with impaired hearing or speech who have access to a
TDD or a conventional teletypewriter may call 800.TDD.GEAC
(800.833.4322) to request information or service.
www.monogram.com
Page 20

20
Notes
Dishwasher
Page 21

21
YOUR MONOGRAM DISHWASHER WARRANTY
Staple sales slip or cancelled check here. Proof of original purchase
date is needed to obtain service under warranty.
WHAT IS
COVERED
From the Date
of the Original
Purchase
ONE-YEAR
Any part of the dishwasher which fails due to a defect in materials or workmanship. During this
full one-year warranty, GE will also provide, free of charge, all labor and in-home service to
replace the defective part.
Second Year
Any part of the dishwasher which fails due to a defect in materials or workmanship. During this
second-year limited warranty, you will be responsible for any labor or in-home service costs.
Five Years
The dishwasher rack and/or the electronic control module, if these should fail due to a defect in
materials or workmanship. During this five-year limited warranty, you will be responsible for any
labor or in-home service costs.
Lifetime
The stainless steel tub or door liner, if it fails to contain water due to a defect in materials or
workmanship. During this full lifetime warranty, GE will also provide, free of charge, all labor
and in-home service to replace the defective part.
This warranty is extended to the original purchaser and any succeeding owner for the products
purchased for ordinary home use in the 48 mainland states, Hawaii, Washington, D.C. or Canada.
In Alaska the warranty is the same except that it is LIMITED because you must pay to ship the
product to the service shop or for the service technician’s travel cost to your home.
All warranty service will be provided by our Factory Service Centers or by our authorized
Customer Care®servicers during normal working hours.
Should your appliance need service, during warranty period or beyond, in the U.S.A. call
800.444.1845. In Canada: 888.880.3030.
Some states do not allow the exclusion or limitation of incidental or consequential damages,
so the above limitation or exclusion may not apply to you. This warranty gives you specific legal
rights, and you may also have other rights which vary from state to state. To know what your
legal rights are in your state, consult your local or state consumer affairs office or your state’s
Attorney General.
Warrantor: General Electric Company, Louisville, KY 40225.
WHAT IS NOT
COVERED
• Service trips to your home to teach you
how to use the product.
• Improper installation, delivery or
maintenance.
• Replacement of house fuses or resetting
of circuit breakers.
• Failure of the product if it is abused, misused,
or used for other than the intended purpose
or used commercially.
• Damage to the product caused by accident,
fire, floods or acts of God.
• Incidental or consequential damage caused by
possible defects with this appliance.
• Cleaning or servicing of the air gap device in
the drain line.
• Damage caused after delivery including
damage from items dropped on the door.
Warranty for customers in the USA
Dishwasher
Page 22

Some provinces do not allow the exclusion or limitation of incidental or consequential damages,
so the above limitation or exclusion may not apply to you. This warranty gives you specific legal
rights, and you may also have other rights which vary from province to province. To know what
your legal rights are in your province, consult your local or provincial consumer affairs office.
Warrantor: Camco Inc., 1 Factory Lane, Suite 310, Moncton, N.B. E1C 9M3.
22
Warranty for customers in Canada
Dishwasher
YOUR MONOGRAM DISHWASHER WARRANTY
Staple sales slip or cancelled check here. Proof of original purchase
date is needed to obtain service under warranty.
WHAT IS
COVERED
From the Date
of the Original
Purchase
ONE-YEAR
Any part of the dishwasher which fails due to a defect in materials or workmanship. During this
full one-year warranty, GE will also provide, free of charge, all labor and in-home service to
replace the defective part.
Second Year
Any part of the dishwasher which fails due to a defect in materials or workmanship. During this
second-year limited warranty, you will be responsible for any labor or in-home service costs.
Five Years
The dishwasher rack, if it should rust, or the electronic control module, if it should fail due to a
defect in materials or workmanship. During this five-year limited warranty, you will be responsible
for any labor or in-home service costs.
Lifetime
The stainless steel tub or door liner, if it fails to contain water due to a defect in materials or
workmanship. During this full lifetime warranty, GE will also provide, free of charge, all labor
and in-home service to replace the defective part.
This warranty is extended to the original purchaser and any succeeding owner for products
purchased for ordinary home use in Canada. Proof of original purchase date is needed to obtain
service under the warranty.
All warranty service will be provided by our Factory Service Centers or by our authorized
Customer Care®servicers during normal working hours.
Should your appliance need service, during warranty period or beyond, call 1.888.880.3030.
WHAT IS NOT
COVERED
• Service trips to your home to teach you
how to use the product.
• Improper installation, delivery or
maintenance.
• Replacement of house fuses or resetting
of circuit breakers.
• Failure of the product if it is abused, misused,
or used for other than the intended purpose
or used commercially.
• Damage to the product caused by accident,
fire, floods or acts of God.
• Incidental or consequential damage caused by
possible defects with this appliance.
• Cleaning or servicing of the air gap device in
the drain line.
• Damage caused after delivery including
damage from items dropped on the door.
Page 23
23
General Electric Company
Warranty Registration Department
P.O. Box 34980
Louisville, KY 40232-2150
Place
1st Class
Letter
Stamp
Here
GE Appliances
Consumer Product
Ownership Registration
Important Mail Today
Page 24
165D4700P289
49-5965-1
Printed in the United States
01-04 JR
Consumer Product Ownership Registration
Dear Customer:
Thank you for purchasing our product and thank you for placing your confidence in us. We are proud to
have you as a customer!
Follow these three steps to protect your new appliance investment:
1
Complete and mail
your Consumer
Product Ownership
Registration today.
Have the peace of mind
of knowing we can
contact you in the
unlikely event of a
safety modification.
2
After completing this
registration, write your
model and serial
numbers in this manual
and store this document
in a safe place. You will
need this information
should you require
service. The service
number in the USA:
800.444.1845. In Canada:
1.888.880.3030.
3
Read your “Owner’s
Manual” carefully.
It will help you
operate your new
appliance properly.
Important: If you did not get a registration card with your product, detach and return the form below to
ensure that your product is registered, or register online at www.monogram.com.
Consumer Product Ownership Registration
Product Model Number Serial Number
Dishwasher
I
m
p
o
r
ta
n
t
M
a
i
l
T
o
d
a
y
!
First
Name
Apt. #
Street
Address
City
Last
Name
Zip
CodeState
Date Placed
In Use
Month Day Year
Phone
Number
TAPE CLOSED
FOLD HERE
Mr. Ms. Mrs.
Miss
General Electric Company
Louisville, KY 40225
Monogram®
✄ ✄
✄
www.monogram.com
E-mail Address*
* Please provide your e-mail address to receive, via e-mail, discounts, special offers and other important
communications from GE Appliances (GEA).
■■ Check here if you do not want to receive communications from GEA’s carefully selected partners.
FAILURE TO COMPLETE AND RETURN THIS CARD DOES NOT DIMINISH YOUR WARRANTY RIGHTS.
For information about GEA’s privacy and data usage policy, go to www.monogram.com and click on “Privacy
Policy” or call 800.626.2224.
Page 25

Manuel du
propriétaire
Lave-vaisselle
ZBD6800K
ZBD6880K
ZBD6890K
Page 26

2
Information pour le consommateur
Lave-vaisselle
Votre nouveau lave-vaisselle Monogram est un symbole éloquent de style, de confort et
de souplesse dans votre cuisine. Que vous le choisissiez pour sa pureté de lignes, pour ses
caractéristiques techniques ou pour sa recherche approfondie du détail—ou pour toutes ces
raisons réunies—vous trouverez que la combinaison supérieure de formes et de fonctions de
votre lave-vaisselle Monogram fera votre bonheur pendant des années.
Vous trouverez dans les pages suivantes des renseignements qui vous aideront à bien faire
fonctionner et à bien entretenir votre lave-vaisselle.
Si vous avez d’autres questions, visitez notre site Web à l’adresse : www.monogram.com
Introduction
Table des
matières
Inscription de votre appareil . . . . . . .3, 21, 22
Soins et nettoyage . . . . . . . . . . . . . . . . . . . . .15
Service à la clientèle . . . . . . . . . . . . . . . . .3, 19
Emplacement du numéro de
modèle et de série . . . . . . . . . . . . . . . . . . . . .3
Instructions de fonctionnement . . . . . . . .6–14
Panneau de contrôle et
fonctionnement . . . . . . . . . . . . . . . . . . .6–8
Température de l’eau . . . . . . . . . . . . . . . .9
Agent de rinçage . . . . . . . . . . . . . . . . . . . .9
Préparation des assiettes avant
le chargement . . . . . . . . . . . . . . . . . . . . . .9
Détergents . . . . . . . . . . . . . . . . . . . . . . . .10
Clayettes du lave-vaisselle . . . . . . . . . .11–14
Règlement des problèmes . . . . . . . . . . .16–18
Instructions de sécurité . . . . . . . . . . . . . . .4, 5
Garantie . . . . . . . . . . . . . . . . . . . . . . . . . . . .23
Page 27

3
Information pour le consommateur
Lave-vaisselle
Avant
d’utiliser
votre lavevaisselle
Lisez soigneusement ce manuel. Il a pour objet
de vous aider à bien faire fonctionner et
entretenir votre lave-vaisselle.
Conservez-le à portée de votre main. Vous y
trouverez des réponses à vos questions.
Si vous ne comprenez pas bien ce qui est écrit
ou avez besoin de davantage d’aide, vous
trouverez une liste de numéros de service à la
clientèle dans la dernière section de ce manuel.
OU
Visitez notre site Web à l’adresse :
www.monogram.com
Écrivez les
numéros de
modèle et
de série
Vous trouverez vos numéros de modèle et de
série sur la paroi de la cuve juste à l’intérieur de
la porte.
Avant d’envoyer la carte, veuillez écrire ces
numéros ici :
Numéro de modèle
Numéro de série
Utilisez ces numéros dans toute correspondance
ou dans tous vos appels de service relatifs à votre
lave-vaisselle.
Si vous
avez reçu un
lave-vaisselle
endommagé
Appelez immédiatement le revendeur (ou le
constructeur) qui vous a vendu le lave-vaisselle.
Économisez
votre temps
et votre
argent
Avant d’appeler le service, vérifiez la section de
résolution des problèmes à la fin de ce manuel.
Vous y trouverez les causes de problèmes
mineurs de fonctionnement que vous pourrez
régler vous-même.
Si vous devez
appeler le
service
Pour obtenir le service, consultez la page de
service à la clientèle à la fin de ce manuel.
Nous sommes fiers de notre service et tenons
à ce que vous soyez satisfaits. Si, pour quelque
raison que ce soit, vous n’êtes pas heureux
du service que vous recevez, voici quelques
mesures à prendre pour obtenir davantage
d’aide.
PREMIÈREMENT, appelez les gens qui ont
entretenu votre appareil électroménager.
Dites-leur pourquoi vous n’êtes pas satisfaits.
Dans la plupart des cas, cela suffira à régler
votre problème.
ENSUITE, si vous n’êtes toujours pas satisfaits,
écrivez tous les détails, y compris votre numéro
de téléphone, à l’adresse suivante :
Directeur, relations avec les consommateurs
Camco Inc.
1 Factory Lane, Suite 310
Moncton, N.B. E1C 9M3
Page 28

4
MESURES DE SÉCURITÉ IMPORTANTES
AVERTISSEMENT
!
Pour votre sécurité, veuillez suivre à la lettre les
directives données dans le présent manuel afin
de réduire les risques d’incendie, d’explosion ou
de chocs électriques, et prévenir les dommages
matériels et les blessures graves ou mortelles.
• Ne modifiez pas le fonctionnement des
commandes.
• Ne montez pas ou ne vous assoyez pas sur la
porte ou les paniers du lave-vaisselle, et ne les
utilisez pas de façon abusive.
• Ne jetez pas un lave-vaisselle sans en avoir
d’abord enlevé la porte ou enlevez le verrou
de la porte.
• N’entreposez pas et n’utilisez pas d’essence,
de vapeurs ou de liquides inflammables à
proximité de cet appareil ou de tout autre
électroménager.
• Ne laissez pas les enfants jouer avec le lavevaisselle ni monter dessus. Ne les laissez pas
s’introduire à l’intérieur de cet appareil ou
d’un vieil appareil qui ne sert plus.
•
Ne permettez jamais à des enfants de jouer à
proximité d’un lave-vaisselle quand vous ouvrez
ou fermez la porte. Ils peuvent se coincer les
doigts dans la porte.
SÉCURITÉ DU CHAUFFE-EAU
Dans certaines conditions, il peut se former de
l’hydrogène à l’intérieur d’un chauffe-eau qui
n’a pas servi pendant deux semaines ou plus.
L’HYDROGÈNE EST UN GAZ EXPLOSIF.
Pour réduire les risques de dommages ou de
blessures lorsque l’eau chaude n’a pas été
utilisée depuis deux semaines ou plus, ouvrez
tous les robinets d’eau chaude et laissez l’eau
couler pendant plusieurs minutes avant
d’utiliser un appareil électrique raccordé au
système d’eau chaude. Vous éliminerez ainsi
l’hydrogène qui pourrait s’y être accumulé.
Puisqu’il s’agit d’un gaz inflammable, ne fumez
pas ou n’utilisez pas une flamme nue au cours
de ce processus.
BONNE DISPOSITION DU LAVE-VAISSELLE
Les machines à laver la vaisselle abandonnée
ou jetée sont dangereuses...même si elles sont
abandonnées «juste pendant quelques jours».
Si vous jetez votre vieux lave-vaisselle, veuillez
suivre les instructions suivantes pour prévenir
tout accident.
Comment jeter votre lave-vaisselle :
•Enlevez la porte du compartiment de lavage
ou enlevez le réceptacle à verrou (comme
l’indique l’illustration).
AVERTISSEMENT! RISQUE D’ENFANT PRIS AU PIÈGE
Réceptacle
à verrou
Page 29

5
BONNE INSTALLATION ET BON ENTRETIEN
Avant de l’utiliser, vous devez installer ce
lave-vaisselle conformément aux directives
d’installation fournies. Si vous n’avez pas reçu
une feuille de directives d’installation avec votre
lave-vaisselle, vous pouvez en obtenir un
exemplaire par visiter notre site Web
à l’adress www.monogram.com.
• Cet appareil doit être relié à un système de
câblage électrique permanent, mis à la terre.
Sinon, un fil de mise à la terre pour
appareillage doit être installé et raccordé à la
borne ou au fil de mise à la terre de l’appareil.
• Un raccordement non approprié du fil
de mise à la terre pour appareillage peut
présenter des risques de chocs électriques.
Si vous doutez de la qualité de la mise à la
terre de votre électroménager, consultez un
représentant du Service après-vente ou un
électricien qualifié.
• Utilisez des fils d’alimentation dont la
température nominale est d’au moins
75º C (167º F).
• Jetez de la façon appropriée les vieux
électroménagers, ainsi que le matériel
d’emballage et d’expédition.
• Ne tentez pas de réparer ou de remplacer
toute pièce de votre lave-vaisselle, à moins que
cela ne soit spécifiquement recommandé dans
le présent manuel. Confiez toutes les autres
réparations à un réparateur qualifié.
• Afin de réduire les risques de chocs
électriques, débranchez toujours l’appareil
avant de le réparer. REMARQUE : Lorsque
vous mettez la commande du lave-vaisselle à
OFF (arrêt), le courant qui alimente l’appareil
n’est pas coupé. Nous vous recommandons de
confier la réparation de votre appareil à un
réparateur qualifié.
N’utilisez ce lave-vaisselle que pour l’usage auquel il
est destiné, comme expliqué dans le présent Manuel
d’utilisation.
MISE EN GARDE : Les
matériaux lavés selon le cycle anti-bactériel
peuvent être chauds. Faites attention quand
vous videz votre machine.
• N’utilisez que des détergents liquides, en poudre ou
en pastilles et les produits de rinçage recommandés
pour lave-vaisselle. Gardez tous ces produits hors de
portée des enfants. Nous approuvons l’utilisation des
détergents pour lave-vaisselle automatique Cascade®,
Cascade Complete®et Electrasol®, ainsi que les
agents de rinçage Jet-Dry®et Cascade Rinse Aid
®
dans toutes les machines à laver la vaisselle
Monogram.
• De la mousse s’accumulera dans le lave-vaisselle si un
détersif spécialement conçu pour celui-ci n’est pas
utilisé.
• Placez les articles aiguisés de manière à ce qu’ils
n’endommagent pas le joint de la porte.
• Placez les couteaux les poignées vers le haut afin de
réduire les risques de coupures.
• Ne lavez pas d’articles en plastique dans le lavevaisselle, à moins qu’ils portent la mention lavable au
lave-vaisselle ou toute mention équivalente. Lorsque les
articles de plastique ne portent aucune mention, lisez
les recommandations du fabricant.
• Articles divers : Ne lavez pas des articles comme les
filtres à air électroniques, les filtres de fournaise et
les pinceaux dans votre lave-vaisselle. Ils pourraient
endommager le lave-vaisselle et décolorer ou tacher
la cuve.
• Ne touchez pas à l’élément chauffant pendant ou
immédiatement après le lavage.
• Ne faites pas fonctionner votre lave-vaisselle lorsque
l’un de ses panneaux est enlevé.
• Il faut exercer une étroite surveillance lorsque vous
faites fonctionner le lave-vaisselle en présence
d’enfants.
• Placez les articles légers en plastique de façon qu’ils
ne bougent pas ou ne tombent au fond de l’appareil
pendant le lavage. Ils pourraient être endommagés
s’ils entrent en contact avec l’élément chauffant.
UTILISATION DE VOTRE LAVE-VAISSELLE
VEUILLEZ LIRE ET SUIVRE À LA LETTRE CES MESURES DE SÉCURITÉ.
CONSERVEZ CES DIRECTIVES
MESURES DE SÉCURITÉ IMPORTANTES
Page 30

6
Lave-vaisselle
Réglages de
contrôle
1. Cycles de lavage Utilisez les touches fléchées pour changer de cycle de lavage. La lumière
située au-dessus ou à côté de la touche choisie s’allumera pour indiquer le cycle
de lavage que vous avez choisi.
NOTE : Ce lave-vaisselle est équipé d’un détecteur ExtraClean™ avec contrôle
automatique de la température; par conséquent, la durée du cycle et sa longueur
peuvent varier selon le degré de saleté (très sale, moyennement sale, peu sale) et
de température.
ANTI Heavy (très sale) 10,0 gallons, 93 minutes
BACTERIAL Medium (moyennement sale) 8,6 gallons, 90 minutes
Light (peu sale) 7,2 gallons, 90 minutes
(ANTI BACTÉRIEN)
Ce cycle élève la température de l’eau pendant le rinçage final pour assainir
votre vaisselle. La longueur du cycle varie selon la température de l’eau qui
entre.
NOTE : Le cycle anti-bactérien correspond aux besoins d’assainissement. Si
le cycle est interrompu pendant ou après la partie de lavage principal ou si la
température de l’eau qui entre est tellement basse que votre appareil ne peut
obtenir une température adéquate d’eau, votre lave-vaisselle ne peut remplir les
conditions d’assainissement. Dans ce cas, la lumière d’assainissement ne s’allume
pas à la fin du cycle.
NOTE : Les lave-vaisselle ménagers certifiés NSF ne sont pas conçus pour les
établissements d’alimentation licenciés.
COOKWARE Heavy (très sale) 11,4 gallons, 95 minutes
(USTENSILES Medium (moyennement sale) 10,0 gallons, 71 minutes
DE CUISINE) Light (peu sale) 10,0 gallons, 66 minutes
Ce cycle convient aux assiettes très sales ou aux ustensiles de cuisine tachés
d’aliments séchés ou cuits. Ce cycle peut ne pas enlever les aliments brûlés. Vous
pouvez utiliser ce cycle pour votre vaisselle de tous les jours.
NORMAL Heavy (très sale) 9,9 gallons, 74 minutes
(NORMAL) Medium (moyennement sale) 7,0 gallons, 61 minutes
Light (peu sale) 5,6 gallons, 48 minutes
Ce cycle convient à la vaisselle ou à la verrerie moyennement/très sale.
SPEED CYCLE Heavy (très sale) 9.3 gallons, 36 minutes
(CYCLE RAPIDE)Medium (moyennement sale) 7.2 gallons, 36 minutes
(sur certains modèles)
Light (peu sale) 5,7 gallons, 33 minutes
Ce cycle convient à la vaisselle ou à la verrerie.
PORCELAINE Heavy (très sale) 10,0 gallons, 49 minutes
CRISTAL Medium (moyennement sale) 7,2 gallons, 36 minutes
Light (peu sale) 7,2 gallons, 36 minutes
Ce cycle convient à la porcelaine ou au cristal peu sale.
Vous trouverez
votre numéro de
modèle dans le bac
juste à l’intérieur
de la porte. Dans
ce manuel, les
caractéristiques
techniques et
l’apparence
peuvent être
différentes de
celles de votre
modèle.
8
1 43
2
5 6
7
910
1 3
2
5 6
7
910
NSF INTERNATIONAL
Remplit la norme 148 NSF d’assainissement et de
lavage des lave-vaisselle ménagers à vaporisation d’eau.
R
E
S
I
D
E
N
T
I
A
L
Panneau de contrôle
ZBD6890
ZBD6800 et ZBD6880
Page 31

7
GLASSES Heavy (très sale) 10,0 gallons, 45 minutes
(VERRES) Medium (moyennement sale) 7,2 gallons, 33 minutes
(sur certains modèles)
Light (peu sale) 7,2 gallons, 32 minutes
Ce cycle convient spécialement aux verres.
PLASTICS Heavy (très sale) 9,9 gallons, 119 minutes
CYCLE Medium (moyennement sale) 7,0 gallons, 106 minutes
(MATIÈRES Light (peu sale) 5,6 gallons, 93 minutes
PLASTIQUES)
Ce cycle est spécialement conçu pour réduire le risque de faire fondre
(sur certains modèles)
les articles en matière plastique et pour améliorer le séchage des articles
en matières plastiques pour les articles en matière plastique lavables en
lave-vaisselle.
RINSE ONLY Heavy (très sale) 2,9 gallons, 7 minutes
(RINÇAGE Light (peu sale) 1,4 gallons, 3 minutes
SEULEMENT)
Pour rincer les charges partielles qui seront lavées plus tard. N’utilisez jamais
de détergents avec ce cycle.
2. DELAY START —Cette option vous permet de retarder l’heure de mise en marche de tout
(MISE EN cycle de lavage de jusqu’à 24 heures (selon le modèle).
MARCHE AVEC
• Choisissez l’heure de mise en marche désirée en appuyant sur la touche
RETARD)
DELAY START (mise en marche avec retard). Vous augmenterez le
nombre d’heures de retard en appuyant plusieurs fois ou en appuyant
continuellement sur la touche. Choisissez le nombre d’heures au bout
desquelles vous désirez commencer le cycle. Appuyez ensuite sur
START/RESET (mise en marche/remise à zéro).
• Une fois la porte fermée, la machine fera un compte à rebours et se mettra
automatiquement en marche à l’heure voulue.
NOTE : Pour annuler le choix DELAY START (mise en marche avec retard)
avant le début du cycle, appuyez sur la touche DELAY START (mise en
marche avec retard) jusqu’à ce que l’écran n’indique plus de chiffre. Vous
n’annulez pas les heures de retard en appuyant sur START/RESET (mise en
marche/remise à zéro).
3. ADDED HEAT — Si vous choisissez ce cycle, la machine fait marcher plus longtemps les
(CHALEUR
éléments de chauffage, afin d’améliorer le lavage et le séchage.
SUPPLÉMENTAIRE)
NOTE : Vous ne pouvez pas choisir cette option avec le cycle RINSE ONLY
(rinçage seulement).
4. PRE WASH — Utilisation pour les vaisselles très sales, avec des aliments collés ou cuits. Vous
(PRÉ-LAVAGE) DEVEZ choisir cette option avant de mettre le cycle en marche. Cette option
ajoute 16 minutes au temps de cycle.
(sur certains modèles)
NOTE : Vous ne pouvez pas choisir cette option avec le cycle RINSE ONLY
(rinçage seulement).
5. HEATED DRY — Cette option met en marche le chauffage et le ventilateur pour sécher
(CHALEUR SÈCHE)
rapidement. Cette option allonge le temps du cycle de 30 minutes pour le
cycle anti-bactérien, de 38 minutes pour le cycle normal et le cycle ustensiles
de cuisine, de 8 minutes pour le cycle rapide, de 15 minutes pour le cycle de
matières plastiques et de 30 minutes pour tous les autres cycles. Quand cette
option n’est PAS choisie, le ventilateur se met en marche pour sécher votre
vaisselle sans augmenter la chaleur—et en économisant l’énergie.
NOTE : Vous ne pouvez pas choisir cette option avec le cycle RINSE ONLY
(rinçage seulement).
6. LOCK — Vous pouvez verrouiller les contrôles pour éviter de faire un choix. Ou bien
(VERROUILLAGE)
vous pouvez verrouiller les contrôles après avoir mis en marche un cycle.
Des enfants ne peuvent pas mettre en marche votre lave-vaisselle en appuyant
sur les touches quand vous avez choisi cette option.
Pour verrouiller le lave-vaisselle, appuyez sur la touche HEATED DRY
(chaleur sèche) et tenez-la appuyée pendant 3 secondes. Pour déverrouiller
les contrôles du lave-vaisselle, appuyez sur la touche HEATED DRY (chaleur
sèche) et tenez-la appuyée pendant 3 secondes. La lumière située au-dessus
de LOCK (verrouillage) s’éteint.
Lave-vaisselle
Panneau de contrôle/Fonctionnement
Page 32

8
7. Lumières indicatrices d’état (les indications varient selon le modèle)
L’affichage d’état vous indique ce qui se passe quand le fonctionne et peut clignoter pour vous signaler
qu’il se passe quelque chose d’anormal. Les lumières s’allument, pour vous indiquer la séquence d’opérations
du lave-vaisselle.
SENSING Apparaît quand le capteur ExtraClean™ mesure le montant de saleté et la
(capteur) température de l’eau. Le lave-vaisselle ajuste le cycle choisi pour obtenir le rendement
optimal.
ADD-A-DISH Apparaît pendant le prélavage pour indiquer que les assiettes ajoutées maintenant
(ajoutez une assiette) seront également lavées.
WASHING Apparaît pendant les périodes de prélavage, de lavage principal et de rinçage.
(lavage)
DRYING Apparaît pendant la période de chauffage sec.
(séchage)
SANITIZED Apparaît quand le cycle a rempli les conditions d’assainissement.
(assainissement)
CLEAN Apparaît quand un cycle de lavage est terminé, ainsi que les additions.
(propre)
8. Affichage du temps restant (sur certains modèles)
Pendant le fonctionnement, l’écran indique les minutes qui restent jusqu’à la fin du cycle. L’écran peut ajuster
le temps restant quand la lumière de capteur est allumée. Pendant une mise en marche avec retard, l’écran
indique les heures restantes jusqu’au début du cycle.
9. START/RESET
(mise en marche/remise à zéro)
START — Après avoir choisi le cycle et les additions souhaitées, appuyez sur la touche
(mise en marche) START/RESET (mise en marche/remise à zéro) pour préparer le lave-vaisselle à
commencer le cycle. Fermez la porte pour commencer le cycle ou commencer le compte à
rebours de mise en marche avec retard. Quand le cycle commence, l’eau commence à
remplir la cuve et après environ 60 secondes, l’action de lavage commence.
Le lave-vaisselle affiche toujours votre dernier choix et vos dernières additions. Si vous ne
désirez pas changer les réglages, appuyez simplement sur la touche START/RESET (mise
en marche/remise à zéro) pour préparer le lave-vaisselle et fermez la porte pour
commencer le cycle.
NOTE : Si la lumière START/RESET (mise en marche/remise à zéro) clignote, c’est
que vous avez interrompu le cycle en appuyant sur la touche START/RESET (mise en
marche/remise à zéro). Les lumières s’arrêtent de clignoter après que le lave-vaisselle ait
automatiquement vidé toute l’eau.
Également, en cas de panne d’électricité, les cycles NORMAL (normal) et HEATED DRY
(chaleur sèche) sont automatiquement programmés. Faites un autre choix et appuyez sur
la touche START/RESET (mise en marche remise à zéro) pour commencer le nouveau
cycle.
RESET — Ouvrez la porte doucement pour éviter toute éclaboussure. Appuyez sur la touche
(remise à zéro) START/RESET (mise en marche/remise à zéro) pour annuler le cycle et refermez la porte.
Le lave-vaisselle pompe toute l’eau et s’arrête après 70 secondes.
NOTE : Si la lumière START/RESET (mise en marche/remise à zéro) clignote, fermez la
porte jusqu’à ce que l’eau soit toute pompée (cela prend environ 70 secondes) et la
lumière s’arrête de clignoter.
Quand la lumière s’arrête de clignoter, vous pouvez reprogrammer le lave-vaisselle et le
remettre en marche.
10. Clean — La lumière CLEAN (propre) s’allume et un double bip sonne quand le cycle choisi et les
(propre) additions se terminent. Vous pouvez enlever la vaisselle n’importe quand. Veuillez noter
que le ventilateur ultra-efficace continue à tourner de 30 minutes à 1 heure (selon le cycle
choisi) après que la lumière CLEAN (propre) s’allume pour continuer à faire sécher la
vaisselle. Vous pouvez l’interrompre en ouvrant la porte et en appuyant sur une touche
quelconque.
NOTE : Pour éteindre l’indicateur de double bip (ou le réactiver si vous l’avez
précédemment éteint) appuyez sur la touche HEATED DRY (chaleur sèche) 5 fois en 3
secondes. Un triple bip sonne pour indiquer que vous avez activé ou désactivé l’option de
bip à la fin du cycle.
Lave-vaisselle
Panneau de contrôle/Fonctionnement
Page 33
9
Utilisation du lave-vaisselle
Lave-vaisselle
Température de l’eau
La température de l’eau qui entre doit être
supérieure à 120ºF (49ºC) et inférieure à 150ºF
(66ºC) pour bien laver et éviter tout dommage
à votre vaisselle. Vérifiez la température de l’eau
à l’aide d’un thermomètre à viande ou à
pâtisserie. Ouvrez le robinet d’eau chaude le
plus proche de votre lave-vaisselle, placez le
thermomètre dans un verre et laissez l’eau
couler dans le verre jusqu’à ce que la
température s’arrête de monter.
Utilisez un
agent de
rinçage
Un agent de rinçage améliore le séchage,
réduit les taches et empêche la formation
d’une pellicule sur vos assiettes, vos verres,
votre argenterie, vos ustensiles de cuisine et vos
matières plastiques. Nous recommandons les
agents de rinçage Jet-Dry®et Cascade Rinse
Aid®pour les Monogram.
Le distributeur d’agent de rinçage contient 3,5
onces d’agent de rinçage. Dans des conditions
normales, cette quantité dure environ un mois.
Essayez de le conserver plein, mais ne
remplissez pas trop.
Pour remplir le distributeur d’agent de
rinçage, assurez-vous de bien ouvrir le
lave-vaisselle.
Tournez le capuchon du distributeur vers la
gauche et enlevez-le en le soulevant. Ajoutez
l’agent de rinçage jusqu’à ce que la fenêtre
indicatrice indique que le distributeur est
plein.
Nettoyez tout agent de rinçage qui a coulé, à
l’aide d’un linge humide. Remettez en place le
capuchon du distributeur.
Vous pouvez ajuster le montant d’agent de
rinçage qui s’écoule dans le lavage final. Le
réglage de fabrique est moyen. S’il y a des
taches de calcaire sur la vaisselle, essayez un
réglage plus élevé. S’il se forme de la mousse,
essayez un réglage plus bas.
Pour ajuster le réglage, enlevez le capuchon
du distributeur; tournez ensuite l’ajustement
dans le sens inverse à celui des aiguilles d’une
montre pour augmenter le montant d’agent de
rinçage.
Ajusteur d’agent
de rinçage
Fenêtre
indicatrice
Capuchon du
distributeur
Préparation
de la
vaisselle
avant le
chargement
• Il n’est pas nécessaire de pré rincer les saletés
normales d’aliments.
• Enlevez en frottant les saletés importantes, en
particulier les arêtes et les os, les cure-dents,
les peaux et les pépins.
• Enlevez les grandes quantités de touts les
aliments qui restent.
• Enlevez les légumes en feuilles, les restants de
viande et les montants excessifs de graisse ou
d’huile.
• Enlevez les taches d’aliments acides qui
peuvent décolorer l’acier inoxydable.
Avez-vous
oublié
d’ajouter
une
assiette?
Vous pouvez ajouter une assiette oubliée
n’importe quand avant le lavage principal.
1. Ouvrez légèrement la porte.
2. Attendez la fin de l’action de pulvérisation
d’eau. Il peut s’échapper de la vapeur du
lave-vaisselle.
3. Ajoutez les assiettes oubliées.
4. Fermez la porte.
Page 34
10
N’utilisez que des détergents fabriqués
spécialement pour lave-vaisselle. Nous
approuvons l’utilisation de Cascade®, Cascade
Complete®et Electrasol®dans tous les
lave-vaisselle Monogram. Conservez votre
détergent en poudre dans un endroit sec et
frais. Ne mettez jamais de détergent dans
votre lave-vaisselle sans être prêt à laver
votre vaisselle.
Tous les cycles de lavage, à l’exception du cycle
RINSE ONLY (rinçage seulement) nécessitent
du détergent dans le contenant principal et de
prélavage. Le montant de détergent à utiliser
dépend du degré de dureté de votre eau. Si
votre eau est dure, remplissez complètement
la section principale de lavage et la section de
prélavage. Si votre eau est douce, remplissez les
deux sections à moitié. Si vous utilisez des pains
de détergent pour lave-vaisselle automatique,
placez simplement un pain dans la section de
lavage principal et fermez.
Protégez votre vaisselle et votre lave-vaisselle
en appelant votre service d’approvisionnement
d’eau et en lui demandant le degré de dureté
de votre eau. Si votre eau a 12 grains ou plus,
elle est très dure. Nous vous recommandons
d’utiliser un adoucisseur d’eau. Sans
adoucisseur d’eau, du calcaire peut
s’accumuler dans le robinet d’eau, qui peut se
bloquer ouvert et occasionner une inondation.
Trop de détergent dans de l’eau douce peut
occasionner un voile permanent sur vos verres.
Pour remplir le distributeur, si le distributeur
est fermé, ouvrez le couvercle en appuyant sur
le taquet du couvercle. Emplissez de détergent
la section de lavage principal. Emplissez la
section de prélavage si nécessaire. Fermez
ensuite le couvercle du distributeur.
Il est normal que le couvercle s’ouvre un peu
pour distribuer le détergent.
N’utilisez jamais de détergent pour lavage de la
vaisselle à la main
NOTE : Si vous utilisez un détergent qui n’est
pas spécialement conçu pour les lave-vaisselle,
vous remplirez votre lave-vaisselle d’eau
savonneuse. Pendant le fonctionnement, cette
eau savonneuse sortira des évents de votre lavevaisselle, en couvrant le sol de la cuisine et en
le mouillant.
Comme toutes les boites de détergent se
ressemblent, gardez votre détergent pour lavevaisselle à part de tous vos autres produits
nettoyants. Montrez à toute personne qui
risque d’utiliser votre lave-vaisselle le bon
détergent et l’endroit où vous le gardez.
Un détergent qui n’est pas conçu pour les lavevaisselle n’endommagera probablement pas
votre vaisselle, mais ne la lavera probablement
pas bien.
Détergents
Section de
prélavage
Couvercle
Taquet du
couvercle
Section de lavage
principal
Utilisation du lave-vaisselle
Lave-vaisselle
Page 35
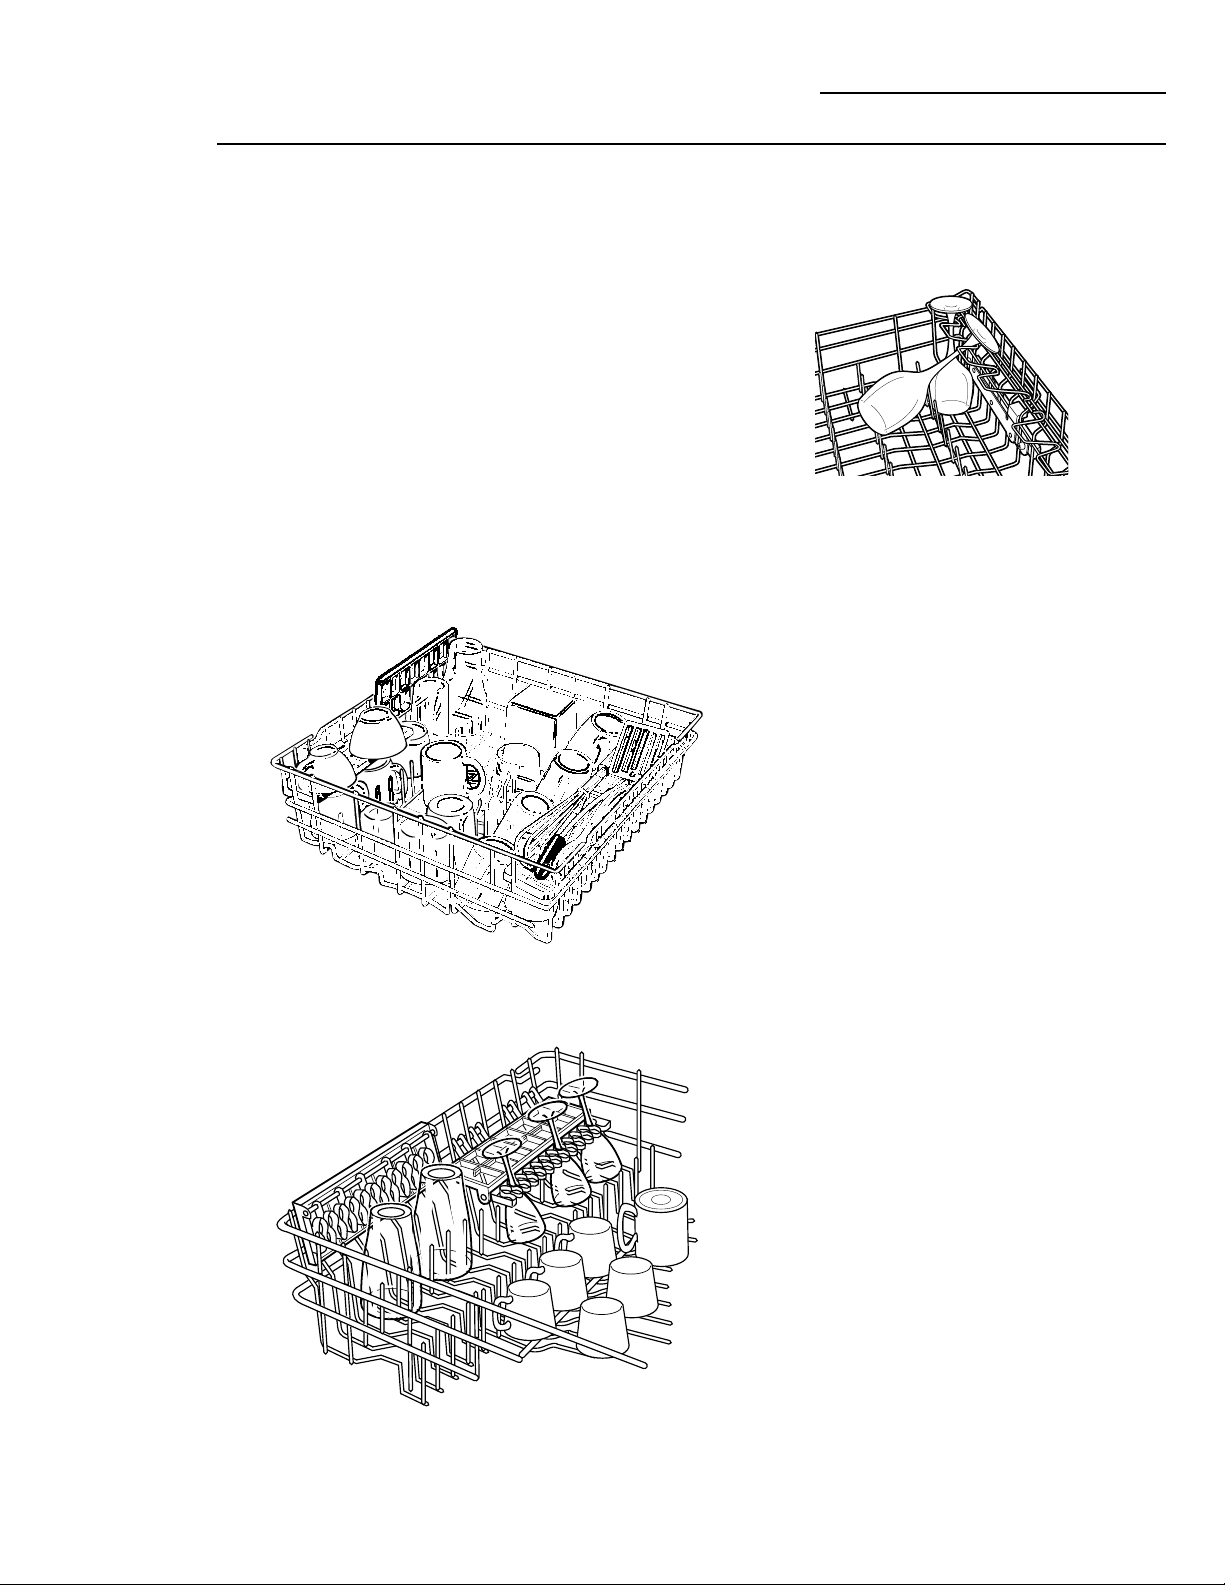
Chargement des clayettes
Lave-vaisselle
Clayette du
haut
Les caractéristiques et l’apparence des clayettes
et du panier à argenterie peuvent être
différentes de celles de votre modèle.
La clayette du haut est conçue pour les verres,
mais vous pouvez y mettre des tasses et des
soucoupes, des casseroles et des ustensiles de
cuisine pour bien les laver. Le meilleur endroit
pour les tasses et les verres est le long des côtés
et vous devez les mettre à l’envers, leur
ouverture vers le bas. C’est aussi un bon
endroit pour les matières plastiques
lavables en lave-vaisselle.
Vous pouvez placer l’étagère à tout mettre (sur
certains modèles) en position supérieure ou
inférieure pour davantage de souplesse. Un
porteur de verre à vin permet un meilleur
lavage des verres à vin.
Certains modèles ont des étagères de tasses en
métal profilé qui peuvent contenir jusqu’à 12
verres à vin (comme l’indique la figure).
Comme les verres à vin sont de tailles variées,
après les avoir mis, poussez doucement dans la
clayette pour vous assurer qu’ils ne dépassent
pas le haut du lave-vaisselle.
La clayette du haut peut contenir toutes sortes
d’ustensiles de différentes formes. Vous devez
placer les bols de malaxage, les casseroles à
l’envers. Des râteliers pliables (sur certains
modèles) permettent de mettre les articles
très grands et difficiles à caser.
Fixez les grands ustensiles en matière plastique
lavables en lave-vaisselle à deux râteliers si possible.
Assurez-vous que les petits articles en matière
plastique soient bien fixés de manière à ne pas tomber
dans le chauffage.
Assurez-vous que les articles ne passent pas par le
fond de la clayette et ne bloquent pas la rotation du
gicleur du milieu. Cela peut occasionner un mauvais
lavage des articles qui se trouvent dans la clayette du
haut.
Assurez-vous qu’aucun article ne peut bloquer la
rotation du gicleur.
11
Page 36
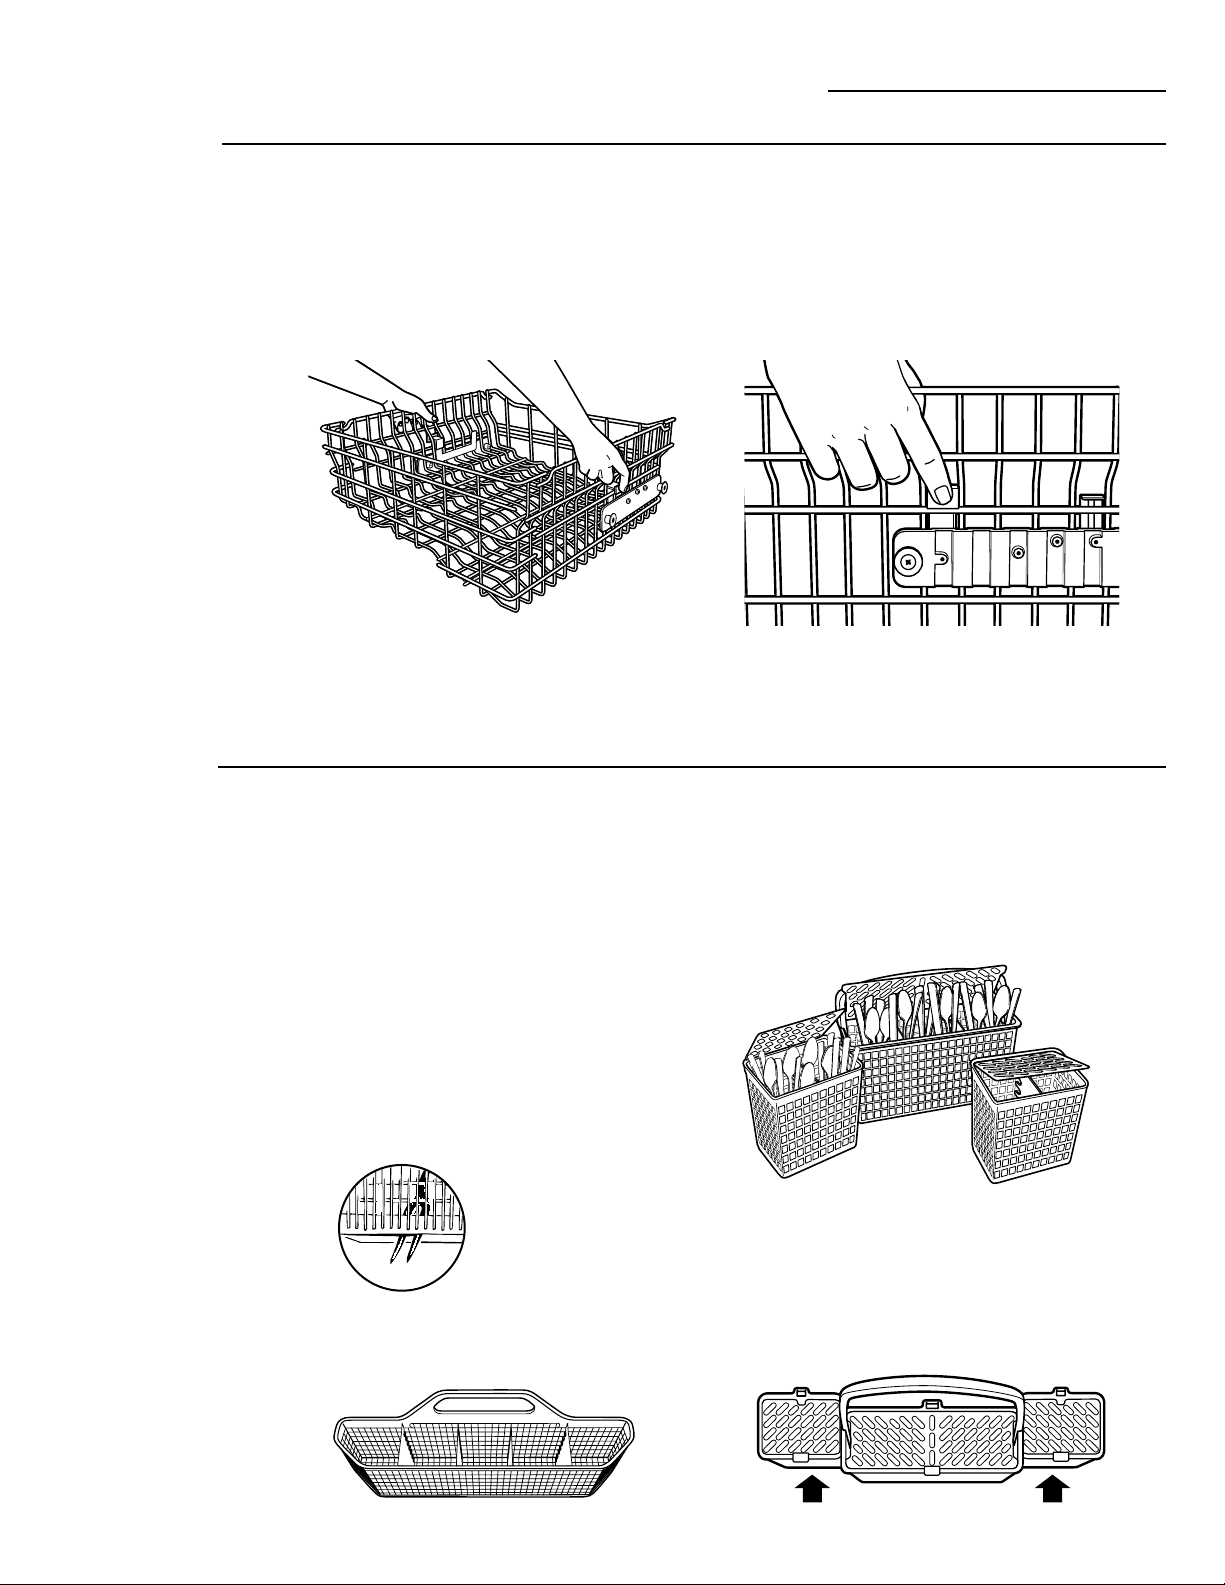
Pour mettre les couverts, poussez simplement
la poignée ajustable d’un côté ou de l’autre
(sur certains modèles).
Mettez vos couverts dans le panier amovible
avec les poignées des fourchettes et des
couteaux orientées vers le haut pour ne pas
vous blesser aux mains. Placez les cuillers dans
le panier le manche vers le bas. Mélangez les
couteaux, les fourchettes et les cuillers de
manière à ce qu’ils ne se collent pas les uns aux
autres. Répartissez-les également. Vous devez
mettre les petits articles en matière plastique,
comme les cuillers à mesurer et les capuchons
de bocaux, en bas du panier à argenterie, avec
l’argenterie au-dessus.
Vous pouvez placer le panier à argenterie en
une pièce à l’avant, du côté droit ou à l’arrière
de la clayette inférieure.
Un grand nombre d’options existent pour le
panier à argenterie en trois pièces (sur certains
modèles). Tout le panier est conçu pour aller
du côté droit de la clayette inférieure. En outre,
chaque extrémité du panier est amovible pour
permettre de mieux disposer les couverts et les
autres articles dans la clayette inférieure.
Vous pouvez fermer le couvercle des paniers du
centre et des extrémités (sur certains modèles)
pour contenir de petits articles. Vous pouvez
placer les articles longs sur l’étagère à tout
mettre dans la clayette supérieure.
La position normale de votre clayette ajustable
est en haut, ce qui donne un maximum de
place aux grands articles placés dans la clayette
inférieure. Si vous avez de grands verres à vin,
des gobelets ou d’autres articles à placer dans
la clayette supérieure, vous pouvez l’ajuster en
position inférieure.
Pour mettre la clayette en position inférieure,
soutenez le poids de la clayette à la main,
comme l’indique la figure, et appuyez sur les
deux touches à doigt d’environ 1/4″ vers
l’intérieur de la clayette, comme l’indique la
figure, et guidez la clayette vers le bas pour la
mettre en position inférieure.
Pour mettre la clayette en position supérieure,
tirez vers le haut le centre du cadre de côté de
la clayette jusqu’à ce que la clayette se bloque
en place.
Chargement des clayettes
Lave-vaisselle
12
Clayette
supérieure
ajustable
(sur certains
modèles)
Panier à
argenterie
Ne laissez aucun
article dépasser
en bas.
Pour enlever les paniers des extrémités, saisissez le panier
aux coins opposés et séparez en faisant glisser.
Panier en une pièce (sur certains modèles)
Panier en trois pièces (sur certains modèles)
Page 37
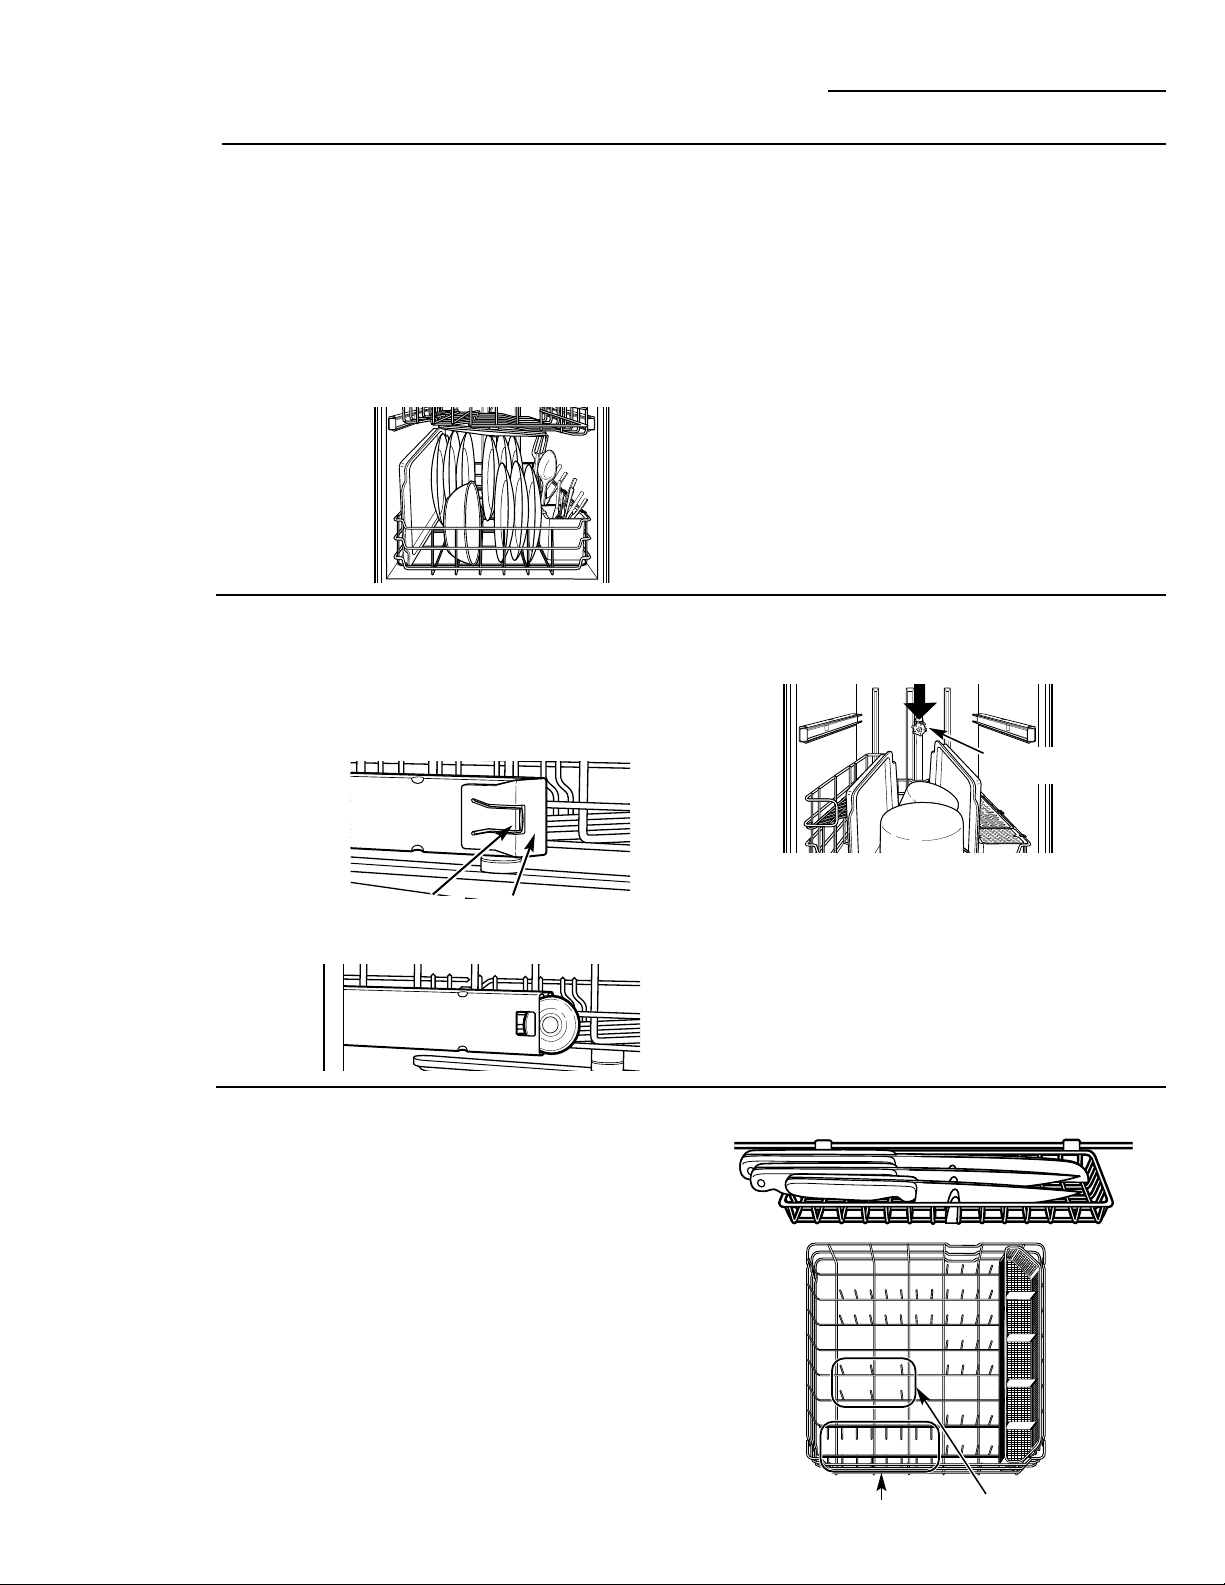
Tiroir à coutellerie
Le tiroir à coutellerie contient jusqu’à 4 grands
couteaux comme un couteau trancheur, un couteau de
chef, un couteau à pain, etc. qui sont trop grands pour
être mis dans le panier à argenterie.
Accrochez le tiroir à l’arrière de la clayette supérieure.
Mettez les couteaux entre les guides (comme l’indique
la figure).
Râteliers à bol
Les grands râteliers à bol spéciaux dans la clayette
inférieure permettent de mieux charger votre
lave-vaisselle. Ils sont utiles pour les bols de service
ou les autres grands bols.
Pour utiliser les râteliers à bol, dépliez les deux rangées
de râteliers flexibles situés à l’avant des râteliers à bol
et chargez les bols juste comme vous le feriez dans la
clayette supérieure.
Vous pouvez enlever la clayette supérieure pour créer
de l’espace pour les grands articles dans la clayette
inférieure.
Pour enlever la clayette supérieure, appuyez avec votre
pouce pour enlever le taquet et enlevez les capuchons
d’extrémités antérieurs de chaque côté du rail.
Tirez la clayette tout droit vers vous pour la faire sortir
de ses rails.
Remettez en place les capuchons d’extrémité, puis
poussez les rails jusqu’au bout dans le lave-vaisselle.
Faites glisser la pomme de douche sur le bec.
Remplissez ensuite la clayette inférieure et commencez
votre cycle.
NOTE : La pomme de douche doit être en place avec
la clayette supérieure enlevée. Si vous ne l’installez pas
bien, vous laverez mal et votre lave-vaisselle fera du
bruit.
NOTE : N’oubliez pas d’enlever la pomme de douche
avant de remettre en place la clayette supérieure.
13
Clayette
inférieure
Vous pouvez utiliser la clayette inférieure pour les
assiettes, les soucoupes et les ustensiles de cuisine. Vous
devez mettre les grands articles comme les casseroles et
les tôles à biscuits le long du côté gauche. Mettez les
plats de service, les casseroles et les bols le long des
côtés, dans les coins ou à l’arrière. Les côtés sales
des articles doivent être orientés vers le centre de la
clayette. Si nécessaire, vous pouvez placer les grands
verres et les grosses tasses dans la clayette inférieure
pour faciliter la charge.
Également, veillez à ne pas laisser une partie d’un
article comme une poignée de casserole ou d’assiette
dépasser de la clayette inférieure. Cela peut bloquer le
gicleur et occasionner un mauvais lavage.
Les râteliers pliants (sur certains modèles) permettent
de mieux placer les très grands articles et les articles
difficiles à placer. Vous pouvez laisser les râteliers en
position levée ou les replier pour accommoder la
clayette inférieure.
Pomme
de douche
Ces râteliers se déplient
Râteliers à gros bol
Enlèvement
de la
clayette
supérieure
Autres
caractéristiques
de clayette
(sur certains
modèles)
Chargement des clayettes
Lave-vaisselle
Enlevez les capuchons d’extrémité
Appuyez avec votre pouce
Page 38

14
Suivez ces
directives
pour charger
les services
de 10 et 12
couverts
Chargement des clayettes
Lave-vaisselle
Les caractéristiques et l’apparence des clayettes et des paniers à argenterie peuvent être
différentes de celles de votre modèle.
Clayette supérieure – service de
10 couverts
Clayette inférieure – service de
10 couverts
Clayette supérieure – service de
12 couverts
Clayette inférieure – service de
12 couverts
Page 39
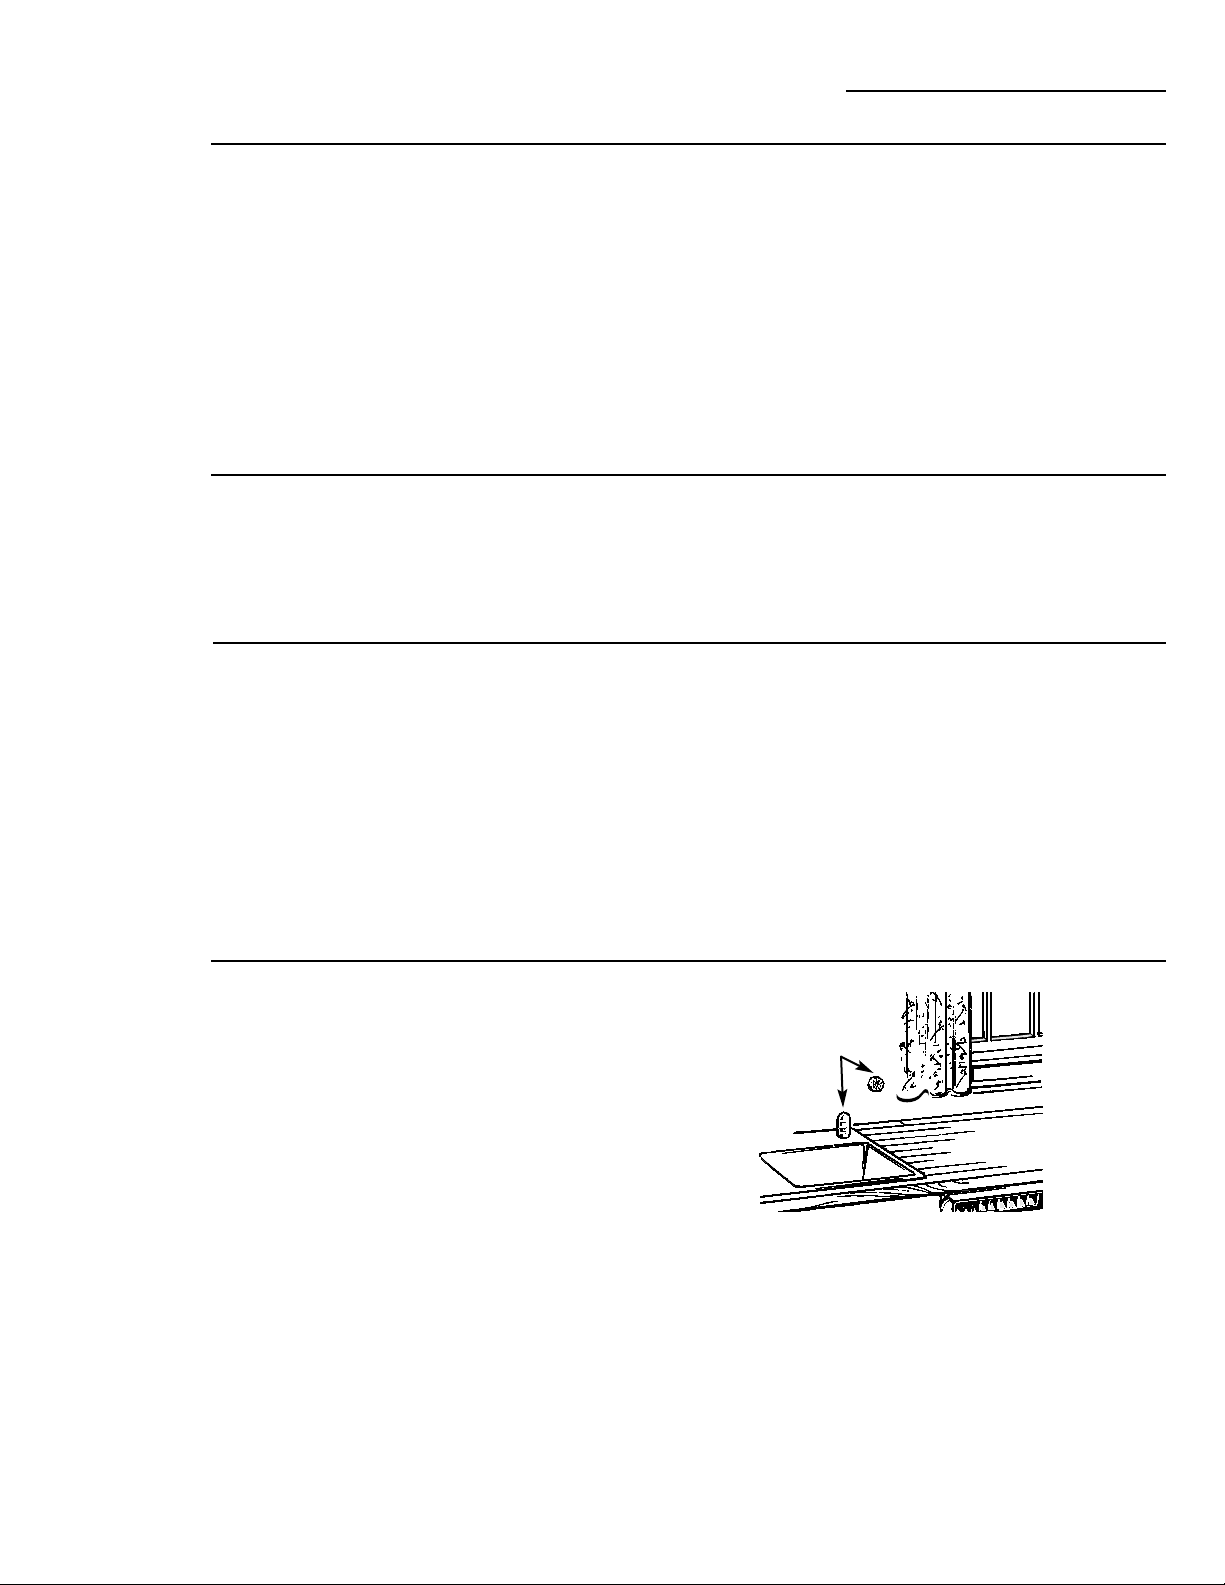
15
Soins et nettoyage
Lave-vaisselle
Extérieur
Pour nettoyer le panneau de contrôle, utilisez un linge légèrement humide, puis séchez bien.
Pour nettoyer les panneaux peints extérieurs, utilisez une bonne cire à polir pour appareil
électroménager.
N’utilisez jamais d’objet pointu, de tampon à récurer ou de nettoyant abrasif sur une partie de
votre lave-vaisselle.
Vous pouvez nettoyer les panneaux en acier inoxydable avec un nettoyant pour appareil
électroménager en acier inoxydable CERAMA BRYTE®ou un produit semblable avec un linge
propre, doux. Vous pouvez commander le nettoyant pour appareil électroménager en acier
inoxydable CERAMA BRYTE®au service de pièces GE en appelant le numéro 800.626.2002
(aux États-Unis uniquement). Au Canada, appelez le 1.888.880.3030.
Protection
contre le gel
Si vous laissez votre lave-vaisselle dans un endroit qui n’est pas chauffé en hiver, demandez à un
technicien du service de faire les opérations suivantes :
1. Couper l’alimentation en courant électrique du lave-vaisselle. Enlever les fusibles ou faire
basculer le disjoncteur.
2. Couper l’alimentation en eau du lave-vaisselle et débrancher la conduite d’alimentation d’eau
du robinet d’eau.
3. Vider l’eau de la conduite d’alimentation d’eau et du robinet d’eau (utilisez une casserole pour
recueillir l’eau).
4. Rebrancher la conduite d’alimentation d’eau au robinet d’eau.
L’écart
anti-retour
Un écart anti-retour protège votre lave-vaisselle
contre un retour de l’eau dans l’appareil si un
tuyau d’évacuation se bouche. L’écart anti-retour
ne fait pas partie de votre lave-vaisselle. Il n’est
pas couvert par votre garantie. Tous les codes de
plomberie n’exigent pas un écart anti-retour, et
il est possible que vous n’en ayez pas un.
L’écart anti-retour est facile à nettoyer.
1. Arrêtez votre lave-vaisselle et soulevez le
couvercle chromé.
2. Dévissez le capuchon en matière plastique et
nettoyez avec un cure-dent.
Intérieur
L’acier inoxydable utilisé pour fabriquer le bac du lave-vaisselle et la porte intérieure fournit la
fiabilité la plus grande disponible dans un lave-vaisselle GE. Si le bac du lave-vaisselle ou sa porte
inférieure se raye ou se cabosse pendant son utilisation normale, il ne rouillera pas et ne subira
pas de corrosion. Ces taches de surface n’ont pas d’effet sur le fonctionnement ou la solidité de
ces pièces.
Vérifiez l’écart anti-retour chaque fois que
votre lave-vaisselle ne se vide pas bien.
Deux catégories
d’écart anti-retour
Page 40
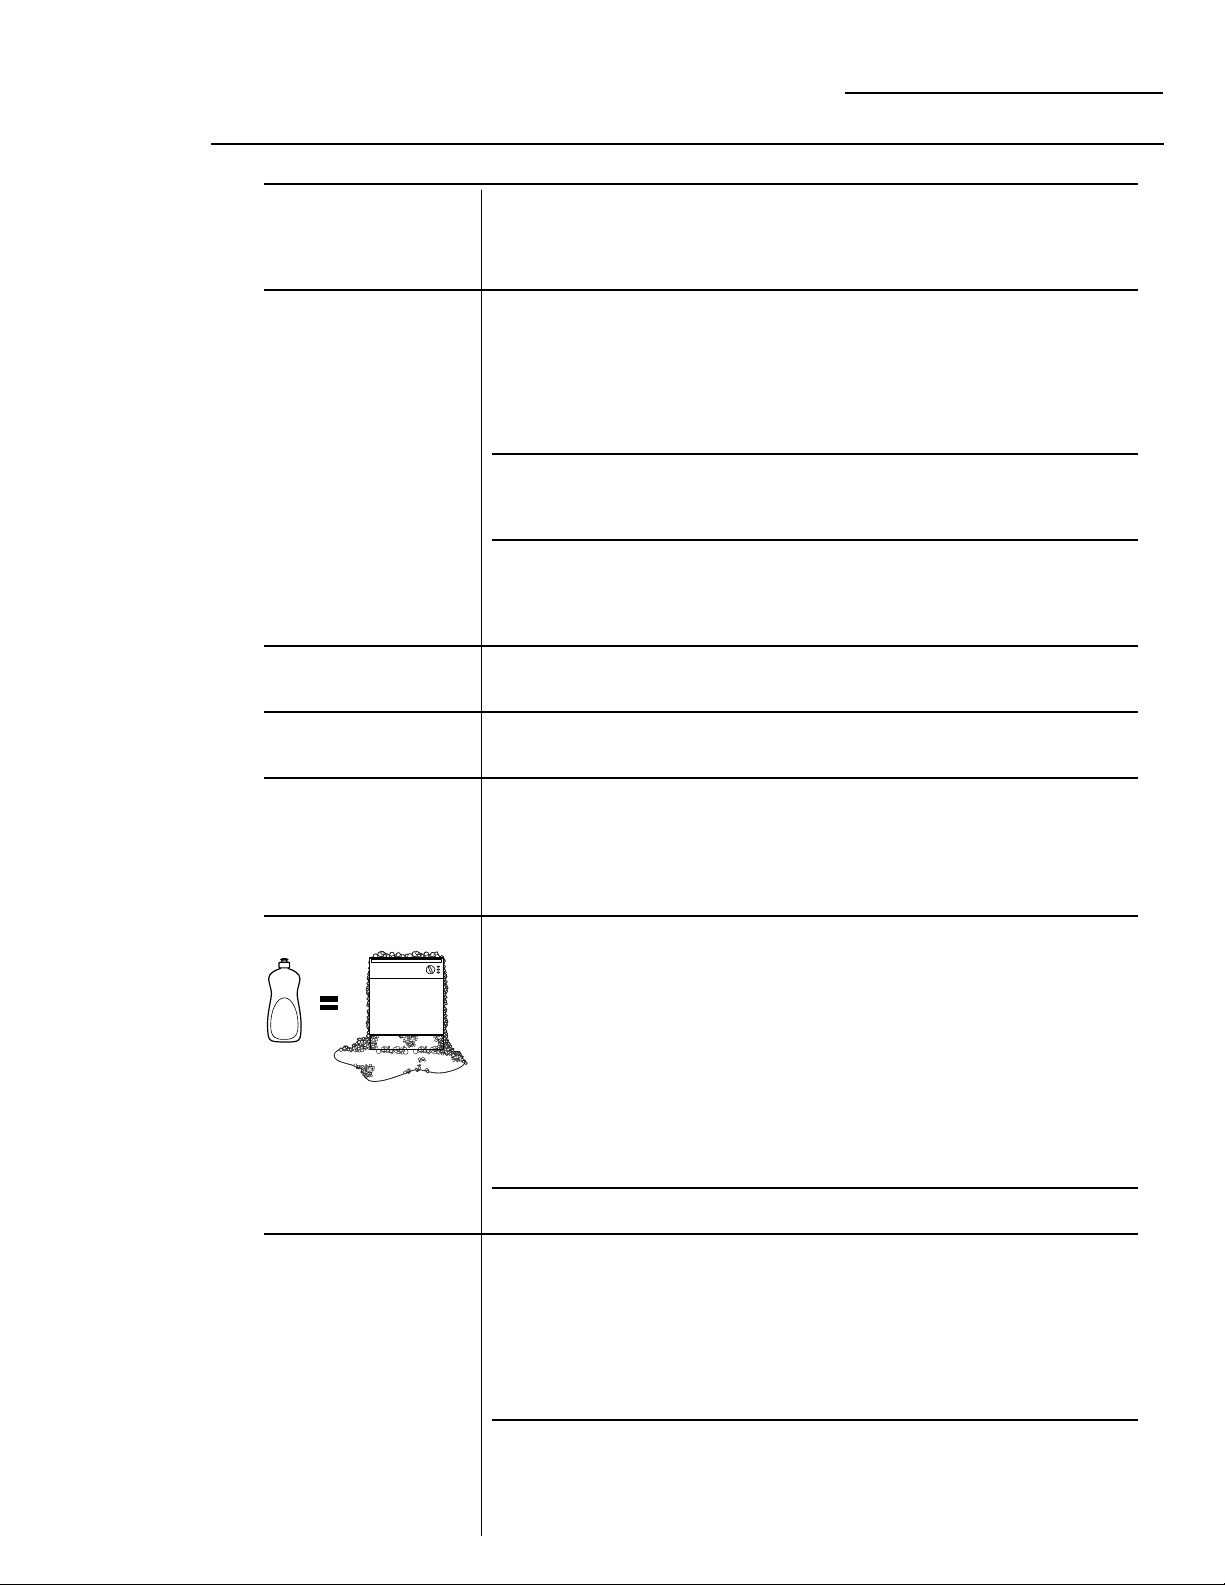
16
PROBLÈME CAUSE POSSIBLE QUE FAIRE
Les lumières du panneau Vous mettez trop de temps • Vous devez appuyer sur chaque touche au
de contrôle ne s’allument pour appuyer sur les plus tard 30 secondes après avoir appuyé sur
pas quand vous réglez les touches choisies les autres. Pour allumer à nouveau, appuyez à
contrôles nouveau sur la touche, ou déverrouillez et
verrouillez à nouveau la porte.
Il y a du bruit Certains des bruits que vous • Le contenant à détergent s’ouvre.
entendez sont normaux
• Le moteur s’arrête pendant la période de séchage.
• L’eau s’écoule en dehors de la cuve
immédiatement après que vous ayez appuyé sur la
touche START/RESET (mise en marche/remise à
zéro).
• Le ventilateur sec est en marche.
Les ustensiles ne sont pas • Assurez-vous que tout est bien mis dans le
bien mis dans la clayette lave-vaisselle.
ou un petit objet est tombé
dans la clayette
Le moteur ronronne • Le lave-vaisselle n’a pas été utilisé sur une base
régulière. Si vous n’utilisez pas souvent votre lavevaisselle, réglez-le pour qu’il se remplisse et
pompez toute l’eau une fois par semaine.
Cela aidera à conserver le joint humide.
Du détergent reste dans La vaisselle bloque les • Remettez en place la vaisselle.
les compartiments compartiments à détergent
distributeurs
Il y a de l’eau en bas C’est normal • Un peu d’eau propre autour de la sortie
du bac d’eau en bas et à l’arrière du bac tient le joint
d’eau lubrifié.
L’eau ne se pompe pas Le tuyau d’évacuation • Si vous avez un écart anti-retour, nettoyez-le.
en dehors du bac est bouché
• Vérifiez que votre évier de cuisine se vide
bien. S’il ne se vide pas bien, vous pouvez
avoir besoin d’un plombier.
• Si votre lave-vaisselle se vide dans un évacuateur de
déchets, videz complètement l’évacuateur.
Il y a de l’eau savonneuse Vous n’avez pas utilisé • N’utilisez que des détergents pour lave-vaisselle
le bon détergent automatique pour éviter les sorties d’eau
savonneuse. Nous approuvons l’usage des
détergents pour lave-vaisselle Cascade®,
Cascade Complete®et Électrasol®dans
tous les laves-vaisselles Monogram.
• Pour enlever l’eau savonneuse de la cuve, ouvrez le
lave-vaisselle et laissez la mousse se dissiper. Ajoutez
1 gallon d’eau froide dans la cuve. Pompez toute
l’eau en commençant tout cycle et ensuite en
réglant à nouveau votre lave-vaisselle après 10
secondes. Consultez la section sur le panneau de
contrôle. Répétez cette opération si nécessaire.
L’agent de rinçage a coulé • Essuyez toujours les éclaboussures d’agent de
rinçage immédiatement.
Des pièces de votre Vous avez utilisé un • Certains détergents contiennent un colorant
lave-vaisselle sont tachées détergent contenant (pigment ou teinture) qui décolore l’intérieur
du colorant du bac à l’usage. Vérifiez que le contenant à
détergent ne soit pas décoloré. Si le contenant
est décoloré, changez de détergent et adoptez un
détergent sans colorant. Nous approuvons l’usage
des détergents pour lave-vaisselle Cascade®,
Cascade Complete
®
et Électrasol®dans
tous les laves-vaisselles Monogram.
Certains aliments à base de • L’utilisation du cycle RINSE ONLY (rinçage
tomate peuvent tacher seulement) après avoir ajouté le plat à la charge
peut diminuer le niveau de taches.
• GE recommande également Cascade
®
Plastic
Booster™pour aider à enlever ce genre de taches.
Avant d’appeler le service
Lave-vaisselle
Des
questions?
Utilisez ce
système de
résolution
de problèmes
Page 41

17
Des
questions?
Utilisez ce
système de
résolution
de problèmes
PROBLÈME CAUSE POSSIBLE QUE FAIRE
La vaisselle et les La température de l’eau • Assurez-vous que la température de l’eau soit
couverts ne sont pas qui entre est plus basse bonne (consultez la section Utilisation du
propres lave-vaisselle).
• Faites couler l’eau au robinet le plus proche
avant de mettre en marche le lave-vaisselle
pour vous assurer une température d’eau
optimale.
La température est • Ouvrez un robinet. Est-ce que l’eau s’écoule
temporairement basse plus lentement que d’habitude? Si c’est le
cas, attendez que la pression de l’eau
redevienne normale pour utiliser votre
lave-vaisselle.
L’écart anti-retour est • Nettoyez l’écart anti-retour.
bouché
Vous avez mal chargé • Assurez-vous qu’un gros ustensile ne bloque
la clayette pas le distributeur de détergent ou le gicleur.
• Les verres et les assiettes doivent faire face au
gicleur.
Il y a des taches et une • Utilisez l’agent de rinçage Jet Dry® ou
pellicule sur la vaisselle Cascade Rinse Aid®pour enlever les taches
et les couverts et empêcher la constitution d’une pellicule.
• Installez un adoucisseur d’eau.
• Pour enlever les taches tenaces et la pellicule
préexistante de la verrerie :
1Enlevez tous les ustensiles en métal de
votre lave-vaisselle.
2N’ajoutez pas de détergent.
3Choisissez le cycle COOKWARE (ustensiles
de cuisine).
4Mettez en marche votre lave-vaisselle et
faites-la fonctionner de 18 à 22 minutes.
Votre lave-vaisselle doit se trouver
maintenant au milieu du lavage principal.
5Ouvrez la porte et versez 2 tasses (500 ml)
de vinaigre blanc en bas de votre lavevaisselle.
6Fermez la porte et laissez votre lave-vaisselle
terminer le cycle. Si le rinçage au vinaigre
ne fonctionne pas, répétez cette opération
en utilisant 1/4 de tasse (60 ml) de cristaux
d’acide citrique au lieu de vinaigre.
Il y a un nuage sur Il y a de l’eau douce avec • Ce nuage est permanent. Pour l’empêcher,
la verrerie trop de détergent utilisez moins de détergent si votre eau est
douce. Lavez la verrerie avec le cycle le plus
court qui la nettoie.
La température de l’eau • Abaissez la température du chauffe-eau.
qui entre dans le lave-vaisselle
est supérieure à 66°C (150°F)
Il y a des marques noires Des ustensiles en aluminium • Enlevez les marques avec un nettoyant doux,
ou grises sur la vaisselle ont frotté contre la vaisselle abrasif.
L’eau est très dure
La température de l’eau qui
entre est basse
Le lave-vaisselle est trop
chargé
La poudre de détergent est
vieille ou humide
Le distributeur d’agent de
rinçage est vide
Il n’y a pas assez de
détergent
Avant d’appeler le service
Lave-vaisselle
Page 42

18
Des
questions?
Utilisez ce
système de
résolution
de problèmes
PROBLÈME CAUSE POSSIBLE QUE FAIRE
Il y a une pellicule jaune Ce sont des taches de thé • Enlevez les taches à la main à l’aide d’une solution
ou brune sur les surfaces ou de café de 1/2 tasse de javel et de 3 tasses d’eau chaude.
intérieures
ATTENTION : Avant de
nettoyer l’intérieur, attendez au moins 20 minutes
après la fin d’un cycle pour permettre à l’élément
chauffant de se refroidir. Si vous ne le faites pas,
vous risquez de vous brûler.
Une pellicule générale jaune • Le seul moyen de corriger ce problème est
ou brune peut être causée de poser un filtre spécial dans la conduite
par des dépôts dans l’eau d’alimentation d’eau. Contactez votre revendeur
GE ou une entreprise d’adoucissement d’eau.
Il y a une pellicule blanche Il y a des minéraux dans • GE recommande le nettoyant pour lave-vaisselle
sur les surfaces intérieures votre eau dure Jet Dry®pour vous aider à enlever certaines
taches dues à l’eau dure et aux minéraux.
• Pour beaucoup de taches, nettoyez l’intérieur en
mettant un détergent pour lave-vaisselle sur une
éponge humide. Portez des gants en caoutchouc.
N’utilisez JAMAIS un nettoyant autre que les
détergents recommandés ou pour lave-vaisselle
parce qu’ils peuvent occasionner de la mousse ou
de l’eau savonneuse. Nous approuvons l’utilisation
de Cascade®, Cascade Complete®et Electrasol
®
dans tous les laves-vaisselles Monogram.
La vaisselle ne sèche pas La température de l’eau qui • Assurez-vous que la température de l’eau qui
entre est basse entre soit bonne (consultez la section Utilisation
du lave-vaisselle).
• Choisissez ADDED HEAT (chaleur
supplémentaire)
• Choisissez HEATED DRY (chaleur sèche)
Le distributeur d’agent de • Vérifiez le distributeur d’agent de rinçage.
rinçage est vide
Le lave-vaisselle ne Le fusible ou le disjoncteur • Remplacez le fusible ou rebranchez le disjoncteur.
fonctionne pas a sauté Débranchez du circuit tous les autres appareils
électroménagers.
• Essayez de remettre à zéro la touche
START/RESET (mise en marche/remise à zéro).
L’interrupteur mural • Vérifiez l’interrupteur mural auquel votre
(dans certaines installations) lave-vaisselle peut être branché. Dans certains
se trouve en position OFF endroits, le code électrique peut requérir un
(arrêt) interrupteur mural. Mettez l’interrupteur en
position ON (marche).
Il y a de la vapeur C’est normal • De la vapeur sort de l’évent situé en bas de la
porte pendant le séchage et quand l’eau est
pompée en dehors de votre lave-vaisselle.
La lumière d’assainissement Vous avez ouvert la porte • N’interrompez pas le cycle pendant ou après le
ne s’allume pas à la fin du et interrompu le cycle pendant lavage principal.
cycle (cycle anti-bactérien ou après la partie de lavage
seulement) principal
L’eau qui entre était à une • Élevez le niveau de température du chauffe-eau à
température trop basse 49°C (120°F).
Avant d’appeler le service
Lave-vaisselle
Page 43

19
Service à la clientèle
Lave-vaisselle
Quand vous achetez un nouvel appareil électroménager Monogram,
vous recevez l’assurance que si vous avez besoin de renseignements
ou d’aide, GE sera présent. Tout ce que vous devez faire est nous
appeler – sans frais!
Centre de
réponses GE
Aux États-Unis :
800.626.2000
Quelle que soit votre question sur un gros appareil électroménager Monogram, le service
d’information du Centre de réponses GE est à votre disposition pour vous aider. Nous
répondrons à votre appel, et à vos questions, rapidement et avec courtoisie. Et vous pouvez
appeler n’importe quand. Le service du Centre de réponses GE est ouvert 24 heures par jour,
7 jours par semaine.
OU
Visitez notre site Web à l’adresse www.monogram.com
Au Canada, appelez le 1.888.880.3030.
Service de
réparations à la
maison
Aux États-Unis :
800.444.1845
Au Canada :
1.888.880.3030
Un professionnel du service à la clientèle GE vous fournira un service de réparations
expertes, à une heure qui vous convient. De nombreux emplacements exploités par
l’entreprise de service à la clientèle GE vous offre un service aujourd’hui ou demain, ou
quand vous le désirez (de 7h00 à 19h00 les jours de semaine, de 9h00 à 14h00 les samedis).
Nos techniciens formés à l’usine connaissent votre appareil par cœur, et la plupart des
réparations peuvent être faites en une seule visite.
Contrats de
service
Aux États-Unis :
800.626.2224
Au Canada :
1.888.880.3030
Vous pouvez avoir le sentiment de sécurité que le service à la clientèle GE demeurera présent
après l’expiration de votre garantie. Achetez un contrat GE pendant que votre garantie est en
vigueur et vous recevrez un escompte substantiel. Avec un contrat pluriannuel, vous serez
assuré d’un service futur aux prix d’aujourd’hui.
Pièces et
accessoires
Aux États-Unis :
800.626.2002
Au Canada :
1.888.880.3030
Les personnes qui sont qualifiées pour réparer leur propre appareil électroménager peuvent se
faire envoyer directement les pièces et les accessoires chez eux. Le système de pièces GE offre
un accès à plus de 47 000 pièces… et toutes les pièces de remplacement GE sont pleinement
garanties.
Les instructions d’entretien de l’utilisateur contenues dans le présent manuel couvrent des
procédures qui peuvent être accomplies par n’importe quel utilisateur. Tout autre service doit
être fait pas du personnel de service qualifié. Il faut faire attention, car un mauvais service peut
occasionner un fonctionnement dangereux.
Pour nos clients
qui ont des
besoins
spéciaux…
Aux États-Unis :
800.626.2000
GE offre des contrôles en Braille pour un grand nombre d’appareils
électroménagers GE et une brochure pour vous aider à planifier une
cuisine sans obstacle pour les personnes qui ont une mobilité
réduire.
Nos clients malentendants ou mal parlant qui ont accès à un appareil
de communication pour malentendant ou à un téléscripteur
conventionnel peuvent appeler le 800.TDD.GEAC (800.833.4322)
pour demander des renseignements ou du service.
www.monogram.com
Page 44

20
Notes
Lave-vaisselle
Page 45

FIRST
CLASS
POSTAGE
REQUIRED
PORT DE
PREMIÈRE
CLASSE
REQUIS
OWNERSHIP REGISTRATION
P.O. BOX 1780
MISSISSAUGA, ONTARIO
L4Y 4G1
(FOR CANADIAN CONSUMERS ONLY)
(SEULEMENT POUR LES CONSOMMATEURS CANADIENS)
21
✁
Notes
Lave-vaisselle
Page 46

Inscription de propriété de produit de consommation
Cher client :
Merci d’avoir acheté notre produit et merci de nous faire confiance.
Nous sommes fiers de vous avoir comme client!
Suivez ces trois étapes pour protéger votre nouvel investissement
en appareil électroménager :
Important : Si vous n’avez pas trouvé votre carte d’inscription
avec votre produit, détachez et envoyez le formulaire
ci-dessous pour vous assurer que votre produit soit
inscrit, ou pour les clients au Canada inscrivez-le en
ligne sur le site www.monogram.com.
1
23
Numéro de modèle Numéro de série
Remplissez et
envoyez votre
inscription de
propriété de produit
de consommation
aujourd’hui.
Soyez rassuré en
sachant que nous
pouvons vous
contacter dans le
cas improbable de
modifications dues
à des questions
de sécurité.
Après avoir envoyé
l’inscription ci-dessous,
conservez ce
document dans un
endroit sûr. Il contient
des renseignements
dont vous aurez besoin
si vous devez appeler
le service de
réparations. Le
numéro de téléphone
de notre service de
réparations au Canada
est le 1.888.880.3030.
Lisez soigneusement
votre manuel du
propriétaire. Il vous
aidera à bien faire
fonctionner votre
nouvel appareil
électroménager.
✁
22
OWNERSHIP REGISTRATION CERTIFICATE • FICHE D’INSCRIPTION DU PROPRIETAIRE
P.O. BOX/C.P. 1780
MISSISSAUGA, ONT. L4Y 4G1
SERIAL/SÉRIEMODEL/MODÈLE
PLEASE COMPLETE AND RETURN THIS VEUILLEZ REMPLIR ET RETOURNER LA
CARD IMMEDIATELY TO ENABLE US TO PRÉSENTE FICHE SANS TARDER AFIN DE
CONTACT YOU IN THE REMOTE EVENT A NOUS PERMETTRE DE COMMUNIQUER AVEC
SAFETY NOTIFICATION IS ISSUED FOR VOUS SI JAMAIS UN AVIS DE SÉCURITÉ
THIS PRODUCT. CONCERNANT CE PRODUIT ÉTAIT ÉMIS.
CHECK MR. MRS.
ONE
COCHEZ MLLE MS
STREET NO. STREET NAME/RUE
N° RUE
CITY/VILLE PROVINCE POSTAL CODE/POSTAL
AREA CODE TELEPHONE NAME OF SELLING DEALER/NOM DU MARCHAND
IND. REG.
M MME
MISS
CORRESPONDENCE FRENCH ENGLISH
CORRESPONDANCE FRANÇAIS ANGLAIS
FIRST NAME/PRÉNOM LAST NAME/NOM
—
INSTALLATION DATE Y/A M
DATE D’INSTALLATION
APT. NO./APP./RR#
—
Page 47

23
Certaines provinces ne permettent pas l’exclusion ou la restriction de dommages indirects ou
consécutifs, et par conséquent la restriction ci-dessus peut ne pas s’y appliquer. Cette garantie
vous donne des droits juridiques spécifiques, mais vous pouvez avoir d’autres droits qui varient
d’une province à l’autre. Pour connaître vos droits juridiques dans votre province, consultez votre
bureau local ou provincial de protection des consommateurs.
Garant : Camco Inc., 1 Factory Lane, Suite 310, Moncton, N.B. E1C 9M3.
Garantie
Lave-vaisselle
VOTRE GARANTIE DE LAVE-VAISSELLE MONOGRAM
Agrafez votre facture ou votre chèque annulé ici. Vous avez besoin
d’une preuve d’achat original pour obtenir du service sous garantie.
QU’EST-CE
QUI EST
COUVERT
Depuis la date
d’achat original
UN AN
Toute pièce du lave-vaisselle qui tombe en panne à cause d’un vice de matériau ou de main-
d’œuvre. Pendant cette année de garantie complète, GE fournira, gratuitement, toute la maind’œuvre et le service à la maison pour remplacer une pièce défectueuse.
Deuxième année
Toute pièce du lave-vaisselle qui tombe en panne à cause d’un vice de matériau ou de main-
d’œuvre. Pendant cette deuxième année de garantie limitée, vous serez responsable de tous les
frais de main-d’œuvre et de service à la maison.
Cinq ans
La clayette du lave-vaisselle, si elle se rouille, ou le module de contrôle électronique, s’il tombe
en panne à la suite d’un vice de matériau ou de main-d’œuvre. Pendant ces cinq ans de garantie
limitée, vous serez responsable de tous les frais de main-d’œuvre et de service à la maison.
À vie
La cuve en acier inoxydable ou le joint de porte, s’il n’arrête pas l’eau à cause d’un vice de
matériau ou de main-d’œuvre. Pendant cette garantie à vie, GE fournira également, gratuitement,
toute la main-d’œuvre et le service à la maison pour remplacer la pièce défectueuse.
Cette garantie est valable pour l’acheteur original ainsi que pour tout propriétaire suivant de
produits achetés pour un foyer ordinaire au Canada. Il faut fournir la preuve de l’achat original
pour obtenir du service en vertu de cette garantie.
Tout le service en vertu de cette garantie sera fourni par nos centres de service de fabrique ou
par nos techniciens autorisés de soins à la clientèle pendant les heures de travail normales.
Si votre appareil électroménager a besoin de service, pendant la période de garantie ou après
cette période, appelez le 1.888.880.3030.
CE QUI N’EST
PAS COUVERT
• Les déplacements de service à votre maison
pour vous apprendre à utiliser ce produit.
• Une mauvaise installation, livraison ou un
mauvais entretien.
• Le remplacement de fusibles ou le
rebranchement de disjoncteurs chez vous.
• Une panne du produit si vous l’avez mal
utilisé, maltraité ou utilisé à d’autres fins que
celles auxquelles il est destiné, ou si vous
l’avez utilisé à des fins commerciales.
• Tout dommage au produit occasionné par un
accident, un incendie, une inondation ou un
acte indépendant de votre volonté.
• Tout dommage indirect ou consécutif
occasionné par une panne possible de cet
appareil électroménager.
• Tout nettoyage ou entretien de l’appareil
d’écart anti-retour dans la conduite
d’écoulement d’eau.
• Tout dommage occasionné après livraison, y
compris tout dommage occasionné par des
articles tombant à terre.
Page 48

165D4700P289
49-5965-1
Imprimé aux États-Unis
01-04 JR
 Loading...