

GE ZBD6890N20II, ZBD6890N00II, ZBD6890K03II, ZBD6890K00II, ZBD6880N20SS Owner’s Manual
...
Dishwasher
ZBD6800
ZBD6880
ZBD6890
ZBD0700
ZBD0710
monogram.com
[

Consumer Information
Dishwasher
Introduction
Contents
Your new Honogram dishwasher makes an eloquent statement of style, convenience and kitchen
planning flexibility. Whether you chose it for its purity of design, practical features or assiduous
attention to detail-or for all of these reasons-you'll find that your Honogram dishwasher's superior
blend of form and function will delight you for gears to come.
The information on the following pages will help you operate and maintain your dishwasher properly.
If you have any other questions, visit our Website at: monogram.corn
Appliance Registration ................ 3, 23,24
Care and Cleaning ......................... 15
Consumer Services ...................... 3, 20
Hodel and Serial Number Location ........... 3
Operating Instructions ................... 6-14
Control Paneland Operation ............ 6-8
Lighting Features ......................... 9
Water Temperature ...................... 9
Rinse Agent .............................. 9
Dish Preparation Prior to Loading ......... 10
Detergents ............................. 10
Dishwasher Racks ................... 11-14
Problem Solver ......................... 16-19
Safety Instructions ........................ 4, 5
U.S.A.Warranty ........................... 21
Canada Warranty ......................... 22

Consumer Information
Dishwasher
Before
using
your
dishwasher
Write
down the
model &
serial
numbers
Read this manual carefully. It is intended to help
you operate and maintain your new dishwasher
properly.
Keep it handy for answers to your questions.
You can locate your model and serial numbers
on the tub wall just inside the doon
If you don't understand something or need more
help, there is a list of toll-free consumer service
numbers included on the Consumer Services
page inthe back section of this manual.
OR
Visit our Website at: monogram.cam
Before sending in the card, please write these
numbers here:
Model Number
Serial Number
Use these numbers in any correspondence or
service calls concerning your dishwasher.
If you received Immediately contact the dealer (or builder) that
a damaged sold you the dishwasher.
dishwasher
Save time
& money
If btou
need service
Before you request service, check the Problem
Solver in the back of this manual.
To obtain service, see the Consumer Services
page in the back of this manual.
We're proud of our service and want you to be
pleased. If for some reason you are not happy
with the service you receive, here are steps to
follow for further help.
For customers in the USA:
FIRST,contact the people who serviced your
appliance. Explain why you are not pleased.
In most cases, this will solve the problem.
NEXT,if you are still not pleased, contact us on
our website, write all the details-including your
phone number-or write to:
It lists causes of minor operating problems that
you can correct yourself.
For customers in Canada:
FIRST,contact the people who serviced your
appliance. Explain why you are not pleased.
In most cases, this will solve the problem.
NEXT,if you are still not pleased, write all the
details-including your phone number-to:
Manager, Consumer Relations
Mabe Canada Inc.
1 Factory Lane, Suite BlO
Moncton, N.B.EIC 9M3
Manager, Customer Relations
GEAppliances
Appliance Park
Louisville, KY40225

IMPORTANT SAFETY INSTRUCTIONS
READ ALL INSTRUCTIONS BEFORE USE
SAVE THESE INSTRUCTIONS
ik WARNING!
For gour safetg, the information in this manual must be followed to minimize the risk of fire
or explosion, electric shock, and to prevent propertg damage, personal injurg, or death.
II, WARNING! WATER HEATER SAFETY
Under certain conditions, hydrogen gas may be
produced in a water heater that has not been
used for two weeks or more. HYDROGEN GAS
IS EXPLOSIVE,
If the hot water hasnot been used for two weeksor
more, preventthe possibility of damage or injury by
turning on all hot water faucets and allow them to
run for severalminutes. Dothis before using any
electrical appliance which isconnected to the hot
water system.Thissimple procedure will allow any
built-up hydrogen gas to escape.Sincethe gas is
flammable, do not smokeor usean openflame or
appliance during this process.
• ,PROPER INSTALLATION AND MAINTENANCE
This dishwasher must be properly installed and located in accordance with the Insto!!ation
Instructions before it is used. !f you did not receive on Insto!!otion Instructions sheet with
gout dishwasher, you can receive one bg visiting our website at monogram.com.
• Connectto a grounded metal, permanent wiring
system; or run anequipment-grounding conductor
with the circuit conductors and connect to the
equipment-grounding terminal or leadof the
appliance.
• Improper connection of the equipment-grounding
conductor can resultin a riskof electric shock.
Checkwith a qualified electrician or service
representative if you arein doubt whether the
appliance is properly grounded,
• Disposeof discardedappliances and shipping
or packingmaterial properly.
• Do not attempt to repairor replaceany part
of your dishwasher unless it isspecifically
recommended in this manual. All other servicing
should be referred to a qualified technician.
• Tominimizethe possibilityof electric shock,
disconnect thisappliance from the power supply
before attempting any maintenance.
NOTE:Turningthe dishwasher off doesnot
disconnectthe appliance from the power supply,
Werecommend having a qualified technician
serviceyour appliance.
CAUTION:
To prevent minor injury or property damage
• Contents washed in Anti-bacterial mode, if
available, may be hot to the touch. Use care
before handling.
• Using adetergent that is
not specifically designed
for dishwashers will
cause the dishwasher
to fill with suds.
• If your dishwasher is connected to a
wall switch, ensure that the switch is
on prior to use.
• Ondishwashers with electronic controls,
if you chooseto turn the wall switch off
between wash cycles,allow 5-10
secondsafter turning the switch on
before touching START/RESETto allow
the control to initialize.
• Non-DishwareItems: Do not wash items such
aselectronic aircleaner filters,furnace filters and
paint brushes in your dishwashen Damage to
dishwasherand discoloration or staining of
dishwasher may result.
• Closesupervision isnecessary if thisappliance
isusedby or near children.
• Load light, plastic items so they will not
become dislodged and drop to the bottom
of the dishwasher-they might come into
contact with the heating element and be
damaged.

IMPORTANT SAFETY INSTRUCTIONS
READ ALL INSTRUCTIONS BEFORE USE
SAVE THESE INSTRUCTIONS
WARNING! RISK OF CHILD ENTRAPMENT
PROPER DISPOSAL OF THE DISHWASHER
Junked or abandoned dishwashers are
dangerous_.even if theg will sit for "just a
few days." If you are getting rid of your old
dishwasher, please follow the instructions below
to help prevent accidents.
Before You Throw Away Your Old Dishwasher:
• Take off the door of the washing compartment
or remove the door latch keeper (as shown).
Door
keeper
WARNING!
• Usethis appliance only for its intended purpose
as described inthis Owner's Manual.
• Use only powder,tabs, liquid detergents or rinse
agents recommended for use in a dishwasher and
keepthem out of the reach of children.Cascade¢,
Cascade ®Complete and Electrasol ®Automatic
Dishwashing Detergents, and Jet-Dry ®and
Cascade Crystal Clear _ rinse agents have been
approved for use in all GEdishwashers,
• Locate sharp items so that theg are not likely
to damage the door seal.
• Load sharp knives with the handles up to reduce
the riskof cut-tgpe injuries.
• Do not wash plastic items unless marked
dishwasher safe or the equivalent. For plastic
items not so marked, check the manufacturer's
recommendations,
• Do not touch the heating element during or
immediately after use.
When using your dishwasher, follow basic precautions,
including the following:
• Donot operate your dishwasher unlessall
enclosure panelsare properly inplace.
• Donot tamper with controls.
• Donot abuse,sit on or stand on the door or dish
rack ofthe dishwashec
Do not allow children to play around dishwasher
when opening or closing door due to the possibility
of small fingers being pinched in dooc
• Do not discard a dishwasher without first removing
the door or the door latch keeper of the washing
compartment.
• Do not store or use combustible materials, gasoline
or other flammable vapors and liquids in the vicinity
of this or any other appliance.
• Do not allow children to play with, on or inside this
appliance or any discarded appliance.
READANDFOLLOWTHISSAFETYINFORMATIONCAREFULLY.
SAVETHESEINSTRUCTIONS
Control Panel
Dishwasher
You can locate
gout model
number on the
tub wall just
inside the door.
Throughout this
manual,
features and
appearance
may vary from
gout model.
Control
Settings
ZBD6800 end ZBD6880
ZBD0710
I WASH CYCLES
ZBD6890 and ZBD0700
TIMEREMAININ_ • NII_tAL • G_$1[$
% D
[] WashCycles
ANTI
BACTERIAL
71
• ANT gA_ERIAL • CHINA CRY_AL
• COOl(WARE • RINSEON_
• NORMAL
• ANTI-BACTErIAL e CHINACRYSTAL
ee COOKWARE • RINSE ONLY
• NORMAL
WASHC_L_
N
[]
® .........®
D D I-qi-q iSSl D
DELAY PRE HF_TE • SANITIZED @
DRY r_ s_c e CLEAN
%FIi 1%% [] iTI
e I)RYJNG S_-ART
N
• ANTI-BACTERIAL• SPEEDCYCLE • pLASTIcs CYCLE• COOk'WAR_ • CHINACI_YSTAL • P,INSEONLY
WASHCYCtES
_ 0 C • WASHING • CLEAN
DD%DD % F1
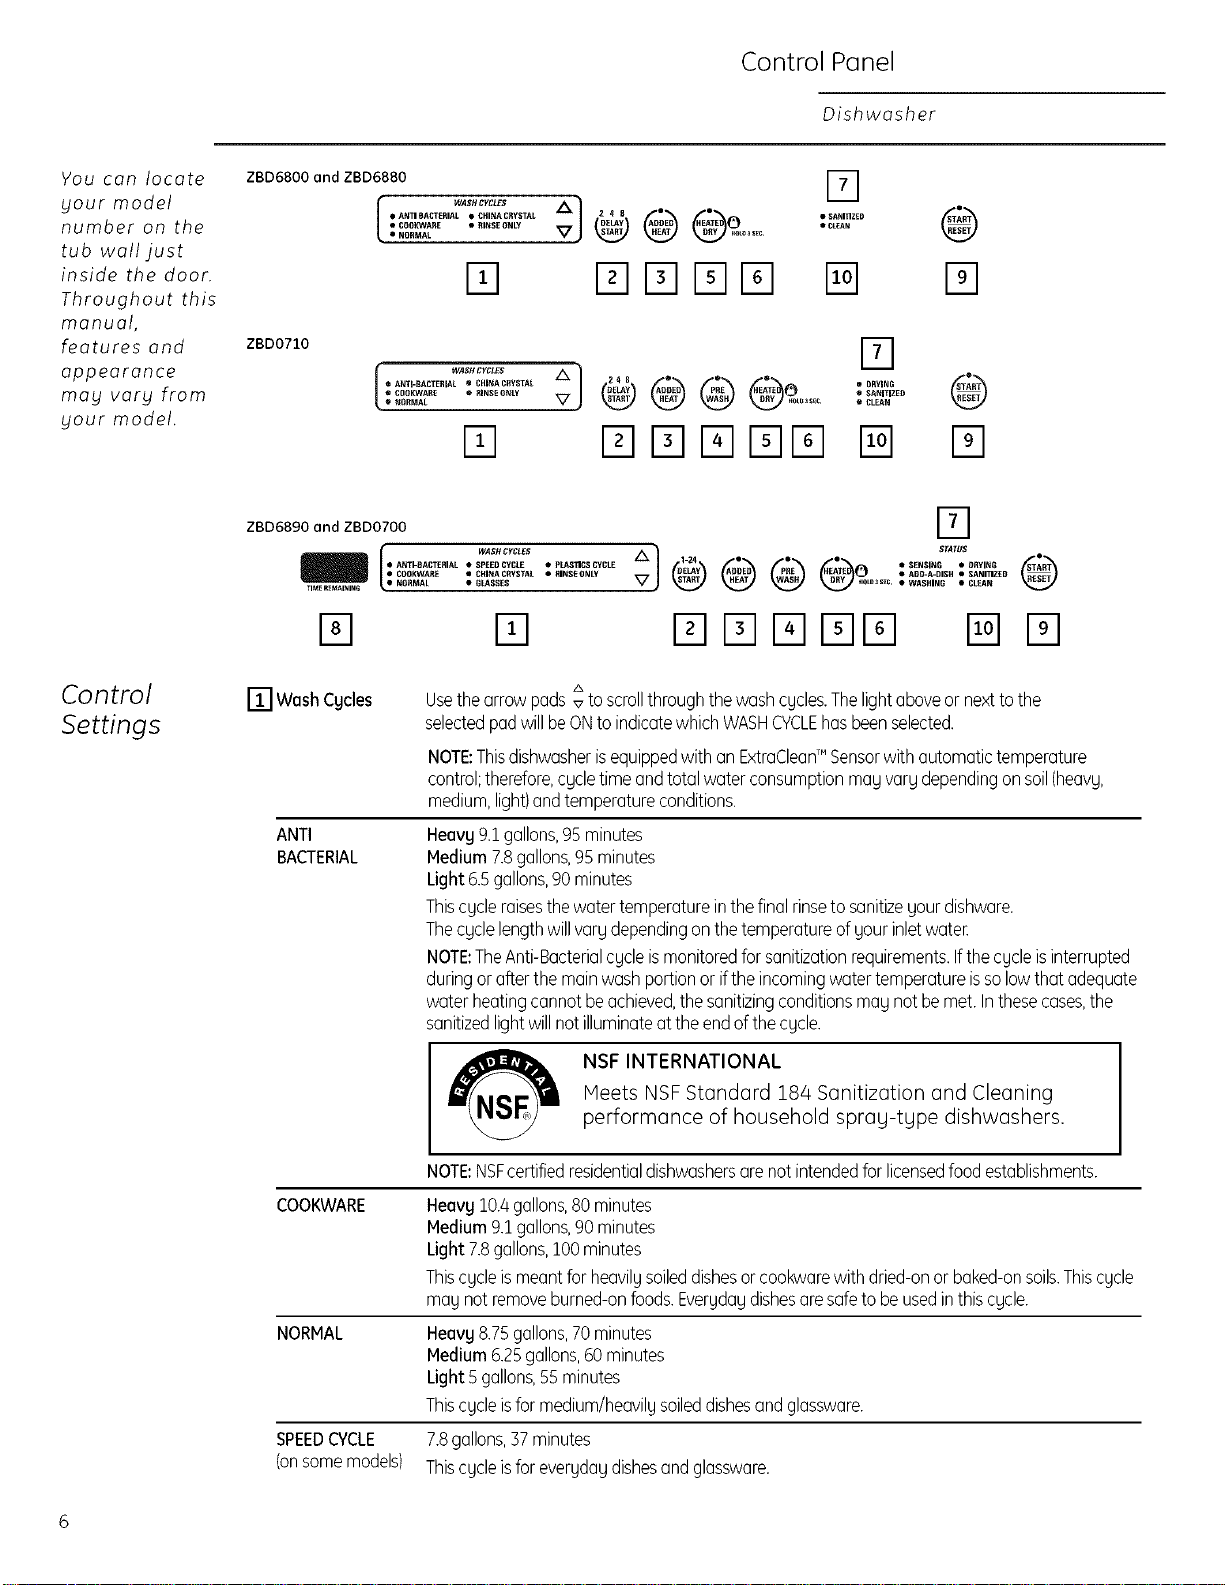
Usethearrow pads ,7to scrollthrough the wash cycles.Thelight above or next to the
selected pad will beONto indicate which WASHCVCLEhas been selected.
NOTE:Thisdishwasher isequipped with an ExtraClean_"Sensorwith automatic temperature
control; therefore,cycle time and total water consumption may vary depending on soil(heavy,
medium, light) and temperature conditions.
Heavy 9.1gallons, 95 minutes
Medium 7.8 gallons, 95 minutes
Light 6.5gallons, 90 minutes
This cycle raisesthe water temperature in the final rinseto sonitizegout dishwore.
The cycle length will vorg depending on the temperature of your inlet waten
NOTE:TheAnti-Bacteriol cycle ismonitored for sanitizotion requirements.If the cycle is interrupted
during orafter the moin wosh portion or if the incoming woter temperoture isso lowthat adequate
woter heating cannot be achieved, the sanitizing conditions may not be met. In these coses,the
sonitized light willnot illuminote at the end of the cycle.
z_
NSF INTERNATIONAL
COOKWARE
NORMAL
SPEEDCYCLE
(onsomemodels)
Meets NSF Standard 18/4 Sanitization and Cleaning
performance of household sprag-tgpe dishwashers.
NOTE:NSFcertified residential dishwashers are not intended for licensedfood establishments.
Heavy 10.4gallons, 80 minutes
Medium 9.1 gallons, 90 minutes
Light 7.8gallons, 100minutes
This cycle is meant for heavily soileddishes or cookware with dried-on or baked-on soils.Thiscycle
may not remove burned-on foods. Everyday dishes are safe to be used in this cycle.
Heavy 8.75gallons, 70 minutes
Medium 6.25 gallons, 60 minutes
Light 5 gallons, 55minutes
This cycle isfor medium/heovily soileddishesand glassware.
7.8gallons,37minutes
Thiscycleisforeverydaydishesandglassware.

Control Panel/Operation
Dishwasher
CHINA
CRYSTAL
GLASSES Heavy 7.8 gallons, S0 minutes
(on some models) This cycle is specifically designed for glosses.
PLASTICS
CYCLE
(on some models)
RINSE ONLY
7.8 gallons, 50 minutes
This cycle is for lightly soiled chino and crystal.
Heavy 7.8 gallons, 70 minutes
Medium 6.5 gallons, 60 minutes
Light 5.2 gallons, 55 minutes
This cycle is specifically designed to reduce the risk of melting plastic items and
improve plastic drying for dishwasher safe plastic items.
Heavy 2.6 gallons, 10 minutes
Light 1.3 gallons, 5 minutes
For rinsing partial loads that will be washed later. Do not use detergent with
this cycle.
[] DELAY START--
This option will allow you to delay the start time of any wash cycle for up to 8
or 24 hours (depending on model).
, Select the delay start time you want by pressing the DELAYSTARTpod.
Multiple or continuous pressing will increment the delay hours. Select the
number of hours you want to delay the start of the cycle. Then press
START/RESET.
. After closing the door,the machine will count down and automatically start
at the correct time.
NOTE:To cancel the DELAYSTARTselection before the cycle begins, press the
DELAYSTARTpad until the display is blank. Pressing START/RESETwill not cancel
delay hours.
[_]ADDEDHEAT--
When selected, the cycle will run longer with the heating element on to improve
both wash and dry performance.
NOTE: Cannot be selected with RINSE ONLY cycle.
[] PREWASH-
(onsomemodels)
For use with heavily soiled and/or dried-on, baked-on soils.This option
MUSTbe selected PRIORto starting the cycle. This option adds 16 minutes
to the cycle time.
NOTE: Cannot be selected with RINSE ONLY cycle.
[] HEATED--
DRY
When selected, turns the drying heater and fan on for fast drying. This option
will extend the cycle time by 30 minutes for the ANTI-BACTERIALcycle,
38 minutes for the NORMALcycle and COOKWAREcycle, 8 minutes for the
SPEEDcycle, 15 minutes for the PLASTICScycle and 30 minutes for all other
cycles. When this is NOTselected, the fan will turn on for 4 hours to dry your
dishes without added heat-and energy is saved.
NOTE: Cannot be selected with RINSE ONLY cgcle.
[] LOCK &--
You can lock the controls to prevent any selections from being made. Or you
con lock the controls after you have started acycle.
Children cannot accidentallg start the dishwasher bg touching pads with
this option selected.
To lock the dishwasher controls, press and hold the HEATEDDRYpad for
3 seconds. The LOCKlight will turn on. To unlock the dishwasher controls, press
and hold the HEATEDDRYpad for 3 seconds. The LOCKlight will turn off.

Control Panel/Operation
Dishwasher
[] Status Indicator Lights (indicatorsvary by model)
The Status display tells you what is happening while the dishwasher is in operation.
The lights will come ON,indicating the sequence of the dishwasher operation.
SENSING Displayed while the ExtraClean'" Sensor is measuring the amount of soil and
temperature of water. The dishwasher will adjust the selected cycle to achieve
optimal performance.
ADD-A-DISH Displayed during prewash, indicating that dishes added now will still be cleaned.
WASHING Displayed during prewash, main wash and rinse periods.
DRYING Displaged during HEATEDDRY.
SANITIZED Displayed when cgcle has met sanitization conditions.
CLEAN Displaged when a wash cgcle and enhancements are complete.
[81Time Remaining Displag (on some models)
During operation, the displag shows the minutes remaining until the cgcle is complete. The display
may adjust the remaining time while the Sensing light is on. The time displayed at the start of
each cgcle mag change from the factory setting as the unit customizes itself to actual home
usage. During a delag start, the display will show hours of time remaining until the cgcle starts.
[] START/RESET
START--
RESET--
[] Clean--
After selecting the cycle and desired enhancements, press the START/RESETpad
one time to ready the dishwasher to begin the cycle. Close the door to start the
cycle or begin the DELAYSTARTcountdown. When the cgcle starts, the water fill
begins and approximately 60 seconds later the wash action begins.
The dishwasher will always display your last selection and enhancements. If you
don't want to change the settings, simply press the START/RESETpad one time
to ready the dishwasher and close the door to begin the cycle.
NOTE:If the START/RESETlight is flashing, the cgcle has been interrupted.
Light will stop flashing after the dishwasher automatically pumps out the water.
Close the door to allow the water to pump out (this takes approximately
70 seconds).When the light stops flashing, the dishwasher can be
reprogrammed and restarted.
Also, if a power failure occurs, NORMALand HEATEDDRYwill automatically be
programmed. Make any new selections and press the START/RESETpad to begin
the new cycle.
Open the door slowly to prevent splash-out. Pressthe START/RESETpad
to cancel the cgcle. Closethe door.The dishwasher will pump out and turn off
after 70 seconds.
The CLEANlight is illuminated and a double beep will sound when the selected
cycle and enhancements are complete. You may remove the dishes at any
time. Note the high-efficiency fan will run quietly for 30 minutes to 4 hours
(depending on selected cycle) after the CLEANlight is illuminated to continue
drying the dishes. This can be stopped by opening the door and pressing
any kegpad.
NOTE:To turn off the double beep indicator (or re-activate it if it was previously
disengaged}, pressthe HEATEDDRYpad 5 times within 3 seconds. A triple beep
will sound to indicate the end-of-cycle beep option has been toggled.
Using the dishwasher
Dishwasher
Lighting
Features
(on some
models)
Water
Temperature
Interior Lights (on some models}
The interior Xenon lights provide better visibilit 9
for loading and unloading. They turn on when the
door is opened and turn off when the door is
latched. The lights will turn off after 15 minutes
if the door remains unlatched. To turn the lights
back on, latch and open the dooE
End-of-Cgcle Indicator Light (on some models}
The end-of-cgcle indicator light is located on the
right side of the dishwasher, above the handle.
This light comes on when the selected cgcle is
complete. The light will stag on until the door is
opened. The dishes mag be removed at ang time.
The entering water must be at least 120°F (49°C)
and not more than 150°F(66°C),for effective
cleaning and to prevent dish damage.
Do not attempt to replace the bulbs. If light bulb
replacement is necessary, please contact the
GEAnswer Center for service bg calling
1.800.626.2000.
Note that the high-efficiencg fan will run quietlg
for BOminutes to 4 hours {depending on the
selected cgcle) after the end-of-cgcle indicator
light is illuminated to continue drging the dishes.
Opening the door and pressing ang kegpad will
stop the fan.
Checkthe water temperature with a candg or
meat thermometer. Turn on the hot water faucet
nearest the dishwasher, place the thermometer in
a glassand let the water run continuouslg into the
glass until the temperature stops rising.
Use a
Rinse
Agent
A rinse agent improves drg performance,
reduces spots and prevents new film buildup
on gour dishes, glasses, flatware, cookware
and plastic. Jet-Drg ®and Cascade Crgstal
Clear®are recommended rinse agents for
Monogram Dishwashers.
The rinse agent dispenser holds 3.5 oz.of rinse
agent. Under normal conditions, this will last
approximatelg one month. Trg to keep it full,
but do not overfill.
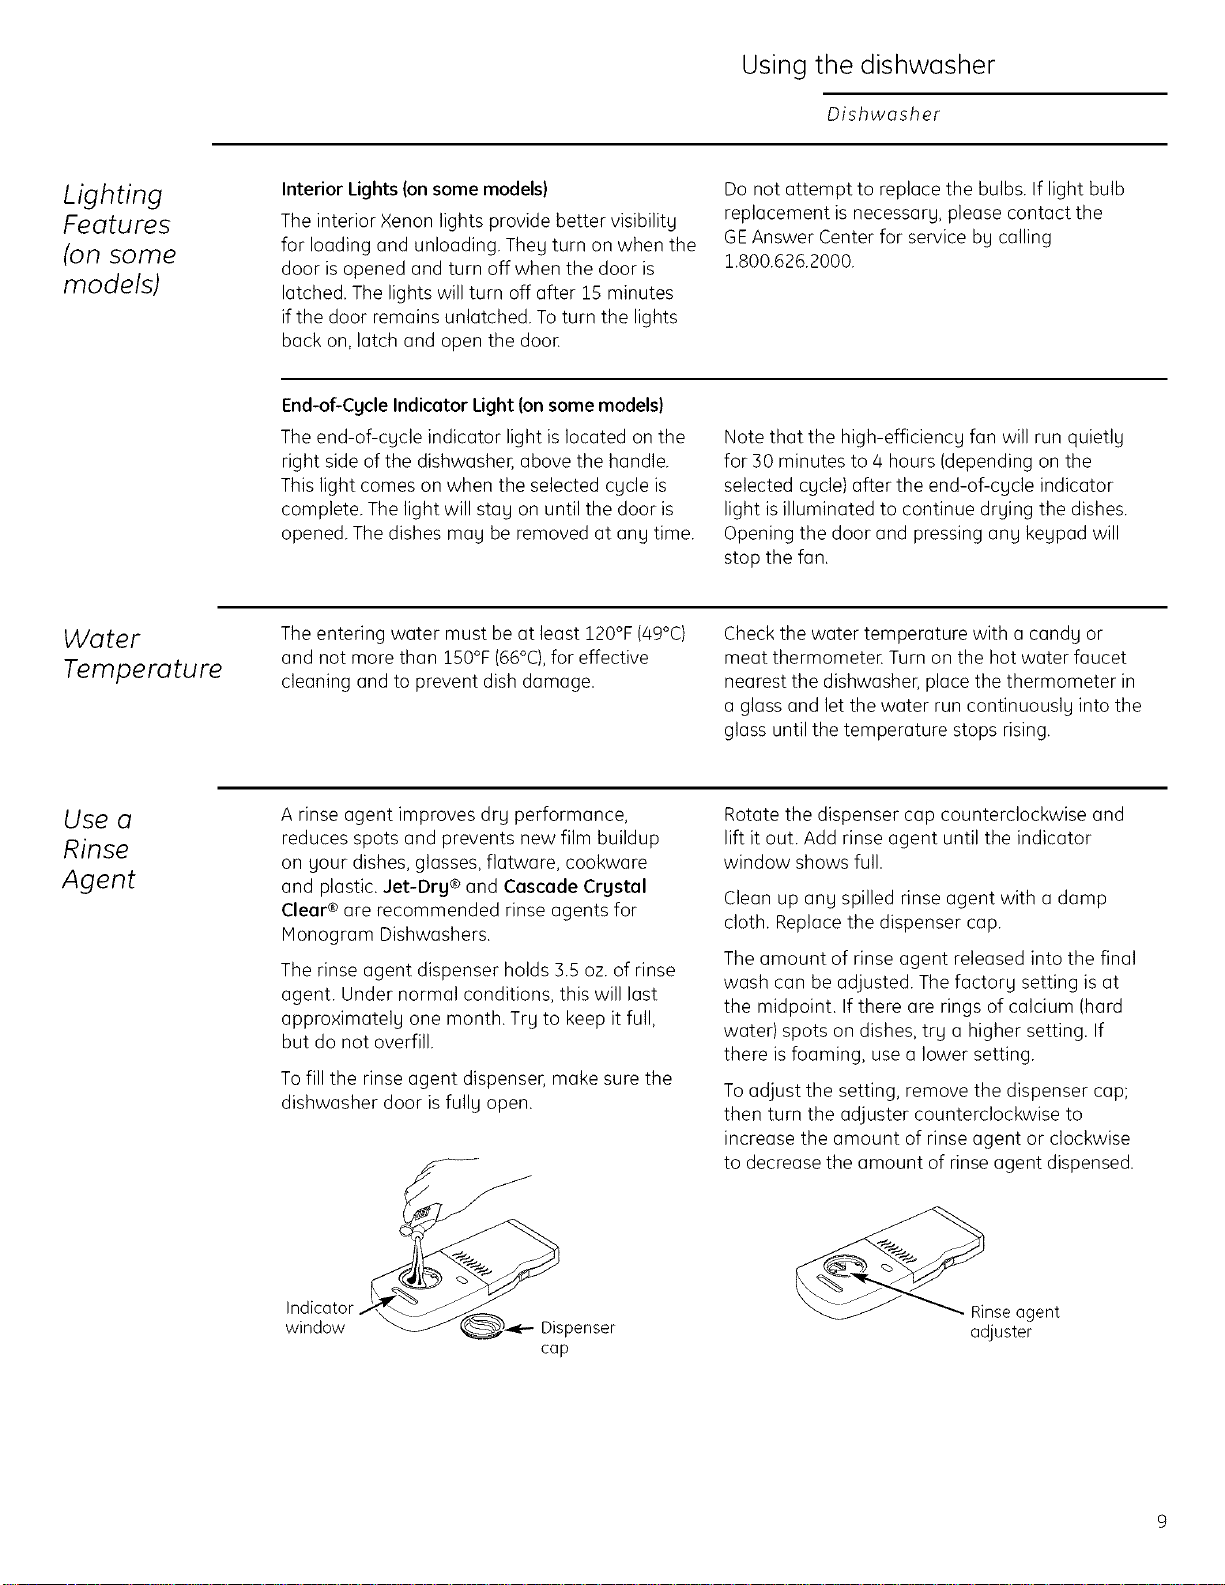
Tofill the rinse agent dispenser, make sure the
dishwasher door is fullg open.
Inidnic_at°r "_r_spenser
cap
Rotate the dispenser cap counterclockwise and
lift it out. Add rinse agent until the indicator
window shows full.
Clean up ang spilled rinse agent with a damp
cloth. Replace the dispenser cap.
The amount of rinse agent released into the final
wash can be adjusted. The factorg setting is at
the midpoint. If there are rings of calcium (hard
water) spots on dishes, trg a higher setting. If
there is foaming, use a lower setting.
To adjust the setting, remove the dispenser cap;
then turn the adjuster counterclockwise to
increase the amount of rinse agent or clockwise
to decrease the amount of rinse agent dispensed.
_nse agent
adjuster

Using the dishwasher
Dishwasher
Dish
Preparation
Prior to
Loading
Forget
to Add
a Dish?
Detergents
• Noprerinsingofnormalfoodsoilisrequired.
• Scrapeoffhardsoils,bones,toothpicks,skinsandseeds.
• Removelargequantitiesof anuremainingfood.
Aforgottendishcan beaddedanutime beforethe
mainwash.
1, Openthedoorslightlg.
2, Waituntilthewatersprauactionstops.Steammau
riseoutofthedishwasher.
Useonludetergentspecificallumadefor usein
dishwashers.Cascade®,CascadeComplete®and
Electrasol®AutomaticDishwashingDetergentshave
beenapprovedforuseinallMonogramDishwashers.
Keepuourpowdereddetergentfreshanddru.Don'tput
detergentintothedispenseruntilgou'rereadgtowash
dishes.
AllwashcuclesexceptRINSEONLYrequiredetergent.
Theamountof detergentto usedependson whether
gourwater ishardor soft.
Protectgourdishesanddishwasherbgcontactinguour
waterdepartmentandaskinghowhardgourwateris.
Twelveor moregrainsisextremelghardwatenAwater
softenerisrecommended.Withoutit, limecan build
upinthewatervalve,whichcouldstickwhileopenand
causeflooding.Toomuchdetergentwithsoftwater
cancausea permanentcloudinessof glassware,
calledetching.
Thedetergentcuphasindicatorlinesto helpUou.
Usethe rightamountof detergent.Asa guide:
ForSoftwater(waterhardnesslessthan 4GrainsPer
Gallon[GPG]),fillcuptothefirstline.
ForMediumsoftwater(4-8GPG),fillcupto thesecondline.
ForMediumhardwater(8-12GPG),fill cup.
ForExtremelghardwater(morethan 12GPG),fillbothcups.
Soft Medium Medium
y-
MAINWASH
Iftheamountoffood soilishigh,usea bitmoredetergent.
Ifwatertemperatureis greaterthan 140%,usea bitless
detergent.
Closecoverandbesureit islatchedafterfillingdispenser
with detergent.
Extremel 9
hard
f--
PRE
WASH
• RemoveleafUvegetables,meattrimmingsand
excessiveamountsofgreaseoroil.
3, Addforgottendishes.
4, Closethedoon
Cover.... _ Mainwash
"___ction
_ _--_q_>_K_ C°ver
k_"_ latch
__ Pre-wash
Donot usehanddishdetergent.
=_ NOTE:Usinga detergent
coveringthe kitchenfloorandmakingthefloor wet.
Becausesomangdetergentcontainerslookalike,
storethedishwasherdetergentina separatespace
fromallothercleaners.Showanyonewhomagusethe
dishwasherthecorrectdetergentandwhereitisstored.
Whiletherewillbenolastingdamageto the dishwasher
gourdisheswill notget cleanusingadishwashing
detergentthat isnotformulatedto workwithdishwashers.
DryingFan
IftheHeatedDrg
optionisselected, ,__illh_-:_
thedryingfanwillrun _ _/
duringthedrying _ I,Q._W
portionofthecycle
and upto 2hours 6_
aftertheCLEANlight
turnson,dependingontheselectedwashcgcle.Ifthe
HeatedDryoptionisnotused,theCLEANlightwillcome
onat theendofthefinalrinseandthe fanwillrunupto
4 hours,dependingontheselectedwashcycle.
Ifthe RinseOnlgwashcycleisselected,the HeatedDrg
optionisautomaticallyturnedoffandthedrgingfan will
runfor4 hours.
Ifthedryingfan isrunningandtheCLEANlightison,the
drgingfancanbeturnedoffbgopeningthedoorand
pressingangkeyon the keypad.
section
that isnotspecificallydesigned
fordishwasherswillcausethe
dishwashertofillwithsuds.
Duringoperation,thesesudswill
spilloutofthedishwashervents
!O

Loading the Racks
Dishwasher
Upper Rack
Features and appearance of racks and
silverware basket may vary from your model.
Although the upper rack is for glasses, cups and
saucers, pots and pans can be placed in this
rack for effective cleaning. Cups and glasses fit
best along the sides and should be placed open-
end down. This is also a secure place for
dishwasher plastics.
The utility shelf (on some models) may be placed
in the up or down position to add flexibility.
The upper rack is good for all kinds of
odd-shaped utensils. Saucepans, mixing bowls
and other items should be placed face down.
Fold-down tines (onsome models) provide
flexibility for extra-large and hard-to-fit items.
Secure larger dishwasher-safe plastics over
2 tines when possible.
Make sure small plastic items are secure so they
can't fall onto the heater.
Be sure that items do not protrude through the
bottom of the rack and block rotation of the
middle spray arm. This will result in poor wash
performance for items in the upper rack.
Checkto make sure that no items in the lower
rack will block rotation of the wash arm mounted
under the upper rack.
A wine glass holder (on some models) secures
wine glasses for best washability. Because wine
glasses come in various sizes, after loading,
slowly push in the rack to make sure they will
clear the top of the dishwashec
!!
Loading the Racks
Dishwasher
AdJustable
Upper Rack
(on some
models)
Silverware
Basket
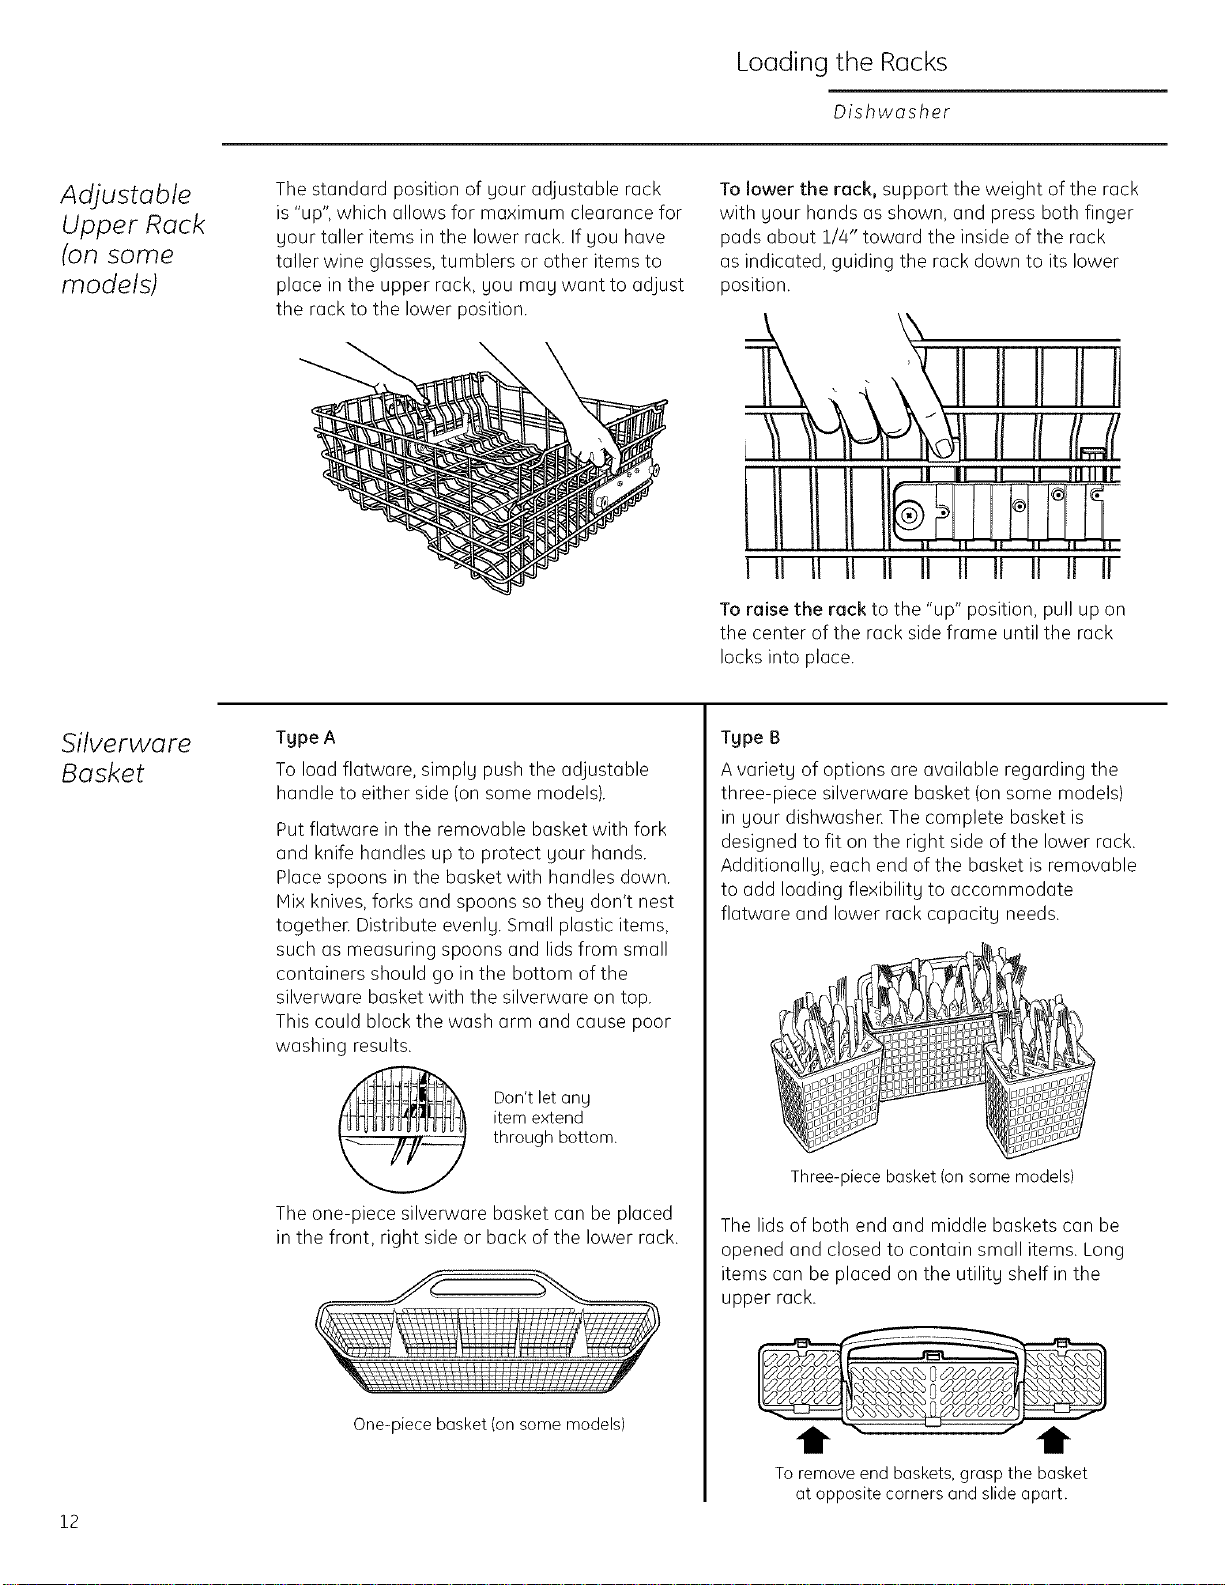
The standard position of your adjustable rack
is "up", which allows for maximum clearance for
your taller items in the lower rack. If you have
taller wine glasses, tumblers or other items to
place in the upper rack, you may want to adjust
the rack to the lower position.
Tgpe A
To load flatware, simply push the adjustable
handle to either side (onsome models).
Put flatware in the removable basket with fork
and knife handles up to protect your hands.
Place spoons in the basket with handles down.
Mix knives, forks and spoons so theg don't nest
together. Distribute evenly. Small plastic items,
such as measuring spoons and lidsfrom small
containers should go in the bottom of the
silverware basket with the silverware on top.
This could block the wash arm and cause poor
washing results.
To lower the rack, support the weight of the rack
with your hands as shown, and press both finger
pads about 1/4" toward the inside of the rack
as indicated, guiding the rack down to its lower
position.
I II II II II II II IJ II IJ II
To raise the rack to the "up" position, pull up on
the center of the rack side frame until the rack
locks into place.
Tgpe B
A variety of options are available regarding the
three-piece silverware basket (on some models)
in your dishwashec The complete basket is
designed to fit on the right side of the lower rack.
Additionally, each end of the basket is removable
to add loading flexibility to accommodate
flatware and lower rack capacity needs.
12
item extend
through bottom.
Don'tletany
The one-piece silverware basket can be placed
in the front, right side or back of the lower rack.
One-piece basket (on some models)
1
Three-piece basket (on some models)
The lids of both end and middle baskets can be
opened and closed to contain small items. Long
items can be placed on the utility shelf in the
upper rack.
t
Toremoveend baskets,graspthe basket
at oppositecornersand slideapart.
Loading the Racks
Dishwasher
Lower Rack
Remove the
Upper Rack
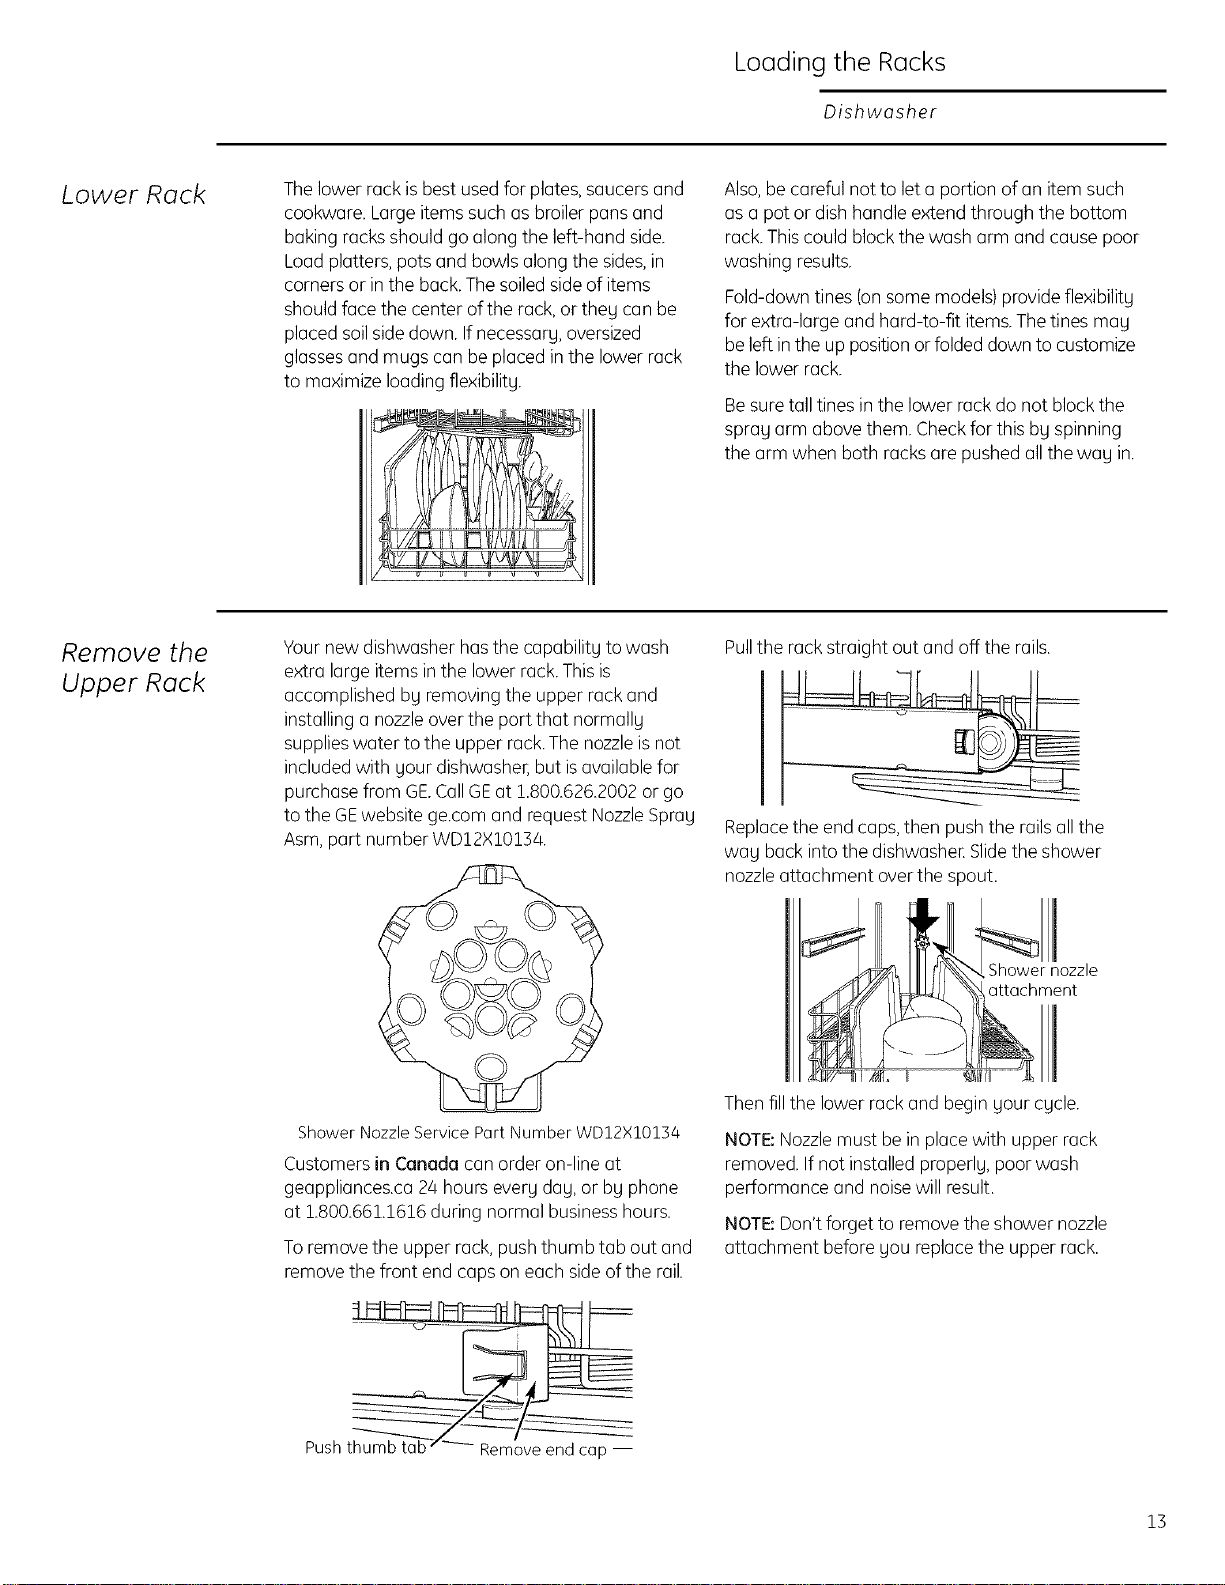
Thelower rackis bestusedfor plates, saucersand
cookware. Large items suchas broilerpans and
baking racks should go alongthe left-hand side.
Load platters, pots and bowls along the sides,in
corners or in the back.Thesoiled sideof items
shouldface the center of the rack, or they can be
placed soil sidedown. If necessary, oversized
glassesand mugs can be placed inthe lower rack
to maximize loading flexibility.
Your new dishwasher hasthe capability to wash
extra largeitems in the lower rack. Thisis
accomplished by removing the upper rackand
installing a nozzleoverthe port that normallu
supplieswater to the upper rack.The nozzleis not
includedwith uour dishwasher,but is available for
purchase from GE.CallGEat 1.800.626.2002orgo
to the GEwebsite ge.com and request NozzleSprau
Asm, part number WD12X!0134.
Also,becareful not to let a portion of an item such
as a pot or dishhandle extend through the bottom
rack.Thiscould blockthe wash arm and cause poor
washing results.
Fold-down tines (onsome models)provideflexibilitu
for extra-large and hard-to-fit items.The tines may
be left in the upposition orfolded down to customize
the lower rack.
Besuretall tines inthe lower rack do not blockthe
sprag arm abovethem. Checkfor this bg spinning
the arm when both racks are pushed allthe wag in.
Pullthe rack straight out and off the rails.
Replacethe end caps, then push the rails all the
wag back into the dishwasheESlidethe shower
nozzleattachment over the spout.
ShowerNozzleServicePartNumberWD12X10134
Customersin Canada can order on-line at
geappliances.ca 24 hours everu day, or bu phone
at !.800.66!.16!6 during normal business hours.
To remove the upper rack, push thumb tab out and
remove the front end caps on each sideof the rail.
Pusht p --
It
Then fill the lower rack and beginuour cycle.
NOTE:Nozzlemust be in place with upper rack
removed. If not installed properlU,poor wash
performance and noisewill result.
NOTE:Don'tforget to removethe shower nozzle
attachment before Uoureplacethe upper rack.
1B

Loading theRacks
Dishwasher
Extra Rack
Features
(on some
models)
Follow
these
guidelines
for loading
10 and
Cutlery Tray
The cutlery tray holds up to 4 largeknives such as
a carver,chef's knives,bread knife,etc.,that are too
tall to fit inthe silverware basket.
Hook the trag onto the rearof the upper rack.
Lag the knivesbetween the guides (asshown).
Bowl Tines
The special large-bowl tines in the lower rack add
flexibility to sour loadingpattern. They areuseful
for serving bowls or other largebowls.
To use the bowl tines,fold down the 2rows of flex
tines infront of the bowl tines and load bowlsjust
as you would in the upperrack.
Features and appearance of racks and silverware baskets may vary from your model.
These tines fold down
Large-bowl tines
12 place
settings
Upper Rack--lOplace settings
Upper Rack--12place settings
Lower Rack--lO place settings
Lower Rack--12 place settings
14

Care and Cleaning
Dishwasher
Exterior
Interior
Protect
Against
Freezing
To clean the control panel, use a lightly dampened cloth, then dry thoroughly. To clean the exterior
painted panels, use a good appliance polish wax. See the note below about wax on stainless steel
panels.
Never use sharp objects, scouring pads or harsh cleaners on any part of the dishwasher.
The stainless steel panels can be cleaned with CERAMA BRVTE® Stainless Steel Appliance Cleaner
or a similar product using a clean, soft cloth. You can order CERAMA BRVTE® Stainless Steel Appliance
Cleaner through GE Parts by calling 800.626.2002 (for U.S. only). In Canada, call !.888.880.3030.
NOTE: Avoid streaks on stainless steel panels. Do not use wax on stainless steel panels.
The stainless steel used to make the dishwasher tub and inner door provides the highest reliability
available in a GEdishwasher If the dishwasher tub or inner door should be scratched or dented
during normal use,they will not rust or corrode. These surface blemishes will not affect their function
or durability.
If your dishwasher is left in an unheated place during the winter, ask a service technician to:
1.Turn off electrical power to the dishwasher. Remove fuses or trip circuit breaker
2.Turn off the water supply and disconnect the water inlet line from the water valve.
3. Drain water from the water inlet line and water valve (use a pan to catch the water).
4. Reconnect the water inlet line to the water valve.
The Air
Gap
An air gap protects your dishwasher against water
backing up into it if a drain clogs.The air gap is not
a part of the dishwasher. It is not covered by your
warranty. Not all plumbing codes require air gaps,
so you may not have one.
A plugged or dirty air gap will prevent the
dishwasher from draining properly. Clean it out
if the dishwasher is not draining properly.
The air gap is easy to clean.
1.Turn off the dishwasher and lift off the chrome
cover
2. Unscrew or unsnap the plastic cap (depending
on model) and clean with a toothpick.
Check the air gap any time your
dishwasher isn't draining well.
15
 Loading...