

Page 1
Owner's
Manual
Dishwasher
ZBD6800
ZBD6880
ZBD6890
ZBD0700
ZBD0710
,,,,,_,,,,onogram.co,,, Monogram:
Page 2

(_onsunler Infi)rmafion
Dishwasher
Introduction Your new Monogram dishwasher makes an eloquent statement of style, convenience and kitchen
planning flexibility: Whether wm chose it ti)r its imrity of design, practical teattlI'es or assiduous
attention to detail--or fin" all of these reasons--you'll find that vom" Monogram dishwasher's
superior blend of form and flmction will delight you tin" years to come.
The information on the tollowing pages will hel I) you operate and maintain wmr dishwasher
properly.
If you have anv other questions, visit our Website at: w'ww.monog2"am.com
Contents Appliance Registration ............ 3, 23, 24
Care and Cleaning .................... 15
Consmner Services .................. 3, 20
Model and Serial Number I,ocation ....... 3
Operating Inst_ uctions ............... 6-14
Control Panel and Operation ........ 6-8
I,ighting Features .................... 9
_4hter Temperature .................. 9
Rinse Agent ........................ 9
Dish Preparation Prior to i,oading ..... 10
Detergents ........................ 10
Dishwasher Racks ................ 11-14
Problem Solver . ................... 16-19
Safety Instructions ................... 4, 5
U.S.A. X4'arrantv ...................... 21
Canada X4'arrantv ..................... 22
Page 3
Consumer Information
l) i,sh w a,sh er
using
yO'LIr
dishwasher
Writ e
down the
model &
serial
n "ll_q_l!)ers
If you received
a damaged
dishwasher
Read this manual carefllllv: It is intended to
hel I) you operate and maintain w)ur new
dishwasher properly.
Kee I) it handy fl)r answet_ to wmr questions.
You c_lIl locate _O/tt" illodel _lIl(1 serial nttIllbet's
on tile tub walljttst inside tile door.
Immediately contact tile dealer (or builder)
that sold xou the dishxvasher,
If wm don't tmderstand something or need
more hell) , there is a list of toll-free consumer
service nmnbers included on tile (_onsmner
Services page in the back section of this
illanttal,
OR
Visit our X*\ebsite at: www.monogram.com
Before sending in the card, please write these
nmnbers here:
Model Nmnber
Serial Nmnber
Llse these nmnbers in any correspondence or
serxice calls concerning )ore" dishwasher.
Save time
& money
l/you
need service
Before you request serxice, check tile Problem It lists causes of minor operating problems that
Solxer in tile back of this manual, you can correct _om'self.
To obtain setwice, see tile Consmner Services
page in the back of this manual.
_'e're proud of our service and want VOlt to be
pleased. If fl)r some reason w)u are not hal)py
with tile service VOlt receive, here are steps to
tOllow for flu'tiler hell).
kbr customers in the USA:
FIRST, contact the people xd/o serviced )ore"
appliance. Explain why you are not pleased.
In most cases, this will solxe tile problem.
NEXT if xou are still not pleased, contact us
on ore" website, write all the details--including
}OUt" phone ntttltbet'--ot" write to:
Manager, Customer Relations
GE Appliances
Appliance Park
q) .....I,ouisxille, KY _t zz:)
bbr customers in Canada:
FIRST, contact tile people who serviced wmr
appliance. Explain wily you are not pleased.
In most cases, this will solve the problem.
NEXT, if wm are still not pleased, write all the
details--including yore" phone nmnber--to:
Manager, Consumer Relations
Camco Inc.
1 Factory I,ane, Suite 310
Moncton, N.B. E1C 9M3
Page 4
• , WARNING. t
IMPORTANT SAFETY INSTRUCTIONS
For your safety, the hfformation in this manual
must be followed to minimize the risk of fire,
explosion, electric shock, or to prevent property
dmnage, persona] injury, or loss of life.
•Do not tamper with controls.
•Do not abuse, sit on, or stand on the door or
dish rack of the dishwasheI:
•Do not discard a dishwasher without first
removing the door or removing fl_e door latch.
•Do not store or use combustible materials,
gasoline or other flammable \_q)ors and liquids
in the vicinity of this or any other appliance.
°Do not allow children to play inside, on or with
this appliance or anv discarded appliance.
°Do not allow children to play around the
dishwasher when opening and closing the door
due to possibility of small fingers being pinched
in the dooi:
• , WARNING.t RISK OF CHILD ENTRAPMENT
PROPEt_ DISI- OSAL OF THE DI3HWASHE'R
.]unked or abandoned dishwashers are
dangerous.. ,even if thev will sit fl)r 'ijust a
few days." If vou are ge{ting rid of w)ur old
dishwasheI; please follow the insti uctions below
to hel I) prevent accidents.
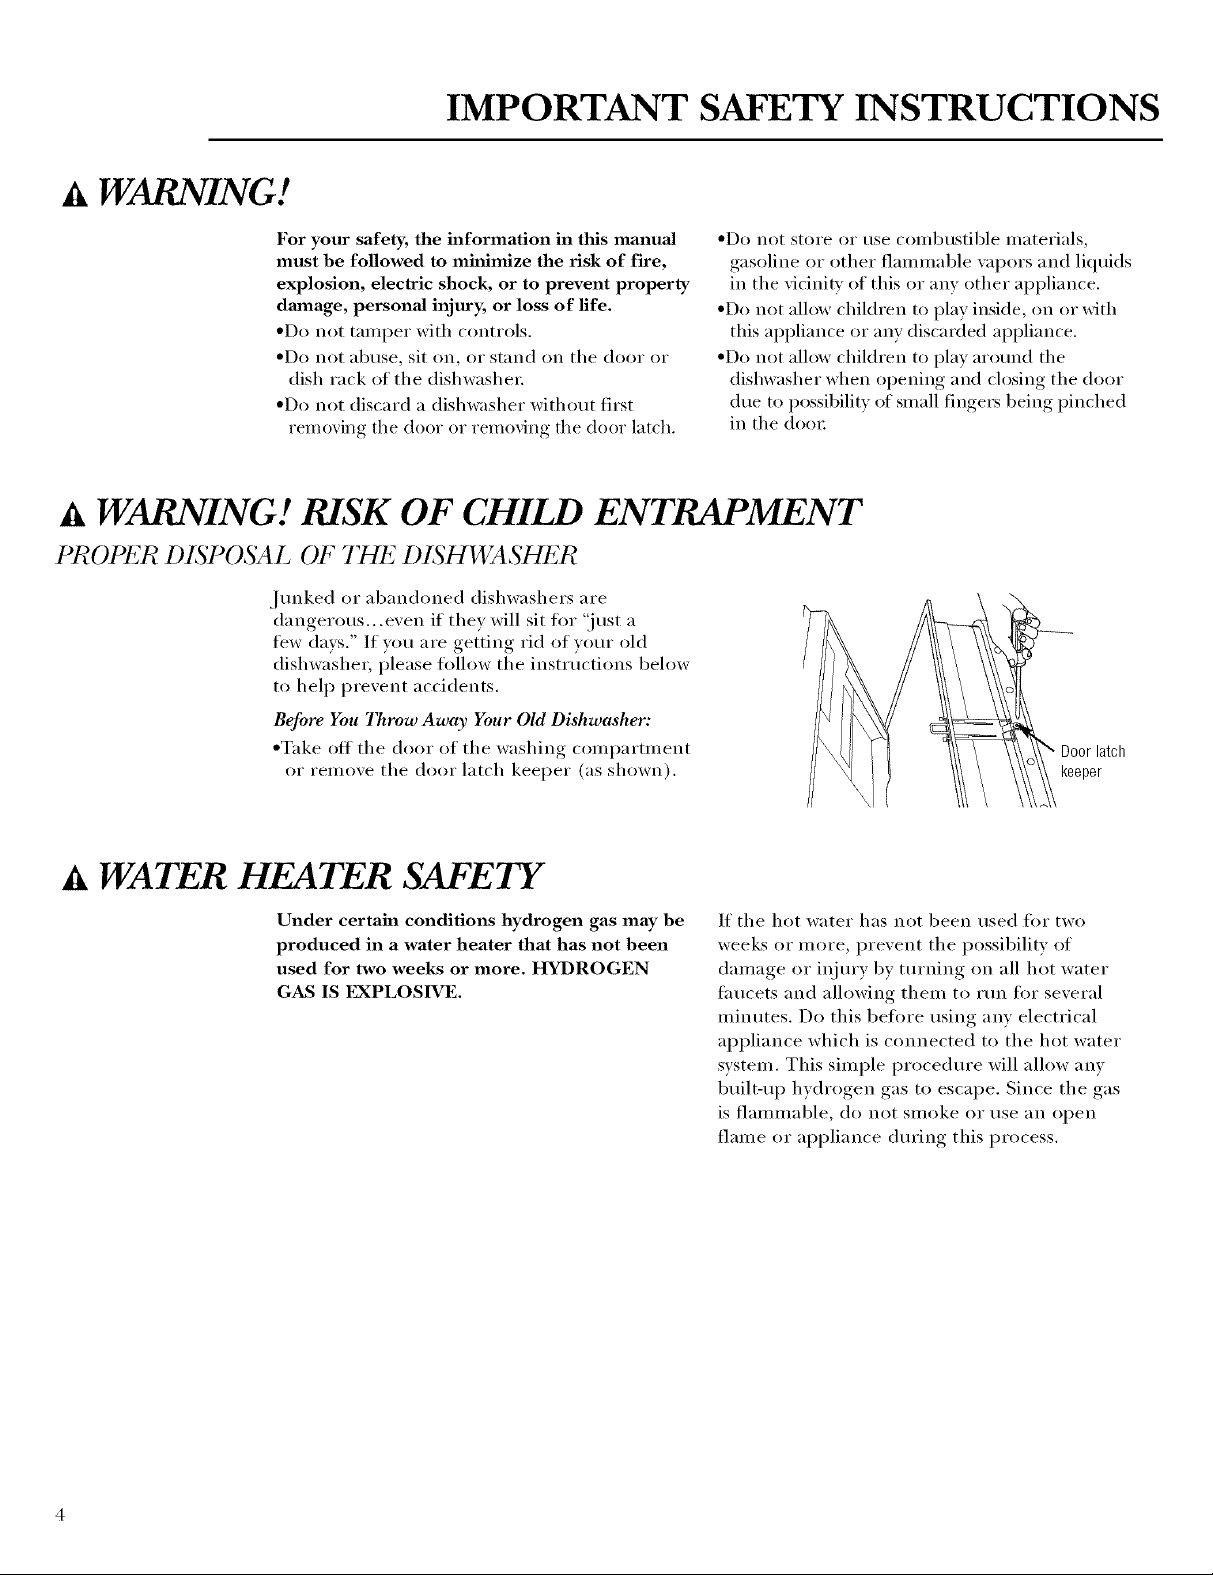
Before You Throw Away Your Old Dishwasher:
• Take off the door of the washing compartment
or remoxe the door latch keeper (as shown).
Door latch
keeper
It, WATER HEATER SAFETY
Under certain conditions hydrogen gas may be
produced in a water heater that has not been
used for two weeks or more. HYDROGEN
GAS IS ILXPLOSIVE.
If the hot water has not been used fi)r two
weeks or more, prevent the i)ossibilitv of
damage or ii_jury by turning on all hot water
faucets and allowing them to Itm for several
minutes. Do this betore using any electrical
appliance which is connected to the hot water
system. This simple procedm'e will allow any
built-up hydrogen gas to escape. Since the gas
is tlaIllIllable, do IlOt Silloke OI" rise _lIl opeil
flame or appliance dm'ing this process.
Page 5
IMPORTANT SAFETY INSTRUCTIONS
PROPER INS TALLA TION AND MAINTENANCE
This dishwasher must be properly installed
and located in accordance with the Installation
Instructions before it is used. If you did not
receive an Installation Instructions sheet with
your dishwasher, you can receive one by visiting
our WebsJte at www.monogrmu.com.
• Connect to a grounded metal, i)ennanent
wiring system; or Iun an equipment-
grounding conductor with the circuit
con(hIctoI's and connect to tile eqtliplllent-
grounding terminal or lead of the appliance.
• hnproper connection of the equipment-
grounding conductor can result in a risk
of electric shock. Check with a qualified
electrician or service representative if you are
in doubt whether the appliance is properly
grounded.
• IJse supply conductors rated at least 75 ° C
(167 '>I?).
WHEN USING YOUR DISHWASHER
Use this appliance only for its intended purpose as
described in this Owner's Manual.
A CAUTION: (kmtentswashedinAntJ-
Bacterial e_cle mm be hot to tile touch. Else calN
beti)re unloading.
• Use on]} po\_del; robs Ill"liquid detergents or wetting
agents recommended for use in a dislm;Mmr and
keep them out of the reach of chikh'en. Cascade ®,
Cascade Complete ® and EleOrasol ® Auton/atic
Dish_Mdng Dewrgems and Jet-Dry ® and Cascade
Rinse Aid ® rinse agents hme been approved fi)r use
ill allMonogram Dishwashers.
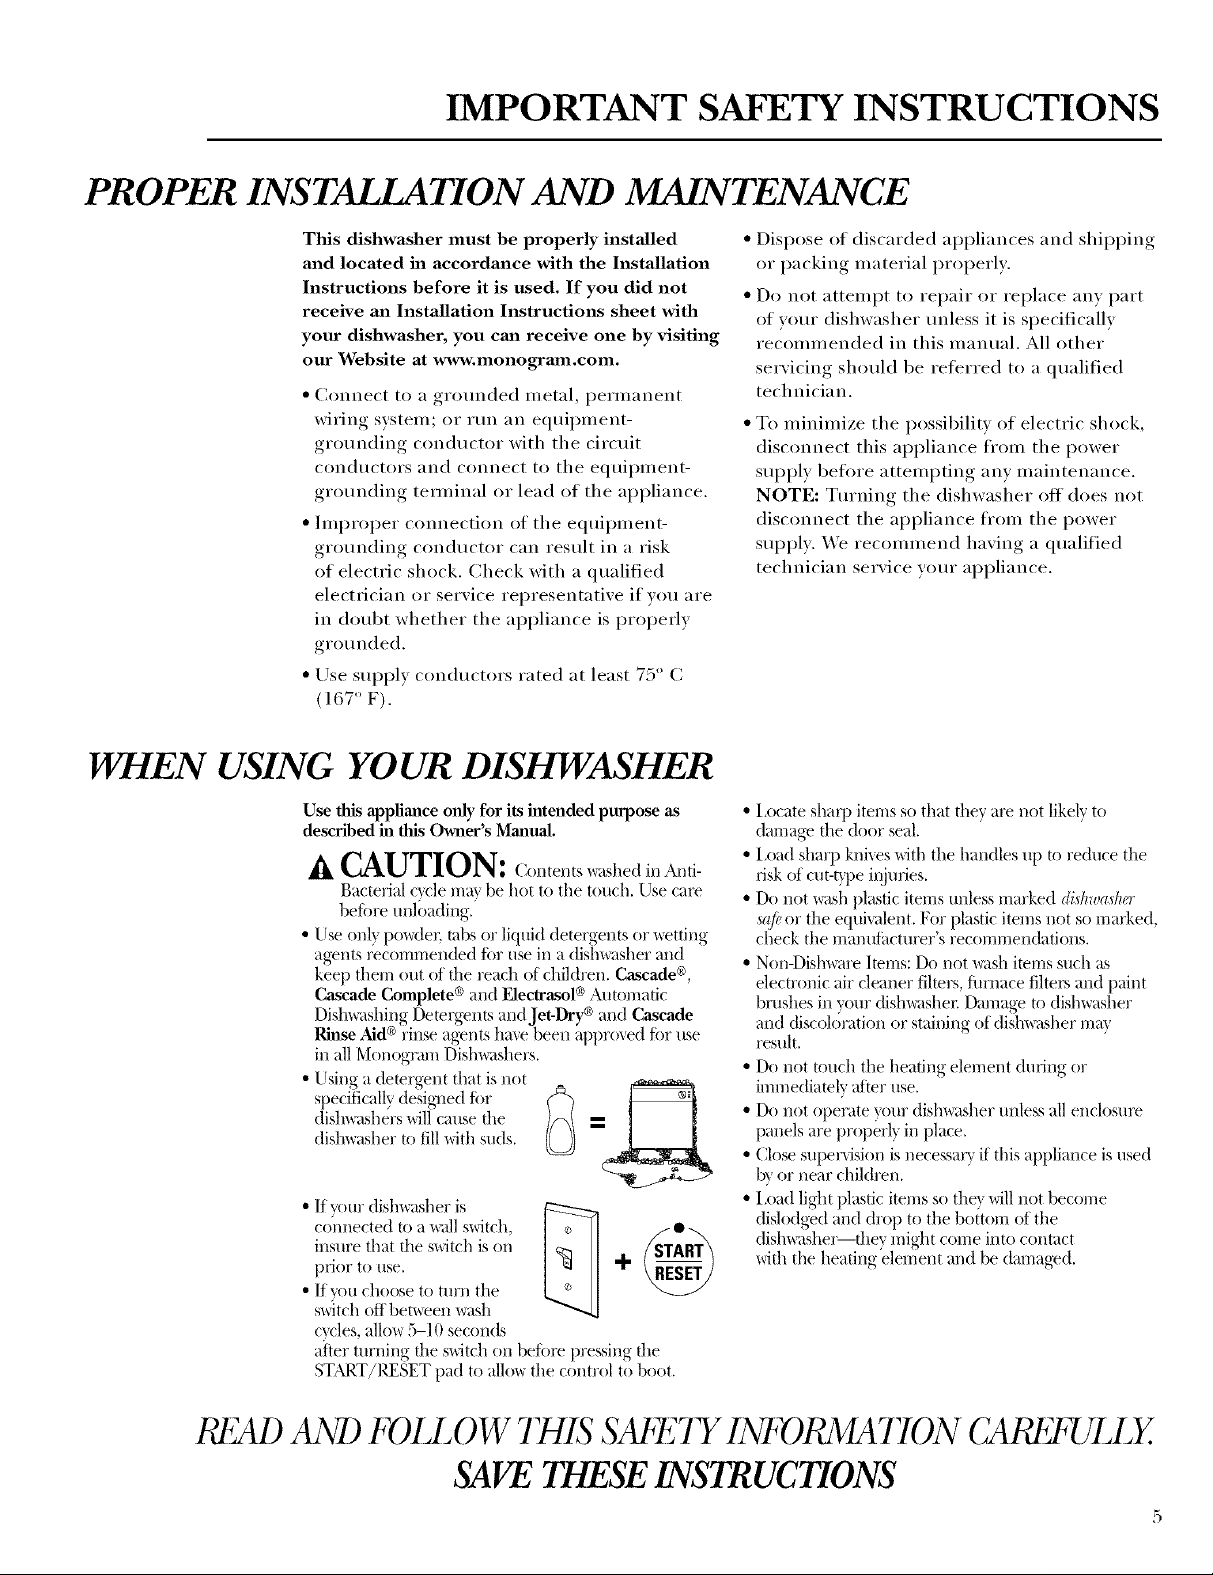
• Using a detergent that is not
specificallydesigned tor
dishwashers willcause file
dishwasher to tillwith suds.
• If your dishwasher is
c/>nnected to a _dl switch,
insure that the switch is on
prior to use.
• If_m choose to turn the
s_(itch offbemeen wash
e}cles, allow 5-10 seconds
after turning file switch on beJbl_ pressing die
START/RESET pad to allo_ tile control to boot.
• Dispose of discarded appliances and shipping
or packing material properly.
• Do not attempt to repair or replace any part
of your dishwasher unless it is specifically
recommended in this manual. All other
servicing should be referred to a qualified
technician.
• To minimize tile possibility of electric shock,
disconnect this appliance fl'om the power
supply beflwe attempting any maintenance.
NOTE: Turning the dishwasher off does not
disconnect the appliance fl'om the power
supply. We recommend having a qualified
technician service your appliance.
• i,ocate sharp items so that flmv al> not likely to
darrlage file door seal.
• i,oad sharp knives with the handles up to reduce the
risk of cut-Nle iI_juries.
• Do not wash plastic items unless marked dhlra_aslm"
sqfi,or the equivalent. For plastic items not so marked,
check the mamdacturer's recommendations.
• Non-Dislm_u'e Imrns: Do not wash imrns such as
electronic air cleaner filmrs, thrnace filters and paint
brushes ill Your,dishwashel: Damage u) dishwasher
and discoh)ration or staining of dishwasher ma?
result.
• Do not umch the heating element during or
imnmdiatelv after use.
• Do not operate }_)ur (tislm_Mmr unless all enclosm_
panels are properl} ill place.
• Close supeIMsion is necessary if this appliance is used
bx or near children.
• i,oad light plastic items so the} will not become
dislodged and drop to the bottom of the
dislm_Mmlmthey might come into contact
with tile heating element and be damaged.
READ AND FOIZ OW 7 SAbETT INFORMATYONCAREbULLY
SAVETHESE INSTRUCTIONS
Page 6
Control Panel
l) is hw as her
your model
number on the
tub wall just
inside lhe door
Throughoul lhis
manual, fi_atures
and appearan(e
may vary J)om
your model.
Control
Settings
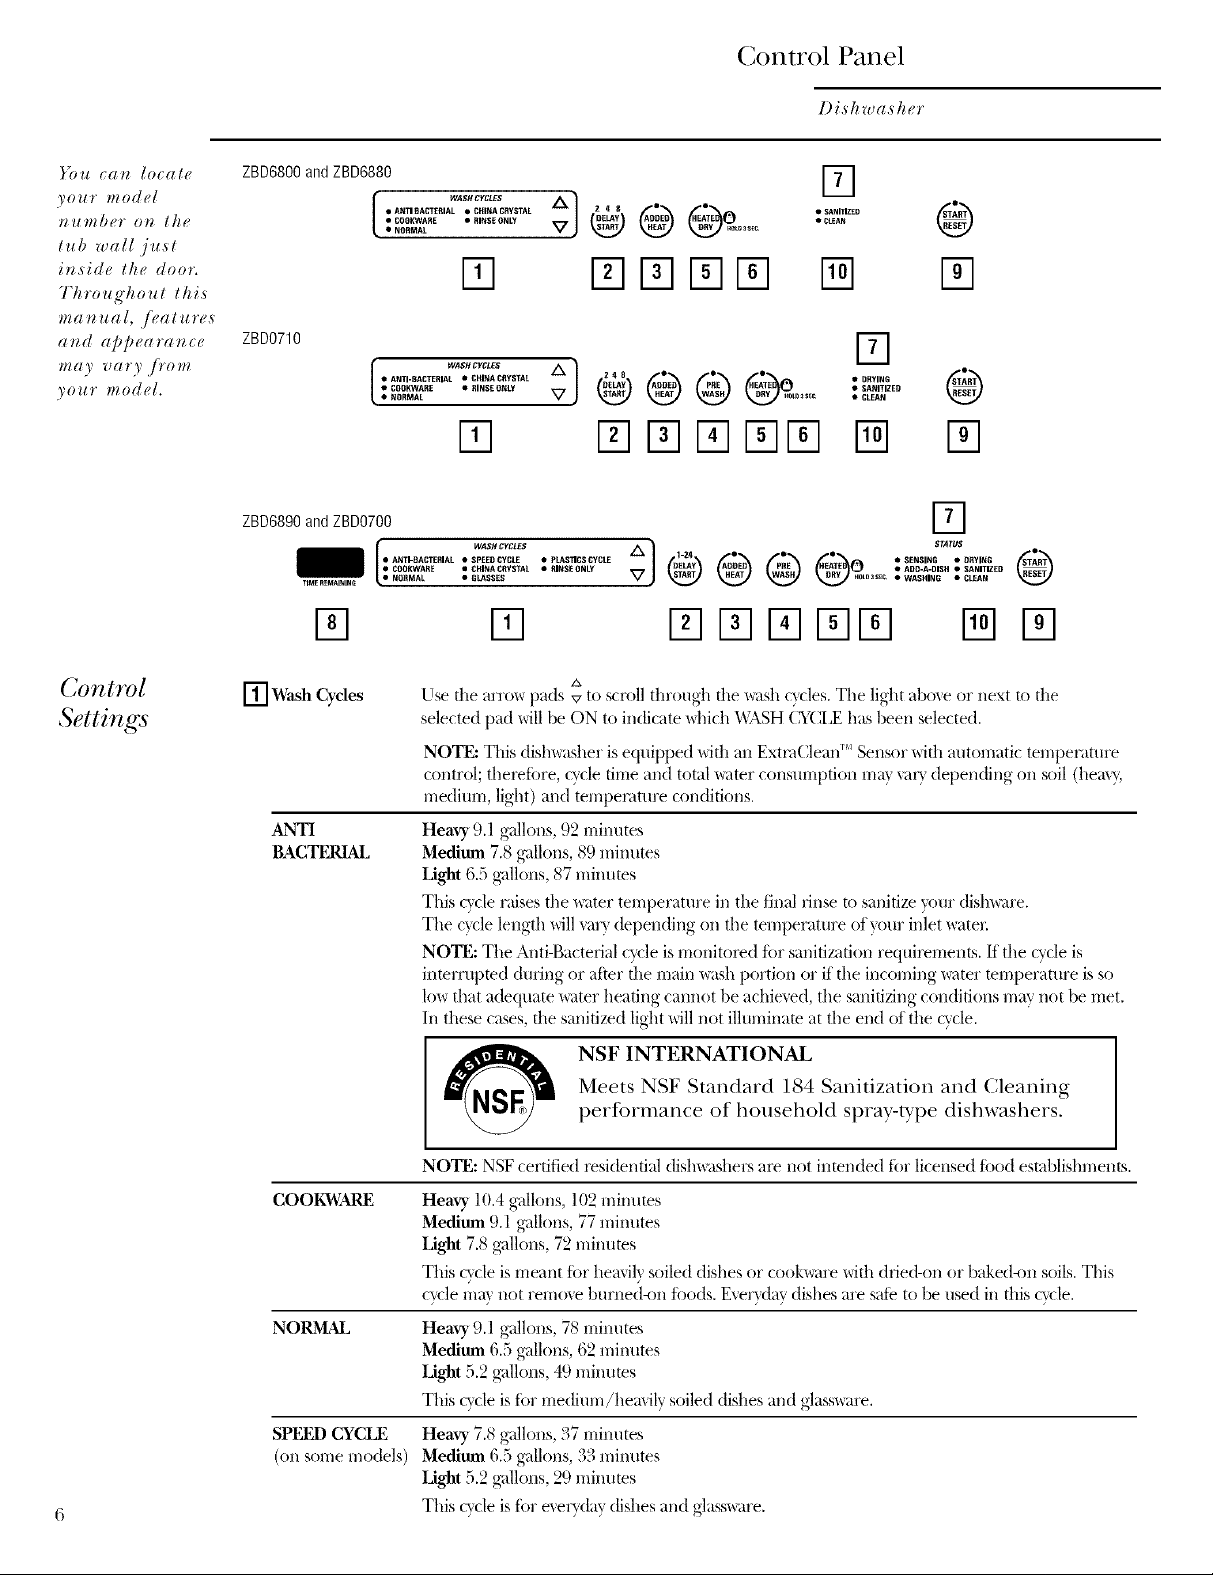
ZBD6800andZBD6880 [_
[ .......... ®
• NORMAL
• CtEAtt
i-q FI FI % % N %
ZBD0710 [-_
• NORMAL V • CLEAN
i-q %FIi-q%N @ %
ZBD6890andZBD0700 [-_
• ANTI-BACTERIAL • SPEED CYCLE • pLASTICS CYCLE A_E_ P_E O • ADO-A-DISH
TIMEREMAININ _ • NORMAL • GLAS$£$ _ _ tmto_s_c • WASHING •• CLEANSANITIZED
• COOI(WAR_ • CHINACI_Y$?AL • 8]NSEONLY OELAy
• SENSING • ORYING START
FI I7-1 ITII-rlI-qFIN N %
[] Wash Cycles
ANTI
BACTERIAL
Use the arrow pads v to scroll through the wash cycles. The light aboxe or next to the
selected pad _dll be ON to indicate _ddch _A_.SH CYCI,E has been selected.
NOTE: "Ntis dishwasher is equipped _ith an ExtniClean r'_ Sensor x_ith automatic temperature
control; therethre, cycle time and total water consumption ma} xar} (lel)ending, on soil (heavy;
medium, light) and temperature conditions.
Heavy 9. l g_,dlons, 92 mim_tes
Meditml 7.8 g_dlons, 89 minutes
Light 6.5 g_dlons, 87 milmtes
This cycle r_fises the _ter temperature in the final rinse to sanitize your dishware.
The ctcle length will val) depending on the temperature of }_)ur inlet water.
NOTE: The Anti-Bacterial cwle is monitored fi)r sanifizafion requil_ments. It the cvcle is
interrupted during or after file main wash portion or if the incoming _lter temper_mlre is so
low that adequate _ter heating cannot be achimed, the sanitizing conditions i-i]_l'}'not be rnet.
In these cases, the sanitized light will not illuminam at the end of the cycle.
zx
NSF INTERNATIONAL
COOKWARE
NORMAL
SPEEI) CYCLE
(on some models)
Meets NSF Standard 184 Sanitization and Cleaning
performance of household spray-type dishwashers.
NOTE: NSF certified residenti_fl dishwashers are not intended tot licensed fi)od establishments.
Heavy 10.4 g_,dlons, 102 minutes
Medium 9.1 g_dlons, 77 minutes
Light 7.8 gvdlons, 72 l;qinutes
This cvcle is meant for heavil_ soiled dishes or cook_,re with dried-on or baked-on soils. This
cvvle mm not remo_e burne(1-on fi)ods. Ever\ttav dishes are sate to be used in this cv(le.
Heavy 9.1 g_,dlons, 78 minutes
Medium 6.5 g_,dlons,62 minutes
Light .5._9,gvdl°ns, 49 minutes
This cycle is I()Fmedium/hea_ily soiled dishes and glassware.
Heavy 7.8g_,dlons,37minutes
Medium 6.5 g_,dlons,33 minutes
Light 5.2 g_dlons,29 minutes
This cycleis fi)r e_ecvdavdishes and glassware.
Page 7
Control Panel/Operation
l) is hw a s h_,r
CHINA
CRYSTAL
Heavy 9.1 galhms, :)3 minutes
Medium 7.8 galhms, 45 minutes
Light 6.5 galhms, 38 minutes
This cxcle is for lightly soiled china and cr_stal.
GLASSES
(on soine models)
Heavy 9.1 gal., 5(1 rain.
Medium 7.8 gal., 42 rain.
Light 6.5 gal., 40 rain.
This cxcle is specifically designed for glasses.
PLASTICS
CYCLE
(on some models)
Heavy 9.1 gal., 123 rain.
Medium 7.8 gal., 114 rain.
Light 6.5 gal., 107 rain.
This cvcle is specifically designed to reduce the risk of melting plastic items
and improve plastic drying fl)r dishwasher sale plastic items.
RINSE ONLY Heavy 2.6 gallons, 7 minutes
Light 1.3 galhms, 4 minutes
For rinsing partial loads that will be washed later. Do not use detergent with
this cycle.
[] DFI,AY START This option will allow you to delay the start time of any wash cycle ti)r up to S
or 24 hours (depending on model).
• Select the delay start time you want by pressing the DEL&_Y START pad.
Multiple or continuous pressing will increment the delay hours. Select the
number of hours vou want to delay the start of the cycle. Then press
START/RESET.
• _Mter closing the door, the machine will count down and automatically start
at the correct time.
NOTE: To cancel the DEI,AY START selection before the c) cle begins, press
the DEI,AY START pad until the display is blank. Pressin(*,,,, START/RESET will
not cancel delax hours.
[] ADDED HEAT "When selected, the cycle will run hmger with heatilw_ elen_ents on to imi)roxe
both wash aim dry i)erfornmnce.
NOTE: Catmot be selected with RINSE ONlY cxcle.
[] PRE WASH-- For use with heaxilv soiled aiM/or dried-on, baked-on soils. This option
(on some models) MUST be selected PRIOR to ,startinob the cx cle. This option adds 16 minutes
to the cycle time.
NOTE: Cannot be selected with RINSE ONlY cxcle.
[] HI_TED--
DRY
When selected, turns the dtTing heater and tan on fl)r last
drying. This option will extend the cycle time bv 30 minutes fl)r
the ANTI-BACTEI)dAI, cycle, 38 minutes fl)r the NORMAl, cvcle and
COOfZWARE cycle, 8 minutes fl)r the SPEED cycle, 15 minutes fl)r the
PI,ASTICS cycle and 30 minutes for all other cycles. When this is NOT
selected, the tan will turn on to dry your dishes without added heat--and
energy is saved.
NOTE: Cannot be selected with RINSE ONlY cxcle.
[] LOCK _
You can lock the controls to i)rexent anx, selections froth beinob made. Or you
can lock the controls alter _ou have started a c_cle.
Children cmmot accidentally start the dishwasher by touching pads with this
option selected.
To lock the dishwasher controls, press and hold the HEATED DRY pad for
3 seconds. The I,OCK light will tui'n on. To tmlock the dishwasher controls,
press aim hold the HEATED DRY pad for 3 seconds. The I,OCK light will
tllI'n ()_.
Page 8
Control Panel/Operation
Dishwasher
[] Status Indicator Lights (indicators xar} by model)
The Status display tells you what is hai_pening while the dishwasher is in operation.
The lights will come ON, indicating the sequence of the dishwasher operation.
SENSING Displayed while the ExtraClean r_ Sensor is measuring the amount of soil and
tempera ture of water. Th e dishwasher will a (!just the selected cycle to a chieve
optimal pertimnance.
ADD-A-DISH Displayed during prewash indicating that dishes added now will still be
WASHING Displayed during prewash, main wash and rinse periods.
DRYING Displayed during HEATED DRY.
SANITIZED Displayed when cycle has met sanitization conditions.
CLI?LAN Displayed when a wash cycle and enhancements are complete.
[] Time Remaining Display (on sore e models)
During operation, the display shows the minutes remaining until the cycle is complete. The
display may at!just the remaining time while the Sensing light is on. The time displayed at the
start of each cycle may change ti'om the tactory setting as the unit customizes itself to home
use. During a delay start, the display will show hours of time remaining until the cycle starts.
cleaned.
[] START/RESET
START--
RESET--
['J-_ Clean--
After selecting the cycle and desired enhancements, press the START/RESET
pad to ready the dishwasher to begin the cvcle. Close the door to start the
cycle or begin the DEI,AY START countdown. When the cycle starts, the water
fill begins and approximately 60 seconds later the wash action begins.
The dishwasher will alwavs display your last selection and enhancements. If
vou don't want to change the settings, simply press the START/RESET pad to
readv the dishwasher and close the door to begin the cycle.
NOTE: If the START/RESET light is flashing, the cycle has been
interrupted. I,ight will stop flashing atter the dishwasher automatically
pumps out the water. Close the door to allow the water to i)ump out (this
takes approximately 70 seconds). When the light stops flashing, the
dishwasher can be reprogrammed and restarted.
Also, if a power tailure occm_ NORMAl, and HEATED DRY will automatically
be programmed. Make anv new selections and press the START/RESET pad
to begin the new cycle.
Open the door slowly to prevent splash-out. Press the START/RESET pad
to cancel the cycle and close the door. Dishwasher will pump out and ttu'n off
atier 70 seconds.
NOTE: If the START/RESET light is flashing, the cvcle has been
inteH Ul)ted. i,ight will stop flashing atter the dishwasher automatically
I)umps out the water. Close the door to allow the water to pure I) out (this
takes approximately 70 seconds). When the light stops flashing, the
dishwasher can be reprogrammed and restarted.
The CI,EAN light is illuminated and a double beep will sound when the
selected cwle and enhancements are complete. You may remove the dishes
at any time. Note the high-etticiency tan will run quietly tot 30 minutes to
4 hours (depending on selected cycle) after the CI,EAN light is illuminated
to continue drying the dishes. This can be stopped by opening the door
and pressing any keypad.
NOTE: To turn off the double beep indicator (or re-acti\:_te it if it was
previously disengaged), press the HEATED DRY pad 5 times within 3
seconds. A triple beep will sound to indicate the end-ot:cycle beep option
has been toggled.
Page 9

Using the dishwasher
Dishwasher
Lighting
b?atures (on
some models)
Waler
7bmperature
Interior Lights (on some models)
Tile interior Xenon lights provide better
visibility tot loading and unloading. They come
on when tile door is opened and tm'n off when
the door is latched. The lights will turn off atter
15 minutes if tile door remains tmlatched. To
turn tile lights back on latch and reopen tile
dooI;
End-of-Cycle Indicator Light (on some models)
Tile end-ot:cvcle indicator light is located on
tile right side of tile dishwasher, above tile
handle. This light comes on when the selected
cvcle and enhancements are complete. Tile
light will stay on tmtil the door is opened. The
dishes may be rein oved at any time.
Tile entering water must be at least 120°F
(49°C) and not more than 17)0°F (66°C), ti)r
efli_ctive cleaning and to prevent dish damage.
Check the x_z_ter temperatm'e with a candy or
illeat thermollletei; Wtli'n on tile hot water taucet
Do not attempt to replace tile bulbs. If light
bulb replacement is necessary, please contact
the GE Answer Center tot service by calling
1-800-626-2000.
Note that tile high-efficiency thn will rtm quietly
fi)r 30 minutes to 4 horn's (depending on tile
selected cycle) after tile end-ot_cvcle indicator
light is ilhm/inated to continue drying tile
dishes. Opening tile door and pressing any
keypad will stop tile tim.
nearest the dishwasher, place tile thermometer
in a glass and let tile water run continuously into
the glass until the temperature stops rising.
Use a Rinse
Agent
A rinse agent improves (h y peril)finance,
reduces spots and prevents new fihn build-u I)
on yore" dishes, glasses, flatware, cookware
and plastic. Jet-Dry ® and Cascade Rinse Aid ®
are recommended rinse agents lot Monogram
Dishwashers.
Tile rinse agent dispenser holds 3.5 oz. of rinse
agent. Under nom/al conditions, this will last
approximately one month. Try to kee I) it flfll,
but do not overfill.
To fill tile rinse agent dispenser; make sm'e tile
dishwasher is flflly open.
Tm'n tile dispenser cap to tile left and lift it
out. Add rinse agent tmtil tile indicator window
shows fifll.
Clean up any spilled rinse agent with a damp
cloth. Replace the dispenser cap.
The amo/mt of rinse agent released into the
final wash can be a(!justed. Tile tactory setting
is at tile midpoint. If there are rings of calcimn
(hard water) spots on dishes, try a higher
setting. If there is toaming, use a lower setting.
To a(!just the setting, remove the dispenser cap;
then turn the a(!juster cotmterclockwise to
increase tile amotmt of rinse agent.
Rinseagent
adjuster
Page 10

Using the dishwasher
l) isk wask er
Dish
Preparation
Prior to
Loading
l' rget to
Add a
Dish ?
Det_gents
10
• No px>dnsing of normal ff)od soil is x>quired.
• Scrape off hard soils, inclu(fing bones, toothpicks,
skins and seeds.
• Remo\e large quantifies of any l_maining tbod.
A tbrgotten dish can be added am time before tile
iHaiI/wash.
1. Open tile door slighdy.
2. V_hituntil tile water spra} action stops. Steam may
rise out of tile dishwashel:
Use only detelgent specifica]]} made tor use ill
dishwashers. Cascade ®, Cascade Complete ® and
Electrasol ®Automatic Dislm_Mling Detergents hme
been approved for use in all Mimogmm Dishwashers.
Keep your powdered detergent flesh and (h> Don't put
detelgent into tile dispenser until you're lea& to _sl/
(fishes.
All wash cFrles except RINSE ONI Y require detergent.
The amount of detergent to use depends on \dmther
your water is ham or ,_p/t.
Protect your dishes and dishwasher by contacOng your
water department and asking how hard your _Jter is.
Twelve or more groins is extremely hard water Awater
softener is recommended. Without it, lime can build
up in tile water vahe, \dfich could stick \dlile open and
cause floo(fing. Too much demrgent with soft water
can cause a peru/anent cloudiness of glass_;u'e,
called elchi_g:
The detergent cup has indicator lines u) help you.
Use the light amount of detelgent. As a guide:
For Soft _lmr (_mr hardness <4 Grains Per Gallon,
GPG), fill cup to the fil_t lille.
For Medim-rl water (4_<'JGPG), fill cup to fl_e second
lille.
For Medium hard x_ater (8-12 GPG), fill cup.
For Extremely hard water (>12 GPG), fill both cups.
Soft Medium Medium Extremely
I hard hard
PRE
MAINWASH
To fill tile (fispenser. if tile dispenser is closed,
open tile co_er b_ depressing the cover latch.
Add detergent to tile Main _Jsll section, as per
guidelines. Fill the Pre4_ash section if water is
extremely hard. Then close tile dispenser co, el:
It is normal tor tile co\ er to open partially \dmn
(fispensing detergent.
WASH
• Remove leafk vegetables, meat trimmings and
excessiveamounts of gTeaseor oil.
• P,emove acidic Ibod soils that can discolor stainless
steel.
3. Add tbrgotten dishes.
4. Close tile dool:
Main wash
Cover
latch
Pre-wash
section
Do not use hand dish detergent.
that is not specificall} designed
tor dishwashers _qll cause tile
__ NOTE: Using a detergent
vents, coveling tile kimhen floor and making tile
floor wet.
Because so man} deteNent containers look alike,
store the dishwasher demrgent in a separate space
ti'om all other cleaners. Sho_ anyone \_ho illa_<use the
dishwasher file correct detel<gen{ and \_here i( is stored.
IA]file there will be no lasting damage to tile dishwasher.
5amr dishes will not get clean using a dishwashing
detergent that is not tbnn ulated to _mrk with
dishwashers.
Drying Fall (on sortie n/odels)
Top Control Panel
models are equipped
with a duing tim to
assist ill (hTing dishes
b} pulling air through
tile mb after tile wash
c_cle.
If the Heated DU opd(m is selected, then tile drying
tim will run during tile dr)Ang portion of tile c}cle and
up to 2 hours after tile CI,E_N light is on, depending
on tile selected wash cycle. If the Heated Dl) option is
not used, then tile CI,EAN light will come on at the end
of the final rinse and tile thn will run tip to 4 hom_,
depending on tile selected wash cycle.
If the Rinse Onh wash cycle is selected, the Heated Dry
option is autom_Jtically tin'ned off and tile drfing fhn
will mn tor 4 hours.
If the dr\ring,< thn is,framing< and the CI,E,_ light is on,
the dr) ing fire can be turned off b} opening the door
and t)ressing-< am, key,(m tile keypad.
dislmasher to fill xqth suds.
Dining operation, these suds
will spill out of the dishwasher
Page 11

I,oading the Racks
Dishwasher
UpperRack
Features and appearance of racks and
silverware basket may w_rv from wmr model.
Although the ui)per rack is fin" glasses, cups
and sauce_, pots and pans can be placed in
this rack tot etti_ctive cleaning. Cups and
glasses fit best along the sides and should be
placed open-end down. This is also
a secm'e place for dishwasher plastics.
The utility shelf (on some models) mav be
placed in the up or down position to add
flexibility,
The ul)per rack is good for all kinds of
odd-shaped utensils. Saucepans, mixing bowls
and other items should be placed tace down.
D_ld-down tines (on some models) provide
flexibility ti)r extra-large and hard-to-tit items.
Secure lag{'er dishwashe>s@ plastics over 2 tines
when po,v_ible.
Make sure small plastic items are se( Im, so they _aa 'I
,/ilg onto the heate*:
Be sure that ilem,s do not protrude lhroug'h the bottom
o/the male and blod¢ rotation o/the midd# sp_r O'
arm. Tiffs couhl *_,,_ult in poor wash pe@wmance
,/br items in the upper rock.
Check to mahe sure that no ilem,s will block rotation
(:/the wa,sh arm.
A wine glass holder (on some models) secures
wine glasses tot best washability. Because wine
glasses come in various sizes, atter loading,
slowly push in the rack to make sm'e they will
clear the top of the dishwasher.
11
Page 12

I,oading the Racks
Dishwasher
Adjustable
Upper Rack
(0)2 SO_IZe
models)
Silverware
Basket
The standard position of wmr a_!justable rack
is "up" which allows lot maxinmn/ clearance lot
your taller items in the lower rack. If you have
taller wine glasses, tumblers or other items to
place in the upper rack, you may want to a_!just
the rack to the lower position.
To load flatware, simply push the a(!justable
handle to either side (on some models).
Put flatware in the remowd_le basket with fi)rk
and knife handles up to protect your hands.
Place spoons in the basket with handles down.
Mix knives, forks and spoons so they don't nest
together. Distribute evenlw Small plastic items,
such as measuring spoons and lids fl'om small
containers should go in the bottom of the
silverware basket with the silverware on top.
To lower the rack, support the weight of the
rack with your hands as shown and press both
finger pads about 1/4" toward the inside of the
rack as indicated and guide the rack down to
its lower position.
IIIIIII
__1 IIIL I_]L I1__ II/
II q[ IF IF IF l_
I II II II II II II I1 II II II
To raise the rack to the "up" position, pull up
on the center of the rack side frame until the
rack locks into place.
A w_rie U of options are available regarding the
three-piece silverware basket (on some models)
in your dishwasher. The complete basket is
designed to fit on the right side of the lower
rack. Additionall> each end of the basket is
remowd)le to add loading flexibility to
aCCOllllllodate _]at\vaYe and lower rack
capacity needs.
12
itemextend
throughbottom,
Don't letany
The one-piece silverware basket can be
placed in the fl'ont, right side or back of the
lower rack.
One-piece basket (on some models)
Three-piece basket (on some models)
The lids of both end and middle baskets
(on some models) can be closed to contain
small items, i,ong items can be placed on the
utility shelf in the upper rack.
To removeend baskets, grasp the basket
at opposite corners and slide apart.
Page 13

I,oading the Racks
l) i,sh w a ,sh er
Lower Rack
Pu?move the
UDDer Rack
Tile lower rack is best used for plates, sauce_s and
cookware, large items such as broiler pans and
baking racks should go along tile left-hand side.
I,oad platte_, pots and bowls along tile sides, in
corne_s or in tile back. The soiled side of items
should fl_ce tile center ot tile rack. If necessa U,
oversized glasses and mugs can be placed in tile
lower rack to maximize hmding flexibility.
_)/l can remove tile upper rack to allow space fin.
large items in tile lower rack.
To relnove tile upper rack, push thumb tab out
and remove the front end caps on each side ot
the rail.
Mso, be carefifl not to let a portion of an item
such as a pot or dish handle extend through the
bottom rack. This could block tile wash am_ and
cause poor washing restdts.
Fol&down fines (on some models) provide
fleMbiliW fin" extra-large and hard-to-tit items.
Tile fines may be left in tile up position or fi)lded
down to c/istoi/lize tile lower rack.
Replace tile end caps, then push tile rails all tile
wax back into the dishwasher. Slide the shower
nozzle attachment oxer tile spout.
,Shower nozzle
attachment
Extra Rack
l_)?atures
(OTI SO_'tg
models)
Pull tile rack straight out and off tile rails.
Cutlery Tray
Tile cutlery tray holds up to 4 large knitbs such as
a ca_wer, chef's knives, bread knife, etc., that are
too tall to fit in tile silverware basket.
Hook tile tray onto tile rear of tile upper rack.
I,a_ tile knixes between tile guides (as shown).
Bowl Tines
Tile special large-bowl fines in tile lower rack add
flexibility to vour loading pattern. They are useflfl
fin" serving bowls or other large bowls.
To use tile bowl fines, told down tile 2 i'ov,:s of flex
tines in fl'ont of the bowl tines and load bowls just
as you would in tile upper rack.
Then fill tile lower rack and begin your cvcle.
NOTE: Nozzle in list be in place with upper rack
removed. If not installed properl> poor wash
pe_tknmance and noise will _esult.
NOTE: Don't fi)_get to remove the shower nozzle
attachment betore vou replace tile upper rack.
Thesetinesfold down Large-bowltines
13
Page 14

I,oading the Racks
l) i,sh w a ,sh e r
kbllow
these
,guidelines
jbr loading
10 and 12
place settings
Features and appearance of racks and silxerware baskets may xarv fi'om xour model.
Upper Rack--10 place settings
Lower Rack--10 place settings
Upper Rack--12 place settings
Lower Rack--12 place settings
14
Page 15

re and Cleaning
Dis hw as her
Extoior
lnt ior
Protect
Against
Freez ing
To clean the control panel use a lightly dampened cloth then dry thoroughly. To clean the
exterior painted panels use a good appliance polish wax.
Never use sharp objects, scouring pads or ha_h cleane_ on any part of tile dishwasher.
The stainless steel panels can be cleaned with CERAMA BRYTE ® Stainless Steel Appliance
Cleaner or a similar product using a clean, soft cloth. You can order CERAMA BRYTE "¢_Stainless
Steel Appliance Cleaner through (;E Parts by calling 800.626.2002 (fi_r U.S. only). In Canada, call
1.888.880.3030.
Tile stainless steel used to make tile dishwasher tub and inner door provides the highest reliabiliw
available in a GE dishwasher. If tile dishwasher tub or inner door should be scratched or dented
during normal use, thev will not _ust or corrode. These surlace blemishes will not altect their
flmction or durability.
If your dishwasher is left in an unheated place during tile winter; ask a service technician to:
1. Cut off electrical power to the dishwasher. Remove fllses or trip circuit breaker.
2. Turn off the water supply and disconnect the water inlet line from the water wflve.
3. Drain water ti'om the water inlet line and water wflve. (Use a pan to catch the water.)
4. Reconnect tile water inlet line to tile water wflve.
The Air
(;ap
An air gap protects )our dish_asher against
x_ater backing up into it if a drain clogs. The air
gap is not a part of the dish_ashe_; It is not
coxered b)your warranty. Not all plumbing
codes require air gaps, so you ll/}ly not have one.
The air I easy
1. Turn off the dishwasher and lift off the
2. Unscrew tile plastic cap and clean with
ga _ is to clean.
chroi//e co_, er.
a toothpick.
Two typesOfairgaps _iiii;Ii_Jlh_[
Checkthe air gap any time your dishwasher
isn't draining well.
15
Page 16

Befi)re You (;all For Service
l) is k w a sk er
Questions ?
Use this
problem
solTdeY
16
PROBLEM POSSIBLE CAUSE WHAT TO DO
Control pmml lights go Time too long between • Each pad must be touched within 30
off when you're setting touching of selected pads seconds of tile othe)_. To relight, touch any
controls pad again, or unlatch and relatch do(n:
Noise
Soule of tile SOHIlds VOH •
will hear are normal' •
Dete)gent cup opening.
Tile motor stoi)ping during tile (hying
period.
_Ahter draining out of tile mb immediately
alter you touch START/RESET pad.
Dr)Jng tim tutoring fin" 2-4 hom_ after
CI,EAN light is illuminamd (Top Control
Panel models only).
Utensils are )lot secure
in the rack or something
• Make sure eveD'thing is secured in
dishwasher.
small has dropped into
the rack
Motor h U)/IS •
Dishes are blocking tile •
dispenser cups
Water standing in the A small amount of clean water around tile
bottom of the tub outlet on tile mb bottom at tile back of tile
Water won't pmnp out Drain is clogged •
of the tub •
dete)gent cups
This is nomlal •
Dishwasher has not been used on a regular
basis. If you do not use your dishwasher
otten, run a RINSE ONI,Y cycle once e;'ep,'
week. This will hel I) kee I) the seal moist.
Reposifion the dishes.Detergent left in
tub keeps tile water seal lubricated.
If you have an air gap, clean it.
Check to see ifvour kitchen sink is
draining well. It not, you may need a
plumber.
If tile dishwasher drains into a disposer,
rtm disposer clem:
Suds Correct detergent •
WaSIl't used
Use only automatic dish_M/er dete)gents
to avoid sudsing. Cascade ®, Cascade
Complete andElectrasol dishwasher
® ®
detergents have been approved fiw use
in all Monogram dishwashe)_.
To remove suds fl'om tile tub, open tile
dishwasher and let suds dissipate. Add 1
gallon of cold water to tile tub. Puln I) ()lit
water by starting any cycle and then resetting
the unit atier l 0 seconds. See Control Panel
section. Repeat if necessary.
Rinse agent was spilled •
_Mwa)_swipe up rinse agent spills
immediately:
Stained dishwasher
parts
Dete)gent with colorant •
_;Is used
Some dete)gents contain colorant (pigment
or dyes) that will discolor the tub interior
with extended use. Check the dete)gent
cup fin" signs of any discoloration./f cup is
discolored, change to detergent without an)
colorant. Cascade ®, Cascade Complete ® and
Electrasol ® dishwasher dete)gents have been
approved fin" use in all Monogram
dishwashe)_.
Soule toi/lat(_based tOo(1s
can stain
• Use of tile RINSE ONI,Y cycle after adding
tile dish to tile load can decrease tile level of
staining.
• GE also recommends Cascade ® Plastic
Booster rMto hel I) remove these types of
stains.
Page 17

Befi)re You Call For Service
Dishwasher
Questions?
Use this
problem
solYdgY
PROBLEM POSSIBLE CAUSE WHAT TO DO
Dishes mad flatware
not dean
I,ow inlet water
temi)erature
Make sure inlet water temperature is correct
(see Lrsing the Dishwasher section).
Rm_ water at the nearest fimcet prior to
starting the dis_z_sher to insm'e optimal _;_ter
temperature.
Water pressure is •
temporarily low
Turn on a fi_eucet. Is water coming out
more slowly than usual?/f so, wait tmtil
pressm'e is nomml bet0re using p)tu"
dishwasher:
?dr gap is clogged
hnproper rack loading
• Clean air gap.
• Make sure large dishware does not block the
detergent dispenser or the wash am/s.
• Glasses and dishes IlltlSt tilce the spray am_s.
Spots and ffdmhag on
glasses mad flatware
Extremely hard water •
I,ow inlet water
temperatm'e
Overloading the dishwasher •
hnproper loading •
Old or damp powder
detergent
Rinse agent dispenser
elnpV
Too little detergent
IUseJet Dry @ or Cascade Rinse Aid ® rinse
agent to remove spots and prevent new film
bull dul).
Install wamr sot*enei:
To remove stubborn spots and pre-existing
film fl'om glassware:
1Remove all metal utensils fl'om the
dishwasher:
2 Do not add detergent.
3 Select the COOK_,_;MIE cycle.
4Start the dishwasher and allow to mn for
18 to 22 minutes, Dishwasher will now be
in the main wash,
5 Open the door and pore" 2 cups (500 ml)
ot white vinegar into the bottom of the
dishwasher:
6 Close the door and allow to complete the
cycle. If vinegar rinse doesn't work: Repeat
as above, except use 1/4 cup (60 ml) of
dtfic acid crystals instead ot vinegar:
Cloudiness on glasswm'e
Combination of soft water
and too much detergent
• This is called ellhing'and is pemmnent.
To prevent this from hapi)ening , use less
detergent if you have soft water: Wash
glassware in the shortest cycle that will get
it clean.
Black or gray marks on
dishes
_'ater temperature
entering the dish_;_sher
exceeds 150°F (66°C)
Mmninum utensils have
rubbed against dishes
• I,ower the water heater temperatm'e.
• Remove marks with a mild, abrasive
cleanei:
17
Page 18

Befi)re You Call For Service
l) is k w ask er
Questions?
Use this
problem
solT)eT"
PROBLEM POSSIBLE CAUSE WHAT TO DO
Tea or coffee stainsYellow or brown film
on inside surfaces
Remove the stain by hand, using a solution
oI l/2 cup bleach and 3 cups wam_ water:
A CAUTION: Befi,recleaning
interior; wait at least 20 minutes alter a
cycle tot the heating element to cool
down. Failm'e to do so can result in burns.
White film on inside
surfaces
An oxerall )ellow or brown
fihn can be caused by iron
deposits in water
Hard water minerals
A special filter in the water sui)ply line is
the only way to correct this problem.
Contnct w)ur GE dealer or a water softener
company
GE recommends Jet Dry ® Dishwasher
Cleaner to hel I) remove some hard water
and mineral stains.
For extreme staining, clean the interior bv
applying dishwasher detergent to a damp
sponge. Wear Iubber gloves. DO NOT rise
any type of cleanser other than those
recommended or dishwasher detergent
because it may cause toaming or sudsing.
Cascade ®, Cascade Complete ® and
Electrasol ® Automatic Dishwashing
Detergents have been approved for
use in all Monogram Dishwashers.
A CAUTION: Bef , ecle . i.g
interior, wait at least 20 minutes after a
wcle tot the heating element to cool
down. Failm'e to do so can result in bm'ns.
Dishes don't dry
i,ow inlet water
tempera ture
Make sure inlet water temperature is
correct (see Using the Dishwasher
section).
Select ADDED HEAT.
Select HEATED DRY.
Rinse agent dispenser is
empty
Dishwasher won't run
Steaan
18
Fuse is blown, or the
circuit breaker tripped
_Mdl switch
(some installations) is in
the "off" position
This is normal
Check and refill the rinse agent dispenser.
Replace flBe or reset circuit breaker.
Remoxe any other appliances from the
circuit.
T_y resetting the START/RESET pad.
Check for a wall switch that the dishwasher
might be connected to. A wall switch is
required by electrical codes in some
localities. Tm'n the switch "on" if it is "off."
Steam comes through the xent on the
bottom of the door dm'ing drxim,, _ and
when water is being immped out.
Page 19

Befi)re You Call For Service
Dishwasher
Questions?
Use this
problem
solYdgY
PROBLEM POSSIBLE CAUSE WHAT TO DO
Sanitized fight does not
illuminate at the end of
the cycle (Anti-Bacteria
cycle only)
Interior fights not
working
Fhld-o f-cycle indicator
light does not illuminate
The door was opei_ed and • Do not interrupt the cycle ai_vtime during
the cvcle was iI_terI upted or atter main wash.
during or after the main
wash portion
i,ow inlet water
telnpera ture
Door was open toÀ" illore
than 15 milmtes
Bulbs are burnt out
Dishwasher has not
completed cycle
• Raise the water heater telnperature to
120°F (49°C).
• I,atch the door and reopen,
• Call fi)i" selvice to replace bulbs.
• (-)pen the door and check the status
indicator lights on control panel to
deternfine if cycle is complete,
19
Page 20

Consumer Services
l) i,sh wa,sher
With the purchase of your new Monogram appliance, receive the
assurance that if you ever need information or assistance from GE,
we'll be there. All you have to do is call toll-free, t
GE Answer
Center ®
In the USA:
800.626. 2000
In-Home
Repair Service
In the USA:
800.444.1845
In Canada:
1.888.880.3030
For Customers
With Special
Needs...
M the USA:
800.626. 2000
Whatever your question about any Mom_gram major appliance, GE Answer Center °
information service is available to hell). Yore" call--and yore" question--will be answered
promptly and com'teouslv. And vou can call anv time. GE Answer Center" service is open
24 horn's a day, 7 days a week.
OR
Visit our X,Vebsite at: www.monogram.com
In Canada, call 1.888.880.3030.
AGE consumer sep,'ice protessional will provide expert repair service, scheduled at a time
that's convenient tot you. Many GE Consmner Service company-operated locations offer you
service today or tomorro_, or at wmr convenience (7:00 a.m. to 7:00 p.m. weekdays, 9:00 a.m.
to 2:00 p.m. Saturdays). Our tactory-trained technicians know your appliance inside and out--
so most repairs can be handled in just one visit.
GE offers Braille controls for a xarietv of GE appliances, and a
brochure to assist in I)lanning, a hattie>free kitchen fi_r persons
with limited mobilitx.
Consumers with impaired hea_ing or speech xd_o haxe access to a
TDD or a conxentional telet)pewriter may call 800.TDD.GEA(_
(800.833.4322) to request information or serxice.
Service Contracts
In the USA:
800.626.2224
ln Canada:
1.888.880.3030
Parts and
Accessories
In the USA:
800.626.2002
ln Canada:
1.888.880.3030
2O
S_eTION
You can have the secure teeling that GE Consumer Service will still be there after vom"
warranty expires. Pro'chase a GE contract while wmr warranty is still in effect and vou'll
receive a substantial discotmt. With a multiple-year contract, you're assm'ed of fllture
service at today's prices.
Individuals qualified to service their own appfiances can have parts or accessories sent directlx
to their home. The GE parts s)stem prmides access to o',er 47,000 parts...and all GE (;enuine
Renewal Parts are fifllx warranted.
User mahltenmace instructions contained in this mm_ual cover procedures intended to be
performed by any user. Other servicing generally should be referred to qualified service
persmmel. Caution must be exercised, since improper servicing may cause mlsafe operation.
Page 21

Warranty fbr custonmrs in the USA
D ishwasher
YOUR MONOGRAM DISHWASHER WARRANTY
Staple sales slip or cancelled check here. Proof of original purchase
date is needed to obtain service under warranty.
WHAT IS
COVERED
From the Date
of the Original
Pu'_hase
ONE-YEAR
Any part of the dishwasher which tails due to a deti_ct in materials or workmanship. During this
full one-year warranty, GE will also provide, free of charge, all labor and in-home service to
replace the detective part.
Second Year
May part of the dishwasher which tails due to a defect in inaterials or workmanship. During this
second-year limited warranty, you will be responsible tor any labor or ii>holne service costs.
Five Years
The dishwasher rack aiM/or the electronic control module, if these should tail due to a defect in
materials or workmanship. During this five-year limited warranty, you will be responsible tor anv
labor or in-home selwice costs.
Lifetime
The stainless steel tub or door liner, if it fails to contain water due to a defect in inaterials or
workmai_shii). During this full lifetime warrm_ty, (;E will also proxide, free of charge, all labor
and it_-hotl_e serxice to replace the defectixe part.
• OO••OOO••OOID••OOID••OOID•OOOOOOOO•OOOO•OOOO•OOOOOOOOOOOOOOIOOOOIOOOOIOOO e
This warran U is extended to the original i)urchaser and any succeeding owner for the products
l)urchased fl)i" ordinal T home use in the 48 nmildand states, Hawaii, WashingtolL D.C. or Calmda.
In Mash the warranW is the same except that it is I,IMITED because you must pay to ship the
product to the service shop or tot the service technician's travel cost to wmr home.
All warranty serxice will be proxided bx our Factory Serxice (_enters or bx our authorized
Custon_er Care serxicei_ during nornml working hours.
Should your, ai)i)liance need serxice, durilw_ warrant) period or beyond in the U.S.A. call
800.444.1845. In Canada: 888.880.3030.
WHAT IS NOT
COVERED
• Service trips to your home to teach you
how to use the product.
• hnproper installation, delivery or
maintenance.
• Replacement of house fuses or resetting
of circuit breakers.
• Failure of the product if it is abused, misused,
or used for other thm_ the intended purpose
or used commercially.
Some states do not allow the exch_sion or linfitation of incidental or consequei_tial dalnages,
so the above limitation or exclusion Inay not apply to win. This warranty gives you specific legal
rights, aim wm nlav also have other rights which wu'v from state to state. To know what wmr
legal rights are in VO/li- state, consult w)ur local or state cons/lnlei" altairs ottice or wmr state's
Attorney General.
• Damage to the product caused by accident,
fire, floods or acts of God.
• Incidental or consequential dmnage caused by
possible defects with this appliance.
• Cleaning or servicing of the air gap device in
the drain line.
• Damage caused after delivery including
dmnage from items dropped on the door.
Warrantor:GeneralElectric Company,Louisville,KY40225.
21
Page 22

Warranty for customers in Ca ada
n
l) i,sh wa,sher
YOUR MONOGRAM DISHWASHER WARRANTY
Staple sales slip or cancelled check here. Proof of original purchase
date is needed to obtain service under warranty.
WHATIS
COVERED
From the Date
of the Or_¢inal
Puwhase
ONE-YEAR
Any part of the dishwasher which tails due to a defect in materials or workmanship. During this
full one-year warranty, GE will also provide, free of charge, all labor and in-home service to
replace the defective part.
Second Year
Any part of the dishwasher which tails due to a defect in materials or workmanship. During this
second-yeaac limited warranty, you will be responsible fl)r any labor or in-home service costs.
Five Years
The dishwasher rack, if it should iust, or the electronic control module, if it should tail due to a
defect in materials or workmanship. During this five-yeaac limited warranty, you will be responsible
toI" _llIV l_IboI" oi" in-holne selwice costs.
Lifetime
The stainless steel tub or door liner, if it fails to contain water due to a defect in materials or
workmanship. During this full lifetime warrm_ty, GE will also prmide, free of charge, all labor
and in-home serxice to replace the detbctixe part.
eOOQOOOOOOOOOOOOOOOOOOOOIOOOOIOOOOIOOOOIOOOOIOOOOQOOOOQ@_@@@@_@@@@_@@@@ •
This warrant)' is extended to the original purchaser and any succeeding owner fl)i" products
purchased fin" ordinal T home use in Canada. Proof of original pro'chase date is needed to obtain
service under the warranty.
All warranty service will be provided by ore" Factory Service (]enters or bv our authorized
Customer Care '_ servicers during normal working horn's.
Should yore', appliance need serxice, dufino_ warranty period or beyond call 1.888.880.3030.
WHAT IS NOT
COVERED
22
• Service trips to your home to teach you
how to use the product.
• Improper installation, delivery or
maintenance.
• Replacement of house fuses or resetting
of circuit breakers.
• Failure of the product if it is abused, misused,
or used for other than the intended purpose
or used commercially.
Some provinces do not allow the exclusion or limitation of incidental or consequential damages,
so the above limitation or exclusion may not apply to win. This warranty gives you specific legal
rights, and wm may also have other rights which vary fl'om province to province. To know what
your legal rights are in yore" province, consult yore" local or provincial consumer affairs office.
Warrantor: Camco Inc., I FactoryLane, Suite310,Moncton,N.B. EfC 911113.
• Damage to the product caused by accident,
fire, floods or acts of God.
• Incidental or consequential damage caused by
possible defects with this applimace.
• Clemfiug or servicing of the air gap device in
the drain line.
Damage caused after delivery including
damage from items dropped on the door.
Page 23

x,_po±l_.,zr__tnz_aodtu I
uogn.q .s__I d.ttlSaau_o
:lanpoa d aattmsuo D
saoue!lddtf39
IIIII
0
Place
1st Class
I _etter
Sialn t)
I Iere
General Electric Company
Warranty Re_stration Department
P.O. Box 34980
Louisville, KY 40232-2150
23
Page 24

Consumer Product Ownership Registration
Dear Custon]er:
Thank )ou fi_r _urchasing our product and thank wm fi_r I _ yourI , )lacin,, , confidence in us. _e are proud to
haxe _ou as a CtlStOi//el J.
Follow these three steps to protect your new appliance investment:
Complete mad mail
your Consumer
Product Ownership
Registration today.
IIave the t)eace oI mind
/
Important: If you did not get a registration card with your product, detach and return the form below to
ensure that your product is registered, or register online at www.monogram.com.
of knowing we can
comact you in tile
mdikcly event of a
sate'Iv modification.
After complethlg lifts
regislratiou, write your
model mid serial
nmnbers hi this manual
mid store fills document
hi a safe place. "tim will
need this inff)nnation
should you require
s('rvJ(('. The s('YVi(e
mmlber in tile USA:
800.444.1845. In Canada:
1.888.880.3030.
F()I A) t tERE
Read your "Owner's
Mamtal" carefully.
It will hel 1) you
operate yore: new
appliance t)rot)crly.
3
Consumer Product Ownership Registration
Product Model Number Serial Number
DishwasherI,,,,,,,,,,, I1,,,,,,, I
Nil: [] Ms. [] Mrs. [] Miss []
Fir_'I I'a_' I I
Na]//c I I I I I I I I I Na]//c I I I I I I I I I I I I I I
S'r""I I
Address I I I I I I I I I I I I I I I I I I I I I I I I I I
,,t,,.#I I I I I I I I I E,,/_,lAddress _:
I I I I_il,I I
City I I I I I I I I I I I I I I I I State _ Code I I I I I
l)at( Placed
t. _,,,I I Phone
Monm[_[_l DavL__ -_,_,rL...._ Numbcr l I I I-I , , I-I i i i I
"* Pleikse pliwid( }o/11 (!-mail il(]dl(N _, tl) r(!ceixe, _q;I (!-ll]_lJ], disctltll/IS, spe(Tia] t)tl(!is add tlth(!l il]]piw[_ll/I
comnmnicafions flora (;E Appliances((;EAt.
C Mo_ogr_ Che(k he,e itH,u do not want u, ,eceis, .................icati,msh'om (;EA's ca,ethll)selected l:,mm,....
Gg Consumer & Industrial ......
Louisville, KY 40225 7UZU'at. lllO#t_T(llll, CO lII Poll()" or call 800.626.2224.
165D4700P304
49-5980
11-04 JR
Printed in the United States
(_) g \II,U RETO (X)MP1,EJ EAND RE FURNJt IIS CARl) DOES N()F I)IMIN1SH_*OtR W,MRRAN'IS"RI(;I] I'S.
For illlol_]]alilll) il])l)/ll GEA's plJ_.il(_ ' add dill_l tls_l£_(! polic_ go to V,_.*,_'.l/IOllOgl'al//.Ctll/I add dick till "PlJ_. I(V
T,\PE C1L)SED
Monogram:
GEConsumer & Industrial
Louisvifle, KY40225
@2004GECompany
Page 25

165D4700P304
49-5980
11-04 J R
Imprime aux Etats-Unis
Monogram:
GEConsumer & industrial
Louisvifle, KY40225
@2004GECompany
 Loading...