

Page 1
...
_.ÌAtiBr £mA1
Ulfff IH zn UIC ifOii. Il UHI
Ibur washer
________
Use and Care of
Miiiiiii
c,S|'^SBSèffiàs|ì^^ ' ’■' ' ”'■ '
’ '■ '........................................ ................
' ^
Snacemaker Washers
WP1170F
WWP1180F
Save Time and Money.
Before you caii for service,
^H""'
use the Problem Solver p22
The GE Answer Center800.626.2000
J C
0EI^EBAL@ ELECTRiC ^
Page 2

Contents
Important Cautions 3
Energy Saving Tips 4
Good Sorting Means Better 5
Washing
It Pays To Check and 5
Pre-treat . ,
Soaking 5
Operating instructions 6,7
for your
Portabie WasherModel WWP1170F
Operating Instructions 8
for your
Stationary Washer—
Model WWP1180F
Speciai Recommendations for 9
Washing Permanent Press
without dryer
Factors To Consider in 9
Ssisction of Dstsrgents ' . ■
and Soap
The Damaging Effects of 10
Carbonate Detergents on
Your Giothes and Washer
How Much Detergent 11
Should You Use?
How To Use Detergent 11
Hard Water— Do You Have !t? 12
Other Lau nd ry Prod u cts 13
How To Remove Stains 14,15
Help us
lieip you...
Bead tliis book carefyily
1+ \A/IM \//^i I ori/H
81 will ywu CAI
maintain your new washer properly.
Keep it handy for answers to your
questions.
if you don’t understand something
or need more help...Call, toll free:
The GE Answer Center™
800.626.2000
information service
or, write (include your phone
f-ii irmKiTM'X
I lUl I /
Consumer Affairs
General Electric Company
Appliance Park
Louisville, KY 40225
Write down the model and ,
serial nyinbers.
You’!! find them on a label located
on the lower left side panel near
the front.
Consumer Product Ownership
Registration card that came with
your washer. Before sending in this
card, please write these numbers
Model No.
Serial No.
Use these numbers in any
correspondence or service calls
concerning your washer.
if you receive a damaged washer,
immediately contact the dealer (or
builder) that sold you the washer.
Save time and money...
before you call for service
Check the Problem Solver (page
22). It lists minor causes of
operating probiems that you can
correct yourself. It could save you
an unnecessary service cail.
Wash! ng G u ide f ór D if f erent 16,17
Fabrics and Loads
Common Laundering 18~20
Problems
How To Care for Your Washer 21
GetTo Know Your Washer 21
The Problem Solver 22
Consumer Services 23
Warranty
Back Cover
con voim
I .r'Vn S Vi’WO-i .1. ■
I if y©y, smell gasT ' .■
,1». Open',window.s , ’■
2. t©ych'‘:eiectrlcal
1
switches’ ' '
immediately call
yoor gas syppiier
■con VOi'iO
■ DQ^lì©t store ©r;yse ^
gasoiiiie.or other - - , ■ •
f lainrriab.ie, ¥ap@rs .and
Page 3

Iniportant Safety iostrijctions
Read a!l iostryGlions before using this appliance
SAVE THESE INSTRUCTIONS
WARNING ■—When using this
appliance, always exercise basic
safety precautions, including the
s V'livyvv If 1^.
® Use this appliance only for its
Intended purpose as described in
this Use and Care Book.
® Tills washer must be properly
Instaffed and located in
accordance with the fnstailation
Instryctlons before ft Is used. If
you did not receive an installation
instructions sheet with your
washer, you can obtain one by
contacting the service location
nearest you.
- Properly ground to conform
with ali governing codes
and ordinances.
~ Install or store where It will not
be exposed to temperatures
below freezing or exposed to
the weather.
- Connect to a properly rated,
|jiUitiULt;u di lu puvvoisupply circuit to avoid electrical
overload.
- Connect to adequate plumbing
and drain facilities as described
in the Installation Instructions,
® With stationary model, turn off
water faucets when the washer is
not in use to relieve pressure on
hoses and valves, and to minimize
leakage if a hose or valve should
break or rupture.
® With portable model, turn
WII ClI l\^ II I
coupler when washer is not in use.
® When disconnecting this
appliance pull by the plug rather
than the cord to avoid damage to
the cord or junction of cord and
plug. Make sure that the cord is
located so that it will not be
stepped on, tripped over or
otherwise subjected to damage
or stress.
® We strongly recommend that
CU ly C5C;!VJU/Hiy IVyi I k/y «
qualified individual.
® The wiring diagram for this
machine is located inside the
lovi/er front access panel.
T© rtnfnlmize the possibility
of injyry:
® Do not mix chlorine bleach with
ammonia or acids such as vinegar
and/or rust remover. Mixing can
produce a toxic gas which may
cause death.
® Do not wash or dry articles that
have been cleaned in, washed in,
soaked in, or spotted with
combustible or explosive
substances (such as gasoline,
degreasers, dry-cleaning solvents,
vapors that could ignite or
explode.
Do not add these substances to
the wash water.
Do not use these substances
around your washer and/or dryer
during operation.
® HYDROGEN GAS is produced by
the chemicai action within your
water heater and the gas can
accumulate in the water heater
and/or water pipes if hot water has
not been used for a period of two
weeks or lonaer. HYDROGEN GAS
CAN BE explosive UNDER
THESE CIRCUMSTANCES. So to
nro\/onf thp no.Q«ihilit\/ nf
or injury, if you have not used hot
water for two weeks or more, or
I MUVt; liiiu a ic^oiuoiiuc; m vvmk<#si li ic?
+ ^ ir» Jlin
hot water system may not have
been used for some time, turn on
aii hot water faucets and aiiow
them to run for several minutes
before using any electrical appli
ance which is connected to the
hot water system. This will allow
any hydrogen gas to escape. Of
course, since the gas is flammabie, do not smoke or use an
open flame or appliance during
this process.
® Never reach into the washer
white parts are moving. Always
stop the washer to load, unload,
add forgotten items or add
additional laundry aids.
vvmv-rii iiiay yiv^
For your safety, the washer lid is_
.locked closed during spin cycle. To
open lid during spin cycle, push
the timer knob !N and wait for lid
lock to release, about 30 seconds,
before opening.
At end of cycle lid iock will release
after about 30 seconds. The washer
will fill and agitate with the lid
open.
® Close supervision is necessary
if this appliance is used by or near
children. Do not allow children to
y}\'cxy IIIÎDIUÜ, un Ui Will I \jt
any discarded appliance. Dispose
of discarded appliances and ship
ping or packing materiais properly.
Before discarding a washer, or
removing from service, remove the
washer lid.
® Never operate portable model in
locations where it could conceiv
ably create a hazard, such as top
of stairs or edge of unguarded
landing.
® Keep ali laundry aids (such as
detergents, bleaches, fabric
softeners, etc.) out of the reach
of children, preferably in a locked
cabinet. Observe all warnings
on container labels to avoid
persona! injury.
® Keep the area around and under
neath your appliances free from
the accumulation of combustible
materials, such as lint, paper, rags,
chemicals, etc.
® Keep the floor around your
appliances clean and dry to reduce
tlîé possibility of slipping.
® To minimize the possibility of
electric shock, unplug this appli
ance from the power-supply before
attempting any maintenance or
cleani.ng (except the removal and
cleaning of the lint filter).
NOTE: Turning the Cycle Selector
+ J«s S-» + M/**^T*
tu an V-/I I puoiiiuii
disconnect the appliance from the
power-supply.
Continued next page
Page 4

ii i iá¡#’fe#b 4&Л1 i ' Safety instruetions (continued)
Do not tamper with controls.
® Do not operate this appliance if
ii is damaged, malfunctioning,
partially disassembled, or has
missing or broken parts, including
a dama^ged cord or plug.
® Do not wash fiberglass articles
in your washer. Skin irritation
could result from the remaining
particles that may be picked up
by clothing during subsequent
washer use.
© The laundry process can reduce
the fiame retardancy of fabrics, lo
avoid such a result, the garment
manufacturer’s care instructions
should be followed very carefully.
® Never climb on or stand on the
washer top.
F@r Washer Operation
© Do not leave washer lid up
during cycle. The washer will fill
and agitate with the lid open.
For your safety, the washer lid is
locked closed during spin cycie. To
Optional Accessories for your Spacemakers
Mode!
Ml imKc^r r^QO/^rir\+i/^n
1 1 L./^C70l i
WMK-30 Wall-Mount Installation Kit. Use to
11-*+ Hr\/c*r\A/oll \A/Qohnr
iiiv«/UMi t^iyc:^i kw vvcAii
SViay be used with
Stationary
Washer
W'//P1180F
Portable
WWP1170F
Washer
open lid during spin cycie, push
the Cycie Selector IN and wait for
lid lock to release, about 30
seconds, before opening.
At end of cycle, lid lock will
release after about 30 seconds.
© DO NOT CHANGE CYCLE OR
MANUALLY ADVANCE CYCLE
SELECTOR WHEN DIAL IS OUT.
Push in Cycle Selector and wait for
washer to stop, i hen seiect new
Cycle and puli Cycle Selector to
restart.
stationary
Dryer
DDP128QF
X(1)
Portable
Dryer
DDP127QF
X(1)
stationary
Dryer
DDP1275F
X(1)
DSR-80 Dryer Stack Rack. Supports dryer
WDF-80* Washer/Dryer Frame for unitized
ir* Ino+aMo+irin
III II lv7V&AM«l.iWI t>
ino+'allo+ion 1 loci mcM in+ rlrx/cir* r*n
IliOtCAMCAVIWII. VW 2IIWUI8ll.\^iy\J^I V./ii
X
X
top of vi/asher.
riC:Q.7il Hrv/Qr RqqI^-
i~f vr U^l jrwi 1
WPP-50 Conversion Kit. To convert washer
fr> Kiiil+.in inc+allQ+inn
k^UIIL'III II IWLUIIUAAIWI 1.
Accessories are available from your dealer or service organization.
ЛЛа\/ I ICQ
\ ■ /
-------
---
^WH—White
--------- ■
AD—Almond
Energy-Saving Tips
We are all conscious of the need
to save energy—to protect our
country’s energy reserves and to
help us save money. There are
several things you can do to
reduce the amount of energy
r^r\r\r4r->.M -f/-\ lA/OC*Pi \//-\lir'
I lOOOCU
LO
VVCLOII youi
OlOlMOO.
1, Use Hot Wash—140° (60°C)—or?
a regular basis only when washing
heavily soiled articles—such as
\ur\r'lc QnH nlc»\/ r-InthoG
2, Under normal soil conditions,
Vi/ash in water above 80°F (27°C).
This generally means using the
WarrT! Wash temperature setting
on your washer—temperatures
approximately 95°F (35°C). If you
notice that soil has accumulaied
after several consecutive
washings, use Hot Wash
occasionally, if safe for fabrics.
Л!\л/о\/о in Г^гч1Н \A/cifor Xho
r^lWVbAy^J IlflOW...........................................................................................
temperature of the rinse does not
affect cleaning.
4. Try to wash less often. Save
articles of the same type of fat
until you have a full load.
5. if you must wash smaller loads,
adjust the amount of water. Small
loads should have lower water
levels. .
X
X
X
X
X
6. Wash in off-peak utility hours.
X/i-vi*»- ll-fll!’)’!/ /-Ч01-* \//^ll \А/Н1/^1л
lUUI lUV^CU UlMliy ОСИ i ЮМ you VViMOM
X X
X
X
are the off-peak hours.
IMPORTANT NOTE: If your clothes
and household items don’t look
r>loan anH froch laftor \«/5achinn
UAIIV4 Vtf «mAWI III ;
what are you apt to do? You will
probably then re-wash them...and
that means you’ll waste energy.
Remember to sort your clothes
carefully, and load them properly,
select correct cycles, use enough
detergent and choose a water
temperature warm enough to
release and get rid of soil.
штштш
Page 5
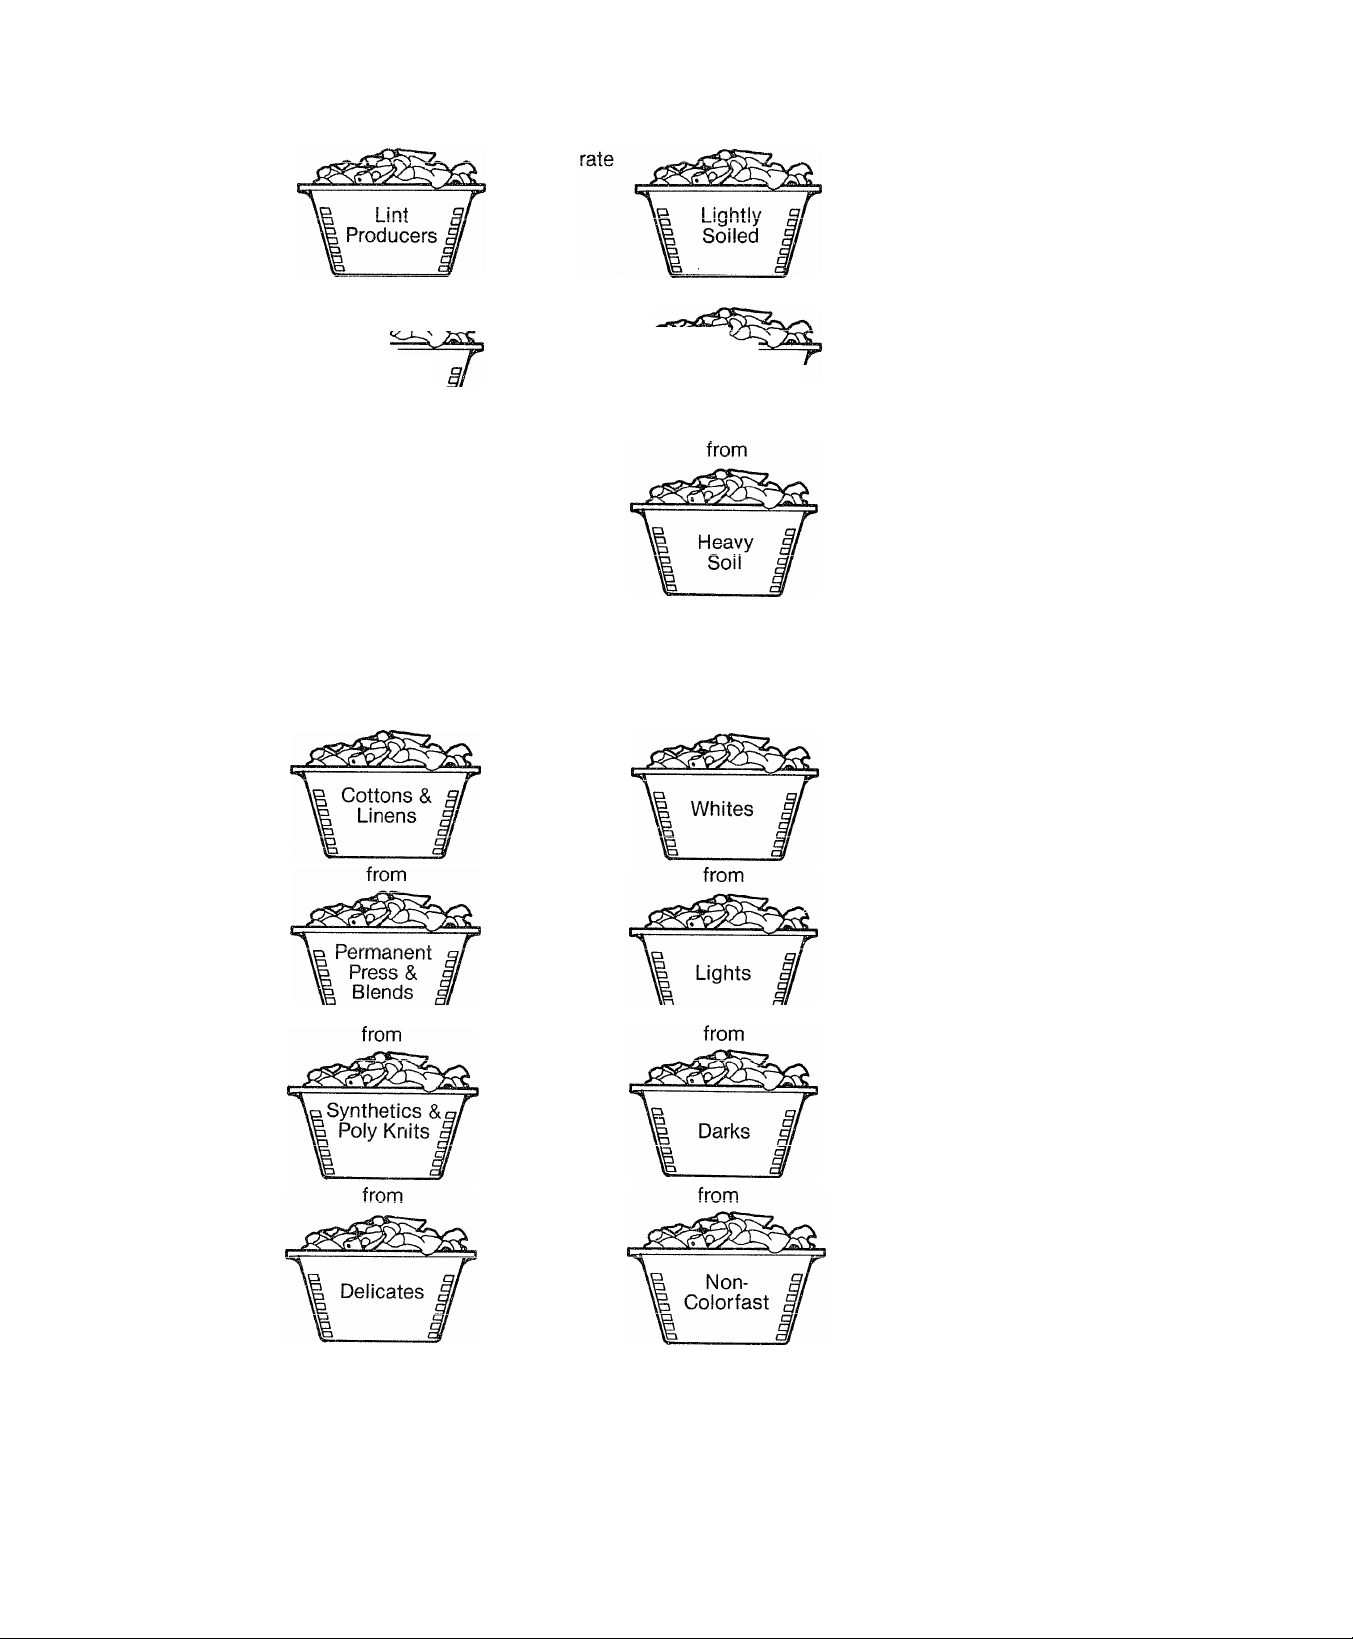
Good sorting means better washing
Sort by surface texture
from
1
ft _ Lint
Coiiectors
I
LINT PRODUCERS—such as terry
toweling and chenille—give up lint.
LINT COLLECTORS—such as man
made fibers and napped fabrics
like velveteen and corduroy—
attract lint. These must be washed
separately.
FOR MORE iNFORMATION ON
LINT CONTROL, SEE PAGE 18.
Sort by fabric
Separate
Sort by soil
Sort by color
Separate
from
Medium
VS Soil “
It pays to check and to pre-treat
® Empty pockets, brush out cuffs,
zip zippers, snap snaps, hook
hooks and button buttons.
® Do any necessary mending
rips, hems, tears.
® Check all items for areas of
heavy soil or stain.
® Remove stains. FOR STAIN
REMOVAL CHART, SEE PAGE 14.
® Pre-treat heavy soil by rubbing in
a small amount of liquid detergent
or a paste made of water and
For best results wait Vz hour
before washing.
• Turn PolyKnits inside-out to
minimize fabric surface damage.
Soaking—a good way to loosen deep soils and stains
A thorough soaking with detergent
or special soaking agent is an
excellent way to remove heavy
ov^iio, C7iiii^^uuc;u uii I oil lu c;vt:;?ii
some stains.
in addition to sorting to reduce lint
collection, it is recommended that
fabrics of similar consiruGtlon be
washed together whenever possible.
FOR INSTRUCTIONS ON
DIFFERENT FABRICS AND LOADS,
SEE PAGES 16 and 1?.
Soaking can be either a completely
separate washing step or a prelimi-
nar\/ cton tr\ a r>r>mr\lQto xA/ooh r>\/^lci
I IVAI j V* WWI I VVMk.71 I wy
For detailed information on how to
soak in your washer, see pages 7
or 8.
FOR information ON SOAKING
AGENTS, SEE PAGE 13.
Page 6
Operating Instructions
for Your Portable Washer — Mode! WWP1170F
GENERAL^ ELECTRIC
spacemaker washer
VARIARIH WATFR I FVFI WARM/RIKJFF TFMPFRATI IRF
Ш
This washer may be used in two
ways — as a portable or as a built-
in washer. Chances are you wiii
first use it as portable and then
have it permanently installed at a
later date. .
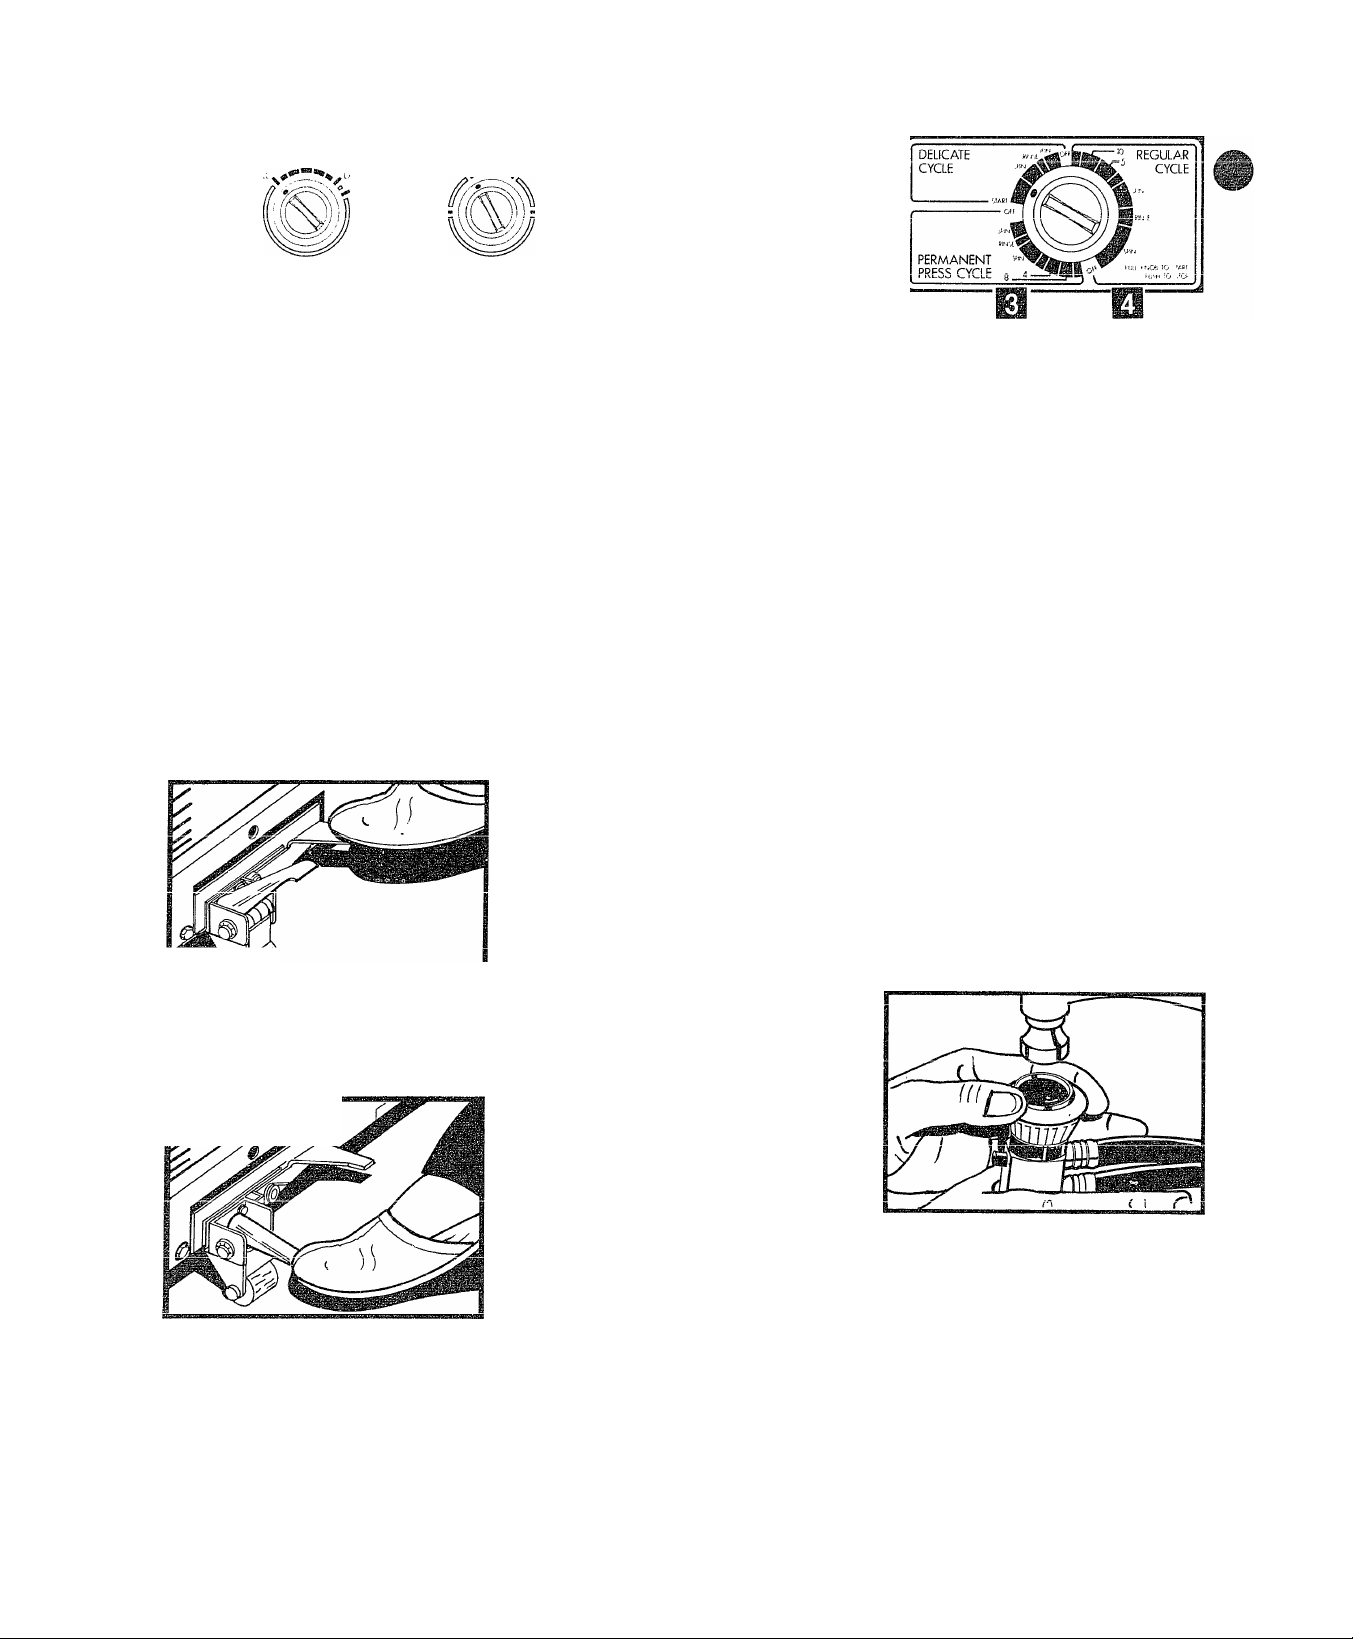
When using your washer as
portable, roll it to the most level
position near the water and power
source. Once the washer is in
position press “Lock Lever” with
your foot (See Illustration A) to
secure washer in position. Make
sure washer is firm to the floor and
r»/-\+ \A/Ml
I IWl. l\^wr\. VVCAOil^l will I IV^l
move until lever is released. When
you have finished washing, press
“Release Lever” (See Illustration B)
and roll washer to your storage area.
ILLUSTRATION A-LOCK LEVER
Press “Lock Lever”—lever on right
to secure your washer in position.
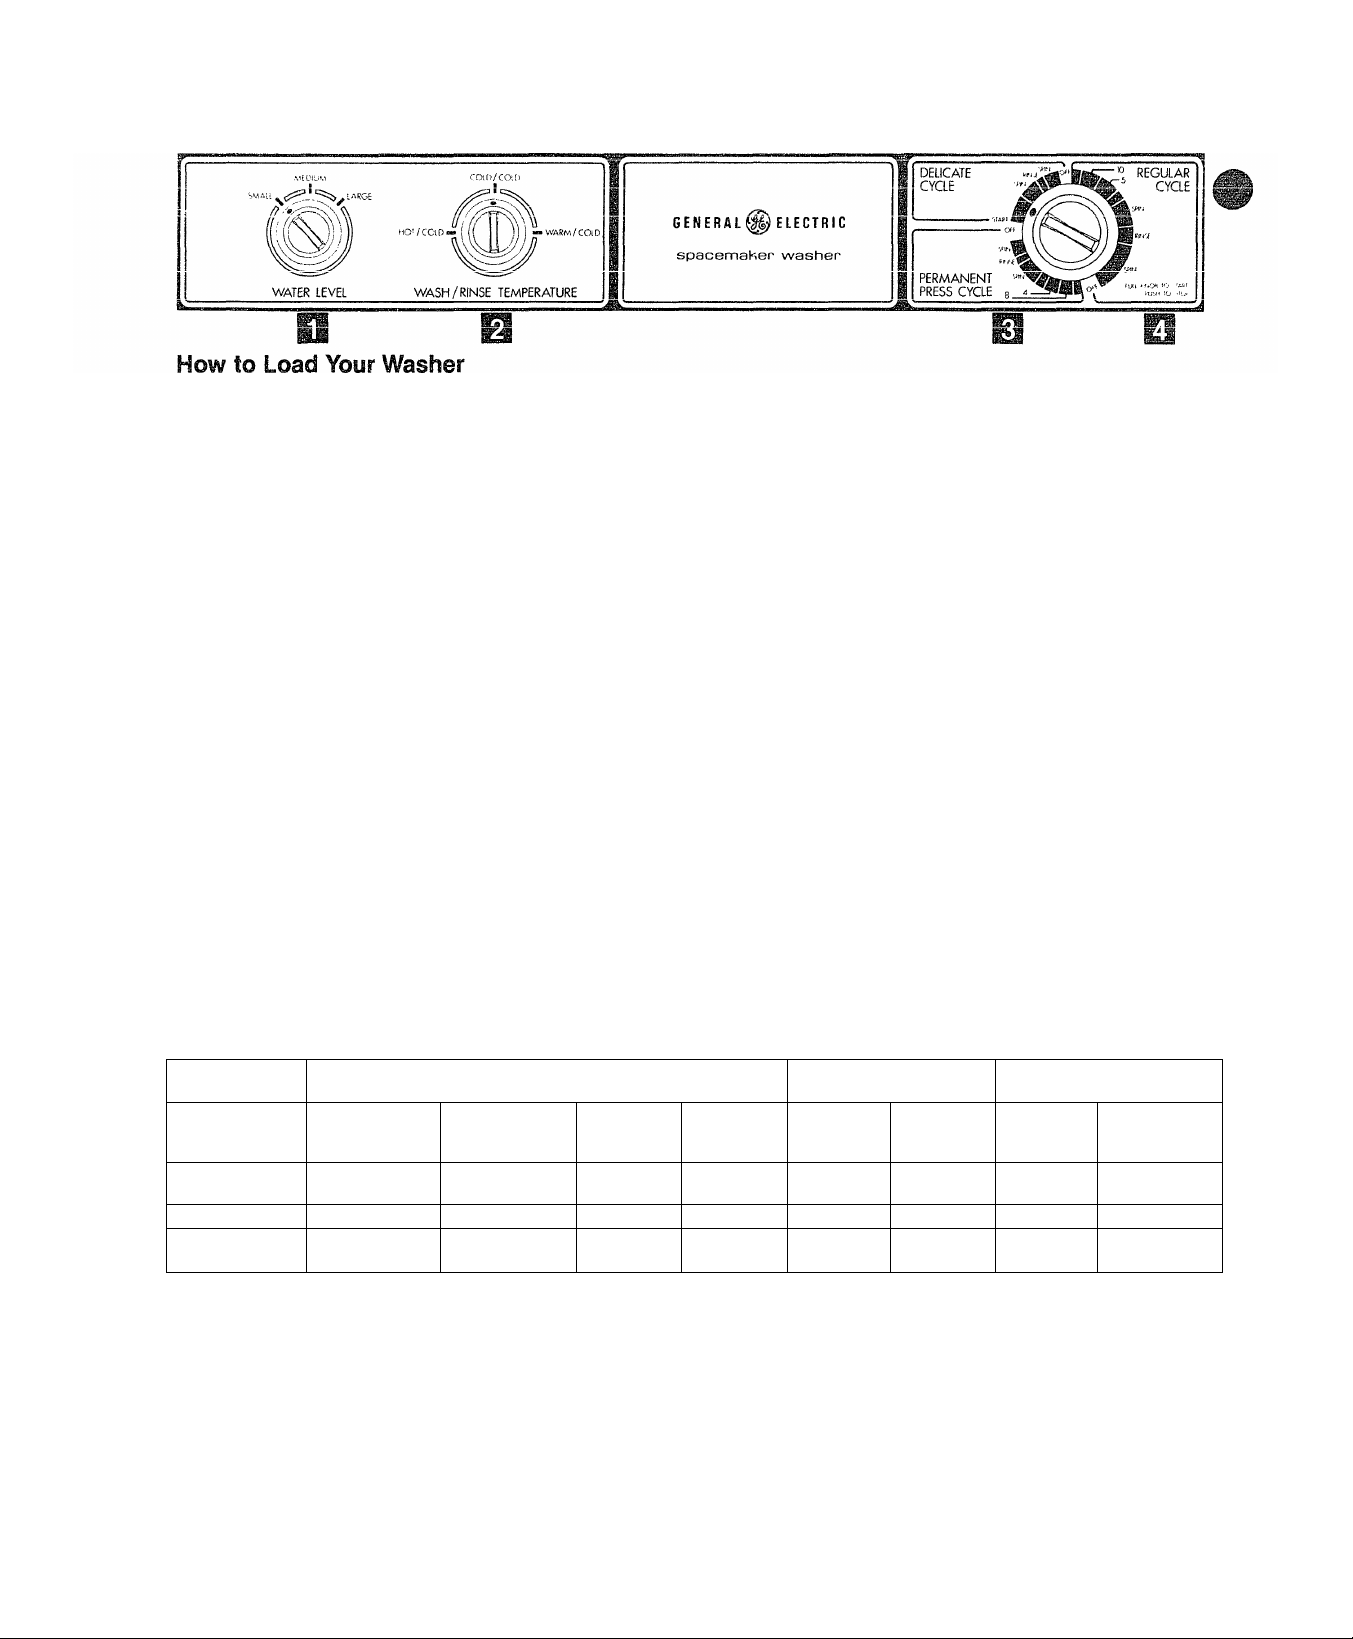
How to Load Your Washer
® Add measured amount of
detergent according to load size,
amount of soil and water level. See
pages 9 through 11 for detailed
information on types and amounts
of detergent.
® Load clothes loosely. Dry clothes
level should be below bottom of
wash tub riiTi. Do not put clothes
on top of the agitator or wind them
around it. For best results, mix
large items with small ones. When
washing a single heavy item, such
oo n I'll/-« 0/-4/-4
ело d oi iC4^ 3 v^i ciuu
one or two other pieces to balance
the load. Large items should be no
more than one-half of the total load.
® Clean lint filter. Be sure filter is
cleaned before washing every
load. See page 21.
® See page 13 for instructions on
how to use bleach, fabric softeners
япг1 nthpr l^linHrv nrnHlirtQ
® Close lid. Washer will fill and
agitate but will not spin with lid
open. This washer has a Safety Lid
Lock. As a safety measure the lid
wiii be automaticaiiy locked during
the spin portion of each cycle. The
lid will automatically unlock about
30 seconds after the end of the
spin cycle. To open lid during spin
cycle, push Cycle Selector IN and
XA/ait for liH loolr to roloaco ahoiit
VV<LAIl IV./I IIV4 LV./ f
30 seconds, before opening.
Set tlie controSs
See the Controls Setting Guide on
page 7.
O Select Water Level
SMALL: Washer is less than Vz full
of clothes.
\/AniAri! 1“. ORAAI I
VMniMDL.C: UtiLWtitin OIVIML.L
and LARGE to adjust load sizes
between Vz and Vz full.
LARGE: Over Vz full.
If you wis.h to increase level after
you’ve made a selection, turn knob
to “RESET” and select new level.
m Select Wash/Rinse Temperature
Set Wash/Rinse Temperature
switch at Warm/Warm (MANUAL)
and leave it at this setting. To
V./V«'! li WMV./IIWI IliUOi illOl
install a faucet adapter according
to the instructions included with
the faucet adapter package. Grasp
coupler, pull hoses out of cabinet
until red marker on hoses is
visible.
-Attach the washer’s hose coupler
to the faucet, (See Illustration C).
\A/QOh£ir \/r\l I miio+ firof
ILLUSTRATION B—
RELEASE LEVER
Press “Release Lever”—lever on
left before you attempt to move
washer.
For your persona! safety, never
reach into washer while parts are
moving. Always stop washer to
load, unload, add forgotten items
or additional laundry aids.
ILLUSTRATION C
Grasp white ring on hose coupier
and pull it down. Siip hose coupler
over faucet adapter and release
white ring. This will connect hose
coupler to faucet adapter. To test
me wcuei lemperaiure, press tne
Page 7

red button on the side of the
adapter. At the end of the wash
cycle turn off faucets, press red
button again to relieve pressure
and eliminate splashing. Do not
disconnect hose coupler until
pressure is relieved.
Set wash temperature at faucet.
Washer drains into sink. Be sure
sink drain is open to prevent
uvtii Iluwmy. Dienu iiui ciiiu uuiu
u^4. ^^1^
water in equal parts for WARM
WASH. After wash agitation has
started, change faucet settings for
P Push Cycle Selector in and turn
clockwise to your selected wash
cycle.
0 Pul! Cycle Selector out to start
the cycle. If you wish to change
cycle setting after washer has
started, push Cycle Selector in
and wait for washer to stop. Then
reset to the new position. Setting
can be changed at any time during
II ic v^yuic?.
How to Soak in Your Washer
Set WASH/RINSE TEMPERATURE
at WARM/WARM (MANUAL) and
adjust faucets for desired soak
temperature. Add detergent or
soak agent. Turn Cycle Selector to
desired cycle. Start the washer.
After washer fills and begins to
agitate, push in the Cycle Selector
to stop washer. Allow to soak for
as long as desired. After desired
soak, turn to the last Spin. Pul!
out the Cycle Selector to complete
the cycie.
your rinse water temperature. Be
Cl iro ir\ nil in \A/ochnr in+n o nmnnr’K/-
grounded three-prong receptacle.
See your Installation Instructions.
Some adjustment to these recommendations may be desirable depending on your particular washing conditions.
Cottons & Linens
Fabric
Wash/Rinse
Temperature*
Cycle
Cycle Selector
Setting
Work clothes,
dungarees, etc.
with heavy soil
Hot/Cold
Regular Regular Regular Regular
15
Work clothes,
dungarees, etc.
with normal soil
Hot/Cold or
Warm/Cold
15 15 10 12
White or
^olori3st
Hot/Cold or
Warm/Cold
Bright
Colors
Cold/Cold
For portable, set at Warm/Warm (Manual) and leave it there.
Permanent Press
Heavy or
Oily Soil
Hot/Cold Warm/Cold Warm/Cold Warm/Cold
Perm. Press Perm. Press Delicate Delicate
Normal or
1 inht Qnil
L-iyi .1
8
Polyester Knits
Syntheiics a Blends
Heavy or
Oily Soil
Start Start
Normal or
1 Inht Qnil
l_.yi 11 WWII
Page 8
Operating Instructions
for Your Stationary Washer — Model WWP1180F
® Add measured amount of
deiergent according io ioad Size,
pages 9 through 11 for detailed
information on types and amounts
of detergent.
e Load clothes loosely. Dry clothes
level should be below bottom of
wash tub rim. Do not put clothes
r>n fon rif thQ Qnitatr»r r\r lA/inH th/am
1 fcSXfAy \yi LI IVy I LLAiWI Wl VVIII\^ Lll^lll
around it. For best results, mix
large items with small ones. When
washing a single heavy item, such
as a shag rug or bedspread, add
one or two other pieces to balance
the ioad. Large items should be no
more than one-half of the total load.
® Clean lint filter. Be sure filter Is
cleaned before washing every
ioad. See page 21.
e See page 13 for instructions on
how to use bleach, fabric softeners
and other laundry products.
• Close lid. Washer will fill and
agitate but will not spin with iid
open. This washer has a Safety Lid
Lock. As a safety measure the lid
will be automatically locked during
the spin portion of each cycle. The
I I ^ t a « i i I I nr« iinl nn Ij' /*« 11^
iiu Will duiuMicuiucuiy umuurv auuui
30 seconds after the end of the
spin cycle. To open lid during spin
cycle, push Cycle Selector IN and
wait for iid lock to release, about
Qn inn
For your persona! safety, never
reach into washer while parts are
moving. Always stop washer to
load, unload, add forgotten items
or additional laundry aids.
Set the controls
See the Controls Setting Guide
below.
H Select Water Level
SMALL: Washer is less than Vs full
of ciothes.
MEDIUM; Between Vs and Vs full.
LARGE: Over Vs full of clothes.
^ Select Wash/Rinse Temperature
Cold rinse will be automatically
provided with all cycles.
O Push Cycle Selector in and turn
clockwise to your selected wash
r»\//^lz:i
m Pull Cycle Selector out to start
+ IF +/-V
u ic? vyoicy. II y\j\j vvioil Lu L/iiai i^c;
cycle setting after washer has
started, push Cycle Selector in
and wait for washer to stop. Then
reset to the new position. Setting
I 1^0 \^i icAi c%i m ly
+ irv^/% I I kJ
III I VJUl il ly
the cvcle.
Controls Setting Guide
Some adjustments to these recommendations may be desirable depending on your particular washing conditions.
Polyester Knits
Synthetics & Blends
Heavy or
Oily Soil
Delicate
Start
raui lu
Wash/Rinse
Temperature
Cycle
Qygjo Selector
Setting
Cottons & Linens
Work clothes,
uungarGBS, Gic.
with heavy soil
Hot/Cold
Regular Regular Regular
15 15 15 10
Work clothes,
uijnQSrGGS, GiC.
with normal soil
Hot/Coid or
Warm/Coid
White or
Colorfast
Hot/Cold or
Warm/Coid
Bright
Colors
Cold/Cold Hot/Cold
Regular
Permanent Press
Heavy or
Oily Soil
Perm, Press
12
Normal or
Light Soil
Warm/r.nld Warm/nnlri Warm/nnIH
Perm. Press
8
How to Soak in Your Washer
Set WASH/RINSE TEMPERATURE
Switch. Add detergent or soak
agent. Turn Cycle Selector to
desired cycle. Start the washer.
After washer fills and begins to
agitate, push in the Cycle Selector
to stop washer. Allow to soak for
as long as desired. .After desired
soak, turn to the last Spin. Pull
out the Cycle Selector to complete
the cycle.
Normal or
Light Soil
Delicate
Start
Page 9

Speoiaf reconniiTiaridations lor
washiriy parmansfii prsss
IS yvM MU' S9V^& sBcsvc; ca ui yc?iy
If you are machine-washing Perm
anent Press clothes that you plan
irs Konn r\r rlrir\_Hrv/ llO£\ /laV + KO r'OrCi
l.\J I ICU 1^ v/l f:/ALiCA WC4IW
to minimize wrinkling in the wash
process;
® Be careful not to overload
washer. Permanent Press clothes
mi IO+ ^mnl/:i rr\rvm ^r\ mr\\//:i
iicAvv^ cAiiipif;^ i 11 fiiwvw
freely. A Medium size load is the
largest you should use for
Permanent Press.
Factors to consider in selection
of detergents and soap.
Products:
Phosphate-
Powdered Detergents
Non-Phosphate—
Powdered Detergents
Advantages:
Perform well in hard or soft
water.
Wash all types of fabrics well.
Can be used in hot, warm, or
cold water.
Perform satisfactorily in soft
or moderately hard water.
In some areas only non
phosphate products are
available.
® Use more water than you would
for a regular load. Use a Medium
P!ll fr»r o Qmall I r>aH" a Pull Fill fnr
I III l\«/l UA Wiill^fl I Will I III IVI
a Medium Load.
® Remove clothes as soon as washer
stoDS and hana immediately.
Disadvantages:
Are not available in some
areas.
Do not clean well in hard
water.
May be difficult to dissolve,
especially in cold water.
Should not be used in cold
v/ater.
1
S.I^UIU
Detergents
Soaps
Those containing sodium
carbonate as an ingredient
may cause harmful limestone
deposits on clothes and
washer when combined with
hard water. (See Page 10.)
Perform well ¡n soft water.
Offer better performance in
hard water than powdered non
May not perform as well as
nn\A/rlpr<=!fi nhosnhatA nrndiint.c;
when diluted in wash water.
phosphate types.
Clean syntheiics and fabric
blends well.
Are excellent as concentrates
for removing spots.
Compieteiy dissolve even in
\iWO + /^r‘
vvai^i.
Perform well in soft water. Do not clean well in medium-
hard or hard water.
May combine with water
hardness minerals to form
ouurvy oua|j L»uiu.
/^11
Page 10

The damaging effects of Carbonate Detergents on your clothes and your washer.
!s your water hard? If it is, and if
you use a carbonate type non
phosphate detergent, the
unavoidable result will be
limestone* deposits on your
clothes and washer surfaces.
Damage to clothes
Although limestone build-up
occurs rnore rspiuly on cotton,
it will eventually affect various
fabrics in the following ways:
® Gives a stiff, harsh, rough feel
•frv -foKri^e oiir'h гас +/^\а/оГшп
1СДЬ^!ЮО vaUWM LW VV V./11 f 1^.
® Causes colors to fade and
become dull and dingy.
Ppiiqpq nrpvinn nf fphrin.c;
® Leaves a white, powdery residue
on dark-colored items.
* Causes spot-fading of bright
colors as a result of direct contact
with detergent.
9 Reduces Vy/rinkle-resistance of
permanent-press fabrics.
® Destroys effectiveness of flameretardant finishes on cottons such
as children’s sleepwear.
® Increases fabric wear because of
the scrubbing action beXv^/een
I f r%/-1 /“2KN/-V Î +
in I ICOlUi 1C UC|JUOUO \JII II !C IdUllOO
during washer agitation.
The hardness of your water and
your washing frequency will
determine how rapidly the
limestone will build up. If your
water is VERY HARD (11 or more
grains) even if you wash just a few
loads a week, you may see
iimtJOLUiit:? uuMU-upo iii juoi a icvv
months, (see Page 12).
Damage to washer
Secondary Meîhods
Unsightly build-up on all washer The following methods have
ot
/^\ / r\ r \ Ci nH \A/ Q o h
OUI Id O üO l\ -/ U lo V VC A OI I
solution.
temporarily the formation of the
limestone deposits.
® Mat-like crusty formations
caused by lint adhering to the
sticky limestone deposits.
® Use of hotter wash water, for
example 125°F to 135°F (52°C to
57°C) for cottons. This also
* Increased service calls because
improves oily-soil removal.
of limestone deposits in the pump,
recirculation water hoses, filters
and other washer parts.
® Adding detergent and allowing
washer to fill and agitate for three
or four minutes to dissolve
® Reduced useful life of washer.
detergent before adding clothes.
How to reduce limestone
build-ups
Recommended Methods
® Use a powdered phosphate
detergent or a liquid detergent if
these are available in your area.
® Install a home water softener.
This will significantly reduce
I I * -i r» / - \ O + f - i K l I i l/ H I I r \
mii c oi v ^t i c u u ii u ’u ^ .
® Use a packaged non-precipitating
water softener, such as Galgón
brand with phosphate.
How to partially restore
clothes
« Soak clothes in a solution of 2
cups of vinegar in one gallon of
hot tap-water for 15 minutes. USE
A PLASTIC CONTAINER. Then
wash clothes in the Washer using
detergent.
CAUTIONS:
9 Vinegar soak solution may
reduce the wrinkle-resistance of
permanent-press fabrics.
nnl\/ Hdla\/
v.i.jr
*LiMESTONE—technically called CALCIUM CARBONATE—is caused by the
reaction of the caicium in the hard water with the sodium carbonate in the detergent.
in
e Vinegar soak may damage the
dve.q in somfi fabric.«?.
Page 11

How much detergent
should you use?
The use of a sufficient amount of If the recommended amount of
Hotomont ic r>no rvf tho mnot ¡m.
V4W VN-'l y \-/l II. t\J V/l IW Wl II iW I I IWwM. MM"
portant things you can do to make
sure your wash comes out clean.
Hcitcirricint rirnHimoc +r>ri man\/
V/V.4V.4V.#V.#V^
suds, switch to a low sudsing
detergent brand, and follow
instructions on package.
Amount required varies
according to:
1. Water hardness
2. .Amount of soil
Il5^inn tnn Hptprnpnt ici « r.nm-
vww .w w» ww...
mon cause of laundry problems.
Always measure detergent in a
standard measuring cup.
3. Size of load
4 Tvnp nf Hptprnpnt
5. Wash temperature
Use more detergent if
you have...
1. Hard water
2. Large loads
3. Greasy or oily soils
4. Lower wash temperature
5. Low phosphate detergent.
How/ to use detergent?
v^icuiuicu v^i I u;vvuc:7iou. i V^l
r\tr iDrwjkir\rsirr\r\ +
results, put the detergent in the
washer before the clothes have
been loaded.
If \/r>iir rio+ornont Hr>ocn’t Hiccrvl\/o
II jrV^<L4l V,4l^U\>l I L VJWWWl I t V.J I I T V./
well, pre-dissolve the detergent in
hot water before clothes are added.
11
Page 12

I WWOI.'^I"
'<UIU' y^U i§0¥^ II, в
uo
BefoTG you C3n decid© whai to do
about hard water, you need to
know if you have it and, if so, how
hard it is.
Tho iinQ\A/fir \A/ill hp ‘S/nii hfl\/P ‘qh
. . V*. VV ... J W WW
many grains’ per gallon” and
means this:
0 to 3 grains per gallon—SOFT,
4 to 10 grains—HARD, 11 to 19
® !f you live in a municipal area,
contact your water company.
e if you iive in a rurai area, or in
some suburban areas, contact
your county agent.
grains—VERY H.ARD, 20 grains
and over—EXTREMiLY HARD.
If your water is SOFT, you have no
problem. You can use soap or
deteraent as vou nrefer and foraet
all about hard water. If you have
HARD water—less than 10
grains—and you use phosphate
Add this much water softener with a full water level
Grains of
hardness
When using
with detergent
When using
with soap
0-10 10-15
0
Уз cup
(BO ml)
Va cup
(60 ml)
Уг cup
(160 ml)
15-20
У2
(120 ml)
У4 cup
(180 ml)
20-25
2/3
(160 ml)
1 cup
(240 ml)
____
25-30
1 cup
(240 ml)
1У2 cup
(300 ml)
detergent, you also have no
problem.
But, if you have more than 10
grains, you will need to soften your
water with either...
1. An installed water softener in
your home, or
2. The use of a packaged water
softener.
For iniormaiion on wafer
softeners, see chart below.
over 30
"1 mm nliic i the fr»r o\/or\/a
1 1 IWI VyV\./ljr
grains above 30 (240 ml plus
15 mi for each extra 5 grains)
iy4 cup plus 1 tbs. for every 5
nrainc aKn\/o 'iO /'500 ml nliic
LAM LAI,y\.^VW \J\J yWWW IIM
15 ml for each extra 5 grains)
"For each additional 5 grains above 30, add 1 tablespoon (15 ml) of softener.
"Do not decrease amount of detergent or soap you v^ouid usually use.
Thp.v яге reniiired for soil removal.
12
Page 13

wi.§i^i i^uiioij pa
Laundry
Product & Type a алое; i&
BBBOU
BLEACH
Chlorine Liquid
such as Clorox brand
Oxygen Powdered
such as Clorox 2
brand
FABRIC SOFTENERS
Rinse additive such
as Downy brand
Wash Additive such
as Rain Barrel brand
SANITIZER
Chlorine Bleach,
such as Clorox brand
Dilute bleach with at least one
quart (0.96 liter) water and add
after wash action has started and
id HJoerxIx/ciH
to \^IOOWIVO\U.
Follow' package directions.
Put bleach into washer with
detergent.
Mix recommended amount with
one cup (240 ml) water and add at
start of rinse cycle.
Follow Package directions.
Add during wash cycle.
Use in case of infection and
contagious disease.
See under Bleach above.
1) Do not pour undiluted liquid chlorine bleach
directly into washer or on dry clothes.
2) Some of today’s washable fabrics should
r»/*\+ Kiii oi i/nI-* rao» inAO/.
i IWL k/C Ul MVI II IC7 k/IC7ClUI lOU OUOl 1 CIO. lUU /U
cotton flame-retardant children’s sleep
wear, silk, wool, mohair, spandex, leather,
or non-fast colors. Dilute bleach before
using on any fabric.
3) Check manufacturer’s hang tags for
special instructions.
1) May be used on ail kinds of fabrics.
2) Is most effective in hot water.
1) Helps make clothes fluffy and soft
2) Reduces static electricity.
3) Use carefully. Too much may cause
staining on some clothes.
4) Do not use w'ith other laundry additives.
5) Do not pour directly on the clothes.
Use carefully. Too much may cause
staining on some clothes.
Guards against infection by killing
most bacteria and viruses.*
Ф
WATER SO.FTENER
Non-Precipitating
such as Calgon brand
Precipitating such as
Borax brand
SOAK AGENT
Such as Biz brand
PRE-TREATING
STAIN AND SPOT
REMOVERS
Such as
Spray ’n Wash
and K2R brands
TINTS AND DYES
Powdered such as
Rit and Tintex brands
Follow package directions
Add at start of wash cycle.
Follow package directions.
Use with detergent or soap in
wash cycle.
Follow package directions for grass,
perspiration, egg, baby formula,
blood, mud and other stains.
Foiiow package directions. Treat
only heavily soiled areas. Check
garment’s hang tag for instructions.
Follow package directions.
NOTE: Tinted garments may not be
color-fast. Wash separately.
Suspends hardness minerals in solution,
keeping water clear.
Combines with water hardness minerals to
form precipitate which gives cloudy or milky
appearance to water.
Do not use with chlorine bleach as chlorine stops
the stain removal action of enzyme soak agents.
CAUTiON; washer control panels and finishes
may be damaged by some laundry pre-treat
ment soil and stain remover products if such
products are sprayed on or have direct contact
with the washer. Apply these pre-treatment
oroducts awav from washer. The fabrin mav
then be washed normally. Damage to your washer
caused by pre-treatment products is not
covered by your warranty.
Clean washer to avoid discoloration of next load.
Go through complete cycle (5-min. wash) using
hot water, 72, cup (120 mi) detergent, 1 cup (240
ml) bleach. Wipe exterior parts. Caution: Tinting
may discolor plastic in washer. Subsequent
washings will reduce discoloration but may never
c;iii I m laic ii.
¡4-
'For more information on sanitizers, send for
Government Bulietin, #57B. “Sanitation in Home
Laundering.” See page 14 for address.
Page 14

How to remove
stains
stain removai guide
1. Try to remove stains as soon as
possible. The fresher the stain, the
easier it is to remove.
2. Before attempting to remove any
stain, take these steps;
® Find the fabric and the finish in
the chart at right, and use oniy
recommended methods.
o Cihp^rk thp hann in<=:tri intinn.ci
that came with the garment.
® Test stain removal product on
an inside seam or sample of the
material.
• Avoid use of hot water on un
known stain. It can set some
stains.
® Try the stain removal procedure
on a hidden part before applying to
the entire garment.
3. Follow stain removal with a
thorough rinsing.
4. Wash with recommended
amount of soap or detergent.
Stain Removal Hint
Using Chlorine Bleach for
White and Bleachabie Fabrics.
Mix Va cup (60 ml) chlorine bleach
with one gallon (3.8 liter) of cool
water—approximately 80°F (27°C)—
in a sink or pan. Soak stained area
for 5 minutes and launder in washer.
The Case of the “Invisible” Stain.
Food or cooking oils on your syn
thetic garments may cause stains
which are virtually invisible and
which you may not notice as you
put your clothes into the washer.
If these stains are not completely
removed in the wash, the oily spots
may pick up dirt from the wash
water. Then they will become very
visible and you may think they were
caused by the wash cycle itself.
Once these spots become visible,
how can you remove them?
® Rub in undiluted liquid detergent
and let stand 30 minutes.
® Re-wash using hottest water the
fabric can stand.
How can you prevent these
“After-You-Wash” stains?
® Increase the amount of detergent
normally used.
® Increase water temperature
where fabric will permit.
® Wash sSynthetic garments more
often.
Adhesives (Chewing Gum, etc.)
Antiperspirants, Deodorants
Blood
Chocolate, Cream, Ice Cream and Milk
Coffee and Tea
Cosmetics: Eye Shadow, Lipstick, Mascara,
Liquid or Pancake Make-up, Rouge, Powder;
Cravon: Grease. Oil. Tar. Cod Liver Oil.
Fresh Fruit, Fruit Juices, Wine, Vegetables,
Grass, Foliage, Flowers, Mildew, Scorch
Important Cautions
® NEVER PUT HIGHLY VOLATILE
SUBSTANCES LIKE GASOLINE,
KEROSENE, OR NAPTHA INTO
A WASHER OR A DRYER.
NEVER PUT WASHABLE ARTI
CLES THAT HAVE GASOLINE,
KEROSENE, NAPTHA OR OTHER
HIGHLY VOLATILE SUBSTANCES
ON THEM IN A WASHER OR
DRYER. FAILURE TO COMPLY
WITH THESE WARNINGS COULD
RESULT IN A FIRE, EXPLOSION
OR SERIOUS BODILY INJURY. All
items with volatile substances on
them should be HAND washed
tuoroughiy with a detergent so that
no trace of volatile substance re
mains. The articles can then be
machine washed. Only after thor
ough hand washing and machine
t a / t-» s v~\ /-a i-» y-v I « I /~4 4- /"S ^ I f /—%
wcti5i m ly CDi luuiu u ic cu iiuic; uc
placed in the dryer.
Do not use these substances
around your washer and/or dryer
during operation.
* Because cleaning fluids tend to
be toxic, be sure you are in a well
ventilated room when using them.
No cleaning fluid should be used
unless user is familiar with the
limitations and required cautions
(usually printed on label). Use
extreme caution with flammable
compounds. Under no circum-
o »r» r-i/-N/-MT' o I I
oiaiiuoo OMUUlu icujiloo ov^iucuniiiy
flammable materials (waxes,
cleaning fluids, etc.) be washed
in washer.
**Do not mix chlorine bleach with
ammonia or acids such as vinegar
and/or rust remover. Mixing can
Q frwir» niac \A/hir*h max/
(.Vy/NIW VVIMV/II I I ««.Ajr
cause death.
Paint and Varnish
Perspiration
Rust
More complete information on
stain removal is given in govern
ment bulletin, “Removing Stains
From Fabrics,” 054D. To obtain a
copy write to;
Consumer Information Center,
Pueblo, Colorado 81009.
Available at low cost.
14
Page 15

Save and refer to Garment Manufacturers’ care Instructions.
> a ■ IB
I »1 »WKIf B»«
i> 11 n« ^ >18 ( 9 j ( I ej
Rub with ice or immerse in very cold water. Use dull tool to
carefully scrape off as much adhesive or gum as possible.
Sponge with a safe dry cleaning fluid*, then launder.
Apply undiluted liquid detergent. Rinse. If stain remains, bleach
according to Stain Removal Hint on opposite page. If color has
changed, you may be able to restore it by sponging with
ammonia.** Rinse thoroughly.
Soak in cool water, then launder in warm water. If stain
remains, bleach according to Stain Removal Hint on opposite
page, launder.
Soak in cool water. Treat stain with a safe dry cleaning fluid*;
Apply undiluted liquid detergent, launder, dry. Bleach according
to Stain Removal Hint on opposite page, launder and dry.
Without cream: Bleach according to Stain Removal Hint on
opposite page. Launder. With cream; Follow chart directions
for cream.
Treat stain with safe dry cleaning fluid*. Apply undiluted liquid
detergent; launder and dry. Bleach according to Stain Removal
Hint on opposite page.
Same as white and bieachable fabrics.
Same as white and bieachable fabrics except use
oxygen bleach.
Sponge or soak in cool water, then launder.
Soak in cool water. Sponge with a safe dry cleaning
fluid*. Apply undiluted liquid detergent. Launder in
warm water.
Sponge with warm water. If stain remains, apply
warm glycerine, let stand 30 minutes and rinse well,
or sponge with a safe dry cleaning fluid*. Launder.
Sponge with safe dry cleaning fluid*. Then launder
in warm detergent water.
w '
Soak stain in cool water. If stain remains, bleach according to
Stain Removal Hint on opposite page, launder.
Apply undiluted liquid detergent. Launder. (Treat mildew spots
while they are fresh, before mold has a chance to weaken
fabric.) if either type stain remains, bleach according to Stain
Removal Hint on opposite page, launder. (Severe scorch cannot
be removed.)
Fresh stains: Place stain face down on an absorbent towel and
sponge with dry cleaning fluid*, or use spray cleaner. Apply
undiluted liquid detergent. Old stains; bleach according to Stain
nemovai Hint on opposite page.
Soften with oil, lard or petroleum jelly, then sponge with
turpentine. Launder in warm water.*
Apply undiluted liquid detergent and launder in warm water. If
color has changed you may be able to restore it by treating with
ammonia or vinegar.** If any stain remains, treat with safe dry
cleaning fluid* or bleach according to Stain Removal Hint on
opposite page, launder and dry.
Apply rust remover**, using manufacturer’s directions. Rinse
and iaunder. Do not use rust remover around washer or dryer, it
can damage finish.
Sponge with warm water. Bleach remaining stain
vviiii <-»Ayyc?ii
Sponge with warm water. Apply undiluted liquid
detergent. Bleach remaining stain with oxygen
bleach, then launder. Old mildew stains can seldom
be removed. Scorch can seldom be removed.
Same as white and bieachable fabrics except
launder using oxygen bleach.
Same as white and bieachable fabrics.
Launder in warm water. Rinse well. Bleach with
oxygen bleach.
Same as white and bieachable fabrics.
15
Page 16

Washing guide for different fabrics and loads
Save and refer to Garment Manufacturer’s Care Instructions
.. . Mm m. m. m m. m ^ ^
Cottons and Linens
Knits—
Polyester, Nylon, Acrylic
Woven Fabrics—
PolvpRtpr Nvion Arrvlir
Permanent
Press, Blends
Rayon and
Acetate
Baby Clothes—
Sturdy, such as Diapers, Nightgowns,
Shirts, Pads, Sheets,
Receiving Blankets, Coveralls
Baby Clothes—
Delicate
Regular Hot or Warm
Delicate Warm
Delicate
Permanent
Warm
Warm
Press
Delicate
Regular
Delicate
Warm
Hot
Warm
#
Blankets—
Wool, Part-Wool, Cotton
Blankets—
Synthetic, Electric
Oiir+nini^ nri Mr\T
Lcuno, Lyu/ /VV^/
MACHINE WASH FIBERGLASS.**
Chenille Bedspreads, Robes**
Bathmats and Rugs
Denims (especially Indigo Blue Jeans)
and other fabrics that bieed.
Plastics: aprons, bibs, tablecloths,
chair covers, bowl covers, curtains
Delicate
Delicate
Delicate
Regular
Regular
Delicate
Warm
Warm
LJ^i.
nui u\ vveinii
Hot or Warm
Hot or Warm
Cold or Warm
Warm
'Unless otherwise recommended under "Special Instructions,” use Cold Rinse to save energy.
■ ‘Check size. Some slipcovers, draperies and bedspreads may be too large for automatic home-size washer.
16
Page 17

For white or colorfast, use liquid
chlorine type; for non-colorfast, use
gentle oxygen type.
For white or colorfast, use liquid
chlorine type; for non-colorfast, use
gentle oxygen type.
If unusually soiled, use Hot Water.
#
For white or colorfast, use liquid
chlorine tvoe: for non-colorfast. use
gentle oxygen type.
For white or colorfast, use liquid
chlorine type; for non-colorfast, use
gentle oxygen type.
Seldom needed.
If needed, use oxygen type.
For white or colorfast, use liquid
chlorine type.
Gentle oxygen type
None
None
If unusually soiled, use Hot Water.
If unusually soiled, use Hot Water. Small loads reduce wrinkling.
You may prefer to use a mild type detergent. Do baby clothes separately.
Pre-treat spots. Rinse diapers, nightgowns, pads, sheets after use. Keep
diapers in a covered pail of cold water and conditioning agent like
Borateem brand.
You may prefer to use a mild type detergent. Do hand-knit garments
by hand.
Add detergent. Partially fill washer, allow detergent to dissolve before
adding blanket. Complete the waterfili. Do one blanket at a time.
On electric blanket sew a strong piece of cloth over plug. Do one blanket
at a time. Pre-treat heavily soiled spots with liquid detergent.
For white or colorfast,
use liquid chlorine type.
For white or colorfast, use liquid
chlorine type.
For white Or colorfast, use liquid
chlorine type unless care tag states
otherwise.
None
None
Vacuum out loose dirt before washing.
Wash only 1 or 2 rugs or mats at one time. Shake before washing to
remove excess dirt.
For new “Indigo blue” jeans wash at least 3 times in very small loads with
fuil vi/ater fiii. Jeans need ample room to move to avoid white lines at
creases. May discolor plastic washer parts. Subsequent washings will
reduce discoloration, but will probably never eliminate it. Will not discolor
subsequent loads.
DO NOT MACHINE DRY WITH HEAT. Use AIR FLUFF only.
17
Page 18

Common laundering problems
PRQBLEM/CAJU,SE
LINT OR RESIDUE ON CLOTHES
1. incorrect sorting of clothes.
2. Washing too long for load size.
3. Use of non-phosphate detergents. Some of these
detergents react with hardness minerals in water to
form a precipitate which can be mistaken for lint. The
precipitate can build up in the fabrics making them
more abrasive and increasing lint.
4. Undissolved granular detergent may leave powdery
residue on fabrics which can be mistaken for lint.
5. Overloading of washer will cause abrasion which
creates excessive lint.
6. Too much bleach. Over-bleached items, such as
towels, will shed excessive lint.
7. Not enough detergent. Enough detergent must be
used to hold lint in suspension during wash cycle.
8. incorrect use of fabric softener, if used in wash cycle,
many softeners may react with detergent to create a
white deposit.
9. Pilling. Most likely to occur with polyester-cotton
blends. The stronger man-made fibers, instead of
breaking off will collect and hold small bundles of
fibers resulting in “pills.” This “pilling” is normal for
these fabrics and can be mistaken for lint.
10. Over-drying in dryer may cause build-up of static
electricity in man-made fabrics, causing lint attraction.
HOW TO PREVENT/HOW TO CORR
TO PREVENT:
1. Do not wash lint-producers (such as terry towels and
chenille) with lint-receivers (such as man-made fabrics,
velveteen, corduroy).
2. Shorten wash time for smaller loads. For normal soil,
iiRp 1 min npr nniind of drv nInthPR
3. (a) If possible, use phosphate detergent or liquid
detergent.
(b) Install a water softener to reduce hardness.
(c) Use a warmer wash water.
(d) Use a packaged water softener.
4. (a) See page 11 for recommendations on how to add
detergent to speed up complete dissolving.
(b) Use a liquid or special cold water detergent.
(c) Predissolve granular detergent in hoi water, or make
sure detergent is dissolved completely in wash water
before adding clothes.
(d) Make certain clothes have ample room to move in
washer.
(e) Use a warmer wash water.
5. Wash fewer items in each load. Make sure water
level is correct for size of load.
6. Use correct amount of bleach according to package
directions.
7. Increase amount of detergent used. Amount is
determined by water hardness, size of load, degree of
soil and amount of water. See Page 11,
8. Use fabric softeners only in rinse cycle, unless
package specifies adding to wash cycle.
9. Cannot be prevented or corrected. Caused by normal
wear of the fabric. (Turning clothes inside-out may
provide some help).
10. Use of fabric softener at the start of the rinse cycle.
SNAGS, HOLES, TEARS, RIPS OR
EXCESSIVE WEAR
1. Pins on garments or sharp objects left in pockets.
2. Snaps, hooks, sharp buttons, belt buckles, zippers.
3. improper use of chlorine bleach. Holes may have
random square shape; yellow discoloration, fabric will
be vyeak at edges of hole.
TO CORRECT:
All of the above causes of residue (except Item 9), can
usually be removed from garments through use of
correct laundry procedures.
TO PREVENT:
1. Remove all pins, check pockets of all garments
before putting in washer. Also check washer to see if
an\/ nKloir'fQ romalruaW in \a/ooH +i iK
2. Make sure all hooks, snaps and buttons are fastened.
Remove sharp buttons and belt buckles. This is very
important when washing knits, which snag easily, turn
knits inside out.
3. (a) Use only correct, measured amount of bleach.
(b) Never add undiluted bleach to washer tub nor allow
clothes to come in contact with undiluted bleach. Do
not wipe up bleach spills with clothes.
18
I jr 1 f K.AII Ml VVMCII 1 (.Uk/t
Page 19

Common laundering problems (Continyed):
#
PROBLEM/CAUSE
4. Damage from chemicals such as hair preparations
(bleach, dye, home permanent solution) battery acid,
some toilet bowl cleaners.
.^mall iinnntippH hnloQ toarc nr rinnoH coamc ma\/
enlarge during washing. Manufacturing defects
unnoticed at purchase may appear after washing.
6. Fraying of collars and cuffs and other wear on
Permanent Press items. This is due to the weakening of
the fibers by the Permanent Press process, it is not
caused by the washer.
7. Roughness or burrs on agitator due to damage
incurred by heavy belt buckles, etc.
8. May be using wrong cycle for delicate fabrics.
9. Garments weakened by aging, or by sun or
atmosphere.
10. Too little water in washer or too large a load.
V« 1 • i (V h 1 W./V« fcWMI W Wl 1 IW t 1
HOW TO PREVENT/HOW TO CORRE
4. Immediately rinse thoroughly towels and other
articles which have come in contact with these
chemicals before putting them in washer. Avoid
contaminating items of clothing with such chemicals.
/^iirm^n+o r'Qrû'fi ili\/ tA/ooK^r
Mend all rips and tears.
6. You can slow this deterioration by washing small
Permanent Press loads with a Large Water Level. Do
not wash heavy items such as towels with Permanent
Press. When possible, remove collar stays.
7. Examine agitator for roughness or burrs and smooth
K\/ fllinn If nûr*ÛOOQr\/
hjy II 1
8. Use Delicate Cycle. Refer to Garment Manufacturer’s
Care Instructions.
9. This is an inevitable process and is not caused by
the washer. You may slow down process by use of
L^ciiL*aic; oyuic.
10. Load washer only with the number of items that will
move freely during agitation and select correct water
level for load. ”
There is no solution once this type of damage has
occurred.
vyi iwoi\ ocu^iuiiy iwauiii^ vvaoiici/i.
WRINKLING IN PERMANENT PRESS
AND “NO-IRON” ITEMS
1. Leaving clothes in dryer after tumbling stops.
2. Too many items in dryer.
3. Too few items in dryer.
4. Imnrnnpr Qnrtinn nf InaH A. A\//^l/H 1Q1 1 n/Hcii'l5+i-krTr»o 011/^1-»
5. Too many items in washer.
6. Use of incorrect wash and drying cycles.
7. Incorrect water level
8. Washing repeatedly in water that is too hot for fabric.
9. Accumulation of lime scale due to use of carbonate
iii r/^+ o
f lO.
10. Failure to use fabric softener.
TO PREVENT:
1. Remove clothes immediately and place on hangers
when dryer stops tumbling.
2. Dry only one washer load at a time. Do not combine
loads.
3. If drying only one article, add two or more similar
articles, even if dry, to insure proper tumbling.
-r. r-\ wiw ii^ui II1^ 1 ic?cavy r c;n 1 lai loi ii ricroo uc;i i lo, ouoi i
as work clothes, with lighter Permanent Press items,
such as shirts or blouses. Also do not wash Permanent
» 1 1 i.wf • IW VVIVII \,.«M iVAi jr IfcWItlW wuvyi 1 tAvi VVi/VVV/lvJj
linens, etc.
5. Items must have room to move freely. Permanent
Press loads should always be smaller than regular
loads...no more than medium loads.
6. Use Permanent Press Wash Cycle. This cycle
provides a cooldown rinse to minimize wrinkling.
Also use Permanent Press Dry Cycle (on models
so equipped).
Level for Small Loads.
8. Wash these fabrics in cool or warm water with plenty
of detergent. ' '
9. If a^non-phosphate detergent must be used avoid the
use of s carbonate built detergent
10. Proper use of fabric softener will minimize wrinkling.
PfP.c;.'? itpm«5 \ft/ith nrrlinarx/ itomo oiir'h ao hoH
#. woe L,aiye vvaiei t-cvci lui ivicuium uucau, ivieuium
7 1 1 \1 K/1 • •'v-t f h ^!I • >-«-«
TO CORRECT:
Steps to remove stubborn wrinkles:
1. Retumble on “Permanent Press” setting (on models
so equipped) with small load.
2. Rerinse and dry on “Permanent Press” setting.
19
Page 20

Common laundering problems (Contlriued):
Be sure to save and refer to Garment Manufacturer’s Care Instructions
1 PROBLEM/CAUSE
HOW TO PREVENT/HOW TO CORRECT
3. Some wrinkles may remain, these wrinkles cannot be
removed.*
‘NOTE: If you follow good laundry procedures and Permanent Press clothes still come out wrinkled, the finish may not be good
GRAYED CLOTHES
1. Insufficient detergent.
quality. Also, in permanent press synthetic/cotton blends, the cotton portion of the fabric can eventually wear away
leaving only the synthetic. Since the cotton has resin finish that imparts the memory, a loss or decrease of permanent
press performance will result.
TO PREVENT:
1. You may need to increase the amount of detergent
used, if the load is larger than normal, if soil is heavier
than average (especially oily soil) if water level is high,
if water hardness is above average.
TO PREVENT:
2. Water is not hot enough for type of load.
3. Use of inferior or poor detergent.
4. Overloaded washer. Clothes cannot move freeiy to
loosen and remove soil, causing gray appearance.
5. Improper soaking, with insufficient detergent.
6. Use of soap in hard water.
7. Washing too long may result In increased soil
redeposition.
8. Detergent dissolves too slowly.
2. Make sure water heater is set to deliver hot water at
tho i/ino rlKnoiT
11 vvaoii(;/i i"tu
—
iov/
I
“UV 1 ivji uu vvaoilill^
when other hot water needs—such as dishwashing or
family baths—are heavy.
3. (a) Follow these steps:
® Use water conditioner, (such as Caigon brand)
« Pre-treat stains.
• Use hottest water possible.
® Use bleach where possible.
• Use pre-soak aids.
® Install water softener.
(b) Change detergent. Use phosphate detergent, if
possible.
4. Follow correct loading procedures for size of load.
-5, Usually a 30 min. soak is sufficient. However, when
using extended soaks for heavily soiled garments,
you may need to use twice the recommended amount
of detergent.
6. Switch to a phosphate detergent or see (3) (a) above.
7. Use shorter wash time for smaller loads.
8. It is important that detergent be present in the wash
solution at the start of wash agitation. See Page 9.
TO CORRECT:
Most grayed clothes can be at least partially restored
by one of the following procedures:
a) Add a non-precipitating type of water softener such
as Caigon brand with phosphate—Use IVz times as
much as you need for norrrial water softening.
b) Do not add soap or detergent.
c) Put ciothes in washer.
d) Fill with HOT water. Check manufacturers’ hang tags
to determine if hot water is suitable for garment.
e) Allow clothes to go through complete cycle.
f) Repeat, if necessary.
g) If you prefer to soak clothes, use the water softener
in place of soak agent or pre-wash detergent and allow
clothes to soak for about 20 minutes.
20
Page 21

OUW W iUI lUUI ¥¥^SIiit^l
User maintenance iristrycllons.
Portable Model WWP1170F:
Turn off water, press red button on
coupler to relieve pressure, then
Hicr'nnnor't hrico r'rninlor frnm
^ I w V'wi 11 1WN^ i 1 iiv^aii
faucet Return hoses to cabinet.
W Wl iMS J IVIV^WWH «1« VVC IIWVB »
When not in use, turn off water
faucets to prevent pressure build
up in the inlet hoses.
The washbasket. After each use,
leave the lid open to allow mois
ture to evaporate. Clean thoroughly
with non-abrasive household
cleanser to remove deposit left
by heavily soiled clothes. Do not
Lint Filter. Clean filter before
washing every load. Remove filter,
bv nullinn toward front, turn it over
~ J I
....
......
------
--------
and tap lightly on hard surface. If
lint remains, rinse filter under warm
\A/\A/D‘i'iftOCT»
----------------
-
-Mil I I I atj»^
------
water. If lint has dried in filter, soak
\\\
Agitator. At the end of each wash
day. lift and clean underneath.
To lift agitator, simply unscrew
cap, grasp agitator with both
hands and pull up. Wipe up any
lint or soil that may have collected
underneath. At regular intervals—
about 4- to 6-months—apply a light
coat of Petroleum Jeiiy around the
agitator support block before replac-
ino the aoitator. Do not over aoDlv.
1
VVliOM lOpIC&UIII^ LI d^llCUV^I, UCLIC7-
rs IS m/-• +1^^ 0/^i + o4*y^r
fully lower straight down onto the
agitator support block. Replace
cap securely.
Exterior. Wipe cabinet with a damp
cloth. Periodically clean the cabi
net with a mild soap and water
..».4 /..IK. /..I-....K/
cii lu UK/oaoiui laiiy oppiy oucu vyi
appliance polish.
uu iiui citiuiu utt; wcioiic;i vviictc; ii
will be exposed to the weather.
Get to Know Your Washer
Note: Lid configuration may
vary, depending on your model.
Variable Water Level Selector (Model
WWP1170F) Water Level Selector (WWP1180F)
Wash Temperature Selector, Lets you select
©
wash and rinse temperatures on Automatic
Model and on Portable Model if it has been
permanently installed. Wash and Rinse Tempgfatijro controlled at faucet for Portable
Operation.
Cycle Selector. Lets you select cycle and
©
wash time you want.
( 4) Mgiiaior. iviuvfcjs me uiuiiies lu piuviue
^ mechanical cleaning.
Wash Basket. Holds your clothes.
Lint Filter. Removes lint from recirculating
wash and rinse water.
Lock and Release Levers. Locks the washer
CD
in place for operation. Releases the washer
for moving to your storage area.
Hose Coupler
*Model WWP1170F only.
Page 22

1 Make sure hose coupler is tightened securely to faucet
2. Make sure intake hoses are tightened securely to machine.
3= Make sure drain hose is fastened securely.
Washer
coinplet© cycle
1. Make sure ild is closed. Washer will not progress through spin cycle with lid
up. Lid wiii be automaticaliy locked during spin portion as a safety measure.
Washer won't spin 1. Make sure ild is closed. Washer wiii not spin with lid up.
Cfotiiss ara abrior=
malty wet after spin
Washer is noisy
1. Load may have been excessively out of balance. Redistribute clothes and
rerun through final spin.
1, The metallic “clicks” you hear during operation are norm.a! as the timer
advances. ’ ^
2= Uneven floor. Make sure washer is level and firm to floor on Model
\A/WP1180F. On Model WWP1170F (when used as Portable) reposition
machine to find ieve! area.
3. Gurgling noise. May be noticed when pump is operating.
Washer won’t start
1. Make sure all controls are set and the Cycle Selector is pulled out.
2. Make sure electric cord is firmly plugged jn eiectrlcai outlet
3» Make sure faucets are turned on.
4. Check fuses and circuit breakers. (Plug lamp, fan or other small appliance
Into eiecihcai receptacle at washer to see if power is available.)
'water does not enter
or enters slowly ^ ■
1. Make sure faucets are on and, adjusted correctiy ^ ^ ^
2. Make sure Unicouple connector is aitached property on Modei VVVVP1170F.
3. Make sure hoses are not kinked.
4. Check screen, iocated in water valve. (Unscrew fiii hose from washer.) Clean
If necessary When re-assembling fiil hose, make hand tight pius Vs turn with
pliers.
5. Make sure temperature control is set to MANUAL on Model WWP1170F,
(when used as portable).
Water temperatore
is incorrect
1. Make sure faucets are adjusted to give desired temperature.
2. Check household water heater to make sure it is set to deliver correct
temperature—140“ to 150°F (60° to 66°C).
3. Make sure Wash/Rinse Temp, Switch is set correctly on Model WWP1180F,
check faucet setting on Modei WWP1170F, (when used as Portable).
V/asher pauses
In cycle
1. The washer normally pauses about one-half minute in progressing from one
portion of its cycle to the next.
IF V¥aSHER still DOES NOT OPERATE, cali for Service. , ^
To keep yoyr washer looking good, wipe cabinet with a damp cloth. Occasionally wash it with mild
soap and water and then apply a light coat of appliance polish to help preserve the finish.
Page 23

1
2
Our Consumer Services are designed with your needs and wants in mind.
Warranty Protsctlon
Your new appliance is a well designed and engineered
product. Before it left the factory, it went through
rigorous tests to detect manufacturing defects. And
yuu liav^ CL VVIILIC71I VVClilCUliy l\J ywu.
Prompt Service at your Convenience
Whether your appiiance is in or out of warranty,
you’re just a phone call away from our nationwide
network of Factory Trained Service professionals.
Simply call our GE service organization. You’ll find
them in the White Pages under “General Electric
v^uitipcuiy vj4c;iioicu r avyiv./i y
and in the Yellow Pages under “General Electric
Customer Care® Service.”
Service is scheduled at your convenience and the
technician drives a fully-stocked parts service truck
in one visit.
We’re proud of our service and want you to be
pleased, but if for some reason you are not happy
with the service you receive, here are three steps to
follow for further helo.
y-kr* I
See the warranty on the back page of this book for
details.
riMGi, coniacT me peopie wno serviceo your
appliance. Explain why you are not pleased. In most
cases, this will solve the problem.
NEXT, if you are still not pleased write all the details
— including your phone number to:
Manager, Consumer Relations
General Eiectric Company
Appliance Park
Louisville, Kentucky 40225
FINALLY, if your problem is still not resolved, write:
Major Appliance Consumer Action Panel
20 North Wacker Drive
Chicago, iiiinois 60606
3
Service Contracts
For troubie-free service beyond ^
the written warranty period. 'I
If you prefer to budget your repair expenditures^
instead of being surprised by them, GE offers
service contracts for varying lengths of time on
al! GE major appliances. With a contract, we’ll
The Quick Fix®System
You can says money and time
by doing it yourself.
For do-it-yourselfers who would
prefer to fix GE major appliances
themselves...GE offers an industry
first, the Quick Fix® System
Help for You By Phsone
Should you need help in the selection and purchase
of new appliances, or have Questions about the
operation of the GE appliances you now own-orhave
any other questions about our consumer products
or services, you are oniy a TOLL-FREE caii away.
keep your appliance in good operating
condition during the contract period at
no additional charge. Service contracts
iei you pay today’s prices for service
a month; a year, or several years from
^ A now. And, you’ll receive service from
‘ ' GE trained service technicians using
nnlu fipniiinp f5F narts
A program for do-it-yourself appliance repair,
the system includes step-by-step repair
manuals for refrigerators, most non-mIcrowave
electric ranges, dishwashers and standard
and large capacity washers and dryers, plus
specially packaged replacement parts, and
The GE Answer CenterT^ 800.626.2000
consumer information service is open 24 hours a
day, seven days a week.
Our staff of experts stands ready to assist you
anytime.
Your Direct Line to General Electric
The GE Answer Center 800.626.2000
23
Page 24

YOUR GENERAL ELECTRIC AUTOMATIC CLOTHES WASHER
WARRANTY
Save proof of original purchase date such as your sales slip or cancelled check to establish warranty period
WHAT IS COVERED
WHAT IS NOT COVERED
FULL ONE-YEAR WARRANTY
For one year from date of original
purchase, we will provide, free of
charge, parts and service labor in
your home to repair or replace any
part of the washer that fails
because of a manufacturing defect.
LliVniED ADDITIONAL
FOUR-YEAR WARRANTY
For the second through fifth year
from date of original purchase,
we will provide, free of charge,
replacement parts for any part of
the transmission that fails because
of a manufacturing defect. You pay
for the service trip to your home
and service labor charges. Or, if
you desire, we will provide a com
pletely reconditioned transmission.
You pay for the shop reconditioning
labor, the service trip to your home
and service labor charges.
® Service trips to your home to
teach you how to use the product.
Read your Use and Care material.
If you then have any questions
about operating the product,
please contact your dealer or our
Consumer Affairs office at the
address below, or call, toll free:
The GE Answer Center™
800.626.2000
consumer information service
This warranty is extended to the
original purchaser and any succeed
ing owner for products purchased
iwi uiumaiy Muiiic uot? in lilt?
mainland states, Hawaii and
Washington, D.C. in Alaska the
warranty is the same except that it
is LIMITED because you must pay
to ship the product to the service
shop or for the service technician’s
travel costs to your home.
All warranty service will be provided
by our Factory Service Centers or
l-v</ ....
uy uui duiiiuiiz.t:;u ousiuiiier
_
____
(iiT
servicers during normal working
hours.
Look in the White or Yellow Pages
of your telephone directory for
GENERAL ELECTRIC COMPANY,
GENERAL ELECTRIC FACTORY
SERVICE, GENERAL ELECTRIC-
HOTPOINT FACTORY SERVICE or
GENERAL ELECTRIC CUSTOMER
CARE® SERVICE.
• Replacement of house fuses
or resetting of circuit breakers.
A r\^ I/-V+ s+ irs
’ I «fluio ^-^1 piuuuui M II lO
used for other than its intended
purpose or used commercially.
9 Damage to product caused
by accident, fire, floods or acts
of God.
e Improper installation.
if you have an installation problem,
SIBLE FOR CONSEQUENTIAL
DAMAGES.
contact your dealer or installer.
You are responsible for providing
adequate electrical, plumbing and
other connecting facilities.
Some states do not aiiow the exclusion or limitation of incidental or consequential damages, so the above limitation or exclusion
may not apply to you. This warranty gives you specific legal rights, and you may also have other rights which vary from state to state.
Tr\ Unrwhi \A/ho-f \/r\i ir lonra I rl/*»K+o + ____________ .... .. ^ .
-w vvMwi y^Li. iiyitio cue III yuui oiaie, euliouii yuui luucst ui isicufci uufibumer arTcurs oTTice or your staio s Aitorney uenerai.
Warrantor: General Electric Company
If further help Is needed concerning this warranty, contact:
Manager—Consumer Affairs, General Electric Company, Appliance Park, Louisville, KY 40225
Part No. 140455
Pub. No. 49-9462
3./84
OEMERAL
ELECTRIC
 Loading...