

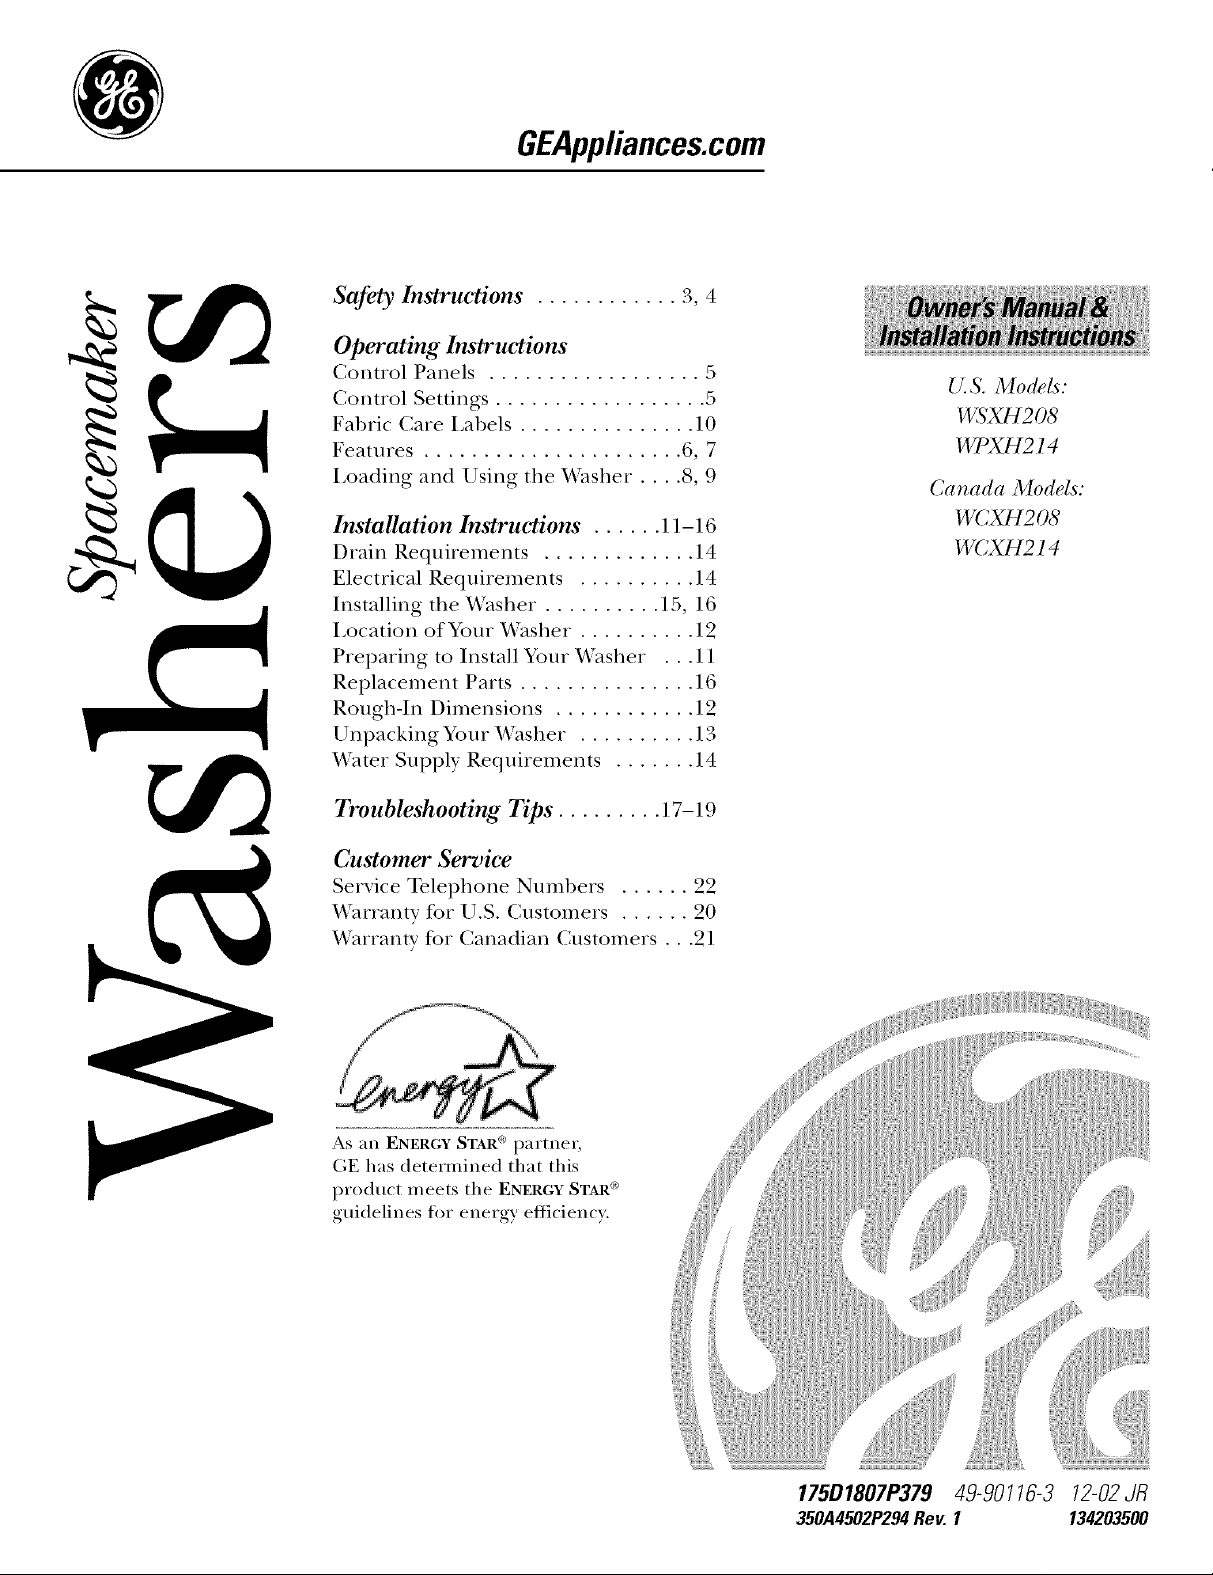
GE WSXH208A1WW, WPXH214A0WW Owner’s Manual
0
&
GEAppliances.com
Safety Instructions ............ 3, 4
Operating Instruc_tions
Control Panels .................. 5
Control Settings .................. 5
Fabric Care I,abels ............... 10
Features ...................... 6, 7
Loading and Using the _'asher . . . .8, 9
Installation Instruc_tions ...... 11-16
Drain Requirements ............. 14
Electrical Requirements .......... 14
Installing the _'asher . ......... 15, 16
Location of Your _'asher . ......... 19
Preparing to Install Your _'asher . . .11
Replacement Parts ............... 16
Rough-ha Dimensions ............ 19
Unpacking Your _4'asher . ......... 13
_4'ater Supply Requirements ....... 14
U.S. Modds:
WSXH208
WPXH2 l 4
Canada Models:
WCXH208
WCXH2 l 4
Troubleshooting Tips ......... 17-19
Customer Service
Service Telephone Numbers ...... 92
¼'arrantv for U.S. Customers ...... 90
VVarranty for Canadian Customers . . .91
As an ENERGY STAR ® partnei;
GE has determined that this
product meets the ENERGY STAR _>
guidelines for energy eflicienc}.
175D1807P379 49-90116-3 12-02 JR
350A4502P294Rev.I 134203500
GE& You,A ServicePartnership.
w
IMPORTANT!
m
m
Staple sales slip or canceled check here.
Proof of the original purchase date is needed to obtnin service under the warranw.
Fill out the Consmner Product Registration Card.
Two easy ways to register your appliance!
• Through the ]nternet at GEAl)pliances.com
• Complete and mail the enclosed Product Registration Card
FORYOURRECORDS
Write the model and serial numbers here:
#
m
,rl_,
#
Y>u can find them at the top inside oI the door opening.
READTHISMANUAL
Inside you Mll find man_ helpflfl hints on how to use and maintain }ore" washer properly:.]ust a little
pre',enti',e care on )our part can sa',e you a great deal of time and mone_ o',er the life of _our washer
K YOUNEEDSERVICE
Ybu'll find many answers to common problems in the Before YouCarl For Service section. If you review
ore" chart of Troubleshooting lips fi_t, you may not need to call fin" service at all.
If you do need se_Mce, you can relax knowing help is only a phone call away. A list ot toll-free customer
se_'ice nmnbe_s is included in the back section.
OR
Visit ore" _,Vebsite at: 6gAppliances.com
m
m
m
m
m
m
q
r --
m
IMPORTANTSAFETYINFORMATION.
READALLINSTRUCTIONSBEFOREUSING.
WARNING! Foryoursafe theinformationinthismanualmustbefollowedtominimizetherisk
off ire or explosion, electric shock, or to prevent property damage, personal injury, or
loss of life.
Theinstructions in this manual and aft other literature included with this washer are
not meant to cover every possible condition and situation that may occur. Good,safe
practices and caution MUSTbe applied when installing, operating, and maintaining
any appliance.
WATERHEATERSAFETY
Under certain conditions hydrogen gas may be produced in a water heater that has not been used for two weeks
or more. Hydrogen gas can be explosive under these circumstances.
If the hot water has not been used tot t_x_x_eeks or more, prevent the possibility of damage or iqjtu y by
turning on all hot x_:_ter timcets and allowing them to mn tot several minutes. Do this betore using any
electrical appliance which is connected to the hot water system. This simple procedure will allow any built-up
hydrogen gas to escape. Since the gas is flammable, do not smoke or tlse an open flame or appliance dunng
this process.
PROPERINSTALLATION
This washer must be properly installed and located in accordance with the Installation Instructions before it is used.
• Install or store _here it will Ilot be exposed to • Properly grotlI]d washer to conJi)rm _]th all
temperattues below fleezing or exposed to the g_)veming codes and ordinances. D)llow details in
weafl_er Installation Instructions.
YOURLAUNDRYAREA
• Keep the area underneath and around w)ur
appliances flee of combustible materials such as
lint, paper; rags and chemicals.
• Do not leave the washer door open. An open door
could entice children to hang on the door or
crawl inside the washe_:
• Close supervision is necessa_ T if this appliance is
used b_ or near children. Do not allow children to
pla) on, with, or inside this or am other appliance.
3
IMPORTANTSAFETYINFORMATION.
READALLINSTRUCTIONSBEFOREUSING.
WHENUSINgTHEWASHER
• Never reach into washer while it is moving.
Wait until the machine has completely stopped
befln'e opening the door.
Use thb
appliance
only for its
intended
• Do not mix chlorine bleach with ammonia or
acids such as vinegar and/or rust relnover.
Mixing difti_rent chemicals can produce a toxic
gas which may cause death.
purpose as
described in • Do not wash or (h) articles that haxe been
this Owner's cleaned in, washed in, soaked in, or spotted
Manual
with combustible or explosive substances (such
as wax, oil, paint, gasoline, degreasers, dry-
cleaning solvents, kerosene, etc.) which may
ignite or explode. Do not add these substances
to the wash water. Do not rise or place these
stlbstances ai'otlnd VO/li" washei" of dryer dtlring
ol) era tion.
• The latmdry process can reduce the flame
retardancy of fhbrics. To avoid such a result,
careflfllv follow the garment inanufhcturer's
wash and care instructions.
• To minimize the possibili U of electric shock,
tml)lug this appliance fl'om the power SUl)ply
or disconnect the washer at the household
distribution panel by removing the fuse or
switching off the circuit breaker befiwe
attempting any maintenance or cleaning,
NOTE: Turning the Cycle Selector knob to
an off position does NOTdisconnect the
appliance fi'om the power sui)ply.
• Never attempt to operate this appliance if
it is damaged, malflmctioning, partially
disassembled, or has missing or broken parts,
including a damaged cord or plug.
• Do not slam the washer door closed or try
to fi)rce the door open when locked (Door
i,ock light ON). This could result in damage
to the washer.
• The washer is equipped with an electrical
overload protector. The motor will stop if it
becomes overheated. The washer will
automatically restart atter a cool-down
period of up to 30 minutes, if the washer
has not been manually turned off during
this time.
WHENNOTIN USE
• Turn off water fhucets to relieve pressure on
hoses and wdves and to minimize leakage if
a break or _upture should occm'. Check the
condition of the fill hoses; they should be
replaced every 5 years.
• gefin'e discarding a washer, or removing it
frOlIl service, reli/ove the washer door to
prevent children fl'om hiding inside.
• Do not attempt to repair or replace any part of
this appliance mfless specifically recommended
in this Owner's Manual, or in published use__
repair instructions that wm tmderstand and
have the skills to carry out.
• Do not tamper with controls.
READANDFOLLOWTHISSAFETYINFORMATIONCAREFULLY.
SAVETHESEINSTRUCTIONS
4
0 0 IV,
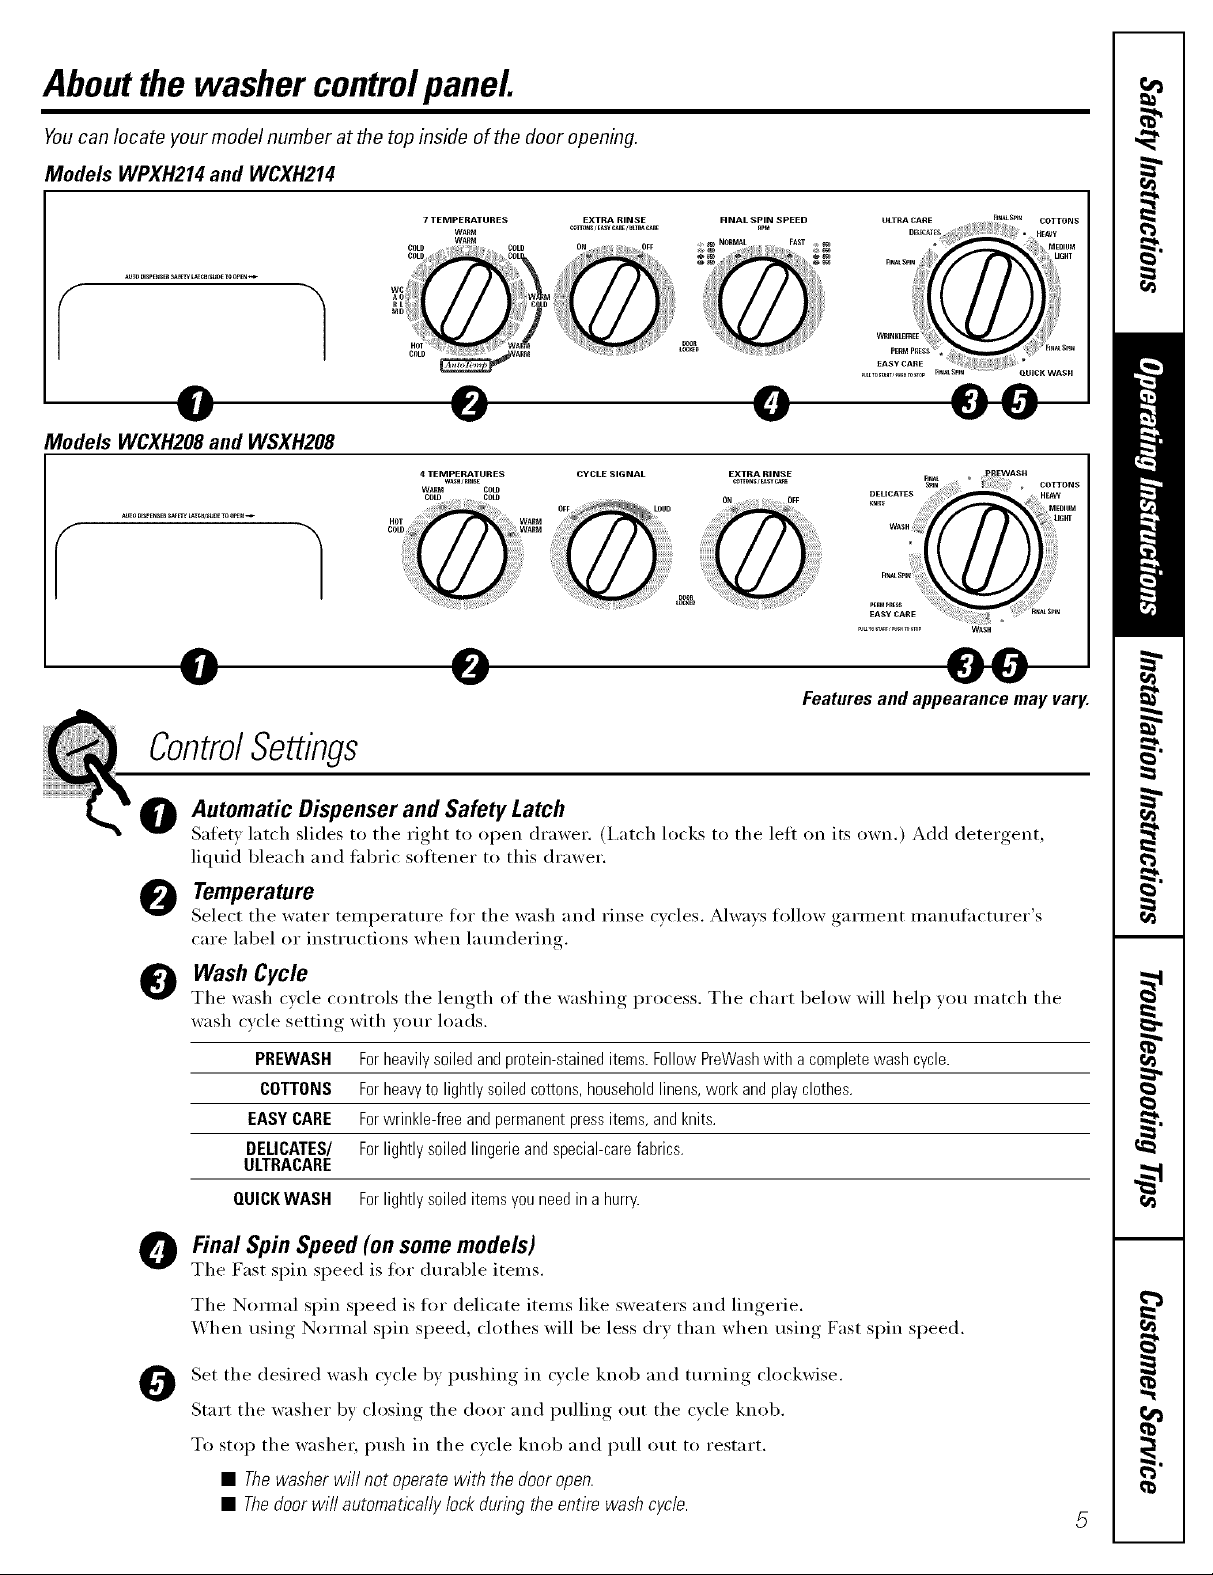
Models WCXH208 and WSXH208
ControlSettings
O Automatic Dispenser and Safety Latch
Safet_ latch slides to the right to open drawer. (I,atch locks to the leit on its own.) Add detergent,
liquid bleach and fabric softener to this drawer,
O Temperature
Select the water temi)erature for the wash and rinse (_(-les. Always follow garment manufacturer's
care label or instHictions when latmdering.
Wash Cycle
The wash (wle controls the length of the washing process, The chart below will hel I) you match the
wash cycle setting with yore" loads,
PREWASH
COTTONS
EASYCARE
DEUCATES/
ULTRACARE
QUICKWASH
4 TEMPERATURES CYCLE SIGNAL
w_emE_
WARM C01D
C01D C01D
EXTRA RINSE
_noNs/_sY_
........................... i
orr_,__
0 001
Features and appearance may vary.
For heavily soiled and protein-stained items. Follow PreWash with a complete wash cycle.
For heavy to lightly soiled cottons, household linens, work and play clothes.
Forwrinkle-free and permanent press items, and knits.
For lightly soiled lingerie and special-care fabrics.
For lightly soiled items you need in a hurry.
Final Spin Speed (on some models)
0
The Fast spin speed is for din'able items.
The Nomml spin speed is fl)r delicate items like sweaters and lingerie,
When using Normal spin speed, clothes will be less dry than when using Fast spin speed.
Set the desired wash cycle by imshing in cycle knob and tm'ning clockwise.
0
Start the washer by closing the door and pulling out the cycle knob.
To stop the washer, push in the cycle knob and pull out to restart,
• Thewasher wi//not operate with the door open.
• Thedoor wit automatically lock during the entire wash cycle.
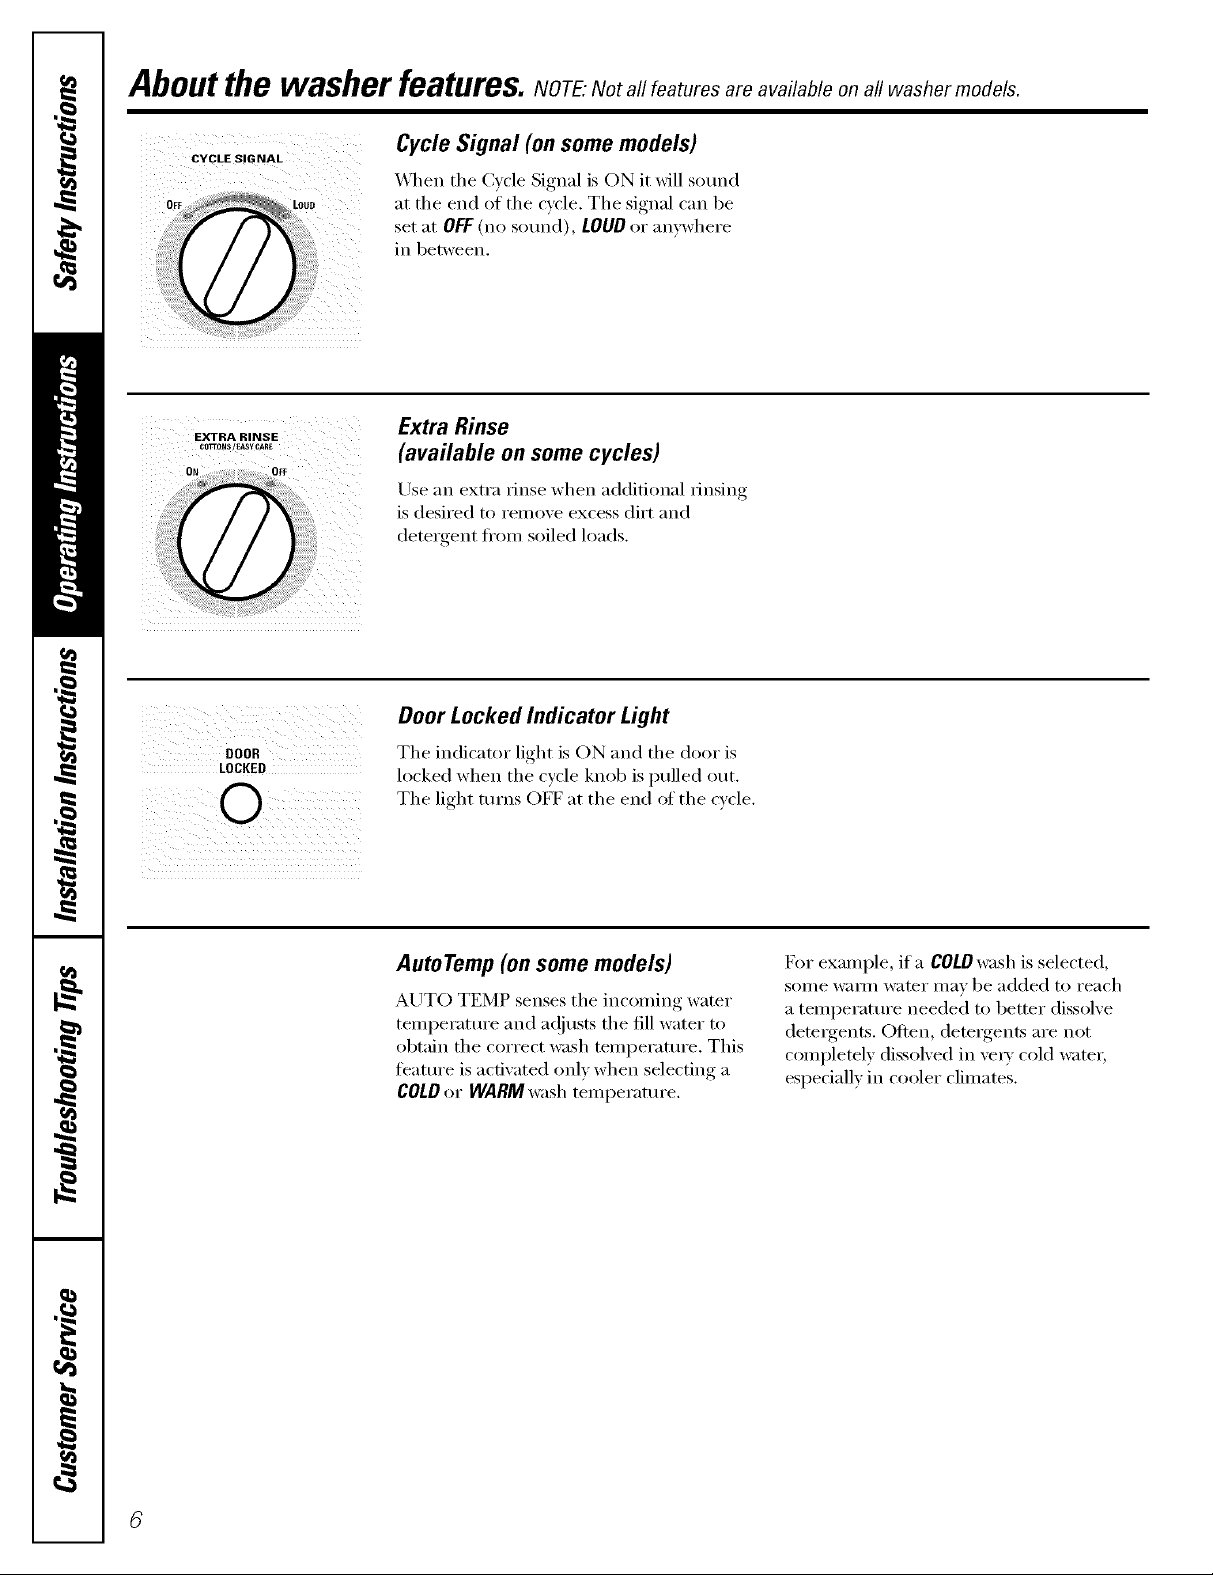
Aboutthe washer features. NOTE: Not all features are available on all washer models.
Cycle Signal (on some models)
_l_en the Cycle Signal is ON it will s(mnd
at the end of the cycle. The signal can be
set at OFF (no sound), LOUD or anywhere
in between.
EXTRA RINSE
C0TrONS/_SY CARE
ON 0FF
DOOR
LOCKED
Extra Rinse
(available on some cycles)
Use an extra rinse when additional rinsing
is desired to remove excess dirt and
detergent fl'om soiled loads.
Door Locked Indicator Light
The indicator light is ON and the door is
locked when the cycle knob is pulled out,
The light tm'ns OFF at the end of the cycle.
Auto Temp(on some models)
AUTO TEMP senses the incoming water
teml)eramre and a(!iusts the fill water to
obtain the correct wash temperatm'e. This
ti_atm'e is acfiw_ted only when selecting a
COLDor WARMwash temperature.
For example, if a COLDwash is selected,
some warn/ water may be added to reach
a temperatm'e needed to better dissolve
detergents. Often, dete_Nents are not
complemly dissolved in \'e_' cold water;
especially in cooler climates.
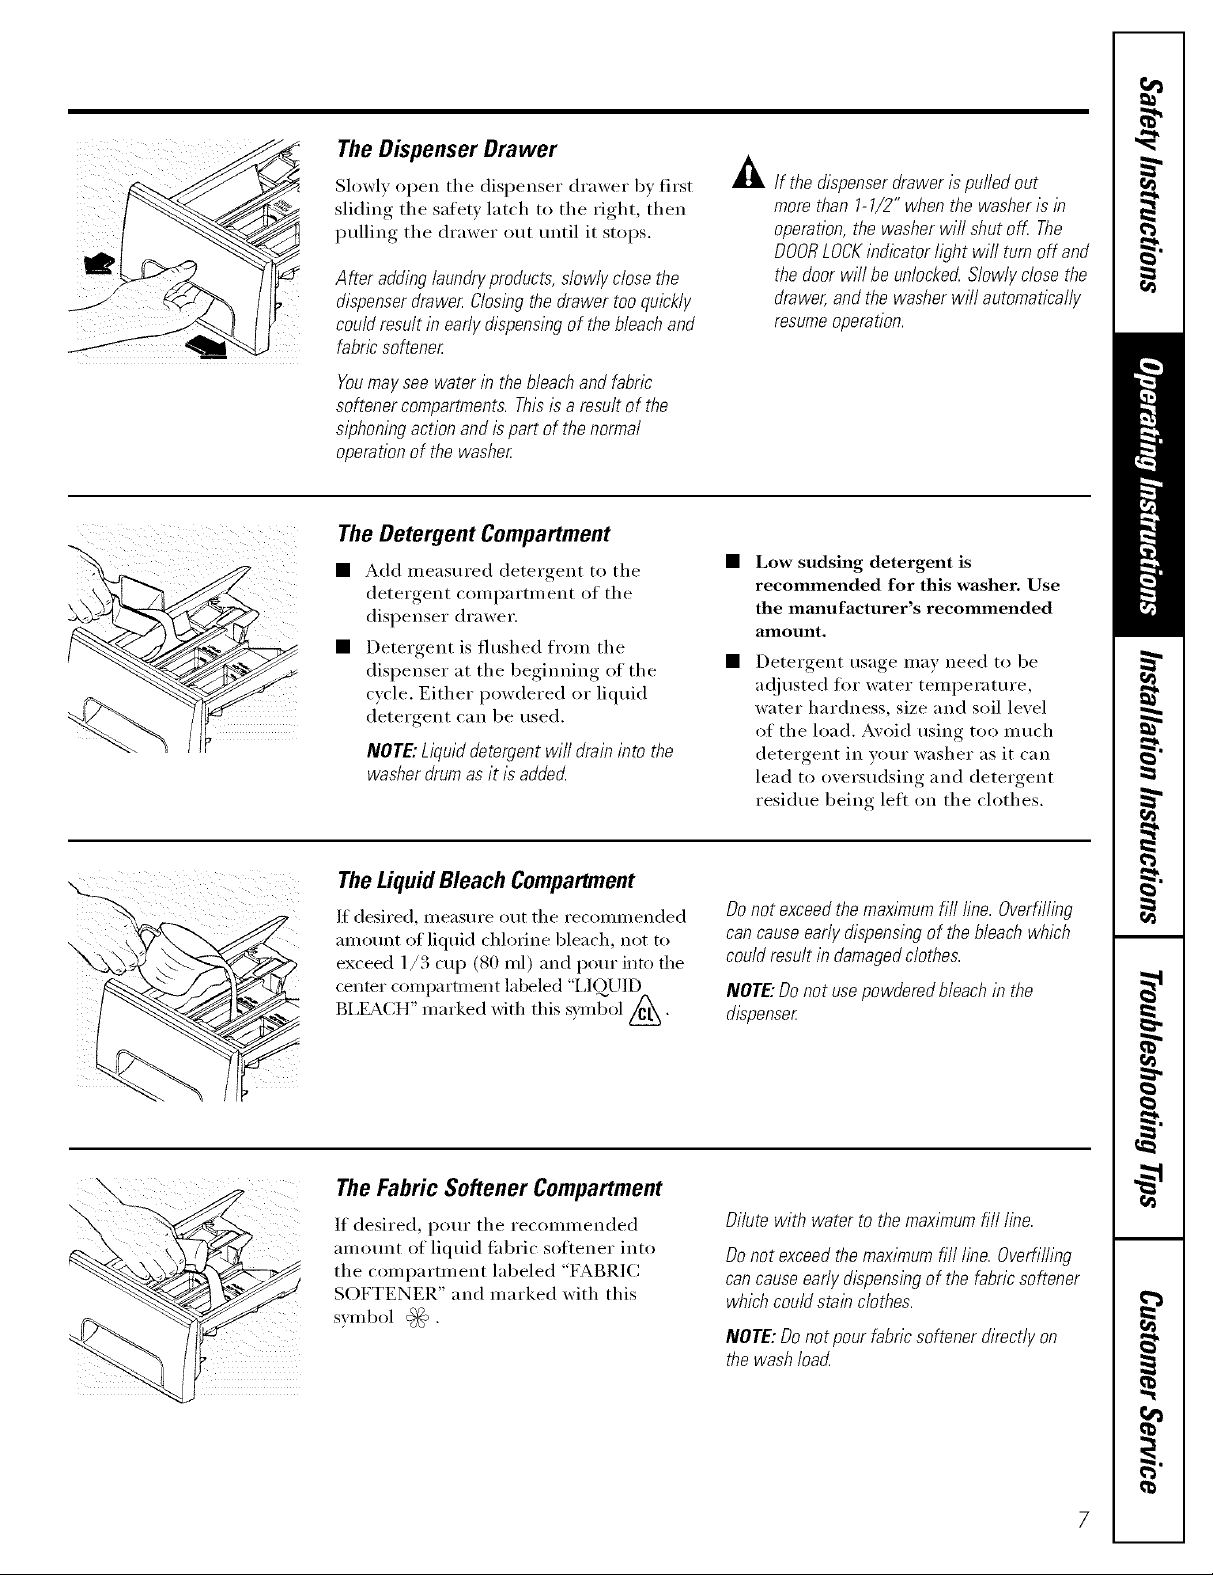
The Dispenser Drawer
Slowly ol)en the dispenser drawer by first
sliding the safety latch to the right, then
pulling the drawer out until it stops.
After addinglaundryproducts,slowlyclosethe
dispenserdrawer Closingthedrawertooquickly
couldresult in earlydispensingof the bleachand
fabricsoftener
Youmay see water in the bleach and fabric
softener compartments. Thisis a result of the
s/phoning action and is part of the normal
operation of the washer
The Detergent Compartment
• Add measured detergent to the
detergent compartment of the
dispenser drawer.
• Detergent is flushed from the
dispenser at the beginning of the
cycle, Either powdered or liquid
detergent can be used.
NOTE:Liquiddetergentwill draininto the
washer drum as it is addecL
A If thedispenserdrawerispulledout
morethan 1-1/2"whenthe washerisin
operation,the washerwit shut off. The
DOORLOCKindicatorhght wit turnoffand
thedoorwill beunlockerLSlowlyclosethe
drawer,andthe washerwill automatically
resume operation.
• Low sudsing detergent is
recommended for this washer. Use
the manufacturer's recommended
anlount,
• Detergent usage may need to be
adjusted for water temperature,
water hardness, size and soil level
of the load. Avoid using too much
detergent in your washer as it can
lead to oversudsing and detergent
residue being left on the clothes.
TheLiquidBleach Compartment
If desired, measure out the recommended
\
amotmt of liquid chlorine bleach, not to
exceed 1/3 cup (80 ml) and I)Om" into the
center compartment labeled "LI@JID
BLEACH" marked with this symbol/_.
"t_Yk3
Do not exceed the maximum fit fine. Overfilling
can cause early dispensing of the bleach which
could result in damaged clothes.
NOTE:Do not use powdered bleach in the
dispenser
The Fabric Softener Compartment
It desired, pore" the recommended
amotmt of liquid fabric sottener into
the compartment labeled "FABPdC
SOFTENER" and marked with this
symbol @_.
Dilute with water to the maximum fill line.
Do not exceed the maximum fill hne. Overfilling
can cause early dispensing of the fabric softener
which could stain clothes.
NOTE:Donot pourfabricsoftenerdirect/yon
thewashloacL
Loadingand usingthe washer. Always follow fabric manufacturer's care label when laundering.
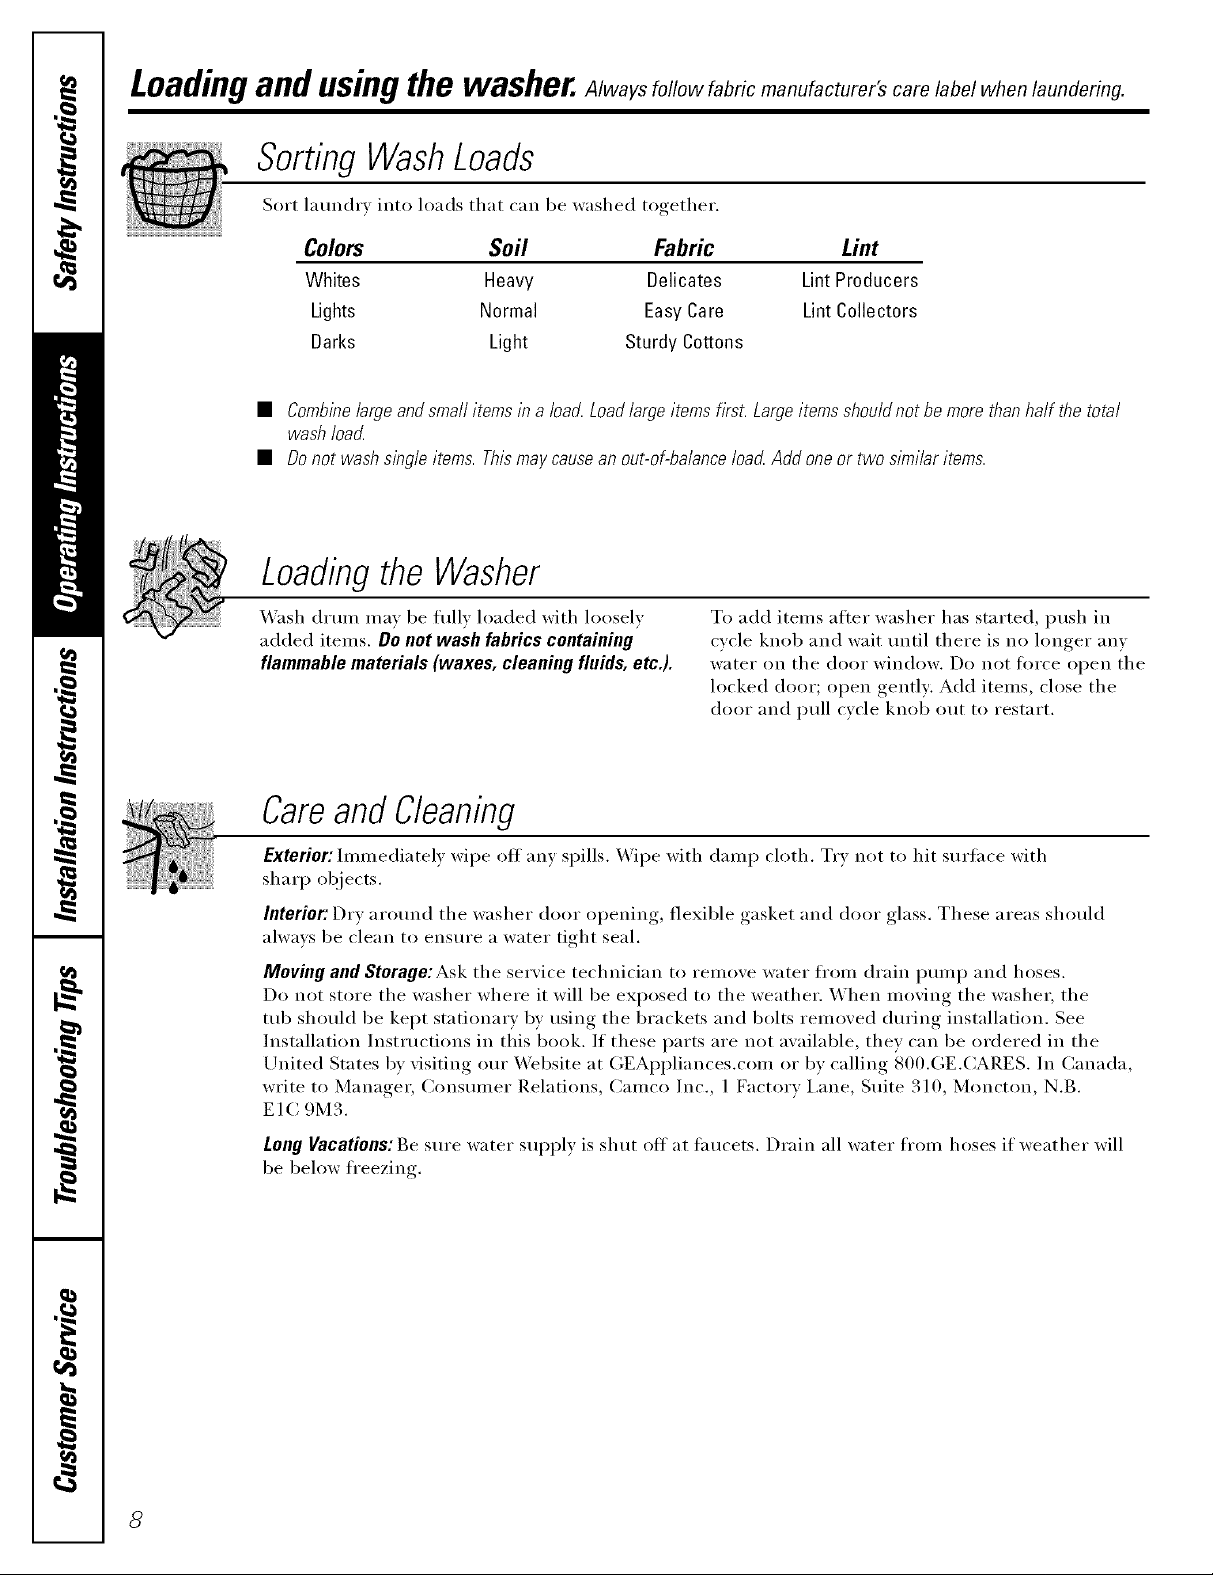
SortingWashLoads
Sort laundry into loads that can be washed together.
Colors Soil Fabric Lint
Whites Heavy Delicates LintProducers
Lights Normal EasyCare Lint Collectors
Darks Light Sturdy Cottons
• Combinelarge and small items in a load. Load large items first. Large items should not be more than half the total
wash loacL
• Donot wash single items. This may cause an out-of-balance loacLAdd one or two similar items.
Loadbg the Washer
Wash (hun/ may be fllllv loaded with loosely
added items. Do not wash fabrics containing
flammable materials (waxes, cleaning fluids, etc.).
To add items after washer has started, push in
cycle knob and wait tmtil there is no longer any
water on the door window. Do not force open the
locked door; open gently: Add items, close the
door and pull cycle knob out to restart.
Careand Cleaning
Exterior: hnmediatelv wipe off any spills. Wipe with damp cloth. Try not to hit surface with
sharp objects.
Interior: Dry arotmd the washer door opening, flexible gasket and (loot" glass. These areas should
always be clean to ensure a water tight seal.
Moving and Storage:Ask the service technician to remove water fl'om drain pump and hoses.
Do not store the washer where it will be exposed to the weather. When moving the washer, the
tub should be kept statiomH T by using the brackets and bolts removed during installation. See
Installation Instructions in this book. If these parts are not available, they can be ordered in the
United States by visiting ore" X.Vebsite at GEAi)pliances.com or by calling 800.GE.CARES. In Canada,
write to Manager, Consumer Relations, Camco Inc., 1 Factory i,ane, Suite 310, Moncton, N.B.
E 1 C 9M3.
LongVacations:Be sm'e water sui)ply is shut off at fimcets. Drain all water from hoses if weather will
be below freezin ,
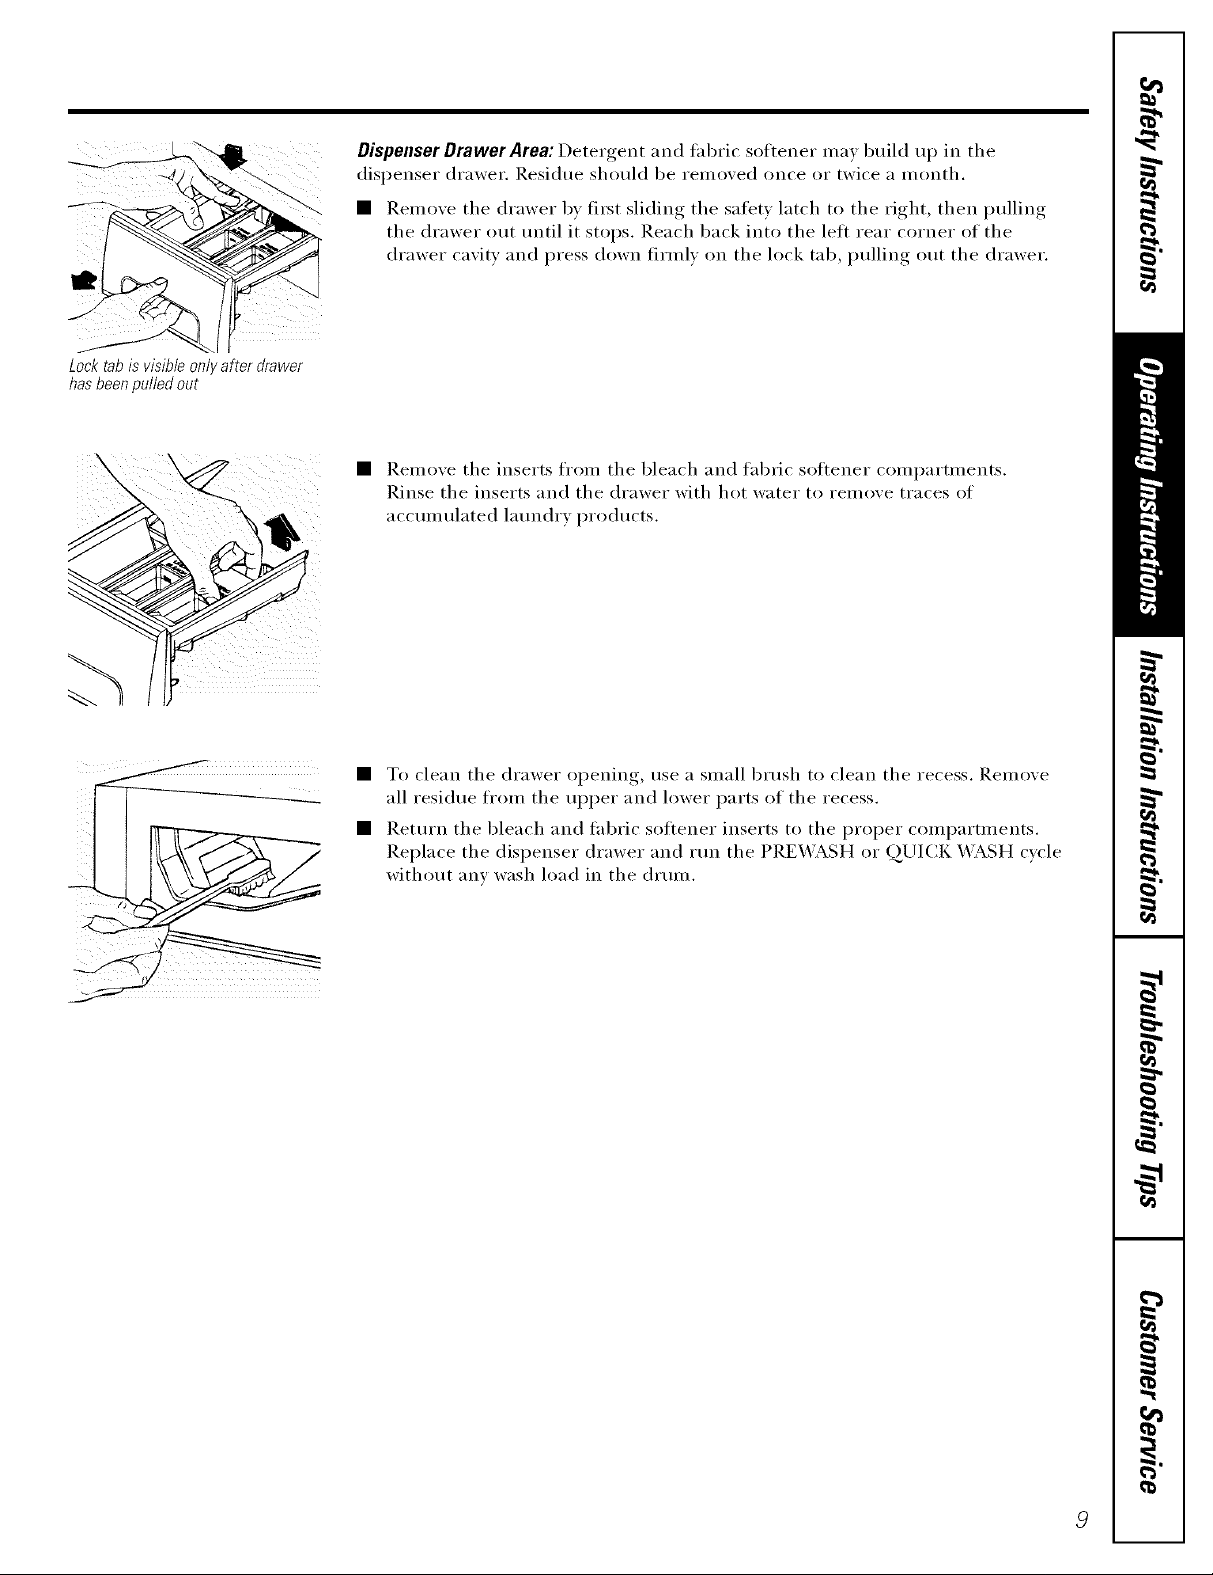
Lock tab is visible only after drawer
has beenpulled out
Dispenser Drawer Area: Detergent and tabric softener may build up in the
dispenser drawer. Residue should be removed once or twice a month.
• Remove the drawer by fi_t sliding the safew latch to the right, then pulling
the drawer out tmtil it stops. Reach back into the leii rear corner of the
drawer cavity and press down firmly on the lock tab, pulling out the drawer.
• Remoxe the inserts from the bleach and fabric softener compartments.
Rinse the inserts and the drawer with hot water to remoxe traces of
acctmmlated latmdr,x products.
• To clean the drawer opening, use a small brush to clean the recess. Remove
all residue fl'om the upper and lower parts of the recess.
• Retm'n the bleach and fabric softener inserts to the proper compartments.
Replace the dispenser drawer and mn the PREX4;_SH or QUICK X4;_SH cycle
without any wash load in the (hmn.
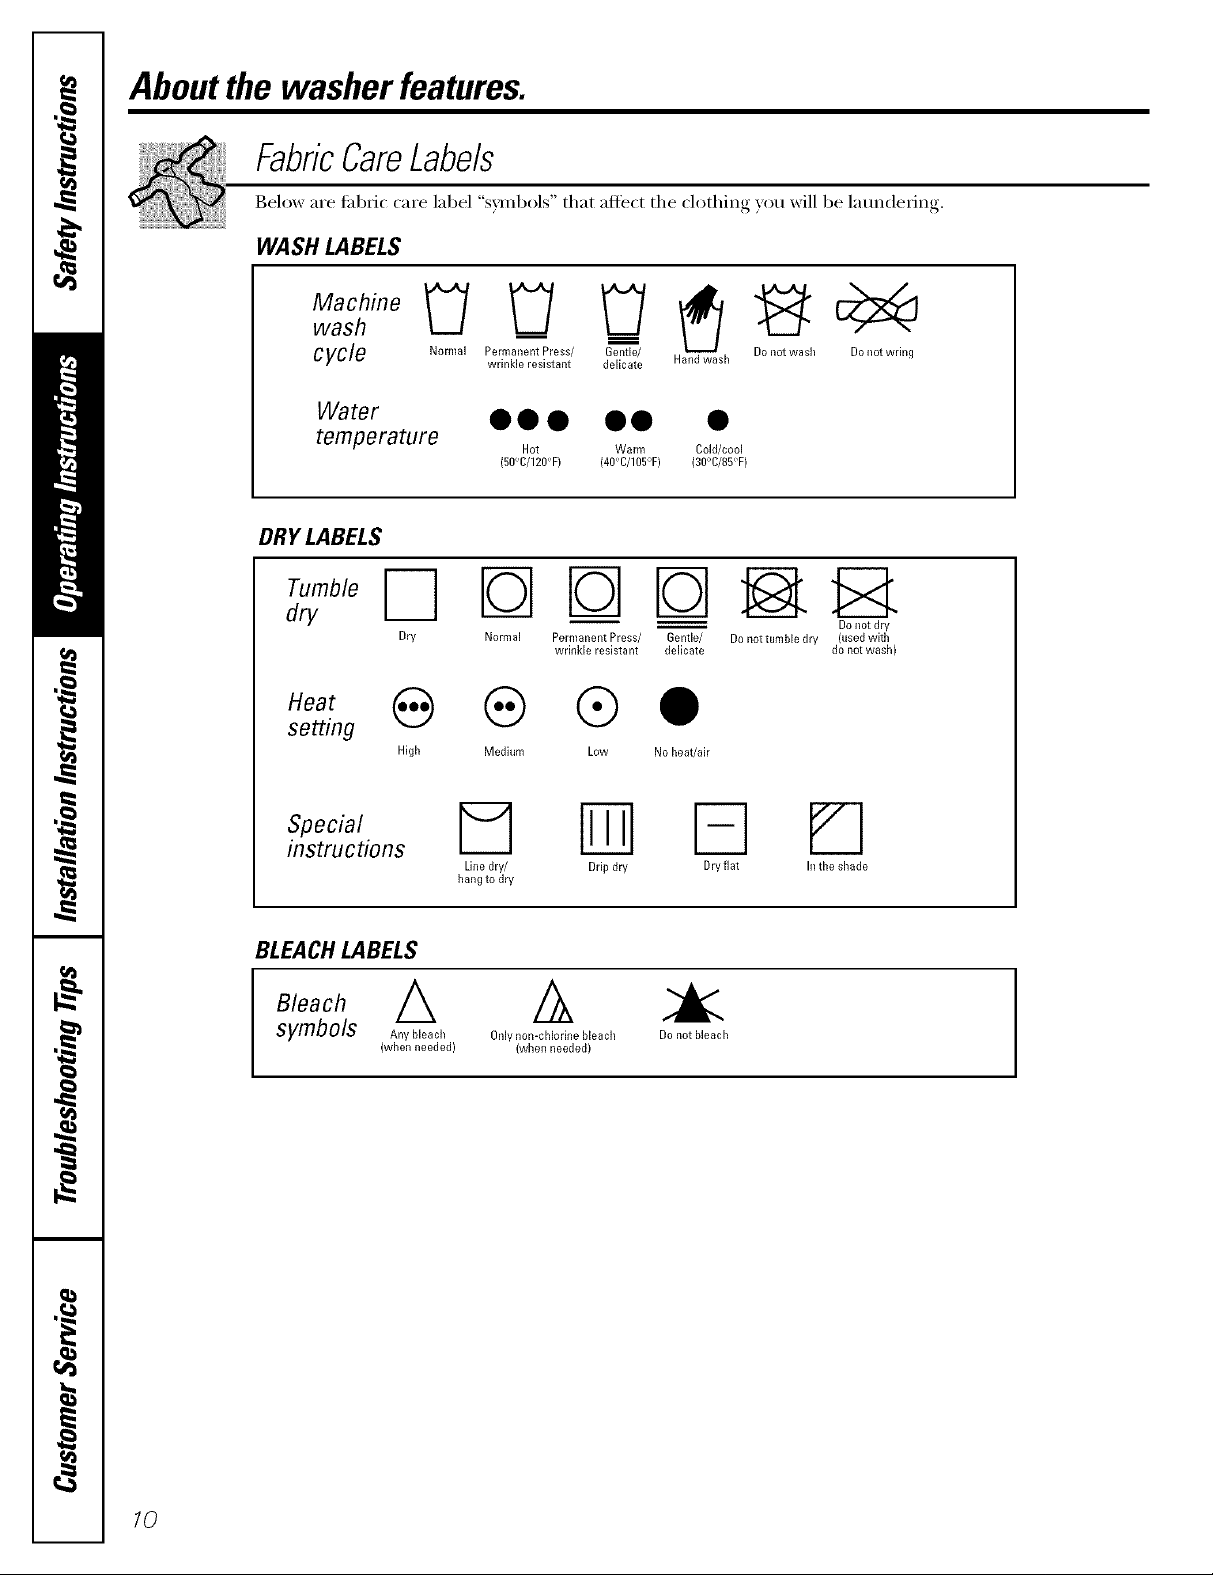
Aboutthe washer features.
FabricCareLabels
Below are ti_bfic care label "symbols" that affect the clothing you will be l_ltlndeiJn_.
WASH LABELS
ch;neUU
wash __ =
cycle Normal P.......... t Press/ Gentle/ Do not wash Do not wring
Water • • • • • •
temperature ,or w.... Co,d/coo,
DRYLABELS
wrinkle resistant delicate Hand wash
(50"C/120"F) (40"C/105°F) (30°C/85"F)
dry
Dry Normal Permanent Press/ Gentle/
setting
Higil Medium Low No heat/air
instructions
BLEACHLABELS
Symu01_ AnyHeaoh O,,IV.......Hori,,obleoch Donot,leaoh
(when needed) (when needed)
Line dry/ Drip dry Dry flat
hang to dry
wrinkle resistant delicate
Do not tumble dry (used with
Do not dry
do not wash)
Pq
In the shade
10
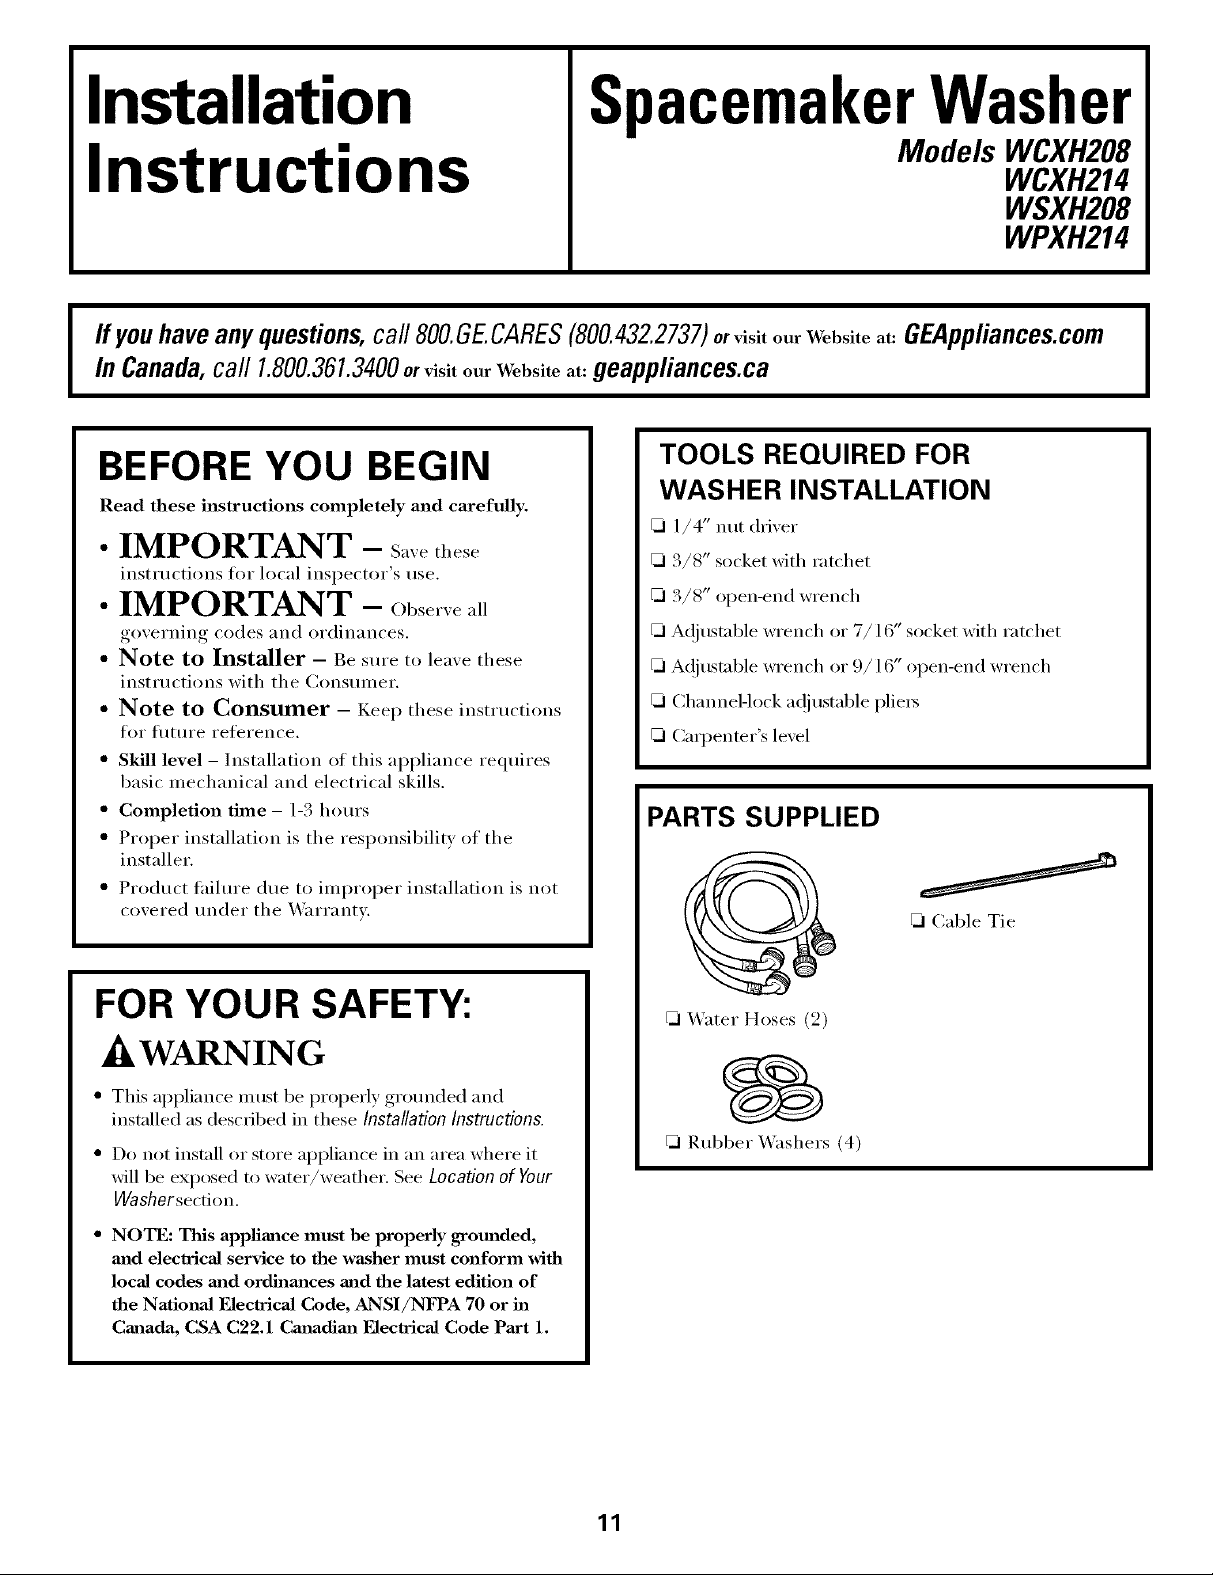
Installation
Instructions
Spacemaker er
Models WCXH208
WCXH214
WSXH208
WPXH214
ffyou haveanyquestions,call 800.GE.CARES(800.432.2737)orvisitourWebsiteat: GEAppliances.com ]In Canada,call 1.800.361.3400orvisitourWebsiteat:geappliances.ca
BEFORE YOU BEGIN
TOOLS REQUIRED FOR
WASHER INSTALLATION
Read these instructions completely and carefully.
• IMPORTANT - S_,,ethese
instructions for local inspector's use.
• IMPORTANT - Obse,ve;,ll
governing codes and ordinances.
• Note to Installer - Be sure to leave these
instructions with tile Consumer.
• Note to Consumer - KeeI) these instructions
for flmu'e reference.
• Skill level - Installation of this appliance requires
basic mechanical and electrical skills,
• Completion time - 1-3 hours
" Proper installation is tile responsibility of tile
installer.
t Product tailure due to improper installation is not
covered trader tile _'arrant>
1/4" mK driver
3/8" socket with ratchet
3/8" open-end wrench
A(!iustable wrench or 7/16" socket with ratchet
A(!iustable wrench or 9/16" open-end wrench
Cham_el-lock a(!j ustable plieI_
Caq)enter's level
PARTS SUPPLIED
I
Cable Tie
FOR YOUR SAFETY:
-_ WARN IN G
" This appliance must be properly grounded and
installed as described in these Installation Instructions.
• Do uot install or store appliance in an area where it
will be exposed to water/weather. See Location of Your
Washer section.
• NOTE: This applimace must be properly grounded,
mad electrical service to the washer must conform with
local codes mad ordJnmaces mad the latest edition of
the National Electrical Code, ANSI/NFPA 70 or in
Canada, CSA C22.1 CmmdJm_ Electrical Code Part 1.
UJ Water Hoses (2)
Rubber _'ashers (4)
11
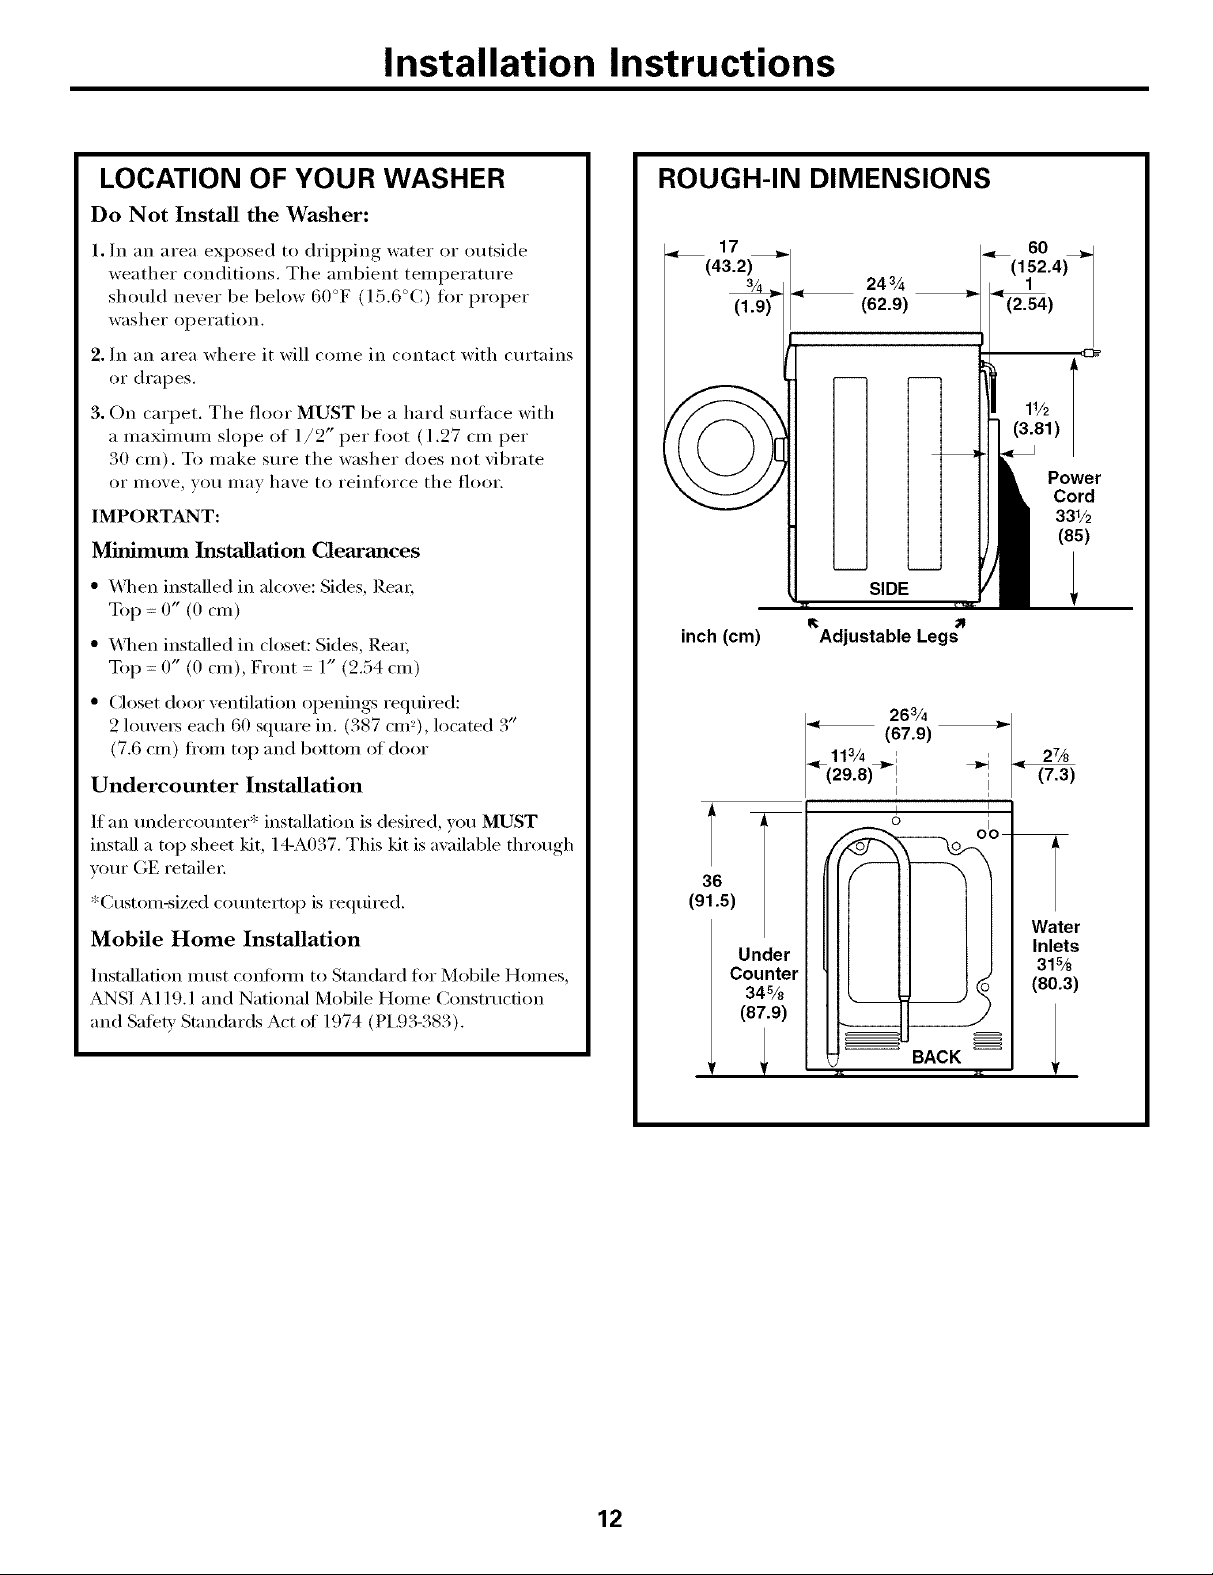
Installation Instructions
LOCATION OF YOUR WASHER
Do Not Install the Washer:
1. In an area exposed to dripping water or outside
weather conditions, The ambient teml)erature
should never be below 60°F (] 5.6°(;) fin" proper
washer ol)eration.
2. In an area where it will come in contact with curtains
or drapes,
3, On carpet, The floor MUST be a hard surface with
a maximmn slope of l/2" per foot (1.27 cm per
30 cm). To make sm'e the washer does not vibrate
or illove, yO/I Ill}IV have to reinforce tile floor.
IMPORTANT:
Minimum Installation Clearances
" _4]/en installed in alcove: Sides, Rein;
Top : 0" (0 cm)
" _]_en installed in closet: Sides, Rein;
Top = 0" (0 cm), Front = 1" (2.54 cm)
" Closet door ventilation openings required:
2 lou\'e_ each 60 square in. (387 cm_), located 3"
(7.6 cm) fl'om top and bottom of door
Undercounter Installation
ROUGH-IN DIMENSIONS
17
3A 24%
(43.2) ,_
inch (cm) Adjustable Legs
(62.9)
SIDE
I (11s24
Power
Cord
33V2
(85)
2_
(7.3)
If an tmderco/mter* installation is desired, )ou MUST
install a top sheet kit, 14-A037. This kit is axailable through
your (;E retaile_;
*Custom-sized countertop is required.
Mobile Home Installation
Installation must confimn to Standard for Mobile Homes,
ANSI A119.1 and National Mobile Honle Construction
and Safety Standards Act of 1974 (PI,93-383).
36
(91.5)
Under
Counter
34%
(87.9)
Water
Inlets
31%
(80.3)
12
Installation Instructions
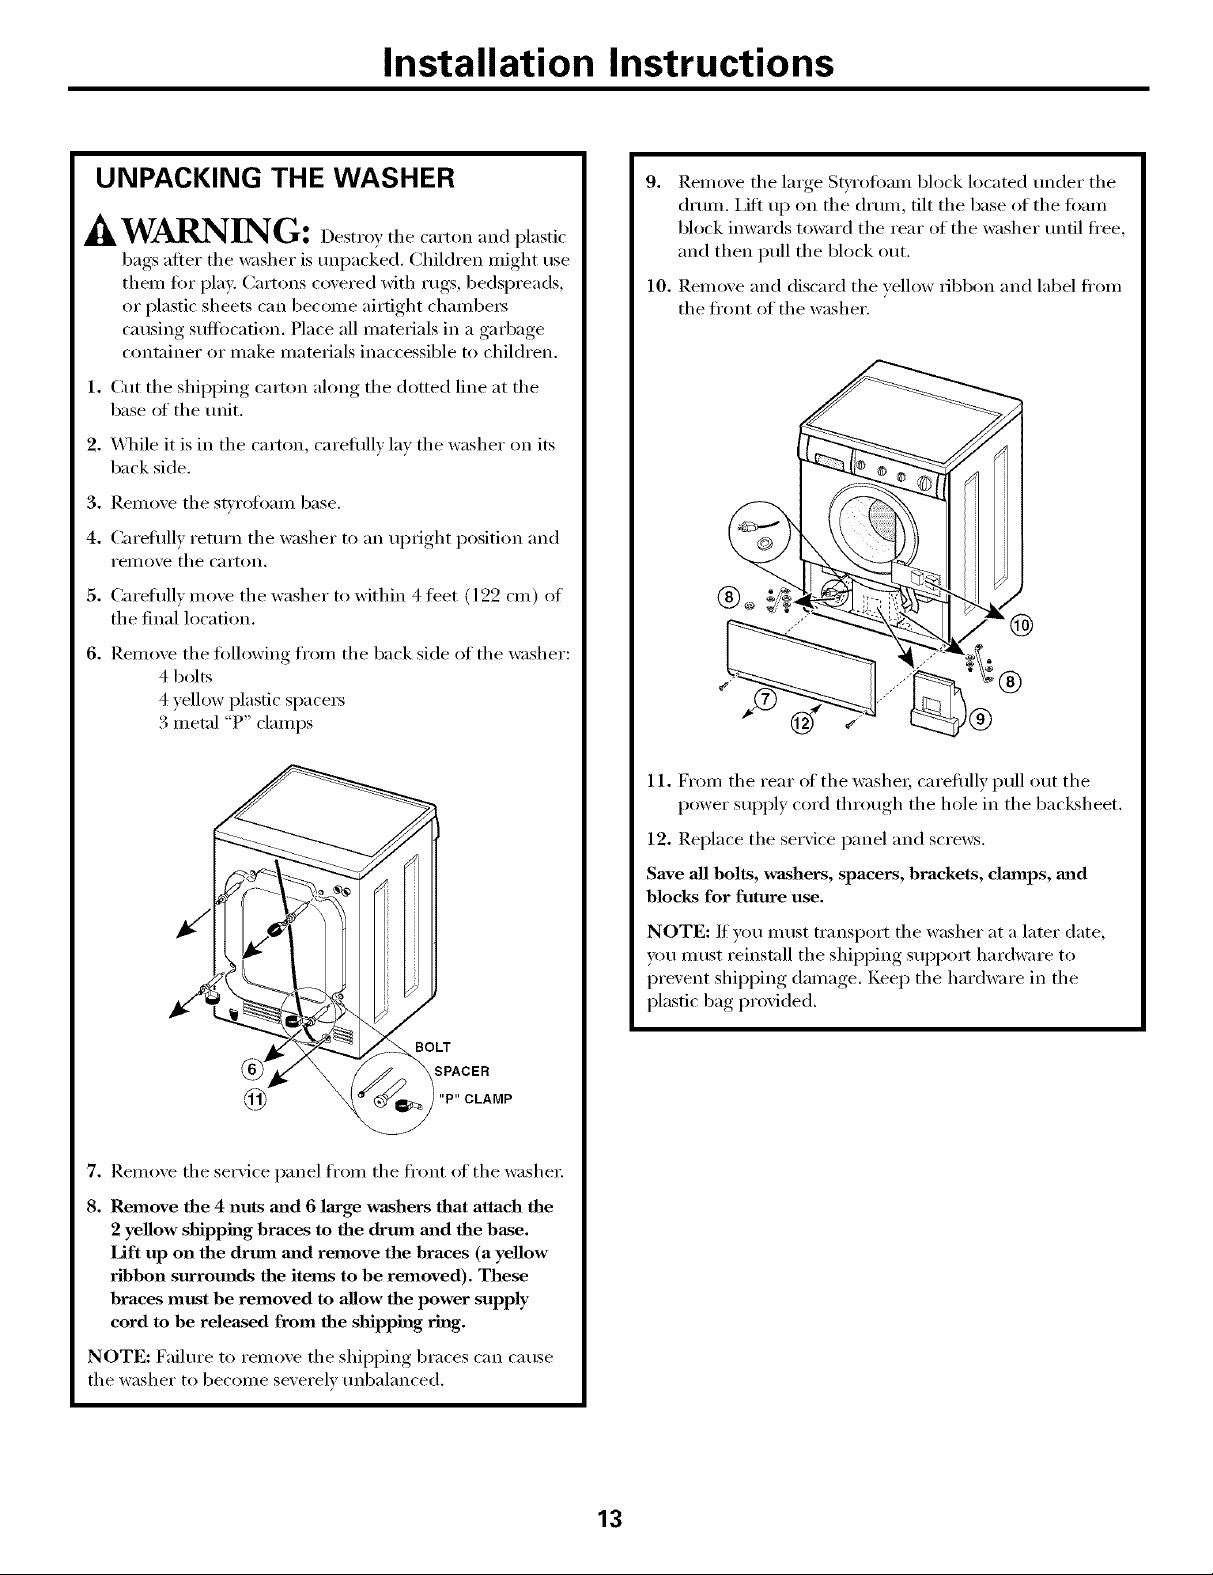
UNPACKING THE WASHER
/k WARNING:
bags after tile washer is unpacked. Children might use
then/fi_I" play. Caroms covered with rugs, bedspreads,
or plastic sheets can become airtight chambe_
causing suffocation. Place all materials in a garbage
container or make materials inaccessible to children.
1. Cut tile shipping carton along tile dotted line at tile
base of tile refit.
2. X4q/ile it is in tile carton, careflfllv lay tile washer on its
back side.
_. Rellloxe tile sgrofoalll base.
4. Careflfll) retm'n tile washer to an ui)ri,d/t_ position and
i'eillO'_e tile cai'ton.
5. Careflfll) move tile washer to within 4 teet (122 cm) of
the final location,
6. Remove tile fi>llowing fl'om tile back side of tile washer:
4 bolts
4 yellow plastic space_
3 metal "P" clamps
9. Rein{we tile large St}TOfi)anl block located trader tile
drain, i,ilt up on tile drum, tilt tile base of tile loam
block inwards toward tile rear of tile washer until ti'ee,
and then pull tile block out.
10. I_.eInove and discard tile vellow ribbon and label from
tile fl'ont of tile washer.
@
BOLT
SPACER
"P" CLAMP
7. Remove tile service panel fl'om tile fl'ont _ff tile washer:
8. Remove the 4 nuts mad 6 large washers that attach the
2 yellow shipping braces to the drum m_d the base.
Lift up on the drum and remove the braces (a yellow
ribbon sttrrom_ds the items to be removed). These
braces must be removed to allow the power supply
cord to be released from the shipping ring.
NOTE: b_ailm'e to remove tile shipping braces can cause
tile washer to become severely tmbalanced.
11. From tile rear ot tile washer; careflflly pull out tile
power supply cord through tile hole in tile backsheet.
12. Replace tile service panel and screws.
Save all bolts, washers, spacers, brackets, damps, mad
blocks for future use.
NOTE: If you must transport tile washer at a later date,
you Inust reinstall tile shipping support hardware to
prevent shipping damage. Keep the hardware ill the
plastic bag pr_wided.
13
Installation Instructions
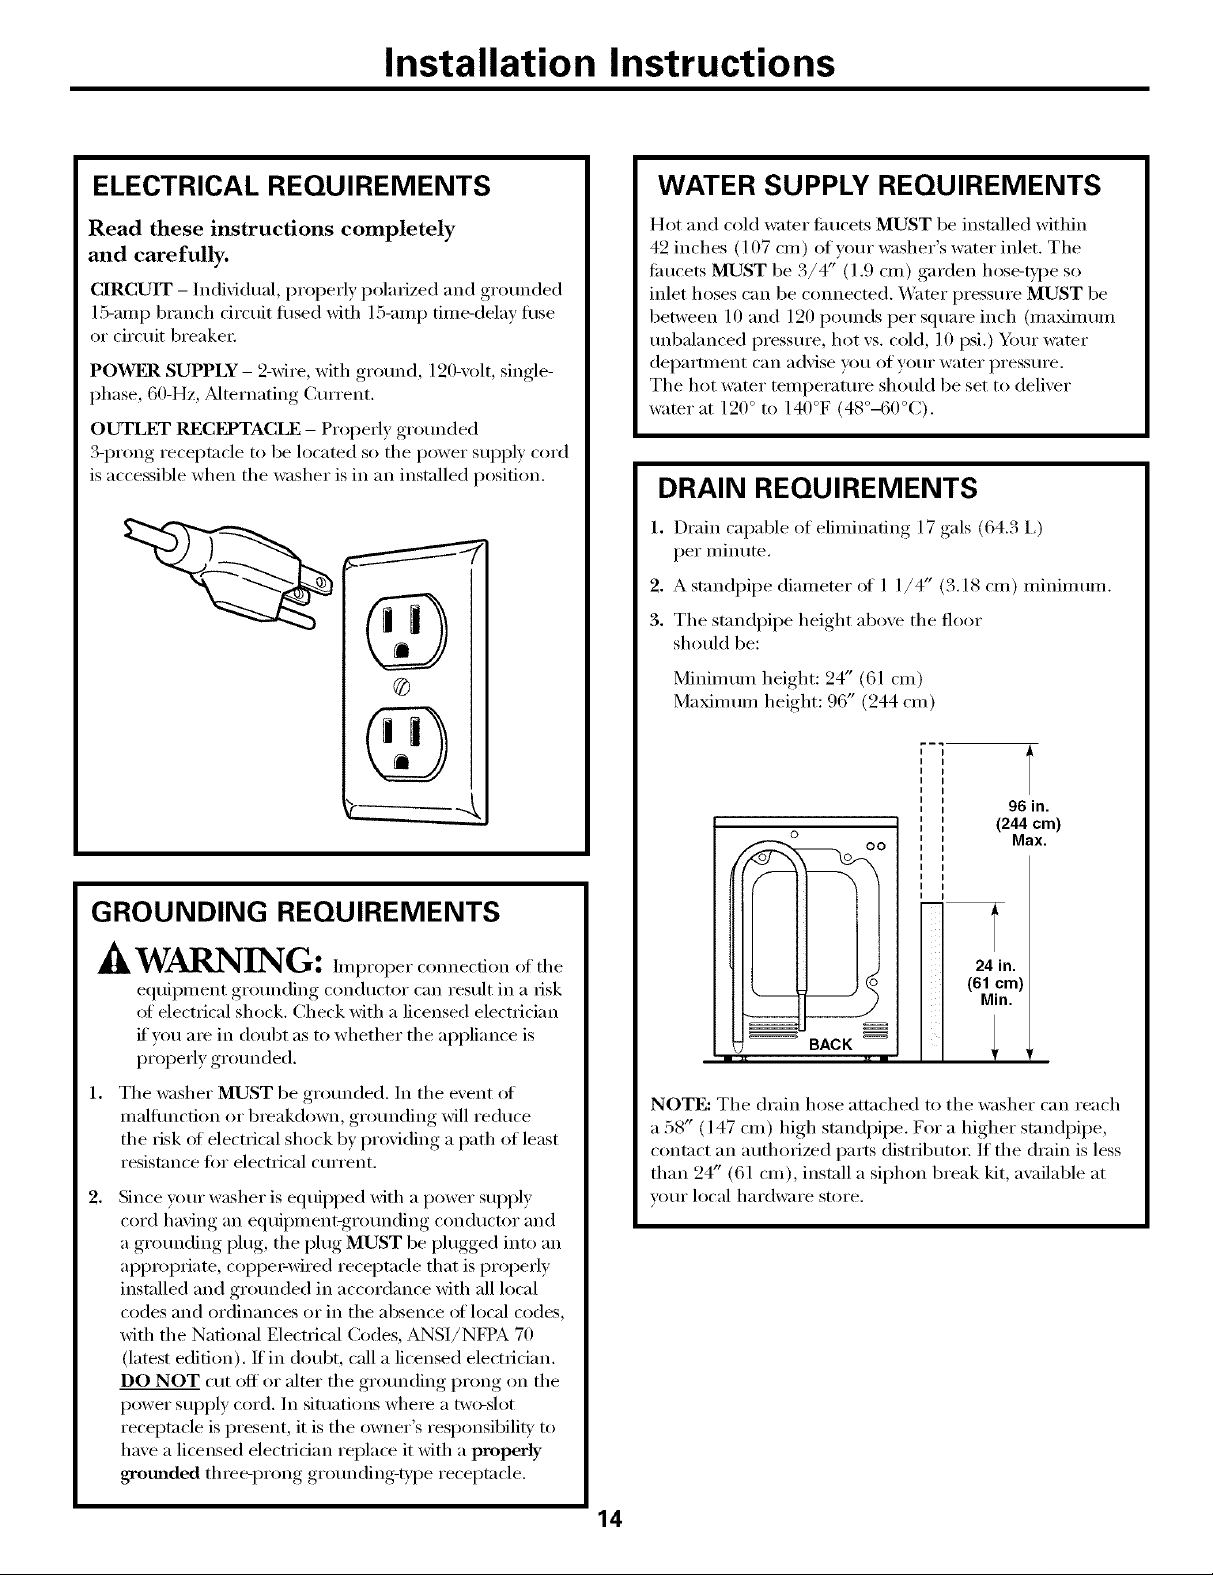
ELECTRICAL REQUIREMENTS
Read these instructions completely
and carefully.
CIRCUIT - Individual, properly polarized and grounded
15-amp branch circuit fllsed with 15-amp time-delay fllse
or circuit breaker:
POWER SUPPLY- 2-wire, with gro/md, 120wolt, single-
phase, 60-Hz, Mternating CmTent.
OUTLET RECEPTACLE - Properly gro/mded
3-prong receptacle to be located so the power supply cord
is accessible when the _z_sl/e_"is in an installed position,
@
@
WATER SUPPLY REQUIREMENTS
Hot and cold water fimcets MUST be installed within
42 inches (] 07 cm) of yore" washer's water inlet. Tile
fimcets MUST be 3/4" (1.9 cm) garden hose-t),l)e so
inlet hoses can be connected. Water pressm'e MUST be
between 10 and 120 pounds per square inch (maMmum
tmbalanced pressm'e, hot vs. cold, l 0 psi.) Yore" water
department can advise w)u of yore" water pressm'e.
The hot _;_ter temperatm'e should be set to deliver
water at 120 ° to 140°F (48°-60°C).
DRAIN REQUIREMENTS
1. Drain capable ot eliminating 17 gals (64.3 I,)
per minute.
2. A standpipe diameter of 1 1/4" (3.18 cm) minim urn.
3. Tile standpipe height above tile floor
should be:
Minimum height: 24" (61 cm)
Maxim um height: 96" (244 cm )
GROUNDING REQUIREMENTS
A WARNING: Imp,ope,connectionofthe
equipment g_x)mMing conductor can result in a risk
(ff electrical shock. Check with a licensed electrician
if you are in doubt as to whether the appliance is
l>ropedy gromMed.
1. The washer MUST be gro/mded. In the event oI
malflmction or breakdown, grounding will reduce
the risk (ff electrical shock by providing a path of least
resistance fi)r electrical current.
Since yore" washer is equipped with a power supply
cord having an equii)ment-gromMing conductor and
a gro/mding plug, the plug MUST be plugged into an
al)propfiate , coppe_vired receptacle that is properly
installed and gro/mded in accordance with all local
codes and ordinances or in the absence ot local codes,
with the National Electrical Codes, ANSI/NFPA 70
(latest edition). If in doubt, call a licensed electfidan.
DO NOT etlt off or alter tile gro/mding prong on tile
power supply cord. In situations where a t_x_-slot
receptacle is present, it is the ()wner's responsibility to
have a licensed electridan replace it with a properly
grounded three-prong grounding-tyl)e recei)tacle.
96 in.
O
o oo
m
iii
_z
BACK
NOTE: Tile drain hose attached to tile washer can reach
a 58" (147 cm) high standpipe. For a higher standpipe,
contact an authorized parts distributor: If tile drain is less
than 24" (61 cm), install a siphon break kit, available at
yore" local hardware store.
(244 cm)
24 in.
(61 cm)
Min.
Max.
14
 Loading...