

Page 1
f!1
ge.com
Safety Instructions ............ 2-4
Operating Instructions
Control Panels ....................... 5
Control Settings ...................... 5
Fabric Care Labels .................. 10
Features ........................... 6, 7
Loading and Using the Washer ...... 8, 9
Installation Instructions ..... 11-16
Drain Requirements ................. 14
Electrical Requirements .............. 14
Installing the Washer ............. 15, 16
Location of Your Washer ............. 12
Preparing to Install Your Washer ...... 11
Replacement Parts .................. 16
Rough-In Dimensions ................ 12
Unpacking Your Washer ............. 13
Water Supply Requirements .......... 14
WSSH300
Troubleshooting Tips ........ 17-19
Consumer Support
Consumer Support .................. 24
Warrantg .......................... 23
As on ENERGY STAR ® portner,
GEhos determined thot this
product meets the ENERGYSTAR®
guidelines for energy efficiency.
134802200 175D1807P580 49-90312 10-06JR
Page 2
IMPORTANTSAFETYINFORMATION.
READALLINSTRUCTIONSBEFOREUSING.
WARNING!
WATERHEATERSAFETY
Under certain conditions, hydrogen gas may be produced in a water heater that has not been used for two weeks
or more. Hydrogen gas can be explosive under these circumstances.
If the hot water has not been used fi)r two weeks or more, prevent the possibility of damage or ii_jtu T by
turning on all hot water fimcets and allowing them to mn fi)r several minutes. Do this befi)re using any
electrical appliance which is connected to the hot water system. This simple procedure _ill allow any built-up
hydrogen gas to escape. Since the gas is flammable, do not smoke or use an open flame or appliance dunng
this process.
For your safety, the information in this manual must be followed to minimize the risk
of fire or explosion, electric shock, or to prevent property damage, personal injury, or
loss of life.
Theinstructions in this manual and all other literature included with this washer are
not meant to cover every possible condition and situation that may occur. Good, safe
practices and caution MUSTbe applied when installing, operating, and maintaining
any appliance.
2
Page 3
PROPERINSTALLAtiON
This washer must be properly installed and located in accordance with the Installation Instructions before it is used.
[] Install or store M_ere it will not be exposed to [] Properly ground _s}_e_" to confi)rm with all
temperatures below fi'eezing o1"exposed to the ,governing codes and ordinances. Follow details in
_vathe_: Installation Instructions.
YOURLAUNDRYAflEA
• Keep the area underneath and around your
appliances fl'ee ot combustible materials such as
lint, paper; rags and chemicals.
• D() not leave the washer door open. An open door
could entice children to hang on the door or
crawl inside the washe_:
• Close super\ision is necessa_ T if this appliance is
used 1)_ or near children. Do not allow children to
pla} on, with, or inside this or any other appliance.
Page 4
IMPORTANTSAFETYINFORMATION.
READALLINSTRUCTIONSBEFOREUSING.
WHENUSINGTHEWASHER
• Never reach into washer while it is moving.
_'\_dt 5mtil tile machine has completely stopped
be%re opening the door.
Use this
appliance
only for its
intended
• Do not mix chlorine bleach with ammonia 05"
acids such as vinegar and/or rust remover.
Mixing different chemicals can produce a toxic
gas which may cause death.
purpose as
described in • Do not wash or dry articles that have been
this Owner's cleaned ill, washed in, soaked in, or spotted
Manual.
with combustible or explosive substances (such
as wax, oil, paint, gasoline, degreasers, dry-
cleaning solvents, keiosene, etc.) which may
ignite or explode. Do not add these substances
to the wash water. Do not use or place these
stlbstances ;15"1)5111(1 VO/lr washer or dr}'er dtlring
operation.
• The laundry process can reduce the flame
retardancy of thbrics. To avoid such a result,
carefully fi)llow the garment manufacturer's
wash and care instructions.
To minimize tile possibility of electric shock,
unplug this appliance fi'om the power supply
or disc(mnect the washer at tile household
distribution panel by removing the fuse or
switching off the circuit breaker betbie
attempting any maintenance 05" cleaning.
NOTE: Pressing the PAUSEbutton does NOT
disconnect the appliance fi'om the power
supply.
• Never attempt to operate this appliance if
it is damaged, malhmctioning, partially
disassembled, or has missing or broken parts,
including a damaged cord or plug.
• Do not slam the washer door closed or try
to fi)rce tile door open when ]ockell (Door
Lock light ON). This could result in damage
to the washer.
• The washer is equipped with an electrical
overload protector. The motor will stop if it
becomes overheated. The washer will
automatically restart after a cool-down
period of up to 30 minutes, if the washer
has not been manually turned off during
this dine.
WHENNOTIN USE
• Turn off water th ucets to relieve pressure on
hoses and wdves and to ndnilnize leakage if
a break 15i"iupture should occur. Check tile
condition of the fill hoses; they should be
replaced every 5 years.
•Betore discarding a washer, or removing it
frOlll selwice, rell/Ove tile washer door to
prevent children fl'oln hiding inside.
• Do not attelnpt to repair oi" replace any part of
this appliance unless specifically recolnlnended
ill this Owner's Manual, or ill published useI_
repair instluctions that you understand and
have the skills to carry out.
• Do not talnper with controls.
READANDFOLLOWTHISSAFETYINFORMATIONCAREFULLY.
SAVETHESEINSTRUCTIONS
4
Page 5
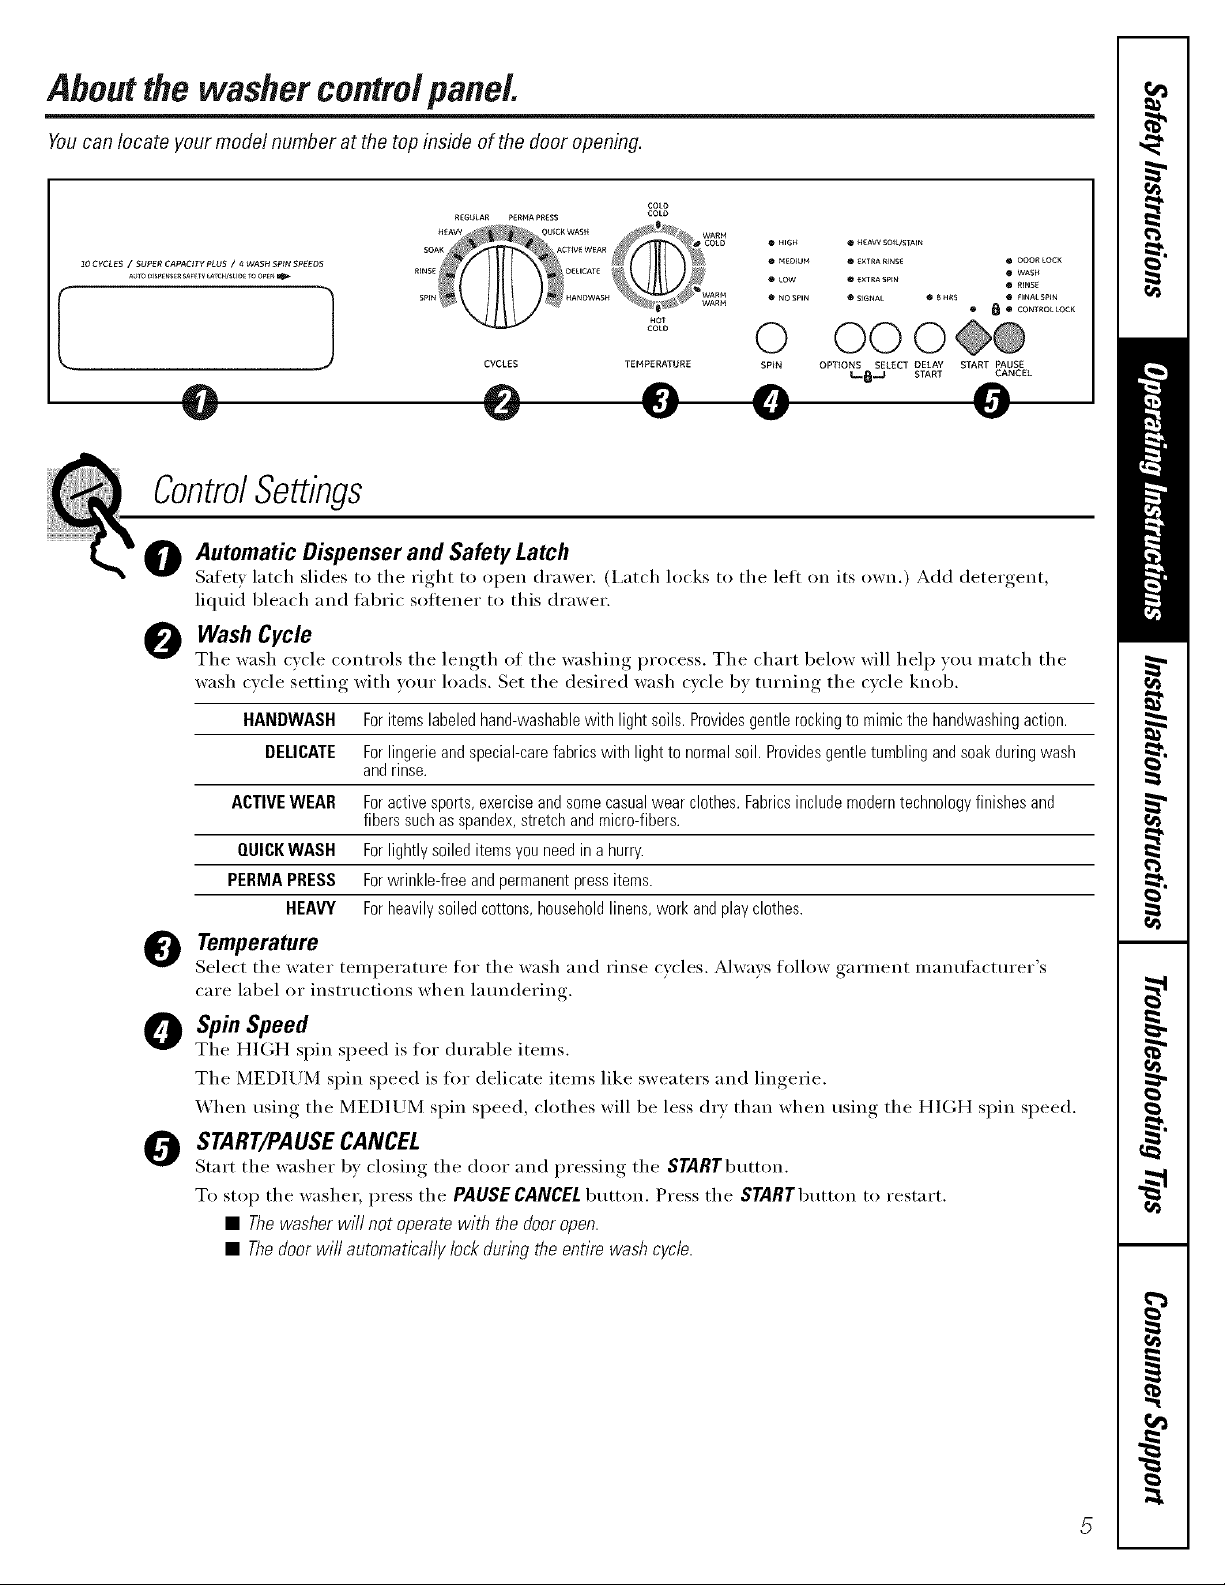
About the washer controlpanel.
Youcan locate your model number at the top inside of the door opening.
IO CVCLES / SUPER CAPACITY PLUS / 4 WASH SPIN SPEEOS
A_0 DISP_S_RSAF_rY_A_CH/SU_)_TOOPeNI_
0
ControlSettings
O Automatic Dispenser and Safety Latch
Safet} latch slides to the right to open drawer. (I,at('h locks to the leit on its own.) Add detergent,
liqtfid bleach and fabric softener to this drawer.
Wash Cycle
The wash cwle controls the length of the washing process. The chart below will hel I) you match the
wash cxcle setting with }ore" loads. Set the desired wash cxcle b) turning the cycle knob.
o HEAVVSOIk/STAIN
e _XTRARJNS_ • OOOR LOCK
e EXXRASP_N
• SIGNAL • B HRS O _INALSPIN
• WASH
e RFNS_
e 6 • CONTRO_LOCK
oo o@@
OPTIONS SELECT DELAY START PAUSE
L.I_,-J START CANCEL
O
HANDWASH For items labeled hand-washable with light soils. Provides gentle rocking to mimic the handwashing action.
DELICATE For lingerie and special-care fabrics with light to normal soil. Providesgentle tumbling and soak during wash
ACTIVE WEAR Foractive sports, exercise and some casual wear clothes. Fabrics include modern technology finishes and
QUICK WASH For lightly soiled items you need in a hurry.
PERMA PRESS Forwrinkle-free and permanent press items.
HEAVY For heavily soiled cottons, household linens, work and play clothes.
and rinse.
fibers such as spandex, stretch and micro-fibers.
Temperature
Select the water temperature for the wash and rinse c_cles. Always follow garment manufacturer's
care label or instH]ctions when latmclering.
0 Spin Speed
The HIGH spin speed is for dural)le items.
The MEDIUM spin speed is fi)r delicate items like sweaters and lingerie.
When using the MEDIUM spin speed, clothes will be less dry than when using the HIGH spin speed.
O START/PAUSECANCEL
Start the washer by (iosin- the door and )ressin,, the STARTbutton.
To stop the washer, press the PAUSE CANCEL button. Press the STARTbutton to restart.
• The washer will not operate with the door open.
• Thedoorwit automaticallylockduringtheentirewashcycle.
Page 6
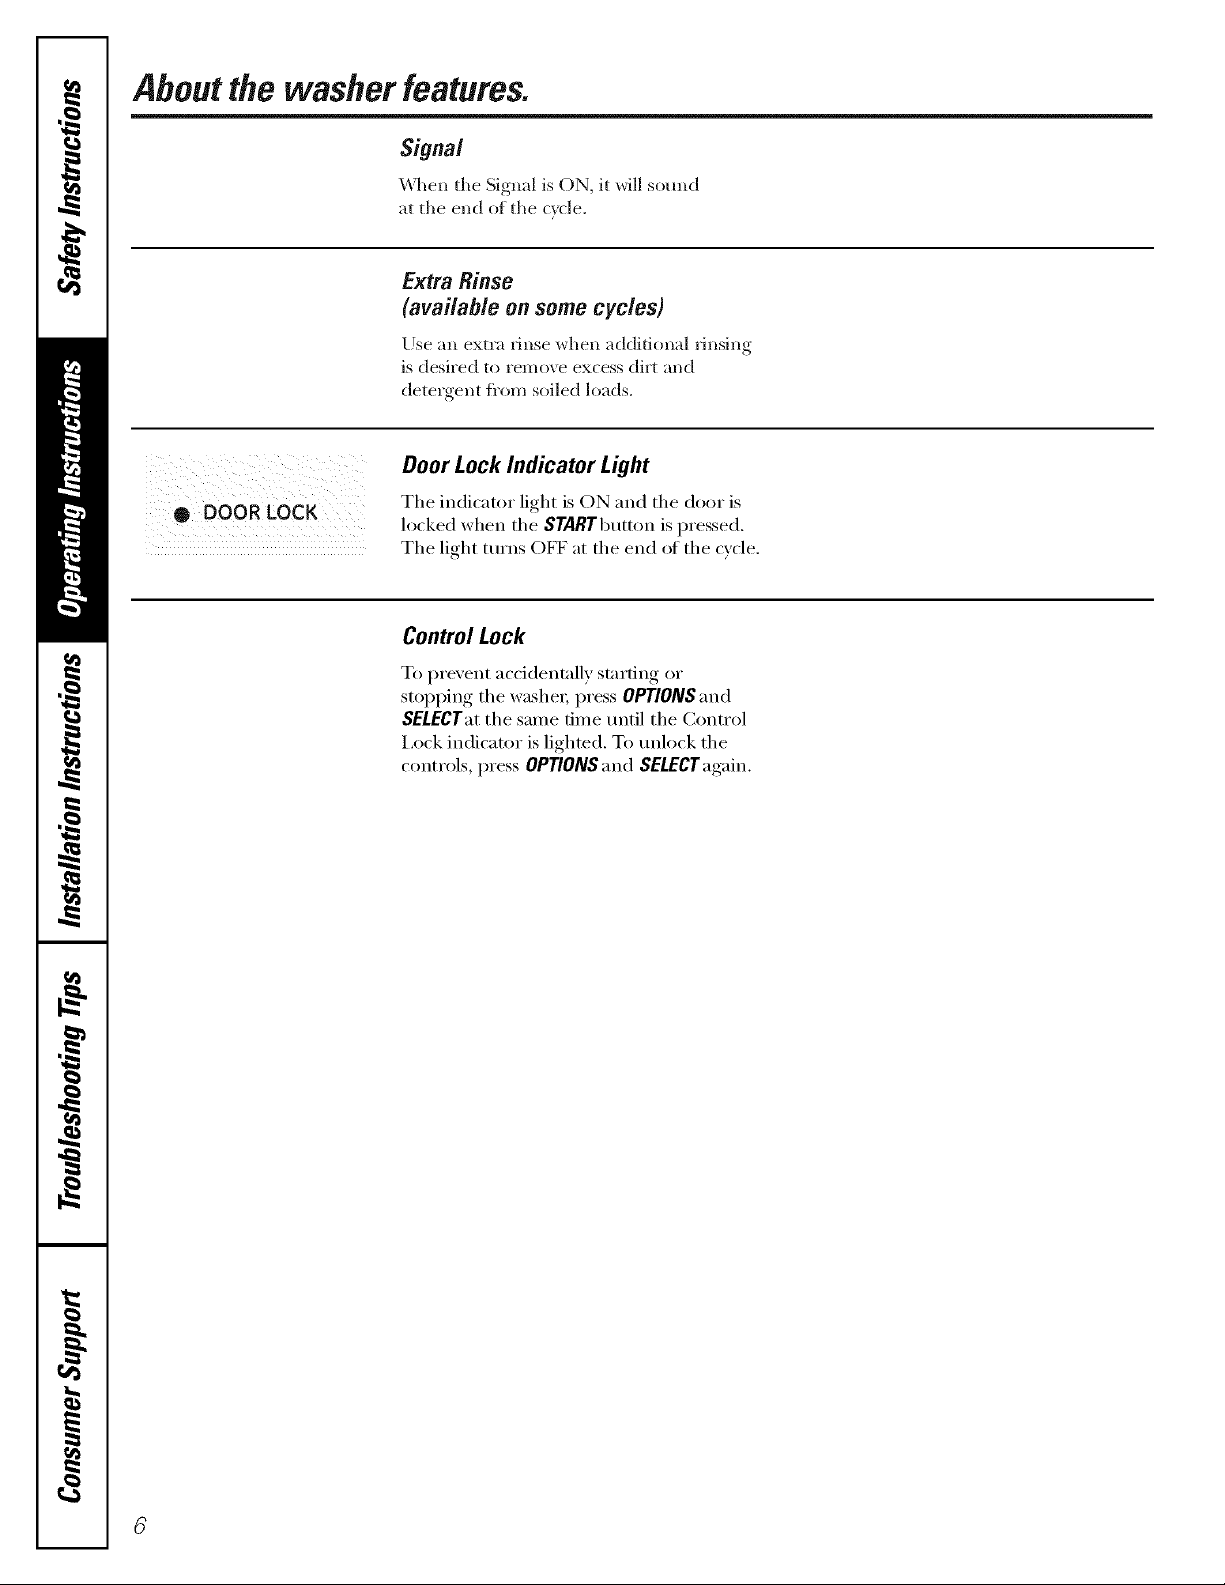
Aboutthe washer features.
Signal
\'\qlen the Signal is ON, it will sound
at the end of the c?cle.
Extra Rinse
(available on some cycles)
Use _m extra rinse when _=dditional rinsing
is desired to remove excess dirt and
detergent fi'om soiled loads.
Door Lock Indicator Light
• DOOR LOCK
Tile indicator light is ON and tile door is
locked when tile STARTbutton is pressed.
Tile light turns OFF at tile end oI tile cycle.
Control Lock
To prevent accidentally starting or
stopping tile washeI; press OPTIONS and
SELECTat tile same tilne until tile Control
I,ock indicator is lighted. To mflock tile
controls, press OPTIONS and SELECT again.
Page 7
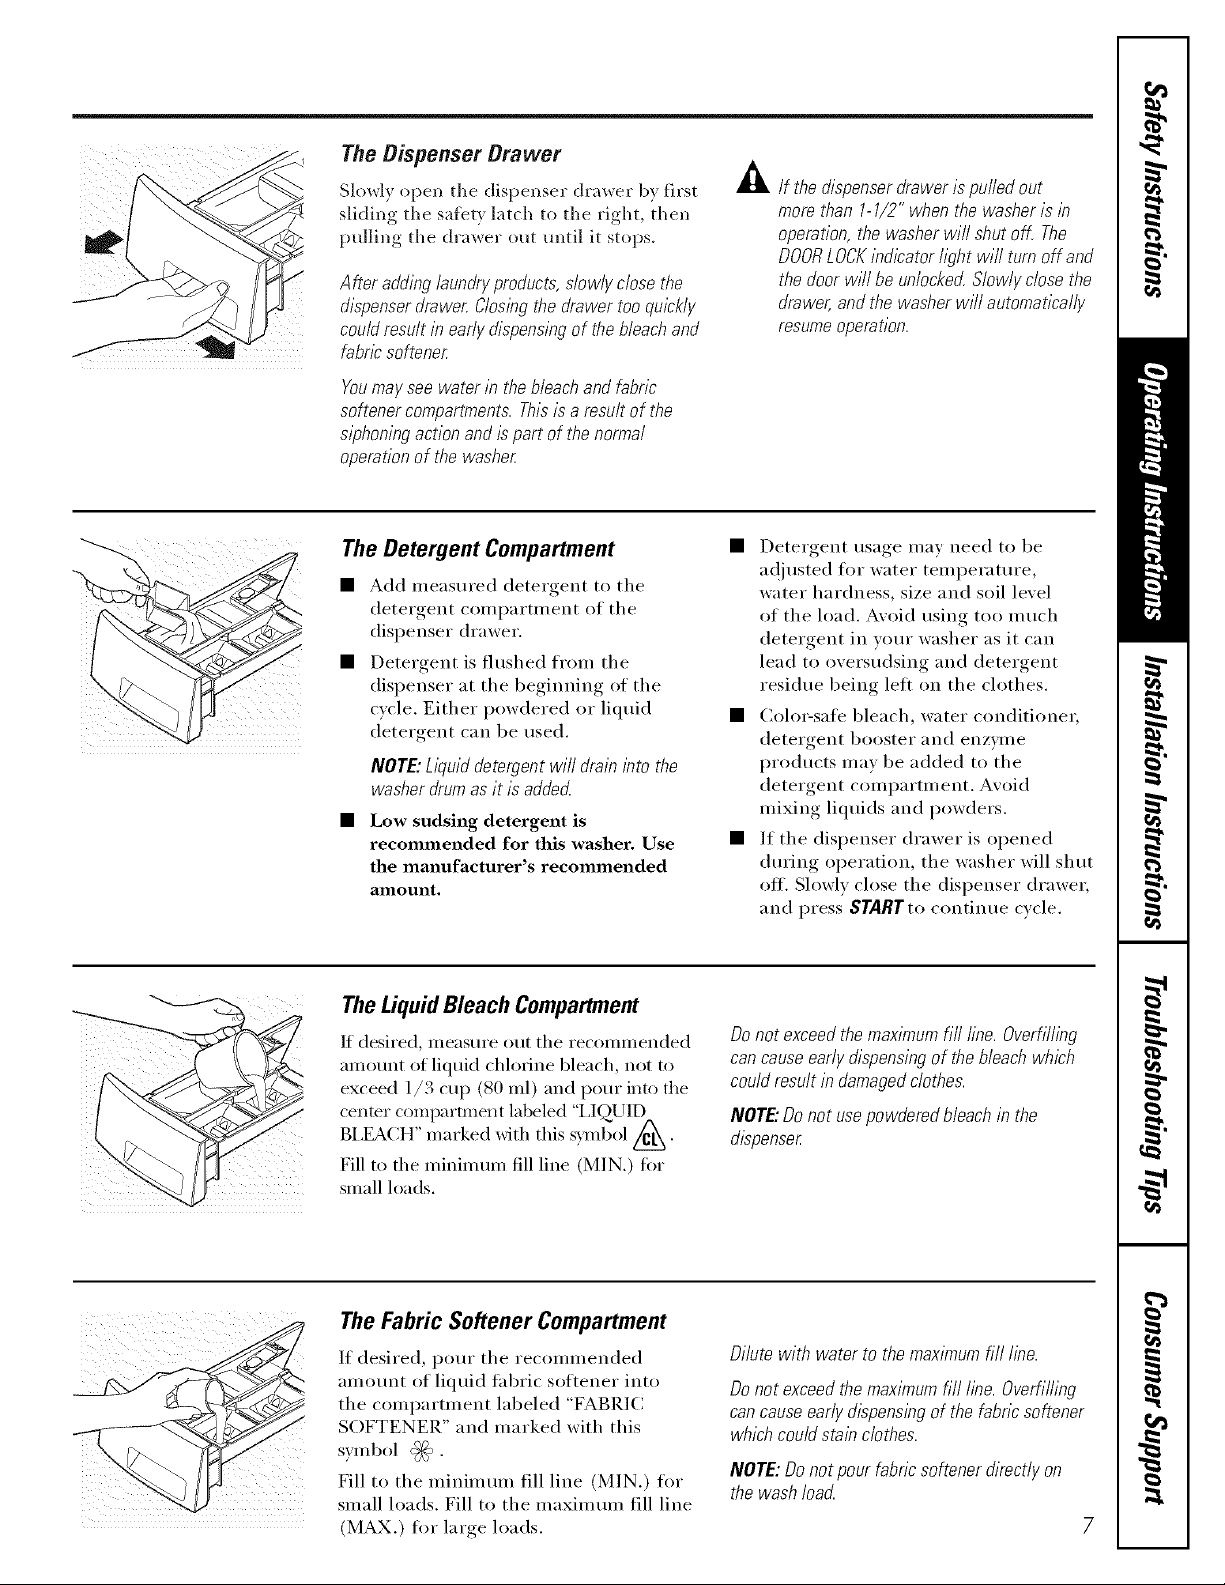
The Dispenser Drawer
Slowly open the dispenser drawer by first
sliding the safety latch to the right, then
pulling the drawer out until it stops.
After a&Jing /aundr}/products, s/owl}/ close the
dispenser drawer. C/osbg the drawer too quickl}/
could result in ear/}/dispensing of the bleach and
fabric softener.
Youma}/ see water in the bleach and fabric
softener compartments. Thisis a result of the
siphoning action and is part of the normal
operation of the washer.
A lf the dispenser drawer is puffed out
more than 1-1/2" when the washer is b
operation, the washer wifl shut off. The
DOORLOCKindicator hght will turn off and
the door will beunlocked. SIowl}/ close the
drawer, and the washer will automatical/}/
resuf77e operation.
The Detergent Compartment
• Add ineasured detergent to the
detergent colni_artlnei_t of the
dispenser drawer.
• Detergent is flushed froln the
dispenser at the begilming of the
cycle. Either powdered or liquid
detergent can be used.
NOTE: Ll?luid detergent will drain ibto the
washer drum as it is added
• Low sudsing detergent is
recommended for this washer. Use
the manufacturer's recommended
amount.
TheLiquidBleach Compartment
If desired, ineasure out the recomlnei_ded
amount of liquid chlorii_e bleach, not to
exceed 1/3 cup (80 inl) and pour into the
center compartlnellt labeled "I3@JID
BLEACH" inarked with this symbol//_.
Fill to the minimum fill line (MIN.) for
small loads.
• Detergent usage inav need to be
a(!iusted for water temi)erature,
water hardness, size and soil level
of the load. Avoid using too much
detergent in your washer as it can
lead to oversudsing and detergent
residue being leii on the clothes.
• Coloi=safi _ bleach, water conditionei;
detergent booster and enzyme
products Inay be added to the
detergent conq_artln ent. Avoid
n_ixing liquids and powders.
• If the dispenser drawer is opened
during operation, the washer will shut
off. Slowly close the dispenser drawer,
and press STARTto contilme cycle.
Do not exceed the maximum tiff fine. Overfilling
can cause ear/}/dispensing of the bleach which
could result in damagedclothes.
NOTE"Do not use powdered bleach in the
dispenser
The Fabric Softener Compartment
If desired, pour the reconm_ended
amount of liquid fabric soliener into
the conq)artn_ent labeled "FABRIC
SOFTENER" and marked with this
swnbol _.
Fill to the minimmn fill line (MIN.) fl)r
small loads. Fill to the maximmn fill line
(MAX.) fl_r large loads.
Dilute with water to the maximum fill line.
Do not exceed the maximum fill line. Overfifling
can cause ear/}/dispensing of the fabdc softener
which could stain clothes.
NOTE: Do not pour fabric softener direct/}/on
the wash load
7
Page 8
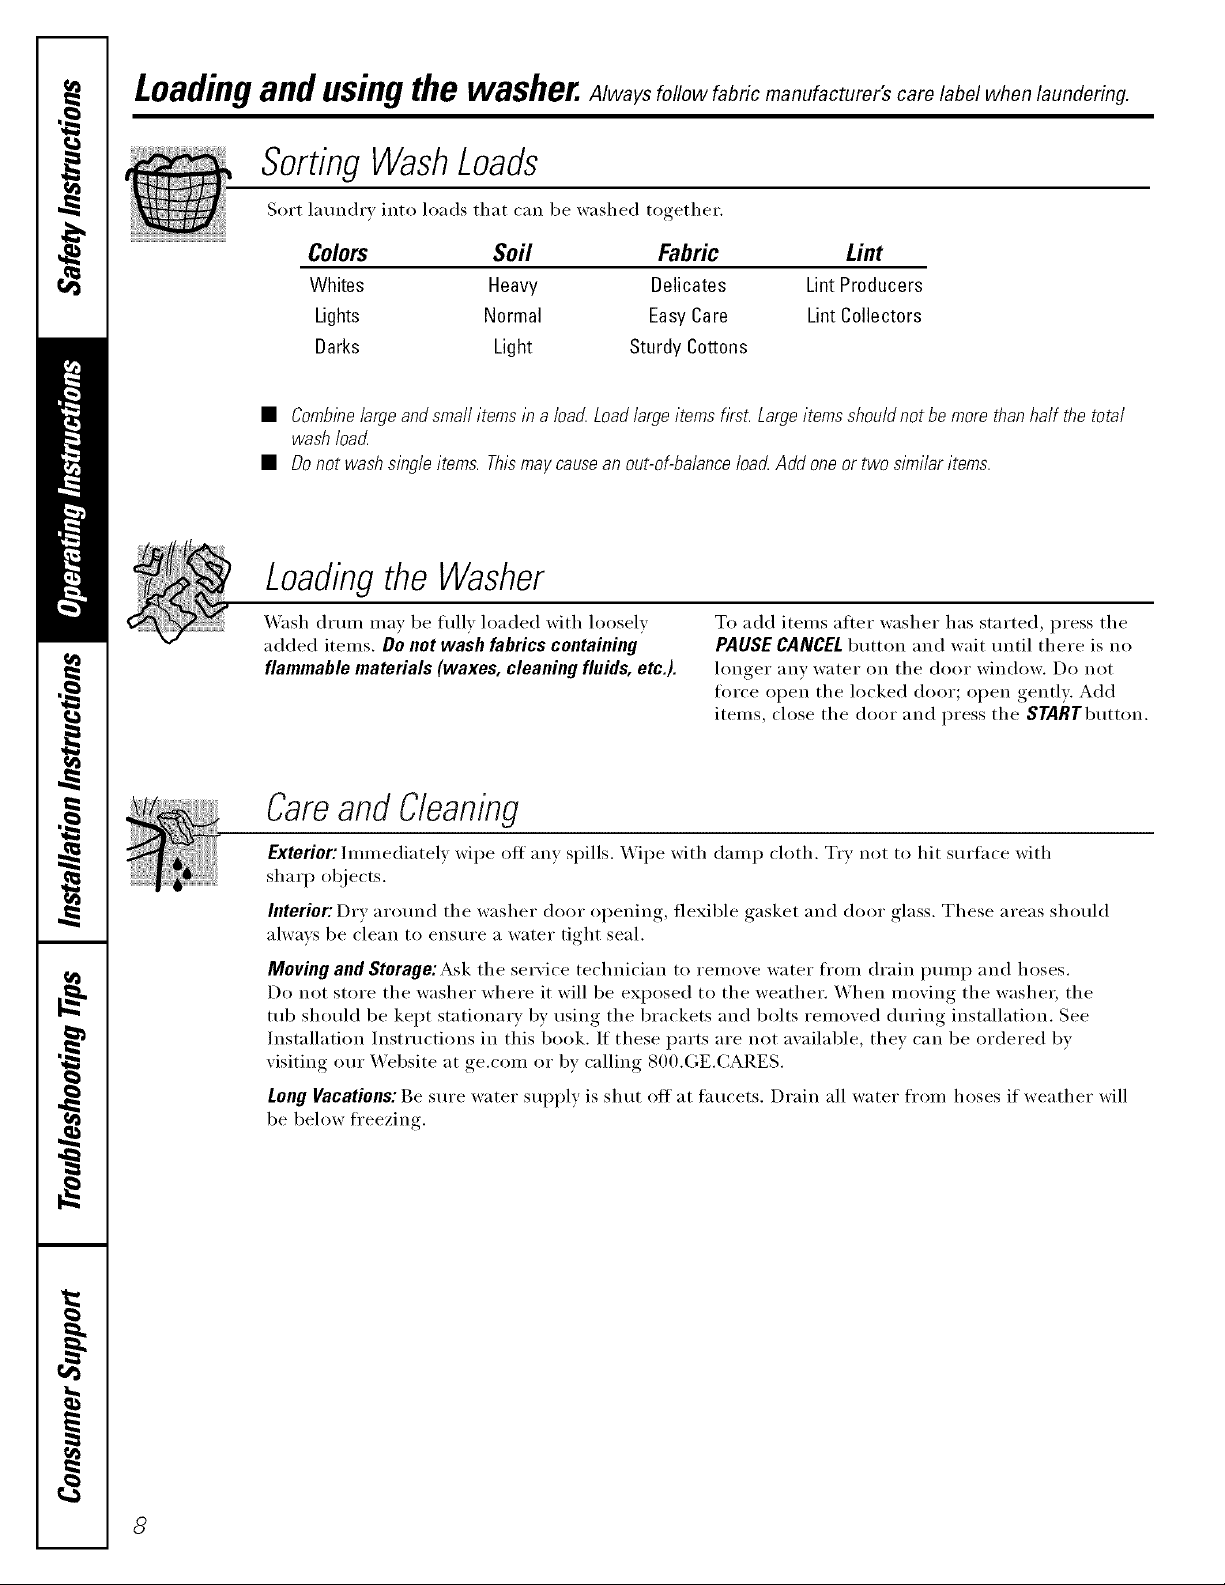
Loadingand usingthe washer. Always follow fabric manufacturer's care label when laundering.
SortingWashLoads
Sort laundry into loads that can be washed together.
Colors Soil Fabric Lint
Whites Heavy Delicates Lint Producers
Lights Normal EasyCare Lint Collectors
Darks Light Sturdy Cottons
• Combine large andsmall items in a load. Load large items first. Large items should not be more than half the total
wash loacL
• Do not wash single items. Thismay cause an out-of-balance loacLAdd one or two similar items.
Loadbg the Washer
Wash dxum may be fllllv loaded with loosely
added items. Do not wash fabrics containing
flammable materials (waxes, cleaning fluids, etc.).
To add items after washer has started, press the
PAUSECANCELbutton and wait until there is no
longer any water on the door window. Do not
tm'ce open the locked door; open gently. Add
items, close the door and press the STARTbutton,
Careand Cleaning
Exterior: Immediately wipe off any spills, _4]pe with damp cloth, Try not to hit Stli't;l(-e with
sharI) objects.
Interior: Dry arotmd the washer door opening, flexible gasket and door glass. These areas should
always be clean to ensure a water tight seal.
Molting and Storage:Ask the service technician to remove water fl'om drain immp and hoses.
Do not store the washer where it will be exposed to the weather. When moving the washer, the
tub should be kept statiomH T by using the brackets and bolts removed during installation. See
Installation Instructions in this book. If these parts are not available, they can be ordered bv
visiting ore" XA'ebsite at ge.com or by calling 800.GE.CARES.
Long Vacations: Be sure water sui)ply is shut off at fimcets. Drain all water fl'om hoses if weather will
be below fl'eezing.
8
Page 9

Lock tab is visible only after drawer
has been pulled out
Dispenser DrawerPrea: Detergent and thbric softener may build up in the
dispenser drawer. Resklue should be removed (race or twice a month.
[] Remove the drawer by first sliding the safety latch to the right, then pulling
the drawer out until it stops. Reach back into the le_t rear corner of the
drawer cavity and press down firmly on the lock tab, pulling out the drawer.
[] Remove the inserts from the bleach and thbric softener compartments.
Rinse the inserts and the dra*_er*_ith hot *_ater to remo_e traces of
accmnulated launch'} products.
[] To clean the drawer opening, use a small brush to clean the recess. Remove
all residue fl'om the upper and lower parts of the recess.
NOTE: Large amounts of fabric softener residue may indicate improper dilution or that morn
frequent cleaning is requlYed.
[] Return the bleach and fabric softener insex'ts to the proper romp;u'tments.
Replace the insert, pressing the "X" to lock it in place. Replace the dispenser
drawer and run the QUICK WASH cycle without any wash h)ad in the drum.
Page 10

Aboutthe washerfeatures.
FabricCareLabels
Below are tid_-ic care label "symbols" that aftect the clothing you will be launde_-ing.
WASH LABELS
Machine_U
wash m
cycle
Water • • • • • •
temperature Hot w.... Co_d/coo_
DRYLABELS
Tumble D
dry
Normal Permanent Press/ Gentle/ Do not wash Do not wring
wrinkle resistant delicate Hand wash
(50"C/120"F) (40"C/105°F) (30°C/85°F)
Dry
Normal Permanent Press/ Gentle/ Do not tumble dry (used with
Do not dry
wrinkle resistant delicate do not wash)
setting
High Medium Low No heat/air
instructions
Line dry/ Drip dry Dry flat
hang to dry
BLEACHLABELS
SymuOla Any bleactl Only ....... Norine bleach Do not bleach
(when needed) (when needed)
Pq
In the shade
/0
Page 11

Installation
SpacemakerWasher
Model WSSH300
Instructions
I ffyou haveanyquestions,call800.GE.CARES(800.432.2737)orvisUourWebsiteat: ge.com I
BEFORE YOU BEGIN
Read these instructions completely and carefully.
• IMPORTANT - S_,,ethese
instructions for local inspector's use.
• IMPORTANT - Obse_.e_,ll
governing codes and ordinances.
• Note to Installer - Be sure to leave these
instructions with the Consumer.
• Note to Consumer - KeeI) these instructions
for flmue reierence.
° Skill level - Installation of this appliance requires
basic mechanical and electrical skills.
• Completion time - 1-3 hours
• Proper installation is the responsibility of the
installer.
• Product tailure due to improper installation is not
covered trader the X_',rrantv:
FOR YOUR SAFETY:
TOOLS REQUIRED FOR
WASHER INSTALLATION
Phillips screwdriver
10 mm socket with ratchet
(_hannel-lock a(!j ustable plie_
Caq)enter's level
PARTS SUPPLIED
Cable Tie
F_IX4ater Hoses (2)
_/kWARN IN G
° This appliance must be I)r°I)erlx,,gr°unded and
installed as described in these Installation Instructions.
° Do not install ,':,rstore appliance in an area where it
will be exposed to water/weather. See Location of Your
Washer section.
° NOTE: This appliance must be properly grounded,
and electrical service to the washer must conform with
local codes mid ordJnm_ces and the latest edition of
the National Electrical Code, ANSI/NFPA 70.
Rubber _,Vashers (4)
11
Page 12

Installation Instructions
LOCATION OF YOUR WASHER
Do Not Install the Washer:
1. In an area exposed to dripping water or outside
weather conditions. The ambient teml)erature
should never be below 60°F (l 5.6°(;) fl)r proper
washer operation.
2. In an area where it will come in contact with era'rains
or drapes.
3. On carpet. The floor MUST be a hard surtace with
a maximum slope of l/2" per foot (1.27 cm per
30 cm). To make sm'e the washer does not vibrate
or illove, yo/I Ill}Iv have to reinforce tile floor.
IMPORTANT:
Minimum Installation Clearances
" _]/en installed in alcove: Sides, Rein;
Top : 0" (0 cm)
" _]_en installed in closet: Sides, Rein;
Top = 0" (0 cm), Front = 1" (2.54 cm)
" Closet door ventilation openings required:
2 lou\'e_ each 60 square in. (387 cmQ, located 3"
(7.6 cm) fl'om top and bottom of door
Undereounter Installation
ROUGH-IN DIMENSIONS
<7&Yfi,:) -
33A,, I_ -- 24 -_l _- 60"--_ _
(9.6 cm)-_- _ (61 cm) (152.4 cm)
/
SIDE
If an undercomKer* installation is desired, you MUST
install a top sheet kit, 14-A037. This kit is axailable through
your (;E retaile_;
*()Btom-sized counterto I) is required.
Mobile Home Installation
Installation must confimn to Standard fi)r Mobile Homes,
ANSI A119.1 and National Mobile Home Construction
and Satetv Standards Act of 1974 (PI,93-383).
Stacked Installation
If a stacked washer/dryer installation is desired,
you MUST use Stacking Kit _4'E25X 10020 or 14-A026.
;Fhis kit is axailable through your (;E retaile_;
81_ t'
(21.6 cm)
) cm) 2s/4"--_
(7 cm)
Drain
321/4"
(81.9 cm)
._-- 27"
_! (68.6 cm)
REAR
m-i_-
63/4"
(17.1 cm)
WaterInlets
337/"
(85.1cm)
J
12
Page 13

Installation Instructions
UNPACKING THE WASHER
bags after the washer is unpacked. (]hildren might use
then] fi)r play. Cations covered with rags, bedspreads,
or plastic sheets can become airtight chambe_
causing suffocation. Place all materials in a garbage
container or make materials inaccessible to children.
1. Cut the shipping carton along the dotted line along the
bottonL RelllO_e the c}li't()n,
2. Using, a rug,, blanket or [)iece of cardboard to protect
the flo(m la_ the washer on its back.
3. Remove and save the stvrofi)am base and shi ) )ino-
)hi )
Balse Shipping
4. Careflfllv retm'n the washer to an upright position.
5. Careflfllv moxe the washer to within 4 teet (122 cm) of
the final location.
6. Remove the fi)llowing fl'om the back panel ol the
washer:
4 shipping bolts
4 space_
1 metal "P" clamp
7. Remove the 4 plugs fl'om the literature pack located in
the drum and install them in the holes w_cated bv the
packaging space_.
Save all bolts, washers, spacers, brackets, dmnps mad
blocks for future use.
NOTE: If you must transport the washer at a later date,
you must reinst;fll the shipping support hardware to
prevent shipping damage. Keep the hardware in the
plastic bag provided.
-PowerCord
Metal "P" Clam
4Shipping
45
13
Page 14

Installation Instructions
ELECTRICAL REQUIREMENTS
Read these instructions completely
and carefully.
CIRCUIT - Individual, properly polarized and grounded
15-amp branch circuit fllsed with 15-amp time-delay fllse
or circuit breaker:
POWER SUPPLY- 2-wire, with gro/md, 120wolt, single-
phase, 60-Hz, Mternating CmTent.
OUTLET RECEPTACLE - Properly grounded
3-prong receptacle to be locamd so the power SUl)ply cord
is accessible when the washer is in an installed position.
@
@
WATER SUPPLY REQUIREMENTS
Hot and cold water fimcets MUST be installed within
42 inches (] 07 cm) of yore" washer's water inlet. The
fimcets MUST be 3/4" (1.9 cm) garden hose-t)'l)e so
inlet hoses can be connected. Water pressm'e MUST be
bet_ven 10 and 120 pounds per square inch (maMmum
tmbalanced pressm'e, hot vs. cold, l 0 psi.) Yimr _;_ter
department can a(Mse )'ou of yore" water pressure.
The hot water temperature should be set to deliver
water at 120 ° to 140°F (48°-(;0°(:).
DRAIN REQUIREMENTS
1. Drain capable ot eliminating 17 gals (64.3 i,)
per minute.
2. A standpipe diameter of 1 1/4" (3.18 cm) minim urn.
3. Tile standpipe height above tile floor
should be:
Minimum height: 24" (61 cm)
Maxim umh eight: 96" (244 cm )
GROUNDING REQUIREMENTS
A WARNING: connectionofthe
equipment g_x)tmding conductor can result in a risk
(ff electrical shock. Check with a licensed electrician
flyou are in doubt as to whether the appliance is
propedy gromMed.
1, Tile washer MUST be grotmded. In tile event oI
malflmction or breakdown, grounding will reduce
the risk ()t electrical shock by pr(Mding a path of least
resistance for electrical cmTent.
Since v()m" washer is equipped with a power supply
cord having an equipment-gromMing conductor and
a gromMing plug, the plug MUST be plugged into an
al)l)ropriate , coppe_vired receptacle that is i)roperly
installed and gro/mded in accordance with all local
codes and ordinances or in the absence ot local codes,
with the National Electrical Codes, ANSI/NFPA 70
(latest edition)./t in doubt, call a licensed electfidan.
DO NOT etlt off- or alter tile grotmding prong on tile
power suI)ply cord. In situations where a two-slot
receptacle is present, it is the owner's responsibility to
have a licensed electrician replace it with a properly
grounded three-prong gromMing-Ql)e receptacle.
o oo
96"
(244cm)
Max.
J
_REAR
NOTE: Tile drain hose am_ched to tile washer can reach
a 90" (229 cm) high standpipe. For a higher standpipe,
contact an authorized parts distributor: If tile drain is less
than 24" (61 cm), install a siphon break kit, available at
yore" local hardware store.
14
Page 15

Installation Instructions
INSTALLING THE WASHER
1. Run some water fl'om the hot and cold flmcets to flush
the water lines and remove particles that might clog up
the water valve screens.
2. Remove the inlet hoses and rubber washers fl'om the
plastic bag and install the rubber washe_ in each end
of the inlet hoses.
3. (90 ° elbow end)
Carefifllv com_ect the inlet
hose marked HOT to the
outside "H" outlet of the
water \;five. Tighten by
hand, then tighten another
2/3 mrn with pliers.
Carefifllv com_ect the other
inlet hose to the inside "C"
outlet of the water wflve. Tighten bv hand; then tighten
another 2/3 mrn with pliers. Do not crossthread or
over-tighten these comaections.
4. Com_ect the inlet hose ends to the HOT and COI,D
water fimcets tightly by hand, then tighten another 2/3
mrn with pliers. Turn the water on and check fin" leaks.
Careflfllv move the washer to its final location. Genflv
5,
lifi up on the fl'ont of the washer and slide back.
NOTE: Do not use the dispenser drawer or door to lifi
the washer.
6,
_]th the washer in its
final position, place a
level on top of the
washer (if the washer
is installed trader a
counter, the washer
should not be able to
rock). At!just the fl'ont
leveling legs up or
down to ensure the washer is resting solid. Tm'n the
lock nuts on each leg up towards the base of the
washer and snug with a wrench.
NOTE: Keep the leg extension at a minimum to
prevent excessive vibration. The fi_rther out the
legs are extended, the more the washer will vibrate.
If the floor is not level or is damaged, you may have
to extend the rear leveling legs. For tmdercounter
instnllations, you can at!just the rear legs by removing
the front service panel.
15
Page 16

Installation Instructions
INSTALLING THE WASHER (cont.)
7. Fo_m a U shape on tile end of tile drain hose with
tile hose pointed toward tile drain. Place tile hose
in a laundry tub or standi)ipe and secure it with
tile cable tie provided in tile enclosm'e package.
NOTE: If the drain hose is placed in a standpii)e
without limning a U shape, a siphoning action could
occm: There must be an air gap around tile drain hose.
A snug hose fit can also cause a siphoning action.
CableTie
CableTie
9. Turn on tile power at a circuit breaker/fllse box.
10. Read the rest of this Owner's Manual. It contains
wduable and hell)tiff information that will save vou
time and monev.
11. Before starting the washer, check to make sure:
Main power is turned on.
Tile washer is plugged in.
Tile water fimcets are turned on.
F_IThe unit is level.
Tile shiI)ping support hardware is removed
and saved.
Tile drain hose is properly tied up.
There are no leaks at tile faucet, drain line
or w;ishei:
12. Rim tile washer through a complete cycle. Check
fi:,r water leaks and proper operation.
13. If yam" washer does not operate, please review
the Before You Call For Service section before
calling tar service.
14. Place these inst_ uctions in a location near the
washer fin" fllture reference.
8. Plug tile power cord into a grounded outlet.
NOTE: Check to be sure the power is off at a
circuit breaker/fllse box before plugging the power
cord into an outlet.
CableTie
REPLACEMENT PARTS
If replacement parts are needed fin" your washe_; they
can be ordered by visiting ore" Website at ge.com or bv
calling 800,GE,CARES,
16
Page 17

Beforeyoucall forservice...
Troubleshooting -tips
Save time and money! Review the charts on the following
pages first and you may not need to call for service.
Possible Causes What ToDo
Waterleaks Fill hoses or drain hose is • Make sure hose c(mnections are tight at washer and
improperly comaected tiu/cets and make sure end of drain hose is con'ecflv
Household drain may • Check hotlsehold l)hunbing. You may need to call
be dogged a l)ltmd)e_:
Constant water pressure • Tighten hoses at the tiu/cets and ttlrla the water off
to the fill hoses at the atier each use.
water source
Oversudsh_g " Use loss detergent or low sudsing detergent.
Toomany suds Type of detergent " Switch t() a h _sudsing detergent a nd fl)lh _w
Very soft water " Try loss detergent.
inserted in and secured to drain tiwilitv.
• Check condition of the fill hoses; they shotdd be
replaced every 5 vea_s.
instructions on package.
Water won't drain Drain hose is khaked or • Straighten drain hose and make stu'e washer is not
improperly comlected sitting on it.
" Top of drain outlet shotfld be loss than 8 ft. (2.5 m)
:l|)()ve flO()l:
Household drain may • Check household l)hunbing. You may need to call
be dogged a l)luml)e_:
Watertemperature Control is not set properly • Check water temperature control and ac!iust.
is incorrect
Water supply is improperly " Make stu'e hoses are connected to correct thu('ets.
comlected
Water valve screens are * T/1/"11 ()_ the i\_ltel" S()UFCe ;111(1 F_J110\re the l\tlte]" COIl])ect]oI1
stopped up hoses fl'om the up])er back of the washe/: Use a brus]l or
toothl)ick to clean file screens in file machine, Recolmect
the h/)ses and true1 the water back on.
House water heater is " Make sure house water heater is delivering water
not set properly at 120°-140°F (48°-60°(:).
Water does not enter Water supply is turned off • Turn on b()th h()t and cold finwets fidlv.
washer or enters slowly
/7
Page 18

Beforeyoucall forservice...
Possible Causes What To Do
Washer pauses in cycle The washer normally pauses
between washing steps
Washer won't operate Washer is unplugged • Make sure cord is I)lugged,, secm'elv• into a working, outlet.
Water supply is turned off • Turn both hot and cold Lmcets fllllx on.
Circuit brea_ker/fuse is • Check house circuit breake_/fllses. Replace fllses or
tripped/blown reset breaker: Washer should haxe separate outlet.
Controls are not set • Check controls and make sure the STARTer
properly DELAFSTARTbutton has been pressed.
Door is open • Close door and press the STARTbutton.
Dispe_ser drawer is open • Close drawe_:
Motor is overheated • "x_asher motor will stop if it becomes oxerheated. It
will automatically restart alter a cool dowu period of
up to 30 minutes (if washer has not been manually
turned off).
Washerwon'tspin Washer door open • Make sm'e door is ch)sed.
Dispenser &cawer open • Close (h'awex;
Load is too small • Add one or two similar items to help balance the load.
Possible Causes What To Do
Washer is noisy Washer is uneven • Make sure washer is level and rests firefly on the floox:
Washer load is m_balmlced • Press the PAUSEbutton to stop the washer, open the
door and redistribute the load evenlx. Close the door
and restart.
High pitch jet engine som_d • This is nom_al din'lug the spin cycle.
Squealing somad or hot • Washer is oxerloaded. Stop washer and reduce load.
rubber odor
Shipping bolts mid foa_m block • See Installation Instructions fin" directions to remoxe
have not been removed shipping bolts and loam block.
Rattling m_d clm_khag caused • Check (hmn for foreign objects. Turn items with
by foreign objects in tub metal fasteners inside out. Call authorized serxicer to
or pump or metal fasteners inspect pump.
hitting tub
i!!
Lintorresidueon
clothes
Possible Causes
Incorrect sorting
Washing too long
Detergent not dJssolvhag • Try a liquid detergent.
Overloading
Incorrect use of fabric softener • Check rid)tic softener package fiw instructions and fi)llow
What ToDo
• Separate lint produce_ ti'om lint collecting.
• Excess wash time max create lint.
• /_.lse tV}llIneI" water teinperattlre.
• Wash drmn max be rifle loaded xfith loosely added items.
directions for usino,_ dispense_;
/8
Page 19

Possible Causes What ToDo
Clothes too wet Load is too small * Add one to two similar items.
Load is out of balance * Redistribute load.
Pilling Result of normal wear on • X_]file this is not caused by tire washeL you can slow tire
poly-cotton blends mad pilling process 1U washing gm_ueuts inside out.
fuzzy fabrics
Grayed or yellowed Not enough detergent • Else c(m'ect mnount (ff detergent.
clothes
Hard water • krse hottest water safe fin"tid_ric.
• Use a water conditioner like Calgon bnmd or install
:1 w:lteI" S()_tellel',
Water is not hot enough • Make sm'e water heater is delivering water at
120°-140°F (48°-60°C).
Detergent is not • TI_' a liquid detergent.
dissolving
Dye Wmasfer • Sort clothes by colo_:/f thbfic label stntes wash separate/g
trustable dyes may be indicated.
Colored spots Incorrect use of fabric • Check tid_ric soDeuer package fl)r instructions and tollow
softener directions tot using dispeuseL
Dye transfer • Sort whites or lightly colored items fl'om dark colors.
• Prouq)tly rel//OVe wash load ti'om washer.
Wrinkling Improper sorting • Avokl mixing heavv itelus (like work clothes) with
light items (like l_louses).
Overloading • l,(>ad )r(>tll"washer s(> cloth es have en()ugh ro(>m
tO U/OVe ti'eelv.
Incorrect wash cycle • Match Cycle selection to the t}pe ot ed)fic you are
washing (especially tot easy care loads).
Repeated washhlg in • Wash in w:mn or cold water:
water that is too hot
Snags, holes, tears, rips Phas, snaps, hooks, sharp • Fasten snaps, hool_s, buttons and zippers.
or excessive wear buttons, belt bucldes,
zippers, mad sharp objects
• Remove loose items like pins, objects in pockets
left in pockets and shm]) lmttous.
• Turn knits (which snag easily) inside out.
Undiluted chlorine bleach • Never add tmdiluted bleach to wash or allow clothes
to come in contact with tu_diluted bleach. Follow
directions for use of bleach dispeuseL
Chemicals like hair bleach
or dye, permmaent wave
solution
• Rinse items that may have chemicals on them betore
washing.
/9
Page 20

m
w
q_
_m
q_
m
q_
NOte$_
mw_
q_
R_
m
q
m
n
2O
Page 21

NOteS.
rJ_
I
rJ_
€_
w
m
w
u_
21
u_
I
_Ah
Page 22

m
w
q_
_m
q_
m
q_
NOte$_
mw_
q_
R_
m
q
m
n
22
Page 23

GEWasherWarranty.
All warranty service provided by our Factory Service Centers,
or an authorized Customer Care_ technician. Toschedule service, on-line,
24 hours a day, visit us at ge.com, or call 800.GE.CARES(800.432.2737).
Please have serial number and model number available when calling
for service.
i
One Year Anypart of the washer which t_fils due to a detect in mate_'ials or workmanship. Dtu'ing this
From the date of the limited one-year warranty, GE will also i)roxide, free of charge, all labor and related set\ice
origina!purchase costs to x'eplace the defective part.
• Service trips to your home to teach you how to use
the product.
• hnproper h_stallation, delivery or maintenance.
• FaJhtre of the product if it is abused, llfisused, or used for
other than the intended purpose or used commereially.
• Damage after delivery.
We Will Replace:
• Replacement of house fuses or resetting of circuit
breakers.
• Damage to the product caused by accident, fire, floods
or acts of God.
• h_cidentaJ or consequential damage caused by possible
defects with this appliat_ce.
• Product not accessible to provide required service.
Staple your receipt here.
Proof of the original purchase
date is needed to obtain service
under the warrantF
EXCLUSION OFIMPLIED WARRANTIES--Your sole and exclusive remedy is product repa# as provided in this
Limited Warranty. Any implied warranties, including the implied warranties of merchantability or fitness for a
particular purpose, are limited to one year or the shortest period allowed by law.
Thiswarrantyis extendedto theonginalpurchaserand any succeed/hgowner forproductspurchasedfor home usewithin theUSA.If the product
islocated in anarea where serviceby a GEAuthorizedServiceris not availeble,youmay beresponsiblefor a tripchargeor youmay berequired
tobring theproduct to anAuthon2edGEService/ocatlbnforservice.InAlaska,the warranty excludesthecostofshlpplbg orserviceca/leto yourhome.
Somestates do not allow theexclusionor hYmtationof incidental or consequentialdamages. Thiswarrantygives youspecificlegal n_?hts,and you
may also have othernghts which vary fromstate tostate. Toknow what your legal nghtsare, consult your local or stateconsumeraffaffs office or
yourstate_ Attomey General.
Warrantor:General Electric Company.Louisville,KY 40225
23
Page 24

ConsumerSupport.
gEAppliancesWebsite go.corn
Have a question or need assistanre _dth ?our appliaure? Tr} the GE Appliances _v\ebsite 24 horn's a day,
am da* of the _,ear! For greater c{mvenience and thster serxice, }ou can now download Owner's Mmmals,
order parts or even schedule service on-line.
ScheduleService go.corn
Exper{ (;E repair sel_'ice is onl} one step awa_ fl'om _our doo_: Get on-line and schedule _our service at }our
convenience 24 horn's an) da) of the )ear! Or call 800.GE.(2M_ES (800.432.2737) during mmnal business horn's.
RealLifeDesignStudio go.corn
GE suppoIts the Univexsal Design concept--prodt/cts, services and eIiviroI]ll]ellts that call be used by people oI all
ages, sizes and capabilities. We recognize the need to design fbr a wide range of physical and mental abilities and
impairments. For details of GE's Universal Design applications, including ldtchen design ideas fbr people with
disabilities, check out our Website toda> For the hearing impaired, please call 800.TDD.GEAC (800.833.4322).
ExtendedWarranties go.corn
Purchase a GE extended _<u'ranB and learn about special disrom_ts that are a_ailable while _our. _<m'anB is still
in efibct. Y_m can pro'chase it on-line an}_ime, or call 800.626.2224 during mmnal business horn's. (;E Consumer
Home Services will still be there atter }our warrant} expires.
PartsandAccessories
Individuals qualified to sel_'ice their own appliances can have pmq:s or accessories sent direcdv to their homes
(VISA, MasterCard and Discover calds aie accepted). Order {}]]-lille today, 24 hours every clay or by ph{me at
800.626.2002 dining normal business hours.
instructions contained in this manual cover procedures to he performed by any user. Other servicing generally shouldhe
referred to qualified service personnel Cautionmust he exercised since impreper servicing may cause unsafe operation.
ge. corn
_ontact Us go.corn
If you are not satisfied with the service you receive fl'{}m GE, contact us on ore" Website with all the details
including yore" phone numbec or write to: General Manage_; Customer Relations
GE Al:lpliances, Appliance Park
Ix}uisslle, KY 40225
Register your new appliance on-line---at your convenience! Timel} product registration will allow for enhanced
q
"I RegisterYourAppliance ge.com
communication and prompt service trader the temps of }our _arranB_ sh{}uld the need arise. _m ma} als{}
_, mail ill the pre-printed registrati{m card included in the l)acldng, material.
24
 Loading...