

Page 1

ge.com
WSLP1500
WSLS1500
Owner’s Manual &
Installation Instructions
Washers
175D1807P628 49-90361-1 12-08 JR
Safety Information . . . . . . . . . . . 2, 3
Operating Instructions
Control and Indicator Settings . . . . . .5, 6
Loading and Using the Washer . . . .7, 8
Special Washer Features . . . . . . . . . . . .4
Installation Instructions
Alcove or Closet Installation . . . . . . . 12
Electrical Requirements . . . . . . . . . . . 10
Grounding Instructions . . . . . . . . . . . . 10
Installation Requirements . . . . . . . . . . . 9
Leveling the Washer . . . . . . . . . . . . . . 10
Washer Connections for
Portable Model . . . . . . . . . . . . . . . . 13–16
Washer Connections for
Stationary Model . . . . . . . . . . . . . . 11, 12
Troubleshooting Tips
Before You Call For Service . . . . . 17–20
Status Indicators . . . . . . . . . . . . . . . . . . 17
Consumer Support
Consumer Support . . . . . . . Back Cover
Ownership Registration for
Customers in Canada Only . . . . .21, 22
Warranty for Customers
in Canada . . . . . . . . . . . . . . . . . . . . . . . . .24
Warranty for Customers
in the U.S.A. . . . . . . . . . . . . . . . . . . . . . . .23
Write the model and serial
numbers here:
#
#
You can find them on a label
on the back of the washer.
Laveuses
Lavadoras
Manuel d’utilisation
et d’installation
Manual del propietario
e instalación
La section française commence à la page 25
La sección en español empieza en la página 49
Page 2
2
IMPORTANT SAFETY INFORMATION.
READ ALL INSTRUCTIONS BEFORE USING.
Consumer Support Troubleshooting Tips
Operating Instructions
Safety Instructions
Installation
Instructions
■ Install or store where it will not be exposed
to temperatures below freezing or exposed
to the weather, which could cause permanent
damage and invalidate the warranty.
■ Properly ground washer to conform with all governing
codes and ordinances. Follow details in Installation
Instructions.
WARNING!
For your safety, the information in this manual must be followed to minimize the risk
of fire or explosion, electric shock, or to prevent property damage, personal injury or
loss of life.
The instructions in this manual and all other literature included with this washer are
not meant to cover every possible condition and situation that may occur. Good, safe
practices and caution MUST be applied when installing, operating and maintaining
any appliance.
WATER HEATER SAFETY
Under certain conditions, hydrogen gas may be produced in a water heater that has not been used for two weeks
or more. Hydrogen gas can be explosive under these circumstances.
If the hot water has not been used for two weeks or more, prevent the possibility of damage or injury by
turning on
all hot water faucets and allowing them to run for several minutes. Do this before using any electrical
appliance
which is connected to the hot water system. This simple procedure will allow any built-up hydrogen
gas to escape. Since the gas is flammable, do not smoke or use an open flame or appliance during this process.
PROPER INSTALLATION
This washer must be properly installed and located in accordance with the Installation Instructions before it is used.
■ Keep the area underneath and around your
appliances free of combustible materials such as
lint, paper, rags and chemicals.
■ Do not leave the washer door open. An open door
could entice children to hang on the door or crawl
inside the washer.
■ Close supervision is necessary if this appliance is
used by or near children. Do not allow children to
play on, with or inside this or any other appliance.
YOUR LAUNDRY AREA
Page 3
3
Consumer Support
Troubleshooting Tips
Operating Instructions
Safety Instructions
Installation
Instructions
ge.com
■ Never reach into washer while it is moving.
Wait until the machine has completely stopped
before opening the door.
■ Do not mix chlorine bleach with ammonia
or acids such as vinegar and/or rust remover.
Mixing different chemicals can produce a toxic
gas which may cause death.
■ Do not wash or dry articles that have been
cleaned in, washed in, soaked in or spotted
with combustible or explosive substances (such as
wax, oil, paint, gasoline, degreasers, dry-cleaning
solvents, kerosene, etc.) which may ignite or
explode. Do not add these substances to the
wash water. Do not use or place these substances
around your washer or dryer during operation.
■ The laundry process can reduce the flame
retardancy of fabrics. To avoid such a result,
carefully follow the garment manufacturer’s
wash and care instructions.
■ To minimize the possibility of electric shock,
unplug this appliance from the power supply
or disconnect the washer at the building’s
distribution panel by removing the fuse or
switching off the circuit breaker before attempting
any maintenance or cleaning. NOTE: Pressing the
power button does NOT disconnect the appliance
from the power supply.
■ Never attempt to operate this appliance
if it is damaged, malfunctioning, partially
disassembled, or has missing or broken parts,
including a damaged cord or plug.
WHEN USING THE WASHER
■ Turn off water faucets to relieve pressure on
hoses and valves and to minimize leakage if
a break or rupture should occur. Check the
condition of the fill hoses; GE recommends
changing the hoses every 5 years.
■ Before discarding a washer, or removing it
from service, remove the washer door to prevent
children from hiding inside.
■ Do not attempt to repair or replace any part of
this appliance unless specifically recommended
in this Owner’s Manual, or in published user-repair
instructions that you understand and have the
skills to carry out.
■ Do not tamper with controls.
WHEN NOT IN USE
READ AND FOLLOW THIS SAFETY INFORMATION CAREFULLY.
SAVE THESE INSTRUCTIONS
Use this
appliance
only for its
intended
purpose as
described in
this Owner’s
Manual.
Page 4
4
Special washer features.
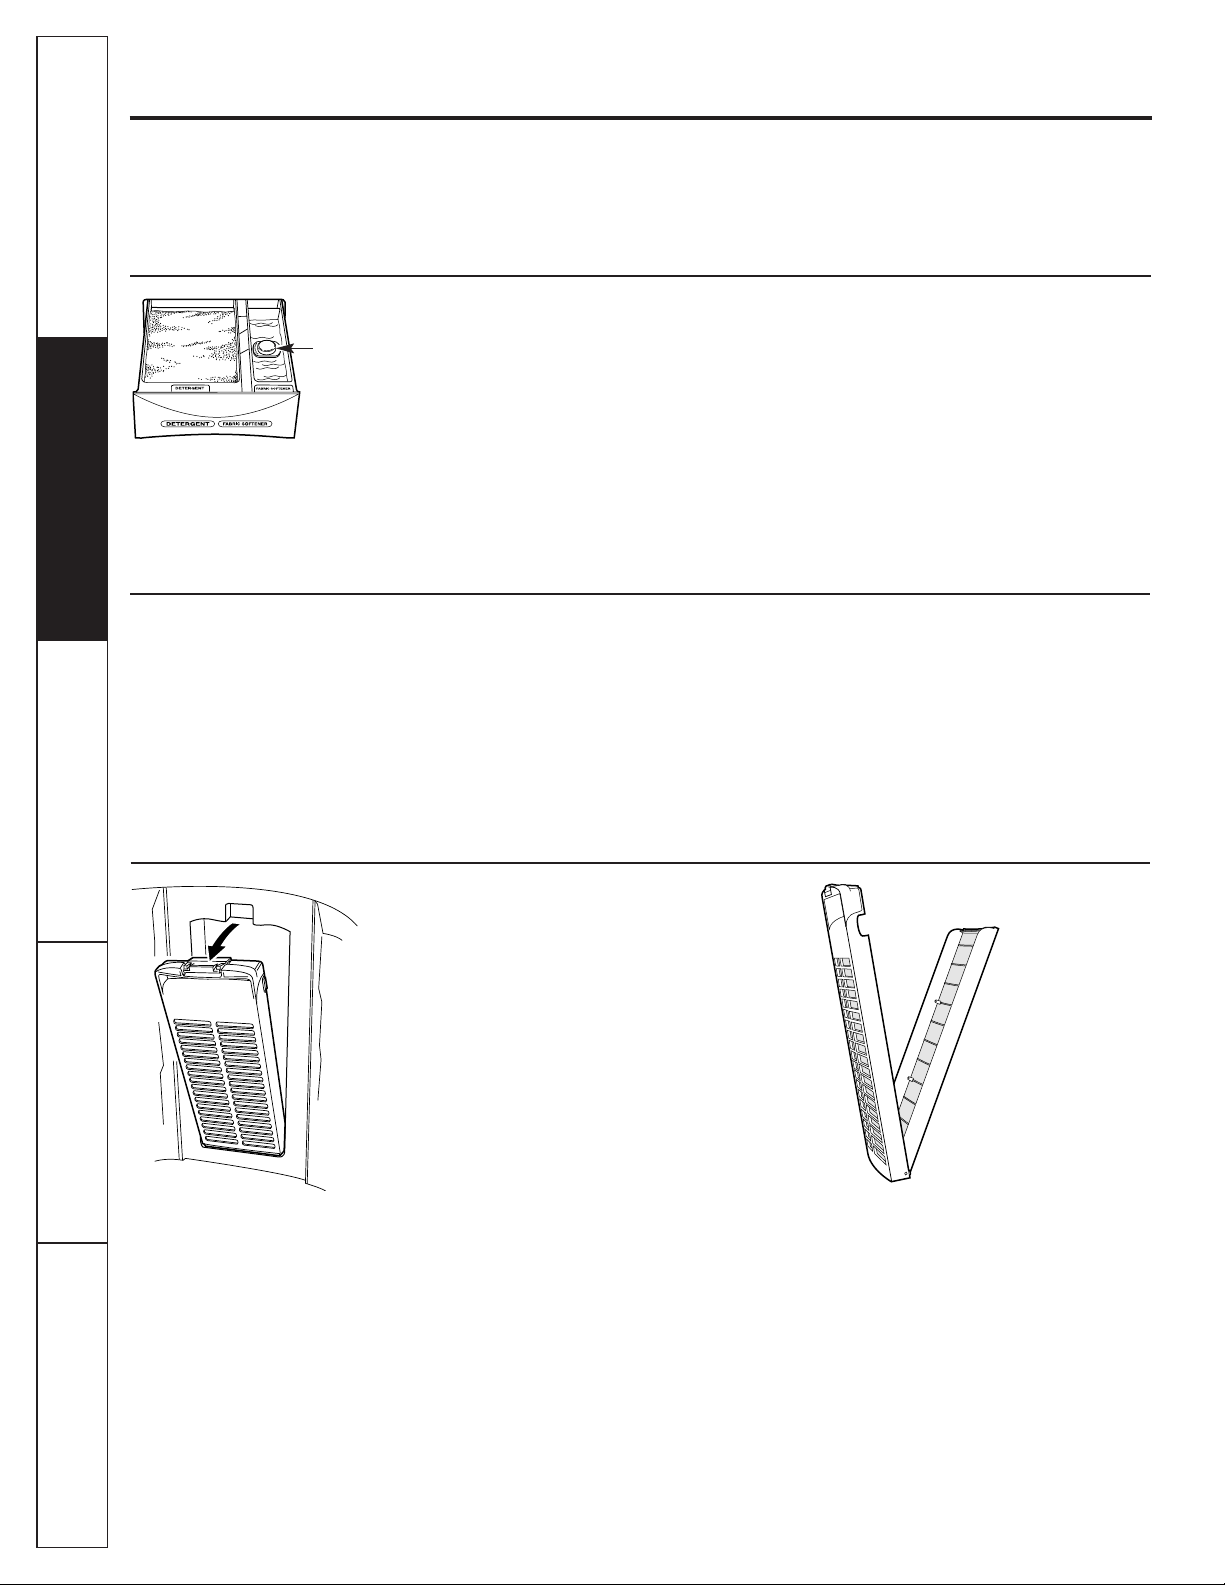
Detergent and Fabric Softener Dispenser Drawer
The detergent and fabric softener dispensers
will automatically release their contents at
the proper time during the cycle.
To Use the Detergent Dispenser:
Add measured detergent to the dispenser.
Make sure detergent is spread evenly and
is level.
To Use the Fabric Softener Dispenser:
Use only liquid fabric softener. Pour into
dispenser, using amount recommended
on package.
■ Do not fill any higher than the top of the
maximum fill tower.
■ Never pour fabric softener directly on
clothes. It may stain them.
Cleaning the Detergent and Fabric Softener Dispenser Drawer
1. Remove the drawer by opening it fully
then tilting the front of the door down.
Pull out.
2. Rinse the drawer with water. If necessary
use a soft cloth to wipe off any debris.
3. Line up the drawer with the opening and
push the dispenser drawer straight in.
Lint Filter
Clean the lint filter inside the wall of
the wash basket once a week for best
filtering results.
To remove:
Press the tab at the top of the filter and
pull out.
To clean:
Open the filter. Clean the filter with
a toothbrush.
Maximum
Fill Tower
Before starting the washer:
• Load the laundry in the washer.
• Add the detergent and fabric softener to the dispenser drawer.
Consumer Support
Troubleshooting Tips
Operating Instructions
Safety Instructions
Installation
Instructions
Installation
Instructions
Safety Instructions
Operating Instructions
Page 5
Consumer SupportTroubleshooting TipsOperating Instructions
Safety Instructions
Installation
Instructions
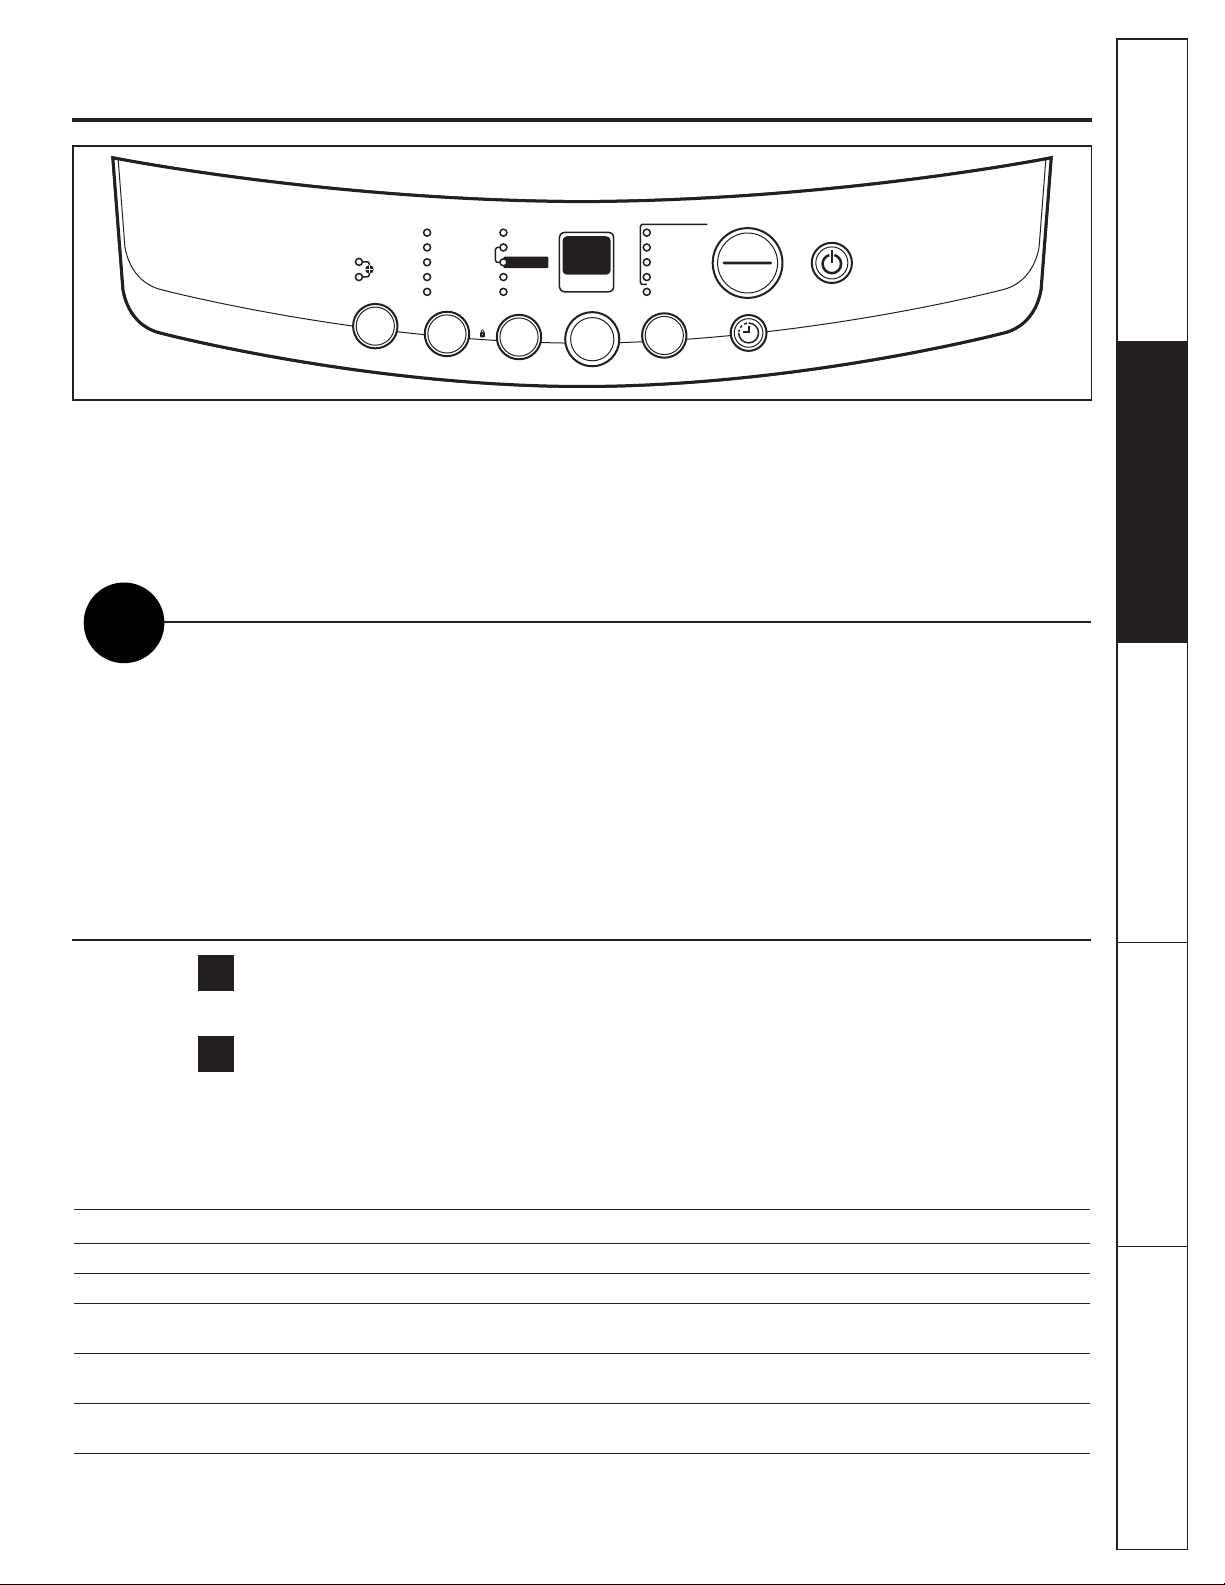
About the control and indicator settings. ge.com
POWER ON/OFF
Press the POWER ON/OFF button to turn on the control panel.
WASH OPTIONS
Choose the wash options you would like to include in the cycle. Press the WASH OPTIONS button
until all the options you want to include are lit. More than one option can be selected.
2
1
To Use Automatic One-Touch Washing
START
PAUSE
The LOAD SENSING feature automatically senses the size of your load, fills with the appropriate amount
of water, and calculates the amount of wash time required to complete the cycle.
NOTE: When using the LOAD SENSING feature, it is normal for the pulsator to rotate before water fills
in the tub.
To choose the automatic LOAD SENSING feature, press POWER ON/OFF.
The COLORS indicator light will light up automatically unless you have selected one of the other LOAD
SENSING cycles such as WHITES, DELICATES, SPEED WASH, CUSTOM CYCLE or ULTRA CLEAN.
Then simply press START/PAUSE.
To Choose Your Own Cycle Selections
Before starting the washer:
• Load the laundry in the washer.
• Add the detergent and fabric softener to the dispenser drawer.
Soak+Wash Soak+Wash+Heavy Wash+Rinse Wash+Heavy Wash Rinse Wash Rinse Spin
Cycle +Rinse+Spin Duty+Rinse+Spin +Spin Duty+Rinse+Spin +Rinse +Spin Only Only Only
COLORS X X X X X X X X X
WHITES X X X X X X X X X
DELICATES X X X X X X X X X
SPEED X X X X X X X X X
WASH
CUSTOM
X X X X X XXXX
CYCLE
ULTRA
X
CLEAN
5
COLD
HOT
TEMP
WARM
EXTRA LARGE
LARGE
MEDIUM
SMALL
EXTRA SMALL
LOAD
SOAK COLORS
WASH
HEAVY DUTY
RINSE
SPIN
LO
C
K
H
OL
D
3
SECS
T
O
LOCK/
UN
LOCK
C
ON
T
R
OL
S
EST. MINUTES
REMAINING
ULTRA
CLEAN
OPTIONS
LOAD SENSING
WHITES
DELICATES
SPEED WASH
CUSTOM CYCLE
CYCLES
START
PAUSE
POWER
DELAY WA SH
18 HOURS
to
1
Page 6
6
About the control and indicator settings.
LOAD SIZE
The water level should just cover the clothes. Adjust the load size accordingly. Loosely load
clothes no higher than the top row of holes in the washer basket.
WASH CYCLE
These wash cycles control the length of the washing process. The chart below will help match the
WASH CYCLE setting to your specific laundry needs. When a cycle is selected, the automatic
temperature that the machine defaults to can be changed to whatever temperature you desire.
Default Wash/Rinse Temperatures
COLORS For easy care and wrinkle-resistant items. WARM / COLD
WHITES For heavy to lightly soiled cotton, household HOT / COLD
linens, towels, work and play clothes.
DELICATES For lingerie and delicate fabrics with COLD / COLD
light to normal soils.
SPEED For one or two lightly soiled items WARM / COLD
WASH that are needed quickly.
CUSTOM Manually selected options of water WARM / COLD
temperature, load size, and wash
options saved for future uses.
ULTRA Maximizes detergent efficiency by adding WARM / COLD
CLEAN water in steps and slowly diluting the
detergent to the standard level.
TEMP WASH/RINSE
Select the water temperature for the wash and rinse cycles. Always follow fabric manufacturer’s
care label or instructions when laundering.
NOTE FOR PORTABLE MODELS: When using a one-faucet connection, adjust the water flow mix
and water temperature at the faucet.
START/PAUSE
Press the START/PAUSE button to start the wash cycle.
EST. MINUTES REMAINING
Displays the time remaining in the wash cycle. It will also display Status Indicators.
See Troubleshooting Tips.
NOTE: When the cycle is complete the control panel will turn off automatically.
3
4
5
6
7
Consumer Support
Troubleshooting Tips
Operating Instructions
Safety Instructions
Installation
Instructions
Installation
Instructions
Safety Instructions
Operating Instructions
Page 7
7
Consumer Support
Troubleshooting Tips
Operating Instructions
Safety Instructions
Installation
Instructions
Loading and using the washer.
Always follow fabric manufacturer’s care label when laundering. ge.com
Sorting Wash Loads
Loading the Washer
Load dry items loosely, no higher than the top row of
holes in the washer tub. When loading wet items
make sure you set the load/water level high enough
to allow the items to move freely. Water level should
just cover the clothes. To add items after washer has
started, open the lid and add the additional items.
Close the lid. Washer will start automatically.
■ Do not wash fabrics containing flammable
materials (waxes, cleaning fluids, etc.).
■ When the lid is up, a signal will sound and “Lo” will
appear in the display. The washer will not agitate
with the lid up.
Colors
Whites
Lights
Darks
Soil
Heavy
Normal
Light
Fabric
Delicates
Easy Care
Sturdy Cottons
Lint
Lint Producers
Lint Collectors
Care and Cleaning of the Washer
Wash Basket: Leave the lid open after washing to
allow moisture to evaporate. If you want to clean
the basket use a clean, soft cloth dampened with
liquid detergent, then rinse. (Do not use harsh
or gritty cleaners.)
Fill Hoses: Hoses connecting washer to faucet should
be replaced every 5 years.
Exterior: Immediately wipe off any spills. Wipe with
damp cloth. Try not to hit surface with sharp objects.
Moving and Storage: Ask the service technician to
remove water from drain pump and hoses. Do not
store the washer where it will be exposed to the
weather.
Long Vacations: Be sure water supply is shut off at
faucets. Drain all water from hoses if weather will
be below freezing.
Proper Use of Detergent
Add detergent and fabric softener before adding
clothes so that the detergent can work effectively.
Using too little or too much detergent is a common
cause of laundry problems.
Use less detergent if you have soft water, a smaller
load or a lightly soiled load.
GE recommends the use of High Efficiency
detergents. HE detergents are formulated
to work with low water wash and rinse systems.
HE detergents reduce the oversudsing problems
commonly associated with regular detergents.
Page 8
Loading and using the washer.
8
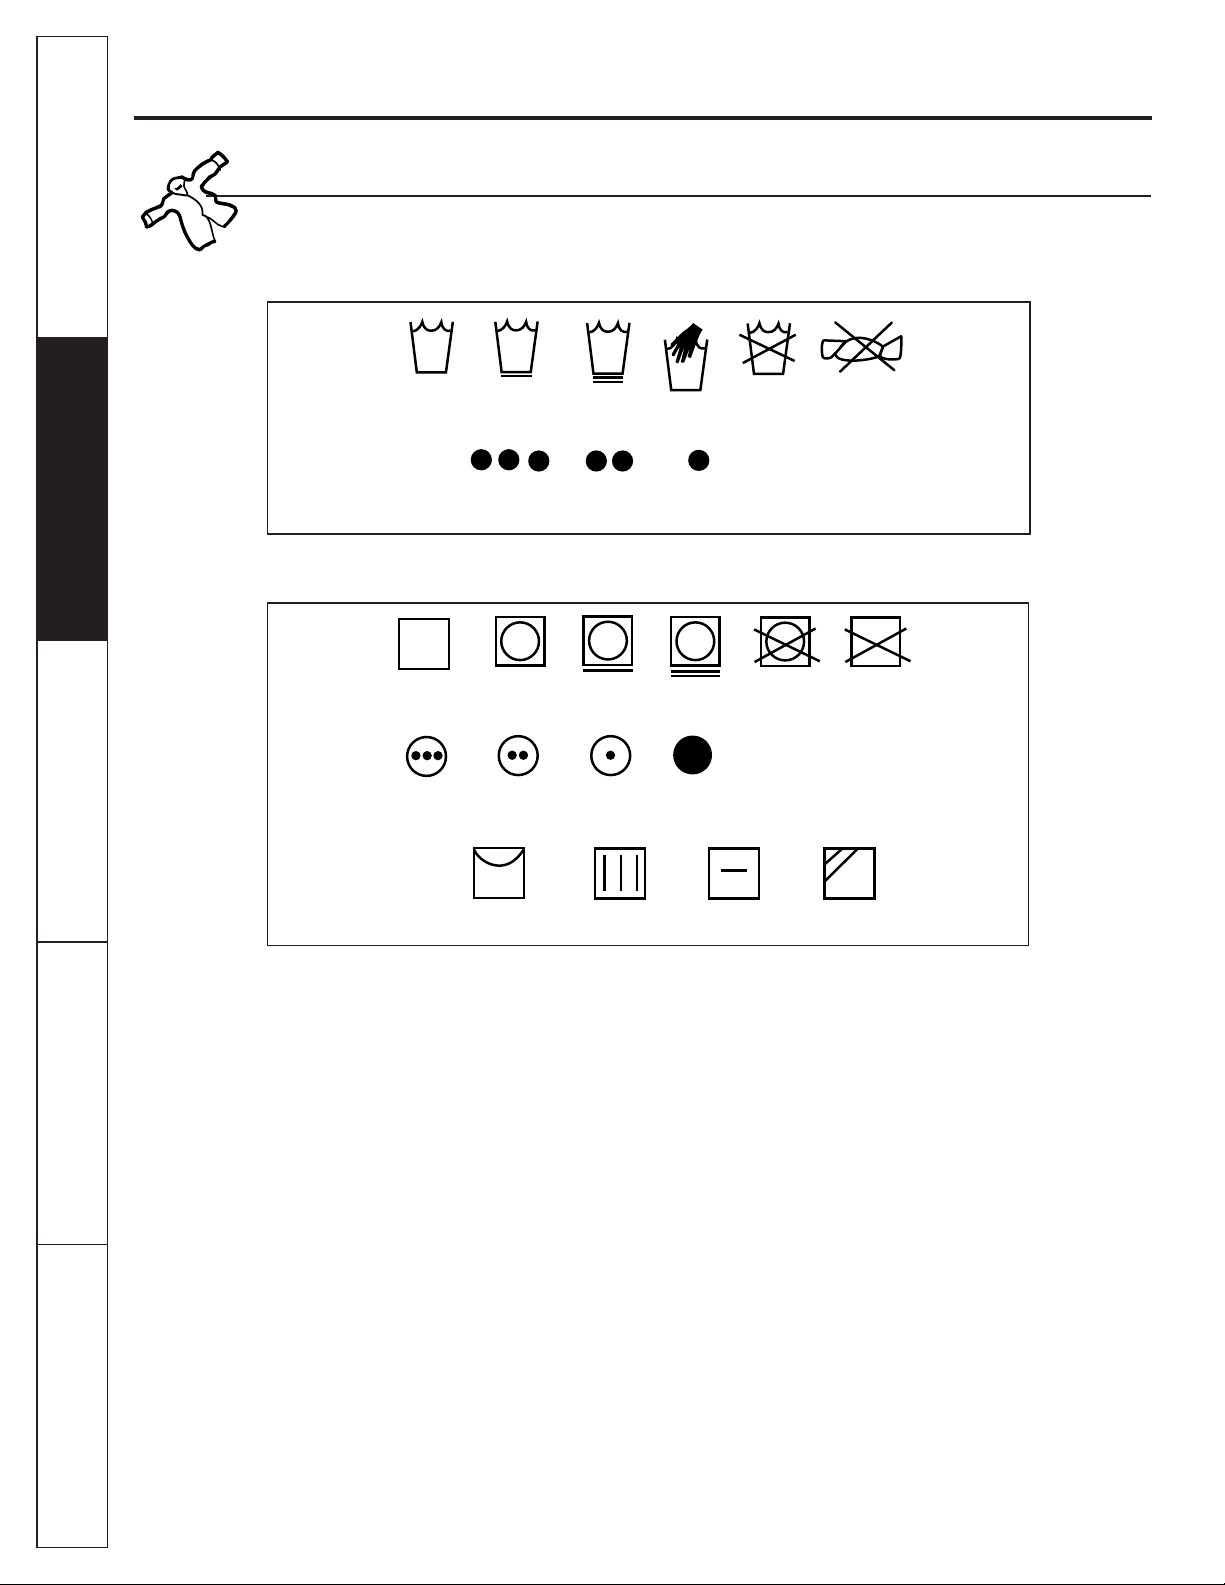
Fabric Care Labels
Machine
wash
cycle
Normal
Permanent Press/
wrinkle resistant
Gentle/
delicate
Hand wash
Do not wash Do not wring
Water
temperature
Hot
(50°C/120°F)
Warm
(40°C/105°F)
Cold/cool
(30°C/85°F)
Tumble
dry
Dry
Normal
Permanent Press/
wrinkle resistant
Gentle/
delicate
Do not tumble dry
Do not dry
(used with
do not wash)
Heat
setting
High
Medium
Low
No heat/air
Special
instructions
Line dry/
hang to dry
Drip dry
Dry flat
In the shade
WASH LABELS
DRY LABELS
Below are fabric care label “symbols” that affect the clothing you will be laundering.
Consumer Support Troubleshooting Tips
Operating Instructions
Safety Instructions
Installation
Instructions
Installation
Instructions
Safety Instructions
Operating Instructions
Page 9
9
BEFORE YOU BEGIN
Read these instructions completely and carefully.
•
IMPORTANT – Save these instructions
for local inspector’s use.
•
IMPORTANT – Observe all governing
codes and ordinances.
• Note to Installer – Be sure to leave these
instructions with the Consumer.
• Note to Consumer – Keep these instructions
for future reference.
• Skill level – Installation of this appliance requires
basic mechanical skills.
• Completion time – 1 hour
• Proper installation is the responsibility of the installer.
• Product failure due to improper installation is not
covered under the Warranty.
• Note
–
This appliance must be properly grounded,
and electrical service to the washer must conform
with local codes and ordinances and the latest
edition of the National Electrical Code, ANSI/NFPA 70.
Washer must be installed on firm flooring to minimize
vibration during spin cycles. Concrete flooring is best,
but wood base is sufficient providing floor support
meets FHA standards. Washer should not be installed
on rugs or exposed to the weather.
Install or store where it will not be exposed to
temperatures below freezing or exposed to the weather.
WASHER LOCATION
Installation
Washers
Instructions
WSLP1500 and WSLS1500
• WATER PRESSURE—Must be 10 p.s.i. minimum to 150
p.s.i. maximum dynamic pressure measured at faucet.
• WATER TEMPERATURE—Household water
heater should be set to deliver water at 120° to 150°F
(50° to 66°C) IN THE WASHER when HOT wash is
selected.
• SHUT-OFF VALVES—Both hot and cold shut-off valves
(faucets) should be supplied.
• DRAIN—Water may be drained into a standpipe or set
tub. The discharge height MUST NOT BE LESS THAN
30" nor more than 8' above the base of the washer.
The standpipe must be 11⁄2" minimum inside diameter
and must be open to the atmosphere.
PLUMBING
• Ensure washer is centered between the rack sides.
RACK INSTALLATION
This appliance must be supplied with the voltage and
frequency indicated on the rating plate (located on
the back of the washer) and connected to an individual,
properly grounded branch circuit, protected by a 15- or
20-amp circuit breaker or time-delay fuse.
If the washer is plugged into the dryer’s 115-volt outlet,
then the dryer needs to be on a dedicated circuit.
ELECTRICAL
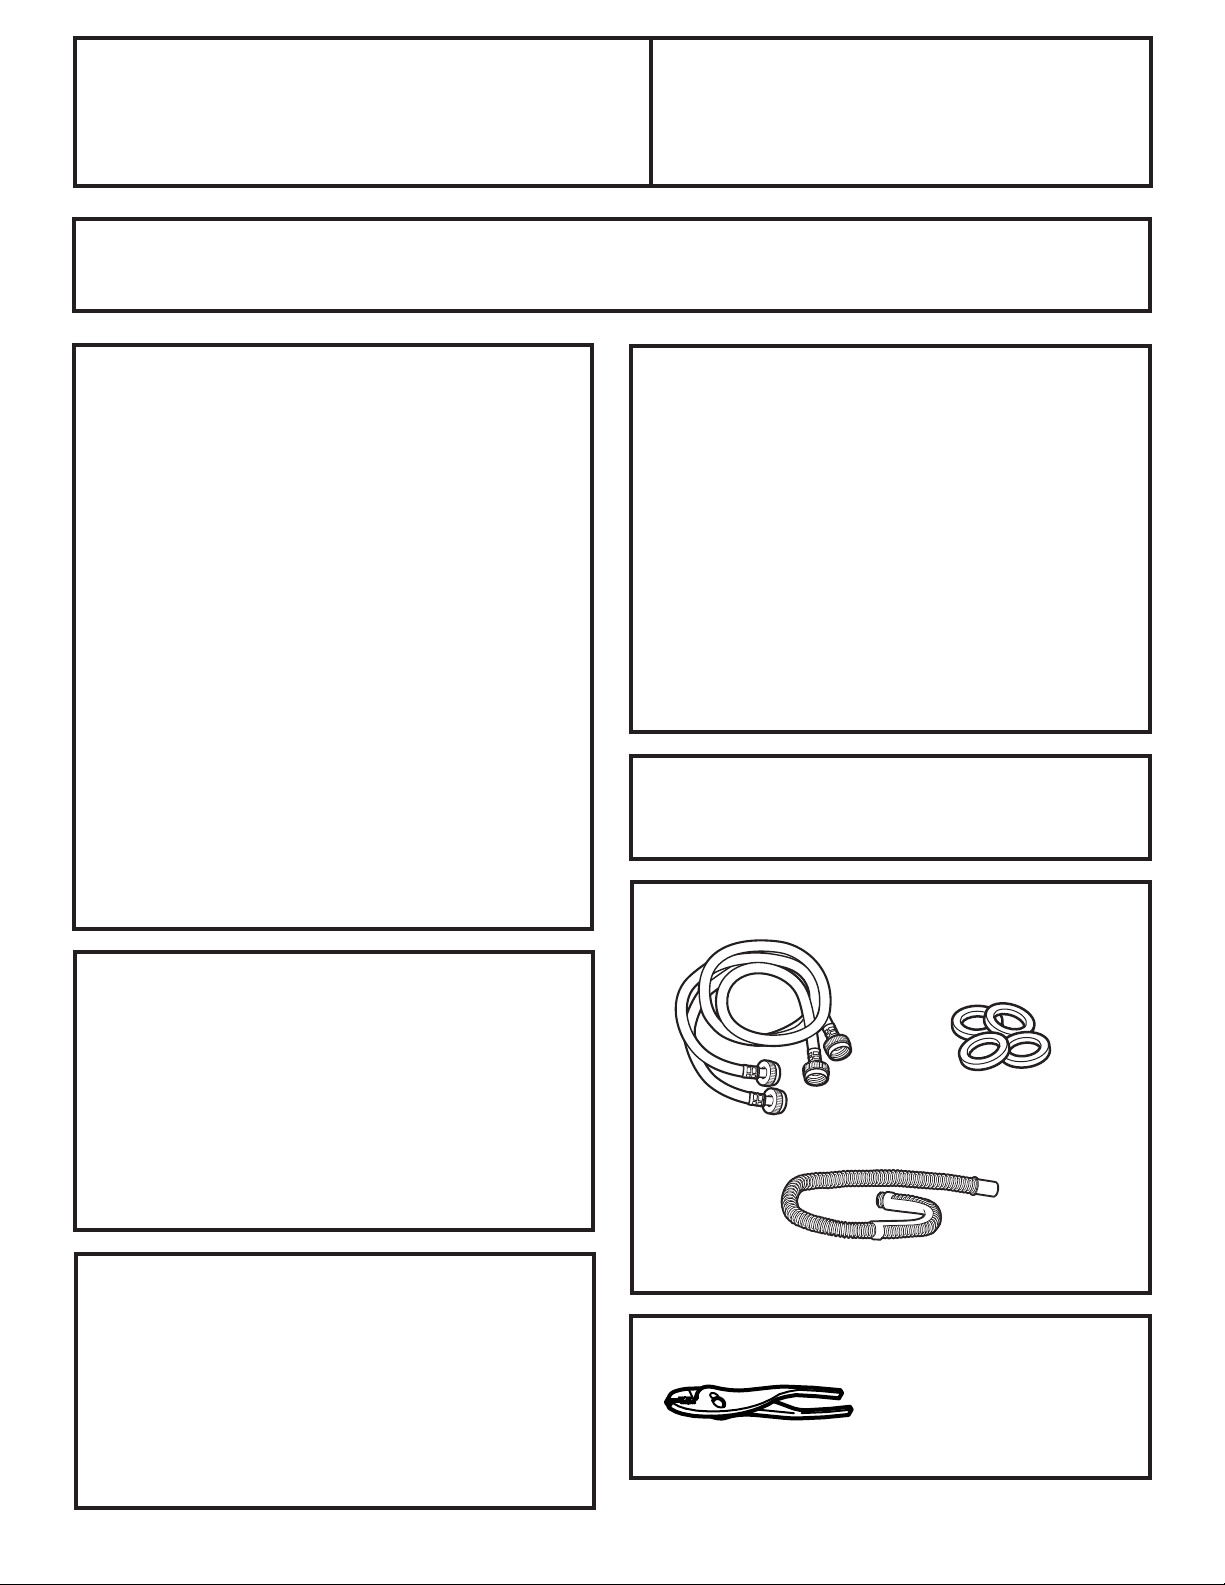
Pliers
TOOLS REQUIRED
Water Hoses (2)
PARTS SUPPLIED
Drain Hose
Rubber Washers (4)
If you have any questions, call 800.GE.CARES (800.432.2737) or visit our Website at: ge.com
In Canada, call 1.800.561.3344
or visit GEAppliances.ca
Page 10
10
CAUTION:For personal safety, do
not use an extension cord or adapter plug with this
appliance.
Do not, under any circumstances, cut or remove the
third grounding prong from the power cord. Follow
National Electrical Codes or prevailing local codes
and ordinances.
This appliance must be supplied with the voltage and
frequency indicated on the rating plate (located on the
back of the washer) and connected to an individual,
properly grounded branch circuit, protected by a
15- or 20-amp circuit breaker or time-delay fuse.
If the electric supply provided does not meet the above
requirements, call a licensed electrician.
ELECTRICAL REQUIREMENTS
Installation Instructions
This appliance must be grounded. In the event of a
malfunction or breakdown, grounding will reduce
the risk of electric shock by providing a path of least
resistance for electrical current.
This appliance is equipped with a cord having an
equipment grounding conductor and a grounding plug.
The plug must be plugged into an appropriate outlet that
is properly installed and grounded in accordance with all
local codes and ordinances.
DANGER: Improper connection of the
equipment-grounding conductor can result in a risk of
electrical shock. Check with a qualified electrician if you
are in doubt as to whether the appliance is properly
grounded.
Do not modify plug with this appliance; if it will not fit
the outlet installed, have a proper outlet installed by
a qualified electrician.
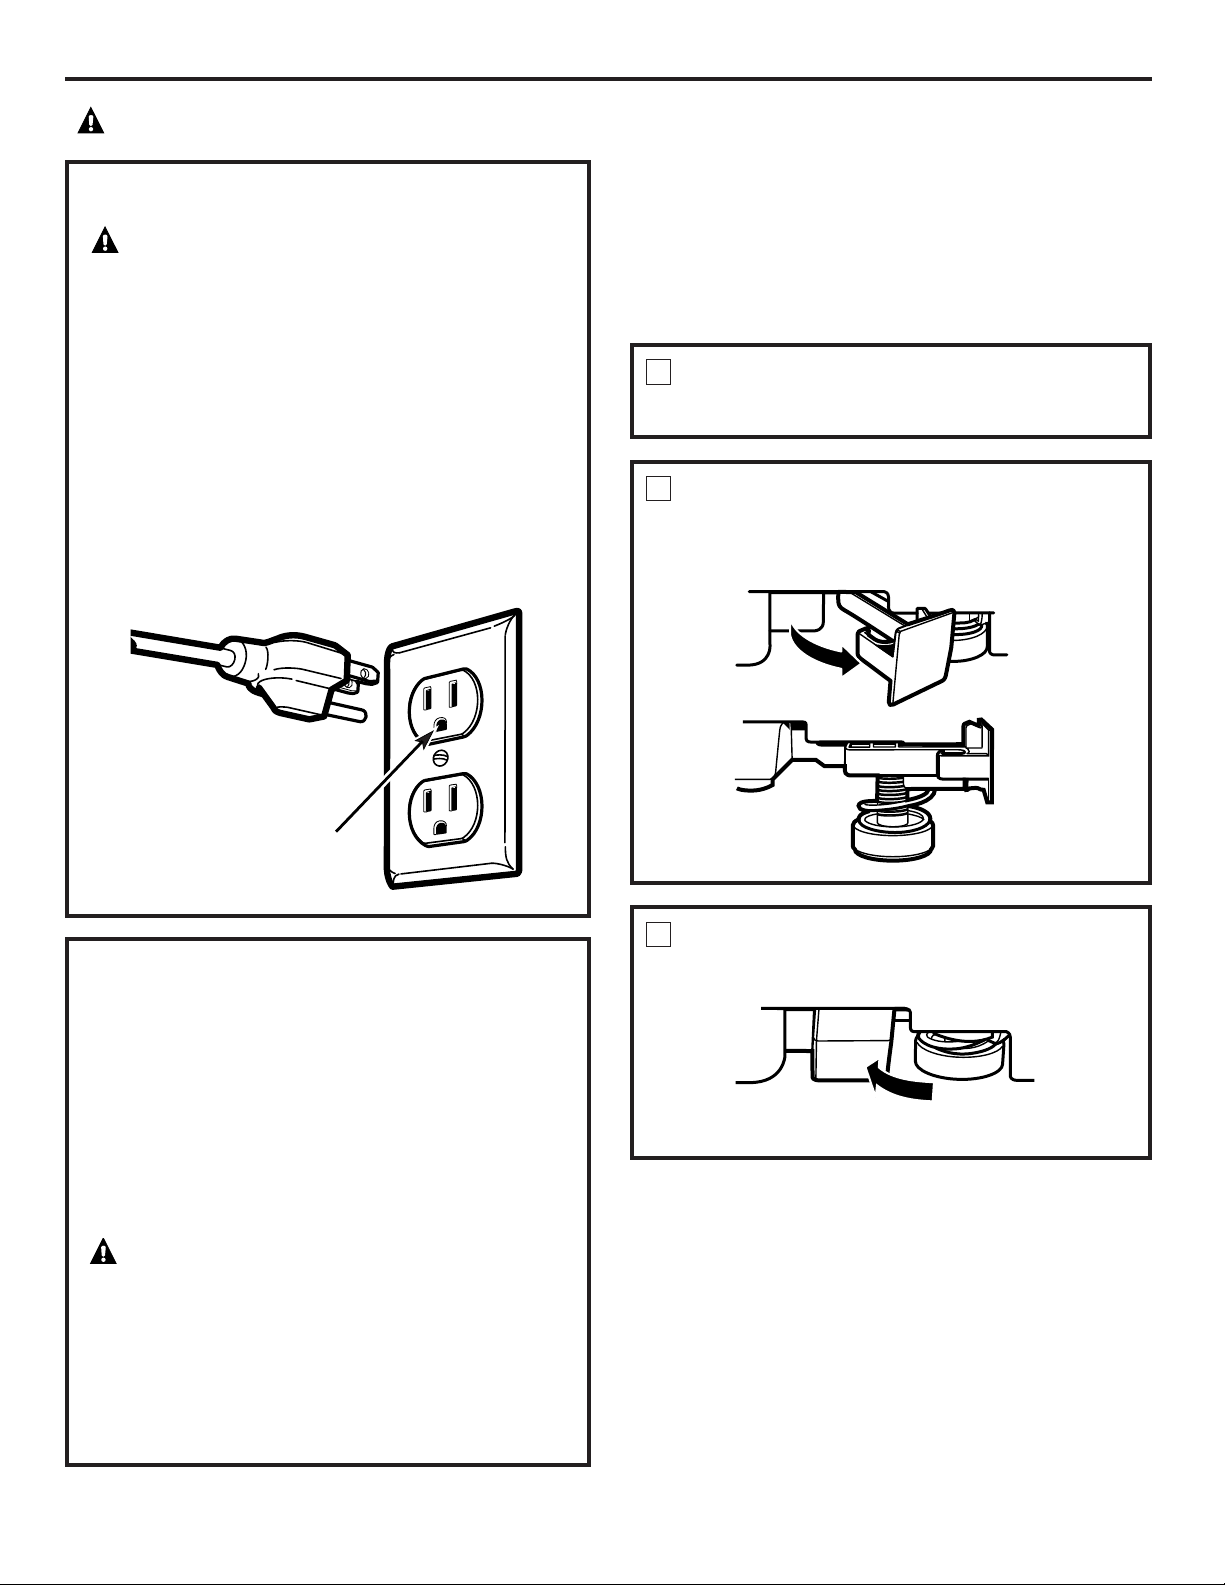
Insure proper ground
exists before use
CAUTION:Before plugging in washer, read the following electrical requirements.
GROUNDING INSTRUCTIONS
Before connecting the hoses, the washer must be level.
Leveling locks are located at the bottom front of the left
and right sides of the washer.
LEVELING THE WASHER—
STATIONARY MODELS
MAKE SURE THE WASHER IS IN ITS
FINAL LOCATION
1
PULL OUT THE LEVELING LOCKS
2
This releases the spring loaded leveling feet.
The washer will automatically level itself.
PUSH THE LEVELING LOCKS BACK IN
3
Do not kick or step on the leveling locks.
Page 11
11
Cable Tie
Cable Tie
Cable Tie
Laundry Tub
Stand Pipe
WARNING
:Make sure the washer is unplugged.
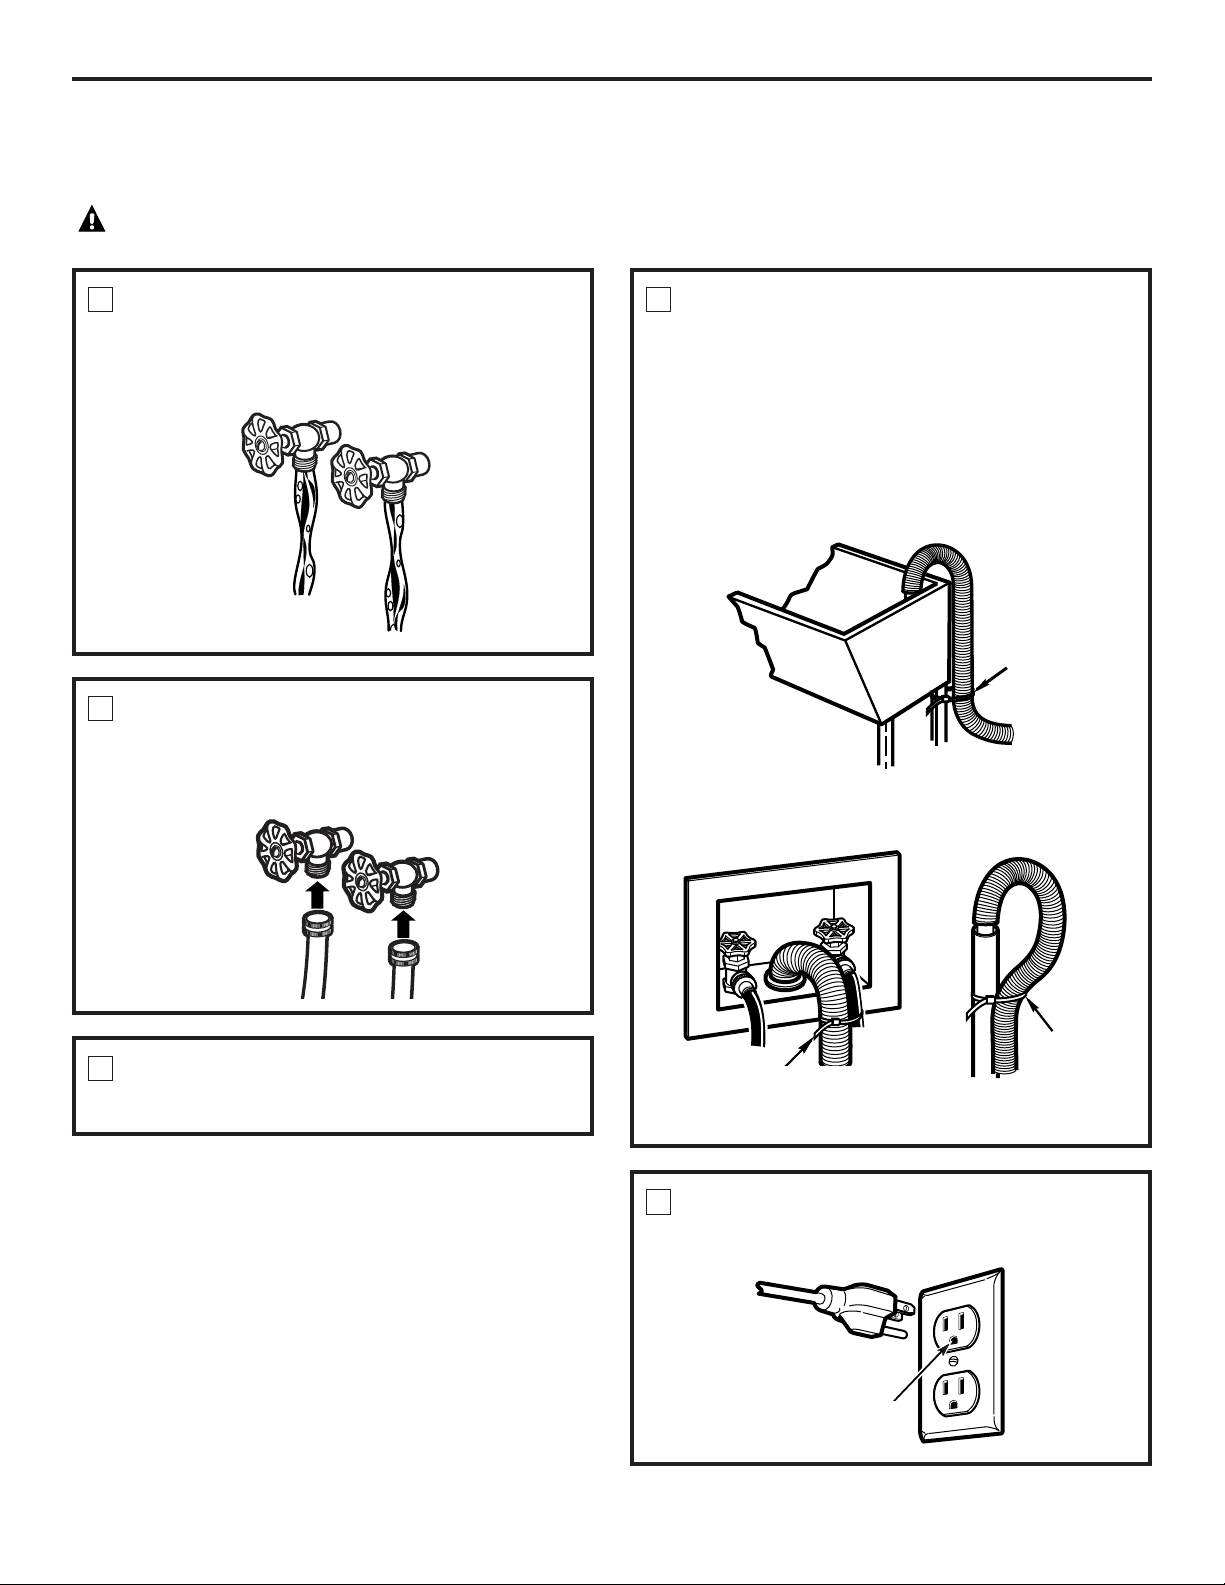
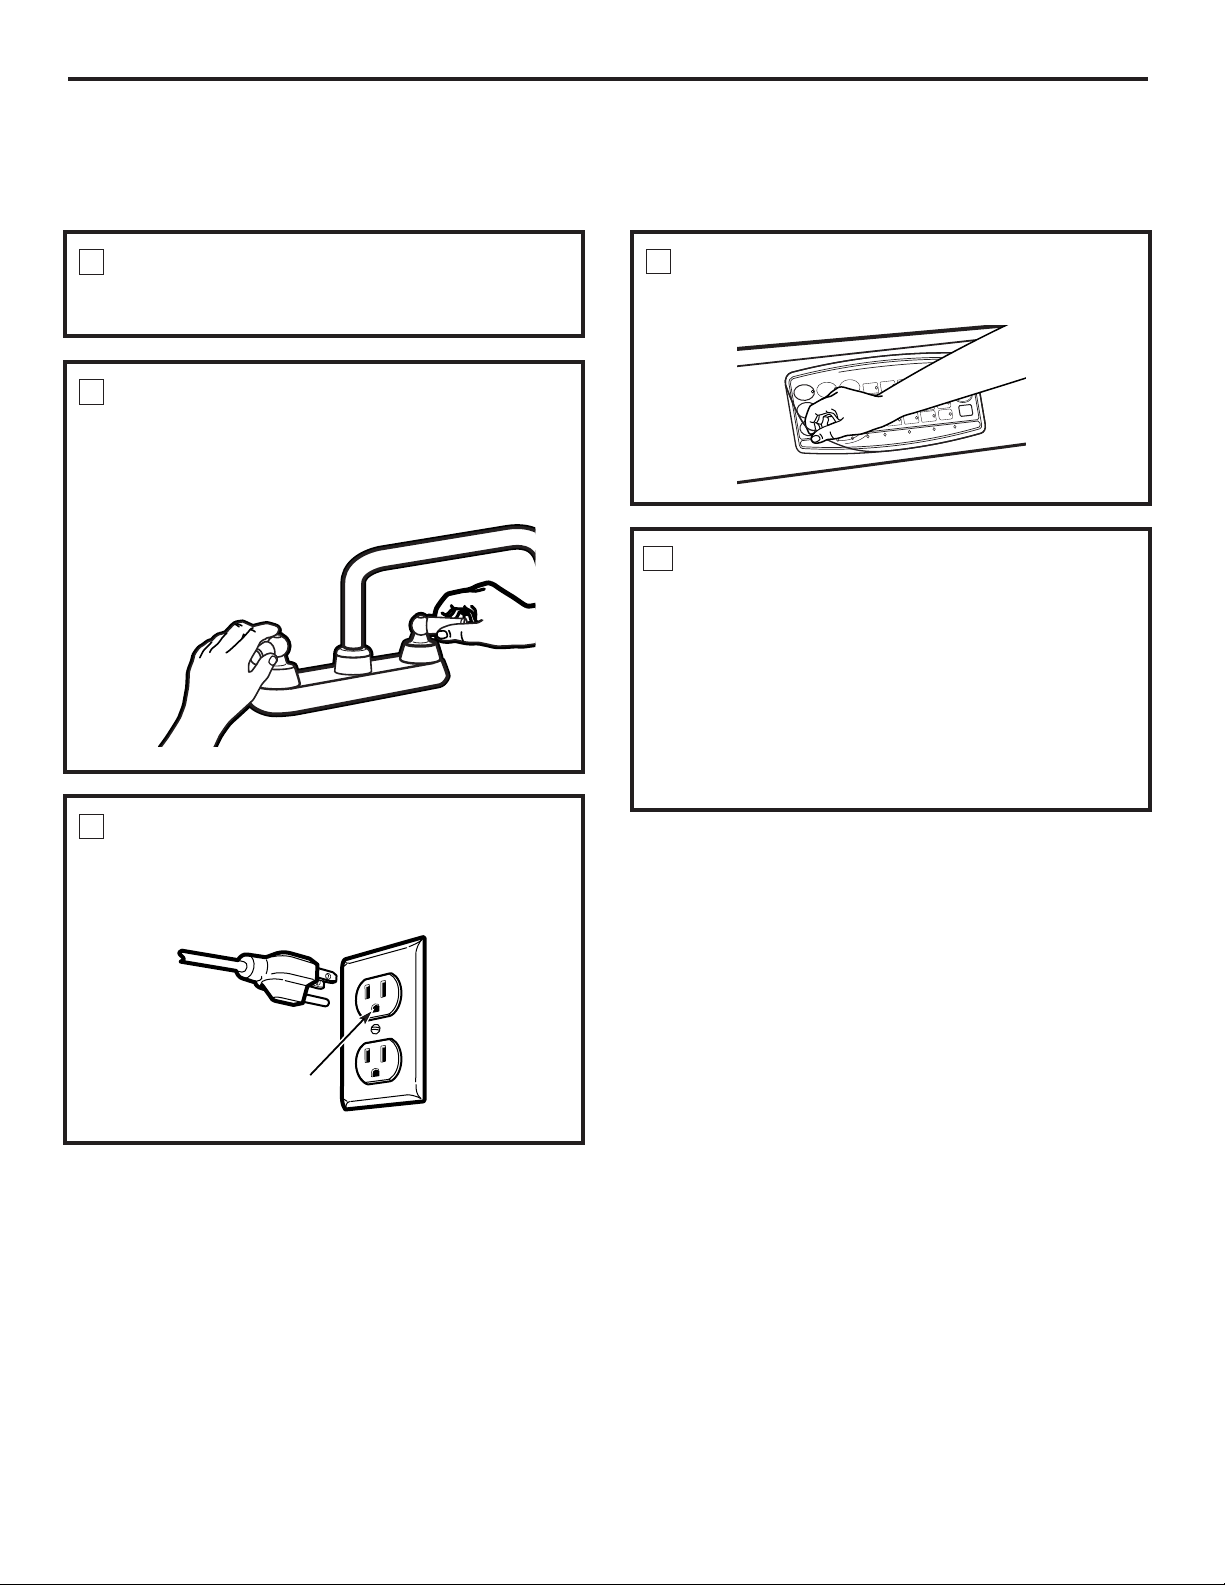
Run some water from the hot and cold faucets to flush
the water lines and remove particles that might clog up
the water valve screens.
FLUSH WATER LINES
1
Installation Instructions
WASHER CONNECTIONS FOR STATIONARY MODEL WSLS1500
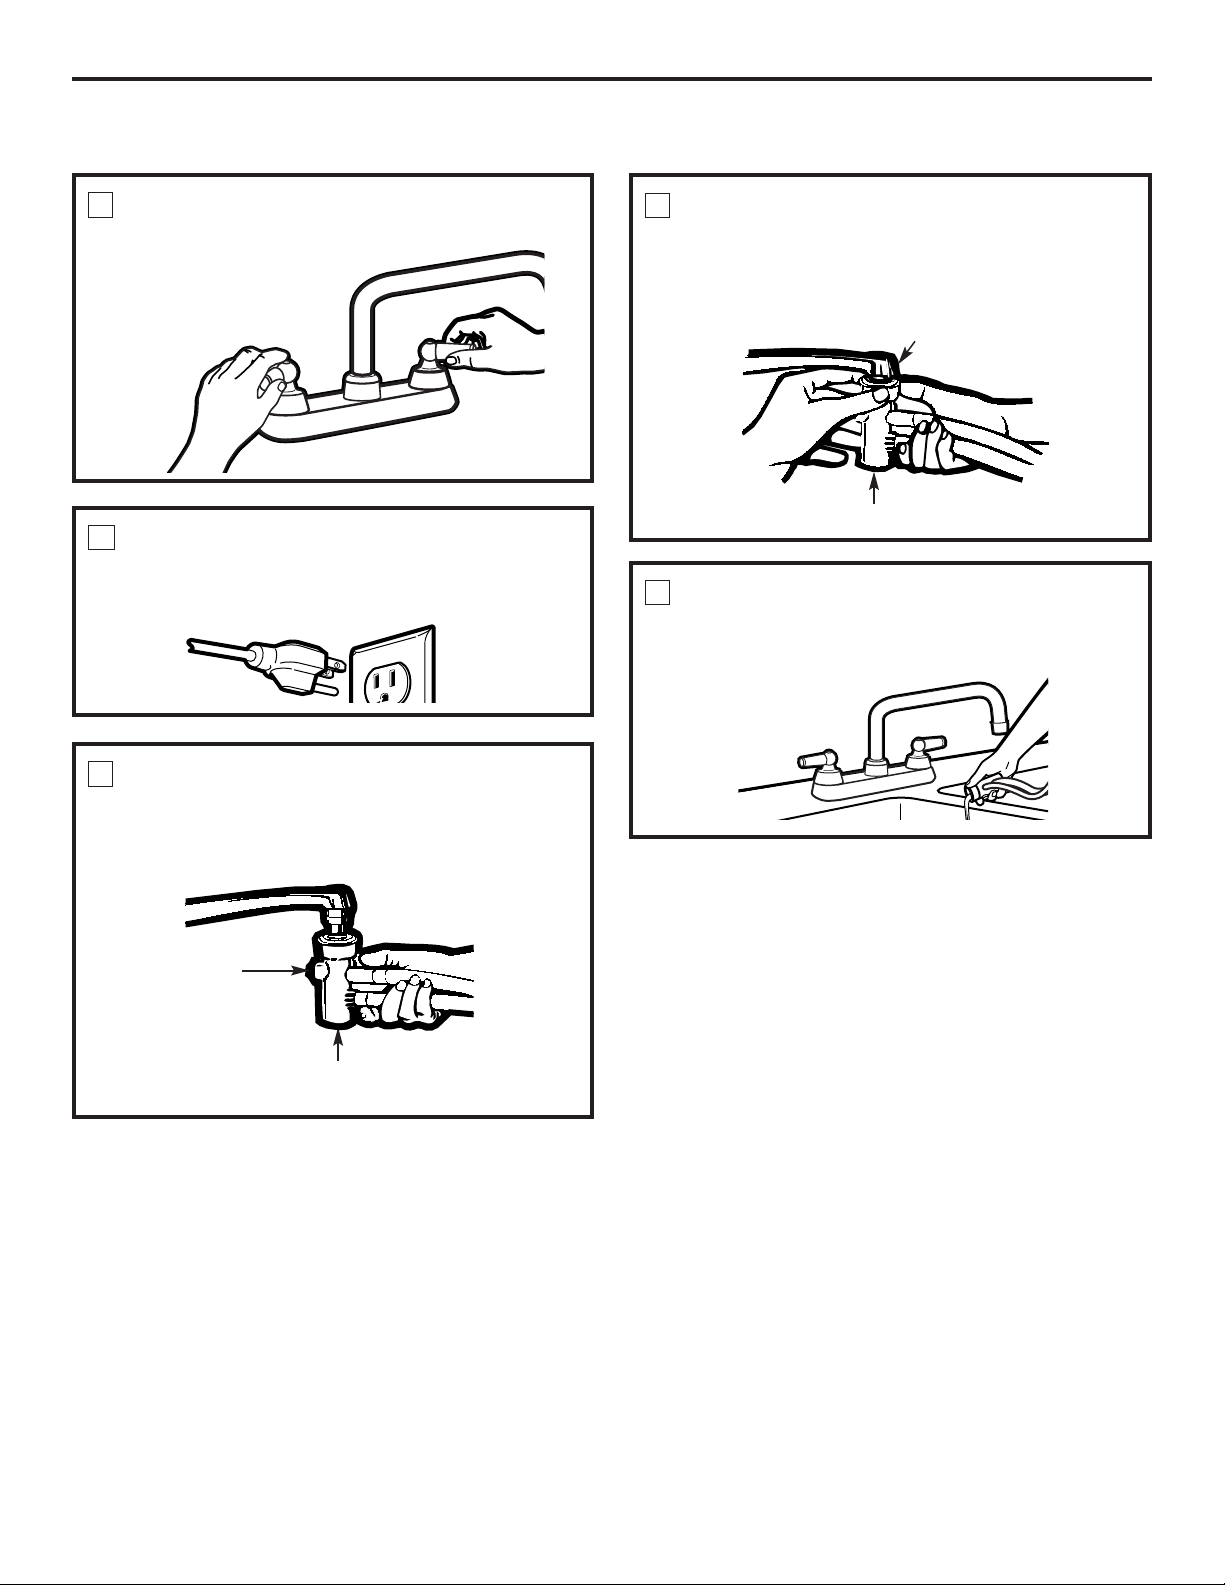
Connect the inlet hose ends to the HOT and COLD water
faucets tightly by hand, then tighten another 2⁄3 turn with
pliers. Turn the water on and check for leaks.
CONNECT TO WATER LINES
2
CAREFULLY MOVE THE WASHER TO
ITS FINAL LOCATION
3
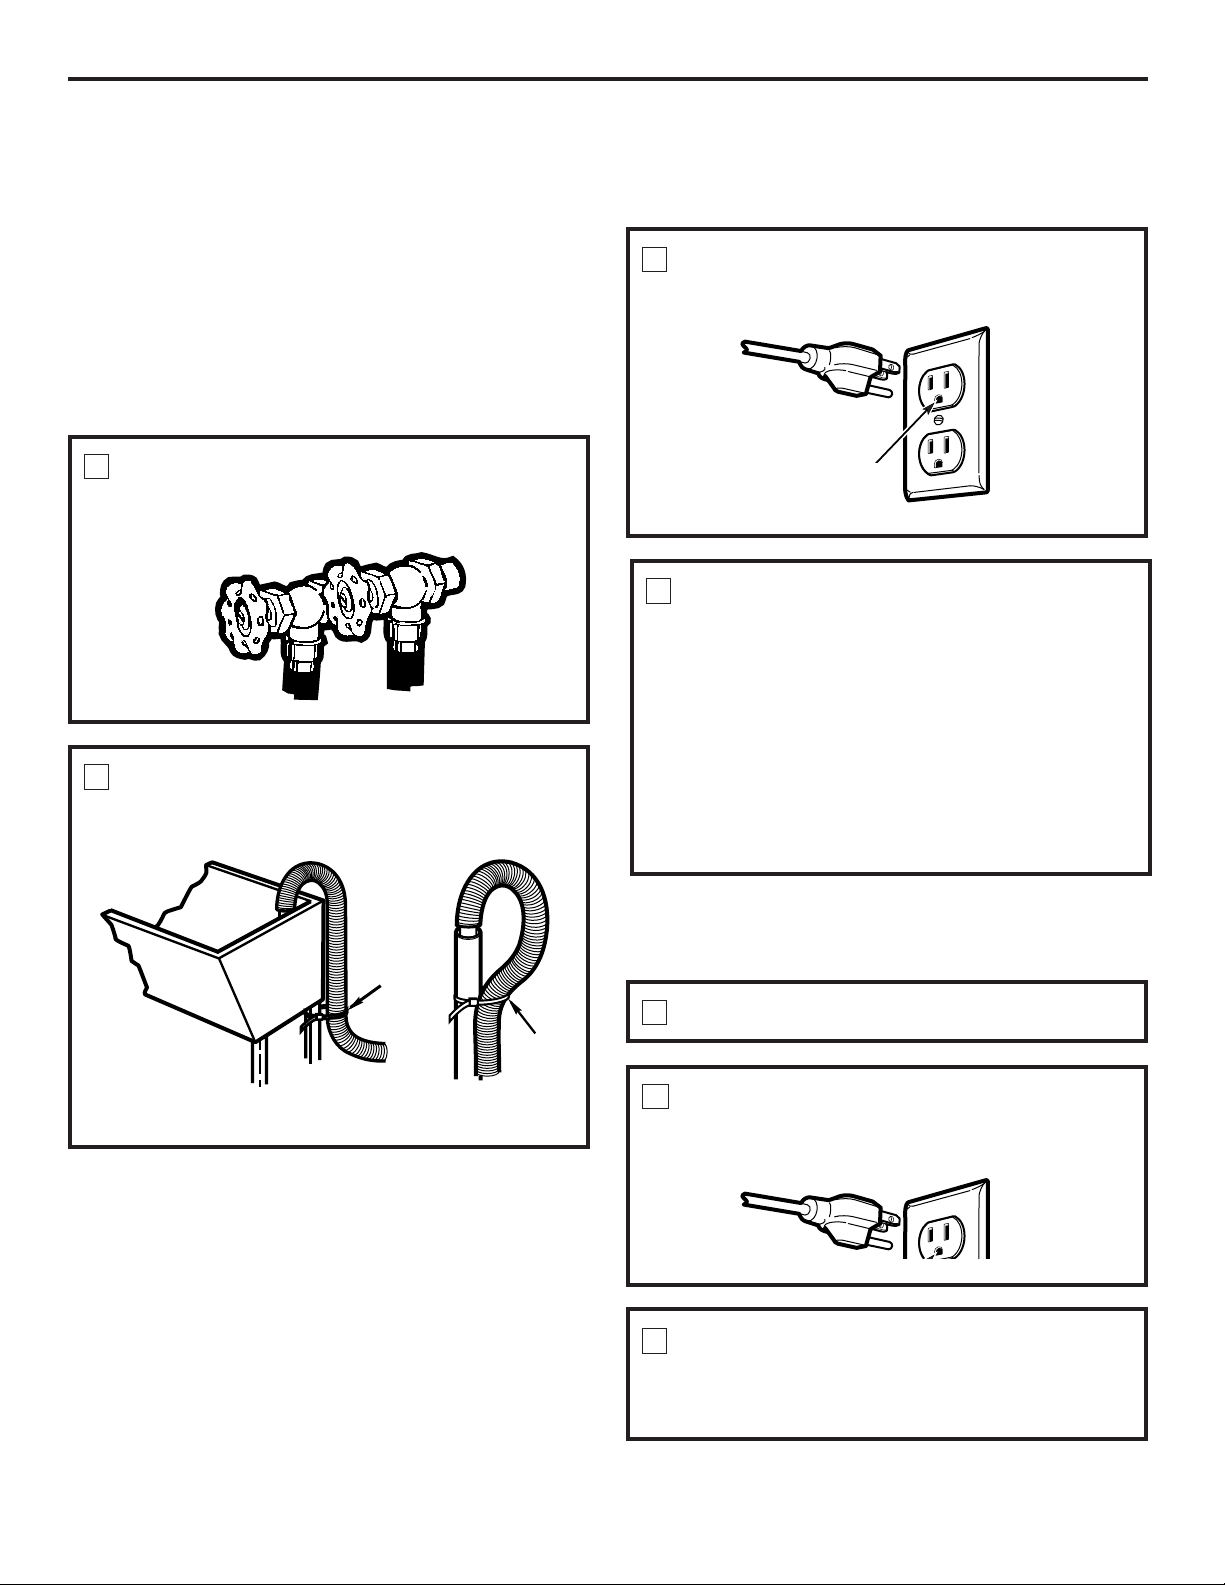
Form a U shape on the end of the drain hose with
the hose pointed toward the drain. Place the hose in
a laundry tub or stand pipe and secure it with a cable
tie (not included).
NOTE: If the drain hose is placed in a stand pipe without
forming a U shape, a siphoning action could occur. There
must be an air gap around the drain hose. A snug hose
fit can also cause a siphoning action.
CONNECT DRAIN HOSE
4
PLUG THE POWER CORD INTO A
GROUNDED OUTLET
5
Insure proper ground
exists before use
Page 12
ALCOVE OR CLOSET INSTALLATION
12
60 sq. in.
(387.1 sq. cm)
60 sq. in.
(387.1 sq. cm)
Closet door
Installation Instructions
WASHER CONNECTIONS FOR STATIONARY MODEL WSLS1500
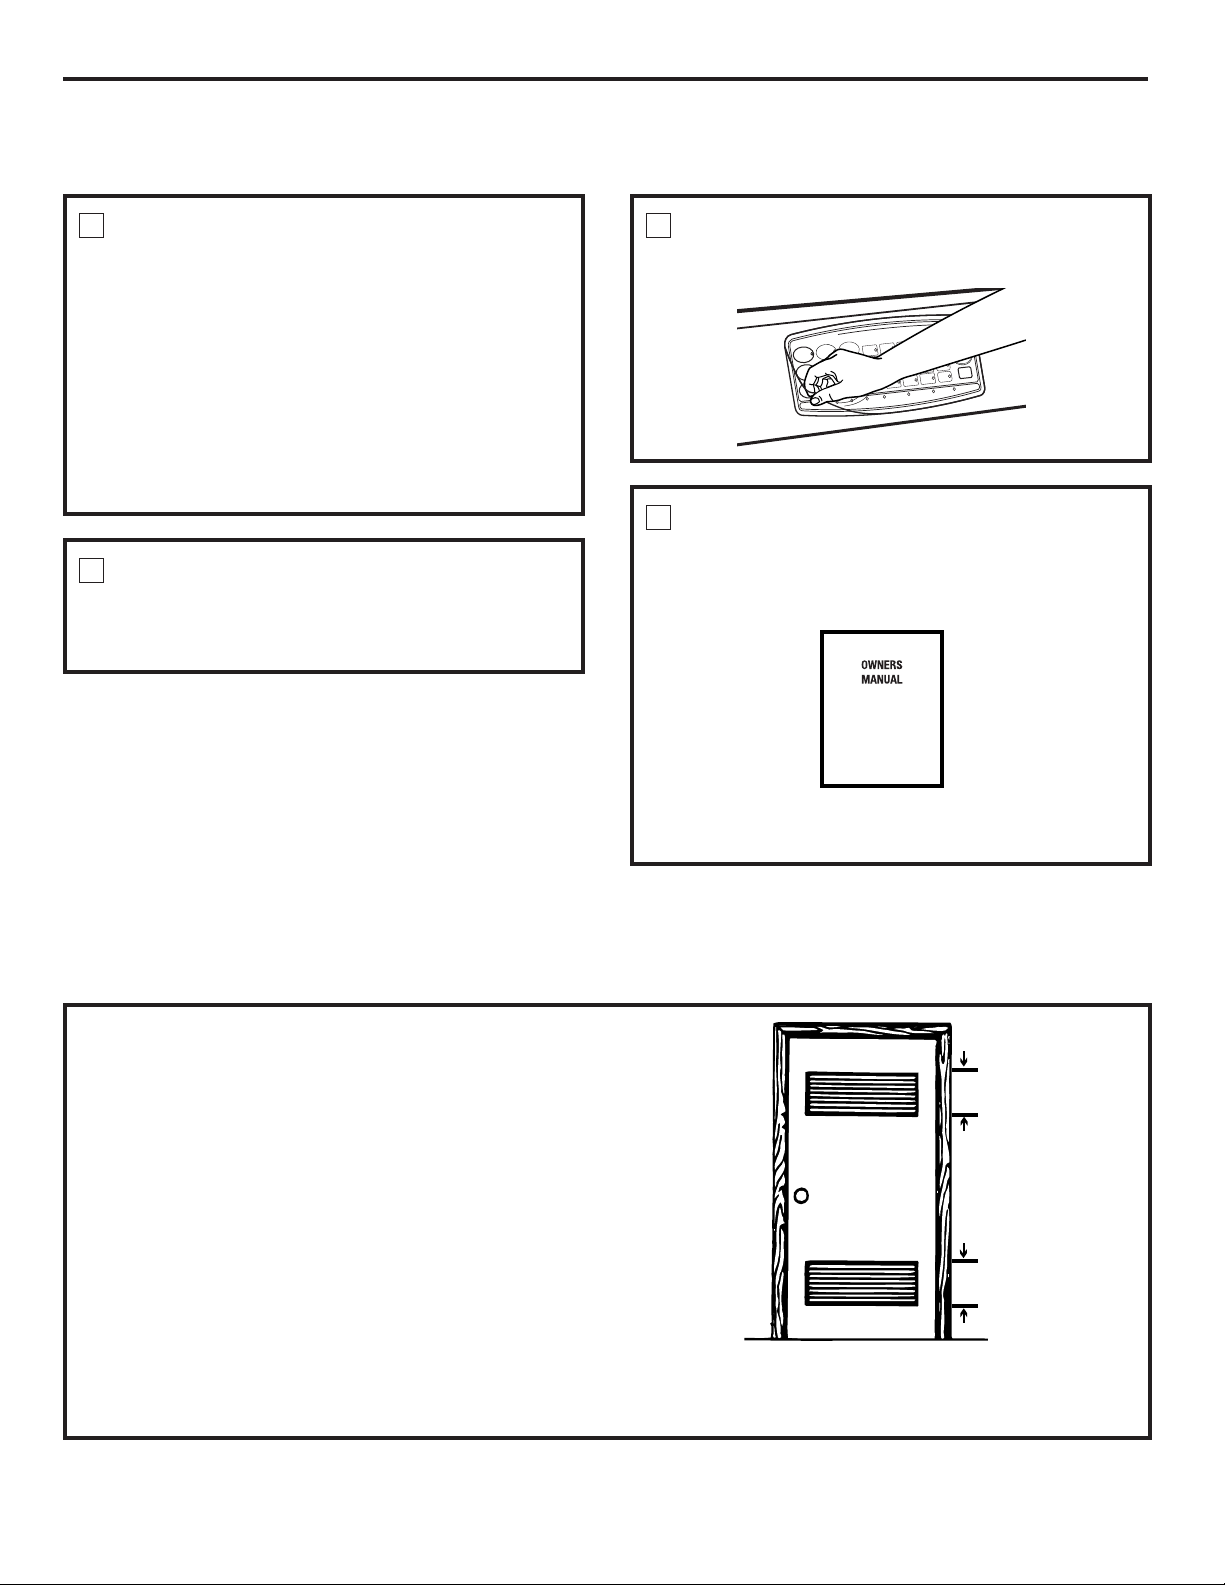
RUN THE WASHER THROUGH A
COMPLETE CYCLE
7
Check for water leaks and proper operation.
REMOVE THE PROTECTIVE FILM
COVERING THE CONTROL PANEL
8
It contains valuable and helpful information that will save
you time and money.
READ THE REST OF THIS OWNER’S
MANUAL
9
NOTE: If your washer does not operate, please review
the Before You Call For Service section.
If your washer is approved for installation in an alcove or
closet, there will be a label on the back of the machine
describing requirements.
• Minimum clearances between washer and adjacent
walls or other surfaces are: 0" either side, 2" front,
3" rear.
• Minimum vertical space from floor to overhead
shelves, cabinets, ceilings, etc. is 96".
• Closet doors must be louvered or otherwise ventilated
and have at least 60 square inches open area for
washer only, or if the closet contains both a washer
and dryer, doors must contain at least 120 square
inches of open area equally distributed.
NOTE: The clearances stated on this label are minimums.
Consideration must be given to providing adequate
clearances for installation and servicing.
INSTALLATION CHECKLIST
6
Before starting the washer, check to make sure:
❏ Main power is turned on.
❏ The washer is plugged in.
❏ The water faucets are turned on.
❏ The unit is level.
❏ The drain hose is properly tied up.
❏ There are no leaks at the faucet, drain line
or washer.
Page 13
13
Hose Connector
Locking Collar
Uni-Coupler Hose
Faucet Connector
Drain Connection
COLD Water
Supply Connector
Water Filter
Installation Instructions
WASHER CONNECTIONS FOR PORTABLE MODEL WSLP1500—
ONE-FAUCET CONNECTIONS
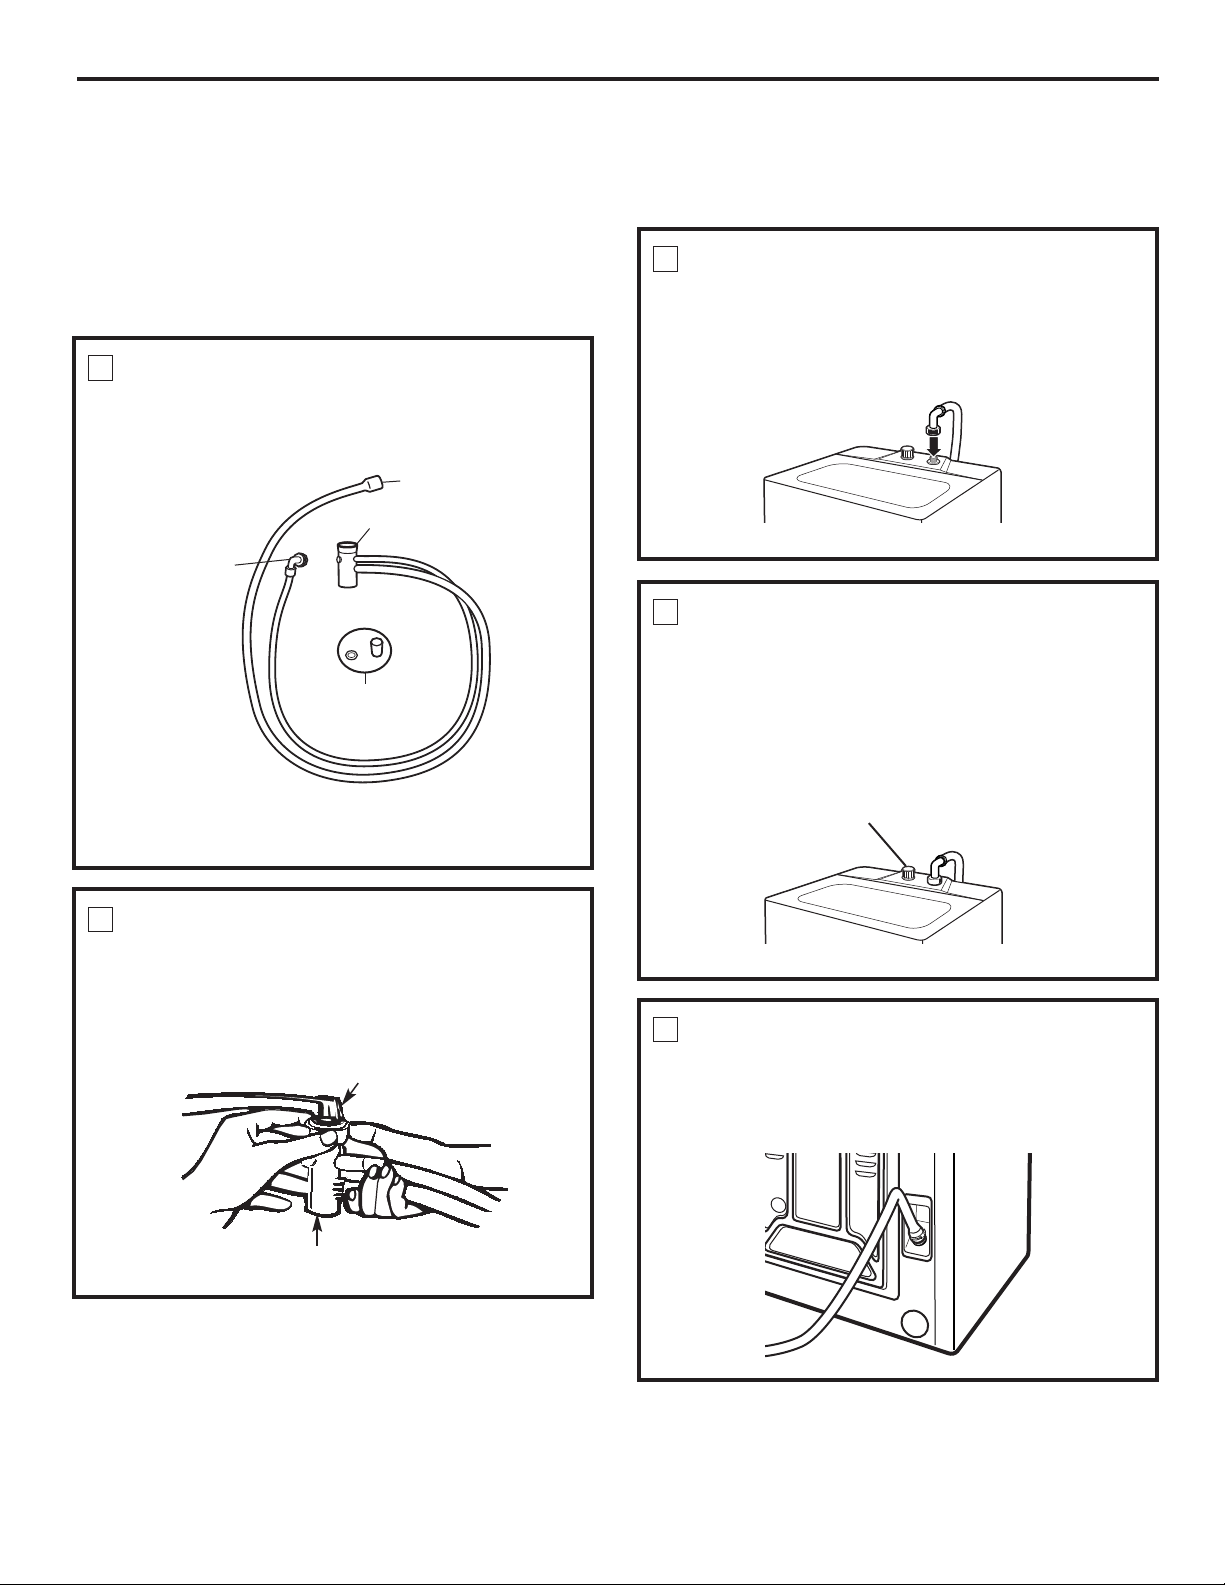
REMOVE THE UNI-COUPLE®HOSE
FROM INSIDE THE WASHER BASKET
1
CONNECT TO WATER LINE
2
Use the hose connector provided with the washer for a
one-faucet connection.
TO CONNECT THE WASHER:
Attach the hose connector to the faucet adapter by
pulling down on the locking collar while lifting up on
the connector until it snaps into place. Make sure the
water filter provided is in place.
CONNECT TO VALVE INLET
3
Attach the COLD water supply connector to the COLD
water valve inlet (color BLUE). Make sure the washer is
inside the connector before tightening.
TIGHTEN CONNECTOR
4
Tighten the connector, ensuring the threads are
aligned properly for tightest fit. Inspect for kinks
or binding of the hose.
NOTE: Do not remove the plastic cap from the HOT
water inlet for uni-coupler connections as leakage may
occur.
Plastic Cap
CONNECT DRAIN HOSE
5
Attach the drain hose to the rear of the washer. Install
the clamp on the drain hose and tighten to prevent
leakage of water.
Page 14
14
Installation Instructions
WASHER CONNECTIONS FOR PORTABLE MODEL WSLP1500—
ONE-FAUCET CONNECTIONS (CONT.)
MAKE SURE THE TEMPERATURE
SELECTOR IS SET AT COLD/COLD
6
SLOWLY TURN ON THE WATER
FAUCET ALL THE WAY TO THE
DESIRED TEMPERATURE SETTING
7
PLUG THE POWER CORD INTO A
3-PRONG GROUNDED OUTLET
8
Insure proper ground
exists before use
The electrical power cord is on the back of the washer.
REMOVE THE PROTECTIVE FILM
COVERING THE CONTROL PANEL
9
INSTALLATION CHECKLIST
10
Before starting the washer, check to make sure:
❏ Main power is turned on.
❏ The washer is plugged in.
❏ The water faucets are turned on.
❏ The unit is level.
❏ There are no leaks at the faucet, drain line
or washer.
Page 15
TO DISCONNECT THE WASHER:
15
Hose Connector
Water Flow
Button
TURN WATER FAUCET OFF
1
UNPLUG POWER CORD AND RETURN
IT TO THE STORAGE AREA
2
PRESS THE RED WATER FLOW
BUTTON TO RELEASE THE WATER
PRESSURE
3
DISCONNECT FROM WATER LINE
4
Installation Instructions
Hose Connector
Locking Collar
Move the locking collar down and pull the hose
connector down to disengage from the faucet
adapter.
DRAIN WATER
5
Drain water from the hoses through the
hose connector.
Page 16
16
TO DISCONNECT THE WASHER:
TO CONNECT THE WASHER:
If you have two separate water connections, your washer
can be connected to both the hot and cold water faucets.
This kit can be purchased from your dealer or from Parts
and Accessories. In the United States, call 800.626.2002.
In Canada, consult the yellow pages for your local Camco
number.
WASHER CONNECTIONS FOR PORTABLE MODEL WSLP1500—
TWO-FAUCET CONNECTIONS
CONNECT TO WATER LINE
1
Connect HOT and COLD water inlet hoses to the HOT
and COLD faucets.
Cable
Tie
Cable
Tie
Sink
Stand Pipe
Secure the drain hose to the sink or stand pipe.
CONNECT DRAIN HOSE
2
PLUG THE POWER CORD INTO A
3-PRONG GROUNDED OUTLET
3
Insure proper ground
exists before use
TURN WATER FAUCETS OFF
1
UNPLUG POWER CORD AND RETURN
IT TO THE STORAGE AREA
2
DISCONNECT THE DRAIN AND WATER
SUPPLY HOSES
3
Hang them on the storage rack.
Installation Instructions
INSTALLATION CHECKLIST
4
Before starting the washer, check to make sure:
❏ Main power is turned on.
❏ The washer is plugged in.
❏ The water faucets are turned on.
❏ The unit is level.
❏ The drain hose is properly tied up.
❏ There are no leaks at the faucet, drain line
or washer.
Page 17

17
Consumer SupportTroubleshooting Tips
Operating Instructions
Safety Instructions
Installation
Instructions
Before you call for service… ge.com
Troubleshooting Tips
Save time and money! Review the charts on the following
pages first and you may not need to call for service.
FF
■ Indicates washer failed to fill. Ensure wall faucets are on and fill hose is
not clogged or kinked.
dr
■ Indicates water has not drained from washer. Ensure the drain hose is
not kinked or connected improperly.
Ub
■ Indicates the laundry load is unbalanced. Reposition laundry evenly in
basket, and ensure washer is level.
Lo
■ Indicates the lid is open. Close the lid.
Status Indicators
LE
■ Indicates washer has leakage. Check the drain hose connection.
IE
■ Press POWER ON/OFF and call service.
OE
■ Indicates water has overflowed. Restart after spinning.
Page 18
18
Consumer Support Troubleshooting Tips
Operating Instructions
Safety Instructions
Installation
Instructions
Troubleshooting Tips
Installation
Instructions
Safety Instructions
Operating Instructions
Troubleshooting Tips
Installation
Instructions
Safety Instructions
Operating Instructions
Before you call for service…
Troubleshooting Tips
WATER POSSIBLE CAUSES WHAT TO DO
Too many suds Type of detergent • Switch to HE detergent.
Very soft water • Try less detergent.
Too much detergent • Measure your detergent carefully. Use less soap if you
have soft water, a smaller load or a lightly soiled load.
Water leaks Fill hoses or drain hose is • Make sure hose connections are tight at faucets and the
improperly connected washing machine. Make sure the end of the drain
hose
is correctly inserted and secured to the drain.
Household drain may • Check household plumbing. You may need to call
be clogged a plumber.
Constant water pressure • Tighten hoses at the faucets and turn the water off
to the fill hoses at the after each use.
water source
• Check condition of the fill hoses; they may need
replacement after 5 years.
Using too much detergent • Use less detergent. Use less soap if you have soft water,
in washer a smaller load or a lightly soiled load.
Water temperature Water supply is turned off • Turn both hot and cold faucets fully on and make sure
is incorrect or improperly connected hoses are connected to correct faucets.
Water valve screens are •
Turn off the water source and remove the water
stopped up
connection hoses from the upper back of the washer.
Remove screens and use a brush or toothpick to clean the
screens in the machine. Reinstall screens, reconnect the
hoses and turn the water back on.
House water heater is • Make sure house water heater is delivering water
not set properly at 120°F–140°F (48°C–60°C).
Water won’t drain Drain hose is kinked or • Straighten drain hose and make sure washer is not
improperly connected sitting on it.
• Top of drain outlet should be less than 8 ft. above floor.
Page 19
19
Consumer SupportTroubleshooting Tips
Operating Instructions
Safety Instructions
Installation
Instructions
ge.com
OPERATION POSSIBLE CAUSES WHAT TO DO
Washer pauses in cycle
The washer normally pauses
between washing steps
Washer won’t operate Washer is unplugged • Make sure cord is plugged securely into a working outlet.
Water supply is turned off • Turn both hot and cold faucets fully on.
Controls are not set properly • Make sure all selections have been made.
Lid is open • Close lid and press START/PAUSE.
Circuit breaker/fuse is • Check house circuit breakers/fuses. Replace fuses or
tripped/blown reset breaker. Washer should have separate outlet.
Washer has not been • Press the POWER ON/OFF button.
turned on
PERFORMANCE POSSIBLE CAUSES WHAT TO DO
Colored spots Incorrect use of fabric • Check fabric softener package for instructions and
softener follow directions for using dispenser.
• Pretreat stain and rewash.
Dye transfer • Sort whites or lightly colored items from dark colors.
Grayed or yellowed Not enough detergent • Use more detergent (especially with larger loads).
clothes
Hard water • Use a water conditioner like Calgon brand or install
a water softener.
Water is not hot enough • Make sure water heater is delivering water at
120°F–140°F (48°C–60°C).
Washer is overloaded • Select load size to match clothes load.
Dye transfer • Sort clothes by color. If fabric label states wash separately,
unstable dyes may be indicated.
Lint or residue on Clothes are air or line dried • If you do not dry your clothes with a clothes dryer,
clothes your clothes may retain more lint.
Incorrect sorting • Separate lint producers from lint collectors.
Washing too long • Wash small loads for a shorter time than larger loads.
Overloading • Load clothes no higher than the top row of holes in the
washer tub.
• Make sure load size selector matches clothes load size.
Incorrect use of fabric softener • Check fabric softener package for instructions and
follow directions for using dispenser.
Pilling Result of normal wear on • While this is not caused by the washer, you can slow the
poly-cotton blends and pilling process by washing garments inside out.
fuzzy fabrics
Page 20
20
Consumer Support Troubleshooting Tips
Operating Instructions
Safety Instructions
Installation
Instructions
Troubleshooting Tips
Installation
Instructions
Troubleshooting Tips
Installation
Instructions
Before you call for service…
PERFORMANCE (cont.) POSSIBLE CAUSES WHAT TO DO
Snags, holes, tears, rips Pins, snaps, hooks, sharp • Fasten snaps, hooks, buttons and zippers.
or excessive wear buttons, belt buckles,
• Remove loose items like pins, objects in pockets
zippers, and sharp objects
and sharp buttons.
left in pockets
• Turn knits (which snag easily) inside out.
Undiluted chlorine bleach • Check bleach package instructions for proper amount.
• Never add undiluted bleach to wash or allow clothes
to come in contact with undiluted bleach.
Chemicals like hair bleach • Rinse items that may have chemicals on them before
or dye, permanent wave washing.
solution
Wrinkling Improper sorting • Avoid mixing heavy items (like work clothes) with
light items (like blouses).
• Try a fabric softener.
Overloading or • Load your washer so clothes have enough room
incorrect water level to move freely.
Repeated washing in • Wash in warm or cold water.
water that is too hot
NOISE POSSIBLE CAUSES WHAT TO DO
Washer is noisy Washer is uneven • Level the washer. See Leveling the Washer.
Washer load is
• Press the
START/PAUSE
button to stop the washer, open
unbalanced the lid and redistribute the load evenly. Close the lid
and restart.
Washer is sitting too close • Pull washer away from the wall; about 4" is needed.
to wall (causes knocking
during cycle)
Dragging noise prior When using the LOAD • This is normal.
to water filling in SENSING feature, the
the tub agitator rotates before
water fills in the tub
OTHER POSSIBLE CAUSES WHAT TO DO
Labels on the exterior Occasionally the adhesive • Use a hair dryer set at the lowest heat setting, directing
of the washer will not used on the labels does the air at the label for a short amount of time. This will
peel off cleanly not release cleanly release the adhesive easily, without damaging the surface
of the washer.
Troubleshooting Tips
Page 21

21
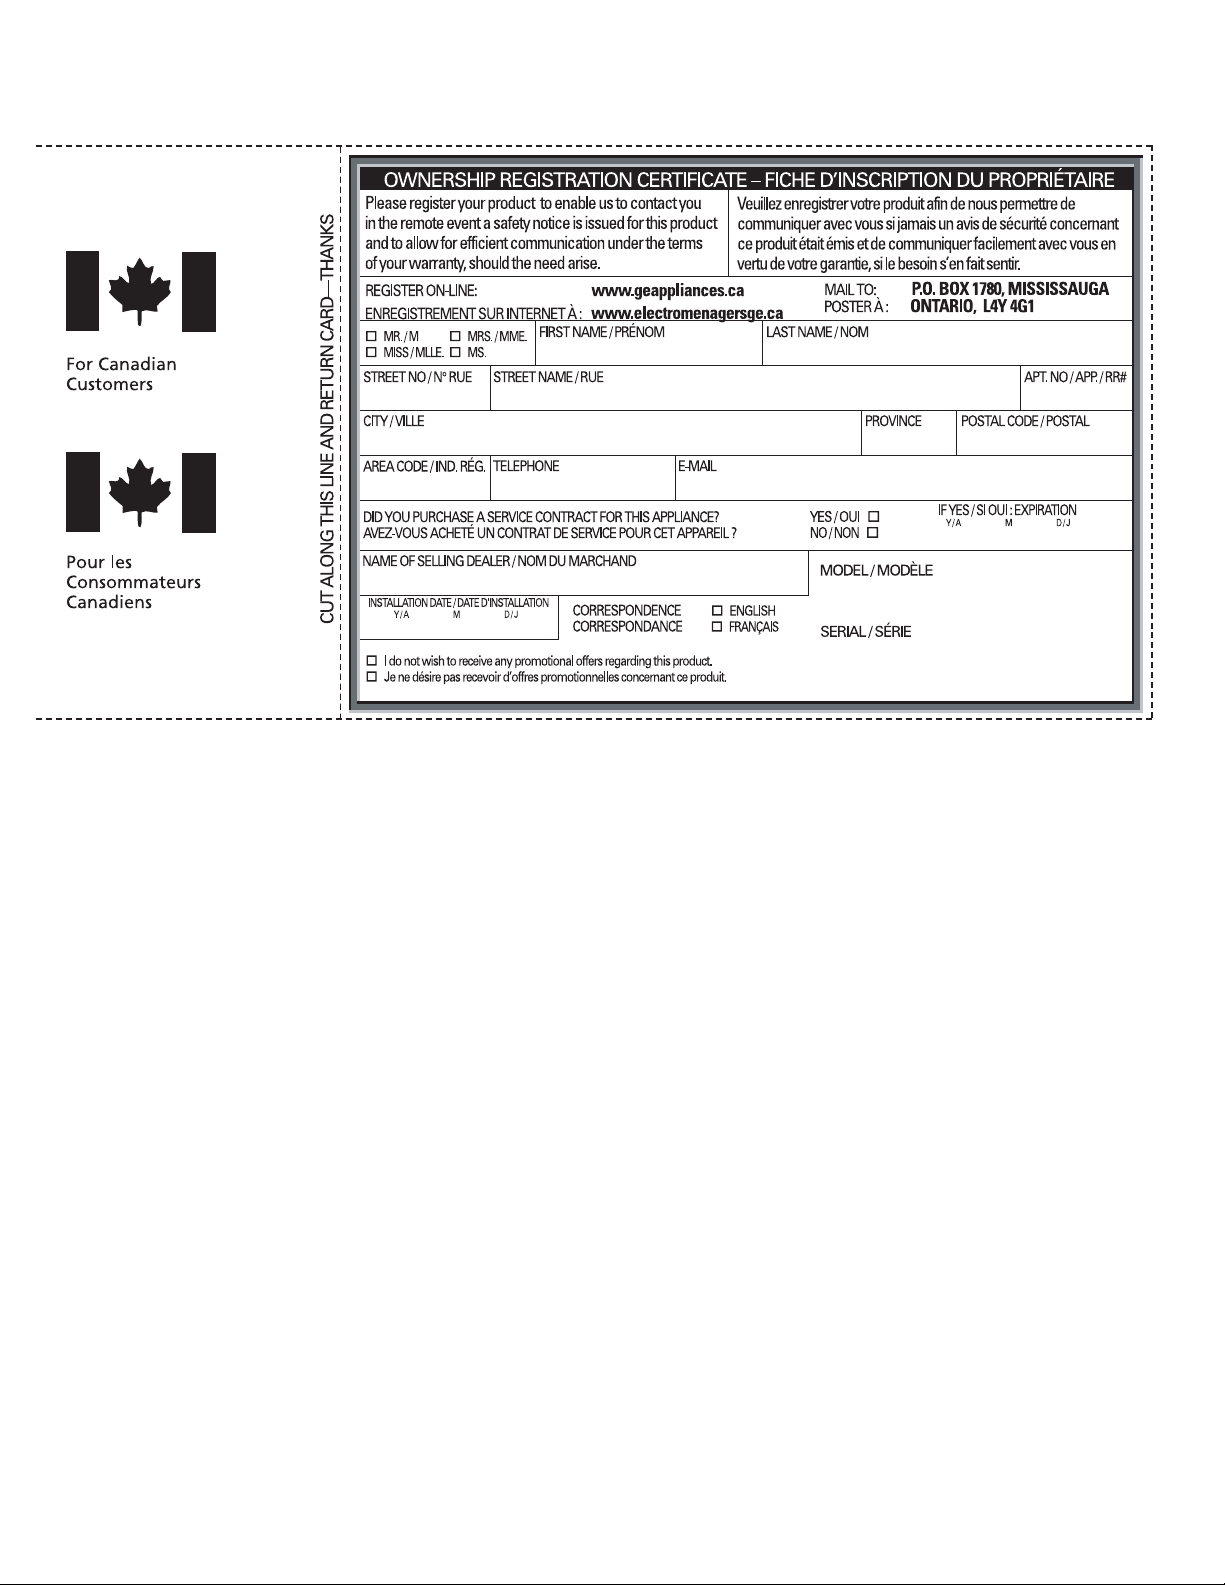
OWNERSHIP REGISTRATION
P.O. BOX 1780
MISSISSAUGA, ONTARIO
L4Y 4G1
(FOR CANADIAN CONSUMERS ONLY)
Please place in envelope and mail to:
Veuillez mettre dans une enveloppe et envoyez à :
Page 22
22
Page 23

23
Consumer SupportTroubleshooting Tips
Operating Instructions
Safety Instructions
Installation
Instructions
GE Washer Warranty. (For customers in the U.S.A.)
For The Period Of: We Will Replace:
All warranty service provided by our Factory Service Centers,
or an authorized Customer Care
®
technician. To schedule service,
on-line, visit us at ge.com, or call 800.GE.CARES (800.432.2737).
Please have serial number and model number availa ble when
calling for service.
This warranty is extended to the original purchaser and any succeeding owner for products purchased for home use
within the USA. If the product is located in an area where service by a GE Authorized Servicer is not available, you may
be responsible for a trip charge or you may be required to bring the product to an Authorized GE Service location for
service. In Alaska, the warranty excludes the cost of shipping or service calls to your home.
Some states do not allow the exclusion or limitation of incidental or consequential damages. This warranty gives you
specific legal rights, and you may also have other rights which vary from state to state. To know what your legal rights
are, consult your local or state consumer affairs office or your state’s Attorney General.
■ Service trips to your home to teach you how to use
the product.
■ Improper installation, delivery or maintenance.
■ Failure of the product if it is abused, misused, or used for
other than the intended purpose or used commercially.
■ Damage after delivery.
■ Replacement of house fuses or resetting of circuit
breakers.
■ Damage to the product caused by accident, fire, floods
or acts of God.
■ Incidental or consequential damage caused by possible
defects with this appliance.
■ Product not accessible to provide required service.
What Is Not Covered (in the United States):
Warrantor: General Electric Company. Louisville, KY 40225
Staple your receipt here.
Proof of the original purchase
date is needed to obtain service
under the warranty.
One Year Any part of the washer which fails due to a defect in materials or workmanship. During this
From the date of the limited one-year warranty, GE will also provide, free of charge, all labor and related service
original purchase costs to replace the defective part.
EXCLUSION OF IMPLIED WARRANTIES—Your sole and exclusive remedy is product repair as provided in this Limited
Warranty. Any implied warranties, including the implied warranties of merchantability or fitness for a particular
purpose, are limited to one year or the shortest period allowed by law.
Page 24

24
GE Washer Warranty. (For customers in Canada)
All warranty service provided by our Factory Service Centres or an authorized
technician. For service, call 1.800.561.3344.
Please have serial number and model number available when calling for service.
■ Service trips to your home to teach you how to use
the product.
■ Improper installation, delivery or maintenance.
■ Failure of the product if it is abused, misused, or used for
other than the intended purpose or used commercially.
■ Damage after delivery.
■ Replacement of house fuses or resetting of circuit
breakers.
■ Damage to the product caused by accident, fire, floods
or acts of God.
■ Incidental or consequential damage caused by possible
defects with this appliance.
■ Product not accessible to provide required service.
What Is Not Covered (in Canada):
Warrantor: MABE CANADA INC.
WARRANTOR IS NOT RESPONSIBLE FOR CONSEQUENTIAL DAMAGES.
This warranty is extended to the original purchaser and any succeeding owner for products purchased for
home use within Canada. In-home warranty service will be provided in areas where it is available and deemed
reasonable by Mabe to provide.
EXCLUSION OF IMPLIED WARRANTIES—Your sole and exclusive remedy is product repair as provided in this Limited
Warranty. Any implied warranties, including the implied warranties of merchantability or fitness for a particular
purpose, are limited to one year or the shortest period allowed by law.
For The Period Of: We Will Replace:
One Year Any part of the washer which fails due to a defect in materials or workmanship. During this
From the date of the limited one-year warranty, GE will also provide, free of charge, all labour and related
original purchase service costs to replace the defective part.
Consumer Support
Troubleshooting Tips Operating Instructions
Safety Instructions
Installation
Instructions
Page 25

Consignes de sécurité . . . . . . 26, 27
Consignes d’utilisation
Caractéristiques et commandes . . .29, 30
Caractéristiques particulières
de la laveuse . . . . . . . . . . . . . . . . . . . . . . . .28
Chargement et utilisation
de la laveuse . . . . . . . . . . . . . . . . . . . . .31, 32
Instructions d’installation
Branchements pour
le modèle fixe . . . . . . . . . . . . . . . . . . . . 35, 36
Branchements pour le
modèle portatif . . . . . . . . . . . . . . . . . . 37–40
Exigences electriques . . . . . . . . . . . . . . . 34
Exigences d’installation . . . . . . . . . . . . . . 33
Installation dans une
alcôve ou dans un placard . . . . . . . . . . 36
Instructions de mise à la terre . . . . . . . . 34
Mise de niveau de la laveuse . . . . . . . . 34
Conseils de dépannage
Avant d’appeler un technicien . . . . 41–43
Indicateurs d’etat . . . . . . . . . . . . . . . . . . . 39
Assistance à la clientèle
Enregistrement du titre
de propriété . . . . . . . . . . . . . . . . . . . . .45, 46
Garantie . . . . . . . . . . . . . . . . . . . . . . . . . . . . 47
Soutien au consommateur . . . . . . . . . . . 48
Inscrivez ici les numéros de
modèle et de série :
#
#
Vous les trouverez sur une étiquette
placée à l’arrière de la laveuse.
25
Page 26

26
IMPORTANTES CONSIGNES DE SÉCURITÉ.
VEUILLEZ LIRE TOUTES LES CONSIGNES AVANT UTILISATION.
■ IInstallez ou entreposez votre appareil dans un endroit
où il ne sera pas exposé au gel ou aux intempéries qui
pourraient causer des dommages permanents et
annuler la garantie.
■ Mettez correctement la laveuse à la terre
conformément à tous les codes et règlements
en vigueur. Suivez tous les détails donnés dans
les Instructions d’Installation.
AVERTISSEMENT
Pour votre sécurité, les informations contenues dans ce manuel doivent être
suivies afin de minimiser les risques d’incendie ou d’explosion, de chocs
électriques et d’éviter les dommages à la propriété, les blessures corporelles
voire la mort.
Les instructions contenues dans ce manuel et dans tous les autres documents
accompagnant cette laveuse ne couvrent pas toutes les conditions ou
situations susceptibles de se produire. Il est important de faire preuve de
prudence et d’utiliser de bonnes méthodes de sécurité lors de l’installation,
l’utilisation et l’entretien de tout appareil électroménager.
SÉCURITÉ DU CHAUFFE-EAU
Dans certaines conditions, de l’hydrogène gazeux peut être produit dans un chauffe-eau lorsque ce dernier n’a pas
été utilisé pendant plus de deux semaines. Dans certaines conditions, l’hydrogène gazeux peut provoquer une
explosion.
Si vous n’avez pas utilisé l’eau chaude depuis plus de deux semaines, évitez tout dommage ou blessure en ouvrant
tous les robinets d’eau chaude et en les laissant couler pendant quelques minutes. Effectuez ce geste avant
d’utiliser tout appareil électroménager branché au système d’eau chaude. Cette procédure simple permet à toute
accumulation d’hydrogène gazeux de s’échapper. Comme ce gaz est inflammable, ne fumez pas, n’utilisez pas de
flamme vive ou d’appareil électroménager pendant cette procédure.
INSTALLATION CORRECTE
Cette laveuse doit être correctement installée et positionnée conformément aux Instructions d’Installation avant
toute utilisation.
■ Gardez la zone autour et en dessous de la laveuse
propre et exempte de tout matériau combustible
tel que des charpies, du papier, des chiffons et
des produits chimiques.
■ Ne laissez pas la porte de la laveuse ouverte. Une
porte ouverte pourrait encourager les enfants à
se pendre à la porte ou à grimper à l’intérieur de
la machine.
■ Une surveillance accrue est nécessaire lors de
l’utilisation de cet appareil en présence d’enfants.
Ne leur permettez pas de jouer sur le dessus, avec
ou dans cette laveuse ou avec tout autre appareil
électroménager.
VOTRE AIRE DE LESSIVE
Soutien au
consommateur
Conseils de dépannage Fonctionnement Mesures de sécurité
Installation
Page 27

27
■ N’essayez jamais d’ouvrir votre laveuse lorsqu’elle
fonctionne. Attendez que la machine soit
complètement arrêtée avant d’ouvrir la porte.
■ Ne mélangez jamais d’eau de javel avec de
l’ammoniaque ou des acides tels que du vinaigre
et/ou de l’antirouille. Le mélange des différents
produits chimiques peut produire des gaz
toxiques pouvant entraîner la mort.
■ Ne lavez pas et ne séchez pas des articles ayant
été nettoyés, lavés, trempés ou tachés par des
substances combustibles ou explosives (telles que
la cire, l’huile, la peinture, l’essence, les
substances dégraissantes, les solvants de
nettoyage à sec, le pétrole, etc...) qui peuvent
potentiellement s’enflammer ou exploser.
N’ajoutez pas ces substances à l’eau de lavage.
N’utilisez pas et ne placez pas ces substances
autour de votre laveuse ou de votre sécheuse
pendant leur fonctionnement.
■ Le processus de lavage peut réduire la résistance
aux flammes des tissus. Pour éviter de tels
résultats, suivez soigneusement les instructions
de lavage et d’entretien données par le fabricant
de vêtements.
■ Pour réduire le risque de choc électrique,
débranchez l’appareil de l’alimentation électrique
ou débranchez la laveuse au niveau du panneau
de distribution en retirant le fusible ou
déclenchant le disjoncteur avant d’entreprendre
toute activité d’entretien ou de nettoyage.
REMARQUE : L’action d’appuyer sur la touche
power (alimentation) ne déconnecte pas l’appareil
de l’alimentation électrique.
■ N’essayez jamais de faire fonctionner cet appareil
s’il est endommagé, s’il ne fonctionne pas
correctement, s’il est partiellement démonté
ou si certaines des pièces sont manquantes ou
cassées, y compris si le cordon d’alimentation
est endommagé.
LORSQUE VOUS UTILISEZ VOTRE LAVEUSE
■ Fermez les robinets d’eau pour réduire la pression
dans les tuyaux et les robinets et pour diminuer le
risque de fuite en cas de cassure ou de rupture.
Vérifiez l’état des tuyaux de remplissage; GE vous
recommande de les changer tous les 5 ans.
■ Avant de mettre votre laveuse au rebut ou de la
mettre hors service, retirez la porte pour éviter
que les enfants ne se cachent à l’intérieur.
■ N’essayez pas de réparer ou de remplacer
une pièce de l’appareil, à moins d’une
recommandation précise à cet effet dans ce
manuel ou dans des instructions de réparation
par l’utilisateur publiées que vous comprenez et
pour lesquelles vous possédez les compétences
requises.
■ Ne modifiez jamais les commandes.
LORSQUE VOUS N’UTILISEZ PAS VOTRE LAVEUSE
LISEZ ET SUIVEZ SOIGNEUSEMENT
CES CONSIGNES DE SÉCURITÉ.
CONSERVEZ CES INSTRUCTIONS
N’utilisez cet
appareil qu’aux
fins prévues
décrites dans
le manuel
d’utilisation.
Soutien au
consommateur
Conseils de dépannageFonctionnement
Mesures de sécurité Installation
www.electromenagersge.ca
Page 28

28
Fonctions particulières de la laveuse.
Le tiroir distributeur de détergent et d’adoucissant
Les compartiments pour le détergent et
l’adoucissant se vident automatiquement
leurs contenus au moment approprié du
programme.
Utilisation du compartiment à détergent :
Ajoutez le volume mesuré de détergent au
compartiment. Assurez-vous que le détergent
soit uniformément réparti et que sa surface
soit de niveau.
Utilisation du compartiment à
adoucissant :
N’utilisez que de l’adoucissant liquide.
Versez-le dans le compartiment en utilisant
la quantité recommandée sur l’emballage.
■ Ne remplissez pas le compartiment au
dessus du repère de remplissage maximal.
■ Ne versez jamais l’adoucissant directement
sur les vêtements. Ils pourraient être tachés.
Nettoyage du tiroir distributeur de détergent et d’adoucissant
1. Enlevez le tiroir en l’ouvrant
complètement puis en inclinant
l’ouverture avant vers le bas.
Retirez le tiroir.
2. Rincez le tiroir à l’eau. Si nécessaire,
utilisez un chiffon doux pour essuyer
les débris restants.
3. Alignez le tiroir avec l’ouverture
puis encastrez-le directement
dans la laveuse.
Filtre à charpie
Une fois par semaine, nettoyez le filtre à
charpie sur la paroi intérieure du panier
de lavage pour obtenir de meilleurs résultats
de filtration.
Retrait :
Appuyez sur la languette sur le haut du
filtre et tirez.
Nettoyage :
Ouvrez le filtre. Nettoyez celui-ci à l’aide
d’une brosse à dent.
Repère de Remplissage
Maximal
Avant de mettre la laveuse en marche :
• Chargez le linge dans votre laveuse.
• Ajoutez le détergent et l’adoucissant dans le tiroir distributeur.
Soutien au
consommateur
Conseils de dépannage
Fonctionnement
Mesures de sécurité
Installation
Page 29

A propos du réglage des commandes
et des indications du tableau.
www.electromenagersge.ca
POWER ON/OFF (ALIMENTATION MARCHE/ARRÊT)
Appuyer sur le bouton POWER ON/OFF (alimentation marche/arrêt) pour allumer le tableau de
commandes.
WASH OPTIONS (OPTIONS DE LAVAGE)
Choisissez les options de lavage que vous souhaitez inclure au programme. Appuyez sur le
bouton WASH OPTIONS (options de lavage) jusqu’à ce que toutes les options que vous souhaitez
inclure soient allumées. Il est possible de sélectionner plus d’une option.
2
1
Utilisation de la fonction automatique One-Touch
(Commande unique) pour le lavage
START
PAUSE
La fonction LOAD SENSING (capteur de charge) détecte automatiquement la taille de la brassée,
remplit la laveuse avec la quantité appropriée d’eau et calcule le temps de lavage requis pour effectuer
le programme.
REMARQUE : Lors de l’utilisation de la fonction LOAD SENSING (capteur de charge), il est normal de voir
la rotation de l’agitateur avant que l’eau ne remplisse la cuve.
Pour choisir la fonction automatique LOAD SENSING (capteur de charge), appuyez sur POWER ON/OFF
(alimentation marche/arrêt)
Le voyant de COLORS (couleurs) s’allumera automatiquement à moins que vous ayez choisi un autre
programme de LOAD SENSING (capteur de charge) tels que WHITES (blanc), DELICATES (délicat), SPEED
WASH (lavage rapide), CUSTOM CYCLE (programme pesonnalisé) ou ULTRA CLEAN (ultra propre).
Puis, il vous suffit d’appuyer sur START/PAUSE (marche/pause).
Choix de votre propre programme
Avant de mettre la laveuse en marche :
• Chargez le linge dans votre laveuse.
• Ajoutez le détergent et l’adoucissant dans le tiroir distributeur.
Soak+Wash Soak+Wash+Heavy Wash+Rinse Wash+Heavy Wash Rinse Wash Rinse Spin
Programme +Rinse+Spin Duty+Rinse+Spin +Spin Duty+Rinse+Spin +Rinse +Spin Only Only Only
COLORS (Couleurs) X X X X X X X X X
WHITES (Blanc) X X
XX
X XXXX
DELICATES (Délicat) X X X X X X X X X
SPEED WASH X X X X X X X X X
(Lavage rapide)
CUSTOM CYCLE
XXXXXXX
XX
(Programme
personnalisé)
ULTRA CLEAN
X
(Ultra propre)
Soutien au
consommateur
Conseils de dépannageFonctionnement
Mesures de sécurité Installation
29
SOAK COLORS
WASH
HEAVY DUTY
RINSE
SPIN
LO
C
K
H
OL
D
3
SECS
T
O
LOCK/
UN
LOCK
C
ON
T
R
OL
S
EST. MINUTES
REMAINING
ULTRA
CLEAN
OPTIONS
COLD
HOT
TEMP
WARM
EXTRA LARGE
LARGE
MEDIUM
SMALL
EXTRA SMALL
LOAD
LOAD SENSING
WHITES
DELICATES
SPEED WASH
CUSTOM CYCLE
CYCLES
START
PAUSE
DELAY WA SH
1
18 HOURS
to
POWER
Page 30

30
A propos du réglage des commandes
et des indications du tableau.
LOAD SIZE (TAILLE DE BRASSÉE)
Le niveau d’eau devrait juste recouvrir les vêtements. Adaptez la taille de la brassée en
conséquence. Placez les vêtements sans les comprimer en ne dépassant pas la dernière rangée
de trous dans le panier de la laveuse.
WASH CYCLE (PROGRAMMES DE LAVAGE)
Les programmes de lavage contrôlent la durée du processus de lavage. Le tableau ci-dessous
vous aidera à sélectionner les WASH CYCLES (programmes de lavages) en fonction de vos
besoins spécifiques. Une fois le programme sélectionné, la température à laquelle la laveuse est
automatiquement réglée par défaut peut être modifiée à la valeur que vous souhaitez.
Températures par défaut de lavage/rinçage
COLORS Pour des articles d’entretien TIÈDE / FROID
(Couleurs) facile et ne se froissant pas.
WHITES Pour les articles peu sales à très CHAUD / FROID
(Blanc) sales, le linge de maison, les serviettes,
les vêtements de jeu et de travail.
DELICATES Pour la lingerie et les textiles FROID / FROID
(Délicats) fragiles peu sales à sales.
SPEED WASH Pour un ou deux articles peu TIÈDE / FROID
(Lavage rapide) sales dont on a un besoin urgent.
CUSTOM Température de l’eau, volume de brassée, TIÈDE / FROID
(Personnalisé) options de lavage manuellement
sélectionnés et enregistrés pour une
utilisation ultérieure.
ULTRA Améliorer l’efficacité du détergent en TIÈDE / FROID
CLEAN ajoutant l’eau par étape et en diluant
(Ultra propre) progressivement le détergent jusqu’au
niveau normal.
TEMP WASH/RINSE (TEMPÉRATURE DE LAVAGE/RINÇAGE)
Choisissez la température de l’eau pour les programmes de lavage et de rinçage. Observez
toujours les recommandations indiquées sur les étiquettes d’entretien du fabricant ou ses
instructions pour le lavage.
REMARQUE POUR LES MODÈLES PORTATIFS : Si l’appareil est raccordé à un robinet unique,
réglez le débit d’eau et la température de l’eau au niveau du robinet.
START/PAUSE (MARCHE/PAUSE)
Appuyez sur la touche START/PAUSE (marche/pause) pour démarrer le programme de lavage.
EST. MINUTES REMAINING (TEMPS RESTANT ESTIMÉ)
Affiche le temps restant pour le programme de lavage. Affiche également les Indications d’etat.
Se référer à la section Conseils de dépannage.
REMARQUE : Lorsque le programme est terminé, le tableau de commande s’éteint
automatiquement.
3
4
5
6
7
Soutien au
consommateur
Conseils de dépannage
Fonctionnement
Mesures de sécuritéInstallation
Page 31

31
Chargement et utilisation de la laveuse
Observez toujours les recommandations indiquées sur les étiquettes d’entretien du fabricant pour le lavage.
www.electromenagersge.ca
Chargement de la laveuse
Ajouter les articles secs sans les comprimer et sans
dépasser la rangée supérieure de trous de la cuve de
la laveuse. Lorsque vous placez des articles mouillés
dans la laveuse, assurez-vous que le niveau d’eau/de
linge est assez élevé pour permettre aux articles de
bouger librement. Le niveau d’eau doit juste recouvrir
les vêtements. Pour ajouter des articles après la mise
en marche de la laveuse, ouvrez le couvercle et
ajoutez les articles supplémentaires. Fermez le
couvercle. La machine se mettra en marche
automatiquement.
■ Ne lavez pas les tissus imbibés de substances
inflammables (cires, liquides de nettoyage, etc.).
■ Lorsque le couvercle est levé, un signal se fait
entendre et « Lo » s’affiche à l’écran. L’agitateur
de la laveuse ne fonctionne pas quand le couvercle
est levé.
Entretien et nettoyage de la laveuse
Panier : Laissez le couvercle ouvert après une lessive
pour permettre l’évaporation de l’humidité. Si vous
souhaitez nettoyer le panier, utilisez un linge propre et
doux légèrement imbibé de détergent liquide, puis
rincez. (N’utilisez pas de produits nettoyants abrasifs).
Tuyaux de remplissage : Les tuyaux connectant
la laveuse au robinet devraient être remplacer tous
les cinq ans.
Extérieur : Essuyez immédiatement tout produit
renversé à l’aide d’un chiffon humide. Evitez de
frapper la surface avec des objets tranchants.
Déménagement et entreposage : Demandez à un
réparateur de vidanger l’eau de la pompe et des
tuyaux. Entreposez la laveuse à l’abri des intempéries.
Vacances prolongées : Coupez l’alimentation en eau
au niveau des robinets. Vidangez l’eau des tuyaux en
cas de risque de gel.
Utilisation correcte du détergent
Ajoutez le détergent et l’adoucissant avant les
vêtements pour que le détergent puisse être vraiment
efficace. L’utilisation d’une quantité insuffisante ou
trop importante de détergent est une cause courante
de problème de lavage.
Vous pouvez utiliser moins de détergent si vous avez
une eau douce, une brassée plus petite ou du linge
peu sale.
GE recommande l’utilisation de détergent à grande
efficacité High Efficiency . Les détergents HE
sont formulés pour fonctionner avec des
programmes utilisant un faible volume d’eau de
lavage et de rinçage. Les détergents HE réduisent les
problèmes de moussage trop important associés aux
détergents habituels.
Soutien au
consommateur
Conseils de dépannage
Fonctionnement
Mesures de sécurité
Installation
Tri des charges de lavage
Couleurs
Blancs
Clairs
Foncés
Saleté
Beaucoup
Normal
Peu
Tissus
Délicat
Soins faciles
Cotonnades
solides
Charpie
Producteurs
de charpie
Collecteurs
de charpie
Page 32

Chargement et utilisation de la laveuse.
32
Étiquettes de tissus
Les symboles suivants de tissus se trouvent sur les vêtements que vous allez laver.
Soutien au
consommateur
Conseils de dépannage
Fonctionnement
Mesures de sécurité
Installation
Étiquettes de lavage
Température
de l’eau
Chaude
(50°C/120°F)
Tiède
(40°C/105°F)
Froide/fraîche
(30°C/85°F)
Tumble
dry
Dry
Normal
Permanent Press/
wrinkle resistant
Gentle/
delicate
Do not tumble dry
Do not dry
(used with
do not wash)
Heat
setting
High
Medium
Low
No heat/air
Special
instructions
Line dry/
hang to dry
Drip dry
Dry flat
In the shade
Étiquettes de séchage
Séchage
Séchage
par
culbutage
Réglage
de chaleur
Instructions
spéciales
Normal Sans repassage/
infroissables
Doux/délicat Ne pas sécher
par culbutage
Ne pas sécher
(utilisé avec
ne pas laver)
Haut
Moyen Bas Pas de chaleur/
aération
Sécher en suspendant
après essorage
Sécher par
égouttage
Sécher à plat
Sécher à l’ombre
Cycle de
lavage à
la machine
Normal
Tissus sans
repassage/
résistants aux plis
Doux/
délicat
Lavage à
la main
Ne pas laver
Ne pas essorer
Page 33

AVANT DE COMMENCER
Lisez ces instructions entièrement et attentivement.
•
IMPORTANT – Conservez ces
instructions pour l’inspecteur électrique local.
•
IMPORTANT – Respectez tous les codes
et règlements applicables.
• Remarque pour l’installateur –
Assurez–vous de remettre ces instructions au client.
• Remarque pour le client – Conservez ces
instructions pour une future référence.
• Niveau de compétence – L’installation de cet
appareil demande des connaissances de base
en mécanique.
• Délai d’exécution – 1 heure
• L’installateur est responsable de l’installation correcte
de l’appareil.
• Une panne de cet appareil due à une mauvaise
installation n’est pas couverte par la Garantie.
• Remarque
–
Cet appareil doit être correctement
mis à la terre. Le branchement électrique de la
laveuse doit être conforme aux codes et règlements
locaux et à la dernière édition du National Electrical
Code, ANSI/NFPA 70.
La laveuse doit être installée sur un sol stable pour
minimiser les vibrations pendant les programmes
d’essorage. Les sols en béton sont les plus appropriés,
mais un plancher en bois est suffisant à condition que le
soubassement de ce plancher respecte les normes FHA.
La laveuse ne doit pas être installée sur un tapis ou
exposée aux intempéries.
Installez ou rangez votre laveuse où elle ne sera pas
exposée au gel ou aux intempéries.
EMPLACEMENT DE LA LAVEUSE
Instructions
Laveuses
d’installation
WSLP1500 et WSLS1500
• PRESSION D’EAU—La pression dynamique mesurée au
robinet doit être comprise entre un minimum de 10 psi
et un maximum de 150 psi.
• TEMPÉRATURE DE L’EAU— Le chauffe-eau doit être
réglé pour alimenter LA LAVEUSE en eau à une
température comprise entre 50°C et 66°C (120° et
150°F) lorsque le programme HOT (Chaud) est
sélectionné.
• ROBINETS D’ARRÊT—Deux robinets d’arrêt (chaud et
froid) doivent être disponibles.
• VIDANGE—L’eau peut être évacuée vers un tuyau de
refoulement ou vers une cuve. La hauteur d’évacuation
NE DOIT PAS ETRE INFÉRIEURE À 30 po ou à plus de
8 pi par rapport à la base de la laveuse. Le tuyau de
refoulement doit avoir un diamètre intérieur minimal
de 11⁄2 po et être ouvert à l’air libre.
PLOMBERIE
• Assurez-vous que la laveuse est bien centrée entre
les côtés de l’étagère.
INSTALLATION SUR ÉTAGÈRE
Cet appareil doit être alimenté avec la tension et la
fréquence indiquées sur la plaque signalétique (située
à l’arrière de la laveuse) e raccordé à un circuit
d’alimentation individuel, correctement mis à la terre et
protégé par un disjoncteur de 15 ou 20 amp ou par un
fusible à action différée.
Si la laveuse est branchée dans la prise de 115 volts
utilisée pour la sécheuse, cette dernière doit être
branchée sur une prise distincte.
BRANCHEMENT ELECTRIQUE
Pinces
OUTILLAGE NÉCESSAIRE
Tuyaux d’eau (2)
PIÈCES FOURNIES
Collier de serrage
Rondelles en caoutchouc (4)
Des questions? Appelez le 1.800.561.3344 ou visitez notre site Web à l’adresse : www.electromenagersge.ca
33
Page 34

MISE EN GARDE : Pour la sécurité
des personnes, n’utilisez pas de rallonges ou
d’adaptateurs avec cet appareil.
Ne coupez pas ou n’enlevez pas, sous aucun prétexte,
la troisième broche de mise à la terre du cordon
d’alimentation. Veuillez suivre les codes électriques
nationaux ou les codes et règlements locaux.
Cet appareil doit être alimenté par la tension et la
fréquence indiquées sur la plaque signalétique (située à
l’arrière de la laveuse). La laveuse doit être branchée sur
une source électrique individuelle, correctement mise à la
terre et protégée par un disjoncteur de 15 ou 20 amp ou
par un fusible à action différée.
Si l’alimentation électrique n’est pas conforme à ces
exigences, appelez un électricien qualifié.
EXIGENCES ÉLECTRIQUES
Cet appareil doit être mis à la terre. En cas de mauvais
fonctionnement ou de panne, la mise à la terre réduit
le risque de choc électrique en fournissant au courant
électrique un chemin de moindre résistance.
Cet appareil est équipé d’un cordon, muni d’un
conducteur de mise à la terre de l’appareil et d’une fiche
de mise à la terre.
La fiche doit être branchée dans une prise appropriée,
elle-même correctement installée et raccordée à la terre,
conformément à tous les codes et règlementations
locales.
DANGER : Une connexion incorrecte de ce
fil de terre pourrait entraîner un risque de choc électrique.
Vérifiez auprès d’un électricien qualifié si vous n’êtes pas
sûr que votre appareil soit correctement mis à la terre.
Ne modifiez pas la fiche fournie avec l’appareil ; si celle-ci
n’est pas adaptée à la prise existante, faites installer une
prise appropriée par un électricien qualifié.
Assurez-vous que la mise à la
terre soit correcte avant toute
utilisation.
MISE EN GARDE : Avant de brancher la laveuse, veuillez lire les exigences électriques suivantes.
INSTRUCTIONS DE MISE À LA TERRE
Avant de brancher les tuyaux, la laveuse doit être mise
de niveau. Les verrous de mise de niveau sont situés sur
la partie inférieure avant sur les côtés gauche et droit.
MISE DE NIVEAU DE LA
LAVEUSE—MODÈLES FIXES
ASSUREZ-VOUS QUE LA LAVEUSE SE
TROUVE À SON EMPLACEMENT FINAL
1
TIREZ LES VERROUS DE MISE DE
NIVEAU
2
Ceci libère les pieds de mise de niveau montés sur
ressort. La laveuse se mettra de niveau
automatiquement.
REPOUSSEZ LES VERROUS DE MISE
DE NIVEAU VERS L’INTÉRIEUR
3
Ne donnez pas de coups de pieds
et ne marchez pas sur les
verrous de mise de niveau.
Instructions d’installation
34
Page 35

Collier de
serrage
Collier de serrage
Collier de
serrage
Cuve de lessivage
Tuyau de refoulement
AVERTISSEMENT :
Assurez-vous que la laveuse est débranchée.
Faites couler de l’eau des robinets d’eau chaude et froide
pour rincer les conduites et éliminer les particules qui
pourraient boucher les filtres du robinet.
RINÇAGE DES CONDUITES D’EAU
1
BRANCHEMENTS POUR LE MODÈLE FIXE—WSLS1500
Raccordez les extrémités des conduites d’admission aux
robinets d’eau CHAUDE et FROIDE en serrant à la main,
puis en serrant de 2⁄3 de tour à l’aide de pinces. Ouvrez
les robinets d’eau pour vérifier l’absence de fuites.
BRANCHEMENT DES CONDUITES
D’EAU
2
PLACEZ LA LAVEUSE À SON
EMPLACEMENT FINAL AVEC
PRÉCAUTION
3
Formez un U à l’extrémité du tuyau de vidange avec le
tuyau en direction de l’évacuation. Placez le tuyau dans
une cuve de lessivage ou dans un tuyau de refoulement
et attachez le à l’aide d’un collier de serrage.
REMARQUE : Si le tuyau de vidange est placé dans un
tuyau de refoulement sans faire un U, il est possible
d’avoir un effet de siphon. Il doit y avoir un espace rempli
d’air autour du tuyau d’évacuation. Un montage serré
peut également provoquer un effet de siphon.
BRANCHEMENT DU TUYAU DE
VIDANGE
4
BRANCHEMENT DU CORDON
D’ALIMENTATION DANS UNE PRISE
MISE À LA TERRE
5
Assurez-vous que la mise à la
terre soit correcte avant toute
utilisation.
Instructions d’installation
35
Page 36

INSTALLATION DANS UNE ALCÔVE OU DANS UN PLACARD
60 po² (387,1 cm²)
60 po² (387,1 cm²)
Porte de placard
BRANCHEMENTS POUR LE MODÈLE FIXE—WSLS1500
FAITES FAIRE UN CYCLE COMPLET
À LA LAVEUSE
7
Vérifiez le fonctionnement et l’absence de fuites.
RETIREZ LA PELLICULE DE
PROTECTION COUVRANT LE TABLEAU
DE COMMANDES
8
Il contient des informations importantes et utiles qui
peuvent vous faire économiser du temps et de l’argent.
LISEZ LE RESTE DE CE MANUEL
D’UTILISATION
9
REMARQUE : Si votre laveuse ne fonctionne pas, veuillez
vous référer à la section Avant d’appeler un réparateur.
Si votre laveuse est homologuée pour une installation dans
une alcôve ou un placard, une étiquette sera apposée à
l’arrière de la laveuse décrivant les exigences.
• Les espaces minimaux entre la laveuse et les murs
adjacents ou autres surfaces sont les suivants : 0 po
de chaque côté, 2 po à l’avant et 3 po à l’arrière.
• L’espace minimal vertical entre le sol et les étagères
supérieures, les placards, le plafond etc. est de 96 po.
• Les portes du placard doivent être équipées de persiennes
ou d’un autre système de ventilation. Elle doivent
comporter une ouverture de 60 pouces carrés pour la
laveuse uniquement ou si le placard doit contenir la
laveuse et la sécheuse, les portes doivent disposer d’une
ouverture minimale de 120 pouces carrés répartis
uniformément.
REMARQUE : Seuls les espaces minimaux sont mentionnés
sur cette étiquette. Il est important de prévoir suffisamment
d’espace pour l’installation et l’entretien.
LISTE DE VÉRIFICATION
D’INSTALLATION
6
Avant de mettre la laveuse en marche, vérifiez que :
❏ L’alimentation principale est connectée.
❏ La laveuse est branchée.
❏ Les robinets d’eau sont ouverts.
❏ L’appareil est de niveau.
❏ Le tuyau de vidange est correctement fixé.
❏ Il n’y a pas de fuites au niveau du robinet, de
la conduite d’évacuation ou de la laveuse.
Instructions d’installation
36
Page 37

Raccord de tuyau
Collier de verrouillage
Tuyau Uni-Couple
Raccord du robinet
Raccord au tuyau
de vidange
Raccord du tuyau
d’alimentation
d’eau FROIDE
Filtre à eau
BRANCHEMENTS POUR LE MODÈLE PORTATIF WSLP1500—
ROBINET UNIQUE
RETIREZ LE TUYAU UNI-COUPLE
®
DE L’INTÉRIEUR DU PANIER DE LA
LAVEUSE
1
BRANCHEMENT À LA CONDUITE
D’EAU
2
Utilisez le raccord de tuyau fourni avec la laveuse pour
effectuer le branchement à un robinet unique.
BRANCHEMENT DE LA LAVEUSE :
Fixez le raccord du tuyau à l’adaptateur du robinet en
tirant le collier de verrouillage vers le bas tout en
soulevant le raccord jusqu’à ce qu’il s’enclenche.
Assurez-vous que le filtre fourni est en place.
BRANCHEMENT À L’ORIFICE
D’ADMISSION DE LA SOUPAPE
3
Fixez le raccord du tuyau d’alimentation en eau
FROIDE à l’orifice d’admission d’eau FROIDE (couleur
bleue). Assurez-vous que la rondelle est à l’intérieur du
raccord avant de serrer.
SERREZ LE RACCORD
4
Serrez le raccord en vous assurant que le filetage est
correctement aligné pour assurer une bonne jonction.
Vérifiez que le tuyau ne soit pas entortillé ou coincé.
REMARQUE : Ne retirez pas le bouchon en plastique de
l’admission d’eau CHAUDE pour les branchements unicouple, une fuite pourrait subvenir dans le cas contraire.
Bouchon en plastique
BRANCHEMENT DU TUYAU
DE VIDANGE
5
Fixez le tuyau de vidange à l’arrière de la laveuse.
Placez la bride sur le tuyau vidange et serrez pour
éviter toute fuite d’eau.
Instructions d’installation
37
Page 38

BRANCHEMENTS POUR LE MODÈLE PORTATIF WSLP1500—
ROBINET UNIQUE (SUITE)
ASSUREZ-VOUS QUE LE SÉLECTEUR
DE TEMPÉRATURE EST RÉGLÉ SUR
FROID/FROID.
6
OUVREZ LENTEMENT LE ROBINET
SUR TOUTE SA COURSE JUSQU’AU
RÉGLAGE DE TEMPÉRATURE
SOUHAITÉ
7
BRANCHEZ LE CORDON
D’ALIMENTATION DANS UNE PRISE
À 3 BROCHES AVEC MISE À LA TERRE
8
Assurez-vous que la mise à
la terre soit correcte avant
toute utilisation.
Le cordon d’alimentation se trouve à l’arrière
de la laveuse.
RETIREZ LA PELLICULE DE
PROTECTION COUVRANT LE TABLEAU
DE COMMANDES
9
LISTE DE VÉRIFICATION
D’INSTALLATION
10
Avant de mettre la laveuse en marche, vérifiez que :
❏ L’alimentation principale est connectée.
❏ La laveuse est branchée.
❏ Les robinets d’eau sont ouverts.
❏ L’appareil est de niveau.
❏ Il n’y a pas de fuites au niveau du robinet,
de la conduite d’évacuation ou de la laveuse.
Instructions d’installation
38
Page 39

POUR DÉBRANCHER LA LAVEUSE :
Raccord de tuyau
Bouton de contrôle
du débit d’eau
FERMEZ LE ROBINET
1
DÉBRANCHEZ LE CORDON
D’ALIMENTATION ET REPLACEZ-LE
DANS SON LOGEMENT
2
APPUYEZ SUR LE BOUTON ROUGE DE
CONTROLE DU DÉBIT POUR LIBÉRER
LA PRESSION DE L’EAU
3
DÉBRANCHEZ LA CONDUITE D’EAU
4
Raccord de tuyau
Collier de verrouillage
Déplacez le collier de verrouillage et tirez le raccord
du tuyau vers le bas pour dégager l’adaptateur du
robinet.
VIDANGE DE L’EAU
5
Vidangez l’eau contenue dans les tuyaux par le
raccord de tuyau.
Instructions d’installation
39
Page 40

POUR DÉBRANCHER LA LAVEUSE :
BRANCHEMENT DE LA LAVEUSE :
Si vous disposez de deux branchements distincts à la conduite
d’eau, votre laveuse peut être branchée aux deux robinets
d’eau chaude et froide. L’équipement nécessaire peut être
acheté chez votre revendeur ou dans notre service de Pièces
Détachées et Accessoires. Aux Etats-Unis, appelez le
800.626.2002. Au Canada, consultez les pages jaunes pour
trouver le numéro de téléphone de votre dépositaire Camco.
BRANCHEMENTS POUR LE MODÈLE PORTATIF WSLP1500—
RACCORD À 2 ROBINETS
BRANCHEMENT À LA CONDUITE
D’EAU
1
Branchez les tuyaux d’admission d’eau CHAUDE et
FROIDE aux robinets d’eau CHAUDE et FROIDE.
Collier
de
serrage
Collier
de
serrage
Evier
Tuyau de
refoulement
Fixez le tuyau de vidange à l’évier ou au tuyau de
refoulement.
BRANCHEMENT DU TUYAU DE
VIDANGE
2
BRANCHEZ LE CORDON
D’ALIMENTATION DANS UNE PRISE À
3 BROCHES AVEC MISE À LA TERRE
3
Assurez-vous que la mise à la
terre soit correcte avant toute
utilisation.
FERMEZ LES ROBINETS
1
DÉBRANCHEZ LE CORDON
D’ALIMENTATION ET REPLACEZ-LE
DANS SON LOGEMENT
2
DÉBRANCHEZ LE TUYAU DE VIDANGE
ET LE TUYAU D’ALIMENTATION D’EAU
3
Suspendez-les à l’étagère de rangement.
LISTE DE VÉRIFICATION
D’INSTALLATION
4
Avant de mettre la laveuse en marche, vérifiez que :
❏ L’alimentation principale est connectée.
❏ La laveuse est branchée.
❏ Les robinets d’eau sont ouverts.
❏ L’appareil est de niveau.
❏ Le tuyau de vidange est correctement fixé.
❏ Il n’y a pas de fuites au niveau du robinet,
de la conduite d’évacuation ou de la laveuse.
Instructions d’installation
40
Page 41

41
FF
■ Indique que la laveuse ne se remplit pas. Assurez-vous que tous les
robinets sont ouverts et que le tuyau de remplissage n’est pas bouché
ou entortillé.
dr
■ Indique que l’eau ne se vidange pas de la laveuse. Assurez-vous que
le tuyau de vidange n’est pas entortillé ou mal branché.
Ub
■ Indique que la brassée est mal équilibrée. Répartissez le linge
uniformément dans le panier et assurez-vous que la laveuse
est de niveau.
Lo
■ Indique que le couvercle est ouvert. Fermez le couvercle.
Indicateurs d’etat
LE
■ Indique que la laveuse a une fuite Vérifiez le branchement du tuyau
de vidange.
IE
■ Appuyez sur POWER ON/OFF (alimentation marche/arrêt) et appelez
un technicien.
OE
■ Indique que l’eau a débordée. Redémarrez après essorage.
Avant d’appeler un réparateur… www.electromenagersge.ca
Conseils de dépannage—Économisez du temps et de l’argent!
Consultez d’abord les tableaux qui suivent et vous pourrez
peut-être éviter de faire appel à un réparateur.
Soutien au
consommateur
Conseils de dépannage
Fonctionnement
Mesures de sécurité
Installation
Page 42

42
EAU CAUSES POSSIBLES QUE FAIRE
Moussage excessif Type de détergent • Adoptez un détergent .
Eau très douce • Utilisez moins de détergent.
Trop de détergent • Mesurez soigneusement votre détergent. Utilisez moins de
détergent si vous avez une eau douce, une brassée plus
petite ou du linge peu sale.
Fuites d’eau Les tuyaux de remplissage ou • Assurez-vous que les branchements soient bien serrés au
de vidange sont mal branchés niveau des robinets et de la laveuse. Assurez-vous que
l’extrémité du tuyau de vidange est correctement insérée
et fixée à l’évacuation.
La canalisation d’évacuation du • Vérifiez la plomberie du domicile. Vous aurez peut-être
domicile est peut être bouchée besoin d’appeler un plombier.
Pression d’eau constante vers • Resserrez les tuyaux au niveau des robinets et fermez les
les tuyaux de remplissage robinets après chaque utilisation.
• Vérifiez l’état des tuyaux de remplissage, ils ont peut être
besoin d’être remplacé après 5 ans.
Utilisation d’une trop grande • Utilisez moins de détergent. Utilisez moins de détergent si
quantité de détergent dans vous avez une eau douce, une brassée plus petite ou du
la laveuse linge peu sale.
La température de L’alimentation en eau est fermée • Ouvrez complètement les robinets d’eau chaude et froide
l’eau est incorrecte ou branchée incorrectement et assurez vous que les tuyaux soient branchés aux bons
robinets.
Les filtres des soupapes • Fermez le robinet et retirez les raccords de
tuyaux à
sont obstrués
l’arrière supérieur de la laveuse. Retirez les filtres et nettoyezles à l’aide d’une brosse ou d’un cure-dent. Remontez les
filtres, rebranchez les tuyaux et ouvrez les robinets.
Le chauffe-eau n’est pas • Assurez-vous que le chauffe-eau produit une eau à une
réglé correctement température variant de 48 à 60°C (120 à 140°F).
La laveuse ne se Le tuyau de vidange est • Redressez le tuyau de vidange et assurez-vous que la
vidange pas entortillé ou mal branché laveuse ne soit pas posée dessus.
• La partie supérieure du tuyau de vidange doit être à moins
de 8 pieds du sol.
Soutien au
consommateur
Conseils de dépannage
Fonctionnement
Mesures de sécurité
Installation
Avant d’appeler un réparateur…
Conseils de dépannage
Page 43

FONCTIONNEMENT CAUSES POSSIBLES QUE FAIRE
La laveuse s’arrête en
Il est normal que la laveuse
cours de programme
fasse une pause entre deux
différentes étapes du lavage
La laveuse ne La laveuse est débranchée • Assurez-vous que le cordon est bien branché dans la prise
fonctionne pas de courant.
Les robinets sont fermés • Ouvrez complètement les robinets d’eau chaude et froide.
Les commandes ne sont pas • Assurez-vous d’avoir fait toutes les sélections.
bien réglées
Le couvercle est ouvert • Fermez le couvercle et appuyez sur START/PAUSE
(Marche/pause).
Le disjoncteur est déclenché • Vérifiez le disjoncteur et les fusibles du domicile. Remplacez
ou le fusible est grillé les fusibles ou enclenchez le disjoncteur. La laveuse doit
être branchée à une prise séparée.
La laveuse n’a pas été • Appuyez sur la bouton POWER ON/OFF
mise en marche (alimentation marche/arrêt).
PERFORMANCE CAUSES POSSIBLES QUE FAIRE
Taches de couleurs Mauvaise utilisation • Vérifiez les instructions sur la bouteille d’adoucissant et
de l’adoucissant suivez les instructions d’utilisation du distributeur.
• Prétraitez la tache et relavez l’article.
Transfert de couleur • Triez les articles blancs et de couleur claire des articles de
couleur foncée.
Vêtements grisâtres Pas assez de détergent • Utilisez plus de détergent (surtout pour les brassées plus
ou jaunis volumineuses).
Eau dure • Utilisez un adoucisseur de type Calgon ou installez un
adoucisseur d’eau.
L’eau n’est pas assez chaude • Assurez-vous que le chauffe-eau produit une eau à une
température de 48 à 60°C (120 à 140°F).
La laveuse est trop chargée • Choisissez le type de brassée en fonction de la brassée
de vêtements.
Transfert de couleur • Triez les vêtements par couleur. Si l’étiquette de votre
vêtement indique que celui-ci doit être lavé séparément,
les couleurs ne sont peut-être pas stables.
Charpie ou résidu Les vêtements sont séchés à • Si vous ne séchez pas votre linge dans une sécheuse,
sur les vêtements l’air ou sur une corde à linge celui-ci peut retenir plus de charpie.
Tri incorrect • Séparez le linge produisant de la charpie de celui qui
la recueille.
Le lavage est trop long • Lavez les petites brassées pendant un durée plus courte
que pour les brassées plus volumineuses.
Surcharge • Le niveau des vêtements ne doit pas dépasser la dernière
rangée de trous dans le panier de la laveuse.
• Réglez le sélecteur de brassée en fonction de votre brassée
de vêtements.
Mauvaise utilisation • Vérifiez les instructions sur la bouteille d’adoucissant et
de l’adoucissant suivez les instructions d’utilisation du distributeur.
Boulochage Usure normale des tissus • Même si ce problème n’est pas provoqué par la laveuse,
en coton et polyester et des vous pouvez l’atténuer en lavant les vêtements à l’envers.
tissus duveteux
Soutien au
consommateur
Conseils de dépannage
Fonctionnement
Mesures de sécurité
Installation
www.electromenagersge.ca
43
Page 44

PERFORMANCE (suite) CAUSES POSSIBLES QUE FAIRE
Fils tirés, trous, accrocs, Epingles, boutons-pression, • Fermez les boutons-pression et les fermetures éclair et
déchirures ou usure crochets, boutons acérés, boucles attachez les boutons et les crochets.
excessive de ceinture, fermetures éclair et
objets pointus laissés dans les
poches
Eau de javel non diluée • Vérifiez la quantité à utiliser sur l’emballage.
• N’ajoutez jamais d’eau de javel non diluée dans la laveuse
ou sur les vêtements.
Produits chimiques tels que • Rincez les articles souillés par ces produits avant de
décolorants capillaires, teintures les laver.
ou solutions pour permanente
Faux plis Tri incorrect • Evitez de mélanger de articles lourds (vêtements de travail
par exemple) avec des articles légers (chemisiers par
exemple).
• Essayez d’utiliser un assouplissant.
Surcharge ou niveau • Chargez votre laveuse de façon à ce que les vêtements
d’eau incorrect aient suffisamment de place pour bouger librement.
Lavages répétés dans une • Lavez le linge dans une eau tiède ou froide.
eau trop chaude
BRUIT CAUSES POSSIBLES QUE FAIRE
La laveuse est bruyante La laveuse n’est pas de niveau • Mettez la laveuse de niveau. Reportez-vous à la section
Mise de niveau de la laveuse.
La brassée est déséquilibrée
• Appuyez sur le bouton START/PAUSE (marche/pause) pour
arrêter la laveuse, ouvrez le couvercle et répartissez à
nouveau la brassée. Fermez le couvercle et redémarrez
la laveuse.
La laveuse est trop près du mur • Eloignez la laveuse du mur d’environ 4 po.
(cognements contre le mur lors
des programmes)
Bruit de raclement Lors de l’utilisation de la fonction • C’est normal.
avant le remplissage LOAD SENSING (Capteur de
de la cuve charge), l’agitateur tourne avant
que l’eau ne remplisse la cuve
AUTRE CAUSES POSSIBLES QUE FAIRE
Les étiquettes apposées L’adhésif utilisé sur les • Utilisez un séchoir à cheveux réglé à la température la plus
sur l’extérieur de la étiquettes ne s’enlève basse en dirigeant l’air chaud vers l’étiquette pendant
laveuse ne s’enlèvent pas toujours facilement quelques instants. Vous pourrez ensuite enlever l’adhésif
pas proprement sans endommager la surface de la laveuse.
Avant d’appeler un réparateur…
Soutien au
consommateur
Conseils de dépannage
Fonctionnement
Mesures de sécurité
Installation
• Enlevez les articles lâches tels que les épingles, les objets
dans les poches et les boutons acérés.
• Retournez les vêtements en maille (ceux dont les fils se
tirent facilement).
44
Page 45

45
OWNERSHIP REGISTRATION
P.O. BOX 1780
MISSISSAUGA, ONTARIO
L4Y 4G1
(FOR CANADIAN CONSUMERS ONLY)
Please place in envelope and mail to:
Veuillez mettre dans une enveloppe et envoyez à :
Page 46

46
Page 47

47
Soutien au
consommateur
Conseils de dépannage
Fonctionnement
Mesures de sécurité
Installation
Garantie de laveuse GE.
Tout le service sous garantie est fourni par nos Centres de service de fabrique ou par un technicien
autorisé. Pour le service, appelez le 1.800.561.3344.
Veuillez fournir le numéro de série et le numéro de modèle lorsque vous appelez pour obtenir le service.
■ Les frais de déplacements à votre maison pour vous
apprendre à utiliser votre produit.
■ Une mauvaise installation, livraison ou entretien.
■ Une panne du produit si celui-ci est maltraité, mal utilisé
ou utilisé à des fins autres que celles auxquelles il est
destiné, ou utilisé commercialement.
■ Des dommages après la livraison.
■ Le remplacement de fusibles de la maison ou la remise en
marche d’un disjoncteur.
■ Des dommages au produit causés par un accident, un
incendie, une inondation ou une catastrophe naturelle.
■ Tout dommage indirect ou consécutif causé par des
pannes possibles de cet appareil électroménager.
■ Le service s’il est impossible d’avoir accès au produit
pour ce faire.
Ce qui n’est pas couvert (au Canada) :
Garant : MABE CANADA INC.
LE GARANT N’EST PAS RESPONSABLE DES DOMMAGES INDIRECTS.
Pour une période de : Nous remplacerons :
Un an Toute pièce de la laveuse qui tombe en panne à cause d’un vice de matériau ou de main-
À partir de la date d’œuvre. Pendant cette garantie limitée d’un an, GE fournit également, gratuitement,
de l’achat original tous les frais de main-d’œuvre et de services connexes pour remplacer la pièce défectueuse.
Cette garantie est offerte à l’acheteur initial, ainsi qu’à tout propriétaire subséquent d’un produit acheté en
vue d’une utilisation domestique au Canada. Le service à domicile en vertu de la garantie sera fourni dans
les régions où il est disponible et où Mabe estime raisonnable de le fournir.
EXCLUSION DE GARANTIES IMPLICITES – Votre seul et unique recours est la réparation du produit
selon les dispositions de cette Garantie limitée. Toutes les garanties implicites, incluant les garanties
de commercialité et d’adéquation à un usage spécifique, sont limitées à une année ou à la période
la plus courte autorisée par la législation.
Page 48

Imprimé en Corée
Soutien au consommateur.
Site Web appareils électroménagers GE
www.electromenagersge.ca
Vous avez une question ou vous avez besoin d’aide pour votre appareil électroménager? Contactez-nous par
Internet au site www.electromenagersge.ca 24 heures par jour, tous les jours de l’année.
Service de réparations 1.800.561.3344
Service de réparations GE est tout près de vous.
Pour faire réparer votre électroménager GE, il suffit de nous téléphoner.
Studio de conception réaliste
Sur demande, GE peut fournir une brochure sur l’aménagement d’une cuisine pour les personnes
à mobilité réduite.
Écrivez: Directeur, Relations avec les consommateurs, Mabe Canada Inc.
Bureau 310, 1 Factory Lane
Moncton, N.B. E1C 9M3
Prolongation de garantie www.electromenagersge.ca
Achetez un contrat d’entretien GE avant que votre garantie n’expire et bénéficiez d’un rabais substantiel.
Ainsi le service après-vente GE sera toujours là après expiration de la garantie.
Visitez notre site Web ou appelez-nous au 1.888.261.2133.
Pièces et accessoires
Ceux qui désirent réparer eux-mêmes leurs électroménagers peuvent recevoir pièces et accessoires
directement à la maison (cartes VISA, MasterCard et Discover acceptées).
Les directives stipulées dans le présent manuel peuvent être effectuées par n’importe quel utilisateur.
Les autres réparations doivent généralement être effectuées par un technicien qualifié. Soyez prudent,
car une réparation inadéquate peut affecter le fonctionnement sécuritaire de l’appareil.
Vous trouverez dans les pages jaunes de votre annuaire le numéro du Centre de service Mabe le plus proche.
Autrement, appelez-nous au 1.800.661.1616.
Contactez-nous
Si vous n’êtes pas satisfait du service après-vente dont vous avez bénéficié :
Premièrement, communiquez avec les gens qui ont réparé votre appareil.
Ensuite, si vous n’êtes toujours pas satisfait envoyez tous les détails–numéro de téléphone compris–au
Directeur, Relations avec les consommateurs, Mabe Canada Inc.
Bureau 310, 1 Factory Lane
Moncton, N.B. E1C 9M3
Inscrivez votre appareil électroménager www.electromenagersge.ca
Inscrivez votre appareil électroménager en direct, aussitôt que possible. Cela améliorera nos
communications et notre service après-vente. Vous pouvez également nous envoyer par la poste
le formulaire d’inscription joint à votre documentation.
48
Page 49

49
Información de seguridad . . . . 50, 51
Instrucciones de funcionamiento
Características especiales
de la lavadora . . . . . . . . . . . . . . . . . . . . . . . . . . .52
Cómo cargar y
utilizar la lavadora . . . . . . . . . . . . . . . . . . .55, 56
Configuraciones de control
y de indicador . . . . . . . . . . . . . . . . . . . . . . . .53, 54
Instrucciones de instalación
Cómo nivelar la lavadora . . . . . . . . . . . . . . 58
Conexiones de la lavadora
para el modelo fijo . . . . . . . . . . . . . . . . 59, 60
Conexiones de la lavadora
para el modelo portátil . . . . . . . . . . . . 61–64
Instrucciones de conexión a tierra . . . . . 58
Instalación en nichos o en closets . . . . . 60
Requisitos de instalación . . . . . . . . . . . . . . 57
Requisitos eléctricos . . . . . . . . . . . . . . . . . . 58
Consejos para identificación
y solución de problemas
Antes de llamar al
servicio técnico . . . . . . . . . . . . . . . . . . . . 65–68
Indicadores de estado . . . . . . . . . . . . . . . . . 65
Atención al cliente
Garantía (EE.UU.) . . . . . . . . . . . . . . . . . . . . . . . 69
Servicio al consumidor . . . . . . . . . . . . . . . . .71
Escriba aquí los números
de modelo y serie:
N.º de modelo ____________
N.º de serie ____________
Puede encontrarlos en una etiqueta
situada en el costado de la lavadora.
Soporte al consumidor
Consejos para la
solución de problemas
Instrucciones
de funcionamiento
Instrucciones
de seguridad
Instrucciones
de instalación
Page 50

50
Soporte al consumidor
Consejos para la
solución de problemas
Instrucciones
de funcionamiento
Instrucciones
de seguridad
Instrucciones
de instalación
■ Instale o almacene la lavadora en un lugar donde
no esté expuesta a temperaturas bajo cero
ni a las inclemencias climáticas, ya que esto puede
provocar daños irreversibles e invalidar la garantía.
■ Conecte correctamente a tierra la lavadora de
conformidad con todos los códigos y ordenanzas
regulatorias. Siga la información de Instrucciones
de instalación.
INFORMACIÓN DE SEGURIDAD IMPORTANTE.
LEA TODAS LAS INSTRUCCIONES ANTES DEL USO.
¡ADVERTENCIA!
Para su seguridad, siga la información de este manual con el fin de
minimizar el riesgo de incendio, explosión o descarga eléctrica, así como
para evitar daños materiales, lesiones o la muerte.
Las instrucciones de este manual, así como el resto de la documentación
que se incluye con la lavadora, no cubren todas las situaciones o
estados posibles que pueden producirse. El usuario DEBE adoptar
procedimientos correctos, seguros y prudentes al instalar, utilizar
y realizar el mantenimiento de cualquier electrodoméstico.
SEGURIDAD DEL CALENTADOR DE AGUA
En determinadas condiciones, en un calentador de agua que no se haya utilizado durante un mínimo
de dos semanas se puede producir gas hidrógeno. El gas hidrógeno puede resultar explosivo en determinadas
circunstancias.
Si el agua caliente no se ha utilizado por dos semanas o más, prevenga la posibilidad de sufrir daños o lesiones
abriendo todos los grifos de agua caliente y dejándola correr durante varios minutos.
Realice este proceso antes
de utilizar cualquier electrodoméstico que se conecte al sistema de agua caliente.
Este sencillo procedimiento le
permitirá liberar todo el gas hidrógeno acumulado. Debido a que el gas es inflamable, no fume ni utilice ninguna
llama o electrodoméstico durante el proceso.
INSTALACIÓN CORRECTA
La lavadora se debe instalar y colocar correctamente de acuerdo con las instrucciones de instalación, antes de utilizarla.
■ Mantenga las zonas debajo de los
electrodomésticos y en torno a ellos sin materiales
combustibles como pelusa, papel, trapos
y productos químicos.
■ No deje la puerta de la lavadora abierta. Si la puerta
está abierta, puede hacer que los niños se cuelguen
de ella o se introduzcan en la lavadora.
■ Es necesario vigilar con atención a los niños
si utilizan la lavadora o se encuentran en las
proximidades. No deje que los niños jueguen
sobre éste u otro electrodoméstico,
con él o en su interior.
ZONA DE LAVADERO
Page 51

51
Soporte al consumidor
Consejos para la
solución de problemas
Instrucciones de
funcionamiento
Instrucciones
de seguridad
Instrucciones
de instalación
■ No abra nunca la lavadora mientras esté
en movimiento. Espere a que se detenga
por completo para abrir la puerta.
■ No mezcle blanqueadores clorados con amoniaco
o ácidos como vinagre o desoxidantes. La mezcla
de distintos productos químicos puede producir
gases tóxicos que pueden causar la muerte.
■ No lave ni seque prendas que se hayan limpiado,
lavado, empapado o manchado con sustancias
inflamables o explosivas (como cera, aceite,
pintura, gasolina, desengrasantes, disolventes
de limpieza en seco, queroseno, etc.) que puedan
prenderse o explosionar. No añada ninguna
de estas sustancias al agua de lavado.
No utilice ni coloque ninguna de estas
sustancias en torno a la lavadora
o la secadora durante el funcionamiento.
■ El proceso de lavado puede reducir el tiempo
previo a la inflamación de los tejidos. Para evitar
este efecto, siga con atención las instrucciones
de lavado y cuidado del fabricante de la prenda.
■ Para minimizar la posibilidad de descarga
eléctrica, desenchufe el electrodoméstico
de la corriente o desconecte la lavadora
en el panel de distribución de la vivienda quitando
el fusible o apagando el interruptor antes de
realizar cualquier tarea de mantenimiento o
limpieza. NOTA: al pulsar el botón de apagado,
NO se desconecta la lavadora de la corriente.
■ No intente en ningún caso utilizar la lavadora
si está dañada, funciona incorrectamente,
está parcialmente desmontada, le faltan
piezas o algunas están rotas, incluidos
el cable o el enchufe.
AL UTILIZAR LA LAVADORA
■ Cierre las llaves de paso para reducir la presión
de las tuberías y las válvulas, y minimizar
las fugas en caso de que se produzca una rotura
o grieta. Compruebe el estado de las tuberías
de toma de agua, ya que deben sustituirse
cada 5 años.
■ Antes de deshacerse de una lavadora o de
desecharla, quite la puerta de la lavadora para
evitar que los niños se escondan en su interior.
■ No intente reparar ni sustituir ninguna pieza
de este electrodoméstico, a menos que se
recomiende de manera explícita en el manual
del propietario o en instrucciones publicadas
de uso y reparación que sean comprensibles
y que pueda realizar usted.
■ No manipule los controles.
CUANDO NO ESTÉ EN USO
GUARDE ESTAS INSTRUCCIONES
Utilice este
electrodoméstico
sólo para el
uso que se
describe en
este manual
del
propietario.
ge.com
LEA DETENIDAMENTE Y SIGA LA INFORMACIÓN
DE SEGURIDAD.
Page 52

52
Características especiales de la lavadora.
Cajón dosificador de detergente y suavizador de prendas
Los dosificadores de detergente y de
suavizador de prendas liberan sus contenidos
automáticamente en el momento justo
durante el ciclo.
Para usar el dosificador de detergente:
Agregue la medida de detergente al
dosificador. Verifique que el detergente se
haya colocado en forma uniforme y nivelada.
Para usar el dosificador de suavizador
de prendas:
Utilice sólo suavizador de prendas líquido.
Viértalo en el dosificador, utilizando la
cantidad recomendada en el paquete.
■ No sobrepase el nivel superior máximo
de la línea de llenado.
■ Nunca vierta suavizador de prendas
directamente sobre la ropa. Éstas
podrían mancharse.
Cómo limpiar el cajón dosificador de detergente y suavizador de prendas
1. Quite el cajón abriéndolo por completo
y luego incline el frente de la puerta
hacia abajo. Tire hacia afuera.
2. Enjuague el cajón con agua. Si hace
falta, utilice un paño suave para
eliminar restos.
3. Alinee el cajón con la abertura y
presione el cajón dosificador hacia
adentro.
Filtro de pelusas
Limpie el filtro de pelusas ubicado dentro de
la pared de la canasta de lavado una vez por
semana para lograr mejores resultados de
filtrado.
Para quitar:
Presione la lengüeta ubicada en la parte
superior del filtro y tire hacia afuera.
Para limpiar:
Abra el filtro. Limpie el filtro con un cepillo
de dientes.
Línea
máxima
de llenado
Antes de encender la lavadora:
• Cargue la ropa en la lavadora.
• Agregue el detergente y el suavizador de prendas al cajón dosificador.
Soporte al consumidor
Consejos para la
solución de problemas
Instrucciones
de funcionamiento
Instrucciones
de seguridad
Instrucciones
de instalación
Page 53

Sobre las configuraciones de control y de indicador. ge.com
POWER ON/OFF (encendido/apagado)
Presione el botón POWER ON/OFF (encendido/apagado) para encender el panel de control.
WASH OPTIONS (opciones de lavado)
Elija las opciones de lavado que le gustaría incluir en el ciclo. Presione el botón WASH OPTIONS
(opciones de lavado) hasta que se enciendan todas las opciones que desee incluir. Puede
seleccionarse más de una opción.
2
1
Para usar el lavado automático de un toque
START
PAUSE
La característica LOAD SENSING (sensor de carga) automáticamente detecta el tamaño de su carga,
utiliza la cantidad adecuada de agua y calcula el tiempo de lavado requerido para completar el ciclo.
NOTA: Cuando utiliza la característica LOAD SENSING (sensor de carga), es normal que el pulsador gire
antes de que el agua ingrese al tambor.
Para seleccionar la característica automática LOAD SENSING (sensor de carga), presione POWER ON/OFF
(encendido/apagado).
La luz indicadora de COLORS (colores) se encenderá de forma automática, a menos que haya
seleccionado uno de los ciclos de LOAD SENSING (sensor de carga) tales como WHITES (blancos),
DELICATES (delicados), SPEED WASH (lavado rápido), CUSTOM CYCLE (ciclo a medida) o ULTRA CLEAN
(ultra limpio).
Luego presione START/PAUSE (iniciar/pausa).
Para seleccionar sus selecciones de ciclo propias
Antes de encender la lavadora:
• Cargue la ropa en la lavadora.
• Agregue el detergente y el suavizador de prendas al cajón dosificador.
Soak+Wash Soak+Wash+Heavy Wash+Rinse Wash+Heavy Wash Rinse Wash Rinse Spin
Cycle +Rinse+Spin Duty+Rinse+Spin +Spin Duty+Rinse+Spin +Rinse +Spin Only Only Only
COLORS (colores) X X X X X X X X X
WHITES (blancos) X X
XX
X XXXX
DELICATES X X X X X X X X X
(delicados)
SPEED WASH X X X X X X X X X
(lavado rápido)
CUSTOM CYCLE
X X X X X XXXX
(ciclo a medida)
ULTRA CLEAN
X
(ultra limpio)
Soporte al consumidor
Consejos para la
solución de problemas
Instrucciones
de funcionamiento
Instrucciones
de seguridad
Instrucciones
de instalación
53
COLD
HOT
TEMP
WARM
EXTRA LARGE
LARGE
MEDIUM
SMALL
EXTRA SMALL
LOAD
SOAK COLORS
WASH
HEAVY DUTY
RINSE
SPIN
LO
C
K
H
OL
D
3
SECS
T
O
LOCK/
UN
LOCK
C
ON
T
R
OL
S
EST. MINUTES
REMAINING
ULTRA
CLEAN
OPTIONS
LOAD SENSING
WHITES
DELICATES
SPEED WASH
CUSTOM CYCLE
CYCLES
START
PAUSE
POWER
DELAY WA SH
18 HOURS
to
1
Page 54

54
Sobre las configuraciones de control y de indicador.
LOAD SIZE (tamaño de carga)
El nivel de agua debe cubrir las prendas ligeramente. Ajuste el tamaño de la carga según
corresponda. Cargue la ropa sin apretar ni superar la hilera superior de orificios del tambor
de la lavadora.
WASH CYCLE (ciclo de lavado)
Estos ciclos de lavado controlan la duración del proceso de lavado. La tabla de abajo ayuda a
adecuar la configuración de WASH CYCLE (ciclo de lavado) con sus necesidades específicas de
lavado. Cuando se selecciona un ciclo, la temperatura automática predeterminada de la máquina
puede cambiarse a cualquier temperatura que usted desee.
Temperaturas predeterminadas de lavado/enjuague
COLORS Para prendas de cuidado fácil WARM / COLD (tibia/fría)
(colores) y ropa resistente a las arrugas.
WHITES Para algodón de suciedad intensa a suave, HOT / COLD (caliente/fría)
(blancos) ropa blanca, toallas, ropa de trabajo y de juegos.
DELICATES Para lencería y telas delicadas con suciedad COLD / COLD (fría/fría)
(delicados) de suave a normal.
SPEED WASH Para una o dos prendas poco sucias que WARM / COLD (tibia/fría)
(lavado rápido) se necesitan rápidamente.
CUSTOM Opciones seleccionadas manualmente de WARM / COLD (tibia/fría)
(a medida) temperatura de agua, tamaño de carga
y opciones de lavado que se guardan para
usos futuros.
ULTRA CLEAN Potencia al máximo la eficiencia del WARM / COLD (tibia/fría)
(ultra limpio) detergente agregando agua por pasos
y lentamente diluyendo el detergente
hasta el nivel normal.
TEMP WASH/RINSE (temp. lavado/enjuague)
Seleccione la temperatura del agua para los ciclos de lavado y de enjuague. Siempre siga las
instrucciones de la etiqueta del fabricante de la prenda cuando realice los lavados.
NOTA PARA MODELOS PORTÁTILES: Cuando utilice una conexión de un grifo, ajuste la mezcla
de flujo de agua y la temperatura de agua desde el grifo.
START/PAUSE (iniciar/pausa)
Presione el botón de START/PAUSE (iniciar/pausa) para iniciar el ciclo de lavado.
EST. MINUTES REMAINING (tiempo restante estimado)
Muestra el tiempo restante del ciclo de lavado. También muestra los indicadores de estado.
Ver Consejos para la solución de problemas.
NOTA: Cuando haya finalizado el ciclo, el panel de control se apagará automáticamente.
3
4
5
6
7
Soporte al consumidor
Consejos para la
solución de problemas
Instrucciones
de funcionamiento
Instrucciones
de seguridad
Instrucciones
de instalación
Page 55

55
Cómo cargar y utilizar la lavadora.
Siempre siga las instrucciones de la etiqueta del fabricante de la prenda cuando realice los lavados. ge.com
Cómo cargar la lavadora
Cargue la ropa seca sin apretar ni superar la hilera
superior de orificios del tambor de la lavadora.
Cuando cargue prendas húmedas, asegúrese de
configurar el nivel de carga/agua lo suficientemente
alto para permitir que se muevan con libertad. El nivel
de agua debe cubrir las prendas ligeramente. Para
agregar prendas después de iniciado el ciclo, abra la
tapa y agregue las prendas adicionales.
Cierre la tapa. La lavadora se encenderá
automáticamente.
■ No lave telas que contengan materiales
inflamables (ceras, líquidos de limpieza, etc.).
■ Cuando la tapa esté levantada, sonará una señal y
"Lo" aparecerá en la pantalla. La lavadora no
arrancará si la tapa se encuentra levantada.
Cuidado y limpieza de la lavadora
Tambor de lavado: Deje la tapa abierta después del
lavado para permitir la evaporación de humedad. Si
desea limpiar el tambor, utilice un paño limpio y suave
humedecido con detergente líquido, luego enjuague.
(No utilice limpiadores abrasivos).
Mangueras de llenado: Las mangueras que conectan
la lavadora al grifo deben cambiarse cada 5 años.
Exterior: Limpie inmediatamente cualquier clase de
derrame. Limpie con un paño húmedo. No golpee la
superficie con objetos filosos.
Desplazamiento y almacenamiento: Solicite al
técnico que elimine toda el agua de la bomba de
drenaje y de las mangueras. No almacene la lavadora
donde se vea expuesta a las inclemencias del tiempo.
Vacaciones prolongadas: Asegúrese de que el
suministro de agua esté cortado desde todos los
grifos. Drene toda el agua de las mangueras si la
temperatura puede llegar a bajo cero.
Uso adecuado del detergente
Agregue detergente y suavizador de prendas antes
de colocar la ropa para que el detergente pueda
funcionar correctamente. Usar muy poca o mucha
cantidad de detergente es una causa común de
problemas de lavado.
Use menos detergente si cuenta con agua blanda,
una carga más pequeña o una carga poco sucia.
GE recomienda el uso de detergentes de High
Efficiency (alta eficiencia) . Los detergentes
HE están formulados para funcionar en sistemas de
lavado y enjuague con poca agua. Los detergentes
HE reducen los problemas de espuma excesiva
comúnmente asociados con los detergentes
comunes.
Soporte al consumidor
Consejos para la
solución de problemas
Instrucciones
de funcionamiento
Instrucciones
de seguridad
Instrucciones
de instalación
Separación de cargas
Colores
Ropa blanca
Ropa de colores
claros
Ropa de colores
oscuros
Suciedad
Mucha
Normal
Poca
Tejido
Prendas delicadas
Prendas de fácil
cuidado
Prendas resistentes
de algodón
Pelusas
Prendas que
sueltan pelusa
Prendas a las
que se adhiere
la pelusa
Page 56

Cómo cargar y utilizar la lavadora.
56
Etiquetas de cuidado de tejido
A continuación se muestran “símbolos” de etiquetas de cuidado de tejido que afectan a las prendas que se lavan.
Soporte al consumidor
Consejos para la
solución de problemas
Instrucciones
de funcionamiento
Instrucciones
de seguridad
Instrucciones
de instalación
ETIQUETAS DE LAVADO
Ciclo de
lavado en
máquina
Normal
Planchado permanente/
resistente a arrugas
Suave/
delicado
Lavar a mano
No lave No escurra
Temperatura
del agua
Caliente
(50°C/120°F)
Tibia
(40°C/105°F)
Fría/fresca
(30°C/85°F)
Tumble
dry
Dry
Normal
Permanent Press/
wrinkle resistant
Gentle/
delicate
Do not tumble dry
Do not dry
(used with
do not wash)
Heat
setting
High
Medium
Low
No heat/air
Special
instructions
Line dry/
hang to dry
Drip dry
Dry flat
In the shade
ETIQUETAS DE SECADO
Secado
Secado en
secadora
Normal
No secar en
secadora
Configuración
de calor
Alto
Medio Bajo Sin calor/aire
Instrucciones
especiales
Colgar para secar
Secado por goteo
Secar extendido À la sombra
Suave/
delicado
Planchado
permanente/
resistente a
las arrugas
No secar
(utilizado con
no lavar)
Page 57

57
ANTES DE COMENZAR
Lea estas instrucciones por completo y con detenimiento.
•
IMPORTANTE – Guarde estas
instrucciones para el uso de inspectores locales.
•
IMPORTANTE – Cumpla con todos los
códigos y ordenanzas vigentes.
• Nota al instalador – Asegúrese de dejar estas
instrucciones con el Consumidor.
• Nota al consumidor – Conserve estas
instrucciones para referencia futura.
• Nivel de capacidad – La instalación de este aparato
requiere capacidades mecánicas básicas.
• Tiempo de finalización – 1 hora
• El instalador tiene la responsabilidad de efectuar una
instalación adecuada.
• La Garantía no cubre las fallas del producto debido a
una instalación incorrecta.
• Note
–
Este aparato debe contar con una adecuada
conexión a tierra y el servicio eléctrico de la lavadora
debe cumplir con códigos y ordenanzas locales y con
la última edición del Código Eléctrico Nacional,
ANSI/NFPA 70.
La lavadora debe instalarse sobre un piso firme a fin de
minimizar la vibración durante los ciclos de centrifugado.
El piso de concreto es el mejor, pero una base de madera
es suficiente siempre y cuando el soporte del piso cumpla
con las normas de FHA. La lavadora no debe instalarse
sobre alfombras o exponerse a las inclemencias del tiempo.
Almacene o instale el aparato donde no sufra temperaturas
bajo cero o condiciones climáticas externas.
UBICACIÓN DE LA LAVADORA
Instrucciones
Lavadoras
de instalación
WSLP1500 y WSLS1500
• PRESIÓN DE AGUA—Debe tener una presión dinámica
mínima de 10 psi y máxima de 150 psi medida en el
grifo.
• TEMPERATURA DEL AGUA—El calentador de agua de
la vivienda debe configurarse para que suministre
agua a 120° a 150°F (50° a 66°C) EN LA LAVADORA
cuando se seleccione el lavado caliente (HOT).
• VÁLVULAS DE CIERRE—Debe contarse con válvulas
(grifos) de cierre de agua caliente y fría.
• DRENAJE—El agua puede drenarse a una tubería
vertical o a un fregadero. La altura de descarga NO
DEBE SER MENOR A 30” ni mayor a 8’ por encima de
la base de la lavadora. La tubería vertical debe ser de
un mínimo de 1½” de diámetro interno y debe estar
abierta a la atmósfera.
REQUISITOS DE PLOMERÍA
• Asegúrese de que la lavadora esté centrada entre los
lados de las bandejas.
INSTALACIÓN DE BANDEJA
Este aparato debe recibir el voltaje y frecuencia indicados
en la placa de clasificación (ubicada en la parte trasera
de la lavadora) y debe conectarse a un circuito derivado
individual con adecuada conexión a tierra, protegido por
un interruptor de circuitos de 15 o 20 amperios o un
fusible con retraso.
Si la lavadora se encuentra conectada al enchufe de
115 voltios de la secadora, entonces la secadora debe
hallarse en un circuito dedicado.
REQUISITOS ELÉCTRICOS
Alicates
HERRAMIENTAS REQUERIDAS
Mangueras de agua (2)
PIEZAS INCLUIDAS
Manguera de drenaje
Arandelas de goma (4)
Si tiene alguna pregunta, llame a 800.GE.CARES (800.432.2737) o visite nuestro sitio Web en: ge.com
Page 58

58
PRECAUCIÓN: Para su seguridad
personal, no utilice un cable de extensión o enchufe
adaptador con este electrodoméstico.
Bajo ninguna circunstancia corte o quite la tercera
clavija a tierra del cable de energía. Siga los Códigos
Eléctricos Nacionales o códigos y ordenanzas locales
vigentes.
Este aparato debe recibir el voltaje y frecuencia
indicados en la placa de clasificación (ubicada en la
parte trasera de la lavadora) y debe conectarse a un
circuito derivado individual con adecuada conexión a
tierra, protegido por un interruptor de circuitos de 15 o
20 amperios o un fusible con retraso.
Si su suministro eléctrico no cumple con dichas
especificaciones, entonces llame a un electricista con
licencia.
REQUERIMIENTOS ELÉCTRICOS
Instrucciones de instalación
Este aparato debe contar con una conexión a tierra. En
caso de mal funcionamiento o avería, la conexión a tierra
reduce el riesgo de una descarga eléctrica brindando un
camino de resistencia menor para la corriente eléctrica.
Este aparato está equipado con un cable que cuenta con
un conductor de conexión a tierra del equipamiento y un
enchufe de conexión a tierra.
El enchufe debe estar colocado en un tomacorriente
apropiado instalado de manera adecuada y con
conexión a tierra de acuerdo con todos los códigos y
ordenanzas locales.
DANGER: Una conexión inadecuada del
conductor de conexión a tierra puede provocar un riesgo
de descarga eléctrica. Consulte a un electricista
calificado si no sabe si el tomacorriente tiene una
adecuada conexión a tierra.
No modifique el enchufe de este aparato; si no entra en
el tomacorriente instalado, solicite a un electricista
calificado que instale un tomacorriente adecuado.
Verifique que haya una conexión
a tierra adecuada antes del uso
PRECAUCIÓN:Antes de enchufar la lavadora, lea los siguientes requisitos eléctricos.
INSTRUCCIONES DE CONEXIÓN A TIERRA
Antes de conectar las mangueras, la lavadora debe hallarse
nivelada. Las trabas de nivelación se encuentran en el frente
inferior de los lados izquierdo y derecho de la lavadora.
CÓMO NIVELAR LA
LAVADORA—MODELOS FIJOS
ASEGÚRESE DE QUE LA LAVADORA SE
ENCUENTRE EN SU UBICACIÓN FINAL
1
EXTIENDA LAS TRABAS DE
NIVELACIÓN
2
Esto libera las patas de nivelación accionadas a
resorte.
La lavadora se nivelará sola en forma automática.
PRESIONE LAS TRABAS DE
NIVELACIÓN HACIA ADENTRO
3
No patee o pise las trabas de nivelación.
Page 59

59
Sujeción de
cable
Sujeción de cable
Sujeción de
cable
Fregadero
Tubería vertical
ADVERTENCIA:
Verifique que la lavadora esté desenchufada.
Haga correr agua de los grifos de agua caliente y fría
para purgar las líneas de agua y para quitar partículas
que podrían tapar los filtros de la válvula de agua.
PURGUE LAS LÍNEAS DE AGUA
1
Instrucciones de instalación
CONEXIONES DE LA LAVADORA PARA EL MODELO FIJO
WSLS1500
Conecte los extremos de la manguera de entrada a los
grifos de agua CALIENTE y FRÍA firmemente a mano, y
luego ajuste con una vuelta de 2⁄3 con alicates. Abra el
agua y verifique la presencia de pérdidas.
CONECTE A LAS LÍNEAS DE AGUA
2
CON CUIDADO TRASLADE LA
LAVADORA A SU UBICACIÓN FINAL
3
Dé una forma de U al extremo de la manguera de
drenaje con la manguera apuntando hacia el drenaje.
Coloque la manguera en un fregadero o tubería vertical
y fíjela con una sujeción de cable (no incluida).
NOTA: Si la manguera de drenaje se coloca en una
tubería vertical sin formar una U, podría ocurrir un efecto
de sifón. Debe haber un espacio de aire alrededor de la
manguera de drenaje. Si la manguera está muy
ajustada, también puede provocarse un efecto de sifón.
CONECTE LA MANGUERA DE DRENAJE
4
ENCHUFE EL CABLE DE ENERGÍA A
UN TOMACORRIENTE CON CONEXIÓN
A TIERRA
5
Verifique que haya una conexión
a tierra adecuada antes del uso
Page 60

INSTALACIÓN EN NICHOS O EN CLOSETS
60
60 pulg.²
(387.1 cm²)
60 pulg.²
(387.1 cm²)
Puerta del closet
Instrucciones de instalación
CONEXIONES DE LA LAVADORA PARA EL MODELO FIJO
WSLS1500
HAGA FUNCIONAR LA LAVADORA
POR UN CICLO COMPLETO
7
Verifique la presencia de pérdidas de agua y controle un
funcionamiento correcto.
QUITE LA PELÍCULA PROTECTORA
QUE CUBRE EL PANEL DE CONTROL
8
Contiene información valiosa y útil que le hará ahorrar
tiempo y dinero.
LEA EL RESTO DEL MANUAL DEL
PROPIETARIO
9
NOTA: Si su lavadora no funciona, consulte la sección
Antes de llamar al servicio técnico.
Si su lavadora se encuentra aprobada para instalación en
un nicho o en un closet, habrá una etiqueta en la parte
trasera de la máquina con una descripción de los requisitos.
• Las distancias mínimas entre la lavadora y las paredes
adyacentes u otras superficies son: 0” a ambos lados,
2” en el frente y 3” en la parte trasera.
• Las distancias mínimas desde el piso a los estantes
superiores, gabinetes, cielorrasos, etc. es de 96 pulgadas.
• Las puertas del closet deben tener persianas u otra clase
de ventilación y deben contar con un área abierta de
60 pulgadas cuadradas sólo para la lavadora, o si el closet
contiene una lavadora y una secadora, las puertas deben
contar con por lo menos 120 pulgadas cuadradas de
espacio abierto distribuido uniformemente.
NOTA: Las distancias mínimas establecidas en esta etiqueta
son mínimas. Deben brindarse distancias adecuadas para
un funcionamiento y una reparación correctos.
LISTA DE CONTROL DE LA INSTALACIÓN
6
Antes de accionar la lavadora, verifique que se
cumplan los siguientes puntos:
❏ El encendido principal esté activado.
❏ La lavadora esté enchufada.
❏ Los grifos de agua estén abiertos.
❏ La unidad esté nivelada.
❏ La manguera de drenaje esté bien sujeta.
❏ No haya pérdidas en el grifo, la línea de drenaje
o la lavadora.
Page 61

61
Conector de la manguera
Collarín de bloqueo
Manguera Uni-Coupler
Conector de grifo
Conexión de drenaje
Filtro de agua
Instrucciones de instalación
CONEXIONES DE LA LAVADORA PARA EL MODELO PORTÁTIL
WSLP1500—CONEXIONES DE UN GRIFO
QUITE LA MANGUERA UNI-COUPLER
®
DEL TAMBOR DE LA LAVADORA
1
CONECTE A LA LÍNEA DE AGUA
2
Utilice el conector de manguera provisto con la lavadora
para conexiones de un grifo.
PARA CONECTAR LA LAVADORA:
Sujete el conector de la manguera al adaptador del
grifo tirando hacia abajo del collarín de bloqueo
mientras levanta el conector hasta que se trabe en su
lugar. Asegúrese de que el filtro de agua provisto se
encuentre en su lugar.
CONECTE A LA ENTRADA DE LA
VÁLVULA
3
Sujete el conector de suministro de agua FRÍA a la
entrada de la válvula de agua FRÍA (color AZUL).
Asegúrese de que la arandela se encuentre dentro
del conector antes de ajustar.
AJUSTE EL CONECTOR
4
Ajuste el conector, verificando que las roscas estén
alineadas correctamente para lograr un calce firme.
Controle que no haya torceduras o dobleces en la
manguera.
NOTA: No quite la tapa plástica de la entrada de agua
CALIENTE para las conexiones del uni-coupler porque
pueden producirse pérdidas.
Tapa plástica
CONECTE LA MANGUERA DE
DRENAJE
5
Sujete la manguera de drenaje a la parte trasera de
la lavadora. Instale la abrazadera en la manguera de
drenaje y ajuste para evitar pérdidas de agua.
Conector de
suministro de
agua FRÍA
Page 62

62
Instrucciones de instalación
CONEXIONES DE LA LAVADORA PARA EL MODELO PORTÁTIL
WSLP1500—CONEXIONES DE UN GRIFO (CONT.)
MASEGÚRESE DE QUE EL SELECTOR
DE TEMPERATURA SE ENCUENTRE EN
FRÍA/FRÍA
6
LENTAMENTE ABRA EL GRIFO DE
AGUA HASTA LA CONFIGURACIÓN
DE TEMPERATURA DESEADA
7
ENCHUFE EL CABLE DE ENERGÍA A
UN TOMACORRIENTE DE 3 CLAVIJAS
CON CONEXIÓN A TIERRA
8
Verifique que haya una
conexión a tierra adecuada
antes del uso
El cable de energía eléctrica se encuentra en la parte
trasera de la lavadora.
QUITE LA PELÍCULA PROTECTORA
QUE CUBRE EL PANEL DE CONTROL
9
LISTA DE CONTROL DE LA
INSTALACIÓN
10
Antes de accionar la lavadora, verifique que se
cumplan los siguientes puntos:
❏ El encendido principal esté activado.
❏ La lavadora esté enchufada.
❏ Los grifos de agua estén abiertos.
❏ La unidad esté nivelada.
❏ No haya pérdidas en el grifo, la línea de drenaje o la
lavadora.
Page 63

PARA DESCONECTAR LA LAVADORA:
63
Conector de la manguera
Botón de flujo
de agua
CIERRE EL GRIFO DE AGUA
1
DESENCHUFE EL CABLE DE ENERGÍA
Y COLÓQUELO EN EL ÁREA DE
ALMACENAMIENTO
2
PRESIONE EL BOTÓN ROJO DE FLUJO
DE AGUA PARA LIBERAR LA PRESIÓN
DE AGUA
3
DESCONECTE DE LA LÍNEA DE AGUA
4
Instrucciones de instalación
Conector de la manguera
Collarín de bloqueo
Desplace el collarín de bloqueo hacia abajo y tire del
conector de la manguera hacia abajo para quitarlo
del adaptador del grifo.
DRENE EL AGUA
5
Drene el agua de las mangueras a través del conector
de la manguera.
Page 64

64
PARA DESCONECTAR LA LAVADORA:
PARA CONECTAR LA LAVADORA:
Si usted cuenta con dos conexiones de agua separadas, su
lavadora puede conectarse a los grifos de agua caliente y fría.
Este kit puede adquirirse en la tienda donde adquirió la
lavadora o solicitándolo a Partes y Accesorios. En los EE.UU.,
llame al 800.626.2002.
CONEXIONES DE LA LAVADORA PARA EL MODELO PORTÁTIL
WSLP1500—CONEXIONES DE DOS GRIFOS
CONECTE A LA LÍNEA DE AGUA
1
Conecte las mangueras de entrada de agua
CALIENTE y FRÍA a los grifos de agua CALIENTE y
FRÍA.
Sujeci
ón de
cable
Sujeción
de cable
Fregadero
Tubería vertical
Fije la manguera de drenaje al fregadero o a la
tubería vertical.
CONECTE LA MANGUERA DE DRENAJE
2
ENCHUFE EL CABLE DE ENERGÍA EN
UN TOMACORRIENTE DE 3 CLAVIJAS
CON CONEXIÓN A TIERRA
3
Verifique que haya una conexión
a tierra adecuada antes del uso
CIERRE LOS GRIFOS DE AGUA
1
DESENCHUFE EL CABLE DE ENERGÍA
Y COLÓQUELO EN EL ÁREA DE
ALMACENAMIENTO
2
DESCONECTE LAS MANGUERAS DE
DRENAJE Y DE SUMINISTRO DE AGUA
3
Cuélguelas en la bandeja de almacenamiento.
Instrucciones de instalación
LISTA DE CONTROL DE LA INSTALACIÓN
4
Antes de accionar la lavadora, verifique que se
cumplan los siguientes puntos:
❏ El encendido principal esté activado.
❏ La lavadora esté enchufada.
❏ Los grifos de agua estén abiertos.
❏ La unidad esté nivelada.
❏ La manguera de drenaje esté bien sujeta.
❏ No haya pérdidas en el grifo, la línea de drenaje o la
lavadora.
Page 65

65
Antes de llamar al servicio técnico… ge.com
Consejos para identificación y solución de problemas
¡Ahorre tiempo y dinero! Lea las tablas de las siguientes
páginas y quizás no necesite llamar al servicio técnico.
FF
■ Indica que la lavadora no se ha llenado. Verifique que todos los grifos
estén abiertos y que la manguera de llenado no se encuentre obstruida
o torcida.
dr
■ Indica que el agua no ha drenado de la lavadora. Verifique que
la manguera de drenaje no esté doblada o mal conectada.
Ub
■ Indica que la carga de prendas está desequilibrada. Vuelva a colocar
la ropa uniformemente y controle que la lavadora esté nivelada.
Lo
■ Indica que la tapa está abierta. Cierre la tapa.
Indicadores de estado
LE
■ Indica que la lavadora tiene una pérdida. Verifique la conexión de
la manguera de drenaje.
IE
■ Presione POWER ON/OFF (encendido/apagado) y llame al servicio
técnico.
OE
■ Indica que el agua ha desbordado. Vuelva a accionar después del
centrifugado.
Soporte al consumidor
Consejos para la
solución de problemas
Instrucciones
de funcionamiento
Instrucciones
de seguridad
Instrucciones
de instalación
Page 66

66
Antes de llamar al servicio técnico…
Consejos para identificación
y solución de problemas
AGUA CAUSAS POSIBLES QUÉ HACER
Demasiada espuma Tipo de detergente • Cambie a detergente HE .
Agua muy blanda • Use menos detergente.
Demasiado detergente • Mida el detergente con cuidado. Use menos jabón si
cuenta con agua blanda, una carga más pequeña o una
carga poco sucia.
Pérdidas de agua Las mangueras de llenado o la • Asegúrese de que las conexiones de la manguera estén
manguera de drenaje están firmes en los grifos y la lavadora. Verifique que el extremo
mal conectadas de la manguera de drenaje esté bien colocado y fijo en el
drenaje.
El drenaje de la vivienda puede • Controle la cañería de la vivienda. Quizás deba llamar a un
estar obstruido plomero.
Presión de agua constante hacia • Ajuste las mangueras en los grifos y cierre el agua después
las mangueras de llenado en de cada uso.
la fuente de agua
• Controle el estado de las mangueras de llenado; es
conveniente cambiarlas cada 5 años.
Se está utilizando demasiado • Use menos detergente. Use menos jabón si cuenta con
detergente en la lavadora agua blanda, una carga más pequeña o una carga poco
sucia.
La temperatura del El suministro de agua está • Abra por completo los grifos de agua caliente y fría y
agua es incorrecta cerrado o mal conectado controle que las mangueras estén conectadas a los grifos
correctos.
Los filtros de la válvula de •
Cierre el suministro de agua y quite las mangueras de
agua quedaron trabados
conexión de agua de la parte superior trasera de la lavadora.
Quite los filtros y utilice un cepillo o escarbadientes para
limpiar los filtros de la máquina. Vuelva a instalar los filtros, a
conectar las mangueras y abra el suministro de agua.
El calentador de agua de la • Verifique que el calentador de agua de la vivienda esté
vivienda no está bien configurado suministrando agua a 120°F–140°F (48°C–60°C).
El agua no drena La manguera de drenaje está • Enderece la manguera de drenaje y verifique que la
torcida o mal conectada lavadora no la esté aplastando.
• La parte superior de la salida del drenaje debe hallarse a
menos de 8 pies del piso.
Soporte al consumidor
Consejos para la
solución de problemas
Instrucciones
de funcionamiento
Instrucciones
de seguridad
Instrucciones
de instalación
Page 67

ge.com
OPERACIÓN CAUSAS POSIBLES QUÉ HACER
La lavadora se
La lavadora normalmente se
detiene durante un ciclo
detiene entre pasos de lavado
La lavadora no funciona La lavadora está desenchufada • Asegúrese de que el cable esté bien enchufado en un
tomacorriente.
El suministro de agua está • Abra por completo los grifos de agua caliente y fría.
cerrado
Los controles no están • Asegúrese de haber realizado todas las selecciones.
configurados correctamente
La tapa está abierta • Cierre la tapa y presione START/PAUSE (iniciar/pausa).
El interruptor de circuitos/ • Controle los interruptores de circuito/fusibles. Cambie los
fusible ha saltado fusibles o reconfigure los interruptores. La lavadora debe
contar con un tomacorriente individual.
No se ha encendido la lavadora • Presione el botón POWER ON/OFF (encendido/apagado).
DESEMPEÑO CAUSAS POSIBLES QUÉ HACER
Manchas de color Uso incorrecto del suavizador • Consulte el paquete del suavizador de prendas sobre las
de prendas instrucciones y siga las indicaciones de uso del dosificador.
• Trate previamente la mancha y vuelva a lavar.
Transferencia de colores • Separe los blancos o los colores claros de los colores oscuros.
Prendas grises No se colocó suficiente • Use más detergente (especialmente con cargas grandes).
o amarillentas detergente
Agua dura • Utilice un acondicionador de agua como Calgon o instale
un suavizador de agua.
El agua no está lo • Verifique que el calentador de agua esté suministrando
suficientemente caliente agua a 120°F–140°F (48°C–60°C).
La lavadora está sobrecargada • Seleccione el tamaño de carga que se ajuste a la carga
de ropa.
Transferencia de colores • Divida las prendas por color. Si la etiqueta de la tela dice
lavar por separado, puede indicarse colores inestables.
Pelusas o residuos Las prendas se secan colgadas • Si no seca sus prendas con una secadora de ropa, sus
en las prendas al aire libre prendas pueden retener más pelusas.
Separación de prendas • Separe las prendas que producen pelusa de las que
incorrecta recogen pelusa.
El lavado toma demasiado • Lave cargas pequeñas por un período menor que las
tiempo cargas más grandes.
Carga excesiva • Cargue la ropa sin superar la hilera superior de orificios del
tambor de la lavadora.
• Verifique que el selector de tamaño de carga se ajuste al
tamaño de carga.
Uso incorrecto del suavizador • Consulte el paquete del suavizador de telas sobre las
de telas instrucciones y siga las indicaciones de uso del dosificador.
Bolitas de pelusa Resultado del desgaste normal • Aunque no es provocado por la lavadora, se puede detener
de ezclas de poliéster-algodón el proceso de formación de bolitas lavando las prendas al
y telas peluda revés.
Soporte al consumidor
Consejos para la
solución de problemas
Instrucciones
de funcionamiento
Instrucciones
de seguridad
Instrucciones
de instalación
67
Page 68

64
Antes de llamar al servicio técnico…
DESEMPEÑO (cont.) CAUSAS POSIBLES QUÉ HACER
Enganches, agujeros, Alfileres, broches, ganchos • Cierre los broches, ganchos, botones y cierres.
rasgones, desgarrones botones filosos, hebillas de
o desgaste excesivo cinturones, cierres y objetos
filosos que se dejaron en
los bolsillos
Blanqueador sin diluir • Consulte las instrucciones del paquete de blanqueador
sobre las cantidades adecuadas.
• Nunca agregue blanqueador sin diluir para lavar ni permita
que las prendas entren en contacto con blanqueador sin
diluir.
Productos químicos como • Enjuague los elementos que pueden tener productos
blanqueador o tintura para químicos antes de lavarlos.
cabello o solución para
permanente
Formación de arrugas Clasificación inadecuada • No mezcle elementos pesados (como prendas de trabajo)
con prendas livianas (como blusas).
• Use suavizador de telas.
Carga excesiva o nivel de • Cargue la lavadora de modo que las prendas tengan
agua incorrecto espacio para moverse libremente.
Lavados repetidos en agua • Lave con agua tibia o fría.
demasiado caliente
RUIDO CAUSAS POSIBLES QUÉ HACER
La lavadora hace ruido La lavadora está torcida • Nivele la lavadora. Ver Cómo nivelar la lavadora.
La carga de la lavadora
• Presione el botón START/PAUSE (iniciar/pausa) para detener
está desequilibrada
la lavadora, abra la tapa y redistribuya la carga en forma
equilibrada. Cierre la tapa y vuelva a accionar.
La lavadora se encuentra muy • Aleje la lavadora de la pared; se necesita cerca de 4″.
cerca de la pared (provoca
golpes durante el ciclo)
Ruido de arrastre antes Cuando detecta la función • Esto es normal.
de que el tambor se LOAD SENSING (sensor de carga),
llene de agua el agitador gira antes de que
se llene el tambor.
OTROS CAUSAS POSIBLES QUÉ HACER
Las etiquetas de la A veces el adhesivo que se • Utilice un secador de cabello en la configuración más baja,
parte exterior de la usa en las etiquetas no puede dirigiendo el aire hacia la etiqueta por un período corto.
lavadora no pueden quitarse por completo Esto liberará el adhesivo fácilmente, sin dañar la superficie
quitarse bien de la lavadora.
Consejos para identificación
y solución de problemas
Soporte al consumidor
Consejos para la
solución de problemas
Instrucciones
de funcionamiento
Instrucciones
de seguridad
Instrucciones
de instalación
• Quite elementos sueltos como alfileres, objetos de los
bolsillos y botones filosos.
• Dé vuelta las prendas de lava (que se enganchan con
facilidad).
Page 69

69
Soporte al consumidor
Consejos para la
solución de problemas
Instrucciones
de funcionamiento
Instrucciones
de seguridad
Instrucciones
de instalación
Período: Se sustituirá:
Garantía de la lavadora GE. (Para clientes de Estados Unidos)
Todos los servicios de garantía se ofrecen a través de nuestros
centros de asistencia técnica o un técnico autorizado de Customer
Care
®
. Para programar servicio de asistencia técnica, en línea,
visite la página ge.com o llame al 800.GE.CARES (1.800.432.2737).
Cuando llame para solicitar servicio, por favor tenga a mano
el número de serie y el número de modelo.
Esta garantía se extiende al comprador original y cualquier comprador posterior de productos comprados para uso
residencial dentro des Estados Unidos. Si el producto está situado en un área que no dispone de servicio por parte
de un proveedor de servicio autorizado de GE, podría tener que hacerse cargo de los costes de envío o bien podría
solicitársele que lleve el producto a una centro de servicio de GE autorizado para realizar la reparación. En Alaska,
la garantía excluye el costo de envío o las visitas de servicio a su casa.
Algunos estados no permiten la exclusión o las limitaciones de daños incidentales o consecuenciales. Esta garantía
da derechos legales específicos, y usted podría tener otros derechos que variarán de estado a estado. Para saber
cuáles son sus derechos legales, consulte a la oficina de asuntos del consumidor local o la oficina del Prucurador
(Attorney General) en su localidad.
■ Visitas de servicio a domicilio para mostrarle cómo
utilizar el producto.
■ Instalación, envío o mantenimiento incorrectos.
■ Fallas del producto por manipulación, uso incorrecto
o distinto al destinado o previsto comercialmente.
■ Daños tras la entrega.
■ Sustitución de los fusibles de la vivienda
o restablecimiento de los interruptores.
■ Daños causados por accidentes, incendios, inundaciones
o fenómenos naturales.
■ Daños emergentes o fortuitos causados por posibles
defectos del electrodoméstico.
■ Producto no accesible para facilitar el servicio requerido.
Exclusiones de la garantía (en Estados Unidos):
Garante: General Electric Company. Louisville, KY 40225
Engrape el recibo aquí.
Se necesita el comprobante
con la fecha de compra original
para que la garantía cubra
los servicios.
Un año Cualquier pieza de la lavadora que falle debido a un defecto en los materiales
A partir de la fecha de o la fabricación. Durante este garantía limitada de un año, GE correrá además, sin cargo
adquisición original alguno, con todos los gastos de mano de obra y reparación relacionados para sustituir
la pieza defectuosa.
EXCLUSIÓN DE GARANTÍAS IMPLÍCITAS—Su único y exclusivo derecho es la reparación del producto,
tal y como se indica en esta Garantía limitada. Cualquier garantía implícita, incluyendo las garantías
implícitas de comerciabilidad o adecuación para un fin determinado, están limitadas a un año
o el período de tiempo más breve permitido por la ley.
Page 70

70
Notas.
Soporte al consumidor
Consejos para la
solución de problemas
Instrucciones
de funcionamiento
Instrucciones
de seguridad
Instrucciones
de instalación
Page 71

71
Servicio al consumidor.
Página Web de GE Appliances
ge.com
¿Tiene alguna pregunta sobre su electrodoméstico? ¡Pruebe la página Web de GE Appliances 24 horas al día,
cualquier día del año! Para mayor conveniencia y servicio más rápido, ya puede descargar los Manuales de los
Propietarios, pedir piezas o incluso hacer una cita en línea para que vengan a realizar una reparación.
Solicite una reparación ge.com
El servicio de expertos GE está a tan sólo un paso de su puerta. ¡Entre en línea y solicite su reparación cuando
le venga bien cualquier día del año! O llame al 800.GE.CARES (800.432.2737) durante horas normales de oficina.
Real Life Design Studio (Estudio de diseño para la vida real)
ge.com
GE apoya el concepto de Diseño Universal—productos, servicios y ambientes que pueden usar gente de todas
las edades, tamaños y capacidades. Reconocemos la necesidad de diseñar para una gran gama de habilidades
y dificultades físicas y mentales. Para más detalles cobre las aplicaciones de GE Diseño Universal, incluyendo
ideas de diseño para la cocina para personas con discapacidades, mire nuestra página Web hoy mismo. Para
personas con dificultades auditivas, favor de llamar al 800.TDD.GEAC (800.833.4322).
Garantías ampliadas ge.com
Compre una garantía ampliada y obtenga detalles sobre descuentos especiales disponibles mientras su garantía
está aún activa. Puede comprarla en línea en cualquier momento, o llamar al (800.626.2224) durante horas
normales de oficina. GE Consumer Home Services estará aún ahí cuando su garantía termine.
Piezas y accesorios ge.com
Aquellos individuos con la calificación necesaria para reparar sus propios electrodomésticos pueden
pedir que se les manden las piezas o accesorios directamente a sus hogares (aceptamos las tarjetas
VISA, MasterCard y Discover). Haga su pedido en línea hoy, 24 horas cada día o llamar por teléfono
al 800.626.2002 durante horas normales de oficina.
Las instrucciones descritas en este manual cubren los procedimientos a seguir por cualquier usuario. Cualquier
otra reparación debería, por regla general, referirse a personal calificado autorizado. Debe ejercerse precaución
ya que las reparaciones incorrectas pueden causar condiciones de funcionamiento inseguras.
Póngase en contacto con nosotros ge.com
Si no está satisfecho con el servicio que recibe de GE, póngase en contacto con nosotros en nuestra
página Web indicando todos los detalles así como su número de teléfono o escríbanos a:
General Manager, Customer Relations
GE Appliances, Appliance Park
Louisville, KY 40225
Registre su electrodoméstico ge.com
¡Registre su nuevo electrodoméstico en línea —cuando usted prefiera! El registrar su producto a tiempo le
proporcionará, si surgiera la necesidad, una mejor comunicación y un servicio más rápido bajo los términos de
su garantía. También puede enviar su tarjeta de registro pre-impresa que se incluye en el material de embalaje
o recorte y use el formulario de este Manual del Propietario.
Page 72

Printed in Korea
Consumer Support.
GE Appliances Website
In the U.S.: ge.com
Have a question or need assistance with your appliance? Try the GE Appliances Website 24 hours a day, any day of
the year! For greater convenience and faster service, you can now download Owner’s Manuals, order parts or even
schedule service on-line. In Canada: www.geappliances.ca
Schedule Service In the U.S.: ge.com
Expert GE repair service is only one step away from your door. Get on-line and schedule your service at your
convenience any day of the year! Or call 800.GE.CARES (800.432.2737) during normal business hours.
In Canada, call 1.800.561.3344
Real Life Design Studio In the U.S.: ge.com
GE supports the Universal Design concept—products, services and environments that can be used by people of all
ages, sizes and capabilities. We recognize the need to design for a wide range of physical and mental abilities and
impairments. For details of GE’s Universal Design applications, including kitchen design ideas for people with disabilities,
check out our Website today. For the hearing impaired, please call 800.TDD.GEAC (800.833.4322).
In Canada, contact: Manager, Consumer Relations, Mabe Canada Inc.
Suite 310, 1 Factory Lane
Moncton, N.B. E1C 9M3
Extended Warranties In the U.S.: ge.com
Purchase a GE extended warranty and learn about special discounts that are available while your warranty is still
in effect. You can purchase it on-line anytime, or call 800.626.2224 during normal business hours. GE Consumer Home
Services will still be there after your warranty expires. In Canada, call 1.888.261.2133
Parts and Accessories In the U.S.: ge.com
Individuals qualified to service their own appliances can have parts or accessories sent directly to their homes (VISA,
MasterCard and Discover cards are accepted). Order on-line today, 24 hours every day or by phone at 800.626.2002
during normal business hours.
Instructions contained in this manual cover procedures to be performed by any user. Other servicing generally
should be referred to qualified service personnel. Caution must be exercised, since improper servicing may cause
unsafe operation.
Customers in Canada should consult the yellow pages for the nearest Mabe service center, or call 1.800.661.1616.
Contact Us In the U.S.: ge.com
If you are not satisfied with the service you receive from GE, contact us on our Website with all the details including your
phone number, or write to: General Manager, Customer Relations
GE Appliances, Appliance Park
Louisville, KY 40225
In Canada: www.geappliances.ca, or write to: Director, Consumer Relations, Mabe Canada Inc.
Suite 310, 1 Factory Lane
Moncton, N.B. E1C 9M3
Register Your Appliance In the U.S.: ge.com
Register your new appliance on-line—at your convenience! Timely product registration will allow for enhanced
communication and prompt service under the terms of your warranty, should the need arise. You may also
mail in the pre-printed registration card included in the packing material. In Canada: www.geappliances.ca
 Loading...