

Page 1
www.GEApp#ances.com
Washer SaJ_ .............. 2
Ir_'tMlation Requirements
7bo[s and P(,,r!._ ................. 3
Location Rl'quh_,me_!,_ ............ 3
Eh'ct_ic(d I_e(/uhvv:enl,_ ............ 4
R<,_oveS!@'pi:._g"M.!._i(d ......... 5
Installation Instructions
l_@m" }_:_;Start ................. 6
Dr.i?_ S)',_tem ................... 6
Cm_<.<:tthe hd_4 Ho,_es ............ 7
Levd the _4,'}t,_h('r................. 8
Compl<.!<.l>d<dlatio_ ............. 8
Washer Use
Sl<trti:.g")'o_o"14'_t,_h('r. ............ 9
@ch<_ ....................... I0
1"{3'A<S'3040
,V.rma2,%_ov& ................ l 1
Laundry Tips
Lo.di_g . ..................... l 1
Washer Care
Ck:,":d>_g}_mr i'i_,',sher . .......... 12
B'{',':erInk< HO,s(<s. .............. 12
'v_wa:ionS:orag<and ,:1.:lovbng,C<m .12
Troubleshooting
7)'o_&Ieshooting . ............... l 3
ConsumerSuppor
tSvduct Rd_4"i,_/r::tio_............. l 7
W<,'rr:ml_ ..................... l 9
Co>s.m_.rS.[)por/........ l_acl<C.v:'r
Write the model and serial
numhem here:
#
#
Yon cm_ fi_d them on a ]abe]
m_der the lid of the washer.
_750_807P483
49-90214
Page 2
WASHERSAFETY
Your safety and the safety of others are very important.
We have provided marly important safety messages in this manuaI and on your appliance. Always read and obey alI safety
messages.
This is the safety alert symbol.
This symbol alerts you to potential hazards that can kilI or hurt you and others.
All safety messages will follow the safety alert symbol and either the word "DANGER" or "WARNING/'
These words mean:
You can be killed or seriousmy injured if you don't immediatemy
foUow instructions.
You can be killed or seriousmy iniured if you don't follow
instructions.
AII safety messages wiII tell you what the potentiaI hazard is, tell you how to reduce the chance of injury, and tell you what can
happen if the instructions are not followed.
mMPORTANT SAFETY mNSTRUCTmONS
WARNING: To reduce the risk of fire, electric shock, or injury to persons when using the washer, follow basic precautions,
including the following:
m Read atl instructions before using the washer.
m Do not wash articles that have been previously cleaned in,
washed in, soaked in, or spotted with gasoline, dry-cleaning
solvents, other flammable, or explosive substances as they
give off vapors that could ignite or explode.
m Do not add gasoline, dry-cleaning solvents, or other
flammable, or explosive substances to the wash water.
These substances give off vapors that could ignite or explode.
m Under certain conditions, hydrogen gas may be produced in a
hot water system that has not been used for 2 weeks or more.
HYDROGEN GAS IS EXPLOSIVE. If the hot water system has
not been used for such a period, before using the washing
machine, turn on all hot water faucets and Ietthe water flow
from each for several minutes. This will release any
accumulated hydrogen gas. As the gas is flammable, do not
smoke or use an open flame during this time.
mDo not allow children to play on or in the washer. Close
supervision of children is necessary when the washer is used
near children.
mBefore the washer is removed from service or discarded,
remove the door or lid.
mDo not reach into the washer if the drum, tub or agitator is
moving.
mDo not instaII or store the washer where it wilI be exposed to
the weather.
mDo not tamper with controls.
mDo not repair or replace any part of the washer or attempt any
servicing unless specifically recommended in this manual or in
published user-repair instructions that you understand and
have the skills to carry out.
mSee "Electrical Requirements" for grounding instructions.
SAVE THESE mNSTRUCTmONS
mMPORTANT SAFETY
_,Keep the area underneath and around your appliances free
of combustible materials such as lint, paper, rags,
chemicals, etc.
_,Do not mix chlorine bleach with ammonia or acids such as
vinegar and/or rust remover. Mixing different chemicals can
produce a toxic gas which may cause death.
_,The laundry process can reduce the flame retardancy of
fabrics. To avoid such a resuIt, carefully follow the garment
manufacturer's wash and care instructions.
mNSTRUCTmONS
,,,To minimize the possibility of electric shock, unplug this
appliance from the power supply or disconnect the washer
at the household distribution panel by removing the fuse or
switching off the circuit breaker before attempting any
maintenance or cleaning.
NOTE: Pushing the OFF button does not disconnect the
appliance from the power supply.
_,Never attempt to operate this appliance if it is damaged,
malfunctioning, partially disassembled, or has missing or
broken parts, including a damaged cord or plug.
_,Use this appliance only for its intended purpose as
described in this Owner's Manuat.
Page 3
iNSTALLATiONREQUIREMENTS
Gather the required tools and parts before starting installation.
Read and follow the instructions provided with any tools listed
here.
Tools needed:
_, Pliers that open to 19/16"(3.95 cm)
_, Flashlight (optional)
_, Adjustable or open end wrench 9/16"(14 mm)
_, Level
m Wood block
Utility knife
_, Measuring tape
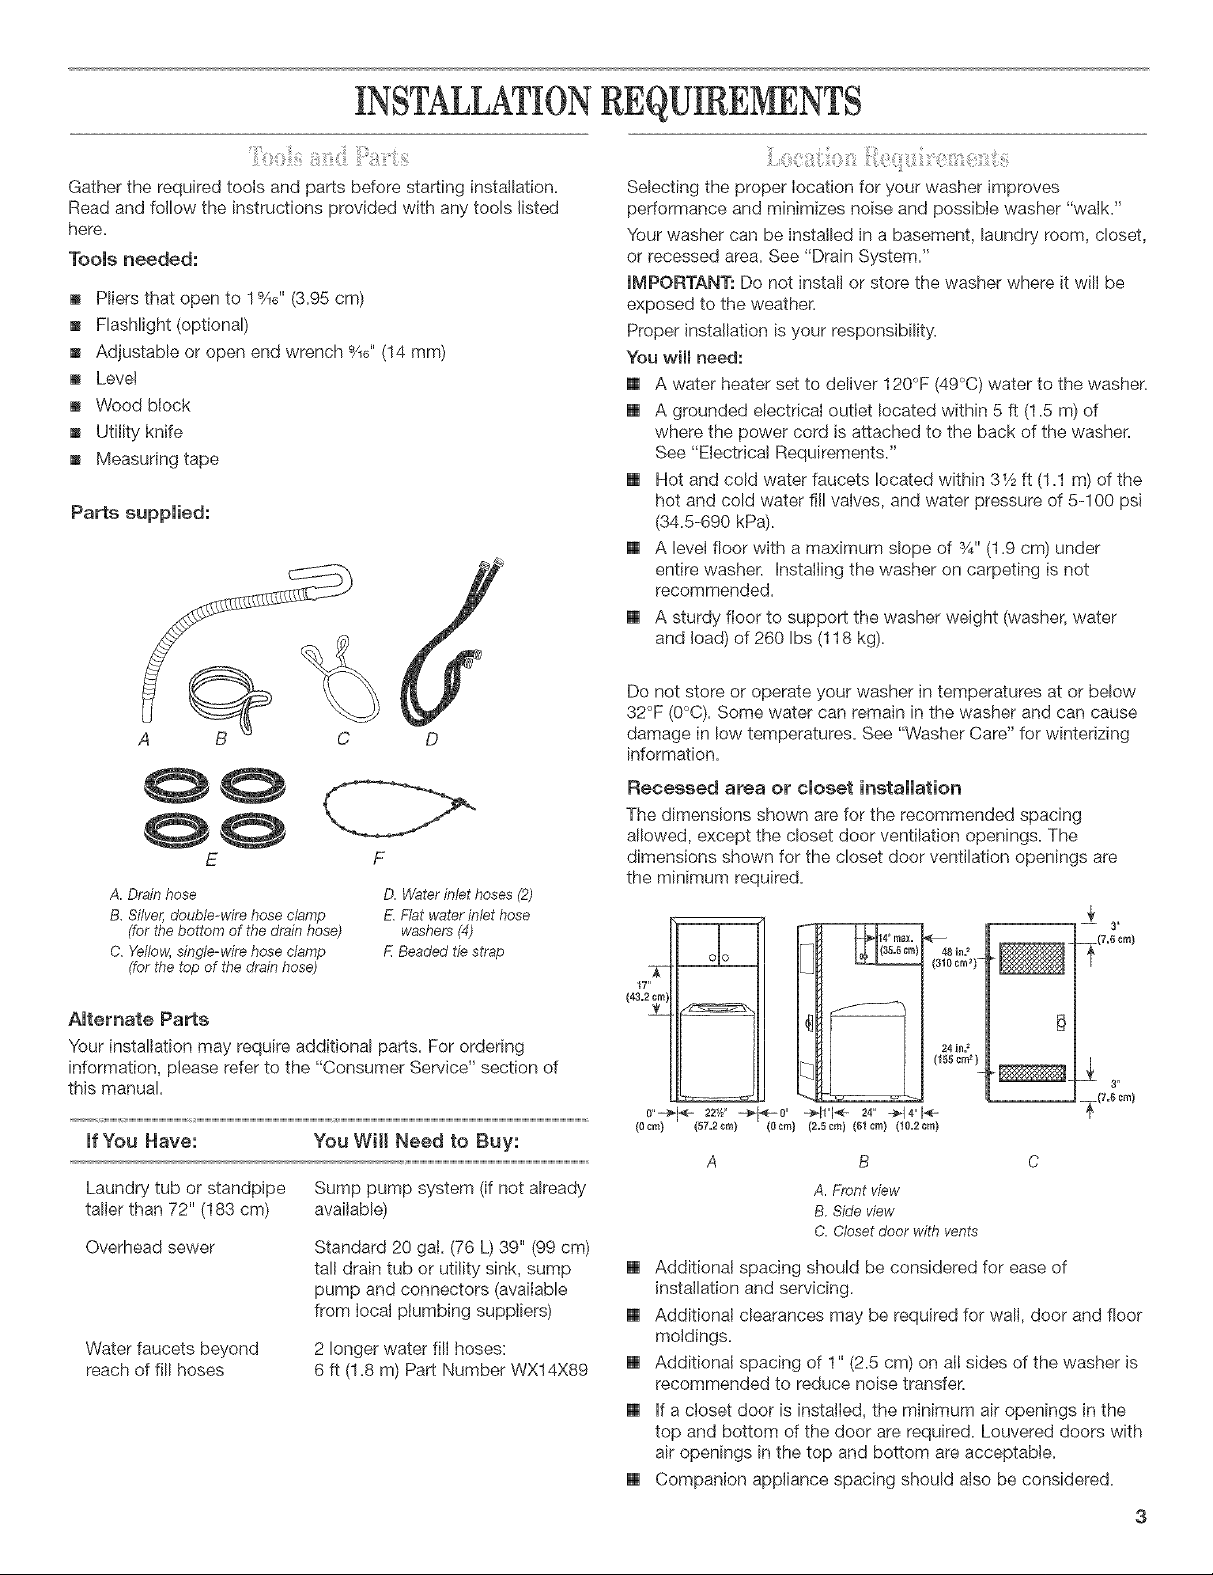
Parts supplied:
C D
E
A. Drain hose
B. Silver, double-wire hose clamp
(for the bottom of the drain hose)
C. Yefle_4single-wire hose clamp
(for the top of the drain hose)
D. Waterinlet hoses (2)
E. Flat water inlet hose
washers (4)
F. Beaded tie strap
Selecting the proper location for your washer improves
performance and minimizes noise and possible washer "walk."
Your washer can be installed in a basement, laundry room, closet,
or recessed area. See "Drain System."
iMPORTANT: Do not install or store the washer where it will be
exposed to the weather.
Proper installation is your responsibility.
You w{H need:
[] A water heater set to deliver 1200F (49°C) water to the washer.
[] A grounded electrical outlet located within 5 ft (1.5 m) of
where the power cord is attached to the back of the washer.
See "Electrlca! Requirements."
[] Hot and cold water faucets !ocated within 31/2ft (! .1 m) of the
hot and cold water fill valves, and water pressure of 5-100 psi
(34.5-690 kPa).
[] A level floor with a maximum slope of %" (1.9 cm) under
entire washer. Installing the washer on carpeting is not
recommended.
[] A sturdy floor to support the washer weight (washer, water
and load) of 260 Ibs (118 kg).
Do not store or operate your washer in temperatures at or below
32°F (0°C). Some water can remain in the washer and can cause
damage in low temperatures. See "Washer Care" for winterizing
information.
Recessed area or closet installation
The dimensions shown are for the recommended spacing
allowed, except the closet door ventilation openings. The
dimensions shown for the closet door ventilation openings are
the minimum required.
2
5"
O_O
14 rn_ [_
(35.4 48 in,=
Amternate Parts
Your installation may require additional parts. For ordering
information, please refer to the "Consumer Service" section of
this manual.
If You Have: You Wilt Need to Buy:
Laundry tub or standpipe
taller than 72" (183 cm)
Overhead sewer
Sump pump system (if not already
available)
Standard 20 gal. (76 L) 39" (99 cm)
tall drain tub or utility sink, sump
pump and connectors (available
from local plumbing suppliers)
Water faucets beyond
reach of fill hoses
2 longer water fill hoses:
6 ft (1.8 m) Part Number WX14X89
(310 cm+)=
(155cm=)
(0 sin) (57,2 cm)
_-0" -_l_"l<- 24+ -_1_"1÷
(Ocm) (2,5cm) (51cm) (lO=2cm)
B
A. Front view
B. Side view
C. Closet door with vents
_
5"
[] Additional spacing should be considered for ease of
installation and servicing.
[] Additional clearances may be required for wall, door and floor
moldings.
[] Additional spacing of 1" (2.5 cm) on al! sides of the washer is
recommended to reduce noise transfer.
[] If a cioset door is installed, the minimum air openings in the
top and bottom of the door are required. Louvered doors with
air openings in the top and bottom are acceptable.
[] Companion appliance spacing should also be considered.
Page 4
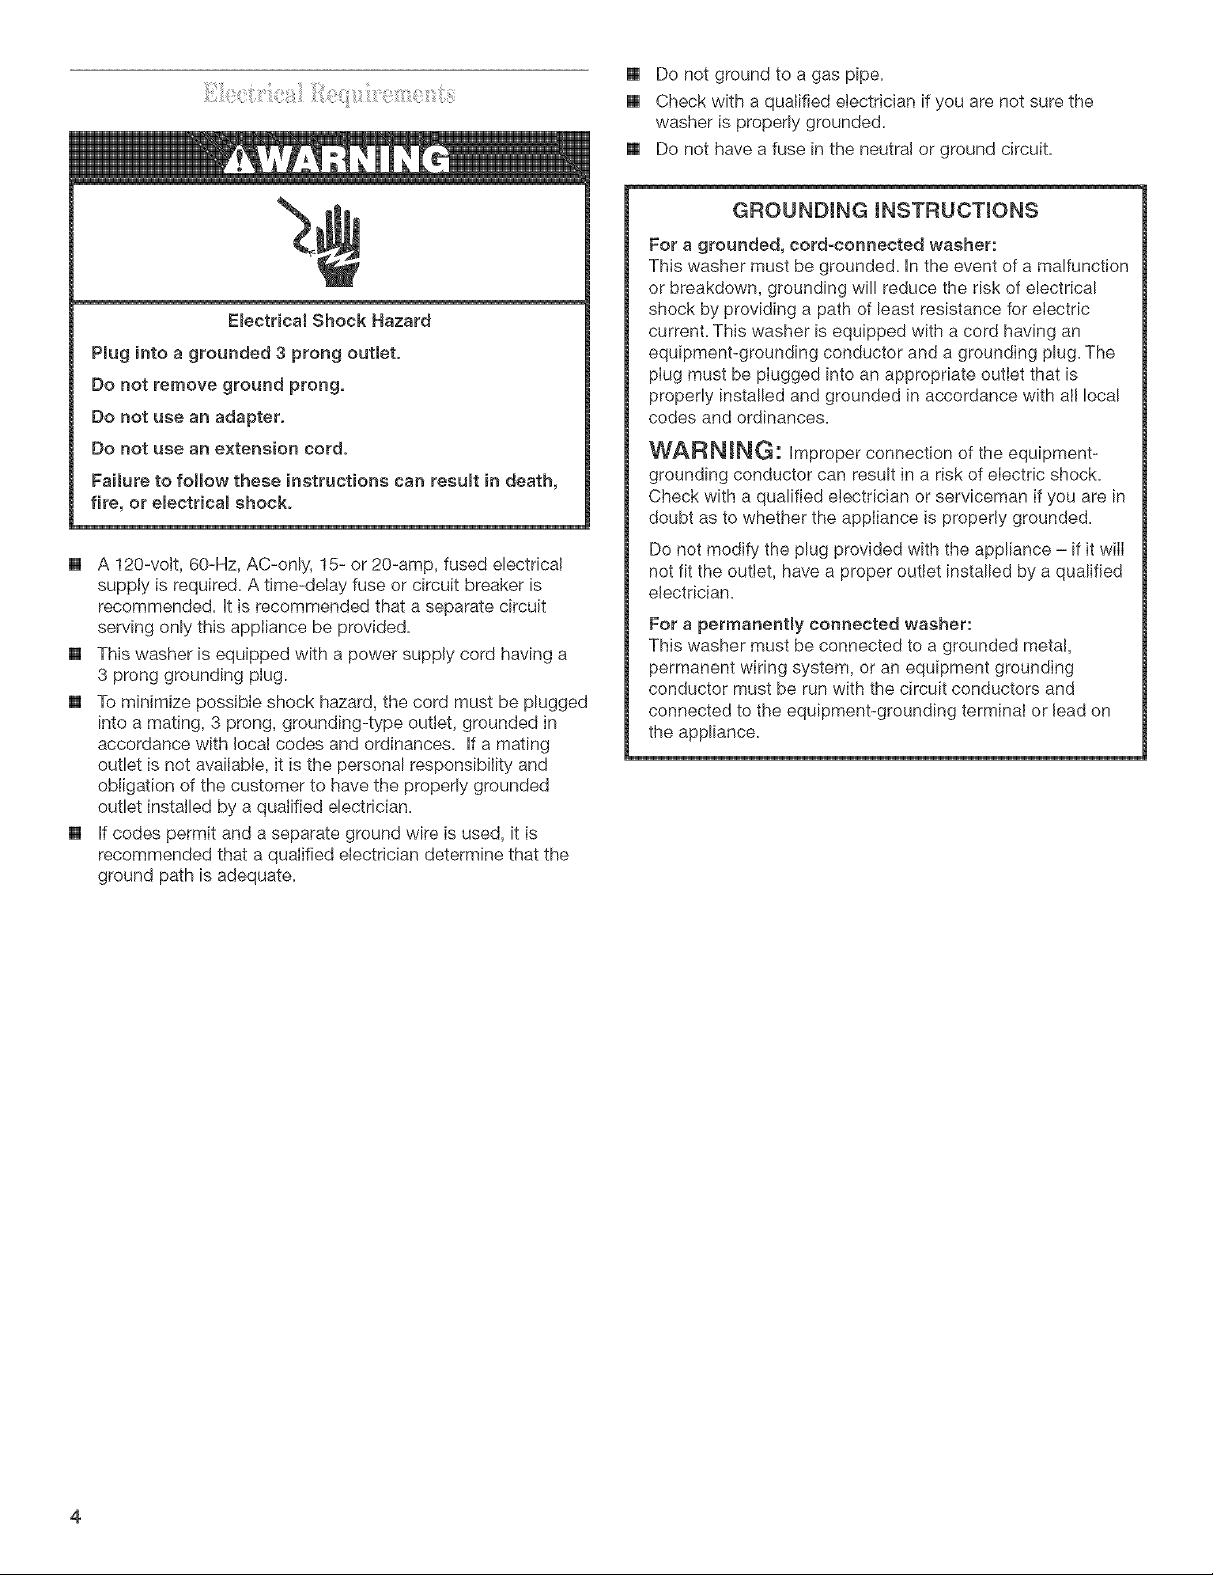
ElectricalShockHazard
Plugintoagrounded3prongoutieto
Donotremovegroundprong,
Donotuseanadapter,
Donotuseanextensioncord.
FaiJuretofollowtheseinstructionscanresultindeath,
fire,or electrical shock.
[] A 120-volt, 60-Hz, AC-only, 15- or 20-amp, fused electrical
supply is required. A time-delay fuse or circuit breaker is
recommended. It is recommended that a separate circuit
serving only this appliance be provided.
[] This washer is equipped with a power supply cord having a
3 prong grounding plug.
[] To minimize possible shock hazard, the cord must be plugged
into a mating, 3 prong, grounding-type outlet, grounded in
accordance with local codes and ordinances. If a mating
outlet is not available, it is the personal responsibility and
obligation of the customer to have the properly grounded
outlet installed by a qualified electrician.
[] If codes permit and a separate ground wire is used, it is
recommended that a qualified electrician determine that the
ground path is adequate.
[] Do not ground to a gas pipe.
[] Check with a qualified electrician if you are not sure the
washer is properly grounded.
[] Do not have a fuse in the neutral or ground circuit.
GROUNDING INSTRUCTIONS
For a grounded, cord-connected washer:
This washer must be grounded, in the event of a malfunction
or breakdown, grounding will reduce the risk of electrical
shock by providing a path of least resistance for eiectdc
current. This washer is equipped with a cord having an
equipment-grounding conductor and a grounding plug. The
plug must be plugged into an appropriate outlet that is
properly installed and grounded in accordance with all local
codes and ordinances.
WARNING: improper connection of the equipment-
grounding conductor can result in a risk of electric shock.
Check with a qualified electrician or serviceman if you are in
doubt as to whether the appliance is properly grounded.
Do not modify the plug provided with the appliance - if it wilI
not fit the outlet, have a proper outlet installed by a qualified
electrician.
For a permanently connected washer:
This washer must be connected to a grounded metal,
permanent wiring system, or an equipment grounding
conductor must be run with the circuit conductors and
connected to the equipment-grounding terminal or lead on
the appliance.
Page 5
iiJ_i!!_iiiii_,_woi_ii!!iii!i_Ziliiiiii;i_iiiVi_iit:_i_i_iill¸i!_J!_i!iii::_i:!_<_iiiiiiiii
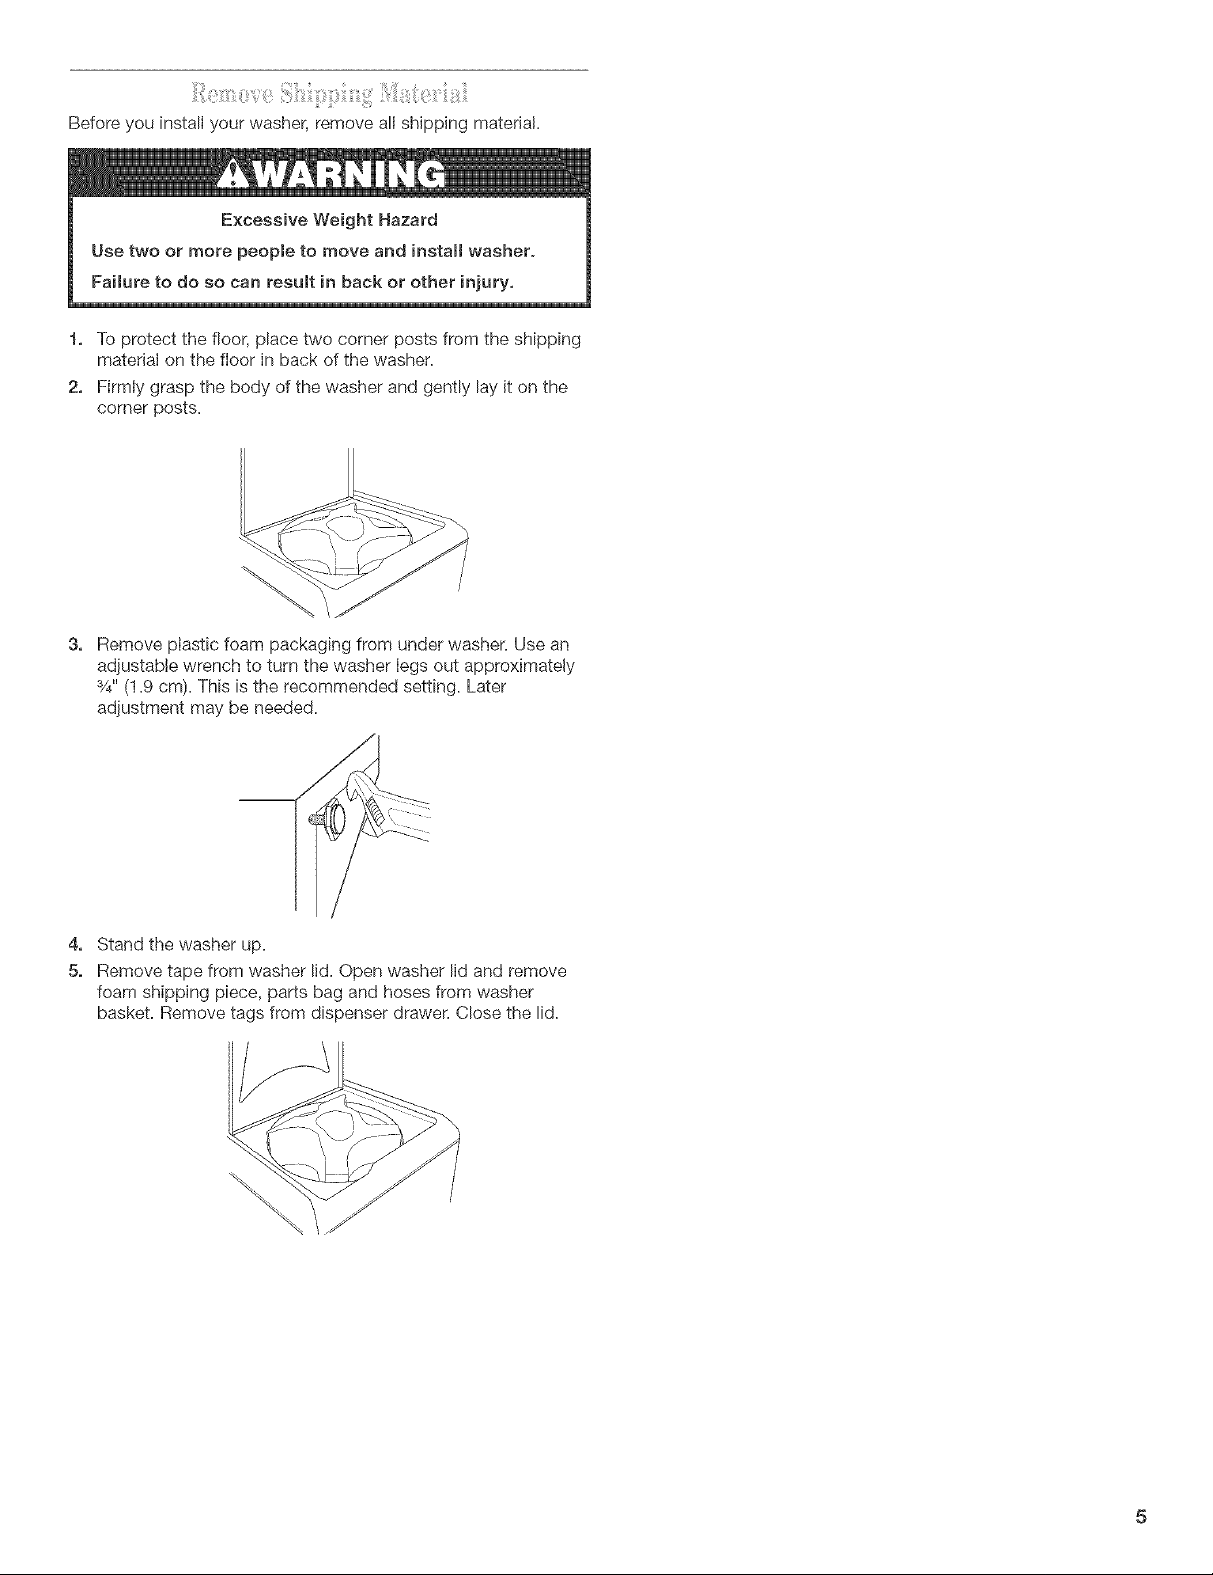
Before you install your washer, remove all shipping material.
1. To protect the floor, place two corner posts from the shipping
material on the floor in back of the washer.
2. Firmly grasp the body of the washer and gently lay it on the
corner posts.
3,
Remove plastic foam packaging from under washer. Use an
adjustable wrench to turn the washer legs out approximately
3/4"(1.9 cm). This is the recommended setting. Later
adjustment may be needed.
4,
Stand the washer up.
5.
Remove tape from washer lid. Open washer lid and remove
foam shipping piece, parts bag and hoses from washer
basket. Remove tags from dispenser drawer. Close the lid.
Page 6
iNSTALLATiONiNSTRUCTiONS
[] To prevent floor damage, set the washer onto cardboard
before moving across floor.
[] Move the washer to within approximately 3 ft (90 cm) of the
final location.
The washer can be installed using the standpipe drain system
(floor or wall), or the laundry tub drain system.
Select the drain hose installation method you need. See "Tools
and Parts."
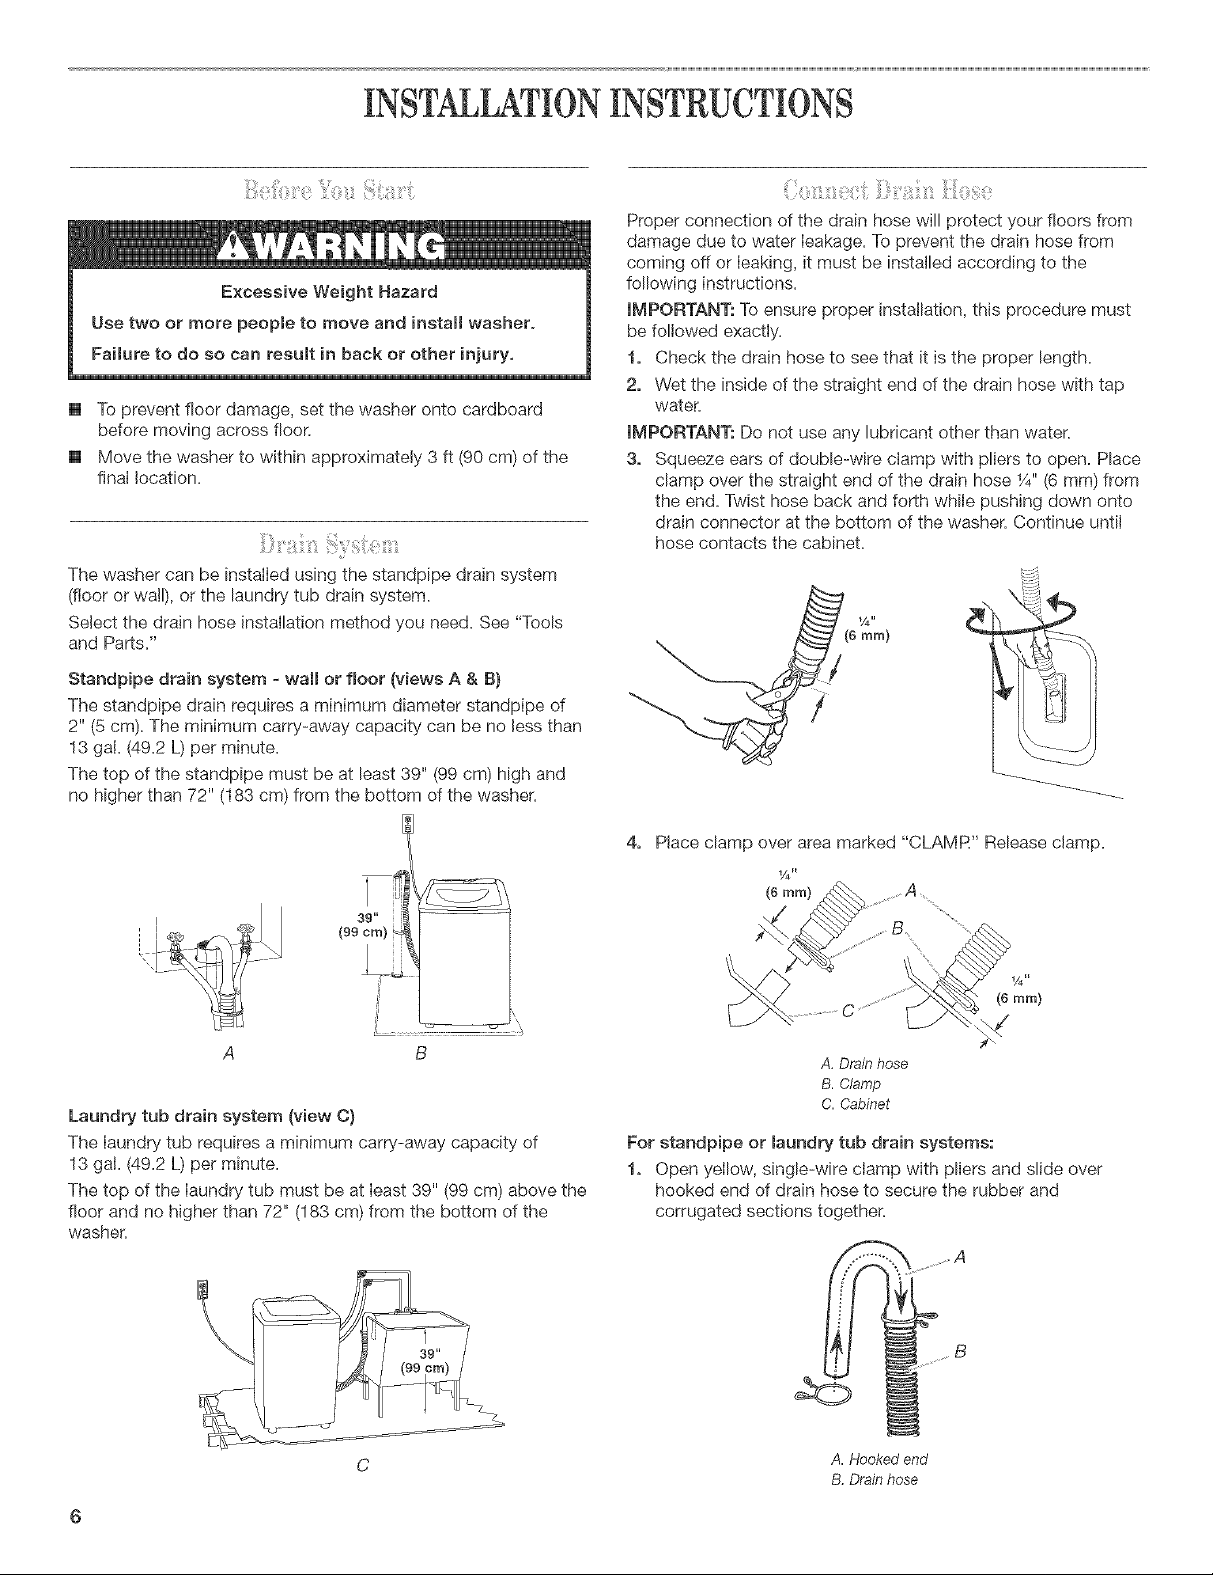
Standpipe drain system - wail or floor (views A & 8)
The standpipe drain requires a minimum diameter standpipe of
2" (5 cm). The minimum carry-away capacity can be no less than
13 gN. (49.2 L) per minute.
The top of the standpipe must be at least 39" (99 cm) high and
no higher than 72" (183 cm) from the bottom of the washer.
Proper connection of the drain hose will protect your floors from
damage due to water leakage. To prevent the drain hose from
coming off or leaking, it must be installed according to the
following instructions.
IMPORTANT: To ensure proper installation, this procedure must
be followed exactly.
1. Check the drain hose to see that it is the proper length.
2. Wet the inside of the straight end of the drain hose with tap
water.
IMPORTANT: Do not use any lubricant other than water.
3. Squeeze ears of double-wire clamp with pliers to open. Place
clamp over the straight end of the drain hose 1/4"(6 mm) from
the end. Twist hose back and forth while pushing down onto
drain connector at the bottom of the washer. Continue until
hose contacts the cabinet.
Laundry tub drain system (view C)
The laundry tub requires a minimum carry-away capacity of
13 gat. (49.2 L) per minute.
The top of the laundry tub must be at least 39" (99 cm) above the
floor and no higher than 72" (183 cm) from the bottom of the
washer.
Place clamp over area marked "CLAMR" Release clamp.
(6ram)
(6mm)
A, Drain hose
B. Clamp
C. Cabinet
For standpipe or _aundry tub drain systems:
1. Open yellow, single-wire clamp with pliers and slide over
hooked end of drain hose to secure the rubber and
corrugated sections together.
jA
A.Hookedend
B.Drainhose
Page 7

2,
Put hooked end of drain hose into laundry tub or standpipe.
Rotate hook to eliminate kinks in the hose.
To prevent drain water from going back into the washer:
[] Do not straighten hooked end of drain hose. Do not force
excess drain hose into standpipe. Hose should be secure,
but loose enough to provide a gap of air.
[] Do not lay excess drain hose in bottom of laundry tub.
[] For floor drain installation, see kit number required under
"Tools and Parts."
Connect the inlet hoses to the washer
6, Attach the hose with the red coupling to the HOT (right) inlet
valve. Attaching the red coupling first makes it easier to
tighten connection with pliers. Screw on coupling by hand
until it is seated on the washer. Using pliers, tighten the
couplings with an additional two-thirds turn.
NOTE: Do not overtighten. Damage to the valves can result.
A B
1, Insert new flat washers (supplied) into each end of the inlet
hoses. Firmly seat the washers in the couplings.
A B
A. Coupling
B. Washer
Connect the inlet hoses to the water faucets
Make sure the washer basket is empty.
2, Attach the hose with the red coupling to the hot water faucet.
Screw on coupling by hand until seated on the washer.
3, Attach the hose with the btue coupling to the cold water
faucet. Screw on coupling by hand until seated on the washer.
4, Using pliers, tighten the couplings with an additional two-
thirds turn.
A. Cold water inlet valve(blue)
B. Hot water inlet valve (red)
7, Attach the hose with the blue coupling to the COLD water
(left) inlet valve. Screw on coupling by hand until it is seated
on the washer. Using pliers, tighten the couplings with an
additional two-thirds turn.
NOTE: Do not overtighten. Damage to the valves can result.
Check for leaks
8, Turn on the water faucets and check for leaks. A small
amount of water might enter the washer. You will drain this
later.
NOTE: Replace inlet hoses after 5 years of use to reduce the
risk of hose failure. Record hose installation or replacement
dates for future reference.
m If you connect only one water hose, you must cap off the
remaining water inlet port.
m Periodically inspect and replace hoses if bulges, kinks,
cuts, wear, or leaks are found.
NOTE: Do not overtighten. Damage to the valves can result.
Clear the water lines
5, Run water through both faucets and inlet hoses, into a bucket
or laundry tub, to get rid of particles in the water lines that
might clog the inlet valve screens=
Page 8

f,
Drape the power cord over the console.
2,
Move the washer to its final location and remove any
cardboard used to move washer.
3,
Locate the beaded tie strap (supplied).
(2Z>
BeadedTieStrap
4,
Wrap the drain hose to the laundry tub leg or standpipe with
the tie strap. (See illustrations A and B.)
A B C
Ifthe washer faucets and the drain standpipe are recessed,
put the hooked end of the drain hose in the standpipe. (See
illustration C.) Tightly wrap the tie strap around the water inlet
hoses and the drain hose.
Do not force excess drain hose back into the rear of the washer.
1, Check the electrical requirements. Be sure that you have the
correct electrical supply and the recommended grounding
method. See "Electrical Requirements."
2, Check to be sure all parts are now installed. If there is an
extra part, go back through the steps to see which step was
skipped.
3, Check to be sure you have atl of your tools.
4, Dispose of/recycle all packaging materials. Keep the
expanded foam plug for use if the washer should be
transported.
5, Check to be sure the water faucets are on.
6, Check for leaks around faucets and inlet hoses.
ElectdcaB Shock Hazard
Pmug into a grounded 3 prong outmet,
Do not remove ground prong,
Do not use an adapter,
Do not use an extension cord,
Failure to follow these instructions can resumt in death,
fire, or electricaB shock,
Properly leveling your washer prevents excessive noise and
vibration.
1, Move washer to final location.
2, Check that the washer is level.
[] Check side to side and front to back by lining up the level
as shown in the following illustration.
3,
Ifthe washer is not level, prop up the front of the washer with
the wood block and adjust the feet up or down as necessary.
Ifthe washer is against a wall, move the washer out slightly
before tipping back. Repeat this step until washer is level.
7, Plug into a grounded 3 prong outlet.
8, Read "Washer Use."
9, To test your washer, measure and add 1/2the normal
recommended amount of detergent to the washer. Close the
lid. Select any cycle, and then press START/OFR Allow it to
complete one whole cycle.
Page 9

WASHERUSE
J
J
/
J COTTONS NORMAL/EASY DELICATES
/
_"!!i_i:i_!:ii_i_i__!!:i z_z_:iiiiii:_!i_!ii_i:_!/_i_iii:_;__;!ii_!!_ii:zi__ii!;_iii
Fire Hazard
Never place items in the washer that are dampened
with gasoline or other flammaMe fluidso
No washer can compmetemy remove oil
Do not dry anything that has ever had any type of oimon
it (inc(uding cooking oims),
Doing so can result in death, explosion, or fire°
CARE
HOT
_ARM 0
COLD
@ P!!;o' = i: _ = r
v
Drop a sorted load of clothes Ioosely into your washer.
m Load evenly to maintain washer balance. Mix large and
small items.
m Items should move easily through the wash water.
Overloading can cause poor cleaning.
m To reduce wrinkling of permanent press clothes and some
synthetic knits, use the large load water level setting to
provide more space (see Step 5).
(OPTIONAL STEP) Pour measured liquid chlorine bleach into
the liquid chlorine bleach dispenser. Bleach will be dispensed
automatically during the wash part of the cycle.
WARNUNG: To reduce the risk of fire, electric shock, or injury
to persons, read the IMPORTANT SAFETY INSTRUCTIONS
before operating this appliance.
The following is a guide to starting your washer. Periodic
references to other sections of this manual provide more detailed
information,
i o Add measured detergent. Add liquid detergent to the bottom
of the washer or powdered detergent to the detergent
dispenser drawer.
NOTE: if desired, powdered color-safe bleach can be added
to the detergent dispenser with the powdered detergent.
Liquid color-safe bleach should be added to the bottom of the
washer basket.
.J
m Do not use more than 1 cup (250 mL) for afull load. Use
less for a smaller load size.
m Follow the manufacturer's directions for proper use.
m To avoid spilling, use a cup with a pouring spout. Do not
let bleach splash, drip, or ran down into the washer
basket.
m Use only liquid chlodne bleach in this dispenser.
Page 10

3,
(OPTIONAL STEP) Pour measured liquid fabric softener into
the liquid fabric softener dispenser. Softener is added
automatically during the rinse portion of the cycle.
Dilute liquid fabric softener by filling the dispenser with warm
water until liquid reaches the top line marked inside the
dispenser.
[] Do not spill or drip any fabric softener on the clothes.
[] Use only liquid fabric softener in this dispenser.
NOTE: Do not wash clothes with the fabric softener dispenser
removed.
4,
Close the washer lid. Washer will not fill, agitate or spin with
the lid open.
5.
Press the WATER LEVEL button to select the correct setting
for your wash load and the type of fabric being washed. For a
medium load the indicator light is on, for a large load the light
is off,
[] Choose a water Ieve! that allows the load to move freely
for best fabric care. See "Loading."
[] You may change the water level setting while the washer
is filling, if you change from high to medium but the water
has filled past medium, you will get medium with the next
fiII.
6,
Set the water temperature for the type of fabric and soils
being washed. Use the warmest wash water safe for fabric.
Follow garment label instructions.
Press the WASH/RINSE TEMPERATURE button to set the
wash temperature. For a Hot wash the top light is on, for Cold
the bottom light is on, for Warm both lights are on. All cycles
use a cold rinse.
Selecting Water Temperatures
Water Temp Use for
Not Whites and pastels
Heavy soils
Warm Bright colors
Moderate to light soils
This section describes the ava[hbte wash cycles and w[I! help you
make the best cycle selections for your wash loads. Each cycle is
designed for different types of fabric and soil levels.
[] The washer pauses briefly throughout each cycle. These
pauses are normal Refer to "Normal Sounds" to learn more
about the sounds you may hear during a wash cycle.
[] Refer to "Understanding Washer Cycles" to learn what
happens during a wash cycle.
COTTONS NORMAL EASY DEUCATES
CARE
Cottons
Use this cycle to get 18 minutes of wash time for sturdy or heavily
soiled loads. Wash combines high-speed agitation and high-
speed spin for maximum soil removal.
Normam
Use this cycle to get 12 minutes of wash time for normally soiled
cottons and linens. Wash combines medium-speed agitation and
high-speed spin to shorten drying time.
Easy Care
Use this cycle to get 10 minutes of wash time. Use for
wrinkle-free and permanent press items, and knits. Wash
combines medium-speed agitation and high-speed spin to
shorten drying time.
Demicates
Use this cycle to get 6 minutes of wash time for lingerie and
loosely knit items. Wash combines tow-speed agitation for gentle
soil removal, and high-speed spin to shorten drying time,
When a cycle is selected, the washer lid is dosed, and
START/OFF is pushed, the washer fills (to the selected load size)
before agitation and timing start. The lid must be closed during
operation. The washer will not fill, agitate or spin with the lid open.
NOTE: The washer pauses briefly throughout each cycle. These
pauses are normal for washer operation.
WASH RINSE
1.Fill 1.Fill
Cored Colors that bleed or fade
Light soils
NOTE: in wash water temperatures colder than 70°F (21°C),
detergents do not dissolve well. Soils can be difficult to
remove. Some fabrics can retain wear wrinkles and have
increased pilling (the formation of small lint-like balls on the
surface of garments).
7. Press the CYCLE SELECTOR button to select the wash cycle
you want. See "Cycles."
8. Press START/OrE
To stop or restart your washer
[] To stop the washer at any time, lift the lid, cycle will
pause.
[] To restart the washer, close the lid, cycle will resume.
10
time
2. IA/ashselected _ 2. Rinse
No agitation No agitation
._ 3. Drain _ 3. Drain
h_ 5. Off
Page 11

Your new washer may make sounds your old one didn't. Because
the sounds might be unfamiliar, you may be concerned about
them. These sounds are normak
During drain
If water is drained quickly from your washer (depending on your
installation), you may hear air being pulled through the pump
during the end of draining.
After drain and before spin
When the cycle changes from draining to spinning, you may hear
gears engaging.
LAUNDRYTiPS
Preparing clothes for washing
Follow these recommendations to help you prolong the life of
your garments.
[] Close zippers, snaps, and hooks to avoid snagging other
items. Remove pins, buckles, and other hard obiects to avoid
scratching the washer interior. Remove non-washable trim
and ornaments.
[] Empty pockets and turn them inside-out.
[] Turn down cuffs; brush away lint and dirt.
[] Turn synthetic knits inside-out to avoid pilling.
[] Tie strings and sashes so they will not tangle.
[] Mend tears, loose hems, and seams.
[] Treat spots and stains.
[] Stained or wet garments should be washed promptly for best
results.
Sorting
[] Separate heavily soiled items from lightly soiled ones, even if
they would normally be washed together. Separate lint-givers
(towels, chenille) from lint-takers (corduroy, synthetics,
permanent press). When possible, turn lint-givers inside-out.
[] Separate dark colors from light colors, colorfast items from
noncoloffast items.
[] Sort by fabric and construction (sturdy cottons, knits,
delicate items).
Unloading
[] Remove clothes from washer after the cycle is completed.
Metal objects such as zippers, snaps, and buckles may rust
if left in the washer basket for a long time.
Loading suggestions
For these suggested full-sized loads, set the WATER LEVEL
selector to the highest setting.
COMPACT WASHERS
Heavy Work Ctothes Knit
2 pair pants 2 slacks
3 work shirts 2 shirts
-or-
3 dresses
Towels Mixed Load
9 bath towels 1 pair slacks
-or- 2 pillowcases
6 bath towels 2 shirts
3 hand towels 1T-shirt
6 washcloths
Permanent Press Delicates
6 shirts 1 camisole
-or- 2 slips
2 double sheets 2 panties
2 pillowcases 2 bras
-or- 1 nightie
2 single sheets 1 half-slip
2 pillowcases
11
Page 12

WASHERCARE
(iiiii_ii!!_ii!iii_iiiiii:iiii_¸'i_!ii_:i:_i:i¸!:_i_if_?_ii!!_!i_iiiiiii_ii!_i_ii¸_
Cmeaning the exterior
Use a soft, damp cloth or sponge to wipe up any spills such as
detergent or bleach. Occasionally wipe the outside of your
washer to keep it looking new.
Cmeaning the interior
Add 1 cup (250 mL) of chlorine bleach and 1 scoop or capful of
detergent to the washer, and run it through a normal cycle using
hot water. Repeat this process if necessary.
NOTE: Remove any hard water deposits using only cleaners
labeled as washer safe.
CBeaning the lint filter:
Clean filter after every load.
1, Grasp the top of the fabric softener dispenser and pull
straight upward to remove. The lint filter is attached to the
end of the shaft.
2, Wash or wipe the lint filter clean.
3, Push fabric softener dispenser and lint filter firmly back into
agitator.
Cmeaning the liquid fabric softener dispenser:
Flush fabric softener dispenser periodically with warm water.
1, Grasp the top of the dispenser and pulI upward to remove.
2, Flush the dispenser with warm water. Repiace after cleaning.
NOTE: To avoid damage to the washer or clothing, do not wash
clothes with the fabric softener dispenser removed. Do not add
detergent or bleach to this dispenser; it is for liquid fabric
softener only.
Repiace inlet hoses after five years of use to reduce the risk of
hose failure. Periodically inspect and replace inlet hoses if
bulges, kinks, cuts, wear or leaks are found.
When replacing your inlet hoses, mark the date of replacement
on the label with a permanent marker.
InstaiI and store your washer where it will not freeze. Because
some water may stay in the hoses, freezing can damage your
washer. If storing or moving your washer during freezing weather,
winterize it.
Non-use or vacation care:
Operate your washer only when you are at home. If you will be on
vacation or not using your washer for an extended period of time,
you should:
[] Unplug washer or disconnect power.
[] Turn off the water supply to the washer. This helps avoid
accidental flooding (due to a water pressure surge) while you
are away.
To winterize washer:
1, Shut off both water faucets.
2, Disconnect and drain water inlet hoses.
3, Put 1 qt (1 L) of R._,(-type antifreeze in the basket.
4, Unplug washer or disconnect power.
To use washer again:
1, Flush water pipes and hoses.
2, Reconnect water inlet hoses.
3, Turn on both water faucets.
4, Plug in washer or reconnect power.
5, Run the washer through any cycle with 1/2the normal
recommended amount of detergent to clean out the
antifreeze.
To transport the washer:
1, Shut off both water faucets.
2, Disconnect and drain water inlet hoses.
3, If washer will be moved during freezing weather, put in
1 qt (1 L) of Ra'vt-type antifreeze in the basket.
4, Disconnect the drain from the drain system.
5, Unplug the power cord.
6, Place the inlet hoses into the basket.
7, Drape the power cord and drain hose over edge into the
basket.
ReinstaIHng the washer
1, Follow the installation instructions for your model to locate,
leve! and connect the washer.
2, Run the washer through any cycle with 1Athe normal
recommended amount of detergent to clean out the
antifreeze, if used.
12
Page 13

TROUBLESHOOTXNG
First try the so{utions suggested here and possibly avoid the cost of a serv{ce cam[°°°
Washer won't fiIt, rinse or wash
[] [s the _id open?
The lid must be closed during operation. The washer will not
fill, agitate or spin with the lid open.
[] Does the water level seem too low, or does the washer
appear to not fill completely?
The top of the agitator is much higher than the highest water
level. This creates a perception that the washer is not filling
completely. This is normal.
[] Check the following:
Is the power cord plugged into a grounded 3 prong outlet?
Is there power at the plug? Check electrical source or call
electrician.
Are the hot and cotd water faucets turned on?
Is the water inlet hose kinked?
Are the water inlet valve screens clogged?
Washer stops
[] Check the following:
Is the power cord plugged into a grounded 3 prong outlet?
Are the hot and coid water faucets turned on?
Is the water inlet hose kinked?
Are the water inlet valve screens clogged?
[]
Is there power at the p_ug?
Check electrical source or call electrician.
[]
Has a fuse b_own, or has the circuit breaker tripped?
If problem continues, call electrician.
[]
Are you using an extension cord?
Do not use an extension cord.
Is the washer overloaded?
[]
Wash smaller loads. See "Starting Your Washer" for maximum
load size.
[]
Is the lid open?
The lid must be closed during operation. The washer will not
fill, agitate or spin with the lid open.
Washer won't drain or spin
[] Is the drain hose dogged, or the end of the drain hose
more than 72" (183 cm} above floor (48" [122 cm] for
portable washers}?
Refer to the installation instructions for your model for proper
installation of drain hose.
[] Is the _id open?
The lid must be closed during operation. The washer wilI not
fill, agitate or spin with the lid open.
[] Is there excessive sudsing?
Always measure detergent. Follow manufacturer's directions.
Ifyou have very soft water, you may need to use less
detergent.
[] Is your voltage _ow?
Check electrical source or call electrician. Do not use an
extension cord.
Washer continues to fill or drain, or the cycle seems
stuck
[] Does the drain hose fit too tightly in the standpipe, or is it
taped to the standpipe?
The drain hose should be loose yet fit securely. Do not seal
the drain hose with tape. The hose needs an air gap. See
"Installation Instructions."
[] Is the end of the drain hose less than 39" (99 cm} above
the floor?
Refer to the installation instructions for your model for proper
installation of drain hose.
Washer makes noise
[] Is the _oad balanced and the washer level?
The wash load should be balanced. See "Starting Your
Washer" for maximum load size.
The washer must be level. Refer to the installation
instructions for your model.
Can you hear water spraying? This is part of the wash action.
Ifwater is drained quickly from the washer, you may hear air
being pulled through the pump. This happens during the end
of draining. It is normal.
When the cycle changes from washing to draining or
spinning, you may hear a noise as the drive system shifts.
This is normal
[] Are you washing items with meta_ snaps, buckles or
zippers?
You may hear metal items touching the basket. This is normal.
[] Are you washing a small load?
You will hear more splashing sounds when washing small
[cads. This is normal.
[] [s the washer installed on a solid floor?
Refer to your installation instructions for flooring requirements.
Washer leaks
[] Check the following:
Are the fill hoses tight? Are the fill hose washers properiy
seated? Is the drain hose clamp properly installed? Refer to
the installation instructions for your model.
[] Is the sink or drain c_ogged?
Sink, floor drain and standpipe must be able to handle
13 gaL (49.2 L) of water per minute.
[] Is water bouncing off the tub ring or the load?
The wash load should be balanced and not overloaded. If not,
the fi[I or spray rinses can bounce off the load.
The washer must be level. Refer to the installation instructions
for your model.
[] Did you install the drain hose in a standpipe or laundry
tub?
See "Installation Instructions."
[] Check household plumbing for leaks°
13
Page 14

Washer basket is crooked
Stains on _oad
[] Was the washer basket pu_[ed forward during loading?
Push the basket to the center before starting wash.
[] Is the _oad balanced and the washer [eve[?
The wash load should be balanced.
The washer must be level Refer to the installation instructions
for your model.
[] The washer basket moves whi_e washing.
This is normal.
Dispensers dogged or teaking
[]
Are the laundry products in the correct dispenser?
Add the correct amounts of powdered detergent, liquid
chlorine bleach, or fabric softener to the correct dispenser.
You can add powdered color-safe bleach to the detergent
dispenser. Liquid detergent should be added to the bottom of
the washer basket.
Be sure to match powdered color-safe bleach with powdered
detergent or match liquid color-safe bleach with liquid
detergent. Use only liquid chlorine bleach in the bleach
dispenser.
Load too wet
[] Cold rinses leave _oads wetter than warm rinses,
This is normal.
[] Did you add powdered detergent to the dispenser?
For best results, use the dispenser to dissolve powdered
detergent. Add liquid detergent directly to the bottom of the
washer basket.
[] Did you use enough detergent?
Use enough detergent to remove soil and hold it in suspension.
Add the manufacturer's recommended amounts.
[] Did you add fabric softener directly to the load?
Use your fabric softener dispenser. Do not drip fabric softener
on clothes.
[] Is there above average iron (rust} in water?
You may need to install an iron filter.
[] Did you properly sort the load?
Sort dark clothes from whites and lights.
[] Did you unload the washer promptly?
To avoid dye transfer, unload the washer as soon as it stops.
[] Did you use powder detergent in a low-speed cycle?
Consider using liquid detergent.
[] Did you add detergent, chlorine b_each or fabric softener
too late in the cycte?
Powdered detergent, chlorine bleach, and fabric softener
should be added to the dispensers before starting the washer.
Add liquid detergent directly to the bottom of the washer
basket.
Load is wrinkled
Residue or lint on load
[] Did you add powdered detergent to the dispenser?
For best results, use the dispenser to dissolve powdered
detergent. Add liquid detergent directly to the bottom of the
washer basket.
[] Did you sort properly?
Sort lint givers (towels, chenille) from lint takers (corduroy,
synthetics). Also sort by color.
[] Did you overload the washer?
The wash load must be balanced. See "Starting Your Washer"
for maximum [cad size. Lint can be trapped in the load if
overloaded. Wash smaller loads.
[] Was paper or tissue _eft in pockets?
[] Did you use enough detergent?
Follow manufacturer's directions. Use enough detergent to
hold the lint in the water.
[] Is your water colder than 70°F (21°0}?
Wash water colder than 70°F (21°C) may not completely
dissolve the detergent.
[] Are you using a gentle wash cycle?
Consider using liquid detergent for slow-speed cycles such as
Gentle or Delicate.
[] Did you unload the washer promptly?
Unload the washer as soon as it stops.
[] Did you overIoad the washer?
The wash load must be balanced and not overloaded. Loads
should move freely during washing.
[] Are the hot and cold water hoses reversed?
Check to be sure the hot and cold water hoses are connected
to the right faucets. See "Installation hstructions."
Load is tangled or twisted
[] Did you overload the washer?
See "Starting Your Washer" for maximum load size. Loads
should move freely during washing.
Gray whites, dingy colors
[] Did you property sort the load?
Dye transfer can occur when mixing whites and colors in a
load. Sort dark fabrics from whites and lights.
[] Was the wash temperature too low?
Use hot or warm washes if safe for the load. Make sure your
hot water system is adequate to provide a hot water wash.
[] Did you use enough detergent, or do you have hard
water?
Use more detergent for washing heavy soils in cold or hard
water. Water temperature should be at least 70°F (21°C) for
detergent to dissolve and work properly.
14
Page 15

Garment damage
[] Check the fo_owing:
Were sharp items removed from pockets before washing?
Empty pockets, zip zippers, snap or hook fasteners before
washing.
Were strings and sashes tied to prevent tangling?
Were items damaged before washing?
Mend rips and broken threads in seams before washing.
[] Did you over_oad the washer?
See "Loading" for maximum load size.
[] Did you proper_y add cHorine b_each?
Do not pour chlorine bleach directly on load. Use your liquid
chlorine bleach dispenser. Wipe up bleach spills. Undiluted
bleach will damage fabrics. Do not place Ioad items on top of
the bleach dispenser when loading and unloading the washer.
[] Did you follow the manufacturer's care _abe_instructions?
Wash temperature is not what 1setected
[] Are the hot and cold water in_et hoses reversed?
As washing progresses, the wash temperature will decrease
slightly for hot and warm washes. This is normal.
15
Page 16

NOTES
16
Page 17

GE Service Protection Plus TM
GE, a name recognized workh_ide fbr quality and dependability, offers you
Ser_i_e Protection Plus'_--comprehensi_e wotection on all wmr appliances--
No Matter What Brand!
Benefits hclude:
o Backed by GE
o All brands covered
o U_nited ser%ce caUs
o All parts and labor costs included
* No out-of-pocket expmlses
o No hidden deductibles
o One g00 nt_ber to call]
_m wiII be compIetely s _tisfied with our service pl'otectio_ oi" you ma) request yot_r mo_e} back
o_ tile remah_ii_g vah_e of_otn" cow,tract. No questions asked. It's that simple.
Pi'otect yoar ref?igerator, dishwasher, w _sher and dryer, range, TV, VCR and much more--any brand!
Plus there's no extra charge fkw emergency service a_d low monthly tinanci_g is available. Even icemaker
coverage and food spoilage protection is offered. _%t_ can iTest easy, knowing that all votn" vahmble
hot_seho/d prodt_cts are protected agaii_st expensive repairs.
for more i,_formatio_.
:_\ll brmds c >v_,_d, up m 20 }_a*s old, in _h_ c mfin_ real /.S.
WeY/CoverAny Appliance.
Anywhere. Anytime.
Please place inenvelope and mail to:
General E/cedric Compan_
Warranty Registration Department
P.O. Box 32150
Louisville, KY 40232-2150
17
Page 18

Consumer Product Ownership Registration
[)ear Gustomer:
Thank you fin" purchasing our product and thank _ou for placing you "confidence in us.
_,% are proud to ba_e }(m as a customer'.
Follow these three steps to protect your new appliance investment:
Comp]lete mid mail
y(mr Consumer
Product O*_lership
Registration today.
Have the peace of
mind _f knowing we
call (olllacI _otl ill
the mflikelv evem of a
satbiv modification.
After mailing the
tegistration 1)elope,
store this doctllllelH
h] a sail, place. It
COll[Si[lS hl]i)Fllla[ioll
w)u will need shol[ld
V{>I[ F('(ltlil {' S(q V[C{'.
Our servk e munber is
8(}0.( E.CARI S
(800.4 _2.2737).
Model Number Serial Number
I I I I I I I I I I I I I I I I I I
Important: If you did not get a registration card with your
product, detach and return the form below to
ensure that your product is registered, or register
online at WTT.GEAppliances.com.
Consumer Product Ownership Registration
Read 7,mu ()wne_ 's
Mamml {avetidh
It will help _ou
I)p( Fate V{)I[F l]eW
appliance properly
,_ Model Number Serial Number
I [ I ] I I [ I I I I I [ I [ I I
M_ [] M_.[] Mrs.[] Miss[]
Fh'_/ I last
Nm_e I I I I I I I I I Nm_e I I I I I I I I I I I I
S1F{2( t ]
\dd_{ ss [ I [ I [ I [ I [ I [ I [ I [ I [ I [ I [ I [
Apt. # I [ ] I ! I ] I E-mail Add*ess
(:M_I I I I I I I I I I I I I I S_ate _L_ Zip
D_{{ PH{cd
Is{
M{mt}]
@
GE Cotisllmer & hld!_str#fl
Loft&uille, Kexlt!_cky
ww_GEAp_fh_llces conl
GEAppliances
: Please plxMde your e-mail addr< ss to icceive, vh e-mail, discounis, spechl ()f_bm and o_her hnpolla]]t
(:ommunicafi(*ns l']x_mGE Appliances (GEA).
[] {filed; []ere if you (lo not _ant t{_luceiv( commulli(aii(}l]s liom (;EA'B c u>hlll selected partl]el-_.
E\I[Z RE TO (OMPIff,7I-E \ND RETURN TillS CARD DOES NOT DIMINISI{ YOUR
X\2\R[{\N'IT RIGHTS.
For inf wm:nion about GEAIs prhaQ _md d_m_us_g_ poliob W_ to x_.(;EAppliances.(om _md (lick
o]] "PvN_cvPolicy" or (all 800.626.2224.
P[]ol](_
NI _tt){ I I
(2od{,lll,l]
F I I I
I
I
18
Page 19

GEWasherWarrantFo
All warranty" service provided by our Factory Service
Centers, or an authorized Customer Care_' technician.
Toschedule service, on-line, 24 hours a da_; contact us
at ww_ GEAppfiance& corn, or carl 800.GE.CARES.
Staple your receipt here.
Proof of the origir,,alpurchase
date is needed to obtain service
under t_e warranty.
For The Period O# We Wilt Replace:
One Year Allypartol t/'_e _sh('r w_'4(:h tidJs din' to _ (h't_'ct ii_ m_tteri_ds or v_orkm;mship. [)[lri_g this
From the date of the foil one=year wafter#g, we wiI! also pro'_id(, free of charge, all ld)or a_d rel _wd service to rep! _ce
the dell'( li_,e part.
Second throngh
Fifth gear
Fromthe date of the
origk}a/pumhase
Second through
Tenth Year
The transmission, suspension red and spring assemhJyif my o[ thes( p_rts shcmId lidl (h_e to _ delbct
i_ m _wriaIs or workm reship. OE will also replace the washerHd or cover, it they sho_fld rust
m_der o]per itiug conditions. Dm'iug this additienaJ feubyear limited wafter#g, yo_ wilI be
resp<msible for az_y labor or related serxi(:e costs.
The washer tab, i[ it shouhl {idl d[_e to a detb(t i_ materi ds or workma;_shi/). D[_ri_g this
additiellM nine=year ]itMted warranty, you will be respo_sible for any Idx_r or rela_ed ser ice (osts.
Fromthe date of the
Secondthrongh The washerhasket, ilit sho_dd lidl due to _ delbct in materials or workmanship. Dm:iug this
rwentieN Year additional #i#eteemyear fimited warra_ty, yo_ will be respo_sible tbr any/dx_r or rela_ed
From Ne date of No serxice costs.
What _sNot Covered:
[] Service tr_ps to yot_r home to teach you how to use
the product.
[] Improper ir_stallatlor_, delivery or malr_ter_ar_ceo
[] Fail,re of the produrt if it is abused, mls_sed, or used for
other tbar_ the ir_tended purpose or used commerdally:
[] Damage caused after delivery.
[] Replacemem of house fuses or resetd_g of c_rctfit
breakers.
[] Damage to the product caused by accldent_ fh°e_ floods or
acts of God.
[] lncldental or consequential damage caused by possible
defects with this applJar_ce.
Thiswarrantyis extendedto the original purchaserandanysucceedingownerforproductspumhasedfor home usewithin the USA.
InAlaska, the warrantyexcludesthe cost of shippieg orservice calls to yourhome.
Somestatesdonot allow the exclusionorlimitation of iecidental or consequentialdamages.Thiswarrantygives you specificlegal rights,
andyoumayalso haveother rights which varyfromstate tostate, Tokeow what your legal rightsare, consultyourlocal or stateconsumer
affairs office or yourstate_ Attorney General.
Warranter: aenera_ Electric Cempa_g Louisville, KY 40225
Page 20

Consumer Support.
6EAppliancesWebsite www.GEApp/iances.cem
Hm e ;( qllestiom/ or m/eed assist;mce )dth yollr _(pp[i_mce? T_ 7 the (;E App[i_mces We]bsite 24 hollr_ _ d_,
amw dav of the _ar! For greater com/em/ie]/ce mid {i(ster selyice, }ttll cm/m_t)!_ dow)l]o:)d ()w))er's Mature]s,
order parts, catalogs, or e_ en schedl_le ser'dce om/-lim/e. \'oll cm/also "Ask ()llr Team of Experts ......
vollr (]llestio]/s, am/(][SO m1111ch more...
Schedule Serl/Tce www.GEApp]iances.cem
Expert (;E repair service is o_/ly om/e step _(wav _'om _om" doo): (;et <m-lim/e mid srhedl)]e _om" service _(t
",ol)r com'enience 24 bow's mw da_' of the _,'ear! ()) c_(]] 80(t.(,E.CAKES 800.432.2737) dwim/_,4 _/orma]
bHsi m/ess hol H'S.
RealLifeDesignStudio www.GEApp/iances.cem
OE sllpports the [ Im/iversal Design concept--prodl_cts, se_ices mid emwirom//em/ts theft cam/be Ilsed ]b/
people <ff a][ _(ges, sizes a_/d capa]l)ihties. We recognize the _/eed to design {or a _,_,ride _;mge <ff ph}'_ica[ mid
m e _/ta] all)i)] ti es a _]d im pal rm en ts. For details of C,E's [ I_]iversa] Design _(pp]] ca tio_/s, 1_/c] _ldi _/g ]d tch en
design ideas fin •people with disa]l)i[ities, check o_lt o_lr Website toda/, t_)_r the hea_J_/g impaired, p[ease call
S00.TDD.(;EAC (800.833.4322).
ExteRded WarraRt/es www.GEApp]iances.cem
[___)"cl/,t.'se a' (;E ext el/de d wa rr_)_/_' _)_/d 1ea )',/_)b o_ _t s[) eci a l di sco _mts th _(t a re a'_'ail_( bl e w h ile _,,(./__r _:'_(i")_(_/tv
is still i_/ effect. "_i_ c_m pro'chase it o_/-li_/e aff','time, or call S00.621:).2224 dm'i_/g _/ormal b_si_/ess horn's.
(;E (:( m s_m/er Hom e Se)•vi ces will still be th e)•e a:[ter ?o __r war);( _/b expi res.
Farts 8Rd Accessories www. EAppfiances.cem
[_/di','id_mls q)mlif_ed to se)_'ice their ow,/ap[(lia_/ces c;m ha'_'e }(;arts or a( cessories se_/t directl',' to their
homes (VISA, MasterCard mid Discover cards are accepted). Order o_/-li_/e toda}. 24 horn's every' da_ or
b) pho_/e at S00.626.2002 dm•h/g _/orma[ b_si_/ess horn's.
oRtact US www.GEApp]iances.cem
If yon1 are _/ot satisfied _._,ri[hthe service yo_l receive [_•om (}E, co]]tact _ls o_/ o_lr Well)site _&rith a[[ the details
i_/chldh/g yo_lr phol/e mm/be_; or w_Jte to: (;el/e_:d Ma_/age_; (51stomer Relati<ms
(;E App[im/ces, Appli;mce Park
I xmisvil]e, K_/ 40225
RegisterYourAppliance www.GEApp]iances.cem
Register your _ew applim_e o_=[_le--at your co_t_ve_Je_ce_ Time[y [>rod_/'t regist_)tio_/,, wi[[ _([lo'w [_/r
e n h ;(_/ce d corn m ))_/i ca t]_/n a nd [1i( m/pt sei'vi ce im de r the t ei'm s (if"y( 11)r w;(r) _(_ t_', sh (111[d the _/ee d a)'ise.
_2/_ m_)_' also mail i_/the [)re--[)rib/ted regist)_(tio_/,, card i_/ch_ded i_/the [)acki_/g, m_)terial.
Printed inBrazil
04/2005
 Loading...