

Page 1

GE Appliances
175D1807P313 49-90047-2 7-00 JR
www.geappliances.com
Washers
WPSE7003
WPSE7002
Owner’s Manual
Safety Information
Proper Installation . . . . . . . . . . . . . .3
Water Heater Safety . . . . . . . . . . . . .3
When Not in Use . . . . . . . . . . . . . . .3
When Using the Washer . . . . . . . . .3
Your Laundry Area . . . . . . . . . . . . .3
Operating Instructions
Clothes care cycles . . . . . . . . . . . .6, 7
Controls . . . . . . . . . . . . . . . . . . . . . .4
Controls features . . . . . . . . . . . . . . .8
Cycle options . . . . . . . . . . . . . . . . . .9
Cycle status . . . . . . . . . . . . . . . . . . . .9
Loading and Using
the Washer . . . . . . . . . . . . . . . .11, 12
One Touch Cycles . . . . . . . . . . . .4, 5
Washer Features . . . . . . . . . . . .6–10
Troubleshooting Tips . . . . .13–16
Customer Service
GE Answer Center®
800 Number . . . . . . . .2, Back Cover
Product Registration . . . . . . . .17, 18
Service Telephone
Numbers . . . . . . . . . . .2, Back Cover
Warranty . . . . . . . . . . . . . . . . . . . . .19
Profile Performance
Manuel d’utilisation
Manual del propietario
La section française commence à la page 21
Laveuses
Profile Performance
Lavadoras
Profile Performance
La sección en español empieza en la página 38
Page 2
A Service Partnership.
FOR YOUR RECORDS
Write the model and serial numbers here:
#
#
You can find them in the upper right corner on the back of your washer.
IMPORTANT!
Fill out the Consumer Product Registration Card.
Two easy ways to register your appliance!
■ Through the internet at www.geappliances.com
■ Complete and mail the enclosed Product Registration Card
2
Operating Instructions Safety InstructionsCustomer Service Troubleshooting Tips
Inside you will find many helpful hints on how to use and maintain your washer properly. Just a little
preventive care on your part can save you a great deal of time and money over the life of your washer.
READ THIS MANUAL
IF YOU NEED SERVICE
You’ll find many answers to common problems in the
Before You Call For Service
section.
If you review our chart of
Troubleshooting Tips
first, you may not need to call for service at all.
If you do need service, you can relax knowing help is only a phone call away. A list of toll-free
customer service numbers is included in the back section.
OR
Visit our Website at
www.geappliances.com
Page 3
■ Install or store where it will not be exposed to
temperatures below freezing or exposed to the weather.
■ Remove the colored protective film from the
control panel.
■ Properly ground washer to conform with all
governing codes and ordinances. Follow details
in Installation Instructions.
IMPORTANT SAFETY INFORMATION.
READ ALL INSTRUCTIONS BEFORE USING.
WARNING!
For your safety, the information in this manual must be followed to minimize the risk of fire
or explosion, electric shock, or to prevent property damage, personal injury, or loss of life.
WATER HEATER SAFETY
Under certain conditions hydrogen gas may be produced in a water heater that has not been used for two weeks
or more. Hydrogen gas can be explosive under these circumstances.
If the hot water has not been used for two weeks or more, prevent the possibility of damage or injury by turning on
all hot water faucets and allowing them to run for several minutes. Do this before using any electrical appliance
which is connected to the hot water system. This simple procedure will allow any built-up hydrogen gas to escape.
Since the gas is flammable, do not smoke or use an open flame or appliance during this process.
PROPER INSTALLATION
This washer must be properly installed and located in accordance with the Installation Instructions before it
is used. If you did not receive an Installation Instructions sheet, you can receive one by visiting our Website at:
www.geappliances.com
.
Customer ServiceTroubleshooting TipsOperating InstructionsSafety Instructions
■ Keep the area underneath and around your
appliances free of combustible materials such as
lint, paper, rags, chemicals, etc.
■ Close supervision is necessary if this appliance is used
by or near children. Do not allow children to play on,
with, or inside this or any other appliance.
YOUR LAUNDRY AREA
■ Never reach into washer while it is moving. Wait
until the machine has completely stopped before
opening the lid.
■ Do not mix chlorine bleach with ammonia or acids
such as vinegar and/or rust remover. Mixing
different chemicals can produce a toxic gas which
may cause death.
■ Do not wash or dry articles that have been cleaned in,
washed in, soaked in, or spotted with combustible or
explosive substances (such as wax, oil, paint, gasoline,
degreasers, dry-cleaning solvents, kerosene, etc.) which
may ignite or explode. Do not add these substances to
the wash water. Do not use or place these substances
around your washer or dryer during operation.
■
The laundry process can reduce the flame retardancy
of fabrics. To avoid such a result, carefully follow the
garment manufacturer’s wash and care instructions.
■ To minimize the possibility of electric shock, unplug
this appliance from the power supply or disconnect
the washer at the household distribution panel by
removing the fuse or switching off the circuit breaker
before attempting any maintenance or cleaning.
NOTE:
Pressing PAUSE or STOP/CANCEL does
NOT
disconnect the appliance from the power supply.
■ Never attempt to operate this appliance if it is damaged,
malfunctioning, partially disassembled, or has missing
or broken parts, including a damaged cord or plug.
WHEN USING THE WASHER
■ Turn off water faucets to relieve pressure on hoses
and valves and to minimize leakage if a break or
rupture should occur. Check the condition of the
fill hoses; they should be replaced after 5 years.
■ Before discarding a washer, or removing it from
service, remove the washer lid to prevent children
from hiding inside.
■ Do not attempt to repair or replace any part of this
appliance unless specifically recommended in this
Owner’s Manual, or in published user-repair
instructions that you understand and have the skills
to carry out.
■ Do not tamper with controls.
WHEN NOT IN USE
READ AND FOLLOW THIS SAFETY INFORMATION CAREFULLY.
SAVE THESE INSTRUCTIONS
3
Use this
appliance
only for its
intended
purpose as
described in
this Owner’s
Manual.
Page 4
Washer control panel.
Operating Instructions Safety InstructionsCustomer Service Troubleshooting Tips
You can locate your model number behind the top edge of the control panel.
Model WPSE7003
Model WPSE7002
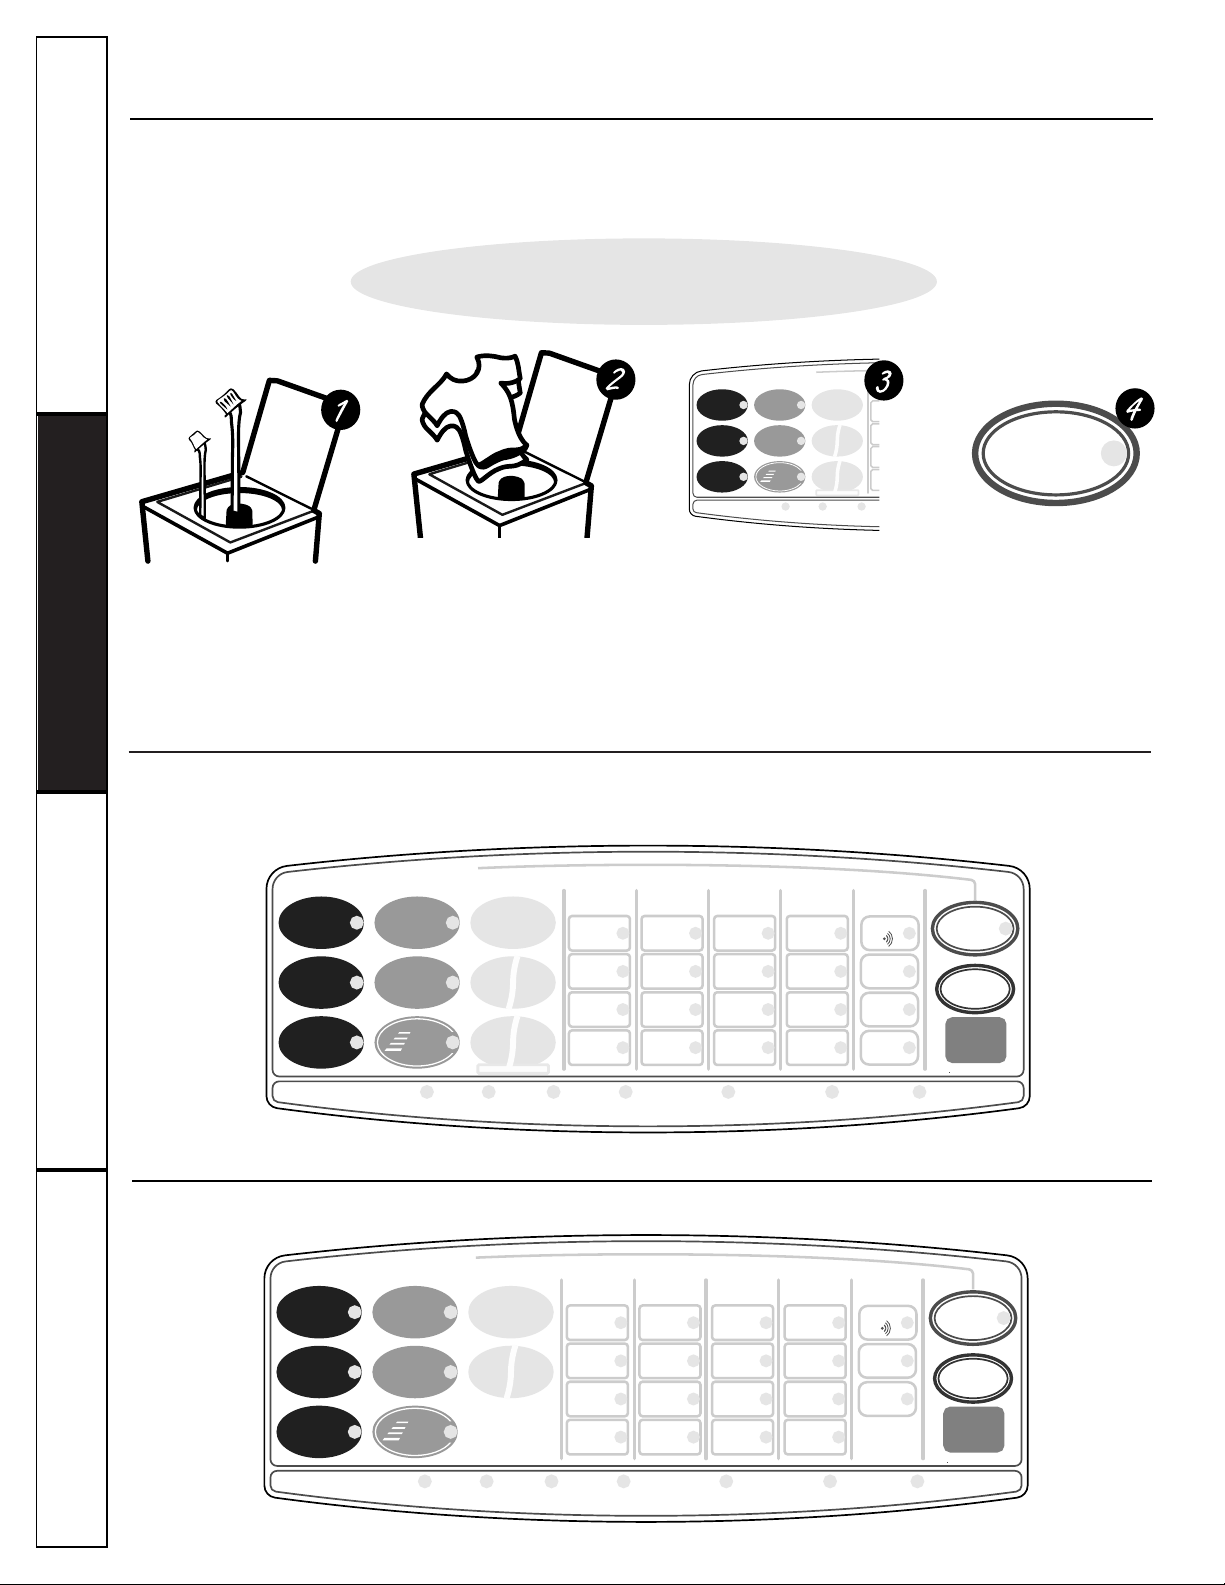
ONE TOUCH
Quick Start Guide
WHITES
HOT
PRESOAK
QUICK
RINSE
WASHSOAK
PerfecTemp
M
DRAIN
& SPIN
CUSTOM CUSTOM
PRESS 3 SEC TO STORE
12
COLORS
WARM
DARK
COLORS
COLD
EASY CARE
PERM PRESS
HAND
WASH
SPEED
WASH
ONE TOUCH
Clothes Care Cycles
S
TART
PAUSE
• Add detergent
• Add diluted fabric
softener
• Add clothes
• Select wash cycle
• Check load size setting
• Close lid
• Push
START
4
Your new washer offers the convenience of starting your wash loads with our easy
ONET
OUCH
cycles. Make one simple
selection, and your
LOAD SIZE, SOIL LEVEL, WASH/RINSE TEMPERATURE
, and
WASH/SPIN SPEED
are automatically set.
Then all you have to do is press
START
.
Easy ONET
OUCH
Cycles.
ONE TOUCH
WHITES
HOT
COLORS
WARM
DARK
COLORS
COLD
WHITES
HOT
COLORS
WARM
DARK
COLORS
COLD
Clothes Care Cycles
EASY CARE
PERM PRESS
HAND
WASH
SPEED
WASH
PerfecTemp
ONE TOUCH
Clothes Care Cycles
EASY CARE
PERM PRESS
HAND
WASH
SPEED
WASH
PerfecTemp
PRESOAK
QUICK
DRAIN
RINSE
& SPIN
CUSTOM CUSTOM
12
PRESS 3 SEC TO STORE
PRESOAK
QUICK
DRAIN
RINSE
& SPIN
LOAD
SIZE
SUPER
LARGE
C
YCLE STATUS
NORMAL
C
YCLE STATUS
NORMAL
MEDIUM
SMALL LIGHT
LOAD
SIZE
SUPER
LARGE
MEDIUM
SMALL LIGHT
SOIL
LEVEL
STAIN
WASH
HEAVY
SOIL
LEVEL
EXTRA
HEAVY
HEAVY
TEMP
WASH/RINSE
HOT
COLD
WARM
WARM
WARM
COLD
COLD
COLD
TEMP
WASH/RINSE
HOT
COLD
WARM
WARM
WARM
COLD
COLD
COLD
SPEED
WASH/SPIN
NORMAL
FAST
NORMAL
SLOW
GENTLE
FAST
GENTLE
SLOW
SPEED
WASH/SPIN
NORMAL
FAST
NORMAL
SLOW
GENTLE
FAST
GENTLE
SLOW
OPTIONS
BEEPER
2ND
RINSE
EXTEND
SPIN
DELAY
1-8 Hrs.
FINAL SPINAUTO BALANCE2ND RINSERINSEWASHSOAK
OPTIONS
BEEPER
2ND
RINSE
EXTEND
SPIN
FINAL SPINAUTO BALANCE2ND RINSERINSEWASHSOAK
S
TART
PAUSE
S
TOP
CANCEL
EST. TIME REMAINING
S
TART
PAUSE
S
TOP
CANCEL
EST. TIME REMAINING
Page 5
Customer ServiceTroubleshooting TipsOperating InstructionsSafety Instructions
5
PRESS... AUTOMATICALLY SELECTS... THEN PRESS...
You can change any of the automatic settings simply by pressing the desired pads.
ONET
OUCH
selections.
Changing the automatic settings.
For heavy to lightly soiled cottons, household linens,
work and play clothes.
For heavy to lightly soiled cottons, household linens,
work and play clothes.
For non-colorfast cottons and blends, and items that
are labeled cold wash by the fabric manufacturer.
For knits, wrinkle-free and permanent press items.
For lingerie and items labeled hand-washable with
light soils. Provides periods of agitation and soak
during wash and rinse.
For lightly soiled items that are needed in a hurry.
Cycle time is approximately 15 minutes, depending
on your household water pressure.
LOAD
SIZE
WHITES
HOT
COLORS
WARM
DARK
LARGE
LARGE
LARGE
SOIL
LEVEL
NORMAL
NORMAL
NORMAL
COLORS
COLD
TEMP
WASH/RINSE
HOT
COLD
WARM
COLD
COLD
COLD
SPEED
WASH/SPIN
NORMAL
FAST
NORMAL
FAST
NORMAL
FAST
S
TART
PAUSE
S
TART
PAUSE
S
TART
PAUSE
EASY CARE
PERM PRESS
HAND
WASH
SPEED
MEDIUM
SMALL
SMALL
NORMAL
LIGHT
LIGHT
WASH
WARM
COLD
COLD
COLD
WARM
WARM
GENTLE
FAST
GENTLE
SLOW
NORMAL
FAST
S
TART
PAUSE
S
TART
PAUSE
S
TART
PAUSE
Page 6
Operating Instructions Safety InstructionsCustomer Service Troubleshooting Tips
About Clothes Care Cycles.
6
PRESOAK
To presoak a load and go straight into a wash cycle:
Select your wash cycle, press the
PRESOAK
pad, then press the
START/PAUSE
pad.
■ Starts with three minutes of agitation, then 12 minutes of soaking, followed by the
selected wash cycle.
■ Uses the speed and water temperature of your selected wash cycle.
To presoak a load for more than 12 minutes:
Press the
PRESOAK
pad. The washer will fill and these automatic settings are selected:
■ Three minutes of agitation is followed by up to 24 hours of soaking.
■ To soak less than 24 hours, press the
DRAIN & SPIN
pad or choose a wash cycle.
PRESOAK
QUICK RINSE
Use this feature to quickly rinse chlorine, perspiration, stains, etc. out of clothes.
■ The washer fills with water, agitates for three minutes, drains and spins.
QUICK
RINSE
Automatic QUICK RINSE settings:
STAIN WASH (on some models)
For heavily soiled or stained items. Adds an extra agitation and soak at the beginning of
the wash cycle.
SOIL
LEVEL
STAIN
WASH
LOAD
SIZE
LARGE
TEMP
WASH/RINSE
WARM
WARM
SPEED
WASH/SPIN
NORMAL
FAST
LOAD
SIZE
MEDIUM
TEMP
WASH/RINSE
COLD
COLD
SPEED
WASH/SPIN
GENTLE
FAST
Page 7
Customer ServiceTroubleshooting TipsOperating InstructionsSafety Instructions
7
CUSTOM 1 and CUSTOM 2 (on some models)
Set up your favorite combination of settings and save them here for one-touch recall.
These custom settings cannot be set while a cycle is in progress.
To store a custom combination of settings:
1. Select a
ONET
OUCH
setting.
2. Change
LOAD SIZE, SOIL LEVEL, TEMPERATURE, orSPEED
to fit your needs.
3. Select any
OPTIONS
you want.
4. Press and hold the
CUSTOM 1
or
CUSTOM 2
pad until the washer beeps to store
your selection.
To recall your stored combination:
Press the
CUSTOM 1
or
CUSTOM 2
pad, then press
START/PAUSE
.
NOTE: DELAY 1-8 HRS.
cannot be used in
CUSTOM 1
and
CUSTOM 2
settings.
To reprogram the custom settings:
Repeat steps 1–4 above.
CUSTOM CUSTOM
PRESS 3 SEC TO STORE
12
DRAIN
& SPIN
DRAIN & SPIN
DRAIN & SPIN
any cycle at any time.
Automatic DRAIN & SPIN setting:
SPEED
WASH/SPIN
GENTLE
FAST
Page 8
Operating Instructions
Safety Instructions
Customer Service
Troubleshooting Tips
About controls features.
8
START/PAUSE
■ After you have selected a new cycle, press once to start the cycle.
■ Press twice to select the last cycle used and start the washer.
■ If the washer is running, press once to interrupt the cycle; press again to continue
the cycle.
S
TART
PAUSE
STOP/CANCEL
This pad should
not
be used to interrupt or pause a cycle.
Pressing this pad will cancel the current settings and the settings will be lost.
S
TOP
CANCEL
Estimated Time Remaining
■ Displays the approximate time remaining until the end of the cycle.
■ If the estimated time remaining is more than 60 minutes, “1H” will flash in the
display, followed by the additional remaining minutes. When the time remaining is
less than 60 minutes, the timer will count down.
■ Cycle time is affected by how long it takes the washer to fill. This depends on the
water pressure in your home. The “smart” timer “learns” the amount of time it
takes to fill your washer and adjusts the total time accordingly.
NOTE:
If
PRESOAK
is selected and a follow up wash cycle is not chosen, two dashes
will come up in the display.
E
ST. TIME REMAINING
Spot Spray
When you open the washer lid and press the
SPOT SPRAY
button, you will see a short stream
of cold water.
Open the washer lid.
Press the
SPOT SPRAY
button. (You will see a short stream of water.)
Dampen your soiled garment with the
SPOT SPRAY
option and rub your favorite
pretreatment product into soiled area.
NOTE:
The
SPOT SPRAY
option will not work if
■
the washer lid is down
■
the washer tub is filling
■
the water has already reached the level you selected.
3
2
1
Page 9
Customer ServiceTroubleshooting TipsOperating InstructionsSafety Instructions
9
About cycle options.
BEEPER
Alerts you when the cycle is complete.
You can turn off the end-of-cycle beeper by pressing this pad.
BEEPER
2ND RINSE
Adds a second rinse to any cycle.
2ND
RINSE
EXTEND SPIN
Extends the last spin of a wash cycle. This will extract more water from your clothes.
Clothes will be drier when you use this option.
EXTEND
SPIN
DELAY 1-8 HOURS (on some models)
Use to delay the start of your washer for 1 to 8 hours. First choose your wash cycle and
any options. Then press this pad for the number of hours you want to delay the cycle.
Press the
START/PAUSE
pad to start the countdown.
The countdown time will be shown in the
Est. Time Remaining
display.
DELAY
1-8 Hrs.
Auto Balance
The washer is sensing load distribution for an even spin.
PerfecTemp
About cycle status.
These cycle status indicator lights display what part of the cycle the washer is in.
PerfecTemp
PerfecTemp
senses the incoming water temperature and adjusts the temperature of the
fill water.
The lid must be closed for
PerfecTemp
to work.
If your water is too cold, detergent will not dissolve effectively and clothes may not get
clean. If the water is too hot, fabrics could be damaged.
PerfecTemp
adjusts these water temperature extremes for better washing performance.
You may hear the water valves turning off and on while the water temperature is being
adjusted. This is normal.
AUTO BALANCE
PerfecTemp
FINAL SPINAUTO BALANCE2ND RINSERINSEWASHSOAK
Page 10
10
Operating Instructions Safety InstructionsCustomer Service Troubleshooting Tips
About washer features.
The Agitator Cap or Fabric Softener Dispenser
The agitator cap
fits into the top of the
agitator. If it accidentally comes off, simply
put it back on.
The fabric softener dispenser
automatically
releases liquid fabric softener at the proper
time during the cycle.
Do not stop the washer during the first spin.
This will cause the dispenser to empty too
soon.
To use, follow these steps:
Make sure dispenser is securely
attached to agitator.
Use only liquid fabric softener.
Pour into dispenser, using amount
recommended on package.
Never pour fabric softener directly on
clothes. It may stain them.
Add water to dispenser until it reaches
the maximum fill line.
3
2
1
Do not pour anything into the agitator if
the agitator cap or dispenser is removed.
Cleaning the Fabric Softener Dispenser
Remove the dispenser from the top of the agitator.
Separate the dispenser cup from the cover by grasping the top and pushing down on
the inside of the cup with your fingers. Dispenser cup will pop free from the cover.
To clean the dispenser, soak both the dispenser cup and the dispenser cover in the
following solution:
■
1 US gallon (3.8 liters) warm water
■
1/4 cup (60 ml) heavy duty liquid detergent
■
1 cup (240 ml) bleach
If necessary, loosen build-up with a clean, soft cloth after soaking. Do not use a stiff
brush; you may roughen the surface of the dispenser.
Rinse and reassemble dispenser. Place dispenser back on the agitator.
5
4
3
2
1
Separate for cleaning.
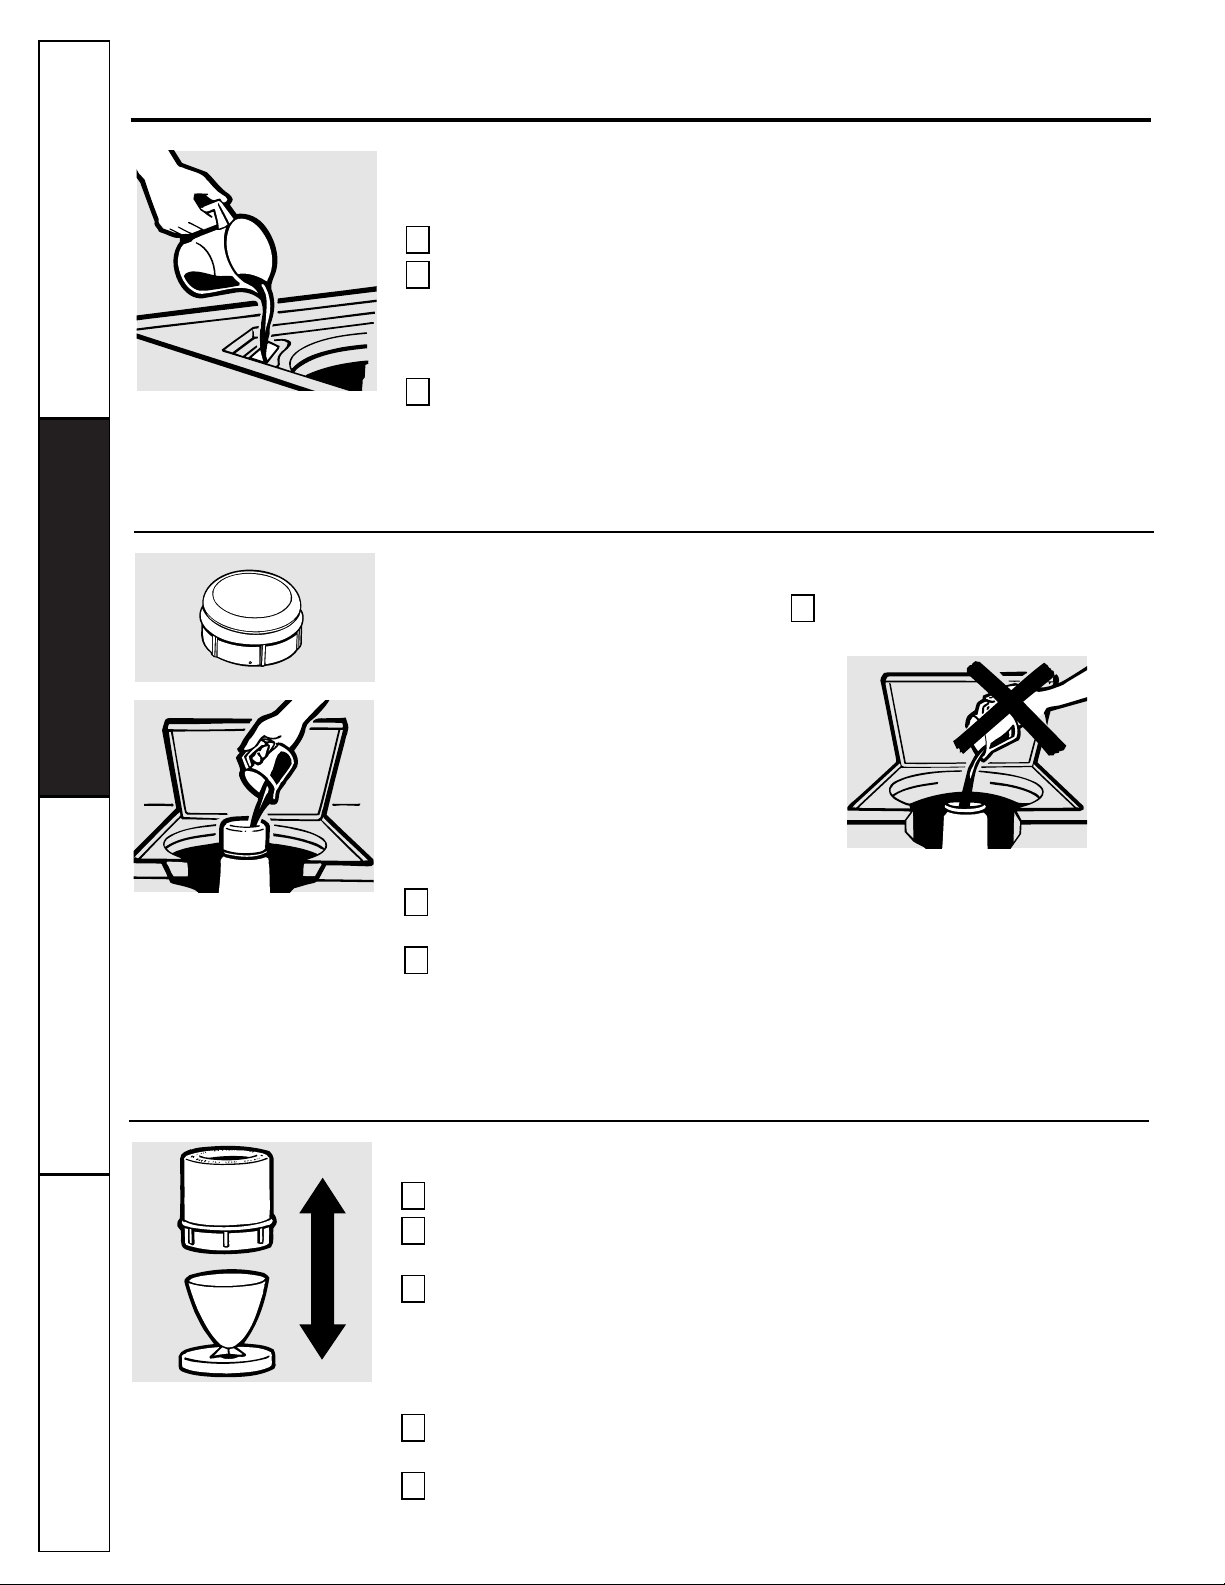
Liquid Bleach Dispenser
The dispenser dilutes liquid chlorine bleach before it reaches into your wash load.
Check clothing care labels for special instructions.
Measure liquid bleach carefully, following instructions on the bottle.
■
Never pour undiluted liquid chlorine bleach directly onto clothes or into the wash basket.
■
Do not pour powdered bleach into bleach dispenser.
Before starting the washer, pour measured amount of bleach directly into bleach
dispenser. Avoid splashing or over-filling dispenser. If you prefer to use powdered
bleach, add it into the wash basket with your detergent.
■
Do not mix chlorine bleach with ammonia or acids such as vinegar and/or rust remover. Mixing can
produce a toxic gas which may cause death.
3
2
1
Page 11
11
Loading and using the washer.
Always follow fabric manufacturer’s care label when laundering.
Customer ServiceTroubleshooting TipsOperating InstructionsSafety Instructions
Sorting Wash Loads
Proper Use of Detergent
Using too much detergent is a common cause
of laundry problems. Today’s detergents are
formulated to be effective without highly visible
sudsing. Be sure to carefully read and follow
manufacturer’s recommendations for how
much detergent to use in your wash.
You can use less detergent if you have soft water, a
smaller load, or a lightly soiled load.
Loading the Washer
Load dry items loosely, no higher than the
top row of holes in the washer basket.
When loading wet items make sure you set
the load/water level high enough to allow
the items to move freely. Water level should
just cover the clothes. To add items after
washer has started, lift the lid and submerge
additional items next to the agitator.
■
Do not wrap long items like sheets or pants
around the agitator.
■
Do not wash fabrics containing flammable
materials (waxes, cleaning fluids, etc.).
■
Agitation will not start with the lid up.
Sort by color (whites, lights, colors), soil level,
fabric type (sturdy cottons, easy care, delicates),
and whether the fabric produces lint (terry cloth,
chenille), or collects lint (velveteen, corduroy).
Page 12
12
Loading and using the washer.
Always follow fabric manufacturer’s care label when laundering.
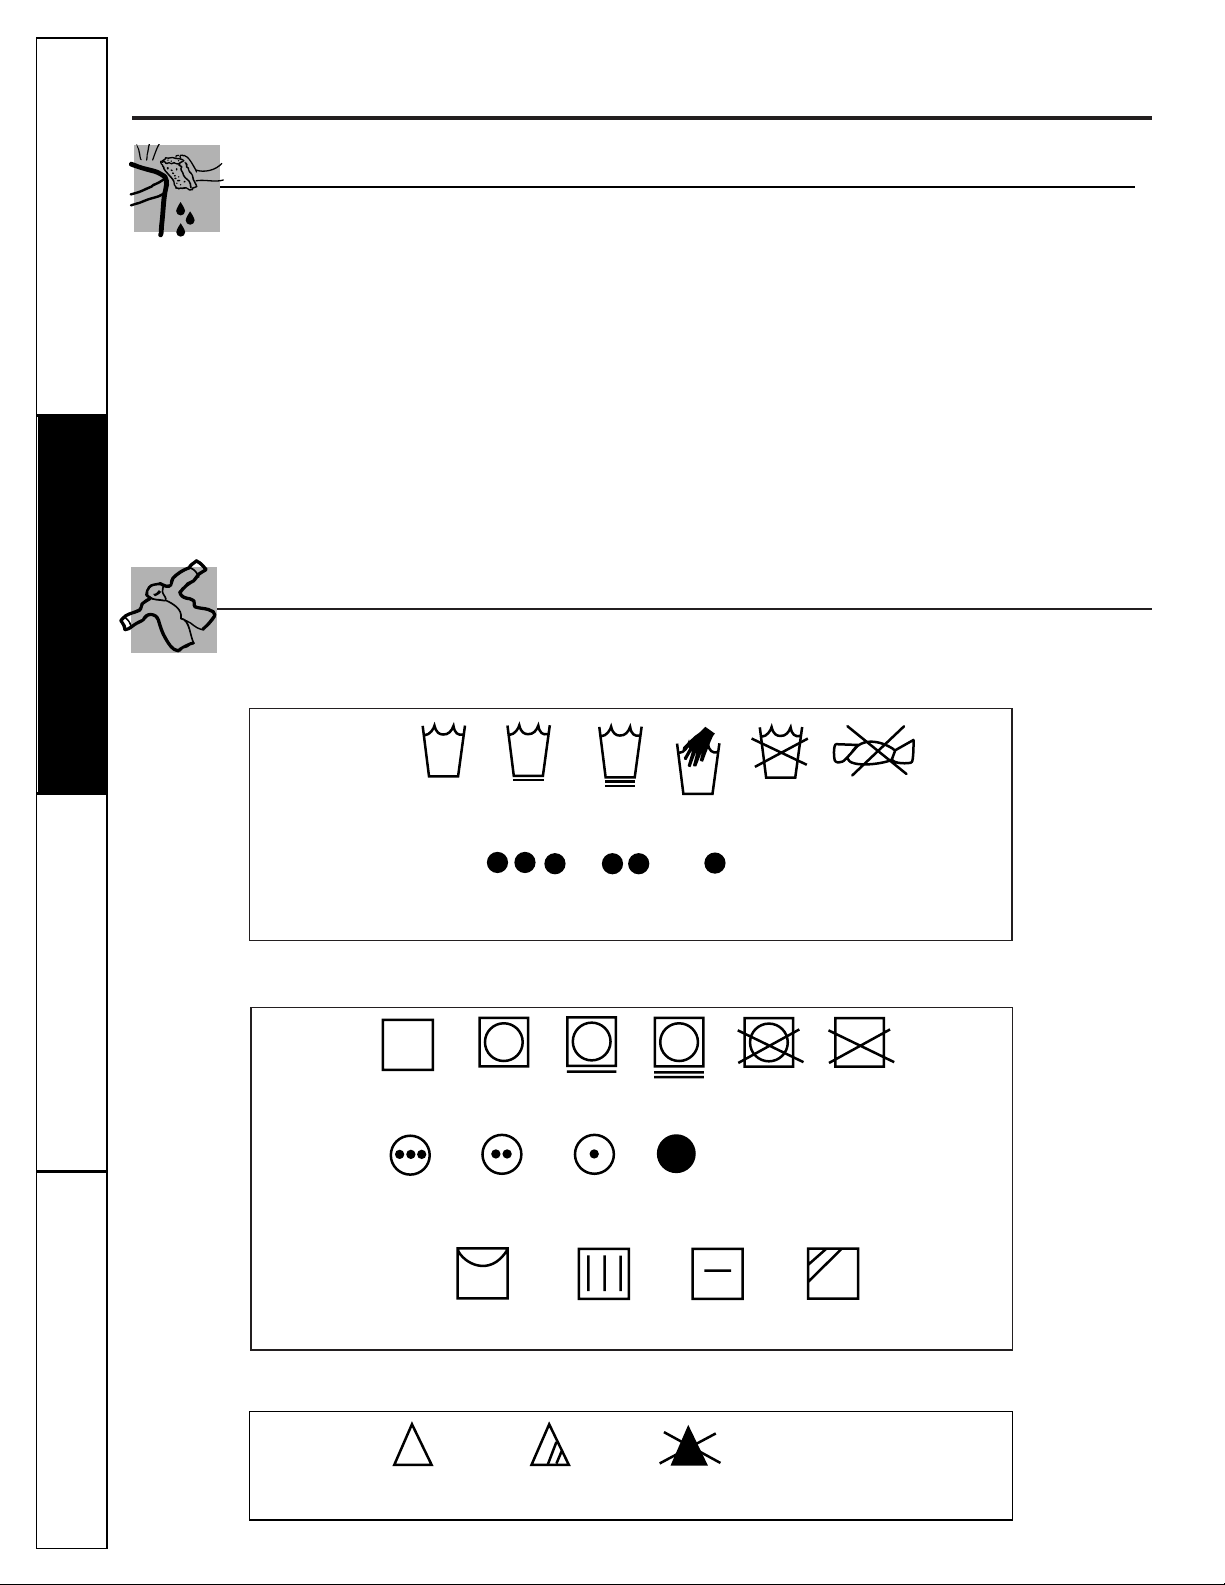
Fabric Care Labels
Machine
wash
cycle
Normal
Permanent Press/
wrinkle resistant
Gentle/
delicate
Hand wash
Do not wash Do not wring
Water
temperature
Hot
(50°C/120°F)
Warm
(40°C/105°F)
Cold/cool
(30°C/85°F)
Tumble
dry
Dry
Normal
Permanent Press/
wrinkle resistant
Gentle/
delicate
Do not tumble dry
Do not dry
(used with
do not wash)
Heat
setting
High
Medium
Low
No heat/air
Special
instructions
Line dry/
hang to dry
Drip dry
Dry flat
In the shade
Bleach
symbols
Any bleach
(when needed)
Only non-chlorine bleach
(when needed)
Do not bleach
Below are fabric care label “symbols” that affect the clothing you will be laundering.
WASH LABELS
DRY LABELS
BLEACH LABELS
Care and Cleaning of the Washer
Wash Basket:
Leave the lid open after washing to
allow moisture to evaporate. If you want to clean the
basket use a clean soft cloth dampened with liquid
detergent, then rinse. (Do not use harsh or gritty
cleaners.)
Fill Hoses:
Hoses connecting washer to faucet should
be replaced every 5 years.
Lint Filter:
The lint filter is located under the agitator.
It is self-cleaning and requires no maintenance.
Exterior:
Immediately wipe off any spills. Wipe with
damp cloth. Try not to hit surface with sharp objects.
Moving and Storage:
Ask the service technician to
remove water from drain pump and hoses. Do not
store the washer where it will be exposed to the
weather. In the
United States
call the GE Answer
Center®, 800.626.2000 for information on how to
keep the tub stationary when moving the washer.
In
Canada
write to Manager, Consumer Relations,
Camco Inc., 1 Factory Lane, Suite 310, Moncton,
N.B. E1C 9M3.
Long Vacations:
Be sure water supply is shut off at
faucets. Drain all water from hoses if weather will
be below freezing.
Operating Instructions Safety Instructions
Customer Service
Troubleshooting Tips
Page 13

Before you call for service…
Customer ServiceTroubleshooting TipsOperating InstructionsSafety Instructions
Troubleshooting Tips
Save time and money! Review the charts on the following
pages first and you may not need to call for service.
PERFECTEMP Possible Causes What To Do
PerfecTemp wash
The washer is in a cold rinse cycle • This is normal. The
PerfecTemp
feature is designed not
temperature is incorrect
to activate during a cold rinse cycle so that the coldest
water available is used.
(Review PerfecTemp
All the water in the water heater • Wait until the water in the water heater is heated to the
in the About washer
has been used correct temperature.
features section)
13
PERFORMANCE Possible Causes What To Do
Clothes too wet
Incorrect spin speed • Make sure the spin cycle selected matches the load you
selected are washing. Some fabrics will feel wetter when rinsed
with cold water.
Colored spots
Incorrect use of fabric • Check fabric softener package for instructions and follow
softener directions for using dispenser.
• Pretreat stain and rewash.
Dye transfer • Sort whites or lightly colored items from dark colors.
Grayed or yellowed
Not enough detergent • Use more detergent (especially with larger loads)
Be sure to follow detergent manufacturer’s directions.
Hard water • Use a water conditioner like Calgon brand or install
a water softener.
Water is not hot enough • Make sure water heater is delivering water at
120°F.–140°F. (48°C.–60°C.).
Washer is overloaded • Select load size to match clothes load.
Detergent is not • Add detergent as wash basket fills with water before
dissolving you load clothes.
Dye transfer • Sort clothes by color. If fabric label states
wash separately,
unstable dyes may be indicated.
Lint or residue on
Clothes are air or line dried • If you do not dry your clothes with a clothes dryer, your
clothes
clothes may retain more lint.
Incorrect sorting • Separate lint producers from lint collectors.
Washing too long • Wash small loads for a shorter time than larger loads.
Detergent not dissolving • Add detergent as wash basket fills with water, before you
load clothes.
• Try a liquid detergent.
• Use warmer water temperature.
Overloading • Load clothes no higher than the top row of holes in the
washer tub.
• Make sure load size selected matches clothes load size.
Incorrect use of fabric softener • Check fabric softener package for instructions and follow
directions for using dispenser.
clothes
Page 14

Before you call for service…
Operating Instructions Safety InstructionsCustomer Service Troubleshooting Tips
PERFORMANCE (cont.) Possible Causes What To Do
Pilling
Result of normal wear on • While this is not caused by the washer, you can slow the
poly-cotton blends and pilling process by washing garments inside out.
fuzzy fabrics
Snags, holes, tears, rips
Pins, snaps, hooks, sharp • Fasten snaps, hooks, buttons, and zippers.
or excessive wear
buttons, belt buckles,
• Remove loose items like pins, objects in pockets
zippers, and sharp objects
and sharp buttons.
left in pockets
• Turn knits (which snag easily) inside out.
Undiluted chlorine bleach • Check bleach package instructions for proper amount.
• Never add undiluted bleach to wash or allow clothes
to come in contact with undiluted bleach.
Chemicals like hair bleach • Rinse items that may have chemicals on them before
or dye, permanent wave washing.
solution
Wrinkling
Improper sorting • Avoid mixing heavy items (like work clothes) with
light items (like blouses).
• Try a fabric softener.
Overloading or • Load your washer so clothes have enough room
incorrect water level to move freely.
Incorrect wash and • Match Cycle selection to the type of fabric you are
dry cycles washing (especially for easy care loads).
Repeated washing in • Wash in warm or cold water.
water that is too hot
14
OPERATION Possible Causes What To Do
Washer pauses in cycle
The
HAND WASH
cycle was chosen • This is normal. The
HAND WASH
cycle has a short soak
period.
Washer won’t operate
Washer is unplugged • Make sure cord is plugged securely into a working outlet.
Water supply is turned off • Turn both hot and cold faucets fully on.
Controls are not set properly • Check controls.
Lid is open • Close lid.
Circuit breaker/fuse is • Check house circuit breakers/fuses. Replace fuses or
tripped/blown reset breaker. Washer should have separate outlet.
Electronics need to be reset • Unplug washer, wait 2 minutes, plug back in, and press
START.
START was not pressed • Press START.
Extremely low water pressure • Press START again.
Page 15

Customer ServiceTroubleshooting TipsOperating InstructionsSafety Instructions
WATER Possible Causes What To Do
Too many suds
Type of detergent • Switch to a lower sudsing detergent brand and follow
instructions on package.
Very soft water • Try less detergent.
Too much detergent • Measure your detergent carefully. Use less soap if you
have soft water, a smaller load, or a lightly soiled load.
Water leaks
Fill hoses or drain hose is • Make sure hose connections are tight at faucets
improperly connected and at washer.
• Make sure end of drain hose is properly connected
to washer and correctly inserted in and secured to
drain facility.
Household drain may • Check household plumbing. You may need to call a
be clogged plumber.
Constant water pressure • Tighten hoses at the faucets and turn the water off after
to the fill hoses at the each use.
water source
• Check condition of the fill hoses; they should be
replaced after 5 years.
Using too much detergent • Use less detergent. Use less soap if you have soft water, a
in washer smaller load, or a lightly soiled load.
Water temperature
Control is not set properly • Check water temperature control and adjust.
is incorrect
Water supply is turned off • Turn both hot and cold faucets fully on and make sure
or improperly connected hoses are connected to correct faucets.
Water valve screens are •
Turn off the water source and disconnect water fill
stopped up
hoses from the upper back of the washer. Use a brush or
toothpick to clean the screens in the machine. Reconnect
the hoses and turn the water back on.
House water heater is • Make sure house water heater is delivering water
not set properly at 120°F.–140°F.(48°C.–60°C.).
PerfecTemp
feature was • The lid must be closed for
PerfecTemp
to work.
not activated
Water pumped out
Lid lifted or cycle was put in • Reset cycle.
before cycle is
pause for over 24 hours
complete
Water won’t drain
Drain hose is kinked or • Straighten drain hose and make sure washer is not sitting
improperly connected on it.
• Top of drain outlet should be less than 8 ft (2.5 m)
above floor.
Water spraying during
Washer in spin cycle • Spray rinse during a spin cycle is normal.
spin cycle
Washer did not fill to
Extremely low water pressure • Press the START button again.
Inlet hoses are kinked • Straighten hoses.
Water valve screens are •
Turn off the water source and disconnect water fill
stopped up
hoses from the upper back of the washer. Use a brush or
toothpick to clean the screens in the machine. Reconnect
the hoses and turn the water back on.
Water fills and drains
Drain stand pipe is too low • Drain stand pipe must be above 30″.
at the same time
chosen level
(PerfecTemp and
START/PAUSE lights
are flashing)
15
Page 16

16
Operating Instructions Safety InstructionsCustomer Service Troubleshooting Tips
OTHER Possible Causes What To Do
Labels on the exterior
Occasionally the adhesive • Use a hair dryer set at the lowest heat setting, directing
of the washer will not
used on the labels does the air at the label for a short amount of time. This will
peel off cleanly
not release cleanly release the adhesive easily, without damaging the surface
of the washer.
NOISE Possible Causes What To Do
Washer is noisy
Washer is uneven • To level the front of the washer, adjust the front leveling
legs by rotating the individual leg in the proper direction
for up or down. To level back of washer, lift back of
machine 4″(11 cm) and set down.
Washer load is • Press PAUSE to stop the washer, open the lid and
unbalanced redistribute the load evenly. Close the lid and press
START.
Shipping rod is still assembled • To remove shipping rod from washer, pull yellow tag and
in unit attached rod from the bottom right hand side of washer.
Washer is sitting too close • Pull washer away from the wall; about 4″(11 cm)
to wall (causes knocking is needed.
during cycle)
PerfecTemp
feature • This is normal.
PerfecTemp
turns water valves off and on
is being used to adjust water temperature.
Before you call for service…
Page 17

General Electric Company
Warranty Registration Department
P.O. Box 32150
Louisville, KY 40232-2150
GE Service Protection Plus
™
GE, a name recognized worldwide for quality and dependability, offers you
Service Protection Plus
™
—comprehensive protection on all your appliances—
No Matter What Brand!
Benefits Include:
• Backed by GE
• All brands covered
• Unlimited service calls
• All parts and labor costs included
• No out-of-pocket expenses
• No hidden deductibles
• One 800 number to call
You will be completely satisfied with our service protection or you may request your money back
on the remaining value of your contract. No questions asked. It’s that simple.
Protect your refrigerator, dishwasher, washer and dryer, range, TV, VCR and much more—any brand!
Plus there’s no extra charge for emergency service and low monthly financing is available. Even icemaker
coverage and food spoilage protection is offered. You can rest easy, knowing that all your valuable
household products are protected against expensive repairs.
Place your confidence in GE and call us in the U.S. toll-free at 800-626-2224
for more information.
*All brands covered, up to 20 years old, in the continental U.S.
We’ll Cover Any Appliance.
Anywhere. Anytime.*
Please place in envelope and mail to:
✁
Cut here
17
Page 18

Consumer Product Ownership Registration
Important
Mail
Today!
First
Name
Mr. ■■ Ms. ■■ Mrs. ■■ Miss ■■
Street
Address
City
State
Date Placed
In Use
Month
Day
Year
Zip
Code
Apt. #
Last
Name
Phone
Number
_
_
Consumer Product Ownership Registration
Dear Customer:
Thank you for purchasing our product and thank you for placing your confidence in us.
We are proud to have you as a customer!
Follow these three steps to protect your new appliance investment:
Important: If you did not get a registration card with your
product, detach and return the form below to
ensure that your product is registered, or register
online at www.geappliances.com.
1
23
Model Number Serial Number
✁
Cut here
Complete and mail
your Consumer
Product Ownership
Registration today.
Have the peace of
mind of knowing we
can contact you in
the
unlikely event of
a
safety modification.
After mailing the
registration below,
store this document
in a safe place. It
contains information
you will need should
you require service.
Our service number is
800 GE CARES
(800-432-2737).
Read your Owner’s
Manual carefully.
It will help you
operate your new
appliance properly.
Model Number Serial Number
E-mail Address
Occasionally, we may allow selected companies to send you information.
■■ Check here if you do not want this information.
18
Page 19

GE Washer Warranty
All warranty service provided by our Factory Service Centers or an authorized Customer Care
®
technician. For service, in the United States, call 1-800-GE-CARES. In Canada, call 1-800-361-3400.
One Year Any part
of the washer which fails due to a defect in materials or workmanship. During this
full
From the date of the one-year warranty,
GE will also provide,
free of charge,
all labor and in-home service to replace the
original purchase
defective part.
Two Years
Any part
of the washer which fails due to a defect in materials or workmanship. During this
additional
From the date of the
one-year
limited warranty,
you will be responsible for any labor or in-home service costs.
original purchase
Five Years The suspension rod and spring assembly and electronics,
if any of these parts should fail due to a
From the date of the
defect in materials or workmanship. GE will also replace the
washer lid or cover,
if they should
original purchase
rust under operating conditions. During this
additional four-year limited warranty,
you will be
responsible for any labor or in-home service costs.
Ten Years The transmission and outer washer tub,
if any of these parts should fail due to a defect in materials
From the date of the
or workmanship. During this
additional nine-year limited warranty,
you will be responsible for any
original purchase
labor or in-home service costs.
Lifetime The washer basket,
if it should fail due to a defect in materials or workmanship. During this
lifetime
From the date of the limited warranty,
you will be responsible for any labor or in-home service costs.
original purchase
For The Period Of: We Will Replace:
This warranty is extended to the original purchaser and any succeeding owner for products purchased for home use within the USA. In Alaska, the
warranty excludes the cost of shipping or service calls to your home.
Some states do not allow the exclusion or limitation of incidental or consequential damages. This warranty gives you specific legal rights, and you
may also have other rights which vary from state to state. To know what your legal rights are, consult your local or state consumer affairs office or
your state’s Attorney General.
■ Service trips to your home to teach you how to use
the product.
■ Improper installation.
■ Failure of the product if it is abused, misused, or used for
other than the intended purpose or used commercially.
■ Replacement of house fuses or resetting of circuit
breakers.
■ Damage to the product caused by accident, fire, floods or
acts of God.
■ Incidental or consequential damage caused by possible
defects with this appliance.
What Is Not Covered (for customers in the United States):
Warrantor: General Electric Company. Louisville, KY 40225
19
Customer ServiceTroubleshooting TipsOperating InstructionsSafety Instructions
What Is Not Covered (for customers in Canada):
■ Service trips to your home to teach you how to use
the product.
Read your Owner’s Manual.
If you then have any questions
about
operating the product, please contact
your dealer
or our Consumer Relations office at:
Manager, Consumer Relations
Camco Inc.
1 Factory Lane, Suite 310
Moncton, N.B.
E1C 9M3
■ Improper installation.
If you have an installation problem, contact your
dealer or installer. You
are responsible for providing
adequate
electrical, exhausting and other connecting
facilities.
■
Replacement of house fuses or resetting
of circuit
breakers.
■ Failure of the product if it is misused, or used for
other than the intended purpose or used
commercially.
■
Damage to product caused by accident,
fire, floods or
acts of God.
WARRANTOR IS NOT RESPONSIBLE FOR CONSEQUENTIAL DAMAGES.
Warrantor: CAMCO INC.
Page 20

20
Félicitations!
Désormais vous faites partie de la famille GE.
Un partenariat de service.
Mesures de sécurité . . . . . .21
Autour de votre laveuse . . . .21
Lorsque la laveuse n’est
pas utilisée . . . . . . . . . . . . . . . .21
Une installation adéquate . .21
Lorsque vous utilisez
la laveuse . . . . . . . . . . . . . . . . .21
Sécurité du
chauffe-eau . . . . . . . . . . . . . . .21
Directives de fonctionnement
Chargement et utilisation
de la laveuse . . . . . . . . . . .29, 30
Cycles à utiliser pour le soin des
vêtements . . . . . . . . . . . . .24, 25
Cycles en option . . . . . . . . . . .27
Les caractéristiques . . . . . . . .28
Particularités des
commandes . . . . . . . . . . . . . . .26
Sélections One Touch
(commande unique) . . . . . .23
Statut des cycles . . . . . . . . . . .27
Tableaux de
commande . . . . . . . . . . . . . . .22
Conseils de dépannage
Avant d’appeler
un réparateur . . . . . . . . . .31–34
Service à la clientèle
Garantie . . . . . . . . . . . . . . . . . .36
GE Answer Center
Numéro 800 . . . . . . . . . . . . . .37
Numéros de
service . . . . . . . . . . . . . . . . . . . .37
À CONSERVER SOIGNEUSEMENT
Transcrivez les numéros de modèle et de série ici.
N
o
N
o
Vous les trouverez derrière le tableau de commande.
IMPORTANT!
Agrafez ici votre facture ou une copie de votre chèque.
Pour bénéficier de réparations sous garantie, il faut fournir une preuve
de la date d’achat d’origine.
Fonctionnement Mesures de sécuritéService à la clientèle Conseils de dépannage
Vous y trouverez de nombreux conseils pour l’utilisation et l’entretien
de votre laveuse. Ces quelques mesures préventives vous permettront
d’économiser du temps et de l’argent, et, ainsi, de prolonger la vie de
votre laveuse.
LISEZ VOTRE MANUEL
SI VOUS AVEZ BESOIN DE SERVICE
Vous trouverez des solutions aux problèmes courants que vous pourriez
rencontrer dans la section
Avant d’appeler un réparateur
. Et, en consultant
d’abord nos
Conseils de dépannage
, vous pourrez peut-être éviter de faire
appel à un réparateur.
Si vous avez besoin de service, vous savez que vous n’avez qu’à nous
téléphoner. Vous trouverez à la fin du présent manuel les numéros
sans frais du service à la clientèle.
Page 21

CONSERVEZ CES DIRECTIVES
21
■Installez ou entreposez la laveuse à l’abri des
températures inférieures au point de congélation et
des intempéries.
■Retirez la pellicule de protection en couleur du
tableau de commande.
■Mettez la laveuse à la terre conformément à tous les
codes et règlements en vigueur. Consultez les
Directives d’installation.
MESURES DE SÉCURITÉ IMPORTANTES.
LISEZ D’ABORD TOUTES LES DIRECTIVES.
MISE EN GARDE!
Pour votre sécurité, suivez les directives fournies dans le présent manuel afin de
minimiser les risques d’incendie, d’explosion et de chocs électriques et prévenir
des dégâts matériels et des blessures graves ou mortelles.
SÉCURITÉ DU CHAUFFE-EAU
Dans certaines circonstances, de l’hydrogène peut se former
dans le chauffe-eau s’il n’a pas été utilisé pendant deux
semaines ou plus. L’hydrogène peut être explosif dans ces
conditions.
Si l’eau chaude n’a pas été utilisée depuis deux semaines
ou plus, réduisez les risques de dommages ou de blessures
en ouvrant tous les robinets d’eau chaude et en laissant
couler l’eau pendant plusieurs minutes avant d’utiliser
un appareil électrique raccordé au système d’eau
chaude. L’hydrogène sera ainsi libéré dans
l’atmosphère. Comme c’est un gaz inflammable, ne
fumez pas ou n’utilisez pas une flamme nue ou un
appareil ménager au cours de ce processus.
UNE INSTALLATION ADÉQUATE
La laveuse doit être correctement installée et positionnée conformément aux directives d’installation avant son utilisation.
Si vous n’avez pas la page contenant les directives d’installation, vous pouvez l’obtenir en visitant notre page Web à
« www.geappliances.com ».
Service à la clientèleConseils de dépannage
FonctionnementMesures de sécurité
■Évitez toute accumulation de matériaux combustibles
(charpie, papiers, chiffons, produits chimiques, etc.) à
proximité de vos électroménagers.
■Il faut exercer une étroite surveillance lorsque
l’appareil fonctionne en présence d’enfants. Ne les
laissez pas jouer sur, avec ou à l’intérieur de cet
appareil ni d’aucun autre électroménager.
AUTOUR DE VOTRE LAVEUSE
■Ne mettez jamais la main dans
la laveuse pendant
qu’elle
fonctionne. Attendez que l’appareil se soit
complètement arrêté avant d’ouvrir le couvercle.
■
Ne mélangez pas de javellisant
avec de l’ammoniaque
ou des acides (vinaigre ou décapant pour la rouille).
Ce mélange peut produire un gaz toxique et mortel.
■Ne lavez pas et ne séchez pas des articles qui ont été
lavés ou trempés dans des produits combustibles ou
explosifs
(cire, huile, peinture, essence,
dégraissants,
solvants de nettoyage à sec, kérosène, etc.). Ne versez
pas ces substances dans l’eau de lavage. N’utilisez pas
ces substances à proximité de votre laveuse ou
sécheuse pendant qu’elle fonctionne.
■La lessive peut atténuer les propriétés ignifugeantes
des tissus. Pour éviter cette situation, suivez les
directives données par le fabricant du vêtement.
■ Pour réduire les risques de
chocs électriques,
débranchez
toujours l’appareil ou débranchez la
laveuse au panneau de distribution en enlevant le
fusible ou en déclenchant le disjoncteur avant de la
réparer ou de la nettoyer.
REMARQUE :
L’enfoncement
du bouton PAUSE (pause) ou STOP/CANCEL
(arrêt/annulation ) ne débranche
PAS
l’appareil de la
source d’alimentation.
■N’essayez jamais de faire fonctionner
l’appareil s’il est
endommagé,
défectueux, partiellement démonté, si
des pièces sont manquantes ou défectueuses
ou si le
cordon d’alimentation
ou la fiche est endommagé.
LORSQUE VOUS UTILISEZ LA LAVEUSE
■Fermez les robinets afin d’alléger la pression de l’eau
dans les tuyaux et soupapes et pour minimiser toute
fuite en cas de bris ou de rupture. Vérifiez l’état des
tuyaux de remplissage qui devraient être remplacés
après 5 ans d’utilisation.
■
Avant de jeter ou d’entreposer
une laveuse, enlevez le
couvercle de l’appareil afin d’empêcher les enfants de
se cacher à l’intérieur.
■Ne réparez et ne remplacez aucune pièce de cet
appareil, à moins que cela soit spécifiquement
recommandé dans le présent manuel ou dans des
directives de réparation que vous comprenez et que
vous êtes en mesure de suivre.
■Ne trafiquez pas les commandes de l’appareil.
LORSQUE LA LAVEUSE N’EST PAS UTILISÉE
VEUILLEZ LIRE ET SUIVRE ATTENTIVEMENT CES MESURES DE SÉCURITÉ.
N’utilisez
cet
appareil
que pour
l’usage
auquel il
est destiné,
comme
expliqué
dans le
présent
manuel.
Page 22

Tableau de commande de la laveuse.
Vous pouvez trouver le no du modèle de la laveuse à l’arrière de la partie supérieure du tableau de commande.
Modèle WPSE7003
Modèle WPSE7002
Guide de démarrage rapide
O
NE TOUCH
WHITES
HOT
PRESOAK
QUICK
RINSE
WASHSOAK
PerfecTemp
M
DRAIN
& SPIN
CUSTOM CUSTOM
PRESS 3 SEC TO STORE
12
COLORS
WARM
DARK
COLORS
COLD
EASY CARE
PERM PRESS
HAND
WASH
SPEED
WASH
ONE TOUCH
Clothes Care Cycles
S
TART
PAUSE
• Ajoutez le détersif
• Ajoutez l’assouplissant
de tissus dilué
• Ajoutez les vêtements
• Choisissez le cycle
de lavage
• Vérifiez la taille de
la brassée
• Fermez le couvercle
• Appuyez sur le
bouton
START
22
Votre nouvelle laveuse facilite le début de votre brassée grâce aux cycles
ONET
OUCH
(commande unique) faciles. Ne
faites qu’une seule sélection et les fonctions
LOAD SIZE
(taille de la brassée),
SOIL LEVEL
(degré de souillure),
WASH/RINSE TEMPERATURE
(température de lavage/rinçage) et
WASH/SPIN SPEED
(vitesse de lavage/essorage)
sont automatiquement réglées. Il ne vous suffit ensuite que d’appuyer sur le bouton
START
(mise en marche).
Cycles ONET
OUCH
(commande unique) faciles.
Fonctionnement
Mesures de sécuritéService à la clientèle Conseils de dépannage
ONE TOUCH
WHITES
HOT
COLORS
WARM
DARK
COLORS
COLD
WHITES
HOT
COLORS
WARM
DARK
COLORS
COLD
Clothes Care Cycles
EASY CARE
PERM PRESS
HAND
WASH
SPEED
WASH
PerfecTemp
ONE TOUCH
Clothes Care Cycles
EASY CARE
PERM PRESS
HAND
WASH
SPEED
WASH
PerfecTemp
PRESOAK
QUICK
DRAIN
RINSE
& SPIN
CUSTOM CUSTOM
12
PRESS 3 SEC TO STORE
PRESOAK
QUICK
DRAIN
RINSE
& SPIN
LOAD
SIZE
SUPER
LARGE
C
YCLE STATUS
NORMAL
C
YCLE STATUS
NORMAL
MEDIUM
SMALL LIGHT
LOAD
SIZE
SUPER
LARGE
MEDIUM
SMALL LIGHT
SOIL
LEVEL
STAIN
WASH
HEAVY
SOIL
LEVEL
EXTRA
HEAVY
HEAVY
TEMP
WASH/RINSE
HOT
COLD
WARM
WARM
WARM
COLD
COLD
COLD
TEMP
WASH/RINSE
HOT
COLD
WARM
WARM
WARM
COLD
COLD
COLD
SPEED
WASH/SPIN
NORMAL
FAST
NORMAL
SLOW
GENTLE
FAST
GENTLE
SLOW
SPEED
WASH/SPIN
NORMAL
FAST
NORMAL
SLOW
GENTLE
FAST
GENTLE
SLOW
OPTIONS
BEEPER
2ND
RINSE
EXTEND
SPIN
DELAY
1-8 Hrs.
FINAL SPINAUTO BALANCE2ND RINSERINSEWASHSOAK
OPTIONS
BEEPER
2ND
RINSE
EXTEND
SPIN
FINAL SPINAUTO BALANCE2ND RINSERINSEWASHSOAK
S
TART
PAUSE
S
TOP
CANCEL
EST. TIME REMAINING
S
TART
PAUSE
S
TOP
CANCEL
EST. TIME REMAINING
Page 23

23
Appuyer sur... Sélectionne automatiquement... Puis appuyez sur...
Il vous est possible de changer les réglages automatiques en appuyant tout simplement sur
la commande correspondante.
Sélections ONET
OUCH
(commande unique).
Changement des réglages automatiques.
Pour vêtements légèrement ou très souillés, linge
de maison, vêtements de travail et de loisir.
Pour vêtements légèrement ou très souillés, linge
de maison, vêtements de travail et de loisir.
Pour les tissus en coton et à fibres mélangées qui
ne sont pas grand teint et ceux pour lesquels le
fabricant recommande un lavage à l’eau froide.
Pour tricots et vêtements sans plis et à pressage
permanent.
Pour la lingerie et articles libellés lavables à la
main légèrement souillés. Assure par période
l’agitation et le trempage au cours du cycle de
lavage et de rinçage.
Pour articles légèrement souillés dont on a
besoin rapidement. La durée du cycle d’environ
15 minutes est fonction de la pression d’eau de
votre circuit d’alimentation.
Service à la clientèleConseils de dépannage
Fonctionnement
Mesures de sécurité
LOAD
SIZE
WHITES
HOT
COLORS
WARM
DARK
LARGE
LARGE
LARGE
SOIL
LEVEL
NORMAL
NORMAL
NORMAL
COLORS
COLD
TEMP
WASH/RINSE
HOT
COLD
WARM
COLD
COLD
COLD
SPEED
WASH/SPIN
NORMAL
FAST
NORMAL
FAST
NORMAL
FAST
S
TART
PAUSE
S
TART
PAUSE
S
TART
PAUSE
EASY CARE
PERM PRESS
HAND
WASH
SPEED
WASH
MEDIUM
SMALL
SMALL
NORMAL
LIGHT
LIGHT
WARM
COLD
COLD
COLD
WARM
WARM
GENTLE
FAST
GENTLE
SLOW
NORMAL
FAST
S
TART
PAUSE
S
TART
PAUSE
S
TART
PAUSE
Page 24

Cycles à utiliser pour le soin des vêtements.
24
PRESOAK (pré-trempage)
Pour prétremper une brassée et passer directement sur le cycle de lavage :
Sélectionnez le cycle de lavage, appuyez sur la commande
PRESOAK
et puis appuyer
sur la commande
START/PAUSE
(mise en marche/pause).
■ Commence par une agitation de 15 minutes suivie d’un trempage de 12 minutes
puis active le cycle de lavage sélectionné.
■ Utilise la vitesse et la température d’eau correspondantes au cycle de
lavage sélectionné.
Pour prétremper une brassée pendant plus de 12 minutes :
Appuyez sur la commande
PRESOAK
. La laveuse se remplit et les réglages
automatiques suivants sont sélectionnés :
■ Une agitation de trois minutes est suivie d’un maximum de 24 heures de trempage.
■ Pour faire un trempage inférieur à 24 heures, appuyez sur la commande
DRAIN &
SPIN
(vidange et essorage) ou choisissez un cycle de lavage.
PRESOAK
QUICK RINSE (rinçage rapide)
Utilisez cette fonction pour rincer rapidement la chlore, la transpiration, les tâches,
etc des vêtements.
■ La laveuse se remplit, l’agitateur fonctionne pendant trois minutes, la laveuse se
vide et l’essorage se déclenche.
QUICK
RINSE
Réglages automatiques de la fonction QUICK RINSE :
STAIN WASH (Lavage des tâches) (sur certains modèles)
Pour articles sérieusement souillés ou tâchés. Ajoute un cycle supplémentaire
d’agitation et de trempage au début du cycle de lavage.
SOIL
LEVEL
STAIN
WASH
Fonctionnement Mesures de sécuritéService à la clientèle Conseils de dépannage
LOAD
SIZE
LARGE
WASH/RINSE
TEMP
WARM
WARM
SPEED
WASH/SPIN
NORMAL
FAST
LOAD
SIZE
MEDIUM
TEMP
WASH/RINSE
COLD
COLD
SPEED
WASH/SPIN
GENTLE
FAST
Page 25

25
CUSTOM 1 et CUSTOM 2 (réglage personnalisé 1 et 2)
(sur certains modèles)
Programmez vos combinaisons favorites des réglages disponibles et les sauvegarder pour
rappel au moyen d’une commande unique. Ces réglages personnels ne peuvent être
effectués si un cycle est en cours.
Pour mettre en mémoire une combinaison de réglages personnels :
1. Sélectionnez un réglage
ONET
OUCH
(commande unique).
2. Changez les réglages
LOAD SIZE
(taille de la brassée),
SOIL LEVEL
(niveau de
souillures),
TEMPERATURE
(température), ou
SPEED
(vitesse) en fonction
de vos besoins.
3. Choisissez n’importe quelles
OPTIONS
(options) que vous désirez.
4. Appuyez et maintenez enfoncée la commande
CUSTOM 1
(réglage personnalisé 1)
ou
CUSTOM 2
(réglage personnalisé 2) jusqu’à ce que la laveuse fasse entendre un bip
signalant que votre sélection a été mise en mémoire.
Pour rappeler une combinaison mise en mémoire :
Appuyez sur la commande
CUSTOM 1
ou
CUSTOM 2
puis appuyer sur le bouton
START/PAUSE
(mise en marche/pause).
REMARQUE :
La fonction
DELAY 1-8 HRS.
(délai 1 à 8 heures) ne peut être utilisée pour les
réglages
CUSTOM 1
et
CUSTOM 2
.
Pour reprogrammer les réglages Custom (réglage personnalisé):
Répétez les étapes 1 à 4 ci-dessus.
CUSTOM CUSTOM
PRESS 3 SEC TO STORE
12
DRAIN
& SPIN
DRAIN & SPIN (vidange et rinçage)
Vous pouvez utiliser la fonction
DRAIN & SPIN
en tout temps sur n’importe quel cycle.
Réglage automatique DRAIN & SPIN :
Service à la clientèleConseils de dépannageFonctionnementMesures de sécurité
SPEED
WASH/SPIN
GENTLE
FAST
Page 26

Particularités des commandes.
26
START/PAUSE (mise en marche/pause)
■ Après la sélection d’un nouveau cycle, appuyez une fois pour activer ce cycle.
■ Appuyez deux fois pour sélectionner le dernier cycle utilisé et démarrer la laveuse.
■ Si la laveuse est en cours de fonctionnement, appuyez une fois pour interrompre le
cycle; appuyez de nouveau pour continuer le cycle.
S
TART
PAUSE
STOP/CANCEL (arrêt/annulation)
N’utilisez pas
cette commande pour interrompre un cycle.
Le fait d’appuyer sur cette commande annule les réglages courants qui seront perdus.
S
TOP
CANCEL
Estimated Time Remaining (temps restant estimé)
■ Affiche le temps approximatif restant jusqu’à la fin du cycle.
■ Si le temps restant estimé est supérieur à 60 minutes, les lettres “1H” clignoteront
dans la fenêtre d’affichage. Ceci est suivi par le nombre de minutes restant.
Lorsque le temps restant est inférieur à 60 minutes, la minuterie effectuera
un compte à rebours.
■ Le temps du cycle dépend du temps nécessaire au remplissage de la laveuse,
lequel est fonction de la pression d’eau existante à votre domicile. La minuterie
intelligente apprend quelle est la valeur du temps nécessité pour le remplissage
de votre laveuse et recale le temps total en conséquence.
REMARQUE :
Si la fonction
PRESOAK
(pré-trempage) est sélectionnée et qu’un cycle de
lavage consécutif n’est pas choisi, deux tirets apparaîtront dans la fenêtre d’affichage.
E
ST. TIME REMAINING
Spot Spray (aspersion des taches)
Lorsque vous ouvrez le couvercle de la laveuse et appuyez sur le bouton
SPOT SPRAY
(aspersion des taches), vous remarquerez un petit jet d’eau.
Ouvrez le couvercle de la laveuse.
Appuyez sur le bouton
SPOT SPRAY
. (Vous remarquerez un petit jet d’eau.)
Mouillez les parties tachées du vêtement avec l’eau du
SPOT SPRAY
et frottez la partie
tachée du vêtement avec un peu de votre produit préféré de prétraitement.
REMARQUE :
L’option
SPOT SPRAY
ne peut pas fonctionner si :
■
le couvercle est fermé
■
la cuve est en train de se remplir
■
l’eau a déjà atteint le niveau que vous avez choisi.
3
2
1
Fonctionnement Mesures de sécuritéService à la clientèle Conseils de dépannage
Page 27

27
Cycles en option.
BEEPER (Avertisseur sonore)
Vous avertit lorsque le cycle est terminé.
Vous pouvez arrêter l’avertisseur sonore de fin de cycle en appuyant sur cette
commande.
BEEPER
2ND RINSE (2ème rinçage)
Ajoute un second rinçage à un cycle.
2ND
RINSE
EXTEND SPIN (essorage allongé)
Allonge le dernier rinçage d’un cycle de lavage. Ceci extrait davantage d’eau de vos
vêtements. Lorsque vous utilisez cette option, les vêtements seront plus secs.
EXTEND
SPIN
DELAY 1-8 HOURS (délai 1 à 8 heures) (sur certains modèles)
Fonction utilisée pour retarder le démarrage de votre laveuse pendant une durée
comprise entre 1 et 8 heures. D’abord, choisissez le cycle de lavage et toute option
désirée, puis appuyez sur cette commande pour obtenir le nombre d’heures pour
lesquelles vous voulez retarder le cycle. Appuyez sur le bouton
START/PAUSE
(mise
en marche/pause) pour commencer le compte à rebours.
Le temps du compte à rebours sera indiqué dans la fenêtre d’affichage
Est Time Remaining
(temps restant estimé).
DELAY
1-8 Hrs.
Auto Balance (Équilibrage automatique)
La laveuse détecte la répartition du chargement de linge pour assurer
un essorage équilibré.
PerfecTemp
Statut des cycles.
Ces voyants indicateurs du statut des cycles indiquent dans quel cycle la laveuse fonctionne.
PerfecTemp (température optimale)
PerfecTemp
détecte la température de l’arrivée d’eau et l’ajuste pour l’eau de
remplissage.
Pour que
PerfecTemp
fonctionne, le couvercle de la laveuse doit être fermée.
Si l’eau est trop froide, le détersif ne se dissout pas correctement et les vêtements
risquent de ne pas être correctement lavés. Si l’eau est trop chaude, les tissus
peuvent être endommagés.
PerfecTemp
ajuste ces extrêmes de température afin d’obtenir le meilleur lavage.
Il est possible que vous entendiez les clapets d’admission d’eau s’ouvrir et se fermer
alternativement au cours du réglage de température. Ceci est normal.
AUTO BALANCE
Service à la clientèleConseils de dépannageFonctionnementMesures de sécurité
PerfecTemp
FINAL SPINAUTO BALANCE2ND RINSERINSEWASHSOAK
Page 28

28
Distributeur d’Eau de Javel
Le distributeur dilue l’Eau de Javel avant que le produit n’atteigne votre charge de linge.
Vérifiez l’étiquette apposée sur le vêtement pour instructions particulières.
Mesurez la quantité d’Eau de Javel avec précaution et suivez les instructions imprimées
sur le contenant.
■
Ne versez jamais d’Eau de Javel non diluée directement sur les vêtements ou dans le panier de lavage.
■
Ne mettez pas un produit de blanchiment en poudre dans le distributeur.
Avant de démarrer la laveuse, versez une quantité mesurée d’Eau de Javel directement
dans le distributeur. Évitez de faire des éclaboussements ou de remplir le distributeur
excessivement. Si vous préférez utiliser un agent de blanchiment en poudre, ajoutez-le
dans le panier de lavage avec le détersif.
■
Ne mélangez pas l’Eau de Javel avec de l’ammoniaque ou des acides, par exemple le vinaigre
et/ou un produit enlevant la rouille. Le mélange peut causer la production de gaz toxiques
risquant d’être mortels.
3
2
1
Capuchon de l’agitateur ou distributeur d’assouplissant de tissus
Le capuchon de l’agitateur
se place à la
partie supérieure de l’agitateur. S’il quitte
son logement accidentellement, il suffit
simplement de le remettre en place.
Le distributeur d’assouplissant de tissus
libère automatiquement le liquide
assouplissant au moment opportun
au cours du cycle.
N’arrêtez pas la laveuse pendant le premier
essorage. Cette manoeuvre entraînerait le
distributeur à se vider trop tôt.
Pour l’utilisation, suivre les étapes suivantes :
Assurez-vous que le distributeur est
bien fixé à l’agitateur.
N’utilisez que de l’assouplissant de
tissus liquide. Verser le liquide dans
le distributeur, la quantité étant
recommandée sur le contenant.
Ne versez jamais l’assouplissant
directement sur les vêtements.
Ceci pourrait causer des tâches.
Ajoutez de l’eau au distributeur jusqu’à
ce que celle-ci atteigne la ligne de
repère de remplissage maximal.
3
2
1
Ne versez rien dans l’agitateur si le
capuchon de celui-ci ou si l’agitateur
est retiré.
Nettoyage du distributeur d’assouplissant de tissus
Retirez le distributeur de la partie supérieure de l’agitateur.
Séparez le contenant du distributeur du couvercle en tenant la partie supérieure
et en le poussant avec les doigts vers le bas dans la partie intérieure du contenant.
Le contenant du distributeur se dégagera du couvercle.
Pour nettoyer le distributeur, faites tremper son contenant et son couvercle dans la
solution suivante :
■
3,8 litres (1 gallon US) d’eau chaude
■
60ml (1/4 de tasse) de liquide détersif fort
■
240ml (1 tasse) d’Eau de Javel
Si nécessaire, essuyez toute accumulation à l’aide d’un chiffon doux et propre après
le trempage N’utilisez pas de brosse dure; vous pourriez endommager la surface du
distributeur.
Rincez et réassemblez le distributeur. Replacez-le sur l’agitateur.
5
4
3
2
1
Séparez pour laver.
Les caractéristiques de la laveuse.
Fonctionnement Mesures de sécuritéService à la clientèle Conseils de dépannage
Page 29

29
Chargement et utilisation de la laveuse.
Lors de la lessive, observez toujours les directives données sur l’étiquette d’entretien du vêtement.
Tri du linge
Utilisation correcte du détersif
L’utilisation de trop de détersif cause souvent des
problèmes de lavage. Les détersifs modernes sont
conçus pour être efficaces sans beaucoup de
mousse visible. Assurez-vous de lire avec soins et de
suivre les recommandations du fabricants sur la
quantité de détersif à utiliser.
Vous pouvez utiliser moins de détersif si votre eau
est douce, si votre brassée est petite ou si votre linge
est légèrement sale.
Chargement de la laveuse
Ajouter les articles secs en vous assurant que les
vêtements ne sont pas entassés et que leur niveau
ne dépasse pas celui de la rangée supérieure de
trous de la cuve. Lorsque vous placez dans la laveuse
des articles mouillés, assurez-vous que le niveau
d’eau est suffisamment élevé pour permettre aux
articles de bouger librement. Le niveau d’eau doit
être suffisant pour couvrir les vêtements. Pour
ajouter des articles après que la laveuse a été mise
en marche, soulevez le couvercle et immergez les
articles près de l’agitateur.
■
N’enroulez pas les articles de grande dimension,
comme les draps ou les pantalons, autour de
l’agitateur.
■
Ne lavez pas de tissus imbibés de substances
inflammables (cire, liquides de nettoyage, etc.)
dans votre laveuse.
■
La laveuse ne se mettra pas en marche si le
couvercle n’est pas fermé.
Triez le linge par couleurs (blanc, couleur pale,
linge de couleur), niveau de souillures, type du tissu
(coton rigide, tissus délicats). Vérifiez si le tissu
produit de la charpie (tissu-éponge, chenille) et s’il
amasse de la charpie (velvet, velours, velours
côtelé).
Service à la clientèleConseils de dépannageFonctionnementMesures de sécurité
Page 30

30
Chargement et utilisation de la laveuse.
Lors de la lessive, observez toujours les directives données sur l’étiquette d’entretien du vêtement.
Entretien et nettoyage de votre laveuse
Panier :
Après la lessive, laissez le couvercle ouvert
pour permettre à l’humidité de s’évaporer. Si vous
désirez nettoyer le panier, utilisez un linge doux et
propre imbibé de détergent liquide, puis rincez.
(N’utilisez pas de produits nettoyants abrasifs.)
Boyaux de remplissage :
Remplacez tous les cinq ans
les boyaux reliant la laveuse aux robinets.
Filtre à charpie :
Il est auto nettoyant, n’exige
pratiquement aucun entretien, et se trouve audessous de l’agitateur.
Extérieur :
Essuyez immédiatement tout produit
renversé avec un linge humide. Évitez de frapper la
surface avec des objets tranchants.
Entreposage et déménagement :
Demandez à un
réparateur de vidanger l’eau de la pompe et des
boyaux. Entreposez la laveuse à l’abri des
intempéries.
Aux États-Unis,
appelez au GE Answer
Center®, 800.626.2000, pour des renseignements
sur la façon garder stationnaire le panier lorsque
vous déménagez la laveuse.
Au Canada,
écrivez au :
Directeur, Relations avec les consommateurs,
Camco Inc., 1 Factory Lane, Bureau 310, Moncton,
N.B. E1C 9M3.
Vacances prolongées :
Coupez l’alimentation en
eau aux robinets. Vidangez l’eau des boyaux si la
température risque de descendre sous le point de
congélation.
Étiquettes d’entretien des tissus
Programme
de
lavage
Normal
Tissus sans repassage/
résistants aux plis
Doux/
délicat
Lavage à
la main
Ne pas laver Ne pas essorer
Température
de l'eau
Chaude
(50°C/120°F)
Tiède
(40°C/105°F)
Froide/fraîche
(30°C/85°F)
Séchage
par
culbutage
Sécher
Normal
Tissus sans repassage/
résistants aux plis
Doux/
délicat
Séchage par
culbutage interdit
Ne pas sécher
(en combinaison
avec ne pas laver)
Réglage
de la
chaleur
Haute
Moyenne
Basse
Sans chaleur/air
Directives
spéciales
Séchage sur corde/
pendre pour sécher
Laisser égoutter
Séchage à plat
Séchage à l'ombre
Symboles
d'eau de
Javel
Toutes les eaux
de Javel (si nécessaire)
Eaux de Javel sans
chlore (si nécessaire)
Eau de Javel interdite
ÉTIQUETTES POUR LE LAVAGE
ÉTIQUETTES POUR LE SÉCHAGE
ÉTIQUETTES POUR L’EAU DE JAVEL
Les “symboles” ci-dessous se trouvent sur les étiquettes d’entretien et ont un effet sur le lavage de vos vêtements.
Fonctionnement Mesures de sécuritéService à la clientèle Conseils de dépannage
Page 31

31
Avant d’appeler un réparateur…
Conseils de dépannage—Économisez du temps et de l’argent!
Consultez d’abord les tableaux qui suivent et vous pourrez
peut-être éviter de faire appel à un réparateur.
RENDEMENT Causes possibles Correctifs
Vêtements trop
Choix d’un programme • Vérifiez si le programme choisi correspond à la brassée que vous
mouillés
incorrect lavez. Certains tissus sembleront plus mouillés lorsque rincés à
l’eau froide.
Taches de couleur
Utilisation incorrecte de • Vérifiez les directives sur la bouteille d’assouplissant et suivez les
l’assouplissant directives pour l’utilisation du distributeur.
• Prétraitez la tache et relavez l’article.
Transfert de couleur • Séparez les articles blancs et de couleur pâle des vêtements de
couleur foncée.
Vêtements grisâtres
Quantité insuffisante • Utilisez plus de détersif (surtout pour les grosses brassées).
ou jaunis
de détersif Assurez-vous de suivre les instructions du fabricant.
Eau dure • Utilisez un adoucisseur, comme celui de marque Calgon, ou
installez un adoucisseur d’eau.
Eau pas assez droude • Assurez-vous que la température de l’eau de votre chauffe-eau
varie entre 120 °F et 140 °F (48 °C et 60 °C).
Surcharge • Réglez le type de brassée en fonction de votre brassée.
Détersif non dissout • Versez le détersif lorsque la laveuse se remplit d’eau, avant d’y
mettre les vêtements.
Transfert de couleur
• Triez votre linge par couleur. Si l’étiquette de votre vêtement
indique
laver séparément,
il est possible que celui-ci ne soit pas
bon teint.
Charpie ou résidus
Les vêtements sont séchés à
• Lorsque vous ne le faites pas sécher dans une sécheuse, votre linge
sur les vêtements
l’air ou sur la corde à linge
peut retenir plus de charpie.
Tri incorrect
• Séparez les tissus qui produisent de la charpie de ceux qui
la recueillent.
Lavage trop long
•
Pour les petites brassées réglez un lavage plus court que pour les grosses.
Détersif non dissout • Ajoutez le détersif pendant que le panier se remplit d’eau et
avant d’ajouter les vêtements.
• Essayez un détersif liquide.
• Utilisez de l’eau plus chaude.
Surcharge • Le niveau des vêtements ne doit pas dépasser celui de la rangée
supérieure de trous de la cuve.
•
Réglez le sélecteur de type de brassée en fonction de votre brassée.
Utilisation incorrecte de • Vérifiez les directives sur la bouteille d’assouplissant et suivez les
l’assouplissant directives pour l’utilisation du distributeur.
Service à la clientèleConseils de dépannageFonctionnementMesures de sécurité
PERFECTEMP Causes possibles Correctifs
La température de
La laveuse est dans un • C’est normal. Le
PerfecTemp
est programmée pour ne
lavage du PerfecTemp
programme de rinçage à pas se mettre en marche pendant un rinçage à l’eau
est incorrecte
l’eau froide froide, afin d’avoir l’eau la plus froide disponible.
(Voir PerfecTemp
Toute l’eau du chauffe-eau • Attendez que le chauffe-eau soit à la bonne température.
dans
la section Les
à été utilisée
caractéristiques
de la laveuse)
Page 32

Avant d’appeler un réparateur…
32
RENDEMENT (suite) Causes possibles Correctifs
Boulochage
Usure normale des tissus • Même s’il n’est pas causé par la laveuse, vous pouvez
duveteux et en coton-polyester atténuer ce problème en lavant les vêtements à l’envers.
Fils tirés, trous,
Épingles, boutons-pression, • Attachez les boutons-pression, crochets, boutons, et
déchirures, usure
crochets, boutons pointus, remontez les fermetures éclair.
excessive
boucles de ceinture, fermetures
• Enlevez les articles lâches, comme les épingles, les objets
éclair et objet pointus laissés
dans les poches et les boutons pointus.
dans les poches
• Tournez à l’envers les tricots (dont les fils se tirent
facilement).
Javellisant à base de chlore • Utilisez la quantité indiquée sur l’emballage.
non dilué
• Ne versez jamais de javellisant non dilué dans la laveuse
ou sur les vêtements.
Produits chimiques tels que • Rincez les articles imbibés de ces produits avant de les
décolorants capillaires, laver.
teintures, solutions à
permanente
Faux plis
Tri incorrect • Évitez de laver des articles lourds (comme des vêtements
de travail) avec des articles légers (comme des blouses).
• Utilisez un assouplissant.
Surcharge ou niveau d’eau • Assurez-vous que les vêtements ont suffisamment de
incorrect place pour bouger librement.
Programmes de lavage et de • Choisissez les programmes en fonction du type de tissu
séchage incorrects lavé (surtout les vêtements à entretien facile).
Lavages répétés dans une eau • Lavez dans une eau tiède ou froide avec beaucoup de
trop chaude détersif.
FONCTIONNEMENT Causes possibles Correctifs
La laveuse fait une
Le cycle
HAND WASH
•
Ceci est normal. La période de trempage du cycle
HAND WASH
pause en cours de cycle (lavage à la main) (lavage à la main)
est très courte.
a été choisi
La laveuse ne
Laveuse non branchée
• Assurez-vous que le cordon d’alimentation est bien branché dans
fonctionne pas
une
prise opérationelle.
Robinets fermés
• Ouvrez complètement les robinets d’eau chaude et d’eau froide.
Commandes mal réglées •
Vérifiez les commandes.
Couvercle ouvert
• Fermez le couvercle.
Disjoncteur déclenché/ • Vérifiez le disjoncteur/fusibles de la résidence. Remplacez le
fusible grillé fusible ou réenclenchez le disjoncteur. La laveuse doit être
branchée dans une prise distincte.
Réinitialisation électronique • Débranchez la laveuse, attendez 2 minutes, rebranchez–la et
nécessaire appuyez sur START (mise en marche).
On n’a pas appuyé sur • Appuyez sur START (mise en marche).
START (mise en marche)
La pression de l’eau •Appuyer à nouveau sur le bouton START (mise en marche).
est très basse
Fonctionnement Mesures de sécuritéService à la clientèle Conseils de dépannage
Page 33

33
Service à la clientèleConseils de dépannage
FonctionnementMesures de sécurité
(Les voyants PerfecTemp
(température optimale)
et START/PAUSE (mise
en marche/pause)
clignotent.)
EAU Causes possibles Correctifs
Moussage excessif
Type de détersif •Adoptez un détersif qui mousse moins et suivez les
directives sur l’emballage.
Eau très douce •Utilisez moins de détersif.
Trop de détersif •Mesurez soigneusement le détersif. Utilisez moins de
détersif si votre eau est douce, si votre brassée est petite
ou si votre linge est légèrement sale.
Fuites d’eau
Boyaux de remplissage
•Assurez-vous que les boyaux sont bien raccordés à la laveuse
ou boyau de vidange mal
et aux robinets,
et que l’extrémité du boyau de vidange est
raccordés solidement insérée dans le renvoi.
Renvoi bouché •Vérifiez la plomberie. Vous aurez peut-être besoin
d’appeler un plombier.
Pression d’eau constante •Serrez les boyaux aux robinets et fermez les robinets après
aux boyaux de remplissage chaque utilisation.
raccordés
•Vérifiez l’état des tuyaux d’alimentation, vous devez les
remplacer tous les 5 ans.
Utilisation d’une trop grande •Utilisez moins de détersif. Utilisez moins de détersif
quantité de détersif dans la si votre eau est douce, si votre brassée est petite ou si
laveuse votre linge est légèrement sale.
La température de l’eau
Commandes mal réglées •Vérifiez le sélecteur de température de l’eau et réglez-le.
est incorrecte
Robinets fermés ou boyaux •Ouvrez complètement les robinets d’eau chaude et d’eau
mal réglés froide et assurez-vous que chaque boyau est raccordé au
bon robinet.
Rondelles-filtres de •Fermez l’alimentation d’eau et débranchez les tuyaux
l’électrovanne obstruées d’alimentation d’eau situés en haut à l’arrière de la
laveuse. Utilisez une brosse ou un cure-dents pour
laveuse. Utilisez une brosse ou un cure-dents pour
tuyaux et re-ouvrez l’alimentation d’eau.
Température incorrecte •Assurez-vous que la température de l’eau du chauffe-eau
de l’eau du chauffe-eau varie entre 120 °F et 140 °F(48 °C et 60 °C).
La fonction
PerfecTemp
•Le couvercle doit être fermé pour que
PerfecTemp
(température optimale) (température optimale) fonctionne.
n’est pas activée
Eau vidangée avant
Couvercle relevé ou programme •Régler de nouveau le programme.
la fin du programme
en mode de pause pendant plus
de 24 heures
La laveuse ne se
Boyau de vidange pincé •Redressez le boyau de vidange et assurez-vous qu’il n’est
vide pas
ou mal raccordé pas coincé sous la laveuse.
•La partie supérieure du boyau de vidange doit être à moins
de 8 pi (2,5m) au-dessus du sol.
L’eau est aspergée
La laveuse est dans •Dans le cycle d’essorage, ceci est normal.
au cours du cycle
le cycle d’essorage
d’essorage
La laveuse ne se remplit
La pression de l’eau •Appuyez à nouveau sur le bouton START
pas au niveau choisi
est très basse (mise en marche).
Les boyaux d’arrivée •Redressez les boyaux.
d’eau sont pincés
Rondelles-filtres de •Fermez l’alimentation d’eau et débranchez les tuyaux
l’électrovanne obstruées d’alimentation d’eau situés en haut à l’arrière de la
laveuse. Utilisez une brosse ou un cure-dents pour
laveuse. Utilisez une brosse ou un cure-dents pour
tuyaux et re-ouvrez l’alimentation d’eau.
L’eau remplit la laveuse
Le tube vertical de •Le tube de vidange doit se trouver au dessus
et se vide simultanément
vidange est trop bas de 76,2 cm (30″).
Page 34

34
Avant d’appeler un réparateur…
AUTRES Causes possibles Correctifs
Les étiquettes posées
Il arrive que l’adhésif des •
À l’aide d’un séchoir à cheveux réglé à la température
sur la laveuse ne
étiquettes ne s’enlève pas la plus basse, dirigez l’air vers l’étiquette pendant
s’enlèvent pas
complètement quelques instants. Vous pourrez ensuite enlever
proprement
l’adhésif sans endommager le fini de la laveuse.
BRUIT Causes possibles Correctifs
La laveuse est bruyante
Laveuse pas d’aplomb • Pour mettre l’avant de la laveuse de niveau, réglez les
pieds de nivellement en les tournant dans le sens
approprié pour abaisser ou relever la laveuse. Pour mettre
l’arrière de la laveuse de niveau, soulevez l’arrière de la
laveuse de 4 po (11 cm) et laissez-la ensuite redescendre.
Brassée mal répartie • Appuyez sur PAUSE pour arrêter la laveuse, ouvrez le
couvercle et répartissez uniformément la brasseé. Fermez
le couvercle et appuyez sur START (MISE EN MARCHE).
La tige d’expédition n’a pas • Pour retirer la tige d’expédition de la laveuse, tirez sur
été retirée de la laveuse l’étiquette jaune fixée à la partie inférieure du côté droit
de la laveuse.
La laveuse est trop près du mur • Éloignez la laveuse du mur d’environ 4 po (11 cm).
(frappe contre le mur pendant
le fonctionnement)
La fonction
PerfecTemp
• Ceci est normal.
PerfecTemp
(température
(température optimale) optimale) ouvre et ferme alternativement les
est utilisée robinets d’alimentation d’eau afin de régler
la température de celle-ci.
Fonctionnement Mesures de sécuritéService à la clientèle Conseils de dépannage
Page 35

35
Service à la clientèleConseils de dépannageFonctionnementMesures de sécurité
Notes.
Page 36

36
Pour une période de : GE remplacera :
Un an Toute pièce
de la laveuse qui se révèle défectueuse en raison d’un vice de matériaux ou de fabrication.
À compter de la date
Pendant cette
garantie complète d’un an,
GE fournira également,
gratuitement,
tous les frais de main
d’achat d’origine
d’œuvre et de déplacement du réparateur à votre domicile pour remplacer la pièce défectueuse.
Deux ans Toute pièce
de la laveuse qui se révèle défectueuse en raison d’un vice de matériaux ou de fabrication.
À compter de la date
Pendant cette
garantie limitée complémentaire de un an,
vous devez assumer tous les frais de main
d’achat d’origine
d’œuvre et de déplacement du réparateur à votre domicile.
Cinq ans La tige de suspension, l’ensemble du ressort et du moteur
, si l’une de ces pièces se révèle défectueuse en
À compter de la date
raison d’un vice de matériaux ou de fabrication. GE remplacera également
tout couvercle, dessus de
d’achat d’origine laveuse et cabinet
qui rouille suite à une utilisation normale. Pendant cette
garantie limitée complémentaire
de quatre ans,
vous devez assumer tous les frais de main d’œuvre et de déplacement du réparateur
à votre domicile.
Dix ans
La transmission et la cuve extérieure de la laveuse,
si l’une de ces pièces se révèle défectueuse en raison
À compter de la date
d’un vice de
matériaux ou de fabrication. Pendant cette
garantie limitée complémentaire de neuf ans
,
d’achat d’origine
vous devez assumer tous les frais de main d’œuvre et de déplacement du réparateur à votre domicile.
À vie Le panier de la laveuse,
si celui-ci se révèle défectueux en raison d’un vice de matériaux ou de
À compter de la date
fabrication. Pendant cette
garantie limitée à vie,
vous devez assumer tous les frais de main d’œuvre
d’achat d’origine
et de déplacement de réparateur à votre domicile.
Garantie de votre laveuse GE
(Pour la clientèle au Canada)
Fonctionnement Mesures de sécuritéService à la clientèle Conseils de dépannage
Toutes les réparations sous garantie seront effectuées par nos centres de réparation ou nos réparateurs autorisés.
Appelez le 1-800-361-3400.
■ Toute visite à votre domicile pour vous expliquer le
fonctionnement de l’appareil.
Lisez votre Manuel d’utilisation. Pour toute question
concernant le fonctionnement de l’appareil, communiquez
avec votre marchand ou notre bureau des Relations avec les
consommateurs à l’adresse indiquée ci-dessous :
Directeur, Relations avec les consommateurs
Camco Inc.
1 Factory Lane, Bureau 310
Moncton, N.B.
E1C 9M3
■ Une installation inadéquate.
Si vous avez des questions concernant l’installation,
communiquez avec votre marchand ou votre installateur.
Il vous incombe de fournir les installations appropriées
électriques d’évacuation et autres.
■ Le remplacement des fusibles ou le réenclenchement des
disjoncteurs du panneau de distribution.
■ Toute défectuosité du produit lorsqu’il est utilisé de façon
abusive, à des fins commerciales ou à toute autre fin que
celle pour laquelle il a été conçu.
■ Tout dommage au produit attribuable à un accident, un
incendie, une inondation ou un cas de force majeure.
Ce qui n’est pas couvert :
Garant : CAMCO INC.
LE FABRICANT NE SE TIENT NULLEMENT RESPONSABLE DE TOUT DOMMAGE INDIRECT.
Page 37

37
Numéros de service Camco.
(Pour la clientèle au Canada)
Questions?
Si vous avez des questions au sujet de votre électroménager, écrivez au :
Directeur, Relations avec les consommateurs, Camco Inc., 1 Factory Lane, Bureau 310,
Moncton, N.B., E1C 9M3.
Ou composez le!
1-800-361-3400
Réparations à domicile
1-800-361-3400
Pour faire réparer votre électroménager Camco, il suffit de nous téléphoner.
Contrats d’entretien
1-800-461-3636
Achetez un contrat d’entretien Camco avant que votre garantie n’expire et bénéficiez d’un
rabais substantiel. Ainsi le service après-vente Camco sera toujours là après expiration de la
garantie.
Pièces et accessoires
Ceux qui désirent réparer eux-mêmes leurs électroménagers peuvent recevoir pièces et
accessoires directement à la maison (cartes VISA, MasterCard et Discover acceptées).
Les directives stipulées dans le présent manuel peuvent être exécuteés par n’importe quel utilisateur.
Les autres réparations doivent généralement être effectuées par un technicien qualifié. Soyez prudent,
car une réparation inadéquate peut affecter le fonctionnement sécuritaire de l’appareil.
Veuillez consulter les pages jaunes pour connaître le numéro de la succursale Camco la plus près.
Un service satisfaisant
Si vous n’êtes pas satisfait du service après-vente dont vous avez bénéficié :
Premièrement,
communiquez avec les gens qui ont réparé votre appareil.
Ensuite,
si vous n’êtes toujours pas satisfait, envoyez tous les détails—numéro de téléphone
compris—au : Directeur, Relations avec les consommateurs, Camco Inc., 1 Factory Lane,
Bureau 310, Moncton, N.B., E1C 9M3.
Service à la clientèleConseils de dépannageFonctionnementMesures de sécurité
Page 38

38
¡Felicidades!
Ahora usted es parte de la familia GE.
Una Asociación de Servicio.
Información de Seguridad
Instalación apropiada . . . . .39
Seguridad del calentador
de agua . . . . . . . . . . . . . . . . . .39
Cuando no se encuentre
usando la lavadora . . . . . . . .39
Cuando se encuentre usando
la lavadora . . . . . . . . . . . . . . . .39
Su área de lavado . . . . . . . . .39
Instrucciones de Operación
Ciclos del cuidado de
la ropa . . . . . . . . . . . . . . . .42, 43
Panel de control . . . . . . . . . .40
Características del panel
de control . . . . . . . . . . . . . . . .44
Opciones de ciclos . . . . . . . .45
Estado de los ciclos . . . . . . . .45
Cómo cargar y usar
la lavadora . . . . . . . . . . . .47, 48
Ciclos de toque único . .40, 41
Características de
la lavadora . . . . . . . . . . . .42–46
Solucionar problemas
Antes de solicitar
servicio
. . . . . . . . . . . . . . .49–52
Servicio al Consumidor
Centro de respuestas para
el consumidor (GE Answer
Center®) Número 800 . . .2, 55
Servicio al consumidor
Garantía . . . . . . . . . . . . . . . . .54
Números del
servicio . . . . . . . . . . . . . . . . . .55
PARA GUARDAR COMO REFERENCIA
Anote aquí los números de modelo y de serie:
No.
No.
Localizados en la esquina superior derecha en la parte posterior
de su lavadora.
¡IMPORTANTE!
Engrape la factura de compra o el cheque cancelado aquí.
Se requiere prueba de la fecha de la compra original para obtener el
servicio cubierto bajo la garantía.
Operación SeguridadServicio al consumidor Solucionar problemas
Este manual contiene instrucciones que le ayudarán a usar y
mantener de manera correcta su lavadora. Un poco de cuidado
preventivo le ayudará a ahorrar tiempo y dinero durante la vida de
su lavadora.
LEA ESTE MANUAL
SI NECESITA SERVICIO
Encontrará en la sección de
Antes de solicitar un servicio
soluciones
a los problemas más comunes. Si revisa nuestra sección de
Solucionar problemas
primero, tal vez no necisite solicitar
un servicio.
Si requiere un servicio, puede sentirse relajado al saber que la ayuda
está sólo a una llamada de distancia. Se incluye una lista de números
gratuitos y de servicio a clientes en la contraportada.
Page 39

■
Instale o guarde la lavadora donde no esté expuesta
a temperaturas bajo cero o a la intemperie.
■
Remueva la película de protección de color del
panel de control.
■
Conecte a tierra de manera adecuada en
conformidad con los códigos y ordenanzas
gubernamentales. Siga las Instrucciones de
instalación.
INFORMACIONES IMPORTANTES DE SEGURIDAD.
LEA PRIMERO TODA LAS INSTRUCCIONES.
¡ADVERTENCIA!
Por su seguridad, la información contenida en este manual debe seguirse al pie
de la letra para minimizar el riesgo de incendio o explosión, choque eléctrico o
para evitar daños a la propiedad, lesiones personales o fallecimientos.
SEGURIDAD DEL CALENTADOR DE AGUA
Bajo determinadas condiciones se puede producir gas hidrógeno en el calentador de agua que no se ha
usado durante dos semanas o más. El gas hidrógeno puede ser explosivo bajo estas circunstancias.
Si no se ha usado agua caliente durante dos semanas o más, evite la posibilidad de daños o lesiones abriendo
todas las llaves de agua y dejando que corra durante varios minutos antes de usar cualquier aparato conectado
al agua caliente. Esto permitirá que el gas hidrógeno escape. Ya que el gas es inflamable, no fume ni use una
llama abierta o algún aparato durante este proceso.
INSTALACION ADECUADA
Esta lavadora debe ser instalada y colocada apropiadamente de acuerdo con las Instrucciones de Instalación antes de
ser usada. Si usted no recibió una hoja con las Instrucciones de Instalación, usted puede recibir una visitando nuestro
sitio en la Internet a www.geappliances.com.
■Mantenga el área alrededor y debajo de su aparato
libre de materiales combustibles como trapos,
papel, sustancias químicas, pelusas, etc.
■Se requiere una supervisión estrecha si este aparato
es usado por o cerca de niños. No permita que los
niños jueguen en el interior, sobre la lavadora o con
cualquier otro aparato.
ALREDEDOR DE SU LAVADORA
■Nunca meta las manos en la lavadora mientras está
funcionando. Espere que se detenga completamente
antes de abrir la tapa.
■No mezcle blanqueador de cloro con amoniaco o
con ácidos como vinagre y/o removedor de óxido.
La mezcla puede producir un gas tóxico y causar la
muerte.
■No lave ni seque artículos que hayan sido limpiados,
lavados, mojados o manchados con combustibles o
con sustancias explosivas (cera, aceite, pintura,
gasolina, desagrasantes, disolventes de lavado en
seco, queroseno, etc.) que puedan incendiarse o
estallar. No añada estas sustancias en el agua de
lavado. No use estas sustancias cerca de su lavadora
y/o secadora mientras están funcionando.
■El proceso de lavado puede reducir la capacidad de
ciertas telas de ser retardantes al fuego. Para evitar
esto, siga todas las instrucciones del fabricante.
■Para minimizar la posibilidad de un choque
eléctrico, desconecte el aparato del suministro
eléctrico o del panel de distribución quitando el
fusible o apagando el interruptor de circuito antes
de llevar a cabo cualquier actividad de
mantenimiento o de limpieza.
NOTA:
El hecho de
que usted oprima
PAUSE
(Pausa),
STOP/CANCEL
(Alto/Cancelar) NOsignifica que el
electrodoméstico
ha sido desconectado de la fuente energética.
■Nunca opere este aparato si está dañado, si funciona
mal, parcialmente desensamblado o si tiene partes
rotas o faltantes, incluyendo el cable o clavija.
CUANDO USE SU LAVADORA
■Cierre los grifos de agua para aliviar la presión en las
mangueras y válvulas y para minimizar la fuga si es
que alguna ruptura o escape ocurriese. Inspeccione
la condición de las mangueras de llenado; estas
mangueras deberían ser reemplazadas después de
5 años.
■Antes de deshacerse de una lavadora, quite la tapa
para impedir a los niños de esconderse adentro.
■No repare ni reemplace partes de este aparato ni le
dé ningún servicio a menos que sea recomendado
en el Manual del propietario y que Ud. pueda
comprender y poner en práctica.
■No manipule indebidamente los controles.
CUANDO NO USE SU LAVADORA
FAVOR DE LEER Y SEGUIR CUIDADOSAMENTE LAS PRECAUCIONES DE SEGURIDAD.
GUARDE ESTAS INSTRUCCIONES
Utilice su
lavadora sólo
para el
propósito para
el que fue
diseñado como
se describe en
el Manual del
propietario.
OperaciónSeguridad Servicio al consumidorSolucionar problemas
39
Page 40

Panel de control de la lavadora.
Operación SeguridadServicio al consumidor Solucionar problemas
Usted puede localizar el número de modelo detrás del extremo superior del panel de control.
Modelo WPSE7003
Modelo WPSE7002
Guía de inicio rápida de
ONE TOUCH
WHITES
HOT
PRESOAK
QUICK
RINSE
WASHSOAK
PerfecTemp
M
DRAIN
& SPIN
CUSTOM CUSTOM
PRESS 3 SEC TO STORE
12
COLORS
WARM
DARK
COLORS
COLD
EASY CARE
PERM PRESS
HAND
WASH
SPEED
WASH
ONE TOUCH
Clothes Care Cycles
S
TART
PAUSE
• Agregue el detergente
• Agregue suavizante
diluido
• Agregue su ropa
• Seleccione el ciclo
de lavado
• Inspeccione los ajustes
correspondientes al
tamaño de la carga
• Cierre la tapa
• Presione START
40
Su nueva lavadora le ofrece la ventaja de iniciar sus cargas de lavado con nuestros ciclos de
ONET
OUCH
(Toque Único)
fáciles de usar. Haga una simple selección, y el
LOAD SIZE
(tamaño de su carga),
SOIL LEVEL
(nivel de suciedad),
WASH/RINSE TEMPERATURE
(temperatura de lavado/enjuagado), y
WASH/SPIN SPEED
(velocidad de lavado/
centrifugado) son ajustados automáticamente. Así que todo lo que tiene que hacer es presionar el botón de
START
(puesta en marcha).
Easy ONET
OUCH
–Ciclos de toque único fáciles de usar.
ONE TOUCH
WHITES
HOT
COLORS
WARM
DARK
COLORS
COLD
WHITES
HOT
COLORS
WARM
DARK
COLORS
COLD
Clothes Care Cycles
EASY CARE
PERM PRESS
HAND
WASH
SPEED
WASH
PerfecTemp
ONE TOUCH
Clothes Care Cycles
EASY CARE
PERM PRESS
HAND
WASH
SPEED
WASH
PerfecTemp
PRESOAK
QUICK
DRAIN
RINSE
& SPIN
CUSTOM CUSTOM
12
PRESS 3 SEC TO STORE
PRESOAK
QUICK
DRAIN
RINSE
& SPIN
LOAD
SIZE
SUPER
LARGE
MEDIUM
SMALL LIGHT
LOAD
SIZE
SUPER
LARGE
MEDIUM
SMALL LIGHT
NORMAL
C
YCLE STATUS
NORMAL
C
YCLE STATUS
SOIL
LEVEL
STAIN
WASH
HEAVY
SOIL
LEVEL
EXTRA
HEAVY
HEAVY
TEMP
WASH/RINSE
HOT
COLD
WARM
WARM
WARM
COLD
COLD
COLD
TEMP
WASH/RINSE
HOT
COLD
WARM
WARM
WARM
COLD
COLD
COLD
SPEED
WASH/SPIN
NORMAL
FAST
NORMAL
SLOW
GENTLE
FAST
GENTLE
SLOW
SPEED
WASH/SPIN
NORMAL
FAST
NORMAL
SLOW
GENTLE
FAST
GENTLE
SLOW
OPTIONS
BEEPER
2ND
RINSE
EXTEND
SPIN
DELAY
1-8 Hrs.
FINAL SPINAUTO BALANCE2ND RINSERINSEWASHSOAK
OPTIONS
BEEPER
2ND
RINSE
EXTEND
SPIN
FINAL SPINAUTO BALANCE2ND RINSERINSEWASHSOAK
S
TART
PAUSE
S
TOP
CANCEL
EST. TIME REMAINING
S
TART
PAUSE
S
TOP
CANCEL
EST. TIME REMAINING
Page 41

Servicio al consumidorSolucionar problemasOperaciónSeguridad
41
Presione… Selecciona automáticamente… Entonces presione…
Usted puede cambiar cualquier ajuste automático simplemente presionando el botón deseado.
Selecciones del ONET
OUCH
.
Cómo cambiar los ajustes automáticos.
Para algodones con sucios ligeros, linos para el uso en la
casa, ropa del trabajo o de jugar.
Para algodones con sucios ligeros, linos para el uso en la
casa, ropa del trabajo o de jugar.
Para algodones y mezclas con colores que no destiñen,
para artículos cuya etiqueta del fabricante específica que
deben ser lavadas en con agua fría.
Para tejidos, artículos que no se arrugan ni
necesitan planchado.
Para ropa interior femenina cuya etiqueta del fabricante
especifique que puede ser lavada a mano, con suciedad
ligera. Proporciona períodos de agitación y remojo durante
el lavado y el enjuagado.
Para artículos con sucios ligeros que se necesitan
rápidamente. El tiempo del ciclo es de aproximadamente
15 minutos, dependiendo de la presión del agua de su casa.
LOAD
SIZE
WHITES
HOT
COLORS
WARM
DARK
LARGE
LARGE
LARGE
SOIL
LEVEL
NORMAL
NORMAL
NORMAL
WASH/RINSE
COLORS
COLD
TEMP
HOT
COLD
WARM
COLD
COLD
COLD
SPEED
WASH/SPIN
NORMAL
FAST
NORMAL
FAST
NORMAL
FAST
S
TART
PAUSE
S
TART
PAUSE
S
TART
PAUSE
EASY CARE
PERM PRESS
HAND
WASH
SPEED
MEDIUM
SMALL
SMALL
NORMAL
LIGHT
LIGHT
WASH
WARM
COLD
WARM
WARM
COLD
COLD
GENTLE
FAST
GENTLE
SLOW
NORMAL
FAST
S
TART
PAUSE
S
TART
PAUSE
S
TART
PAUSE
Page 42

Acerca de los ciclos de cuidado de su ropa.
42
PRESOAK (Preremojado)
Para preremojar una carga y pasar directamente al ciclo de lavado:
Seleccione su ciclo de lavado, presione el botón de
PRESOAK
, entonces presione el
botón de
START/PAUSE
.
■ Comienza con tres minutos de agitación, entonces 12 minutos de remojo, seguidos
por el ciclo de lavado seleccionado.
■ Usa la velocidad y la temperatura del agua de su ciclo de lavado seleccionado.
Para preremojar una carga más de 12 minutos:
Presione el botón de
PRESOAK
. La lavadora se llenará y estos ajustes automáticos son
seleccionados:
■ Tres minutos de agitación seguidos por un máximo de 24 horas de remojo.
■ Para remojar menos de 24 horas, presione el botón de
DRAIN & SPIN
(Drenar y
Girar) o escoja el ciclo de lavado.
PRESOAK
QUICK RINSE (Enjuagado rápido)
Use esta característica para remover rápidamente cloro, sudor, manchas, etc.
de la ropa.
■ La lavadora se llena de agua, se agita por 3 minutos, drena y comienza a girar.
QUICK
RINSE
Ajustes automáticos para QUICK RINSE:
STAIN WASH (Lavados de manchas) (en algunos modelos)
Para piezas de vestir excesivamente sucias o manchadas. Agrega agitación adicional
y remojo al inicio del ciclo de lavado.
SOIL
LEVEL
STAIN
WASH
Operación SeguridadServicio al consumidor Solucionar problemas
LOAD
LARGE
SIZE
WASH/RINSE
TEMP
WARM
WARM
SPEED
WASH/SPIN
NORMAL
FAST
LOAD
SIZE
MEDIUM
TEMP
WASH/RINSE
COLD
COLD
SPEED
WASH/SPIN
GENTLE
FAST
Page 43

43
CUSTOM 1 y CUSTOM 2 (A la Medida 1 y A la Medida 2)
(en algunos modelos)
Ajuste las combinaciones de sus ajustes favoritos y sálvelos para que pueda usarlos
con presionar un solo botón.
Estos ajustes variables no pueden ser hechos mientras hay un ciclo en progreso.
Para almacenar una combinación de ajustes:
1. Seleccione un ajuste
ONE TOUCH
(Toque Único).
2. Cambie
LOAD SIZE
(tamaño de la carga),
SOIL LEVEL
(nivel de suciedad),
TEMPERATURE
(temperatura), o
SPEED
(velocidad), hasta que se ajusten a
sus necesidades.
3. Seleccione cualquier
OPTIONS
(opción) que usted desee.
4. Presione y sostenga los botones
CUSTOM 1o CUSTOM 2
hasta que la lavadora
emita un sonido para almacenar la selección.
Para llamar otra vez su combinación almacenada:
Presione los botones
CUSTOM 1o CUSTOM 2
, entonces presione
START/PAUSE
(Puesta en marcha/Pausa).
NOTA: DELAY 1-8 HRS
(demora de 1-8 horas) no puede ser usado en los ajustes de
CUSTOM 1 yCUSTOM 2
.
Para reprogramar los ajustes variables:
Repita los pasos anteriores del 1 al 4.
CUSTOM CUSTOM
PRESS 3 SEC TO STORE
12
DRAIN
& SPIN
DRAIN & SPIN (drenar y girar)
DRAIN & SPIN
(drenar y girar) cualquier ciclo en cualquier momento.
Ajustes automáticos para DRAIN & SPIN :
Servicio al consumidorSolucionar problemasOperaciónSeguridad
SPEED
WASH/SPIN
GENTLE
FAST
Page 44

Operación
Seguridad
Servicio al Consumidor
Solucionar problemas
Características del panel de control.
44
START/PAUSE (Puesta en marcha/Pausa)
■ Después de haber seleccionado un nuevo ciclo, presione una vez para
iniciar el ciclo.
■ Presiones dos veces para seleccionar el último ciclo usado y empezar la marcha
de la lavadora.
■ Si la lavadora está en marcha, presione una vez para interrumpir el ciclo; presione
otra vez para continuar el ciclo.
S
TART
PAUSE
STOP/CANCEL (Alto/Cancelar)
Este botón NOdebe ser usado para interrumpir o poner el ciclo en pausa.
Al presionar este botón cancelará los más recientes ajustes y los mismos se perderán.
S
TOP
CANCEL
Estimated Time Remaining (Tiempo Restante Estimado)
■ Muestra en la pantalla el tiempo restante aproximado para terminar el ciclo.
■ Si el tiempo restante estimado es más de 60 minutos, “1H” aparecerá parpadeando
en la pantalla, seguido por los minutos restantes adicionales. Cuando el tiempo
restante es menor de 60 minutos, el reloj automático contará regresivamente.
■ El tiempo del ciclo es afectado por la duración del proceso de llenado de la
lavadora. Esto dependerá de la presión del agua en su casa. El reloj automático
“smart” “aprende” la cantidad de tiempo que es necesaria para llenar su lavadora
y se ajusta automáticamente según el tiempo requerido.
NOTA:
Si
PRESOAK
(preremojado) es seleccionado y un ciclo no es seleccionado a
continuación, aparecerán dos guiones en la pantalla.
E
ST. TIME REMAINING
Spot Spray (Rociador para manchas)
Cuando abra la tapa de la lavadora y empuje el botón
SPOT SPRAY
(rociador para
manchas), usted verá un pequeño chorro de agua.
Abra la tapa de la lavadora.
Empuje el botón
SPOT SPRAY
. (Usted verá un pequeño chorro de agua.)
Moje su prenda sucia con la opción
SPOT SPRAY
y frote su producto de pretratamiento
favorito en el área sucia.
NOTA: La opción SPOT SPRAY
no funcionará si:
■
la tapa de la lavadora está cerrada
■
la tina de lavado se está llenando
■
si el nivel del agua alcanzó el nivel seleccionado.
3
2
1
Page 45

Servicio al ConsumidorSolucionar problemasOperaciónSeguridad
45
Opciones de ciclos.
BEEPER (Bíper)
Le alerta cuando el ciclo ha sido completado.
Usted puede desconectar esta función presionando este botón.
BEEPER
2ND RINSE (2doEnjuague)
Agrega un segundo enjuague a cualquier ciclo.
2ND
RINSE
EXTEND SPIN (Extensión de giro)
Extiende la duración del último centrifugado de un ciclo de lavado. Esto extraerá más
agua de su ropa. La ropa quedará más seca cuando escoja esta opción.
EXTEND
SPIN
DELAY 1-8 HOURS (demora de 1-8 horas) (en algunos modelos)
Usar para demorar la puesta en marcha de su lavadora de 1 a 8 horas. Primero escoja
el ciclo de lavado y cualquier otra opción. Entonces presione este botón para el
número de horas que usted desea que ocurra la demora del ciclo.
Presione el botón de
START/PAUSE
(Puesta en marcha/Pausa) para comenzar la
cuenta regresiva.
El tiempo de la cuenta regresiva será mostrado en la pantalla de
Estimated Time
Remaining
(Tiempo Restante Estimado).
DELAY
1-8 Hrs.
Auto Balance (Balanceado Automático)
La lavadora está detectando la distribución de la carga para lograr que el
centrifugado sea balanceado.
PerfecTemp
Acerca de los ciclos de estado.
Estas luces indicadoras de los estados de los ciclos muestran parte del ciclo en el cual la lavadora se encuentra.
PerfecTemp
La función
PerfecTemp
detecta la temperatura del agua siendo alimentada y ajusta la
temperatura del agua de llenado.
La tapa debe estar cerrada para que
PerfecTemp
funcione.
Si su agua es demasiado fría, el detergente no se disolverá efectivamente y es posible
que la ropa no quede limpia. Si el agua es demasiado caliente, la tela podría dañarse.
PerfecTemp
ajusta estos extremos de las temperaturas del agua para que exista un
rendimiento mayor en el lavado.
Es posible que usted escuche las válvulas de agua abriéndose y cerrándose mientras la
temperatura del agua está siendo ajustada. Esto es normal.
AUTO BALANCE
PerfecTemp
FINAL SPINAUTO BALANCE2ND RINSERINSEWASHSOAK
Page 46

46
Operación SeguridadServicio al Consumidor Solucionar problemas
Acerca de las características de su lavadora.
Tapa del agitador o despachador de suavizante para tela
La tapa del agitador
se pone encima del
agitador. Si se desprende accidentalmente,
simplemente póngala de nuevo.
El despachador de suavizante
expulsa
automáticamente suavizante líquido en
el momento adecuado durante el ciclo.
No detenga la lavadora durante la primera
rotación. Esto ocasionará que el
despachador se vacíe demasiado rápido.
Para usarlo, siga estos pasos:
Cerciórese de que el despachador esté
firmemente asegurado en el agitador.
Use solamente suavizante líquido.
Viértalo en el despachador usando la
cantidad recomendada en el paquete.
Nunca vierta el suavizante directamente
sobre la ropa. Esto puede mancharlas.
Añada agua en el despachador hasta
que llegue al máximo nivel de la línea
de llenado.
3
2
1
No vierta nada en el agitador si el
agitador o la tapa han sido removidos.
Cómo limpiar el despachador de suavizante para telas
Remueva el despachador de la parte superior del agitador.
Separe la taza del despachador de la cubierta tomando la parte superior y
empujando hacia abajo con los dedos en la parte interior de la taza. La taza se
liberará de la cubierta.
Para limpiar el despachador, remoje al taza y la cubierta en la siguiente solución:
■
3,8 litros (1 galón) de agua tibia
■
60 ml (1/4 taza) de detergente para uso pesado
■
240 ml (1 taza) de blanqueador
Si es necesario, afloje los residuos con una tela suave después de remojar. No use un
cepillo duro; puede rayar la superficie del despachador.
Enjuague y vuelva a ensamblar el despachador. Colóquelo de nuevo en el agitador.
5
4
3
2
1
Sepárelo para limpiarlo.
Despachador de blanqueador líquido
El despachador diluye el blanqueador líquido antes de que llegue a la carga de ropa.
Lea las etiquetas de las ropas por si hay indicaciones especiales.
Mida cuidadosamente el blanqueador, siguiendo las instrucciones de la botella.
■
Nunca vierta blanqueador sin diluir directamente sobre la ropa o la canastilla de lavada.
■
No vierta blanqueador en polvo en el despachador.
Antes de iniciar la lavadora, vierta la cantidad de blanqueador medida directamente
en el despachador. Evite salpicaduras o llenar en exceso. Si prefiere usar blanqueador
en polvo, viértalo en la canastilla con su detergente.
■
No mezcle blanqueador de clara como amoniaco o con ácidos, como vinagre y/o removedor
de óxido. La mezcla puede producir un gas tóxico capaz de causar la muerte.
3
2
1
Page 47

47
Cómo cargar y usar su lavadora.
Servicio al ConsumidorSolucionar problemasOperaciónSeguridad
Cómo clasificar las cargas de ropa
Uso adecuado del detergente
Usar demasiado detergente es una causa común
por la que surgen problemas durante el proceso de
lavado. Los detergentes de hoy están formulados
para ser efectivos sin una gran cantidad de agua
jabonosa. Cerciórese de leer y seguir las
recomendaciones del fabricante para la cantidad
de detergente que debe usar en su lavado.
Se puede utilizar menos detergente si el agua
es suave, la carga es ligera y si la ropa no está
muy sucia.
Cómo cargar su lavadora
Cargue los artículos secos de modo que queden
sueltos, no más alto que la última
fila de agujeros en la cesta de lavado. Cuando
cargue artículos mojados cerciórese de que el
nivel de carga/agua sea lo suficientemente alto
como para que la ropa se mueva con facilidad.
El nivel del agua debe cubrir las prendas. Para
agregar prendas una vez que la lavadora ha
empezado a operar, levante la tapa y sumerja las
prendas adicionales cerca del agitador.
■
No envuelva artículos largos como sábanas o
pantalones alrededor del agitador.
■
No lave artículos que contengan materiales
inflamables (ceras, líquidos de limpieza, etc.).
■
La agitación no empezará con la tapa abierta.
Clasifique las cargas de acuerdo a los colores
(blanco, colores encendidos, colores vivos); de
acuerdo al nivel de sucio (algodones gruesos, de
cuidado fácil, delicados); y dependiendo de si la
ropa produce pelusa (tela de toalla, felpilla), o si
recoge pelusa (velvetón, corderoy o pana).
Siempre siga las instrucciones del fabricante de la ropa antes de lavar.
Page 48

48
Cuidado y limpieza de su lavadora
Canastilla de lavado:
Deje la tapa abierta después de
lavar para permitir que la húmedad se evapore. Si
quiere limpiar la canastilla use una tela suave
mojada con detergente líquido, y enjuague. (No use
limpiadores abrasivos o fuertes.)
Mangueras de llenado:
Las mangueras que conectan
la lavadora con las llaves deben remplazarse cada 5
años.
Filtro para pelusa:
Se limpia solo, no requiere
mantenimiento y se encuentra debajo del agitador.
Exterior:
Limpie de inmediato cualquier derrame.
Frote con una tela mojada. Trate de no golpear la
superficie con objetos afilados.
Mudanza y almacenamiento:
Solicite al técnico que
saque el agua de la bomba de desagüe y de las
mangueras. No almanece la lavadora a la
intemperie.
En los Estados Unidos,
llame al GE
Answer Center®, 800.626.2000 para informaciones
sobre cómo mantener la canastilla de lavado
inmóvil al mudar la lavadora.
Vacaciones prolongadas:
Asegúrese de cerrar las
llaves de suministro de agua. Saque toda el agua de
las mangueras si la temperatura alcanzara puntos de
congelamiento.
Operación SeguridadServicio al consumidor Solucionar problemas
Cómo cargar y usar su lavadora.
Siempre siga las instrucciones del fabricante de la ropa antes de lavar.
Etiquetas de cuidado de telas
Ciclo de
lavado en
máquina
Normal
Planchado permanente/
resistente a arrugas
Suave/
delicado
Lavar a mano
No lave No escurra
Temperatura
del agua
Caliente
(50°C/120°F)
Tibia
(40°C/105°F)
Fría/fresca
(30°C/85°F)
Secado
por volteo
Secar
Normal
Planchado permanente/
resistente a arrugas
Suave/
delicado
No seque por volteo
No seque
(usado con
no lave)
Ajuste
de calor
Alto
Medio
Bajo
Sin calor/aire
Instrucciones
especiales
Secar en una cuerda/
colgar para secar
Dejar gotear
Secar en un
sitio llano
Secar en la
sombra
Símbolos de
blanqueador
Cualquier blanqueador
(cuando se necesita)
Sólo blanqueador sin cloro
(cuando se necesita)
No use blanqueador
Abajo están “símbolos” de cuidado de telas que afectan la ropa que va lavar.
ETIQUETAS PARA EL LAVADO
ETIQUETAS PARA EL SECADO
ETIQUETAS PARA EL BLANQUEADOR
Page 49

49
PERFECTEMP Causas posibles Qué hacer
La temperatura de
La lavadora está en un ciclo de • Esto es normal. El
PerfecTemp
está programado para no
lavado del PerfecTemp
enjuagado con agua fría
encenderse durante un enjuagado con agua fría, para que
está incorrecta
la agua más fría disponible sea usada.
(Vea PerfecTemp en la
Se usó toda el agua en el • Espere hasta que el calentador de agua llegue a la
sección Características
calentador de agua temperatura correcta.
de la lavadora)
Antes de solicitar un servicio…
Solucionar problemas
¡Ahorre tiempo y dinero! Revise primero las tablas en las siguientes
páginas y tal vez no necesitará de solicitar un servicio.
Servicio al consumidorSolucionar problemasOperaciónSeguridad
RENDIMIENTO Causas posibles Qué hacer
Ropa demasiada mojada
Ciclo incorrecto • Asegúrese que el ciclo coincida con la carga de lavado.
Algunas telas se sienten húmedas cuando se enjuagan
en agua fría.
Manchas de colores
Uso incorrecto de suavizante • Revise el paquete del suavizante para instrucciones y siga
para telas las instrucciones para usar el despachador de suavizante.
• Aplique algún agente químico a la mancha antes de lavar
y lave de nuevo.
Translado de tinte • Separe las prendas blancas o de colores claros de las
prendas de colores oscuros.
Prendas grisáceas
No hay suficiente detergente • Use más detergente (en especial con cargas grandes).
y amarillentas
Cerciórese de seguir las direcciones recomendadas
por el fabricante del detergente.
Agua dura • Use un ablandador como Calgon o instale un filtro
ablandador.
El agua no está lo • Asegúrese que el agua sale del calentador de agua a una
suficientemente caliente temperatura de 120°F–140°F (48°C–60°C).
Sobrecarga • Verifique que el selector de tamaño coincida con el
tamaño de la carga.
El detergente no se disuelve • Añada el detergente al mismo tiempo que la canastilla
de lavado se llena de agua, antes de cargar la ropa.
Translado de tinte • Clasifique por colores. Si la etiqueta de la ropa indica
lave
por separado,
eso significa que el tinte puede desteñir.
Pelusa o residuos en
La ropa se seca por aire o • Si su ropa no se seca en una secadora, su ropa puede
las ropas
tendido retener más pelusa.
Clasificación incorrecta • Separe la ropa que produce pelusa de la que la recoge.
Lavado demasiado largo • Lave pequeñas cargas por menos tiempo que las grandes.
El detergente no se disuelve • Añada el detergente al mismo tiempo que la canastilla
de lavado se llena de agua, antes de cargar la ropa.
• Use un detergente líquido.
• Use agua más caliente.
Sobrecarga • Cargue la ropa no más alto que la última línea de
agujeros en la tina de lavado.
• Verifique que el selector de tamaño corresponda a la carga
que lave.
Uso incorrecto de suavizante • Revise el paquete del suavizante para instrucciones y siga
para telas las instrucciones para usar el despachador de suavizante.
Page 50

Antes de solicitar un servicio…
Operación SeguridadServicio al Consumidor Solucionar problemas
50
OPERACIÓN Causas posibles Qué hacer
La lavadora hace pausa
El ciclo
HAND WASH (lavado
• Esto es normal. El ciclo
Hand Wash (Lavado a Mano)
durante el ciclo
de mano)
ha sido seleccionado tiene un período de remojo corto.
La lavadora no funciona
La lavadora está desconectada • Cerciórese de que el cable eléctrico esté conectado con
firmeza en un tomacorriente que esté funcionando.
La alimentación de agua hacia • Abra los grifos del agua caliente y del agua fría.
la lavadora está desconectada
Los controles no están • Inspeccione los controles.
ajustados apropiadamente
La tapa está abierta • Cierre la tapa.
El interruptor de circuito/ • Inspeccione los circuitos/fusibles de su casa.
fusible se disparó Reemplace los fusibles o reajuste los circuitos según
sea necesario. La lavadora debe tener salidas exclusivas.
El sistema electrónico de la • Desconecte la lavadora, espere 2 minutos, conéctela
lavadora necesita ser reajustado otra vez, y presiones START (puesta en marcha).
START (puesta en marcha) • Presione START (puesta en marcha).
no fue presionado
Presión de agua • Presione START (puesta en marcha) una vez más.
extremadamente baja
RENDIMIENTO (CONT.) Posibles causas Qué hacer
Desgaste
Resultado normal por mezclas • Aunque la lavadora no lo causa, puede retardar el
de algodón-poliester o ropas proceso volteando al revés la ropa antes de lavarlas.
vellosas
Desgarres, agujeros,
Alfileres, broches de presión, • Abroche los ganchillos, cierre las cremalleras y botones.
costuras rotas o
botones afilados, hebillas de
• Quite los objetos sueltos como alfileres, objetos en
uso excesivo
cinturones, cremalleras y
bolsillos y botones afilados.
objetos afilados en bolsillos
• Voltee al revés las ropas tejidas (porque se
desgarran fácilmente).
Blanqueador sin diluir • Consulte las instrucciones del paquete para usar
la cantidad correcta.
• Nunca use blanqueador sin diluir en el lavado ni
directamente en contracto con la ropa.
Químicos como tintes o • Enjuague la ropa que pueda tener estas sustancias antes
descolorantes para cabello, de verterlas en la lavadora.
soluciones para ondulados
permanentes
Arrugas
Clasificación incorrecta • Evite mezclar la ropa pesada (como ropa de trabajo)
con ropa más ligera (como blusas).
• Use un suavizante para telas.
Sobrecarga o nivel de • Cargue la lavadora de tal manera que la ropa se
agua incorrecto mueva con facilidad.
Ciclos de lavado y de • Ajuste el ciclo al tipo de tela que se disponga a
secado incorrectos lavar (especialmente para ropa de cuidado fácil).
Lavados repetidos en agua • Lave en agua tibia o fría.
demasiado caliente
Page 51

AGUA Causas posibles Qué hacer
Demasiado espumas
Tipo de detergente • Cambie a un detergente que produzca menos espuma
y siga las instrucciones en la empaquetadora.
Agua muy suave • Agregue menos detergente.
Demasiado detergente • Mida su detergente con cuidado. Use menos jabón
si está usando agua suave, una carga pequeña, o una
carga con suciedad ligera.
Fuga de agua
Las mangueras de llenado o las • Cerciórese de que las conexiones de las mangueras
mangueras de drenaje no están están firmes en los grifos y en la lavadora.
conectadas apropiadamente
• Cerciórese de que el extremo de la manguera está
conectada a la lavadora en la manera apropiada e
insertada correctamente en la instalación de drenaje
de su casa.
El sistema de drenaje de la casa • Inspeccione la plomería de la casa. Quizás necesite
puede que esté obstruido llamar un plomero.
Presión de agua constante en • Apriete las mangueras a sus grifos y desconecte el
las mangueras de llenado en la suministro de agua después de cada uso.
fuente de agua
• Inspeccione la condición de las mangueras de llenado;
estas mangueras deberían ser reemplazadas después
de 5 años.
Usando demasiado detergente • Mida su detergente con cuidado. Use menos jabón si está
en la lavadora usando agua suave, una carga pequeña, o una carga con
suciedad ligera.
La temperatura del
El control no está ajustado • Inspeccione el control de la temperatura del agua
agua es incorrecta
apropiadamente y ajústelo.
El suministro de agua está • Conecte tanto el grifo de agua caliente como el de agua
desconectado o conectado fría hasta el máximo y cerciórese de que las mangueras
incorrectamente están conectadas a los grifos apropiados.
Los cedazos de la válvula de •
Cierre la entrada de la fuente de agua y desconecte
agua están obstruidos
las mangueras de llenado de agua de la parte superior
posterior de la lavadora. Use un cepillo o un palillo
para impiar las pantallas de la máquina. Reconecte las
mangueras y abra la entrada de la fuente de agua otra vez.
El calentador de agua no está • Cerciórese de que el calentador de agua está
ajustado correctamente suministrando agua a 48° C – 60° C (120° F – 140° F).
La característica
PerfecTemp
• La tapa debe estar cerrada para que
PerfecTemp
funcione.
no fue activada
El agua es bombeada
La tapa fue levantada o el • Reajuste el ciclo.
hacia afuera antes del
ciclo fue colocado en pausa
ciclo haber sido
de 24 horas
completado
El agua no es drenada
La manguera de drenaje está • Enderece la manguera y cerciórese de que la lavadora
enroscada o está conectada no la está pisando.
incorrectamente
• La parte superior de la salida de drenaje debe estar
localizado a menos de 2,5 m (8 pies) del nivel del piso.
51
Servicio al consumidorSolucionar problemasOperaciónSeguridad
Page 52

52
OTRA Causas posibles Qué hacer
Las etiquetas en el
De vez en cuando el adhesivo • Use un secador de pelo en su velocidad menor, dirija
exterior de la lavadora
usado en las etiquetas no se el aire hacia la etiqueta por unos segundos. Esto hará
no se despegan
despega fácilmente que el adhesivo se despegue fácilmente, sin causar daños
correctamente
a la superficie de la lavadora.
Antes de solicitar un servicio…
Operación SeguridadServicio al Consumidor Solucionar problemas
RUIDOS Causas posibles Qué hacer
La lavadora hace ruido
No está nivelada • Para nivelar el frente de la lavadora, ajuste las patas
niveladoras girando cada pata hacia arriba o hacia abajo
según corresponda. Para nivelar la parte posterior de la
lavadora, levante la máquina 11 cm (4 pulgadas) y vuelva
a colocarla.
La carga de la ropa no • Oprima PAUSE (Pausa) para detener la lavadora,
está equilibrada abra la tapa y redistribuya la carga. Cierre la tapa y
oprima START (puesta en marcha).
La varilla de embarque todavía • Para quitar la varilla de embarque, jale la etiqueta
está montada en la unidad amarilla y sujete la varilla desde el fondo de la parte
derecha de la lavadora.
Lavadora está demasiado • Retire la lavadora de la pared; necesita dejar un
cerca de la pared (golpea espacio de tolerancia de 11 cm (4 pulgadas) entre
durante el ciclo) la pared y la lavadora.
La función
PerfecTemp
• Esto es normal.
PerfecTemp
activa y desactiva las válvulas
está siendo usada de agua para ajustar la temperatura del agua.
AGUA (CONT) Causas posibles Qué hacer
El agua está siendo
La lavadora está en el ciclo • La pulverización de enjuague es normal durante el
pulverizada durante el
de centrifugado ciclo de centrifugado.
ciclo de centrifugado
La lavadora no se llenó
La presión del agua es • Presione START (puesta en marcha) para intentarlo
hasta el nivel escogido
extremadamente baja otra vez.
Las mangueras de admisión • Enderece las mangueras.
están enredadas
Los cedazos de la válvula de •
Cierre la entrada de la fuente de agua y desconecte
agua están obstruidos
las mangueras de llenado de agua de la parte superior
posterior de la lavadora. Use un cepillo o un palillo
para limpiar las pantallas de la máquina. Reconecte las
mangueras y abra la entrada de la fuente de agua otra vez.
El agua se llena y se
El tubo de drenaje está • El tubo de drenaje debe estar localizado a más de
drena al mismo tiempo
demasiado bajo 76,2 cm (30 pulgadas).
(
Las luces de
PerfecTemp y
START/PAUSE (Puesta
en marcha/pausa)
están parpadeando)
Page 53

Notas.
53
Servicio al ConsumidorSolucionar problemasOperaciónSeguridad
Page 54

54
Operación SeguridadServicio al Consumidor Solucionar problemas
Garantía de la lavadora GE
(Para los consumidores en los Estados Unidos)
Todos los servicios bajo la garantía los proporcionan nuestros centros de fábrica o nuestros técnicos
de Customer Care
®
autorizados. Para solicitar servicio, llame al 800-GE-CARES.
Esta garantía se extiende al comprador original y a cualquier propietario que lo suceda para el caso de productos comprados para uso doméstico normal en los
Estados Unidos. En Alaska, usted tendrá que pagar el flete del producto o los costos de viaje del técnico de servicio hasta su hogar.
Algunos estados no permiten la exclusión o limitación de daños incidentales o consecuenciales. Esta garantía le proporciona derechos legales específicos,
y puede tener otros derechos que pueden variar de un estado a otro. Para conocer los derechos legales de su estado, consulte con su oficina local de asuntos
del consumidor o al procurador general de su estado.
■Viajes de servicio a su hogar para enseñarle cómo usar el
producto.
■Una instalación incorrecta.
■Fallas del producto si hay abuso, mal uso, o uso para otros
propósitos que los propuestos, o uso para fines
comerciales.
■Reemplazo de fusibles de su hogar o reajuste de
interruptores de circuito.
■Daño al producto causado por accidente, fuego,
inundaciones, o actos de Dios.
■Daño incidental o consecuencial causado por posibles
defectos con el aparato.
Lo que GE no cubrirá:
Garantidor: General Electric Company. Louisville, KY 40225
Un año Cualquier parte
de la lavadora que falle debido a un defecto de fabricación o de mano de obra.
A partir de la fecha
Durante este
año de garantía completa,
GE también proporcionará
sin costo,
mano de obra
de compra original
y servicio en su hogar para reemplazar las partes defectuosas.
Dos años
Cualquier parte
de la lavadora que falle debido a un defecto de fabricación o mano de obra
.
A partir de la fecha
Durante este
año adicional de garantía limitada,
usted pagará los costos de los viáticos para hacer
de compra original
servicio en su hogar y los costos de mano de obra.
Cinco años
Cualquier parte de la suspensión
que falle debido a un defecto de fabricación o mano de obra. GE
A partir de la fecha
también reemplazará
cualquier tapao cubierta
que se oxide
bajo condiciones de operación
de compra original
normales. Durante estos
cuatro años adicionales de garantía limitada,
usted pagará los costos
de los viáticos para hacer servicio en su hogar y los costos de mano de obra.
Diez años Una transmisión y tina externa,
si cualquiera de estas partes falla debido a un defecto de fabricación
A partir de la fecha
o mano de obra. Durante estos
nueve años adicionales de garantía limitada,
usted pagará los costos
de compra original
de losviáticos para hacer servicio en su hogar y los costos de mano de obra.
Por vida La canastilla de lavado,
si falla debido a un defecto de fabricación o de mano de obra. Durante esta
A partir de la fecha garantía limitada de por vida,
usted pagará los costos de los viáticos para hacer servicio en su hogar
de compra original
y los costos de mano de obra.
Durante:
GE reemplazará
:
Page 55

55
Servicio al ConsumidorSolucionar problemasOperaciónSeguridad
Números de servicio.
GE Answer Center
®
En los EE.UU.: 800.626.2000
El GE Answer Center®está abierto las 24 horas del día, los 7 días de la semana.
Reparaciones en su hogar
En los EE.UU.: 800-432-2737
Para reparar su aparato GE, sólo llame por teléfono.
Necesidades especiales
En los EE.UU.: 800.626.2000
TDD 800-TDD-GEAC (800-833-4322)
GE le ofrece, sin costo, un folleto de ayuda para planear cocinas para personas limitadas
en su movilidad.
En los EE.UU., llame 800-TDD-GEAC (800-833-4322).
Contratos de servicio
En los EE.UU.: 800-626-2224
Compre un contrato GE antes de que su garantía expire, y recibirá un discuento considerable.
Así el servicio al consumidor GE estará allí aún después de que expire su garantía.
Partes y accesorios
En los EE.UU.: 800-626-2002
Las personas calificadas para dar servicio a sus aparatos pueden recibir partes y accesorios
en sus hogares (se aceptan VISA, MasterCard y Discover).
Las instrucciones de mantenimiento para el usuario que contiene este manual, las puede realizar
cualquier usuario. Otro tipo de servicios los deberá ejecutar un personal calificado. Tenga
precaución, un servicio inadecuado puede ser causa de peligros en el funcionamiento.
Servicio satisfactorio
Si no quedara satisfecho con el servicio GE:
Primero,
contacte las personas que le dieron servicio.
Después,
si sigue insatisfecho,
en los EE.UU.,
escriba todos los detalles—incluso su número de
teléfono—a: Manager, Customer Relations, GE Appliances, Appliance Park, Louisville, KY 40225.
Page 56

56
Printed in Louisville, KY
Operating Instructions Safety InstructionsCustomer Service Troubleshooting Tips
Service Telephone Numbers.
GE Answer Center
®
In the U.S.: 800-626-2000
The GE Answer Center® is open 24 hours a day, 7 days a week.
In Canada,
contact: Manager, Consumer Relations, Camco Inc., 1 Factory Lane, Suite 310,
Moncton, N.B., E1C 9M3.
OR
Visit our Website at
www.geappliances.com
In-Home Repair Service
In the U.S.: 800-432-2737
Expert GE repair service is only a phone call away.
In Canada,
call 1-800-361-3400.
Special Needs Service
In the U.S.: 800-626-2000
GE offers, free of charge, a brochure to assist in planning a barrier-free kitchen for persons
with limited mobility.
In the U.S., call 800-TDD-GEAC (800-833-4322).
Service Contracts
In the U.S.: 800-626-2224
Purchase a GE service contract while your warranty is still in effect and you’ll receive a
substantial discount. GE Consumer Service will still be there after your warranty expires.
In Canada,
call 1-800-461-3636.
Parts and Accessories
In the U.S.: 800-626-2002
Individuals qualified to service their own appliances can have parts or accessories sent directly
to their homes (VISA, MasterCard and Discover cards are accepted).
Instructions contained in this manual cover procedures to be performed by any user. Other servicing
generally should be referred to qualified service personnel. Caution must be exercised, since
improper servicing may cause unsafe operation.
In Canada, please consult your yellow pages for your local Camco number.
Service Satisfaction
If you are not satisfied with the service you receive from GE:
First,
contact the people who serviced your appliance.
Next,
if you are still not pleased,
in the U.S.,
write all the details—including your phone number—to:
Manager, Customer Relations, GE Appliances, Appliance Park, Louisville, KY 40225; or,
in Canada,
to Director, Consumer Relations, Camco Inc., 1 Factory Lane, Suite 310, Moncton, N.B.,
E1C 9M3.
 Loading...