

Page 1
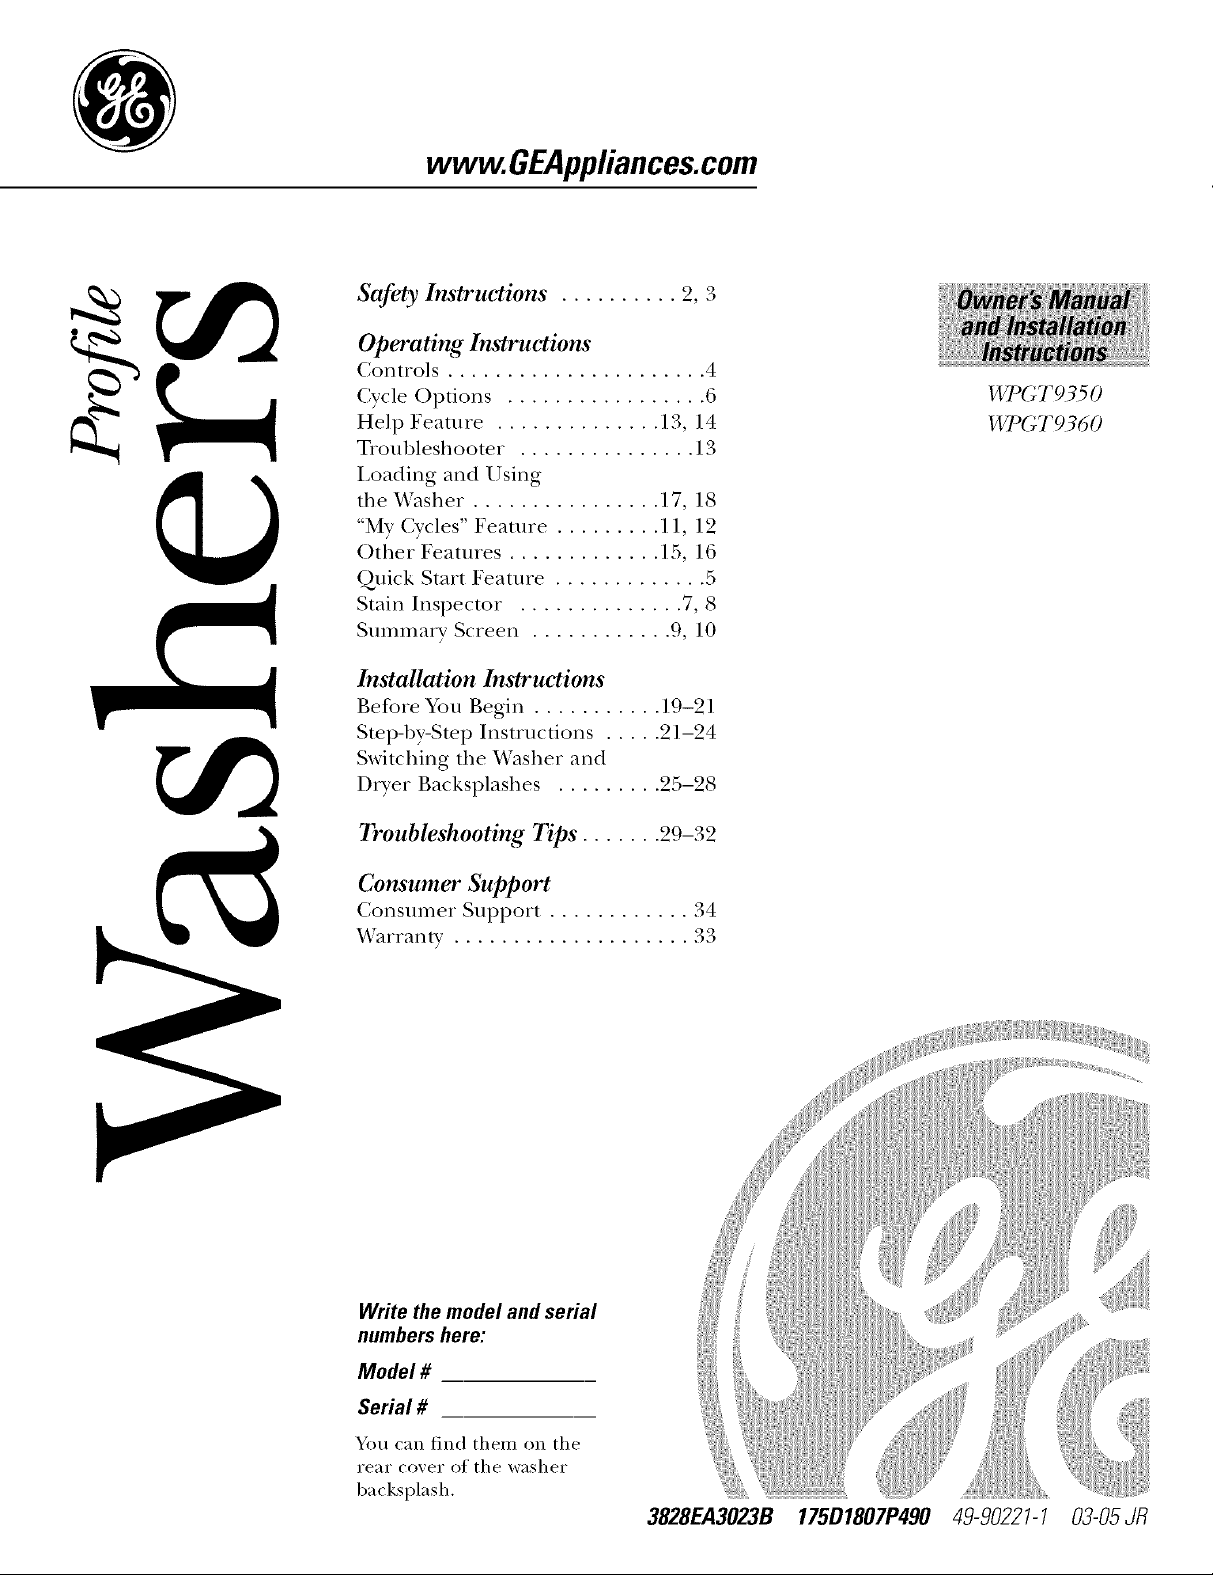
www.GEAppliances.com
Safety Instruc_tions .......... 2, 3
Operating Instruc_tions
Controls ...................... 4
Cycle Options ................. 6
Help Feature .............. ] 3, ] 4
Troubleshooter ............... ] 3
I,oading and Using
the _'asher ................ 17, 18
"My Cycles" Feaulre ......... 11, 12
Other Features ............. 15, 16
Quick Start Feature ............. 5
Stain Inspector .............. 7, 8
Summa_ T Screen ............ 9, 10
Installation Instructions
Before You Begin ........... 19-21
Stop-by-Stop Instructions ..... 21-24
Switching the _4'asher and
Dvver Backsplashes ......... 25-28
Troubleshooting Tips ....... 29-32
Consumer Support
Consumer Support ............. 34
Warranty .................... 33
Write the model and serial
numbers here:
Model #
Serial #
You can find them on the
rear cover of the washer
backsplash.
3828EA3023B 175D1807P#90 49-9022!-1 03-05JR
Page 2
IMPORTANT SAFETY INSTRUCTIONS
READ ALL INSTRUCTIONS BEFORE USING.
A WARNING. t vo,.yo.rsaJeO,,,hei.I,,.,,a,io,i. ,his,,,...._m._tbep.,,wedtominimizetheriskoffire or
explosion, dearie shock, or to prevent proper O, damage, personal injury, or loss of lilb.
WA 7_2R HEA 7_2R SAF};TY
I "mler _ertabz _omlilio_s; I_rch_g'er_gas may be p_>dlu:al in a waler healer thal ha.s nol ba,r_usal fi*rIwo wa,ks or
morn. Hydrqtl_:_zg_.s ca_z be @lo.sive urMer tlu:.w,circumsla_(e._.
If the hot water has not been used tor two weel<s or more, prevent the possibility _ffdamage or injury
by turning on all hot water emcets and allowing them to nm tot several minutes. Do this befiwe
using any electrical appliance which is connecmd to the hot water system. This simple procedure will
allow any built-up hydrogen gas to escape. Since the gas is flammable, do not smoke or use an open
flanle or appliance during this process.
PROPER INS TALIA TION
Thi.s wa.sher mu.st bep_qJedy ir_stallal arm localed in acmrdam:e with tlu, h_.slallation h_.slruclior_.sbqfim_il is
u.w,d, h_slallation h_slrltctior_s aw b_chMal in the bm k (_/thi.s mar_ual.
• Install or store where it will not be eN_osed • Properly ground washer to confimn with all
to temperatures below ti'eezing or exposed governing codes and ordinances. N>llow details
to the weather: in Installation Instructions.
YOUR LA UNDR Y APd'2A
• Keep the area underneath and around your
appliances fl'ee of combustible materials such
as lint, paper; rags, chemicals, etc.
• Close supervision is necessm T if this appliance
is used by or near chihh'en. Do not allow
children to play on, with or inside this or any
other appliance.
Page 3

IMPORTANT SAFETY INSTRUCTIONS
READ ALL INSTRUCTIONS BEFORE USING.
A WARNING! vo,.yo.rsa/eO,,,hei./,..,,a.o.i.,his,,,...._m._tbep.,,wedtominimizetheriskoffire or
explosion, dearie shock, or to prevent proper O, damage, personal injury, or loss of li]b.
WHEN USING THE WASHER
• Use this appliance only fi)r its intended
puq)ose as described in this Owner's Manual.
• Never reach into washer while it is moving.
Wait until the machine has completely stopped
befi)re opening the lid.
• Do not mix chlorine bleach with ammonia
or acids such as vinegar and/or rust removei:
Mixing different chemicals can produce a toxic
gas which may cause death.
• Do not wash or dry m*icles that have been
cleaned in, washe_i in, soaked in, or spotted
with combustible or explosive substances
(such as wax, oil, paint, gasoline, degrease_,
dry-cleaning solvents, kerosene) which may
ignite or explode. Do not add these substances
to the wash water: Do not use or place these
s/Ibst_llIces aI'O/llld VO/li" _;lsheI" oY dryer
during operation.
WHEN NOT IN USE
• Turn off water timcets to relieve pressure on
hoses and wflves and to minimize leakage if
a break or rupture should occm: Check the
condition of the fill hoses; they should be
replaced ex'eIT 5 yem_.
• Befin'e discarding a washe_; or removing
it fl'om se_Mce, remove the washer lid to
prevent children ti'om hiding inside.
• The laundty process can reduce the flame
retardan W ot lid)tics. To avoid such a result,
carefldlv follow the gam/ent inanufilcturer's
wash and care instructions.
• To minimize the possibili_' _ff electric shock,
tmplug this appliance from the power supply
or disconnect the washer at the household
distribution panel by removing the fllse or
switching off the circuit breaker befin'e
attempting any maintenance or cleaning.
NOTF: Pressing START/STOP or POWER
does NOT disconnect the appliance fl'om
the power supply:
• Never attempt to operam this appliance
if it is damaged, malflmcfioning, partially
disassembled, or has missing or broken
parts, including a damaged cord or plug.
• Do not attempt to repair or replace any part of
this appliance mfless specifically recommended
in this Owner's Manual, or in published tlseI _
repair instructions that you tmde_tand and
have the skills to cam' out.
• Do not tamper with controls.
READ AND FOLLOW THIS SAFETY
INFORMATION CAREFULLY.
SAVE THESE INS TR UC TIONS.
Page 4
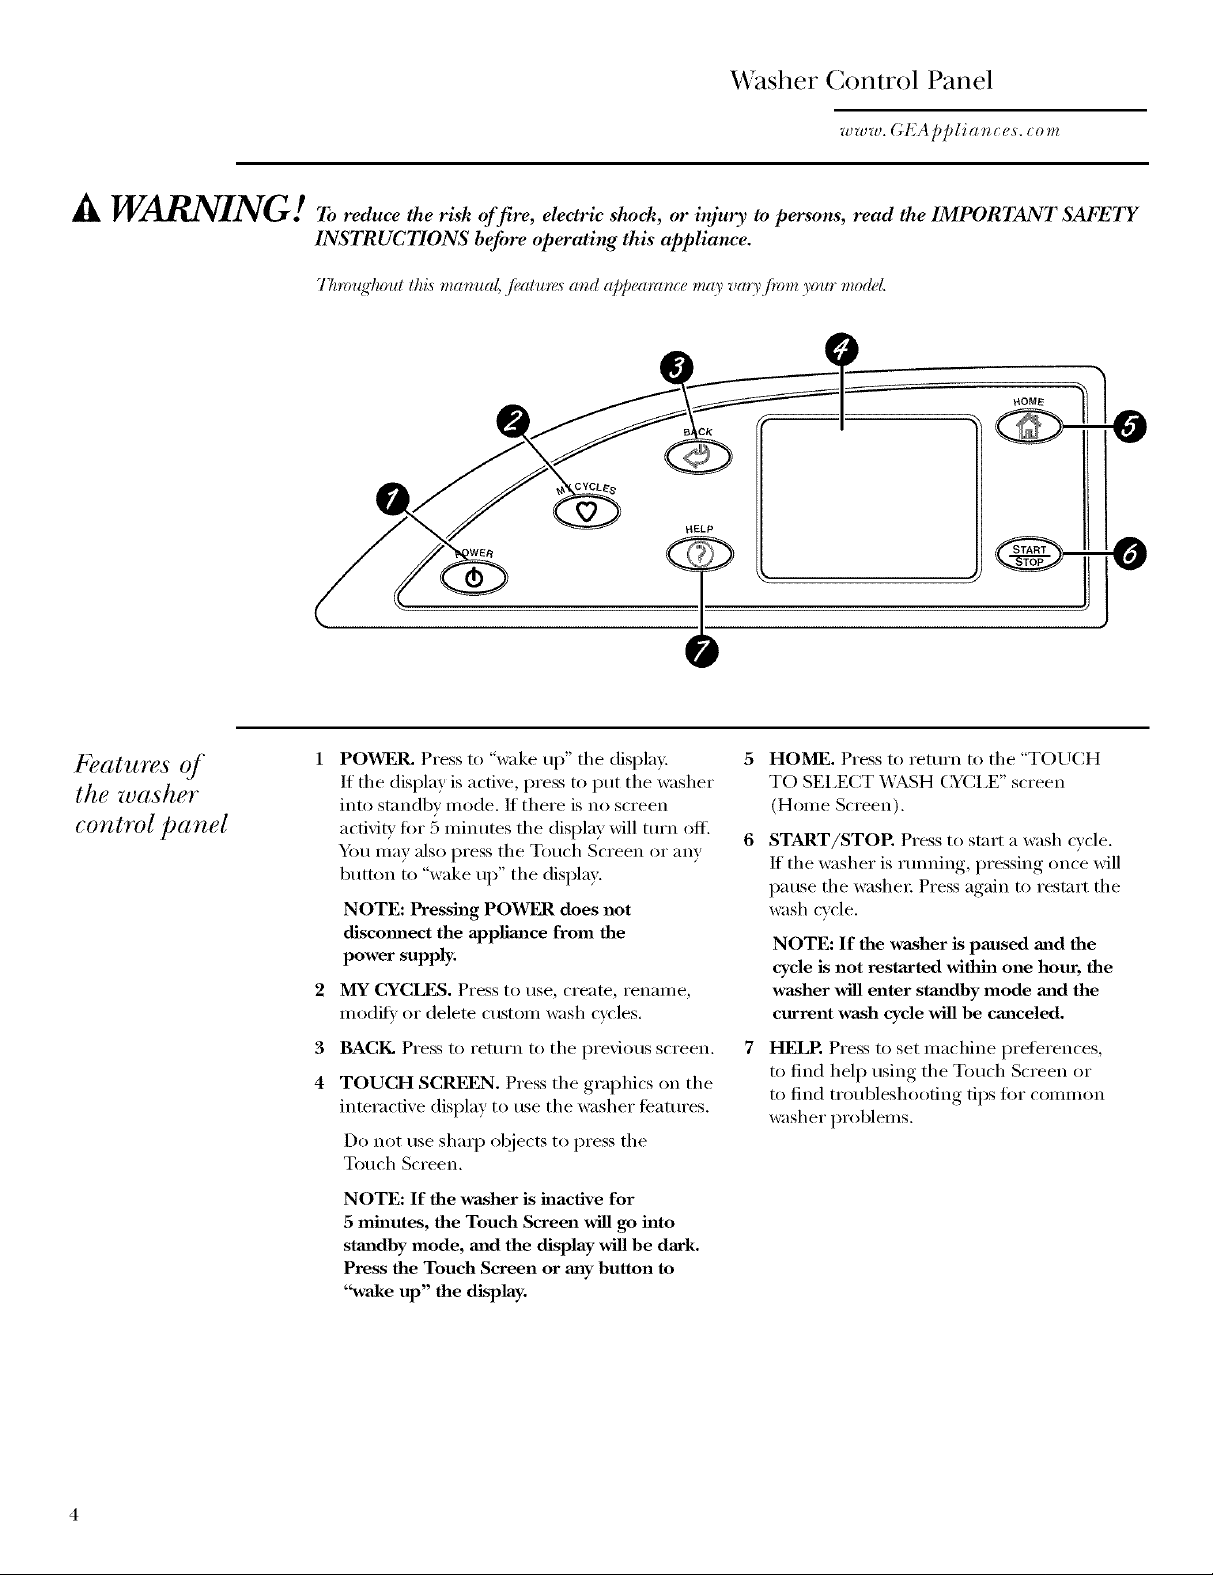
Washer Control Panel
www. GEAppliances. (ore
A WARNING. t r,,red.cethe,qsh ele..cshoch,orinS. y1,,persons, readtheIMPORTANTSAFETY
INSTRUCTIONS befin'e operating this appliance.
77zroug'kol_Ilkis manual, fi, alure,_and appearance may varyJmm your model
HOME
HELP
Feat_!lres of
the washer
control panel
POWER. Press to %_ke up" the display.
If the display is active, press to put the _sher
into standby inode. If there is no screen
activity fin" 5 Ufilmtes the display will turI_ off.
YOU Inay also press the Touch Screen or any
button to "wake up" the display,
NOTE: Pressing POWER does not
dJscmmect the applimlce from the
power supply.
2
MY CYCLES. Press to use, create, renalne,
Inodif_, ' or delete custoln _lsl/cycles.
3
BACK. Press to return to the l)revious screen.
4
TOUCH SCREEN. Press the graphics on the
interactive display to use the washer ti_atui'es.
Do not use shaq) objects to press the
Touch Screen.
NOTE: If the washer is inactive for
5 minutes, the Touch Screen will go into
staa_dby mode, m_d the display will be dark.
Press the Touch Screen or mV button to
"wake up" the display.
HOME. Press to returt_ to the "TOUCH
TO SELECT X___SH (_Y(_LE"screen
(Holne Screen).
START/STOP. Press to start a wash cycle.
If the washer is rulming, pressing once will
pause the washeI: Press again to restart the
wash cycle.
NOTE: If the washer is paused and the
cycle is not restarted within one hour, the
washer will enter sta_ldby mode and the
current wash cycle will be cmlceled.
HELE Press to set machine preferences,
to find hel I) using the Touch Screen or
to find troubleshooting tips fi)r colnlnon
washer i)roblelns.
Page 5
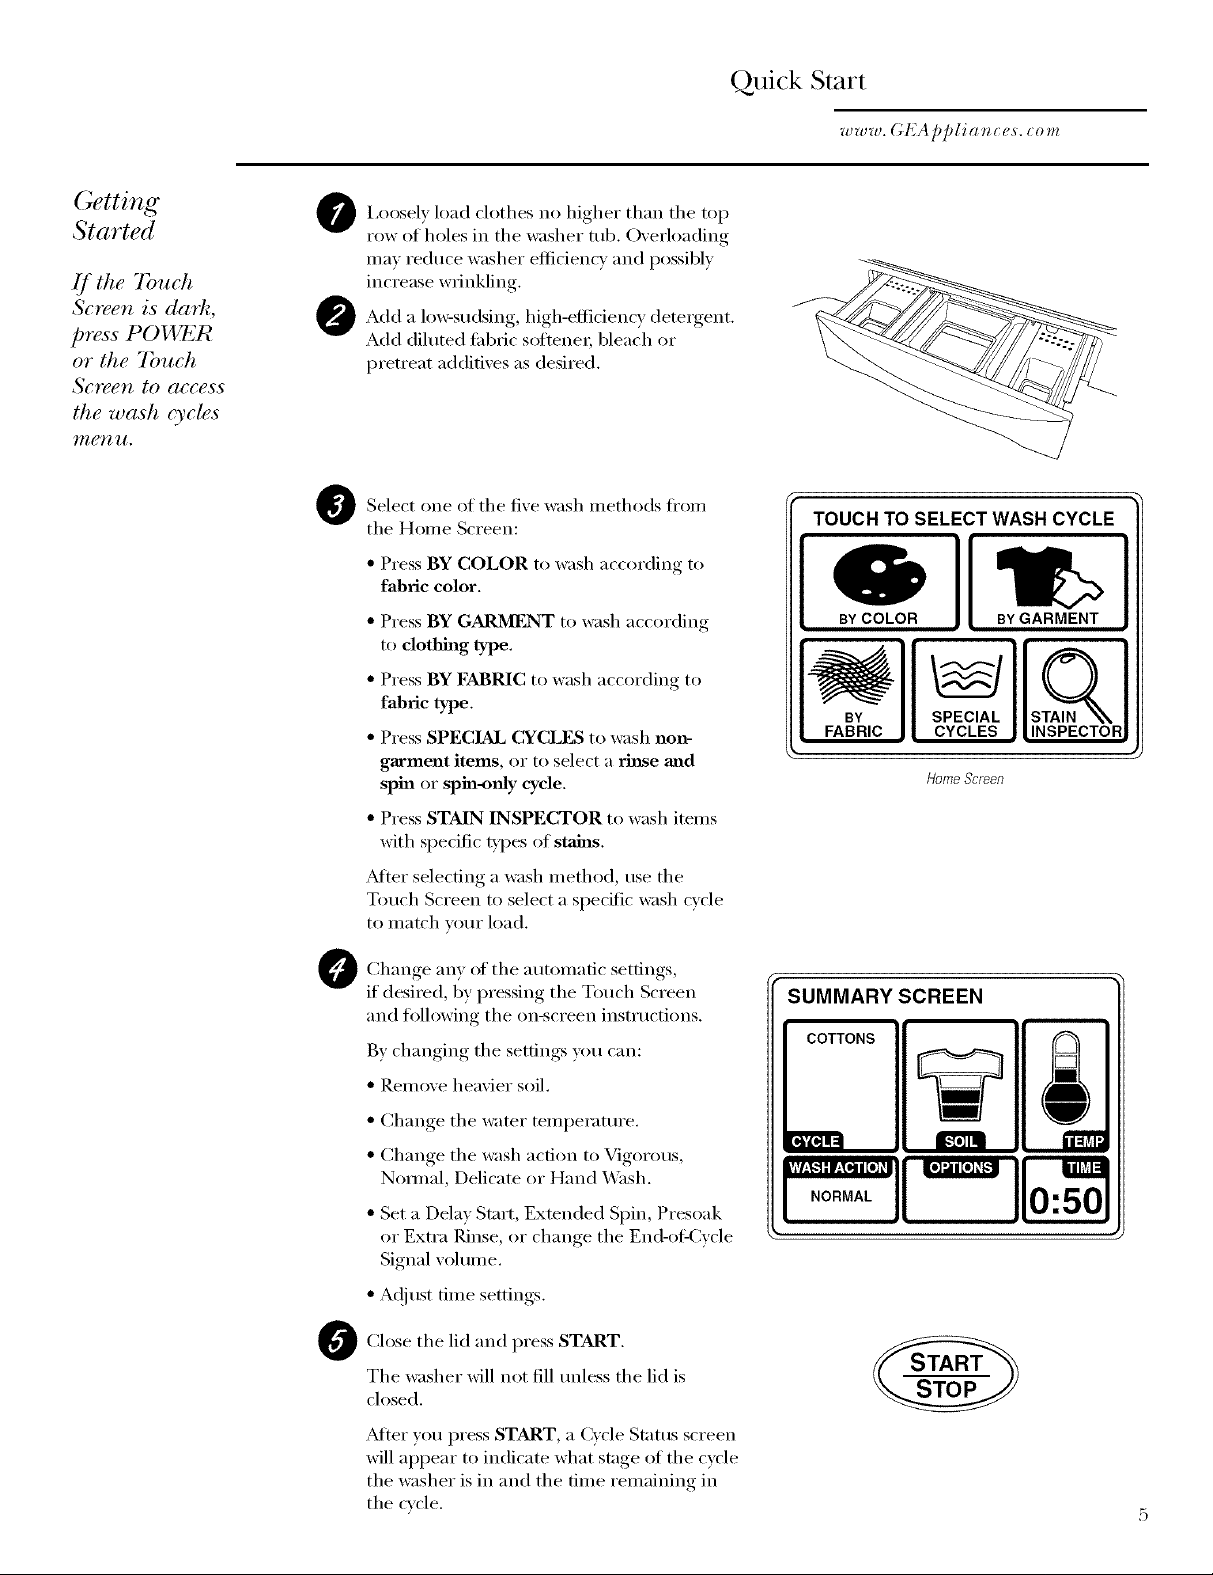
Quick Start
www. GEA pplia r_ces. corn
Getting
Started
If the 7buch
Screen is dark,
press POWER
or the 7buch
Screen to access
the wash cycles
_ll,_Tt 11.
I,oosely load clothes no higher than the top
0
row of holes in the washer tub. Overloading
may reduce washer efficiency and possibly
increase wrinkling.
Add a lo_sudsing, high-efficiency detergent.
@
Add diluted tid)ric sotiene_; bleach or
pretreat additives as desired.
Select one of the fixe wash methods fl'om
@
the Home Screen:
• Press BY COLOR to wash according to
fabric color.
• Press BY GARMENT to wash according
to clothing type.
• Press BY 1_5_2BRICto wash according to
fabric type.
• Press SPECIAL CYCLES to wash non-
garment items, or to select a rinse mad
spin or sphl-o_fly cycle.
• Press STAIN INSPECTOR to wash imms
with specific types of stains.
_Mter selecting a wash method, use the
Touch Screen to select a specNc wash cycle
to Illatch VO/lI" load.
TOUCH TO SELECT WASH CYCLE
Gb
BY COLOR BY GARMENT
BY SPECIAL S
FABRIC CYCLES INSPECTOR
HomeScreen
Change any of the automatic settings,
0
if desired, by pressing the Touch Screen
and tollowing the on-screen instructions.
By changing the settings you can:
• Remove heavier soil.
• Change, ....the water temi)erature
• Change the wash action to Vigorous,
N(mnal, Delicate or Hand X_'ash.
• Set a Delta Start Extended Spin, Presoak
or Extra Rinse, or change the End-ol:Qvcle
Signal xolume.
• A(!i ust time settin ,s
Close the lid and press START.
0
The washer will not fill unless the lid is
closed.
_Mter you press START, a Cycle Stares screen
will appear to indicate what stage of the cycle
the washer is in and the time remaining in
the cycle.
SUMMARY SCREEN
COTTONS
iihVJ:
0:50
Page 6
• h
Vvas Cycles
www. GEApplia,_es.c0m
If the Touch Screen is dark, press POWER or the Touch Screen to access the wash cycles menu.
The default cycle settings axe based on staaldmxl load types. Always follow the fabric mmmfacturer's
care label when laundering.
Washing by
Color
Washing by
Garment
7)pe
Washing by
l')zbric Type
Select By Color to wash loads sorted by color.*
COI,OR (NCI,ES include:
• Bright/Dark • Mixed (h)lors
(_olors
• i,ight Colors
' • _ hites
Select By Garment to wash loads sorted by garment type.*
GARMENT (NCI,ES include:
• Mhletic Wear
• Blouses
• Delicates
• Dress Shirts
•Easv Care
• Everyday
Weai'/Casual
Select By Fabric to wash loads sorted by fabric type.
[L_BRIC (WCI,ES include:
• Blends • Delicates • Polxester
(on some models) • Easx Care • Silks (Washable)
• (_ottons (on some models)
• New Coh)rs
•,Jackets/Coats
• Jeans
• Khakis
• Knits
• I,ingerie
• Mixed Garn_ents
• Knits
• Play (_lothes
• Sweaters
• Swimwear
• Underwear
• Silks (Xa'ashable)
BY COLOR
BY GARMENT
Washing
Using the
Special Cycles
Select SPECIAL CYCLES to wash loads of nongarment items or to
select a rinse mad spin or spin-only cycle.
SPECIAl, (NCI,ES include:
• Blankets (Cotton) • Pet Bedding • Spin Only
• Blankets (Other) ('Washable) • Super Clean
• (_omforter • Throw Rugs
• EnelgDPlus
• Handwash
X4'oolite (': HE • Sneakers • XM_shable X,Vools
• Hosiery/Bras
(use Inesh bag)
* After colnnmi]icatioi] occurs fix)n] the washer to the dryer the dryer n]av ask for additional
"[L__BRIC TYPE" infiwmation.
• Quick _M_sh
• Rinse aim Spin (_4'ashable)
• Sheets • Towels
SPECIAL
CYCLES
Page 7

Stain Inspector
www. (;EAppliances. corn
Washing
Using the
Stain
Inspector
The Stain Inspector provides l)retreatment
tips and opfim um washing ti)r specific t},])es
of stains.
Y)m select the specific stain, tid)ric D])e and colo_;
and the washer creates the wash cycle tot treating
the stain.
Example: Washing a chocolate-stained, white cotton shirt
1 Press STAIN INSPECTOR.
2 Read and follow the instructions on the
Touch Screen before treatino the tabric.
TREATING
BEFORE
FABRIC
1) REFER TO FABRIC CARE LABEL FOR
INSTRUCTIONS. USE HELP FUNCTION
FOR ADDITIONAL STAIN TIPS
2) TEST STAIN REMOVAL TIPS ON HIDDEN
AREA OF FABRIC
3) DO NOT PUT STAINED ITEM INTO DRYER
(STAIN MAY BE SET INTO FABRIC)
3 Select FOOD/DAIRY/COOKING fl'om
the list of stain categories and select
CHOCOLATE from the list of stains.
4 Press the HELP button to find pretreatment
inf0mmtion for the specific type of stain.
CHOCOLATE
- ADD ANENZYMECONTAINING
DETERGENT,LIKE LIQUIDTIDEHE(R)
TOTHEPRE-TREATDISPENSERAND A
NIGH EFFICIENCYDETERGENTTOTHE
DETERGENTDISPENSER.
5 Select COTTONS from the list of fabric
types, and select WHITES from the list
of coloi_.
6 Fill the detergent tray with a lo_sudsing,
high-etticiency liquid detergent such as
Tide ') HE. Fill the Pretreat tray with
the proper pretreatment additive.
PRETREAT
Tray
Appearancemayvar'/
You can find additional stain categories and
stains by pressing MORE in the lower right
corner of the Touch Screen.
DetergentTra_
7 Place the stained garment(s) in the washer
first; then add the rest of the load. For best
stain remowd, only wash items with stains
matching your selection.
8 Press START.
The washer will _un a Pretreat presoak cxcle
prior to the main wash c_cle.
NOTE: For some stain cycles, the water
temperature for the presoak cycle may not be
the same as the water teml)erature fl)r the main
wash cycle.
IMPORTANT: Check to make sure the stain
is completel) remoxed before I)lacin'*_ the
garment in the dryer.
Page 8
Stain Inspector
www. GEAppliances. corn
Stain
Selections
Below is a listing _ff the stain selections awfilable
on the washer Touch Screen. [_)n_additional
inflmnation on handling these types of stains,
visit the Tide': Stain Detective at
www.tide.com/staJndetective.
Stain Selections (not all selections a_v available on all modds)
Beverages
• Alcoholic beverages
• (_otfee
• Fruit juice, Other
• Grape juice
• Hot chocolate
• Kool-Aid <)
• Milk
• Soda, colored
• Tea
• _lter
• Wine, white
• Wine, red
School/Office/Home
• Adhesive tape
• Ballpoint ink
• Crayon
• Fabric sot*ener
• Glue (synthetic)
• Glue
(white/common)
• Mildew
• Paint (wate>based)
• Paint (oil-based)
• Pencil mark
• Rubber cement
• Shoe polish
• Wite-OtW:
Food/DaJry/Cookhlg
• Animal tilt
• Baby fl)rm ula
• Barbecue sauce
• Blueberry
• Butter/margarine
• Chocolate
• Cooking oil
• Cream/cheese sauce
• Egg
• Frozen
Popsicle<':/,lEi,i =O <':
• ( ;I'_IVV
• Grease
• Maple sylup
•Mavonnaise
• Milk
• Mustard
• Pudding
• Salad dressing
• Nov Satlce
• Tomato-based
• Vegetable oil
Heavy Oils/Grease
• Gasoline
• Motor oil/I,ube
• Ointment/Salve
Outdoor
• Carbon
• Clav
• Dingy white socks
• ( ;I'_ISS
• Mud/dirt
• Rust/iron
• Tree sap
Personal
• Baby stains
• Blood
• Medication, general
• Mouthwash
• Perspiration
• Urine/Feces
• Vomit
Cosmetics
• Cha I) Stick _
• Deodorant/
antiperspirant
• i,ipstick
• I,otions
• Makeup (oil-based)
• Makeup (wate>
based)
• Nail polish
Specialty Stains
• Adhesive tape
• Asphalt/tar
• Ballpoint ink
• Glue (synthetic)
• Pine sap (on some
models)
• ]).ubber cement
• Silly Putty _
• Tree sa l) (on SOlile
models)
Waxes
• Candle wax
• Cha I) Stick <)
• Crayon
Page 9
Sulnn]ary Screen
www. GEAppliances. corn
About the
Summary
SCT(?eJ2
Changing the
Soil Level
After sdecthlg a wash cycle, fl_e Summarx Screen
displays tim automatic settings tor the wcle you hme
chosen. 5bu can adjust these bx umching the screen
location tot any of the settings sho_n.
It?_m change any of fl_e automatic settings, you can sa\e
the new setting_ as a custom %13C}cle" bx pressing tim
MY CYCIJgS button and choosing SAVE CURRENT
SETI_NGS.
Changing the soil level increases or decreases the wash
time to remove different amounts of soil.
To change file soil le\el, touch SOIL on file Touch
Screen; then use the arro_vs to select more or less soil.
Px_ss OK \d_en w,u hme reached fl_e desired setting.
SUMMARY SCREEN
COTTONS
NORMAL 0:50
SOIL LEVEL 5
MORE SOIL
LESS SOIL
rFagrr,rt_.=l
i11_1=
HEAVY
LIGHT
Changing
the Wash
7bmperature
Changing the
Wash Action
Changing the temperature changes the wash and
presoak temperatures only. The finial rinse Mll always
be a cold rinse.
Follo_ the thbric manldlmturer s care label \d_en
selecting the wash tempenmlre.
To change die wash mmperamre, touch fl_e TEMP pad
on die Touch Screen; then use file arro_ts to select a
higher or lo_r temI)eratm>. Press OK \dlen you hme
reached the desired setting.
-ACAUTION:O.somec,'c,es he
temperature can be set at _ERY HOT. This setting
utilizes file washer's internal hearer \dfich will extend file
wash time. When using the XERY HOT temperature
setting, do not put hands in the wateL
Changing the wash action changes the wash mid spin
speeds of the cycle.
Always ff}llo_ die ii_bric manutlmturer's care label when
changing the wash action.
To change die wash action, touch _A.SH ACTION
on tim Touch Scx_en; then select die desix_d setting.
Tspicalls, slox_er spin speeds result in less water removed
ti'om clofl_es.
Wash Action Wash Speed Spin Speed*
Normal Medium Fast
\'igorous Fast Fast
Delicam Slo_ Slo_
Hand Wash** Extra Slo_ Extra Slo_
TEMPERATURE
HIGHER
COOL
LOWER
WASH ACTION
[NO OA"T!'"ANOIwAs.
: Th{ slow(r the spin speed tl_( less likely wrinkles
will be sel in lhe clothes.
':*1 s( a low-sudsing, high-( ffMenc,; genii( liqtfid
det( rgent such as Wooliw_ I]E. 9
Page 10
Summary Screen
www. GEAppliances. corn
About the
VVash Options
The Wash Options allow you to set options for the
current wash cycle only. After you have made all
desired changes, press OK.
Delay Staxt- Use to delay tile start ot wmr washe_:
Press DFJ_,AY START to change the delay time.
Presoak - Soaks tile clothes bet0re begimfing tile
wash cycle. Press PRESOAK to change the soaking
time.
Additives - Appea_ ONI,YM_TER a presoak has
been selected. Uses tile contents of tile Pretreat
dispenser tray t0r a presoak. _]/en selected, the
washer will drain alter the presoak and fill again t0r
the wash cycle. Press ADDITIVES to specit)' if you
will NOT be using a Pretreat additive or ifvou do
not want the washer to drain atter presoak.
Extra Rinse - Adds an additional cold rinse to the
end of the wash cycle.
Signal - Merts w)u that tile cycle is complete. Tile
clothes should be removed when the beeper goes
off so wrinkles won't set in. Touch SIGNAl, to
select tile volmne or to ttlYiS tile beeper off. Tile
new volume will be saved as the delimit setting.
Extended Spin - Increases the length of the spin
time to extract iiloi'e water tl"OlIl VO/lI" clothes.
OPTIONS
_1 DELAY HR] hhEXTENDEDSTART 1 _FSPIN (_]
_)ORE 15 MINI hlEXTRASOAK V" RINSE _* ]
ARE YOU USING
PRESOAK ADDITIVES ?
I
Acljusting the
7 me Settings
NOTE: Tile water level Mll \my depending on tile
load size and _*pe. Tile washer uses adaptive filling
and load sensing to provide tile ai)propfiate water
level flw effective and efficient wash pe_imnance
and energy' usage.
NOTE: X4'ater may not cover tile top level of tile
clothes. This is nomml fi)r high efficiency washe_.
The water fill is optimized by the system fiw better
wash perfimnance.
You cma adjust the length of the wash cycle by
changing the cycle time, adding a Delay Stm't
or adding an Extending Spin.
Cycle Thne - Press CYCLE TIME; then use
tile }IITOIVS to select illOi'e oF less tilne,
Delay Time - Use to add a Dela) Start to tile
begimfing of the wash c_cle. Press DFI,AY
TIME; then set the DEI__Y START time in the
OPTIONS menu.
ILxtended Spin - Increases the length of tile spin
tilI/e to extract iiloi'e water ti'oli/ VO/li" clothes, Press
1?2XTENDED SPIN; then select 1?2XTENDED SPIN
ti'om the OPTIONS menu.
ADJUST TIME SETTINGS
[CYCLETIME] [DELAYTIME I
[ EXTENDED SPIN ]
NOTE: Mter tile wash cycle begins, you Mll not
be able to change tile Cycle Time or Delay Time.
Tile washer Mll beep twice if you t_' to change
10
tile times alter tile cycle begins.
Page 11
"My Cycles"
w w w. (; EA p p Iia n ces. com
About the
"My(;yc#s"
k ature
Creating
and Using a
"Myc>.#"
The "My Cycles" feature allows you to create,
store mid reuse up to 6 custom cycles. Create
your own cycles fl'om scratch, or ac!iust tile
settings of a predefined wash wcle, then sa;'e
for one-touch recall.
You cm_ create "My Cycles" two ways, by either
modil)'ing a predefined wash cycle or creating
a cycle ti'om wmr own combination of settings
and options.
To build your mm "My Cycle" from the
Home Screen:
1 Press tile MY CYCLES button.
2 Select CRFATE fl'om tile Touch Screen
inelnl.
3 Choose whether wm want to mo(lit)' a
predefined cycle or create a new cycle.
4 If you are modil}'ing a predeth_ed cycle,
select the wash cycle you wish to modify:
5 Chan,*e,_ any, of the automatic settings and
select any options.
6 Press SAVE on tile Touch Screen.
7 Using tile keypad on tile Touch Screen, Q:l)e
tile name of your "Mv (:vcle" and press OK.
To begin using your new "My Cycle" right
awaB select it fl'om the Touch Screen menu
and press START.
To save a current cycle as a "My Cycle" from
the Smmnaacy Screen:
1 ?dter setting a wash cycle, or alter a wash cycle
hasj ust completed, press the MY CYCLES
b/lttoIl.
2 Select SAVE CLrRRENT SETTINGS fl'om
tile Touch Screen menu.
3 Using tile keypad on tile Touch Screen, Upe
the name ot umr "My Cycle" and press OK.
To begin using your new "My Cycle" right
away, select it ti'om tile Touch Screen menu
and press START.
MY CYCLES
l USE
l CREATE
l DELETE
II
II
I
MODIFY
RENAME
I
I
MY CYCLES
I USE ]1 MODIFY
I CREATE ] [ RENAME
I DELETE ]
To use a "My Cycle" from the Home Screen:
l Press tile MY CYCLILS button.
2 Select USE fl'om tile Touch Screen menu.
3 Select the cycle name fl'om the Touch Screen
inelnl.
4 Change any of tile atltOulatic settings and
select any options.
5 Press START.
11
Page 12

"My Cycles"
w w w. (; EA p p Iia n ce,s. co m
ModiJying,
t_maming or
Deleting a
"my(;yc#"
To modify the setth_gs of a "My Cycle" from
the Home Screen:
1 Press the MY CYCLES button.
2 Select MODIFY fi'om the Touch Screen
IlleIl[I,
3 Select the cycle name fl'om the Touch Screen
I1/e II [ L
4 Change any otthe automatic settings and
select any options.
5 Press SAVE on the Touch Screen.
To renmne a "My Cycle" from the
Home Screen:
1 Press the MY CYCLE.S button.
2 Select RENAME fi'om the Touch Screen
Inelltl.
3 Select the cycle name fl'om the Touch Screen
Illelltl.
4 Using the keypad on the Touch Screen, D'i)e
the name of your "My Cycle" and press OK.
To delete a "My Cycle" from the Home Screen:
1 Press the MY CYCLES button.
2 Select DELETE fi'om the Touch Screen
Illell/I.
3 Select the cycle name fl'om the Touch Screen
II/eIl[I.
4 Choose YES to delete the cycle or CANCEL
to i'eturn to the list of "Mv Cycles."
12
Page 13

Help
www. GEAppliances. corn
About the
Help f_ature
Using the
Troubleshooter
Press*hag the HELP button from the Home Screen
allows you to locate troubleshooting tips for
common washer problems, to find help wRh using
the Home Screen or to set machine preferences.
Pressing the HELP button while on any other
screen alhm:s wm to find additional infimnafion
on features fi)und oil that screen. Press HELP;
then touch any pad on the Touch Screen fi)r an
explanation of that teatm'e. To exit the teatm'e,
press HI?7I_P once to return to the I)revious screen
or twice to exit Hell).
To locate Troubleshooting Tips for common
washer problems:
1 Press the I-_7,LP button.
2 On the Touch Screen, select TROUBLE
SHOOTER.
3 On the Touch Screen, select the problem
description fl'om the list. _m can use the arrows
at the right of the screen to scroll up and down
through the list of additional problems.
4 On the Touch Screen, select a possible cause
fin" the problem and fi)llow the on-screen
instructions to find a solution.
PREFERENCES HELP
[ MACHINE ] [ HOMESCREEN ]
I TROUBLESHOOTER I
TROUBLE SHOOTER
PRESS DESCRIPTION FOR POSSIBLE CAUSES
NOFILL OR SLOW FILL
_ SPORADIC FILL
FILLING AND DRAINING AT THE SAME
TIME
MACHINE MOVES BEFORE WATER FILL
NOINFUSOR OR BASKET MOTION
Finding Hel D
Using the
Home Screen
Pressing the HELP button, then selecting HOME
SCRF):N HELP allows you to f'md additional
information on features found on the Home
Screen. Touch any pad on the Touch Screen fin.
an explanation of that ti_atm'e. To exit the teatm'e,
press the BACK button.
13
Page 14

Help
www. GEA pplianc es, corn
Setting the
Machine
P /krences
The machine settings on tile Hel I) feature
allow you to control tile volmne of tile butum beep
and end-oI:c}rle signal, and turn the x_sher/duer
COl//l//llIlication feature on or off.
Button Beep
The button beep controls file volume of the beep fl_at
is made \_hen you press any of file buttons or file
Touch Screen.
To change the volume of the button beep:
1 Dora the Home Screen, press the HFJ_P button.
2 Select MACHINE PRE_I_7111_;NCESfrom
the Touch Screen.
3 Select BUTTON BFk]P frorli the Touch Screen.
4 Use the arro_:s to make the w)lmne louder
or softer, or to turn tile beep off]
5 Select OKfi'om the Touch Screen.
The ne_ \ohlme is no_ saved as the defm_lt setting.
Washer/Dryer Communication
Washer/Duer commtmicafion allo_s v()ur washer to
send cxcle in_brmation to _mr dryer to create a dr\
c_cle that matches _our wash load.
Alter fl_e _;_sh ctcle is complete, commmfication
begins once either the _sher or drxer Touch Screen
is activated or _sher lid is up.
Once the information is sent, your dryer will cx_ate
the optimal (hT_'cycle tor your load.
If you hate sorted wmr _;isl/load bx color or g',mnent
and thex>tbre selected color or g_,m-l-lenton the
washer Touch Screen, upon tnmsten'ing the
information to tile (tr}ec the dr}er will ask you to
select the tabric N)e. This is normal, and is done to
propedy optimize drying time for the)ust-\_ashed
load. ,Mier selecting the tabfic type, the (h)er displa}
screen will be sho_n. ,Mier x>\iewing, px>ss START.
If the dr}er (fispla} screen is off and you _;li/t to
use tile "Washer Recommended (5.c]e" to dr\ your
clothes, touch the display sc_>en on the dryer to
activate. 51m will have a "Washer Recommended
(kcle" N_tton appear on }_)ur (hver Home Screen.
Push it tor retfie\ing the recommended (h) er cycle
tot the just-\_,ashed load.
To turn the Washer/Dryer Commmfication feature on
or off:
1 FrOlTithe Home Screen, press the t_J_P button.
2 Select MACItlNI_] PRE_3/ENCES fi'om
the Touch Sci>en.
MACHINE PREFERENCES
SIGNAL COMMUNICATION
3 Select WASHFJ//DRYI_]/COMMUNICATION
frorli the Touch Screen.
4 Touch the pad at the bottom of the Touch Screen
to select ON or OFF.
5 Select OKfrom the Touch Screen.
I )
End-of-Cyde Signal
The End<)i:Cvcle signal alerts you \dmn the cycle is
complete.
To change the volume of the end-of-cycle signal:
1 From the Home Screen, press the ItFJ_P N_tton.
2 Select MACHINE PRf_'EI/ENCES fl'om the
Touch Screen.
3 Select END OF CYCLF SIGNAL Ii'om the Touch
Screen.
4 Use tile arrm_:s to make the volume louder
or soflec or to turn the signal off.
5 Select OKii'om the Touch Screen.
The ne_ vohlme is no_ sa\ed as the defimlt setting.
Language (On some models)
The lang-uage button allo_:s the user to switch
bet\_een English and Spanish.
To change the lmNuage:
1 From the Home Screen, t)ress the ItFJ_ Ninon.
2 Select MACHINE
PRf_}7111_2NCES/PRf_'EIII_NCIAS DE LA
MAQI_NA ti'om the Touch Screen.
3 Select LANGUAGE/IDIOMA fi'om the Touch
Screen.
4 Select either ENGLISH or ESPANOL Ii'om fl_e
Touch Screen.
5 Select OKfi'om the Touch Screen.
14
Page 15

Washer Features
www. (;EAJJliat_ces. corn
Using the
Liquid Bleach
Dispenser
The bleach dispenser automatically dilutes and
dispenses liquid chlorine bleach at the proper time
in the wash cycle.
1 Check clothing caw labels for special instructions.
2 Measure liqtfid bleach carefldl_; tollowing instructions
on the bottle.
• Neverpour undiluted liquid chlorbw bleach directly onto
clothes or into the was'h basher.
• Do not pour powdered bleach into bleach dispenser.
• Avoid overfillilN or _plashing when adding bleach
to the di*pcus_ The maximum cupaei_ of the bh,ach
dispenser is one cup of bleach per wash o,cle. Overfilling
could result in early dispem'iug of bleach.
3 getore starting the washel; pour measured amount of
bleach directly into bleach dispenser If you preter to
use po_tered bleach, add it into the wash basket
directly before adding clothes.
WARNING!Do not ,nix chlorine bleach
with ammonia or acids"such as vbwgar and/or rust remover.
Mixing can produce a toxicgas"which may cause death.
Tile lll}|II[lf_lC[UreF's l'ecoi//l//ei/ded }llllO[lilt of
un(filuted bleach g_)esinu) file Neach dispenser During
the final "Inhlsor" _sh action the bleach is added to
the wash load. This ensures pertormance _xm't be
diminished. T\_o sequential flushes through the bleach
dispenser completely remo\es the bleach fi'om the
dispenser Any residual liqukl lett in file dispenser at the
end of the cycle is water, not Neach. To pxevent sell:
siphoning of the Neach into file _sh basket and
damage to your clothes, never add more than the
maximum fill level marked on the dispensel:
Ms() kee I) clothes a_w fi'Orl) the Neach dispenser so they
don't absorb any bleach droplets left around the Neach"
dispenser
Using the
Dispenser
Drawer
Tile dispenser drawer contains 3 compartments:
• iJquid Fabric Softener
• i Jquid or Pounder i o_-Sudsing, High-Efticiency
Demrgent
• iJquid Pretreat Additives
The dispenser automatically dispeltses additives at the
proper time in the wash cycle.
1 Slo\dy open the dispenser dm_er b? pulling file
(lra_vr out until it stops.
2 Mfer adding laundl) products, slo\dy close the
dispenser drawer. Closing the dnm_r too quickly
could result ill earl} dispensing of additives.
• Avoid overfilling or splashing \allen adding laundry
pro&rots to the dJspensex; Doing so coukl l_sult ill
early dispensing of latmdr} products.
At the end of the cycle, you ma} see water in the
compartments. This is part of the normal operation of
the washex:
NOTF: Do not use bleach in the dispenser drawer.
15
Page 16

Washer Features
www. (;EAppliances. corn
Adding
Detergent
Adding b)zbric
Sqfiener
NOTE: Use only low-sudsing, high-efficiency
detergent such as Tide <`:HE.
Add measured detergent to the detergent
c()mi)artment of the dispenser drawe_;
• Do not exceed the maximumfill line.
Detergent is flushed through the dispenser at the
beginning ot the wash phase. Either powdered or
liquid detergent can be used.
_]_en using liquid detergent, make sure the
detergent box and insert are in place. For powdered
detergent, remove both the detergent box and
insert. Powdered detergent will not dispense with
the detergent box mad insert in place.
Detergent usage may need to be a(!iusted fin" water
temperature, wamr hardness, size and soil level _ff
the load. Avoid using too much detergent in yore"
washe_; as it can lead to ove_udsing and detergent
residue being left on the clothes.
If desired, pore" the recommended amount of liquid
rid)tic softener into the left-hand compartment.
Use only liquid lid)tic soflene_:
Dilute with water to the maximmn fill line.
insert
Detergent box
Adding
Prvtreat
Additives
16
• Do not exceed the maximumfill line.
OxeHilling can cause early dispensing of the lid)tic
softener, which could stain clothes.
NOTF: Do not i)om" rid)tic softener directly on the
wash load. It may stain the clothes,
The Pretreat dispenser may be used to clean heavily
soiled or stained gam_ents more efficiently. Selecting
ADDITIVES when setting a presoak sets a spedal
Pretreat that soaks, drains and spins, then refills the
washer for the main wash cycle./t ADDITIVES is not
selected, the washer will not drain and refill after the
presoak.
Place the additives fi)r the _4"_sh Boost setting in the
right-hand compartment. Select an Extra Rinse to
make sure all remaining detergent is removed fl'om
the wash load.
You may add lo_sudsing, high-efficiency liquid
detergent to this compartment when selecting a
Stain Inspector cycle or when choosing a Presoak
requiring special additives.
• Do not exceed the maximum fill line to avoid
ovetxudsing:
OveHilling can cause early dispensing of presoak
additives, which could result in damaged clothes.
Page 17

I,oading and Using the Washer
atwaysfollowfabrie manufazCurerk care label when laundering:
www. Gl_Appliances. cam
Sorting Wash
Loads
Loading the
Washer
l'_tbric Ca e
Labels
Sort by color (whites, lights, calms), soil level,
rid)tic t)])e (sturdy cottons, easy care, delicates)
and whether the rid)tic produces lint (ten T
cloth, chenille) or collects lint (velveteen,
cordm'oy).
I,oad dry items loosely, no higher than the top
row at holes in the washer basket. Overloading
may reduce washer eflidency and possibly
increase wrinkling.
Bulky items should be placed as tier down in
the wash basket as possible fin" optimal results.
_MwaD place buoyant items at the bottom of
the wash basket.
Below are tid)ric care label "symbols" that afle'ct
the clothing you will be latmdering.
Bleach Labels
Bleach.._,.,^ \ Z_
Symu01_ A,,vHeooh O,,,v.......h,o_,,eHeoch DonotHe,oh
(when needed) (when needed)
The washer will automatically detect the load
size. Because of the high-efficiency wash system,
the water level may not completely cover the
load. To add items atter washer has started, lift
the lid, add items and close the lkl.
• Do not wash fabrics eontainingflammable
materials (waxes, eleaningfluids, etc.)
• 7he washer will notfill or operate with the
lid open.
Washer
7>mperature
Ranges
For Model WPG T9360 only
Category Target Temperature
%11) Cold Varied
Cold 63°F
W:mn 80°F
H ot 112 °F
Ve_w Hot* 140°F
NOTES:
Use HE (high efficiency) labeled detergem. ItE detergents m:e a_alilable that provide good cleaning
t)erlimnan(e in hot, wam_ or caM water temperatures.
* This temperat m:e category is ann a\ ailable in certain selecied c?'cles. Nwa}:s check gamlem label {Dr
)x'( ommended washing insu:uctions.
':* ATC stands/or automatic teml)eramre comrol, whi(h targets a water temperature range in which clothes
are washed.
Temperature dependent on cold water sui_ply to home
ATC** controlled. Actual temperature range is
detemfined by cycle type and time selected.
Collllllent
ATC** controlled
ATC** controlled
ATC** controlled
17
Page 18

I,oading and Using the Washer
www. GEAppliances. corn
Prvper Use of
Detergent
C(IH? (lfld
Cleaningof
the Washer
Using too much detelgent is a common cause
of laund_ y problems. Today's detergents are
titan ulated to be effective without highly visible
sudsing. Be sm'e to careflfllv read and tollow
iilantt[ilCttli'ei"s i'ecolilli/endations J[Oi" how
much detergent to use in w)ur wash.
Lid: Wash with a damp cloth on tile outside and
inside and dry with a soft cloth.
Wash Basket: I,eave tile lid open after washing to
allow illoisttli'e to e\'al)omte. If VO/I want to clean
tile lx_sket, use a clean soft cloth dampened with
liquid dem_gent; then rinse. (Do not use harsh
or gritty cleane_.)
Fill Hoses: Hoses cmmecfing washer to fimcet
should be replaced evelw 5 veai_.
I?_terior: hmnediately wipe off any spills. _,\]pe
with damp cloth. Do not touch tile surli_ce or
the Touch Screen with shaq) objects.
Movhag mad Storage: _&skthe service
technician to remove water fl'om drain
pmnp and hoses. For more intommtion, visit
www. GFAppliaa_ces.com or call 800.GF.CARES
(800.439.2737). Do not store the washer where
it will be exposed to the weather:
You can use less detergent if win, have soft water;
a smaller load or a lightE soiled load.
NOTE: Use only hm_sudsing, high-efficiency
detergent such as Tide _ HE.
2 Remove tile inserts fl'om tile 3 compartments;
rinse the inserts and the drawer with wam_
water to I'eI/lOVe traces ot aCC/lllltllated
lmmdry products.
3 To clean tile drawer opening, use a small,
non-metal brush to clean the recess. Remove
all residue ti'om tile upper and lower parts
of the recess.
Long Vacations: Be sure water supply is shut off'
at ti_ucets. Drain all water fl'om hoses if weather
will be below fl'eeAng.
Dispenser Drawers: Detergent and lift)tic
softener inay build up in tile dispenser drawei:
Residue should be removed once or twice a
month.
1 Remove tile drawer by pulling it straight out
tmfil it stops. I,ift up on tile fl'ont of tile
drawer and pull it out.
18
4 Retm'n tile inserts to tile proper
compartments and replace tile (h'awe_:
Page 19

Installation
Washer
Instructions
I Questions? Call 800.GE.CARES (800.432.2737) or visit our Web site at: www.GEAppliances.com I
BEFORE YOU BEGIN
Read these instructions completely and
carefully.
• IMPORTANT- Savethese
instructions for local electrical inspector's
use.
• IMPORTANT- Observeall
governing codes and ordinances.
• Note to Installer - Be sure to leave these
instructions with the Consumer.
• Note to Consumer - Keep these instructions
for future reference.
• Skill level - Installation of this appliance
requires basic mechanical skills.
• Proper installation is the responsibility of
the installer.
• Product failure due to improper installation
is not covered under the Warranty.
WPGT9350, WPGT9360
FOR YOUR SAFETY:
ELECTRICAL REQUIREMENTS
-&CAUTION -For personal safety,
do not use an extension cord or adapter plug
with this appliance. Do not, under any
circumstances, cut or remove the third
grounding prong from the power cord. Follow
national electrical codes and ordinances. This
appliance must be supplied with the voltage
and frequency indicated on the rating plate
(located on the rear cover of the backsplash),
and connected to an individual, properly
grounded branch circuit, protected by a
15- or 20-amp circuit breaker or time-delay
fuse. If the electric supply provided does not
meet the above requirements, call a licensed
electrician.
GROUNDING INSTRUCTIONS
PLUMBING REQUIREMENTS
WATER PRESSURE - Must be 10 psi minimum
to 120 psi maximum.
WATER TEMPERATURE - Household water
heater should be set to deliver water at 120 °
to 150°F (50 ° to 66°C) TO THE WASHER.
SHUTOFF VALVES - Both hot and cold shutoff
valves (faucets) should be supplied.
DRAIN - Water may be drained into
standpipe or set tub. Discharge height MUST
NOT BE LESS THAN 30 INCHES and no more
than 8 feet above the base of the washer.
Standpipe must be 11½inches minimum
inside diameter and must be open to
atmosphere.
This appliance must be grounded.
In the event of malfunction or breakdown,
grounding will reduce the risk of electric
shock by providing a path of least resistance
for electric current. This appliance is equipped
with a cord having an equipment-grounding
conductor and a grounding plug. The plug
must be plugged into an appropriate outlet
that is properly installed and grounded in
accordance with all local codes and
ordinances.
_4,WARNING -Improper connection
of the equipment-grounding conductor can
result in a risk of electric shock. Check with
a qualified electrician or serviceman if you
are in doubt as to whether the appliance is
properly grounded. Do not modify the plug
provided with the appliance--if it will not fit
the outlet, have a proper outlet installed by
a qualified electrician.
19
Page 20

Installation Instructions
WASHER LOCATION
The washer must be installed on firm flooring
to minimize vibration during the spin cycle,
Concrete flooring is best, but a wood floor
is sufficient, provided floor support meets
FHA standards. The washer should not be
installed on rugs or exposed to weather.
Minimum clearance between washer and
adjacent walls or other surfaces:
• 0" either side
• 2" front
• 3" rear
Minimum vertical space from floor to
overhead shelves, cabinets, ceilings, etc.,
is 52".
WASHER DIMENSIONS
Front View
43%"
109.4 cm)
REQUIREMENTS FOR ALCOVE OR
CLOSET INSTALLATION
Your washer is approved for installation in
an alcove or closet, as stated on a label on
the back of the machine.
Minimum clearance between washer and
adjacent walls or other surfaces:
• 0" either side
• 2" front
• 3" rear
Minimum vertical space from floor to
overhead shelves, cabinets, ceilings, etc.,
is 52".
Closet doors must be Iouvered or otherwise
ventilated and have at least 60 square inches
of open area for washer only, or if the closet
contains both a washer and a dryer, door
must contain at least 120 square inches of
open area equally distributed, Air openings
are required to be unobstructed when a door
is installed. A Iouvered door with equivalent
air openings for the full length of the door is
acceptable.
NOTE: The clearances stated on this label are
minimums. Consideration must be given to
providing adequate clearances for installing
and servicing.
Side View
523/4"
133.7 cm)
(with lid
open)
281/4"
(71.6 cm)
20
Page 21

Installation Instructions
PARTS INCLUDED
[] Water Hoses (2)
[] Cable Tie
TOOLS YOU WILL NEED
[] Adjustable Pliers
[] Carpenter's Level
[] UNPACK THE WASHER (CONT.)
Remove the Styrofoam block containing the
Owner's Manual, parts, water hoses and
laundry product samples.
Remove the power cord from the back of the
washer.
[] UNPACK THE WASHER
After the washer is in the home, remove the
carton and Styrofoam shipping base from
the washer.
SWITCH WASHER AND DRYER
BACKSPLASHES (OPTIONAL)
If necessary, switch the backsplashes for the
washer and dryer (see "Switching the Washer
and Dryer Backsplashes").
21
Page 22

Installation Instructions
[] ATTACH WATER HOSES TO WASHER
Thread the hot water hose onto the washer
hot water connection (ORANGE) and the cold
water hose onto the cold water connection
(BLUE). Hand tighten; then make an
additional 1/8 turn with pliers.
[] MOVE WASHER CLOSE TO
HOUSE UTILITIES
Move the washer as close to the final location
as possible, leaving enough room to make
water, drain and electrical connections to the
home.
The minimum required rear clearance is 3".
[] CONNECT WATER HOSES TO
HOUSE UTILITIES
Connect the water hoses to the HOT and
COLD water valves of your home. Hand
tighten, plus make an additional 1/4 turn
with pliers.
[] ATTACH DRAIN HOSE TO
HOUSE DRAIN
Firmly insert the free end of the drain hose
into the drain opening of your home. Make
sure the soft rubber end is completely inside
the drain opening.
• If the water valves and drain are built into
the wall, fasten the drain hose to one of the
water hoses with the cable tie (ribbed side
on inside).
• If your drain is a standpipe, fasten the drain
hose to the standpipe with the cable tie
provided.
3"
Cable Tie
Cable Tie
22
Page 23

Installation Instructions
[] SET REAR LEGS
Remove the level and tilt the washer forward
(pivot on front legs) about 4 to 6 inches and
gently lower the rear legs back onto the floor.
This action will set rear leg adjustments to
correspond to front settings.
[] LEVEL THE WASHER
[] ATTACH SERIAL CABLE FOR
WASHER/DRYER
COMMUNICATION
(if desired)
Attach the serial cable shipped with the dryer
for washer/dryer communication to the serial
port on the back of the washer.
Serial Port
Rear of Washer
Move the washer into final position.
• To check if the washer is level side to side,
open the lid and place a level at the back of
the opening above the dispenser drawer.
• To check if the washer is level front to back,
place a level at the side of the washer on
the edge where the cabinet side meets the
top cover.
L_Raise
If the washer is not level, adjust the front
leveling legs. Turn clockwise to raise,
counterclockwise to lower.
23
Page 24

Installation Instructions
[] PLUG WASHER IN
[] WASHER STARTUP
Press the POWER button.
pOWER
NOTE: If the washer has been exposed to
temperatures below freezing for an extended
period of time, allow it to warm up before
pressing POWER. Otherwise, the display will
not come on.
The washer is now ready for use.
SERVICING
-&WARNING - Label all wires prior
to disconnection when servicing controls.
Wiring errors can cause improper and
dangerous operation after
servicing/installation.
For replacement parts and other information,
refer to the Owner's Manual for servicing
phone numbers.
24
Page 25

Installation Instructions
SWITCHING THE WASHER AND DRYER
BACKSPLASHES (not required for most installations)
When viewed from the front, the washer is
shipped for installation on the left and the
dryer is shipped for installation on the right.
If your hose utility connections are arranged
so that the units must be installed with the
washer on the right and the dryer on the
left, you can switch the backsplashes of the
washer and dryer in order to maintain the
proper curved appearance.
J
[] REMOVE WASHER BACKSPLASH
Place a towel over the lid of the washer to
prevent scratches to the surface.
Remove the two outer screws from the rear
of the washer backsplash, Rotate backsplash
forward and lift off.
_' Screw
Rear of Washer
TOOLS YOU WILL NEED
[] #2 Phillips screwdriver [] Towel (2)
WARNING!
Make sure the washer and dryer are
unplugged.
[] REMOVE BACKSPLASH REAR
COVER
Remove the two screws holding the washer
backsplash to the rear cover.
Pull off the rear cover.
Rear Cover
25
Page 26

Installation Instructions
[] DISCONNECT WASHER
CONTROL BOARD
Disconnect the ribbon at the right of the
control board by pulling the connector at the
end of the ribbon off the metal pins on the
control board.
NOTE: Do not disconnect any other wires
from the control board.
Rear of Washer
[] REMOVE DRYER BACKSPLASH
Place a towel over the top surface of the dryer
to prevent scratches to the surface.
Remove the four screws from the rear of the
dryer backsplash. Rotate backsplash forward
and lift off.
\
Rear of Dryer
[] REMOVE CONTROL BOARD
FROM WASHER BACKSPLASH
Remove the four screws holding the control
board to the backsplash. Remove the control
board and set it aside.
Screws
[] DISCONNECT DRYER CONTROL
BOARD
Disconnect the ribbon at the right of the
control board by pulling the connector at the
end of the ribbon off the metal pins on the
control board.
NOTE: Do not disconnect any other wires
from the control board.
26
Page 27

Installation Instructions
[] REMOVE CONTROL BOARD
FROM DRYER BACKSPLASH
Remove the four screws holding the control
board to the backsplash. Remove the control
board and set it aside.
Screws
Screws
[] SWITCH BACKSPLASHES
Place the backsplash from the dryer on top of
the washer and place the backsplash from the
washer on top of the dryer.
[] RECONNECT DRYER CONTROL
BOARD
Connect the dryer control board to the new
backsplash by sliding the ribbon connector on
the new backsplash onto the metal pins on
the control board and pushing in. Make sure
the ribbon is not twisted before inserting the
connector.
Place the ribbon and the wire from the rear
cover under the strain relief on the new
backsplash.
[] ATTACH DRYER CONTROL
BOARD TO NEW BACKSPLASH
Attach the control board to the new
backsplash by replacing the four screws
removed from the control board earlier.
The control board will now be on the opposite
side of the dryer backsplash.
Screws
[] ATTACH DRYER BACKSPLASH
Insert the tabs on the bottom front of the
backsplash into the slots on the dryer and
rotate the backsplash into place. Secure the
new backsplash to the dryer using the four
screws removed earlier.
27
Page 28

Installation Instructions
ATTACH WASHER CONTROL
BOARD TO NEW BACKSPLASH
Replace the four screws removed from the
control board earlier.
The control board will now be on the
opposite side of the washer backsplash.
r_l RECONNECT WASHER
CONTROL BOARD
ATTACH WASHER BACKSPLASH
Using the two small screws removed earlier,
screw the new washer backsplash onto the
rear cover.
Screws
E I
Place the gray wire from the serial port under
the strain relief on the new backsplash.
Connect the washer control board to the
new backsplash by sliding the ribbon
connector on the new backsplash onto the
metal pins on the control board and pushing
in. Make sure the ribbon is not twisted
before inserting the connector.
Insert the tabs on the bottom front of the
backsplash into the slots on the washer and
rotate the backsplash into place. Press the
rear of the backsplash down to make sure it
fits properly.
Secure the new backsplash to the washer
using the two long screws removed earlier.
RECONNECT POWER SUPPLY
TO WASHER AND DRYER
• Plug the washer and dryer back in.
• Press the POWER buttons on both the
washer and dryer to make sure both
control boards are properly connected.
28
Page 29

Problem Solver
w w w. (; E,4 p p Ii a n ce,s. c0m
For a complete list of solutions to common washer problems, use the
Troubleshooting Tips feature located by pressing the HELP button
while on the washer Home Screen (see Using the Troubleshooter).
If your washer will not operate, check the Problem Solver below:
Problem Possible Cause What To Do
Washer won't operate Control panel is asleep • This is nom/al. Press POWER, the Touch Screen
or any button to acfiw_te the control panel.
_'_sl_e_" is mq)lugged • Make stlI'e coi'd is plugged secm'ely into a working otlflet.
_'ater supply is turned off • Turn both hot and cold taucets flfllv on.
Controls are not set propedy • Make sure the wcle was set correcfl> close the lid and
press START.
i,id is open_satbty feature. • Close lid and reset cycle, to the begimling if necessalw.
Prevents the washer fl'om filling
and operating when lid is up
Circuit breaker/filse is • Check house circuit breaket_/filses. Replace fllses or
tripped/blown reset breaker: _'asher should have separate outlet.
Electronics need to be reset • Unplug washe_; wait 2 minutes, plug back in and press
POWER.
START was not pressed atter a • Press START.
cycle was set
Extremely low water pressm'e • Press START again,
_]_sher is too cold • If tile washer has been exposed to temperatm'es below
fl'eezing fi)r an extended period of time, allow it to waml
up betiwe pressing POWER. Otherwise, the display will
IlOt COllie oil,
Water not filling propedy Filter clogged or fill hoses may • Make sm'e that tile water \;live filte_ (blue and orange
be kinked screen must be fl'ee of solids) on the trait are not
clogged. Tm'n off water and check filter by discomlecfing
hose at machine. Check that fill hoses are not kinked
or clogged.
Energ 0, eflidencv • This is an energ 0, efficient washe_: _s a result, tile
temperatm'e settings t0r this washer may be different
than non-energy' eflident washe_.
Insufficient water supply • Make sure that the water supply is tin'ned on. Make sm'e
that the water fimcets are turned to their completely
open positions.
The washer lid is open • The washer lid inust be closed tot all washer cycle
operations. If the lid is opened dining washer
operation, all flmctions will stop, including water filling.
Incorrect fill hose cmmection * Make sure that the fill hoses comlect the hot water
supply to the hot inlet on the washe_; and the cold water
supply to the cold inlet on the washer (hot to hot, cold
to cold).
_'ater fill optimization • _'ater may not cover the top level of the dothes. This is
nomlal for this high efficiency washer: The water fill is
optimized by the system fi)r best wash i)e_-10mlance.
29
Page 30

Problem Solver
www. G EA pp lia nc es. corn
For a complete list of solutions to common washer problems, use the
Troubleshooting Tips feature located by pressing the HELP button
while on the washer Home Screen (see Using the Troubleshooter).
If your washer will not operate, check the Problem Solver below:
Problem Possible Cause What To Do
Washer will not drain /_nked drain hose or drain • Ensm'e that the drain hose is not kinked. Per the
water standin_" in the tub located higher than 8' above floor recommended installation instructions, the drain outlet
Water leaks ever), load Hoses not inst;flled correctly • Check all fill and drain hose connections to ensure that
Water leaks Ove_udsing ot detergent * Ove_udsing may create leaks, and may be caused bv the
cannot be over 8' above tile floor.
they are tight and secure.
type and amount of detergent used. High efficiency
detergent is recommended. Make sure that detergent
and am' additives are put into the correct dispenser bins.
Folh)w the detergent mamdactm'er's recommendations
fi)r the amount of detergent, but ti T using less detergent,
especially if home water conditioning or water softening
milts are used.
Display blank after 9_le Fixe minutes haxe passed • This is part of nomml operation. The display is designed
has finished without input to autonlaticallv ttli'ii O_Z_'after 5 ii/iiltltes of inactivity.
Settings will remain saved alter the display has turned off.
Display LCD color Perceixed color of display • This is nomml.
appears different depends on xiewing angle
belween washer mM dryer
Washer not communicaling Dryer settings are not displayed * Tile recommended d_yer settings will be displayed only
with the dr)_'r atter the fi_t time the washer or dover touchscreen is
acfi\_Ked fi)llowing a completed wash cycle. _Mter the
recommended settings are displayed, the five minum
tinleout feature on the dryer will erase the recommended
cycle. If the I,CD times out betore the cycle is started,
you can press the washer recommended cycle button
to recall yore" previous washer load inflmnafion.
Option disabled
Make sure that tile communication featm'e is enabled.
Fi_t push the HOME button and then HELP. Then
select machine preterences and washer/d_yer
comm mfication. Press the selection bar to display "on"
and select "ok". Press the HOME button to begin cycle
selection.
Incomplete or no
dispensing of deter_t
Poor cable COllllectioIl
Detergent bins clogged fl'om
incorrect filling
If the cable c(mnecfing the washer and dryer is not
secm'ely attached, communication will be affected.
Ensure that the cable is secm'elv attached to both the
washer and dryer at the back of the milts. This should
be checked especially if the bac!<splashes were revet_ed.
Make sure that detergent and additives are put into
the correct dispenser bins. If liquid detergent is used,
make sure that the liquid detergent insert box is in the
dispenser bin. If powdered detergent is used, make sm'e
that the liquid detergent insert box is not used. i,iquids
must be put in the tid)ric softener and pre-treat bins.
For all detelgent types, al_m:s make sure that tile
dispenser box is fifllv closed beflwe the start of the cycle.
_)
Page 31

Problem Solver
www. GEA pp lia nc es. corn
Problem Possible Cause What To Do
Incomplete or no Too much detergent used • Make sure that the suogested,_,.... amom_t of detergent, is
dispensing" ofdeCcr_t used per the manufactm'er's recommendations. Y(m max
(con/.) also dilute the detergent with water to he maMmum
fill line on the bin to avoid clogging. High efficiency
detergent is recommended tor this washe_:
Insufficient water supply • Make sure that the water supply is turned on. Make sure
that the water fimcets are turned to their completely
open positions.
Nomml residue * Nomml operation. Residue may remain in the bins of
the dispenser box The dispenser box may be removed
for occasional cleaning with wam_ water aild a scrtlb
brush. The liquid detergent insert box and siphon caps
may also be removed ti'om the detergent bin for
occasional cleaning, Remember that only liquid may be
used in the rid)tic softener and pre-treat bins. Powder
will not dispense ti'om the lid)tic softener or pre-treat bins.
Premature dispensing" Bleach bin filled for fimue load * Yim cannot store bleach in the dispenser for flmue use.
of bleach The bleach bin will be dispensed every load tot optimal
satiety ot the washe_:
Overfilling the bleach bin • Overfilling the bin with bleach may lead to premature
dispensing. There is a ma_mum fill line indicated on
the bleach bin to hel I) avoid overfilling.
Clo_ing'ofbleaz.h Bleach bin is not seated " Make stlre that the bleach cover is properly seated and
snapped into place betore the start ot the cycle.
Insufficient cleaning " You may remove and clean the bleach cover with wam_
water and a scrub brush to clear clogging.
Poor stain removal Stain inspector not used " Tly using the stain inspector recommended cycle.
The system optimizes washer settings according to the
type of stain specified. Mwa):s make sure that anv
additives, such as your high eflidency liquid detergent,
are added m the pre-treat dispenser bin betore starting
the cycle. Pdwavs reference wmr clothes care label heft)re
treating stains.
Presoak not selected
_]_en stain inspector is used, presoak temperature and
time is automatically selected. If um choose not m use
the stain inspectm; we recommend that you select
presoak when defining yore" wash cycle. Mways make sure
that any additives, such as yore" high efficiency liquid
detergent, are added to the pre-treat dispenser bin
betore starting the cycle. M\vm_s reterence wmr clothes
care label heft)re treating stains.
Controls do not work
double beep is heard
but control screen does
not ehan_e
Btlth)II 0I" to/IchscI'eeIl ol)tioll
was selected that is temporarily
disabled
A double beep will result if a button or touchscreen
option is selected that is temporarily disabled. For
example, pressing the start button with the washer lid
open will result in a double beep, indicating that the lid
in ust be closed betore the start button is enabled.
31
Page 32

Problem Solver
www. GEApplian_es.c om
The following are normal sounds you may hear:
Sound Description
Repeated starting" and • The Hx (ho_._sh '_action spins the wash basket in one direction, then pauses and spins in
stopping" the opposite direction to clean your items.
Sound of water being" added • The washer adapts to the load size and type to add more water to the c_cle as needed.
after the washer has already • The wash load ma} be tmbalanced. If the washer senses that the load is tmbalanced, it will
been operating" stop and refill to redistribute the load.
" The washer ma} be diluting lmmch T additives to add to the wash load.
Cli&ingsound during" the • The washer will make a series of clicking noises as it changes the cleaning mode.
wash c3_te
High-pitched noise during'the • The wash basket spins iiaster to remove moistm'e fi'om theload.
spin c3rle
Water flushing" sound • The washer is diluting lmmch T additives to add to the wash load. Wash Boost additives
are dispensed dining presoak. Detergent is dispensed at the begimfing of the wash cycle.
Bleach is disi)ensed dining, the main wash. Fabric softener is dispensed dining the
final rinse.
Humming noise during • The pump is oi)erafing, to reinoxe water from the basket.
draining"
Piing noise during" the spin • The washer has special rinse features to remove detergent residue fl'om the load alter the
or rinse e)_'le main wash cycle.
Water doshingsound when • A liquid in the balance ring arotmd the wash basket helps the basket spin smoothly.
washer is turned off aad tub
is rotated
32
Page 33

Washer Warranty
www. gEA pp lia _ _es. corn
All wa_n'anty se)wice p)vvided by our Facto U 8e'mJice Cente)5 or
an authorized Customer Care ® technician. 7b schedule se)wice,
on-line, 24 hours a day, visit us at www. (;EAppliances. corn or
call 800. (;E. CA RES (800. 432. 2 737).
For The Period Of."
One Yeas
From the dale g_/the
o*_it{'inal pur( ha,s_,
Second Year
o*_it{'inal pur( ha,s_,
Third through Fifth Year
t')'om tlu_dale g3/the
o*',!t_inal pumha.s_¢
Third through Tenth
Year t'}'om the dale g3/the
or,!¢inal plm:ha.s,¢
Lifetime of Product
From the dale _/ the
o_iq'inal purgium¢
We Will Replace:
An), part of the washer which tifils due to a detect in materials or workmanship. During this
full one-year warraut),, GE will also pr(wide, free ofcha_'e, all labor and related service costs to
replace the detective part.
An), part of the washer which tifils due to a detect in materials or workmanship. During this
addilimtal one-year limited warraut),, you will be responsible tot anv labor or related service cost.,;.
The suspension rod and spring assembly, and main electronic control board if any of these parts should
tifil due to a defect in materials or workananship. GE will also replace the washer lid or cover if thev
should rust under operating conditions. During this additional three-)_ar 6mired warrant); you will be
responsible fi)r anv labor or related service costs.
The direct drive motor and outer washer tub if any of these parts should tifil due to a defect in materials
or workmanship. During this additional eight-year limited warrant, you will be responsible fl)r anv
labor or related service costs.
The washer basher if it should tifil due to a detect in materials or workmanship. During this product
lifetime limited warranly, you will be responsible tot any labor or related service costs.
Slaple your r_,ceipthere.
I'ro(( (J the orig'inal plm:hase
dale is needed to obtain servi_e
under the warmnly.
What Is Not Covered:
• Service trips to your home to teach you how to use the
product.
• hnproper installation, delivery or maintenance.
• FaJhtre of the product if it is abused, misused, or
used for other than the intended purpose or used
commercially.
• Replacement of house fuses or resetting of circuit
breakers.
• Damage to the product caused by accident, fire, floods
or acts of God.
• Incidental or consequential dmnage caused by possible
defects with this applim_ce.
• Damage caused after delivery.
77_iswarranl_, is extezMed to the or{ffinal pu_rha.so and a_y .su(zeeding owno'jbr pmduct.s pu_rha.v,dji)r home use within the
USA. 1_ A la._ka, the warranty excluch_s lbe cost (f ._hipping or .v,trice calh to your home. tS_uf (if the original pu_rha._e date is
needed to obtain ._erviee under lbe warranty.
Some .stat_<sdo not allow the exclusion or limitation (j ineide_tal or eon.swue_,tial damag_<_. 77_is warranly giw<_you .qweif!e
leg_d rigi_ls, and you m(9, aho have other rigl_t._which vary .f!'om .stale to state. 7b know what your lrgal rigl_ls a'r_5consult
your lo<-alor state <-on._um<,r<{[/air_<?[fleeor your state's Attorn+3, (;eneral.
Warrantor: Genera] Electric Company. Louisville, KY 40225
33
Page 34

Consmner Support
GE Appliances Web site wurw. GEAppliances.com
Have a ques0on or need assistance with your appliance? Try tile GE Appliances Web site 24 hotu_ a day,
any day ot tile year! For greater convenience and tilster service, you can now download (-)wner's Manuals,
order parts, cat;flogs, or even schedule service on-line. _)u can also "_sk Our Team ot Exl)erts"' your
questions, and so II/Hch II/OI'e...
Schedule Service www.GEAppliances.com
Expert GE repair service is only one step awa) from your doo_: Get on-line and schedule _our service at
your con'_enience 24 hems any day of tile year'. Or call 800.GE.(_AI/ES 800.432.2737) dufin{, n{mnal
business hom_.
Real Life Design Studio www.GEAppliances.com
GE supports tile Universal Design concept--products, services, and environments that can be used by
people of all ages, sizes, and capabili0es. _,\'e recognize tile need to design for a wide range of ph):sical and
mental abili0es and impaim/ents. For details of (;E's Universal Design applications, including kitchen
design ideas for people with disabili0es, check gilt O/li"_*\'eb site today. For tile hearing impaired, please
call 800.TDD.GEAC (800.833.4322).
Extended Warranties z_ww.GEAppliances.com
Purchase a GE extended warranty and learn about special discounts that are axailable while your warranty
is still in effect. Ybu can purchase it on-line an)0me or call 800.626.2224 during nomml business hours.
GE Consumer Home Services will still be there alter }our warran_ expires.
Parts and Accessories www. GEAppliances.com
Individuals qualified to service their own appliances can have parts or accessories sent directly to their
homes (VISA, MasterCard, and Discover cards are accepted). Order on-line today, 24 l/otu_ e\'e_y day, or
by phone at 800.626.2002 during nomml business l/otu_.
Instructions contained in thismanual cover procedures to be performed byany user. Otherservicing generally
should be referred to qualified service personnel. Cautionmust be exercised, since improper servicing may cause
unsafe operation.
Contact Us www.GEAppliances.com
If you are not satisfied with tile service w)u receive fl'om (;E, contact us on our _4'eb site with all tile details,
including your phone numbe_; or write to: General Manage_; Customer RelaOons
(;E Appliances, Appliance Park
I*)uisville, KY 40225
Register Your Appliance www. GEApp liances,com
Register )_ur new appliance on-line--at xour corn enience! Tim ely, pr_duct regist_o,-,atu"m will"allow for
enhanced commtmica0on and prompt service under tile temps of your warranty, should tile need arise.
You may also mail in tile i)repfinted registra0on card included in tile I)acking, material.
34 15'inled i)_ Kenya
 Loading...