

Page 1

Safety Instructions . . . . . . . . . . 2, 3
Operating Instructions
Controls . . . . . . . . . . . . . . . . . . . . . . . . . . .4
Cycle Options . . . . . . . . . . . . . . . . . . . . . .6
Help Feature . . . . . . . . . . . . . . . . . .13, 14
Troubleshooter . . . . . . . . . . . . . . . . . . .13
Loading and Using
the Washer . . . . . . . . . . . . . . . . . . .17, 18
“My Cycles” Feature . . . . . . . . . . .11, 12
Other Features . . . . . . . . . . . . . . . .15, 16
Quick Start Feature . . . . . . . . . . . . . . . .5
Stain Inspector . . . . . . . . . . . . . . . . . .7, 8
Summary Screen . . . . . . . . . . . . . . .9, 10
Installation Instructions
Before You Begin . . . . . . . . . . . . . .19–21
Step-by-Step Instructions . . . . . .21–24
Switching the Washer and
Dryer Backsplashes . . . . . . . . . . .25–28
Troubleshooting Tips . . . . . .29–32
Consumer Support
Consumer Support . . . . . . . . . . . . . . . 34
Warranty . . . . . . . . . . . . . . . . . . . . . . . . 33
ge.com
Washers
3828EA3023B 175D1807P530 49-90262 11-05 JR
Profile
Write the model and serial
numbers here:
Model # ______________
Serial # ______________
You can find them on the
rear cover of the washer
backsplash.
WPGT9350
WPGT9360
Owner’s Manual
and Installation
Instructions
Page 2

2
WATER HEATER SAFETY
Under certain conditions, hydrogen gas may be produced in a water heater that has not been used for two weeks or
more. Hydrogen gas can be explosive under these circumstances.
If the hot water has not been used for two weeks or more, prevent the possibility of damage or injury
by turning on all hot water faucets and allowing them to run for several minutes. Do this before
using any electrical appliance which is connected to the hot water system. This simple procedure will
allow any built-up hydrogen gas to escape. Since the gas is flammable, do not smoke or use an open
flame or appliance during this process.
WARNING! For your safety, the information in this manual must be followed to minimize the risk of fire or
explosion, electric shock, or to prevent property damage, personal injury, or loss of life.
IMPORTANT SAFETY INSTRUCTIONS
READ ALL INSTRUCTIONS BEFORE USING.
PROPER INSTALLATION
• Install or store where it will not be exposed
to temperatures below freezing or exposed
to the weather.
• Properly ground washer to conform with all
governing codes and ordinances. Follow details
in Installation Instructions.
This washer must be properly installed and located in accordance with the Installation Instructions before it is
used. Installation Instructions are included in the back of this manual.
YOUR LAUNDRY AREA
• Keep the area underneath and around your
appliances free of combustible materials such
as lint, paper, rags, chemicals, etc.
• Close supervision is necessary if this appliance
is used by or near children. Do not allow
children to play on, with or inside this or any
other appliance.
Page 3

3
READ AND FOLLOW THIS SAFETY
INFORMATION CAREFULLY.
SAVE THESE INSTRUCTIONS.
WHEN USING THE WASHER
• Use this appliance only for its intended
purpose as described in this Owner’s Manual.
• Never reach into washer while it is moving.
Wait until the machine has completely stopped
before opening the lid.
• Do not mix chlorine bleach with ammonia
or acids such as vinegar and/or rust remover.
Mixing different chemicals can produce a toxic
gas which may cause death.
• Do not wash or dry articles that have been
cleaned in, washed in, soaked in, or spotted
with combustible or explosive substances
(such as wax, oil, paint, gasoline, degreasers,
dry-cleaning solvents, kerosene) which may
ignite or explode. Do not add these substances
to the wash water. Do not use or place these
substances around your washer or dryer
during operation.
• The laundry process can reduce the flame
retardancy of fabrics. To avoid such a result,
carefully follow the garment manufacturer’s
wash and care instructions.
• To minimize the possibility of electric shock,
unplug this appliance from the power supply
or disconnect the washer at the household
distribution panel by removing the fuse or
switching off the circuit breaker before
attempting any maintenance or cleaning.
NOTE: Pressing START/STOP or POWER
does NOT disconnect the appliance from
the power supply.
• Never attempt to operate this appliance
if it is damaged, malfunctioning, partially
disassembled, or has missing or broken
parts, including a damaged cord or plug.
WARNING! For your safety, the information in this manual must be followed to minimize the risk of fire or
explosion, electric shock, or to prevent property damage, personal injury, or loss of life.
IMPORTANT SAFETY INSTRUCTIONS
READ ALL INSTRUCTIONS BEFORE USING.
WHEN NOT IN USE
• Turn off water faucets to relieve pressure on
hoses and valves and to minimize leakage if
a break or rupture should occur. Check the
condition of the fill hoses; they should be
replaced every 5 years.
• Before discarding a washer, or removing
it from service, remove the washer lid to
prevent children from hiding inside.
• Do not attempt to repair or replace any part of
this appliance unless specifically recommended
in this Owner’s Manual, or in published userrepair instructions that you understand and
have the skills to carry out.
• Do not tamper with controls.
Page 4

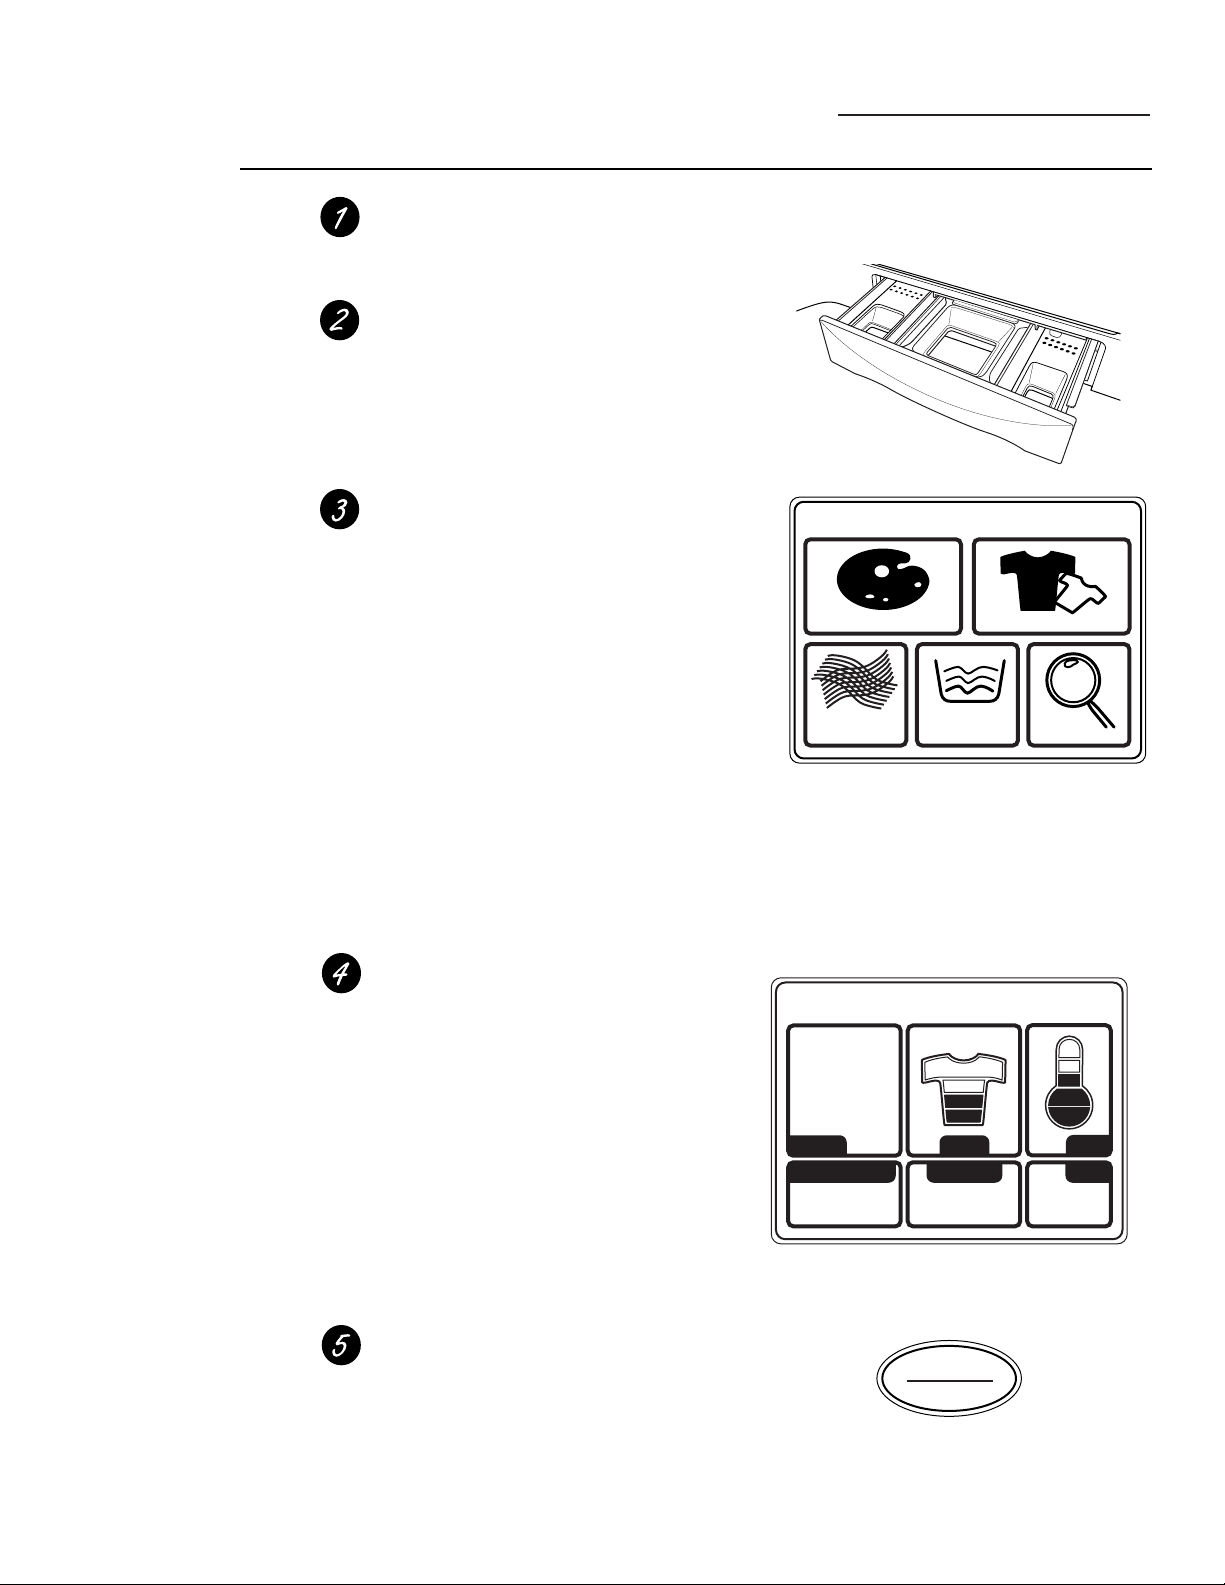
Washer Control Panel
ge.com
Features of
the washer
control panel
1 POWER. Press to “wake up” the display.
If the display is active, press to put the washer
into standby mode. If there is no screen
activity for 5 minutes the display will turn off.
You may also press the Touch Screen or any
button to “wake up” the display.
NOTE: Pressing POWER does not
disconnect the appliance from the
power supply.
2 MY CYCLES. Press to use, create, rename,
modify or delete custom wash cycles.
3 BACK. Press to return to the previous screen.
4 TOUCH SCREEN. Press the graphics on the
interactive display to use the washer features.
Do not use sharp objects to press the
Touch Screen.
NOTE: If the washer is inactive for
5 minutes, the Touch Screen will go into
standby mode, and the display will be dark.
Press the Touch Screen or any button to
“wake up” the display.
5 HOME. Press to return to the “TOUCH
TO SELECT WASH CYCLE” screen
(Home Screen).
6 START/STOP. Press to start a wash cycle.
If the washer is running, pressing once will
pause the washer. Press again to restart the
wash cycle.
NOTE: If the washer is paused and the
cycle is not restarted within one hour, the
washer will enter standby mode and the
current wash cycle will be canceled.
7 HELP. Press to set machine preferences,
to find help using the Touch Screen or
to find troubleshooting tips for common
washer problems.
Throughout this manual, features and appearance may vary from your model.
4
WARNING! To reduce the risk of fire, electric shock, or injury to persons, read the IMPORTANT SAFETY
INSTRUCTIONS before operating this appliance.
M
E
O
H
C
K
A
B
C
Y
L
C
E
Y
S
M
L
P
E
H
W
E
R
O
P
START
STOP
Page 5
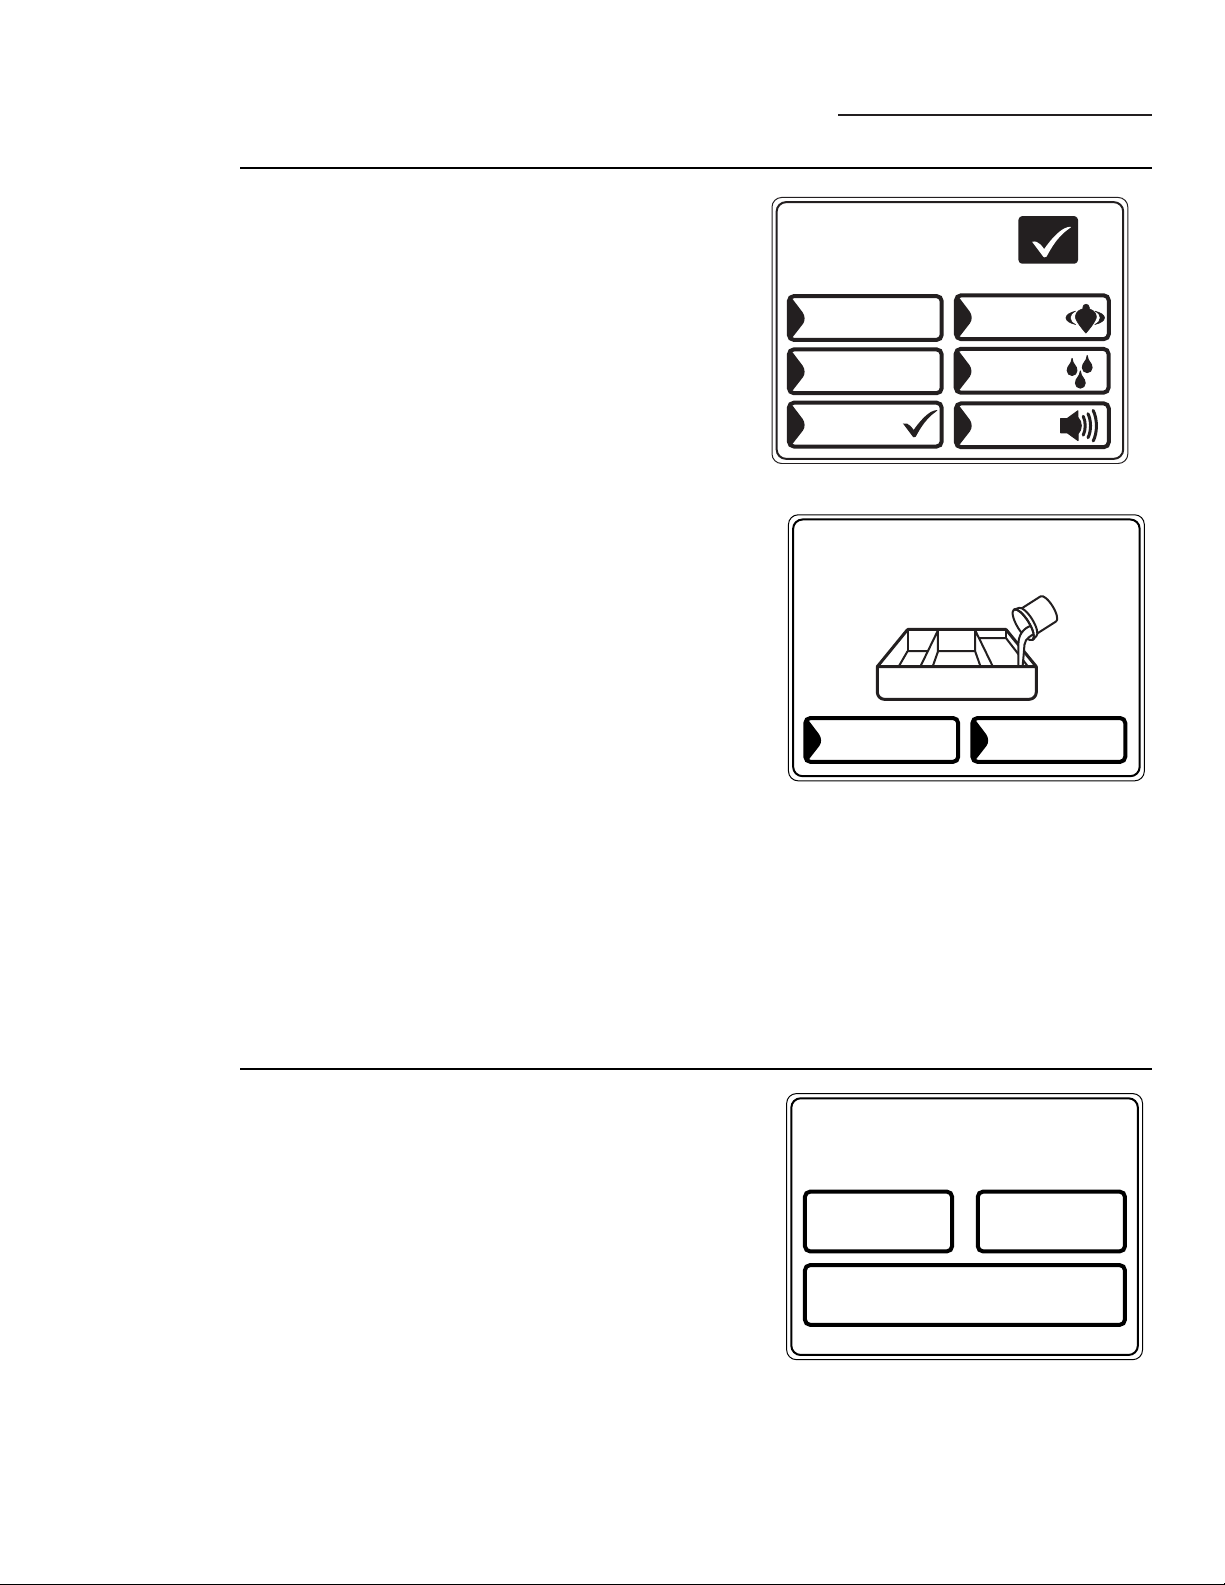
5
Quick Start
ge.com
Home Screen
Getting
Started
If the Touch
Screen is dark,
press POWER
or the Touch
Screen to access
the wash cycles
menu.
Loosely load clothes no higher than the top
row of holes in the washer tub. Overloading
may reduce washer efficiency and possibly
increase wrinkling.
Add a low-sudsing, high-efficiency detergent.
Add diluted fabric softener, bleach or
pretreat additives as desired.
Select one of the five wash methods from
the Home Screen:
• Press BY COLOR to wash according to
fabric color.
• Press BY GARMENT to wash according
to clothing type.
• Press BY FABRIC to wash according to
fabric type.
• Press SPECIAL CYCLES to wash non-
garment items, or to select a rinse and
spin or spin-only cycle.
• Press STAIN INSPECTOR to wash items
with specific types of stains.
After selecting a wash method, use the
Touch Screen to select a specific wash cycle
to match your load.
Change any of the automatic settings,
if desired, by pressing the Touch Screen
and following the on-screen instructions.
By changing the settings you can:
• Remove heavier soil.
• Change the water temperature.
• Change the wash action to Vigorous,
Normal, Delicate or Hand Wash.
• Set a Delay Start, Extended Spin, Presoak
or Extra Rinse, or change the End-of-Cycle
Signal volume.
• Adjust time settings.
Close the lid and press START.
The washer will not fill unless the lid is
closed.
After you press START, a Cycle Status screen
will appear to indicate what stage of the cycle
the washer is in and the time remaining in
the cycle.
TOUCH TO SELECT WASH CYCLE
BY COLOR BY GARMENT
BY
FABRIC
SPECIAL
CYCLES
STAIN
INSPECTOR
SUMMARY SCREEN
COTTONS
CYCLE
WASH ACTION
NORMAL
SOIL
START
STOP
TEMP
TIMEOPTIONS
0:50
Page 6
6
Wash Cycles
ge.com
Washing by
Color
If the Touch Screen is dark, press POWER or the Touch Screen to access the wash cycles menu.
The default cycle settings are based on standard load types. Always follow the fabric manufacturer’s
care label when laundering.
• Bright/Dark
Colors
• Light Colors
• Mixed Colors
• New Colors
• Whites
Washing by
Garment
Type
• Athletic Wear
• Blouses
• Delicates
• Dress Shirts
• Easy Care
• Everyday
Wear/Casual
• Jackets/Coats
• Jeans
• Khakis
• Knits
• Lingerie
• Mixed Garments
• Play Clothes
• Sweaters
• Swimwear
• Underwear
• Silks (Washable)
Select By Color to wash loads sorted by color.*
COLOR CYCLES include:
Select By Garment to wash loads sorted by garment type.*
GARMENT CYCLES include:
Washing by
Fabric Type
• Blends
(on some models)
• Cottons
• Delicates
• Easy Care
(on some models)
• Knits
• Polyester
• Silks (Washable)
Select By Fabric to wash loads sorted by fabric type.
FABRIC CYCLES include:
Washing
Using the
Special Cycles
• Blankets (Cotton)
• Blankets (Other)
• Comforter
• Energy-Plus
• Handwash
Woolite®HE
• Hosiery/Bras
(use mesh bag)
• Pet Bedding
(Washable)
• Quick Wash
• Rinse and Spin
• Sheets
• Sneakers
• Spin Only
• Super Clean
• Throw Rugs
(Washable)
• Towels
• Washable Wools
Select SPECIAL CYCLES to wash loads of nongarment items or to
select a rinse and spin or spin-only cycle.
SPECIAL CYCLES include:
* After communication occurs from the washer to the dryer, the dryer may ask for additional
“FABRIC TYPE” information.
BY COLOR
BY GARMENT
BY
FABRIC
SPECIAL
CYCLES
Page 7
7
Washing
Using the
Stain
Inspector
The Stain Inspector provides pretreatment
tips and optimum washing for specific types
of stains.
You select the specific stain, fabric type and color,
and the washer creates the wash cycle for treating
the stain.
Stain Inspector
ge.com
1 Press STAIN INSPECTOR.
2 Read and follow the instructions on the
Touch Screen before treating the fabric.
3 Select FOOD/DAIRY/COOKING from
the list of stain categories and select
CHOCOLATE from the list of stains.
You can find additional stain categories and
stains by pressing MORE in the lower right
corner of the Touch Screen.
4 Press the HELP button to find pretreatment
information for the specific type of stain.
5 Select COTTONS from the list of fabric
types, and select WHITES from the list
of colors.
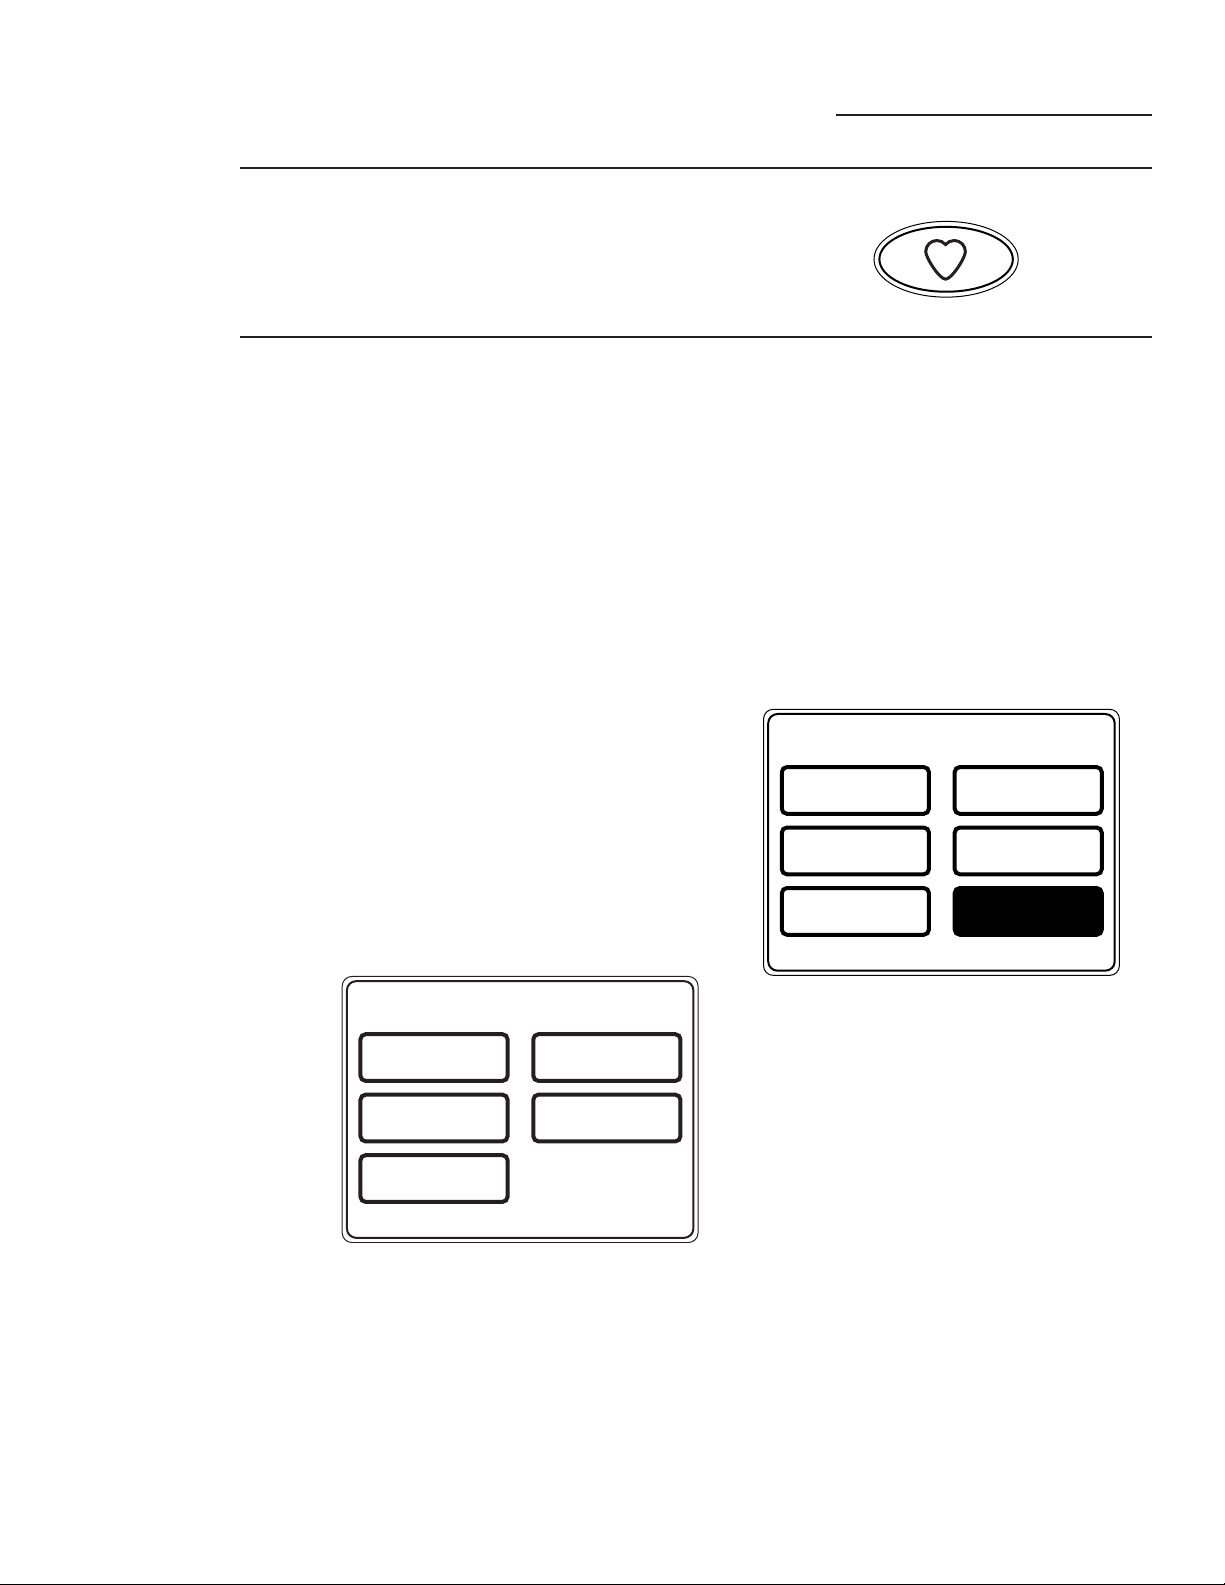
6 Fill the detergent tray with a low-sudsing,
high-efficiency liquid detergent such as
Tide®HE. Fill the Pretreat tray with
the proper pretreatment additive.
7 Place the stained garment(s) in the washer
first; then add the rest of the load. For best
stain removal, only wash items with stains
matching your selection.
8 Press START.
The washer will run a Pretreat presoak cycle
prior to the main wash cycle.
NOTE: For some stain cycles, the water
temperature for the presoak cycle may not be
the same as the water temperature for the main
wash cycle.
IMPORTANT: Check to make sure the stain
is completely removed before placing the
garment in the dryer.
Example: Washing a chocolate-stained, white cotton shirt
Detergent Tray
PRETREAT
Tray
Appearance may vary.
or
STAIN
INSPECTOR
BEFORE
TREATING
OK
FABRIC
1) REFER TO FABRIC CARE LABEL FOR
INSTRUCTIONS. USE HELP FUNCTION
FOR ADDITIONAL STAIN TIPS
2) TEST STAIN REMOVAL TIPS ON HIDDEN
AREA OF FABRIC
3) DO NOT PUT STAINED ITEM INTO DRYER
(STAIN MAY BE SET INTO FABRIC)
CHOCOLATE
- ADD AN ENZYME CONTAINING LAUNDRY
DETERGENT, LIKE LIQUID TIDE HE(R)
TO THE PRE-TREAT DISPENSER AND A
HIGH EFFICIENCY DETERGENT TO THE
DETERGENT DISPENSER.
FOOD/DAIRY/COOKING
ANIMAL FAT
BUTTER/
MARGARINE
COOKING OIL
FOOD/DAIRY/COOKING
TOMATO-BASED
SALAD
DRESSING
MAYONNAISE
BABY FORMULA
CHOCOLATE
MORE
BUTTER
MARGARINE
CHOCOLATE
MORE
Page 8

8
Stain
Selections
Stain Inspector
ge.com
Below is a listing of the stain selections available
on the washer Touch Screen. For additional
information on handling these types of stains,
visit the Tide®Stain Detective at
www.tide.com/staindetective.
Beverages
• Alcoholic beverages
• Coffee
• Fruit juice, Other
• Grape juice
• Hot chocolate
• Kool-Aid
®
• Milk
• Soda, colored
• Tea
• Water
• Wine, white
• Wine, red
School/Office/Home
• Adhesive tape
• Ballpoint ink
• Crayon
• Fabric softener
• Glue (synthetic)
• Glue
(white/common)
• Mildew
• Paint (water-based)
• Paint (oil-based)
• Pencil mark
• Rubber cement
• Shoe polish
• Wite-Out
®
Food/Dairy/Cooking
• Animal fat
• Baby formula
• Barbecue sauce
• Blueberry
• Butter/margarine
• Chocolate
• Cooking oil
• Cream/cheese sauce
• Egg
• Frozen
Popsicle®/JELL-O
®
• Gravy
• Grease
• Maple syrup
• Mayonnaise
• Milk
• Mustard
• Pudding
• Salad dressing
• Soy sauce
• Tomato-based
• Vegetable oil
Heavy Oils/Grease
• Gasoline
• Motor oil/Lube
• Ointment/Salve
Outdoor
• Carbon
• Clay
• Dingy white socks
• Grass
• Mud/dirt
• Rust/iron
• Tree sap
Personal
• Baby stains
• Blood
• Medication, general
• Mouthwash
• Perspiration
• Urine/Feces
• Vomit
Cosmetics
• Chap Stick
®
• Deodorant/
antiperspirant
• Lipstick
• Lotions
• Makeup (oil-based)
• Makeup (waterbased)
• Nail polish
Specialty Stains
• Adhesive tape
• Asphalt/tar
• Ballpoint ink
• Glue (synthetic)
• Pine sap (on some
models)
• Rubber cement
• Silly Putty
®
• Tree sap (on some
models)
Waxes
• Candle wax
• Chap Stick
®
• Crayon
Stain Selections (not all selections are available on all models)
Page 9
9
Summary Screen
ge.com
About the
Summary
Screen
After selecting a wash cycle, the Summary Screen
displays the automatic settings for the cycle you have
chosen. You can adjust these by touching the screen
location for any of the settings shown.
If you change any of the automatic settings, you can save
the new settings as a custom “My Cycle” by pressing the
MY CYCLES button and choosing SAVE CURRENT
SETTINGS.
Changing the
Soil Level
Changing the soil level increases or decreases the wash
time to remove different amounts of soil.
To change the soil level, touch SOIL on the Touch
Screen; then use the arrows to select more or less soil.
Press OK when you have reached the desired setting.
Changing
the Wash
Temperature
Changing the temperature changes the wash and
presoak temperatures only. The final rinse will always
be a cold rinse.
Follow the fabric manufacturer’s care label when
selecting the wash temperature.
To change the wash temperature, touch the TEMP pad
on the Touch Screen; then use the arrows to select a
higher or lower temperature. Press OK when you have
reached the desired setting.
CAUTION: On some cycles the
temperature can be set at VERY HOT. This setting
utilizes the washer’s internal heater which will extend the
wash time. When using the VERY HOT temperature
setting, do not put hands in the water.
Changing the
Wash Action
Changing the wash action changes the wash and spin
speeds of the cycle.
Always follow the fabric manufacturer’s care label when
changing the wash action.
To change the wash action, touch WASH ACTION
on the Touch Screen; then select the desired setting.
Typically, slower spin speeds result in less water removed
from clothes.
Wash Action Wash Speed Spin Speed*
Normal Medium Fast
Vigorous Fast Fast
Delicate Slow Slow
Hand Wash** Extra Slow Extra Slow
* The slower the spin speed the less likely wrinkles
will be set in the clothes.
**Use a low-sudsing, high-efficiency, gentle liquid
detergent such as Woolite®HE.
SUMMARY SCREEN
COTTONS
CYCLE
WASH ACTION
NORMAL
SOIL
SOIL LEVEL
MORE SOIL
LESS SOIL
TEMP
TIMEOPTIONS
0:50
OK
HEAVY
LIGHT
TEMPERATURE
HIGHER
LOWER
OK
COOL
WASH ACTION
VIGOROUS DELICATE
NORMAL
HAND
WASH
Page 10
10
Summary Screen
ge.com
About the
Wash Options
The Wash Options allow you to set options for the
current wash cycle only. After you have made all
desired changes, press OK.
Delay Start – Use to delay the start of your washer.
Press DELAY START to change the delay time.
Presoak – Soaks the clothes before beginning the
wash cycle. Press PRESOAK to change the soaking
time.
Additives – Appears ONLY AFTER a presoak has
been selected. Uses the contents of the Pretreat
dispenser tray for a presoak. When selected, the
washer will drain after the presoak and fill again for
the wash cycle. Press ADDITIVES to specify if you
will NOT be using a Pretreat additive or if you do
not want the washer to drain after presoak.
Extra Rinse – Adds an additional cold rinse to the
end of the wash cycle.
Signal – Alerts you that the cycle is complete. The
clothes should be removed when the beeper goes
off so wrinkles won’t set in. Touch SIGNAL to
select the volume or to turn the beeper off. The
new volume will be saved as the default setting.
Extended Spin – Increases the length of the spin
time to extract more water from your clothes.
NOTE: The water level will vary depending on the
load size and type. The washer uses adaptive filling
and load sensing to provide the appropriate water
level for effective and efficient wash performance
and energy usage.
NOTE: Water may not cover the top level of the
clothes. This is normal for high efficiency washers.
The water fill is optimized by the system for better
wash performance.
Adjusting the
Time Settings
You can adjust the length of the wash cycle by
changing the cycle time, adding a Delay Start
or adding an Extending Spin.
Cycle Time – Press CYCLE TIME; then use
the arrows to select more or less time.
Delay Time – Use to add a Delay Start to the
beginning of the wash cycle. Press DELAY
TIME; then set the DELAY START time in the
OPTIONS menu.
Extended Spin – Increases the length of the spin
time to extract more water from your clothes. Press
EXTENDED SPIN; then select EXTENDED SPIN
from the OPTIONS menu.
NOTE: After the wash cycle begins, you will not
be able to change the Cycle Time or Delay Time.
The washer will beep twice if you try to change
the times after the cycle begins.
OPTIONS
DELAY
START
PRE
SOAK
ADDITIVES
15
1
HR
MIN
ARE YOU USING
PRESOAK ADDITIVES ?
YES
OK
EXTENDED
SPIN
EXTRA
RINSE
SIGNAL
NO
ADJUST TIME SETTINGS
CYCLE TIME DELAY TIME
EXTENDED SPIN
Page 11
11
“My Cycles”
ge.com
About the
“My Cycles”
Feature
The “My Cycles” feature allows you to create,
store and reuse up to 6 custom cycles. Create
your own cycles from scratch, or adjust the
settings of a predefined wash cycle, then save
for one-touch recall.
Creating
and Using a
“My Cycle”
You can create “My Cycles” two ways, by either
modifying a predefined wash cycle or creating
a cycle from your own combination of settings
and options.
To build your own “My Cycle” from the
Home Screen:
1 Press the MY CYCLES button.
2 Select CREATE from the Touch Screen
menu.
3 Choose whether you want to modify a
predefined cycle or create a new cycle.
4 If you are modifying a predefined cycle,
select the wash cycle you wish to modify.
5 Change any of the automatic settings and
select any options.
6 Press SAVE on the Touch Screen.
7 Using the keypad on the Touch Screen, type
the name of your “My Cycle” and press OK.
To begin using your new “My Cycle” right
away, select it from the Touch Screen menu
and press START.
To save a current cycle as a “My Cycle” from
the Summary Screen:
1 After setting a wash cycle, or after a wash cycle
has just completed, press the MY CYCLES
button.
2 Select SAVE CURRENT SETTINGS from
the Touch Screen menu.
3 Using the keypad on the Touch Screen, type
the name of your “My Cycle” and press OK.
To begin using your new “My Cycle” right
away, select it from the Touch Screen menu
and press START.
To use a “My Cycle” from the Home Screen:
1 Press the MY CYCLES button.
2 Select USE from the Touch Screen menu.
3 Select the cycle name from the Touch Screen
menu.
4 Change any of the automatic settings and
select any options.
5 Press START.
C
Y
L
C
Y
M
E
S
MY CYCLES
MY CYCLES
USE MODIFY
CREATE RENAME
DELETE
USE MODIFY
CREATE RENAME
DELETE
SAVE CURRENT
SETTINGS
Page 12

12
“My Cycles”
ge.com
Modifying,
Renaming or
Deleting a
“My Cycle”
To modify the settings of a “My Cycle” from
the Home Screen:
1 Press the MY CYCLES button.
2 Select MODIFY from the Touch Screen
menu.
3 Select the cycle name from the Touch Screen
menu.
4 Change any of the automatic settings and
select any options.
5 Press SAVE on the Touch Screen.
To rename a “My Cycle” from the
Home Screen:
1 Press the MY CYCLES button.
2 Select RENAME from the Touch Screen
menu.
3 Select the cycle name from the Touch Screen
menu.
4 Using the keypad on the Touch Screen, type
the name of your “My Cycle” and press OK.
To delete a “My Cycle” from the Home Screen:
1 Press the MY CYCLES button.
2 Select DELETE from the Touch Screen
menu.
3 Select the cycle name from the Touch Screen
menu.
4 Choose YES to delete the cycle or CANCEL
to return to the list of “My Cycles.”
Page 13
13
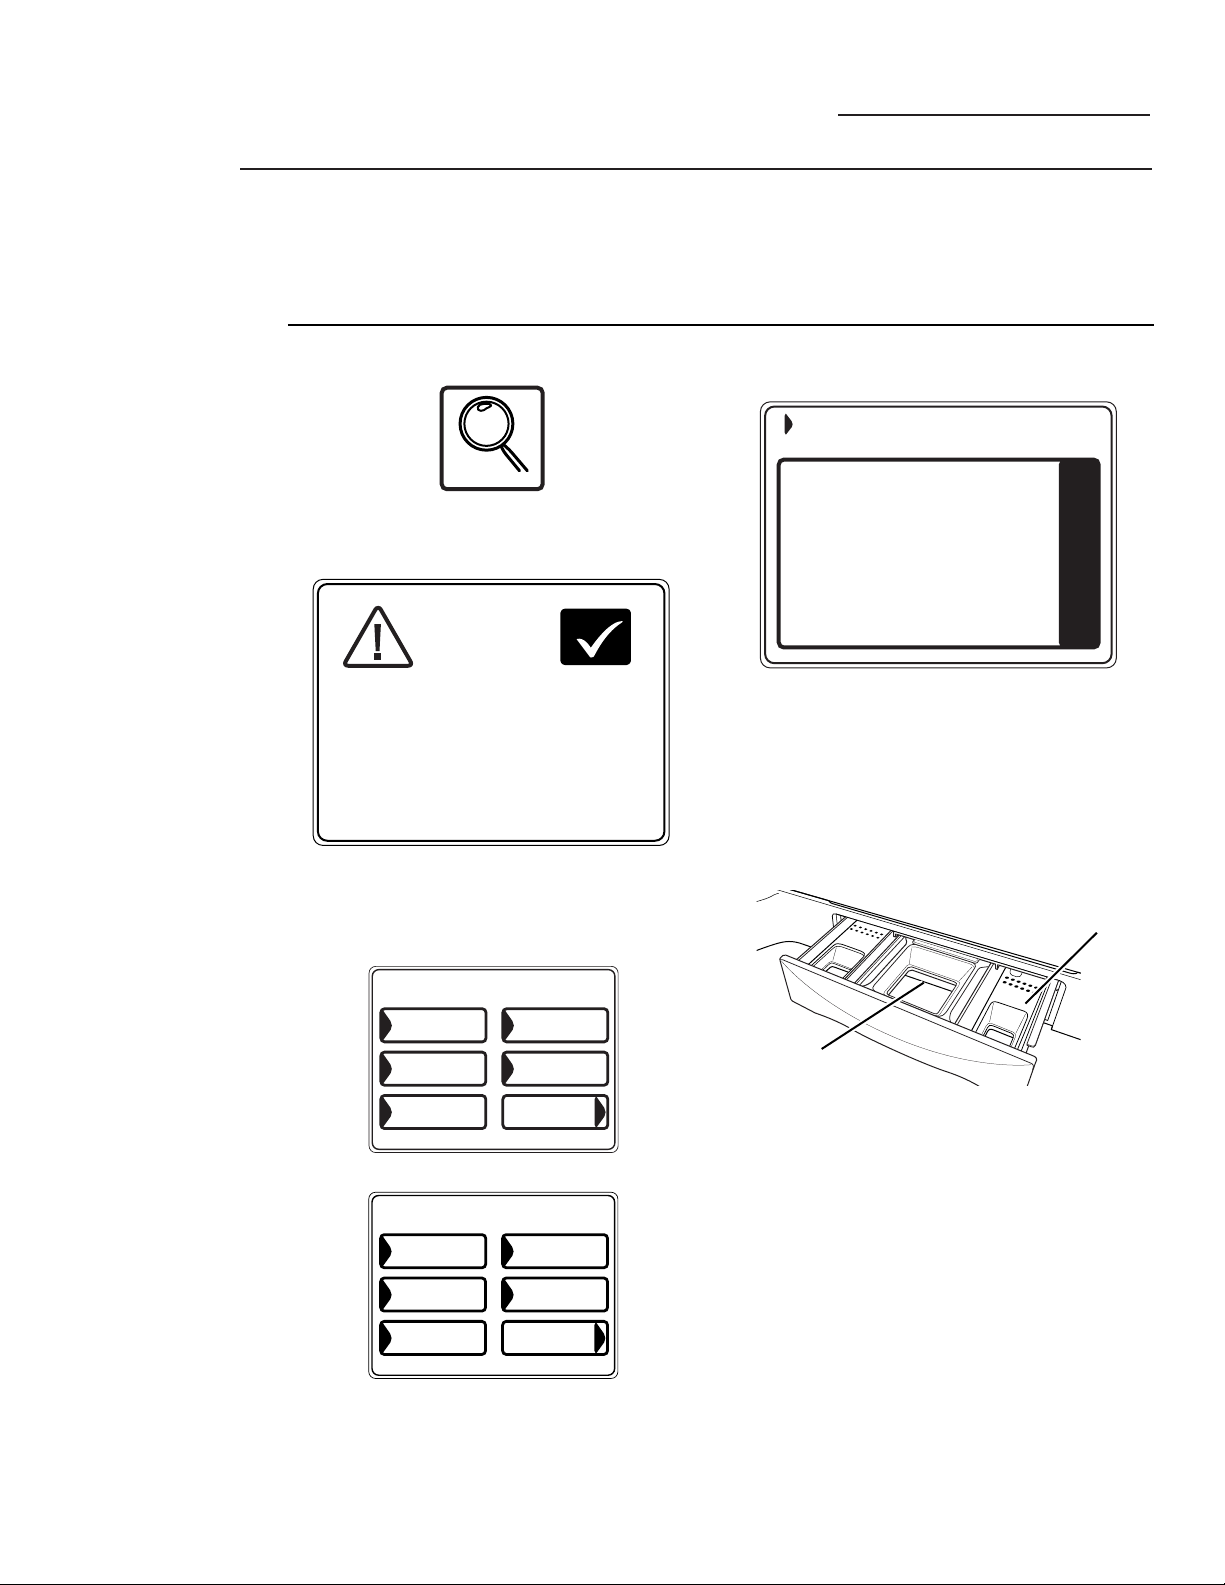
Help
ge.com
About the
Help Feature
Pressing the HELP button from the Home Screen
allows you to locate troubleshooting tips for
common washer problems, to find help with using
the Home Screen or to set machine preferences.
Pressing the HELP button while on any other
screen allows you to find additional information
on features found on that screen. Press HELP;
then touch any pad on the Touch Screen for an
explanation of that feature. To exit the feature,
press HELP once to return to the previous screen
or twice to exit Help.
Using the
Troubleshooter
To locate Troubleshooting Tips for common
washer problems:
1 Press the HELP button.
2 On the Touch Screen, select TROUBLE
SHOOTER.
3 On the Touch Screen, select the problem
description from the list. You can use the arrows
at the right of the screen to scroll up and down
through the list of additional problems.
4 On the Touch Screen, select a possible cause
for the problem and follow the on-screen
instructions to find a solution.
Finding Help
Using the
Home Screen
Pressing the HELP button, then selecting HOME
SCREEN HELP allows you to find additional
information on features found on the Home
Screen. Touch any pad on the Touch Screen for
an explanation of that feature. To exit the feature,
press the BACK button.
MACHINE
PREFERENCES
TROUBLE SHOOTER
TROUBLE SHOOTER
PRESS DESCRIPTION FOR POSSIBLE CAUSES
NO FILL OR SLOW FILL
SPORADIC FILL
FILLING AND DRAINING AT THE SAME
TIME
MACHINE MOVES BEFORE WATER FILL
NO INFUSOR OR BASKET MOTION
HOME SCREEN
HELP
Page 14

14
The machine settings on the Help feature
allow you to control the volume of the button beep
and end-of-cycle signal, and turn the washer/dryer
communication feature on or off.
Button Beep
The button beep controls the volume of the beep that
is made when you press any of the buttons or the
Touch Screen.
To change the volume of the button beep:
1 From the Home Screen, press the HELP button.
2 Select MACHINE PREFERENCES from
the Touch Screen.
3 Select BUTTON BEEP from the Touch Screen.
4 Use the arrows to make the volume louder
or softer, or to turn the beep off.
5 Select OK from the Touch Screen.
The new volume is now saved as the default setting.
Washer/Dryer Communication
Washer/Dryer communication allows your washer to
send cycle information to your dryer to create a dry
cycle that matches your wash load.
After the wash cycle is complete, communication
begins once either the washer or dryer Touch Screen
is activated or washer lid is up.
Once the information is sent, your dryer will create
the optimal dry cycle for your load.
If you have sorted your wash load by color or garment
and therefore selected color or garment on the
washer Touch Screen, upon transferring the
information to the dryer, the dryer will ask you to
select the fabric type. This is normal, and is done to
properly optimize drying time for the just-washed
load. After selecting the fabric type, the dryer display
screen will be shown. After reviewing, press START.
If the dryer display screen is off and you want to
use the “Washer Recommended Cycle” to dry your
clothes, touch the display screen on the dryer to
activate. You will have a “Washer Recommended
Cycle” button appear on your dryer Home Screen.
Push it for retrieving the recommended dryer cycle
for the just-washed load.
To turn the Washer/Dryer Communication feature on
or off:
1 From the Home Screen, press the HELP button.
2 Select MACHINE PREFERENCES from
the Touch Screen.
3 Select WASHER/DRYER COMMUNICATION
from the Touch Screen.
4 Touch the pad at the bottom of the Touch Screen
to select ON or OFF.
5 Select OK from the Touch Screen.
End-of-Cycle Signal
The End-of-Cycle signal alerts you when the cycle is
complete.
To change the volume of the end-of-cycle signal:
1 From the Home Screen, press the HELP button.
2 Select MACHINE PREFERENCES from the
Touch Screen.
3 Select END OF CYCLE SIGNAL from the Touch
Screen.
4 Use the arrows to make the volume louder
or softer, or to turn the signal off.
5 Select OK from the Touch Screen.
The new volume is now saved as the default setting.
Language (on some models)
The language button allows the user to switch
between English and Spanish.
To change the language:
1 From the Home Screen, press the HELP button.
2 Select MACHINE
PREFERENCES/PREFERENCIAS DE LA
MÁQUINA from the Touch Screen.
3 Select LANGUAGE/IDIOMA from the Touch
Screen.
4 Select either ENGLISH or ESPANOL from the
Touch Screen.
5 Select OK from the Touch Screen.
Help
ge.com
Setting the
Machine
Preferences
MACHINE PREFERENCES
LANGUAGE
END OF CYCLE
SIGNAL
BUTTON BEEP
WASHER/DRYER
COMMUNICATION
Page 15
15
Washer Features
ge.com
Using the
Liquid Bleach
Dispenser
The bleach dispenser automatically dilutes and
dispenses liquid chlorine bleach at the proper time
in the wash cycle.
1 Check clothing care labels for special instructions.
2 Measure liquid bleach carefully, following instructions
on the bottle.
• Never pour undiluted liquid chlorine bleach directly onto
clothes or into the wash basket.
• Do not pour powdered bleach into bleach dispenser.
• Avoid overfilling or splashing when adding bleach
to the dispenser. The maximum capacity of the bleach
dispenser is one cup of bleach per wash cycle. Overfilling
could result in early dispensing of bleach.
3 Before starting the washer, pour measured amount of
bleach directly into bleach dispenser. If you prefer to
use powdered bleach, add it into the wash basket
directly before adding clothes.
WARNING!
Do not mix chlorine bleach
with ammonia or acids such as vinegar and/or rust remover.
Mixing can produce a toxic gas which may cause death.
The manufacturer’s recommended amount of
undiluted bleach goes into the bleach dispenser. During
the final “Infusor” wash action the bleach is added to
the wash load. This ensures performance won’t be
diminished. Two sequential flushes through the bleach
dispenser completely removes the bleach from the
dispenser. Any residual liquid left in the dispenser at the
end of the cycle is water, not bleach. To prevent selfsiphoning of the bleach into the wash basket and
damage to your clothes, never add more than the
maximum fill level marked on the dispenser.
Also keep clothes away from the bleach dispenser so they
don’t absorb any bleach droplets left around the bleach
dispenser.
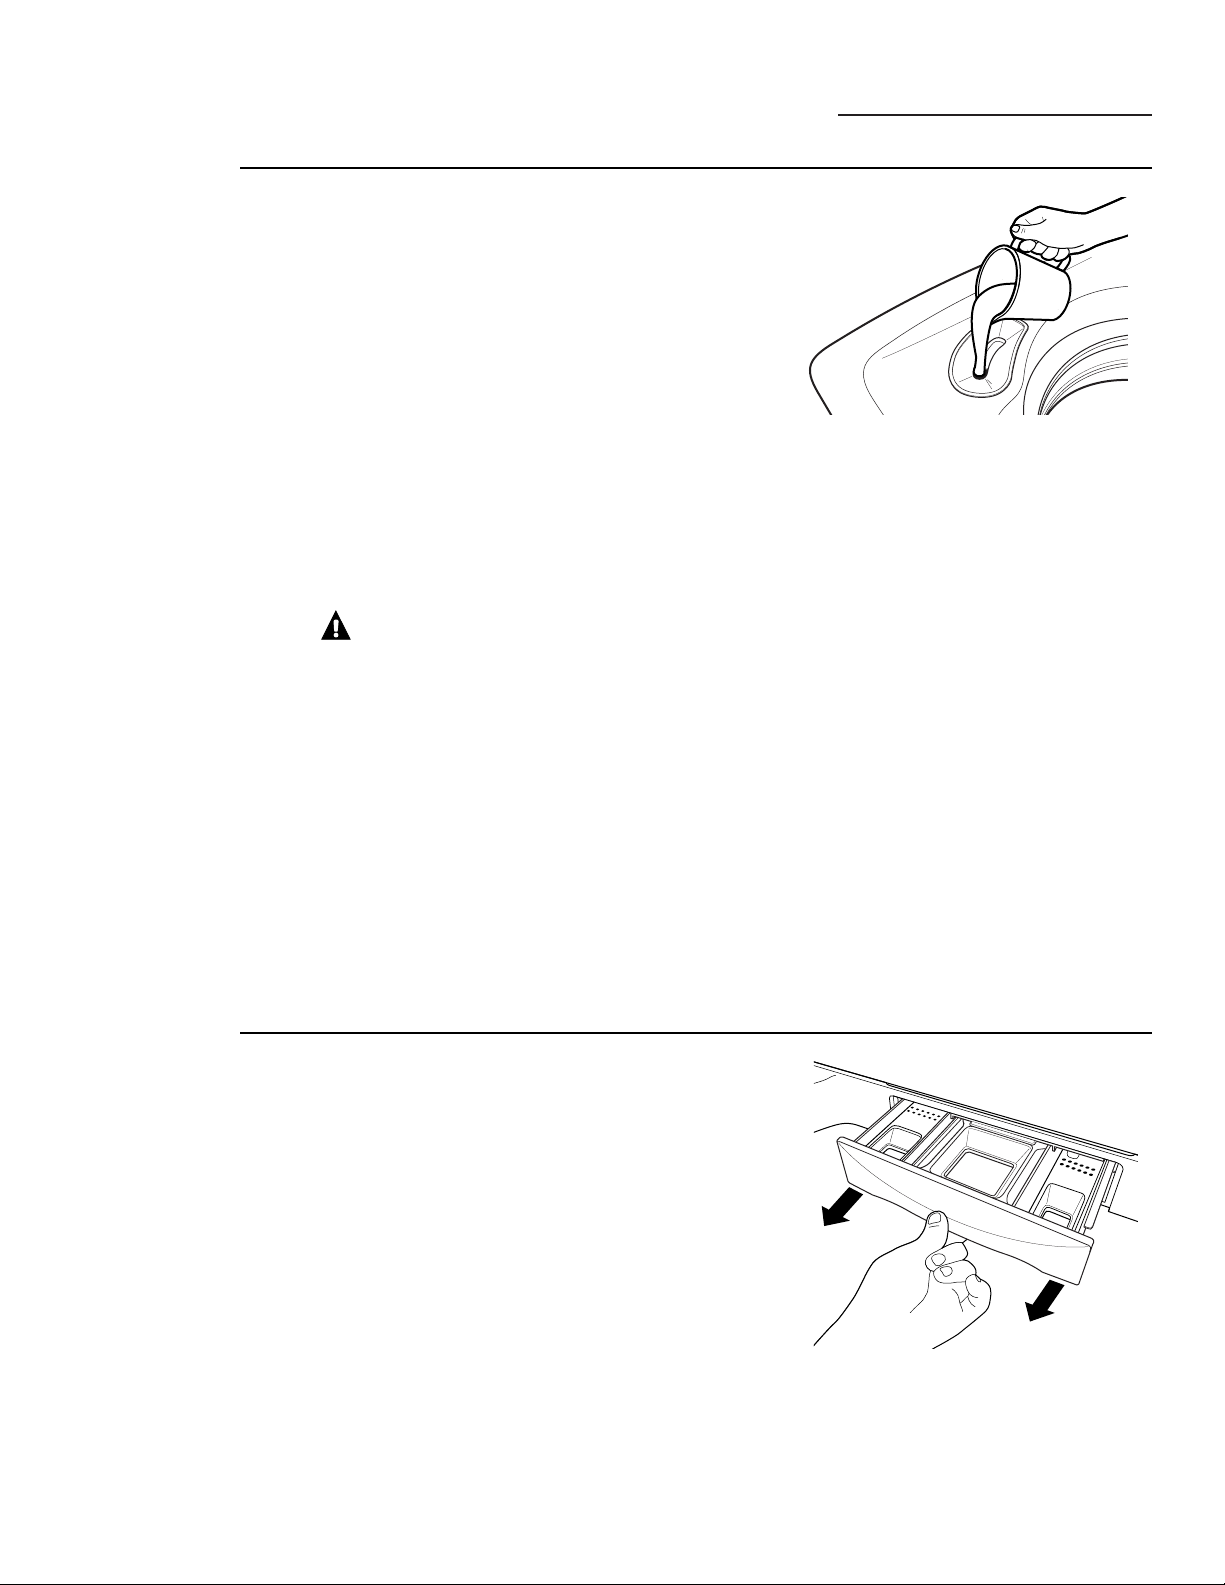
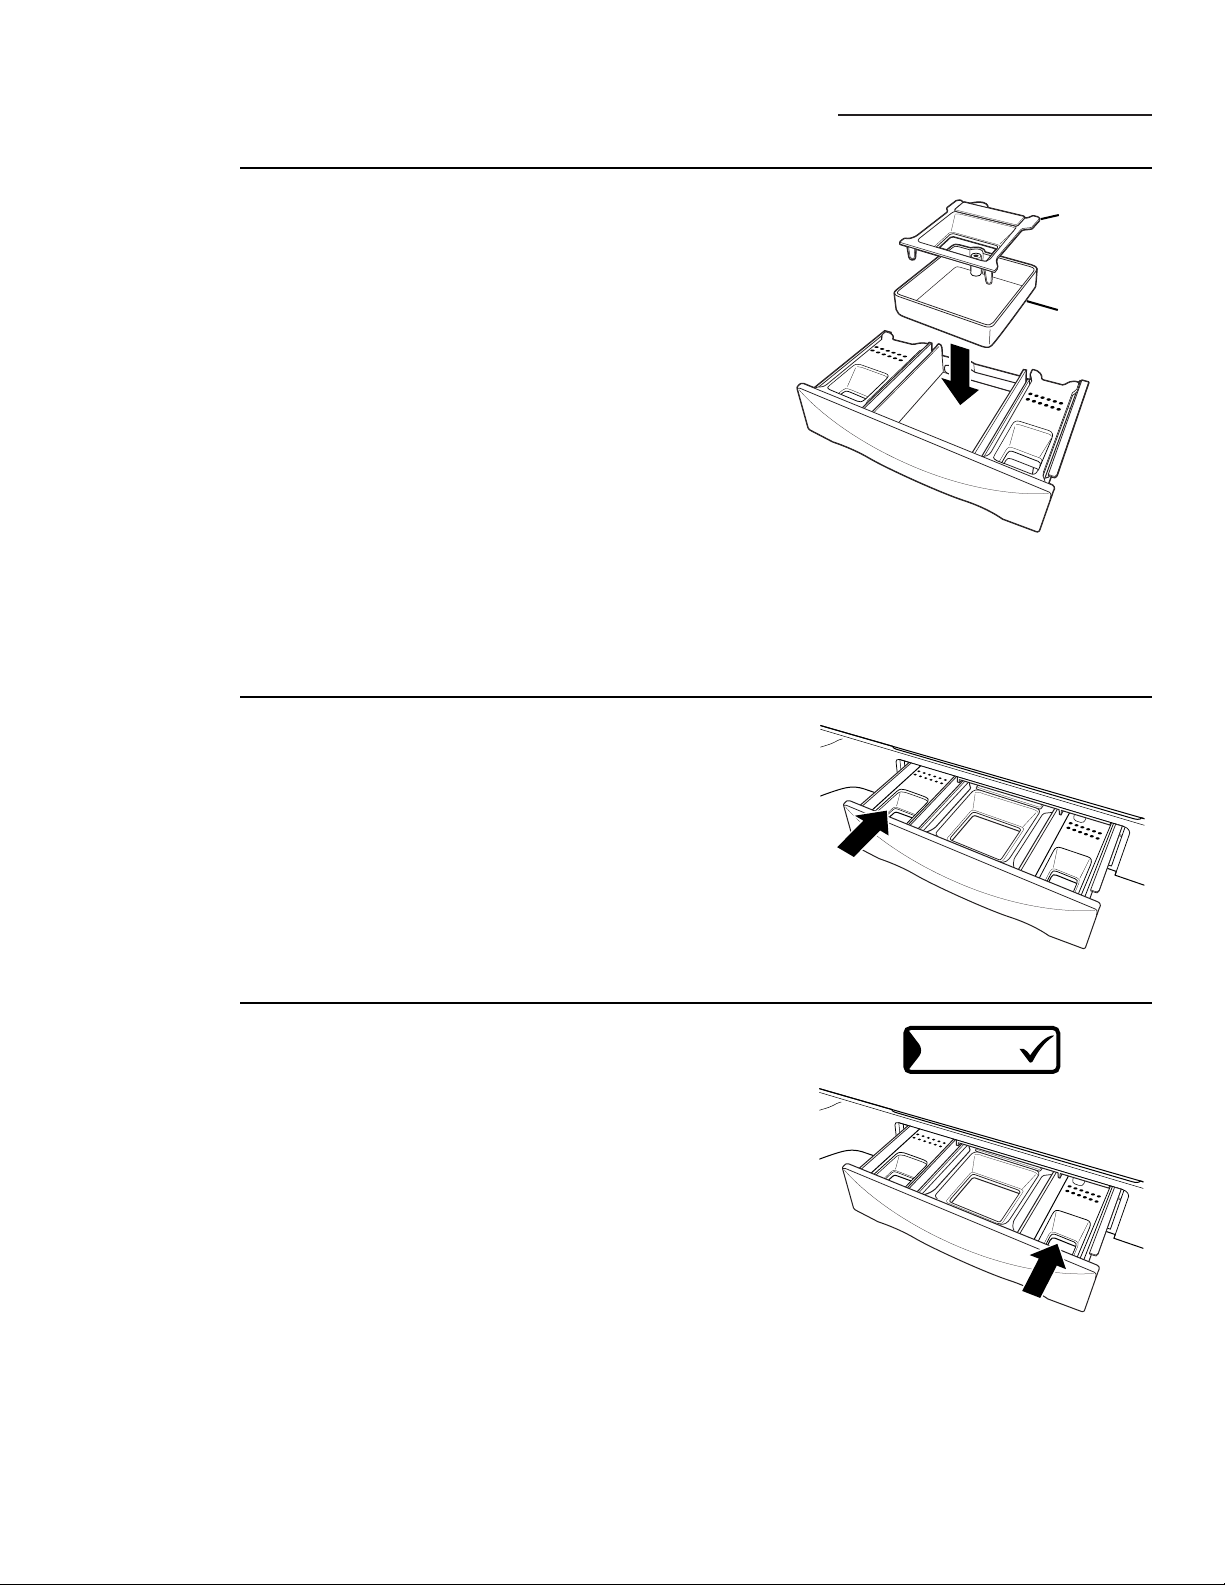
Using the
Dispenser
Drawer
The dispenser drawer contains 3 compartments:
• Liquid Fabric Softener
• Liquid or Powder Low-Sudsing, High-Efficiency
Detergent
• Liquid Pretreat Additives
The dispenser automatically dispenses additives at the
proper time in the wash cycle.
1 Slowly open the dispenser drawer by pulling the
drawer out until it stops.
2 After adding laundry products, slowly close the
dispenser drawer. Closing the drawer too quickly
could result in early dispensing of additives.
• Avoid overfilling or splashing when adding laundry
products to the dispenser. Doing so could result in
early dispensing of laundry products.
At the end of the cycle, you may see water in the
compartments. This is part of the normal operation of
the washer.
NOTE: Do not use bleach in the dispenser drawer.
Page 16
16
Washer Features
ge.com
Adding
Detergent
NOTE: Use only low-sudsing, high-efficiency
detergent such as Tide
®
HE.
Add measured detergent to the detergent
compartment of the dispenser drawer.
• Do not exceed the maximum fill line.
Detergent is flushed through the dispenser at the
beginning of the wash phase. Either powdered or
liquid detergent can be used.
When using liquid detergent, make sure the
detergent box and insert are in place. For powdered
detergent, remove both the detergent box and
insert. Powdered detergent will not dispense with
the detergent box and insert in place.
Detergent usage may need to be adjusted for water
temperature, water hardness, size and soil level of
the load. Avoid using too much detergent in your
washer, as it can lead to oversudsing and detergent
residue being left on the clothes.
Adding Fabric
Softener
If desired, pour the recommended amount of liquid
fabric softener into the left-hand compartment.
Use only liquid fabric softener.
Dilute with water to the maximum fill line.
• Do not exceed the maximum fill line.
Overfilling can cause early dispensing of the fabric
softener, which could stain clothes.
NOTE: Do not pour fabric softener directly on the
wash load. It may stain the clothes.
Adding
Pretreat
Additives
The Pretreat dispenser may be used to clean heavily
soiled or stained garments more efficiently. Selecting
ADDITIVES when setting a presoak sets a special
Pretreat that soaks, drains and spins, then refills the
washer for the main wash cycle. If ADDITIVES is not
selected, the washer will not drain and refill after the
presoak.
Place the additives for the Wash Boost setting in the
right-hand compartment. Select an Extra Rinse to
make sure all remaining detergent is removed from
the wash load.
You may add low-sudsing, high-efficiency liquid
detergent to this compartment when selecting a
Stain Inspector cycle or when choosing a Presoak
requiring special additives.
• Do not exceed the maximum fill line to avoid
oversudsing.
Overfilling can cause early dispensing of presoak
additives, which could result in damaged clothes.
Insert
Detergent box
ADDITIVES
Page 17
17
Loading and Using the Washer
ge.com
Sorting Wash
Loads
Sort by color (whites, lights, colors), soil level,
fabric type (sturdy cottons, easy care, delicates)
and whether the fabric produces lint (terry
cloth, chenille) or collects lint (velveteen,
corduroy).
Loading the
Washer
Load dry items loosely, no higher than the top
row of holes in the washer basket. Overloading
may reduce washer efficiency and possibly
increase wrinkling.
Bulky items should be placed as far down in
the wash basket as possible for optimal results.
Always place buoyant items at the bottom of
the wash basket.
The washer will automatically detect the load
size. Because of the high-efficiency wash system,
the water level may not completely cover the
load. To add items after washer has started, lift
the lid, add items and close the lid.
• Do not wash fabrics containing flammable
materials (waxes, cleaning fluids, etc.)
• The washer will not fill or operate with the
lid open.
Always follow fabric manufacturer’s care label when laundering.
Bleach
symbols
Any bleach
(when needed)
Only non-chlorine bleach
(when needed)
Do not bleach
Bleach Labels
Fabric Care
Labels
Below are fabric care label “symbols” that affect
the clothing you will be laundering.
Washer
Temperature
Ranges
Category Target Temperature Comment
Tap Cold Varied Temperature dependent on cold water supply to home
Cold 63°F ATC** controlled
Warm 80°F ATC** controlled
Hot 112°F ATC** controlled
Very Hot* 140°F ATC** controlled. Actual temperature range is
determined by cycle type and time selected.
NOTES:
Use HE (high efficiency) labeled detergent. HE detergents are available that provide good cleaning
performance in hot, warm or cold water temperatures.
* This temperature category is only available in certain selected cycles. Always check garment label for
recommended washing instructions.
** ATC stands for automatic temperature control, which targets a water temperature range in which clothes
are washed.
For Model WPGT9360 only
Page 18
Lid: Wash with a damp cloth on the outside and
inside and dry with a soft cloth.
Wash Basket: Leave the lid open after washing to
allow moisture to evaporate. If you want to clean
the basket, use a clean soft cloth dampened with
liquid detergent; then rinse. (Do not use harsh
or gritty cleaners.)
Fill Hoses: Hoses connecting washer to faucet
should be replaced every 5 years.
Exterior: Immediately wipe off any spills. Wipe
with damp cloth. Do not touch the surface or
the Touch Screen with sharp objects.
Moving and Storage: Ask the service
technician to remove water from drain
pump and hoses. For more information, visit
www. GEAppliances.com or call 800.GE.CARES
(800.432.2737). Do not store the washer where
it will be exposed to the weather.
Long Vacations: Be sure water supply is shut off
at faucets. Drain all water from hoses if weather
will be below freezing.
Dispenser Drawers: Detergent and fabric
softener may build up in the dispenser drawer.
Residue should be removed once or twice a
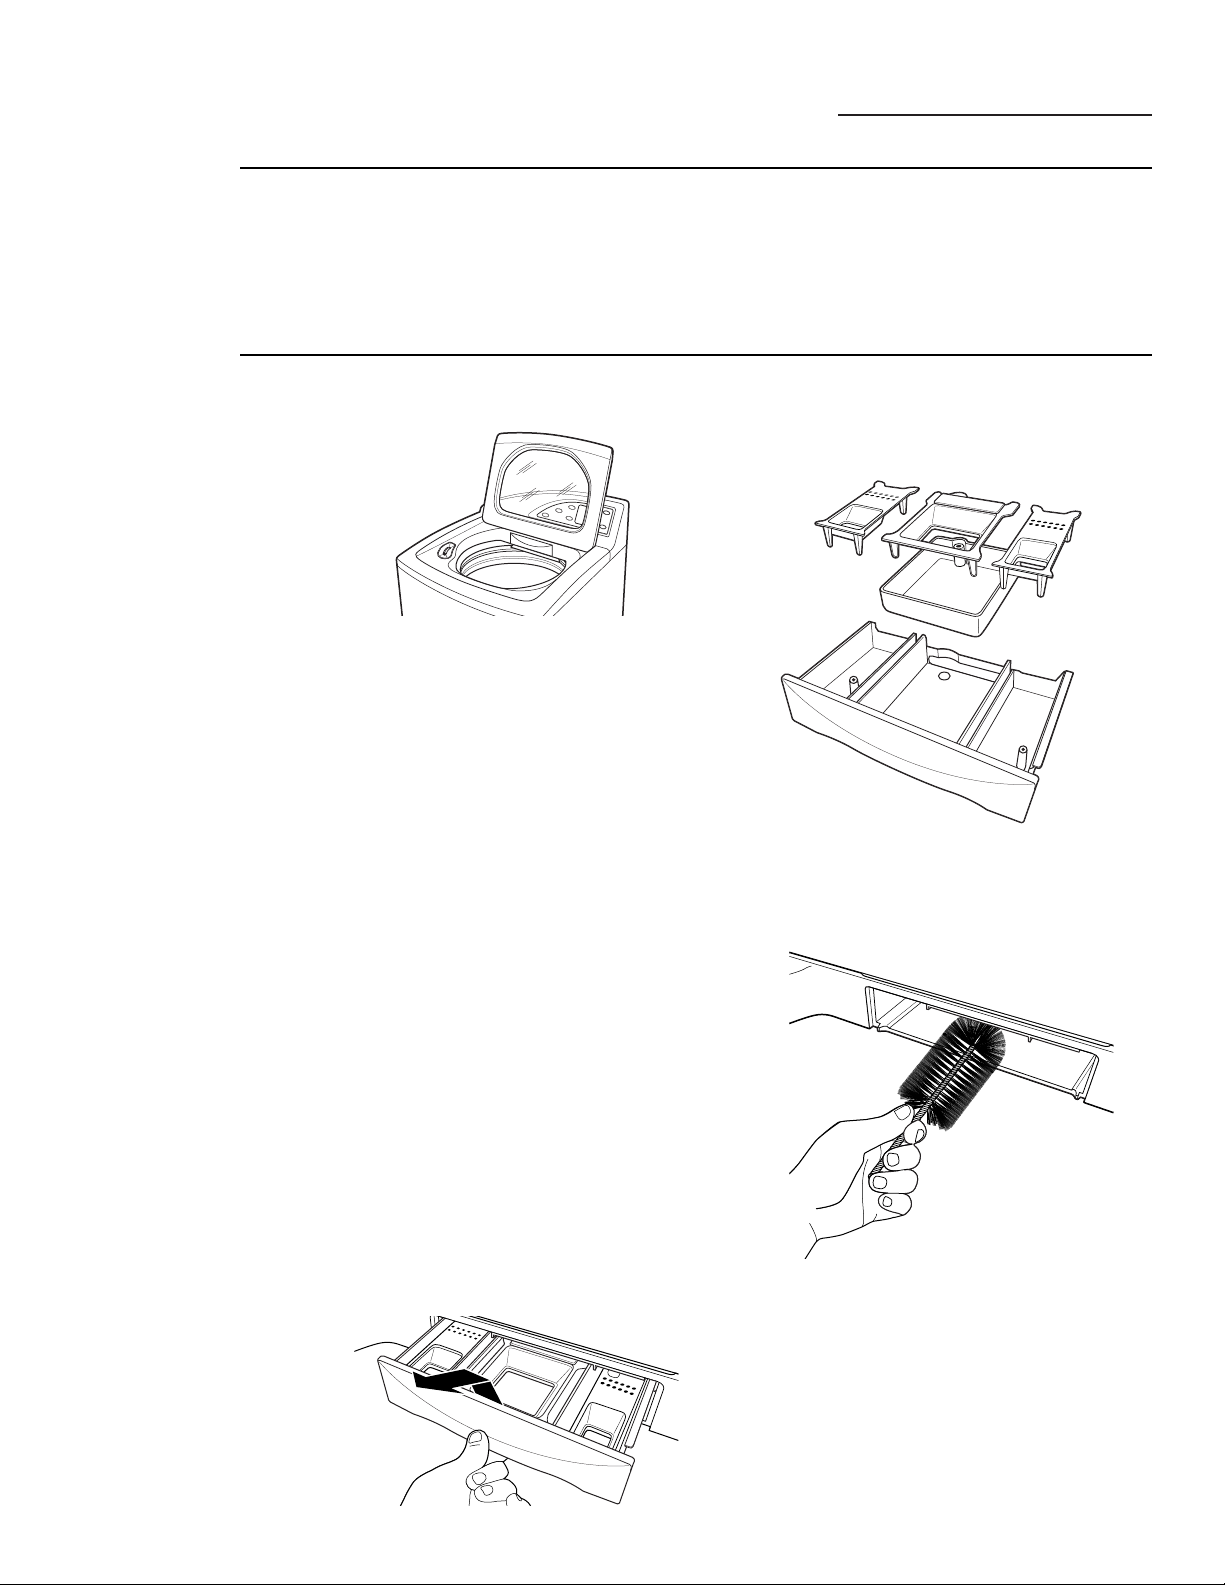
month.
1 Remove the drawer by pulling it straight out
until it stops. Lift up on the front of the
drawer and pull it out.
2 Remove the inserts from the 3 compartments;
rinse the inserts and the drawer with warm
water to remove traces of accumulated
laundry products.
3 To clean the drawer opening, use a small,
non-metal brush to clean the recess. Remove
all residue from the upper and lower parts
of the recess.
4 Return the inserts to the proper
compartments and replace the drawer.
Loading and Using the Washer
ge.com
Care and
Cleaning of
the Washer
Proper Use of
Detergent
Using too much detergent is a common cause
of laundry problems. Today’s detergents are
formulated to be effective without highly visible
sudsing. Be sure to carefully read and follow
manufacturer’s recommendations for how
much detergent to use in your wash.
You can use less detergent if you have soft water,
a smaller load or a lightly soiled load.
NOTE: Use only low-sudsing, high-efficiency
detergent such as Tide®HE.
18
Page 19
BEFORE YOU BEGIN
Read these instructions completely and
carefully.
•
IMPORTANT – Save these
instructions for local electrical inspector’s
use.
•
IMPORTANT – Observe all
governing codes and ordinances.
• Note to Installer – Be sure to leave these
instructions with the Consumer.
• Note to Consumer – Keep these instructions
for future reference.
• Skill level
– Installation of this appliance
requires basic mechanical skills.
• Proper installation is the responsibility of
the installer.
• Product failure due to improper installation
is not covered under the Warranty
.
Installation Washer
Instructions
WPGT9350, WPGT9360
19
Questions? Call 800.GE.CARES (800.432.2737) or visit our Web site at: ge.com
PLUMBING REQUIREMENTS
FOR YOUR SAFETY:
ELECTRICAL REQUIREMENTS
CAUTION – For personal safety,
do not use an extension cord or adapter plug
with this appliance. Do not, under any
circumstances, cut or remove the third
grounding prong from the power cord. Follow
national electrical codes and ordinances. This
appliance must be supplied with the voltage
and frequency indicated on the rating plate
(located on the rear cover of the backsplash),
and connected to an individual, properly
grounded branch circuit, protected by a
15- or 20-amp circuit breaker or time-delay
fuse. If the electric supply provided does not
meet the above requirements, call a licensed
electrician.
WATER PRESSURE – Must be 10 psi minimum
to 120 psi maximum.
WATER TEMPERATURE – Household water
heater should be set to deliver water at 120°
to 150°F (50° to 66°C) TO THE WASHER.
SHUTOFF VALVES – Both hot and cold shutoff
valves (faucets) should be supplied.
DRAIN – Water may be drained into
standpipe or set tub. Discharge height MUST
NOT BE LESS THAN 30 INCHES and no more
than 8 feet above the base of the washer.
Standpipe must be 1
1
⁄2 inches minimum
inside diameter and must be open to
atmosphere.
GROUNDING INSTRUCTIONS
This appliance must be grounded.
In the event of malfunction or breakdown,
grounding will reduce the risk of electric
shock by providing a path of least resistance
for electric current. This appliance is equipped
with a cord having an equipment-grounding
conductor and a grounding plug. The plug
must be plugged into an appropriate outlet
that is properly installed and grounded in
accordance with all local codes and
ordinances.
WARNING – Improper connection
of the equipment-grounding conductor can
result in a risk of electric shock. Check with
a qualified electrician or serviceman if you
are in doubt as to whether the appliance is
properly grounded. Do not modify the plug
provided with the appliance—if it will not fit
the outlet, have a proper outlet installed by
a qualified electrician.
Page 20
Installation Instructions
20
WASHER LOCATION
The washer must be installed on firm flooring
to minimize vibration during the spin cycle.
Concrete flooring is best, but a wood floor
is sufficient, provided floor support meets
FHA standards. The washer should not be
installed on rugs or exposed to weather.
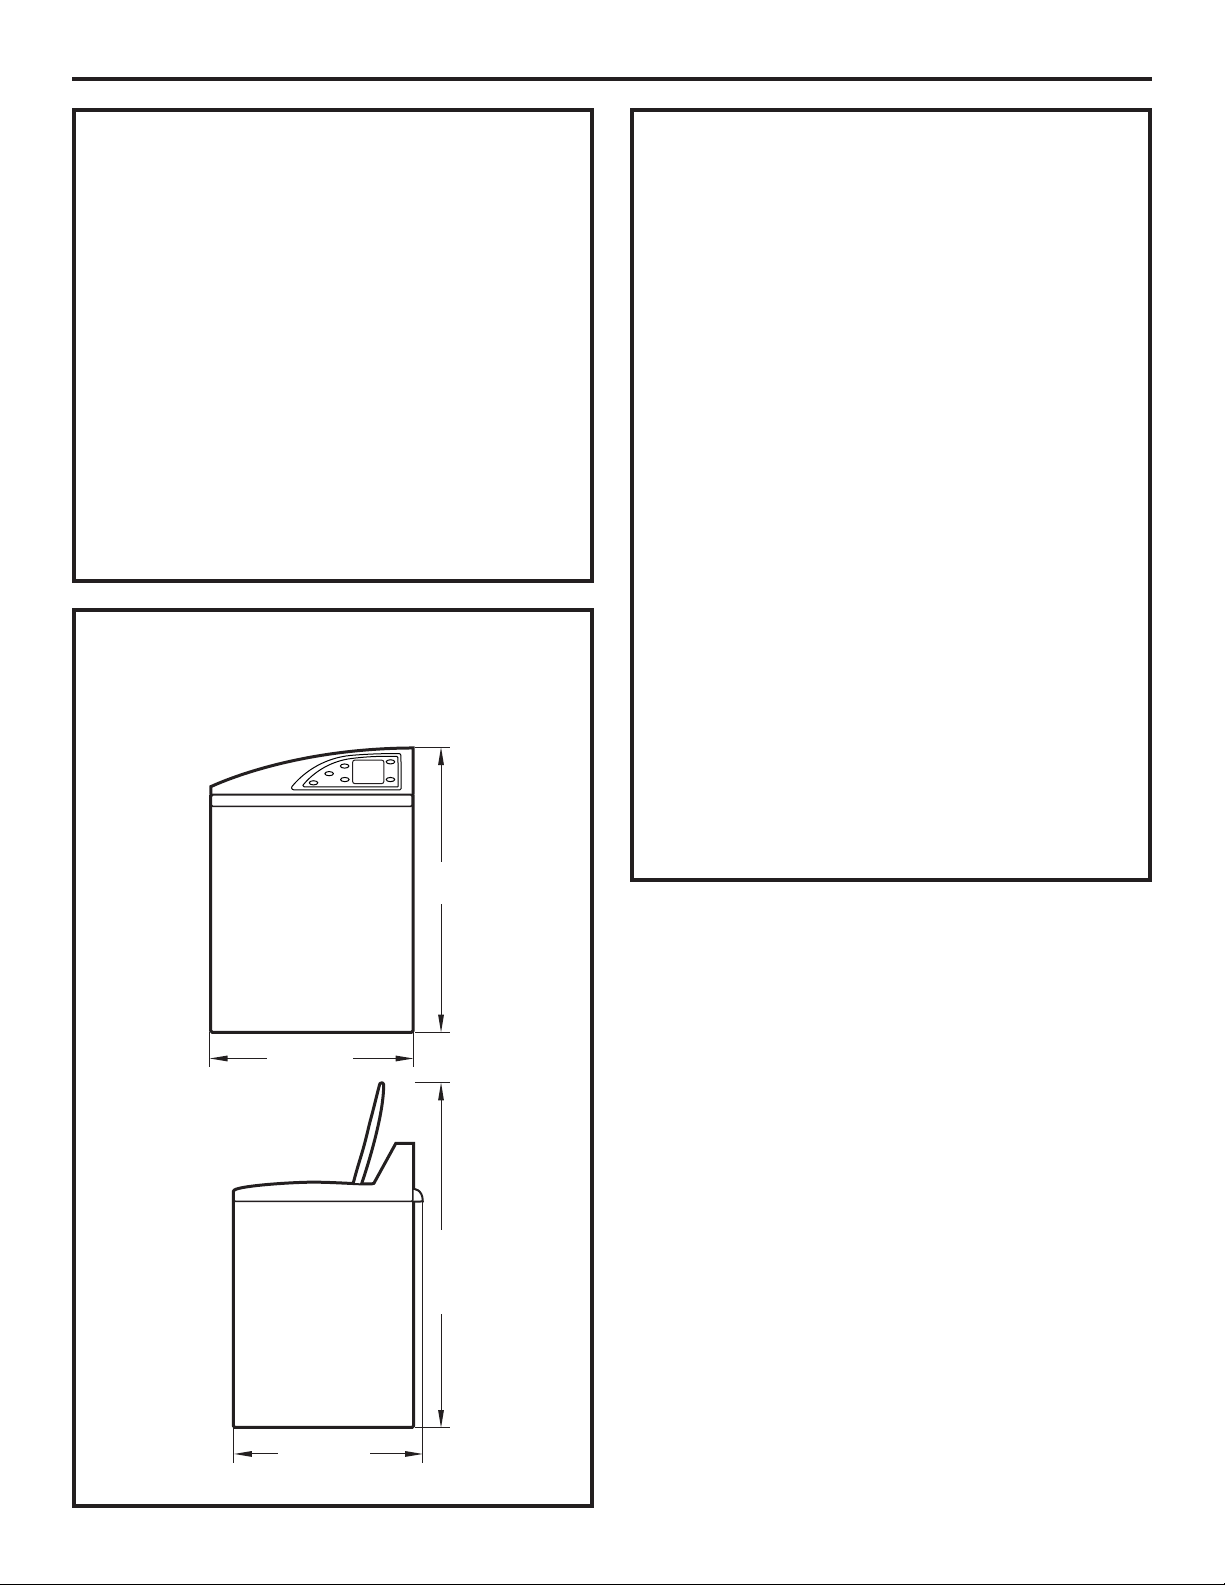
Minimum clearance between washer and
adjacent walls or other surfaces:
• 0” either side
• 2” front
• 3” rear
Minimum vertical space from floor to
overhead shelves, cabinets, ceilings, etc.,
is 52”.
WASHER DIMENSIONS
27”
(68.6 cm)
431⁄8”
(109.4 cm)
523⁄4”
(133.7 cm)
(with lid
open
)
281⁄4”
(71.6 cm)
Side View
Front View
REQUIREMENTS FOR ALCOVE OR
CLOSET INSTALLATION
Your washer is approved for installation in
an alcove or closet, as stated on a label on
the back of the machine.
Minimum clearance between washer and
adjacent walls or other surfaces:
• 0” either side
• 2” front
• 3” rear
Minimum vertical space from floor to
overhead shelves, cabinets, ceilings, etc.,
is 52”.
Closet doors must be louvered or otherwise
ventilated and have at least 60 square inches
of open area for washer only, or if the closet
contains both a washer and a dryer, door
must contain at least 120 square inches of
open area equally distributed. Air openings
are required to be unobstructed when a door
is installed. A louvered door with equivalent
air openings for the full length of the door is
acceptable.
NOTE: The clearances stated on this label are
minimums. Consideration must be given to
providing adequate clearances for installing
and servicing.
Page 21
❑ Adjustable Pliers
❑ Carpenter’s Level
21
Installation Instructions
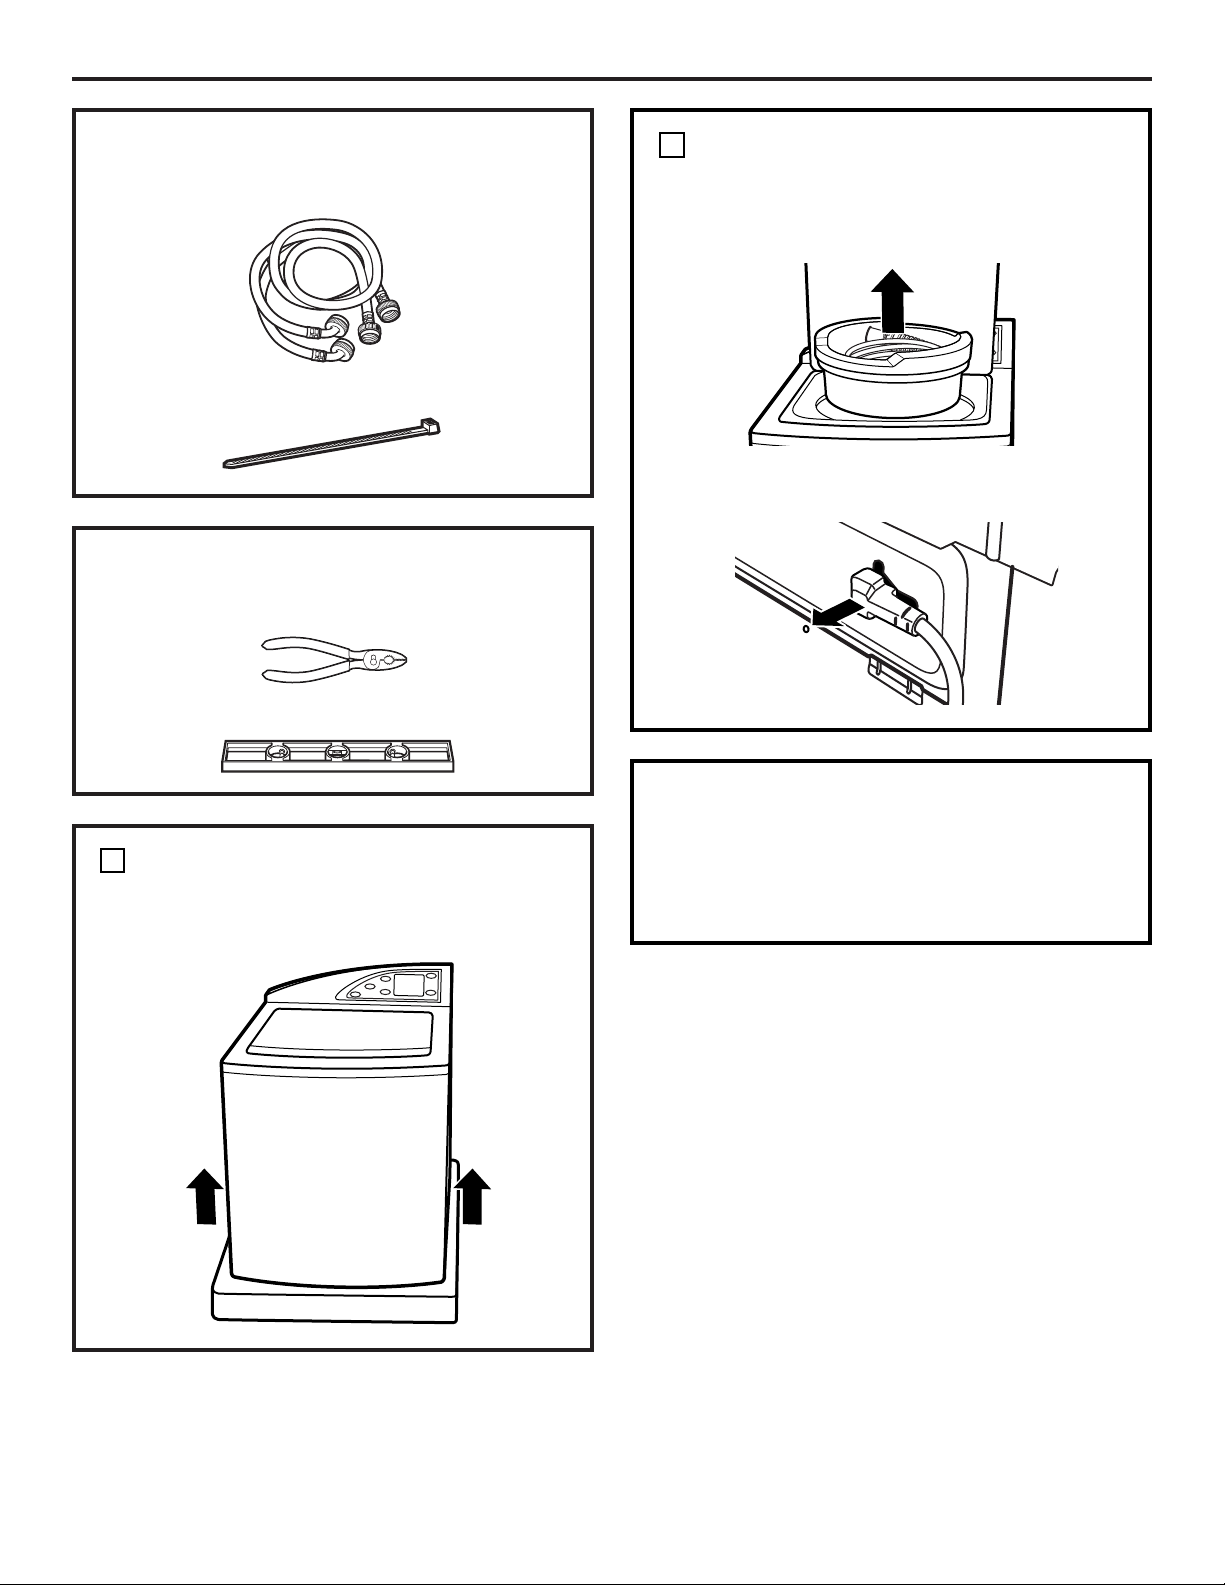
PARTS INCLUDED
❑ Water Hoses (2)
❑ Cable Tie
TOOLS YOU WILL NEED
UNPACK THE WASHER
1
UNPACK THE WASHER (CONT.)
Remove the Styrofoam block containing the
Owner’s Manual, parts, water hoses and
laundry product samples.
Remove the power cord from the back of the
washer.
1
SWITCH WASHER AND DRYER
BACKSPLASHES (OPTIONAL)
If necessary, switch the backsplashes for the
washer and dryer (see ”Switching the Washer
and Dryer Backsplashes”).
After the washer is in the home, remove the
carton and Styrofoam shipping base from
the washer.
Page 22

22
Installation Instructions
ATTACH WATER HOSES TO WASHER
Thread the hot water hose onto the washer
hot water connection (ORANGE) and the cold
water hose onto the cold water connection
(BLUE). Hand tighten; then make an
additional 1/8 turn with pliers.
2
Hot
Cold
MOVE WASHER CLOSE TO
HOUSE UTILITIES
Move the washer as close to the final location
as possible, leaving enough room to make
water, drain and electrical connections to the
home.
The minimum required rear clearance is 3”.
3
CONNECT WATER HOSES TO
HOUSE UTILITIES
Connect the water hoses to the HOT and
COLD water valves of your home. Hand
tighten, plus make an additional 1/4 turn
with pliers.
4
ATTACH DRAIN HOSE TO
HOUSE DRAIN
Firmly insert the free end of the drain hose
into the drain opening of your home. Make
sure the soft rubber end is completely inside
the drain opening.
• If the water valves and drain are built into
the wall, fasten the drain hose to one of the
water hoses with the cable tie (ribbed side
on inside).
• If your drain is a standpipe, fasten the drain
hose to the standpipe with the cable tie
provided.
5
Cable Tie
Cable Tie
3”
Page 23

23
Installation Instructions
LEVEL THE WASHER
Move the washer into final position.
• To check if the washer is level side to side,
open the lid and place a level at the back of
the opening above the dispenser drawer.
• To check if the washer is level front to back,
place a level at the side of the washer on
the edge where the cabinet side meets the
top cover.
If the washer is not level, adjust the front
leveling legs. Turn clockwise to raise,
counterclockwise to lower.
7
SET REAR LEGS
Remove the level and tilt the washer forward
(pivot on front legs) about 4 to 6 inches and
gently lower the rear legs back onto the floor.
This action will set rear leg adjustments to
correspond to front settings.
6
ATTACH SERIAL CABLE FOR
WASHER/DRYER
COMMUNICATION
(if desired)
Attach the serial cable shipped with the dryer
for washer/dryer communication to the serial
port on the back of the washer.
8
Serial Port
Lower
Raise
Rear of Washer
Page 24

PLUG WASHER IN
24
Installation Instructions
9
WASHER STARTUP
Press the POWER button.
NOTE: If the washer has been exposed to
temperatures below freezing for an extended
period of time, allow it to warm up before
pressing POWER. Otherwise, the display will
not come on.
The washer is now ready for use.
10
SERVICING
WARNING – Label all wires prior
to disconnection when servicing controls.
Wiring errors can cause improper and
dangerous operation after
servicing/installation.
For replacement parts and other information,
refer to the Owner’s Manual for servicing
phone numbers.
W
E
R
O
P
Page 25

25
Installation Instructions
SWITCHING THE WASHER AND DRYER
BACKSPLASHES (not required for most installations)
When viewed from the front, the washer is
shipped for installation on the left and the
dryer is shipped for installation on the right.
If your hose utility connections are arranged
so that the units must be installed with the
washer on the right and the dryer on the
left, you can switch the backsplashes of the
washer and dryer in order to maintain the
proper curved appearance.
TOOLS YOU WILL NEED
❑ #2 Phillips screwdriver
❑ Towel (2)
WARNING!
Make sure the washer and dryer are
unplugged.
REMOVE WASHER BACKSPLASH
Place a towel over the lid of the washer to
prevent scratches to the surface.
Remove the two outer screws from the rear
of the washer backsplash. Rotate backsplash
forward and lift off.
1
Screw
Screw
REMOVE BACKSPLASH REAR
COVER
Remove the two screws holding the washer
backsplash to the rear cover.
Pull off the rear cover.
2
Rear Cover
Screws
Rear of Washer
Page 26

26
Installation Instructions
DISCONNECT WASHER
CONTROL BOARD
Disconnect the ribbon at the right of the
control board by pulling the connector at the
end of the ribbon off the metal pins on the
control board.
NOTE: Do not disconnect any other wires
from the control board.
3
Rear of Washer
REMOVE CONTROL BOARD
FROM WASHER BACKSPLASH
Remove the four screws holding the control
board to the backsplash. Remove the control
board and set it aside.
4
Screws
REMOVE DRYER BACKSPLASH
Place a towel over the top surface of the dryer
to prevent scratches to the surface.
Remove the four screws from the rear of the
dryer backsplash. Rotate backsplash forward
and lift off.
5
Screws
DISCONNECT DRYER CONTROL
BOARD
Disconnect the ribbon at the right of the
control board by pulling the connector at the
end of the ribbon off the metal pins on the
control board.
NOTE: Do not disconnect any other wires
from the control board.
6
Rear of Dryer
Rear of Dryer
Page 27

27
Installation Instructions
REMOVE CONTROL BOARD
FROM DRYER BACKSPLASH
Remove the four screws holding the control
board to the backsplash. Remove the control
board and set it aside.
7
SWITCH BACKSPLASHES
Place the backsplash from the dryer on top of
the washer and place the backsplash from the
washer on top of the dryer.
8
ATTACH DRYER CONTROL
BOARD TO NEW BACKSPLASH
Attach the control board to the new
backsplash by replacing the four screws
removed from the control board earlier.
The control board will now be on the opposite
side of the dryer backsplash.
9
RECONNECT DRYER CONTROL
BOARD
Connect the dryer control board to the new
backsplash by sliding the ribbon connector on
the new backsplash onto the metal pins on
the control board and pushing in. Make sure
the ribbon is not twisted before inserting the
connector.
10
ATTACH DRYER BACKSPLASH
Insert the tabs on the bottom front of the
backsplash into the slots on the dryer and
rotate the backsplash into place. Secure the
new backsplash to the dryer using the four
screws removed earlier.
11
Screws
Screws
Screws
Screws
Strain Relief
Place the ribbon and the wire from the rear
cover under the strain relief on the new
backsplash.
Page 28

28
Installation Instructions
RECONNECT WASHER
CONTROL BOARD
Connect the washer control board to the
new backsplash by sliding the ribbon
connector on the new backsplash onto the
metal pins on the control board and pushing
in. Make sure the ribbon is not twisted
before inserting the connector.
ATTACH WASHER CONTROL
BOARD TO NEW BACKSPLASH
Replace the four screws removed from the
control board earlier.
The control board will now be on the
opposite side of the washer backsplash.
ATTACH WASHER BACKSPLASH
Insert the tabs on the bottom front of the
backsplash into the slots on the washer and
rotate the backsplash into place. Press the
rear of the backsplash down to make sure it
fits properly.
Secure the new backsplash to the washer
using the two long screws removed earlier.
Using the two small screws removed earlier,
screw the new washer backsplash onto the
rear cover.
RECONNECT POWER SUPPLY
TO WASHER AND DRYER
Screws
12
13
15
14
Strain Relief
Place the gray wire from the serial port under
the strain relief on the new backsplash.
• Plug the washer and dryer back in.
• Press the POWER buttons on both the
washer and dryer to make sure both
control boards are properly connected.
Page 29

Problem Solver
ge.com
Problem Possible Cause What To Do
Washer won’t operate Control panel is asleep • This is normal. Press POWER, the Touch Screen
or any button to activate the control panel.
Washer is unplugged • Make sure cord is plugged securely into a working outlet.
Water supply is turned off • Turn both hot and cold faucets fully on.
Controls are not set properly • Make sure the cycle was set correctly, close the lid and
press START.
Lid is open—safety feature. • Close lid and reset cycle, to the beginning if necessary.
Prevents the washer from filling
and operating when lid is up
Circuit breaker/fuse is • Check house circuit breakers/fuses. Replace fuses or
tripped/blown reset breaker. Washer should have separate outlet.
Electronics need to be reset • Unplug washer, wait 2 minutes, plug back in and press
POWER.
START was not pressed after a • Press START.
cycle was set
Extremely low water pressure • Press START again.
Washer is too cold • If the washer has been exposed to temperatures below
freezing for an extended period of time, allow it to warm
up before pressing POWER. Otherwise, the display will
not come on.
Water not filling properly Filter clogged or fill hoses may • Make sure that the water valve filters (blue and orange
be kinked screen must be free of solids) on the unit are not
clogged. Turn off water and check filter by disconnecting
hose at machine. Check that fill hoses are not kinked
or clogged.
Energy efficiency • This is an energy efficient washer. As a result, the
temperature settings for this washer may be different
than non-energy efficient washers.
Insufficient water supply • Make sure that the water supply is turned on. Make sure
that the water faucets are turned to their completely
open positions.
The washer lid is open • The washer lid must be closed for all washer cycle
operations. If the lid is opened during washer
operation, all functions will stop, including water filling.
Incorrect fill hose connection • Make sure that the fill hoses connect the hot water
supply to the hot inlet on the washer, and the cold water
supply to the cold inlet on the washer (hot to hot, cold
to cold).
Water fill optimization • Water may not cover the top level of the clothes. This is
normal for this high efficiency washer. The water fill is
optimized by the system for best wash performance.
For a complete list of solutions to common washer problems, use the
Troubleshooting Tips feature located by pressing the HELP button
while on the washer Home Screen (see Using the Troubleshooter).
If your washer will not operate, check the Problem Solver below:
29
Page 30

Problem Solver
ge.com
Problem Possible Cause What To Do
Washer will not drain— Kinked drain hose or drain • Ensure that the drain hose is not kinked. Per the
water standing in the tub located higher than 8′ above floor recommended installation instructions, the drain outlet
cannot be over 8′ above the floor.
Water leaks every load Hoses not installed correctly • Check all fill and drain hose connections to ensure that
they are tight and secure.
Water leaks Oversudsing of detergent • Oversudsing may create leaks, and may be caused by the
type and amount of detergent used. High efficiency
detergent is recommended. Make sure that detergent
and any additives are put into the correct dispenser bins.
Follow the detergent manufacturer’s recommendations
for the amount of detergent, but try using less detergent,
especially if home water conditioning or water softening
units are used.
Display blank after cycle Five minutes have passed • This is part of normal operation. The display is designed
has finished without input to automatically turn off after 5 minutes of inactivity.
Settings will remain saved after the display has turned off.
Display LCD color Perceived color of display • This is normal.
appears different depends on viewing angle
between washer and dryer
Washer not communicating Dryer settings are not displayed • The recommended dryer settings will be displayed only
with the dryer after the first time the washer or dryer touchscreen is
activated following a completed wash cycle. After the
recommended settings are displayed, the five minute
timeout feature on the dryer will erase the recommended
cycle. If the LCD times out before the cycle is started,
you can press the washer recommended cycle button
to recall your previous washer load information.
Option disabled • Make sure that the communication feature is enabled.
First push the HOME button and then HELP. Then
select machine preferences and washer/dryer
communication. Press the selection bar to display “on”
and select “ok”. Press the HOME button to begin cycle
selection.
Poor cable connection • If the cable connecting the washer and dryer is not
securely attached, communication will be affected.
Ensure that the cable is securely attached to both the
washer and dryer at the back of the units. This should
be checked especially if the backsplashes were reversed.
Incomplete or no Detergent bins clogged from • Make sure that detergent and additives are put into
dispensing of detergent incorrect filling the correct dispenser bins. If liquid detergent is used,
make sure that the liquid detergent insert box is in the
dispenser bin. If powdered detergent is used, make sure
that the liquid detergent insert box is not used. Liquids
must be put in the fabric softener and pre-treat bins.
For all detergent types, always make sure that the
dispenser box is fully closed before the start of the cycle.
For a complete list of solutions to common washer problems, use the
Troubleshooting Tips feature located by pressing the HELP button
while on the washer Home Screen (see Using the Troubleshooter).
If your washer will not operate, check the Problem Solver below:
30
Page 31

Problem Solver
ge.com
Problem Possible Cause What To Do
Incomplete or no Too much detergent used • Make sure that the suggested amount of detergent is
dispensing of detergent used per the manufacturer’s recommendations. You may
(cont.) also dilute the detergent with water to he maximum
fill line on the bin to avoid clogging. High efficiency
detergent is recommended for this washer.
Insufficient water supply • Make sure that the water supply is turned on. Make sure
that the water faucets are turned to their completely
open positions.
Normal residue • Normal operation. Residue may remain in the bins of
the dispenser box The dispenser box may be removed
for occasional cleaning with warm water and a scrub
brush. The liquid detergent insert box and siphon caps
may also be removed from the detergent bin for
occasional cleaning. Remember that only liquid may be
used in the fabric softener and pre-treat bins. Powder
will not dispense from the fabric softener or pre-treat bins.
Premature dispensing Bleach bin filled for future load • You cannot store bleach in the dispenser for future use.
of bleach The bleach bin will be dispensed every load for optimal
safety of the washer.
Overfilling the bleach bin • Overfilling the bin with bleach may lead to premature
dispensing. There is a maximum fill line indicated on
the bleach bin to help avoid overfilling.
Clogging of bleach Bleach bin is not seated • Make sure that the bleach cover is properly seated and
snapped into place before the start of the cycle.
Insufficient cleaning • You may remove and clean the bleach cover with warm
water and a scrub brush to clear clogging.
Poor stain removal Stain inspector not used • Try using the stain inspector recommended cycle.
The system optimizes washer settings according to the
type of stain specified. Always make sure that any
additives, such as your high efficiency liquid detergent,
are added to the pre-treat dispenser bin before starting
the cycle. Always reference your clothes care label before
treating stains.
Presoak not selected • When stain inspector is used, presoak temperature and
time is automatically selected. If you choose not to use
the stain inspector, we recommend that you select
presoak when defining your wash cycle. Always make sure
that any additives, such as your high efficiency liquid
detergent, are added to the pre-treat dispenser bin
before starting the cycle. Always reference your clothes
care label before treating stains.
Controls do not work— Button or touchscreen option • A double beep will result if a button or touchscreen
double beep is heard was selected that is temporarily option is selected that is temporarily disabled. For
but control screen does disabled example, pressing the start button with the washer lid
not change open will result in a double beep, indicating that the lid
must be closed before the start button is enabled.
31
Page 32

32
Problem Solver
ge.com
Sound Description
Repeated starting and • The HydroWash™action spins the wash basket in one direction, then pauses and spins in
stopping the opposite direction to clean your items.
Sound of water being added • The washer adapts to the load size and type to add more water to the cycle as needed.
after the washer has already
• The wash load may be unbalanced. If the washer senses that the load is unbalanced, it will
been operating
stop and refill to redistribute the load.
• The washer may be diluting laundry additives to add to the wash load.
Clicking sound during the • The washer will make a series of clicking noises as it changes the cleaning mode.
wash cycle
High-pitched noise during the • The wash basket spins faster to remove moisture from the load.
spin cycle
Water flushing sound • The washer is diluting laundry additives to add to the wash load. Wash Boost additives
are dispensed during presoak. Detergent is dispensed at the beginning of the wash cycle.
Bleach is dispensed during the main wash. Fabric softener is dispensed during the
final rinse.
Humming noise during • The pump is operating to remove water from the basket.
draining
Pinging noise during the spin • The washer has special rinse features to remove detergent residue from the load after the
or rinse cycle main wash cycle.
Water sloshing sound when • A liquid in the balance ring around the wash basket helps the basket spin smoothly.
washer is turned off and tub
is rotated
The following are normal sounds you may hear:
Page 33

33
Staple your receipt here.
Proof of the original purchase
date is needed to obtain service
under the warranty.
For The Period Of: We Will Replace:
One Year Any part of the washer which fails due to a defect in materials or workmanship. During this
From the date of the limited one-year warranty, GE will also provide, free of charge, all labor and related service costs to
original purchase replace the defective part.
Second through Fifth Year The suspension rod and spring assembly, and main electronic control board if any of these parts should
From the date of the fail due to a defect in materials or workmanship. GE will also replace the washer lid or cover if they
original purchase should rust under operating conditions. During this additional three-year limited warranty, you will be
responsible for any labor or related service costs.
Second through Tenth The direct drive motor and outer washer tub if any of these parts should fail due to a defect in materials
Year From the date of the or workmanship. During this additional eight-year limited warranty, you will be responsible for any
original purchase labor or related service costs.
Lifetime of Product The washer basket if it should fail due to a defect in materials or workmanship. During this product
From the date of the lifetime limited warranty, you will be responsible for any labor or related service costs.
original purchase
Washer Warranty
ge.com
All warranty service provided by our Factory Service Centers or an
authorized Customer Care®technician. To schedule service, on-line,
24 hours a day, visit us at ge.com or call 800.GE.CARES
(800.432.2737). Please have serial number and model number
available when calling for service.
■ Service trips to your home to teach you how to use the
product.
■ Improper installation, delivery or maintenance.
■ Failure of the product if it is abused, misused, or
used for other than the intended purpose or used
commercially.
■ Replacement of house fuses or resetting of circuit
breakers.
■ Damage to the product caused by accident, fire, floods
or acts of God.
■ Incidental or consequential damage caused by possible
defects with this appliance.
■ Damage caused after delivery.
■ Product not accessible to provide required service.
What Is Not Covered:
This warranty is extended to the original purchaser and any succeeding owner for products purchased for home use within the
USA. If the product is located in an area where service by a GE Authorized Servicer is not available, you may be responsible for a trip
charge or you may be required to bring the product to an Authorized GE Service location. In Alaska, the warranty excludes the cost
of shipping or service calls to your home. Proof of the original purchase date is needed to obtain service under the warranty.
Some states do not allow the exclusion or limitation of incidental or consequential damages. This warranty gives you specific
legal rights, and you may also have other rights which vary from state to state. To know what your legal rights are, consult
your local or state consumer affairs office or your state’s Attorney General.
Warrantor: General Electric Company. Louisville, KY 40225
EXCLUSION OF IMPLIED WARRANTIES—Your sole and exclusive remedy is product repair as provided in this Limited Warranty. Any
implied warranties, including the implied warranties of merchantability or fitness for a particular purpose, are limited to one year or
the shortest period allowed by law.
Page 34

Consumer Support
GE Appliances Web site ge.com
Have a question or need assistance with your appliance? Try the GE Appliances Web site 24 hours a day,
any day of the year! For greater convenience and faster service, you can now download Owner’s Manuals,
order parts, catalogs, or even schedule service on-line. You can also “Ask Our Team of Experts™” your
questions, and so much more...
Schedule Service ge.com
Expert GE repair service is only one step away from your door. Get on-line and schedule your service at
your convenience 24 hours any day of the year! Or call 800.GE.CARES (800.432.2737) during normal
business hours.
Real Life Design Studio ge.com
GE supports the Universal Design concept—products, services, and environments that can be used by
people of all ages, sizes, and capabilities. We recognize the need to design for a wide range of physical and
mental abilities and impairments. For details of GE’s Universal Design applications, including kitchen
design ideas for people with disabilities, check out our Web site today. For the hearing impaired, please
call 800.TDD.GEAC (800.833.4322).
Extended Warranties ge.com
Purchase a GE extended warranty and learn about special discounts that are available while your warranty
is still in effect. You can purchase it on-line anytime or call 800.626.2224 during normal business hours.
GE Consumer Home Services will still be there after your warranty expires.
Parts and Accessories ge.com
Individuals qualified to service their own appliances can have parts or accessories sent directly to their
homes (VISA, MasterCard, and Discover cards are accepted). Order on-line today, 24 hours every day, or
by phone at 800.626.2002 during normal business hours.
Instructions contained in this manual cover procedures to be performed by any user. Other servicing generally
should be referred to qualified service personnel. Caution must be exercised, since improper servicing may cause
unsafe operation.
Contact Us ge.com
If you are not satisfied with the service you receive from GE, contact us on our Web site with all the details,
including your phone number, or write to: General Manager, Customer Relations
GE Appliances, Appliance Park
Louisville, KY 40225
Printed in Korea
Register Your Appliance ge.com
Register your new appliance on-line—at your convenience! Timely product registration will allow for
enhanced communication and prompt service under the terms of your warranty, should the need arise.
You may also mail in the preprinted registration card included in the packing material.
34
Page 35

Instrucciones de seguridad . . . . 2, 3
Instrucciones de operación
Ayuda . . . . . . . . . . . . . . . . . . . . . . . . . . .13, 14
Ciclos de lavado . . . . . . . . . . . . . . . . . . . . . .6
Comienzo rápido . . . . . . . . . . . . . . . . . . . . . .5
Cómo llenar y usar
su lavadora . . . . . . . . . . . . . . . . . . . . . .17, 18
Inspector de manchas . . . . . . . . . . . . . .7, 8
“My cycles” (Mis ciclos) . . . . . . . . . . . .11, 12
Otras funciones . . . . . . . . . . . . . . . . . .15, 16
Panel de control de su lavadora . . . . . . . .4
Pantalla resumen . . . . . . . . . . . . . . . . . .9, 10
Solucionador de problemas . . . . . . . . . . .13
Instrucciones de instalación
Antes de comenzar . . . . . . . . . . . . . . .19–21
Cómo intercambiar los tableros
de la lavadora y la secadora . . . . . .25–28
Instalación paso por paso . . . . . . . . .21–24
Solucionador
de problemas . . . . . . . . . . . . . . . . .29–32
Servicio al consumidor
Servicio al consumidor . . . . . . . . . . . . . . . 34
Garantía . . . . . . . . . . . . . . . . . . . . . . . . . . . . 33
ge.com
Lavadoras
3828EA3023B 175D1807P530 49-90262 11-05 JR
Profile
Escriba los números de
modelo y de serie aquí:
No. de modelo __________
No. de serie ____________
Usted puede encontrar estos
números en la parte posterior
del tablero de la lavadora.
WPGT9350
WPGT9360
Manual del propietario
e Instrucciones de
instalación
Page 36

2
SEGURIDAD DEL CALENTADOR DE AGUA
Bajo ciertas condiciones, el gas de hidrógeno podría producirse en un calentador de agua que no se ha usado por
dos semanas o más. El gas de hidrógeno podría ser explosivo bajo ciertas circunstancias.
Si no se ha usado agua caliente por dos o más semanas, evite la posibilidad de daños o lesiones
de quemaduras abriendo todos los grifos de agua por varios minutos. Haga esto antes de usar
cualquier electrodoméstico eléctrico que esté conectado a un sistema de agua caliente. Este
procedimiento permite que el gas de hidrógeno que se pudiera haber acumulado escape. Debido
a que el gas es inflamable, no fume ni encienda llamas ni encienda el electrodoméstico durante
este proceso.
¡ADVERTENCIA! Por su seguridad, debe seguir las indicaciones de este manual para minimizar
el riesgo de incendio o explosión, descarga eléctrica, o para evitar daños a la
propiedad, lesiones personales o muerte.
INSTRUCCIONES IMPORTANTES DE SEGURIDAD
LEA TODAS LAS INSTRUCCIONES ANTES DE USAR.
INSTALACIÓN APROPIADA
• Instale o almacene donde no esté expuesta
a temperaturas por debajo del punto de
congelación o a la intemperie.
• Conecte la lavadora a tierra correctamente de
manera que cumpla con todos los códigos y
ordenanzas de regulación. Siga con cuidado las
Instrucciones de instalación.
Antes de usarse, la lavadora se debe instalar correctamente de acuerdo con las Instrucciones de instalación. Las
Instrucciones de instalación se incluyen en la parte posterior de este manual.
SU ÁREA DE LAVADO
• Mantenga el área debajo y alrededor de
sus electrodomésticos libre de materiales
combustibles (pelusas, papel, trapos, productos
químicos, etc.).
• Supervise a los niños en caso de que ellos usen
la lavadora o jueguen cerca de ella durante su
operación. No permita que los niños jueguen
con la lavadora, en su anterior, o sobre ella o
ningún otro electrodoméstico.
Page 37

3
LEA Y SIGA ESTA INFORMACIÓN DE
SEGURIDAD CON MUCHO CUIDADO.
GUARDE ESTAS INSTRUCCIONES.
CUANDO USE SU LAVADORA
• Use este electrodoméstico solamente para los
propósitos especificados en este Manual del
propietario.
• Nunca introduzca sus manos en la lavadora
mientras se está moviendo. Espere hasta que la
máquina se haya detenido completamente
antes de abrir la tapa.
• No mezcle blanqueador con amoniaco o
ácidos tales como vinagre y/o removedor de
óxido. Mezclar diferentes tipos de productos
químicos puede producir gases tóxicos que
podrían causar la muerte.
• No lave o seque artículos que se hayan
lavado, secado, remojado, o salpicado
con combustibles o sustancias explosivas
(tales como cera, aceite, pintura, gasolina,
desengrasadores, solventes de lavado en
seco, queroseno) porque podrían encenderse
o explotar. No agregue estas sustancias al
agua de la lavadora. No use o coloque estas
sustancias alrededor de su lavadora o secadora
durante el uso.
• El proceso de lavado puede reducir la
habilidad de retardo de llama en las telas. Para
evitar tal resultado, siga las instrucciones de
lavado que le recomienda el fabricante.
• Para minimizar las posibilidades de
una descarga eléctrica, desconecte el
electrodoméstico del suministro eléctrico
o desconecte la lavadora del panel de
distribución de su casa antes de intentar
realizar cualquier tipo de mantenimiento o
limpieza. NOTA: Presionar START/STOP
(ARRANCAR/PARAR) o POWER
(ENCENDER) NO desconecta el
electrodoméstico del suministro eléctrico.
• Nunca intente operar este electrodoméstico
si está dañado, si funciona mal, si está
parcialmente desensamblado o si tiene partes
faltantes o rotas, incluyendo el cable eléctrico
o el enchufe.
¡ADVERTENCIA! Por su seguridad, debe seguir las indicaciones de este manual para minimizar
el riesgo de incendio o explosión, descarga eléctrica, o para evitar daños a la
propiedad, lesiones personales o muerte.
INSTRUCCIONES IMPORTANTES DE SEGURIDAD
LEA TODAS LAS INSTRUCCIONES ANTES DE USAR.
CUANDO NO SE ENCUENTRE USANDO SU LAVADORA
• Cierre los grifos para aliviar la presión en
las mangueras y válvulas y para minimizar las
fugas si ocurriera una ruptura. Inspeccione la
condición de las mangueras las cuales deberán
reemplazarse cada 5 años.
• Antes de desechar la lavadora, o de removerla
para darle servicio, remueva la tapa de la
misma para evitar que algún niño se esconda
en su interior.
• No intente reparar o remplazar parte alguna
de la lavadora a no ser que se especifique
en el Manual del propietario, o en alguna
instrucción de reparación publicada que usted
entienda y que pueda llevar a cabo.
• No intente alterar los controles.
Page 38

Panel de control de su lavadora
ge.com
Funciones
del tablero de
control de su
lavadora
1 POWER (ENCENDER). Presione para
encender la pantalla. Si la pantalla está activa,
presione para colocar la lavadora en el modo
de alerta (Standby). Si no hay actividad por
5 minutos, la pantalla se apagará. Usted
también puede presionar la pantalla de tacto
o cualquier botón para encender la pantalla.
NOTA: Presionar POWER (ENCENDER) no
desconecta el electrodoméstico del
suministro eléctrico.
2 MY CYCLES (MIS CICLOS). Presione para
usar, crear, cambiar el nombre, cambiar o
borrar ciclos de lavado personalizados.
3 BACK (REGRESAR). Presione para regresar
a la pantalla anterior.
4 PANTALLA DE TACTO. Presione los
gráficos en la pantalla interactiva para usar las
funciones de la lavadora.
No intente usar objetos filosos para presionar
la pantalla de tacto.
NOTA: Si la lavadora está inactiva por
5 minutos, la pantalla cambiará al modo de
alerta (Standby), y la pantalla se apagará.
Presione la pantalla de tacto o cualquier
otro botón para encender la pantalla.
5 HOME. Presione para regresar a la pantalla
“TOQUE PARA ESCOGER UN CICLO DE
LAVADO” (Pantalla inicial).
6 START/STOP (ARRANCAR/PARAR).
Presione para comenzar el ciclo de lavado.
Si la lavadora está funcionando, presione una
vez para poner la lavadora en pausa. Presione
de nuevo para reiniciar el ciclo de lavado.
NOTA: Si la lavadora es pausada y el ciclo no
es reiniciado dentro de una hora, la lavadora
entrará en el modo de alerta (Standby) y el
ciclo actual de lavado se cancelará.
7 HELP (AYUDA). Presione para escoger las
preferencias de la máquina para encontrar
ayuda usando la pantalla de tacto o para
encontrar ideas para la identificación y
solución de problemas comunes de la
lavadora.
A lo largo de este manual, las funciones y la apariencia podrían ser diferentes a su modelo.
4
¡ADVERTENCIA! Para reducir el riesgo de incendio o lesiones personales, lea las INSTRUCCIONES
IMPORTANTES DE SEGURIDAD antes de operar este electrodoméstico.
M
E
O
H
C
K
A
B
C
Y
L
C
E
Y
S
M
L
P
E
H
W
E
R
O
P
START
STOP
Page 39

5
Comienzo rápido
ge.com
Pantalla inicial
Para
comenzar
Si la pantalla
de tacto está
apagada,
presione el
botón POWER
(ENCENDER)
en la pantalla
de tacto para
tener acceso al
menú de los
ciclos de
lavado.
Introduzca la ropa sin sobrepasar la línea
de agujeros en la tina de la lavadora. Llenar la
lavadora en exceso podría reducir la eficiencia del
lavado y posiblemente aumentar las arrugas.
Agregue un detergente de poca espuma y de alta
eficiencia. Agregue un suavizante de tela diluido,
blanqueador o aditivos de pre-tratamiento previo
según desee.
Seleccione uno de los cinco métodos de lavado
de la pantalla inicial:
• Presione POR COLOR para lavar de acuerdo al
color de la tela.
• Presione POR PRENDA para lavar de acuerdo
al tipo de ropa.
• Presione POR TELA para lavar de acuerdo al
tipo de tela.
• Presione CICLOS ESPECIALES para lavar
artículos que no sean prendas de vestir, o
seleccione un enjuagado y giro o un ciclo
de giro solamente.
• Presione INSPECTOR DE MANCHAS para
lavar artículos con tipos específicos de manchas.
Después de seleccionar un método de lavado, use
la pantalla de tacto para seleccionar un ciclo de
lavado específico que se ajuste a la carga.
Cambie cualquiera de los ajustes automáticos, si
lo desea, presionando la pantalla de tacto y
siguiendo las instrucciones en la pantalla.
Cambiando los ajustes usted puede:
• Remover más suciedad.
• Cambiar la temperatura del agua.
• Cambiar la acción del lavado a Vigorosa,
Normal, Delicada o Lavado a mano.
• Escoja un Arranque demorado, Giro
prolongado, Pre-remojo o Enjuagado adicional,
o cambie el volumen de la señal del final
del ciclo.
• Escoger los ajustes del tiempo.
Cierre la tapa y presione START (ARRANCAR).
La lavadora no se llenará hasta que la tapa esté
cerrada.
Después de que usted presione START
(ARRANCAR), una pantalla de estado de ciclo
aparece para indicar en qué etapa del ciclo la
lavadora se encuentra y el tiempo que le queda
para completarla.
TOQUE PARA ESCOGER UN CICLO DE LAVADO
POR COLOR POR PRENDA
POR
TELA
CICLOS
ESPECIALES
INSPECTOR
DE MANCHAS
PANTALLA RESUMEN
ALGODONES
CICLO
ACCIÓN DE LAVADO
NORMAL
SUCIO
TEMP
TIEMPOOPCIONES
0:50
START
STOP
Page 40

6
Ciclos de lavado
ge.com
Lavado
por color
Si la pantalla de tacto está apagada, presione el botón POWER (ENCENDER) o la pantalla de tacto
para accesar al menú de ciclos de lavado.
Los ajustes de ciclos predeterminados están basados en tipos de cargas comunes. Cuando lave,
siempre siga las instrucciones en la etiqueta del fabricante de la tela.
• Blancos
• Colores claros
• Colores mezclados
• Colores nuevos
• Colores vivos /
oscuros
Lavado
por tipo
de ropa
• Blusas
• Camisas de vestir
• Chaquetas / abrigos
• Cuidado fácil
• Delicados
• Jeans
• Kakis
• Prendas mezcladas
• Ropa de jugar
• Ropa deportiva
• Ropa diaria / casual
• Ropa interior
• Ropa interior
femenina
• Sedas / rayón
(lavable)
• Suéteres
• Tejidos
• Trajes de baño
Seleccione POR COLOR para lavar cargas clasificadas por el color. *
LOS CICLOS DE COLOR incluyen:
Seleccione POR PRENDA para lavar cargas clasificadas por el tipo de ropa.*
LOS CICLOS POR PRENDA incluyen:
Lavado por
tipo de tela
• Algodones
• Cuidado fácil (en
algunos modelos)
• Delicados
• Mezclas (en algunos
modelos)
• Poliéster
• Sedas / rayón
(lavable)
• Tejidos
Seleccione POR TELA para lavar cargas clasificadas por el tipo de tela.
LOS CICLOS DE TELAS incluyen:
Lavado
usando
los ciclos
especiales
• Ahorro de energía
• Camita para
mascotas (lavable)
• Cobijas (algodón)
• Cobijas (otras telas)
• Edredón
• Enjuague y giro
• Lana lavable
• Limpieza rápida
• Medias / brasiers
(use una bolsa de
malla)
• Sábanas
• Sólo giro
• Superlimpio
• Tapetes (lavables)
• Toallas
• Woolite®HE para
lavado a mano
• Zapatos deportivos
Seleccione CICLOS ESPECIALES para lavar cargas de artículos que no
son ropa o para seleccionar un ciclo de enjuague y giro o de giro
solamente.
Los CICLOS ESPECIALES incluyen:
* Después de que ocurra la comunicación entre la lavadora y la secadora, la secadora podría
pedir información adicional sobre el “TIPO DE TELA”.
POR COLOR
POR PRENDA
POR
TELA
CICLOS
ESPECIALES
Page 41

Cómo lavar
usando el
Inspector
de manchas
El inspector de manchas ofrece ideas para el
tratamiento y lavado óptimos de tipos de manchas
específicas.
Usted selecciona el tipo de mancha, tela o color
específicos y la lavadora crea un ciclo de lavado
para tratar la mancha.
Inspector de manchas
ge.com
1 Presione INSPECTOR DE MANCHAS.
2 Lea y siga las instrucciones en la pantalla de
tacto antes de tratar la tela.
3 Seleccione COMIDA / LÁCTEOS /
COCINA de la lista de categorías de
manchas y seleccione CHOCOLATE
de la lista de manchas.
Usted también puede encontrar
categorías de manchas adicionales,
presionando MÁS CICLOS en la esquina
inferior derecha de la pantalla de tacto.
4 Presione el botón HELP (AYUDA) para
encontrar información sobre el pretratamiento de los tipos de manchas
específicos.
5 Seleccione ALGODONES de la lista de tipos
de telas, y seleccione BLANCOS de la lista
de colores.
6 Llene el canasto del detergente con un
detergente líquido de alta eficiencia y que
produzca poca espuma como Tide®HE.
Llene el canasto de pre-tratamiento con el
aditivo de pre-tratamiento apropiado.
7 Coloque la ropa manchada en la lavadora
primero; luego agregue el resto de la carga.
Para eliminar las manchas más eficazmente,
solamente lave artículos con manchas que se
ajusten a la selección.
8 Presione START (ARRANCAR).
La lavadora iniciará un ciclo de remojo previo
al ciclo de lavado principal.
NOTA: Para algunos ciclos de mancha,
la temperatura del agua para el ciclo de
remojo previo podría no ser la misma que la
temperatura del agua para el lavado del ciclo
principal.
IMPORTANTE: Asegúrese de que la mancha
se removió completamente antes de colocar el
artículo en la secadora.
Ejemplo: Cómo lavar una camisa blanca de algodón manchada con chocolate
Canasto de
detergente
Canasto de
PRE-TRATAMIENTO
La apariencia podría variar.
o bien
7
INSPECTOR
DE MANCHAS
ANTES
DE TRATAR
OK
LA TELA
1) VEA LAS INSTRUCCIONES DE LA ETIQUETA
DEL CUIDADO DE LA TELA. USE LA
FUNCIÓN DE AYUDA PARA CONSEJOS
ADICIONALES SOBRE MACHAS.
2) PRUEBE LOS CONSEJOS DE RETIRO DE
MANCHAS EN UN ÁREA NO VISIBLE DE LA TELA.
3) NO COLOQUE PRENDAS MANCHADAS
EN LA SECADORA.
(LA MANCHA SE PUEDE FIJAR A LA TELA).
COMIDA/LÁCTEOS/COCINA
CHOCOLATE
- ADD AN ENZYME CONTAINING LAUNDRY
DETERGENT, LIKE LIQUID TIDE HE(R)
TO THE PRE-TREAT DISPENSER AND A
HIGH EFFICIENCY DETERGENT TO THE
DETERGENT DISPENSER.
LECHE PARA
BEBÉ
CHOCOLATE
MÁS CICLOS
MANTEQUILLA/
MARGARINA
CHOCOLATE
MÁS CICLOS
GRASA ANIMAL
MANTEQUILLA/
MARGARINA
ACEITE
DE COCINA
COMIDA/LÁCTEOS/COCINA
BASE DE
TOMATE
ADEREZO DE
ENSALADA
MAYONESA
Page 42

8
Selecciones
de manchas
Inspector de manchas
ge.com
A continuación hay una lista de las selecciones de
manchas disponibles en la pantalla de tacto de la
lavadora. Para información adicional acerca del
manejo de estos tipos de manchas, visite Tide
®
Stain Detective (Detective de manchas Tide®) en
www.tide.com/staindetective.
Bebidas
• Agua
• Bebidas alcohólicas
• Café
• Chocolate caliente
• Jugo de frutas, otros
• Jugo de uva
• Kool-Aid
®
• Leche
• Soda / con color
• Té
• Vino, blanco
• Vino, rojo
Escuela / Oficina /
Casa
• Betún
• Borrador líquido
(Wite-Out®)
• Cemento de goma
• Cinta adhesiva
• Creyón
• Marcas de lápiz
• Moho
• Pegamento
blanco / común
• Pegamento sintético
• Pintura (de aceite)
• Pintura (de agua)
• Suavizante de ropa
• Tinta de pluma
Comida / Lácteos /
Cocina
• Aceite de cocina
• Aceite vegetal
• Aderezo de ensalada
• Arándano
• Base de tomate
• Chocolate
• Grasa
• Grasa animal
• Huevo
• Leche
• Leche para bebé
• Mantequilla /
Margarina
• Mayonesa
• Mostaza
• Popsicle
congelado/gelatina
• Pudín
• Salsa
• Salsa barbacoa
• Salsa de crema /
queso
• Salsa de soya
• Sirope de maple
Aceites pesados /
Grasa
• Aceite lubricante
para motores
• Gasolina
• Ungüento /
Bálsamo
Exterior
• Arcilla
• Barro / Tierra
• Calcetines blancos
sucios
• Carbón
• Hierba
• Óxido / Hierro
• Savia de árboles
Personal
• Enjuague bucal
• Manchas de bebé
• Medicamentos,
general
• Orina / heces
fecales
• Sangre
• Sudor
• Vómito
Cosméticos
• Chapstick
®
• Desodorante /
antitranspirante
• Esmalte de uñas
• Lápiz labial
• Lociones
• Maquillaje con base
de aceite
• Maquillaje con base
de agua
Manchas especiales
• Asfalto / Alquitrán
• Cemento de goma
• Cinta adhesiva
• Pegamento sintético
• Savia de árboles (en
algunos modelos)
• Savia de pino (en
algunos modelos)
• Silly Putty
®
• Tinta de pluma
Ceras
• Cera de vela
• Chapstick
®
• Creyón
Selección de manchas (no todas las selecciones están disponibles en todos los modelos)
Page 43

9
Pantalla resumen
ge.com
Acerca de
la pantalla
resumen
Después de seleccionar un ciclo de lavado, la pantalla
resumen muestra las opciones automáticamente para el
ciclo que usted escogió. Usted puede ajustarlas tocando
la pantalla para cualquiera de las opciones mostradas.
Si cambia cualquiera de los ajustes automáticos, usted
puede guardar los nuevos ajustes como un “My cycle”
(Mi ciclo) a la medida presionando el botón MY
CYCLES (MIS CICLOS) y escogiendo GUARDAR LOS
AJUSTES ACTUALES EN LA MEMORIA.
Cómo
cambiar el
nivel de
suciedad
Cambiar el nivel de la suciedad aumenta o reduce el
tiempo de lavado para remover diferentes cantidades de
suciedad.
Para cambiar el nivel de la suciedad, toque SUCIO
en la pantalla de tacto; luego use las flechas para
seleccionar más o menos suciedad. Presione OK
cuando haya alcanzado el nivel deseado.
Cómo
cambiar la
temperatura
de lavado
Cambiar la temperatura cambia las temperaturas de
lavado y pre-remojo solamente. El enjuague final
siempre será un enjuague en frío.
Siga las instrucciones en las etiquetas del fabricante de la
tela cuando seleccione la temperatura de lavado.
Para cambiar la temperatura de lavado, toque el botón
TEMP en la pantalla de tacto; luego use las flechas para
seleccionar una temperatura mayor o menor. Presione
OK cuando haya alcanzado el ajuste deseado.
PRECAUCIÓN: En algunos
ciclos, se puede escoger una temperatura “MUY
CALIENTE”. Este ajuste utiliza el calentador interno
de la lavadora, el cual extenderá el tiempo de lavado.
Cuando use un ajuste de temperatura “MUY
CALIENTE”, no introduzca sus manos en el agua.
Cómo
cambiar la
acción de
lavado
Cambiar la acción de lavado cambia las velocidades de
lavado y de giro del ciclo.
Siempre siga las instrucciones en las etiquetas del
fabricante de las telas cuando cambie la acción de lavado.
Para cambiar la acción de lavado, toque ACCIÓN DE
LAVADO en la pantalla de tacto; luego seleccione
el ajuste deseado.
Generalmente, las velocidades de giro más lentas resultan
en que se extraiga menos agua de la ropa.
Acción de lavado Velocidad de lavado Velocidad de giro*
Normal Medio Rápido
Vigoroso Rápido Rápido
Delicado Lento Lento
Lavado a mano** Extra lento Extra lento
* Mientras más lenta es la velocidad de giro, menos
probable es que las arrugas se marquen en la ropa.
** Use un detergente líquido suave de alta eficiencia y poco
espumoso como Woolite®HE.
PANTALLA RESUMEN
ALGODONES
CICLO
ACCIÓN DE LAVADO
NORMAL
NIVEL DE SUCIO
MÁS SUCIO
MENOS SUCIO
TEMPERATURA
MÁS ALTA
MÁS BAJA
SUCIO
TEMP
TIEMPOOPCIONES
0:50
OK
MUCHO
POCO
OK
TIBIO
ACCIÓN DE LAVADO
VIGOROSO DELICADO
NORMAL
LAVADO
A MANO
Page 44

10
Pantalla resumen
ge.com
Acerca de las
opciones de
lavado
Las opciones de lavado le permiten escoger ajustes para el
ciclo de lavado actual solamente. Después de que usted haya
hecho los cambios deseados, presione OK.
Arranque demorado – Use para retardar
el arranque de su lavadora. Presione ARRANQUE
DEMORADO para cambiar el tiempo de retardo.
Remojo – Remoja la ropa antes de comenzar el ciclo de
lavado. Presione REMOJO para cambiar el tiempo de
pre-remojo.
Aditivos – Aparece SOLAMENTE DESPUÉS de que el
pre-remojo se ha seleccionado. Usa el contenido del canasto
del dispensador de pre-tratamiento para un pre-remojo.
Cuando se selecciona, la lavadora se drenará después
del pre-remojo y se llenará de nuevo para el ciclo de lavado.
Presione ADITIVOS para especificar si usted NO usará un
aditivo de pre-tratamiento o si usted no desea que la
lavadora se drene después del pre-remojo.
Extra enjuague – Agrega un enjuague en frío adicional al
final del ciclo de lavado.
Señal – Le alerta cuando su ciclo se ha completado. La ropa
se debería sacar cuando la alarma suena para que no se
marquen las arrugas. Toque SEÑAL para seleccionar el
volumen o para apagar la alarma. El volumen nuevo se
grabará como la selección predefinida.
Giro prolongado – Aumenta la duración del tiempo de giro
para extraer más agua de su ropa.
NOTA: El nivel del agua variará dependiendo del tamaño
de la carga. La lavadora usa llenado adaptable y sensores
de carga para proveer el nivel de agua apropiado para un
rendimiento de lavado eficiente y para ahorrar energía.
NOTA: Es posible que el agua no cubra el nivel superior de
la ropa. Esto es normal para lavadoras de alta eficiencia. El
llenado de agua es optimizado por el sistema para un
mejor rendimiento de lavado.
Cómo ajustar
las opciones
de tiempo
Usted puede ajustar la duración del ciclo de lavado
cambiando el tiempo del ciclo, agregando un Arranque
demorado o un giro prolongado.
Tiempo del ciclo – Presione TIEMPO DEL CICLO; luego
use las flechas para seleccionar más o menos tiempo.
Tiempo de demora – Use para agregar un arranque
demorado al arranque de un ciclo de lavado. Presione
TIEMPO DE DEMORA; luego ajuste el tiempo de
ARRANQUE DEMORADO del menú de OPCIONES.
Giro prolongado – Aumenta la duración del tiempo de
giro para extraer más agua de su ropa. Presione GIRO
PROLONGADO; luego seleccione GIRO PROLONGADO
del menú de OPCIONES.
NOTA: Después de que comience el ciclo de lavado, usted
no podrá cambiar el tiempo del ciclo o el tiempo de retraso.
La lavadora sonará dos veces si usted trata de cambiar el
tiempo después de comenzar el ciclo.
OPCIONES
ARRANQUE
DEMORADO
REMOJO
ADITIVOS
1
15
HORA
MIN
GIRO
EXTENDIDO
EXTRA
ENJUAGUE
SEÑAL
¿ ESTÁ USANDO
ADITIVOS DE REMOJO ?
SI
OK
NO
CAMBIE LOS AJUSTES DE TIEMPO
TIEMPO
DEL CICLO
TIEMPO
DE DEMORA
GIRO PROLONGADO
Page 45

11
“My Cycles” (Mis ciclos)
ge.com
Acerca de la
función “My
Cycles” (Mis
ciclos)
La función “My Cycles” (Mis ciclos) le
permite crear, guardar y reutilizar hasta 6 ciclos
personalizados. Cree sus propios ciclos desde
el comienzo o cambie los ajustes de un ciclo
de lavado predefinido; luego guárdelos en la
memoria para usarlos después a través de
un toque de pantalla.
Cómo crear
y usar
“My Cycles”
(Mis ciclos)
Usted puede crear “My Cycles” (Mis ciclos) en
dos formas: modificando un ciclo de lavado
predefinido o creando un ciclo de su propia
combinación de ajustes y opciones.
Para construir su propio “My Cycles” (Mis
ciclos) a partir de la pantalla inicial:
1 Presione el botón MY CYCLES
(MIS CICLOS).
2 Seleccione CREAR en el menú de la pantalla
de tacto.
3 Escoja si desea cambiar un ciclo predefinido o
crear un ciclo nuevo.
4 Si está modificando un ciclo predefinido,
seleccione el ciclo de lavado que usted desea
cambiar.
5 Cambie cualquiera de los ajustes automáticos
y seleccione cualquier opción.
6 Toque GUARDAR LOS AJUSTES
ACTUALES EN LA MEMORIA en la pantalla
de tacto.
7 Usando el teclado en la pantalla de tacto,
escriba el nombre de “My Cycle” (Mi ciclo)
y presione OK.
Para comenzar a usar su nuevo “My Cycle”
(Mi ciclo) inmediatamente, selecciónelo del
menú de la pantalla de tacto y presione START
(ARRANCAR).
Para guardar un ciclo actual en “My Cycles”
(Mis ciclos) a partir de la pantalla resumen:
1 Después de escoger un ciclo de lavado, o
después de que un ciclo de lavado se haya
completado, presione el botón MY CYCLES
(MIS CICLOS).
2 Seleccione GUARDAR LOS AJUSTES
ACTUALES EN LA MEMORIA del menú de
la pantalla de tacto.
3 Usando el teclado en la pantalla de tacto,
escriba el nombre de su “My Cycle” (Mi ciclo)
y presione OK.
Para comenzar a usar su nuevo “My Cycle”
(Mi ciclo) inmediatamente, selecciónelo del
menú de la pantalla de tacto y presione START
(ARRANCAR).
Para usar “My Cycles” (Mis ciclos) a partir de la
pantalla inicial:
1 Presione el botón MY CYCLES (MIS
CICLOS).
2 Seleccione USO del menú de la pantalla de
tacto.
3 Seleccione el nombre del ciclo a partir del
menú de la pantalla de tacto.
4 Cambie cualquiera de los ajustes automáticos
y seleccione cualquier opción.
5 Presione START (ARRANCAR).
C
Y
L
C
Y
M
E
S
MIS CICLOS
MIS CICLOS
USO CAMBIAR
CREAR
BORRAR
CAMBIO
DE NOMBRE
USO CAMBIAR
CREAR
BORRAR
CAMBIO
DE NOMBRE
GUARDAR LOS AJUSTES
ACTUALES EN
LA MEMORIA
Page 46

12
“My Cycles” (Mis ciclos)
ge.com
Cómo
cambiar,
renombrar o
borrar un
“My Cycle”
(Mi ciclo)
Para cambiar los ajustes de un “My Cycle”
(Mi ciclo) a partir de la pantalla inicial:
1 Presione el botón MY CYCLES (MIS
CICLOS).
2 Seleccione CAMBIAR del menú de la pantalla
de tacto.
3 Seleccione el nombre del ciclo a partir del
menú de la pantalla de tacto.
4 Cambie cualquiera de los ajustes automáticos
y seleccione cualquier opción.
5 Seleccione GUARDAR LOS AJUSTES
ACTUALES EN LA MEMORIA en la pantalla
de tacto.
Para renombrar un “My Cycle” (Mi ciclo) de la
pantalla inicial:
1 Presione el botón MY CYCLES (MIS
CICLOS).
2 Seleccione CAMBIO DE NOMBRE del menú
de la pantalla de tacto.
3 Seleccione el nombre del ciclo a partir del
menú de la pantalla de tacto.
4 Usando el teclado en la pantalla de tacto,
escriba el nombre de su “My Cycle” (Mi ciclo)
y presione OK.
Para borrar un “My Cycle” (Mi ciclo) de la
pantalla Home:
1 Presione el botón MY CYCLES (MIS
CICLOS).
2 Seleccione BORRAR del menú de la pantalla
de tacto.
3 Seleccione el nombre del ciclo a partir del
menú de la pantalla de tacto.
4 Escoja SÍ para borrar el ciclo o CANCELAR
para regresar a la lista de “My Cycles” (Mis
ciclos).
Page 47

13
Ayuda
ge.com
Acerca de la
función de
ayuda
Presionar el botón HELP (AYUDA) en la
pantalla inicial le permitirá encontrar una lista
para la identificación de problemas comunes
de la lavadora, encontrar ayuda sobre el uso
de la pantalla inicial o ajustar las preferencias
de la máquina.
Al presionar el botón HELP (AYUDA) mientras
usted se encuentra en cualquier otra pantalla,
podrá encontrar información adicional sobre las
funciones en esa pantalla. Presione HELP
(AYUDA); luego toque cualquier botón en la
pantalla de tacto para una explicación de esa
función. Para terminar esa función, presione
HELP (AYUDA) una vez para regresar a la pantalla
anterior o dos veces para terminar la función Help
(Ayuda).
Cómo usar el
solucionador
de problemas
Para encontrar la lista de identificación de
problemas comunes de la lavadora:
1 Presione el botón HELP (AYUDA).
2 En la pantalla de tacto, seleccione
SOLUCIONADOR DE PROBLEMAS.
3 En la pantalla de tacto, seleccione la
descripción del problema en la lista. Usted
puede usar las flechas en la parte derecha de la
pantalla para buscar hacia arriba o hacia abajo a
través de la lista de problemas adicionales.
4 En la pantalla de tacto, seleccione una
causa posible del problema y siga las
instrucciones en la pantalla para
encontrar la solución.
Cómo
encontrar
ayuda de la
pantalla
inicial
Presione el botón HELP (AYUDA) y después
seleccione AYUDA DE PANTALLA INICIAL
para encontrar información adicional sobre las
funciones encontradas en la pantalla inicial. Toque
cualquier botón en la pantalla de tacto para una
explicación de esa función. Para terminar
esta función, presione el botón BACK
(REGRESAR).
PREFERENCIAS
DE LA MÁQUINA
SOLUCIONADOR DE PROBLEMAS
BUSCADOR DE PROBLEMAS
OPRIMA DESCRIPCIÓN PARA CAUSAS POSIBLES
NO LLENA AGUA O LLENA MUY LENTO
LLENADO ESPORÁDICO
LLENANDO Y DRENANDO AL MISMO
TIEMPO
LA LAVADORA SE MUEVE ANTES DE
QUE SE LLENE DE AGUA
NO HAY MOVIMIENTO DEL INFUSOR NI
DE LA CANASTA
AYUDA DE
PANTALLA INICIAL
Page 48

14
Las preferencias de la máquina en la función de
Ayuda le permiten controlar el volumen de la señal
del botón y la señal de fin del ciclo, además de
encender y apagar la función de comunicación
entre la lavadora y la secadora.
Volumen del botón
Esta función controla el volumen cuando usted
presiona cualquiera de los botones de la pantalla de
tacto.
Para cambiar el volumen de la señal del botón:
1 En la pantalla inicial, presione el botón HELP
(AYUDA).
2 Seleccione PREFERENCIAS DE LA MÁQUINA
en la pantalla de tacto.
3 Seleccione VOLUMEN DEL BOTÓN en la
pantalla de tacto.
4 Use las flechas para aumentar o reducir el
volumen o para apagar la señal del botón.
5 Seleccione OK en la pantalla de tacto.
El nuevo volumen ahora es guardado en la memoria
como la opción predefinida.
Comunicación entre la lavadora y la secadora
La comunicación entre la lavadora y la secadora
permite que la lavadora le envíe información sobre el
ciclo a la secadora para crear un ciclo de secado que
se ajuste a la carga de lavado.
Después de que el ciclo de lavado termina, la
comunicación comienza, ya sea cuando la pantalla de
tacto de la lavadora o la secadora es activada o si se
levanta la tapa de la lavadora.
Una vez la información sea enviada, su secadora
creará el ciclo de secado óptimo para su carga.
Si usted ha clasificado su carga de lavado por color
o por el tipo de ropa y por lo tanto ha seleccionado
color o ropa en la pantalla de tacto de su lavadora,
una vez transferida la información a la secadora, ésta
le pedirá que usted seleccione el tipo de tela. Esto es
normal, y se hace para optimizar el tiempo de secado
correcto para la carga que se acaba de lavar. Después
de seleccionar el tipo de tela, la pantalla de la
secadora aparecerá. Después de verla, presione
START (ARRANCAR).
Si la pantalla de la secadora está apagada y usted
quiere usar el “Ciclo recomendado por la lavadora”
para secar su ropa, toque la pantalla de la secadora
para activarla. Usted verá que aparece un botón de
Ciclo recomendado de la lavadora en la pantalla
inicial de su secadora. Presiónelo para comenzar el
ciclo de secado recomendado para la carga que se
acaba de lavar.
Para encender o apagar la función de Comunicación
entre la lavadora y la secadora:
1 En la pantalla inicial, presione el botón HELP
(AYUDA).
2 Seleccione PREFERENCIAS DE LA MÁQUINA
en la pantalla de tacto.
3 Seleccione COMUNICACIÓN ENTRE LA
LAVADORA Y LA SECADORA de la pantalla
de tacto.
4 Toque el botón en la parte inferior de la pantalla
de tacto para seleccionar ON (ENCENDIDO) u
OFF (APAGADO).
5 Seleccione OK en la pantalla de tacto.
Señal de fin del ciclo
La señal de fin del ciclo le alerta cuando el ciclo ha
finalizado.
Para cambiar el volumen de la señal de fin del ciclo:
1 En la pantalla inicial, presione el botón HELP
(AYUDA).
2 Seleccione PREFERENCIAS DE LA MÁQUINA
en la pantalla de tacto.
3 Seleccione SEÑAL DE FIN DEL CICLO de la
pantalla de tacto.
4 Use las flechas para aumentar o reducir el
volumen o para apagar la señal.
5 Seleccione OK en la pantalla de tacto.
El nuevo volumen ahora es guardado en la memoria
como la opción por defecto.
Idioma (en algunos modelos)
El botón de idioma le permite al usuario cambiar
entre inglés y español.
Para cambiar el idioma:
1 En la pantalla inicial, presione el botón HELP
(AYUDA).
2 Seleccione PREFERENCIAS DE LA MÁQUINA
de la pantalla de tacto.
3 Seleccione IDIOMA en la pantalla de tacto.
4 Seleccione ENGLISH o ESPAÑOL en la pantalla
de tacto.
5 Seleccione OK en la pantalla de tacto.
Ayuda
ge.com
Cómo
seleccionar
las
preferencias
de la
máquina
PREFERENCIAS DE LA MÁQUINA
IDIOMA
SEÑAL DE FIN
DEL CICLO
VOLUMEN
DEL BOTÓN
COMUNICACIÓN
ENTRE LA LAVADORA
Y LA SECADORA
Page 49

15
Otras funciones de la lavadora
ge.com
Cómo usar el
dispensador de
blanqueador
líquido
El dispensador de blanqueador diluye y dispensa
automáticamente el cloro líquido en el momento preciso
durante el ciclo de lavado.
1 Inspeccione las etiquetas de instrucciones especiales para el
cuidado de su ropa.
2 Mida el blanqueador líquido con cuidado, siguiendo las
instrucciones en el envase.
• Nunca vierta cloro blanqueador líquido directamente sobre la
ropa o sobre el canasto de lavado.
• No vierta cloro blanqueador en polvo en el dispensador de
blanqueador.
• Evite llenar excesivamente o salpicar cuando agregue el
blanqueador al dispensador. La capacidad máxima del
dispensador de blanqueador es una taza de blanqueador por
ciclo de lavado. Si usted llena excesivamente el dispensador,
el blanqueador se dispensará demasiado temprano en el ciclo.
3 Antes de activar la lavadora, vierta una cantidad medida
de blanqueador directamente en el dispensador de
blanqueador. Si prefiere usar blanqueador líquido,
agréguelo en el canasto de lavado directamente
antes de agregar la ropa.
¡ADVERTENCIA!
No mezcle cloro
blanqueador con amoniaco o ácidos tales como el vinagre y/o
removedor de óxido. Mezclarlos podría producir gases tóxicos que
podrían resultar en la muerte.
La cantidad recomendada de blanqueador no diluido que el
fabricante recomienda se introduce en el canasto de lavado. El
blanqueador se agrega automáticamente a la carga de lavado
durante la acción de lavado final de “Infusor.” Esto asegura que
el rendimiento no disminuya. Dos purgas secuenciales a través
del dispensador de blanqueador vacían completamente el
blanqueador del dispensador. Cualquier líquido restante en el
dispensador al final del ciclo es agua, no blanqueador. Para evitar
que el blanqueador se escape hacia el canasto de lavado y dañe
la ropa, nunca agregue blanqueador por encima de la marca de
nivel máximo en el dispensador.
También mantenga sus ropas alejadas del dispensador
de blanqueador para que no absorban ninguna gota de
blanqueador que haya quedado cerca del dispensador de
blanqueador.
Cómo usar
la gaveta
dispensadora
La gaveta dispensadora contiene 3 compartimentos:
• Para suavizante de tela líquido
• Para detergente de alta eficiencia en polvo o líquido de baja
producción de espuma
• Para aditivos de pre-tratamiento líquidos
El dispensador dispensa automáticamente los aditivos en el
momento apropiado durante el ciclo de lavado.
1 Lentamente abra la gaveta del dispensador hasta que se
detenga.
2 Después de agregar los productos de lavado, cierre la gaveta
del dispensador lentamente. Cerrar la gaveta demasiado
rápido podría resultar en que se dispensen aditivos
demasiado temprano.
• Evite llenar excesivamente o salpicar cuando agregue
los productos de lavado al dispensador. Si usted llena
excesivamente el dispensador, los productos de lavado
podrían ser dispensados demasiado temprano en el proceso.
Al final del ciclo, es posible que usted vea agua en los
compartimentos. Esto es normal en la operación de la lavadora.
NOTA: No use blanqueador en la gaveta dispensadora.
Page 50

16
Otras funciones de la lavadora
ge.com
Cómo
agregar
detergente
NOTA: Solamente use detergente de alta eficiencia de
baja producción de espuma como Tide®HE.
Agregue detergente medido al compartimiento del
detergente en la gaveta dispensadora.
• No sobrepase la línea de llenado máxima.
El detergente es purgado a través del dispensador al
comienzo de la fase de lavado. Se puede usar detergente
líquido o en polvo.
Cuando use detergente líquido, asegúrese de que la caja
del detergente y el inserto estén en su lugar. Para
detergente en polvo, remueva la caja del detergente y el
inserto. El detergente en polvo no se dispensará con la
caja del detergente y el inserto en su lugar.
Podría ser necesario ajustar el uso del detergente a la
temperatura del agua, la dureza del agua, el tamaño y el
nivel de suciedad de la carga. Evite usar demasiado
detergente en su lavadora, ya que puede crear demasiada
espuma y se podrían acumular residuos de detergente en
su ropa.
Cómo agregar
suavizante de
tela
Si lo desea, vierta la cantidad recomendada de suavizante
de tela líquido en el compartimiento izquierdo de la
gaveta. Solamente use suavizante líquido de tela.
Diluya con agua hasta la línea de llenado máximo.
• No sobrepase la línea de llenado máxima.
Un llenado excesivo podría causar que se dispense el
suavizante demasiado temprano y manchar la ropa.
NOTA: No vierta suavizante de tela directamente sobre la
carga de ropa. Podría manchar la ropa.
Cómo agregar
aditivos de
pre-tratamiento
El dispensador de pre-tratamiento podría usarse para
limpiar ropa manchada o con mucha suciedad más
eficazmente. Si elige ADITIVOS al configurar el preremojo, seleccionará un pre-tratamiento que remoja,
drena y gira, y luego vuelve a llenar la lavadora para
el ciclo principal de lavado. Si usted no selecciona
ADITIVOS, la lavadora no drenará ni se volverá
a llenar después del pre-remojo.
Coloque los aditivos para el ajuste Mejora del lavado
en el compartimiento de la mano derecha. Seleccione
Extra-enjuague para asegurarse de que se elimine todo
el detergente de la carga de lavado.
Usted puede agregar un detergente líquido de alta
eficiencia y de baja producción de espuma en este
compartimiento cuando seleccione un ciclo de inspección
de manchas o cuando escoja un pre-remojo que requiera
aditivos especiales.
• No exceda la línea de llenado máximo para evitar que se
produzca demasiada espuma.
Un llenado excesivo podría causar que se dispensen los
aditivos del pre-remojo muy temprano, lo que podría
dañar la ropa.
Inserto
Caja del
detergente
ADITIVOS
Page 51

17
Cómo llenar y usar su lavadora
ge.com
Cómo
clasificar la
ropa
Clasifique por color (blancos, claros, colores),
por nivel de suciedad, por tipo de tela
(algodones fuertes, de cuidado fácil, delicados),
o dependiendo de si la tela produce pelusa
(felpa, felpilla) o si suelta mucha pelusa
(velvetón, pana).
Cómo llenar
la lavadora
Llene con los artículos secos sin sobrepasar la
fila superior de agujeros en el canasto de lavado.
Si sobrecarga la lavadora, podría reducir la
eficiencia del lavado y posiblemente aumentar
las arrugas.
Los artículos voluminosos se deberían colocar
tan bajos en la lavadora como sea posible para
obtener resultados óptimos.
Siempre coloque los artículos flotantes en el
fondo del canasto de la lavadora.
La lavadora detectará automáticamente el tamaño
de la carga. Debido al sistema de lavado de alta
eficiencia, es posible que el nivel de agua no cubra
totalmente la carga. Para agregar artículos a la
lavadora una vez haya comenzado el ciclo, levante
la tapa, agregue los artículos y cierre la tapa.
• No lave telas que contengan materiales
inflamables (cera, líquidos de limpieza, etc.)
• La lavadora no se llena ni opera con la puerta
abierta.
Siempre siga las instrucciones en las etiquetas del fabricante de la ropa cuando lave.
Etiquetas
del cuidado
de la tela
Aquí puede ver símbolos de etiquetas de
cuidado de las telas que afectan la ropa que
usted lavará.
Bleach
symbols
Any bleach
(when needed)
Only non-chlorine bleach
(when needed)
Do not bleach
Etiquetas de blanqueador
Solamente blanqueador
sin cloro (cuando se
necesite)
No use blanqueador
Cualquier
blanqueador
(cuando se necesite)
Símbolos de
blanqueador
Gama de
temperaturas
de la
lavadora
Categoría Temperatura objetivo Comentario
Agua fría del grifo Variada La temperatura depende del suministro
de agua fría en la casa
Agua fría 63°F Controlada por ATC**
Agua tibia 80°F Controlada por ATC**
Agua caliente 112°F Controlada por ATC**
Agua muy caliente* 140°F Controlada por ATC**. La gama de
temperatura real está determinada
por el tipo de ciclo y el tiempo elegido.
NOTAS:
Use detergente marcado como de alta eficiencia. Los detergentes de alta eficiencia que están disponibles
ofrecen una buena limpieza en temperaturas de agua caliente, tibia o fría.
* Esta categoría de temperatura está disponible únicamente en ciertos ciclos selectos. Siempre revise la
etiqueta de las prendas para las instrucciones recomendadas de lavado.
** ATC significa Control Automático de Temperatura (por las iniciales en inglés), refiriéndose a la gama
de temperaturas de agua en las cuales se lava la ropa.
Modelo WPGT9360 solamente
Page 52

Tapa: Lave la tapa con un paño húmedo en la parte
externa y en la parte interna y seque con un paño
suave.
Canasto de lavado: Deje la tapa abierta después
de lavar para permitir que la humedad se evapore.
Si desea limpiar el canasto, use un paño limpio
humedecido con detergente líquido; luego enjuague.
(No use limpiadores abrasivos o arenosos.)
Mangueras de llenado: Las mangueras que conectan
la lavadora con el grifo deberían reemplazarse cada
5 años.
Exterior: Limpie inmediatamente cualquier derrame
que ocurra. Use un paño humedecido. No toque
la superficie o la pantalla de tacto con objetos afilados.
Mudanza y almacenamiento: Solicite a un técnico
de servicio que remueva el agua de la bomba de
drenaje y de las mangueras. Para más información,
visite ge.com o llame al 800.GE.CARES
(800.432.2737). NO
almacene la lavadora donde esté
expuesta a la intemperie.
Vacaciones prolongadas: Asegúrese de que el
suministro de agua a los grifos esté cerrado. Drene
toda el agua de las mangueras si la temperatura estará
por debajo del punto de congelación.
Gaveta dispensadoras: Es posible que se acumule
detergente y suavizante líquido en la gaveta. Los
residuos se deben remover una o dos veces al mes.
1 Remueva la gaveta abriéndola hasta que se
detenga. Levante el frente de la gaveta y hale
hacia afuera.
2 Remueva los insertos de los 3 compartimientos;
enjuague los insertos y la gaveta con agua tibia
para remover los rastros de los productos de
lavandería que se hayan acumulado.
3 Para limpiar la abertura de la gaveta, use un cepillo
no metálico pequeño para limpiar la muesca.
Remueva todos los residuos de las partes
superiores e inferiores de la muesca.
4 Regrese los insertos a los compartimentos
correspondientes y vuelva a colocar la gaveta.
Cómo llenar y usar su lavadora
ge.com
Cómo
cuidar y
limpiar la
lavadora
Uso
apropiado del
detergente
Usar demasiado detergente es una causa común
de los problemas de lavado. Los detergentes de
hoy están formulados para ser efectivos sin una
producción visible de demasiada espuma.
Asegúrese de leer y obedecer cuidadosamente las
recomendaciones del fabricante sobre la cantidad
de detergente que debe usar en cada lavado.
Puede usar menos detergente si cuenta con agua
suavizada, una carga más pequeña o si la ropa no está
demasiado sucia.
NOTA: Solamente use detergente de alta eficiencia y
de baja producción de espuma tal como Tide®HE.
18
Page 53

ANTES DE COMENZAR
Lea estas instrucciones completa y
cuidadosamente.
•
IMPORTANTE – Guarde estas
instrucciones para el uso del inspector
eléctrico.
•
IMPORTANTE – Observe todos los
códigos y ordenanzas aplicables.
• Nota al instalador – Asegúrese de dejar
estas instrucciones con el Consumidor.
• Nota al consumidor – Guarde estas
instrucciones para su referencia.
• Nivel de habilidad técnica
– La instalación
de este electrodoméstico requiere
habilidades técnicas básicas.
• La instalación apropiada es responsabilidad
del instalador.
• Las fallas del producto causadas por una
instalación inapropiada no están cubiertas
bajo la Garantía.
Instrucciones Lavadora
de instalación
WPGT9350, WPGT9360
19
¿Preguntas? Llame a 800.GE.CARES (800.432.2737) o visite nuestra página Web: ge.com
REQUISITOS DE PLOMERÍA
POR SU SEGURIDAD:
REQUISITOS ELÉCTRICOS
PRECAUCIÓN –
Por su
protección personal, no use un cable de
extensión o un enchufe adaptador con este
electrodoméstico. Bajo ninguna circunstancia
corte o remueva el tercer terminal de conexión
a tierra del cable eléctrico. Siga los códigos y
ordenanzas eléctricas nacionales. Este
electrodoméstico se debe alimentar con el
voltaje y la frecuencia indicados en la placa
de especificaciones eléctricas (localizada en
la parte posterior del tablero) y se debe
conectar a un circuito individual que esté
conectado a tierra correctamente, protegido por
un interruptor de circuito de 15 o 20 amperios o
un fusible demorado. Si el suministro eléctrico
no cumple con las especificaciones anteriores,
llame a un electricista que tenga licencia.
PRESIÓN DE AGUA – Debe ser de un mínimo
de 10 psi y un máximo de 120 psi.
TEMPERATURA DEL AGUA – El calentador
normal de su casa debería ajustarse para
proporcionar agua a 120°–150° F (50°–66° C)
PARA LA LAVADORA.
VÁLVULAS DE CIERRE – Se deben proveer las
válvulas de cierre de agua fría y caliente
(grifos).
DRENAJE – El agua se puede drenar hacia
una tubería vertical o hacia una tina fija. La
altura de la descarga NO DEBE SER MENOR
DE 30 PULGADAS o mayor de 8 pies por
encima de la base de la lavadora. El tubo
vertical debe tener un diámetro interno
mínimo de 1
1
⁄2” y debe estar abierto hacia
la atmósfera.
INSTRUCCIONES DE CONEXIÓN A TIERRA
Este electrodoméstico se debe conectar a
tierra. En el caso de una falla o ruptura, la
conexión a tierra reducirá el riesgo de una
descarga eléctrica proveyendo una vía de
menor resistencia para la corriente eléctrica.
Este electrodoméstico está equipado con un
cable eléctrico que tiene un conductor de
conexión a tierra y un enchufe conectado a
tierra. El enchufe se debe conectar a un
tomacorriente que también esté conectado a
tierra de manera apropiada, conforme con
todos los códigos y ordenanzas locales.
ADVERTENCIA – La
conexión inapropiada del conductor de
conexión a tierra puede resultar en un riesgo
de descarga eléctrica. Póngase en contacto
con un electricista calificado o con un
técnico de servicio si tiene dudas sobre si su
electrodoméstico está conectado a tierra de
manera apropiada – si el enchufe no encaja
en el tomacorriente, póngase en contacto
con un electricista calificado.
Page 54

Instrucciones de instalación
LOCALIZACIÓN DE LA LAVADORA
La lavadora se debe instalar en un piso firme
para minimizar las vibraciones durante el ciclo
de giro.
Los pisos de concreto son las mejores
superficies, pero un piso de madera es
suficiente, siempre que el piso cumpla con los
estándares de la FHA. La lavadora no se debe
instalar sobre alfombras ni se debe dejar
expuesta a la intemperie.
El espacio mínimo entre la lavadora y las
paredes adyacentes y otras superficies:
• 0” de cualquier lado
• 2” del frente
• 3” de la parte posterior
El espacio vertical mínimo del piso a los estantes
superiores, gabinetes, techos, etc. es 52”.
DIMENSIONES DE LA LAVADORA
27”
(68,6 cm)
431⁄8”
(109,4 cm)
523⁄4”
(133,7 cm)
(con la
tapa
abierta)
281⁄4”
(71,6 cm)
Vista lateral
Vista frontal
REQUISITOS PARA LA
INSTALACIÓN EN UN HUECO
O UN ARMARIO
Su lavadora está aprobada para instalarse en
huecos o armarios, como se establece en una
etiqueta en la parte posterior de la máquina.
Espacio mínimo entre la lavadora y las paredes
adyacentes y otras superficies:
• 0” de cualquier lado
• 2” del frente
• 3” de la parte posterior
El espacio vertical mínimo del piso a los estantes
superiores, gabinetes, techos, etc. es 52”.
Las puertas del armario se deben apersianar o
ventilar y tener un área abierta de por lo menos
60 pulgadas cuadradas para la lavadora
solamente, o si el armario contiene una lavadora
y una secadora, la puerta debe contener por lo
menos 120 pulgadas cuadradas de área abierta
distribuidas de manera uniforme. Las aperturas
del aire se requieren sin obstrucción alguna
cuando se instale una puerta. Una puerta
apersianada con las aperturas de aire
equivalentes es aceptable.
NOTA: Los espacios especificados en esta
etiqueta son mínimos. Se debe considerar
proveer espacio suficiente para la instalación
y el servicio.
20
Page 55

❑ Pinzas ajustables
❑ Nivel de carpintero
21
Instrucciones de instalación
PARTES INCLUIDAS
❑ Mangueras de agua (2)
❑ Cinta de seguridad para el cable
HERRAMIENTAS QUE USTED
NECESITARÁ
DESEMPAQUE LA LAVADORA
1
DESEMPAQUE LA LAVADORA
(CONT.)
Remueva el bloque de espuma de
poliestireno que contiene el Manual del
propietario, las partes, las mangueras de agua
y las muestras de productos de lavandería.
Remueva el cable eléctrico de la parte
posterior de la lavadora.
1
INTERCAMBIE LOS TABLEROS DE
LA LAVADORA Y LA SECADORA
(OPCIONAL)
Si es necesario, cambie los tableros
de la lavadora y la secadora (ver “Cómo
intercambiar los tableros de la lavadora
y la secadora”).
Después de que la lavadora esté en su casa,
remueva el cartón y la base de espuma de
poliestireno que se usó en el envío de la
lavadora.
Page 56

22
Instrucciones de instalación
INSTALE LAS MANGUERAS DE
AGUA EN LA LAVADORA
Enrosque la manguera de agua caliente en
la conexión de agua caliente de la lavadora
(NARANJA) y la manguera de agua fría en la
conexión de agua fría de la lavadora (AZUL).
Apriete a mano; luego haga un giro de 1/8 de
vuelta adicional con las pinzas.
2
Caliente
Fría
COLOQUE LA LAVADORA CERCA
DE LAS CONEXIONES DE LOS
SERVICIOS PÚBLICOS DE LA CASA
Coloque la lavadora lo más cerca posible del
lugar definitivo, dejando suficiente espacio
para hacer las conexiones de plomería,
electricidad y drenaje.
El espacio mínimo requerido en la parte
posterior es de 3”.
3
CONECTE LAS MANGUERAS DE
AGUA A LOS SERVICIOS
PÚBLICOS DE LA CASA
Conecte las mangueras de agua a las válvulas
de agua CALIENTE y FRÍA de su casa. Apriete
a mano y luego haga un giro de 1/4 de vuelta
adicional con las pinzas.
4
CONECTE LA MANGUERA DE
DRENAJE AL DRENAJE DE LA
CASA
Inserte con firmeza el extremo libre de
la manguera de drenaje en la abertura de
drenaje de su casa. Asegúrese de que el
extremo de goma quede completamente
insertado en la abertura del drenaje.
• Si las válvulas de agua y drenaje están
empotradas en la pared, sujete la manguera
de drenaje contra una de las mangueras de
agua con la cinta de seguridad
proporcionada (con el lado estriado hacia
adentro).
•
Si el drenaje consiste un tubo vertical, apriete
la manguera de drenaje contra el tubo vertical
con la cinta de seguridad proporcionada.
5
Cinta de seguridad
Cinta de
seguridad
3”
Page 57

Mueva la lavadora hacia su posición definitiva.
• Para inspeccionar si la lavadora está
nivelada de lado a lado, abra la tapa y
coloque un nivel en la parte posterior
de la abertura encima de la gaveta del
dispensador.
• Para inspeccionar si la lavadora está
nivelada de frente hacia atrás, coloque
un nivel en el borde de la lavadora, donde
el lado del gabinete se encuentra con la
tapa.
Si la lavadora no está nivelada, ajuste
las patas niveladoras frontales. Gire en
dirección de las agujas del reloj para subir
y contra las agujas del reloj para bajar.
23
Instrucciones de instalación
NIVELE LA LAVADORA
7
AJUSTE LAS PATAS
POSTERIORES
Remueva el nivel e incline la lavadora hacia
adelante (gire sobre las patas frontales) entre
4 y 6 pulgadas y suavemente baje las patas
posteriores hacia el piso. Esta acción hará que
el ajuste de las patas corresponda a las patas
frontales.
6
CONECTE EL CABLE SERIAL
PARA LA COMUNICACIÓN
ENTRE LA LAVADORA Y LA
SECADORA (si lo desea)
Conecte el cable serial enviado con su
secadora para la comunicación de la lavadora
y la secadora al puerto serial en la parte
posterior de la lavadora.
8
Puerto serial
Bajar
Subir
Parte posterior de la lavadora
Page 58

CONECTE LA LAVADORA
24
Instrucciones de instalación
9
ENCENDIDO DE LA LAVADORA
Presione el botón POWER (ENCENDER).
NOTA: Si la lavadora se expuso a
temperaturas por debajo del punto de
congelación por un período de tiempo
extenso, permita que se caliente antes
de presionar POWER. Si no lo hace, la
pantalla no se encenderá.
La lavadora ahora está lista para usarse.
10
SERVICIO
ADVERTENCIA – Etiquete
todos los cables antes de darle servicio a
los controles de la lavadora. Los errores
de cableado podrían causar un mal
funcionamiento y ser peligrosos después
de la instalación/servicio.
Para obtener partes de repuesto y más
información, busque en el Manual del
propietario los números de servicio a
los que debe llamar para solicitar servicio.
W
E
R
O
P
Page 59

¡ADVERTENCIA!
Asegúrese de que la lavadora y la secadora
estén desconectadas.
25
Instrucciones de instalación
CÓMO INTERCAMBIAR LOS TABLEROS DE LA
LAVADORA Y LA SECADORA (no se requiere para la
mayoría de las instalaciones)
Cuando se ve desde el frente, la lavadora
se envía para instalarse a la izquierda y
la secadora a la derecha. Si las conexiones de
los servicios (agua y electricidad) de su casa
están arregladas de forma tal que las unidades
deben instalarse con la lavadora a la derecha y
la secadora a la izquierda, usted puede cambiar
los tableros de la lavadora y la secadora para
mantener la apariencia de curva apropiada.
HERRAMIENTAS QUE USTED
NECESITARÁ
❑ Un destornillador de
estrella #2
❑ Toalla (2)
REMUEVA EL TABLERO DE LA
LAVADORA
Coloque una toalla encima de la tapa de la
lavadora para evitar que se raye la superficie.
Remueva los dos tornillos externos de la
parte posterior del tablero de la lavadora. Gire
el tablero hacia adelante y levántelo.
1
Tornillo
Tornillo
REMUEVA LA TAPA POSTERIOR
DEL TABLERO
Remueva los dos tornillos que sostienen el
tablero de la lavadora a la tapa posterior.
Remueva la tapa posterior.
2
Tapa
posterior
Tornillos
Parte posterior de la lavadora
Page 60

26
Instrucciones de instalación
DESCONECTE LA TARJETA DE
CONTROL DE LA LAVADORA
Desconecte la cinta en el lado derecho de la
tarjeta de control halando el conectador en el
extremo de la cinta y despegándolo de los
pasadores metálicos en la tarjeta de control.
NOTA: No desconecte ningún otro cable de la
tarjeta de control.
3
Parte posterior de la lavadora
REMUEVA LA TARJETA DE
CONTROL DEL TABLERO DE LA
LAVADORA
Remueva los cuatro tornillos que sostienen
la tarjeta de control. Remueva la tarjeta de
control y póngala a un lado.
4
Tornillos
REMUEVA EL TABLERO DE LA
SECADORA
Coloque una toalla encima de la parte
superior de la secadora para evitar que se
raye la superficie.
Remueva los cuatro tornillos de la parte
posterior del tablero. Gire el tablero hacia
adelante y levántelo.
5
Tornillos
DESCONECTE LA TARJETA DE
CONTROL DE LA SECADORA
Desconecte la cinta en el lado derecho de la
tarjeta de control tirando del conectador en el
extremo de la cinta y despegándolo de los
pasadores metálicos en la tarjeta de control.
NOTA: No desconecte ningún otro cable de la
tarjeta de control.
6
Parte posterior de la secadora
Parte posterior de la secadora
Page 61

27
Instrucciones de instalación
REMUEVA LA TARJETA DE
CONTROL DEL TABLERO
Remueva los cuatro tornillos que sostienen
la tarjeta de control del tablero. Remueva la
tarjeta de control y póngala a un lado.
7
CAMBIE LOS TABLEROS
Coloque el tablero de la secadora sobre la
lavadora y coloque el tablero de la lavadora
sobre la secadora.
8
COLOQUE LA TARJETA DE
CONTROL DE LA SECADORA EN
EL TABLERO NUEVO
Coloque la tarjeta de control en el tablero nuevo
colocando los cuatro tornillos removidos de la
tarjeta de control del paso anterior.
La tarjeta de control ahora estará en el lado
opuesto del tablero de la secadora.
9
RECONECTE LA TARJETA DE
CONTROL DE LA SECADORA
Conecte la tarjeta de control de la secadora
al tablero nuevo deslizando el conectador de
la cinta en el nuevo tablero en los pasadores
metálicos la tarjeta de control y empuje hacia
adentro. Asegúrese de que la cinta no esté
doblada antes de insertar el conectador.
10
COLOQUE EL TABLERO EN LA
SECADORA
Inserte las orejillas del fondo frontal del
tablero en las ranuras en la secadora y gire
el tablero en su lugar. Asegure el tablero
nuevo en la secadora usando los cuatro
tornillos removidos en un paso anterior.
11
Tornillos
Tornillos
Tornillos
Tornillos
Aliviador de presión
Coloque la cinta y el cable desde el tablero
debajo del aliviador de presión en el nuevo
tablero.
Page 62

Instrucciones de instalación
RECONECTE EL PANEL DE
CONTROL DE LA LAVADORA
Conecte el panel de control de la secadora
al tablero nuevo deslizando el conectador de
la cinta en el tablero nuevo en los pasadores
metálicos en el panel de control y empuje
hacia adentro. Asegúrese de que la cinta no
esté doblada antes de insertar el conectador.
COLOQUE LA TARJETA DE
CONTROL DE LA LAVADORA
EN EL TABLERO NUEVO
Reemplace los cuatro tornillos removidos de
la tarjeta de control en un paso anterior.
La tarjeta de control ahora estará en el lado
opuesto del tablero de la lavadora.
COLOQUE EL TABLERO EN LA
LAVADORA
Inserte las orejillas del fondo frontal del
tablero en las ranuras de la lavadora y gire el
tablero en su lugar. Presione la parte
posterior del tablero hacia abajo para
asegurarse de que ajuste correctamente.
Asegure el tablero nuevo a la lavadora
usando los dos tornillos largos removidos en
un paso anterior.
Usando los dos tornillos pequeños que
removió antes, atornille el tablero nuevo de
la lavadora.
RECONECTE EL SUMINISTRO
ELÉCTRICO A LA LAVADORA Y
A LA SECADORA
Tornillos
12
13
15
14
Aliviador
de presión
Coloque el cable gris del puerto serial debajo
del aliviador de tensión en el tablero nuevo.
• Conecte la lavadora y la secadora otra vez.
• Presione los botones POWER (ENCENDER)
en la secadora y en la lavadora para
asegurarse de que las tarjetas de control
estén conectadas correctamente.
28
Page 63

Solucionador de problemas
ge.com
Problema Posible causa Qué hacer
La lavadora no opera El tablero de control está apagado • Esto es normal. Presione POWER (ENCENDER), la pantalla
de tacto o cualquier otro botón para activar el tablero de
control.
La lavadora está desconectada • Asegúrese de que el cable eléctrico esté bien conectado en un
tomacorriente que funcione.
El suministro de agua está cerrado
• Abra los grifos de agua caliente y fría completamente.
Los controles no están ajustados • Asegúrese de que el ciclo fue seleccionado correctamente,
apropiadamente cierre la tapa y presione START (ARRANCAR).
La tapa está abierta—función de • Cierre la tapa y reajuste el ciclo desde el inicio si es necesario.
seguridad. Evita que la lavadora se
llene y opere cuando la tapa está
levantada
El fusible está dañado / se disparó • Inspeccione el circuito de fusibles / interruptores de la casa.
el circuito de interruptores Cambie los fusibles o reajuste los interruptores. La lavadora
debería tener un tomacorriente separado.
Los circuitos electrónicos necesitan • Desconecte la lavadora, espere 2 minutos, conéctela otra vez y
reajustarse presione POWER (ENCENDER).
START (ARRANCAR) no se presionó • Presione START (ARRANCAR).
después de que el ciclo fue seleccionado
Presión de agua extremadamente baja
• Presione START (ARRANCAR) otra vez.
La lavadora está demasiado fría • Si la lavadora se ha expuesto a temperaturas por debajo
del punto de congelación por períodos extensos de tiempo,
permita que se caliente antes de presionar POWER
(ENCENDER). De no ser así, la pantalla no se activará.
El agua no se está llenando El filtro está obstruido o • Asegúrese de que los filtros de la válvula de agua
correctamente las mangueras de llenado (la rejilla azul y naranja debe estar libre de sólidos) en
están dobladas la unidad no estén obstruidos. Cierre el agua e inspeccione el
filtro desconectando la manguera de la máquina. Asegúrese de
que las mangueras no están dobladas u obstruidas.
Eficiencia de energía • Esta es una lavadora de alta eficiencia de energía. Como
resultado, los ajustes de temperatura para la lavadora podrían
ser diferentes de las lavadoras que no son de alta eficiencia de
energía.
Suministro de agua insuficiente • Asegúrese de que el suministro de agua esté abierto. Asegúrese
de que los grifos estén en la posición completamente abierta .
La tapa de la lavadora está abierta • La tapa de la lavadora debe estar cerrada para todos los ciclos
de la lavadora. Si la tapa se deja abierta durante
alguna operación, todas las funciones se detendrán,
incluyendo el llenado de agua.
La conexión de la manguera de • Asegúrese de que la manguera de llenado de agua
llenado no es correcta caliente esté conectada con la entrada del suministro de agua
caliente en la lavadora, y que la manguera de llenado de agua
fría esté conectada con la entrada de suministro de agua fría en
la lavadora (caliente con caliente y fría con fría).
Optimización del llenado del agua • Es posible que el agua no cubra el nivel superior de la ropa.
Esto es normal para esta lavadora de alta eficiencia. El llenado
de agua es optimizado por el sistema para obtener un lavado
de mayor rendimiento.
Para obtener una lista completa de soluciones a problemas comunes de la lavadora, use la
función de Solucionador de problemas que encontrará si presiona el botón AYUDA en la pantalla
inicial de la lavadora (Ver Solucionador de problemas).
Si la lavadora no funciona, consulte la tabla que se encuentra a continuación:
29
Page 64

Solucionador de problemas
ge.com
Problema Posible causa Qué hacer
La lavadora no drena—el agua La manguera de drenaje está • Asegúrese de que la manguera de drenaje no esté doblada.
está acumulada en la tina doblada o la salida de drenaje De acuerdo con las instrucciones de instalación recomendadas,
está a más de 8 pies del piso la salida de drenaje no puede estar instalada a más de 8 pies
del piso.
El agua se fuga en cada carga Instalación defectuosa • Verifique que todas las conexiones de las mangueras de
de las mangueras llenado y drenaje estén bien ajustadas y seguras.
Fuga de agua Producción de espuma excesiva • La producción excesiva de espuma podría causar fugas.
Esto se debe al tipo o cantidad de detergente que se use. Se
recomienda el uso de un detergente de alta eficiencia.
Asegúrese de agregar el detergente y los aditivos en el
compartimiento correcto del dispensador. Siga las
recomendaciones del fabricante del detergente, pero trate de
reducir la cantidad de detergente usado, especialmente si usted
usa unidades de acondicionamiento o suavizado de agua en
su casa.
La pantalla está en blanco Han transcurrido 5 minutos • Esto es parte de la operación normal. La pantalla está
después de que el ciclo ha de inactividad diseñada para apagarse automáticamente después
terminado de 5 minutos de inactividad. Las opciones se guardarán
en la memoria cuando se apague la pantalla.
El color de la pantalla LCD es El color que se percibe en la pantalla • Esto es normal.
diferente para la lavadora depende del ángulo de visualización
y la secadora
La lavadora no se está Los ajustes de la secadora no se • Los ajustes recomendados en la secadora se verán después
comunicando con la secadora pueden ver de la primera vez que la pantalla de la lavadora o secadora
se active después de que se complete un ciclo de lavado.
Después de que los ajustes recomendados se vean, la
función de tiempo de espera de 5 minutos en la secadora
borrará el ciclo recomendado. En caso de que la pantalla se
apague por inactividad antes de que el ciclo inicie, usted
puede presionar el botón de ciclo recomendado en la lavadora
para llamar la información previa de la carga de la lavadora.
La opción está desactivada • Asegúrese de que la función de comunicación esté activada.
Primero presione el botón “HOME” (INICIO) y luego
presione AYUDA (HELP). A continuación, seleccione las
preferencias de la máquina y de comunicación entre la
lavadora y la secadora. Presione la barra de selección “ON”
(ENCENDER) y seleccione “OK”. Presione el botón
“HOME” (INICIO) para comenzar la selección del ciclo.
El cable está mal conectado • Si el cable de conexión entre la lavadora y la secadora no está
bien conectado, la comunicación se verá afectada. Asegúrese de
que el cable esté bien ajustado tanto en la secadora como a la
lavadora. Inspeccione esto especialmente si se intercambiaron
los tableros.
La distribución del detergente Los compartimientos del • Asegúrese de que el detergente y los aditivos están
no se completa o detergente están obstruidos en los compartimientos correctos del dispensador. Si se usa
no se realiza debido a un llenado incorrecto un detergente líquido, asegúrese de que la caja del inserto
esté en el dispensador. Si se usa un detergente en polvo,
asegúrese de no usar el inserto del detergente. Se debe usar
un líquido en los compartimentos de suavizante de tela y
pre-tratamiento. Para todos los tipos de detergente, siempre
asegúrese de que la caja del dispensador esté completamente
cerrada antes de comenzar el ciclo.
Para obtener una lista completa de soluciones a problemas comunes de la lavadora, use la
función de Solucionador de problemas que encontrará si presiona el botón AYUDA en la pantalla
inicial de la lavadora (Ver Solucionador de problemas).
Si la lavadora no funciona, consulte la tabla que se encuentra a continuación:
30
Page 65

Solucionador de problemas
ge.com
Problema Posible causa Qué hacer
La distribución del detergente Se usó demasiado detergente • Asegúrese de usar la cantidad de detergente
no se completa o no serealiza sugerida en las recomendaciones del fabricante
(cont.) Usted también puede diluir el detergente con
agua hasta alcanzar la línea máxima en el depósito para evitar
alguna obstrucción. Se recomienda un detergente de alta
eficiencia para esta lavadora.
El suministro de agua no • Asegúrese de que el suministro de agua esté abierto. Asegúrese
es suficiente de que los grifos de agua estén en la posición completamente
abierta.
Residuo normal • Operación normal. Podrían quedar residuos en los
compartimientos de la caja dispensadora. La caja dispensadora
se puede remover para limpiarse de vez en cuando con agua y
un cepillo. La caja de inserto del detergente líquido y las tapas
del sifón también se pueden sacar del compartimiento del
detergente para una limpieza ocasional. Recuerde que
solamente se pueden usar líquidos en los compartimientos para
suavizante y pre-tratamiento de las telas. No es posible dispensar
polvo de los compartimientos de suavizante o pre-tratamiento
de telas.
Distribución prematura El compartimiento del blanqueador • No se puede almacenar blanqueador en el dispensador
del blanqueador está lleno para una carga futura para usos futuros. El contenido del compartimiento se
dispensará en cada carga para optimizar el rendimiento
de la lavadora.
El depósito se llenó con demasiado • Llenar excesivamente el compartimiento con blanqueador
blanqueador podría producir la descarga prematura del blanqueador hacia
la ropa. Hay una línea de llenado máximo indicada en el
depósito del blanqueador para ayudarle a evitar llenarlo
excesivamente.
Obstrucción del El depósito del blanqueador • Cerciórese de que la tapa del blanqueador esté asentada
blanqueador no está asentado correctamente y ajustada en su lugar antes de comenzar
el ciclo.
Limpieza insuficiente • Usted puede remover y limpiar la tapa del blanqueador
con agua tibia y un cepillo para remover cualquier
obstrucción.
Remoción deficiente No se usó el inspector de manchas •
Trate de usar el inspector de manchas recomendado en el
de las manchas ciclo. El sistema optimiza los ajustes de la lavadora de acuerdo
con el tipo de mancha especificado. Siempre asegúrese de que
cualquier aditivo, tal como un detergente líquido de alta
eficiencia, sea agregado al compartimiento del dispensador de
pre-tratamiento antes de iniciar el ciclo. Siempre consulte las
instrucciones en las etiquetas de su ropa antes de tratar las manchas.
No se seleccionó pre-remojo • Cuando se usa el inspector de manchas, la temperatura de pre-
remojo y el tiempo se seleccionan automáticamente. Si usted
decide no usar el inspector de manchas, recomendamos que
seleccione pre-remojo cuando defina el ciclo de lavado.
Siempre asegúrese de que cualquier aditivo, tal como un
detergente líquido de alta eficiencia, sea agregado en el
depósito de pre-tratamiento antes de comenzar el ciclo.
Siempre consulte las instrucciones encontradas en las etiquetas
de la ropa antes de tratar las manchas.
Se seleccionó un botón o una
opción de la pantalla de tacto que
está temporalmente desactivada
Los controles no funcionan — se
escucha un sonido doble, pero la
pantalla no cambia
• Se escuchará un sonido doble si un botón o una opción en
la pantalla de tacto está temporalmente desactivada. Por
ejemplo, si el usuario presiona el botón de arranque con la
tapa de la lavadora abierta, se escuchará un sonido doble,
indicando que la tapa se debe cerrar antes de que el botón
de arranque se pueda presionar.
31
Page 66

Sonido Descripción
La lavadora arranca • La acción HydroWashMRhacer girar el canasto de lavado en una dirección, luego pausa y
y se para repetidamente gira en la dirección opuesta para limpiar los artículos.
Sonido del agua que se • La lavadora se adapta al tamaño y al tipo de la carga para agregar más agua al ciclo según
agrega después que la sea necesario.
lavadora ha estado operando
• La carga de la lavadora podría estar desbalanceada. Si la lavadora siente que la carga no
está balanceada, se detendrá y se volverá a llenar para redistribuir la carga.
• La lavadora podría estar diluyendo los aditivos de lavado para agregar a la carga de
lavado.
Un sonido de clic durante • La lavadora producirá una serie de sonidos conforme cambia el modo de limpieza.
el ciclo de lavado
Un sonido muy agudo durante • El canasto de lavado gira más rápidamente para remover la humedad de la
el ciclo de giro carga.
Un sonido de evacuación • La lavadora está diluyendo los aditivos de lavado para agregarlos a la carga de lavado. Los
de agua aditivos de Mejora de lavado se dispensan durante el pre-remojo. El detergente se dispensa
en el momento del comienzo del ciclo de lavado. El blanqueador se dispensa durante el
ciclo de lavado principal. El suavizante de telas se dispensa durante el enjuague final.
Zumbido durante • La bomba está operando para remover el agua del canasto de lavado.
el drenaje
Sonidos metálicos • La lavadora tiene funciones de enjuague especiales para remover los residuos de detergente
durante el ciclo de giro y de la carga después del ciclo de lavado principal.
el ciclo de enjuague
El agua hace un sonido de • Un líquido en el aro de balanceo alrededor del canasto de lavado ayuda a que el canasto
chapoteo cuando la lavadora gire con suavidad.
se apaga y el canasto de
lavado gira
32
Solucionador de problemas
ge.com
Los siguientes son sonidos normales que usted podría escuchar:
Page 67

Engrape su recibo aquí. Se
necesita un comprobante de fecha
de compra original para obtener
servicio bajo la garantía.
Por el período de: Nosotros reemplazaremos:
Un año Cualquier parte de la lavadora que falle debido a defectos en los materiales o en la fabricación.
De la fecha de la Durante esta garantía limitada de un año, GE también proporcionará, sin costo alguno, toda la mano
compra original de obra y servicios relacionados con el reemplazo de las partes defectuosas.
Del segundo al quinto año El conjunto del vástago de suspensión y resorte y la tarjeta de control electrónico principal, si alguna
De la fecha de la de estas partes falla debido a defectos en los materiales o en la fabricación. GE también reemplazará
compra original la tapa o la cubierta de la lavadora si se oxidan bajo las condiciones de operación. Durante estos tres
años adicionales de garantía limitada, usted será responsable de cualquier gasto de mano de obra o
costos relacionados con el servicio.
Del segundo al décimo año El motor de acción directa y la tina de lavado externa si alguna de estas partes falla debido a defectos en
De la fecha de la los materiales o en la fabricación. Durante estos ocho años adicionales de garantía limitada, usted será
compra original responsable de cualquier gasto de mano de obra o costos relacionados con el servicio.
Por la vida del producto El canasto de la lavadora si falla debido a defectos en los materiales o en la fabricación. Durante
De la fecha de la la garantía de por vida limitada de este producto, usted será responsable de cualquier gasto de mano de
compra original obra o costos relacionados con el servicio.
Garantía de la lavadora
ge.com
Todo el servicio de garantía es proporcionado por los Centros de servicio de
fábrica o por un técnico de servicio Care
®
autorizado. Para solicitar servicio por
Internet las 24 horas al día, visítenos en ge.com o llame al 800.GE.CARES
(800.432.2737). Cuando llame para solicitar servicio, por favor tenga a mano
el número de serie y el número de modelo.
■ Viajes del personal de servicio a su casa para enseñarle
cómo usar su producto.
■ Instalación, entrega o mantenimiento inapropiados.
■ Fallas del producto si es maltratado, mal usado, o usado
para un propósito diferente del que se creó o si es
usado para usos comerciales.
■ Cambio de los fusibles de su casa o reajuste del circuito
de interruptores.
■ Daños al producto causados por accidentes, incendios,
inundaciones o actos de la naturaleza.
■ Daño incidental o consecuencial causado por defectos
posibles con este electrodoméstico.
■ Daños causados después del envío.
■ Producto no accesible para facilitar el servicio requerido.
Lo que no está cubierto:
Esta garantía se extiende al comprador original y a cualquier propietario subsecuente para productos comprados para uso
doméstico dentro Estados Unidos. Si el producto está situado en un área que no dispone de servicio por parte de un proveedor
de servicio autorizado de GE, podría tener que hacerse cargo de los costes de envío o bien podría solicitársele que lleve el
producto a una centro de servicio de GE autorizado para realizar la reparación. En Alaska, la garantía excluye los costos de
envío o llamadas de servicio a su casa. Se necesitará un comprobante de la fecha original de compra para obtener servicio
bajo la garantía.
Algunos estados no permiten la exclusión o limitación de daños imprevistos. Esta garantía le da sus derechos legales
específicos, y es posible que usted tenga otros derechos legales que variarán de estado a estado. Para enterarse de cuáles son sus
derechos legales, consulte a su oficina de asuntos del consumidor local o estatal o póngase en contacto con la Oficina de su
Procurador General.
Garante: General Electric Company. Louisville, KY 40225
EXCLUSIÓN DE GARANTÍAS IMPLÍCITAS—Su único y exclusivo derecho es la reparación del producto, tal y como
se indica en esta Garantía limitada. Cualquier garantía implícita, incluyendo las garantías implícitas de
comerciabilidad o adecuación para un fin determinado, están limitadas a un año o el período de tiempo más breve
permitido por la ley.
33
Page 68

Servicio al consumidor
Página Web de GE Appliances ge.com
¿Tiene alguna pregunta o necesita asistencia con su electrodoméstico? ¡Visite la página de GE Appliances
las 24 horas del día, cualquier día del año! Para un servicio conveniente más rápido, usted puede bajar de la
página de Internet los Manuales del propietario, ordenar partes, catálogos, o hasta programar visitas de
servicio por Internet. Usted también le puede hacer preguntas a nuestro equipo de expertos y mucho
más…
Para planificar servicio
ge.com
Los expertos de servicio de reparación de GE están a un paso de su puerta. Entre a nuestra página y
programe su visita de servicio a su conveniencia las 24 horas, cualquier día del año. O llame al
800.GE.CARES (800.432.2737) durante las horas de servicio regular.
Estudio de diseño Real Life ge.com
GE apoya el concepto Universal Design – productos, servicios y ambientes que personas de todas las edades,
tamaños y habilidades puedan usar. Nosotros reconocemos la necesidad de diseñar productos para cumplir
con las necesidades de un amplio rango de necesidades físicas y mentales. Para detalles de las aplicaciones
de Universal Design de GE, incluyendo ideas para el diseño de cocinas para personas minusválidas, visite
nuestra página Web hoy mismo. Las personas con impedimentos auditivos pueden llamar al
800.TDD.GEAC (800.833.4322).
Garantías extendidas ge.com
Compre una garantía extendida de GE y entérese de los descuentos que están disponibles mientras su
garantía todavía está en efecto. Usted puede comprarla en línea o llamando al 800.626.2224 durante las
horas de servicio regular. El departamento de Servicios residenciales del consumidor de GE estará ahí
después de que su garantía se venza.
Repuestos y accesorios ge.com
Podemos enviar repuestos y accesorios a aquellos individuos calificados para darle servicio a sus propios
electrodomésticos directamente a sus casas (se aceptan VISA, MasterCard y Discover). Ordene hoy mismo
en Internetnternet, las 24 horas del día, o por teléfono al 800.626.2002 durante las horas de servicio regular.
Las instrucciones contenidas en este manual cubren los procedimientos cualquier usuario pueda llevar a cabo.
Otros servicios deberían dejarse en manos del personal de servicio calificado. Se debe tener cuidado,
ya que el servicio técnico inapropiado podría causar un funcionamiento inseguro.
Póngase en contacto con nosotros ge.com
Si usted no está satisfecho con el servicio que usted reciba de GE, póngase en contacto con nosotros a través
de nuestra página Web con todos los detalles, incluyendo su número telefónico, o escríbanos a:
General Manager, Customer Relations
GE Appliances, Appliance Park
Louisville, KY 40225
Registre su electrodoméstico ge.com
Registre su nuevo electrodoméstico en Internet – a su conveniencia. El registro oportuno le permitirá una
mejor comunicación y un servicio más eficiente bajo los términos de su garantía, si se presentara la
necesidad. Usted también puede enviar por correo la tarjeta de registro pre-impresa incluida con este
manual.
34
Impreso en Corea
 Loading...