

Page 1
www.GEAppliances.com
Safety Instructions .......... 2, 3
Operating Instructions
Controls ...................... 4
Cycle Options ................. 6
Help Feature .............. 13, 14
Troubleshooter .............. 13
Loading and Using
the Washer ................ 17, 18
"My Cycles" Feature ......... 11, 12
Other Features ............. 15, 16
Quick Start Feature ............. 5
Stain Inspector .............. 7, 8
Summary Screen ............ 9, 10
Installation Instruc_tions
Before You Begin ........... 19-21
Step-by-Step Instructions ..... 21-24
Switching the Washer and
Dryer Backspl_hes ......... 25-28
WPGT9350
Troubleshooting Tips ...... 29, 30
Consumer Support
Consumer Support ..... Back Cover
Warranty .................... 31
Write the model and serial
numbers here:
Model #
Serial #
You can find them on the
rear cover of the washer
backsplash.
3828EA3023 175D1807P415
49-90151-1 04-03dR
Page 2
IMPORTANT SAFETY INSTRUCTIONS
READ ALL INSTRUCTIONS BEFORE USING.
A WARNING ! For your safety, the information in this manual must be followed to minimize the risk offire or
explosion, electric shock, or to prevent property damage, personal injury, or loss of life.
WATER HEATER SAFETY
U_ulercertain conditio_, hydrog_z ga_ may be pmd_g:ed in a water lu_aterthat lgLs not been usedJi,r two week_ or
more. Hydrogen g_,s can he explosive u_uter thaw circum_tances.
If the hot water has not been used fbr two weeks or more, prevent tile possibility of damage or injury
by turning on all hot water faucets and allowing them to run for several minutes. Do this before
using any electrical appliance which is connected m the hot water system. This simple procedure will
allow any buih-up hydrogen gas to escape. Since the gas is flammable, do not smoke or use an open
flame or appliance during this process.
PROPER INSTALLATION
7his wa,slwr m_J._the/,_[mt_ imtalied amt located in accontance with the l_talkztion Instructiom b_ore it _
used. h_stallation l_t,'uctio_ are i_wluded in the back oJ th£s'manual.
,*Install or store where it will not be exposed
to temperatures below freezing or exposed
to the weathen
,*Properly ground washer to confbrm with all
governing codes and ordinances. Follow details
in Installation Instructions.
YOUR LA UNDR Y AREA
'*Keep the area underneath and around your
appliances free of combustible materials such
as lint. papm; rags, chemicals, etc.
,*Close supervision is necessal T if this appliance
is used by or near children. Do not allow
children to play on, with or inside this or any
other appliance.
2
Page 3
IMPORTANT SAFETY INSTRUCTIONS
READ ALL INSTRUCTIONS BEFORE USING.
A WARNING ! For your safety, the information in this manual must be followed to minimize the risk offire or
explosion, electric shock, or to prevent property damage, personal injury, or loss of life.
WHEN USING THE WASHER
'*Use this appliance only for its intended
purpose as described in this Owner's Manual.
,*Never reach into washer while it is mox;mg.
Wait until the machine has completely stopped
before opening the lid.
,*Do not mix chlorine bleach with ammonia
or acids such as xdnegar and/or rust remove_:
Mixing different chemicals can produce a toxic
gas which may cause death.
,*Do not wash or dry articles that have been
cleaned in, w-ashed in, soaked in, or spotted
with combustible or explosive sut)stances
(such as wax, oil, paint, gasoline, degreasers,
dry-cleaning mlvents, kerosene) which may
ignite or explode. Do not add these substances
to the wash water. Do not use or place these
substances around your washer or dryer
during operation.
WHEN NOT IN USE
,*Turn offwater faucets to relieve pressure on
hoses and waivesand to minimize leakage if
a break or rupture should occun Check the
condition of"the fill hoses; they should be
replaced every 5 years.
,*The laundry process can reduce the flame
retardanc y of fabrics. To avoid such a result.
carefially follow the ,garment manufacturer's
wash and care instructions.
,*To minimize the possibility of electric shock,
unplug this appliance from the power supply
or disconnect the washer at the household
distribution panel by remo_dng the fuse or
switehing off the circuit breaker before
attempting any maintenance or cleaning.
NOTE: Pressing START/STOP or POWER
does NOT disconnect the appliance from
the power supply.
Never attempt to operate this appliance
if it is damaged, malfunctioning, partially
disassembled, or has missing or broken
parts, including a damaged cord or plug.
,*Do not attempt to repair or replace any part of
this appliance unless specifically recommended
in this Owner's Manual, or in published user-
repair instructions that you understand and
have the skills to carry out.
,*Befbre discarding a washm; or removing
it from service, remove the vcasher lid to
prevent children from hiding inside.
READ AND FOLLOW THIS SAFETY
SAVE THESE INSTRUCTIONS.
,*Do not tamper with controls.
INFORMATION CAREFULLY.
Page 4
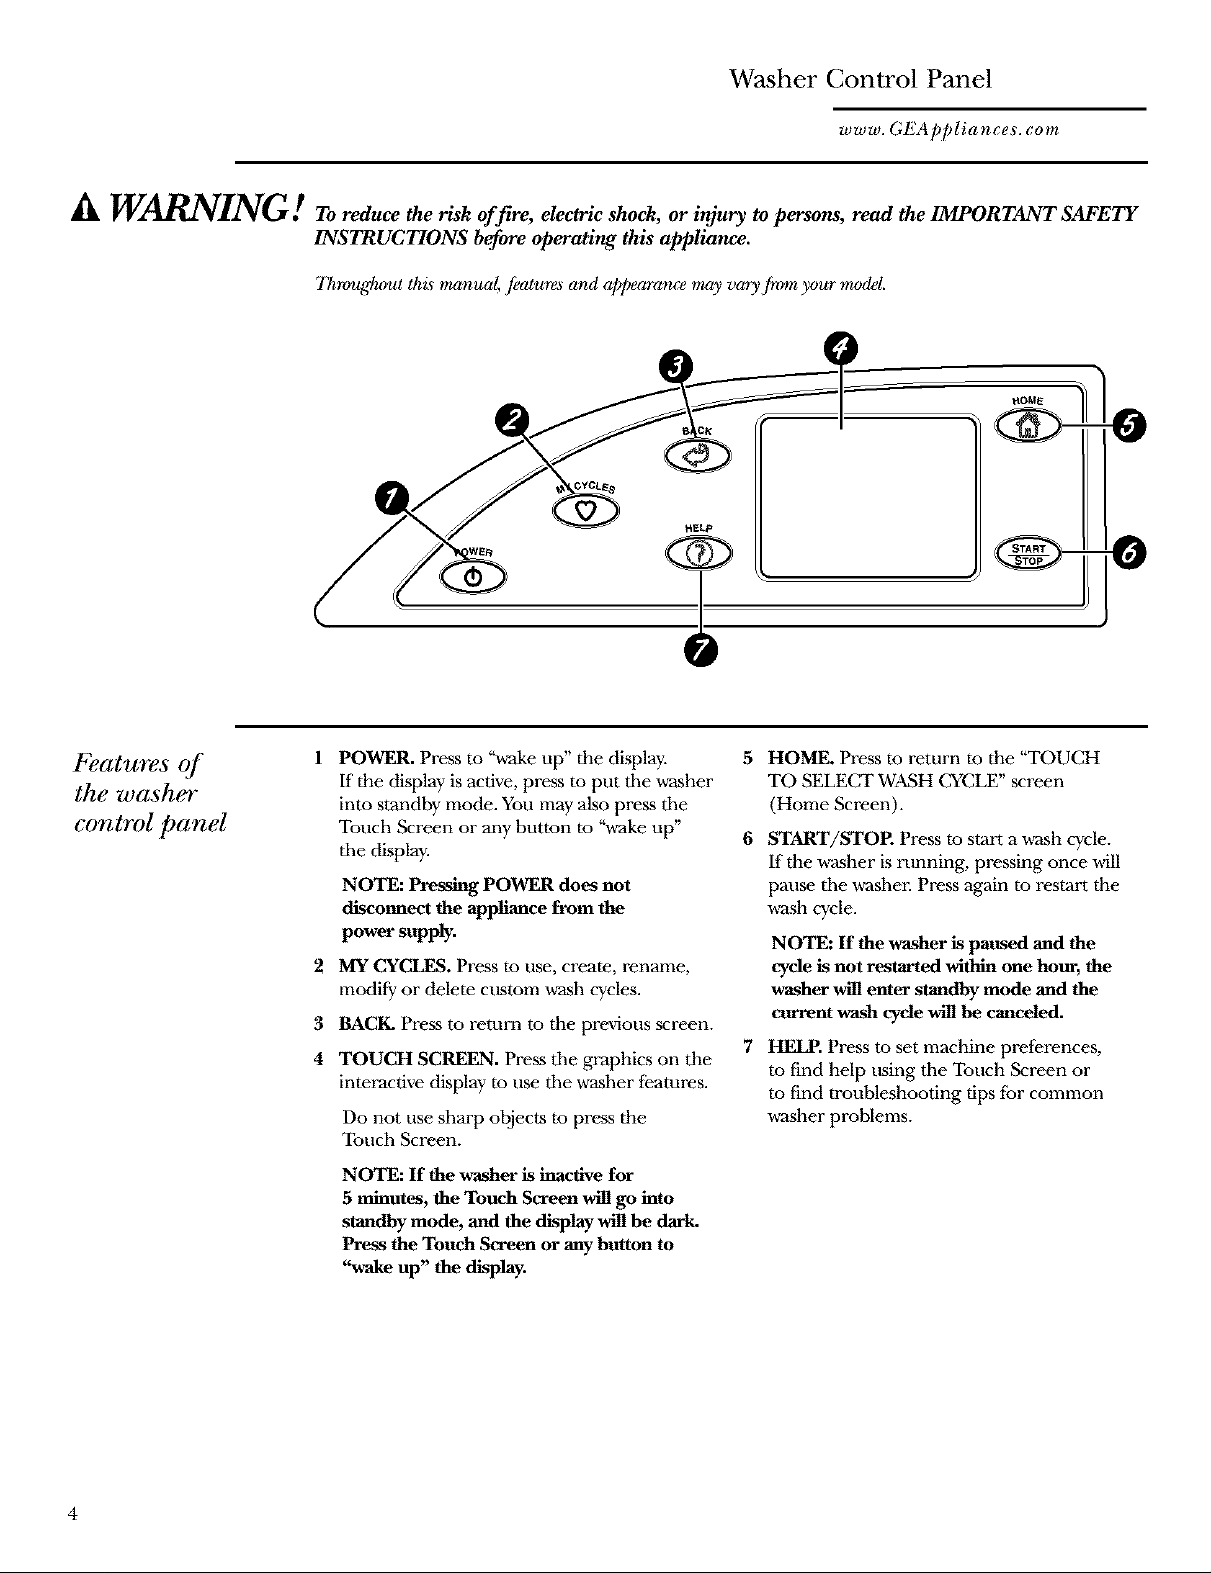
Washer Control Panel
www. GEAppliances. corn
A WARNING / ro reduce the risk offire, electric shock, or in_ry to persons, read the IMPORTANT SAFETY
INSTRUCTIONS before operating this appliance.
7hrouh&out this' manual, fkatura_ and appeara_we rruzyvary fit_m your modal.
Features of
the washer
control panel
POWER. Press to ",a_ke up" the display. 5
If the display is active, press to put tile vcasher
into standby mode. You may also press tile
Touch Screen or any button to "wake up" 6
tile display.
NOTE: Pressing POWER does not
disconnect the appliance from the
power supply.
2
MY CYCI_S. Press to use, create, rename,
modify or delete custom ,a-ashcycles.
3
BACK. Press to return to the prmdous screen.
4
TOUCH SCREEN. Press the graphics on dm
interactive display to use the washer features.
Do not use sharp objects to press the
Touch Screen.
NOTE: If the washer is inactive for
5 minutes, the Touch Screen will go into
standby mode, and the display will be dark.
Press the Touch Screen or any button to
"wake up" the display.
HOME. Press to return to the "TOUCH
TO SELECT WASH CYCLE" screen
(Home Screen).
START/STOE Press to start a wash cycle.
If the w-asher is running, pressing once will
pause the washer. Press again to restart the
w_sh cycle.
NOTE: If the washer is paused and the
cyde is not restarted within one hour, the
washer will enter standby mode and the
cur_nt wash cycle will be canceled.
HELP. Press to set machine preferences,
to find help using the Touch Screen or
to find troubleshooting tips tot common
vcasher problems.
4
Page 5

Quick Start
www. GEAppliances. corn
Getting
Started
If the 7buch
Screen is dark,
press POWER
or the 7buch
Screen to access
the wash cycles
Loosely load clothes no higher than tile mp
row of holes in the washer tub. Overloading
may reduce w-asher efficiency and possibly
increase wrinkling.
Add a low-sudsing, high-efficiency detergent.
Add diluted fabric soffenm; bleach or vcash
boost additives as desired.
Select one of the five wash methods from
0
the Home Sereen:
• Press BY COLOR to w_ash according to
fabric color.
• Press BY GARMENT to wash according
to clothing type.
• Press BY FABRIC to wash according to
fabric type.
• Press SPECIAL CYCI_S to wash non-
garment items, or to select a rinse and
spin or spin-only cycle.
• Press STAIN INSPECTOR to wash items
with specific types of stains.
After selecting a wash method, use the
Touch Screen to select a specific wash cycle
to match your load.
TOUCH TO SELECT WASH CYCLE
qEb 'IN
BYCOLOR BY GARMENT
FABRIC CYCLES INSPECTO_
SPECIAL
HomeScreen
Change any of the automatic settings,
0
if desired, hy pressing the Touch Screen
and following the on-screen instructions.
By changing the settings you can:
• Remove heavier soil.
• Change the water temperature.
• Change the wash action to Vigorous,
Normal, Delicate or Hand Wash.
• Set a Delay S'tart, Extended Spin, Presoak
or Extra Rinse, or change the End-ofa2ycle
Signal volume.
• Adjust time settings.
Close the lid and press START.
0
The washer will not fill unless the lid is
closed.
After you press START, a Cycle Status screen
will appear m indicate what stage of the cycle
the vcasher is in and the time remaining in
the cycle.
SUMMARY SCREEN
COTTONS
light m
?_l:r_'l:IDJ[S,]l| [o]_I
pIh_l:
0:54
Page 6
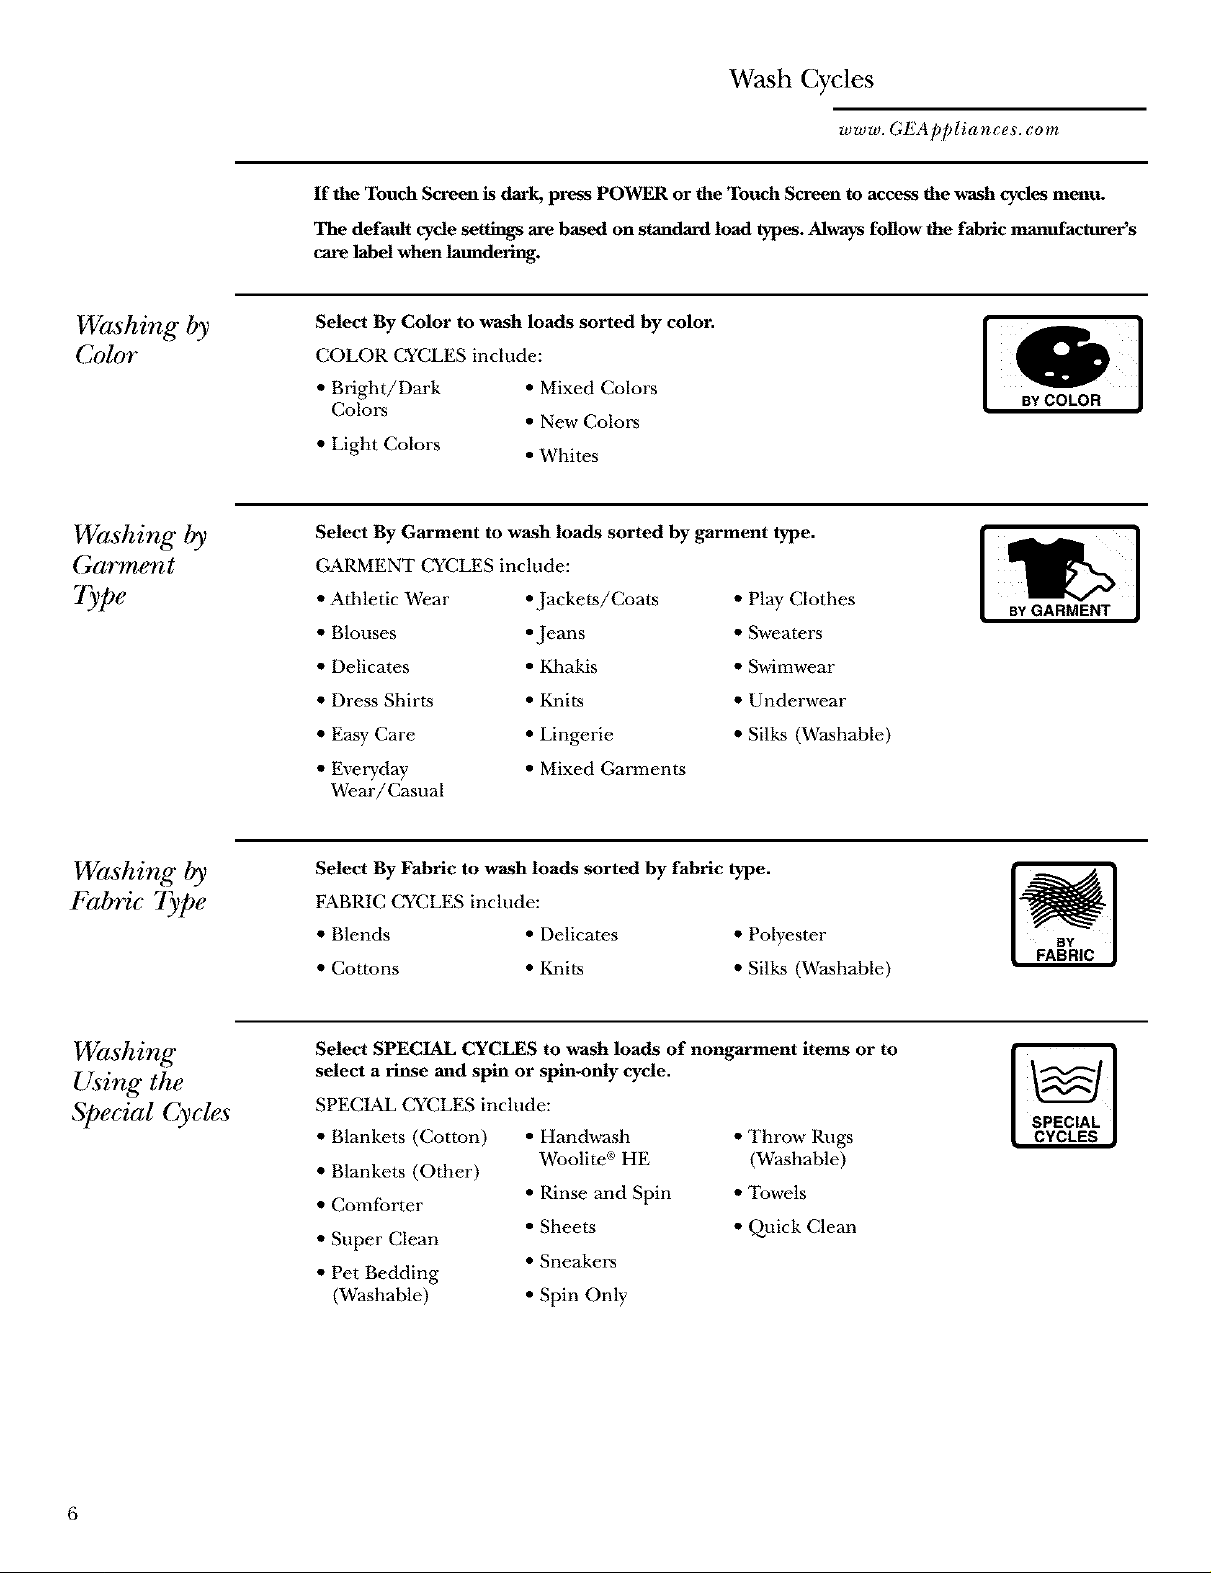
Wash Cycles
www. GEAppliance,L corn
If the Touch Screen is dark, press POWER or the Touch Screen to access the wash cycles menu.
The default cycle settings are based on standard load types. Always follow the fabric manufacturer's
care label when laundering.
Washing by
Color
Washing by
Garment
"X e
Washing by
Fabric Type
Select By Color to wash loads sorted by color.
COLOR CYCLES include:
• Bright/Dark • Mixed Colors
Colors
• Light Colors • Whites
Select By Garment to wash loads sorted by garment type.
GARMENT CYCLES include:
• Athletic Wear • Jackets/Coats • Play Clothes
• Blouses • Jeans • Sweaters
• Delicates • Khakis • S,Mmwear
• Dress Shirts • Knits • Underwear
• Easy Care • Lingerie • Silks (Washable)
• Everyday • Mixed Garments
Wear/Casual
Select By Fabric to wash loads sorted by fabric type.
FABRIC CYCLES include:
• Blends • Delicates • Polyester
• Cottons • Knits • Silks (Washable)
• New Colors
Washing
Using the
Special Cycles
6
Select SPECIAL CYCLES to wash loads of nongarment items or to
select a rinse and spin or spin-only cycle.
SPEC1AL CYCLES include:
• Blankets (Cotton)
• Blankets (Other)
• Comforter
• Super Clean
• Pet Bedding
(Washable)
• Hand,a-ash
Woolite ®HE
• Rinse and Spin
• Sheets
• Sneakers
• Spin Only
• Throw Rugs
(Washable)
• Towels
• ()uick Clean
Page 7
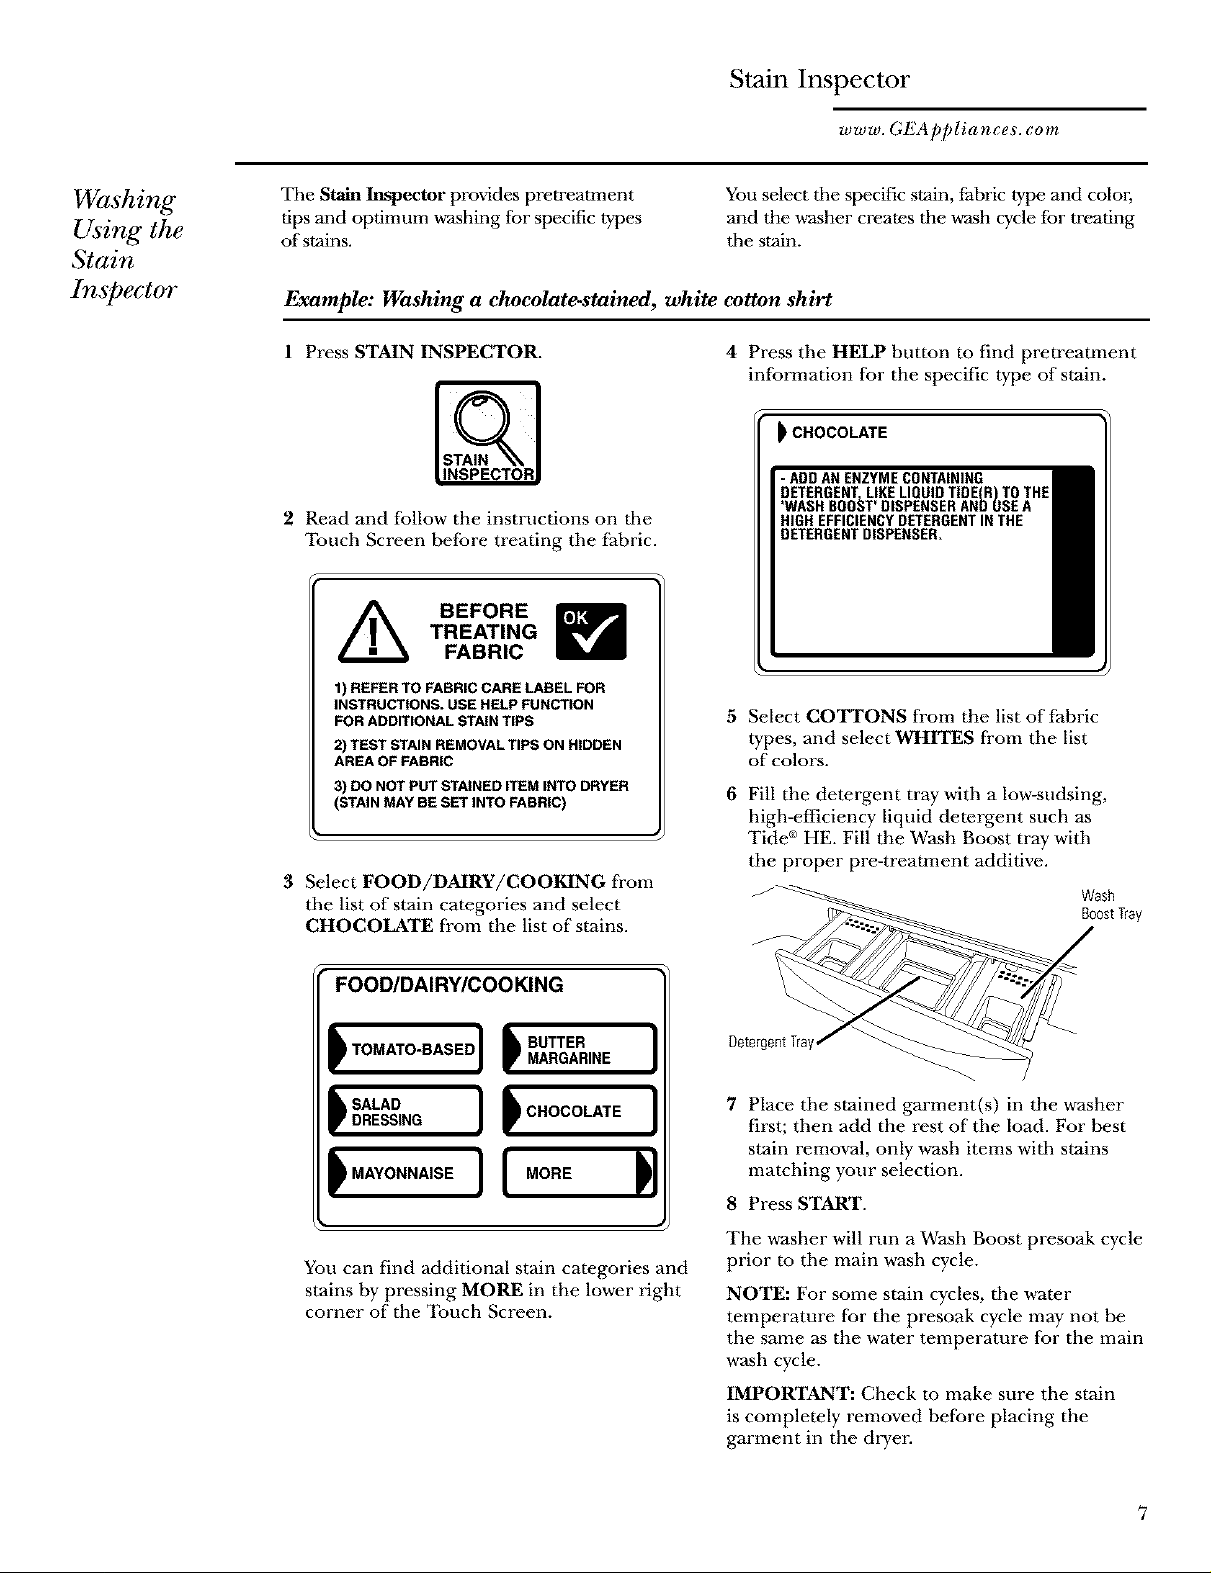
Stain inspector
www. GEAppliances. com
Washing
Using the
Stain
Inspector
Tile Stain Inspector proxddes prerrearment
tips and optimum washing for specific types
of stains.
You select tile specific stain, fabric type and color,
and the vcasher creates the wash cycle for treating
tile stain.
Example: Washing a chocolate-stained, white cotton shirt
1 Press STAIN INSPECTOR.
2 Read and follow the instructions on the
Touch Screen before treating the fabric.
TREATING
BEFORE
FABRIC
1) REFER TO FABRIC CARE LABEL FOR
INSTRUCTIONS. USE HELP FUNCTION
FOR ADDITIONAL STAIN TIPS
2) TEST STAIN REMOVAL TIPS ON HIDDEN
AREA OF FABRIC
3) DO NOT PUT STAINED ITEM INTO DRYER
(STAIN MAY BE SET INTO FABRIC)
4 Press the HELP button to find pretreatment
information for the specific type of stain.
CHOCOLATE
- ADDANENZYMECONTAINING
DETERGENTLIKELIQUIDTIDEIR) TO THE
'WASH BOOST'DISPENSERAND USEA
HIGHEFFICIENCYDETERGENTIN THE
DETERGENTDISPENSER.
5 Select COTTONS from the list of fhbric
types, and select WHITES from the list
of colors.
6 Fill the detergent tray with a low-sudsing,
high-efficiency liquid detergent such as
Tide ®HE. Fill the Wash Boost tray with
the proper pre-trearment additive.
3 Select FOOD/DAIRY/COOKING from
the list of stain categories and select
CHOCOLATE from the list of stains.
Wash
BoostTroy
FOOD/DAIRY/COOKING
pOOATOBASEOI I
DRESSING
_MAYONNAISE [ MORE
You can find additional stain categories and
stains by pressing MORE in the lower right
corner of the Touch Screen.
DetergentTray
7 Place the stained garment(s) in the washer
first; then add the rest of the load. For best
stain removal, only wash items with stains
marching your selection.
8 Press START.
The washer will run a Wash Boost presoak cycle
prior to the main wash cycle.
NOTE: For some stain cycles, the water
temperature for the presoak cycle may not be
the same as the water temperature for the main
wash cycle.
IMPORTANT: Check to make sure the stain
is completely removed before placing the
garment in the dryer.
Page 8
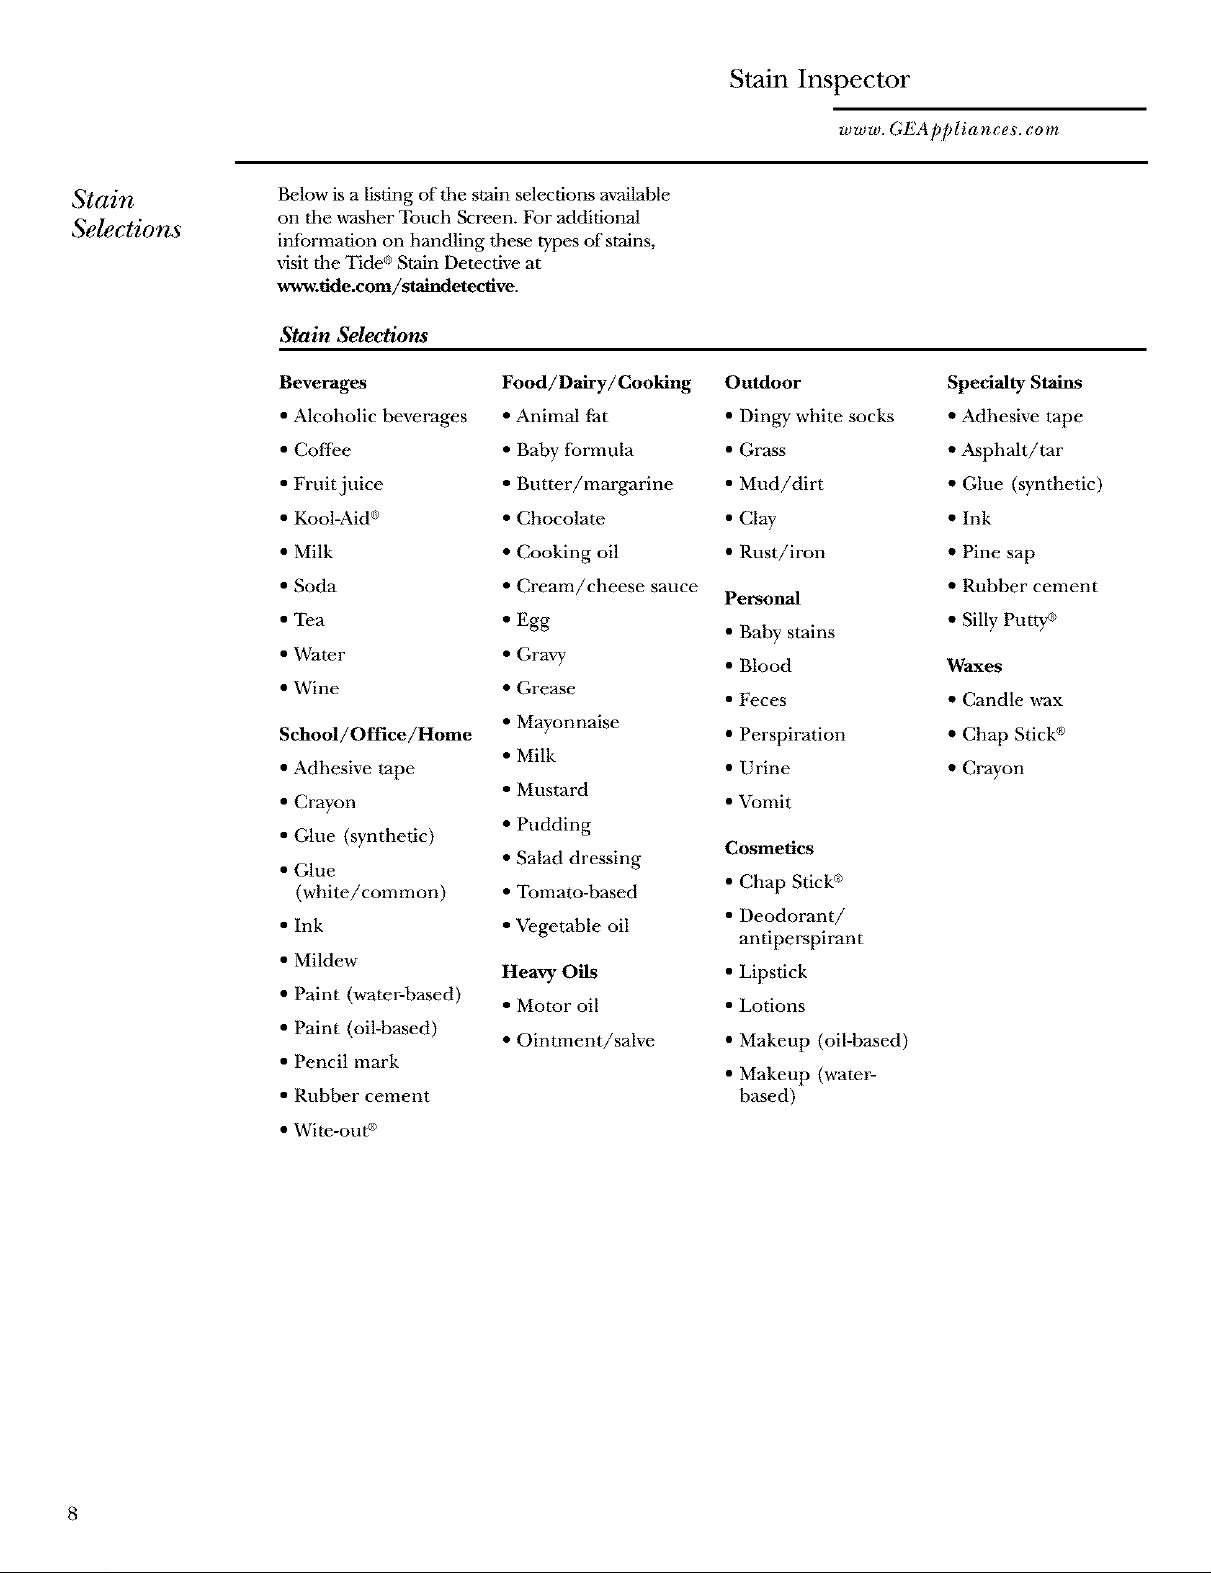
Stain inspector
www. GEAppliances. com
Stain
Selections
Below is a listing of the stain selections available
on the washer Touch Screen. For additional
inlbrmation on handling these types of stains,
xdsit the Tid&_ Stain Detective at
www.tide.eom/staindetecdve.
Stain Selections
Beverages
• Alcoholic beverages
• Coffee
• Fruit juice
• Kool-Aid ®
• Milk
• Soda
• Tea
• Water
• Wine
School/Office/Home
Food/Dairy/Cooking
• Animal fat
• Baby formula
• Butter/margarine
• Chocolate
• Cooking oil
• Cream/cheese sauce
• Egg
• Gra W
• Grease
• Mayonnaise
• Milk
• Adhesive tape
• Mustard
• Crayon
• Glue (synthetic)
• Glue
(white/common)
• Ink
• Mildew
• Paint (water-based)
• Paint (oil-based)
• Pencil mark
• Rubber cement
• Pudding
• Salad dressing
• Tomato-based
• Vegetable oil
Heavy Oils
• Motor oil
• Ointment/salve
• Wite_out®
Outdoor
• Dingy white socks
• Grass
• Mud/dirt
• Clay
• Rust/iron
Personal
• Baby stains
• Blood
• Feces
• Perspiration
• Urine
• Vomit
Cosmetics
• Chap Stick _
• Deodorant/
antiperspirant
• Lipstick
• Lotions
• Makeup (oil-based)
• Makeup (water-
based)
Speciahy Stains
• Adhesive tape
• Asphalt/tar
• Glue (synthetic)
• Ink
• Pine sap
• Rubber cement
• Silly Putty _
Waxes
• Candle wax
• Chap Stick _>
• Crayon
8
Page 9
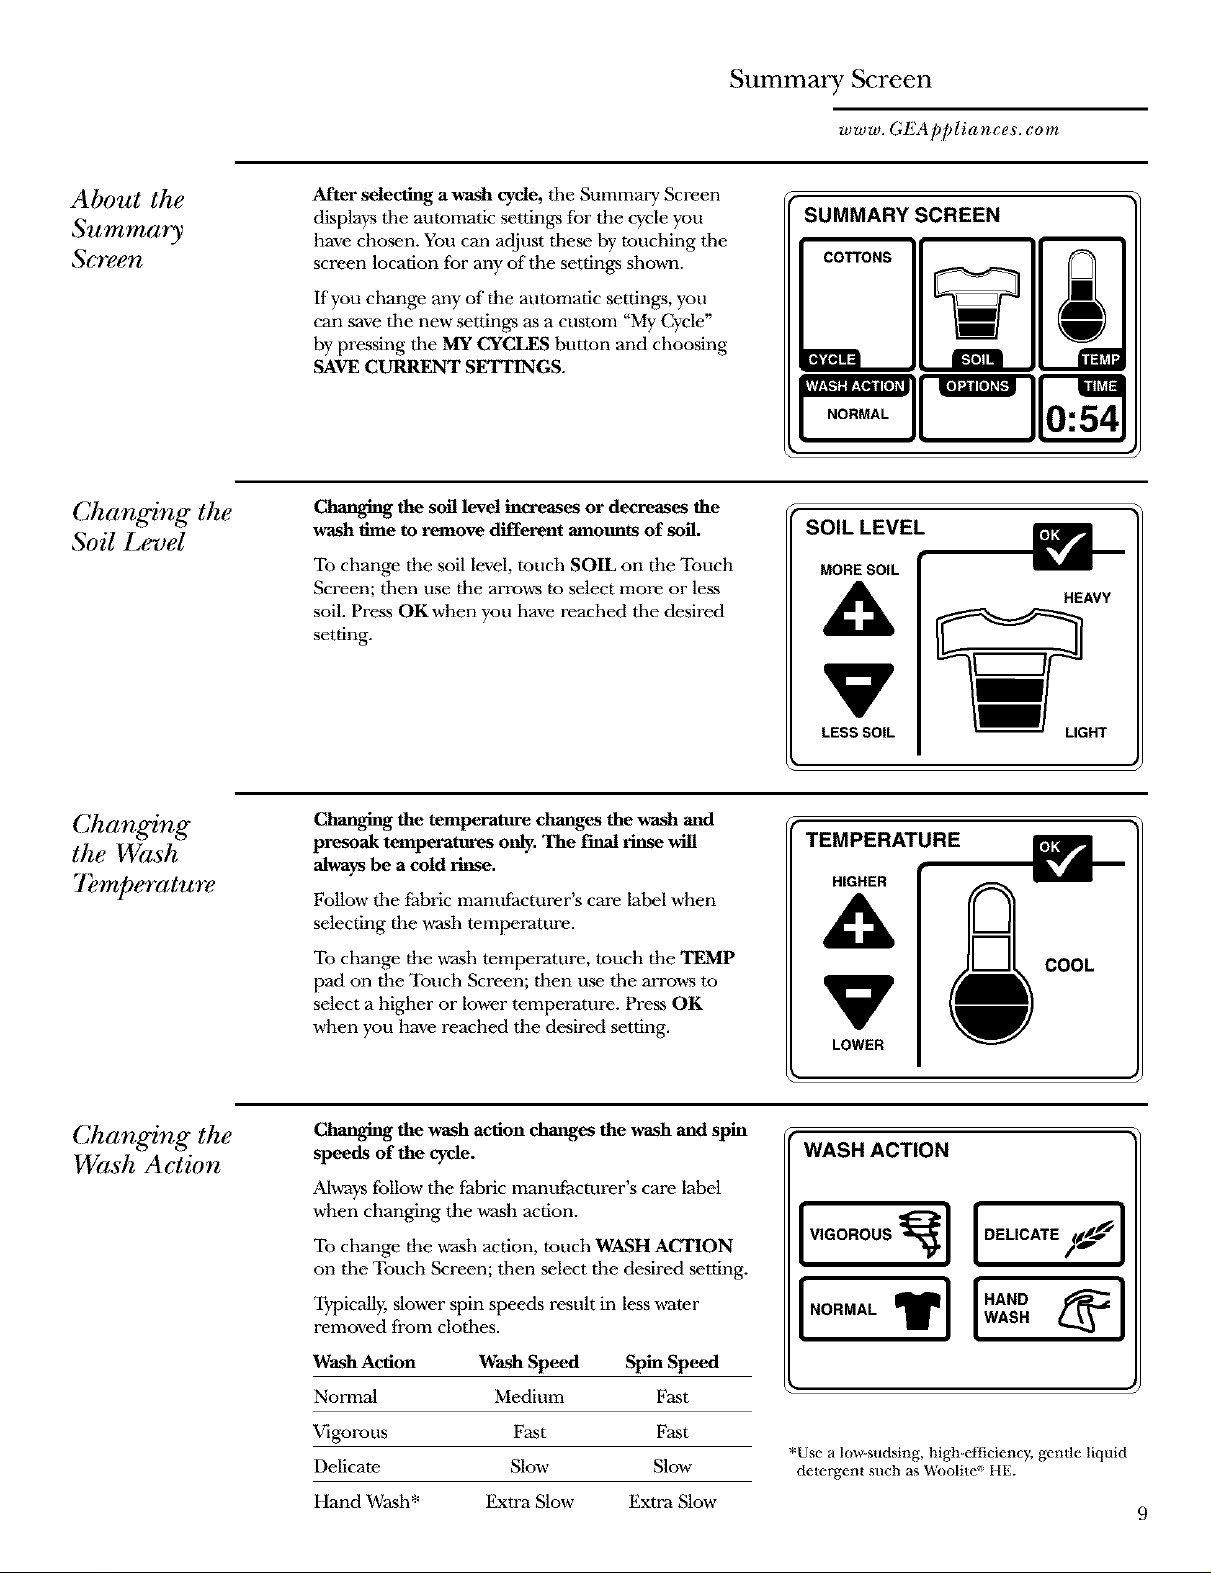
Summary Screen
www. GEAppliances. corn
About the
Summary
Screen
Changing the
Soil Level
Mter selecting a wash cycle, the Summary Screen
displays the anmmatic settings for the cycle you
have chosen. You can adjust these by touching the
screen location for any of the settings shown.
If you change any of the automatic settings, you
can save tile new settings as a custom "My Cycle"
by pressing tile MY CYCLES button and choosing
SAVE CURRENT SETrlNGS.
Changing the soil level increases or decreases the
wash time to remove different amounts of soil.
To change the soil level, touch SOIL on the Touch
Screen; then use the arrows to select more or less
soil. Press OKwhen you have reached the desired
setting.
SUMMARY SCREEN
COTTONS _
hvl,.%"]?,f._I_l i D] _I
_[I]),.ili[o]_[_ _,lhVJl;
HOR.," 0:54
SOIL LEVEI[__
MORE SOIL
,_ HEAVY
LESS SOIL LIGHT
Changing
the Wash
7_mperatm_
Changingthe
Wash Action
Changing the temperature changes the wash and
presoak temperatures only. The Final rinse will
always be a cold rinse.
Y Y
Follo,a the tabric mare tacturer s care label _hen
selecting the wash temperature.
To change the wash temperature, touch the TEMP
pad on the Touch Screen; then use the arro_a_ to
select a higher or lower temperature. Press OK
when you have reached the desired setting.
Changing the wash action changes the wash and spin
speeds of the cycle.
Always tollow the fabric manut:actt rer s care label
when changing the vcash action.
To change the wash action, touch WASH A_ION
on the Touch Screen; then select the desired setting.
Typically, slower spin speeds result in less water
removed from clothes.
Wash Action Wash Speed Spin Speed
Normal Medium Fast
TEMPERATURE
HIGHER
COOL
LOWER
• WASH ACTION
iv,oo,oo,, l
I,o,o,,TIl=
Vigorous Fast Fast
Delicate Slow Slow
Hand Wash* Extra Slow Extra Slow
'Use a low-sudsing, high-etIicienc}, gentle liquid
detergent such as _)olite HE.
r
Page 10
Summary Screen
www. GEAppliances. corn
About the
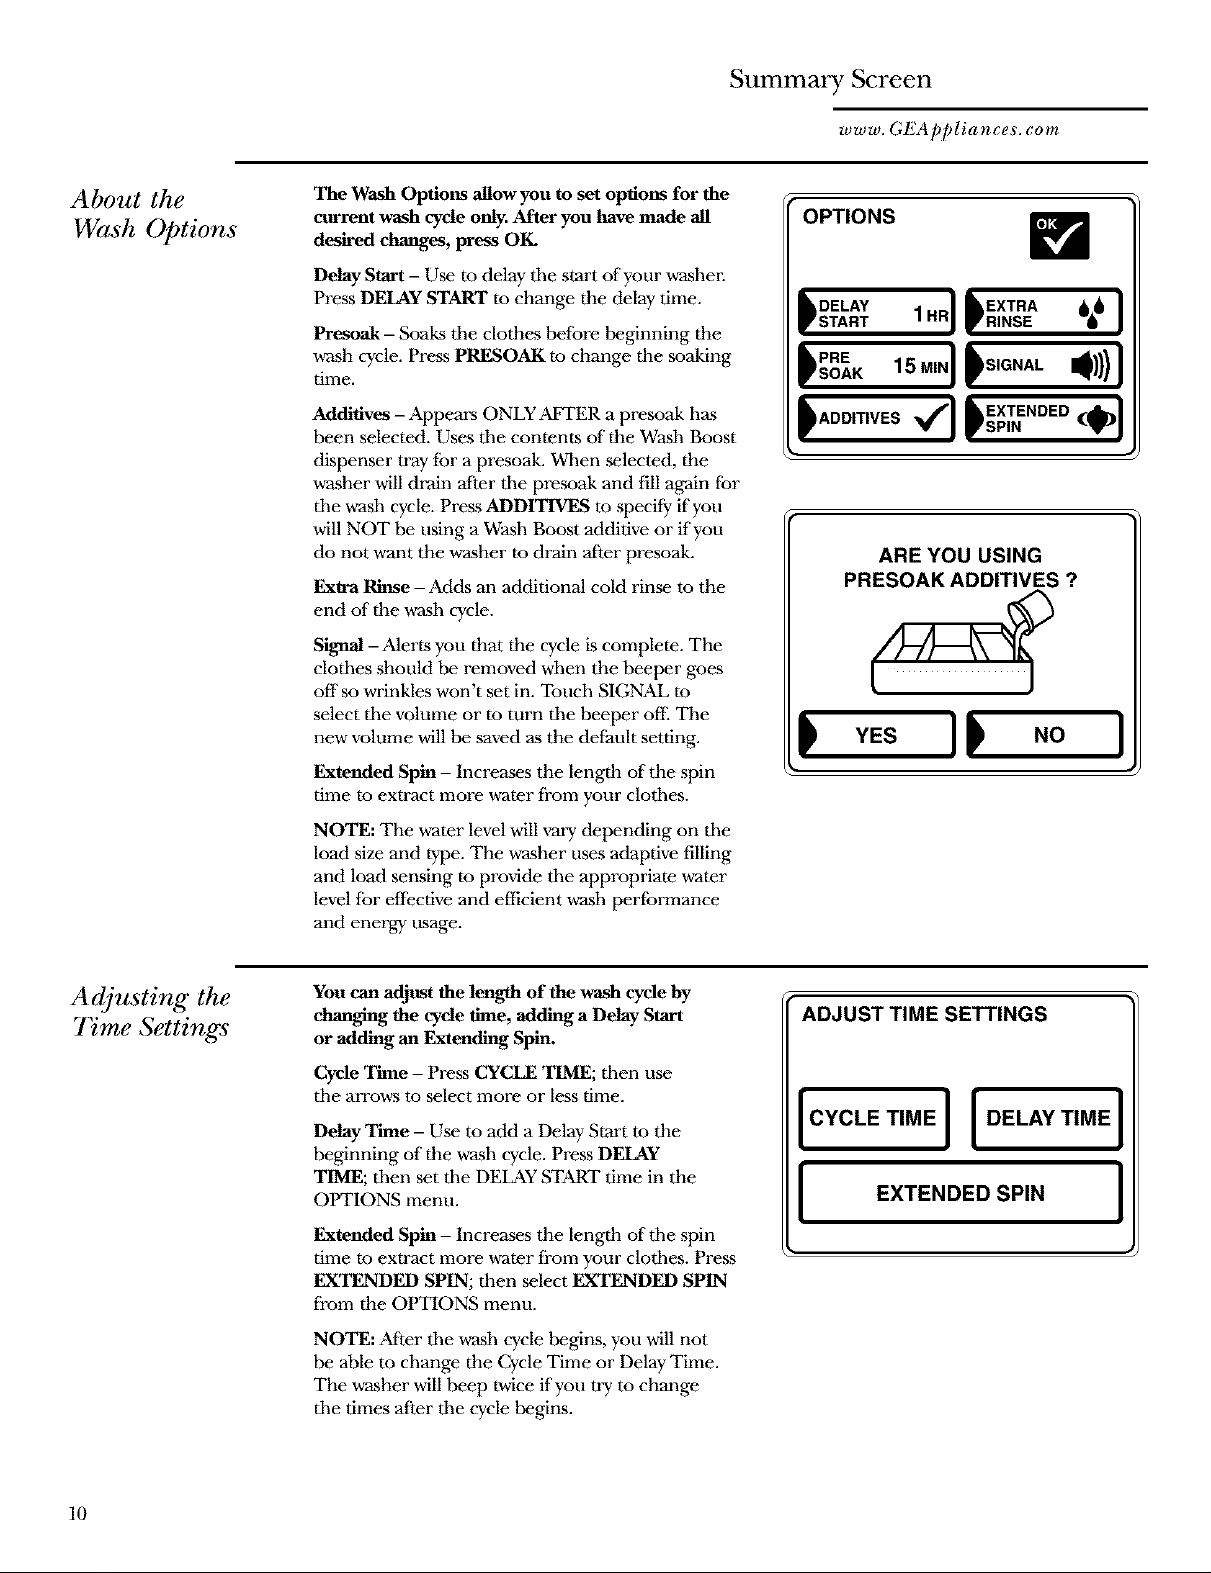
Wash Options
The Wash Options allow you to set options for the
current wash cycle only. After you have made all
desired changes, press OK.
Delay Start - Use m delay tile start of your vcasher.
Press DELAY START to change the delay time.
Presoak - Soaks tile clothes before beginning the
wash cycle. Press PRESOAK to change the soaking
rime.
Additives -Appears ONLY AFTER a presoak has
been selected. Uses tile contents of the Wash Boost
dispenser tray far a presoak. When selected, the
vcasher will drain after tile premak and fill again for
tile wash cycle. Press ADDITIVES m specify if you
will NOT be using a Wash Boost additive or if you
do not want the vmsher to drain after presoak.
Extra Rinse - Adds an additional cold rinse to the
end of the wash cycle.
Signal -Alerts you that the cycle is complete. The
clothes should be removed when the beeper goes
off so wrinkles won't set in. Touch SIGNAL to
select the volume or to torn the beeper off. The
new volume will be saved as the default setting.
Extended Spin - Increases the length of the spin
time to extract more water from your clothes.
OPTIONS
p:o":,"o'"lP'°""
ARE YOU USING
PRESOAK ADDITIVES ?
Adjusting the
7Vme Settings
NOTE: The water level will vary depending on the
load size and type. The washer uses adaptive filling
and load sensing to provide tlle appropriate water
level for effective and efficient w-ash pertormance
and energy usage.
You can adjust the length of the wash cycle by
changing the cycle time, adding a Delay Start
or adding an Extending Spin.
Cycle Time - Press CYCLE TIME; then use
the arro,a_ to select more or less time.
Delay Thne - Use to add a Delay Start m the
beginning of the wash cycle. Press DELAY
TIME; then set the DELAY START time in the
OI_FIONS menu.
Extended Spin - Increases the length of the spin
rime to extract more water from your clothes. Press
EXTENDED SPIN; then select EXTENDED SPIN
from the OPTIONS menu.
NOTE: After tlle wash cycle begins, you will not
be able to change the Cycle Time or Delay Time.
The vcasher will beep twice if you try to change
the times after the cycle begins.
ADJUST TIME SETTINGS
I CYCLETIME I DELAYTIME I
I EXTENDED SPIN I
10
Page 11

"My Cycles"
www. GEAppliances. corn
About the
"My Cycles"
Feature.
Creating
and Using a
"My Cycle"
The "My Cycles" feature allows you to create,
store and reuse up to 6 custom cycles. Create
your own cycles from scratch, or adjust the
settings of"a predefined wash cycle, then save
for one-touch recall.
You can create "My Cycles" two ways, by either
modifying a predefined wash cycle or creating
a cycle from your twin combination of settings
and options.
To build your own "My Cycle" from the
Home Screen:
1 Press the MY CYCLES button.
2 Select CREATE from tile Touch Screen
menu.
3
Choose whether you ,a_nt to modif}_a
predefined cycle or create a new cycle.
4
lfyou are modifying a predefined cycle,
select the vcash cycle you wish to modif}_.
5
Change any of the automatic settings and
select any options.
6
Press SAVEon the Touch Screen.
MY CYCLES
USE
CREATE
DELETE
To save a current cycle as a "My Cycle" from
the Summmy Screen:
1 After setting a wash cycle, or after a wash cycle
has just completed, press the MY CYCLES
button.
2 Select SAVE CURRENT SETTINGS from
the Touch Screen menu.
3 Using the keypad on the Touch Screen, type
the name of your "My Cycle" and press OK.
To begin using your new "My Cycle" right
away, select it from the Touch Screen menu
and press START.
[ MODIFY
I I RENAME
I
I
I
7 Using the keypad on the Touch Sereen, type
the name of your "My Cycle" and press OK
To begin using your new "My Cycle" right
away, select it from the Touch Screen menu
and press START.
To use a "My Cycle" from the Home Screen:
1 Press the MY CYCLES button.
2 Select USE from the Touch Screen menu.
3 Select the cycle name from the Touch Screen
nlenu.
4 Change any of the automatic settings and
select any options.
5 Press START.
11
Page 12

"My Cycles"
www. GEAppliances. corn
Modifying,
Renaming or
Deleting a
"My Cycle"
To modify the settings of a "My Cycle" from
the Home Screen:
1 Press the MY CYCLES button.
2 Select MODIFY from the Touch Screen
Fllenu.
3 Select the cycle name from the Touch Screen
Fllenu.
4 Change any of the automatic settings and
select any options.
5 Press SAVE on the Touch Screen.
To rename a "My Cycle" from the
Home Screen:
1 Press the MY CYCLES button.
2 Select RENAME from the Touch Screen
Fllenu.
3 Select the cycle name from the Touch Screen
l_lenu.
4 Using the keypad on the Touch Sereen, type
the name of your "My Cycle" and press OK.
To delete a "My Cycle" from the Home Screen:
1 Press the MY CYCLES button.
2 Select DELETE from the Touch Screen
lnenu.
3 Select the cycle name from the Touch Screen
lnenu.
4 Choose YES to delete the cycle or CANCEL
to return to the list of"My Cycles."
12
Page 13

Help
www. GEAppliances. corn
About the
Help Feature
Using the
7}'oubleshootm"
Pressing the HELP button from the Home Screen
allows you to locate troubleshooting tips for
common washer problems, to find help with using
the Home Screen or to set machine preferences.
Pressing the HELP button while on any other
screen allow_ you to find additional infbrmation
on features found on that screen. Press HELP;
then touch any pad on tile Touch Screen fbr an
explanation of that feature. To exit tile feature,
press HELP once to return to the previous screen
or twice to exit Help.
To locate Troubleshooting Tips for common
washer problems:
1 Press the HELP button.
2 On the Touch Screen, select TROUBLE
SHOOTER.
3 On the Touch Screen, select the problem
description from the list. You can use the arrows
at the right of the screen m scroll up and down
through the list of additional problems.
IIO'C"'"EII"o EsC"E °PREFERENCES HELP
TROUBLESHOOTER
TROUBLE SHOOTER
PRESS DESCRIPTION FOR POSSIBLE CAUSES
I
I
Finding Help
Using the
Home Screen
4 On the Touch Screen, select a po_ible cause
for the problem and follow the on-screen
instructions to find a solution.
Pressing the HELP button, then selecting HOME
SCREEN HELP allows you to find additional
information on features found on the Home
Screen. Touch any pad on the Touch Screen for
an explanation of that feature. To exit the feature,
press the BACK button.
13
Page 14

Help
www. GEAppliances. corn
Setting the
Machine
Preferences
The machine settings on the Help feature
allow you to control the volume of" the button
beep and end-of-cycle signal, and turn the
w_asher/dryer communication feature on or offl
Button Beep
The button beep controls the volume of tile
beep that is made when you press any of the
buttons or the Touch Screen.
To change the vohtme of the button beep:
1 From the Home Screen, press the HELP
button.
2 Select MACHINE PREFERENCES from
the Touch Screen.
3 Select BUTTON BEEF' from the Touch
Screen.
4 Use the arrows to make the volume louder
or softer, or to turn the beep off.
5 Select OKfrom the Touch Screen.
The new volume is now saved as the default
setting.
Washer/Dryer Communication
Washer/Dryer communication allows your
washer to send cycle information to your
dryer to create a dry cycle that matches your
wash load.
After the wash cycle is complete, communication
begins once either the ,a_asher or dryer Touch
Screen is activated.
MACHINE PREFERENCES
ENOOFC',CLEI , .A., UTT°N E FI
_ ASHER/DRYER]
COMMUNICATION
End.ofCycle Signal
The End-of4_ycle signal alerts you when the
cycle is complete.
To change the vohtme of the end-of-cycle signal:
1 From the Home Screen, press the HELP
button.
2 Select MACHINE PREFERENCES from the
Touch Screen.
3 Select END OF CYCLE SIGNAL from the
Touch Screen.
4 Use the arrows to make the volume louder
or softer, or to turn the signal off.
5 Select OKfrom the Touch Screen.
The new volume is now saved as the default
setting.
14
Once the infbrmation is sent, your dryer will
create the optimal dry cycle fbr your load.
To turn the Washer/Dryer Communication
feature on or off:
1 From the Home Screen, press the HELP
button.
2 Select MACHINE PREFERENCES from
the Touch Sereen.
3 Select WASHER/DRYER
COMMUNICATION from the Touch Screen.
4 Touch the pad at the bottom of the Touch
Screen to select ON or OFF.
5 Select OKfrom the Touch Screen.
Page 15

Washer Features
www. GEAppliances. corn
Using the
Liquid Bleach
Dispenser
The bleach dispenser automatically dilutes and
dispenses liquid chlorine bleach at the proper time
in the wash cycle.
1 Check clothing care labels for special
instrucdons.
2 Measure liquid bleach carefully, following
insn'ucdons on tile bottle.
• Never pour undi/uted 1iquh/ch/orine b/each
directly onto clothes or into the wash baskel.
• Do not pour powdered bleach into bleach
• Avoid overfilling or splashingwhen adding bleach
to the d@peaser. The maximum capaci{y of the
bleach dispenser is one cup of bleach per wash
cycle. Overfilling cotdd res_dt in early d_
of bleach.
3 Before stardng the washes; pour measured
amount of bleach directly into bleach dispensm:
lfyou prefer to use powdered bleach, add it into
the vcash basket directly before adding clothes.
Do not ndx chlorine bleach with a_ia or acids such
as vinegar and/or ru&_tremover. Mixing can produce
a toxic gas which may cause death.
/
Using the
Dispenser
Drawer
The dispenser drawer contains 3 compartments:
• Liquid Fabric Softener
• Liquid or Powder Low-Sudsing, High-Efficiency
Detergent
• Liquid Wash Boost Additives
The dispenser automatically dispenses additives
at the proper time in the wash cycle.
1 Slovdy open the dispenser drawer by pulling
the drawer out until it stops.
2 After adding laundry products, slowly close the
dispenser drawer. Closing the drawer mo quickly
could result in early dispensing of additives.
Avoid overfilling or splashing when adding
laundry products to the dispenser. Doing so
could result in early dispensing of laundry
products.
At the end of the cycle, you may see ,a-ater in
the compartments. This is part of the normal
operation of the washer.
NOTE: Do not use bleach in the dispenser drawer.
15
Page 16

Washer Features
www. GEAppliance,s. corn
Adding
Detergent
Adding Fabric
Sq!':tener
NOTE; Use only low-sucMng, high-efficiency
detergent such as Tide ®HE.
Add measured dete_ent to tile detergent
compartment of tile dispenser drawer.
• Do not exceed the maximumf_ line.
Detergent is flushed through the dispenser at the
beginning of the wash phase. Either powdered or
liquid detergent can be used.
When using liquid detergent, make sure tile
detergent box and insert are in place. For powdered
detergent, remove both the dete_ent box and
inserL Powdered detergent will not dispense with
the detergent box and insert in place.
Detergent usage may need to be adjusted for water
temperature, water hardness, size and soil level of
the load. Avoid using too much detergent in your
vcashm; as it can lead to oven-sudsing and detergent
residue being left on the clothes.
If desired, pour tile recommended anaount of liquid
Fabric softener into the left-hand compartment.
Use only liquid fabric softener.
Dilute with water to the maximum fill line.
Insert
Detergentbox
• Do not exceed the maximumf_ line.
Oa,erfilling can cause early dispensing of the Fabric
softenm, which could stain clothes.
NOTE: Do not pour tabric softener direcdy on the
vcash load. It may stain the clothes.
Adding
Wash Boost
Additives
16 additives, which could result in damaged clothes.
The Wash Boost dispenser may be used to clean
heavily soiled or stained garments more efficiently.
Selecting ADDITIVES when setting a presoak sets
a special '¢Wash Boost" that soaks, drains and spins,
then refills the washer tot the main w-ash cycle.
IfADDmVES is not selected, the washer will not
drain and refill after the presoak.
Place the additives for the Wash Boost setting in the
right-hand compartment. Select an Extra Rinse to
make sure all remaining detergent is removed from
the wash load.
You may add low-sudsing, high-efficiency liquid
detergent to this compartment when selecting a
Stain Inspector cycle or when choosing a Presoak
requiring special additives.
• Do not exceedthe maximum fill line to avoid
o_.
Oa,erfilling can cause early dispensing of presoak
_ADDmVES ,_]
Page 17

Loading and Using the Washer
Always follow fabric manufact'tn'er's care label when laundering.
www. GEApplianced. com
Sorting Wash
Loads
Loading the
Washer
Fabric Cm_
Labels
Sort by color (whites, lights, colors), soil level,
tZabric type (sturdy cottons, easy care, delicates)
and whether the fabric produces lint (teny
cloth, chenille) or collects lint (velveteen,
corduroy).
Load dry items loosely, no higher than tile mp
row of holes in tile washer basket. Overloading
may reduce ,a-asher efficiency and possibly
increase wrinkling.
Bulky items should be placed as {ar down in
tile wash basket as possible {or optimal results.
Always place buoyant items at tile bottom of
tile wash basket.
Below are fabric care label "syml_ols" that affect
the clothing you will be laundering.
Wash Labels
Machine__
wash
cycle .o,ma_Permane°tP,es_
wrinkle resistant
=
Gentle/ Do not wash Do not wring
delicate Hand wash
The vcasher will automatically detect tile load
size. Because of tile high-etFmiency wash system,
the water level may not completely cover the
load. To add items after vcasher has started, lift
the lid, add items and close the lid.
• Do not wash fabrics containingflammable
materials (waxes, cleaningfluids, etc.)
• Thewasherwillnotfi!loropo'atewiththe
tidop_,_
Water 000 O0 •
temperature Hot Wo,m c01d/_001
(50°C/_gO°F) (_°C/IOS°F) (30°C/85°F(
Dry Labels
drTLyble _ _-_ _--_ F-_ _ _
Dry Normal Permanent Press/ Gentle/ Do nottumNe dry (used with
wrinkle resistant delicate do not wash(
Heat _ @ @ O
setting
Nigh Medim_l Low No heat/aN
Special _ F_ _ _7_
instructions
Bleach Labels
Line dry/ Dripdry Dry flat inthe shade
hang to dry
leach_ , A A
SymuOla Any Neach Only non-chlorine Neach Do not bleach
(when needed) (when needed l
DOnot dry
17
Page 18

Loading and Using the Washer
www. GEAppliances. com
Proper Use of
Detergent
and
Cleaning of
the Washer
Using too much detergent is a common cause
of laundry problems. Today's detergents are
formulated to be effective without highly visible
sudsing. Be sure to carefully read and follow
manufacturer's recommendations for how
much detergent to use in your vmsh.
Wash Basket: Leave tile lid open after washing to
allow moisture to e'_aporate, lfyou want to clean
the basket, use a clean soft cloth dampened with
liquid detergent; then rinse. (Do not use harsh
or gritty cleanm.-s.)
Fill Hoses: Hoses connecting washer to faucet
should be replaced every 5 years.
Exterior: Immediately wipe off any spills. Wipe
with damp cloth. Do not touch the surface or
the Touch Screen with sharp objects.
Moving and Storage: Ask tile service
technician to remove water from drain
pump and hoses. For more inIbrmation, xdsit
www. GEAppliances.eom or call 800.GE.CARES
(800.432.2737). Do not store the w-asher where
it will be exposed to tile weather.
You can use less detergent if you have soft water,
a smaller load or a lightly soiled load.
NOTE: Use only low-sudsing, high-efficiency
detergent such as Tide ®HE.
2 Remove tile inserts from the 3 compartments;
rinse tile inserts and tile drawer with warm
water to remove traces of accumulated
laundry products.
Long Vacations: Be sure water supply is shut off
at faucets. Drain all water from hoses if weather
will be helow freezing.
Dispenser Drawers: Detergent and fabric
softener may build tip in the dispenser drawer.
Residue should be removed once or twice a
month.
1 Remove tile drawer by pulling it straight out
until it stops. Lift tip on the front of tile
drawer and pull it out.
/ j
3 To clean tile drawer opening, use a small,
non-metal brush to clean tile recess. Remove
all residue from the upper and lower parts
of tile recess.
4 Return the inserts to tile proper
compartments and replace the drawer.
18
Page 19

Installation
Washer
Instructions
I Questions? Call 800.GE.CARES (800.432.2737) or visit our Web site at: www.GEAppliances.com I
BEFORE YOU BEGIN
Read these instructions completely and
carefully.
• IMPORTANT- Savethese
instructions for local electrical inspector's
use.
• IMPORTANT- Observeall
governing codes and ordinances.
• Note to Installer - Be sure to leave these
instructions with the Consumer.
• Note to Consumer - Keep these instructions
for future reference.
• Skill level- Installation of this appliance
requires basic mechanical skills.
• Proper installation is the responsibility of
the installer.
• Product failure due to improper installation
is not covered under the Warranty.
FOR YOUR SAFETY:
ELECTRICAL REQUIREMENTS
CAUTION - Forpersonal safety,
do not use an extension cord or adapter plug
with this appliance. Do not, under any
circumstances, cut or remove the third
grounding prong from the power cord. Follow
national electrical codes and ordinances. This
appliance must be supplied with the voltage
and frequency indicated on the rating plate
(located on the rear cover of the backsplash),
and connected to an individual, properly
grounded branch circuit, protected by a
15- or 20-amp circuit breaker or time-delay
fuse. If the electric supply provided does not
meet the above requirements, call a licensed
electrician.
WPGT9350
GROUNDING INSTRUCTIONS
PLUMBING REQUIREMENTS
WATER PRESSURE - Must be 10 psi minimum
to 120 psi maximum.
WATER TEMPERATURE - Household water
heater should be set to deliver water at 120 °
to 150°F (50 ° to 66°C) TO THE WASHER.
SHUTOFF VALVES - Both hot and cold shutoff
valves (faucets) should be supplied.
DRAIN - Water may be drained into
standpipe or set tub. Discharge height MUST
NOT BE LESS THAN 30 INCHES and no more
than 8 feet above the base of the washer.
Standpipe must be 11/2inches minimum
inside diameter and must be open to
atmosphere.
This appliance must be grounded. In
the event of malfunction or breakdown,
grounding will reduce the risk of electric
shock by providing a path of least resistance
for electric current. This appliance is equipped
with a cord having an equipment-grounding
conductor and a grounding plug. The plug
must be plugged into an appropriate outlet
that is properly installed and grounded in
accordance with all local codes and
ordinances.
WARNING -Improper connection
of the equipment-grounding conductor can
result in a risk of electric shock. Check with
a qualified electrician or serviceman if you
are in doubt as to whether the appliance is
properly grounded. Do not modify the plug
provided with the appliance--if it will not fit
the outlet, have a proper outlet installed by
a qualified electrician.
19
Page 20

Installation Instructions
WASHER LOCATION
The washer must be installed on firm flooring
to minimize vibration during the spin cycle.
Concrete flooring is best, but a wood floor
is sufficient, provided floor support meets
FHA standards. The washer should not be
installed on rugs or exposed to weather.
Minimum clearance between washer and
adjacent walls or other surfaces:
• 0" either side
• 2" front
• 3" rear
Minimum vertical space from floor to
overhead shelves, cabinets, ceilings, etc.,
is 52".
WASHER DIMENSIONS
Front View
431/8"
(109.4 cm)
REQUIREMENTS FOR ALCOVE OR
CLOSET INSTALLATION
Your washer is approved for installation in
an alcove or closet, as stated on a label on
the back of the machine.
Minimum clearance between washer and
adjacent walls or other surfaces:
• 0" either side
• 2" front
• 3" rear
Minimum vertical space from floor to
overhead shelves, cabinets, ceilings, etc.,
is 52".
Closet doors must be Iouvered or otherwise
ventilated and have at least 60 square inches
of open area for washer only, or if the closet
contains both a washer and a dryer, door
must contain at least 120 square inches of
open area equally distributed. Air openings
are required to be unobstructed when a door
is installed. A Iouvered door with equivalent
air openings for the full length of the door is
acceptable.
NOTE: The clearances stated on this label are
minimums. Consideration must be given to
providing adequate clearances for installing
and servicing.
Side View
27"
(68.6 cm) _
y23/4"
(133.7 cm)
(with lid
open)
1
281/4"
(71.6 cm)
2O
Page 21

Installation Instructions
PARTS INCLUDED
[3 Water Hoses (2)
[3CableTie
TOOLS YOU WILL NEED
[3 Adjustable Pliers
[3 Carpenter's Level
[] UNPACK THE WASHER (CONT.)
Remove the Styrofoam block containing the
Owner's Manual, parts, water hoses and
laundry product samples.
Remove the power cord from the back of the
washer.
[] UNPACK THE WASHER
After the washer is in the home, remove the
carton and Styrofoam shipping base from
the washer.
SWITCH WASHER AND DRYER
BACKSPLASHES (OPTIONAL)
If necessary, switch the backsplashes for the
washer and dryer (see "Switching the Washer
and Dryer Backsplashes').
21
Page 22

Installation Instructions
[] ATTACH WATER HOSES TO WASHER
Thread the hot water hose onto the washer
hot water connection (ORANGE) and the cold
water hose onto the cold water connection
(BLUE). Hand tighten; then make an
additional 1/8 turn with pliers.
[] MOVE WASHER CLOSE TO
HOUSE UTILITIES
Move the washer as close to the final location
as possible, leaving enough room to make
water, drain and electrical connections to the
home.
The minimum required rear clearance is 3".
F
[] CONNECT WATER HOSES TO
HOUSE UTILITIES
Connect the water hoses to the HOT and
COLD water valves of your home. Hand
tighten, plus make an additional 1/4 turn
with pliers.
[] ATTACH DRAIN HOSE TO
HOUSE DRAIN
Firmly insert the free end of the drain hose
into the drain opening of your home. Make
sure the soft rubber end is completely inside
the drain opening.
• If the water valves and drain are built into
the wall, fasten the drain hose to one of the
water hoses with the cable tie (ribbed side
on inside).
• If your drain is a standpipe, fasten the drain
hose to the standpipe with the cable tie
provided.
3"
22
/
Cable Tie
/
Page 23

Installation Instructions
[] SET REAR LEGS
Remove the level and tilt the washer forward
(pivot on front legs) about 4 to 6 inches and
gently lower the rear legs back onto the floor.
This action will set rear leg adjustments to
correspond to front settings.
[] LEVEL THE WASHER
[] ATTACH SERIAL CABLE FOR
WASHER/DRYER
COMMUNICATION
(if desired)
Attach the serial cable shipped with the dryer
for washer/dryer communication to the serial
port on the back of the washer.
Serial Port
Rear of Washer
Move the washer into final position.
• To check if the washer is level side to side,
open the lid and place a level at the back of
the opening above the dispenser drawer.
• To check if the washer is level front to back,
place a level at the side of the washer on
the edge where the cabinet side meets the
top cover.
If the washer is not level, adjust the front
leveling legs. Turn clockwise to raise,
counterclockwise to lower.
23
Page 24

Installation Instructions
[] PLUG WASHER IN
[] WASHER STARTUP
Press the POWER button.
pOWER
NOTE: If the washer has been exposed to
temperatures below freezing for an extended
period of time, allow it to warm up before
pressing POWER. Otherwise, the display will
not come on.
The washer is now ready for use.
SERVICING
A WARNING - Label all wires prior
to disconnection when servicing controls.
Wiring errors can cause improper and
dangerous operation after
servicing/installation.
For replacement parts and other information,
refer to the Owner's Manual for servicing
phone numbers.
24
Page 25

Installation Instructions
SWITCHING THE WASHER AND DRYER
BACKSPLASHES (not required for most installations)
When viewed from the front, the washer is
shipped for installation on the left and the
dryer is shipped for installation on the right.
If your hose utility connections are arranged
so that the units must be installed with the
washer on the right and the dryer on the
left, you can switch the backsplashes of the
washer and dryer in order to maintain the
proper curved appearance.
TOOLS YOU WILL NEED
[] REMOVE WASHER BACKSPLASH
Place a towel over the lid of the washer to
prevent scratches to the surface.
Remove the two outer screws from the rear
of the washer backsplash. Rotate backsplash
forward and lift off.
Screw
Rear of Washer
[] REMOVE BACKSPLASH REAR
COVER
[3 #2 Phillips screwdriver Q Towel (2)
WARNING!
Make sure the washer and dryer are
unplugged.
Remove the two screws holding the washer
backsplash to the rear cover.
Pull off the rear cover.
Screws
Rear Cover
25
Page 26

Installation Instructions
[] DISCONNECT WASHER
CONTROL BOARD
Disconnect the ribbon at the right of the
control board by pulling the connector at the
end of the ribbon off the metal pins on the
control board.
NOTE: Do not disconnect any other wires
from the control board.
Rear of Washer
[] REMOVE DRYER BACKSPLASH
Place a towel over the top surface of the dryer
to prevent scratches to the surface.
Remove the four screws from the rear of the
dryer backsplash. Rotate backsplash forward
and lift off.
I, _ Screws
I
Rear of Dryer
[] REMOVE CONTROL BOARD
FROM WASHER BACKSPLASH
Remove the four screws holding the control
board to the backsplash. Remove the control
board and set it aside.
[] DISCONNECT DRYER CONTROL
BOARD
Disconnect the ribbon at the right of the
control board by pulling the connector at the
end of the ribbon off the metal pins on the
control board,
NOTE: Do not disconnect any other wires
from the control board.
Rear of Dryer
26
Page 27

Installation Instructions
[] REMOVE CONTROL BOARD
FROM DRYER BACKSPLASH
Remove the four screws holding the control
board to the backsplash. Remove the control
board and set it aside.
Screws
Screws
[] SWITCH BACKSPLASHES
Place the backsplash from the dryer on top of
the washer and place the backsplash from the
washer on top of the dryer.
[] RECONNECT DRYER CONTROL
BOARD
Connect the dryer control board to the new
backsplash by sliding the ribbon connector on
the new backsplash onto the metal pins on
the control board and pushing in. Make sure
the ribbon is not twisted before inserting the
connector.
Place the ribbon and the wire from the rear
cover under the strain relief on the new
backsplash.
[] ATTACH DRYER CONTROL
BOARD TO NEW BACKSPLASH
Attach the control board to the new
backsplash by replacing the four screws
removed from the control board earlier.
The control board will now be on the opposite
side of the dryer backsplash.
[] ATTACH DRYER BACKSPLASH
Insert the tabs on the bottom front of the
backsplash into the slots on the dryer and
rotate the backsplash into place. Secure the
new backsplash to the dryer using the four
screws removed earlier.
27
Page 28

Installation Instructions
[_] ATTACH WASHER CONTROL
BOARD TO NEW BACKSPLASH
Replace the four screws removed from the
control board earlier.
The control board will now be on the
opposite side of the washer backsplash.
[] RECONNECT WASHER
CONTROL BOARD
[_]ATTACH WASHER BACKSPLASH
Using the two small screws removed earlier,
screw the new washer backsplash onto the
rear cover.
Screws
I
Place the gray wire from the serial port under
the strain relief on the new backsplash.
Connect the washer control board to the
new backsplash by sliding the ribbon
connector on the new backsplash onto the
metal pins on the control board and pushing
in. Make sure the ribbon is not twisted
before inserting the connector.
Insert the tabs on the bottom front of the
backsplash into the slots on the washer and
rotate the backsplash into place. Press the
rear of the backsplash down to make sure it
fits properly.
Secure the new backsplash to the washer
using the two long screws removed earlier.
[] RECONNECT POWER SUPPLY
TO WASHER AND DRYER
* Plug the washer and dryer back in.
• Press the POWER buttons on both the
washer and dryer to make sure both
control boards are properly connected.
28
Page 29

Problem Solver
www. GEAppliances. corn
For a complete list of solutions to common washer problems, use the
Troubleshooting Tips feature located by pressing the HELP button
while on the washer Home Screen (see Using the Troubleshooter).
If your washer will not operate, check the Problem Solver below:
Problem Possible Cause What To Do
Washer won't operate Control panel is asleep • This is normal. Press POWER, tile Touch Screen
or any button to activate tile control panel.
Washer is unplugged • Make sure cord is plugged securely into a working outlet.
Water supply is turned off • Tm'n both hot and cold fhucets fi.dly on.
Controls are not set properly • Make sure tile cycle w-as set correctly, close tile lid and
press START.
Lid is open---safety fizature. • Close lid and reset cycle, to tile beginning if necessary.
Prevents the washer from filling
and operating when lid is up.
Circuit breaker/fuse is • Check house circuit breake_.'s/fuses. Replace fuses or
tripped/blown reset breaker. Washer should have separate outlet.
Electronics need to be reset • Unplug w-ashel; w_t 2 minutes, plug back in and press
POWER.
START was not pressed after a • Press START.
cycle w-as set
Extremely low water pressure • Press START again.
Washer is rot cold • If the washer has been exposed to temperatures below
freezing fbr an extended period of time, allow it to warm
up before pressing POWER. Otherwise, the display will
not come on.
29
Page 30

Problem Solver
www. GEAppliances. corn
The following are normal sounds you may hear:
Sound Description
Repeated starti_ and • The HydroWash _' action spins the wash txasket in one direction, then pauses and spins in
stopping tile opposite direction to clean your items.
Sound of wato. being added • Thevcasheradaptstotheloadsizeandvypetoaddmorewatertothecycleasneeded.
after the washer has already
been 0perating • The w_sh load may be unbalanced. If the washer senses that tile load is unbalanced, it will
Clicking sound during the • The vcasher will make a series of clicking noises as it changes the cleaning mode.
Hi_pilched noise during the • The vcash basket spins thster to remove moisture from the load.
spineycte
Water flushing sound • The vcasher is diluting laundry additives to add ro the wash load. Wash Boost additives
stop and refill to redistribute the load.
• The vcasher may be diluting laundry additives to add to the vcash load.
are dispensed during presoak. Detergent is dispensed at the beginning of the wash cycle.
Bleach is dispensed during the main wash. Fabric softener is dispensed during the
final rinse.
Humming noise dur_ • The pump is operating to remove water from the basket.
&aining
Pinging noise &_#tg the spin • The w_sher has special rinse features to remove detergent residue fi'om the load after the
or _ cycle main vcash cycle.
Water sloshing sound when • A liquid in the balance ring around the wash basket helps the basket spin smoothly.
washer is turned off and tub
is rotated
30
Page 31

Washer Warranty
www. GEAppliances. corn
All warranty service pvvided by our Factory Service Cente_ or
an authorized Customer Care _ technician. 7b schedule service,
on-line, 24 hou_ a day, visit us at www.GEAf@liances.com or
call 800. GE. CARES (800. 432.2737).
For The Period Of: We Will Replace:
One Year Any part of the washer which fails due to a defect in materials or workmanship. During tiffs
From the date tithe fu//one-year warran/y, GE will also provide,fi-ee of charge, all labor and related service costs to
orti_dnalpurchase replace the defective part.
Second Year Any part of the washer which flails due to a defect in materials or workmanship. During tbis
From the date of the add'_ional one-year limited zoarrat_, you will be responsible for any labor or related service costs.
orti_dnalpurchase
Third through Fifth Year Thesuspensi_nr_dandspringassemb_andmainele_r_nice_ntr_b_ardifany_ftbesepartssh_u_d
From the &tte o]the fhil due to a defect in materials or workmanship. GE will also replace the washer lid or cover if tbey
oniq,'inalpurchase should rust under operating conditions. During tiffs add'u6onal three.year lindl_ warranty, you will be
responsible for any labor or related service costs.
Third through Tenth The direct oh'ire motor and outer washer tub if any of these parts should fail due to a defect in materials
Year bkom the date oJ the _r w_rkmanship. During tbis additi_na1eight_year limited warran_y_ y_u wi_ be resp_nsib_e fbr any
cn_i_dnalpurchase labor or related service costs.
Lifetime of Product The washer basket if it should fail due to a defect in materials or workmanship. During tiffs product
From the date tithe life,me limited warrant, you will be responsible for any labor or related service costs.
oni_dnal purchase
Staple your receipt here.
ProoJ oJ the m{ginal purchase
date is needed to obtain service
under the warranty.
What Is Not Covered:
• Service trips to your home to teach you how to use the • Replacement of house fuses or resetting of circuit
product, breakers.
• Improper installation, delivery or maintenance.
• Failure of the product if it is abused, misused, or
used for other than the intended purpose or used
commercially.
• Damage to the product caused by accident, fire, floods
or acts of God.
• Incidental or consequential damage caused by possible
defects with this appliance.
• Damage caused after delivery.
This warranty is extended to the original pu_rhaser and any succeeding" owner for p_oducts purchased for home use within the
USA. In Alaska, the warranty excludes the cost of shipping" or service calls to your home. Proof of the original purchase date is
needed to obtain service under the warranty.
Some states do not aUow the exclusion or limitation of incidental or consequential damages. This warranty gTves you spec!fic
legal rights, and you may also have other rights which vary from state to state. To know what your legal rights are, consult
your local or state consumer affairs office or your state _ Attorney General
Warrantor: General Electric Company. Louisville, KY 40225
31
Page 32

Consumer Support
GE Appliances Web site www.GEApplianoes.com
Have a question or need assistance with your appliance? Try the GE Appliances Web site 24 hours a day,
any day of the year! For greater convenience and Paster service, you can now download Owner's Manuals,
order parts, catalogs, or even schedule service on-line. You can also "Ask Our Team of Experts'"" your
questions, and so much more...
Schedule Service
Expert GE repair serxdce is only one step away from your door. Get on-line and schedule your service at
your convenience 24 hours any day of the year! Or call 800.GE.C_MLES (800.432.2737) during normal
business hours.
Real Life Design Studio
GE supports the Univet.'sal Design concept--products, smMces, and environments that can be used by
people of all ages, sizes, and capabilities. We recognize the need m design for a wide range of physical and
mental abilities and impairments. For details of GE's Universal Design applications, including kitchen
design ideas for people with disabilities, check out our Web site today. For the hearing impaired, please
call 800.TDD.GEAC (800.833.4322).
Extended Warranties
Purchase a GE extended warranty and learn about special discounts that are available while your warranty
is still in effect. You can purchase it on-line anytime or call 800.626.2224 during normal business hours.
GE Consumer Home Services will still be there after your warranty expires.
Parts and Accessories
www. GEApplianoes.com
www. GEApplianoes.com
www. GEApplianoes.com
www. GEApplianoes.com
Individuals qualified to smwice their own appliances can have parts or accessories sent directly to their
homes (VISA, MasterCard, and Discover cards are accepted). Order on-line today, 24 hours every day, or
by phone at 800.626.2002 during normal business hom.-s.
Instructionscontainedin thismanualcoverproceduresto beperformedbyanyuser.Otherservicinggenerally
shouldbereferredtoqualifiedservicepersonnelCautionmustbeexercised,sinceimproperservicingmaycause
unsafeoperation,
www. GEAppliances.com
If you are not satisfied with the service you receive from GE, contact us on our Web site with all the details,
including your phone number, or write to: General Managm; Customer Relations
GE Appliances, Appliance Park
Louisville, KY40225
Register YourAppliance
Register your new appliance on-line--at your convenience! Timely product regisn'ation will allow for
enhanced communication and prompt serxdce under the terms of your warranty, should the need arise.
You may also mail in the preprinted regisU'ation card included in the packing material.
www. GEAppliances.com
Printed in Korea
 Loading...