

Page 1
GEAppliances.com
175D1807P631 49-90366 05-09 JR
Washers
Safety Instructions . . . . . . . . . . . . . 2, 3
Operating Instructions
Available Accessories . . . . . . . . . . . . . . . . .14
Control Panel . . . . . . . . . . . . . . . . . . . . . . . . . 4
Control Settings . . . . . . . . . . . . . . . . . . . . 5–9
Demand Response . . . . . . . . . . . . . . . . . . .15
Features . . . . . . . . . . . . . . . . . . . . . . . . . . . . .10
Loading and Using the Washer . . . .11–14
Installation Instructions . . . . .16–21
Drain Requirements . . . . . . . . . . . . . . . . . .19
Electrical Requirements . . . . . . . . . . . . . . .19
Grounding Requirements . . . . . . . . . . . . .19
Installing the Washer . . . . . . . . . . . . .20, 21
Location of Your Washer . . . . . . . . . . . . .17
Preparing to Install Your Washer . . . . . .16
Replacement Parts . . . . . . . . . . . . . . . . . . .21
Rough-In Dimensions . . . . . . . . . . . . . . . . .17
Unpacking Your Washer . . . . . . . . . . . . . .18
Water Supply Requirements . . . . . . . . . .19
Troubleshooting Tips . . . . . . . . .22–24
Consumer Support
Consumer Support . . . . . . . . . . Back Cover
Warranty (Canada) . . . . . . . . . . . . . . . . . . 26
Warranty (U.S.) . . . . . . . . . . . . . . . . . . . . . . 25
Owner’s Manual &
Installation Instructions
Write the model and serial
numbers here:
Model # __________________
Serial # __________________
You can find them on a label on the
side of the washer.
As an ENERGY STAR®partner,
GE has determined that this
product meets the E
NERGY STAR
®
guidelines for energy efficiency.
Laveuses
Profile
Lavadoras
Profile
Manuel d’utilisation
et d’installation
Manual del propietario
e instalación
La section française commence à la page 27
La sección en español empieza en la página 55
WPDH8850
WPDH8910
WPDH8900
Profile
Page 2
■ Install or store where it will not be exposed
to temperatures below freezing or exposed
to the weather, which could cause permanent
damage and invalidate the warranty.
■ Properly ground washer to conform with all governing
codes and ordinances. Follow details in Installation
Instructions.
IMPORTANT SAFETY INFORMATION.
READ ALL INSTRUCTIONS BEFORE USING.
WARNING!
For your safety, the information in this manual must be followed to minimize the risk
of fire or explosion, electric shock, or to prevent property damage, personal injury or
loss of life.
The instructions in this manual and all other literature included with this washer are
not meant to cover every possible condition and situation that may occur. Good, safe
practices and caution MUST be applied when installing, operating and maintaining
any appliance.
WATER HEATER SAFETY
Under certain conditions, hydrogen gas may be produced in a water heater that has not been used for two weeks
or more. Hydrogen gas can be explosive under these circumstances.
If the hot water has not been used for two weeks or more, prevent the possibility of damage or injury by
turning on
all hot water faucets and allowing them to run for several minutes. Do this before using any electrical
appliance
which is connected to the hot water system. This simple procedure will allow any built-up hydrogen
gas to escape. Since the gas is flammable, do not smoke or use an open flame or appliance during this process.
PROPER INSTALLATION
This washer must be properly installed and located in accordance with the Installation Instructions before it is used.
■ Keep the area underneath and around your
appliances free of combustible materials such as
lint, paper, rags and chemicals.
■ Do not leave the washer door open. An open door
could entice children to hang on the door or crawl
inside the washer.
■ Close supervision is necessary if this appliance is
used by or near children. Do not allow children to
play on, with or inside this or any other appliance.
YOUR LAUNDRY AREA
2
Consumer Support Troubleshooting Tips
Operating Instructions
Safety Instructions
Installation
Instructions
Page 3
3
Consumer SupportTroubleshooting Tips
Operating Instructions
Safety Instructions
Installation
Instructions
■ Never reach into washer while it is moving.
Wait until the machine has completely stopped
before opening the door.
■ Do not mix chlorine bleach with ammonia
or acids such as vinegar and/or rust remover.
Mixing different chemicals can produce a toxic
gas which may cause death.
■ Do not wash or dry articles that have been
cleaned in, washed in, soaked in or spotted
with combustible or explosive substances (such as
wax, oil, paint, gasoline, degreasers, dry-cleaning
solvents, kerosene, etc.) which may ignite or
explode. Do not add these substances to the
wash water. Do not use or place these substances
around your washer or dryer during operation.
■ The laundry process can reduce the flame
retardancy of fabrics. To avoid such a result,
carefully follow the garment manufacturer’s
wash and care instructions.
■ To minimize the possibility of electric shock,
unplug this appliance from the power supply
or disconnect the washer at the building’s
distribution panel by removing the fuse or
switching off the circuit breaker before attempting
any maintenance or cleaning. NOTE: Pressing the
power button does NOT disconnect the appliance
from the power supply.
■ Never attempt to operate this appliance
if it is damaged, malfunctioning, partially
disassembled, or has missing or broken parts,
including a damaged cord or plug.
■ Do not slam the washer door closed. Do not try
to force the door open when locked (LOCKED
indicator ON). This could result in damage to
the washer.
■ The washer is equipped with an electrical
overload protector. The motor will stop
if it becomes overheated. The washer will
automatically restart after a cool-down
period of up to 2 hours, if the washer
has not been manually turned off
during this time.
WHEN USING THE WASHER
■ Turn off water faucets to relieve pressure
on hoses and valves and to minimize leakage
if a break or rupture should occur. Check
the condition of the fill hoses; they should
be replaced every 5 years.
■ Before discarding a washer, or removing it
from service, remove the washer door to prevent
children from hiding inside.
■ Do not attempt to repair or replace any part of
this appliance unless specifically recommended
in this Owner’s Manual, or in published user-repair
instructions that you understand and have the
skills to carry out.
■ Do not tamper with controls.
WHEN NOT IN USE
READ AND FOLLOW THIS SAFETY INFORMATION CAREFULLY.
SAVE THESE INSTRUCTIONS
Use this
appliance
only for its
intended
purpose as
described in
this Owner’s
Manual.
GEAppliances.com
Page 4
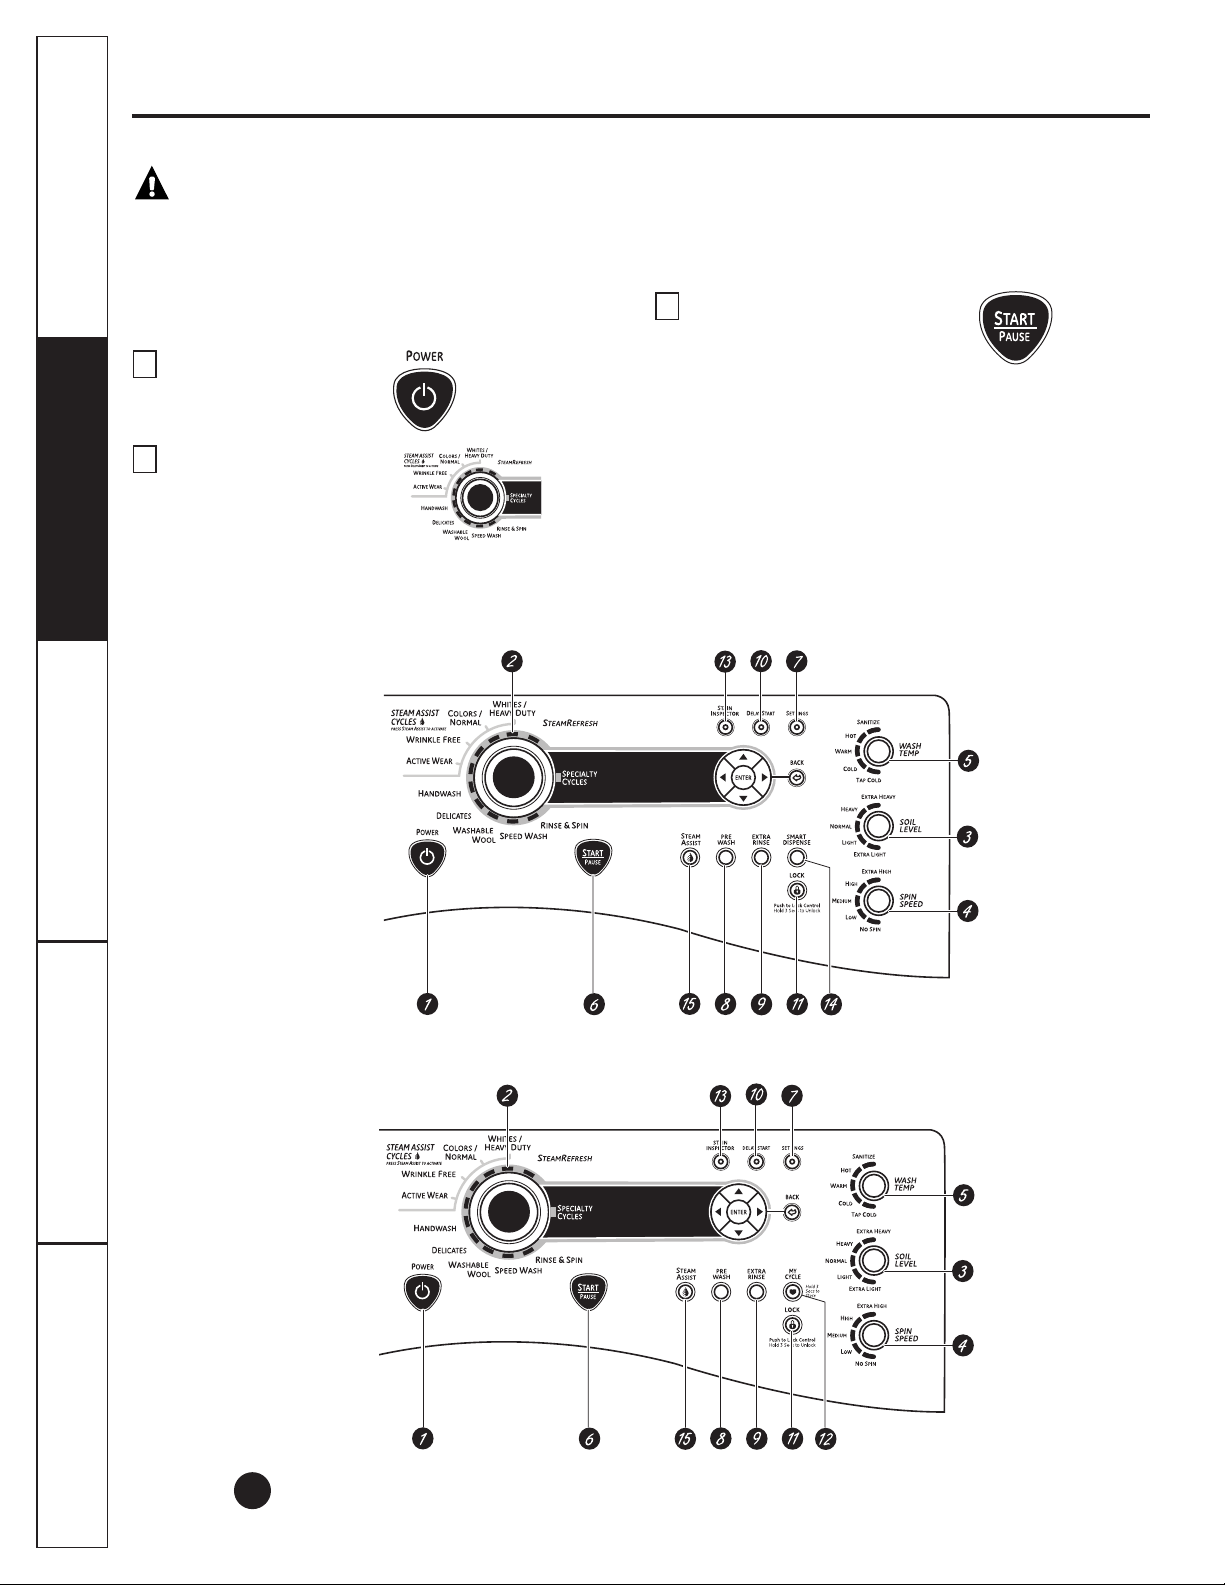
About the washer control panel.
4
You can locate your model number on a label on the side of the washer.
Consumer Support Troubleshooting Tips
Operating Instructions
Safety Instructions
Installation
Instructions
Power
Press to “wake up” the display. If the display is active, press to put the washer into standby mode.
NOTE: Pressing POWER does not disconnect the appliance from the power supply.
1
WARNING! To reduce the risk of fire, electric shock, or injury to persons, read the IMPORTANT
SAFETY INSTRUCTIONS before operating this appliance.
WPDH8900J, WPDH8910K – Profile HA Steam Washer w/ SmartDispense
™
WPDH8850J – Profile HA Steam Washer
Quick Start
If the screen is dark, press the POWER button to “wake up”
the display.
Press the
POWER
button.
Select a wash cycle
or Steam Refresh cycle.
(Defaults are set for each
cycle. These default settings
can be changed. See Control
settings for more information.)
If you selected a cycle other
than the SPECIALTY CYCLE,
press the START/PAUSE button.
If you selected SPECIALTY CYCLE, choose between Drain
& Spin, Garments, Bed and Bath, Other Specialty and
Basket Clean for your specific needs before pressing
START/PAUSE. See Specialty Cycles for more information.
3
2
1
Page 5
5
Consumer SupportTroubleshooting TipsOperating Instructions
Safety Instructions
Installation
Instructions
Control settings. GEAppliances.com
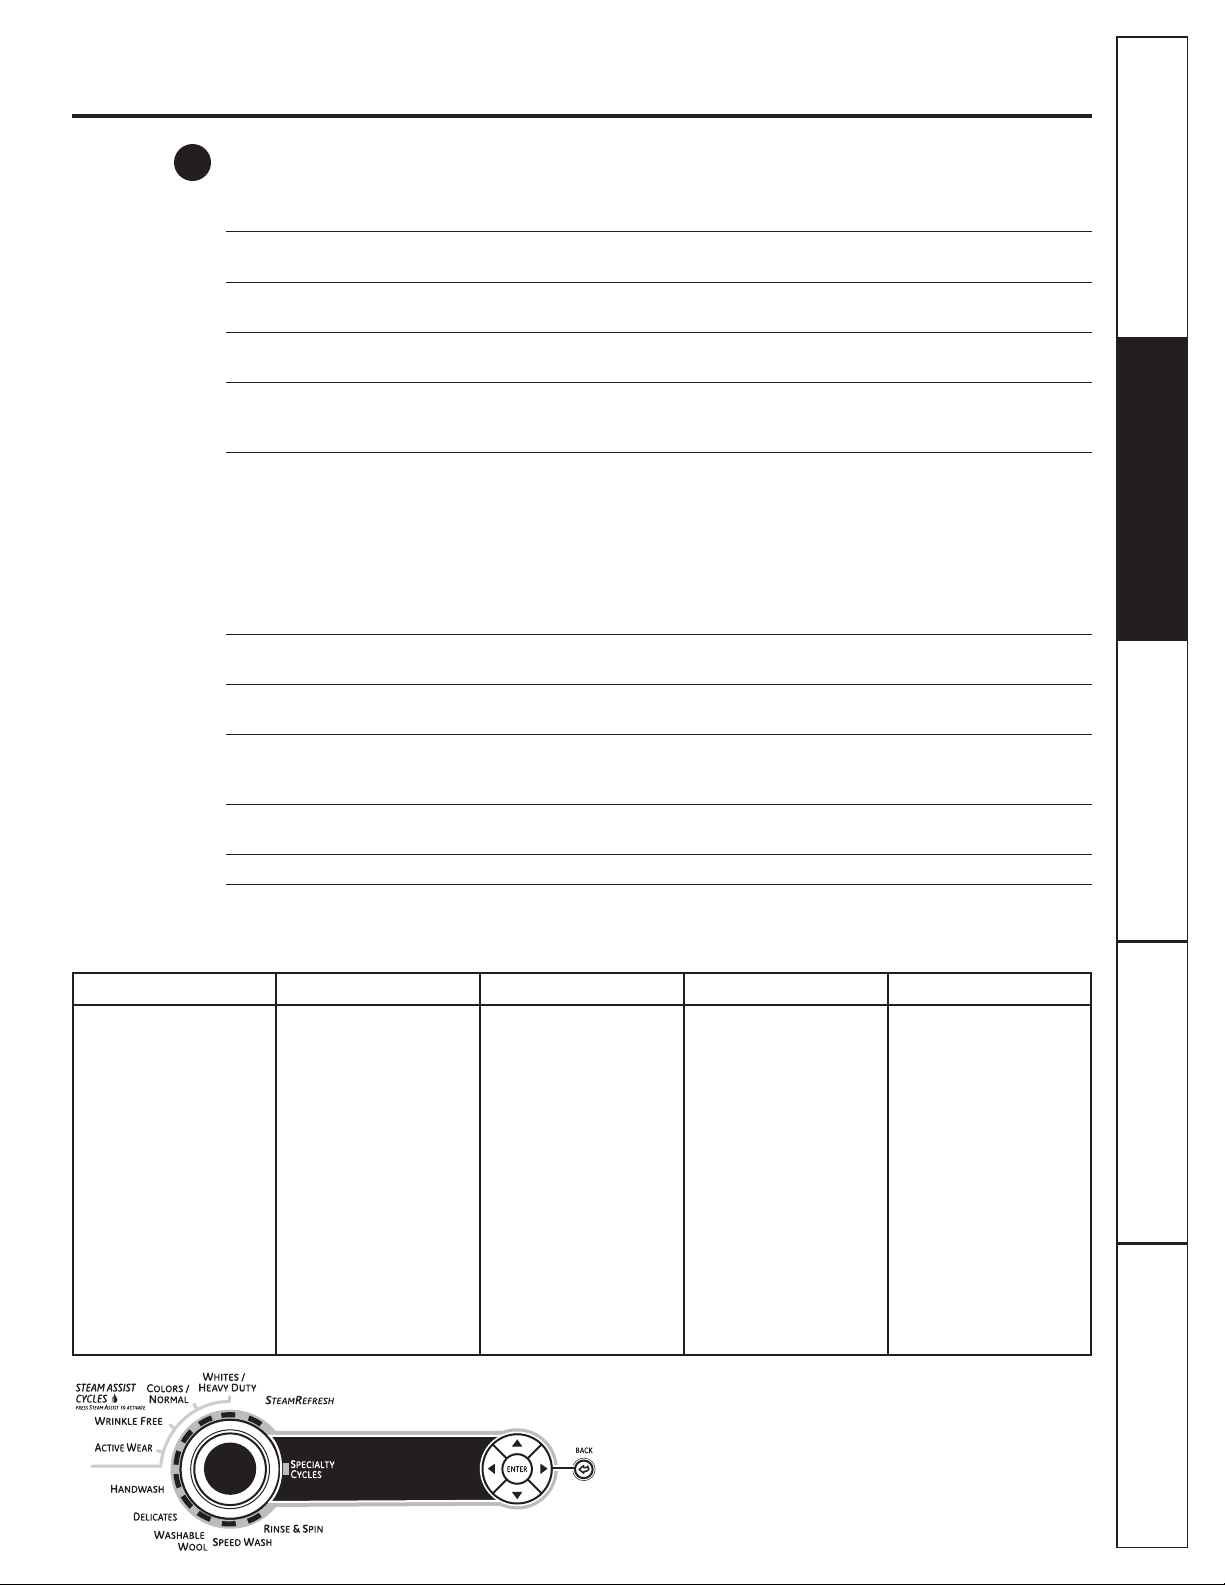
Wash Cycles
The wash cycles are optimized for specific types of wash loads. The chart below will help you match
the wash setting with the loads. The GentleClean
™
lifters lightly tumble the clothes into the water and
detergent solution to clean the load.
WHITES/ For heavily to lightly soiled white cottons, household linens, work and play clothes.
HEAVY DUTY Can use the STEAM ASSIST option with this cycle.
COLORS/NORMAL For heavy to lightly soiled colorfast cottons, household linens, work and play
clothes. Can use the STEAM ASSIST option with this cycle.
WRINKLE FREE For Easy Care and permanent press items. Can use the STEAM ASSIST option with
(PERMA PRESS) this cycle.
ACTIVE WEAR For active sports, exercise and some casual wear clothes. Fabrics include modern
technology finishes and fibers such as spandex, stretch and micro-fibers. Can use
the STEAM ASSIST option with this cycle.
STEAM REFRESH To de-wrinkle 1 to 5 cotton blend items. This is not a wash cycle, but a cycle that
applies only steam to the garments. Select the correct number of garments using
the arrow keys and press ENTER.
The washer will beep upon completion of the cycle, and will continue to tumble
for 30 minutes to keep wrinkles from setting in. Press START/PAUSE to remove
clothes.
If clothes are slightly damp after completion of the cycle, hang dry clothes
for 5 minutes before wearing.
HANDWASH For items labeled hand-washable with light soils. Provides gentle rocking to mimic
the handwashing action.
DELICATES For lingerie and special-care fabrics with light to normal soil. Provides gentle
tumbling and soak during wash and rinse.
WASHABLE For the washing of machine washable wool products, provided that they are
WOOL washed according to the instructions on the garment label. When selecting this
cycle, you must use a detergent suitable for washing wool.
SPEED WASH For lightly soiled items that are needed in a hurry. Cycle time is approximately
30 minutes, depending on selected options.
RINSE & SPIN To quickly rinse out any items at any time.
SPECIALTY CYCLES
For unique garments that may need special treatment.
2
DRAIN & SPIN
Drain & spin
at any time.
GARMENTS
Coats
Dress Shirts
Hosiery/Bras
Jeans
Khakis
Sweaters
BED and BATH
Blankets (cotton)
Comforters
Sheets
Towels
SPECIALIZED CYCLES
Athletic Shoes
Energy Savings
Fabric Refresh
Fleece
Fragile Cottons
Performance Fabrics
Pet Bedding
Play Clothes
Single Item Wash
Sleeping Bag
Soak
Super Clean
Throw Rugs
BASKET CLEAN
Specialty Cycles
While in the Specialty Cycle, use the ▲ and ▼
arrow keys to scroll between the different options.
Press ENTER to select the cycle. Press BACK to go
to the previous menu.
Page 6
Consumer Support Troubleshooting Tips
Operating Instructions
Safety Instructions
Installation
Instructions
Settings
Use the SETTINGS button to adjust
the following features:
Dryer Link:
Press the SETTINGS button.
When “DRYER LINK” appears in
the display, press ENTER. Using
the / arrow keys, select ON
and press ENTER.
When the washer cycle is
completed, the washer will
communicate with the dryer when
any button on the control panel is
touched or the door is opened.
The washer will display,
“TRANSFERRING CYCLE
INFORMATION TO THE DRYER”
and the dryer will display,
“RECEIVING CYCLE INFORMATION
TO THE DRYER”.
The dryer will only communicate
with the washer if the dryer is not
running a cycle.
If the washer starts a new cycle
before the dryer has a chance
to communicate with it,
the information will be lost.
End-of-Cycle Volume:
Press the SETTINGS button. When
“VOLUME” appears in the display,
press ENTER, then select “End of
Cycle”. Using the / arrow keys,
select High, Medium, Low or Off.
Control Sounds:
Press the SETTINGS button, then
select “Volume”. When “CONTROL
SOUNDS” appears in the display,
press ENTER. Using the / arrow
keys, select High, Medium, Low
or Off.
Display Brightness:
Press the SETTINGS button. When
“DISPLAY BRIGHTNESS” appears
in the display, press ENTER. Using
the / arrow keys, select High,
Medium or Low.
Water Hardness
(Only appears when SMART
DISPENSER Pedestal Accessory
is connected to washer):
This will adjust the amount of
detergent dispensed automatically
for the SMART DISPENSER. See the
Owner’s Manual supplied with the
SMART DISPENSER for instructions
for use.
▼
▼
▼
▼
▼
▼
▼
▼
6
7
Soil Level
Changing the SOIL LEVEL increases or decreases the wash time to remove different amounts of soil.
To change the SOIL LEVEL, press the SOIL LEVEL button until you have reached the desired setting. You can choose
between Extra Light, Light, Normal, Heavy or Extra Heavy soil.
Spin Speed
Changing the SPIN SPEED changes the final spin speed of the cycles. Always follow the garment manufacturer’s care
label when changing the SPIN SPEED.
To change the SPIN SPEED, press the SPIN SPEED button until you have reached the desired setting. You can choose
between No Spin, Low, Medium, High or Extra High Spin. Higher spin speeds are not available on certain cycles, such as
Delicates.
Higher spin speeds remove more water from the clothes and will help reduce dry time, but may also increase the
possibility of setting wrinkles on some fabrics.
Wash Temp
Adjust to select the proper water temperature for the wash cycle. The prewash and rinse water is always cold to help
reduce energy usage and reduce setting of stains and wrinkles.
Follow the fabric manufacturer’s care label when selecting the wash temperature.
To change the wash temperature, press the WASH TEMP button until you have reached the desired setting. You can
choose between Tap Cold, Cold, Warm, Hot or Sanitize. The Sanitized wash temperature is not available on certain cycles,
such as Delicates.
When selecting the Sanitize wash temperature, the washer increases the water temperature to sanitize and kill more
than 99% of many common bacteria found in home laundry. The sanitize wash temperature is only available on the
Whites/Heavy Duty wash cycle. For best results, select the heavy soil setting when using the Sanitize wash temperature
setting.
NOTE: The first 10 seconds of the wash fill is always cold. This feature assists in conditioning the fabric and preventing stains
from setting on garments.
START/PAUSE
Press to start a wash cycle. If the washer is running, pressing it once will pause the washer and unlock the door.
It will take a few seconds for the door to unlock after pressing PAUSE. Press again to restart the wash cycle.
NOTE: If the washer is paused and the cycle is not restarted within 15 minutes, the current wash cycle will be cancelled.
NOTE: In some cycles the washer will drain first, then unlock the door when it is paused.
NOTE: The washer performs automatic system checks after pressing the START button. Water will flow in 45 seconds
or less. You may hear the door lock and unlock before water flows; this is normal.
3
4
5
6
Control settings.
Page 7
Consumer SupportTroubleshooting TipsOperating Instructions
Safety Instructions
Installation
Instructions
GEAppliances.com
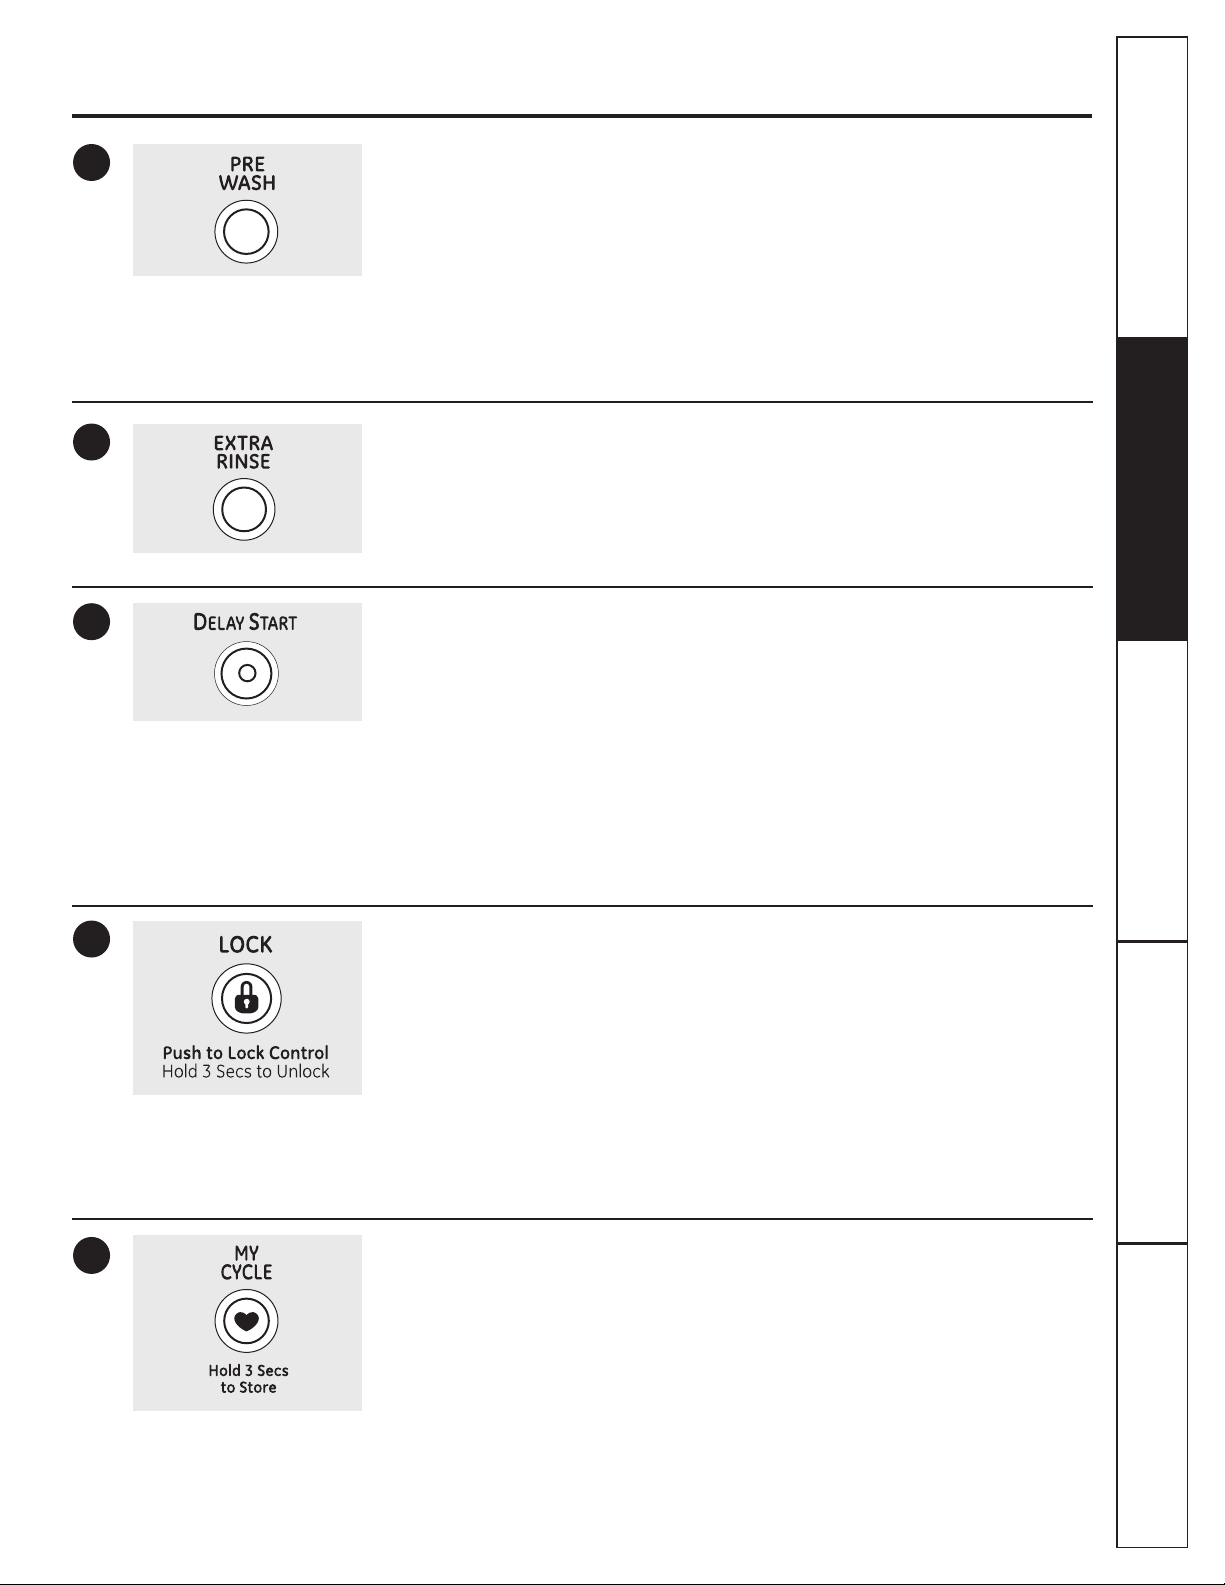
Prewash
Prewash is an extra wash before
the main wash. Use it for heavily soiled
clothes or for clothes with a care label
that recommends prewashing before
washing. Be sure to add high-efficiency
detergent, or the proper wash additive
to the prewash dispenser.
The prewash feature will fill the washer
(adding the prewash detergent), tumble
the clothes, drain and spin. Then the
washer will run the selected wash
cycle.
NOTE: In some special cycles,
the prewash is selected automatically
as the default. You can modify this
selection at any time.
Extra Rinse
Use an extra rinse when additional
rinsing is desired to remove excess dirt
and detergent from soiled loads.
NOTE: In some special cycles, the extra
rinse is selected automatically as the
default. You can modify this selection at
any time. Some cycles have additional
rinses done automatically.
Delay Start
You can delay the start of a wash cycle
for up to 24 hours. Press the DELAY
START button to choose the number
of hours you want to delay the start
of the cycle. Use the ▲ and ▼ (up and
down) arrows to find the desired delay
time; then press ENTER to select the
delay time. Finally, press the START
button after the desired cycle is
selected. The machine will count
down and start automatically
at the correct time.
NOTE: If you forget to fully close
the door, a reminder signal will beep
reminding you to do so.
NOTE: If you open the door when the
delay is counting down, the machine
will enter the pause state. You must
close the door and press START again
in order to restart the countdown.
Lock
You can lock the controls to prevent
any selections from being made. Or
you can lock or unlock the controls
after you have started a cycle.
Children cannot accidentally start
the washer by touching pads with
this option selected.
To lock the washer, press and hold
the LOCK button for 3 seconds.
To unlock the washer controls,
press and hold the LOCK button for
3 seconds. A sound is made to indicate
the lock/unlock status.
The control lock icon on the display will
light up when it is on.
NOTE: The POWER button can still be
used when the machine is locked.
MY CYCLE (on some models)
To save a favorite cycle, set the desired
settings for wash cycle, soil level, spin
speed and wash temp settings and
hold down the MY CYCLE button for
3 seconds. A beep will sound to indicate
the cycle has been saved.
To use your custom cycle, press
the MY CYCLE button before washing
a load.
To change the saved cycle, set
the desired settings and hold down
the MY CYCLE button for 3 seconds.
NOTE: When using MY CYCLE,
wash options cannot be modified
after the cycle has been started.
NOTE: If you change wash options
with MY CYCLE before starting the cycle,
the MY CYCLE light will turn off and you
will be returned to the base cycle.
8
9
10
11
12
7
Page 8
Consumer Support Troubleshooting Tips
Operating Instructions
Safety Instructions
Installation
Instructions
8
Control settings.
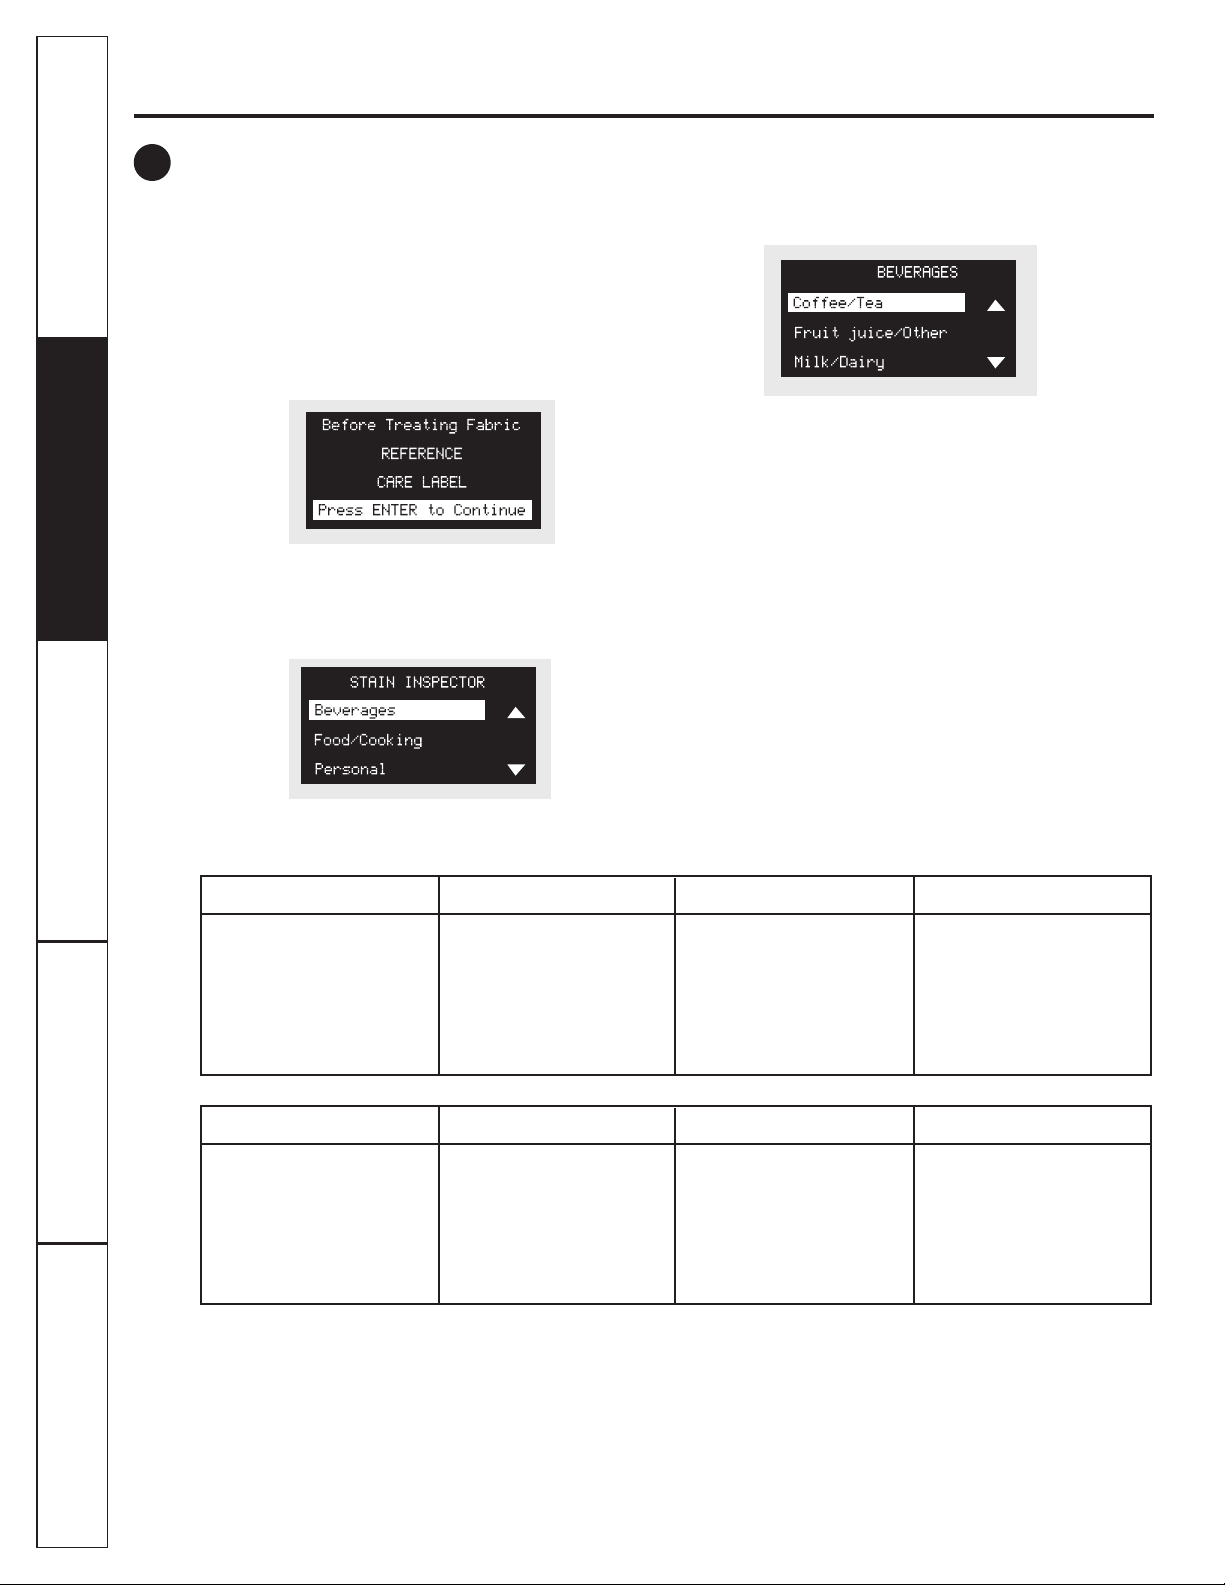
Stain Inspector
The STAIN INSPECTOR feature allows you
to indicate what stains are on the garments in your
load. This feature can be used with any wash cycle.
To use STAIN INSPECTOR:
1. Select the wash cycle.
2. Press the STAIN INSPECTOR button (the button will
light up when it is on).
3. Check the wash instructions on your garment.
4. Press the ENTER button to continue.
5. Use the ▲ and ▼ arrows to find the desired stain
category.
6. Press the ENTER button to select the stain
category.
7. Use the ▲ and ▼ arrows to select the desired
stain.
13
You have the following stains available to choose from:
8. Press the ENTER button to select the stain.
9. Your selected stain will appear on the display.
10. Press the START button to start the cycle.
NOTE: To turn off STAIN INSPECTOR or to select a
different stain, press the STAIN INSPECTOR button
again.
NOTE: Prewash is selected automatically
as the default for some stains. When selected
automatically, the PREWASH button will light.
For optimum stain removal, it is recommended
to add high-efficiency detergent or proper wash
additive to the prewash dispenser. You can turn
off the prewash option if you do not want to add
the prewash to the cycle.
OUTDOOR
Clay
Grass
Mud/Dirt
Rust Iron
Tree Sap
COSMETICS
Lipstick/Lip Balm
Deodorant
Lotions
Makeup (water-based)
Oil (hair/mineral)
BEVERAGES
Grape Juice
Coffee/Tea
Fruit Juice Other
Milk/Dairy
Wine (red/white)
FOOD/COOKING
Butter/Margarine
Cooking/Vegetable Oil
Chocolate
Tomato Based
Barbecue Sauce
PERSONAL
Blood
Perspiration
Urine/Feces
Mouthwash
Vomit
SCHOOL/OFFICE/HOME
Adhesive Tape
Ballpoint Ink
Glue (white common)
Pencil Mark
Correction Fluid
LAUNDRY
Dingy White Socks
Collar/Cuff Soil
Dye Transfer
Fabric Softener
Yellowing
OIL/GREASE/WAX
Motor Oil/Lube
Ointment/Salve
Candle Wax
Crayon
Chapstick
™
Page 9

Consumer SupportTroubleshooting Tips
Operating Instructions
Safety Instructions
Installation
Instructions
9
SMART DISPENSE
™
– optional accessory (on some models)
If you have purchased the PROFILE SMART DISPENSE
System, refer to the Owner’s Manual that comes with
the SMART DISPENSE System.
If you have not purchased the PROFILE SMART
DISPENSE System, you will not have bulk-dispensing
capability. If you select the SMART DISPENSE option,
a message will be displayed advising that your unit
does not have the capability. You should then put
detergent and other selected additive in the flowthrough dispenser drawer located at the top left of
the unit. To purchase the PROFILE SMART DISPENSE
System, go online to GEAppliances.com or contact
your local retailer.
14
GEAppliances.com
STEAM ASSIST
STEAM ASSIST adds steam into the washer during
WHITES/HEAVY DUTY, COLORS/NORMAL, WRINKLE
FREE or ACTIVE WEAR cycles.
To use:
1. Turn power ON and select a wash cycle.
The STEAM ASSIST option is only available
on WHITES/HEAVY DUTY, COLORS/NORMAL,
WRINKLE FREE or ACTIVE WEAR cycles.
2. Select the STEAM ASSIST button to activate Steam.
3. Press the START/PAUSE button.
15
Page 10
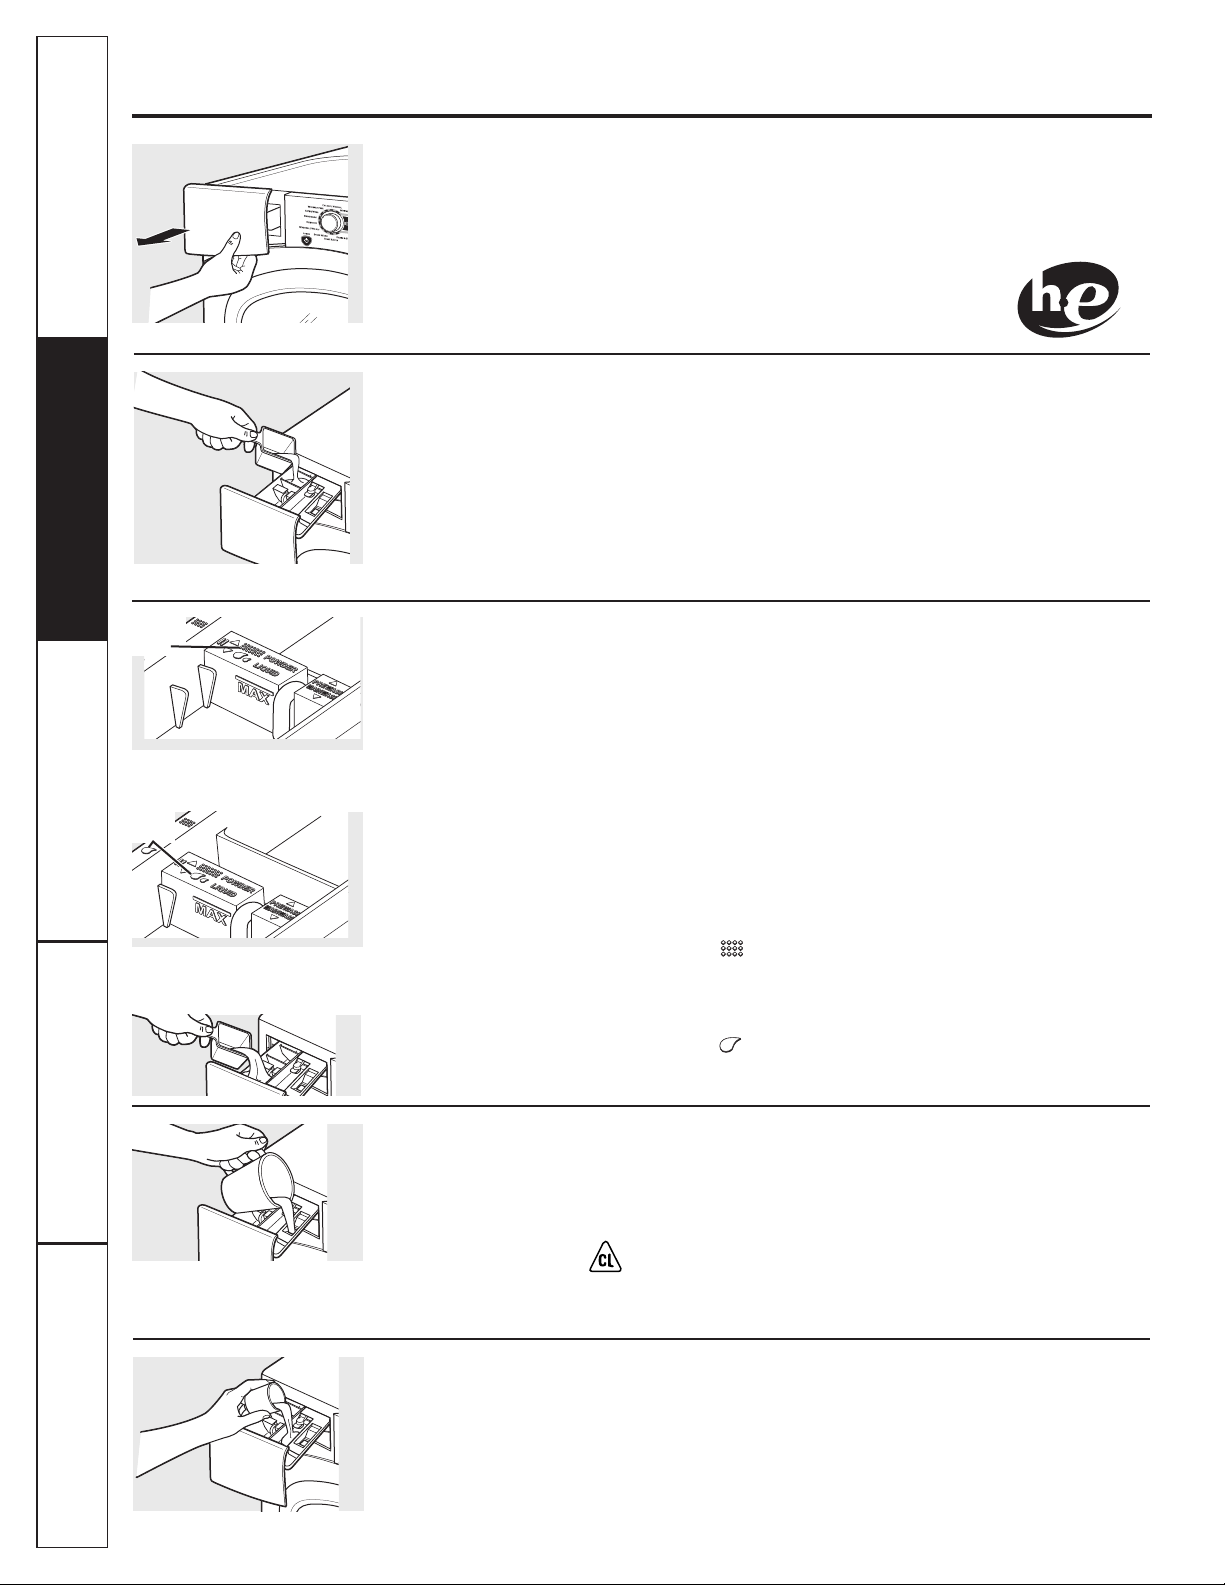
The Fabric Softener Compartment
If desired, pour the recommended amount
of liquid fabric softener into the compartment
labeled “FABRIC SOFTENER.”
Use only liquid fabric softener in the dispenser.
Dilute with water to the maximum fill line.
Do not exceed the maximum fill line. Overfilling
can cause early dispensing of the fabric
softener, which could stain clothes.
NOTE: Do not pour fabric softener directly
on the wash load.
10
Consumer Support Troubleshooting Tips
Operating Instructions
Safety Instructions
Installation
Instructions
About the washer features.
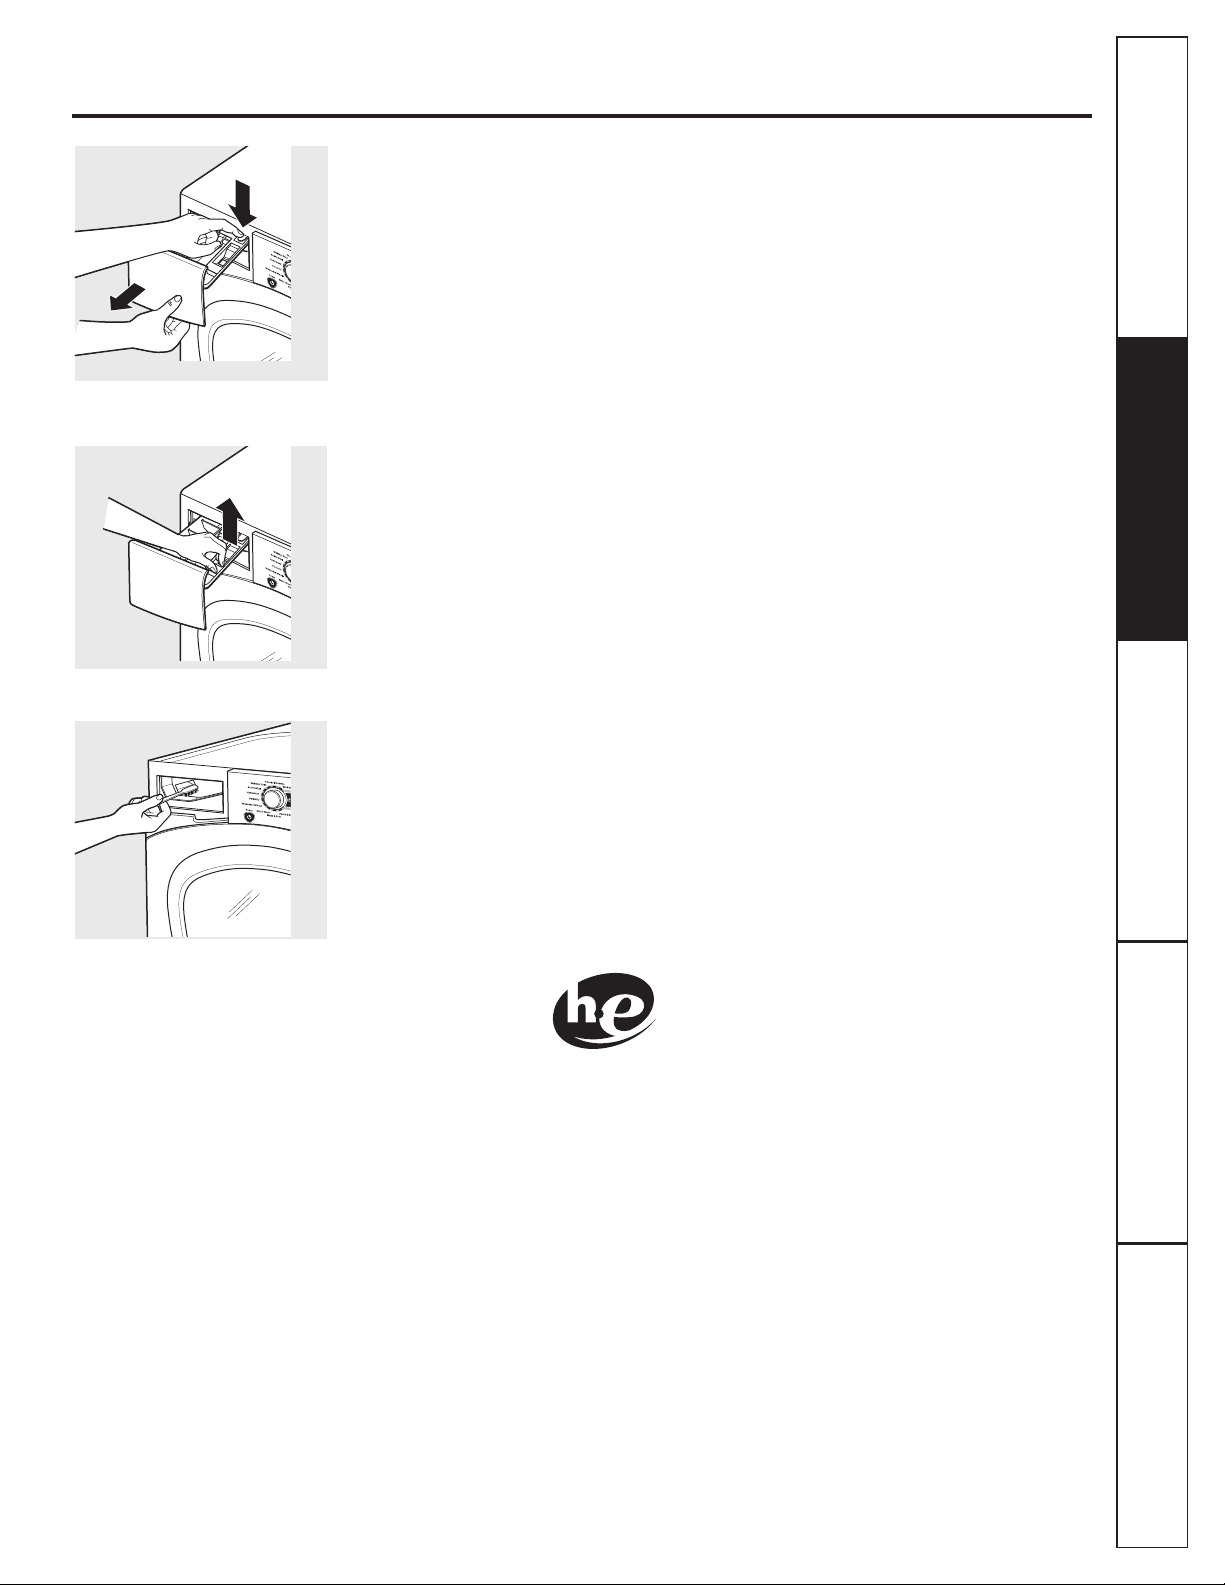
The Dispenser Drawer
Slowly open the dispenser drawer by pulling
it out until it stops.
After adding laundry products, slowly close
the dispenser drawer. Closing the drawer
too quickly could result in early dispensing
of the bleach, fabric softener or detergent.
You may see water in the bleach and fabric
softener compartments at the end of the cycle.
This is a result of the flushing/siphoning action
and is part of the normal
operation of the washer.
Use only HE High-Efficiency
detergent.
The Liquid Bleach Compartment
If desired, measure out the recommended
amount of liquid bleach, not to exceed
1/3 cup (80 ml) and pour into the center
compartment labeled “LIQUID BLEACH”
marked with this symbol .
It is recommended to use High-Efficiency (HE)
bleach in this front-load washer.
Do not exceed the maximum fill line. Overfilling
can cause early dispensing of the bleach which
could result in damaged clothes.
NOTE: Do not use powdered bleach in the
dispenser.
The Detergent Compartment
■ Only use high-efficiency detergent
in this washer. MAX line is for normal
detergent. DO NOT fill above the MAX
line.
DO NOT fill high-efficiency detergent
to the MAX line. Use detergent
manufacturer’s recommended amount.
The detergent selection insert must be placed
in the detergent compartment in a specific
position according to the type of detergent
you are using.
■ Powder Detergent – Place the insert
in the rear position. The Powder Icons
must line up on center when the insert
is in the powder position.
■ Liquid Detergent – Place the insert in
the forward position. The Liquid Icons
must line up on center when the insert
is in the liquid position.
Move the insert by pulling it up and replace
it by sliding it down between either the rear
or front detergent compartment molded rails,
as desired, for powder or liquid detergent.
■ Add measured detergent to the front left
detergent compartment of the dispenser
drawer.
■ Detergent is flushed from the dispenser
at the beginning of the wash cycle. Either
powdered or liquid detergent can be used.
■ Detergent usage may need to be adjusted
for water temperature, water hardness,
size and soil level of the load. Avoid using
too much detergent in your washer as it
can lead to oversudsing and detergent
residue being left on the clothes.
■ DO NOT put clumped detergent
in the dispenser. Clumped detergent
can cause a leak.
Insert in rear position for powder
detergent
Insert in forward position for liquid
detergent
The Prewash Compartment
■ Only use the Prewash Compartment if you
are selecting the Prewash cycle for heavily
soiled clothes. Add measured detergent or
prewash additive to the back left prewash
compartment of the dispenser drawer.
■ Detergent or prewash additive is flushed
from the dispenser in the prewash cycle
(if selected).
NOTE: Liquid detergent will drain
into the washer drum as it is added.
■ Detergent usage may need to be adjusted
for water temperature, water hardness, size
and soil level of the load. Avoid using too
much detergent in your washer as it can
lead to over sudsing and leave detergent
residue on the clothes.
Liquid
Icons
Powder
Icons
Page 11

Consumer SupportTroubleshooting TipsOperating Instructions
Safety Instructions
Installation
Instructions
Loading and using the washer.
Always follow fabric manufacturer’s care label when laundering. GEAppliances.com
Sorting Wash Loads
Loading the Washer
The wash drum may be fully loaded with loosely
added items. Do not wash garments containing
flammable materials (waxes, cleaning fluids, etc.).
To add items after the washer has started, press
START/PAUSE and wait until the door is unlatched.
The washer may take up to 30 seconds to unlock
the door after pressing START/PAUSE, depending
on the machine conditions. Do not try to force
the door open when it is locked. After the door
unlocks, open gently. Add items, close the door
and press START/PAUSE to restart.
Colors
Whites
Lights
Darks
Soil
Heavy
Normal
Light
Fabric
Delicates
Easy Care
Sturdy Cottons
Lint
Lint Producers
Lint Collectors
■ Combine large and small items in a load. Load large items first. Large items should not be more than
half the total wash load.
■ Washing single items is not recommended. This may cause an out-of-balance load. Add one or two
similar items.
■ Pillows and comforters should not be mixed with other items. This may cause an out-of-balance load.
■ Sort dark-colored clothes from light-colored clothes to prevent dye transfer. This is a high-efficiency
washer, so it uses less water, making dye transfer more common.
11
WORKWEAR
4 Jeans
5 Work Wear
Shirts
5 Work Wear
Pants
LINENS
2 Bath Sheets
10 Bath Towels/
12 Washcloths
7 Hand Towels/
2 Terrycloth Bath
Mats
OR
2 Flat Queen-Sized
Sheets
2 Fitted Queen-
Sized Sheets
4 Pillowcases
MIXED LOAD
4 Pillowcases
2 Hand Towels
2 Flat Sheets/
2 Fitted Sheets
2 Bath Towels/
4 Washcloths
OR
6 Shirts (Men’s
or Women’s)
4 Pair Pants
(Khakis
or Twills)
5 T-shirts
7 Pairs of Boxers
4 Pairs of Shorts
OR
6 T-shirts
4 Pairs of
Sweatpants
4 Sweatshirts
2 Hoodies
7 Pairs of Socks
DELICATES*
7 Bras
7 Panties
3 Slips
2 Camisoles
4 Nightgowns
*Using a nylon
mesh bag for
small items is
recommended.
SPEED WASH
(2–4 GARMENTS)
2 Casual Wear
Work Shirts
1 Pair Casual Wear
Work Pants
OR
3 Soccer Uniforms
Loading Examples*
*Using a nylon mesh bag for small items is recommended.
Page 12

Care and Cleaning/General Maintenance
Exterior: Immediately wipe off any spills. Wipe with damp cloth. Do not hit surface with sharp objects.
Interior: Dry around the washer door opening, flexible gasket (including attached hoses) and door glass.
These areas should always be clean to ensure a water-tight seal.
It is recommended to rinse the washer at least once per month with 1 cup of bleach (or other
commercially available product manufactured for this purpose) poured into the prewash section
of the dispenser (no clothes) using the BASKET CLEAN CYCLE (found in the SPECIALTY CYCLES menu).
Check to ensure the steam nozzle is not clogged. Clean the nozzle if necessary.
Moving and Storage: Ask the service technician to remove water from drain pump and hoses.
Do not store the washer where it will be exposed to the weather. When moving the washer,
the tub should be kept stationary by using the shipping bolts removed during installation.
See Installation Instructions in this manual. If these parts are not available, they can be ordered
by visiting our Website at GEAppliances.com or by calling 800.GE.CARES.
Long Vacations: Be sure water supply is shut off at faucets. Drain all water from hoses if weather
will be below freezing.
Clean Pump Filter
Due to the nature of the front-load washer, it is sometimes possible for small articles to pass
to the pump. The washer has a filter to capture lost items so they are not dumped to the drain.
To retrieve lost items, clean out the pump filter.
1. Using a coin in the notch on the door, open the access door.
2. Place a shallow pan or dish under the pump access door
and towels on the floor in front of the washer to protect
the floor. It is normal to catch about a cup of water when
the filter is removed.
3. Turn the pump filter counterclockwise and remove the filter.
4. Clean the debris from the filter.
5. Replace the filter and turn clockwise to the marked position.
6. Close the access door.
12
Consumer Support Troubleshooting Tips
Operating Instructions
Safety Instructions
Installation
Instructions
Loading and using the washer.
Pump filter
Cleaning the Door Gasket
Open the washer door. Using both hands, press down the door gasket.
Remove any foreign objects if found trapped inside the gasket. Make sure
there is nothing blocking the holes behind the gasket.
While holding down the door gasket, inspect the interior gasket by pulling
it down with your fingers. Remove any foreign objects if found trapped
inside this gasket. Make sure there is nothing blocking the holes behind
the gasket.
When you are finished cleaning the door gasket, remove your hands and
the gaskets will return to the operating position.
Page 13
Dispenser Drawer Area: Detergent and fabric softener may build up in the dispenser
drawer. Residue should be removed once or twice a month.
■ Remove the drawer by first pulling it out until it stops. Then reach back into the
right rear corner of the drawer cavity and press down firmly on the lock tab,
pulling out the drawer.
■ Remove the insert from the bleach and fabric softener compartments and the
detergent insert. Rinse the inserts and the drawer with hot water to remove
traces of accumulated laundry products.
■ To clean the drawer opening, use a small brush to clean the recess.
Remove all residue from the upper and lower parts of the recess.
■ Return inserts to the proper compartments. Replace the dispenser drawer.
■ To reduce buildup in the Dispenser Drawer area:
Use only HE
High-Efficiency
detergent.
Lock tab is visible only after
drawer has been pulled out
Always follow fabric manufacturer’s care label when laundering. GEAppliances.com
Consumer SupportTroubleshooting Tips
Operating Instructions
Safety Instructions
Installation
Instructions
13
Page 14

Loading and using the washer.
Fabric Care Labels
Machine
wash
cycle
Normal
Permanent Press/
wrinkle resistant
Gentle/
delicate
Hand wash
Do not wash Do not wring
Water
temperature
Hot
(50 C/120 F)
Warm
(40 C/105 F)
Cold/cool
(30 C/85 F)
Bleach
symbols
Any bleach
(when needed)
Only non-chlorine bleach
(when needed)
Do not bleach
WASH LABELS
BLEACH LABELS
Below are fabric care label “symbols” that affect the clothing you will be laundering.
DETERGENT LABELS
Use only HE High-Efficiency detergent.
Profile Smart Dispense System
The Profile SMART DISPENSE System
lets you store laundry detergent and
fabric softener to be dispensed
automatically during the wash and
rinse cycles of this washer. NO BLEACH
may be used in this dispense system.
See the Owner‘s Manual that is
included with the Profile SMART
DISPENSE System for installation
instructions.
Pedestal
There is a pedestal available for your
washer. This pedestal gives the washer
more height and gives storage for your
washing necessities. Included with the
pedestal is a divider that allows you
to store liquid laundry detergent out
of sight. See the pedestal installation
instructions.
14
Consumer Support Troubleshooting Tips
Operating Instructions
Safety Instructions
Installation
Instructions
Available accessories.
Page 15
Consumer SupportTroubleshooting TipsOperating Instructions
Safety Instructions
Installation
Instructions
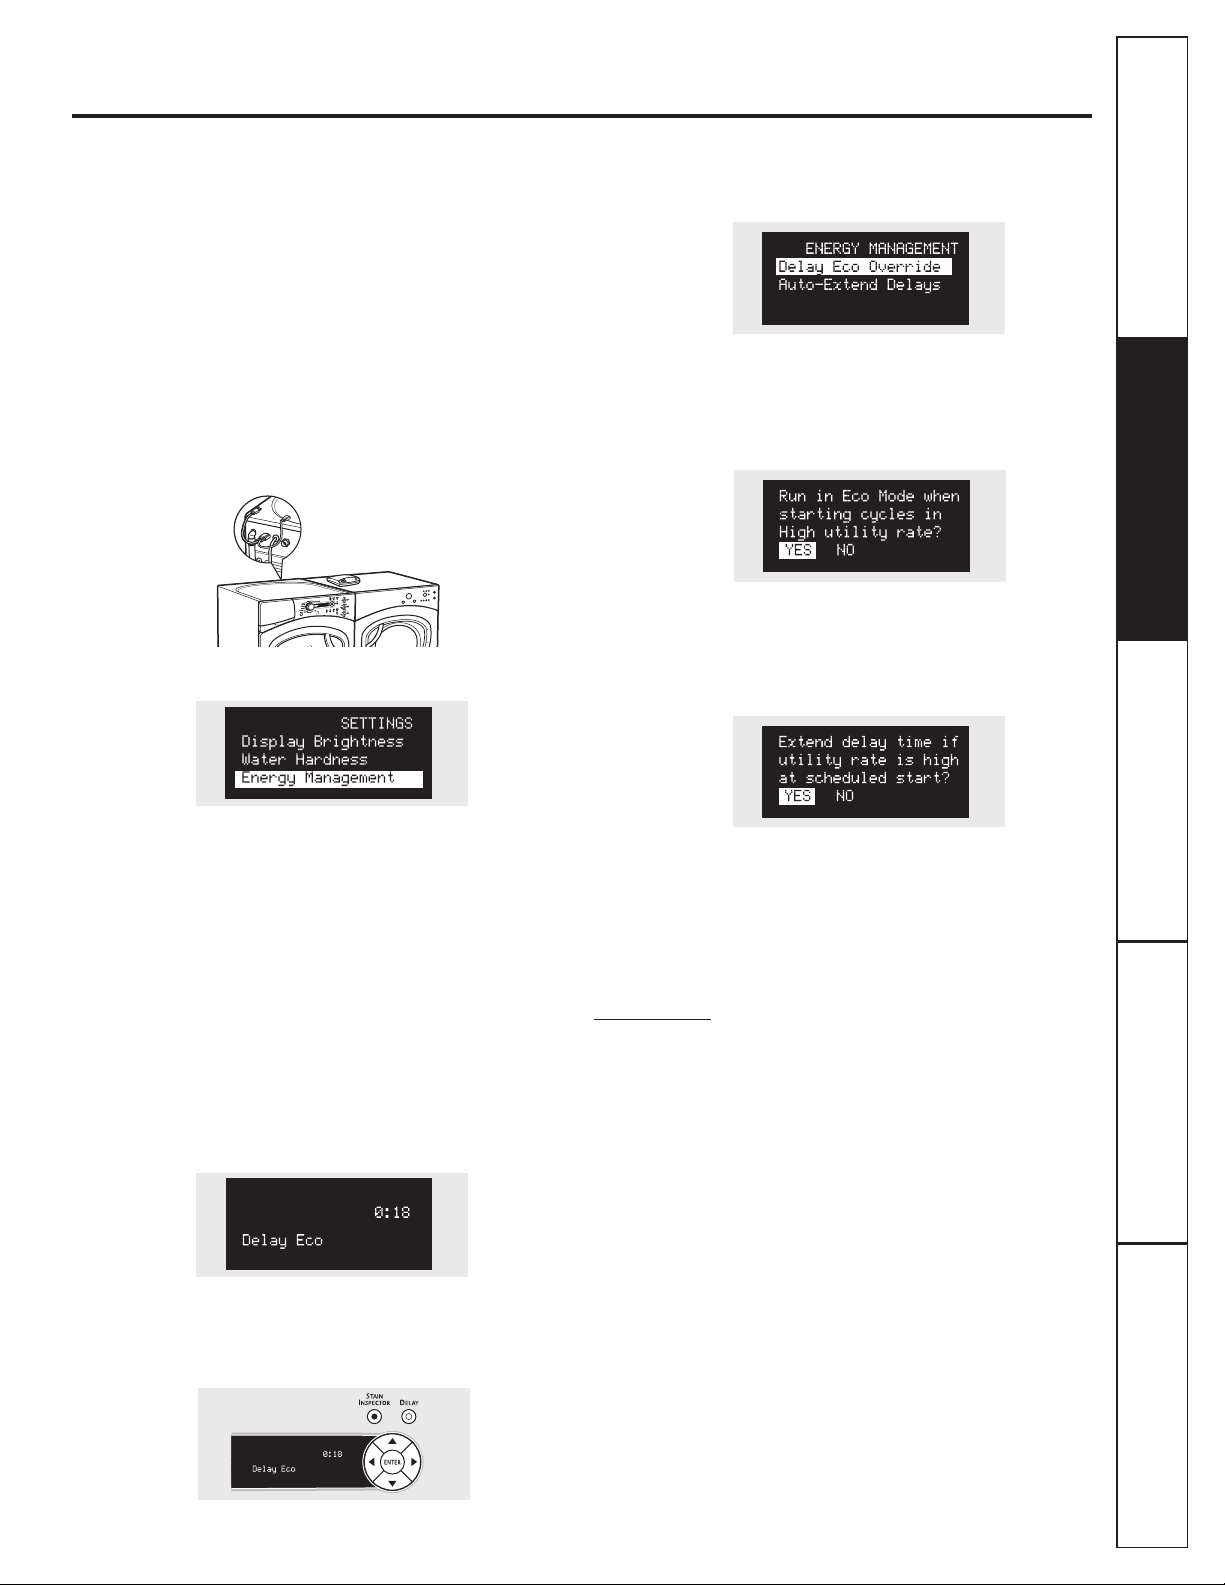
Demand Response. (on some models) GEAppliances.com
Model WPDH8910 is compatible with the GE Demand
Response (DR) module which can be purchased
separately. Contact your local utility or visit
www.GEAppliances.com/demand_response to
see if your area is using DR technology.
The following demand response features are available
as part of a pilot test program with the local utility
company to help consumers reduce peak electricity
usage in the home.
INSTALLATION
The preferred location for the module installation is on top
of the clothes dryer.
Details on how to connect the cables to the module are
in the instructions that come with the module.
Wait 5 minutes; then press the Settings button. Scroll and
look for the energy management screen as seen below.
This screen means the module is attached correctly and
you can begin to use your DR-enabled appliance following
the instructions below.
If the Energy Management Screen is not available, refer to
the DR module troubleshooting guide.
QUICK GUIDE
There are 4 power levels available: Critical, High, Medium
and Low. On the Medium and Low levels, the unit runs as
normal. The following steps show how the unit reacts
during startup at Critical and High power levels.
Option 1 (Delay Eco)
During startups at Critical and High levels, the unit will
delay starting until the level becomes Medium or Low.
Press the START/PAUSE button.
Option 2 (Override Delay Eco)
To start the washer when Delay Eco is shown, press the
DELAY START button to turn the delay off. Then press
START/PAUSE to begin the wash.
SETTINGS MENU
Press SETTINGS; then select Energy Management.
Delay Eco Override
If you are starting a cycle in a Critical or High utility rate,
this option allows the unit to automatically run on an Eco
Cycle. This setting will wash with less energy than normal
cycles. The default setting is YES.
Auto-Extend Delays
If a timed delay is selected, this option allows for the
scheduled start to extend if the utility rate is Critical or
High at the scheduled start. The default setting will
automatically extend these cycles.
In order for the demand response features on the
appliance to work, additional equipment is required to be
installed to interface with the local utility. Such equipment
may be sold separately and/or is available through your
utility as part of the pilot test program. Check with your
utility company to see if a pilot test program is available in
your area and for full details.
PLEASE NOTE: At the conclusion of the pilot test program
or if you move to an area where the program is not
available, the demand response features cannot be
activated and utilized on the appliance. The appliance will
function as normal after the demand response equipment
has been deactivated or disconnected.
15
Page 16
Installation
Washer
Instructions
If you have any questions, call 800.GE.CARES (800.432.2737)
or visit our Website at: GEAppliances.com
In Canada, call 1.800.561.3344
or visit www.GEAppliances.ca
BEFORE YOU BEGIN
Read these instructions completely and carefully.
•
IMPORTANT –Save these instructions
for local inspector’s use.
•
IMPORTANT –Observe all governing
codes and ordinances.
• Note to Installer – Be sure to leave these
instructions with the Consumer.
• Note to Consumer – Keep these instructions
for future reference.
• Skill level – Installation of this appliance requires
basic mechanical and electrical skills.
• Completion time – 1-3 hours
• Proper installation is the responsibility of the installer.
• Product failure due to improper installation is not
covered under the Warranty.
WARNING
• This appliance must be properly grounded and
installed as described in these Installation Instructions.
• Do not install or store appliance in an area where
it will be exposed to water/weather. See Location
of Your Washer section.
• NOTE: This appliance must be properly
grounded, and electrical service to the washer
must conform with local codes and ordinances
and the latest edition of the National Electrical
Code, ANSI/NFPA 70.
FOR YOUR SAFETY:
16
TOOLS REQUIRED FOR
WASHER INSTALLATION
❏ 1/4″ nut driver
❏ 3/8″ socket with ratchet
❏ 3/8″ open-end wrench
❏ Adjustable wrench or 7/16″ socket with ratchet
❏ Adjustable wrench or 9/16″ open-end wrench
❏ Channel-lock adjustable pliers
❏ Carpenter’s level
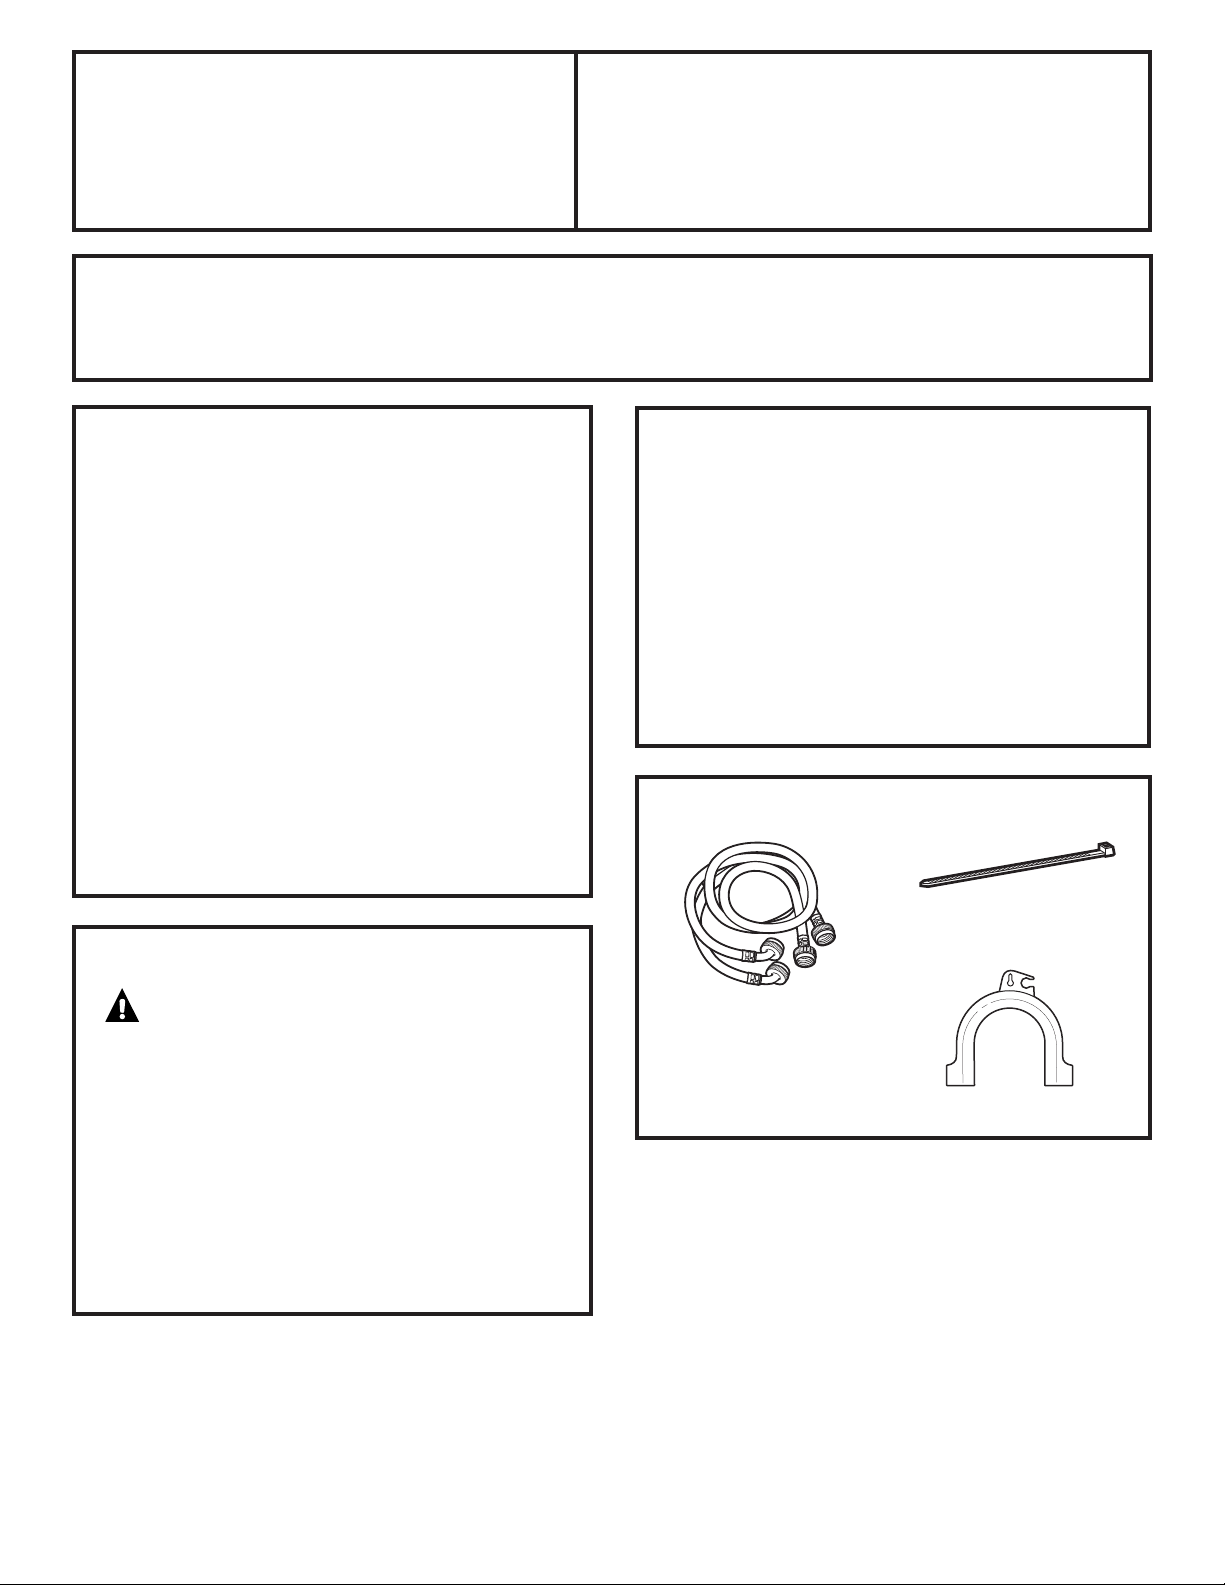
❏ Water Hoses (2)
PARTS SUPPLIED
❏ Cable Tie
❏ Hose Guide
WPDH8850, WPDH8910, WPDH8900
Page 17
17
Installation Instructions
LOCATION OF YOUR WASHER
Do Not Install the Washer:
1.In an area exposed to dripping water or outside
weather conditions. The ambient temperature
should never be below 60°F (15.6°C) for proper
washer operation.
2.In an area where it will come in contact with curtains
or drapes.
3.On carpet. The floor MUST be a hard surface with
a maximum slope of 1/2″ per foot (1.27 cm per
30 cm). To make sure the washer does not vibrate
or move, you may have to reinforce the floor.
NOTE: If floor is in poor condition, use 3/4″ impregnated
plywood sheet solidly attached to existing floor covering.
IMPORTANT:
Minimum Installation Clearances
• When installed in alcove: Sides, Rear,
Top = 0″ (0 cm)
• When installed in closet: Sides, Rear,
Top = 0″ (0 cm), Front = 1″ (2.54 cm)
• Closet door ventilation openings required:
2 louvers each 60 square in. (387 cm2), located 3″
(7.6 cm) from top and bottom of door
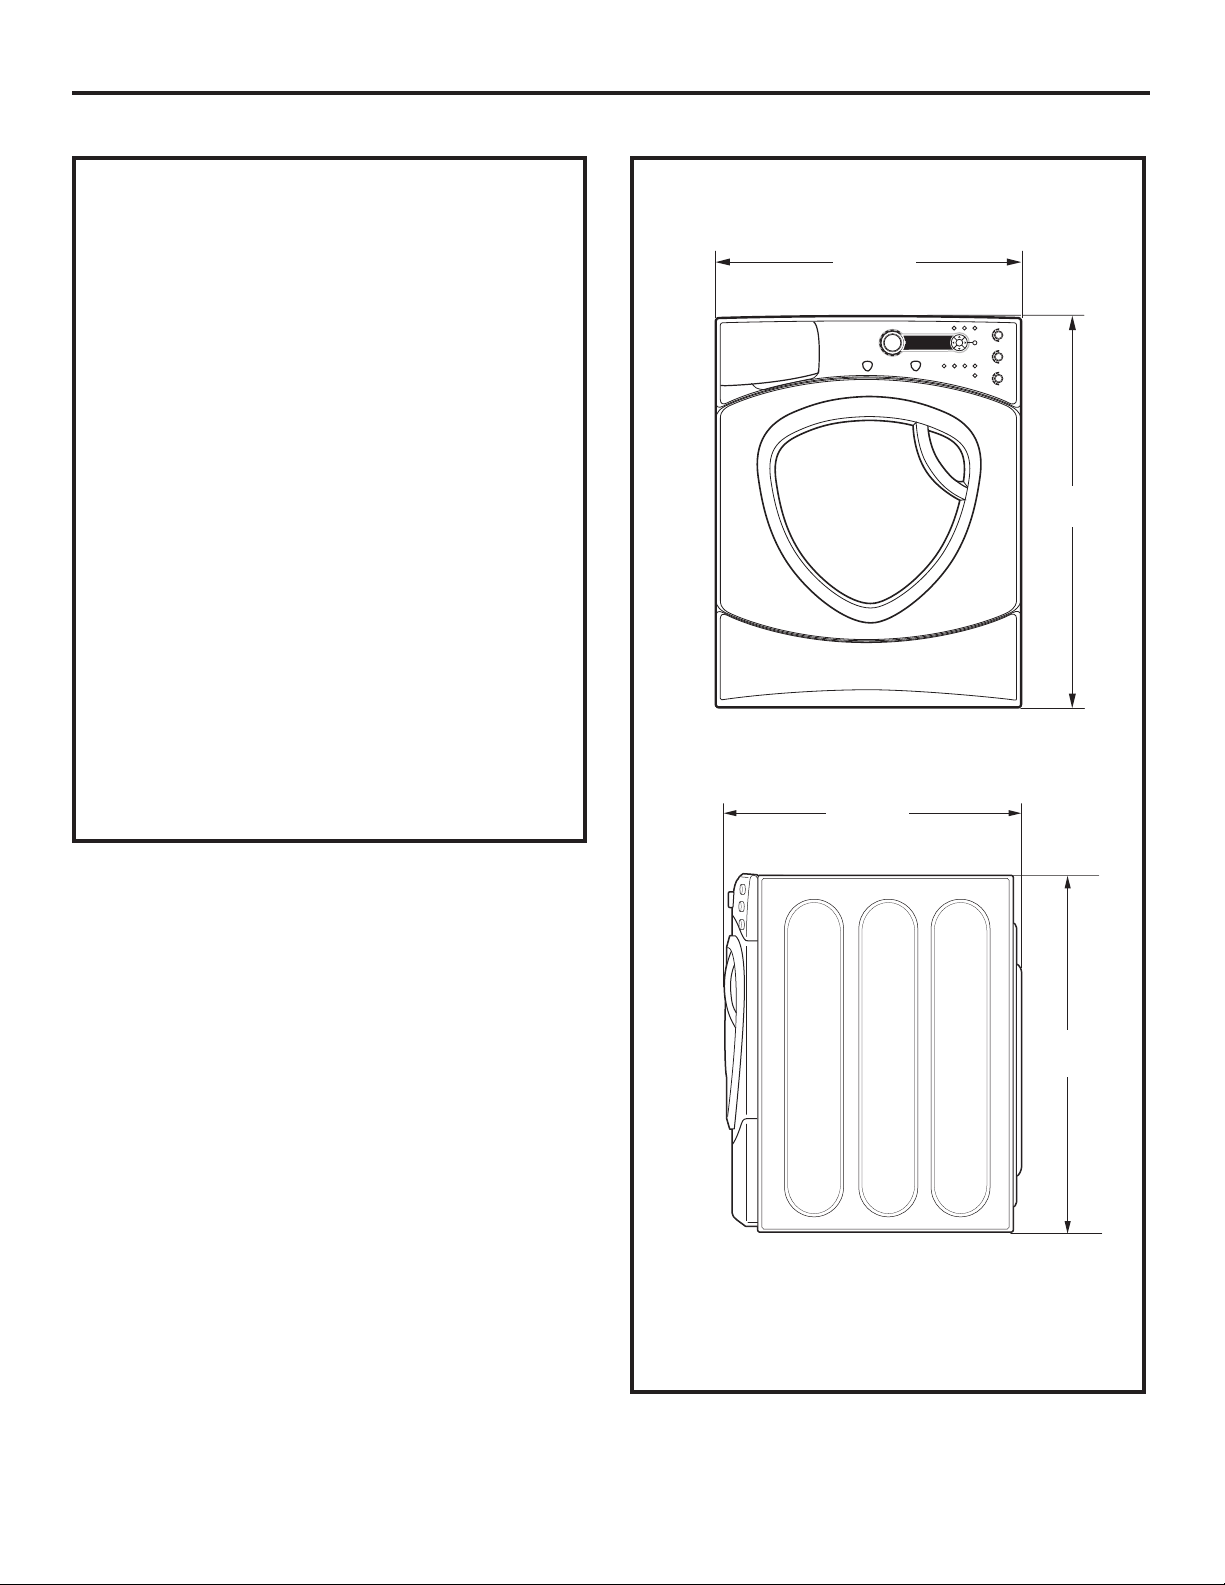
ROUGH-IN DIMENSIONS
SIDE
FRONT
27.0”
(68.6 cm)
39.2”*
(99.5 cm)
32.1”
(81.5 cm)
39.2”*
(99.5 cm)
*NOTE:
With Washer Legs: 40.5” (102.5 cm)
(0.75” adjustability)
With Pedestal: 53.75” (136.6 cm)
(0.75” adjustability)
Stacked: 82.75” (209.8 cm)
Page 18
UNPACKING THE WASHER
WARNING: Recycle or destroy the carton
and plastic bags after the washer is unpacked. Make
materials inaccessible to children. Children might use
them for play. Cartons covered with rugs, bedspreads
or plastic sheets can become airtight chambers causing
suffocation.
1. Cut and remove the top and bottom packaging straps.
2. While it is in the carton, carefully lay the washer on its
side. DO NOT lay the washer on its front or back.
3. Turn down the bottom flaps—remove all base packaging,
including the cardboard, styrofoam base and styrofoam
tub support (inserted in center of base). Save the stacking
brackets located on the styrofoam pad that covered
the top of the washer.
NOTE: If you are installing a pedestal, proceed to
the installation instructions that come with the pedestal.
4. Carefully return the washer to an upright position and
remove the carton.
5. Carefully move the washer to within 4 feet (122 cm)
of the final location.
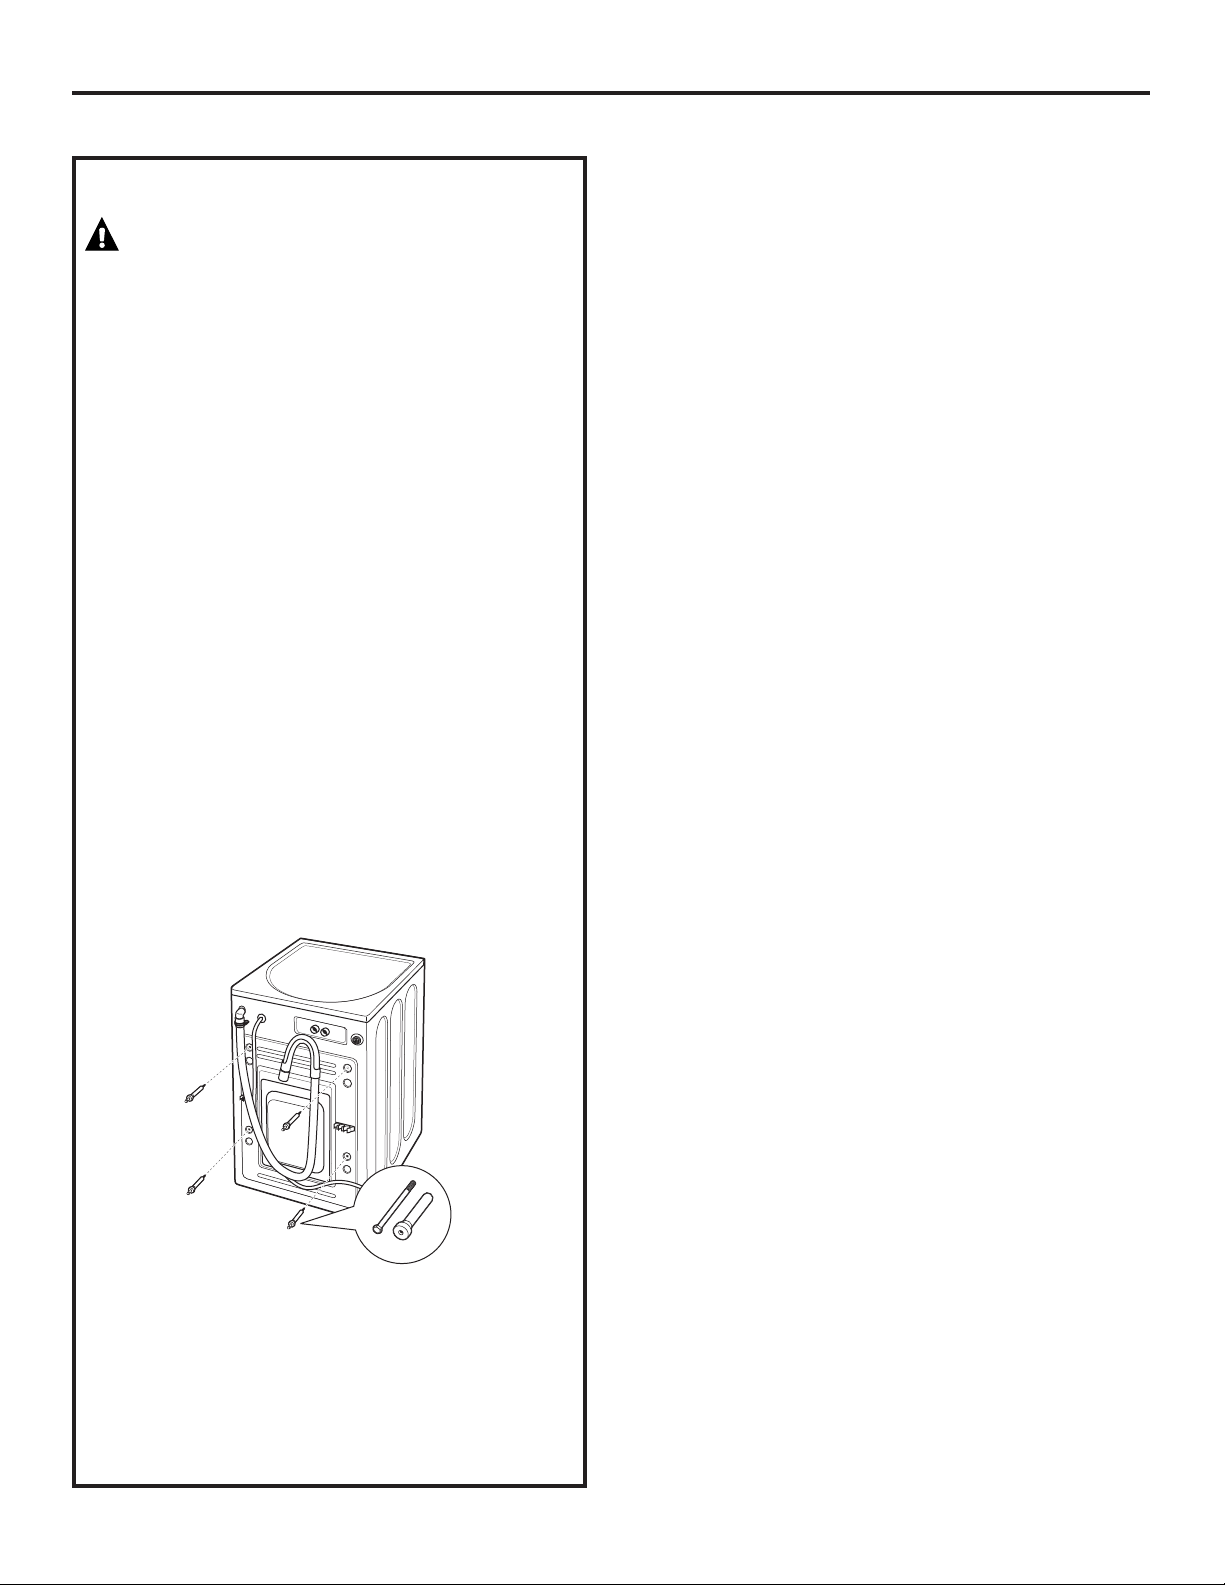
6. Remove the following from the back side of the washer:
4 bolts
4 plastic spacers (including rubber grommets)
4 power cord retainers
7. Remove the shipping bolt. Insert plug into shipping
bolt hole.
NOTE: Failure to remove the shipping braces can cause
the washer to become severely unbalanced.
Save all bolts for future use.
NOTE: If you must transport the washer at a later date,
you must reinstall the shipping support hardware to prevent
shipping damage. Keep the hardware in the plastic bag
provided.
Installation Instructions
18
Page 19
19
Installation Instructions
ELECTRICAL REQUIREMENTS
CIRCUIT – Individual, properly polarized and grounded
15-amp branch circuit fused with 15-amp time-delay fuse
or circuit breaker.
POWER SUPPLY – 2-wire, with ground, 120-volt,
single-phase, 60-Hz, Alternating Current.
OUTLET RECEPTACLE – Properly
grounded 3-prong receptacle to be
located so the power supply cord
is accessible when the washer is
in an installed position.
WARNING: Improper connection of the
equipment grounding conductor can result in a risk
of electrical shock. Check with a licensed electrician
if you are in doubt as to whether the appliance is
properly grounded.
1. The washer MUST be grounded. In the event of
malfunction or breakdown, grounding will reduce
the risk of electrical shock by providing a path of least
resistance for electrical current.
2. Since your washer is equipped with a power supply
cord having an equipment-grounding conductor and
a grounding plug, the plug MUST be plugged into an
appropriate, copper-wired receptacle that is properly
installed and grounded in accordance with all local
codes and ordinances or in the absence of local codes,
with the National Electrical Codes, ANSI/NFPA 70 (latest
edition). If in doubt, call a licensed electrician. DO NOT
cut off or alter the grounding prong on the power supply
cord. In situations where a two-slot receptacle is present,
it is the owner’s responsibility to have a licensed
electrician replace it with a properly grounded
three-prong grounding-type receptacle.
Read these instructions completely
and carefully.
GROUNDING REQUIREMENTS
WATER SUPPLY REQUIREMENTS
Hot and cold water faucets MUST be installed within
42 inches (107 cm) of your washer’s water inlet. The faucets
MUST be 3/4″ (1.9 cm) garden hose-type so inlet hoses can
be connected. Water pressure MUST be between 10 and 120
pounds per square inch. Your water department can advise
you of your water pressure. The hot water temperature
should be set to deliver water at 120° to 140°F (48°–60°C)
to provide proper Automatic Temperature Control (ATC)
performance.
NOTE: A water softener is recommended to reduce buildup
of scale inside the steam generator if the home water supply
is very hard.
DRAIN REQUIREMENTS
1. Drain capable of eliminating 17 gals (64.3 L)
per minute.
2. A standpipe diameter of 1 1/4″ (3.18 cm) minimum.
3. The standpipe height above the floor should be:
Minimum height: 24″ (61 cm)
Maximum height: 96″ (244 cm)
NOTE: The drain hose attached to the washer can reach
a 58″ (147 cm) high standpipe. For a higher standpipe,
contact an authorized parts distributor.
BACK
WARNING—TO REDUCE THE RISK OF
FIRE, ELECTRICAL SHOCK AND PERSONAL INJURY:
• DO NOT USE AN EXTENSION CORD OR AN ADAPTER
PLUG WITH THIS APPLIANCE.
Washer must be electrically grounded in accordance
with local codes and ordinances, or in the absence
of local codes, in accordance with the NATIONAL
ELECTRICAL CODE, ANSI/NFPA NO. 70.
96”
(244 cm)
Max.
24”
(61 cm)
Min.
Page 20
INSTALLING THE WASHER
1. Run some water from the hot and cold faucets to flush
the water lines and remove particles that might clog
the water valve screens.
2. Remove the inlet hoses from the plastic bag.
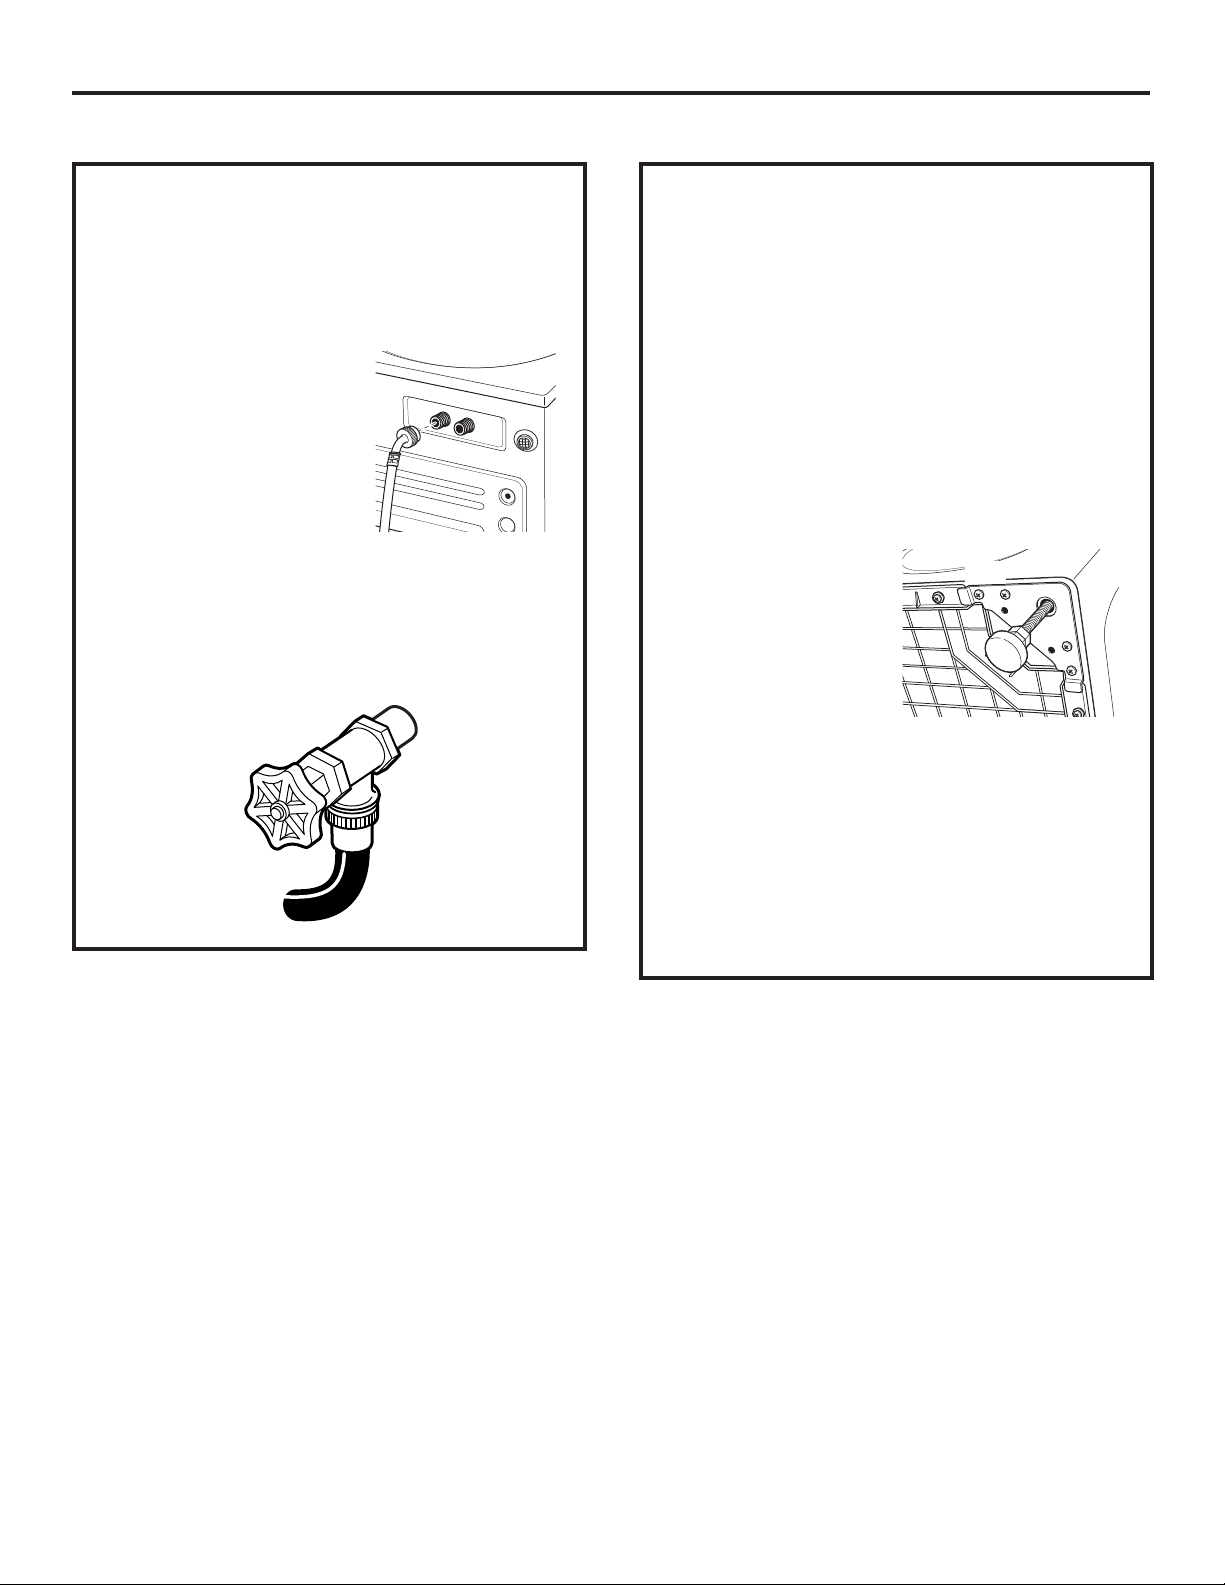
3. (90° elbow end)
Carefully connect the inlet
hose marked HOT to the
outside “H” outlet of the
water valve. Tighten by hand,
then tighten another 2/3 turn
with pliers. Carefully connect
the other inlet hose to the
inside “C” outlet of the water
valve. Tighten by hand; then
tighten another 2/3 turn with pliers. Do not crossthread
or over-tighten these connections.
4. Connect the inlet hose ends to the HOT and COLD water
faucets tightly by hand, then tighten another 2/3 turn
with pliers. Turn the water on and check for leaks.
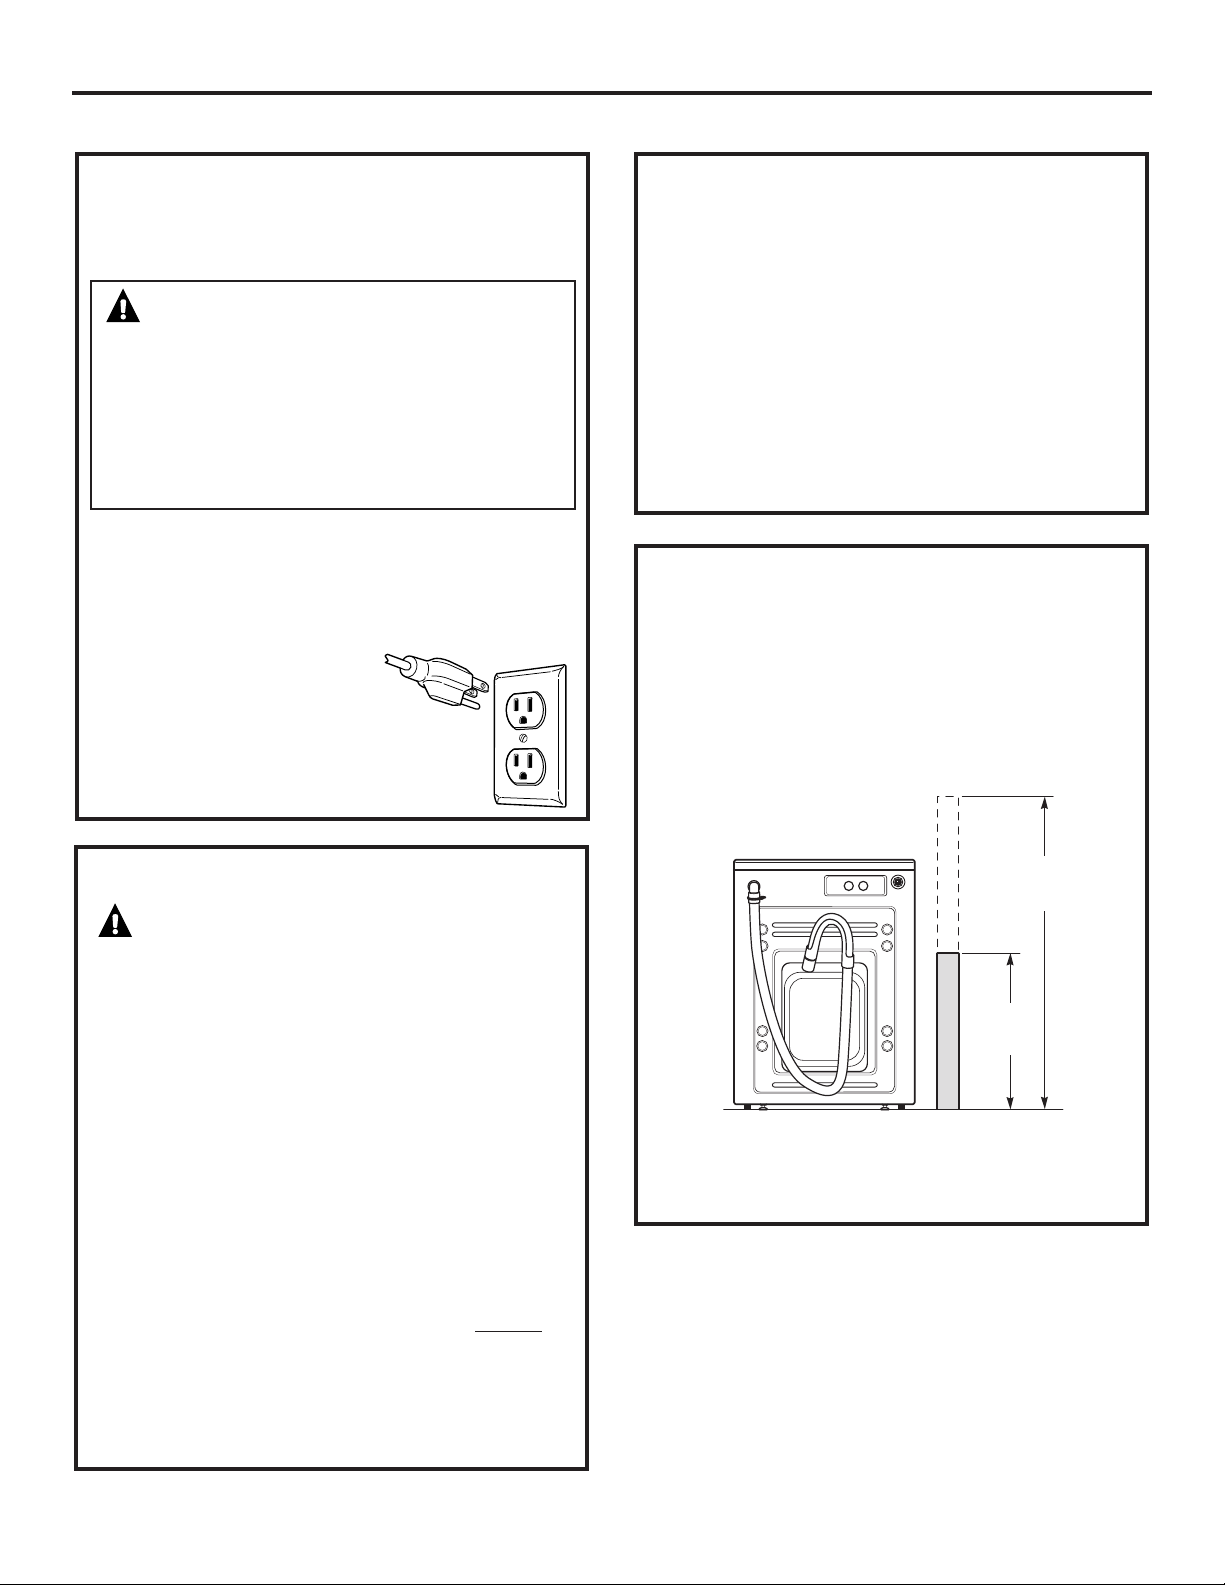
5. Carefully move the washer to its final location. Gently rock
the washer into position. It is important not to damage
the rubber leveling legs when moving your washer
to its final location. Damaged legs can increase washer
vibration. It may be helpful to spray window cleaner on
the floor to help move your washer into its final position.
NOTE: To reduce vibration, ensure that all four rubber
leveling legs are firmly touching the floor. Push and
pull on the back right and then back left of your
washer.
NOTE: Do not use the dispenser drawer or door to lift
the washer.
NOTE: If you are installing into a drain pan, you can use
a 24-inch long 2x4 to lever the washer into place.
6. With the washer in its
final position, place
a level on top of the
washer (if the washer
is installed under a
counter, the washer
should not be able to
rock). Adjust the front
leveling legs up or down to ensure the washer
is resting solidly. Turn the lock nuts on each leg
up toward the base of the washer and snug with
a wrench.
NOTE: Keep the leg extension at a minimum to prevent
excessive vibration. The farther out the legs are
extended, the more the washer will vibrate.
If the floor is not level or is damaged, you may have
to extend the rear leveling legs.
20
Installation Instructions
Page 21
21
Installation Instructions
INSTALLING THE WASHER
(cont.)
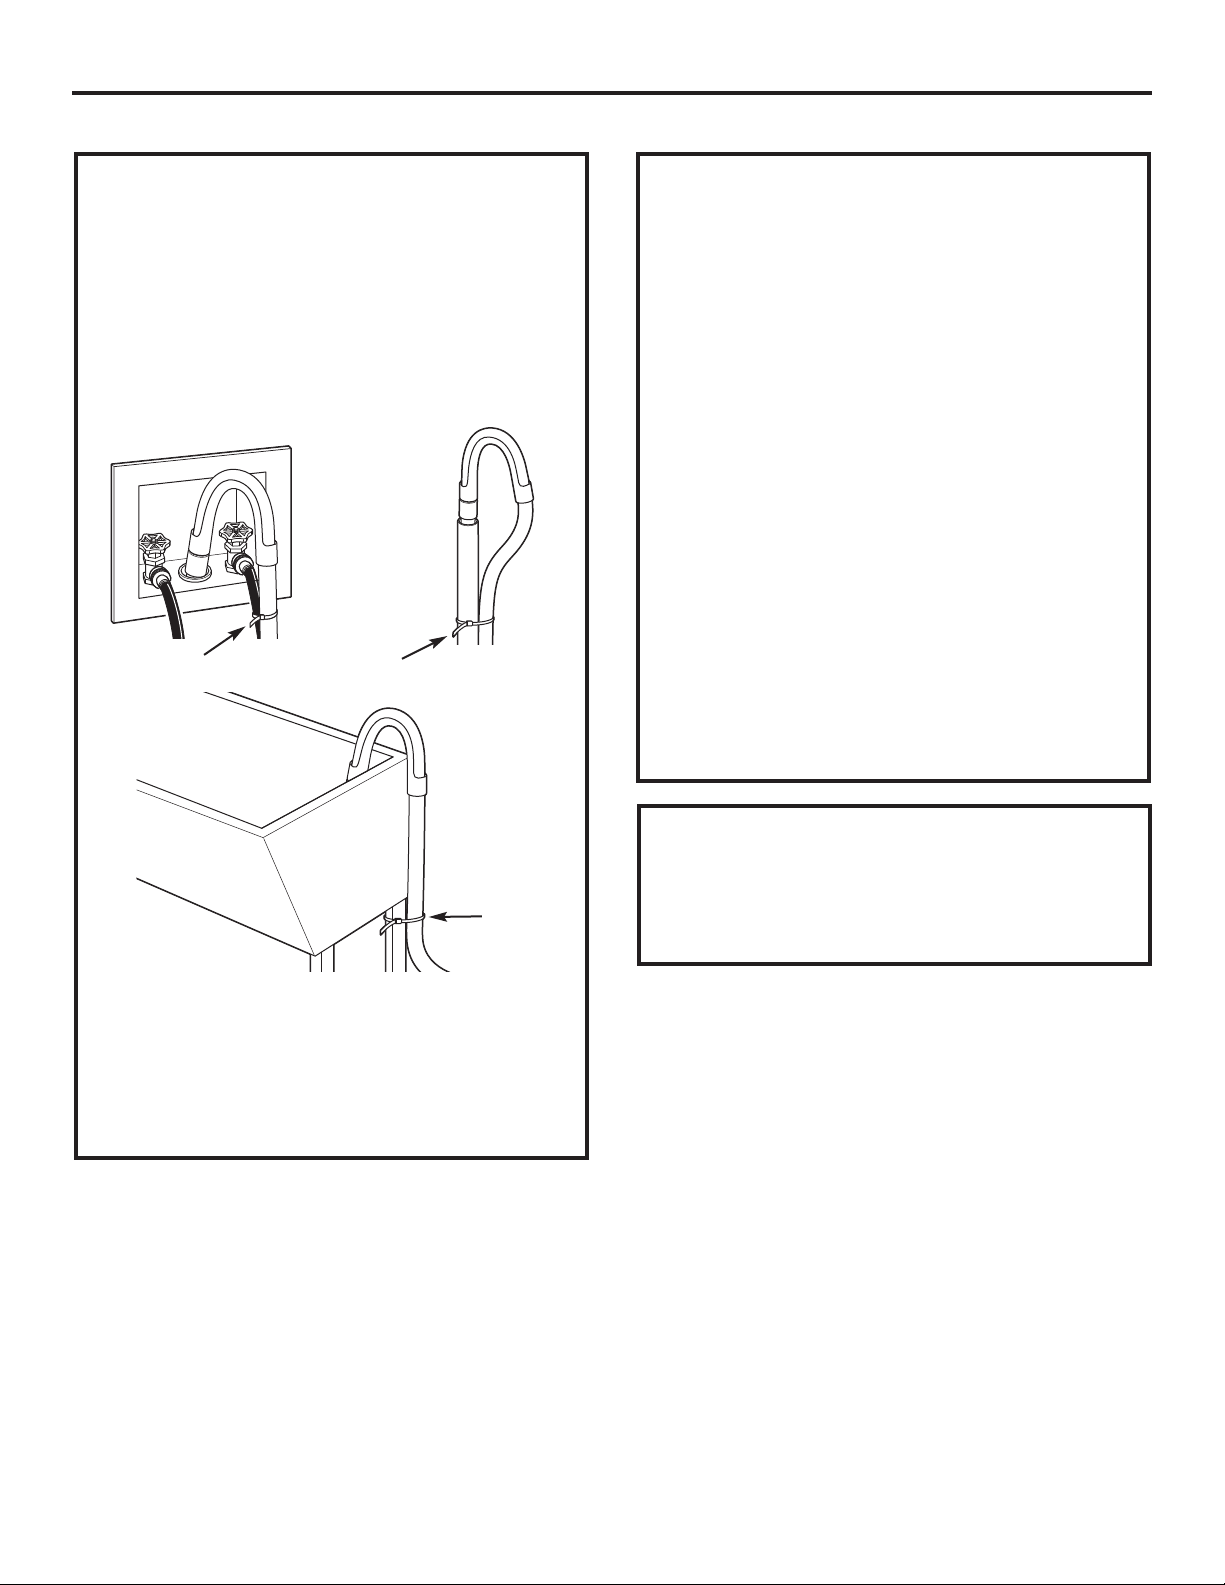
7. Attach U-shaped hose guide to the end of the drain
hose. Place the hose in a laundry tub or standpipe
and secure it with the cable tie provided in the
enclosure package.
NOTE: If the drain hose is placed in a standpipe without
forming a U shape, a siphoning action could occur. There
must be an air gap around the drain hose. A snug hose
fit can also cause a siphoning action.
8. Plug the power cord into a grounded outlet.
NOTE: Check to be sure the power is off at the circuit
breaker/fuse box before plugging the power cord into
an outlet.
9. Turn on the power at the circuit breaker/fuse box.
10. Read the rest of this Owner’s Manual. It contains
valuable and helpful information that will save you
time and money.
11. Before starting the washer, check to make sure:
❏ Main power is turned on.
❏ The washer is plugged in.
❏ The water faucets are turned on.
❏ The unit is level and all four leveling legs are firmly
on the floor.
❏ The shipping support hardware is removed
and saved.
❏ The drain hose is properly tied up.
❏ There are no leaks at the faucet, drain line
or washer.
12. Run the washer through a complete cycle.
Check for water leaks and proper operation.
13. If your washer does not operate, please review
the Before You Call For Service section before
calling for service.
14. Place these instructions in a location near the washer
for future reference.
Cable Tie
Cable Tie
Cable Tie
If replacement parts are needed for your washer, they can
be ordered in the United States by visiting our Website
at GEAppliances.com or by calling 800.GE.CARES. In
Canada, visit geappliances.ca or call 1.800.561.3344.
REPLACEMENT PARTS
Page 22
Consumer Support Troubleshooting Tips
Operating Instructions
Safety Instructions
Installation
Instructions
Before you call for service…
22
Troubleshooting Tips
Save time and money! Review the charts on the
following pages first and you may not need to call
for service.
Problem Possible Cause What To Do
Not spinning or agitating Drain hose is kinked or • Straighten drain hose and make sure washer is not
improperly connected sitting on it.
Household drain may • Check household plumbing. You may need to call
be clogged a plumber.
Drain hose siphoning; drain hose • Ensure there is an air gap between hose and drain.
pushed too far down the drain
Washer pump filter may • Clean Pump Filter – Open the pump access door (use a coin)
be clogged and remove the pump filter by turning it counterclockwise and
pulling out. Clean the filter, removing all loose debris, and put filter
back in place.
Load is out of balance • Redistribute clothes and run drain & spin or rinse & spin.
• Increase load size if washing small load containing heavy
and light items.
Leaking water Door gasket is damaged • Check to see if gasket is seated and not torn. Objects
left in pockets may cause damage to the washer (nails,
screws, pens, pencils).
Door gasket not damaged • Water may drip from the door when the door is opened.
This is a normal operation.
Check back left of washer • If this area is wet, you have oversudsing condition.
for water Use less detergent.
Fill hoses or drain hose is • Make sure hose connections are tight at washer and
improperly connected faucets and make sure end of drain hose is correctly
inserted in and secured to drain facility.
Household drain may • Check household plumbing. You may need to call
be clogged a plumber.
Not draining Drain hose is kinked or • Straighten drain hose and make sure washer is not
improperly connected sitting on it.
Household drain may • Check household plumbing. You may need to call
be clogged a plumber.
Drain hose siphoning; drain hose • Ensure there is an air gap between hose and drain.
pushed too far down the drain
Washer pump filter may • Clean Pump Filter – Open the pump access door (use a coin)
be clogged and remove the pump filter by turning it counterclockwise and
pulling out. Clean the filter, removing all loose debris, and put filter
back in place.
Not spinning Drain hose is kinked or • Straighten drain hose and make sure washer is not sitting on it.
improperly connected
Household drain may • Check household plumbing. You may need to call a plumber.
be clogged
Drain hose siphoning; drain hose • Ensure there is an air gap between hose and drain.
pushed too far down the drain
Washer pump filter may • Clean Pump Filter – Open the pump access door (use a coin)
be clogged and remove the pump filter by turning it counterclockwise and
pulling out. Clean the filter, removing all loose debris, and put filter
back in place.
Load is out of balance • Redistribute clothes and run drain & spin or rinse & spin.
• Increase load size if washing small load containing heavy
and light items.
Motor is overheated • Washer motor will stop if it becomes overheated. It will
automatically restart after a cool-down period of up to
2 hours (if washer has not been manually turned off).
Door is open • Make sure door is closed.
Page 23
Problem Possible Cause What To Do
Incomplete cycle or timer Drain hose is kinked or • Straighten drain hose and make sure washer is not
not advancing improperly connected sitting on it.
Household drain may • Check household plumbing. You may need to call
be clogged a plumber.
Drain hose siphoning; drain hose • Ensure there is an air gap between hose and drain.
pushed too far down the drain
Washer pump filter may • Clean Pump Filter – Open the pump access door (use a coin)
be clogged and remove the pump filter by turning it counterclockwise and
pulling out. Clean the filter, removing all loose debris, and put filter
back in place.
Automatic load redistribution • Remaining time display has changed as the machine has
redistributed the load once or twice. This is normal operation.
Do nothing; the machine will finish the wash cycle.
Loud or unusual noise; Cabinet moving • Washer is designed to move 1/4″ to reduce forces
vibration or shaking transmitted to the floor. This movement is normal.
All rubber leveling legs are not • Push and pull on the back right and then back left of your
firmly touching the floor washer to check if it is level. If the washer is uneven, adjust
the rubber leveling legs so they are all firmly touching the
floor. Your installer should correct this problem.
Unbalanced load • Open door and manually redistribute load. To check
machine, run rinse and spin with no load. If normal,
unbalance was caused by load.
Whistling • SteamAssist or SteamREFRESH is selected. This is normal
operation for the selected steam modes.
Clothes too wet Drain hose is kinked or • Straighten drain hose and make sure washer is not
improperly connected sitting on it.
Household drain may • Check household plumbing. You may need to call
be clogged a plumber.
Drain hose siphoning; drain hose • Ensure there is an air gap between hose and drain.
pushed too far down the drain
Washer pump filter may • Clean Pump Filter – Open the pump access door (use a coin)
be clogged and remove the pump filter by turning it counterclockwise and
pulling out. Clean the filter, removing all loose debris, and put filter
back in place.
Load is out of balance • Redistribute clothes and run drain & spin or rinse & spin.
• Increase load size if washing small load containing heavy
and light items.
No power/washer not Drain hose is kinked or • Straighten drain hose and make sure washer is not
working or dead improperly connected sitting on it.
Household drain may • Check household plumbing. You may need to call
be clogged a plumber.
Drain hose pushed too far • Ensure there is an air gap between hose and drain.
down the drain
Washer pump filter may • Clean Pump Filter – Open the pump access door (use a coin)
be clogged and remove the pump filter by turning it counterclockwise and
pulling out. Clean the filter, removing all loose debris, and put filter
back in place.
Washer is unplugged • Make sure cord is plugged securely into a working outlet.
Water supply is turned off • Turn both hot and cold faucets fully on.
Circuit breaker/fuse is • Check house circuit breakers/fuses. Replace fuses or
tripped/blown reset breaker. Washer should have separate outlet.
Controls are not set properly • Hold START/PAUSE button to start cycle.
Automatic self system checks • First time the washer is plugged in, automatic checks
occur. It may take up to 20 seconds before you can use
your washer. This is normal operation.
23
Consumer SupportTroubleshooting TipsOperating Instructions
Safety Instructions
Installation
Instructions
GEAppliances.com
Page 24

24
Problem Possible Cause What To Do
Water does not enter Automatic self system checks • After START is pressed, the washer does several system
washer or enters slowly
checks. Water will flow several seconds after
START
is
pressed.
Water supply is turned off • Turn on both hot and cold faucets fully.
Water valve screens are •
Turn off the water source and remove the water connection
stopped up
hoses from the upper back of the washer. Use a brush or
toothpick to clean the screens in the machine. Reconnect
the hoses and turn the water back
on.
Snags, holes, tears, rips Pens, pencils, nails, screws or • Remove loose items from pockets.
or excessive wear other objects left in pockets
Pins, snaps, hooks, sharp • Fasten snaps, hooks, buttons and zippers.
buttons, belt buckles, zippers
and sharp objects left in pockets
Wrinkling Improper sorting • Avoid mixing heavy items (like work clothes) with
light items (like blouses).
Overloading • Load your washer so clothes have enough room
to move freely.
Incorrect wash cycle • Match Cycle selection to the type of fabric you are
washing (especially for easy care loads).
Repeated washing in • Wash in warm or cold water.
water that is too hot
Grayed or yellowed Not enough detergent • Use correct amount of detergent.
clothes
Not using HE (high-efficiency) • Use HE detergent.
detergent
Hard water • Use hottest water safe for fabric.
• Use a water conditioner like Calgon brand or install
a water softener.
Water is not hot enough • Make sure water heater is delivering water at
120°–140°F (48°–60°C).
Detergent is not • Try a liquid detergent.
dissolving
Dye transfer • Sort clothes by color. If fabric label states wash separately,
unstable dyes may be indicated.
Colored spots Incorrect use of fabric • Check fabric softener package for instructions and follow
softener directions for using dispenser.
Dye transfer • Sort whites or lightly colored items from dark colors.
• Promptly remove wash load from washer.
Water temperature Water supply is improperly • Make sure hoses are connected to correct faucets.
is incorrect connected
House water heater is • Make sure house water heater is delivering water
not set properly at 120°–140°F (48°–60°C).
Bad odor inside Washer unused for a long time • Leave the door slightly open for the water to air dry.
your washer or not using recommended
• Run a BasketClean cycle (found in the Specialty cycle
quality of HE detergent
Menu) with 1 cup of bleach. See the Care and Cleaning/
General Maintenance section.
Slight variation This is normal • Due to the metallic properties of paint used for this unique
in metallic color product, slight variations of color may occur due to viewing
angles and lighting conditions.
Door unlocks slowly This is normal • During SteamASSIST and SteamREFRESH, access
to the tub is delayed to reduce exposure to steam.
Before you call for service…
Consumer Support Troubleshooting Tips
Operating Instructions Safety Instructions
Installation
Instructions
Page 25
For The Period Of: We Will Replace:
GE Washer Warranty. (For customers in the United States)
All warranty service provided by our Factory Service Centers,
or an authorized Customer Care
®
technician. To schedule service,
on-line, visit us at GEAppliances.com, or call 800.GE.CARES
(800.432.2737). Please have serial number and model number
availa ble when calling for service.
This warranty is extended to the original purchaser and any succeeding owner for products purchased for home use
within the USA. If the product is located in an area where service by a GE Authorized Servicer is not available, you may
be responsible for a trip charge or you may be required to bring the product to an Authorized GE Service location for
service. In Alaska, the warranty excludes the cost of shipping or service calls to your home.
Some states do not allow the exclusion or limitation of incidental or consequential damages. This warranty gives you
specific legal rights, and you may also have other rights which vary from state to state. To know what your legal rights
are, consult your local or state consumer affairs office or your state’s Attorney General.
■ Service trips to your home to teach you how to use
the product.
■ Improper installation, delivery or maintenance.
■ Failure of the product if it is abused, misused, or used for
other than the intended purpose or used commercially.
■ Damage after delivery.
■ Replacement of house fuses or resetting of circuit
breakers.
■ Damage to the product caused by accident, fire, floods
or acts of God.
■ Incidental or consequential damage caused by possible
defects with this appliance.
■ Product not accessible to provide required service.
What Is Not Covered (in the United States):
Warrantor: General Electric Company. Louisville, KY 40225
Staple your receipt here.
Proof of the original purchase
date is needed to obtain service
under the warranty.
One Year Any part of the washer which fails due to a defect in materials or workmanship. During this
From the date of the limited one-year warranty, GE will also provide, free of charge, all labor and related service
original purchase costs to replace the defective part.
Second through The suspension strut assembly, motor and motor controller if any of these parts should fail due
Fifth Year to a defect in materials or workmanship. GE will also replace the washer top panel, front panel or
From the date of the service panel if they should rust under operating conditions. During this additional three-year
original purchase limited warranty, you will be responsible for any labor or related service costs.
Second through The outer tub and driven pulley if any of these parts should fail due to a defect in materials
Tenth Year or workmanship. During this additional eight-year limited warranty, you will be responsible
From the date of the for any labor or related service costs.
original purchase
Lifetime of Product The washer basket if it should fail due to a defect in materials or workmanship. During this
From the date of the product lifetime limited warranty, you will be responsible for any labor or related service costs.
original purchase
EXCLUSION OF IMPLIED WARRANTIES—Your sole and exclusive remedy is product repair as provided in this Limited
Warranty. Any implied warranties, including the implied warranties of merchantability or fitness for a particular
purpose, are limited to one year or the shortest period allowed by law.
25
Consumer Support
Troubleshooting Tips
Operating Instructions
Safety Instructions
Installation
Instructions
Page 26
26
GE Washer Warranty. (For customers in Canada)
All warranty service provided by our Factory Service Centres or an authorized
technician. For service, call 1.800.561.3344.
Please have serial number and model number available when calling for service.
■ Service trips to your home to teach you how to use
the product.
■ Improper installation, delivery or maintenance.
■ Failure of the product if it is abused, misused, or used for
other than the intended purpose or used commercially.
■ Damage after delivery.
■ Replacement of house fuses or resetting of circuit
breakers.
■ Damage to the product caused by accident, fire, floods
or acts of God.
■ Incidental or consequential damage caused by possible
defects with this appliance.
■ Product not accessible to provide required service.
What Is Not Covered (in Canada):
Warrantor: MABE CANADA INC.
WARRANTOR IS NOT RESPONSIBLE FOR CONSEQUENTIAL DAMAGES.
This warranty is extended to the original purchaser and any succeeding owner for products purchased in
Canada for home use within Canada. In-home warranty service will be provided in areas where it is available
and deemed reasonable by Mabe to provide.
EXCLUSION OF IMPLIED WARRANTIES—Your sole and exclusive remedy is product repair as provided in this Limited
Warranty. Any implied warranties, including the implied warranties of merchantability or fitness for a particular
purpose, are limited to one year or the shortest period allowed by law.
For The Period Of: We Will Replace:
One Year Any part of the washer which fails due to a defect in materials or workmanship. During this
From the date of the limited one-year warranty, GE will also provide, free of charge, all labour and related
original purchase service costs to replace the defective part.
Second through The suspension strut assembly, motor and motor controller if any of these parts should fail due
Fifth Year to a defect in materials or workmanship. GE will also replace the washer top panel, front panel or
From the date of the service panel if they should rust under operating conditions. During this additional three-year
original purchase limited warranty, you will be responsible for any labour or related service costs.
Second through The outer tub and driven pulley if any of these parts should fail due to a defect in materials
Tenth Year or workmanship. During this additional eight-year limited warranty, you will be responsible
From the date of the for any labour or related service costs.
original purchase
Lifetime of Product The washer basket if it should fail due to a defect in materials or workmanship. During this
From the date of the product lifetime limited warranty, you will be responsible for any labour or related service costs.
original purchase
Consumer Support Troubleshooting Tips
Operating Instructions
Safety Instructions
Installation
Instructions
Page 27

Mesures de sécurité . . . . . . . . . . . . 28, 29
Fonctionnement
Accessoires disponibles . . . . . . . . . . . . . . . . .40
Caractéristiques . . . . . . . . . . . . . . . . . . . . . . . .36
Chargement et utilisation
de la laveuse . . . . . . . . . . . . . . . . . . . . . . . .37–40
Panneau de contrôle . . . . . . . . . . . . . . . . . . . 30
Réglage des contrôles . . . . . . . . . . . . . . .31–35
Réponse à la demande . . . . . . . . . . . . . . . . . .41
Installation . . . . . . . . . . . . . . . . . . . . . . .42–47
Déballage de votre laveuse . . . . . . . . . . . . .44
Dimensions . . . . . . . . . . . . . . . . . . . . . . . . . . . . .43
Emplacement de votre laveuse . . . . . . . . .43
Exigences d’alimentation d’eau . . . . . . . . . .45
Exigences de mise à la terre . . . . . . . . . . . . .45
Exigences de vidange . . . . . . . . . . . . . . . . . . .45
Exigences électriques . . . . . . . . . . . . . . . . . . .45
Installation de la laveuse . . . . . . . . . . . .46, 47
Pièces de rechange . . . . . . . . . . . . . . . . . . . . .47
Préparation à l’installation de
votre laveuse . . . . . . . . . . . . . . . . . . . . . . . . . .42
Conseils de dépannage . . . . . . . . . .48–51
Soutien au consommateur
Garantie (Canada) . . . . . . . . . . . . . . . . . . . . . . 53
Soutien au consommateur . . . . . . . . . . . . . 54
Inscrivez ici les numéros
de modèle et de série :
Modèle # ________________
Série # __________________
Vous les trouverez sur une etiquette
placée du côté de la laveuse.
En qualité de partenaire ENERGY
STAR®, GE a trouvé que ce produit
rencontre les directives d’ENERGY
STAR®en matière d’efficience
énergétique.
Conseils de dépannage
Fonctionnement
Mesures de sécurité
Installation
Soutien au
consommateur
27
Page 28

■ Installez ou placez votre laveuse dans un endroit où
elle n’est pas exposée à des températures inférieures
à zéro degré centigrade ou à du mauvais temps.
Cela risque de causer des dommages permanents
et d’annuler la garantie.
■ Mettez bien à la terre la laveuse, conformément à tous
les codes et les ordonnances en vigueur. Suivez tous
les détails des instructions d’installation.
RENSEIGNEMENTS IMPORTANTS EN MATIÈRE DE SÉCURITÉ.
LISEZ TOUTES LES INSTRUCTIONS AVANT D’UTILISER VOTRE
LAVEUSE.
AVERTISSEMENT!
Pour votre sécurité, vous devez suivre les instructions contenues
dans ce manuel, pour réduire le danger d’incendie ou d’explosion,
de secousse électrique et pour empêcher les dommages matériels,
les blessures corporelles ou les pertes de vie humaine.
Les instructions contenues dans ce manuel et dans tous les autres
documents qui accompagnent la laveuse ne couvrent pas toutes
les situations ou conditions possibles qui peuvent se produire. Vous
devez faire preuve de prudence et utiliser des méthodes sécuritaires
pour installer, faire fonctionner et entretenir tout appareil
électroménager.
SÉCURITÉ DU CHAUFFE-EAU
Dans certaines conditions, un chauffe-eau peut produire de l’hydrogène gazeux si on ne l’a pas utilisé pendant plus
de deux semaines. Dans ces conditions, l’hydrogène gazeux peut exploser.
Si vous n’avez pas utilisé le chauffe-eau pendant deux semaines ou plus, empêchez tout dommage ou blessure
possible en ouvrant tous les robinets d’eau chaude et en les laissant couler pendant plusieurs minutes. Faites cela
avant d’utiliser tout appareil électroménager branché au système d’eau chaude. Cette procédure simple permet
à toute accumulation d’hydrogène gazeux de s’échapper. Comme ce gaz est inflammable, ne fumez jamais ou
n’utilisez jamais de flamme vive ou d’appareil électroménager pendant cette procédure.
BONNE INSTALLATION
Vous devez bien installer et placer cette laveuse, conformément aux instructions d’installation, avant de l’utiliser.
■ Ne conservez aucun materiau combustible, comme
de la charpie, du papier, des chiffons ou des produits
chimiques, en dessous ou à proximité de votre
laveuse.
■ Ne laissez jamais la porte de la laveuse ouverte. Une
porte ouverte est, pour des enfants, une invitation à
se pendre à la porte ou à se cacher dans la laveuse.
■ Vous devez surveiller constamment votre laveuse
si vous l’utilisez à proximité d’enfants ou si des
enfants l’utilisent. Ne permettez jamais à des
enfants de jouer avec, ou dans cet appareil,
ou avec tout autre appareil électroménager.
VOTRE AIRE DE LESSIVE
28
Soutien au
consommateur
Conseils de dépannage
Fonctionnement
Mesures de sécurité
Installation
Page 29

29
Soutien au
consommateur
Conseils de dépannage
Fonctionnement
Mesures de sécurité
Installation
■ N’essayez jamais d’ouvrir votre laveuse quand
elle fonctionne. Attendez que la machine soit
complètement arrêtée pour ouvrir la porte.
■ Ne mélangez jamais d’eau de javel au chlore
avec de l’ammoniaque ou des acides comme
du vinaigre et/ou de l’antirouille. Le mélange
de différents produits chimiques peut produire
des gaz toxiques qui peuvent causer la mort.
■ Ne lavez jamais ou ne faites jamais sécher des
articles qui ont été nettoyés, lavés, trempés ou
mouillés dans des substances combustibles ou
explosives (comme la cire, l’huile, la peinture,
l’essence, les substances dégraissantes, les
solvants de nettoyage à sec, le pétrole, etc.) qui
peuvent brûler ou exploser. N’ajoutez jamais ces
substances à l’eau de lavage. N’utilisez jamais ou
ne placez jamais ces substances à proximité de
votre laveuse ou de votre sécheuse pendant leur
fonctionnement.
■ La procédure de lessivage peut réduire la
résistance aux flammes des tissus. Pour éviter
cela, suivez soigneusement les instructions de
lavage et de soins du fabricant de vêtements.
■ Pour réduire le risque de secousse électrique,
débranchez votre laveuse de sa prise murale ou
débranchez la laveuse au niveau du panneau de
distribution de l’immeuble en enlevant le fusible
ou en faisant basculer le disjoncteur, avant
d’entreprendre tout entretien ou nettoyage.
NOTE : Vous ne débranchez pas votre appareil
de son alimentation électrique en appuyant
sur le bouton POWER (alimentation).
■ N’essayez jamais de faire fonctionner votre
laveuse si elle est endommagée, si elle ne
fonctionne pas bien, si elle est partiellement
démontée ou si elle a des pièces manquantes
ou cassées, en particulier sa fiche ou son
cordon d’alimentation endommagé.
■ Ne faites jamais claquer la porte pour la fermer.
N’essayez jamais de forcer sur la porte pour
l’ouvrir quand elle est verrouillée (le voyant
LOCKED [verrouillée] est allumé). Vous risquez
d’endommager votre laveuse.
■ Votre laveuse est équipée d’un mécanisme de
protection contre la surintensité. Son moteur
s’arrête s’il chauffe trop. Votre laveuse se remet
automatiquement en marche après une période
de refroidissement qui peut atteindre 2 heures,
si vous n’avez pas arrêté à la main votre laveuse
pendant ce temps.
QUAND VOUS UTILISEZ VOTRE LAVEUSE
■ Fermez les robinets d’eau pour réduire la pression
sur les tuyaux et les robinets et pour réduire la
fuite s’il se produit une cassure ou une rupture.
Vérifiez l’état des tuyaux d’alimentation; vous
devez les remplacer tous les 5 ans.
■ Avant de jeter une laveuse ou de la mettre hors-
service, enlevez sa porte pour empêcher les
enfants de se cacher dedans.
■ N’essayez jamais de réparer ou de remplacer
une pièce de votre laveuse, à moins que ce ne soit
spécifiquement recommandé dans ce Manuel
du propriétaire ou dans des instructions de
réparations par l’utilisateur publiées, que vous
comprenez et pour lesquelles vous possédez
les compétences nécessaires.
■ Ne faussez jamais les contrôles.
QUAND VOUS NE L’UTILISEZ PAS
LISEZ ET SUIVEZ SOIGNEUSEMENT CES
RENSEIGNEMENTS EN MATIÈRE DE SÉCURITÉ.
CONSERVEZ CES INSTRUCTIONS
N’utilisez
votre
laveuse
qu’aux fins
prévues
décrites
dans ce
manuel du
propriétaire.
www.electromenagersge.ca
Page 30

Le panneau de contrôle de votre laveuse.
30
Vous pouvez repérer le numéro de modèle sur l’étiquette figurant sur le côté de la laveuse.
Soutien au
consommateur
Conseils de dépannage
Fonctionnement
Mesures de sécurité
Installation
Power (alimentation)
Appuyez pour activer l’affichage. Si l’affichage est actif, appuyez pour mettre la laveuse en mode d’attente.
NOTE : Vous ne débranchez pas votre appareil de l’alimentation électrique en appuyant sur POWER (alimentation).
1
AVERTISSEMENT! Pour réduire le risque d’incendie, d’électrocution ou de blessure
corporelle, veuillez lire les CONSIGNES DE SÉCURITÉ IMPORTANTES
avant de mettre cet appareil en service.
Démarrage rapide
Si l’écran est obscur, appuyez sur le bouton POWER
(alimentation) pour activer l’afficheur.
Appuyez sur le bouton
POWER (alimentation).
Sélectionnez le cycle de lavage
ou le cycle Steam Refresh
(Rafraîchissement à la vapeur).
(Des réglages par défaut sont établis
pour chaque lavage. Ces réglages
peuvent être modifiés. Consultez la section
Réglages des contrôles pour de plus amples informations).
Si vous avez choisi un cycle de lavage différent
de SPECIALTY CYCLE (Cycles particuliers),
appuyez sur le bouton START/PAUSE
(Marche/pause).
Si vous avez sélectionné SPECIALTY CYCLE, choisissez
entre Drain & Spin (Vidange & Essorage), Garments
(Vêtements), Bed and Bath (Literie et Salle de Bain),
Other Specialty (Autres cycles particuliers) et Basket
Clean (Nettoyage du panier) selon vos besoins
particuliers avant d’appuyer sur le bouton START/PAUSE
(Marche/Pause). Consultez la section Specialty Cycles
(Cycles Particuliers) pour de plus amples informations.
3
2
1
WPDH8900J, WPDH8910K – Laveuse à la vapeur Profile HA avec SmartDispense
™
WPDH8850J – Laveuse à la vapeur Profile HA
Page 31

Soutien au
consommateur
Conseils de dépannageFonctionnement
Mesures de sécurité
Installation
Réglage des contrôles. www.electromenagersge.ca
Cycles de lavage
Les cycles sont optimisés pour des catégories particulières de charges de lavage. Le tableau ci-dessous vous aidera
à trouver un réglage de lavage qui correspond à votre charge de lavage. Les pales élévatrices GentleClean
™
font
délicatement culbuter les vêtements dans la solution d’eau et de détergent pour les laver.
WHITES/HEAVY DUTY
Pour les cotonnades blanches, le linge de maison, les vêtements de travail et de jeux très
(BLANCS/INTENSIF)
à légèrement salés. L’option STEAM ASSIST (Aide vapeur) peut être utilisée avec ce cycle.
COLORS/NORMAL
Pour les cotonnades de couleur, le linge de maison, les vêtements de travail et de jeu très
(COULEURS/NORMAL)
à légèrement salés. L’option STEAM ASSIST (Aide vapeur) peut être utilisée avec ce cycle.
WRINKLE FREE (PERMA PRESS)
Pour articles à entretien facile et à pressage permanent.
(TISSUS INFROISSABLES [PRESS. PERM.])
L’option STEAM ASSIST (Aide vapeur) peut être utilisée avec ce cycle.
ACTIVE WEAR
Pour les vêtements de sports, d’exercices et certains vêtements sports. Leurs tissus
(VÊTEMENTS SPORT)
comprennent des fibres et des finitions modernes comme le spandex, les microfibres
et les fibres élastiques. L’option STEAM ASSIST (Aide vapeur) peut être utilisée avec ce cycle.
STEAM REFRESH Pour défroisser 1 à 5 articles en coton mélangé. Il ne s’agit pas d’un cycle de lavage, mais d’un cycle
(RAFRAÎCHISSEMENT permettant l’application de vapeur sur les vêtements. Sélectionnez le nombre de vêtements souhaités
À LA VAPEUR) à l’aide des touches fléchées, puis appuyez sur la touche ENTER (Entrée).
La laveuse émet un bip à la fin du cycle et continue à tourner pendant 30 minutes pour éviter que
les froissements ne se fixent. Appuyez sur START/PAUSE (Marche/pause) pour retirer les vêtements.
Si vos vêtements sont légèrement humides à la fin du cycle, éteindez les secs pendant 5 minutes
avant de les porter.
HANDWASH
Pour les articles étiquetés lavage à la main peu sales. La laveuse remue gentiment pour
(LAVAGE À MAIN)
imiter le lavage à la main.
DELICATES
Pour les tissus délicats peu ou normalement sales. La laveuse trempe et remue doucement
(DELICATE)
pendant le lavage et rinçage.
WASHABLE WOOL
Pour laver les produits lainiers lavables à la machine à condition que ces produits ils soient lavés
(LAINIER LAVABLE)
conformément aux instructions de l’étiquette du vêtement. En choisissant ce cycle, vous devez
utiliser un détergent approprié pour laver la laine.
SPEED WASH
Pour articles légèrement sales qu’il faut laver en vitesse. La durée du cycle est d’environ
(LAVAGE RAPIDE)
30 minutes, selon les options choisies.
RINSE & SPIN
Pour rincer rapidement les articles n’importe quand.
(RINÇAGE ET ESSORAGE)
SPECIALTY CYCLES
Pour vêtements particuliers nécessitant un traitement spécial.
(CYCLES PARTICULIERS)
2
Cycles particuliers
Une fois Specialty Cycle (Cycles particuliers) choisi, utilisez
les touches ▲ et ▼ pour défiler entre différentes options.
Appuyez sur ENTER (Entrée) pour sélectionner le cycle.
Appuyez sur BACK (Précédent) pour revenir au menu
précédent.
31
DRAIN &SPIN
(Vidange & essorage)
Vidangez & essorez
à tout moment.
GARMENTS
(VÊTEMENTS)
Coats (Manteaux)
Dress Shirts (Chemises habillées)
Hosiery/Bras
(Bas/Soutiens-gorge)
Jeans
Khakis (Kakis)
Sweaters (Chandails)
BED and BATH
(LIT et SALLE DE BAIN)
Blankets (cotton) (
Couvertures [coton])
Comforters (Douillettes)
Sheets (Draps)
Towels (Serviettes)
SPECIALIZED CYCLES
(CYCLES PARTICULIERS)
Athletic Shoes
(Chaussures athlétiques)
Energy Savings
(Économie d’énergie)
Fabric Refresh
(Revitalisant textile)
Fleece (Molleton)
Fragile Cottons (Cotons fragiles)
Performance Fabrics
(Tissus de performance)
Pet Bedding (Literie d’animaux)
Play Clothes (Vêtements de jeux)
Single Item Wash (Article unique)
Sleeping Bag (Sac de couchage)
Soak (Trempage)
Super Clean (Super propre)
Throw Rugs (Carpettes)
BASKET CLEAN
(NETTOYAGE DU PANIER)
Page 32

Soutien au
consommateur
Conseils de dépannage
Fonctionnement
Mesures de sécurité
Installation
Settings (Réglages)
Utilisez le bouton SETTINGS (Réglages) pour
régler les fonctions suivantes :
Communication avec la sécheuse :
Appuyez sur le bouton SETTINGS. Lorsque
le message « DRYER LINK » (Communication
avec la sécheuse) s’affiche, appuyez sur
ENTER (Entrée). À l’aide des touches fléchées
/ , choisissez ON (Marche) et appuyez
sur ENTER.
Une fois le cycle de lavage terminé,
la laveuse communiquera avec la sécheuse
dès l’ouverture de la porte ou sur simple
pression de n’importe quel bouton
du panneau de contrôle.
La laveuse affichera le message
« TRANSFERRING CYCLE INFORMATION
TO THE DRYER » (Transfert d’information
sur le cycle à la sécheuse) et la sécheuse
affichera « RECEIVING CYCLE INFORMATION
TO THE DRYER » (Réception d’information
sur le cycle par la sécheuse).
Pour communiquer avec la laveuse,
la sécheuse ne doit pas se trouver
en cours de cycle.
Si la laveuse démarre un nouveau cycle
avant que la sécheuse ait eu la possibilité
de communiquer avec elle, l’information
sera perdue.
Volume de fin de cycle :
Appuyez sur le bouton SETTINGS. Lorsque
« VOLUME » s’affiche, appuyez sur ENTER
(Entrée), puis choisissez « End of Cycle »
(Fin de cycle). À l’aide des touches fléchées
/ , sélectionnez High (Fort), Medium
(Modéré), Low (Faible) ou Off (Désactiver).
Sonorité des contrôles :
Appuyez sur le bouton SETTINGS,
puis sélectionnez « Volume ». Lorsque
« CONTROL SOUNDS » (Sonorité des
contrôles) s’affiche, appuyez sur ENTER.
À l’aide des touches fléchées / ,
sélectionnez High, Medium, Low ou Off.
Luminosité de l’affichage :
Appuyez sur le bouton SETTINGS. Lorsque
« DISPLAY BRIGHTNESS » (Luminosité de
l’affichage) s’affiche, appuyez sur ENTER.
À l’aide des touches fléchées / ,
sélectionnez High, Medium ou Low.
Dureté de l’eau (S’affiche seulement lorsque
l’accessoire SMART DISPENSER [Distributeur
intelligent] est connecté à la laveuse) :
Cette fonction règle la quantité de détersif
distribué automatiquement pour le SMART
DISPENSER. Consultez le Manuel du
propriétaire qui accompagne le SMART
DISPENSER pour les directives d’utilisation.
▼
▼
▼
▼
▼
▼
▼
▼
32
7
Soil Level (Niveau de saleté)
En changeant le niveau de saleté, vous augmentez ou diminuez la durée de lavage pour enlever divers montants de saleté.
Pour changer le niveau de saleté, appuyez sur le bouton SOIL LEVEL (niveau de saleté) jusqu’au réglage désiré. Vous pouvez choisir
entre Extra Light (très peu sale), Light (peu sale), Normal (normal) ou Heavy Soil (vraiment sale).
Spin Speed (Vitesse d’essorage)
En changeant la vitesse d’essorage, vous changez la vitesse de l’essorage final des cycles. Suivez toujours les instructions de l’étiquette
du vêtement pour changer la vitesse d’essorage.
Pour changer la vitesse d’essorage, appuyez sur le bouton SPIN SPEED (vitesse d’essorage) jusqu’au réglage désiré. Vous pouvez
choisir entre No Spin (Pas d’essorage), Low (Lent), Medium (Modéré), High (Rapide) ou Extra High (Très rapide). Les vitesses d’essorage
les plus rapides ne sont pas offertes pour certains cycles, comme le cycle délicats.
Les vitesses d’essorage plus rapides enlèvent plus d’eau des vêtements, et aident à réduire le temps de séchage, mais augmentent
également la possibilité de froisser certains tissus.
Wash Temp (Température de lavage)
Ajustez pour choisir la bonne température de l’eau pour le cycle de lavage. L’eau de prélavage et de rinçage est toujours froide pour
réduire l’utilisation d’énergie et diminuer la fixation des taches et les froissements.
Suivez l’étiquette du fabricant pour choisir la température de lavage.
Pour changer la température de lavage, appuyez sur le bouton WASH TEMP (température de lavage) jusqu’au réglage désiré.
Vous pouvez choisir entre Tap Cold (Froide du robinet), Cold (Froide), Warm (Tiède), Hot (Chaude) ou Sanitize (Hygiénique). La température
de lavage aseptisé n’est pas offerte pour certains cycles, comme le cycle délicats.
En choisissant la température de lavage
Sanitize
(Hygiénique), la machine à laver augmente la température de l’eau pour désinfecter
et tuer plus de 99 % de nombreuses bactéries courantes que l’on retrouve dans le lavage résidentiel. La température de lavage hygiénique
n’est disponible que pour le cycle de Whites/Heavy Duty (Blancs/Lavage intense). Pour de meilleurs résultats, choisissez le réglage
de lavage très sale en utilisant le réglage de température de lavage
Sanitize
(Hygiénique).
NOTE : Pendant les dix premières secondes du remplissage, l’eau est toujours froide. Cela aide à conditionner les tissus et empêche
la fixation des taches sur les vêtements.
START/PAUSE (Départ/pause)
Appuyez pour mettre en marche un cycle de lavage. Si la laveuse fonctionne, vous l’arrêtez en appuyant une fois et déverrouillez
la porte. Après avoir appuyer sur PAUSE (pause), il s’écoulera quelques secondes avant que la porte ne s’ouvre. Appuyez à nouveau
pour remettre en marche le cycle de lavage.
NOTE : En arrêtant la laveuse et en ne remettant pas en marche le cycle dans les 15 minutes qui suivent, vous annulez le cycle de lavage actuel.
NOTE : Dans certains cycles, la laveuse évacuera l’eau d’abord, puis déverrouillera la porte à la pause.
NOTE : La laveuse procède à des vérifications automatiques du système une fois que vous avez appuyé sur le bouton START. L’eau se mettra
à couler dans un délai de 45 secondes ou moins. Vous entendrez peut-être la porte se verrouiller et se déverrouiller avant que l’eau ne coule;
ceci est normal.
3
4
5
6
Réglage des contrôles.
Page 33

Soutien au
consommateur
Conseils de dépannageFonctionnement
Mesures de sécurité
Installation
www.electromenagersge.ca
Prewash (Pré-lavage)
Prélavage est un lavage supplémentaire
avant le lavage principal. Utilisez-le
pour les vêtements très sales ou pour les
vêtements dont l’étiquette recommande
un prélavage avant le lavage. Assurezvous d’ajouter du détergent à rendement
élevé ou le bon additif de lavage au
distributeur de prélavage.
La fonction de prélavage déclenche
les étapes suivantes : remplissage de la
laveuse (ajout du détersif de prélavage),
culbutage des vêtements, évacuation
et essorage. Ensuite, la laveuse exécute
le cycle de lavage sélectionné.
NOTE : Pour certains cycles spéciaux, le
prélavage est présélectionné par défaut.
Vous pouvez modifier cette sélection en
tout temps.
Extra Rinse (Rinçage extra)
Utilisez un rinçage supplémentaire quand
il faut davantage rincer pour enlever la
saleté et le détergent supplémentaires mis
pour du linge vraiment sale.
NOTE : Pour certains cycles spéciaux, le
rinçage extra est présélectionné par défaut.
Vous pouvez modifier cette sélection en
tout temps. Certains cycles exécute un
rinçage extra automatiquement.
Delay Start
(Mise en marche retardée)
Vous pouvez retarder la mise en marche
d’un cycle de lavage jusqu’à 24 heures.
Appuyez sur le bouton DELAY START pour
choisir le nombre d’heures que vous
voulez attendre pour commencer le cycle
de lavage. Utilisez les touches fléchées ▲
et ▼ pour faire apparaître le délai désiré ;
appuyez ensuite sur ENTER pour
sélectionner le délai. Enfin, appuyez sur le
bouton START après la sélection du cycle.
La machine compte automatiquement le
temps d’attente, puis se met en marche
automatiquement à l’heure désirée.
NOTE : Si vous oubliez de fermer
complètement la porte, un signal sonore
de rappel se fait entendre pour vous
rappeler de le faire.
NOTE : Si vous ouvrez la porte pendant
que la machine compte à rebours le temps
qui reste avant la mise en marche, la
machine fait une pause. Vous devez
refermer la porte et appuyer à nouveau
sur le bouton START pour recommencer
le compte à rebours.
Lock (Verrouillage)
Vous pouvez verrouiller les contrôles pour
empêcher tout choix de cycle, ou vous
pouvez verrouiller les contrôles après avoir
commencé un cycle.
Les enfants ne peuvent pas mettre
accidentellement en marche la laveuse en
appuyant sur des touches quand vous
choisissez cette option.
Pour verrouiller les contrôles de la laveuse,
appuyez sur le bouton LOCK et tenez-la
appuyée pendant 3 secondes. Pour
déverrouiller les contrôles de la laveuse,
appuyez sur le bouton LOCK et tenez-la
appuyée pendant 3 secondes. Un son
retentit pour indiquer l’état
verrouillé/déverrouillé.
L’icône de contrôle de verrouillage de
l’affichage s’allume quand il est branché.
NOTE : Vous pouvez encore utiliser
le bouton POWER(alimentation) quand
la machine est verrouillée.
MY CYCLE (Favori)
(sur certain modèles)
Pour sauvegarder un cycle favori,
choisissez le réglage désiré pour le cycle
de lavage, le degré de souillure, la vitesse
de rotation et la température de l’eau
et appuyez sur le bouton MY CYCLE
(Favori) pendant 3 secondes. Un signal
sonore se fait entendre pour indiquer
que le cycle est sauvegardé.
Pour utiliser votre cycle personnalisé,
appuyez sur le bouton MY CYCLE avant
de laver une charge.
Pour changer le cycle sauvegardé,
choisissez le réglage désiré et appuyez sur
le bouton MY CYCLE pendant 3 secondes.
NOTE : Quand vous utilisez MY CYCLE,
vous ne pouvez pas modifier les options de
lavage une fois que le cycle a commencé.
NOTE : Si vous changez les options de
lavage avec MY CYCLE avant le début
du cycle, le voyant MY CYCLE s’éteindra
et vous reviendrez au cycle de base.
8
9
10
11
12
33
Page 34

Soutien au
consommateur
Conseils de dépannage
Fonctionnement
Mesures de sécurité
Installation
34
Réglage des côntroles.
Stain Inspector (Inspecteur de taches)
La fonction STAIN INSPECTOR (Inspecteur de taches)
vous permet d’indiquer les catégories de taches qui
salissent les vêtements de votre brassée. Cette
fonction s’utilise avec n’importe quel cycle de lavage.
Pour utiliser l’inspecteur de taches :
1. Sélectionnez le cycle de lavage.
2. Appuyez sur le bouton STAIN INSPECTOR (Inspecteur
de taches) (le bouton s’allume lorsqu’il est activé).
3. Lisez les instructions de lavage de vos vêtements.
4. Appuyez sur le bouton ENTER pour continuer.
5. Utilisez les flèches ▲ et ▼ pour repérer la
catégorie de taches concernée.
6. Appuyez sur le bouton ENTER pour sélectionner
la catégorie de taches.
7. Utilisez les flèches ▲ et ▼ pour choisir la tache
concernée.
13
Vous pouvez choisir parmi les taches suivantes :
8. Appuyez sur le bouton ENTER pour sélectionner
la tache.
9. La tache sélectionnée s’affichera.
10. Appuyez sur le bouton START pour démarrer le cycle.
NOTE : Pour désactiver STAIN INSPECTOR (Inspecteur
de taches) ou sélectionner une tache différente,
appuyez sur le bouton STAIN INSPECTOR de nouveau.
NOTE : Le prélavage est automatiquement sélectionné
par défaut pour certaines taches. Dans le cas d’une
sélection automatique, le bouton PREWASH (Prélavage)
s’allumera. Pour un nettoyage optimal des taches, on
recommande d’ajouter un détersif à haute efficacité ou
un additif de lavage approprié dans le distributeur pour
prélavage. Vous pouvez désactiver l’option de prélavage
si vous ne souhaitez pas ajouter un prélavage au cycle.
OUTDOOR (EXTÉRIEUR)
Clay (Argile)
Grass (Herbe)
Mud/Dirt (Boue/Saleté)
Rust Iron (Rouille)
Tree Sap (Sève)
COSMETICS (COSMÉTIQUES)
Lipstick/Lip Balm
(Rouge à lèvres/Pommade)
Deodorant (Déodorant)
Lotions
Makeup (water-based)
(Maquillage [à base d’eau])
Oil (hair/mineral)
(Huile [cheveux/minérale])
BEVERAGES (BOISSONS)
Grape Juice (Jus de raisin)
Coffee/Tea (Café/Thé)
Fruit Juice Other
(Autres jus de fruits)
Milk/Dairy (Lait/Produits laitiers)
Wine (red/white)
(Vin [rouge/blanc])
FOOD/COOKING (ALIMENTS/CUISSON)
Butter/Margarine (Beurre/Margarine)
Cooking/Vegetable Oil
(Huile de cuisson/végétale)
Chocolate (Chocolat)
Tomato Based (Aliments à base de tomates)
Barbecue Sauce (Sauce Barbecue)
PERSONAL (PERSONNEL)
Blood (Sang)
Perspiration (Sueur)
Urine/Feces (Urine/Fèces)
Mouthwash (Rince-bouche)
Vomit (Vomissure)
SCHOOL/OFFICE/HOME
(ÉCOLE/BUREAU/DOMICILE)
Adhesive Tape (Ruban adhésif)
Ballpoint Ink (Encre de stylo)
Glue (white common) (Colle [blanche])
Pencil Mark (Marque de crayon)
Correction Fluid (Correcteur liquide)
LAUNDRY (LESSIVE)
Dingy White Socks (Bas blanc)
Collar/Cuff Soil (Cerne au collet/poignet)
Dye Transfer (Transfert de colorant)
Fabric Softener (Assouplissant)
Yellowing (Jaunissement)
OIL/GREASE/WAX
(HUILE/GRAISSE/CIRE)
Motor Oil/Lube (Huile/Lubrifiant à moteur)
Ointment/Salve (Onguent/Pommade)
Candle Wax (Cire de chandelle)
Crayon (Crayon de couleur)
Chapstick™(Baume pour lèvres)
Page 35

Soutien au
consommateur
Conseils de dépannage
Fonctionnement
Mesures de sécurité
Installation
35
SMART DISPENSE
™
– accessoire en option
(sur certains modèles)
Si vous avez fait l’acquisition du système PROFILE
SMART DISPENSE (Distributeur intelligent), reportezvous au Manuel du propriétaire qui accompagne
ce produit.
Si vous ne possédez pas le PROFILE SMART DISPENSE,
votre laveuse est tout de même dotée d’un système
de distribution en vrac. Dans ce cas, la sélection de
l’option SMART DISPENSE fera apparaître un message
vous informant de l’absence de ce système. Vous
devez alors placer le détersif et tout autre additif
sélectionné dans le tiroir de distribution situé dans
la partie supérieure gauche de l’appareil.
Pour vous procurer le système PROFILE SMART
DISPENSE, visitez le site electromenagersge.ca
ou communiquez avec votre détaillant local.
14
www.electromenagersge.ca
STEAM ASSIST (Aide vapeur)
Le STEAM ASSIST (Aide vapeur) ajoute de la vapeur
dans la laveuse pendant les cycles WHITES/HEAVY
DUTY (Blancs/Intensif), COLORS/NORMAL
(Couleurs/Normal), WRINKLE FREE (Tissus infroissables)
ou ACTIVE WEAR (Vêtements de sport).
Utilisation :
1. Allumez la laveuse (ON) et sélectionnez le cycle
de lavage. L’option STEAM ASSIST est seulement
disponible avec les cycles WHITES/HEAVY
DUTY (Blancs/Intensif), COLORS/NORMAL
(Couleurs/Normal), WRINKLE FREE (Tissus
infroissables) ou ACTIVE WEAR (Vêtements
de sport).
2. Sélectionnez le bouton STEAM ASSIST (Aide vapeur)
pour activer la vapeur.
3. Appuyez sur le bouton START/PAUSE
(Marche/pause).
15
Page 36

Le compartiment d’adoucissant
Si vous le désirez, versez le montant recommandé
d’adoucissant liquide dans le compartiment
étiqueté FABRIC SOFTENER (adoucissant).
N’utilisez que de l’adoucissant liquide dans
le distributeur.
Diluez dans de l’eau jusqu’à la ligne maximum
de remplissage.
Ne dépassez jamais la ligne maximum de
remplissage. Si vous mettez trop d’adoucissant,
cela risque de provoquer une distribution
prématurée d’adoucissant, qui peut tacher
vos vêtements.
NOTE : Ne mettez jamais d’adoucissant
directement dans la charge à laver.
36
Soutien au
consommateur
Conseils de dépannage
Fonctionnement
Mesures de sécurité
Installation
Les caractéristiques de votre laveuse.
Le tiroir distributeur
Ouvrez lentement le tiroir distributeur en le tirant
jusqu’à son arrêt final.
Après avoir ajouté vos produits de lavage, fermez
lentement le tiroir distributeur. Si vous fermez le
tiroir trop vite, vous risquez de distribuer l’eau de
Javel, l’adoucissant ou le détergent trop tôt.
Vous pouvez voir de l’eau dans les compartiments
d’eau de Javel et d’adoucissant à la fin du cycle.
C’est occasionné par l’action de vidange/
siphonnage et cela fait partie du fonctionnement
normal de la laveuse.
Utilisez seulement le détergent
à haute efficacité HE.
Le compartiment d’eau de Javel liquide
Si vous le désirez, mesurez le montant
recommandé d’eau de Javel, ne dépassant
pas 1/3 de tasse (80 ml) et versez-le dans le
compartiment central étiqueté LIQUID BLEACH
(eau de Javel) et portant le symbole .
Il est recommandé d’employer un javellisant à haute
efficacité (HE) pour cette laveuse à chargement frontal.
Ne dépassez jamais la ligne de remplissage
maximum. Si vous mettez trop d’eau de Javel, cela
risque de provoquer une distribution prématurée de
l’eau de Javel, qui peut occasionner des dommages
à vos vêtements.
NOTE : N’utilisez jamais de poudre à blanchir dans
le distributeur.
Le compartiment de détergent
■ Mettez seulement du détergent à haute
efficacité dans la laveuse. La ligne MAX
concerne le détersif régulier. NE dépassez
PAS la ligne MAX.
NE versez PAS de détersif à haute
performance jusqu’à la ligne MAX. Utilisez
la quantité recommandée par le fabricant
du détersif.
La étiquette de choix de détergent doit être placée
dans le compartiment de détergent, dans un
emplacement particulier, selon la catégorie de
détergent que vous utilisez.
■ Détergent en poudre – Placez l’étiquette
à l’arrière. Les icônes de poudre doivent
être alignées au centre quand
l’étiquette de dosage est en position
de poudre.
■ Détergent liquide – Placez l’étiquette
en avant. Les icônes de liquide
doivent être alignées au centre
quand l’étiquette de dosage est
en position de liquide.
Bougez l’étiquette et la tirant vers le haut et
remettez-la en place en la faisant glisser entre
les rails moulés avant ou arrière du compartiment
de détergent, à votre choix, pour du détergent
en poudre ou liquide.
■ Ajoutez le détergent mesuré à l’avant
gauche du compartiment de détergent
du tiroir distributeur.
■ Le détergent est évacué du distributeur
au début du cycle de lavage. Vous pouvez
utiliser du détergent en poudre ou liquide.
■ Vous devez peut-être ajuster l’utilisation
du détergent à la température de l’eau,
à la dureté de l’eau, à la taille et au niveau
de saleté de la charge. Évitez d’utiliser trop
de détergent dans votre laveuse car cela
peut provoquer des traces de détergent
et de mousse sur les vêtements.
■ N’utilisez PAS de détersif agglutiné
(mottes) dans le distributeur. Le détersif
agglutiné peut causer une fuite.
L’étiquette à l’arrière pour détergent
en poudre
L’étiquette en avant pour détergent
liquide
Le compartiment de prélavage
■ N’utilisez le compartiment de prélavage que
si vous choisissez le cycle de prélavage pour
des vêtements très sales. Ajoutez le détergent
mesuré ou l’additif de prélavage au
compartiment de prélavage situé à l’arrière
gauche du tiroir distributeur.
■ Le détergent ou l’additif de prélavage est
évacué du distributeur pendant le cycle de
prélavage (si vous l’avez choisi).
NOTE : Le détergent liquide passe dans le tambour
de la laveuse à mesure que vous l’ajoutez.
■ Vous devez ajuster la quantité de détergent
à la température de l’eau, à la dureté de l’eau,
à la taille de la charge et à son niveau de
saleté. Évitez d’utiliser trop de détergent dans
votre laveuse car cela peut provoquer des
traces de détergent et de mousse sur les
vêtements.
Icônes
de liquide
Icônes
de
poudre
Page 37

Soutien au
consommateur
Conseils de dépannageFonctionnement
Mesures de sécurité
Installation
Chargement et utilisation de la laveuse.
Suivez toujours l’étiquette du fabricant de tissus pour laver. www.electromenagersge.ca
Tri des charges de lavage
Chargement de la laveuse
Vous pouvez charger complètement le tambour de
lavage en ajoutant les articles lachement. Ne lavez
jamais de vêtements qui contiennent des matériaux
inflammables (cires, liquides de nettoyage, etc.).
Pour ajouter des articles après avoir mis en marche
la laveuse, appuyez sur START/PAUSE (mise en marche/
pause) et attendez que la porte soit déverrouillée.
La laveuse peut prendre jusqu’à 30 secondes pour
déverrouiller sa porte après que vous ayez appuyé
sur START/PAUSE, selon les conditions. N’essayez
pas de forcer la porte pour l’ouvrir quand elle est
verrouillée. Quand la porte est déverrouillée, ouvrez
gentiment. Ajoutez les articles, refermez la porte
et appuyez sur START/PAUSE pour remettre en marche.
Couleurs
Blancs
Clairs
Foncés
Saleté
Beaucoup
Normal
Peu
Tissus
Délicat
Soins faciles
Cotonnades
solides
Charpie
Producteurs
de charpie
Collecteurs
de charpie
■ Regroupez les grands et des petits articles dans une même charge. Chargez les grands articles d’abord. Les
grands articles ne doivent pas représenter plus de la moitié de la totalité de la charge de lavage.
■ Nous vous recommandons de ne pas laver un article seul. Cela peut occasionner un déséquilibre de charge.
Ajoutez un ou deux articles semblables.
■ Vous ne devez pas mélanger les oreillers et les édredons aux autres articles. Cela peut occasionner une
charge mal équilibrée.
■ Séparez les couleurs foncées des pâles pour prévenir le transfert de colorant. Comme il s’agit d’une laveuse
à haute efficacité qui consomme moins d’eau, le transfert de colorant est plus fréquent.
37
VÊTEMENTS
DE TRAVAIL
4 Jeans
5 chemises de travail
5 pantalons de travail
LINGE DE MAISON
2 draps de bain
10 serviettes de bain/
12 débarbouillettes
7 essuie-mains/
2 tapis de baignoire
en tissu éponge
OU
2 draps plats format
grand lit
2 draps-housses format
grand lit
4 taies d’oreiller
BRASSÉES MIXTES
4 taies d’oreiller
2 essuie-mains
2 draps plats/
2 draps-housses
2 serviettes de bain/
4 débarbouillettes
OU
6 chemises (homme
ou femme)
4 pantalons (kakis ou
tissus croisés)
5 tee-shirts
7 boxeurs
4 caleçons
OU
6 tee-shirts
4 pantalons
molletonnés
4 pulls molletonnés
2 kangourous
7 paires de bas
TISSUS DÉLICATS*
7 soutiens-gorge
7 culottes
3 slips
2 camisoles
4 chemises de nuit
*On recommande
de placer les petits
articles dans un sac
en filet de nylon.
LAVAGES RAPIDES
(2 à 4 vêtements)
2 chemises sport
1 pantalons sport
OU
3 uniformes de soccer
Exemples de brassées*
*On recommande de placer les petits articles dans un sac en filet de nylon.
Page 38

Soins et nettoyage/Entretien général
Extérieur : Essuyez immédiatement tout débordement. Essuyez avec un linge humide. Ne frappez jamais
la surface avec des objets aiguisés.
Intérieur : Séchez autour de l’ouverture de la porte de la laveuse, du joint flexible (y compris les tuyaux) et de
la porte en verre. Ces surfaces doivent être toujours propres pour assurer que le joint soit bien imperméable.
Il est recommandé de rincer la laveuse une fois par mois au minimum, à l’aide d’une tasse (250 ml) de
javellisant (ou un autre produit commercialisé à cette fin) versé dans la section prélavage du distributeur (aucun
vêtement), au cycle BASKET CLEAN (Nettoyage du panier) (menu SPECIALTY CYCLES [Cycles particuliers]).
Vérifiez que l’injecteur de vapeur ne soit pas bouché. Nettoyez l’injecteur si nécessaire.
Déménagement et rangement : Demandez au technicien de service d’enlever l’eau de la pompe et des tuyaux
de vidange. Ne rangez jamais la laveuse dans un endroit où elle est exposée au mauvais temps. Quand vous
déménagez la laveuse, vous devez immobiliser le bassin de lavage en utilisant les boulons d’expédition enlevés
pendant l’installation. Consultez les Instructions d’installation dans ce manuel. Si vous n’avez pas ces pièces,
vous pouvez les commander en visitant notre site web à l’adresse www.electromenagersge.ca ou en appellant
le numéro de telephone 800.561.3344.
Longues vacances : Assurez-vous de fermer tous les robinets d’alimentation de l’eau. Vidangez toute l’eau des
tuyaux si la température risque de descendre en dessous de celle de gel.
Nettoyage du filtre de pompe
Étant donné la nature d’une laveuse à chargement frontal, de petits articles sont susceptibles d’être aspirés
par la pompe. La laveuse est équipée d’un filtre qui retient les articles perdus lorsqu’ils sont évacués vers
le drain. Pour récupérer les articles perdus, nettoyez le filtre de pompe.
1. Insérez une pièce de monnaie dans la fente du panneau
d’accès pour ouvrir celui-ci.
2. Placez une casserole ou un plat peu profonds sous la trappe
d’accès de la pompe ainsi qu’une serviette sur le plancher
devant la laveuse pour protéger celui-ci. Il est normal de
recueillir environ une tasse d’eau lors du retrait du filtre.
3. Tournez le filtre de pompe dans le sens antihoraire et retirez-le.
4. Enlevez les débris sur le filtre.
5. Replacez le filtre et tournez-le dans le sens horaire jusqu’à
la marque.
6. Fermez le panneau d’accès.
38
Soutien au
consommateur
Conseils de dépannage
Fonctionnement
Mesures de sécurité
Installation
Chargement et utilisation de la laveuse.
Filtre
de pompe
Nettoyage du joint d’étanchéité de la porte
Ouvrez la porte de la laveuse. Avec les deux mains, poussez le joint
d’étanchéité vers le bas. Enlevez tout objet étranger qui pourrait se trouver
dans le joint. Assurez-vous que rien ne bloque les orifices derrière le joint.
Tout en maintenant le joint en position basse, inspectez-en l'intérieur en
tirant vers le bas avec les doigts. Enlevez tout objet étranger qui pourrait
se trouver dans le joint. Assurez-vous que rien ne bloque les orifices derrière
le joint.
Une fois le nettoyage terminé, retirez vos mains et les joints retourneront
à ses positions normales.
Page 39

Emplacement du tiroir distributeur : Le détergent et l’adoucisseur peuvent s’amasser
dans le tiroir distributeur. Il faut enlever ces résidus une ou deux fois par mois.
■ Enlevez le tiroir en le tirant d’abord jusqu’à ce qu’il s’arrête. Atteignez ensuite le coin
arrière droit de la cavité du tiroir et appuyez fermement sur le taquet de verrouillage,
en tirant le tiroir.
■ Enlevez les etiquettes des compartiments d’eau de Javel et d’adoucissant et
l’étiquette de détergent. Rinsez à l’eau chaude les étiquettes et le tiroir pour enlever
toute trace de produit de lessivage.
■ Pour nettoyer l’ouverture du tiroir, utilisez une petite brosse pour l’intérieur. Enlevez
tout résidu en haut et en bas de l’intérieur.
■ Remettez les étiquettes dans leur bon compartiment. Remettez en place le tiroir
de distribution.
■ Pour réduire l’accumulation dans le tiroir de distribution :
Utilisez seulement
un détergent à
haute efficacité HE.
Le taquet du verrou n’est visible que
quand le tiroir est complètement tiré
Suivez toujours l’étiquette du fabricant de tissus pour laver. www.electromenagersge.ca
Soutien au
consommateur
Conseils de dépannage
Fonctionnement
Mesures de sécurité
Installation
39
Page 40

Chargement et utilisation de la laveuse.
Étiquettes de tissus
ÉTIQUETTES DE LAVAGE
ÉTIQUETTES D’EAU DE JAVEL
Les symboles suivants de tissus se trouvent sur les vêtements que vous allez laver.
ÉTIQUETTES DE DÉTERGENT
Utilisez seulement un détersif à haute efficacité HE.
Système Profile Smart Dispense
(Distributeur intelligent)
Le système SMART DISPENSE
permet de ranger et de distribuer
automatiquement le détergent et
l’assouplissant durant les cycles de
lavage et de rinçage de cette laveuse.
AUCUN JAVELLISANT ne peut être
utilisé dans ce distributeur intelligent.
Consultez le Manuel du propriétaire qui
accompagne le système Profile SMART
DISPENSE pour connaître les
instructions d’installation.
Piédestal
Vous pouvez vous procurer un piédestal
pour votre laveuse. Ce piédestal
augmente la hauteur de la laveuse et
procure du rangement pour les articles
de lavage. Le piédestal comprend un
diviseur pour ranger discrètement le
détersif liquide. Consultez les instructions
d’installation du piédestal.
40
Soutien au
consommateur
Conseils de dépannage
Fonctionnement
Mesures de sécurité
Installation
Accessoires disponibles.
Température
de l’eau
Chaude
(50°C/120°F)
Tiède
(40°C/105°F)
Froide/fraîche
(30°C/85°F)
Symboles
d’eau
de Javel
Toutes les eaux
de Javel
(si nécessaire)
Eaux de Javel sans chlore
(si nécessaire)
Ne pas utiliser
d’eau de Javel
Cycle de
lavage à
la machine
Normal
Tissus sans
repassage/
résistants aux plis
Doux/
délicat
Lavage à
la main
Ne pas laver
Ne pas essorer
Page 41

Réponse à la demande. (sur certains modèles) www.electromenagersge.ca
Soutien au
consommateur
Conseils de dépannage
Fonctionnement
Mesures de sécurité
Installation
Modèle WPDH8910 est compatible avec le module de
Réponse à la Demande (RD) qui peut être acquis séparément.
Contactez vos services publics locaux ou consultez
www.GEAppliances.com/demand_response pour savoir
si votre zone utilise la technologie de Réponse à la demande.
Les fonctions suivantes de réponse à la demande sont
disponibles en tant que programme d’essai pilote en
collaboration avec votre compagnie locale de services
publics pour aider les consommateurs à réduire leur
consommation électrique de pointe.
INSTALLATION
L’endroit préféré pour l’installation de module est sur la
sécheuse de vêtements.
Les instructions fournies avec le module incluent les détails
sur la façon de brancher les câbles au module.
Attendez 5 minutes, puis appuyez sur le bouton Settings
(réglages). Faites défiler le menu jusqu’à l’affichage de
« Energy Management » (gestion de la consommation
électrique), comme indiqué ci-dessous.
Cet affichage indique que le module est correctement
branché et que vous pouvez utiliser votre appareil ainsi que la
Réponse à la demande en suivant les instructions ci-dessous.
Si « Energy Management » (gestion de la consommation
électrique) ne s’affiche pas, consultez votre guide de
dépannage du module de Réponse à la demande.
GUIDE RAPIDE
4 niveaux énergétiques sont disponibles : Critical (critique),
High (élevé), Medium (moyen) et Low (faible). Aux niveaux
Medium (moyen) et Low (faible), l’appareil fonctionne
normalement. Les étapes suivantes indiquent la façon dont
l’unité réagit lors de la mise en marche aux niveaux
énergétiques Critical (critique) et High (élevé).
Option 1 (Delay Eco – Départ différé éco)
Au moment de la mise en marche lors des niveaux Critical
(critique) et High (élevé), l’appareil retardera la mise en marche
en attendant le retour à un niveau Medium (moyen) ou Low
(faible). Appuyez sur le bouton START/PAUSE (marche/pause).
Option 2 (Override Delay Eco – Annuler départ différé éco)
Pour mettre en marche la laveuse lorsqu’elle affiche Delay
Eco (Départ différé éco), appuyez sur le bouton DELAY START
(mise en marche différée) pour annuler le départ différé. Puis,
appuyez sur START/PAUSE (marche/pause) pour lancer
un cycle de lavage.
MENU DE RÉGLAGE
Appuyez sur SETTINGS (réglages) puis sélectionnez Energy
Management (gestion de la consommation électrique).
Delay Eco Override (Annulation départ différé éco)
Si vous lancez un cycle lors des tarifs Critique (critique)
ou High (élevé), grâce à cette option, l'appareil fonctionne
automatiquement en Cycle eco. Ce réglage vous permet
d’utiliser moins d’énergie qu’avec un cycle normal. Le réglage
par défaut est YES (Oui).
Auto-Extend Delays (Prolongation automatique du délai)
Si un départ différé est sélectionné, cette option permet de
prolonger le délai si le tarif au moment de la mise en marche
est Critical (critique) ou High (élevé). Le réglage par défaut
prolonge automatiquement ces cycles.
Pour que les fonctions de réponse à la demande marchent,
un équipement supplémentaire doit être installé à l’interface
avec vos services publics. Cet équipement peut être vendu
séparément et/ou est disponible auprès de vos services
publics dans le cadre de ce programme d’essai pilote. Vérifiez
auprès de vos services publics si le programme d’essai pilote
est disponible dans votre zone ainsi que pour obtenir de plus
amples informations.
VEUILLEZ NOTER
: À la fin du programme d’essai pilote ou
si vous déménagez dans une zone où le programme n’est pas
disponible, les fonctions de réponse à la demande ne pourront
être activées ni utilisées sur votre appareil. L’appareil
fonctionnera normalement après que l’équipement de
réponse à la demande ait été désactivé ou déconnecté.
41
Page 42

Instructions
Laveuse
d’installation
Des questions? Appelez le 1.800.561.3344 ou Visitez notre site Web à l’adresse : www.electromenagersge.ca
42
WPDH8850, WPDH8910, WPDH8900
AVANT DE COMMENCER
Lisez ces instructions entièrement et soigneusement.
•
IMPORTANT –Conservez ces instructions
pour l’inspecteur local.
•
IMPORTANT –Observez tous les codes et
les ordonnances en vigueur.
•
Note à l’installateur – Assurez-vous de laisser
ces instructions au consommateur.
•
Note au consommateur – Conservez ces
instructions à titre de référence.
• Niveau de compétences – L’installation de cet
appareil électoménager nécessite des compétences
mécaniques et électriques de base.
• Temps d’installation – 1-3 heures
• L’installateur est responsable de bien installer
cet appareil.
• Toute panne de produit due à une mauvaise
installation n’est pas couverte par la garantie.
AVERTISSEMENT
• Cet appareil électroménager doit être bien mis à la terre
et installé conformément à ces Instructions d’installation.
• N’installez jamais ou ne rangez jamais votre appareil
dans un endroit où il est exposé à l’eau ou aux
intempéries. Consultez la section Emplacement de votre
laveuse.
• NOTE : Cet appareil électroménager doit être bien mis
à la terre et l’alimentation électrique de votre laveuse
doit se conformer aux ordonnances et codes locaux et
à la dernière édition du National Electrical Code,
ANSI/NFPA 70.
POUR VOTRE SÉCURITÉ :
OUTILS NÉCESSAIRES POUR INSTALLER
LA LAVEUSE
❏ Tourne-écrou de 1/4 po.
❏ Douille de 3/8 po. avec clé à cliquet
❏ Clé à fourche de 3/8 po.
❏ Clé anglaise ou douille de 7/16 po. avec clé à cliquet
❏ Clé anglaise ou clé à fourche de 9/16 po.
❏ Pince multiprise à crémaillère
❏ Niveau à bulle
❏ Tuyaux d’eau (2)
PIÈCES FOURNIES
❏ Attache de câble
❏ Guide de tuyau
Page 43

43
Instructions d’installation
DIMENSIONS
CÔTÉ
AVANT
27,0 po
(68,6 cm)
39,2 po*
(99,5 cm)
32,1 po
(81,5 cm)
39,2 po*
(99,5 cm)
*NOTE :
Avec les pattes de nivellement : 40,5 po (102,5 cm)
(réglable de 1,9 cm [0,75 po])
Avec piédestal : 53,75 po (136,6 cm)
(réglable de 1,9 cm [0,75 po])
Superposé : 82,75 po (209,8 cm)
EMPLACEMENT DE VOTRE LAVEUSE
N’installez jamais votre laveuse :
1. Dans un endroit exposé à de l’eau qui coule ou aux
conditions climatiques extérieures. La température
ambiante ne doit jamais être inférieure à 15,6°C
(60°F) pour que la laveuse fonctionne bien.
2. Dans un endroit où elle entre en contact avec des
tentures ou des rideaux.
3. Sur un tapis. Le sol DOIT être une surface dure avec
une pente maximum de 1,27 cm per 30 cm (1/2 pouce
par pied). Pour vous assurer que la laveuse ne vibre
pas ou ne bouge pas, il est possible que vous deviez
renforcer le plancher.
NOTE : Si le plancher est en mauvais état, utilisez
une feuille de contreplaqué traité de 3/4 po. fixé
solidement à la couverture de plancher actuelle.
IMPORTANT :
Espaces libres minimum pour l’installation
• Installation dans une alcôve : Côtés, arrière,
haut = 0 cm (0 po.)
• Installation dans un placard : Côtés, arrière,
haut = 0 cm (0 po.), avant = 2.54 cm (1 po.)
• Ouverture de ventilation de porte de placard requise :
2 grilles d’aération chaque 387 cm
2
(60 pouce carré),
situées à 7,6 cm (3 po.) du haut et du bas de la porte.
Page 44

Instructions d’installation
DÉBALLAGE DE VOTRE LAVEUSE
AVERTISSEMENT : Recyclez
ou détruisez le carton et les sacs en matière plastique
après avoir déballé votre laveuse. Mettez ces matériaux
hors de la portée des enfants. Les enfants peuvent être
tentés de les utiliser pour jouer. Les cartons recouverts
de tapis, de couve-lit, ou de drap en matière plastique
peuvent devenir des chambres hermétiquement closes
risquant d’étouffer des enfants.
1. Coupez et enlevez les bandes d’emballage du haut et
du bas.
2. Alors qu’elle est dans le carton, posez avec soin la laveuse
sur son côté. NE LAISSEZ JAMAIS reposer la laveuse sur
son avant ou son arrière.
3. Tournez vers le bas les rebords du bas–enlevez tout
l’emballage de base, y compris le carton, la base en
styrofoam et le soutien de cuve en styrofoam (insérée
au centre de la base). Conservez les supports de
superposition situés sur le coussinet de styromousse
qui recouvre le dessus de la laveuse.
NOTE : Si vous installez votre laveuse sur un piédestal, suivez
les instructions d’installation qui acccompagnent le piédestal.
4. Remettez soigneusement soin la laveuse debout et
enlevez le carton.
5. Amenez soigneusement la laveuse à moins de 4 pieds
(122 cm) de son emplacement final.
6. Enlevez les pièces suivantes de l’arrière de la laveuse :
4 boulons
4 bagues en matière plastique
(y compris les anneaux en caoutchouc)
4 dispositifs de cordon d’alimentation
7. Enlevez le boulon de transport. Insérez le bouchon
dans le trou du boulon de transport.
NOTE : Si vous n’enlevez pas les cales d’expédition,
vous risquez de déséquilibrer sérieusement la laveuse.
Conservez tous les boulons pour un usage futur.
NOTE : Si vous devez transporter la laveuse à une date
future, vous devez remettre en place la quincaillerie de
soutien d’emballage pout éviter tout dommage pendant
le transport. Conservez la quincaillerie dans le sac en
matière plastique fourni.
44
Page 45

45
Instructions d’installation
CIRCUIT –
Circuit de dérivation individuel, bien polarisé et mis
à la terre, de 15 amp., branché par l’intermédiaire d’un fusible
à retardement ou d’un disjoncteur de 15 amp.
ALIMENTATION ÉLECTRIQUE – 2-fils, avec mise à la terre,
monophasée, 120-volt., 60-Hz, courant alternatif.
PRISE MURALE – Prise bien mise
à la terre, triphasée, située dans
un emplacement tel que le cordon
d’alimentation est accessible quand
la laveuse est installée.
EXIGENCES ÉLECTRIQUES
AVERTISSEMENT : Un mauvais
branchement de la mise à la terre de votre laveuse
peut occasionner un risque de secousse électrique.
Vérifiez auprès d’un électricien licencié si vous ne savez
pas si votre appareil est bien mis à la terre.
1. La laveuse DOIT être mise à la terre. En cas de mauvais
fonctionnement ou de panne, la mise à la terre réduit le
risque de secousse en fournissant un chemin de moindre
résistance au courant électrique.
2. Comme votre laveuse est équipée d’un cordon
d’alimentation électrique qui a un conducteur de mise à
la terre et une fiche de mise à la terre, la fiche DOIT être
branchée dans une prise adéquate, câblée en cuivre, qui
est bien installée et mise à la terre conformément à
toutes les ordonnances et à tous les codes locaux ou, en
l’absence de codes locaux, aux National Electrical Codes,
ANSI/NFPA 70 (dernière édition). En cas de doute, appelez
un électricien licencié. NE COUPEZ PAS ou ne modifiez
jamais la broche de mise à la terre du cordon
d’alimentation électrique. Dans les situations où il existe
une prise à deux trous, le propriétaire est responsable
de demander à un électricien licencié de la remplacer
par une prise à trois trous bien mise à la terre.
Lisez ces instructions soigneusement et complètement.
EXIGENCES DE MISE À LA TERRE
EXIGENCES D’ALIMENTATION D’EAU
Vous DEVEZ installer des robinets d’eau chaude et froide
à moins de 42 pouces (107 cm) de l’entrée d’eau de votre
laveuse. Les robinets DOIVENT être des robinets de jardin
de 1,9 cm (3/4 po.), pour pouvoir brancher les tuyaux
d’entrée. La pression de l’eau DOIT être entre 10 et 120 livres
par pouce carré. Votre service d’eau peut vous indiquer votre
pression d’eau. La température de l’eau chaude doit être
réglée de manière à fournir de l’eau à une température de
48°C à 60°C (120°F à 140°F) pour obtenir un rendement
adéquat de la commande de température automatique (ATC).
REMARQUE : L’utilisation d’un adoucisseur d’eau est
recommandée pour réduire l’accumulation de calcaire à
l’intérieur du générateur de vapeur si votre eau est très dure.
1. Une vidange capable d’éliminer 64,3 L (17 gals) par
minute.
2. Un diamètre minimum de tuyau ascendant de
3,18 cm (1 1/4 po.).
3. La hauteur du tuyau ascendant au dessus du plancher
doit être la suivante :
Hauteur minimum : 61 cm (24 po.)
Hauteur maximum : 244 cm (96 po.)
NOTE : Le tuyau de vidange attaché à la laveuse doit
pouvoir atteindre un tuyau ascendant de 147 cm (58 po.).
Pour un tuyau ascendant plus élevé, contactez un
distributeur autorisé de pièces.
EXIGENCES DE VIDANGE
AVERTISSEMENT—POUR
RÉDUIRE LE DANGER D’INCENDIE, DE SECOUSSE
ÉLECTRIQUE ET LES BLESSURES CORPORELLES :
• N’UTILISEZ PAS DE CORDON PROLONGATEUR
OU UNE FICHE D’ADAPTATION AVEC CET APPAREIL.
La laveuse doit être mise à la terre conformément
à toutes les ordonnances et à tous les codes locaux
ou, en l’absence de codes locaux, aux National
Electrical Code, ANSI/NFPA 70.
ARRIÈRE
96 po
(244 cm)
Max.
24 po
(61 cm)
Min.
Page 46

46
Instructions d’installation
INSTALLATION DE LA LAVEUSE
1. Faites couler un peu d’eau des robinets chaud et froid
pour purger les tuyaux d’eau et enlever les particules
qui peuvent boucher les tamis de robinet d’eau.
2. Enlevez les tuyaux d’entrée d’eau du sac en matière
plastique.
3. (extrémité coudée 90°)
Branchez soigneusement le
tuyau d’entrée marqué HOT
(chaud) à la sortie extérieure
du robinet d’eau marquée H.
Serrez à la main, puis serrez
encore 2/3 de tour avec des
pinces. Branchez
soigneusement l’autre tuyau
d’entrée à la sortie intérieure
du robinet d’eau marquée C. Serrez à la main, puis serrez
encore 2/3 de tour avec des pinces. Ne faussez pas le
filetage ou ne serrez pas trop ces branchements.
4. Branchez les extrémités du tuyau d’entrée aux robinet
d’eau CHAUDE et FROIDE, en serrant légèrement à
la main, puis en serrant encore 2/3 de tour avec des
pinces. Ouvrez l’eau et vérifiez qu’il n’y ait pas de fuite.
5. Amenez soigneusement la laveuse dans son
emplacement final. Mettez gentillement la laveuse à
sa place, en la balançant. Il est important de ne pas
endommager les pattes de nivellement en caoutchouc
lorsque vous déplacez la laveuse vers sa position finale.
Des pattes endommagées peuvent accroître les
vibrations produites par la laveuse. La vaporisation
de nettoyant à vitres sur le plancher peut faciliter le
déplacement de la laveuse vers sa position finale.
NOTE : Afin de réduire les vibrations, assurez-vous
que les quatre pattes de nivellement reposent
fermement au plancher. Poussez et tirez sur l’arrière
de la laveuse du côté droit, puis du côté gauche
pour ajuster les pattes.
NOTE : N’essayez jamais de soulever la laveuse par
sa porte ou par son tiroir distributeur.
NOTE : Si vous installez dans un bac de vidange,
vous pouvez utiliser un 2 x 4 long de 24 po. pour bien
mettre à l’horizontale la laveuse.
6. La laveuse dans son
emplacement final,
placez un niveau à bulle
sur la laveuse (si elle
est installée sous un
comptoir, elle ne doit pas
bouger). Ajustez les
pattes de nivellement
avant vers le haut ou vers le bas pour vous assurer
qu’elle ne bouge pas. Tournez les contre-écrous de
chaque patte vers la base de la laveuse et serrez
avec une clé anglaise.
NOTE : Conservez les extensions des pattes à un
minimum pour empêcher les vibrations. Plus les pattes
sont tirés, et plus la laveuse vibre.
Si le plancher n’est pas bien horizontal ou est
endommagé, il est possible que vous deviez allonger
les pattes de nivellement arrière.
Page 47

47
Instructions d’installation
INSTALLATION DE LA LAVEUSE (suite)
7. Attachez le guide de tuyau en U à l’extrémité du tuyau
de vidange. Placez le tuyau dans une cuve à lessive
ou un tuyau vertical et liez-le avec la ligature de câble
fournie dans le paquet.
NOTE : Si le tuyau de vidange est placé dans un tuyau
vertical sans être recourbé en U, il peut produire un effet
de siphonnement. Vous devez maintenir un espace d’air
libre autour du tuyau de vidange. Un tuyau ajusté peut
aussi occasionner un effet de siphonnement.
8. Branchez le cordon d’alimentation dans une prise
mise à la terre.
NOTE : Vérifiez que le courant est coupé au niveau
du disjoncteur ou de la boîte à fusibles avant de
brancher le cordon d’alimentation à une prise.
9. Branchez le courant au niveau du disjoncteur ou
de la boîte à fusibles.
10. Lisez le reste de ce Manuel du propriétaire. Il contient
des renseignements précieux et utiles qui vous feront
économiser du temps et de l’argent.
11. Avant de mettre en marche la laveuse, vérifiez que
tout est en ordre :
❏ L’alimentation principale de courant est branchée.
❏ La laveuse est branchée à la prise.
❏ Les robinets d’eau sont ouverts.
❏ L’appareil est bien horizontal et les quatre pattes
de nivellement reposent fermement sur le plancher.
❏ La quincaillerie de soutien pour l’expédition est
enlevée et mise de côté.
❏ Le tuyau de vidange est bien attaché.
❏ Le robinet, les rondelles et le tuyau de vidange
ne fuient pas.
12. Faites marcher la laveuse pendant un cycle complet.
Vérifiez qu’il n’y a aucune fuite d’eau et qu’elle
fonctionne bien.
13. Si votre laveuse ne fonctionne pas, nous vous prions
de consulter la section Avant d’appeler un réparateur,
avant d’appeler le service.
14. Rangez ces instructions dans un emplacement
proche de la laveuse pour référence future.
Ligature de câble
Ligature
de câble
Ligature
de câble
Si vous avez besoin de pièces de rechange pour votre
laveuse, vous pouvez les commander au Canada en visitant
notre site web www.electromenagersge.ca ou en appelant
le 800.561.3344.
PIÈCES DE RECHANGE
Page 48

Soutien au
consommateur
Conseils de dépannage
Fonctionnement
Mesures de sécurité
Installation
48
Problème Causes possibles Correctifs
Aucune rotation Le tuyau de vidange est coudé • Remettez droit le tuyau de vidange et assurez-vous que
ni mouvement ou mal branché la laveuse ne le bloque pas.
La vidange de la maison est • Vérifiez la plomberie de la maison. Il est possible que
peut-être bloquée vous ayez besoin d’appeler un plombier.
Siphonnement du tuyau de • Assurez-vous qu’il y a un espace d’air entre le tuyau
vidange; le tuyau de vidange de vidange et le drain.
a été poussé trop loin dans
le drain
Le filtre de la pompe à eau • Nettoyez le filtre de pompe – Ouvrez le panneau d’accès
est peut-être bouché à la pompe (à l’aide d’une pièce de monnaie) et retirez le
filtre de pompe en le tournant dans le sens antihoraire puis
le tirant. Nettoyez le filtre, enlevez tous les débris lâches,
puis remettez le filtre en place.
La charge de vêtements • Répartissez la charge de vêtements dans la laveuse et
est déséquilibrée programmez le cycle « drain & spin » (drainage et
rotation) ou « rinse & spin » (rinçage et rotation).
• Augmentez la taille de la charge de vêtements si vous avez
une petite charge à laver contenant à la fois des articles
lourds et des articles légers.
Fuite d’eau Le joint de la porte est • Vérifiez si le joint est bien en place et s’il n’est pas
endommagé déchiré. Les objets oubliés dans les poches peuvent
endommager la laveuse (clous, vis, stylos, crayons).
Le joint de la porte n’est • L’eau peut dégoutter de la porte lorsque celle-ci est
pas endommagé ouverte. Il s’agit d’un fonctionnement normal.
Vérifiez la présence d’eau à la partie • Si cette partie est mouillée, cela indique la présence d’un
arrière gauche de la laveuse surplus de mousse savonneuse. Utilisez moins de détergent.
Les tuyaux d’entrée de l’eau ou • Assurez-vous que les tuyaux soient bien branchés au
le tuyau de vidange ne sont pas niveau des robinets et la laveuse et assurez-vous que
bien branchés le tuyau de vidange soit bien inséré et fixé à l’installation
de vidange.
La vidange de la maison est • Vérifiez la plomberie de la maison. Il est possible que
peut-être bloquée vous ayez besoin d’appeler un plombier.
L’eau ne s’écoule pas Le tuyau de vidange est coudé • Remettez droit le tuyau de vidange et assurez-vous que
ou mal branché la laveuse ne le bloque pas.
La vidange de la maison est • Vérifiez la plomberie de la maison. Il est possible que
peut-être bloquée vous ayez besoin d’appeler un plombier.
Siphonnement du tuyau de • Assurez-vous qu’il y a un espace d’air entre le tuyau
vidange; le tuyau de vidange de vidange et le drain.
a été poussé trop loin dans
le drain
Le filtre de la pompe à eau • Nettoyez le filtre de pompe – Ouvrez le panneau d’accès
est peut-être bouché à la pompe (à l’aide d’une pièce de monnaie) et retirez le
filtre de pompe en le tournant dans le sens antihoraire puis
le tirant. Nettoyez le filtre, enlevez tous les débris lâches,
puis remettez le filtre en place.
Avant d’appeler un réparateur…
Conseils de dépannage—Économisez du temps et de l’argent!
Consultez d’abord les tableaux qui suivent et vous pourrez
peut-être éviter de faire appel à un réparateur.
Page 49

Avant d’appeler un réparateur… www.electromenagersge.ca
Problème Causes possibles Correctifs
Aucune rotation Le tuyau de vidange est coudé • Remettez droit le tuyau de vidange et assurez-vous que
ou mal branché la laveuse ne le bloque pas.
La vidange de la maison est • Vérifiez la plomberie de la maison. Il est possible que
peut-être bloquée vous ayez besoin d’appeler un plombier.
Siphonnement du tuyau de • Assurez-vous qu’il y a un espace d’air entre le tuyau
vidange; le tuyau de vidange de vidange et le drain.
a été poussé trop loin dans
le drain
Le filtre de la pompe à eau • Nettoyez le filtre de pompe – Ouvrez le panneau d’accès
est peut-être bouché à la pompe (à l’aide d’une pièce de monnaie) et retirez le
filtre de pompe en le tournant dans le sens antihoraire puis
le tirant. Nettoyez le filtre, enlevez tous les débris lâches,
puis remettez le filtre en place.
La charge de vêtements • Répartissez la charge de vêtements dans la laveuse et
est déséquilibrée programmez le cycle « drain & spin » (drainage et
rotation) ou « rinse & spin » (rinçage et rotation).
• Augmentez la taille de la charge de vêtements si vous avez
une petite charge à laver contenant à la fois des articles
lourds et des articles légers.
Le moteur surchauffe • Le moteur de la laveuse s’arrête s’il surchauffe. Il se
remet automatiquement en marche après une période
de refroidissement pouvant atteindre 2 heures
(si la laveuse n’a pas été arrêtée manuellement).
La porte est ouverte • Assurez-vous de fermer la porte.
Cycle incomplet ou Le tuyau de vidange est coudé • Remettez droit le tuyau de vidange et assurez-vous que
minuterie arrêtée ou mal branché la laveuse ne le bloque pas.
La vidange de la maison est • Vérifiez la plomberie de la maison. Il est possible que
peut-être bloquée vous ayez besoin d’appeler un plombier.
Siphonnement du tuyau de • Assurez-vous qu’il y a un espace d’air entre le tuyau
vidange; le tuyau de vidange a de vidange et le drain.
été poussé trop loin dans le drain
Le filtre de la pompe à eau • Nettoyez le filtre de pompe – Ouvrez le panneau d’accès
est peut-être bouché à la pompe (à l’aide d’une pièce de monnaie) et retirez le
filtre de pompe en le tournant dans le sens antihoraire puis
le tirant. Nettoyez le filtre, enlevez tous les débris lâches,
puis remettez le filtre en place.
Nouvelle répartition automatique • L’affichage du temps résiduel a changé étant donné que
de la charge de vêtements la laveuse répartit la charge à une ou deux reprises. Il s’agit
d’un fonctionnement normal. Vous n’avez rien à faire;
la laveuse va compléter son cycle de lavage.
Bruit fort ou inhabituel; Mouvement de la caisse • La laveuse a été conçue de façon à permettre un mouvement
vibrations ou secousses de 0,6 cm (1/4 po) afin de réduire la transmission des forces
au plancher. Ce mouvement est normal.
Les pattes de nivellement en • Poussez et tirez sur l’arrière de la laveuse du côté droit,
caoutchouc ne reposent pas puis du côté gauche pour vérifier qu’elle est bien de
toutes fermement sur le plancher niveau. Si la laveuse n’est pas de niveau, réglez les pattes
de nivellement en caoutchouc de manière à ce qu’elles
reposent toutes fermement sur le plancher. Votre
installateur devrait corriger ce problème.
La charge de vêtements • Ouvrez la porte et répartissez la charge de vêtements
est déséquilibrée manuellement. Pour vérifier que la machine fonctionne
bien, programmez-la avec le cycle « rinse and spin »
(rinçage et rotation) et aucune charge. Si tout va bien,
le débalancement était causé par la mauvaise répartition
de la charge.
Sifflement • SteamAssist (Aide vapeur) ou SteamREFRESH
(Rafraîchissement à la vapeur) est sélectionné. Il s’agit du
fonctionnement normal lorsque ces cycles à vapeur sont
sélectionnés.
49
Soutien au
consommateur
Conseils de dépannageFonctionnement
Mesures de sécurité
Installation
Page 50

Avant d’appeler un réparateur…
Soutien au
consommateur
Conseils de dépannage
Fonctionnement
Mesures de sécurité
Installation
Problème Causes possibles Correctifs
Vêtements trop mouillés Le tuyau de vidange est coudé • Remettez droit le tuyau de vidange et assurez-vous que
ou mal branché la laveuse ne le bloque pas.
La vidange de la maison est • Vérifiez la plomberie de la maison. Il est possible que
peut-être bloquée vous ayez besoin d’appeler un plombier.
Siphonnement du tuyau de • Assurez-vous qu’il y a un espace d’air entre le tuyau
vidange; le tuyau de vidange de vidange et le drain.
a été poussé trop loin dans
le drain
Le filtre de la pompe à eau • Nettoyez le filtre de pompe – Ouvrez le panneau d’accès
est peut-être bouché à la pompe (à l’aide d’une pièce de monnaie) et retirez le
filtre de pompe en le tournant dans le sens antihoraire puis
le tirant. Nettoyez le filtre, enlevez tous les débris lâches,
puis remettez le filtre en place.
La charge de vêtements • Répartissez la charge de vêtements dans la laveuse et
est déséquilibrée programmez le cycle « drain & spin » (drainage et
rotation) ou « rinse & spin » (rinçage et rotation).
• Augmentez la taille de la charge de vêtements si vous avez
une petite charge à laver contenant à la fois des articles
lourds et des articles légers.
Aucune puissance/ Le tuyau de vidange est coudé • Remettez droit le tuyau de vidange et assurez-vous que
la laveuse ne fonctionne ou mal branché la laveuse ne le bloque pas.
pas ou semble hors tension
La vidange de la maison est • Vérifiez la plomberie de la maison. Il est possible que
peut-être bloquée vous ayez besoin d’appeler un plombier.
Le tuyau de vidange a été poussé • Assurez-vous qu’il y a un espace d’air entre le tuyau
trop loin dans le drain de vidange et le drain.
Le filtre de la pompe à eau • Nettoyez le filtre de pompe – Ouvrez le panneau d’accès
est peut-être bouché à la pompe (à l’aide d’une pièce de monnaie) et retirez le
filtre de pompe en le tournant dans le sens antihoraire puis
le tirant. Nettoyez le filtre, enlevez tous les débris lâches,
puis remettez le filtre en place.
La laveuse n’est pas branchée • Assurez-vous que la fiche de la laveuse est fermement
branchée dans une prise de courant sous tension.
L’alimentation d’eau est coupée • Ouvrez complètement les robinets d’eau chaude et froide.
Le disjoncteur a basculé/ • Vérifiez les disjoncteurs/fusibles de la maison.
le fusible a sauté Remplacez les fusibles ou remettez en marche le
disjoncteur. La laveuse doit avoir une sortie différente
de courant.
Les contrôles ne sont pas • Appuyez sur le bouton START/PAUSE (mise en
bien réglés marche/pause) pour commencer le cycle.
Vérifications automatiques • La première fois que la laveuse est branchée, des
du système vérifications du système sont effectuées. Vous devez
attendre jusqu’à 20 secondes avant de pouvoir vous
servir de la laveuse. Il s’agit d’un fonctionnement normal.
L’eau n’entre pas ou entre Vérifications automatiques • Après que la touche START a été enfoncée, la laveuse
lentement dans la laveuse du système
procède à plusieurs vérifications de système. L’eau se
mettra à couler plusieurs secondes après que la touche
START a été enfoncée.
L’alimentation d’eau est coupée • Ouvrez complètement les robinets d’eau chaude et froide.
Les tamis des robinets d’eau •
Coupez la source d’eau et enlevez les tuyaux de
sont bouchés
branchement de l’eau à l’arrière en haut de la laveuse.
Utilisez une brosse ou un cure-dents pour nettoyer
les tamis de la machine. Rebranchez les tuyaux et
ouvrez l’eau à nouveau.
50
Page 51

Problème Causes possibles Correctifs
Files tirés, trous, déchirures Des stylos, crayons, clous, vis • Retirez les objets des poches des vêtements.
coupures ou usure excessive ou autres objets ont été oubliés
dans les poches de vêtements
Épingles, agrafes, crochets, • Attachez les agrafes, les crochets, les boutons et
boutons aiguisés, boucles de les femetures éclair.
ceinture, fermetures éclair et
objets aiguisés laissés dans
les poches
Plissage Mauvais tri • Évitez de mélanger les articles lourds (comme les
vêtements de travail) avec les articles légers (comme
les blouses).
Surcharge • Chargez votre laveuse de manière à ce que les vêtements
aient assez d’espace pour bouger.
Mauvais cycle de lavage • Utilisez un cycle de lavage qui convient à la catégorie de
tissus que vous lavez (en particulier pour les charges de
tissus faciles à laver).
Lavages répétés dans de l’eau • Lavez dans de l’eau chaude ou froide.
trop chaude
Vêtements devenus gris Pas assez de détergent • Utilisez le bon montant de détergent.
ou jaunes
Vous n’utilisez pas le détergent • Utilisez du détergent à haute efficience.
à haute efficience
Eau calcaire • Utilisez de l’eau plus chaude pour les tissus.
• Utilisez un conditionneur d’eau comme celui de marque
Calgon ou installez un adoucisseur d’eau.
L’eau n’est pas suffisamment • Assurez-vous que le chauffe-eau produit de l’eau à une
chaude température de 48°–60°C (120°–140°F).
Le détergent ne se dissout pas • Essayez un détergent liquide.
Transfert de colorant • Triez les vêtements par couleur. Si l’étiquette du tissu
indique lavez séparément, cela peut indiquer que le tissu
contient des colorants instables.
Taches de couleur Mauvaise utilisation •
Vérifiez les instructions du paquet d’adoucisseur et suivez-
de l’adoucisseur les pour utiliser le distributeur.
Transfert de colorant • Séparez les articles blancs ou de couleur claire de
ceux de couleur sombre.
• Retirez rapidement la charge de lavage de la laveuse.
La température de l’eau L’alimentation d’eau n’est pas • Assurez-vous que les tuyaux sont branchés aux
n’est pas bonne bien branchée bons robinets.
Le chauffe-eau de la maison •
Assurez-vous que le chauffe-eau de la maison fournisse
n’est pas bien réglé
de l’eau à une température de 48°–60°C (120°–140°F).
Mauvaise odeur à Laveuse inutilisée pendant une • Laissez la porte légèrement ouverte pour laisser sécher
l’intérieur de votre laveuse longue période ou le détergent à l’air.
HE de la qualité recommandée
• Exécutez un cycle BasketClean (Nettoyage du panier)
n’a pas été utilisé
(voir le menu Specialty Cycle [cycles particuliers]) avec
une tasse de javellisant. Consultez la section Entretien
et nettoyage/Entretien général.
Légère variation de Ceci est normal • Étant donné les propriétés métalliques de la peinture
la couleur métallique utilisée pour ce produit unique, de légères variations
de couleur peuvent survenir selon l’angle de vision
et les conditions d’éclairage.
Les portes se déverrouillent
Ceci est normal • Pendant les cycles SteamASSIST (Aide vapeur)
lentement et SteamREFRESH (Rafraîchissement à la vapeur),
il y a un délai d’accès à la cuve pour éviter toute
exposition à la vapeur.
www.electromenagersge.ca
Soutien au
consommateur
Conseils de dépannageFonctionnement
Mesures de sécurité
Installation
51
Page 52

52
Soutien au
consommateur
Conseils de dépannage
Fonctionnement
Mesures de sécurité
Installation
Notes.
Page 53

53
Garantie de laveuse GE.
Tout le service sous garantie est fourni par nos Centres de service de fabrique ou par un technicien
autorisé. Pour le service, appelez le 1.800.561.3344.
Veuillez fournir le numéro de série et le numéro de modèle lorsque vous appelez pour obtenir le service.
■ Les frais de déplacements à votre maison pour vous
apprendre à utiliser votre produit.
■ Une mauvaise installation, livraison ou entretien.
■ Une panne du produit si celui-ci est maltraité, mal utilisé
ou utilisé à des fins autres que celles auxquelles il est
destiné, ou utilisé commercialement.
■ Des dommages après la livraison.
■ Le remplacement de fusibles de la maison ou la remise en
marche d’un disjoncteur.
■ Des dommages au produit causés par un accident, un
incendie, une inondation ou une catastrophe naturelle.
■ Tout dommage indirect ou consécutif causé par des
pannes possibles de cet appareil électroménager.
■ Le service s’il est impossible d’avoir accès au produit
pour ce faire.
Ce qui n’est pas couvert (au Canada) :
Garant : MABE CANADA INC.
LE GARANT N’EST PAS RESPONSABLE DES DOMMAGES INDIRECTS.
Pour une période de : Nous remplacerons :
Un an Toute pièce de la laveuse qui tombe en panne à cause d’un vice de matériau ou de main-
À partir de la date d’œuvre. Pendant cette garantie limitée d’un an, GE fournit également, gratuitement,
de l’achat original tous les frais de main-d’œuvre et de services connexes pour remplacer la pièce défectueuse.
De la deuxième L’assemblage des entretoises de suspension, le moteur et la commande de moteur si n’importe
à la cinquième année laquelle de ces pièces s’avère défectueuse à cause d’un vice de matière ou de fabrication. GE
À partir de la date remplacera aussi le panneau supérieur de la laveuse, le panneau frontal ou le panneau de service
de l’achat original si ceux-ci rouillent en cours de fonctionnement. Pendant la période de trois ans couverte par cette
garantie limitée additionnelle, vous serez tenu d’assumer les coûts afférents de main-d’oeuvre ou
de réparation.
De la deuxième La cuve extérieure et la poulie d’entraînement si n’importe laquelle de ces pièces s’avère
à la dixième année défectueuse à cause d’un vice de matière ou de fabrication. Pendant la période de huit ans couverte
À partir de la date par cette garantie limitée additionnelle, vous serez tenu d’assumer les coûts afférents de main-
de l’achat original d’oeuvre ou de réparation.
Durée de vie du produit Le panier de la laveuse s’il s’avère défectueux à cause d’un vice de matière ou de fabrication.
À partir de la date Pendant la durée de vie du produit couverte par cette garantie limitée, vous serez tenu d’assumer
de l’achat original les coûts afférents de main-d’oeuvre ou de réparation.
Cette garantie est offerte à l’acheteur initial, ainsi qu’à tout propriétaire subséquent d’un produit acheté
au Canada en vue d’une utilisation domestique au Canada. Le service à domicile en vertu de la garantie
sera fourni dans les régions où il est disponible et où Mabe estime raisonnable de le fournir.
EXCLUSION DE GARANTIES IMPLICITES – Votre seul et unique recours est la réparation du produit
selon les dispositions de cette Garantie limitée. Toutes les garanties implicites, incluant les garanties
de commercialité et d’adéquation à un usage spécifique, sont limitées à une année ou à la période
la plus courte autorisée par la législation.
Soutien au
consommateur
Conseils de dépannageFonctionnement
Mesures de sécurité
Installation
Page 54

Soutien au consommateur.
Site Web appareils électroménagers GE
www.electromenagersge.ca
Vous avez une question ou vous avez besoin d’aide pour votre appareil électroménager? Contactez-nous par
Internet au site www.electromenagersge.ca 24 heures par jour, tous les jours de l’année.
Service de réparations 1.800.561.3344
Service de réparations GE est tout près de vous.
Pour faire réparer votre électroménager GE, il suffit de nous téléphoner.
Studio de conception réaliste
Sur demande, GE peut fournir une brochure sur l’aménagement d’une cuisine pour les personnes
à mobilité réduite.
Écrivez: Directeur, Relations avec les consommateurs, Mabe Canada Inc.
Bureau 310, 1 Factory Lane
Moncton, N.B. E1C 9M3
Prolongation de garantie www.electromenagersge.ca
Achetez un contrat d’entretien GE avant que votre garantie n’expire et bénéficiez d’un rabais substantiel.
Ainsi le service après-vente GE sera toujours là après expiration de la garantie.
Visitez notre site Web ou appelez-nous au 1.888.261.2133.
Pièces et accessoires
Ceux qui désirent réparer eux-mêmes leurs électroménagers peuvent recevoir pièces et accessoires
directement à la maison (cartes VISA, MasterCard et Discover acceptées).
Les directives stipulées dans le présent manuel peuvent être effectuées par n’importe quel utilisateur.
Les autres réparations doivent généralement être effectuées par un technicien qualifié. Soyez prudent,
car une réparation inadéquate peut affecter le fonctionnement sécuritaire de l’appareil.
Vous trouverez dans les pages jaunes de votre annuaire le numéro du Centre de service Mabe le plus proche.
Autrement, appelez-nous au 1.800.661.1616.
Contactez-nous
Si vous n’êtes pas satisfait du service après-vente dont vous avez bénéficié :
Premièrement, communiquez avec les gens qui ont réparé votre appareil.
Ensuite, si vous n’êtes toujours pas satisfait envoyez tous les détails–numéro de téléphone compris–au
Directeur, Relations avec les consommateurs, Mabe Canada Inc.
Bureau 310, 1 Factory Lane
Moncton, N.B. E1C 9M3
Inscrivez votre appareil électroménager www.electromenagersge.ca
Inscrivez votre appareil électroménager en direct, aussitôt que possible. Cela améliorera nos
communications et notre service après-vente. Vous pouvez également nous envoyer par la poste
le formulaire d’inscription joint à votre documentation.
Imprimé en Chine
54
Page 55

Escriba aquí los números de
modelo y serie:
N.º de modelo ____________
N.º de serie ______________
Puede encontrarlos en una etiqueta
situada en el costado de la lavadora.
Como socio de Energy Star®, GE
ha confirmado que este producto
cumple las directrices de Energy
Star®relativas al rendimiento
energético.
Instrucciones de seguridad . . . 56, 57
Instrucciones de funcionamiento
Accesorios disponibles . . . . . . . . . . . . . . .68
Ajustes de control . . . . . . . . . . . . . . . .59–63
Carga y uso de la lavadora . . . . . . .65–68
Funciones . . . . . . . . . . . . . . . . . . . . . . . . . . . .64
Panel de control . . . . . . . . . . . . . . . . . . . . . 58
Respuesta ante demanda . . . . . . . . . . . . 69
Instrucciones de instalación 70–75
Desembalaje de la lavadora . . . . . . . . . .72
Dimensiones aproximadas . . . . . . . . . . . .71
Instalación de la lavadora . . . . . . . . .74, 75
Piezas de repuesto . . . . . . . . . . . . . . . . . . .75
Preparación para la instalación
de la lavadora . . . . . . . . . . . . . . . . . . . . . . . .70
Requisitos de conexión de tierra . . . . . .73
Requisitos de desagüe . . . . . . . . . . . . . . . .73
Requisitos de suministro de agua . . . . .73
Requisitos eléctricos . . . . . . . . . . . . . . . . . .73
Ubicación de la lavadora . . . . . . . . . . . . .71
Consejos para la solución
de problemas . . . . . . . . . . . . . . . . . .76–79
Atención al cliente
Garantía (EE.UU.) . . . . . . . . . . . . . . . . . . . . . 82
Servicio al consumidor . . . . . . . . . . . . . . .83
Soporte al consumidor
Consejos para la
solución de problemas
Instrucciones
de funcionamiento
Instrucciones
de seguridad
Instrucciones
de instalación
55
Page 56

■ Instale o almacene la lavadora en un lugar donde
no esté expuesta a temperaturas bajo cero
ni a las inclemencias climáticas, ya que esto puede
provocar daños irreversibles e invalidar la garantía.
■ Conecte correctamente a tierra la lavadora de
conformidad con todos los códigos y ordenanzas
regulatorias. Siga la información de Instrucciones
de instalación.
INFORMACIÓN DE SEGURIDAD IMPORTANTE.
LEA TODAS LAS INSTRUCCIONES ANTES DEL USO.
¡ADVERTENCIA!
Para su seguridad, siga la información de este manual con el fin de
minimizar el riesgo de incendio, explosión o descarga eléctrica, así como
para evitar daños materiales, lesiones o la muerte.
Las instrucciones de este manual, así como el resto de la documentación
que se incluye con la lavadora, no cubren todas las situaciones o
estados posibles que pueden producirse. El usuario DEBE adoptar
procedimientos correctos, seguros y prudentes al instalar, utilizar
y realizar el mantenimiento de cualquier electrodoméstico.
SEGURIDAD DEL CALENTADOR DE AGUA
En determinadas condiciones, en un calentador de agua que no se haya utilizado durante un mínimo
de dos semanas se puede producir gas hidrógeno. El gas hidrógeno puede resultar explosivo en determinadas
circunstancias.
Si el agua caliente no se ha utilizado por dos semanas o más, prevenga la posibilidad de sufrir daños o lesiones
abriendo todos los grifos de agua caliente y dejándola correr durante varios minutos.
Realice este proceso antes
de utilizar cualquier electrodoméstico que se conecte al sistema de agua caliente.
Este sencillo procedimiento le
permitirá liberar todo el gas hidrógeno acumulado. Debido a que el gas es inflamable, no fume ni utilice ninguna
llama o electrodoméstico durante el proceso.
INSTALACIÓN CORRECTA
La lavadora se debe instalar y colocar correctamente de acuerdo con las instrucciones de instalación, antes de utilizarla.
■ Mantenga las zonas debajo de los
electrodomésticos y en torno a ellos sin materiales
combustibles como pelusa, papel, trapos
y productos químicos.
■ No deje la puerta de la lavadora abierta. Si la puerta
está abierta, puede hacer que los niños se cuelguen
de ella o se introduzcan en la lavadora.
■ Es necesario vigilar con atención a los niños
si utilizan la lavadora o se encuentran en las
proximidades. No deje que los niños jueguen
sobre éste u otro electrodoméstico,
con él o en su interior.
ZONA DE LAVADERO
56
Soporte al consumidor
Consejos para la
solución de problemas
Instrucciones
de funcionamiento
Instrucciones
de seguridad
Instrucciones
de instalación
Page 57

57
Soporte al consumidor
Consejos para la
solución de problemas
Instrucciones de
funcionamiento
Instrucciones
de seguridad
Instrucciones
de instalación
■ No abra nunca la lavadora mientras esté
en movimiento. Espere a que se detenga
por completo para abrir la puerta.
■ No mezcle blanqueadores clorados con amoniaco
o ácidos como vinagre o desoxidantes. La mezcla
de distintos productos químicos puede producir
gases tóxicos que pueden causar la muerte.
■ No lave ni seque prendas que se hayan limpiado,
lavado, empapado o manchado con sustancias
inflamables o explosivas (como cera, aceite,
pintura, gasolina, desengrasantes, disolventes
de limpieza en seco, queroseno, etc.) que puedan
prenderse o explosionar. No añada ninguna
de estas sustancias al agua de lavado.
No utilice ni coloque ninguna de estas
sustancias en torno a la lavadora
o la secadora durante el funcionamiento.
■ El proceso de lavado puede reducir el tiempo
previo a la inflamación de los tejidos. Para evitar
este efecto, siga con atención las instrucciones
de lavado y cuidado del fabricante de la prenda.
■ Para minimizar la posibilidad de descarga
eléctrica, desenchufe el electrodoméstico
de la corriente o desconecte la lavadora
en el panel de distribución de la vivienda quitando
el fusible o apagando el interruptor antes de
realizar cualquier tarea de mantenimiento o
limpieza. NOTA: al pulsar el botón de apagado,
NO se desconecta la lavadora de la corriente.
■ No intente en ningún caso utilizar la lavadora
si está dañada, funciona incorrectamente,
está parcialmente desmontada, le faltan
piezas o algunas están rotas, incluidos
el cable o el enchufe.
■ No cierre la puerta bruscamente. No intente
forzar la puerta para abrirla cuando esté
bloqueada (el indicador LOCKED [Bloqueada]
está ENCENDIDO). Puede dañar la lavadora.
■ La lavadora está equipada con un sistema
de protección de sobrecargas eléctricas.
El motor se detendrá si se recalienta.
La lavadora se iniciará de nuevo
automáticamente después de un período
de enfriamiento de hasta 2 horas si no
se apaga manualmente durante ese tiempo.
AL UTILIZAR LA LAVADORA
■ Cierre las llaves de paso para reducir la presión
de las tuberías y las válvulas, y minimizar
las fugas en caso de que se produzca una rotura
o grieta. Compruebe el estado de las tuberías
de toma de agua, ya que deben sustituirse
cada 5 años.
■ Antes de deshacerse de una lavadora o de
desecharla, quite la puerta de la lavadora para
evitar que los niños se escondan en su interior.
■ No intente reparar ni sustituir ninguna pieza
de este electrodoméstico, a menos que se
recomiende de manera explícita en el manual
del propietario o en instrucciones publicadas
de uso y reparación que sean comprensibles
y que pueda realizar usted.
■ No manipule los controles.
CUANDO NO ESTÉ EN USO
GUARDE ESTAS INSTRUCCIONES
Utilice este
electrodoméstico
sólo para el
uso que se
describe en
este manual
del
propietario.
GEAppliances.com
LEA DETENIDAMENTE Y SIGA LA INFORMACIÓN
DE SEGURIDAD.
Page 58

El panel de control de la lavadora.
58
Puede encontrar el número de modelo en una etiqueta situada en el costado de la lavadora
Soporte al consumidor
Consejos para la
solución de problemas
Instrucciones
de funcionamiento
Instrucciones
de seguridad
Instrucciones
de instalación
Power (Encendido/apagado)
Pulse este botón para “activar” la pantalla. Si la pantalla está activa, púlselo para poner la lavadora
en modo de espera.
NOTA: Al pulsar el botón de POWER (encendido/apagado) no se desconecta la lavadora de la corriente.
1
ADVERTENCIA! Para reducir el riesgo de incendio, descarga eléctrica o lesiones a personas, lea
las INSTRUCCIONES IMPORTANTES DE SEGURIDAD antes de utilizar este aparato.
Inicio rápido
Si la pantalla está oscura, presione el botón POWER
(encendido) para “despertar” la pantalla.
Presione el botón
POWER
(encendido).
Seleccione un ciclo de lavado
o el ciclo Steam Refresh (renovación
con vapor). (Existen configuraciones
predeterminadas para cada ciclo.
Estas configuraciones predeterminadas
pueden cambiarse. Para más información,
ver Configuraciones de control).
Si seleccionó un ciclo diferente a un SPECIALTY
CYCLE (ciclo de especialidad), presione el botón
START/PAUSE (iniciar/pausa).
Si seleccionó SPECIALTY CYCLE (ciclo de especialidad), elija
entre Drain & Spin (desagüe y centrifugado), Garments (prendas),
Bed and Bath (cama y baño), Other Specialty (otra especialidad)
y Basket Clean (limpieza de tambor) para sus necesidades
específicas antes de presionar START/PAUSE (iniciar/pausa).
Para más información, ver Ciclos de especialidad).
3
2
1
WPDH8900J, WPDH8910K – Lavadora con vapor Profile HA con SmartDispense
™
WPDH8850J – Lavadora con vapor Profile HA
Page 59

Soporte al consumidor
Consejos para la
solución de problemas
Instrucciones
de funcionamiento
Instrucciones
de seguridad
Instrucciones
de instalación
Ajustes de control. GEAppliances.com
Ciclos de lavado
Los ciclos de lavado se han optimizado para tipos específicos de cargas de lavado. La siguiente tabla le ayudará a combinar el tipo de lavado
con las cargas. Los elevadores GentleClean™hacen girar la ropa suavemente en la solución de agua y detergente para limpiar la carga.
WHITES/HEAVY DUTY Para prendas de algodón, ropa de hogar, prendas de trabajo o deportivas de color blanco con mucha
(ROPA BLANCA/MUY RESISTENTES) o poca suciedad. Puede utilizarse la opción STEAM ASSIST (ayuda de vapor) con este ciclo.
COLORS (ROPA DE COLOR)/ Para prendas de algodón, ropa de cama, prendas de trabajo o deportivas de colores sólidos con mucha
NORMAL o poca suciedad. Puede utilizarse la opción STEAM ASSIST (ayuda de vapor) con este ciclo.
WRINKLE FREE (PERMA PRESS) Para prendas de cuidado normal y planchado permanente. Puede utilizarse la opción STEAM
LIBRE DE ARRUGAS ASSIST (ayuda de vapor) con este ciclo.
(PLANCHADO PERMANENTE)
ACTIVE WEAR Para prendas que se utilicen a la hora de practicar deportes, ejercicios, así como algunas prendas sport.
(ROPA DE EJERCICIO) Entre los tejidos, se incluyen acabados y fibras de última tecnología como spandex, telas elásticas
y microfibras. Puede utilizarse la opción STEAM ASSIST (ayuda de vapor) con este ciclo.
STEAM REFRESH Para estirar de 1 a 5 elementos de mezcla de algodón. Este no es un ciclo de lavado, sino un ciclo que
(RENOVACIÓN POR VAPOR) sólo aplica vapor a las prendas. Seleccione la cantidad correcta de prendas utilizando las teclas de flecha
y presione ENTER.
La lavadora emitirá un sonido cuando finalice el ciclo, y seguirá girando durante 30 minutos para evitar
la formación de arrugas. Presione START/PAUSE (iniciar/pausa) para quitar las prendas.
Si la ropa se encuentra ligeramente húmeda una vez completado el ciclo, seque la misma a mano durante
5 minutos antes de usar.
HANDWASH Para prendas en las que se indique que se pueden lavar a mano con poca suciedad.
(LAVADO A MANO) La ropa se sacude con ligereza a fin de imitar la acción del lavado a mano.
DELICATES Para lenceria y telas de cuidado especiales con poca o normal suciedad. Proporciona
(PRENDAS DELICADAS) una limpieza y un remojo suaves durante el lavado y el enjuagado.
WASHABLE WOOLS Para lavar aquellos productos de lana lavables a máquina, siempre y cuando se realice de acuerdo
(LANAS LAVABLES) con las instrucciones de la etiqueta de la prenda. Cuando seleccione este ciclo, debe utilizar
un detergente apropiado para el lavado de la lana.
SPEED WASH Para prendas con poca suciedad que se necesiten en poco tiempo. La duración del ciclo
(LAVADO RÁPIDO) es de aproximadamente 30 minutos, dependiendo de las opciones seleccionadas.
RINSE & SPIN Para enjuagar las prendas rápidamente en cualquier momento.
(ENJUAGADO Y CENTRIFUGADO)
SPECIALTY CYCLES Para prendas únicas que necesitan un tratamiento especial.
(CICLOS ESPECIALES)
2
Ciclos especiales
Mientras se encuentre usando un ciclo de especialidad, utilice
las flechas ▲ y ▼ para desplazarse entre las diferentes opciones.
Presione ENTER (ingresar) para seleccionar el ciclo. Presione BACK
(atrás) para volver al menú anterior.
59
DRAIN & SPIN
(DESAGÜE Y CENTRIFUGADO)
Desagüe y centrifugue
en cualquier momento.
GARMENTS
(PRENDAS)
Coats (Abrigos)
Dress Shirts (Camisas de vestir)
Hosiery/Bras (Medias/sostenes)
Jeans
Khakis
Sweaters
BED and BATH
(CAMA y BAÑO)
Blankets (cotton)
(Mantas [cotón])
Comforters (Edredones)
Sheets (Sábanas)
Towels (Toallas)
SPECIALIZED CYCLES
(CICLOS DE ESPECIALIDAD)
Athletic Shoes (Zapatillas)
Energy Savings
(Ahorro de energía)
Fabric Refresh
(Renovación de telas)
Fleece (Corderito)
Fragile Cottons
(Algodones frágiles)
Performance Fabrics
(Telas de rendimiento)
Pet Bedding
(Camas de mascotas)
Play Clothes (Prendas de juego)
Single Item Wash
(Lavado de prenda única)
Sleeping Bag (Bolsa de dormir)
Soak (Remojo)
Super Clean (Súper lavado)
Throw Rugs (Mantas de viaje)
BASKET CLEAN
(LIMPIEZA DE TAMBOR)
Page 60

Soporte al consumidor
Consejos para la
solución de problemas
Instrucciones
de funcionamiento
Instrucciones
de seguridad
Instrucciones
de instalación
Settings (Configuraciones)
Utilice el botón SETTINGS
(configuraciones) para ajustar
las siguientes características:
Dryer Link (conexión con secadora):
Presione el botón SETTINGS. Cuando
aparece “DRYER LINK” (conexión con
secadora) en la pantalla, presione
ENTER. Utilizando las teclas / ,
seleccione ON (encendido) y presione
ENTER.
Cuando finaliza el ciclo de la lavadora,
ésta se comunicará con la secadora
cuando se presione cualquier botón
del panel de control o se abra la puerta.
La lavadora mostrará la siguiente
leyenda: “TRANSFERRING CYCLE
INFORMATION TO THE DRYER”
(transfiriendo información del ciclo
a la secadora) y la secadora mostrará
“RECEIVING CYCLE INFORMATION
TO THE DRYER” (secadora recibiendo
información del ciclo).
La secadora se comunicará con
la lavadora sólo si la secadora no está
operando un ciclo.
Si la lavadora comienza un nuevo
ciclo antes de que la secadora pueda
comunicarse con ella, la información
se perderá.
Volumen de final de ciclo:
Presione el botón SETTINGS. Cuando
aparece “VOLUME” (volumen) en
la pantalla, presione ENTER, luego
seleccione “End of Cycle” (final de ciclo).
Utilizando las teclas / , seleccione
High (alto), Medium (medio), Low (bajo)
u Off (apagado).
Sonidos del control:
Presione el botón SETTINGS, luego
seleccione “Volume” (volumen). Cuando
aparece “CONTROL SOUNDS” (sonidos
del control) en la pantalla, presione ENTER.
Utilizando las teclas / , seleccione
High (alto), Medium (medio), Low (bajo)
u Off (apagado).
Brillo de la pantalla:
Presione el botón SETTINGS. Cuando
aparece “DISPLAY BRIGHTNESS” (brillo
de la pantalla) en la pantalla, presione
ENTER. Utilizando las teclas / ,
seleccione High (alto), Medium (medio)
o Low (bajo).
Dureza del agua (sólo aparece cuando
se conecta a la lavadora el accesorio de
pedestal SMART DISPENSER [dosificador
inteligente]):
Esto ajustará la cantidad de detergente
que se dosifica automáticamente para
el SMART DISPENSER. Ver el Manual
de Propietario incluido con SMART
DISPENSER para las instrucciones
de uso.
▼
▼
▼
▼
▼
▼
▼
▼
60
7
Soil Level (Nivel de suciedad)
Al cambiar el nivel de suciedad, aumenta o disminuye el tiempo de lavado con el fin de eliminar las distintas cantidades de suciedad.
Para cambiar el nivel de suciedad, pulse el botón SOIL LEVEL (Nivel de suciedad) hasta obtener el valor deseado. Puede elegir entre
los niveles de suciedad Extra Light (Muy poca), Light (Poca), Normal o Heavy (Mucha).
Spin Speed (Velocidad de centrifugado)
Al cambiar la velocidad de centrifugado, cambia la velocidad final de centrifugado de los ciclos. Siga siempre las indicaciones
de la etiqueta de cuidado del fabricante de la prenda al cambiar la velocidad de centrifugado.
Para cambiar la velocidad de centrifugado, pulse el botón SPIN SPEED (Velocidad de centrifugado) hasta obtener el valor deseado.
Puede elegirse entre No Spin (sin centrifugado), Low (bajo), Medium (medio), High (alto) o Extra High Spin (centrifugado extra alto).
Las velocidades de centrifugado más rápidas no están disponibles en determinados ciclos, como Delicates (Prendas delicadas).
Con dichas velocidades, se elimina más agua de las prendas y se reduce el tiempo de secado, aunque también puede aumentar
la posibilidad de que se formen arrugas en algunos tejidos.
Wash Temp (Temperatura de lavado)
Ajuste este control para seleccionar la temperatura del agua adecuada para el ciclo de lavado. El agua de prelavado y enjuagado
está siempre fría para poder reducir el consumo de energía y las manchas y arrugas.
Siga las indicaciones de la etiqueta de cuidado del fabricante del tejido al seleccionar la temperatura de lavado.
Para cambiar la temperatura de lavado, pulse el botón WASH TEMP (Temperatura de lavado) hasta obtener el valor deseado.
Puede elegirse entre Tap Cold (frío de grifo), Cold (frío), Warm (tibio), Hot (caliente) o Sanitize (desinfección). La temperatura de lavado
de desinfección no está disponible en determinados ciclos, como Delicates (Prendas delicadas).
Al seleccionar la temperatura de Sanitize (Desinfección), la lavadora aumenta la temperatura del agua para esterilizar y eliminar
más del 99% de las bacterias que aparecen de forma frecuente en los lavados hogareños. La temperatura de desinfección está
disponible exclusivamente en el ciclo Whites/Heavy Duty (Ropa blanca/Muy resistentes). Para obtener mejores resultados, seleccione
la configuración de suciedad excesiva cuando utilice la opción de temperatura de desinfección.
NOTA: Los 10 primeros segundos de la toma de agua, siempre está fría. Esta función permite acondicionar el tejido y evitar
que las manchas se adhieran a las prendas.
START/PAUSE (Inicio/pausa)
Pulse este botón para iniciar un ciclo de lavado. Si la lavadora está en funcionamiento, al pulsarlo una vez, la lavadora se detendrá
y se desbloqueará la puerta. La puerta tardará unos segundos en destrabarse después de presionar PAUS E (pausa). Vuelva a pulsar
el botón para reiniciar el ciclo de lavado.
NOTA: Si la lavadora está detenida y el ciclo no se reinicia en 15 minutos, se cancelará el ciclo de lavado actual.
NOTA: En algunos ciclos, la lavadora realiza el desagüe primero, luego destrabe la puerta cuando se encuentra en pausa.
NOTA: La lavadora realiza revisiones automáticas del sistema después de presionar el botón START (Inicio). El flujo de agua se iniciará
en 45 segundos o antes. Podrá escuchar la puerta al trabarse y destrabarse antes de que comience a fluir el agua; esto es normal.
3
4
5
6
Ajustes de control.
Page 61

Soporte al consumidor
Consejos para la
solución de problemas
Instrucciones
de funcionamiento
Instrucciones
de seguridad
Instrucciones
de instalación
GEAppliances.com
Prewash (Prelavado)
El prelavado es un lavado adicional que se
realiza antes del lavado principal. Utilícelo
con prendas muy sucias o con aquellas
prendas en cuyas etiquetas de cuidado
se recomiende realizar un prelavado.
Asegúrese de añadir detergente de alta
eficacia o la sustancia de lavado
correspondiente en la cubeta de
prelavado.
La característica de prelavado llenará
la lavadora (agregando el detergente
de prelavado), girará la ropa, efectuará
el desagüe y el centrifugado. Luego la
lavadora realizará el ciclo de lavado
seleccionado.
NOTA: En algunos ciclos especiales, el
prelavado se selecciona automáticamente
por defecto. Esta selección puede
modificarse en cualquier momento.
Extra Rinse (Enjuagado extra)
Use esta función cuando desee un
enjuagado adicional para eliminar los
restos de suciedad y detergente en
cargas sucias.
NOTA: En algunos ciclos especiales,
el enjuague extra se selecciona
automáticamente por defecto. Esta
selección puede modificarse en cualquier
momento. Algunos ciclos cuentan con
enjuagues adicionales que se realizan
automáticamente.
Delay Start (Retrasar inicio)
Puede retrasar el inicio del ciclo de lavado
hasta 24 horas. Pulse el botón DELAY
START (Retrasar inicio) para seleccionar el
número de horas que desee retardar el
inicio del ciclo. Utilice las teclas ▲ y ▼
(arriba y abajo) para buscar el tiempo
de demora; luego presione ENTER
para seleccionar el tiempo de demora.
Finalmente, presione el botón START
después de haber seleccionado el ciclo
deseado. La lavadora comenzará la cuenta
regresiva y se pondrá en funcionamiento
automáticamente a la hora señalada.
NOTA: Si olvida cerrar por completo la
puerta, sonará una señal para recordárselo.
NOTA: Si abre la puerta durante la cuenta
regresiva, la lavadora entrará en estado
de pausa. Debe cerrar la puerta y pulsar
de nuevo START (Iniciar) para reiniciar
la cuenta regresiva.
Lock (Bloquear)
Puede bloquear los controles para impedir
que se realice cualquier selección. O bien
puede bloquear los controles después de
haber iniciado un ciclo.
Con esta opción seleccionada, los niños no
podrán poner en marcha la lavadora de
manera fortuita aunque toquen el panel.
Para bloquear la lavadora, mantenga
pulsado el botón LOCK (bloquear) durante
3 segundos. Para desbloquear los
controles de la lavadora, mantenga
pulsado el botón LOCK durante
3 segundos. Se escuchará un sonido
que indica la condición de
bloqueado/desbloqueado.
El icono de bloqueo de los controles
que aparece en la pantalla se encenderá
cuando esté activado.
NOTA: El botón POWER
(encendido/apagado) puede seguir
utilizándose cuando la lavadora está
bloqueada.
MY CYCLE (Mi ciclo)
(en algunos modelos)
Para guardar el ciclo que prefiera,
establezca los valores deseados para
los ajustes de ciclo de lavado, nivel
de suciedad, velocidad de giro y
temperatura de lavado y mantenga
pulsado el botón MY CYCLE (Mi ciclo)
durante 3 segundos. Sonará un pitido
para indicar que el ciclo se ha guardado.
Para utilizar el ciclo personalizado, pulse
el botón MY CYCLE antes de lavar una
carga.
Para cambiar el ciclo guardado, establezca
los valores deseados y mantenga pulsado
el botón MY CYCLE durante 3 segundos.
NOTA: Al utilizar MY CYCLE, no se pueden
modificar las opciones de lavado una vez
que comience el ciclo.
NOTA: Si cambia las opciones de lavado
con MY CYCLE antes de que el ciclo
comience, el indicador de MY CYCLE
se apagará y volverá al ciclo base.
8
9
10
11
12
61
Page 62

62
Ajustes de control.
Stain Inspector (Inspector de manchas)
La característica STAIN INSPECTOR le permite señalar
las manchas que se encuentran en las prendas de la
carga. Esta característica puede usarse con cualquier
ciclo de lavado.
Cómo usar STAIN INSPECTOR:
1. Seleccione el ciclo de lavado.
2. Presione el botón STAIN INSPECTOR (el botón
se iluminará cuando se encienda).
3. Verifique las instrucciones de lavado de su prenda.
4. Presione el botón ENTER para continuar.
5. Utilice las teclas ▲ y ▼ para buscar la categoría
de manchas deseada.
6. Presione el botón ENTER para seleccionar
la categoría de manchas.
7. Utilice las teclas ▲ y ▼ para seleccionar
la mancha deseada.
13
Pueden seleccionarse las siguientes manchas:
8. Presione el botón ENTER para seleccionar la mancha.
9. La mancha seleccionada aparecerá en la pantalla.
10. Presione el botón START para iniciar el ciclo.
NOTA: Para apagar STAIN INSPECTOR o para
seleccionar una mancha diferente, presione de nuevo
el botón STAIN INSPECTOR.
NOTA: El prelavado se selecciona por defecto
automáticamente para algunas manchas. Cuando se
selecciona automáticamente, se encenderá el botón
PREWASH (prelavado). Para una remoción óptima de
manchas, se recomienda agregar detergente de alta
eficiencia o aditivos de lavado adecuados al dosificador
de prelavado. La opción de prelavado puede cancelarse
si no se desea agregar el prelavado al ciclo.
OUTDOOR (EXTERIOR)
Clay (Arcilla)
Grass (Césped)
Mud/Dirt (Barro/suciedad)
Rust Iron (Herrumbre)
Tree Sap (Savia)
COSMETICS (COSMÉTICOS)
Lipstick/Lip Balm
(Lápiz de labios/protector labial)
Deodorant (Desodorante)
Lotions (Lociones)
Makeup (water-based)
(Maquillaje [base agua])
Oil (hair/mineral)
(Aceite [cabello/mineral])
BEVERAGES (BEBIDAS)
Grape Juice (Jugo de uvas)
Coffee/Tea (Café/té)
Fruit Juice Other
(Otro jugo de frutas)
Milk/Dairy (Leche/lácteos)
Wine (red/white)
(Vino [tinto/blanco])
FOOD/COOKING (ALIMENTOS/COCCIÓN)
Butter/Margarine
(Manteca/margarina)
Cooking/Vegetable Oil
(Aceite para cocción/vegetal)
Chocolate
Tomato Based (Base tomate)
Barbecue Sauce (Salsa barbacoa)
PERSONAL
Blood (Sangre)
Perspiration (Transpiración)
Urine/Feces (Orina/heces)
Mouthwash (Enjuague bucal)
Vomit (Vómito)
SCHOOL/OFFICE/HOME
(ESCUELA/OFICINA/HOGAR)
Adhesive Tape (Cinta adhesiva)
Ballpoint Ink (Tinta de bolígrafo)
Glue (white common)
(Pegamento [blanco común])
Pencil Mark (Marca de lápiz)
Correction Fluid (Fluido corrector)
LAUNDRY (ROPA SUCIA)
Dingy White Socks (Medias blancas sucias)
Collar/Cuff Soil
(Suciedad en cuellos/mangas)
Dye Transfer (Transferencia de colores)
Fabric Softener (Suavizante)
Yellowing (Prendas amarillentas)
OIL/GREASE/WAX
(ACEITE/GRASA/CERA)
Motor Oil/Lube (Aceite/lubricante de motor)
Ointment/Salve (Ungüento/bálsamo)
Candle Wax (Cera de velas)
Crayon (Crayón)
Chapstick
™
Soporte al consumidor
Consejos para la
solución de problemas
Instrucciones
de funcionamiento
Instrucciones
de seguridad
Instrucciones
de instalación
Page 63

63
SMART DISPENSE
™
(Dosificación inteligente) –
accesorio opcional (en algunos modelos)
Si ha adquirido el sistema SMART DISPENSE de
PROFILE, diríjase al Manual de Propietario incluido
con el sistema SMART DISPENSE.
Si no ha adquirido el sistema SMART DISPENSE de
PROFILE, no contará con la capacidad de dosificación
a granel. Si selecciona la opción SMART DISPENSE,
aparecerá un mensaje señalando que su unidad no
cuenta con dicha capacidad. Tendrá que colocar
detergente y otros aditivos seleccionado en el cajón
dosificador ubicado en la parte superior izquierda
de la unidad.
Para adquirir el sistema SMART DISPENSE de PROFILE,
diríjase a GEAppliances.com o comuníquese con su
minorista local.
14
GEAppliances.com
Soporte al consumidor
Consejos para la
solución de problemas
Instrucciones
de funcionamiento
Instrucciones
de seguridad
Instrucciones
de instalación
STEAM ASSIST (Ayuda de vapor)
La función de STEAM ASSIST (ayuda de vapor) agrega
vapor a la lavadora durante los ciclos de lavado de
WHITES/HEAVY DUTY (ropa blanca/muy resistentes),
COLORS/NORMAL (ropa de color/normal), WRINKLE
FREE (libre de arrugas) o ACTIVE WEAR (ropa de
ejercicio).
Para usar:
1. Encienda el aparato (ON) y seleccione un ciclo de
lavado. La opción STEAM ASSIST (ayuda de vapor)
sólo se encuentra disponible en los ciclos
WHITES/HEAVY DUTY (ropa blanca/muy
resistentes), COLORS/NORMAL (ropa de
color/normal), WRINKLE FREE (libre de arrugas)
o ACTIVE WEAR (ropa de ejercicio).
2. Seleccione el botón STEAM ASSIST para activar
Steam (vapor).
3. Presione el botón START/PAUSE (iniciar/pausa).
15
Page 64

Compartimento para el suavizante
Si lo desea, vierta la cantidad recomendada
de suavizante líquido en el compartimento
con la etiqueta “Fabric Softener” (Suavizante).
Utilice sólo suavizante líquido en el depósito.
Dilúyalo con agua hasta la línea de llenado máximo.
No sobrepase la línea de llenado máximo. Un
llenado excesivo puede hacer que el suavizante se
administre demasiado pronto y manche las prendas.
NOTA: No vierta directamente el suavizante
sobre la carga.
64
Acerca de las funciones de la lavadora.
Depósito de detergente
Abra lentamente el depósito de detergente tirando
de él hasta que se detenga.
Tras añadir los productos de lavado, ciérrelo
despacio. Si cierra el depósito demasiado rápido,
puede provocar que la lejía, el suavizante o
el detergente se administren antes de tiempo.
Es posible que observe agua en los
compartimentos de lejía y suavizante al final del
ciclo. Este es el resultado de la acción de trasvase
y forma parte del funcionamiento
normal de la lavadora.
Use sólo detergente de alta
eficiencia HE.
Compartimento para lejía líquida
Si lo desea, mida la cantidad recomendada
de lejía líquida, que no sobrepase 1/3 del
recipiente (80 ml) y viértala en el compartimento
central con la etiqueta “Liquid Bleach” (Lejía
líquida) marcado con este símbolo .
Se recomienda el uso de lejía de alta eficiencia
(HE) con esta lavadora de carga frontal.
No sobrepase la línea de llenado máximo.
Un llenado excesivo puede hacer que la lejía
se administre demasiado pronto y, como resultado,
dañe las prendas.
NOTA: No utilice lejía en polvo en el depósito.
Compartimento para el detergente
■ Sólo use detergente de alta eficiencia en esta
lavadora. La línea MAX es para detergente
normal. NO sobrepase la línea MAX de
llenado.
NO llene con detergente de alta eficiencia
hasta la línea MAX. Utilice la cantidad
recomendada por el fabricante
del detergente.
La pieza de selección de detergente se debe
colocar en el compartimento de detergente
en la posición específica con respecto al tipo
de detergente que se vaya a utilizar.
■ Detergente en polvo – Coloque la pieza
en la posición trasera. Los iconos de
detergente en polvo deben quedar
alineados cuando la pieza esté en la
posición de detergente en polvo.
■ Detergente líquido – Coloque la pieza
en la posición delantera. Los iconos
de detergente líquido deben quedar
alineados cuando la pieza esté en
la posición de detergente líquido.
Mueva la pieza sacándola y deslizándola entre
las ranuras del compartimento de detergente
delantero o trasero, según desee, para detergente
líquido o en polvo.
■ Añada la medida de detergente al
compartimento de detergente delantero
izquierdo del depósito.
■ El detergente se añade desde el depósito
al comienzo del ciclo de lavado. Se puede
utilizar tanto detergente en polvo como
líquido.
■ Es posible que haya que ajustar el uso
de detergente a la temperatura del agua,
a la dureza de la misma, al tamaño y al nivel
de suciedad de la carga. Evite utilizar
demasiado detergente en la lavadora ya que
puede producir demasiado jabón y dejar
restos en las prendas.
■ NO coloque detergente apelmazado
en el dispensador. El detergente apelmazado
puede provocar una pérdida.
La pieza en la posición trasera
para utilizar detergente en polvo
La pieza en la posición delantera
para utilizar detergente líquido
Compartimento de prelavado
■ Utilice sólo el compartimento de prelavado
si va a seleccionar el ciclo Pre Wash (Prelavado)
para prendas muy sucias. Añada la cantidad
de detergente o de sustancia de prelavado al
compartimento de prevalado situado en la parte
posterior izquierda del depósito de detergente.
■ El detergente o la sustancia de prelavado
se añaden desde el depósito durante el ciclo
de prelavado (en caso de que se seleccione).
NOTA: El detergente líquido se vaciará en el
tambor de la lavadora a medida que se añada.
■ Es posible que haya que ajustar el uso de
detergente a la temperatura del agua, a la
dureza de la misma, al tamaño y al nivel de
suciedad de la carga. Evite utilizar demasiado
detergente en la lavadora ya que puede
producir demasiado jabón y dejar restos
en las prendas.
Iconos
de líquido
Iconos
de
polvo
Soporte al consumidor
Consejos para la
solución de problemas
Instrucciones
de funcionamiento
Instrucciones
de seguridad
Instrucciones
de instalación
Page 65

Carga y uso de la lavadora.
Siga siempre las indicaciones de la etiqueta de cuidado del tejido del fabricante en el lavado y el planchado. GEAppliances.com
Separación de cargas
Carga de la lavadora
Puede que el tambor de la lavadora esté totalmente
lleno con prendas sueltas que se añadan. No lave
prendas que contengan materiales inflamables
(ceras, líquidos de limpieza, etc.).
Para añadir prendas una vez que la lavadora esté en
marcha, pulse START/PAUSE (Iniciar/pausa) y espere
hasta que se desbloquee la puerta. La lavadora puede
tardar unos 30 segundos en desbloquear la puerta
después de pulsar START/PAUSE, dependiendo de las
condiciones de la misma. No intente forzar la puerta
para abrirla cuando esté bloqueada. Una vez que
se desbloquee, ábrala con cuidado. Añada prendas,
cierre la puerta y pulse START/PAUSE para reiniciar
el funcionamiento.
Colores
Ropa blanca
Ropa de colores
claros
Ropa de colores
oscuros
Suciedad
Mucha
Normal
Poca
Tejido
Prendas delicadas
Prendas de fácil
cuidado
Prendas resistentes
de algodón
Pelusas
Prendas que
sueltan pelusa
Prendas a las
que se adhiere
la pelusa
■ Combine las prendas grandes y pequeñas en cada carga. Cargue primero las prendas grandes. Las prendas
grandes no deben representar más de la mitad de la carga total de lavado.
■ No se recomienda lavar prendas sueltas. Esto puede producir una carga desequilibrada. Añada una o dos
prendas similares.
■ Las almohadas y los edredones no deben mezclarse con otras prendas. Esto puede producir una carga
desequilibrada.
■ Separe las prendas de colores oscuros de las de colores claros para evitar la transferencia de colores. Esta es
una lavadora de alta eficiencia, que usa menos agua, por lo que la transferencia de colores resulta más común.
65
ROPA
DE TRABAJO
4 Jeans
5 camisas
de trabajo
5 pantalones
de trabajo
ROPA
DE CAMA
2 toallones
grandes
10 toallas de baño/
12 toallitas
7 toallas de mano/
2 alfombras de
baño de toalla
O
2 sábanas rectas
tamaño Queen
2 sábanas
ajustables
tamaño Queen
4 fundas
de almohada
CARGA MIXTA
4 fundas de
almohada
2 toallas de mano
2 sábanas rectas/
2 sábanas ajustables
2 toallas de baño/
4 toallitas
O
6 camisas
(de hombre
o de mujer)
4 pantalones
(Khakis o
de sarga)
5 camisetas
7 boxers
4 shorts
O
6 camisetas
4 pantalones
de gimnasia
4 sudaderas
2 sudaderas
con capucha
7 pares de medias
DELICADOS*
7 sostenes
7 pantaletas
3 enaguas
2 camisolas
4 camisones
*Se recomienda
el uso de una
bolsa de malla
de nylon para
elementos
pequeños
LAVADO RÁPIDO
(2–4 PRENDAS)
2 camisas de
trabajo informales
1 pantalón de
trabajo informal
O
3 uniformes
de fútbol
Ejemplos de carga*
*Se recomienda el uso de una bolsa de malla de nylon para elementos pequeños.
Soporte al consumidor
Consejos para la
solución de problemas
Instrucciones
de funcionamiento
Instrucciones
de seguridad
Instrucciones
de instalación
Page 66

Cuidado y limpieza/Mantenimiento general
Exterior: Limpie inmediatamente cualquier vertido. Utilice un trapo húmedo. No aplique objetos afilados
a la superficie.
Interior: Seque alrededor de la abertura de la puerta de la lavadora, así como la junta obturadora elástica
(incluidas las tuberías conectadas) y el cristal de la puerta. Estas zonas deben estar siempre limpias para
garantizar un sellado hermético frente al agua.
Se recomienda enjuagar la lavadora por lo menos una vez por mes con 1 taza de lejía (u otro producto
disponible comercialmente fabricado con ese objetivo) vertida dentro de la sección de prelavado del
dosificador (sin prendas) utilizando el ciclo BASKET CLEAN (limpieza de tambor) (se encuentra dentro
del menú de CICLOS ESPECIALES). Verifique que la boquilla de vapor no se encuentre obstruida. Limpie
la boquilla si fuese necesario.
Desplazamiento y almacenamiento: Pida al técnico de servicio que elimine el agua de las tuberías y la bomba
de desagüe. No guarde la lavadora en un lugar donde esté expuesta a las inclemencias climáticas. Al mover
la lavadora, la cuba debe mantenerse estable utilizando los pernos de transporte que se han extraído durante
la instalación. Consulte las Instrucciones de instalación en este manual. Si estas piezas no están disponibles,
se pueden solicitar a través del sitio Web GEAppliances.com o llamando al 800.GE.CARES.
Largas vacaciones: Asegúrese de cortar el agua de todas las llaves de paso. Vacíe todas las tuberías de agua
si la temperatura va a encontrarse por debajo de punta de congelación.
Cómo limpiar el filtro de la bomba
Debido a la naturaleza de la lavadora de carga frontal, es posible que a veces pasen partículas pequeñas
a la bomba. La lavadora cuenta con un filtro de captura de elementos perdidos para que no caigan en
el drenaje. Para recuperar los elementos perdidos, limpie el filtro de la bomba.
1. Con una moneda en la ranura de la puerta, abra la puerta
de acceso.
2. Coloque una bandeja o plato poco profundos bajo la puerta
de acceso y toallas en el piso frente a la lavadora para proteger
el piso. Es normal que salga alrededor de una taza de agua
cuando se quita el filtro.
3. Gire el filtro de la bomba en sentido contrario a las agujas
del reloj y quite el filtro.
4. Limpie los residuos del filtro.
5. Vuelva a colocar el filtro y gire en sentido de las agujas
del reloj hasta la posición marcada.
6. Cierre la puerta de acceso.
66
Carga y uso de la lavadora.
Filtro de
la bomba
Soporte al consumidor
Consejos para la
solución de problemas
Instrucciones
de funcionamiento
Instrucciones
de seguridad
Instrucciones
de instalación
Cómo limpiar la junta de la puerta
Abra la puerta de la lavadora. Usando ambas manos, presione la junta de
la puerta hacia abajo. Quite los objetos extraños que encuentre atrapados
dentro de la junta. Asegúrese de que no haya ningún objeto bloqueando
los orificios ubicados detrás de la junta.
Mientras presiona la junta de la puerta hacia abajo, inspeccione la junta
interior jalándola hacia abajo con los dedos. Quite los objetos extraños
que encuentre atrapados dentro de esta junta. Asegúrese de que no haya
ningún objeto bloqueando los orificios ubicados detrás de la junta.
Cuando haya terminado de limpiar la junta de la puerta, quite las manos
y las juntas volverán a la posición de funcionamiento.
Page 67

Zona del depósito de detergente: El detergente y el suavizante pueden acumularse
en el depósito de detergente. Los residuos deben eliminarse una o dos veces al mes.
■ Saque el depósito tirando de él hasta que se detenga. En la esquina trasera derecha
de la cavidad del cajón, presione firmemente en la pestaña de bloqueo y tire a la vez
del depósito.
■ Extraiga la pieza de los compartimentos para lejía y suavizante, así como la pieza del
detergente. Lave las piezas y el depósito con agua caliente para eliminar los restos
de productos de limpieza acumulados.
■ Para limpiar la abertura del depósito, utilice un cepillo pequeño a fin de limpiar
el hueco. Retire todos los restos de las partes superior e inferior del hueco.
■ Vuelva a colocar las piezas en los compartimentos correspondientes. Introduzca
de nuevo el depósito de detergente.
■ Para reducir la acumulación en la zona del depósito de detergente:
Use sólo detergente
de alta eficiencia HE.
La lengüeta de bloqueo sólo
es visible tras sacar el depósito
Siga siempre las indicaciones de la etiqueta de cuidado del tejido del fabricante en el lavado y el planchado. GEAppliances.com
67
Soporte al consumidor
Consejos para la
solución de problemas
Instrucciones
de funcionamiento
Instrucciones
de seguridad
Instrucciones
de instalación
Page 68

Carga y uso de la lavadora.
Etiquetas de cuidado de tejido
Símbolos de
blanqueador
Cualquier blanqueador
(cuando se necesita)
Sólo blanqueador sin cloro
(cuando se necesita)
No use blanqueador
ETIQUETAS DE LAVADO
ETIQUETAS DE LEJÍA
A continuación se muestran “símbolos” de etiquetas de cuidado de tejido que afectan a las prendas que se lavan.
ETIQUETAS DE DETERGENTES
Use sólo detergente de alta eficiencia HE.
Sistema Smart Dispense
de Profile
El sistema SMART DISPENSE
(dosificación inteligente) de Profile
le permite almacenar detergente y
suavizante para que se dosifiquen
automáticamente durante los ciclos
de lavado y enjuague de esta
lavadora. NO PUEDE USARSE LEJÍA en
este sistema de dosificación. Consulte
el Manual de Propietario incluido con el
sistema SMART DISPENSE de Profile
para instrucciones de instalación.
Pedestal
Su lavadora cuenta con un pedestal
disponible. El pedestal otorga más
altura a la lavadora y ofrece un lugar
de almacenamiento para sus
productos de lavado. Con el pedestal
se incluye un elemento divisorio que
le permite almacenar detergente
líquido fuera de la vista. Consulte
las Instrucciones de instalación
del pedestal.
68
Accesorios disponibles.
Soporte al consumidor
Consejos para la
solución de problemas
Instrucciones
de funcionamiento
Instrucciones
de seguridad
Instrucciones
de instalación
Ciclo de
lavado en
máquina
Normal
Planchado permanente/
resistente a arrugas
Suave/
delicado
Lavar a mano
No lave No escurra
Temperatura
del agua
Caliente
(50°C/120°F)
Tibia
(40°C/105°F)
Fría/fresca
(30°C/85°F)
Page 69

Respuesta ante demanda. (en algunos modelos) GEAppliances.com
El modelo WPDH8910 es compatible con el módulo de
Respuesta ante Demanda (DR) de GE, que puede adquirirse
por separado. Comuníquese con su empresa local de servicio
público o visite www.GEAppliances.com/demand_response
para ver si en su área se está utilizando la tecnología DR.
Las siguientes características de respuesta ante demanda
se encuentran disponibles como parte de un programa de
prueba piloto con la empresa local de servicio público a fin
de ayudar a los consumidores a reducir el uso de electricidad
durante el pico de demanda.
INSTALACIÓN
La ubicación preferida para la instalación del módulo es sobre
la secadora de ropa.
Adjuntos con las instrucciones que vienen con el módulo
encontrará detalles de cómo conectar los cables.
Espere 5 minutos; luego presione el botón “Settings”
(configuraciones). Desplácese por la pantalla y busque la
pantalla de administración de energía cono puede verse
abajo.
Esta pantalla significa que el módulo se encuentra bien
conectado y que usted puede comenzar a utilizar su aparato
con activación de DR siguiendo las instrucciones de abajo.
Si la pantalla de administración de energía no se encuentra
disponible, consulte la guía de identificación y solución
de problemas del módulo de DR.
GUÍA RÁPIDA
Existen 4 niveles de energía disponibles: Critical (crítico), High
(alto), Medium (medio) y Low (bajo). En los niveles Medium
(medio) y Low (bajo), la unidad funciona de manera normal.
Los siguientes pasos muestran cómo reacciona la unidad
durante el inicio en los niveles de energía Critical (crítico)
y High (alto).
Opción 1 (Delay Eco) (Retardo ecológico)
Durante los inicios en los niveles Critical (crítico) y High (alto),
la unidad retardará el inicio hasta que los niveles alcancen
Medium (medio) o Low (bajo). Presione el botón START/PAUSE
(iniciar/pausa).
Opción 2 (Override Delay Eco) (Cancelar retardo ecológico)
Para accionar la lavadora cuando puede verse Delay
Eco (retardo ecológico), presione el botón DELAY START
(inicio retardado) para apagar el retardo. Luego presione
START/PAUSE (iniciar/pausa) para comenzar el lavado.
MENÚ DE CONFIGURACIONES
Presione SETTINGS (configuraciones); luego seleccione
“Energy Management” (administración de energía).
Delay Eco Override (Cancelar retardo ecológico)
Si usted está comenzando un ciclo con un nivel de energía
de la empresa de servicio público Critical (crítico) o High (alto),
esta opción permite que la unidad funcione automáticamente
en Eco Cycle (ciclo ecológico). Esta configuración lava con
menos energía que los ciclos normales. La configuración
predeterminada es YES (sí).
Auto-Extend Delays (Retardos de prolongación automática)
Si se selecciona un retardo temporizado, esta opción permite
la prolongación del inicio programado si el nivel de energía
de la empresa de servicio público se encuentra en Critical
(crítico) o High (alto) en el inicio programado. La configuración
predeterminada prolongará estos ciclos en forma automática.
Para que funcionen las características de respuesta ante
demanda del aparato, debe instalarse equipamiento adicional
para poder conectarse con la empresa local de servicio
público. Ese equipamiento puede venderse por separado y/o
se encuentra disponible a través de su empresa de servicio
público como parte de un programa de prueba piloto.
Consulte a su empresa de servicio público sobre la existencia
de un programa de prueba piloto en su área y solicite todos
los detalles.
NOTA IMPORTANTE
: Al finalizar el programa de prueba piloto
o si usted se muda a un área donde el programa no se
encuentra disponible, las características de respuesta ante
demanda no pueden activarse o utilizarse en el aparato.
El aparato funcionará de modo normal después de que el
equipamiento de respuesta ante demanda se haya
desactivado o desconectado.
Soporte al consumidor
Consejos para la
solución de problemas
Instrucciones
de funcionamiento
Instrucciones
de seguridad
Instrucciones
de instalación
69
Page 70

Instrucciones
Lavadora
de instalación
Si tiene alguna pregunta, llame a 800.GE.CARES (800.432.2737) o visite nuestro sitio Web en: GEAppliances.com
70
WPDH8850, WPDH8910, WPDH8900
ANTES DE COMENZAR
Lea detenidamente todas las instrucciones.
•
IMPORTANTE –Guarde estas
instrucciones para uso del inspector local.
•
IMPORTANTE –Cumpla todos
los códigos y ordenanzas regulatorias.
•
Nota al instalador – Asegúrese de dejar
estas instrucciones al usuario.
•
Nota al usuario – guarde estas instrucciones
para consultas futuras.
• Nivel de habilidad – la instalación de este
electrodoméstico requiere habilidades mecánicas
y eléctricas básicas.
• Duración – de 1 a 3 horas
• La instalación adecuada es responsabilidad
del instalador.
• La garantía no cubre fallas producidas por
la instalación inadecuada del producto.
ADVERTENCIA
• Este electrodoméstico se debe conectar a tierra
e instalar correctamente tal y como se describe en estas Instrucciones de instalación.
• No instale ni guarde este electrodoméstico en una zona
en la que esté expuesto al agua o al exterior. Consulte
la sección Ubicación de la lavadora.
• NOTA: Este electrodoméstico debe estar
correctamente conectado a tierra y la corriente
eléctrica de la lavadora debe cumplir los códigos y
ordenanzas locales, así como la última edición del
Código eléctrico nacional, ANSI/NFPA 70.
PARA SU SEGURIDAD:
HERRAMIENTAS NECESARIAS PARA
LA INSTALACIÓN DE LA LAVADORA
❏ Llave para tuercas de 1/4″
❏ Toma de corriente con trinquete de 3/8″
❏ Llave de boca de 3/8″
❏
Llave inglesa o toma de corriente con trinquete de 7/16″
❏ Llave inglesa o llave de boca de 9/16
❏ Alicates ajustables Channel-lock
❏ Nivel de carpintero
❏ Tuberías de agua (2)
PIEZAS INCLUIDAS
❏ Abrazadera de cable
❏ Guía de tuberías
Page 71

71
Instrucciones de instalación
DIMENSIONES APROXIMADAS
COSTADO
PARTE DELANTERA
27,0”
(68,6 cm)
39,2”*
(99,5 cm)
32,1”
(81,5 cm)
39,2”*
(99,5 cm)
*NOTE:
Con patas de la lavadora: 40,5” (102,5 cm)
(ajustabilidad de 0,75”)
Con pedestal: 53,75” (136,6 cm)
(ajustabilidad de 0,75”)
Apilada: 82,75” (209,8 cm)
UBICACIÓN DE LA LAVADORA
No instale la lavadora:
1. En un área expuesta a goteras o a las condiciones
del exterior. La temperatura ambiente no debe ser
nunca inferior a 60°F (15,6°C) para que la lavadora
funcione correctamente.
2. En una zona en la que pueda entrar en contacto
con cortinas u otras telas.
3. Sobre una alfombra. El suelo DEBE ser una superficie
dura con una inclinación máxima de 1/2″ por pie
(1,27 cm por cada 30 cm). Para asegurarse de que
la lavadora no vibre ni se mueva, es posible que tenga
que reforzar el suelo.
NOTA: Si el suelo se encuentra en mal estado, utilice
una plancha con 3/4″ de contrachapado bien fija
al revestimiento existente en el suelo.
IMPORTANTE:
Distancias mínimas de separación para la
instalación
• Cuando se instale en alcoba: costados, parte trasera,
parte superior = 0″ (0 cm)
• Cuando se instale en un armario: costados, parte trasera,
parte superior = 0″ (0 cm), parte delantera = 1″ (2,54 cm)
• Aberturas de ventilación necesarias en la puerta
del armario:
2 listones, cada uno de 60 pulgadas cuadradas
(387 cm2), situados a 3″ (7,6 cm) de las partes superior e
inferior de la puerta
Page 72

Instrucciones de instalación
DESEMBALAJE DE LA LAVADORA
ADVERTENCIA:
Recicle o deseche la caja
de cartón y las bolsas de plástico una vez que haya
desembalado la lavadora. Mantenga estos materiales
fuera del alcance de los niños, pues éstos podrían
utilizarlos para jugar. Las cajas de cartón cubiertas con
mantas, colchas o láminas de plástico pueden convertirse
en cámaras de aire herméticas y producir asfixia.
1. Corte y retire las bandas de embalaje superiores e inferiores.
2. Mientras se encuentre dentro de la caja, coloque con
cuidado la lavadora sobre el costado de la misma. NO la
tumbe por la parte delantera ni trasera.
3. Abra las tapas inferiores y retire todo el embalaje de la
base, incluido el cartón, la base y el soporte de la cuba
de espuma de poliestireno (insertado en el centro de
la base). Conserve los soportes de apilado ubicados en
la almohadilla de poliestireno que cubría la parte superior
de la lavadora.
NOTA:
Si va a instalar un pedestal, continúe con
las instrucciones de instalación correspondientes.
4. Vuelva a levantar la lavadora con cuidado y retire la caja
de cartón.
5. Desplace poco a poco la lavadora hasta 4 pies (122 cm)
de su ubicación definitiva.
6. Quite las siguientes piezas de la parte trasera de la
lavadora:
4 pernos
4 separadores de plástico (incluidas las arandelas
de goma)
4 sujeciones del cable de alimentación
7. Quite el perno de embalaje. Introduzca la clavija dentro
del orificio del perno de embalaje.
NOTA: Si se retiran incorrectamente los pernos de
transporte, puede que la lavadora se vea gravemente
desequilibrada.
Guarde todos los pernos para uso futuro.
NOTA: Si necesitara transportar la lavadora posteriormente,
debe volver a colocar las piezas de sujeción para el
transporte con el fin de evitar daños durante el mismo.
Guarde dichas piezas en la bolsa de plástico que se incluye.
72
Page 73

73
Instrucciones de instalación
REQUISITOS ELÉCTRICOS
ADVERTENCIA: La conexión incorrecta
del conductor de tierra del equipo puede causar
riesgos de descargas eléctricas. Consulte a un
electricista calificado si tiene dudas acerca de la
conexión a tierra correcta del electrodoméstico.
1. La lavadora DEBE estar conectada a tierra. En caso de
un mal funcionamiento o avería, la conexión a tierra
reducirá el riesgo de descargas eléctricas al proporcionar
un recorrido de resistencia mínima a la corriente
eléctrica.
2.
Debido a que la lavadora está equipada con un cable
de alimentación que tiene un conductor para conexión
a tierra y una clavija de conexión a tierra, la clavija se
DEBE enchufar en el receptáculo de hilo de cobre
apropiado que se haya instalado y conectado a tierra
correctamente de acuerdo con todos los códigos y
ordenanzas locales o, a falta de normativa local, con el
Código eléctrico nacional, ANSI/NFPA 70 (última edición).
En caso de duda, llame a un electricista calificado. NO
corte ni modifique la clavija de conexión a tierra del cable
de alimentación. En situaciones en las que exista un
receptáculo de dos ranuras, es responsabilidad del
propietario que un electricista calificado lo sustituya
por un receptáculo apropiado de tipo de conexión
a tierra para tres clavijas.
Lea detenidamente todas las instrucciones.
REQUISITOS DE CONEXIÓN A TIERRA
REQUISITOS DE SUMINISTRO DE AGUA
REQUISITOS DE DESAGÜE
1. Desagüe capaz de eliminar 17 galones (64,3 l) por minuto.
2. Diámetro mínimo de tubería vertical de 1 1/4″ (3,18 cm).
3. La altura de la tubería vertical desde el suelo debe ser:
Altura mínima: 24″ (61 cm)
Altura máxima: 96″ (244 cm)
NOTA: La tubería de desagüe de la lavadora puede alcanzar
la altura de una tubería vertical de 58″ (147 cm). Para una
tubería vertical más alta, póngase en contacto con un
distribuidor de piezas autorizado.
Las llaves de paso de agua caliente y fría DEBEN
encontrarse a 42 pulgadas (107 cm) como máximo de la
toma de agua de la lavadora. Las llaves de paso DEBEN ser
de 3/4″ (1.9 cm) y tipo jardín para que se puedan conectar
las tuberías de entrada. La presión del agua DEBE estar
entre 10 y 120 libras por pulgada cuadrada. La compañía
de agua puede informarle de la presión del agua. La
temperatura del agua caliente se debe establecer para
suministrar agua a una temperatura de entre 120° y 140°F
(48°– 60°C) para brindar un desempeño adecuado del
control automático de temperatura (ATC).
NOTA: Se recomienda el uso de un suavizante de agua para
reducir la acumulación de sarro dentro del generador de
vapor si el suministro doméstico contiene agua muy dura.
CIRCUITO – circuito derivado de 15 amperios individual,
correctamente polarizado y conectado a tierra, con
interruptor o fusible de retardo de 15 amperios.
ALIMENTACIÓN ELÉCTRICA – corriente alterna de 60 Hz,
monofásica, de 120 voltios, con conexión a tierra, bifilar.
RECEPTÁCULO DE SALIDA –
receptáculo correctamente
conectado a tierra con 3 clavijas,
situado de forma que se pueda
acceder al cable de alimentación
cuando la lavadora esté instalada.
ADVERTENCIA—PARA MINIMIZAR
EL RIESGO DE INCENDIO, DESCARGA ELÉCTRICA
O LESIONES PERSONALES:
• NO USE UN ENCHUFE ADAPTADOR O UN CABLE
DE EXTENSIÓN CON ESTE ELECTRODOMÉSTICO.
La lavadora debe ser conectado a tierra de acuerdo
con todos los códigos y ordenanzas locales o, a falta
de normativa local, con el Código eléctrico nacional
(National Electrical Code) ANSI/NFPA NO. 70.
PARTE TRASERA
96”
(244 cm)
Máx.
24”
(61 cm)
Mín.
Page 74

74
Instrucciones de instalación
INSTALACIÓN DE LA LAVADORA
1. Deje correr un poco de agua de los grifos de agua
caliente y fría para purgar las tuberías de agua y eliminar
las partículas que puedan obstruir los filtros de la válvula
de agua.
2. Saque las tuberías de entrada de la bolsa de plástico.
3. (Extremo acodado de 90°)
Conecte con cuidado la
tubería de entrada marcada
con HOT (Caliente) a la salida
“H” exterior de la válvula de
agua. Apriete con la mano y,
a continuación, apriete 2/3
de vuelta con los alicates.
Conecte con cuidado la otra
tubería de entrada a la salida
“C” interior de la válvula de agua. Apriete con la mano
y, a continuación, apriete 2/3 de vuelta con los alicates.
No pase las roscas ni apriete excesivamente estas
conexiones.
4. Conecte los extremos de la tubería de entrada a las
tomas de agua CALIENTE y FRÍA ajustándolos con la
mano y, a continuación, apriete de nuevo 2/3 de vuelta
con los alicates. Abra la llave de paso y compruebe
que no hay ninguna fuga.
5. Desplace la lavadora con cuidado hasta su ubicación
final. Mueva suavemente la lavadora para situarla en su
lugar. Es importante no dañar las patas niveladoras de
caucho al trasladar su lavadora a su ubicación final. Si
las patas se dañan podría aumentar la vibración de la
lavadora. Podría ser útil rociar el piso con limpiador para
ventanas a fin de trasladar más fácilmente su lavadora
a su ubicación final. NOTA: Para reducir la vibración,
asegúrese de que cada una de las cuatro patas
niveladoras estén en contacto con el piso. Empuje
y tire de la parte posterior derecha y luego de la
parte posterior izquierda de su lavadora.
NOTA: No utilice el depósito de detergente ni la puerta
para levantar la lavadora.
NOTA: Si se instala en un depósito de desagüe, puede
utilizar una tabla 2x4 de 24 pulgadas de longitud para
colocar la lavadora en su lugar haciendo palanca.
6. Una vez situada la
lavadora en su posición
final, coloque un nivel en
la parte superior de la
misma (si está instalada
debajo de un contador,
la lavadora no debería
vibrar). Ajuste las patas
niveladoras delanteras
hacia arriba o hacia abajo para asegurarse que
la lavadora se apoya en una superficie sólida. Gire
las contratuercas de cada pata hacia la base de
la lavadora y apriételas con una llave.
NOTA: Mantenga la extensión de los soportes al
mínimo para evitar una vibración excesiva. Cuanto
más se extiendan las patas, más vibrará la lavadora.
Si el suelo no está nivelado o está dañado, puede que
sea necesario extender las patas niveladoras traseras.
Page 75

75
Instrucciones de instalación
INSTALACIÓN DE
LA LAVADORA (cont.)
7. Coloque la guía de la tubería en forma de U en
el extremo de la tubería de desagüe. Coloque
la tubería en una pila de lavar o tubería vertical
y sujétela con la abrazadera de cable que se
proporciona en el paquete adjunto.
NOTA: Si la tubería de desagüe se coloca en una
tubería vertical que no tiene forma de U, se puede
producir un efecto sifón. Debe haber un espacio de
aire alrededor de la tubería de desagüe. Una tubería
demasiado ajustada también puede producir un
efecto de sifón.
8. Enchufe el cable de alimentación en una salida
de conexión a tierra.
NOTA: Asegúrese de que la alimentación está
cortada en un interruptor/caja de fusibles antes
de enchufar el cable de alimentación a una toma de
corriente.
Abrazadera
de cable
Abrazadera
de cable
Abrazadera
de cable
Si se necesitan piezas de repuesto para la lavadora, se
pueden solicitar en Estados Unidos a través del sitio Web
GEAppliances.com o llamando a 800.GE.CARES.
PIEZAS DE REPUESTO
9. Conecte la alimentación a un interruptor/caja
de fusibles.
10. Lea el resto del Manual del propietario. Contiene
información valiosa y útil que supondrá un ahorro
de tiempo y dinero.
11. Antes de poner en funcionamiento la lavadora,
asegúrese de comprobar lo siguiente:
❏ La alimentación está conectada.
❏ La lavadora está enchufada.
❏ Las llaves de paso están abiertas.
❏ La lavadora está nivelada y que cada una de las cuatro
patas niveladoras estén en contacto con el piso.
❏ Las piezas de sujeción para el transporte se han
quitado y guardado.
❏ La tubería de desagüe se ha asegurado
correctamente.
❏ No existe ninguna fuga en la llave de paso, la tubería
de desagüe ni la lavadora.
12. Ponga en funcionamiento la lavadora en un ciclo
completo. Compruebe que no haya fugas de agua
y que funcione correctamente.
13. Si la lavadora no funciona, revise la sección Antes
de llamar al servicio de asistencia técnica antes
de ponerse en contacto con el servicio de asistencia
técnica.
14. Coloque las instrucciones en un lugar próximo
a la lavadora para futuras consultas.
Page 76

Soporte al consumidor
Consejos para la
solución de problemas
Instrucciones
de funcionamiento
Instrucciones
de seguridad
Instrucciones
de instalación
76
Antes de llamar al servicio de asistencia técnica…
Consejos para la solución de problemas
¡Ahorre tiempo y dinero! Consulte primero las tablas de
las páginas siguientes y quizás no necesite llamar al
servicio de asistencia técnica.
Problema Causas posibles Solución
La lavadora no gira La tubería de desagüe está torcida • Enderece la tubería de desagüe y asegúrese de que
o agita o no se ha conectado correctamente la lavadora no está situada sobre la misma.
Puede que la tubería de desagüe • Compruebe las tuberías de la vivienda. Puede que sea
de la vivienda esté obstruida necesario llamar a un plomero.
La manguera de drenaje está • Asegúrese de que haya un espacio de aire entre
un sifón; la manguera de drenaje la manguera y el drenaje.
fue introducida de manera
demasiado profunda en el drenaje
El filtro de la bomba de • Limpie el filtro de la bomba – Abra la puerta de acceso de
la lavadora podría estar obstruido la bomba (utilice una moneda) y quite el filtro de la bomba
girándolo en sentido contrario a las agujas del reloj y
jalando hacia fuera. Limpie el filtro, quitando todos los
residuos sueltos, y vuelva a colocar el filtro en su lugar.
La carga se encuentra • Redistribuya las prendas y realice un ciclo drain & spin
desbalanceada (drenar y girar) o rinse & spin (enjuagar y girar).
• Aumente el tamaño de la carga si va a lavar una carga
pequeña compuesta de elementos pesados y livianos.
Fugas de agua La junta de la puerta • Revise que la junta esté colocada en su sitio y que no se
está dañada haya roto. Los objetos dejados en los bolsillos podrían
causar daños a la lavadora (clavos, tornillos, lápices,
bolígrafos).
La junta de la puerta • El agua podría gotear de la puerta cuando la misma
no está dañada está abierta. Esto forma parte del funcionamiento normal.
Revise la parte posterior • Si esta área se encuentra mojada, existe una condición
izquierda de la lavadora para de espuma excesiva. Utilice menos cantidad de
verificar si hay presencia de agua detergente.
Las tuberías de toma de agua o • Asegúrese de que se han apretado correctamente las
la tubería de desagüe no se han conexiones de las tuberías de la lavadora y las llaves de
conectado correctamente paso y que el extremo de la tubería de desagüe se ha
introducido y fijado correctamente al desagüe.
Puede que la tubería de desagüe • Compruebe las tuberías de la vivienda. Puede que sea
de la vivienda esté obstruida necesario llamar a un plomero.
No se desagua La tubería de desagüe está torcida • Enderece la tubería de desagüe y asegúrese de que
o no se ha conectado correctamente la lavadora no está situada sobre la misma.
Puede que la tubería de desagüe • Compruebe las tuberías de la vivienda. Puede que sea
de la vivienda esté obstruida necesario llamar a un plomero.
La manguera de drenaje está • Asegúrese de que haya un espacio de aire entre
un sifón; la manguera de drenaje la manguera y el drenaje.
fue introducida de manera
demasiado profunda en el drenaje
El filtro de la bomba de • Limpie el filtro de la bomba – Abra la puerta de acceso de
la lavadora podría estar obstruido la bomba (utilice una moneda) y quite el filtro de la bomba
girándolo en sentido contrario a las agujas del reloj y
jalando hacia fuera. Limpie el filtro, quitando todos los
residuos sueltos, y vuelva a colocar el filtro en su lugar.
Page 77

Antes de llamar al servicio de asistencia técnica… GEAppliances.com
Problema Causa posible Solución
La lavadora no centrifuga La tubería de desagüe está torcida • Enderece la tubería de desagüe y asegúrese de que
o no se ha conectado correctamente la lavadora no está situada sobre la misma.
Puede que la tubería de desagüe • Compruebe las tuberías de la vivienda. Puede que sea
de la vivienda esté obstruida necesario llamar a un plomero.
La manguera de drenaje está • Asegúrese de que haya un espacio de aire entre
un sifón; la manguera de drenaje la manguera y el drenaje.
fue introducida de manera
demasiado profunda en el drenaje
El filtro de la bomba de • Limpie el filtro de la bomba – Abra la puerta de acceso de
la lavadora podría estar obstruido la bomba (utilice una moneda) y quite el filtro de la bomba
girándolo en sentido contrario a las agujas del reloj y
jalando hacia fuera. Limpie el filtro, quitando todos los
residuos sueltos, y vuelva a colocar el filtro en su lugar.
La carga se encuentra • Redistribuya las prendas y realice un ciclo drain & spin
desbalanceada (drenar y girar) o rinse & spin (enjuagar y girar).
• Aumente el tamaño de la carga si va a lavar una carga
pequeña compuesta de elementos pesados y livianos.
El motor se ha recalentado •
El motor de la lavadora se detendrá si se recalienta. La
lavadora se iniciará de nuevo automáticamente después
de un período de enfriamiento de hasta 2 horas (si
no se ha apagado manualmente).
La puerta está abierta • Asegúrese de que la puerta esté cerrada.
Ciclo o temporizador La tubería de desagüe está torcida • Enderece la tubería de desagüe y asegúrese de que
incompleto o no se ha conectado correctamente la lavadora no está situada sobre la misma.
Puede que la tubería de desagüe • Compruebe las tuberías de la vivienda. Puede que sea
de la vivienda esté obstruida necesario llamar a un plomero.
La manguera de drenaje está • Asegúrese de que haya un espacio de aire entre
un sifón; la manguera de drenaje la manguera y el drenaje.
fue introducida de manera
demasiado profunda en el drenaje
El filtro de la bomba de • Limpie el filtro de la bomba – Abra la puerta de acceso de
la lavadora podría estar obstruido la bomba (utilice una moneda) y quite el filtro de la bomba
girándolo en sentido contrario a las agujas del reloj y
jalando hacia fuera. Limpie el filtro, quitando todos los
residuos sueltos, y vuelva a colocar el filtro en su lugar.
Redistribución automática • La pantalla de tiempo restante ha cambiado ya que
de carga la máquina ha distribuido la carga una or dos veces.
Esto forma parte del funcionamiento normal. No debe
hacer nada; la máquina terminará el ciclo de lavado.
Ruido fuerte o poco común; La lavadora se mueve • La lavadora está diseñada para desplazarse 1/4″ para
vibración o sacudidas reducir las fuerzas transmitidas al piso. Este movimiento
es normal.
Las patas de nivelación no se • Empuje y tire de la parte posterior derecha y luego
encuentran en contacto firme posterior izquierda de su lavadora para asegurarse de que
con el piso se encuentre nivelada. Si la lavadora no está nivelada,
ajuste las patas niveladoras de caucho de modo que cada
una quede en contacto firme con el piso. Su técnico
instalador debería corregir este problema.
Carga desbalanceada • Abra la puerta y redistribuya la carga manualmente.
Para revisar la máquina, ejecute el ciclo de enjuague
y giro sin carga. Si esto es normal, la causa del desbalance
fue la carga.
Silbido • Se ha seleccionado SteamAssist (ayuda de vapor)
o SteamREFRESH (renovación por vapor). Esta es una
operación normal para los modos de vapor seleccionados.
77
Soporte al consumidor
Consejos para la
solución de problemas
Instrucciones
de funcionamiento
Instrucciones
de seguridad
Instrucciones
de instalación
Page 78

Soporte al consumidor
Consejos para la
solución de problemas
Instrucciones
de funcionamiento
Instrucciones
de seguridad
Instrucciones
de instalación
Antes de llamar al servicio de asistencia técnica…
78
Problema Causa posible Solución
Las prendas están La tubería de desagüe está torcida • Enderece la tubería de desagüe y asegúrese de que
demasiado mojadas o no se ha conectado correctamente la lavadora no está situada sobre la misma.
Puede que la tubería de desagüe • Compruebe las tuberías de la vivienda. Puede que sea
de la vivienda esté obstruida necesario llamar a un plomero.
La manguera de drenaje está • Asegúrese de que haya un espacio de aire entre
un sifón; la manguera de drenaje la manguera y el drenaje.
fue introducida de manera
demasiado profunda en el drenaje
El filtro de la bomba de • Limpie el filtro de la bomba – Abra la puerta de acceso de
la lavadora podría estar obstruido la bomba (utilice una moneda) y quite el filtro de la bomba
girándolo en sentido contrario a las agujas del reloj y
jalando hacia fuera. Limpie el filtro, quitando todos los
residuos sueltos, y vuelva a colocar el filtro en su lugar.
La carga se encuentra • Redistribuya las prendas y realice un ciclo drain & spin
desbalanceada (drenar y girar) o rinse & spin (enjuagar y girar).
• Aumente el tamaño de la carga si va a lavar una carga
pequeña compuesta de elementos pesados y livianos.
No hay suministro eléctrico; La tubería de desagüe está torcida • Enderece la tubería de desagüe y asegúrese de que
la lavadora no está o no se ha conectado correctamente la lavadora no está situada sobre la misma.
en funcionamiento
Puede que la tubería de desagüe • Compruebe las tuberías de la vivienda. Puede que sea
de la vivienda esté obstruida necesario llamar a un plomero.
La manguera de drenaje se • Asegúrese de que haya un espacio de aire entre
encuentra introducida de manera la manguera y el drenaje.
demasiado profunda en el drenaje
El filtro de la bomba de • Limpie el filtro de la bomba – Abra la puerta de acceso de
la lavadora podría estar obstruido la bomba (utilice una moneda) y quite el filtro de la bomba
girándolo en sentido contrario a las agujas del reloj y
jalando hacia fuera. Limpie el filtro, quitando todos los
residuos sueltos, y vuelva a colocar el filtro en su lugar.
La lavadora está desconectada • Asegúrese de que el cable esté enchufado de manera
segura en un enchufe funcional.
El suministro de agua está cerrado•Abra por completo las llaves de paso de agua fría y caliente.
El interruptor/fusible se • Compruebe los interruptores/fusibles de la vivienda.
ha quemado/saltado Cambie los fusibles o restablezca el interruptor. La
lavadora debe tener una toma individual.
Los controles no se han • Mantenga pulsado el botón START/PAUSE
establecido correctamente (Iniciar/pausa) para iniciar el ciclo.
Revisiones automáticas • La primera vez que se enchufa la lavadora, se efectúan
del sistema las verificaciones automáticas. Podrían pasar hasta 20
segundos antes de que pueda utilizar su lavadora. Esto
forma parte del funcionamiento normal.
El agua no entra Revisiones automáticas • Después de pulsar START, la lavadora realiza varias
en la lavadora o entra del sistema
revisiones del sistema. Habrá flujo de agua varios segundos
lentamente
después de pulsar START.
El suministro de agua está cerrado•Abra por completo las llaves de paso de agua fría y caliente.
Los filtros de la válvula de agua •
Cierre la llave de paso y quite las tuberías de conexión de
están obstruidos
agua de la parte trasera superior de la lavadora. Utilice
un cepillo o un palillo de dientes para limpiar los filtros
de la lavadora. Vuelva a conectar las tuberías y abra la llave
de paso.
Page 79

Problema Causa posible Solución
Enganchones, agujeros, Lápices, bolígrafos, clavos, • Retire todos los elementos sueltos de los bolsillos.
rotos, rasgaduras o tornillos u otros objetos dejados
deterioro excesivo en los bolsillos
Alfileres, broches, corchetes, • Abroche los corchetes, broches, botones y cremalleras.
botones en punta, hebillas de
cinturones, cremalleras y objetos
puntiagudos olvidados en
los bolsillos
Arrugas Separación incorrecta • Evite mezclar prendas pesadas (como prendas de
trabajo) con prendas delicadas (como blusas).
Sobrecarga • Cargue la lavadora de manera que haya suficiente
espacio para que las prendas se muevan libremente.
Ciclo de lavado incorrecto • Combine la selección de ciclo con el tipo de tejido que
va a lavar (especialmente para cargas de prendas de fácil
cuidado).
Lavado constante en agua • Lave las prendas en agua tibia o fría.
demasiado caliente
Prendas oscurecidas o No hay suficiente detergente • Utilice la cantidad adecuada de detergente.
amarillentas
No se utiliza detergente de • Utilice detergente de alta eficacia.
alta eficacia
Agua dura • Utilice agua lo más caliente posible para no dañar los
tejidos.
• Utilice un acondicionador de agua como, por ejemplo,
el de la marca Calgon o instale un ablandador de agua.
El agua no está suficientemente • Asegúrese de que el calentador suministre agua a
caliente 120°–140°F (48°–60°C).
El detergente no se disuelve • Pruebe un detergente líquido.
Tinte • Separe las prendas por colores. Si en la etiqueta de la
prenda se indica Lavar por separado, puede ser indicio
de tintes con poca fijación.
Manchas de color Uso incorrecto del suavizante • Consulte el bote de suavizante para ver las instrucciones
y siga las indicaciones de uso del distribuidor.
Tinte • Separe las prendas blancas o de color claro de las
prendas oscuras.
• Saque inmediatamente la carga de la lavadora.
La temperatura del agua El suministro de agua no está • Asegúrese de que las tuberías están conectadas a las
no está correcta conectado correctamente tomas correctas.
El calentador de agua de la • Asegúrese de que el calentador de agua de la vivienda
vivienda no se ha ajustado suministre agua a 120°–140°F (48°–60°C).
correctamente
Mal olor dentro La lavadora no se ha usado • Deje la puerta un poco abierta para que el agua se seque.
de la lavadora durante un período prolongado
• Haga funcionar un ciclo BasketClean (incluido en el menú
o no se está usando una calidad
de ciclos especiales) con 1 taza de lejía. Consulte la sección
recomendada de detergente HE
Cuidado y limpieza/Mantenimiento general.
Pequeña variación Esto es normal • Debido a las propiedades metálicas de la pintura utilizada
del color metálico con este producto único, pueden ocurrir pequeñas variaciones
de color debido ángulos de visualización y condiciones de
iluminación.
La puerta se destraba Esto es normal • Durante SteamASSIST (ayuda de vapor) y SteamREFRESH
lentamente (renovación por vapor), se retarda el acceso al tambor para
reducir la exposición al vapor.
79
GEAppliances.com
Soporte al consumidor
Consejos para la
solución de problemas
Instrucciones
de funcionamiento
Instrucciones
de seguridad
Instrucciones
de instalación
Page 80

80
Notas.
Soporte al consumidor
Consejos para la
solución de problemas
Instrucciones
de funcionamiento
Instrucciones
de seguridad
Instrucciones
de instalación
Page 81

81
Soporte al consumidor
Consejos para la
solución de problemas
Instrucciones
de funcionamiento
Instrucciones
de seguridad
Instrucciones
de instalación
Notas.
Page 82

82
Período: Se sustituirá:
Garantía de la lavadora GE. (Para clientes de Estados Unidos)
Todos los servicios de garantía se ofrecen a través de nuestros centros
de asistencia técnica o un técnico autorizado de Customer Care
®
. Para
programar servicio de asistencia técnica en línea, visite la página
GEAppliances.com o llame al 800.GE.CARES (1.800.432.2737). Cuando
llame para solicitar servicio, por favor tenga a mano el número de serie
y el número de modelo.
Esta garantía se extiende al comprador original y cualquier comprador posterior de productos comprados para uso
residencial dentro des Estados Unidos. Si el producto está situado en un área que no dispone de servicio por parte
de un proveedor de servicio autorizado de GE, podría tener que hacerse cargo de los costes de envío o bien podría
solicitársele que lleve el producto a una centro de servicio de GE autorizado para realizar la reparación. En Alaska,
la garantía excluye el costo de envío o las visitas de servicio a su casa.
Algunos estados no permiten la exclusión o las limitaciones de daños incidentales o consecuenciales. Esta garantía
da derechos legales específicos, y usted podría tener otros derechos que variarán de estado a estado. Para saber
cuáles son sus derechos legales, consulte a la oficina de asuntos del consumidor local o la oficina del Prucurador
(Attorney General) en su localidad.
■ Visitas de servicio a domicilio para mostrarle cómo
utilizar el producto.
■ Instalación, envío o mantenimiento incorrectos.
■ Fallas del producto por manipulación, uso incorrecto o
distinto al destinado o previsto comercialmente.
■ Daños tras la entrega.
■ Sustitución de los fusibles de la vivienda o
restablecimiento de los interruptores.
■ Daños causados por accidentes, incendios, inundaciones
o fenómenos naturales.
■ Daños emergentes o fortuitos causados por posibles
defectos del electrodoméstico.
■ Producto no accesible para facilitar el servicio requerido.
Exclusiones de la garantía (en Estados Unidos):
Garante: General Electric Company. Louisville, KY 40225
Engrape el recibo aquí.
Se necesita el comprobante
con la fecha de compra original
para que la garantía cubra los
servicios.
Un año Cualquier pieza de la lavadora que falle debido a un defecto en los materiales o la
A partir de la fecha de fabricación. Durante este garantía limitada de un año, GE correrá además, sin cargo alguno,
adquisición original con todos los gastos de mano de obra y reparación relacionados para sustituir la pieza
defectuosa.
Del segundo El montaje del puntal de suspensión, motor y controlador del motor si alguna de estas piezas
al quinto año fallara debido a un defecto de materiales o mano de obra. GE también reemplazará el panel superior
A partir de la fecha de de la lavadora, el panel frontal o el panel de servicio si se herrumbraran en condiciones de
adquisición original funcionamiento. Durante esta garantía limitada adicional de tres años, usted será responsable
de cualquier clase de costos de mano de obra o de servicios relacionados.
Del segundo El tambor externo y la polea impulsada si alguna de estas piezas fallara debido a un defecto
al décimo año de materiales o mano de obra. Durante esta garantía limitada adicional de ocho años, usted
A partir de la fecha de será responsable de cualquier clase de costos de mano de obra o de servicios relacionados.
adquisición original
Toda la vida del producto El tambor de la lavadora si fallara debido a un defecto de los materiales o mano de obra. Durante
A partir de la fecha de esta garantía limitada de por vida del producto, usted será responsable de cualquier clase de
adquisición original costos de mano de obra o de servicios relacionados.
EXCLUSIÓN DE GARANTÍAS IMPLÍCITAS—Su único y exclusivo derecho es la reparación del producto,
tal y como se indica en esta Garantía limitada. Cualquier garantía implícita, incluyendo las garantías
implícitas de comerciabilidad o adecuación para un fin determinado, están limitadas a un año o
el período de tiempo más breve permitido por la ley.
Soporte al consumidor
Consejos para la
solución de problemas
Instrucciones
de funcionamiento
Instrucciones
de seguridad
Instrucciones
de instalación
Page 83

Servicio al consumidor.
Página Web de GE Appliances
GEAppliances.com
¿Tiene alguna pregunta sobre su electrodoméstico? ¡Pruebe la página Web de GE Appliances 24 horas al día,
cualquier día del año! Para mayor conveniencia y servicio más rápido, ya puede descargar los Manuales
de los Propietarios, pedir piezas o incluso hacer una cita en línea para que vengan a realizar una reparación.
Solicite una reparación GEAppliances.com
El servicio de expertos GE está a tan sólo un paso de su puerta. ¡Entre en línea y solicite su reparación cuando
le venga bien cualquier día del año! O llame al 800.GE.CARES (800.432.2737) durante horas normales de oficina.
Real Life Design Studio (Estudio de diseño para la vida real)
GEAppliances.com
GE apoya el concepto de Diseño Universal—productos, servicios y ambientes que pueden usar gente de todas
las edades, tamaños y capacidades. Reconocemos la necesidad de diseñar para una gran gama de habilidades
y dificultades físicas y mentales. Para más detalles cobre las aplicaciones de GE Diseño Universal, incluyendo
ideas de diseño para la cocina para personas con discapacidades, mire nuestra página Web hoy mismo. Para
personas con dificultades auditivas, favor de llamar al 800.TDD.GEAC (800.833.4322).
Garantías ampliadas GEAppliances.com
Compre una garantía ampliada y obtenga detalles sobre descuentos especiales disponibles mientras su garantía
está aún activa. Puede comprarla en línea en cualquier momento, o llamar al (800.626.2224) durante horas
normales de oficina. GE Consumer Home Services estará aún ahí cuando su garantía termine.
Piezas y accesorios GEAppliances.com
Aquellos individuos con la calificación necesaria para reparar sus propios electrodomésticos pueden
pedir que se les manden las piezas o accesorios directamente a sus hogares (aceptamos las tarjetas
VISA, MasterCard y Discover). Haga su pedido en línea hoy, 24 horas cada día o llamar por teléfono
al 800.626.2002 durante horas normales de oficina.
Las instrucciones descritas en este manual cubren los procedimientos a seguir por cualquier usuario. Cualquier
otra reparación debería, por regla general, referirse a personal calificado autorizado. Debe ejercerse precaución
ya que las reparaciones incorrectas pueden causar condiciones de funcionamiento inseguras.
Póngase en contacto con nosotros GEAppliances.com
Si no está satisfecho con el servicio que recibe de GE, póngase en contacto con nosotros en nuestra
página Web indicando todos los detalles así como su número de teléfono o escríbanos a:
General Manager, Customer Relations
GE Appliances, Appliance Park
Louisville, KY 40225
Registre su electrodoméstico GEAppliances.com
¡Registre su nuevo electrodoméstico en línea —cuando usted prefiera! El registrar su producto a tiempo le
proporcionará, si surgiera la necesidad, una mejor comunicación y un servicio más rápido bajo los términos de
su garantía. También puede enviar su tarjeta de registro pre-impresa que se incluye en el material de embalaje
o recorte y use el formulario de este Manual del Propietario.
83
Page 84

Printed in China
Consumer Support.
GE Appliances Website
In the U.S.: GEAppliances.com
Have a question or need assistance with your appliance? Try the GE Appliances Website 24 hours a day, any day
of the year! For greater convenience and faster service, you can now download Owner’s Manuals, order parts or even
schedule service on-line. In Canada: www.GEAppliances.ca
Schedule Service In the U.S.: GEAppliances.com
Expert GE repair service is only one step away from your door. Get on-line and schedule your service at your
convenience any day of the year! Or call 800.GE.CARES (800.432.2737) during normal business hours.
In Canada, call 1.800.561.3344
Real Life Design Studio In the U.S.: GEAppliances.com
GE supports the Universal Design concept—products, services and environments that can be used by people of all
ages, sizes and capabilities. We recognize the need to design for a wide range of physical and mental abilities and
impairments. For details of GE’s Universal Design applications, including kitchen design ideas for people with disabilities,
check out our Website today. For the hearing impaired, please call 800.TDD.GEAC (800.833.4322).
In Canada, contact: Manager, Consumer Relations, Mabe Canada Inc.
Suite 310, 1 Factory Lane
Moncton, N.B. E1C 9M3
Extended Warranties In the U.S.: GEAppliances.com
Purchase a GE extended warranty and learn about special discounts that are available while your warranty is still
in effect. You can purchase it on-line anytime, or call 800.626.2224 during normal business hours. GE Consumer Home
Services will still be there after your warranty expires. In Canada, call 1.888.261.2133
Parts and Accessories In the U.S.: GEAppliances.com
Individuals qualified to service their own appliances can have parts or accessories sent directly to their homes (VISA,
MasterCard and Discover cards are accepted). Order on-line today, 24 hours every day or by phone at 800.626.2002
during normal business hours.
Instructions contained in this manual cover procedures to be performed by any user. Other servicing generally
should be referred to qualified service personnel. Caution must be exercised, since improper servicing may cause
unsafe operation.
Customers in Canada should consult the yellow pages for the nearest Mabe service center, or call 1.800.661.1616.
Contact Us In the U.S.: GEAppliances.com
If you are not satisfied with the service you receive from GE, contact us on our Website with all the details including your
phone number, or write to: General Manager, Customer Relations
GE Appliances, Appliance Park
Louisville, KY 40225
In Canada: www.GEAppliances.ca, or write to: Director, Consumer Relations, Mabe Canada Inc.
Suite 310, 1 Factory Lane
Moncton, N.B. E1C 9M3
Register Your Appliance In the U.S.: GEAppliances.com
Register your new appliance on-line—at your convenience! Timely product registration will allow for enhanced
communication and prompt service under the terms of your warranty, should the need arise. You may also
mail in the pre-printed registration card included in the packing material. In Canada: www.GEAppliances.ca
 Loading...