

Page 1
2
Important Safety Information
4
Operating Instructions
The Controls on Your Washer
Other Washer Features
Preparing to Wash
Care of Product
10
Helpful Information
Specialized Fabric Guide
11
If Something Goes Wrong
Washer
Owner’s Manual
Models: WISQ416C WISQ416D
WISQ416F
GE Appliance
175D1807P236
49-9965
11-97 CG
C Printed in the United States
General Electric Company, Appliance Park, Louisville, KY 40225 USA
English Version
Versión en español 19
37
Page 2

2
Water Heater Safety
Important Safety Information
Read all safety information before using
Under certain conditions
hydrogen gas may be produced
in a water heater that has not
been used for two weeks or more.
HYDROGEN GAS CAN BE
EXPLOSIVE UNDER THESE
CIRCUMSTANCES.
If the hot water has not been used
for two weeks or more, prevent
the possibility of damage or injury
by turning on all hot water taps
and allow them to run for several
minutes before using any electrical appliance which is connected
to the hot water system. This will
allow any hydrogen gas to escape.
Since the gas is flammable, do
not smoke or use an open flame
or appliance during this process.
SAVE THESE INSTRUCTIONS
Page 3

• Use this appliance only for its
intended purpose as described
in this Owner’s Manual.
— Properly ground to conform
with all governing codes and
ordinances. Follow details in
Installation Instructions.
— Install or store where it will not
be exposed to temperatures
below
freezing or exposed to the
weather.
• Do not repair or replace any
part of the appliance or attempt
any servicing unless specifically
recommended in this Owner’s
Manual or in published userrepair instructions that you
understand and have the skills
to carry out.
• If the supply cord is damaged,
it must be replaced by the
manufacturer or its service agent
or a similarly qualified person in
order to avoid a hazard.
• Do not tamper with the controls.
• Never reach into the washer
while it is moving.
• Close supervision is necessary
if this appliance is used by or
near children or infirm persons.
Do not allow children to play
inside, on or with this appliance
or any discarded appliance.
Dispose of discarded appliances
and shipping/packing materials
properly. Before discarding
a washer, or removing from
service, remove the washer lid.
• Do not wash or dry articles that
have been cleaned in, washed in,
soaked in, or spotted with
combustible or explosive
substances (such as wax, oil,
paint, gasoline, degreasers, drycleaning solvents, kerosene, etc.)
which may ignite or explode. Do
not add these substances to the
wash water. Do not use these
substances around your washer
and/or dryer during operation.
• To minimize the possibility
of electric shock, unplug this
appliance from the power supply
or disconnect the washer at the
household distribution panel by
removing the fuse or switching
off the circuit breaker before
attempting any maintenance
or cleaning.
• NOTE: Turning the Cycle
Selector knob to an off position
does NOT disconnect the
appliance from the power supply.
Warning
To reduce the risk of fire, electric shock, or injury to persons
when using your appliance, follow basic precautions, including
the following sections.
Safety Precautions
3
Page 4
wash
temperature
hot
warm*
warm*
cold
warm*
rinse
temperature
cold
cold
cold
cold
warm*
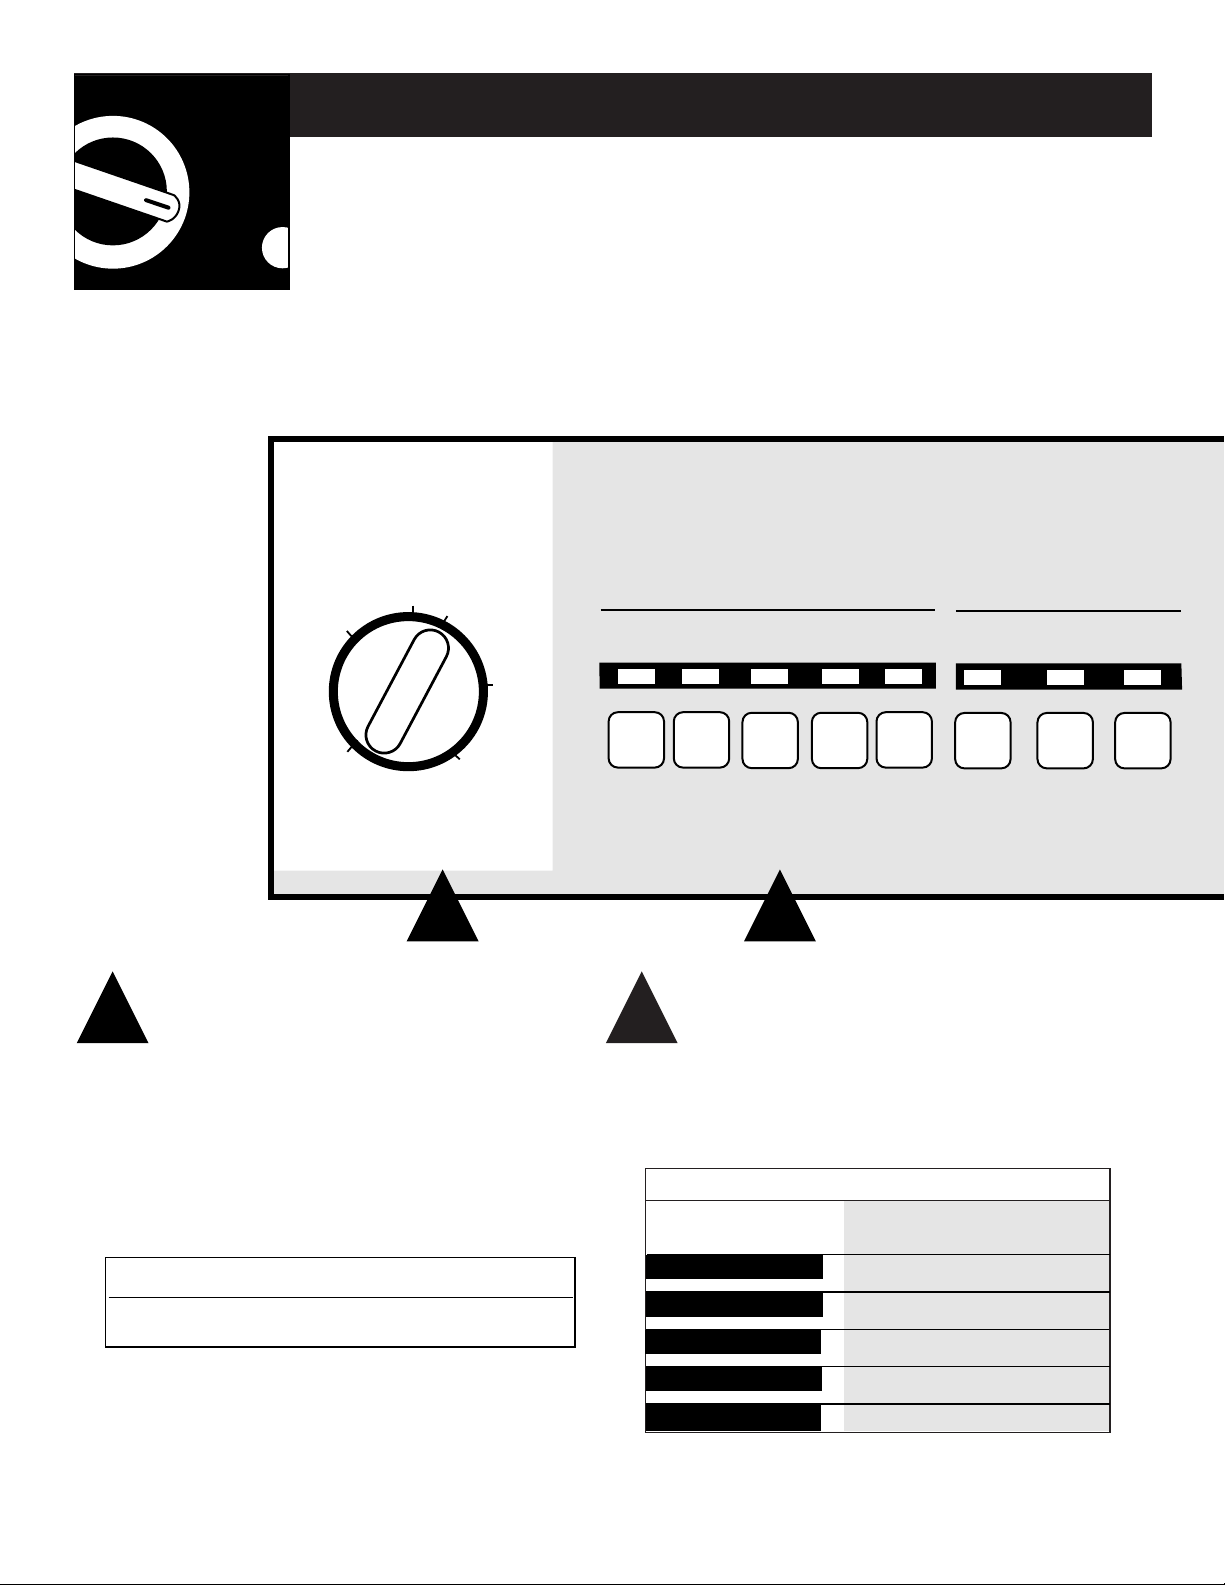
Fabric Care Guide
Operating Instructions
The controls on your washer
4
Always follow Fabric Manufacturer’s Care Label
or instructions when laundering. Use this chart
as a general guide.
For information on fabric care for specialty
items see the Specialty Care Guide.
21
Load Size Wash/Rinse Temp
By selecting load size, you are setting the
water level. For the best results, select a size
appropriate for the load you are washing.
You can change your load size selection by
selecting RESET and a new load size.
LOAD SIZE
LARGE
HAND
WASH
EXTRA
LARGE
RESET
SUPER
MEDIUM
COTTON
WHITES
COTTON
COLORS
PERM
PRESS
OPTIONS
SIGNAL EXTENDED
SPIN
EXTRA
RINSE
FABRIC CARE
DELICATES
WASH
WOOL
WASH
RINSE
HOT
COLD
WARM
COLD
WARM
COLD
COLD
COLD
WARM
WARM
1 2
*Warm water is approximately 32°C. to 43°C. (90°F. to 110°F.) (hand comfortable)
COTTON WHITES
COTTON COLORS
PERM PRESS
DELICATES
WASH WOOL
Country Maximum Load Capacity
Australia 7.5 kg
Page 5
COTTONS REGULAR
For normal to lightly
soiled cottons, linens,
work and play clothes
with
SHORT WASH
being
the shortest and
REGULAR/HEAVY
being
the longest regular warm
wash program.
PERMANENT PRESS
For synthetics and blends
with normal soil.
KNITS
Specially designed for
normally soiled knits.
AUTO HANDWASH
For l
ingerie and special-
care
fabrics with light soils.
Select Handwash for load
size and for cycle. Provides
periods of agitation and
soak during wash and rinse.
AUTO SOAK
For heavily soiled clothes
with the
HOT-COLD
wash
setting. Begins with a brief
agitation, soaks for a specified period of time, agitates
again, then spins out and
stops.
PREWASH
For heavily soiled clothes
or for clothes with a care
label that recommends
prewashing before wearing.
5
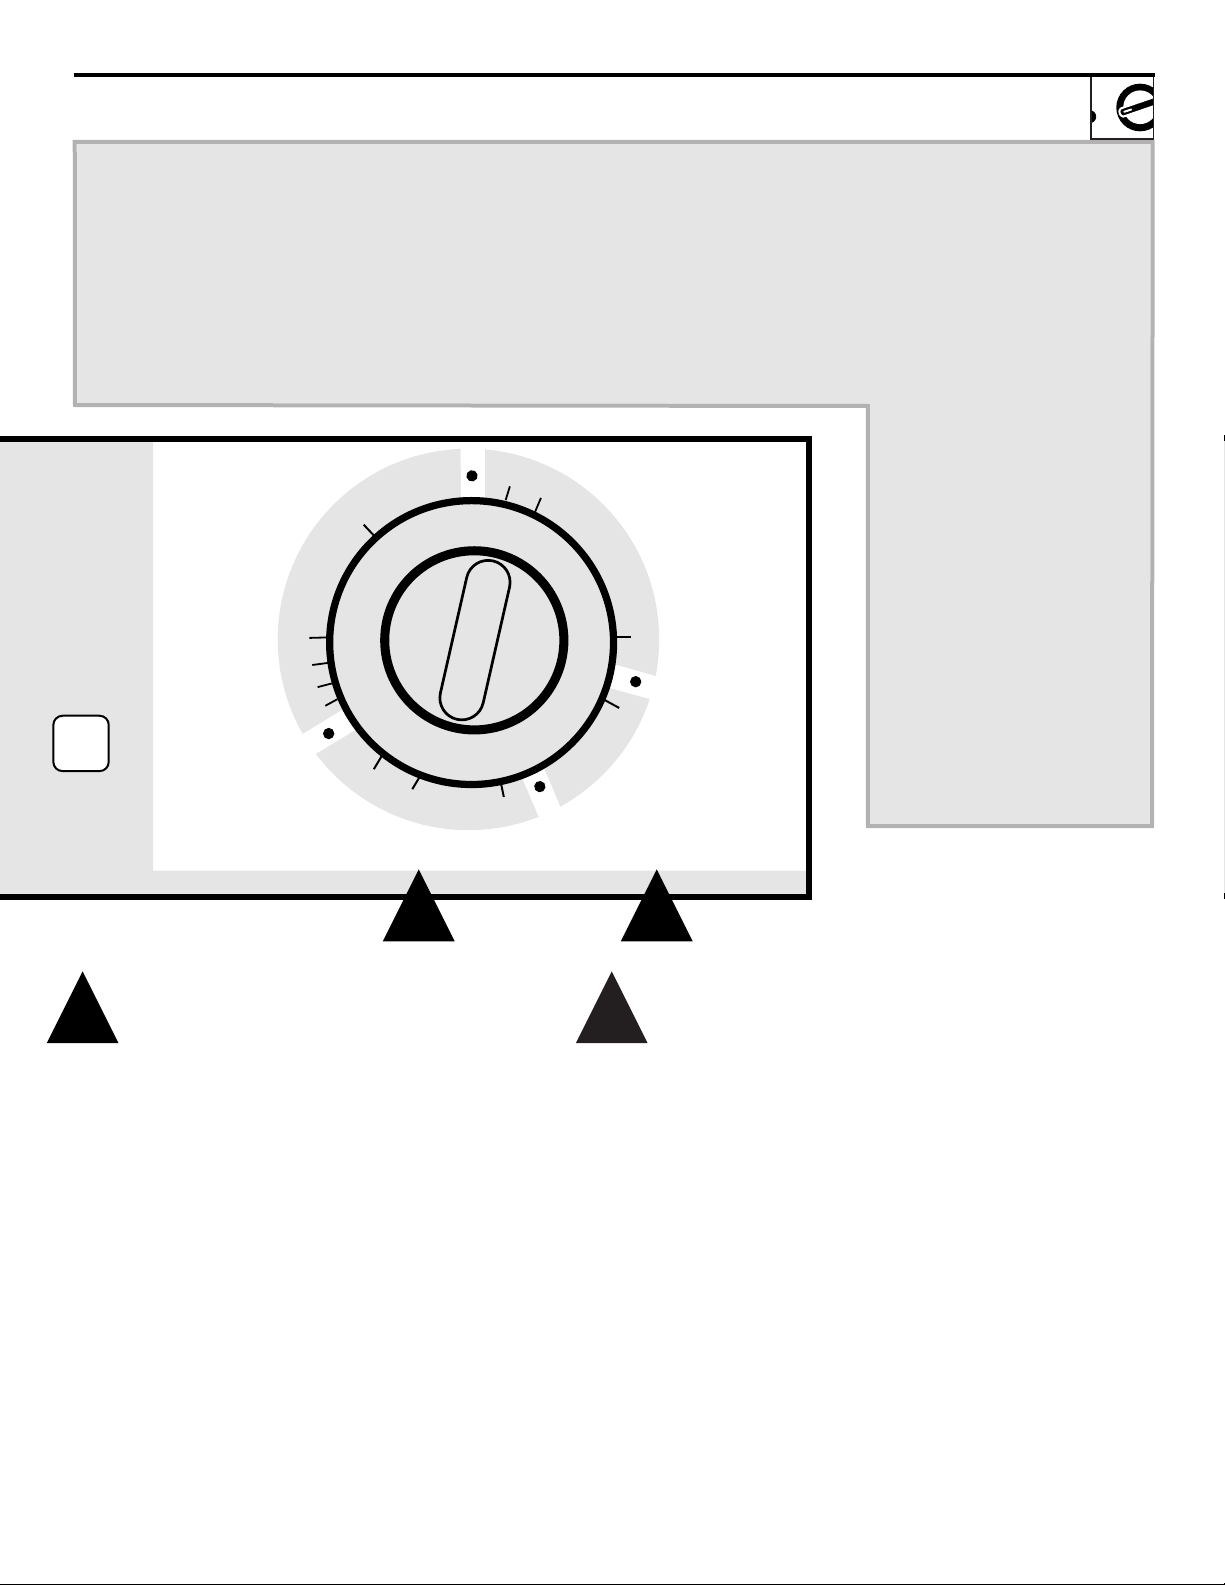
Cycle Descriptions
43
See next page for other washer features
Selecting Cycle Starting Washer
• Add detergent.
• Add clothes and close lid.
• Pull out the Cycle knob to start washer.
Push in the Cycle knob to select the desired
cycle. See the above Cycle Descriptions.
KNITS
MEDIUM SOIL
REGULAR/
HEAVY
LIGHT SOIL
SHORT WASH
PERMANENT PRESS
COTTONS
REGULAR
AUTO SOAK/
PREWASH
PERMANENT
PRESS
AUTO
HANDWASH
RESET
OPTIONS
60 MIN
AUTO SOAK
30 MIN
AUTO SOAK
PREWASH
3 4
Page 6
6
Operating Instructions
Other washer features your model has
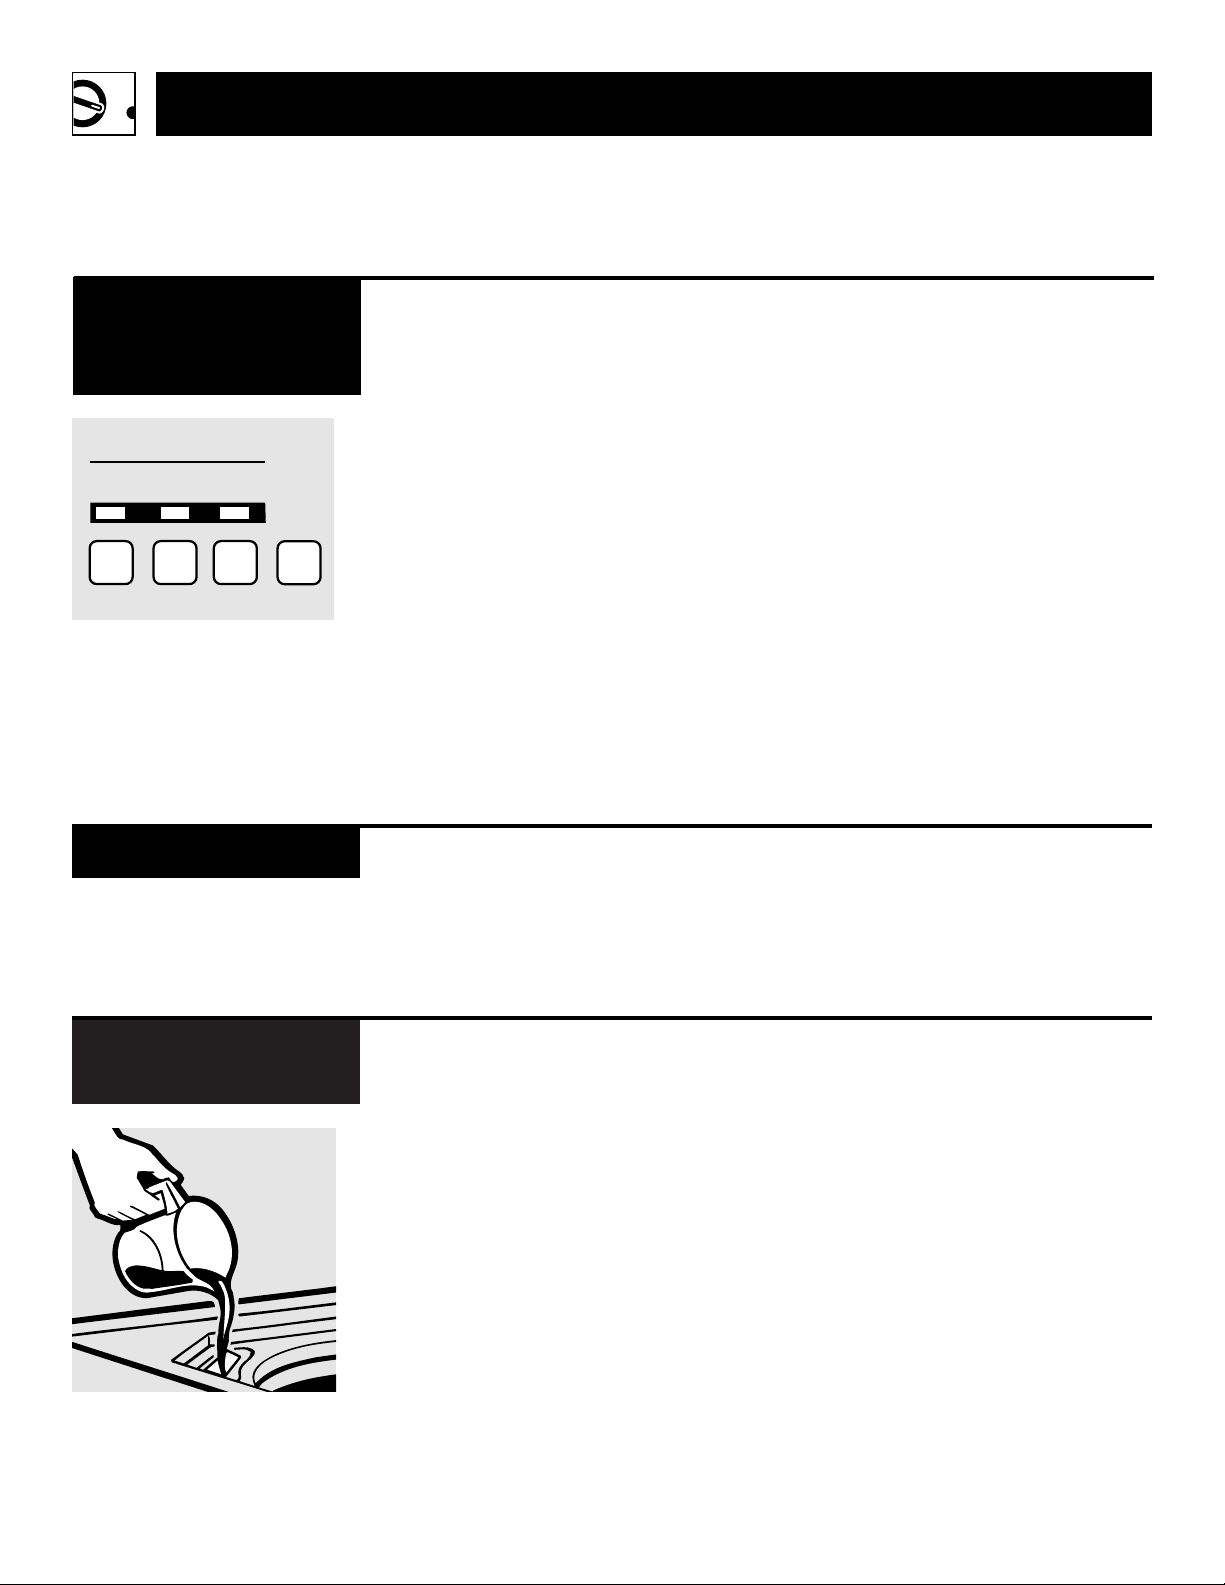
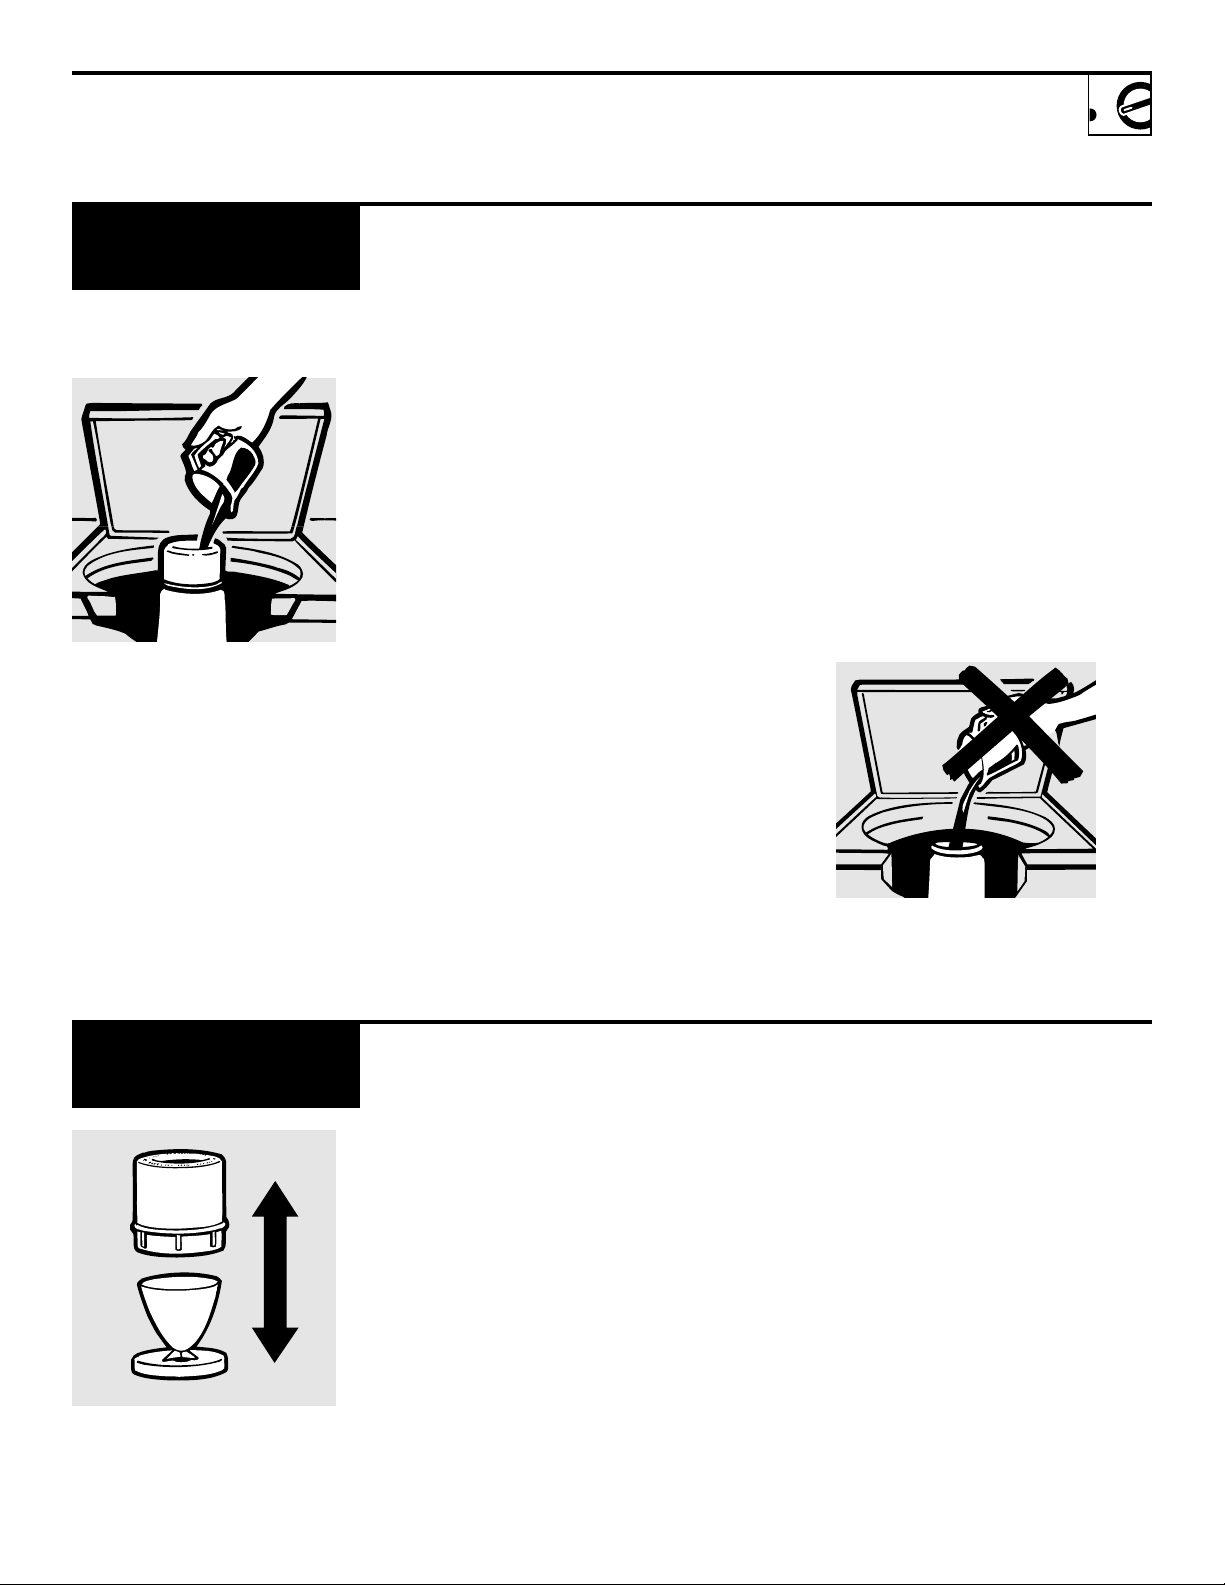
This dispenser dilutes liquid
chlorine bleach before it reaches
into your wash load. To use, follow
these steps:
1
Check clothing care labels for
special instructions.
2
Measure liquid bleach carefully,
following instructions on bottle.
3
Before starting the washer, pour
measured amount of bleach
directly into bleach dispenser.
Avoid
splashing or over-filling
dispenser.
NOTE:
•
Never pour undiluted liquid chlorine
bleach directly onto clothes or into
the wash basket.
•
Do not pour powdered bleach into
bleach dispenser. If you prefer to
use powdered bleach, pour it into
the wash basket with your
detergent.
Liquid Bleach
Dispenser
Pour liquid bleach into bleach
dispenser
Signal:
If the Signal option is selected, a
signal will sound just before the end
of the cycle. This reminds you to
remove the clothes to avoid excess
wrinkling before drying. If you
selected Extra Rinse the signal will
sound at the end of the cycle and at
the end of the Extra Rinse.
Extended Spin:
This option is recommended for
washable woolens and sweaters.
It will extend the spin without
stretching the knit.
Extra Rinse:
When you use extra detergent
or bleach to clean heavily soiled
clothes, you may want to use the
Extra Rinse option. This option
provides a second deep
cold rinse
in the Cottons Regular and
Permanent Press cycles. Select Extra
Rinse.
The washer will pause for a
few minutes before the Extra Rinse
cycle begins.
Reset Options:
Selecting RESET OPTIONS cancels
all options that have been selected.
Signal, Extended Spin,
Extra Rinse and
Reset Options
OPTIONS
SIGNAL EXTENDED
SPIN
EXTRA
RINSE
RESET
OPTIONS
The lint filter is located under the
agitator. It is self-cleaning and
requires no maintenance.
Lint Filter
Page 7
This dispenser automatically releases liquid fabric softener at the proper time during the cycle. To use,
follow these steps:
1
Make sure dispenser is securely
attached to agitator.
2
Pour liquid fabric softener
into dispenser, using amount
recommended on package.
3
Add water to dispenser until it
reaches the maximum fill line.
NOTE:
•
Do not stop the washer during
the first spin. This will cause
the dispenser to empty too soon.
•
Do not use the Fabric Softener
Dispenser with the Auto Soak.
•
Never pour fabric softener directly
on clothes. It will leave spots on
clothes.
•
Only use dispenser for liquid fabric
softeners. If dispenser gets clogged,
see Cleaning section below.
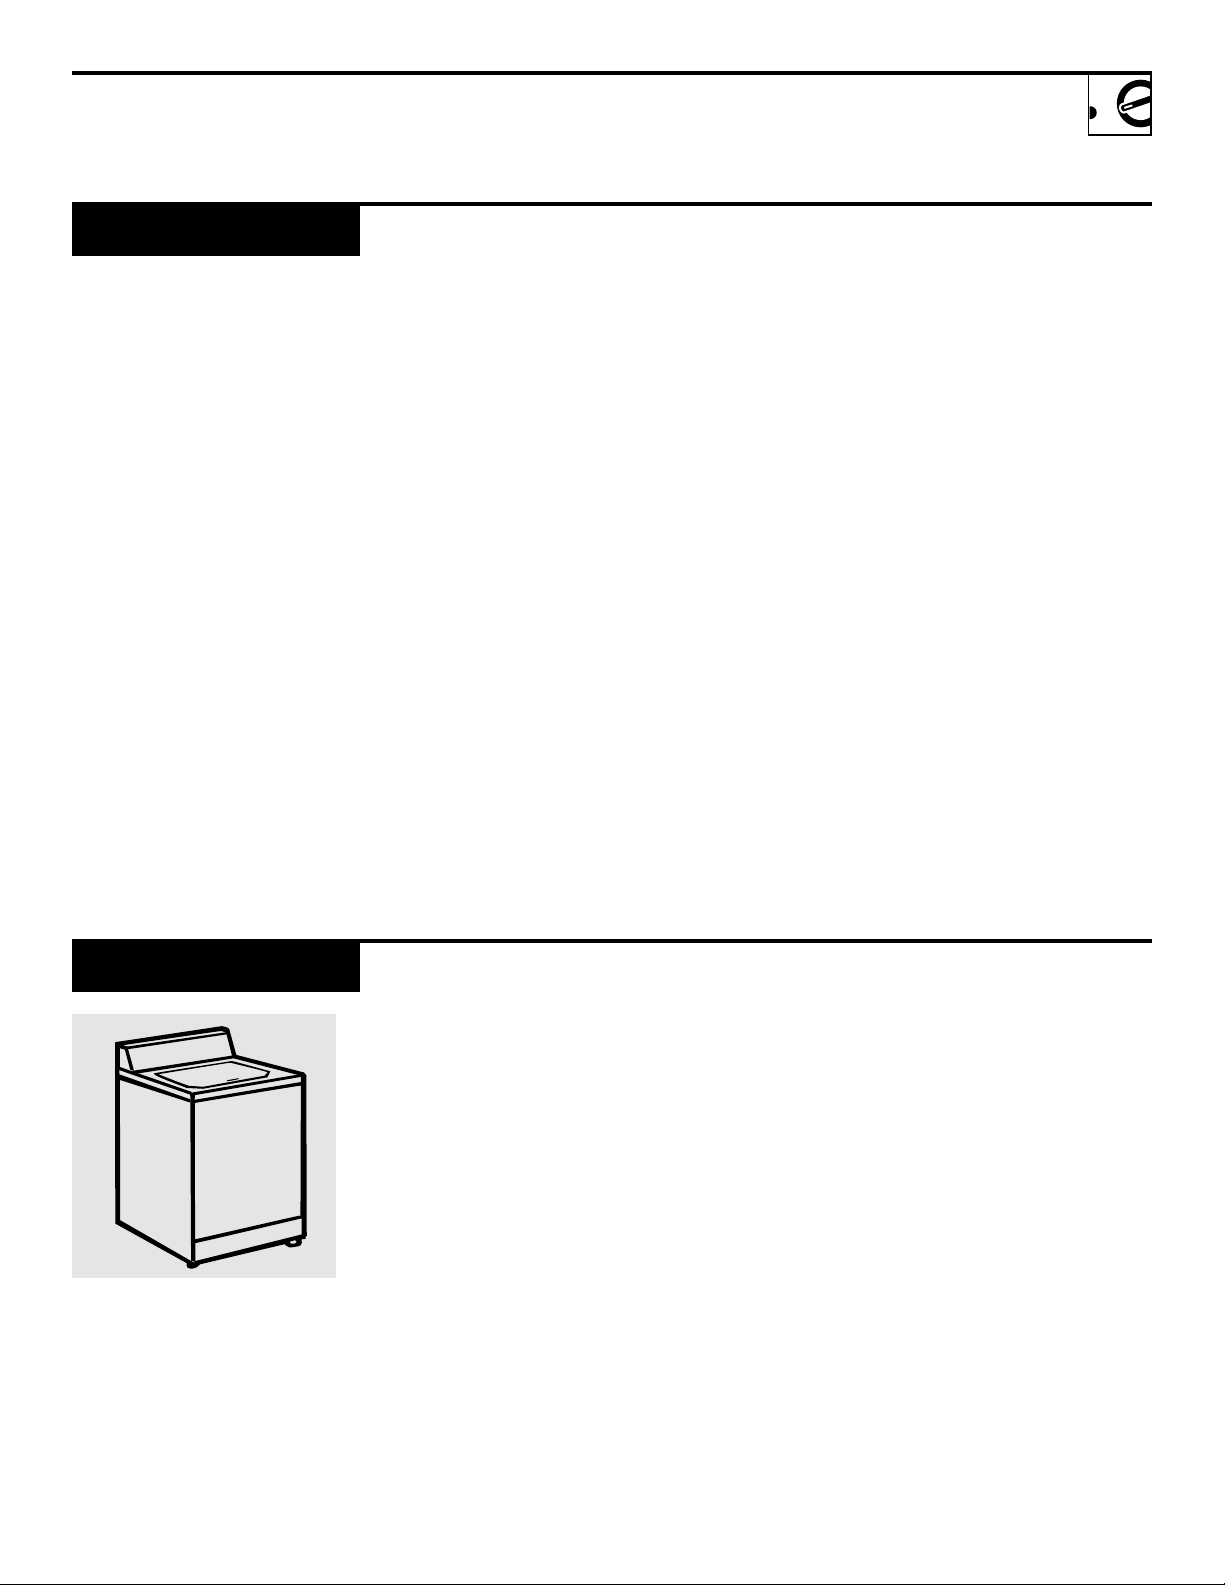
Do not pour anything into the
agitator if the top is removed
Fabric Softener
Dispenser
1
Remove the dispenser from the
top of the agitator.
2
Separate the dispenser cup from
the cover by grasping the top and
pushing down on the inside of the
cup with your fingers. Dispenser
cup will pop free from the cover.
3
To clean dispenser, soak both the
dispenser cup and the dispenser
cover in a solution of warm water
and liquid detergent.
4
If necessary, loosen build-up with
a clean, soft cloth after soaking.
Do not use a stiff brush; you may
roughen the surface of the dispenser.
5
Rinse and reassemble dispenser.
Place dispenser back on the
agitator.
Cleaning Fabric
Softener Dispenser
Pour liquid fabric softener
and water into fabric softener
dispenser
7
Separate for cleaning
Page 8

8
Operating Instructions
Preparing to Wash
Always follow Fabric Manufacturer’s
Care Label when laundering.
Sort by color
(Separate colorfast from
non-colorfast fabrics*)
• Whites
• Lights
• Darks
Separate by fabric type
• Cottons and linens
•
Permanent press cottons and
blends
• Synthetic and poly knits
• Delicates
Separate lint producers from
lint collectors
• Lint producers: terry cloth and
chenille
• Lint collectors: velveteen and
corduroy
Sort by soil
• Light
• Medium
• Heavy
* Non-colorfast fabrics may bleed or fade. Sort by
individual color.
Sort
Always add detergent before
adding clothes so that the detergent can work effectively.
Using the correct amount of
detergent is one of the most
important things you can do to
make sure your wash comes out
clean. Always follow the detergent
package directions.
Using too little detergent is
a common cause of laundry
problems. Use more detergent if
you have hard water, large loads,
greasy or oily soils or lower water
temperature.
Detergent
Page 9
Load dry items loosely, spacing
evenly around agitator, and close
the lid.
A typical wash load: two twin sheets,
two tablecloths, four collared
shirts, three pillow cases, three
small bath
towels, three t-shirts,
and three pairs of shorts
.
Place large items in bottom, small
items in the middle and medium
items on top.
When loading wet items make
sure you set the load/water level
high enough to allow the items to
move freely.
Wash bulky items like blankets
separately.
To add items after washer has
started, push in Cycle knob and
submerge additional items next to
the agitator. Close the lid and pull
Cycle knob out to restart.
To reduce wrinkling, give
permanent press items, synthetics
and poly knits room to move freely
in the washer.
NOTE:
•
Do not wrap large items like sheets
around the agitator.
•
Do not wash fabrics containing
flammable materials (waxes, cleaning fluids, etc.) in your washer.
Load
Leave the lid open after washing
to allow moisture to evaporate. The
wash basket is practically care free.
If you want to clean the washer use
a clean soft cloth dampened with
liquid detergent, then rinse. (Do
not use harsh or gritty cleaners.)
Fill Hoses—
Hoses connecting
washer to faucet should be replaced
every five years.
Moving and Storage—
Ask the service
technician to remove water from
drain pump and hoses. Contact
your local distributor for information on how to keep the tub stationary when moving the washer.
Long Vacations—
Be sure water
supply is shut off at taps. Drain all
water from hoses if weather will be
below freezing.
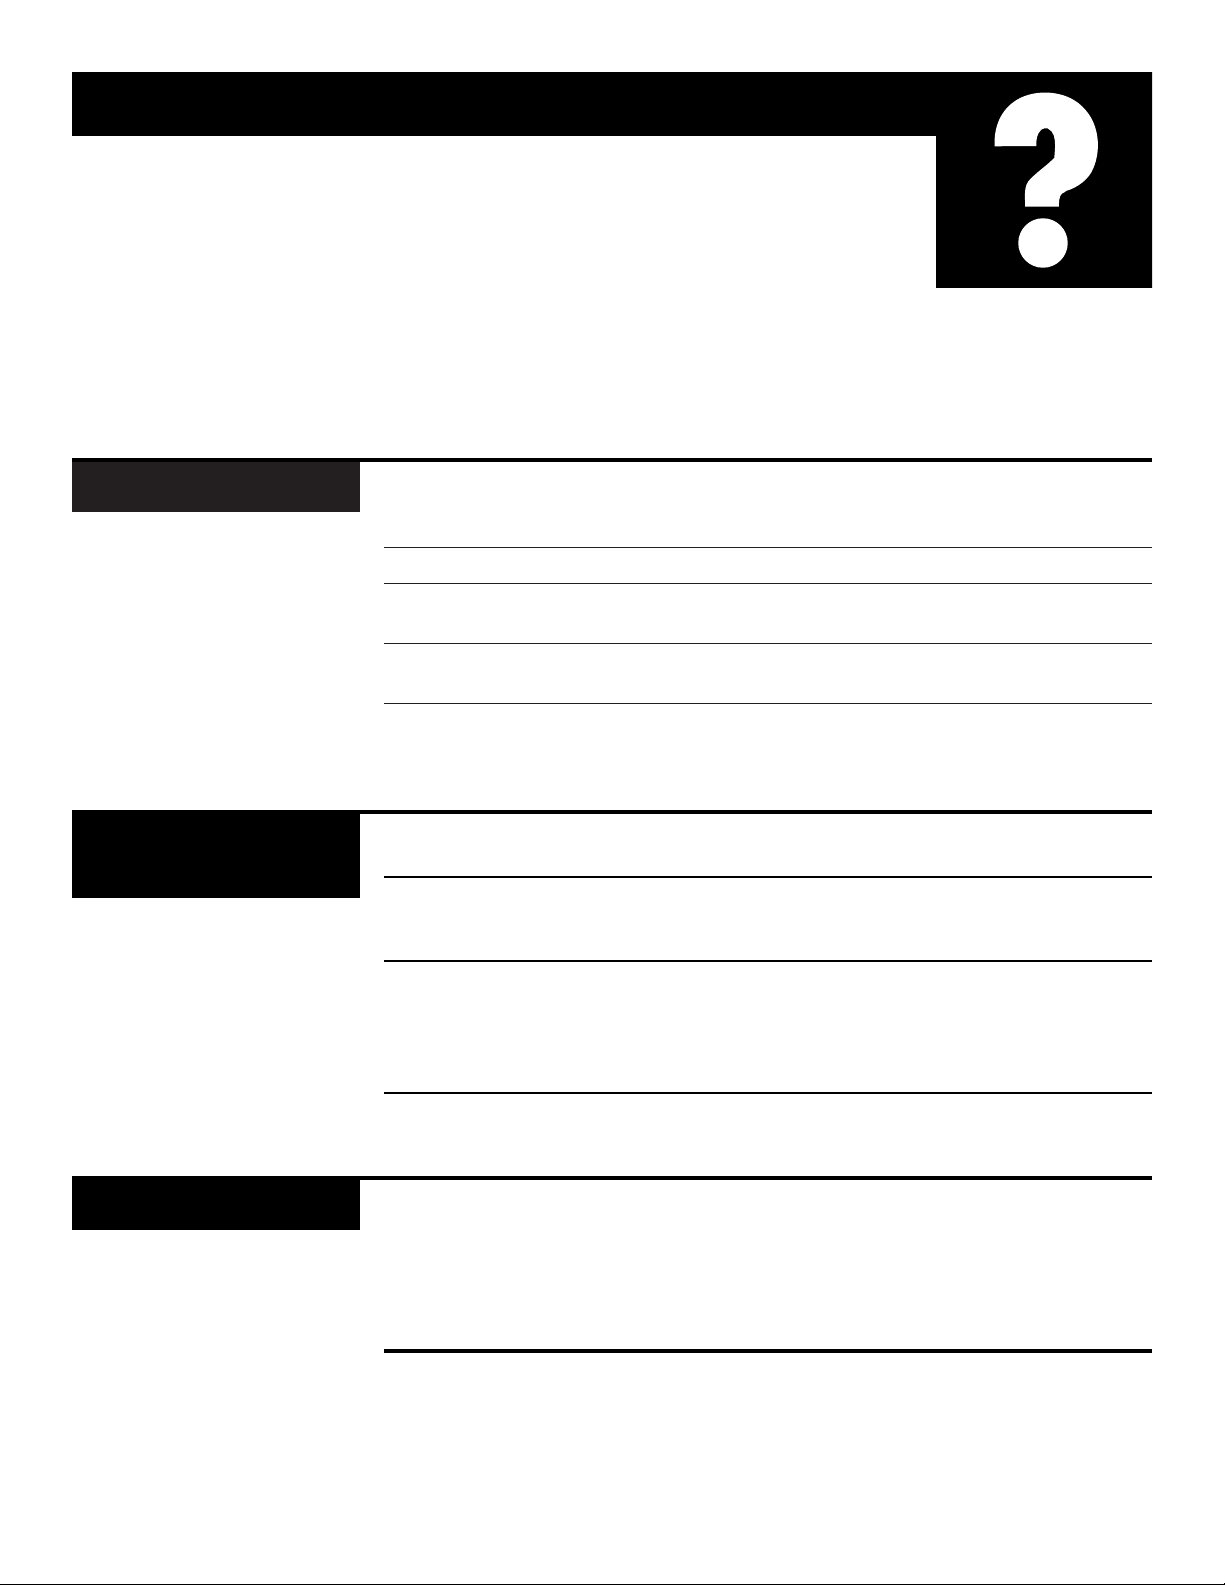
The Washer
Care & Cleaning
9
Page 10

Down-Filled Garments Always wash down-filled garments separately from other types
of garments. Wet down gives off an odor that will disappear when
the down is dried. Wash down items frequently to fluff up the
down and to retain down’s warmth. When washing make sure
the load is balanced. Add towels if necessary. Always tumble-dry
down garments.
Pillows Pillows are made from a variety of materials. Wash only if
recommended on the Pillow Manufacturer’s Care Label. Before
washing check pillows for weak seams or holes, and mend. Let
the washer fill with water and add detergent. Let the washer
agitate for several minutes and then add pillows in pairs. This
will keep the load balanced. Use the largest load/water level
available.
Blankets Let the washer fill with water, add detergent, allow detergent to
dissolve, then add blanket. Wash only one blanket at a time.
Permanent Press Clothes Select a larger load/water level than normal. This will provide
that are Line Dried more water to help reduce wrinkling and to allow clothes enough
room to move around. Remove clothes as soon as the wash cycle is
complete and hang them up immediately.
10
Helpful Information
Specialty Care Guide
Item Suggested Care
Always follow Fabric Manufacturer’s Care Label or instructions when laundering.
Otherwise use the information below as a general guide.
Page 11
11
If Something Goes Wrong
Problem Possible Causes What to Do
Washer is unplugged • Make sure cord is plugged securely into a
working outlet.
Water supply is turned off • Turn both hot and cold taps fully on.
Controls are not set properly • Check controls and make sure Cycle knob
is pulled out to ON position.
Lid is open • Close lid and pull Cycle knob out to ON
position.
Circuit breaker/fuse is • Check house circuit breakers/fuses. Replace
tripped/blown fuses or reset breaker. Washer should have
separate outlet.
Washer Won’t Operate
Drain hose is kinked or • Straighten drain hose and make sure
improperly connected washer is not sitting on it.
• Top of drain outlet should be less than
1m (3 ft.) above floor.
Water Won’t Drain
Control is not set properly • Check water temperature control and adjust.
Water supply is turned off • Turn both hot and cold taps fully on and
or improperly connected make sure hoses are connected to correct
taps.
Water valve screens are • Turn off the water source and remove the
stopped up
water connection hoses from the upper back
of the washer. Use a brush or toothpick to
clean the screens in the machine. Reconnect
the hoses and turn the water source back on.
House water heater is not set • Make sure house water heater is delivering
properly water at 48°C.–65°C. (120°F.–150°F.).
Water Temperature
is Incorrect
Page 12

12
Problem Possible Causes What to Do
Fill hoses or drain hose is • Make sure hose connections are tight at taps
improperly connected and make sure end of drain hose is correctly
inserted in and secured to drain facility.
Household drain may
•
Check household plumbing. You may need
be clogged to call a plumber.
Constant water pressure to the • Tighten hoses at the taps and turn the water
fill hoses at the water source off after each use.
•
Check condition of the fill hoses; they may
need replacement after 5 years.
Water Leaks
Washer is uneven • Make sure washer is level and firm
to the floor.
Washer load is unbalanced • Push the Cycle knob in to stop the
washer, open the lid and redistribute
the load evenly. Close the lid and restart.
Shipping rod has not been • Remove the shipping rod on the bottom
removed right side of the washer just before sliding
the washer in place. Do not use the washer
with the shipping rod in place.
Water is draining • There will be a gurgling, “sucking” sound
prior to the spin cycle. This is normal and
will stop as soon as the machine goes into
the spin cycle.
Washer is Noisy
The washer normally pauses
between washing steps
Washer Pauses
in Cycle
Incorrect cycle • Make sure the cycle selected matches the
selected load you are washing.
This is normal for some fabrics
Clothes too Wet
If Something Goes Wrong
Page 13

13
Problem Possible Causes What to Do
Incorrect sorting • Separate lint producers from
lint collectors.
Washing too long • Wash small loads for a shorter time than
larger loads.
Detergent not dissolving •
For best performance always add detergent
before adding clothes. If you use powdered
detergent, pre-dissolve
detergent in hot water
before adding to washer.
• Try a liquid detergent.
• Use warmer water temperature.
Overloading • Make sure load/water level setting matches
load size.
Too much bleach • Check bleach package for correct amount.
Not enough detergent • Try using more detergent.
Incorrect use of fabric softener • Check fabric softener package for
instructions (see Fabric Softener
Dispenser section).
Lint or Residue
on Clothes
Improper loads • Avoid mixing heavy items (like work
clothes) with light items (like blouses).
• Separate permanent press from
other laundry.
• Try a fabric softener.
Overloading or incorrect • Load your washer so clothes have enough
water level room to move freely.
Incorrect wash and dry cycles • Match Cycle selection to the type of fabric
you are washing (especially for permanent
press loads).
Repeated washing in water • Wash in warm or cold water with plenty
that is too hot of detergent.
Wrinkling
Page 14

14
If Something Goes Wrong
Problem Possible Causes What to Do
Some fabrics will naturally • Hot water is more likely to cause shrinkage
shrink in the wash than cold water.
• Follow directions on fabric care label.
Shrinkage
Pins, snaps, hooks, sharp • Fasten snaps, hooks, buttons, and zippers.
buttons, belt buckles,
• Remove loose items like pins, objects in
zippers, and sharp objects
pockets and sharp buttons.
left in pockets
• Turn knits (which snag easily) inside out.
Undiluted chlorine bleach • Check bleach package instructions for
proper amount.
• Never add undiluted bleach to wash or
allow clothes to come in contact with
undiluted bleach.
Small tears or holes • Repair tears and holes before washing.
present before wash
Chemicals like hair bleach, • Rinse items that may have chemicals
hair dye, permanent wave on them before washing.
solution and toilet bowl cleaners
Permanent press items • While this is not caused by the washer,
naturally fray (especially you can slow the fraying process by
collars and cuffs) washing small permanent press loads with
a higher load/water level setting.
• Avoid washing heavy items (like towels)
with permanent press items.
Snags, Holes, Tears,
Rips, or Excessive
Wear
Page 15

15
Problem Possible Causes What to Do
Not enough detergent • Try using more detergent (especially with
(larger loads, heavy soil, larger loads).
and hard water might
• If you live in a hard water area try using
require more detergent)
a water conditioner or install a water
softener.
Water is not hot enough • Make sure water heater is delivering water
at 48°C.–65°C. (120°F.–150°F.).
• Do not use the washer when hot water is
used for other needs (dishes, baths, etc.).
Washer is overloaded • Make sure load/water level setting matches
load size.
Soak time is too short • Soak at least 30 minutes.
Soaking with too little detergent • Use more detergent (especially with
heavy soil).
Detergent is not dissolving • Add detergent as wash basket fills with
water before you load clothes.
To restore grayed clothes, • Put clothes through a wash cycle using hot
try one of the following water. (Check the garment’s manufacturing
care label to see if hot water can be used.)
Add a non-precipitating water softener. Use
2 1⁄2 times more than is recommended
for normal water softening. Do not use
detergent or soap. Allow clothes to go
through a complete cycle. Repeat if
necessary.
• Soak your clothes using a water softener
instead of a soaking agent. Allow clothes
to soak for about 20 minutes.
Grayed Clothes
Page 16

16
Not enough detergent • Always use the recommended amount of
on a consistent basis detergent.
Chlorine bleach may yellow • Use non-chlorine bleach.
some fabrics
Iron or manganese in water may •
Use extra detergent plus a non-precipitating
cause yellowing or yellow spots water softener dissolved in water and
non-chlorine bleach.
• Run hot water for 2 minutes to help the
pipes clean out iron buildup.
• Drain your house water heater occasionally.
• To remove spots spread stain area over a pan
of boiling water and squeeze lemon juice
through the stain.
Yellowed Clothes
Incorrect use of fabric softener • Check fabric softener package
for instructions (see Fabric Softener
Dispenser section).
• To remove spots dampen the spots
and rub with undiluted liquid detergent.
Rewash, using chlorine bleach if it is safe
for the fabric.
Blue or Gray Spots
Type of detergent • Switch to a lower sudsing detergent brand
and follow instructions on package.
Very soft water • Try less detergent.
Too Many Suds
Result of normal wear on • While this is not caused by the washer,
poly-cotton blends you can slow the pilling process by washing
poly-cotton blends inside out.
Pilling
If Something Goes Wrong
Problem Possible Causes What to Do
Page 17

17
Page 18

18
Page 19

20
Información importante de
seguridad
22
Instrucciones de operación
Los controles de su lavadora
Otras características de su lavadora
Prepárese para lavar
Cuidado del producto
28
Información útil
Guía de cuidados especiales
29
Si algo sale mal
Lavadora
Manual del propietario
Modelos: WISQ416C WISQ416D
WISQ416F
19
175D1807P236
49-9965
11-97 CG
Aparatos GE
General Electric Company, Appliance Park, Louisville, KY 40225 USA
220–240 V. 50 Hz 5.5 A
Page 20

GUARDE ESTAS INSTRUCCIONES
20
Seguridad en el calentador de agua
Información importante de seguridad
Lea todas las informaciones de seguridad
antes de usar la lavadora
Bajo determinadas condiciones se
puede producir gas hidrógeno en
el calentador de agua que no se
ha usado durante dos semanas o
más. EL GAS HIDROGENO
PUEDE SER EXPLOSIVO BAJO
ESTAS CIRCUNSTANCIAS.
Si no se ha usado agua caliente
durante dos semanas o más, evite
la posibilidad de daños o lesiones
abriendo todas las llaves de agua y
dejando que corra durante varios
minutos antes de usar cualquier
aparato eléctrico que esté
conectado al sistema de agua
caliente. Esto permitirá que el gas
de hidrógeno escape. Ya que el
gas es inflamable, no fume ni use
una llama abierta o algún aparato
durante este proceso.
Page 21

Advertencia
Para reducir el riesgo de incendio, choque eléctrico o lesiones a las
personas cuando use su aparato, siga las precauciones básicas,
incluyendo las siguientes secciones.
Precauciones de
seguridad
• Utilice este aparato sólo para
el propósito para el que fue
diseñado como se describe en
el Manual del propietario.
— Conecte a tierra de manera
adecuada en conformidad
con todos los códigos y
ordenanzas gubernamentales.
Siga detalladamente las
Instrucciones de instalación.
—
Instale o guarde la lavadora
donde no esté expuesta a
temperaturas de congelamiento
o a la intemperie.
• No repare ni reemplace cualquiera
parte de este aparato ni intente
darle ningún servicio a menos que
esté específicamente recomendado
en este Manual del propietario o
en instrucciones de reparaciones
publicadas que usted comprenda y
que tenga las habilidades para
poner en práctica.
• Si el cable de alimentación está
dañado, debe ser reemplazado
por el fabricante o por su agente
de mantenimiento, o por una
persona igualmente cualificada,
para evitar cualquier peligro.
• No manipule indebidamente los
controles.
• Nunca meta las manos en la
lavadora mientras ésta se
encuentre funcionando.
• Se necesita una supervisión
estrecha si esta lavadora es
utilizada cerca de niños o personas
ancianas o enfermas. No permita
que los niños jueguen en el
interior, sobre la lavadora o con
la lavadora ni con cualquier otro
aparato que haya desechado.
Deshágase de los aparatos que
ya no use y empaque o trasládelos
usando materiales adecuados.
Antes de deshacerse de una
lavadora o de enviarla a servicio,
quite la tapa de la lavadora.
• No lave ni seque artículos que
hayan sido limpiados, lavados,
mojados o manchados con
combustible con sustancias
explosivas [tales como cera,
aceite, pintura, gasolina,
desengrasantes, queroseno
(petróleo destilado), etc.] y que
puedan incendiarse o estallar. No
utilice estas sustancias cerca de su
lavadora y/o secadora mientras
ésta se encuentre en
funcionamiento.
• Para minimizar la posibilidad de
un choque eléctrico, desconecte
este aparato del suministro de
corriente eléctrica o desconecte
la lavadora al panel de
distribución quitando el fusible
o apagando el interruptor de
circuitos antes de intentar llevar
a cabo cualquiera actividad de
mantenimiento o limpieza.
• NOTA: El hecho de colocar la
perilla del Selector de ciclo en
posición de apagado NO
desconecta el aparato del
suministro de energía eléctrica.
21
Page 22

temperatura
de lavado
HOT (caliente)
WARM (tibia*)
WARM (tibia*)
COLD (fría)
WARM (tibia*)
temperatura
de enjuague
COLD (fría)
COLD (fría)
COLD (fría)
COLD (fría)
WARM (tibia*)
COTTON WHITES
(Algodones Blancos)
COTTON COLOR
(Algodones de Color)
PERM PRESS
(Planchado Permanente)
DELICATES
(Delicados)
WASH WOOL
(Lanas Lavables)
*El agua tibia es aprox. de 32°C. a 43°C. (90°F. a 110°F.) (agradable para las manos)
Instrucciones de operación
Los
controles
de su
lavadora
2
1
Load Size
(Tamaño de la carga)
Temp. de lavado/enjuagado
22
LOAD SIZE
LARGE
HAND
WASH
EXTRA
LARGE
RESET
SUPER
MEDIUM
COTTON
WHITES
COTTON
COLORS
PERM
PRESS
OPTIONS
SIGNAL EXTENDED
SPIN
EXTRA
RINSE
FABRIC CARE
DELICATES
WASH
WOOL
WASH
RINSE
HOT
COLD
WARM
COLD
WARM
COLD
COLD
COLD
WARM
WARM
1 2
Para informaciones sobre el cuidado de prendas para artículos
especiales vea la Guía de Cuidados Especiales.
Al seleccionar el tamaño de la carga, usted está
determinando el nivel de agua. Para mejores
resultados, elija un tamaño apropiado para la
carga que está lavando.
Algunos modelos le permiten incrementar
el nivel de agua después de que usted ya
hizo su elección. Seleccione RESET (volver
a seleccionar) y un nuevo nivel.
Siempre siga las instrucciones de cuidado
de la etiqueta del fabricante cuando lave sus
prendas. Use esta tabla como una guía general.
Guía de cuidado para prendas
Page 23

Oprima la perilla de Ciclo para seleccionar el
ciclo deseado. Vea las descripciones de los
Ciclos que están arriba.
• Añada detergente.
• Coloque las prendas y cierre la tapa.
• Tire de la perilla de Ciclo para empezar la
lavadora.
23
Descripción de los ciclos
4
3
Selección de ciclo Inicio de lavado
COTTONS REGULAR
(Regular)
Para prendas de algodón,
lino, ropa de trabajo y de
juego muy sucias o poco
sucias.
PERMANENT PRESS
(Planchado Permanente)
Para sintéticos y mezclas
con suciedad normal.
KNITS
(Tejidos)
Especialmente diseñado
para tejidos con suciedad
normal.
AUTO HANDWASH
(Lavado a Mano Auto)
Para lencería y telas
que requieren cuidados
especiales con suciedad
ligera. Seleccione Lavado
a mano para el tamaño
de la carga y el ciclo.
Proporciona períodos de
agitación y remojo durante
el lavado y enjuagado.
AUTO SOAK
(Auto Remojo)
Para prendas muy sucias.
Comienza con una agitación
breve y remoja durante un
período especificado de
tiempo y luego realiza
el resto del ciclo
automáticamente.
PREWASH
(Prelavado)
Para prendas muy sucias
o con una etiqueta del
fabricante que recomienda
un prelavado antes de
llevarlas.
Consulte la página siguiente para otras
características de lavado.
KNITS
MEDIUM SOIL
REGULAR/
HEAVY
LIGHT SOIL
SHORT WASH
PERMANENT PRESS
COTTONS
REGULAR
AUTO SOAK/
PREWASH
PERMANENT
PRESS
AUTO
HANDWASH
RESET
OPTIONS
60 MIN
AUTO SOAK
30 MIN
AUTO SOAK
PREWASH
3
4
Page 24

24
Instrucciones de operación
Otras características que puede tener su modelo
El filtro para pelusa se encuentra debajo del agitador. Se limpia solo y no
requiere mantenimiento.
Filtro para pelusa
OPTIONS
SIGNAL EXTENDED
SPIN
EXTRA
RINSE
RESET
OPTIONS
Signal (Señal),
Extended Spin
(Centrifugado
prolongado), Extra
Rinse (Enjuague extra)
y Reset Options
(Volver a programar)
SIGNAL (Señal):
Si se selecciona la opción de
SIGNAL (Señal), una señal sonará
justo antes de que termine el ciclo
para recordarle que saque las
prendas para evitar que se formen
arrugas en la ropa antes de secarla.
Si se seleccionó EXTRA RINSE
(Enjuague extra) la señal sonará al
final del ciclo y al final del EXTRA
RINSE (Enjuague extra).
EXTENDED SPIN (Centrifugado
prolongado):
Se recomienda esta opción para
lanas lavables y suéteres. Se
prolongará el secado sin deformar
las lanas.
EXTRA RINSE (Enjuague extra):
Cuando use detergente o
blanqueador adicional para lavar
ropa muy sucia, tal vez prefiera el
EXTRA RINSE (Enjuague extra).
Esta opción proporciona un segundo
enjuague profundo con agua fría en
los ciclos COTTONS REGULAR
(Algodones regulares) y
PERMANENT PRESS (Planchado
permanente). Seleccione EXTRA
RINSE (Enjuague extra). La lavadora
se parará durante algunos minutos
antes de que se inicie el Ciclo de
EXTRA RINSE (Enjuague extra).
RESET OPTIONS (Volver a programar):
Si se selecciona RESET OPTIONS
(Volver a programar), se cancelan
todas las opciones seleccionadas
anteriormente.
Este despachador diluye el
blanqueador de cloro líquido antes
de llegar a su carga de ropa. Para
usarlo, siga estos pasos:
1
Lea las instrucciones de las
etiquetas de las prendas por si
hay indicaciones especiales.
2
Mida cuidadosamente la cantidad
de blanqueador siguiendo las
instrucciones en la botella.
3
Antes de iniciar la lavadora,
vierta la cantidad medida de
blanqueador líquido
directamente en el despachador
para blanqueador. Evite
salpicaduras o llenar en exceso el
despachador.
NOTA:
•
Nunca vierta blanqueador a base
de cloro, sin diluir, directamente
sobre las ropas o en la cubeta de la
lavadora.
•
No vierta el blanqueador en polvo
en el surtidor de blanqueador. Si
usted prefiere utilizar blanqueador
en polvo, viétalo en la cubeta de la
lavadora con su detergente.
Despachador de
blanqueador líquido
Vierta el blanqueador líquido
en el despachador para el
blanqueador.
Page 25

Este despachador libera
automáticamente suavizante
líquido para telas en el momento
adecuado durante el ciclo. Para
usarlo, siga estos pasos:
1
Cerciórese de que el
despachador de suavizante para
telas esté firmemente asegurado
en el agitador.
2
Vierta la cantidad de suavizante
para telas recomendada por el
fabricante dentro del
despachador de suavizante para
telas.
3
Añada agua en el despachador
hasta que llegue al máximo nivel
de la línea de llenado.
NOTA:
•
No detenga la lavadora durante la
primera rotación. Esto ocasionaría
que el despachador se vaciara
demasiado rápido.
•
No use el despachador de
suavizante para telas en el ciclo de
AUTO SOAK (Auto remojo).
•
Nunca vierta suavizante para telas
directamente sobre las prendas.
Dejará manchas en las prendas.
•
Sólo use el despachador con
suavizantes líquidos para telas. Si
el despachador se tapa, consulte la
sección Limpieza que está abajo.
No vierta nada dentro del
agitador si éste no tiene la parte
superior.
Despachador de
suavizante para telas
1
Quite el despachador de la parte
superior del agitador.
2
Separe la taza del despachador
de la cubierta tomando la parte
superior y empujando hacia
abajo con los dedos en la parte
interior de la taza. La taza se
liberará de la cubierta.
3
Para limpiar el despachador,
remoje tanto la taza del
despachador como la cubierta
del despachador en una solución
de agua caliente y de detergente
líquido.
4
Si es necesario, afloje los
residuos con una tela suave
después de remojar. No use un
cepillo duro ya que puede rayar
la superficie del despachador.
5
Enjuague y vuelva a ensamblar
el despachador. Colóquelo de
nuevo en el agitador.
Vierta el suavizante para telas
y el agua en el despachador
para el suavizante.
25
Separe para limpiar
Limpieza del
despachador de
suavizante para telas
Page 26

26
Instrucciones de operación
Prepárese para lavar
Siempre siga las instrucciones de la
etiqueta del fabricante al lavar.
Clasifique por color
(Separe las prendas de colores
firmes de aquellas que destiñen*)
• Prendas blancas
• Prendas de colores claros
• Prendas oscuras
Separe según el tipo de tela
• Algodones y linos
• Algodones y mezclas de
planchado permanente
• Sintéticos y tejidos de poliéster
• Telas delicadas
Separe las ropas que producen
pelusa de las que recolectan pelusa
• Productores de pelusa: Las toallas
de tejido de rizo y de felpilla
• Recolectores de pelusa:
terciopana o la pana
Clasifique según el grado de
suciedad
• Prendas no muy sucias
• Medianamente sucias
• Muy sucias
* Es posible que las telas de colores no permanentes
destiñan. Separe por color individual.
Clasifique
Siempre añada el detergente antes
de añadir la ropa para que el
detergente pueda funcionar
eficazmente.
Usar la cantidad correcta de
detergente es uno de los puntos
más importantes que usted puede
observar para asegurarse de que su
ropa salga limpia. Siempre siga las
instrucciones del empaque.
Una causa muy común de
problemas en el lavado es el uso de
muy poco detergente. Use más
detergente si su agua es dura, si las
cargas son grandes, si la ropa está
grasosa o aceitosa o si baja la
temperatura del agua.
Detergente
Page 27

Cargue las prendas de modo que
queden sueltas y repartidas de
modo uniforme alrededor del
agitador y cierre la tapa.
Una carga típica de ropa: dos
sábanas gemelas, dos manteles,
cuatro camisas con cuellos, tres
fundas, tres toallas de baño
pequeñas, tres playeras y tres pares
de calzoncillos.
Coloque las prendas grandes abajo,
las pequeñas en medio y las
medianas en la parte superior.
Cuando cargue prendas húmedas,
asegúrese de que el nivel de
carga/agua sea lo suficientemente
alto como para que las prendas se
muevan con libertad.
Lave por separado los artículos
voluminosos como cobertores.
Para agregar prendas una vez que
la lavadora ha empezado a operar,
oprima la perilla de Ciclos y
sumerja las prendas adicionales
cerca del agitador. Cierre la tapa y
tire la perilla de ciclos para
reiniciar.
Para reducir la cantidad de arrugas,
permita que los artículos de
planchado permanente, sintéticos y
tejidos de poliéster tengan espacio
para moverse libremente en la
lavadora.
NOTA:
•
No envuelva artículos grandes como
sábanas alrededor del agitador.
•
No lave telas que contengan
materiales inflamables (ceras,
líquidos de limpieza, etc.) en su
lavadora.
Carga
Deje la tapa abierta después de
lavar para permitir que la humedad
se evapore. La canastilla de lavado
prácticamente no requiere
mantenimiento.
Si quiere limpiar la lavadora use
una tela suave empapada en
detergente líquido y luego
enjuague. (No use limpiadores
abrasivos o fuertes.)
Mangueras de llenado
—Las
mangueras que conectan la
lavadora con las llaves deben
reemplazarse cada cinco años.
Mudanzas y almacenamiento
—Solicite
al técnico que saque el agua de la
bomba de desagüe y de las
mangueras. No almacene la lavadora
a la intemperie. Llame al
distribuidor de su localidad para
información sobre cómo mantener
la canastilla de lavado inmóvil al
mudar la lavadora.
Vacaciones prolongadas
—Asegúrese
de cerrar las llaves de suministro de
agua. Saque toda el agua de las
mangueras si la temperatura
alcanzara bajo el punto de
congelación.
La lavadora
Cuidado y limpieza
27
Page 28

Prendas rellenas Siempre lave las prendas rellenas sin mezclarlas con otro
tipo de prendas. La humedad despide un olor que desaparece
cuando la prenda se seca. Lávelas con frecuencia para que el
relleno no pierda su forma y puede retener su capacidad de
calentar. Cuando las lave, asegúrese de que la carga esté equilibrada.
Añada toallas si es necesario. Séquelas siempre en secadora.
Almohadas Las almohadas se fabrican con distintos materiales. Lávelas sólo
si se recomienda en las instrucciones de la etiqueta de cuidado
del fabricante. Antes de lavar, revise las almohadas para que no
haya costuras flojas o agujeros y cósalos para evitar que el relleno
se salga. Llene con agua, añada el detergente. Deje que la
lavadora se agite durante varios minutos y luego añada las
almohadas por pares para equilibrar la carga. Use el nivel de agua
más alto de que disponga.
Cobertores
Llene la lavadora con agua, añada detergente y permita que éste se
disuelva y luego ponga el cobertor. Lave sólo un cobertor a la vez.
Prendas de planchado Elija un nivel de agua mayor que el normal. Esto proporcionará
permanente que se secan más agua para minimizar la formación de arrugas y permitir que
en una cuerda las prendas tengan suficiente espacio para moverse. Saque las
prendas con prontitud, en cuanto la lavadora se detenga y
cuélguelas de inmediato.
28
Artículo Cuidado sugerido
Siempre siga las instrucciones de cuidado de la etiqueta del fabricante cuando lave sus prendas. De lo
contrario, use la información que se dio abajo como una guía general.
Información útil
Guía de cuidados especiales
Page 29

29
Problema Causas posibles Qué hacer
La lavadora no
funciona
La manguera de drenaje está • Enderece la manguera y asegúrese de que la
doblada o conectada de modo lavadora no la aplaste.
incorrecto • La parte superior de la salida de desagüe debe
estar a menos de 1 m (3 pies) sobre el nivel
del suelo.
El agua no se desagua
El control no está correctamente • Verifique el control de temperatura del agua
colocado y ajuste.
El suministro de agua está cerrado • Abra las llaves de agua caliente y fría y asegúrese
o mal conectado que las mangueras estén conectadas a la llave
correcta.
Los filtros de las válvulas de agua • Cierre el suministro de agua y quite las
están tapados mangueras de conexión al agua de la parte
trasera superior de la lavadora. Use un cepillo
o palillo de dientes para limpiar los filtros en la
lavadora. Vuelva a conectar las mangueras y
vuelva a abrir el suministro de agua.
El calentador de agua de la casa no • Revise el calentador de agua de la casa
está a la temperatura correcta para cerciorarse de que está saliendo agua
a 48°C.–65°C. (120°F.–150°F.).
La temperatura del
agua es incorrecta
La lavadora está desconectada • Asegúrese de que la clavija esté conectada a
la toma de corriente.
El suministro de agua está apagado • Abra las llaves de agua fría y caliente por
completo.
Los controles no están puestos • Revise los controles y asegúrese de que la perilla
correctamente del Ciclo esté arrancada en la posición de
encendido.
La tapa está abierta • Cierre la tapa y arranca la perilla en posición de
encendido.
Se fundió el interruptor del circuito • Revise los interruptores o fusibles de la casa.
o el fusible Reemplace los fusibles o vuelva a encender el
interruptor. La lavadora debe tener una salida
de corriente separada.
Si algo sale mal
Page 30

30
Problema Causas posibles Qué hacer
La lavadora no está nivelada • Asegúrese de que la lavadora esté bien nivelada
y firme sobre el suelo.
La carga de la lavadora no está • Oprima la perilla del Ciclo para detener la
equilibrada lavadora, abra la tapa y redistribuya la carga de
modo uniforme. Cierre la tapa y reinicie.
La varilla de embarque no ha sido • Saque la varilla de embarque en el lado inferior
sacada derecho de la lavadora justo antes de colocar
la lavadora en su sitio. No use la lavadora con
la varilla de embarque en su sitio.
El agua se está escapando de la • Se oirá un ruido de gorgoteo o de “chupadura”
cubeta por la tubería antes del ciclo
de exprimido. Esto es normal, y
cesará tan pronto como la máquina entre en el
ciclo de exprimido.
La lavadora hace ruido
Las mangueras de llenado o la • Asegúrese de que las conexiones de la
manguera de desagüe está mal manguera estén bien ajustadas en las llaves de
conectada agua y de que el extremo final de la manguera
esté bien insertado y asegurado en la instalación
de drenaje.
El desagüe puede estar tapado • Verifique la plomería. Puede ser necesario
llamar al plomero.
Presión de agua constante hacia • Apriete las mangueras a las llaves de agua y
las mangueras de llenado al cierre el suministro de agua después de
suministro de agua cada uso.
•
Verifique la condición de las mangueras de
llenado; puede ser necesario reemplacerlas
después de 5 años.
Fugas de agua
La lavadora normalmente hace
pausas entre los pasos de lavado
La lavadora hace
pausas durante el ciclo
Ciclo incorrecto seleccionado • Asegúrese de que el ciclo seleccionado coincida
con la carga que se lava.
Esto es normal para ciertas telas
Ropa demasiado
mojada
Si algo sale mal
Page 31

31
Problema Causas posibles Qué hacer
Cargas inadecuadas • Evite mezclar artículos pesados (como ropa de
trabajo) con artículos ligeros (como blusas).
• Separe las de planchado permanente de otras
prendas.
• Utilice suavizante para telas.
Sobrecarga o nivel de agua • Cargue su lavadora sólo con prendas que tengan
incorrecto suficiente espacio para moverse libremente.
Ciclos de lavado y secado • Ajuste la selección del ciclo al tipo de tela que
incorrectos está lavando (en especial para cargas de tela de
planchado permanente).
Lavado repetido en agua • Lave con agua tibia o fría con mucho
demasiado caliente detergente.
Arrugas
Clasificación incorrecta • Separe la ropa que produce pelusa de la que
recoge pelusa.
Un lavado demasiado • Lave pequeñas cargas durante tiempos cortos
prolongado en vez de cargas grandes.
El detergente no se disuelve • Para el mejor rendimiento siempre añada
el detergente antes de añadir la ropa. Si usa
detergente en polvo, disuelva previamente el
detergente en agua caliente antes de ponerlo
en la lavadora.
• Intente usar un detergente líquido.
• Use agua más caliente.
Sobrecarga • Asegúrese de que el nivel de carga/agua
sea el adecuado al tamaño de la carga.
Demasiado blanqueador • Revise el empaque del blanqueador para saber
la cantidad correcta.
No hay suficiente detergente • Intente usar más detergente.
Uso incorrecto de suavizante • Verifique el empaque del suavizante para telas.
para telas (Consulte la sección Despachador de suavizante
para telas.)
Pelusa o residuos en
la ropa
Page 32

32
• Trate de usar más detergente (en especial con
cargas grandes).
• Si vive en una área con agua dura intente usar un
ablandador o instale un filtro ablandador.
No hay suficiente detergente
(cargas mayores, mucha suciedad
y agua dura pueden requerir más
detergente)
Prendas grisáceas
Problema Causas posibles Qué hacer
Algunas telas se encogerán • Es más probable que el agua caliente cause más
naturalmente en el lavado encogimiento que el agua fría.
• Siga las instrucciones de cuidado de la etiqueta.
Encogimiento
• Abroche los ganchillos, cierre las cremalleras y
abotone los botones.
• Quite los objetos sueltos como alfileres, objetos
en los bolsillos y botones afilados.
• Voltee al revés las prendas tejidas. (Se desgarran
fácilmente.)
Blanqueador de cloro sin diluir • Lea las instrucciones del empaque para saber la
cantidad correcta.
• Nunca añada blanqueador sin diluir en el
lavado ni permita que las ropas entren en
contacto con blanqueador sin diluir.
Pequeños desgarres o agujeros • Repare los desgarres o agujeros antes de lavar.
que existan antes de lavar
Los químicos como decolorantes • Enjuague las prendas que puedan tener estas
para el cabello, tintes para el sustancias antes de lavarlas.
cabello, soluciones para
ondulados permanentes y
limpiadores para sanitarios
Las prendas de planchado • Aunque esto no lo ocasiona la lavadora, se
permanente se desgastan en puede retardar el desgaste lavando cargas
forma natural (especialmente pequeñas de prendas de planchado
cuellos y puños) permanente con niveles de carga/agua
mayores.
• Evite lavar artículos pesados (como toallas) con
artículos de planchado permanente.
Desgarres, agujeros,
costuras rotas o uso
excesivo
Si algo sale mal
Alfileres, broches de presión,
botones afilados, hebillas de
cinturón, cremalleras y objetos
afilados que hayan quedado
en los bolsillos
Page 33

33
El agua no está lo suficientemente • Cerciórese de que el calentador de agua deje
caliente salir agua a 48°C.–65°C. (120°F.–150°F.).
• No use la lavadora cuando el agua caliente se
esté usando para otras necesidades (lavar
vajillas, baño, etcétera).
La lavadora está sobrecargada • Asegúrese de que el selector de Tamaño de
carga/agua coincida con el tamaño de la carga.
El tiempo de remojo es muy breve • Remoje al menos durante 30 minutos.
Remojo con muy poco detergente • Use más detergente (especialmente con
prendas muy sucias).
El detergente no se disuelve • Añada detergente a medida que la canastilla de
lavado se llene con agua antes de cargar las
prendas.
Para restituir su color a las • Remoje las prendas usando un ablandador de
prendas grisáceas, siga uno de agua en lugar de un agente de remojo. Deje que
estos procedimientos la ropa se remoje durante unos 20 minutos.
Para restituir su color a las • Haga que la ropa pase por un ciclo de lavado
prendas grisáceas, siga uno usando agua caliente. (Revise las etiquetas de
de estos procedimientos cuidado del fabricante para ver si puede usarse
agua caliente.) Añada un ablandador de agua
que no se precipite. Use 2 1/2 veces más que la
cantidad recomendada para ablandar el agua
que en condiciones normales. No use detergente
ni jabón. Permita que las ropas pasen por el
ciclo completo. Repita si es necesario.
Problema Causas posibles Qué hacer
Prendas grisáceas
(continuación)
Ropas amarillentas
No hay suficiente detergente en • Siempre use la cantidad recomendada de
base consistente detergente.
El blanqueador con cloro puede • Use un blanqueador sin cloro.
volver amarillas algunas prendas
El hierro y el manganeso en el agua • Use detergente adicional además de un
pueden causar color amarillento o ablandador de agua que no se precipite,
manchas amarillas disuelto en agua y blanqueador sin cloro.
• Deje correr el agua caliente durante dos
minutos para ayudar a que las tuberías se
limpien de residuos de hierro.
• Drene el calentador de agua de su casa
ocasionalmente.
• Para quitar manchas, extienda la área manchada
sobre una olla con agua hirviendo y exprima
zumo de limón en la mancha.
Page 34

34
Problema Causas posibles Qué hacer
Si algo sale mal
Uso incorrecto de suavizante • Revise las instrucciones del empaque del
para telas suavizante. (Consulte la sección Despachador
de suavizante para telas.)
• Para quitar las manchas, mójelas y frótelas con
detergente líquido sin diluir. Vuelva a lavar usando
blanqueador con cloro si éste no daña la tela.
Manchas azules o
grises
Tipo de detergente • Cambie a un detergente que produzca menos
espuma y siga las instrucciones del empaque.
Agua muy blanda • Use menos detergente.
Demasiada espuma
Resultado normal del uso de • Aunque esto no lo causa, la lavadora puede
mezclas algodón-poliéster retardar el proceso volteando las prendas de
algodón-poliéster para lavarlas.
Desgaste
Page 35

35
 Loading...