

Page 1
GE Healthcare
Getting Started with
ÄKTAavant and UNIC ORN 6
™ ™
Page 2

Page 3

Table of Contents
Table of Contents
51 About this guide ...................................................................................................
61.1 Get started ...............................................................................................................................................
101.2 Regulatory information ......................................................................................................................
122 Safety instructions ...............................................................................................
132.1 Safety precautions ...............................................................................................................................
202.2 Labels .........................................................................................................................................................
232.3 Emergency procedures ......................................................................................................................
263 Start up .................................................................................................................
273.1 Start the system and log on to UNICORN ..................................................................................
314 The instrument and the software .....................................................................
324.1 ÄKTAavant instrument overview ...................................................................................................
364.2 UNICORN software overview ..........................................................................................................
394.3 UNICORN software modules ...........................................................................................................
404.3.1 Method Editor module ......................................................................................................................
434.3.2 System Control module ...................................................................................................................
454.3.3 Evaluation module .............................................................................................................................
475 Files and folders in UNICORN .............................................................................
485.1 Navigator overview .............................................................................................................................
515.2 Handling files and folders .................................................................................................................
556 Create a method ..................................................................................................
566.1 Guide to method creation .................................................................................................................
576.1.1 Create and edit methods ................................................................................................................
656.1.2 Predefined methods ..........................................................................................................................
676.1.3 Predefined phases .............................................................................................................................
686.2 Print a method .......................................................................................................................................
707 Prepare the system for a run .............................................................................
717.1 Before you prepare the system ......................................................................................................
727.2 Prepare the flow path .........................................................................................................................
787.3 Prime buffer inlets and purge System pumps .........................................................................
837.4 Connect a column ................................................................................................................................
887.5 Calibrate the pH monitor ..................................................................................................................
907.6 Prepare the Fraction collector ........................................................................................................
958 Run a method ........................................................................................................
968.1 Before you start .....................................................................................................................................
988.2 Applying the sample ............................................................................................................................
1018.3 Start a method run ..............................................................................................................................
Getting Started with ÄKTAavant and UNICORN 6 28-9440-69 AB 3
Page 4

Table of Contents
1068.4 Monitor the run ......................................................................................................................................
1118.5 After run procedures ...........................................................................................................................
1159 Evaluate and print the results ...........................................................................
1169.1 View the results .....................................................................................................................................
1209.2 Peak integration ....................................................................................................................................
1259.3 Print the results ......................................................................................................................................
13010 Maintenance .........................................................................................................
13110.1 Maintenance program .......................................................................................................................
4 Getting Started with ÄKTAavant and UNICORN 6 28-9440-69 AB
Page 5

1 About this guide
Introduction
This chapter describes the purpose of the guide and provides regulatory information
relevant for ÄKTAavant system.
Contents
This chapter contains the following sections:
1 About this guide
See pageSection
61.1 Get started
101.2 Regulatory information
Getting Started with ÄKTAavant and UNICORN 6 28-9440-69 AB 5
Page 6

1 About this guide
1.1 Get started
1.1 Get started
Introduction
Read this section for an understanding of the purpose and conventions of this guide, as
well as the requirements that you must fulfill before using the ÄKTAavant system.
Purpose of Getting Started
The purpose of this guide is to present a quick and easy guide to the system for a user
with limited or no experience of UNICORN software and ÄKTAavant instrument. The work
flow is presented as practical instructions on how to operate the software and the
instrument. The instructions form a basic framework that you can expand on by reading
selected parts in the other manuals. This Getting Started guide includes the following
topics:
•
Basic features of ÄKTAavant and UNICORN
•
Create methods
•
Prepare the system for runs
•
Perform runs
•
Make simple evaluations
•
Print reports
For best results, follow the guide from page to page in front of the system.
Prerequisites
In order to follow this guide and use the system in the manner it is intended, it isimportant
that:
•
you have a general understanding of how the computer and Windows™ work.
•
you understand the concepts of liquid chromatography.
•
you have read and understood the Safety instructions chapter in the user
documentation.
•
the instrument and software are installed, configured and calibrated according to
ÄKTAavant and UNICORN 6 Installation Guide.
•
a user account has been created according to UNICORN 6 Administration and
Technical Manual.
6 Getting Started with ÄKTAavant and UNICORN 6 28-9440-69 AB
Page 7

Pushing the limits beyond
Getting Started
Users who are familiar with the instrument and software and want to learn more about
the system’s advanced features should refer to the list below.
about...
databases
functions
1 About this guide
1.1 Get started
please read..To find out more
ÄKTAavant and UNICORN 6 Installation Guideinstallation
UNICORN 6 Administration and Technical Manualadministration of
ÄKTAavant and UNICORN 6 User Manualinstrument modulesand
ÄKTAavant and UNICORN 6 User Manualcalibration
UNICORN 6 Method Manualpredefined methods
UNICORN 6 Method Manualcolumn handling
UNICORN 6 Method Manualmanual method editing
buffer preparation
UNICORN 6 Method ManualBufferPro–automatic
UNICORN 6 Method Manualscouting
UNICORN 6 Method ManualDesign of Experiment
UNICORN 6 Evaluation Manualevaluation
UNICORN 6 Evaluation Manualpeak integration
UNICORN 6 Evaluation Manualcustomized printformat
Getting Started with ÄKTAavant and UNICORN 6 28-9440-69 AB 7
Page 8
1 About this guide
1.1 Get started
Intended use
ÄKTAavant is a liquid chromatography system intended for method development. The
system can be used to screen for optimal choice of columns, media and running
parameters to purify selected proteins.
The ÄKTAavant system is intended for research use only, and shall not be used in any
clinical procedures, or for diagnostic purposes.
Safety notices
This user documentation contains WARNINGS, CAUTIONS and NOTICES concerning the
safe use of the product. See definitions below.
Warnings
WARNING
WARNING indicates a hazardous situation which, if not avoided,
could result in death or serious injury. It is important not to proceed
until all stated conditions are met and clearly understood.
Cautions
Notices
CAUTION
CAUTION indicates a hazardous situation which, if not avoided,
could result in minor or moderate injury. It is important not to
proceed until all stated conditions are met and clearly understood.
NOTICE
NOTICE indicates instructions that must be followed to avoid
damage to the product or other equipment.
8 Getting Started with ÄKTAavant and UNICORN 6 28-9440-69 AB
Page 9

Typographical conventions
Software items are identified in the text by bold italic text. A colon separates menu levels,
thus File:Open refers to the Open command in the File menu.
Hardware items are identified in the text by bold text (e.g., Power switch).
Text entries that UNICORN generates or that the user must type are represented by a
monotype typeface (e.g., \Program Files\GE
Healthcare\UNICORN\bin\UNICORN Instrument Server.exe.config).
1 About this guide
1.1 Get started
Getting Started with ÄKTAavant and UNICORN 6 28-9440-69 AB 9
Page 10

1 About this guide
1.2 Regulatory information
1.2 Regulatory information
Introduction
This section describes the directives and standards that are fulfilled by the ÄKTAavant
system.
CE conformity
This product complies with the European directives listed in the table below, by fulfilling
the corresponding harmonized standards. A copy of the Declaration of Conformity is
available on request.
TitleDirective
Machinery Directive2006/42/EC
Low Voltage Directive2006/95/EC
ElectroMagnetic Compatibility (EMC) Directive2004/108/EC
CE marking
1999/5/EC
The CE marking and the corresponding declaration of conformity, is valid for the
instrument when it is:
•
used as a stand-alone unit, or
•
connected to other CE marked GE Healthcare instruments, or
•
connected toother products recommended or describedin the user documentation,
and
•
used in the same state as it was delivered from GE Healthcare, except for alterations
described in the user documentation.
Radio Equipment and Telecommunications Terminal
Equipment Directive
10 Getting Started with ÄKTAavant and UNICORN 6 28-9440-69 AB
Page 11

International standards
This product fulfills the requirements of the following standards:
1 About this guide
1.2 Regulatory information
NotesDescriptionStandard
EN 61010-1, IEC
61010-1, UL 61010-1,
CAN/CSA-C22.2
No.61010-1
EN 61326-1
EN-ISO 12100-1,
12100-2
EN ISO 14121-1,
14121-2
Software declaration of
conformity
UNICORN 6 is technically compatible with all relevant sections of FDA 21 CFR Part 11.
A part 11-system assessment checklist is available on request through the local GEHC
representative.
Safety requirements for electrical
equipment for measurement,
control, and laboratory use
EMC emissions and immunity
requirements for electrical
equipment for measurement,
control and laboratory use.
Safety of machinery — Basic
concepts, general principles for
design
Safety of machinery — Principles of
risk assessment
Harmonized with
2004/108/EC
CISPR 11 Group 1,
Class B
Harmonized with
2006/42/EC
Harmonized with
2006/42/EC
Regulatory compliance of
connected equipment
Any equipment connected to the ÄKTAavant system should meet the safety requirements
of EN 61010-1/IEC 61010-1, or other relevant harmonized standards. Within EU,
connected equipment must be CE marked.
Getting Started with ÄKTAavant and UNICORN 6 28-9440-69 AB 11
Page 12

2 Safety instructions
2 Safety instructions
Introduction
This chapter contains instructions of how to handle the ÄKTAavant instrument in a safe
way.
Contents
This chapter contains the following sections:
See pageSection
132.1 Safety precautions
202.2 Labels
232.3 Emergency procedures
12 Getting Started with ÄKTAavant and UNICORN 6 28-9440-69 AB
Page 13
2.1 Safety precautions
Introduction
The ÄKTAavant instrument is poweredby mains voltage and handles pressurized liquids
that may be hazardous. Beforeinstalling, operating or maintaining the system, youmust
be aware of the hazards described in this manual. Follow the instructions provided to
avoid personal injuries or damage to the equipment.
The safety precautions in this section are grouped into the following categories:
•
General precautions
•
Personal protection
•
Installing and moving the instrument
•
System operation
•
Maintenance
2 Safety instructions
2.1 Safety precautions
General precautions
•
Do not operate the ÄKTAavant instrument in any other way than described in the
ÄKTAavant and UNICORN manuals.
•
Operation and user maintenance of the ÄKTAavant instrument should be performed
by properly trained personnel only.
•
Before connecting a column to the ÄKTAavant instrument, read the instructions for
use of the column. To avoid exposing the column to excessive pressure, make sure
that the pressure limit is set to the specified maximum pressure of the column.
•
Do not use any accessories not supplied or recommended by GE Healthcare.
•
Do not use the ÄKTAavant instrument if it is not working properly, or if it has suffered
any damage, for example:
-
damage to the power cord or its plug
-
damage caused by dropping the equipment
-
damage caused by splashing liquid onto it
WARNING
Always followthese General precautions toavoid injury when using
the ÄKTAavant instrument.
Getting Started with ÄKTAavant and UNICORN 6 28-9440-69 AB 13
Page 14
2 Safety instructions
2.1 Safety precautions
Using flammable liquids
•
Fire Hazard. Before starting the system, make sure that there are no unintentional
leakage in the instrument or tubing.
•
Explosion hazard. To avoid building up an explosive atmosphere when using
flammable liquids, make sure that the room ventilation meets the requirements
specified in ÄKTAavant and UNICORN 6 Installation Guide.
•
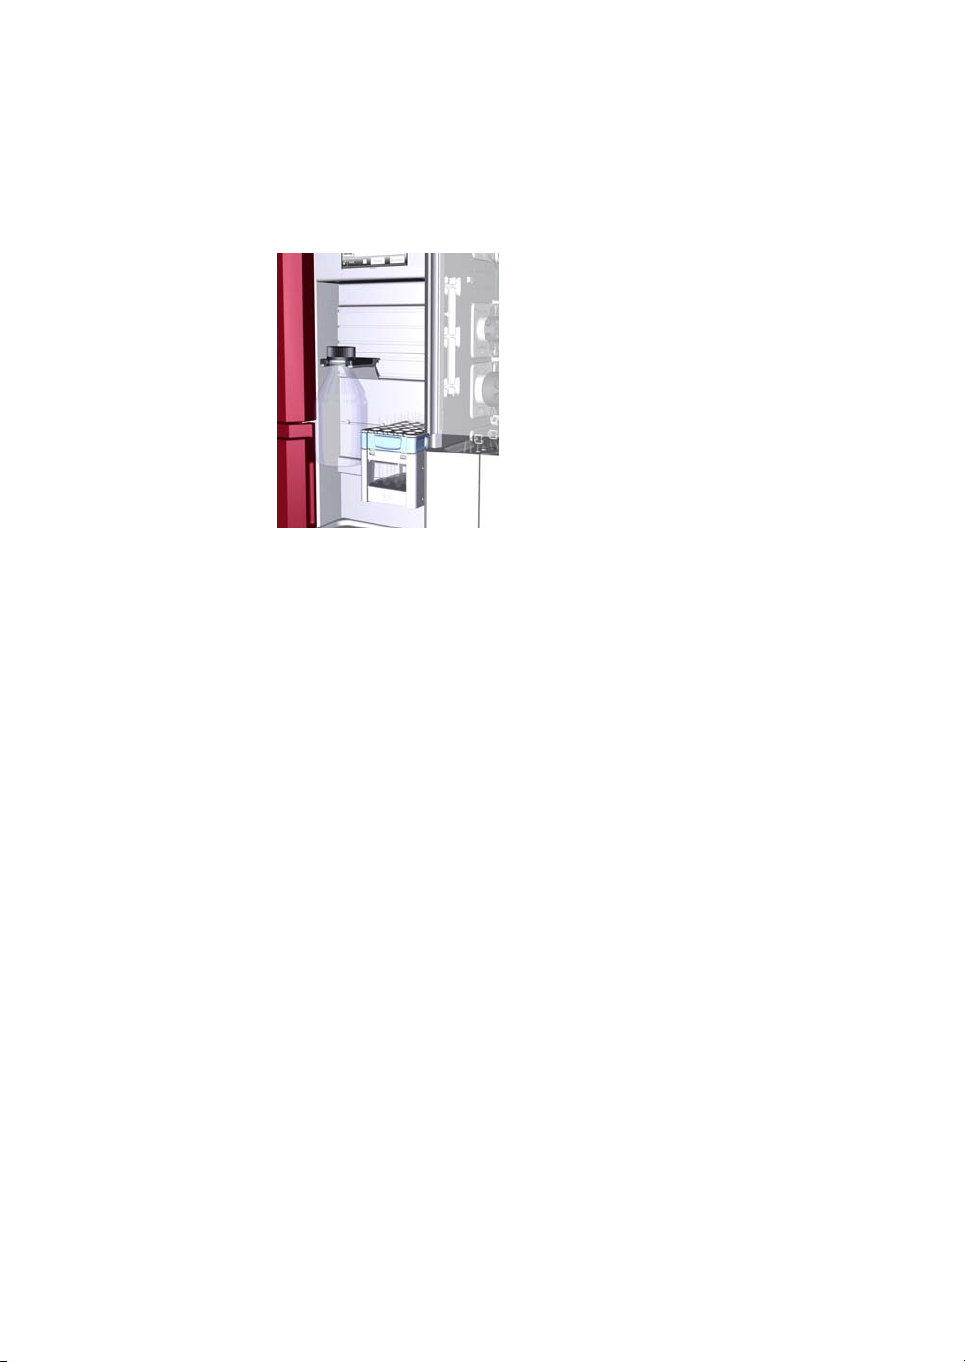
Fraction collector. Do not fractionate flammable liquids. When running RPC methods,
or other procedures using solvent based buffers, collect fractions through the outlet
valve.
NOTICE
Avoid condensationby letting the instrument equilibrate to ambient
temperature.
WARNING
When using flammable liquids with the ÄKTAavant instrument,
follow these precautions to avoid any risk of fire or explosion.
Personal protection
Warnings
WARNING
To avoid hazardous situations when working with the ÄKTAavant
system, take the following measures for personal protection.
•
Always use appropriate personal protective equipment during operation and
maintenance of ÄKTAavant system.
•
Hazardous substances. When using hazardous chemical and biological agents,
take all suitable protective measures, suchas wearing protective glassesand gloves
resistant to the substances used. Follow local and/or national regulations for safe
operation and maintenance of the system.
14 Getting Started with ÄKTAavant and UNICORN 6 28-9440-69 AB
Page 15
2 Safety instructions
2.1 Safety precautions
•
Spread of biological agents. The operator has to take all necessary actions to avoid
spreading hazardous biological agents in the vicinity of the instrument . The facility
should comply with the national code of practice for biosafety.
•
High pressure. The ÄKTAavant instrument operates under high pressure. Wear
protective glasses at all times.
Cautions
CAUTION
To avoid hazardous situations when working with the ÄKTAavant
system, take the following measures for personal protection.
•
Close doors. To minimize the risk of exposure to hazardous chemicals and pressurized
liquids, always close the Foldable door and the Pump cover before starting a run.
•
Cut injuries. The tubing cutter is very sharp and must be handled with care to avoid
injuries.
Installing and moving the
instrument
Warnings
•
Heavy object. The ÄKTAavant instrument weighs about 100 kg. Use proper lifting
equipment, or use four or more persons when moving the instrument. All lifting and
moving must be performed in accordance with local regulations.
•
Moving theinstrument horizontally. Three persons arerecommended when moving
the instrument horizontally.
•
Supply voltage. Make sure that the supply voltage at the wall outlet corresponds to
the marking on the instrument, before connecting the power cord.
•
Protective ground. The ÄKTAavant instrument must always be connected to a
grounded power outlet.
•
Power cord. Only use power cords delivered or approved by GE Healthcare.
WARNING
To avoid personal injury when installing or moving the ÄKTAavant
instrument, follow the instructions below.
Getting Started with ÄKTAavant and UNICORN 6 28-9440-69 AB 15
Page 16

2 Safety instructions
2.1 Safety precautions
•
•
Notices
•
•
•
Access to power switch and power cord. Do not block the rear and side panel of
the instrument. The Power switch must always be easy to access. The power cord
must always be easy to disconnect.
Installing the computer. The computer should be installed and used according to
the instructions provided by the manufacturer of the computer.
NOTICE
To avoid damage to ÄKTAavant or otherequipment when installing
or moving the instrument, follow the instructions below.
Vents on the ÄKTAavant instrument. To ensure adequate ventilation, keep papers
and other objects away from the vents of the instrument.
Disconnect power. To prevent equipment damage, always switch off power to the
ÄKTAavant instrument before an instrument module is removed or installed, or a
cable is connected or disconnected.
Misuse of UniNet-9 connectors. The UniNet-9 connectors at the rear panel should
not be mistaken for Firewire connectors. Do not connect any external equipment to
the UniNet-9 connectors. Do not disconnect or move the UniNet-9 bus cable.
System operation
Warnings
WARNING
To avoid personal injury when operating the ÄKTAavant system,
follow the instructions below.
•
Rotating theinstrument. Make surethat there is always at least 20 cm offree space
around the ÄKTAavant instrumentto allow rotation on theswivel foot. When rotating
the system, take care not to stretch or squeeze tubing or cables. A disconnected
cable may cause power interruption or network interruption. Stretched tubes may
cause bottles to fall, resulting in liquid spillage and shattered glass. Squeezed tubing
may cause increase in pressure, or block liquid flow. To avoid the risk of turning over
bottles, always place bottles on the buffer tray, and close the doors before rotating
the instrument.
16 Getting Started with ÄKTAavant and UNICORN 6 28-9440-69 AB
Page 17
2 Safety instructions
2.1 Safety precautions
•
Fasten sample bottles. Always fasten bottles and cassettes to the rails at the sample
tray. Use appropriate holders for bottles. Shattered glass from falling bottles may
cause injury. Spilled liquid may cause fire hazard and personal injury.
•
Electrical shock hazard after spillage. If there is a risk that large volumes of spilled
liquid may penetrate the casing of the ÄKTAavant instrument, immediately switch
off the instrument , disconnect the power cord, and contact an authorized service
engineer.
•
Moving parts in Fractioncollector. Do not open the Fraction collector drawer when
the Fraction collector is active. If you need to access the Fraction collector, press
Pause, and make sure that the movement has stopped before opening the drawer.
•
Using a Superloop. After loading a Superloop, always plug the Syr port on the
Injection valve with a Stop plug. With a Superloop connected to the valve, an
over-pressure may be created during injection.
•
Hazardous chemicals during run. When using hazardous chemicals, run System
CIP and Column CIP to flush the entire system tubing with distilled water, before
service and maintenance.
•
Hazardous biological agents during run. When using hazardous biological agents,
run System CIP andColumn CIP to flush theentire system tubing withbacteriostatic
solution (e.g., NaOH) followed by a neutral buffer and finally distilled water, before
service and maintenance.
•
RPC runs with 100% acetonitrile. Always replace the green PEEK tubing between
the used system pump and the pressure monitor with orange PEEK tubing, i.d. 0.5
mm, before running RPC with 100% acetonitrile. Set the System pressure alarm to
10 MPa.
Getting Started with ÄKTAavant and UNICORN 6 28-9440-69 AB 17
Page 18
2 Safety instructions
2.1 Safety precautions
Cautions
•
•
•
CAUTION
To avoid hazardous situations when operating the ÄKTAavant
system, follow the instructions below.
Risk of breaking test vials. Do not use excessive force to press vials with incorrect
dimensions into the Fraction collector cassettes. Glass vials may break and cause
injuries.
Hazardous chemicalsor biological agents inUV flow cell. Make sure that the entire
flow cell has been flushed thoroughly with bacteriostatic solution (e.g., NaOH) and
distilled water, before service and maintenance.
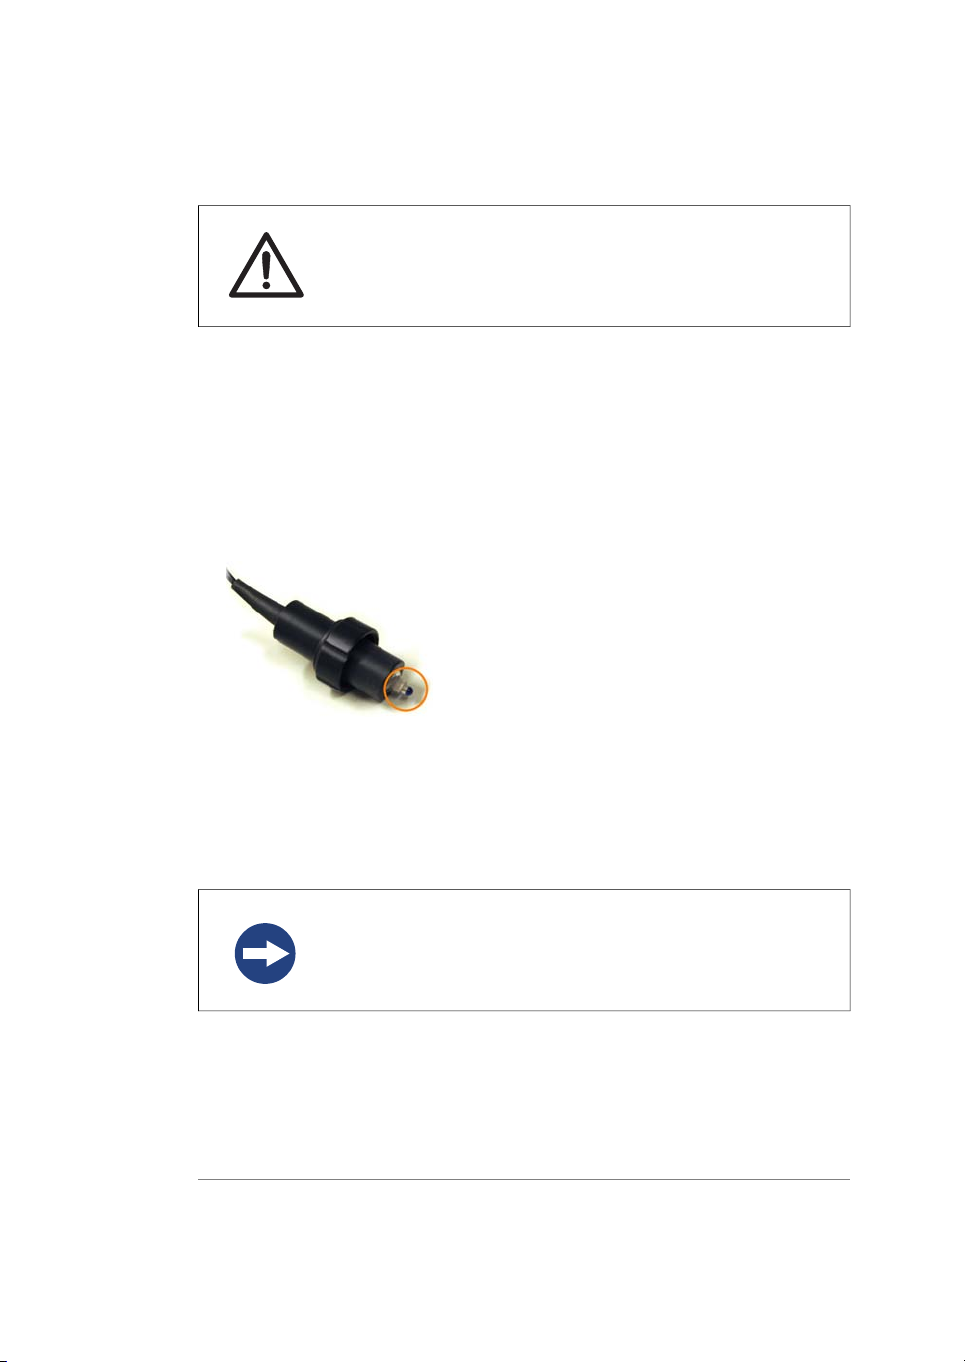
pH-electrode. Handle the pH-electrode with care.The glass tip may break and cause
injury.
•
Max. weight on top tray. Do not place containers with a volume of more than 10
liters on the top tray. The total allowed weight on the top tray is 40 kg.
•
Max. size of bottles on front panel. Do not fasten bottles with a volume of more
than 1 liter in the front panel rails.
Notices
NOTICE
To avoid damage to ÄKTAavant or other equipment when operating
the instrument, follow the instructions below.
•
Keep UV flow cell clean. Do not allow solutions containing dissolved salts, proteins
or other solid solutes to dry out in the flow cell. Do not allow particles to enter the
flow cell, as damage to the flow cell may occur.
•
Waste container height. The maximum level of the waste container content must
be lower than 30 cm above the lab bench, for trouble-free use.
18 Getting Started with ÄKTAavant and UNICORN 6 28-9440-69 AB
Page 19
Maintenance
2 Safety instructions
2.1 Safety precautions
Warnings
WARNING
To avoid personal injury when performing maintenance on the
ÄKTAavant instrument, follow the instructions below.
•
Electrical shock hazard. All repairs should be done by service personnel authorized
by GE Healthcare. Do not open any covers or replace parts unless specifically stated
in the user documentation.
•
Disconnect power. Always switch off power to the instrument before replacing any
component on the instrument, unless stated otherwise in the user documentation.
•
Hazardous chemicals during maintenance. When using hazardous chemicals for
system or column cleaning, wash the system or columns with a neutral solution in
the last phase or step.
NOTICE
Cleaning. Keep the instrument dry and clean. Wipe regularly with
a soft damp tissue and, if necessary, a mild cleaning agent. Let the
instrument dry completely before use.
Getting Started with ÄKTAavant and UNICORN 6 28-9440-69 AB 19
Page 20
2 Safety instructions
2.2 Labels
2.2 Labels
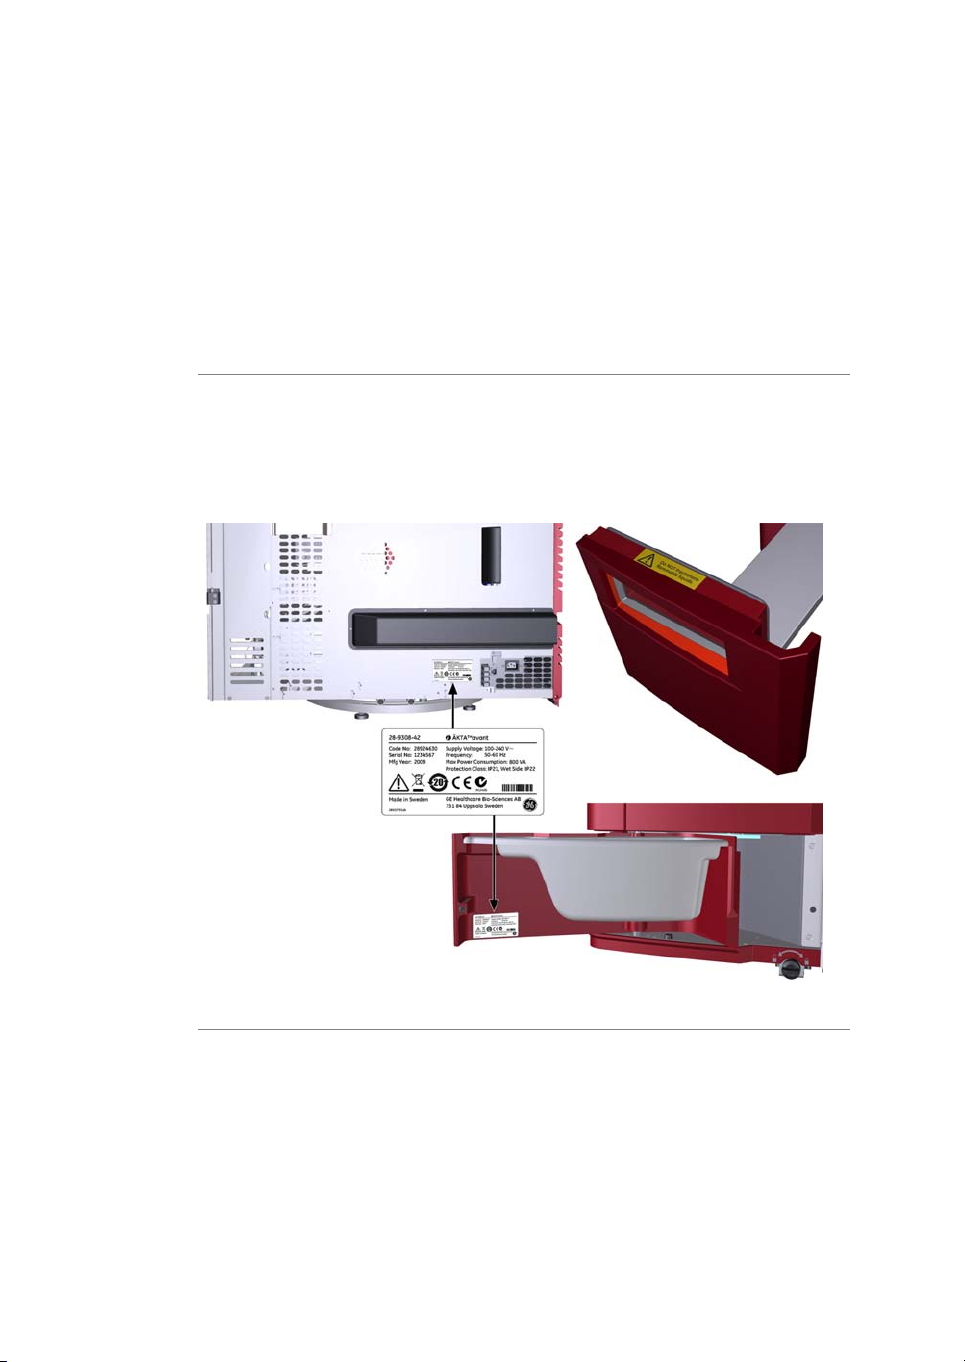
Introduction
This section describes the safety labels and labels concerning hazardous substances
that are attached to the ÄKTAavant instrument. For information about marking of the
computer equipment, refer to the manufacturer’s instructions.
Labels on the ÄKTAavant
instrument
The illustrations below show the labels that are attached to the ÄKTAavant instrument.
20 Getting Started with ÄKTAavant and UNICORN 6 28-9440-69 AB
Page 21
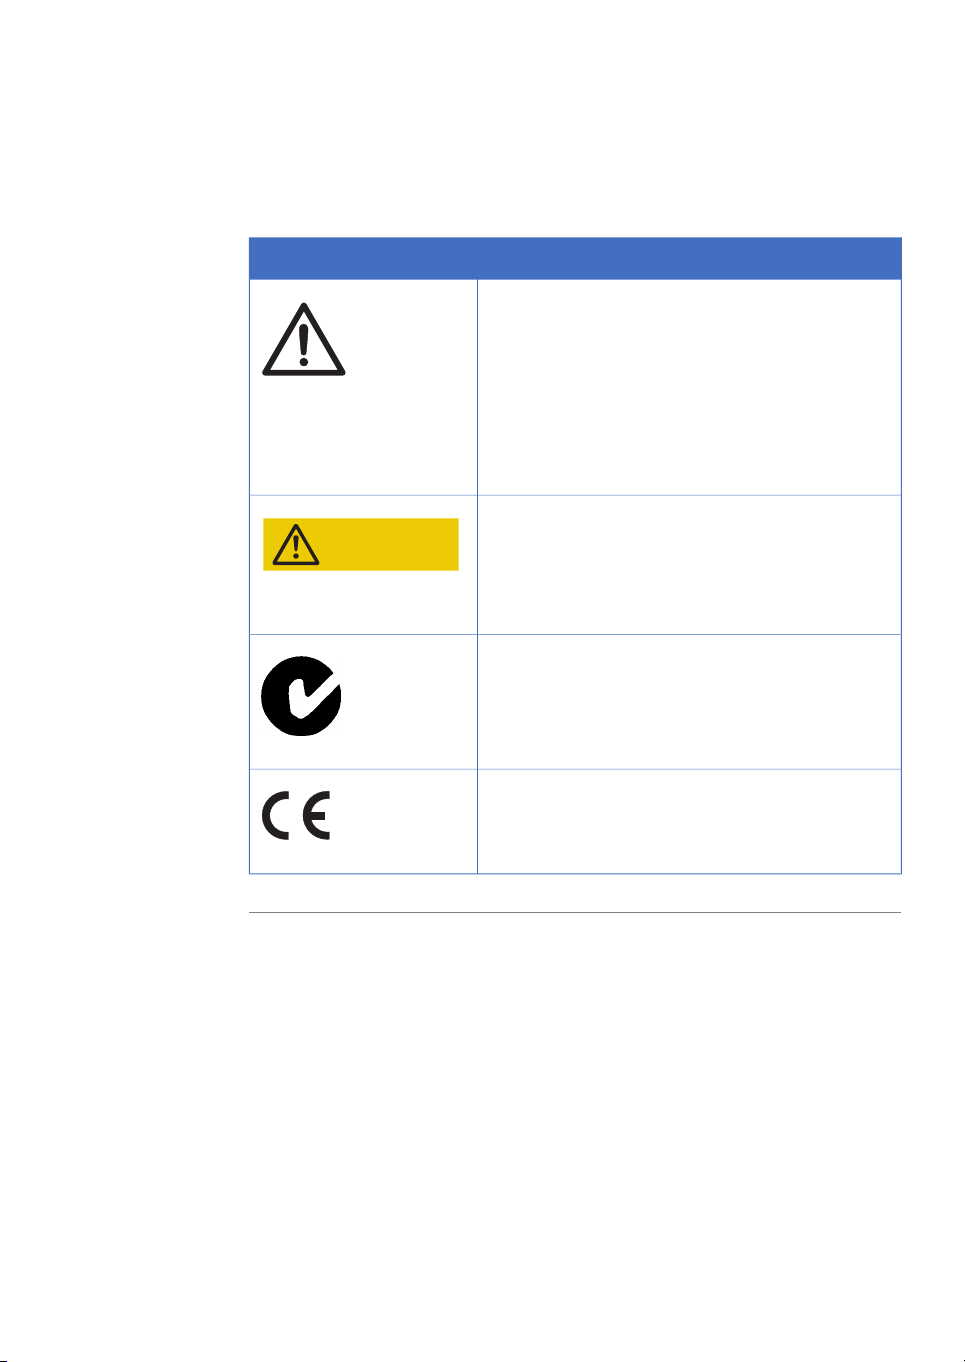
Safety symbols
Do NOT fractionate
flammable liquids.
The following safety symbols are used in the labels:
2 Safety instructions
2.2 Labels
MeaningLabel
Warning!
Electrical shock hazard. All repairs should be done by
service personnel authorizedby GE Healthcare. Do not
open any covers or replace parts unless specifically
stated in the user documentation.
Supply voltage. Make sure that the supply voltage at
the wall outlet corresponds to the marking on the
instrument, before connecting the power cord.
Warning!
Fraction collector. Do not fractionate flammable
liquids. When running RPC methods, or other
procedures using solvent based buffers, collect
fractions through the outlet valve.
The system complies with the requirements for
electromagnetic compliance (EMC) in Australia and
New Zealand.
The system complies with applicable European
directives.
Getting Started with ÄKTAavant and UNICORN 6 28-9440-69 AB 21
Page 22
2 Safety instructions
2.2 Labels
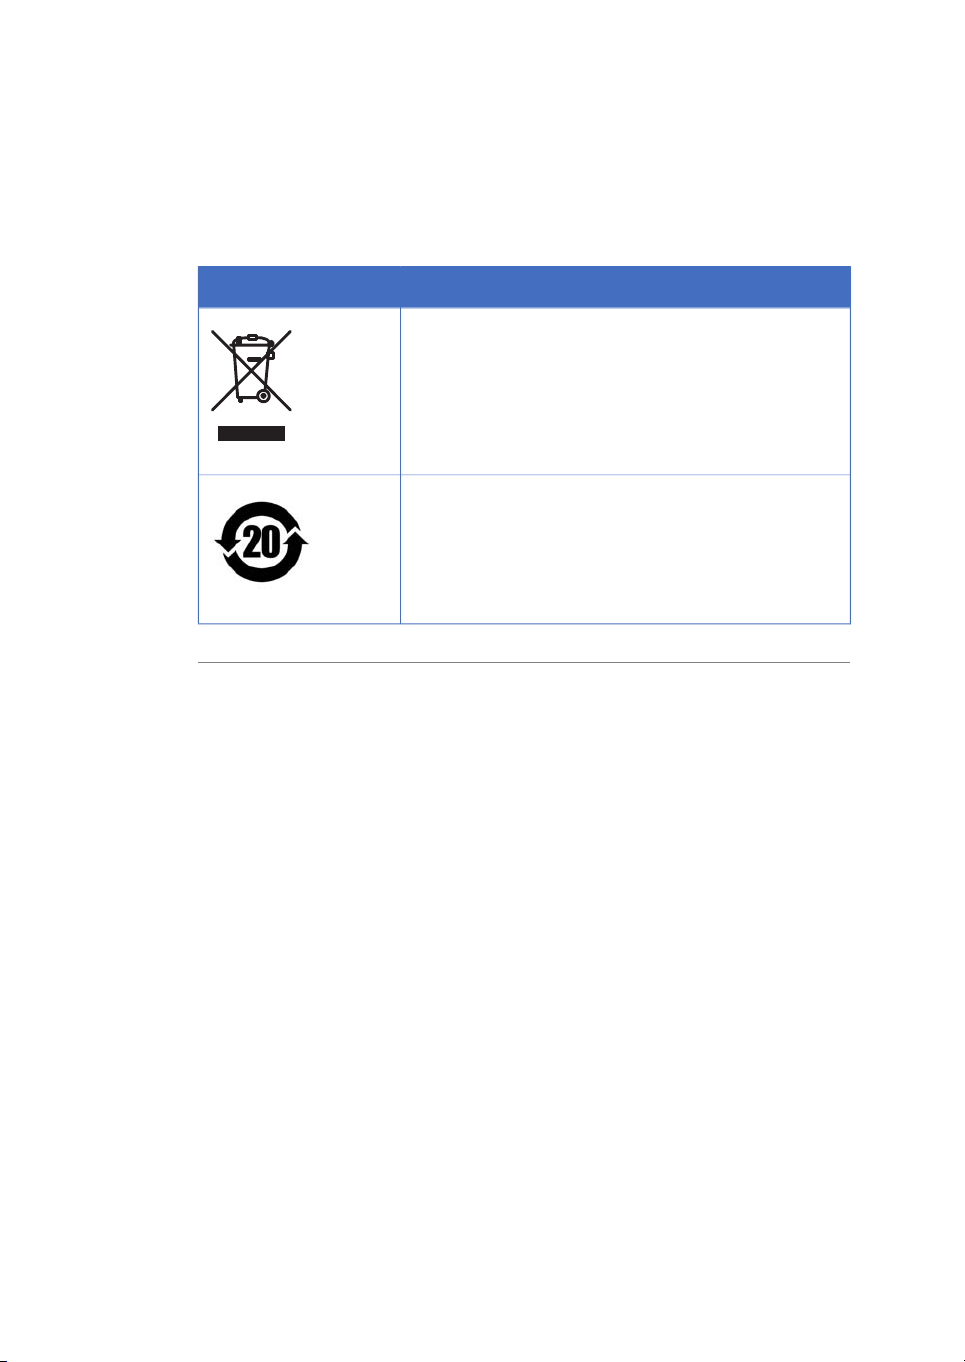
Labels concerning hazardous
substances
The following symbols on the labels concern hazardous substances:
MeaningLabel
This symbol indicates that electrical and electronic
equipment mustnot be disposed of as unsorted municipal
waste and must be collected separately. Please contact
an authorized representative of the manufacturer for
information concerning the decommissioning of
equipment.
This symbol indicates that the productcontains hazardous
materials in excess of the limits establishedby the Chinese
standard SJ/T11363-2006 Requirements for Concentration
Limits for Certain Hazardous Substances in Electronic
Information Product.
22 Getting Started with ÄKTAavant and UNICORN 6 28-9440-69 AB
Page 23

2.3 Emergency procedures
Introduction
This section describes how to do an emergency shutdown of the ÄKTAavant system.
The section also describes the result in theevent of power failure or network interruption.
Emergency shutdown
In an emergency situation, follow the steps below to stop the run:
ActionStep
2 Safety instructions
2.3 Emergency procedures
1
Press the Pause button on the instrument display. This will stop all pumps
in the instrument .
To pause the run from UNICORN, click the Pause icon:
Getting Started with ÄKTAavant and UNICORN 6 28-9440-69 AB 23
Page 24
2 Safety instructions
2.3 Emergency procedures
ActionStep
Power failure
2
The result of a power failure depends on which unit is affected.
ÄKTAavant instrument
If required, switch off power to the instrument by pressing the Power switch
to the O position. The run is interrupted immediately.
will result in...Power failure to...
The run is interrupted immediately
•
The data collected up to the time of the power
•
failure is available in UNICORN.
24 Getting Started with ÄKTAavant and UNICORN 6 28-9440-69 AB
Page 25
2 Safety instructions
2.3 Emergency procedures
will result in...Power failure to...
Computer
Uninterruptible power supply
(UPS)
A UPS can eliminate data loss after a power failure, and allow time for a controlled
shut-down of the ÄKTAavant system.
The UNICORN computer shuts down
•
The instrument display shows status Not
•
connected
The run is interrupted immediately
•
Data generated up to 10 seconds before the
•
power failure can be recovered
Note:
The UNICORN client may
close down during a
temporary overload of the
processor. This may appear
as a computer failure. The
run continues and you can
restart the UNICORN client to
regain control.
Getting Started with ÄKTAavant and UNICORN 6 28-9440-69 AB 25
Page 26

3 Start up
3 Start up
Introduction
This chapter describes how to start the system, both the software and the instrument,
and also how to log off and exit UNICORN.
It is assumed that your user profile is already created. For information about how to set
up and define users, user groups and access rights, please refer to UNICORN 6
Administration and Technical Manual.
Contents
This chapter contains the following sections:
See pageSection
273.1 Start the system and log on to UNICORN
26 Getting Started with ÄKTAavant and UNICORN 6 28-9440-69 AB
Page 27
3.1 Start the system and log on to UNICORN
3.1 Start the system and log on to UNICORN
Introduction
This section describes how to start UNICORN and the instrument, and how to connect
to the system.
Start UNICORN and log on
Follow the instruction below to start and log on to UNICORN.
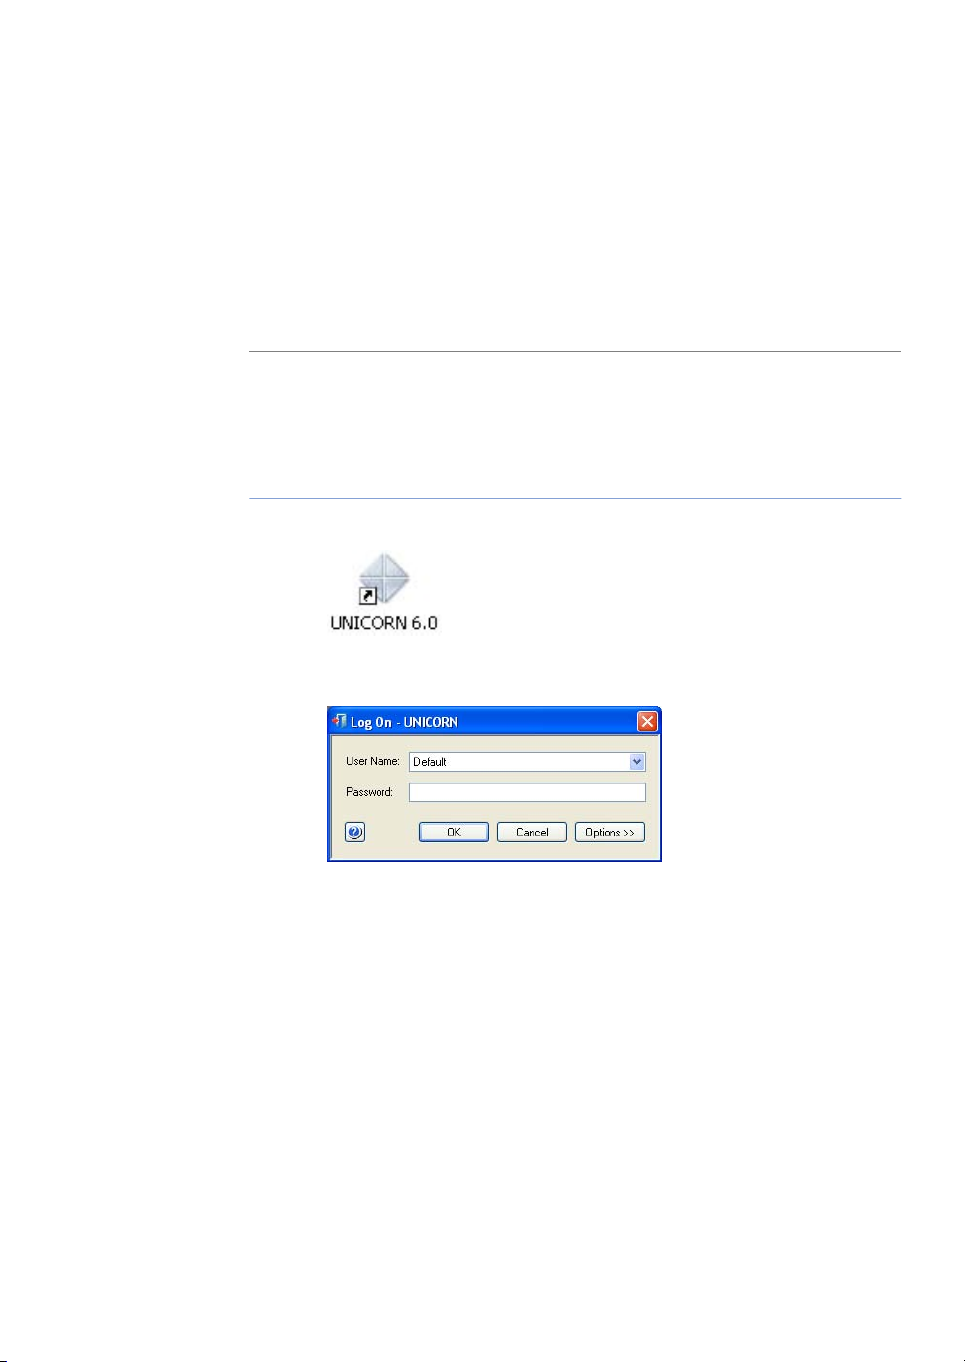
ActionStep
To start the program, double-click the UNICORN icon on the desktop.1
3 Start up
Result: The Log On dialog opens.
Getting Started with ÄKTAavant and UNICORN 6 28-9440-69 AB 27
Page 28
3 Start up
3.1 Start the system and log on to UNICORN
ActionStep
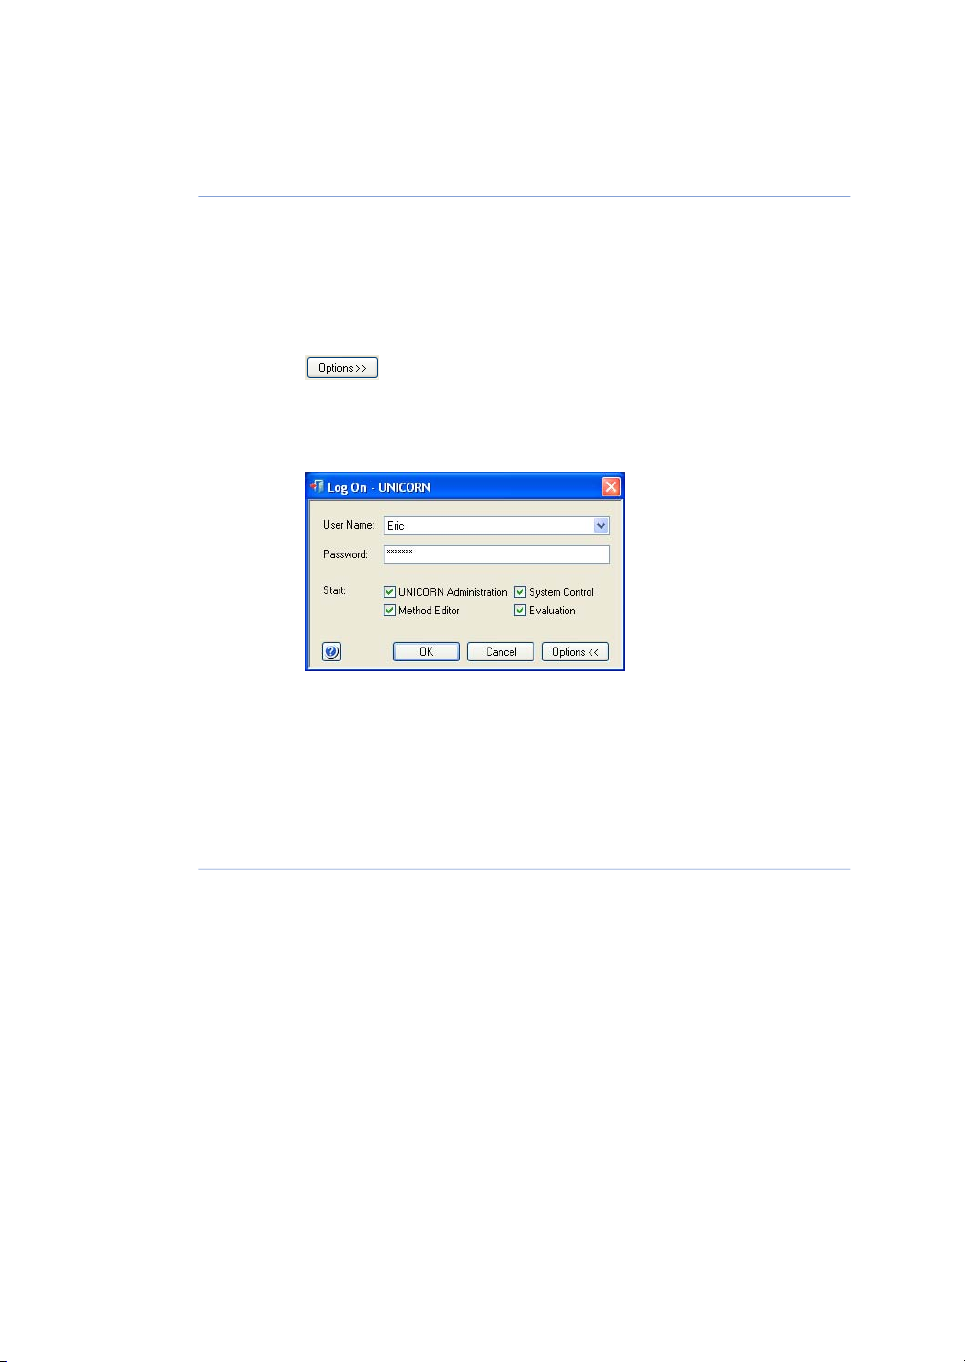
In the Log On dialog:2
Select your User Name from the drop-down list.
•
Enter your Password.
•
Click the Options button.
•
Result: Checkboxes for each of the UNICORN modules are displayed in
the Log On dialog.
In the Log On dialog:3
Select which UNICORN modules to start by clicking the corresponding
•
checkboxes.
Click OK.
•
Result: The selected UNICORN modules open.
28 Getting Started with ÄKTAavant and UNICORN 6 28-9440-69 AB
Page 29
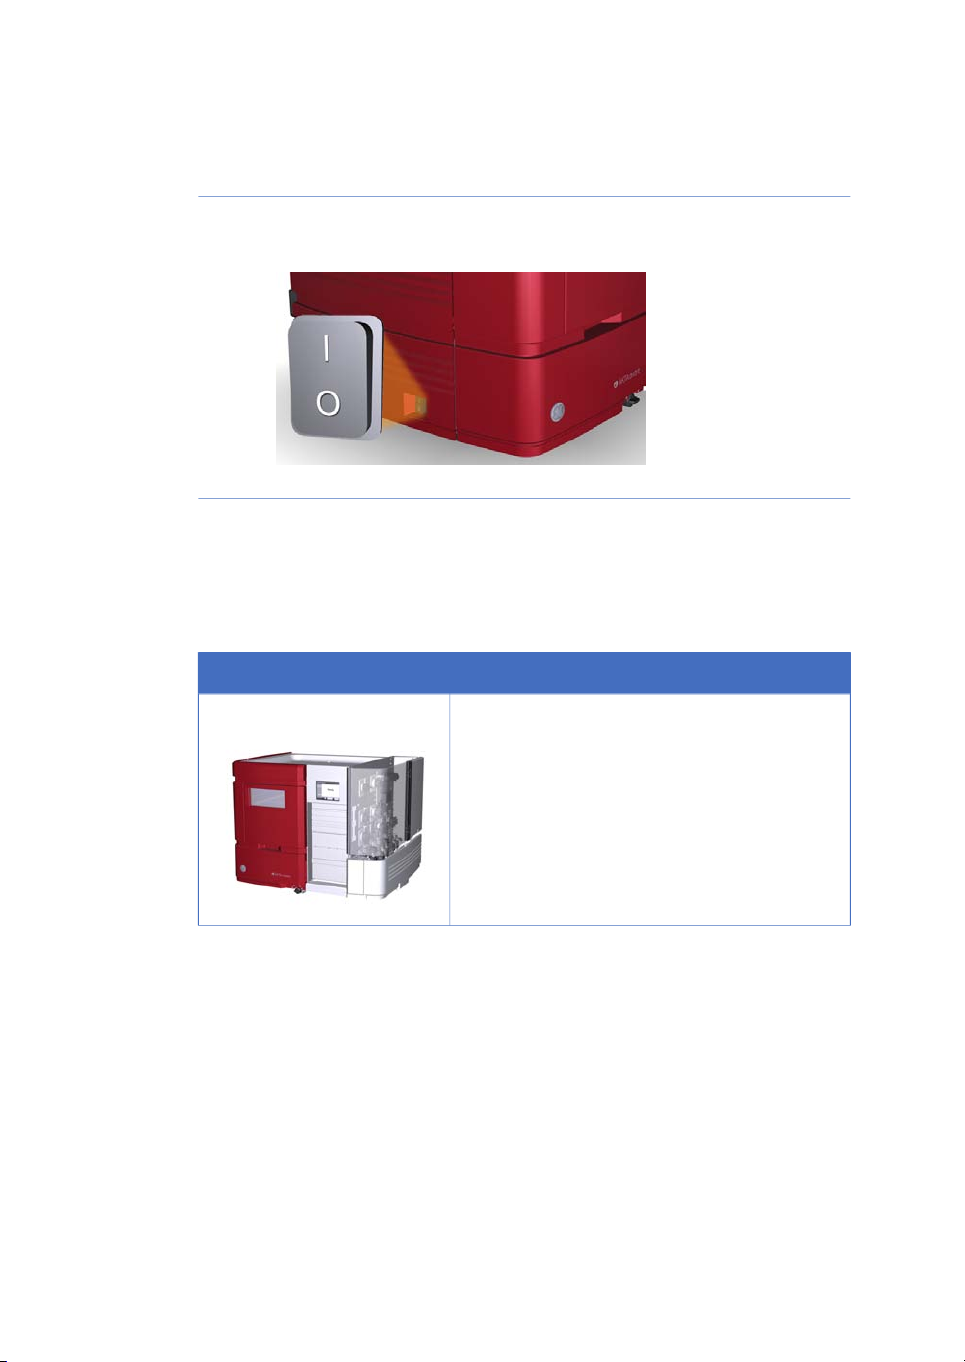
Start the instrument and connect
to the system
Follow the instruction below to start the instrument and connect to the UNICORN
software.
ActionStep
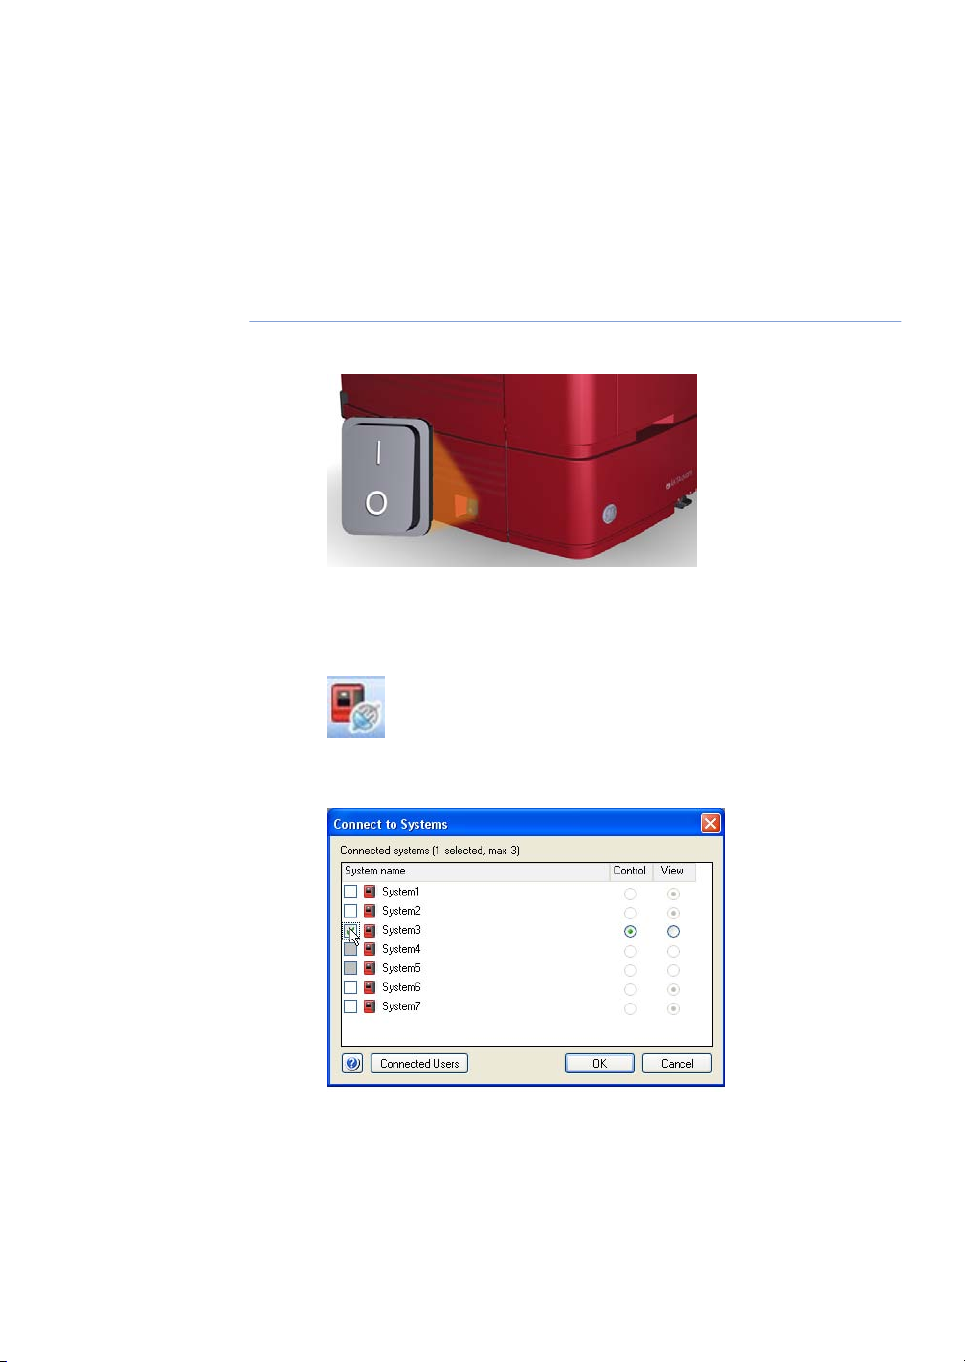
Switch on the instrument by pressing the Power switch to the I position.1
3 Start up
3.1 Start the system and log on to UNICORN
2
Open the the System Control module in UNICORN and click the Connect to
Systems icon.
Result: The Connect to Systems dialog opens.
Getting Started with ÄKTAavant and UNICORN 6 28-9440-69 AB 29
Page 30

3 Start up
3.1 Start the system and log on to UNICORN
ActionStep
In the Connect to Systems dialog:3
Select the instrument .
•
Select Control mode.
•
Click OK.
•
Result: The selected instrument can now be controlled by the software.
30 Getting Started with ÄKTAavant and UNICORN 6 28-9440-69 AB
Page 31

4 The instrument and the software
4 The instrument and the software
Introduction
This chapter gives an overview of the ÄKTAavant system: instrument, software and
accessories.
Illustration of the system
The illustration below shows the ÄKTAavant instrument with UNICORN software installed
on a computer.
Contents
This chapter contains the following sections:
See pageSection
324.1 ÄKTAavant instrument overview
364.2 UNICORN software overview
394.3 UNICORN software modules
Getting Started with ÄKTAavant and UNICORN 6 28-9440-69 AB 31
Page 32

4 The instrument and the software
4.1 ÄKTAavant instrument overview
4.1 ÄKTAavant instrument overview
Introduction
This section provides an overview of the ÄKTAavant instrument. Technical details about
the instrument and the individual modules are found in ÄKTAavant and UNICORN 6 User
Manual.
Exterior design
ÄKTAavant has a modular design, with all the liquid handling modules placed on the
exterior of the instrument. Buffer vessels are placed on the Buffer tray on top of the
instrument. An Instrument display is placed on the front. From this side the built-in
Fraction collector is handled, as well as the sample. The rest of the modules are placed
on the right-hand side of the instrument. This side can be covered by a foldable door
and a pump cover. By rotating the instrument using the swivel foot any side is easily
accessed.
Operating ranges
The table below shows some of the instrument’s operational limits.
LimitsParameter
Up to 25 ml/minFlow rate
20 MPaMax. operating pressure
190 - 700 nmWavelength
32 Getting Started with ÄKTAavant and UNICORN 6 28-9440-69 AB
Page 33

Illustration of the main parts of
the instrument
The illustration below shows the location of the main parts of the instrument.
4 The instrument and the software
4.1 ÄKTAavant instrument overview
DescriptionPart
Fraction collector1
Buffer tray2
Instrument display3
Wet side4
Foldable door5
Pump cover6
Holder rails7
Swivel foot Lock/Unlock knob8
Swivel foot9
Swing out toolbox10
Power switch11
Getting Started with ÄKTAavant and UNICORN 6 28-9440-69 AB 33
Page 34

4 The instrument and the software
4.1 ÄKTAavant instrument overview
Illustration of the wet side
modules of the instrument
The illustration below shows the modules of the wet side of the instrument.
DescriptionPart
Injection valve1
Column valve2
Flow restrictor3
pH valve4
UV monitor5
Conductivity monitor6
Inlet valve B7
Quaternary valve8
System pump B9
Pressure monitor of System pumps10
Inlet valve A11
34 Getting Started with ÄKTAavant and UNICORN 6 28-9440-69 AB
Page 35

4 The instrument and the software
4.1 ÄKTAavant instrument overview
DescriptionPart
System pump A12
Mixer13
Pressure monitor of Sample pump14
Sample pump15
Pump piston rinsing system tubes16
Sample inlet valve17
Outlet valve18
Holder rails19
Getting Started with ÄKTAavant and UNICORN 6 28-9440-69 AB 35
Page 36

4 The instrument and the software
4.2 UNICORN software overview
4.2 UNICORN software overview
Introduction
This section gives a brief overview of the UNICORN software—a complete package for
control, supervision and evaluation of chromatography instruments and purification
runs. It also describes how to access the help utility that is included in UNICORN.
UNICORN modules overview
UNICORN consists of four modules: Administration, Method Editor, System Control and
Evaluation. The main functions of each module are described in the table below.
Main functionsModule
Administration
Enter a UNICORN module
To enter a module:
•
click the Taskbar button of the module of interest,
or
•
choose the module of interest in the Tools menu inany of the other software modules.
The illustration below shows the Tools menu of the Evaluation module.
Perform userand system setup, system log and database
administration.
Create and edit methods.Method Editor
Start, view and control runs.System Control
Open results, evaluate runs and create reports.Evaluation
36 Getting Started with ÄKTAavant and UNICORN 6 28-9440-69 AB
Page 37

Access the help utility
A comprehensive help utility is included in the UNICORN software. The table below
describes how to access the different parts of the help utility.
a UNICORN module
4 The instrument and the software
4.2 UNICORN software overview
then...If you want to...
select Help:Help for... in the UNICORN module of interestfind information about
find information about
the item currently
selected and in focus
(e.g., a pane, a dialog, or
a method phase)
Getting Started with ÄKTAavant and UNICORN 6 28-9440-69 AB 37
press the F1 key with the item of interest selected and
•
in focus
Note:
or
click the Help icon in the open dialog
•
To find information about a phase,
make sure that the Phase
Properties tab is selected before
pressing the F1 key.
Page 38

4 The instrument and the software
4.2 UNICORN software overview
then...If you want to...
navigate the online help
search for a specific
term in the online help
access any of the
manuals in PDF format
select Help:Help for... in any of the UNICORN modules
•
(see illustration above)
in the TOC pane, expand the headings of interest to
•
navigate the content structure
click the heading of interest to open a section
•
select Help:Help for... in any of the UNICORN modules
•
(see illustration above)
in the Search pane, enter the term of interest in the
•
input field
click the Search button
•
select Help:Help for... in any of the UNICORN modules
•
(see illustration above)
in the TOC pane, expand theheading UNICORN online
•
documentation portal and select Online
documentation overview
in the PDF manuals section, click one of the text links
•
click the illustration or the text link of the manual of
•
interest
In the Method Editor module:find information about
a method instruction
open a method
•
select the instruction of interest in the Instruction box
•
in the Text instruction pane
press the F1 key
•
In the System Control module:
select Manual:Execute Manual Instructions
•
expand a heading and select the instruction of interest
•
click the Help icon in the dialog
•
38 Getting Started with ÄKTAavant and UNICORN 6 28-9440-69 AB
Page 39

4.3 UNICORN software modules
Introduction
Three ofthe four UNICORN modules are used in this Getting Started guide and described
in this section: Method Editor, System Control and Evaluation. The Administration
module and its icons are described in UNICORN 6 Administration and Technical Manual.
Contents
This section contains the following subsections:
4 The instrument and the software
4.3 UNICORN software modules
See pageSection
404.3.1 Method Editor module
434.3.2 System Control module
454.3.3 Evaluation module
Getting Started with ÄKTAavant and UNICORN 6 28-9440-69 AB 39
Page 40

4 The instrument and the software
4.3 UNICORN software modules
4.3.1 Method Editor module
4.3.1 Method Editor module
Introduction
In UNICORN software, the instructions to control a chromatography run are defined in
a method. The Method Editor module is used to create or edit such methods. The
graphical user interface combines default settings with the ability to change settings.
This simplifies method creation and replaces the method wizard in earlier versions of
UNICORN.
Predefined methods and phases
A method is built up by a number of phases. Each phase represents a major process
step in the method, for example, equilibrationor elution. Predefined methods,that include
all the phases necessary to run the system, are available for different chromatography
techniques and also for system cleaning.
40 Getting Started with ÄKTAavant and UNICORN 6 28-9440-69 AB
Page 41

Method Editor panes
1
32
4
As illustrated below, four panes show in the Method Editor by default . Available phases
are found in the Phase Library (1), and an overview of the phases included in the active
method is displayed in a Method Outline (2). Detailed information about the method is
presented in the upper right-hand pane (3), containing the two tabs Phase Properties
and Text Instructions. The gradient used in the method is displayed in a Gradient
illustration (4).
4 The instrument and the software
4.3 UNICORN software modules
4.3.1 Method Editor module
Getting Started with ÄKTAavant and UNICORN 6 28-9440-69 AB 41
Page 42

4 The instrument and the software
4.3 UNICORN software modules
4.3.1 Method Editor module
Method Editor toolbar icons
The table below shows the Method Editor toolbar icons that are referredto in this Getting
Started guide.
FunctionIconFunctionIcon
New Method: Opens the
New Method dialog where
methods can be created.
Save: Saves the active
method.
Copy: Copies the selected
method or folder.
Undo: Restores the method
to the state it was in before
the last change.
Open Method Navigator:
Opens the Method
Navigator where available
methods are listed.
Print: Opens the Print
dialog from where a
method can be printed.
Paste: Pastes a copied
method or folder to a new
location.
Redo: Restores the method
to the state it was in before
the Undo command was
used.
42 Getting Started with ÄKTAavant and UNICORN 6 28-9440-69 AB
Page 43
4.3.2 System Control module
1
2
3 4
Introduction
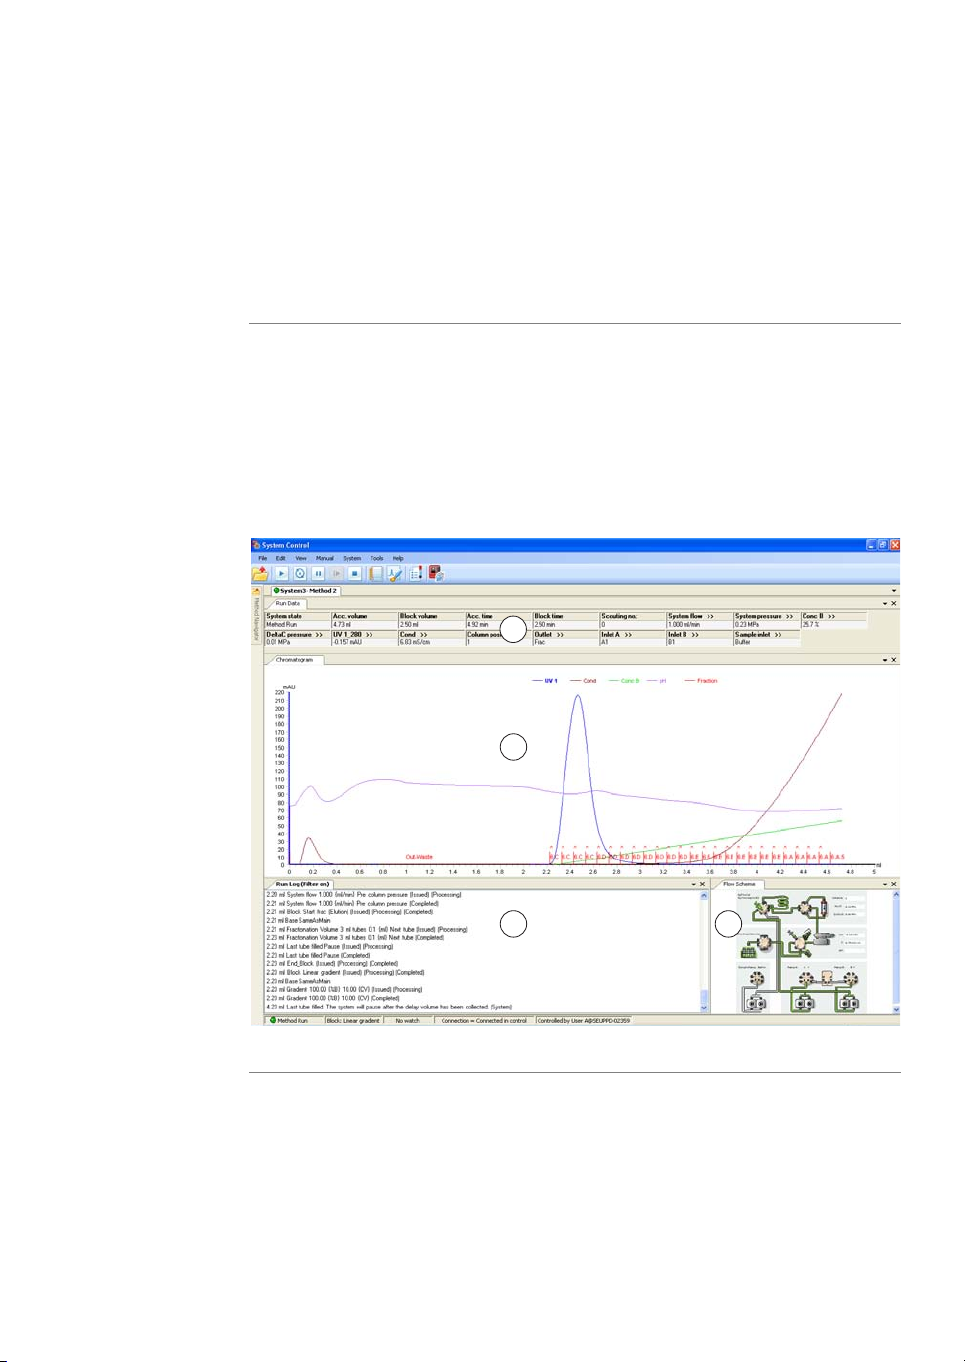
The System Control module is used to start , view, and control a method run.
System Control panes
As illustrated below, four panes show in the System Control by default. The Run Data
pane (1) presents current data in numerical values, while the Chromatogram pane (2)
illustrates data as curves during the entire method run. Information about the method
progression is presented in the Run Log (3) and the current flow path is illustrated in the
Flow Scheme (4).
4 The instrument and the software
4.3 UNICORN software modules
4.3.2 System Control module
Getting Started with ÄKTAavant and UNICORN 6 28-9440-69 AB 43
Page 44
4 The instrument and the software
4.3 UNICORN software modules
4.3.2 System Control module
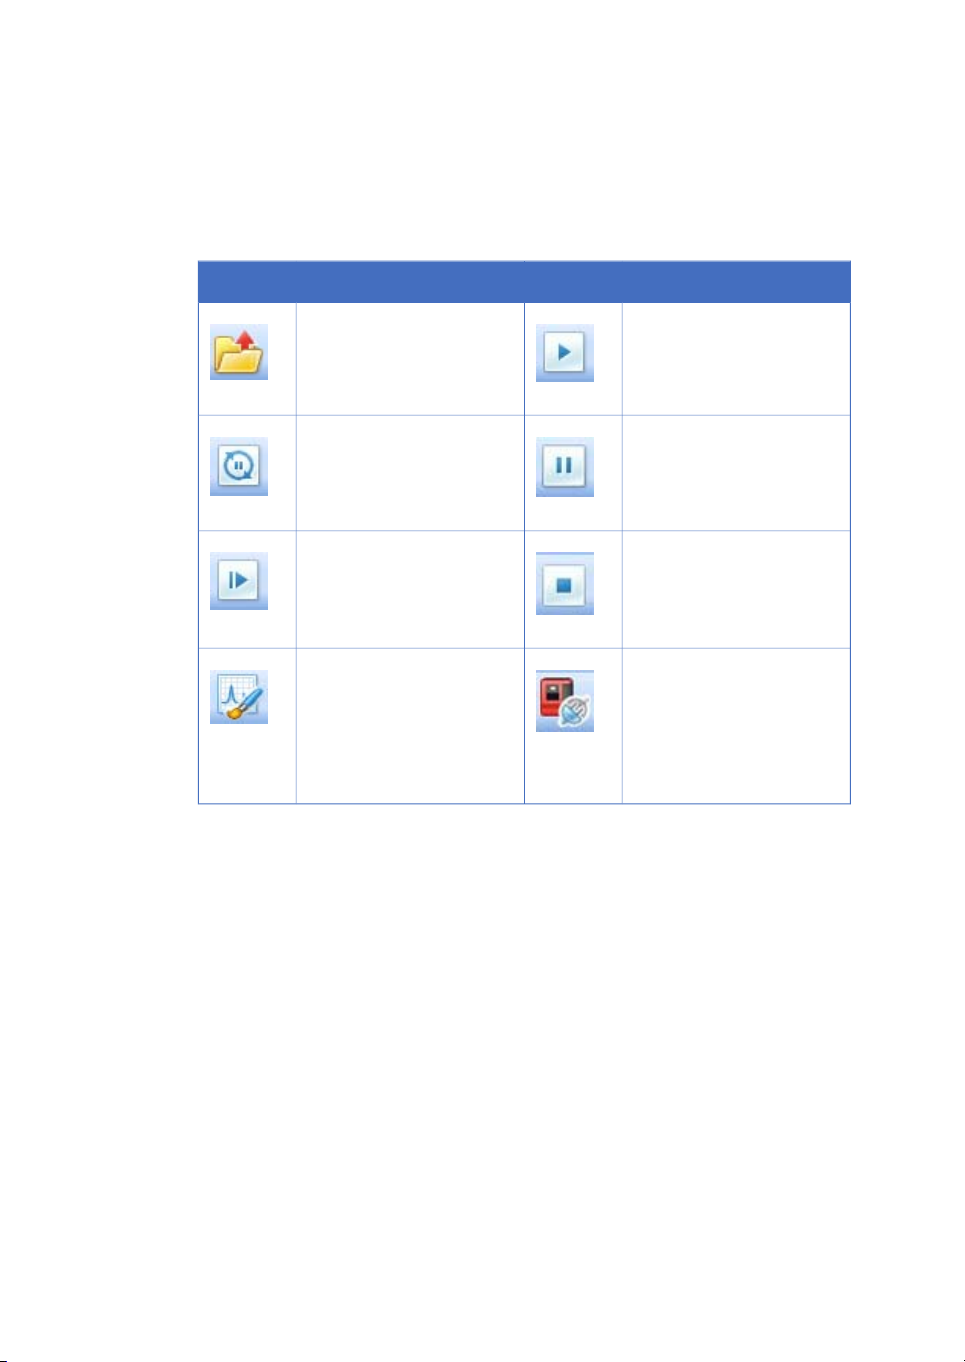
System Control toolbar icons
The table below shows the System Control toolbar icons that are referred to in this
Getting Started guide.
Opens the Method
Navigator where available
methods are listed.
FunctionIconFunctionIcon
Run: Starts a method run.Open Method Navigator:
Hold: Suspends the method
run, while current flow rate
and valve positions are
sustained.
Continue: Resumes for
example a held or paused
method run.
Customize: Opens the
Customize dialog where
curve settings, run data
groups and run log
contents can be set.
Pause: Suspends the
method run and stops all
pumps.
End: Permanently ends the
method run.
Connect to Systems: Opens
the Connect to Systems
dialog where systems can
be connected,and currently
connected users are
displayed.
44 Getting Started with ÄKTAavant and UNICORN 6 28-9440-69 AB
Page 45
4.3.3 Evaluation module
1
2
3
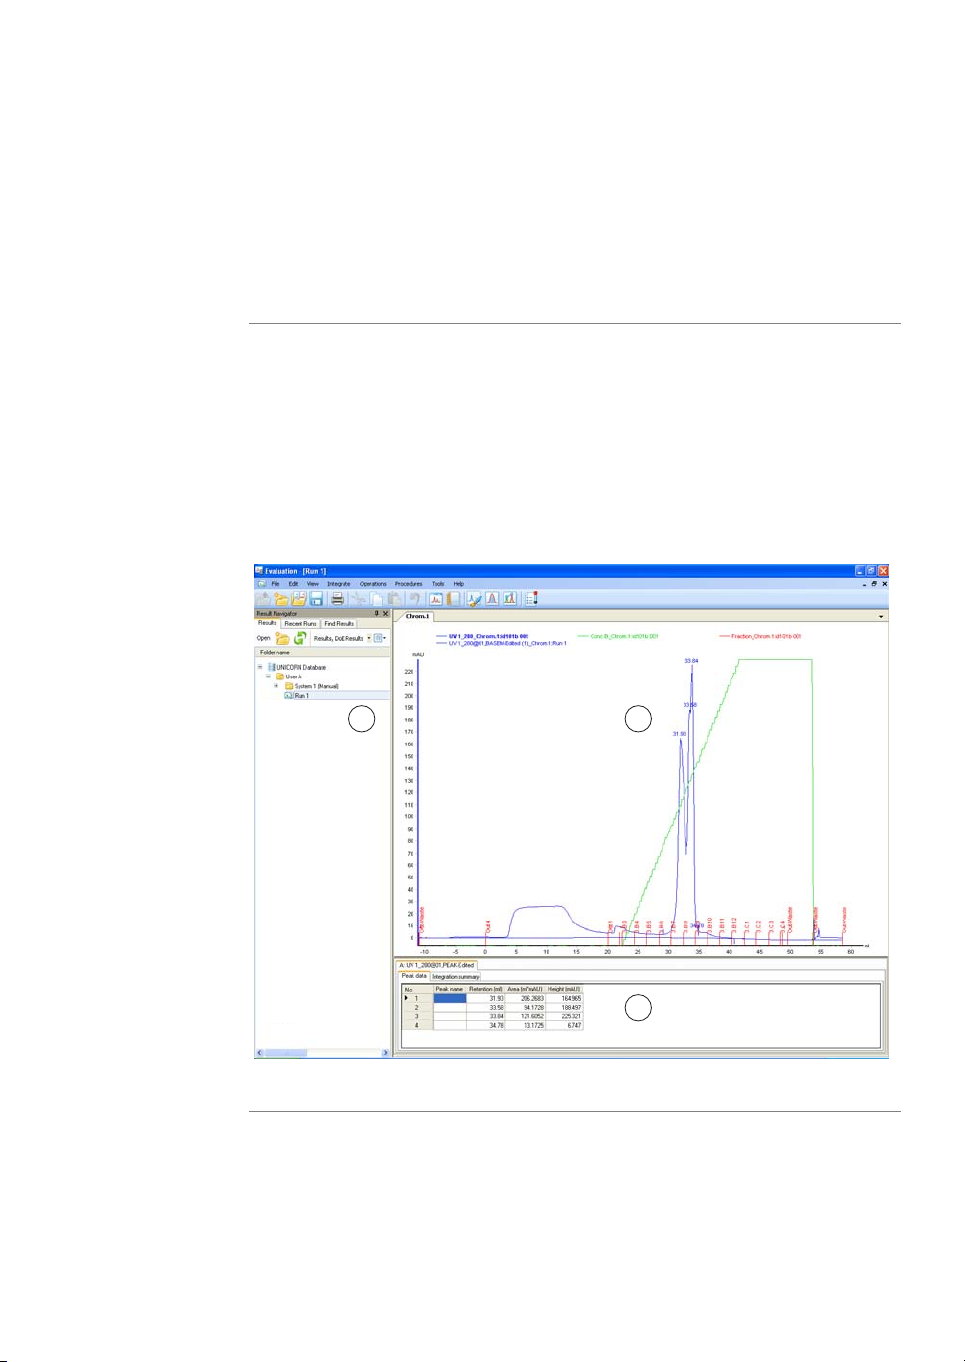
Introduction
The Evaluation module is used to evaluate the results from chromatography runs.
Evaluation panes
As illustrated below, the Evaluation module contains three panes. When a result is
opened from the Result Navigator (1) the Chromatogram pane (2) is displayed. After a
peak integration has been performed, details about the peaks are shown in the lower
right-hand pane (3), in the tabs Peak data and Integration summary. In the Evaluation
module it is also possible to view the complete documentation about the results, and to
generate reports.
4 The instrument and the software
4.3 UNICORN software modules
4.3.3 Evaluation module
Getting Started with ÄKTAavant and UNICORN 6 28-9440-69 AB 45
Page 46

4 The instrument and the software
4.3 UNICORN software modules
4.3.3 Evaluation module
Evaluation toolbar icons
The table below shows the Evaluation toolbar icons that are referred to in this Getting
Started guide.
FunctionIconFunctionIcon
Open Result Navigator:
Opens theResult Navigator
where available results are
listed.
Print: Opens the Print
chromatograms dialog
from where a
chromatogram can be
printed.
Paste: Pastes a copied
result or folder to the
selected folder.
Report: Opens the Create
report dialog where a
report of the result can be
created.
Customize: Opens the
Customize dialog where
curve settings, peak table
content andheader content
can be set .
Save: Saves the changes
made to the current result.
Copy: Copies the selected
result or folder.
Undo: Restores the method
to the state it was in before
the last change.
View Documentation:
Opens the Documentation
dialog that contains the
complete documentation
for a method run.
Peak Integrate: Opens the
Peak Integrate dialog from
where curves can be
integrated.
46 Getting Started with ÄKTAavant and UNICORN 6 28-9440-69 AB
Page 47

5 Files and folders in UNICORN
5 Files and folders in UNICORN
Introduction
In the UNICORNuser interface, method and result data are represented by files. All users
have a designated home folder where all methods and result files created by the user
will automatically be located. The files and folders are displayed in Navigator panes.
This chapter briefly describes the Navigator panes available in the different modules. It
also describes how to handle the files and folders.
Contents
This chapter contains the following sections:
See pageSection
485.1 Navigator overview
515.2 Handling files and folders
Getting Started with ÄKTAavant and UNICORN 6 28-9440-69 AB 47
Page 48

5 Files and folders in UNICORN
5.1 Navigator overview
5.1 Navigator overview
Introduction
This section describes the navigator panes that are available in all UNICORN modules,
with exception for the Administration module. The navigator panes can be used to
locate and open methods and results, and to handle files and folders.
In the modules Method Editor and System Control, the navigator panes are called
Method Navigator and are used primarily to access methods.
In the Evaluation module, the navigator pane is called Result Navigator. In this navigator
pane three different panes can be used to access the results–Results, Recent Runs and
Find Results.
Show the navigator pane
To openand display the navigator pane in any of the UNICORN modules, click the Open...
toolbar icon.
The navigator panes may either be displayed statically in the position where they open,
or the Auto Hide function can be selected by clicking the pin symbol in the top right-hand
corner of the pane (illustrated below). If Auto Hide is selected, the panes open
automatically whenthe mouse pointeris placed overthe corresponding tab, and remain
open as long as the mouse pointer remains over the pane. The pane closes automatically
when the pointer is moved outside.
48 Getting Started with ÄKTAavant and UNICORN 6 28-9440-69 AB
Page 49

Navigator toolbar icons
The table below shows the common navigator toolbar icons.
FunctionIcon
Open: Opens the selected file.
New folder: Creates a new folder in the folder that is currently selected.
Refresh: Updates all items in the navigator pane to the current status.
Opens the View Details droplist (see illustration below) where the following
optional information may be selected for display in the navigator pane:
5 Files and folders in UNICORN
5.1 Navigator overview
System
•
Created by (user name of the person who created the original file)
•
Last modified (date and time when then file or folder was lastmodified)
•
Getting Started with ÄKTAavant and UNICORN 6 28-9440-69 AB 49
Page 50

5 Files and folders in UNICORN
5.1 Navigator overview
Filter settings
By default, the Method Navigator shows only methods, and the Result Navigator only
results. This is the Default Filter setting for the items that are displayed. However, each
navigator may also show items that primarily are used in another UNICORN module.
The options are:
•
Default Filter: only items belonging to the active module show
-
In Method Editor and System Control: "Methods, Method Queues"
-
In Evaluation: "Results, DoE Results"
•
All: all items show, regardless of the active module
•
All except Archived: only items that are not archived show
The illustration below shows the filter settings available in the Method Navigator.
Close the navigator pane
Click the smallcross in the top right-handcorner of the pane to close the navigator pane.
50 Getting Started with ÄKTAavant and UNICORN 6 28-9440-69 AB
Page 51

5.2 Handling files and folders
Introduction
The handling of files and folders in UNICORN is similar to thegeneral Windows functions.
This section describes how to create new folders and how to copy, move, delete and
rename both files and folders. It also describes the general search function that helps
you find the files and folders that you are looking for.
Create a folder
To arrange your files for better overview, you can create sub-folders in any folder that
you have access to. Follow the instruction below to create a new folder in the Method
Navigator or in the Result Navigator.
ActionStep
Select the folder in which you want to create the new sub-folder.1
Click the New Folder icon.2
5 Files and folders in UNICORN
5.2 Handling files and folders
Result: A sub-folder named "New Folder" is created in the selected folder.
Note:
Type a name for the new folder.3
Result: The new folder is renamed.
Getting Started with ÄKTAavant and UNICORN 6 28-9440-69 AB 51
The new folder is placed after all other sub-folders, but
before any files directly in the selected folder.
Page 52

5 Files and folders in UNICORN
5.2 Handling files and folders
Copy and paste files and folders
Follow the instructionbelow to copy and paste files and folders in the Method Navigator
or in the Result Navigator. If you copy a folder you will also copy all the files and folders
that it contains.
ActionStep
Select one or several files and/or folders.1
Click the Copy toolbar icon.2
Result: The selected items are copied.
Select a target folder.3
Click the Paste toolbar icon.4
TIP:
Move files and folders
Files and folders may be moved by drag-and-drop within the folder structure that you
have access to. The destination must always be a folder and the contents will normally
be re-sorted automatically so that:
•
folders are placed first, in alphabetical order, and
•
individual files are placed in alphabetical order, after the folders.
Note:
Result: The copied items are pasted into the selected folder.
You can select a range of items by pressing the keyboard Shift key or
several individual items by pressing the keyboard Ctrl key
The sorting order may be changed by clicking the header of each
column. You can also move folders and files by using Cut and Paste in
the same manner as Copy and Paste.
52 Getting Started with ÄKTAavant and UNICORN 6 28-9440-69 AB
Page 53

Delete files and folders
Follow the instruction below to delete files and folders in the Method Navigator or in
the Result Navigator.
Note:
ActionStep
Select the item(s) that you want to delete.1
Choose Edit:Delete.2
Result: A dialog for confirmation of the delete action opens.
Press Yes to confirm the delete action in the confirmation dialog.3
Result: The selected items are deleted.
5 Files and folders in UNICORN
5.2 Handling files and folders
Top levelfolders, for example homefolders, cannot be deleted thisway.
Refer to UNICORN 6 Administration and Technical Manual for more
information about home folders.
Note:
Rename files and folders
Follow the instruction below to rename files and folders in the Method Navigator or in
the Result Navigator.
ActionStep
Select the item that you want to rename.1
Choose Edit:Rename.2
Result: The current name is selected.
If you have chosen to delete a folder that is not empty, a special
confirmation dialog opens. This dialog displays all the items that will
be deleted as a consequence, both items in the active UNICORN module
and items in other UNICORN modules (see illustration below).
Type a new name.3
Getting Started with ÄKTAavant and UNICORN 6 28-9440-69 AB 53
Page 54

5 Files and folders in UNICORN
5.2 Handling files and folders
ActionStep
Press Enter.4
Result: The selected item is renamed.
Find files and folders
Follow the instruction below to use the Find dialog to search for files or folders in the
Method Navigator or in the Result Navigator.
ActionStep
1
2
Select the file or folder in the navigator pane from where you want to
•
perform the search.
Choose Edit:Find.
•
Result: The Find dialog opens.
Type a name or a partial name in the Find what field.
•
Select none, one, or both of the the matching levels described below.
•
Match whole word only: Matches only whole words and disregards
-
partial matches.
Match case: Matches the case of the Find what field entry.
-
Select a Direction for the search.
•
Up: The search proceeds upwards in the folder structure from the
-
selected level.
Down: The search proceeds downwardsin the folder structure from
-
the selected level.
Click Find Next.3
Result: The first located match is selected in the navigator pane. The search
can be continued step by step until the whole folder structure has been
searched.
54 Getting Started with ÄKTAavant and UNICORN 6 28-9440-69 AB
Page 55

6 Create a method
Introduction
A method is created in the Method Editor module. Thischapter describes method creation
based on predefined methods, and also how to print a method.
Contents
This chapter contains the following sections:
6 Create a method
See pageSection
566.1 Guide to method creation
686.2 Print a method
Getting Started with ÄKTAavant and UNICORN 6 28-9440-69 AB 55
Page 56

6 Create a method
6.1 Guide to method creation
6.1 Guide to method creation
Introduction
This section describes how to create a new method based on a predefined method, and
how to edit a method. The section also provides an overview of the predefined methods
and phasesthat are available.You can createboth purification methodsand maintenance
methods. You can also add a maintenance phase at the end of a purification method.
For further information about method creation, see UNICORN 6 Method Manual.
Contents
This sections contains the following subsections:
See pageSection
576.1.1 Create and edit methods
656.1.2 Predefined methods
676.1.3 Predefined phases
56 Getting Started with ÄKTAavant and UNICORN 6 28-9440-69 AB
Page 57

6.1.1 Create and edit methods
1
32
4
Introduction
Method creation in UNICORN 6 is performed in the Method Editor module. Predefined
methods areavailable for a number of different chromatographytechniques, for example
affinity chromatographyand gel filtration. There are also predefined methodsfor column
preparation and system cleaning. A method is comprised of a number of phases. Each
phase represents a major process step in the method, for example, equilibration or
elution. If desired, a predefined method can be edited by adding, deleting and/or
rearranging phases, and also by editing the settings of each phase included in the
method.
Illustration of the Method Editor
user interface
The illustration and table below shows the Method Editor module and its panes.
6 Create a method
6.1 Guide to method creation
6.1.1 Create and edit methods
Getting Started with ÄKTAavant and UNICORN 6 28-9440-69 AB 57
Page 58

6 Create a method
6.1 Guide to method creation
6.1.1 Create and edit methods
DescriptionPart
Phase Library: Displays all available phases.1
2
Create a method
Follow the instruction below to create and edit a chromatographic method based on a
predefined method.
Method Outline: Presentsan overview of the phases included in the active
method.
Phase Properties: Presents detailed settings for the selected phase.3
Gradient: Illustrates the gradient used in the active method.4
ActionStep
Open the Method Editor module and click the New Method icon.1
Result: The New Method dialog opens.
Select System and Predefined Method in the dialog. Click OK.2
Result: The phases included in the chosen method show in the Method
Outline pane, and the default settings for each of the phases show in the
Phase Properties pane.
58 Getting Started with ÄKTAavant and UNICORN 6 28-9440-69 AB
Page 59

6 Create a method
6.1 Guide to method creation
6.1.1 Create and edit methods
ActionStep
3
In the Phase Properties pane of the Method Settings phase, edit general
settings like Column type and Method Base Unit. UNICORN automatically
calculates correct settings for volume, flow rate, and pressure limits based
on the selected column type.
The illustration below shows the Method Outline pane and the Phase
Properties pane of the Method Settings phase.
Getting Started with ÄKTAavant and UNICORN 6 28-9440-69 AB 59
Page 60

6 Create a method
6.1 Guide to method creation
6.1.1 Create and edit methods
ActionStep
4
In the Phase Properties pane of the Method Settings phase, click the Result
Name & Location button to specify the name and location of the results
from the method runs.
Result: The Result Name & Location dialog opens.
In the Result Name & Location dialog:
Set Result location by clicking the Browse button and select a folder in
•
which to save the results. By default, the results will be saved in your
home folder.
Select Result name. With the default selection Method name the results
•
will be named with the method name together with a serial number.
Click OK to confirm and close the dialog.
•
60 Getting Started with ÄKTAavant and UNICORN 6 28-9440-69 AB
Page 61

6 Create a method
6.1 Guide to method creation
6.1.1 Create and edit methods
ActionStep
5
In the Phase Properties pane of the Method Settings phase, click the Start
Protocol button if you wish to include a start protocol.
Result: The Start Protocol dialog opens.
In the Start Protocol dialog:
Select items to display at method start. Result Name and Location is
•
selected by default .
Click OK to confirm and close the dialog.
•
6
Select the next phase in the Method Outline pane by clicking it, and choose
appropriate parameter values in the Phase Properties pane.
Repeat step 6 until all phases are edited.7
TIP:
If the instrument will not be used for a couple of days or
longer, add one or several System CIP phases to the end
of the method as described below.
Getting Started with ÄKTAavant and UNICORN 6 28-9440-69 AB 61
Page 62
6 Create a method
6.1 Guide to method creation
6.1.1 Create and edit methods
ActionStep
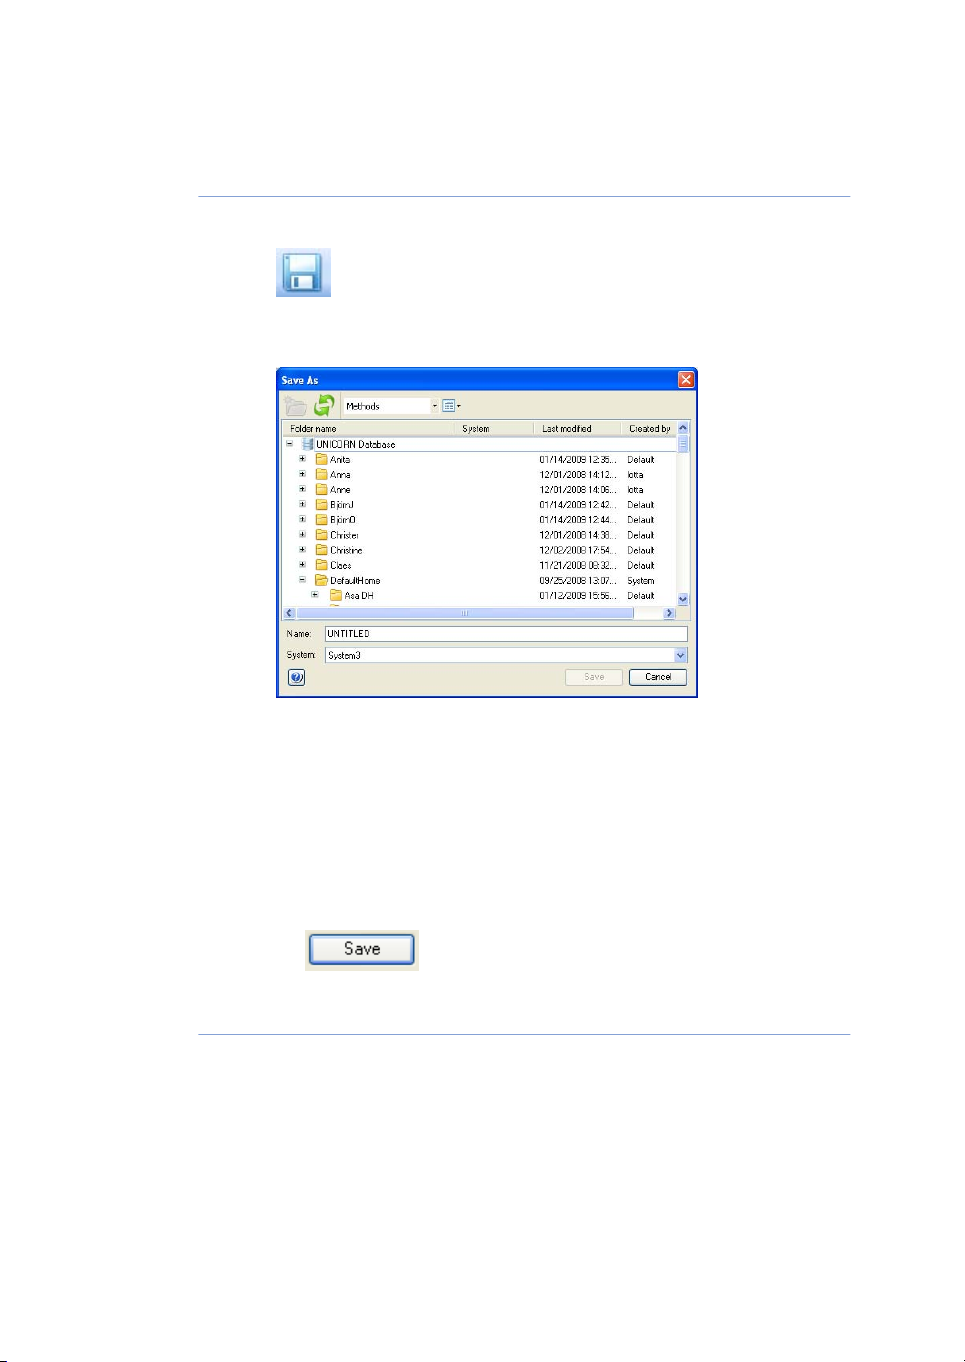
Click the Save the method icon.8
Result: The Save As dialog opens.
In the Save As dialog:9
Select a target folder to enable the Save button.
•
Type a Name for the method.
•
Select a System from the list.
•
Click the Save button.
•
Result: The created method is saved in the selected folder.
62 Getting Started with ÄKTAavant and UNICORN 6 28-9440-69 AB
Page 63

Add phases to a method
Follow the instruction below to add phases to a method.
ActionStep
Select the desired phase in the Phase Library pane.1
6 Create a method
6.1 Guide to method creation
6.1.1 Create and edit methods
2
Drag-and-drop thephase to requested position in the Method Outline pane.
The phase can be placed at any postion below the Method Settings phase.
Result: The phase is included in the method at the the requested position.
Delete phases from a method
Follow the instruction below to delete phases from a method.
ActionStep
Select the phase to delete in the Method Outline pane.1
Note:
Click the Delete button located below the Method Outline pane.2
Result: The selected phase is excluded from the method.
Rearrange phases within a
method
Follow the instruction below to rearrange phases within a method.
The Method Settings phase cannot be deleted.
ActionStep
Select the phase to move in the Method Outline pane.1
Note:
Drag-and-drop thephase to requested position in the Method Outline pane.2
Result: The selected phase is moved to the requested position.
Getting Started with ÄKTAavant and UNICORN 6 28-9440-69 AB 63
The Method Settings phase cannot be moved.
Page 64

6 Create a method
6.1 Guide to method creation
6.1.1 Create and edit methods
Choose a maintenance method
A number of predefined methods for preparation and cleaning are available. Use these
maintenance methods to prepare and clean the system and columns, and to fill the
system and columns with storage solution. The table below gives suggestions for what
methods and solutions to choose for the different purposes.
before a run
SolutionPhase/MethodIf you wish to...
suitable buffersSystem PreparationPrepare tubing and instrument modules
suitable buffersColumn PreparationPrepare column before a run
0.5-1 M NaOHSystem CIPClean tubing and modules
0.5-1 M NaOHColumn CIPClean column
20% EthanolSystem CIPLeave system in storage solution
20% EthanolColumn CIPLeave column in storage solution
TIP:
TIP:
Note:
CIP (Cleaning-In-Place) and preparation of columns and system may
be run either as separate predefined methods or as phases included
in chromatographic methods.
The System CIP and System Preparation phases are designed to use
one cleaning solution each. The System Preparation method includes
two System Preparationphases and the System CIP method includes
three System CIP phases. To use additional solutions sequentially, add
phases to the method.
Usually 0.5-1 M NaOH is used for cleaning of the system and column.
However, before choosing cleaning agent always consider the media
and buffers used, and also the chemical resistance of the column.
64 Getting Started with ÄKTAavant and UNICORN 6 28-9440-69 AB
Page 65

6.1.2 Predefined methods
The predefined methods that are available are described in the table below.
6 Create a method
6.1 Guide to method creation
6.1.2 Predefined methods
DescriptionMethod
Affinity
chromatography
(AC)
Anion Exchange
Chromatography
(AIEX)
Cation Exchange
Chromatography
(CIEX)
Chromatofocusing
(CF)
Column CIP
After equilibration and sample application, the protein of
interest is adsorbed to the column ligand. After a wash to
remove unboundsample, elution is performed either by using
a buffer containing a competitor to displace the protein of
interest, or by changing the pH or ionic strength. Finally, the
column is re-equilibrated with start buffer.
After equilibration and sample application, negativelycharged
proteins are adsorbed to the column ligand. After a wash, to
remove unbound sample, elution isperformed using a gradient
of increasing salt concentration (of e.g., NaCl). Finally, the
column is washed and re-equilibrated with start buffer.
After equilibration and sample application, positively charged
proteins are adsorbed to the column ligand. After a wash, to
remove unbound sample, elution isperformed using a gradient
of increasing salt concentration (of e.g., NaCl). Finally, the
column is washed and re-equilibrated with start buffer.
After equilibrationand sample application, elution is performed
using a pH gradient. The proteinsseparate and elute according
to their isoelectricpoints. Finally, the column is re-equilibrated.
The column is filled with a cleaning solution. Select inlet
positions. Enter the solution identity, volume, flow rate and
incubation time. By adding steps, several cleaning solutions
can be used. Suggestions for cleaning steps are available for
a number of column types.
Column
Performance Test
Column
Preparation
Getting Started with ÄKTAavant and UNICORN 6 28-9440-69 AB 65
After equilibration of the column, sample is injected via a
capillary loop and eluted isocratically. A non-adsorbing sample
like acetone or salt should be used. After the run, calculate
column performance in the Evaluation module. The efficiency
of the column is determined in terms of height equivalent to
a theoreticalplate (HETP), and the peak asymmetry factor (As).
The result is logged in the column logbook.
The column is filled with buffer solution. Select inlet positions.
Enter the solution identity, volume, flow rate and incubation
time. By adding steps, several preparation solutions can be
used.
Page 66

6 Create a method
6.1 Guide to method creation
6.1.2 Predefined methods
DescriptionMethod
Desalting (DS)
Gel filtration (GF)
Hydrophobic
Interaction
Chromatography
(HIC)
Reversed Phase
Chromatography
(RPC)
System CIP
After equilibration and sample application, the proteins are
eluted isocratically.This technique is commonly used for buffer
exchange.
After equilibration and sample application, proteins separate
and elute according to their size (largest first).
After equilibration and sample application (use a buffer
containing a high salt concentration, for example 2 M
Ammonium Sulphate) hydrophobic proteins are adsorbed to
the column ligand. After a wash to remove unbound sample,
elution is performed using a gradient of decreasing salt
concentration. Finally, the column is washed and
re-equilibrated with start buffer.
After equilibration and sample application, hydrophobic
proteins adsorb to the column ligand. After a wash to remove
unbound sample,elution is performed by generating a gradient
of a non-polar, organic solvent such as Acetonitrile. Finally,
the column is washed and re-equilibrated.
The system is filled with cleaning solution. Select for example
inlets, outlets and column positions to be cleaned. Three
System CIP phases are included in the method to facilitate
the use of three different cleaningsolution. Additional System
CIP phases can be added from the Phase Library if desired.
System
Preparation
The system is filled with preparation solution. Select for
example inlets, outlets and column positions to be prepared.
Two System Preparation phases are included in the method.
Additional System Preparation phases can be added from
the Phase Library if desired.
66 Getting Started with ÄKTAavant and UNICORN 6 28-9440-69 AB
Page 67

6.1.3 Predefined phases
The predefined phases that are available in the predefined methods and in the Phase
Library are described in the table below.
6 Create a method
6.1 Guide to method creation
6.1.3 Predefined phases
DescriptionPhase
Method Settings
Equilibration
Sample Application
Column Wash
Elution
Column
Preparation
Column CIP
System
Preparation
The first, and mandatory, phase in any method. Defines
common parameters used in the subsequent phases.
Equilibrates the column before purification, or re-equilibrates
the column after purification.
Applies sample to the column. Defines the sample application
technique, the sample volume, and the handling of
flowthrough.
Washes out unbound sample after sample application or
removes strongly bound proteins after elution.
Elutes the sample from the column. Defines parameters for
the elution and fractionation settings.
Prepares the column before use by removing the storage
solution and equilibrating the column. By adding steps, several
preparation solutions can be used sequentially.
Cleans the column after purification runs by rinsing the column
with a cleaning solution to remove unspecifically bound
proteins. By adding steps, several cleaning solutions can be
used sequentially.
Prepares the system before arun by removing storage solution
and filling the system and inlets with buffer solution. One
preparation solution is used per phase.
System CIP
Column
Performance Test
Getting Started with ÄKTAavant and UNICORN 6 28-9440-69 AB 67
Cleans the system after purification runs by rinsing the system
with a cleaning solution. One cleaning solution is used per
phase.
Tests the efficiency of a packed column in terms of height
equivalent to a theoretical plate (HETP), and the peak
asymmetry factor (As).
Page 68

6 Create a method
6.2 Print a method
6.2 Print a method
Introduction
This section describes how to print the text instructions and variables of a method.
UNICORN uses the printers and printer settings that are installed on your computer.
How to print a method
Follow the instruction below to print a method.
ActionStep
1
2
Open the Method Editor module and click the Open Method Navigator icon
in the toolbar.
Result: The Method Navigator pane opens.
Select themethod to print and click the Open a Method iconin the navigator
toolbar.
Result: The selected method opens.
68 Getting Started with ÄKTAavant and UNICORN 6 28-9440-69 AB
Page 69

ActionStep
Click the Print icon.3
Result: The Print dialog opens.
In the Print dialog:4
select Printer
•
6 Create a method
6.2 Print a method
click OK
•
Result: The method is printed.
Getting Started with ÄKTAavant and UNICORN 6 28-9440-69 AB 69
Page 70
7 Prepare the system for a run
7 Prepare the system for a run
Introduction
Follow this chapter to perform the necessary preparations of the system before starting
a run.
WARNING
Always use appropriate personal protective equipment during
operation and maintenance of ÄKTAavant system.
Contents
This chapter contains the following sections:
See pageSection
717.1 Before you prepare the system
727.2 Prepare the flow path
787.3 Prime buffer inlets and purge System pumps
837.4 Connect a column
887.5 Calibrate the pH monitor
907.6 Prepare the Fraction collector
70 Getting Started with ÄKTAavant and UNICORN 6 28-9440-69 AB
Page 71

7.1 Before you prepare the system
Introduction
It is important to prepare the system in accordance with the settings in the method to
be run. Before preparing the system, check the settings in the Method Editor and make
sure that all accessories to be used are available.
Checklist
Make sure to prepare the system in accordance with the settings in the method to be
run. Remember to check:
•
which valve ports to use for inlets and outlets
•
which cassettes with corresponding deep well plates and/or tubes to use in the
Fraction collector, if applicable
•
which column type to use
•
which column position to use
•
which sample application technique to use
•
that the pH electrode is connected, if applicable
•
if it is a reversed phase chromatography (RPC) run
7 Prepare the system for a run
7.1 Before you prepare the system
WARNING
RPC runs with 100% acetonitrile. Always replace the green
PEEK tubing between the used system pump and the pressure
monitor with orange PEEK tubing, i.d. 0.5 mm, before running
RPC with 100% acetonitrile. Set the System pressure alarm to
10 MPa.
WARNING
Fraction collector. Do not fractionate flammable liquids. When
running RPC methods, or other procedures usingsolvent based
buffers, collect fractions through the outlet valve.
Getting Started with ÄKTAavant and UNICORN 6 28-9440-69 AB 71
Page 72

1
9
8
7
6
5
3
42
12
11
10
16
15 14
13
7 Prepare the system for a run
7.2 Prepare the flow path
7.2 Prepare the flow path
Introduction
The flow path contains tubing, valves,pumps and monitors. Thissection gives an overview
of the flow path and describes how to prepare the flow path before a run.
Illustration of the flow path
The illustration below shows the flow scheme as illustrated in the System Control module.
The individual instrument modules are presented in the table below.
72 Getting Started with ÄKTAavant and UNICORN 6 28-9440-69 AB
Page 73

7 Prepare the system for a run
7.2 Prepare the flow path
DescriptionPart
Sample inlet valve1
Sample pump2
Inlet valve A3
System pump A4
Quaternary valve5
Inlet valve B6
System pump B7
Injection valve8
Capillary loop or Superloop9
Column valve10
Column11
UV monitor12
Conductivity monitor13
pH valve with pH monitor and flow restrictor14
Outlet valve15
Fraction collector16
Getting Started with ÄKTAavant and UNICORN 6 28-9440-69 AB 73
Page 74

7 Prepare the system for a run
7.2 Prepare the flow path
Tubing and connectors
The table below shows what types of tubing and connectors to usefor different purposes.
PhotoConnectorTubingScope of use
Inlet ports
Inlet tubing
Tubing to
connect
columns
Waste tubing
The tablebelow shows the inletports of Inlet valveA, Inlet valve B and Sample inlet valve.
Inlet valve A
Inlet ports:
Teflon™, o.d.
1/8", i.d. 1.6
mm
PEEK, o.d.
1/16", i.d. 0.50
mm
Tefzel™, o.d.
1/8", i.d. 1.0
mm
Tubing connector, 1/8"
+ Ferrule (yellow), 1/8"
Fingertight connector,
1/16"
Fingertight connector,
1/16"
IllustrationsValves and ports
A1-A7
•
74 Getting Started with ÄKTAavant and UNICORN 6 28-9440-69 AB
Page 75

Inlet valve B
Inlet ports:
B1-B7
•
Sample inlet valve
Inlet ports:
S1-S7, Buff
•
7 Prepare the system for a run
7.2 Prepare the flow path
IllustrationsValves and ports
Getting Started with ÄKTAavant and UNICORN 6 28-9440-69 AB 75
Page 76

7 Prepare the system for a run
7.2 Prepare the flow path
Waste ports
The table below shows the waste ports of Injection valve, pH valve, and Outlet valve.
Injection valve
Waste ports:
W1, W2
•
pH valve
Waste port:
W3
•
IllustrationsValves and ports
Outlet valve
Waste port:
W
•
76 Getting Started with ÄKTAavant and UNICORN 6 28-9440-69 AB
Page 77

Prepare inlets and outlets
Follow the instruction below to prepare the inlets and outlets that are to be used in the
method run.
ActionStep
Connect inlet and outlet tubing to the ports that are to be used.1
7 Prepare the system for a run
7.2 Prepare the flow path
2
3
Immerse all inlet tubing that is to be used during the method run in the
correct buffers.
Immerse the waste tubing from the Injection valve, the pH valve, the Outlet
valve, andthe Fraction collector into a sufficiently large waste vessel (typically
2-10 liters).
Getting Started with ÄKTAavant and UNICORN 6 28-9440-69 AB 77
Page 78

7 Prepare the system for a run
7.3 Prime buffer inlets and purge System pumps
7.3 Prime buffer inlets and purge System pumps
Introduction
Before usage of the System pumps, it is important to:
1
Prime the inlets (fill the buffer inlets with liquid).
2
Purge the System pumps (remove air from the pumps).
Prime buffer inlets
Follow the instructionbelow to prime the buffer inlets. Each buffer inlet that is to be used
during the method run has to be primed.
ActionStep
1
2
3
Make sure that all buffer inlet tubing that is to be used during the method
run is immersed in the correct buffers.
Make sure that the waste tube connected to Injection valve port W1 is
immersed in a waste vessel.
Open the System Control module in UNICORN, and select Manual:Execute
Manual Instructions.
Result: The Manual instructions dialog opens.
78 Getting Started with ÄKTAavant and UNICORN 6 28-9440-69 AB
Page 79

7 Prepare the system for a run
7.3 Prime buffer inlets and purge System pumps
ActionStep
4
TIP:
If desired, the flow rate and volume of the pump wash
can be edited before the pump wash is started. In the
Manual instructions dialog, select Pumps and
pressures:Wash settings and edit the settingsfor System
flow rate andSystem pump wash volume. Click Execute.
In the Manual instructions dialog:
Select Pumps and pressures:Pump wash, and select the inlet to be
•
primed from the Inlet A or Inlet B drop-down list.
If several inlets are to be used, click Insert to insert a selected inlet in
•
the Instruction execution list. Insert all inlets to be used in the Instruction
execution list.
•
Click .
Result: A pump wash of the first inlet in the Instruction execution list starts.
Getting Started with ÄKTAavant and UNICORN 6 28-9440-69 AB 79
Page 80

7 Prepare the system for a run
7.3 Prime buffer inlets and purge System pumps
ActionStep
5
Connect a 25-30 ml syringe to one of the purge valves of the selected system
pump. Make sure that the syringe fits tightly into the purge connector.
6
Open the purge valve by turning it counterclockwise about 3/4 of a turn.
Draw 5-10 ml of liquid slowly into the syringe.
7
Close the purge valve by turning it clockwise. Disconnect the syringe and
discard its contents.
8
Click the Continue button on the Instrument display to start a pump wash
of the next inlet in the Instruction execution list.
9
Repeat steps 4-7 until all inlets in the Instruction execution list have been
primed (filled with liquid).
80 Getting Started with ÄKTAavant and UNICORN 6 28-9440-69 AB
Page 81

Purge the system pumps
Follow the instruction below to purge System pump A and/or System pump B. Note that
both pump heads of each system pump have to be purged. Also, note that both system
pumps have to be purged after priming of buffer inlets.
7 Prepare the system for a run
7.3 Prime buffer inlets and purge System pumps
TIP:
Prime all buffer inlets and purgeSystem pump B beforefinally purging
System pump A with start buffer.The instrument is then ready for start
of a method run.
ActionStep
In the Manual instructions dialog:1
Select Pumps and pressures:Pump wash, and select one inlet from the
•
Inlet A or Inlet B drop-down list. Preferably, choose the buffer inlet to be
used in the beginning of the method run.
•
Click .
Result: A pump wash of the selected inlet starts.
Getting Started with ÄKTAavant and UNICORN 6 28-9440-69 AB 81
Page 82

7 Prepare the system for a run
7.3 Prime buffer inlets and purge System pumps
ActionStep
2
Connect a 25-30 ml syringe to the left purge valve of the selected system
pump. Make sure that the syringe fits tightly into the purge connector.
3
Open the purge valve by turning it counterclockwise about 3/4 of a turn.
Draw 5-10 ml of liquid slowly into the syringe with a rate of about 1 ml/s.
4
Close the purge valve by turning it clockwise. Disconnect the syringe and
discard its contents.
5
Connect the syringe to the purge valve on the right pump head of the
selected system pump, and repeat steps 3-4.
82 Getting Started with ÄKTAavant and UNICORN 6 28-9440-69 AB
Page 83

7.4 Connect a column
Introduction
This section describes how to connect a column to the instrument, using a column holder
and without introducing air into the flow path. Several types of column holders are
available for ÄKTAavant.
WARNING
Before connecting a column to the ÄKTAavant instrument, read
the instructions for use of the column. To avoid exposing the column
to excessive pressure, make sure that the pressure limit is set to
the specified maximum pressure of the column.
Methods automatically include a pressure alarm based on the tolerance of the chosen
column type. However, when running manual runs you have to set the pressure limits
yourself.
7 Prepare the system for a run
7.4 Connect a column
CAUTION
Do notovertighten when connecting columns. Overtightening might
rupture the connectors or squeeze the tubing and thereby result
in high backpressure.
Getting Started with ÄKTAavant and UNICORN 6 28-9440-69 AB 83
Page 84

7 Prepare the system for a run
7.4 Connect a column
Attach a column holder and
connect a column to the
instrument
Follow the instruction below to connect a column to the instrument. Always use a column
holder. The column is connected to two opposite parts of the Column valve, using
appropriate tubing and connectors.
ActionStep
1
Choose a column according to the column selections made in the method
to be run.
Attach an appropriate column holder to the rail on the instrument.2
Attach the column to the column holder.3
84 Getting Started with ÄKTAavant and UNICORN 6 28-9440-69 AB
Page 85

7 Prepare the system for a run
7.4 Connect a column
ActionStep
4
Connect a suitable tubing to a Column valve port , for example port 2A if
column position 2 was chosen in the method to be run.
5
Open the System Control module and select Manual:Execute Manual
Instructions.
Result: The Manual instructions dialog opens.
In the Manual instructions dialog:6
Select Flow path:Column position.
•
Choose the Position used for connection of the column, in this example
•
Position 2.
Choose the Flow Direction Down flow.
•
•
Click .
Result: The Column valve switches to position 2.
Getting Started with ÄKTAavant and UNICORN 6 28-9440-69 AB 85
Page 86

7 Prepare the system for a run
7.4 Connect a column
ActionStep
In the Manual instructions dialog:7
•
•
•
Result: A system flow of 0.2 ml/min starts.
Select Pumps and pressure:System flow.
Enter a low Flow rate (e.g., 0.2 ml/min).
Click .
8
When buffer leaves the tube on port 2A in a continuous mode and the top
part of the column is filled with buffer, connect the tube to the top of the
column.
86 Getting Started with ÄKTAavant and UNICORN 6 28-9440-69 AB
Page 87

7 Prepare the system for a run
7.4 Connect a column
ActionStep
Connect a tube to the bottom of the column.9
10
When buffer leaves the tube at the bottom of the column in a continuous
mode, connect this tube to the Column valve. Use the port opposite to the
one already connected to the column, in this example port 2B.
Click the End icon in the System Control toolbar to end the run.11
Getting Started with ÄKTAavant and UNICORN 6 28-9440-69 AB 87
Page 88

7 Prepare the system for a run
7.5 Calibrate the pH monitor
7.5 Calibrate the pH monitor
Introduction
If pH will be measured during the chromatographic run, the pH monitor should be
calibrated before the run is started. Use two pH calibration buffers with a difference of
at least one pH unit. Preferably use a pH standardbuffer pH 4 or 7 as the first calibration
point, and a pH standard buffer close to the lowest or highest pH you need to measure
as your second point . Allow the buffers to reach the operating temperature before use.
Note:
Calibrate the pH monitor
Follow the instruction below to perform the calibration.
Do not run a system flow during pH calibration.
ActionStep
Open the System Control module and select System:Calibrate.1
Result: The Calibration dialog opens.
Set the pH monitoras the Monitor to calibrate by selecting pH from the list.2
3
88 Getting Started with ÄKTAavant and UNICORN 6 28-9440-69 AB
Click .
Result: The pH valve switches to the calibration position.
Enter the pH of the first pH standard buffer in the pH for buffer 1 field.4
Page 89

7 Prepare the system for a run
7.5 Calibrate the pH monitor
ActionStep
5
6
7
10
Fill a syringe with approximately 10 ml of the first pH standard buffer.
Connect the syringe to the Luer connector in pH valve port Cal, and inject
the buffer.
When the Current value is stable, click .
Wash the pH flow cell by injecting water into pH valve port Cal using a new
syringe.
Enter the pH of the second pH standard buffer in the pH for buffer 2 field.8
Repeat steps 5-6 using the second pH standard buffer.9
Result: The calibration date and time are displayed in the dialog, and also
values for Calibrated electrode slope and Asymmetry potential at pH 7.
Is the Calibrated electrode slope ≥ 80% and the Asymmetry potential at
pH 7 inside the interval ±60 mV?
•
If Yes:Click to switch the pH valve back to the default position,
and to close the Calibration dialog.
If No: Clean the pH electrode, and repeat the calibration procedure. If
•
this does not help, replace the electrode. For information aboutcleaning
and replacing the pH electrode, see User Manual Chapter Maintenance.
CAUTION
pH-electrode. Handle the pH-electrode with care. The glass tip
may break and cause injury.
Getting Started with ÄKTAavant and UNICORN 6 28-9440-69 AB 89
Page 90

7 Prepare the system for a run
7.6 Prepare the Fraction collector
7.6 Prepare the Fraction collector
Introduction
This section describes how to prepare the Fraction collector. For information regarding
the types of deep well plates, tubes and cassettes, see ÄKTAavant and UNICORN 6 User
Manual.
WARNING
Fraction collector. Do not fractionate flammable liquids. When
running RPC methods, or other procedures using solvent based
buffers, collect fractions through the outlet valve.
Prepare the Fraction collector
Follow the instruction below to prepare the Fraction collector beforea run. Choose deep
well plates and/or tubes according to the fractionation settings in the method to be run,
and choose appropriate cassettes.
ActionStep
If youare to use cassetteswith the QuickRelease function, open the cassettes.1
90 Getting Started with ÄKTAavant and UNICORN 6 28-9440-69 AB
Page 91

7 Prepare the system for a run
7.6 Prepare the Fraction collector
ActionStep
2
Place the tubes and deep well plates in the cassettes. Make sure that the
deep well plates are rotated so that the well marked A1 is positioned above
the A1 marking on the cassette.
Close the cassettes that have the QuickRelease function.3
Getting Started with ÄKTAavant and UNICORN 6 28-9440-69 AB 91
Page 92
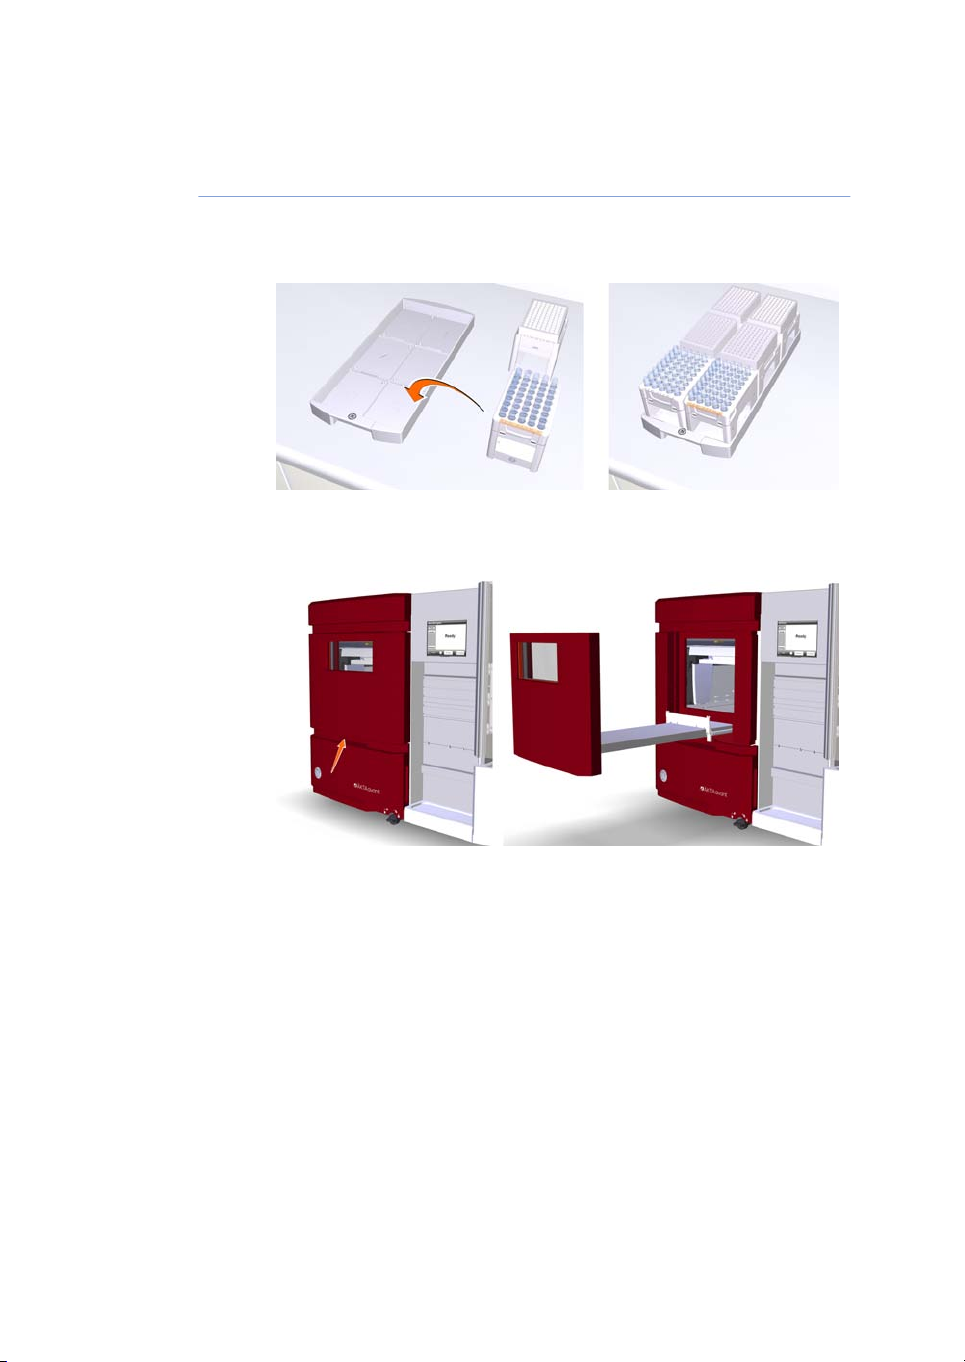
7 Prepare the system for a run
7.6 Prepare the Fraction collector
ActionStep
4
Place the cassettes on the Cassette tray. Make sure that the Cassette type
code (see illustration below) faces the front of the tray marked with the GE
logo.
5
Open the Frac drawer by pressing the handle upwards, and pulling out the
drawer.
92 Getting Started with ÄKTAavant and UNICORN 6 28-9440-69 AB
Page 93

7 Prepare the system for a run
7.6 Prepare the Fraction collector
ActionStep
6
Place the Cassette tray on the Tray support of the Frac drawer. Make sure
that the front of the tray (marked with the GE logo) faces the front of the
drawer and is hooked onto the two pins.
Close the Frac drawer. Make sure that it snaps into closed position.7
Cassette identification
After the Frac drawer has been closed, the Frac arm scans the Cassette type code of
each cassette to identify the cassette types. If deep well plates are used, the instrument
also identifies the types of deep well plates.
WARNING
Moving parts in Fraction collector. Do not open the Fraction
collector drawer when the Fraction collector is active. If you need
to access the Fraction collector, press Pause, and make sure that
the movement has stopped before opening the drawer.
Getting Started with ÄKTAavant and UNICORN 6 28-9440-69 AB 93
Page 94

7 Prepare the system for a run
7.6 Prepare the Fraction collector
View Fraction collector content
To viewthe content of the Fraction collector, open the System control module and select
View:Fraction Collector Content.
94 Getting Started with ÄKTAavant and UNICORN 6 28-9440-69 AB
Page 95

8 Run a method
Introduction
This chapter describes how to start up and run a method, and also how to handle the
system after the run.
Contents
This chapter contains the following sections:
8 Run a method
See pageSection
968.1 Before you start
988.2 Applying the sample
1018.3 Start a method run
1068.4 Monitor the run
1118.5 After run procedures
Getting Started with ÄKTAavant and UNICORN 6 28-9440-69 AB 95
Page 96

8 Run a method
8.1 Before you start
8.1 Before you start
Introduction
Before starting a run, it is necessary to read and understand the information in this
section and to perform the checks listed below.
Checklist
Make sure that the system is correctly prepared. Check that:
•
the system is prepared according to chapter 6.
•
a suitable column has been selected for the application (consider target protein and
pressure range).
•
the buffer inlettubing is immersed in correct buffer vessels (consider solution identity
and volume).
•
the waste tubing is immersed into appropriate waste vessels (consider vessel size
and vessel material).
•
no tubing is twisted and the flow path is free from leakage.
Hold, pause or stop the run
At the end of a method the run stops automatically. All pumps stop and the system
makes an acoustic end signal and displays End in the Run Log.
To interrupt a method during a run you may use the Hold, Pause or End icons in System
Control. A held or paused method run can be resumed by using the Continue icon. See
the instructions in the table below.
then...If you want to...
click the Hold icon.temporarily holdthe method, with current
flow rate and valve positions sustained
click the Pause icon.temporarily pause the method, and stop
all pumps
96 Getting Started with ÄKTAavant and UNICORN 6 28-9440-69 AB
Page 97

method run.
8 Run a method
8.1 Before you start
then...If you want to...
click the Continue icon.resume, for example, a held or paused
Note:
When ending a method run in advance, it is possible to save the partial
result.
Warnings concerning use of
hazardous substances
WARNING
Hazardous chemicals during run. When using hazardous
chemicals, run System CIP and Column CIP to flush the entire
system tubing with distilled water, before service and maintenance.
WARNING
Hazardous biological agents during run. When using hazardous
biological agents, run System CIP and Column CIP to flush the
entire system tubing with bacteriostatic solution (e.g., NaOH)
followed by a neutral buffer and finallydistilled water, before service
and maintenance.
Note:
click the End icon.permanently end the run
An ended method
cannot be continued.
Getting Started with ÄKTAavant and UNICORN 6 28-9440-69 AB 97
Page 98

8 Run a method
8.2 Applying the sample
8.2 Applying the sample
Introduction
A number of different sample application techniques are available. The sample can be
applied either directly onto the column using the Sample pump, or via a loop. A loop can
be filled either manually or by use of the Sample pump. This section describes sample
application using a syringe to manually fill a capillary loop. The two stages of the sample
application are described in the table below. For detailed instructions and information
regarding the different sample applications techniques, see User Manual.
DescriptionStage
The capillary loop is filled with sample.Load
The sample is injected onto the column.Inject
Sample application through a
capillary loop
A capillary loop is manually filled with sample using a syringe connected to the Injection
valve port Syr. During the method run, the sample is automatically injected onto the
column. The loop is emptied and washed out using buffer from the system pumps. The
total buffer volume to be used for emptying and washing the capillary loop is set in the
Phase Properties tab of the Sample Application phase at Empty loop with.
98 Getting Started with ÄKTAavant and UNICORN 6 28-9440-69 AB
Page 99

8 Run a method
8.2 Applying the sample
TIP:
Empty the capillary loop with a buffer volume that exceeds the volume
of the loop. This will ensure that the loop is completely emptied.
How to fill a capillary loop
Follow the instruction below to fill the capillary loop with sample.
ActionStep
1
Connect a suitable capillary loop to Injection valve ports LoopF (fill) and
LoopE (empty).
Fill a syringe with sample.2
Connect the syringe to the Injection valve port Syr.3
Getting Started with ÄKTAavant and UNICORN 6 28-9440-69 AB 99
Page 100

8 Run a method
8.2 Applying the sample
ActionStep
4
Load sample into the capillary loop. To avoid sample loss due to siphoning,
leave the syringe in the port until the sample has been injected onto the
column during the run.
TIP:
It is recommendedto overload the loop to make sure that
the loop is completely filled. Excess of sample will leave
the valve through port W1.
100 Getting Started with ÄKTAavant and UNICORN 6 28-9440-69 AB
 Loading...