

GE TX808 User Manual

WARNING
To reduce the risk of fire or shock
hazard, do not expose this TV to
rain or moisture.
To reduce the risk of electric shock, do not remove
kVlVl_fl _11_[el
RISK OFELECTRIC cover (or back). No user serviceable parts inside.
SHOCK DO NOT OPEN Refer servicing to qualified service personnel.
.&
This symbol indicates
"dangerous voltage" inside the
product that presents a risk of
electric shock or personal
injury.
,_ This symbol indicates
important instructions
accompanying the product.
Caution: To prevent electric shock, match wide blade of plug to wide slot, fully insert.
Attention: Pour 6viter les chocs 61ectriques, introduire la lame la plus large de la fiche dans la borne correspondante de
la prise et pousser jusqL_ au fond.
Refer to the identification/rating label located on the back panel of your product for its proper operating voltage.
FCC Regulations state that unauthorized changes or modifications to this equipment may void the user's authority to
operate it.
if fixed (non-moving) images are left on the screen for long periods, they may be permanently imprinted on
the screen. Such images include network Iogos, phone numbers, and video games. This damage is not
covered by your warranty. Extended viewing of channels displaying these images should be avoided.
Cable TV Installer: This reminder is provided to call your attention to Article 820-40 of the National Electrical Code
(Section 54 of the Canadian Electrical Code, Part 1) which provides guidelines for proper grounding and, in particular,
specifies that the cable ground shall be connected to the grounding system of the building as close to the point of cable
entry as practical.
Product
Registration
Please fill out the product registration card and return it immediately. Returning it
will allows us to contact you if needed.
Keep your sales receipt to obtain warranty parts and service and for proof of
purchase. Attach it here and record the serial and model nmnbers in case you ever
need them. The nmnbers are located on the back of the TV.
Model No:
Serial No:
Purchase Date:
DealedAddress/Phone:
GETTING STARTED .................................................................... 2
Setup and Connection ................................................................ 2
Dipole Antenna Connection ...................................................... 3
Using the Optional DC Source ................................................... 4
Channel Marker .......................................................................... 5
Front Panel Controls ................................................................... 5
Front Panel Lock ......................................................................... 5
Remote Control Buttons ............................................................ 6
THE MENU SYSTEM .................................................................... 7
TV Main Menu ............................................................................ 7
The Picture Quality Menu ........................................................ 7
The Screen Menu ...................................................................... 7
The Channel Menu ................................................................... 8
V-Chip Parental Controls ............................................................ 8
V-Chip Movie Rating Limit ......................................................... 9
Blocking Movie Ratings ............................................................ 9
Viewing Movie Ratings ............................................................ 9
V-Chip TV Rating Limit ............................................................... 9
The TV Rating Limit Screen .................................................... 10
Blocking Age-Based Ratings and Content Themes .............. 11
Viewing Age-Based Ratings and Content Themes ............... 11
V-Chip Unrated Program Block ................................................ 12
Lock/Unlock Parental Controls ................................................. 12
The Time menu ......................................................................... 12
Commercial Skip ....................................................................... 13
TROUBLESHOOTING ............................................................... 14
ACCESSORIES ............................................................................. 15
LIMITED WARRANTY ................................................................. 17
Setup and Connection
Your TV can be used with an AC power or DC power source, and it
comes packed with two separate power cords. Connecting your TV to
AC power is discussed in this section.
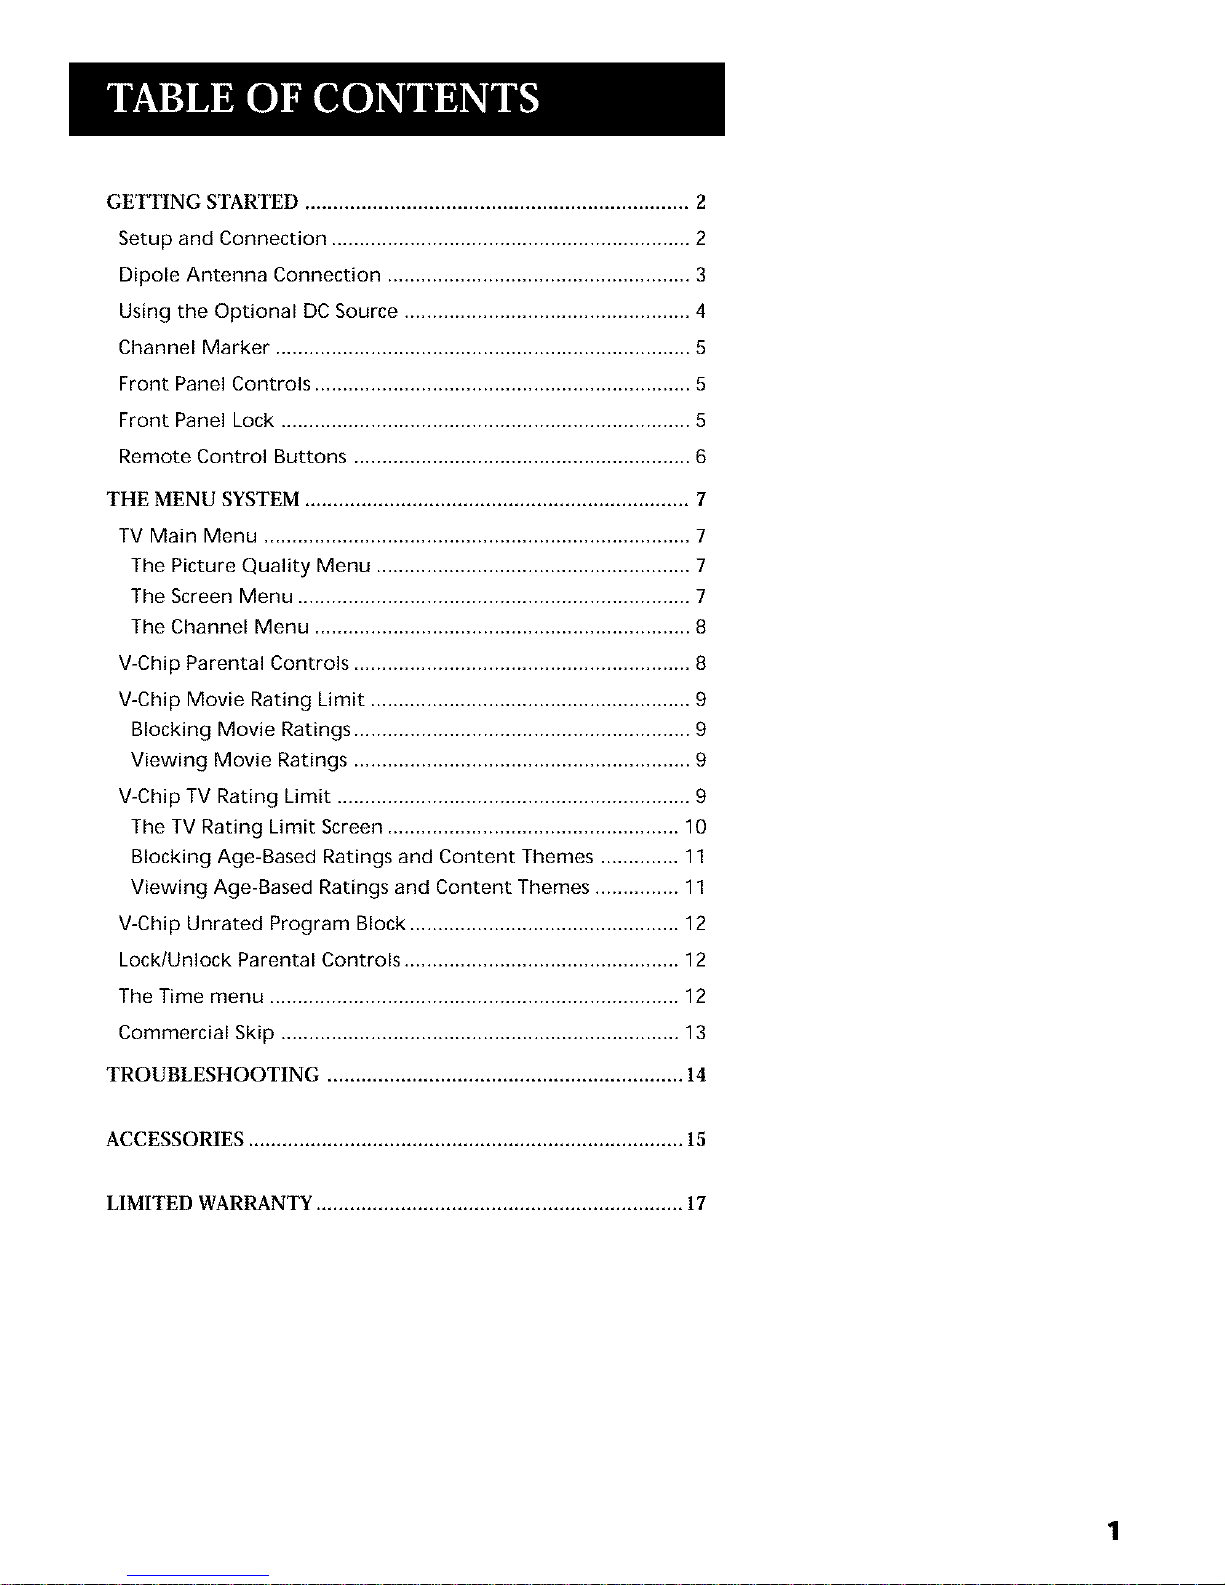
Step 1: Connect Your TV
Connect the cable from your cable system or off-air antenna to the
ANTENNA jack on the back of the TV, as shown.
Step 2: Plug In Your TV
Attach the square end of the AC power cord to the TV and then plug the
other end of the power cord into the wall outlet, matching the wide blade
of the plug with the wide slot in the outlet. Be sure to insert the plug
completely.
Step 3: Put Batteries in the Remote Control
1. Remove the battery compartment cover from the back of the remote.
2. Insert batteries as shown, matching the + and - ends of each battery
in the compartment.
3. Replace the cover.
Step 4: Turn on the TV
Press the POWER button on the remote or front panel.
Step 5: Auto Channel Search
Perform an Auto Channel Search (described in the Channel menu
section). This will program all active channels into the TV's channel scan
list.
Step 6 (Optional): Connect External Speaker (not supplied)
1. Plug in an external speaker.
2. Set the speaker switch on the TV to the desired selection:
liT Listen to the TV's audio through both the internal speaker and
external speaker (if one is attached). If you do not want to hear
the audio from the external speaker, you must disconnect if
from the back of the TV.
EXT Listen to the audio only through the external speaker
connected to the external speaker jack.
INTIEXT
Speaker Switch (Back Panel)
2
ANTENNA, CABLE, CABLE BOX OR VCR
....
kN_XT EXTERNAL
SPEAKER _
8 OHM MIN
TV (Back Panel)
Back of TV
Caution
The external speaker must be a
minimum of 8 ohms. Connecting a
speaker of less than 8 ohms could
damage the TV.
]ip
You will be able to hear the TV's audio
from either position of the switch if
no external speaker is attached.
I
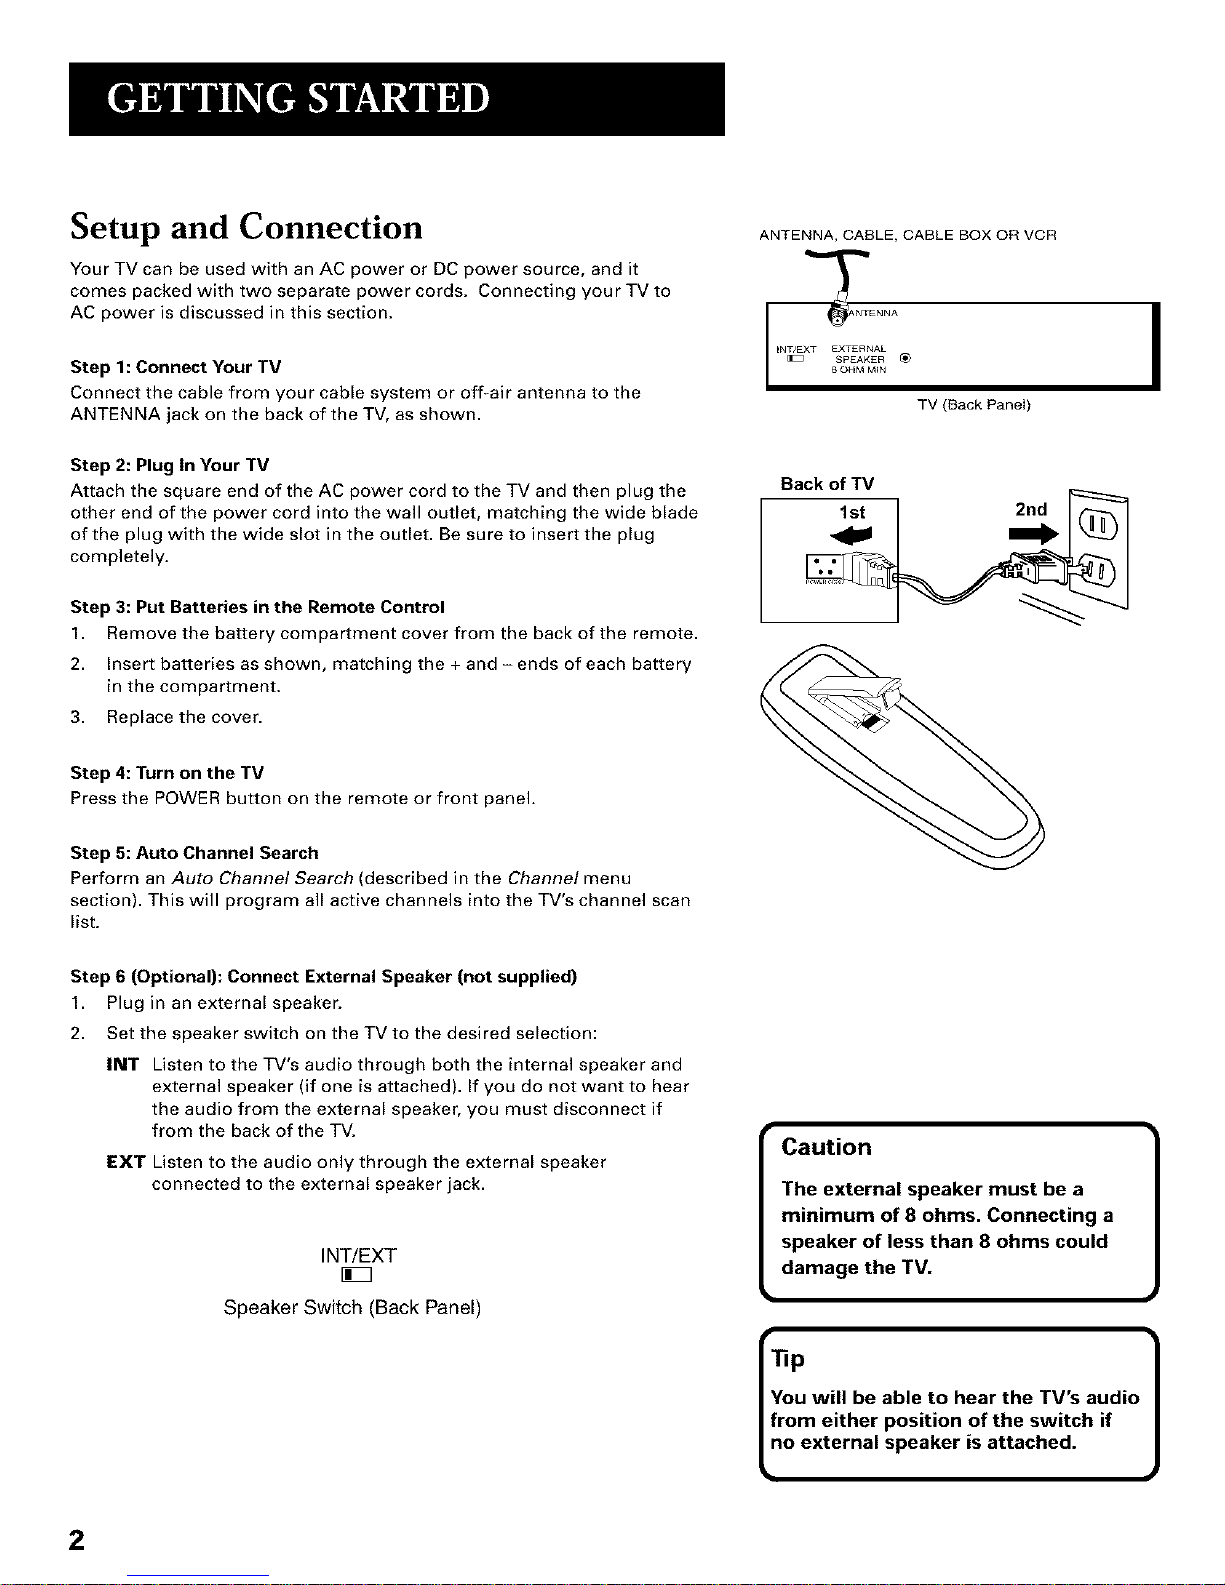
Dipole Antenna Connection
Follow the steps to connect the indoor antenna supplied with your TV (only
if you do not connect an outdoor antenna or a cable-TV system).
Insert the antenna base into the pocketed slot on the back of your set.
Stand at the back of your set with the antenna twin-lead facing you, and
press the base of the antenna into the slot until it locks in place.
Connect the ends of the twin-lead to the Antenna Adapter (supplied).
Connect the Antenna Adapter to the ANTENNA connector on the back of the
TV.
Later, after you've turned on the TV, adjust the length and position of the
antenna rods for best reception.
• For viewing VHF channels, extend the rods fully.
• For viewing UHF channels, adjust the rods for best reception.
Dipole Antenna (Supplied)
Slot
Base
Antenna Adapter i__ -_"
(Supplied)
Twin Lead
ANTENNA
3
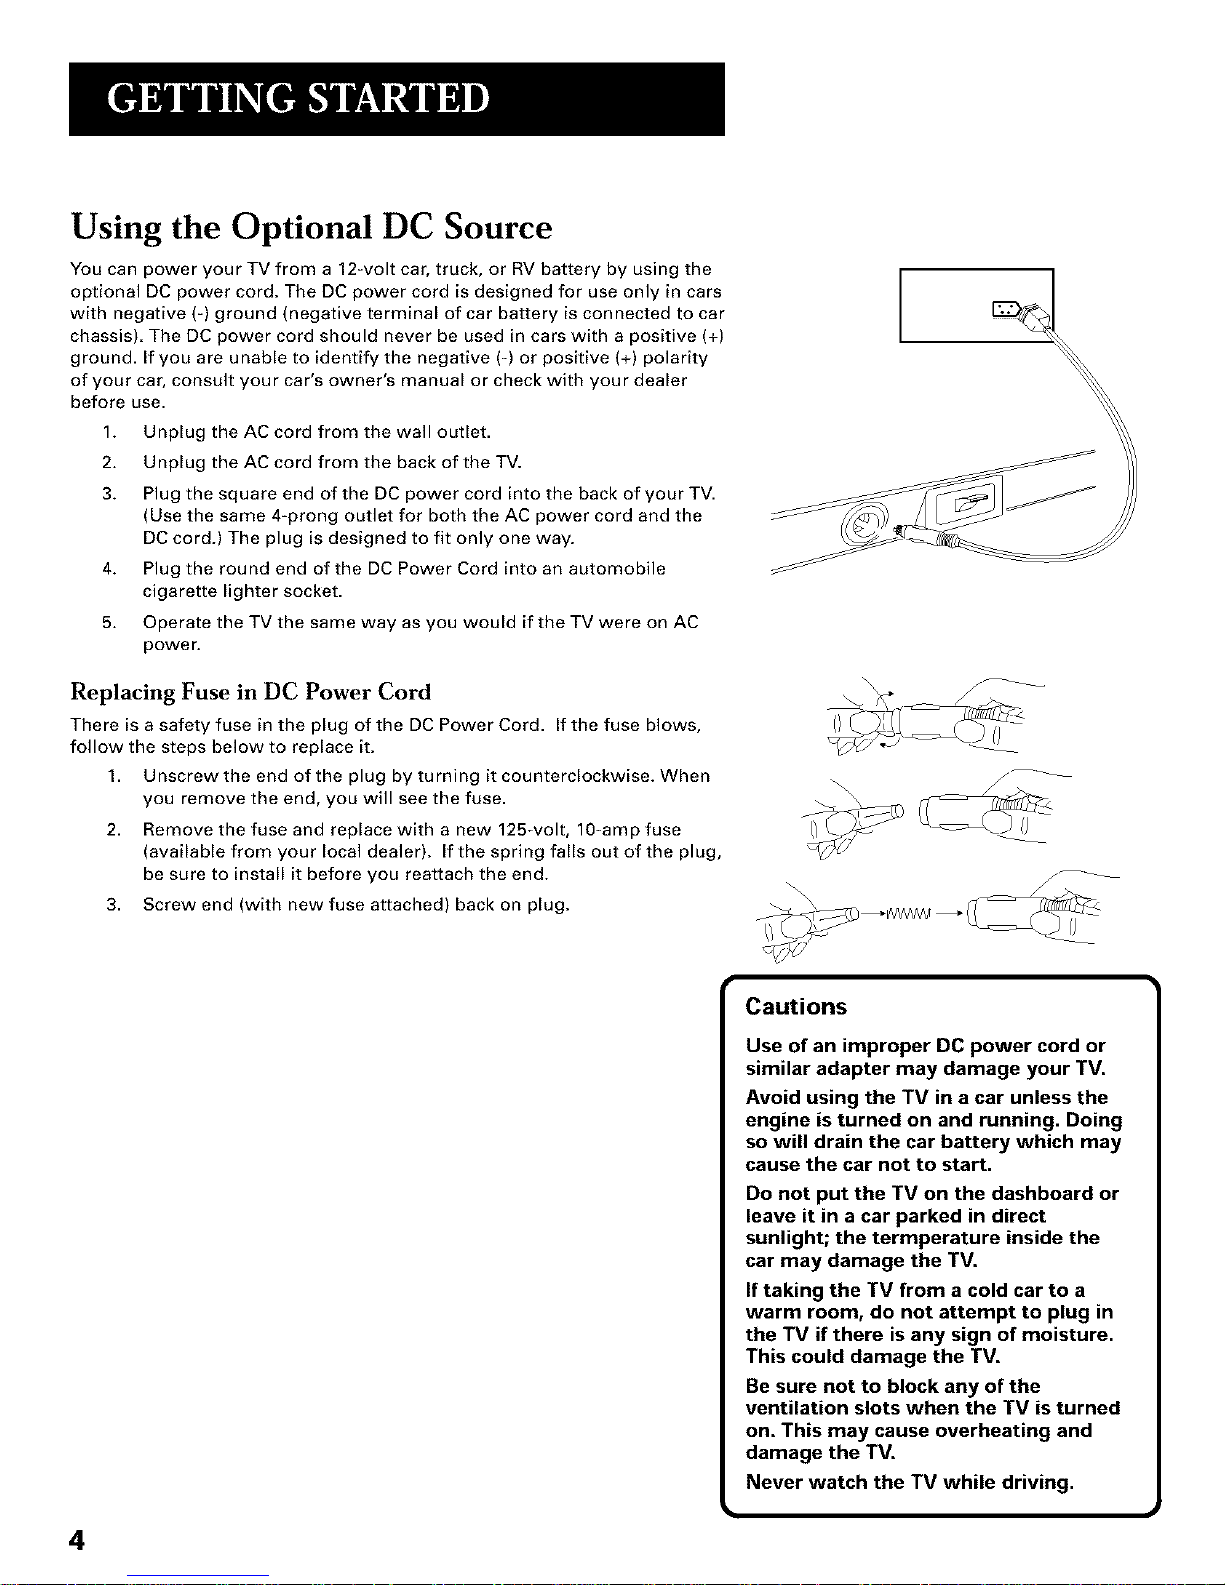
Using the Optional DC Source
You can power your TV from a 12-volt car, truck, or RV battery by using the
optional DC power cord. The DC power cord is designed for use only in cars
with negative (-) ground (negative terminal of car battery is connected to car
chassis). The DC power cord should never be used in cars with a positive (+)
ground. If you are unable to identify the negative (-) or positive (+) polarity
of your car, consult your car's owner's manual or check with your dealer
before use.
1. Unplug the AC cord from the wall outlet.
2. Unplug the AC cord from the back of the TV.
3. Plug the square end of the DC power cord into the back of your TV.
(Use the same 4-prong outlet for both the AC power cord and the
DC cord.) The plug is designed to fit only one way.
4. Plug the round end of the DC Power Cord into an automobile
cigarette lighter socket.
5. Operate the TV the same way as you would if the TV were on AC
power.
Replacing Fuse in DC Power Cord
There is a safety fuse in the plug of the DC Power Cord. If the fuse blows,
follow the steps below to replace it.
1. Unscrew the end of the plug by turning it counterclockwise. When
you remove the end, you will see the fuse.
2. Remove the fuse and replace with a new 125-volt, 10-amp fuse
(available from your local dealer). If the spring falls out of the plug,
be sure to install it before you reattach the end.
3. Screw end (with new fuse attached) back on plug.
Cautions
Use of an improper DC power cord or
similar adapter may damage your TV.
Avoid using the TV in a car unless the
engine is turned on and running. Doing
so will drain the car battery which may
cause the car not to start.
Do not put the TV on the dashboard or
leave it in a car parked in direct
sunlight; the termperature inside the
car may damage the TV.
If taking the TV from a cold car to a
warm room, do not attempt to plug in
the TV if there is any sign of moisture.
This could damage the TV.
Be sure not to block any of the
ventilation slots when the TV is turned
on. This may cause overheating and
damage the TV.
Never watch the TV while driving.
4
 Loading...