

GE TuffSat User's Manual And Service Manual
GE Healthcare
TuffSat® Pulse Oximeter
User’s Guide and Service Manual

GE Healthcare
TuffSat® Pulse Oximeter
User’s Guide and Service Manual
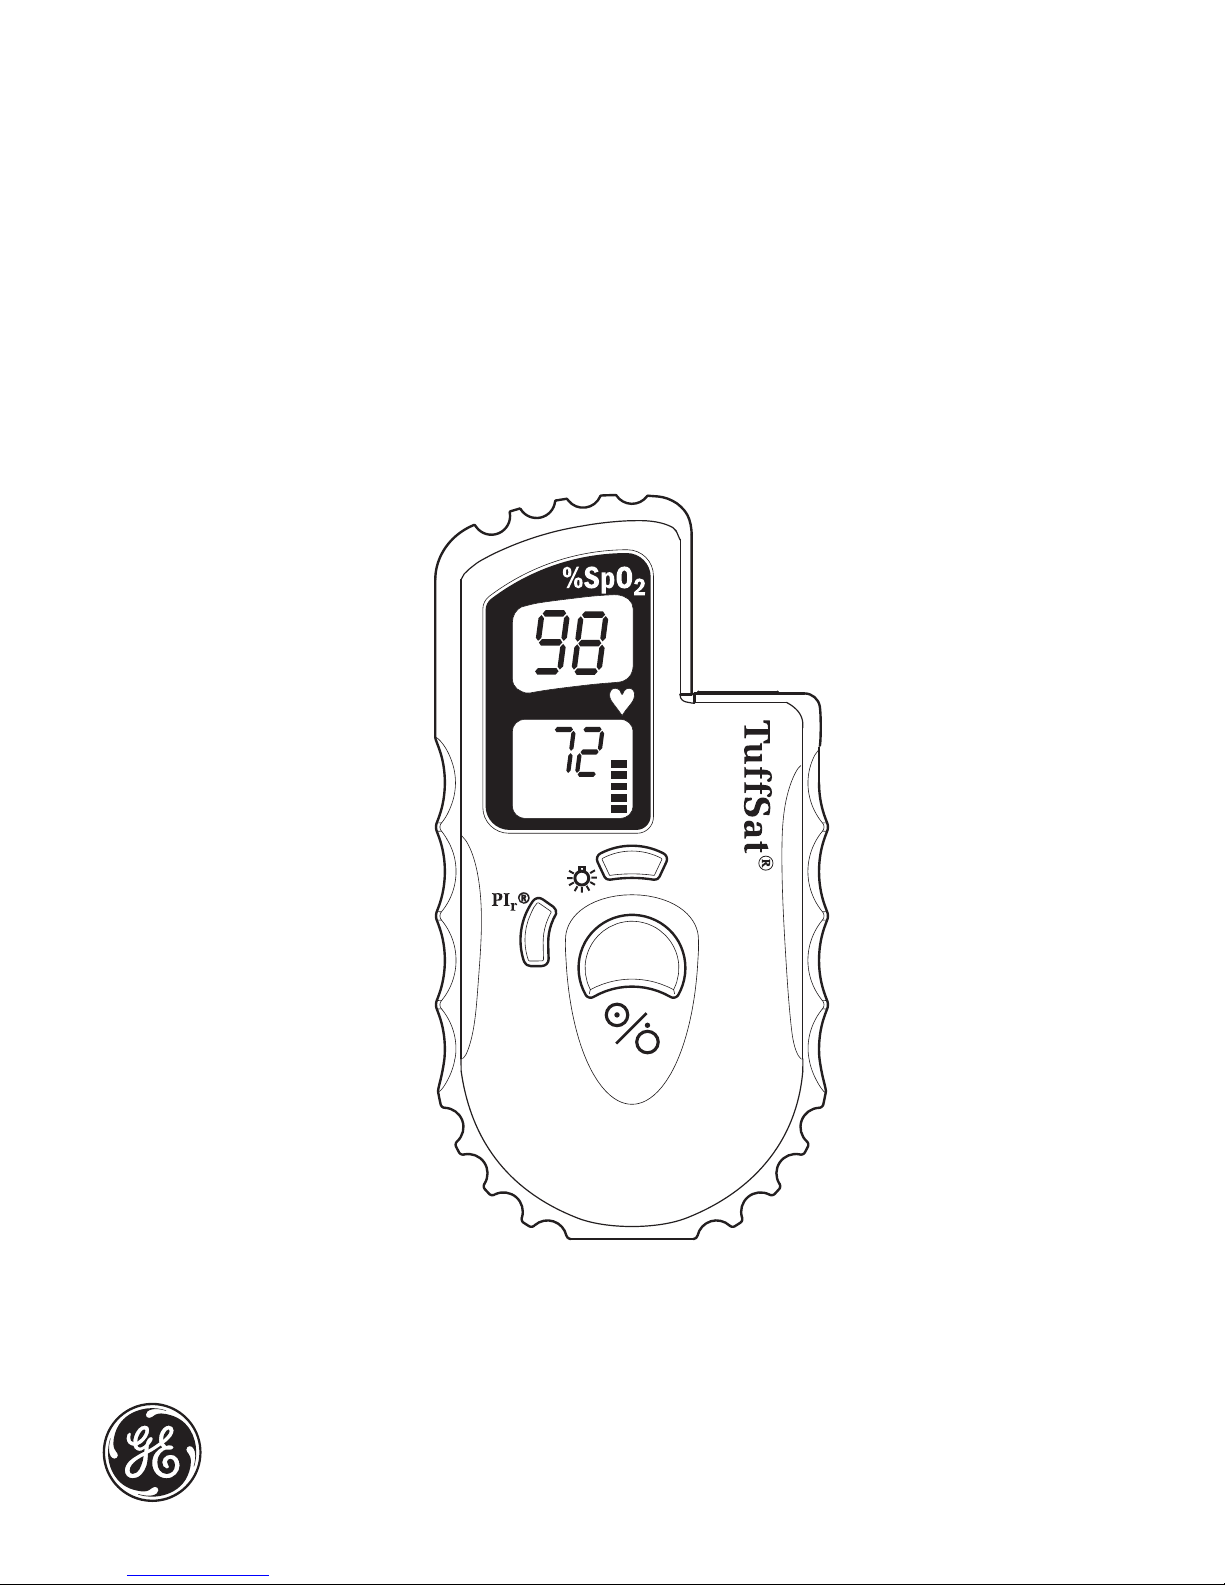
Oxygen saturation % (SpO2)
Pulse rate in beats per minute
Low battery and print icons
Flashes on and off when
battery power is low.
Appears when you start
printing to the optional printer.
For details about printing data,
see the appendix: Printer
Features and Use.
PIr button
Press to display the PIr pulsatile
value. Press again to cancel the
PIr display.
Sensor connector
Connect a Datex-Ohmeda sensor
(or sensor cable) approved for
use with the TuffSat.
Pleth bar
Segments flash to match pulse
rate. Number of flashing segments
indicates pulse strength.
Backlight button
Press to power on the backlight.
Press again to power it off.
On/off button
Press to power on the oximeter.
Press again to power it off.
6050-0006-075
March 2005

Important
Rx Only (USA)
Attention! Consult the accompanying instructions, including all safety
precautions, before using this device.
Responsibility of the manufacturer
The safety, reliability, and performance of this device can be assured by the
manufacturer only under the following conditions:
• Assembly, extensions, readjustments, modifications, and repairs are carried out by
authorized personnel.
• The device is used in accordance with this manual.
Service and repair
Service and repair procedures must be performed by authorized service personnel.
Repair this device or its parts only in accordance with instructions provided by the
manufacturer. To order replacement parts or for assistance, contact an authorized
service office. When shipping the monitor for repair, clean the monitor, allow it to dry
completely, and pack it for shipment in the original shipping container, if possible.
Trademarks
TuffSat®, OxyTip®, TruTrak®, and PIr® are the property of GE Healthcare Finland Oy. All
other product and company names are the property of their respective owners.
0537
GE Healthcare Finland Oy
Helsinki, Finland
+358 10 394 11
www.gehealthcare.com
© 2005 General Electric Company. All rights reserved.

1. Overview
Product description................................................................................................... 1-1
Clinical use ..................................................................................................................................................1-1
Relative Perfusion Index (PIr) pulsatile value..............................................................................1-2
TruTrak data sampling system.........................................................................................................1-2
Theory of operation.................................................................................................. 1-2
Signal processing.....................................................................................................................................1-2
Calibration...................................................................................................................................................1-4
Circuit board...............................................................................................................................................1-5
Patient and operator safety................................................................................. 1-6
Electrical shock and flammability hazard...................................................................................1-6
Fire/explosion hazard............................................................................................................................1-6
Failure of operation ................................................................................................................................1-6
Data validity...............................................................................................................................................1-6
Operator safety ........................................................................................................................................1-6
Patient safety and operator safety................................................................................................1-6
Patient safety (oximeter)......................................................................................................................1-7
Patient safety (sensors) ........................................................................................................................1-7
Cleaning........................................................................................................................................................1-7
Maintenance and repair.......................................................................................................................1-8
Disposal........................................................................................................................................................1-8
Contents
Assumptions .....................................................................................................................................1-4
Methods ..............................................................................................................................................1-4
2. Oximeter Features and Use
Product information labels .................................................................................................................2-1
Oximeter features and controls ......................................................................... 2-2
PIr pulsatile value display....................................................................................................................2-3
Top view .......................................................................................................................................................2-3
Checking normal operation.................................................................................. 2-4
Using the oximeter .................................................................................................... 2-5
Data validity and signal strength...................................................................... 2-6
Pleth bar (pulse rate and strength indicator).............................................................................2-6
3. Maintenance, Troubleshooting, and Service
Oximeter maintenance ...........................................................................................3-1
Replacing oximeter batteries.............................................................................................................3-1
Cleaning the oximeter...........................................................................................................................3-2
Sensors................................................................................................................................................3-2
Troubleshooting.......................................................................................................... 3-3
Repair procedures .....................................................................................................3-5
Disassembling the oximeter...............................................................................................................3-5
Replacing parts.........................................................................................................................................3-6
Assembling the oximeter.....................................................................................................................3-6
Assembly drawing ..................................................................................................... 3-7
Parts list ..........................................................................................................................3-8
i

Contents
4. Compliance and Specifications
A. Printer Features and Use
Compliance with standards.................................................................................. 4-1
General safety requirements............................................................................................................ 4-1
Electromagnetic compatibility (EMC) ............................................................................................4-2
Electromagnetic effects .............................................................................................................4-2
Software safety checks........................................................................................................................4-2
Performance specifications.................................................................................. 4-3
General.........................................................................................................................................................4-3
SpO2..............................................................................................................................................................4-3
Interfering substances ................................................................................................................ 4-3
Sensor emitter wavelength ranges................................................................................................4-3
Pulse rate.....................................................................................................................................................4-3
PIr pulsatile value....................................................................................................................................4-3
Alarms........................................................................................................................................................... 4-4
Displays........................................................................................................................................................ 4-4
Power ............................................................................................................................................................4-4
Low battery indicator (screen icon)......................................................................................4-4
Environment ..............................................................................................................................................4-4
Dimensions and weight .......................................................................................................................4-4
Functions and features ...........................................................................................A-1
How the TuffSat stores data..............................................................................................................A-1
Printer components ...............................................................................................................................A-2
Using the printer.........................................................................................................A-2
Powering the printer..............................................................................................................................A-2
Positioning the oximeter and printer.............................................................................................A-3
Printing data..............................................................................................................................................A-3
Sample printouts........................................................................................................A-4
Real-time printout and Trend #1 printout ..................................................................................A-4
Trend #2 printout ....................................................................................................................................A-5
Troubleshooting..........................................................................................................A-5
Printer maintenance.................................................................................................A-6
Replacing printer paper.......................................................................................................................A-6
Cleaning the printer ...............................................................................................................................A-7
Ordering the printer and printer accessories.............................................A-7
Printer specifications ...............................................................................................A-8
Electromagnetic compatibility (EMC) ............................................................................................A-8
Print indicator (screen icon)................................................................................................................A-8
Power ............................................................................................................................................................A-8
Environment ..............................................................................................................................................A-8
Dimensions.................................................................................................................................................A-8
Warranty
ii

1. OVERVIEW
This chapter contains:
• A brief description of the Datex-Ohmeda TuffSat® Pulse Oximeter.
• The theory of operation for the oximeter.
• A list of the precautions you must take when using this device.
Product description
The TuffSat is a small, durable, portable pulse oximeter that operates on battery
power. These items are included with the oximeter:
• Four 1.5V alkaline AA batteries.
• Neoprene carrying case with belt clip.
The TuffSat oximeter is capable of printing data through an infrared link to the
optional Hewlett-Packard® Infrared Printer (HP 82240B). For information on
ordering and using this printer with the TuffSat, see the appendix: Printer Features
and Use.
Important: Only OxyTip®+ sensors can be used with this monitor.
Clinical use
The TuffSat is designed specifically for spot-checking arterial oxygen saturation
(SpO2) and pulse rate. This easy-to-use oximeter is ideal for use in the environments
listed below:
• Respiratory care
• Subcritical care for hospital satellite locations
• Home care
• Prehospital/EMS
• Rehabilitation
• Physician’s office
WARNING: Patient safety. The TuffSat oximeter is not intended for continuous
monitoring. It has no alarms (audible or visual) and no user-definable parameters.
1-1
TuffSat User’s Guide and Service Manual
Relative Perfusion Index (PI
The PIr pulsatile value indicates the strength of the pulse signal at the sensor site:
the higher the PIr value, the stronger the pulse signal. A strong pulse signal
increases the validity of SpO2 and pulse rate data.
PIr is a relative value that varies from patient to patient. Clinicians can use the PI
value to compare the strength of the pulse signal at different sites on a patient in
order to locate the best site for the sensor (the site with the strongest pulse signal).
TruTrak® data sampling system
The TruTrak data sampling system, patented by Datex-Ohmeda, enables the TuffSat
oximeter to calculate SpO2 many times each second through advanced statistical
data processing. While other oximeters calculate only at the peak and trough of
each waveform, the TuffSat assesses SpO2 continuously. The TruTrak data sampling
system provides reliable readings during times of low perfusion, motion, or
electrical interference.
The TuffSat oximeter employs an analog/digital (A/D) converter and maximized
digital signal processing techniques to produce samples for the TruTrak system to
process. The result is a highly reliable level of oximetry performance.
Theory of operation
®) pulsatile value
r
r
Signal processing
Sensor
LED
Photodetector
Front End
Amplifier
The TuffSat oximeter uses a two-wavelength pulsatile system—red and infrared
light—to distinguish between oxygenated (O2Hb) and reduced (HHb) hemoglobin,
each of which absorbs different amounts of light emitted from the oximeter sensor.
The SpO2 and pulse rate are determined by the oximeter through sensor signal
processing and microprocessor calculations.
Analog
Processing
Figure 1-1. Signal processing block diagram
The sensor contains a light source and a photodetector:
• The light source consists of red and infrared light-emitting diodes (LEDs).
• The photodetector is an electronic device that produces an electrical current
proportional to incident light intensity.
A/D
Converter
Digital
Processing
Display
1-2
Overview
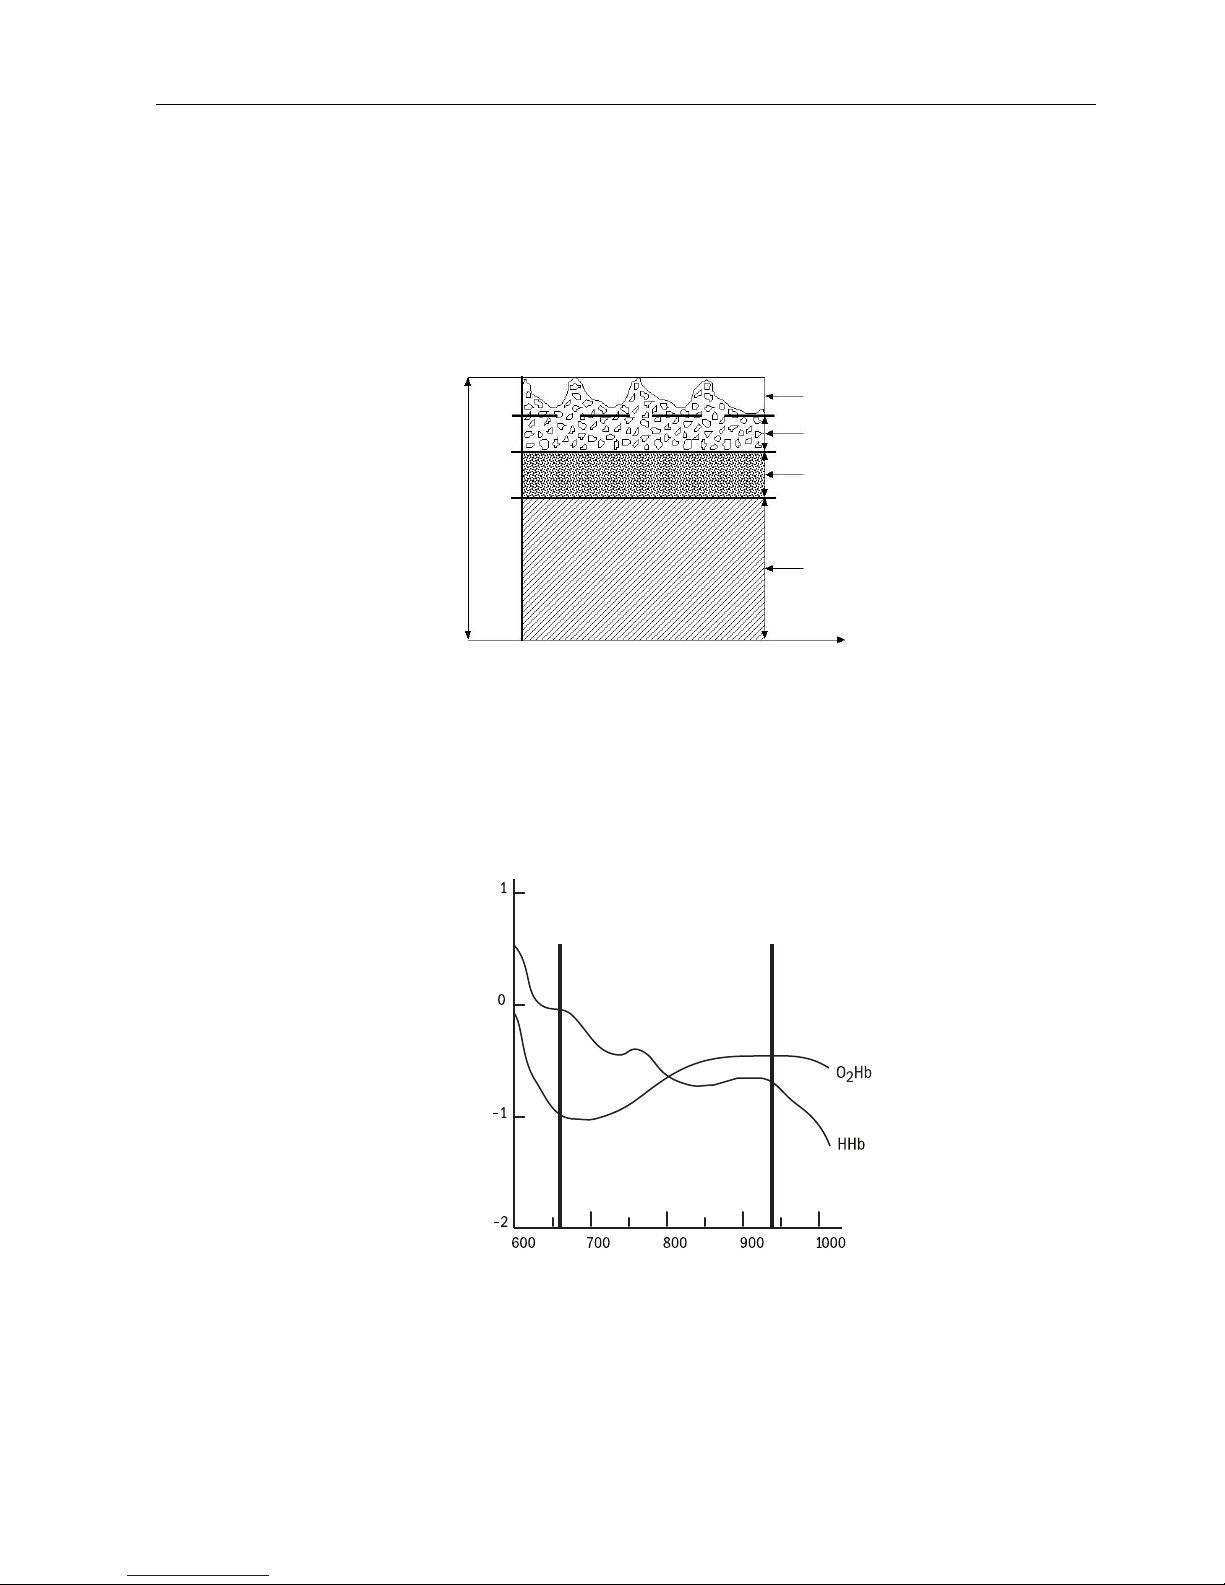
The two light wavelengths generated by the sensor light source (the red and
infrared LEDs) pass through the tissue at the sensor site. The light is partially
absorbed and modulated as it passes through the tissue.
Arterial blood pulsation at the sensor site modulates transmission of the sensor’s
light. Since other fluids and tissues present generally don’t pulsate, they don’t
modulate the light passing through that location. The pulsatile portion of the
incoming signal is used to detect and isolate the attenuation of light energy due to
arterial blood flow.
Variable absorption
(due to arterial pulse)
Arterial blood absorption
Venous blood absorption
Absorption
Other tissue absorption
Time
Figure 1-2. Comparative light absorption
The sensor’s photodetector collects and converts the light into an electronic signal.
Since O2Hb and HHb allow different amounts of light to reach the photodetector at
the selected wavelengths, the electronic signal varies according to which light
source is “on” (red or infrared) and the oxygenation of the arterial hemoglobin. The
oximeter uses this information to calculate the relative percentage of O2Hb and HHb.
(Red)
660 nm
(Infrared)
940 nm
Extinction (10x)
Wavelength (nm)
Figure 1-3. Extinction vs. wavelength graph
1-3

TuffSat User’s Guide and Service Manual
The photodetector sends the electronic signal, which contains the light intensity
information, to the oximeter. The oximeter’s electronic circuitry processes the
electronic signal, calculates the SpO2 and pulse rate values, and displays them on
the screen.
Calibration
Datex-Ohmeda pulse oximeters use two wavelength ranges, 650 nm to 670 nm and
930 nm to 950 nm, both with an average power of less than 1 mW. These
wavelengths are used to calculate the presence of oxyhemoglobin (O2Hb) and
reduced hemoglobin (HHb).
A CO-oximeter typically uses four or more wavelengths of light and calculates
reduced hemoglobin (HHb), oxyhemoglobin (O2Hb), carboxyhemoglobin (COHb), and
methemoglobin (MetHb).
Therefore, pulse oximetry readings and CO-oximetry readings will differ in
situations where a patient’s COHb or MetHb are increased. Increased patient COHb
leads to falsely increased SpO2 in all pulse oximeters.
Assumptions
The calculation of SpO2 assumes 1.6% carboxyhemoglobin (COHb), 0.4%
methemoglobin (MetHb), and no other pigments. These values are based on the
Datex-Ohmeda Pulse Oximeter Empirical Calibration Study. Appreciable variation
from these values will influence SpO2 accuracy.
Methods
Two different methods of calibration are currently used by manufacturers of pulse
oximeters: fractional and functional.
Important: The TuffSat pulse oximeter uses the functional calibration method. The
user cannot change the calibration method to fractional.
Functional saturation is represented mathematically as the percentage of
hemoglobin capable of carrying oxygen that is carrying oxygen.
O2Hb
Functional SpO2 =
The functional calibration is obtained by multiplying the fractional SpO2 by a value
of 1.02.
()
Hb
– COHb – MetHb
TOTAL
x 100 =
O2Hb
()
O2Hb + HHb
x 100
1-4
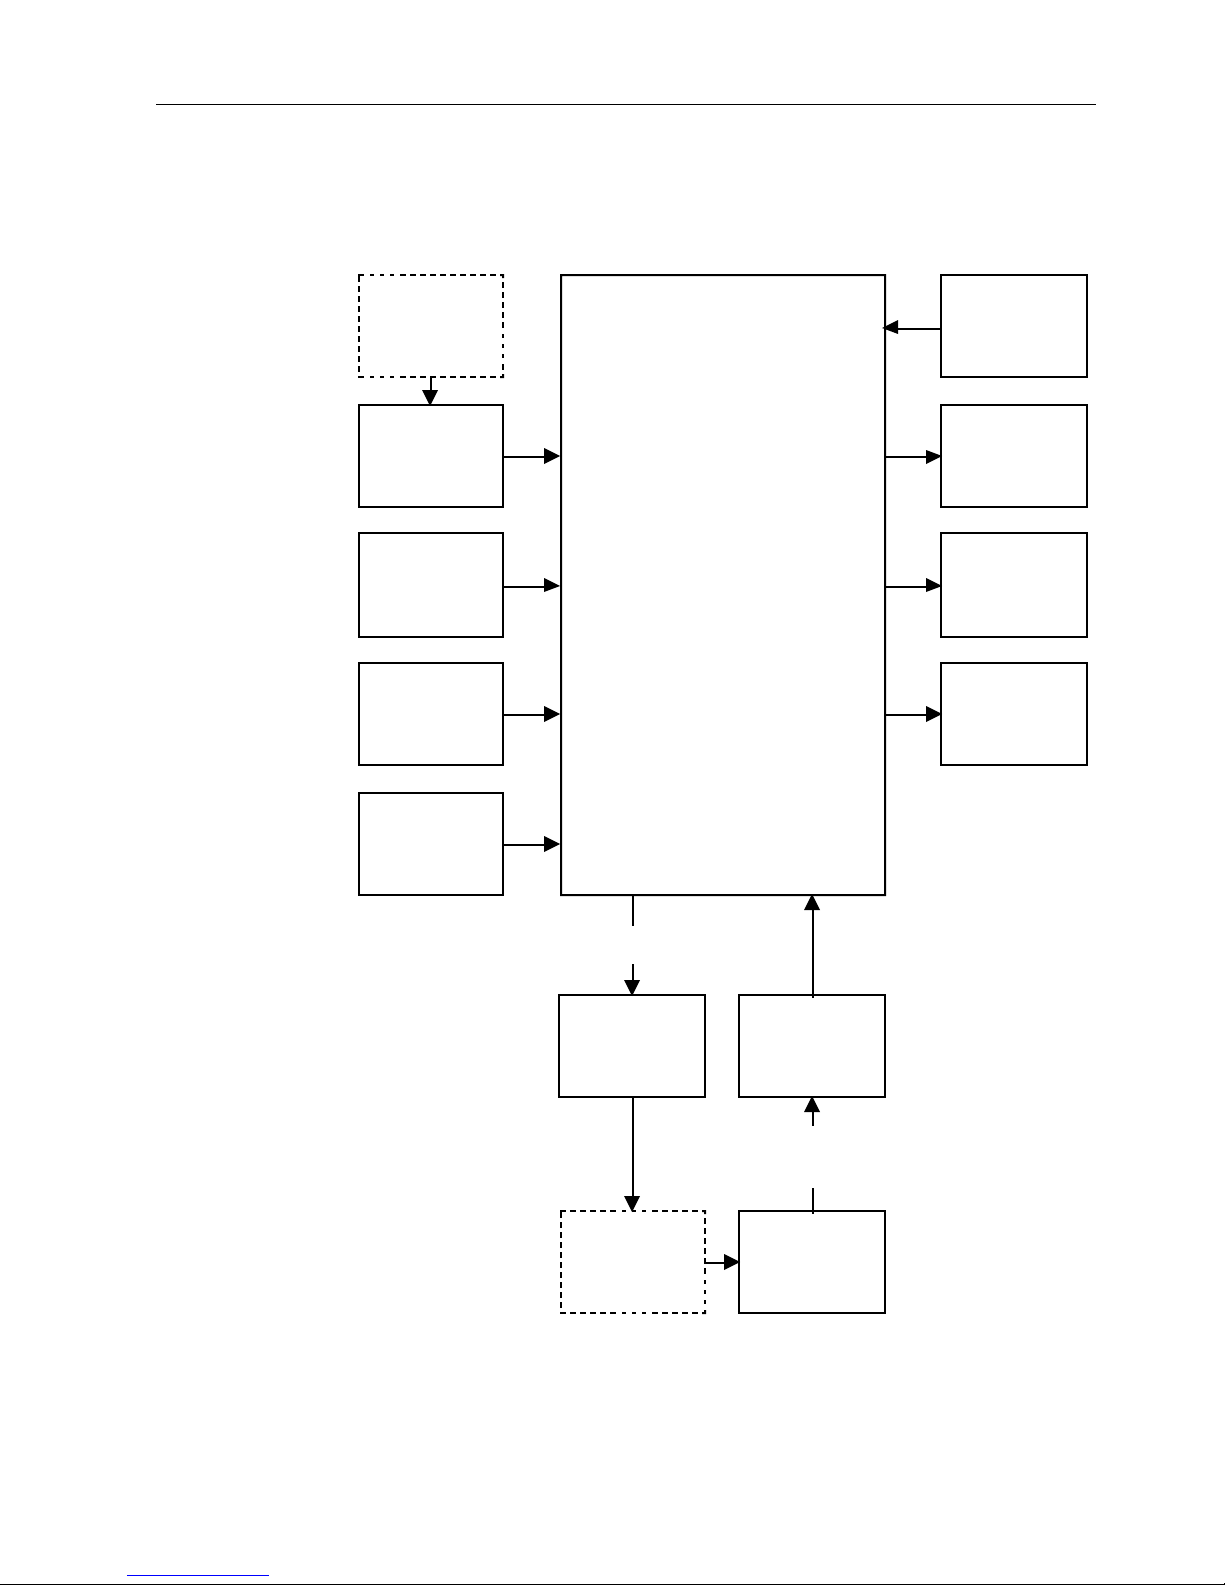
Circuit board
The circuit board contains all the circuitry for the TuffSat oximeter. The functions
performed by this board are illustrated below.
Overview
Power supply
Power on/off
control
(reset control)
Ambient light
detection
Code memory
and
Data memory
Watchdog
timer
Processor
Keys
Backlight LED
Alphanumeric
LCD and LCD
driver
Infrared (IR)
wireless
transmitter
Timing
Sensor LED
drive
Sensor
Figure 1-4. Circuit board block diagram
A/D converter
Analog
Signal Path
Analog
front end
1-5

TuffSat User’s Guide and Service Manual
Patient and operator safety
Warnings and cautions associated with following safe practices while using the
oximeter appear throughout this manual.
• WARNINGS indicate potentially harmful situations that may cause injury to a
patient or operator.
• CAUTIONS indicate conditions that may lead to equipment damage or
malfunction.
Read this section carefully before using the oximeter to monitor patients.
Electrical shock and flammability hazard
Warning: Power off the oximeter before cleaning or servicing.
Fire/explosion hazard
Warning: Do not use the monitor in the presence of any flammable anesthetic
mixture.
Warning: Use only AA batteries in the oximeter.
Failure of operation
Warning: It is possible for any device to malfunction; therefore, always verify
unusual data by performing a formal patient assessment.
Warning: Do not use the oximeter if it fails to function as described or if the validity
of data is questionable. Refer to the appropriate sections of this manual to identify
and correct the malfunction.
Data validity
Warning: To prevent erroneous readings, do not use an inflated blood pressure cuff
or arterial blood pressure measurement device on the same limb as the oximeter
sensor.
Warning: Conditions that may cause inaccurate readings include interfering
substances, excessive ambient light, electrical interference, excessive motion, low
perfusion, low signal strength, incorrect sensor placement, poor sensor fit, and
movement of the sensor on the patient.
Operator safety
Warning: Do not handle hot or leaking batteries.
Patient safety and operator safety
Warning: To protect against injury and equipment damage from leaking batteries,
remove the batteries when the oximeter is not to be used for some time.
1-6

Patient safety (oximeter)
Warning: The TuffSat oximeter is not intended for continuous monitoring. It has no
alarms (audible or visual) and no user-definable parameters.
Warning: Never test or perform maintenance on the oximeter while using it to
monitor a patient.
Warning: When the battery becomes depleted, the oximeter shuts off. No alarm
sounds.
Warning: The correct use of the oximeter is to measure only arterial oxygen
saturation (SpO2), pulse rate, and the Relative Perfusion Index (PIr) pulsatile value. A
pulse oximeter does not measure respiration and should never be used as a
substitute for an apnea monitor.
Warning: This device is not intended for use in a magnetic resonance imaging (MRI)
environment.
Patient safety (sensors)
Warning: When the display indicates an error condition or the oximeter appears to
be operating abnormally, disconnect the sensor immediately.
Overview
Warning: Patient conditions (such as reddening, blistering, skin discoloration,
ischemic skin necrosis, and skin erosion) may warrant changing the site frequently
or using a different style of sensor.
Warning: Discard a damaged sensor immediately. Do not repair a damaged sensor
or use a sensor repaired by others.
Warning: To prevent patient injury or equipment damage, use only Datex-Ohmeda
sensors approved for use with this oximeter. For complete information about the safe
and appropriate use of a sensor, consult the instructions for that sensor.
Cleaning
Caution: Follow these guidelines when cleaning the oximeter:
• Do not autoclave, pressure sterilize, or gas sterilize the oximeter.
• Use cleaning solution sparingly. Do not immerse the oximeter in liquid. Excessive
solution can flow into the oximeter and damage internal components.
• When cleaning the display lens, do not use abrasive cleaning compounds or
other materials that could damage the lens.
• Do not use petroleum-based solutions or solutions containing acetone, freon, or
harsh solvents. These substances may damage the oximeter and cause a
malfunction.
Caution: Disposable sensors are intended for single-patient-use only.
1-7
 Loading...